

Cisco AIR-WLC4402-50-K9, AIR-WLC4402-12-K9, AIR-WLC4402-25-K9, AIR-WLC4404-100-K9 Installation And Configuration Manual
Page 1

Corporate Headquarters
Cisco Systems, Inc.
170 West Tasman Drive
San Jose, CA 95134-1706
USA
http://www.cisco.com
Tel: 408 526-4000
800 553-NETS (6387)
Fax: 408 526-4100
Cisco 4400 Series Wireless LAN
Controllers - Installation and
Configuration Guide
Text Part Number: 78-17157-01
Page 2

THE SPECIFICATIONS AND INFORMATION REGARDING THE PRODUCTS IN THIS MANUAL ARE SUBJECT TO CHANGE WITHOUT NOTICE. ALL
STATEMENTS, INFORMATION, AND RECOMMENDATIONS IN THIS MANUAL ARE BELIEVED TO BE ACCURATE BUT ARE PRESENTED WITHOUT
WARRANTY OF ANY KIND, EXPRESS OR IMPLIED. USERS MUST TAKE FULL RESPONSIBILITY FOR THEIR APPLICATION OF ANY PRODUCTS.
THE SOFTWARE LICENSE AND LIMITED WARRANTY FOR THE ACCOMPANYING PRODUCT ARE SET FORTH IN THE INFORMATION PACKET THAT
SHIPPED WITH THE PRODUCT AND ARE INCORPORATED HEREIN BY THIS REFERENCE. IF YOU ARE UNABLE TO LOCATE THE SOFTWARE LICENSE
OR LIMITED WARRANTY, CONTACT YOUR CISCO REPRESENTATIVE FOR A COPY.
The following information is for FCC compliance of Class A devices: This equipment has been tested and found to comply with the limits for a Class A digital device, pursuant
to part 15 of the FCC rules. These limits are designed to provide reasonable protection against harmful interference when the equipment is operated in a commercial
environment. This equipment generates, uses, and can radiate radio-frequency energy and, if not installed and used in accordance with the instruction manual, may cause
harmful interference to radio communications. Operation of this equipment in a residential area is likely to cause harmful interference, in which case users will be required
to correct the interference at their own expense.
The following information is for FCC compliance of Class B devices: The equipment described in this manual generates and may radiate radio-frequency energy. If it is not
installed in accordance with Cisco’s installation instructions, it may cause interference with radio and television reception. This equipment has been tested and found to
comply with the limits for a Class B digital device in accordance with the specifications in part 15 of the FCC rules. These specifications are designed to provide reasonable
protection against such interference in a residential installation. However, there is no guarantee that interference will not occur in a particular installation.
Modifying the equipment without Cisco’s written authorization may result in the equipment no longer complying with FCC requirements for Class A or Class B digital
devices. In that event, your right to use the equipment may be limited by FCC regulations, and you may be required to correct any interference to radio or television
communications at your own expense.
You can determine whether your equipment is causing interference by turning it off. If the interference stops, it was probably caused by the Cisco equipment or one of its
peripheral devices. If the equipment causes interference to radio or television reception, try to correct the interference by using one or more of the following measures:
• Turn the television or radio antenna until the interference stops.
• Move the equipment to one side or the other of the television or radio.
• Move the equipment farther away from the television or radio.
• Plug the equipment into an outlet that is on a different circuit from the television or radio. (That is, make certain the equipment and the television or radio are on circuits
controlled by different circuit breakers or fuses.)
Modifications to this product not authorized by Cisco Systems, Inc. could void the FCC approval and negate your authority to operate the product.
The Cisco implementation of TCP header compression is an adaptation of a program developed by the University of California, Berkeley (UCB) as part of UCB’s public
domain version of the UNIX operating system. All rights reserved. Copyright © 1981, Regents of the University of California.
NOTWITHSTANDING ANY OTHER WARRANTY HEREIN, ALL DOCUMENT FILES AND SOFTWARE OF THESE SUPPLIERS ARE PROVIDED “AS IS” WITH
ALL FAULTS. CISCO AND THE ABOVE-NAMED SUPPLIERS DISCLAIM ALL WARRANTIES, EXPRESSED OR IMPLIED, INCLUDING, WITHOUT
LIMITATION, THOSE OF MERCHANTABILITY, FITNESS FOR A PARTICULAR PURPOSE AND NONINFRINGEMENT OR ARISING FROM A COURSE OF
DEALING, USAGE, OR TRADE PRACTICE.
IN NO EVENT SHALL CISCO OR ITS SUPPLIERS BE LIABLE FOR ANY INDIRECT, SPECIAL, CONSEQUENTIAL, OR INCIDENTAL DAMAGES, INCLUDING,
WITHOUT LIMITATION, LOST PROFITS OR LOSS OR DAMAGE TO DATA ARISING OUT OF THE USE OR INABILITY TO USE THIS MANUAL, EVEN IF CISCO
OR ITS SUPPLIERS HAVE BEEN ADVISED OF THE POSSIBILITY OF SUCH DAMAGES.
Cisco 4400 Series Wireless LAN Controllers - Installation and Configuration Guide
© 2005 Cisco Systems, Inc. All rights reserved.
CCSP, CCVP, the Cisco Square Bridge logo, Follow Me Browsing, and StackWise are trademarks of Cisco Systems, Inc.; Changing the Way We Work, Live, Play, and Learn, and
iQuick Study are service marks of Cisco Systems, Inc.; and Access Registrar, Aironet, ASIST, BPX, Catalyst, CCDA, CCDP, CCIE, CCIP, CCNA, CCNP, Cisco, the Cisco
Certified Internetwork Expert logo, Cisco IOS, Cisco Press, Cisco Systems, Cisco Systems Capital, the Cisco Systems logo, Cisco Unity, Empowering the Internet Generation,
Enterprise/Solver, EtherChannel, EtherFast, EtherSwitch, Fast Step, FormShare, GigaDrive, GigaStack, HomeLink, Internet Quotient, IOS, IP/TV, iQ Expertise, the iQ logo, iQ
Net Readiness Scorecard, LightStream, Linksys, MeetingPlace, MGX, the Networkers logo, Networking Academy, Network Registrar, Pac ke t , PIX, Post-Routing, Pre-Routing,
ProConnect, RateMUX, ScriptShare, SlideCast, SMARTnet, StrataView Plus, TeleRouter, The Fastest Way to Increase Your Internet Quotient, and TransPath are registered
trademarks of Cisco Systems, Inc. and/or its affiliates in the United States and certain other countries.
All other trademarks mentioned in this document or Website are the property of their respective owners. The use of the word partner does not imply a partnership relationship
between Cisco and any other company. (0502R)
Page 3

iii
Cisco 4400 Series Wireless LAN Controllers - Installation and Configuration Guide
78-17157-01
CONTENTS
Preface v
Organization v
Conventions v
Obtaining Documentation vi
Cisco.com vi
Documentation DVD vi
Ordering Documentation vii
Documentation Feedback vii
Cisco Product Security Overview vii
Reporting Security Problems in Cisco Products viii
Obtaining Technical Assistance viii
Cisco Technical Support Website viii
Submitting a Service Request ix
Definitions of Service Request Severity ix
Obtaining Additional Publications and Information x
Installation and Configuration 1
Controller Models 2
Collecting Required Tools and Information 6
Cisco Wireless LAN Controller Hardware 6
CLI Console 6
Local TFTP Server 6
Initial System Configuration Information 6
Determining a Physical Location 8
Installing the Chassis 10
Connecting and Using the CLI Console 14
Performing Power On Self Test 15
Using the Startup Wizard 18
Logging In 20
Connecting the Network (Distribution System) 21
Connecting the Service Port Interfaces 23
Connecting Cisco 1000 Series Lightweight Access Points 25
Where to Go from Here 26
Page 4

Contents
iv
Cisco 4400 Series Wireless LAN Controllers - Installation and Configuration Guide
78-17157-01
FCC Statements for Cisco 4400 Series Wireless LAN Controllers 1
Safety Considerations 1
Page 5

v
Cisco 4400 Series Wireless LAN Controllers - Installation and Configuration Guide
78-17157-01
Preface
This guide will help you to install a Cisco 4400 Series Wireless LAN Controller (referred to hereafter
as the Controller). The controller is part of the Cisco Wireless LAN Solution.
Organization
This guide is organized into the following sections:
• Collecting Required Tools and Information
• Determining a Physical Location
• Installing the Chassis
• Connecting and Using the CLI Console
• Performing Power On Self Test
• Using the Startup Wizard
• Logging In
• Connecting the Network (Distribution System)
• Connecting the Service Port Interfaces
• Connecting Cisco 1000 Series Lightweight Access Points
• Where to Go from Here
Conventions
Interactive examples use these conventions:
• Terminal sessions and system displays are in screen font.
• Information you enter is in boldface screen font.
• Nonprinting characters, such as passwords or tabs, are in angle brackets (< >).
Page 6

Preface
Obtaining Documentation
vi
Cisco 4400 Series Wireless LAN Controllers - Installation and Configuration Guide
78-17157-01
Notes, cautions, and timesavers use these conventions and symbols:
Tip Means the following will help you solve a problem. The tips information might not be troubleshooting
or even an action, but could be useful information.
Note Means reader take note. Notes contain helpful suggestions or references to materials not contained in
this manual.
Caution Means reader be careful. In this situation, you might do something that could result equipment damage
or loss of data.
Warning
This warning symbol means danger. You are in a situation that could cause bodily injury. Before you
work on any equipment, be aware of the hazards involved with electrical circuitry and be familiar
with standard practices for preventing accidents.
Obtaining Documentation
Cisco documentation and additional literature are available on Cisco.com. Cisco also provides several
ways to obtain technical assistance and other technical resources. These sections explain how to obtain
technical information from Cisco Systems.
Cisco.com
You can access the most current Cisco documentation at this URL:
http://www.cisco.com/univercd/home/home.htm
You can access the Cisco website at this URL:
http://www.cisco.com
You can access international Cisco websites at this URL:
http://www.cisco.com/public/countries_languages.shtml
Documentation DVD
Cisco documentation and additional literature are available in a Documentation DVD package, which
may have shipped with your product. The Documentation DVD is updated regularly and may be more
current than printed documentation. The Documentation DVD package is available as a single unit.
Registered Cisco.com users (Cisco direct customers) can order a Cisco Documentation DVD (product
number DOC-DOCDVD=) from the Ordering tool or Cisco Marketplace.
Cisco Ordering tool:
http://www.cisco.com/en/US/partner/ordering/
Page 7

Preface
Obtaining Documentation
vii
Cisco 4400 Series Wireless LAN Controllers - Installation and Configuration Guide
78-17157-01
Cisco Marketplace:
http://www.cisco.com/go/marketplace/
Ordering Documentation
You can find instructions for ordering documentation at this URL:
http://www.cisco.com/univercd/cc/td/doc/es_inpck/pdi.htm
You can order Cisco documentation in these ways:
• Registered Cisco.com users (Cisco direct customers) can order Cisco product documentation from
the Ordering tool:
http://www.cisco.com/en/US/partner/ordering/
• Nonregistered Cisco.com users can order documentation through a local account representative by
calling Cisco Systems Corporate Headquarters (California, USA) at 408 526-7208 or, elsewhere in
North America, by calling 1 800 553-NETS (6387).
Documentation Feedback
You can send comments about technical documentation to bug-doc@cisco.com.
You can submit comments by using the response card (if present) behind the front cover of your
document or by writing to the following address:
Cisco Systems
Attn: Customer Document Ordering
170 West Tasman Drive
San Jose, CA 95134-9883
We appreciate your comments.
Cisco Product Security Overview
Cisco provides a free online Security Vulnerability Policy portal at this URL:
http://www.cisco.com/en/US/products/products_security_vulnerability_policy.html
From this site, you can perform these tasks:
• Report security vulnerabilities in Cisco products.
• Obtain assistance with security incidents that involve Cisco products.
• Register to receive security information from Cisco.
A current list of security advisories and notices for Cisco products is available at this URL:
http://www.cisco.com/go/psirt
If you prefer to see advisories and notices as they are updated in real time, you can access a Product
Security Incident Response Team Really Simple Syndication (PSIRT RSS) feed from this URL:
http://www.cisco.com/en/US/products/products_psirt_rss_feed.html
Page 8
Preface
Obtaining Technical Assistance
viii
Cisco 4400 Series Wireless LAN Controllers - Installation and Configuration Guide
78-17157-01
Reporting Security Problems in Cisco Products
Cisco is committed to delivering secure products. We test our products internally before we release them,
and we strive to correct all vulnerabilities quickly. If you think that you might have identified a
vulnerability in a Cisco product, contact PSIRT:
• Emergencies—security-alert@cisco.com
• Nonemergencies—psirt@cisco.com
Tip We encourage you to use Pretty Good Privacy (PGP) or a compatible product to encrypt any sensitive
information that you send to Cisco. PSIRT can work from encrypted information that is compatible with
PGP versions 2.x through 8.x.
Never use a revoked or an expired encryption key. The correct public key to use in your correspondence
with PSIRT is the one that has the most recent creation date in this public key server list:
http://pgp.mit.edu:11371/pks/lookup?search=psirt%40cisco.com&op=index&exact=on
In an emergency, you can also reach PSIRT by telephone:
• 1 877 228-7302
• 1 408 525-6532
Obtaining Technical Assistance
For all customers, partners, resellers, and distributors who hold valid Cisco service contracts, Cisco
Technical Support provides 24-hour-a-day, award-winning technical assistance. The Cisco Technical
Support Website on Cisco.com features extensive online support resources. In addition, Cisco Technical
Assistance Center (TAC) engineers provide telephone support. If you do not hold a valid Cisco service
contract, contact your reseller.
Cisco Technical Support Website
The Cisco Technical Support Website provides online documents and tools for troubleshooting and
resolving technical issues with Cisco products and technologies. The website is available 24 hours a day,
365 days a year, at this URL:
http://www.cisco.com/techsupport
Access to all tools on the Cisco Technical Support Website requires a Cisco.com user ID and password.
If you have a valid service contract but do not have a user ID or password, you can register at this URL:
http://tools.cisco.com/RPF/register/register.do
Page 9

Preface
Obtaining Technical Assistance
ix
Cisco 4400 Series Wireless LAN Controllers - Installation and Configuration Guide
78-17157-01
Note Use the Cisco Product Identification (CPI) tool to locate your product serial number before submitting a web
or phone request for service. You can access the CPI tool from the Cisco Technical Support Website by
clicking the Tools & Resources link under Documentation & Tools. Choose Cisco Product Identification
Tool from the Alphabetical Index drop-down list, or click the Cisco Product Identification Tool link under
Alerts & RMAs. The CPI tool offers three search options: by product ID or model name; by tree view; or for
certain products, by copying and pasting show command output. Search results show an illustration of your
product with the serial number label location highlighted. Locate the serial number label on your product and
record the information before placing a service call.
Submitting a Service Request
Using the online TAC Service Request Tool is the fastest way to open S3 and S4 service requests. (S3
and S4 service requests are those in which your network is minimally impaired or for which you require
product information.) After you describe your situation, the TAC Service Request Tool provides
recommended solutions. If your issue is not resolved using the recommended resources, your service
request is assigned to a Cisco TAC engineer. The TAC Service Request Tool is located at this URL:
http://www.cisco.com/techsupport/servicerequest
For S1 or S2 service requests or if you do not have Internet access, contact the Cisco TAC by telephone.
(S1 or S2 service requests are those in which your production network is down or severely degraded.)
Cisco TAC engineers are assigned immediately to S1 and S2 service requests to help keep your business
operations running smoothly.
To open a service request by telephone, use one of the following numbers:
Asia-Pacific: +61 2 8446 7411 (Australia: 1 800 805 227)
EMEA: +32 2 704 55 55
USA: 1 800 553-2447
For a complete list of Cisco TAC contacts, go to this URL:
http://www.cisco.com/techsupport/contacts
Definitions of Service Request Severity
To ensure that all service requests are reported in a standard format, Cisco has established severity
definitions.
• Severity 1 (S1)—Your network is “down,” or there is a critical impact to your business operations.
You and Cisco will commit all necessary resources around the clock to resolve the situation.
• Severity 2 (S2)—Operation of an existing network is severely degraded, or significant aspects of
your business operation are negatively affected by inadequate performance of Cisco products. You
and Cisco will commit full-time resources during normal business hours to resolve the situation.
• Severity 3 (S3)—Operational performance of your network is impaired, but most business
operations remain functional. You and Cisco will commit resources during normal business hours
to restore service to satisfactory levels.
• Severity 4 (S4)—You require information or assistance with Cisco product capabilities, installation,
or configuration. There is little or no effect on your business operations.
Page 10

Preface
Obtaining Additional Publications and Information
x
Cisco 4400 Series Wireless LAN Controllers - Installation and Configuration Guide
78-17157-01
Obtaining Additional Publications and Information
Information about Cisco products, technologies, and network solutions is available from various online
and printed sources.
• Cisco Marketplace provides a variety of Cisco books, reference guides, and logo merchandise. Visit
Cisco Marketplace, the company store, at this URL:
http://www.cisco.com/go/marketplace/
• Cisco Press publishes a wide range of general networking, training and certification titles. Both new
and experienced users will benefit from these publications. For current Cisco Press titles and other
information, go to Cisco Press at this URL:
http://www.ciscopress.com
• Pack et magazine is the Cisco Systems technical user magazine for maximizing Internet and
networking investments. Each quarter, Packet delivers coverage of the latest industry trends,
technology breakthroughs, and Cisco products and solutions, as well as network deployment and
troubleshooting tips, configuration examples, customer case studies, certification and training
information, and links to scores of in-depth online resources. You can access Packet magazine at
this URL:
http://www.cisco.com/packet
• iQ Magazine is the quarterly publication from Cisco Systems designed to help growing companies
learn how they can use technology to increase revenue, streamline their business, and expand
services. The publication identifies the challenges facing these companies and the technologies to
help solve them, using real-world case studies and business strategies to help readers make sound
technology investment decisions. You can access iQ Magazine at this URL:
http://www.cisco.com/go/iqmagazine
• Internet Protocol Journal is a quarterly journal published by Cisco Systems for engineering
professionals involved in designing, developing, and operating public and private internets and
intranets. You can access the Internet Protocol Journal at this URL:
http://www.cisco.com/ipj
• World-class networking training is available from Cisco. You can view current offerings at
this URL:
http://www.cisco.com/en/US/learning/index.html
Page 11

1
Cisco 4400 Series Wireless LAN Controllers - Installation and Configuration Guide
78-17157-01
Installation and Configuration
These controllers offer the highest level of performance and scalability for large-scale enterprise WLAN
deployments. In addition, these controllers deliver WLAN services over an existing ethernet or IP
infrastructure, protecting existing network investments while providing best-in-class wireless services.
As a core component of the award-winning Cisco Wireless LAN Solution, these controllers deliver
wireless security, intrusion detection, RF management, Quality of Service (QoS) and mobility across an
entire enterprise. It works in conjunction with other controllers, Cisco WCS, and access points to provide
network managers with a robust Wireless LAN (WLAN) solution that enables business-critical wireless
applications. From voice and data services to location tracking, the controllers provide the control,
scalability, and reliability that IT managers need to build secure enterprise-scale wireless networks.
This document is written assuming that you have already determined the 802.11 topology. Because the
Radio Resource Management (RRM) feature automatically detects and configures the access points as
they appear on the network, it is not necessary to have any access points on the network to install and
configure a controller.
The controller is 17.5 in. wide x 15.75 in. deep x 1.75 in. high (443 x 400 x 44.5 mm). The chassis can
be rack or shelf mounted.
Page 12

Installation and Configuration
2
Cisco 4400 Series Wireless LAN Controllers - Installation and Configuration Guide
78-17157-01
Controller Models
The controller comes in 2 variants—4402 and 4404.
The 4404 controller has four front-panel slots for 1000BASE-SX, 1000BASE-LX, or 1000BASE-T SFP
modules, as described in the 1000BASE-SX, 1000BASE-LX, and 1000BASE-T SFP module Quick Start
Guide.
The 4402 Cisco Wireless LAN Controller is similar, except that it has two front-panel slots for
1000BASE-SX, 1000BASE-LX, or 1000BASE-T SFP modules instead of four. The 1000BASE-SX SFP
module provides 1000 Mbps wired connections through 850nM (SX) fiber-optic links using LC physical
connectors. The 1000BASE-LX SFP module provides 1000 Mbps wired connections through 1300nM
(LX/LH) fiber-optic links using LC physical connectors. The 1000BASE-T SFP module provides
1000 Mbps wired connections through CAT-5 or higher cables using RJ-45 physical connectors.
4402 Series Controller
There are three types 4402 series controllers:
• AIR-WLC4402-12-K9—This 4402-12 controller uses two redundant GigE connections to bypass
single network failures. That is, at any given time one of the Cisco 4400 Series Wireless LAN
Controller GigE connections is active and the other is passive. In case of a network failure, the active
connection becomes passive, and the passive connection becomes active. The 4402 controller has
one back-panel slot for future expansion modules and communicates with up to 12 access points
• AIR-WLC4402-25-K9—This 4402-25 controller uses two redundant GigE connections to bypass
single network failures, and communicates with up to 25 access points. It has one back-panel slot
for future expansion modules.
• AIR-WLC4402-50-K9—This 4402-50 controller uses two redundant GigE connections to bypass
single network failures, and communicates with up to 50 access points. It has one back-panel slot
for future expansion modules.
4404 Series Controller
There is only one type of 4404 series controller
• AIR-WLC4404-100-K9—This 4404-100 controller uses four redundant GigE connections to
bypass one or two single network failures, and communicates with up to 100 access points. It has
two back-panel slots for future expansion modules.
For information on installing the network adapter modules, refer to the 1000BASE-SX, 1000BASE-LX,
and 1000BASE-T SFP module Quick Start Guide.
Page 13
Installation and Configuration
3
Cisco 4400 Series Wireless LAN Controllers - Installation and Configuration Guide
78-17157-01
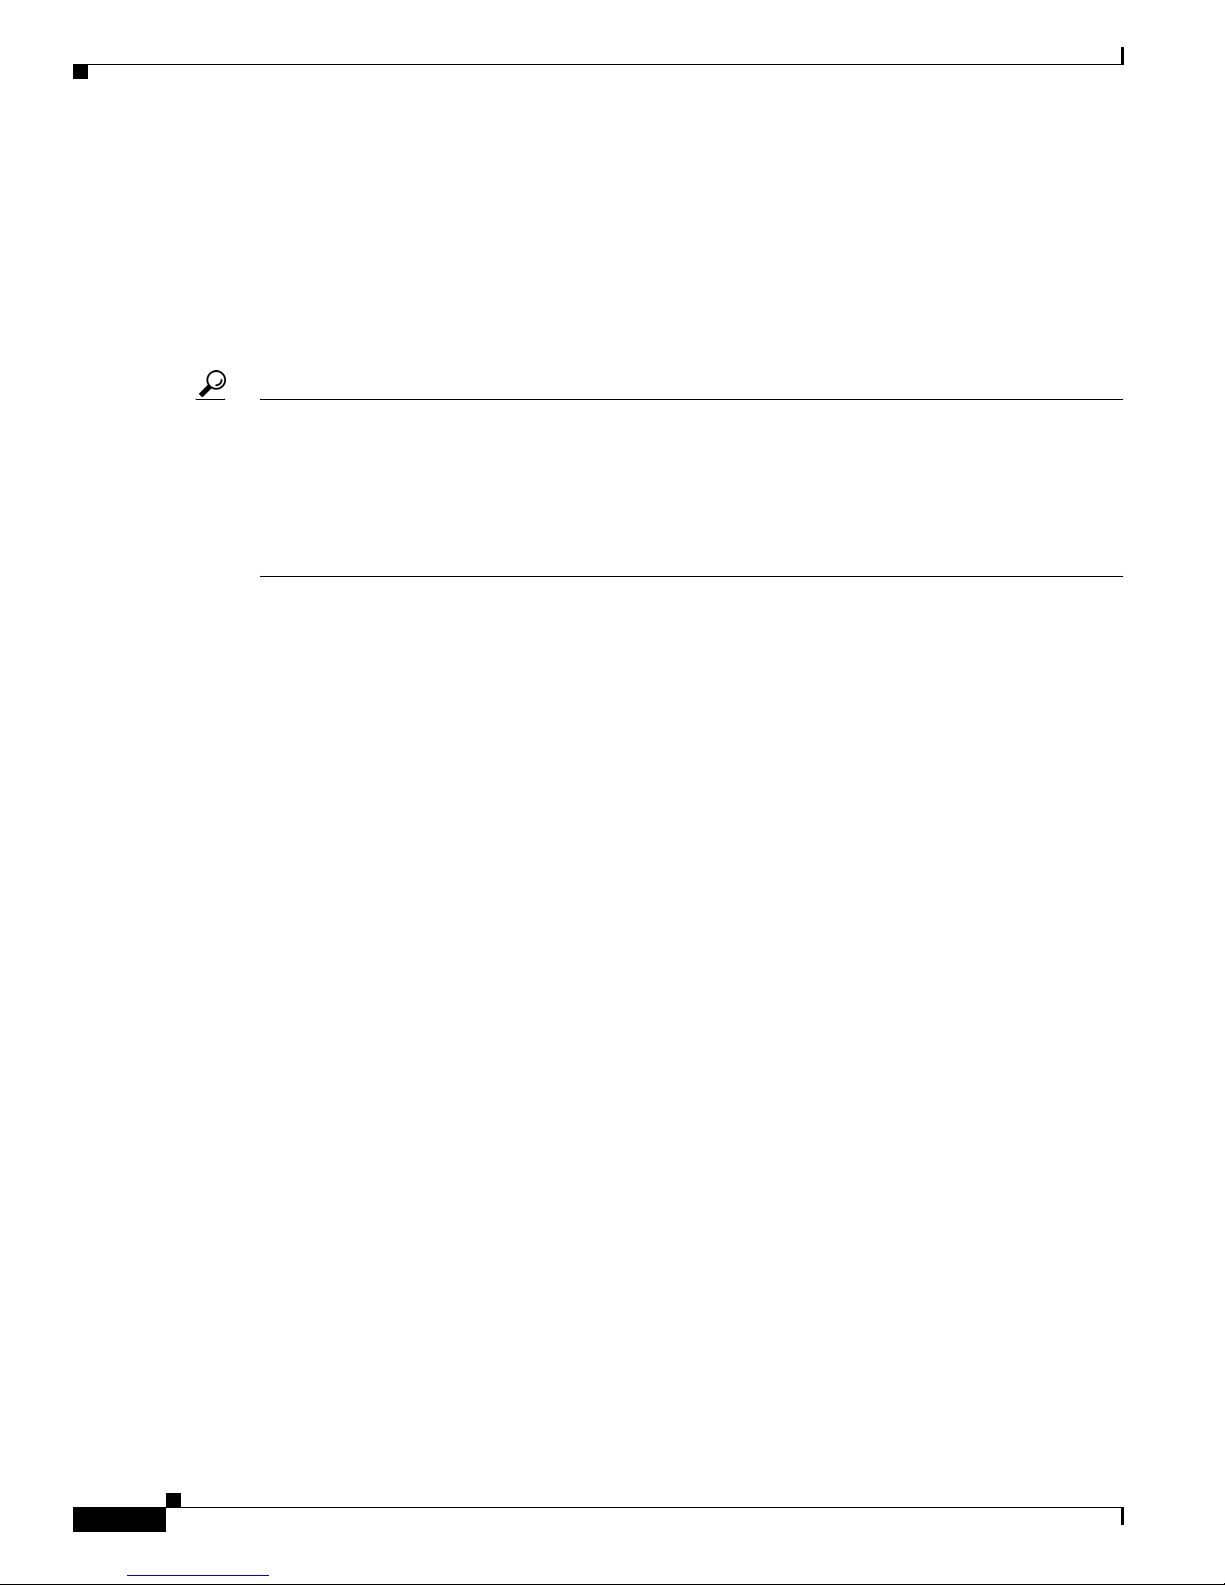
The following figure shows the back panel of a 4404 controller:
Figure 1 4404 Series Controller
Note The 4404 controller has two back-panel slots for future expansion modules, while the 4402 controller
has one back-panel slots for a future expansion module.
The controllers can accommodate a second, redundant power supply. Refer to the Cisco 4400 Series
Power Supply Quick Start Guide.
Note All controller models come from the factory with integral 19-inch EIA equipment rack flush-mount ears.
The 4402 controller uses one set of two redundant front-panel SX/LC/T SFP modules uses two while the
4404 controller uses sets of two redundant front-panel SX/LC/T SFP modules:
• 1000BASE-SX SFP modules provide a 1000 Mbps wired connection to a network through an
850nM (SX) fiber-optic link using an LC physical connector.
• 1000BASE-LX SFP modules provide a 1000 Mbps wired connection to a network through a
1300nM (LX/LH) fiber-optic link using an LC physical connector.
• 1000BASE-T SFP modules provide a 1000 Mbps wired connection to a network through a copper
link using an RJ-45 physical connector.
• One or Two Enhanced Security Modules. Refer to Enhanced Security Module for the Cisco 4400
Series Wireless LAN Controller Quick Start Guide.
Page 14
Installation and Configuration
4
Cisco 4400 Series Wireless LAN Controllers - Installation and Configuration Guide
78-17157-01
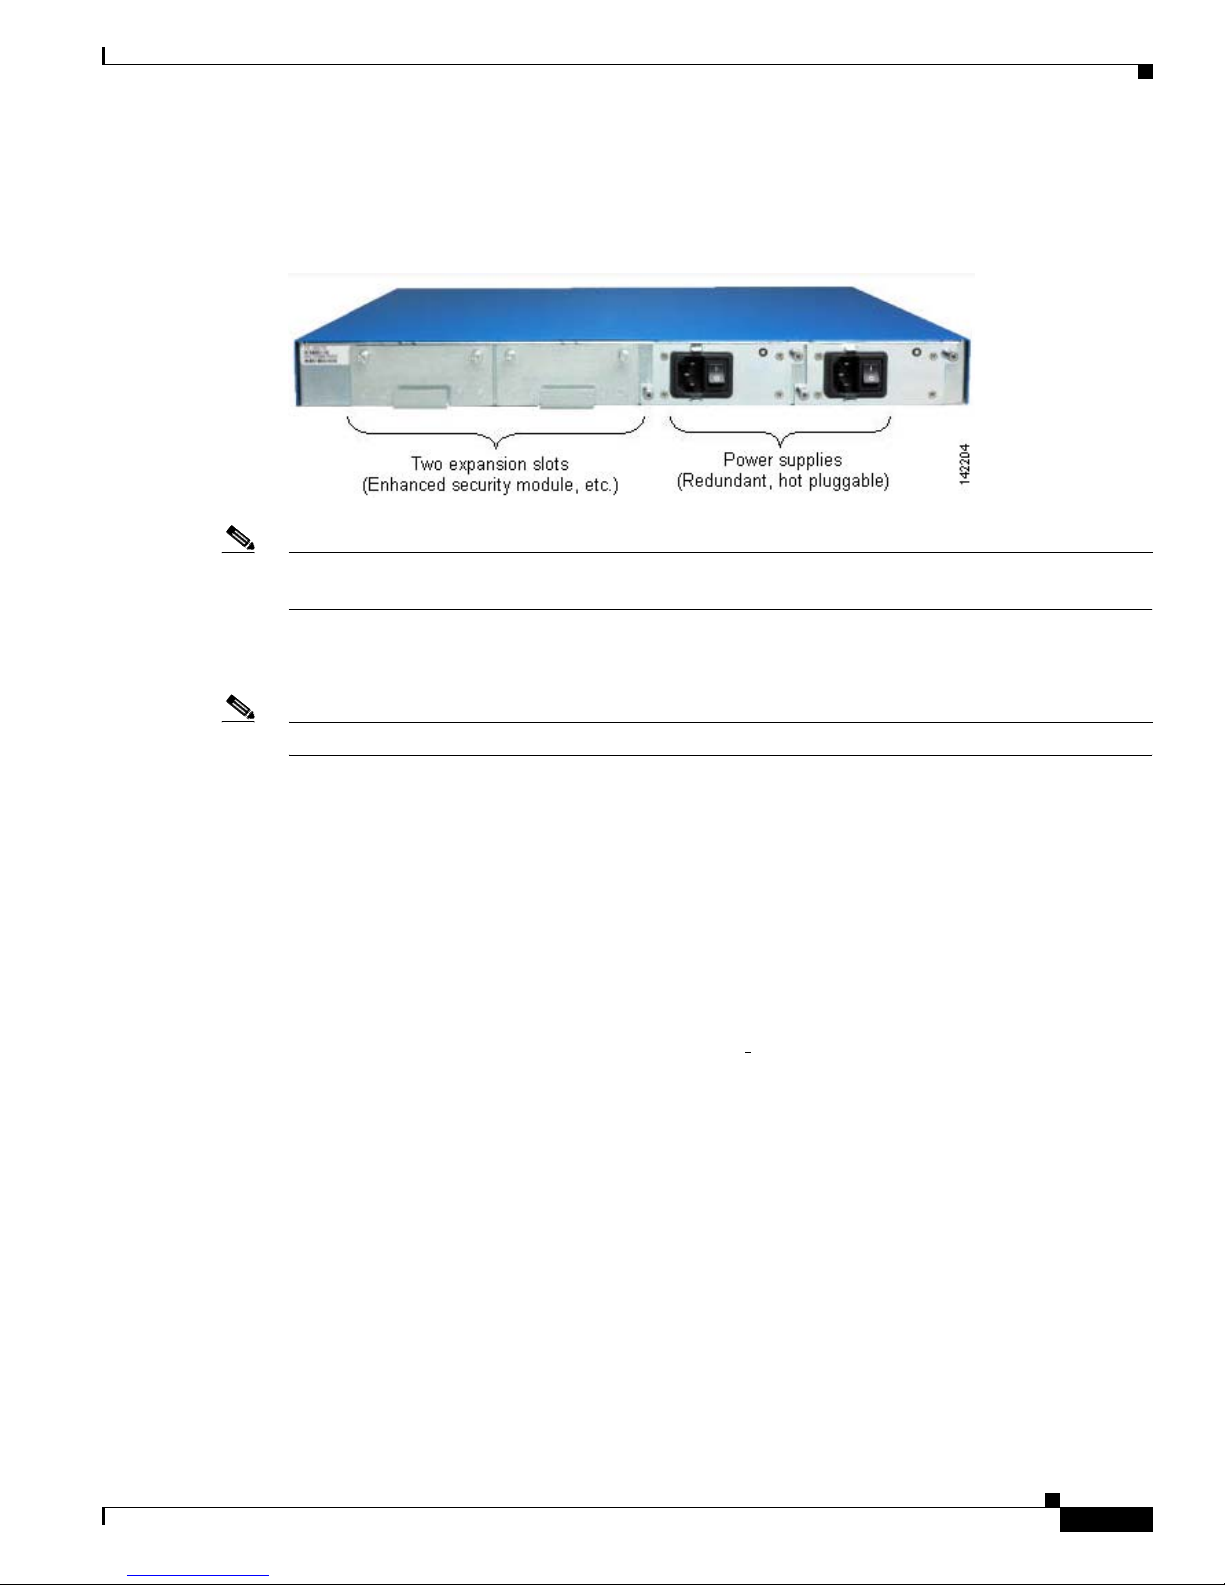
The controller communicates indirectly with access points through the network. The following figure
shows a controller connected in this way.
Figure 2 Typical Controller Deployment
142197
Network
Cisco Wireless
LAN Controller
Cisco 1000
Access Points
Page 15

Installation and Configuration
5
Cisco 4400 Series Wireless LAN Controllers - Installation and Configuration Guide
78-17157-01
The following figure shows a typical controller network topology and network connections:
Figure 3 Typical Controller Topology and Network Connections
142202
Cisco 1000
access points
Network
CLI
console
Cisco wireless LAN
controllers
1 to 4 1000BASE-SX,
-LX, or -T
10/100BASE-T
Cisco Wireless
control System,
Web User
Interface, CLI
Cisco wireless
control system,
Web User
Interface, CLI
Service
port
connections
Serial
console
connection
Distribution
system
connections
Access
point
connections
Optional
management network
Page 16

Installation and Configuration
Collecting Required Tools and Information
6
Cisco 4400 Series Wireless LAN Controllers - Installation and Configuration Guide
78-17157-01
Collecting Required Tools and Information
This section lists the tools and information that you should have before installing the controller.
Cisco Wireless LAN Controller Hardware
• Controller (ships with factory-supplied power cord and mounting hardware).
• Network, Operating System Service network, and access point cables, as required.
CLI Console
• VT-100 terminal emulator on CLI console laptop or palmtop.
• Null modem serial cable to connect CLI console and Controller DB-9 console port.
Local TFTP Server
This is required for downloading Operating System software updates. (Contact Cisco Technical
Assistance Center (TAC) for software updates.)
Note The Cisco WCS uses an integral TFTP server. This means that third-party TFTP servers cannot run on
the same workstation as the Cisco WCS, because Cisco WCS and third-party TFTP servers use the same
communication port.
Initial System Configuration Information
Obtain the following initial configuration parameters from the wireless LAN/network planner:
–
System (Controller) name.
–
Administrative username and password. (Default Administrative username and password are
admin and admin, respectively.)
Note The service-port interface and management interface MUST be on different subnets.
–
Service-Port Interface IP address configuration protocol (none or DHCP). Refer to “Installation
and Configuration” for the Service port location.
–
If Service port configuration protocol = none, Service Port (front-panel Service port) IP address
and Service Port netmask.
–
Management Interface (DS Port, or Network Interface Port) IP address. Refer to “Installation
and Configuration” for the Distribution System port locations.
–
Management Interface netmask.
–
Management Interface default router IP address.
Page 17

Installation and Configuration
Collecting Required Tools and Information
7
Cisco 4400 Series Wireless LAN Controllers - Installation and Configuration Guide
78-17157-01
–
VLAN identifier, if the management interface is assigned to a VLAN, or ‘0’ for an untagged
VLAN.
–
Distribution System Physical Port number:
* 4402: 1 - 2 for front panel GigE ports
* 4404: 1 - 4 for front panel GigE ports
–
IP address of the default DHCP server that will supply IP addresses to clients.
–
LWAPP Transport Mode, LAYER2 or LAYER3.
• Virtual Gateway IP address: one fictitious, unassigned IP address (such as 1.1.1.1) to be used by all
Cisco Wireless LAN Controller Layer 3 Security and Mobility managers.
• Cisco Wireless LAN Controller Mobility Group (RF Group) Name, if required.
• 802.11 Network Name (SSID) for WLAN 1. This is the default SSID that the access points use when
they join with the Cisco Wireless LAN Controller.
• Whether or not to allow static IP addresses for clients.
* Yes = more convenient, but lower security (session can be hijacked), clients can supply their own
IP address, better for devices that cannot use DHCP.
* No = less convenient, higher security, clients must use DHCP for an IP address, works well for
Windows XP devices.
• When you are configuring a RADIUS server, the server IP address, communication port, and Secret.
• Country Code for this installation. Refer to Configuring the Cisco Wireless LAN Controller and
Cisco WLAN Solution Supported Country Codes in the Product Guide.
• 802.11b network enabled or disabled?
• 802.11a network enabled or disabled?
• 802.11g network enabled or disabled?
• Radio Resource Management (RRM) (Auto-RF) enabled or disabled?
Continue with “Determining a Physical Location.”
Page 18

Installation and Configuration
Determining a Physical Location
8
Cisco 4400 Series Wireless LAN Controllers - Installation and Configuration Guide
78-17157-01
Determining a Physical Location
The controller can be installed almost anywhere, it is more secure and reliable if installed in a secure
equipment room or wiring closet. For maximum reliability, mount the controller using the following
guidelines:
• Make sure you can reach the controller and all cables.
• Make sure that water or excessive moisture cannot get into the controller.
• Ensure that airflow through the controller is not obstructed. Leave at least 4 inches clear on both
sides of the controller chassis.
• Verify that the ambient temperature remains between 0 and 40° C (32 and 104° F).
• Make sure the controller is within 328 ft. (100 m) equivalent distance of equipment connected to a
1000BASE-T port.
• Make sure the controller is within one of the following distances of equipment connected to the
optional 1000BASE-SX or -LX port:
–
722 ft. (220 m) when using 160 MHz-km rated 62.5/125 µm multimode fiber.
–
902 ft. (275 m) when using 200 MHz-km rated 62.5/125 µm multimode fiber.
–
1312 ft. (400 m) when using 400 MHz-km rated 50/125 µm multimode fiber.
–
1641 ft. (500 m) when using 500 MHz-km rated 50/125 µm multimode fiber.
Note These distances depend on the SFP being used - refer to the Cisco SFP datasheet at
http://www.cisco.com/en/US/products/hw/modules/ps5000/products_data_sheet09186a008014cb62.ht
ml.
The 1000BASE-SX SFP modules provide 1000 Mbps wired connections to a network through
850nM (SX) fiber-optic links using LC physical connectors. The 1000BASE-LX SFP modules
provide 1000 Mbps wired connections to a network through 1300nM (LX/LH) fiber-optic links
using LC physical connectors.
Warning
Class 1 laser product.
Statement 1008
Waarschuwing
Klasse-1 laser produkt.
Varoitus
Luokan 1 lasertuote.
Attention
Produit laser de classe 1.
Warnung
Laserprodukt der Klasse 1.
Avvertenza
Prodotto laser di Classe 1.
Advarsel
Laserprodukt av klasse 1.
Aviso
Produto laser de classe 1.
¡Advertencia!
Producto láser Clase I.
Page 19

Installation and Configuration
Determining a Physical Location
9
Cisco 4400 Series Wireless LAN Controllers - Installation and Configuration Guide
78-17157-01
• Ensure that the power cord can reach a 110 or 220 VAC grounded electrical outlet.
Varning!
Laserprodukt av klass 1.
Aviso
Produto a laser de classe 1.
Advarsel
Klasse 1 laserprodukt.
Page 20

Installation and Configuration
Installing the Chassis
10
Cisco 4400 Series Wireless LAN Controllers - Installation and Configuration Guide
78-17157-01
Installing the Chassis
This section describes how to install the controller chassis.
Warning
Only trained and qualified personnel should be allowed to install, replace, or service
this equipment.
Statement 1030
Waarschuwing
Deze apparatuur mag alleen worden geïnstalleerd, vervangen of hersteld door bevoegd
geschoold personeel.
Varoitus
Tämän laitteen saa asentaa, vaihtaa tai huoltaa ainoastaan koulutettu ja laitteen
tunteva henkilökunta.
Attention
Il est vivement recommandé de confier l'installation, le remplacement et la maintenance
de ces équipements à des personnels qualifiés et expérimentés.
Warnung
Das Installieren, Ersetzen oder Bedienen dieser Ausrüstung sollte nur geschultem,
qualifiziertem Personal gestattet werden.
Avvertenza
Questo apparato può essere installato, sostituito o mantenuto unicamente da un
personale competente.
Advarsel
Bare opplært og kvalifisert personell skal foreta installasjoner, utskiftninger eller
service på dette utstyret.
Aviso
Apenas pessoal treinado e qualificado deve ser autorizado a instalar, substituir ou fazer
a revisão deste equipamento.
¡Advertencia!
Solamente el personal calificado debe instalar, reemplazar o utilizar este equipo.
Varning!
Endast utbildad och kvalificerad personal bör få tillåtelse att installera, byta ut eller
reparera denna utrustning.
Aviso
Somente uma equipe treinada e qualificada tem permissão para instalar, substituir ou dar
manutenção a este equipamento.
Page 21

Installation and Configuration
Installing the Chassis
11
Cisco 4400 Series Wireless LAN Controllers - Installation and Configuration Guide
78-17157-01
The controller is shipped with rack-mounting ears attached, and the desktop/shelf mounting rubber feet
in a separate bag. Mount the controller as follows:
• When you are mounting the controller on a desktop or shelf, adhere the rubber feet to the bottom of
the chassis, and place the chassis on any secure horizontal surface. Note that you may also remove
the rack mounting ears from the controller, if desired.
• When you are mounting the controller in an EIA-standard rack, attach the ears to the equipment rack
using the factory-supplied screws.
Caution The controller weighs 15.2 pounds (6.95 kg). For safety, two or more people must work together to
perform the installation.
You have installed the controller chassis.
Install the SFP modules as described in the 1000BASE-SX, 1000BASE-LX, and 1000BASE-T SFP module
Quick Start Guide.
If you have purchased an extra power supply module or Enhanced Security Modules refer to the Cisco
4400 Series Power Supply Quick Start Guide.
Advarsel
Kun uddannede personer må installere, udskifte komponenter i eller servicere dette
udstyr.
Page 22

Installation and Configuration
Installing the Chassis
12
Cisco 4400 Series Wireless LAN Controllers - Installation and Configuration Guide
78-17157-01
Warning
This unit might have more than one power supply connection. All connections must be
removed to de-energize the unit.
Statement 1028
Waarschuwing
Deze eenheid kan meer dan één stroomtoevoeraansluiting bevatten. Alle aansluitingen
dienen ontkoppeld te worden om de eenheid te ontkrachten.
Varoitus
Tässä laitteessa voi olla useampia kuin yksi virtakytkentä. Kaikki liitännät on irrotettava,
jotta jännite poistetaan laitteesta.
Attention
Cette unité peut avoir plus d'une connexion d'alimentation. Pour supprimer toute tension
et tout courant électrique de l'unité, toutes les connexions d'alimentation doivent être
débranchées.
Warnung
Dieses Gerät kann mehr als eine Stromzufuhr haben. Um sicherzustellen, dass der Einheit
kein Strom zugeführt wird, müssen alle Verbindungen entfernt werden.
Avvertenza
Questa unità può avere più di una connessione all'alimentazione elettrica. Tutte le
connessioni devono essere staccate per togliere la corrente dall'unità.
Advarsel
Denne enheten kan ha mer enn én strømtilførselskobling. Alle koblinger må fjernes fra
enheten for å utkoble all strøm.
Aviso
Esta unidade poderá ter mais de uma conexão de fonte de energia. Todas as conexões
devem ser removidas para desligar a unidade.
¡Advertencia!
Puede que esta unidad tenga más de una conexión para fuentes de alimentación. Para
cortar por completo el suministro de energía, deben desconectarse todas las conexiones.
Varning!
Denna enhet har eventuellt mer än en strömförsörjningsanslutning. Alla anslutningar
måste tas bort för att göra enheten strömlös.
Aviso Esta unidade pode ter mais de uma conexão de fonte de alimentação. Todas as conexões devem ser
removidas para interromper a alimentação da unidade.
Page 23

Installation and Configuration
Installing the Chassis
13
Cisco 4400 Series Wireless LAN Controllers - Installation and Configuration Guide
78-17157-01
Advarsel Denne enhed har muligvis mere end en strømforsyningstilslutning. Alle tilslutninger skal fjernes for
at aflade strømmen fra enheden.
Page 24

Installation and Configuration
Connecting and Using the CLI Console
14
Cisco 4400 Series Wireless LAN Controllers - Installation and Configuration Guide
78-17157-01
Connecting and Using the CLI Console
For initial system configuration, use the command-line interface (CLI) console. As shown in the
following figure, the CLI console connects to the controller front-panel console port.
Figure 4 CLI Console Connection to Controller
Do the following to connect the CLI console to the controller:
• Use a null-modem serial cable to connect the CLI console to the controller console port.
Note The Cisco Wireless LAN Controller end of the cable is female DB-9. The other end should be any kind
of connector that plugs into your VT-100 terminal emulator (usually a laptop or palmtop computer).
• Make sure the VT-100 terminal emulator (HyperTerminal, ProComm, minicom, tip, or other) is
configured for the following parameters:
–
9600 baud
–
8 data bits
–
no flow control
–
1 stop bit
–
no parity
142201
Page 25

Installation and Configuration
Performing Power On Self Test
15
Cisco 4400 Series Wireless LAN Controllers - Installation and Configuration Guide
78-17157-01
Performing Power On Self Test
When you plug the controller into an AC power source, the bootup script initializes the system, verifies
the hardware configuration, loads its microcode into memory, verifies its Operating System software
load, and initializes itself with its stored configurations. Do the following to perform POST and
Operating System software initialization:
Note This procedure is written assuming that you have connected the CLI console to the controller as
described in “Connecting and Using the CLI Console.”
Step 1 Plug an AC power cord into the back of the Cisco Wireless LAN Controller, and connect the other end
to a grounded 100 to 240 VAC 50/60 Hz electrical outlet.
Note If you wish to run a previous release of the controller code, press the <ESC> key immediately after the
Model and S/N line. This takes you to the Bootloader Boot Options menu.
Step 2 Monitor the Cisco Wireless LAN Controller bootup using the CLI Screen:
The Bootup script displays Operating System software initialization (code download and POST
verification) and basic configuration as shown in the following sample bootup display:
Bootloader 3.0.72.0 (Apr 22 2005 - 19:14:47)
Motorola PowerPC ProcessorID=00000000 Rev. PVR=80200020
4400 Wireless LAN Switch Board
CPU: 833 MHz
CCB: 333 MHz
DDR: 166 MHz
LBC: 41 MHz
L1 D-cache 32KB, L1 I-cache 32KB enabled.
I2C: ready
DTT: 1 is 43 C
DRAM: 512 MB
8540 in PCI Host Mode.
8540 is the PCI Arbiter.
Memory Test PASS
FLASH:
Flash Bank 0: portsize = 2, size = 8 MB in 142 Sectors
8 MB
L2 cache enabled: 256KB
In: serial
Out: serial
Err: serial
Card Id: 1536
Card Revision Id: 1
Card CPU Id: 1287
Number of MAC Addresses: 32
Number of Slots Supported: 4
Serial Number: 12345678-12345678-12444
Manufacturers ID: 30464
Board Maintenance Level: ml1
Number of supported APs: 12
MAC address = 00:0b:85:15:67:21
Page 26

Installation and Configuration
Performing Power On Self Test
16
Cisco 4400 Series Wireless LAN Controllers - Installation and Configuration Guide
78-17157-01
.o88b. d888888b .d8888. .o88b. .d88b.
d8P Y8 `88' 88' YP d8P Y8 .8P Y8.
8P 88 `8bo. 8P 88 88
8b 88 `Y8b. 8b 88 88
Y8b d8 .88. db 8D Y8b d8 `8b d8'
`Y88P' Y888888P `8888Y' `Y88P' `Y88P'
Model 4404 S/N: 12345678-12345678-12345
Net:
PHY DEVICE : Found Intel LXT971A PHY at 0x01
FEC ETHERNET
IDE: Bus 0: OK
Device 0: Model: SanDisk SDCFB-256 Firm: HDX 2.15 Ser#: 111814I06043655
Type: Hard Disk
Capacity: 245.0 MB = 0.2 GB (501760 x 512)
Device 1: not available
Booting Primary Image...
Press <ESC> now for additional boot options...
(If desired, press <ESC> now to display the Bootloader Boot Options Menu.)
Boot Options
Please choose an option from below:
1. Run primary image
2. Run backup image
3. Manually update images
4. Change active boot image
5. Clear Configuration
Please enter your choice:
(Enter 1 to run the current Code, enter 2 to run the previous Code, enter 4 to run the current Code
and clear the Controller configuration to factory defaults. Do not enter 3 unless directed to do so by
Cisco Technical Assistance Center (TAC).)
Detecting Hardware...
(The rest of this process takes two to three minutes. Do not reboot the Cisco Wireless
LAN Controller until you receive the user login prompt.)
Software Copyright <company>. 2005 c All rights reserved.
Cisco AireOS Version 3.0.72.0
Initializing OS Services: ok
Initializing Serial Services: ok
Initializing Network Services: ok
Starting ARP Services: ok
Starting Trap Manager: ok
Starting Network Interface Management Services: ok
Starting System Services: ok
Starting Fast Path Hardware Acceleration: ok
Starting Switching Services: ok
Starting QoS Services: ok
Starting Policy Manager: ok
Starting Data Transport Link Layer: ok
Starting Access Control List Services: ok
Starting System Interfaces: ok
Starting LWAPP: ok
Starting Crypto Accelerator[s]: None Present
Starting Certificate Database: ok
Starting VPN Services: ok
Starting Security Services: ok
Starting Policy Manager: ok
Starting Authentication Engine: ok
Starting Mobility Management: ok
Page 27

Installation and Configuration
Performing Power On Self Test
17
Cisco 4400 Series Wireless LAN Controllers - Installation and Configuration Guide
78-17157-01
Starting Virtual AP Services: ok
Starting AireWave Director: ok
Starting Network Time Services: ok
Starting Broadcast Services: ok
Starting Logging Services: ok
Starting DHCP Server: ok
Starting IDS Signature Manager: ok
Starting External Policy Interface: ok
Starting RFID Tag Tracking: ok
Starting Power Supply Status Monitoring Service: ok
Starting Management Services:
Web Server: ok
CLI: ok
Secure Web: ok
Step 3 If this is the first time a Cisco Wireless LAN Controller has been powered up, or if you enter
Recover-Config in the User: prompt, the bootup script runs the Startup Wizard described in the Product
Guide, which prompts you for basic configuration inputs.
If this is at least the second time that you have powered up the controller, the bootup script prompts you
for a login and password. Enter the login and password as described in “Logging In,” or reset the
controller configuration to factory defaults by entering the following command to:
Recover-Config
In either of the last two cases, the Cisco Wireless LAN Controller has passed the POST test.
Page 28

Installation and Configuration
Using the Startup Wizard
18
Cisco 4400 Series Wireless LAN Controllers - Installation and Configuration Guide
78-17157-01
Using the Startup Wizard
The first time you power up a controller with a new factory Operating System configuration, use the
Startup Wizard to do the following:
Note Use the information you collected in “Collecting Required Tools and Information” for this step.
Step 1 Enter the system (controller) name, up to 32 printable ASCII characters.
Step 2 Enter the administrative username and password, each up to 24 printable ASCII characters. The default
administrative user login and password are admin and admin, respectively.
Note The Service-Port Interface and Management Interface must be on different subnets.
Step 3 Enter the Service-Port Interface IP configuration protocol (none, or DHCP). If you do not want to use
the Service port or if you want to assign a static IP address to the Service port, enter none.
Step 4 If you entered none, enter the Service-Port Interface IP address and netmask on the next two lines. If
you do not want to use the Service port, enter 0.0.0.0 for the IP address and netmask.
Step 5 Enter the Management Interface (refer to Management Interface in the Product Guide) IP address,
netmask, default router IP address, and optional VLAN identifier (a valid VLAN identifier, or ‘0’ for
untagged).
Step 6 Network Interface (Distribution System) Physical Port number:
* 4402: 1 -2 for front panel GigE port
* 4404: 1 - 4 for front panel GigE port
Enter the IP address of the default DHCP Server that will supply IP addresses to clients, the Controller
Management Interface, and optionally to the Service Port Interface.
Step 7 Enter the LWAPP Transport Mode, LAYER2 or LAYER3 (refer to Layer 2 and Layer 3 Operation in the
Product Guide).
Note When you select Layer 3 LWAPP operation, you must also create an AP-Manager interface.
Step 8 Enter the Virtual Gateway IP address; one fictitious, unassigned IP address (such as 1.1.1.1) to be used
by all Controller Layer 3 Security and Mobility managers.
Step 9 Enter the Controller Mobility Group (RF Group) Name.
Step 10 Enter the WLAN 1 SSID, or Network Name. This is the default SSID that the access points use when
they join a controller.
Step 11 Allow or disallow static IP addresses for clients. (Yes = clients can supply their own IP address. No =
clients must request an IP address from a DHCP server.)
Step 12 If you are configuring a RADIUS server now, enter YES, and the RADIUS Server IP address,
communication port, and Secret. Otherwise, enter NO.
Step 13 Enter the Country Code for this installation. Type ‘help’ to list the supported countries, and refer to
Configuring the Cisco Wireless LAN Controller and Cisco WLAN Solution Supported Country Codes in
the Product Guide.
Step 14 Independently enable and/or disable the 802.11b, 802.11a, and 802.11g Cisco 1000 Series lightweight
access point networks.
Page 29

Installation and Configuration
Using the Startup Wizard
19
Cisco 4400 Series Wireless LAN Controllers - Installation and Configuration Guide
78-17157-01
Step 15 Enable or disable the Radio Resource Management (RRM) (Auto RF).
The controller saves your configuration, reboots with your changes, and prompts you to log in or enter
‘Recover-Config’ to repeat this step.
Page 30

Installation and Configuration
Logging In
20
Cisco 4400 Series Wireless LAN Controllers - Installation and Configuration Guide
78-17157-01
Logging In
Perform the steps below to log into the controller:
Step 1 Enter a valid login and password to enter the CLI.
User:
Password:
Note The login and password functions are case sensitive. The default Administrative User login and
password are admin and admin, respectively.
Step 2 The CLI displays the root level system prompt:
(system prompt)>
The system prompt can be any alphanumeric string up to 31 characters. You can change it entering
the following command:
(system prompt)>config prompt
Because this is a user-defined variable, it is omitted from the rest of this documentation.
Step 3 The CLI automatically logs you out without saving any changes after 5 minutes of inactivity. This
automatic logout can be set from 0 (never log out) to 160 minutes using the following command:
(system prompt)>config serial timeout
Refer to the Navigating the CLI and Logging Out of the CLI sections in the Product Guide for more
information.
Page 31

Installation and Configuration
Connecting the Network (Distribution System)
21
Cisco 4400 Series Wireless LAN Controllers - Installation and Configuration Guide
78-17157-01
Connecting the Network (Distribution System)
See the following figure for connections from the network (Distribution System) to the controller.
• For the 4402 controller, up to two of the following connections are supported in any combination:
–
1000BASE-T (GigE, front panel, RJ-45 physical port, UTP cable).
–
1000BASE-SX (GigE, front panel, LC physical port, multi-mode 850nM (SX) fiber-optic links
using LC physical connectors).
–
1000BASE-LX (GigE, front panel, LC physical port, multi-mode 1300nM (LX/LH) fiber-optic
links using LC physical connectors).
• For the 4404 controller, up to four of the following connections are supported in any combination:
–
1000BASE-T (GigE, front panel, RJ-45 physical port, UTP cable).
–
1000BASE-SX (GigE, front panel, LC physical port, multi-mode 850nM (SX) fiber-optic links
using LC physical connectors).
–
1000BASE-LX (GigE, front panel, LX physical port, multi-mode 1300nM (LX/LH) fiber-optic
links using LC physical connectors).
Depending on the Distribution System physical port to be assigned in Configuring Cisco Wireless LAN
Controller Interfaces in the Product Guide, use ethernet CAT-5, CAT-5e, CAT-6, or CAT-7 cables or
SX/LX/LH compatible fiber optic cables to connect the network equipment to the Controller.
Figure 5 Physical Network Connections to 4402 and 4404 Controllers
142203
Network
Two 1000BASE-SX,
-LX, or -T
Four 1000BASE-SX,
-LX, or -T
Model 4402 Model 4404
Page 32

Installation and Configuration
Connecting the Network (Distribution System)
22
Cisco 4400 Series Wireless LAN Controllers - Installation and Configuration Guide
78-17157-01
Figure 6 External Equipment Connections to 4400 Controller
Note The Utility Port (1000 Mbps Ethernet, RJ-45) is not currently used and is reserved for future use.
142202
Cisco 1000
access points
Network
CLI
console
Cisco wireless LAN
controllers
1 to 4 1000BASE-SX,
-LX, or -T
10/100BASE-T
Cisco Wireless
control System,
Web User
Interface, CLI
Cisco wireless
control system,
Web User
Interface, CLI
Service
port
connections
Serial
console
connection
Distribution
system
connections
Access
point
connections
Optional
management network
Page 33

Installation and Configuration
Connecting the Service Port Interfaces
23
Cisco 4400 Series Wireless LAN Controllers - Installation and Configuration Guide
78-17157-01
Connecting the Service Port Interfaces
After connecting the network (Distribution System) to the controller as described in “Connecting the
Network (Distribution System),” you can make Cisco Wireless Control System, Web Browser, or CLI
console (management interface) connections to the controller in one of two ways.
• You can connect any of the Cisco Wireless Control System, Web Browser, or CLI console directly
to the secure front-panel service port.
• You can connect any or all of the Cisco Wireless Control System, Web Browser, or CLI console (use
telnet and ssh) through a dedicated Management Network connected to the front-panel Service port.
Note In either case, you must use a shielded, twisted-pair cable to meet FCC Class A requirements.
Use the following figures to connect the Cisco Wireless Control System, Web Browser, and/or CLI
console to the controller.
1. For a direct front-panel Cisco Wireless Control System, Web Browser, or CLI console connection,
use Ethernet CAT-5 or higher Ethernet cables to connect the Cisco Wireless Control System (Cisco
WCS) Server, Web User Interface, or another CLI console to the dedicated front-panel Service port.
Figure 7 CLI Console Connection to Controller through a Null-Modem Serial Cable
2.
For a remote Cisco Wireless Control System, Web Browser, or CLI console connection, use CAT-5,
CAT-5e, CAT-6, or CAT-7 ethernet cables to connect the management network to the front-panel
service port.
Use the appropriate cables to connect the Cisco Wireless Control System, Web Browser, or CLI
console to the management network.
142199
Page 34

Installation and Configuration
Connecting the Service Port Interfaces
24
Cisco 4400 Series Wireless LAN Controllers - Installation and Configuration Guide
78-17157-01
Figure 8 CLI Console Connection to a Controller through a Management Network
142198
Optional management
network
Page 35

Installation and Configuration
Connecting Cisco 1000 Series Lightweight Access Points
25
Cisco 4400 Series Wireless LAN Controllers - Installation and Configuration Guide
78-17157-01
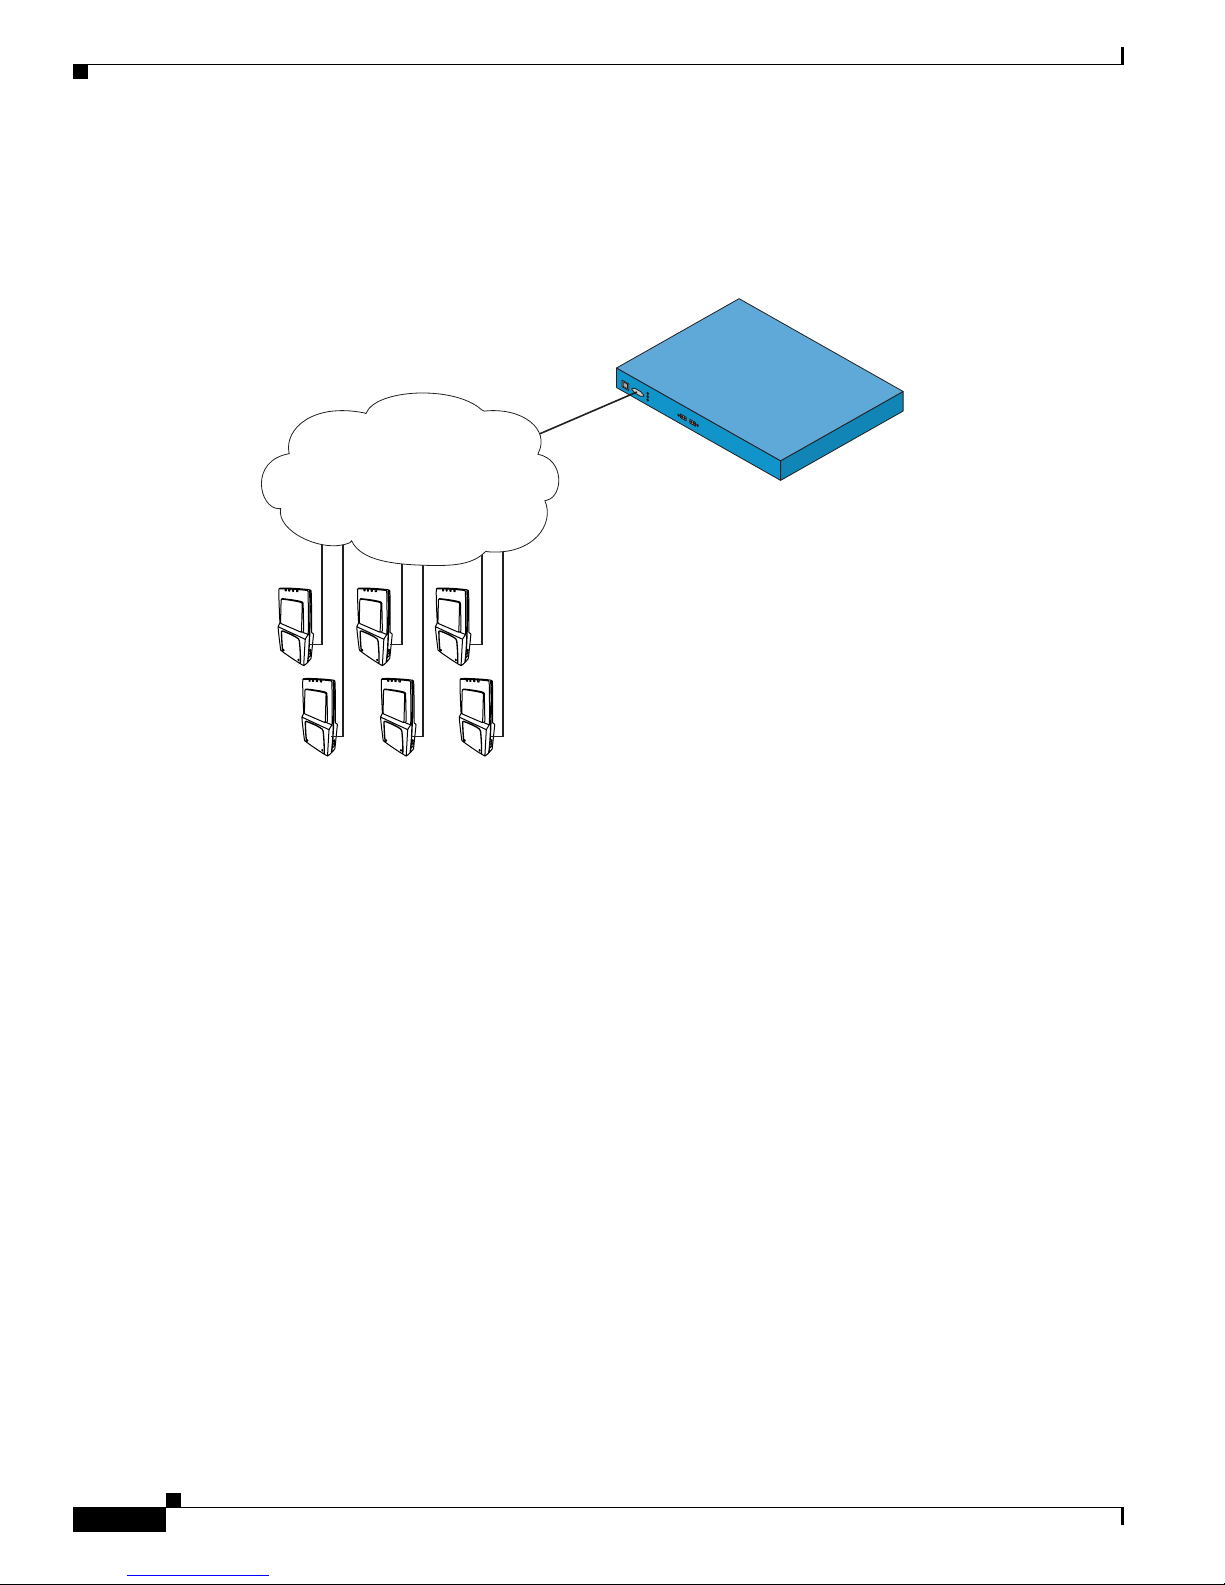
Connecting Cisco 1000 Series Lightweight Access Points
After you have installed and configured the Controller, use CAT-5, CAT-5e, CAT-6, or CAT-7 ethernet
cables to connect the access points to the network (Distribution System) as shown in the following
figure.
Note As soon as the controller is activated, it starts to scan for access points. When it detects an access point,
it records its MAC address in its database. The Radio Resource Management (RRM) function then
automatically configures the access point to start transmitting and start allowing clients to connect
through the Cisco WLAN Solution.
Figure 9 Cisco 1000 Series Lightweight Access Points Connected to a Controller
142197
Network
Cisco Wireless
LAN Controller
Cisco 1000
Access Points
Page 36

Installation and Configuration
Where to Go from Here
26
Cisco 4400 Series Wireless LAN Controllers - Installation and Configuration Guide
78-17157-01
Where to Go from Here
You have completely installed the controller hardware.
• Register your controller.
• Refer to Configuring the Cisco Wireless LAN Controller in the Product Guide for more information
on configuring the controller.
• Refer to the Product Guide for more information on configuring, operating, maintaining and
troubleshooting the Cisco Wireless LAN Solution (Cisco WLAN Solution).
Page 37

A-1
Cisco 4400 Series Wireless LAN Controllers - Installation and Configuration Guide
78-17157-01
APPENDIX
A
FCC Statements for Cisco 4400 Series Wireless
LAN Controllers
This equipment has been tested and found to comply with the limits for a Class B digital device, pursuant
to Part 15 of the FCC Rules. These limits are designed to provide reasonable protection against harmful
interference in a residential installation. This equipment generates, uses and can radiate radio frequency
energy and, if not installed and used in accordance with the instructions, may cause harmful interference
to radio communications. However, there is no guarantee that interference will not occur in a particular
installation. If this equipment does cause harmful interference to radio or television reception, which can
be determined by turning the equipment off and on, the user is encouraged to try to correct the
interference by one or more of the following measures:
Safety Considerations
Warning
This warning symbol means danger. You are in a situation that could cause bodily injury. Before you
work on any equipment, be aware of the hazards involved with electrical circuitry and be familiar
with standard practices for preventing accidents. Use the statement number provided at the end of
each warning to locate its translation in the translated safety warnings that accompanied this device.
Statement 1071
• Verify that the ambient temperature remains between 0 to 40° C (32 to 104° F), taking into account
the elevated temperatures when installed in a rack or an enclosed space.
• When multiple Cisco 4400 Series Wireless LAN Controllers are mounted in an equipment rack, be
sure that the power source is sufficiently rated to safely run all of the equipment in the rack.
• Verify the integrity of the electrical ground before installing Cisco 4400 Series Wireless LAN
Controllers.
Page 38

A-2
Cisco 4400 Series Wireless LAN Controllers - Installation and Configuration Guide
78-17157-01
Appendix A FCC Statements for Cisco 4400 Series Wireless LAN Controllers
This equipment must be grounded. Never defeat the ground conductor or operate the
equipment in the absence of a suitably installed ground conductor. Contact the appropriate
electrical inspection authority or an electrician if you are uncertain that suitable grounding is
available. Statement 1024
Waarschuwing
Deze apparatuur dient geaard te zijn. De aardingsleiding mag nooit buiten werking worden
gesteld en de apparatuur mag nooit bediend worden zonder dat er een op de juiste wijze
geïnstalleerde aardingsleiding aanwezig is. Neem contact op met de bevoegde instantie voor
elektrische inspecties of met een elektricien als u er niet zeker van bent dat er voor passende
aarding gezorgd is.
Varoitus
Laitteiden on oltava maadoitettuja. Älä koskaan ohita maajohdinta tai käytä laitteita ilman
oikein asennettua maajohdinta. Ota yhteys sähkötarkastusviranomaiseen tai sähköasentajaan,
jos olet epävarma maadoituksen sopivuudesta.
Attention
Cet équipement doit être mis à la masse. Ne jamais rendre inopérant le conducteur de masse
ni utiliser l'équipement sans un conducteur de masse adéquatement installé. En cas de doute
sur la mise à la masse appropriée disponible, s'adresser à l'organisme responsable de la
sécurité électrique ou à un électricien.
Warnung
Dieses Gerät muss geerdet sein. Auf keinen Fall den Erdungsleiter unwirksam machen oder
das Gerät ohne einen sachgerecht installierten Erdungsleiter verwenden. Wenn Sie sich nicht
sicher sind, ob eine sachgerechte Erdung vorhanden ist, wenden Sie sich an die zuständige
Inspektionsbehörde oder einen Elektriker.
Avvertenza
Questa apparecchiatura deve essere dotata di messa a terra. Non escludere mai il conduttore
di protezione né usare l'apparecchiatura in assenza di un conduttore di protezione installato
in modo corretto. Se non si è certi della disponibilità di un adeguato collegamento di messa a
terra, richiedere un controllo elettrico presso le autorità competenti o rivolgersi a un
elettricista.
Advarsel
Dette utstyret må jordes. Omgå aldri jordingslederen og bruk aldri utstyret uten riktig montert
jordingsleder. Ta kontakt med fagfolk innen elektrisk inspeksjon eller med en elektriker hvis
du er usikker på om det finnes velegnet jordning.
Aviso
Este equipamento deve ser aterrado. Nunca anule o fio terra nem opere o equipamento sem
um aterramento adequadamente instalado. Em caso de dúvida com relação ao sistema de
aterramento disponível, entre em contato com os serviços locais de inspeção elétrica ou um
eletricista qualificado.
¡Advertencia!
Este equipo debe estar conectado a tierra. No inhabilite el conductor de tierra ni haga
funcionar el equipo si no hay un conductor de tierra instalado correctamente. Póngase en
contacto con la autoridad correspondiente de inspección eléctrica o con un electricista si no
está seguro de que haya una conexión a tierra adecuada.
Varning!
Denna utrustning måste jordas. Koppla aldrig från jordledningen och använd aldrig
utrustningen utan en på lämpligt sätt installerad jordledning. Om det föreligger osäkerhet
huruvida lämplig jordning finns skall elektrisk besiktningsauktoritet eller elektriker
kontaktas.
Page 39

A-3
Cisco 4400 Series Wireless LAN Controllers - Installation and Configuration Guide
78-17157-01
Appendix A FCC Statements for Cisco 4400 Series Wireless LAN Controllers
To prevent bodily injury when mounting or servicing this unit in a rack, you must take special
precautions to ensure that the system remains stable. The following guidelines are provided
to ensure your safety:
This unit should be mounted at the bottom of the rack if it is the only unit in the rack.
When mounting this unit in a partially filled rack, load the rack from the bottom to the top
with the heaviest component at the bottom of the rack.
If the rack is provided with stabilizing devices, install the stabilizers before mounting or
servicing the unit in the rack. Statement 1006
Waarschuwing
Om lichamelijk letsel te voorkomen wanneer u dit toestel in een rek monteert of het daar een
servicebeurt geeft, moet u speciale voorzorgsmaatregelen nemen om ervoor te zorgen dat het
toestel stabiel blijft. De onderstaande richtlijnen worden verstrekt om uw veiligheid te
verzekeren:
Dit toestel dient onderaan in het rek gemonteerd te worden als het toestel het enige in het rek is.
Wanneer u dit toestel in een gedeeltelijk gevuld rek monteert, dient u het rek van onderen naar boven te
laden met het zwaarste onderdeel onderaan in het rek.
Als het rek voorzien is van stabiliseringshulpmiddelen, dient u de stabilisatoren te monteren voordat u
het toestel in het rek monteert of het daar een servicebeurt geeft.
Page 40

A-4
Cisco 4400 Series Wireless LAN Controllers - Installation and Configuration Guide
78-17157-01
Appendix A FCC Statements for Cisco 4400 Series Wireless LAN Controllers
Varoitus
Kun laite asetetaan telineeseen tai huolletaan sen ollessa telineessä, on noudatettava erityisiä
varotoimia järjestelmän vakavuuden säilyttämiseksi, jotta vältytään loukkaantumiselta.
Noudata seuraavia turvallisuusohjeita:
Jos telineessä ei ole muita laitteita, aseta laite telineen alaosaan.
Jos laite asetetaan osaksi täytettyyn telineeseen, aloita kuormittaminen sen alaosasta kaikkein
raskaimmalla esineellä ja siirry sitten sen yläosaan.
Jos telinettä varten on vakaimet, asenna ne ennen laitteen asettamista telineeseen tai sen huoltamista
siinä.
Attention
Pour éviter toute blessure corporelle pendant les opérations de montage ou de réparation de
cette unité en casier, il convient de prendre des précautions spéciales afin de maintenir la
stabilité du système. Les directives ci-dessous sont destinées à assurer la protection du
personnelþ:
Si cette unité constitue la seule unité montée en casier, elle doit être placée dans le bas.
Si cette unité est montée dans un casier partiellement rempli, charger le casier de bas en haut en plaçant
l'élément le plus lourd dans le bas.
Si le casier est équipé de dispositifs stabilisateurs, installer les stabilisateurs avant de monter ou de
réparer l'unité en casier.
Warnung
Zur Vermeidung von Körperverletzung beim Anbringen oder Warten dieser Einheit in einem
Gestell müssen Sie besondere Vorkehrungen treffen, um sicherzustellen, daß das System
stabil bleibt. Die folgenden Richtlinien sollen zur Gewährleistung Ihrer Sicherheit dienen:
Wenn diese Einheit die einzige im Gestell ist, sollte sie unten im Gestell angebracht werden.
Bei Anbringung dieser Einheit in einem zum Teil gefüllten Gestell ist das Gestell von unten nach oben
zu laden, wobei das schwerste Bauteil unten im Gestell anzubringen ist.
Wird das Gestell mit Stabilisierungszubehör geliefert, sind zuerst die Stabilisatoren zu installieren,
bevor Sie die Einheit im Gestell anbringen oder sie warten.
Avvertenza
Per evitare infortuni fisici durante il montaggio o la manutenzione di questa unità in un
supporto, occorre osservare speciali precauzioni per garantire che il sistema rimanga stabile.
Le seguenti direttive vengono fornite per garantire la sicurezza personale:
Questa unità deve venire montata sul fondo del supporto, se si tratta dell’unica unità da montare nel
supporto.
Quando questa unità viene montata in un supporto parzialmente pieno, caricare il supporto dal basso
all’alto, con il componente più pesante sistemato sul fondo del supporto.
Se il supporto è dotato di dispositivi stabilizzanti, installare tali dispositivi prima di montare o di
procedere alla manutenzione dell’unità nel supporto.
Advarsel
Unngå fysiske skader under montering eller reparasjonsarbeid på denne enheten når den
befinner seg i et kabinett. Vær nøye med at systemet er stabilt. Følgende retningslinjer er gitt
for å verne om sikkerheten:
Denne enheten bør monteres nederst i kabinettet hvis dette er den eneste enheten i kabinettet.
Ved montering av denne enheten i et kabinett som er delvis fylt, skal kabinettet lastes fra bunnen og opp
med den tyngste komponenten nederst i kabinettet.
Hvis kabinettet er utstyrt med stabiliseringsutstyr, skal stabilisatorene installeres før montering eller
utføring av reparasjonsarbeid på enheten i kabinettet.
Page 41

A-5
Cisco 4400 Series Wireless LAN Controllers - Installation and Configuration Guide
78-17157-01
Appendix A FCC Statements for Cisco 4400 Series Wireless LAN Controllers
Aviso
Para se prevenir contra danos corporais ao montar ou reparar esta unidade numa estante,
deverá tomar precauções especiais para se certificar de que o sistema possui um suporte
estável. As seguintes directrizes ajudá-lo-ão a efectuar o seu trabalho com segurança:
Esta unidade deverá ser montada na parte inferior da estante, caso seja esta a única unidade a ser
montada.
Ao montar esta unidade numa estante parcialmente ocupada, coloque os itens mais pesados na parte
inferior da estante, arrumando-os de baixo para cima.
Se a estante possuir um dispositivo de estabilização, instale-o antes de montar ou reparar a unidade.
¡Advertencia!
Para evitar lesiones durante el montaje de este equipo sobre un bastidor, o posteriormente
durante su mantenimiento, se debe poner mucho cuidado en que el sistema quede bien estable.
Para garantizar su seguridad, proceda según las siguientes instrucciones:
Colocar el equipo en la parte inferior del bastidor, cuando sea la única unidad en el mismo.
Cuando este equipo se vaya a instalar en un bastidor parcialmente ocupado, comenzar la instalación
desde la parte inferior hacia la superior colocando el equipo más pesado en la parte inferior.
Si el bastidor dispone de dispositivos estabilizadores, instalar éstos antes de montar o proceder al
mantenimiento del equipo instalado en el bastidor.
Varning!
För att undvika kroppsskada när du installerar eller utför underhållsarbete på denna enhet på
en ställning måste du vidta särskilda försiktighetsåtgärder för att försäkra dig om att systemet
står stadigt. Följande riktlinjer ges för att trygga din säkerhet:
Om denna enhet är den enda enheten på ställningen skall den installeras längst ned på ställningen.
Om denna enhet installeras på en delvis fylld ställning skall ställningen fyllas nedifrån och upp, med de
tyngsta enheterna längst ned på ställningen.
Om ställningen är försedd med stabiliseringsdon skall dessa monteras fast innan enheten installeras eller
underhålls på ställningen.
•
•
•
Page 42

A-6
Cisco 4400 Series Wireless LAN Controllers - Installation and Configuration Guide
78-17157-01
Appendix A FCC Statements for Cisco 4400 Series Wireless LAN Controllers
Aviso
Para evitar lesões corporais ao montar ou dar manutenção a esta unidade em um rack, é
necessário tomar todas as precauções para garantir a estabilidade do sistema. As seguintes
orientações são fornecidas para garantir a sua segurança:
Se esta for a única unidade, ela deverá ser montada na parte inferior do rack.
Ao montar esta unidade em um rack parcialmente preenchido, carregue-o de baixo para cima com o
componente mais pesado em sua parte inferior.
Se o rack contiver dispositivos estabilizadores, instale-os antes de montar ou dar manutenção à unidade
existente.
Advarsel
For at forhindre legemesbeskadigelse ved montering eller service af denne enhed i et rack,
skal du sikre at systemet står stabilt. Følgende retningslinjer er også for din sikkerheds skyld:
Enheden skal monteres i bunden af dit rack, hvis det er den eneste enhed i racket.
Ved montering af denne enhed i et delvist fyldt rack, skal enhederne installeres fra bunden og opad med
den tungeste enhed nederst.
Hvis racket leveres med stabiliseringsenheder, skal disse installeres for enheden monteres eller
serviceres i racket.
•
•
•
•
•
•
Page 43

A-7
Cisco 4400 Series Wireless LAN Controllers - Installation and Configuration Guide
78-17157-01
Appendix A FCC Statements for Cisco 4400 Series Wireless LAN Controllers
Page 44

A-8
Cisco 4400 Series Wireless LAN Controllers - Installation and Configuration Guide
78-17157-01
Appendix A FCC Statements for Cisco 4400 Series Wireless LAN Controllers
There is the danger of explosion if the battery is replaced incorrectly. Replace the battery
only with the same or equivalent type recommended by the manufacturer. Dispose of used
batteries according to the manufacturer’s instructions. Statement 1015
Waarschuwing
Er is ontploffingsgevaar als de batterij verkeerd vervangen wordt. Vervang de batterij slechts
met hetzelfde of een equivalent type dat door de fabrikant aanbevolen is. Gebruikte
batterijen dienen overeenkomstig fabrieksvoorschriften weggeworpen te worden.
Varoitus
Räjähdyksen vaara, jos akku on vaihdettu väärään akkuun. Käytä vaihtamiseen ainoastaan
saman- tai vastaavantyyppistä akkua, joka on valmistajan suosittelema. Hävitä käytetyt akut
valmistajan ohjeiden mukaan.
Attention
Danger d'explosion si la pile n'est pas remplacée correctement. Ne la remplacer que par une
pile de type semblable ou équivalent, recommandée par le fabricant. Jeter les piles usagées
conformément aux instructions du fabricant.
Warnung
Bei Einsetzen einer falschen Batterie besteht Explosionsgefahr. Ersetzen Sie die Batterie nur
durch den gleichen oder vom Hersteller empfohlenen Batterietyp. Entsorgen Sie die
benutzten Batterien nach den Anweisungen des Herstellers.
Avvertenza
Pericolo di esplosione se la batteria non è installata correttamente. Sostituire solo con una
di tipo uguale o equivalente, consigliata dal produttore. Eliminare le batterie usate secondo
le istruzioni del produttore.
Advarsel
Det kan være fare for eksplosjon hvis batteriet skiftes på feil måte. Skift kun med samme
eller tilsvarende type som er anbefalt av produsenten. Kasser brukte batterier i henhold til
produsentens instruksjoner.
Aviso
Existe perigo de explosão se a bateria for substituída incorrectamente. Substitua a bateria
por uma bateria igual ou de um tipo equivalente recomendado pelo fabricante. Destrua as
baterias usadas conforme as instruções do fabricante.
Page 45

A-9
Cisco 4400 Series Wireless LAN Controllers - Installation and Configuration Guide
78-17157-01
Appendix A FCC Statements for Cisco 4400 Series Wireless LAN Controllers
¡Advertencia!
Existe peligro de explosión si la batería se reemplaza de manera incorrecta. Reemplazar la
batería exclusivamente con el mismo tipo o el equivalente recomendado por el fabricante.
Desechar las baterías gastadas según las instrucciones del fabricante.
Varning!
Explosionsfara vid felaktigt batteribyte. Ersätt endast batteriet med samma batterityp som
rekommenderas av tillverkaren eller motsvarande. Följ tillverkarens anvisningar vid
kassering av använda batterier.
Page 46

A-10
Cisco 4400 Series Wireless LAN Controllers - Installation and Configuration Guide
78-17157-01
Appendix A FCC Statements for Cisco 4400 Series Wireless LAN Controllers
 Loading...