

Page 1

Corporate Headquarters
Cisco Systems, Inc.
170 West Tasman Drive
San Jose, CA 95134-1706
USA
http://www.cisco.com
Tel: 408 526-4000
800 553-NETS (6387)
Fax: 408 526-4100
Cisco Aironet Wireless LAN Adapters
Installation and Configuration Guide
for Mac OS
340 and 350 Series
Customer Order Number:
Text Part Number: OL-1377-01
Page 2

THE SPECIFICATIONS AND INFORMATION REGARDING THE PRODUCTS IN THIS MANUAL ARE SUBJECT TO CHANGE WITHOU T
NOTICE. ALL STATEMENTS, INFORMATION, AND RECOMMENDATIONS IN THIS MANUAL ARE BELIEVED TO BE ACCURATE BUT ARE
PRESENTED WITHOUT WARRANTY OF ANY KIND, EXPRESS OR IMPLIED. USERS MUST TAKE FULL RESPONS IBILITY FOR THEIR
APPLICATION OF ANY PRODUCTS.
THE SOFTWARE LICENSE AND LIMITED WARRANTY FOR THE ACCOMPANYING PRODUCT ARE SET FORT H IN THE INFORMATION
PACKET THAT SHIPPED WITH THE PRODUCT AND ARE INCORPORATED HEREIN BY THIS REFERENCE. IF YOU ARE UNABLE TO
LOCATE THE SOFTWARE LICENSE OR LIMITED WARRANTY, CONTACT YOUR CISCO REPRESENTATIVE FOR A COPY.
The following information is for FCC compliance of Class A devices: This equipment has been tested and found to comply with the limits for a Class A
digital device, pursuant to part 15 of the F CC rules . These limit s are designe d to provi de reason able prot ection again st harmfu l interference when the
equipment is operated in a commercial environment. This equipment generates, uses, and can radiate radio-frequency energy and, if not installed and used
in accordance with the instruction manual, m ay cause harmful interference to radio communications. Operation of this equipmen t in a residential area is
likely to cause harmful interference, in which case users will be required to correct the interference at their own expense.
The following information is for FCC compliance of Class B devices: The equipment described in this manual generates and may radiate rad io- frequency
energy. If it is not installed in accordance with Cisco’s installation instructions, it may cause interference with radio and television reception. This
equipment has been tested and found to comply with the limits for a Class B digital device in accordance with the specifications in part 15 of the FCC rules.
These specifications are designed to provide reasonable protection against such interference in a residential installation. However, there is no guarantee
that interference will not occur in a particular installation.
Modifying the equipment without Cisc o’s writ ten author ization m ay resul t in the equi pment no lo nger comp lyi ng with FCC requi rements for Class A or
Class B digital devices. In that event, your r ight to use th e equip ment may be li mited by FCC regu lations , and you may be r equi red to correct any
interference to radio or televisio n communi cations at you r own expense.
You can determine whether your equipment is causing interference by turning it off. If the interference stops, it was probably caused by the Cisco equipment
or one of its peripheral devices. If the equipment causes interference to radio or television reception, try to correct the interference by using one or more
of the following measures:
• Turn the television or radio antenna unt il the int erference st ops.
• Move the equipment to one side or the other of the televisio n or radi o.
• Move the equipment farther away from the te levision or radio.
• Plug the equipment into an outlet that is on a different circuit from the television or radio. (That is, make certain the equipment and the television or radio
are on circuits controlled by different circuit breakers or fuses.)
Modifications to this product no t author ized by Cis co Syst ems, Inc. coul d voi d the FCC appro val and ne gate your authorit y to op erate the pr odu ct.
The Cisco implementation of TCP header compression is an adaptation of a program developed by the University of California, Berkeley (UCB) as part of
UCB’s public domain version of the UNIX op erating system. All righ ts reser ved. Copy right © 1981, Regent s of th e Univers ity of Californ ia.
NOTWITHSTANDING ANY OTHER WARRANTY HEREIN, ALL DOCUMENT FILES AND SOFTWARE OF THESE SUPPLIERS ARE PROVIDED
“AS IS” WITH ALL FAULTS. CISCO AND THE ABOVE-NAMED SUPPLIERS DISCL AIM ALL WARRANTI ES, EXPRESSE D OR IMPLIED,
INCLUDING, WITHOUT LIMITATION, THOSE OF MERCHANTABILITY, FITNESS FOR A PARTICULAR P URPOSE AND
NONINFRINGEMENT OR ARISING FROM A COURSE OF DEALING, USAGE, OR TRADE PRACTICE.
IN NO EVENT SHALL CISCO OR ITS SUPPLIERS BE LIABLE FOR ANY INDIRECT, SPECIAL, CONSEQUENTIAL, OR INCIDENTAL
DAMAGES, INCLUDING, WITHOUT LIMITATION, LOST PROF ITS OR LOSS OR DAMAG E TO DATA ARISING OUT OF THE USE OR
INABILITY TO USE THIS MANUAL, EVEN IF CISCO OR ITS SUPPLIERS HAVE BEEN ADVISED OF THE POSSIBILITY OF SUCH DAMAGES.
Cisco Aironet Wireless LAN Adapters Instal lation and Con figuration Guide for Mac OS
Copyright © 2002, Cisco Systems, I nc.
All rights reserved.
CCIP, the Cisco Powered Network mark, the Cisco Systems Verified logo, Cisco Unity, Follow Me Browsing, FormShare, Internet Quotient, iQ Breakthrough, iQ Expertise, iQ
FastTrack, the iQ Logo, iQ Net Readiness Scorecard, Networking Academy, ScriptShare, SMARTnet, TransPath, and Voice LAN are trademarks of Cisco Systems, Inc.; Changing
the Way We Work, Live, Play, and Learn, Discover All That’s Possible, The Fastest Way to Increase Your Internet Quotient, and iQuick Study are service marks of Cisco Systems,
Inc.; and Aironet, ASIST, BPX, Catalyst, CCDA, CCDP, CCIE, CCNA, CCNP, Cisco, the Cisco Certified Internetwork Expert logo, Cisco IOS, the Cisco IOS logo, Cisco Press,
Cisco Systems, Cisco Systems Capital, the Cisco Systems logo, Empowering the Internet Generation, Enterprise/Solver, EtherChannel, EtherSwitch, Fast Step, GigaStack, IOS,
IP/TV, LightStream, MGX, MICA, the Networkers logo, Network Registrar, Pack et , PIX, Post-Routing, Pre-Routing, RateMUX, Registrar, SlideCast, StrataView Plus, Stratm,
SwitchProbe, TeleRouter, and VCO are registered trademarks of Cisco Systems, Inc. and/or its affiliates in the U.S. and certain other countries.
All other trademarks mentioned in this document or Web site are the property of their respective owners. The use of the word partner does not imply a partnership relationship
b
etween Cisco and any other company. (0203R)
Page 3

iii
Cisco Aironet Wireless LAN Adapters Installation and Configuration Guide for Mac OS
OL-1377-01
CONTENTS
Preface ix
Audience x
Purpose x
Organization x
Conventions xi
Related Publications xiii
Obtaining Documentation xiii
World Wide Web xiii
Documentation CD-ROM xiii
Ordering Documentation xiv
Obtaining Technical Assistance xiv
Cisco Connection Online xiv
Technical Assistance Center xv
Documentation Feedback xv
Overview 1-1
Introduction to the Client Adapters 1-2
Introduction to the Client Adapter Software Components 1-2
Terminology 1-3
Parts of the Client Adapter 1-3
Radio 1-3
Radio Antenna 1-3
LEDs 1-4
Network Configurations Using the Client Adapter 1-4
Ad Hoc Wireless LAN 1-5
Wireless Infrastructure with Workstations Accessing a Wired LAN 1-6
Introduction to the Client Utility 1-7
Opening the Client Utility for Mac OS 9.x 1-7
Opening the Client Utility for Mac OS X 1-8
Page 4

Contents
iv
Cisco Aironet Wireless LAN Adapters Installation and Configuration Guide for Mac OS
OL-1377-01
Client Utility Basics 1-8
Mac OS 9.x 1-8
Switching between Screens 1-8
Buttons on the Client Utility Screens 1-9
Mac OS X 1-10
Switching between Screens 1-10
Buttons on the Client Utility Screens and Dialog Boxes 1-11
Preparing for Installation 2-1
Safety Information 2-2
FCC Safety Compliance Statement 2-2
Safety Guidelines 2-2
Warnings 2-3
System Requirements 2-3
Site Requirements 2-4
Installing the Driver, Client Utility, and Client Adapter 3-1
System Requirements 3-2
Installing the Driver and Client Utility 3-2
Initial Configuration Settings for Mac OS X 3-5
Inserting the Client Adapter into a Computing Device 3-9
Inserting a PC Card 3-9
Inserting a PCI Client Adapter 3-10
Configuring the Client Adapter 3-11
Basic Configuration on Mac OS 9.x 3-11
Basic Configuration on Mac OS X 3-13
Setting TCP/IP Options 3-13
Setting Basic Wireless LAN options 3-14
Verifying a Successful Installation and Configuration on Mac OS 9.x 3-14
Verifying a Successful Installation and Configuration on Mac OS X 3-15
Security Features 4-1
Overview of Security Features 4-2
Static WEP Keys 4-2
Dynamic WEP Keys with EAP 4-2
EAP-Cisco Wireless or LEAP 4-3
Security Options for Mac OS 9.x 4-4
Configuring WEP Keys 4-4
Entering a New WEP Key 4-4
Selecting an Existing WEP Key 4-7
Page 5

Contents
v
Cisco Aironet Wireless LAN Adapters Installation and Configuration Guide for Mac OS
OL-1377-01
Enabling WEP 4-8
For an Office Network 4-8
For a Home Network 4-10
LEAP 4-11
Verifying Installation 4-12
Security Options for Mac OS X 4-12
Configuring WEP Keys 4-12
Entering a New WEP Key 4-12
Selecting an Existing WEP Key 4-14
Enabling WEP 4-15
LEAP 4-16
Verifying Installation 4-17
Advanced Configuration on Mac OS 9.x 5-1
Using the Client Utility on Mac OS 9.x 5-2
Getting Started 5-2
Loading New Firmware 5-4
Configuring Your Client Adapter 5-6
Setting Enterprise Parameters 5-6
Setting System Parameters 5-7
Setting RF Network Parameters 5-11
Setting Advanced Infrastructure Parameters 5-15
Setting Advanced Ad Hoc Parameters 5-18
Setting Home Networking Parameters 5-21
Specifying a Home Network Configuration 5-26
Turning Your Client Adapter Radio On or Off 5-26
Obtaining System Address and Software Version Information 5-27
Getting Help 5-28
Exiting the Client Utility 5-29
Advanced Configuration on Mac OS X 6-1
Using the Client Utility on Mac OS X 6-2
Opening the Client Utility 6-2
Basic Properties 6-3
Location Profiles 6-6
Selecting a Location Profile 6-6
Editing a Location Profile 6-7
Loading New Firmware 6-8
Advanced Properties 6-10
Page 6

Contents
vi
Cisco Aironet Wireless LAN Adapters Installation and Configuration Guide for Mac OS
OL-1377-01
Advanced Connection Properties 6-10
Setting RF Parameters 6-14
Turning Your Client Adapter Radio On or Off 6-18
Obtaining Software Version Information 6-21
Getting Help 6-22
Exiting the Client Utility 6-23
Performing Diagnostics 7-1
Diagnostic Tools for Mac OS 9.x 7-2
Viewing the Current Status of Your Client Adapter 7-2
Viewing Statistics for Your Client Adapter 7-7
Viewing Receive Statistics 7-7
Viewing Transmit Statistics 7-9
Assessing the RF Link 7-11
Viewing the Link Status Meter 7-11
Running an RF Link Test 7-12
Diagnostic Tools for Mac OS X 7-16
Viewing the Current Status of Your Client Adapter 7-16
Assessing the Wireless and Wired Links 7-18
Viewing the Link Status Meter 7-18
Running a Link Test 7-20
Determining Local Access Points 7-21
Scanner Tab 7-21
LSM Scanner 7-24
Routine Procedures 8-1
Determining the Driver and Client Utility Versions 8-2
Updating the Driver and Client Utility 8-2
Removing the Driver and Client Utility 8-4
Removing the Client Adapter 8-6
Removing a PC Card 8-6
Removing a PCI Client Adapter 8-7
Troubleshooting 9-1
Accessing the Latest Troubleshooting Tips 9-2
Interpreting the Indicator LEDs 9-2
Problems after Installing the Driver 9-3
Radio Not Found 9-3
Page 7

Contents
vii
Cisco Aironet Wireless LAN Adapters Installation and Configuration Guide for Mac OS
OL-1377-01
Client Adapter Recognition Problems 9-3
Problems Associating to the Access Point 9-3
Problems Authenticating 9-4
Problems Connecting to the Network 9-4
Running the Troubleshooting Tool on Mac OS X 9-5
Technical Specifications A-1
Translated Safety Warnings B-1
Explosive Device Proximity Warning B-2
Warning for Laptop Users B-3
Declarations of Conformity and Regulatory Information C-1
Manufacturers Federal Communication Commission Declaration of Conformity Statement C-2
Department of Communications – Canada C-3
Canadian Compliance Statement C-3
European Community, Switzerland, Norway, Iceland, and Liechtenstein C-4
Declaration of Conformity with Regard to the R&TTE Directive 1999/5/EC C-4
Declaration of Conformity for RF Exposure C-5
Guidelines for Operating Cisco Aironet Wireless LAN Adapters in Japan C-6
Japanese Translation C-6
English Translation C-6
Channels and Antenna Settings D-1
Channels D-2
Maximum Power Levels and Antenna Gains D-3
Positioning Wireless Devices E-1
Overview E-2
Site Survey E-2
Performing a Site Survey E-3
Guidelines E-3
Site Survey on Mac OS 9.x E-3
Site Survey on Mac OS X E-6
GLOSSARY
I
NDEX
Page 8

Contents
viii
Cisco Aironet Wireless LAN Adapters Installation and Configuration Guide for Mac OS
OL-1377-01
Page 9

ix
Cisco Aironet Wireless LAN Adapters Installation and Configuration Guide for Mac OS
OL-1377-01
Preface
The preface pr ovide s an overv iew of t h e Cisco Aironet Wireless LAN Adapters Installation and
Configuration Guide for Mac OS, references related publications, and explains how to obtain oth er
documentation and technical assistance.
The following topics are covered in this section:
• Audience, pagex
• Purpose, page x
• Organization, page x
• Conventions, page xi
• Related Publications, page xiii
• Obtaining Documentation, page xiii
• Obtaining Technical Assistance, page xiv
Page 10

x
Cisco Aironet Wireless LAN Adapters Installation and Configuration Guide for Mac OS
OL-1377-01
Preface
Audience
Audience
This publication is fo r the pe rso n res pons ibl e for inst al ling a nd m ainta ining a Cisc o A irone t Wireless
LAN Adapter, al so refe rr ed to as a clie nt adapter. T he i ns taller sh ould be fam il iar wi th com put ing
devices and with network terms and co ncepts .
Purpose
This publication describes the cli ent adap ters, e xpl ains ho w to install t he adapter s and th e clien t utilities
(which enable you to configure and view the status of the adapter), and offers troubleshooting
information.
Organization
This publication is organized into the following chapters:
• Chapter 1, “Overview,” provides an introduction to the client adapters and describes network
configurations.
• Chapter 2, “Preparing for Installation,” provides information that you need to know before installing
a client adapter, such as safety information and system requirements.
• Chapter 3, “Installing the Driver, Client Utility, and Client Adapter,” provides instructions for
inserting a client adapter, installing the driver and the client utility, configuring your client adapter
with basic settings, and how to verify y our configura tion sett ings.
• Chapter 4, “Securit y Feat ures ,” pr ovide s an overview of t h e WEP a nd LE A P s ecu ri ty fe atur es a s
well as explains how use the client utility to enable WEP and LEAP for your client adapter.
• Chapter 5, “Adv ance d Co nf i gur ation on Mac OS 9.x, ” pro vid es an o v ervie w of th e client utility and
describes how to open and use the utility on the Mac OS 9.x operating system.
• Chapter 6, “Advanced Configuration on Mac OS X,” provides an overview of the client utility and
describes how to open and use the utility on the Mac OS X operating system.
• Chapter 7, “Performing Diagnostics,” explains how to use the client utility to perform user-level
diagnostics.
• Chapter 8, “Routine Procedures,” explains how to det erm in e t he versi on o f firmware , driver, and
client utility; explains how to update the firmware, driver, and client utility; explains how to
uninstall the driver and client utility; and explains how to remove the client adapter
• Chapter 9, “ Troubleshooting,” pr ovides i nf orma tio n o n diag nosing a nd co rrec ti ng comm on
problems, defines error me ssage s, an d explai ns how to a cce ss onl ine help.
• Appendix A , “Technical Specifications,” lists the physical , radio, power, and regulatory
specifications for the client adapters.
• Appendix B, “ Translated Saf ety Warnings,” provides translations of the client adapters’ safety
warnings in nine l angu ag es.
• Appendix C , “ Dec la ratio ns o f Confor mi ty a nd Regul at ory Info rm ati on,” provide s confor mity an d
regulatory information for the client adapters
• Appendix D , “ Cha nnels and Ant enna Set tings, ” lists the channels, maximum power levels, and
antenna gains su ppo rted by t he wo rld’s regulatory dom ain s.
Page 11

xi
Cisco Aironet Wireless LAN Adapters Installation and Configuration Guide for Mac OS
OL-1377-01
Preface
Conventions
• Appendix E , “Position ing Wireless Devices,” provides guidelines for positioning equipment in a
wireless network and describes how to run the site survery tool.
Conventions
This publication uses the following conventions to convey instructions and informa tion:
• Commands and keywords are in boldface.
• Variables are in italics.
• Notes, cautions, and warnings use the following conventions and symbols:
Note Means reader take note. Notes contain helpful suggestions or references to materials not contained
in this manual.
Caution Means reader be ca reful. In this situation, you might do something that could result in equipment
damage or loss of data.
Warning
This warning symbol means danger. You are in a situation that
could cause bodily injury. Before you work on any equipment, be
aware of the hazards involved with electrical circuitry and be
familiar with standard practices for preventing accidents. (To
see translations of the warnings that appear in this publication,
refer to the appendix “Translated Safety Warnings.”)
Waarschuwing
Dit waarschuwingssymbool betekent gevaar. U verkeert in een
situatie die lichamelijk letsel kan veroorzaken. Voordat u aan
enige apparatuur gaat werken, dient u zich bewust te zijn van de
bij elektrische schakelingen betrokken risico’s en dient u op de
hoogte te zijn van standaard maatregelen om ongelukken te
voorkomen. (Voor vertalingen van de waarschuwingen die in deze
publicatie verschijnen, kunt u het aanhangsel “Translated Safety
Warnings” (Vertalingen van veiligheidsvoorschriften)
raadplegen.)
Varoitus
Tämä varoitusmerkki merkitsee vaaraa. Olet tilanteessa, joka voi
johtaa ruumiinvammaan. Ennen kuin työskentelet minkään
laitteiston parissa, ota selvää sähkökytkentöihin liittyvistä
vaaroista ja tavanomaisista onnettomuuksien ehkäisykeinoista.
(Tässä julkaisussa esiintyvien varoitusten käännökset löydät
liitteestä "Translated Safety Warnings" (käännetyt turvallisuutta
koskevat varoitukset).)
Page 12

xii
Cisco Aironet Wireless LAN Adapters Installation and Configuration Guide for Mac OS
OL-1377-01
Preface
Conventions
Attention
Ce symbole d’avertissement indique un danger. Vous vous trouvez
dans une situation pouvant entraîner des blessures. Avant
d’accéder à cet équipement, soyez conscient des dangers posés
par les circuits électriques et familiarisez-vous avec les
procédures courantes de prévention des accidents. Pour obtenir
les traductions des mises en garde figurant dans cette
publication, veuillez consulter l’annexe intitulée « Translated
Safety Warnings » (Traduction des avis de sécurité).
Warnung
Dieses Warnsymbol bedeutet Gefahr. Sie befinden sich in einer
Situation, die zu einer Körperverletzung führen könnte. Bevor Sie
mit der Arbeit an irgendeinem Gerät beginnen, seien Sie sich der
mit elektrischen Stromkreisen verbundenen Gefahren und der
Standardpraktiken zur Vermeidung von Unfällen bewußt.
(Übersetzungen der in dieser Veröffentlichung enthaltenen
Warnhinweise finden Sie im Anhang mit dem Titel “Translated
Safety Warnings” (Übersetzung der Warnhinweise).)
Avvertenza
Questo simbolo di avvertenza indica un pericolo. Si è in una
situazione che può causare infortuni. Prima di lavorare su
qualsiasi apparecchiatura, occorre conoscere i pericoli relativi
ai circuiti elettrici ed essere al corrente delle pratiche standard
per la prevenzione di incidenti. La traduzione delle avvertenze
riportate in questa pubblicazione si trova nell’appendice,
“Translated Safety Warnings” (Traduzione delle avvertenze di
sicurezza).
Advarsel
Dette varselsymbolet betyr fare. Du befinner deg i en situasjon
som kan føre til personskade. Før du utfører arbeid på utstyr, må
du være oppmerksom på de faremomentene som elektriske
kretser innebærer, samt gjøre deg kjent med vanlig praksis når det
gjelder å unngå ulykker. (Hvis du vil se oversettelser av de
advarslene som finnes i denne publikasjonen, kan du se i
vedlegget "Translated Safety Warnings" [Oversatte
sikkerhetsadvarsler].)
Aviso
Este símbolo de aviso indica perigo. Encontra-se numa situação
que lhe poderá causar danos fisicos. Antes de começar a
trabalhar com qualquer equipamento, familiarize-se com os
perigos relacionados com circuitos eléctricos, e com quaisquer
práticas comuns que possam prevenir possíveis acidentes. (Para
ver as traduções dos avisos que constam desta publicação,
consulte o apêndice “Translated Safety Warnings” - “Traduções
dos Avisos de Segurança”).
Page 13

xiii
Cisco Aironet Wireless LAN Adapters Installation and Configuration Guide for Mac OS
OL-1377-01
Preface
Related Publications
Related Publications
For more informati on abou t Cisc o Ai rone t Wireless LAN A da pter s an d re la ted pr oduct s, refe r to th e
following publications:
• Quick Start Guide: Cisco Aironet Wireless LAN Adapters
• Release Notes for Cisco Aironet Wireless LAN Adapters
• Release Notes for Cisco Air onet Client Utilit y and Driver Version 1.0.0 for Mac OS 10.1 and Version
1.0.2 for Mac OS 9. x
• Cisco Aironet Access Point Software Configuration Guide
Obtaining Documentation
World Wide Web
You can access the most current Cisco documentation on the World Wide Web at http://www.cisc o.com,
http://www-china.cisco.com, or http://www-europe.cisco.com.
Documentation CD-ROM
Other Cisco documentation and additional literature are available in a CD-ROM package shipped
separately from the Cisco Aironet Series Wireless LAN Adapters CD that shipped with your product.
The Documentatio n CD-ROM is updated mont hly. Therefore, it is proba bly more curren t than print ed
documentation. The CD-ROM package i s available as a single unit or as an annual subscrip tion.
¡Advertencia!
Este símbolo de aviso significa peligro. Existe riesgo para su
integridad física. Antes de manipular cualquier equipo,
considerar los riesgos que entraña la corriente eléctrica y
familiarizarse con los procedimientos estándar de prevención de
accidentes. (Para ver traducciones de las advertencias que
aparecen en esta publicación, consultar el apéndice titulado
“Translated Safety Warnings.”)
Varning!
Denna varningssymbol signalerar fara. Du befinner dig i en
situation som kan leda till personskada. Innan du utför arbete på
någon utrustning måste du vara medveten om farorna med
elkretsar och känna till vanligt förfarande för att förebygga
skador. (Se förklaringar av de varningar som förekommer i denna
publikation i appendix "Translated Safety Warnings" [Översatta
säkerhetsvarningar].)
Page 14

xiv
Cisco Aironet Wireless LAN Adapters Installation and Configuration Guide for Mac OS
OL-1377-01
Preface
Obtaining Technical Assistance
Ordering Documentation
Registered CCO users can order the Docu mentation CD-ROM and other Cisco Produc t docume ntatio n
through our online Subscription Services at http://www.cisco.com/cgi-bin/subcat/kaojump.cgi.
Nonregistered CCO u ser s ca n o rder do cum ent ation t hroug h a loca l a cco unt r epre se ntative by calli ng
Cisco’s corporate headquarter s ( Calif orn ia, US A) a t 4 08 526-4000 or, in North A meri ca, ca ll
800 553- NETS (6387).
Obtaining Technical Assistance
Cisco provides Cisco Connection Online (CCO) as a starting point for all technical assistance. Warranty
or maintenance contract customers can use the Technical Assistance Center. All customers can submit
technical feedback on Cisco documentation using the web, e-mail, a self-addressed stamped response
card included in many printed doc s, or by sending mail to Cisco.
Cisco Connection Online
Cisco continues to revolutionize how business is done on the Internet. Cisco Connection Online is the
foundation of a suite of interac tive, networked services that provi des immed iate, open ac cess to Cisco
information and resour ces at any time, from anywher e in the world. This highly integrat ed Inter net
application is a p owerful, e asy-t o- use too l for doing business with Ci sco.
CCO’s broad range of features and services helps cust omers and part ners to strea mline busines s
processes and improve prod uct ivity. Through CCO, you will find inf orm atio n a bout Cisc o an d our
networking solutions, se rvic es, a nd pr og rams. In addi tion, you can re solve t echn ical issues w ith online
support services, d ownload an d t est soft ware pa cka ge s, an d o rde r Ci sco l ea rning m ateri als and
merchandise. Valuable online skill assessment, training, and certification programs are also available.
Customers and partners can self-register on CCO to obtain additional personalized information and
services. Registered users may order products, check on the status of an order and view benefits specific
to their relationships with Cisco.
You can ac cess CCO in the fol lowing ways:
• WWW: www.cisco.com
• Telnet: cco.cisco.com
• Modem using standard conn ection ra tes and th e following termin al sett ings: VT10 0 emulation;
8 data bits; no parity; and 1 stop bit.
–
From North Amer ica, c all 4 08 526-8070
–
From Europe, call 3 3 1 6 4 46 40 82
You ca n e-mai l question s about using CCO to cc o-team@ cisc o.com.
Page 15

xv
Cisco Aironet Wireless LAN Adapters Installation and Configuration Guide for Mac OS
OL-1377-01
Preface
Obtaining Technical Assistance
Technical Assistance Center
The Cisco Technical Assistance Center (TAC) is available to warranty or maintenance contract
customers who ne ed t ech ni cal assi sta nce with a Cisc o pro duc t t hat is und er warr an ty o r covered by a
maintenance contract.
To display the TAC web site that includes links to technical support informat ion and software upgrade s
and for reques ting TAC support, use www.cisco.com/techsupport.
To contact by e-mail, use one of the following:
In North America, TAC can be reached at 800 553-2447 or 408 526-7209. For other telephone numbers
and TAC e-mail addresses worldwide, consult the following web site:
http://www.cisco.com/warp/public/687/Directory/DirTAC.shtml.
Documentation Feedback
If you are reading Cisco product doc umen tation on the World Wide Web, you ca n submit tech nica l
comments electronically. Click Feedback in the toolbar and select Documentation. After you complete
the form, click Submit to send it to Cisco.
You ca n e-mai l your comm ents t o bug-doc@c isco.com.
To submit your co mme nts by mai l, f or your co nvenience many d ocume nts co ntai n a r esponse c ard
behind the front cover. Otherwise, you c an ma il your c omme nts to the fo llowing add re ss:
Cisco Systems, Inc.
Document Resource Connect ion
170 West Tasman Dr ive
San Jose, CA 95134- 988 3
We appreciat e and value you r comm ents .
Language E-mail Address
English tac@cisco.com
Hanzi (Chinese) chinese-tac@cisco.com
Kanji (Japanese) japan-tac@cisco.com
Hangul (Korean) korea-tac@cisco.com
Spanish tac@cisco.com
Thai thai-tac@cisco.com
Page 16

xvi
Cisco Aironet Wireless LAN Adapters Installation and Configuration Guide for Mac OS
OL-1377-01
Preface
Obtaining Technical Assistance
Page 17

CHAPTER
1-1
Cisco Aironet Wireless LAN Adapters Installation and Configuration Guide for Mac OS
OL-1377-01
1
Overview
This chapter describes the Cisco Aironet Wireless LAN Adapters, also referred to as client adapters, and
illustrates their role in a wireless network.
The following topics are covered in this section:
• Introduction to the Client Adapters, page 1-2
• Parts of the Client Adap ter, page 1-3
• Network Configurations Using the Client Adapt er, page 1-4
• Introduction to the Client Utility, page 1-7
• Opening the Client Utility for Mac OS 9.x, page 1-7
• Opening the Client Utility for Mac OS X, page 1-8
• Client Utility Basics, page 1-8
Page 18

1-2
Cisco Aironet Wireless LAN Adapters Installation and Configuration Guide for Mac OS
OL-1377-01
Chapter 1 Overview
Introduction to the Client Adapters
Introduction to the Client Adapters
The Cisco Aironet Wireless LAN Ad apters , also refe rred to as client adapters, ar e radio mod ules that
provide transparent wireless data communications between fixed, portable, or mobile devices and other
wireless devices or a wired network infrastructure. The client adapters are fully compatible when used
in devices supporting Plug- an d-Play ( PnP) techn ol ogy.
The primary function of the client adapters is to transfer data pack ets transparen tly through the wirele ss
infrastructu re. Th e adap ter s operat e sim ilarly to a stan dard ne twork pr oduct exce pt that the ca ble is
replaced with a radio connection. No special wireless networking functions are required, and all existing
applications that operate over a network will operate using the adapters.
This document c overs thre e t ypes of clie nt a dap ters:
• PC card client adapter (also referred to as a PC card) – A PCMCIA card radio module that can be
inserted into a ny de vice eq uipped with an external Type II or Type III PC card slot. Host devices can
include laptops, notebook computers, personal digital assistants, and hand-held or portable devices.
• LM card client adapter (also referred to as an LM card) – A PCMCIA card radio module that can
be inserted into any device equipped with an internal Type II or Type III PC card sl ot . H o s t devices
usually include hand -held or port able devices.
• PCI client adapter – A client adapter card radio module that can be inserted into any device
equipped with an empty PCI expan sion slot, suc h as a desktop compute r.
Refer to the “Radio Ante nna” secti on on page 1-3 for an tenn a differen ces be tween these adapt ers.
Introduction to the Client Adapter Software Components
The software components of the client adapter consists of a driver, firmware, and a client utility. These
components work together to allow the client adapter to work properly in your workstation. Typically,
the driver and client utility are designed for use with a specific operating system or a group of similar
operating systems, while the firmware is designed specifically for the client adapter’s hardware and
radio. The firmware controls the radio operations.
CISCO AIRONET 340
SERIES
11 Mbps WIRELESS LAN ADAPTER
47519
CISCO AIRONET 340
SERIES
11 Mbps WIRELESS LAN ADAPTER
47893
adapter
47518
Page 19

1-3
Cisco Aironet Wireless LAN Adapters Installation and Configuration Guide for Mac OS
OL-1377-01
Chapter 1 Overview
Parts of the Client Adapter
The client adapte r firmware provides the inte rface between the radio and the driv er. The driver provides
the interface between the client adapter firmware and the workstation’s operating system. The client
adapter is installed as a network communications adapter on the workstation’s operating system.
The client utility interfaces to the operating system to allow you to configure, test, and monitor the
operations of the client adapter on the wireless LAN. The client utility also allows you to load new
firmware into the client adapter.
Terminology
Throughout this doc um en t, the fo llowing te rms a re u sed :
• client adapter – Refers to all three types of adapters
• PC card, LM card, or PCI client adapter – Refers to only a specific adapter
• workstati on (or station ) – Refers to a computing device with an installed client adapter
Parts of the Client Adapter
The client adapter is compose d of three major par ts: a radio, a radio ante nna, and t wo LEDs.
Radio
The client adapter contains a direct-se quence spread spectrum (DSSS) radio that operates i n the 2.4-GHz
license-free Industrial Scientific Medical (ISM) band. The radio transmits data over a half-duplex radio
channel oper ati ng at up t o 11 Mbps.
DSSS technology causes radio signals to be transmitted over a wide frequency range, using multiple
frequencies simultaneously. The benefit of this technology is its ability to protect the data transmission
from interfere nce . For examp le, i f a pa rti cul ar fre que ncy enc ou nt ers no ise or int erf er en ce o r bot h,
enough redundancy is built into the signal on other frequencies that the client adapter is usually still
successful in its transmission.
Radio Antenna
The type of antenna use d depends on you r clie nt adapte r:
• PC cards have an integrated, permanently attached diversity antenna. The benefit of the diversity
antenna system is improved coverage. The system works b y allowing the card to switch and sample
between its two antenna ports in order to select the optimum port for receiving data packets. As a
result, the card has a better chance of maintaining the radio frequency (RF) connection in areas of
interference. The anten n a is ho u sed with in the sec tion of the card th at h angs o ut of the PC car d slot
when the card is installed.
• LM cards are shipped without an antenna; however, an antenna can be connected through the card’s
external connector. If a snap-on antenna is used, it should be operated in diversity mode. Otherwise,
the antenna mode used should correspond to the antenna port to which the antenna is connected.
• PCI client adapters are shipped with a 2-dBi dipole antenna that attaches to the adapter’s antenna
connector. However, other types of antennas ma y be used . PCI cli ent adap ters can be operate d
through the right ant enn a por t on ly.
Page 20

1-4
Cisco Aironet Wireless LAN Adapters Installation and Configuration Guide for Mac OS
OL-1377-01
Chapter 1 Overview
Network Configurations Using the Client Adapter
Note For information on setting the client adapter’s antenna mode, refer to Chapter 5, “Advanced
Configuration on Mac OS 9.x” or to Chapt er 6, “Advanced Configuration on Mac OS X.”
Note External antennas used in co mbination w ith a po wer setting resulting in a radia ted power leve l abo v e
100 mW equivalent isotropic radiated power (EIRP) are not allowed for use within the European
community and othe r countrie s that have adopted the European R&TTE dire ctive or the CEPT
recommendatio n Rec 70. 03 or both. For more de tails on legal combina tions of power levels and
antennas in those countries, contact Cisco Corporate Compliance. See also the “Declarations of
Conformity and Regulator y Informat ion” sect ion on page C-1.
LEDs
The client adapter has two LEDs that glow or blink to indicate the status of the adapter or to convey error
messages. Refer to Chapter 9 for an interpretation of the LED codes.
Network Configurations Using the Client Adapter
The client adapter ca n be used in a variety of networ k configurati ons. In some co nfigurati ons, access
points provide connections to you r network or act as re peate rs to increa se wirel ess communic ation
range. The maxim um comm un icat ion r ang e is ba sed on h ow you con figure y our w ire less net work.
This section describes and illustrates the following common network configurations:
• Ad hoc wireless local area network (LAN)
• Wireless infrastructure with workstations accessing a wired LAN
Note For examples of more complex network configurations involving client adapters and access points,
refer to the Cisco Aironet Access Point Hardware Installation Guide.
Note For information on setting the client adapter’s network mode, refer to Chapter 5 for the Mac OS 9.x
operating system or to Chapter 6 for the Mac OS X operating system.
Page 21
1-5
Cisco Aironet Wireless LAN Adapters Installation and Configuration Guide for Mac OS
OL-1377-01
Chapter 1 Overview
Network Configurations Using the Client Adapter
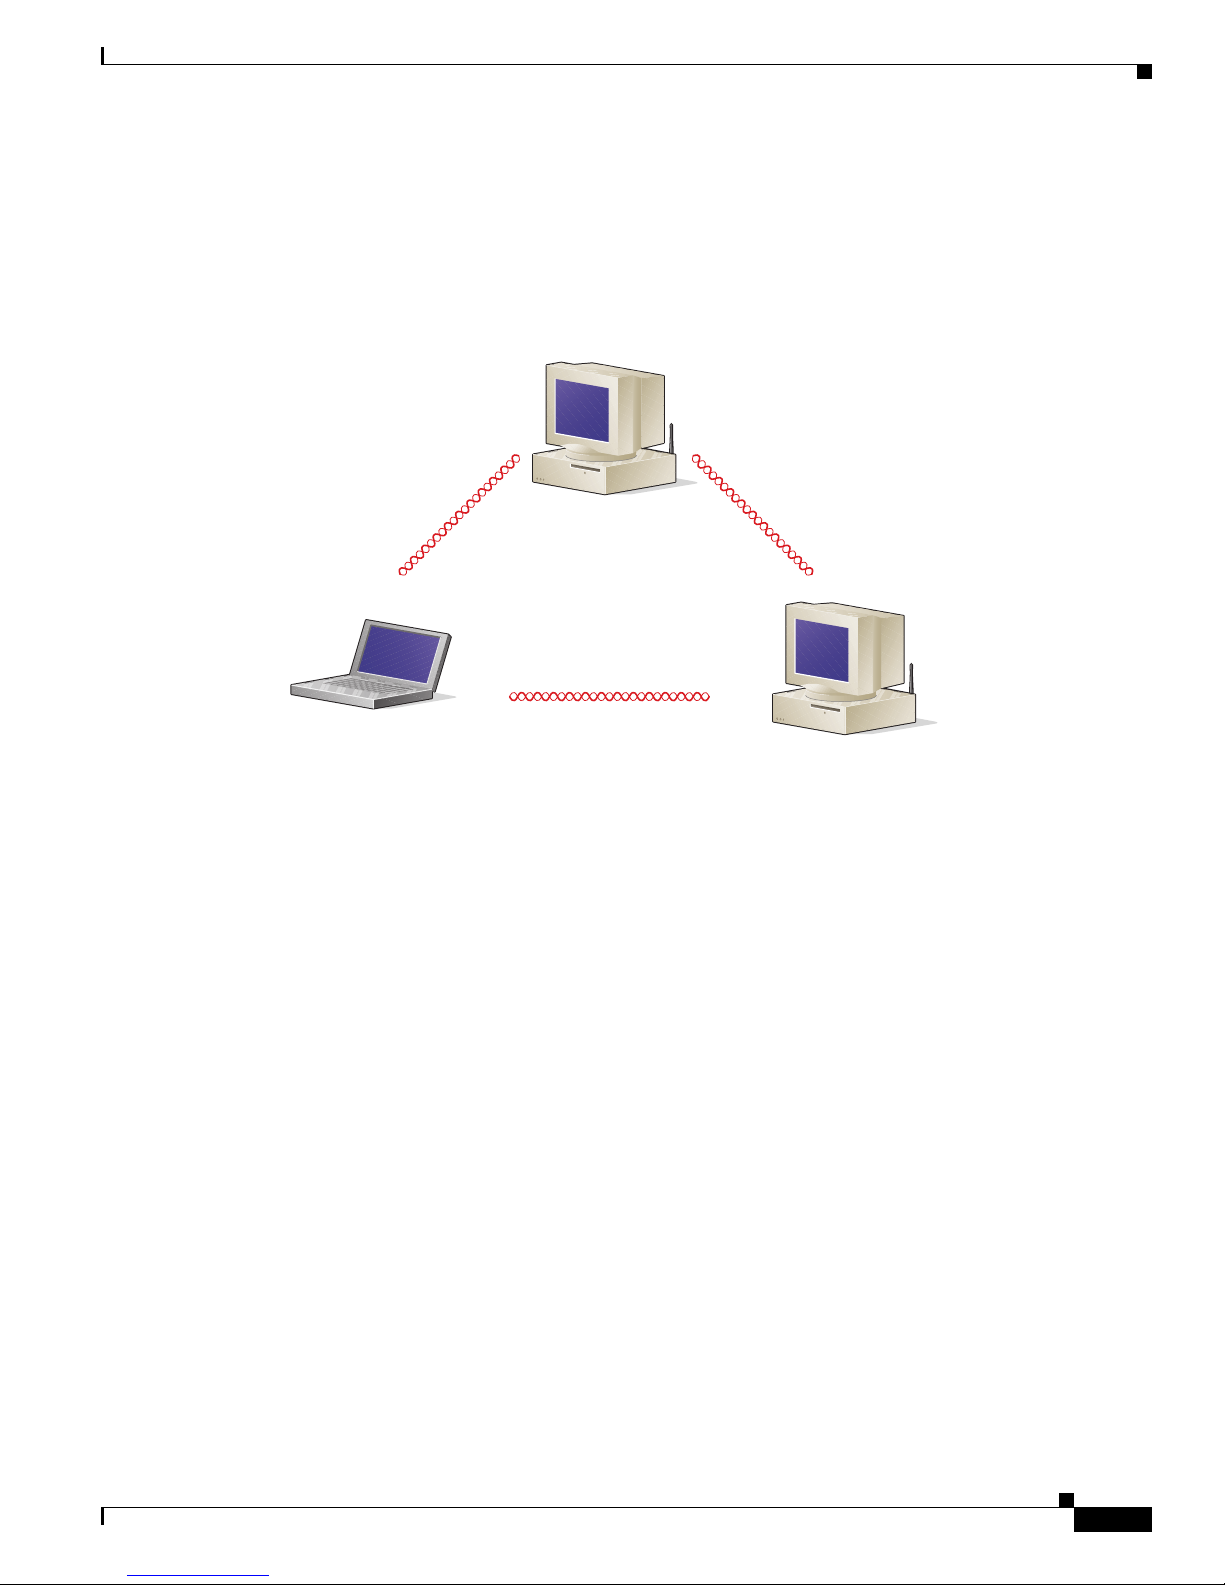
Ad Hoc Wireless LAN
An ad hoc (or peer-to-peer) wireless LAN (see Figure 1-1) is the simplest wireless LAN configuration.
In a wireless LAN using an ad hoc network configuration, all devices equipped with a client adapter can
be linked together and communicate directly with each other.
Figure 1-1 Ad Hoc Wireless LAN
47520
Page 22
1-6
Cisco Aironet Wireless LAN Adapters Installation and Configuration Guide for Mac OS
OL-1377-01
Chapter 1 Overview
Network Configurations Using the Client Adapter
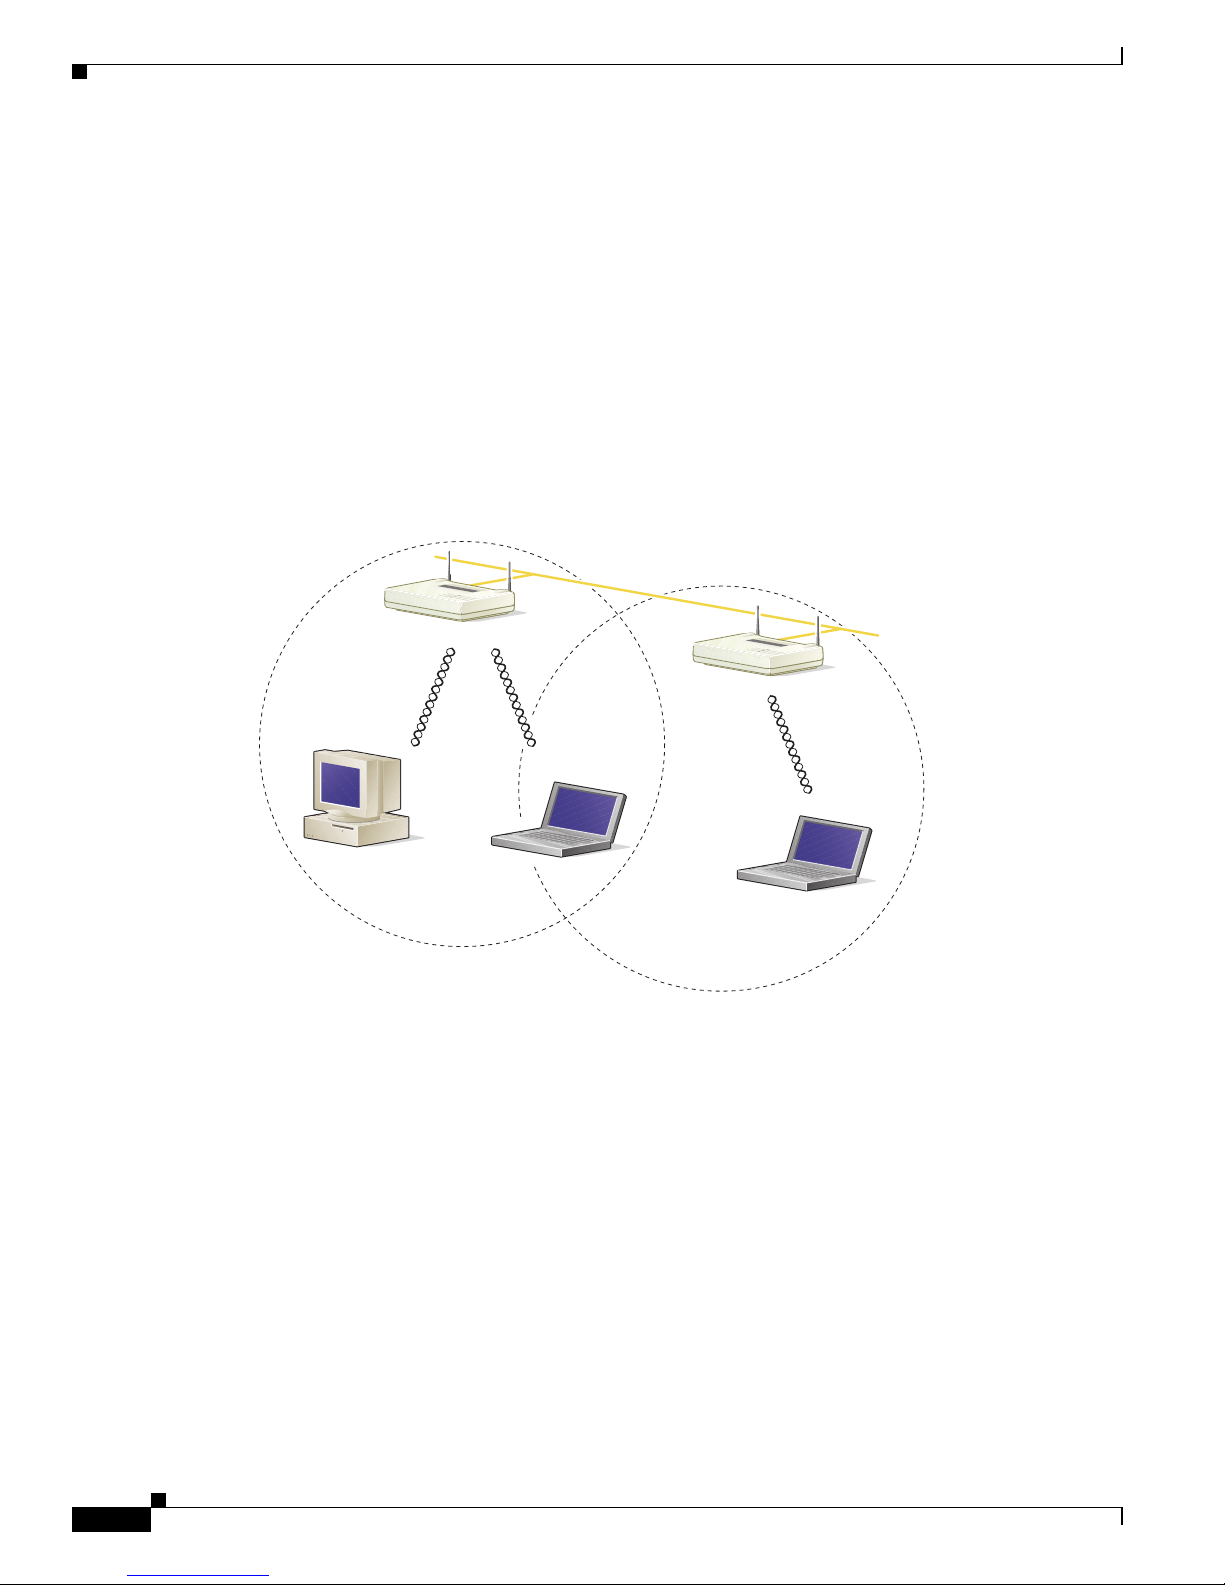
Wireless Infrastructure with Workstations Accessing a Wired LAN
A microcellular network ca n be create d by placing two or mo re access po ints on a LAN . Figure 1-2
shows a microcellular networ k with workstations accessing a wired LAN through several access points.
This configuration is useful with portable or mobile stations because it allows them to be directly
connected to the wired network even while moving from one microcell domain to another. This process
is transparent, and the connection to the f ile serv er or host is maintained witho ut disruption . The mobile
station stays connected to an access point as long as it can. However, once the transfer of data packets
needs to be retried or beacon s are missed, the stati on automatically sear ches for and associates to another
access point. This process is referred to as seamless roaming.
Figure 1-2 Wireless Infrastructure with Workstations Accessing a Wired LAN
Access Point
(Root Unit)
Access Point
(Root Unit)
5835
Wired LAN
Page 23

1-7
Cisco Aironet Wireless LAN Adapters Installation and Configuration Guide for Mac OS
OL-1377-01
Chapter 1 Overview
Introduction to the Client Utility
Introduction to the Client Utility
The client utility allows you to load new firmware, enable security features, configure your client
adapter, and perform user-level diagnostics. The latest client utility software package for both the Mac
OS 9.x and the Mac OS X operati ng systems is available from Cisco’s web site.
Note The latest Macintosh software package on CCO contains the driver and client utility for both the Mac
OS 9.x and the Ma c O S X ope ra ting syst ems.
To obtain the latest driver and client utility from the Cisco Web site, follow these steps:
Step 1 Use your web browser to access the following URL:
http://www.cisco.com/pcgi-bin/tablebuild.pl/aironet-utils-mac.
Step 2 Click on the latest software file (MA COSInstallv2x.sit) for both the Mac OS 9x and Mac OS X operating
systems. The 2x identifies the software package version number.
Step 3 Read and accept the terms and conditions of the Software License Agreement.
Step 4 Select the Cisco server from whic h you wish to download th e file.
Step 5 Save the file to your hard drive then exit the web browser.
For installation instructions, refer to Chapter 3, “Installing the Driver, Client Utility, and Client
Adapter.”
Opening the Client Utility for Mac OS 9.x
To open the client utility on a Mac OS 9.x operating system, follow the steps below:
Step 1 Double-click the Ma cin to sh hard disk i con o n th e de sktop.
Step 2 Double-click the Cisco pcm3x0 Folder icon. If you selected a location other than the default (the Cisco
pcm3x0 Folder) during the installation process, select the folder in which the utility was installed.
Step 3 Double-click the pcm3x0PPC icon. The compu te r se ar ch es fo r th e cl ie nt ad apt e r. Aft e r th e ad ap t er is
found, the Basic Propertie s scree n appear s.
Page 24

1-8
Cisco Aironet Wireless LAN Adapters Installation and Configuration Guide for Mac OS
OL-1377-01
Chapter 1 Overview
Opening the Client Utility for Mac OS X
Opening the Client Utility for Mac OS X
To open the client utility on a Mac OS X operating system, follow the steps below:
Step 1 On the Finder menu bar, click Go and sel ect Applications from the pull-down menu.
Step 2 Double-click the Aironet Client Utility icon in the Applications folder. The computer searches for the
radio on the client adap ter. After the adap ter and radio ar e found, the client utility basic prop erties screen
appears.
Client Utility Basics
This section explains the basic features of the client utility for Mac OS 9.x and Mac OS X.
Mac OS 9.x
The client utility on Mac OS 9.x supports several screens used for specific functions.
Switching between Screens
The client utility allo ws more than one scree n (or windo w) to be open at a time. The W ind ows menu (see
Figure 1-3) di splays a list of the open scree ns.
Figure 1-3 Windows Menu
The screen marked with a diamond in dicat es the acti v e screen . You can change which screen is acti ve b y
clicking on anothe r scre en i n the Windows menu.
Note The Basic Proper ties scree n and th e Edi t Proper ties s creen c annot be open a t the same tim e.
Page 25

1-9
Cisco Aironet Wireless LAN Adapters Installation and Configuration Guide for Mac OS
OL-1377-01
Chapter 1 Overview
Client Utility Basics
Buttons on the Client Utility Screens
The buttons on the bottom of the client utility screens are used to perform specific functions. Table 1-1
describes the most common buttons.
Table 1-1 Client Utility Buttons on Mac OS 9.x
Button Description
Cancel Exits the applica tion with out saving any change s
OK Saves any changes and exits t he ap plic at ion
Apply Saves any changes but does not exit the application
Pause Freezes the infor mation on the Statis tics scre ens and prevents it from be ing update d
Continue Allows the information on the Statistics screens to be upda ted after the Pause button
is selected
Clear Stats Temporarily clears any values on the Statistics screens and resets them to 0
Start Initiates a RF Link test
Stop Stops an RF Link test that is running
Defaults Sets the parameters for a screen to their default values
Help Provides information on the screen and its parameters
Page 26
1-10
Cisco Aironet Wireless LAN Adapters Installation and Configuration Guide for Mac OS
OL-1377-01
Chapter 1 Overview
Client Utility Basics
Mac OS X
The client utility on Mac OS X supports three main screens, the basic and advanced parameter screens
and the troubleshoot ing scre en.
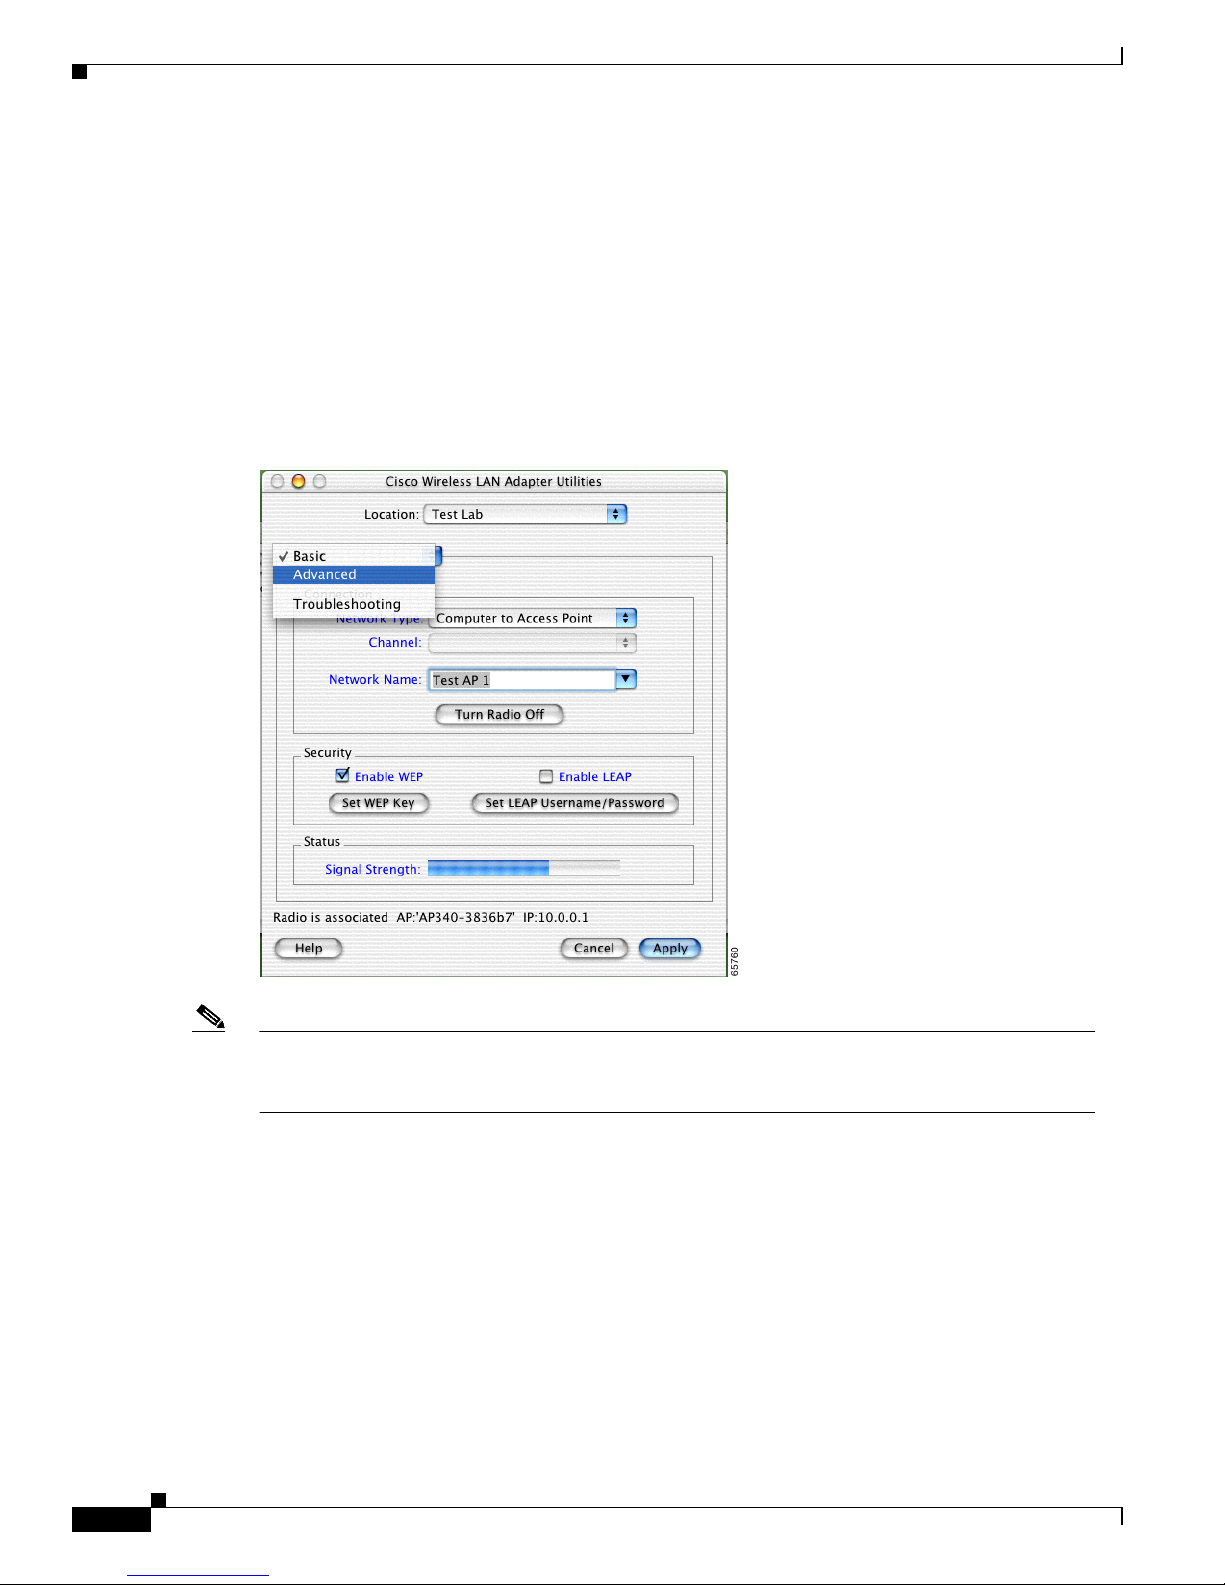
Switching between Screens
You can change the client utility’s active screen by clicking the parameter option field’s up or down
arrows. Figure 1 -4 shows the screen pull-down parameter options.
Figure 1-4 Client Utility Screen Pull-Down Parameter Options
Note You can click the highlighted blue text on the client utility screens to obtain additional descriptive
information on the highlighted words. You can also click the Help button to obtain detailed
information on the client utility parameters and fields.
Page 27

1-11
Cisco Aironet Wireless LAN Adapters Installation and Configuration Guide for Mac OS
OL-1377-01
Chapter 1 Overview
Client Utility Basics
Buttons on the Client Utility Screens and Dialog Boxes
The buttons supported by the client utility are use d to perform specif ic functions. Table 1-2 describes the
most common buttons.
Table 1-2 Client Utility Buttons for Mac OS X
Button Description
Apply Saves any changes but does not exit the application.
Cancel Exits the applicati on or screen withou t saving any changes. If
changes have been made, a message appears asking i f you want to
save the changes.
Turn Radio Off
Turn Radio On
Turns the radio off or on.
Set WEP Key Sets the WEP keys.
Set LEAP Username/Password Sets the LEAP username and password.
Help Provides information on the screen and its parameters.
Page 28

1-12
Cisco Aironet Wireless LAN Adapters Installation and Configuration Guide for Mac OS
OL-1377-01
Chapter 1 Overview
Client Utility Basics
Page 29

CHAPTER
2-1
Cisco Aironet Wireless LAN Adapters Installation and Configuration Guide for Mac OS
OL-1377-01
2
Preparing for Installation
This chapter provides information that you need to know before installing a client adapter.
The following topics are covered in this section:
• Safety Informat ion, p ag e 2-2
• System Requirements, page 2-3
• Site Requirements, page 2-4
Page 30

2-2
Cisco Aironet Wireless LAN Adapters Installation and Configuration Guide for Mac OS
OL-1377-01
Chapter 2 Preparing for Installation
Safety Information
Safety Information
Follow the guidelines in this section to ensure proper operation and safe use of the client adapter.
FCC Safety Compliance Statement
The FCC, with its action in ET Doc ket 96-8, has adop ted a safe ty standard for human exposur e to RF
electromagnetic energy emitted by FCC-certified equipment. When used with approved Cisco Aironet
antennas, Cisco Aironet products meet the uncontrolled environmental limits found in OET-65 and ANSI
C95.1, 1991. Proper operation of this radio device according to the instructions in this publication will
result in user exposure substantially below the FCC recommended limits.
Safety Guidelines
• Do not touch or move the antenna while the unit is transmitting or receiving.
• Do not hold any component containing a radio such that the antenna is very close to or touching any
exposed parts of the body, especially the face or eyes, while transmitting.
• Do not operate the radio or attempt to transmit data unless the antenna is connected; otherwise, the
radio may be damaged.
• Use in specific environme nts :
–
The use of wireless devices in hazardous locations is limited to the constraints posed by the
safety directors of su ch e nvironments.
–
The use of wir eless d evices on airpl ane s is governed by the Fede ra l Aviation Administrat ion
(FAA).
–
The use of wireless devices in hospitals is restricted to the limits set forth by each hospital.
• Antenna use:
–
In order to com ply with FCC RF expo sure limi ts, d ipol e a nte nnas sh ould be lo cat ed a t a
minimum distance of 7.9 inch es (20 cm) or mor e from the body of all perso ns.
–
High-gain, wall-mount, or mast-mount antennas are designed to be professionally installed and
should be located at a mini mum dist ance of 12 i nches (30 cm ) or more from the body of all
persons. Please contact your pro fessiona l instal ler, VAR, or antenna manufact urer for pro per
installation requirements.
Page 31

2-3
Cisco Aironet Wireless LAN Adapters Installation and Configuration Guide for Mac OS
OL-1377-01
Chapter 2 Preparing for Installation
System Requirements
Warnings
Observe the following warnings when operating the client adapter:
Warning
Do not operate your wireless network device near unshielded blasting caps or in an explosive
environment unless the device has been modified to be especially qualified for such use.
Warning
In order to comply with RF exposure limits established in the ANSI C95.1 standards, it is
recommended when using a laptop with a PC card client adapter that the adapter’s integrated
antenna is positioned more than 2 inches (5 cm) from your body or nearby persons during extended
periods of transmitting or operating time. If the antenna is positioned less than 2 inches (5 cm) from
the user, it is recommended that the user limit exposure time.
Translated versions of the se sa fety warn ings are pr ovided in App endix B.
System Requirements
As a minimum, yo ur co mput er sy stem mu st su ppor t t he f oll owing:
• Macintosh comput er w it h Mac OS 9 .x or M ac OS X op era ting sy stem
–
Apple PowerMac G3 (Blue and White) or G4 computer
–
Apple PowerBook G3 Series 1998 , G3 Serie s 1 999 , G3 ( with firewire), or G4 com pute r
You also need the following to install and configure the client adapter:
• A Type II or Type III PC card slot o r an e mpty PCI expa nsion slot
Note If you are using a PC card client adapter, all supporting software for the PC card slot must
be loaded and configured.
• The following information from your system administrator:
–
The client name to use for your client adapter
–
The case-sensitive network name or service set identifier (SSID) for your wireless network
–
If you are not connected t o a DHCP server, the IP address, subnet mask, and defa ult gateway
address for your Ma cint os h
–
The username and password for your network ac count
–
If you are using WEP security, the WEP keys for your wireless network
–
If you are usin g L EA P sec uri ty, your LEAP u ser na me a nd pa sswor d
Note To install the client utility on the Mac OS X operating system, you must have administrator
privileges.
Page 32

2-4
Cisco Aironet Wireless LAN Adapters Installation and Configuration Guide for Mac OS
OL-1377-01
Chapter 2 Preparing for Installation
Site Requirements
Site Requirements
Because the client adapter is a radio device, it is susceptible to RF obstructi ons and common sources of
interference that can reduce throughput and range. Follow these guidelines to ensure the best possible
performance:
• Install the client adapter in an area where large steel structures such as shelving units, bookcases,
and filing cabinets will not obstruct radio signals to and from the client adapter.
• Install the client ad ap ter away from micr owave ovens and 2.4 GHz cordless pho nes. T hes e devices
operate on the same frequency as the client adapter and can cause signal interference.
Note Refer to the Appendix E, “Positionin g Wireless Devices,” for additional guidelines on achieving
optimum placement of your Ma cint osh workstation .
Page 33

CHAPTER
3-1
Cisco Aironet Wireless LAN Adapters Installation and Configuration Guide for Mac OS
OL-1377-01
3
Installing the Driver, Client Utility, and Client
Adapter
This chapter provides installation and configuration instructions for the driver, client utilities, and the
client adapter.
The following topics are covered in this section:
• System Requirements, page 3-2
• Installing the Driver and Client Utility, page 3-2
• Inserting the Client Adapter into a Computing Device, page 3-9
• Configuring the Client Adap ter, page 3-1 1
• Verif ying a Suc c essful I nsta llat ion an d C onfiguration o n M ac OS 9.x, p age 3-1 4
• Verif ying a Suc c essful I nsta llat ion an d C onfiguration o n M ac OS X, page 3 -15
Page 34

3-2
Cisco Aironet Wireless LAN Adapters Installation and Configuration Guide for Mac OS
OL-1377-01
Chapter 3 Installing the Driver, Client Utility, and Client Adapter
System Requirements
System Requirements
The instructions in this section can be used only with the following:
• Cisco Aironet Wireless LAN Adapters
–
340, 350, and 4 800 se rie s c li ent ad ap ter s
–
PC Cards and PCI client adapters
• Apple Macintosh computers running the Mac OS 9.x or Mac OS X (version 10.1) operating system
–
Apple PowerBook G3 and G4 laptops using PC card client ad apters
–
Apple PowerMac G3 desktops (Blue and White) using PCI client adapters
–
Apple PowerMAC G4 desktops using PCI c lien t a dapter s
Installing the Driver and Client Utility
This section describes the driver and client utility installation procedures for the Mac OS 9.x and the
Mac OS X operating systems.
For Mac OS 9.x, you must instal l the driv er and client uti lity before installing the cl ient adapter into your
PowerBook or PowerMac. Follow the instructions in this section.
For Mac OS X, you should install th e client ad apter into y our Po werBook or Power Mac before installing
the driver and client utility. Follow the instructions in the “Inserting the Client Adapter into a Computing
Device” section on page 3-9 to insert the client adapter into your PowerBook or PowerMac.
To install the driver and client utility software for the Mac OS 9.x and Mac OS X operating systems,
follow these st eps:
Step 1 Power-up your computer.
Step 2 To obtain the latest driver and client utility from the Cisco Web site, follow these steps:
a. Use your web browser to access the following URL:
http://www.cisco.com/pcgi-bin/tablebuild.pl/aironet-utils-mac.
b. Click on the latest software file (MACOSInstallv2x.sit) that supports both Mac OS X and Mac OS
9.x operating s ystem s. Th e 2 x identifies the software package version number.
c. Read and accept the terms and conditions of the Software License Agreement.
d. Select the Cisco server from which you wish to download the file.
e. Save the file to your hard drive then exit the web browser.
f. Double-click the MACOSInstallv2x.sit file to expand the file.
Page 35

3-3
Cisco Aironet Wireless LAN Adapters Installation and Configuration Guide for Mac OS
OL-1377-01
Chapter 3 Installing the Driver, Client Utility, and Client Adapter
Installing the Driver and Client Utility
Step 3 Double-click CiscoWLAN Install to activate the installer.
Note You should keep the Cisco WLAN Install file. The file may be needed in the future to
possibly uninstall your client utility and driver for a clean install.
Step 4 If you are using Mac OS X, when the Authenticate screen appears, enter your password in the Password
field. Your Macintosh u s er n am e will ap pear i n the N ame field. C lic k OK .
Note To install the client utility on Mac OS X, you must have administrator privileges for the
Macintosh.
Step 5 When the Cisco Aironet Wireless LAN Adapter Software screen appears, click Continue.
Step 6 Read the terms and conditions of the Software License Agreement and click Accept or Decline. If you
decline the license agreement, the client utility installation ends.
Note You can print or save the software license agreement by clicking Print or Save As.
Step 7 Read the Read Me screen information and click Continue.
Note You ca n print or save the read-me informa tion by click ing Pri nt or Save As.
The Cisco WLAN I nsta ller de tects yo ur comp ut er o pera ting s yst em and disp lays the appr opr iate
installation screen (see Figure 3-1 for Mac OS 9.x or Figure 3-2 for Ma c OS X) .
Figure 3-1 Mac OS 9.x Install Screen
Page 36

3-4
Cisco Aironet Wireless LAN Adapters Installation and Configuration Guide for Mac OS
OL-1377-01
Chapter 3 Installing the Driver, Client Utility, and Client Adapter
Installing the Driver and Client Utility
Figure 3-2 Mac OS X Install Screen
Step 8
When the Cisco WLAN Install screen appears, perform the following operations:
a. Expand the Mac OS software component list by clicking the right triangle on the left of the Mac OS
name.
Note Both the PCI and PC Card driver s are normally installed by the installer. Y ou can deselect
one of the drivers by clicki ng the s ele cti on box t o rem ove the X ; f or exam ple: you c an
deselect the PCI driver when using a PowerBook or you can deselect the PC Card driver
when using a PowerMac.
b. Click Install to begin the installation process.
Step 9 Click Continue when a screen appears indicating your computer must restart after installing the
software.
Note You ca n click Cancel to terminate the install process.
Step 10 A message appears indicat in g “One moment please...” then a screen appears that shows the installation
progress. After t he files ar e c opie d to th e M aci nto sh h ard di sk, a wi ndow appe ars indi cat ing tha t t he
installation was successful. Perform one of the following steps:
a. Click Restart to restart your computer and finish the client utility installation.
b. Click Continue if you need to perform additional installations.
c. Click Quit to leave the installer program and return to your computer desktop screen. You must
manually restart your computer a t a late r time to f in ish the cl ient utili ty installa tion and to m anually
configure the client adapter using the client utility.
The client utility, the help files, and the drivers have been installed by the installer.
Note When your Mac OS 9.x computer restarts, a pop-up message appears and indicates that you must use
the client utility to set your LEAP username and password.
Page 37

3-5
Cisco Aironet Wireless LAN Adapters Installation and Configuration Guide for Mac OS
OL-1377-01
Chapter 3 Installing the Driver, Client Utility, and Client Adapter
Installing the Driver and Client Utility
For Mac OS 9.x, follow the instructions in the “Inserting the Client Adapter into a Computing Device”
section on page 3 -9 to insert the client adapter into your PowerBook or PowerMac.
Initial Configuration Settings for Mac OS X
When your Macintosh compl etes the power-up process following a successful install, the client adapter
setup assistant acti v ates. T he setup a ssistant gu ides you through the initial c onfig uration options of your
client adapter or it allows you to manually select the screens by clicking the configuration tabs. Each
screen contain d escrip tive informat ion to a ssist you i n configuri ng you r cli ent ada pte r.
Note You can cl ick underl ined words or blue colored words on the se tup assistant screens to obtain
additional descriptiv e information . You can also click the Back button to return to a pre vious screen.
Follow the steps below to complete the initial configuration settings for your wireless system:
Step 1 If the Introduction screen is not visible, click the Introduction tab. Read the screen information and
click Start to continue to the Client Name screen.
Note Click the Done button (on any screen) to exit the setup assistant and to manually configure
your client adapter using the client utility.
Step 2 Read the Client Name screen information and enter the client name (case-sensitive) for your client
adapter. Click Next to continue to the Network Name screen.
Step 3 Read the Network Name screen information and enter the Network Name or SSID (case-sensitive) for
your wireless network. Clic k Next to continue to the Network Type screen.
Step 4 Read the Network T ype screen infor mation. Click the up and down arro ws next to the Network Type field
and perform one of the fol lowing operatio ns:
• If your computer connects to an access point, select Computer to Access Point in the dialog box.
Click Next to continue to the Power screen.
• If your computer connects to another computer in a peer-to-peer (ad hoc) network, select Computer
to Computer in the dialog bo x. Cli ck t he up a nd down arrows next to th e Ch an nel field and se lec t
the operating fr eq ue ncy cha nnel for t he c omp ute rs on your n etwor k. Click Next to continue to the
Power screen.
Step 5 On the Power screen, read the power mode information, click the up and down arrows next to the Power
Mode field and select one of the fol lowing modes in the di alog box:
a. Constant Awake Mode—provides the least power savings because your client adapter is always
powered on. This is the typical setting for desktop systems with AC power.
b. Po wer Sav e Mode—provides some power savings because your client adapter is occasionally turned
off. This setting is typical ly use d fo r bat tery powere d sys tems that nee d quic ker resp onse a nd have
sufficient battery capacity to support higher usage.
c. Maximum Power Save Mode—provides the greatest power savings because your client adapter is
only occasionally turned on to receive and send data. This setting is typically used for battery
powered systems that have limited battery capacity and c an tolerate de layed tran smissions.
Page 38

3-6
Cisco Aironet Wireless LAN Adapters Installation and Configuration Guide for Mac OS
OL-1377-01
Chapter 3 Installing the Driver, Client Utility, and Client Adapter
Installing the Driver and Client Utility
Step 6 On the Power screen, read the screen information, click the Transmit Power up and down arrows, and
select the desired client adapter transmit power level. To help minimize cell overlaps, you should strive
to use the lowest power setting that supports full coverage of your wireless cell. Click Next to continue
to the Security screen.
Step 7 Read the Security screen information on wireless network security options. If your wireless network uses
these security options, click the Enable WEP or Enable LEAP check boxes.
Note For computer-to-access point configuratio ns, you must ch eck with you r corpo rate or
enterprise network administrator for the appropriate security settings. For
computer-to-computer configurations, you must onl y determine if WEP is used by the ot her
computers because WEP i s not available.
Step 8 When you have completed all setup assistant screens, click Done.
Step 9 When the summary screen appears, review your selected configuration options and perform one of the
following steps:
a. If the configuration options are correct, click OK and go to Step 10.
b. If the configuration options are not correct, click Cancel and go to Step 1.
c. Click Quit to exit the setup assistant and to manually configure your client adapter using the client
utility.
Step 10 When a drop-down screen appears stating that your settings have been saved, read the information and
perform one of the fol lowing st ep s:
a. If you previously selected the Enable WEP option, click the Hexadecimal or ASCII check box and
enter your WEP key in the entry box. Click OK.
b. If you previously selected the Enable LEAP option, enter your LEAP username and password in the
entry boxes. Click OK.
A screen drops down t o indic a te y our c li en t ad ap ter is b ein g c on figured an d tr ying t o associ at e to a n
access point. When the test process completes, one of four screens will appear:
• Congratulations
• Almost There
• Troubleshoot screen
• Done
The screens provide the following status information:
• Saving of configuration settings —indicates whether your settings have been successfully saved in
the prefere nce s file.
• Detection of client adapter radio—indicates whether your client adapter radio was detected.
• Access point association—indicates if your client adapter is associated to an access point.
• Data transfer progress—indicates whethe r yo ur client adapter was able to succes sf ully send data to
an access point.
Page 39

3-7
Cisco Aironet Wireless LAN Adapters Installation and Configuration Guide for Mac OS
OL-1377-01
Chapter 3 Installing the Driver, Client Utility, and Client Adapter
Installing the Driver and Client Utility
Step 11 If the Congratulations screen app ears, your client ada pter has su ccessfully associa ted and se nt data to a n
access point. Perform one of the following operations:
a. Click Network Settings to configure your M acint osh network p aramet ers. Go to Step 15.
b. Click Quit to configure your Macintosh net work parameters at a later time. When you are ready to
complete the configuration of your client adapter go to the “Configuring the Client Adapter” section
on page 3-11 .
Step 12 If the Almost There screen appears, this indicates your client adapter is associated to an access point but
is unable to pass dat a t hrough t he a cce ss poi nt. Perf orm one of the f ollowing ope rat ions:
a. Click Finish to exit the setup assistant and use the client utility to help resolve the problem. See
“Troubleshooting” se ctio n o n pag e 9-1.
b. Click Return to Setup Assistant to revise your settings using the setup assistant. Return to Step 3.
Step 13 If the Troubleshoot screen appears, this indicates your client adapter is unable to associate to an access
point. The screen status information identifies the problem area. Perform one of the following
operations:
a. If you want to manually trouble sho ot t he p rob l em or u se the cl ient uti lity t o cha ng e yo ur
configuration settings, click Finish. See “Troubleshoo ting” section on page 9-1.
Note Installation problems are typic ally caused by mismatch ed parameter settings betwe en the
client adapter and the access point. Chec k your settings for the Network Name (or SSID),
Network Type, your WEP setting s, and your LEAP setti ngs.
b. Click Return to Setup Assistant to revise your settings using the setup assistant. Return to Step 3.
Step 14 If the Done screen appears, r ead the screen infor ma tion and click OK. This message appears when your
client adapter is not insta lled in your Macintosh . Your configuration par ameters ar e saved in your
preference file on the hard disk but your Mac OS X Network settings and your client adapter are not
configured. Perform the fo llowing ope ratio ns:
a. Refer to the “Inserting the Client Adapter into a Computing Device” section on page 3-9 for
instructions on i nsert ing yo ur clie nt a dapt er in to your c om pute r.
Note If you are using LEAP, a wireless network login screen appears when you re start you r
computer. Enter your LEAP use rname an d p assword. C lic k OK.
b. Refer to the “Setting TCP/IP Options” section on page 3-13 for instructions on co nfiguring your
Mac OS X Network settings.
c. Go to “Verifying a Succe ssful I nsta llat ion an d C onfigurati on on M a c O S X ” section on pa ge 3-15.
Step 15 When the Network screen appears, verify that the Location dialog box contains Automatic or click the
Location up or down arr ows and se lect Automatic.
Step 16 Click the Show up or down arrows and select Ethernet Adaptor (en x ) or PC I E th ernet S lot x (w here
x is a number that indicates a specific adapter or slot).
Step 17 Click the TCP/IP tab. The TCP/IP window appears.
Page 40

3-8
Cisco Aironet Wireless LAN Adapters Installation and Configuration Guide for Mac OS
OL-1377-01
Chapter 3 Installing the Driver, Client Utility, and Client Adapter
Inserting the Client Adapter into a Computing Device
Step 18 Perfo rm one of the following opera tions:
• If you are connected to a DHCP server, select Using DHCP in the Configure drop- down box a nd
type your compute r’s unique c lient name in the DHCP Client ID field. If required by your wi reless
network, enter the I P addr esse s for t he dom ain name s ervers ( obta ined f rom your sy stem
administrator ).
• If you need to specify a fixed IP address when using your DHCP server, select Using DHCP with
fixed IP Address in the Configure drop-down box and enter the client adapter IP address. If required
by your wireless network, enter the IP addresse s for the doma in name servers (ob tained fr om your
system administrator).
• If you are connected t o a BootP server, select Using BootP in th e C onfigure dr op- down box. If
required by your w irele ss ne twork, ent er the IP ad dresse s f or t he d oma in name se rvers (o bt ain ed
from your system administra tor).
• If you are not co nne c ted t o a D HCP or Boo t P s erver, selec t Manually in the C onfigur e dro p-d own
box and enter the client adapter IP address, the subnet mask, and the router IP address. If required
by your wireless network, enter the IP addresse s for the doma in name servers (ob tained fr om your
system administrator).
Step 19 Click Apply Now to apply y our T CP/IP co nfigurati on op tio ns.
Step 20 Click System Prefs on the main menu bar and click Quit System Prefs.
Note To uninstall the client utilities, follow the instructions in the “Removing the Driver and Client
Utility” section on page 8-4.
You have complete d the basic co nfigurati on of your clie nt adap ter. To verify a successful instal lation,
refer to the “Verifying a Successful Installation and Configuration on Ma c OS X” section on page 3-15.
Inserting the Client Adapter into a Computing Device
This section provides instructions for inserting a PC card or a PCI client adapter into an Apple Macintosh
computing device.
Inserting a PC Card
Step 1 Before you begin, examine the PC card. One end has a dual-row, 68-pin PC card connector. The card is
keyed so it can be inserted only one way into the PC card slot.
Note The PC card slot i s on the le ft sid e of the com pute r, depending o n th e model .
Step 2 Hold the PC card with the Cisco logo facing up and inse rt it into the PC card slot, applying just enough
pressure to make s ure it is fu lly se ate d (see Fi gure 3-3).
Caution Do not f orc e the PC card into y our co mpute r’s PC card slot. Forcing it will d amage both the car d and
the slot. If the PC card does not insert easily, remove the card and reinsert it.
Page 41

3-9
Cisco Aironet Wireless LAN Adapters Installation and Configuration Guide for Mac OS
OL-1377-01
Chapter 3 Installing the Driver, Client Utility, and Client Adapter
Inserting the Client Adapter into a Computing Device
Figure 3-3 Inserting a PC Card into a Computing Device
Note You can remove and reinsert your PC card when necessary. Refer to the “Removing a PC Card”
section on page 8 -6 fo r instruct ions.
Step 3 Perform one of the following opera tions:
a. If you are using the Mac OS 9. x ope rati ng syste m, go t o t he “Configuring the Client Adapter”
section on page 3 -11.
b. If you are using the Mac OS X operating system, go to the “Installing the Driver and Client Utility”
section on page 3 -2.
Inserting a PCI Client Adapter
Caution Static electricity can dama ge your computer and your client adapter. Before opening your computer
or removing the ada pter from t he an ti- stat ic pac kagi ng, d is charge s tat ic by touc hing the m etal PCI
port covers of your grounded computer (conne cted to a gro unded power connector) .
Step 1 Turn off the computer and a ll its comp one nts.
Note Refer to your Macintosh com puter ma nual for inst ructi ons on open ing or removi ng your co mputer
cover and on locating the PC I expansio n s lots.
Step 2 Remove or open the computer cover.
Step 3 Locate an emp ty PC I exp ans ion s lo t in you r c omput er.
Step 4 Examine the client ad apter a nd ensur e the anten na is not att ached to the card . The ante nna conn ector a nd
the LEDs face out of your compu ter and ar e visible when you put the cover back on. The bot tom edge
of the adapter is the connector you will insert into the PCI expansion slot.
Step 5 Tilt the adapter to allow the antenna connector and LEDs to slip through the opening in the computer
back panel.
Step 6 Press the client adapter into the empty PCI expansion slot until the adapter is firmly seated.
Page 42

3-10
Cisco Aironet Wireless LAN Adapters Installation and Configuration Guide for Mac OS
OL-1377-01
Chapter 3 Installing the Driver, Client Utility, and Client Adapter
Configuring the Client Adapter
Caution Do not force or rock the adapter into the ex pansion slot as this cou ld damage the adapt er and the slot.
If the adapter does not insert easily, remove the adapter and reinsert it.
Step 7 Replace the computer cover.
Step 8 Attach the 2-dBi antenna to the adapter’s antenna connector until it is finger-tight. Do not overtighten.
Step 9 For optimal reception, position the antenna so it is straight up.
Step 10 Boot up your comp uter.
Step 11 Perfo rm one of the following opera tions:
a. If you are using the Mac OS 9. x ope rati ng syste m, go t o t he “Configuring the Client Adapter”
section on page 3 -11.
b. If you are using the Mac O S X op era tin g sy stem , go t o th e “To install the driver and client utility
software for the Mac OS 9.x and Ma c OS X operat ing systems, follow these step s:” section on
page 3-2.
Note Instructions are provided in the “Removing a PCI Client Adapter” section on pa ge 8-7 in case
you ever need to remove your PCI cl ient ad ap ter.
Configuring the Client Adapter
This section describes the client adapter’s conf iguration pro cess for Mac OS 9 .x and Mac OS X operating
systems.
Basic Configuration on Mac OS 9.x
Step 1 Click the apple-shaped icon in the top left corner of the desktop.
Step 2 Select Control Panels > AppleTalk. T he Appl eTalk window appears.
Step 3 Make sure the name of th e correct wirel ess LAN adapter ap pears in the Conne ct via dialog box . If it does
not, click the up or down arrow on the right side of the Conne ct via dial og box and selec t the corre ct
adapter.
Step 4 Close the AppleTalk window.
Step 5 If a window appears ask ing i f you wan t to s ave change s to t he c urr en t c onfigura tion , cl ic k th e Save
button.
Step 6 Click the apple-shaped icon in the top left corner of the desktop.
Step 7 Select Control Panels > TCP/IP. The TCP/IP window appears.
Step 8 Select Cisco Wireless LAN Adapter in the Connect via drop-d own box.
Page 43

3-11
Cisco Aironet Wireless LAN Adapters Installation and Configuration Guide for Mac OS
OL-1377-01
Chapter 3 Installing the Driver, Client Utility, and Client Adapter
Configuring the Client Adapter
Step 9 Perform one of the following:
• If you are connec ted to a DHC P serv er , sele ct Using DHCP Server in the Configure drop-down box
and type your computer ’s unique client name in the DHCP Client ID field.
• If you are not connected to a DHCP server, select Manually in the Configure drop-down box and
enter the client adapter IP address, the subnet mask, and the router IP address. If required by your
wireless network, ente r the IP addre sses f or the d omai n na me se rvers (o bt ain ed fr om yo ur syst em
administrator ).
Step 10 Close t he TCP/I P wi ndow.
Step 11 If a wi ndow appe ars ask in g if yo u want t o s ave change s t o t he c urr en t c onfigura tion , cl ic k the Save
button.
Step 12 Doub le-cli ck the Macin tosh ha rd disk icon on th e desktop. The Macin tosh hard di sk window appears .
Step 13 Loca te and dou ble- click th e Cisco pcm3x0 Folder icon. T he C is co pc m3 x0 Folde r window app ears.
Step 14 Double-click the pcm3x0PP C icon. The Cisco pcm3x0 window appears, and the computer searches for
the client adap ter. After the ad ap ter is f oun d, the Cisco pc m3x 0 - B asi c Pr opert ie s window a ppea rs.
Step 15 Unde r Radio, make sure that ra dio status is on. If it is off, click th e Turn radio on button.
Step 16 Perfo rm one of t he following:
• If your computer connects to an access point or to the Cisco Aironet 340 Series Base Station, select
Computer to base station in the Network subw indow.
• If your computer connects to another computer in a peer-to-peer (ad hoc) network, select Computer
to computer in the Network subwindow.
Step 17 Type your RF network’s (case-sensitive) SSID in the SSID dialog box.
Step 18 Click OK.
The basic configuration of the dri ver and clie nt utility is complete. If security is not used in your wireless
network, your clien t a dapt er sh ould now be a ble to asso cia te to a loca l a ccess p oi nt, base sta tion, or
another compu ter. You can check the assoc iat ion of y our cl ient ad ap ter on the b ott om of the C isco
Wireless LAN Adapter Utilities screen. If associated, you should also see the MAC address and IP
address of the associated device.
Note If security is neede d, refer t o the Chapte r 4, “Se curi ty Fe atures .”
Note If you ever need to uninstall the client utilities, follow the instructions in the “Removing the Driver
and Client Utility” section on page 8-4.
Page 44

3-12
Cisco Aironet Wireless LAN Adapters Installation and Configuration Guide for Mac OS
OL-1377-01
Chapter 3 Installing the Driver, Client Utility, and Client Adapter
Configuring the Client Adapter
Basic Configuration on Mac OS X
During the installation process, the setup assistant is typically used to configure the client adapter and
the Mac OS X net work o pti ons. T his sec tion de scri bes t he p roce ss u sed to set an d ver ify basic
configuration options when t he setup assistant is not used. If you have used the setup assistant, proceed
to “Verifying a Successful Instal lation and Con figuration on Mac OS X” section on page 3-15.
Setting TCP/IP Options
Step 1 Click the apple-shaped icon in the top left corner of your desktop.
Step 2 Click System P referenc e s. The Syst em Pr efer ence s win dow appea rs.
Step 3 Click the Network icon. The Network window appears.
Note If a New Port Detected screen appears, click OK to activate the new port, such as Ethernet
Adapter (en1) or PCI Ethernet Slot 1.
Step 4 Click the Show up or down arrows and select Ethernet Ad apto r ( enx ) or PCI E t hern et Sl ot x (whe re
x is a number that indicates a specific adapter or slot).
Step 5 Select the TCP/IP tab. The TCP/IP window appears.
Step 6 Perform one of the following:
• If you are connected to a DHCP server, select Using DHCP in the Configure drop- down box a nd
type your compute r’s unique c lient name in the DHCP Client ID field. If required by your wi reless
network, enter the I P addr esse s for t he dom ain name s ervers ( obta ined f rom your sy stem
administrator ).
• If you need to specify a fixed IP address when using your DHCP server, select Using DHCP with
fixed IP Address in the Configure drop-down box and enter the client adapter IP address. If required
by your wireless network, enter the IP addresse s for the doma in name servers (ob tained fr om your
system administrator).
• If you are connected t o a BootP server, select Using BootP in th e C onfigure dr op- down box. If
required by your w irele ss ne twork, ent er the IP ad dresse s f or t he d oma in name se rvers (o bt ain ed
from your system administra tor).
• If you are not co nne c ted t o a D HCP or Boo t P s erver, selec t Manually in the C onfigur e dro p-d own
box and enter the client adapter IP address, the subnet mask, and the router IP address. If required
by your wireless network, enter the IP addresse s for the doma in name servers (ob tained fr om your
system administrator).
Step 7 Click Apply Now to save the TCP/IP configuration options you have specified.
Step 8 Click System Prefs on the main menu bar and click Quit System P refs.
Page 45

3-13
Cisco Aironet Wireless LAN Adapters Installation and Configuration Guide for Mac OS
OL-1377-01
Chapter 3 Installing the Driver, Client Utility, and Client Adapter
Configuring the Client Adapter
Setting Basic Wireless LAN options
Step 1 Click Go on the main Finder menu bar and select Applications from the drop down menu.
Step 2 Double click Aironet Client Utility on the Applications screen.
Step 3 Click the Network Type up or down arrows and selec t on e of t he f oll owing opti on s:
• If your computer connects to an access point or to the Cisco Aironet 340 Series Base Station, select
Computer to Access Point.
• If your computer connects to another computer in a peer-to-peer (ad hoc) network, select Computer
to Computer.
Step 4 If you selecte d Comput er to Co mput er, click t he C ha nne ls up o r d own arrows an d se le ct th e de sire d
frequency channel f rom the dro p-down list .
Step 5 Type your network ’s (case-sensitive) name (o r SSID ) in the Ne twork N ame d ialog box.
Step 6 Click Tu rn Ra di o O n if the button is visible.
If security is neede d, refer t o the Chapte r 4, “Se curi ty Fe atures .”
T o v erif y a succ essful install, refer to the “Verifying a Successful Installation and Configuration on Mac
OS X” section on p age 3-15.
Note If you ever need to uninstall the client utilities, follow the instructions in the “Removing the Driver
and Client Utility” section on page 8-4.
Verifying a Successful Installation and Configuration on Mac OS 9.x
The installation an d conf iguration o f your client adapter is successful when your client card is associated
and authenticated to an access point. To verify a successful configuration, perform the following steps:
Step 1 Double-click the pcm3x0 PPC icon in the c isco pcm3x0 fol der to ope n the client ut ility.
If the Aironet Client Utility icon is not in the pcm3x0 folder or the client utility screen does not appear,
verify that your Maci ntos h is run ning Mac OS 9. x and r einstall the client utility and dri ver again. If you
continue to have problems refer to the “Obtaining Technical Assistance” section on page xiv.
Step 2 When the client utility screen appears, check the status line on the bottom of the screen. The status line
should indicate that the radio is associated to an access point, the access point name , and the IP address.
The status line should be similar to: Radio is associated A P: ’AP34 0-3 836 b7’ I P: 10 .0.0. 1.
Page 46

3-14
Cisco Aironet Wireless LAN Adapters Installation and Configuration Guide for Mac OS
OL-1377-01
Chapter 3 Installing the Driver, Client Utility, and Client Adapter
Configuring the Client Adapter
Verifying a Successful Installation and Configuration on Mac OS X
The installation an d conf iguration o f your client adapter is successful when your client card is associated
and authenticated to an access point. To verify a successful configuration, perform the following steps:
Step 1 On the Finder main menu bar, click Go and select Applications.
Step 2 Double-click Aironet Client Utility on the Applications screen.
If the Aironet Client Utility icon is not on the Applications screen or the client utility screen does not
appear, verify that your Macintosh is running Mac OS X and reinstall the client utility and driver. If you
continue to have problems refer to the “Obtaining Technical Assistance” section on page xiv.
Step 3 When the client utility screen appears, check the status line on the bottom of the screen. The status line
should indicate that the radio is associated to an access point, the access point nam e, and the IP address.
The status line should be similar to: Radio is associated A P: ’AP34 0-3 836 b7’ I P: 10 .0.0. 1.
If the client utility screen appears but your client card is not associated, verify your settings match with
the access point. If you are unable to determine your problem, refer to the Chapter 9, “Troubleshooting.”.
Page 47

CHAPTER
4-1
Cisco Aironet Wireless LAN Adapters Installation and Configuration Guide for Mac OS
OL-1377-01
4
Security Features
This chapter descr ibes the se curit y fea tures of your client adap ter an d pro v ides instru ction s for ena bling
security.
The following topics are covered in this section:
• Overview of Security Features, page 4-2
• Security Option s f or Mac OS 9.x, pa ge 4- 4
• Security Options for Mac OS X, page 4-12
Page 48

4-2
Cisco Aironet Wireless LAN Adapters Installation and Configuration Guide for Mac OS
OL-1377-01
Chapter 4 Security Features
Overview of Security Features
Overview of Security Features
When you use your clie nt adap te r wi th t he M ac O S op er ati ng s yst em, y ou c a n prot ec t yo ur d ata as it is
transmitted through your wireless network by encrypting it through the use of Wired Equivalent Privacy
(WEP) encryption ke ys. W ith WEP encry ption, the transmitti ng devic e encrypts each packet with a WEP
key, and the receiving device uses that same key to decryp t each packet.
The WEP keys used to encrypt and decrypt transmitted data can be statically associated with your
adapter or dynamically created as part of the LEAP authentication process. The information in the
sections below can help you t o de c ide w hich typ e of WE P keys you wa nt to u se. Dyn ami c WEP keys
with LEAP offer a higher degree of security than static WEP keys.
WEP keys, whether static or dynamic, are either 40 or 128 bits in length. The 128-bit WEP keys contain
more characters than the 40-bit keys and, therefore, offer a greater level of security.
Static WEP Keys
Each device (or profile) w ith in yo ur wi reless ne twork can be assign ed u p to fo ur stat ic WE P keys. If a
device receives a packet that is not encrypted with the appropriate key (as the WEP keys must match in
all devices that are to commu nicat e with each ot her), t he device disc ards th e packe t.
For the Mac OS X, the Static WEP keys are write-only and stored in an encrypted format (for security
reasons) in your Macintosh; therefore, you canno t read them back. When the driver loads and reads the
client adapter’s parameters, it also finds the static WEP keys, decrypts them, and stores them in vo lat ile
memory on the client adapter. The WEP keys in the client adapter are temporary and they are lost when
power to the adapter is removed or the Mac intosh is reboote d. Althoug h the keys in the cli ent adapt er
are temporary, you do not need to re-enter them when you restore power or reboot because the keys are
stored in your M aci nto sh.
For the Mac OS 9.x, the Stat ic WEP keys can be perm anently or temporarily stored in your client adapter .
If the keys are temporarily stored in v olatile me mory, the keys will be lost wh en p ower is removed fr om
your client adapter.
The client utility allows you to enable or disable static WEP and to add or change keys.
Dynamic WEP Keys with EAP
The new standard for wireless LA N securit y, as defined by the Institute of Electrical and Electr onics
Engineers (IEEE), is called 802.1X for 802.11, or simply 802.1X. An access point that supports 802.1X
and its protocol, Extensi ble Auth entica tion Protoc ol (EAP) , acts as th e interfac e betwee n a wireless
client and an authentication server, such as a Remote Authentication Dial-In User Service (RADIUS)
server, to which the access point communicates over the wired network.
The use of an 802.1X authenticat ion type, whic h is supported by the client an d the authenticatio n serve r ,
causes the foll owing to oc cur:
• After associating to the access point, the client does not gain access to the network until mutual
authentication between the client and the authentication server is successful.
• The client and authentication server derive the same dynamic WEP key.
• The authentication server sends the dynamic WEP key to the access point.
• For the length of a session, or time period, the access point and the client use the dynamic WEP key
to encrypt and decrypt all unicast packets that travel between the access point and the client.
Page 49

4-3
Cisco Aironet Wireless LAN Adapters Installation and Configuration Guide for Mac OS
OL-1377-01
Chapter 4 Security Features
Overview of Security Features
A Cisco Aironet client adapter running on the Mac OS operating system supports the following 802.1X
authentication type:
• EAP-Cisco Wireless (or LEA P)
EAP-Cisco Wireless or LEAP
Support for EAP-Cisco Wireless or LEA P i s provide d in a Cisc o Ai rone t cli ent ad apte r’s firmware and
the Cisco software that supports it. The RADIUS servers that support LEAP include Cisco Secure ACS
version 2.6 and above and Cisc o A cce ss Registra r version 1. 7 and a bove.
LEAP is enabled or disab led usin g the clien t utility. When LEAP is enabled, the client adapter uses your
LEAP username and password to perform mutual authentication with the RADIUS server through the
access point. The username and password are stored in the client adapter’s volatile memory; therefore,
they are temporary and need to be re-entered whenever the radio is turned off, the client adapter is
removed, or the Macintosh is powered down.
Note In Mac OS 9. x, w he n y our c om pute r is rebo ot ed, a po p-u p m es sag e ap pear s to i nfo rm you t h at you
must use the client utility to enter your LEAP username and password.
Note In Mac OS X, when yo ur comp ut er i s reboo t ed, th e Wireless Networ k Log in scre en app ears a nd
prompts you to ent er y our L EAP use rname and p assword.
When you enable Network-EAP on you r access poin t and LE AP on your clie nt adapte r, authentication
to the network occurs in the following sequence:
a. The client adapter associates to an access point and begins the authentication process.
Note The client adapter does not gain access to the network until the mutual authentication with
the authentication server is successful.
b. Communicating through the access point, the client adapter and the authentication server complete
a mutual authentication process, with the password being the shared secret for authentication. The
password is never transmitted during the process.
c. If mutual authentication is successful, the client adapter and the authentication server derive a
dynamic, session-ba sed W EP key that is un ique.
d. The authentication server transmits the key to the access point using a secure channel on the wired
LAN.
e. For the length of a session, or a time period, the access point and the client adap ter use th is key to
encrypt or decrypt all uni cast packe ts that travel between the m.
Note Refer to the IEE E 802.1 1 Stand ar d for m ore in for mat ion on 802 .1X au then tic atio n a nd to the
following URL for additional information on RADIUS servers:
http://www.cisco.com/univercd/cc/td/doc/product/software/ios120/12cgcr/secur_c/scprt2/scrad.htm
Page 50

4-4
Cisco Aironet Wireless LAN Adapters Installation and Configuration Guide for Mac OS
OL-1377-01
Chapter 4 Security Features
Security Options for Mac OS 9.x
Security Options for Mac OS 9.x
Configuring WEP Keys
The client utility allows you to create a new WEP key or use an existing key.
Note Entering a WEP key does not enable WEP.
Entering a New WEP Key
Follow the instructions below to enter a new WEP key for your client adapter. If you wish to select an
existing WEP key, go to the “Selecting an Existing WEP Key” section on page 4-7.
Step 1 Select WEP Keys from the Edit pull-down menu (see Figure 4-1).
Figure 4-1 Edit Pull-Down Menu
Page 51

4-5
Cisco Aironet Wireless LAN Adapters Installation and Configuration Guide for Mac OS
OL-1377-01
Chapter 4 Security Features
Security Options for Mac OS 9.x
The WEP Keys scre e n ( see Figure 4-2) allows you to c rea te up to f our W EP keys.
Figure 4-2 WEP Keys Screen
Step 2
Under WEP Key input type, sel ect w he the r t he WEP keys a re e nte re d in hexade cim al ch ar act ers ( 0-9 ,
A-F, and a-f) or ASCII text.
Step 3 Decide on a WEP key and ent er i t in th e blan k field for the key you are c r eat ing. Follow the guide li nes
below to create a new WEP key:
• Your c lient adapt er’s WEP key must match the WEP key used by the access point or clients with
which you are planning to comm unicate .
• When setting more than one WEP key, the WEP keys must be assigned to the same WEP key
numbers for all devices .
• WEP keys can be comprised of ASCII text or hexadecimal characters, depending on the option you
selected in Step 2.
• WEP keys must contain the following number of characters:
–
13 characters for 1 28- bit WE P keys usin g ASCI I input
–
26 characters for 1 28- bit WE P keys usin g hexadec imal inpu t
–
5 characters for 40-bi t WEP keys using ASCII input
–
10 characters for 40-bit WEP keys using hexadecim al input
Note Any key that is entered with more than 10 characters is padded by the client adapter
to 26 characters to create a 128-bit key.
Note After you create a WEP key, you can delete it by selecting the Clear Key check box
to the left of the key.
Step 4 Click Tr ansmit Key next to the key you just created to indicate that this is the key you want to use to
transmit packet s.
Page 52
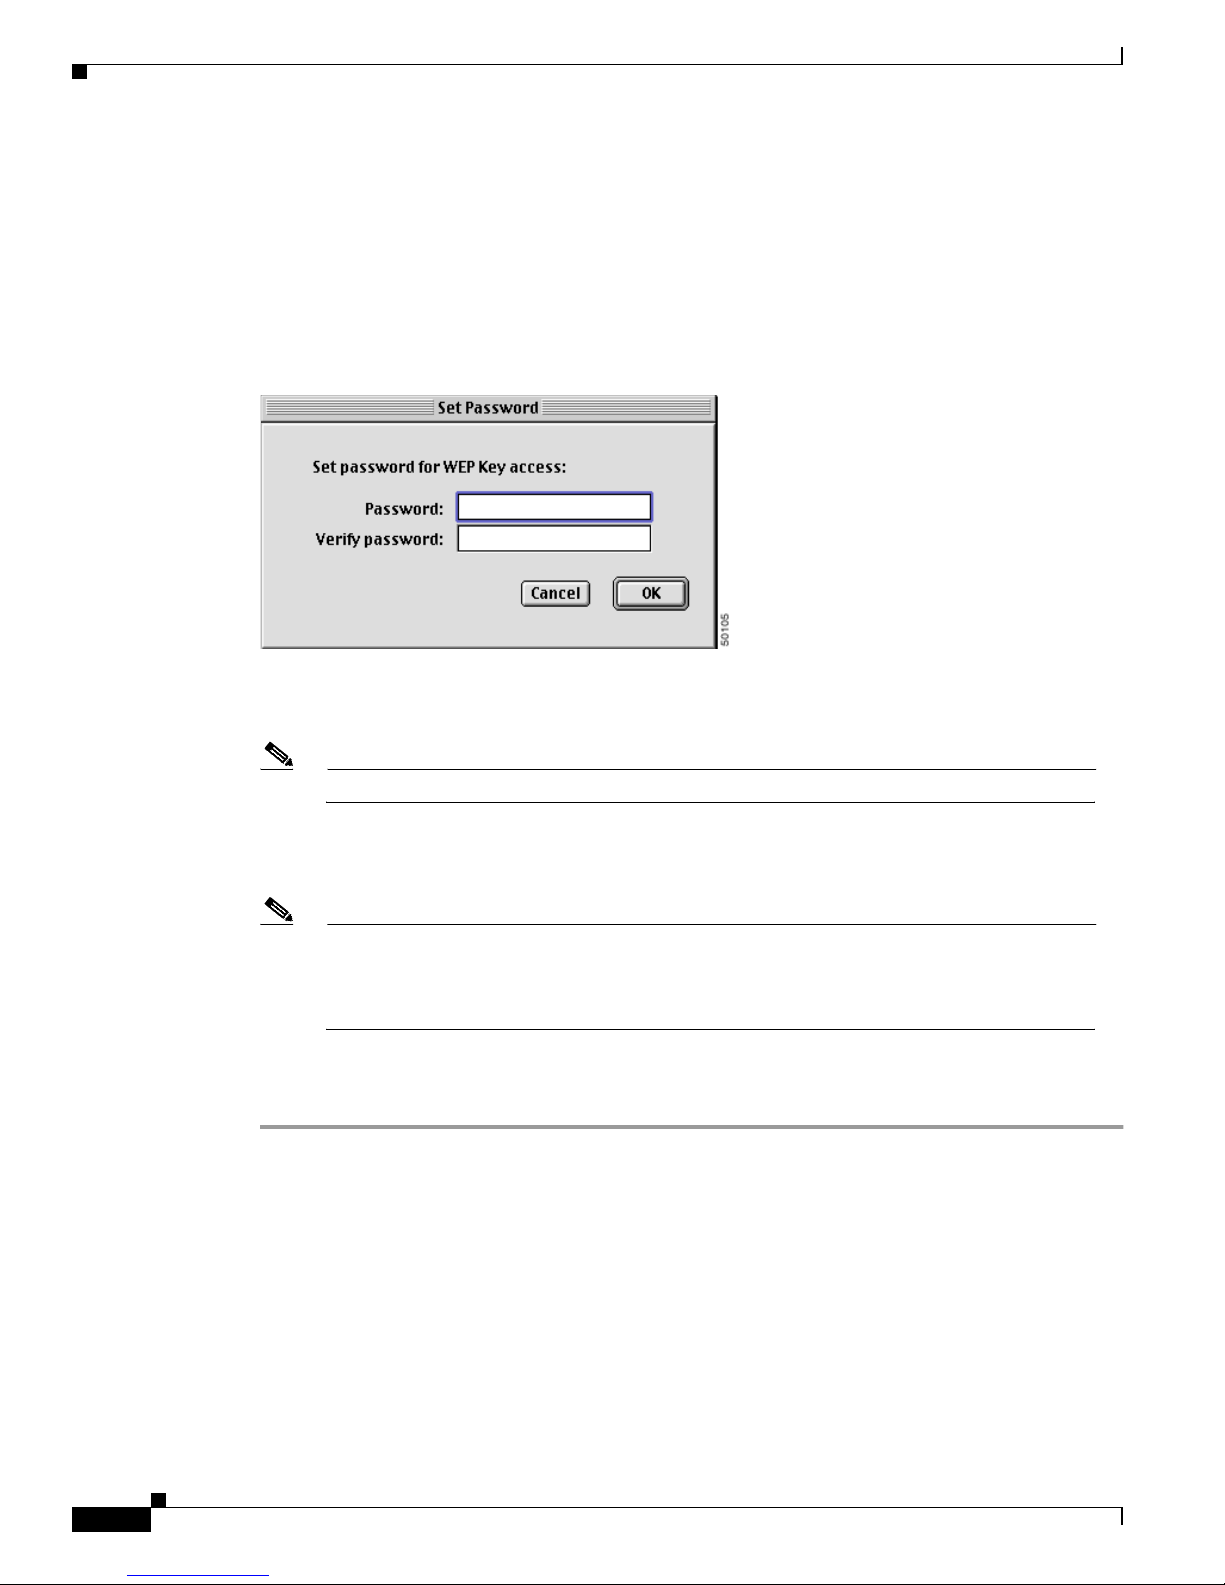
4-6
Cisco Aironet Wireless LAN Adapters Installation and Configuration Guide for Mac OS
OL-1377-01
Chapter 4 Security Features
Security Options for Mac OS 9.x
Step 5 Click Permanent under WEP K ey Storage to allow your client adap ter to retain th is WEP key e ven when
power to the adapter is removed or the computer in which it is installed is rebooted.
If you select Temporary, the WEP key is lost when power is removed from your client adapter or when
the adapter is reset.
Step 6 If you want the WEP Keys scree n to be password pr otecte d, c lick the Se t Password button. The Set
Password screen (see Figure 4-3) appears.
Figure 4-3 Set Password Screen
Follow these steps to password protect the WEP keys:
a. Enter a password in the Password field.
Note Passwords are case sensitive and must contain at least eight characters.
b. Re-enter the password in the Verify Password field.
c. Click OK to set the password protection.
Note The next time you at te mp t to e nt er th e WE P Keys screen you wi ll be pro mp ted to
enter the correct password. After you enter the screen, the password can be changed
using the Change Password button . If you l eave the fields bl ank in th e Chang e
Password screen, the password is cleare d.
Step 7 When you have completed the entry of the WEP keys, click OK
To enable WEP, follow the instructions in the “Enabling W EP” section on page 4-8.
Page 53

4-7
Cisco Aironet Wireless LAN Adapters Installation and Configuration Guide for Mac OS
OL-1377-01
Chapter 4 Security Features
Security Options for Mac OS 9.x
Selecting an Existing WEP Key
If you want an existing WEP key to be used with your client adapter, follow the instructions below.
Step 1 Select WEP Keys from the Edit pull-down menu (see Figure 4-1).
Step 2 Enter the correct password and click OK.
Step 3 The WEP Keys screen appears (see Figure 4-4).
Figure 4-4 WEP Keys Screen
A checkmark appe ars in t he 4 0-b it or 12 8-b it col umn for al l existing WEP keys.
Note T o protect WEP key security, the codes for existing WEP keys do not appear on the
screen.
Step 4 Click Tr ansmit Key next to the key you want to use to transmit packets.
Step 5 Click OK.
To enable WEP, follow the instructions in the “Enabling W EP” section on page 4-15.
Page 54

4-8
Cisco Aironet Wireless LAN Adapters Installation and Configuration Guide for Mac OS
OL-1377-01
Chapter 4 Security Features
Security Options for Mac OS 9.x
Enabling WEP
The client utility provid es se v eral scr eens that al lo w you to enable WEP for an o f f ice netwo rk or a home
network.
For an Office Network
After you have created or selected a WEP key, follow the steps below to enable WEP.
Step 1 Open one of the following screens:
a. Basic Properties screen (see Figure 4-6) by selecting Basic Properties from the File pull-down
menu (see Figure 4-5).
Figure 4-5 File Pull-Down Menu
Figure 4-6 Basic Properties Screen
Page 55

4-9
Cisco Aironet Wireless LAN Adapters Installation and Configuration Guide for Mac OS
OL-1377-01
Chapter 4 Security Features
Security Options for Mac OS 9.x
b. RF Network Parameters screen (see Figure 4-7) by selecting Edit Properties from the File
pull-down menu (see Figure 4-5) and click the RF Ne twork Paramet ers tab.
Figure 4-7 RF Network Parameters Screen
Step 2
Select the Enable WEP check box in the Basic Properties screen or RF Network Parameters screen.
Note You ca n disable WE P at any time by deselecti ng the Enabl e WEP ch eck box.
Step 3 Click Apply.
To enable LEAP, refer to the “LEAP” section on page 4-11.
Page 56

4-10
Cisco Aironet Wireless LAN Adapters Installation and Configuration Guide for Mac OS
OL-1377-01
Chapter 4 Security Features
Security Options for Mac OS 9.x
For a Home Network
After you have created or selected a WEP key, follow the steps below to enable WEP.
Step 1 Open the Home Networking screen (see Figure 4-8) by selecting Edit Properties from the File
pull-down menu (see Figure 4- 5) and cli cking the Home Networking tab.
Figure 4-8 Home Networking Screen
Step 2
Select the Enable WEP for Home Network check box in the Home Net working screen.
Note You can disable WEP at any time by deselecting the Enable WEP for home network
check box.
Step 3 Click Apply.
To enable LEAP, refer to the “LEAP” section on page 4-11.
Page 57

4-11
Cisco Aironet Wireless LAN Adapters Installation and Configuration Guide for Mac OS
OL-1377-01
Chapter 4 Security Features
Security Options for Mac OS 9.x
LEAP
Follow the instructions below to enable LEAP for your client adapter.
Step 1 Select LEAP User & Password from the Edit pull-down menu (see Figure 4-1 on page 4-4). The Set
LEAP Username an d Password sc r een ap pear s ( see Figu re 4-9).
Figure 4-9 Set LEAP Username and Password Screen
Step 2
Enter your LEA P u ser na me i n the Us erna me field.
Note If you work in an environment with multiple domains an d want your lo gin domai n to be
passed to the RADIUS server along with your username, you must append the domain name
to your userna me ; fo r examp le: domain\ us ernam e. Che ck with y our ne twor k adm ini strato r.
Step 3 Enter a LEAP password in the Password field.
Step 4 Click OK.
Step 5 Select the Enable LEAP check box on one of t he fol lowing sc reen s:
• For the office network use one of the following screens:
–
Basic Properties screen (see Figure 4-6).
–
RF Network Parameters screen (see Figure 4-7).
• For the home network u se th e H ome N etworki ng sc re en ( see Figure 4-8).
After LEAP is enabled, your client adapter authenticates to the RADIUS server using your LEAP username
and password and receives a session-based WEP key.
Note When you enable LEAP, the Enable WEP check box is automatically checked. This indicates that
dynamic, session based WEP is active. You do not have to enter a static WEP key.
Note You c an di sabl e LE A P at a ny tim e by desel ecti ng the E nabl e LE A P ch ec k box, but to e na ble LEA P
again, you will have to reenter your LEAP username and password.
Page 58

4-12
Cisco Aironet Wireless LAN Adapters Installation and Configuration Guide for Mac OS
OL-1377-01
Chapter 4 Security Features
Security Options for Mac OS X
Verifying Installation
To verify that you have properly installed the appropriate driver and client utilities, perform one of the
following:
• Double-click the pcm3x0PPC icon in the Cisco pcm3x0 folder to open the pcm3x0PPC client
utility. If the installation was successful, the top of the Basic Properties screen indicates that your
client adapt er is a ss oc iat ed to a n ac ces s poin t an d provid es i ts IP a ddres s .
Note If your installation was unsuccessful or you experienced problems during or after driver installation,
refer to Chapter 8 for troubleshooting tips.
Security Options for Mac OS X
Configuring WEP Keys
The client utility allo ws you to enable or d isable WEP and to crea te new WEP k eys or use an existing k ey .
Note Entering a WEP key does not enable WEP.
Entering a New WEP Key
Follow the instructions below to enter a new WEP key for your client adapter. If you wish to select an
existing WEP key, go to the “Selecting an Existing WEP Key” section on page 4-14.
Step 1 If the client utility is not active on your desktop perform the following steps:
a. From the Finder menu bar on the top of the screen, select Go and click Applications (see
Figure 4-10). The applications screen appears.
Figure 4-10 Finder Menu Bar
Page 59

4-13
Cisco Aironet Wireless LAN Adapters Installation and Configuration Guide for Mac OS
OL-1377-01
Chapter 4 Security Features
Security Options for Mac OS X
b. Double-click the Aironet Client Utility icon. The client utility screen appears, and the computer
searches for the clie nt adapte r radio. Aft er the ra dio is found , the basi c properti es scree n appears
(see Figure 4-11).
Figure 4-11 Client Utility Basic Properties Screen
Step 2 On the Client Utility Basic Properties screen, click Set WEP Key (see Figure 4-11). The W EP key
screen appears (see Figure 4-12).
The WEP key screen allows you to create up to four WEP keys.
Figure 4-12 WEP Key Screen
Step 3
Under WEP Key Input Method, select whether the WEP keys are entered in hexadecimal characters (0-9,
A-F, and a-f) or ASCII text.
Page 60

4-14
Cisco Aironet Wireless LAN Adapters Installation and Configuration Guide for Mac OS
OL-1377-01
Chapter 4 Security Features
Security Options for Mac OS X
Step 4 Decide on a WEP key and ent er i t in th e blan k field for the key you are c r eat ing. Follow the guide li nes
below to create a new WEP key:
• Your c lient adapt er’s WEP key must match the WEP key used by the access point or clients with
which you are planning to comm unicate .
• When setting more than one WEP key, the WEP keys must be assigned to the same WEP key
numbers (1 to 4) for all devices.
• WEP keys can be comprised of ASCII text or hexadecimal characters, depending on the option you
selected in Step 3.
• WEP keys must contain the following number of characters
–
For 128-bit ASCII WEP keys, use 13 ASCII characters
–
For 128-bit hexadecima l WE P keys, use 26 h exadeci mal ch ar ac ters
–
For 40-bit ASCII WEP keys, use 5 A SCI I ch ar act ers
–
For 40-bit hexadecimal WEP keys, use 10 hexadecima l charac ters
Note You must enter the number of characters shown above because the client utility does not fill
the WEP key with zeros or nul ls. The c lient utility a lso uses the number of c haracters enter ed
to determine 40-bit or 128-bit WEP keys.
Step 5 Click Tr ansmit Key next to the key you want to use to transmit packets.
Note Only one WEP key can be selected as the Transmit Key.
Note You can delete an existing WEP key by selecting the Clear Key check box to the right of the
key.
Step 6 Click Apply when you have finished entering WE P keys.
To enable WEP, follow the instructions in the “Enabling W EP” section on page 4-15.
Selecting an Existing WEP Key
If you want an existing WEP key to be used with your client adapter, follow the instructions below.
Step 1 If the client utility is not active on your desktop perform the following steps:
a. From the Finder menu bar on the top of the screen, select Go and click Applications (see
Figure 4-10). The Applications window appears.
b. Double-click the Aironet Client Utility icon. The client utility screen appears, and the computer
searches for the clie nt adapte r radio. Aft er the ra dio is found , the basi c properti es scree n appears.
Page 61

4-15
Cisco Aironet Wireless LAN Adapters Installation and Configuration Guide for Mac OS
OL-1377-01
Chapter 4 Security Features
Security Options for Mac OS X
Step 2 On the Client Utility Basic Properties screen, click Set WEP Key (see Figure 4-11). The W EP key
screen appears (see Figure 4-13).
Figure 4-13 WEP Keys Screen
The WEP key size identifies all existing WEP keys; for example: 128 bit or 40 bit.
Note To protect WEP key security, the existing WEP keys do not appear on the screen.
Step 3 Click Transmit Key next to the key you want to use to transmit packets.
Note You can de lete a WE P key by selec ting the Cl ear Key check bo x to the ri ght of the key.
Step 4 Click Apply.
Enabling WEP
The client utility allows you to enable or disable WEP.
Step 1 If the client utility is not active on your desktop perform the following steps:
a. From the Finder menu bar on the top of the screen, select Go and click Applications (see
Figure 4-10). The Applications window appears.
b. Double-click the Aironet Client Utility icon. The client utility screen appears, and the computer
searches for the clie nt adapte r radio. Aft er the ra dio is found , the basi c properti es scree n appears.
Step 2 On the Client Utility Basic Properties screen (see Figure 4-11), you can enable WE P by clicking the
Enable WEP check box.
Note You ca n disable WE P at any time by deselecti ng the Enabl e WEP ch eck box.
Step 3 Click Apply.
Page 62

4-16
Cisco Aironet Wireless LAN Adapters Installation and Configuration Guide for Mac OS
OL-1377-01
Chapter 4 Security Features
Security Options for Mac OS X
LEAP
The client utility allows you to enable or disable LEAP and to set your LEAP username and password.
Note You must enter your LEAP username and password each time you power-up your Macintosh, reinsert
your client adapter, or turn-on the radio.
Step 1 If the client utility is not active on your desktop perform the following steps:
a. From the Finder menu bar on the top of the screen, select Go and click Applications (see
Figure 4-10). The applications screen appears.
b. Double-click the Aironet Client Utility icon. The client utility screen appears, and the computer
searches for the clie nt adapte r radio. Aft er the ra dio is found , the basi c properti es scree n appears.
Step 2 On the Client Utility Basic Properties screen, you can enable LEAP by clic king the Enable LEAP check
box (see Figure 4-11).
Step 3 On the Client Utility Basic Properties screen, click Set LEAP Usernam e/ Pas swo rd an d the LE AP
username and password screen appears (see Figure 4- 14).
Figure 4-14 LEAP Username and Password Screen
Step 4
Type your LEAP use rname in the Us e rna m e fie l d.
Note If you work in an environment with multiple domains an d want your lo gin domai n to be
passed to the RADIUS server along with your username, you must append the domain name
to your userna me ; fo r exampl e: dom ain\ u ser na me.
Step 5 Type your LEAP password in the Password fi e l d .
Step 6 Click Save Password in Keychain, if you want to save your LEAP userna me and passwor d in your
Macintosh keychain. When saved, your LEAP password i s stored (in an encrypt ed forma t) and will be
automatically entered into the password field.
Page 63

4-17
Cisco Aironet Wireless LAN Adapters Installation and Configuration Guide for Mac OS
OL-1377-01
Chapter 4 Security Features
Security Options for Mac OS X
Step 7 Click Apply when you have finished entering your username and password.
After LEAP is enabled, your client adapter authenticates to the RADIUS server using your LEAP username
and password and receives a session-based WEP key.
Note When you enable LEAP, the Enable WEP check box is automatically checked. This indicates that
dynamic, session based WEP is active. You do not have to enter a static WEP key.
Note You c an di sabl e LE A P at a ny tim e by desel ecti ng the E nabl e LE A P ch ec k box, but to e na ble LEA P
again, you will have to reenter your LEAP username and password.
Verifying Installation
To verify that you have properly installed the driver and client utility, perform the following:
Step 1 From the Finder menu bar, click Go and select Applications. The applications screen appears.
Step 2 Double-click the Aironet Client Utility icon. The client utility screen appears.
If the installation was successful, th e cl ien t ut ility suc cessf ully detects the client adapter radio and your
client adapter associates to an access point and provides its IP address (check the bottom of the client
utility basic properties screen).
Note If your installation was unsuccessful or you experienced problems during or after driver installation,
refer to Chapter 9, “Troubleshooting.”
Page 64

4-18
Cisco Aironet Wireless LAN Adapters Installation and Configuration Guide for Mac OS
OL-1377-01
Chapter 4 Security Features
Security Options for Mac OS X
Page 65

CHAPTER
5-1
Cisco Aironet Wireless LAN Adapters Installation and Configuration Guide for Mac OS
OL-1377-01
5
Advanced Configuration on Mac OS 9.x
This chapter describes the advanced configuration options of the Cisco Aironet Wireless Client Utility
running on the M ac OS 9 .x ope rat ing syste m.
The following topics are covered in this chapter:
• Using the Client Utility on Mac OS 9.x, page 5-2
• Getting Started, page 5-2
• Loading New Firmware, page 5-4
• Configuring Your Client Ad ap ter, page 5-6
• Turning Your Client Ada pter Radio On or Off, page 5-26
• Obtaining System Add re ss and Sof tware Version Information, page 5- 27
• Getting Help, page 5-28
• Exiting the Client Utility, page 5-29
Page 66

5-2
Cisco Aironet Wireless LAN Adapters Installation and Configuration Guide for Mac OS
OL-1377-01
Chapter 5 Advanced Configuration on Mac OS 9.x
Using the Client Utility on Mac OS 9.x
Using the Client Utility on Mac OS 9.x
This section explains h ow to use pc m 3x0PPC , the Ma c OS 9 .x cli en t uti lity, to load new firmware, and
to configure your client adapter for use in a wireless enterprise or home network. Y ou can set parameters
that prepare th e adapte r f or ne tw ork use, go v ern how the adapter tran smits or r ecei v es dat a, an d co ntro ls
the adapter’s operation within an infrastructure or ad hoc network.
Getting Started
To open the pcm3x0PPC client utility, follow the steps below.
Step 1 Double-click the Ma cin to sh hard di sk icon on t h e desktop.
Step 2 Double-click the Cisco pcm3x0 folder icon.
Note If you selected a locati on other tha n the default (the Cisco pc m3x0 Folder ) during th e
installation process, select the folder in which you directed the utility to be installed.
Step 3 Double-click the pcm3x0PPC icon. The compu te r se ar ch es fo r th e cl ie nt a da pt e r. A ft er th e ad ap t er i s
found, the Basic Prop er ties s creen ap pe ars ( see Fig ure 5-1).
Figure 5-1 Basic Properties Screen
The Basic Properties screen provides useful information about your client adapter, enables you to set a
few key configuration parameters initi al ly, and serves as a quick configura tio n menu f or la ter us e. This
screen reflects the information and parameters for either an office network or a home network, depending
on which one is set in the System Parameters screen (see Figure 5-6 on page 5-7). Office network is the
default value.
Page 67

5-3
Cisco Aironet Wireless LAN Adapters Installation and Configuration Guide for Mac OS
OL-1377-01
Chapter 5 Advanced Configuration on Mac OS 9.x
Getting Started
The Basic Properties screen displays the following information:
• Status – The operational mode of your client adapter. If your client adapter is associated to an access
point, the nam e and IP addr ess of the access point a re also dis playe d, if t his info rmati on is a v ailab le.
Value: “Error retrieving st atu s” – Your client adapter experienced a communication error.
“Card asso cia ted ” – Your client adapter is associated to an access point.
“Card not associated” – Your client adapter is ready and enabled but not associated to an
access point.
“Card not enabled” – Your client adapter is ready but not enabled.
“Card not configured” – Your client adapter is not ready and not enabled.
• Radio Status – Indica tes whet her your cli ent adap ter’s radio is o n or off. You can click the Turn
Radio On/Off button to turn the radio on or off.
• Radio ID – The MAC address of your cli ent ada pter.
• Signal Level – The strength of you r clie nt adapte r’s radio signal (Rang e: 0 to 10 0%).
• Base Station ID – The MAC address of the access point or base station to which your client adapter
is associated.
Table 5-1 lists and descr ibes the parameters that can b e s et from the Basic Proper ties screen. Follow the
instructions in the table to initially set or change any parameters.
Table 5-1 Basic Properties Parameters
Parameter Description
Network Specifies the type of network in which your client adapter is installed.
Default:Comp uter to Base Station
Network Type Description
Computer to Com put er Also referred to a s ad h oc or peer to peer.
Used to set up a small network between two
or more devices. For example, an a d hoc
network could be set up between computers in
a conference room so users can share
information in a m eet ing.
Computer to Base Station Also referred to as infrastru cture. Used to set
up a connection to a wired Et hernet network
(through an access point or base stat ion).
SSID The service set identifier (SSID) identifies the wireless network that you
want to access.
Range: Up to 32 characters (case sensitive)
Note If you leave this parameter blank, yo ur clie nt adapt er can
associate to an y a cce ss poi nt o n th e ne twor k th at is configured to
allow broadcast SSIDs (see the AP Radio Hardware page in the
access point Management System). If the access points with
which you wish to commun icat e are no t configured to al low
broadcast SSIDs, the value of this parameter must match the
SSID of the access points. Otherwise, you w ill not be able to
access the network.
Page 68

5-4
Cisco Aironet Wireless LAN Adapters Installation and Configuration Guide for Mac OS
OL-1377-01
Chapter 5 Advanced Configuration on Mac OS 9.x
Loading New Firmware
Step 4 The menu bar (see Figure 5-2) in the top l eft-hand c orner of the desktop a llows you to choose me nu
options that you can use to configure a nd diagnose your cli ent adapt er.
Figure 5-2 Menu Bar
Loading New Firmware
Your client adapter’s firmware is contained in the adapter’s Flash memory, which allows it to be easily
updated in the future. The current version of your adapter’s firmware is provided in the Status screen.
See the “Viewing the Current Status of Your Client Adapter” section on pa ge 7-2 for inst ruct ions on
accessin g t h is sc re en .
You can find the latest firmware version at http://www.cisco.com/public/sw-center/sw-wireless.shtml.
Under “Wireless Software Products,” select your client adapter’s series (such as Cisco Aironet 340
Series) and copy the radio firmware image file to a direc tory on yo ur comp uter’s hard drive.
Enable WEP Enables or disables Wired Equivalent Privac y (WEP) for your client adapter.
• If you want to enable WEP for your client adapter, you must se lect this
check box and create a WEP key. Refer to Chapter 4, “Security
Features” for more information on WEP and instructions on setting a
WEP key.
Note This check box can also be used to disable or en able WEP af ter
it is enabled.
• If you enable LEAP for your cl ient ada pter, thi s check box i s select ed
automatically.
Default:Deselected
Enable LEAP Enables or disables LEAP (also referred to as EAP - Cisco W ir eless) for your
client adapter.
If you want to enable LEA P for your cli ent ada pter, you must select this
check box and set a username and password. Refer to the “LEAP” section on
page 4-1 1 for more in format ion about LE AP and inst ructions on se tting a
LEAP username and password.
Note This check box can also be used to disable or enable LEAP after
it is enabled.
Default:Deselected
Table 5-1 Basic Properties Parameters (continued)
Parameter Description
Page 69

5-5
Cisco Aironet Wireless LAN Adapters Installation and Configuration Guide for Mac OS
OL-1377-01
Chapter 5 Advanced Configuration on Mac OS 9.x
Loading New Firmware
Note The firmware image file available online is a compressed file and you must expand (uncompress) the
file before you can use it.
Follow the instructions below to expand the compressed file and load the new firmware into your client
adapter.
Note If a power failure occurs while you are loading new firmware, your client adapter may become
inoperable. If thi s oc cu rs, st art th e pro ce du re agai n.
Step 1 Locate and use the Stu ffit Expander pro gram on yo ur hard dr ive to expand ( unc ompre ss) the r adio
firmware imag e file you copied to your hard dri ve. This c reates an image f ile (f ilename.img ) in the folder
where the compressed file is located.
Step 2 Make sure the client adapte r is insta lled in your computer an d is oper ationa l.
Step 3 Select Load Firmware from the Edit pull-down menu (see Figure 5-3). The Firmware wind ow appears
(see Figure 5-4).
Figure 5-3 Edit Pull-Down Menu
Figure 5-4 Firmware Window
Step 4
Under Name, sel ect t h e loca tion of the n ew firmware (f or exampl e, Ma ci ntosh HD) .
Page 70

5-6
Cisco Aironet Wireless LAN Adapters Installation and Configuration Guide for Mac OS
OL-1377-01
Chapter 5 Advanced Configuration on Mac OS 9.x
Configuring Your Client Adapter
Step 5 Click the new firmware image file (*.img).
Step 6 Click the Open button. A dialog box appears indicatin g the pro gress of the download. The se lected
image is loaded into the client adapter’s Flash memory.
Step 7 When the Firmware download successful message appears, click OK.
Configuring Your Client Adapter
The pcm3x0PPC client utility enables you to change the configuration parameters of your client adapter.
The adapter ’s parameters are organize d into two main ca tegorie s depend ing on your ne twork’s
configuration:
• Enterprise pa ra met ers – Use these parameters to configure your client adapter for use in an
enterprise network, suc h as t hat f ound i n a l arge organiza ti on:
–
System parameters – Prepare the client adapter for use in a wireless network
–
RF network parameters – Control how the client adapter transmits and receives data
–
Advanced infrast ru ctu re p ar ame te rs – Control how the client adapter operates within an
infrastructure network
–
Advanced ad hoc parameters – Control how the client adapter op erate s withi n an ad hoc
(peer-to-peer) n etwor k
• Home networking parameters – Use these parameters to prepare your client adapter to operate in
a home network.
Note Despite their name, the home networking parameters are not limited to use in a home
network. For instance, these parameters, which are confined to one screen, provide a
convenient way to minimally configure the client adapter.
Table 5-2 enables you to quickly locate the instructions for modifying the client adapter’s parameters.
Setting Enterprise Parameters
The parameters in thi s sectio n can be used to configure your client ad apter for use in an ente rprise
network. If you a re p l anni ng to u se yo ur cli ent ada pt er in a h ome ne twork, g o to t he “Setting Home
Networking Parameters ” section on page 5 -21.
Table 5-2 Locating Configuration Instructions
Parameter Category Page Number
Enterprise 5-6
System 5-7
RF network 5-11
Advanced infrastructure 5-15
Advanced ad hoc 5-18
Home networking 5-21
Page 71

5-7
Cisco Aironet Wireless LAN Adapters Installation and Configuration Guide for Mac OS
OL-1377-01
Chapter 5 Advanced Configuration on Mac OS 9.x
Configuring Your Client Adapter
Setting System Parameters
The System Parameters screen (see Figure 5-6) enables you to set parameters that prepare the client
adapter for use in a wireless network. To access this screen, select Edit Properties from the File
pull-down menu (see Figure 5-5) and click the System Parameters tab.
Note The Basic Pro perties screen and the Edit Properties screen cannot be ope n at the same tim e. Use the
Close option from the File menu (see Figure 5-5) or click the square Close button in the top left-hand
corner to close th e sc reen .
Figure 5-5 File Pull-Down Menu
Figure 5-6 System Parameters Screen
Page 72

5-8
Cisco Aironet Wireless LAN Adapters Installation and Configuration Guide for Mac OS
OL-1377-01
Chapter 5 Advanced Configuration on Mac OS 9.x
Configuring Your Client Adapter
Table 5-3 lists and describes the client adapter’s system parameters. Follow the instructions in the table
to initially set or change any parameters.
Ta b l e 5 - 3 Sy s t e m P a r a m e te r s
Parameter Description
Client Name A logical name for your workstation. It enables an administrator to determine
which devices are connecte d to the ac cess point without having to me moriz e
every MAC address. This name is included in the access point’s list of
connected devices.
Range: Up to 16 charact ers
Note Each computer on the network should have a unique client name.
SSID1 The service set identifier (SSID) identifies the specific wireless network that
you want to access.
Range: Up to 32 characters (case sensitive)
Note If you leave this parameter blank, your client adapter can associate to
any access point on the net work that is configur ed to all ow broadcas t
SSIDs (see the AP Radio Hardware page in the Access Point
Management System). If the access point s with whic h you wish to
communicate are not configured to allow broadcast SSIDs, the value
of this parameter must match the SSID of the access points.
Otherwise, you cannot access the network.
SSID2 An optional SSI D th at id entifies a second distinct netw ork a nd e nab les you to
roam to that network without having to reconfigure your client adapter. See
the note below.
Range: Up to 32 characters (case sensitive)
SSID3 An optional SSID that identifies a third distinct network and enables you to
roam to that network without having to reconfigure your client adapter. See
the note below.
Range: Up to 32 characters (case sensitive)
Note If your client adapter’s firmware version is below 4.04, your optional SSIDs, which are set
by the SSID2 and SSID3 parameters, are effective only for access points that are configured
to allow broadcast SSIDs (see the AP Radio Hardware page in the Access Point
Management System ). To take full advantage of the optional SSID featu re, upgra de your
firmware to version 4.04 or higher.
Page 73

5-9
Cisco Aironet Wireless LAN Adapters Installation and Configuration Guide for Mac OS
OL-1377-01
Chapter 5 Advanced Configuration on Mac OS 9.x
Configuring Your Client Adapter
Power Save Mode Sets your client adapter to its opt imum power consum ption setting .
Default:C onsta nt Awake Mode (CAM)
Power Save Mode Description
Constant Aw ake Mode Keeps the client adapter powered up continuously
so there is little lag in message response time.
Consumes the most power but offers the highest
throughput. Is r ecom mend ed for de sktop
computers and devices that use AC power.
Fast Power Save Mode Switches between a PSP mode and CAM mode,
depending on network traffic. This mode switches
to CAM when retrieving a large number of
packets and switche s back to PSP after the pack ets
are retrieved.
Is recommended when power consump tion is a
concern but you need greater throughput than that
allowed by Max PSP.
Maximum Power
Save Mode
Causes the access point to buffer incoming
messages for the client adapter, which wakes up
periodically and polls the access point to see if
any buffered messages are waiting for it. The
adapter can request each message and then go
back to sleep.
Conserves the most power but offers the lowest
throughput. Is recomme nded for devices for
which power consumption is the ultimate concern
(such as small battery-p owered devices).
Table 5-3 System Parameters (continued)
Parameter Description
Page 74

5-10
Cisco Aironet Wireless LAN Adapters Installation and Configuration Guide for Mac OS
OL-1377-01
Chapter 5 Advanced Configuration on Mac OS 9.x
Configuring Your Client Adapter
Click Apply at the bottom of the System Parameters screen to save any changes you have made.
Network Type Specifies the type of network in which your client adapter is installed.
Default:I nfr as truc tu re M od e
Network Type Description
Ad Hoc Mode Often referred to as peer to peer. Used to set up a
small network between two or more devices. For
example, an ad hoc network could be set up
between computers in a conference room so users
can share information in a meeting.
Infrastructure Mode Used to set up a connection to a wired Ethernet
network (through an access po int).
Network Specifies the network configur ation in which your client adap ter is used .
Default:Office Network
Note Select Office Network if your client adapter will be used in an
enterprise network. If you are planning to use your client adapter in a
home network, go to the “Setting Home Networking Parame ters ”
section on page 5-21.
Table 5-3 System Parameters (continued)
Parameter Description
Page 75

5-11
Cisco Aironet Wireless LAN Adapters Installation and Configuration Guide for Mac OS
OL-1377-01
Chapter 5 Advanced Configuration on Mac OS 9.x
Configuring Your Client Adapter
Setting RF Network Parameters
The RF Network Parameters screen (see Figure 5-7) enables you to set parameters that control how and
when the client adapter transmits and receives data. To access this screen, select Edit Properties from
the File pull-down menu (see Figure 5-5 on page 5-7) and click the RF Netwo rk Par amete rs tab.
Figure 5-7 RF Network Parameters Screen
Table 5-4 lists and describes the client adapter’s RF network parameters. Follow the instructions in the
table to initially set or change any parameters.
Table 5-4 RF Network Parameters
Parameter Description
Fragment Threshold Defines the threshold above which an RF data packet is split up or
fragmented. If one of those fragmented packets experiences interference
during transmission , onl y that spec ific pac ket woul d nee d to b e re sent .
Throughput is gen er ally lower f or fr ag me nted pac kets b eca use t he fixed
packet overhead consumes a higher po rtion of the RF bandwidth .
Range: 256 to 2312
Default: 231 2
Data Retries Defines the number of times a packet is resent if the initial transmission is
unsuccessful.
Range: 1 to 128
Default: 16
Note If your net work protocol performs i ts own retries, set thi s to a
smaller value than the default. This way notification of a “bad”
packet will be sent up the protocol stack quickly so the application
can retransmit th e packe t if nece ssary.
Page 76

5-12
Cisco Aironet Wireless LAN Adapters Installation and Configuration Guide for Mac OS
OL-1377-01
Chapter 5 Advanced Configuration on Mac OS 9.x
Configuring Your Client Adapter
Authentication Type Defines how your client adapter will attempt to authenticate to an access
point.
Default: Open
Authentication Description
Open Allows your client adapter, regardless of its WEP
settings, to authenticate and attempt to
communicate with an access point.
Shared Key Allows your client adapter to communicate only
with access points that have the same WEP keys.
The access point sends a known unencrypted
“challenge packet” to the client adapter, which
encrypts the pa cket and sen ds it ba ck to t he acce ss
point. The access point attempts to decrypt the
encrypted pac ket and se nd s a n au th en tic a tio n
response packet indicati ng the suc cess or failur e of
the decryption back to the client adapter.
Note If LEAP is enabled on your client adapter, Open is the only available option.
Note The Shared Key option is available only if the client adapter has been assigned a WEP key
and WEP is enable d. Ref er t o th e Chap ter 4, “Security Features” for instructions on setting
a WEP key and enabling WEP.
Data Rate Specifies the rate at which you want your client adapter to transmit or
receive packets to or from access poi nts (in inf rastruc ture mo de) or othe r
clients (in ad hoc mod e) .
The data rate must be auto or the same as the wireless dev ice with which you
wish to communicate.
Default: Auto
Data Rate Description
Auto Uses the 11-Mbps data rate when possible but drops
to lower rates when neces sary.
1 Mbps Offers the greatest r ange but the lowest throughput.
2 Mbps Offers less range but greater throughput than the 1
Mbps Only option.
5.5 Mbps Offers less range but greater throughput than th e 2
Mbps Only option.
11 Mbps Offers the greatest throughpu t but the lowest range.
Table 5-4 RF Network Parameters (continued)
Parameter Description
Page 77

5-13
Cisco Aironet Wireless LAN Adapters Installation and Configuration Guide for Mac OS
OL-1377-01
Chapter 5 Advanced Configuration on Mac OS 9.x
Configuring Your Client Adapter
Channel Specifies which f reque ncy y our cl ient ad ap ter uses as t he c ha nnel for
communications. These channels conform to the IEEE 802.11 Standard for
your regulatory dom ain .
• In infrastructure mode, this parameter is set automatically and cannot
be changed. The client adapter listens to the entire spectrum, selects the
best access point to associate to, and uses the same frequency as that
access point.
• In ad hoc mode, the channel of the client adapter must be set to match
the channel used by the other clients with which you wish to
communicate.
Range: Dependent on regula tory d oma in
Example: 1 to 11 ( 2412 t o 24 62 MH z ) i n N ort h Amer i ca
Note Refer to Appendix A for a list of channel identifiers, channel
center frequenci es, an d regulato ry doma ins for ea ch chann el.
Transmit Power Defines the level at which your client adapter transmits power. This value
must not be higher than that allowed by your country ’s regulatory agency
(FCC in the U.S., DOC in Canada, ETSI in Europe, MKK in Japan, etc.).
When World Mode is enabled, only the transmit power levels supported by
the country of operatio n’s regulatory agency are available.
Range: 1, 5, 15, 20, 3 0, 50 , or 100 m W ( 30 mW is th e maxi mum power
level supported by 340 series client adapters)
Default: Th e minim um level allowed by your country ’s regulatory agency
Note 15 mW is su ppo rte d by 3 40 seri es clie nt a dapt ers onl y, and 20
mW is supported by 350 ser ies cli ent ada pte rs only.
Note Reducing t he transmi t power level conserves battery power but
decreases radio range.
Short Preamble Specifies if your client adapter uses short radio headers. However, the
adapter can use short radio he ader s only if the ac cess point is also
configured to support them. Short radio heade rs improve throughput
performance; long radio headers ensure compatibility with clients and
access points that do no t sup por t sho rt radi o hea ders .
Default: On
Short Preamble Description
Off Prevents s hort rad io header s from be ing used during
transmissions
On Allows short radio headers to be used during
transmissions
Table 5-4 RF Network Parameters (continued)
Parameter Description
Page 78

5-14
Cisco Aironet Wireless LAN Adapters Installation and Configuration Guide for Mac OS
OL-1377-01
Chapter 5 Advanced Configuration on Mac OS 9.x
Configuring Your Client Adapter
Click Apply at the bottom of the RF Ne twork Param ete rs scre en to save any chan ges yo u h ave made.
World Mode Selecting this check box enables the client adapter to assume the legal
transmit power level and channel set of the access point to which it is
associated. This parameter is available only in infrastructure mode and is
designed for users who travel between c ountries be cause it all ows the
adapter to be used in different regulatory domains.
Default: De s e l ec ted
Note When World Mode is enabled, only the transmit power levels
supported by the country of ope ration ’s regulatory ag ency are
available.
Enable LEAP Enables or disables LEAP for you r client adapter.
If you want to ena ble LEA P f or your c lient ada pte r, you must sel ec t t his
check box and set a username and pa ssword. Refer to the “LEAP” section
on page 4-11 for more information about LEAP and instructions on setting
a LEAP userna me a nd passwor d.
Note This check box can also be used to disab le or enable LE AP after
it is enabled.
Default: De s e l ec ted
Enable WEP Enables or disables WEP for you r clie nt adapter.
• If you want to enable WEP for your client adapter, you must select this
check box and create a WEP key. Refer to the Chapter 4, “Security
Features” for more information on WEP and instructions on setting a
WEP key.
• If you enable L EAP for y our c lient ad apte r, t his ch ec k box i s sele c ted
automatic ally.
Default: De s e l ec ted
Allow Association To
Mixed Cells
If your network’s access points are set to communicate with either
WEP-enabled or WEP-disabled clients (that is, if the Use of Data
Encryption by Stations parameter on the AP Radio Data Enc rypt ion scr een
is set to Optional), you must select this check box, even if your client
adapter is not using WEP. If this setting is not enabled, your client adapter
cannot establish a connection with the access point.
Default: De s e l ec ted
Note For security reasons, Cisco recommends that both WEP-enabled
and WEP-disabled c lient s not be a llowed in th e same c ell
because broadcast pac kets wi ll be se nt unenc ry pted , even to
clients running WEP.
Table 5-4 RF Network Parameters (continued)
Parameter Description
Page 79

5-15
Cisco Aironet Wireless LAN Adapters Installation and Configuration Guide for Mac OS
OL-1377-01
Chapter 5 Advanced Configuration on Mac OS 9.x
Configuring Your Client Adapter
Setting Advanced Infrastructure Parameters
Note You can set advanced infrastructure parameters only if your client adapter has been set to operate in
an infrastructure network. See the Network Type parameter in the “Setting System Parameters”
section on page 5 -7.
The Advanced screen (see Figure 5-8) allows you to set parameters that control how the client adapter
operates within an infrastructure network. To access this screen, select Edit Properties from the File
pull-down menu (see Figure 5-5 on page 5- 7) and clic k the Advanced tab.
Figure 5-8 Advanced Screen
Page 80

5-16
Cisco Aironet Wireless LAN Adapters Installation and Configuration Guide for Mac OS
OL-1377-01
Chapter 5 Advanced Configuration on Mac OS 9.x
Configuring Your Client Adapter
Table 5-5 lists and describes the client adapter’s advanced infrastructure parameters. Follow the
instructions in the table to initially set or change any parameters.
Table 5-5 Advanced (Infrastructure) Parameters
Parameter Description
Transmit Antenna Mode Specifies the antenna that your client adapter uses to transmit data..
• PC card – The PC card’s integrated, permanently attached antenna
operates best when used in Ant enna s 1 and 2 mod e (als o ref erred
to as diversity mode). Diversity mode allows the card to use the
better signal from its two antenna ports.
Range: Antenn a 1 Only, Antenna 2 Only, Antennas 1 and 2
Default: Ante nnas 1 an d 2
• LM card – T he LM ca rd is shi pp ed wi thout an an t enna; however,
an antenna can be connected through the card’s external
connector. If a snap-o n an te nn a is us ed, d iversity m ode i s
recommended. Otherwise, select the mode that corresponds to the
antenna port to which the antenna is connected.
Range: Antenn a 1 Only, Antenna 2 Only, Antennas 1 and 2
Default: Ante nnas 1 an d 2
• PCI client adapter – The PCI client adapter must use the Antenna
1 Only option.
Default: Ante nna 1 Onl y
Receive Antenna Mode Specifies the antenna that your client adapter uses to receive data. See
the Transmit Antenna Mode par amete r above for infor mati on on the
options available for your client adapter.
Specified Access Point 1- 4 Specifies the MAC addresses of up to four preferred access points to
which you want to associate. If the specified access points are not
found or you roam out of range, you ma y associate to anoth er access
point.
You can enter the MAC addresses of the access points in the edit boxe s
or choose not to specify access po ints by leaving the boxes blank.
Default: No access points specified
Note This para met er sh ould be u sed onl y f or a cce ss po ints tha t
are in repeater mode. For normal operation, these fields
should be left blank because spec ifyin g an access poi nt
slows down the roaming proces s.
Page 81

5-17
Cisco Aironet Wireless LAN Adapters Installation and Configuration Guide for Mac OS
OL-1377-01
Chapter 5 Advanced Configuration on Mac OS 9.x
Configuring Your Client Adapter
Click Apply at the bottom of the Ad vanced sc re en to save any chan ges yo u h ave made.
RTS Threshold Specifies the size of the data packet that the low-level RF protocol
issues to a request-to-send (RTS) packet.
Setting this parameter to a small value causes RTS packets to be sent
more often. Whe n this oc cu rs, m ore of t he available b and widt h is
consumed and the throughput of other network packets is reduced, but
the system is able to recover faster from interference or collisions,
which may be cause d from a high m ultipath en vironment characterized
by obstructions or metallic surfaces.
Range: 0 to 2312
Default: 2312
Note Refer to the IEEE 802.11 Standard for more information on
the RTS/CTS mechanis m.
RTS Retry Limit Specifies the number of times the client adapter resends a
request-to-send (RTS) packet if it does not receive a clear-to-send
(CTS) packet from the previously sen t RTS packet. You ca n type a
number in the edit box to change this value.
Setting this parameter to a large value decreases the available
bandwidth whene ver interference is encountere d but mak es the system
more immune to interference and collisions, which may be caused
from a high multipath environment characterized by obstructions or
metallic surfaces.
Range: 1 to 128
Default: 16
Note Refer to the IEEE 802.11 Standard for more information on
the RTS/CTS mechanis m.
Table 5-5 Advanced (Infrastructure) Parameters (continued)
Parameter Description
Page 82

5-18
Cisco Aironet Wireless LAN Adapters Installation and Configuration Guide for Mac OS
OL-1377-01
Chapter 5 Advanced Configuration on Mac OS 9.x
Configuring Your Client Adapter
Setting Advanced Ad Hoc Parameters
Note You ca n set advanced ad hoc paramet ers only if you r clien t adapter has been set to ope rate in an ad
hoc network. See the N e twork Type parameter in t he “Setting System Parameters” section on
page 5-7.
The Advanced screen (see Figure 5-9) enables you to set paramete rs that contro l how the client adapter
operates within an ad hoc network. To access this screen, select Edit Properties from the File pull-down
menu (see Figure 5-5 on page 5 -7) and click th e Advanced tab.
Figure 5-9 Advanced Screen
Page 83

5-19
Cisco Aironet Wireless LAN Adapters Installation and Configuration Guide for Mac OS
OL-1377-01
Chapter 5 Advanced Configuration on Mac OS 9.x
Configuring Your Client Adapter
Table 5-6 lists and describes the client adapter’s ad vanced ad hoc parameters. F ollow the instru ctio n s in
the table to initially set or change any parameters.
Table 5-6 Advanced (Ad Hoc) Parameters
Parameter Description
Transmit Antenna Mode Specifies the antenna that your client adapter uses to transmit data.
• PC card – The PC card’s integrated, permanently attached antenna
operates best when used in Antennas 1 and 2 mode (also referred
to as diversity mode). Diversity mode allows the card to use the
better signal from its two antenna ports.
Range: Antenn a 1 Only, Antenna 2 Only, Antennas 1 and 2
Default: Ante nnas 1 an d 2
• LM card – The LM card is shipped without an antenna; however,
an antenna can be connected through the card’s external
connector. If a snap-o n an te nn a is us ed, d iversity m ode i s
recommended. Otherwise, select the mo de that corres ponds to the
antenna port to which the antenna is connected.
Range: Antenn a 1 Only, Antenna 2 Only, Antennas 1 and 2
Default: Ante nnas 1 an d 2
• PCI client adapter – The PCI client adapter must use the An tenn a
1 Only option.
Default: Antenna 1 Only
Receive Antenna Mode Specif ies the antenna th at your clie nt adapter uses to r ecei ve d ata. See
the Transmit Antenna Mode par amete r above for infor mati on on the
options available for your client adapter.
Specified Access Point 1- 4 These par ameters ar e not available in ad-hoc mode.
RTS Threshold Specifies the size of the data packet that the low-level RF protocol
issues to a request-to-send (RTS) packet.
Setting this parameter to a small value causes RTS packets to be sent
more often. Whe n this oc cu rs, m ore of t he available b and widt h is
consumed and the throughput of other network packets is reduced, but
the system is able to recover faster from interference or collisions,
which may be caused from a high multipa th environment
characterized by obstructions or metallic surfaces.
Range: 0 to 2312
Default: 2312
Note Refer to the IEEE 802.11 Standard for more information
on the RTS/CTS mechanism.
Page 84

5-20
Cisco Aironet Wireless LAN Adapters Installation and Configuration Guide for Mac OS
OL-1377-01
Chapter 5 Advanced Configuration on Mac OS 9.x
Configuring Your Client Adapter
Click Apply at the bottom of the Ad vanced sc re en to save any chan ges yo u h ave made.
RTS Retry Limit Specifies the number of times the client adapter resends a
request-to-send (RTS) packet if it does not receive a clear-to-send
(CTS) packet from the previously sent RTS packet.
Setting this parameter to a large value decreases the available
bandwidth whenever interference is encountered but makes the system
more immune to interference and collisions, which may be caused
from a high multipath environment characterized by obstructions or
metallic surfaces.
Range: 1 to 128
Default: 16
Note Refer to the IEEE 802.11 Standard for more information
on the RTS/CTS mechanism.
Beacon Period (Kµs) S pecifies the duration between beacon packets, which are used to help
clients find each other in ad hoc mode.
Range: 20 to 976 Kµs
Default: 100 Kµs
Note Kµs is a unit of measurement in software terms. K = 1024,
µ = 10
-6
, and s = seconds, so Kµs = .001024 seconds, 1.024
milliseconds, or 1024 micr oseconds .
Wake Duration (Kµs) Specifies th e amount of time following a b eacon that the clie nt adapter
stays awake to receive announcement traffic indication message
(ATIM) packets, which are sent to the adapter to keep it awake until
the next beacon.
This parameter is used only in Power Save Mode (Max PSP or Fast
PSP). Refer to the Power Save M ode parameter in the “Setting System
Parameters” section on page 5-7.
Range: 5 to 60 Kµs
Default: 5 Kµs
Table 5-6 Advanced (Ad Hoc) Parameters (continued)
Parameter Description
Page 85

5-21
Cisco Aironet Wireless LAN Adapters Installation and Configuration Guide for Mac OS
OL-1377-01
Chapter 5 Advanced Configuration on Mac OS 9.x
Configuring Your Client Adapter
Setting Home Networking Parameters
The parameters in thi s sectio n can be used t o configure your clien t adapter for use in a home
(non-enterprise) n etwor k. If yo u a re pl ann ing to use yo ur cli ent ada pter in a n en terp rise ne twor k, go to
the “Setting Enterprise Parameters” section on page 5-6.
The Home Networking scree n (see Figu re 5-10) enables you to set par ameters t hat prep are the client
adapter to operate in a home network. To access this screen, select Edit Properties from the Fil e
pull-down menu (see Figure 5-5 on page 5- 7) and clic k the Home Networking tab.
Figure 5-10 Home Networking Screen
Page 86

5-22
Cisco Aironet Wireless LAN Adapters Installation and Configuration Guide for Mac OS
OL-1377-01
Chapter 5 Advanced Configuration on Mac OS 9.x
Configuring Your Client Adapter
Table 5-7 lists and describes the client adapter’s home networking parameters. Follow the instructions
in the table to initially set or change any parameters.
Table 5-7 Home Networking Parameters
Parameter Description
Home Computer Name The client name for the home network. It is a logical name for your
workstation. It allows you to determine which devices are connected to the
base station (the home equivalent of an access poin t) withou t having to
memorize every MAC address. This name is included in the base station’s
list of connected devices.
Range: Up to 16 char acter s
Note Each computer on th e home net work must have a unique
computer name.
Home Radio Netwo rk
Name
The service set identifier (SSID) for the home network. It allows you to
access the home network.
Range: Up to 32 characters (case sensitive)
Note Only one SSID can be set in a home ne twork, and ea ch device
on the network must use the same SSID.
Encryption Key Input
Type
Specifies whether the WEP key is entered in hexadecimal characters or
ASCII text.
Default:Hexadecimal
Encryption Key
Input Type
Description
Hexadecimal S pecifies that the WEP key be entered in
hexadeci mal c hara cters, w hich i ncl ude 0- 9, A-F, and
a-f.
Example:ADC423BE04
ASCII Text Specifies that the WEP key be entered in ASCII tex t,
which include s a lph a ch ar ac ter s, nu mbe rs, an d
punctuation marks.
Example:ZZ18YXPRA3
Home Encrypt ion Key The WEP key for the ho me n etwor k. Re fer t o th e Chapt er 4, “Security
Features” for information on WEP keys.
Range: Up to 13 characters (case sensitive in ASCII format)
Note Only one WEP key can be se t i n a ho me n etwor k, a nd eac h
device on the network mus t use the same key.
Page 87

5-23
Cisco Aironet Wireless LAN Adapters Installation and Configuration Guide for Mac OS
OL-1377-01
Chapter 5 Advanced Configuration on Mac OS 9.x
Configuring Your Client Adapter
Enable LEAP for Home
Network
Enables or dis ables LE AP for y our c lien t ad ap ter .
If you want to enable LEA P for your cl ient ada pter, you must sele ct this
check box and set a username and password. Refer to Chapter 4, “Security
Features” for more information about LEAP and instructions on setting a
LEAP username and password.
Note This check box can also be used to disable or enable LEAP aft er
it is enabled.
Default:Deselected
Enable WEP for Home
Network
Enables or dis ables WEP fo r y our cl ient ad ap ter.
• If you want to enable WEP for your client adapter, you must select this
check box and create a WEP key. Refer to the Chapter 4, “Security
Features” for more information on WEP and instructions on setting a
WEP key.
Note This check box can also be used to disable or enable WEP after
it is enabled.
• If you enable LEAP for your client adapter, this check box is selected
automatically.
Default:Deselected
Note 40-bit client adapters cannot be used with the Cisco Aironet 340
Series Base Station.
Home Network Type Specifies the type of network in which your client adapter is installed.
Default:I nfrast ruc ture
Home Network Type Description
Ad Hoc Also referred to as peer to peer. Used to set up a
small network between two or more devices. For
example, a network witho ut a b ase stat ion coul d be
set up between computers in a room so information
can be shared.
Infrastructure Used to set up a connectio n to a wired Ethe rnet
network (through a base station ).
Table 5-7 Home Networking Parameters (continued)
Parameter Description
Page 88

5-24
Cisco Aironet Wireless LAN Adapters Installation and Configuration Guide for Mac OS
OL-1377-01
Chapter 5 Advanced Configuration on Mac OS 9.x
Configuring Your Client Adapter
Home Data Rate Specifies the rate at which you want your client adapter to transmit or
receive packets to or from other devices on the hom e network .
The data rate must be auto or the same as the wireless device with which
you wish to communicate .
Default:Auto
Home Data Rate Description
Auto Uses the 11-Mbps data rate when possible but drops
to lower rates when necessary.
1 Mbps Offers the greatest range but the lowest throug hput.
2 Mbps Offers less range but greater throug hput than th e
1 Mbps Only op tion .
5.5 Mbps Offers less range but greater throug hput than the
2 Mbps Only op tion .
11 Mbps Offers the greatest throughput but the lowest range.
Table 5-7 Home Networking Parameters (continued)
Parameter Description
Page 89

5-25
Cisco Aironet Wireless LAN Adapters Installation and Configuration Guide for Mac OS
OL-1377-01
Chapter 5 Advanced Configuration on Mac OS 9.x
Configuring Your Client Adapter
Click Apply at the bottom of the Home Ne twork ing scr een to save any c hange s you have made .
Go to the “Specifying a Home Network Configuratio n” section below for instructions on activating a
home network configuratio n.
Home Authentication
Type
Defines how your client adapter attempts to authenticate to a base station.
If LEAP is enabled on your client adapter, Open is the only available
option.
The Shared Key option is available only if the client adapter is assigned a
WEP key and WEP is enabled. For additional information, refer to the
Chapter 4, “Security Features.”
Default:Open
Authentication Description
Open Allows your client adapter, regardless of its WEP
settings, to authenticate a nd attempt to communicate
with a base station.
Shared Key Allows your client adapter to comm unicate only with
base stations that have the same WEP keys.
The base station se nds a kn own unenc ry pted
“challenge packet” to the client adapter, which
encrypts the packet and sen ds it back to the base
station. The base station atte mpts to decr ypt the
encrypted packet and send s an au then tica tion
response packet indicating the success or failure of
the decryption back to the client adapter.
Home Channe l Specifies which freq ue ncy yo ur cl ie nt a da pte r uses as t h e ch anne l for
communications. These channels conform to the IEEE 802.11 Standard for
your regulatory d omai n.
• If your home network uses a base station , this para meter doe s not
appear because i t is set auto matically and c annot be cha nged. The cli ent
adapter uses the same frequency as the base station.
• If your home network does not use a base station, the chann el of the
client adapter must be set to match th e channel used b y the other clients
with which you wish to communicate.
Range: Dependent on regulatory do main
Example: 1 to 11 (2 412 t o 246 2 MH z) i n N or th A meri ca
Note Refer to Appendix A for a list of channel identifiers, channel
center frequencies, and regulatory domains for each channel.
Table 5-7 Home Networking Parameters (continued)
Parameter Description
Page 90

5-26
Cisco Aironet Wireless LAN Adapters Installation and Configuration Guide for Mac OS
OL-1377-01
Chapter 5 Advanced Configuration on Mac OS 9.x
Turning Your Client Adapter Radio On or Off
Specifying a Home Network Configuration
After you have set the pa rame ter s to pre pare you r c li ent a da pter f or use i n a ho me net work, you must
specify a home network configuration. To do so, follow the instructions below.
Step 1 Select Edit Pr operties from the File pull-down menu (see Figure 5-5 on page 5-7) and click the System
Parameters tab. The System Parameters screen appears (see Figure 5-6 on page 5-7).
Step 2 Select Home Network under Network.
Step 3 Click Apply to save this setting.
Turning Your Client Adapter Radio On or Off
Your c lient ada pter radi o can be tur ned on or off. Turning the radio off prevents the adapter fro m
transmitting RF energ y . You might want to turn of f the client ad apter radio when you are not transmitti ng
data and want to c on ser ve bat ter y p ower or w hen yo u a re using a la ptop on an a irpl ane a nd wa nt t o
prevent the adap te r’s transmissions from potentially interfering with electronic devices.
If the radio is not turned off, it periodically sends out inquiry packets even if it is not associated to an
access point, as required by the 802.11 specification. Therefo re, it is import ant to turn it off around
devices that are susc ept ibl e to RF int erf eren ce.
Note Your client adapter is not associated while the radio is off.
Follow the steps below to turn the cl ient ad ap ter radi o on or o ff.
Step 1 If your client adapter ra dio is on, sel ect Radio Off from the File pull-down menu (see Figure 5-11) or
click the Turn Radio Off button on the Basic Properties screen (see Figure 5-12) to turn the radio off.
Step 2 If your client adapter radio is off, select Radio On from the File pull-down menu or click the Turn Radio
On button on the Basic Properties screen to turn the radio on.
Figure 5-11 File Pull-Down Menu
Page 91

5-27
Cisco Aironet Wireless LAN Adapters Installation and Configuration Guide for Mac OS
OL-1377-01
Chapter 5 Advanced Configuration on Mac OS 9.x
Obtaining System Address and Software Version Information
Figure 5-12 Basic Properties Screen
Obtaining System Address and Software Version Information
To obtain information on system a ddresses and versions of sof tware, sele ct Get Info from the File
pull-down menu (see Figur e 5-11 on pa ge 5-26). T he In fo sc reen ( see Fig ure 5-13) appe ar s.
Figure 5-13 Info Screen
The top of the s creen di spla ys th e IP addr ess an d M A C addr ess of you r com put er, the IP address of your
network’s router, and the IP address of the access point. The bottom of the screen displays the version
of the open transport sof tware that is used wi th the driver, the version of the driver, and the version of
the pcm3x0PPC client utility.
Page 92

5-28
Cisco Aironet Wireless LAN Adapters Installation and Configuration Guide for Mac OS
OL-1377-01
Chapter 5 Advanced Configuration on Mac OS 9.x
Getting Help
You can also determine the pcm3x0PPC version by selecting the apple icon (see Figure 5-14) from th e
menu bar and cl icking A bout pcm3x0PPC .
Figure 5-14 Apple Pull-Down Menu
The About pcm3x0PPC screen appears (see Figur e 5-15).
Figure 5-15 About pcm3x0PPC Screen
Getting Help
To access information about the pcm3x0PPC client utility, select pcm3x0PPC Help from the Help
pull-down menu (see Figure 5- 16).
Figure 5-16 Help Pull-Down Menu
Page 93
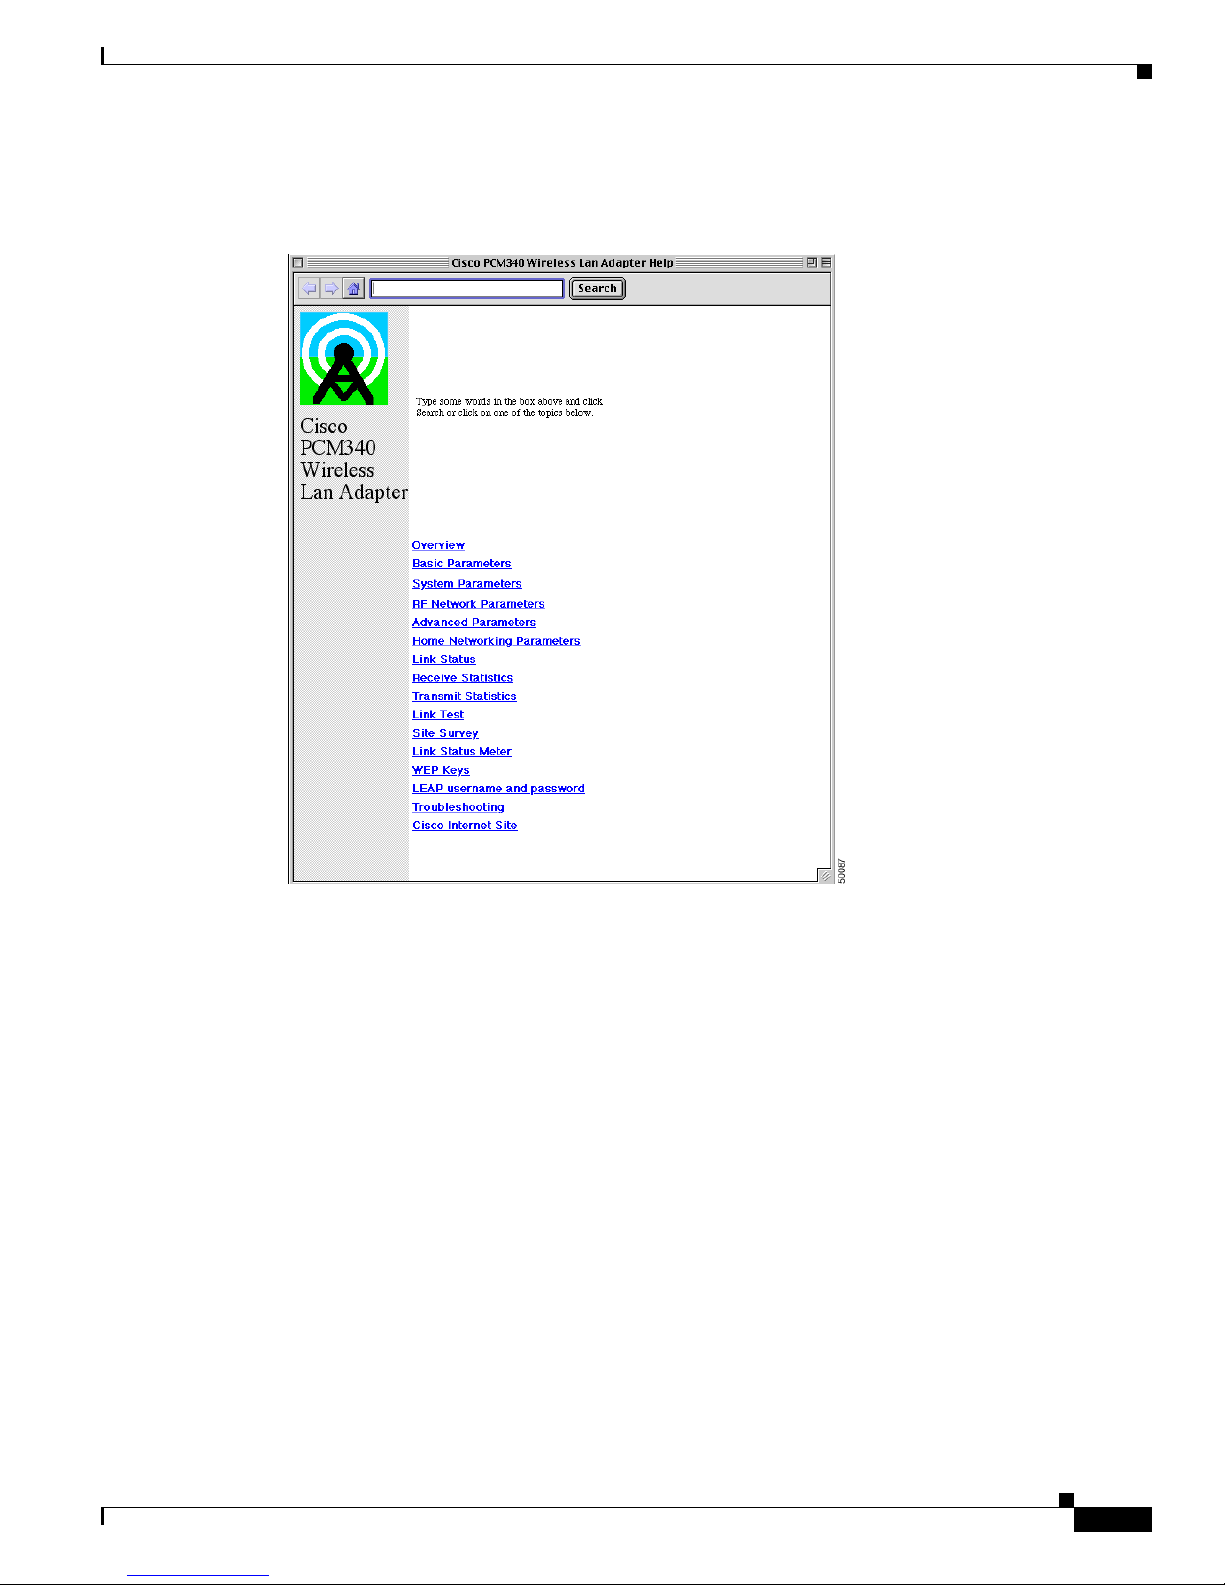
5-29
Cisco Aironet Wireless LAN Adapters Installation and Configuration Guide for Mac OS
OL-1377-01
Chapter 5 Advanced Configuration on Mac OS 9.x
Exiting the Client Utility
The Cisco PCM3x0 Wireless LAN Adapter screen (see Figure 5-17) appears.
Figure 5-17 Cisco PCM3x0 Wireless LAN Adapter Screen
From the Cisco PCM3x0 Wireless LAN Adapter scree n, you can ac cess addit ional infor mation.
• T o search for a specific word or phrase, enter the word in the Search box at the top of the screen and
click Search.
• To access information on a specific topic, click the desired topic in the middle of the screen.
Exiting the Client Utility
To exit the pcm3x0PPC client utility, select Quit from the File pull-down menu (see Figu re 5-11 on
page 5-26 ).
Page 94

5-30
Cisco Aironet Wireless LAN Adapters Installation and Configuration Guide for Mac OS
OL-1377-01
Chapter 5 Advanced Configuration on Mac OS 9.x
Exiting the Client Utility
Page 95

CHAPTER
6-1
Cisco Aironet Wireless LAN Adapters Installation and Configuration Guide for Mac OS
OL-1377-01
6
Advanced Configuration on Mac OS X
This chapter describes the client utility used with a Cisco Aironet W ireless LAN Adap ter running on the
Mac OS X operating system.
The following topics are covered in this chapter:
• Using the Client Utility on Mac OS X, page 6-2
• Obtaining Software Version Information, page 6 -21
• Getting Help, page 6-22
• Exiting the Client Utility, page 6-23
Page 96

6-2
Cisco Aironet Wireless LAN Adapters Installation and Configuration Guide for Mac OS
OL-1377-01
Chapter 6 Advanced Configuration on Mac OS X
Using the Client Utility on Mac OS X
Using the Client Utility on Mac OS X
This section explains how to use the client utility to load new firmware and to configure your client
adapter for use in a wireless netwo rk. T his section also explains how you can us e the client utility to set
parameters that govern how the adapter transmits or receives data, and controls the adapter’s operation
within an infr astru ctu re or a d hoc net work.
Opening the Client Utility
To open the client utility, follow the steps below.
Step 1 From the Finder menu bar on the top of the screen, select Go and click Applications (see Figure 6-1) .
The Applications scre en appea rs.
Figure 6-1 Finder Menu Bar
Step 2
On the Applications sc reen, doub le-cl ick the Aironet Client Utility icon. The client utility screen
appears, and th e comp uter se arche s for th e client adapte r radio. Whe n the radi o is found , the ba sic
properties screen a ppea rs (see Figur e 6-2).
Page 97

6-3
Cisco Aironet Wireless LAN Adapters Installation and Configuration Guide for Mac OS
OL-1377-01
Chapter 6 Advanced Configuration on Mac OS X
Using the Client Utility on Mac OS X
Basic Properties
The basic properties screen displays when you open the client utility. The screen provides useful
information about you r cli ent ada pte r and e nabl es yo u to q uick ly se t key c onfigurati on pa r amete rs
needed to successfully com munica te with an access poin t or another wireless device.
The basic properties screen is shown in Figure 6-2.
Figure 6-2 Client Utility Basic Properties Screen
Note You can click the blue words on any client utility screen to obtain descriptive information, such as
Signal Strength or Ena ble W EP.
The basic properties screen provides the following information:
• Location—Allows you to select or define different wireless network profiles for various operatin g
locations.
• Connection—Allows you to specify the network type, the network name, and the frequency channel
for computer to c om pute r (A d- Hoc ) n etworks. You can also turn the radio on or o ff.
• Security—Allows you to specify the WEP and LEAP security settings. You can enable WEP and
LEAP, set u p to f our WE P keys, an d se t y our L EAP use rname an d passwo rd.
• Status—Shows a bar graph to represent the signal strength of the received RF signal.
• Association Status—Shows the association status of your clie nt adapte r.
Valu e: Radio associ ated —Your client adapter is associated to an access point or other
wireless device. For an access point, the name and IP address are shown.
Radio not associated—Your client adapter is ready and enabled but not associated to
an access point or wireless device.
Page 98

6-4
Cisco Aironet Wireless LAN Adapters Installation and Configuration Guide for Mac OS
OL-1377-01
Chapter 6 Advanced Configuration on Mac OS X
Using the Client Utility on Mac OS X
Table 6-1 lists and describes the parameters that can be set from the basic properties screen. Follow the
instructions in the table to initially set or change any parameter. Click Apply at the bottom of the basic
properties screen t o save any ch an ges yo u ma ke.
Table 6-1 Basic Properties Parameters
Parameter Description
Location Sp ecifies different radio network pr ofile settings used in various locatio ns,
such as your office, your h ome , t he fa ctor y, or the airpo rt. For ea ch profile ,
you can specify unique co nnection and secu rity sett ings. Clic k the up and
down arrows to select a different profile. For additional information see the
“Location Profile s” sec tion on page 6-6.
Range: (number of profiles supported is lim ited by available disk space)
Default:Default
Network Type Specifies the type of network in which your client adapter is installed.
Default:Co mputer to Access Po int
Network Type Description
Computer to Access Point Also referred to as infrastructure. Used to set
up a connection to a wired Ethe rnet ne twork
(through an access point) .
Computer to Computer Also referred to as ad h oc or peer to peer.
Used to set up a small network between two
or more wireless devices. For example, an ad
hoc network could be set up betw een
computers in a conference room so users can
share information in a meeting.
Channel Specifies which frequency yo ur clie nt ada pte r use s as th e ch an nel fo r
communications. T he se cha nnel s conf or m to th e I EEE 80 2.1 1 Sta nd ard f or
your regulatory d omai n.
• In infrastructure mode, this paramete r is set automatically and ca nnot be
changed. The client adapter listens to the entire spectrum, selects the
best access point to associate to, and uses the same frequency as that
access point.
• In ad hoc mode, the channel of the client adapter must be set to match
the channel used by the other clie nts with wh ich you wish to
communicate.
Range: Dependent on regulatory do main
Example: 1 to 11 (2 412 t o 246 2 MH z) i n N or th A meri ca
Note Refer to Appendix D, “Channels and Antenna Settings,” for a list
of channel identif iers, chann el center frequen cies, and reg ulatory
domains for each channel.
Page 99

6-5
Cisco Aironet Wireless LAN Adapters Installation and Configuration Guide for Mac OS
OL-1377-01
Chapter 6 Advanced Configuration on Mac OS X
Using the Client Utility on Mac OS X
Table 6-2 describes th e buttons on the basic pr opertie s screen.
Network Name Network name is the same as service set identifier (SSID) and it identifies
the wireless network that you want to access.
Range: Up to 32 characters (case sensitive)
Note If you leave this parameter blank, yo ur clie nt adapt er can
associate to any access point or wireless device on the ne twork
that is configured to allow broadcast SSIDs. If the access points
or wireless devices with which you wish to communicate are not
configured to allo w broadcast SSI Ds, the value of this parameter
must exactl y m atc h th eir SSID or net wo rk na me. Ot he rwi se, you
will not be able to access the access point or wireless device.
Enable WEP Enables or disables Wired Equivalent Privac y (WEP) for your client adapter.
If you want to enable WEP for your client adapter, you must select this check
box and create a WEP key. This check box can also be use d to disable WEP.
Refer to Chapter 4, “Sec urity Feat ures” for more information on WEP and
instructions on setting a WEP key.
Note If you enable LEAP for you r client adapter, t his chec k box is
automatically selected (check marked) to indicate the use of
dynamic WEP keys.
Default:Deselected
Enable LEAP Enables or disables LEAP (also referred to as EAP - Cisco W ir eless) for your
client adapter.
If you want to enable LEA P for your cl ient ada pter, you must sele ct this
check box and set a LEAP username and password. Refe r to Chapter 4,
“Security Features” for more information about LEA P and inst ructio ns on
setting a LEAP username and password.
Default:Deselected
Table 6-1 Basic Properties Parameters (continued)
Parameter Description
Table 6-2 Buttons on the Basic Properties Screen
Button Description
Turn Radio On
Turn Radio Off
Turns the client adapter radio on or off. The button changes to indicate the
operation to be performed; for example: T ur n Radi o On indicates the radio
is turned on whe n you cl ick the button a nd Turn Radio Off indicates the
radio is turned off wh en y ou cl ic k th e butto n.
Set WEP Key Allows you to set up to four WEP keys (for additional information see
Chapter 4, “Security Features”).
Set LEAP
Username/Password
Allows you to set your LEAP username and password (for additional
information see Chapter 4, “Security Features”).
Page 100

6-6
Cisco Aironet Wireless LAN Adapters Installation and Configuration Guide for Mac OS
OL-1377-01
Chapter 6 Advanced Configuration on Mac OS X
Using the Client Utility on Mac OS X
Location Profiles
The client utility allows you to specify different wireless network profile settings used in up to 16
operating location s, such as you r office, your home, th e factory, or the airport. You can specify unique
connection and security settings for each location profile. These unique settings are stored in your
Macintosh and recalled when you select each locati on.
To configure a loca ti on pr ofile involves the following ope rat ions:
• Select a location profile or add a new profile. See “Selecting a Location Profile ” section on pa ge 6-6.
• Specify unique connection parameters on t he basic proper ties screen (se e Figure 6-2) or the
advanced properties scre en ( se e Figur e 6-8).
–
Set the network type
–
Set the network name or SSID
• Specify security parame ters on th e basic pr operties screen (see Fig ure 6-2) or the advanced
properties screen (see Figure 6-8). Refer to Chapter 4, “Security Features” for in formation on LEAP
and WEP and instructions on setting these securit y feature s.
–
Enable or disable WEP
–
If WEP is enabl ed, s et u p to f our WEP keys
–
Enable or disable LEA P
–
If LEAP is enabled , set your LEAP usernam e and pas sword
• Click the Apply button on the basi c pro p ert ies s cre en ( see Fi g ure 6-2) o r t h e ad vanced pr ope rti e s
screen (see Figure 6-8) to set and store the parameters for the specified profile.
Selecting a Location Profile
T o select a location pr ofile from the client u tility basic or adva nced screens, click the u p and down arro ws
at the end of the Location fie ld an d select the de sired lo cation fr om the pull -do wn m enu (see Figure 6-3).
Figure 6-3 Location Pull-Down Menu
Click Apply on the basic or advanced properties screen to activate the selected location profile.
Cancel Exits the application or screen without saving revised settings.
Apply Exits the applicati on or screen and saves the revised settings.
Help Allows you to access the client utility he lp screen (fo r addi tional
information see the “Getting Help” section on page 6-22.
Table 6-2 Buttons on the Basic Properties Screen (continued)
Button Description
 Loading...