

Page 1
Quick Start Guide
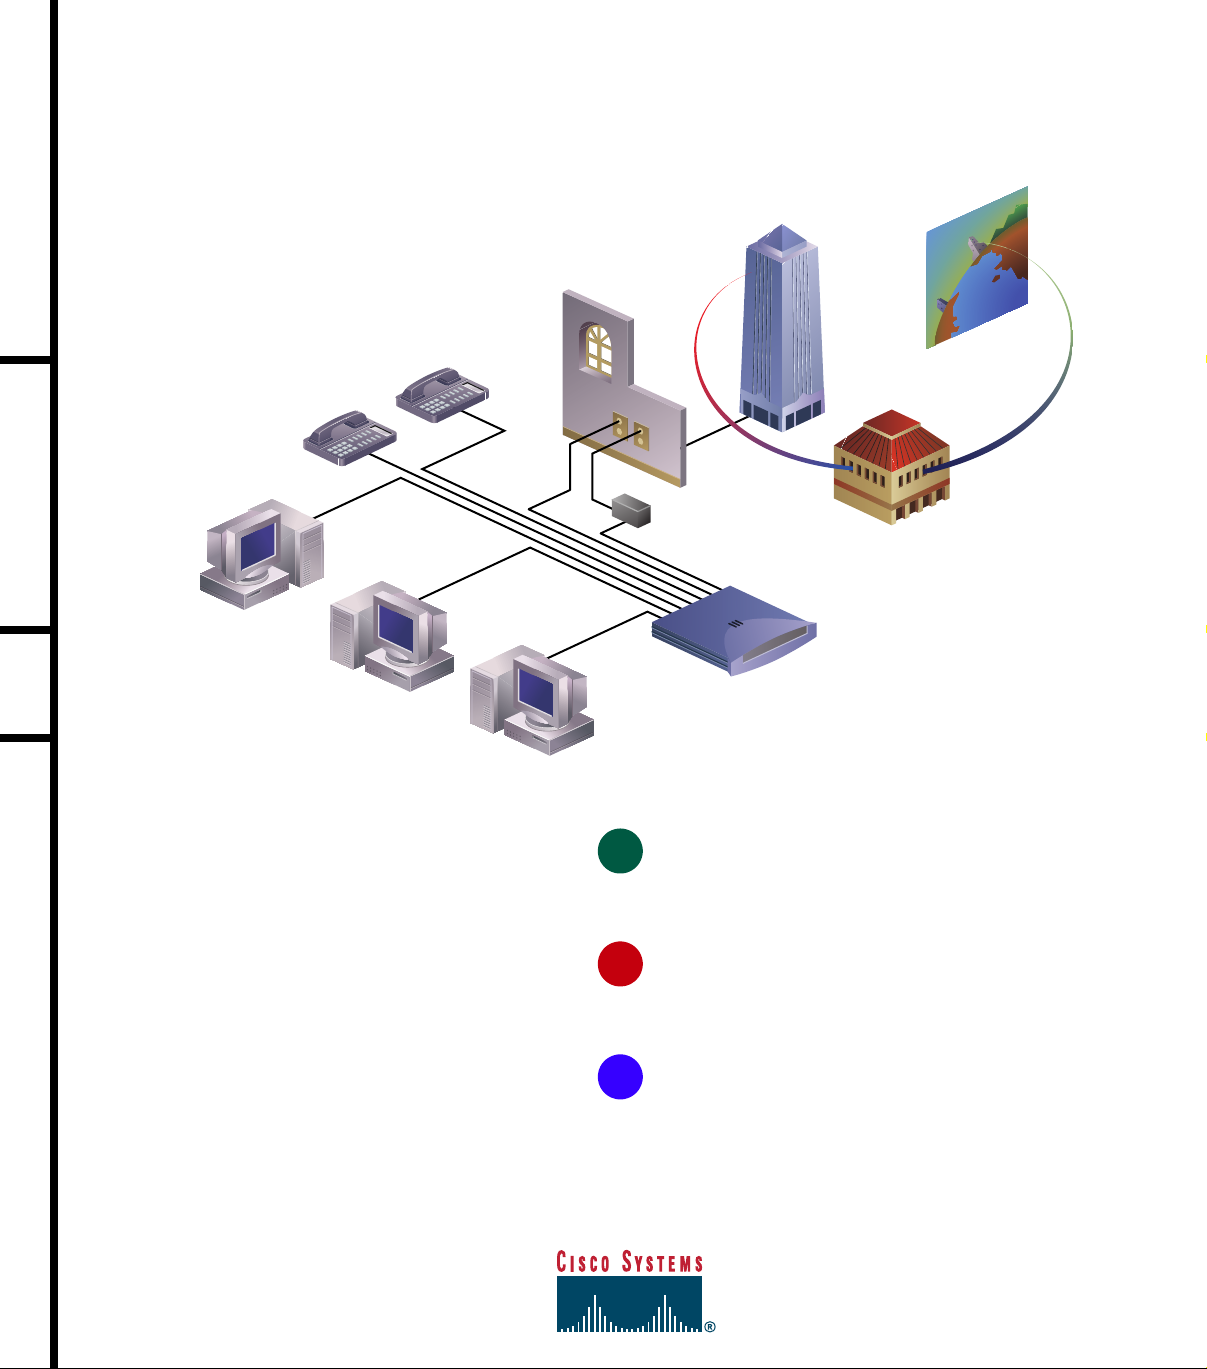
CISCO 760 SERIES CABLING AND SETUP
ISDN provider/
telephone company
ISDN telephone jack
Your computer
Phone #2
Your computer
Phone #1
Power supply
Cisco 700 series router
Your computer
1
Unpack the Router
2
Internet
Internet service provider/
corporate headquarters
2
Connect Cables to the Router
3
Set Up the Router
Page 2
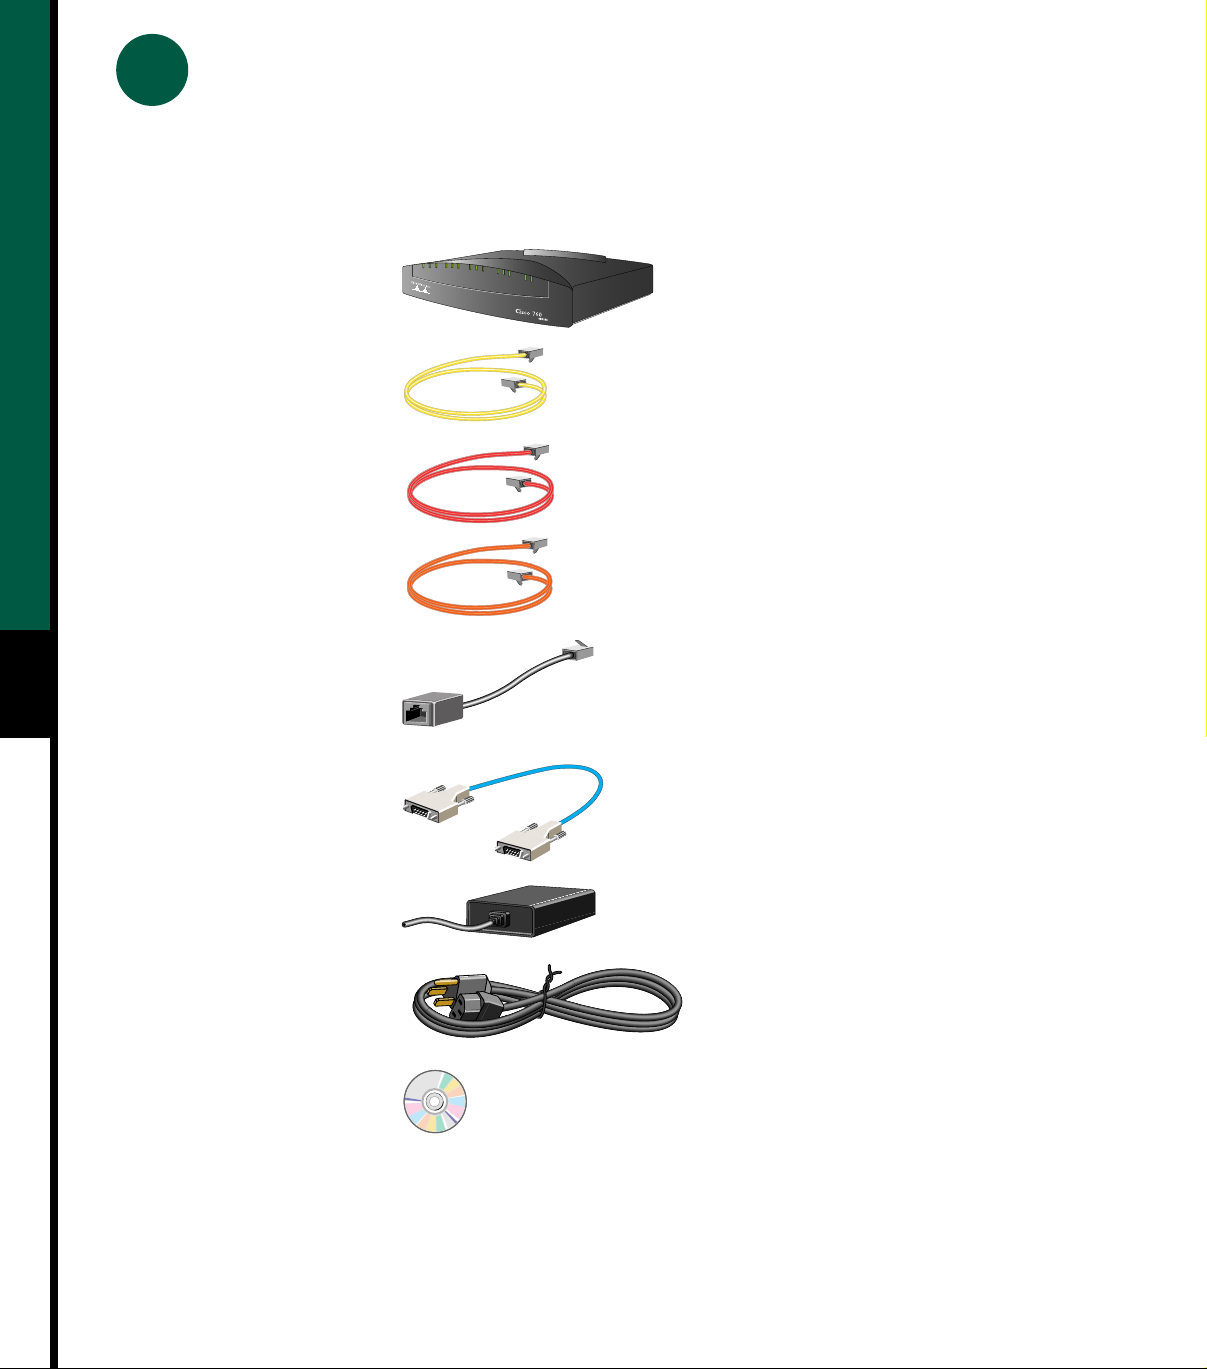
1 Unpack the Router
Remove the router from the package and locate the clear plastic bag labeled “Open Me First.” The bag contains
all the required cables for your router. Also remove the black power supply located in the accessory kit.
LINE
LA
N
NT1
RXD
RD
T
X
D
CH1
RXD
TXD
C
H
2
RXD
T
X
D
PH
1
1 Cisco 760 series router
1 yellow Ethernet cable
1 red ISDN U cable Cisco 762, Cisco 766 routers only.
1 orange ISDN S/T cable Cisco 761, Cisco 765 routers only.
1 RJ-45-to-RJ-11 adapter
PH2
2
1 blue config cable
(optional)
1 black power supply
1 black power supply cord
1 Cisco Fast Step CD-ROM
and 2 Cisco Documentation
CD-ROMs
Page 3
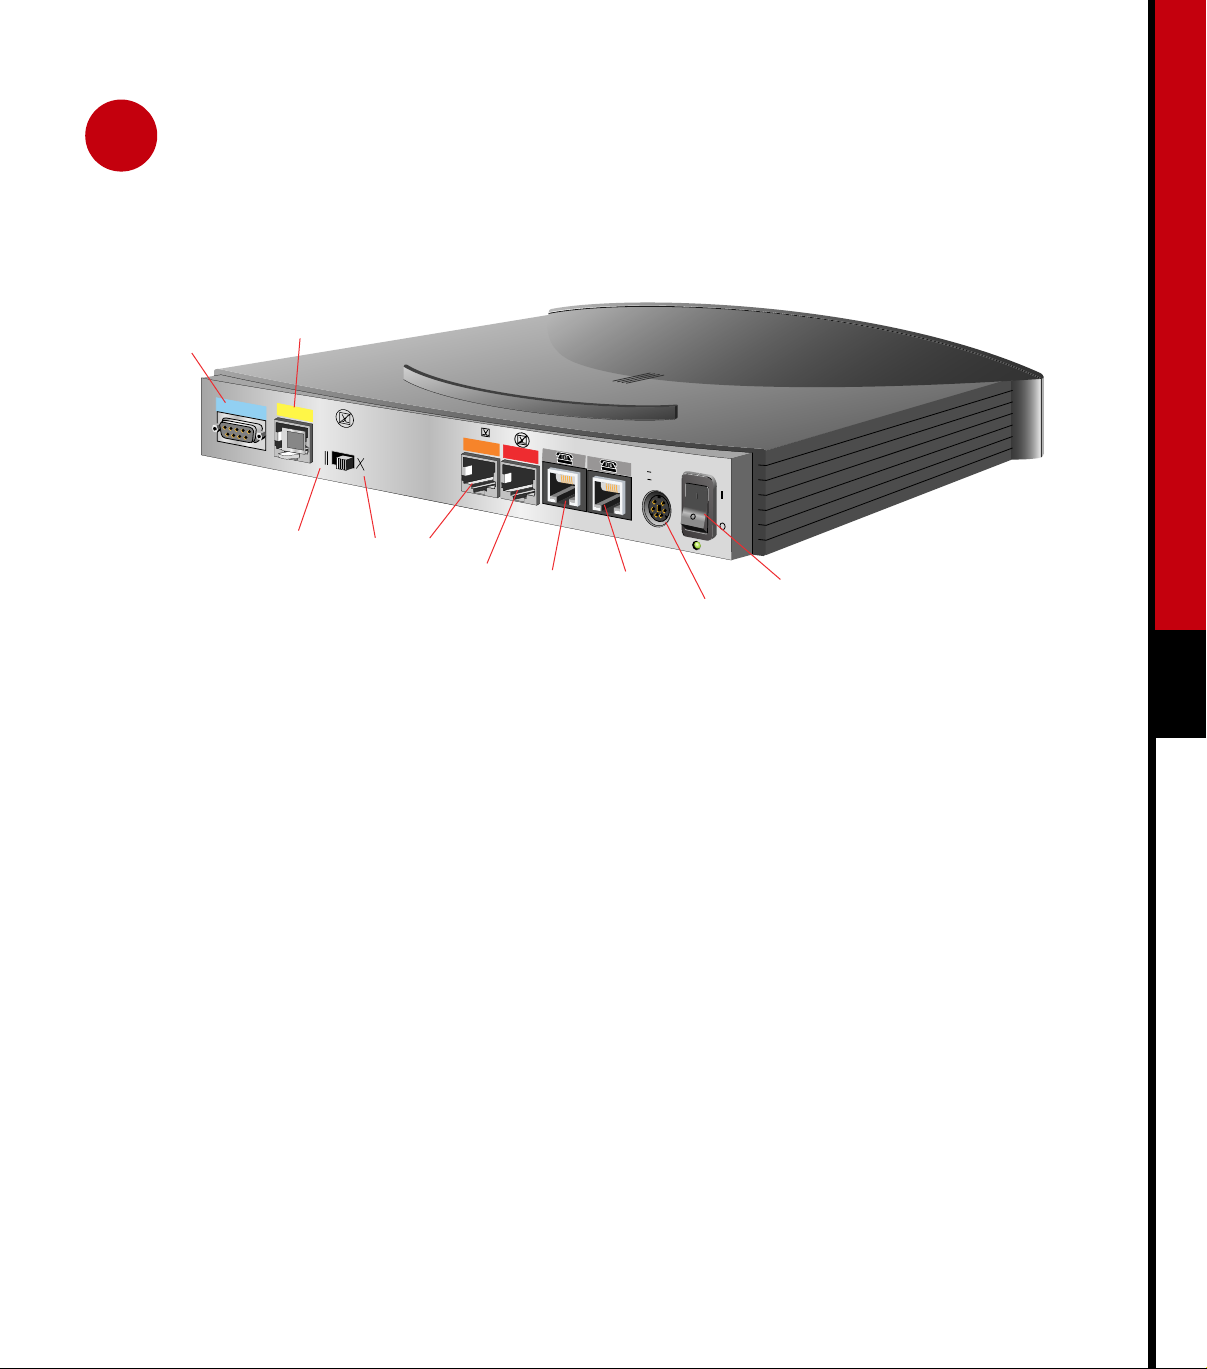
2 Connect Cables to the Router
(Cisco 766 shown)
CONFIG
ETHERNET
10BASET
NODE
NODE
HUB
HUB
CISCO 776
ISDN S/T
ISDN S/T
S
0
ISDN U
CONFIG
ISDN U
The ports on the router and the cables are color
coded to assist you in making the proper
connections. Position the router so that the rear
panel is facing you.
The following pages contain detailed
instructions on connecting cables to your
router.
NT-1
PHONE 1 PHONE 2
+5V ---1.5A +/-5%
-30V--- 0.2A +/-25%
Power connector
Power switch
3
Page 4
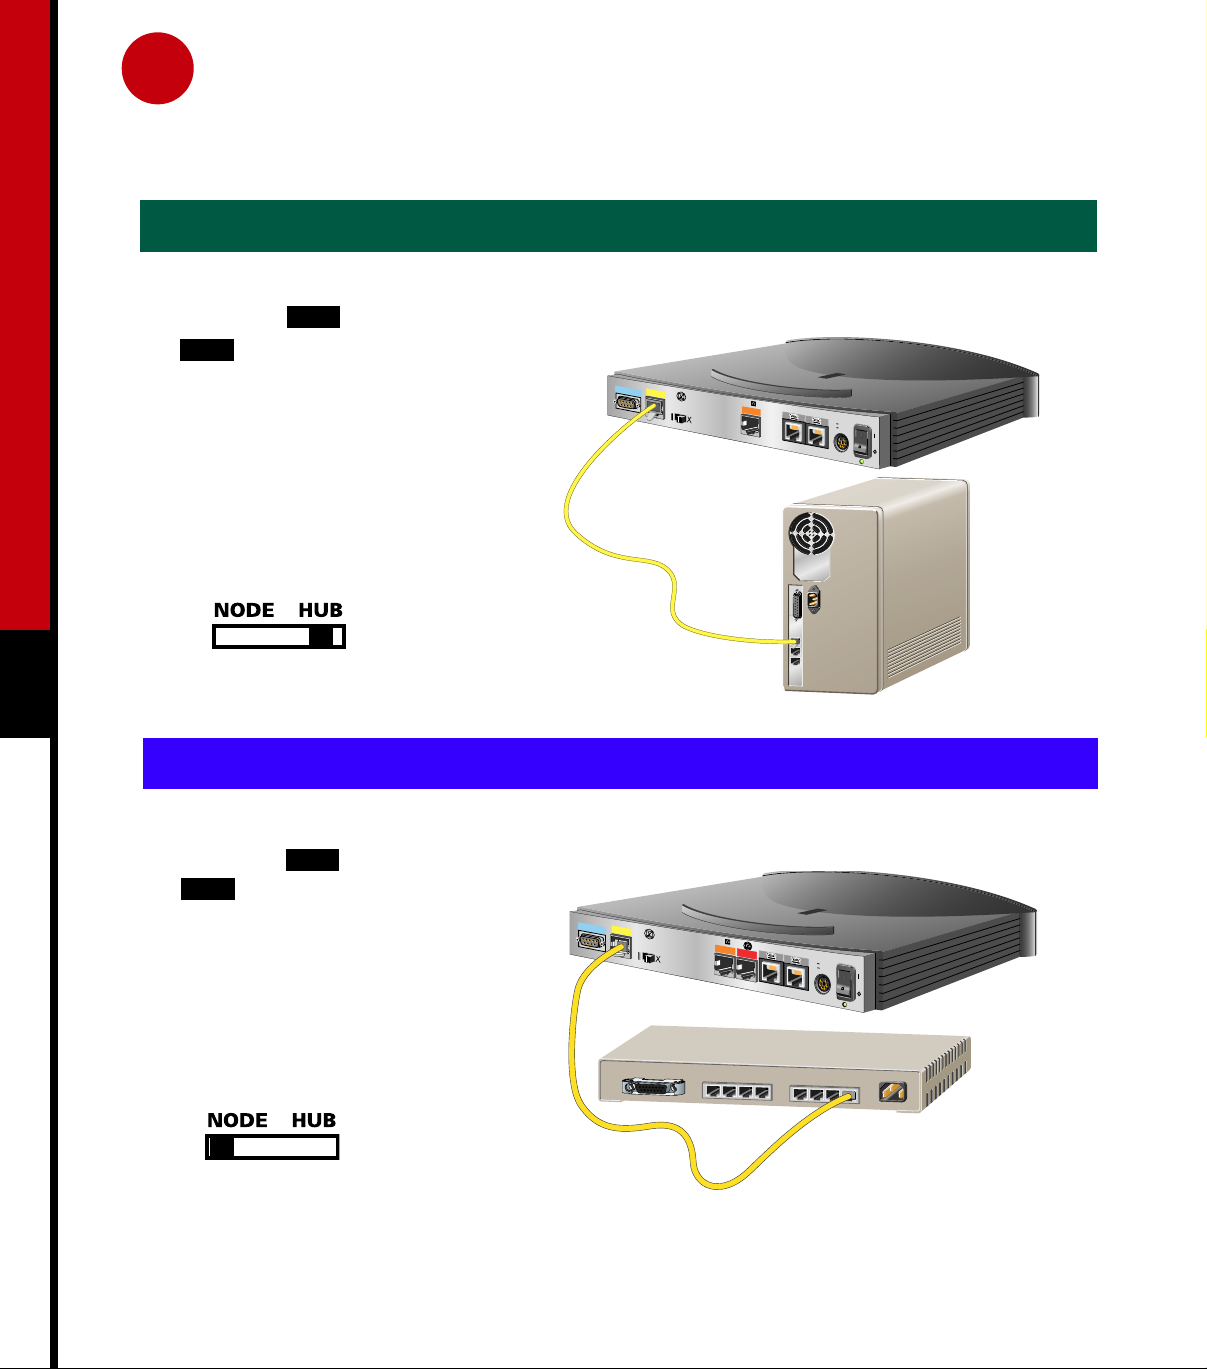
2 Connect the Ethernet Cable to a Computer or Hub
Option 1: To connect the Ethernet cable to a computer, go to option 1 below.
Option 2: To connect the Ethernet cable to a hub, go to option 2 below.
Option 1 Connect the Ethernet Cable to a Computer
Connect the yellow Ethernet cable to the
1
yellow port labeled ETHERNET on the
rear panel of your router.
Connect the other end of the cable to the
2
Ethernet connector on the back of your
computer.
Set the node-hub switch to the “HUB”
3
position.
C
O
N
F
IG
1
0
B
A
S
E
T
1
CISCO 776
NODE
HUB
ISDN S/T
+5V
---1.5A
+/-5
%
-3
0V--- 0.2A
S
0
+/-25%
2
4
Option 2 Connect the Ethernet Cable to a Hub
Connect the yellow Ethernet cable to the
1
yellow port labeled ETHERNET on the
rear panel of your router.
Connect the other end of the cable to an
2
available port on your Ethernet hub.
Set the node-hub switch to the “NODE”
3
position.
1
CO
N
FIG
10BA
SET
NODE
3
Ethernet
cable
CISCO 776
IS
HUB
D
N
S
/T
ISDN U
S
0
N
T-1
+
5V
---1.5A
+/-5
%
-30V--- 0
.2A
+/-25%
2
Ethernet hub
Page 5

2 Connect the ISDN Line
c
Check the rear panel of your router to find out which model you have.
Option 1: If you have a Cisco 762 or 766, go to option 1 below.
Option 2: If you have a Cisco 761 or 765, go to option 2 below.
Option 1 Connect the ISDN Line to a Cisco 762 or Cisco 766 Router
Connect the red ISDN U cable to the red port
1
labeled ISDN U on the rear panel of your router.
Connect the other end of the ISDN U cable
2
directly to an RJ-45 ISDN wall jack. If necessary,
use the enclosed RJ-45-to-RJ-11 adapter to
connect to an RJ-11 ISDN wall jack.
CONFIG
10BASET
NODE
HUB
CISCO 776
ISD
N
S/T
ISDN U
S
0
N
T
-1
+5V ---1.5A +/-5%
-30V--- 0.2A +/-25%
1
2.
RJ-11
wall jack
Option 2 Connect the ISDN Line to a Cisco 761 or Cisco 765 Router
Outside North America
Connect the orange ISDN S/T cable to the orange
1
port labeled ISDN S/T on the rear panel of your
router.
Connect the other end of the ISDN S/T cable to
2
the ISDN wall socket.
North America Only
Connect the orange ISDN S/T cable to the orange
1
port labeled ISDN S/T on the rear panel of your
router.
Connect the other end of the orange ISDN S/T
2
cable to the NT1 terminal connector.
Connect the NT1 terminal connector to the
3
ISDN wall jack using the ISDN S/T cable that
came with your NT1 terminal connector.
2
RJ-45
ISDN U
wall jack
cable
5
CO
NFIG
10B
A
SE
T
CISCO 776
NODE
ISDN S/T
cable
C
O
N
F
IG
1
0
B
A
S
E
T
NODE
ISDN S/T
HUB
S
0
1
2
CISCO 776
HUB
ISDN S/T
1
ISDN S/T
cable
ISDN S/T cable
(not included)
+
5
V
---1.5A
+
/-5%
-3
0
V--- 0.2
A
+
/-2
5%
ISDN
wall socket
ISDN U
S
0
NT-1
+5V ---1.5A +/-5%
-30V--- 0.2A +/-25%
NT1 terminal conne
(not included)
2
3
RJ-45
wall jack
Page 6

2 Connect Optional Telephones and Facsimile Machines
C
O
N
F
IG
1
0B
A
SE
T
N
OD
If you are using a Cisco 765 or Cisco 766, you can
connect telephones and facsimile machines directly
to the router.
CISCO 776
E
HU
B
ISDN S/T
ISDN U
S
0
NT-1
+5V ---1.5A +/-5%
-30V--- 0.2A +/-25%
RJ-11 telephone cable
Telephone
6
Connect the telephone cable (provided with your
telephone or facsimile machine) to the gray port
labeled PHONE 1 or PHONE 2 on the rear panel of
your router.
If you are connecting only one device, connect it to
the port labeled PHONE 1.
Page 7

2 Connect Power and Turn On the Router
CONFIG
1
ETHERNET
2
CISCO 776
3
4
ISDN S/T
???
S
0
BRI
+5V ---1.5A +/-5%
-30V--- 0.2A +/-25%
1
4
Power connector
2
Desktop power supply
3
Step 1 Connect the round end of the power
supply cable to the black circular power
connector on the rear panel of your router.
Step 2 Connect the black power supply cord to
the black power supply.
Step 3 Connect the power supply cord to an
electrical outlet.
Step 4 Turn on the router by using the on/off
switch on the rear panel.
The green RDY LED (and the NT1 LED on the
Cisco 762 and Cisco 766) on the front panel of your
router goes on. Your router is ready to be configured.
7
If the green RDY LED is not on, refer to the
“Troubleshooting Cisco 700 Series Routers” chapter
in the Cisco 700 Series Installation Guide, located
inside the plastic bag labeled “Open Me Only If
Needed.”
Page 8

3 Set Up the Router
If you are configuring your router using Microsoft
Windows 95 or Windows NT version 4 operating
systems, insert the CD-ROM located in the back of this
guide into the CD-ROM drive of your computer. The
Fast Step setup program should start automatically.
If the setup program does not start automatically, follow
these instructions:
Step 1 Double-click the My Computer icon.
Step 2 Double-click the CD icon.
Step 3 Double-click the Setup.exe icon.
Follow the on-screen instructions to guide you through
setting up and testing of the router.
8
For your convenience, information on ordering your
ISDN line is provided on page 9. A form prompting you
for setup information is on page 10.
Page 9

Order the ISDN Line
Step 1 Contact your ISDN service provider
(usually the telephone company).
Step 2 Order a single 128-kbps ISDN BRI line
(which is equivalent to two telephone
lines).
If applicable, request the additional call
offering option that allows telephone
conversations while the router is in use.
Order other features you want—for
example, call conferencing, call waiting,
or call transferring.
Step 3 Obtain and record the following
information from your ISDN service
provider:
9
ISDN Information
1 Switch type (check one):
NI-1 National ISDN-1
5ESS AT&T 5ESS
DMS Nortel DMS-100
INS Japan - NTT Information
Network System
VN3 France - ISDN BRI Standard
NET3 Europe - ISDN BRI Standard
1TR6 Germany - ISDN Standard
TPH Australia
2 SPIDs (optional):
a. SPID1
b. SPID2
3 ISDN telephone numbers (optional):
a. ISDN telephone number 1
b. ISDN telephone number 2
Page 10

Gather Connection Information
Option 1: To connect directly to an Internet service provider, go to option 1 below.
Option 2: To connect directly to your remote corporate network, go to option 2 below.
10
Option 1 Internet Service Provider
Step 1 Contact your Internet service provider.
Step 2 Order Internet service for a single
128-kbps ISDN BRI line.
Step 3 Obtain and record the following
information from your Internet service
provider. Some of this information may
not be required.
4 Internet service provider telephone number
5 Internet service provider second telephone
number (optional)
6 Your router user name
7 Your Internet service provider password
8 Primary DNS
9 Secondary DNS
10 WAN I P a dd r es s
Option 2 Remote Corporate Network
Step 1 Contact your network administrator.
Step 2 Obtain and record the following
information from your network
administrator. Some of this information
may not be required.
4 Remote corporate network telephone number
5 Remote corporate network second telephone
number (optional)
6 Your router user name
7 Your remote corporate network password
To use Internet applications like Web browsers, or to
connect to Microsoft Windows NT servers using
TCP/IP, obtain the following information:
8 Primary DNS
9 Secondary DNS
10 WAN IP address
11 WAN subnet mask
12 Primary WINS
11 WAN s ub ne t m a sk
13 Secondary WINS
To connect to files and printers on NetWare,
Windows NT, or Windows 95 computers using the
Novell protocol, obtain the following information:
14 IPX LAN network number
15 IPX frame type (check one):
Ethernet_II 802.3 802.2 SNAP
16 IPX WAN network number
Page 11

11
Page 12

Corporate Headquarters
Cisco Systems, Inc.
170 West Tasman Drive
San Jose, CA 95134-1706
USA
http://www.cisco.com
Tel: 408 526-4000
800 553-NETS (6387)
Fax: 408 526-4100
European Headquarters
Cisco Systems Europe s.a.r.l.
Parc Evolic, Batiment L1/L2
16 Avenue du Quebec
Villebon, BP 706
91961 Courtaboeuf Cedex
France
http://www-europe.cisco.com
Tel: 33 1 69 18 61 00
Fax: 33 1 69 28 83 26
Americas
Headquarters
Cisco Systems, Inc.
170 West Tasman Drive
San Jose, CA 95134-1706
USA
http://www.cisco.com
Tel: 408 526-7660
Fax: 408 527-0883
Asia Headquarters
Nihon Cisco Systems K.K.
Fuji Building, 9th floor
3-2-3 Marunouchi
Chiyoda-ku, Tokyo 100
Japan
http://www.cisco.com
Tel: 81 3 5219 6250
Fax: 81 3 5219 6001
Cisco Systems has more than 200 offices in the following countries. Addresses, phone numbers, and fax numbers are listed on the
Cisco Connection Online Web site at http://www.cisco.com/offices.
Argentina • Australia • Austria • Belgium • Brazil • Canada • Chile • China • Colombia • Costa Rica • Croatia • Czech Republic • Denmark • Dubai, UAE
Finland • France • Germany • Greece • Hong Kong • Hungary • India • Indonesia • Ireland • Israel • Italy • Japan • Korea • Luxembourg • Malaysia
Mexico • The Netherlands • New Zealand • Norway • Peru • Philippines • Poland • Portugal • Puerto Rico • Romania • Russia • Saudi Arabia • Singapore
Slovakia • Slovenia • South Africa • Spain • Sweden • Switzerland • Taiwan • Thailand • Turkey • Ukraine • United Kingdom • United States • Venezuela
<Paste in the current trade marks block here from the TM_JA.fm file.>
Printed in the USA on recycled paper containing 10% postconsumer waste.
 Loading...