

Page 1

Text Part Number:
78-2167-02
Cisco 7513 and Cisco 7576
Unpacking Instructions
Product Numbers: CISCO7513, CHAS-7513, MAS-7513 (Cisco 7513)
CISCO7576, CHAS-7576, MAS-7576 (Cisco 7576)
ThisdocumentcontainsimportantinstructionsforunpackingtheCisco7513andCisco7576;review
these instructions before you open the container. After you unpack the system, refer to the
Cisco 7500 Series Installation and Configuration Guide on the Documentation CD-ROM, or in
print, for installation instructions.
Document Contents
This publication includes the following sections:
• Unpacking Precautions, page 1
• Unpacking a Cisco 7513 or Cisco 7576, page 3
• Cisco Connection Online, page 6
Unpacking Precautions
Before unpacking the Cisco 7513 or Cisco 7576, review these precautions to avoidinjuryto yourself
or damage to the equipment:
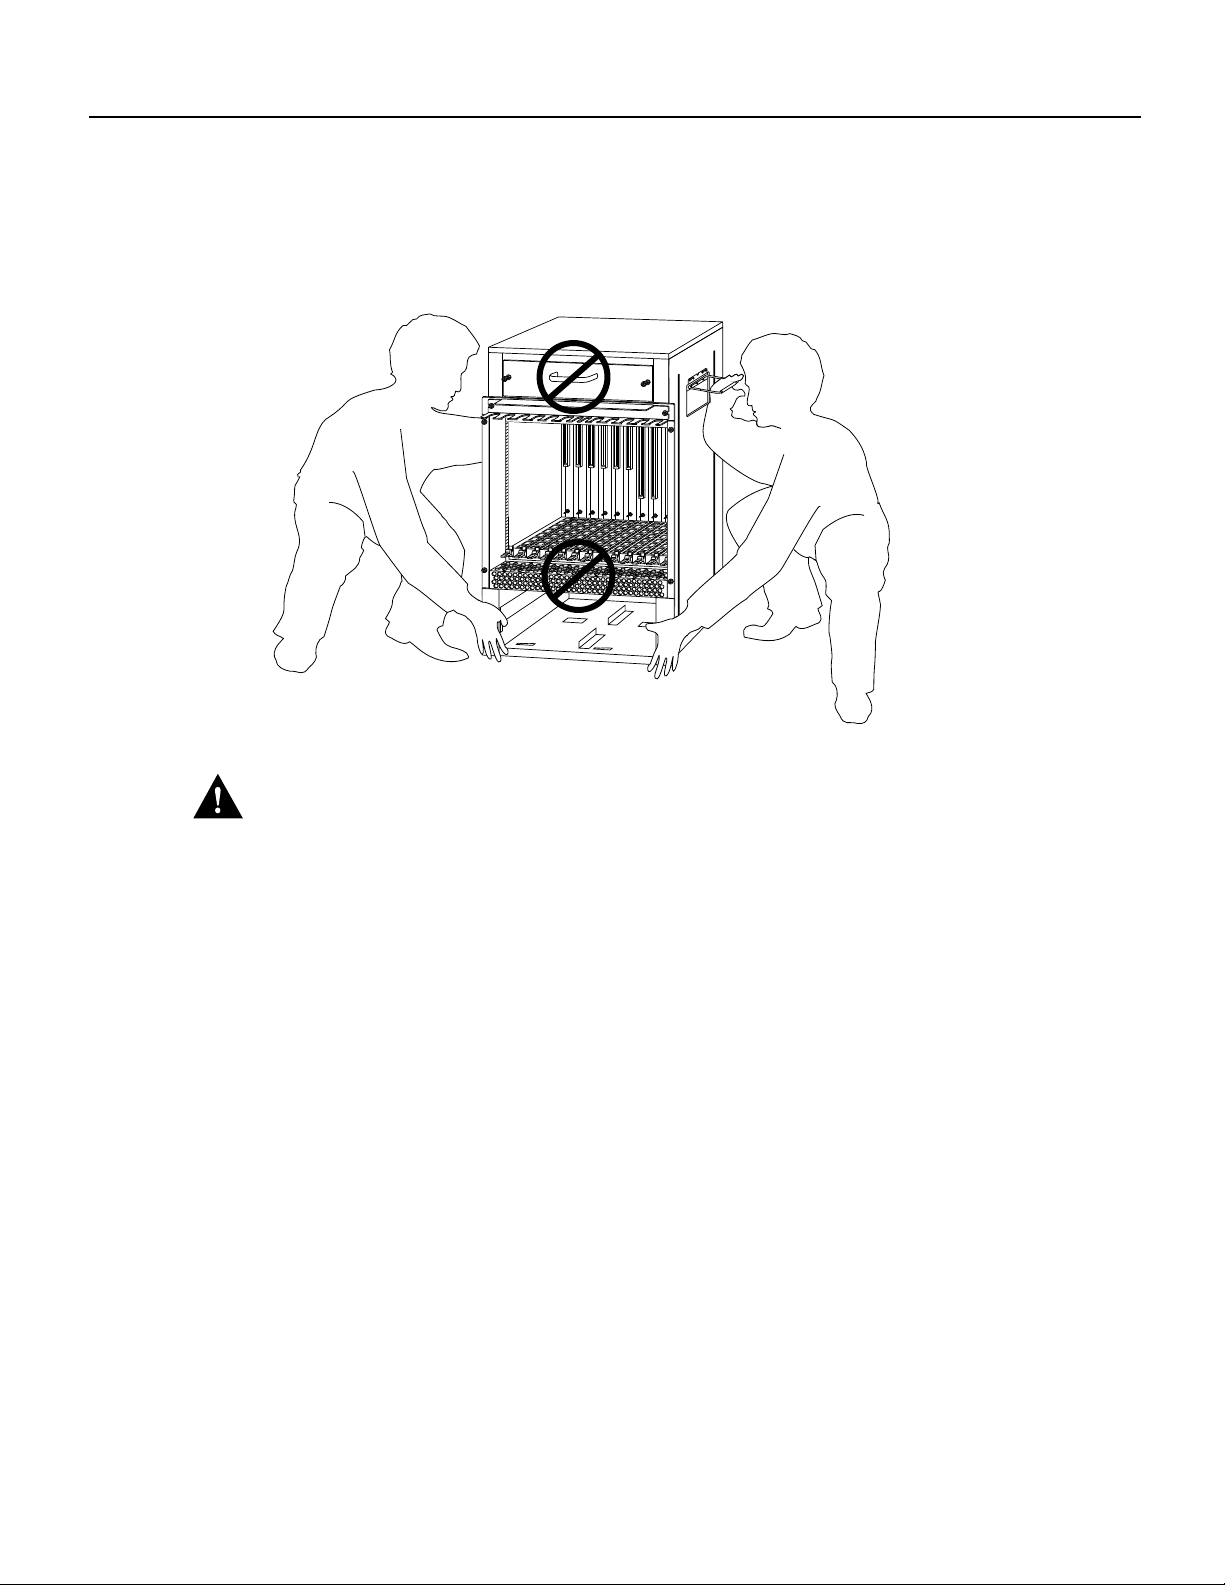
• Two people are required to lift the chassis, one at each end or each side. Youshouldliftthechassis
by grasping the handle with one hand and the bottom of the chassis with the other, and lift with
your legs, as shown in Figure 1. (Do not lift the chassis using the blower module handle or the
air intake vent below the card cage.)
• Keep your back straight; lift with your legs.
• Always remove all power supplies before lifting the chassis. The chassis weighs approximately
110 pounds without power supplies and with 13 processor modules installed.
• Use a hand cart, pallet jack, or forklift to move the chassis to another location.
Corporate Headquarters
Cisco Systems, Inc.
170 West Tasman Drive
San Jose, CA 95134-1706
USA
Copyright © 1996-1998
Cisco Systems, Inc.
All rights reserved.
1
Page 2
Unpacking Precautions
• Note the dimensions of the shipping container before moving it to ensure that you have adequate
Figure 1 Correct Way to Lift the Cisco 7513 and Cisco 7576
clearance through doors and passages.
POWER
A
POWER
B
H3118
Caution To prevent damage to the air intake vent below the card cage, do not lift the chassis by grasping the
handle with one hand and the bottom of the card cage with the other,as shown in Figure 2. The air intake vent
is not designed to support the weight of the chassis.
2 Cisco 7513 and Cisco 7576 Unpacking Instructions
Page 3

Unpacking a Cisco 7513 or Cisco 7576
Figure 2 Incorrect Way to Lift the Cisco 7513 and Cisco 7576
POWER
A
POWER
B
Before moving the chassis to a permanent site, we recommend that you review the site, safety, and
environmental considerations provided in the Cisco 7500 Series Installation and Configuration
Guide on the Document CD-ROM, or in print.
Do not destroy the shipping containers. Flatten and store them with the pallet. Use these containers
to either transport the chassis or, if necessary, return it to the factory.
Unpacking a Cisco 7513 or Cisco 7576
To unpack a Cisco 7513 or Cisco 7576 router, follow these steps:
Step 1 Using a hand cart, pallet jack, or forklift, place the chassis as close to the installation
location as possible.
Step 2 Ensure that you have sufficient room to unpack the chassis.
Step 3 Using scissors, cut the three plastic bands that secure the chassis to the pallet. Set these
bands out of the way or dispose of them properly (they are not reusable).
Step 4 Remove the cap from the top of the packaging, and set it aside. (See Figure 3.)
Step 5 If you ordered any optional cables or any interfaces that ship with cables, remove the
accessory boxes and set them aside.
H3119
Step 6 Refer to Figure 3 and familiarize yourself with the relative locations of packing
components inside the outer tube. Then carefully remove the outer tube from around the
chassis, and set it aside.
Cisco 7513 and Cisco 7576 Unpacking Instructions 3
Page 4
Unpacking a Cisco 7513 or Cisco 7576
Step 7 RefertoFigure 3andlocatethesmalltapedtubethatcontainstherack-mountkitpacking.
Raise the top perimeter foam and remove the tube, with the rack-mount kit inside, and set
it aside.
Step 8 Remove the top perimeter foam and set it aside. (See Figure 3.)
Step 9 Remove the large taped tube and set it aside. Depending on your order, it should contain
the accessory box and up to two powersupply boxes. Removethe accessory box first, and
then slide the large tube from the power supply boxes. After you expose the powersupply
boxes, remove the power supplies and set them aside.
Step 10 Refer to Figure 3 and locate the two black board racks, located between the large taped
tube and the chassis. Remove the racks and set them aside.
Note The board racks provide a secure, safe place to temporarily store the processor modules when
you install the chassis in a rack. Refer to the Cisco 7500 Series Installation and Configuration Guide
for information on properly removing processor modules from the chassis.
Caution The power supply boxes are heavy. Carefully remove them from the large taped tube.
Step 11 Carefully slide the bottom perimeter foam up and over the chassis. (Refer to Figure 3.)
Step 12 Using a nut driver,a phillips screwdriver,anda flat-blade screwdriver,locate and remove
the chassis anchors that fasten the chassis to the pallet. (Refer to Figure 3.) When these
anchors are removed, you can remove the chassis from the pallet.
Step 13 If present, remove the Flash memory card retainer,which is placed over the Route Switch
Processors (RSPs) installed in slots 6 or 7 in the chassis. (Refer to Figure 3.)
The chassis is now ready to be installed on a tabletop or in a rack. Although it is not required, we
recommend rack-mounting the chassis to assure optimum airflow, cable and maintenance
clearances, dust control, and accessibility.
4 Cisco 7513 and Cisco 7576 Unpacking Instructions
Page 5

Figure 3 Packaging Detail for the Cisco 7513 and Cisco 7576
Unpacking a Cisco 7513 or Cisco 7576
Cap
Outer tube
Optional cable
accessory boxes
Top perimeter
foam
Board rack (2)
Flash memory
card retainer
Accessory
box
Power
supply
boxes
Large
taped
tube
Rack-mount
kit
Anchor
Bottom
perimeter
foam
H3591
Pallet
Small taped tube
Cisco 7513 and Cisco 7576 Unpacking Instructions 5
Page 6

Cisco Connection Online
Cisco Connection Online
CiscoConnectionOnline(CCO)isCiscoSystems’primary,real-time support channel. Maintenance
customers and partners can self-register on CCO to obtain additional information and services.
Available 24 hours a day, 7 days a week, CCO provides a wealth of standard and value-added
services to Cisco’s customers and business partners. CCO services include product information,
product documentation, software updates, release notes, technical tips, the Bug Navigator,
configuration notes, brochures, descriptions of service offerings, and download access to public and
authorized files.
CCO serves a wide variety of users through two interfaces that are updated and enhanced
simultaneously: a character-based version and a multimedia version that resides on the World Wide
Web (WWW). The character-based CCO supports Zmodem, Kermit, Xmodem, FTP, and Internet
e-mail,and it is excellentforquickaccess to information overlowerbandwidths.TheWWWversion
of CCO provides richly formatted documents with photographs, figures, graphics, and video, as well
as hyperlinks to related information.
You can access CCO in the following ways:
• WWW: http://www.cisco.com
• WWW: http://www-europe.cisco.com
• WWW: http://www-china.cisco.com
• Telnet: cco.cisco.com
• Modem: From North America, 408 526-8070; from Europe, 33 1 64 46 40 82. Use the
following terminal settings: VT100 emulation; databits: 8; parity: none; stop bits: 1; and
connection rates up to 28.8 kbps.
For a copy of CCO’s Frequently Asked Questions (FAQ), contact cco-help@cisco.com. For
additional information, contact cco-team@cisco.com.
Note If you are a network administrator and need personal technical assistance with a Cisco
product that is under warranty or covered by a maintenance contract, contact Cisco’s Technical
Assistance Center (TAC) at 800 553-2447, 408 526-7209, or tac@cisco.com. To obtain general
information about Cisco Systems, Cisco products, or upgrades, contact 800 553-6387,
408 526-7208, or cs-rep@cisco.com.
This document is to be used in conjunction with the Cisco 7500 Series Installation and Configuration Guide publication.
AccessPath, Any to Any, AtmDirector, the CCIE logo, CD-PAC, Centri, the Cisco Capital logo, CiscoLink, the Cisco Management Connection logo, the Cisco NetWorks logo, the Cisco
Powered Network logo, the Cisco Press logo, the Cisco Technologies logo, ClickStart, ControlStream, DAGAZ, Fast Step, FireRunner, IGX, IOS, JumpStart, Kernel Proxy, LoopRunner,
MGX, Natural Network Viewer, NetRanger, NetSonar,Packet, PIX, Point and Click Internetworking, Policy Builder, RouteStream, Secure Script, SMARTnet, SpeedRunner, Stratm,
StreamView, The Cell, TrafficDirector, TransPath, VirtualStream, VlanDirector, Workgroup Director, and Workgroup Stack are trademarks; Changing the Way We Work, Live, Play, and
Learn, Empowering the Internet Generation, The Internet Economy, and The New Internet Economy are service marks; and BPX, Catalyst, Cisco, Cisco IOS, the Cisco IOS logo, Cisco
Systems, the Cisco Systems logo, Enterprise/Solver, EtherChannel, FastHub, ForeSight, FragmentFree, IP/TV, IPX, LightStream, MICA, Phase/IP, StrataSphere, StrataView Plus, and
SwitchProbe are registered trademarks of Cisco Systems, Inc. in the U.S. and certain other countries. All other trademarks mentioned in this document are the property of their respective
owners. (9810R)
Copyright © 1998, Cisco Systems, Inc.
All rights reserved. Printed in USA.
6 Cisco 7513 and Cisco 7576 Unpacking Instructions
 Loading...