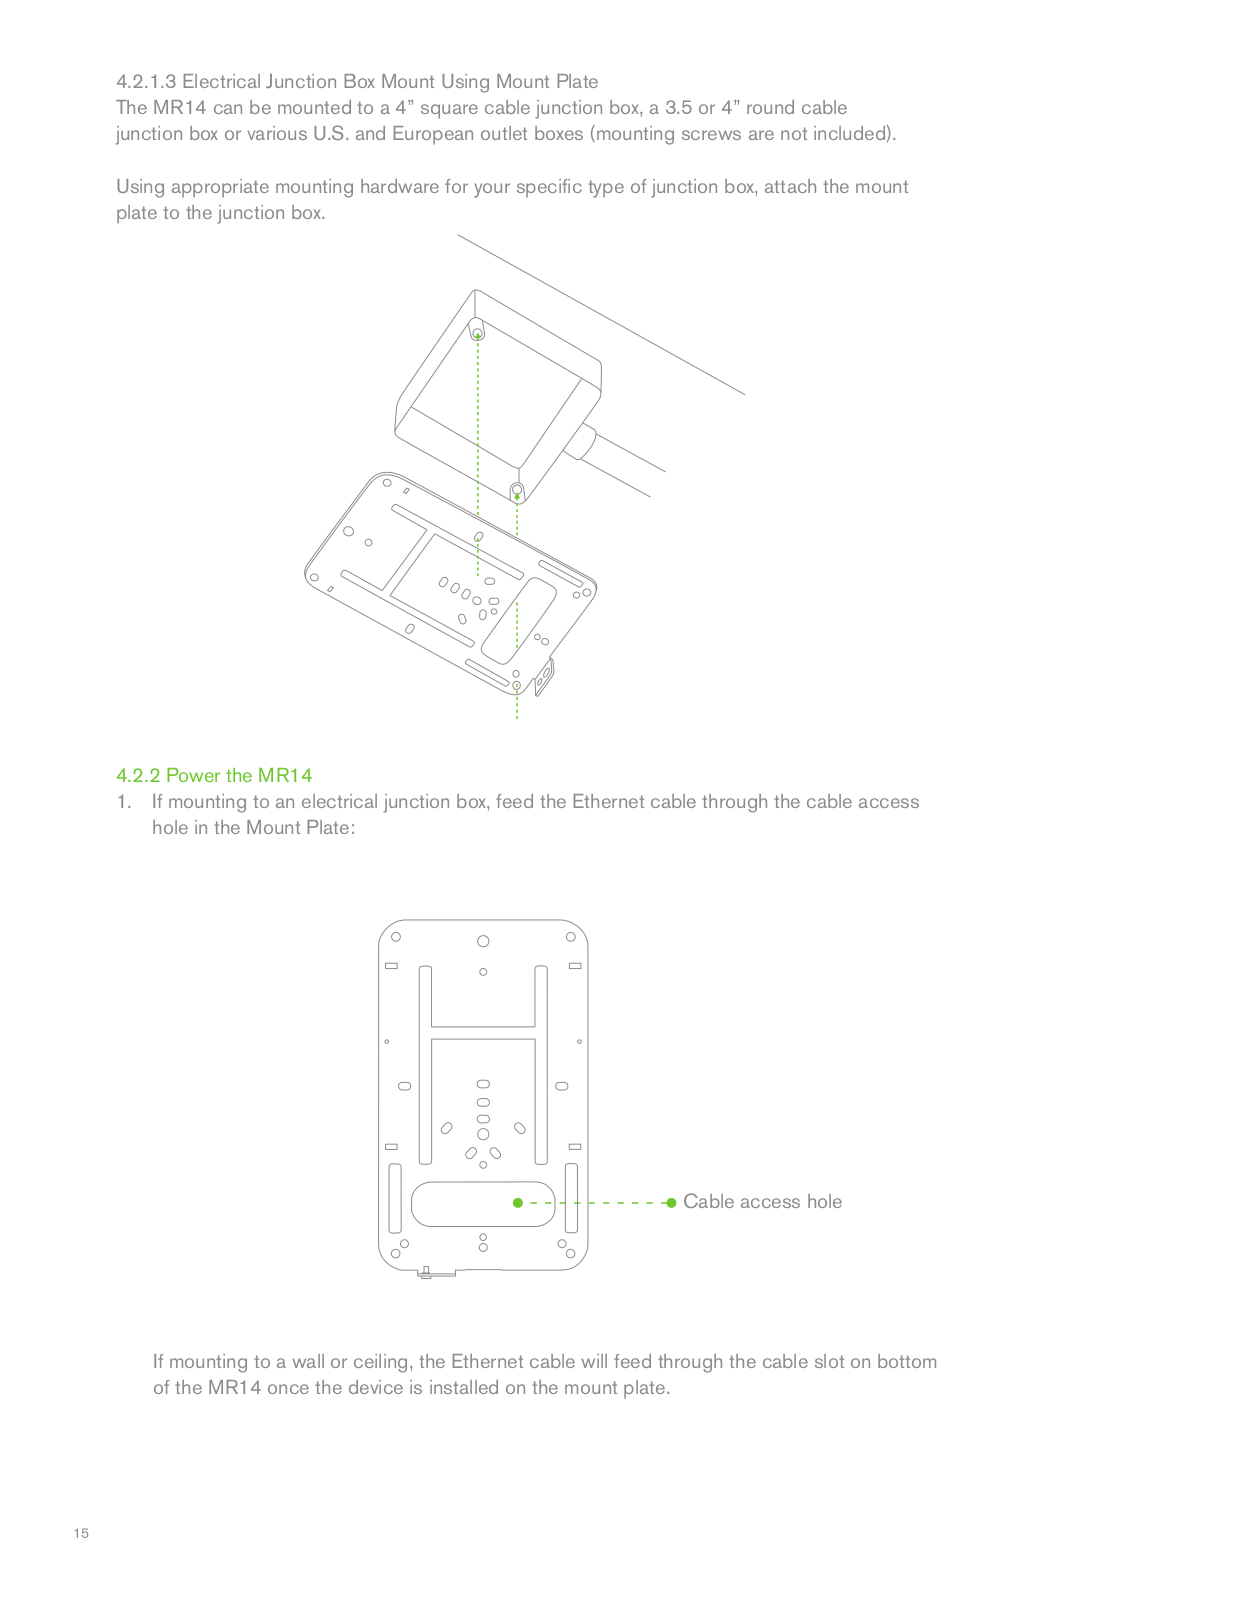
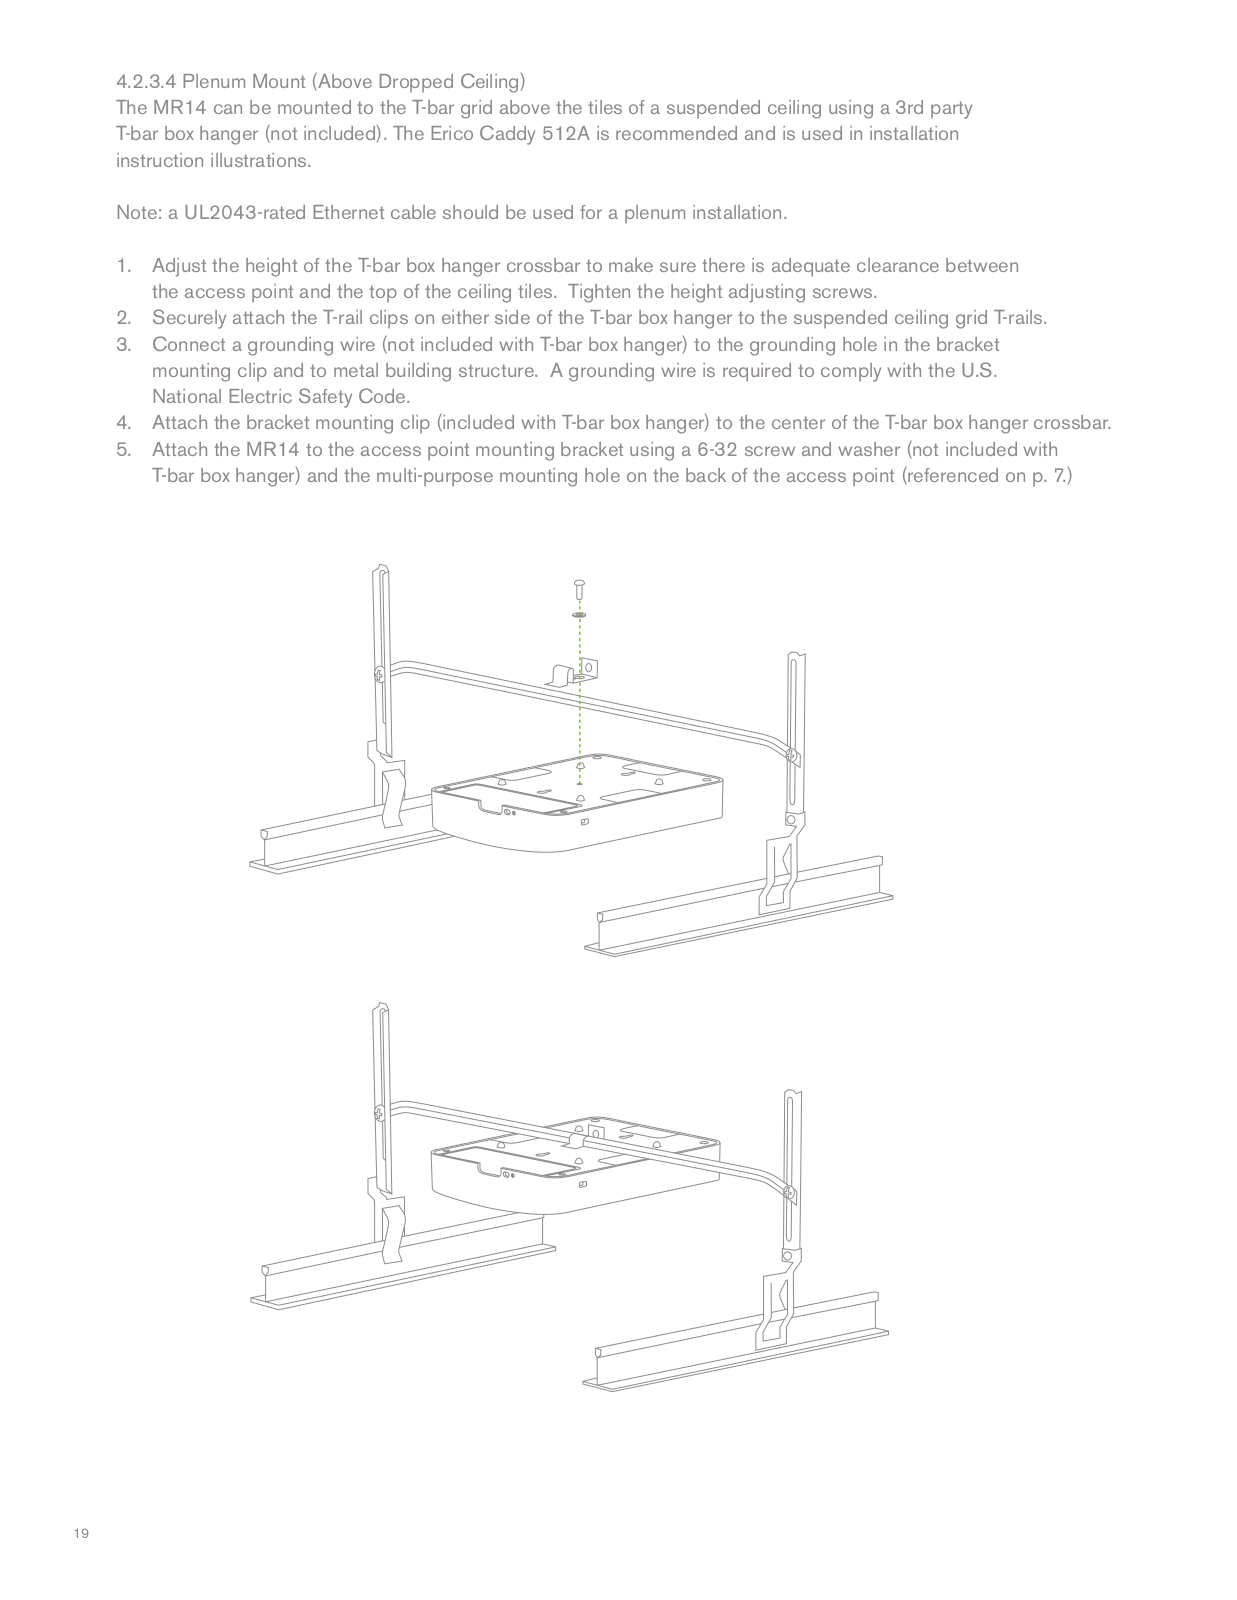
Cisco Systems 60010030, 60010040 User Manual

Meraki MR11/14

Hardware Installation Guide

Table of Contents

1 Scope of Document and Related Publications

7

2

MR14 Overview

8


2.1 Package Contents

8


2.2

Understanding the MR14

9


2.3

Power Source Options

11


2.4

Security Features

10


2.5

Factory Reset Button

11


2.6 LED Indicators and Run Dark Mode

11


2.7 UL 2043 Plenum rating

12

3

Pre-Site Preparation

13


3.1 Check and Upgrade Firmware

13


3.2

Collect Tools

13


3.3

Collect Additional Hardware for Installation

14


3.4

Configure Your Network in Dashboard

13

4

On Site Instructions

16


4.1 Choose Your Mounting Location

16


4.2

Install the MR14

16


4.2.1 Attach the Mount Plate

16


4.2.1.1 Wall or Solid Ceiling Mount Using Mount Plate

18


4.2.1.2 Drop Ceiling Mount Using Mount Plate

19


4.2.1.3 Electrical Junction Box Mount Using Mount Plate

22


4.2.2 Power the MR14

22


4.2.3 Mount the MR14

22


4.2.3.1 Assemble MR14 to the Mount Plate

22


4.2.3.2 Desk or Shelf Mount

24


4.2.3.3 Wall or Solid Ceiling Mount without Mount Plate

24


4.2.3.4 Plenum Mount (Above Dropped Ceiling)

25


4.3

Secure the MR14

26


4.4

Verify Device Functionality and Test Network Coverage

27

5

Troubleshooting

28

6

Regulatory Information

29

2

1 Scope of Document and Related Publications

The MR11/14 Hardware Installation Guide describes the installation procedure for the MR11 and MR14 access point.

Note: All instructions in this hardware installation guide will reference the MR14 product but apply equally to the MR11.

Additional reference documents are available online at www.meraki.com/library/products, including:

Meraki Network Design Guide – This document describes how to effectively design a Meraki wireless network.

Meraki Cloud Controller Manual – This document describes how to use the Meraki Cloud Controller to set up and configure a Meraki network.

3

Cisco Systems 60010030, 60010040 User Manual

2 MR14 Overview

The Meraki MR14 is an enterprise-class 802.11n access point that enables you to create high-speed, reliable wireless networks in even the most challenging RF environments quickly, easily and cost-effectively.

2.1 Package Contents

The MR14 package contains the following:

MR14 Access Point

Mounting Plate

T-rail Mounting Kit

Wall Screws/Anchors

2.2 Understanding the MR14

Your Meraki MR14 has the following features:

LED indicators

Kensington lock hard point

Mount plate attachment

Multi-purpose mounting hole

Desk mount Feet (4x)

Cable access bay

4

Ethernet port (with PoE)

Cable slot

Your MR14 mount plate has the following features:

Access point mounting post

Security screw

Factory reset button

Pad lock and security screw holes

Various mounting holes (see p. 13-14 for details)

Cable slot

5

2.3 Security Features

The MR14 features multiple options for physically securing the access point after installation:

1.Security screw – The mount plate contains a security screw that can be used to secure the access point to the mount plate. Engaging the security screw prevents accidental dislodging and theft.

2.Pad lock – The access point and mount plate contain hard points to allow them to be locked together using a Masterlock 120T or equivalent. Securing the MR14 with a pad lock provides an additional level of theft protection.

3.Kensington lock – The access point contains a hard point that allows it to be secured to any nearby permanent structure using a standard Kensington lock.

2.4Power Source Options

The MR14 access point can be powered using either a third-party 802.3af PoE switch or the Meraki 802.3af PoE injector (sold separately).

2.5 Factory Reset Button

The Factory Reset Button restores the MR14 to its original factory settings by deleting all configuration information stored on the unit.

2.6 LED Indicators and Run Dark Mode

Your MR11 is equipped with a series of LED lights on the front of the unit to convey information about system functionality and performance.

Signal Strength


1 Light:

Fair, 4 Lights: Strongest

Moving Lights:

Searching for Signal

Flashing Lights:

Error state. May indicate bad gateway or other routing fault

Radio Power


Off:

MR14 is off

Solid ORANGE:

MR14 is booting or trying to find a path to the internet

Solid GREEN:

MR14 is fully operational and connected to the network

Flashing ORANGE:

Firmware is upgrading

Flashing GREEN:

Error state. May indicate bad gateway or other routing fault

Ethernet


Off:

No active network connection at the Ethernet port

On:

Active network connection at the Ethernet port

Flashing:

Error state. May indicate bad gateway or other routing fault

The MR14 may be operated in “Run Dark” mode for additional security and to reduce the visibility of the access point. In this mode, the LEDs will not be illuminated. This mode may be enabled through the Meraki Dashboard.

2.7 UL 2043 Plenum rating

The MR14 meets the UL 2043 plenum-rating standard. This certifies that the MR14 has adequate fire resistance and low smoke-emission characteristics to be mounted and operated in a building’s environmental air spaces, such as above suspended ceilings in an office environment.

6

3 Pre-Install Preparation

You should complete the following steps before going on-site to perform and installation.

3.1 Configure Your Network in Dashboard

The following is a brief overview only of the steps required to add an MR14 to your network. For detailed instructions about creating, configuring and managing Meraki wireless networks, refer to the Meraki Hosted Controller Manual (meraki.com/collateral).

1.Login to http://dashboard.meraki.com. If this is your first time, create a new account

2.Find the network to which you plan to add your nodes or create a new network.

3.Add your nodes to your network. You will need your Meraki order number (found on your invoice if you ordered directly from Meraki) or the serial number of each node, which looks like Qxxx-xxxx-xxxx, and is found on the bottom of the unit.

4.Finally, go to the map / floor plan view and place each node on the map by clicking and dragging it to the location where you plan to mount it. You can always modify the location later.

3.2Check and Upgrade Firmware

To ensure your MR14 performs optimally immediately following installation, Meraki recommends that you facilitate a firmware upgrade prior to mounting your MR14.

1.Attach your MR14 to power and a wired Internet connection. See p. 19 of this Hardware Installation Guide for details.

2.The MR14 will turn on and the Power LED will glow solid orange. If the unit does not require a firmware upgrade, the Power LED will turn green within thirty seconds.

*If the unit requires an upgrade, the Power LED will begin blinking orange until the upgrade is complete, at which point the Power LED will turn solid green. You should allow about an hour for the firmware upgrade to complete, depending on the speed of your internet connection.

7

3.3 Collect Tools

You will need the following tools to perform an installation:


Hammer


Hex wrench


Straight-slot

Phillips

Drill with 5/32”

screwdriver

screwdriver


(4mm) bits

5/64” (2.0)

3.4 Collect Additional Hardware for Installation

802.3af PoE power source (either PoE switch or Meraki 802.3af PoE Injector)

Network cables with RJ45 connectors long enough for your particular mounting location

8

4 Installation Instructions

4.1 Choose Your Mounting Location

A good mounting location is important to getting the best performance out of your MR14 access point. Keep the following in mind:

1.The device should have unobstructed line of sight to most coverage areas. For example, if installing in an office filled with workspaces divided by mid-height cubicle walls, installing on the ceiling or high on a wall would be ideal.

2.Power over Ethernet supports a maximum cable length of 300 ft (100 m).

3.If being used in a mesh deployment, the MR14 should have line of sight to at least two other Meraki devices. For more detailed instructions regarding access point location selection, reference the Meraki Network Design Guide (meraki.com/collateral).

4.2Install the MR14

For most mounting scenarios, the MR14 mount plate provides a quick, simple and flexible means of mounting your device. The installation should be done in two steps. First, install the mount plate to your selected location. Then, attach the MR14 to the mount plate.

4.2.1 Attach the Mount Plate

The MR14 mount plate can be used to install your access point in a wide range of scenarios: wall or solid ceiling, below a suspended ceiling, various electrical junction boxes or above a suspended ceiling (in the plenum). The mount plate contains a variety of hole patterns that are customized for each installation scenario.

The following images show the hole patterns that should be used for each type of mount:

Wall Mount (also marked with

4” Square Cable Junction Box

European Outlet Box

W on the mount plate)

Mount (US style)


9

Loading...
+ 20 hidden pages