

Page 1

Android 4.4
RS30
Version 1.00
Page 2

Copyright © 2015 CIPHERLAB CO., LTD.
All rights reserved
The software is provided under a license agreement containing restrictions on use and
disclosure a n d is also protected by copyright law. R ev erse engineering of the soft ware is
prohibited.
Due to continued product development this information may change without notice. The
information and intellectual property contained herein is confidential between CIPHERLAB
and the cli ent and remains the excl usive property of CIPHERLAB CO. , LTD. If you find
any problems in the documentation, please report them to us in writing. CIPHERLAB
does not warrant that this document is error-free.
No part of this publication may be reproduced, stored in a retrieval system, or
transmitted in any form or by any means, electronic, mechanical, photocopying,
recording or otherwise without the prior written permission of CIPHERLAB CO., LTD.
For product consultancy and technical support, please contact your local sales
representative. Also, you may visit our web site for more information.
The CipherLab logo is a registered trademark of CIPHERLAB CO., LTD.
All brand , product and ser vic e, and t radema rk na mes are t he pr opert y of th eir r egist ered
owners.
The editorial use of these names is for identification as well as to the benefit of the
owners, with no intent ion of infringeme nt .
CIPHERLAB CO., LTD.
Website: http://www.CipherLab.com
Page 3
FOR USA
IMPORTANT NOTICES
This equipment has been tested and found to comply with the limits for a Class B digital
device, pursuant to Part 15 of the FCC Rules. These limits are designed to provide
reasonable protection against harmful interference in a residential installation. This
equipment generates, uses and ca n radiate radio frequ ency energy and, if not installed
and used in accordance with the instructions, may cause harmful interference to radio
communication. However, there is no guarantee that interference will not occur in a
particular installation. If this equipment does cause harmful interference to radio or
television reception, which can be determined by turning the equipment off and on, the
user is encouraged to try to correct the interference by one or more of the following
measures:
Reorient or relocate the receiving antenna.
Increase the separation between the equipment and receiver.
Connect the equipment into an outlet on a circuit different from that to which the
receiver is connected.
Consult the dealer or an experienced radio/TV technician for help.
This device complies with Part 15 of the FCC Rules. Operation is subject to the following
two conditions: (1) This device may not cause harmful interference, and (2) this device
must accept any interferenc e received, incl uding interferenc e that may caus e undesired
operation.
FCC Caution:
Any changes or modifications not expressly approved by the party responsible for
compliance could void the user's authority to operate this equipment.
This transmitter must not be co-located or operating in conjunction with any other
antenna or transmitter.
Operations in the 5.15-5.25GHz band are restricted to indoor usage only.
Page 4
FOR PRODUCT WITH LASER
SPECIFIC ABSORPTION RATE (SAR) INFORMATION
SAFETY PRECAUTIONS
CARE & MAINTENANCE
CAUTION
This laser c om pone nt em its FD A / IEC C las s 2 la ser lig ht at the exit p ort . Do not
stare into beam.
The product complies with the FCC / Canada portable RF exposure limit set forth for an
uncontrolled environm e n t an d a re safe for inten ded operation as describ ed i n t his manual.
The furthe r RF exp osure r eduction can be achieved if the p roduct s can be kept as far as
possible from the user body or set the d evice to lower outpu t power if such funct ion is
available.
1. FCC SAR Value
USA (1g): Body position is 0.23 W/kg and head position is 1.14 W/Kg.
2. CE SAR Value
CE (10g): Body-Worn (1.5cm gap) is 0.184 W/Kg.
RISK OF EXPLOSION IF BATTERY IS REPLACED BY AN INCORRECT TYPE.
DISPOSE OF USED BATTERIES ACCORDING TO THE INSTRUCTI ONS.
The use of any batteries or charging devices, which are not originally sold or
manufactured by CipherLab, will void your warranty and may cause damage to
human body or the product itself.
DO NOT disassemble, incinerate or short circuit the battery.
DO NOT expose the scanner or the battery to any flammable sources.
For green-environment issue, it's important that batteries should be recycled in a
proper way.
Under no circumstances, internal components are self-serviceable.
This mobile computer is intended for industrial use. The mobile computer is rated
IP65, however, damage may be done to the mobile computer if it is exposed to
extreme temperatures or soaked in water.
Wh en the body of t he mobile comp uter gets d irty, use a cl ean, wet cloth to wipe off
dust and debris. DO NOT use bleaches or cleaners.
Use a clean, non-abra sive, lint-free cloth to wipe dust off the LCD touch screen. DO
NOT use any poi n t ed or sharp ob j ects against the surface. Always keep the LCD dry.
Page 5

If you want to put away the mobile computer for a period of time, download the
collected data to a host computer, and then remove the battery pack from the mobile
computer’s battery compartment. Store the mobile computer and battery pack
separately.
If you encounter malfunction on the mobile computer, write down the specific
scenario and consult your local sales representative.
Page 6

Version
Date
Notes
1.00 Jan 26, 2015
RELEASE NOTES
Initial release
Page 7

CONTENTS
IMPORTANT NOTICES..................................................................................................................... - 3 -
RELEASE NOTES ............................................................................................................................ - 7 -
INTRODUCTION ................................................................................................................................. 1
QUICK START .................................................................................................................................... 3
USING THE RS30 MOBILE COMPUTER ........................................................................................... 13
For USA .......................................................................................................................................... - 3 -
For Canada .................................................................................................................................... - 4 -
For Product with Laser .................................................................................................................. - 5 -
Specific Absorption Rate (SAR) information ................................................................................ - 5 -
Safety Precautions ........................................................................................................................ - 5 -
Care & Maintenance ..................................................................................................................... - 5 -
Features ............................................................................................................................................. 2
Inside the Package ............................................................................................................................ 2
Accessories ........................................................................................................................................ 2
1.1. Overview ................................................................................................................... 3
1.1.1. Installing Battery ...................................................................................................... 5
1.1.2. Installing SIM Card, SAM Card and Memory Card ................................................. 6
1.1.3. Power On/Off Mobile Computer ............................................................................. 7
1.1.4. Using Hardware Buttons ......................................................................................... 7
1.1.5. Connecting Headset ................................................................................................ 8
1.2. Charging & Communication .................................................................................... 9
1.2.1. Charge Mobile Computer ........................................................................................ 9
1.2.2. Wired Data Transmission ...................................................................................... 11
1.2.3. Using Wireless Networks ....................................................................................... 11
2.1. Battery .................................................................................................................... 14
2.1.1. Battery Status Indicators....................................................................................... 15
2.1.2. Monitor Battery Level ............................................................................................ 16
2.1.3. Replace Main Battery ............................................................................................ 18
2.1.4. Power Management .............................................................................................. 19
2.2. Memory .................................................................................................................. 20
2.2.1. Check Storage Space ............................................................................................ 21
2.3. Touch Screen ......................................................................................................... 22
2.3.1. Screen Brightness ................................................................................................. 22
2.3.2. Screen Rotation ..................................................................................................... 22
2.3.3. Screen Timeout Settings ....................................................................................... 23
2.3.4. Text Size ................................................................................................................. 24
2.4. Notifications ........................................................................................................... 25
2.4.1. Status LED ............................................................................................................. 25
2.4.2. Audio ....................................................................................................................... 25
2.4.3. Vibrator ................................................................................................................... 27
Page 8

BASIC OPERATION OF THE RS30 MOBILE COMPUTER ................................................................... 35
WIRELESS RADIOS .......................................................................................................................... 53
USING THE PHONE.......................................................................................................................... 67
2.5. Date and Time ....................................................................................................... 28
2.5.1. Set Date, Time and Time Zone ............................................................................. 28
2.6. Language & Keyboard Input ................................................................................. 29
2.6.1. On-screen Keyboard .............................................................................................. 29
2.7. Sound and Volume ................................................................................................ 30
2.8. Data Capture .......................................................................................................... 31
2.8.1. Barcode Reader ..................................................................................................... 31
2.8.2. Digital Camera ....................................................................................................... 31
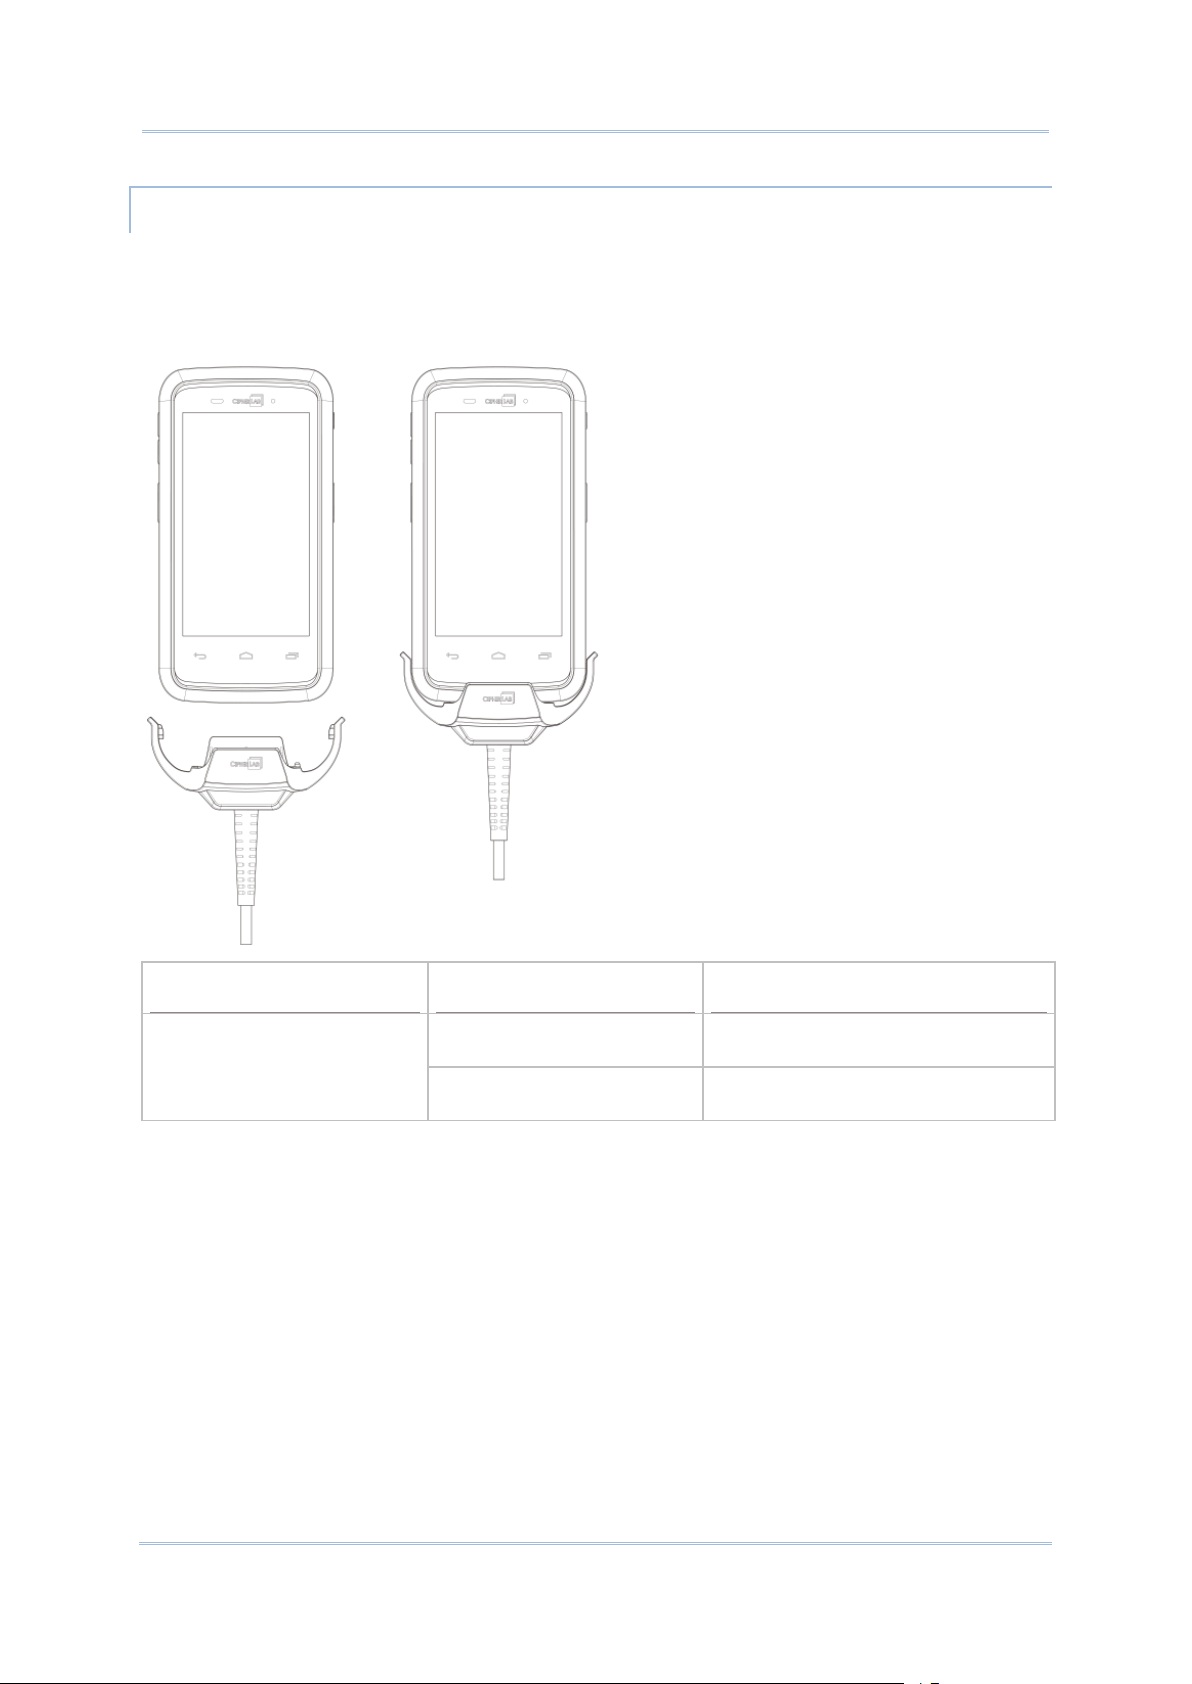
2.9. Snap-on USB Cable ............................................................................................... 32
2.10. Charging & Communication Cradle ...................................................................... 32
3.1. Home Screen ......................................................................................................... 36
3.1.1. Customize Home Screen ....................................................................................... 38
3.1.2. Customize Wallpaper............................................................................................. 40
3.2. Widgets ................................................................................................................... 41
3.2.1. Add Widgets ........................................................................................................... 42
3.2.2. Remove Widgets .................................................................................................... 43
3.3. Status Bar .............................................................................................................. 44
3.4. Notifications Panel ................................................................................................ 47
3.5. Applications Menu ................................................................................................. 49
3.6. Manage Applications ............................................................................................. 51
3.6.1. Current Applications .............................................................................................. 51
3.7. Suspend & Lock ..................................................................................................... 52
3.7.1. Suspend Device ..................................................................................................... 52
3.7.2. Lock Device ............................................................................................................ 52
4.1. Use Wireless Wide Area Network ......................................................................... 54
4.2. Use Wireless Local Area Network (Wi-Fi) ............................................................. 56
4.2.1. Power On/Off Wi-Fi ................................................................................................ 56
4.2.2. Connect to Wi-Fi Network ...................................................................................... 56
4.2.3. Manually Add Wi-Fi Network ................................................................................. 58
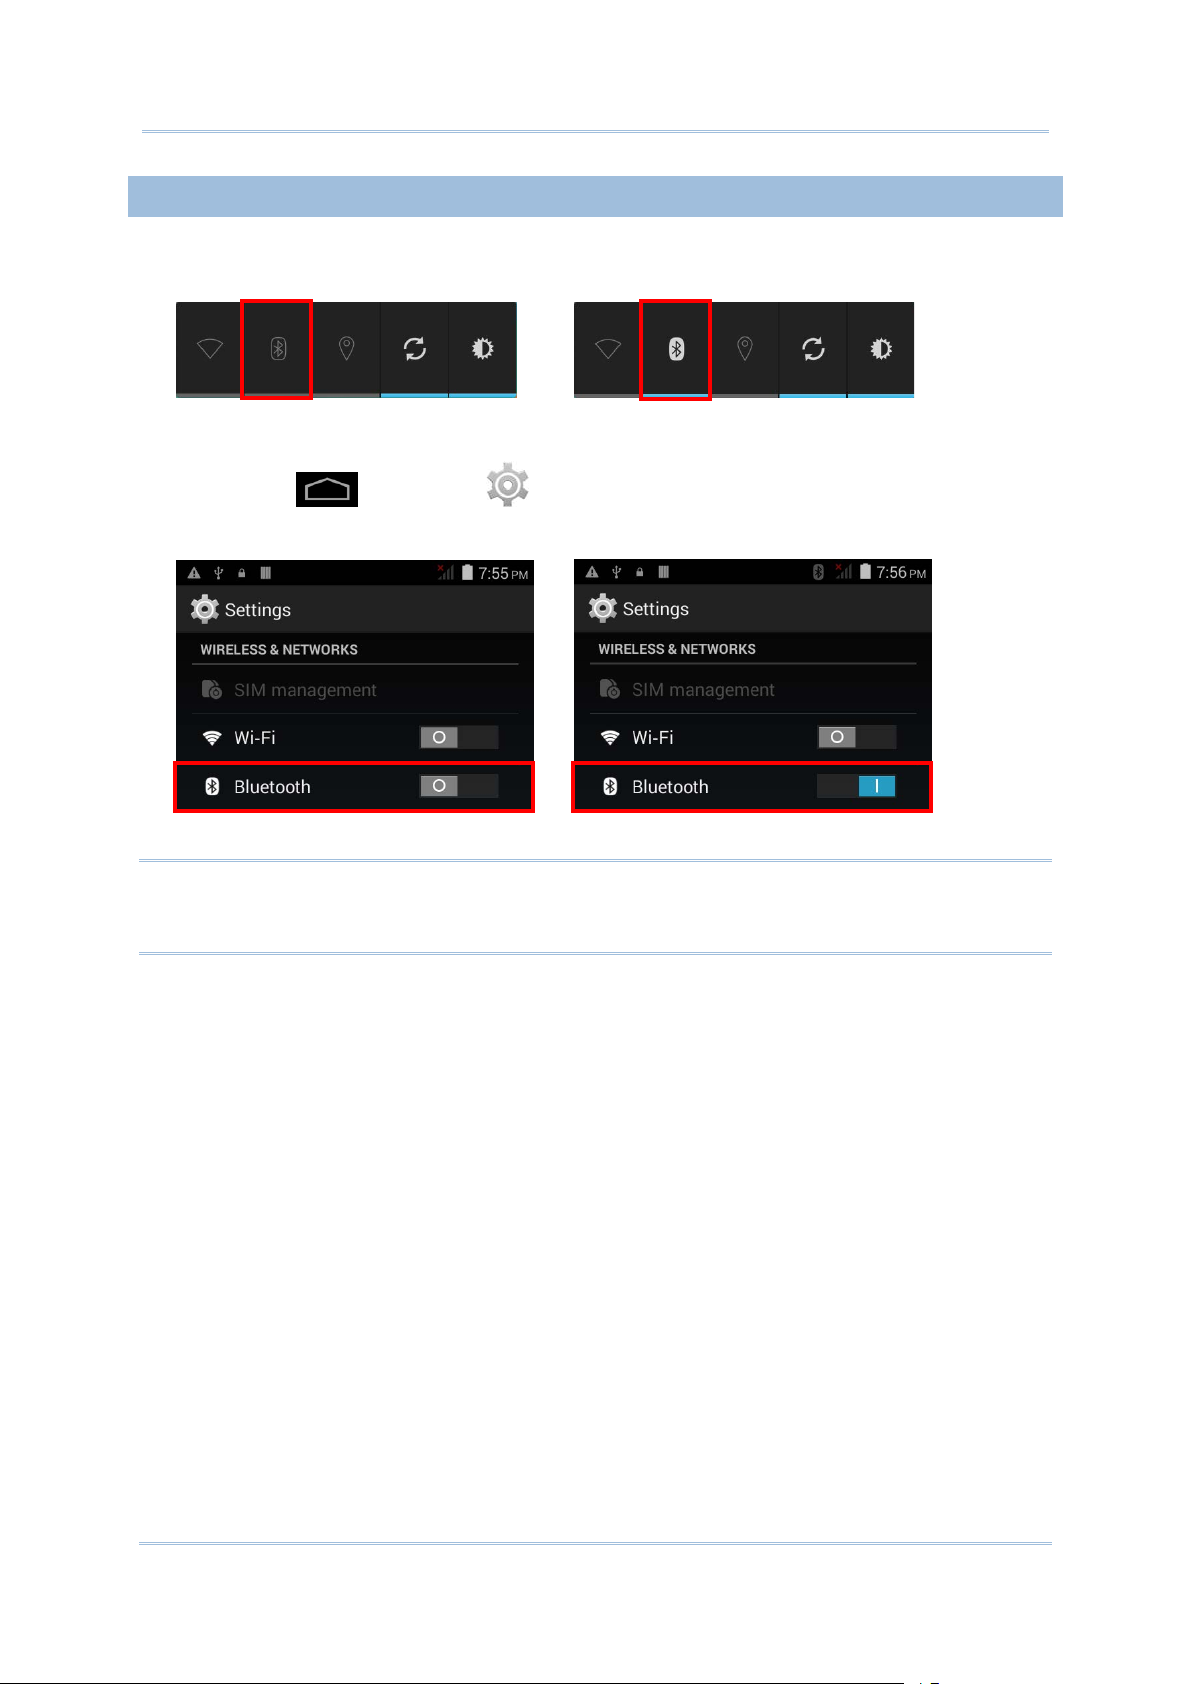
4.3. Use Bluetooth ........................................................................................................ 59
4.3.1. Bluetooth Profiles .................................................................................................. 59
4.3.2. Power On/Off Bluetooth ........................................................................................ 60
4.3.3. Set Bluetooth Visibility........................................................................................... 61
4.3.4. Change Bluetooth Name ....................................................................................... 62
4.3.5. Pair Bluetooth Device ............................................................................................ 62
4.3.6. Unpair Bluetooth Device ....................................................................................... 63
4.3.7. Select Bluetooth Service ....................................................................................... 63
4.4. Use Near Field Communications .......................................................................... 64
5.1. Phone Power .......................................................................................................... 68
5.1.1. Turn On/Off Phone Power ..................................................................................... 69
5.1.2. SIM Card Missing ................................................................................................... 69
Page 9

SPECIFICATIONS ............................................................................................................................. 71
Platform, Processor & Memory....................................................................................................... 71
Communication & Data Capture .................................................................................................... 71
Electrical Characteristics ................................................................................................................ 72
Physical Characteristics .................................................................................................................. 73
Environmental Characteristics ....................................................................................................... 74
Programming Support ..................................................................................................................... 75
Accessories ...................................................................................................................................... 75
Page 10

Page 11

The RS30 Mobile Computer, powered by Android 4.4, is light-weight, easy to use, and
INTRODUCTION
provides more powerful and handy tools to delivering flexibility in customization.
Specifically designed to work as an industrial PDA, the RS30 Mobil e Computer provi des
rich options of data collection, voice and data communication , lon g-lasting working hours,
and so on. Its large color transmissive TFT display guarantees ease in reading in all
lighting conditions. Integrated with Bluetooth and 802.11b/g technologies, you may
choose to include a GSM/GPRS module to gain greater speeds and optimal mobility. In
particular, an integrated GPS receiver is made available for use with third-party
location-based applications.
This manual serves to guide you through how to install, configure, and operate the
mobile compu te r. Th e C are & Ma i nt enan ce sect i on i s sp ecif ic all y crucial for th ose wh o a re
in charge of taking care of the mobile computer.
We recommend you to keep one copy of the manual at hand for quick reference or
maintenance purposes. To avoid any improper disposal or operation, please read the
manual thoroughly before use.
Thank you for choosing CipherLab products!
1
Page 12

9200 Mobile Computer Reference Manual
FEATURES
INSIDE THE PACKAGE
ACCESSORIES
Built tough to survive drop test and sealed against moisture/dust to industrial
standard IP54
Android 4.4 operating system with a powerful MT8382 Quad Core 1.3 GHz processor
8GB eMMC flash memory to store OS and software programs
1GB LPDDR2 to store and run programs, as well as store program data
One microSD expansion slot for SDHC memory card up to 32GB with SDXC support
Three reader options — 1D linear, 1D laser or 2D imager
Built-in 8.0 Megapixel CMOS digital camera with white LED for flash and auto focus
Left and right side triggers for ambidextrous scanning
Tota l wirel ess solution — connectivity includes Bluetooth, 802.11b/g and GSM/EDGE/
UMTS/HSPA
A 4.7” color transmissive TFT display delivering excellent visibility in all lighting
conditions
Programmable feedback indicators including speaker and vibrator
Built-in scan engine setting tool Reader Configuration
Accessories and peripherals include Snap-on Charging Cable and Charging Cradle
The following items are included in the kit package. Save the box and packaging material
for future use in case you need to store or ship the mobile computer.
RS30 Mobile Computer
Rechargeable Li-ion battery pack
Wrist Band
Protective Boot
AC Power Adaptor
Quick Guide
Snap-on Charging Cable
Charging Cradle
2
Page 13

1.1. OVERVIEW
Chapter 1
QUICK START
3
Page 14

9200 Mobile Computer Reference Manual
No. Description No. Description
1 Light Sensor 2 Receiver
3 Status LED 4 Touchscreen
5 Power Button 6 Micro USB Port
7 Side Key 8 Speaker
9 Wristband Slot 10 Charging Pins
11 Headset Jack 12 Scan Window
13 Camera Flash 14 Camera
15 Battery Cover Latch 16 Battery Cover
17 Volume Buttons 18 Side Key
19 Wristband Slot
4
Page 15

Chapter 1 Quick Start
1.1.1. INSTALLING BATTERY
For shipping and storage purposes, the mobile computer and the main battery are saved
in separate packages.
Note: Any improper handling may reduce the battery life.
To install the main battery:
1) Push the battery lock at the top of the battery cove r to the right in order to unlock.
2) Open the battery cover by pulling up the tab in the lower right corner.
3) Insert the main battery with the contact pins seated in the bottom left corner.
4) Fix the left edge of the battery cover first.
5) Press in the battery cover at the dotted sites.
6) Push the battery lock back to the lock position.
Warning:
(1) Check that the battery lock is at the “lock” position before powering on the device.
(2) For initial use, in sert a charg ed bat te ry, lock batt ery c ove r i n pl ace, then press the
Power key to power on the mobile computer.
5
Page 16
9200 Mobile Computer Reference Manual
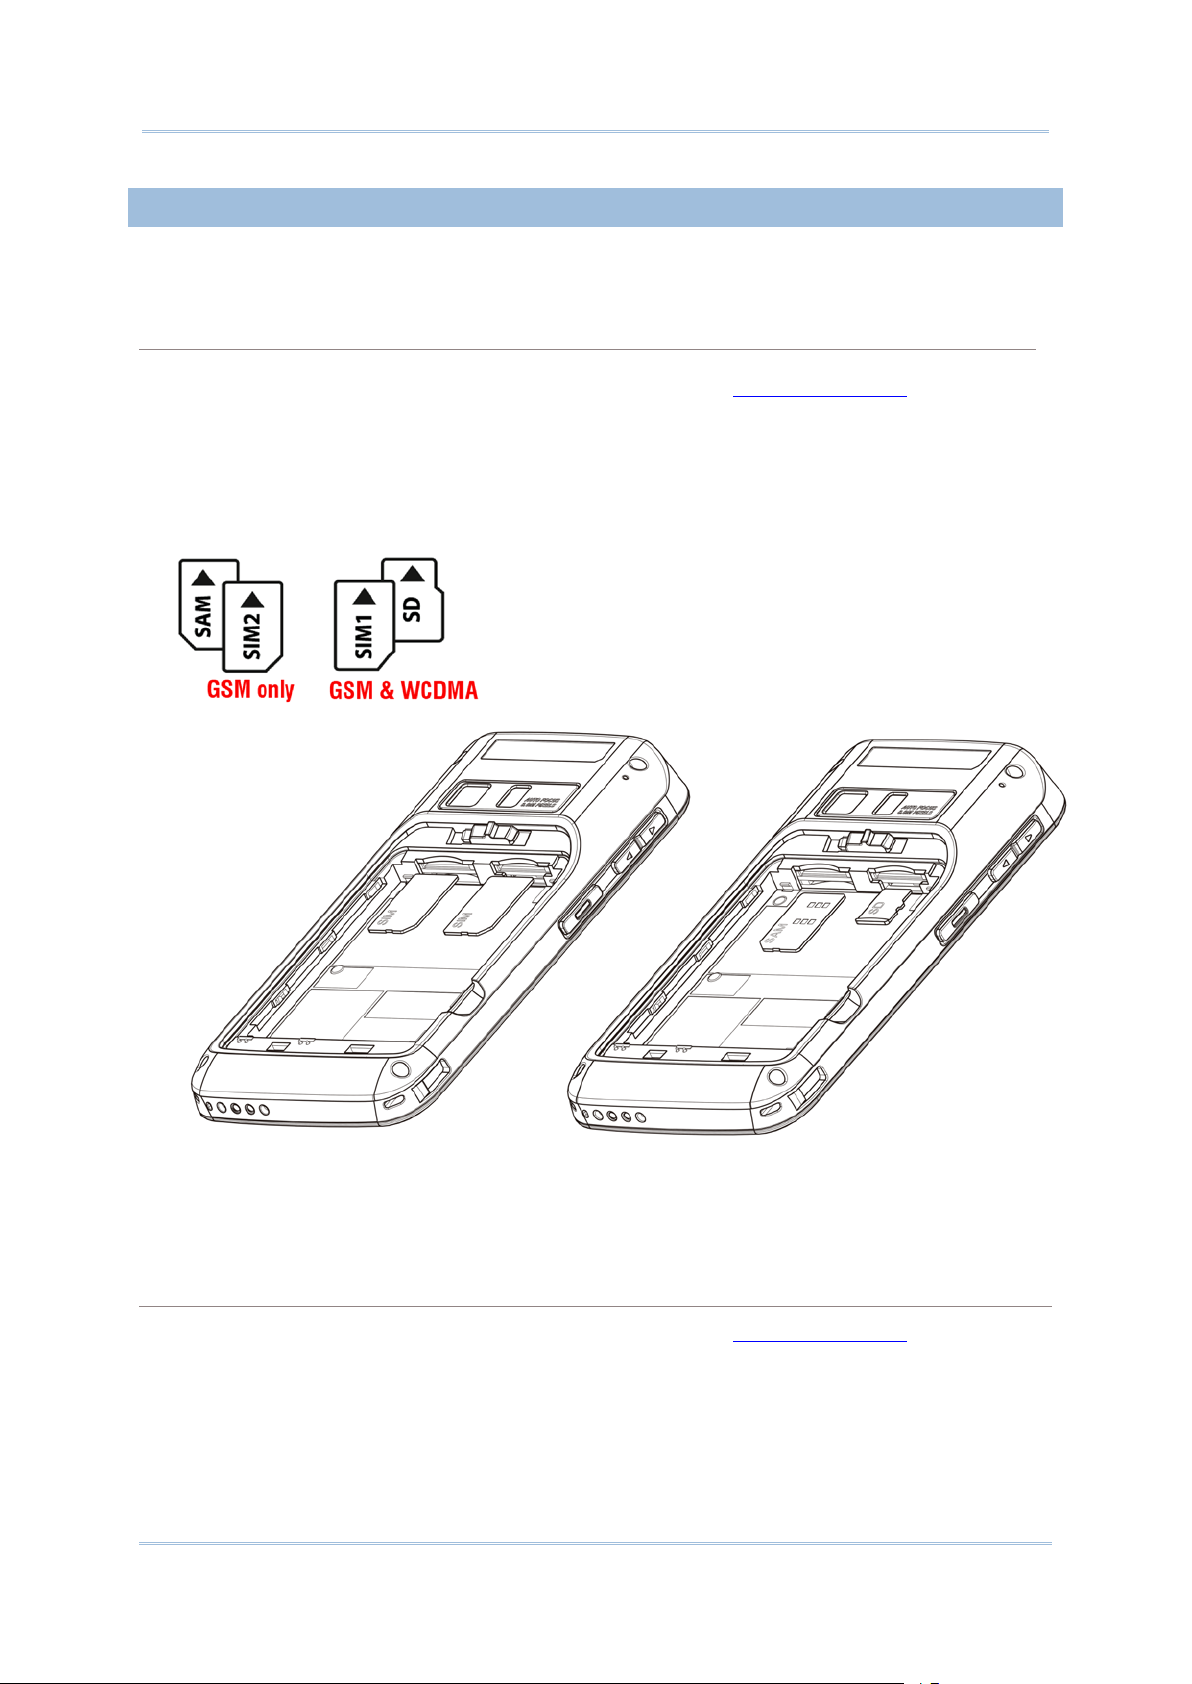
1.1.2. INSTALLING SIM CARD, SAM CARD AND MEMORY CARD
Insert Cards
Remove Cards
The RS30 Mobile Computer is equipped with two SIM ca rd slots, one SAM card sl ot and
one memory card slot.
1) Remove the battery cover as described in steps 1-3 of Installing Battery.
2) The two SIM card slots are located above the slots for the SAM card and SD card.
Insert the cards into their respective slots according to the directions indicated. Push
the cards to lock them in.
The SIM 1 slot (on the right) supports both 2G and 3G networks, while the SIM 2 slot
(on the left) supports only 2G networks.
3) Replace the battery cover and push the ba ttery lock back to the lock position.
1) Remove the battery cover as described in steps 1-3 of Installing Battery.
2) Push the SIM cards, SAM card and SD card to eject them from their slots.
3) Replace the battery cover and push the battery lock back to the lock position.
6
Page 17
Chapter 1 Quick Start
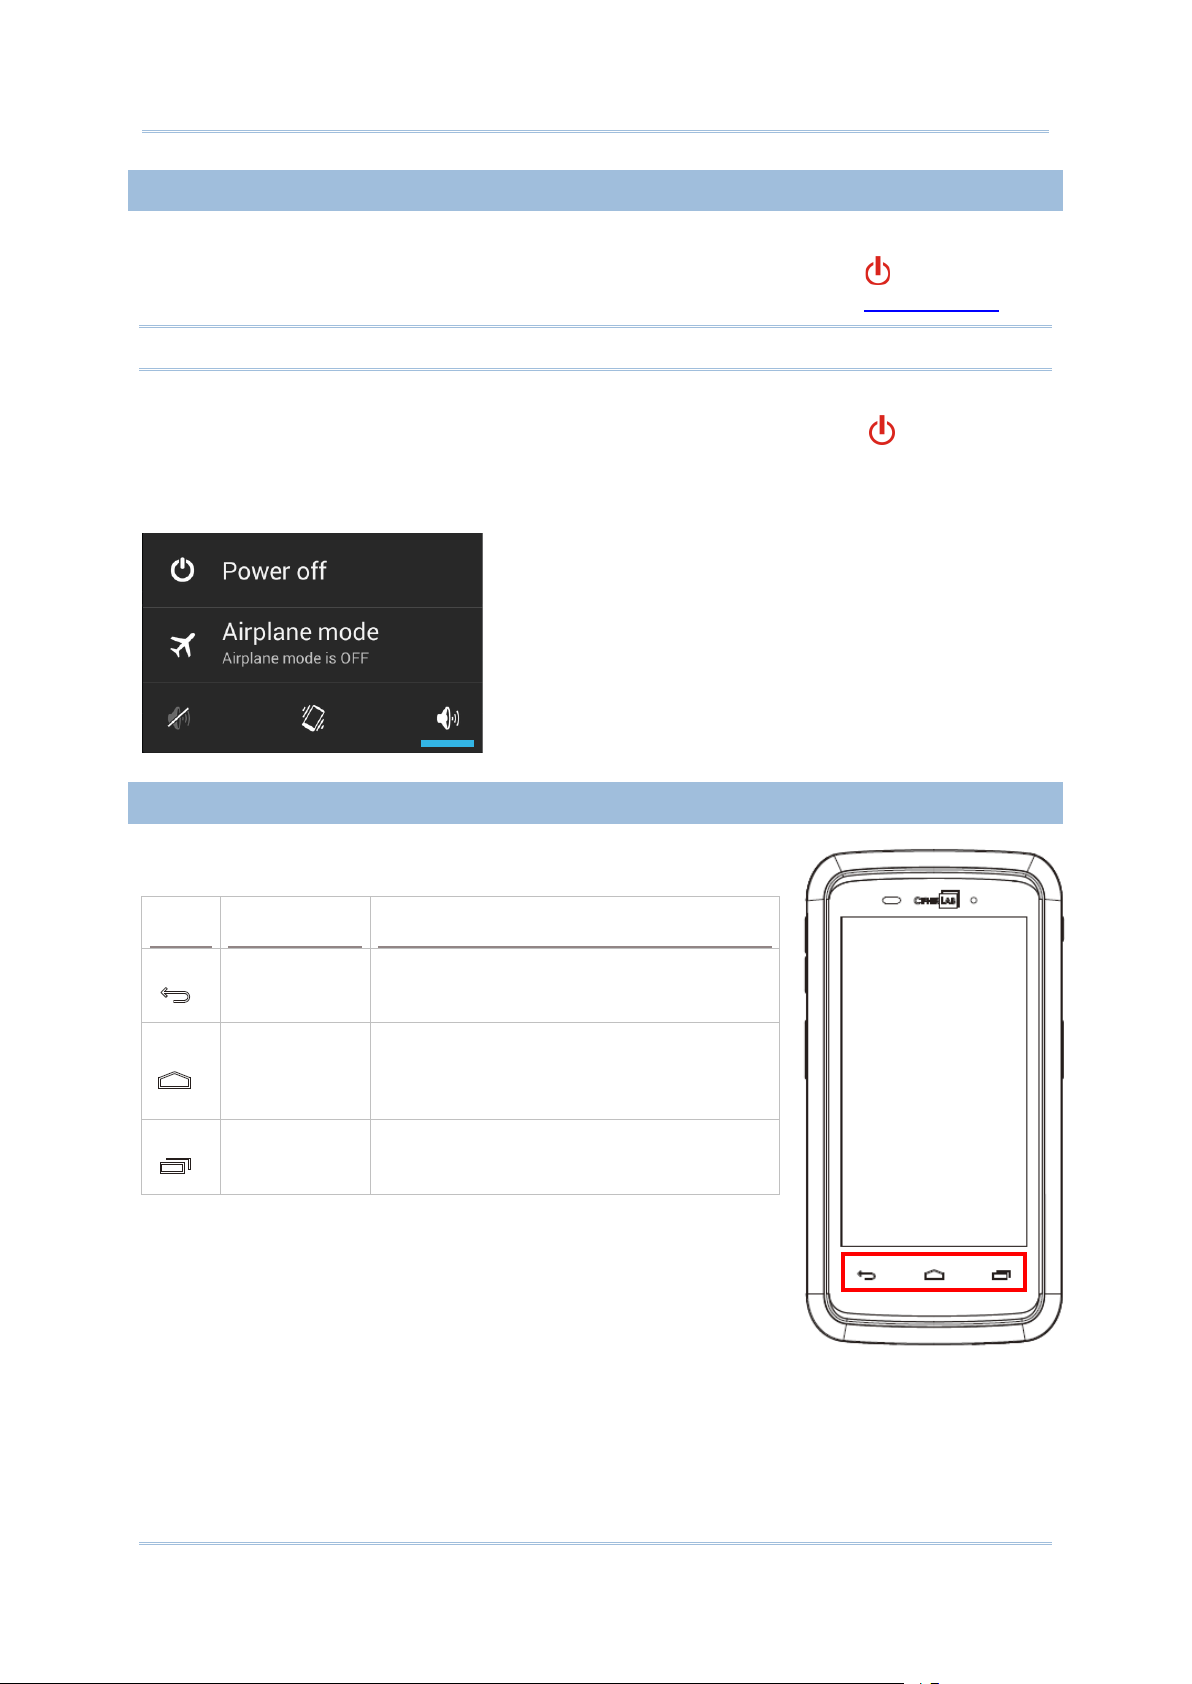
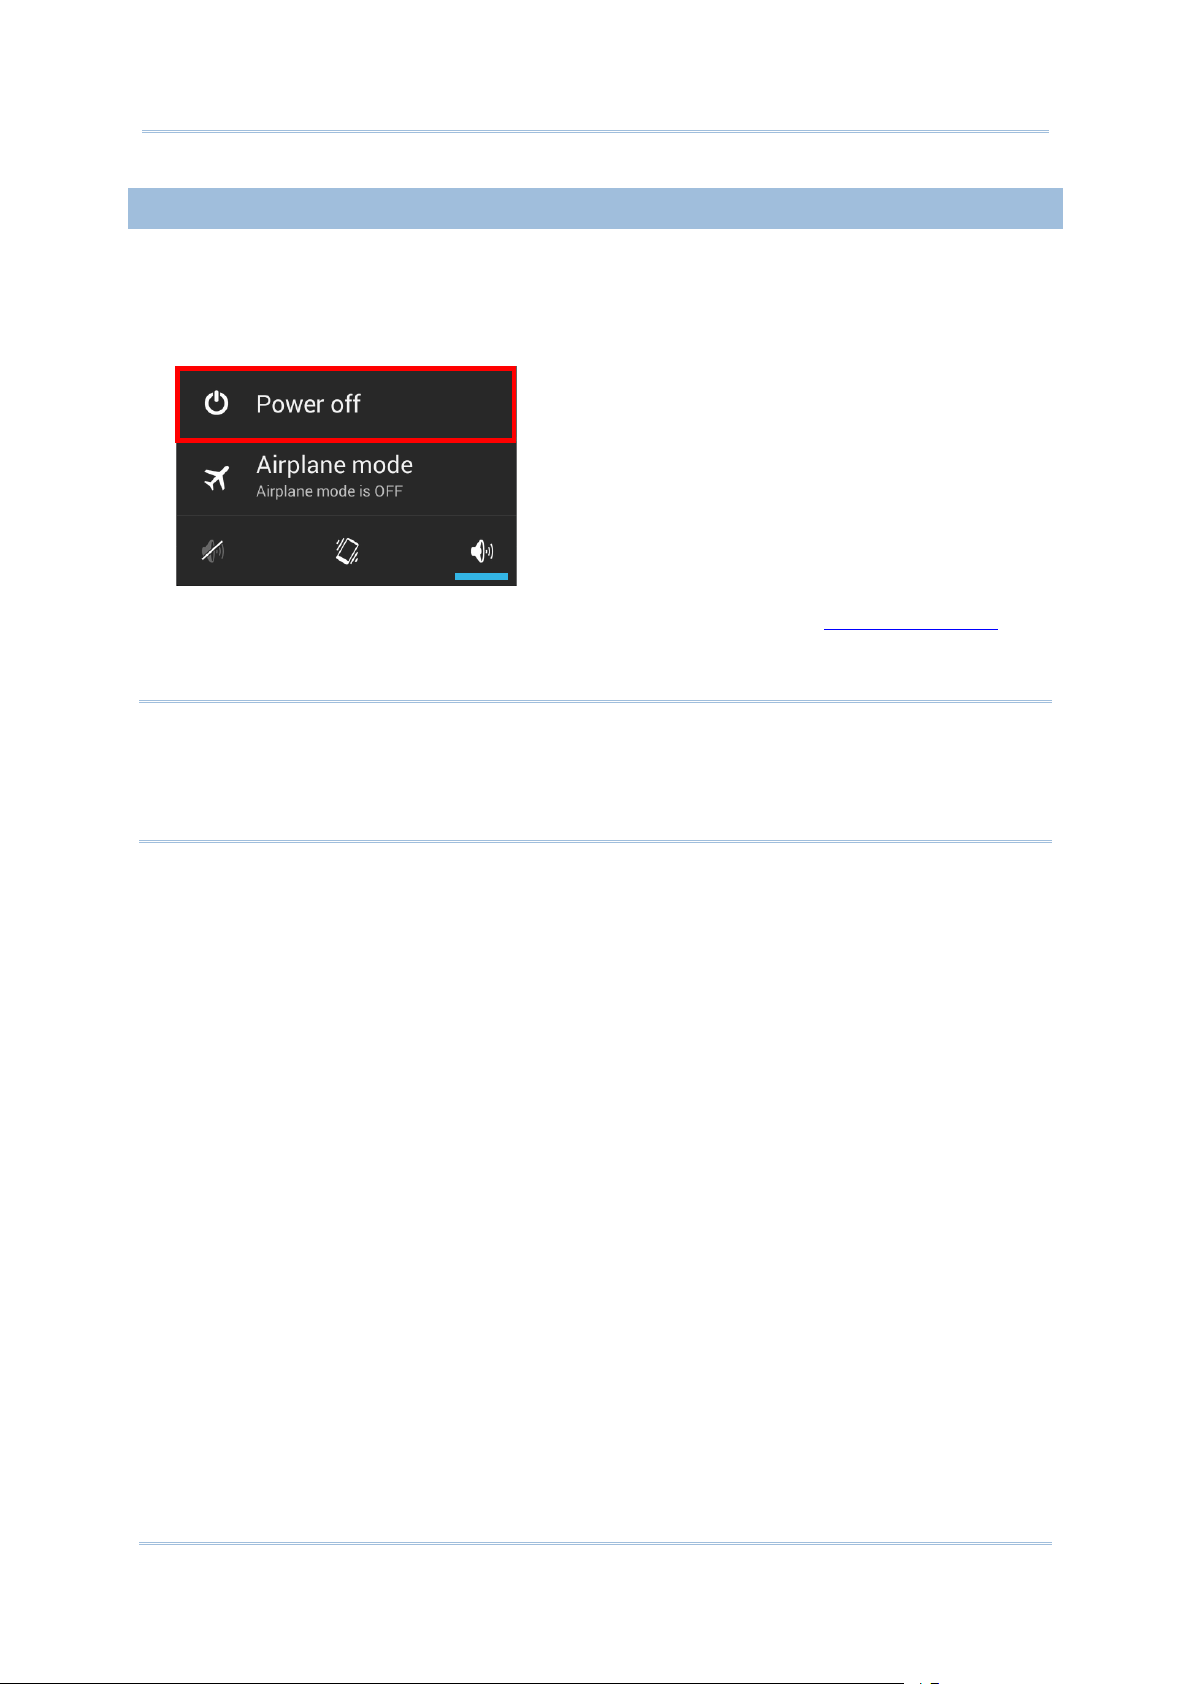
1.1.3. POWER ON/OFF MOBILE COMPUTER
POWER ON
POWER OFF
1.1.4. USING HARDWARE BUTTONS
Button
Function
Description
To power on the mobile computer, press and hold the power button located on the
upper right side of the device. The mobile computer opens to show the Home Screen
Note: For the mobile computer to power on, the battery cover must be secured in place.
To power off the mobile computer, press and hold the power button for more than
three secon ds. A menu wi ll appear on -screen wh ich allows you t o power off the devi ce,
switch to airplane mode, or set the system sound to mute or vibrate only. Make sure all
user data and tasks have been stored before tapping Power off.
.
On the bottom of the mobile computer are three hardware
buttons that deliver the following functions:
Back button
Home button
Recent apps
button
Returns to the previous screen or closes
the active window or keyboard.
Displays the Home screen. Tap and hold
the Home button to ope n a list of recently
used applications.
Opens a list of recently used applications.
7
Page 18

9200 Mobile Computer Reference Manual
1.1.5. CONNECTING HEADSET
The he adset jack is located on the top of the mob ile comput er. You c an use th e headset
for audio playback or communicat ion via the phone application, audio instant messaging,
etc.
1) Flip up the rubber cover.
2) Connect the headset to the headset jack.
3) Replace the rubber cover.
8
Page 19

Chapter 1 Quick Start
1.2. CHARGING & COMMUNICATION
1.2.1. CHARGE MOBILE COMPUTER
Charging Time
The backup battery is mounted on the main board. Its role is to temporarily
obile computer in suspension when the main battery is drained out so data in
Charging Temperature
at room temperature (18°C to 25°C) for optimal
Operation on Battery Power
after the battery is drained out, we suggest that you
or connect the mobile computer to an
The main battery may not be charg ed to ful l for shi pment . When you first rec eive th e kit
package, you will need to charge the main battery to full before using the mobile
computer. You may use the USB Snap-on USB Cable or Charging Cradle along with a
power adapter to charge the mobile computer.
Main batt e ry: The main battery powers the mob ile computer to work. It takes approximately 4
hours to charge an empty main battery to full. The charging LED above the screen (located on
the right) will light u p in red while charging and will turn green when charging is complete.
When the main battery is removed, R TC retention will be m a intained.
Backup battery:
keep the m
DRAM will be retained. The backup battery takes approximately 3.5 hours to charge to full by
the main battery or power adapter.
It is recommended to charge the battery
performance.
Battery charging stops when ambient temperature drops below 0°C or exceeds 40°C.
When 802.11b/g, GSM/GPRS, Bluetooth and GPS are all enabled on battery power, the main
battery charge w ill drop down substantially.
In order to prevent system shut down
keep a fresh battery for replacement at all times,
external power.
9
Page 20
9200 Mobile Computer Reference Manual
USING USB SNAP-ON USB CABLE
RS30 LED Indicator
Status
Description
1) Fasten the Snap-on USB Cable to the lower end of the mobile computer.
2) Connect the other end of the Snap-on USB Cable to the adapter.
3) Fix the adapter plug onto the adapter, and plug in into an electrical outlet.
Charging Red, solid Charging the mobile c om puter
Green, solid Charging complete
10
Page 21

Chapter 1 Quick Start
USING CRADLE
RS30 Cradle LED Indicator
Status
Description
1.2.2. WIRED DATA TRANSMISSION
1.2.3. USING WIRELESS NETWORKS
1) Insert the mobile computer onto the Charging Cradle.
2) If a Protective Boot is installed on the mobile computer, remove the cap on the
Cradle’s charging station, and insert the mobile computer.
3) Connect the adapter to the Cradle, and plug the other end into an electrical outlet.
Charging Red, solid Charging the mobile c om puter
Green, solid Charging complete
No light Charging error (charging will sto p)
Use the micro USB cable to connect the mobile computer to your PC for data
transmission.
The mobile computer supports widely applied wireless technologies, Bluetooth and
802.11b/g, and is able to send/receive data in real time in an efficient way. Select
GSM/GPRS modules embedded for a total wireless solution for data and voice
communication.
11
Page 22

9200 Mobile Computer Reference Manual
12
Page 23

This chapter explains the features and usag e of the mobile computer.
IN THIS CHAPTER
Chapter 2
USING THE RS30 MOBILE COMPUTER
2.1 Battery ...................................................................... 14
2.2 Memory ..................................................................... 20
2.3 Touch Screen ............................................................. 22
2.4 Notifications ............................................................... 25
2.5 Date and Time ............................................................ 28
2.6 Language & Keyboard Input ......................................... 29
2.7 Sound and Volume ...................................................... 30
2.8 Data Capture .............................................................. 31
2.9 Snap-on USB Cable ..................................................... 32
2.10 Charging & Communic ation Cradle .............................. 32
13
Page 24

9200 Mobile Computer Reference Manual
2.1. BATTERY
Main Battery
The mobile computer is powered by a rechargeable 3.8V / 3100mAh Li-ion battery
pack, and it takes approximately 4 hours to charge it to full from the power adaptor.
However, the charging time may vary by your working condition.
Sp are B at t e ry
A spare battery pack is provided as an accessory. We recommend keeping a fully
charged spare battery at hand in order to replace the main battery when it is nearly
drained out.
Backup Battery
Settled on the main board is a backup battery that keeps the mobile computer in
suspension when the main battery is depleted. The backup battery is a 60 mAh
rechargeabl e Li-ion battery, and can retain data in the DRAM for 30 minutes when it
is fully cha rged (as long as wireless modul es on the mobile compu ter are inactive).
The backup battery can be charged by the main battery or the power adapter, and
takes approximately 3.5 hours to charge to full.
Warning:
(1) The battery cover must be secured in position. If not, the mobile computer cannot
turn on by pressing the power ke y or wake up by pressing the scan key.
(2) For a new battery, make sure it is fully charged before using.
(3) To avoid data loss, when replacing the main battery, make sure you replace it with
a well-charged spare battery pack. Always prepare a spare battery at hand,
especially when you are on the road.
14
Page 25
Chapter 2 Using the RS30 Mobile Computer
2.1.1. BATTERY STATUS INDICATORS
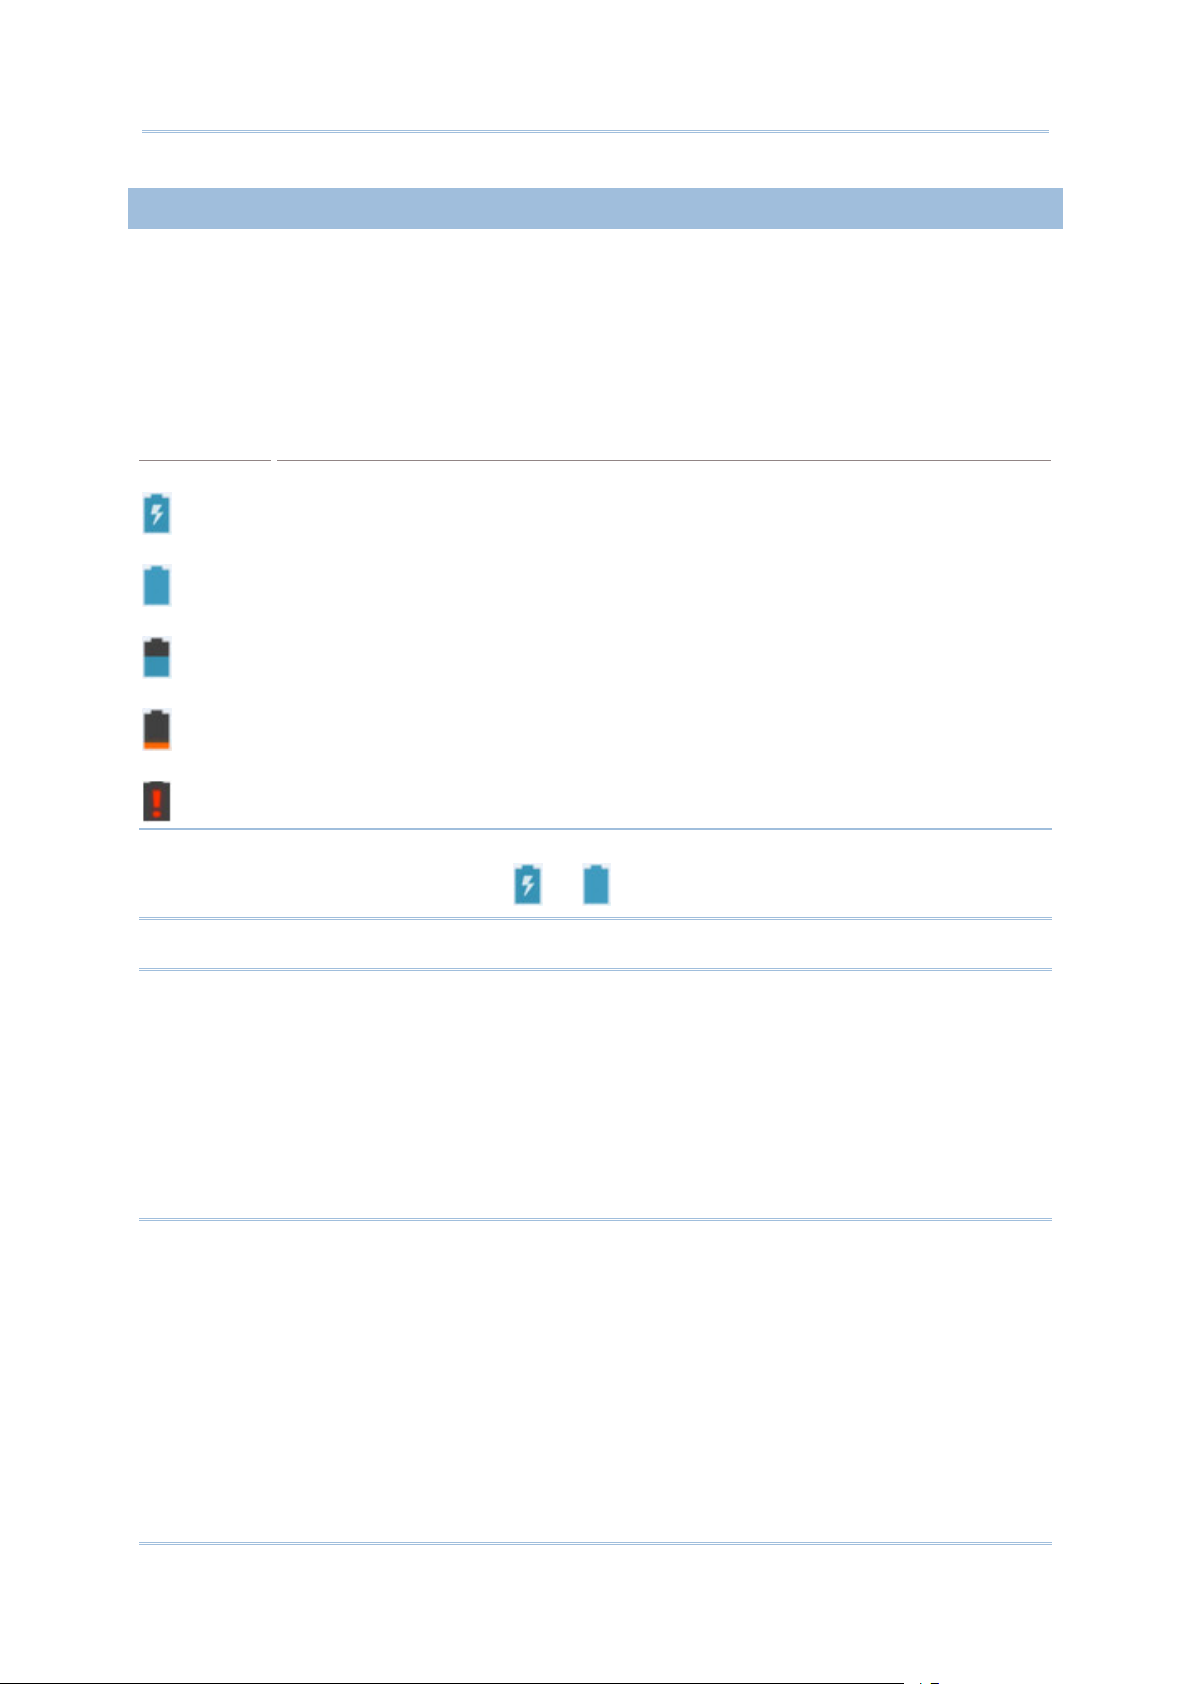
Battery Icon
Description
The main battery pack is the only power source for the mobile computer to work.
Therefore, w hen the mai n battery level goes low, you need to replace the battery pack
with a charged one or charge it as soon as possible. Most of all, you should backup
important data on a regular basis.
By checking the battery status icon, you can tell the battery level remainin g in the m ain
battery.
External power s ource is connected and main battery is being charged.
Main battery is fully charged.
Main battery level is partially drained.
Main battery level is low.
Main battery level is very low and needs charging immediately.
Note: When t he mobile computer i s fully charged an d battery level reach es 100%, the
battery icon will change from to to indicate charging is completed.
Warning:
(1) Once the battery level drops below 20%, the low battery notification will be
displayed on the screen.
(2) Data loss with RAM may occur when b attery l evel is low . Always save data before
the battery runs out of power or keep a fresh battery for replacement.
(3) Constant usage of the mobile computer at low battery level can affect battery life.
For maximum performance, recharge the battery periodically to avoid battery
drain out and maintain good battery he alth.
15
Page 26
9200 Mobile Computer Reference Manual
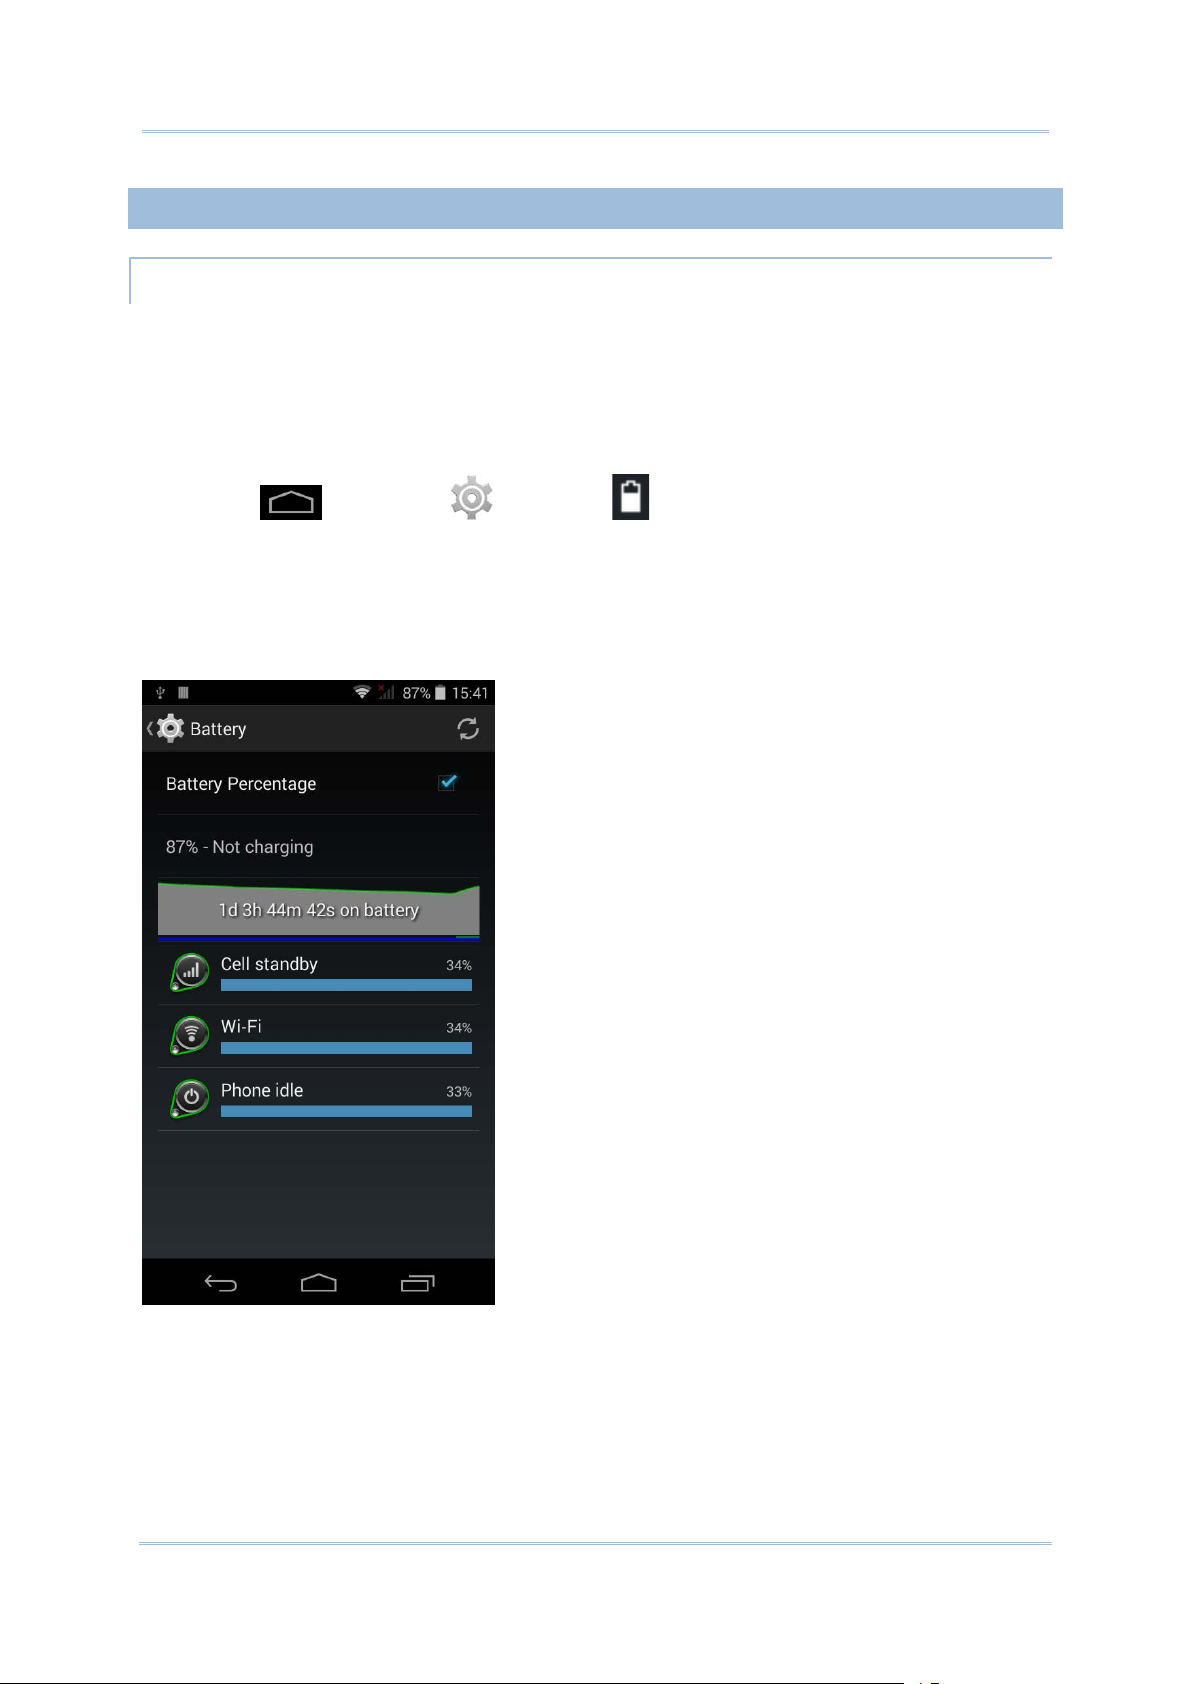
2.1.2. MONITOR BATTERY LEVEL
MAIN BATTERY LEVEL
The main battery is the only source that feeds the mobile computer to work. It also
supplies the backup battery on the main board in order to retain the data stored in DRAM.
When main battery level gets low, recharge it or replace it as soon as possible. Most
critically, back up the important data from time to time to protect your work.
To check main battery level:
Tap Home
Battery level percent age is also sh own to pro vide a clear g rasp of th e remaini ng battery
power. The screen also shows the rate of battery discharge since the last battery
charging session, how long the device has been running on battery power, and which
applications are consuming the most battery power.
| Settings | Battery .
16
Page 27

Chapter 2 Using the RS30 Mobile Computer
LOW BATTERY ALERT
When the main battery level drops to 20%, the mobile computer prompts a warning
reminding you to charge the mai n battery. When the main battery level drops to 10%,
the mobile computer prompts a second warning. When the main bat tery level drops to
4%, the mobile computer shuts down. When either of th ese situations occurs, connect
the mobil e computer to an external power source, or repla ce the main batter y pack as
soon as possible.
To replace the main battery pack, se e Replace Main Battery
.
17
Page 28
9200 Mobile Computer Reference Manual
2.1.3. REPLACE MAIN BATTERY
When main battery level is low, follow the steps below to replace the main battery.
1) Press and hold the power button on the side of the mobile computer.
2) Tap power off in the pop-up menu. The mobile computer will power off.
3) Open the battery cover and insert a charge d main battery a s in Installing Battery
4) Press the power button t o pow e r on the mobile computer.
Note:
(1) Before replacing the main battery, make sure the backup battery is well-charged in
order to avoid unnecessary data loss.
(2) After removing the main battery, insert a well-charged battery as soon as possible.
.
18
Page 29

Chapter 2 Using the RS30 Mobile Computer
2.1.4. POWER MANAGEMENT
For any portab le device, p ower managemen t is a criti cal i ssu e especially wh en you are on
the road. Below are some tips to help you save battery power.
Warning: Using backlight, wireless connectivity, and peripheral devices while on
battery power will substantially reduce battery power.
Bring an additional main battery pack with you on the road.
End wireless connections (such as Bluetooth, 802.11a/b/g/n, GSM/GPRS, and GPS)
which are not in use.
Shorten the screen turn off time. See Screen Timeout Settings.
Reduce the screen brightness level. See Screen Brightness.
Shut down automatic data syncing of applications (such as Email, Calendar,
Contacts).
19
Page 30

9200 Mobile Computer Reference Manual
2.2. MEMORY
CAUTION OF DATA LOSS
Flash Memory (ROM)
8GB flash memory for storing the OS (Android 4.4) and custom application programs.
Random-access Memory (RAM)
1GB RAM for storing and running programs, as well as storing program data.
Expansion Slot
The mobile computer is equipped with one microSD card sl ot which accommodates an
SD card up to 32 GB. High capacity memory card (microSDHC) is supported as well.
When the main battery is removed or drained, the backup battery on the main board
takes over to supply the mobile computer and keep it in suspension. A fully charged
backup battery will retain the data in the RAM for 30 m inutes. When th e backup battery
is drained out as well, only the contents of RTC wil l be retained. A ll other unsaved d ata
will be lost.
If you w ant to put away the mobile computer for a couple of days, you should be aware
that data loss occurs when the main battery and backup battery discharges completely.
Therefore, it is necessary to backup data and files before putting away the mobile
computer.
20
Page 31

Chapter 2 Using the RS30 Mobile Computer
2.2.1. CHECK STORAGE SPACE
Tap Home | Settings | Storage to check usage of the internal and
external storage spaces.
21
Page 32

9200 Mobile Computer Reference Manual
2.3. TOUCH SCREEN
2.3.1. SCREEN BRIGHTNESS
2.3.2. SCREEN ROTATION
The mobile computer comes with a 4.7” TFT graphic LCD with 240 by 320 pixels
resolution (QVGA). The LED backlight of the screen, w hich helps ea se read ing u nder di m
environments, can be controlled manually and automatically.
Warning: DO NOT use any pointed or sharp objects to move against the surface of
the screen.
Tap Home | Settings | Display | Brightness.
Adjust screen brightness by dragging the slider to the right (to i ncrease brightness) or
left (to reduce brightness). Select the Economical backlight checkbox to enable
automatic backlight adjustment with the mobile computer’s built in sensor.
Note: To sa ve bat tery p ower, dim the screen brigh tness whi le worki ng in a well-li t area,
or set a shorter sleeping plan for the screen back light to g o off.
For the mobile computer to automatically adjust screen orientation:
Select Home
Note: The Home Screen does not rotate.
| Settings | Display | Auto-rotate sc reen.
22
Page 33
Chapter 2 Using the RS30 Mobile Computer
2.3.3. SCREEN TIMEOUT SETTINGS
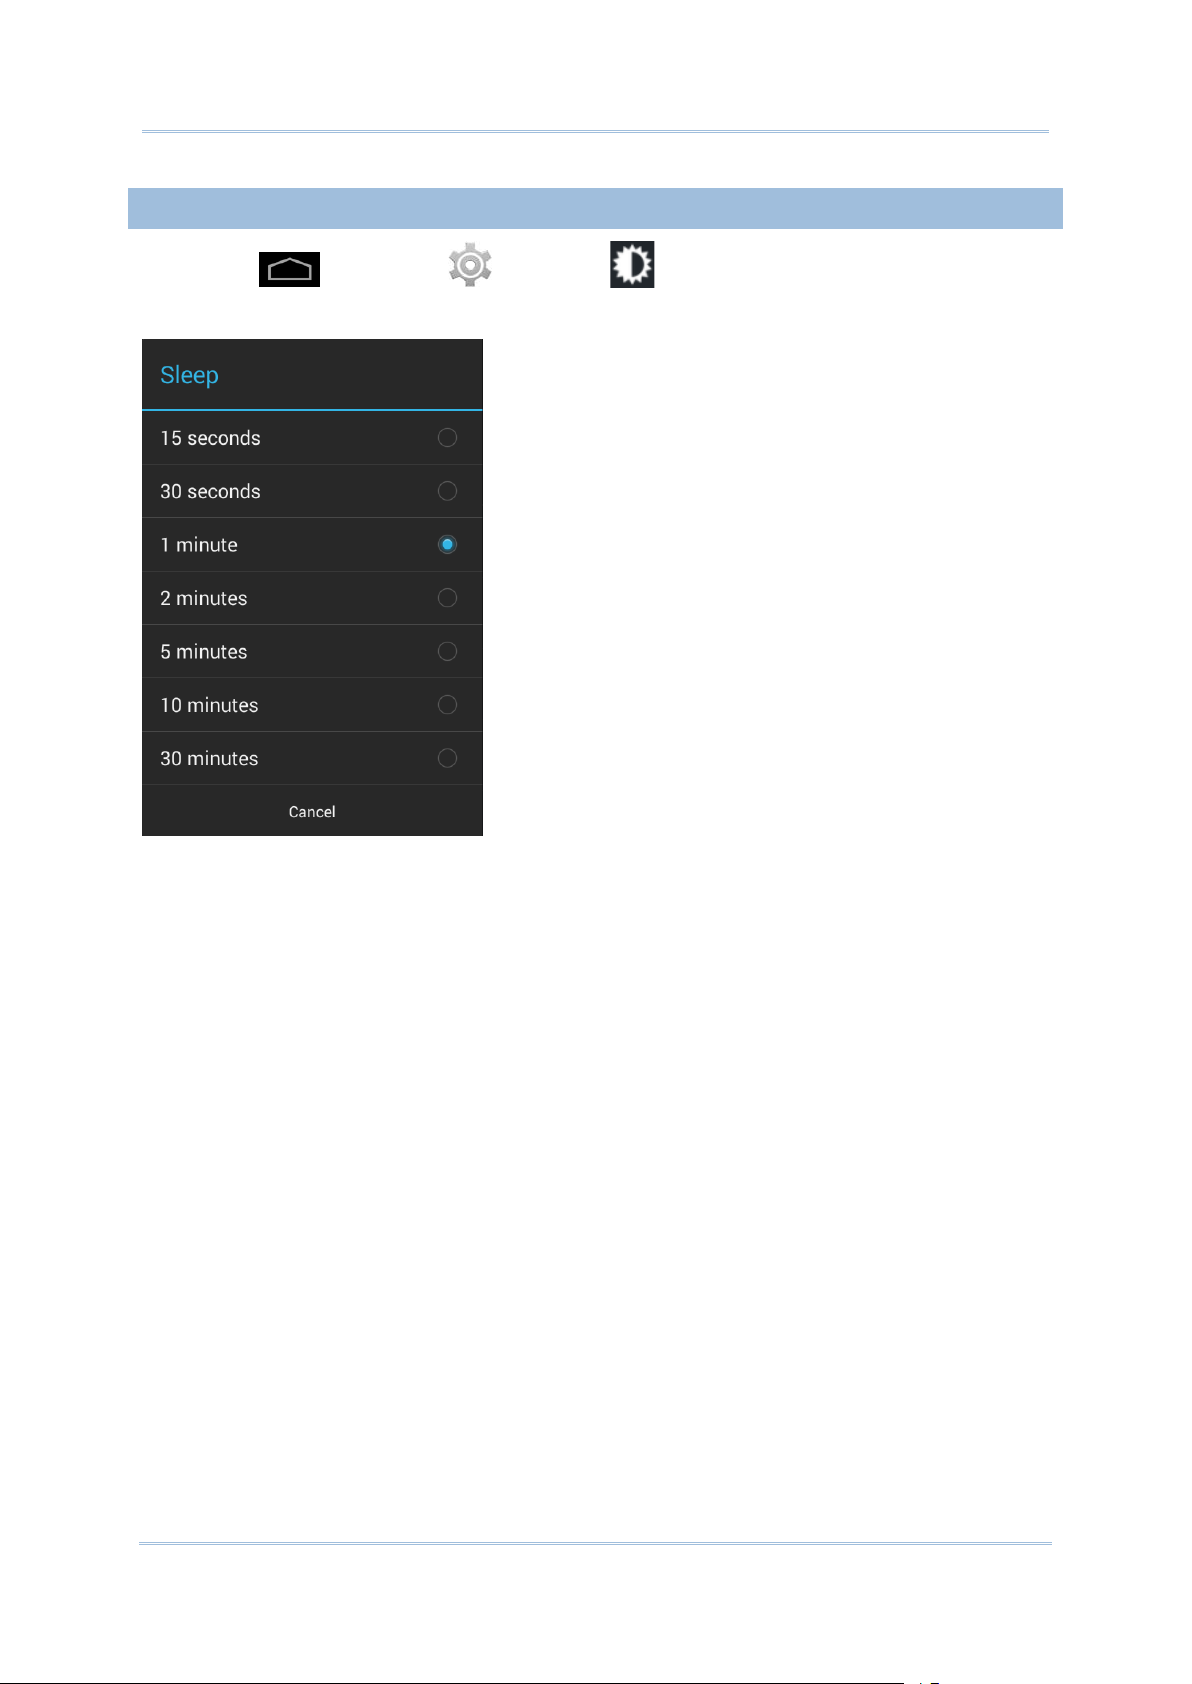
Tap Home | Settings | Display | Sleep.
Select the time for screen timeout.
23
Page 34
9200 Mobile Computer Reference Manual
2.3.4. TEXT SIZE
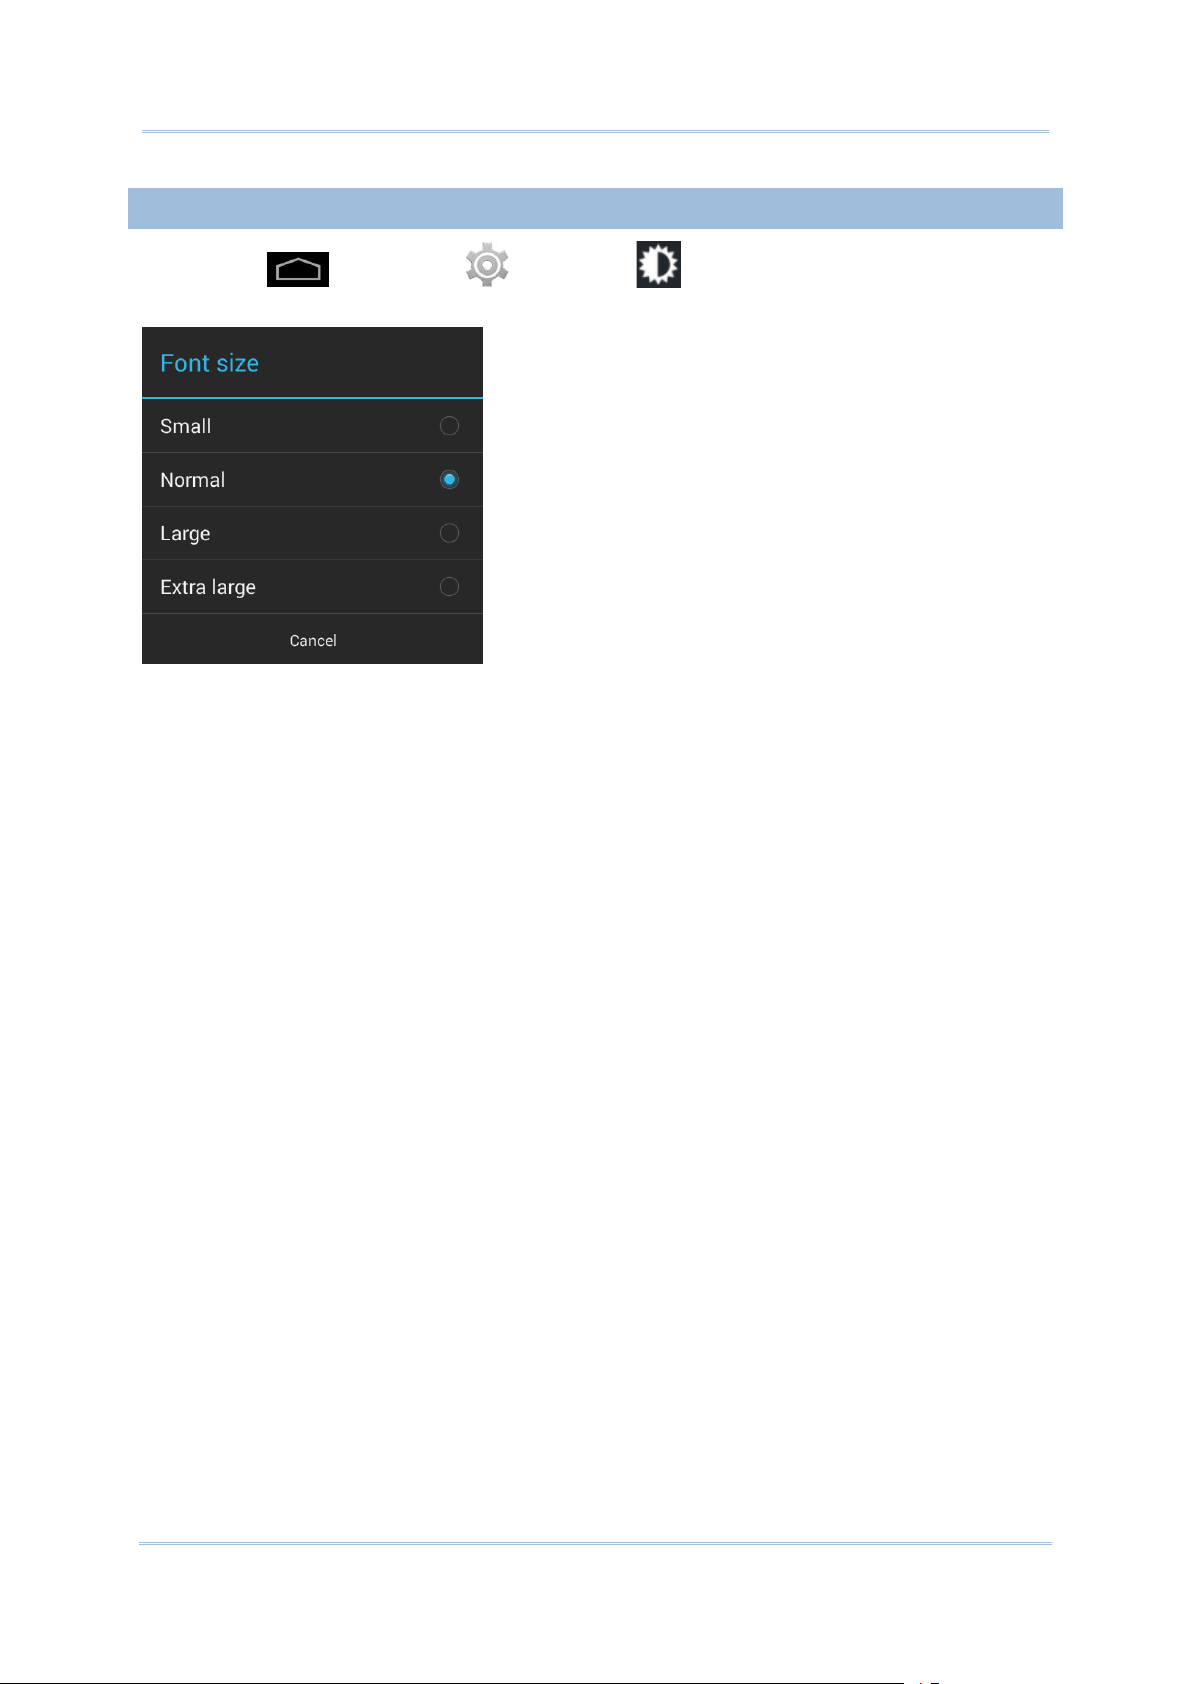
Tap Home | Settings | Display | Font Size. Select the font size
between Small, Normal, Large and Extra Large.
24
Page 35
Chapter 2 Using the RS30 Mobile Computer
2.4. NOTIFICATIONS
2.4.1. STATUS LED
Indicator
Status
Description
2.4.2. AUDIO
AUDIO PROFILE
An LED indicators located above the touch screen provide information about charging
status, scanner light beam, and sc anner "Good Read" during data collection.
Green, solid
Charging
Scanner decode Green, flash once Good read
Wireless radio Blue, blinking Wi-Fi, Bluetooth, or mob ile data is in use
Red, solid Charging the mobile c om puter
Red, blinking
Charging complete
Charging error (for instance, battery not in
place)
The speaker is used to play sounds for events in Windows and programs, or play audio
files. In addition, it can be programmed for status feedback. In noisy environments, you
may consider conne cting a headset instea d. A headset jack i s provi ded on th e top of the
mobile computer, which is a 3.5 mm DIA stereo earphone jack. The mobile computer
also supports using Bluetooth headsets.
Supported audio file formats include: WAV, MP3, AAC, AAC+, Enhanced AAC+, AU
(including ADPCM), Midi, XMF, AMR (NB and WB).
Use the volume buttons on the side of the mobile computer to adjus t the system volume.
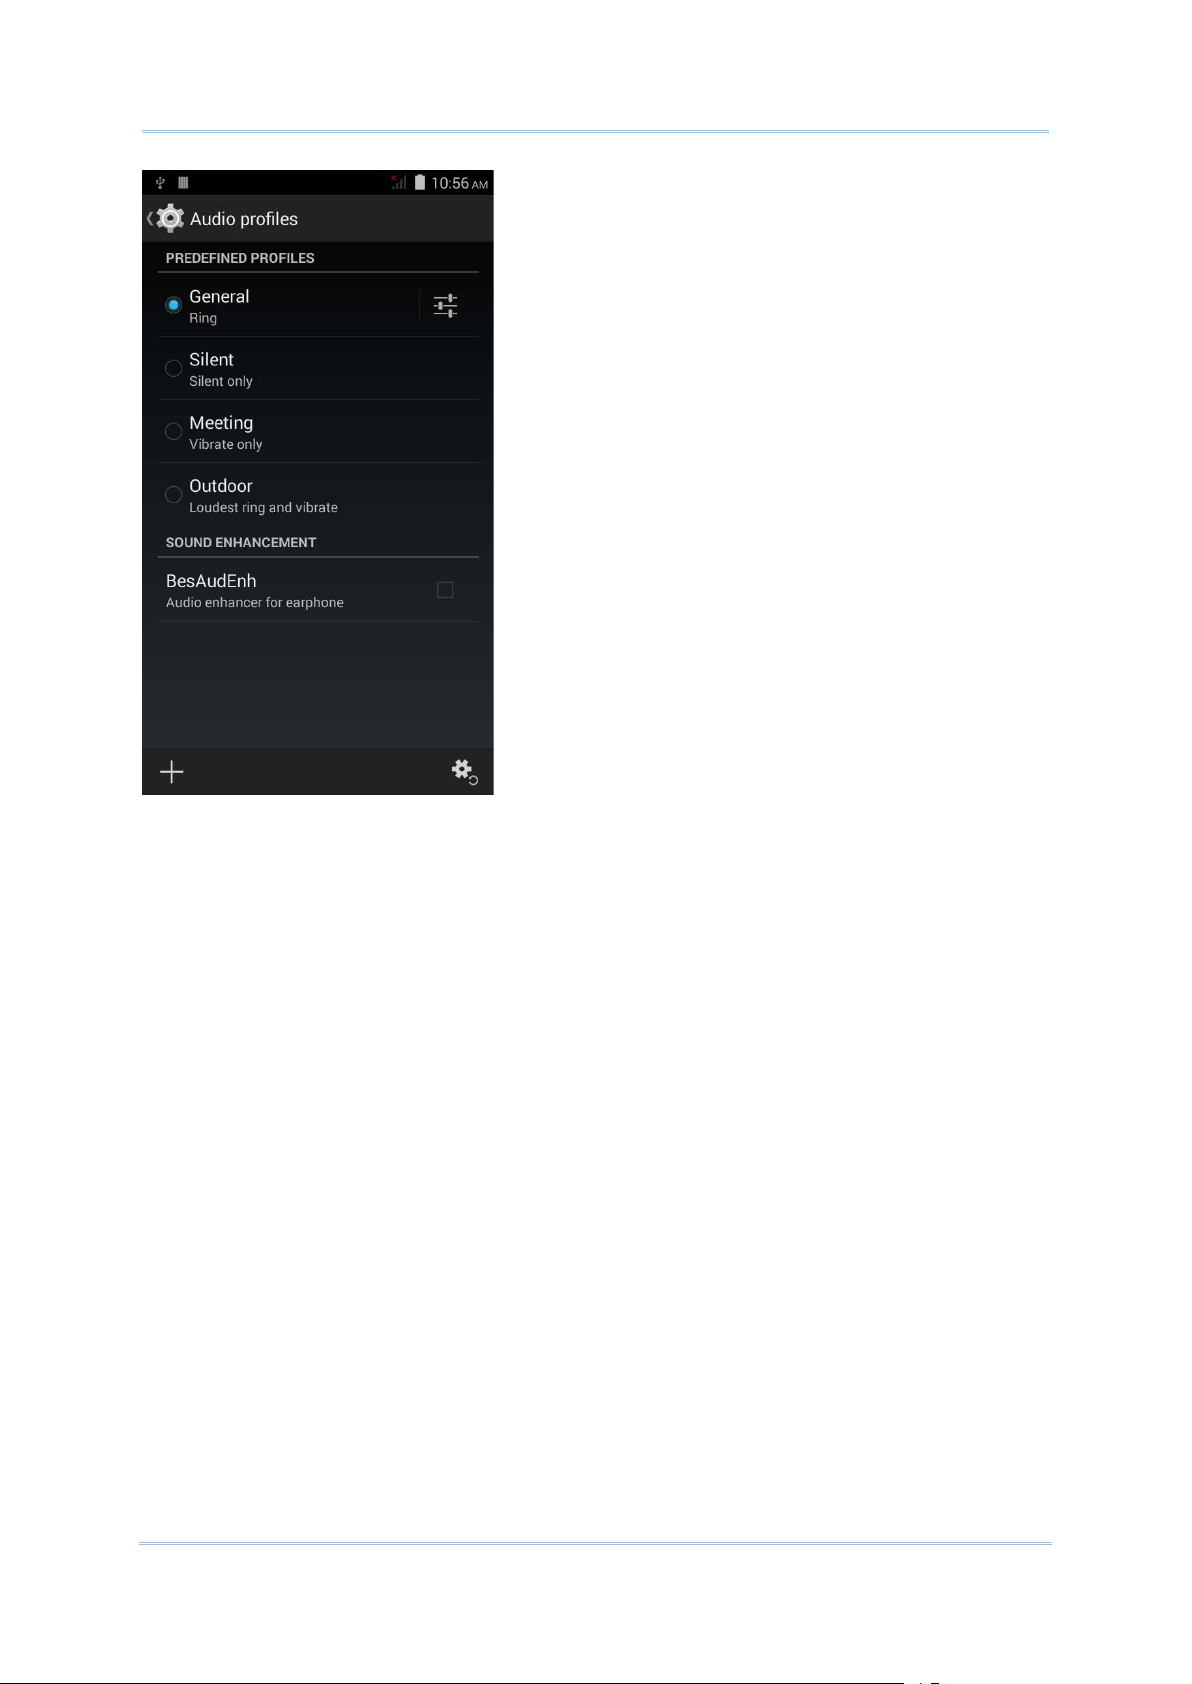
Tap Home | Settings | Audio profiles .
Select the audio profile to suit your working environment.
25
Page 36
9200 Mobile Computer Reference Manual
26
Page 37
Chapter 2 Using the RS30 Mobile Computer
2.4.3. VIBRATOR
The mobil e computer is int egrated with a vib rator, which is soft ware programmabl e for
tactile feedback. This can be helpful when worki ng in noisy environments.
You may also s et the m obile computer to vibrate only, in which all system sounds will be
muted and replaced by the vibrator. Tap Home
and select Meeting – Vibrate o nly.
| Settings | Audio profiles
OR
Press and hold the power key, and tap the vibrate mode ico n
27
in the menu.
Page 38

9200 Mobile Computer Reference Manual
2.5. DATE AND TIME
2.5.1. SET DATE, TIME AND TIME ZONE
By default, the mobile computer automatically synchronizes the date and time to the
WAN network (if connected).
To set the data and time manually:
1) Tap Home
2) Tap Automatic data & time and select Off to disable using network-provided time.
3) Deselect Automatic time zone.
4) Tap Set date. Use the sliders to select the c orrect mont h, date and year. Tap Done
to save.
5) Tap Set time . Use the sliders to select the correct time. Tap Done to save.
6) Tap Select time zone. Select the correct time zone from the list.
| Settings | Date & time .
28
Page 39

Chapter 2 Using the RS30 Mobile Computer
2.6. LANGUAGE & KEYBOARD INPUT
2.6.1. ON-SCREEN KEYBOARD
ADJUST KEYBOARD SETTINGS
EDIT TEXT
ENTER NUMBERS AND SYMBOLS
Tap Home | Settings | Language & input to change the system language,
default keyboard type, and configure keyboard input and speech settings.
Tap a text input field to automatically open an on-screen keyboard.
To configure keyboard settings, tap and hold the comma button until a settings
button
would like to use an input language different from the system language) or keyboard
settings.
appears. A menu will open allowing you to adjust input language (if you
Tap and hold text on the screen to enable a text editing menu f or selecting all text, or
cutting, copying and pasting text within or across applications. Some applications may
use different ways to select or edit text.
The top row of keys on the on-screen keyboard have an ellipsis (…) below the character.
Tap and hold one of the top row keys until a menu opens, and select a number.
29
Page 40
9200 Mobile Computer Reference Manual
ENTER UPPERCASE LETTERS
ENTER SYMBOLS
2.7. SOUND AND VOLUME
Tap and hold the Shift key, and tap a character key to enter an uppercase letter. The
letters will return to lower case once an uppercase letter is entered.
Tap to switch to a keyboard for entering numbers and symbols. On this keyboard,
tap
symbol key to open a menu of additional symbols related to that key.
Tap
to open a keyb oard for entering special characters. Tap and hold a number or
to switch back to the keyboard for entering lowercase letters.
Use the volume buttons on the left side of the mobile computer to adjust system and
ringer volume.
30
Page 41

Chapter 2 Using the RS30 Mobile Computer
2.8. DATA CAPTURE
2.8.1. BARCODE READER
2.8.2. DIGITAL CAMERA
A selection of scan engines is available for delivering flexibility to meet different
requirement s. Depend ing on th e scan en gine i ntegrated, t he mobi le compu ter is capab le
of scanning barcodes of a number of symbologies that are enabled by default while
running the ReaderConfig.exe u tili ty. If you need to scan barcodes that are encoded in a
different symbology, enable the symbology first.
An integrated 8 megapixel camera in the mobile computer is specifically designed for
collecting image data. You may use the image capture utility to turn on the camera and
capture images.
31
Page 42

9200 Mobile Computer Reference Manual
2.9. SNAP-ON USB CABLE
The Snap-on USB Cable provides a convenient way to charge your mobile computer.
Click the Snap-on USB Cable on to attach; pull either side outwards to detach
Connect USB to PC or adapter to charge mobile computer
Cable completes charging in approximately 4 hours
LED on mobile computer shows charging status
Adapter input 100-240VAC, 50/60Hz; output 5VDC/2A
32
Page 43

Chapter 2 Using the RS30 Mobile Computer
2.10. CHARGING & COMMUNICATION CRADLE
The Charging & Communication Cradle charges your mobile computer and a spare
battery at the same time.
Presents charging compartment for mobile computer and spare battery
Provides microUSB socket on the back for charging
Supports USB Host Mode via a USB OTG cable
Completes charging in approximately 4 hours
Two LEDs, one for power connection status and one for battery charging status
Adapter input 100-240VAC, 50/60Hz; output 5VDC/2A
33
Page 44

9200 Mobile Computer Reference Manual
34
Page 45

This chapter describes the basic skills to work with the RS30 Mobile Computer, for
IN THIS CHAPTER
Chapter 2
BASIC OPERATION OF THE RS30 MOBILE COMPUTER
instance how to operate the home screen, check system statuses and manage
notifications. The add-on utilities for applications regarding data collection, processing,
and transmission are introduced in the following chapters.
3.1 Home Screen .............................................................. 36
3.2 Widgets ..................................................................... 41
3.3 Status Bar .................................................................. 44
3.4 Notifications Panel47
3.5 Applications Menu ....................................................... 49
3.6 Manage Applications .................................................... 51
3.7 Suspend & Lock .......................................................... 52
35
Page 46

9200 Mobile Computer Reference Manual
3.1. HOME SCREEN
When the mobile computer is fully charged, press the Power key for three seconds to
turn on the mobile computer. A locked screen will appear. Slide the lock button
either direction to unlock the screen.
in
The Home Screen appears showing a status bar, shortcut icons, and a dock bar
containing an All Apps button. The home screen allows up to four pages for placing
shortcut icons and widgets. You may customize the home screen according to your
preferences.
36
Page 47

Chapter 2 Basic Operation of the RS30 Mobile Computer
Status bar
Search bar
Widget icons
Shortcut icons
All Apps button
Dock
37
Page 48

9200 Mobile Computer Reference Manual
3.1.1. CUSTOMIZE HOME SCREEN
ADD APPLICATION SHORTCUT TO HOME SCREEN
ADD WIDGET TO HOME SCREEN
MOVE APPLICATION SHORTCUTS ON HOME SCREEN
REMOVE APPLICATION SHORTCUT OR WIDGET FROM HOME SCREEN
CREATE FOLDER
NAME FOLDER
1) On the home screen you would like to customize, tap .
2) Locate the application to add.
3) Tap and hold the application icon. The home screen will appear.
4) Drag the application icon to your preferred position and release to have it placed.
1) Tap and hold any empty spot on the home screen.
2) Tap Widgets in the menu that appears.
3) Tap and hold the widget to add. The home screen will appear.
4) Drag the widget to your preferred position and release to have it placed.
1) On the home screen you would like to customize, tap and hold the application
shortcut you would like to move.
2) Drag the icon to the preferred position and release it to have it placed.
1) On the home screen you would like to customize, tap and hold the application
shortcut or widget you would like to move.
2) Drag the icon to the top of the screen where the remove icon
is located.
1) On the home screen you would like to customize, tap and hold the application
shortcut you would like to move.
2) Drag the icon on the top of another icon to create a folder.
1) Tap the folder you would like to name.
2) Tap Unnamed Folder and edit the folder name.
3) Tap Done on the on-screen keyboard.
38
Page 49

Chapter 2 Basic Operation of the RS30 Mobile Computer
REMOVE FOLDER
CHANGE HOME SCREEN WALLPAPER
1) Tap and hold the folder you would like to remove.
2) Drag the folder to the top of the screen where the remove icon
located.
1) Tap and hold any empty spot on the home screen.
2) Tap Wallpapers in the menu that appears.
3) Select an image to apply as the wallpaper.
4) Tap Set wallpaper at the bottom of the wallpaper preview screen to apply it.
is
39
Page 50

9200 Mobile Computer Reference Manual
3.1.2. CUSTOMIZE WALLPAPER
1) Tap and hol d any empty area on the Home S creen. A settings menu for the Home
Screen will open at the bottom.
2) Tap WALLPAPER in the settings menu.
3) A wallpaper selection screen opens. Scroll through the wallpapers to select a
wallpaper to apply.
40
Page 51
Chapter 2 Basic Operation of the RS30 Mobile Computer
3.2. WIDGETS
Default Widget
Icon
Description
high accuracy and
Widgets are designed for easy control of settings and viewing of statu s. Enabled widgets
will be displayed on the Home Screen.
Widgets on Home
Screen
By default, two widgets are enabled, the power control widget and digital clock widget.
Wi-Fi control. .See Power On/Off Wi-Fi
Bluetooth contr ol. See Pow er O n/Off Bluetooth.
Power control
GPS control. Sets GPS mode between
battery saving.
Data syncing control. Syncs data of your Google accoun t.
.
41
Page 52
9200 Mobile Computer Reference Manual
3.2.1. ADD WIDGETS
Screen brightness control. Sets the screen brightness
profile between full, half, dim or a uto.
Digital clock
Shows the current time, date and the set alarm.
To add a widget:
1) Tap and hol d any empty area on the Home S creen. A settings menu for the Home
Screen will open at the bottom.
2) Tap WIDGETS in the settings menu.
3) A widget menu opens. Tap and hold a widget and drag it to the Home Screen you
would like to place it on.
42
Page 53

Chapter 2 Basic Operation of the RS30 Mobile Computer
3.2.2. REMOVE WIDGETS
To remove a widget:
1) Tap and hold a widget so it becomes highlighted. The widget is available for
relocation.
2) Drag the wid get to t he top of th e screen wh ere a re move i con i s loc ated . The rem ove
icon will change to red to indicate the widget is about to be removed.
43
Page 54

9200 Mobile Computer Reference Manual
3.3. STATUS BAR
NOTIFICATION ICONS
Icon
Description
Connected to PC via USB cable. Change the type of USB connection by
Status icons
Notification ic ons
The left side of the status bar shows notification icons, and the right side of the status
bar shows status icons.
More notification s are available, tap to s how the Notifications Panel
Upcoming event
Data is syncing
A problem has occurred with s ign-in or data sync
A song is currently playing
Preparing storage card
Storage card is almost full
Uploading data
Downloading data; when download is finished, icon s top s flashing
viewing the notif ic a tion in the Notific ations Panel
No SIM card detected in e ither of the two SIM card slots
NFC is enabled
44
Page 55

Chapter 2 Basic Operation of the RS30 Mobile Computer
STATUS ICONS
Icon
Description
Vibrate mode is active; all system sounds (except media and alarms) are
Multiuser feature is enabled
New user is logged in
Text message is received
Missed call
Car mode is active
Connected to/disconnected from VPN network
Bluetooth tethering is active
USB tethering is a c tive
Wi-Fi network is ava ila ble
Wi-Fi hotspot is active
The icons at the top of the screen are explained below.
GPS is active
Currently sea r c hing for location data
Alarm is active
muted
Phone ringer is muted
Microphone is mu ted d uring a call
Battery is fully charged
45
Page 56
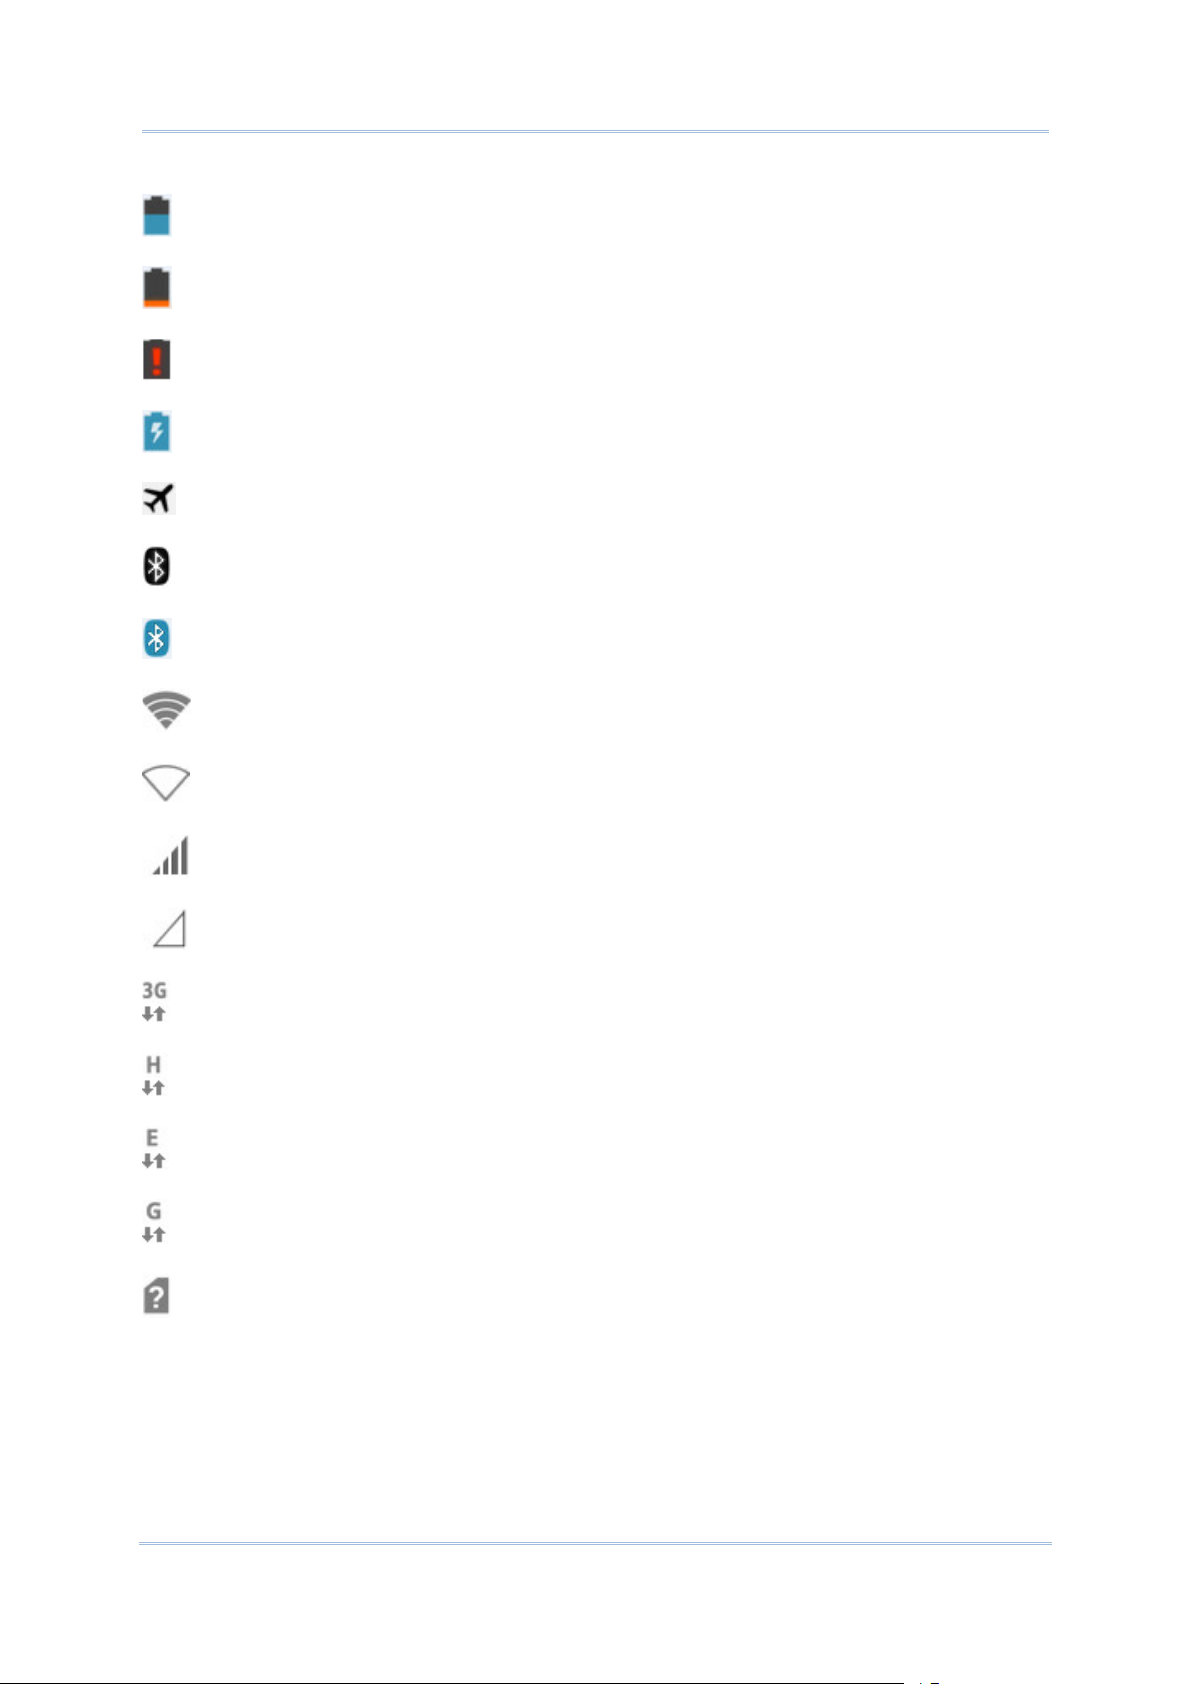
9200 Mobile Computer Reference Manual
Battery is partially drained
Battery level is ver y low
Battery is almost com pletely drained and needs chargin g im m ediately
Battery is charging
Airplane mode is active
Bluetooth is active
Connected to a Blu e tooth device
Connected to a Wi-Fi network
No Wi-Fi signal detected
Signal strength of mobile network
No mobile network s ig nal
Connected to 3G network
Connected to HSPA network
Connected to EDGE network
Connected to GPRS network
No SIM card installed
46
Page 57

Chapter 2 Basic Operation of the RS30 Mobile Computer
3.4. NOTIFICATIONS PANEL
VIEW NOTIFICATIONS
Use a downwards sliding motion from the top of the screen to open the notifications
panel. To close the panel, slide the screen back upwards.
Tap a notification message to enter a page for subsequent activity. The activity required
for each notification will differ .
47
Page 58

9200 Mobile Computer Reference Manual
CLEAR NOTIFICATION
CLEAR ALL NOTIFICATIONS
Slide each notification sideways to have it cleared. Some notifications will require
subsequent activity to be clear ed; tap the notification to enter a corresponding settings
page for taking further steps.
Tap on the status bar to clear all notifications. Ongoing notifications and
notifications that require subsequent ac tivity to b e cleared will remain in the list.
48
Page 59

Chapter 2 Basic Operation of the RS30 Mobile Computer
3.5. APPLICATIONS MENU
Icon
Name
Description
e, time, time zone according to your locale and sets and
GPS signal chart, satellite positions, your current location, speed,
Tap on the Home screen to open the applications menu.
Browser Accesses the in ter net or intranet.
Calculator Performs mathematical calculations.
Calendar Creates and manages events, meetings and appoin tments.
Camera Takes pictures and shoots videos.
Clock
Downloads List all files down loa ded on the mobile computer.
Email Sends and receives emails.
File Manager Browses and manages files on the local storage and storage card.
Gallery Views photos a nd videos stored on the mobile computer.
GPS Test
Messaging Sends SMS and MMS messages.
Sets dat
manages alarms.
Shows GPS information read from the internal GPS antenna, i ncluding
direction, altitude, and time read of your curren t tim e zone.
Movie Studio Creates movies with the video files st or e d on the mobile comp uter.
Music
Plays music and audio files stored on the mobile computer and storage
card.
49
Page 60
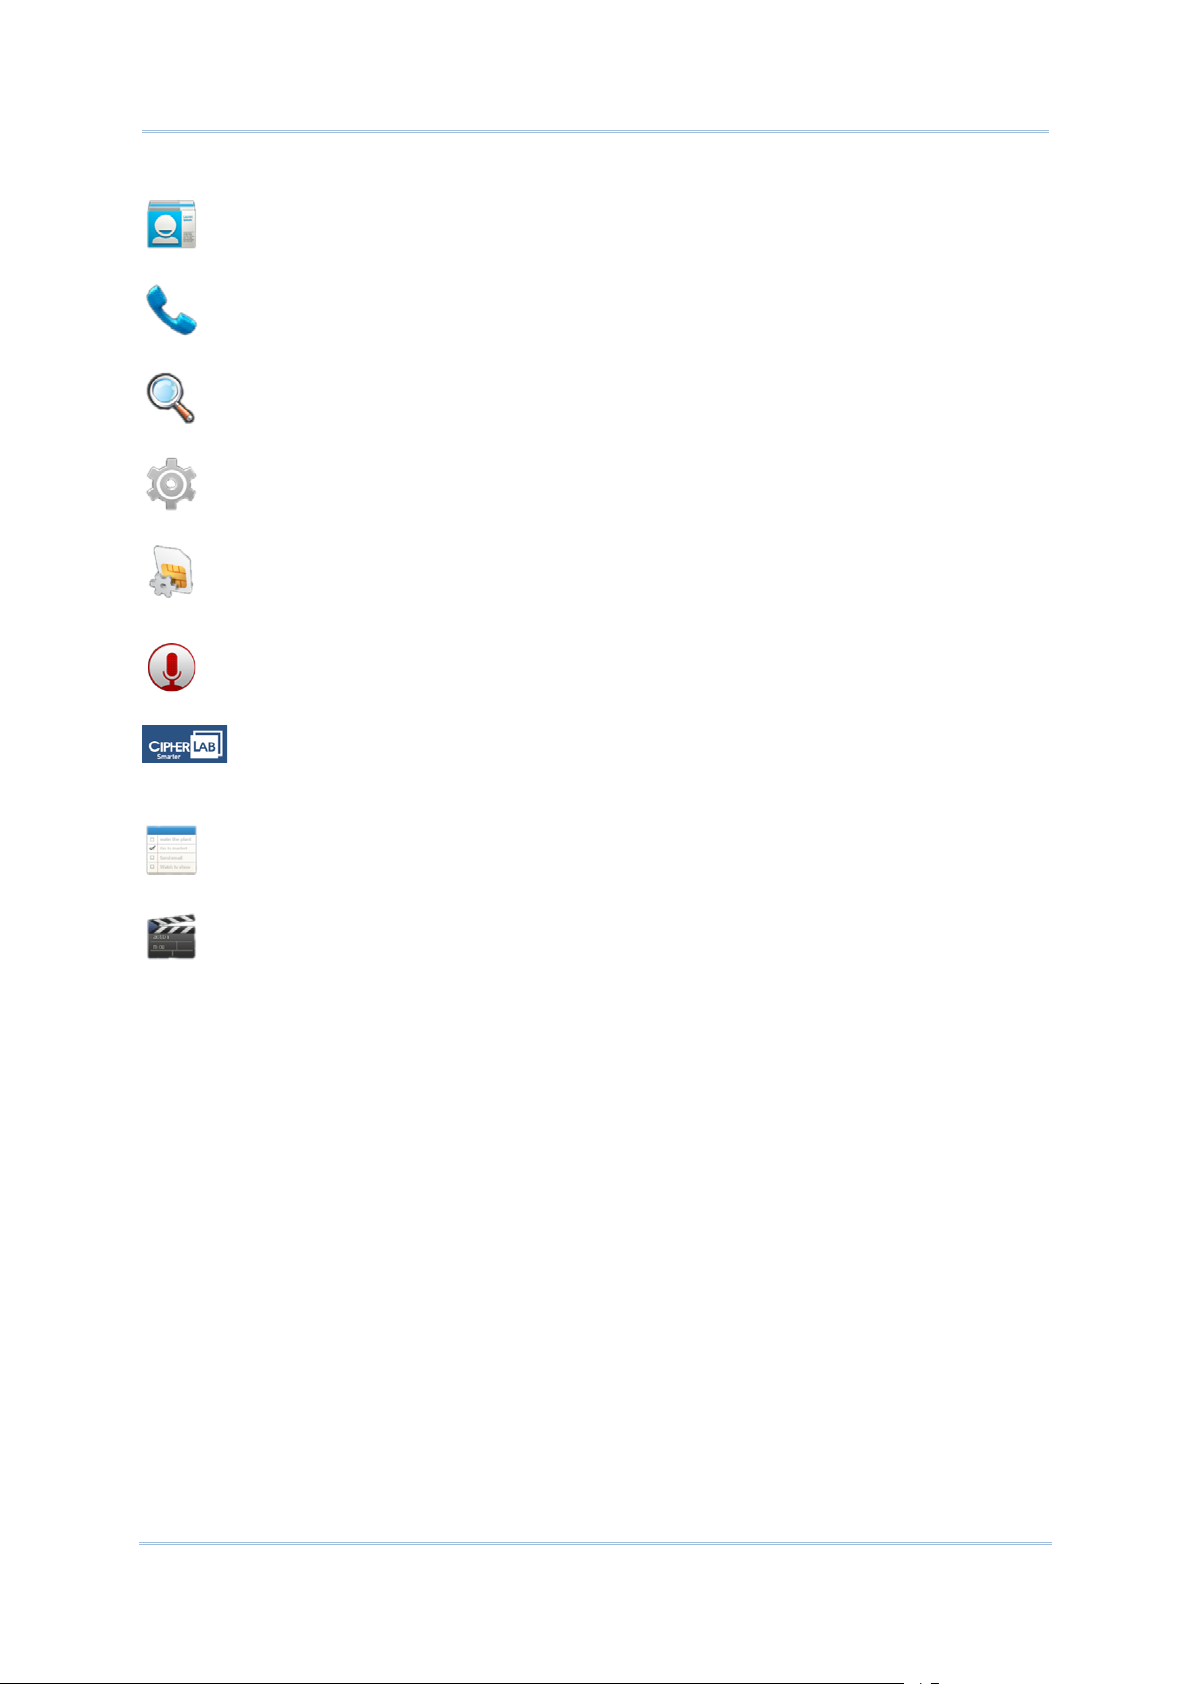
9200 Mobile Computer Reference Manual
ceives calls, accesses voicemail, views call history,
le computer with the Google search
People
Phone
Search
Manages contact information, and shares or exports/imports the
information to other devices or S D c ard.
Places and re
manages phone contacts and adjusts phone settings.
Searches the internet and mobi
engine.
Settings Opens settings to configur e the mobile computer.
SIM Toolkit Additional services provided by your mobile car rier .
Sound
Recorder
Records and plays audio information.
Switch
Barcode
Enables/Disables the mobile c om puter’s barcode reader servic e.
Service
ToDo Manages tasks to do.
Videos Plays video files tak en or stored on the m ob ile c omputer.
50
Page 61

Chapter 2 Basic Operation of the RS30 Mobile Computer
3.6. MANAGE APPLICATIONS
3.6.1. CURRENT APPLICATIONS
SWITCH BETWEEN APPLICATIONS
END APPLICATION
Tap and hold the Home button . The screen will show a list of recently used
applications.
Actions to taks on this screen include the following:
Tap one of the listed applications to open it on the screen.
Slide an application to the left or right to close it.
Note: Close unused applications in order to release RAM. Remember to save y ou r dat a o r
settings before closing any application.
51
Page 62

9200 Mobile Computer Reference Manual
3.7. SUSPEND & LOCK
3.7.1. SUSPEND DEVICE
SUSPEND RS30
The mobil e comput er is suspend ed wh en th e powe r butt on i s press ed, or when the ti me
3.7.2. LOCK DEVICE
LOCK RS30
UNLOCK RS30
The mobile computer operates continuously once it is powered on. To minimize power
consumption, suspend the mobile computer if you are not actively using it. When the
mobile computer enters suspension, the system i s in a power-savin g status and can be
quickly awoken to operate as needed
Lock the mobile computer to prevent unintended operation. When locked, the mobile
computer will not respond to screen touch until it is unlocked; volume keys and side
buttons will also be u navailable until the device is unlocked.
period set in Screen Timeout Settings has passed without any activity.
Tap Home | Settings | Security | Screen lock to change the lock
method.
None
Slide: Uses the default slide gesture to unlock a locked screen.
Voice Unlock: Select a voice command to use for unlocking the screen.
Pattern: Enter a pattern to use for unlocking the screen.
PIN: Uses the PIN code to unlock a locked screen.
Password: Enter a password of at least 4 characters for unlocking the screen.
When the mob ile compu ter is in susp end mode, press ing the pow er button will wak e it
up. If a lock method is set, follow the gestures below to unlock the screen:
None
Slide: Slide the lock icon in either direction so it relocates outside of the white circle.
Voice Unlock: Say the voice command to unlock.
Pattern: Swipe the set pattern to unlock.
PIN: Enter the PIN code to unlock.
Password: Enter the password unlock.
Warning: To save battery power, suspend the mobile computer when not in use.
52
Page 63

The Wi-Fi m odule integrated on the mobile computer l ets you configure and connect to
IN THIS CHAPTER
Chapter 4
WIRELESS RADIOS
network wirelessly.
4.1 Use Wireless Wide Area Network ................................... 54
4.2 Use Wireless Local Area Network (Wi-Fi) ...................... 56
4.3 Use Bluetooth ............................................................. 59
4.4 Use Near Field Communications .................................... 64
53
Page 64
9200 Mobile Computer Reference Manual
4.1. USE WIRELESS WIDE AREA NETWORK
The mobil e compute r will be autom aticall y confi gured t o conn ect to y our wi reless s ervice
provider’s network when you insert a SIM card and turn on data connection for the fi rst
time.
1) When a SIM card is inserted, a dialog will appear confirming the mobile carrier
detected. By default, data connection is set as “off”.
If you would like to change the default settings, tap Change to enter the SIM
management settings page.
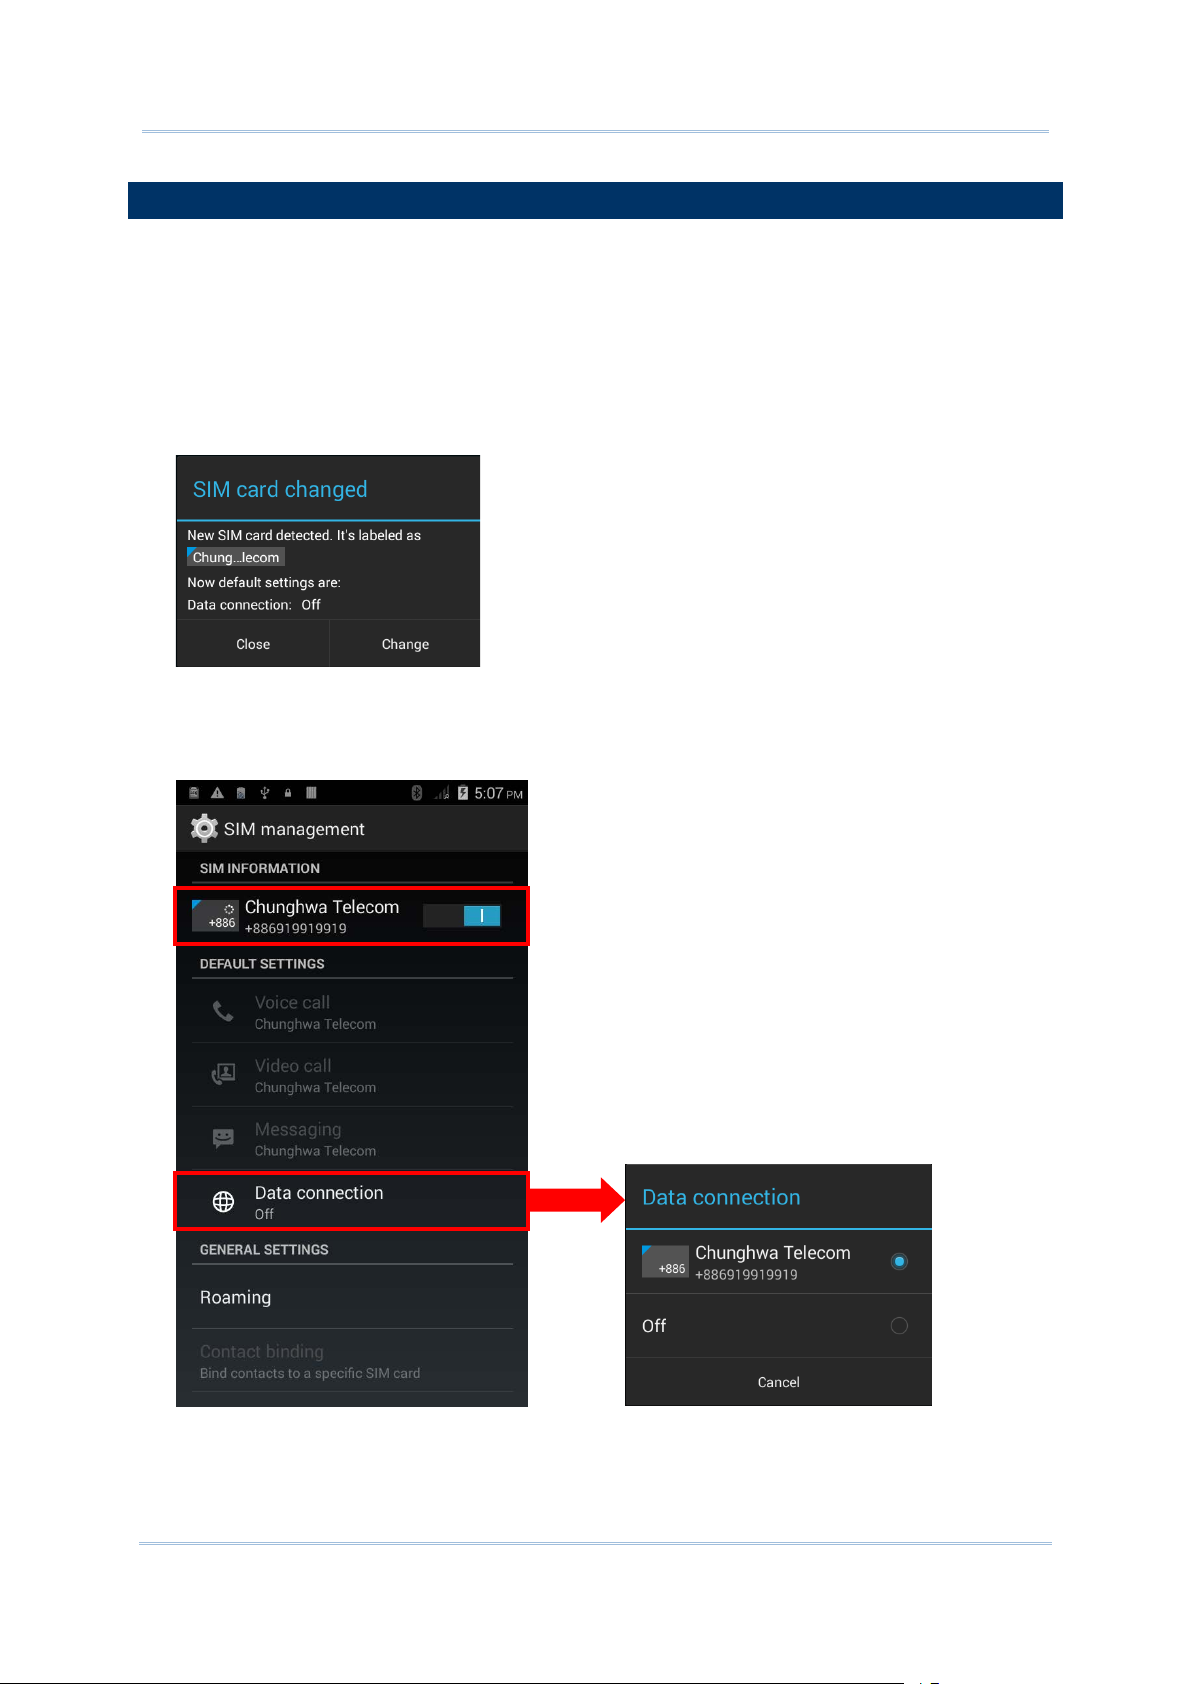
2) By default, phone power is turned “on”, and data connection is turned “off”. To
enable mobile data connection, tap Data connection, and sel ect the mobile car rier
you would like to use.
54
Page 65

Chapter 4 Wireless Radio
EDIT ACCESS POINT NAME
You may need to change the access point name according to the information obtained
from your mobile carrier.
1) Tap Home
2) On the Network settings pa ge, tap Access Point Names.
3) Tap the settings button
4) Tap each field to input t he APN name and settings obained from your mobile carrier.
5) When finished, tap the settings button
6) Tap the radio button next to the APN you would like to apply.
| Settings | Mobile networks.
, and tap New APN in the po p-up me nu.
and tap Save.
55
Page 66

9200 Mobile Computer Reference Manual
4.2. USE WIRELESS LOCAL AREA NETWORK (WI-FI)
4.2.1. POWER ON/OFF WI-FI
4.2.2. CONNECT TO WI-FI NETWORK
To power on Wi-Fi:
1) Tap the Wi-Fi icon on the power control widget.
OR
1) Tap Home
2) Slide the Wi-Fi switch to the right to turn on Wi-Fi power.
Slide the switch back to turn off Wi-Fi power.
| Settings .
To connect to a Wi-Fi network:
1) Tap Home
The Wi-Fi screen shows a list of available Wi-Fi
hotspots.
| Settings | Wi-Fi .
2) Tap the network you would like to connect to.
OR
Tap and hold the network to connect, and tap
Connect to network in the pop-up menu.
3) If the network is an open one, the mobile
computer will attempt to connect to it directly.
When connected, the status will change to show
“Connected”.
56
Page 67
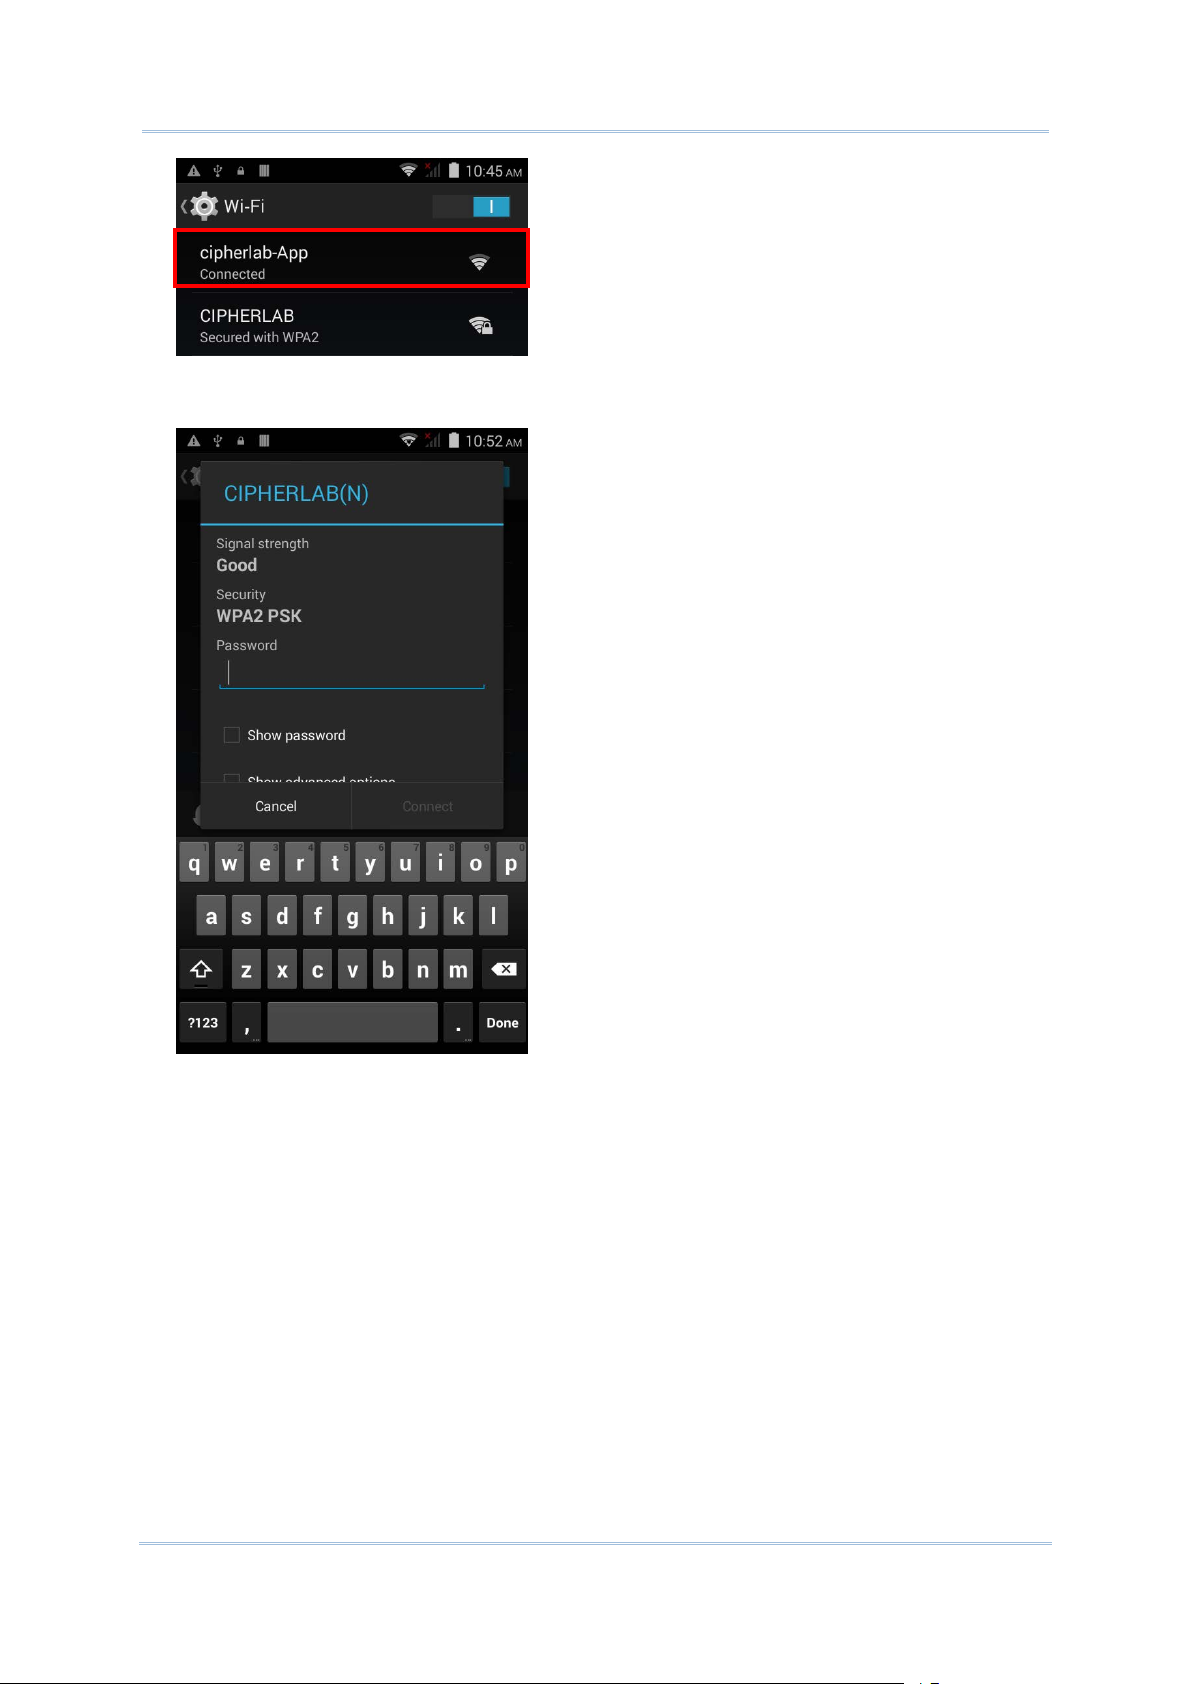
Chapter 4 Wireless Radio
If the netwo rk is a secured one, the mobil e computer prompts a dialog to enter th e
password for conne ction.
For WEP/WPA/WPA2 PSK connections: Enter the required password and tap Connect.
For 802.1x EAP connections: Check the Show advanced options checkbox and
select the EAP method i n the drop-down box (PEAP, TLS, TTLS, PWD, SIM, AKA),
and the Phase 2 authentication in the drop-down box (None, MSCHAPV2, GTC).
Select a CA ce rtificate and User certificate if required (certificates may be installed
under Home | Settings | Security.) Enter your username in the Identity box and
the password in the Password box if required.
57
Page 68

9200 Mobile Computer Reference Manual
4.2.3. MANUALLY ADD WI-FI NETWORK
If the network you would like to connect to does not broadcast its SSID, or if the network
is out of range, you may add it manually.
1) On the Wi-Fi screen, tap the add button
2) In the dialog box, enter the name of the network in the Network SSID field, and
select a secu rity method in th e Security field (None, WEP, WPA/WPA 2 PSK, 802.1x
EAP).
seated at the bottom.
For WEP/WPA/WPA2 PSK connections: Enter the required password and tap Save.
For 802.1x EAP connections: Check the Show advanced options checkbox and
select the EAP method in the drop-down box (PEAP, TLS, TTLS, PWD, SIM, AKA),
and the Phase 2 authentication in the drop-down box (None, MSCHAPV2, GTC).
Select a C A cert ifi cate and User certificate if required (certificates may be installed
under Home | Settings | Security.) Enter your username in the Identity b ox and
the password in the Password box if required.
3) If necessar y, select th e Proxy se rver and IPv4 settings. By d efault, n o proxy is s et
and IP settings are set to DHCP.
58
Page 69

Chapter 4 Wireless Radio
4.3. USE BLUETOOTH
4.3.1. BLUETOOTH PROFILES
Bluetooth Profiles Supported
Sets up a virtual serial port to connect two Bluetooth
quality audio to a wireless headset or
l for
to a car kit to display
ll received on the
The RS30 Mobile Computer lets you configure Bluetooth settings and manage Bluetooth
services provided on remote devices.
Generic Access Profile (GAP) For device discovery and auth entication.
Serial Discovery Profile (SDP) Discovers services on remote devices.
Serial Port Profil e (SPP)
devices.
Human Interface Device
Profile
Object Push Profile (OPP) Pushes and pulls objects to and from a push server.
Dial-Up Networking Profile (DUN) Accesses the internet an d other dial -u p services.
Hands-Free Profile (HFP) Allows using a hands-free device to place and receive
Advanced Audio Distribution
Profile
Audio/Video Remote Control
Profile
Generic Object Exchan ge
Profile
Personal Area Networking
Profile
General Audio/Video
Distribution P r ofile
(HID) Provides a low latency Bluetooth connection with
keyboards, pointing device s , etc.
calls.
(A2DP)
(AVRCP) Allows controlling of televis ion and Hi-Fi equipment.
(GEOP) Provides a basis for other data profil es.
(PAN) Uses Bluetooth Network Encapsulation Protoco
(GAVDP) Provides a basis for A2DP and VDP.
Streams stereospeaker.
Bluetooth tran s m ission.
Phone Book Ac c ess Profile (PBAP)
Transfers Phone Book Objects
the information of an incoming ca
mobile phone, or in itiate a call.
59
Page 70
9200 Mobile Computer Reference Manual
4.3.2. POWER ON/OFF BLUETOOTH
To power on Bluetooth:
1) Tap the Bluetooth icon on the power control widget.
.
OR
1) Tap Home
2) Slide the Bluetooth switch to the right to turn on Bluetooth power.
Slide the switch back to turn off Bluetooth power.
Note: After turned on, Bluetooth power is maintained even when the mobi le com pute r is
suspended. However, if the power m ode is switched to Airplane Mode, Bluetooth
power will be turned off regardless of the settings.
| Settings .
60
Page 71
Chapter 4 Wireless Radio
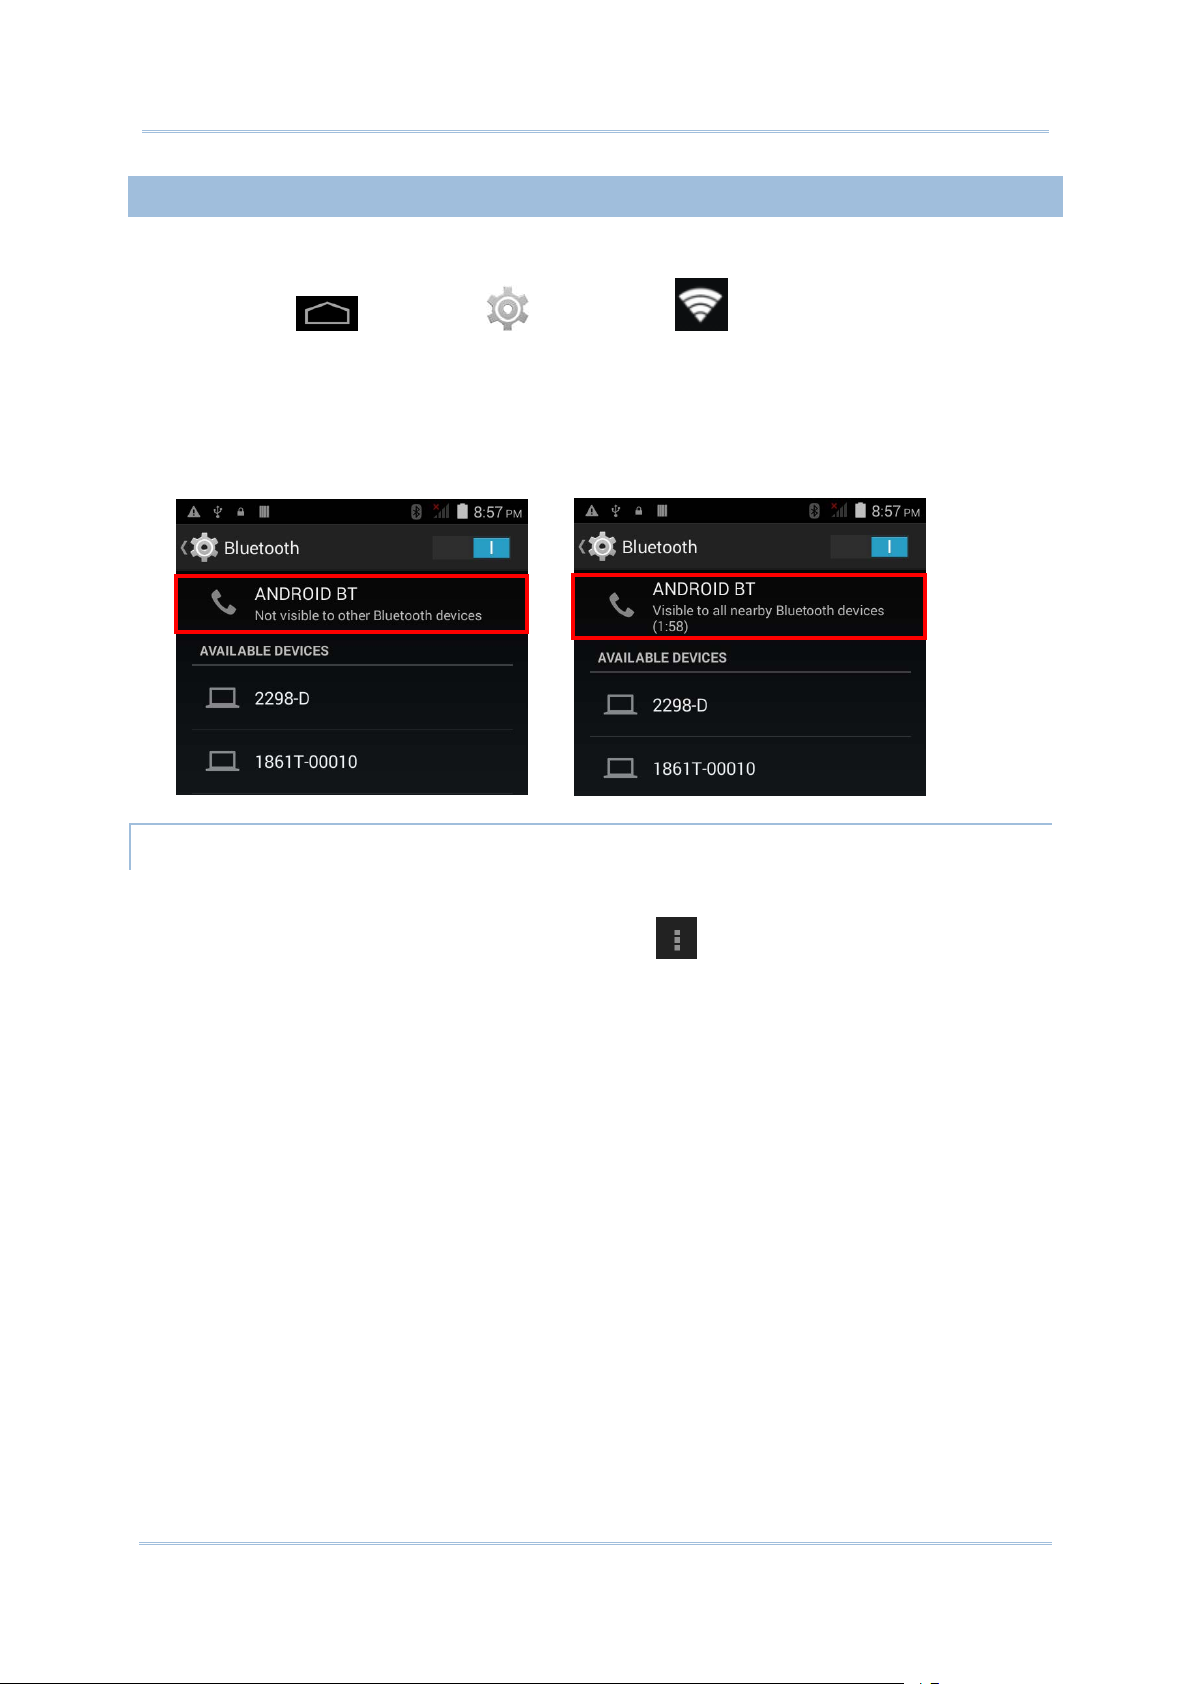
4.3.3. SET BLUETOOTH VISIBILITY
BLUETOOTH VISIBILITY TIMEOUT
To pair Bluetooth devices:
1) Tap Home
2) Tap Search For Devices at the bottom of the screen. The screen shows a list of
Bluetooth devices nearby.
3) By default, Bluetooth visibility is turned off. Tap ANDROID BT at the top of the
screen to tu rn on Bluet ooth visi bility. The status will change to “Visibile to all nearby
Bluetooth devices”.
| Settings | Bluetooth .
To change the timeout period for Bluetooth visibility:
1) On the available Bluetooth devices screen, tap
2) Tap Visibility timeout in the pop-up menu.
3) Select a timeout period for Bluetooth visibility to be automatically turned off.
in the bottom right corner.
61
Page 72
9200 Mobile Computer Reference Manual
4.3.4. CHANGE BLUETOOTH NAME
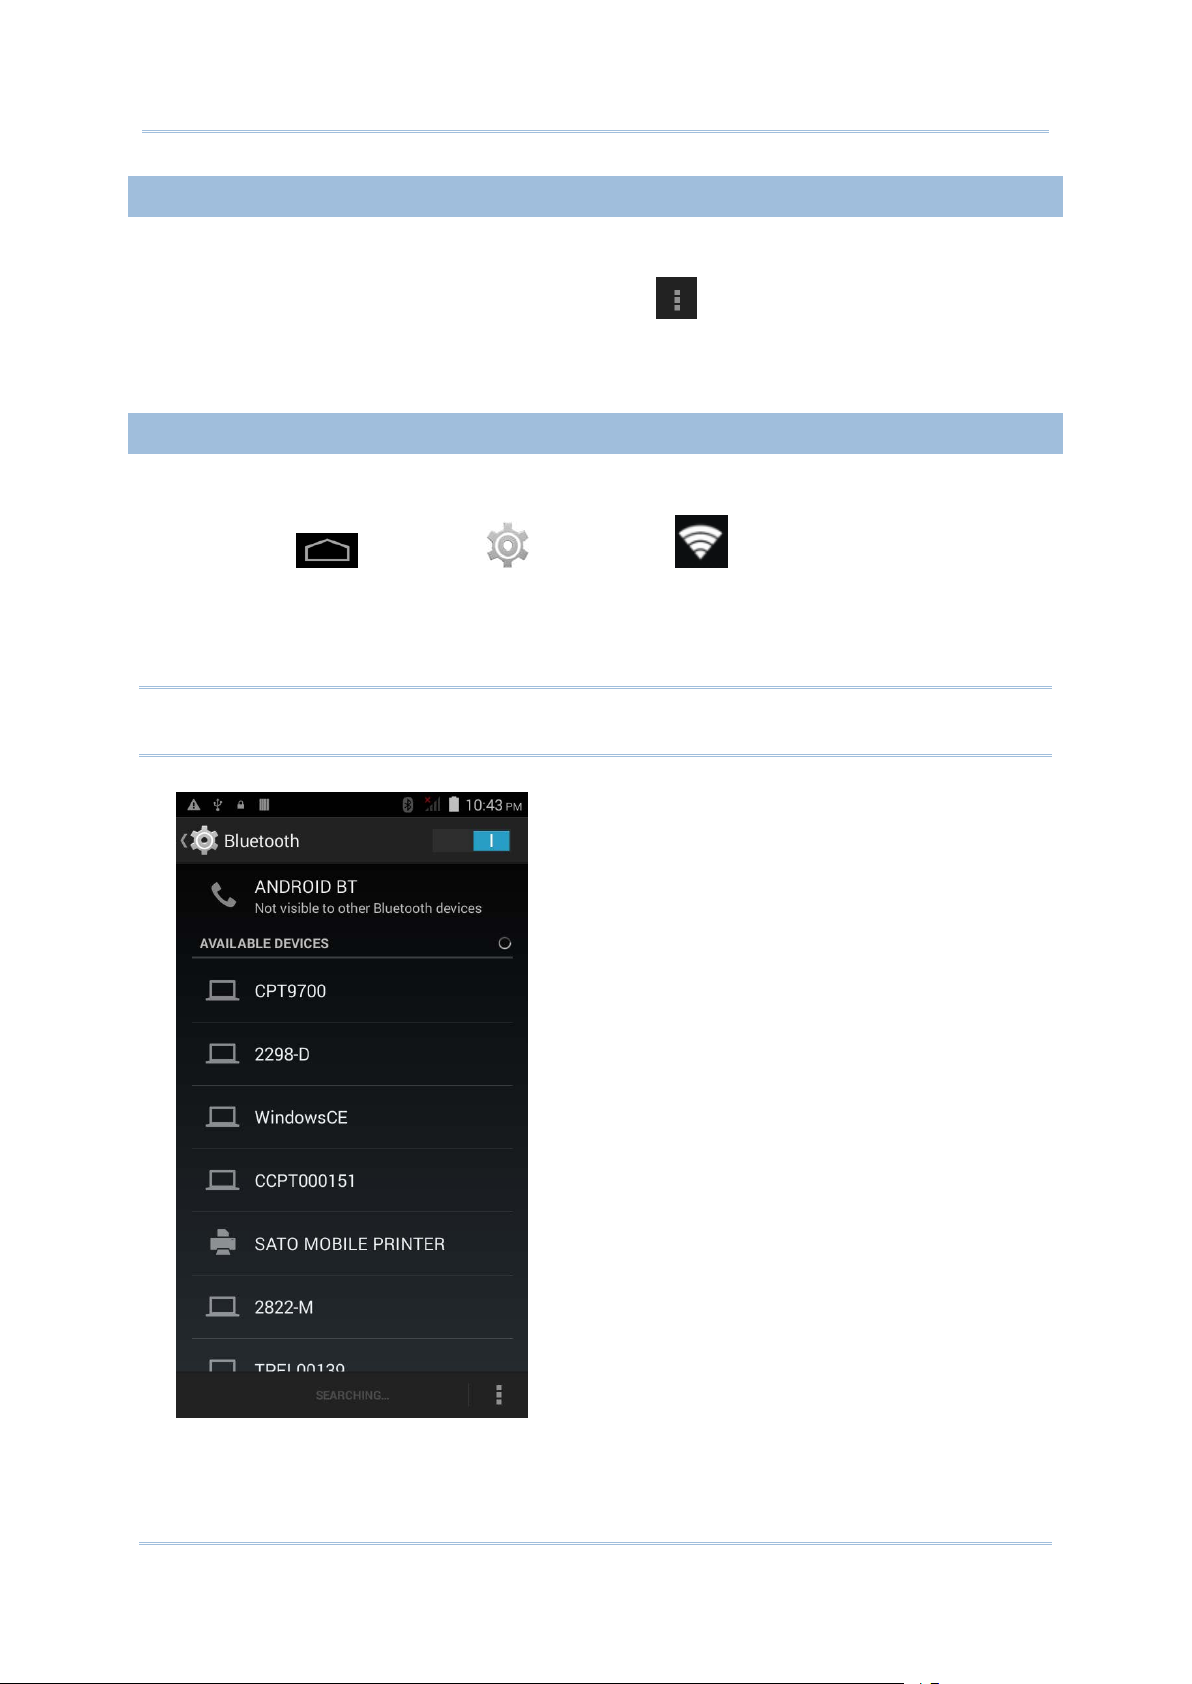
4.3.5. PAIR BLUETOOTH DEVICE
To change the Bluetooth name to make the mobile computer more:
1) On the available Bluetooth devices screen, tap
2) Select Rename phone in the pop-up menu. Type a n ew name in the field and tap
Rename.
in the bottom right corner.
To pair Bluetooth devices:
1) Tap Home
2) Tap Search For Devices at the bottom of the screen. The screen shows a list of
Bluetooth devices nearby.
3) Scroll throught the list and tap the device you would like to pair.
Note: If the device you would like to pair with is not listed, make sure Bluetooth visibility
is enabled on the device.
| Settings | Bluetooth .
62
Page 73

Chapter 4 Wireless Radio
4.3.6. UNPAIR BLUETOOTH DEVICE
4.3.7. SELECT BLUETOOTH SERVICE
4) The Blu etooth p airing req uest window opens. Depending on the pairing settings of
the Bluetooth device, you may need to enter a passkey, or confirm the assigned
passkey on the device to pair if a smart pairing nethod is applied.
5) Enter/confirm the passkey on the device to pair.
6) Once pairing is done, the Bluetooth device will be listed in the Paired Devic e s list.
To unpair a paired device:
1) In the Paired Devices list, tap the settings button
2) On the Paired Bluetooth device screen, tap Unpair.
To select the service of a paired device:
1) In the Paired Devic es list, tap the settings button
next to the paired device.
2) On the Paired Bluetooth device screen, check
the profile to use.
next to the paired device.
63
Page 74

9200 Mobile Computer Reference Manual
4.4. USE NEAR FIELD COMMUNICATIONS
Near field communications (NFC) uses close p roximity (4 cm or less) to establish radio
communication through electromagnetic fields. With NFC enabled, the mobile computer
can collect information from NFC tags, exchange information with other NFC supported
devices, and even change information on the NFC tag if autho rized.
Before starti ng to communicate through NFC, perform the following:
1) On the mobile computer, tap Home
2) On the Wireless & networks page, make sure the NFC switch is enabled.
3) Tap the NFC label to enter the NFC settings page, and tap Android Beam.
| Settings | More….
4) Make sure the Android Beam switch is enabled.
64
Page 75

Chapter 4 Wireless Radio
PAIR WITH NFC ENABLED BLUETOOTH DEVICES
SHARE INFORMATION
COMMUNICATION WITH NFC
1) On the device y ou would lik e to pair with, make su re NFC is enabled, and Bluetooth
discovery is enabled.
2) Hold the mobile computer without covering the antenna are a above t he battery door.
3) Move the mobile computer in proximity with the device. A screen notification will
appear to indicate that pairing is successf ul.
1) Open the web page, video, photo or contact info page you would like to transfer.
2) Place the back of the mobile computer in close proximity with the other device you
would like to share data with.
3) When the two devices connect, a “Touch to beam” notification will appear on the
screen.
4) Touch the screen to initiate data transfer.
Note: Once the data begins to transfer, the two devices only need to be held within a 10
m (32.8 ft.) range; they no longer have to be held within close range in order t o
transfer successfully.
1) On the mobile computer, launch an NFC enabled application.
2) Hold the mobile computer without covering the antenna area above the battery door.
3) Place the mobile computer close to the NFC tag or device until the application
indicates data transfer is complete.
65
Page 76

9200 Mobile Computer Reference Manual
66
Page 77

The RS30 Mobile Computer allows making phone calls and connecting to the network
IN THIS CHAPTER
Chapter 6
USING THE PHONE
over General Packet Radio Service (GPRS). Insert the SIM card before turning on the
power. Refer to Installing SIM Card
Note: If t he SIM card i s not in position, you may make emerg ency calls if t he service is
supported.
5.1 Phone Power .............................................................. 68
.
67
Page 78

9200 Mobile Computer Reference Manual
5.1. PHONE POWER
The mobile computer accommodates two SIM cards and supports dual standby of two
different n et works. Both n et works will be monitor ed at the sam e t ime, and th e phone will
dynamically switch between the two networks during usage. Calls will be placed with
either on e of the networks; you cannot switch networks in the middle of a received call
or placed call, or receive or place calls with both networks at the same time.
1) When a SIM card is installed for the first time, the phone power is turned on
automatically when the mobile computer is p owered on. A dialog box pops-up when
the mobile computer is powered on notifying that a SIM car d is detec ted.
Note: If only one SIM card is installed on the mobile computer, make sure it is installed
in the first SIM card slot.
2) Tap Change in the dialog box.
3) The SIM management screen opens showing the
name of the mobile carrier and the cu rrent phone
settings.
4) To open the SIM management screen from
other screens, tap Home
| SIM management
Note: If only one SIM card is installed on the mobile
computer, make sure it is installed in the first
SIM card slot.
.
| Settings
68
Page 79

Chapter 6 Wireless Radio
5.1.1. TURN ON/OFF PHONE POWER
5.1.2. SIM CARD MISSING
EMERGENCY CALLS
To power on the phone:
1) On the SIM management screen, slide the phone power switch to the right.
Slide the switch back to turn off Wi-Fi power.
If either one of the SIM card slots is empty, a warning icon will be displayed on the
status bar.
Open the Notifications list to check the notification.
Depending on your service provider, the mobile computer might support making
emergency p h one call wh en t h e SIM card is locked, or e v en when no S I M ca rd is ins erted.
Emergency phone numbe rs will vary by country.
69
Page 80

9200 Mobile Computer Reference Manual
70
Page 81

PLATFORM, PROCESSOR & MEMORY
Operating System & CPU
Memory
COMMUNICATION & DATA CAPTURE
Communication
SPECIFICATIONS
OS Version Android 4.4
CPU Cortex-A7 1.3 GHz Quad-core
ROM 8GB NAND flash memory
RAM 1GB RAM
Expansion Slot One microSD card slot (up to 32GB)
SDXC supported
USB Client USB 2.0 OTG
WPAN Bluetooth Class II, v4.0 & v2.1 EDR
WLAN IEEE 802.11b/g/n networking
WWAN Built-in module for HSPA+/Quadband
GSM/WCDMA850/900/1900/2100/HSPA+
GPRS/EDGE/WCDMA/HSPA
Frequency band:
WCDMA 850/900/1900/2100
GPS Built-in GPS with AGPS support, ephem er is downloadable
71
HSPA+ 14.4 Mbps/5.76 Mbps
Page 82

9200 Mobile Computer Reference Manual
Data & Image Capture
ELECTRICAL CHARACTERISTICS
Batteries
Power Adaptor
Working Time
Digital Camera 8 Mega pixels with user-controllable fla s h
Barcode Reader Ordering options include
Linear Imager (SM1)
1D Laser (SE955)
2D Imager (SE4500)
HF RFID Reader ISO14443A/B (Mifare), ISO15693 (Felica)
Supports NFC (Peer-to-peer, Card r ea der , Card emulation)
Main Battery Pack Rechargeable Li-ion battery – 3.8V, 3100 mAh
Charging time: 4 hours
Backup Battery Pack Rechargeable Li-ion battery – 4.2 V, 70 mAh
Data retention f or 30 m inutes
Charging time: 4 hours
Power Supply Cor d with
Universal Power Adaptor
Supports working time for up to 8-10 hours.
Input AC 100~240 V, 50/60 Hz
Output DC 5 V, 2 A
72
Page 83

Specifications
PHYSICAL CHARACTERISTICS
Color Touch Screen Display
Notifications
Dimensions & Weight
Display 4.7” Transmissive IPS LCD, 510 NITS, Corning Gorilla Glass 3
Resolution QVGA (960 x 540 pixels)
Status LED Single LED whi ch lights red whe n charging, gre en when chargi ng
is complete, and blue when wireless r a d io is on
Audio Integrated with one speaker, dual array digital microphones with
echo and noise cancellation
Dimensions 155 mm (L) x 80mm (W) x 15.3 (H)
Weight 250 g (Laser, including battery)
73
Page 84

9200 Mobile Computer Reference Manual
ENVIRONMENTAL CHARACTERISTICS
Temperature
Humidity
Resistance
applicable IEC tumble
applicable IEC tumble
Operating -20 °C to 50 °C
Storage -30 °C to 70 °C (transmissive)
Charging 0°C to 40°C
Operating 10% to 90% (non-condensing)
Storage 5% to 95% (non-condensing)
Impact Resistance With protective bo ot:
Multiple drops onto concrete at 1.2 m (4 ft.) on all six sides
Without protect ive boot:
Multiple drops onto concrete at 1.5 m (5 ft.) on all six s ide s
Tumble Test With protective bo ot:
500 tumbles (1000 drops) at 0.5 m per
specifications
Without protect ive boot:
150 tumbles (300 drops) at 0.5 m per
specifications
Splash/Dust Resistance IP54 per applicable IEC sealing specifications
Electrostatic D is charge ±15 kV air discharge, ±8 kV contact discharge
74
Page 85

Specifications
PROGRAMMING SUPPORT
Development Environment & Tools
tegrated Development
Software & Utilities
ACCESSORIES
Accessory Options
In
Environment
Software Development Kit Microsoft SDK
CipherLab Software Package
Third-party Software
Visual Studio 2008
Visual Studio 2005
Reader API (DLL) for reader configuration
Reader Configuration
Kalipso
Charging Cradle
75
Page 86

This phone has been tested and rated for use with hearing aids for some of the wireless
technologies that it uses. However, there may be some newer wireless technologies used in this
phone that have not been tested yet for use with hearing aids. It is important to try the different
features of this phone thoroughly and in different locations, using your hearing aid or cochlear
implant, to determine if you hear any interfering noise. Consult your service provider or the
manufacturer of this phone for information on hearing aid compatibility. If you have questions
about return or exchange policies, consult your service
To determine the compatibility of a WD and a particular hearing aid, simply add the numerical
part of the hearing aid category (e.g. M2/T2=2) with the numerical part of the WD emission
rating (e.g., M3=3) to arrive at the system classification for this particular combination of WD
and hearing aid. A sum of 5 would indicate that the WD and hearing aid would provide normal
use, and a sum of 6 or greater would indicate that the WD and hearing aid would provide
excellent performance. A category sum of less than 4 would likely result in a performance that is
judged unacceptable by the hearing aid user.
WHAT IS HEARING AID COMPATIBILITY?
The Federal Communications Commission has implemented rules and a rating system
designed to enable people who wear hearing aids to more effectively use these wireless
telecommunications devices. The standard for compatibility of digital wireless phones with
hearing aids is set forth in American National Standard Institute (ANSI) standard C63.19. There
are two sets of ANSI standards with ratings from one to four (four being the best rating): an “M”
rating for reduced interference making it easier to hear conversations on the phone when using
the hearing aid microphone, and a “T” rating that enables the phone to be used with hearing
aids operating in the telecoil mode thus reducing unwanted background noise.
HOW WILL I KNOW WHICH WIRELESS PHONES ARE HEARING AID COMPATIBLE?
The Hearing Aid Compatibility rating is displayed on the wireless phone box.
A phone is considered Hearing Aid Compatible for acoustic coupling (microphone mode) if it has
an “M3” or “M4” rating. A digital wireless phone is considered Hearing Aid Compatible for
inductive coupling (telecoil mode) if it has a “T3” or “T4” rating.
The tested M-Rating and T-Rating for this device (FCC ID: Q3N-RS30) are M3 and T3.
HOW WILL I KNOW IF MY HEARING AID WILL WORK WITH A PARTICULAR DIGITAL
WIRELESS PHONE?
You’ll want to try a number of wireless phones so that you can decide which works the best with
your hearing aids. You may also want to talk with your hearing aid professional about the extent
to which your hearing aids are immune to interference, if they have wireless phone shielding,
and whether your hearing aid has a HAC rating.
 Loading...