

Page 1

RK25 Mobile Computer
Android 7.0, Nougat
Version 1.00
Page 2

Page 3

Copyright © 2018 CIPHERLAB CO., LTD.
All rights reserved
The software contains proprietary information of its owner; it is provi ded under a license
agreement containing restrictions on use and disclosure and is also protected by copyright
law. Reverse engineering of the software is prohibited.
Due to continued product development, this information may change without notice. The
information and intellectual property cont ained herein is confidential between the owner
and the client and remains the exclusive property of the owner. If having any problems in
the documentation, please report them to us in writing. The owner does not warrant that
this document is error-free.
No part of this publication may be reproduced, stored in a retrieval system, or transmitted
in any form or by any means, electronic, mechanical, photocopying, recording or otherwise
without the prior written permission of the owner.
For product consultancy and technical support, pl ease contact the local sales representative.
Also, visit our website for more information.
All brand, logo, product and service, and trademark names are the property of their
registered owners.
Google, Android, Google Play, YouTube and other marks are trademarks of Google Inc.
The editorial use of these names is for identification as well as to the benefit of the owners,
with no intention of infringement.
CIPHERLAB logo is a registered trademark of CIPHERLAB CO., LTD.. All other brands,
products and services, and trademark names are the property of their registered owners.
The editorial use of these names is for identification as well as to the benefit of the owners,
with no intention of infringement.
CIPHERLAB CO., LTD.
Website: http://www.CipherLab.com
Page 4

Page 5

Important Notices
IMPORTANT NOTICES
FOR USA
This equipment has been tested and found to comply with the limits for a Class B digital
device, pursuant to Part 15 of the FCC Rules. These limits are designed to provide
reasonable protection against harmful interference in a residential installation. This
equipment generates, uses and can radiate radio frequency energy and, if not installed and
used in accordance with the instructions, may cause harmful interference to radio
communication. However, there is no guarantee that interference will not occur in a
particular installation. If this equipment does cause harmful interference to radio or
television reception, which can be determined by turning the equipment off and on, the user
is encouraged to try to correct the interference by one or more of the following measures:
Reorient or relocate the receiving antenna.
Increase the separation between the equipment and receiver.
Con nect the equipment into an outlet on a circuit different from that to which the receiver
is connected.
Consult the dealer or an experienced radio/TV technician for help.
This device complies with Part 15 of the FCC Rules. Operation is subject to the following two
conditions: (1) This device may not cause harmful int erference, and (2) this device must
accept any interference received, including interference that may cause undesired
operation.
FCC Caution:
Any changes or modifications not expressly approved by the party responsible for
compliance could void the user's authority to operate this equipment.
This transmitter must not be co-located or operating in conjunction with any other a ntenna
or transmitter.
Find the certificate information from:
Setup About Phone Regulatory information
Tested to Comply with FCC Standards
FOR HOME OR OFFICE USE
- 1 -
Page 6

RK25 Mobile Computer
FOR PRODUCT WITH LASER
This laser component emits FDA / IEC Class 2 laser light at the exit port.
Do NOT STARE INTO BEAM DIRECTLY.
Do not aim the beam at the eyes.
Any adjustments or performance excluding those specified herein may
result in hazardous laser light exposure.
ENVIRONMENT
Operate the mobile computer at ambient temperatures from -20°C to 50°C and with
humidity range from 10% to 90%.
Store the device at ambient temperatures from -30°C to 70°C and with humidity range
from 5% to 95%.
Charge the device at ambient temperatures from 0°C to 40°C.
This device is built with a dust-proof and splash-proof structure that conforms to
protection class IP65.
SPECIFIC ABSORPTION RATE (SAR) INFORMATION
The product complies with the FCC / Canada portable RF exposure limit set forth for an
uncontrolled environment and are safe for intend ed operation as described in this manual.
The further RF exposure reduction can be achieved if the products can be kept as far as
possible from the user body or set the device to lower output power if such function is
available.
For body-worn operating conditions please use belt-clips, holsters, and/or accessories that have no
metallic component in the assembly and must provide at least 10mm separation between the device
and the user's body.
FCC SAR Value (Standard limit is 1.6 W/Kg)
USA (1g): Max. 0.52 W/Kg
A minimum separation distance of 0.5 cm must be maintained between the user’s body and
the device, including the antenna during body-worn operation to comply with the RF
exposure requirements in Europe.
To compliance with RF Exposure requirements in Europe, third-party belt-clips, holsters or
similar accessories used by this device should not contain any metallic components. The use
of accessories that do not satisfy these requirements may not comply with RF exposure
requirements, and should be avoided.
CE SAR Value (Standard limit is 2 W/Kg)
EU (10g): Max. 1.03 W/Kg
台灣 NCC 注意事項
第十二條 經型式認證合格之低功率射頻電機,非經許可,公司、商號或使用者不得擅自變更頻
率、加大功率或變更原設計之特性及功能。
第十四條 低功率射頻電機之使用不得影響飛航安全及干擾合法通信;經發現有干擾現象時,應
立即停用,並改善至無干擾時方得繼續使用。
前項合法通信,指依電信法規定作業之無線電通信。
低功率射頻電機需忍受合法通信或工業、科學及醫療用電波輻射性電機設備之干擾。
註:若要減少電磁波影響,請妥適使用。SAR 標準值 2.0W/Kg;送測產品實測值為:0.882W/Kg。
- 2 -
Page 7

Important Notices
SAFETY PRECAUTIONS
Warning statement:
A pleine puissance, l’écoute prolongée du baladeur peut endommager
l’oreille de l’utilisateur.
To prevent possible hearing damage, do not listen at high volume levels
for long periods.
.
RISK OF EXPLOSION IF BATTERY IS REPLACED BY AN INCORRECT TYPE. DISPOSE
OF USED BATTERIES ACCORDING TO THE INSTRUCTIONS.
For people’s safety
Do not listen at high volume levels for long periods to prevent possible hearing damage.
Do not operate this device while walking, cycling or car driving.
For the equipment
Do not use any batteries or charging devices which are not originally sold or
manufactured by CIPHERLAB CO., LTD.
Do not replace the battery with an incorrect type, to avoid the risk of heat generation,
fire, or explosion.
Do not disassemble, incinerate or short circuit the battery.
Do not touch the contact pins of the battery pack.
Do not expose the mobile computer or battery to any flammable sources.
Do not expose the mobile computer to extreme temperatures or soak it in water.
Do not use any pointed or sharp objects against the screen surface.
Do not use the styluses which are not supplied or approved by CIPHERLAB CO., LTD., to
prevent possible scratches to the touch screen.
Water residue on the touch screen may cause abnormal behaviors or the fall of its
sensitivity levels.
On the surface of the terminal and the barcode reading window, the fog or water drops
caused by low temperatures may influence barcode reading.
Do not use bleaches or cleaners to clean the device. Use a clean, wet cloth instead.
BATTERY
The main battery may not be charged to full fo r shipment. Charge the main battery to full
before using the mobile computer for the first time.
Main battery: The main battery powers the mobile computer to work. It takes
approximately 4 hours to charge an empty main battery to full. For the first time
charging the main battery, please charge it for at least 8 to 12 hours. The charging LED
above the screen will light up in red while charging and will turn green when charging is
complete.
When the main battery is removed, RTC retention will be maintained for at least 30
minutes.
Backup battery: The backup battery is mounted on the main board. Its role is to
temporarily keep the mobile computer in suspension when the main battery is drained
out so data in DRAM will be retained. The backup ba ttery takes approximately 3.5 hours
to charge to full by the main battery or power adapter.
- 3 -
Page 8

RK25 Mobile Computer
The allowed battery charging ambient temperature is between 0°C to 40°C. It is
recommended to charge the battery at room temperature (18°C to 25°C) for optimal
performance.
Please note that ba ttery charging stops when ambient temperature drops below 0°C or
exceeds 40°C.
In order to prevent system from shutting down after the battery is drained out, keep a
fresh battery for replacement at all times, or connect the mobile computer to an external
power.
If there are drippings or dust on the device or battery pack, wipe them away with a soft
clean cloth before battery replacement.
Turn off the power before battery replacement.
If you want to put away the mobile computer for a period of time, remove the battery
pack from the mobile computer’s battery compartment. Store the mobile computer and
battery pack separately.
Recycle batteries in a proper way for the green-environment issue.
SCANNER
Scan a 1D barcode
1) Open ReaderConfig and tap Scan Test on the menu bar.
2) Aim the scanning window at the barcode to read. Move the device, having the barcode
located in the center of the scanning area.
3) Press any of the two side triggers. The scanning light beams to read the printed barcodes.
The buzzer beeps after scanning. The scanning light goes off once the data is decoded,
or when the decode timeout period has passed.
Scan a 2D barcode
1) Open ReaderConfig and tap Scan Test on the menu bar.
2) Aim the scanning window at the barcode to read. Move the device, having the barcode
located in the center of the scanning area.
3) Press any of the two side triggers. The scanning light beams to read the printed barcodes.
The buzzer beeps after scanning. The scanning light goes off once the data is decoded,
or when the decode timeout period has passed.
- 4 -
Page 9

Important Notices
CONNECTION
Via Bluetooth or WLAN
Connection may fail when the mobile computer is around other wireless machines or
power cables as the radio frequencies of those may cause interferences.
If communication fails, move the devices much closer to each other, and try to
communicate again
After turning on, Bluetooth power is sustained even when the mobile computer is
suspended. However, if the power mode is switched to Airplane Mode, Bluetooth power
will be turned off regardless of the settings.
To a Charging & Communication Cradle
Do not insert the mobile computer to a Charging & Communication Cradle if water or
drippings are staying on the device.
The LED indicator on a Charging & Communication Cradle shows the status of battery
charging only; the status of terminal charging is shown on the device itself.
Not Charging could be the result of battery damage, battery’s failure to touch the
connector or AC plug coming off.
Charging error could be due to high battery temperature.
CARE & MAINTENANCE
This mobile computer is intended for industrial use. The mobile computer is rated IP67,
however, damage may be done to the mobile computer if it is exposed to extreme
temperatures or soaked in water.
When the body of the mobile computer gets d irty, use a clean, wet cloth to wipe off d ust
and debris. DO NOT use bleaches or cleaners.
Use a cl ean, non-abrasive, lint-free cloth to wipe dust off the LCD touch screen. DO NOT
use any pointed or sharp objects against the surface. Always keep the LCD dry.
If you want to put away the mobile computer for a period of time, download the collected
data to a host computer, and then remove the battery pa ck from the mobile computer’s
battery compartment. Store the mobile computer and battery pack separately.
If you encounter malfunction on the mobile computer, write down the specific scenario
and consult your local sales representative.
- 5 -
Page 10

RK25 Mobile Computer
E-LABEL
- 6 -
Page 11

CE DECLARATION
Important Notices
- 7 -
Page 12

RK25 Mobile Computer
RELEASE NOTES
Version Date Notes
1.00 March 8, 2018 Initial release
- 8 -
Page 13

CONTENTS
IMPORTANT NOTICES ...................................................................................................................... - 1 -
For USA .......................................................................................................................................... - 1 -
For Product with Laser .................................................................................................................. - 2 -
Environment .................................................................................................................................. - 2 -
Specific Absorption Rate (SAR) information ................................................................................ - 2 -
Safety Precautions ........................................................................................................................ - 3 -
Battery ....................................................................................................................................... - 3 -
Scanner ..................................................................................................................................... - 4 -
Connection ................................................................................................................................ - 5 -
Care & Maintenance ................................................................................................................ - 5 -
RELEASE NOTES .............................................................................................................................. - 6 -
CONTENTS ........................................................................................................................................... 9
INTRODUCTION .................................................................................................................................. 13
Features ........................................................................................................................................... 14
Inside the Package .......................................................................................................................... 14
Accessories ...................................................................................................................................... 14
Related Documentation .................................................................................................................. 14
QUICK START ..................................................................................................................................... 15
1.1. Overview ................................................................................................................. 16
1.1.1. Install/ Remove Battery ........................................................................................ 18
1.1.2. Installing SIM Card, SAM Card and Memory Card ............................................... 21
1.1.3. Power On/Off Mobile Computer ........................................................................... 23
1.1.4. Homescreen Selection .......................................................................................... 24
1.1.5. Using Hardware Buttons ....................................................................................... 25
1.1.6. Connecting Headset .............................................................................................. 26
1.2. Charging & Communication .................................................................................. 27
1.2.1. Charge Mobile Computer ...................................................................................... 27
1.2.2. Wired Data Transmission ...................................................................................... 32
1.2.3. Using Wireless Networks ....................................................................................... 33
USING RK25 MOBILE COMPUTER .................................................................................................... 34
2.1. Battery .................................................................................................................... 35
2.1.1. Battery Status Indicators....................................................................................... 36
2.1.2. Monitor Battery Level ............................................................................................ 38
2.1.3. Replace Main Battery ............................................................................................ 44
2.1.4. Power Management .............................................................................................. 47
2.1.5. Battery Precautions ............................................................................................... 49
2.2. Memory .................................................................................................................. 50
2.2.1. Check Memory Usage ............................................................................................ 51
2.2.2. Manage Storage Space ......................................................................................... 52
2.3.
Touch Screen ......................................................................................................... 60
9
Page 14

RK25 Mobile Computer
2.3.1. Screen Brightness ................................................................................................. 60
2.3.2. Screen rotation ...................................................................................................... 61
2.3.3. Screen Timeout Settings ....................................................................................... 65
2.3.4. Text Size ................................................................................................................. 66
2.3.5. Display Size ............................................................................................................ 67
2.4. Notifications ........................................................................................................... 68
2.4.1. Status LED ............................................................................................................. 68
2.4.2. Audio ....................................................................................................................... 68
2.4.3. Sounds and Vibration ............................................................................................ 69
2.5. Date and Time ....................................................................................................... 72
2.6. Language & Keyboard Input ................................................................................. 73
2.6.1. Change Display Language ..................................................................................... 73
2.6.2. On-screen Keyboard .............................................................................................. 75
2.7. Physical Keypad ..................................................................................................... 82
2.7.1. Basic Key ................................................................................................................ 83
2.7.2. Alpha Key ............................................................................................................... 84
2.7.3. Function Key (only for 25-key Model) ................................................................... 86
2.7.4. Shift Keys ............................................................................................................... 87
2.7.5. Key Functions in Different Modes ........................................................................ 88
2.7.6. Keypad Lock........................................................................................................... 91
2.7.7. Keypad backlight ................................................................................................... 92
2.8. Sound and Volume ................................................................................................ 93
2.9. Data Capture .......................................................................................................... 94
2.9.1. Barcode Reader ..................................................................................................... 94
2.9.2. Digital Camera ....................................................................................................... 94
BASIC OPERATION ............................................................................................................................. 95
3.1. Home Screen ......................................................................................................... 96
3.1.1. Customize Home Screen ....................................................................................... 98
3.2. Status Bar ............................................................................................................ 109
3.2.1. Icons on Status Bar ............................................................................................. 110
3.2.2. Open Quick Setting Menu ................................................................................... 112
3.2.3. Open Notifications Drawer .................................................................................. 115
3.3. Manage Applications ........................................................................................... 117
3.3.1. Application Menu ................................................................................................. 117
3.3.2. Current Applications ............................................................................................ 119
3.4. Suspend & Lock ................................................................................................... 120
3.4.1. Suspend Device ................................................................................................... 120
3.4.2. Lock Device .......................................................................................................... 121
3.5. OS Update ............................................................................................................ 123
3.6. Back up Your Data ............................................................................................... 125
3.7. Reset to Factory Default ...................................................................................... 126
WIRELESS RADIOS ........................................................................................................................... 129
4.1. Use Wireless Wide Area Network ....................................................................... 130
4.1.1. Share WWAN Data ............................................................................................... 132
4.1.2. Data Connection Settings ................................................................................... 138
4.1.3. SIM Card Settings ................................................................................................ 139
4.2. Use Wireless Local Area Network (Wi-Fi) ........................................................... 140
4.2.1. Connect to Wi-Fi Network .................................................................................... 140
10
Page 15

CONTENTS
4.2.2. Manually Add Wi-Fi Network ............................................................................... 141
4.2.3. Advanced Wi-Fi Settings ...................................................................................... 142
4.2.4. Configure Wi-Fi ..................................................................................................... 143
4.2.5. Configure Proxy Server ........................................................................................ 144
4.2.6. Use Static IP Address .......................................................................................... 144
4.2.7. Connect With Wi-Fi Protected Setup (WPS) ....................................................... 144
4.2.8. Modify Wi-Fi Network ........................................................................................... 145
4.2.9. Disconnect Wi-Fi Network ................................................................................... 145
4.3. Use Bluetooth ...................................................................................................... 146
4.3.1. Bluetooth Profiles ................................................................................................ 146
4.3.2. Turn On Bluetooth ............................................................................................... 147
4.3.3. Change Bluetooth Name ..................................................................................... 148
4.3.4. Pair Bluetooth Devices ........................................................................................ 149
4.3.5. Unpair Bluetooth Device ..................................................................................... 149
4.4. Use Near Field Communications ........................................................................ 150
USING THE PHONE .......................................................................................................................... 152
5.1. SIM Card Management ....................................................................................... 153
5.2. Phone Application ................................................................................................ 156
5.2.1. Phone Interface ................................................................................................... 156
5.2.2. Place Call .............................................................................................................. 158
5.2.3. During A Call ......................................................................................................... 159
5.2.4. Receive Incoming Call ......................................................................................... 161
5.2.5. Check Missed Calls ............................................................................................. 162
5.2.6. Call History ........................................................................................................... 163
5.2.7. Call Settings ......................................................................................................... 164
5.2.8. Make Multi-Party Calls ......................................................................................... 165
5.3. Audio Modes ........................................................................................................ 166
5.4. In-call Volume ...................................................................................................... 167
USING READER CONFIGURATION UTILITY ....................................................................................... 168
6.1. Configure Reader ................................................................................................. 169
6.1.1. General Settings .................................................................................................. 170
6.1.2. Symbology ............................................................................................................ 177
6.1.3. Miscellaneous ...................................................................................................... 180
6.1.4. Reader Config Option Menu ................................................................................ 181
6.2. Read Printed Barcodes ....................................................................................... 188
SPECIFICATIONS .............................................................................................................................. 190
Platform, Processor & Memory..................................................................................................... 190
Communication & Data Capture .................................................................................................. 191
Electrical Characteristics .............................................................................................................. 192
Physical Characteristics ................................................................................................................ 192
Environmental Characteristics ..................................................................................................... 193
Programming Support ................................................................................................................... 194
APPENDIX I ....................................................................................................................................... 195
Scan Engine Settings .................................................................................................................... 195
Symbologies Supported ........................................................................................................... 195
APPENDIX II ...................................................................................................................................... 198
2D Imager ...................................................................................................................................... 198
11
Page 16

RK25 Mobile Computer
Symbology Settings .................................................................................................................. 198
APPENDIX III ..................................................................................................................................... 209
Open Source License .................................................................................................................... 209
12
Page 17

Introduction
INTRODUCTION
The RK25 mobile computer, powered by Android 7.0 Nougat, is light-weight, easy to use,
providing powerful and handy tools for the purpose of delivering flexibility in customization.
Specifically designed to work as an industrial PDA, it provides rich options of data collection,
voice and data communication, long-lasting working hours, and so on. Its large color
transmissive display guarantees ease in reading in all lighting condition s. Integrated with
Bluetooth 2.1EDR/4.0 BLE/V4.1, 802.11 b/g/n, 802.11a/n technologies, the mobile
computer also includes a GSM/GPRS/EDGE/WCDMA/UMTS/HSDPA/HSUPA/HSPA+/LTE
module to gain greater speeds and optimal mobility. In particular, an integrated GPS
receiver is made available for use with third-party location-based applications.
This manual serves to guide you through how to install, configure, and operate the mobile
computer. The Care & Maintenance section is specifically crucial for those who are in charge
of taking care of the mobile computer.
We recommend you to keep one copy of the manual at hand for quick reference or
maintenance purposes. To avoid any improper disposal or operation, please read the
manual thoroughly before use.
13
Page 18

RK25 Mobile Computer
FEATURES
Bui lt tough to survive d rop test a nd sealed against moi stur e/dust to i ndustri al standard
IP65.
Android 7.0 Nougat operating system with a powerful Cortex 1.45 GHz Quad-Core
processor
16GB eMMC flash memory to store OS and software programs
2GB LPDDR3 SDRAM to store and run programs, as well as store program data
One expansion slot for microSDHC card up to 32GB and microSDXC card up to 64GB.
Built-in 8.0 Megapixel rear camera with white LED for flash and auto focus.
Left and right side triggers for ambidextrous scanning
Total wireless solution — connectivity includes Bluetooth 2.1EDR/4.0BLE/V4.1 and,
802.11 b/g/n, 802.11a/n, GSM/GPRS/EDGE/WCDMA/UMTS/HSDPA/HSUPA/HSPA+/LTE,
and near field communication (NFC).
A 4” color transmissive display with 480x800 pixels to deliver excellent visibility in all
lighting conditions
Configurable feedback indicators including speaker and vibrator
Built-in scan engine setting tool Reader Configuration which serves out-of-the-box
keyboard wedge functionality
INSIDE THE PACKAGE
The following items are included in the kit package. Save the box and packaging material for
future use in case you need to store or ship the mobile computer.
RK25 Mobile Computer
USB Cable
Snap-on Cable
AC Power Adaptor
Quick Start Guide
ACCESSORIES
Hand Strap
1-slot Charging + Communication Cradle
Pistol Grip
RELATED DOCUMENTATION
Log in to GoBetween to access related documentation about the RK25 mobile computer
from the CipherLab Central Service (CCS) platform. Download the GoBetween desktop or
mobile device application, or launch the GoBetween Lite web application from the following
site: http://ccs.cipherlab.com/.
14
Page 19

Chapter 1
QUICK START
This chapter helps you get ready for starting using the mobile computer.
IN THIS CHAPTER
1.1 Overview .................................................................. 16
1.2 Charging & Communication ......................................... 27
Quick Start
15
Page 20

RK25 Mobile Computer
1.1. OVERVIEW
16
Page 21

Quick Start
25-key Model 28-key Model
No. Description No. Description
1 Power Button 2 Scan Window
3 Status LED 4 Receiver
5 Touchscreen 6 Scan Key
7 Microphone 8 Headset Jack
9 Side-Trigger 10 Micro USB Port
11 Camera 12 Camera Flash
13 Wrist Band Hole 14 Battery
15 Battery Cover Latch and Lock 16 Speaker
17 Volume Buttons 18 NFC Detection Area
19 Wrist Band Hole 20 Charging & Communication Pins
Note:
Please refer to “Physical Keypad” for the difference between 28-key Model and 25-key
Model.
17
Page 22
RK25 Mobile Computer
1.1.1. INSTALL/ REMOVE BATTERY
For shipping and storage purposes, the mobile computer and the main battery are saved in
separate packages.
Note:
Any improper handling may reduce the battery life.
To install the main battery:
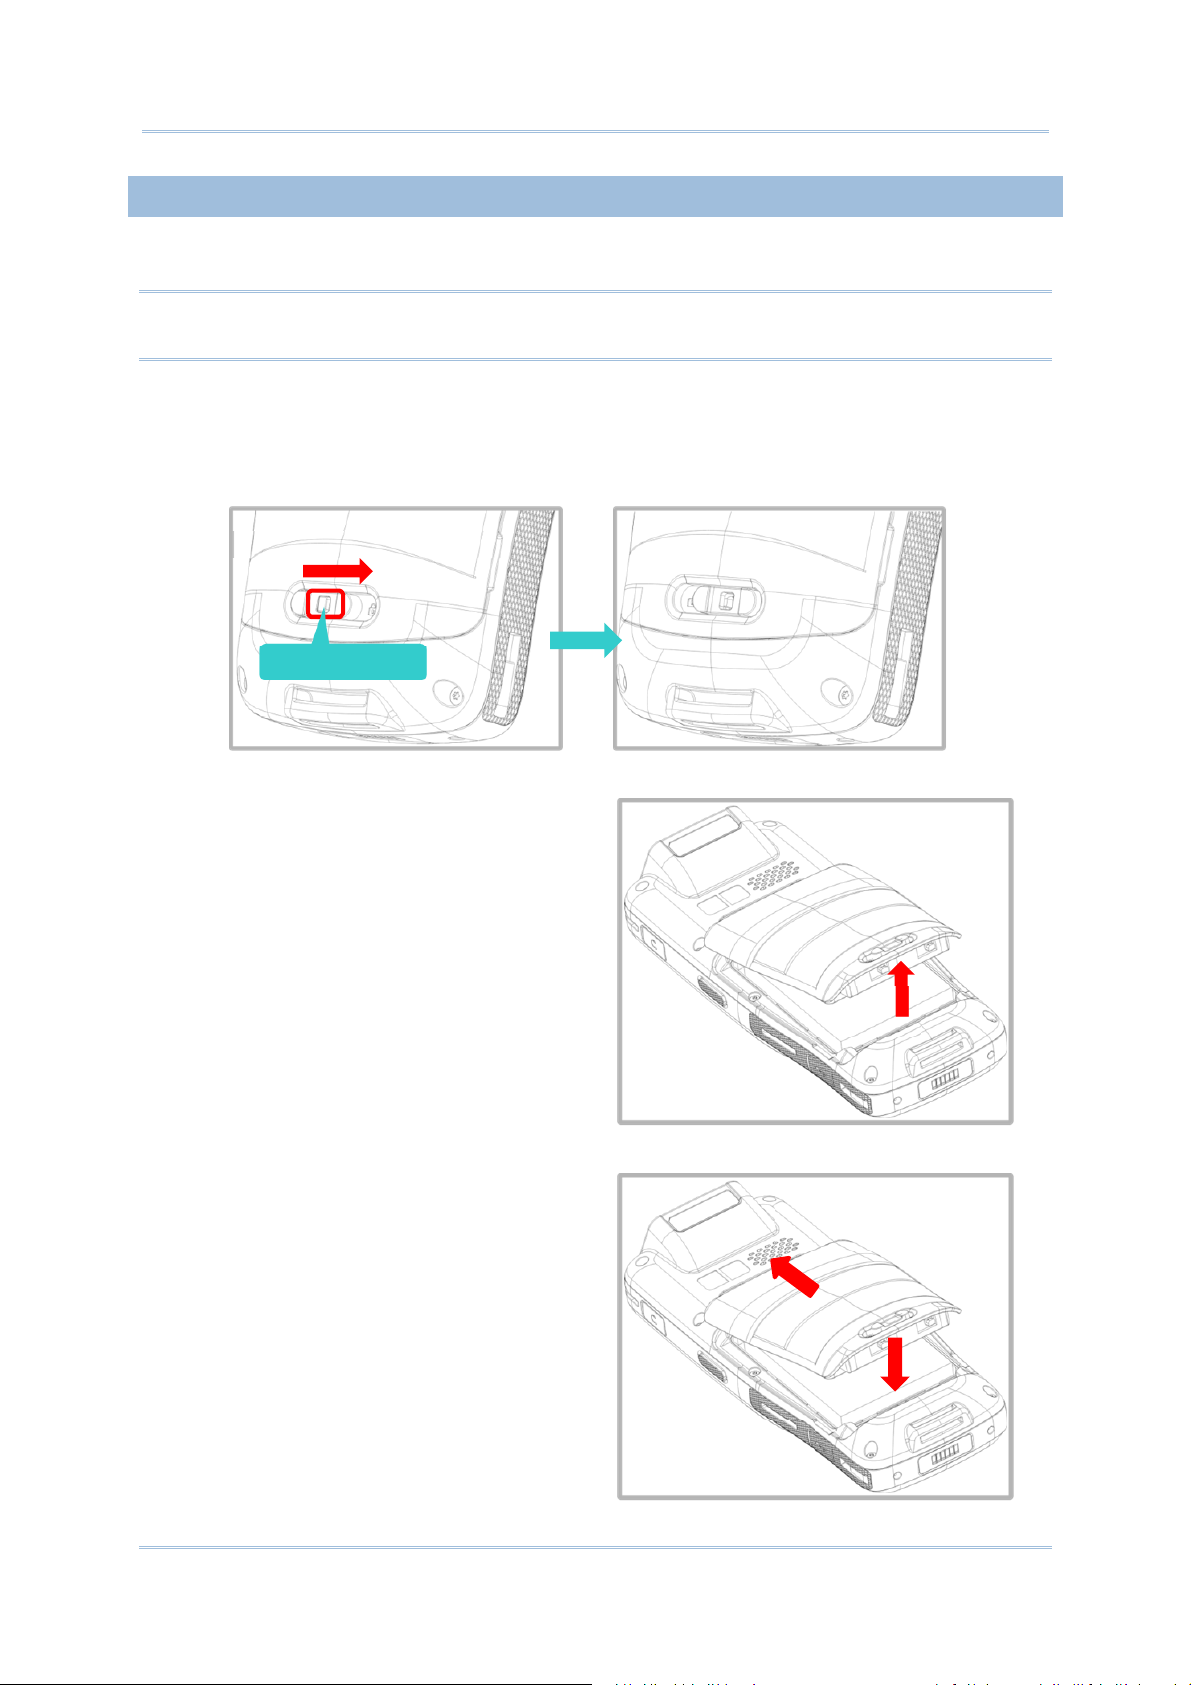
1)
Press down the lock button and slide the battery latch rightward to the “Unlock”
position.
Sliderightwardstounlock
Thelockbutton
2)
Lift up the main battery (which is with
the battery cover) from its lower end to
remove it.
Liftupfrom
3)
Insert a fully-charged main battery from
its upper end, and then press down the
lower edge of the battery.
○1 Insertitfromthe
upperend
○2 Pressdown
thelowerend
18
Page 23
Quick Start
4)
Slide the battery latch leftward to
“Lock” position.
Pushlefttolock.
Warning:
(1) Make sure the battery latch is at the “Lock” position before powering on the device.
(2) For initial use, insert a charged battery, lock the battery cover in place, and then press
the Power key to power on the mobile computer.
19
Page 24
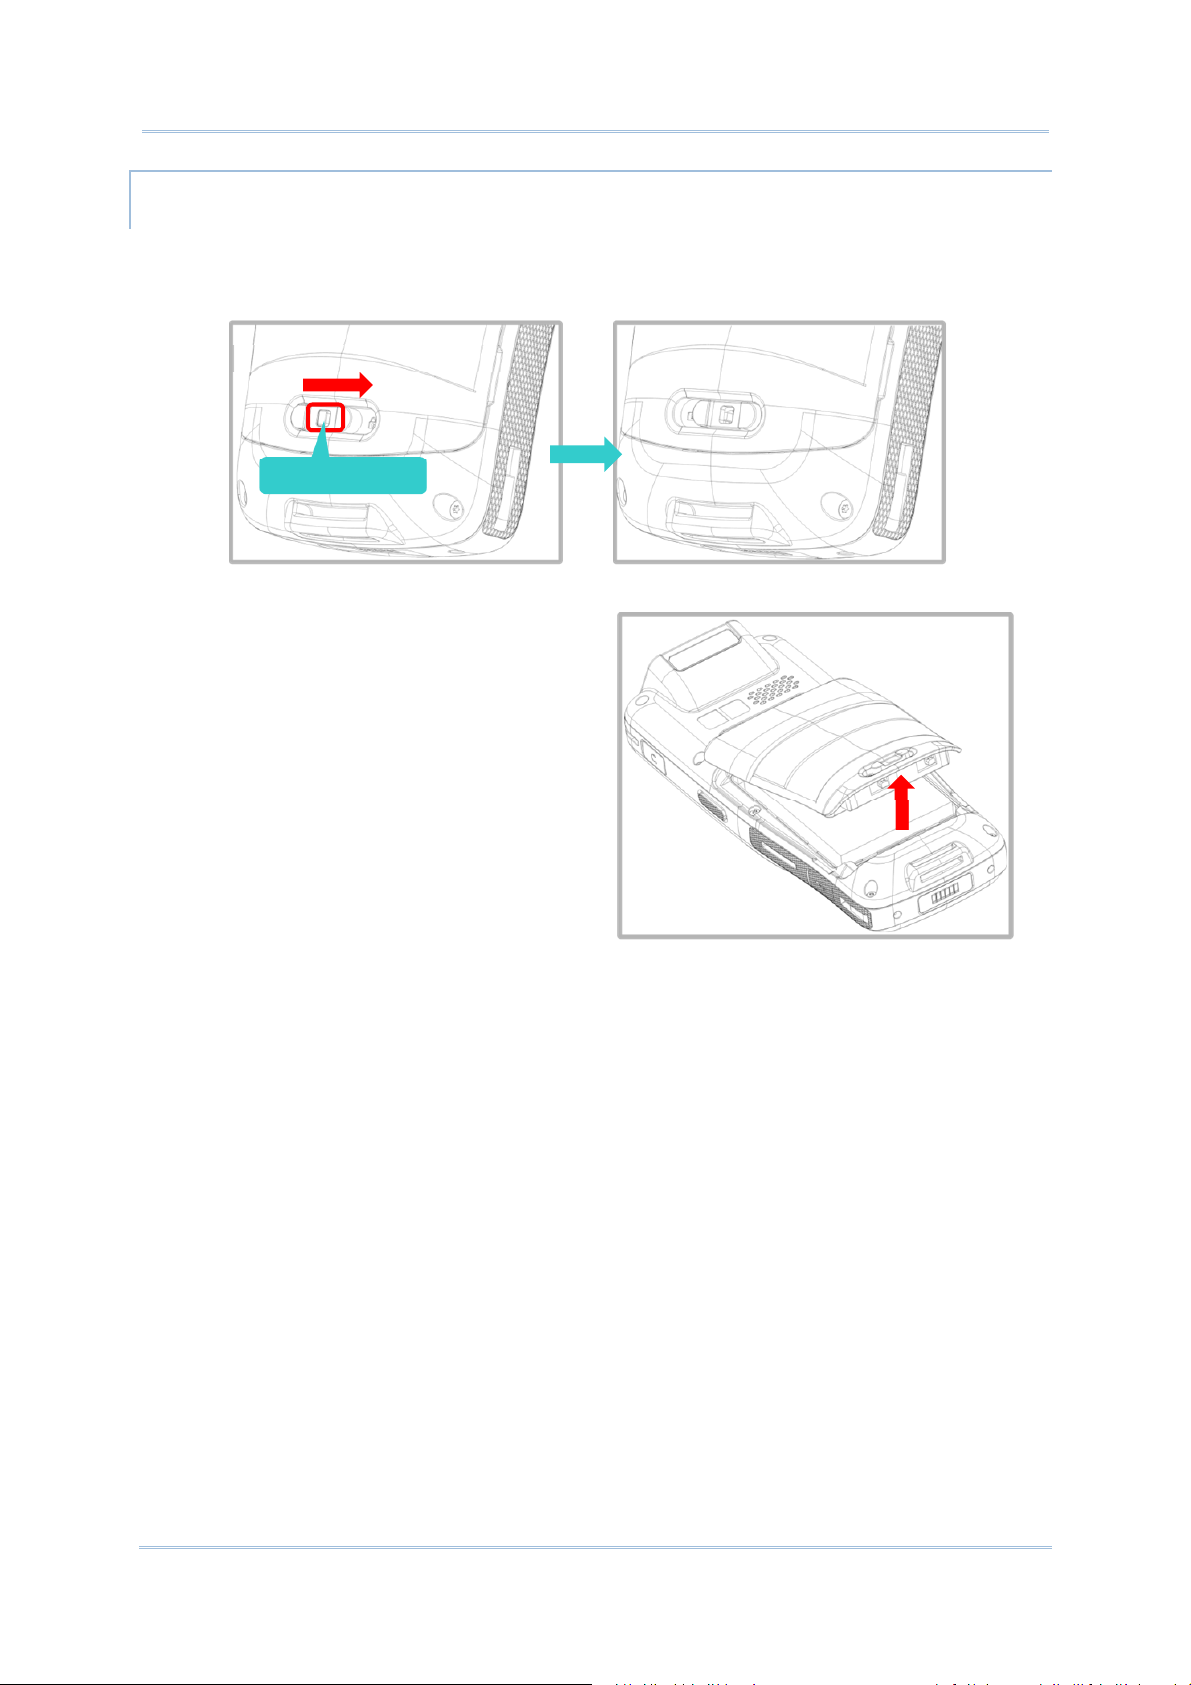
RK25 Mobile Computer
REMOVE BATTERY
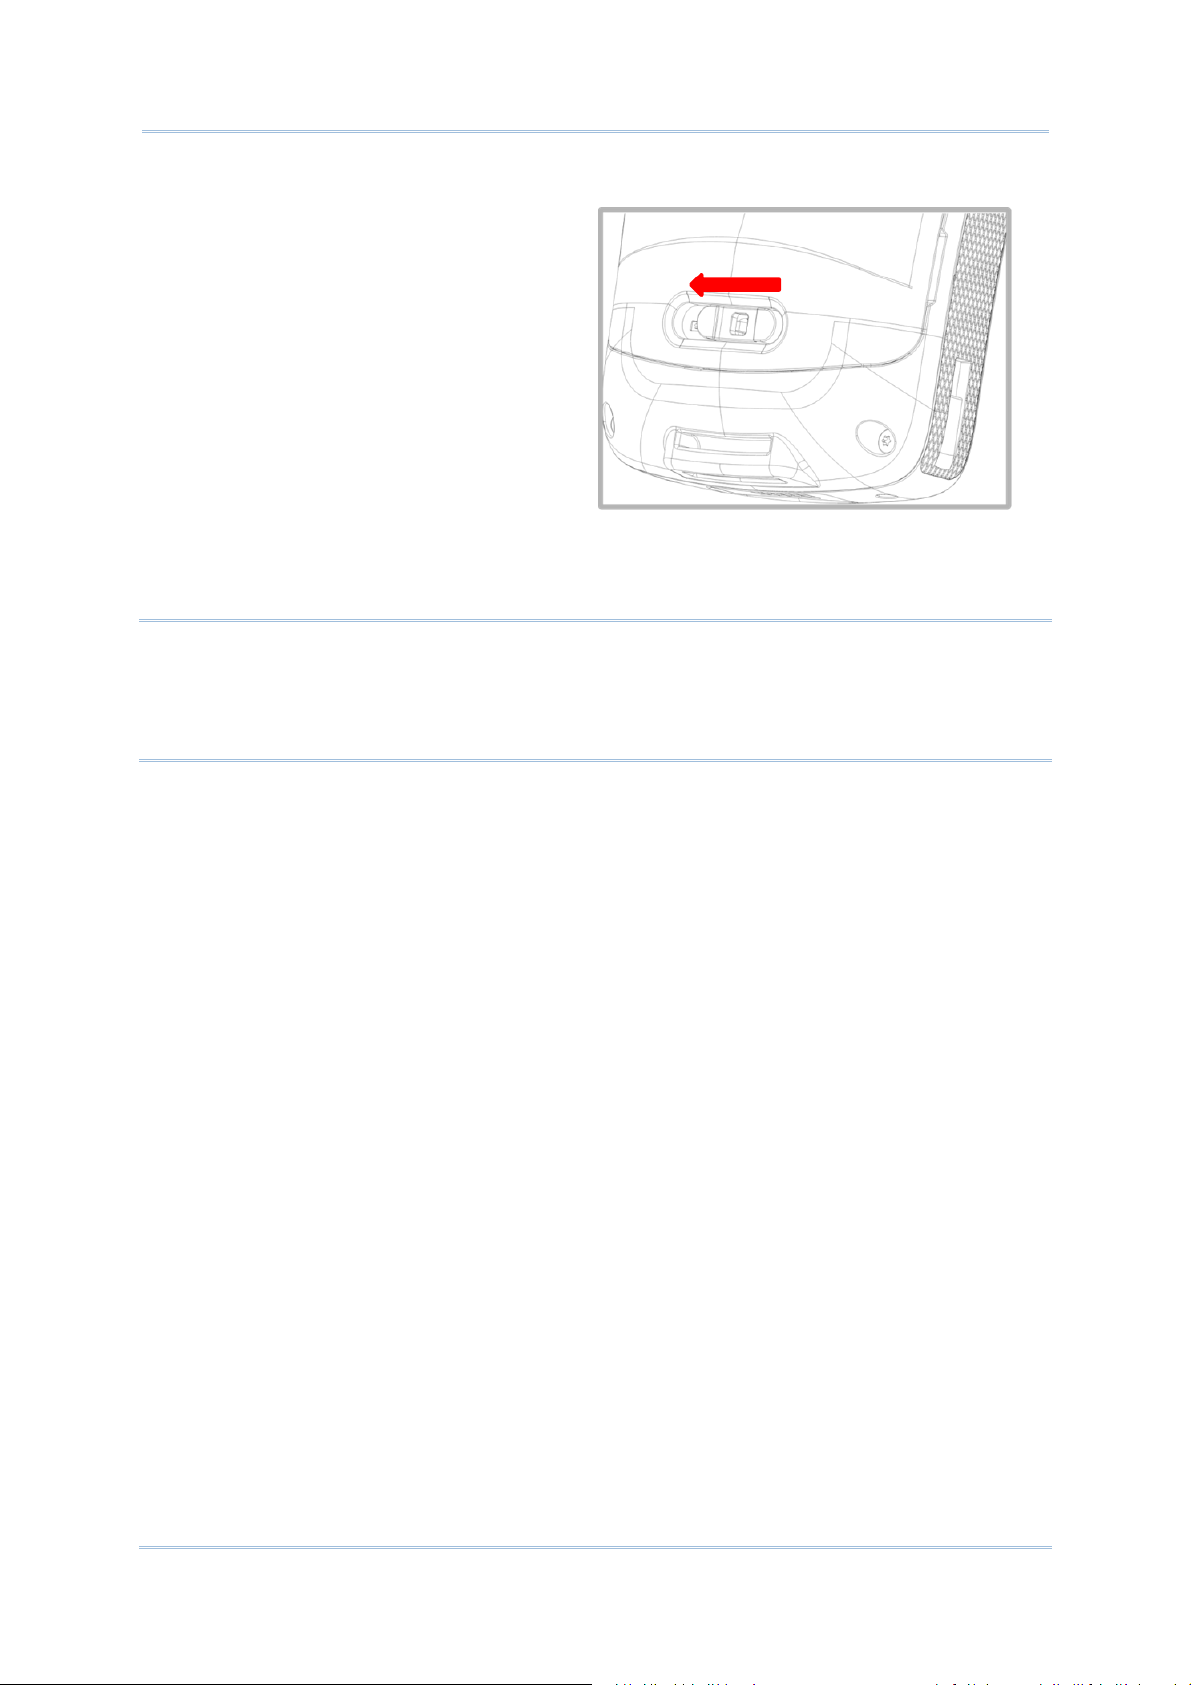
1) Press down the lock button and slide the battery latch rightward to the “Unlock”
position.
Sliderightwardstounlock
Thelockbutton
2) Lift up the main battery (which is with
the battery cover) from its lower end to
remove it.
Liftupfrom
20
Page 25
Quick Start
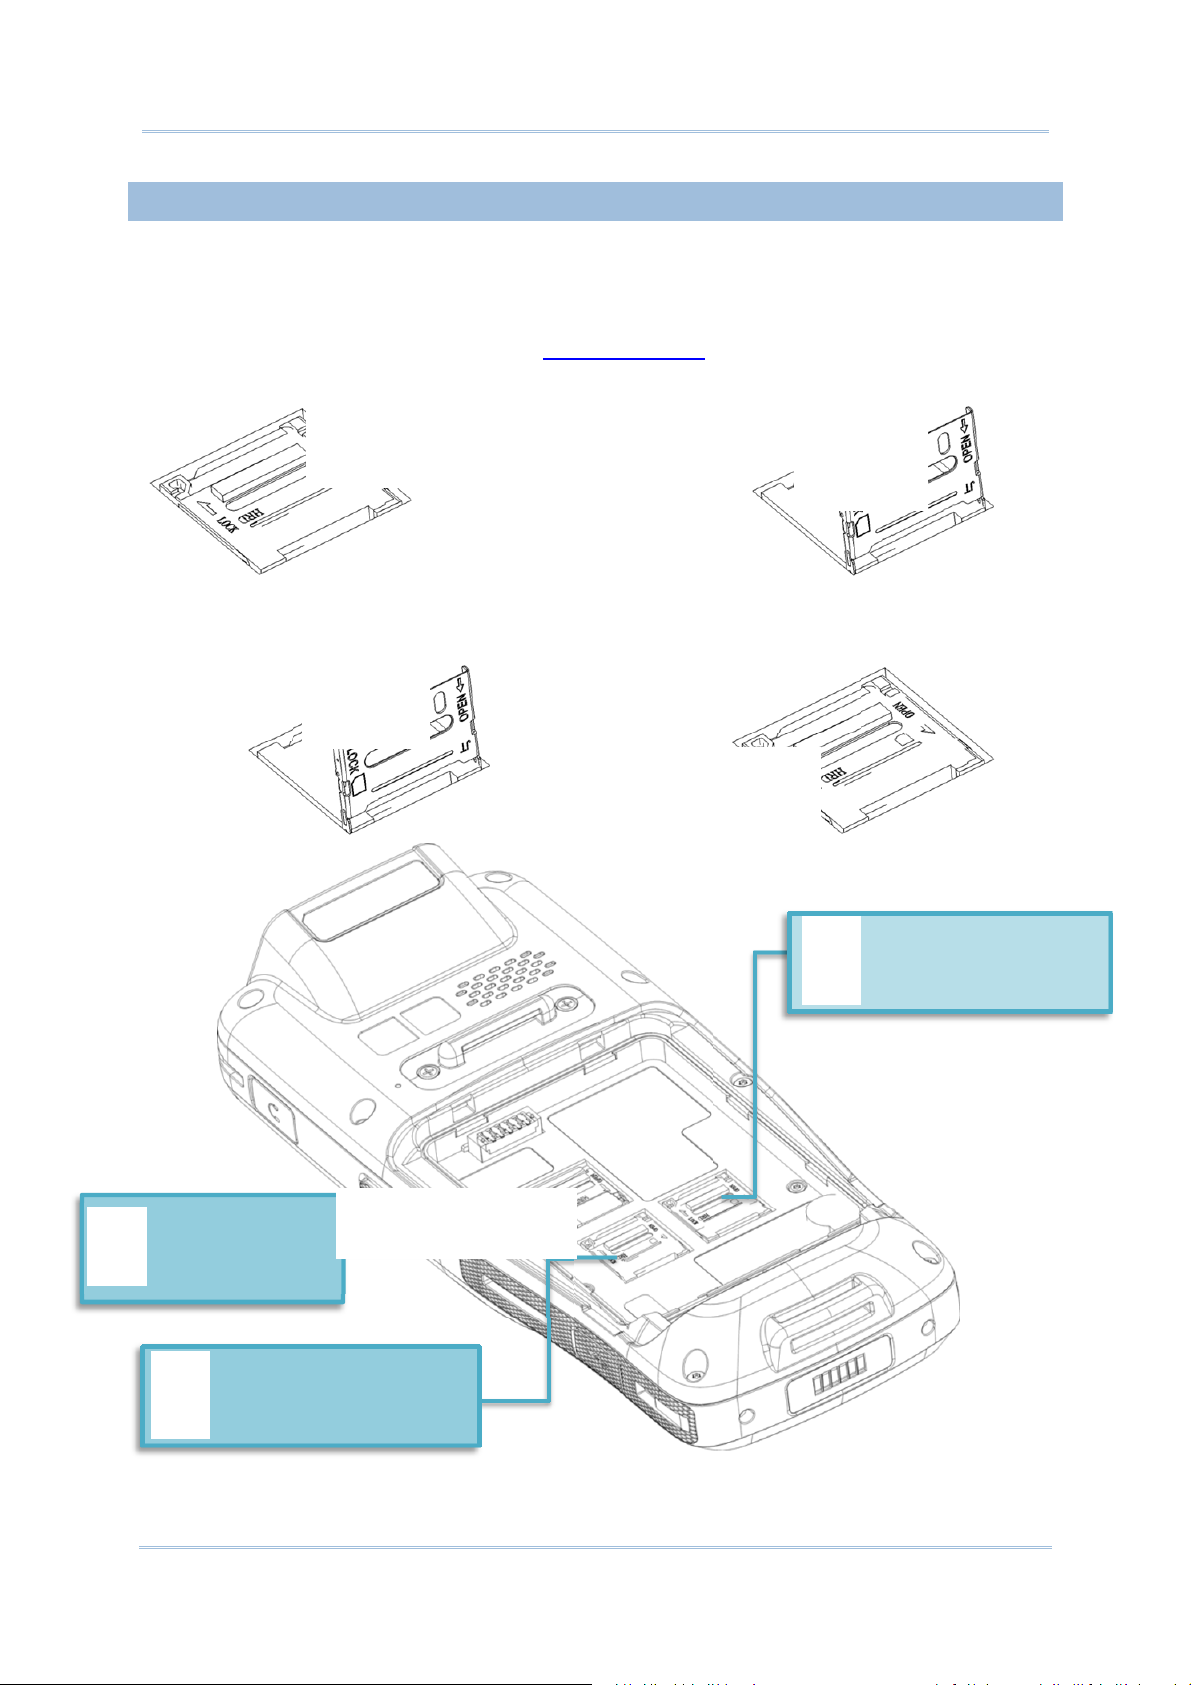
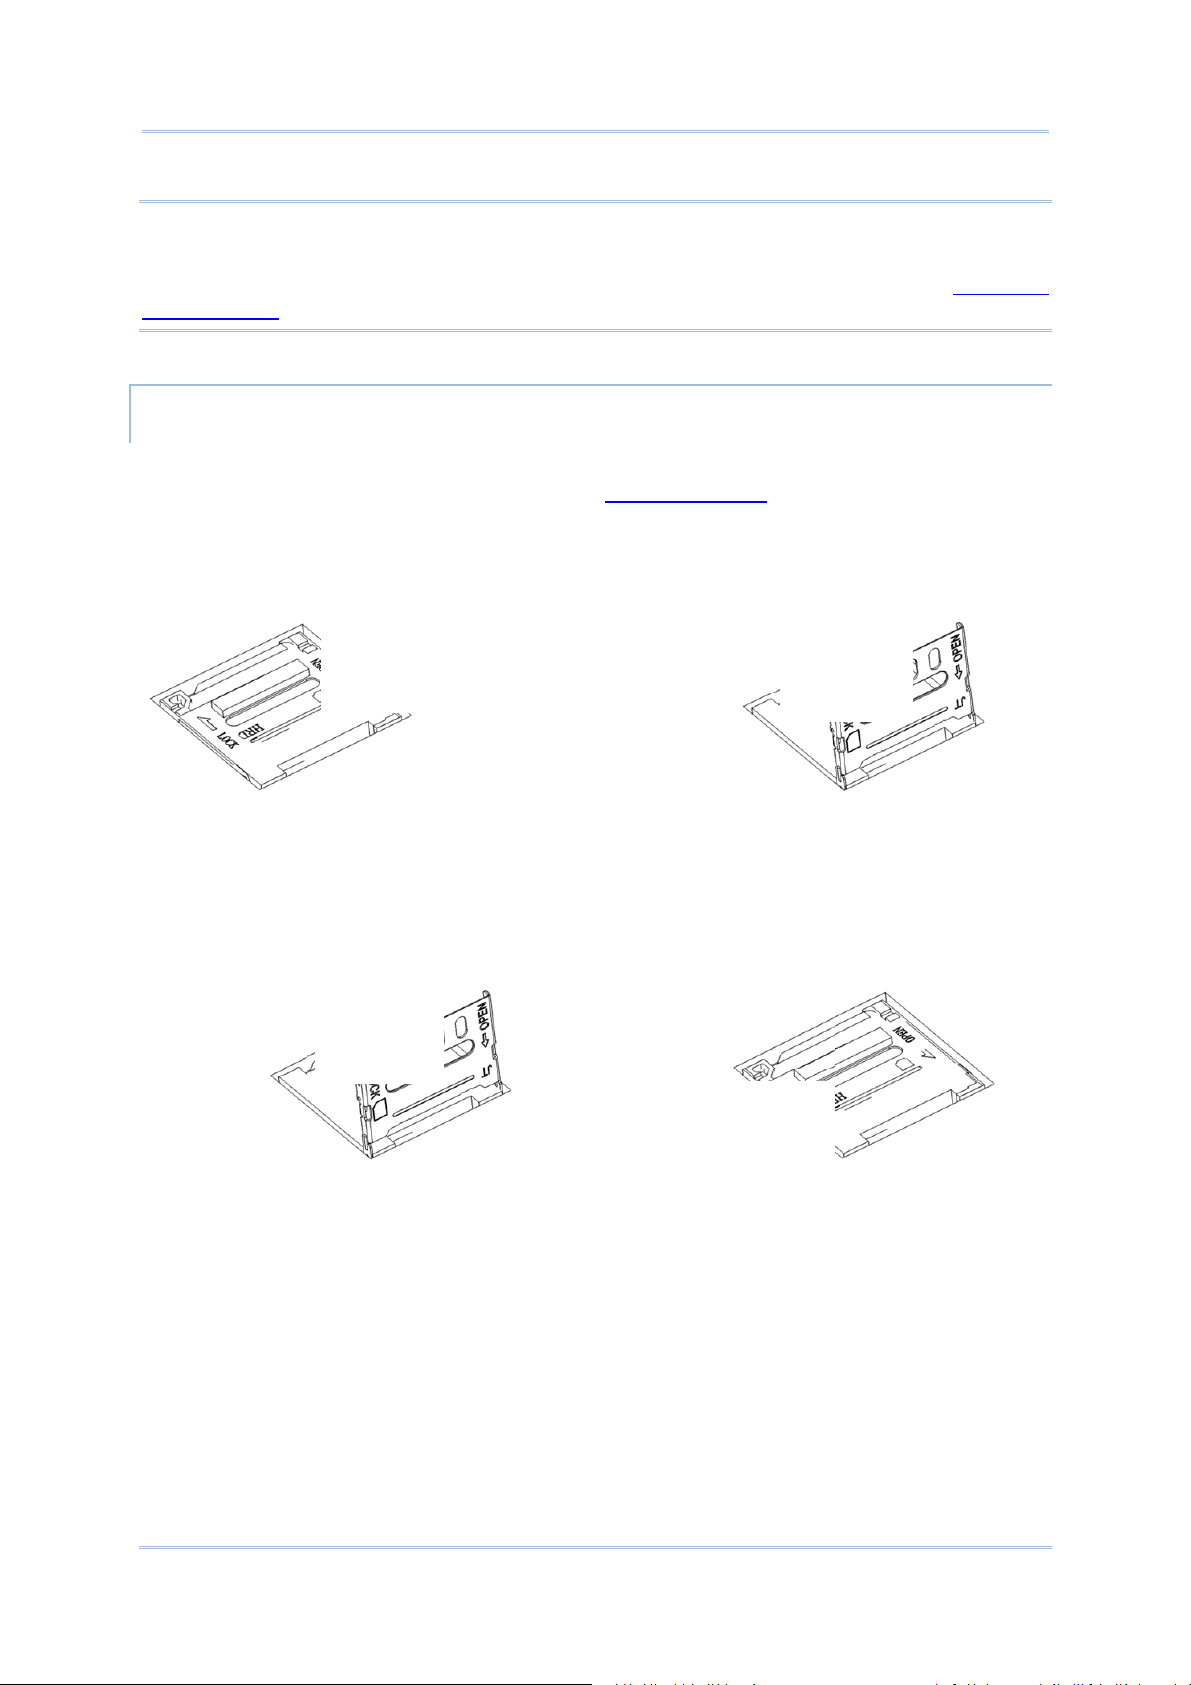
1.1.2. INSTALLING SIM CARD, SAM CARD AND MEMORY CARD
The RK25 mobile computer is equipped with two SIM card slots (SIM 2 slot is compatible
with SAM card) and one memory card slot.
To insert the cards:
1)
Remove the battery as described in Remove Battery.
2)
Slide the hinged cover backward, and swing the top to open.
○1 Slidethe
○2Swingtoopen
hingedcover
3)
Place the card into the slot with its metal contacts downward.
4)
Close the hinged cover, and then push it toward to lock.
○1 Closethe
hingedcover
○2 Slidethehinged
covertolock
SIM2/SAMCardSlot
Supports2G/3G/4GCard
MicroSDCardSlot
Supports
SD/SDHC/SDXC
SIM1Slot
Supports2G/3G/4GCard
5)
Replace the battery cover and push the battery latch back to the “Lock” position.
21
Page 26
RK25 Mobile Computer
Note:
Both SIM1 and SIM2 card slots support 2G/3G/4G cards. However, you can have 3G/4G
data transmission on either SIM but not on both at the same time. Refer to SIM Card
Management for details on managing dual SIM cards.
REMOVE CARDS
1)
Remove the battery cover as described in Remove Battery.
2)
Slide the hinged cover backward, and swing the top to open.
○1 Slidethe
○2 Swingtoopen
hingedcover
3)
Take out the cards directly from their slots.
4)
Close the hinged cover, and then push it toward to lock.
○1 Closethe
hingedcover
○2 Slidethehinged
covertolock
5)
Replace the battery cover and push the battery latch back to the “Lock” position.
22
Page 27
Quick Start
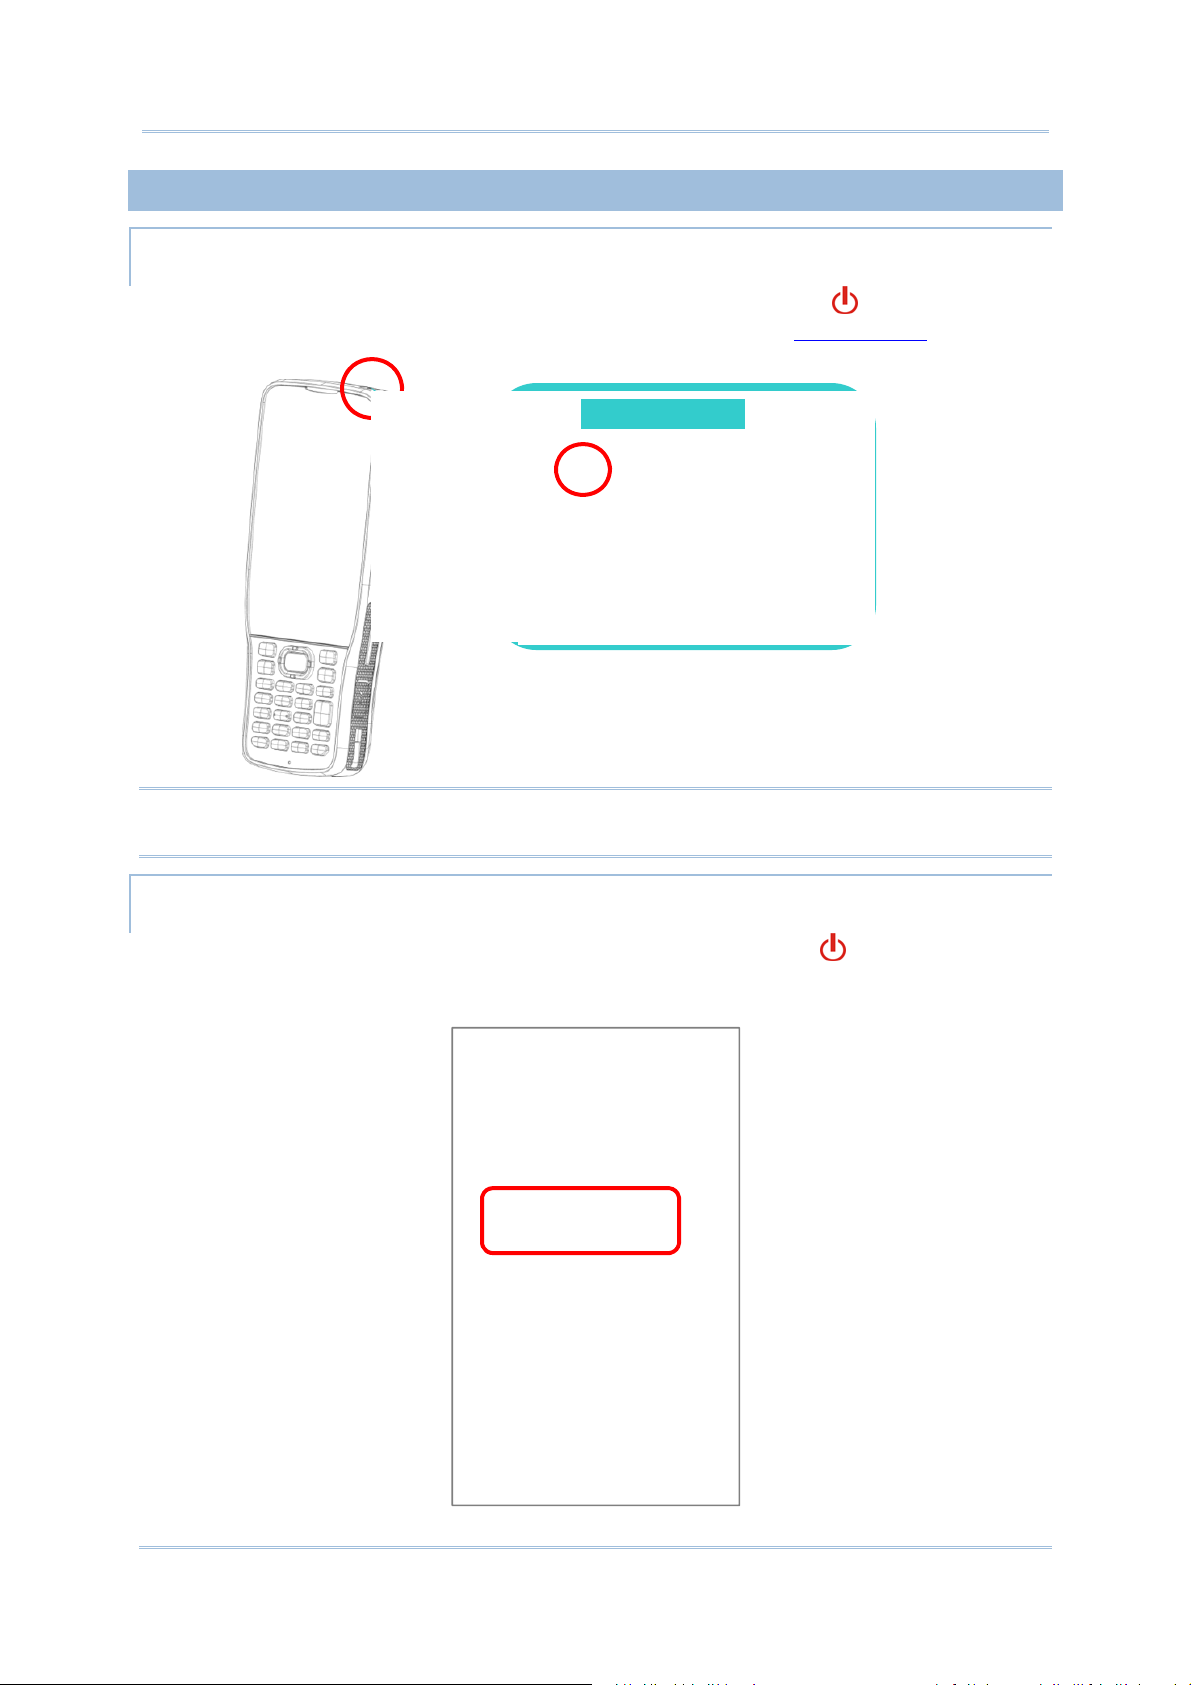
1.1.3. POWER ON/OFF MOBILE COMPUTER
POWER ON
To power on the mobile computer, press and hold the power button located on the top
end of the device. The mobile computer will turn on and show the Home Screen after splash
screen.
PowerButton
Note:
For the mobile computer to power on, the battery cover must be secured in place.
POWER OFF
To power off the mobile computer, press and hold the power button for more than three
seconds. A menu will appear on-screen which allows you to power off the device. Make sure
all user data and tasks have been stored before tapping on Power off.
23
Page 28
RK25 Mobile Computer
1.1.4. HOMESCREEN SELECTION
Upon the first time you launch the system, a Select Home app window will pop up to
request your immediate choice of home screen. By selecting “AppLock”, you will directly
enter AppLock application (please refer to AppLock User Guide for detailed instructions on
AppLock settings) to start configuring the interface provided to normal users of this device;
by selecting “Launcher”, you will enter the default Android 7.0 home screen.
24
Page 29
Quick Start
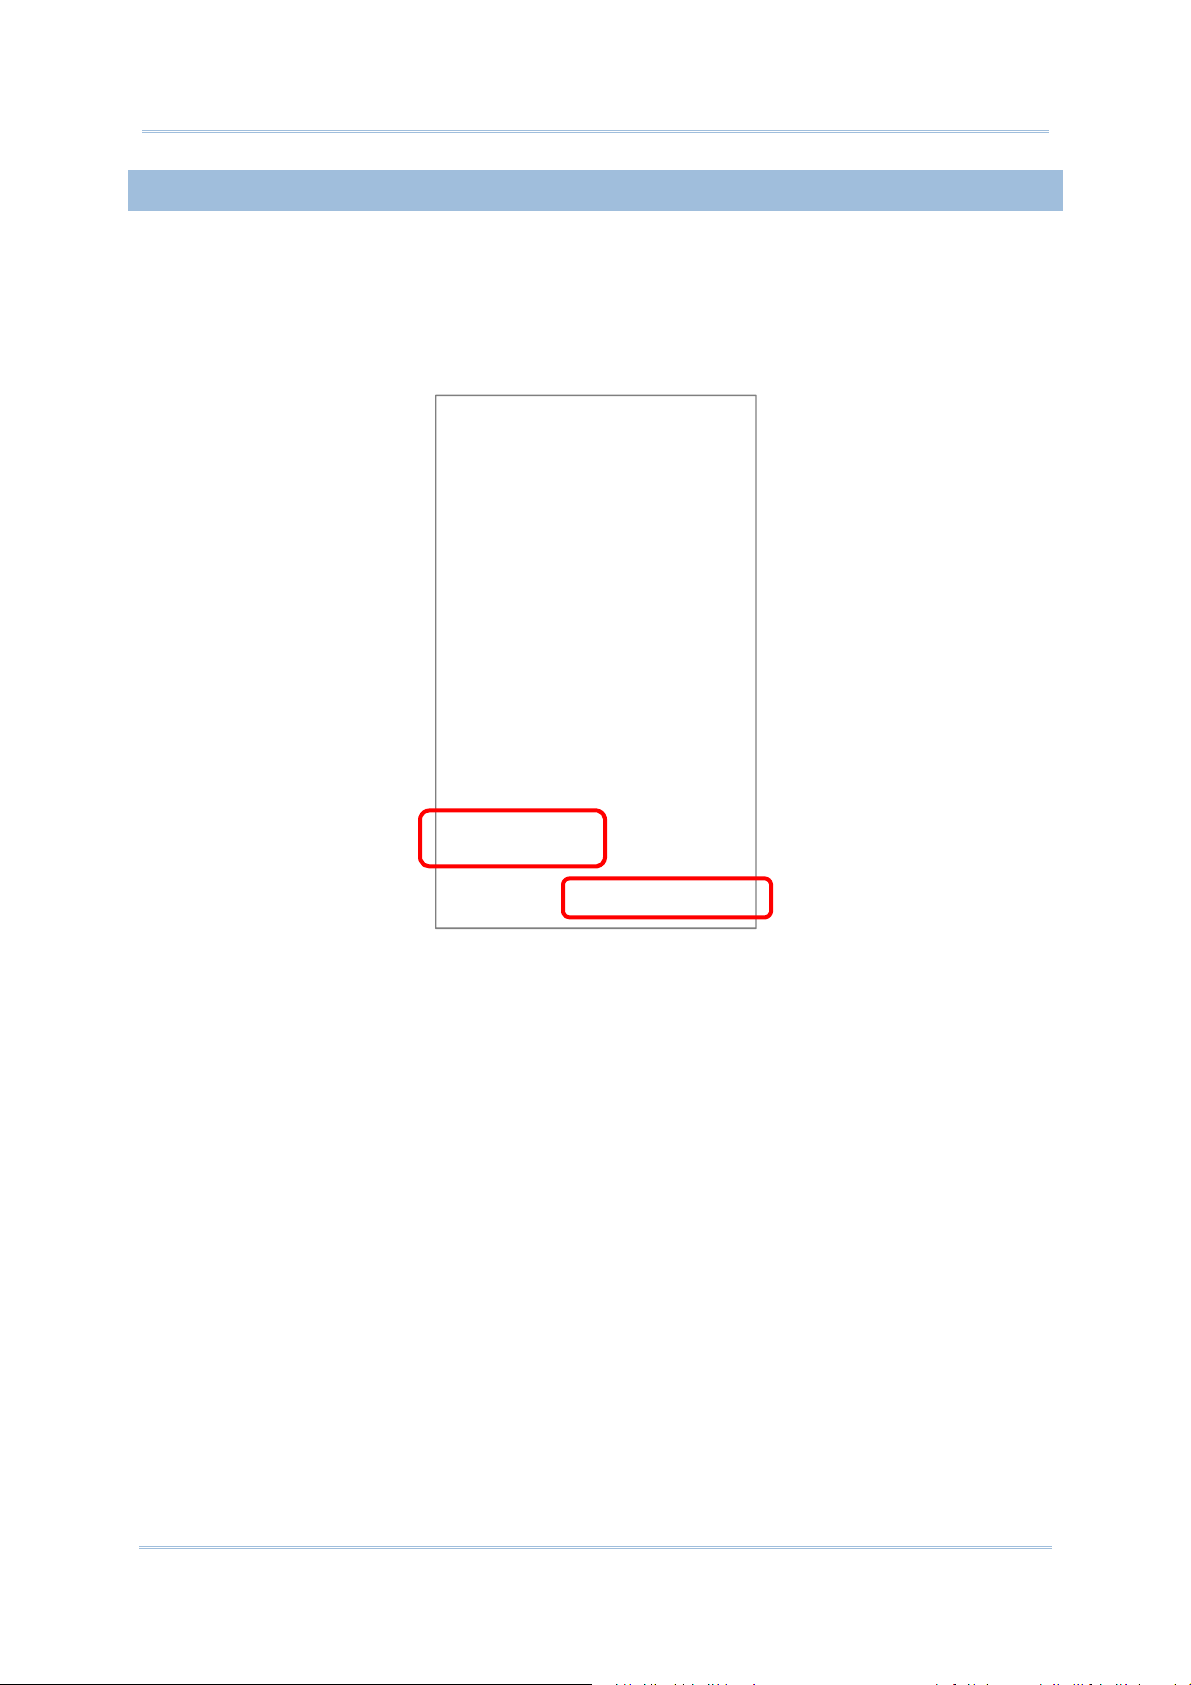
1.1.5. USING HARDWARE BUTTONS
Beneath the LCD display are three hardware buttons that deliver the following functions:
28-key Model 25-key Model
PhysicalKeypad
Button
Function Description
Back button
Home
button
Returns to the previous screen or closes the active window or
keyboard.
Displays the Home screen.
HardwareButtons
Recent
apps button
Opens a list of recently used applications.
25
Page 30
RK25 Mobile Computer
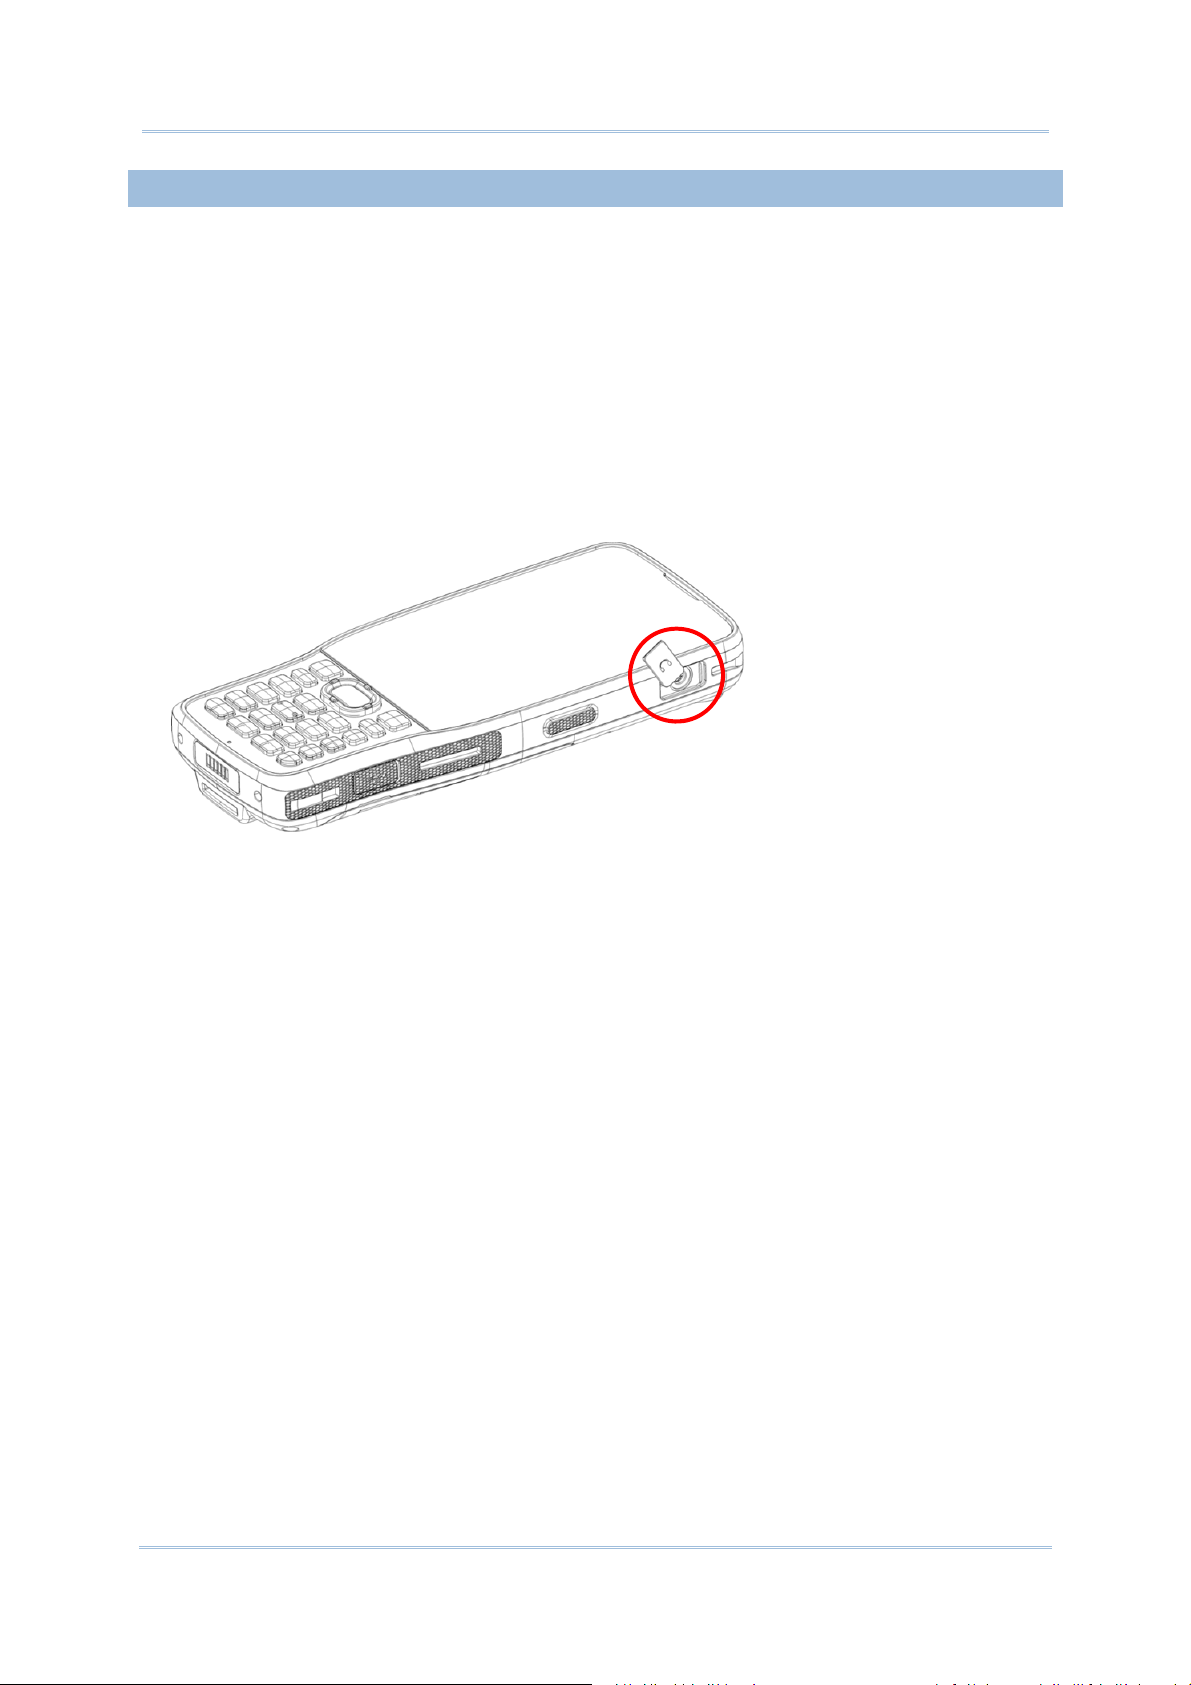
1.1.6. CONNECTING HEADSET
The headset jack is located on the upper right side of the mobile computer. You can use the
headset for audio playback or communication via the phone application, audio instant
messaging, etc.
1) Flip up the rubber cover.
2) Connect the headset to the headset jack.
3) Once the headset is removed, please replace the rubber cover.
26
Page 31

Quick Start
1.2. CHARGING & COMMUNICATION
1.2.1. CHARGE MOBILE COMPUTER
The main battery may not be charged to full for shipment. When you first receive the kit
package, you will need to charge the main battery to full before using the mobile computer.
You may use the Snap-on Charging Cable or Charging & Communi cation Cradle al ong with
a power adapter to charge the mobile computer.
Your device can also be charged by connecting to a host computer using the USB cable. It's
slower than charging using the supplied snap-on cable or Charging & Communication
Cradle.
CHARGING TIME
Main battery: The main battery powers the mobile computer to work. It takes
approximately 4 hours to charge an empty main battery to full. For the first time
charging the main battery, please charge it for at least 8 to 12 hours. The charging LED
above the screen (located on the right) will ligh t up in red wh ile charging and w ill turn
green when charging is complete.
When the main battery is removed, RTC retention will be maintained for at least 30
minutes.
Backup battery: The backup battery is mounted on the main board. Its role is to
temporarily keep the mobile computer in suspension when the main battery is drained
out so data in DRAM will be retained. The backup ba ttery takes approximately 3.5 hours
to charge to full by the main battery or power adapter.
CHARGING TEMPERATURE
The allowed battery charging ambient temperature is between 0°C to 40°C. It is
recommended to charge the battery at room temperature (18°C to 25°C) for optimal
performance.
Please note that battery charging stops when ambient temperature drops below 0°C or
exceeds 40°C.
OPERATION ON BATTERY POWER
When Bluetooth 2.1EDR/4.0 BLE/V4.1, 802.11 b/g/n, 802.11a/n,
GSM/GPRS/EDGE/WCDMA/UMTS/HSDPA/HSUPA/HSPA+/LTE, and GPS are all enabled on
battery power, the main battery level will drop down substantially. Prolonged use of the
display and continued scanning of barcodes will also affect battery level.
In order to prevent system from shutting down after the battery is drained out, we suggest
that you keep a fresh battery for replacement at all times, or connect the mobile computer
to an external power.
27
Page 32

RK25 Mobile Computer
USE SNAP-ON CABLE
LED Status Indicator
Snap-on Cup
The Snap-on Cable provides a convenient way to charge your mobile computer as well as
data communication.
To install:
1) Hold the snap-on cup toward the bottom of the RK25 mobile computer, and place one of
the snap-on cup side to the side of the RK25 mobile computer.
2) Push the Snap-on cup upwards to make its another side to be attached to the RK25
Mobile computer.
3) A “click” sound is made once the Snap-on cable is connected with the bottom of the
RK25 mobile computer in place.
4) Connect the USB plug to the approved adapter for external power connection, or plug it
to the USB port of PC/laptop for data transmission/ charging.
28
Page 33

Quick Start
While the device battery is being charged, the LED on mobile computer will indicate
charging status.
LED Indicator Status Description
Charging Red, solid Charging the mobile computer
Red, blink Charging error
Green, solid Charging complete
No light The cable is not correctly connected
Note:
For data communication, you could also use the micro USB cable to connect the mobile
computer to your PC or laptop.
29
Page 34

RK25 Mobile Computer
USE CHARGING & COMMUNICATION CRADLE
The Charging & Communication Cradle charges your mobile computer and a spare battery
at the same time, and it could also be used for data communication.
MainChargingStation
(MobileComputerCompartment)
LEDIndicator
SpareBattery Compartment
(forpoweradapterconnection)
RJ45Connector
(EthernetFunction)
SpareBattery Compartment
MicroUSBPort
DCJackConnector
ENCR Model CCCR Model
Note: The Charging & Communication Cradle is equipped with either one Micro USB Port
(CCCR Model) or one RJ45 Connector (ENCR Model).
To charge your mobile computer on the Charging & Communication Cradle:
1)
Insert the RK25 mobile computer onto the Cradle. The installed hard shell or hand strap
is not necessary to be removed in advance before inserting the mobile computer. To
remove, please take out the RK25 mobile computer directly.
30
Page 35

Quick Start
2)
For the spare battery, please make sure the battery latch is at “Unlock” position , and
then insert the battery from its top side (where the contact pins are located) into the
spare battery compartment of the cradle with their contact pins connected. Press down
the bottom side of the battery (where the battery latch is located), a nd slide the battery
latch leftward to “Lock” position to fasten it.
To remove, please slide the battery latch to “Unlock” position, and directly take the
battery out.
3)
Connect the adapter to the Cradle, and plug the other end into an electrical outlet.
The status of the mobile computer charging is shown on the device itself, while the LED
indicator on RK25 Charging & Communication Cradle shows the status of battery chargi ng
as below:
LEDIndicatoronRK25
MobileComputer:
Indicates the charging status of
main battery
LEDIndicatoroncradle:
Indicates the charging status of
spare battery
Cradle LED Indicator Status Description
Charging Red, solid Charging the battery
Red, blink Charging error
Red, flash once No battery
Green, solid Charging complete
No light Not charging
Note:
(1) Not Charging could be the result of battery damage, battery’s failure to touch the
connector, or AC plug coming off.
(2) Charging error could be due to high battery temperature.
31
Page 36

RK25 Mobile Computer
1.2.2. WIRED DATA TRANSMISSION
Use the micro USB cable/ the Snap-on Cable to connect the mobile computer to your PC for
data transmission.
1) Connect your device to the computer with suppl ied USB cable/ Snap-on Cable / Cradle.
2) Swipe down from the status bar to reveal Notifications Drawer.
3) Tap “USB charging this device” to enter USB options. By default, the device will be in
charging mode, in which you are unable to access the files on this device f rom the PC
client. To transfer all types of files between your device and PC, choose “ Transfer files”.
To transfer videos and photos, you can select “Transfer photos (PTP)”, in which your
device will share only videos and photos in DCIM and Pictures folders.
USBport
32
Page 37

Quick Start
1.2.3. USING WIRELESS NETWORKS
The mobile computer supports widely applied wireless technologies including Bluetooth
2.1EDR/4.0 BLE/V4.1, 802.11 b/g/n, 802.11a/n, and is able to send/receive data in real
time in an efficient way.
Select GSM/GPRS/EDGE/WCDMA/UMTS/HSDPA/HSUPA/HSPA+/LTE modules embedded
for a total wireless solution for data and voice communication.
33
Page 38

RK25 Mobile Computer
Chapter 2
USING RK25 MOBILE COMPUTER
This chapter walks you through the fundamental usage and features of this device.
IN THIS CHAPTER
2.1 Battery ..................................................................... 35
2.2 Memory .................................................................... 50
2.3 Touch Screen ............................................................ 60
2.4 Notifications .............................................................. 68
2.5 Date and Time ........................................................... 72
2.6 Language & Keyboard Input ........................................ 73
2.7 Physical Keypad ......................................................... 82
2.8 Sound and Volume ..................................................... 93
2.9 Data Capture ............................................................ 94
34
Page 39

Using RK25 Mobile Computer
2.1. BATTERY
Main Battery
The mobile computer is powered by a rechargeable 3.85V / 2960 mAh Li-Polymer battery
pack, and it takes approximately 4 hours to charge it to full from the power adaptor (for
the first time charging the main battery, please charge it for at least 8 to 12 hours).
However, the charging time may vary by your working condition.
Spare Battery
A spare battery pack is provided as an accessory. We recommend keeping a fully charged
spare battery at hand in order to replace the main battery when it is nearly drained out.
Backup Battery
Settled on the main board is a backup battery that keeps the mobile computer in
suspension when the main battery is depleted. The backup battery is a 60 mAh
rechargeable Li-Polymer battery, and can retain data in the DRAM for 30 minutes when
it is fully charged (as long as wireless modules on the mobile computer are inactive). The
backup battery can be charged by the main battery or the power adapter, and takes
approximately 3.5 hours to charge to full.
Warning:
(1) The battery cover must be secured in position with its latch locked.
(2) For a new battery, make sure it is fully charged before using.
(3) To avoid data loss, when replacing the main battery, make sure you replace it with a
well-charged spare battery pack. Always prepare a spare battery at hand, especially
when you are on the road.
(4) When the mobile computer has been on backup battery for 30 minutes, the system will
shut down. Be sure to replace the main battery as soon as possible in order to avoid
data loss.
35
Page 40

RK25 Mobile Computer
2.1.1. BATTERY STATUS INDICATORS
The main battery pack is the only power source for the mobile computer to work. Therefore,
when the main battery level goes low, you need to replace the battery pack with a charged
one or charge it as soon as possible. Most of all, you should backup important data on a
regular basis.
By checking the battery status icon on Status Bar, you can tell the battery level remaining
in the main battery.
Mainbatteryisfullycharged.
Mainbatterylevelispartially
drained.
Mainbatterylevelislow(5%~15%).
Mainbatterylevelisverylowand
needschargingimmediately(<5%).
Externalpowersourceisconnected
andmainbatteryisbeingcharged.
To check the exact remaining percentage of power and battery life:
1)
Use two fingers to swipe down from the top of the screen to open Quick Settings.
2)
The percentage of remaining battery power is shown below the battery icon; you ca n tap
on it to enter Battery usage for quick setting. Tap “DONE” to exit Battery usage
page or “MORE SETTINGS” for more details and configurations.
36
Page 41

Using RK25 Mobile Computer
Also, you can simply swipe down from the status bar to open Notificati ons Drawer, and tap
the battery icon to enter Battery usage page.
Note:
When the mobile computer is fully charged and battery level reaches 100%, the battery
icon will change from to to indicate charging is completed.
Warning:
(1) Once the battery level drops below 15%, the low battery notification will be displayed on
the screen.
(2) Data loss with RAM may occur when battery level is low. Always save data before the
battery runs out of power or keep a fresh battery for replacement.
(3) Constant usage of the mobile computer at low battery level can affect battery life. For
maximum performance, recharge the battery periodically to avoid battery drain out and
maintain good battery health.
37
Page 42

RK25 Mobile Computer
2.1.2. MONITOR BATTERY LEVEL
MAIN BATTERY LEVEL
The main battery is the only source that feeds the mobile computer to work. It also supplies
the backup battery on the main board in order to retain the data stored in DRAM. When
main battery level gets low, recharge it or replace it as soon as possible. Most critically, back
up the important data from time to time to protect your work.
To check main battery level:
Go to App Drawer | Settings | Battery
Battery level percentage is shown to provide a clear grasp of the remaining battery power.
The screen also shows the rate of battery discharge since the last battery charging session,
how long the device has been running on battery power, and which applications are
consuming the most battery power.
38
Page 43

Using RK25 Mobile Computer
To look at the timeline of each application that drained or has been draining the battery
power, tap on the chart; with this, you can diagnose any serious power drains.
To prevent certain applications from being draining the battery power, tap the
application listed in “Use since last full charge” to get into its Use details page for
“Adjust power use” suggestion. Tap the suggestion part to get into the related page
and change the configurations for saving battery power.
39
Page 44

RK25 Mobile Computer
BATTERY SAVER MODE
You can have the Battery saver mode automatically turned on when the main battery gets
low. This mode will limit the use of location services, vibration and most background
processing data.
1) On Battery screen, tap “Battery saver”.
2) Switch on the function to directly enable battery saver function, or choose when to have
this mode automatically activated. After this function is enabled, the title bar of your
screen will turn orange.
Note:
This mode will automatically become inactive when your device is being charged.
40
Page 45

Using RK25 Mobile Computer
BATTERY OPTIMIZATION
With Battery optimization enabled for the applications, you can make sure they stay
inactive when your device is idle or when they have not been used for days.
1) On Battery screen, tap More and then select “Battery optimization”.
2) On dropdown list, select “All apps”; all the applications will be optimized by this
function by default. You can individually turn of f the optimization mode of a certain app
if you would like it always activated by tapping on the app name and select “Don’t
optimize” and then “DONE”.
41
Page 46

RK25 Mobile Computer
LOW BATTERY ALERT
The mobile computer prompts a warning notification reminding you to charge the main
battery when the main battery level drops to 15% and 5%.
Opening Notifications Drawer, you will also see this warning appearing on the notifications
list; you may turn on Battery Saver Mode, connect the mobile computer to an external
power source, or replace the main battery pack as soon as possible. To replace the main
battery pack, see Replace Main Battery.
42
Page 47

Using RK25 Mobile Computer
LOW SUB BATTERY ALERT
When the main battery’s power is drained out, RK25 mobile computer will automatical ly
suspend by backup battery’s power for 30 minutes. When backup battery’s power is low,
the “Low Sub Battery” notification will remind you to connect the device with an external
power source to charge it immediately. Please note that do not replace the main battery at
this moment, otherwise data loss may occur.
43
Page 48

RK25 Mobile Computer
2.1.3. REPLACE MAIN BATTERY
When main battery level is low, follow the steps below to replace the main battery.
SHUT DOWN TO REPLACE THE MAIN BATTERY
Shut the device down to replace the main battery, please:
1)
Make sure the sub battery (backup battery) and the new main battery are fully-charged.
2)
Press and hold the power button on the top end of the mobile computer.
3)
Tap “Power off” in the pop-up menu. The mobile computer will power off.
4)
Follow the steps as Install/ Remove Battery describes to remove the main battery and
replace it with the new one.
44
Page 49

Using RK25 Mobile Computer
BATTERY SWAP
RK25 backup battery supplies system power during battery swap. When battery cover is
removed, the system will enter suspend mode and not wake up until battery cover is put
back and the power button is pressed. Please refer to “Low Sub Battery Alert” section to
make sure the sub battery is fully charged before battery swap process.
1) Press and hold the power button on the top end of the mobile computer, and select
“Battery Swap” and then “OK” in the pop-up menus. The system will prepare to enter
suspend mode with the red Status LED on the front panel lit.
2) Observe the red light on the front panel; as it goes off, the device is in complete suspend
mode and Main battery is ready to be replaced. Fellow the steps described in Install/
Remove Battery to remove the battery and replace it with the new one.
3) When the main battery is removed, system can stay in susp end mode at least 5 minutes.
Please replace with a fully-charged main battery as soon as possible.
4) Make sure the battery latch is properly locked before pressing the power button to wake
up the mobile computer from suspend mode.
Warning:
Please do not perform a battery swapping before the mobile computer’s OS is ready.
Removing the battery cover during powering up your mobile computer may cause system
failure.
45
Page 50

RK25 Mobile Computer
Note:
(1) When main battery is removed, the system will stay in suspend mode for at least 5
minutes. To prevent the system from being shut down without advance warni ng, please
DO replace the main battery within the 5 minutes.
(2) Backup battery keeps the mobile computer in suspension when the main battery is
depleted. Thus, to prevent data loss, DO NOT replace the main battery when backup
battery’s power is low. Please connect RK25 mobile computer with the external power
source to charge it till the “Low Sub Battery” notification icon disappears from the
status bar. Once the “Low Sub Battery” notification disappears, the main battery
replacement could be proceeded.
46
Page 51

Using RK25 Mobile Computer
2.1.4. POWER MANAGEMENT
For any portable device, power management is a critical issue especially when you are on
the road. Below are some tips to help you save battery power.
Warning:
Using backlight, wireless connectivity, and peripheral devices while on battery power will
substantially reduce battery power.
Bring an additional main battery pack with you on the road.
End wireless connections (such as Bluetooth transmission, wireless connection, NFC a nd
GPS) which are not in use.
Shorten the screen off time. See Screen Timeout Settings.
Reduce the screen brightness level, see Screen Brightness.
If you have had your Google account signed in on this device, you could turn off certain
automatic data syncing of applications (such as Email, Calendar, and Contacts). Go to
App Drawer | Settings | Accounts | Google and disable the data
syncing services of your desired items.
Enable Batt ery saver mode and Battery optimization m ode. See Battery Saver Mode
and Battery Optimization.
47
Page 52

RK25 Mobile Computer
ENTER AIRPLANE MODE
You can enable Airplane mode to have all the wireless radios (including call functions, data
connections such as Bluetooth, Wi-Fi and 3G/4G) on your mobile computer turned off,
which will considerably reduce the power consumption of your battery.
To enter Airplane mode, please:
1) Use two fingers to swipe down from the top of
the screen to open Quick Settings menu.
2) Tap on the Airplane mode icon to
enable/disable the mode.
48
Page 53

Using RK25 Mobile Computer
2.1.5. BATTERY PRECAUTIONS
For safety purpose, please do notice the following instructions about battery.
PRECAUTIONS WHEN CHARGING THE MAIN BATTERY FOR A LONG TIME
Please avoid using RK25 mobile computer with heavy system loading when it is being
charged for a long time, for the battery is continuously charged and discharged in this
period of time, and it might result in battery bulge.
Due to safety precautions, it is a normal phenomenon that the battery status shows it is not
fully recharged when RK25 mobile computer is connected to an external power supply for a
long time. Please pull out the charging cable and then plug it again to recharge the battery.
BATTERY TEMPERATURE ANOMALY
High ambient temperature or keeping using RK25 mobile computer while charging might
results in battery temperature rises. RK25 mobile computer will automatically suspend
charging battery or shut down for safety purpose. Once the battery temperature cools down
to normal temperature, battery charging could be proceeded again.
49
Page 54

RK25 Mobile Computer
2.2. MEMORY
Flash Memory (ROM)
16GB flash memory for storing the OS (Android 7.0 Nougat and custom application
programs).
Random-access Memory (RAM)
2GB RAM for storing and running programs, as well as storing program data.
Expansion Slot
The mobile computer is equipped with one SD card slot which can accommodate a micro
SD card, a microSDHC (up to 32GB) or a microSDXC (up to 64GB). When choosing an
SD card for best compatibility and performance with RK25, please make sure of the
capacity you need. For the use of SDXC card, please use a new card and make sure it has
not been used in other host devices (computers, cameras, or readers).
CAUTION OF DATA LOSS
When the main battery is removed or drained, the backup battery on the main bo ard takes
over to supply the mobile computer and keep it in suspension. A fully charged backup
battery will retain the data in the RAM for 30 minutes. When the backup battery is drained
out as well, the mobile computer will shut down, and only the contents of RTC will be
retained. All other unsaved data will be lost.
If you want to put away the mobile computer for a couple of days, you should be aware that
data loss occurs when the main battery and backup battery discharges completely.
Therefore, it is necessary to backup data and files before putting away the mobile computer.
50
Page 55

Using RK25 Mobile Computer
2.2.1. CHECK MEMORY USAGE
The memory manager can offer a glance of how the device is using its RAM.
Go to App Drawer | Settings | Memory to enter memory manager screen.
On the main screen, it tells you not only the used and free
memory space of the RAM, but how your pattern of usage has
impacted the device’s overall performance. To figure out how
the system and apps have been taking up the memory over a
longer period, tap the dropdown list to choose a different time
span.
To look at how individual apps are consuming the memory
space, tap “Memory used by apps” to get a breakdown of
memory usage by apps.
Tap an application name to
check its memory usage. This
allows you to make sense of
how much memory a
newly-installed application can
potentially consume your RAM.
51
Page 56

RK25 Mobile Computer
2.2.2. MANAGE STORAGE SPACE
To your Android device, the SD card can serve as an extension of your device’s internal
storage (which comes as 16 GB of flash memory to store the OS, applications and files)
other than a portable storage place.
Go to App Drawer | Settings | Storage to check usage of the internal and
external storage spaces.
By default, all the videos, photos and downloaded files are directly saved to the device’s
internal storage. If you have previously inserted and mounted an SD card as portable
storage, you could transfer/save photos & other media in this SD card; if the SD card is set
as internal storage, photos, files, and some apps could be moved to the SD card.
SD card as portable storage
in Storage Settings page
SD card as internal storage
in Storage Settings page
. The SD card is used for moving
photos and other media between
devices.
The SD card is used for storing
anything on this device only,
including apps and photos.
Requires formatting that
prevents it from working with
other devices.
52
Page 57

Using RK25 Mobile Computer
SET UP SD CARD AS PORTABLE STORAGE
Using SD card as a portable device allows you to treat it as a USB disk, by swapping it
between your Android device and the computer to easily transfer files. This is quite handy
when there is a need to offload files that are taking up too much storage space.
When this device is connected with PC, the disk content is readable from PC client:
On Storage screen, this disk can be managed separately.
TheSDcardisconsidereda
separatestorage,thecapacity
ofwhichisnotincludedintotal
devicestorage.Youcantap
toejectamountedSDcard.
53
Page 58

RK25 Mobile Computer
To start:
1) Insert the SD card. A notification icon indicating that an SD card is detected will be
shown in the status bar; swipe down from the status bar and tap “SET UP”.
2) Tap “Use as portable storage” and then “NEXT”.
3) When the setting is completed, tap “DONE”.
4) Swipe down from the status bar to reveal Notifications Drawer, and you will find a
notification indicating that the SD card is for transferring photos and media; tap
“EXPLORE” to check its content.
OR tap the SD card in Storage Settings page to check it.
Tap
Tap
54
Page 59

Using RK25 Mobile Computer
TRANSFER PHOTOS & MEDIA BETWEEN THE DEVICE & PC
To transfer photos and media between this device and PC when the mounted SD card is set
as portable storage, please:
1) Connect your mobile computer with PC with supplied USB cable.
2) Swipe down from the status bar to reveal Notificati ons Drawer, and tap “USB charging
this device” to enter USB options menu.
3) Choose “Transfer files”, and now you will find the disk content is readable from PC
client. Please make sure the USB cable is properly connected while transferring files
over USB connection.
55
Page 60

RK25 Mobile Computer
CONVERT THE SD CARD TO INTERNAL STORAGE
You can always convert the SD Card from portable storage to internal storage. On
1)
Storage screen, tap the SD card. Before you start, make a backup of the files on this
disk if you would like to keep them.
2)
On SD card content screen, tap More and then tap “Storage settings”.
3)
By selecting “Format as internal”, the device will eventually format this SD card into a
specific file format only readable by this device.
4)
On Format as internal storage screen, tap “ERASE & FORMAT” to format the card.
5)
You will then be asked whether to move multimedia files to this new SD card right away
or later; make your choice and then tap “Next”.
6)
When the formatting is completed, tap “DONE”.
56
Page 61

Using RK25 Mobile Computer
SET UP SD CARD AS INTERNAL STORAGE
Using SD card as internal storage allows you to extend your existing d evice storage and to
store huge applications. This SD card will be reformatted and encrypted with a file f ormat
that is not readable by another device. Therefore, it is essential that you back up important
files on this SD card in advance. Please note that if you eject this SD card, the ap plications
and media files stored on it will not be available until you reinsert the card.
When this device is connected with PC, the disk content is not readable from PC client:
On Storage screen, the capacity of this SD card is merged into the total device storage.
Please note that. In this setting, you will have no control of which files to be stored on SD
card.
ToejectthisSDcard:
1) SelectthisSDcard.
2) OnSDcardcontentscreen,
tapMoreandthen
tap“Eject”.
Warning:
Do not physically remove the SD card from the device without ejecting this card in advance.
57
Page 62

RK25 Mobile Computer
To start:
1)
Insert the SD card. A notification will pop up indicating that an SD card is detected tap
“SET UP”.
2)
Tap “Use as internal storage” and then “NEXT”.
3)
Tap “ERASE & FORMAT” to format this card.
4)
You will then be asked to whether to move media files to this new SD card, make your
choice and then tap “Next”.
5)
When the setting is completed, tap “DONE”.
Note:
It is recommended that you
select “Move now” at Step
4 to have the device
immediately start making
use of SD card space. If you
select “Move later”, the
device will continue to
consider device’s original
storage the primary location
to save files.
58
Page 63

Using RK25 Mobile Computer
CONVERT THE SD CARD TO PORTABLE STORAGE
You can always convert the SD Card from internal storage to portable storage. On
1)
Storage screen, tap the SD card. Before you start, make a backup of the files on this
disk if you would like to keep them.
2)
On SD card content screen, tap More and then tap “Format as portable”.
3)
Tap “Format” to have this SD card re-formatted into a file type accessible by other
devices.
4)
When the formatting is completed, tap “DONE”.
Note:
Please do back up important
files on this SD card before
proceeding formatting.
59
Page 64

RK25 Mobile Computer
2.3. TOUCH SCREEN
The mobile computer comes with a 4.0” transmissive LCD with 480RGBx800 resolution. The
LED backlight of the screen, which helps ease reading under dim environments, can be
controlled manually and automatically.
Warning:
DO NOT use any pointed or sharp objects to move against the surface of the screen.
2.3.1. SCREEN BRIGHTNESS
Go to App Drawer | Settings | Display | Brightness level.
Adjust screen brightness by dragging the slider to the right (to increase brightnes s) or left
(to reduce brightness). Switch on the Adaptive brightness to enable automatic backlight
adjustment with the mobile computer’s built-in sensor.
You can also use the shortcut button on Quick Settings menu to adjust the brightness
level.
QuickSettings
Menu
Note:
To save battery power, dim the screen brightness while working in a well-lit area, or set a
shorter sleeping plan for the screen backlight to go off.
60
Page 65

Using RK25 Mobile Computer
2.3.2. SCREEN ROTATION
By default, the device automatically rotates the screen to when you turn the device
sideways. To switch this function on or off:
1) Go to App Drawer | Settings | Display
2) Tap When device is rotated and then select Stay in current orientation to turn the
rotation function off or tap Rotate the contents of the screen to enable it.
Please note that “Stay in current orientation” might be portrait or landscape depending
on the screen display orientation when you select it.
61
Page 66

RK25 Mobile Computer
OR
3) Use two fingers to swipe down from the top of the screen to open Quick Settings and
tap the Auto rotate status icon to enable screen rotation. This quick setting method
allows you to temporarily enter landscape mode to enhance your typing experience by
using a wide keyboard.
To enable Home screen rotation, please make sure Auto Rotation is enable, and press any
empty spot on Home screen, tap “Setting” and enable “Allow Home screen rotation”:
62
Page 67

Using RK25 Mobile Computer
REMOVE AUTO ROTATION FROM QUICK SETTING MENU & DISPLAY SETTINGS
You can remove the Auto rotate switch icon on Quick Settings menu to minimize the
possibility of accidentally turning on the auto-rotat ion function:
1) Use two fingers to swipe down from the top of the screen to open Quick Settings menu.
2) Click button to get into Edit page; tap on and hold the Auto rotate switch icon,
and drag it to the light gray area and then release it.
3) Return to the Quick Settings menu, the Auto rotate switch icon is now hidden.
TheAuto‐rotate
statusiconis
absent.
63
Page 68

RK25 Mobile Computer
Go to App Drawer | Settings | Accessibility and swi tch off Auto-rotate screen.
By doing so, the auto-rotation option will be hidden in Settings | Display .
Note:
Auto-rotation is not supported for certain applications. Without enabling “Allow Home
Screen Rotation”, auto-rotation is inapplicable in Home Screen and App Drawer screen.
64
Page 69

2.3.3. SCREEN TIMEOUT SETTINGS
Go to App Drawer | Settings | Display | Sleep.
Select the time lapse for screen timeout.
Using RK25 Mobile Computer
65
Page 70

RK25 Mobile Computer
2.3.4. TEXT SIZE
Go to App Drawer | Settings | Display | Font size.
Tap the small A icon or the large A icon to select the font size between Small,
Default, Large and Largest.
66
Page 71

Using RK25 Mobile Computer
2.3.5. DISPLAY SIZE
Go to App Drawer | Settings | Display | Display size.
Tap the plus icon or the minus icon to select th e display size as Small or
Default.
67
Page 72

RK25 Mobile Computer
2.4. NOTIFICATIONS
2.4.1. STATUS LED
Two LED indicators located above the touch screen provide information about charging
status, scanner light beam, and scanner "Good Read" during data collection.
LED 1 for Power Indication
Indicator Status Description
Green, solid Charging complete
Charging
Battery Swap Red, flash once
Red, solid Charging the mobile computer
Red, blinking
Charging temperature error
(lower than 0°C or exceed 40°C)
Pressing power button and select “Battery Swap” in the
pop-up menu, and the red status LED lights up. As the red
light goes off, the device is in complete suspend mode and
Main battery is ready to be replaced
LED 2 for Reader & System Notification
Indicator Status Description
Barcode decode Green, flash once Good read
WLAN & Bluetooth Blue WLAN & Bluetooth on/off indication
System Notification Blue, blinking System notifications such as missed calls or new messages.
Note:
For Scanner decode and Scanner beam LED to function, LED notification must be enabled in
Reader Configuration.
2.4.2. AUDIO
The speaker is used to play sounds for events in windows and programs, or play audio files.
In addition, it can be programmed for status feedback. In noisy environments, you may
consider connecting a headset instead. A headset jack is provided on the upper right size of
the mobile computer, which is a 3.5 mm DIA stereo earphone jack. The mobile computer
also supports using Bluetooth headsets.
Supported audio file formats include: MP3, AAC, He-AAC v1 and v2, WMA9/Pro, Dolby AC-3,
DTS-HD M6 and DTS-HD M8.
Use the volume buttons on the side of the mobile computer to adjust the system volume.
68
Page 73

Using RK25 Mobile Computer
2.4.3. SOUNDS AND VIBRATION
The mobile computer is integrated with a vibrator, which is software programmable for
tactile feedback. This can be helpful when work ing in noisy environments.
You may also set the mobile computer to vibrate only, in which all system sounds will be
muted and replaced by the vibrator.
On any screen, press down Volume Up or Volume Down key to open quick sound menu.
Tap to switch this device to Vibration mode. To modify specific sound settings,
tap to access more settings.
Keep pressing Volume Down key to turn the device into Do not disturb mode directly.
69
Page 74

RK25 Mobile Computer
SOUND SETTINGS
Go to App Drawer | Settings | Sound for more sound settings.
“Ringvolume”isnot
adjustablewhen“Donot
disturb”modeison.
70
Page 75

Using RK25 Mobile Computer
DISABLE UNWANTED NOTIFICATIONS WITH “DO NOT DISTURB”
You can temporarily disable specific notifications (vibration or sound) using “Do Not
Disturb” in Quick Settings menu. What’s more, you can schedule the duration of the
disabled status so that the notifications will switch to enabled state automatically based on
your arrangement.
Use your two fingers to swipe down from the sta tus bar to open Qui ck Settings, tap on “ Do
not disturb” to enable this feature and make further adjustment.
Item
Alarm
Reminders
Events
Incoming Calls
Messages
Music, Video, Game
or Media
Total Silence Alarm Only Priority Only
OFF ON ON
OFF
OFF
OFF
OFF
OFF
OFF
OFF OFF
Adjustable(Default:ON)
Adjustable(Default:ON)
Adjustable
(Default:From Contacts Only)
Adjustable(Default:OFF)
OFF ON ON
In-Call
ON
ON ON
71
Page 76

RK25 Mobile Computer
2.5. DATE AND TIME
By default, the mobile computer automatically synchronizes the date and ti me to the WWAN
network (if connected).
To set the date and time manually:
1) Go to App Drawer | Settings | Date & time
2) Tap Automatic date & time and select Off to disable using network-provided time.
3) Deselect Automatic time zone.
4) Tap Set date. Use the sliders to select the correct month, date and year. Tap OK to
save.
5) Tap Set time. Use the sliders to select the correct time. Tap OK to save.
6) Tap Select time zone. Select the correct time zone from the list.
72
Page 77

Using RK25 Mobile Computer
2.6. LANGUAGE & KEYBOARD INPUT
Go to App Drawer | Settings | Language & input to change the system
language, default keyboard type, and configure keyboard input and speech settings.
2.6.1. CHANGE DISPLAY LANGUAGE
To change display language:
1) On Language & input screen, tap Language to get into “Language preference”
page, and then click “Add a language” to select your desired system language.
2) Press and hold your desired system language to change its sorting order to the 1
dragging. Once it is released, the new language setting will immediately be applied.
QuickSearch
st
by
73
Page 78

RK25 Mobile Computer
DELETE LANGUAGE
Tap in the upper right corner and tap “Remove” option; select the language to delete.
Please note that the display language will be changed if it is selected to be delet ed.
74
Page 79

Using RK25 Mobile Computer
2.6.2. ON-SCREEN KEYBOARD
Tap a text input field to automatically open an on-screen keyboard. The virtual keyboard
will vary depending on the data type (text or numbers) this field requires.
SELECT KEYBOARD (INPUT METHOD)
On Language & input screen, select Virtual Keyboard to manage the installed keyboards
by taping “Manage keyboard” and switch on/off the input methods you need.
75
Page 80

RK25 Mobile Computer
Android provides a variety of keyboard layouts of different languages. T o have more options
of key layouts, for example, German, you can:
1) On Language & input screen, tap Virtual Keyboard, select Android Keyboard
(AOSP), and then Languages.
2) On the list, disable “Use system language”.
3) Select your desired language keypad layouts.
4) Return to Virtual Ke yboard screen, and your Android Keyboard (AOSP) now lists
more languages below.
5) Expand your Andr oid Keyboard (AOSP) and press to open “Change Keyboard”
menu and select your desired input language. Or simply tap to cycle through the
options.
76
Page 81

Using RK25 Mobile Computer
ADJUST KEYBOARD SETTINGS
To configure keyboard settings, tap and hold t he comma butto n until a settings button
appears. A menu will open, allowing you to adjust input language (if you would like to
use an input language different from the system language) or keyboard settings.
By tapping Android Keyboard Settings (AOSP), you can further adjust the settings to
suit your needs.
77
Page 82

RK25 Mobile Computer
2
CHANGE KEYBOARD (INPUT METHOD)
The input methods you enabled in Virtual Keyboar d un der Language & input are
available by tapping on the on-screen keyboard.
1) For the default keyboar d “Android Keyboard Settings (AOSP)” & other Google input
keyboards, to use other input methods, simply tap to cycle through the options.
2
1
1
English (US) Keyboard
Korean Keyboard
2) If there’s any other keyboards installed by you, please press on “Android
Keyboard Settings (AOSP)” till “Changle Keyboard” appears and select the
keyboard you need. Or swipe down from the status bar to open Notifications Drawer
and tap “Change Keyboard” notification to change it.
78
Page 83

Using RK25 Mobile Computer
EDIT TEXT
Tap and hold text on the screen to enable a text editing menu for selecting all text, or
copying and pasting text within or across applications. Some applications may use different
ways to select or edit text.
79
Page 84

RK25 Mobile Computer
ENTER NUMBERS AND SYMBOLS
The appearance of the switch button to numeric or symbol keyboard may vary; the example
below demonstrates how to use the switch key to access your desired numeric or symbol
keyboards from the default Android English (US) keyboa rd. To enter Numeric / Symbol
keyboard, tap .On Numeric / Symbol keyboard, tap to access more symbols or
tap to return to Android English (US) keyboard.
English (US) Keyboard
On Android English (US) keyboard, you can input number or symbols without switching
to Numeric / Symbol keyboard.
Numeric / Symbol Keyboard
Symbol Keyboard
Tap and hold the period button to open quick symbol keyboard.
Tap and hold a letter from q~p on the top row to bring up the specific number key.
English (US) Keyboard
80
Page 85

Using RK25 Mobile Computer
ENTER UPPERCASE LETTERS
Tap and hold the Shift key , and tap a character key to enter an uppercase letter. The
letters will return to lower case once an uppercase letter is entered.
English (US) Keyboard
81
Page 86

RK25 Mobile Computer
2.7. PHYSICAL KEYPAD
The physical keypad receives supplementary backlight along with the screen, and supports
multi-key operation, which normally requires two keys hit simultaneously. The keypad is
capable of entering numbers, letters, symbols and punctuation marks.
Keypad of 28-key Model:
ShiftKey
AlphaKey
Keypads of 25-key Model:
ShiftKey
FunctionKey
AlphaKey
82
Page 87

2.7.1. BASIC KEY
Basic Keys deliver the folloing functions:
BASIC KEY OF 28-KEY MODEL
Key Description
Using RK25 Mobile Computer
Scan
Arrows
Home
Back
Backspace
Tab
Enter
BASIC KEY OF 25-KEY MODEL
Press the scan key to read a barcode in place.
The arrow keys are circled around the center scan key.
These can be used to move the cursor up, down, left or
right during text input, or move between items in certain
applications.
Displays the Home screen.
Returns to the previous screen or closes the active window
or keyboard.
Remove the last input letter.
To advance the cursor to the next tab stop.
Enter key works as tap or double-tap.
Scan
Arrows
Back
Delete
Enter
Key Description
Press the scan key to read a barcode in place.
The arrow keys are circled around the center scan key.
These can be used to move the cursor up, down, left or
right during text input, or move between items in certain
applications.
Returns to the previous screen or closes the active window
or keyboard.
Remove the last input letter.
Enter key works as tap or double-tap.
83
Page 88

RK25 Mobile Computer
2.7.2. ALPHA KEY
ALPHA KEY OF 28-KEY MODEL
The Alpha key is the blue button located in the bottom right corner of the keypad. When the
Alpha key is pressed, a blue icon shows up in the status bar to indicate that Alpha
Mode is on:
AlphaKey
When Alpha Mode is on, the keypad enter Alpha lock mode, and the keys deliver the
function as the text in blue on the keys (please refer to Key Functions in Different Mo des for
details). To turn off Alpha Mode, press Alpha key again to return to the default in put mode.
DefaultInputMode AlphaMode
Note:
Alpha mode can coexist with Shift mode. When both modes are active, the input letters wi ll
be uppercase. Please refer to Key Functions in Different Modes.
84
Page 89

Using RK25 Mobile Computer
ALPHA KEY OF 25-KEY MODEL
The Alpha key is the blue button located in the bottom right corner of the keypad. When the
Alpha key is pressed, a blue icon shows up in the status bar to indicate that Alpha
Mode is on:
AlphaKey
When Alpha Mode is on, the keypad enter Alpha lock mode, and the keys deliver the
function as the text in blue on the keys (please refer to Key Functions in Different Mo des for
details). To turn off Alpha Mode, press Alpha key again to return to the default in put mode.
DefaultInputMode AlphaMode
Note:
Alpha mode can coexist with Shift mode & Function Mode. When both Sh ift mode and Alpha
Mode are active, the input letters will be uppercase. Please refer to Key Functions in
Different Modes for details.
85
Page 90

RK25 Mobile Computer
2.7.3. FUNCTION KEY (ONLY FOR 25-KEY MODEL)
The Function key is the orange button located right above in the Alpha Key (the blue button).
When the Function key is pressed, a orange icon shows up in the status bar to indicate
that Function Mode is on:
FunctionKey
Keypad returns from Function Mode to Default Input Mode upon pressi ng any but t o n
engraved in orange. If Alpha key/Shift Key is pressed, keypad will return to Alpha
mode/Shidt Lock Mode until Alpha key/Shift Key is pressed again.
DefaultInputMode FunctionMode
Note:
Function mode can coexist with Shift mode & Alpha Mode. Please refer to Key Functi ons in
Different Modes for details.
86
Page 91

Using RK25 Mobile Computer
2.7.4. SHIFT KEYS
The Shift key is located right above the Alpha key for 28-key Model, while it is
located right above the Function Key for 25-key Model. When the Shift key is pressed once,
an icon shows up in the status bar to indicate the Key Status is in Shift Resume Mode.
The keypad will return to the Default Input mode right after pressi ng any key (except o f
Backspace key for 28-key Model and Delete key for 25-key Model).
28-key Model Keypad
25-key Model Keypad
ShiftResumeMode
When the Shift key is pressed twice, the keypad will ent er Shift Lock Mode with an icon
appears in the status bar, and the keypad stays in Shift Lock Mode till the Shift key is
pressed again.
In both Shift Resume Mode and Shift Lock Mode, the keys del iver the f unctions as Key
Functions in Different Modes describes:
87
ShiftLockMode
Page 92

RK25 Mobile Computer
2.7.5. KEY FUNCTIONS IN DIFFERENT MODES
FOR 28-KEY MODEL KEYPAD
Default Input Mode Shift Mode Alpha Mode Shift Mode+ Alpha Mode
!
@
#
$
%
^
&
*
(
)
<
A, B
P, Q,R
W, X,Y
,orC inuppercase
D, E
,orF inuppercase
G, H
,orI inuppercase
J, K
,orL inuppercase
M, N
,orO inuppercase
,orS inuppercase
T, U
,orV inuppercase
,orZ inuppercase
Returntothenextlineor
startanewparagraphin
textinputfield.
>
88
Page 93

FOR 25-KEY MODEL KEYPAD
Using RK25 Mobile Computer
Default Input Mode
Shift Mode Alpha Mode Function Mode
N/A
!
@
#
$
%
^
&
N/A
N/A
Returntothenextlineor
startanewparagraphintext
inputfield.
*
(
)
<
>
N/A
0
-
.
N/A
89
Page 94

RK25 Mobile Computer
Default Input Mode
Shift Mode + Alpha Mode
N/A
N/A
A, B
,orC inuppercase
D, E
,orF inuppercase
G, H
,orI inuppercase
J, K
,orL inuppercase
M, N
,orO inuppercase
P, Q,R
,orS inuppercase
Shift Mode + Alpha Mode + Function Mode
Alpha Mode + Function Mode
Shift Mode+ Function Mode
N/A
T, U
W, X,Y
,orV inuppercase
,orZ inuppercase
N/A
Returntothenextlineorstartanewparagraph
intextinputfield.
)
_
>
90
Page 95

Using RK25 Mobile Computer
2.7.6. KEYPAD LOCK
The keypad lock mode can be triggered by pressing:
1) For 28-key Model: Shift key and Backspace key
2) For Chiba SKU: Shift key and Delete key
When the keypad lock mode is triggered, all keys on the keypad will become locked to
prevent any accidental pressing of keys. A keypad lock icon will appear on the status
bar to indicate keys are currently locked.
Note:
When Alpha Mode is on, the hot key combination (Shift + Backspace) would not work for
28-key Model, because Backspace key becomes “Delete” in Alpha Mode. For 25-key
Model, the hot key combination (Shift + Delete) would not work.
91
Page 96

RK25 Mobile Computer
2.7.7. KEYPAD BACKLIGHT
The default setting of keypad backlight is enabled. To turn on/off the keypad backlight,
please go to App Drawer | Settings | Display , and tap “Keypad backlight” to
enable/disable it.
92
Page 97

Using RK25 Mobile Computer
2.8. SOUND AND VOLUME
Use the volume buttons on the left side of the mobile computer to adjust system and ringer
volume.
93
Page 98

RK25 Mobile Computer
2.9. DATA CAPTURE
2.9.1. BARCODE READER
A selection of scan engines is available for delivering flexibility to meet different
requirements. Depending on the scan engine integrated, the mobile computer is capable of
scanning barcodes of a number of symbologies that are enabled by default while running
the ReaderConfig application. You won't be able to scan a specific barcode symbology which
is not enabled. Run ReaderConfig.exe to enable/disable barcode symbologies.
2.9.2. DIGITAL CAMERA
An integrated 8 megapixel rear camera in the mobile computer is specifically designed for
collecting image data. You may use the image capture utility to turn on the camera and
capture images. By default, the images taken by this camera application are saved as JPG
files in the DCIM folder in the device’s primary storage.
94
Page 99

Basic Operation
Chapter 3
BASIC OPERATION
This chapter describes the basic skills to work with the RK25 mobile computer, for instance
how to operate the home screen, check system status and manage notifications. The
add-on utilities for applications regarding data collection, processing, and transmission are
introduced in the following chapters.
IN THIS CHAPTER
3.1 Home Screen ............................................................ 96
3.2 Status Bar ............................................................... 109
3.3 Manage Applications .................................................. 117
3.4 Suspend & Lock ........................................................ 120
3.5 OS Update ............................................................... 123
3.6 Back up Your Data .................................................... 125
3.7 Reset to Factory Default ............................................ 126
95
Page 100

RK25 Mobile Computer
3.1. HOME SCREEN
When the mobile computer is fully charged, press the Power key for three seconds to turn
on the mobile computer. A locked screen will appear. Slide the lock button upward to
unlock the screen.
96
 Loading...