

Page 1
Windows Embedded Handheld 6.5
CP60 / CP60G
Version 0.5
Page 2

PREFACE
COPYRIGHT
Copyright © 2012 CIPHERLAB CO., LTD.
All rights reserved
The information contained in this document, including all pictures, illustrations and software,
is the proprietary information of CIPHERLAB CO., LTD. and its respective legal owners; it is
protected by copyright laws and international copyright treaties, as well as other intellectual
property laws and treaties, with all rights reserved.
In no event and by no part shall this document be reproduced, stored in a retrieval system,
or transmitted in any form or by any means including but not limited to electronic,
mechanical, photocopying, and recording without the prior written consent of CIPHERLAB
CO., LTD. Any reverse engineering of software is also prohibited.
DISCLAIMER
The information herein is subject to change without notice. The information and the
intellectual property herein are confidential between you and CIPHERLAB CO., LTD. and
remain the exclusive property of CIPHERLAB CO., LTD. and its respective legal owners.
Should you find any problems in this document, please report them to CIPHERLAB in writing.
CIPHERLAB does not warrant this document is error-free.
TRADEMARK RECOGNITION
CipherLab logo is a registered trademark of CIPHERLAB CO., LTD. Windows Embedded
Handheld is a registered trademark or trademark of Microsoft Corporation in the United
States and/or other countries. All other brands, products and services, and trademark
names are the property of their registered owners. The editorial use of these names is for
identification as well as to the benefit of the owners, with no intention of infringement.
CONTACT
For product consultancy and technical support, please contact CIPHERLAB’s sales
representative in your local area. You may also visit CIPHERLAB web site for more
information.
CIPHERLAB CO., LTD.
Website: http://www.cipherlab.com
Page 3

SAFETY NOTICES
FOR HAND-HELD PRODUCT WITH RF FUNCTIONS
CP60 serial handheld equipment uses wireless radios that have been designed and
manufactured to meet safety requirements for limiting exposure to radio waves. When used
in accordance with the instructions set forth in this manual, the equipment has been
independently verified to not exceed the emission limits for safe exposure to radio
frequency (RF) energy as specified by EN50360 of EEC.
These limits are part of comprehensive guidelines and establish permitted levels of RF
energy for the general population. The guidelines are based on standards that were
developed by independent scientific organization through periodic and thorough evaluation
of scientific studies. The standards include a substantial safety margin designed to assure
the safety of all persons, regardless of age and health.
The exposure standard for all wireless devices employs a unit of measurement known as the
Specific Absorption Rate, or SAR; the SAR limit set by CE is 2.0W/Kg.
For trunk, the SAR value of CP60 serial body is: 1.028W/Kg
EEC: MAX 1.35 W/Kg (CP60G)
FOR PRODUCT WITH LASER
CAUTION
This laser component emits FDA / IEC Class 2 laser light at the exit port. Do not
stare into beam.
Page 4

SAFETY PRECAUTIONS
RISK OF EXPLOSION: IF BATTERY IS REPLACED BY AN INCORRECT TYPE.
DISPOSE OF USED BATTERIES ACCORDING TO THE INSTRUCTIONS.
The use of any batteries or charging devices, which are not originally sold or
manufactured by CipherLab, will void your warranty and may cause damage to human
body or the product itself.
DO NOT disassemble, incinerate or short circuit the battery.
DO NOT expose the scanner or the battery to any flammable sources.
For green-environment issue, it's important that batteries should be recycled in a proper
way.
Under no circumstances, internal components are self-serviceable.
The charging and communication cradle uses an AC power adapter. A socket outlet shall
be installed near the equipment and shall be easily accessible. Make sure there is stable
power supply for the mobile computer or its peripherals to operate properly.
CARE & MAINTENANCE
This mobile computer is intended for industrial use. The mobile computer is rated IP65,
however, the mobile computer can get damaged when being exposed to extreme
temperatures or soaked wet.
When the enclosure of the mobile computer gets dirty, use a clean and wet cloth to wipe
off the dust. DO NOT use/mix any bleach or cleaner. Always keep the LCD dry.
For a liquid crystal display (LCD) or touchscreen, use a clean, non-abrasive, lint-free
cloth to wipe dust off the screen. DO NOT contact the surface with any pointed or sharp
object.
If you want to put away the mobile computer for a period of time, download the
collected data to a host computer, and then take out the battery pack. Store the mobile
computer and battery pack separately.
When the mobile computer resumes its work, it takes some time for the main and
backup batteries to become fully charged.
If you shall find the mobile computer malfunctioning, write down the specific scenario
and consult the sales representative in your local area.
Page 5

DECLARATION OF CONFORMITY
n
Manufacturer European informatio
CIPHERLAB Co., Ltd. CipherLab GmbH
12F., 333, Dunhua S. Rd., Sec. 2 Willicher Damm 145
Taipei, Taiwan 106, R.O.C. 41066 Mönchengladbach, Germany
Tel: +886 2 8647 1166 Tel: +49 2161 56230
http://www.cipherlab.com http://www.cipherlab.de
Type of Equipment
Mobile Computer
Model(s) Declared
CP60, CP60G
Initial Year of Manufacture 2012
Reference to the specification under which conformity is declared in accordance with Directive2004/108/EC, 95/5/EC
EN 300 328 V1.7.1:2006 EN 300 440-1 V1.6.1:2010
EN 300 440-2 V1.4.1:2010 EN 301 489-1 V1.8.1:2008
EN 301 489-17 V2.1.1:2009 EN 301 489-24 V1.5.1:2010
EN 301 489-3 V1.4.1:2002 EN 301 489-7 V1.3.1:2005
EN 301 511 V9.0.2:2003 EN 301 908-1 V5.2.1:2011
EN 301 908-2 V3.2.1:2007 EN 50360:2001
EN 62209-1:2006 EN 62209-2:2010
EN 62311:2008 EN 62479:2010
The manufacturer also declares the conformity of above mentioned product with the actual required
safety standards in accordance with Directive 2006/95/EC
EN 60950-1Κ2006+A11:2009
Safety for information technology equipment including electrical business equipment
I the undersigned, hereby declare that the equipment specified above conforms to the above
Directive(s) and Standard(s).
Representative:
Signature
Full Name Herbie Jiang
Title Assistant Manager
Herbie.Jiang@cipherlab.com.tw
http://www.cipherlab.com
Page 6

RELEASE NOTES
Version Date Notes
0.5 20th Sep 2012 Draft version
Page 7

CP60 Mobile Computer Reference Manual
CONTENTS
PREFACE ............................................................................................... - 2 -
Copyright ............................................................................................ - 2 -
Disclaimer ........................................................................................... - 2 -
Trademark Recognition ........................................................................... - 2 -
Contact .............................................................................................. - 2 -
Safety Notices ...................................................................................... - 3 -
For Hand-held Product with RF Functions ................................................. - 3 -
For Product with Laser ........................................................................ - 3 -
Safety Precautions................................................................................. - 4 -
Care & Maintenance ............................................................................... - 4 -
Declaration of Conformity ....................................................................... - 5 -
RELEASE NOTES ....................................................................................... - 6 -
INTRODUCTION........................................................................................... 1
About This Document ................................................................................. 1
Features ................................................................................................. 2
Inside the Package .................................................................................... 2
Accessories ............................................................................................. 2
USE MOBILE COMPUTER ................................................................................ 3
1.1. Take A Tour ........................................................................... 4
1.1.1. Overview .............................................................................. 4
1.1.2. Inside Battery Chamber ............................................................. 5
1.1.3. Before Initial Use .................................................................... 5
1.2. Power On Mobile Computer ........................................................ 6
1.3. Notifications .......................................................................... 7
1.4. Battery.................................................................................9
1.4.1. Main Battery Setup .................................................................. 9
1.4.2. Charge Batteries ................................................................... 12
1.4.3. Monitor Battery Level ............................................................. 14
1.4.4. Power Management ................................................................ 17
1.4.5. Optimize Battery Life ............................................................. 18
1.5. Text Input ........................................................................... 19
1.5.1. Physical Keypad .................................................................... 19
1.5.2. Onscreen Keyboard ................................................................ 28
1.5.3. Edit Text ............................................................................ 32
1.6. Touch Control ...................................................................... 34
1.6.1. Use Touchscreen ................................................................... 34
1.6.2. Adjust Backlight .................................................................... 34
1.6.3. Calibration .......................................................................... 35
1.7. Memory .............................................................................. 37
1.7.1. Data Loss Caution .................................................................. 37
1.7.2. Check Storage ...................................................................... 37
1.7.3. Insert SD Card ...................................................................... 40
Page 8

CP60 Mobile Computer Reference Manual
1.8. Direct Data Connection ........................................................... 41
1.8.1. Use Cable ............................................................................ 41
1.8.2. Use Cradle ................................................... ᙑᎄ! ࡸآࡳᆠ᧘Ζ
1.8.3. Syncing Tools ....................................................................... 42
1.8.4. Sync Partnership ................................................................... 42
1.8.5. 1
st
USB Sync ......................................................................... 42
1.8.6. Disconnect USB ActiveSync ....................................................... 45
1.8.7. ActiveSync Actions to Take ....................................................... 46
1.9. Audio Playback ..................................................................... 52
1.9.1. Volume Control ..................................................................... 52
CAMERA .................................................................................................. 54
2.1. Launch Camera ..................................................................... 55
2.1.1. Camera Screen ..................................................................... 55
2.2. Take Pictures ....................................................................... 56
2.2.1. Camera Settings .................................................................... 56
2.3. Launch Video Camera ............................................................. 59
2.3.1. Video Camera Screen .............................................................. 59
2.4. Shoot Videos ........................................................................ 60
2.4.1. Video Camera Settings ............................................................ 60
2.5. Pictures & Videos .................................................................. 63
OPERATING SYSTEM .................................................................................... 66
3.1. 1
st
Startup ........................................................................... 67
3.2. Today Screen ....................................................................... 68
3.2.1. Customize Today Screen .......................................................... 69
3.2.2. Return to Today Screen ........................................................... 69
3.3. Start Screen ......................................................................... 70
3.3.1. Return to Start screen ............................................................ 71
3.3.2. Title Bar ............................................................................. 71
3.3.3. Manage Notifications .............................................................. 73
3.3.4. Customize Start Screen ........................................................... 75
3.3.5. Start Screen Icons .................................................................. 78
3.4. Suspend & Reset Mobile Computer .............................................. 80
3.4.1. Suspend Mobile Computer ........................................................ 80
3.4.2. Wake up Mobile Computer ........................................................ 81
3.4.3. Reset Mobile Computer ........................................................... 81
3.5. Set Screen Lock .................................................................... 83
3.5.1. Unlock Screen ...................................................................... 83
3.6. Work with Menus ................................................................... 84
3.6.1. Option Menus ....................................................................... 84
3.6.2. Context Menus ...................................................................... 85
3.7. Manage Applications ............................................................... 86
3.7.1. Task Manager ....................................................................... 86
RADIOS.................................................................................................... 93
4.1. Access Cellular WAN ............................................................... 93
4.1.1. Status Icons ................................................. ᙑᎄ! ࡸآࡳᆠ᧘Ζ
4.1.2. Check What Network You’re Using .............................................. 93
Page 9

CP60 Mobile Computer Reference Manual
4.1.3. Enable/Disalbe Mobile Data ...................................................... 94
4.1.4. Use Only 2G Networks ............................................................. 94
4.1.5. Cellular Data Setup ................................................................ 95
4.1.6. Edit & Add Access Points ......................................................... 96
4.1.7. USB Internet Sharing .............................................................. 97
4.2. Use Wi-Fi ............................................................................ 99
4.2.1. Status Icons ......................................................................... 99
4.2.2. Enable/Disable Wi-Fi .............................................................. 99
4.2.3. Wi-Fi Connection Setup .......................................................... 100
4.2.4. Connect Another Wi-Fi network ................................................ 104
4.2.5. Edit Wi-Fi Networks .............................................................. 104
4.2.6. Forget Wi-Fi Netowrks ........................................................... 104
4.2.7. Receive notifications of Available networks .................................. 104
4.2.8. Add Wi-Fi Networks ............................................................... 105
4.2.9. Connect by Static IP .............................................................. 106
4.2.10. Advanced Wi-Fi Settings ......................................................... 107
4.3. Use Bluetooth ...................................................................... 108
4.3.1. Status Icons ........................................................................ 108
4.3.2. Change Bluetooth name ......................................................... 108
4.3.3. Expose Mobile computer ......................................................... 109
4.3.4. Turn on/off Bluetooth ............................................................ 111
4.3.5. Pair & Connect Bluetooth devices .............................................. 111
4.3.6. Disconnect Bluetooth Devices ................................................... 113
4.3.7. Unpair Bluetooth Devices ........................................................ 114
4.3.8. Reconnect Bluetooth devices ................................................... 114
4.3.9. Edit Bluetooth Features to Use ................................................. 114
4.3.10. Bluetooth File Exchange ......................................................... 115
4.3.11. Bluetooth ActiveSync ............................................................. 117
4.3.12. Bluetooth Internet Sharing ...................................................... 118
4.3.13. Bluetooth Pass-through Networking ............................................ 119
4.4. Connect to Virtual Private Networks .......................................... 120
4.4.1. VPN Connection Setup ........................................................... 120
4.4.2. Connect VPN ....................................................................... 122
4.4.3. Disconnect VPN .................................................................... 123
4.4.4. Edit a VPN .......................................................................... 123
4.4.5. Delete a VPN ....................................................................... 123
4.5. Install Secure Certificates ....................................................... 125
4.5.1. Supported Certificate Formats ................................................. 125
4.5.2. View Secure Certificates ......................................................... 125
4.5.3. Install secure Certificates ....................................................... 125
4.6. Location Discovery ................................................................ 127
4.6.1. Launch GPS ......................................................................... 127
4.6.2. Use GPS ............................................................................. 128
PHONE .................................................................................................. 129
5.1. About Phone ................................................ ᙑᎄ! ࡸآࡳᆠ᧘Ζ
5.2. SIM Card ............................................................................ 130
5.2.1. Assemble SIM Card ................................................................ 130
5.3. Status Icons ........................................................................ 130
Page 10

CP60 Mobile Computer Reference Manual
SPECIFICATIONS ....................................................................................... 133
Platform, Processor & Memory ................................................................... 133
Communications & Data Capture ................................................................ 133
Electrical Characteristics .......................................................................... 134
Physical Characteristics ........................................................................... 135
Environmental Characteristics .................................................................... 136
Programming Support .............................................................................. 136
Accessories .......................................................................................... 137
Page 11

INTRODUCTION
Thank you for choosing CipherLab products. CipherLab welcomes another Windows
Embedded by introducing CP60 Series Mobile Computer. Powered by Windows Embedded
Handheld 6.5, the mobile computer delivers better user experience and promises enterprise
mobile computing.
The mobile computer has transflective LCD to hold up the readability in a wide range of light
conditions, courtesy of the supplementary backlight enabled by a built-in ambient light
sensor. Also on board is a G-sensor to save power according to the mobile computer’s
motion and posture. G-sensor also enables screen orientation when the device is posed
sideways or upright. Furthermore, the mobile computer has integrated a built-in e-compass
and gyroscope, both of which provide useful functions in navigation.
The series sports satisfactory data connections by integrating a communication port for
direct data exchange. For wireless data connections it hosts each Bluetooth and
802.11a/b/g/n module while a HSPA+ module (CP60G only) is provided on option.
Dedicated to data capture, the mobile computer has essential 1D (laser) reader or 2D
imager. A high-specced 5 mega-pixel camera also comes inside to take pictures and shoot
videos to deliver better documentation for users.
Rated with IP65/67, the rugged CP60 Series are light-weighted and easy to cradle in your
hand, and will be your good help on field works.
ABOUT THIS DOCUMENT
This guide distills the information about CP60 Series Mobile Computer. Subjects discussed
include the mobile computer’s physical features, platform basics, software and applications,
and part of the accessories to boost the mobile computer’s performance.
We recommend that you keep one copy of this manual at hand for the quick reference for
necessary maintenance.
CP60 Series include CP60 and CP60G,
CP60 : Radio include WLAN ( a/b/g/n), Bluetooth (2.1+EDR), GPS
CP60G : Radio include WWAN (HSPA+), WLAN ( a/b/g/n), Bluetooth (2.1+EDR),
GPS
1
Page 12

CP60 Mobile Computer Reference Manual
FEATURES
Rugged yet smoothened outlined, with hand strap for secure hold
IP65/67-rated tough form to survive drop, shock, heat, cold, and impervious to
moisture/dust.
Windows Embedded Handheld 6.5 OS, TI DM3730 1GHz CPU
512MB SDRAM to run application programs
4GB NAND flash to store OS, applications, settings and so on.
Storage expansion: Up to 32GB MicroSDHC.
OS upgradable through USB connection
Sunlight-readable screen to enhance the viewability of outdoor use.
Ambient light sensor to enable supplementary backlight for LCD and keypad.
G-sensor for power management and screen orientation.
Gyroscope sensor and E-compass for direction sensing
Proximity sensor for disabling touch screen action during calls
2 symmetric side-triggers for ambidextrous scanning
Total data solution — supporting Bluetooth, 802.11a/b/g/n and HSPA+ (CP60G only)
Built-in GPS receiver to deliver location discovery
5 mega-pixel camera for taking pictures and shooting videos.
C++ and .Net programming support
INSIDE THE PACKAGE
The mobile computer ships with the following items. Save the box and packaging material
in case of future need to store or deliver the mobile computer.
Mobile Computer
Rechargeable Li-ion battery pack (standard/high capacity)
Stylus
Screen protector
Hand strap
Product CD
Quick Start Guide
ACCESSORIES
Optional accessories to enhance the mobile computer’s performance:
Pistol Grip
Snap-on Charging and Communication Cable
Charging & Communication Cradle
Belt Holster
2
Page 13

Chapter 1
USE MOBILE COMPUTER
Before the mobile computer takes part in your work, get to know it first. This chapter combs
the basic features of the mobile computer including the power supply, memory, and the
units that bridge users with the mobile computer. This chapter helps you set the mobile
computer to work at the earliest.
1. IN THIS CHAPTER
1.1 Take A Tour ................................................................ 4
1.2 Power On .................................................................... 6
1.3 Notifications ................................................................ 7
1.4 Battery ....................................................................... 9
1.5 Text Input ................................................................ 19
1.6 Touch Control ............................................................ 34
1.7 Memory .................................................................... 37
1.8 Direct Data Connection ............................................... 41
1.9 Audio Playback .......................................................... 52
3
Page 14
CP60 Mobile Computer Reference Manual
2.1. TAKE A TOUR
This section shows the major components on the mobile computer and inside battery
chamber. You will also learn how to power on/off the mobile computer and how the mobile
computer gives information about its status.
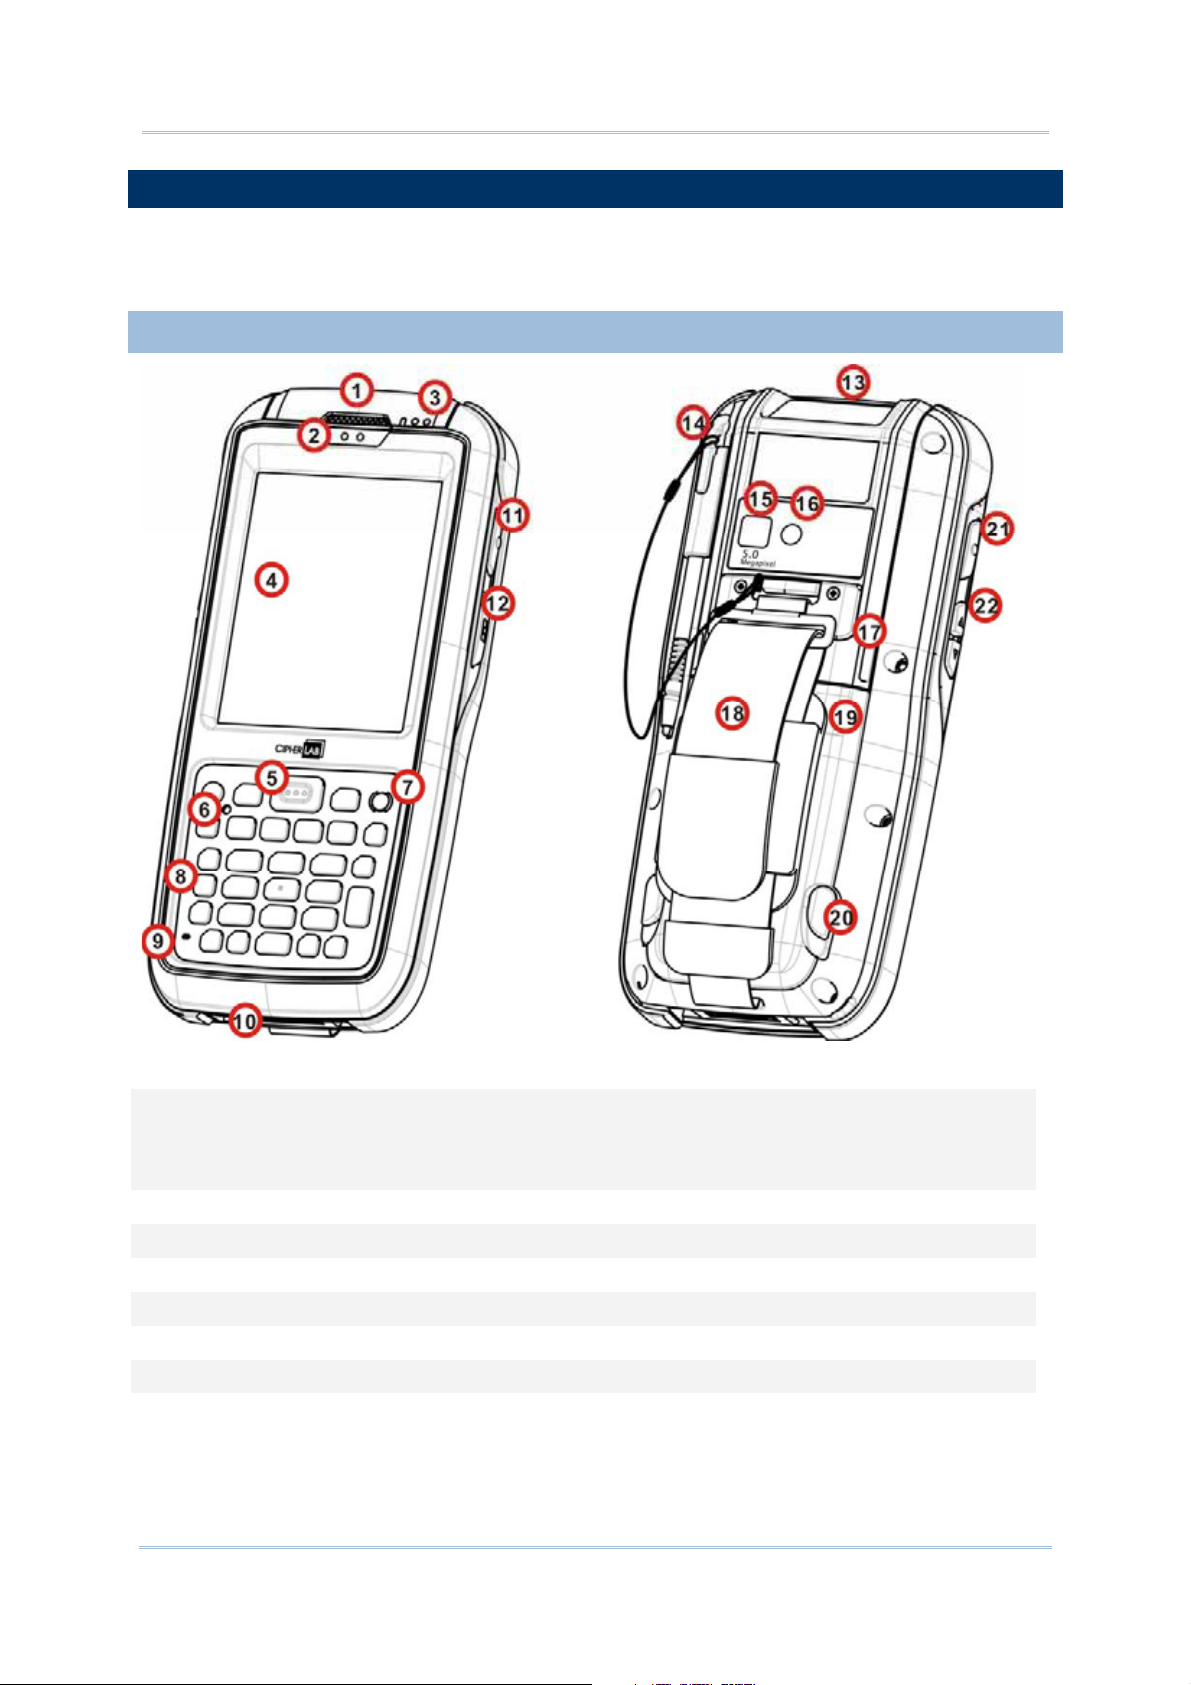
2.1.1. OVERVIEW
Figure 1: Overview
No. Description No. Description
1 Receiver 2 Sensors (proximity sensor & light sensor)
3 Status LEDs 4 Touchscreen (QVGA)
5 Scan key 6 Reset button (recessed in keypad)
7 Power button 8 Keypad
9 Microphone 10 Charging and communication port
11 Side trigger (user-definable) 12 Camera shutter key
13 Scan window 14 Stylus (with attaching cord)
15 Camera 16 Camera flash
17 Speaker 18 Handstrap
19 Battery door 20 Battery door latch
21 Side trigger (user-definable) 22 Volume rocker
4
Page 15
Chapter 1 Use Mobile Compute
r
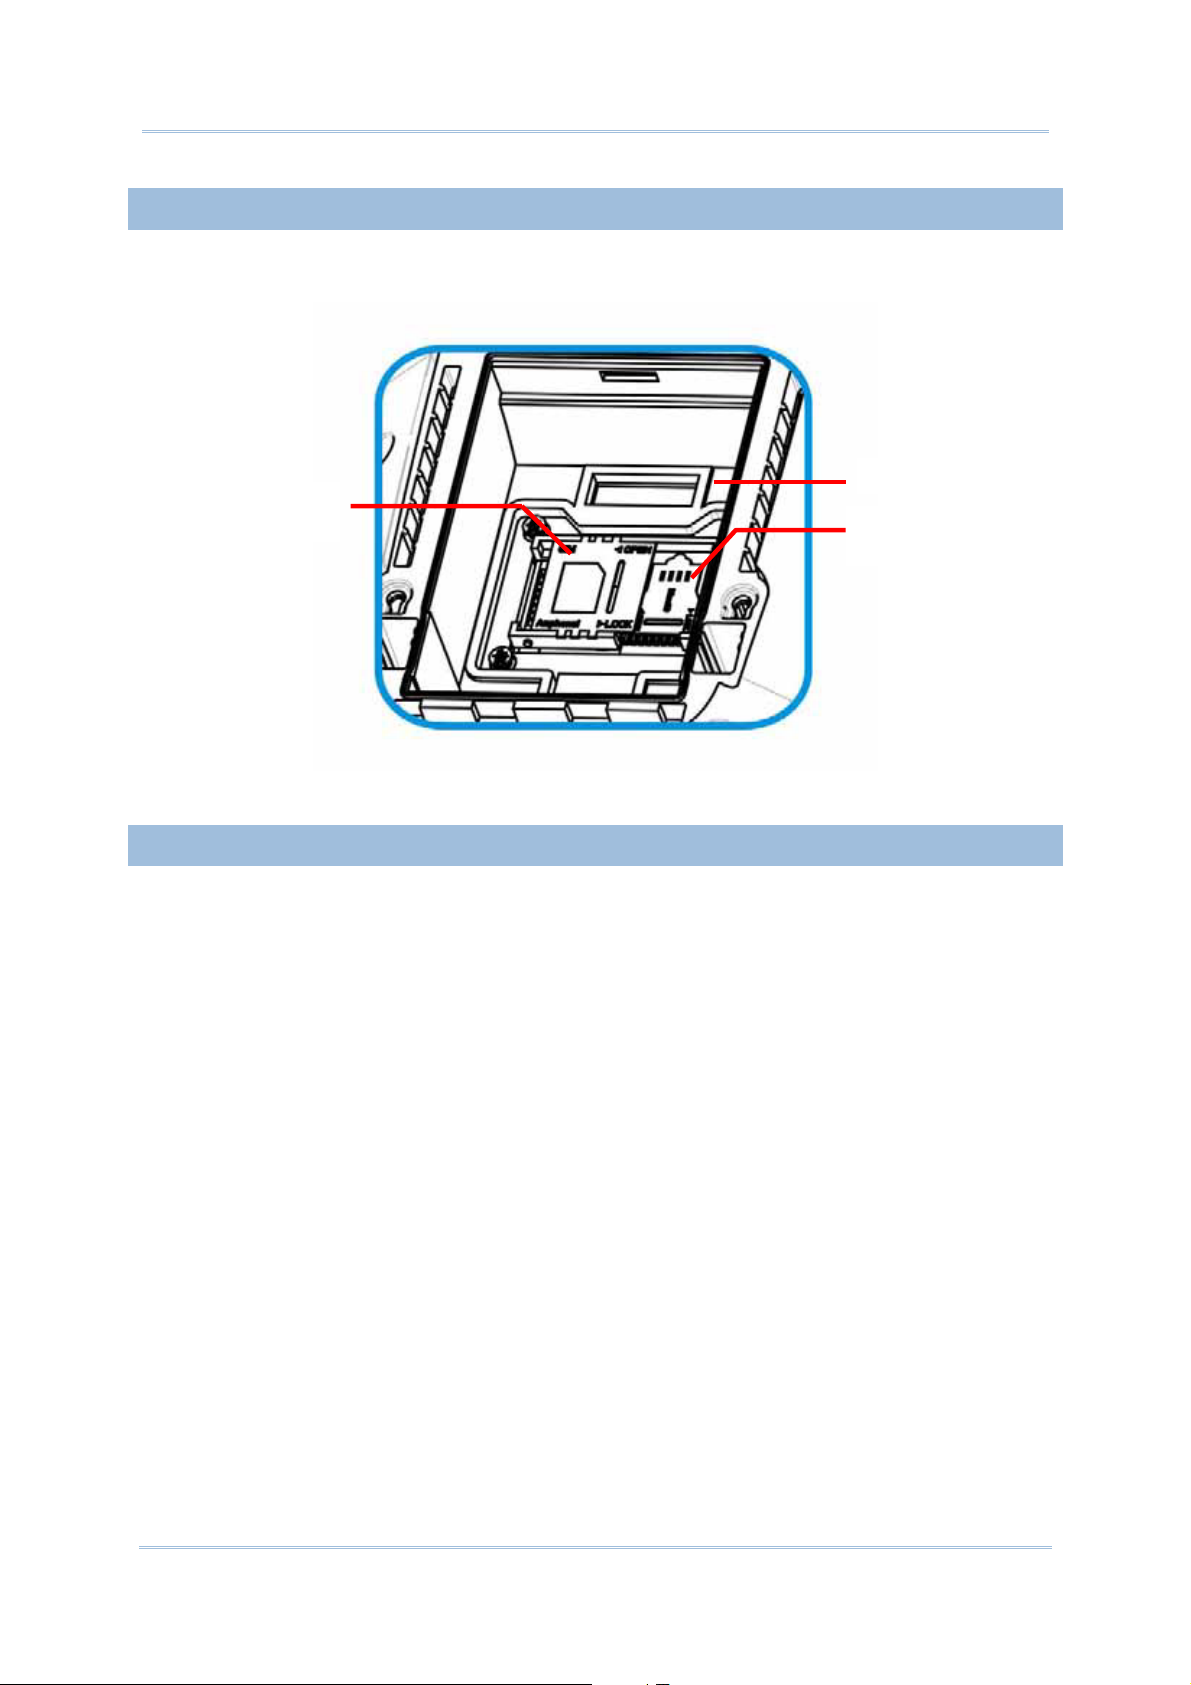
2.1.2. INSIDE BATTERY CHAMBER
Inside the battery chamber of the mobile computer are the sockets for SIM card and storage
card. Each is equipped with a hinged cover.
Battery chamber
SIM card slot
SD card slot
Figure 2: Inside Battery Chamber
2.1.3. BEFORE INITIAL USE
Prior to using the mobile computer for the first time, it is recommended to apply the
protective film over the LCD. This will prevent scratching the touchscreen during daily usage,
and also help enhance the durability of the touchscreen.
To apply the LCD protective film:
1) Upon delivery, the touchscreen of the mobile computer is covered with a thin
transparent film. Peel off and discard this film.
2) Wipe the touchscreen with a clean, non-abrasive, lint-free cloth.
3) Carefully apply the LCD protective film to the touchscreen by aligning its edges with the
edges of the touchscreen. Make sure the film adheres tightly to the surface.
The mobile computer is then ready for usage.
5
Page 16

CP60 Mobile Computer Reference Manual
2.2. POWER ON MOBILE COMPUTER
To power on the mobile computer, press the Power button sitting at the upper right of
the keypad.
This Power button is also a suspend button. Press without holding this button to suspend the
mobile computer when you are not actively using it. Press it again to wake the mobile
computer from suspension. See Suspend Mobile Computer
for details.
6
Page 17

Chapter 1 Use Mobile Compute
r
2.3. NOTIFICATIONS
The mobile computer features visible, audible, and tactile feedback to draw users’ prompt
awareness of the mobile computer’s contiguous events such as barcode reading,
wireless/mobile data connections, and battery charging.
STATUS LED
Three LED lights are located on the upper-right corner of the mobile computer. Their
functions are:
Matter
Battery
Charging
(Right)
Scanning
Good Read
(Middle)
Radios
(Left)
LED Color Action Description
Green, solid
Orange, solid
Green,
Orange, Red
Green
Blue Blinking
Red, solid
Red, slow blinking for 3
times
Red, fast blinking
continuously
On for less than 1
second, then off
Battery is nearly fully charged (battery
level>95%).
Battery is charging, and battery level is
sufficient for the mobile computer to
power on.
Battery is charging, but battery level is too
low for the mobile computer to power on.
Battery charging error (battery failure).
Replace battery with another one.
Charging error that may be caused by
temperature dropping below 0°C or
exceeding 35°C. See also Charge
Batteries.
Indicates good reading results of the
scanned barcode.
Enable/disable this notification with the
CipherLab utility Reader Config.
Wi-Fi, Bluetooth or mobile data in use.
LED light is also programmable. See the API library that is readied for your reference.
SPEAKER
The mobile computer has a speaker on the back for audio signaling, audio playback, and
phone ringtones.
The speaker sounds for system events, application warnings, onscreen items selections and
stroke on physical keypad. In noisy environment, the speaker remains efficacious with the
help of a headset. To control sound volume, see Volume Control
.
The speaker also sounds for good barcode reading, which can be enabled/disabled by
CipherLab’s Reader Config.
VIBRATOR
The mobile computer owes the tactile feedback to the vibrator built inside. Vibration
delivered to the mobile computer alerts users of its currents status.
Working based on user’s sense, the vibrator is particularly helpful when the mobile
computer is serving in noisy environment.
7
Page 18

CP60 Mobile Computer Reference Manual
Same as the speaker and LED light, the vibrator works for good barcode reading.
CipherLab’s utility Reader Config enables users to turn the vibration on/off and decides the
duration.
The vibrator is also programmable. See the API library that is provided for your reference.
8
Page 19
Chapter 1 Use Mobile Compute
r
2.4. BATTERY
The mobile computer is fed by two batteries, main battery pack and backup battery. The
main battery is removable and replaceable from battery chamber while the backup battery
is mounted on the main board inside the mobile computer.
When the mobile computer is shipped, the main battery is stored in a package separated
from the mobile computer, which keeps it in good condition for future use.
MAIN BATTERY
The main battery is a Li-ion battery pack that comes in two sizes, a standard 3.7V/3600mAh
pack and an extended 3.7V/4400mAh pack. Both types will take around 4 hours to charge
to full. The working time of the mobile computer varies by its working states. Under normal
operation, it works for at least 12 hours. An icon on Title Bar
level. See Main Battery Level
.
helps monitor main battery
See also Main Battery Setup
for the assembly.
BACKUP BATTERY
The backup battery settles on the main board inside the mobile computer. It is a 15 mAh
rechargeable Li-ion battery. When main battery is absent or depleted, backup battery takes
over to feed the mobile computer. Without main battery, a fully charged backup battery
retains the data in the DRAM and holds the system in suspension for 30 minutes(as long as
wireless modules are inactive).
The backup battery is rechargeable by the external power (through power adapter) or main
battery pack. It takes about ˈ8 hours to charge it to full. An
it observant that backup battery gets low. See also Backup Battery Level
icon on the Title Bar makes
.
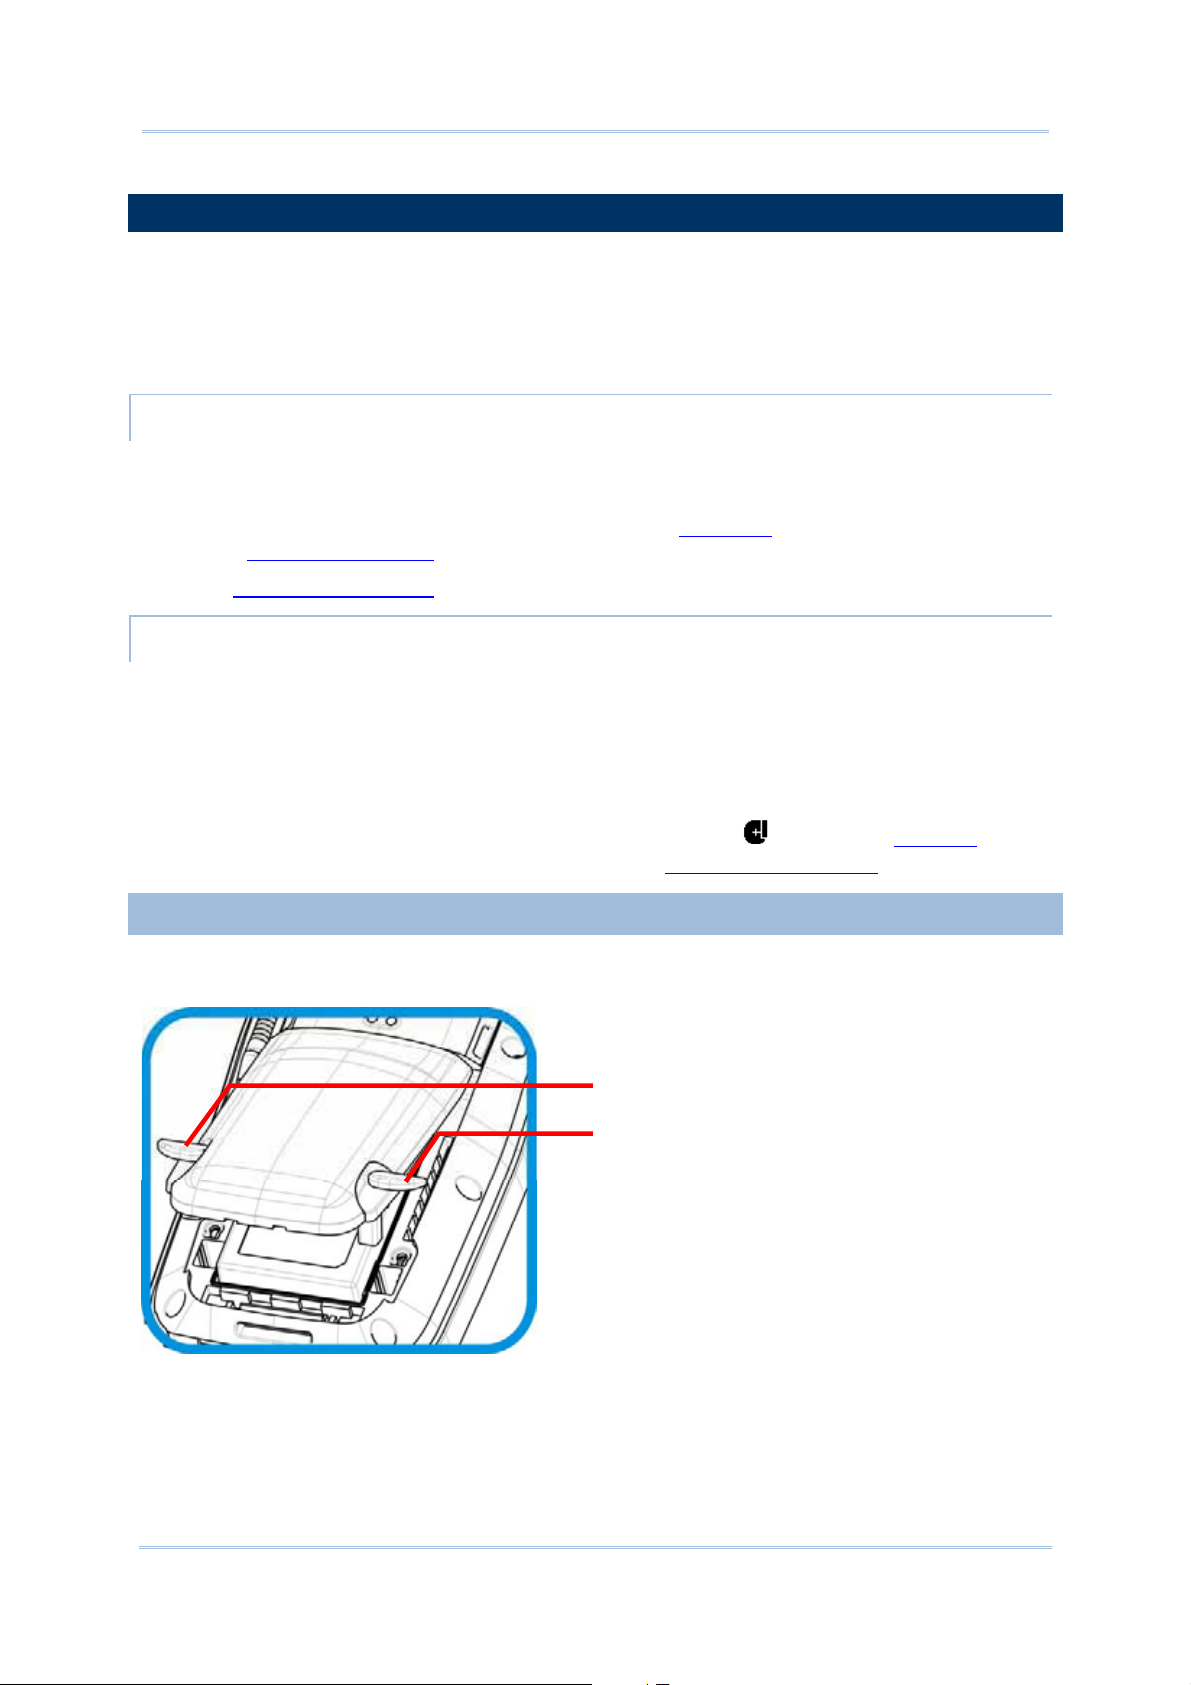
2.4.1. MAIN BATTERY SETUP
To secure main battery in place, the battery door is equipped with two latches, one on each
side.
Battery door latches
Figure 3: Battery Door Latches
9
Page 20
CP60 Mobile Computer Reference Manual
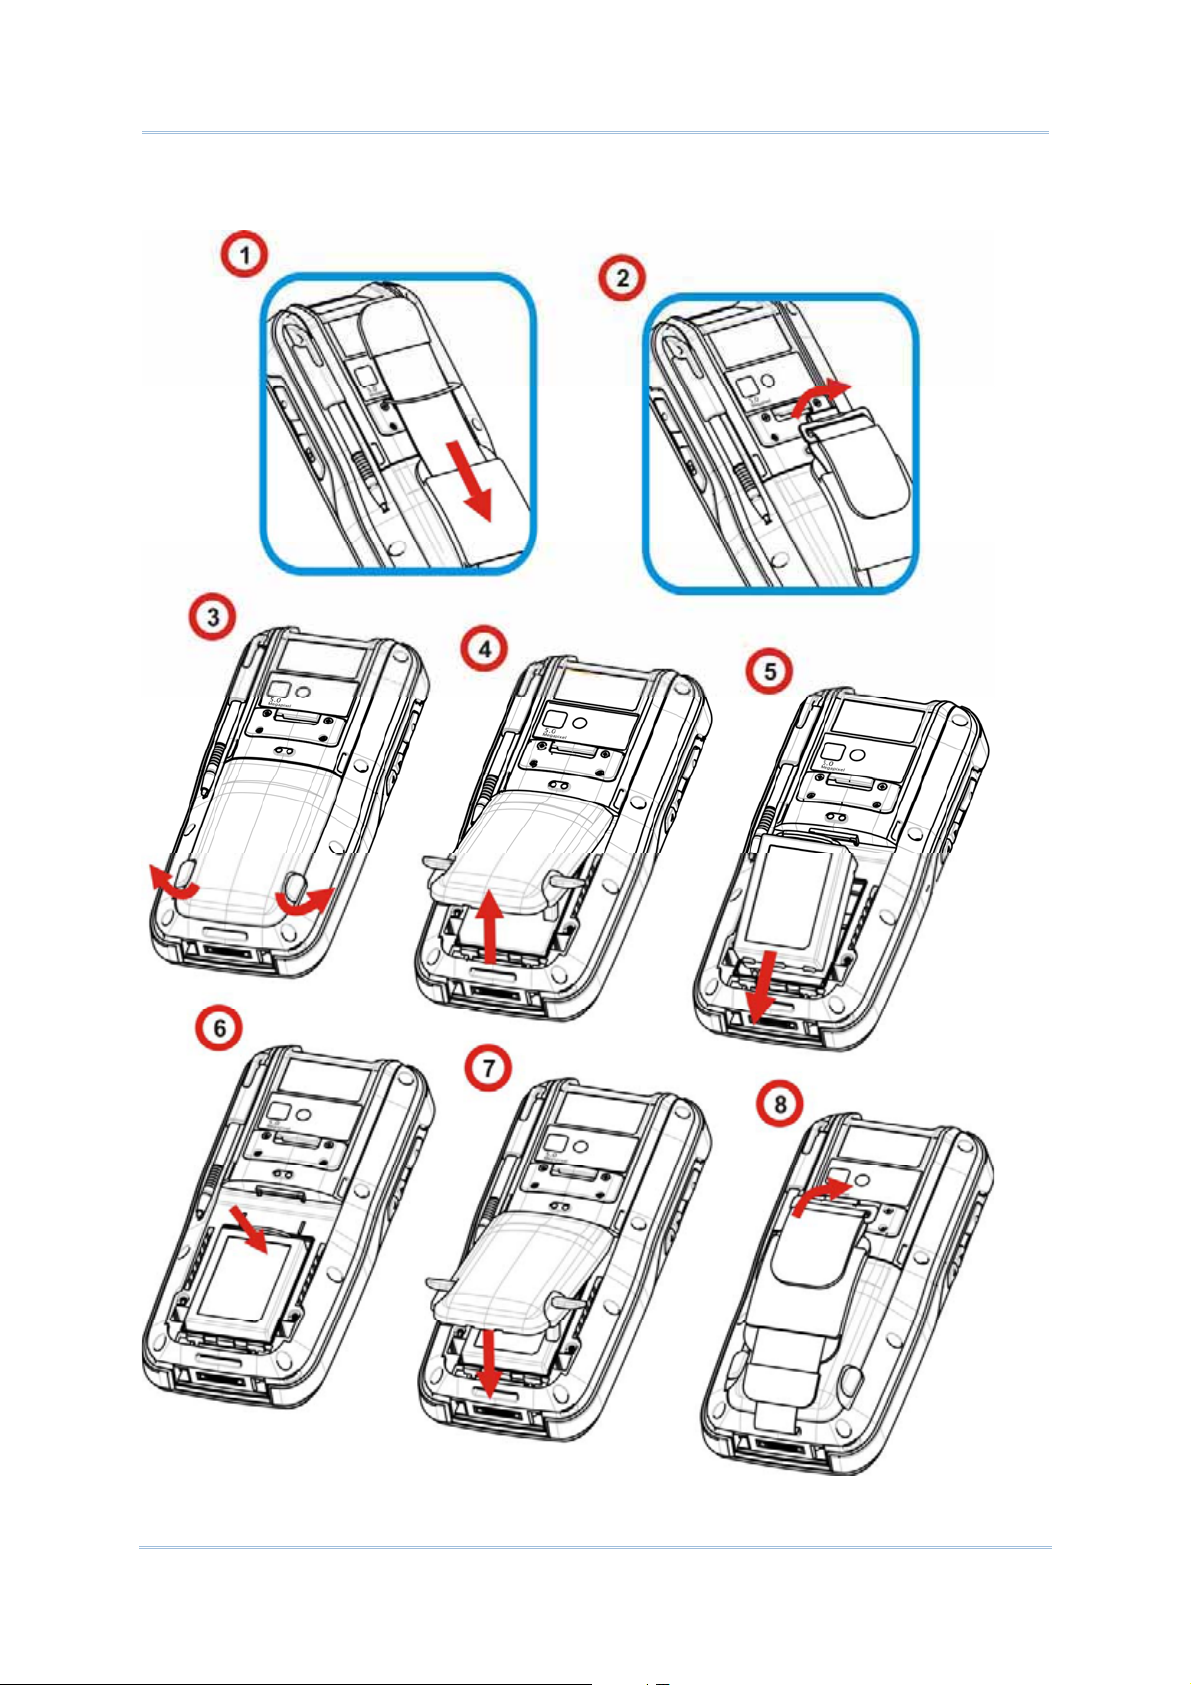
To install main battery pack, follow through the steps below by referencing to the
illustrations:
Figure 4: Main Battery Setup
10
Page 21

Chapter 1 Use Mobile Compute
r
1) Loosen the handstrap and pull it downwards so the metal hook is positioned at the lower
edge of the Velcro band
2) Unhook the hand strap by pressing the square metal ring lightly in the middle and lifting
it upwards in a single motion.
Note: The lower end of the handstrap can be left as is without detaching. After the main
battery is installed, the handstrap can be hooked back into place.
3) On the outer sides of the battery door are two door latches. Pull them outwards to
unlock battery door.
4) Lift up the lower end of the battery door to remove it.
5) Position the main battery pack into the battery chamber with the contact pins facing
down. Fix the bottom edge first.
6) Press the upper end of the main battery inwards until the clip at the top “clicks” into
place.
7) Replace the battery door. Fix the upper edge first and then press the lower edge in. Push
the door latches back to their original position.
8) Secure the handstrap hook back into its groove.
Note:
(˄) When main battery level drops to low level, charge it ASAP or replace it with a
charged one.
(˅) Always turn off the mobile computer to replace the main battery pack.
(3) The battery door must be secured in place for the mobile computer to operate.
(4) Any improper handling may reduce battery life.
11
Page 22

CP60 Mobile Computer Reference Manual
2.4.2. CHARGE BATTERIES
Due to shipment, it is likely that the main battery and backup battery won’t be fully charged
when you receive the package. Before setting the mobile computer to work, charge the
main battery to full by direct charging via a power adapter (with the help of a Snap-on
Charging & Communication Cable or Charging & Communication Cradle).
Since the main battery is the only source backup battery taps power from, be sure to install
main battery for the 1
Some key facts about charging batteries:
Charging Time
st
charge so both main battery and backup battery get charged.
Main battery: It takes circa 4 hours to charge main battery to full (via direct charging with
power adapter). The battery charging LED above the touchscreen (the one to the right) lights red
or orange during charging (depending on the battery level at the moment), and lights green
when mobile computer is near 100% charged.
Backup battery: The backup battery is rechargeable by both main battery and power adapter.
It takes about 8 hours to charge it to full, however it does not need to be fully charged for the
mobile computer to work.
Charging Temperature
It is recommended that batteries be charged at room temperature (18°C~25°C) for optimal
performance.
Charging stops when temperature drops below 0°C or exceeds 35°C. In this case the battery
charging LED will be continuously blinking in red.
Power Consumption
When all radios (802.11 a/b/g/n, Bluetooth, mobile data (HSPA+), GPS) are active on battery
power, main battery level drops substantially.
In order to prevent the system from shutting down due to depleted main battery, we suggest
that you keep a fully charged battery for replacement or have the mobile computer access the
radios on external power.
The following guides how to charge batteries.
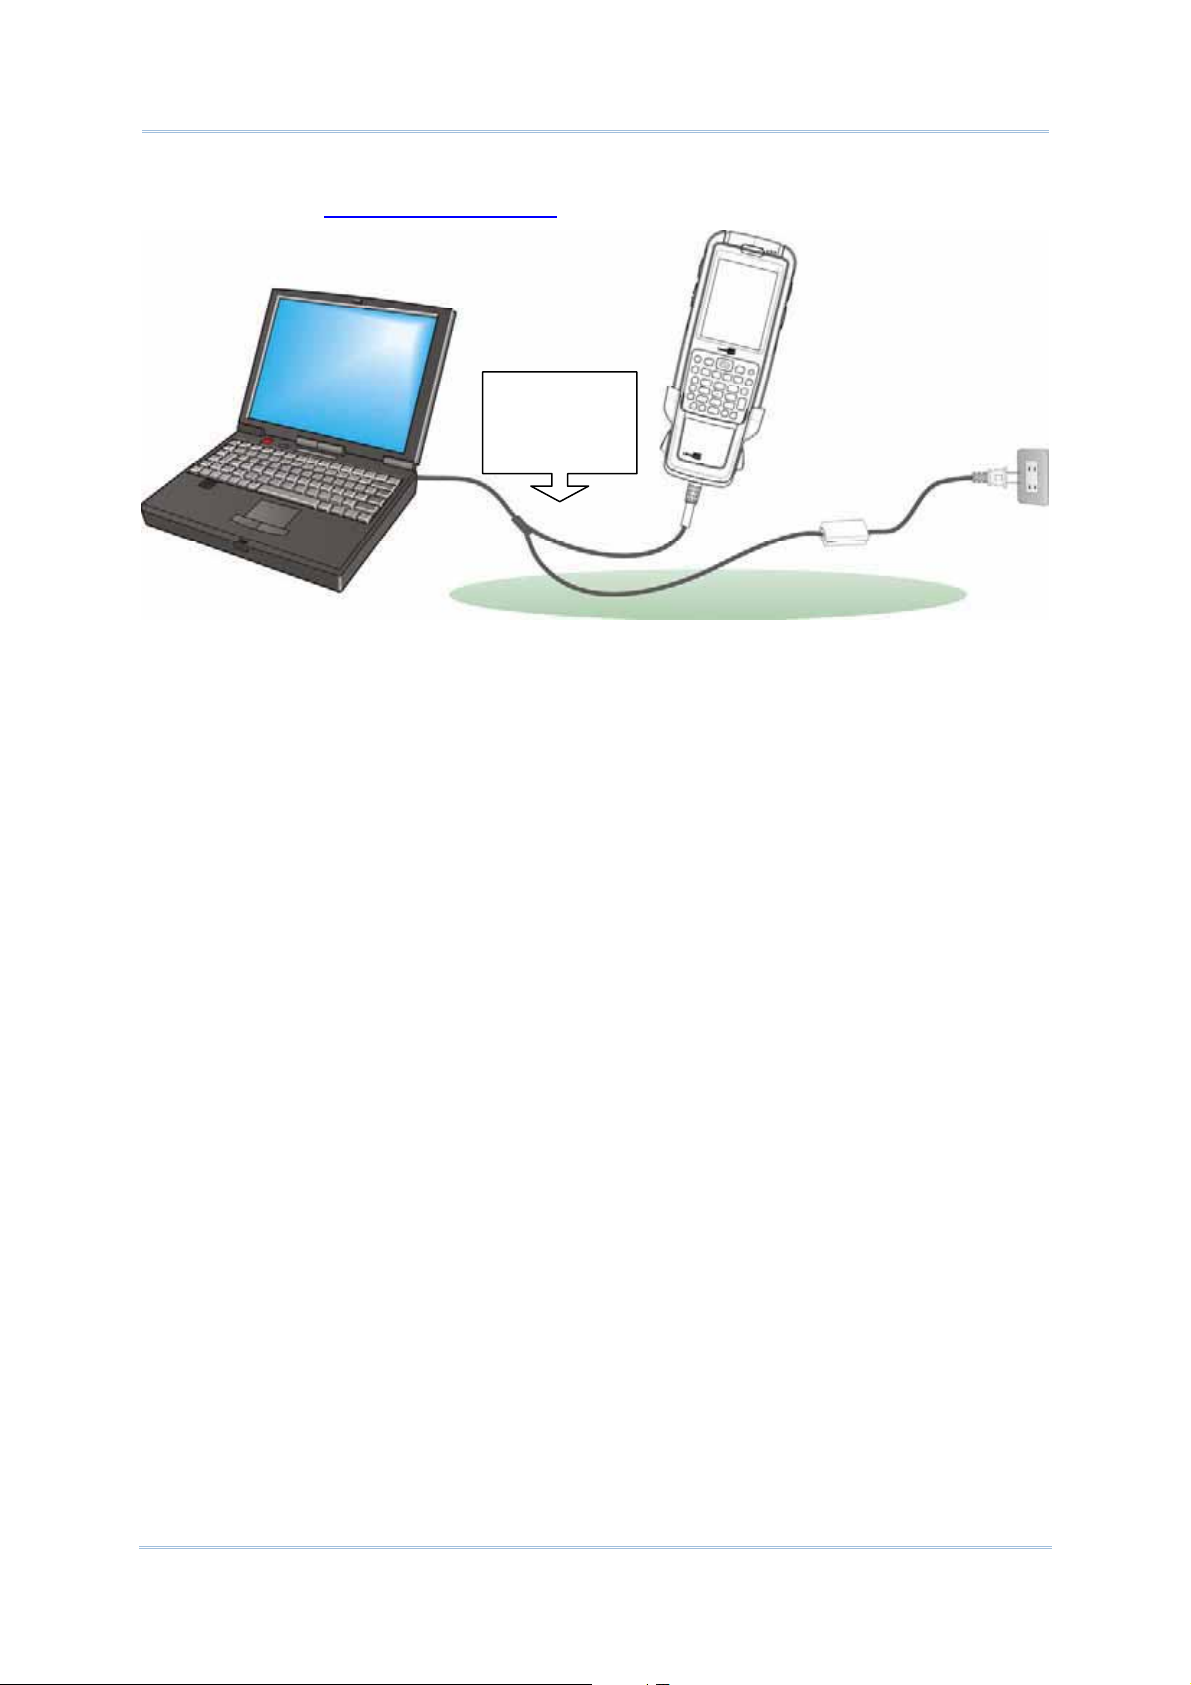
DIRECT CHARGING USING SNAP-ON CABLE
Direct charging the mobile computer relies on the Snap-on Charging & Communication
Cable (hereinafter “snap-on cable”). There is a power jack on the connector of this cable to
connect external power.
Prior to charging, install main battery as described in Main Battery Setup
steps below:
1) Attach the snap-on cable to the mobile computer.
2) Plug the head of the power adapter cord into the power jack located on snap-on cable’s
connector.
3) Connect the power adapter to a power outlet.
12
. Then follow the
Page 23
Chapter 1 Use Mobile Compute
r
To output data to your PC or laptop, connect the snap-on cable (either USB or RS-232
format) to it. See Direct Data Connection
When data
transmission is
required.
Figure 5: Direct Charging Using Snap-on Cable
for follow-ups.
13
Page 24
CP60 Mobile Computer Reference Manual
2.4.3. MONITOR BATTERY LEVEL
Main battery is the only source that feeds the mobile computer to work. It also supplies the
backup battery on main board to retain the data stored in DRAM. Hence when main battery
level gets low, recharge it or change it as soon as possible. But foremost, back up the
important data from time to time to protect your work.
MAIN BATTERY LEVEL
The O.S. features a few icons for user’s immediate awareness of main battery level. These
icons avail themselves of Title Bar
screen.
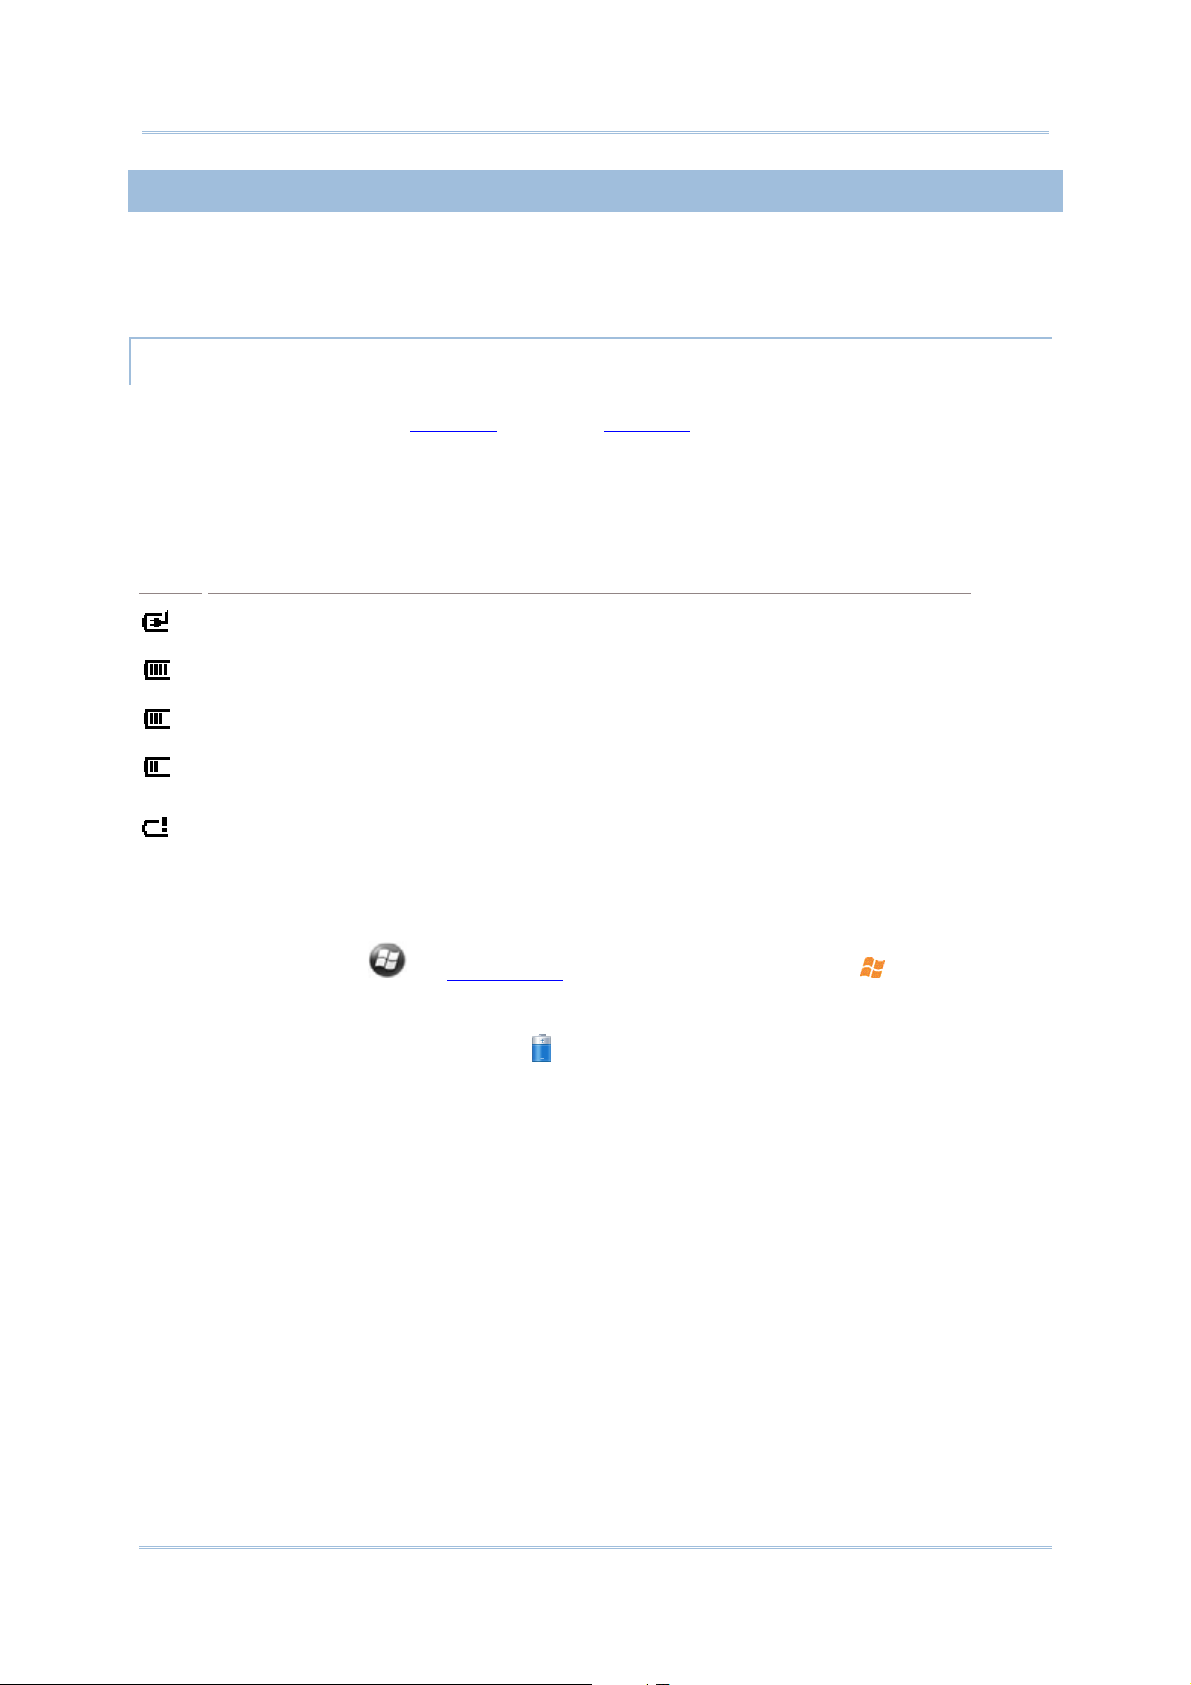
STATUS ICONS
Main battery icons communicate the following statuses:
to show. Title Bar settles at the top of almost every
Icon
Battery Status
Main battery is being charged from external power.
Main battery level is 70% to full.
Main battery level is partially drained between 40%-69%.
Main battery level is between 20%-39%.
Main battery has dropped between 10%-19% Battery needs charging
immediately.
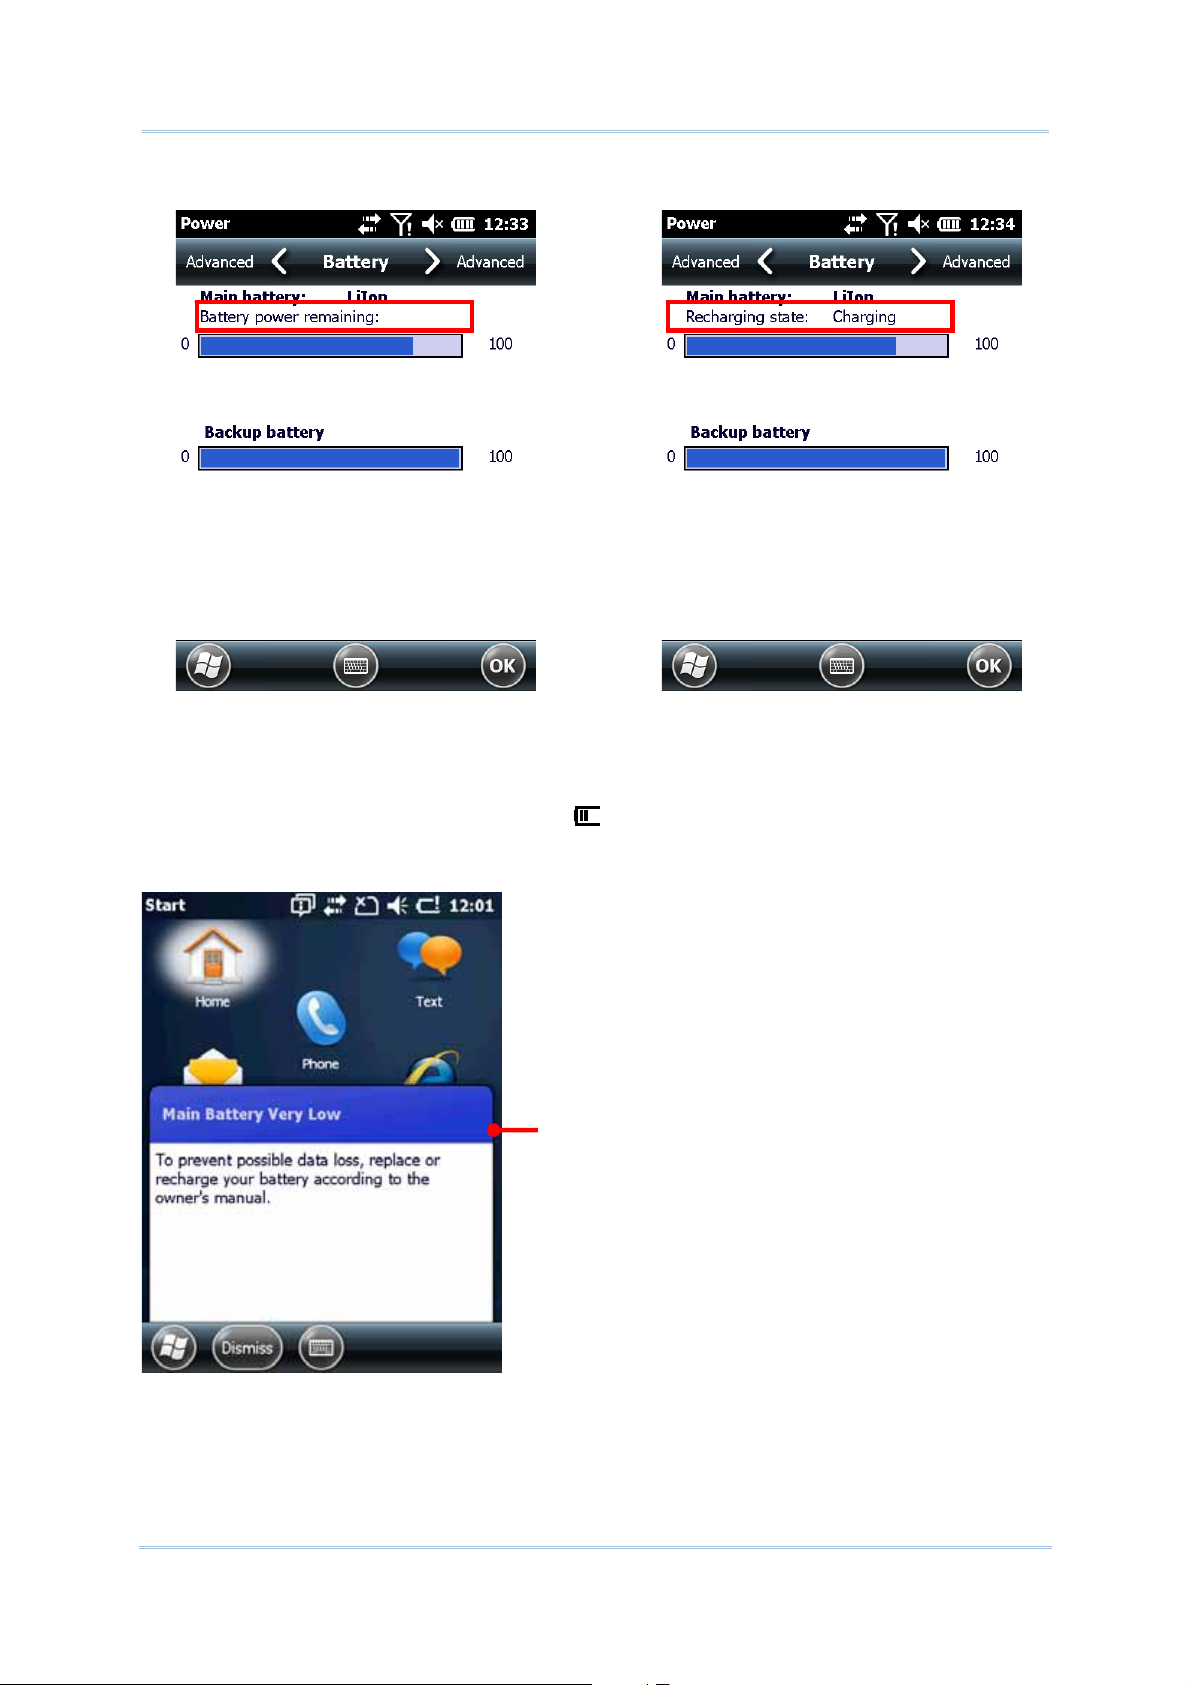
MORE CHARGE INFO
To know more about main battery level:
1) Tap Windows icon
Start screen opens.
2) Tap Settings | System | Power
Power application opens showing Battery tabbed page. The page shows a horizontal
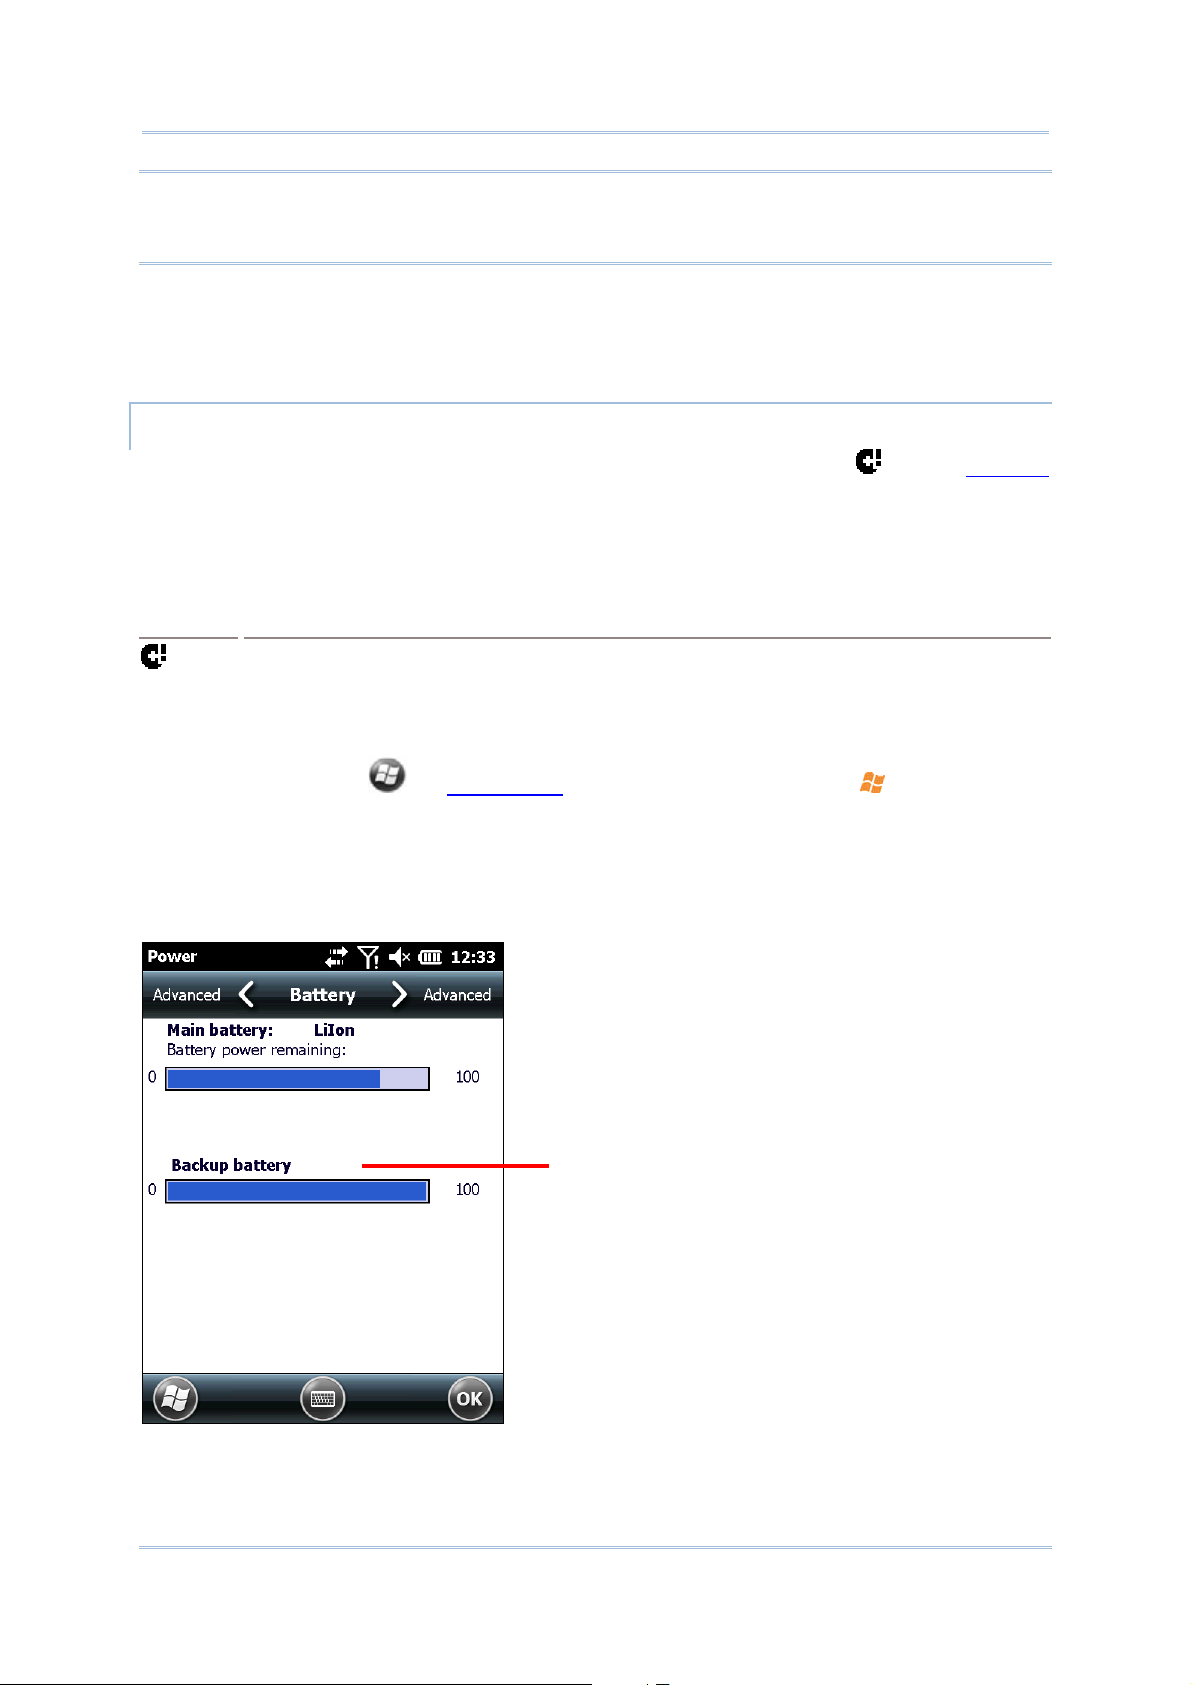
bar to enable quick grasp of battery level at a glance.
When main battery isn’t being charged, the page displays the remaining power in a
horizontal bar. When main battery is being charged, the page indicates that the battery
is in “charging” state. The current battery level is encapsulated in the horizontal bar
whether the battery is under charging or not.
on Softkey bar or hit physical Windows key .
.
14
Page 25
Chapter 1 Use Mobile Compute
r
Main battery isn’t being charged. Main battery is being charged.
Power amount delivered in percentage
enables more accuracy.
The horizontal graphic bar shows coarse
power amount.
LOW BATTERY ALERTS
When main battery level drops below 40% , the mobile computer prompts “Main Battery
Low” for a recharge. When further reduced to under 20%, the mobile computer prompts
“Main Battery Very low” to solicit your immediate transaction.
Main Battery Very Lowprompt
Low battery may incur shutdown to the mobile computer and cause DRAM data damage.
Always save data before running short of power or keep a fully charged battery at hand for
replacement.
15
Page 26
CP60 Mobile Computer Reference Manual
Note: Constant usage of the mobile computer at low battery level can affect battery life. For
maximum performance, recharge the battery periodically to avoid battery drain out and
maintain good battery health.
When main battery drains out entirely, the mobile computer shuts down automatically.
Backup battery takes over to hold DRAM data for 30 minutes if it is fully charged. When this
occurs, replace main battery pack immediately.
BACKUP BATTERY LEVEL
For user’s immediate awareness of backup battery level, O.S. shows an icon on Title Bar
when battery level drops low.
STATUS ICONS
Backup battery icon delivers the following statuses:
Icon
Battery Status
Battery level has dropped low and needs charging.
MORE CHARGE INFO
To learn more about backup battery level:
1) Tap Windows icon
Start screen opens.
2) Tap Settings | System | Power.
Power application opens showing Battery tabbed page. Backup battery level displays in a
horizontal bar beneath Main battery level:
on Softkey bar or hit physical Windows key .
Backup battery level is
displayed in a horizontal bar
16
Page 27
Chapter 1 Use Mobile Compute
r
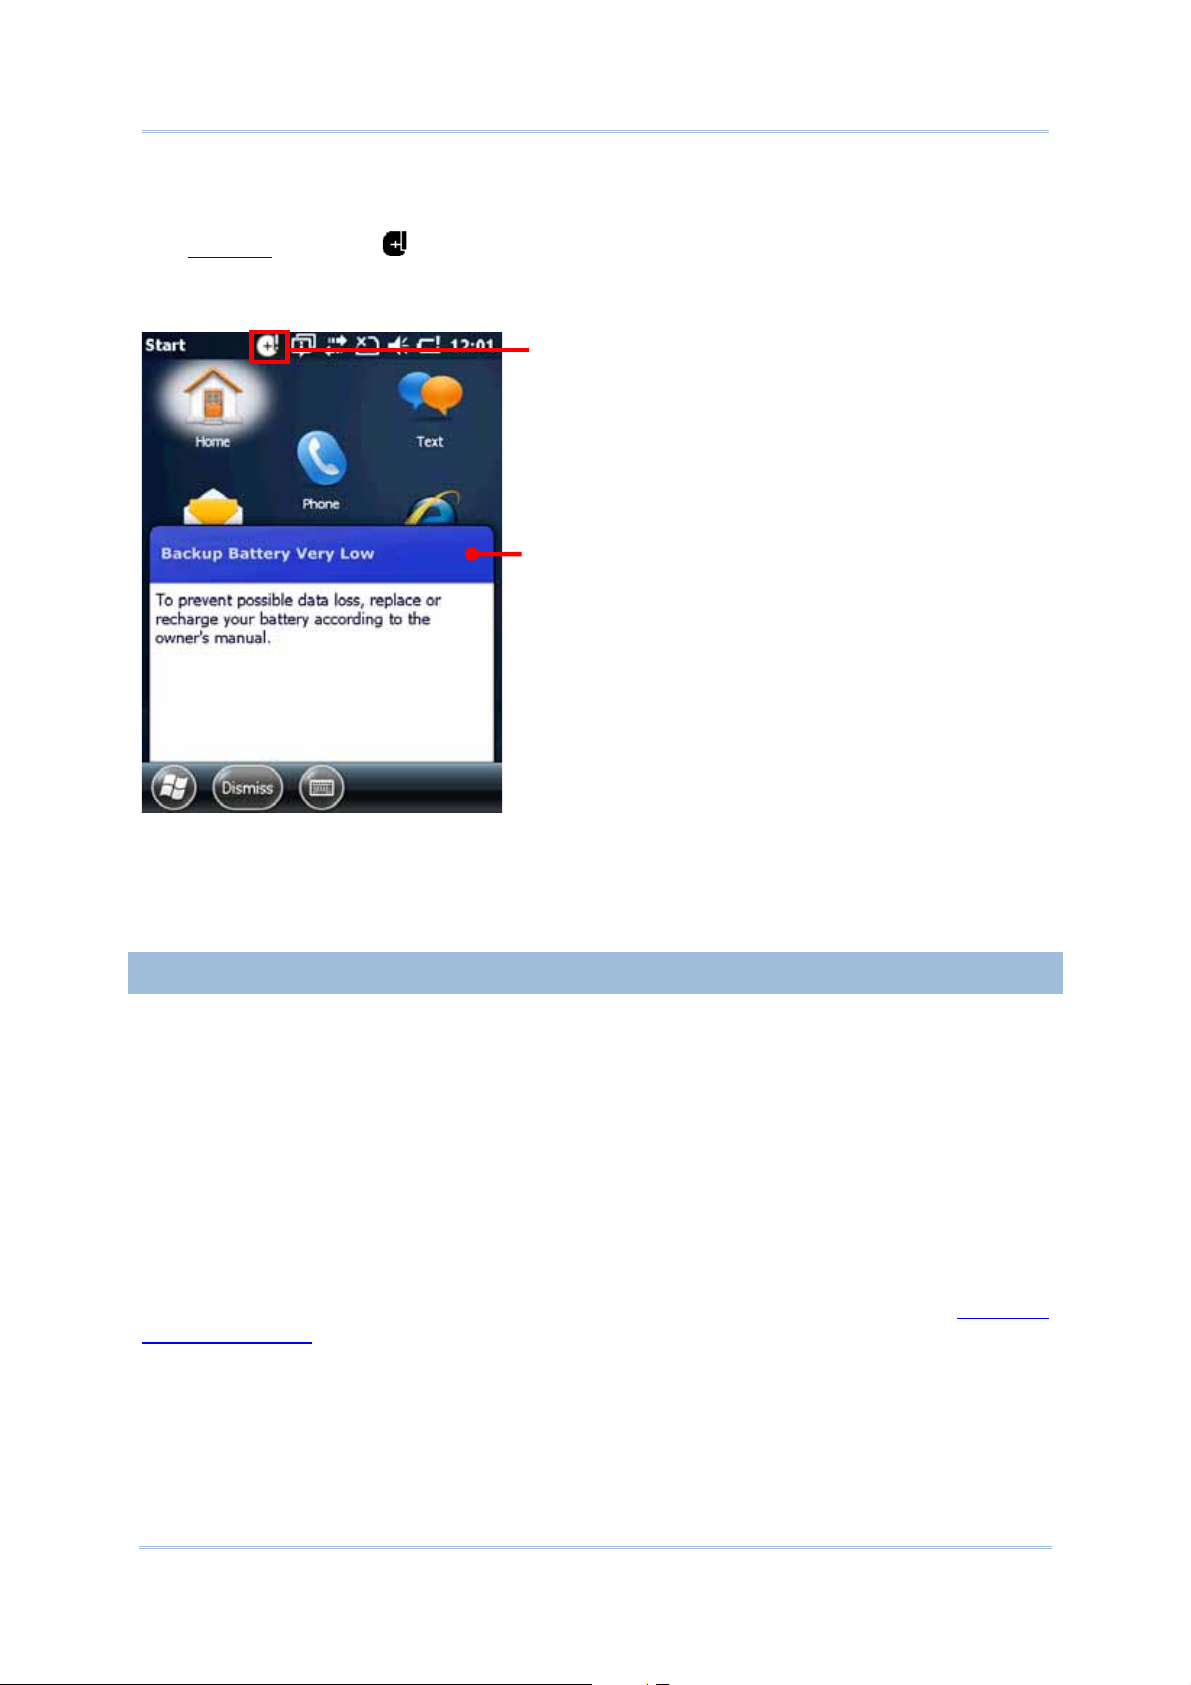
LOW BATTERY ALERT
When backup battery drops low, the mobile computer prompts for recharge with a dialog.
And Title Bar
Backup battery is rechargeable by external power (through power adapter) or main battery
pack.
shows an icon.
An alert icon shows on Title Bar
Backup Battery Very Low
Low backup battery puts DRAM data in great danger. Always save data from time to time or
keep a fully charged battery at hand for replacement.
Once backup battery drains out completely, the data in DRAM is gone. Any data yet to be
saved is lost!
2.4.4. POWER MANAGEMENT
The mobile computer features “suspension”, a “soft-off” state allowing the mobile computer
to consume less power and quickly to wake up.
The mobile computer auto-enters “suspension” when one of the following happens:
When placed face-down, which suggests the mobile computer isn’t actively used.
When battery door isn’t in place.
And it wakes up from the following events:
Power button or scan key pressed
WWAN ringing signal
USB cable plugging
Note the mobile computer is also manually suspensible through Power button. See Suspend
Mobile Computer.
17
Page 28

CP60 Mobile Computer Reference Manual
2.4.5. OPTIMIZE BATTERY LIFE
Power issues are critical for portable devices. Always turn off the features you don’t need on
the mobile computer to save power. To extend battery life as long as possible, always take
the following actions:
Suspend the mobile computer when it isn’t actively used. (See Suspend Mobile
Computer.)
Turn down LCD backlight brightness as described in Adjust Backlight, and set a shorter
LCD timeout as described in Suspend & Reset Mobile Computer
Auto Sync the mobile computer with your PC less frequently. See Direct Data
Connection.
If you are using any “push e-mail” or any automatic syncing service on the mobile
computer, change the syncing schedule to manually check updates.
When Wi-Fi, Bluetooth, mobile data (HSPA+), or GPS isn’t used, turn it off. See Radios.
18
Page 29
2.5. TEXT INPUT
The mobile computer has a physical keypad and a touchscreen to receive user’s input.
Among the two, the touchscreen provides more intuitiveness than the physical keypad to
interact with the device.
This section shows how to input text using physical keypad and onscreen keyboard. To
know how to touch-control the mobile computer, see Touch Control
.
2.5.1. PHYSICAL KEYPAD
The physical keypad sitting front the mobile computer is quite an advanced one with much
resemblance to laptop or PC keyboards. It supports multi-key operation, which normally
requires two keys hit simultaneously, one of which a modifier key,
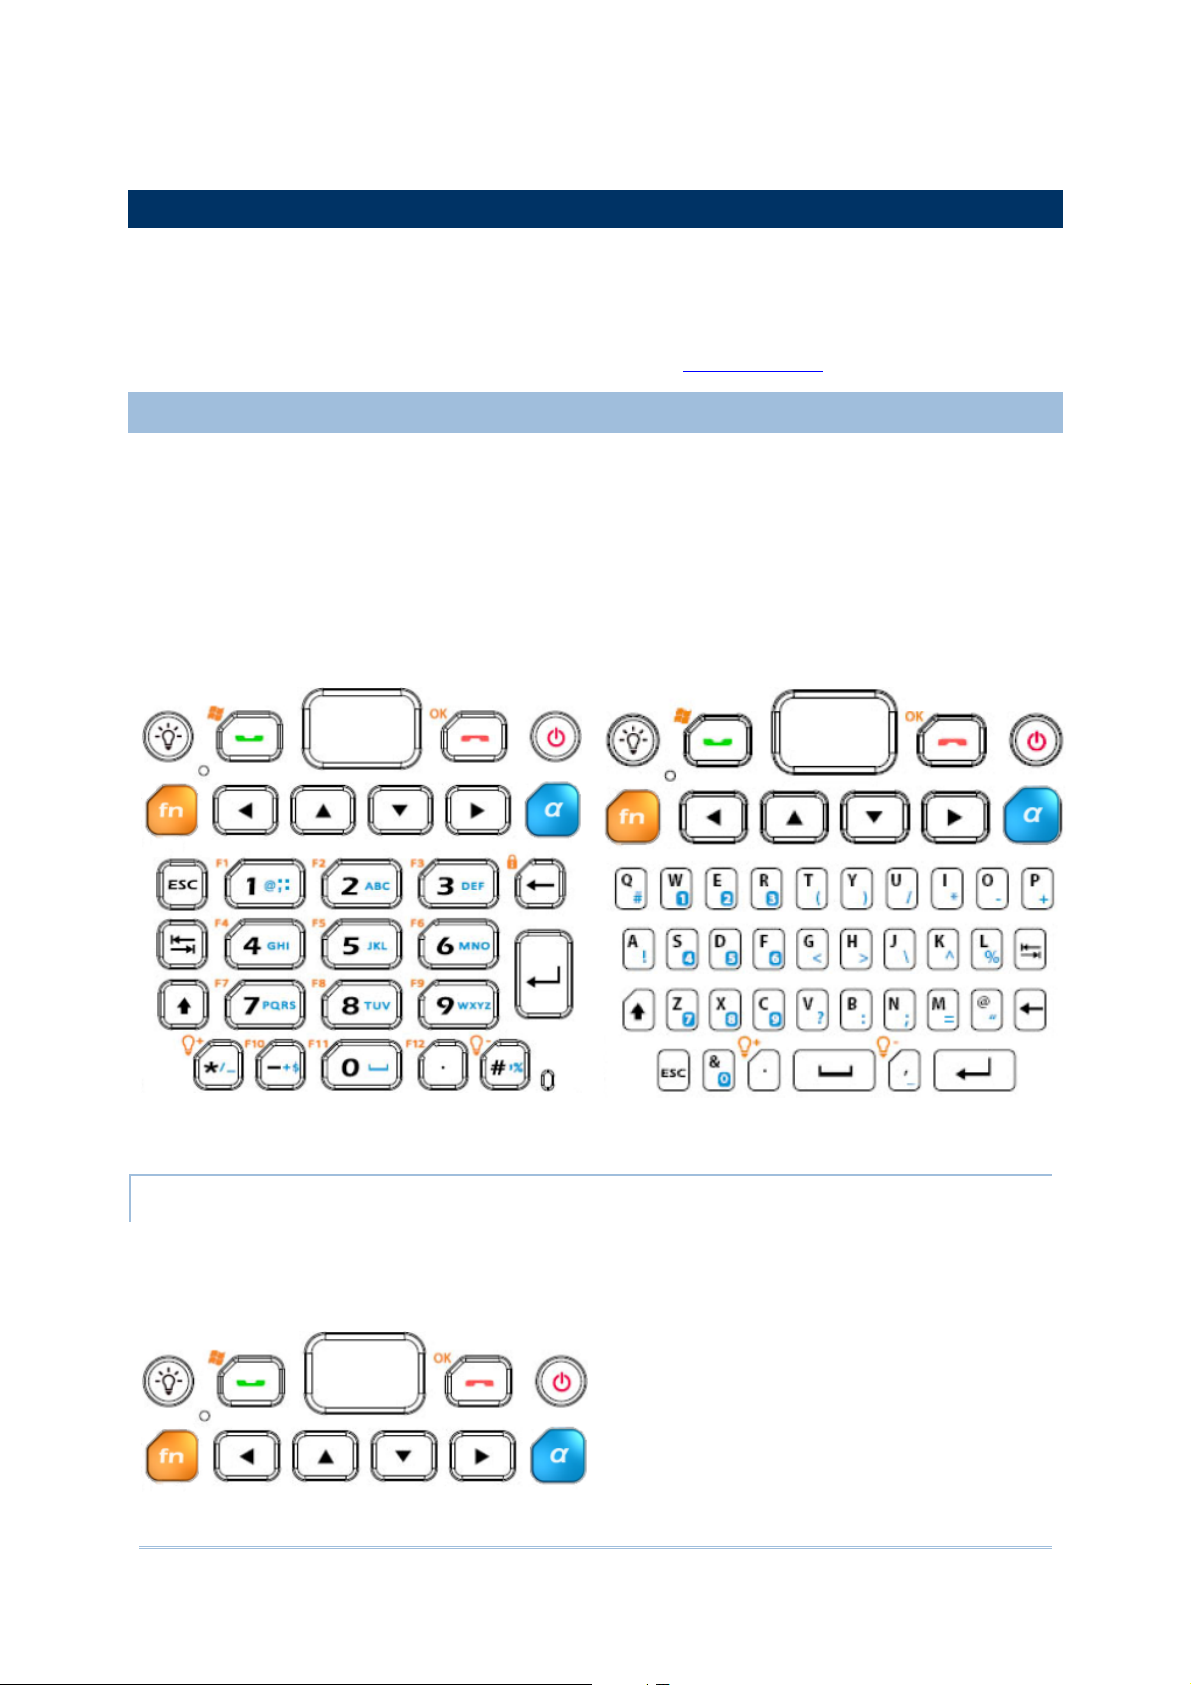
The physical keypad is either a numeric type or a QWERTY one. Each wedges a set of
“enhanced keys” along the top and a set of character keys at the lower half.
As for entering text, the numeric and QWERTY keypad are equally capable of entering
numbers, letters, symbols and a few punctuations. Both also receive supplementary
backlight as the screen does.
Figure 6: Numeric Keypad Figure 7: QWERTY Keypad
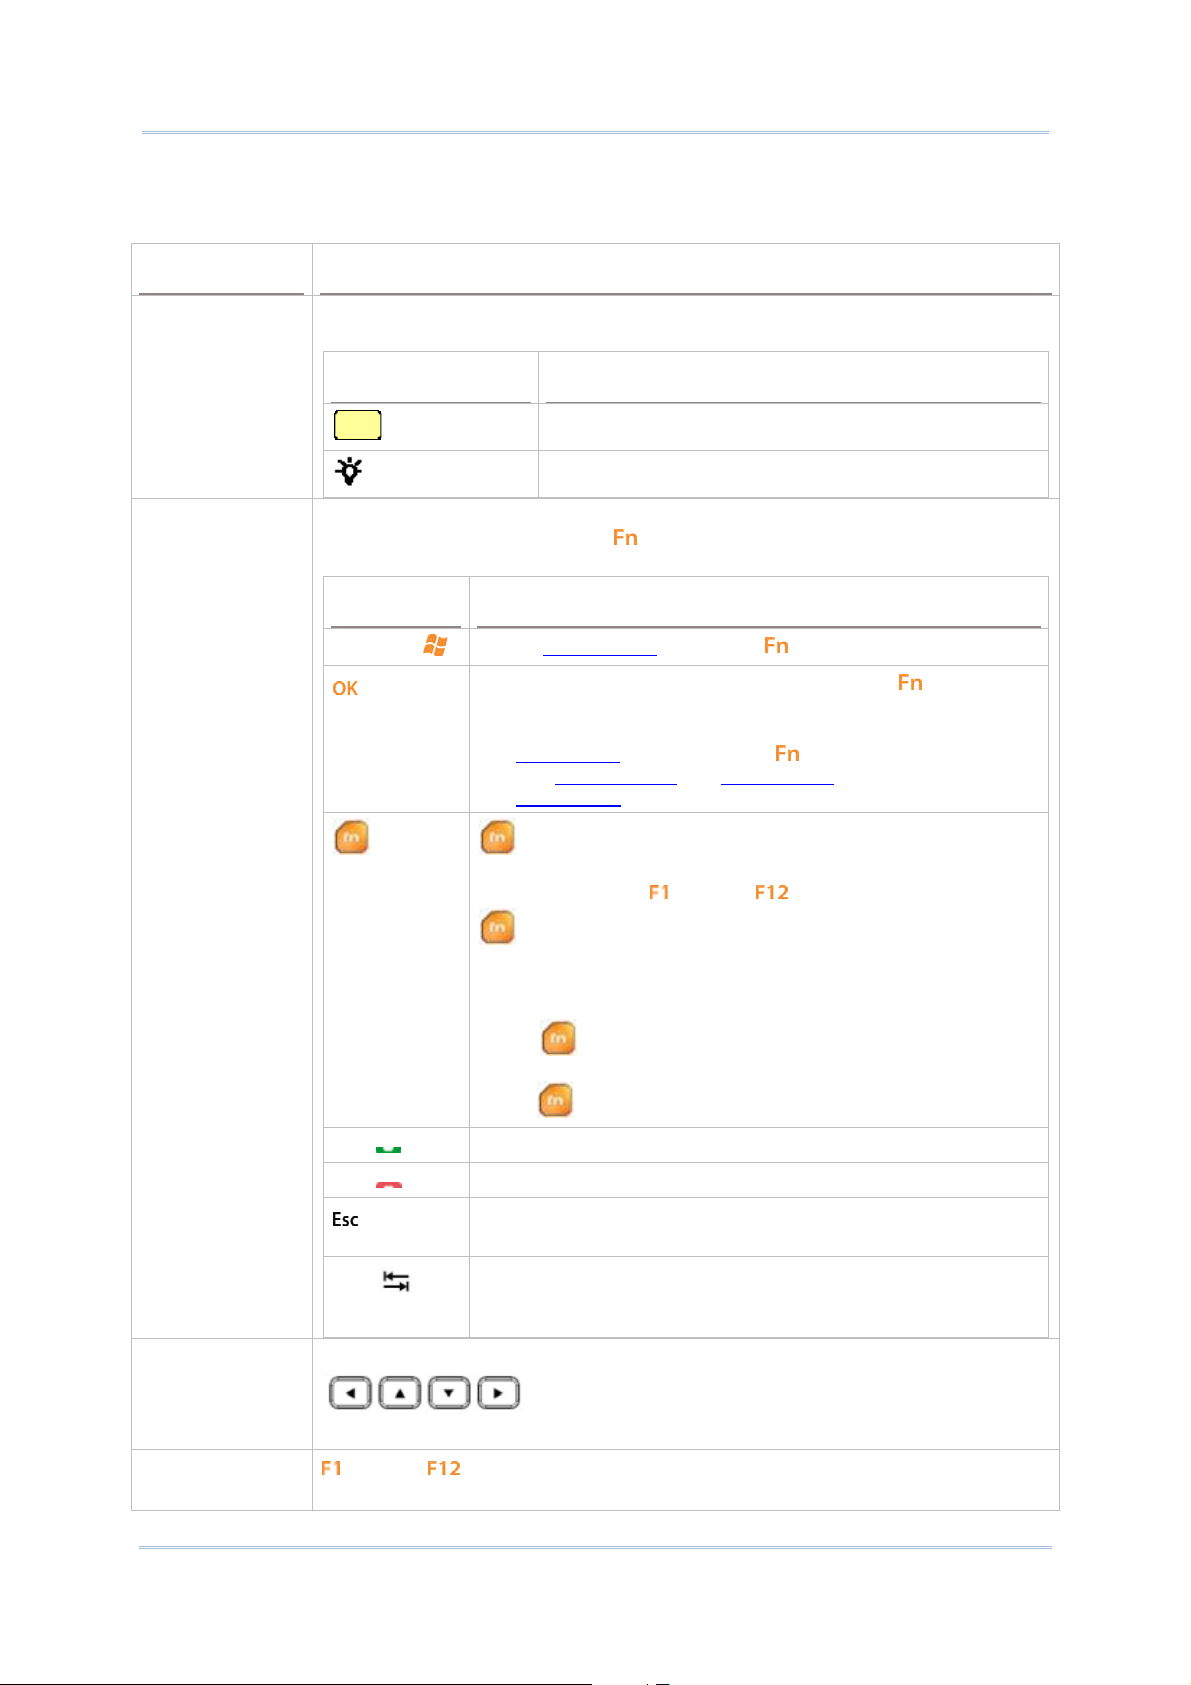
“ENHANCED KEYS”
“Enhanced keys” are arranged along the top of physical keypad and separated from
character keys. Use these “enhanced keys” to launch actions from the mobile computer and
O.S., cause the active application to work, or switch physical keypad between input modes.
Navigation keys are included also to move the caret in a text input field.
19
Page 30
CP60 Mobile Computer Reference Manual
Figure 8: Enhanced Keys
Enhanced keys can be categorized to five groups and explicated as follows:
Key Group
ACTION KEYS
O.S. KEYS
Description
“Action keys” are Scan key and Backlight key. They cause the mobile computer
to deliver functions as below:
Key Press
Scan Key
Backlight Key
The following tabulates O.S. keys and their functions. Some of them are engraved
in orange colorm, which means
to function.
Reads barcodes
Turns on/off screen backlight.
key needs to be pressed beforehand in order
Key Press
Windows
Opens Start Screen. (Requires key pressed beforehand.)
Confirms input in an input field. (Requires key pressed
beforehand.)
Delivers the same function as the “OK” command on
Softkey bar
See Today Screen
Softkey bar
key applies its function when used in conjunction with
other keys. Together they make the O.S. take actions or
produce functions
does. (Requires key pressed beforehand.)
and Start Screen for more details about
.
through .
NAVIGATION
KEYS
FUNCTION
KEYS
key comes with an LED indicator beside it. When pressed
once, the LED indicator lights up in orange and the function
indicated in orange is delivered to the next pressed key. When
another key is pressed, keypad returns to default mode.
When
the function is delivered to all pressed keys. To quit this mode,
press
Call Launches phone or places a call.
End Closes phone or ends a call.
ʳ key is pressed twice, the LED indicator stays lit and
key again
Opens the previous screen worked on.
Closes a menu of an application, or an opened dialog.
Tab
The buttons right below Scan key are the up/down/right/left navigation keys
applications, they navigate vertically or horizontally among highlighted items.
through are known as the functions keys on physical keypad. They are all
Navigates among the highlight items in some applications.
Enters Tab character, which means it moves the caret to
the next tab stop.
. They move the caret in an input field. In certain
20
Page 31

Chapter 1 Use Mobile Compute
r
application-dependent and they all team up with key to cause actions from
the active application. They produce nothing when pressed alone.
[ALPHA] KEY
key changes keypad input mode. When key is pressed once, [alpha]
mode is activated temporarily, and the LED indicator next to the physical key
lights up in blue accordingly. This mode will end after a single key has been
pressed. Upon pressing any key, keypad input mode will resume back to default,
and the LED indicator will turn off.
When
LED indicator next to the physical key stays lit. Press the key again to quit this
mode and return to default.
With combined use of the Shift key
modes for physical keypad. Mode availability however depends on keypad type,
numeric or QWERTY. On a numeric keypad, 6 text input modes are triggered by
the [alpha] key, while on a QWERTY keypad, 2 modes are available.
The icons
key is pressed twice, [alpha] mode is activated permenantly, and the
, key enables maximum six input
on the Title Bar signify current input state.
Numeric keypad input modes triggered by key:
Mode Description
Physical keypad enters an alphabetic character for the first
key pressed.
Physical keypad enters alphabetic characters for all keys
pressed.
QWERTY keypad input modes triggered by key:
Mode Description
Physical keypad enters a number or symbol for the first key
pressed.
Physical keypad enters numbers and symbols for all keys
pressed.
NUMERIC KEYPAD CHARACTERʳKEYS
Numeric keypad wedges a set of character keys at the lower half. They are laid out
analogously to a telephone keypad, and additionally featured are an
Enter key
, Backspace key , and Shift key that enable more sophisticated text
input.
Numeric keypad enters numbers 0 through 9 by default. Symbols * through ) and
alphabetic characters can be entered by combined use of the
See [Alpha] Key
for more details.
key, Tab key ,
key and Shift key .
21
Page 32

CP60 Mobile Computer Reference Manual
Key Description
Opens the previous screen worked on.
Closes a menu of an application, or an opened dialog.
Tab
Navigates among the highlight items in some applications.
Enters Tab character, which means it moves the caret to the next tab stop.
Executes a command or confirms input. For text input, it inserts a break between
paragraphs.
Backspace
Space
Shift Shift key changes keypad input mode. When is pressed once, [Shift]
Erases the characters to the left of caret.
Inserts a blank space where caret is.
mode is activated temporarily, and the LED indicator next to the physical key
lights up in green accordingly. This mode will end after a single key has been
pressed. Upon pressing any key, keypad input mode will resume back to default,
and the LED indicator will turn off.
When
LED indicator next to the physical key stays lit. Press the key again to quit this
mode and return to default.
With combined use of the
the physical keypad. The icons
signify current input state.
key is pressed twice, [Shift] mode is activated permenantly, and the
key, Shift key enables eight input modes for
on Title Bar
Numeric keypad input modes:
Mode Description Trigger and Withdrawal
Default mode.
No
icon
Keypad enters numbers
only.
This mode remains until key or
Shift key
is pressed.
22
Keypad enters the first
Press
once to enter this mode.
Page 33

Chapter 1 Use Mobile Compute
r
typed key as a symbol.
Keypad enters all typed
keys as symbols.
Keypad enters the first
typed key as an
alphabetic letter.
Keypad enters the first
typed key as a
capitalized alphabetic
letter.
Keypad enters the first
typed key as a
capitalized alphabetic
letter.
Input mode returns to default once a key
is pressed.
Press
Input mode returns to default by
pressing
Press
Input mode returns to default once a key
is pressed.
Press
mode.
Input mode returns to default once a key
is pressed.
Press
this mode.
Input mode returns to default once a key
is pressed.
twice to enter this mode.
again.
once to enter this mode.
and once to enter this
once and twice to enter
Keypad enters all typed
keys as alphabetic
letters.
Keypad enters all typed
keys as alphabetic
letters and capitalizes
the first one.
Keypad enters all typed
keys as capitalized
alphabetic letters.
For details about key, see [Alpha] Key.
TEXT INPUT
To enter text by numeric keypad:
Numeric Input
Press
Input mode returns to default by
pressing
Press
this mode.
Input mode returns to default by
pressing
Press both
this mode.
Input mode returns to default by
pressing
twice to enter this mode.
again.
twice and once to enter
again.
and twice to enter
again.
The numeric keypad enters numbers 0-9 by default when neither
key
Literal Input
key nor Shift
is pressed.
23
Page 34

CP60 Mobile Computer Reference Manual
1)
To enter a single letter, press
key once so appears on the Title Bar. To
enter the letter in uppercase, press Shift key
To enter multiple letters, press
Additionally press Shift key
in uppercase, or press it twice to activate
in uppercase.
2) Continuously press a key engraved with blue-color character until the character
you desire is entered.
once to activate mode and enter the first letter
key twice so appears on the Title Bar.
additionally to trigger mode.
mode in which all letters are entered
Symbols Input
1)
To enter a single symbol, press Shift key
To enter multiple symbols, press Shift key
2) Press one or more key(s) engraved with white-color characters until the desired
symbol(s) is entered.
once so is seen on the Title Bar.
twice to activate mode.
Symbols Input
Press
means numeric keypad readies to enter one symbol while
readies to continuously enter more symbols.
key and/or shift key continuously until seeing an or on Title Bar.
means numeric keypad
Note there are cases when a typed letter is capitalized automatically:
The letter follows a period mark and a blank space (because it is seen as the start of a
new sentence).
The letter is typed after a paragraph break (because it is seen as the start of a new
paragraph).
24
Page 35

Chapter 1 Use Mobile Compute
r
QWERTY KEYPAD CHARACTER KEYS
QWERTY keypad also arranges its character keys in the lower half and features them in a
compact “QWERTY” layout as its name suggests.
QWERTY keypad is a pared down version of an average laptop’s keyboard that bears also an
key, Tab key , Enter key , Backspace key , Shift key , and space key .
QWERTY keypad enters alphabetic characters by default. To enter numbers and some
symbols, press
key. See [Alpha] Key for more details.
key, key and shift key are the modifier keys. / key is pressed with another
key to launch particular actions from O.S. or the active application while shift key
capitalizes the letter(s) typed.
25
Page 36

CP60 Mobile Computer Reference Manual
Key
key
key
Backspace
Space
Description
Performs a special operation from O.S. or the active application when pressed in
conjunction with another key.
Changes the function of the key pressed together with. The launched function
depends on the application.
Erases the characters to the left of caret.
Executes a command or confirms input. For text input, it inserts a break between
paragraphs.
Inserts a blank space where the caret is.
Opens the previous screen worked on.
Closes a menu of an application, or an opened dialog.
Tab
Shift Shift key changes keypad input mode. When is pressed once, [Shift]
Navigates among the highlight items in some applications.
Enters Tab character, which means it moves the caret to the next tab stop.
mode is activated temporarily, and the LED indicator next to the physical key
lights up accordingly. This mode will end after a single key has been pressed.
Upon pressing any key, keypad input mode will resume back to default, and the
LED indicator will turn off.
When
LED indicator next to the physical key stays lit. Press the key again to quit this
mode and return to default.
key is pressed twice, [Shift] mode is activated permenantly, and the
With combined use of the
the physical keypad. The icons
state.
key, Shift key enables four input modes for
on Title Bar signify current input
QWERTY keypad input modes:
Mode Description Trigger and Withdrawal
Default mode.
No
icon
Keypad enters lowercase
letters.
Keypad enters the first
typed key as an
uppercase letter.
Keypad enters all typed
keys as uppercase
letters.
Keypad enters the first
typed key as a
This mode remains until key or
Shift key
Press
Input mode returns to default once a key
is pressed.
Press
Input mode returns to default by
pressing
Press
is pressed.
once to enter this mode.
twice to enter this mode.
again.
once to enter this mode.
26
Page 37

Chapter 1 Use Mobile Compute
r
number/symbol.
Keypad enters all typed
keys as
numbers/symbols.
For details about key, see [Alpha] Key.
TEXT INPUT
To enter text using QWERTY keypad:
Literal Input
The QWERTY keypad enters lowercase letters a-z by default when neither
nor Shift key
To enter a letter in uppercase, press Shift key
To continuously type in uppercase, press Shift key
is pressed.
Input mode returns to default once a key
is pressed.
Press
Input mode returns to default by
pressing
twice to enter this mode.
again.
key
so appears on the Title Bar.
twice to trigger mode.
Numeric or symbols Input
To enter a single number/symbol, press
1)
Bar. To enter multiple numbers/symbols, press Shift key twice to trigger
mode.
Press a key engraved with blue-color character to enter number(s) and symbol(s)
2)
as desired.
Note there are cases when a typed letter is capitalized automatically:
key once so appears on the Title
The letter follows a period mark and a blank space (because it is seen as the start of a
new sentence).
The letter is typed after a paragraph break (because it is seen as the start of a new
paragraph).
CHANGE INPUT TEXT SIZE
Set the size to show typed text:
1) On Start screen, tap Settings | System | Screen | Text Size.
2) Tap Text Size tab.
3) Adjust the text size by moving the slider.
4) Tap the “OK” command on Softkey bar
to apply the change and quit setting.
27
Page 38

CP60 Mobile Computer Reference Manual
y
2.5.2. ONSCREEN KEYBOARD
The O.S. provides users with an onscreen keyboard. Compared to physical keypads, the
onscreen keyboard bears more likeness to a conventional laptop’s keyboard by all the
modifiers keys arranged on the left edge and the “QWERTY” layout. The onscreen keyboard
isn’t overshadowed by physical keypads at all but outdoing them by being able to enter a
series of diacritics for European languages.
Onscreen keyboard auto-opens in some applications while in others it doesn’t unless you
tap on a field that accepts input.
In case the onscreen keyboard doesn’t open, tap the keyboard icon
on Softkey bar to
open it.
Onscreen keyboard opens and readies to enter lowercase letters, numbers, and a few
frequently used symbols.
Onscreen
keyboard opens.
Backspace
Input modifier
Caps Lock
Shift key
Ctrl key
Softkey bar
Input modifier
Enter ke
Navigation keys
Space bar
Opens/closes
onscreen keyboard
MODIFIER KEYS
Although the touchscreen is a resistive single-touch type, use of modifier key, which
normally involves hitting two keys, are still available on onscreen keyboard.
On onscreen keyboard there are five modifier keys. They all sit at the left edge. This is how
they basically work:
1) Hit a modifier key on onscreen keyboard.
The onscreen keyboard enters modifier state.
2) Hit the second key.
28
Page 39

Chapter 1 Use Mobile Compute
r
The desired performance will be produced to the active application or screen at the
moment.
Modifier keys are explicated as following
Key
Ctrl key
Shift key
Caps Lock
Input
modifier
Description
Once tapped, it becomes color-inverted
the active application when a character key is tapped. It quits once the said action is
triggered or when it is tapped again.
For example: Tap
Windows environment usually selects all content on the active screen. Once “A” is
tapped, the onscreen keyboard quits Ctrl state.
Once tapped, it becomes color-inverted
quits once a character key is tapped or it is tapped again.
To enter all caps, use Caps Lock
Once tapped, it becomes color-inverted
characters typed. It doesn’t quit until it is tapped again.
This key does not affect numbers, punctuation marks, or symbols.
Once tapped, it becomes color-inverted
digits and enters them. It won’t quit until it is tapped again.
key and then tap key “A” to produce Ctrl+A function, which in
and causes a special action from O.S. or
and capitalizes the (one) letter typed. It
.
and capitalizes all the alphabetic
and presents more symbols and a set of
Tap input modifier .
When tapped it
becomes
color-inverted.
And have more symbols with a set of
digits.
29
Page 40

CP60 Mobile Computer Reference Manual
Input
modifier
Once tapped, it becomes color-inverted
such as ä, æ, ë, ï, ö, ú or letter variants such as ß and ç which are needed for European
languages. It quits once a character key is tapped.
and presents a series of accented vowels
N
M
Tap key on onscreen keyboard. key becomes color-inverted .
Then tap a character key.
Letter variant “ß” is entered.
Once an accented vowel or
letter variant is entered, the
onscreen keyboard restores
to English keyboard.
After the letter variant “ß” is entered,
the onscreen keyboard restores to
normal English alphanumeric layout.
Diacritical letters and letter variants are presented bother lowercase and
uppercase.
30
Page 41

Chapter 1 Use Mobile Compute
r
OTHER KEYS
Lowercase
Uppercase
Key Description
Tab key Navigates among the highlight items in some applications. For text input, it
inserts Tab character, which means it moves caret to the next tab stop.
Backspace Erases the characters to the left of caret.
Enter key
Nav Move caret in an input field. In certain applications, they navigate vertically or
Spacebar Inserts a blank space where caret is.
Executes a command or confirms input. When text input, it inserts a break
between paragraphs.
horizontally among highlight items.
DICTIONARY
Onscreen keyboard comes with an English dictionary. When onscreen keyboard is opened,
the dictionary is enabled and will display a list of suggested words as you type to allow quick
selection.
When you tap a letter key on the onscreen keyboard, a list of suggested words displays
shortly over the keyboard. Tap a suggested word from the list to enter it. When you have
entered a word that is not in the dictionary, it is added to the dictionary and becomes a
suggestible word next time.
The screenshot below shows an example when “L” is entered on onscreen keyboard:
31
Page 42

CP60 Mobile Computer Reference Manual
A list of suggested
words briefly display
over the keyboard
Dictionary suggestions
CHANGE KEYBOARD ORIENTATION
The mobile computer is built-in with a G-sensor and supports screen orientation, which is
enabled by default. So when the mobile computer turns sideways or upright, the screen
changes its orientation, and onscreen keyboard readjusts itself to the new orientation.
CHANGE TEXT INPUT SIZE
See Note there are cases when a typed letter is capitalized automatically:
The letter follows a period mark and a blank space (because it is seen as the start of a
new sentence).
The letter is typed after a paragraph break (because it is seen as the start of a new
paragraph).
Change Input Text Size.
2.5.3. EDIT TEXT
On the mobile computer, cut, copy, and paste text within an application or across
applications by the menu commands. Some applications don’t support editing some or all of
the text they display while others may offer their own way to edit text.
EDIT TEXT IN INPUT FIELDS
To edit text in a text input field:
1) Tap where you want to edit text.
Caret moves there and manifests itself as a vertical bar that blinks to indicate where the
typed or pasted text will be inserted.
2) Type, paste or delete text.
To paste text, see Paste Text
32
.
Page 43

Chapter 1 Use Mobile Compute
r
SELECT TEXT
When you see some text on a page you want to copy, select it first. Selecting texts varies
from application to application. But primarily it requires you to tap & hold somewhere on the
text to open a context menu or open the applications’ option menu which provide
commands to select a text.
To select a text:
1) Tap & hold somewhere on the text.
A context menu comes up.
2) Tap the command that makes selection.
3) Select the desired text.
It relies on defining the start and end to make selection of a text. Some applications
support tapping and dragging along the text to select it while others require you to mark
the start and end of the desired text with the onscreen facility featured by the
application.
CUT OR COPY TEXT
After a text is selected, system then presents Copy/Cut commands on “Softkey bar” or a
context menu shows up featuring Copy/Cut commands. Tap them to copy/cut the selected
text.
PASTE TEXT
Within the O.S., texts can be copied to and from different applications.
To paste a text:
1) Tap & hold the text field where you want to paste the text.
Context menu opens.
2) Tap the “Paste” command from the context menu.
The copied/cut text is pasted.
33
Page 44

Chapter 1 Use Mobile Compute
r
2.6. TOUCH CONTROL
The mobile computer’s LCD is overlaid by a resistive touch panel and thus forms a resistive
touchscreen. Since a resistive touchscreen locates the user’s touch by the force applied on
it, by operating with the stylus one can apply minimum force to trigger actions from the
touchscreen.
Touch control is one of the main ways to interact with the mobile computer. Users are able
to manipulate icons, buttons, menu commands, the onscreen keyboard, or any onscreen
items with touch control.
2.6.1. USE TOUCHSCREEN
The mobile computer comes with a stylus. Touch-operate the mobile computer with the
stylus. Apply the gestures below to work on the touchscreen:
Tap – Touch any item on the screen such as an application icon or a setting icon to work
on them, or touch any key on the onscreen keyboard to type it.
Tap & hold – Touch an item on the screen and do not release until an action occurs.
Drag – Touch and hold an item for a moment and then, without release, move the item
onscreen until you reach the target.
Flick – Quickly move your finger or stylus across the surface of the screen. Note when
the stylus contacts the screen, do not pause so you don’t drag an item instead. Flick is
helpful, for example, for scrolling up or down a list.
Double-tap – Touch quickly twice on a webpage or other screen to zoom. For example,
double-tap a section of a webpage in a web browser to zoom that section to fit the width
of the screen. Some applications such as map-info applications support picture zooming
with double-tap.
Rotate screen – On most screens, the screen rotates as the mobile computer changes
its orientations between upright and sideways.
2.6.2. ADJUST BACKLIGHT
To adjust backlight
1) Tap Windows icon
Start screen opens.
2) Tap Settings | System | Backlight
Backlight settings open.
3) Select between Battery Power and External Power tabbed pages.
4) Select Manual brightness control and manually adjust the brightness level, or
deselect Manual brightness control and leave the brightness on automatic.
on Softkey bar or hit physical Windows key .
.
34
Page 45

Chapter 1 Use Mobile Compute
r
Backlight’s Battery Power
tabbed page
1.6.3. CALIBRATION
A resistive touchscreen needs calibration to work accurately after serving for a period of
time. Calibration aligns the coordinates of touch panel and the LCD underneath to improve
touch accuracy.
To calibrate touchscreen:
1) Tap Windows icon
Start screen opens.
2) Tap Settings | System | Screen
Screen settings open showing Alignment tabbed page.
on Softkey bar or hit physical Windows key .
.
35
Page 46

CP60 Mobile Computer Reference Manual
3) Tap Align Screen button.
Screen alignment application opens.
4) Accurately tap on the centers of each cross mark to show consecutively onscreen, 5 in
total.
5) Follow through the calibration.
36
Page 47

Chapter 1 Use Mobile Compute
r
2.7. MEMORY
The mobile computer packs the following memory units to retain data and instructions from
users:
Random-access Memory (RAM)
512 MB SDRAM for temporary storage and fast access of active applications. SDRAM is
fed by backup battery to hold data.
Internal Storage
4GB flash memory to store O.S. (Windows Embedded Handheld 6.5), application files,
settings, and other data used by applications.
External Storage
Insert a storage card to increase the mobile computer’s storage capacity. Supported are
MicroSDHC cards up to 32GB.
2.7.1. DATA LOSS CAUTION
When main battery is absent or used up, backup battery on the main board takes over to
supply power to the mobile computer. A fully charged backup battery retains SDRAM data
and suspends the mobile computer for 30 minutes.
Note if you are leaving the mobile computer to sit for a couple of days, data loss is to occur
when both main and backup batteries drain out. Consider backing up data before putting
away the mobile computer.
2.7.2. CHECK STORAGE
RAM SIZE
To check RAM size:
From start screen, tap Settings | System | System Information to open Device
Information application. It opens retrieving the information about the mobile computer,
including device manufacturer, device ID, memory size, and firmware/software version.
RAM size will be listed among this info.
37
Page 48

CP60 Mobile Computer Reference Manual
System Information page
Tap to view information on
memory size
INTERNAL STORAGE
On Start screen, tap Settings | System | Memory . Memory screen opens showing
Main tabbed page. This page gives the information about the mobile computer’s use of RAM
and internal storage.
Main tabbed page delivers two labels – Storage and Program:
Storage - Internal memory for files storage, such as O.S., applications and the files
needed for applications.
Program - RAM usage for running applications.
Memory settings
Main tabbed page
Internal storage
RAM usage for running applications
38
Page 49
Chapter 1 Use Mobile Compute
r
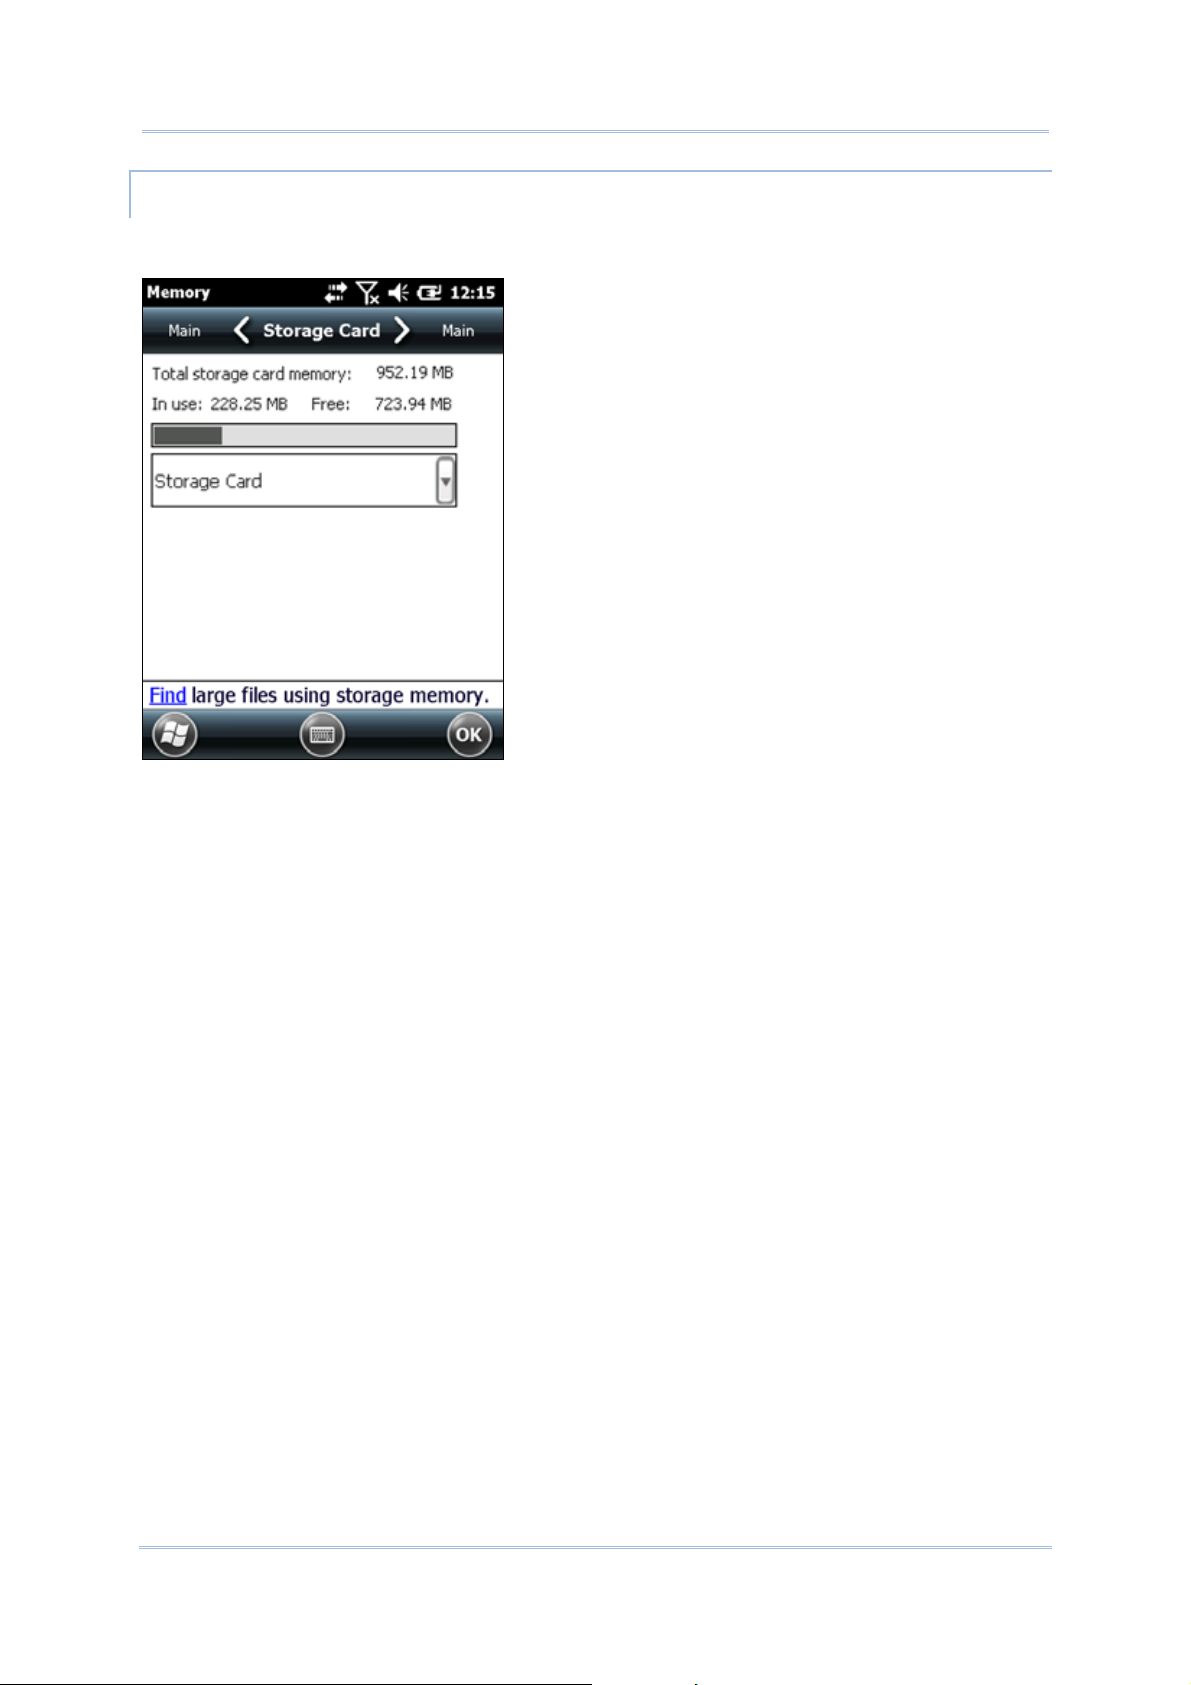
EXTERNAL STORAGE
When Memory screen opens, tap Storage Card tab. Storage Card tabbed page then
opens and shows the info about external storage (when a storage card is inserted).
39
Page 50

CP60 Mobile Computer Reference Manual
2.7.3. INSERT SD CARD
Day-to-day use of the mobile computer might cause the available internal storage to run
short. Equip the mobile computer with an external memory unit to expand storage capacity.
Follow the steps below to install a SD card:
1) Power off the mobile computer.
2) Place the mobile computer face-down on a flat and soft surface.
3) Remove the battery door and main battery pack as described in Main Battery Setup
Battery chamber is opened.
.
4) Locate the SD card socket inside battery chamber. (See Inside Battery Chamber
SD card socket is equipped with a hinged cover.
5) Push the hinged cover to the open
position.
6) The hinged cover unlocks.
7) Swivel up the cover.
8) Insert SD card into the cover slot in
the direction indicated . The
metal contact pins should face down
9) Put down the hinged cover and lock
it into place.
10) Restore main battery pack and the
battery door.
.) The
Figure 9: Inserting SD Card
40
Page 51
Chapter 1 Use Mobile Compute
r
2.8. DIRECT DATA CONNECTION
“Direct” data connection means “hardwired” data connection between the mobile computer
and a Windows-based PC as opposed to wireless connection. Direct data connection relies
on a RS-232 cable or a USB cable (sometimes plus an auxiliary cradle) between the two
mentioned devices. Once the mobile computer and PC are “directly” connected with each
other by a RS-232 or USB-cable, they can sync data with each other.
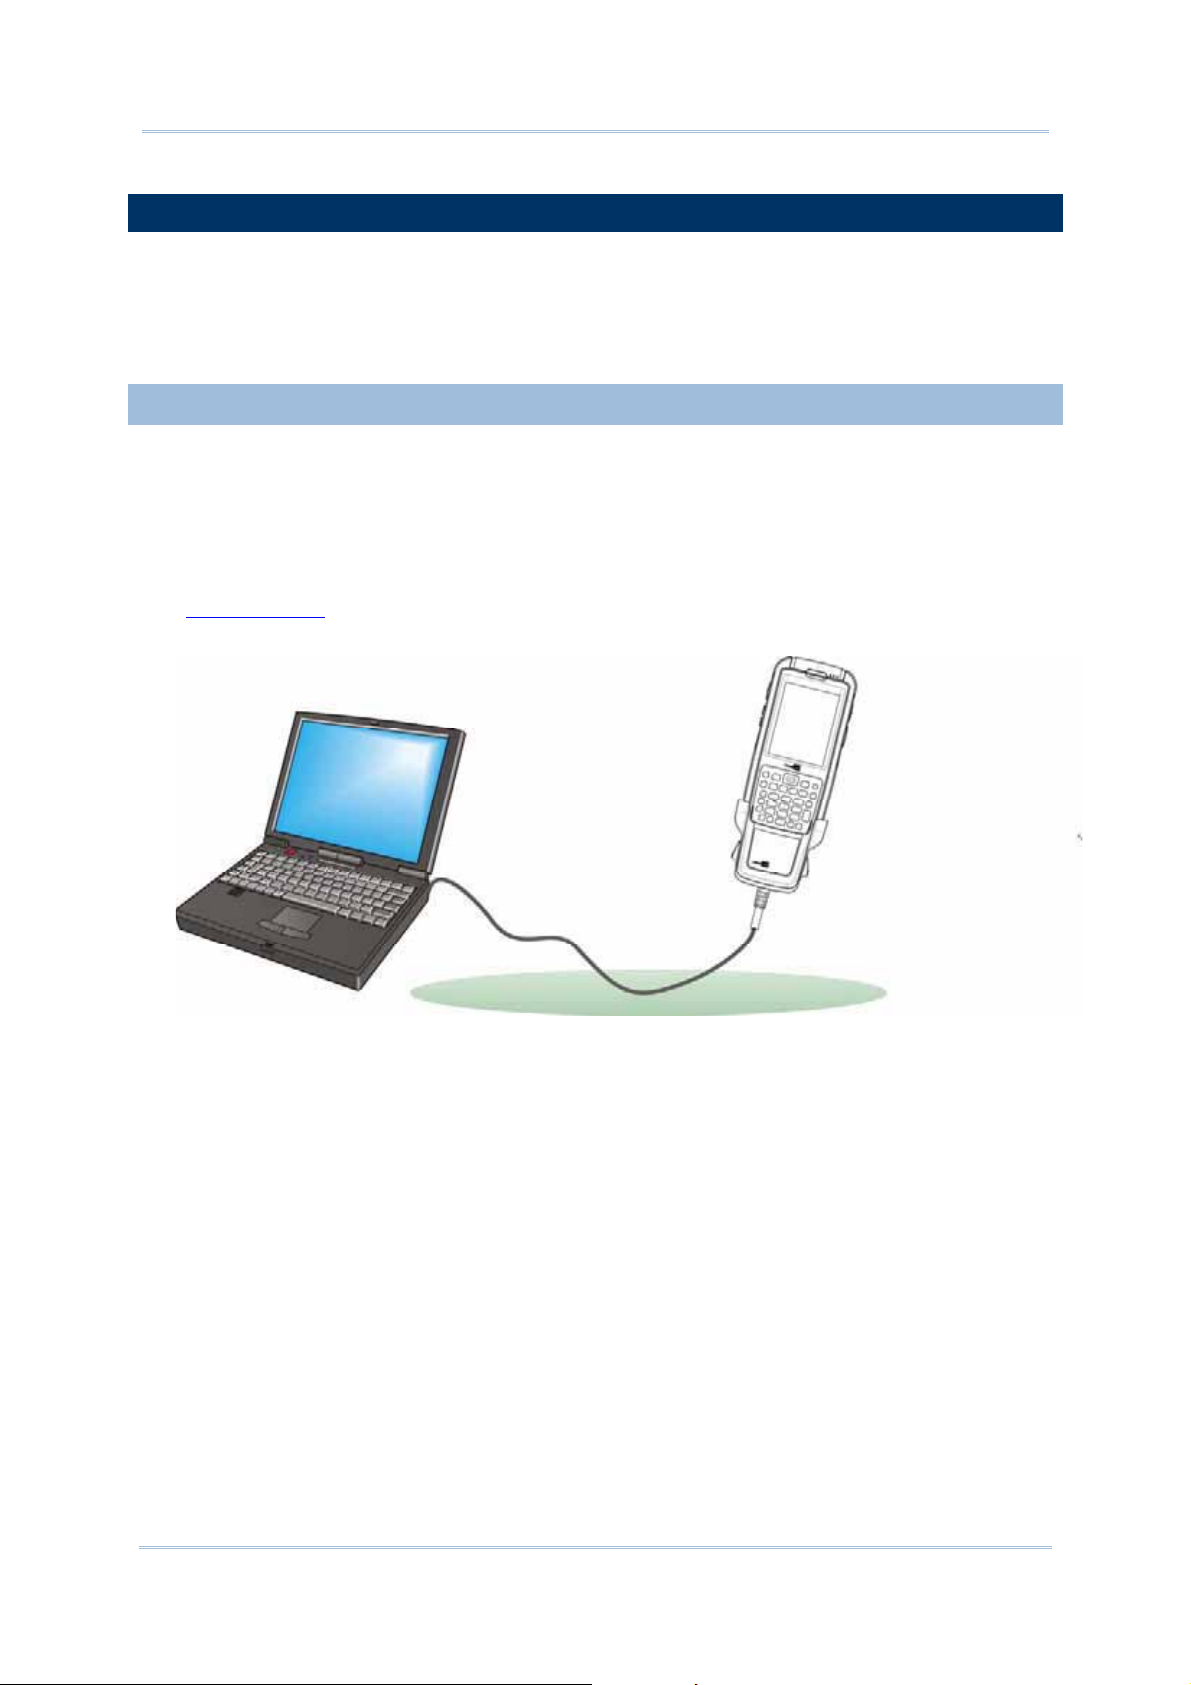
2.8.1. USE CABLE
Direct data connection using a cable:
1) Connect the mobile computer to your PC with a USB or RS-232 type Snap-on Charging
and Communication Cable. Fix the cable to both sides.
ActiveSync will automatically detect connection between the two and prompt for data
synchronization.
See Syncing Tools
Figure 10: Direct Data Connection Using Cable
and subsequent sections to know how to use ActiveSync.
41
Page 52

CP60 Mobile Computer Reference Manual
1.8.2. SYNCING TOOLS
Microsoft’s syncing tools enables users to update or back up the data on their handheld
computers to desktop computers.
Two syncing tools are featured by Microsoft - ActiveSync and Windows Mobile Device Center
(hereinafter “WMDC”). Which tool to use depends on which OS is running on your PC. See
the rule below:
O.S.
Windows Vista or Windows 7
Windows XP SP3 and earlier
ActiveSync and WMDC can be downloaded from Microsoft’s website. Download and install
the right one on your PC.
Hereafter in this manual, we will focus on ActiveSync only. For WMDC usage, see its
documentation or help file.
Syncing Program
WMDC
ActiveSync
1.8.3. SYNC PARTNERSHIP
Once a direct connection is established between the mobile computer and your PC as
described in Use Cable
Sync Partnership
Synchronization Relationship
or ᙑᎄ! ބլࠩᅃࠐᄭΖ, they are able to form the following ties:
Services
Allows the mobile computer and PC to sync Microsoft Office
Outlook data with each other.
Allows PC to add and remove programs to/from the mobile
computer.
Allows PC to browse files on the mobile computer.
Alllows PC to copy files to/from the mobile computer.
Allows PC to back up the files on the mobile computer.
Temporary Relationship
(Mobile computer works as a
“guest” to PC)
Allows PC to add and remove programs to/from the mobile
computer.
Allows PC to browse files on the mobile computer.
Allows PC to copy files to/from the mobile computer.
Allows PC to back up the files on the mobile computer.
Note that data stored on external storage (the SD card) cannot be synchronized.
See ActiveSync Actions to Take
that details each mentioned service.
1.8.4. 1ST USB SYNC
This section will guide you through USB syncing. For Bluetooth syncing, see Bluetooth
ActiveSync.
To connect ActiveSync using USB:
1) Download the right syncing tool as described in Syncing Tools
2) Connect the mobile computer and your PC as described in Use Cable
ᅃࠐᄭΖ.
42
and install it on your PC.
or ᙑᎄ! ބլࠩ
Page 53

Chapter 1 Use Mobile Compute
r
3) On your PC, run the syncing program.
ActiveSync should detect the mobile computer. Sync Setup Wizard launches and
prompts to set up “Sync Partnership
” between two computers
ActiveSync Sync
Setup Wizard
opens.
Press Next to set up
“Synchronization
Relationship”.
Press Cancel to create
“Temporary Relationship” by
which the mobile computer
works as a “guest” to the PC.
43
Page 54

CP60 Mobile Computer Reference Manual
4) Press Next button for “Synchronization Relationship”, or press Cancel button for
“Temporary Relationship” if you don't plan to connect to the PC on a regular basis.
If you have pressed Next, follow the onscreen instructions to go through the setup of
“Synchronization Relationship”. Once setup finishes, ActiveSync opens showing
“Synchronizing”. Two computers are synchronized.
Two computer are
synchronized
OR
If you have pressed Cancel, Microsoft ActiveSync opens showing “Guest” and
“Connected”. Two computers are connected.
The mobile computer
connected as a “guest” to the
PC.
44
Page 55

r
2.8.5. DISCONNECT USB ACTIVESYNC
To disconnect USB ActiveSync:
Chapter 1 Use Mobile Compute
1) On your PC, open ActiveSync by double-clicking its icon
ActiveSync opens.
2) From the menu bar, click File | Connection Settings.
[Connection Settings] window opens.
3) Deselect Allow USB connections.
4) Press the OK button to apply the change and quit setting.
This way when you plug your mobile computer the next time, it still gets charged but
ActiveSync won’t attempt to synchronize with it.
To disconnect Bluetooth syncing, see Disconnect Bluetooth ActiveSync
in the notification area.
.
45
Page 56

CP60 Mobile Computer Reference Manual
2.8.6. ACTIVESYNC ACTIONS TO TAKE
Once “Synchronization Relationship” or “Temporary Relationship” is established between
two computers, a variety of actions can be taken to enhance resource sharing between
them as previously mentioned in Sync Partnership
In summary, “Synchronization Relationship” outshines “Temporary Relationship” by being
capable of syncing Microsoft Office Outlook data. However “Temporary Relationship”
provides satisfactory file sharing if you don’t want to synchronize information.
See the following to know what actions to take with ActiveSync:
CHANGE MICROSOFT OFFICE OUTLOOK DATA TO SYNCHRONIZE
Note this is for “Synchronization Relationship” only.
In default state, “Synchronization Relationship” doesn’t synchronize all Microsoft Office
Outlook data but only a limited amount between two computers in order to save storage on
the mobile computer. You can change the amount of information to synchronize:
1) On your PC, from the menu bar of ActiveSync, select Tool | Options.
ActiveSync’s [Settings] window opens showing Options tabbed page.
.
2) Select an information type to synchronize, and deselect an information type to stop
synchronizing.
3) Press OK button to save the change and quit setting.
Note you can also change the information to synchronize on the mobile computer by
disconnecting ActiveSync first as mentioned in Disconnect USB ActiveSync
Bluetooth ActiveSync and then tap ActiveSync’s “Menu” command on Softkey bar and tap
Options.
46
or Disconnect
Page 57

Chapter 1 Use Mobile Compute
r
ADD/REMOVE PROGRAMS
Note basically the applications to be installed to the mobile computer need to be installed on
your PC first. So download the application programs to your PC first and install them on your
PC so they can be installed onto the mobile computer later.
Many application programs are installed in different ways. Read their installation guides or
documentation to know how they are installed. If you are installing an application that
cannot be installed on your PC first, try to install it right from the mobile computer, see
Download & Install Applications
To install an application on the mobile computer:
for more details.
1) Connect two computers as described in Use Cable
2) Sync two computers as described in 1st USB Sync
3) On the PC, from the menu bar of ActiveSync, select Tools | Add/Remove Programs.
ActiveSync starts to search for the application programs installed on your PC and opens
its [Add/Remove Programs] dialog which lists those found. Each entry comes with a
check box on the left. An unchecked box means the program is yet to install to the
mobile computer while a checked one means an installed program.
or ᙑᎄ! ބլࠩᅃࠐᄭΖ.
.
47
Page 58

CP60 Mobile Computer Reference Manual
4) Select the application program(s) to install to the mobile computer, and deselect the
application program(s) to uninstall from the mobile computer.
5) Hit the OK button.
ActiveSync proceeds to install programs and/or remove programs to/from the mobile
computer.
6) Follow the onscreen instructions on both your PC and the mobile computer to proceed.
Noteworthy facts:
Normally the application program(s) downloaded from external resources are installed
to the mobile computer’s directory at Mobile Device\Program Files. However
sometimes there are exceptions and it depends on the application.
You can uninstall application(s) right by the mobile computer rather than on the PC. See
Uninstall Applications
for more details.
If you would like to uninstall a program isn’t listedin the [Add/Remove Programs]
dialog, browse to it on the mobile computer using File Explorer
select Delete from the context menu that pops up.
ADD APPLICATION SHORTCUTS TO START SCREEN
ActiveSync features “Explore” to add an application shortcut to Start screen where it is
easier to launch the application.
. Tap & hold it, and
To add an application shortcut to Start screen:
1) Connect two computers as described in Use Cable
2) Sync two computers as described in 1st USB Sync
3) On the PC, from ActiveSync’s menu bar, select Tools | Explore Pocket PC, or from its
toolbar, press Explore
The mobile computer’s internal storage’s root directory “Mobile Device” opens
presenting a few folders (and files).
button.
or ᙑᎄ! ބլࠩᅃࠐᄭΖ.
.
48
Page 59

Chapter 1 Use Mobile Compute
r
4) Double-click My Windows Mobile-Based Device .
My Windows Mobile-Based Device opens.
5) Double-click Program Files.
Program Files folder opens. This is where the downloaded applications are normally
installed on the mobile computer’s local storage.
In the folder, each sub-folder stores an application.
6) Open the folder of the application to create shortcut for.
7) Find the executable file of that application. Right-click on it and select Copy from the
context menu that comes up.
The executable file is copied.
8) Browse to My Windows Mobile-Based Device\Windows\Start Menu\Programs.
Programs folder opens.
9) Right-click any vacant spot in the folder and select Paste shortcut from the context
menu that comes up.
A shortcut to the application is added to Start screen.
Note: You can also copy & paste by the sequence Create Shortcut -> Cut -> Paste.
You can also add an application shortcut to Start screen right by the mobile computer. See
Add Items to Start Screen
for more details.
ADD FILE SHORTCUTS TO START SCREEN
ActiveSync features “Explore” to add to Start screen a shortcut to some local file so it is
accessible more easily.
To add a file shortcut to Start screen:
1) Connect two computers as described in Use Cable
2) Sync two computers as described in 1st USB Sync
3) On the PC, from ActiveSync menu bar, select Tools | Explore Pocket PC, or from its
toolbar, press Explore
The mobile computer’s internal storage root directory “Mobile Device” opens
presenting a few folders.
4) Browser for the file to create shortcut for.
5) Right-click on the file and select Copy from the context menu that comes up.
6) Browse to My Windows Mobile-Based Device\Windows\Start Menu\Programs.
Programs folder opens.
button.
or ᙑᎄ! ބլࠩᅃࠐᄭΖ.
.
7) Right-click any vacant spot in the folder and select Paste shortcut from the context
menu that comes up.
A shortcut to the file is added to Start screen.
Note: You can also copy & paste by the sequence Create Shortcut -> Cut -> Paste.
49
Page 60

CP60 Mobile Computer Reference Manual
You can also add a file shortcut to Start screen right by the mobile computer. See Add Items
to Start Screen for more details.
REMOVE SHORTCUTS FROM START SCREEN
Note the inherent shortcuts aren’t removable. Only the added shortcuts are removable.
To remove an added shortcut from Start screen, simply use ActiveSync’s Explore
delete the shortcut from My Windows Mobile-Based Device\Windows\Start
Menu\Programs folder.
You can also remove an added shortcut from Start screen right by the mobile computer. See
Remove Items from Start Screen
for more details.
to
CREATE NEW FOLDERS
To create a new folder on the mobile computer:
1) Connect two computers as described in Use Cable
2) Sync two computers as described in 1st USB Sync.
On the PC, from ActiveSync menu bar, select Tools | Explore Pocket PC, or from its
toolbar, press Explore
The mobile computer’s internal storage root directory “Mobile Device” opens
presenting a few folders (and some files).
3) Browse where you want to create a folder.
4) Right-click any vacant spot there.
Context menu opens
5) Select New Folder.
A new folder is created.
button.
or ᙑᎄ! ބլࠩᅃࠐᄭΖ.
BACKUP DATA
To best protect your work, back up regularly the data on your mobile computer. Manually
back up using ActiveSync by either “Synchronization Relationship” or “Temporary
Relationship” with simple copy & paste to back up files to your PC.
USB PASS-THROUGH NETWORKING
ActiveSync supports “Pass-Through Networking” whereby the mobile computer networks
using your PC’s data connection.
For security, disable the network bridging on the PC, especially the bridging to a Remote
NDIS adapter. For more information on network bridging, see Windows Help on the PC.
After sync partnership is up between the mobile computer and your PC:
1) On your PC, from the menu bar of ActiveSync, select File | Connection Settings.
[Connection Settings] window opens.
2) For This computer is connected to, select a network which your PC should connect to
when passing through ActiveSync. Options are:
50
Page 61

r
Option Description
Automatic Auto-detects proxy
This option detects if a proxy should be used when passing connections
through the PC. If yes, configure the proxy on the mobile computer.
This option best suits connecting to a PC (laptop) that may be used at
home (with no proxy), as well as to a corporate network (with proxy).
Work Network Always uses proxy
This option assumes a proxy should be used when passing connections
through the PC, and uses whatever proxy is already configured on the
mobile computer.
This option best suits connecting to a PC that is always on corporate
network.
The Internet Never uses proxy
This option assumes no proxy is necessary when passing connections
through the PC.
This option best suits connecting to a PC connected directly to the
Internet through ISP (at home)
3) Select Open ActiveSync when my device connects.
4) Hit OK button to apply the change and quit setting.
Chapter 1 Use Mobile Compute
To pass-through network using Bluetooth, see Bluetooth Pass-through Networking
Also compare with USB Internet Sharing
.
.
51
Page 62

CP60 Mobile Computer Reference Manual
2.9. AUDIO PLAYBACK
Use a headset for audio playback and hands-free telephone communication. Bluetooth
headsets are supported to deliver better mobility. See Use Bluetooth
.
2.9.1. VOLUME CONTROL
The mobile computer has two volume control facilities – the physical volume rocker perched
on the waist of the mobile computer and the onscreen volume gauges featured by the O.S.
The physical rocker controls the system volume (media playback and event/notification
sounds).
When either the system volume or phone ringer volume is enabled, the O.S. shows an
icon on Title Bar; otherwise it shows an . See the table after the break for a summary.
Volume Control
Physical Volume Rocker Yes No Yes
Onscreen Volume Gauge Yes Yes Yes
Title bar Volume Icons
System volume
Yes Yes No
Ringer volume In-call volume
PHYSICAL VOLUME ROCKER
Use physical volume rocker to turn up and down system volume.
Turns up and down
system
Figure 11: Physical Volume Rocker
ONSCREEN VOLUME GAUGES
The onscreen volume gauges adjust all three of system, phone ringer. To adjust any of
them:
1) Tap Title bar at the top of the screen.
A horizontal drop-down bar opens.
2) Tap the volume icon
52
.
Page 63

Chapter 1 Use Mobile Compute
r
y
[Volume] dialog opens presenting the gauges for system volume and phone ringer
volume. Two radio buttons [On] and [Off] are featured on the right. Select [On] or [Off]
to enable or mute both volumes.
Onscreen volume facilit
Adjusts system volume
[On] and [Off] enables or
mutes both system and
phone ringer volumes
Manufactory reserve
3) Adjust to the setting that meets your needs.
53
Page 64

Chapter 3
CAMERA
The mobile computer is adorned with a 5.0 mega-pixel camera that can also serve as a
camcorder. The O.S. provides a camera/camcorder application, which launches the camera,
takes pictures, shoots videos and stores the works on the mobile computer’s storage where
they can be viewed, edited and output.
The camera/camcorder application provides users with satisfactory customization that is
helpful for users’ image capture for better documentation.
This chapter will guide you to use the camera.
2. IN THIS CHAPTER
2.1 Launch Camera ......................................................... 55
2.2 Take Pictures ............................................................ 56
2.3 Launch .................................................................... 59
2.4 Shoot Videos ............................................................. 59
2.5 Pictures & Videos ....................................................... 63
54
Page 65

CP60 Mobile Computer Reference Manual
2.1. LAUNCH CAMERA
To launch the camera:
1) On Start screen, tap Pictures and Videos
.
Pictures and Videos application opens.
2) Tap Camera icon located at the upper left of the window.
Camera opens in portrait mode and readies to take pictures.
2.1.1. CAMERA SCREEN
Camera opens showing subject area on the screen with related information displayed in the
lower right corner. A menu bar sitting on the bottom allows users to switch to thumbnail
display under Pictures & Videos, adjust camera settings, switch to video shooting mode,
exit the camera tool and more.
Camera tool under Pictures &
Videos
Focus area
Opens Pictures & Videos
Opens Start Screen
Menu bar
Opens/closes
onscreen keyboard
Shows the number of
pictures the system can store
Shows camera zoom size
Closes camera
Switches to Video mode or
accesses camera settings. See
Camera Settings
55
Page 66

CP60 Mobile Computer Reference Manual
2.2. TAKE PICTURES
By default, pictures are taken in JPEG format and are saved to the mobile computer’s
internal storage under My Device\My Documents\My Pictures. To change the default
storage path, see Camera Settings.
To take a picture:
9) Open camera as described in Launch Camera
.
Camera opens in portrait mode and readies to take pictures.
10) Adjust picture quality and any other settings according to your preferences. See Camera
Settings.
11) Frame your object on the screen.
12) Press the physical shutter button to take the picture. (See Overview
.)
After the picture is taken, a preview of it will appear briefly on the screen.
Preview of picture taken
Returns to camera screen
Opens camera settings or
switches to Video mode
2.2.1. CAMERA SETTINGS
The camera supports changing shooting mode, brightness, resolution, and camera zoom.
Users can also enable full screen shooting mode which leaves the screen clean of option
buttons and picture information.
To access camera settings:
13) Open camera as described in Launch Camera
14) Tap Menu command on the Softkey bar
A pop-up option menu appears onscreen showing various option settings.
Note: The Menu command and pop-up option menu are also available in the picture
preview screen.
.
56
Page 67

Chapter 3 Camera
Available menu items are detailed as below:
Item
Video Switch to video camera.
Mode Sets camera mode between normal, burst or timer.
Brightness Sets brightness between -3 EV to +3 EV in 1 EV increments.
Resolution The mobile computer supports QVGA resolution.
Zoom Sets zoom from 1x to 4x in 0.5x increments.
Full Screen Switches to full screen mode (all menu buttons will be hidden).
Options… Opens Pictures & Videos settings page showing four tabbed pages: Camera,
Description
Video, General, and Slide Show.
Camera tabbed page Video tabbed page
57
Page 68

CP60 Mobile Computer Reference Manual
General tabbed page
Slide Show tabbed page
58
Page 69

CP60 Mobile Computer Reference Manual
2.3. LAUNCH VIDEO CAMERA
To launch the video camera:
1) Launch camera as described in Launch Camera
.
2) Tap Menu command on the Softkey bar
A pop-up option menu appears onscreen showing various option settings.
15) Tap Video in the option menu.
Video camera is readied to begin shooting.
2.3.1. VIDEO CAMERA SCREEN
Video camera launches showing subject area onscreen with the remaining recording time
displayed in the lower right corner. A menu bar sitting on the bottom allows users to switch
to thumbnail display under Pictures & Videos, adjust camera settings, switch to picture
taking mode, exit the camera tool and more.
Video Camera tool under Pictures &
Videos
Opens Pictures & Videos
Opens Start Screen
Menu bar
Opens/closes
onscreen keyboard
Focus area
Time length for each video
recorded
Closes video camera
Switches to Camera mode or
accesses video settings. See
Camera Settings
59
Page 70

CP60 Mobile Computer Reference Manual
2.4. SHOOT VIDEOS
By default, videos are shot in WMV format and are saved to the mobile computer’s internal
storage under My Device\My Documents\My Pictures. To change the default storage
path, see Camera Settings.
To shoot a video:
1) Open video camera as described in Launch Camera
.
Video camera opens in portrait mode and readies to shoot.
16) Adjust brightness and other settings according to your preferences. See Camera
Settings.
17) Frame your object on the screen.
18) Press the physical shutter button. (See Overview
.)
The video then starts shooting, and two time meters located respectively on the lower
left and right will show the shooting time and the remaining time allowed for shooting
the video.
Note: Video shooting length can be adjusted in Video tabbed page under Pictures &
Video settings. See Camera Settings
for more details.
Shooting time
Stop shooting Pause shooting
Remaining time for the video
recorded
2.4.1. VIDEO CAMERA SETTINGS
The video camera supports changing brightness and quality. Users can also enable full
screen shooting mode which leaves the screen clean of option buttons and picture
information.
To access camera settings:
1) Open video camera as described in Launch Camera
60
.
Page 71

Chapter 3 Camera
2) Tap Menu command on the Softkey bar
A pop-up option menu appears onscreen showing various option settings.
Note: The Menu command and pop-up option menu are also available in the video
preview screen.
Available menu items are detailed as below:
61
Page 72

CP60 Mobile Computer Reference Manual
Item Description
Still Switch to camera.
Brightness Sets brightness between -3 EV to +3 EV in 1 EV increments.
Quality The mobile computer supports QVGA resolution.
Full Screen Switches to full screen mode (all menu buttons will be hidden).
Options… Opens Pictures & Videos settings page showing four tabbed pages: Video,
General, Slide Show and Camera.
Video tabbed page
General tabbed page
Slide Show tabbed page
Camera tabbed page
62
Page 73

Chapter 3 Camera
y
p
2.5. PICTURES & VIDEOS
Pictures & Videos is an application that views and edits the pictures taken and videos shoot,
or those copied or downloaded. It also sets background for Today Screen
and sets avatars for your contacts. It also emails pictures and videos.
LAUNCH PICTURES & VIDEOS
To launch Pictures & Videos:
and Start Screen,
1) On Start screen, tap Pictures & Videos icon
.
OR
Tap Thumbnails command on camera or camcorder menu bar if it is active at the
moment.
Pictures & Videos opens unfolding My Device\My Documents\My Pictures, the
default folder that stores the pictures and videos copied/downloaded from external
resources or took/shot on the mobile computer. Each picture and video therein displays
in thumbnail.
Pictures & Videos
The application opens
folder My Device\My
Documents\My
Pictures by default
Opens camera
Sorts files b
Browses for other files on the
mobile computer
Tap a picture to view it. Tap &
hold it to edit it, manage it or
take other actions to it.
Tap a video to play it. Tap &
hold it to edit it, manage it or
take other actions to it.
other orders
Minimizes the application
Opens application’s option
menu
O
ens onscreen keyboard
VIEW A PICTURE OR VIDEO
To view a picture or video:
1) Open Pictures & Video as described in Launch Pictures & Videos
Pictures & Videos opens.
2) Tap the thumbnail of the picture or video to view.
.
63
Page 74

CP60 Mobile Computer Reference Manual
The picture displays or the video starts to play onscreen.
TAKE OTHER ACTIONS TO A VIDEO OR A PICTURE
To edit, manage or take other actions to a video or picture:
1) Open Pictures & Video as described in Launch Pictures & Videos
Pictures & Videos opens.
2) Tap & hold the thumbnail of the picture or video to edit, manage or take other actions to.
A context menu comes up.
3) Tap a menu item to perform the desired action.
OR
1) Tap the thumbnail of the prospective picture or video.
It becomes selected with highlight.
Tap the command button that comes up on Softkey bar
.
.
64
Page 75

Chapter 3 Camera
<reserved>
65
Page 76

Chapter 3
OPERATING SYSTEM
The mobile computer is powered by Windows Embedded Handheld 6.5, a member of
Windows Embedded family branded for full compatibility with Windows Mobile 6.5.
Windows Embedded Handheld 6.5 features a prettier UI and a series of fresh new looks
unseen in the predecessor Windows CE. The most important enhancement of all is those
touch-friendlier UI elements such as the inertial scrolling of lists and redesigned context
menus. These elements are offered throughout the platform and are particularly helpful for
mobile computing. Users rely only on a few basic gestures such as Tap or Flick to navigate
within the O.S.
Windows Embedded Handheld 6.5 also features a Today Screen
other hand lays out application icons in a staggered manner to maximize the space
available to touch each icon and increase icons allowed onscreen.
This chapter goes through the basics of the O.S. and guides to Today Screen
Screen where all features on the mobile computer are accessible from.
. The Start Screen on ther
and Start
3. IN THIS CHAPTER
3.1 1st Startup ............................................................... 67
3.2 Today Screen ............................................................ 68
3.3 Start Screen ............................................................. 70
3.4 Suspend & Reset Mobile Computer ............................... 80
3.5 Set Screen Lock ......................................................... 83
3.6 Work with Menus ....................................................... 84
3.7 Manage Applications ................................................... 86
66
Page 77

CP60 Mobile Computer Reference Manual
3.1. 1ST STARTUP
Finished with the setup as described in Main Battery Setup and Insert SD Card, proceed to
power on the mobile computer as described in Power On Mobile Computer.
If you haven’t installed a SIM card, the mobile computer isn’t able to connect to mobile
networks for phone or data.
Upon first power-on, the O.S. boots into Today Screen
Windows Embedded Handheld 6.5:
, a new feature introduced by
Today screen
67
Page 78

Chapter 3 Operating System
y
phone boo
3.2. TODAY SCREEN
It is Today screen that first shows oncscreen when the mobile computer powers on or is
unlocked. Today screen shows a scrollable list of applications such as pictures, music,
phone, voicemail, clock & time and so on, and the application in the center is always the
active one.
When an application is active, today sceen displays additional information, and command
buttons appear on the Softkey bar
application to open it.
Toda
screen
Application label
to take actions to the application. Tap an active
Title bar
Scroll bar
Windows icon opens
Start screen
A command to open
Contacts application, the
mobile computer’s
k
Facility
Notification area
Description
Shows the mobile computer’s statues such as time, radio signal
strength, battery level and so on.
Softkey bar
A command that opens the
application selected onscreen.
Displays the notifications issued by O.S.
Scroll bar Scrolls up and down the screen to select among the applications.
Application label
Delivers application name.
Delivers application status when selected by scroll bar.
Opens the application when selected (by scroll bar) and tapped.
Softkey bar A horizontal rectangle bar presented at the bottom of almost every screen
within the O.S. It bares the commands to cause the currently active
application/screen to take actions.
Command Launch actions from the current screen or currently active application.
Commands are available in context with the application selected onscreen.
Windows icon
Opens Start screen.
68
Page 79

Chapter 3 Operating System
3.2.1. CUSTOMIZE TODAY SCREEN
Customize Today screen to change its appearance and presented items.
To customize Today screen:
1) Tap Windows icon
on Softkey bar or hit physical Windows key .
2) Tap Settings | Home.
Home settings open.
3) Select between Appearance and Items tabs.
Appearance tabbed page changes the background for Today screen while Items tabbed
page changes the items to present.
Home Settings
- Appearance tabbed page
Changes the background for Today screen
Home Settings
- Items tabbed page
Changes the items to present on Today screen
3.2.2. RETURN TO TODAY SCREEN
Tap the Home icon on the Start screen to re-open the today screen..
69
Page 80

CP60 Mobile Computer Reference Manual
3.3. START SCREEN
Start screen is where all features on the mobile computer are accessed from. This screen
lays out the application icons, shortcuts and so on in a staggered manner so each icon are
more touchy and icons allowed onscreen are increased.
Basic operations on Start screen:
If you see the icon of the application you want to open, tap it.
Flick the screen to scroll down and bring more application icons into view. (See also Use
Touchscreen
.)
Customize Start screen by changing background and the items to display. See
Customize Start Screen
Take a look around Start screen:
for more details.
Notification area
Title of current
screen or active
application
Start screen
Locks screen
Opens Start screen
Facility Description
Start screen Accesses all applications and settings.
Title bar
An application icon/shortcut
Minimizes current screen
Softkey bar
Notification area Shows the time, radio signal strength, battery status, and other
information. It also displays notification icons and status icons.
Minimize button
Windows icon
lock icon
Minimizes the active application or current screen.
Opens Start screen.
Locks screen.
70
Page 81

Chapter 3 Operating System
3.3.1. RETURN TO START SCREEN
Tap Windows icon on Softkey bar or hit physical Windows key to return to Start
screen.
3.3.2. TITLE BAR
At the top of almost every screen is Title bar. It shows a title on the left and a notification
area on the right. The title delivers the name of the current screen or currently active
application while notification area shows a sequence of graphic icons delivering system
statuses or notifications issued to users.
Title of current
screen or
currently active
application
Shows
notification/status
icons
Status icons assert mobile computer’s contiguous statues such as time, radio signal
strength, battery level and so on. Notification icons report the arrival of a new message,
alarm, and some ongoing events. When a notification is issued, an icon comes up in
notification area, and the mobile computer produces a sound or vibrates.
A general view of the status/notification icons on the mobile computer:
STATUS & NOTIFICATION ICONS
The O.S. presents the following icons for users. Note there may be application-particular
icons not included here.
External power connected
Battery level (See Monitor Battery Level for details.)
Numeric keypad enters symbols;QWERTY keypad enters uppercase letters.
Numeric keypad enters alphabetic letters; QWERTY keypad enters numbers/symbols.
System sound or phone ringer enabled
System sound or phone ringer muted
Vibration on
No SIM card installed
Phone off
SIM card locked. PIN code required to turn on phone.
Phone on with signal strength
Mobile data (HSPA+/EDGE/GPRS) in use
Wi-Fi on but not connected
71
Page 82

CP60 Mobile Computer Reference Manual
WiFi network(s) available
WiFi in use
Bluetooth in use
Bluetooth headset in use
Alarm on
More notifications to be viewed. Tap Title bar or tap the “Notification” command on Softkey
bar to view them all.
Email received
Text message received
Syncing data with a Windows-based PC
Roaming
Microsoft’s appeal for customer feedback to help improve Windows Embedded Handheld
software.
To learn more status icons of mobile/wireless data connections, see Radios.
72
Page 83

Chapter 3 Operating System
3.3.3. MANAGE NOTIFICATIONS
Status/notification icons are relatively small, however by tapping the Title bar a drop-down
bar will appear to provide larger and touchy icons.
Tap Title bar to open a
drop-down bar.
Drop-down bar opens.
Checks what the
O.S. notifies of.
Note there are commands that come up on Softkey bar to manage a notification.
A general view of bigger notification/status icons on Drop-down bar:
Icon
Description
Zooms in/out of current screen.
Leads to Wireless Manager and Connections (Manager) where your current
mobile data can be viewed and configured.
This icon signifies Wi-Fi network(s) are available. Tap it to show available Wi-Fi hotspots
and opens Wireless Manager
Delivers current system/ringer volume and opens volume settings. See Onscreen
Volume Gauges for more details.
Opens power settings where battery level and charging status can be viewed. See More
Charge Info.
to connect.
Opens clock settings.
Reports customer feedback to Microsoft for improving Windows Embedded Handheld
software.
Opens the reminder for an alarm or appointment.
73
Page 84

CP60 Mobile Computer Reference Manual
Bluetooth A2DP profile in use. Tap it to access Bluetooth devices list.
Checks a new e-mail.
Opens Text application.
Roaming on
RESPOND TO NOTIFICATIONS
1) Tap Title bar to open Drop-down bar.
Drop-down bar opens.
2) Tap the status/notification icon to manage.
Drop-down bar closes and you are taken to the application in question.
CLEAR NOTIFICATIONS
A notification won’t be cleared until it is managed. Upon receiving a notification, tap Title
bar to open Drop-down bar to manage it, or tap the action command which appears on the
Softkey bar
.
74
Page 85

Chapter 3 Operating System
3.3.4. CUSTOMIZE START SCREEN
Customize Start screen by changing the background, application shortcuts, and so on.
Rearrange the application shortcuts to make the applications that you use most often
easiest to access.
CHANGE BACKGROUND
Craft your Start screen and Today screen with any of your own pictures or a number of
designer’s themes bundled with the O.S.
APPLY ONE OF YOUR OWN PICTURES:
1) On Start screen, tap Pictures & Videosʳ .
Pictures & Videos opens.
2) Tap a picture. The picture opens. Tap the “Menu” command on Softkey bar
OR
Tap & hold a picture.
Context menu shows up directly.
3) Tap Set as Home background.
The picture is set as background
.
APPLY ONE OF THE DESIGNER’S THEMES:
1) On Start screen, tab Settings | Home.
Appearance tabbed page opens.
2) Tab a theme from the list.
3) Tap the “OK” command on Softkey bar
Change is applied to Today & Start screens.
.
MOVE APPLICATION SHORTCUTS ON START SCREEN
On Start screen, you can re-tile the application shortcuts (icons) as you like. For example,
move your favorite applications atop others:
1) Tap & hold an application icon until it is hoisted by a white border.
2) Drag the application icon and do not release until it reaches the desired position.
ADD ITEMS TO START SCREEN
A variety of shortcuts can be added to Start screen to quick-open some files or bookmarked
webpages or applications.
The mobile computer relies on File Explorer
add application shortcuts to Start screen:
, one of the O.S. featured applications, to
ADD APPLICATION SHORTCUTS
1) On Start menu, tap File Explorer .
File Explorer opens.
2) Browse to the executable file of the application to add shortcut for.
75
Page 86

CP60 Mobile Computer Reference Manual
3) Tap & hold the executable file.
A context menu comes up.
4) Tap Copy.
5) Browse to My Device\Windows\Start Menu\Programs.
Programs folder opens.
6) Tap & hold any vacant spot onscreen.
Context menu comes up
7) Tap Paste Shortcut.
The application shortcut is added to Start screen.
ADD BOOKMARKED WEBPAGE SHORTCUTS
1) On Start screen, tap File Explorer .
File Explorer opens.
2) Browse to My Device\Windows\Favorites.
3) Tap & hold the bookmark to create shortcut for.
Context menu comes up.
4) Tap Copy.
5) Browse to My Device\Windows\Start Menu\Programs.
Programs folder opens.
6) Tap & hold any vacant spot onscreen.
Context menu comes up
7) Tap Paste Shortcut.
Shortcut to the bookmarked page is added to Start screen.
ADD FILE SHORTCUTS
1) On Start screen, tap File Explorer .
File Explorer opens.
2) Browse to the file to create shortcut for.
3) Tap & hold it.
Context menu comes up.
4) Tap Copy
5) Browse to My Device\Windows\Start Menu\Programs.
Programs folder opens.
6) Tap & hold any vacant spot onscreen.
Context menu comes up.
7) Tap Paste Shortcut.
Shortcut to the file is added to Start screen.
76
Page 87

Chapter 3 Operating System
REMOVE ITEMS FROM START SCREEN
The mobile computer relies on File Explorer to remove an application shortcut from
Start screen:
1) On Start screen, tap File Explorer
File Explorer opens.
2) Browse to My Device\Windows\StartMenu\Programs.
Programs folder opens. This is where all applications/bookmarks/file shortcuts are.
3) Tap & hold the shortcut to remove.
Context menu comes up.
4) Tap Delete.
The shortcut is removed from Start screen.
.
77
Page 88

CP60 Mobile Computer Reference Manual
3.3.5. START SCREEN ICONS
Start screen presents a number of icons in a staggered pattern that makes them easily
touchable. Each icon opens an application, folder or a group of settings when it is tapped.
This section will give an overview of these icons.
Icon
Name Description
Home (Today) Opens Today screen. See Today Screen
Text Sends SMS text messages.
E-mail Pens and sends emails.
Contacts Integrates all types of contacts including phone contacts, email
contacts, instant messenger contacts and so on. This application is
similar to the phone book on a cell phone.
Internet Explorer Browses world wide web.
Calendar Creates and manages events, meetings, and appointments.
Settings Accesses system settings.
.
Getting Started Opens Getting Started application to set up some O.S. basic features.
Alarms Opens Clock & Alarms application to:
Set date, time, time zone for your locale.
Set and manage alarms.
Pictures & Videos Views pictures and plays videos downloaded, copied or taken/shot
with the built-in camera. See Pictures & Videos
Internet Sharing Shares the mobile computer’s mobile data connection with another
computer through a USB or serial cable. See USB Internet Sharing
Bluetooth Internet Sharing
Search Phone Searches contacts, files and other data on the mobile computer.
Office Mobile
2000
Opens Microsoft Office suite applications including Excel Mobile,
SharePoint WorkSpace Mobile, OneNote Mobile, Word Mobile, and
PowerPoint Mobile.
for details.
.
&
78
Page 89

Chapter 3 Operating System
Camera Takes pictures and shoots videos. See Camera
for details.
Windows Media Plays audio/video files.
Marketplace An online software download/purchase service which was shut down
on 22
nd
May 2012.
MSN Weather Checks the weather of your locale and other parts of the world.
Windows Live Accesses Windows Live services (such as Hotmail) or searches world
wide web.
MSN Money Checks stocks.
Calculator Performs mathematical calculations.
Notes Creates notes by typing on the physical keypad or text entering on the
onscreen keypad.
Tasks Creates, tracks, and manages tasks.
File Explorer Browses and manages the files on local storage.
ActiveSync Synchronizes Microsoft Office Outlook data between the mobile
computer and another Windows-based computer such as your PC. See
Syncing Tool
and subsequent sections for more details
Task Manager Monitors the active applications and CPU/memory usage on the mobile
computer. See Task Manager
.
Help Accesses O.S. online help.
Remote Desktop
Connects to a remote computer.
Mobile
SimTkUI Accesses the WAP/XML services provided by your mobile carrier.
79
Page 90

CP60 Mobile Computer Reference Manual
3.4. SUSPEND & RESET MOBILE COMPUTER
To save from repeatedly charging and replacing batteries more often than you would like to,
suspend the mobile computer when you are not actively using it. “Suspension” is a state to
hold the device from running without turning off power. It is a “soft-off” state whicih
enables less power consumption, and also a state from which a device can quickly awake
from since there is no need to restart the software (applications).
3.4.1. SUSPEND MOBILE COMPUTER
The mobile computer is suspensible both manually and automatically. See also Wake up
Mobile Computer.
MANUAL SUSPENSION
Press physical Power button without holding it to suspend the mobile computer.
AUTO-SUSPENSION
Set up a power plan to suspend the mobile computer in an apt timing.
To set up a power plan:
1) On Start screen, tap Settings | Systems | Power
Power setting opens showing Battery tabbed page.
2) Tap Advanced tab.
Advanced tabbed page opens.
Power’s Advanced tabbed page
.
3) Set a time to turn off LCD and suspend the mobile computer.
80
Page 91

Note the following cases also suspend the mobile computer:
Battery door isn’t in place.
Battery fails.
Chapter 3 Operating System
To get the most from the battery power, see Optimize Battery Life
.
3.4.2. WAKE UP MOBILE COMPUTER
“Waking up” is to restore the suspended device to its previous working state. The mobile
computer can be awoken both manually and automatically.
MANUAL AWAKENING
Press (without holding) the physical Power button or central scan key to wake up the mobile
computer.
AUTO-AWAKING
The mobile computer wakes up by itself when either of the following happens:
Plugging of USB or serial cable.
Plugging of AC power cord.
WWAN ringing signal occurs.
RTC alarm occurs.
Note: There are certain cases when the mobile computer cannot be awoken:
(1) When battery door isn’t installed in place.
(2) Imperfect contact between main battery and battery chamber contact pins.
3.4.3. RESET MOBILE COMPUTER
The mobile computer features 2 reset mechanisms, warm boot and cold boot. Performing
these two resetting acts helps resolve certain problems within the O.S. and applications.
Make use of the physical Power button and the reset toggle located on the mobile
computer’s keypad to produce the said actions.
81
Page 92

CP60 Mobile Computer Reference Manual
[1] Power button
[2] Reset toggle
Figure 12: Reset
WARM BOOT (SOFT RESET)
“Warm boot” is also known as “soft reset”. When the mobile computer runs slower than
normal or when one or more active applications crash, perform warm boot to close all active
applications and restart the mobile computer without turning off power supply to hardware.
After warm boot, all flash memory, system settings and clock/calendar time are kept, and
all saved data are preserved. However unsaved data is gone after warm boot if the warm
boot is performed when the application in question is still running.
To perform “warm boot”:
Poke the reset toggle using the stylus.
COLD BOOT (HARD RESET)
“Cold boot” is also known as “hard reset”. In case one or more applications are misbehaving
and the mobile computer doesn’t cooperate, perform cold boot as the final act.
“Cold boot” restarts the mobile computer by turning power off just like pulling the battery
and then powering on again. As “Cold boot” initializes DRAM, all data cached in DRAM is
gone after cold boot. However all flash memory, system settings and clock/calendar time
are preserved.
To perform “cold boot”:
Press and hold the physical Power button and poke the reset toggle.
Note Power button should be held down and not released until the mobile computer
powers on again.
OR
Simply reload main battery and re-power on the mobile computer.
82
Page 93

Chapter 3 Operating System
3.5. SET SCREEN LOCK
For the sake of security, you may want to restrict the access to the mobile computer by a
self-set password. The O.S. supports setting up a password to recover the access to the
mobile computer.
To set up an unlock password:
1) On Start screen, tap Settings | Lock.
Password setting opens.
2) Configure how much time the mobile computer should be left unused before locking out
the screen. Set up a unique password to unlock the screen.
3) Tap the “OK” command on Softkey bar to apply the change and quit setting.
3.5.1. UNLOCK SCREEN
Once a screen lock is set, the screen locks out all access after the mobile computer is left
idled for the defined time. To recover access to the mobile computer:
1) On the locked screen, tap and drag the lock icon
An onscreen keypad appears resembling an average phone keypad.
2) Enter either the password that unlocks the screen or an emergency call number.
to the right or left.
Enter the password to unlock screen. If an emergency call number is entered, the
buttons to place and end calls display.
3) Follow onscreen instructions to proceed.
83
Page 94

CP60 Mobile Computer Reference Manual
3.6. WORK WITH MENUS
The O.S. presents two kinds of menus: option menus and context menus. By these menus,
users are able to operate onscreen and use applications.
3.6.1. OPTION MENUS
Normally a screen or an active application features a “Menu” command on Softkey bar
to launch an “option menu”, which causes actions to be taken by the screen or the active
application. Examples:
Internet Explorer features a menu bar
along the bottom that includes a “Menu”
command to open a option menu.
E-mail application features two
commands on Softkey bar
command to produce actions taken by
the application.
. Tap a
84
Page 95

Note some screens/applications may not have an option menu.
A screen that doesn’t feature
a “Menu” command on
Softkey bar
An example of Start screen.
.
Chapter 3 Operating System
3.6.2. CONTEXT MENUS
The context menu on the other hand contains the actions to be performed on a specific item
selected onscreen. Tap & hold an onscreen item to open the context menu.
Not all items have context menus. Nothing happens if you tap and hold such an item.
A context menu launches for a
selected item.
An example of Notes application.
85
Page 96

CP60 Mobile Computer Reference Manual
3.7. MANAGE APPLICATIONS
On Windows Embedded Handheld 6.5, Start screen is where all inherent applications of the
O.S. are accessed from.
In the O.S., when you run an application, the other applications that have been running
don’t shut down but keep on running whether it is music that is being played or a webpage
that is being browsed.
Start screen
Application shortcuts
3.7.1. TASK MANAGER
The O.S. featured Task Manager is a tool to monitor the memory and CPU resources
consumed by each running application and cached process. Task Manager also provides an
interface for users to close applications and switch between the opened applications.
LAUNCH TASK MANAGER
To launch Task Manager:
1) On Start screen, tap Task Manager icon
Task Manager opens showing monitored applications.
.
86
Page 97

Chapter 3 Operating System
MONITOR OPENED APPLICATIONS
Upon launch, Task Manager shows a list of all opened applications which are under monitor:
Delivers the application’s
Task Manager screen
“Application” shows a
list of opened
applications which are
being monitored
Closes the application
selected onscreen
memory usage. Tap to
ascend/descend the
entries
Deliver the application’s
CPU usage. Tap to
ascend/descend the
entries
Opens Task Manager’s
option menu
To monitor cached processes, see Monitor Cached Processes.
CLOSE APPLICATIONS
Close an application when it isn’t used, or when it is misbehaving. Check for any
misbehaving applications by looking up its usage of memory and CPU.
In the O.S., how to close an application varies. Some applications have inherent facilities to
close themselves such as a GUI button or a menu command while others don’t. When it is
the latter case, Task Manager closes them for you.
To close an application by Task Manager:
1) Launch Task Manager as described in Launch Task Manager.
Task Manager opens monitoring opened applications.
2) Tap & hold the application to close. From the context menu that comes up, tap End
Task.
OR
Tap the application to close. The application is then highlighted onscreen. Tap the “End
Task” command on Softkey bar
.
87
Page 98

CP60 Mobile Computer Reference Manual
Task Manager monitors opened applications
Tap & hold an entry to pop up the context
menu.
Context menu opens.
SWITCH TO ANOTHER OPENED APPLICATION
To switch to another opened application:
1) Launch Task Manager as described in Launch Task Manager.
Task Manager opens monitoring opened applications.
2) Tap & hold the application to switch to.
Context menu shows up.
3) Tap Switch to.
The desired application opens onscreen.
MONITOR CACHED PROCESSES
Task Manager also monitors how much RAM and CPU is being consumed by a cached
processes.
To monitor cached processes:
1) Launch Task Manager as described in Launch Task Manager
Task Manager opens monitoring opened applications.
2) Tap the “Menu” command on Softkey bar
.
Option menu opens.
.
3) Tap View | Processes.
88
Page 99

Task Manager shifts to monitor processes.
Task Manager
monitors cached
processes.
Chapter 3 Operating System
Note: Stopping an application or process or service may interrupt one or more dependant
functions on the mobile computer. You may need to restart the mobile computer to recover
full functionality.
DOWNLOAD & INSTALL APPLICATIONS
A rich resource of applications is downloadable from the Internet to run on the O.S. The
executable files for installing on Windows Embedded Handheld 6.5 devices are named with
the suffix “.cab”, short for “cabinet”. Download a “.cab” file that supports Windows
Embedded Handheld 6.5.
Warning: To protect your mobile computer and personal data, always download
applications from trusted sources.
As mentioned in Add/Remove Programs, you can download and install an application on
your PC first and offload it to the mobile computer later using Microsoft’s ActiveSync.
Alternatively, the O.S. allows you to download and install an application right from the
mobile computer.
To download an application, the mobile computer needs to connect to Internet first. See
Radios
connections for the mobile computer.
After download finishes, use File Explorer
local storage. Tap the program file to run the installation.
or USB Pass-through Networking or Bluetooth Pass-through Networking to get data
to browse to the application program in the
89
Page 100

CP60 Mobile Computer Reference Manual
This screenshot shows downloading an
application program on the mobile
computer. When asked to confirm the
download, tap the “Yes” command on
Softkey bar
.
Download starts and proceeds.
If an SD card is equipped, you’re asked
where to install the application; or this
screen won’t show and the application is
straight installed to internal storage.
90
Installation progresses.
 Loading...