

Page 1
Windows Mobil e 6 . 5 Computer
CP30
Version 1.16
Page 2

Copyright © 2012 CIPHERLAB CO., LTD.
All rights reserved
The software is provided under a license agreement containing restrictions on use and
disclosure and is also protected by copyright law. Reverse engineering of the software is
prohibited.
Due to continued product development this information may change without notice. The
information and intellectual property contained herein is confidential between CIPHERLAB
and the client and remains the exclusive prop erty of CIPHERLAB CO., L TD. If you find
any problems in the documentation, please report them to us in writing. CIPHERLAB
does not warrant that this document is error-free.
No part of this publication may be reproduced, stored in a retrieval system, or
transmitted in any form or by any means, electronic, mechanical, photocopying,
recording or otherwise without the prior written permission of CIPHERLAB CO., LTD.
For product consultancy and technical support, please contact your local sales
representative. Also, you may visit our web site for more information.
The CipherLab logo is a registered trademark of CIPHERLAB CO., LTD.
All brand, product and service, and trademark names are the property of their registered
owners.
The editorial use of these names is for identification as well as to the benefit of the
owners, with no i nt e nt i o n of i nf ringement.
CIPHERLAB CO., LTD.
Website: http://www.cipherlab.com
Page 3

FOR USA
FOR CANADA
IMPORTANT NOTICES
This equipment has been tested and found to comply with the limits for a Class B digital
device, pursuant to Part 15 of the FCC Rules. These limits are designed to provide
reasonable protection against harmful interference in a residential installation. This
equipment generates, uses and can radiate radio frequency energy and, if not inst alled
and used in accordance with the instructions, may cause harmf ul interference to radio
communications. However, there is no guarantee that interference will not occur in a
particular installation. If this equipment does cause harmful interference to radio or
television r eception, which can be determined by turning the equipment off a nd on, the
user is encouraged to try to correct the interference by one or more of the following
measures:
Reorient or relocate the receiving antenna.
Increase the separation between the equipment and receiver.
Connect the equipment into an outlet on a circuit different from that to which the
receiver is connected.
Consult the dealer or an experienced radio/TV technician for help.
This device complies with Part 15 of the FCC Rules. Operation is subject to the following
two conditions: (1) This device may not cause harmful interference, and (2) this device
must accept any interference received, including interference that may cause undesired
operation.
This digital apparatus does not exceed the Class B limits for radio noise emissions from
digital apparatus as set out in the interference-causing equipment standard entitled
"Digital Apparatus," ICES-003 of Industry Canada.
This device complies with Part 15 of the FCC Rules. Operation is subject to the following
two conditions: (1) This device may not cause harmful interference, and (2) this device
must accept any interference received, including interference that may cause undesired
operation.
Cet appareil numerique respecte les limites de bruits radioelectriques applicables aux
appareils numeriques de Classe B prescrites dans la norme sur le material brouilleur:
"Appareils Numeriques," NMB-003 edictee par l'Industrie.
Page 4

FOR PRODUCT WITH LASER
SPECIFIC ABSORPTION RATE (SAR) INFORMATION
SAFETY PRECAUTIONS
CARE & MAINTENANCE
CAUTION
This laser component emits FDA / IEC Class 2 laser ligh t at the exit port. Do not
stare into beam.
This mobile computer model CP30 has been designed to comply with applicable safety
requirements for exposure to radio waves. These requirements are based on scientific
guidelines that include safety margins designed to assure the safety of all persons,
regardless of age and health. The radio wave exposure guidelines employ a unit of
measurement known as the Specific Absorption Rate, or SAR. Tests for SAR are
conducted using standardized methods with the CP30 transmitting at its highest certified
power level in all used frequency bands. While there may be differences between the SAR
levels of various models, they are all designed to meet the relevant guidelines for
exposure to radio waves. SAR data information for residents in countries that have
adopted the SAR limit recommended by the International Commission of Non-Ionizing
Radiation Protection (ICNIRP), which is 2 W/kg averaged over ten (10) gram of tissue
(for example Eur op e a n U ni o n ) :
The highest SAR value for this model when tested by CIPHERLAB for use at the body
position is 1.02 W/kg (10g).
RISK OF EXPLOSION IF BATTERY IS REPLACED BY AN INCORRECT TYPE.
DISPOSE OF USED BATTERIES ACCORDING TO THE INSTRUCTIONS.
The use of any batteries or charging devices, which are not originally sold or
manufactured by CipherLab, will void your warranty and may cause damage to
human body or the product itself.
DO NOT disassemble, incinerate or short circuit the battery.
DO NOT expose the scanner or the battery to any flammable sources.
For green-environment issue, it's important that batteries should be recycled in a
proper way.
Und e r no ci r c um st ances, internal components are self-serviceable.
The charging and communication cradle uses an AC power adaptor. A socket outlet
shall be installed near the equipment and shall be easily accessible. Make sure there
is stable power supply for the mobile computer or its peripherals to operate properly.
This mobile computer is intended for industrial use. The mobile computer is rated IP
42, however, it may do damage to the mobile computer when being exposed to
extreme temperatures or soaked wet.
When the body of the mobile computer gets dirty, use a clean and wet cloth to wipe
off the dust. DO NOT use/mix any bleach or cleaner. Always keep the LCD dry.
Page 5

For a li quid crystal display (LC D) or touch screen, use a clean, non-abrasive, lint-free
cloth to wipe dust off the screen. DO NOT use any pointed or sharp object to move
against the surface.
If you want to put away the mobile computer for a period of time, download the
collected data to a host computer, and then take out the battery pack. Store the
mobile computer and battery pack separately.
If you shall find the mobile computer malfunctioning, write down the specific scenario
and consult your local sales representative.
Page 6

DECLARATION OF CONFORMITY
EN 301 489-1 V1.8.1 2008-04
EN 301 489-3 V1.4.1 2002-08
EN 301 489-7 V1.3.1 2005-11
EN 301 489-17 V2.1.1 2009-05
EN 301 489-24 V1.4.1 2007-09
EN 300 328 V1.7.1:2006
EN 301 511 V9.0.2
EN 62311:2008
EN 301 908-1 V4.2.1
EN 301 908-2 V4.2.1
EN 55022:2006+A1:2007
EN 50360:2001
格式化:
Manufacturer European information
CIPHERLAB Co., Ltd. CipherLab GmbH
12F., 333, Dunhua S. Rd., Sec. 2 Willicher Damm 145
Taipei, Taiwan 106, R.O.C. 41066 Mönchengladbach, Germany
TEL: +886 2 8647 1166
http://www.cipherlab.com
TEL : +49 2161 56230
http://www.cipherlab.de
Type of Equipment
Mobile Computer
Model(s) Declared
CP30
Initial Year of Manufacture 2011
Reference to the specification under which conformity is declared in accordance with
Directive- 2004/108/EC, 95/5/EC
EN 300 440-1 V1.6.1:2010 EN 300 440-2 V1.4.1:2010
The manufacturer also declares the conformity of above mentioned product with the
actual required safety standards in accordance with Directive 2006/95/EC
EN 60950-1:2006+A11:2009
Safety for information technology equi p ment including electrical business equipment
I the undersigned, hereby declare that the equipment specified above conforms to the above Directive(s) and
Standard(s).
Manufactory Representative:
Signature
Full Name Kan Chen
Title Engineer
項目符號及編號
Page 7

Version
Date
Notes
1.16 Jul 22, 2015
update registry
Full/partial restore
: Easy Cloning, path for saving registry files,
RELEASE NOTES
1.15 Dec 4, 2012
1.12 Jan 02, 2012
1.11 Nov 08, 2011
1.10 Oct 12, 2011
1.00 Aug 10, 2011
Delete descriptio n r elating to CD
Add Related Documentation to Introduction
Update Declaratio n of Conformity, copyright year
Add Specific Absorption Rate (SAR) informatio n
Add: 1.1.1 Warning for low battery level
Delete 4.2 WLAN Configuration
Modified 9.1: Full restore operation, Warning for
backup file, Preparing for backup, Update
descriptions and screenshot
Delete 9.1
automatic/manual restore
Modified 9.2: Button assignment key function description
Delete: Remove OS update.
Delete: Remove HSUPA Spec.
Modified: Update BT chapter, working time
Delete: Remove Com Port Mapping, WAPI icon and car charger
New: Add battery lock and Multiple adaptor information
Initial release
Page 8

Page 9

CONTENTS
IMPORTANT NOTICES..................................................................................................................... - 3 -
RELEASE NOTES ............................................................................................................................ - 7 -
INTRODUCTION ................................................................................................................................. 1
QUICK START .................................................................................................................................... 5
USING THE CP30 MOBILE COMPUTER ........................................................................................... 15
For USA .......................................................................................................................................... - 3 -
For Canada .................................................................................................................................... - 3 -
For Product with Laser .................................................................................................................. - 4 -
Safety Precautions ........................................................................................................................ - 4 -
Care & Maintenance ..................................................................................................................... - 4 -
Features ............................................................................................................................................. 2
Inside the Package ............................................................................................................................ 3
Accessories ........................................................................................................................................ 3
Overview ............................................................................................................................................. 5
Installing Battery .......................................................................................................................... 6
Inserting SIM Card ........................................................................................................................ 7
Using Memory Card ...................................................................................................................... 8
Connecting Headset ..................................................................................................................... 8
Charging & Communications ............................................................................................................ 9
Using Wireless Networks ........................................................................................................... 10
Using Cable ................................................................................................................................. 10
Using Cradle ............................................................................................................................... 11
1.1 Battery ....................................................................................................................................... 15
1.1.1 Battery Status Indications ............................................................................................... 16
1.1.2 Power Management ......................................................................................................... 17
1.2 Memory ..................................................................................................................................... 18
1.2.1 Caution of Data Loss ........................................................................................................ 18
1.2.2 Check Storage Space ....................................................................................................... 18
1.3 Keypad ...................................................................................................................................... 19
1.3.1 Keypad Settings ............................................................................................................... 20
1.3.2 Alpha Key .......................................................................................................................... 21
1.3.3 Shift Key ............................................................................................................................ 21
1.3.4 Function Key ..................................................................................................................... 22
1.3.5 Programmable Keys ......................................................................................................... 22
1.4 Touch Screen ............................................................................................................................ 23
1.4.1 Adjust the LCD Backlight ................................................................................................. 23
1.4.2 Screen Settings ................................................................................................................ 24
1.5 Notifications .............................................................................................................................. 25
1.5.1 Status LED ........................................................................................................................ 25
1.5.2 Audio ................................................................................................................................. 25
Page 10

CP30 Mobile Computer Reference Manual
LEARNING WINDOWS MOBILE BASICS ........................................................................................... 29
CONFIGURING CP30 MOBILE COMPUTER ...................................................................................... 47
USING 802.11 RADIO ..................................................................................................................... 59
USING BLUETOOTH ......................................................................................................................... 65
1.5.3 Vibrator ............................................................................................................................. 26
1.6 Data Capture ............................................................................................................................. 27
1.6.1 Barcode Reader ............................................................................................................... 27
1.6.2 Digital Camera .................................................................................................................. 27
1.7 Cradle ........................................................................................................................................ 28
2.1 Getting Started.......................................................................................................................... 30
2.1.1 Home Screen .................................................................................................................... 30
2.1.2 Title Bar ............................................................................................................................. 31
2.1.3 Title Bar Drop-down List ................................................................................................... 32
2.1.4 Start Menu ........................................................................................................................ 34
2.1.5 Device Lock ...................................................................................................................... 35
2.2 Input Methods ........................................................................................................................... 36
2.3 Managing Programs ................................................................................................................. 37
2.3.1 Add a Program to Start Menu .......................................................................................... 37
2.3.2 Create a new Folder ......................................................................................................... 37
2.3.3 Switch Among Programs .................................................................................................. 37
2.3.4 End a Program .................................................................................................................. 38
2.3.5 Find a File ......................................................................................................................... 39
2.4 Using ActiveSync ....................................................................................................................... 40
2.4.1 Synchronization with Your Computer .............................................................................. 40
2.4.2 Add/Remove Programs .................................................................................................... 41
2.4.3 Explore Device .................................................................................................................. 42
2.4.4 Backup/Restore ............................................................................................................... 43
2.5 Reset ......................................................................................................................................... 44
2.5.1 STANDBY Mode ................................................................................................................ 44
2.5.2 Software Reset (Warm Boot) ........................................................................................... 44
2.5.3 Hardware Reset (Cold Boot) ............................................................................................ 45
3.1 smart shell ................................................................................................................................ 48
3.2 Settings ..................................................................................................................................... 50
3.2.1 Connections ...................................................................................................................... 52
3.2.2 Personal ............................................................................................................................ 53
3.2.3 System .............................................................................................................................. 54
3.3 Device Name & Configuration ................................................................................................. 57
3.3.1 Change Device Name ...................................................................................................... 57
3.3.2 Understand Device Configuration ................................................................................... 58
4.1 Wi-Fi Power ................................................................................................................................ 60
4.1.1 Power On via Wireless Manager ...................................................................................... 60
4.1.2 WLAN Connection ............................................................................................................. 61
5.1 Bluetooth Power ....................................................................................................................... 66
5.1.1 Power On via Wireless Manager ...................................................................................... 66
5.1.2 Changing Bluetooth Settings ........................................................................................... 67
5.2 Search Devices ......................................................................................................................... 68
Page 11

CP30 Mobile Computer Reference Manual
USING THE PHONE.......................................................................................................................... 81
USING READER CONFIGURATION UTILITY ...................................................................................... 99
USING CAMERA ............................................................................................................................. 107
MORE APPLICATIONS .................................................................................................................... 121
5.3 Pair Devices .............................................................................................................................. 70
5.3.1 pair .................................................................................................................................... 70
5.3.2 Unpair................................................................................................................................ 72
5.4 Serial Port Service .................................................................................................................... 73
5.5 Object Push via Beam .............................................................................................................. 77
5.5.1 Send a File ........................................................................................................................ 77
5.5.2 Receive a File ................................................................................................................... 78
5.6 Active Sync via Bluetooth ......................................................................................................... 79
6.1 Phone Power ............................................................................................................................. 82
6.1.1 Wireless Manager ............................................................................................................ 82
6.1.2 SIM Card Missing ............................................................................................................. 84
6.2 Phone Application ..................................................................................................................... 85
6.2.1 Phone Interface ................................................................................................................ 85
6.2.2 Buttons ............................................................................................................................. 86
6.2.3 Volume .............................................................................................................................. 86
6.3 Phone Settings .......................................................................................................................... 87
6.4 Making Phone Calls .................................................................................................................. 91
6.4.1 Dial a Number .................................................................................................................. 91
6.4.2 Make a Call ....................................................................................................................... 92
6.4.3 Answer a Call .................................................................................................................... 93
6.5 Configuring GPRS Network ...................................................................................................... 95
7.1 Run ReaderConfig.exe ............................................................................................................ 100
7.2 Barcode Reader Settings ....................................................................................................... 101
7.3 Data Output ............................................................................................................................. 102
7.4 Notifications (for Good Read) ................................................................................................ 104
7.5 Symbology Settings ................................................................................................................ 105
8.1 Camera Interface .................................................................................................................... 108
8.2 Taking an Image ..................................................................................................................... 109
8.3 Shooting a Video ..................................................................................................................... 111
8.4 Pictures & Videos .................................................................................................................... 112
8.4.1 View an Image ................................................................................................................ 112
8.4.2 Playback a Video ............................................................................................................ 114
8.4.3 Advanced Editing Settings ............................................................................................. 115
8.5 Camera Settings ..................................................................................................................... 118
9.1 Backup Utility .......................................................................................................................... 122
9.1.1 Managing the Registry ................................................................................................... 122
9.1.2 Preparing for Backup ..................................................................................................... 123
9.1.3 Backing up Files ............................................................................................................. 123
9.1.4 Using Backups for Restore ............................................................................................ 126
Page 12

CP30 Mobile Computer Reference Manual
SPECIFICATIONS ........................................................................................................................... 141
SCAN ENGINE SETTINGS .............................................................................................................. 145
LASER (SE955) ............................................................................................................................. 149
2D IMAGER (SE4500) ................................................................................................................... 161
KEY REFERENCE TABLES ............................................................................................................. 173
9.2 Button Assignment Utility ....................................................................................................... 128
9.3 Signature Utility ....................................................................................................................... 131
9.3.1 Capturing a Signature .................................................................................................... 132
9.3.2 Viewing a Signature ....................................................................................................... 133
9.3.3 Changing Signature Settings ......................................................................................... 134
9.4 GPS Viewer .............................................................................................................................. 136
9.4.1 Receiving GPS Information ............................................................................................ 138
9.4.2 Data of NMEA Format .................................................................................................... 139
Platform, Processor & Memory..................................................................................................... 141
Communications & Data Capture ................................................................................................ 141
Electrical Characteristics .............................................................................................................. 142
Physical Characteristics ................................................................................................................ 142
Environmental Characteristics ..................................................................................................... 143
Programming Support ................................................................................................................... 143
Accessories .................................................................................................................................... 144
Symbologies Supported ................................................................................................................ 146
Reader Settings Table ................................................................................................................... 149
Symbology Settings Table ............................................................................................................. 151
Miscellaneous .......................................................................................................................... 154
AIM Code ID – Code Characters .............................................................................................. 155
AIM Code ID – Modifier Characters......................................................................................... 155
Reader Settings Table ................................................................................................................... 161
Symbology Settings Table ............................................................................................................. 163
1D Symbologies ....................................................................................................................... 163
2D Symbologies ....................................................................................................................... 169
Miscellaneous .......................................................................................................................... 171
28-key Keypad ............................................................................................................................... 173
Use of Alpha (α) & Shift () ..................................................................................................... 174
Use of Function (Fn) ................................................................................................................. 175
Page 13

The CP30 Mobile Computer , runni ng Wind ows Mobile 6.5 in palm size, i s our new product
INTRODUCTION
line of PDA-style Mobile Computer. Light-weight, easy to use, it adds even more powerful
and handy tools to delivering the flexibility in customization.
Specifically designed to work as an industrial PDA, the CP30 Mobile Computer provides
rich options of data collection, voice and data communications, long-lasting working
hours, and so on. Its large color transflective TFT display guarantees ease in reading in
all lighting conditions. Integrated with Bluetooth and 802.11b/g technologies, you may
choose to add the GSM/GPRS module to gain greater speeds and optimal mobility. In
particular, an integrated GPS receiver is made available for use with third-party
location-based applications.
This manual serves to guide you through how to install, configure, and operate the
mobile computer. The Care & Maintenance section is specifically prepared for those who
are in charge of taking care of the mobile computer.
We recommend you to keep one copy of the manual at hand for quick reference or
maintenance purposes. To avoid any improper disposal or operation, please read the
manual thoroughly before use .
Thank you for cho osing CipherLab p r od uct s !
1
Page 14

CP30 Mobile Computer Reference Manual
FEATURES
Built tough to survive drop test and sealed against moisture/dust to industrial
standard IP 42.
Micr osoft Windows Mobile 6.5 operating system with a powerful Qualcomm MSM7225
528 MHz processor.
512 MB NAND flash memory to store OS and software programs.
256 MB DDRAM to store and run programs, as well as store program data.
One microSD expansion slot for memory card up to 4GB, a nd SDHC is supported up
to 16GB.
Two r e ad e r opt i ons — 1D laser scanner or 2D imager.
Built-in digital camera 3.2 CMOS sensor and auto fo cus .
Ambidextrous side triggers.
Total wireless solution — connectivity includes Bluetooth, 802.11b/g and
GSM/EDGE/GPRS/UMTS.
A 3.2" color transflective TFT display delivers excellent visibility in all lighting
conditions and transmissive display.
Programmable feedback includes speaker and vibrator.
Built-in power tools includ e Re ader Configuration Utility, Backup Utility, etc.
Accessories and peripherals include international AC charging cradle, etc.
Support Mirror Browser, Application Generator utility tools.
2
Page 15

Introduction
INSIDE THE PACKAGE
ACCESSORIES
RELATED DOCUMENTATION
The following items are included in the package. Save the box and packaging material for
future use in case you need to store or ship the mobile computer.
CP30 Mobile Computer
Rechargeable Li-ion battery pack
Stylus
USB & Micro USB cable
AC Power Adaptor
LCD Protective Film
SIM Sticker Pack
Qui ck G ui d e
Protective Cover
Spare rechargeable battery pack
Charging Cradle
3.5mm Earphone, 4rings
Log in to GoBetween to access related documentation about the CP30 mobile computer
from the CipherLab Central Service (CCS) platform. Download the GoBetween desktop or
mobile device application, or launch the GoBetween Lite web application from the
following site: http://ccs.cipherlab.com/
3
.
Page 16

CP30 Mobile Computer Reference Manual
4
Page 17
OVERVIEW
QUICK START
No. Description No. Description
1 Receiver 2 Status LEDs for Battery Charging / Good
3 Volume Buttons 4 Side Triggers, user-definable
5 Touch Screen 6 Scan Key, user-definable
7 Microphone 8 Headset Jack
9 I/O Connector & Memory Card Slot 10 Power Key
11 Digital Camera 12 Scanning Window
13 Stylus (to be tethered) 14 Speaker
15 Battery Compartment 16 Battery Cover Latch
Read (left) and Messaging (right)
5
Page 18
CP30 Mobile Computer Reference Manual
INSTALLING BATTERY
the metal contacts of the battery are met with the protruding contacts inside the
For shipping and storage purposes, the mobile computer and the main batter y are saved
in separate packages.
Note: Any improper handling may reduce the battery life.
1. Slide the battery co ver latch to unlock the battery cover.
2. Remove the battery cover.
Insert the battery pack into the battery compartment at a proper angle (30°~45°) so th at
3.
compartment. Make sure that the battery is snugly fit into the co m partment.
4. Replace the battery cover.
5. Slide the battery cover latch to the end till you hear a “click” sound to make sure the cover
is locked in.
Warning:
(1) Please check the battery latch is at the “lock” position as indicated
in Step 5 above before powering on the device.
(2) For initial use, insert a charged battery; press the Power key to
enable the CP30.
6
Page 19
Quick Start
INSERTING SIM CARD
1. Slide the battery co ver latch to unlock the battery cover.
2. Remove the battery cover as well as the battery.
3. Insert the SIM card to the SIM card slot, following the car d orientation as shown.
4. Replace the battery and battery cover.
5. Slide the battery cover latch to the end till you hear a “click” sound to make sure the cover
is locked in.
7
Page 20
CP30 Mobile Computer Reference Manual
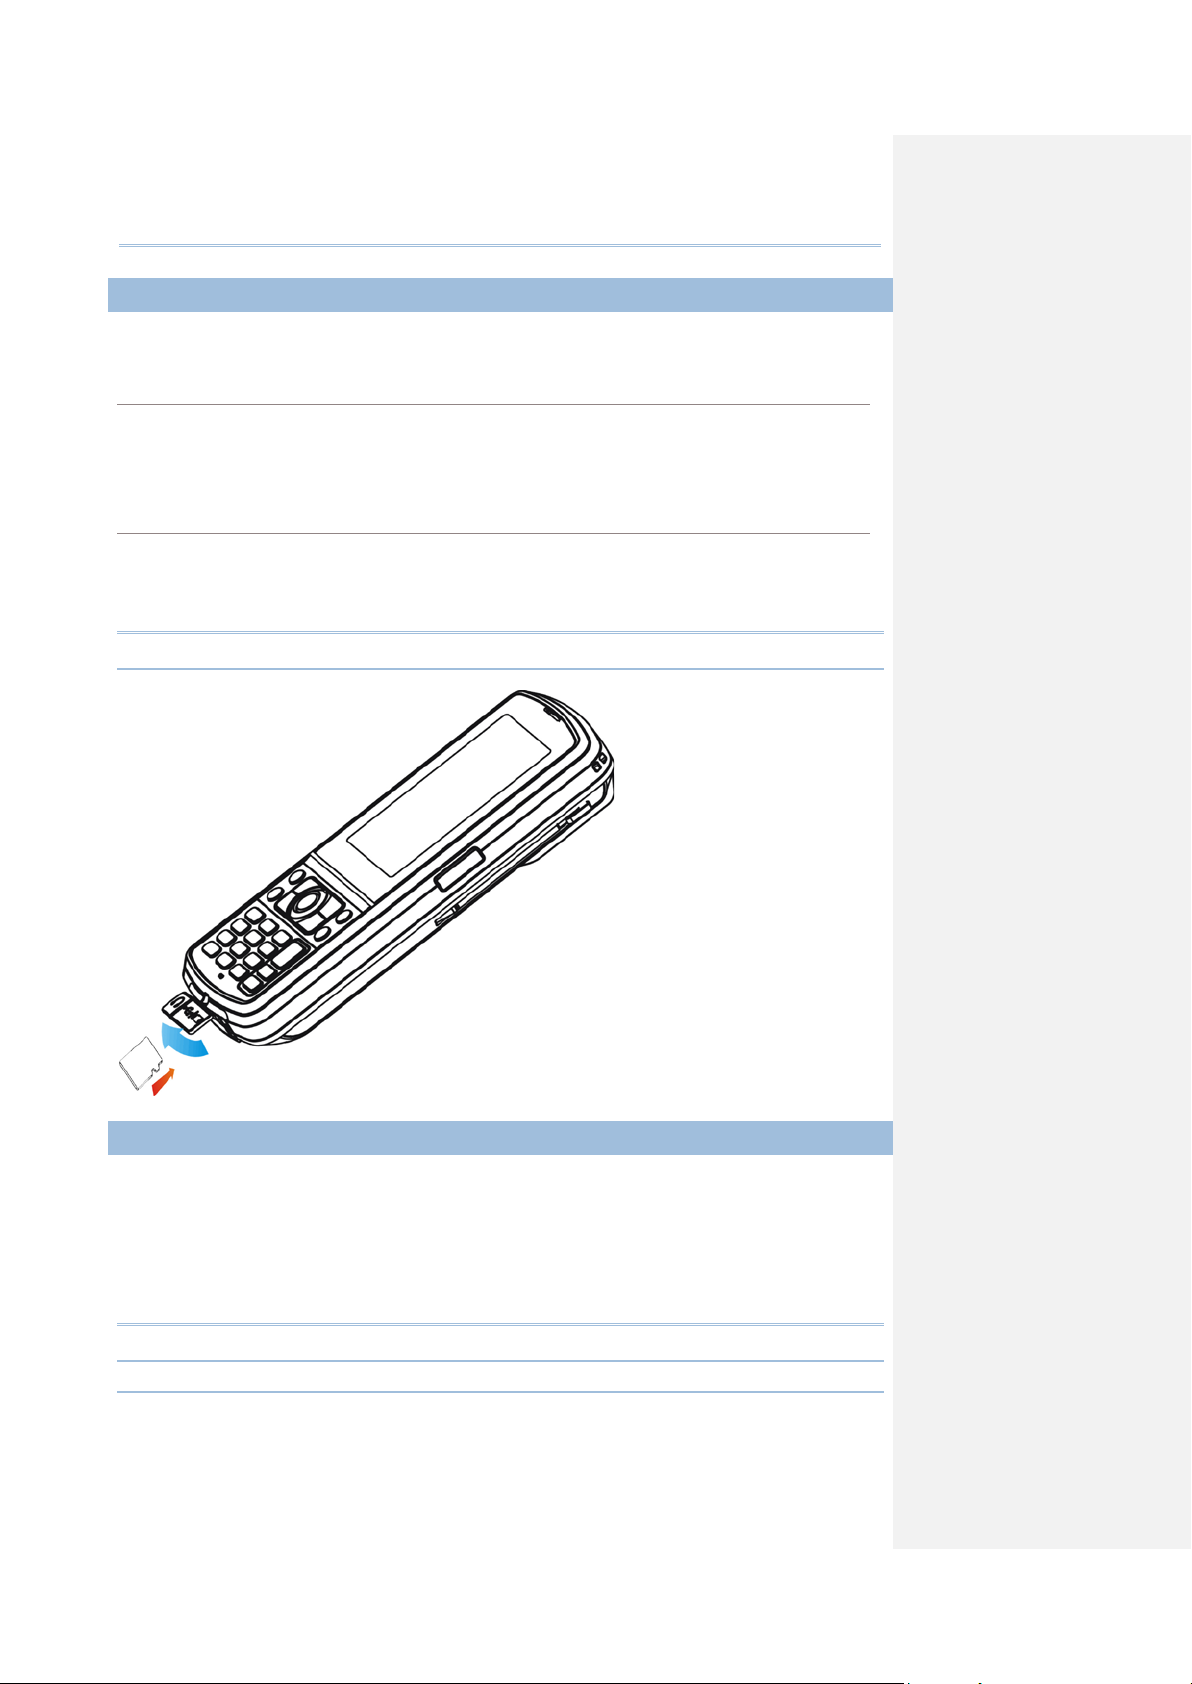
USING MEMORY CARD
Inserting Card
Removing Card
CONNECTING HEADSET
The SD card slot is at the bottom of the mobile computer, which allows microSD card.
1. Flip up the rubber cover.
2. Insert the memory card to the SD card slot.
3. Replace the rubber cover.
1. Flip up the rubber cover.
2. Press the memory card. It will be r e je c te d automatically for removal.
3. Replace the rubber cover.
Note: We sugg e st usi ng To s hi b a a nd Sa nDisk cl ass 4 card types.
The headset jack is at the bottom of the mobile computer. You can use the he adset for
audio playback or communication via the phone application, Messenger, etc.
1. Flip up the rubber cover.
2. Connect the headset to the headset jack.
3. Replace the rubber cover.
Note: Bluetooth headset is supported, bringing you the freedom of cordless mobility.
8
Page 21

Quick Start
CHARGING & COMMUNICATIONS
Charging Time
A full backup battery is
Charging Temperature
Operation on Battery Power
In order to prevent a cold boot after the battery is drained out, we suggest that you keep a
The main and backup batteries may not be charged to full for shipment. When you first
receive the package, you will need to charge the main battery to full before using the
mobile computer. Instead of direct charging, you may use a cradle or charger to charge
the mobile computer or backup batteries.
You can also have both the main and backup batteries charged at the same time via a
cradle or charger.
Main battery: It takes approximately 4 hours to charge the main battery to full. The LED
above the screen is r ed while charging and will turn green whe n c harging is done.
Backup battery: Supports for RTC retention when main battery is not existent. It
takes over 1 hour to charge the backup battery to full.
available for about 90days.
It is recommended to charge the battery at room temperature (18°C to 25°C) for optimal
performance.
Battery charging stops when the temperature drops below 0°C or exceeds 35°C.
When 802.11b/g, GSM/GPRS, and BT are all enabled on battery power, the main battery
charge will drop down substantially.
fresh battery for replacement or connect the mobile computer to an external p ower.
9
Page 22

CP30 Mobile Computer Reference Manual
USING WIRELESS NETWORKS
USING CABLE
CP30 LED Indicator
Status
Description
The mobile computer supports state-of-the-art wireless technologies, Bluetooth and
802.11b/g, so that it is able to send/receive data in real time in an efficient way. You
may choose to have the GSM/GPRS module embedded for a total wireless solution for
data and voice communications. Refer to the associated utilities.
1. Flip up the rubber cover.
2. Connect the Micro USB end of the USB cable to the I/O connector.
3. For fast charging, connect the other end of the USB cable to the USB power adaptor.
4. Insert the USB power adaptor to a suitable power outlet.
The left LED lights red while charging. It will turn green when charging is done.
Note: (1) You may connect the USB cable to PC for data communications and charging.
(2) CP30 supplied a Multiple Adaptor, please select suitable adaptor for using, the
illustration as below is only for Europe Standard reference.
Charging Red, solid Charging the mob ile computer
10
Green, solid Charging don e
Red, flashing Battery is abnormal
Page 23
Quick Start
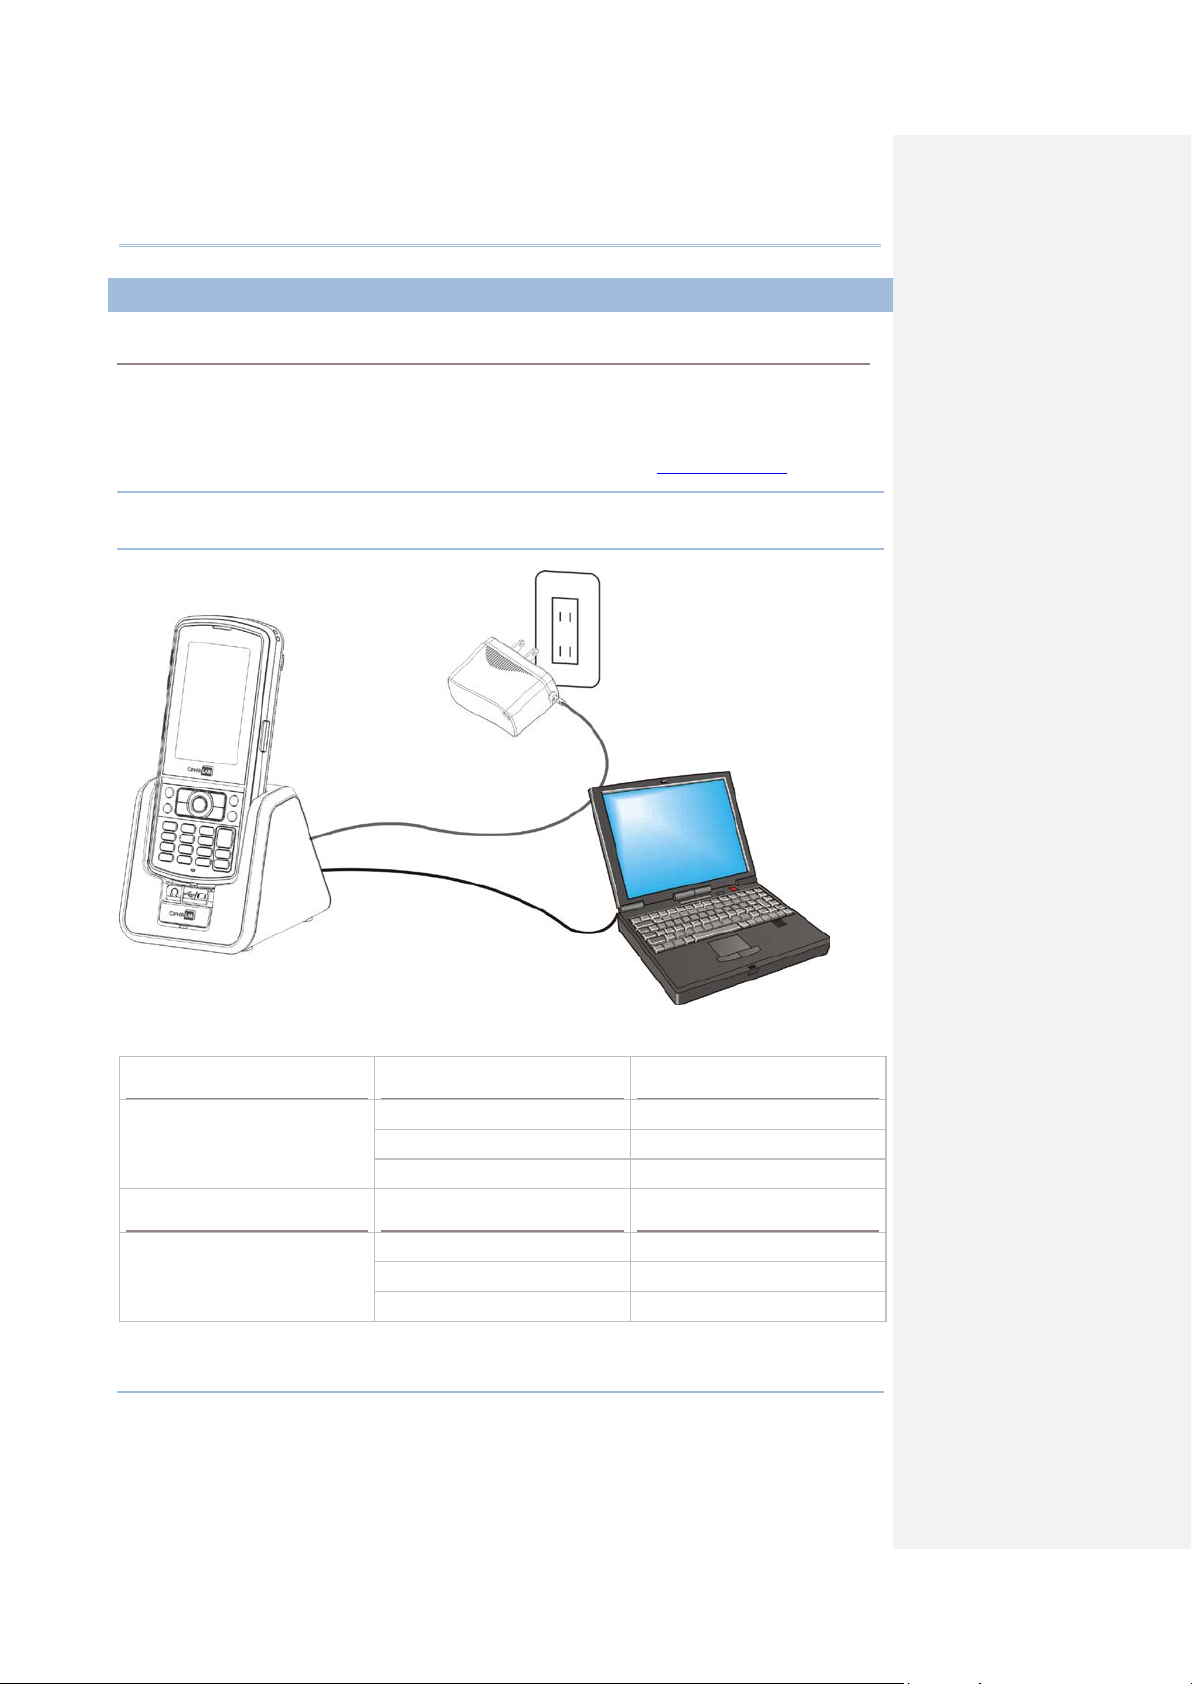
USING CRADLE
Charging via the Cradle
CP30 Indicator
Status
Description
Cradle Indicator
Status
Description
1. Seat the mobile computer in the cradle.
2. Connect the portable adaptor to the power receptacle on the cradle.
3. Connect the other end o f the power adaptor to a suitable power outlet.
4. Connect the USB cable if data transmissio n is r e quired. Refer to Using Ac tiveSync
Note: M ake sure that you have Microsoft ActiveSync installed on your computer before
you connect the cable from the cradle to your computer.
.
Charging Red, solid Charging the mob ile computer
Green, solid Charging don e
Red, flashing Battery is abnormal
Charging Red, solid Charging the spare battery
Green, solid Charging don e
Red, flashing Error occurs
11
Page 24
CP30 Mobile Computer Reference Manual
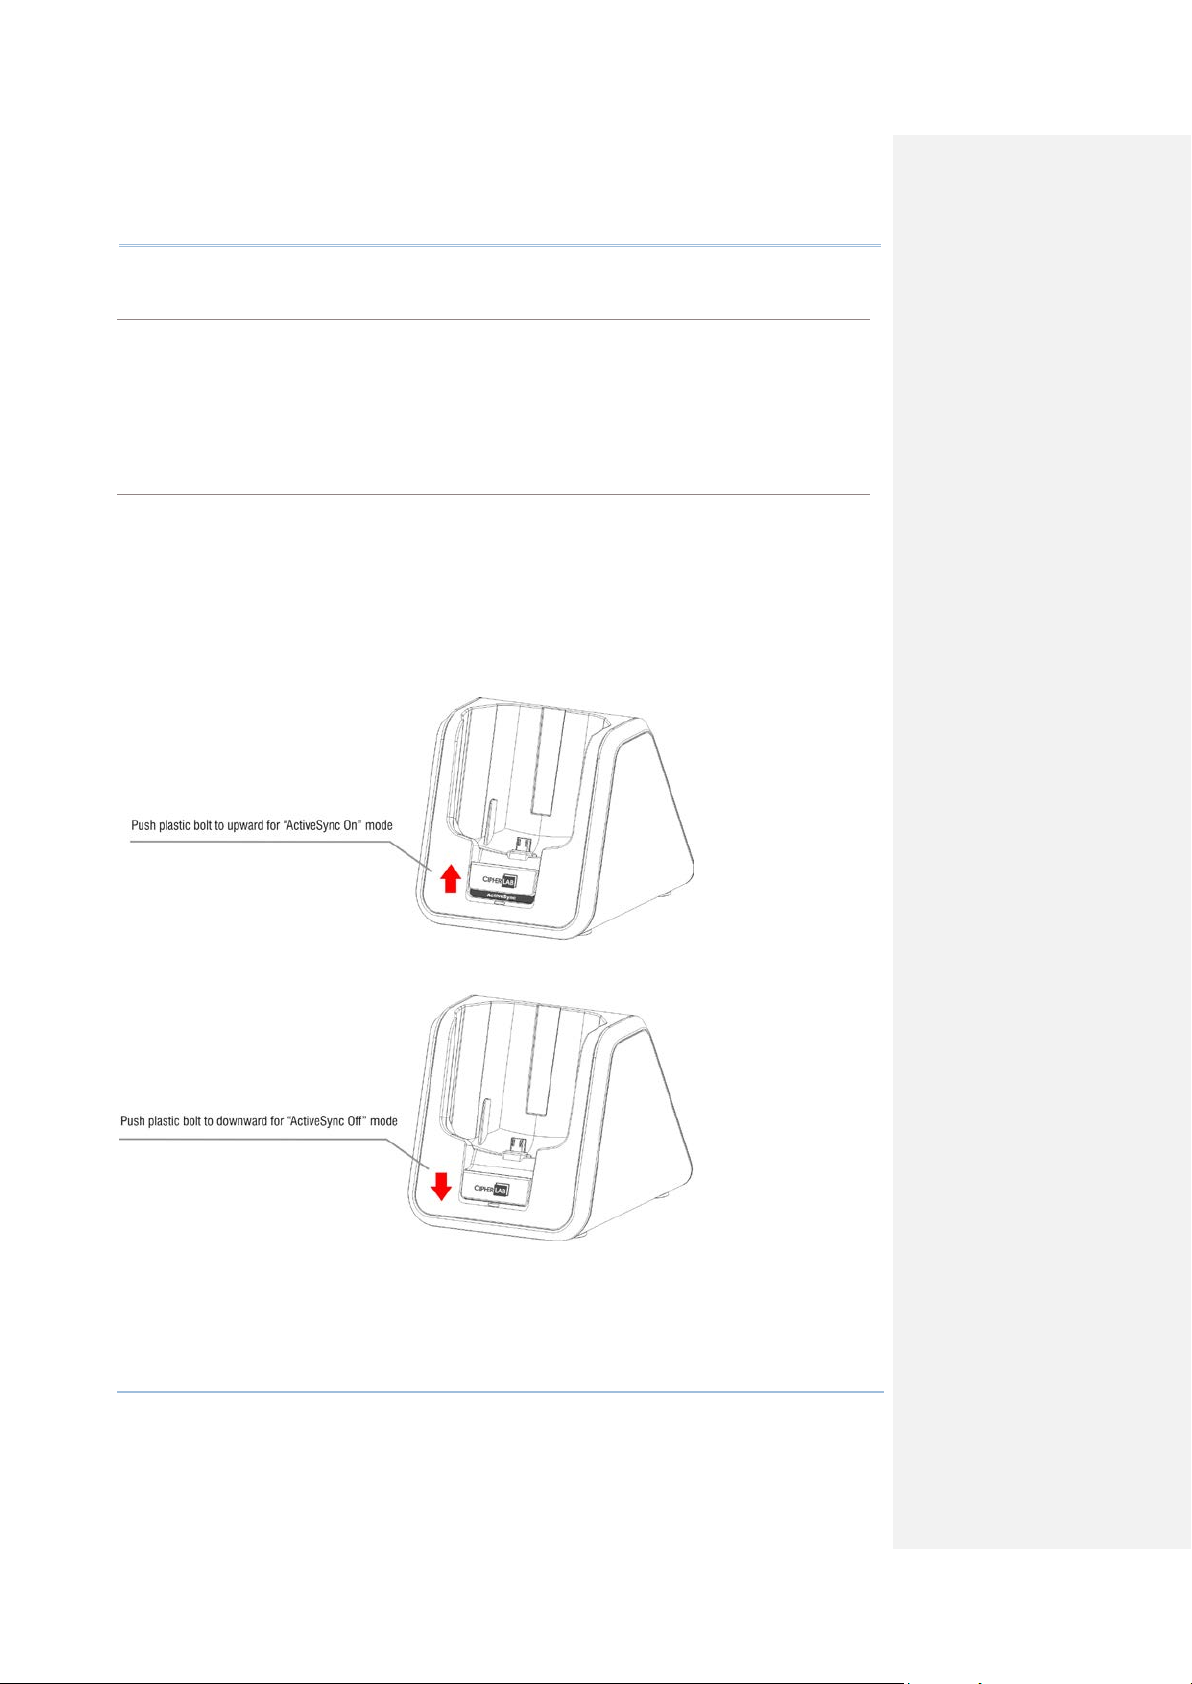
ActiveSync On Mode
ActiveSync Off Mode
The mobile computer can transmit data via USB cable. The ActiveSync on your PC is enabled.
1. Connect the USB cable from the cradle to your co mputer.
Make sure the plastic bolt in front of th e cradle has been pushed to upward for “ ActiveSync
On” mode.
2. Seat the mobile computer in the cradle.
Only charging is allowed in this mode. The mobile computer will only be charged via adaptor
power. The ActiveSync on your PC is dis abled.
1. Connect the power adaptor cable directly to the power supply outlet.
Make sure the plastic bolt in front of the cradle bee n pushe d to downw ard for “ActiveSync
Off” mode.
2. Seat the mobile computer in the cradle.
12
Page 25

Quick Start
13
Page 26

Page 27

This chapter explains the features and usage of the mobile computer.
IN THIS CHAPTER
1.7 Cradle ....................................................................... 28
1.1 BATTERY
Chapter 1
USING THE CP30 MOBILE COMPUTER
1.1 Battery ...................................................................... 15
1.2 Memory ..................................................................... 18
1.3 Keypad ...................................................................... 19
1.4 Touch Screen ............................................................. 23
1.5 Notifications ............................................................... 25
1.6 Data Capture .............................................................. 27
Main Battery
The mobile computer is powered by a rechargeable 3.7 V/2200mAh Li-ion battery
pack, and it takes approx. 4 hours to charge it to full from the power adaptor or
approx. 8 hours from the USB cable (at 500mA). However, the charging time may
vary by working condition.
Spare Battery
The spare battery f or accessory takes charge when the main battery is removed or
drained out. However, you have to replace the main battery as soon as possible.
Backup Battery
Lithium Battery, RTC retention when main battery is not existent.
Warning: The battery cover must be in position. If not, the mobile computer cannot
turn on b y pressing [Power] or wake up by pressing [Scan], and the red LED indicator
will flash twice to alert.
For a new battery, make sure it is fully charged before using. Always prepare a spare
battery pack, especially when you are on the road.
15
Page 28

CP30 Mobile Computer Reference Manual
1.1.1 BATTERY STATUS INDICATIONS
Battery Icon
Description
charge become low (10%) and
The battery pack is the only power source for the mobile computer to work. Therefore,
when the main battery charge goes low, you need to replace the battery pack with a
charged one or charge it as soon as possible. Most of all, you should backup important
data on a regular basis.
By looking at the battery status icon, y ou can tell battery charge remaining in the main
battery – the more the white bars, the more power in the main battery. Tap the top of
the screen to invoke the title bar pull-down list, and then tap the battery icon to quickly
access the Power Settings. Refer to 2.1.3 Title Bar Drop-down List
Alternatively, you may go to Start | Settings, and tap Power.
.
External power source is connected and main battery is charging.
Main battery level 100% ~ 76%
Main battery level 76% ~ 51%
Main battery level 51% ~ 26%
Main battery level 26% ~ 6% when main battery
needs charging
Main battery charge become very low (5%) and needs charging immediately.
Warning: (1) Once the battery charge drops below 10%, the low battery notification
will be displayed on the screen. It will keep supplying power to the real-time clock (RTC)
for at least 168 hours after low battery shutdown.
(2) Data loss may occur wit h RAM during low battery condition. Always save data before
running out of power or keep a fresh battery for replacement.
(3) Constant usage of the mobile computer at low battery level can affect battery life. For
maximum performance, recharge the battery periodically to avoid battery drain out and
maintain good battery health.
16
Page 29
Chapter 1 Using the CP30 Mobile Computer
1.1.2 POWER MANAGEMENT
For any portable device, power management is a critical issue especially when you are on
the road. Below are some tips to help you save battery power.
Warning: Using backlight, keylight, wireless connectivity, and peripherals while on
battery power will substantially reduce battery power.
Bring a second battery pack on the road.
Stop wireless connectivity, Bluetooth, 802.11b/g or GSM/GPRS that is not in use.
Shorten the turn off Backlight time, go to Start | Settings | System, and tap
Backlight. Refer to 1.4.1 Adjust the LCD Backlight
.
Disable key light function, go to Start | Settings | System, and tap Keypad to
select Always off item to disable keypad Backlight function.
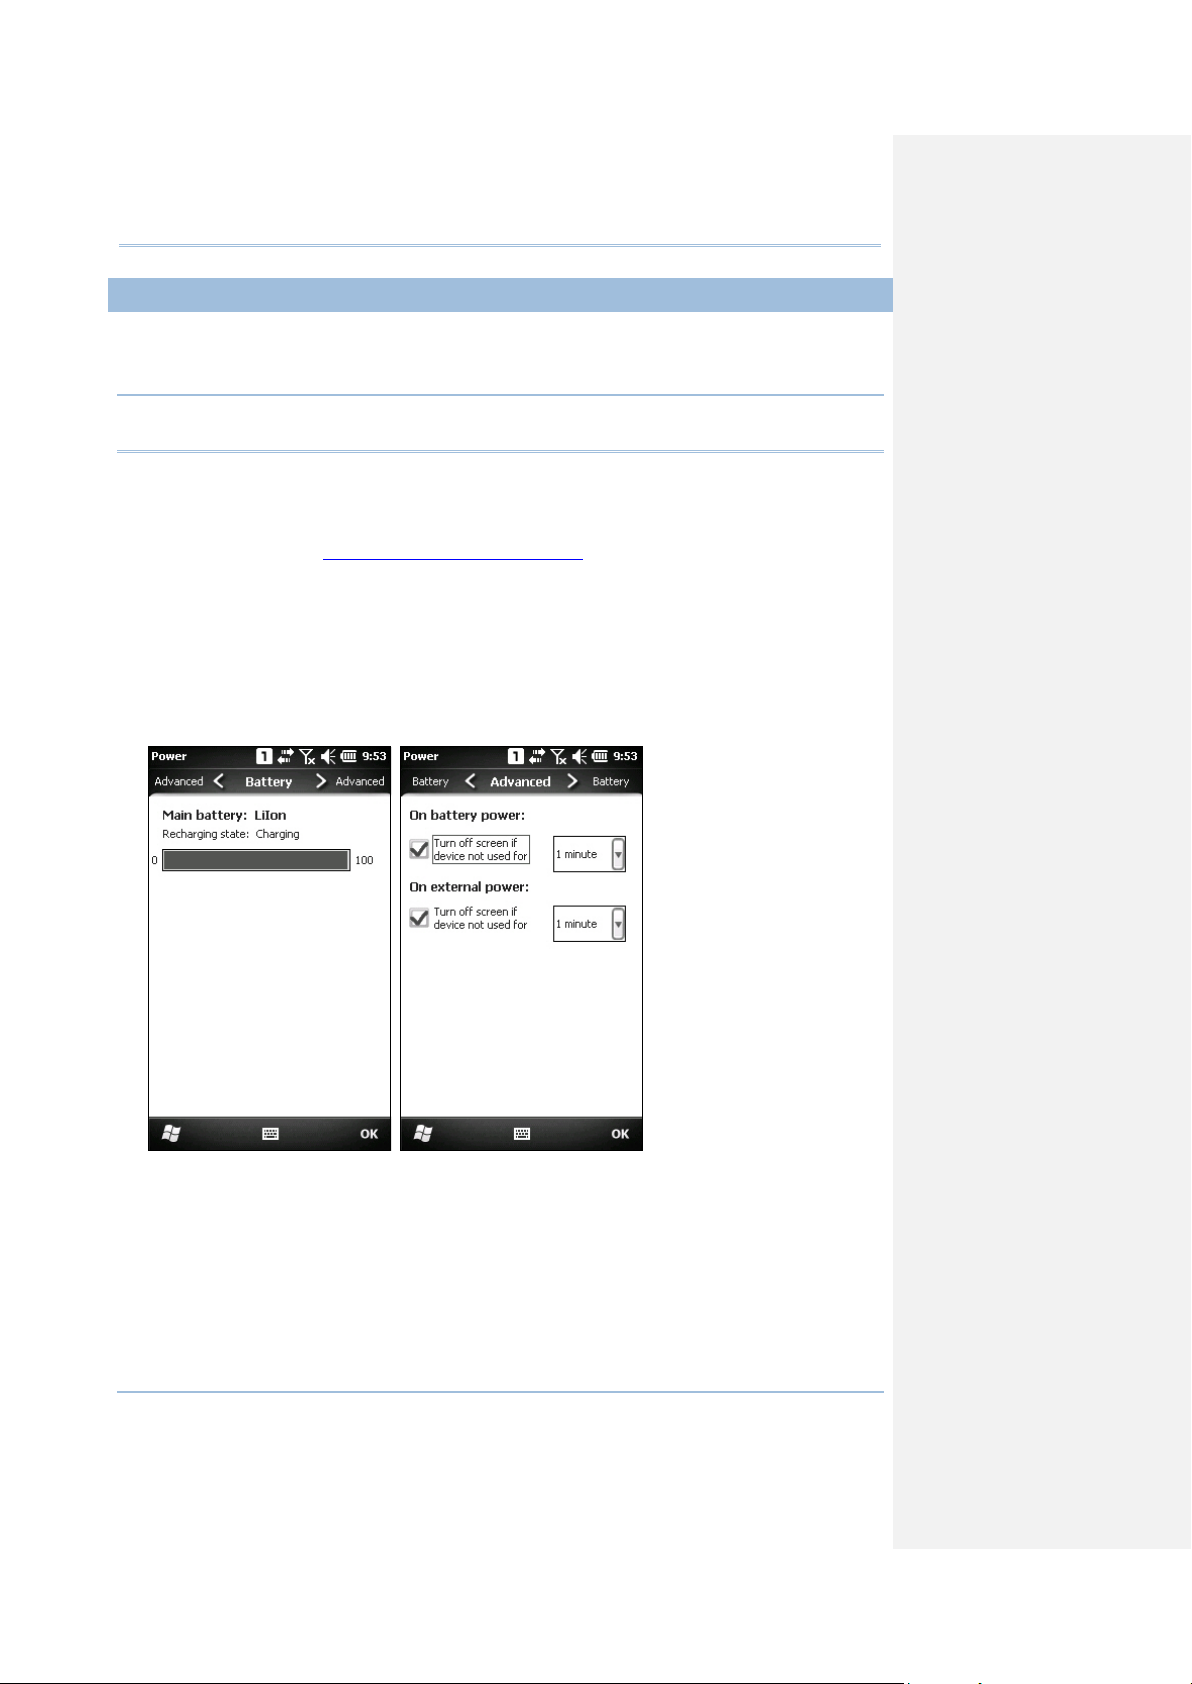
Go to Start | Settings, and tap Power.
In the Battery tab, you can always monitor the charging status.
In the Advanced tab, you may specify automatic turn-off times for the mobile
computer to conserve power. When it is turned off, the system is in standby mode,
which is read y for use but not in use.
17
Page 30

CP30 Mobile Computer Reference Manual
1.2 MEMORY
1.2.1 CAUTION OF DATA LOSS
1.2.2 CHECK STORAGE SPACE
Flash Memory (ROM)
512 MB flash memory for storing OS (Windows Mobile 6.5) and custom application
programs. Yet a portion of the memory is referred to as Flash Disk (folder), which can
store data and programs that you wish to retain even after hardware reset.
Random-acces s Me mor y ( R AM )
256 MB RAM for storing and running programs, as well as storing program data.
Expansion Slot
The mobile computer is equipped with one microSD card slot, which is user acce ssible.
High capacity memory card (microSDHC) is supported.
When the main battery is removed or drained, the backup battery on the main board is
only to retain the contents of RTC on condition that the backup battery has sufficient
power.
If you want to put away the mobile computer for a couple of days, you should be aware
that data loss occurs when the main batteries discharge completely. Therefore, it is
necessary to backup data and files before putting away the mobile computer!
Go to Start | Settings | System, and tap Memory. It displays the current capacity and
usage of the onboard RAM.
Storage memory refers to the memory allocated for file and data storage.
Program memory refers to the memory allocated for running programs.
Also, it provides information on the Flash Disk folder or storage card. The Flash Disk
folder is part of the onboard 512 MB flash memory. Because the flash memory is
non-volatile, data or programs stored in this folder will not be erased after hardware
reset.
18
Page 31

Chapter 1 Using the CP30 Mobile Computer
1.3 KEYPAD
The Alphanume ric keypad includes alphanumer ic, navigation, function ke ys, and so on.
This keypad is set to numeric mode by default.
19
Page 32

CP30 Mobile Computer Reference Manual
1.3.1 KEYPAD SETTINGS
Go to Start | Settings | System, and tap Keypad to configure related settings.
The LED backlight of keypad is turned off by default. It is suggested to turn on the
keypad backlight while working in a dark area; however, using backlight while on battery
power will substantially reduce battery power.
The keypad backlight is set to be automatically turned on for 5 seconds when any key is
pressed. You may have it always turned off or turned on instead.
20
Page 33

Chapter 1 Using the CP30 Mobile Computer
1.3.2 ALPHA KEY
Status Icon
Alpha Key
Input Mode
1.3.3 SHIFT KEY
Status Icon
Shift Key
Input Mode
t will
will lock the
t will
This alphanumeric keypad is set to numeric mode by default. The Alpha key [α] serves as
a switch key among numeric, alpha (lower-case alphabetic) input modes.
Note: Press [α] key to swit ch t he num e r i c a nd l ow e r-case alphabetic modes.
The alpha icon will appear on the status bar with a sequence as shown below.
Note: (1) Under mode, use the Shift key [] to enter ALPHA (upper-case alphabetic)
character ( or ) mode.
(2) If you are using the software keyboard via screen, tap CAP (Caps Lock) to switch
upper-case and lower-case alphab e t ic m ode s.
--- Numbers
Press [α] one time Lower-case alphabetic
→
Press [] one time
The Shift key [] modifies the next key pressed.
Depending on the input mode.
(1) In numeric mode ( ), it will modify the next ke y
pressed and is user-definable.
→
(2) In alpha (lower-case alphabetic) mode ( ), i
show a single upper-case character after press Shift
] one time.
key [
For example, input “ABC”, it will show “Abc. Refer to
Use of Alpha (α) & Shift ().
→
Press [] two times
(enter Shift Lock Mode)
If you press Shift key [] two times
present input mode.
(1) In numeric mode ( ), it will lock numeric mode
pressed and is user-definable.
→
(2) In alpha (lower-case alphabetic) mode ( ), i
lock all upper-case characters (= Caps Lock).
For example, input “ABC”, it will show “ABC”. Refer to
Use of Alpha (α) & Shift ().
Note: It i s not nece ssar y t o long press the Shift key [].
21
Page 34

CP30 Mobile Computer Reference Manual
1.3.4 FUNCTION KEY
Key Combination
Action
1.3.5 PROGRAMMABLE KEYS
The Function key [Fn] serves as a specified key, and the functionality of each key
combination is application-dependent.
1) To enable this special key, press [Fn] on the keypad. Its icon
will appear on the
status bar.
2) Now press another key to get the value of key combination (say, press [1] to get the
value of F1 ) .
3) To get the value of another key com binati on specified by the funct ion ke y, repea t the
step 2.
4) To disable the special key function, press [Fn] again, and the i con
w ill go off .
Note: It i s not nece ssar y t o long press the [Fn] key.
The default [Fn] key combinations are defined as below:
[Fn], [1] = F1 Softkey 1
[Fn], [2] = F2 Softkey 2
[Fn], [3] = F3 Talk
[Fn], [4] = F4 End now active window and return to home screen
[Fn], [5] = F5 n/a
[Fn], [6] = F6 Volume Up
[Fn], [7] = F7 Volume Down
[Fn], [8] = F8 *
[Fn], [9] = F9 #
[Fn], [0] = F10 Record
Note: Press the [Fn] key first, and then press the second key for a specific function.
The following keys are user-definable. They can be re-defined as another key or to serve
as a shortcut key for launching a specific program. Refer to
Utility.
[Scan]
Two side triggers on each side of the touch screen
[] (Asterisk)
[#] (Hash)
22
9.2 Button Assignment
Page 35

Chapter 1 Using the CP30 Mobile Computer
1.4 TOUCH SCREEN
1.4.1 ADJUST THE LCD BACKLIGHT
The mobile computer comes with a 3.2" TFT graphic LCD, 240 by 400 pixels resolution
(WQVGA). The LED backlight of screen, which helps ease reading under dim
environments, can be controlled manually and automatically.
Warning: Using backlight while on battery power will substantially reduce battery
power. It is suggested to dim the backlight while working in a well-lit area or
automatically turn off the mobile computer whe n not i n u se .
Go to Start | Settings | System, and tap Backlight to configure related settings. In
the Backlight/External Power configuration screen, you can select the Turn off
backlight if device is not used for check box to disable the backlight function, and
select the time from the related drop-down list to control the backlight disabled time. You
can also set the backlight brightness via tap, hold and drag the slider to the right for
bright, left for dark.
23
Page 36

CP30 Mobile Computer Reference Manual
1.4.2 SCREEN SETTINGS
This LCD is also a tou c h scr een that can be calibrated through scr een alignment.
Go to Start | Settings | System, and tap Screen to configure related settings. You
may re-calibrate the touch screen, smooth the font edges or adjust the text size
displayed on the screen if necessary.
Warning: DO NOT use any pointed or sharp objects to move against the surface of
the screen.
24
Page 37

Chapter 1 Using the CP30 Mobile Computer
1.5 NOTIFICATIONS
1.5.1 STATUS LED
LED Indicators
Status
Description
1.5.2 AUDIO
The two LED indicators on top are used to provide information on the charging status,
scanner "Good Read" while collecting data, and messages.
Top left Charging Red, solid Charging the mob ile computer
Green, solid Charging don e
Scanner Green, on-off Good Read
Top right Messaging Amber, flashing Messages received, e.g. missed call, voicemail,
new SMS/MMS message or e-mail
The speaker is used to play sounds for events in Windows and programs, or play audio
files such as .WAV files. In addition, it can be programmed for status feedback. In noisy
environments, you may consider connecting a headset instead. A headset jack is
provided, which is a 3.5 mm DIA stereo earphone jack. Bluetooth headset is also
supported.
Go to Start | Settings, and tap Sounds & Notifications to configure related settings.
25
Page 38

CP30 Mobile Computer Reference Manual
1.5.3 VIBRATOR
The mobile computer is integrated with a vibrator, which is software programmable for
feedback. This can be helpful w he n w or ki ng i n noisy environment s.
Tap the top of the screen to invoke the title bar drop-down list, and then tap the volume
setting icon to change the system volume or phone ring. You may mute it or have it
vibrate instead.
Note: You can switch the volume settings among On, Vibrate and Off items in the Volume
control screen. Volume adjustment slider bar is only available in volume “On” mode.
26
Page 39

Chapter 1 Using the CP30 Mobile Computer
1.6 DATA CAPTURE
1.6.1 BARCODE READER
1.6.2 DIGITAL CAMERA
A wide variety of scan engines is available for delivering flexibility to meet different
requirements. Depending on the scan engine integrated, the mobile computer is capable
of scanning barcodes of a number of symbologies that are enabled by default while
running the ReaderConfig.exe utility. If you need to scan barcodes that are encoded in a
different symbology, enable the symbology first.
Refer to Appendix II - Laser (SE955) (1D) and Appendix III - 2D Imager (2D) for using
the barcode reader utility.
An integrated 3.2 mega-pixel CMOS camera in the mobile computer is specifically
designed for collecting image data. We provide an image capture utility that is specifically
designed to turn on the camera and capture image.
27
Page 40

CP30 Mobile Computer Reference Manual
1.7 CRADLE
A specified cradle is supported for CP30; it can transfer data or charging via a Micro USB
2.0 cable. There is also a LED indicator in front of the cradle to indicate the charging
status of battery. For plastic bolt switch that in front of the cradle information, please
refer to Using Cradle
.
Supports Micro USB 1.1 compatible.
USB Synchronization between charging terminal and battery.
LED indicator to show battery charging status.
Supports 2 modes (ActiveSync On a nd Of f) for charging and date transmission.
Charging Time shall b e le ss t han 4 hours.
DC Input 5V@2A , DC-Jack on the back of cra dl e.
100-240VAC 50/60Hz, 5VDC+5%2A with DC jack for AC adaptor.
Due to the limitation of CP30 terminal charging circuit, it supports 1000mA charging
current through ActiveSync disable or only under 500mA with ActiveSync enable.
Charging
Time
28
Approx. 4 hours for spare battery via adaptor.
Approx. 4 hours fo r terminal via adaptor (Ac tiveSync is disabled)
Approx. 8 hours fo r terminal via adaptor (Ac tiveSync is enabled)
Page 41

This chapter mainly describes the basic skills to work with the CP30 Mobile Computer.
IN THIS CHAPTER
2.5 Reset......................................................................... 44
Chapter 2
LEARNING WINDOWS MOBILE BASICS
The add-on utilities for applications regarding data collection, processing, and
transmission, are introduced in the following chapters.
The mobile computer is specifically designed for real-time data collection in the Windows
Mobile 6.5 environment. It won't take long for any Windows user to get familiarized with
it. Keep these basic skills in mind and explore this Windows Mobile device at ease.
Tap an item to select it.
Tap and hold an item to see a menu that ena bles tasks, suc h as cut, copy, rena me,
delete, etc.
Tap [
] at the bottom of the screen to close an active window, a dialog box, or a
running appli ca t i o n.
Tap [OK] at the bottom of the screen to save the current settings and exit the
application (or minimize the window in some applications).
Tap [] at the bottom of the screen to return the previous menu.
2.1 Getting Started ........................................................... 30
2.2 Input Methods ............................................................ 36
2.3 Managing Programs ..................................................... 37
2.4 Using ActiveSync ........................................................ 40
29
Page 42

CP30 Mobile Computer Reference Manual
2.1 GETTING STARTED
2.1.1 HOME SCREEN
Title Bar
Soft Key Bar
Application Info.
Application Icon
When the mobile computer is fully charged, press the Power key for three seconds to
turn on the mobil e c om p uter and wait for the Home Screen to come up.
Tap and hold the Home Screen up and down to highlight a desired application. The
additional information or items will appear sideways, and right soft key will be available
at the bottom of the screen as well.
If you are using the mobile computer for the first time, there are a couple of things to do
after the Home Screen comes up. The Getting Started wizard that will walk you through
e-mail setup, changing the background image, setting up Bluetooth headset connection,
etc.
Go to Start | Settings, and tap Home to change theme, background, and status
items shown on the Home Screen, etc.
Go to Start | Settings, and tap Clock & Alarms t o select time zone, change local
time, set alarms, etc.
30
Page 43

Chapter 2 Learning Windows Mobile Basics
2.1.2 TITLE BAR
Icon
Description
power in the
the more bars, the stronger the
The icons at the top of the screen are explained below.
.
External power source is connected.
Battery power remaining: The more the white bars, the more
main battery.
Current input mode of keypad.
Shift [] is enabled in numeric mode.
Shift [] is enabled in alpha mode.
Volume status: On, off, or vibrate .
Insert SIM card: The SIM card is missin g. You can still make emergency calls
if your service provider supports it.
EDGE service available.
EDGE connection is established.
GPRS service available.
GPRS connection is es ta blished.
Incoming call.
Missed call.
Antenna signal status: Phone power off.
Antenna signal status: PIN Code required for powering on the Phone.
Antenna signal status: Phone power on;
signal.
Connection is active.
Wi-Fi Network is detected.
Wi-Fi Network is connected.
Reminder for an alarm or appointment is active.
Receiving Bluetooth beams.
Bluetooth stereo headset is in use.
More notification icons can be displayed.
E-mail/text message is received.
Roaming.
31
Page 44

CP30 Mobile Computer Reference Manual
2.1.3 TITLE BAR DROP-DOWN LIST
Icon
Description
Tap it to show detected networks for Wireless local area networking (WLAN)
change the system volume or phone ring. You may mute it or have it
to Microsoft for improving Windows Mobile
Tap the title bar to reveal
Drag the drop-down list
to left or right to view
The title bar drop-down list is hidden at the top of the screen be showed below:
the drop-down list.
all the icons.
32
Tap it to zoom in or zoom out of current view.
Tap it to check the connections status. You may configure the settings through
Wireless Manager.
Tap it to check the phone status. You may configure the settings through
Wireless Manager.
connection, which is not available until Wi-Fi power is turned on through Wireless
Manager. Alternatively, you m ay tap Notification on the left soft key bar.
Tap it to
vibrate instead.
Tap it to monitor the charging status and change the power scheme.
Tap it to change the clock and alarms settings.
Tap it to help leave customer feedback
software.
Page 45

Chapter 2 Learning Windows Mobile Basics
Icon
Description
Tap it to view the reminder for an alarm or appointment.
Tap it to receive incom ing Bluetooth beams.
Bluetooth A2DP profile is in use. Tap it to ac cess the Bluetooth devices list.
Tap it to overlook a m issed call.
Tap it to check a new e-mail.
Tap it to check a new voicemail.
Tap it to send an SMS text message.
Speakerphone is on.
Tap it to access the Bluetooth configuration.
Tap it to configure ActiveSync connection settings.
Roaming is on.
33
Page 46

CP30 Mobile Computer Reference Manual
2.1.4 START MENU
Tap to open the Start Menu. You can tap to access application programs, find useful
utilities developed by CipherLab, or configure system settings.
34
Page 47

Chapter 2 Learning Windows Mobile Basics
2.1.5 DEVICE LOCK
Lock CP30
Password Lock
Unlock CP30
Tap to lock device.
It’s locked now!
By default, the device is unlocked. You may lock the mobile computer to prevent
unintended ope ration. When locked, it will not respond to screen t ouch or keypad input
until it is unloc ked again. However, on the Lock screen you can stil l monitor the device
status on the title bar. If the Lock screen is enab le, the Volume adjustme nt on the left
side of CP30 will unavailable.
Go to Start Menu, and tap the lock icon on the soft key bar to protect your mobile computer.
You may further apply pa ssw ord pr ote cti on to block unauthorized access. Go to Start | Settings,
and tap Lock.
Simple PIN: Set up a password (4-digit at least)
Strong alphanum e r ic: Set up a strong password (7-character at least)
Drag the lock slide to left or right of the unlock screen.
Note: For the Simple PIN password to Lock scre en, the password can not be a sequence
numerals (e.g.111 or 1234). And also not be uppercase, lowercase letters or
punctuations.
35
Page 48

CP30 Mobile Computer Reference Manual
2.2 INPUT METHODS
Physical Keypad
Data Capture
Software Keypad
The keyboard icon at the middle bottom of the screen is for Software Input Panel
(SIP). Tap the icon t o sho w or hide the software keyboard.
Data entry can be performed by the following methods.
Type with the hardware keypad.
Scan barcode in applications , e.g. Notes, CipherLab's FORGE Ap plication Generator, etc.
Type or write using SIP (Soft Input Panel):
Tap the SIP button on middle soft key bar to show or hide the input panel.
36
Page 49

Chapter 2 Learning Windows Mobile Basics
2.3 MANAGING PROGRAMS
2.3.1 ADD A PROGRAM TO START MENU
2.3.2 CREATE A NEW FOLDER
2.3.3 SWITCH AMONG PROGRAMS
Tap the Start button to view the Start Menu. To quick launch a program, tap it. To add
a new program or subfolder to the Start Menu, you can either use File Explorer or
ActiveSync.
File Explorer: to move the program by [Copy] and [Paste Shortcut].
ActiveSync on the desktop computer: to create a shortcut to the program, and place
the shortcut in the Programs folder.
Warning: To avoid making any changes to the program configurations by accident,
we recommend you to use [Copy] and [Paste Shortcut] rather than [Cut] and [Paste].
1. Tap Start | File Explorer.
2. Navigate through f ile folders to find the program you desire.
3. Tap and hold the program to select [Copy] from the pop-up menu.
4. Navigate to the Programs folder – My Device\Windows\Start Menu\Programs.
5. Tap and hold anywhere blank on the screen to select [Paste Shortcut] from the pop-up
menu. The new program will be added to the Programs folder.
6. Go to Start Menu and the new added program will appear now.
1. Tap Start | File Explorer.
2. Navigate through f ile folders to find where to create a new folder.
3. Tap Menu | New Folder and a subfolder will be created.
1. Tap Start | Task Manager.
2. Select which running program to use.
3. Tap Menu | Switch To on the right soft key bar and the program will be launched.
37
Page 50

CP30 Mobile Computer Reference Manual
2.3.4 END A PROGRAM
In general, the system manages memory automatically, and there is no need to exit a
program in order to open another or to conserve memory. However, random access
memory (RAM) may be used up when running too many programs. As a result, it will
slow down the operation or cause program errors. In that case, you should stop one or
more running programs to release memory. In order to use memory in a more eff icient
way, you are recommended to exit a program when it is not desired any longer.
Warning: Always remember to save data or settings before you exit a program.
Tap [] to close an active window, a dial og box, or a runni ng app li cati on. If the b utt on is
not displayed on the soft key bar, press [ESC] on the physical keypad.
Tap [OK] to save the current settings and exit the application (or minimize the window in
some applications). If the button is not displayed on the soft key bar, press [OK] on the
physical keypad.
Note: Some programs, such as the ActiveSync, may create an associated icon on the
taskbar. You may tap the icon and tap End Task to end the active program.
1. Tap Start | Task Manager.
2. Select which running program to stop.
3. Tap End Task on the left soft key bar and the program will be closed.
38
Page 51

Chapter 2 Learning Windows Mobile Basics
2.3.5 FIND A FILE
box, enter the file name, word, or other information you want to search
1. Tap Start | Search Phone.
In the “Search for”
2.
for. If you have looked for this item befo r e, tap the drop-down list and select it.
In the “Type” box, select a data type to help narrow your search. If the data type of your
file is other than listed, you may try [Larger than 64 KB]. However, if such file is less than
64 KB, it will not be searchable.
3. Tap Search.
4. In the Results list, tap the item you want to op en.
39
Page 52

CP30 Mobile Computer Reference Manual
2.4 USING ACTIVESYNC
2.4.1 SYNCHRONIZATION WITH YOUR COMPUTER
Select which partnership to set up. If you want to synchronize data between the mobile
ActiveSync is used to synchronize infor mation between the mobile computer and your
desktop computer, to install programs on the mobile computer, and to backup and
restore the mobile computer.
The Microsoft ActiveSync program has to be installed on your desktop computer first.
To download the up-to-date version of the program, you may need to go to
Microsoft's off ici a l web site for Windows Mobile devices as shown below.
http://www.microsoft.com/windowsmobile/activesync/activesync45.mspx
After downloading and installation, run the program. For detailed information on the
program, you may click the Help menu, and then select the Microsoft ActiveSync
Help.
1. Follow these instructions for initial Activ e Sync operation:
Connect the USB cable from the mobile computer or via a cradle to your computer.
Turn on the mobile computer or seat in the cradle.
2. Your computer will au tomatically detect the USB device.
3.
computer and your personal computer, select Standard Partnership; otherwise, select
Guest Partnership
4. Wait a few seconds for the mobile computer to get connected (and synchronized if a
Standard Partnership is selected).
Note: F or ActiveSync via Bluetooth, refer to Using Bluetooth.
40
Page 53

Chapter 2 Learning Windows Mobile Basics
2.4.2 ADD/REMOVE PROGRAMS
Alternative to Install New Programs (Copy & Paste)
Alternative to Remove Programs
Click [Add/Remove Programs] from the Tools Menu so that you can proceed to install a
program that is designed to be used on a mobile device running Windows Mobile. If a
user program is no longer desired, you may remove it from the system.
Click [Add/Remove Programs] from the Tools Menu so that you can un-install a program
that is designed to be used on a mobile device running Windows Mobile .
You may install a new program manually.
1. When connected, o pen the Microsoft ActiveS ync window on your desktop computer.
2. Click the Explorer button from the toolba r .
3. Navigate to the target folder, e.g. the Programs folder (\Windows\Start Menu\Programs),
depending on where you wish to access the program.
4. Navigate through f ile folders on your computer to find the new program (.CAB, .EXE, etc.)
5. Right-click the program and select [copy] from the pop-up menu.
6. Back to the target folder in step 3. Right-click anywhere blank and select [Paste] from the
pop-up menu.
7. On the mobile computer , go to Start Menu and the new program will appear.
You may un-install a new program manually.
1. Go to Start | Settings | System and select Remove Programs.
2. Tap the name of the program that you want to de lete.
3. Tap [Remove].
4. Tap [Yes] to un-install the program.
Note: If the program does not appear in the list of installed programs, you may use File
Explorer to locate it. Tap and hold the program to select [Delete] from the pop-up menu.
41
Page 54

CP30 Mobile Computer Reference Manual
2.4.3 EXPLORE DEVICE
Add a Program to Start Menu
up menu.
Create a New Folder
1. When connected, o pen the Microsoft ActiveS ync window on your desktop computer.
2. Click the Explorer button from the toolba r .
3. Navigate through f ile folders to find the program you desire.
4. Right-click the program and select [Create Shortcut] from the pop-up menu.
5. Right-click the shortcut and select [Cut] from the pop-up menu.
6. Navigate to the Programs folder –\Windows\Start Menu\Programs.
7. Right-click anywhere blank on the window and select [Paste] from the pop-
The new program will b e added to the Program s fo ld er .
8. On the mobile computer , go to Start Menu and the new program will appear now.
Note: [Create Shortcut], [Cut], and [Paste]: The same result can be performed by [Copy]
and [Paste Shortcut].
1. When connected, o pen the Microsoft ActiveS ync window on your desktop computer.
2. Click the Explorer button from the toolba r .
3. Navigate to the target folder wher e y ou wish to create a new folder.
4. Right-click anywhere blank on the window and select [New Folder] from the pop-up menu.
A subfolder will be c r eated.
42
Page 55

Chapter 2 Learning Windows Mobile Basics
2.4.4 BACKUP/RESTORE
To best protect your work, you should regularly back up information on your mobile
computer. You can perform a backup by during the ActiveSync operation. The backup file
is stored on your desktop computer.
43
Page 56

CP30 Mobile Computer Reference Manual
2.5 RESET
2.5.1 STANDBY MODE
Enter Standby
Resume from Standby
2.5.2 SOFTWARE RESET (WARM BOOT)
Software Reset (= Warm Boot)
Are you sure you want to shut down? All
Like your PDA, Pocket PC and most handheld devices, the CP30 Mobile Computer
functions when it is turned on. This is because the Windows Mobile operating system
eliminates the booting process and runs continuously.
You may reset the mobile computer when it stops responding to input with a warm or
cold boot. Files not stored in RAM will be erased after a reset. But you can restore data
that is previously synchronized with your computer by performing an ActiveSync
operation, or backed up by using CipherLab Backup Utility.
After performing a reset, the recalibration and setup process is required to ensure touch
screen accuracy and set up user settings for initial use. Follow the on-scre en instruction
to complete the process. You must manually adjust system date and time, as well as the
time zone.
When the mobile computer enters standby mode, the system is ready for use but not
using. It means the syst e m i s in power-saving status and waiting for user start.
Press the Power key for about 0.2 seconds to enter Standby mode.
Press the Power key for about 0.2 seconds to awake the mobile computer. Alternatively, you may
press the Scan key.
Warning: To save battery power, it is suggested that the mobile computer is set to
be automatically turned off when not in use . Refer to 1.1.2 Power Management for more
information about saving power.
Software reset, also known as a warm boot, will restart the mobile computer and keep all
the saved files.
1. Turn off the mobile c omputer by pressing the Power key for 3 seconds.
The Shut Down dialog is displayed asking “
unsaved data will be lost”. Tap [Yes] to perform a warm boot.
2. Turn on the mobile computer by pressing the Power key for 3 seconds.
Warning: Data loss may occur when files are not properly closed before software
reset.
44
Page 57

Chapter 2 Learning Windows Mobile Basics
2.5.3 HARDWARE RESET (COLD BOOT)
Hardware Reset (= Cold Boot)
Hardware reset, also known as a cold boot, will restart the mobile computer and initialize
RAM. Perform a hardware reset if software reset cannot be properly operated.
1. Remove the battery cover and the main battery.
2. Replace the main battery and the battery cover.
3. Turn on the mobile computer by pressing the Power key for 3 seconds.
Warning: Data loss may occur when files are not properly closed before hardware
reset.
45
Page 58

CP30 Mobile Computer Reference Manual
46
Page 59

In this chapter, a b r ie f on the system settings is provided for your reference.
IN THIS CHAPTER
Chapter 3
CONFIGURING CP30 MOBILE COMPUTER
3.1 smart shell ................................................................. 48
3.2 Settings ..................................................................... 50
3.3 Device Name & Configuration ....................................... 57
Tap
to open the Start Menu, and tap Settings to configure related settings.
47
Page 60

CP30 Mobile Computer Reference Manual
3.1 SMART SHELL
CipherLab Smart Shell is a utility allows you to customize some settings and behavior(s).
You can easy to employ and control the programs installed via Smart Shell utility. For
more information, please refer to the CipherLab Smart Shell User Guide.
48
Page 61

Chapter 3 Configuring CP30 Mobile Computer
Icon
Description
Tap it to activate or close any listed program or enable any running
Fight Mode: Tap it to disable all wireless signals. The color of Fight Mode icon
Tap it for a 3D carousel View.
Provide a fast and convenient way to access your favorite or recently use d
items and services.
programs.
According to active screen to support change settings.
Tap it to enable Bluetooth.
Tap it to enable Wi-Fi.
Tap it to enable GSM/GPRS.
will changed from white to red.
49
Page 62

CP30 Mobile Computer Reference Manual
3.2 SETTINGS
Bluetooth
Clock & Alarms
Home
Lock
Power
Advanced tab: You may configure to turn off the device when it is idle for a specific
50
Refer to Using Bluetooth.
Time tab: Change the da te, time an d time zone settings. By default, the time zone
settings will be auto m atically synchronized and updated by notification.
Alarms tab: You may set up at most three alarms to wake you up or as a reminder.
Refer to 2.1.1 Home Screen.
Appearance tab: Customize the theme and background of the Home Screen.
Items tab: Select items that will appear on the Home Screen, and configure Home
Screen timeout.
Tap it to apply password protection to limit access to the mobile computer, and any
screen or keypad input will be blocked.
Refer to 2.1.5 Device Lock.
Battery tab: You may view the current charge of main battery.
period of time, either on battery or ex ter nal power.
Page 63

Chapter 3 Configuring CP30 Mobile Computer
Sounds & Notifications
Connections
Personal
System
Microsoft My Phone
Refer to 1.5.2 Audio.
Sounds tab: Configure sounds for specific actions, events, programs, etc.
Notifications tab: Select to pla y sounds as notifications f or some events.
Refer to 3.2.1 Connections.
Refer to 3.2.2 Personal.
Refer to 3.2.3 System.
Tap it to synchronize contacts, calendars, tasks, and so on with a Microsoft My Phone
account. You will be asked to sig n in us ing your Windows Live ID.
51
Page 64

CP30 Mobile Computer Reference Manual
3.2.1 CONNECTIONS
Beam
Connections
Domain Enroll
USB to PC
en your PC connects to a local area network or the Internet, the USB connection
Go to Start | Settings | Connections.
52
Tap it to receive incoming Bluetooth beams.
Refer to 6.5 Configuring GPRS Network.
Tap it to connect to a SCMDM server with an enrollment ID and password, allowing
company deployment on multiple m obile computers.
Tap it to change the USB conn ection type. By default, it will automatically establish the
connection and start the ActiveSync operation when the mobile computer is connected to
PC. Wh
may be disconnected for priority concern. In this case , try to disable advanced network
functionality to tr oubleshoot ActiveSync connection proble m s .
Page 65

Chapter 3 Configuring CP30 Mobile Computer
Wi-Fi
Wireless Manager
3.2.2 PERSONAL
Buttons
Owner Information
Phone
Refer to Using 802.11 Radio .
Tap it to enable/disable the Wi-Fi, Bluetooth or Phone P owe r, r el at ed inf ormat ion refer to
4.1.1 Power On via Wireless Manager and 6.1.1 Wireless Manager (Phone).
Go to Start | Settings | Persona l .
Tap i t to adjust the character input repeat delay and rate, move the slider to right or
left for repeat speed.
Identification tab: Enter your contact information.
Notes tab: Enter your notes.
Refer to 6.2 Phone .
53
Page 66

CP30 Mobile Computer Reference Manual
3.2.3 SYSTEM
About
Backlight
Battery Power tab: You may configure when to turn on/off the backlight the
en to turn on/off the backlight the
Certificates
Customer Feedback
Device Information
Go to Start | Settings | System .
54
Version tab: It displays informa tion of OS software, processor, etc.
Device ID tab: You may enter a name and description for identifying the mobile
computer.
Copyrights tab: It displays important statements on copyrights.
brightness of the LC D backlight when on battery power.
External Power tab: You may configure wh
brightness of the LCD backlight when on external power (the mobile computer being
seated in the cradle for charging or connected for direct charging).
You may view or modify digital certificates that some applications use to establish trust
for secure connections.
You may send customer feedback to Micr osoft for improving Wind ows Mobile software.
It displays impor tant device information in system, s o f tware and hardware.
Page 67

Chapter 3 Configuring CP30 Mobile Computer
Encryption
Error Reporting
External GPS
GPS Manager
, or tap
ephemeris at any time. The data is valid for seven days
Keypad
Managed Programs
Memory
Regional Settings
You may encrypt files stored in the SD card. The encrypted files are read only on the
mobile computer.
You may determine whether to enable error reporting to help Microsoft improve Windows
Mobile software. By default, it will automatically collect errors and report to Microsoft.
Programs tab: You may specify a program por t for multiple GPS-enabled programs to
access GPS data.
Hardware tab: For GPS program port to work, you must specify correct hardware
port. If using the GPS receiver integrated on the mobile computer, select COM 7 and
4800 for baud rate.
Access tab: By defaul t, Windows Mobile manages access to your GPS receiver and
allows multiple programs to obtain GPS data simultaneously. If you clear the check
box, some progra m s may not be able to obtain GPS d a ta .
AGPS tab: You may select to enable AGPS function to improve GPS performa nce.
Ephemeris tab: You may configure how to download ephemeris data
[Download] to update
according to the system date a nd time. The date of last download will be displayed at
the lower left of the screen.
You may change the keyp ad backlight beh avior. By defaul t, the keypad backlight will be
automatically tur ned off for five seconds when any key is pressed.
You may manage programs that are installed in RAM.
Main tab: You may view the current capacity and usage of the onboard RAM.
Storage Card tab: Y ou may view th e memory occupat ion of the Flash Disk folder or
any storage card.
Region tab: You may customize the appearance and formatting to your geographic
region.
Number tab: You may further customize the number formats.
Currency tab: You may further customize the currency formats.
Time tab: You may further customize the time format.
Date tab: You may further customize the date format.
55
Page 68

CP30 Mobile Computer Reference Manual
Remove Programs
Screen
Task Manager
have a list of all applications which are currently running on the mobile
You may remove programs that are stored in RAM.
Alignment tab: You may align the screen for calib r ation.
ClearType tab: You may apply Clear Type fonts.
Text Size tab: You may use the slider to adjust the text size.
You may
computer. Tap and hold the application to switch to enable or end it if processing too
many applications wi ll waste a lot of memory or CPU resource.
56
Page 69

Chapter 3 Configuring CP30 Mobile Computer
3.3 DEVICE NAME & CONFIGURATION
3.3.1 CHANGE DEVICE NAME
Go to Start | Settings | System, and tap About to change the device name on the
Device ID tab if necessary.
57
Page 70

CP30 Mobile Computer Reference Manual
3.3.2 UNDERSTAND DEVICE CONFIGURATION
01”; therefore, the mobile computer has the
Device ID
Modular Component
Types
Go to Start | Settings | System, and tap Device Information to view the device
information. The device configuration of CP30 Mobile Computer is displayed in 7 digits:
xxxxxxx
Take the screenshot for example. Its device ID is
“20576
following features –
28-key, WQVGA screen
A sca n e ng i ne t hat e m p loy s La se r scan engine
Integrated communications: Bluetooth, Wi-Fi and
GSM/GPRS
Integrated GPS receiver and camera
1st digit Reader module 0= none
2nd digit Reserved 0
3rd digit Bluetooth, GSM/GPRS 0= none
4th digit Wi-Fi, GPS 0= none
5th digit LCD, Camera 2= WQVGA
6th digit Keypad 0= 28-key
7th digit PCB main board 1= EVT1
58
2= Laser (SE955)
3= 2D Imager
1= Bluetooth
4= GSM/GPRS
5= Bluetooth + GSM/GPRS
3= Wi-Fi
4= GPS
7= Wi-Fi + GPS
6= WQVGA + Camera
Page 71

The Wi-Fi module integrated on the mobile computer l ets you configure and connect to
IN THIS CHAPTER
4.1 Wi-Fi Power ................................................................ 60
Chapter 4
USING 802.11 RADIO
network wirelessly.
59
Page 72

CP30 Mobile Computer Reference Manual
4.1 WI-FI POWER
4.1.1 POWER ON VIA WIRELESS MANAGER
1. Go to Start | Wireless Manager as shown below.
2. Tap [All] or [Wi-Fi] to turn on the power.
60
Page 73

Chapter 4 Using 802.11 Radio
4.1.2 WLAN CONNECTION
3. When the Wi-Fi status is “Available”, it means it is turned on and Wi-Fi networks are
available.
1. Tap Menu | Wi-Fi Settings to configure related settings.
61
Page 74

CP30 Mobile Computer Reference Manual
Icon
Indication
The signal strength (RSSI) for the current AP (to which the radio is
interference. For best performance, connect to the wireless network with the strongest
To improve the signal strength, you can move your mobile computer closer to the wireless
2. On the Wireless t ab, y ou may have a list of available Wi-Fi networks. Select one or tap [Add
New…] and follow the on-screen instructions to configure related settings, such as the
network name, authentication and encryption type, etc.
The icon next to the network name provides a visual status for th e radio. It is only available
when all of the followi ng is true:
(no-bar)
(one-bar)
(two-bar)
(three-bar)
(four-bar)
(Encryption)
(fail)
A strong si gnal (four bars) usually me ans that the wireless network is close or there is no
signal. However, if an unsecured network has a stronger signal than a security-enabl ed on e,
it's safer for your data if you conn ect to the security-enabled/encryption network ( but you
must be an authorized user of that networ k).
router or access point, or move the router or access point so it’s not close to sources of
interference such as brick walls or walls that contain metal support beams.
associated) is -91 dBm or weaker.
The RSSI for the current AP is -90 dBm or stron ger but n o more than
-82 dBm.
The RSSI for the current AP is -81 dBm or stronger bu t no more than
-72 dBm.
The RSSI for the current AP is -71 dBm or s tronger bu t no more than
-68 dBm.
The RSSI for the curr ent AP is -67 dBm or stronger.
The RSSI for the curr ent AP has a data encryption for connection.
The signal for the curre nt AP is unavailable.
62
Page 75

Chapter 4 Using 802.11 Radio
Wait a few seconds for the mobile computer to connect to the preferred network you have
3.
configured. Tap [OK] to close the current window.
4.
Once connected successfully, the associated icon
connected network na m e will be displayed for Wi-Fi status in Wireless Manager.
will appear on the title bar and the
Note: I f the Wi-Fi power item is disappeared during the Wi-Fi connection, please go to
the ActiveSync configuration screen to enable “Allow wireless connection on device when
connected to the desktop” check box that located in the File | Connection Settings of
ActiveSync to appear Wi-Fi power item.
63
Page 76

CP30 Mobile Computer Reference Manual
64
Page 77

The CP30 Mobile Computer lets you confi gure Bluetooth sett ings and manage Bluetooth
Bluetooth Profiles Supported
IN THIS CHAPTER
5.6 Active Sync via Bluetooth ............................................. 79
Chapter 5
USING BLUETOOTH
services provided on the remote devices.
Serial Port Prof ile (SPP) supports Server/Client
Object Push Profile (OPP) supports Server/Client
Dial-Up Networking Profile (DUN) supports Client only
Personal Area Networking Profile (PAN)
Human Interface Device Profile (HID) supports keyboard and mouse without cursor
Headset Profile (HSP)
Hands-Free Profile (HFP)
Generic Access Profile (GAP)
Generic Object Exchange Pro file (GEOP)
Advanced Audio Dis tr ibution Profile (A2DP)
Audio/Video Remote Control Profile (AVRCP)
Phone Book Acces s P r ofile (PBAP)
ActiveSync-Over-Bluetooth
5.1 Bluetooth Power ......................................................... 66
5.2 Search Devices ........................................................... 68
5.3 Pair Devices ............................................................... 70
5.4 Serial Port Service....................................................... 73
5.5 Object Push via Beam .................................................. 77
65
Page 78

CP30 Mobile Computer Reference Manual
5.1 BLUETOOTH POWER
5.1.1 POWER ON VIA WIRELESS MANAGER
1. Go to Start | Wireless Manager as shown below.
2. Tap [All] or [Bluetoo th] to turn on the power.
66
Page 79

Chapter 5 Using Bluetooth
3. When the Bluetooth status is “Visible”, it means it is turned on and deployment is enabled.
5.1.2 CHANGING BLUETOOTH SETTINGS
Tap Menu | Bluetooth Settings to configure related settings. On the Mode tab, you
may select to enable/disable Bluetooth function or whether hide the mobile computer
from other Bluetooth devices.
67
Page 80

CP30 Mobile Computer Reference Manual
5.2 SEARCH DEVICES
1. In the Bluetooth configurations screen, on the Devices mode tab you can search for other
Bluetooth device o r g o to Start | Settings | Bluetooth for the same settings.
2. Tap [Add new device…] or Add on the soft key bar to search for other Bluetooth devices.
68
Page 81

Chapter 5 Using Bluetooth
3.
Wait for a few seconds, and it will list the discovered devices. If you do not see the devices
that want to be connected, make sure it is set discoverable. Tap Refresh to search again.
69
Page 82

CP30 Mobile Computer Reference Manual
5.3 PAIR DEVICES
5.3.1 PAIR
1. Select a connected device and tap Next.
2. If necessary, please enter the password that is specified on the remote device. Tap Next.
70
Page 83

Chapter 5 Using Bluetooth
3. Tap Done.
Once paired successfully, the device will appear in the device list. Tap it to view available
4.
Bluetooth services or modify its display name.
71
Page 84

CP30 Mobile Computer Reference Manual
5.3.2 UNPAIR
On the Devices tab, ta p and hold the desired d evic e to select [Delete] from the pop-up menu.
Note: The mobile computer must be unpaired on the remote device as well. For example,
also remove it from the device list on the remote device. (Both devices must be unpaired
and removed!)
72
Page 85

Chapter 5 Using Bluetooth
5.4 SERIAL PORT SERVICE
1. On the Devices tab, ta p and hold the desired d evic e to select [Edit] from the pop-up menu.
2. Make sure the Serial Port service is enabled for use on the remote Bluetooth device. For PC
example, you can launch the Bluetooth Device configuration utility and in the Bluetooth
Device configuration screen, tap COM Ports tab, tap [Add] as below. Select “Incoming
(device initiates the connection)” item tap [OK].
73
Page 86

CP30 Mobile Computer Reference Manual
3. The searched COM port will be showed on the screen, select the connected COM port then
tap [OK].
Note: For PC example, You can use just like Hype r Terminal application tool to confirm
the connecti on betwe en your PC and mobile computer. By the way, the Hyper Terminal
COM port No. has to set as same a s the i ncomi n g p or t No. of your PC.
4. On the Bluetooth configuration screen of mobile computer, tap [Refresh] to select Serial
Port check box, click [Save].
74
Page 87

Chapter 5 Using Bluetooth
5. On the COM Ports tab, tap [Ne w Outgoing Port].
6. Select the remote device, and then tap Next.
75
Page 88

CP30 Mobile Computer Reference Manual
7. Select a COM port, and then tap Finish. (For Bluetooth, please select COM0 or COM3 for
connection.
8. Tap OK.
76
Page 89

Chapter 5 Using Bluetooth
5.5 OBJECT PUSH VIA BEAM
5.5.1 SEND A FILE
1. Tap Start | File Explorer.
2. Navigate through file folders to find the file you wish to send to the remote device.
3. Tap and hold the file to select [Beam File] from the pop-up menu.
4. Tap the required remote device to send the file via Bluetooth. The mobile computer will
start uploading the file. Wait a few seconds for the remote device to receive the file. When
it is done, tap OK to return.
77
Page 90

CP30 Mobile Computer Reference Manual
5.5.2 RECEIVE A FILE
1. Tap Start | Settings | Connections | Beam, and make sure the Beam Mode is enable d in
order to receive all incoming beams.
2. On the remote device, send a desired file to the m obile computer via Bluetooth.
3. When the “Receiving Data” dialog appears on the screen, tap Yes. The received data will
be saved to \My Device\My Documents.
78
Page 91

Chapter 5 Using Bluetooth
5.6 ACTIVE SYNC VIA BLUETOOTH
Configure Bluetooth settings for your computer, such as “Turn discovery on”, adding a COM
You must configure Bluetooth settings correctly on your computer first.
1.
port (Incoming), the COM port value depend on your computer active etc.
2. Allow connections to the specified COM por t in ActiveSync.
79
Page 92

CP30 Mobile Computer Reference Manual
take off the USB cable between mobile computer and remote computer so that it can
3. Deploy the mobile computer to your computer. Make sure the ActiveSync service is enabled
for use on the remote computer. For the Bluetooth connection via ActiveSync, you have to
release the ActiveSync check box as below for conn ection. Select ActiveSync check box,
then click Save to continue.
80
Page 93

The CP30 Mobile Computer allows making phone calls and connecting to network over
IN THIS CHAPTER
6.5 Configuring GPRS Network ........................................... 95
Chapter 6
USING THE PHONE
General Packet Radio Service (GPRS). Insert the SIM card before turning on the power.
Refer to Inserting SIM Card
Note: I f the SIM car d is not in position, you may make emergency calls if the service is
supported.
.
6.1 Phone Power .............................................................. 82
6.2 Phone Application ....................................................... 85
6.3 Phone Settings ........................................................... 87
6.4 Making Phone Call s ..................................................... 91
81
Page 94

CP30 Mobile Computer Reference Manual
6.1 PHONE POWER
6.1.1 WIRELESS MANAGER
Wireless Manager
1. Phone power is turned on by default. If not, go to Start | Wireless Manager to access
Wireless Manager.
2. Tap [All] or [Phone ] to turn on the power.
82
Page 95

Chapter 6 Using the Phone
3. When the power is turned on, the Phone status appears “On”, and an antenna signal icon
will be displayed on the title bar.
4. Tap Menu | Phone Settings to configure related settings if necessary.
Note: Phone Settings is only available when the phone power has been turned on. You
can find out the security setting, change PIN code on your SIM card and so on, if
necessary. Refer to
6.3 Phone Settings.
83
Page 96

CP30 Mobile Computer Reference Manual
6.1.2 SIM CARD MISSING
1.
On the Home Screen, the notification icon
missing.
on the title bar sh ow that the SIM card is
2. Tap Phone or press the [SEND] button on the physical keypad to access the phone
application. Depending on your service provider, only emergency calls are allowed.
84
Page 97

Chapter 6 Using the Phone
6.2 PHONE APPLICATION
6.2.1 PHONE INTERFACE
Antenna signal icon
Show or hide
phone keypad
After the phone application is launched, the antenna signal icon on
the title bar indicates whether you are connected to your service provider’s network. As
the strength of the signal dimi nishes, so will the num ber of bars be in the icon, r anging
from no signal to excellence (four-bars).
The display panel on the top half of the scr een is used to show your service provider’s
name and the contact name and/or phone number when making or receiving a call.
Tap the scroll bar next to the display panel to browse call history, which keeps a
record of the phone number that called in or out or you missed.
Tap a contact name to view, edit the contact details, send or beam contact, or add to
speed dial list.
Tap the Menu button on the soft key bar to switch the view options.
The phone keypad is displayed for telephone number input or speed dial.
Tap the button (Hide keypad) on the soft key bar to hide the keypad.
Tap the button (Show keypad) on the soft key bar to show the keypad.
85
Page 98

CP30 Mobile Computer Reference Manual
6.2.2 BUTTONS
Button
Description
6.2.3 VOLUME
Buttons on the phone keypads are described as below:
[Backspace] button allows you to delete the last input.
[Speed Dial] button all ows you to view, edit the speed dial list and pick the
number you want to c a ll.
[Call History] button allows you to browse, edit call history and pick the
number you want to call.
[Talk] button allows you to make or receive a call.
Alternatively, you may press [SEND] from the keypad.
[End] button allows you to hang up a call.
Alternatively, you may press [END] from the keypad.
Tap the title bar and then the speaker icon on the title bar drop-down list to change the
system volume or phone ring. You may mute it or have it vibrate instead.
Note: Alternatively, you may press volume buttons at the left side of the CP30 touch
screen.
86
Page 99

Chapter 6 Using the Phone
6.3 PHONE SETTINGS
Sounds tab
Tap Menu | Options to configure phone set t i ng s if necessary.
Tap the Sounds tab to adjust the ring type, ring tone, and the keypad sound.
87
Page 100

CP30 Mobile Computer Reference Manual
Security tab
Services tab
Tap the Security tab to change SIM card security and PIN code setting.
Note: The PIN verification on the mobile computer allows three chances to input the
correct PIN code. If input fails three times, the PIN will be blocked, and you will nee d to
obtain the PUK code from your network operator and unblock the SIM card on your
cellular phone /mobile computer.
Tap the Services tab to get the phone service settings from your network operator.
88
 Loading...