

Page 1

1560/1562 Barcode Scanner
Setup barcodes included.
Version 1.10
Page 2

Copyright © 2009~2011 CIPHERLAB CO., LTD.
All rights reserved
The software contains proprietary information of CIPHERLAB CO., LTD.; it is provided
under a license agreement containing restrictions on use and disclosure and is also
protected by copyright law. Reverse engineering of the software is prohibited.
Due to continued product development this information may change without notice. The
information and intellectual property contained herein is confidential between CIPHERLAB
and the client and remains the exclusive property of CIPHERLAB CO., LTD. If you find
any problems in the documentation, please report them to us in writing. CIPHERLAB
does not warrant that this document is error-free.
No part of this publication may be reproduced, stored in a retrieval system, or
transmitted in any form or by any means, electronic, mechanical, photocopying,
recording or otherwise without the prior written permission of CIPHERLAB CO., LTD.
For product consultancy and technical support, please contact your local sales
representative. Also, you may visit our web site for more information.
The CipherLab logo is a registered trademark of CIPHERLAB CO., LTD.
All brand, product and service, and trademark names are the property of their registered
owners.
The editorial use of these names is for identification as well as to the benefit of the
owners, with no intention of infringement.
CIPHERLAB CO., LTD.
Website:
http://www.cipherlab.com
Page 3

IMPORTANT NOTICES
FOR USA
This equipment has been tested and found to comply with the limits for a Class B digital
device, pursuant to Part 15 of the FCC Rules. These limits are designed to provide
reasonable protection against harmful interference in a residential installation. This
equipment generates, uses and can radiate radio frequency energy and, if not installed
and used in accordance with the instructions, may cause harmful interference to radio
communications. However, there is no guarantee that interference will not occur in a
particular installation. If this equipment does cause harmful interference to radio or
television reception, which can be determined by turning the equipment off and on, the
user is encouraged to try to correct the interference by one or more of the following
measures:
Reorient or relocate the receiving antenna.
Increase the separation between the equipment and receiver.
Connect the equipment into an outlet on a circuit different from that to which the
receiver is connected.
Consult the dealer or an experienced radio/TV technician for help.
This device complies with Part 15 of the FCC Rules. Operation is subject to the following
two conditions: (1) This device may not cause harmful interference, and (2) this device
must accept any interference received, including interference that may cause undesired
operation.
FOR CANADA
This digital apparatus does not exceed the Class B limits for radio noise emissions from
digital apparatus as set out in the interference-causing equipment standard entitled
"Digital Apparatus," ICES-003 of Industry Canada. This device complies with Part 15 of
the FCC Rules. Operation is subject to the following two conditions: (1) This device may
not cause harmful interference, and (2) this device must accept any interference received,
including interference that may cause undesired operation.
Cet appareil numerique respecte les limites de bruits radioelectriques applicables aux
appareils numeriques de Classe B prescrites dans la norme sur le material brouilleur:
"Appareils Numeriques," NMB-003 edictee par l'Industrie.
Page 4

FOR HAND-HELD PRODUCT WITH RF FUNCTIONS
The 1560/1562 unit (FCC ID: Q3N-1560) complies with FCC radiation exposure limits set
forth for uncontrolled environment and meets the FCC radio frequency (RF) Exposure
Guidelines in Supplement C to OET65. The unit has very low level of RF energy that it is
deemed to comply without testing of specific absorption ratio (SAR).
The 3656 unit (FCC ID: Q3N-3656) complies with FCC radiation exposure limits set forth
for an uncontrolled environment. This equipment should be installed and operated with
minimum distance 20 cm between the radiator & your body. It only operated in
hand-held used. If you only transfer data to the host wirelessly, please keep the
minimum distance 20 cm between machine & your body.
FOR PRODUCT WITH LASER
CAUTION
This laser component emits FDA / IEC Class 2 laser light at the exit port. Do not
stare into beam.
SAFETY PRECAUTIONS
RISK OF EXPLOSION IF BATTERY IS REPLACED BY AN INCORRECT TYPE.
DISPOSE OF USED BATTERIES ACCORDING TO THE INSTRUCTIONS.
The use of any batteries or charging devices, which are not originally sold or
manufactured by CipherLab, will void your warranty and may cause damage to
human body or the product itself.
DO NOT disassemble, incinerate or short circuit the battery.
DO NOT expose the scanner or the battery to any flammable sources.
For green-environment issue, it's important that batteries should be recycled in a
proper way.
Under no circumstances, internal components are self-serviceable.
The charging device uses an AC power adaptor. A socket outlet shall be installed near
the equipment and shall be easily accessible. Make sure there is stable power supply
for the scanner or its peripherals to operate properly.
CARE & MAINTENANCE
Use a clean cloth to wipe dust off the scanning window and the body of the scanner
as well as the charging device. DO NOT use/mix any bleach or cleaner.
If you want to put away the scanner for a period of time, download the collected data
to a host computer when in the memory mode, and then take out the battery. Store
the scanner and battery separately.
When the scanner resumes its work, make sure the battery is fully charged before
use.
If you shall find the scanner malfunctioning, write down the specific scenario and
consult your local sales representative.
Page 5

RELEASE NOTES
Version Date Notes
1.10 Aug 31, 2011
1.09 May 25, 2011
1.08 Mar. 11, 2011
1.07 Jan. 10, 2011
1.06 Nov. 30, 2010
New: “Auto Power Off Ignoring Scan Mode” is added. Sections
Modified: 3656+USB+Adaptor issue
Modified: 2.1 BT HID — add Inter-Character Delay
Modified: 2.6 USB HID via 3656 — add Inter-Character Delay
New: Quick Start — Create One-Scan Setup Barcodes (e.g. ”109950”
Modified: 1.11 Auto-Sense Mode (1560 Only) — add High Sensitivity
Modified: Specifications — Power Adaptor
Modified: Introduction, Product Highlights — add CipherConnect
Modified: 4.10 GS1-128 (EAN-128) —
Modified: 5.6.1 Edit a Concatenation of Barcodes — Code type for
New: 6.4.5 Pause Field Setting
Modified: 6.5 Configuring Format — Define Transmission Sequence
Modified: Introduction, Symbologies Supported — add support of
New: Introduction — Charging the Battery via Charger
Modified: 1.1.2 Auto Power Off & Power-Saving
Modified: 1.4 Beeper — describe “Low Battery Alarm”
New: 2.1.6 Keypad Support for iPhone/iPad
Modified: 3.2.3 Connect to Dongle —
Modified: 4.16 GS1 DataBar (RSS Family)
Modified: 4.16.2 GS1 DataBar Omnidirectional (RSS-14)
Modified: 4.16.3 GS1 DataBar Expanded (RSS Expanded)
Modified: 5.2 Character Substitution —
involved are:
- Renamed section 1.1.1 “Turn on/off the Scanner”
- Modified section: 1.1.2 “Power Economy”.
- Adjusted new section: 1.1.3 “Power Economy vs. WPAN
Connection”
”#@109950#”)
behavior
Cannot read when disabled
since firmware v1.01
ISBT 128
(add Pause Field, Null Character Field )
more RSS symbologies
describe random PIN in Step
12
add table for Scan
Code/Normal Key
Page 6

1.05 Apr. 09, 2010
Modified: 1.1.2 Auto Power Off & Power-Saving
Modified: 2.1.1 Activate BT HID & Select Keyboard Type — add
Turkish
Modified: 2.1.3 Keyboard Settings — BT HID supports “Alphabets
Layout”
Modified: 2.1.5 HID Character Transmit Mode
Modified: 2.2 BT SPP Slave
Modified: 2.3 BT SPP Master
Modified: 2.4.1 Activate Keyboard Wedge & Select Keyboard
Type — add Turkish
Modified: 2.5.2 Baud Rate — add setup barcode for 4800 bps
(100100)
Modified: 2.5.2 Baud Rate —
bps
Modified: 2.6.1 Activate USB HID & Select Keyboard Type —
Turkish
Modified: 2.6.2 Keyboard Settings — USB HID supports “Alphabets
Layout”
Modified: 2.6.4 HID Character Transmit Mode
New: 3.1.3 Configure Related Settings — Sniff Mode
Modified: 4.9.4 Security Level
Modified: Appendix III Keyboard Wedge Table — remove settings for
user-defined scan code
Modified: Appendix III Keyboard Wedge Table — provide examples
1.04 Mar. 02, 2010
1.03 Oct. 30, 2009
Modified: Charging the Battery via 3656 — suggest connecting
power cord for USB
Modified: 1.10 Auto-Sense Mode (1560 Only) — Continuous mode as
an alternative
Modified: 1.13 Symbologies Supported —
default
Modified: 5.2.2 Symbologies for Character Substitution (All 3
Sets) — add ISBT 128
Modified: 5.4.1 Select Pre-defined Code ID — add ISBT 128
Modified: 5.4.2 Change Code ID — add ISBT 128
Modified: 5.5 Length Code — add ISBT 128
Modified: 6.3.1 Applicable Code Type (for Editing Format) —
ISBT 128
1.02 July 07, 2009
Modified: Charging the Battery via 3656 —charging time changed
from 3 to 5 (hr)
Modified: 1.1 Battery — charging time changed from 3 to 5 (hr)
Modified: 1.1.2 Auto Power Off & Power-Saving — add setup barcode
for Power-Saving setting (101021)
Modified: 3.2.2 Configure Related Settings — Authentication
1.01 June 3, 2009
Modified: 1.10 Auto-Sense Mode — Power supply cord is required.
Modified: Appendix II Host Serial Commands
1.00 Apr. 29, 2009 Initial release
change default baud rate to 115200
add
ISBT 128 enabled by
add
Page 7

CONTENTS
IMPORTANT NOTICES ...................................................................................................................... - 3 -
For USA .......................................................................................................................................... - 3 -
For Canada .................................................................................................................................... - 3 -
For Hand-held Product with RF Functions ................................................................................... - 4 -
For Product with Laser .................................................................................................................. - 4 -
Safety Precautions ........................................................................................................................ - 4 -
Care & Maintenance ..................................................................................................................... - 4 -
RELEASE NOTES.............................................................................................................................. - 5 -
INTRODUCTION.................................................................................................................................... 1
Getting Familiarized with 1560/1562 and 3656 ........................................................................... 2
Installing the Battery to 1560/1562 .......................................................................................... 2
Setting up 3656 ........................................................................................................................... 3
Charging the Battery via 3656 .................................................................................................... 5
Charging the Battery via Charger ................................................................................................ 6
Inside the Package............................................................................................................................ 7
Product Highlights ............................................................................................................................. 7
Symbologies Supported .................................................................................................................... 8
QUICK START ..................................................................................................................................... 11
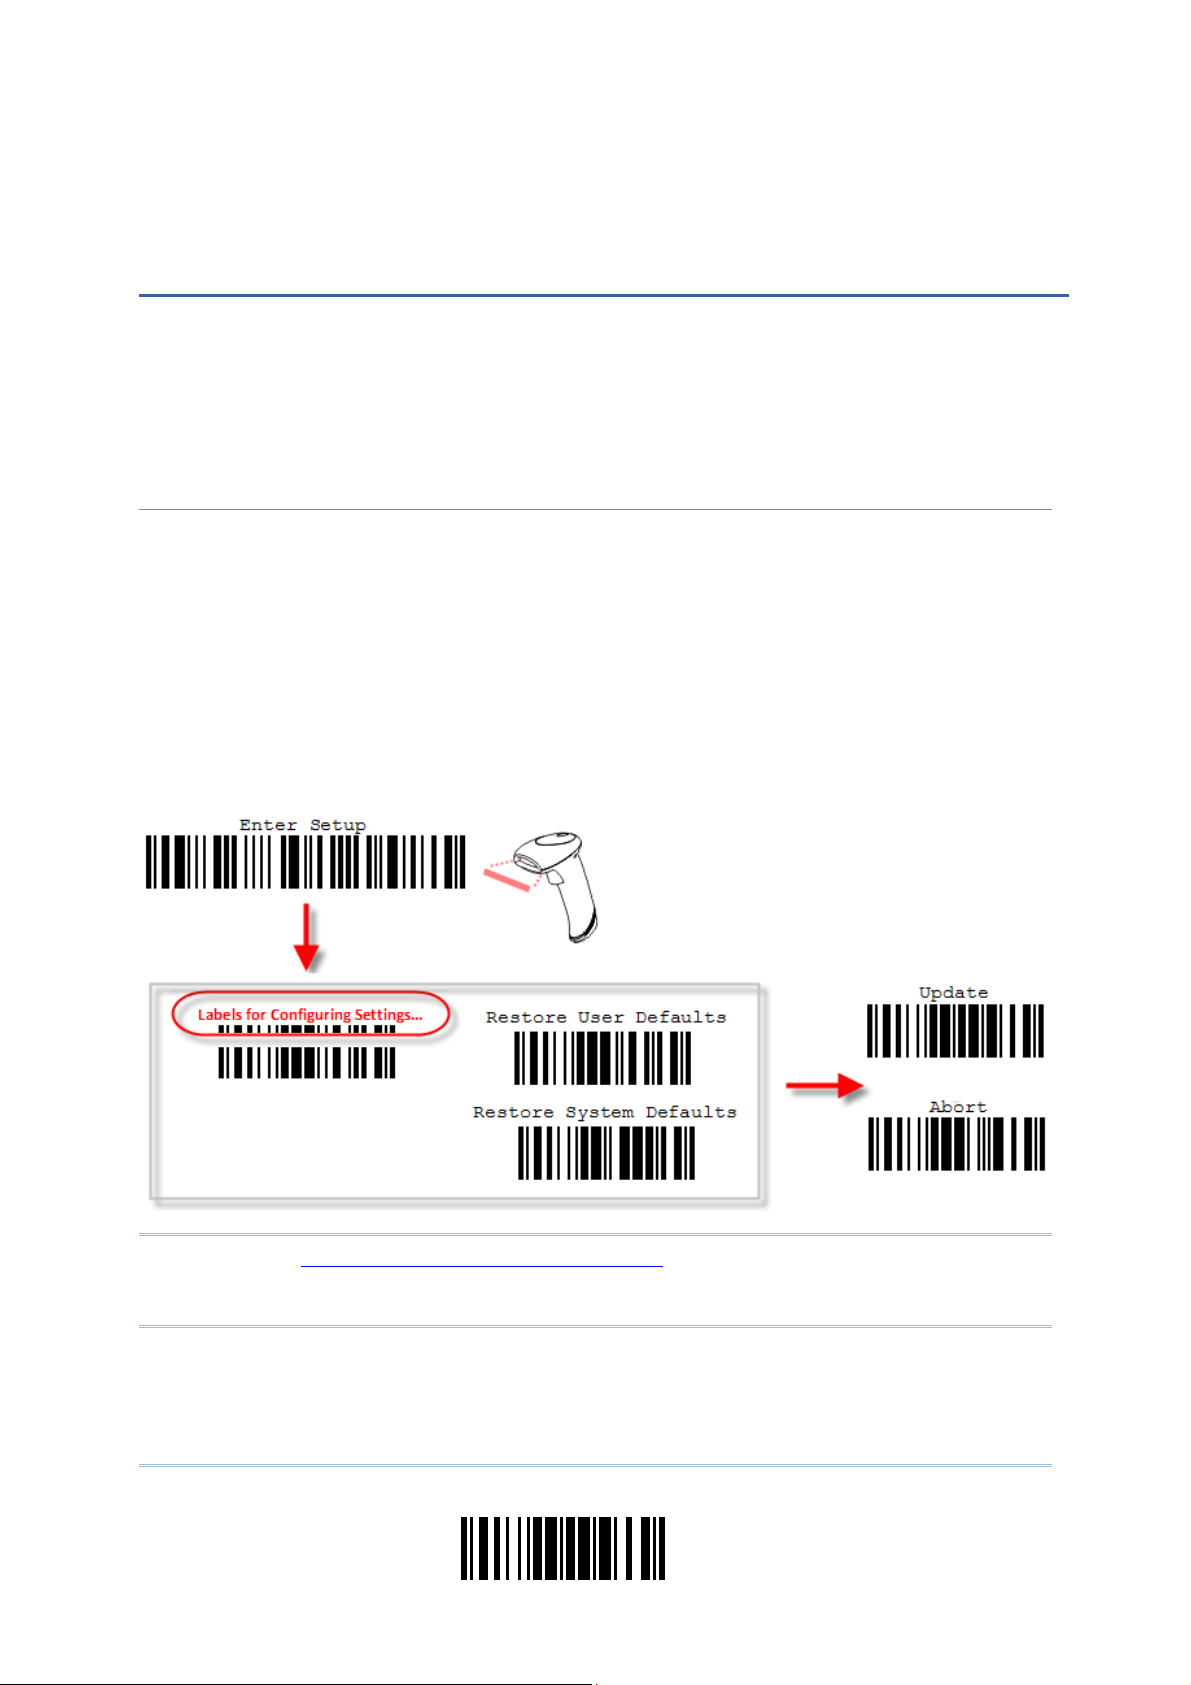
Enter Configuration Mode............................................................................................................... 13
Exit Configuration Mode..................................................................................................................13
Default Settings............................................................................................................................... 14
Save User Settings as Defaults................................................................................................. 14
Restore User Defaults................................................................................................................ 14
Restore System Defaults ...........................................................................................................14
Read a Setup Barcode.................................................................................................................... 15
Configure Parameters................................................................................................................ 15
List the Current Settings............................................................................................................ 19
Create One-Scan Setup Barcodes..................................................................................................21
UNDERSTANDING THE BARCODE SCANNER.................................................................................... 23
1.1 Battery .......................................................................................................................................23
1.1.1 Turn on/off the Scanner ..................................................................................................23
1.1.2 Power Economy ................................................................................................................24
1.1.3 Power Economy vs. WPAN Connection ...........................................................................27
1.2 Memory .....................................................................................................................................29
1.2.1 Transmit Buffer ................................................................................................................29
1.2.2 Memory Mode ..................................................................................................................30
1.3 LED Indicator ............................................................................................................................32
1.3.1 Good Read LED ................................................................................................................ 33
1.3.2 Good Read LED Duration................................................................................................. 33
Page 8

1560 Series Barcode Scanner User Guide
1.4 Beeper.......................................................................................................................................
34
1.4.1 Beeper Volume................................................................................................................. 35
1.4.2 Good Read Beep .............................................................................................................. 36
1.4.3 Low Battery Alarm ............................................................................................................ 37
1.5 Send “NR” to Host ....................................................................................................................38
1.6 Scan Modes .............................................................................................................................. 39
1.6.1 Continuous Mode............................................................................................................. 40
1.6.2 Test Mode......................................................................................................................... 40
1.6.3 Laser Mode....................................................................................................................... 41
1.6.4 Auto Off Mode...................................................................................................................41
1.6.5 Auto Power Off Mode ....................................................................................................... 41
1.6.6 Alternate Mode.................................................................................................................42
1.6.7 Aiming Mode..................................................................................................................... 42
1.6.8 Multi-Barcode Mode......................................................................................................... 43
1.7 Scanning Timeout.....................................................................................................................44
1.8 Delay between Re-read ............................................................................................................ 45
1.9 Read Redundancy for All Symblogies...................................................................................... 46
1.10 Addon Security for UPC/EAN Barcodes ................................................................................47
1.11 Auto-Sense Mode (1560 Only) .............................................................................................. 48
1.12 CCD Sensor Always Active (1560 Only).................................................................................50
1.13 Negative Barcodes .................................................................................................................50
1.14 Effective Decoding Area.........................................................................................................51
1.14.1 Positioning Window........................................................................................................51
1.14.2 Adjusting Window...........................................................................................................52
SELECTING OUTPUT INTERFACE .......................................................................................................53
2.1 BT HID........................................................................................................................................54
2.1.1 Activate BT HID & Select Keyboard Type........................................................................ 55
2.1.2 Reset Connection............................................................................................................. 56
2.1.3 Keyboard Settings............................................................................................................ 57
2.1.4 Inter-Character Delay ....................................................................................................... 64
2.1.5 Inter-Function Delay......................................................................................................... 64
2.1.6 HID Character Transmit Mode......................................................................................... 65
2.1.7 Keypad Support for iPhone/iPad ....................................................................................65
2.2 BT SPP Slave.............................................................................................................................66
2.2.1 Activate BT SPP Slave Mode ...........................................................................................66
2.2.2 Inter-Function Delay......................................................................................................... 66
2.2.3 ACK/NAK Timeout............................................................................................................ 67
2.3 BT SPP Master .......................................................................................................................... 68
2.3.1 Activate BT SPP Master Mode......................................................................................... 68
2.3.2 Inter-Function Delay......................................................................................................... 70
2.3.3 ACK/NAK Timeout............................................................................................................ 71
2.3.4 Switch between Master/Slave Mode.............................................................................. 71
2.4 Keyboard Wedge via 3656 ......................................................................................................72
2.4.1 Activate Keyboard Wedge & Select Keyboard Type....................................................... 73
2.4.2 Keyboard Settings............................................................................................................ 74
2.4.3 Inter-Character Delay ....................................................................................................... 82
2.4.4 Inter-Function Delay......................................................................................................... 82
2.5 RS-232 via 3656 ...................................................................................................................... 83
Page 9

1560 Series Barcode Scanner User Guide
2.5.1 Activate RS-232 Interface ...............................................................................................83
2.5.2 Baud Rate......................................................................................................................... 83
2.5.3 Data Bits ........................................................................................................................... 84
2.5.4 Parity ................................................................................................................................. 84
2.5.5 Stop Bit .............................................................................................................................85
2.5.6 Flow Control......................................................................................................................85
2.5.7 Inter-Character Delay ....................................................................................................... 86
2.5.8 Inter-Function Delay......................................................................................................... 86
2.5.9 ACK/NAK Timeout............................................................................................................ 87
2.6 USB HID via 3656..................................................................................................................... 88
2.6.1 Activate USB HID & Select Keyboard Type ..................................................................... 89
2.6.2 Keyboard Settings............................................................................................................ 90
2.6.3 Inter-Character Delay ....................................................................................................... 97
2.6.4 Inter-Function Delay......................................................................................................... 97
2.6.5 HID Character Transmit Mode......................................................................................... 98
2.7 USB Virtual COM via 3656....................................................................................................... 99
2.7.1 Activate USB Virtual COM ................................................................................................99
2.7.2 Inter-Function Delay......................................................................................................... 99
2.7.3 ACK/NAK Timeout..........................................................................................................100
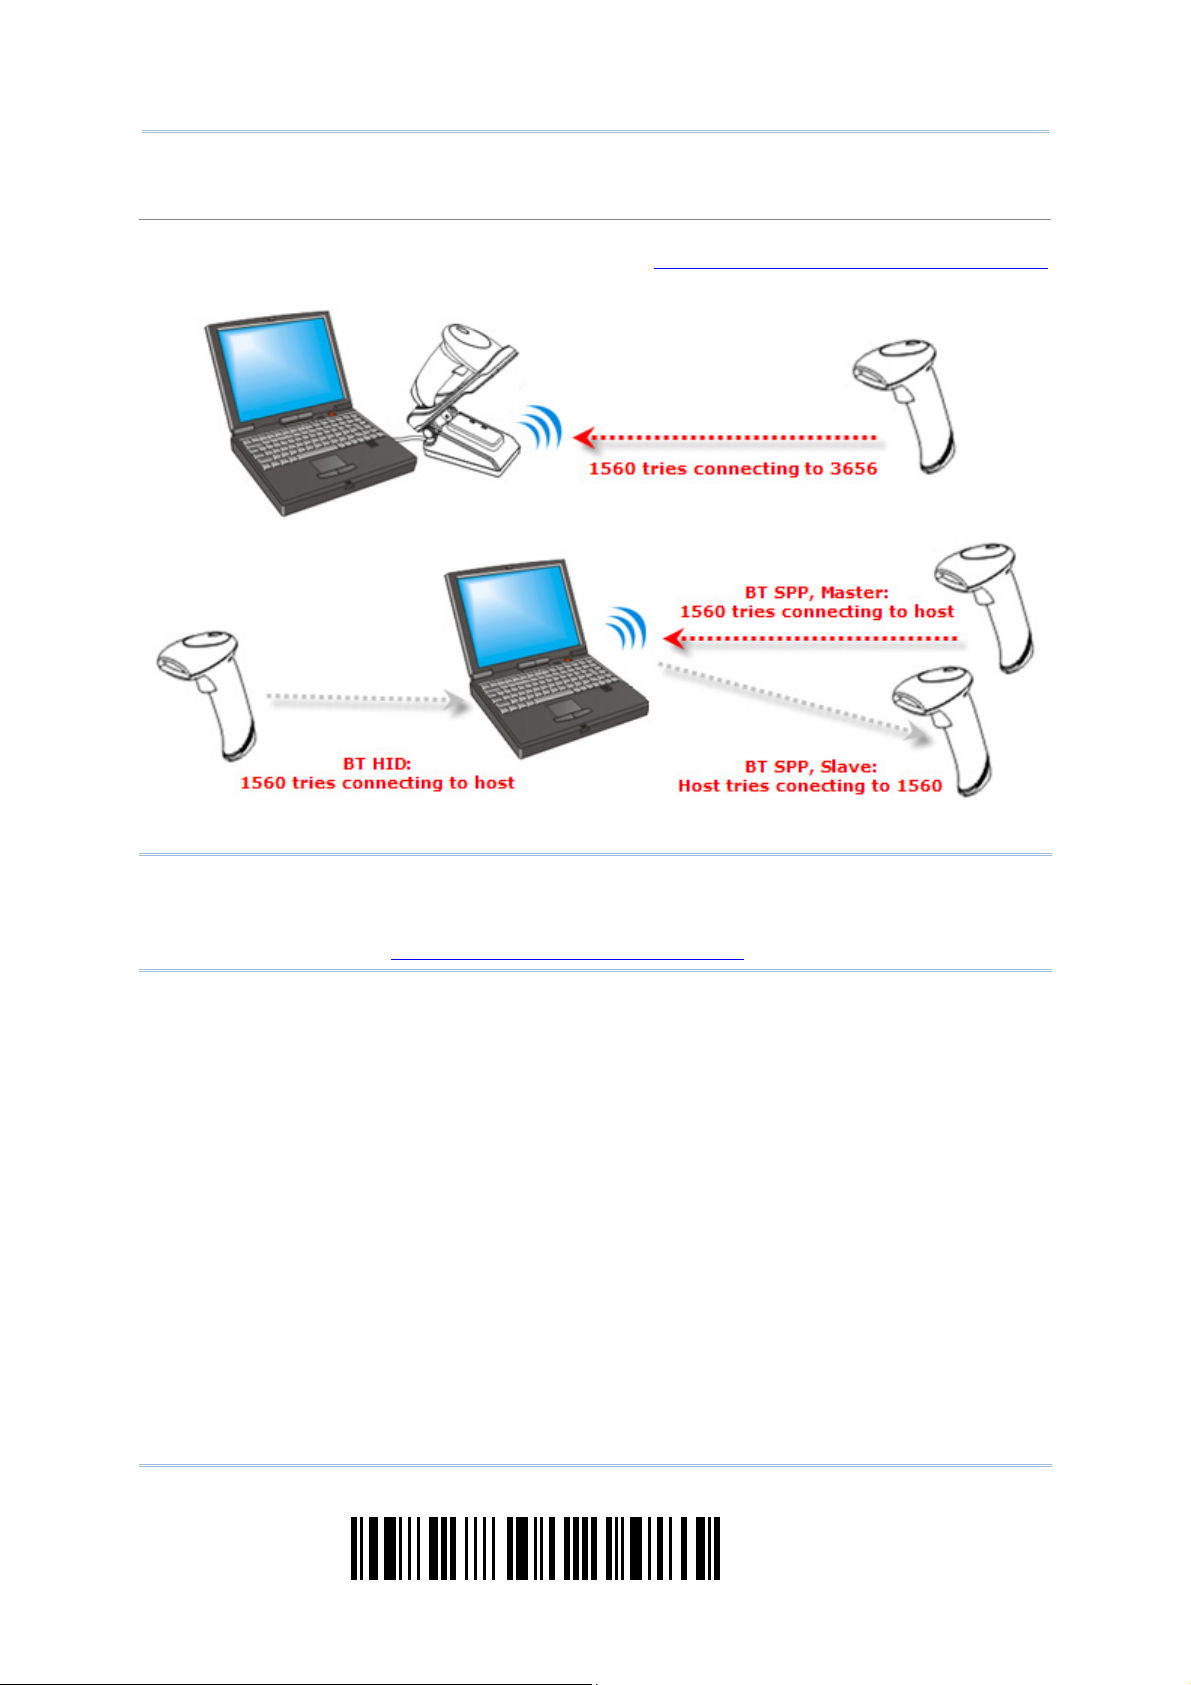
SETTING UP A WPAN CONNECTION ................................................................................................101
3.1 Connecting via 3656 ..............................................................................................................102
3.1.1 Connect to 3656 ............................................................................................................102
3.1.2 Change Interface............................................................................................................103
3.1.3 Configure Related Settings............................................................................................104
3.2 Connecting via Bluetooth® Dongle ........................................................................................105
3.2.1 Change Interface............................................................................................................105
3.2.2 Configure Related Settings............................................................................................106
3.2.3 Connect to Dongle..........................................................................................................109
CHANGING SYMBOLOGY SETTINGS................................................................................................117
4.1 Codabar...................................................................................................................................118
4.1.1 Start/Stop Characters Selection ...................................................................................118
4.1.2 Start/Stop Transmission................................................................................................119
4.1.3 CLSI Conversion .............................................................................................................119
4.2 Code 25 – Industrial 25.........................................................................................................120
4.2.1 Start/Stop Pattern Selection .........................................................................................120
4.2.2 Verify Check Digit ...........................................................................................................121
4.2.3 Transmit Check Digit......................................................................................................121
4.2.4 Code Length Qualification .............................................................................................122
4.3 Code 25 – Interleaved 25......................................................................................................123
4.3.1 Start/Stop Pattern Selection .........................................................................................123
4.3.2 Verify Check Digit ...........................................................................................................124
4.3.3 Transmit Check Digit......................................................................................................124
4.3.4 Code Length Qualification .............................................................................................125
4.4 Code 25 – Matrix 25 ..............................................................................................................126
4.4.1 Start/Stop Pattern Selection .........................................................................................126
4.4.2 Verify Check Digit ...........................................................................................................127
4.4.3 Transmit Check Digit......................................................................................................127
4.4.4 Code Length Qualification .............................................................................................128
4.5 Code 39...................................................................................................................................129
Page 10

1560 Series Barcode Scanner User Guide
4.5.1 Start/Stop Transmission................................................................................................
129
4.5.2 Verify Check Digit ...........................................................................................................129
4.5.3 Transmit Check Digit......................................................................................................130
4.5.4 Standard/Full ASCII Code 39 ........................................................................................130
4.6 Code 93...................................................................................................................................131
4.7 Code 128 ................................................................................................................................131
4.8 EAN-8.......................................................................................................................................132
4.8.1 Convert to EAN-13..........................................................................................................133
4.8.2 Transmit Check Digit......................................................................................................133
4.9 EAN-13 ....................................................................................................................................134
4.9.1 ISBN Conversion.............................................................................................................135
4.9.2 ISSN Conversion.............................................................................................................135
4.9.3 Transmit Check Digit......................................................................................................135
4.9.4 Security Level .................................................................................................................136
4.10 GS1-128 (EAN-128) .............................................................................................................137
4.10.1 Code ID Transmission..................................................................................................137
4.10.2 Field Separator (GS Character)...................................................................................137
4.11 ISBT 128 ...............................................................................................................................138
4.12 MSI ........................................................................................................................................139
4.12.1 Verify Check Digit.........................................................................................................139
4.12.2 Transmit Check Digit ...................................................................................................139
4.12.3 Code Length Qualification ...........................................................................................140
4.13 French Pharmacode.............................................................................................................141
4.13.1 Transmit Check Digit ...................................................................................................141
4.14 Italian Pharmacode ..............................................................................................................142
4.14.1 Transmit Check Digit ...................................................................................................142
4.15 Plessey ..................................................................................................................................143
4.15.1 Convert to UK Plessey .................................................................................................143
4.15.2 Transmit Check Digit ...................................................................................................143
4.16 GS1 DataBar (RSS Family) ..................................................................................................144
4.16.1 Code ID Selection ........................................................................................................144
4.16.2 GS1 DataBar Omnidirectional (RSS-14).....................................................................145
4.16.3 GS1 DataBar Expanded (RSS Expanded)...................................................................147
4.16.4 GS1 DataBar Limited (RSS Limited) ...........................................................................148
4.17 Telepen .................................................................................................................................149
4.17.1 Telepen Output – Full ASCII/Numeric ........................................................................149
4.18 UPC-A.....................................................................................................................................150
4.18.1 Convert to EAN-13 .......................................................................................................151
4.18.2 System Number Transmission....................................................................................151
4.18.3 Transmit Check Digit ...................................................................................................151
4.19 UPC-E.....................................................................................................................................152
4.19.1 System Number Selection...........................................................................................153
4.19.2 Convert to UPC-A..........................................................................................................153
4.19.3 System Number Transmission....................................................................................154
4.19.4 Transmit Check Digit ...................................................................................................154
DEFINING OUTPUT FORMAT............................................................................................................155
5.1 Letter Case..............................................................................................................................155
5.2 Character Substitution ...........................................................................................................156
Page 11

1560 Series Barcode Scanner User Guide
5.2.1 Select a Set for Character Substitution ........................................................................157
5.2.2 Symbologies for Character Substitution (All 3 Sets) ....................................................158
5.3 Prefix/Suffix Code...................................................................................................................164
5.4 Code ID....................................................................................................................................165
5.4.1 Select Pre-defined Code ID............................................................................................165
5.4.2 Change Code ID..............................................................................................................167
5.4.3 Clear Code ID Settings...................................................................................................168
5.5 Length Code............................................................................................................................169
5.6 Multi-Barcode Editor...............................................................................................................173
5.6.1 Edit a Concatenation of Barcodes ................................................................................174
5.6.2 Activate the Concatenation of Barcodes ......................................................................175
5.7 Removal of Special Character ...............................................................................................176
APPLYING FORMATS FOR DATA EDITING........................................................................................177
6.1 Activating Editing Formats .....................................................................................................178
6.1.1 Activate Editing Formats................................................................................................178
6.1.2 Exclusive Data Editing....................................................................................................179
6.2 How to Configure Editing Formats.........................................................................................180
6.2.1 Select Format to Configure............................................................................................181
6.2.2 Restore Default Format .................................................................................................182
6.3 Configuring Format — Define Data Criteria ...........................................................................183
6.3.1 Applicable Code Type.....................................................................................................183
6.3.2 Data Length ....................................................................................................................190
6.3.3 Matching String & Location ...........................................................................................191
6.4 Configuring Format — Define Data Field ...............................................................................192
6.4.1 Start Position ..................................................................................................................192
6.4.2 Field Adjustment ............................................................................................................192
6.4.3 Total Number of Fields...................................................................................................193
6.4.4 Field Settings..................................................................................................................194
6.4.5 Pause Field Setting ........................................................................................................200
6.5 Configuring Format — Define Transmission Sequence ........................................................201
6.6 Programming Examples .........................................................................................................203
6.6.1 Example I ........................................................................................................................203
6.6.2 Example II .......................................................................................................................204
SPECIFICATIONS..............................................................................................................................205
FIRMWARE UPGRADE......................................................................................................................207
How to Upgrade 1560/1562 Firmware.......................................................................................207
Using 3656...............................................................................................................................207
Using Bluetooth® Dongle .........................................................................................................210
How to Upgrade 3656 Firmware ..................................................................................................212
Upgrading 3656 CPU Firmware...............................................................................................212
Upgrading 3656 USB Bridge Firmware...................................................................................214
HOST SERIAL COMMANDS..............................................................................................................217
1560/1562 Serial Commands ....................................................................................................217
Example ....................................................................................................................................218
3656 Setup Barcodes & Serial Commands ................................................................................219
3656 Serial Command Table ..................................................................................................220
Page 12

1560 Series Barcode Scanner User Guide
Example ....................................................................................................................................
222
KEYBOARD WEDGE TABLE..............................................................................................................223
Key Type & Status .........................................................................................................................224
Key Type....................................................................................................................................224
Key Status ................................................................................................................................224
Example .........................................................................................................................................225
NUMERAL SYSTEMS........................................................................................................................227
Decimal System.............................................................................................................................227
Hexadecimal System.....................................................................................................................228
ASCII Table.....................................................................................................................................229
Entering PIN Code for Authentication ..........................................................................................230
Use Preset PIN..........................................................................................................................230
Disable Authentication or Use Random PIN...........................................................................231
Page 13

INTRODUCTION
CipherLab’s 1560 Series Barcode Scanners are specifically designed to answer your
mobile demands. The versatile scanners are designed to help accelerate productivity
while lowering the total cost of ownership. Intensive data collection jobs are made easier
with fast, accurate barcode scanning in various working environments, especially in small
businesses. Integrating short-distance wireless technology to small-form-factor scanners,
the 1560/1562 scanners are ideal for carrying around, and thus give workers tether-free
mobility anytime anywhere and get job done more efficiently. This line of scanners
deliver data over a wireless personal network at a range of up to 90 meters and a
prolonged battery life to keep business running.
Owing to the slim, ergonomic design, extremely low power consumption, and powerful
decoding capability, the 1560 Series Barcode Scanners are the best choice for the
following applications –
Receiving in Retail
Product labeling & Tracking
Shelf Product Replenishment
Mobile Point of Sale (POS)
Mobile Inventory Management
Order Picking & Staging
Work-In-Process Tracking
Material Flow Control
Transportation & Distribution
Warehousing
Asset Management
This manual contains information on operating the scanner and using its features. We
recommend you to keep one copy of the manual at hand for quick reference or
maintenance purposes. To avoid any improper disposal or operation, please read the
manual thoroughly before use.
Thank you for choosing CipherLab products!
1
Update
Page 14
1560 Series Barcode Scanner User Guide
GETTING FAMILIARIZED WITH 1560/1562 AND 3656
INSTALLING THE BATTERY TO 1560/1562
When you first receive the package, the rechargeable battery is stored separately from
the scanner. Insert the battery into the scanner first so that it can be charged when
sitting in the Auto-Sense stand.
Note: Any improper handling may reduce the battery life.
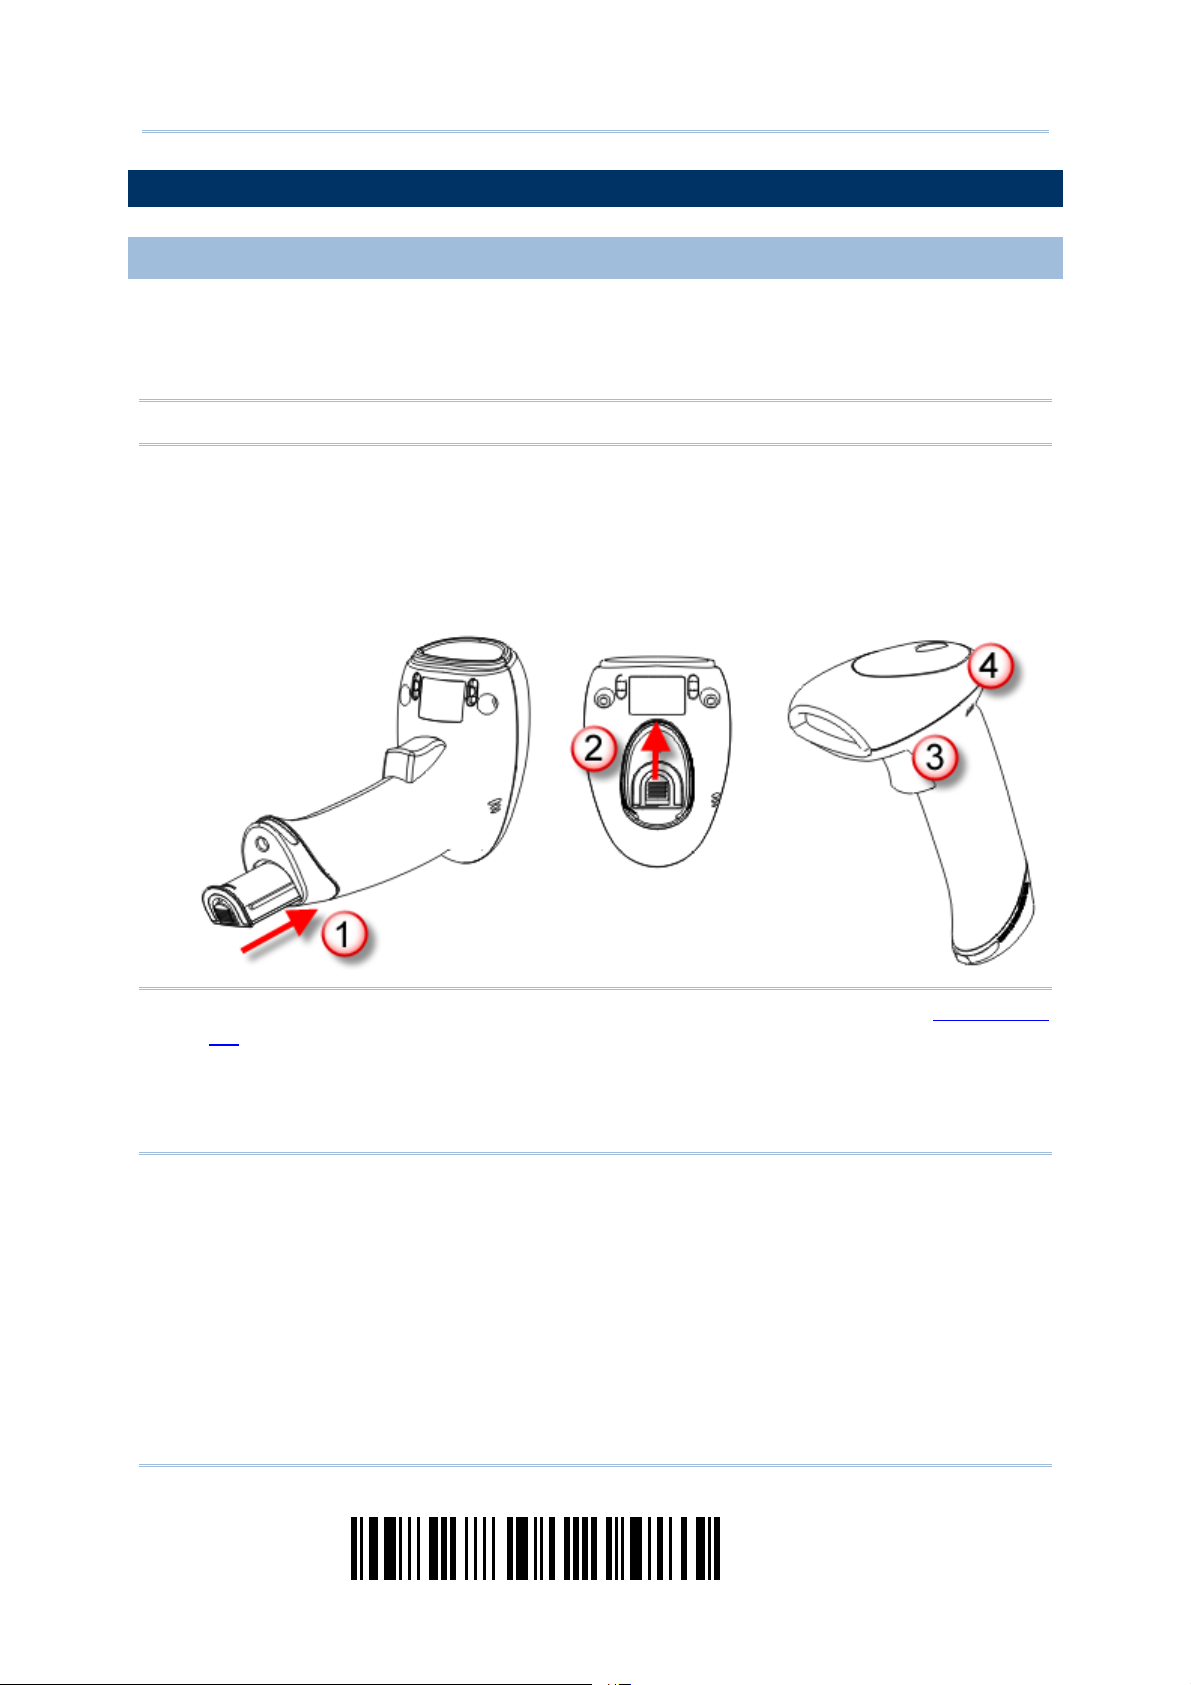
1) Hold the scanner still and insert the battery into the battery compartment at the
bottom of the scanner.
2) Slide the battery latch to lock the battery in the compartment.
3) Hold down the trigger about 2 seconds to turn on the scanner.
4) The scanner will respond with a long beep and its LED will come on-off shortly.
Note: (1) To turn off the scanner, remove the battery. Refer to settings of “
Off”.
(2) For shipping and storage purposes, save the scanner and the battery
separately. This will keep the battery in good condition for future use.
(3) When the battery charge becomes low, you will find the scanner cannot emit
scan beam and its power-on beep sounds differently.
2
Auto Power
Enter Setup
Page 15
Introduction
SETTING UP 3656
Capable of charging 1560/1562, the 3656 stand is specifically designed for the scanner
to communicate with a host computer wirelessly. The connection between the scanners
and 3656 is made easy and reliable. Refer to
also an Auto-Sense stand when used with the scanner set to Auto-Sense mode.
3.1.1 Connect to 3656. The 3656 stand is
Two LED indicators are provided for power and communications status.
Power LED
Red,
solid
--- --- Power OFF
--- Power ON
Meaning
Communication LED Meaning
--- Blue,
solid
Red,
solid
Red,
solid
Red,
flashing
--- Blue,
--- Failed to establish a USB connection
Blue,
flashing
Blue,
flashing
flashing
Initialize
Serial command mode with USB Virtual COM or RS-232: wait 3 seconds for
starting a serial command
Serial command mode with USB HID: wait 3 seconds for pressing [Num
Lock] or [Caps Lock] 5 times via keyboard
Wait for connection request from the scanner (Slow flash at 0.5 Hz)
3
Update
Page 16

1560 Series Barcode Scanner User Guide
--- Blue,
flashing
Red,
solid
Red,
flashing
Blue,
flashing
--- Enter Download Mode
Connected with the scanner (Fast flash at 1 Hz)
Failed to send data to host via USB Virtual COM (Fast flash at 1 Hz)
4
Enter Setup
Page 17
Introduction
o
CHARGING THE BATTERY VIA 3656
The battery may not be charged to full for shipment. When you first receive the package,
you will need to charge the battery to full before using the scanner. When using the
RS-232 cable, it takes approximately 5 hours to charge the battery to full (from the
power adaptor).
Note: Battery charging stops when the temperature drops below 0°C or exceeds 40°C. It
is recommended to charge the battery at room temperature (18°C to 25°C) for
optimal performance.
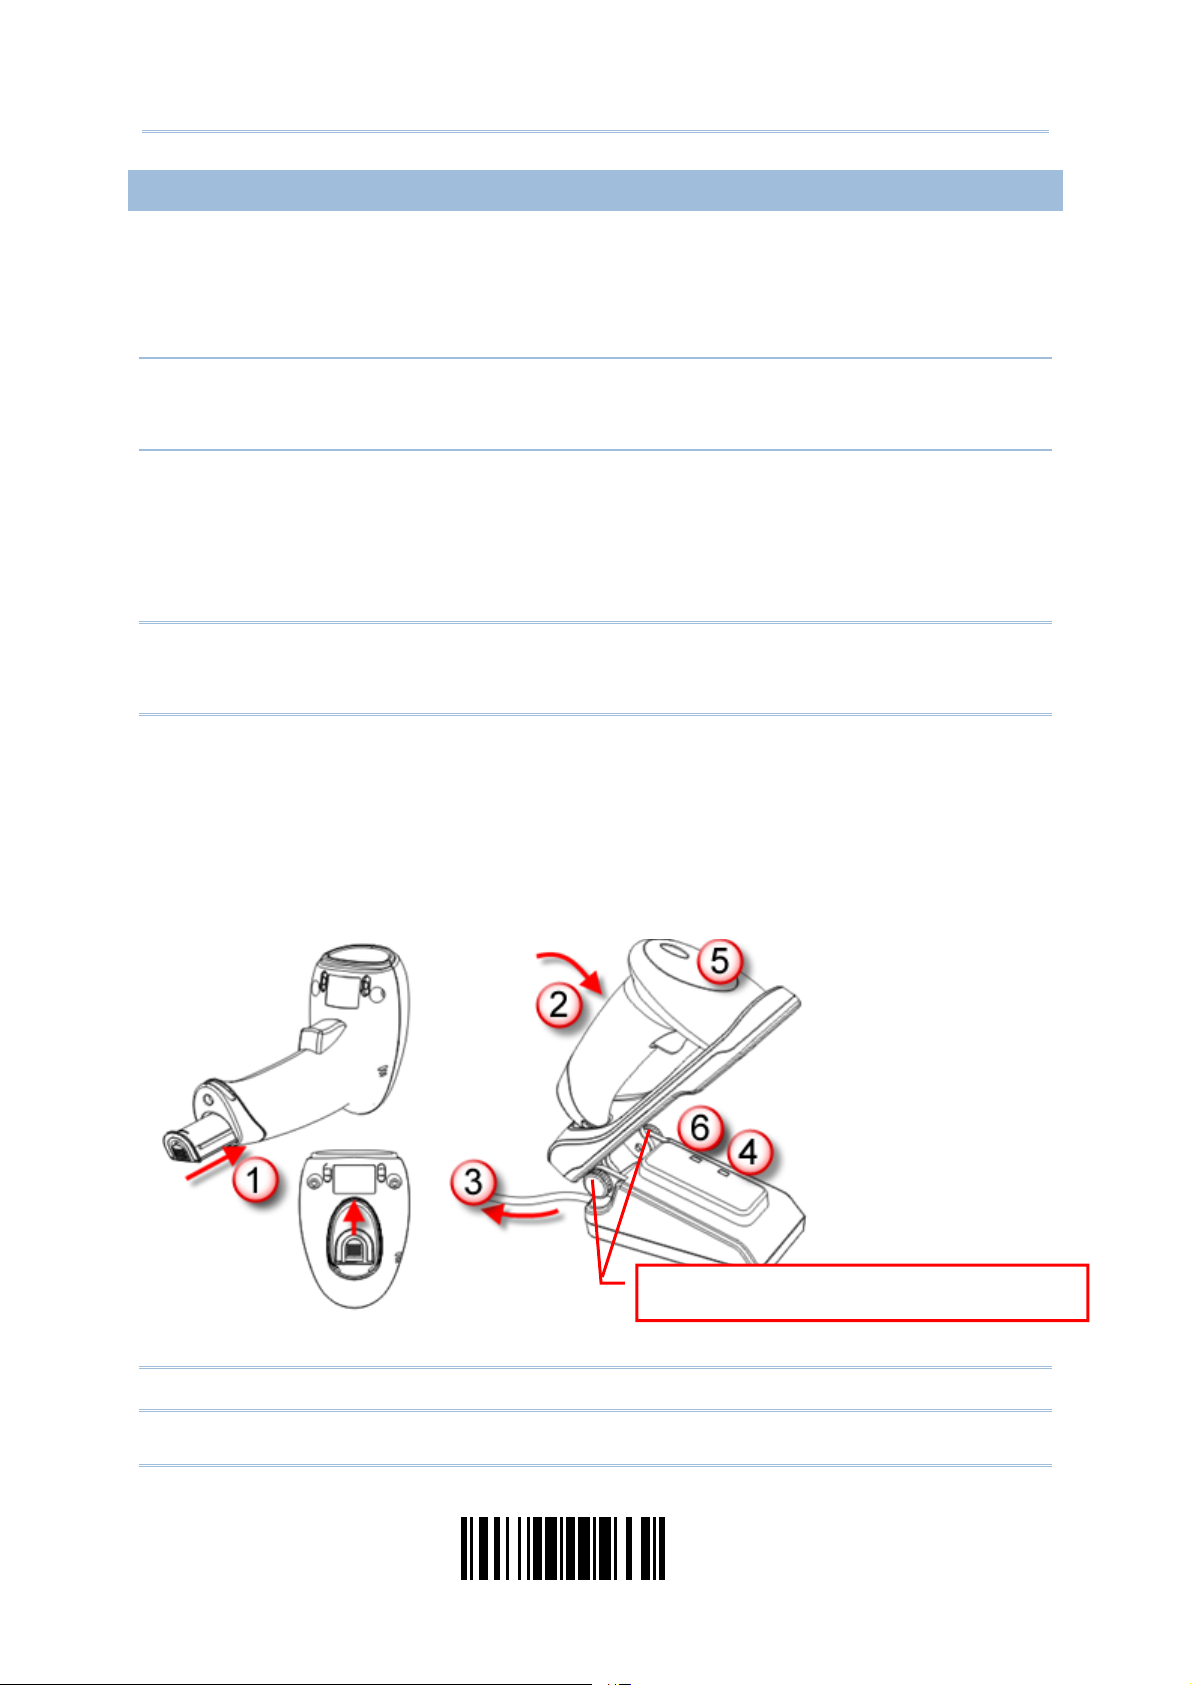
1) Install the battery to the scanner.
2) Seat the scanner in the 3656 stand.
3) Connect the 3656 stand to your computer or notebook via the USB or RS-232 cable.
4) Connect the power supply cord from 3656 to a proper power outlet.
Warning: RS-232/USB interface both require connecting the power supply cord.
When the stand is solely on USB power, the current may be insufficient for
it to function normally. You must connect the power supply cord.
5) The LED for power indication on 3656 will become solid red.
6) The scanner LED will be flashing red during charging.
When the charging is done, the LED will turn off.
When charging error occurs, the LED will turn solid red.
7) The LED for communications on 3656 will first become solid blue while initializing.
Refer to the table above for details on different stage of communications.
The two pivot bolts need to be tightened,
r charging error may occur.
Warning: If the two pivot bolts are not tightened properly, charging error may occur.
5
Update
Page 18
1560 Series Barcode Scanner User Guide
CHARGING THE BATTERY VIA CHARGER
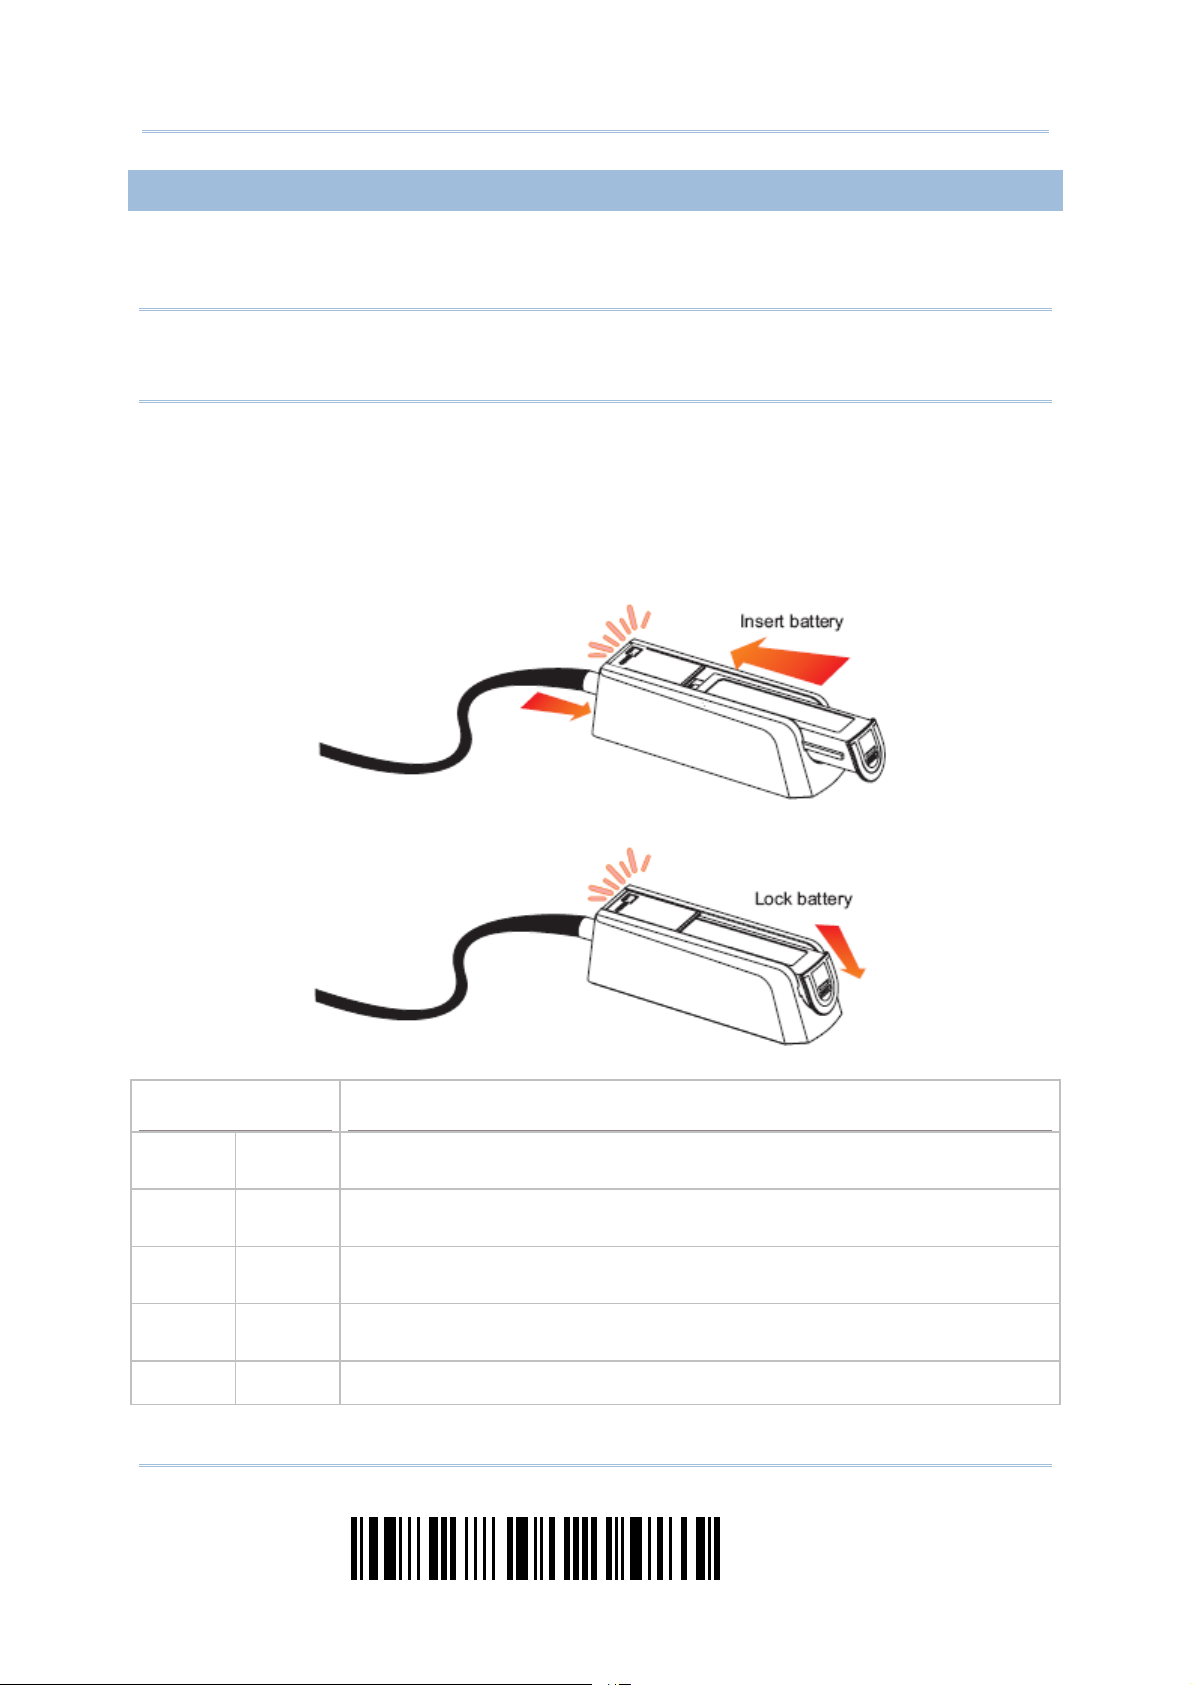
The battery charger is provided for charging the battery only. You may purchase the
charger separately. It takes approximately 3 hours to charge the battery to full.
Note: Battery charging stops when the temperature drops below 0°C or exceeds 40°C. It
is recommended to charge the battery at room temperature (18°C to 25°C) for
optimal performance.
1) Insert the battery.
2) Lock the battery.
3) Connect the power supply cord to the charger.
4) Connect the other end of the power cord to a suitable power outlet.
Status LED
Red,
solid
Red,
solid
--- Green,
Red,
solid
--- --- Power or battery not ready
--- Charger power ON (LED on for 0.5 second)
--- Charging battery
solid
Green,
solid
Meaning
Charging done
Pre-charging when battery voltage under 3V (Typical)
6
Enter Setup
Page 19

Introduction
INSIDE THE PACKAGE
The items included in the package may be different, depending on your order. Save the
box and packaging material for future use in case you need to store or ship the scanner.
Barcode Scanner (1560 or 1562)
BT Base (3656)
Rechargeable Li-ion battery
Product CD
Note: The CD-ROM includes this manual and Windows-based ScanMaster software for
configuration, as well as the USB Virtual COM driver.
PRODUCT HIGHLIGHTS
Small-form-factor and built tough to survive drop test
Extremely low power consumption
Firmware upgradeable
Supports most popular barcode symbologies, including GS1-128 (EAN-128), GS1
DataBar (RSS), etc.
Supports negative barcodes
Supports different scan modes, including Aiming Mode and Multi-Barcode Mode
User feedback via LED indicator and beeper
Beeping tone and duration programmable for Good Read
512 KB flash memory for Memory Mode operation, storing up to 32,768 scans based
on EAN-13 barcodes
Provides up to 4 KB SRAM for reserve buffer while getting out of range over a
wireless personal area network (WPAN), storing up to 256 scans based on EAN-13
barcodes
Capable of transmitting scanned data, emulating a serial cable (BT SPP) or as
keyboard input (BT HID), to a notebook computer or PDA with Bluetooth
technology
®
wireless
Programmable parameters include data output format, editing format, symbologies,
etc.
Easy configuration through ScanMaster
Easy connection through CipherConnect, available via online marketplace for mobile
devices running on Android 2.x, BlackBerry 5.x, or Windows Mobile 6.x
7
Update
Page 20

1560 Series Barcode Scanner User Guide
SYMBOLOGIES SUPPORTED
Most of the popular barcode symbologies are supported, as listed below. Each can be
individually enabled or disabled. The scanner will automatically discriminate and
recognize all the symbologies that are enabled. Refer to
Settings for details of each symbology.
Chapter 4 Changing Symbology
Symbologies Supported: Enable/Disable
Codabar Enabled
Code 93 Enabled
MSI Disabled
Plessey Disabled
Telepen Disabled
Code 128
Code 128 Enabled
GS1-128 (EAN-128) Disabled
ISBT 128 Enabled
Default
Note: Starting from firmware version 1.01, ISBT 128 is enabled by default.
Code 2 of 5
Code 3 of 9
Industrial 25 Enabled
Interleaved 25 Enabled
Matrix 25 Disabled
Code 39 Enabled
Italian Pharmacode Disabled
French Pharmacode Disabled
EAN/UPC
8
EAN-8 Enabled
EAN-8 Addon 2 Disabled
EAN-8 Addon 5 Disabled
EAN-13 Enabled
EAN-13 & UPC-A Addon 2 Disabled
EAN-13 & UPC-A Addon 5 Disabled
ISBN Disabled
UPC-E0 Enabled
UPC-E1 Disabled
UPC-E Addon 2 Disabled
UPC-E Addon 5 Disabled
UPC-A Enabled
Enter Setup
Page 21

Introduction
GS1 DataBar
(RSS)
GS1 DataBar Omnidirectional (RSS-14) Disabled
GS1 DataBar Truncated Disabled
GS1 DataBar Stacked Disabled
GS1 DataBar Stacked Omnidirectional Disabled
GS1 DataBar Limited (RSS Limited) Disabled
GS1 DataBar Expanded (RSS Expanded) Disabled
GS1 DataBar Expanded Stacked Disabled
9
Update
Page 22

1560 Series Barcode Scanner User Guide
10
Enter Setup
Page 23
QUICK START
The configuration of the scanner can be done by reading the setup barcodes contained in
this manual or via the ScanMaster software.
This section describes the procedure of configuring the scanner by reading the setup
barcodes and provides some examples for demonstration.
Configuration Mode
1. Hold down the trigger about 2 seconds to turn on the scanner. It will respond with a long beep
and its LED will come on-off shortly.
2. Have the scanner read the “Enter Setup” barcode. It will respond with six beeps and its LED
indicator will become flashing red after reading the barcode.
3. Have the scanner read more setup barcodes… Most of the setup barcodes are normal. The
scanner will respond with two beeps (low-high tone). For special setup barcodes, it requires
reading more than one setup barcode to complete the setting.
4. Have the scanner read the “Update” or “Abort” barcode. It will respond with six beeps and its
LED indicator will become flashing red after reading the barcode.
5. The scanner will restart automatically upon reading the “Update” or “Abort” barcode. It will
respond with a long beep and its LED will come on-off shortly.
Note: Refer to Appendix II Host Serial Commands for how to configure the 3656 stand
by having the scanner read 3656-related setup barcodes or using serial
commands.
11
Update
Page 24
1560 Series Barcode Scanner User Guide
Working Mode
Upon powering up, the 1560/1562 scanner will try to establish a connection with 3656 or a
computer with Bluetooth
for details. The connection between the scanners and 3656 is made easy and reliable.
®
wireless technology. Refer to Chapter 3 – Setting up a WPAN Connection
Note: If RS-232, USB Virtual COM or BT SPP is selected for output interface, the host can
directly send serial commands to configure the scanner. For example, run
HyperTerminal.exe and type the 6-digit command located under each setup
barcode. Refer to
Appendix II Host Serial Commands.
12
Enter Setup
Page 25

Quick Start
ENTER CONFIGURATION MODE
For the scanner to enter the configuration mode, you must have it read the “Enter Setup”
barcode, which can be located at the bottom of almost every even page of this manual.
The scanner will respond with six beeps and its LED indicator will become flashing red
after reading the barcode.
Enter Setup
For configuring scanner parameters, see “Read a Setup Barcode” below.
EXIT CONFIGURATION MODE
For the scanner to save settings and exit the configuration mode, you must have it read
the “Update” barcode, which can be located at the bottom of almost every odd page of
this manual. If you want to exit the configuration mode without saving any changes,
have the scanner read the “Abort” barcode instead.
Just like reading the “Enter Setup” barcode, the scanner will respond with six beeps
and its LED indicator will become flashing red after reading the barcode. Wait for a
few seconds for the scanner to restart itself.
Update
Abort
13
Update
Page 26

1560 Series Barcode Scanner User Guide
S
DEFAULT SETTINGS
SAVE USER SETTINGS AS DEFAULTS
For the scanner to keep the customized settings as user defaults, you must have it read
the “Save as User Defaults” barcode. This is a normal setup barcode, and the scanner will
respond with two beeps (low-high tone).
After reading the “Update” barcode, the current settings will be saved as user
defaults.
ave as User
Defaults
RESTORE USER DEFAULTS
For the scanner to restore the user defaults, which you have saved earlier, you must
have it read the “Restore User Defaults” barcode. This is a normal setup barcode, and the
scanner will respond with two beeps (low-high tone).
After reading the “Update” barcode, all the parameters of the scanner will return to
their customized values.
Restore User
Defaults
RESTORE SYSTEM DEFAULTS
For the scanner to restore the factory defaults, you must have it read the “Restore
System Defaults” barcode. This is a normal setup barcode, and the scanner will respond
with two beeps (low-high tone). For 3656 to restore factory defaults, refer to
Barcodes & Serial Commands
.
3656 Setup
After reading the “Update” barcode, all the parameters of the scanner will return to
their default values. The current connection record will be cleared as well.
Restore System
Defaults
Note: The system default value (if there is) for each setting is indicated by an asterisk
“*”.
14
Enter Setup
Page 27
Quick Start
READ A SETUP BARCODE
CONFIGURE PARAMETERS
For most of the scanner parameters, only one read is required to set them to new values.
The scanner will respond with two beeps (low-high tone) when each parameter is set
successfully.
But for a number of special parameters, multiple reads are required to complete the
setting. In this case, the scanner will respond with a short beep to indicate it needs to
read more setup barcodes. These special parameters may require reading one or more
setup barcodes, such as
Numeric barcodes, say, for keyboard type, inter-character delay, length qualification
Hexadecimal barcodes, say, for character strings as prefix, suffix, etc.
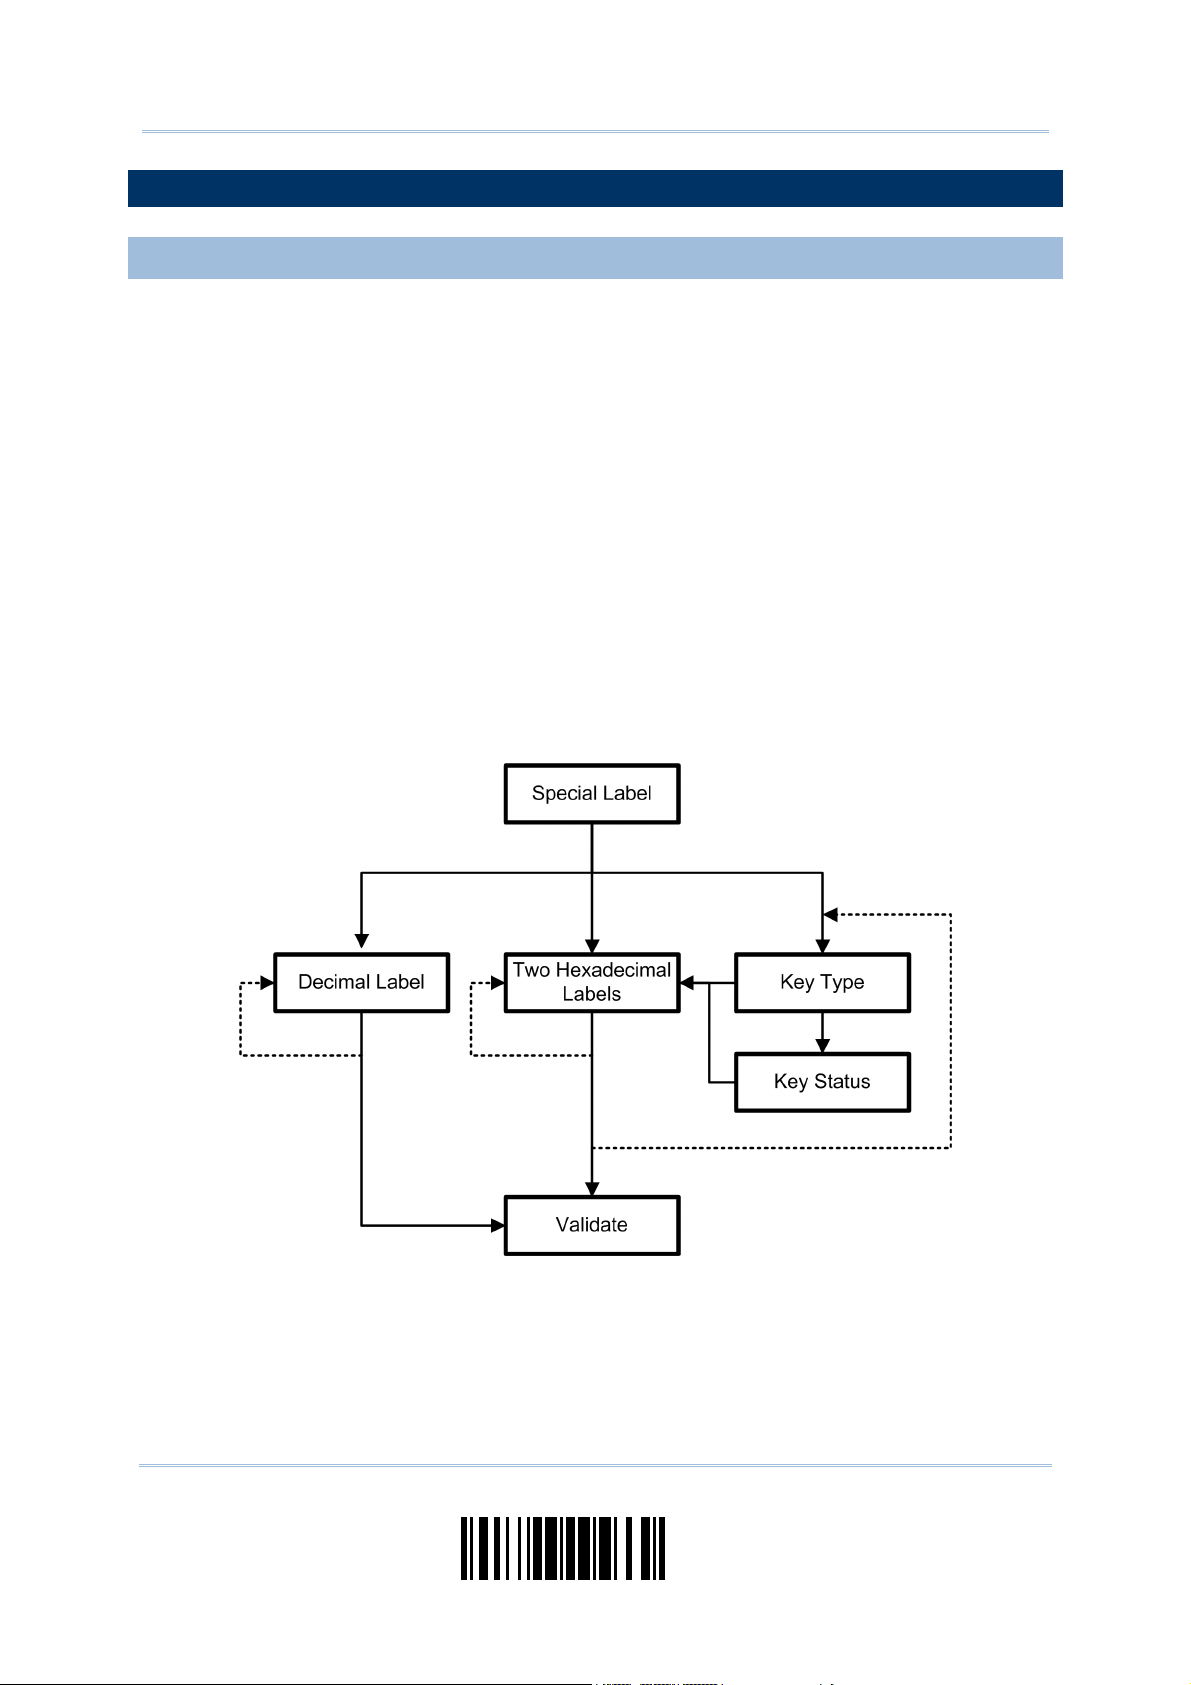
When “BT HID”, “USB HID” or “Keyboard Wedge” is configured for interface, Key
Type and Key Status will then become applicable. You may decide whether or not to
change key status when “Normal Key” is selected for Key Type.
To complete the configuration of these special parameters, it requires reading the
“Validate” barcode, and the scanner will respond with two beeps (low-high tone) to
indicate the input values are validated.
15
Update
Page 28

1560 Series Barcode Scanner User Guide
T
T
T
The example below shows how to save your settings as “User Default” so that you may
restore user defaults at a later time:
Steps
1 Power on the scanner…
2 Enter the Configuration Mode…
3 Read a Setup barcode…
4 Exit the Configuration Mode…
Action User Feedback if Successful
For example,
he scanner will respond with a long beep
(high tone) and its LED indicator will
become solid red and go off quickly.
The scanner will respond with six beeps
(high-low tone repeats three times), and
its LED indicator will be flashing red.
he scanner will respond with two beeps
(low-high tone) if reading a normal setup
barcode.
Same as for Enter the Configuration Mode.
OR
5 The scanner will automatically restart itself… Same as for Power on the scanner.
* When any configuration error occurs...
he scanner will respond with one long
beep (low tone).
16
Enter Setup
Page 29
Quick Start
T
T
T
T
T
N
N
The example below shows how to set numeric parameters:
Steps
1 Power on the scanner...
2 Enter the Configuration Mode…
3
ormal setup
ormal setup
Special setup
Decimal barcodes
4 Exit the Configuration Mode…
Action User Feedback if Successful
Read a Setup barcode...
For example,
barcode
barcode
barcode
he scanner will respond with a long beep
(high tone) and its LED indicator will
become solid red and go off quickly.
he scanner will respond with six beeps
(high-low tone repeats three times), and
its LED indicator will become flashing red.
he scanner will respond with two beeps
(low-high tone) if reading a normal setup
barcode.
he scanner will respond with one short
beep if reading a special setup barcode
such as “Max. Length”, indicating the
setup requires reading more barcodes.
Read the “Decimal Value” barcode(s).
Refer to Appendix IV “Decimal
System”
he scanner will respond with two beeps
(low-high
validated.
Same as for Enter the Configuration Mode.
tone) when the input values are
5 The scanner will automatically restart itself… Same as for Power on the scanner.
OR
17
Update
Page 30
1560 Series Barcode Scanner User Guide
T
T
T
T
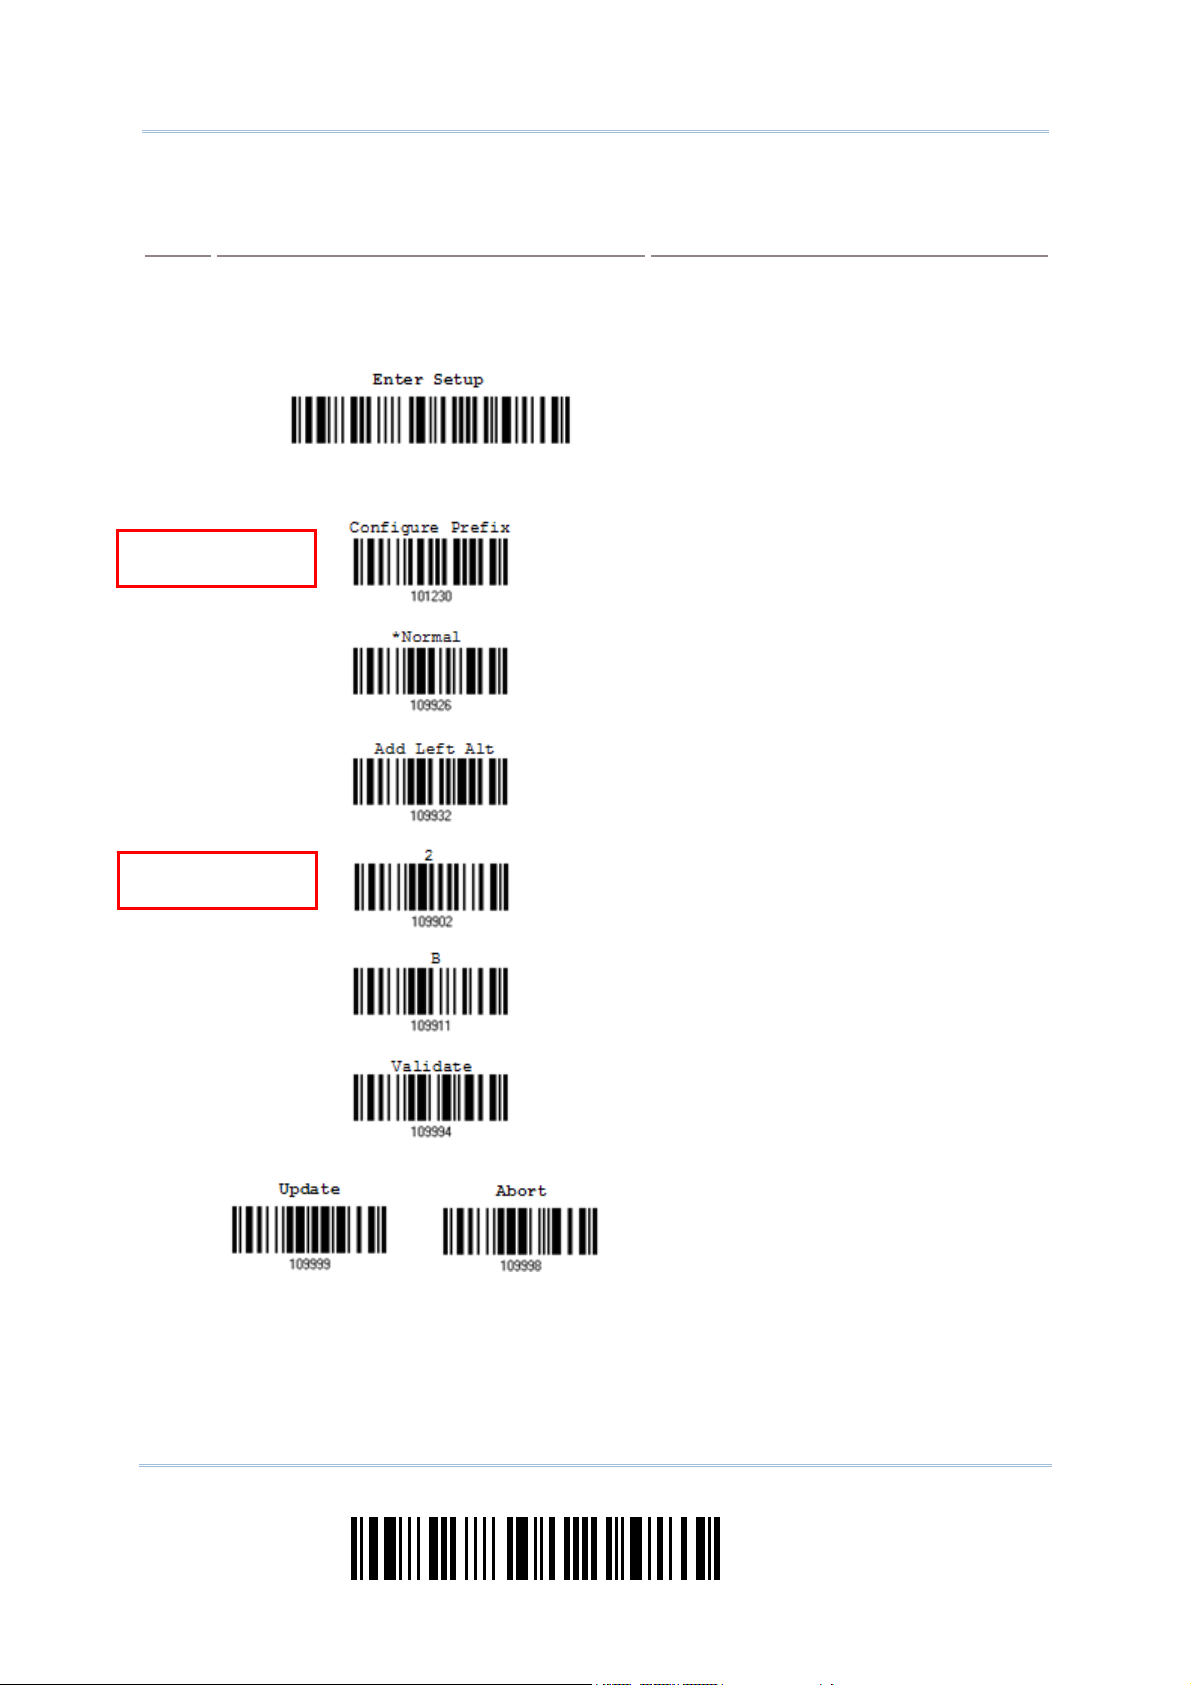
The example below shows how to set string parameters:
Steps
1 Power on the scanner...
2 Enter the Configuration Mode…
3
Special setup
Hexadecimal
4 Exit the Configuration Mode…
Action User Feedback if Successful
Read a Setup barcode...
For example,
barcodes
barcodes
he scanner will respond with a long beep
(high tone) and its LED indicator will
become solid red and go off quickly.
he scanner will respond with six beeps
(high-low tone repeats three times), and
its LED indicator will become flashing red.
The scanner will respond with one short
beep if reading a special setup barcode
such as “Prefix Code”, indicating the setup
requires reading more barcodes.
When “BT HID”, “USB HID” or “Keyboard
Wedge”
ype and Key Status will then become
applicable. You may decide whether or not
to change key status when “Normal Key”
is selected for Key Type.
is configured for interface, Key
Refer to Appendix III
Read the “Hexadecimal Value” barcodes
for the desired character string. For
example, read “2” and “B” for the scanner
to prefix the character “+”.
Refer to Appendix IV “Hexadecimal
System”
he scanner will respond with two beeps
(low-high tone) when the input values are
validated.
Same as for Enter the Configuration Mode.
5 The scanner will automatically restart itself… Same as for Power on the scanner.
OR
18
Enter Setup
Page 31

Quick Start
LIST THE CURRENT SETTINGS
The current settings of all scanner parameters can be sent to the host computer for user
inspection. The listing includes pages as shown below. You can select the page of interest
by having the scanner read the “List Page x” barcode. The scanner will respond with two
beeps (low-high tone) and send the selected page to the host immediately.
List settings regarding Firmware Version, Serial
Number, Interface, Buzzer, and Other Scanner
Parameters
List settings regarding Prefix, Suffix, and Length
Code Setting
List settings regarding Code ID
List Page 1
List Page 2
List Page 3
List settings regarding: Readable Symbologies
List settings regarding Symbology Parameters
(1/3)
List settings regarding Symbology Parameters
(2/3)
List settings regarding Symbology Parameters
(3/3)
List settings regarding Editing Format 1
List settings regarding Editing Format 2
List Page 4
List Page 5
List Page 6
List Page 7
List Page 8
List Page 9
List settings regarding Editing Format 3
List Page 10
19
Update
Page 32

1560 Series Barcode Scanner User Guide
List settings regarding Editing Format 4
List settings regarding Editing Format 5
List Page 11
List Page 12
20
Enter Setup
Page 33

Quick Start
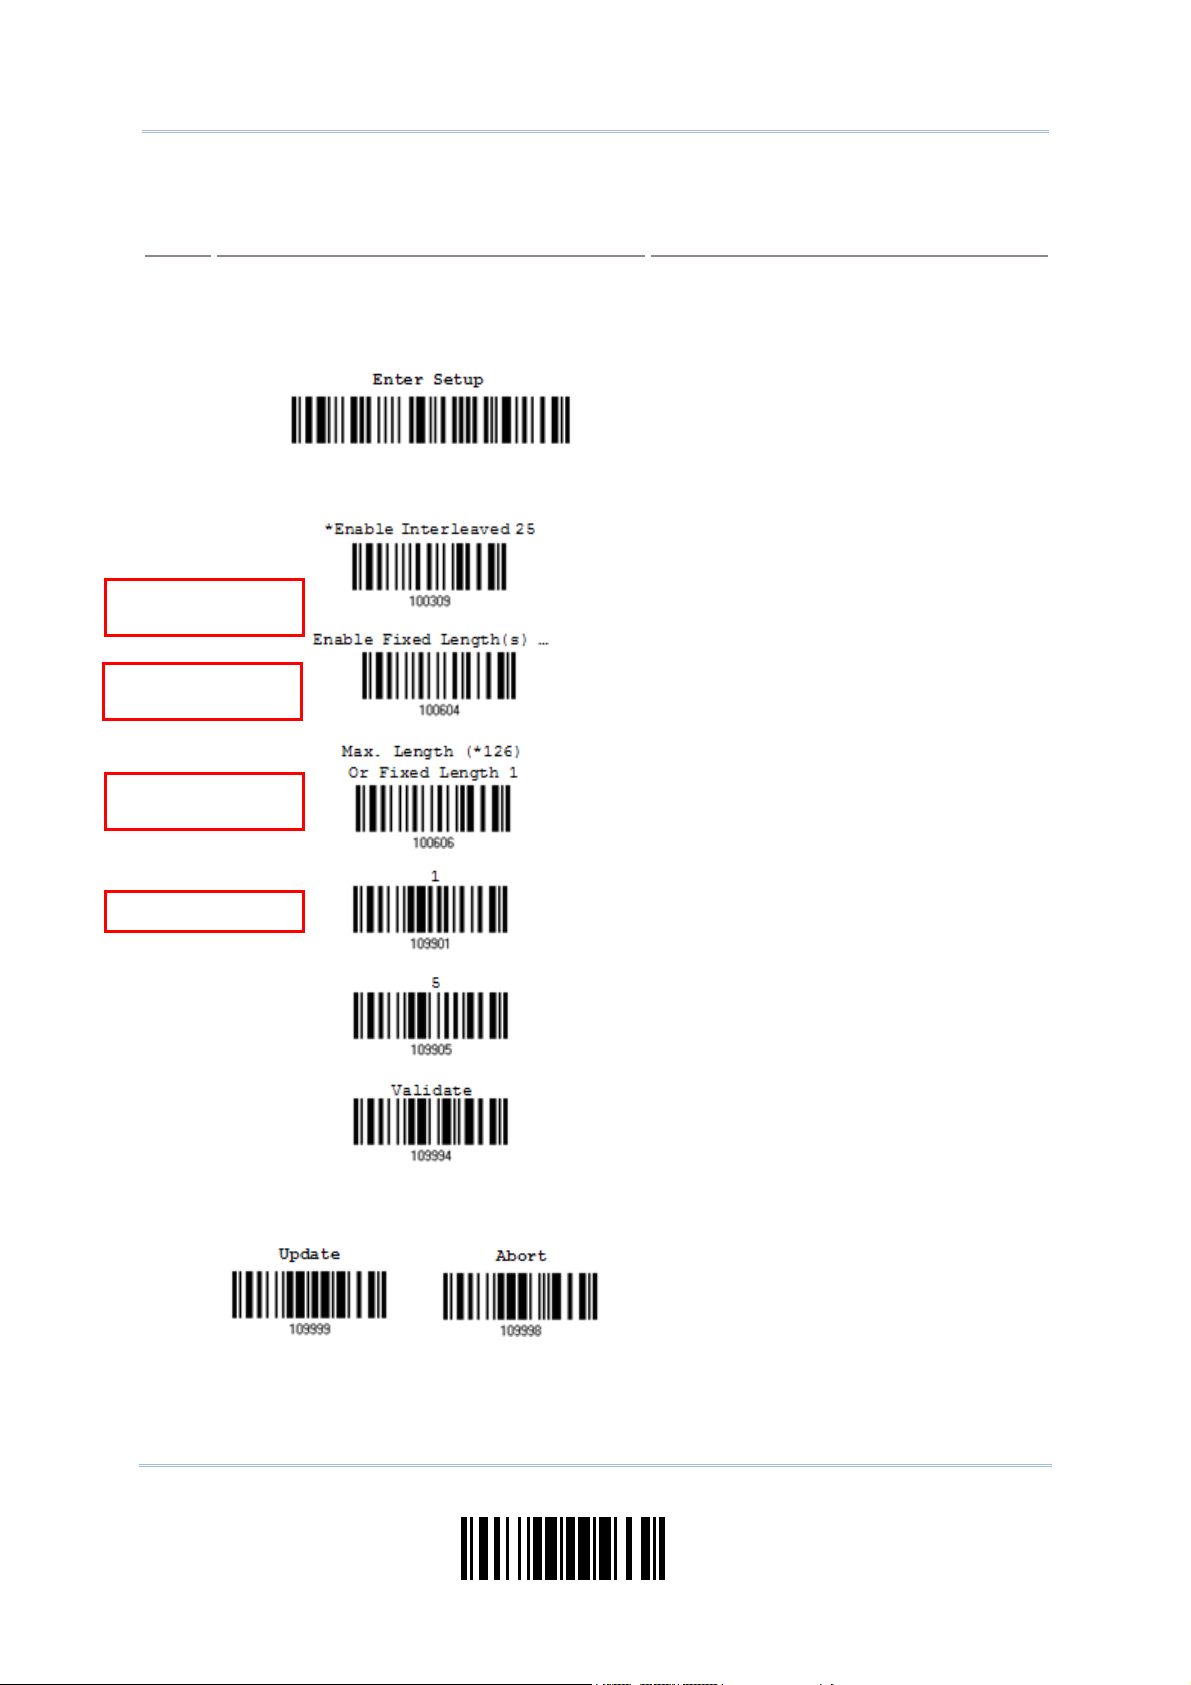
CREATE ONE-SCAN SETUP BARCODES
The fact is most of the scanner parameters require only one read for setting new values.
To facilitate configuring the scanner, you may create One-Scan setup barcodes for use.
The requirements of a One-Scan setup barcode are:
a prefix of the “#@” characters
the six digits of command parameters
a suffix of the “#”character
For example, the scanner needs reading three setup barcodes for the command
parameter “109952” to take effect:
Enter Setup
List Page 3
Update
Now, it requires only one read:
One-Scan Setup Barcode
for 109952
Note: The scanner will restart automatically upon reading the One-Scan setup barcode
for (1) changing the interface or (2) setting memory mode, enable or disable. It
will respond with a long beep and its LED will come on-off shortly.
21
Update
Page 34

1560 Series Barcode Scanner User Guide
22
Enter Setup
Page 35

Chapter 1
UNDERSTANDING THE BARCODE SCANNER
This chapter will guide you through the features of the barcode scanner and how it can
function for you.
IN THIS CHAPTER
1.1 Battery..................................................................... 23
1.2 Memory.................................................................... 29
1.3 LED Indicator ............................................................ 32
1.4 Beeper ..................................................................... 34
1.5 Send “NR” to Host ..................................................... 38
1.6 Scan Modes .............................................................. 39
1.7 Scanning Timeout ...................................................... 44
1.8 Delay between Re-read............................................... 45
1.9 Read Redundancy for All Symblogies ............................ 46
1.10 Addon Security for UPC/EAN Barcodes ........................ 47
1.11 Auto-Sense Mode (1560 Only) ................................... 48
1.12 CCD Sensor Always Active (1560 Only) ....................... 50
1.13 Negative Barcodes ................................................... 50
1.14 Effective Decoding Area ............................................ 51
1.1 BATTERY
The scanner is powered by a rechargeable 3.7 V/800 mAh Li-ion battery, and it takes
approximately 5 hours to charge the battery to full (via 3656 from the power adaptor).
However, the charging time may vary by working condition. For intensive data collection,
you may need to purchase a spare battery for non-stop operation.
Note: See also “
“Low Battery Alarm”.
Power Economy”, “CCD Sensor Always Active”, “Sniff Mode”, as well as
1.1.1 TURN ON/OFF THE SCANNER
Turn on the scanner…
After installing the battery, pull down the trigger for about 2 seconds. The scanner will respond
with a long beep (high tone), then the LED will become solid red and go off quickly.
Turn off the scanner…
Remove the battery directly or let it turn off automatically in specific circumstances.
23
Update
Page 36

1560 Series Barcode Scanner User Guide
S
1.1.2 POWER ECONOMY
The scanner features “Power-Saving”, “Auto Power Off” and “Auto Power Off Ignoring
Scan Mode” giving consideration to the power issue that is generally critical for
Bluetooth-enabled devices. By the scanner’s support of power economy, its power
consumption may progress by the following transition:
1) running at full CPU speed at power-on
2) shifting to low CPU speed (Power-Saving)
3) finally shutting down automatically (Auto Power Off)
In the following content of this section, you will be guided through the configurations for
the scanner’s power economy.
1.1.2.1 POWER-SAVING
For the scanner to save power, you need to appoint the timing for the scanner to shift to
power-saving mode. Make the configuration that best suits your application while noting
the following points:
Power-Saving: 1~254 minutes configurable. 0= Disable.
By default, the scanner stands by at full-speed for 2 minutes after power-on and
before entering low-speed mode. If Power-Saving isn’t desired, set it to 0 to disable it.
Read the setup barcode in the following to achieve the setup.
Note: Power-Saving setting won’t take effect when the WPAN connection is established
successfully whether via BT HID or SPP.
Power-
1) Read the barcode above to enable the scanner to enter low-speed “Power-Saving”.
2) Assign the time for the scanner to enter low-speed mode by reading the “
Value” barcode on page 227. For example, read “5” for the scanner to enter
low-speed mode after idleness of 5 minutes.
3) Read the “Validate” barcode on the same page to complete this setting.
aving after
0~254 min. (*2)
Decimal
24
Enter Setup
Page 37

Chapter 1 Understanding the Barcode Scanner
O
Note: Power-Saving won’t take effect when one of the following conditions is met:
(1) the scanner has already established a BT HID/SPP connection,
(2) the scanner is in the configuration mode,
(3) the scan mode is set to Test, Continuous or Alternate Mode,
(4) 1560 is in Auto-Sense mode and seated in the 3656 stand, or
(5) the setting value of Power-Saving is greater than that of Auto Power Off.
1.1.2.2 AUTO POWER OFF
For the scanner to save power, further to setting up “Power-Saving” mode, you may also
need to enable “Auto Power Off”, which deals with a time for the scanner to automatically
power off after power-on. Make the configuration that best suits your application while
noting the following points:
Auto Power Off: 1~254 minutes configurable. 0= Disable.
1. By default, the scanner automatically shuts down 10 minutes after power-on.
2. If Auto Power Off isn’t desired, set the parameter to 0 to disable it.
3. When the scan mode is set to any of Continuous Mode, Test Mode, and Alternate
Mode, you need to enable “Auto Power Off Ignoring Scan Mode” in addition to
enabling “Auto Power Off”. See the following section
Ignoring Scan Mode
to achieve auto power off.
1.1.2.3 Auto Power Off
Note: When the scanner is set to any scan mode other than Continuous Mode, Test Mode
and Alternate Mode, you can skip “Auto Power Off Ignoring Scan Mode”.
Auto Power
0~254 min. (*10)
ff after
1) Read the barcode above to enable the scanner to automatically turn off at a specified
time after power-on.
2) Assign the auto power off time by reading the “
Decimal Value” barcode on page 227.
For example, read “1” and “5” for the scanner to automatically turn off after idleness
of 15 minutes.
3) Read the “Validate” barcode on the same page to complete this setting.
25
Update
Page 38

1560 Series Barcode Scanner User Guide
Note: “Auto Power Off” will not take effect when one of the following conditions is met:
(1) the scanner is in the configuration mode, or
(2) 1560 is in Auto-Sense mode and seated in the 3656 stand.
1.1.2.3 AUTO POWER OFF IGNORING SCAN MODE
This mode is intended only for Continuous Mode, Test Mode, and Alternate Mode. To
force a scanner that is set to one of these three modes to automatically power off to save
power, you need the following settings:
1. Enable “Auto Power Off” as detailed in the foregoing section
. And set a time for the scanner to automatically power off after power-on.
Off
1.1.2.2 Auto Power
2. Enable “Auto Power Off Ignoring Scan Mode” by reading the barcode below:
Enable
*Disable
Read the barcode above to enable/disable automatic power-off for Continuous Mode, Test
Mode, and Alternate Mode.
Note: “Auto Power Off Ignoring Scan Mode” only features enabling and disabling. It
doesn’t feature the setting of auto power-off time. Such setting should be
configured in the preceding setup of “Auto Power Off”.
26
Enter Setup
Page 39

Chapter 1 Understanding the Barcode Scanner
1.1.3 POWER ECONOMY VS. WPAN CONNECTION
Before the scanner can communicate with the host computer, Bluetooth connection (or
WPAN connection) needs to be established. The scanner’s power economy always
accommodates itself to the establishment of the WPAN connection.
The following describes how the scanner carries out power economy before and after the
establishment of the WPAN connection:
Before establishing a WPAN connection successfully…
1. The scanner stays active for a specified period of time (2 minutes by default) for the following
scenarios. The CPU runs at full speed, and the LED blinks blue (On/Off ratio 0.5 s: 0.5 s).
(a) waiting for a connection request from the host (BT SPP Slave Mode)
(b) trying to connect to the host (BT HID or BT SPP Master Mode)
(c) trying to connect to 3656
2. If the scanner fails to connect within 2 minutes, it becomes inactive to save power for the
remaining period of time (the specified “Auto Power Off” value minus 2 minutes). The CPU
starts to run at low speed, and the LED begins to blink red (On/Off ratio 0.3 s: 2.5 s).
Pull the trigger to wake up the scanner when it becomes inactive, and the scanner will become
active again.
3. If it fails to connect again and again, and finally stays inactive until the specified Auto Power
Off time elapses, the scanner will automatically turn off in order to conserve battery power.
Pull down the trigger for about 2 seconds to turn it on again.
Note: For scenarios (a) and (b) in step 1, you may need to search for the scanner again
on your computer.
After establishing a WPAN connection successfully…
1. Once a WPAN connection is established successfully, the scanner will stay active for a specified
period of time (2 minutes by default) for data transmission. The CPU runs at full speed, and
the LED blinks blue (On/Off ratio 0.02 s: 3 s).
2. If the scanner stays idle for 2 minutes (default), it will then turn inactive to save power for the
remaining period of time (the specified “Auto Power Off” value minus 2 minutes). The CPU
runs at low speed, and the LED is blinking red (On/Off ratio 0.3 s: 2.5 s).
Pull the trigger to wake up the scanner when it becomes inactive, then the scanner will stay
active again.
For BT HID or SPP, the scanner automatically shuts down after the configured “Auto Power
Off” time without the transition from full CPU speed to low CPU speed. However, when
connecting with 3656, the scanner will go through the transition in order to save power.
3. If the scanner first becomes idle and finally stays inactive until the specified Auto Power Off
time is up, the scanner will automatically turn off in order to conserve battery power. You will
hear three short beeps, tone descending from high to low.
Pull down the trigger for about 2 seconds to turn it on again.
For BT HID, the scanner resumes the connection with the host upon powering on again, as
long as the host application is running. You will hear three short beeps, tone ascending
from low to high upon the resumption. If the scanner fails to resume the connection, it will
27
Update
Page 40

1560 Series Barcode Scanner User Guide
try every 5 seconds to re-connect to the host unless you have the scanner read the “Reset
Connection” barcode.
For BT SPP Slave Mode, the scanner waits for the host to re-connect.
For BT SPP Master Mode, the scanner resumes the connection with the host upon
powering on again as long as the host application is running. You will hear three short
beeps, tone ascending from low to high upon resumption. If the scanner fails to resume
the connection, it will try every 5 seconds to re-connect to the host unless you have the
scanner read the “Reset Connection” or “Restore System Defaults” barcode.
With the use of 3656, the scanner tries to re-connect 3656 unless you turn off the
scanner.
28
Enter Setup
Page 41

Chapter 1 Understanding the Barcode Scanner
1.2 MEMORY
The collected data can be sent back to a host computer one by one via the WPAN
connection or stored in flash memory when the scanner is set to Memory mode.
1.2.1 TRANSMIT BUFFER
By default, transmit buffer is enabled and for use when the scanner is out of range. Upon
reading a barcode successfully within range, the scanner responds with one short beep
(high tone) and its LED indicator becomes solid green and goes off quickly. However, the
host computer may not receive the data immediately if getting out of range. With the 4
KB transmit buffer, the scanner can ignore the transmission status and keep on reading
barcodes until the buffer is full.
When transmit buffer is enabled…
If the scanner is out of range, it will respond with two short beeps, high-low tone, upon reading a
barcode successfully.
When transmit buffer is full, the scanner will respond with one long beep (low tone) and its LED
indicator will become solid red and go off quickly. You are advised to get back to range.
When transmit buffer is disabled…
If the scanner is out of range, it will respond with one long beep (low tone) and its LED indicator
will become solid red and go off quickly. You are advised to get back to range.
*Enable
Disable
Note: The 4 KB transmit buffer on the scanner can hold as many as 256 scans based on
EAN-13 barcodes. Data will be cleared out once the scanner is turned off or
running out of battery power!
29
Update
Page 42

1560 Series Barcode Scanner User Guide
1.2.2 MEMORY MODE
The scanner keeps 512 KB flash memory for memory mode operation. When the scanner
is in memory mode, it means any real-time connection established with the host is
disabled.
Enable
*Disable
Warning: No real-time connection is allowed unless the memory mode is disabled.
Memory Data Delay
You may set a delay between each data record while transmitting data back to the host.
*None
250 ms
500 ms
1 sec
2 sec
3 sec
5 sec
30
Enter Setup
Page 43

Chapter 1 Understanding the Barcode Scanner
8 sec
Send Data
The 512 KB flash memory on the scanner can store up to 32,768 scans based on EAN-13 barcodes.
When it is used up, the scanner will respond with two short beeps (high-low tone) as a warning.
You are advised to send data to the host immediately by having the scanner read the “Send Data”
barcode below. It will resume the previous WPAN connection with the host temporarily.
Send Data
Clear Data & Confirm
Even though data has been sent back to the host, the flash memory is still occupied unless you
erase the memory by having the scanner read two barcodes – “Clear Data” and “Confirm”.
1. Read the “Clear Data” barcode to clear the flash memory.
2. Read the “Confirm” barcode to confirm the action.
Clear Data
Confirm
31
Update
Page 44

1560 Series Barcode Scanner User Guide
1.3 LED INDICATOR
The triple-color LED on top of the scanner is used to provide user feedback. For example,
the LED becomes solid red and goes off quickly upon powering on or running out of
transmit buffer. You may tell the difference by the beeps – you will hear a long beep of
high tone when powering on the scanner, and a long beep of low tone when the transmit
buffer becomes full.
Scanner LED
Red,
flashing
Red,
solid
Red,
flashing
--- ---
--- --- Charging error
--- --- Flashing red (On/Off ratio 0.3 s: 2.5 s) indicates the scanner is
Meaning
Charging (On/Off ratio 0.5 s: 0.5 s)
Configuration Mode (On/Off ratio 0.5 s: 0.5 s)
inactive and its CPU running at low speed to save power —
No WPAN connection is established after waiting for two
Red,
on-off
--- ---
Power on, with one long beep (high tone, LED on for 1
Data saved to buffer when transmit buffer is enabled and the
Transmit buffer full, with one long beep (low tone)
Transmit buffer disabled, with one long beep (low tone)
Memory full in memory mode, with two short beeps (high-low
--- --- Green,
on-off
--- Blue,
flashing
--- First, flashing blue (On/Off ratio 0.5 s: 0.5 s) for two minutes
Good Read, with one short beep (high tone) and beeper pitch and
duration programmable
indicates the scanner is waiting for connection, and goes off if no
connection is established, then flashing red (On/Off ratio 0.3 s:
2.5 s) indicates the scanner is inactive.
It is ready for connection only while the LED is flashing blue —
SPP Slave: waiting host to connect
HID or SPP Master: trying to connect to host
Using 3656: trying to connect to 3656
--- Blue,
flashing
--- Flashing blue (On/Off ratio 0.1 s: 0.1 s) indicates the scanner
receives a PIN code request from host (flashing more quickly
than waiting connection).
minutes
second)
scanner is out of range, with two short beeps (high-low tone)
tone)
--- Blue,
flashing
--- Blue,
flashing
--- Flashing blue (On/Off ratio 0.02 s: 3 s) indicates the scanner has
established a WPAN connection successfully.
Green,
flashing
Flashing blue and green (On/Off ratio 0.1 s: 0.1 s) indicates an
error occurs while entering the PIN code. Press the trigger to get
ready for re-connecting.
32
Enter Setup
Page 45

Chapter 1 Understanding the Barcode Scanner
*
D
0
1.3.1 GOOD READ LED
Enable
Good Read LED
isable
Good Read LED
1.3.2 GOOD READ LED DURATION
By default, the Good Read LED stays on for 40 milliseconds. Specify a value, ranging
from 1 to 254 in units of 10 milliseconds.
Good Read LED
Time-out after
.01~2.54 sec.
(*40 ms)
1) Read the barcode above to specify the time interval before the Good Read LED goes
off.
2) Read the “
Decimal Value” barcode on page 227. For example, read “1” and “5” for the
Good Read LED to go off after 150 milliseconds.
3) Read the “Validate” barcode on the same page to complete this setting.
33
Update
Page 46

1560 Series Barcode Scanner User Guide
1.4 BEEPER
The scanner has a buzzer to provide user feedback in various operating conditions.
Beeping
One long beep, high tone Power on, with red LED on (1 second) and off quickly
One short beep, high tone
Meaning
Good Read, with green LED on-off quickly
Programmable, default to 4 KHz
Six short beeps
High-low tone repeats three
times
Two short beeps, low-high tone Setup barcode read successfully
One short beep, high tone
Enter Configuration Mode, with red LED flashing
Exit Configuration Mode
More setup barcode required
Input PIN code
Clear PIN code
One short beep, low tone More barcodes required to complete the “output sequence”
requirements of Multi-Barcode Editor, with green LED on-off
quickly (Upon completion, same as Good Read.)
One long beep, low tone
Transmit buffer full, with red LED on-off quickly
Transmit buffer disabled, with red LED on-off quickly
Configuration error (Wrong barcode…)
PIN code input error
Reject random PIN request
Fail to send data in memory mode
Two short beeps, high-low tone
Data saved to buffer when transmit buffer is enabled
and the scanner is out of range, with red LED on-off
quickly
Memory Mode – Memory full, with red LED on-off quickly
Two short beeps, high tone Low Battery Alarm
Two long beeps, high-low tone Multi-Barcode Mode – Buffer full
Three short beeps, tone ascending
from low to high
Three short beeps, tone ascending
from high to low
WPAN connection established, with blue LED flashing
WPAN connection resumed, with blue LED flashing
WPAN connection out of range or suspended
34
Enter Setup
Page 47

Chapter 1 Understanding the Barcode Scanner
1.4.1 BEEPER VOLUME
Mute
Minimum Volume
Medium Volume
*Maximum Volume
35
Update
Page 48

1560 Series Barcode Scanner User Guide
1.4.2 GOOD READ BEEP
Frequency
8 kHz
*4 kHz
2 kHz
1 kHz
Duration
*Shortest
Shorter
Longer
Longest
36
Enter Setup
Page 49

Chapter 1 Understanding the Barcode Scanner
1.4.3 LOW BATTERY ALARM
By default, it will activate the beeper to give a warning when the battery charge gets low.
In order to prevent data loss, you are advised to replace the battery immediately when
you hear two short beeps (high tone).
No Alarm
*Low Battery Alarm
37
Update
Page 50

1560 Series Barcode Scanner User Guide
1.5 SEND “NR” TO HOST
The scanner can send the “NR” string to the host to notify the No Read event.
Enable
*Disable
38
Enter Setup
Page 51

Chapter 1 Understanding the Barcode Scanner
1.6 SCAN MODES
Different scan modes are supported – select the scan mode that best suits the
requirements of a specific application. Refer to the comparison table below.
Scan Mode
Always Press
Continuous
mode
Test mode
Laser mode
Auto Off mode
Auto Power Off
mode
Alternate mode
Aiming mode
Start to Scan Stop Scanning
trigger
once
Hold
trigger
Press
trigger
twice
Release
trigger
Press
trigger
once
Barcode
being
read
Timeout
Multi-Barcode
mode
Note: By default, the scan mode is set to Laser mode.
39
Update
Page 52

1560 Series Barcode Scanner User Guide
1.6.1 CONTINUOUS MODE
The scanner is always scanning.
After a successful decoding, the removal of barcode is required. It is not allowed to
proceed to decode until the decoding delay time has passed.
To decode the same barcode repeatedly, move away the barcode and put it back
again and again for scanning.
Note: Refer to “Delay between Re-read”.
Continuous Mode
Decoding Delay
Set the time interval between each decoding.
*Disable
0.5 sec
1 sec
2 sec
1.6.2 TEST MODE
The scanner is always scanning.
Capable of decoding the same barcode repeatedly without removing it, for testing
purpose.
Test Mode
40
Enter Setup
Page 53

Chapter 1 Understanding the Barcode Scanner
1.6.3 LASER MODE
The scanner will start scanning once the trigger is held down.
The scanning won’t stop until (1) a barcode is decoded, (2) the pre-set timeout
expires, or (3) you release the trigger.
Note: Refer to “Scanning Timeout”.
*Laser Mode
1.6.4 AUTO OFF MODE
The scanner will start scanning once the trigger is pressed.
The scanning won’t stop until (1) a barcode is decoded, and (2) the pre-set timeout
expires.
Note: Refer to “Scanning Timeout”.
Auto Off Mode
1.6.5 AUTO POWER OFF MODE
The scanner will start scanning once the trigger is pressed.
The scanning won’t stop until the pre-set timeout expires, and, the pre-set timeout
period re-counts after each successful decoding.
Note: Refer to “Delay between Re-read” and “Scanning Timeout”.
Auto Power Off Mode
41
Update
Page 54

1560 Series Barcode Scanner User Guide
a
1.6.6 ALTERNATE MODE
The scanner will start scanning once the trigger is pressed
The scanning won't stop until you press the trigger again.
Alternate Mode
1.6.7 AIMING MODE
The scanner will aim at a barcode once the trigger is pressed, and start scanning when
the trigger is pressed again within one second.
The scanning won't stop until (1) a barcode is decoded, and (2) the pre-set timeout
expires.
Aiming Mode
Aiming Timeout
You can limit the aiming time interval (1~15). By default, the scanner time-out is set to 1 second.
Aiming Time-out
fter 1~15 sec.
(*1)
1. Read the barcode above to specify the time interval before aiming ends. (It is set to 1 by
default.)
2. Read the “Decimal Value” barcode on page 227. For example, read “1” and “0” for the scanner
to automatically shut down after idleness for 10 seconds.
3. Read the “Validate” barcode on the same page to complete this setting.
42
Enter Setup
Page 55

Chapter 1 Understanding the Barcode Scanner
1.6.8 MULTI-BARCODE MODE
The scanner will be scanning as long as the trigger is held down, capable of decoding one
single barcode, as well as multiple unique barcodes one at a time. While decoding a
bunch of unique barcodes, if a barcode is decoded twice, its subsequent decoding will be
ignored and the scanner is expecting another unique barcode.
The scanning won't stop until you release the trigger.
Multi-Barcode Mode
Note: (1) A barcode is considered unique when its Code Type or data is different from
others.
(2) Multi-Barcode Mode has nothing to do with the
Multi-Barcode Editor.
43
Update
Page 56

1560 Series Barcode Scanner User Guide
a
1.7 SCANNING TIMEOUT
Specify the scanning time interval (1~254 sec.; 0= Disable) when the scan mode is set
to any of the following –
Laser mode
Auto Off mode
Auto Power Off mode
Aiming mode
Scanner Time-out
fter 0~254 sec.
1) Read the barcode above to specify the time interval before the scan engine times out.
(*10)
2) Read the “
Decimal Value” barcode on page 227. For example, read “1” and “5” for the
scanner to automatically shut down after idleness of 15 seconds.
3) Read the “Validate” barcode on the same page to complete this setting.
44
Enter Setup
Page 57

Chapter 1 Understanding the Barcode Scanner
1.8 DELAY BETWEEN RE-READ
This is also referred to as the “Blocking Time”, which is used to prevent the scanner from
accidentally reading the same barcode twice when the scan mode is set to any of the
following –
Continuous mode
Auto Power Off mode
Alternate mode
100 ms
200 ms
*400 ms
800 ms
1 sec
2 sec
3 sec
5 sec
45
Update
Page 58

1560 Series Barcode Scanner User Guide
1.9 READ REDUNDANCY FOR ALL SYMBLOGIES
Select the level of reading security. For example,
If “No Redundancy” is selected, one successful decoding will make the reading valid
and induce the “READER Event”.
If “Three Times” is selected, it will take a total of four consecutive successful
decoding of the same barcode to make the reading valid. The higher the reading
security is (that is, the more redundancy the user selects), the slower the reading
speed gets.
It is obvious that the more redundancy you select, the higher the reading security is, and
thus, the slower the reading speed becomes. You will have to compromise between
reading security and decoding speed.
*No Redundancy
One Time
Two Times
Three Times
46
Enter Setup
Page 59

Chapter 1 Understanding the Barcode Scanner
1.10 ADDON SECURITY FOR UPC/EAN BARCODES
The scanner is capable of decoding a mix of UPC/EAN barcodes with and without addons.
The read redundancy (0~30 times) allows changing the number of times to decode a
UPC/EAN barcode before transmission. The more redundancy you select, the higher the
reading security is, and thus, the slower the reading speed becomes. You will have to
compromise between reading security and decoding speed.
Note: UPC/EAN Addon 2 and Addon 5 must be enabled individually for this setting to
take effect.
Addon Security Level
(*0~30)
1) Read the barcode above to specify the read redundancy for UPC/EAN barcodes. (It is
set to 0 by default.)
2) Read the “
scanner to re-read the barcode for 12 times.
3) Read the “Validate” barcode on the same page to complete this setting.
Decimal Value” barcode on page 227. For example, read “1” and “2” for the
47
Update
Page 60

1560 Series Barcode Scanner User Guide
1.11 AUTO-SENSE MODE (1560 ONLY)
This mode is only available when you want to seat the scanner in the Auto-Sense stand.
When you enable this mode, it will force the scanner to apply Laser mode as the scan
mode. However, it works slightly differently from the original Laser mode. Now the
scanner will be expecting barcodes as long as it is seated in the Auto-Sense stand, as
shown below. Whenever a barcode is brought within range, the scanner will be able to
decode it.
Note: Auto-sense can only be enabled for CCD scanner and will force it to Laser mode.
To stop this mode, you may remove the scanner from the stand or have the
scanner read the “Disable (Auto-Sense)” barcode below. It will return to Laser
mode. If Laser mode is not desired, proceed to select a scan mode best suits your
application.
Note: For Auto-Sense mode to work, you must connect both the power supply cord and
the interface cable to the Auto-Sense stand. USB power is insufficient.
Enable
*Disable
48
Enter Setup
Page 61

Chapter 1 Understanding the Barcode Scanner
When the ambient light is too dim to activate the sensor, you may have the scanner read
the “High Sensitivity” barcode to improve performance. Starting from firmware version
1.23, it will emit scan beam every 300 milliseconds when “High Sensitivity” is enabled.
High Sensitivity
*Normal
Note: If the ambient light is under 100 lux, we suggest that you either add lighting or
use Continuous mode instead.
49
Update
Page 62

1560 Series Barcode Scanner User Guide
1.12 CCD SENSOR ALWAYS ACTIVE (1560 ONLY)
This feature is used to keep the CCD sensor always active so that the scanner can decode
more efficiently. However, you may disable it in order to save battery power.
*Enable
Disable
1.13 NEGATIVE BARCODES
Normally, barcodes are printed with the color of the bars darker than that of the spaces.
But for negative barcodes, they are printed in the opposite sense just like negative films.
The spaces of negative barcodes are printed with a color darker than that of the bars.
You can configure the scanner to be able to read negative barcodes.
Enable
*Disable
50
Enter Setup
Page 63

Chapter 1 Understanding the Barcode Scanner
1.14 EFFECTIVE DECODING AREA
By default, the effective decoding area is 100% covered by the scanned area. However,
you may narrow down the decoding area to prevent reading the wrong barcode when a
number of barcodes are printed closely. The scanner will only read barcodes that appear
in the effective decoding area.
Read the barcode “Centering On” and specify the percentage to narrow down the
decoding area. For example, read “Left 10%” and then “Right 30%” for the scanner to
decode barcode “A” only.
1.14.1 POSITIONING WINDOW
Centering On
*Centering Off
51
Update
Page 64

1560 Series Barcode Scanner User Guide
1.14.2 ADJUSTING WINDOW
Percentage for Left Half
*Left 50%
Left 40%
Left 30%
Left 20%
Percentage for Right Half
Left 10%
Right 10%
Right 20%
Right 30%
Right 40%
*Right 50%
52
Enter Setup
Page 65

Chapter 2
SELECTING OUTPUT INTERFACE
In order to establish a proper connection between your computer and the scanner, we
suggest that you follow these instructions –
1) Install the battery and hold down the trigger for about 2 seconds to turn on the
scanner.
2) Have the scanner read the “Enter Setup” barcode to enter the configuration mode.
3) Have the scanner read the associated barcodes to activate the desired interface.
See the following sections for output interfaces supported.
4) Have the scanner read the barcodes for related settings.
5) Have the scanner read the “Update” barcode to exit the configuration mode.
6) Turn on your computer or laptop and establish a WPAN connection with the scanner.
Refer to
Note: By default, the output interface is set to “BT HID”.
Chapter 3 – Setting up a WPAN Connection.
IN THIS CHAPTER
2.1 BT HID..................................................................... 54
2.2 BT SPP Slave............................................................. 66
2.3 BT SPP Master........................................................... 68
2.4 Keyboard Wedge via 3656 .......................................... 72
2.5 RS-232 via 3656........................................................ 83
2.6 USB HID via 3656...................................................... 88
2.7 USB Virtual COM via 3656........................................... 99
53
Update
Page 66

1560 Series Barcode Scanner User Guide
2.1 BT HID
For BT HID, refer to Chapter 3 – Setting up a WPAN Connection for related connection
settings. Run any text editor on your computer, and the scanned data will be transmitted
to the computer.
HID Settings
Keyboard Type PCAT (US)
Alphabets Layout Normal
Digits Layout Normal
Capital Lock Type Normal
Capital Lock State Off
Alphabets Transmission Case-sensitive
Digits Transmission Alphanumeric keypad
Inter-Character Delay 0 (ms)
Inter-Function Delay 0 (ms)
Defaults
54
Enter Setup
Page 67

Chapter 2 Selecting Output Interface
2.1.1 ACTIVATE BT HID & SELECT KEYBOARD TYPE
When BT HID interface is activated, you will have to select a keyboard type to complete
this setting. By default, BT HID is activated on the scanner, and the keyboard type is set
to PCAT (US).
Activate BT HID &
Select Keyboard
Type…
1) Read the barcode above to activate BT HID and select a keyboard type.
2) Read the “
Decimal Value” barcode on page 227. Refer to the table below for the
number of desired keyboard type.
3) Read the “Validate” barcode on the same page to complete this setting.
BT HID
By default, the keyboard type is set to PCAT (US). The following keyboard types are supported —
No. Keyboard Type No. Keyboard Type
64 PCAT (US) 71 PCAT (Belgium)
65 PCAT (French) 72 PCAT (Spanish)
66 PCAT (German) 73 PCAT (Portuguese)
67 PCAT (Italy) 74 PS55 A01-2 (Japanese)
68 PCAT (Swedish) 75 User-defined table
69 PCAT (Norwegian) 76 PCAT (Turkish)
70 PCAT (UK)
55
Update
Page 68

1560 Series Barcode Scanner User Guide
2.1.2 RESET CONNECTION
For BT HID, you can only have the scanner connected to one computer at a time. If you
want to connect the scanner to another host, you must have it read the “Reset
Connection” barcode so that the current connection record will be cleared. Then, the
scanner will restart itself automatically. Go through the whole process in
Dongle
to establish a new connection.
Reset Connection
Note: The “Restore System Defaults” barcode will have the current connection record
cleared as well.
3.2.3 Connect to
56
Enter Setup
Page 69

Chapter 2 Selecting Output Interface
2.1.3 KEYBOARD SETTINGS
Alphabets Layout
Digits Layout
Capital Lock Type
Capital Lock Setting
Alphabets Transmission
Digits Transmission
Note: BT HID does not support these functions on PDAs – (1) Capital Lock Setting: Auto
Detection (2) Digits Transmission: Numeric Key
Alphabets Layout
By default, the alphabets layout is set to normal mode, also known as the standard English layout.
Select French or German keyboard layout if necessary. The scanner will make adjustments when
sending the "A", "Q", "W", "Z", "Y", and "M" characters according to this setting.
*Normal
AZERTY
QWERTZ
Note: This setting only works when the keyboard type selected is US keyboard, such as
PCAT (US). The Alphabets Layout and Digits Layout setting must match your
keyboard.
57
Update
Page 70

1560 Series Barcode Scanner User Guide
US Keyboard Style – Normal
QWERTY layout, which is normally used in western countries.
Select “Lower Row” for the “Digits Layout” setting for the upper row is for special characters.
French Keyboard Style – AZERTY
French layout; see below for French Keyboard Style.
Select “Upper Row” for the “Digits Layout” setting for the lower row is for special characters.
German Keyboard Layout – QWERTZ
German layout; see below for German Keyboard Style.
Select “Lower Row” for the “Digits Layout” setting for the upper row is for special characters.
58
Enter Setup
Page 71

Chapter 2 Selecting Output Interface
Digits Layout
Select a proper layout that matches the alphabets layout. The scanner will make adjustments
according to this setting.
Options Description
Normal Depends on the [Shift] key or [Shift Lock] setting
Lower Row For QWERTY or QWERTZ keyboard
Upper Row For AZERTY keyboard
*Normal
Upper Row
Lower Row
Note: This setting is to be used with the Character Substitution setting when support to
certain keyboard types (languages) is unavailable but required.
59
Update
Page 72

1560 Series Barcode Scanner User Guide
T
Capital Lock Type & Setting
In order to send the alphabets with correct case, the scanner needs to know the status of Caps
Lock on the keyboard. Incorrect settings may result in reversed case of the alphabets being
transmitted.
Cap Lock Type Description
Normal Normal type
Capital Lock When enabled, the keys of alphabetic characters will be interpreted as
capital letters. However, this does not affect the number or punctuation
keys.
Shift Lock When enabled, the keys of alphabetic characters will be interpreted as
capital letters. In addition, this affects the number or punctuation keys.
*Normal
Shift Lock
Capital Lock
Capital Lock State Description
Capital Lock OFF Assuming that the status of Caps Lock on the keyboard is OFF,
transmitted characters are exactly the same as in the barcode (when
"case-sensitive" is selected for Alphabets Transmission).
Capital Lock ON Assuming that the status of Caps Lock on the keyboard is ON, transmitted
characters are exactly the same as in the barcode (when "case-sensitive"
is selected for Alphabets Transmission).
Refer to the Capital Lock Type above.
Auto Detection
he scanner will automatically detect the status of Caps Lock on the
keyboard before data is transmitted; transmitted characters are exactly
the same as in the barcode (when "case-sensitive" is selected for
Alphabets Transmission).
This setting is not supported on PDAs.
Auto Detect
Capital Lock ON
60
Enter Setup
Page 73

Chapter 2 Selecting Output Interface
*Capital Lock OFF
61
Update
Page 74

1560 Series Barcode Scanner User Guide
R
Alphabets Transmission
By default, the alphabets transmission is case-sensitive, meaning that the alphabets will be
transmitted according to their original case, the status of Caps Lock on the keyboard, as well as the
Capital Lock setting. Select [Ignore Case] to have alphabets transmitted according to the status of
Caps Lock on the keyboard only.
Ignore Case
*Case-sensitive
efer to 5.1 Letter Case.
62
Enter Setup
Page 75

Chapter 2 Selecting Output Interface
Digits Transmission
By default, the alphanumeric keypad is used for transmitting digits. Select “Numeric Keypad” if you
wish to use the keys on the numeric keypad.
Numeric Key
*Alphanumeric Key
Note: If you select “Numeric Keypad”, the Num Lock status of the physical keyboard
should be “ON”. This setting is not supported on PDAs.
63
Update
Page 76

1560 Series Barcode Scanner User Guide
2.1.4 INTER-CHARACTER DELAY
By default, the inter-character delay is set to zero. Specify a value, ranging from 0 to
254 in units of millisecond, to match the computer response time of the keyboard
interface. Such delay time is inserted between every character being transmitted. The
longer the delay time is, the slower the transmission speed will be.
Inter-Character
Delay… (*0~254)
1) Read the barcode above to specify the inter-character delay.
2) Read the “
(millisecond).
3) Read the “Validate” barcode on the same page to complete this setting.
Decimal Value” barcode on page 227 for the desired inter-character delay
2.1.5 INTER-FUNCTION DELAY
By default, the inter-function delay is set to zero. Specify a value, ranging from 0 to 254
in units of millisecond, to match the computer response time of the keyboard interface.
Such delay time is inserted between every function code (0x01 ~ 0x1F) being
transmitted. The longer the delay time is, the slower the transmission speed will be.
Inter-Function
Delay… (*0~254)
1) Read the barcode above to specify the inter-function delay.
2) Read the “
(millisecond).
3) Read the “Validate” barcode on the same page to complete this setting.
Decimal Value” barcode on page 227 for the desired inter-function delay
64
Enter Setup
Page 77

Chapter 2 Selecting Output Interface
2.1.6 HID CHARACTER TRANSMIT MODE
By default, HID interface sends data to the host in batch. You may have the scanner read
the “By Character” barcode to process data one character at a time.
*Batch Processing
By Character
Note: “By Character” transmit mode is required when working with iPhone or iPad.
2.1.7 KEYPAD SUPPORT FOR IPHONE/IPAD
When the scanner has been successfully connected to iPhone or iPad for data collection,
the onscreen keypad of iPhone or iPad will disappear.
Have the scanner read the following barcode to show or hide the keypad if necessary.
Show or Hide Keypad
Note: This function only works for
(1) iPhone 4 and 3GS version 4.1 or later, and (2) iPad version 4.2 or later.
65
Update
Page 78

1560 Series Barcode Scanner User Guide
2.2 BT SPP SLAVE
For BT SPP Slave, refer to Chapter 3 – Setting up a WPAN Connection for related
connection settings.
2.2.1 ACTIVATE BT SPP SLAVE MODE
This is SPP Slave Mode.
Activate BT SPP,
Slave Mode
2.2.2 INTER-FUNCTION DELAY
By default, the inter-function delay is set to zero. Specify a value, ranging from 0 to 254
in units of millisecond, to match the computer response time of the keyboard interface.
Such delay time is inserted between every function code (0x01 ~ 0x1F) being
transmitted. The longer the delay time is, the slower the transmission speed will be.
Inter-Function
Delay… (*0~254)
1) Read the barcode above to specify the inter-function delay.
2) Read the “
Decimal Value” barcode on page 227 for the desired inter-function delay
(millisecond).
3) Read the “Validate” barcode on the same page to complete this setting.
66
Enter Setup
Page 79

Chapter 2 Selecting Output Interface
2.2.3 ACK/NAK TIMEOUT
By default, the scanner sends data to the host without waiting for an ACK/NAK response
before sending more data. Specify a value, ranging from 1 to 99 in units of 0.1 second. If
no response within the specified period of time, the scanner will attempt to send the
same data two more times. If all three attempts fail without any notification, data loss
will occur.
ACK/NAK Time-out
after … (*0~99)
1) Read the barcode above to specify the time interval for the scanner to send data and
wait for a response from the host.
2) Read the “
Decimal Value” barcode on page 227. For example, read “1” and “0” for the
scanner to automatically shut down after idleness of 1 second.
3) Read the “Validate” barcode on the same page to complete this setting.
ACK/NAK Error Beep
Enable Error Beep
*Disable Error Beep
Note: We suggest enabling the error beep so that you will be notified of such data loss
and have the scanner re-read data.
67
Update
Page 80

1560 Series Barcode Scanner User Guide
P
2.3 BT SPP MASTER
As a SPP master device, the scanner will be able to resume connection with the host
upon powering on again, as long as the host application is running. If the scanner fails to
resume connection, it will try every 5 seconds to re-connect to the host unless you have
the scanner read the “Reset Connection” or “Restore System Defaults” barcode.
For BT SPP Master, refer
3.2.2 Configure Related Settings for related connection settings.
Note: In SPP Master Mode, if the scanner fails to re-connect within the specified period
of time (2 minutes by default), the scanner will become inactive to save power.
Once the re-connection is established successfully, the scanner will not go through
transition from full CPU speed to low CPU speed even though it is idle during the
specified time interval for Auto Power Off. It will automatically turn off when the
time is up. Refer to
1.1.3 Power Economy vs. WPAN
Connection.
2.3.1 ACTIVATE BT SPP MASTER MODE
This is SPP Master Mode.
Activate BT SPP,
Master Mode
How to connect with the target device?
Produce two setup barcodes for the target SPP slave device, just like what we do for 3656.
“Set Connection”
“MAC ID”
Note: The “MAC ID” barcode must have a prefix of two characters, either “0x” or “0X”,
followed by the real MAC address of the target device.
Usage:
1. Read the “Activate BT SPP, Master Mode” barcode above and barcodes for connection settings,
such as authentication and preset PIN. Skip this step if no connection settings are desired.
2. Read the “Set Connection” and “MAC ID” barcodes. The scanner will respond with one beep
upon reading each of the barcodes.
Set Connection
refix “0X” to target MAC address
68
Enter Setup
Page 81

Chapter 2 Selecting Output Interface
Note: Read the “Set Connection” barcode first, and then the “MAC ID” barcode within 10
seconds.
Instead of producing the “MAC ID” barcode, you may have the scanner read the setup barcodes for
entering the MAC address.
Have the scanner read the “Abort” barcode to cancel the operation at any time while reading
setup barcodes for the MAC address. If the MAC address has not been completed yet, having
the scanner read the “Validate” barcode can cancel the operation as well.
Enter MAC ID in
Hexadecimal…
Usage:
1. Read the barcode above.
2. Read the “Hexadecimal Value” barcode on page 228 for the desired MAC address.
3. Read the “Validate” barcode on the same page to complete this setting.
Exit SPP Master Mode
To stop such re-connection, have the scanner read “Reset Connection” or “Restore System
Defaults” barcode so that the current connection record (= MAC ID) will be cleared. Then, the
scanner will restart itself automatically. Go through the whole process in
to establish a new WPAN connection.
Reset Connection
3.2.3 Connect to Dongle
69
Update
Page 82

1560 Series Barcode Scanner User Guide
2.3.2 INTER-FUNCTION DELAY
By default, the inter-function delay is set to zero. Specify a value, ranging from 0 to 254
in units of millisecond, to match the computer response time of the keyboard interface.
Such delay time is inserted between every function code (0x01 ~ 0x1F) being
transmitted. The longer the delay time is, the slower the transmission speed will be.
Inter-Function
Delay… (*0~254)
1) Read the barcode above to specify the inter-function delay.
2) Read the “
Decimal Value” barcode on page 227 for the desired inter-function delay
(millisecond).
3) Read the “Validate” barcode on the same page to complete this setting.
70
Enter Setup
Page 83

Chapter 2 Selecting Output Interface
2.3.3 ACK/NAK TIMEOUT
By default, the scanner sends data to the host without waiting for an ACK/NAK response
before sending more data. Specify a value, ranging from 1 to 99 in units of 0.1 second. If
no response within the specified period of time, the scanner will attempt to send the
same data two more times. If all three attempts fail without any notification, data loss
will occur.
ACK/NAK Time-out
after … (*0~99)
1) Read the barcode above to specify the time interval for the scanner to send data and
wait for a response from the host.
2) Read the “
Decimal Value” barcode on page 227. For example, read “1” and “0” for the
scanner to automatically shut down after idleness of 1 second.
3) Read the “Validate” barcode on the same page to complete this setting.
ACK/NAK Error Beep
Enable Error Beep
*Disable Error Beep
Note: We suggest enabling the error beep so that you will be notified of such data loss
and have the scanner re-read data.
2.3.4 SWITCH BETWEEN MASTER/SLAVE MODE
After the scanner has established a connection as a SPP slave device, you may have it
read the “Activate BT SPP, Master Mode” setup barcode to switch to SPP Master Mode.
This will result in easy and reliable re-connection, just like connecting with 3656.
71
Update
Page 84

1560 Series Barcode Scanner User Guide
2.4 KEYBOARD WEDGE VIA 3656
The Y cable allows you to connect the scanner via 3656 to the keyboard input port of PC
and you may join the keyboard as well. The scanned data will be transmitted to the host
keyboard port as if it is manually entered via the keyboard. For example, run a text
editor on your computer to receive the data.
Keyboard Wedge Settings
Keyboard Type PCAT (US)
Alphabets Layout Normal
Digits Layout Normal
Capital Lock Type Normal
Capital Lock State Off
Alphabets Transmission Case-sensitive
Digits Transmission Alphanumeric keypad
Alternate Composing No
Laptop Support Disable
Inter-Character Delay 0 (ms)
Inter-Function Delay 0 (ms)
Defaults
72
Enter Setup
Page 85

Chapter 2 Selecting Output Interface
2.4.1 ACTIVATE KEYBOARD WEDGE & SELECT KEYBOARD TYPE
When Keyboard Wedge interface is activated, you will have to select a keyboard type to
complete this setting.
Activate 3656
Keyboard Wedge &
Select Keyboard
Type…
1) Read this barcode above to activate Keyboard Wedge and select a keyboard type.
2) Read the “
Decimal Value” barcode on page 227. Refer to the table below for the
number of desired keyboard type.
3) Read the “Validate” barcode on the same page to complete this setting.
Keyboard Wedge via 3656
By default, the keyboard type is set to PCAT (US). The following keyboard types are supported
when using 3656 with the keyboard wedge cable provided —
No. Keyboard Type No. Keyboard Type
1 PCAT (US) 16 PS55 001-2
2 PCAT (French) 17 PS55 001-82
3 PCAT (German) 18 PS55 001-3
4 PCAT (Italian) 19 PS55 001-8A
5 PCAT (Swedish) 20 PS55 002-1, 003-1
6 PCAT (Norwegian) 21 PS55 002-81, 003-81
7 PCAT (UK) 22 PS55 002-2, 003-2
8 PCAT (Belgium) 23 PS55 002-82, 003-82
9 PCAT (Spanish) 24 PS55 002-3, 003-3
10 PCAT (Portuguese) 25 PS55 002-8A, 003-8A
11 PS55 A01-1 26 IBM 3477 Type 4 (Japanese)
12 PS55 A01-2 (Japanese) 27 PS2-30
13 PS55 A01-3 28 IBM 34XX/319X, Memorex Telex 122 Keys
14 PS55 001-1 29 User-defined table
15 PS55 001-81 30 PCAT (Turkish)
73
Update
Page 86

1560 Series Barcode Scanner User Guide
2.4.2 KEYBOARD SETTINGS
Alphabets Layout
Digits Layout
Capital Lock Type
Capital Lock Setting
Alphabets Transmission
Digits Transmission
Alternate Composing
Laptop Support
Alphabets Layout
By default, the alphabets layout is set to normal mode, also known as the standard English layout.
Select French or German keyboard layout if necessary. The scanner will make adjustments when
sending the "A", "Q", "W", "Z", "Y", and "M" characters according to this setting.
*Normal
AZERTY
QWERTZ
Note: This setting only works when the keyboard type selected is US keyboard, such as
PCAT (US). The Alphabets Layout and Digits Layout setting must match your
keyboard.
74
Enter Setup
Page 87

Chapter 2 Selecting Output Interface
US Keyboard Style – Normal
QWERTY layout, which is normally used in western countries.
Select “Lower Row” for the “Digits Layout” setting for the upper row is for special characters.
French Keyboard Style – AZERTY
French layout; see below for French Keyboard Style.
Select “Upper Row” for the “Digits Layout” setting for the lower row is for special characters.
German Keyboard Layout – QWERTZ
German layout; see below for German Keyboard Style.
Select “Lower Row” for the “Digits Layout” setting for the upper row is for special characters.
75
Update
Page 88

1560 Series Barcode Scanner User Guide
Digits Layout
Select a proper layout that matches the alphabets layout. The scanner will make adjustments
according to this setting.
Options Description
Normal Depends on the [Shift] key or [Shift Lock] setting
Lower Row For QWERTY or QWERTZ keyboard
Upper Row For AZERTY keyboard
*Normal
Upper Row
Lower Row
Note: This setting is meant to be used with the Alphabets Layout; and perhaps with the
Character Substitution setting when support to certain keyboard types (languages)
is unavailable but required.
76
Enter Setup
Page 89

Chapter 2 Selecting Output Interface
T
Capital Lock Type & Setting
In order to send the alphabets with correct case, the scanner needs to know the status of Caps
Lock on the keyboard. Incorrect settings may result in reversed case of the alphabets being
transmitted.
Cap Lock Type Description
Normal Normal type
Capital Lock When enabled, the keys of alphabetic characters will be interpreted as
capital letters. However, this does not affect the number or punctuation
keys.
Shift Lock When enabled, the keys of alphabetic characters will be interpreted as
capital letters. In addition, this affects the number or punctuation keys.
*Normal
Shift Lock
Capital Lock
Capital Lock State Description
Capital Lock OFF Assuming that the status of Caps Lock on the keyboard is OFF,
transmitted characters are exactly the same as in the barcode (when
"case-sensitive" is selected for Alphabets Transmission).
Capital Lock ON Assuming that the status of Caps Lock on the keyboard is ON, transmitted
characters are exactly the same as in the barcode (when "case-sensitive"
is selected for Alphabets Transmission).
Refer to the Capital Lock Type above.
Auto Detection
he scanner will automatically detect the status of Caps Lock on the
keyboard before data is transmitted; transmitted characters are exactly
the same as in the barcode (when "case-sensitive" is selected for
Alphabets Transmission).
Auto Detect
Capital Lock ON
77
Update
Page 90

1560 Series Barcode Scanner User Guide
*Capital Lock OFF
78
Enter Setup
Page 91

Chapter 2 Selecting Output Interface
R
Alphabets Transmission
By default, the alphabets transmission is case-sensitive, meaning that the alphabets will be
transmitted according to their original case, the status of Caps Lock on the keyboard, as well as the
Capital Lock setting. Select [Ignore Case] to have alphabets transmitted according to the status of
Caps Lock on the keyboard only.
Ignore Case
*Case-sensitive
efer to 5.1 Letter Case.
79
Update
Page 92

1560 Series Barcode Scanner User Guide
Digits Transmission
By default, the alphanumeric keypad is used for transmitting digits. Select “Numeric Keypad” if you
wish to use the keys on the numeric keypad.
Numeric Key
*Alphanumeric Key
Note: If you select “Numeric Keypad”, the Num Lock status of the physical keyboard
should be “ON”.
80
Enter Setup
Page 93

Chapter 2 Selecting Output Interface
ALT Composing
By default, Alternate key composing is disabled. Select [Yes] to allow emulating Alternate key code
of a specific keyboard character. For example, [Alt] + [065] will be sent to host for the character
“A” regardless the keyboard type you are using.
Yes
*No
Laptop Support
By default, laptop support is disabled. It is suggested to enable this feature if you connect the
wedge cable to a laptop without an external keyboard being inter-connected.
Enable
*Disable
81
Update
Page 94

1560 Series Barcode Scanner User Guide
2.4.3 INTER-CHARACTER DELAY
By default, the inter-character delay is set to zero. Specify a value, ranging from 0 to
254 in units of millisecond, to match the computer response time of the keyboard
interface. Such delay time is inserted between every character being transmitted. The
longer the delay time is, the slower the transmission speed will be.
Inter-Character
Delay… (*0~254)
1) Read the barcode above to specify the inter-character delay.
2) Read the “
Decimal Value” barcode on page 227 for the desired inter-character delay
(millisecond).
3) Read the “Validate” barcode on the same page to complete this setting.
2.4.4 INTER-FUNCTION DELAY
By default, the inter-function delay is set to zero. Specify a value, ranging from 0 to 254
in units of millisecond, to match the computer response time of the keyboard interface.
Such delay time is inserted between every function code (0x01 ~ 0x1F) being
transmitted. The longer the delay time is, the slower the transmission speed will be.
Inter-Function
Delay… (*0~254)
1) Read the barcode above to specify the inter-function delay.
2) Read the “
(millisecond).
3) Read the “Validate” barcode on the same page to complete this setting.
Decimal Value” barcode on page 227 for the desired inter-function delay
82
Enter Setup
Page 95

Chapter 2 Selecting Output Interface
2.5 RS-232 VIA 3656
Use the RS-232 cable to connect the scanner via 3656 to the serial port of PC, and
connect the power supply cord. The associated RS-232 parameters must match those
configured on the computer. You may run HyperTerminal.exe on your computer, and the
scanned data will be transmitted to the computer.
RS-232 Settings
Baud Rate, Data Bit, Parity, Stop Bit 115200 bps, 8 bits, No parity, 1 stop bit
Flow Control None
Inter-Character Delay 0 (ms)
Inter-Function Delay 0 (ms)
ACK/NAK Timeout 0
ACK/NAK Beep Disable
Defaults
2.5.1 ACTIVATE RS-232 INTERFACE
Activate 3656
RS-232 Interface
2.5.2 BAUD RATE
*115200 bps
57600 bps
38400 bps
19200 bps
9600 bps
83
Update
Page 96

1560 Series Barcode Scanner User Guide
2.5.3 DATA BITS
4800 bps
2400 bps
1200 bps
600 bps
*8 bits
2.5.4 PARITY
7 bits
*No parity
Even
Odd
84
Enter Setup
Page 97

Chapter 2 Selecting Output Interface
2.5.5 STOP BIT
2 stop bits
*1 stop bit
2.5.6 FLOW CONTROL
By default, there is no flow control in use. Select the flow control (handshake) method.
Options
No No flow control
Scanner Ready The scanner will activate the RTS signal upon powering on. After each good
Data Ready The RTS signal will be activated after each good read. The scanner will then
Inverted Data Ready It works the same as the Data Ready flow control except that the RTS signal
Description
read, the scanner will then wait for the CTS signal to become active. Data
will not be sent until the CTS signal becomes active.
wait for the CTS signal to become active. Data will not be sent until the CTS
signal becomes active.
level is inverted.
*None
Scanner Ready
Data Ready
Invert Data
Ready
85
Update
Page 98

1560 Series Barcode Scanner User Guide
2.5.7 INTER-CHARACTER DELAY
By default, the inter-character delay is zero. Specify a value, ranging from 0 to 254 in
units of millisecond, to match the computer response time. Such delay time is inserted
between every character being transmitted. The longer the delay time is, the slower the
transmission speed will be.
Inter-Character
Delay… (*0~254)
1) Read the barcode above to specify the inter-character delay.
2) Read the “
Decimal Value” barcode on page 227 for the desired inter-character delay
(millisecond).
3) Read the “Validate” barcode on the same page to complete this setting.
2.5.8 INTER-FUNCTION DELAY
By default, the inter-function delay is set to zero. Specify a value, ranging from 0 to 254
in units of millisecond, to match the computer response time of the keyboard interface.
Such delay time is inserted between every function code (0x01 ~ 0x1F) being
transmitted. The longer the delay time is, the slower the transmission speed will be.
Inter-Function
Delay… (*0~254)
1) Read this barcode above to specify the inter-function delay.
2) Read the “
(millisecond).
3) Read the “Validate” barcode on the same page to complete this setting.
Decimal Value” barcode on page 227 for the desired inter-function delay
86
Enter Setup
Page 99

Chapter 2 Selecting Output Interface
2.5.9 ACK/NAK TIMEOUT
By default, the scanner sends data to the host without waiting for an ACK/NAK response
before sending more data. Specify a value, ranging from 1 to 99 in units of 0.1 second. If
no response within the specified period of time, the scanner will attempt to send the
same data two more times. If all three attempts fail without any notification, data loss
will occur.
ACK/NAK
Time-out after …
(*0~99)
1) Read the barcode above to specify the time interval for the scanner to send data and
wait for a response from the host.
2) Read the “
Decimal Value” barcode on page 227. For example, read “1” and “0” for the
scanner to automatically shut down after idleness off 1 second.
3) Read the “Validate” barcode on the same page to complete this setting.
ACK/NAK Error Beep
Enable Error Beep
*Disable Error
Beep
Note: We suggest enabling the error beep so that you will be notified of such data loss
and have the scanner re-read data.
87
Update
Page 100

1560 Series Barcode Scanner User Guide
2.6 USB HID VIA 3656
For USB HID, use the USB cable to connect the scanner via 3656 to the USB port of PC
and connect the power supply cord. Run any text editor on your computer, and the
scanned data will be transmitted to the computer.
Warning: When the 3656 stand is solely on USB power, the current may be
insufficient for it to function normally. You must connect the power supply
cord.
HID Settings Defaults
Keyboard Type PCAT (US)
Digits Layout Normal
Capital Lock Type Normal
Capital Lock State Off
Alphabets Transmission Case-sensitive
Digits Transmission Alphanumeric keypad
Inter-Character Delay 0 (ms)
Inter-Function Delay 0 (ms)
88
Enter Setup
 Loading...