

Page 1

Cipherium bonalinx-W 1300
Administrator’ s Manual
Cipherium bonalinx-W 1300
Administrator's Manual
Version 1.0.0
© 2004 Cipherium Systems Co., Ltd.
Page 2

Cipherium bonalinx-W 1300
Administrator’ s Manual
Copyright
The intellectual property rights and copyright of this manual belong to Cipherium Systems Co.,
Ltd. and are protected by the R.O.C. copyright laws and international copyright laws. No
part or the manual in its entirety may be transshipped, transmitted, duplicated, distributed,
displayed, published, or broadcasted in any form or by any means without the prior written
permission of Cipherium Systems Co., Ltd. The trademarks mentioned in the manual belong
to the owners of the respective registered companies or organizations.
Please contact Cipherium Systems if you have any questions on copyright:
Tel.: +886-2-2731-6669
Fax: +886-2-2731-7776
E-mailǺ[email protected]
© 2004 Cipherium Systems Co., Ltd.
Page 3

Cipherium bonalinx-W 1300
Administrator’ s Manual
Table of Contents
1. Preface....................................................................................................... 1
1.1. Brief Introduction of bonalinx -W 1300 .......................................................1
1.2. Before you Read .....................................................................................2
1.2.1. Audience ........................................................................................2
1.2.2. Document Convention .....................................................................2
2. Product Description............................................................................... 3
2.1. Package Contents...................................................................................3
2.2. Front Panel.............................................................................................3
2.3. Hardware Specifications ..........................................................................5
2.4. Technical Specifications ...........................................................................6
2.4.1. Standards .......................................................................................6
2.4.2. Networking .....................................................................................6
2.4.3. Firewall...........................................................................................6
2.4.4. User Management ...........................................................................6
2.4.5. Administration.................................................................................7
2.4.6. Accounting......................................................................................7
3. Installation ................................................................................................ 8
3.1. Installing the bonalinx -W 1300 .................................................................8
3.1.1. System Requirements .....................................................................8
3.1.2. Installation Procedure......................................................................8
3.1.3. Setting the PC for the Public LAN and Private LAN
Sections 9
3.2. Getting Started......................................................................................17
3.2.1. System Concept ............................................................................17
3.2.2. Connecting Network Devices .........................................................19
3.2.3. Begin Installation ...........................................................................20
4. Console Interface..................................................................................26
i
Page 4

Cipherium bonalinx-W 1300
Administrator’ s Manual
4.1. Main Menu of Console interface .............................................................26
4.2. Utilities for network debugging of Console interface.................................27
4.3. Change admin password of Console interface.........................................28
4.4. Reload factory default of Console interface .............................................29
4.5. Restart Cipherium bonalinx-W 1300 .......................................................29
5. Web Management Interface ...............................................................30
5.1. System Configuration ............................................................................31
5.1.1. Configuration Wizard.....................................................................31
5.1.2. System Information .......................................................................44
5.1.3. WAN Configuration........................................................................46
5.1.4. Authentication Configuration ..........................................................48
5.2. User Authentication ...............................................................................61
5.2.1 Authentication Policy ..........................................................................61
5.2.2 Group Configuration ...........................................................................71
5.2.3 Black List Configuration .....................................................................72
5.2.4 Guest User Configuration ..................................................................74
5.2.5 Roaming Configuration ......................................................................75
5.2.6 Additional Configuration.....................................................................77
5.2.7 On-demand User Configuration ..........................................................82
5.3 Group Profile ........................................................................................88
5.3.1 Firewall Profile ..................................................................................88
5.3.2 Specific Route Profiles.......................................................................91
5.3.3 Login Schedule Profiles .....................................................................92
5.4 Network Configuration ...........................................................................93
5.4.1 Network Address Translate ................................................................93
5.4.2 Privilege List .....................................................................................95
5.4.3 Monitor IP List...................................................................................97
5.4.4 Walled Garden List............................................................................99
5.4.5 Proxy Server Properties................................................................... 100
5.5 Utilities ............................................................................................... 102
5.5.1 Change Password........................................................................... 102
ii
Page 5

Cipherium bonalinx-W 1300
iii
Administrator’ s Manual
5.5.2 Backup / Restore Strategy ............................................................... 102
5.5.3 Firmware Upgrade........................................................................... 104
5.5.4 Restart ........................................................................................... 104
5.6 Status ................................................................................................. 105
5.6.1 System Status................................................................................. 105
5.6.2 Interface Status ............................................................................... 108
5.6.3 Current Users ................................................................................. 110
5.6.4 Traffic History.................................................................................. 110
5.6.5 DHCP Server Reporting....................................................................111
5.6.6 Notify Configuration......................................................................... 112
6 Technical Support...............................................................................113
7 Appendix - Windows TCP/IP Setup................................................114
7.3 Check the TCP/IP Setup of Windows 9x/ME ......................................... 114
7.4 Check the TCP/IP Setup of Windows 2000 ........................................... 118
7.5 Check the TCP/IP Setup of Windows XP .............................................. 123
Appendix A Statements.......................................................................136
Page 6

Cipherium bonalinx-W 1300
iv
Administrator’ s Manual
Figure Index
Figure 3-1 The bonalinx -W 1300 User Public LAN Flow .................................... 18
Figure 3-2 Example of Setting up a Small Enterprise Network ..........................19
Figure 3-3 Administrator Login .........................................................................20
Figure 3-4 Welcome Screen..............................................................................21
Figure 3-5 Configuration Wizard Screen...........................................................22
Figure 3-6 Entering Username and Password...................................................23
Figure 3-7 Successful Login Page ....................................................................23
Figure 3-8 Logon Fails (not an on-demand user) .............................................. 24
Figure 3-9 Successfully logon page for on-demand user.................................. 24
Figure 3-10 Redeem page ....................................................................................25
Figure 3-11 Remaining hours or data size ...........................................................25
Figure 4-1 Main Menu of bonalinx -W 1300 Console Interface ...........................26
Figure 4-2 bonalinx-W 1300 Utility Menu...........................................................27
Figure 5-1 Setup Wizard Interface.....................................................................31
Figure 5-2 Setup Wizard Description ................................................................32
Figure 5-3 Change Admin’ s Password Screen..................................................33
Figure 5-4 Choose the System’ s Time Zone......................................................33
Figure 5-5 Set System Information....................................................................34
Figure 5-6 Select the Connection Type for WAN Port........................................ 35
Figure 5-7 Set the Connection Type for WAN Static IP Address........................35
Figure 5-8 Select the Connection Type for WAN Dynamic IP Address ..............36
Figure 5-9 Set WAN PPPoE ...............................................................................36
Figure 5-10 Configure Public LAN ..................................................................... 37
Figure 5-11 Set DHCP Server ............................................................................37
Figure 5-12 Select Public LAN Methods............................................................38
Figure 5-13 Add Local Users.............................................................................39
Figure 5-14 POP3 Setup Screen........................................................................39
Figure 5-15 Radius Setup Screen......................................................................40
Figure 5-16 LDAP Setup Screen........................................................................40
Figure 5-17 Set Wireless – Access Point Connection .......................................41
Page 7

Cipherium bonalinx-W 1300
v
Administrator’ s Manual
Figure 5-18 Configure Wireless port .................................................................42
Figure 5-19 Enable DHCP Sever of Wireless Port ............................................. 42
Figure 5-20 Restart............................................................................................ 43
Figure 5-21 System Configuration ....................................................................44
Figure 5-22 Example of WAN Static IP Mode .....................................................46
Figure 5-23 WAN Dynamic IP Mode...................................................................46
Figure 5-24 WAN PPPoE Mode .......................................................................... 47
Figure 5-25 Dial on Demand..............................................................................47
Figure 5-26 Authentication Configuration .........................................................48
Figure 5-27 Public LAN Configuration ..............................................................48
Figure 5-28 Disable the DHCP Server on Public LAN.............................................49
Figure 5-29 Disable the DHCP Server on Public LAN ........................................49
Figure 5-30 Enable the DHCP Server on Public LAN.........................................50
Figure 5-31 Reserve the IP Address Setting on Public LAN..............................50
Figure 5-32 Enable the DHCP Relay on Public LAN ..........................................51
Figure 5-33 Security setting .................................................................................52
Figure 5-34 Example of Private LAN Interface...................................................58
Figure 5-35 Wireless Port Configuration(2)...........................................................55
Figure 5-36 Disable the DHCP Server on Wireless..................................................56
Figure 5-37 Disable DHCP Server on Private LAN .............................................59
Figure 5-38 Enable DHCP Server on Private LAN..............................................59
Figure 5-39 Reserve IP Address Setting on Private LAN ...................................57
Figure 5-40 Enable DHCP Relay on Private LAN ...............................................60
Figure 5-41 Disable DHCP Server on Private LAN.................................................59
Figure 5-42 Example of Authentication Policy(1)..............................................61
Figure 5-43 Example of Authentication Policy(2)..............................................62
Figure 5-44 Exception Configuration ................................................................ 63
Figure 5-45 Local User List ...............................................................................64
Figure 5-46 Example of Adding User Accounts.................................................65
Figure 5-47 Added User Accounts Screen ........................................................66
Figure 5-48 Example of Editing User Accounts.................................................66
Figure 5-49 Example of Upload User Account Interface ....................................66
Page 8

Cipherium bonalinx-W 1300
vi
Administrator’ s Manual
Figure 5-50 Example of Download User Account Interface ............................... 67
Figure 5-51 POP3 Setup Screen........................................................................ 67
Figure 5-52 RADIUS Setup Screen....................................................................69
Figure 5-53 LDAP Setup Screen........................................................................70
Figure 5-54 NT Domain Setup Screen...............................................................70
Figure 5-55 Group Configuration Screen..........................................................71
Figure 5-56 Example of Black List .....................................................................72
Figure 5-57 Example of Adding User to Black List ............................................73
Figure 5-58 Example of Deleting a User from Black List ...................................74
Figure 5-59 Guest User Configuration Management Interface ..........................74
Figure 5-60 Example of Guest User Management Interface .............................. 75
Figure 5-61 Roaming Configuration ..................................................................76
Figure 5-62 Guest User Configuration Management Interface .................................74
Figure 5-63 Additional Configura tion ................................................................ 77
Figure 5-64 Upload User-defined Login Interface..............................................78
Figure 5-65 HTML Instructions Required for Using User-Defined Interface ......79
Figure 5-66 Path of Graphic File in User Login Interface ..................................79
Figure 5-67 Graphic File Description ................................................................79
Figure 5-68 Path of Graphic File for User Logout Interface...............................80
Figure 5-69 Upload User Logout Interface ........................................................80
Figure 5-70 HTML Codes Required for User Logout Interface ...........................81
Figure 5-71 POP3 Message ............................................................................... 81
Figure 5-72 MAC Address Control Interface......................................................82
Figure 5-73 Receipt Information........................................................................83
Figure 5-74 On-demand User Configuration .....................................................84
Figure 5-75 On-demand User Page Field and Description ................................84
Figure 5-76 On-demand User List .....................................................................85
Figure 5-77 Example of Firewall Profile.............................................................88
Figure 5-78 Select the Group for Applying Firewall Profile Rules.....................89
Figure 5-79 Example of Edit Filter Rule............................................................. 89
Figure 5-80 Example of Editing Specific Route Profile...................................... 91
Figure 5-81 Example of Guest Login Schedule Management Interface.............92
Page 9

Cipherium bonalinx-W 1300
Administrator’ s Manual
Figure 5-82 Defining the Static Assignment Address Correspondence ............ 93
Figure 5-83 Defining Public Accessible Server.................................................94
Figure 5-84 IP Address and Network Port Redirect ...........................................95
Figure 5-85 Privilege IP Address ....................................................................... 96
Figure 5-86 Direct Connecting MAC Address.................................................... 97
Figure 5-87 Monitor IP List ................................................................................ 98
Figure 5-88 Defining Walled Garden Server Address ...................................... 100
Figure 5-89 Proxy List ..................................................................................... 101
Figure 5-90 Change Administrator’ s Account ................................................. 102
Figure 5-91 Backup and Restore ..................................................................... 103
Figure 5-92 Executing the Firmware Upgrade................................................. 104
Figure 5-93 Restart.......................................................................................... 105
Figure 5-94 System Status Example................................................................ 106
Figure 5-95 System Status Description ........................................................... 106
Figure 5-96 Interface Status Example ............................................................. 108
Figure 5-97 Interface Status Example ............................................................. 109
Figure 5-98 Online User Data .......................................................................... 110
Figure 5-99 History Example............................................................................111
Figure 5-100 Traffic History Example (2)..........................................................111
Figure 5-101 DHCP Server Reporting Example............................................... 112
Figure 5-102 Notify Configuration Example.................................................... 112
vii
Page 10

Cipherium bonalinx-W 1300
Administrator’ s Manual
1. Preface
1.1. Brief Introduction of bonalinx-W 1300
Wireless network breaks through the barrier of traditional thinking, and releases unlimited
innovation and implementability, which becomes the working attitude and living environment
pursued by people nowadays. In addition, manufacturers try very hard to lower the entry
level and thus more consumers are happy to have such technology to get rid of the tangled
network cables and limitations. However, the problems accompanying the wireless technology
cannot be overlooked. The ways of preventing your neighbors from “borrowing” your
wideband or becoming your “Network Neighbor” to enter your computer system anytime are
the important topics when upgrading to wireless users. The Cipheriium bonalinx-W 1300 is
easy to set up and operate, but also has built only one gate to filter user’s entrance and exit,
and thus takes care of both the strictness of management and the convenience of usage.
Finally, you can have peace of mind to carry out the wireless construction or implement a
wireless studio at home.
Also we integrate a wireless port into bonalinx-W 1300 which support 54Mbps wireless
networking standard and almost five times faster than the widely deployed 802.11b products
arround in homes, businesses, and public wireless hotspots around the country —802.11b and
802.11g share the same 2.4GHz radio band, so bonalinx-W 1300 can also work with existing
11Mbps 802.11b equipment.
Quick InstallationǸOnline Immediately
The installation and setup of the bonalinx-W 1300 are easy without changing the present
existing network architecture. You can install and login the system within a short time and
establish the security mechanism. With the protection by the bonalinx-W 1300, users must
be authenticated before logging on to the network, and the administrator can assign a
fine-grained priority to each user specify the scope and right of using network resources.
Friendly Management and Application Interfaces
The bonalinx-W 1300 is not only easy to install, but also has friendly management interface
1
Page 11

Cipherium bonalinx-W 1300
Administrator’ s Manual
and operation logic, which allows you to get a hand on it easily. You can use all of the
functions of the system with a click. A full web-based management interface allows you to
operate and manage the system online by the browser. At the user end, the login Public LAN
is also operated through the browser, and it does not require installing an additional software
interface.
Integrating the Existing User Password Database
In general, most organizations have used a specific database system to centralize and manage
user passwords before introducing the wireless network into the organization. The bonalinx-W
1300 supports the POP3, POP3S, RADIUS, and LDAP external Public LAN mechanisms and
allows you to integrate the current user password database. This system also provides a
built-in user database, so that the administrator can create or upload Public LAN data by batch
processing.
1.2. Before you Read
1.2.1. Audience
This manual is intended for system or network administrators, therefore we assume that our
readers have knowledge on networks to a certain extent and are able to complete the setups
according to this manual in order to use the Cipherium System’ s bonalinx-W 1300 to manage
the network system and users.
1.2.2. Document Convention
For cautions or warnings in this manual that require the reader’s special attention,
eye-catching italic font accompanied with a box is used as the highlight. An example is
given below:
Warning: For security purposes, you should immediately change the Administrator’s
password.
2
Page 12
Cipherium bonalinx-W 1300
Power Indicating Light
2. Product Description
2.1. Package Contents
The standard package of the bonalinx-W 1300 includes:
z bonalinx-W 1300 x 1
z CD-ROM (Administrator’s Manual and Quick Installation Guide) x 1
z Power adaptor x 1
z Ethernet cable x 1
z console cable x 1
z Wall-mount
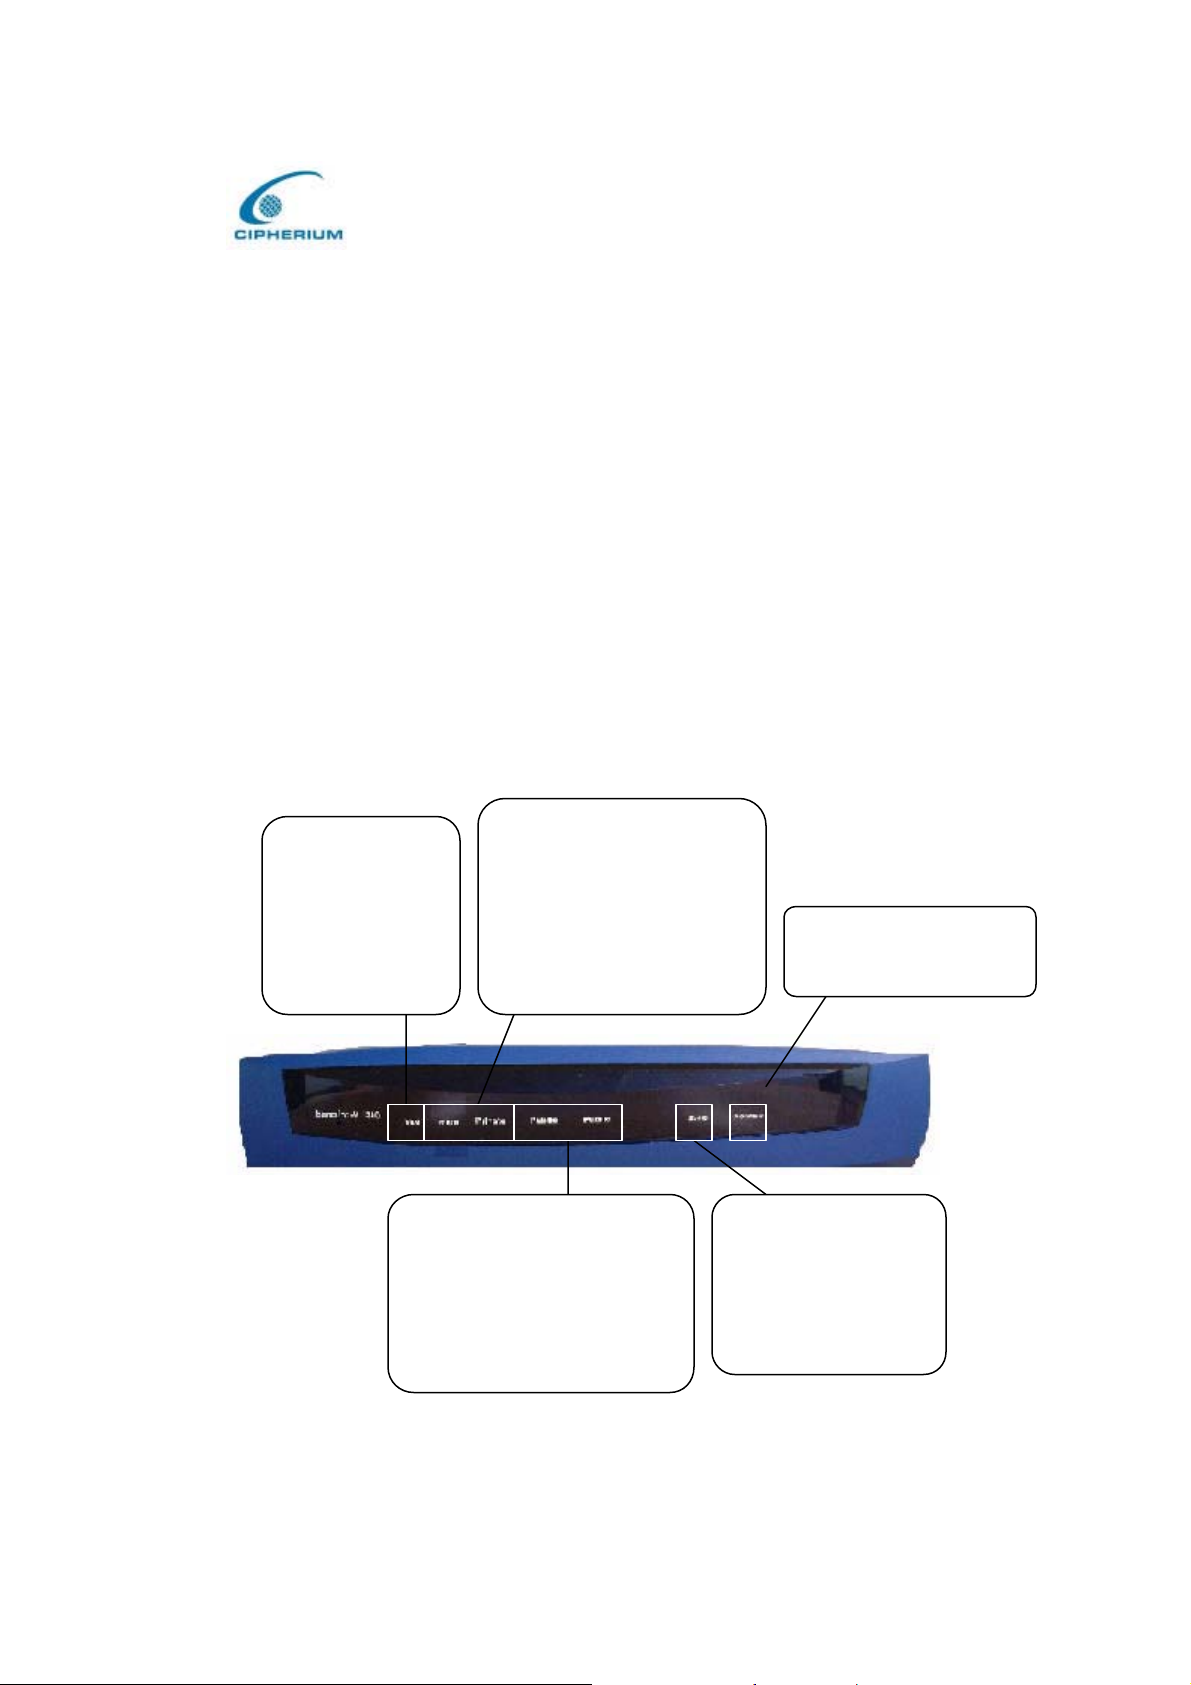
2.2. Front Panel
Administrator’ s Manual
WAN Indicating
Light
Stands for being
connected to
WAN port.
.
Public LAN Indicating Light
Stands for being connected to
Public LAN of the open
network environment
managed by the system.
Private LAN Indicating
Light
Stands for being connected
to Private LAN port of the
trustful Intranet
environment.
Power is on when this
light is on all the time.
Wireless Indicating
Light: Stands for
wireless function
properly.
3
Page 13
(Back Side )
t
t
Cipherium bonalinx-W 1300
Administrator’ s Manual
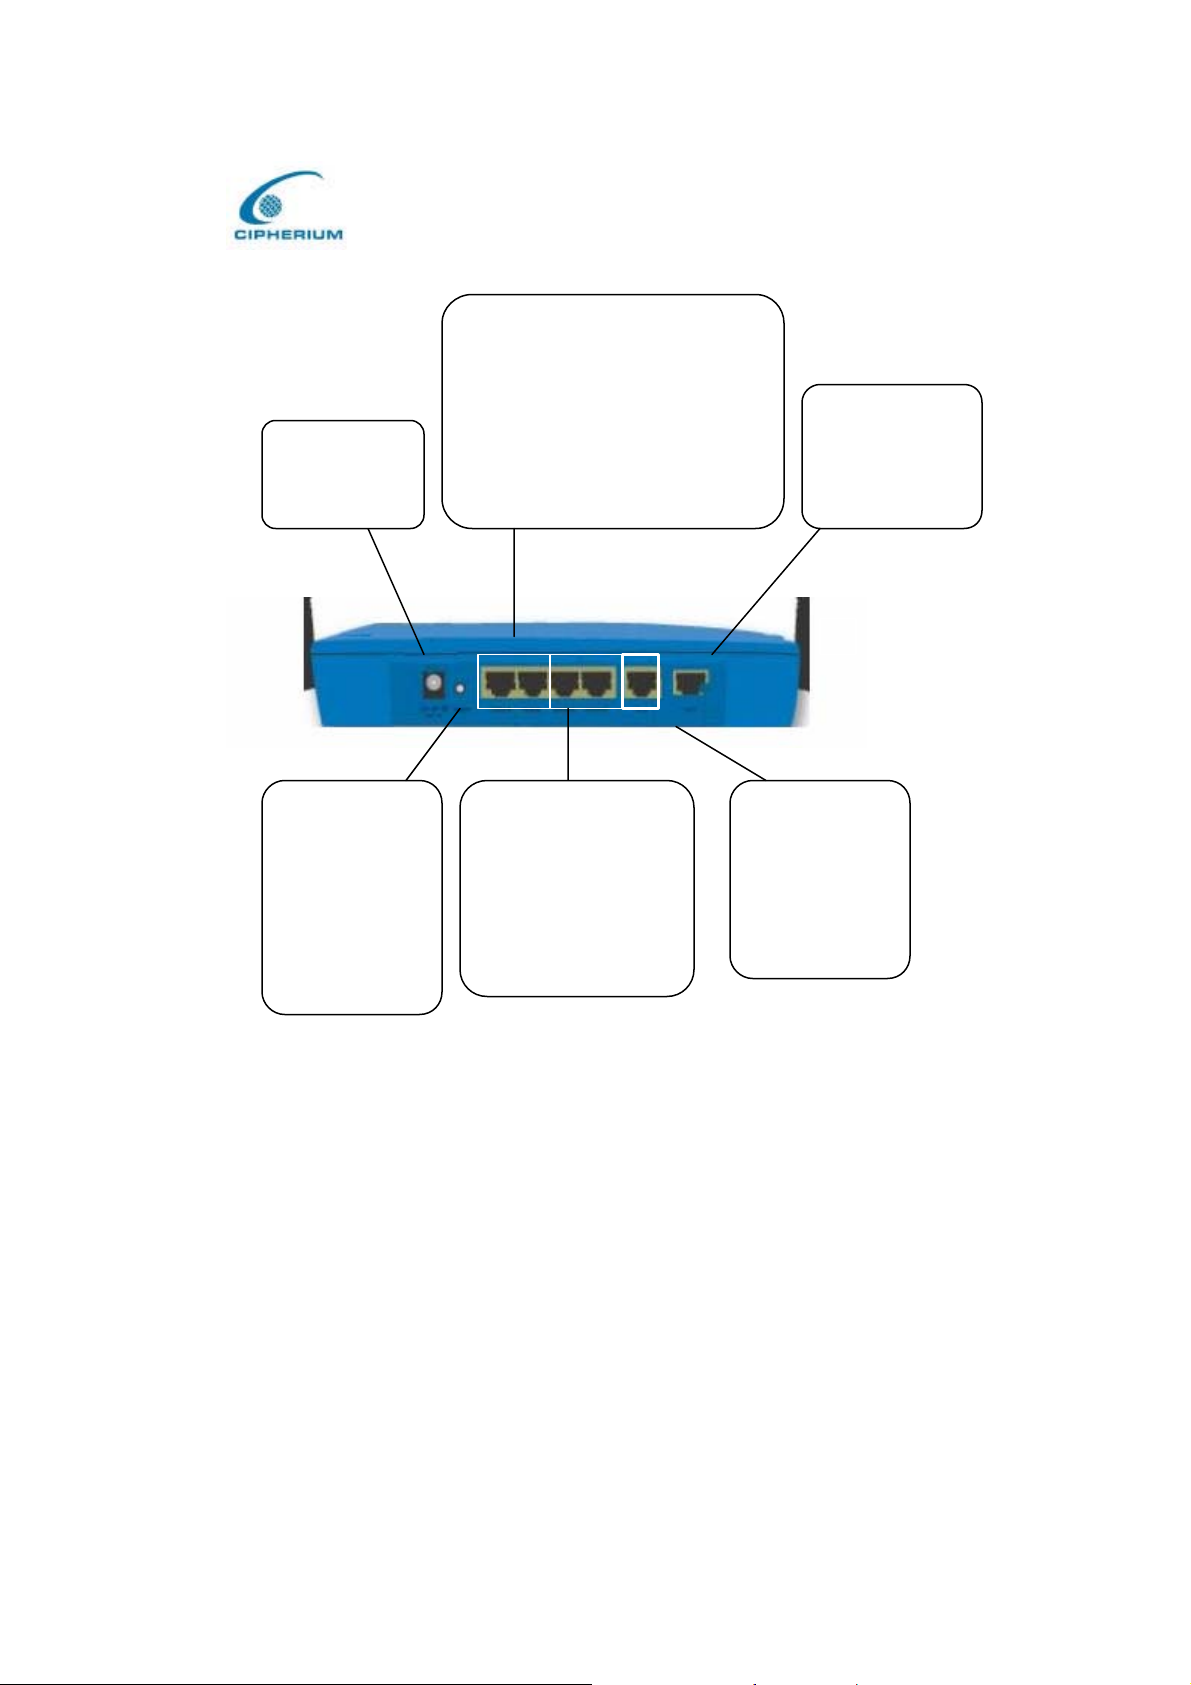
Public LAN Por
can be connected to the open
AC Power
Power Cord
Plug
Reset button
Resumes the
factory defaults
or reconfigures
the system. We
recommend
you to set this
configuration
by experts.
network environment managed
by the system, and requires
authentication before logging on
to the Internet.
Private LAN Port
can be connected to
the trustful Intranet
environment by
Switch without
authentication for
logging on to the
Internet.
RJ11 Port
can be console
interface or
printer
interface.
WAN P or
can be
connected to
the Internet or
Intranet by
Switch.
Port
The port is connected to a network which is not managed by the bonalinx-W 1300 system, and
this port can be used to connect the ATU-Router of ADSL, the port of Cable Modem, or the
Switch or Hub on the WAN of a company.
WAN Port
The WAN port is connected to a network which is not managed by the bonalinx-W 1300
system, and this port can be used to connect the ATU-Router of ADSL, the port of Cable
Modem, or the Switch or Hub on the LAN of a company.
4
Page 14

Cipherium bonalinx-W 1300
Administrator’ s Manual
Public LAN Port
The Public LAN is used to connect the desired network for management or WLAN, and all
users connected to the Public LAN must login successfully before using the network
resources.
Private LAN Port
The Private LAN port is used to connect to the trustful network or Ethernet. In other words,
the computer or user connected to the bonalinx-W 1300 from Private LAN does not require
login to use the network resources. This port can be used to connect to a server such as File
Server or a DataBase Server, etc.
DC Power Socket
It is used to connect the power supply.
RJ11 Port
There have 2 functions but can’t be used at the same time.
1. Connect to a specific printer for on-demand user to printer tickets.
2. If you need to set the Administrator’s Password, you can connect a PC to the Console Serial
Port of the bonalinx-W 1300, and use the terminal connection program (such as the super
terminal and the parameter is 9600, 8, N, 1, None flow control) for the connection to change
the Administrator’s Password.
2.3. Hardware Specifications
y Dimensions: 14.9cm(W) x 4.7cm(H) x 24.8cm(L)
y Weight: 470g
y Power: DC12V/1A 5.5F
y Operating Temperature: 5-45±C
y 5 Fast Ethernet RJ 45 Connectors
y 1 RJ11 Ports
y Supports 10/100Mbps Full / Half Duplex Transfer Speed
5
Page 15

2.4. Technical Specifications
2.4.1. Standards
y Supports IEEE 802.1x
y Supports IEEE 802.11g
2.4.2. Networking
y WAN interface supports Static IP, DHCP client, and PPPoE client
y Interface supports static IP
y Supports NAT mode and router mode
y Built-in DHCP server
y Built-in NTP client
y Supports Redirect of network data
Cipherium bonalinx-W 1300
Administrator’ s Manual
y Supports IPSec(ESP), PPTP and H.323 pass through (under NAT)
y Customizable static routing table
y Supports Virtual Server
y Supports DMZ Server
y Supports machine operation status monitoring and reporting system
y Supports roaming across networks
2.4.3. Firewall
y Provides Several DoS protection mechanisms
y Customizable packet filter rules
y Customizable walled garden (free surfing area)
2.4.4. User Management
y The bonalinx-W 1300 supports at least 500 on-line users concurrently
y Supports POP3, POP3S, RADIUS, and LDAP Public LAN mechanisms
6
Page 16

Cipherium bonalinx-W 1300
Administrator’ s Manual
y Supports two or more Public LAN mechanisms simultaneously
y Built-in user database can choose MAC address locking
y Can set the time for the user to login to the system
y Can set the user’s idle time
y Can specify the connection to MAC address without Public LAN
y Can specify the connection to IP address without Public LAN
y Permits or refuses all connections when the WAN interface fails
y Supports web-based login
y Provides several friendly logout methods
y Supports RADIUS accounting protocol to generate the billing record on RADIUS
server.
2.4.5. Administration
y Provides online status monitoring and history traffic
y Supports SSL encrypted web administration interface and user login interface
y Customizable user login & logout web interface
y Customizable redirect after users are successfully authenticated during login & logout
y Supports Console management interface
y Supports SSH remote administration interface
y Supports web-based administration interface
y Supports SNMP v2
y Supports user’s bandwidth restriction
y Supports remote firmware upgrade
2.4.6. Accounting
y Supports built-in user databas e and RADIUS accounting
7
Page 17

Cipherium bonalinx-W 1300
Administrator’ s Manual
3. Installation
3.1. Installing the bonalinx-W 1300
3.1.1. System Requirements
y Standard 10/100BaseT including four network cables with RJ-45 connectors.
y All PCs need to install the TCP/IP network protocol.
3.1.2. Installation Procedure
Following the following steps to install the bonalinx-W 1300:
1. Make sure the power of the bonalinx-W 1300 is turned off.
2. Connect the WAN port.
Use the network cable of the 10/100BaseT to connect to the bonalinx-W 1300 and the network
not managed by the bonalinx-W 1300 system such as the ATU-Router of ADSL, port of Cable
Modem, or the Switch or Hub on the LAN of a company.
3. Connect the port. (Optional)
Use the network cable of the 10/100BaseT to connect to the bonalinx-W 1300 and the network
not managed by the bonalinx-W 1300 system such as the ATU-Router of ADSL, port of Cable
Modem, or the Switch or Hub on the LAN of a company.
4. Connect the Public LAN.
The Public LAN is used to connect the desired network for management or WLAN, and all
users connected to the Public LAN must login successfully before using the network resources.
Use the network cable of the 10/100BaseT to connect to the Switch or Hub of the Public LAN,
and then use the network cable of the 10/100BaseT to connect to the Administrator’s PC. If
it is necessary to connect the PC or wireless AP directly to the Public LAN, then we need to
8
Page 18

Cipherium bonalinx-W 1300
Administrator’ s Manual
use the cross over line.
Warning: Public LAN cannot connect to Layer 3 device.
5. Connect the Private LAN port.
The Private LAN port is used to connect the trustful network or Ethernet. In other words, the
computer connected to the bonalinx-W 1300 from Private LAN does not require login to use
the network resources. This port can be used to connect to a server such as File Server or a
DataBase Server, etc. Use the network cable of the 10/100BaseT to connect to the Switch or
Hub of the Private LAN, and then use the network cable of the 10/100BaseT to connect to the
Administrator’s PC. If it is necessary to connect the PC or wireless AP directly to the Private
LAN, then we need to use the cross over line.
6. Turn on the power.
Plug the bundled power supply connector into the socket.
7. Check the LED indicating light.
After the power is on, the power indicating light should be lit. The WAN and indicating lights
should be lit when the WAN and ports are properly connected to the network equipment. The
corresponding indicating lights also should be lit when the Public LAN and Private LAN ports
are properly connected.
3.1.3. Setting the PC for the Public LAN and Private LAN
Sections
After the bonalinx-W 1300 is installed, the following must be set up for the Public LAN and
Private LAN sections:
y TCP/IP Network Setup
y Internet Connection Setup
9
Page 19
Cipherium bonalinx-W 1300
Administrator’ s Manual
3.1.3.1. TCP/IP Network Setup
y If the operating system of your PC is Windows 95/98/ME/2000/XP, then you just need
to keep the default setting (without any change) to directly start/restart the system.
y During the process of starting the system, the bonalinx-W 1300 with DHCP function
will automatically assign the appropriate IP address (and related information) to each
PC.
y For the Windows operating systems other than those for servers, the default setting of
the TCP/IP will treat the PC as the DHCP client, and such function is called “obtain an
IP address automatically”.
y If you want to use the static IP in the Public LAN or Private LAN section or check the
TCP/IP setup, please refer to Appendix - Windows TCP/IP Setup.
3.1.3.2. Internet Connection Setup
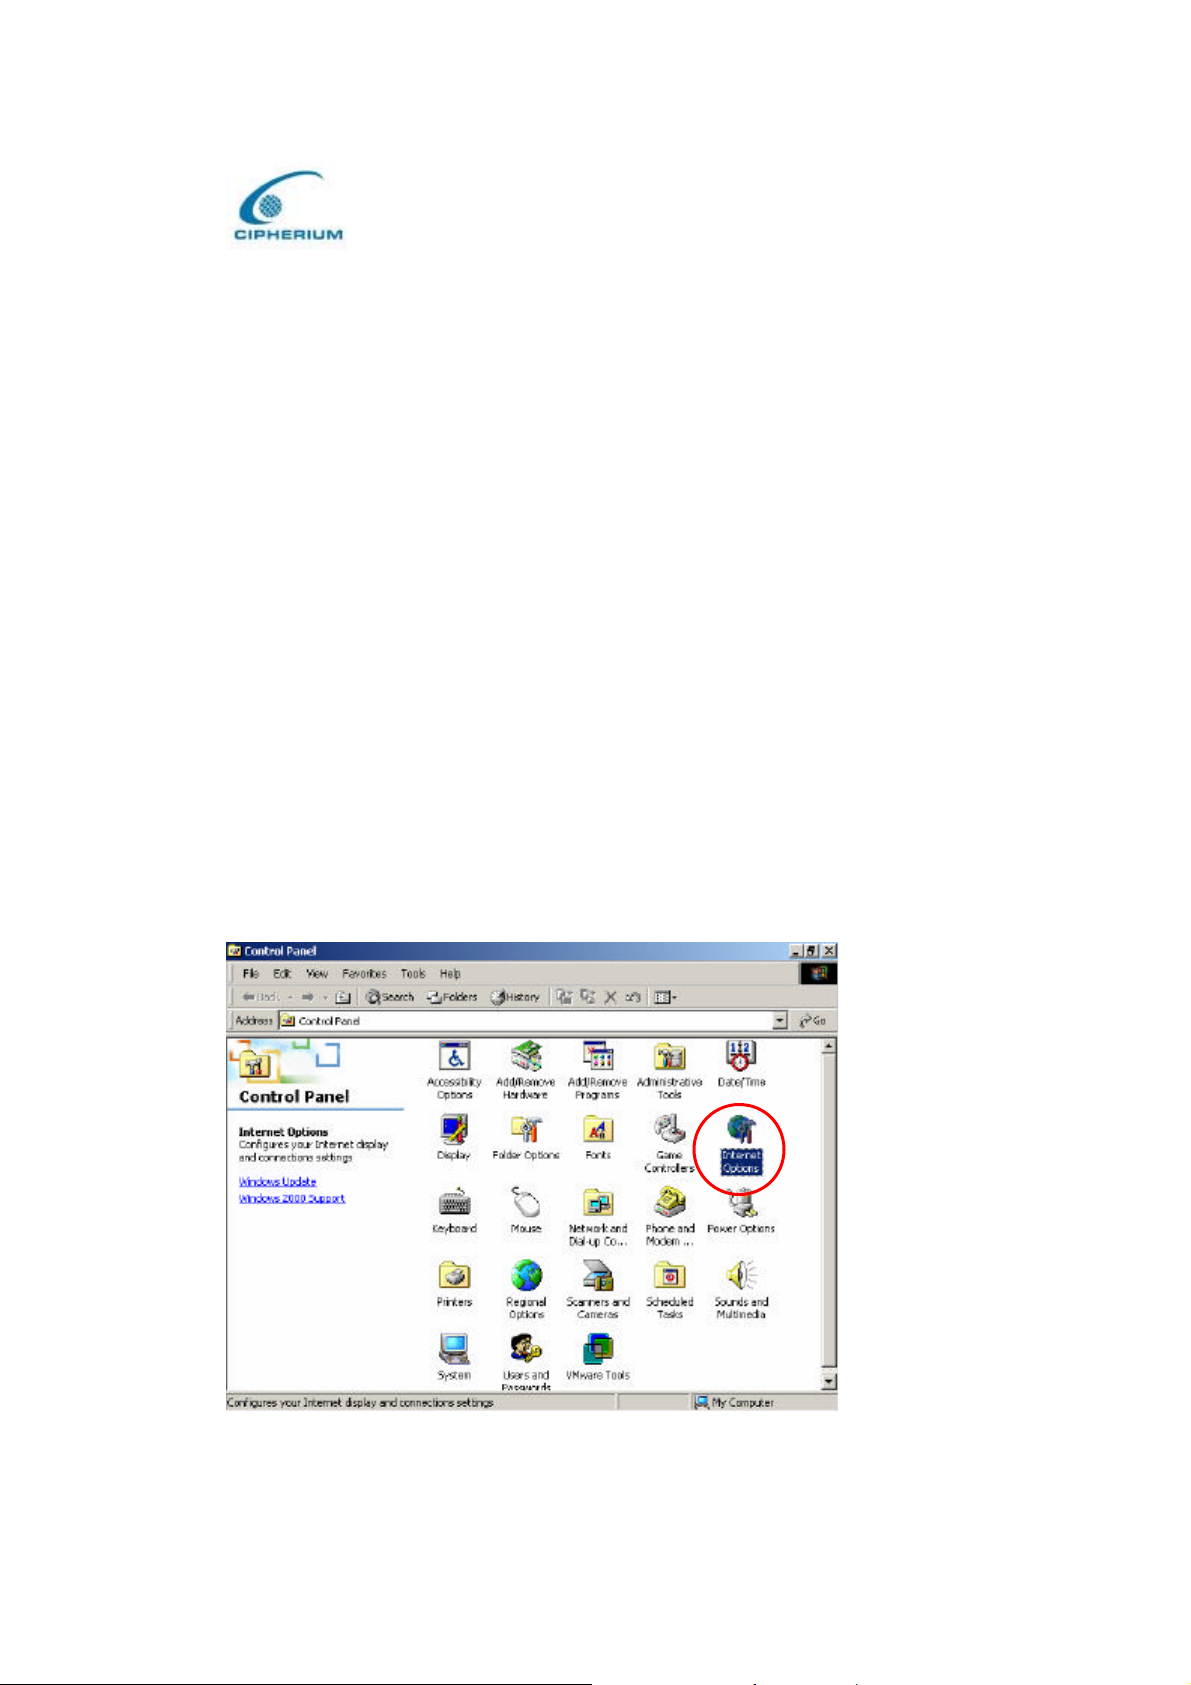
Windows 9x/2000
1. Choose Start - Console – Internet Options .
10
Page 20
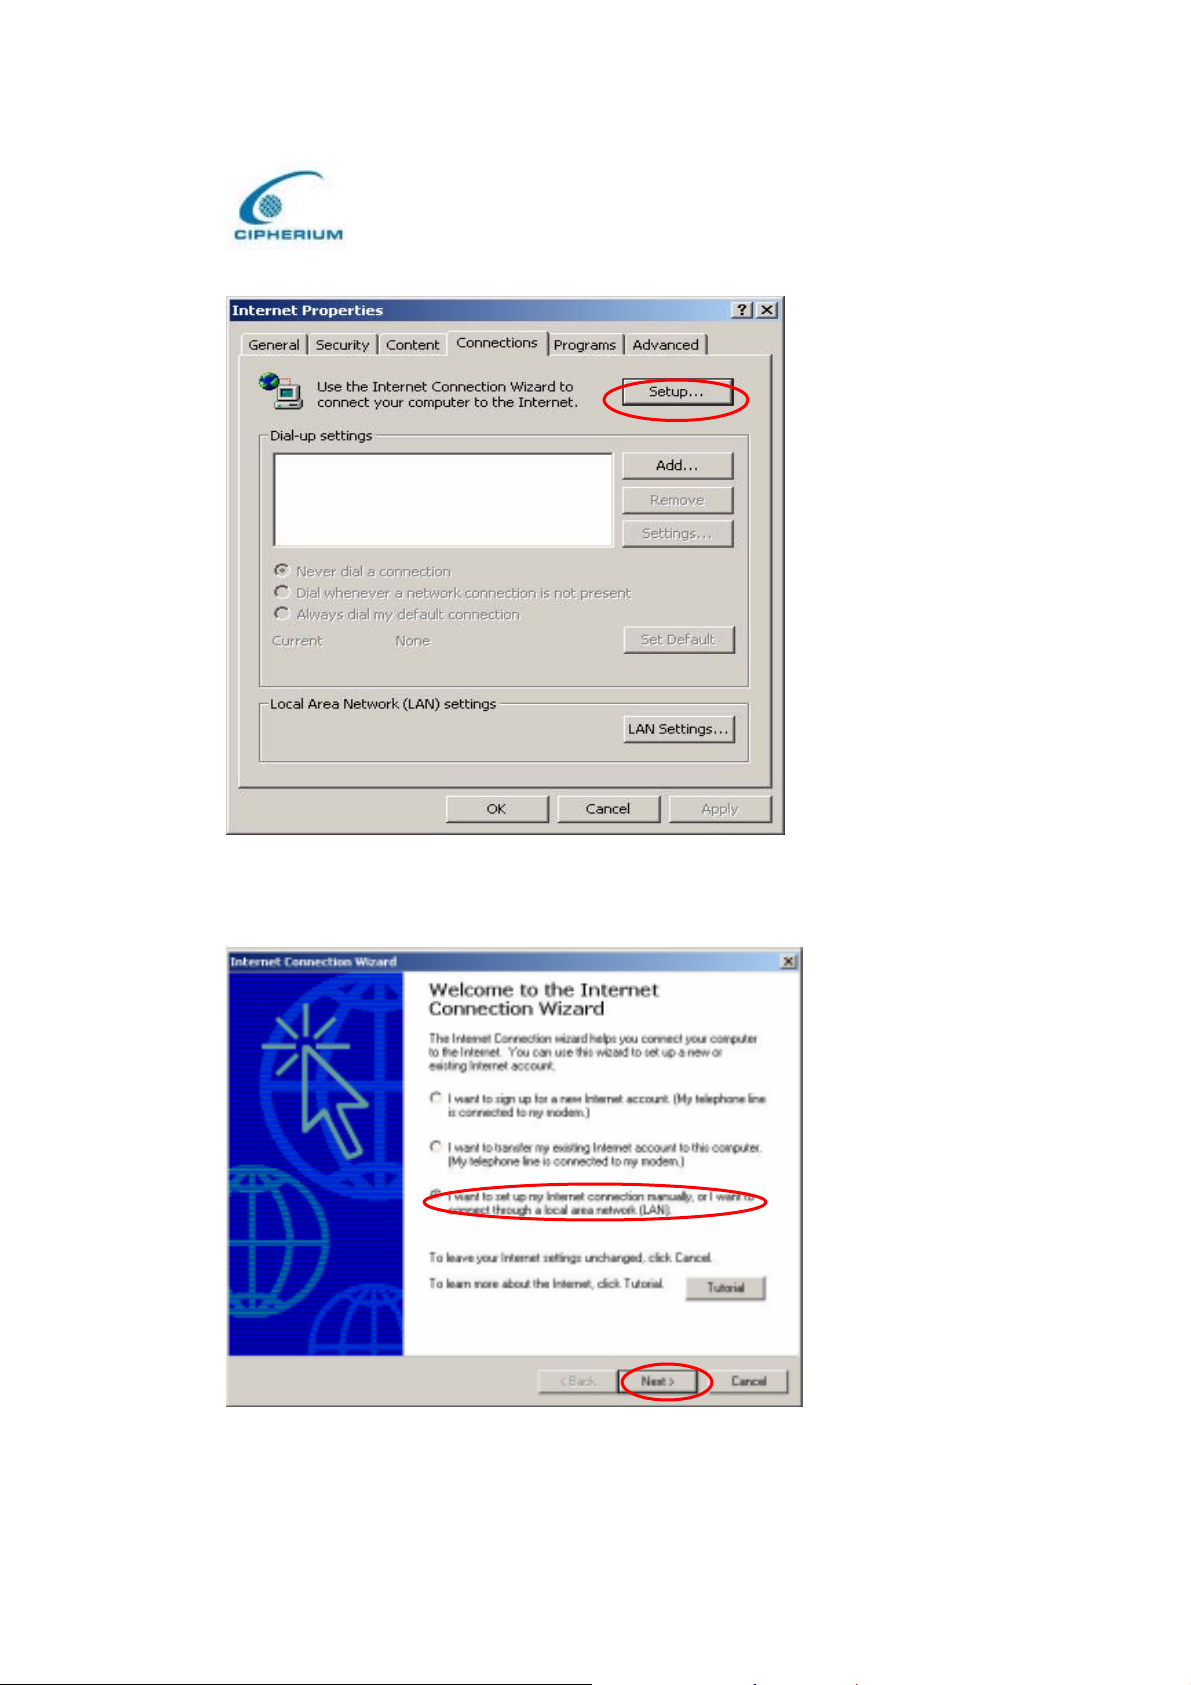
2. Choose the “Connections” Icon, and then click “Setup”.
Cipherium bonalinx-W 1300
Administrator’ s Manual
3. Choose “I want to set up my Internet connection manually, or I want to connect
through a local Area network (LAN)”, and then click “Next”.
11
Page 21
Cipherium bonalinx-W 1300
Administrator’ s Manual
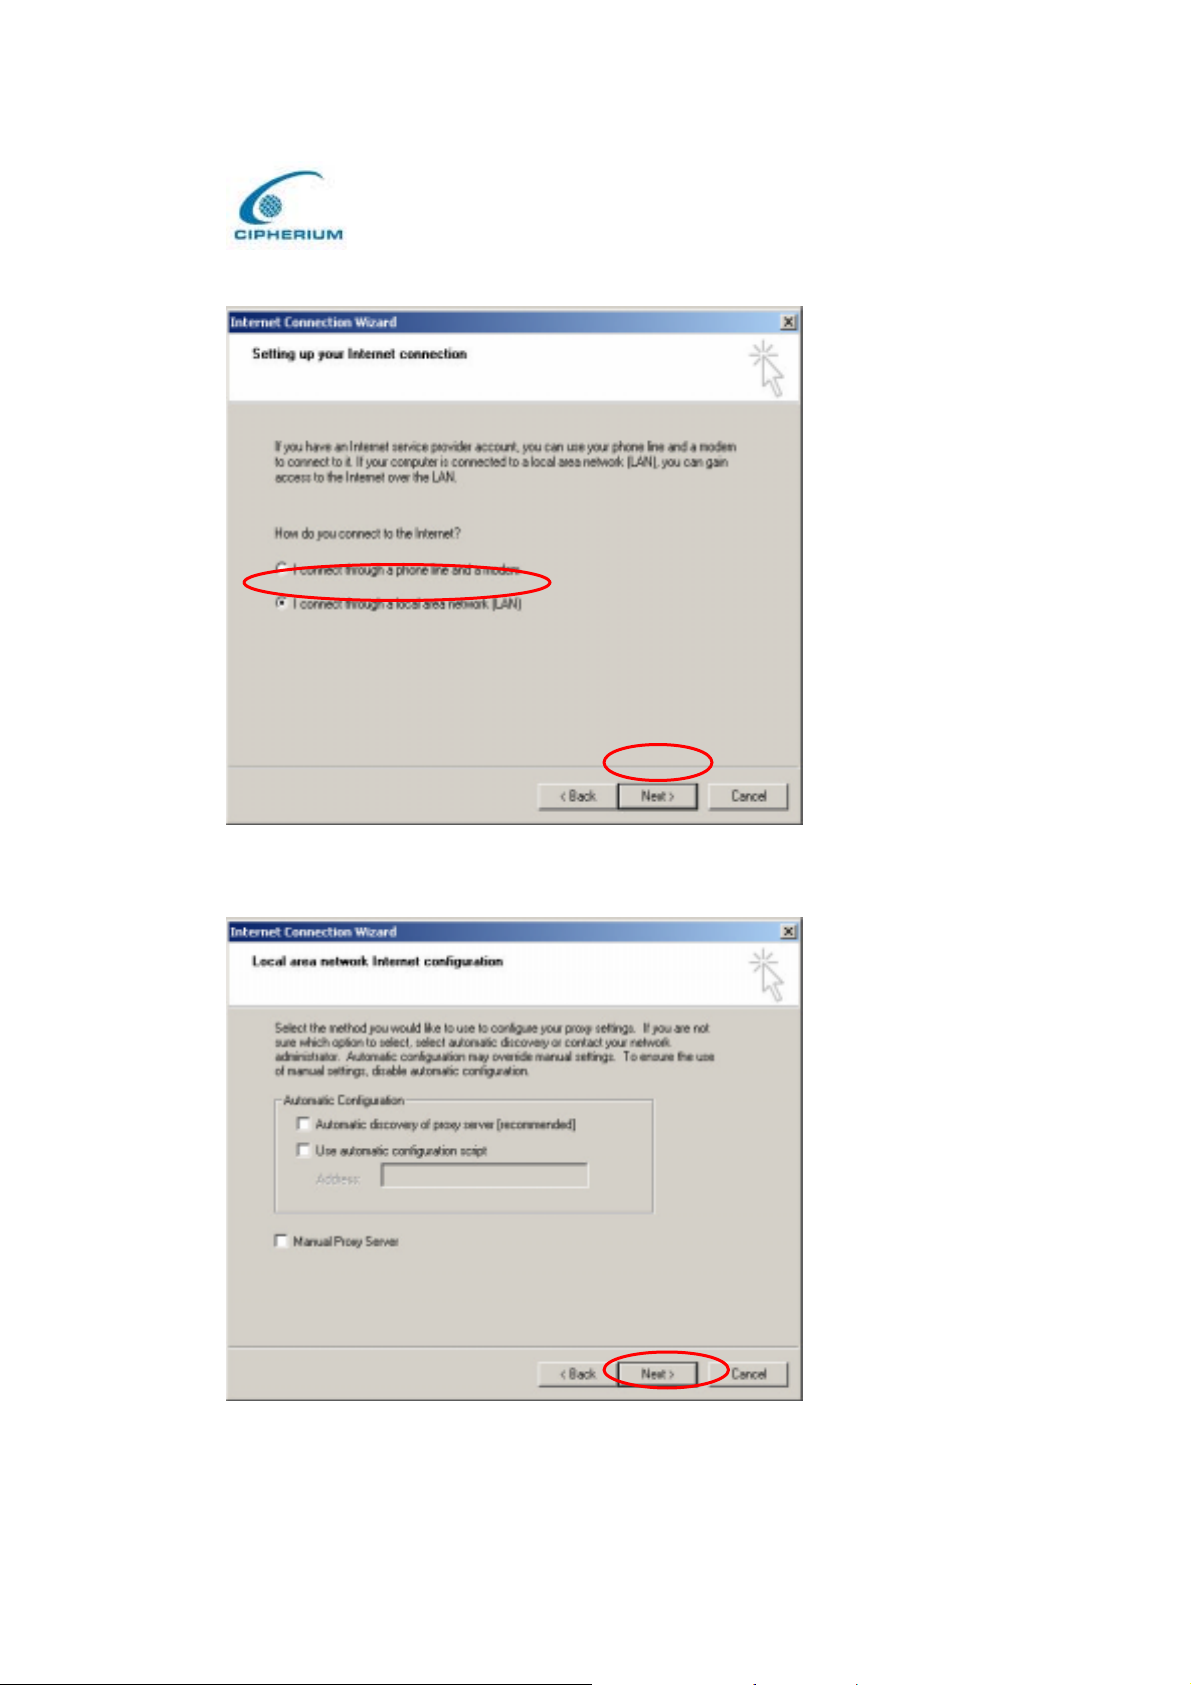
4. Choose “I connect through a local area network (LAN)” and click “Next”.
5. Do not choose any option in the following LAN window for Internet configuration.
12
Page 22
Cipherium bonalinx-W 1300
Administrator’ s Manual
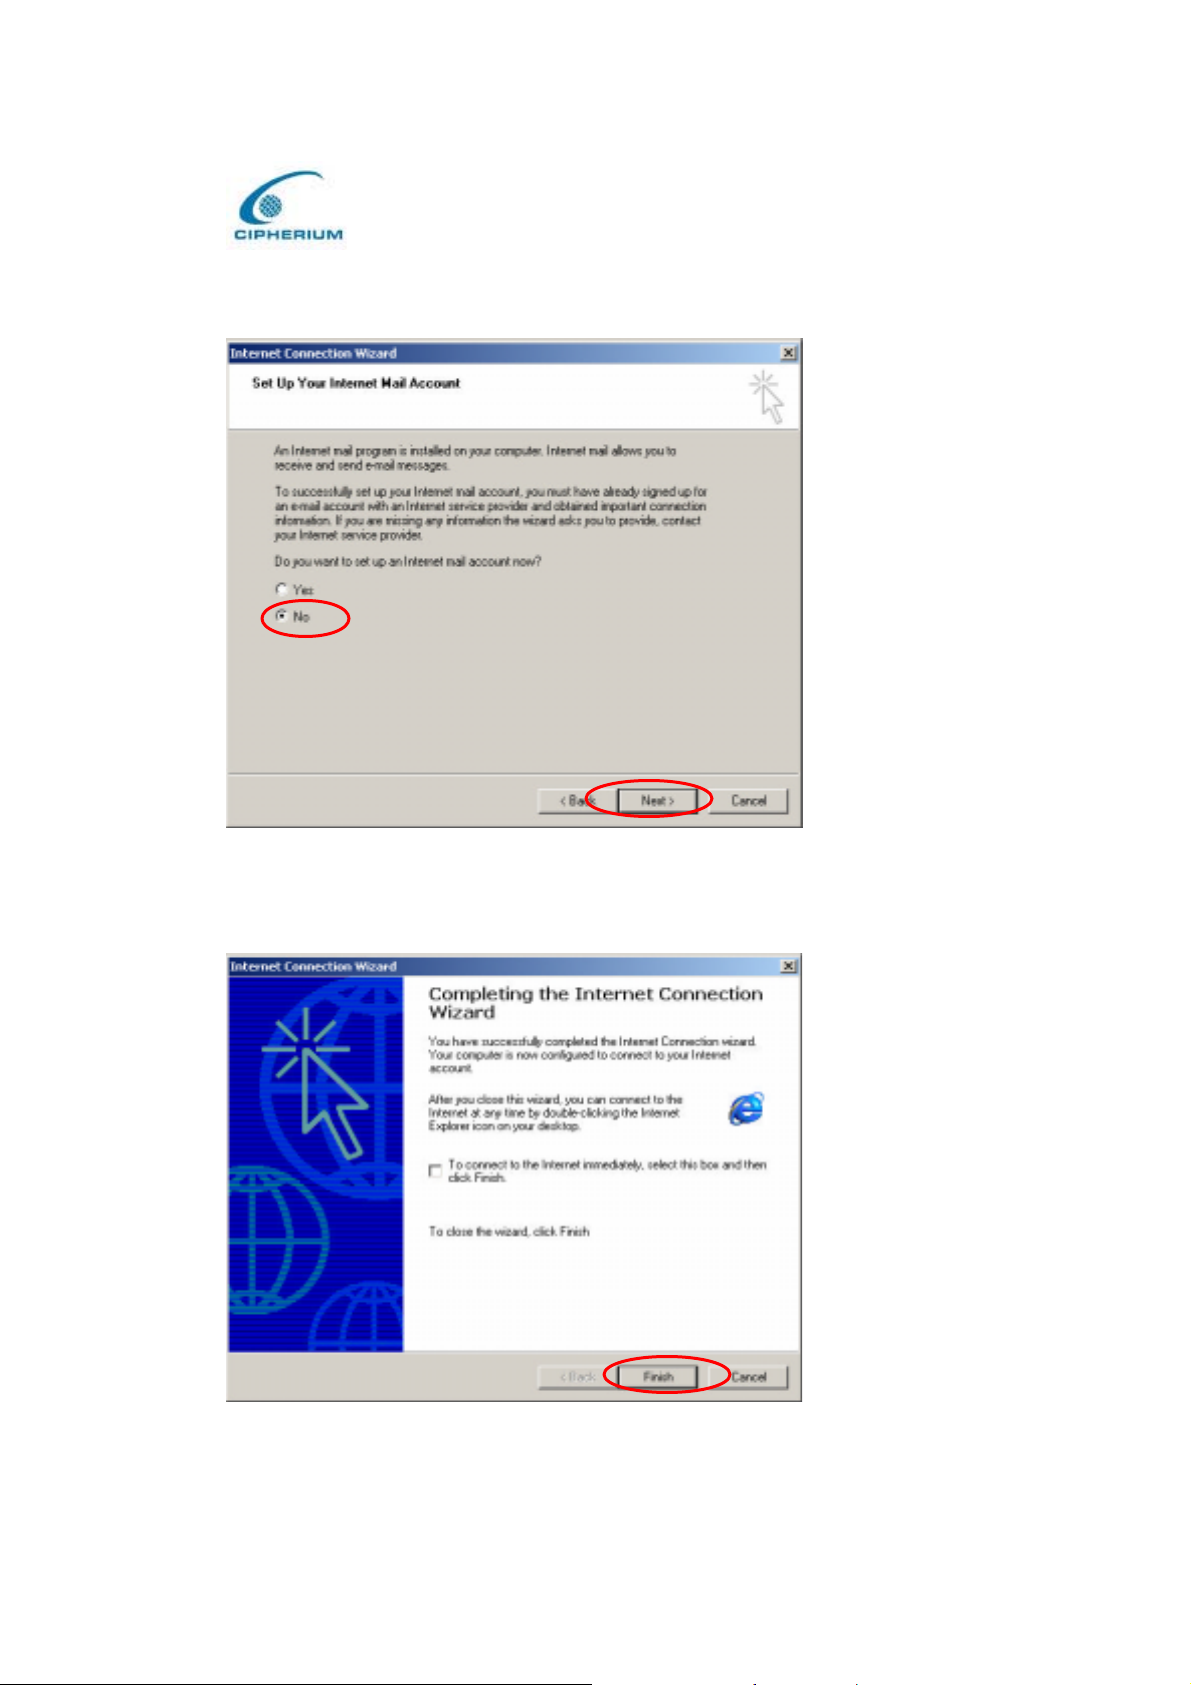
6. When the system asks “Do you want to set up an Internet mail account now? ”,
choose “No”.
7. Click “ Finish” to exit the Internet Connection Wizard. Now, you have completed the
setup.
13
Page 23
Windows XP
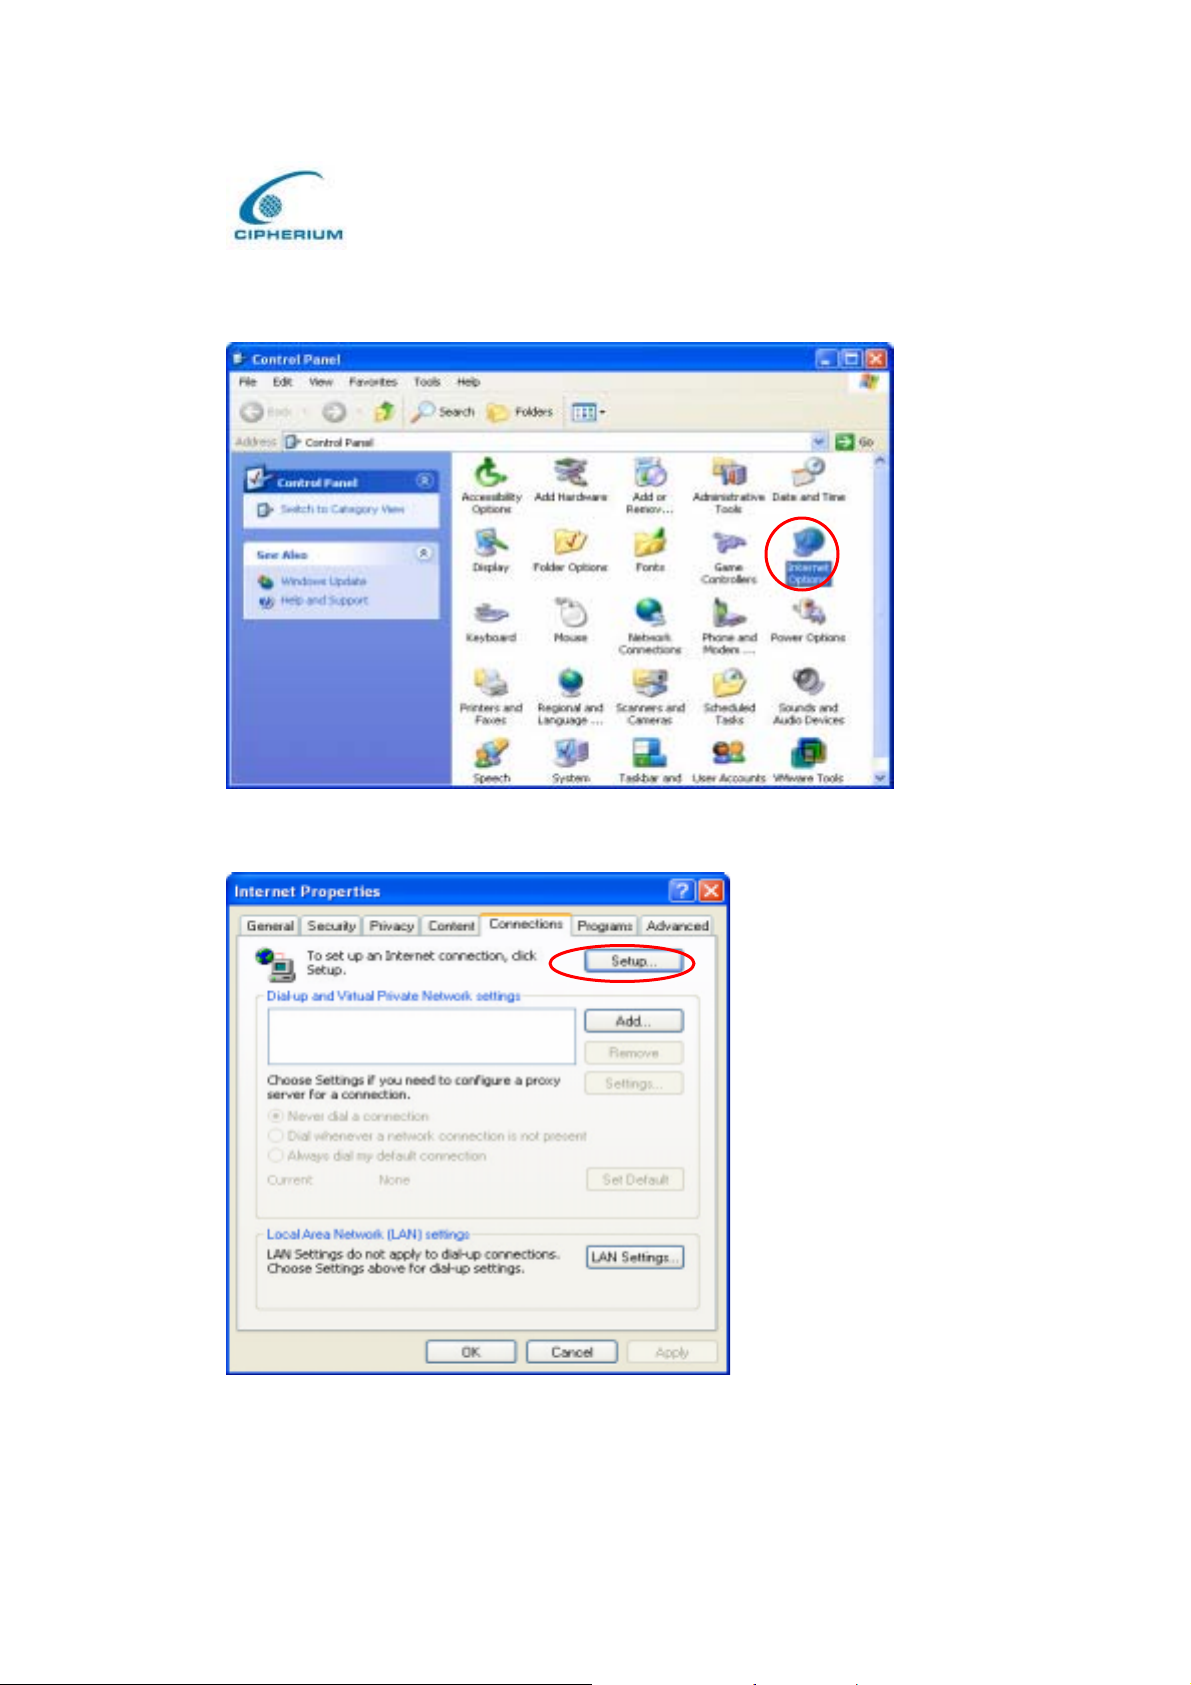
1. Choose Start - Console – Internet Option .
Cipherium bonalinx-W 1300
Administrator’ s Manual
2. Choose the “Connections” icon, and then click “Setup” .
14
Page 24
Cipherium bonalinx-W 1300
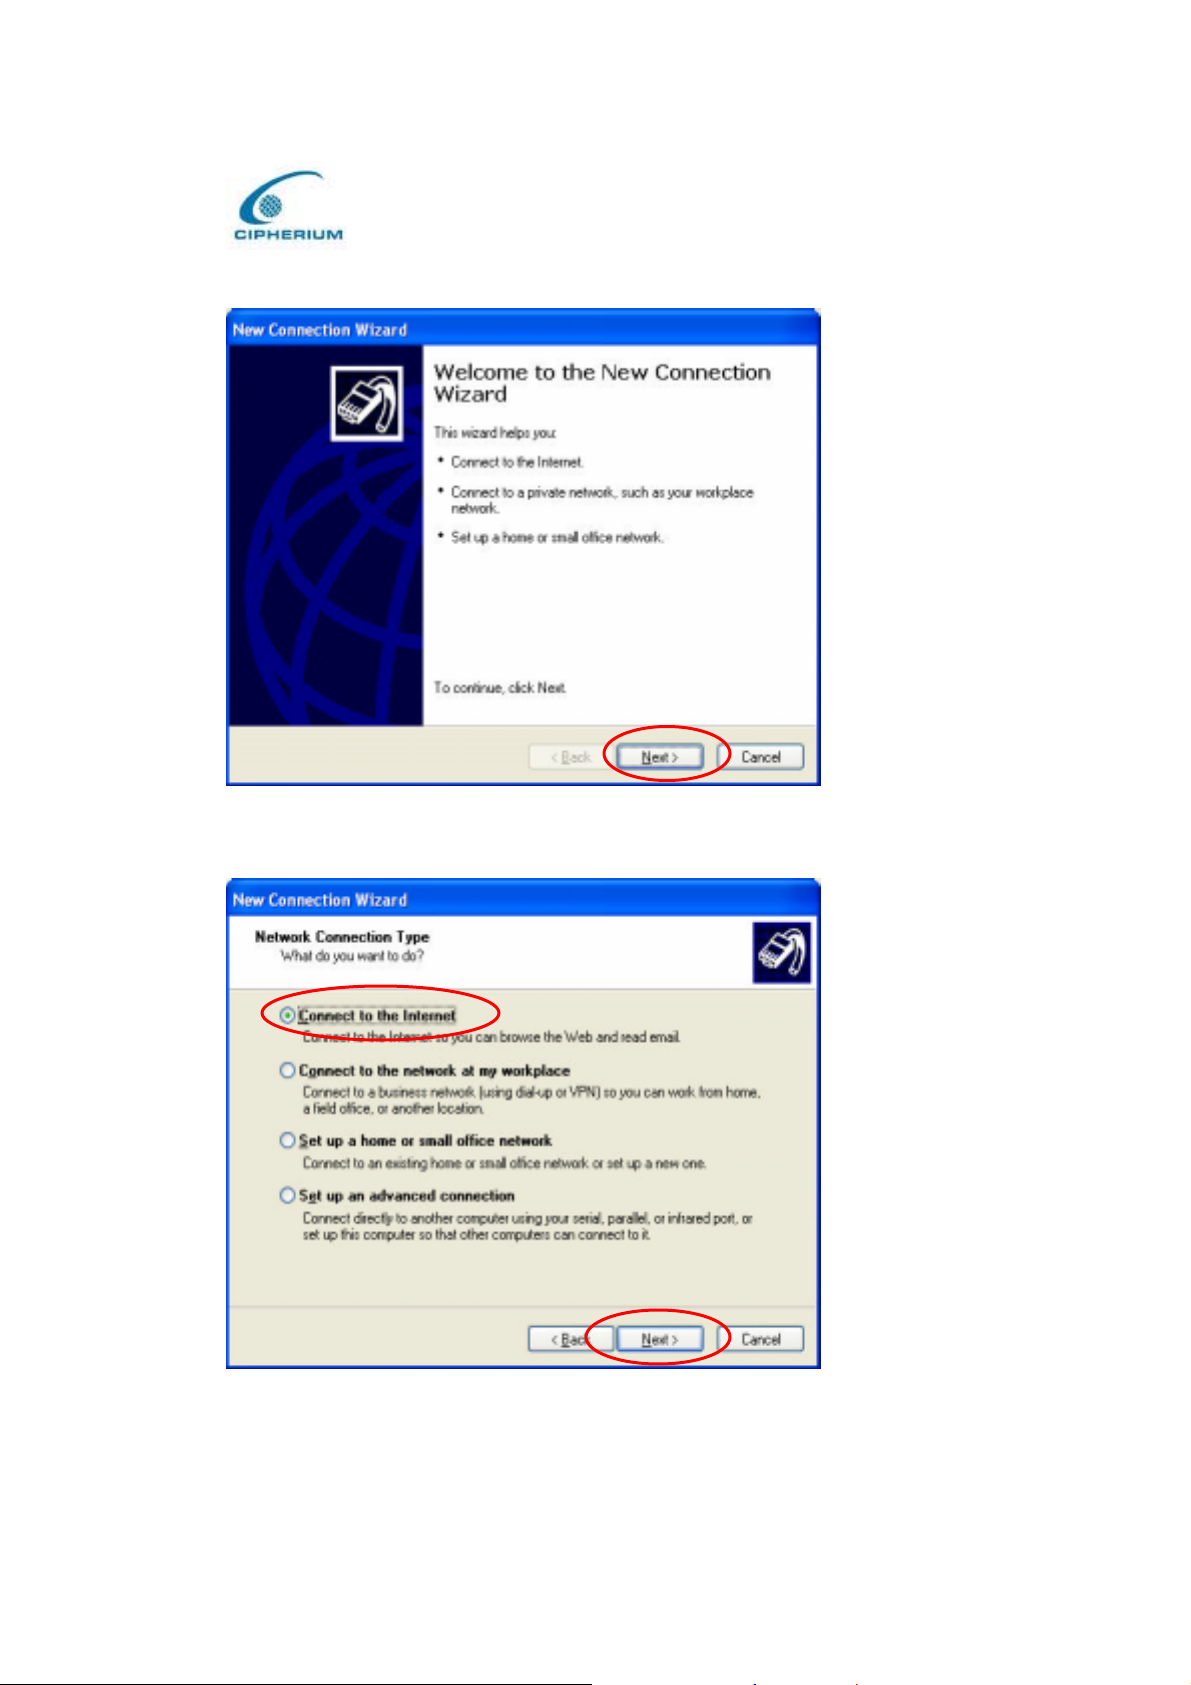
3. Press “Next” when the new connection wizard appears on the screen.
Administrator’ s Manual
4. Choose “Connect to the Internet” and then click “Next”.
15
Page 25
Cipherium bonalinx-W 1300
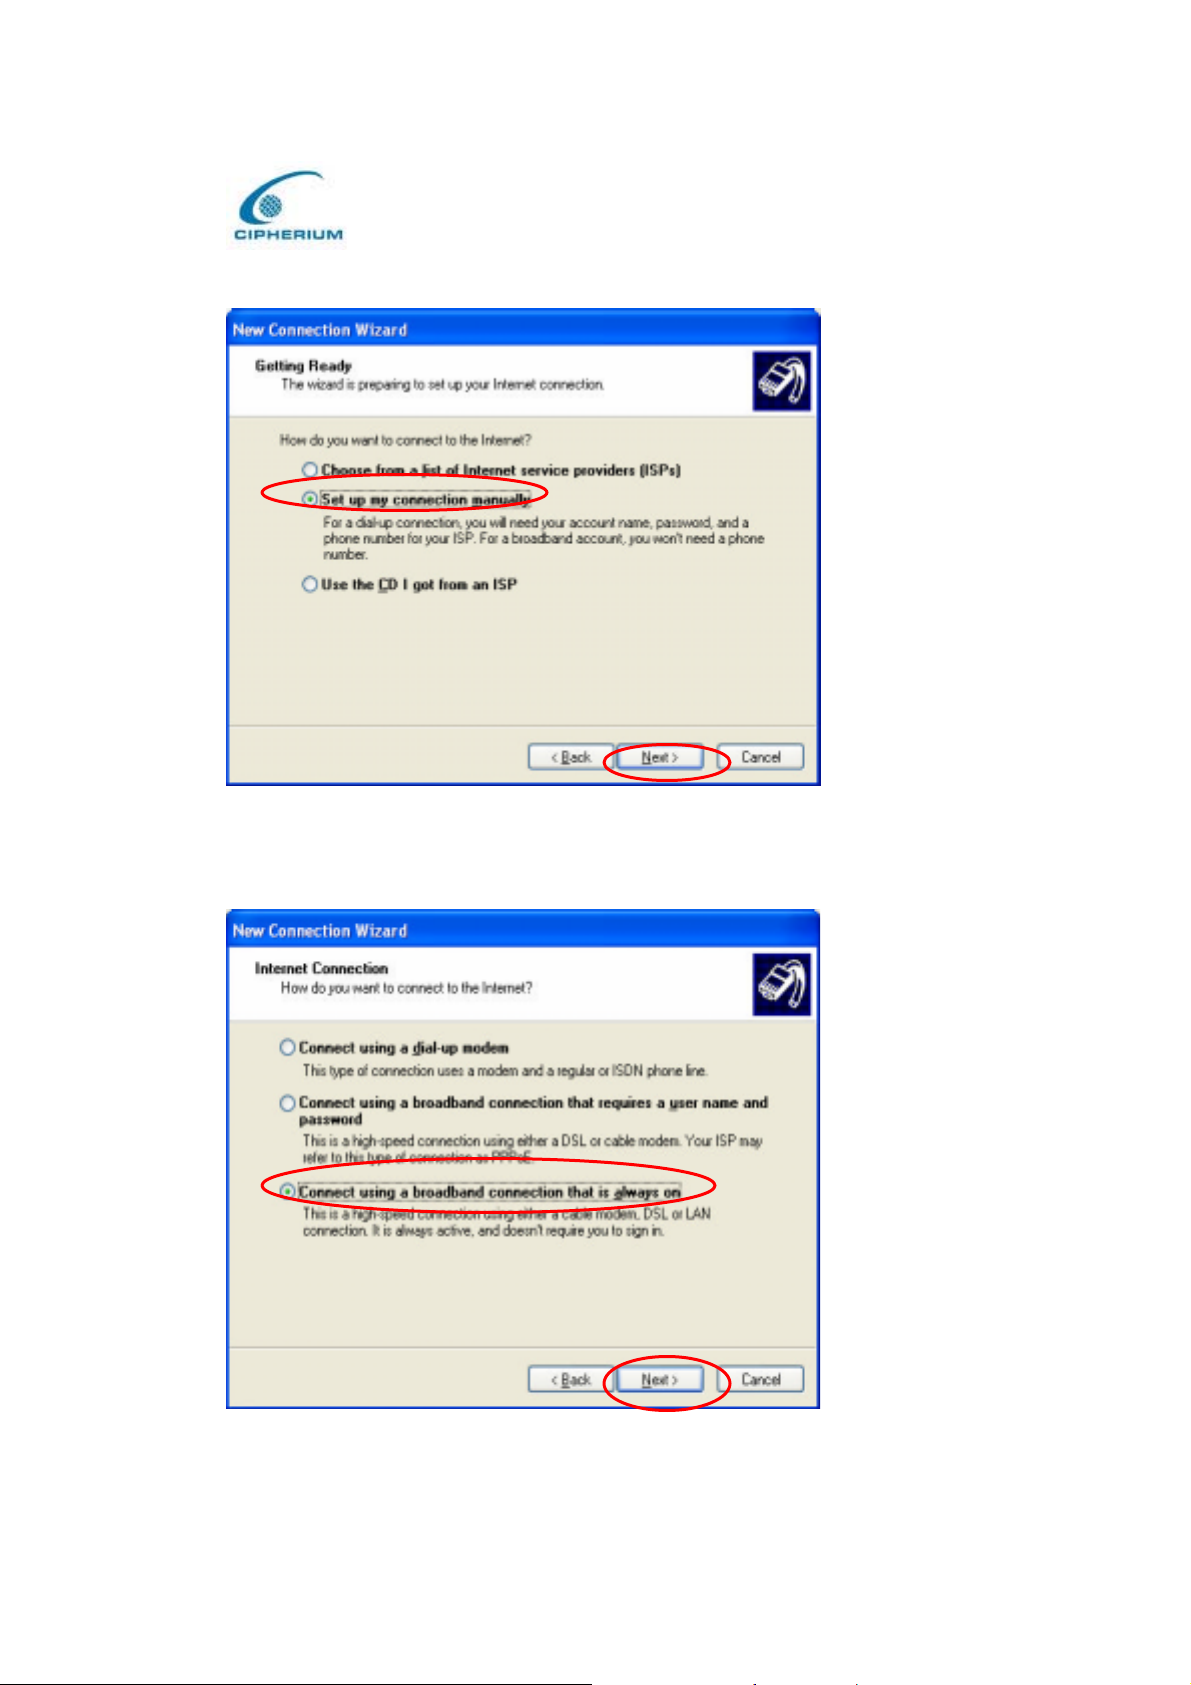
5. Choose “Set up my connection manually”, and then click “Next”.
Administrator’ s Manual
6. Choose “Connect using a broadband connection that is always on”, and then click
“Next” .
16
Page 26
Cipherium bonalinx-W 1300
Administrator’ s Manual
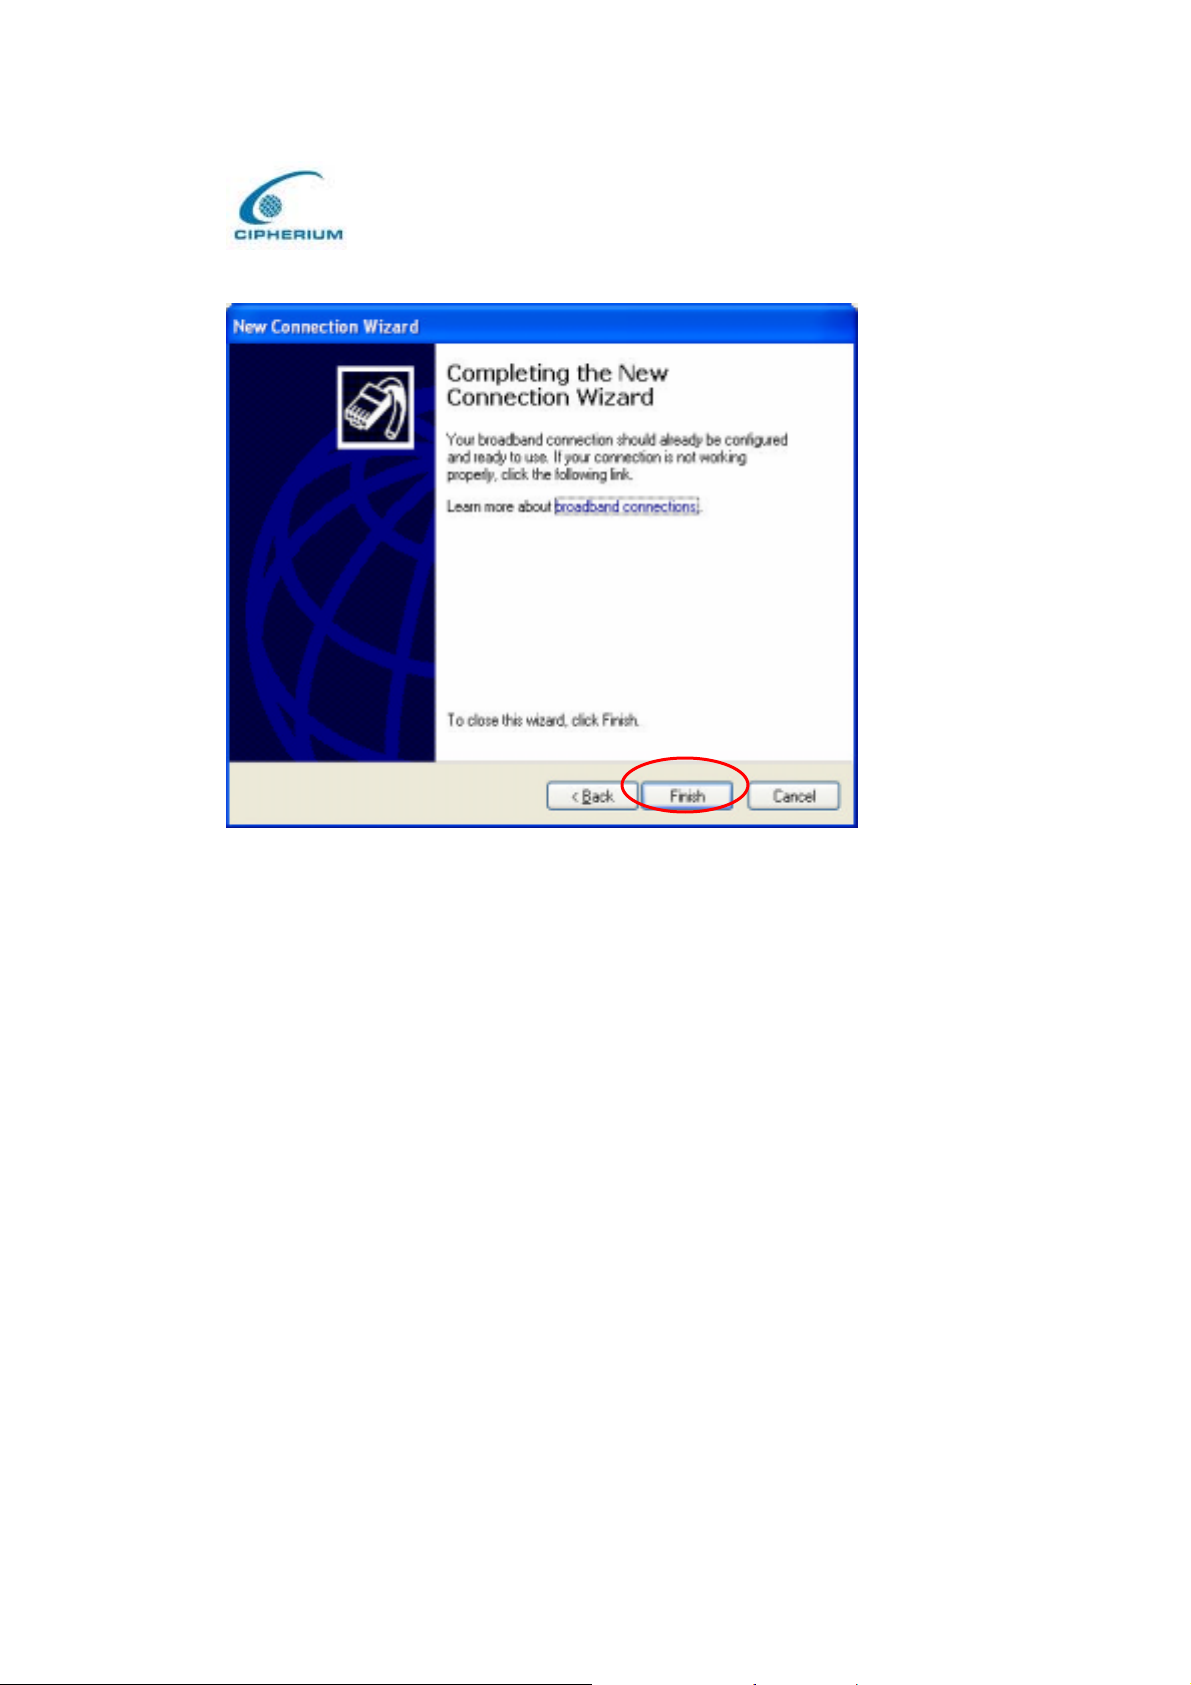
7. Click “Finish” to exit the Connection Wizard. Now, you have completed the setup.
3.2. Getting Started
3.2.1. System Concept
The bonalinx-W 1300 is responsible for controlling all network data passing through the
system. The users under the managed network must be authenticated in order to obtain the
right to access the network beyond the managed network. The Public LAN mechanism at the
user’ s end is provided via the bonalinx-W 1300 server, and the SSL encryption is used to
protect the webpage When a user Public LAN is requested , the bonalinx-W 1300 server
software will check the Public LAN database at the rear end to confirm the user’ s access right.
The Public LAN database can be the local database of the bonalinx-W 1300 or any external
database that the bonalinx-W 1300 supports . If the user is not an authorized user, the
bonalinx-W 1300 will refuse the user’ s request for the access. In the meantime, the
bonalinx-W 1300 will also continue blocking the user from accessing the network. If the user
17
Page 27
Cipherium bonalinx-W 1300
Administrator’ s Manual
is an authorized user, then the bonalinx-W 1300 will authorize the user with an appropriate
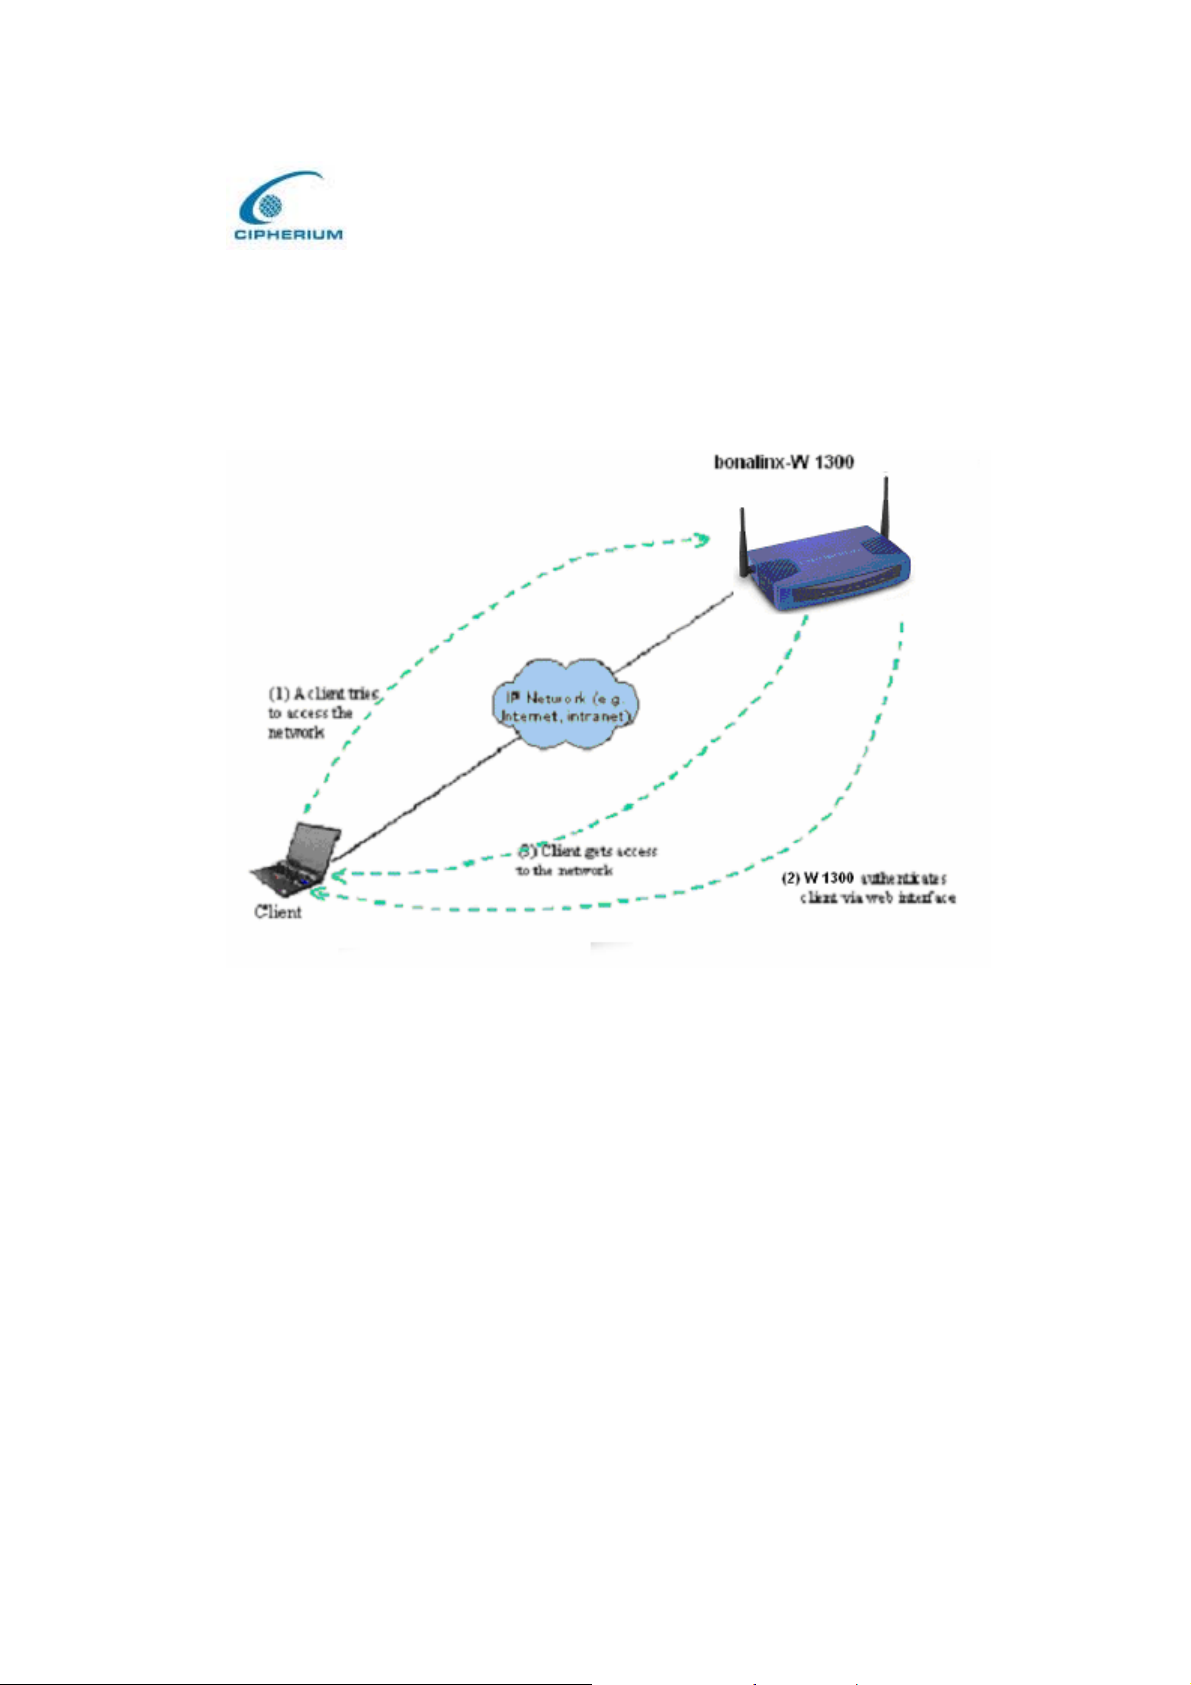
access right, so that the user can use the network. The concept of the operation of the whole
Public LAN procedure is shown in the following figure.
Figure 3-1 The bonalinx -W 1300 User Public LAN Flow
If the online user remains idle without using the network for a time exceeding a predetermined
time on the bonalinx-W 1300 or the online user logs out of the system, the bonalinx-W 1300
will exit the working stage of such user, and terminate the user’ s access right of the network.
In the system, the bonalinx-W 1300 is responsible for authorization and management functions.
The user account information is stored in the bonalinx-W 1300 database, or other specified
external Public LAN databases. The process of authenticating the user’s identity is executed
via the SSL encrypted webpage. Using the web interface can ensure the system is compatible
to most desktop systems and palm computers.
18
Page 28
Cipherium bonalinx-W 1300
Administrator’ s Manual
3.2.2. Connecting Network Devices
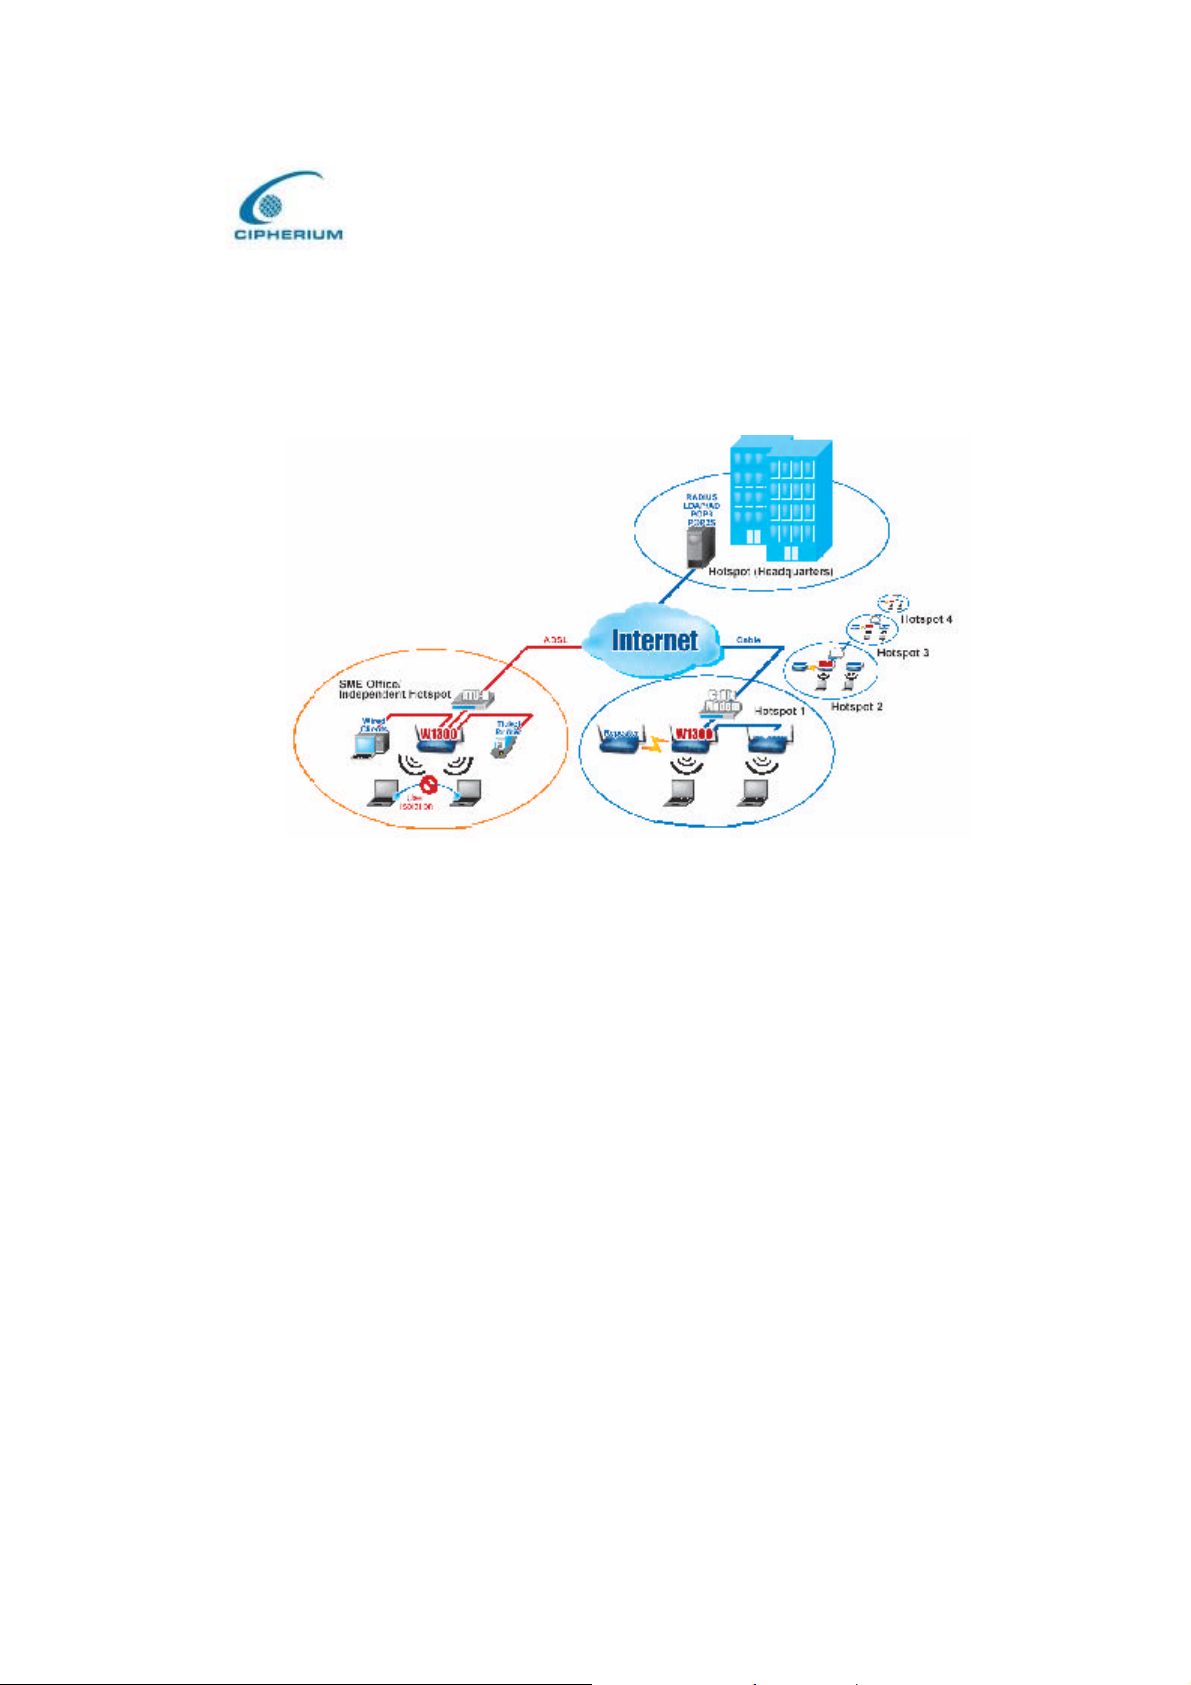
Figure 3-2 provides a simple example of setting up a small enterprise network.
Figure 3-2 Example of Setting up a Small Enterprise Network
In Figure 3-2, the bonalinx-W 1300 is set to control a part of the company’s intranet. The
whole managed network includes cable network users and wireless network users.
In the beginning, any user located at the managed network is unable to access the network
resource without permission. If you want to have the access right to access the network
beyond the managed network, you must open an Internet browser such as the Internet Explorer
to connect to any website. When the browser attempts to connect to a website, the
bonalinx-W 1300 will force the browser to redirect to the user login webpage. The user must
enter the username and password for Public LAN. After the identity is authenticated
successfully, the user will gain proper access right defined on the bonalinx-W 1300. Please
refer to Figure 3-1 for the user Public LAN flow.
19
Page 29
Cipherium bonalinx-W 1300
Administrator’ s Manual
3.2.3. Begin Installation
After the bonalinx-W 1300 is connected to the network devices, you can start setting the
bonalinx-W 1300 to control your network environment. In the following sections, we will
guide you step by step to set up a system composed by individual bonalinx-W 1300.
3.2.3.1. Entering the Web Management Interface
1. Opening Browser
After the bonalinx-W 1300 is installed and the foregoing setup is completed, use the network
cable of the 10/100BaseT to connect to the Private LAN port, please open the browser (such as
Microsoft IE). In the website, enter the administrator’s URL such as https://192.168.2.254
IF you can’ t get the login screen, may be you wouldn’ t obtain an IP address automatically
from Private LAN port, please specify an IP address such as 192.168.2.xx then do it again.
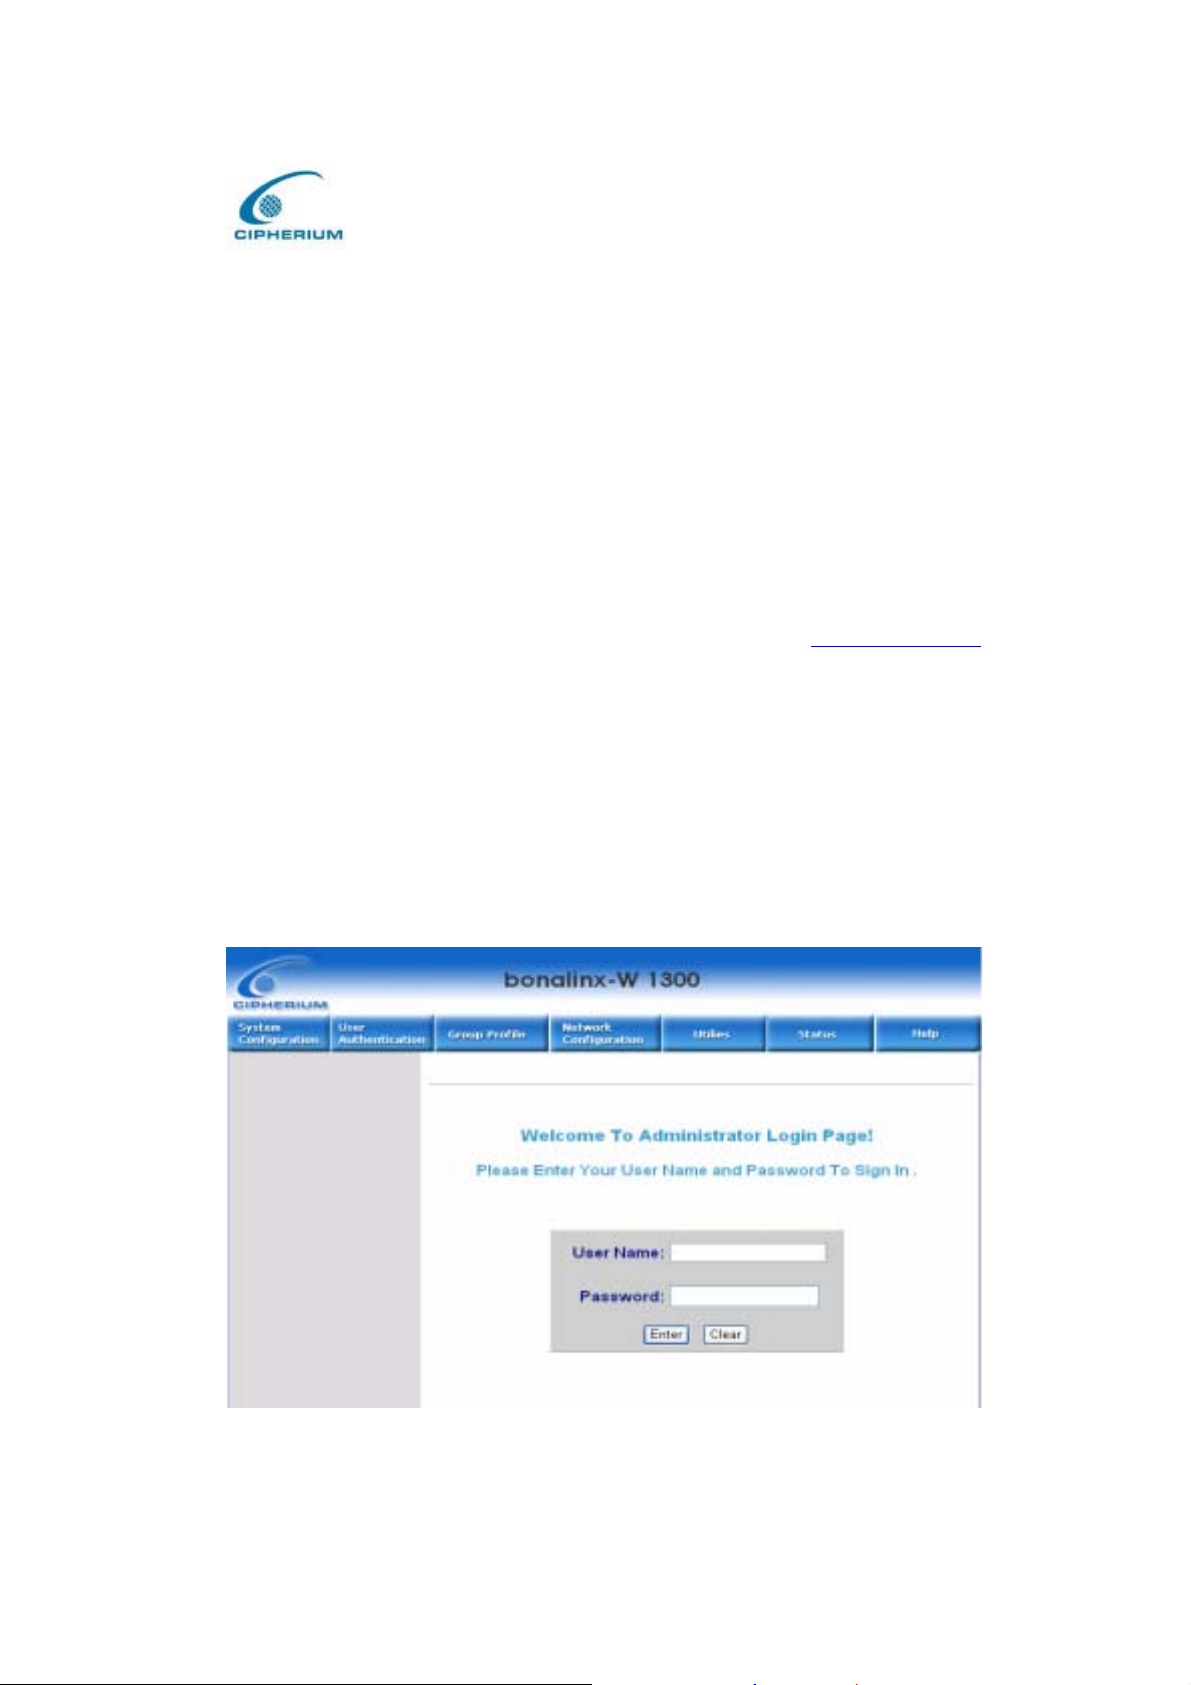
2. Keying in the Administrator’s Username and Password
In the opened webpage, you will see the login screen as shown in Figure 3-3. Please key in
“admin” in the Username column, and then “admin” in the Password column. Click “Enter”
to login.
Figure 3-3 Administrator Login
.
20
Page 30
Cipherium bonalinx-W 1300
Administrator’ s Manual
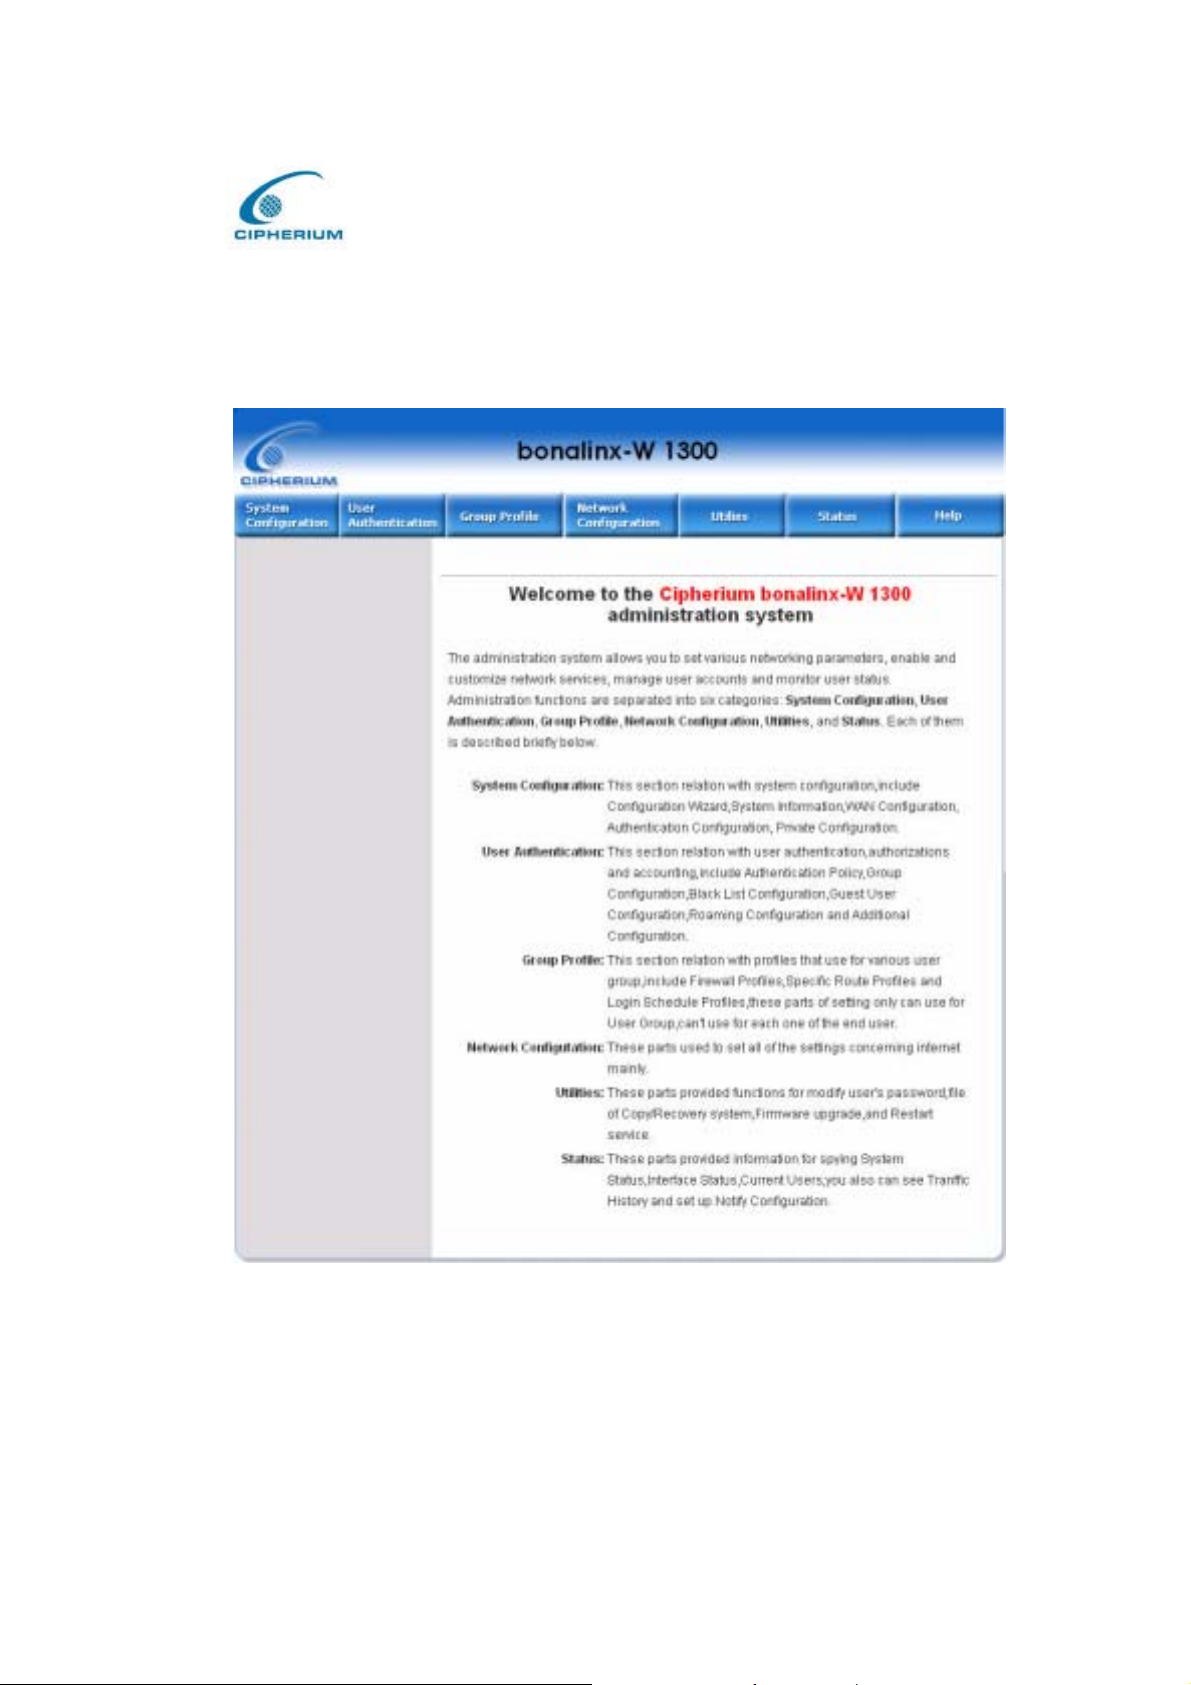
3. System Setup
After successfully logging on to the bonalinx-W 1300 and entering into the web management
interface, you can run the installation wizard to help you complete the setup.
Figure 3-4 Welcome Screen
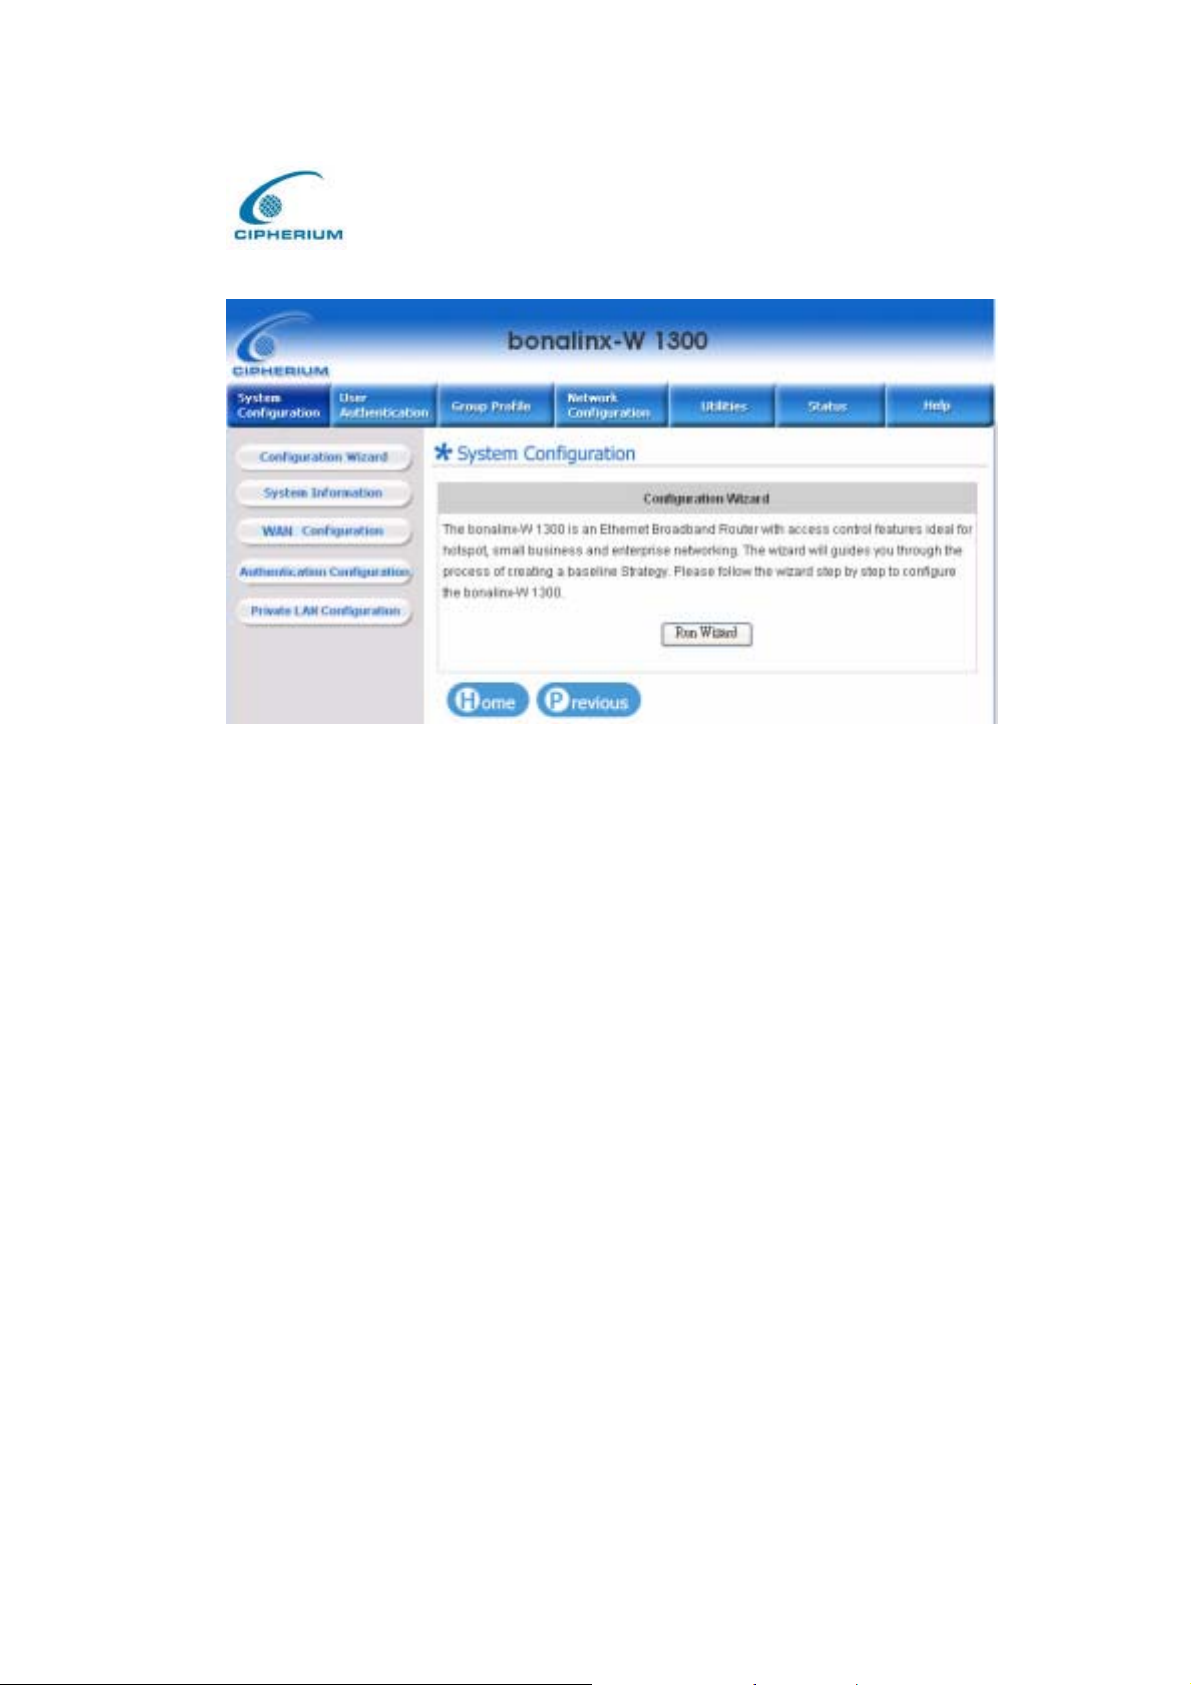
Click System Configuration > Configuration Wizard and the configuration wizard will
appear on the screen as shown in Figure 3-5.
21
Page 31
Cipherium bonalinx-W 1300
Administrator’ s Manual
Figure 3-5 Configuration Wizard Screen
Click “Run Wizard” and the configuration wizard will guide you through the seven steps for
completing the setup.
Please refer to Chapter 5.1.1 “Configuration Wizard” for the detailed description.
.
3.2.3.2. Accessing External Network from Network Section Managed by
System
If all the steps are set properly so far, we can further connect the bonalinx-W 1300 to the
managed network to experience the controlled network access environment. First, connect a
user-end device to the network at the bonalinx-W 1300 Public LAN, and set the dynamic
access network. After the network address is obtained at the user end, open an Internet
browser, and link to any website. Then, the default login webpage will appear in the Internet
browser.
22
Page 32
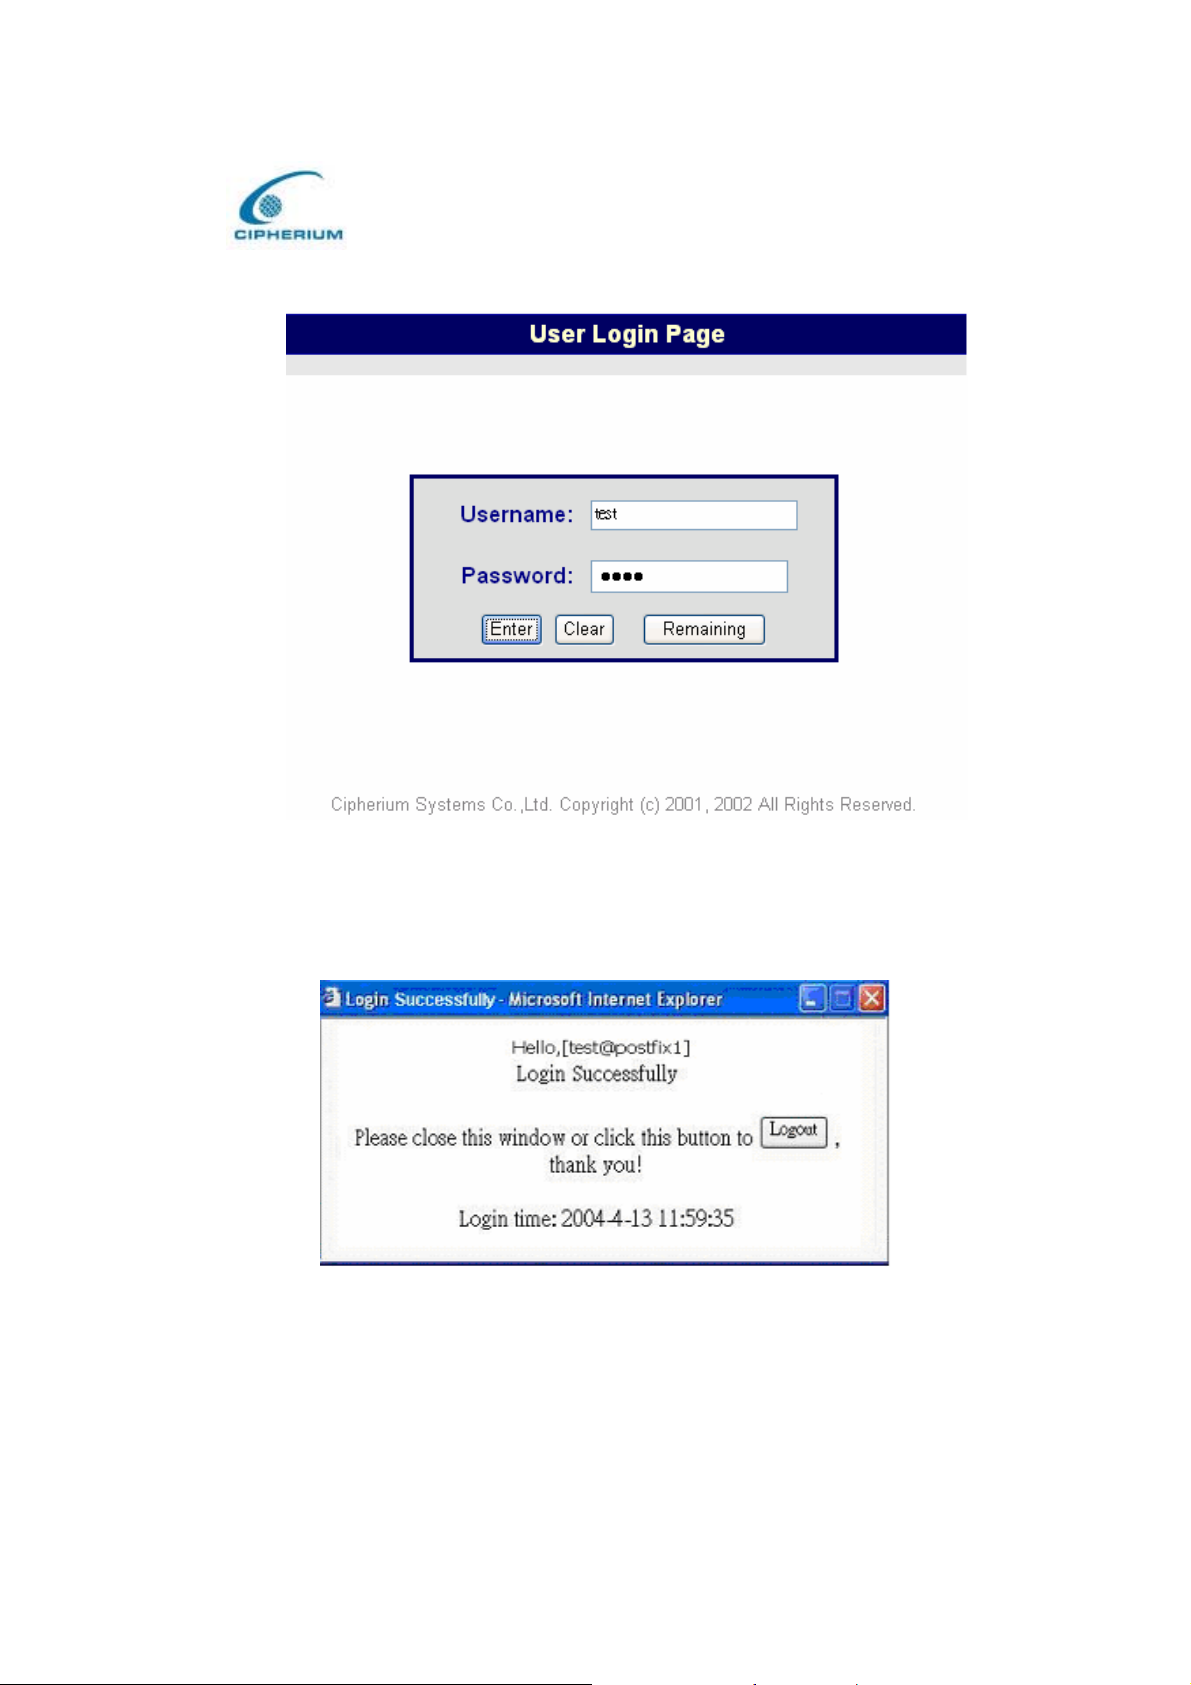
Figure 3-6 Entering Username and Password
Cipherium bonalinx-W 1300
Administrator’ s Manual
Key in the created username and password in this interface. And then click on the “Enter”
button (for both standard user and on-demand user).
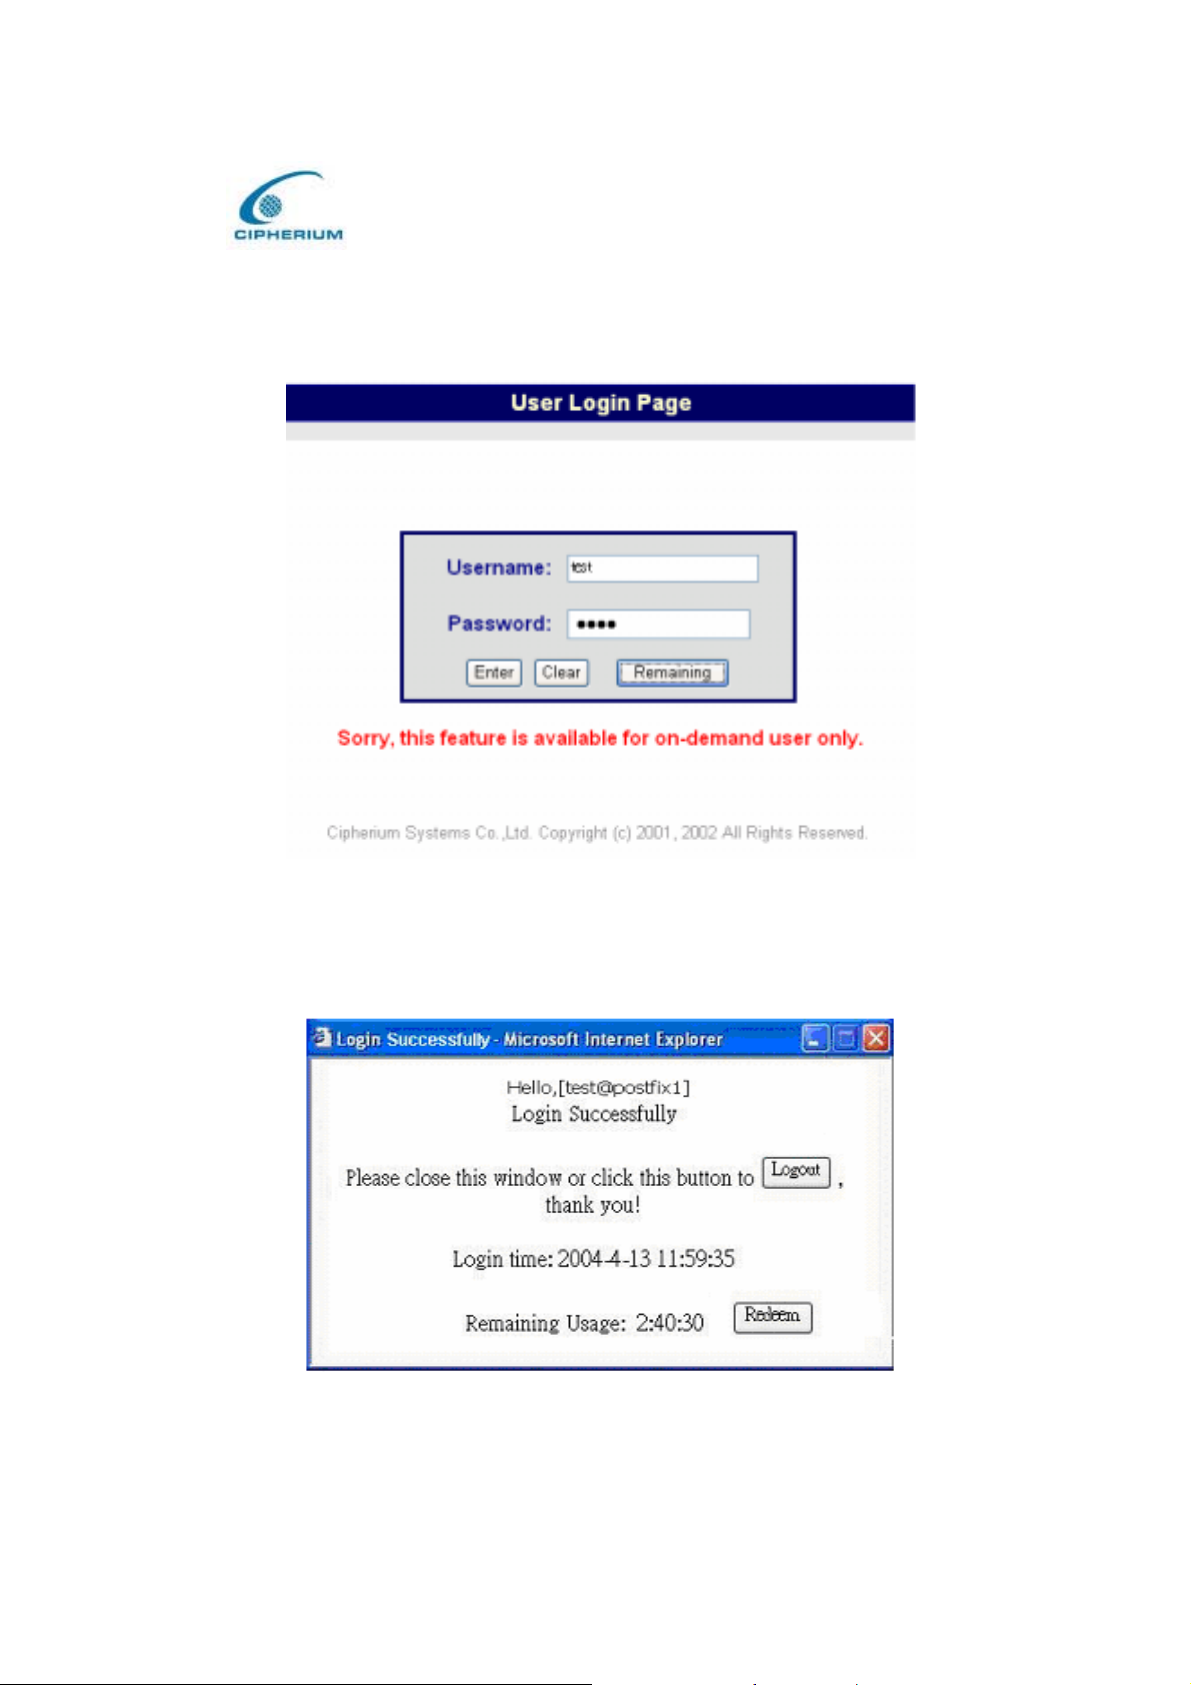
Figure 3-7 Successful Login Page
After this user login successfully, you have just completed the setup of the bonalinx-W 1300
and allowed it to provide you with a managed network environment. This u ser can also browse
the webpage on the Internet.
23
Page 33
Cipherium bonalinx-W 1300
Administrator’ s Manual
Nevertheless, if you are not a on-demand user, please do not click on “Remaining ”, because
the following error window will appear.
Figure 3-8 Logon Fails (not an on-demand user)
The following is the successful login page for on-demand user. There is an extra
function, the “Redeem” buttom, that user can add credit in the current account if the remaining
usage is considered to be insufficient.
Figure 3-9 Successfully logon page for on-demand user
24
Page 34
Cipherium bonalinx-W 1300
Administrator’ s Manual
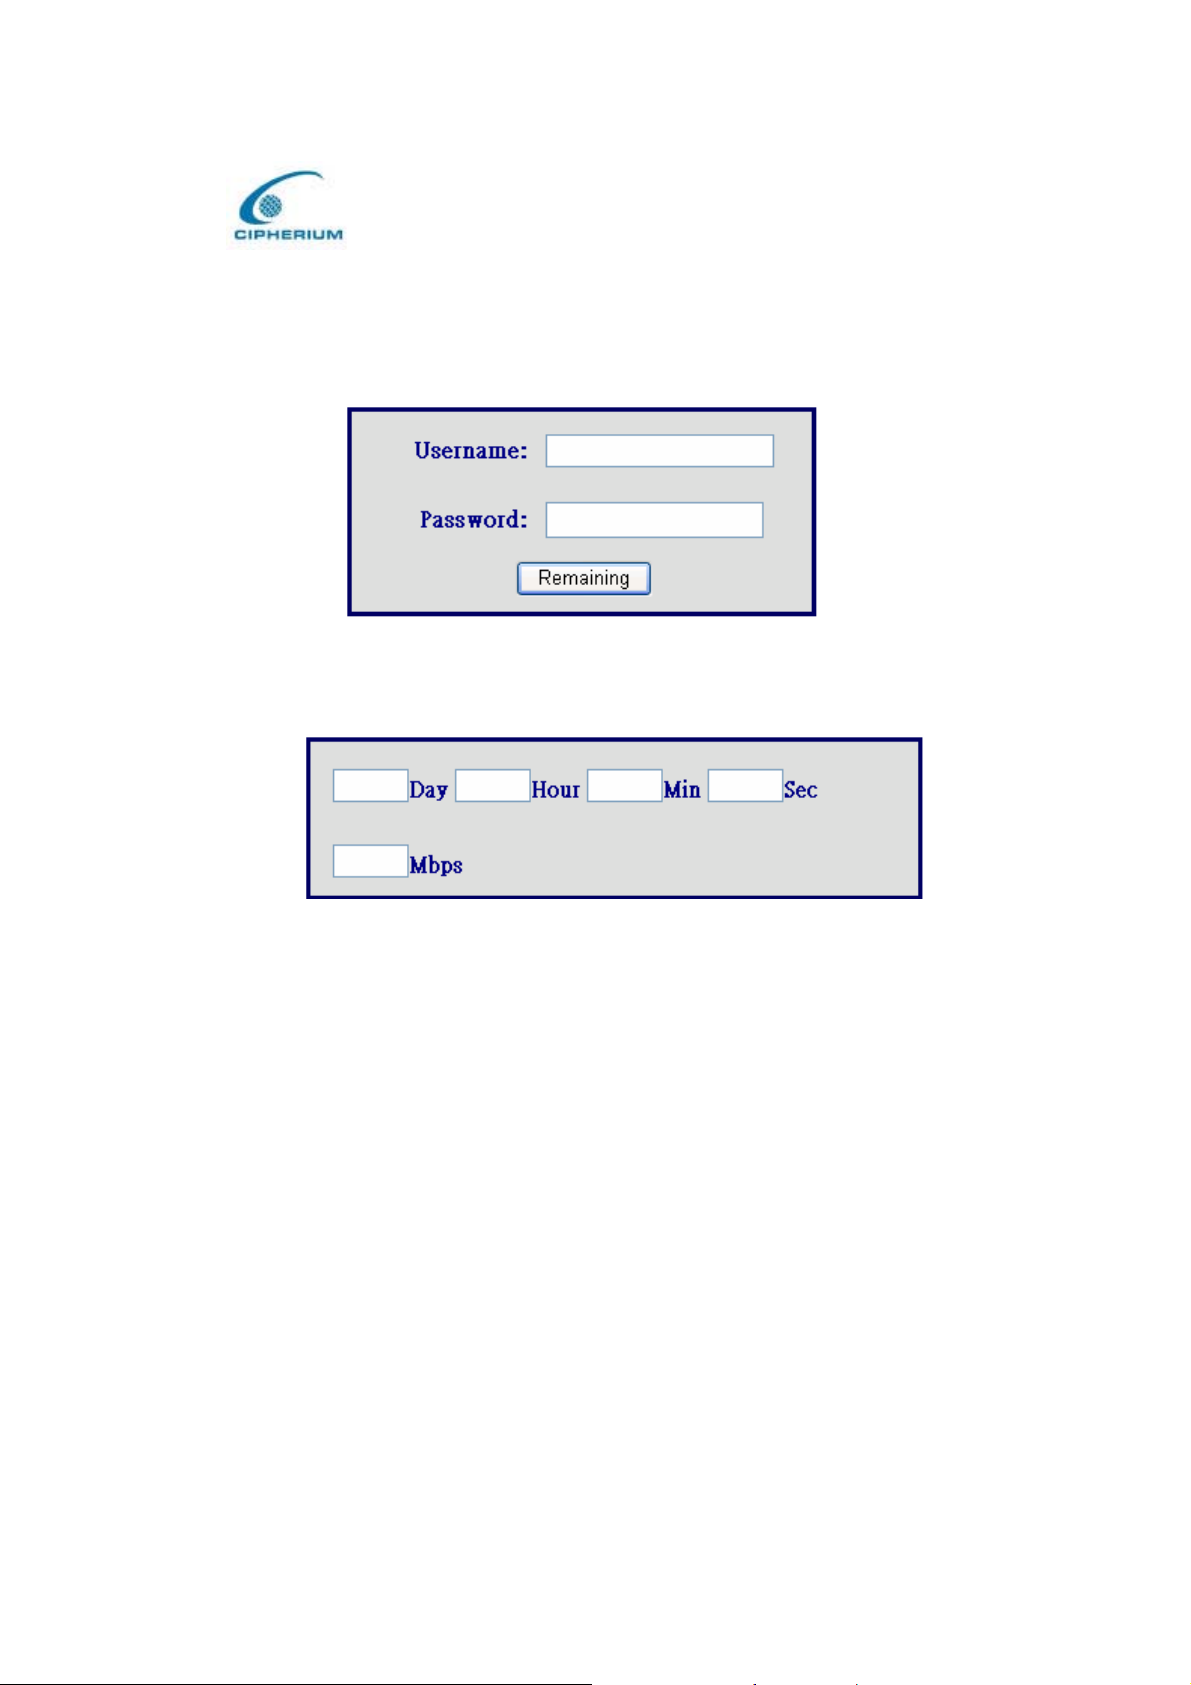
After user has payed the redeem cost at counter, he/she will get another username and
password, by key in this information in the appropriate window, the system will merge the two
identities and the available usage.
Figure 3-10 Redeem page
This window will show the remaining hours or data size for user’s online access.
Figure 3-11 Remaining hours or data size
25
Page 35
Cipherium bonalinx-W 1300
Administrator’ s Manual
4. Console Interface
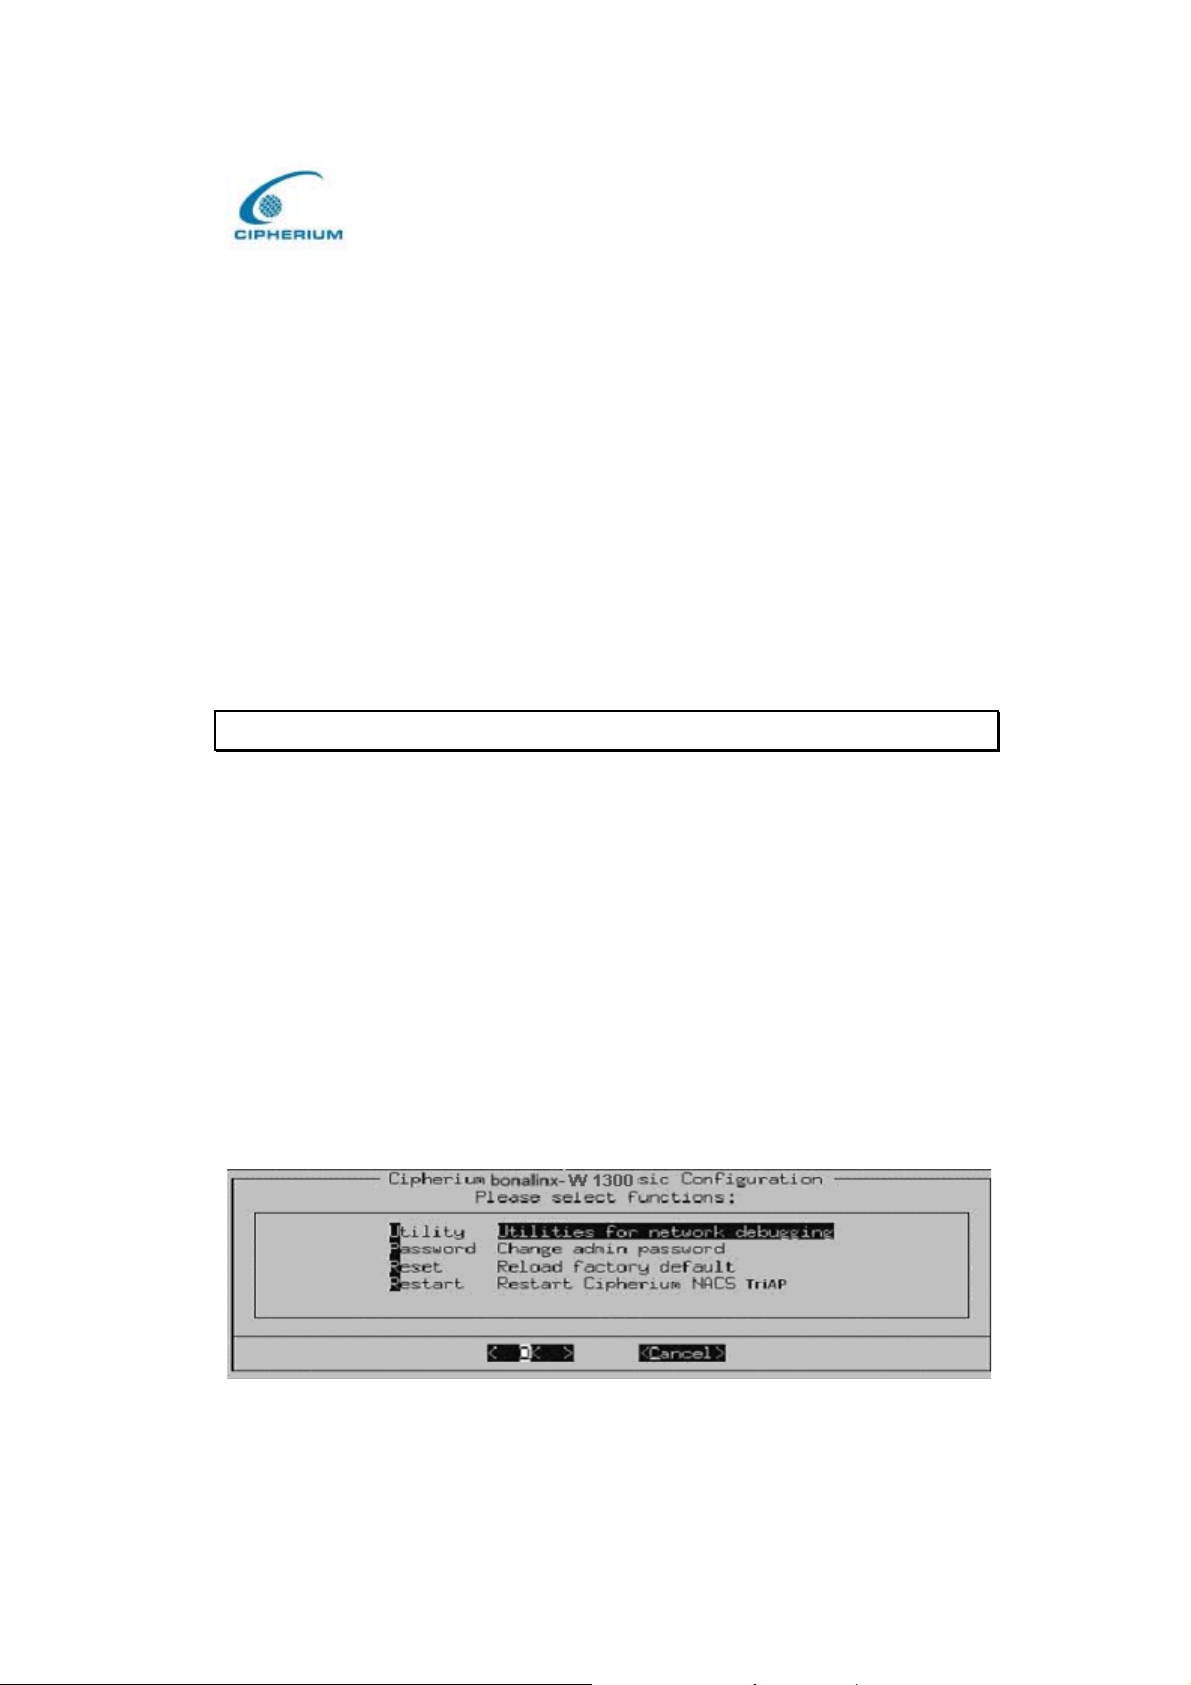
The interface of bonalinx -W 1300 provide 2 kinds of function,
A. The bonalinx-W 1300 provides a RJ11 interface for the manager to handle different
problems and situations for the operation. To link to the RJ11 interface of the bonalinx-W
1300, you need a modem cable. The terminal simulation program that you use, such as the
super terminal, should be set to the parameter value of 9600,8,n,1 .
The main console is a basic interface using interactive dialog boxes. Please use the arrow
keys on the keyboard to browse the menu and press the “Enter” key to select specific
menus and confirm entered data.
B. It’s also can be as a printer interface which connect to specific thermal line ticket
generation printer.
Warning: These two functions can ’t be used by the same time.
4.1. Main Menu of Console interface
Once you properly connect to the serial port of the bonalinx-W 1300, the console welcome
screen will appear automatically. If the welcome screen does not appear in the terminal
simulation program automatically, please try to press the “Down” arrow key, so that the
terminal simulation program will send some commands to the serial port of the bonalinx-W
1300, and the welcome screen or the main menu will appear again. If you are still unable to
see the welcome screen or the main menu of the console, please check if the connection of
your cables and the setup of the terminal simulation program are correct.
Figure 4-1 Main Menu of bonalinx-W 1300 Console Interface
26
Page 36
Cipherium bonalinx-W 1300
Administrator’ s Manual
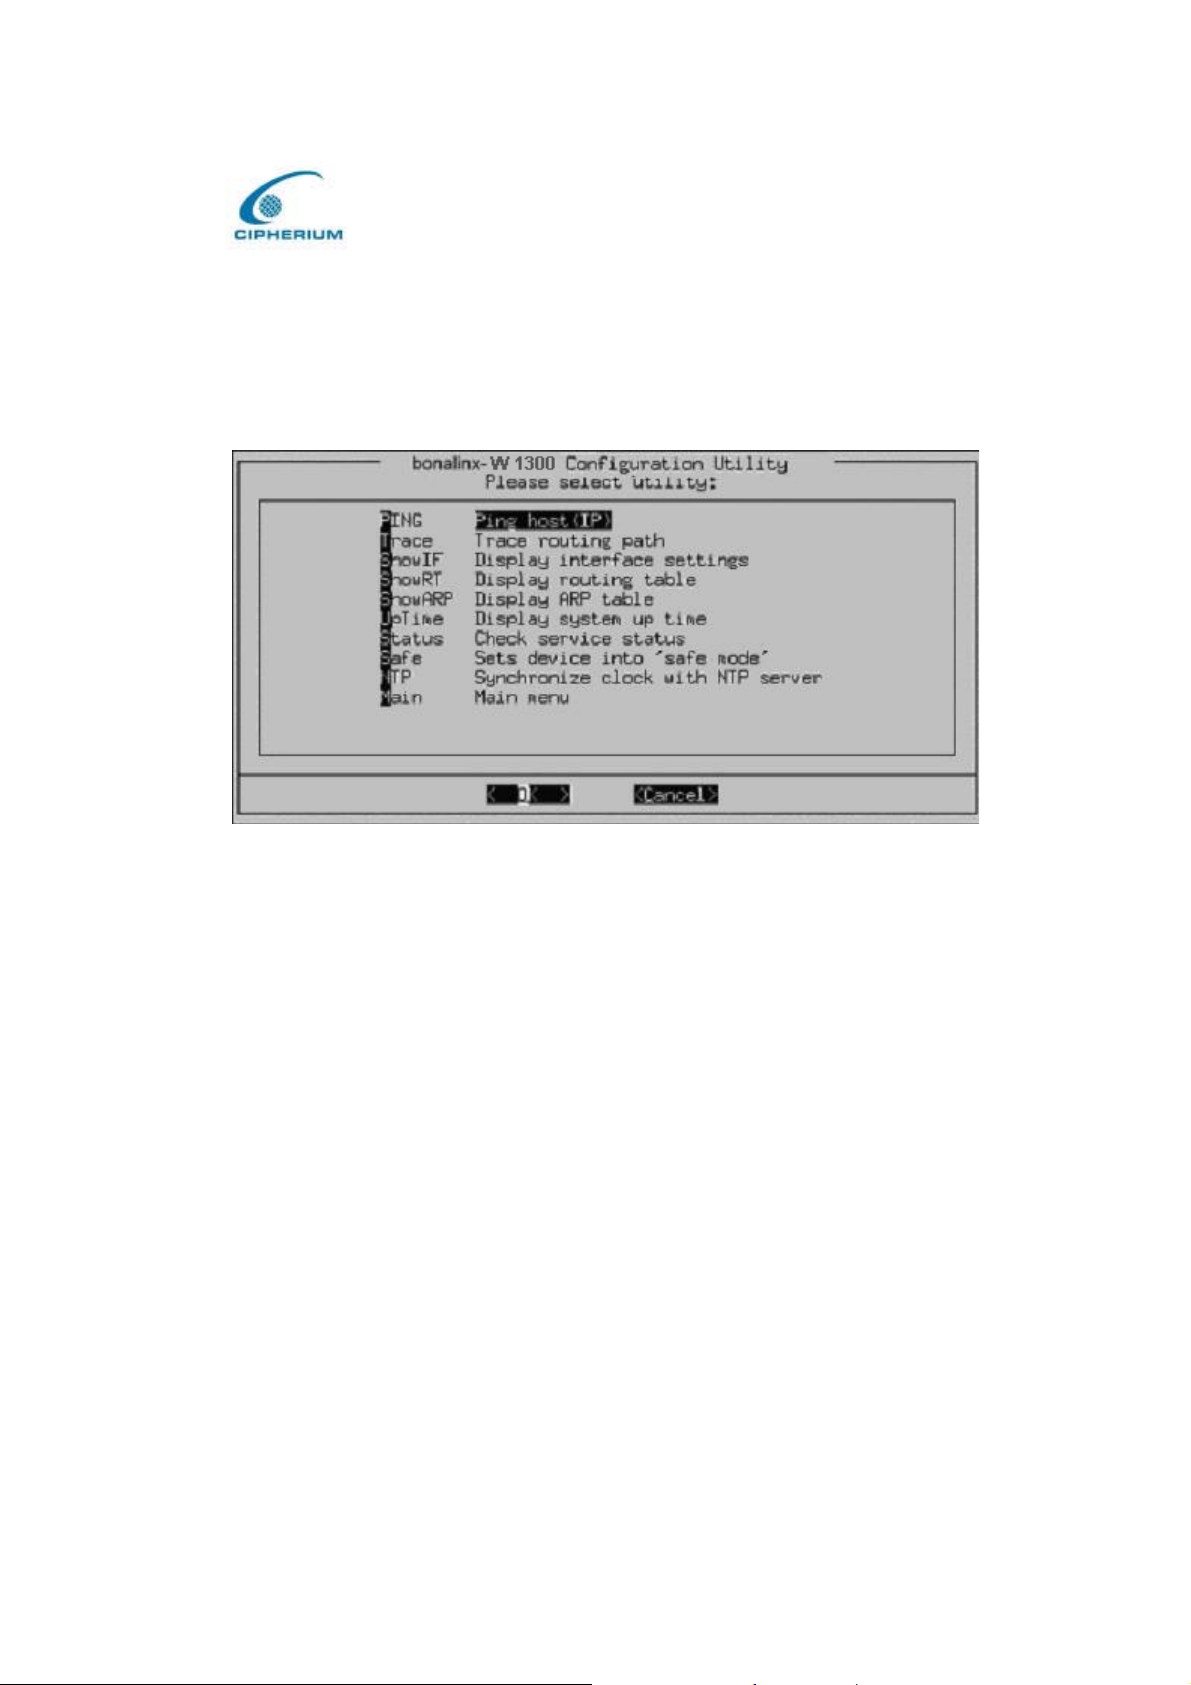
4.2. Utilities for network debugging of Console
interface
Figure 4-2 bonalinx-W 1300 Utility Menu
The bonalinx-W 1300 console interface provides several utilities to assist the Administrator to
control the system conditions and debug. The utilities provided are described as follows:
1. Ping host (IP): By sending ICMP echo request, the online condition with specific target
can be tested.
2. Trace routing path: Trace and inquire the routing path to a specific target.
3. Display interface settings: It displays the information of each network interface setting
including the MAC address, IP address, and netmask.
4. Display the routing table: The internal routing table of the bonalinx-W 1300 is displayed
to assist the confirmation of successful setup of another Static Route on bonalinx-W 1300.
5. Display ARP table: The internal ARP table of the bonalinx-W 1300 is displayed.
27
Page 37

Cipherium bonalinx-W 1300
Administrator’ s Manual
6. Display system up time: The system up time of the bonalinx-W 1300 is displayed.
7. Check service status: The current execution status of each service on the bonalinx-W 1300
is checked.
8. Set device into “safe mode”: If administrator is unable to use Web Management Interface
on the browser while bonalinx-W 1300 is unexplicit failure. He can choose this utility and
set bonalinx-W 1300 into safe mode, then administrator can management this device with
browser again.
9. Synchronize clock with NTP server: Specify and immediately check and correct the clock
through the NTP protocol and network time server. Since the bonalinx-W 1300 does not
support manual setup for its internal clock, therefore we must reset the internal clock
through the NTP.
4.3. Change admin password of Console interface
Besides supporting the use of console management interface through the connection of null
modem, the bonalinx-W 1300 also supports the SSH online connection to connect to the
bonalinx-W 1300 for the setup. When using a null modem to connect to the bonalinx-W 1300
console, we do not need to enter administrator’s password to enter the console management
interface.
When SSH is used to connect the bonalinx-W 1300, the username is “admin” and the default
password is also “admin”. The set values are the same as those for the Web management
interface. You can use this option to change the bonalinx-W 1300 administrator’s password.
Even if you forgot the password and are unable to login the console management interface of
the bonalinx-W 1300 from the Web or the remote end of the SSH, you can still use the null
modem to connect to the console management interface of the bonalinx-W 1300 and set the
administrator’s password again.
28
Page 38

Cipherium bonalinx-W 1300
Administrator’ s Manual
Caution: Although it does not require a password for the connection via the serial port, the
same management interface can access via SSH. Therefore we recommend you to
immediately change the bonalinx-W 1300 Admin username and password after you login to
the system for the first time.
4.4. Reload factory default of Console interface
It will reset the system configuration to factory defaults.
4.5. Restart Cipherium bonalinx-W 1300
It will restart the bonalinx-W 1300.
29
Page 39

Cipherium bonalinx-W 1300
Proxy Server
Administrator’ s Manual
5. Web Management Interface
This section gives a complete description on the setup of the bonalinx-W 1300. Table 5-1
shows all options and functions of the bonalinx-W 1300 and facilitates your operation and
using the bonalinx-W 1300.
Table 5-1 List of the Functions of bonalinx-W 1300
Option System Configuration User
Authentication
Configuration Wizard Authentication
Policy
Function
System Information Group
Configuration
WAN Configuration Black List
Configuration
Authentiction
Configuration(include
auth. Port & wireless
port)
Private Configuration Roaming
Guest User
Configuration
Group
Profile
Firewall
Profiles
Specific
Route
Profiles
Login
Schedule
Profiles
Network
Configuration
Network
Address
Translate
Privilege List Backup /
Walled
Garden List
Properties
Utilities Status
Change
Password
Restore
Strategy
Firmware
Upgrade
Restart Traffic
System Status
Interface
Status
Current Users
History
DHCP
Configuration
Addition
Configuration
On-demand
User
configuration
reporting
Notify
Configuration
30
Page 40
Cipherium bonalinx-W 1300
Administrator’ s Manual
5.1. System Configuration
This option provides the following detailed items to further set up your system, and these
items include: Configuration Wizard, System Information, WAN Configuration,
Authentication Configuration, and Private LAN Configuration . Please refer to the detailed
setup if you want mo re detailed information.
5.1.1. Configuration Wizard
The Wizard provides a simple way to help you to set up the bonalinx-W 13001200. All you
need is to follow the procedures and instructions given by the Wizard step by step to fill in the
required set values. And, then restart the bonalinx-W 1300 bonalinx-W 1300 to start the
operation.
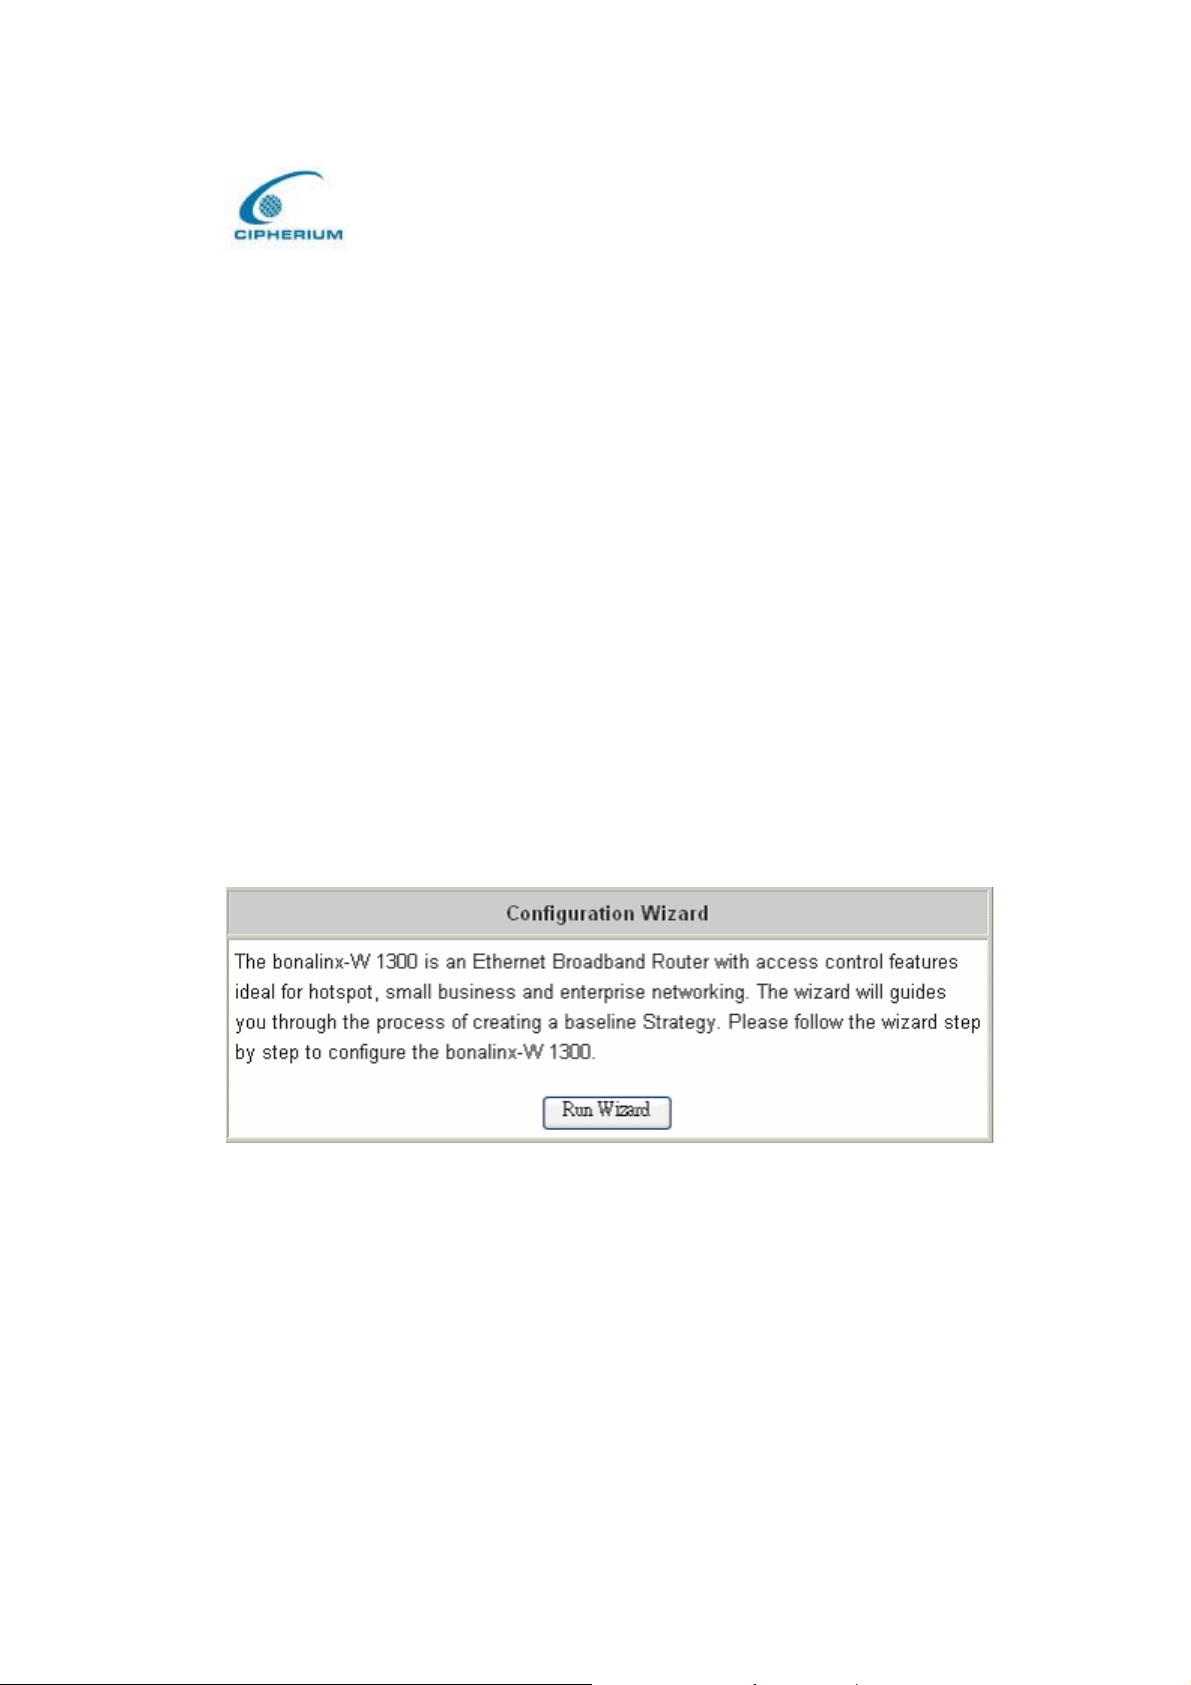
Please click the “Run Wizard” button on the Setup Wizard interface as shown in Figure 5-1
to start the system setup.
Figure 5-1 Setup Wizard Interface
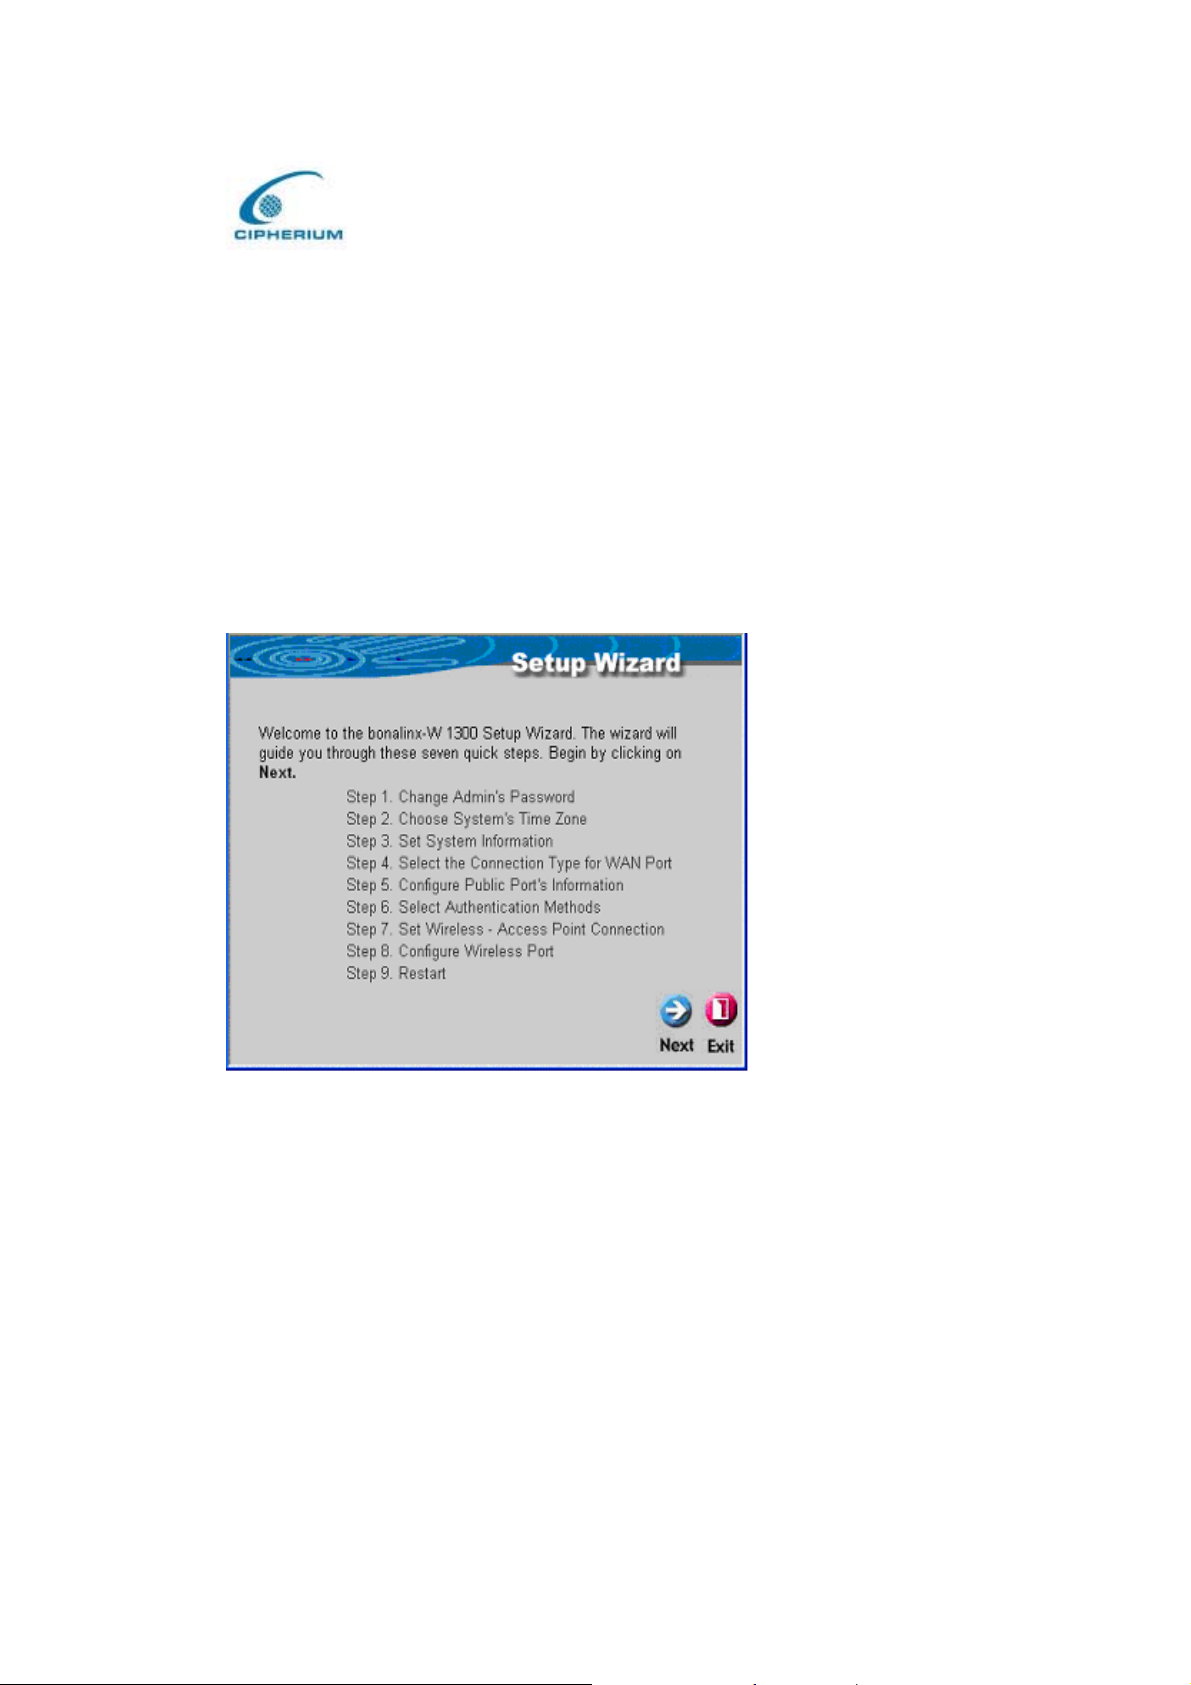
The Setup Wizard Interface as shown in Figure 5-2 describes the installation procedure, and
there are 9 procedures as listed below:
1. Change Admin Password
2. Choose System’s Time Zone
3. Set System Information
4. Select the Connection Type for WAN Port
31
Page 41
Cipherium bonalinx-W 1300
Administrator’ s Manual
5. ConfigureAuthentication Information
6. Select Authentication Methods
7. Set Wireless – Access Point Connection
8. Configure Wireless Port’s Information
9. Restart
After you are familiar with the whole process, please click “Next” to continue, or “ Exit” to
exit the Setup Wizard.
Figure 5-2 Setup Wizard Description
1. Change Admin’s Password
Please change the admin’s password as shown in Figure 5-3.
After this setup is completed, click “Next” to continue or “Exit” to exit.
32
Page 42
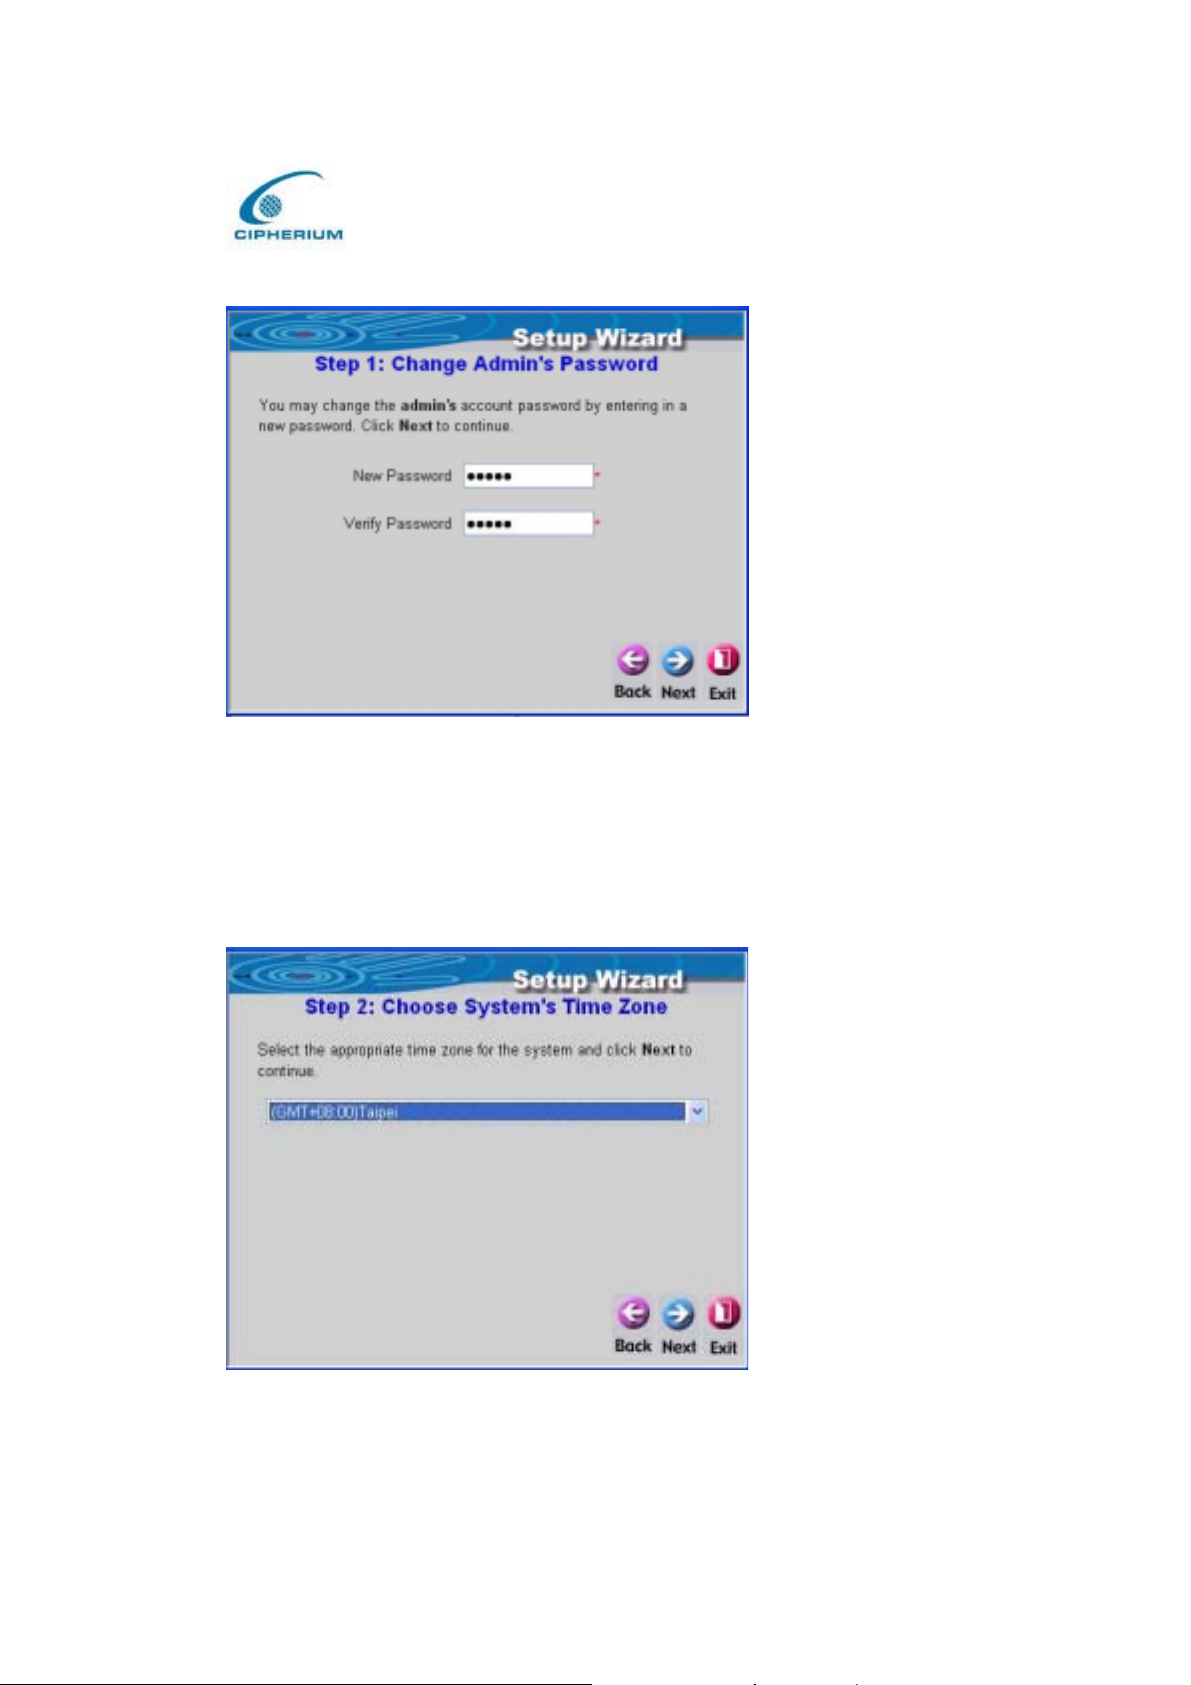
Figure 5-3 Change Admin’s Password Screen
2. Choose the System’s Time Zone
Cipherium bonalinx-W 1300
Administrator’ s Manual
Choose your system’s time zone as shown in Figure 5-4. After this setup is completed, click
“Next” to continue or “Exit” to exit.
Figure 5-4 Choose the System’s Time Zone
33
Page 43
Cipherium bonalinx-W 1300
Administrator’ s Manual
3. Set System Information
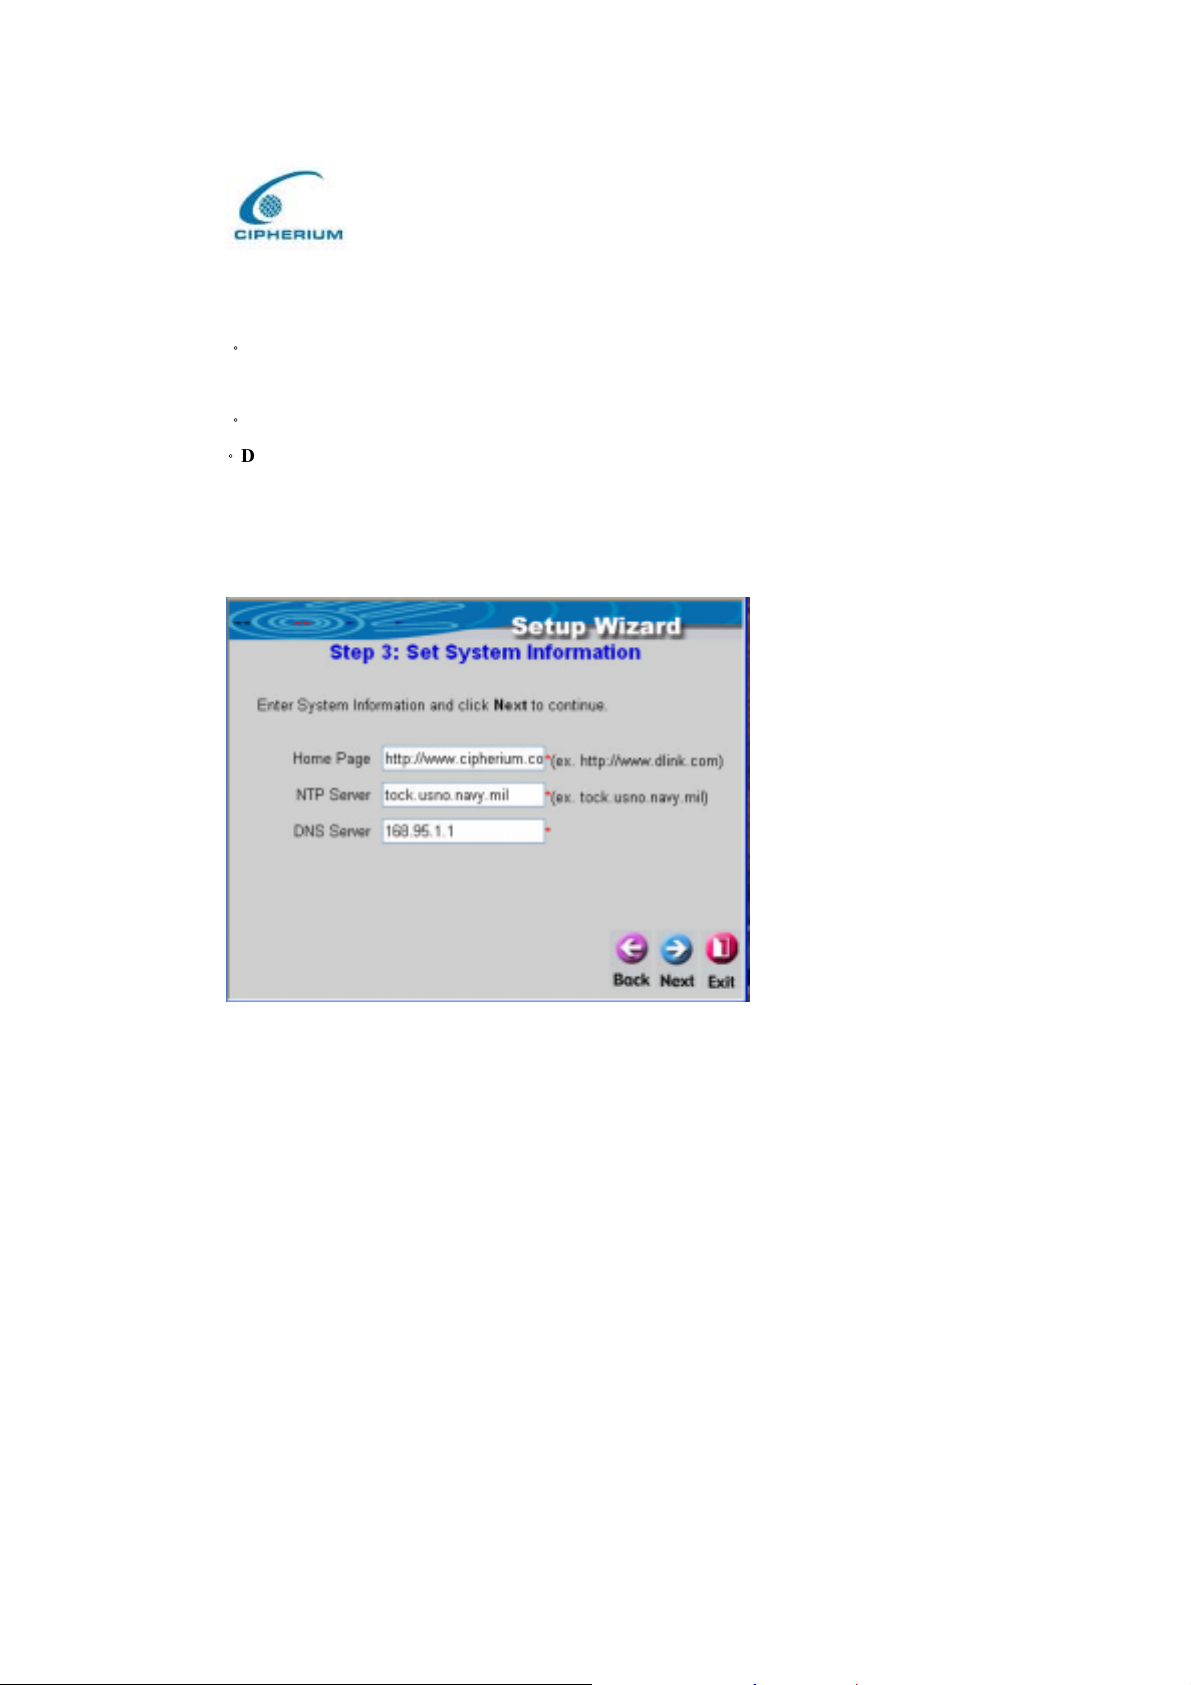
After logging on successfully, you will see the Home Page, NTP Server, and DNS server first.
Ƿ
Succeed Page: It will direct you to the website after a user logs on. You can enter the
website of your company or any major entry website.
Ƿ
Time Server: Please enter the website of the timer server.
Ƿ
DNS Server: Please enter the DNS server that provides service on the network as shown in
Figure 5-5. After this setup is completed, click “Next” to continue or “Exit” to exit.
Figure 5-5 Set System Information
4. Select Connection Type for WAN Port
To select the connection type for WAN PORT, you can choose any of the following three
types:
Please choose one of the following as shown in Figure 5-6. Click “ Next” to go to the next
screen.
• For static IP address, please select Static IP Address.(Figure5-7)
• For dynamic IP address, please select the Dynamic IP Address (Figure 5-8).
• For xDSL and using PPPoE to connect to Internet, please select PPPoE Client ( Figure
5-9, Figure 5-10).
34
Page 44
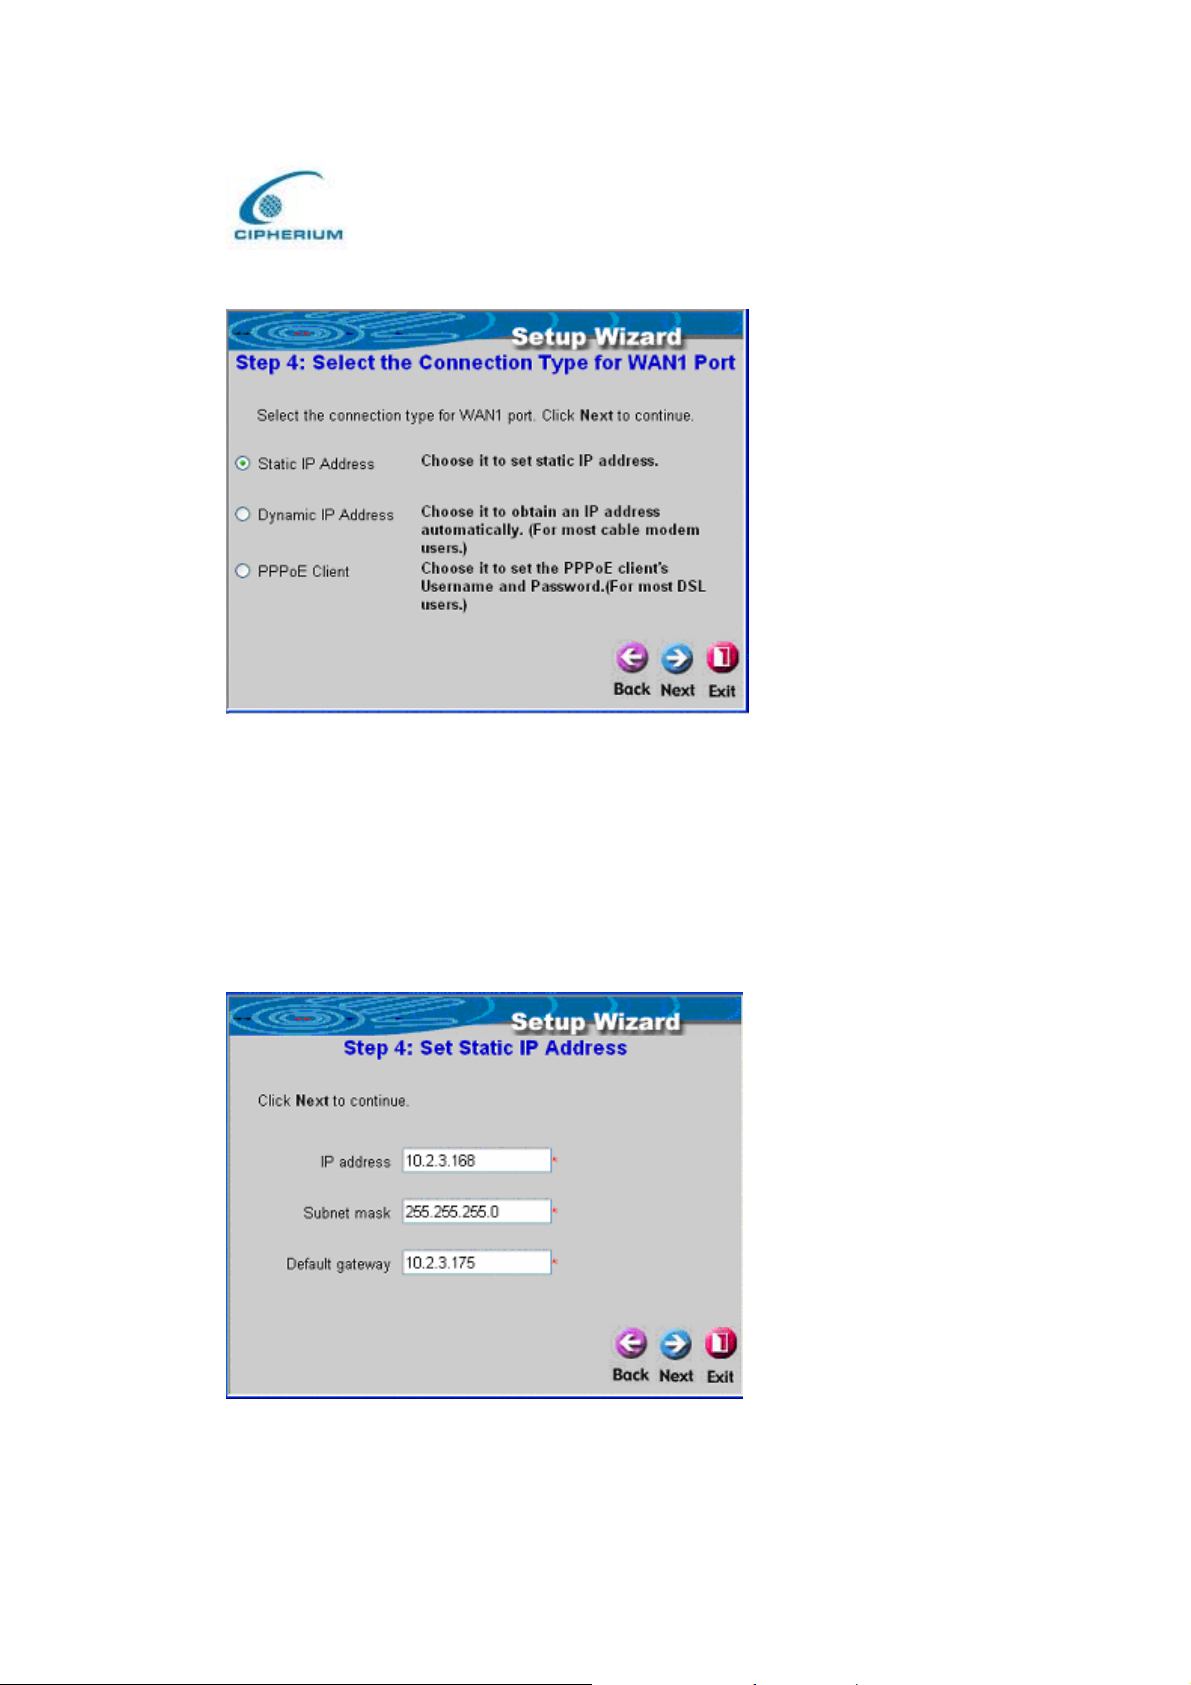
Figure 5-6 Select the Connection Type for WAN Port
• For static IP address
Cipherium bonalinx-W 1300
Administrator’ s Manual
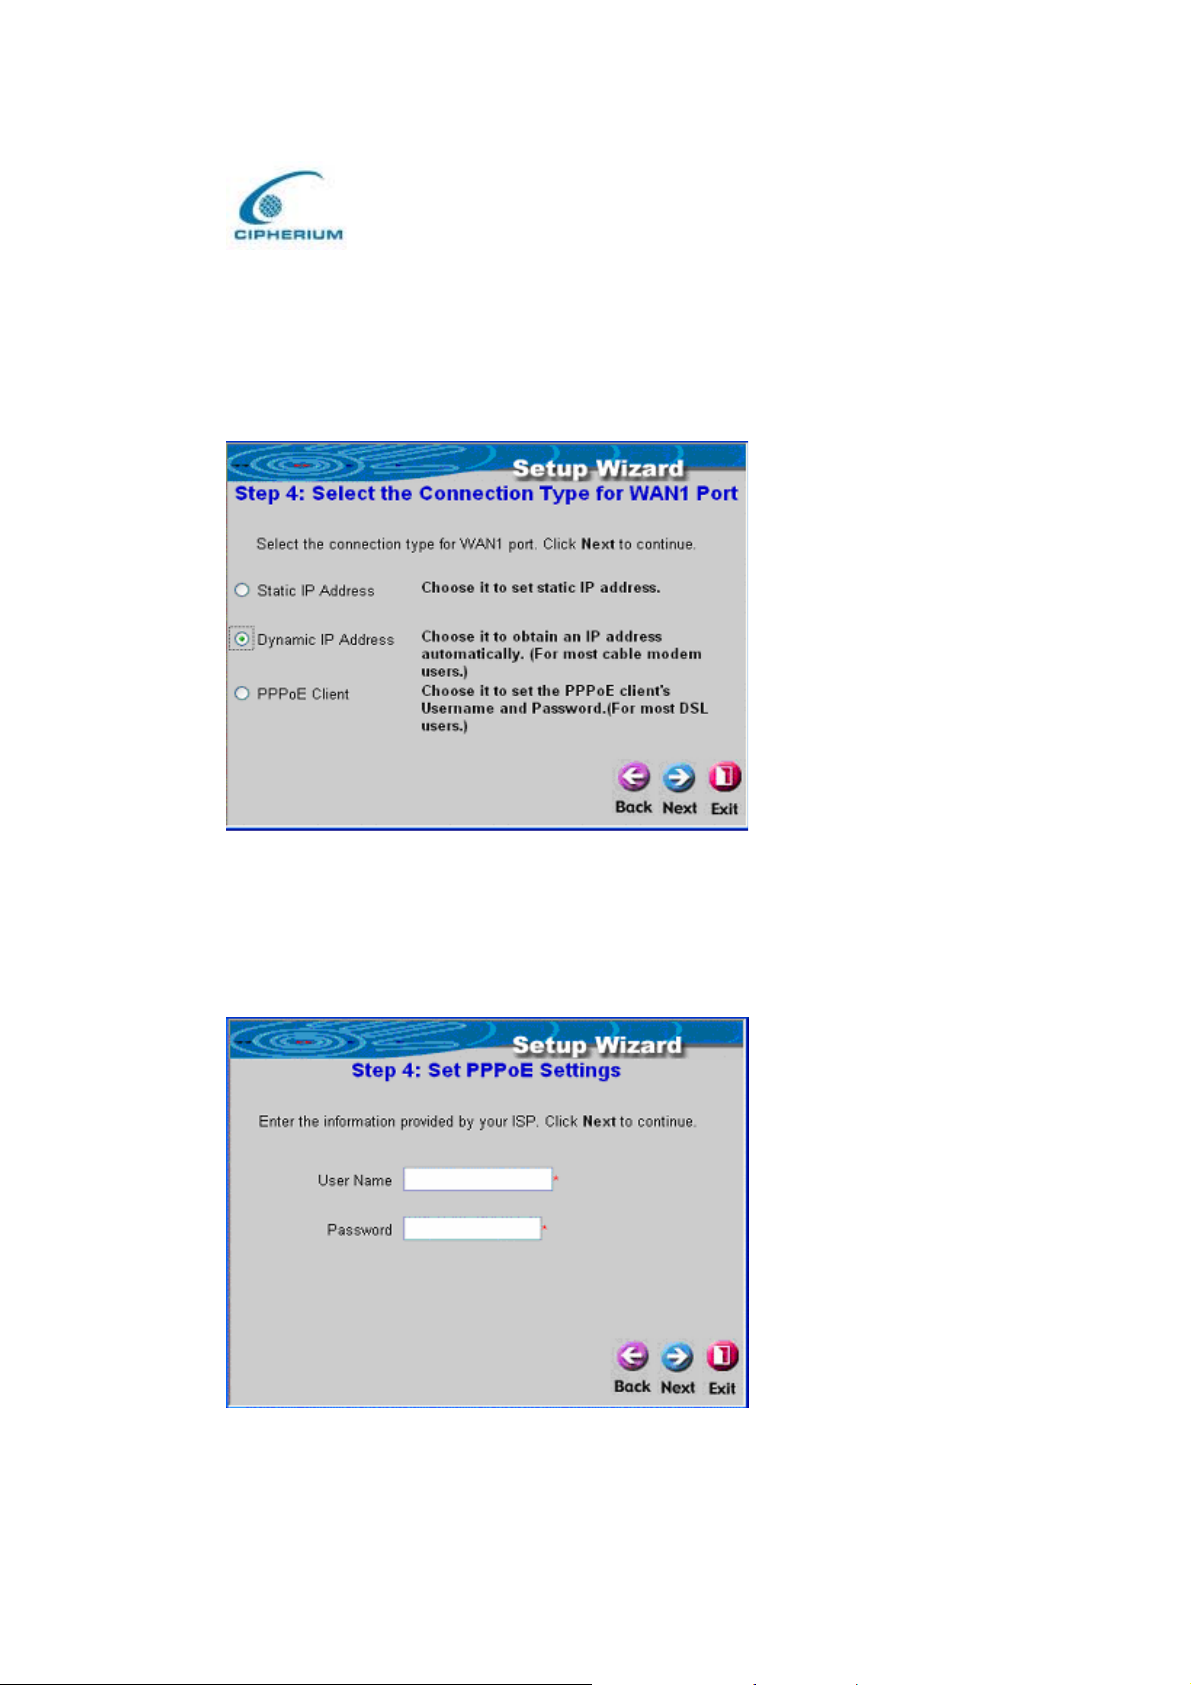
After you select Static IP Address, please enter the IP, Netmask, and Gateway of WAN PORT
as shown in Figure 5-7. After this setup is comp leted, click “Next” to continue or “ Exit” to
exit.
Figure 5-7 Set the Connection Type for WAN Static IP Address
35
Page 45
Cipherium bonalinx-W 1300
Administrator’ s Manual
• For dynamic IP address
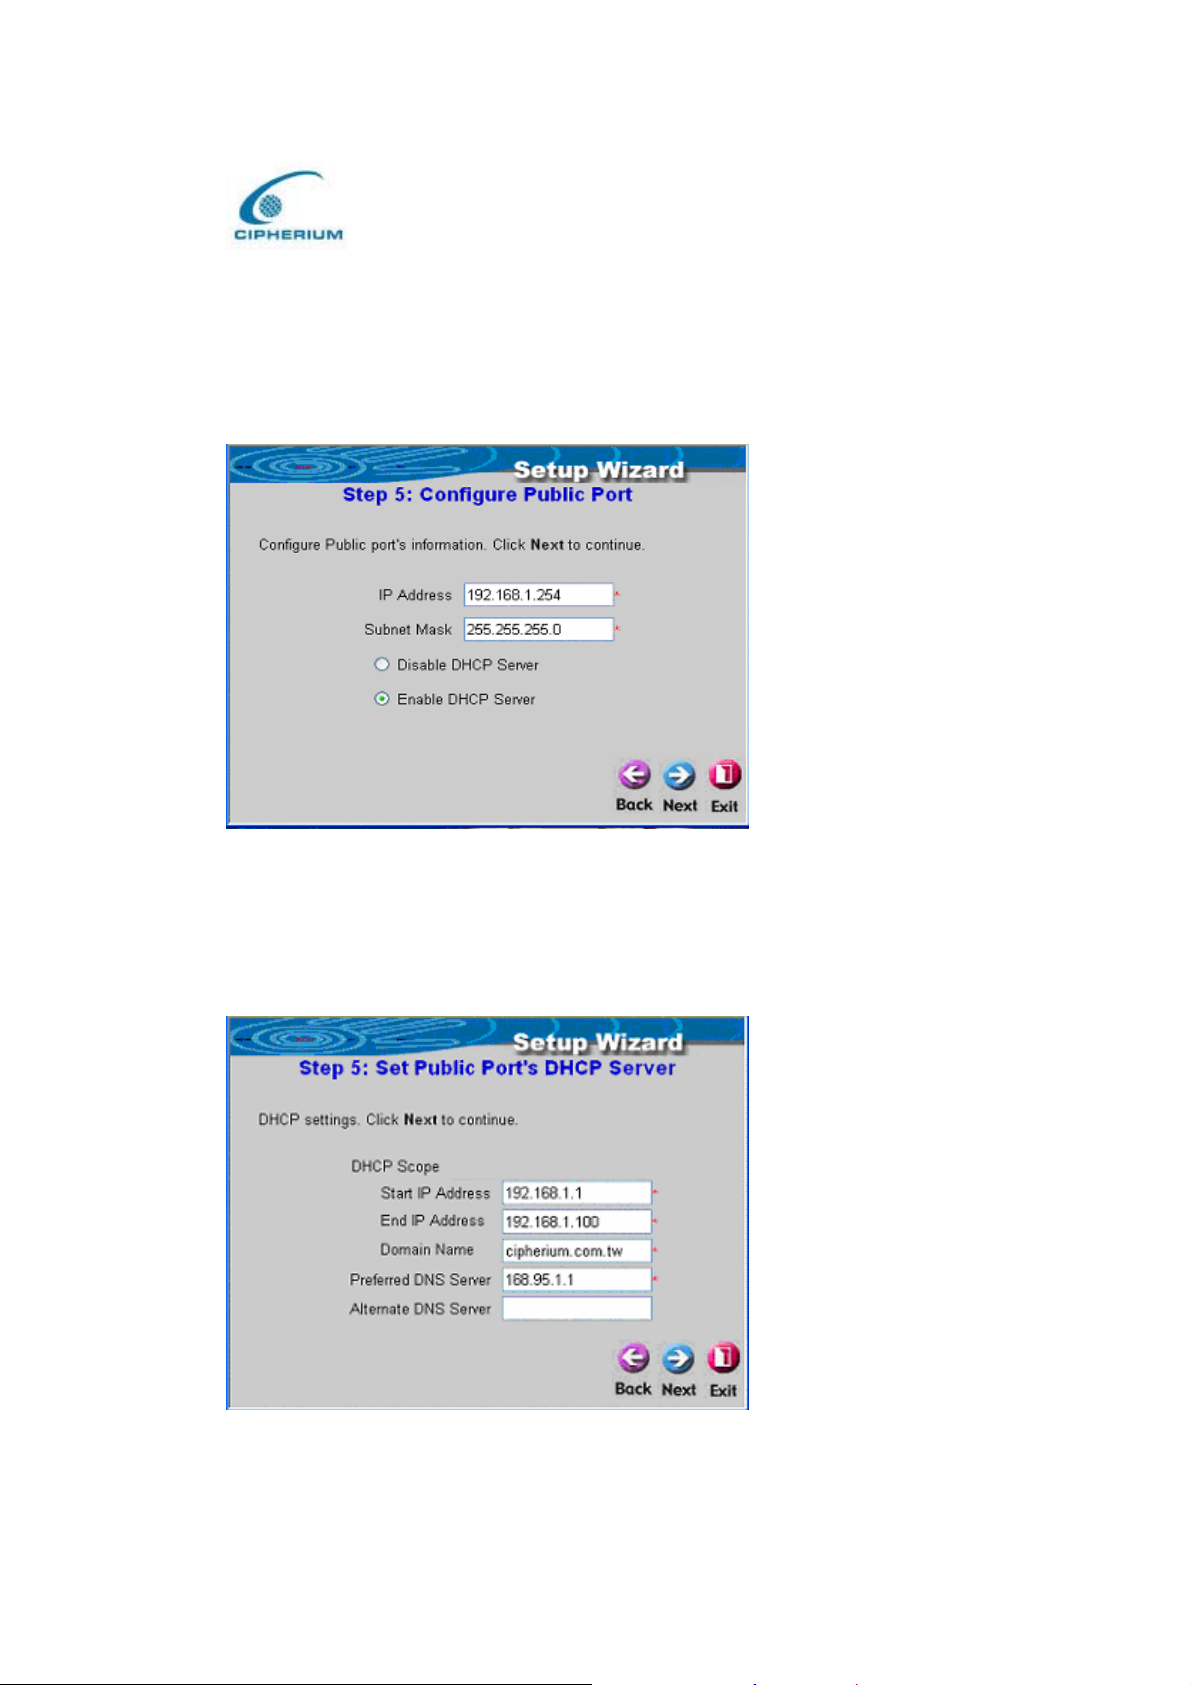
After you select Dynamic IP Address as shown in Figure 5-8, click “Next” to continue or
“Exit” to exit.
Figure 5-8 Select the Connection Type for WAN Dynamic IP Address
• For PPPoE
After you select PPPoE, enter the username and password of the PPPoE as shown in Figure
5-9. After this setup is completed, click “Next” to continue or “Exit” to exit.
Figure 5-9 Set WAN PPPoE
36
Page 46
Cipherium bonalinx-W 1300
Administrator’ s Manual
5. Configure Public LAN
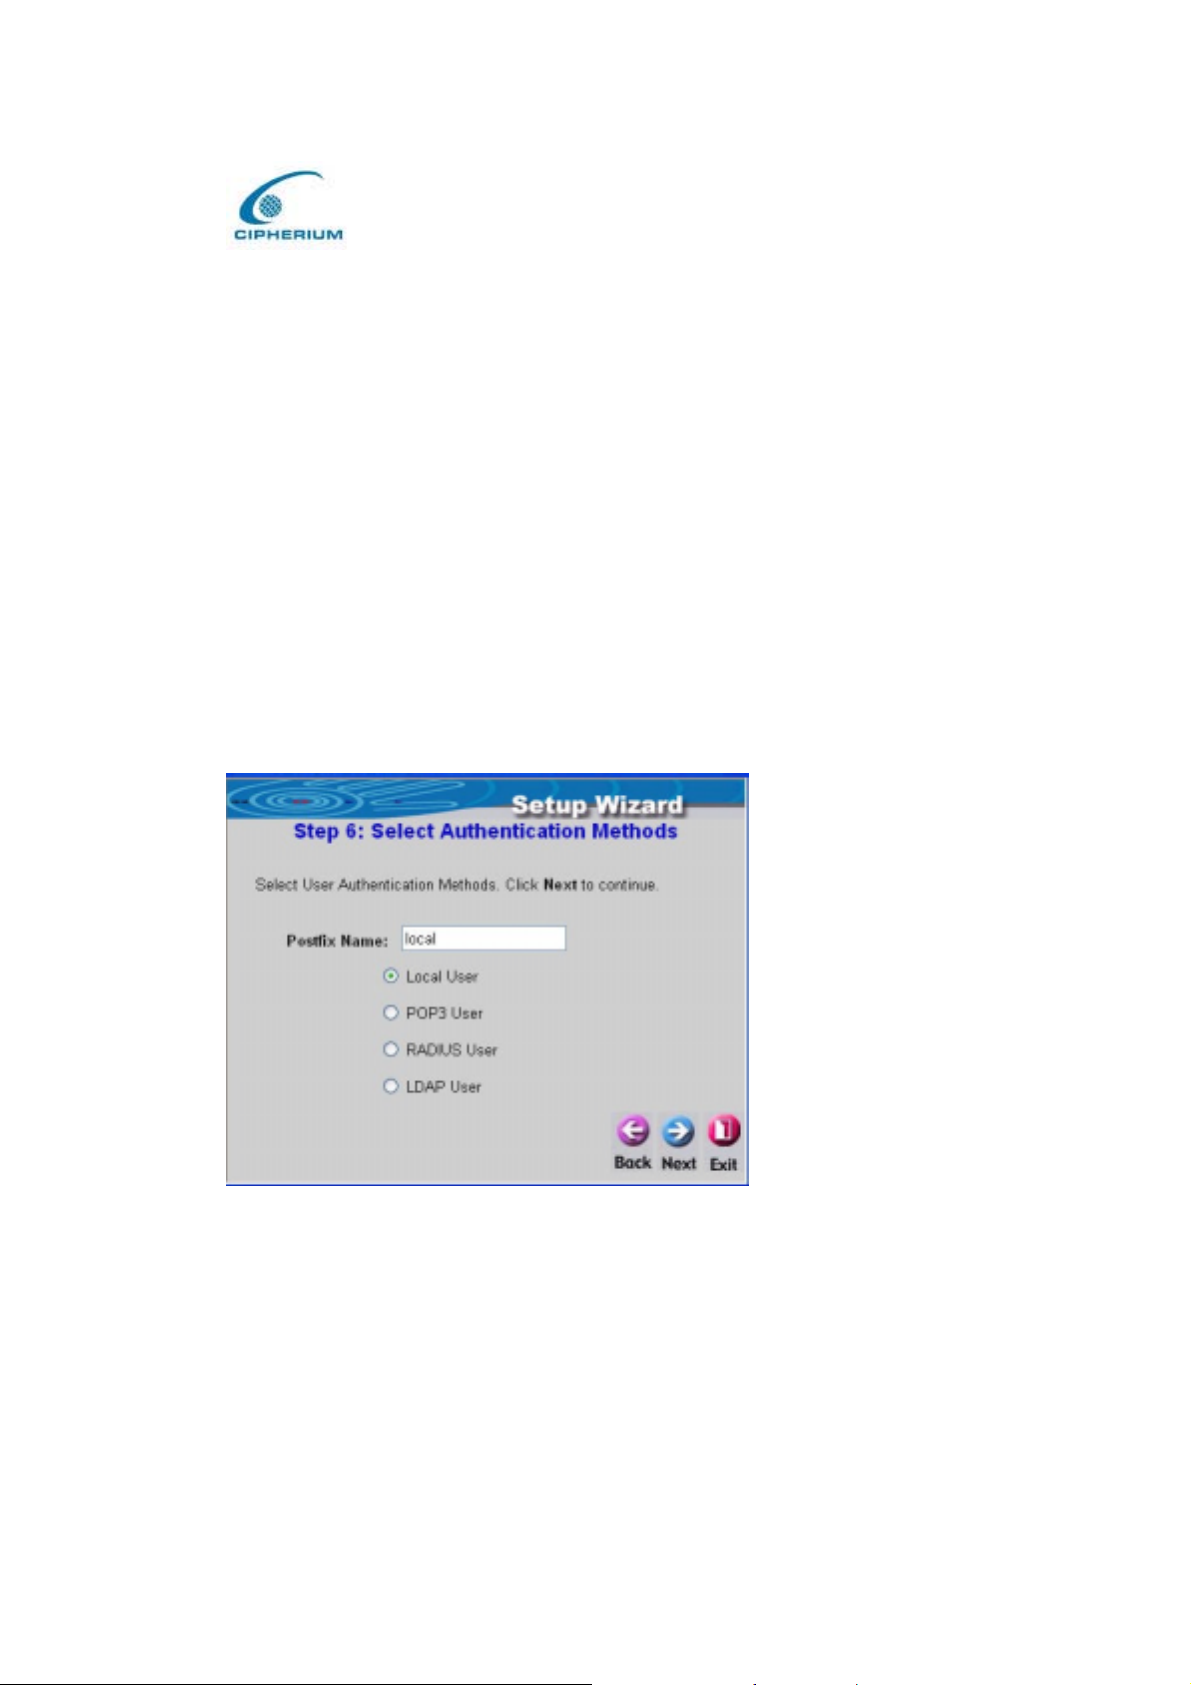
This procedure sets the related information of the Public LAN as shown in Figure 5-10.
Please enter IP and Subnet Mask, and determine to Enable or Disable the DHCP.
Figure 5-10 Configure Public LAN
After this setup is completed, click “Next” to continue or “ Exit” to exit.
• If you select to enable the DHCP, please refer to Figure 5-11.
Figure 5-11 Set DHCP Server
37
Page 47
Cipherium bonalinx-W 1300
Administrator’ s Manual
Related information for enabling the DHCP Server includes DHCP Start IP Address, DHCP
End IP Address, Domain Name, Primary DNS IP Address, and Secondary DNS IP address.
After this setup is completed, click “Next” to continue or “Exit” to exit.
6. Select Public LAN Methods
The Public LAN method sets the user’s information and authenticates the user’s account.
You can set the Postfix Name to an easily identified name such as “Local User” and the like.
The system provides 4 Public LAN mechanisms as described below:
• If you select Local User, please refer to Figure 5-13.
•If you select POP3 User, please refer to Figure 5-14.
•If you select RADIUS User, please refer to Figure 5-15.
•If you select LDAP User, please refer to Figure 5-16.
Figure 5-12 Select Public LAN Methods
• After you select a Local User, please enter the Postfix Name . After this setup is completed,
click “Next” to continue or “Exit” to exit.
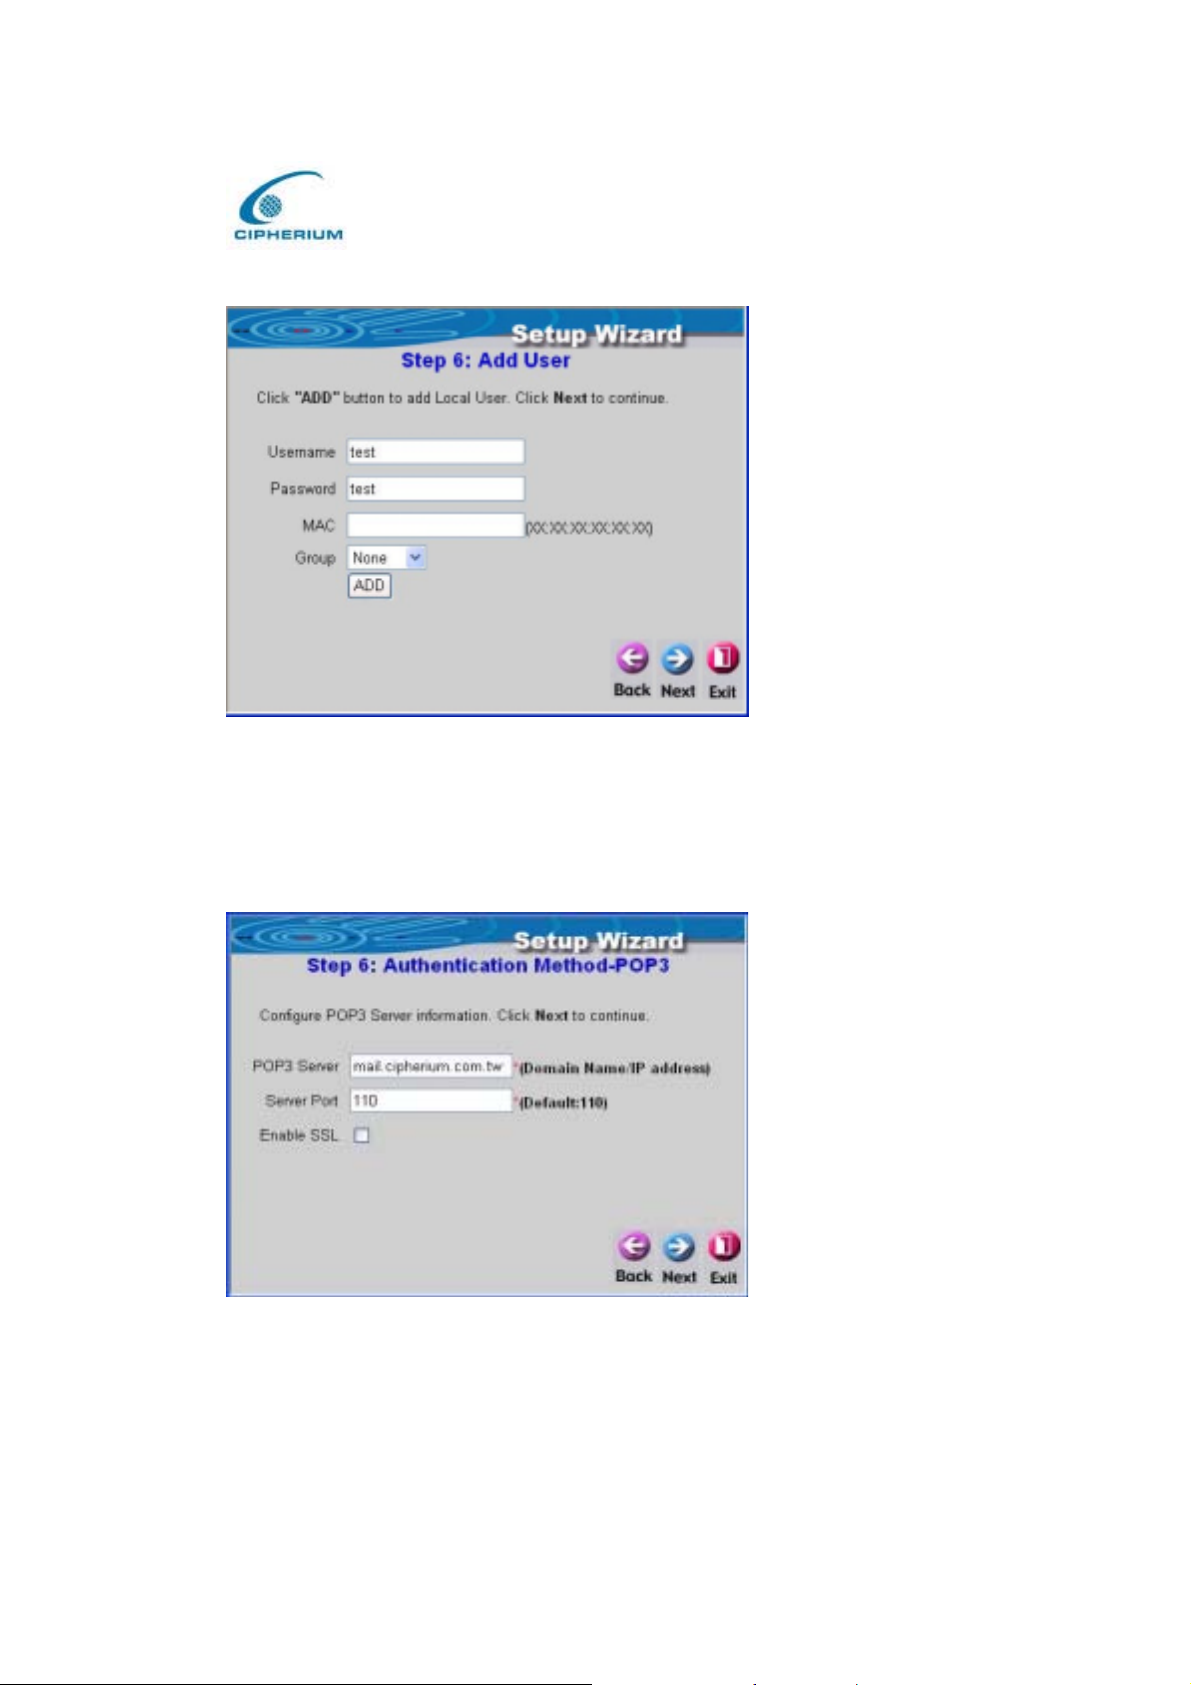
If you want to continue to add Local users, enter the Username, Password, and MAC (not
compulsory), and then click “ADD” to complete the procedure as shown in Figure 5-13.
Ex: Uername:test, Password:test
38
Page 48
Cipherium bonalinx-W 1300
Administrator’ s Manual
Figure 5-13 Add Local Users
• After you select POP3 User, please enter the Server IP and Server Port of POP3 and
determine whether or not to enable SSL function as shown in Figure 5-14.
Figure 5-14 POP3 Setup Screen
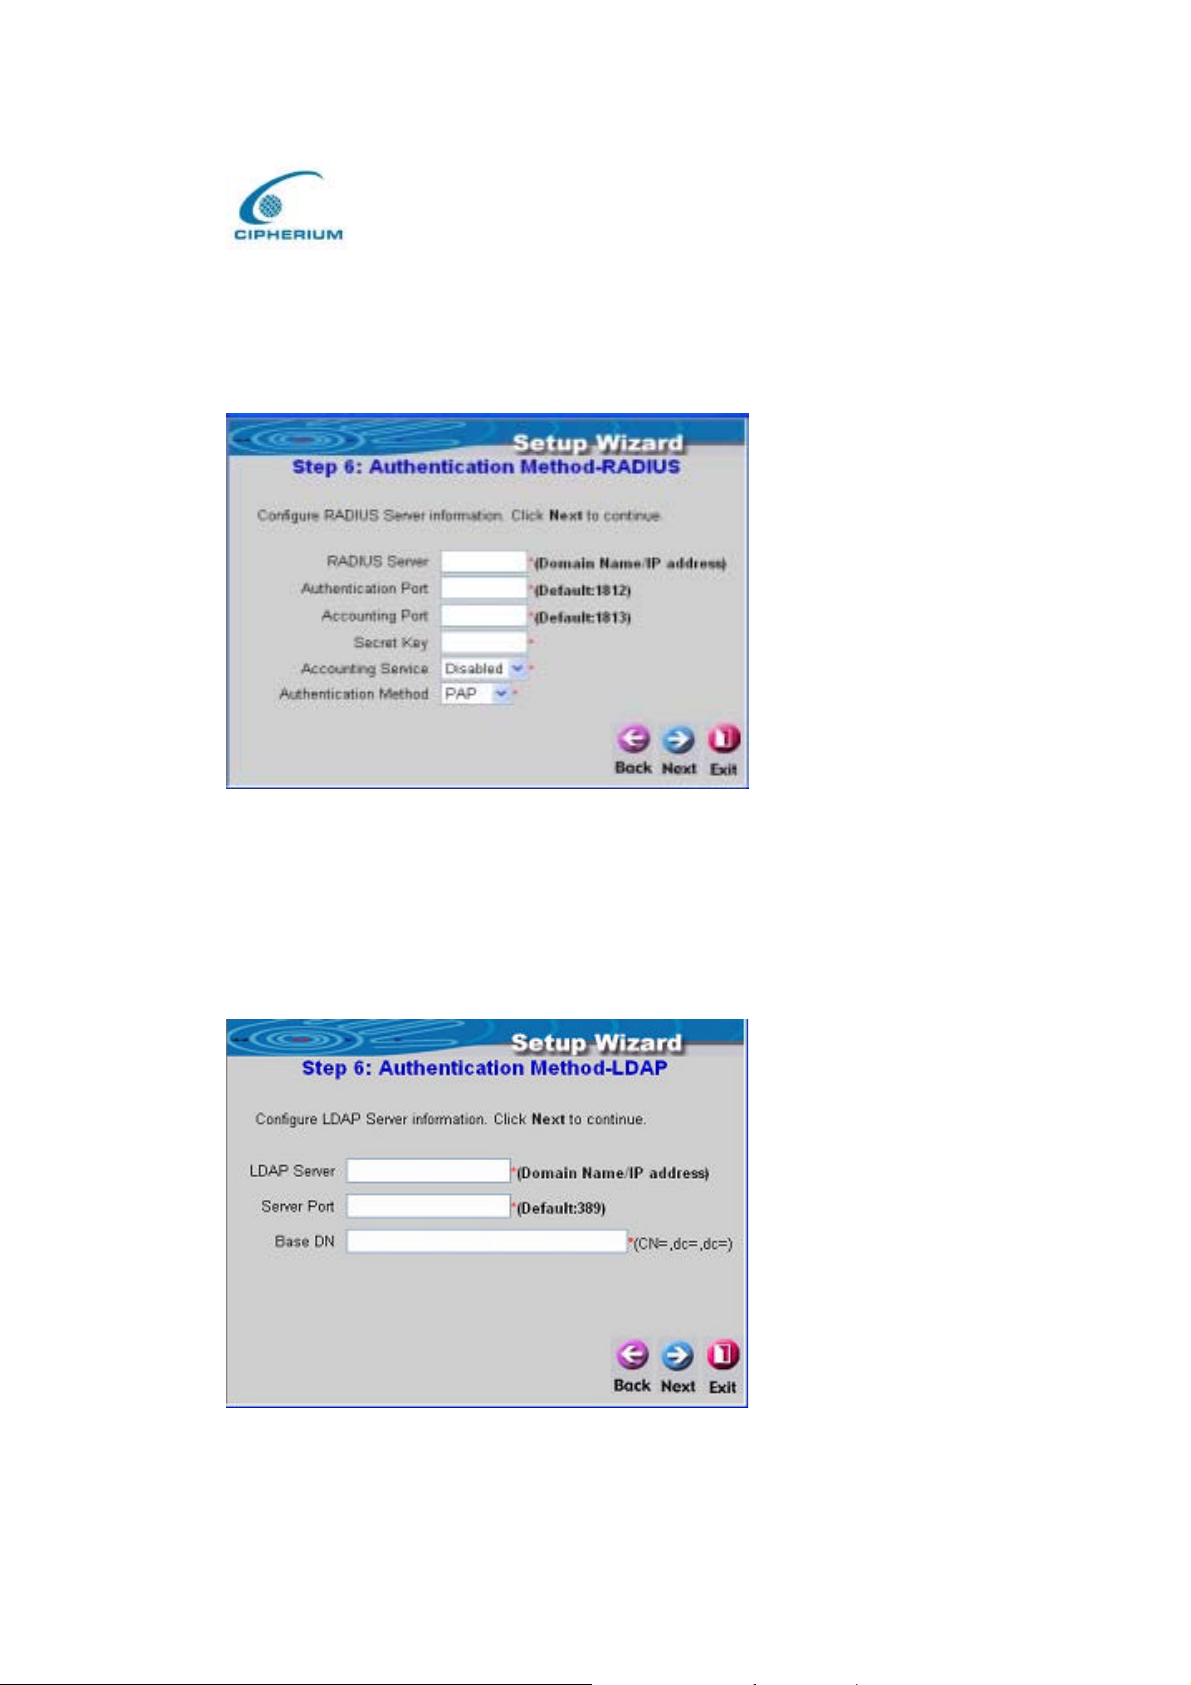
• After you select RADIUS User, please enter the related settings for the RADIUS Server,
including Server IP, Public LAN, Accounting Port, Secret Key, Accounting Service, and
39
Page 49
Cipherium bonalinx-W 1300
Administrator’ s Manual
Public LAN Method as shown in Figure 5 -15. After this setup is completed, click “ Next” to
continue or “ Exit” to exit.
Figure 5-15 Radius Setup Screen
• After you select LDAP User, please enter the information for Server IP, Server Port, and
Base DN as shown in Figure 5-16. After this setup is completed, click “Next” to continue or
“Exit” to exit.
Figure 5-16 LDAP Setup Screen
40
Page 50
Cipherium bonalinx-W 1300
Administrator’ s Manual
7. Set Wireless – Access Point Connection
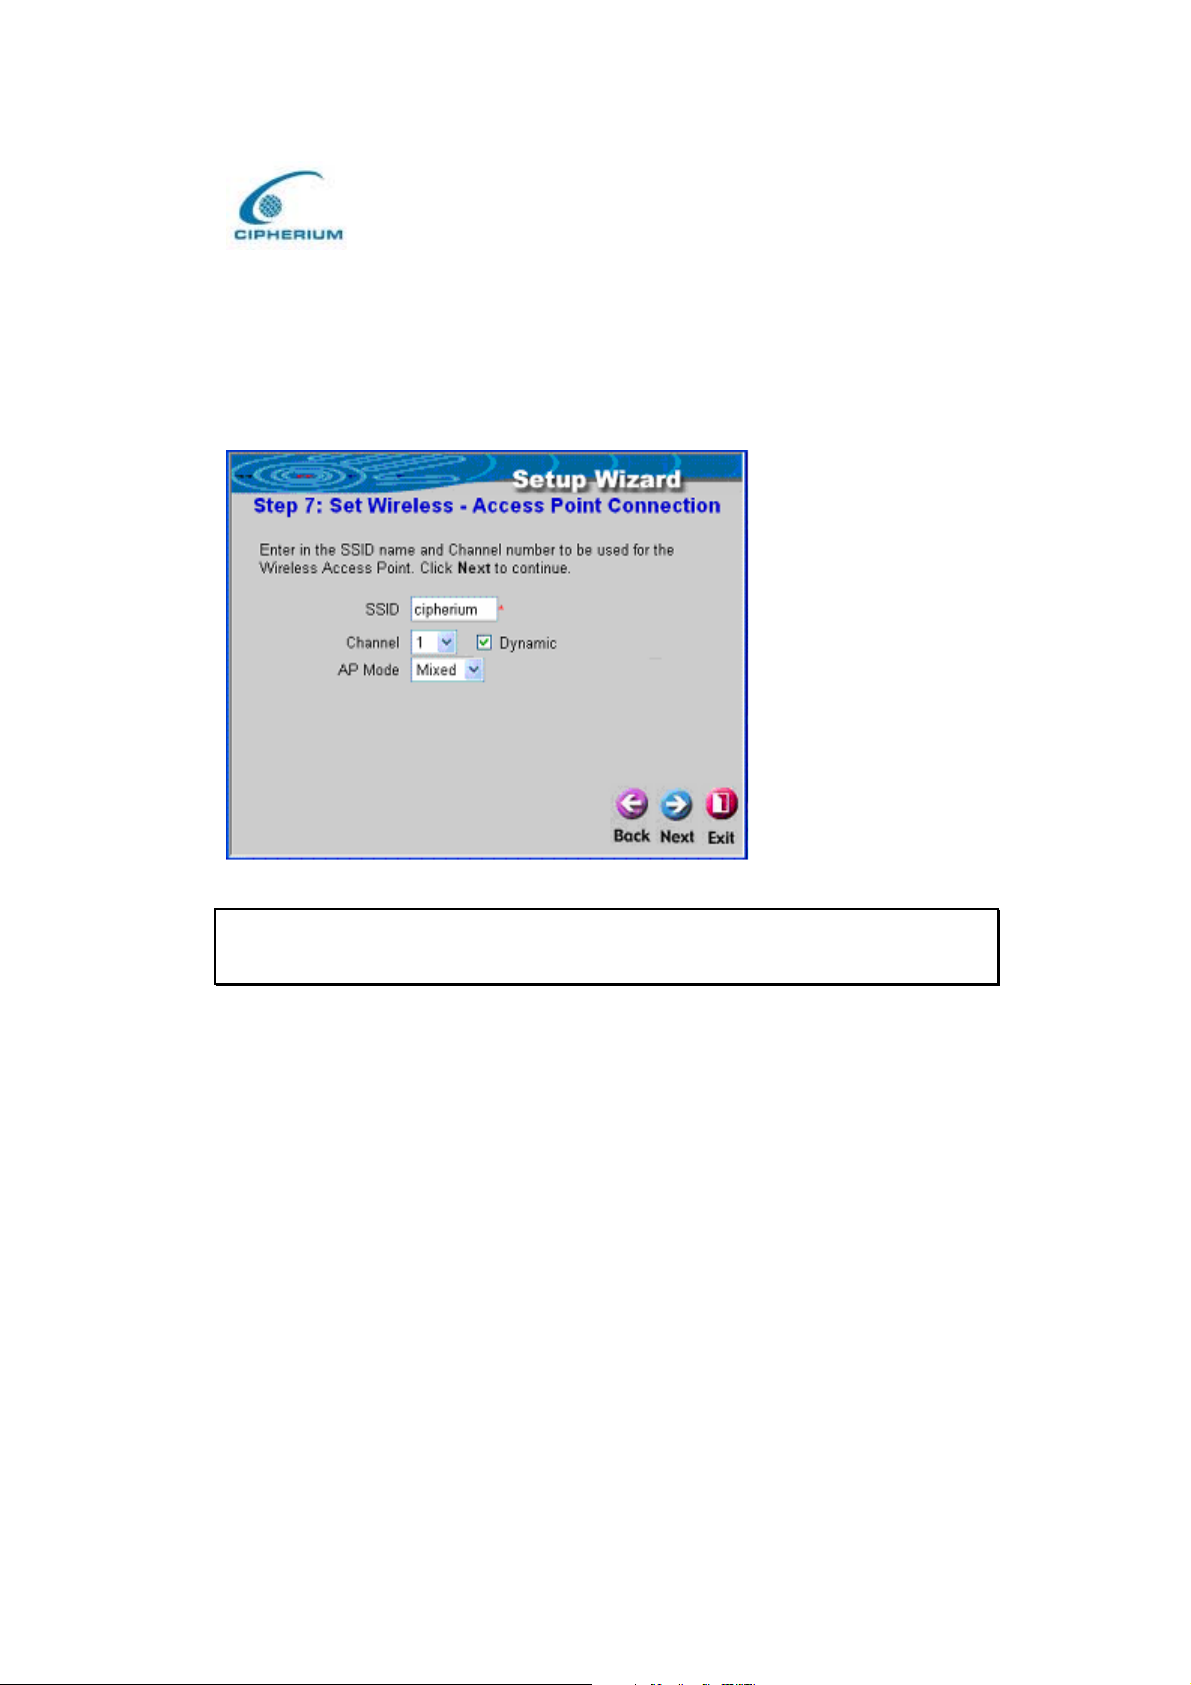
Please enter SSID name and select the Wireless Port’s function, such as select channel from 1
to 6 and select AP mode then click next.
Figure 5-17 Set Wireless – Access Point Connection
Caution: This device can support Channel 1-13. When using in other plcace as Taiwan,
USA, Channel 12, 13 will be disabled by software and only Channel 1-11 are applicable.
8. Configure Wireless port’s information
This procedure sets the related information of the Wireless port as shown in Figure 5-18.
Please enter IP and Subnet Mask, and determine to Enable or Disable the DHCP.
41
Page 51
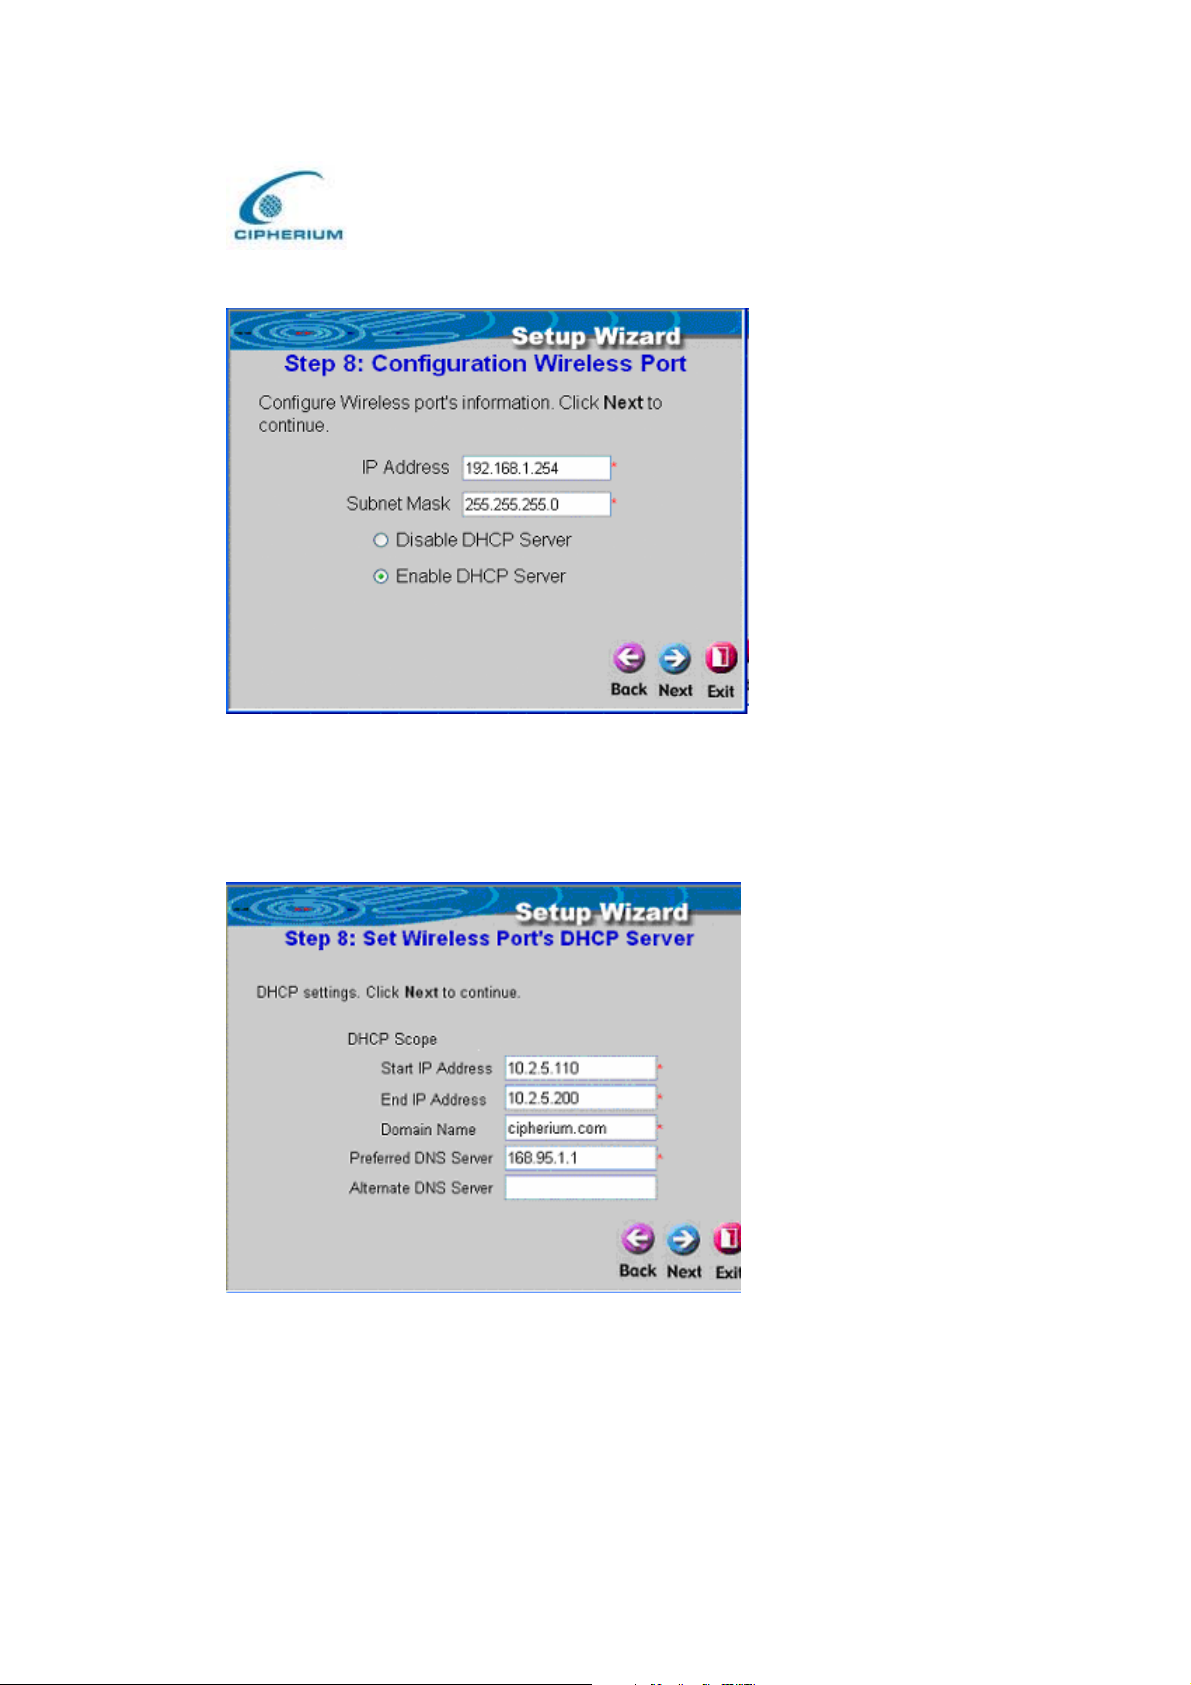
Figure 5-18 Configure Wireless port
• If you select to enable the DHCP, please refer to Figure 5-19.
Cipherium bonalinx-W 1300
Administrator’ s Manual
Figure 5-19 Enable DHCP Sever of Wireless Port
Related information for enabling the DHCP Server includes DHCP Start IP Address, DHCP
End IP Address, Domain Name, Primary DNS IP Address, and Secondary DNS IP address.
42
Page 52
Cipherium bonalinx-W 1300
Administrator’ s Manual
After this setup is completed, click “Next” to continue or “Exit” to exit.
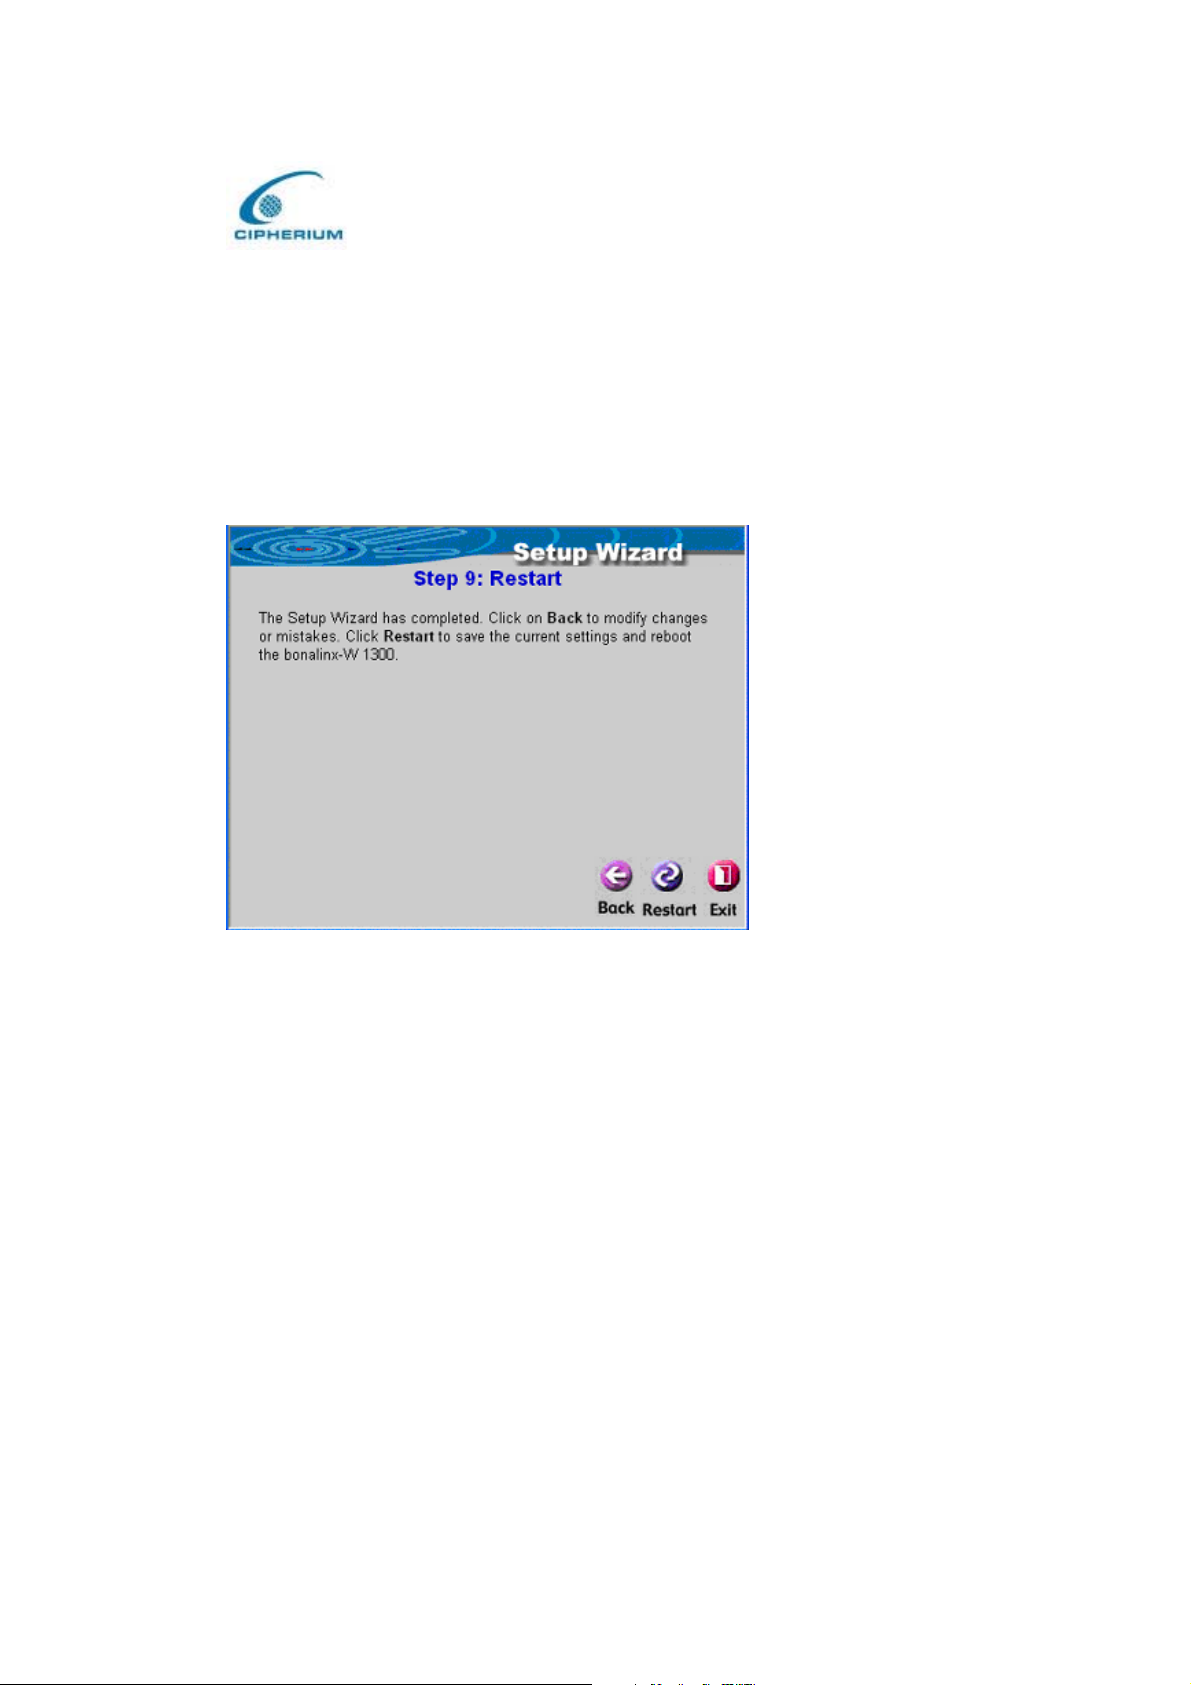
9. Restart
If you are sure that your setup is correct, please click the “Restart” button to restart and
complete all setup procedures. If you do not want to keep the previous setups, please click
“Exit”. It will invalidate the previous setups.
Figure 5-20 Restart
43
Page 53
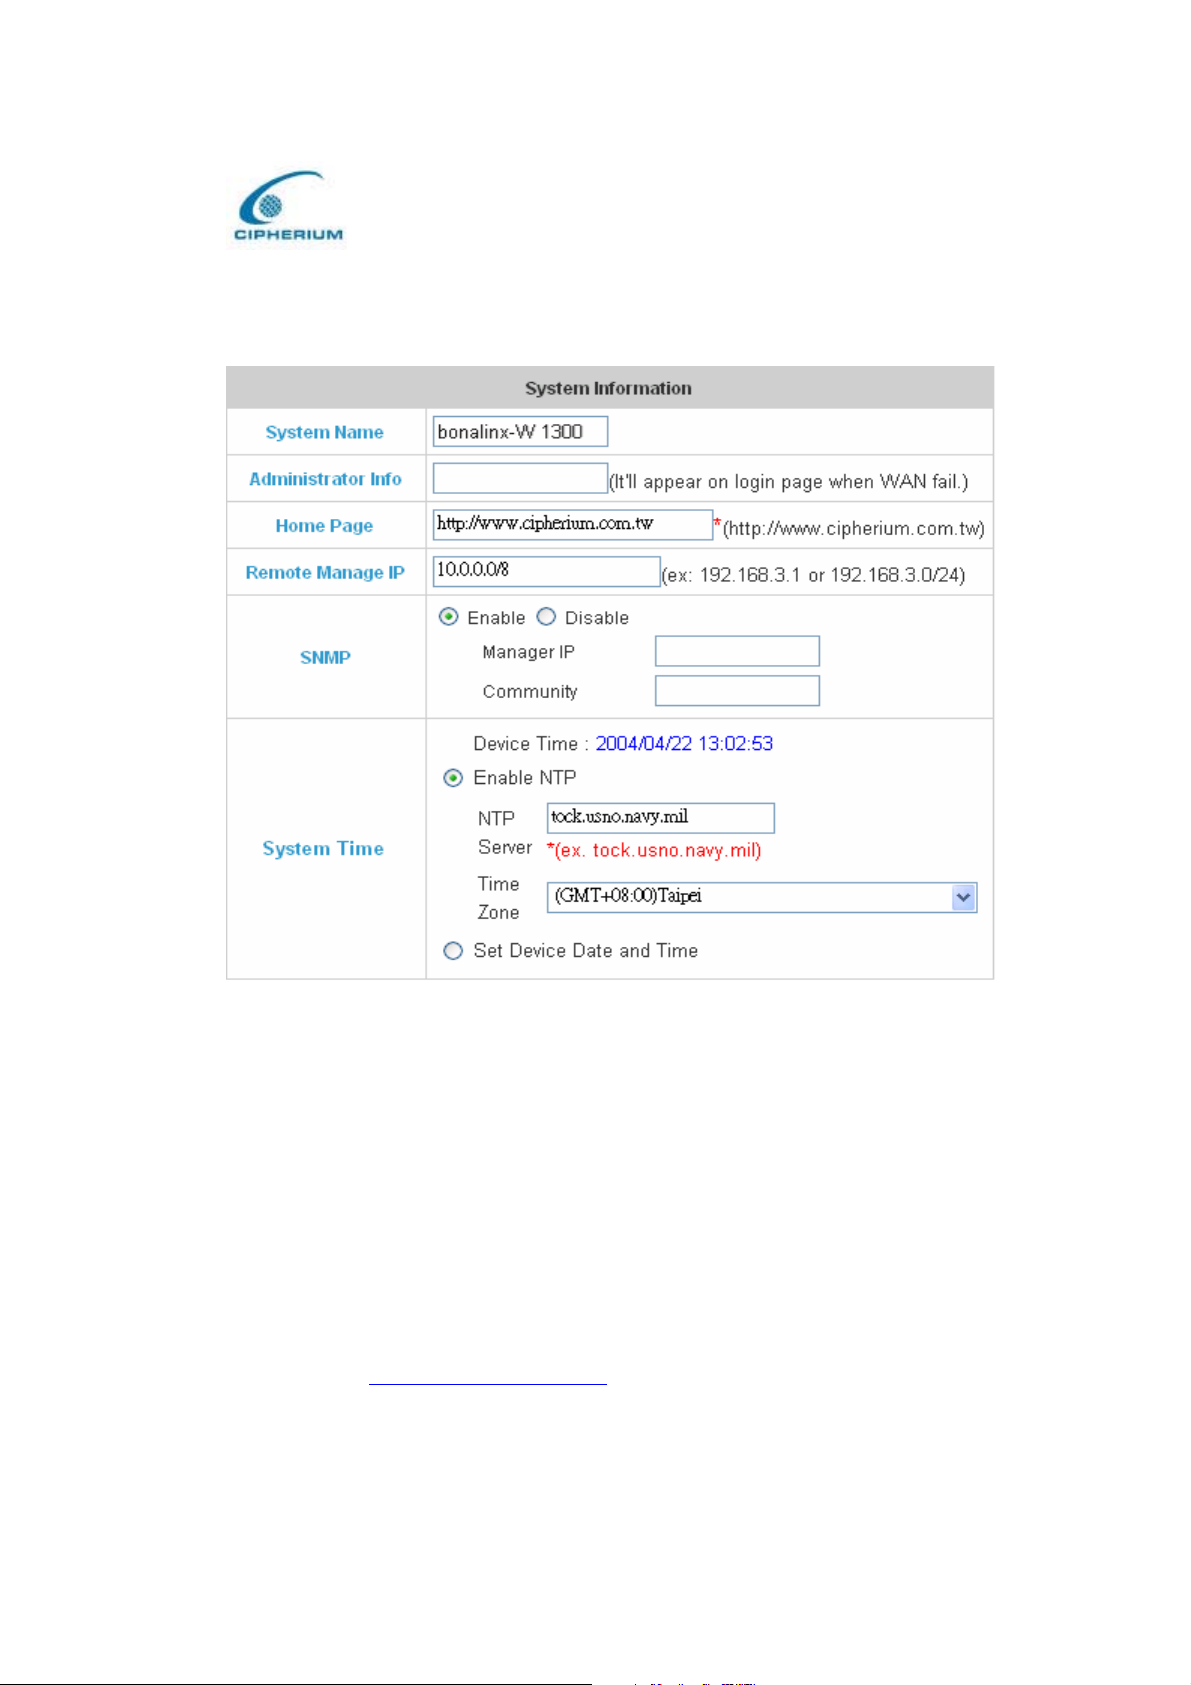
5.1.2. System Information
Figure 5 -21 System Configuration
Cipherium bonalinx-W 1300
Administrator’ s Manual
System Name : The name is bonalinx-W 1300 system, and the default is “bonalinx-W 1300”.
Administrator Info: It lets the Administrator enter the related information such as
administrator’s name, telephone number, and e-mail. If a user connects to the bonalinx-W
1300 and the WAN Port has a connection problem, the user login screen will show the data
entered into these columns on screen.
Home Page: You can enter the website of the Web Server. When a user logs on, the user will
be linked to this home page automatically. The home page is usually set to the website of the
company such as http://www.cipherium.com.tw
link, the user will be redirected to the set website here.
. No matter which webpage the user wants to
44
Page 54
Cipherium bonalinx-W 1300
Administrator’ s Manual
Remote Manage IP: You can set up the system to connect the WAN Port to the website that
executes the functions of managing the bonalinx-W 1300 such as 10.2.3.0/24. It means that
as long as you are at the IP address of 10.2.3.0/24, you can execute the functions for managing
the bonalinx-W 1300. Another example is 10.0.0.3. It means that as long as you are at the IP
address of 10.0.0.3, you can execute the function of connecting the WAN to the bonalinx-W
1300 to execute the functions for managing the bonalinx-W 1300.
SNMP: bonalinx-W 1300 supports SNMP v2 read only data access. The Administrator can
specify the IP address and the SNMP community name to determine the target of the
management information base (MIB) exported from the bonalinx-W 1300.
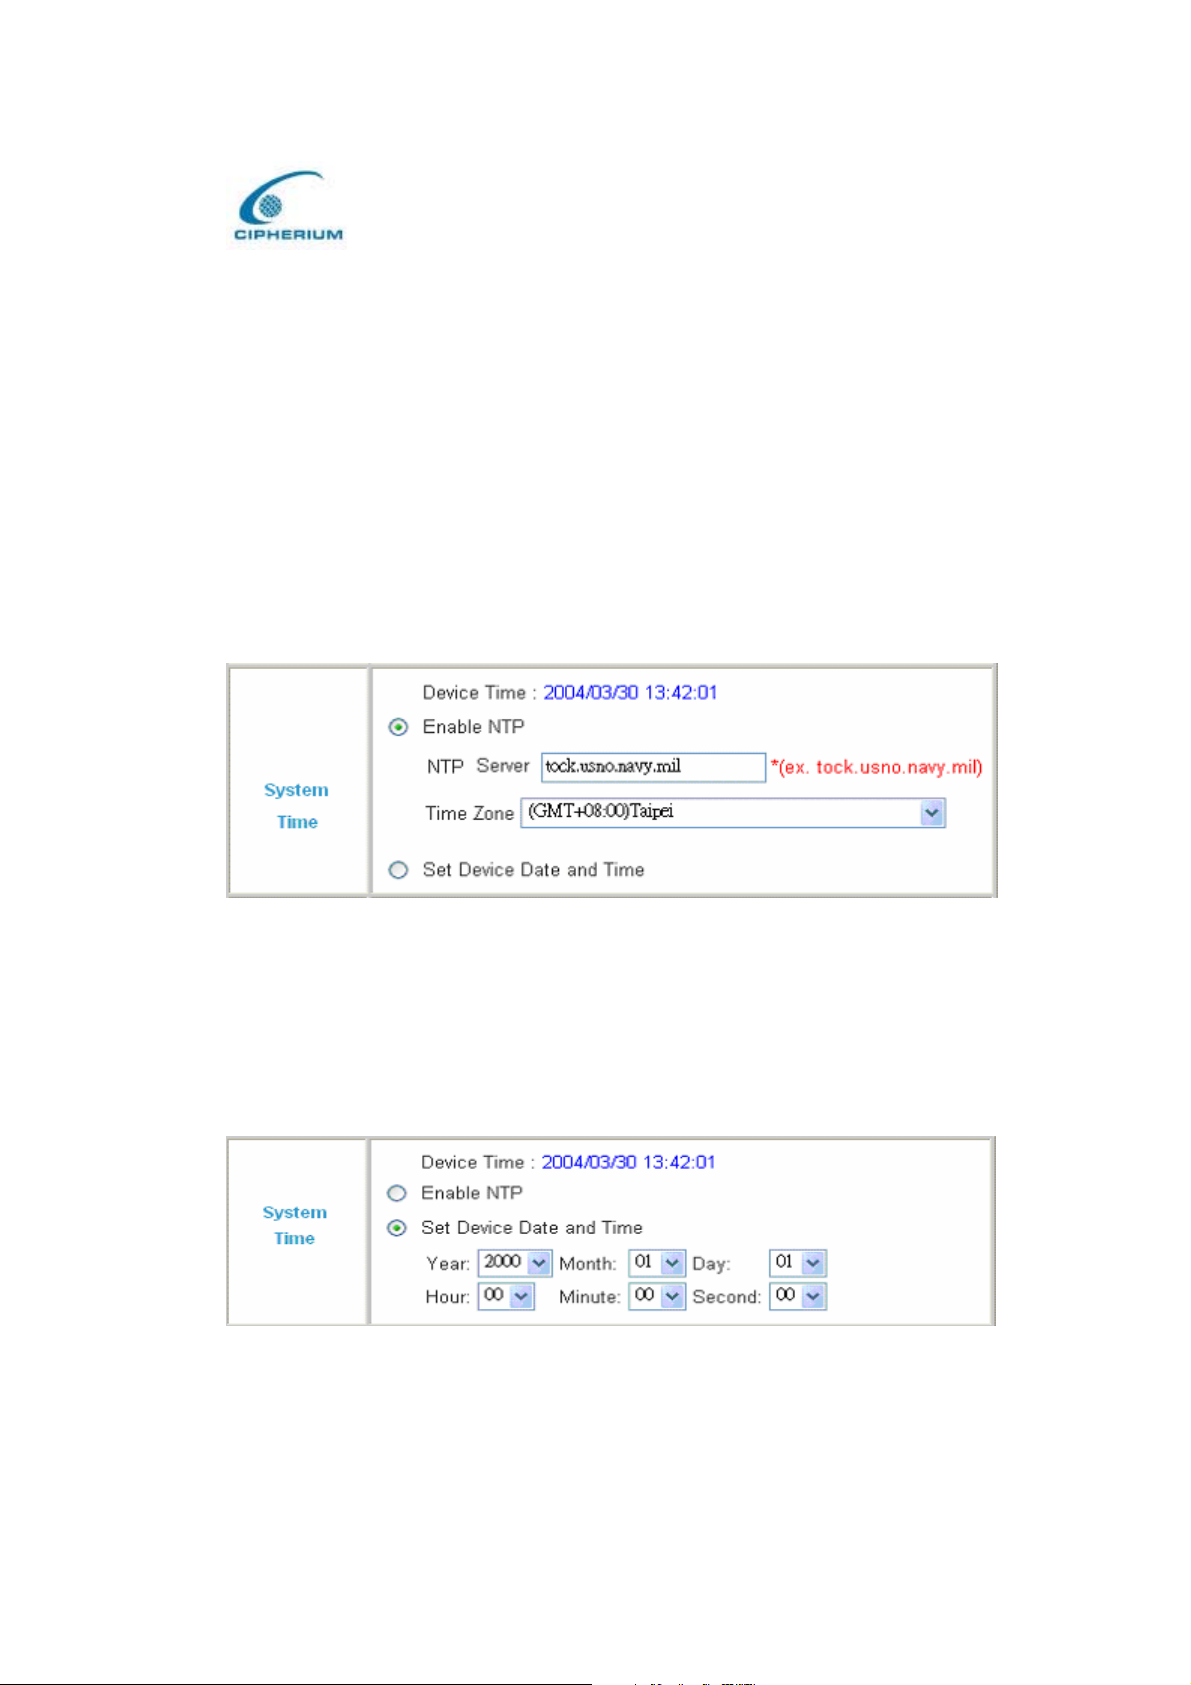
System Time : The bonalinx-W 1300 supports NTP communication protocol for correct the
network time. Please specify the IP address of a server on the system configuration interface.
(Coordinated Universal Time, which is the former Greenwich Mean Time , GMT).
Time Zone: Set up the time zone for the bonalinx-W 1300, and the default is GMT+08:00.
Set Device Date and Time: Set up the current time for the bonalinx-W 1300.
45
Page 55
Cipherium bonalinx-W 1300
Administrator’ s Manual
5.1.3. WAN Configuration
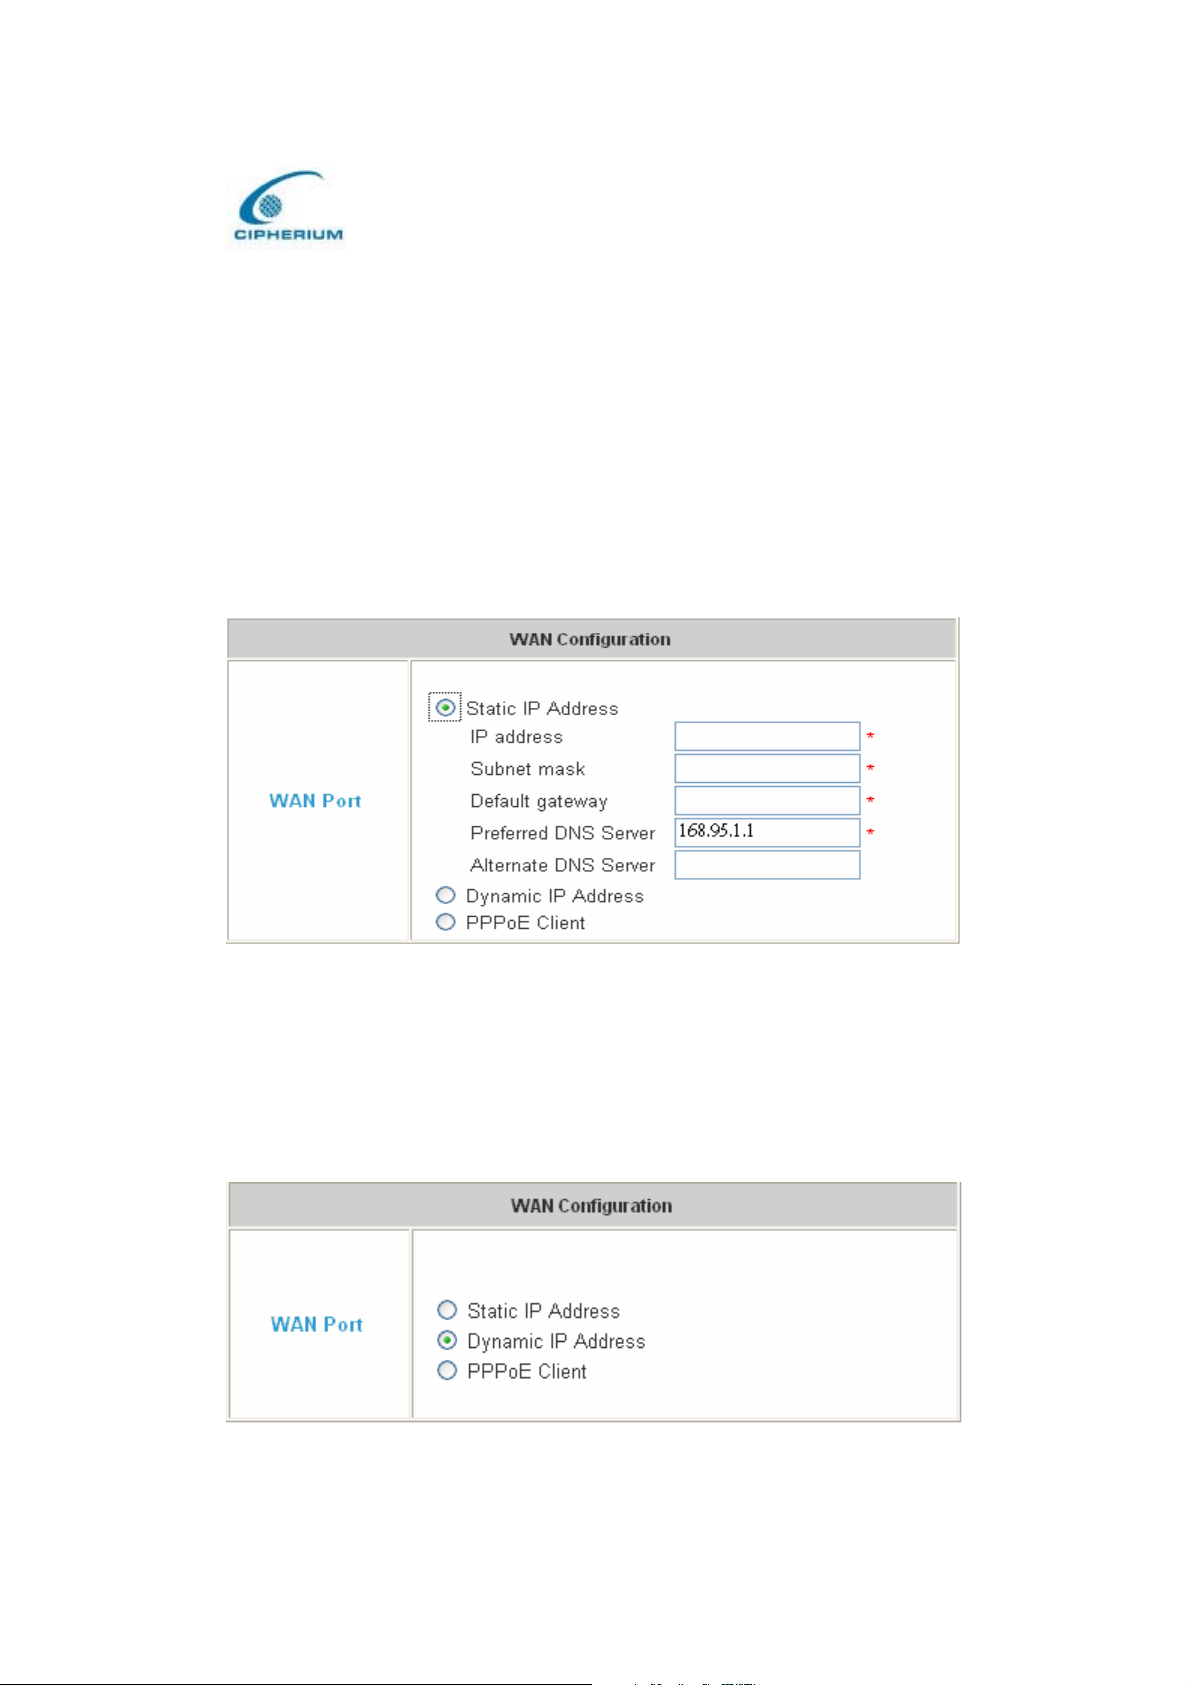
There are 3 methods of obtaining IP from the WAN Port: Static IP Address, Dynamic IP
Address, and PPPoE.
1. Static IP Address: Manually specify the IP address of the WAN Port, which is applicable
for the network environment that the IP address cannot be obtained from WAN Port
automatically.
Figure 5 -22 Example of WAN Static IP Mode
2. Dynamic IP Address: It is applicable for the network environment for the WAN Port that
can automatically obtain the IP address, such as the DHCP Server constructed in the
network of the WAN Port.
Figure 5-23 WAN Dynamic IP Mode
46
Page 56
Cipherium bonalinx-W 1300
Administrator’ s Manual
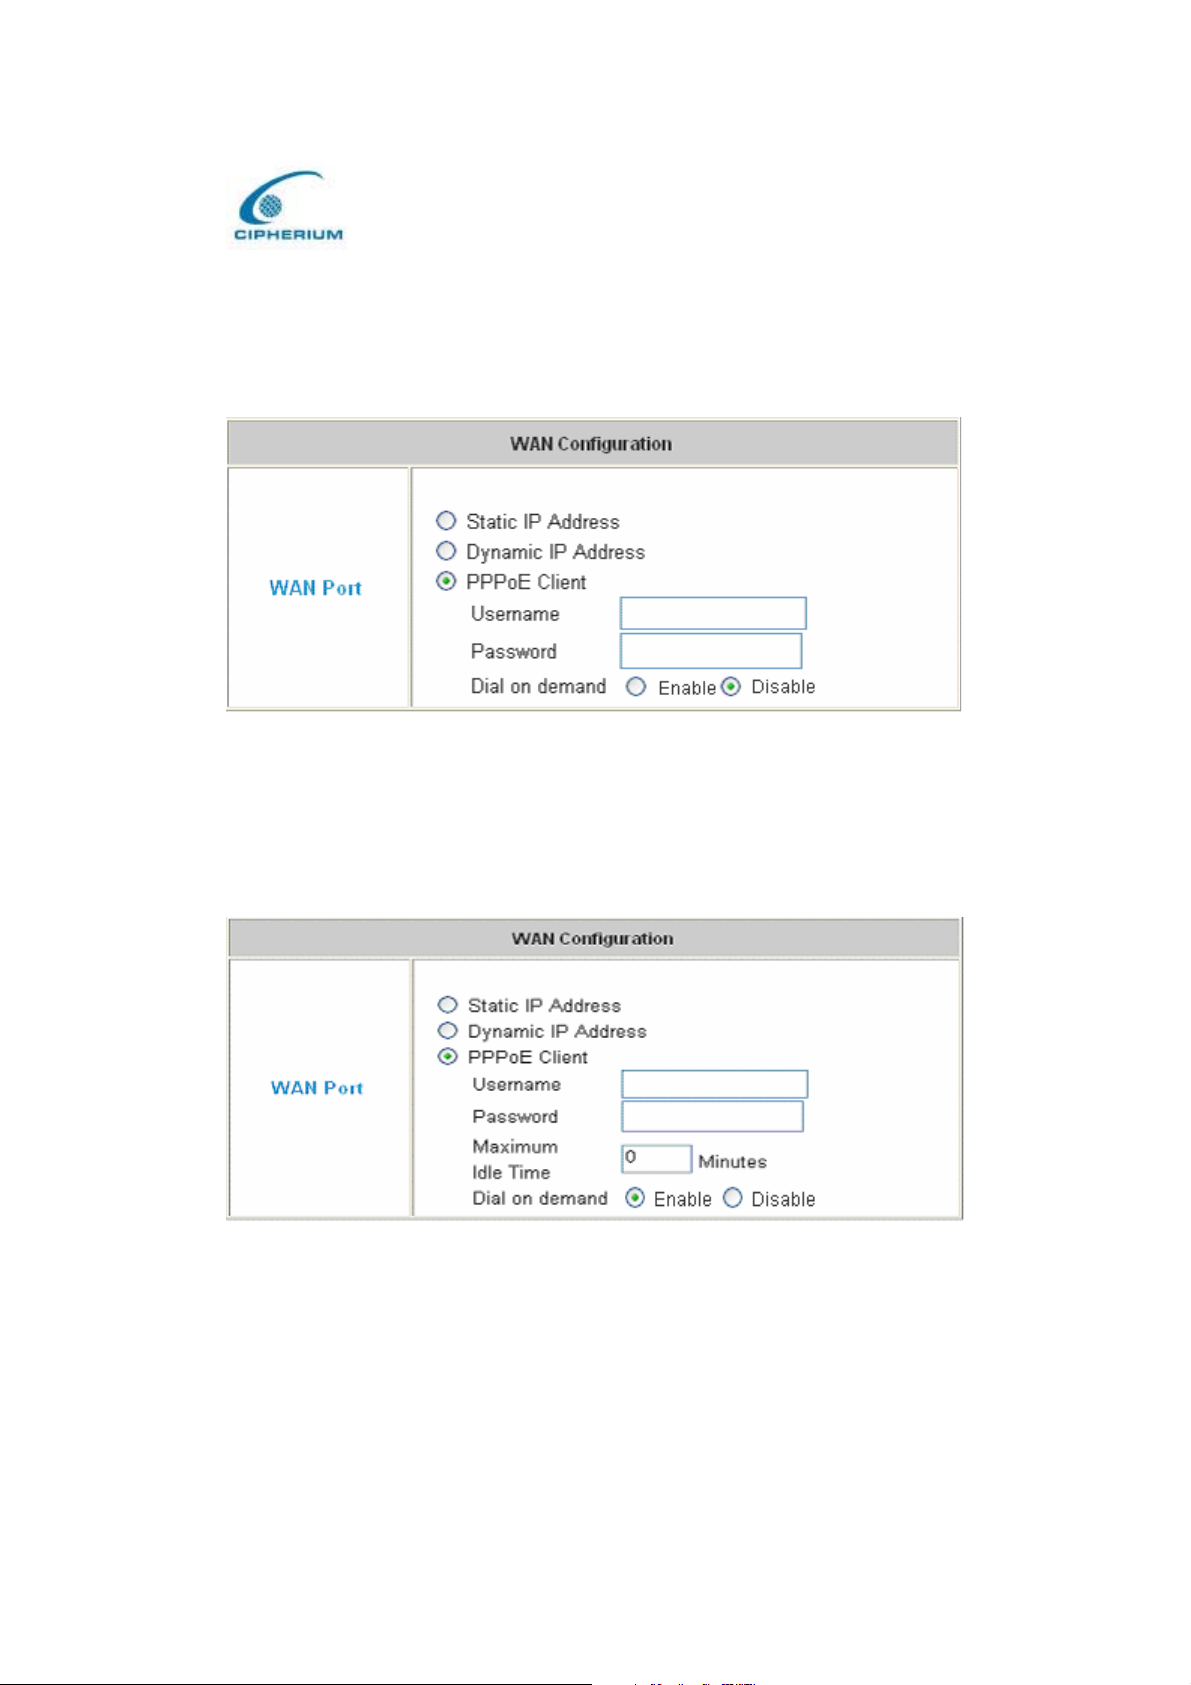
3. PPPoE: If WAN Port uses the network environment connected by PPPoE, please select
PPPoE, and set the username and password.
Figure 5-24 WAN PPPoE Mode
3.1 Dial on Demand: When the Dial on Demand function is enabled under PPPoE, it allows
users to have the maximum idle time.
Figure 5-25 Dial on Demand
47
Page 57
Cipherium bonalinx-W 1300
Administrator’ s Manual
5.1.4. Authentication Configuration
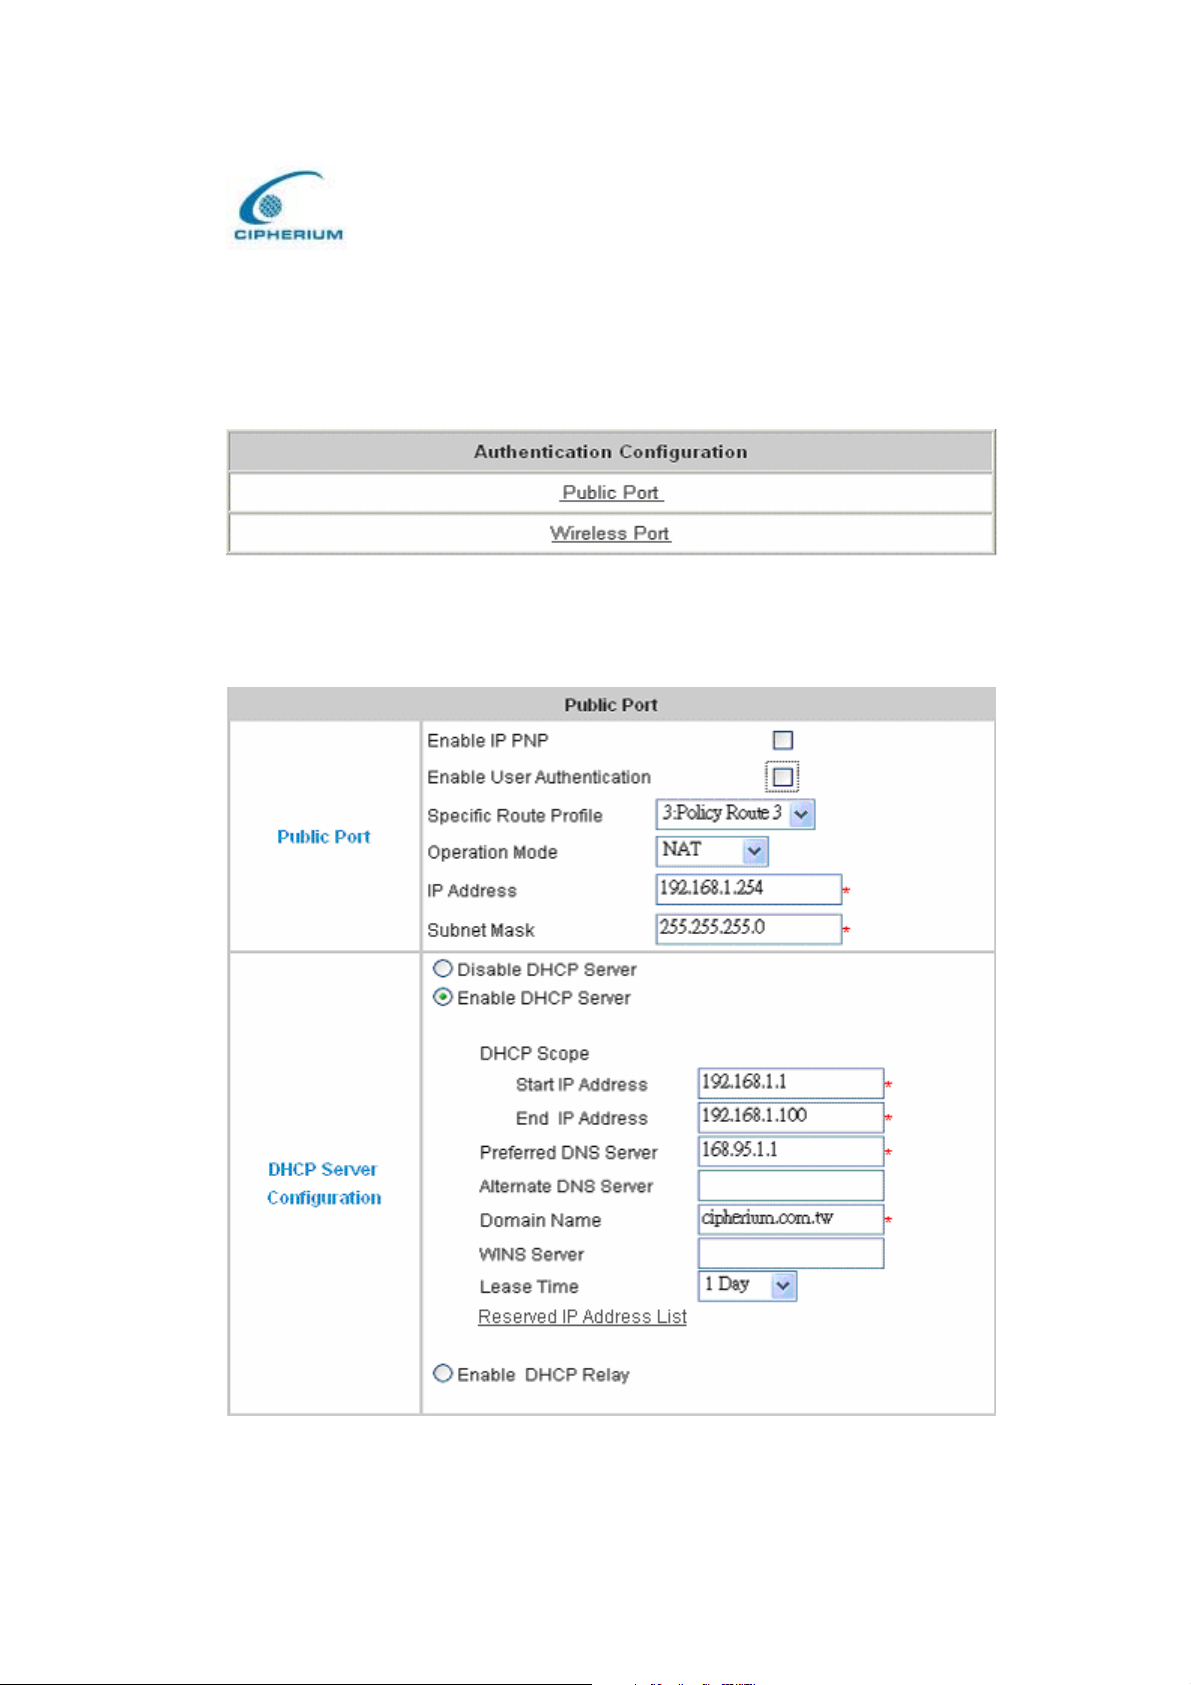
bonalinx-W 1300 have two ports need to authenticate , one is General Public LAN , the other
is Wireless port.
Figure 5-26 Authentication Configuration
1. Public LAN
Figure 5-27 Example of Public LAN Interface Configuration
48
Page 58
Cipherium bonalinx-W 1300
Administrator’ s Manual
ΘIP PNP: At the user end, you can use any IP address to connect to the machine at the Public
LAN section; no matter what the IP address at the user end is, you can obtain the Public
LAN from bonalinx-W 1300 and access the network resources properly. Suppose you had
used static IP address and specified IP address, Subnet Mask, Default Gateway and DNS.
ΘUser Public LAN: You can choose to Enable or Disable user Public LAN, if you enable user
authentication, you have to define Specific Route Profile to user .
ΘSpecific Route Profile: To define specific route for user to access internet.
ΘOperation Mode: It provides two modes: NAT Mode and ROUTER Mode.
ΘIP Address: Enter your desired IP address for setup.
ΘSubnet Mask: Enter your desired Subnet Mask for setup.
Related Setup for DHCP Server of Public LAN
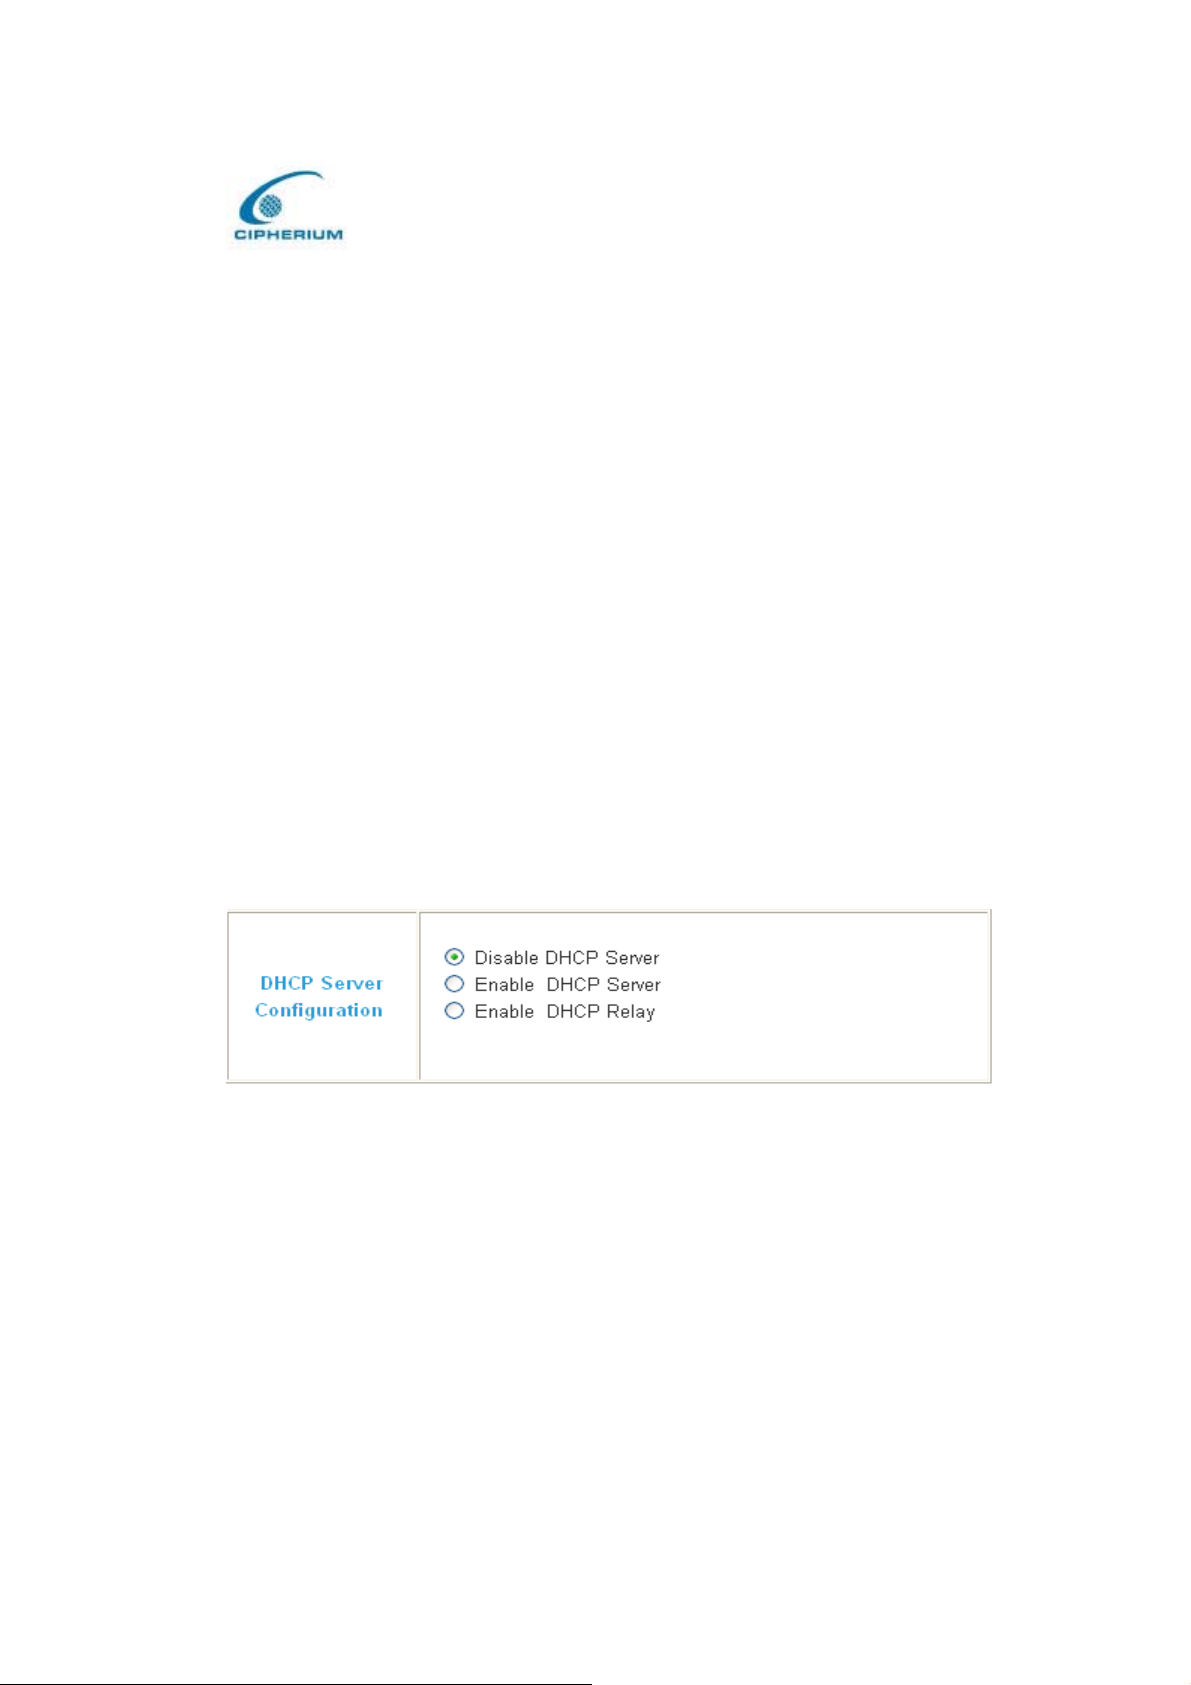
DHCP Server has three choices: Disable DHCP Server, Enable DHCP Server, and Enable
DHCP Relay.
(1) Disable DHCP Server: Disable the function of the DHCP Server.
Figure 5-28 Disable the DHCP Server on Public LAN
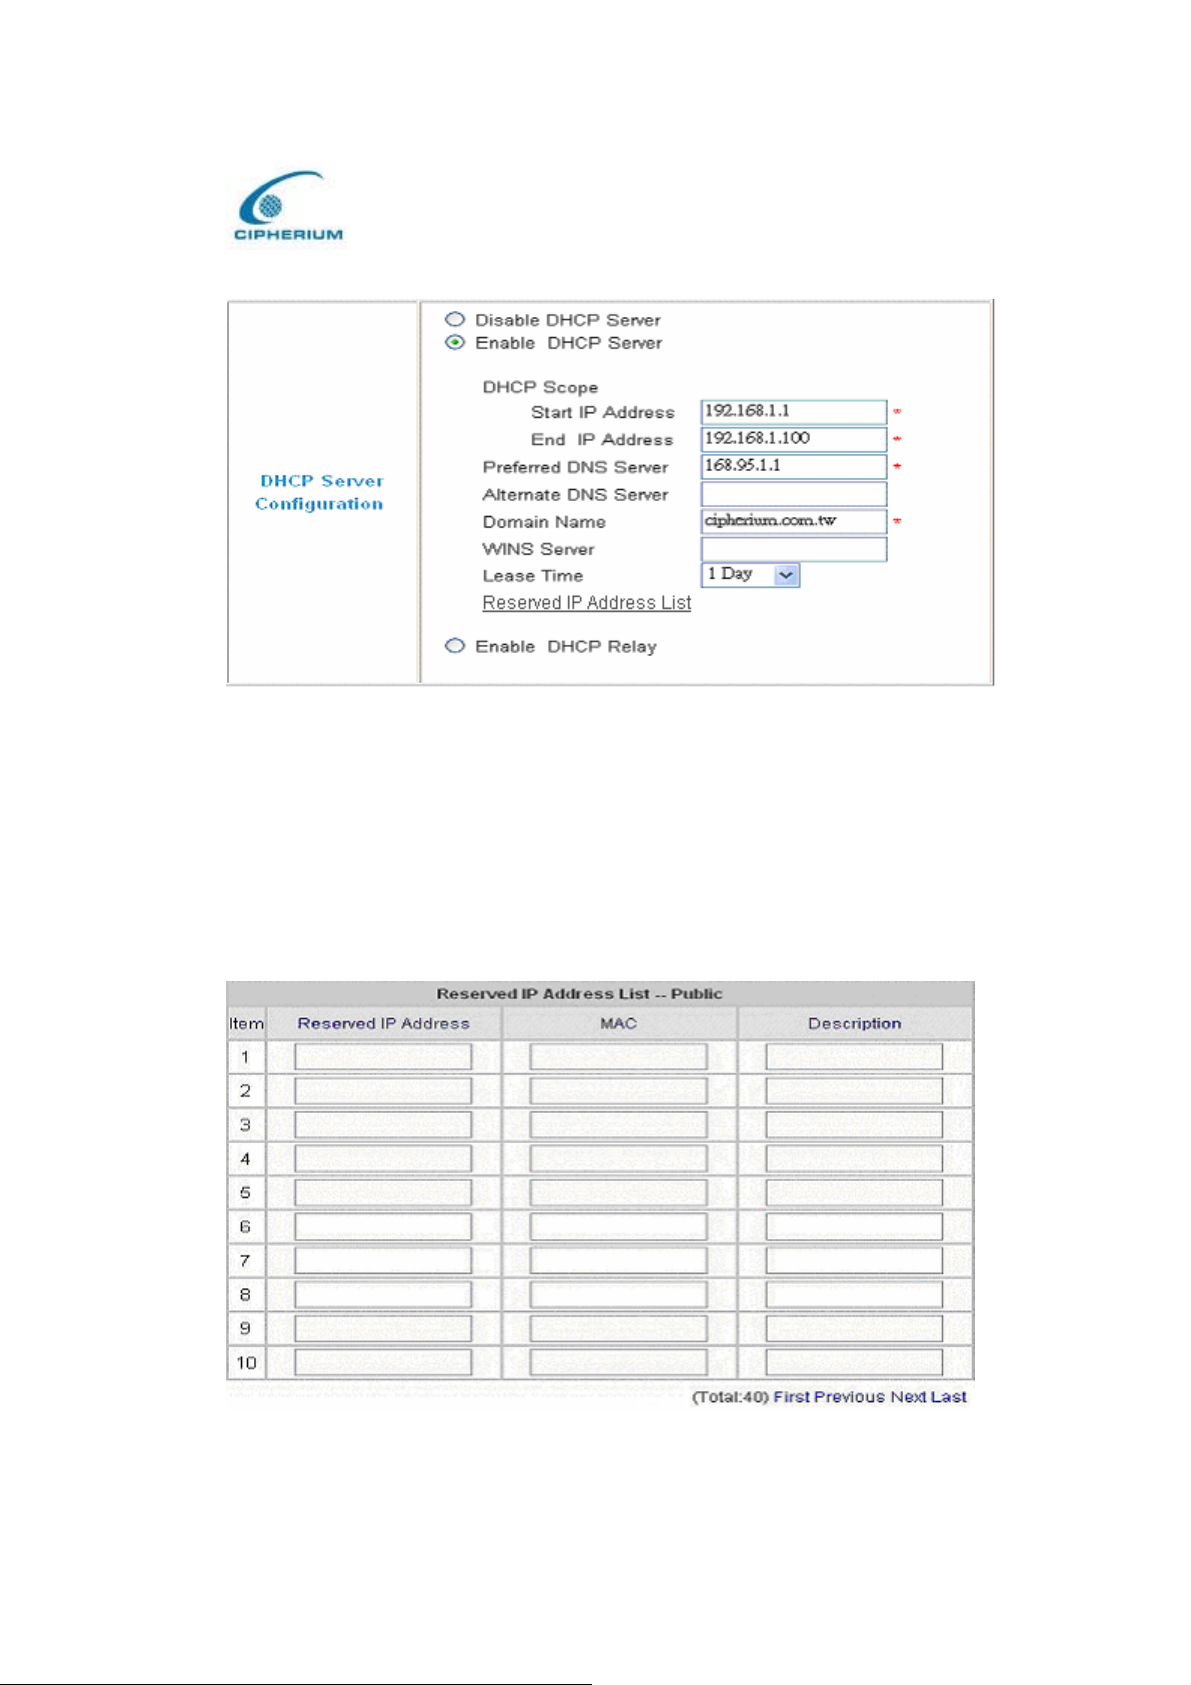
(2) Enable DHCP Server: Enable the functions of the DHCP Server. Appropriate setup is
needed for the normal enabling of the DHCP server, and the setup information for the
DHCP Server includes DHCP Scope Start IP Address, End IP Address, Preferred DNS
Server, Alternate DNS Server, Domain Name, WINS Serve, and Reserved IP Address List.
49
Page 59
Cipherium bonalinx-W 1300
Administrator’ s Manual
Figure 5-29 Enable the DHCP Server on Public LAN
If you want to use the Reserved IP Address List function, please click the hyperlink of the
Reserved IP Address List on the management interface. Then, the setup of the Reserved IP
Address List as shown in the following figure will appear. Please enter the related Reserved IP
Address, MAC, and description (not compulsory) on the management interface. After the
information is keyed, click “Apply” to complete the setup.
Figure 5-30 Reserve the IP Address Setting on Public LAN
50
Page 60
Cipherium bonalinx-W 1300
Administrator’ s Manual
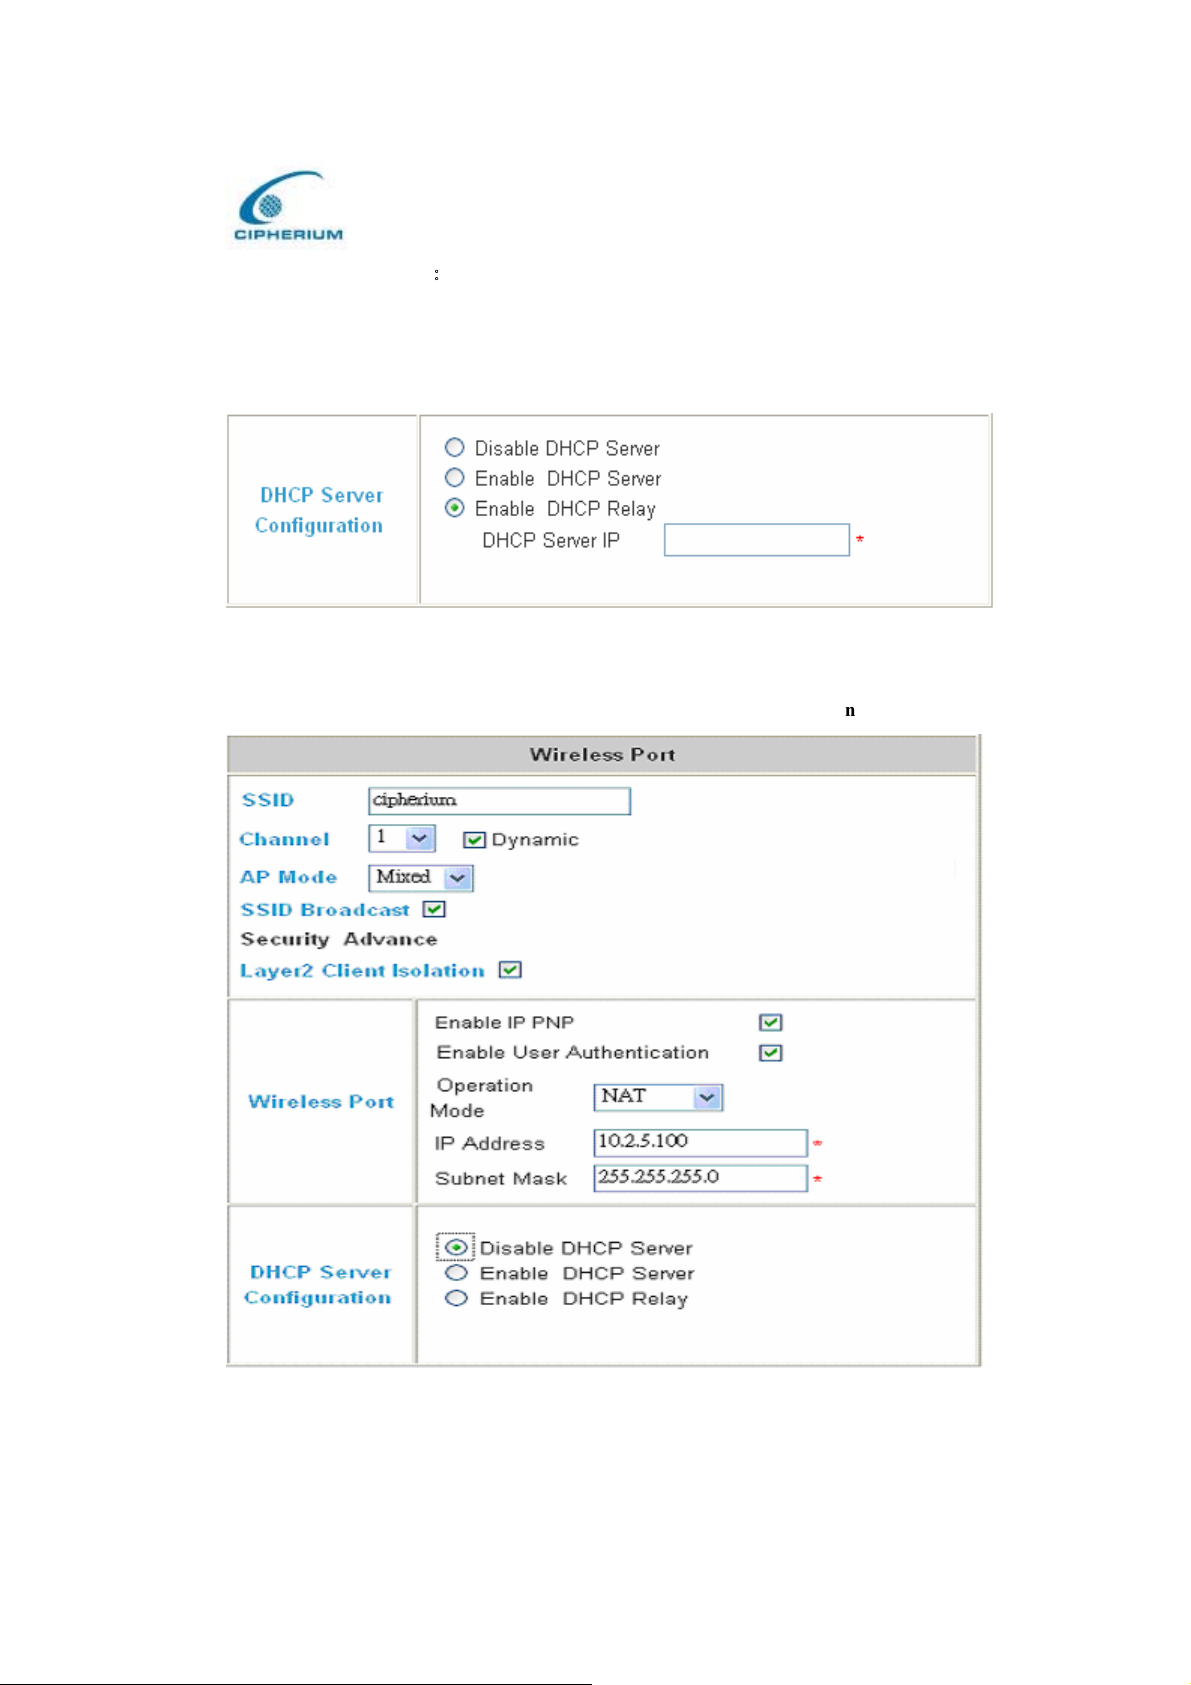
(3) Enable DHCP RelayǺIf you want to enable the DHCP Relay mode, you must specify
other DHCP Server IP Address.
Figure 5-31 Enable the DHCP Relay on Public LAN
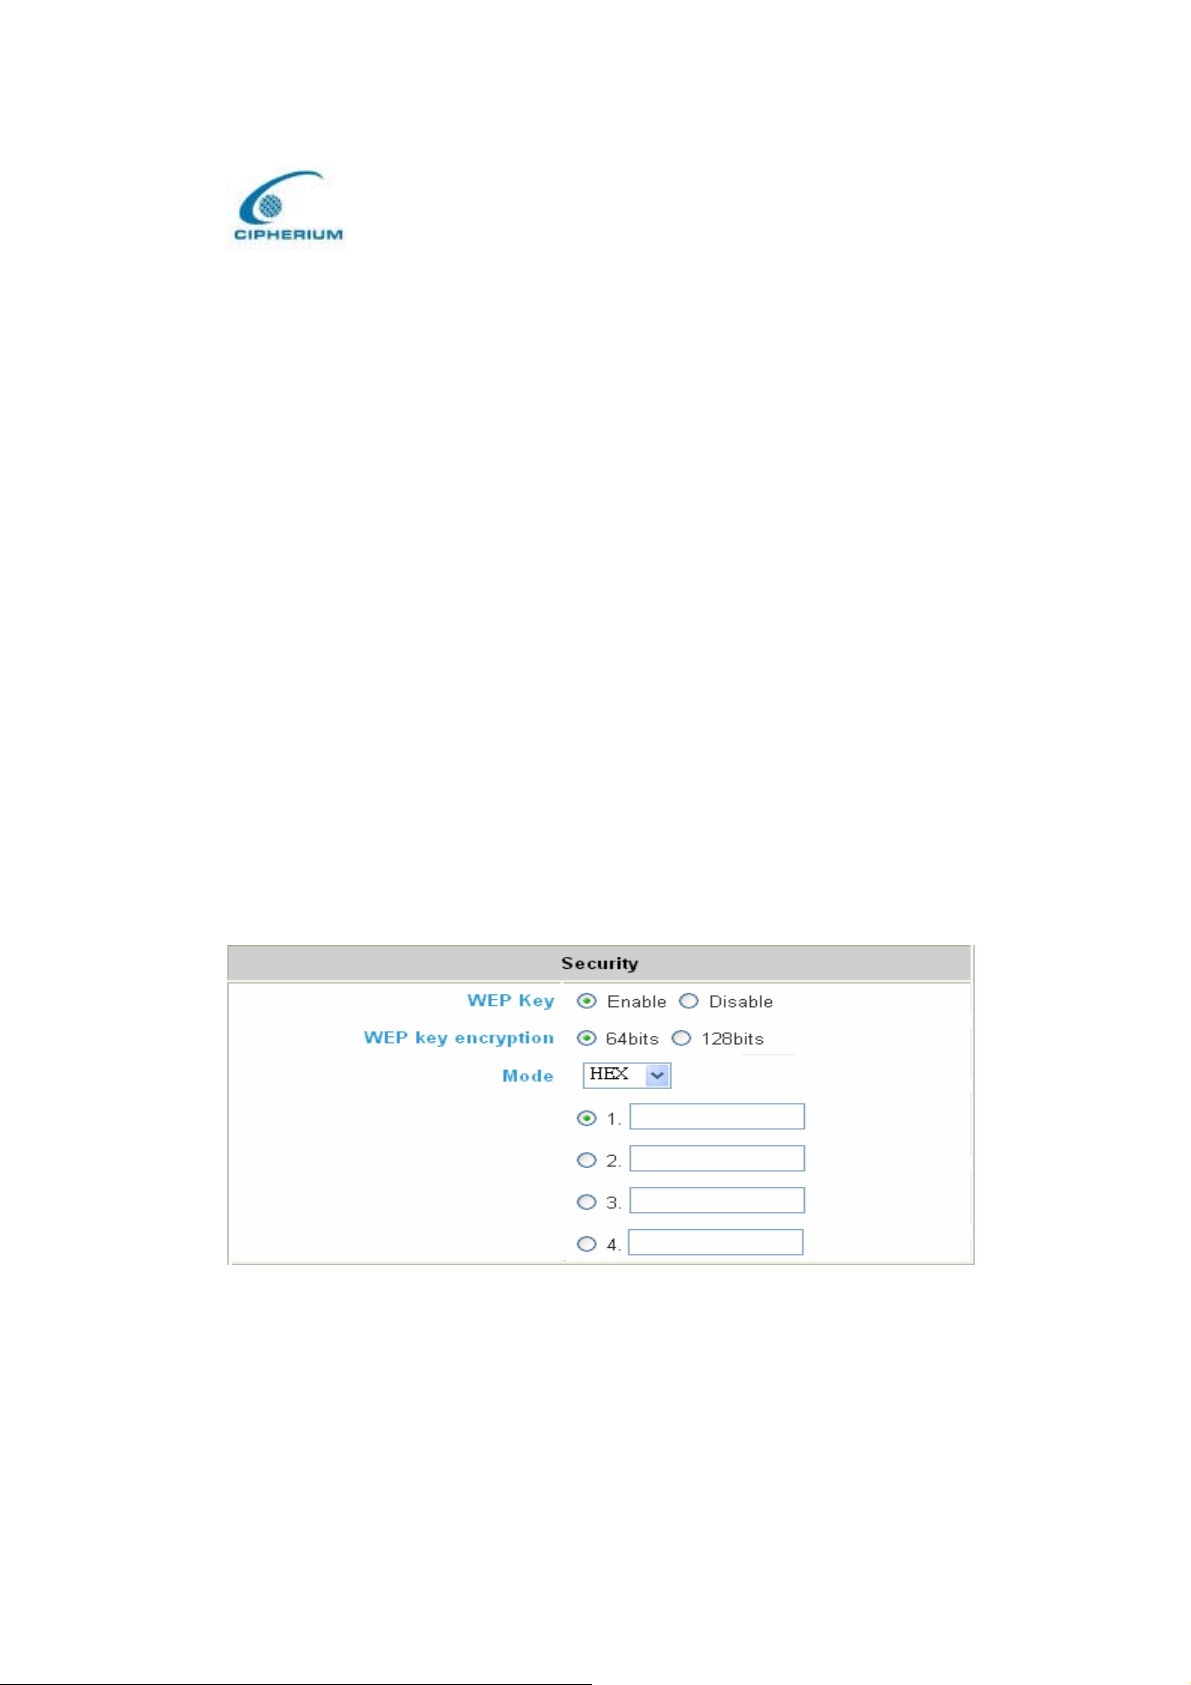
2. Wireless Port
Figure 5-32 Example of Wireless Interface Configuration
51
Page 61
Cipherium bonalinx-W 1300
Administrator’ s Manual
SSID : The SSID is the unique name shared among all devices in a wireless network. The
SSID must be the same for all devices in the wireless network. It is case sensitive, must not
exceed 32 characters, and may be any keyboard character.
Chanel : Select the appropriate channel from the list provided to correspond with your
network settings, between 1 and 11 (in North America). All points in your wireless network
must use the same channel in order to make sure function correctly.
AP Mode : There have 3 mode you can select, b-only(2.4G,1~11Mbps), g-only(2.4G,54Mbps)
and mix mode(b and g)
SSID brocast : Allows the SSID to be broadcast on your network. You may want to enable
this function while configuring your network, but make sure that you disable it when you are
finished. With this enabled, someone could easily obtain the SSID information with site
survey software and gain unauthorized access to your network. Click Enable to broadcast.
Click Disable to increase network security and prevent the SSID from being seen on
networked
Figure 5-33 Security setting
WEP Key(Wired Equivalent Privacy)A data privacy mechanism based on a 64-
bit, 128-bit, or 256-bit shared key algorithm, If you do not wish to utilize WEP encryption,
make sure Disabled is selected.
52
Page 62
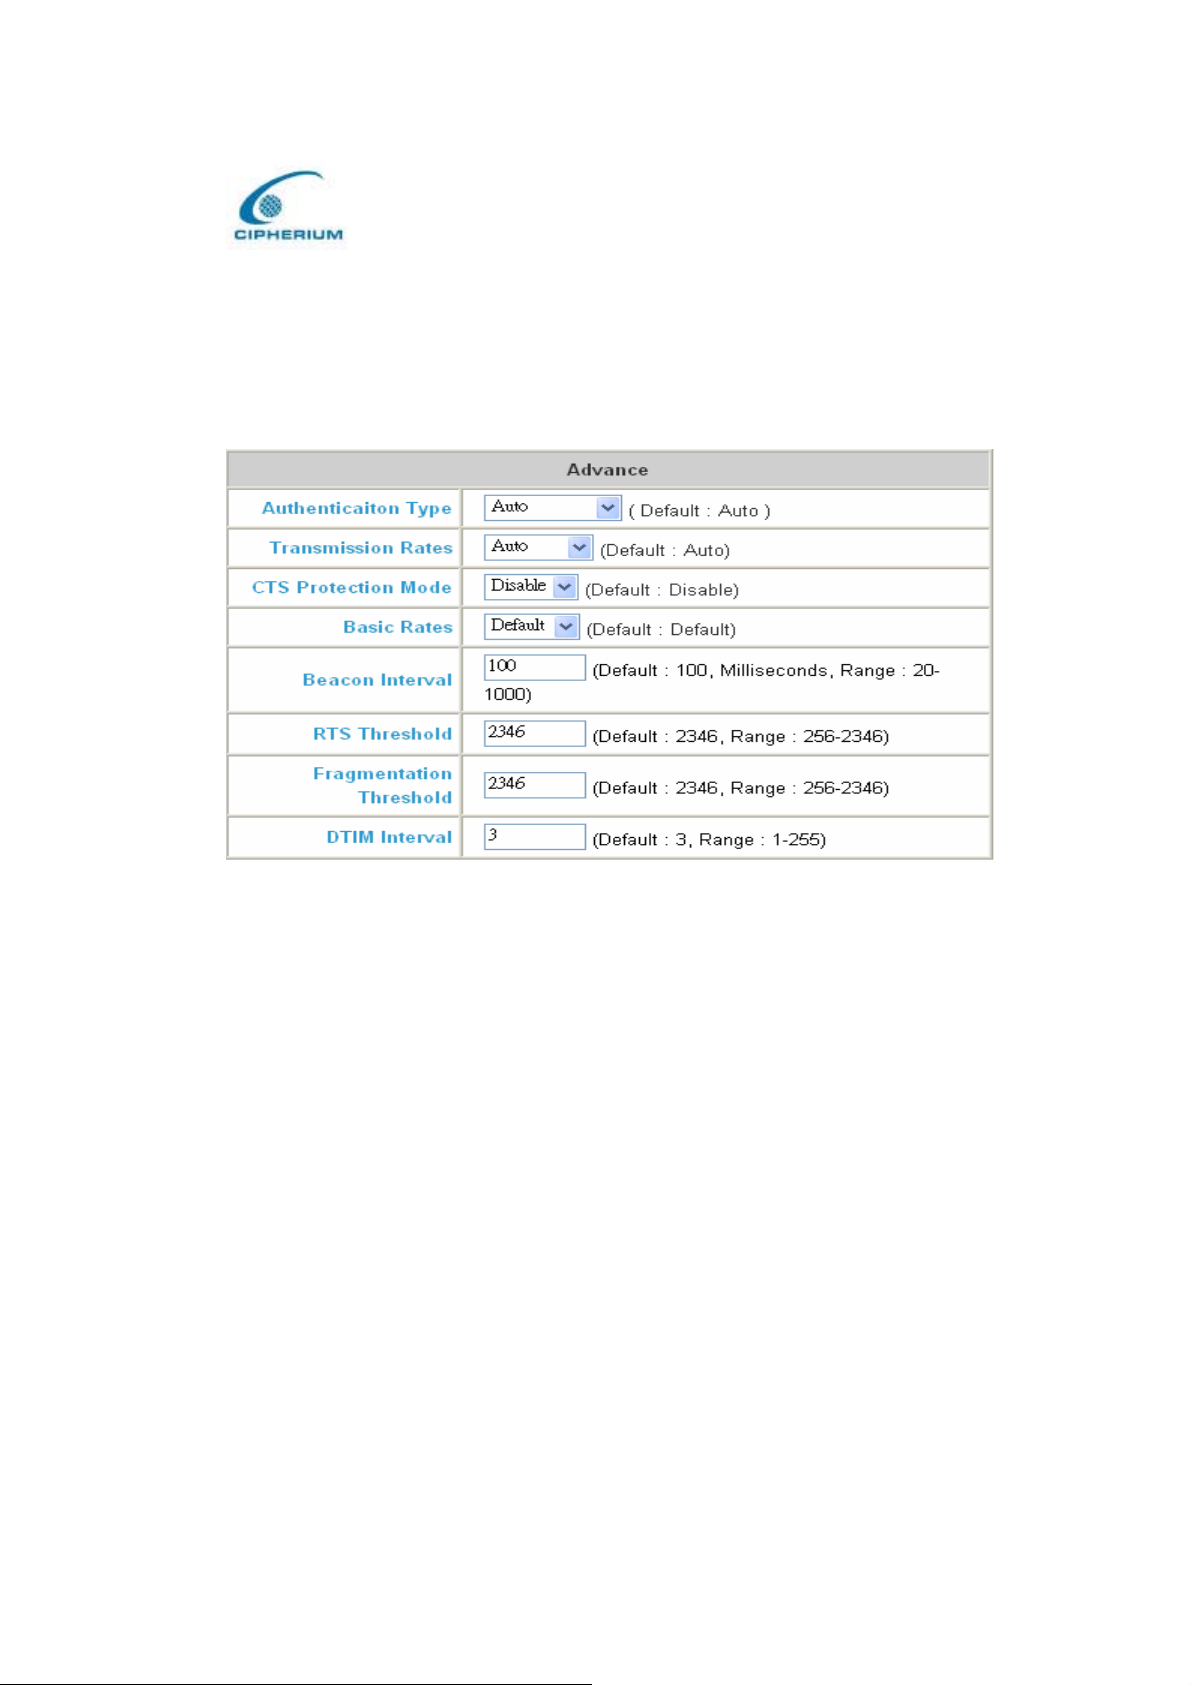
Mode : There have two types that you can select , HEX and ASCII.
Relate to Advance setting : Please click the hyperlink of Advance.
Figure 5-34 Advance setting of Wireless
Cipherium bonalinx-W 1300
Administrator’ s Manual
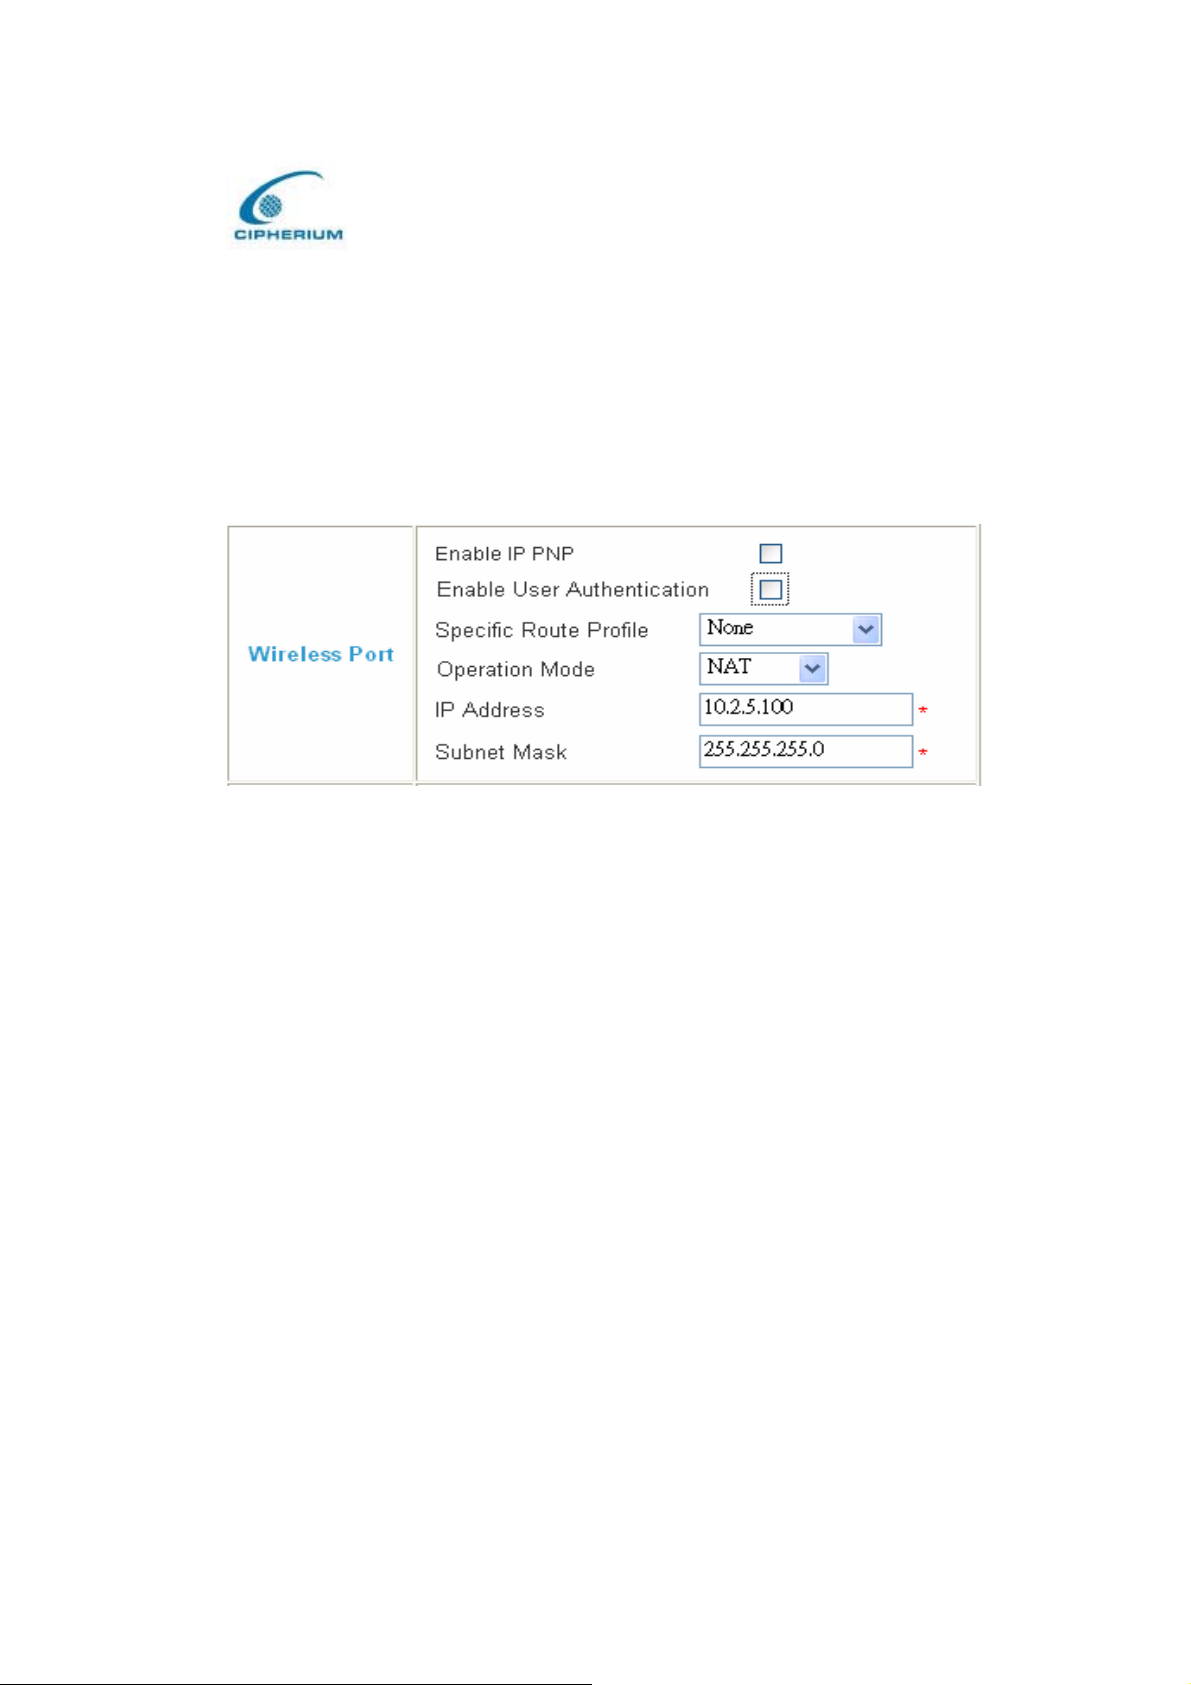
Authntication Type : The default is set to Auto, where it auto-detects for Shared Key or
Open System. Shared Key is when both the sender and the recipient share a WEP key for
authentication. Open Key is when the sender and the recipient do not share a WEP key for
authentication. All points on your network must use the same authentication type.
Transmission Rates : The default setting is Auto. The range is from 1 to 54Mbps. The rate of
data transmission should be set depending on the speed of your wireless network. You can
select from a range of transmission speeds, or you can keep the default setting, Auto, to have
the Access Pointautomatically use the fastest possible data rate and enable the Auto-Fallback
feature. Auto-Fallback will negotiate the best possible connection speed between the Access
Point and a wireless client.
CTS Protection Mode : The default value is set to Disabled. When set to Auto, a protection
mechanism will ensure that your Wireless-B devices willconnect to the Access Point when
53
Page 63

Cipherium bonalinx-W 1300
Administrator’ s Manual
many Wireless-G devices are present. However, performance of your Wireless-G devices may
be decreased.
Basic Rates : The SNMP screen allows you to customize the Simple Network Management
The default value is set to Default. Depending on the wireless mode you have selected, a
default set of supported data rates will be selected. The default setting will ensure maximum
compatibility with all devices. You may also choose to enable all data rates by selecting ALL.
For compatibility with older Wireless-B devices, select 1-2Mbps.
Antenna select : The default value is set to Diversity. In Diversity mode, both antennas will
be enabled. Otherwise, you can set to have wireless transmission operate only on the Left or
Right antenna.
Beacon Interval : This value indicates the frequency interval of the beacon.The default value
is 100. Enter a value between 20 and 1000 milliseconds. The Beacon Interval value indicates
the frequency interval of the beacon. A beacon is a packet broadcast by the Access Point to
synchronize the wireless network.
RTS Threshold : This value should remain at its default setting of 2346.Should you
encounter inconsistent data flow, only minor reductions are recommended.
Fragmentation Threshold : This value specifies the maximum size for a packet before data is
fragmented into multiple packets. It should remain at its default setting of 2346. A smaller
setting means smaller packets, which will create more packets for each transmission. Only
minor reductions of this value are recommended.
DTIM Interval : .The default value is 3. This value, between 1 and 255 milliseconds,
indicates the interval of the Delivery Traffic Indication Message (DTIM). A DTIM field is a
countdown field informing clients of the next window for listening to broadcast and multicast
messages. When the Access Point has buffered broadcast or multicast messages for associated
clients, it
sends the next DTIM with a DTIM Interval value. Access Point Clients hear the beacons and
54
Page 64
Cipherium bonalinx-W 1300
Administrator’ s Manual
awaken to receive the broadcast and multicast messages.
Layer2 Client Isolation : You can enable this function to isolate 2 different domain or just
Disable from system default.
EX:10.2.3.4 can’t see 10.2.4.4
Figure 5-35 Wireless Port Configuration(2)
IP PNP: At the user end, you can use any IP address to connect to the machine at the
Public LAN section; no matter what the IP address at the user end is, you can obtain the
Public LAN from bonalinx-W 1300 and access the network resources properly. Suppose you
had used static IP address and specified IP address, Subnet Mask, Default Gateway and DNS.
User Public LAN: You can choose to Enable or Disable user Public LAN, if you enable user
authentication , you have to define Specific Route Profile to user .
Specific Route Profile: To define specific route for user to access internet.
Operation Mode : It provides two modes: NAT Mode and ROUTER Mode.
IP Address: Enter your desired IP address for setup.
Subnet Mask: Enter your desired Subnet Mask for setup.
55
Page 65
Cipherium bonalinx-W 1300
Administrator’ s Manual
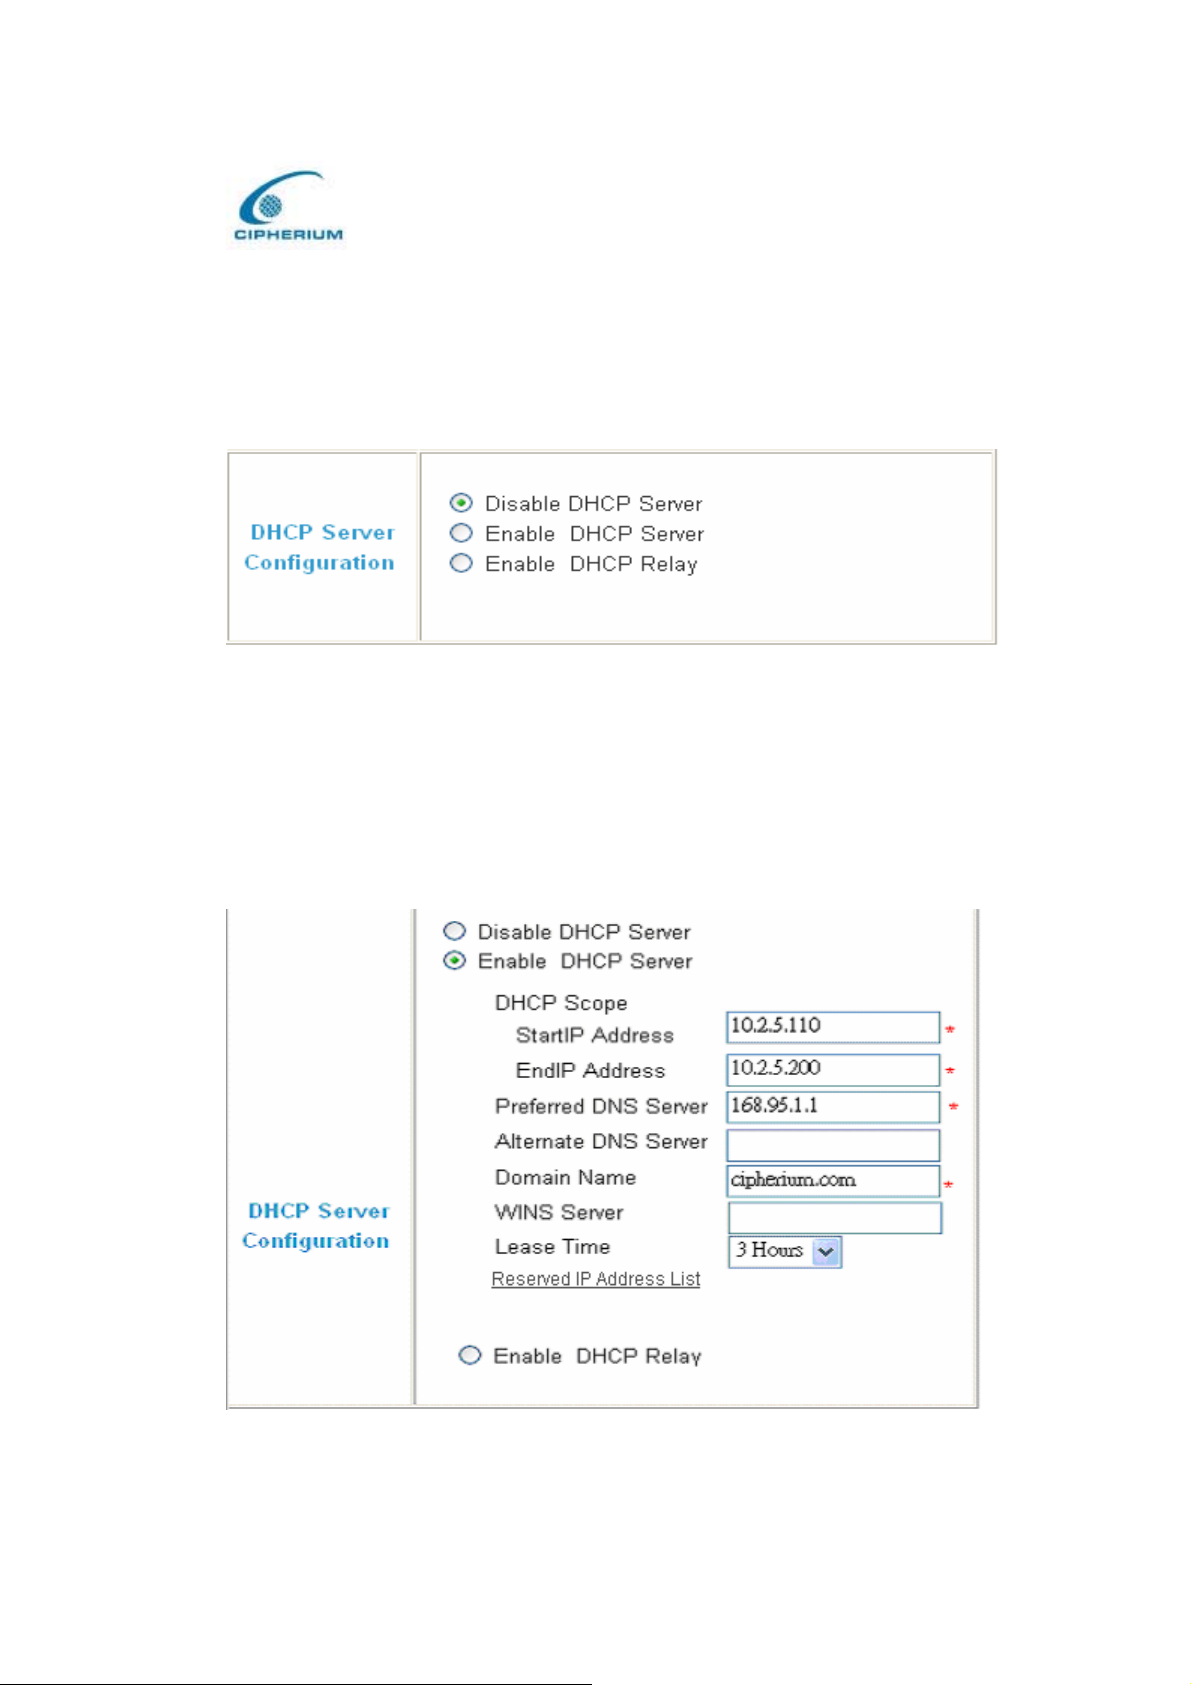
Related Setup for DHCP Server of Public LAN DHCP Server has three choices: Disable
DHCP Server, Enable DHCP Server, AND Enable DHCP Relay
1. Disable DHCP Server: Disable the function of the DHCP Server.
Figure 5-36 Disable the DHCP Server on Wireless
2. Enable DHCP Server: Enable the functions of the DHCP Server. Appropriate setup
is needed for the normal enabling of the DHCP server, and the setup information for the
DHCP Server includes DHCP Scope Start IP Address, End IP Address, Preferred DNS
Server, Alternate DNS Server, Domain Name, WINS Serve, and Reserved IP Address
List.
Figure 5-37 Enable the DHCP Server on Wireless
56
Page 66
Cipherium bonalinx-W 1300
Administrator’ s Manual
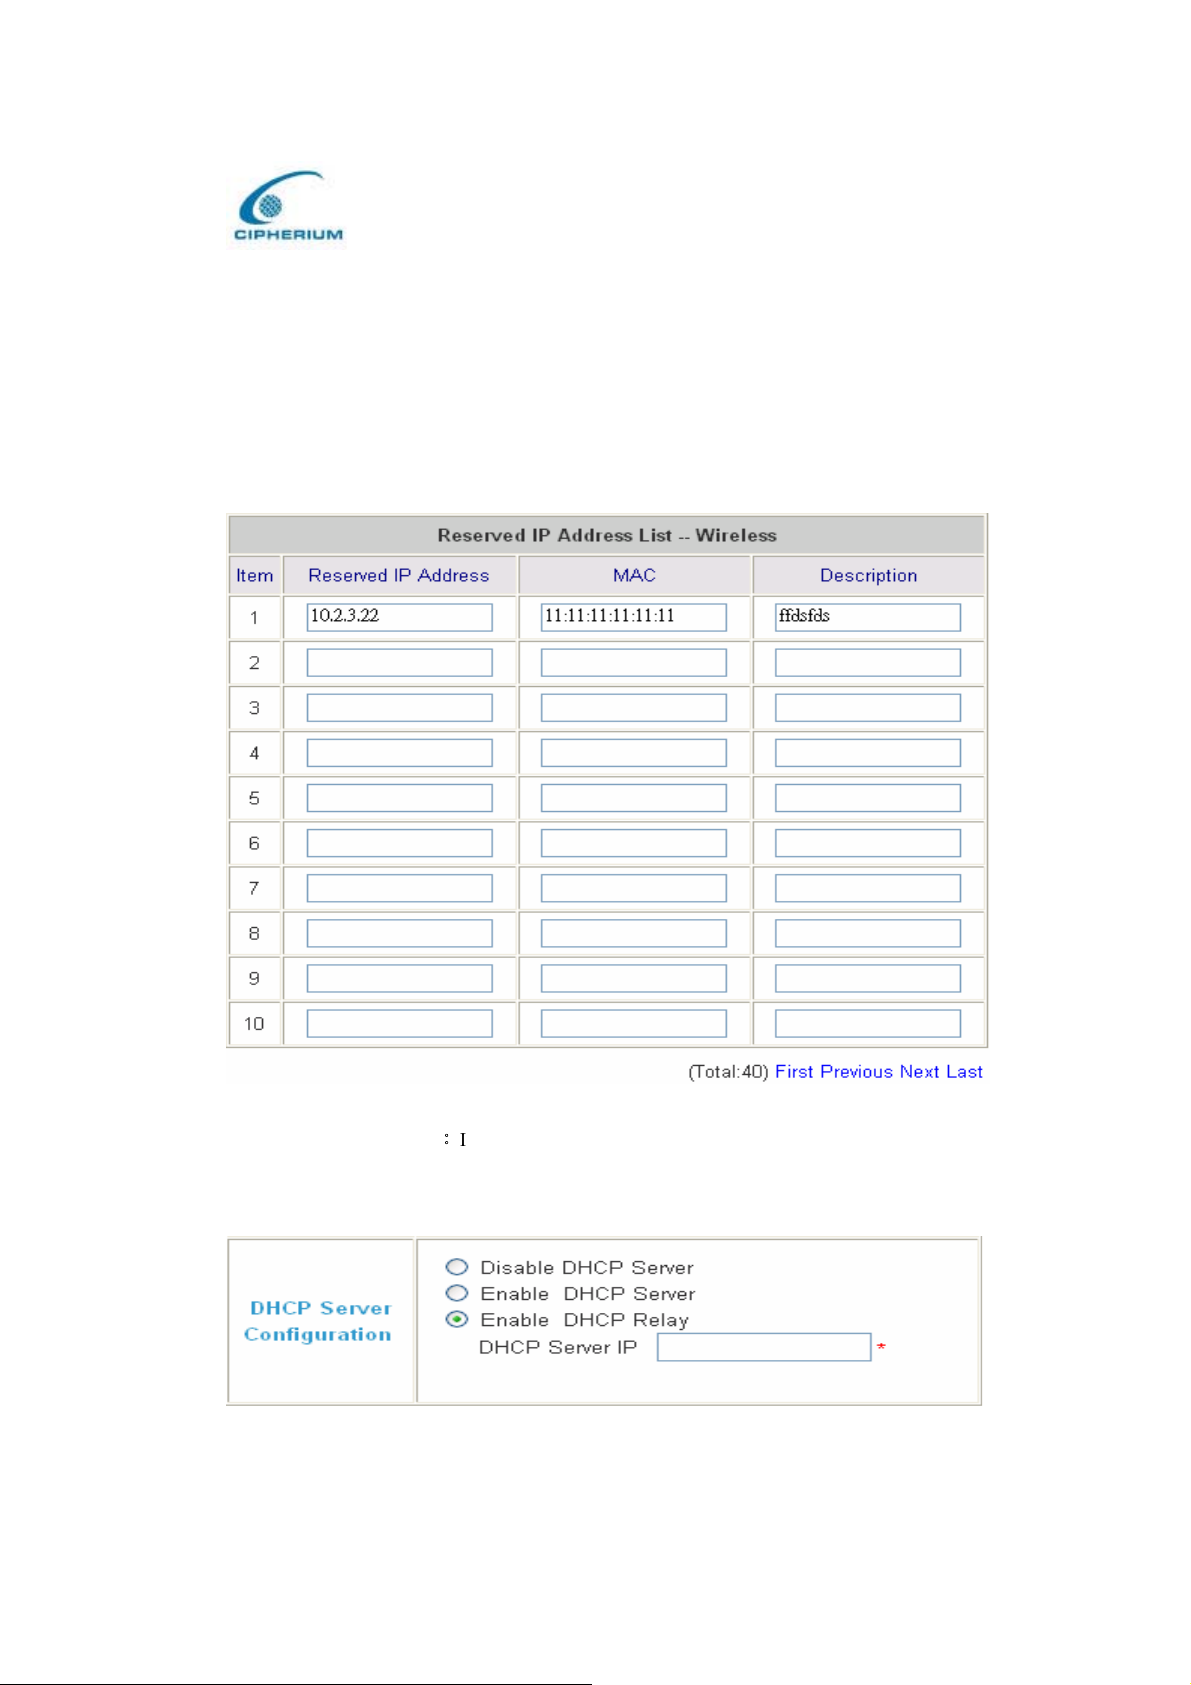
If you want to use the Reserved IP Address List function, please click the hyperlink of the
Reserved IP Address List on the management interface. Then, the setup of the Reserved IP
Address List as shown in the following figure will appear. Please enter the related Reserved IP
Address, MAC, and description (not compulsory) on the management interface. After the
information is keyed, click “Apply” to complete the setup.
Figure 5-38 Reserve the IP Address Setting on Wireless
3. Enable DHCP RelayǺIf you want to enable the DHCP Relay mode, you must specify
other DHCP Server IP Address.
Figure 5-39 Enable the DHCP Relay on Wireless
57
Page 67
Cipherium bonalinx-W 1300
Administrator’ s Manual
5.1.5. Private Configuration
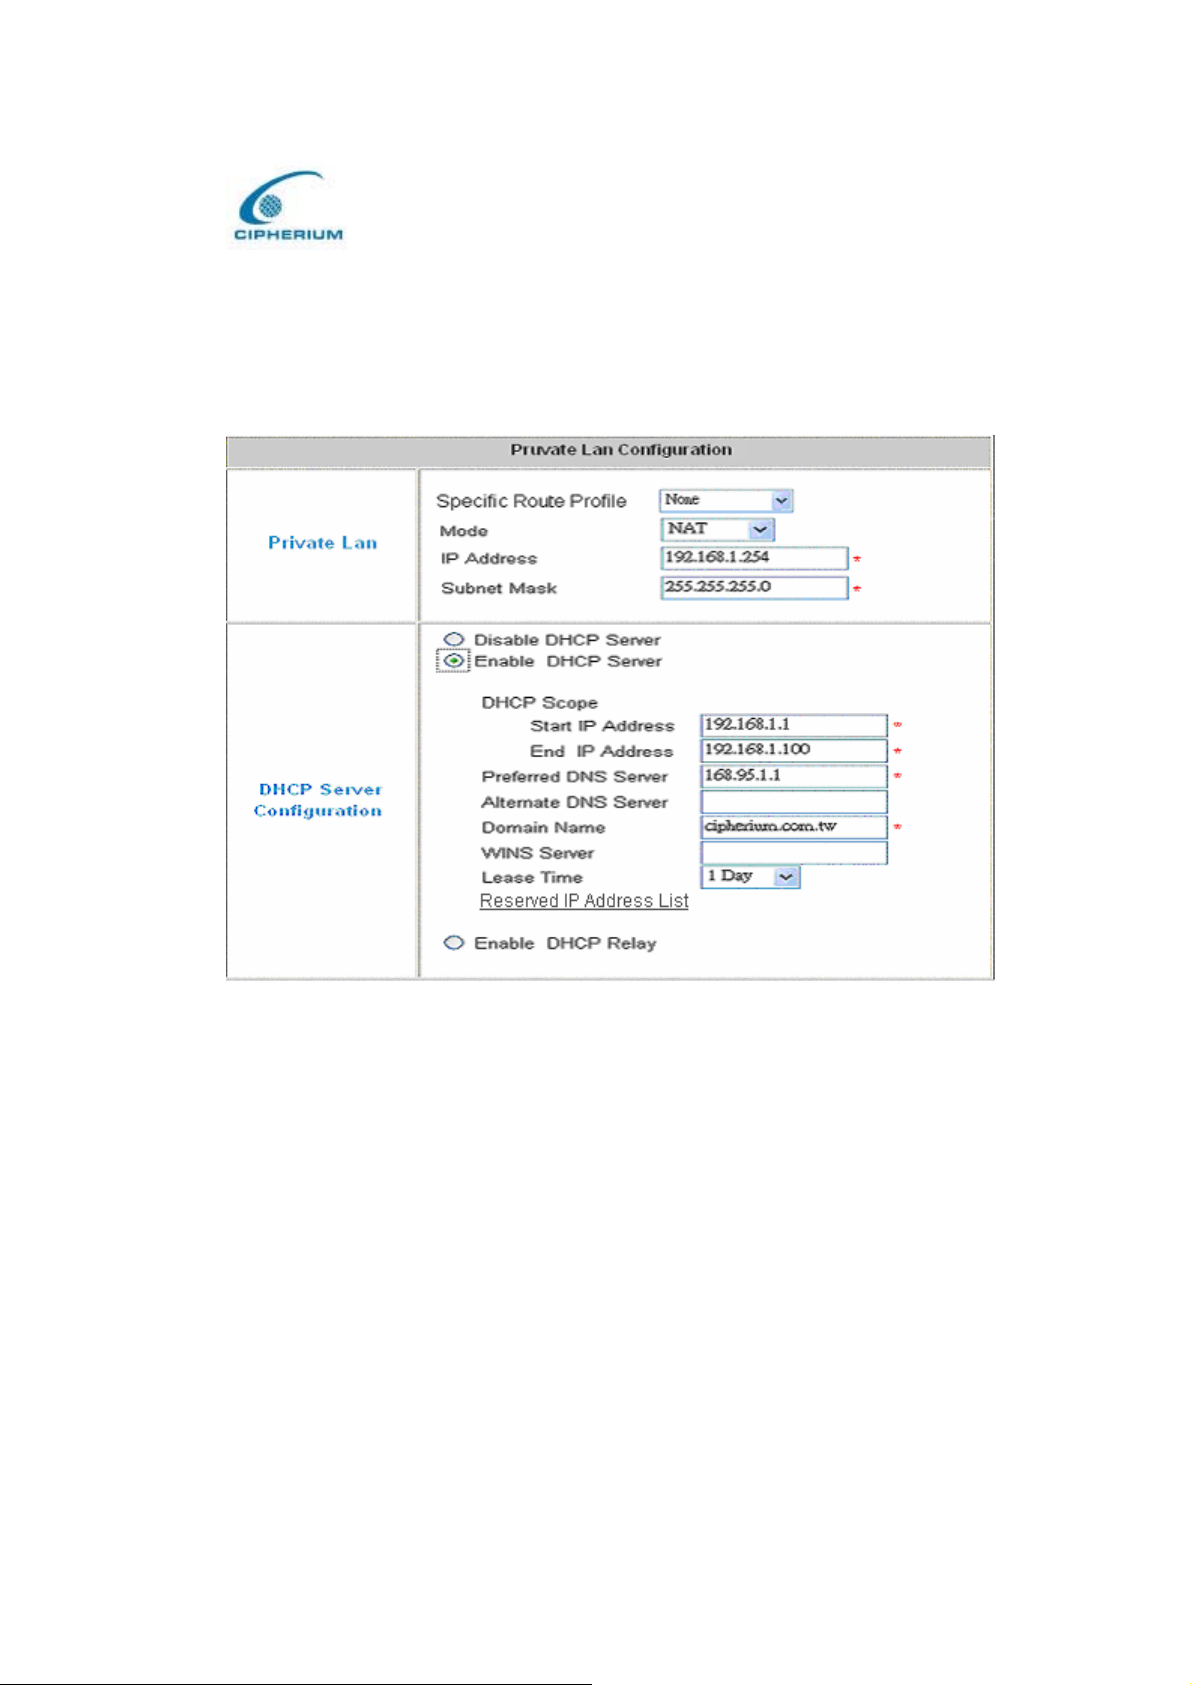
Set up the Specific Route Profile rule, execution mode, IP address, and Subnet Mask of
Private LAN Port as shown in the following figure.
Figure 5-40 Example of Private LAN Interface
Specific Route Profile: From the pull-down menu, select your desired Specific Route Profile
rule or select “None”.
Mode: It provides two modes: NAT Mode and ROUTER Mode.
NAT ModeǺAll IP addresses externally connected through the Private LAN Port (these
IP address must belong to the same network for the Private LAN Port) will be
converted into the IP address of the WAN Port by the bonalinx-W 1300 and connected
to the outside.
Router ModeǺAll IP addresses externally connected through the Private LAN Port use
its own IP address for external connections. Then, the bonalinx-W 1300 acts like a
Router.
58
Page 68
Cipherium bonalinx-W 1300
Administrator’ s Manual
IP Address: Enter your desired IP address for the setup.
Subnet Mask: Enter your desired Subnet Mask for the setup.
Related Setup of DHCP Server of Private LAN Port
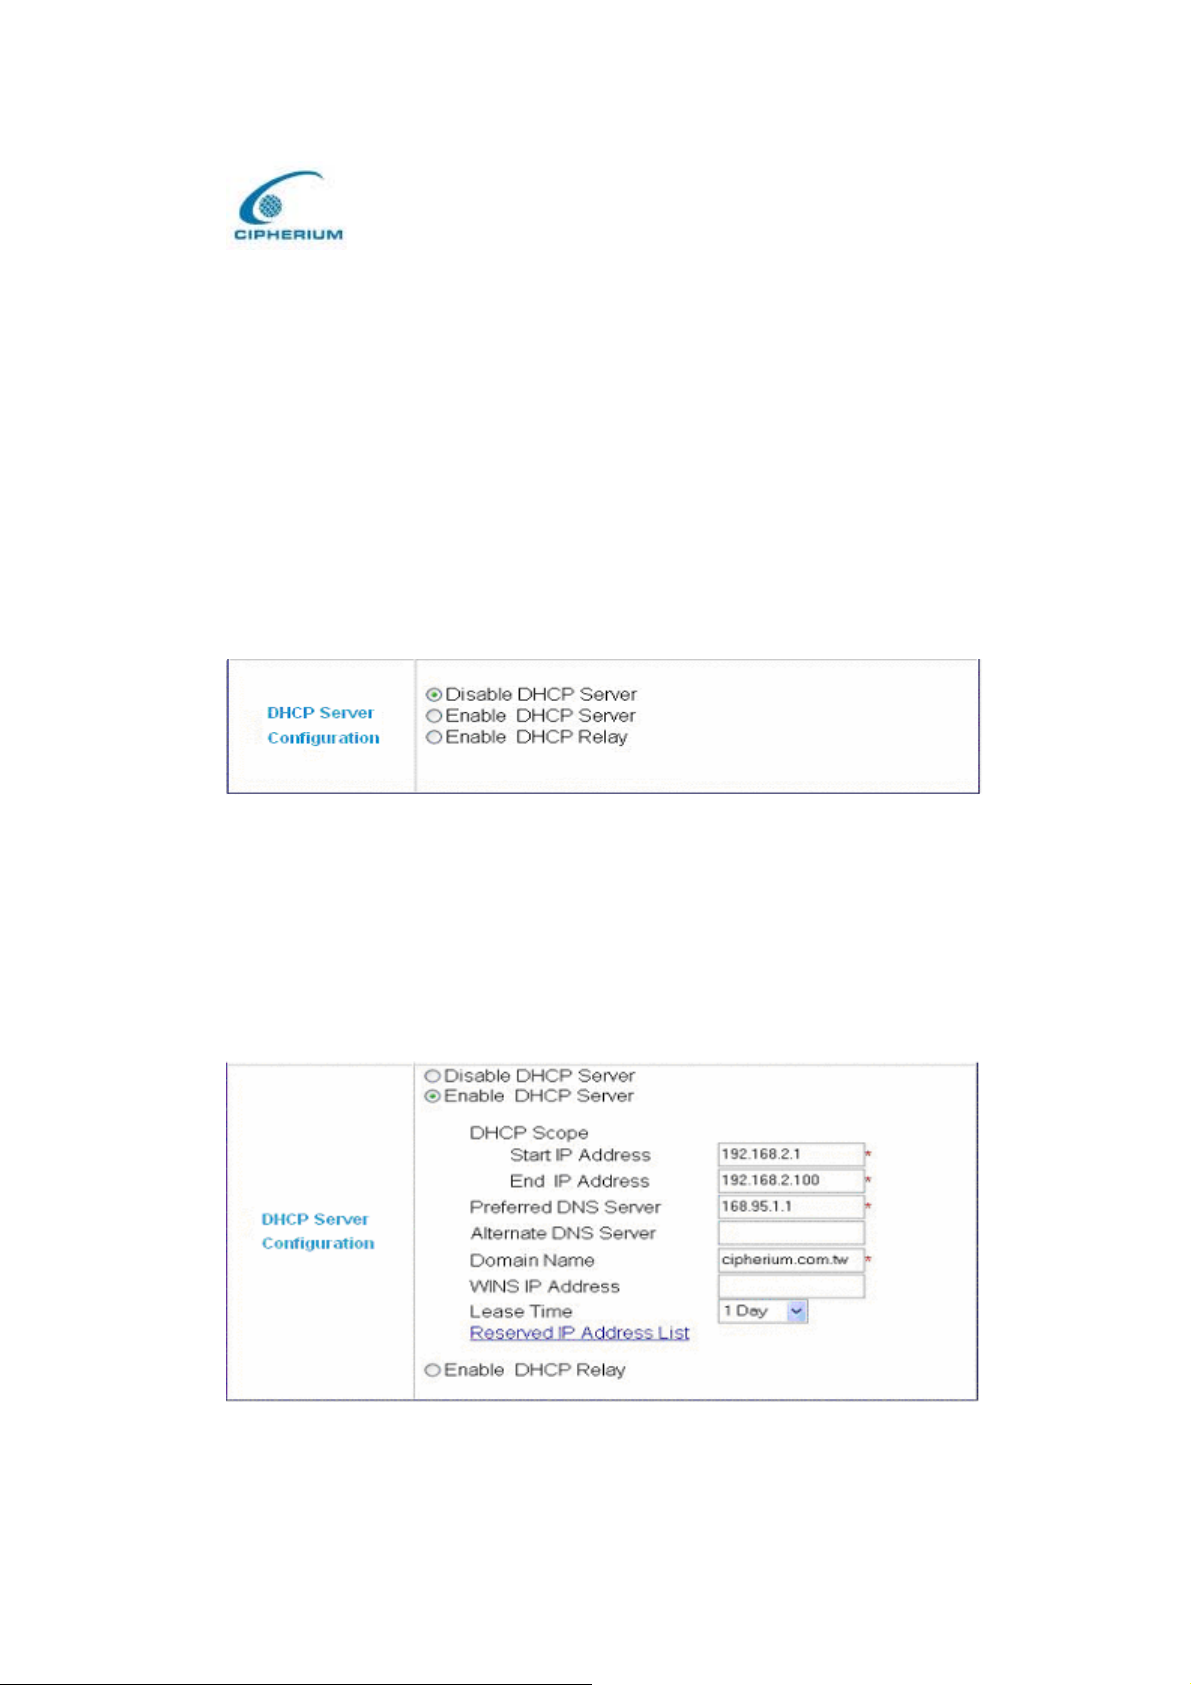
DHCP Server provides 3 choices: Disable DHCP Server, Enable DHCP Server, and Enable
DHCP Relay.
1. Disable DHCP Server: Disable the DHCP Server function.
Figure 5-41 Disable DHCP Server on Private LAN
2. Enable DHCP Server: If you enable the DHCP Server function, it is necessary to have
appropriate setups to properly enable the DHCP server. The setup related data includes DHCP
Scope Start IP Address, End IP Address, Preferred DNS Server, Alternate DNS Server,
Domain Name, WINS Serve, and Reserved IP Address List.
Figure 5-42 Enable DHCP Server on Private LAN
59
Page 69
Cipherium bonalinx-W 1300
Administrator’ s Manual
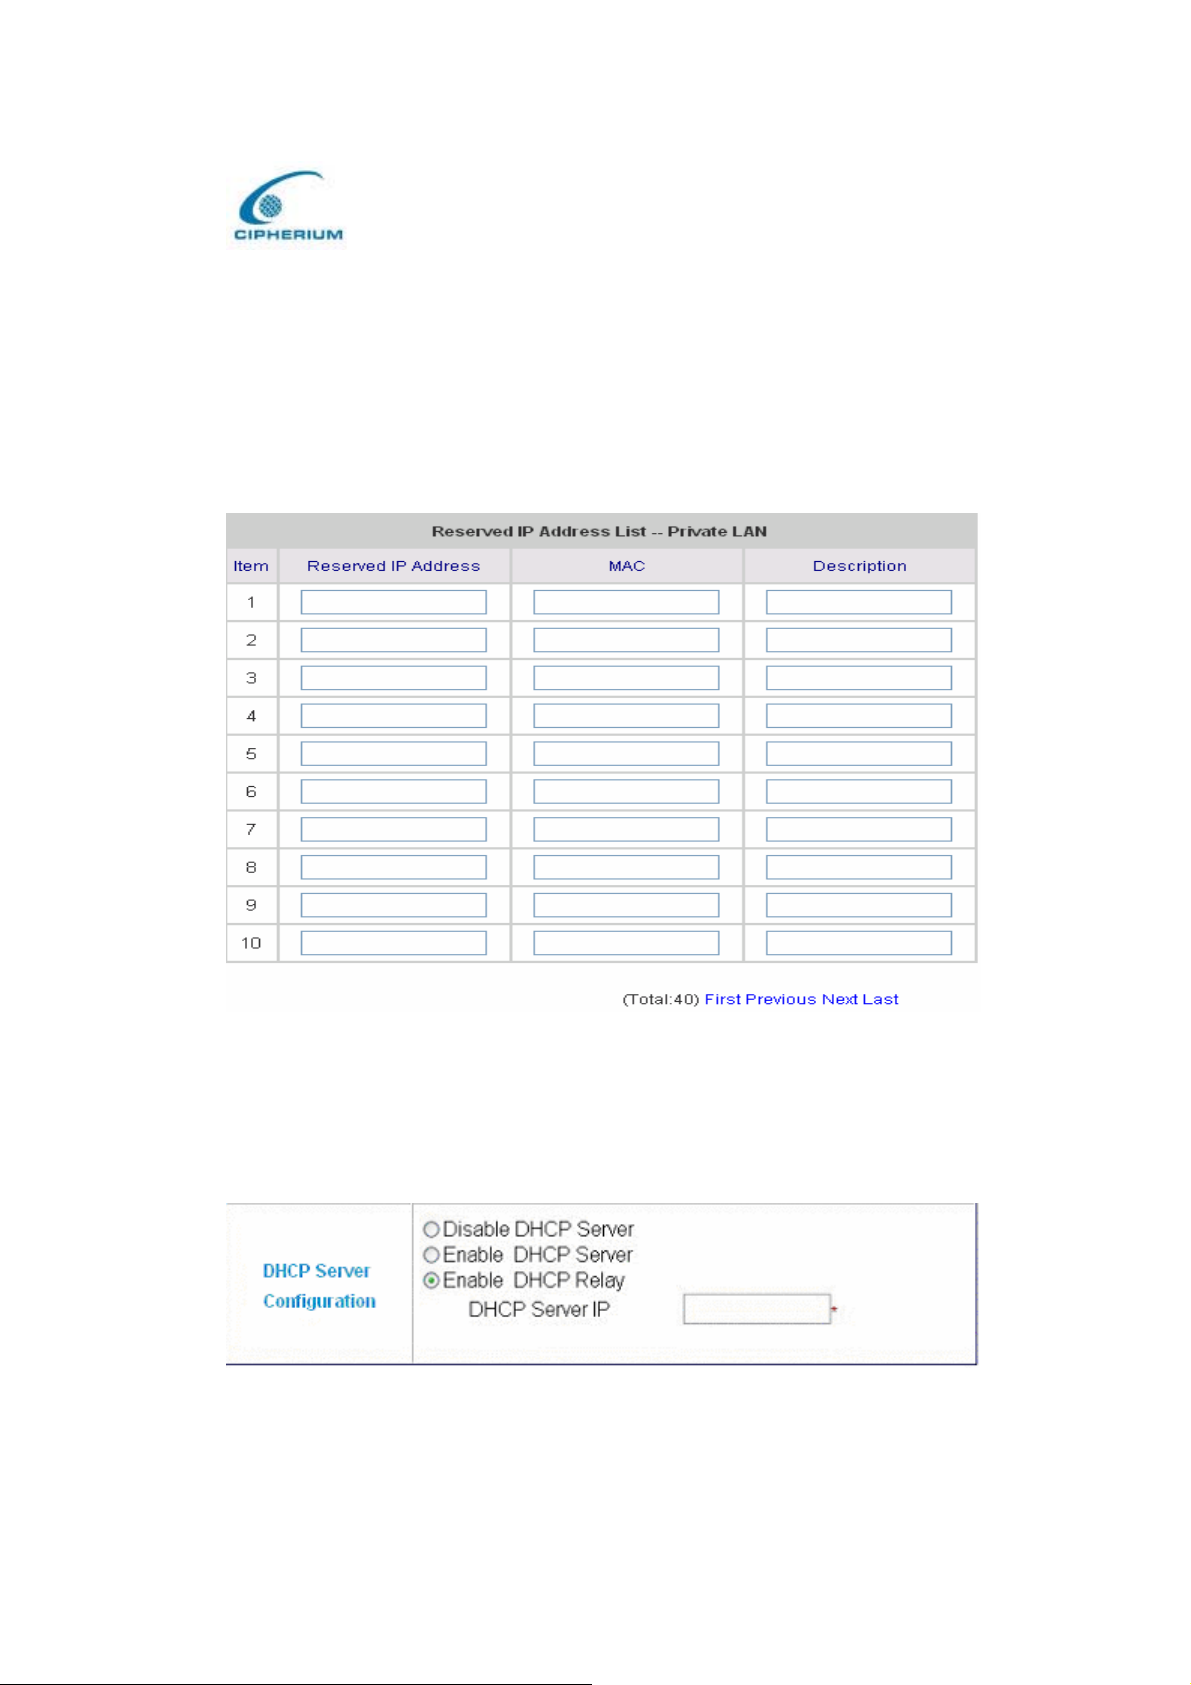
If you want to use the Reserved IP Address List function, please click the hyperlink of the
Reserved IP Address List on the management interface. Then, the setup of the Reserved IP
Address List as shown in the following figure will appear. Please enter the related Reserved IP
Address, MAC, and some description (not comp ulsory) on the management interface. After
the information is keyed in, click “Apply” to complete the setup.
Figure 5-43 Reserve IP Address Setting on Private LAN
3. Enable DHCP Relay: Enable the DHCP Relay mode. If you want to set up this mode, it
is necessary to specify another DHCP Server IP address.
Figure 5-44 Enable DHCP Relay on Private LAN
60
Page 70
Cipherium bonalinx-W 1300
Administrator’ s Manual
5.2. User Authentication
This option provides the Administrator the advanced set up for the system according to the
following detailed items including Authentication Policies, Group Configuration, Black
List Configuration, Guest User Configuration, Roaming Configuration , Additional
Configuration and On-demand User configuration.
5.2.1 Authentication Policy
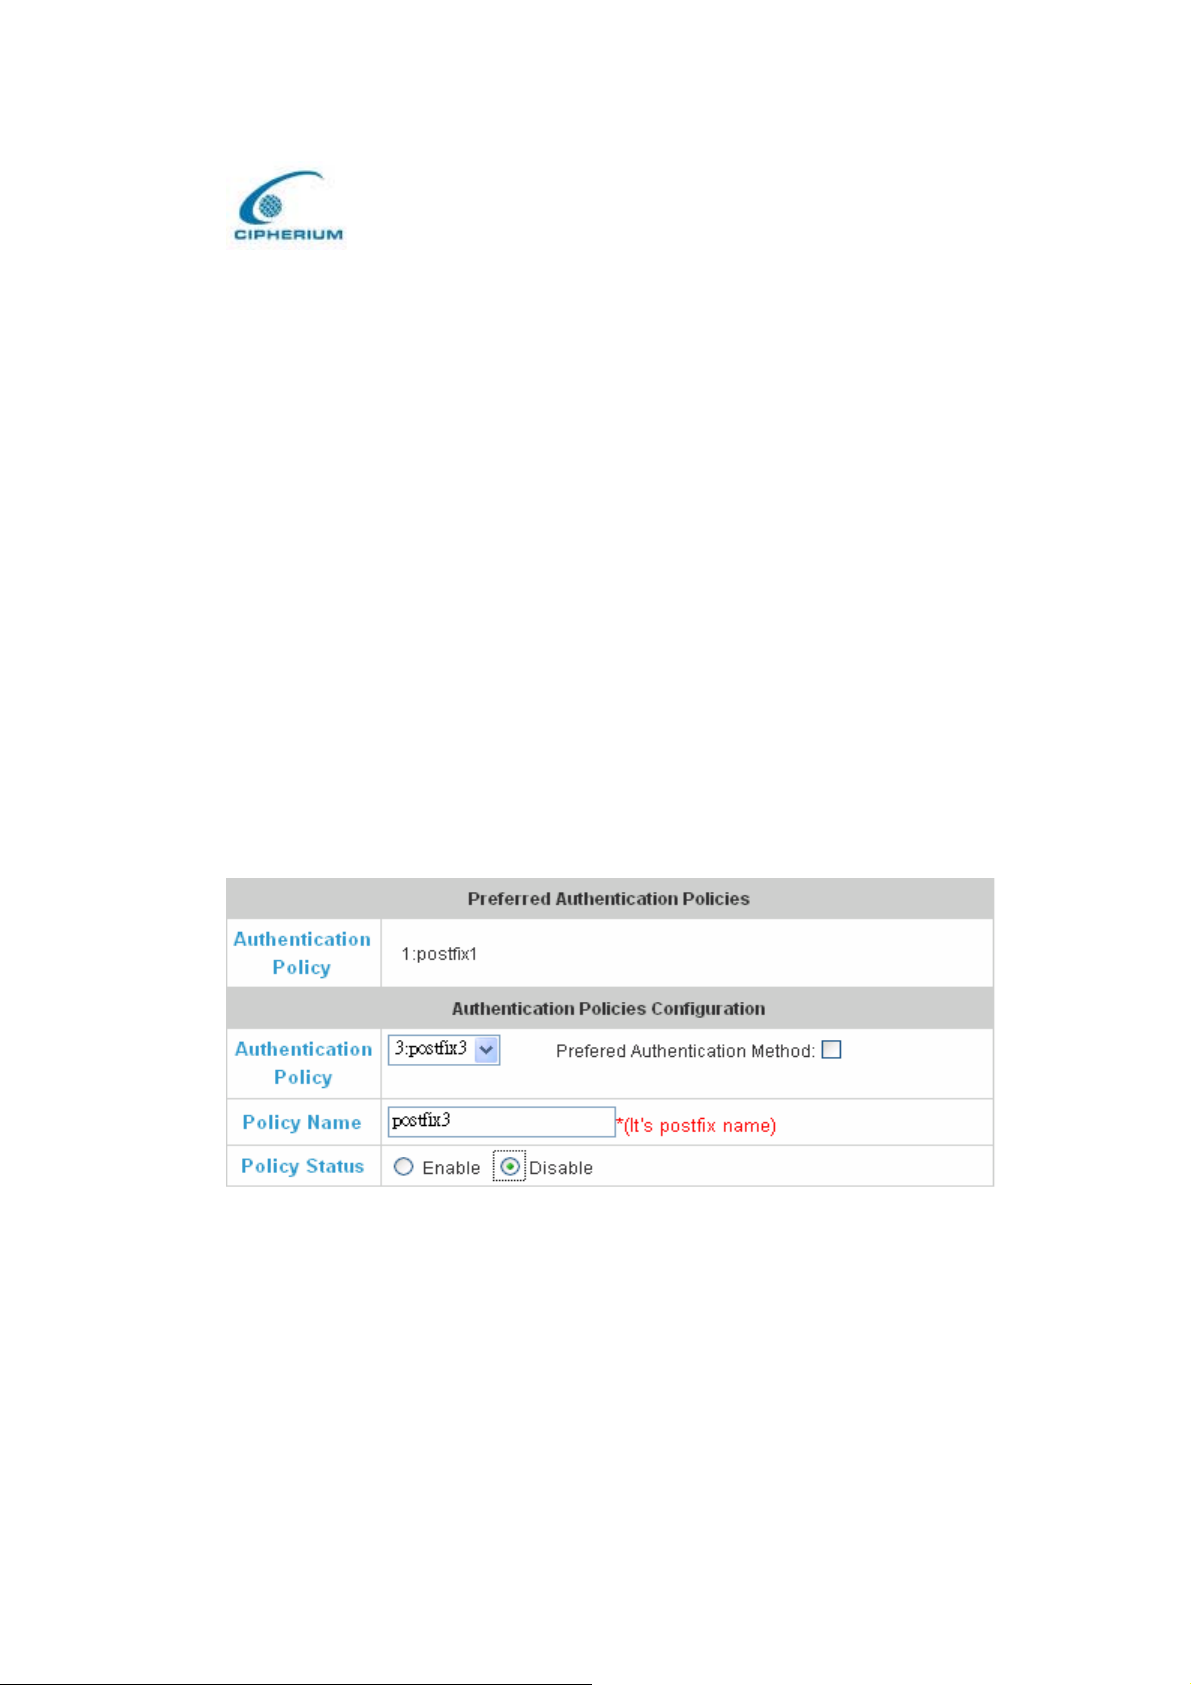
The bonalinx-W 1300 provides a simple interface to let the Administrator to simplify the
complicated management setup, and the system provides a total of 5 management setups. The
Administrator can adopt different Authetication methods according to each management setup.
Each management setup can use at most 20 management rules to go with the group
configuration, so that the management on general users can be more diversified and flexible.
The Administrator can select the desired management set up through the pull-down menu.
Figure 5-45 Example of Authentication Policy(1)
Preferred Authentication Method:
The system prefers to adopt this Public LAN method.
Authentication Policy: It is the preferred Authentication group.
61
Page 71
Cipherium bonalinx-W 1300
Administrator’ s Manual
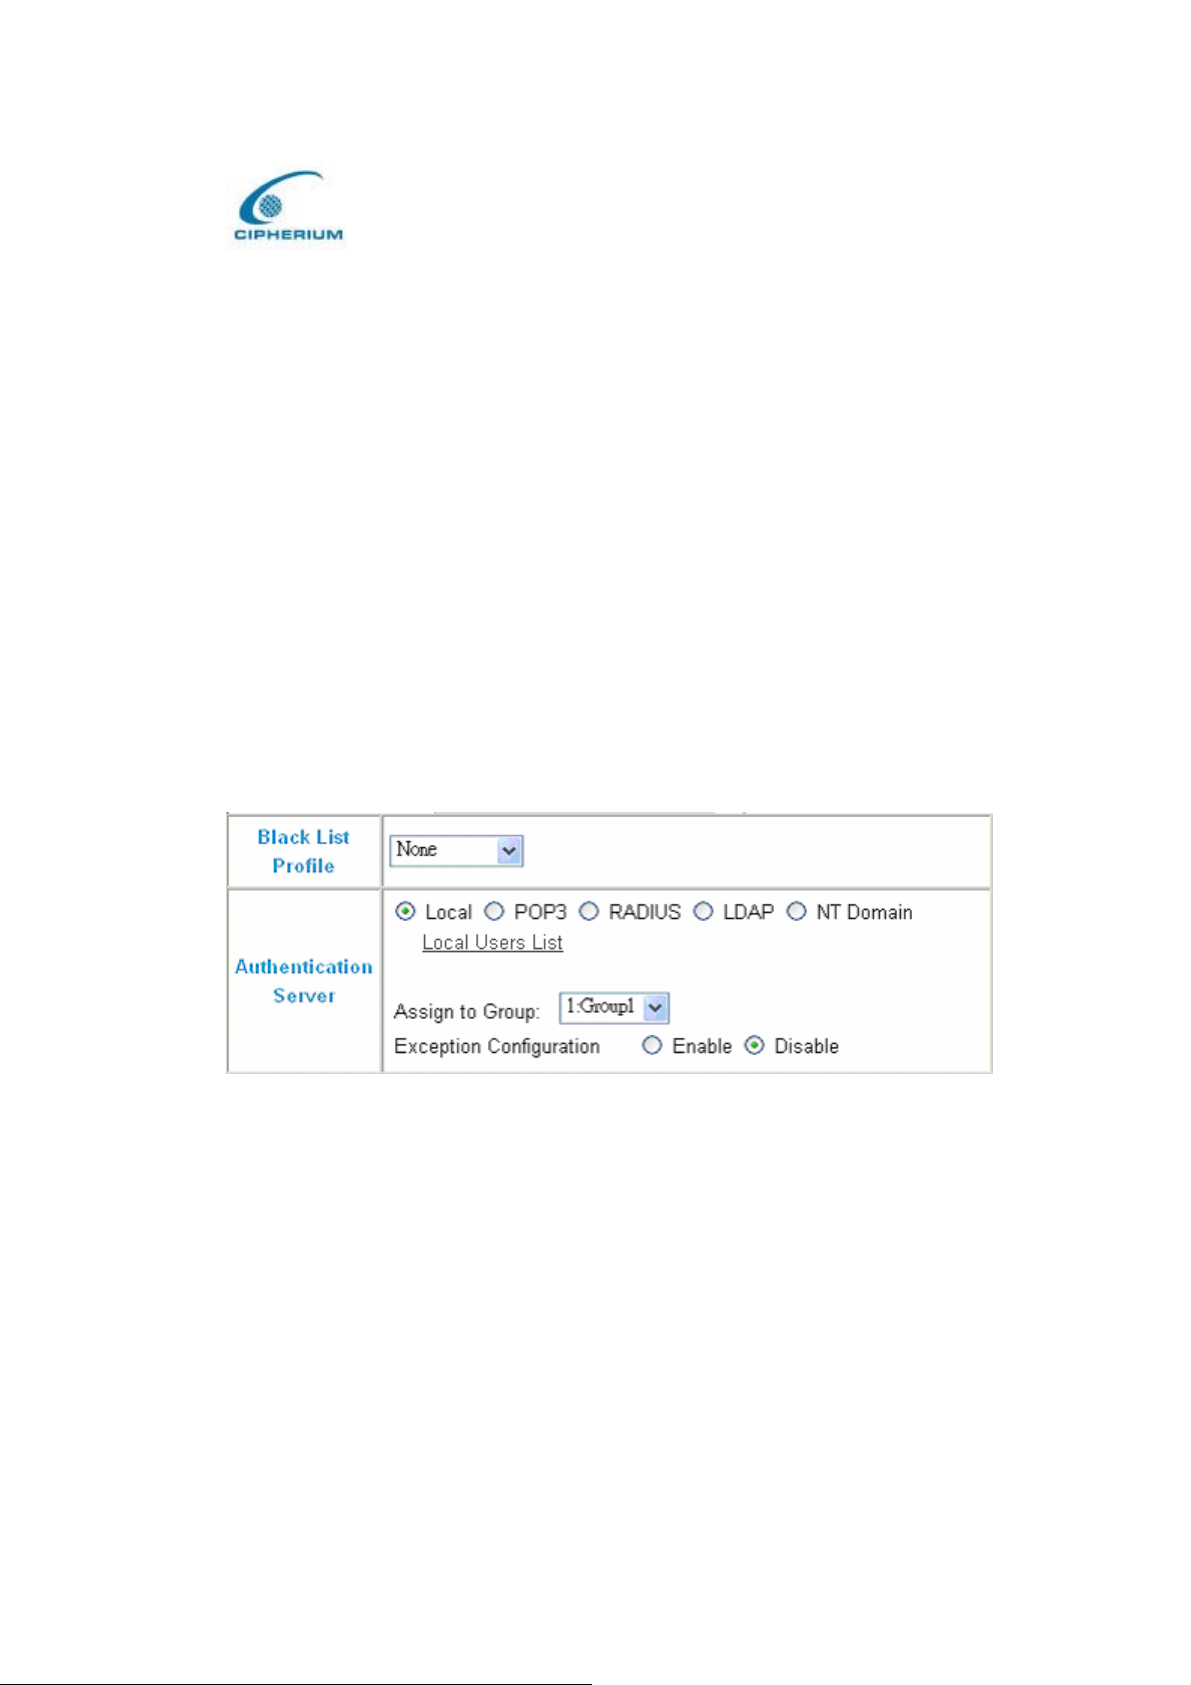
Authentication Methods Configuration:Authentication method setup.
Authentication Policy: The system provides 5 groups of the setup of your choice. Select the
desired control group from the pull-down menu.
Preferred Authentication Method: After selecting the item, it means that the selected setup
control group as shown above is the preferred Authentication method.
Policy Name : In the postfix of this management setup, the bonalinx-W 1300 system will
control the priority according to the following postfix when the user logs in the system.
Policy Status: You can select Enable (default) or Disable. If you select Enable, then such
postfix will be disabled.
Figure 5-46 Example of Authentication Policy(2)
Black List Profile: It goes with the blacklist.
Authentication Server: Provides 5 Authentication Methods: Local, POP3, RADIUS, LDAP,
and NT Domain.
Assign to Group: Assign a group to the control group from the pull-down menu.
Exception Configuration: It permits Exception Configuration: It permits to exclude certain
62
Page 72
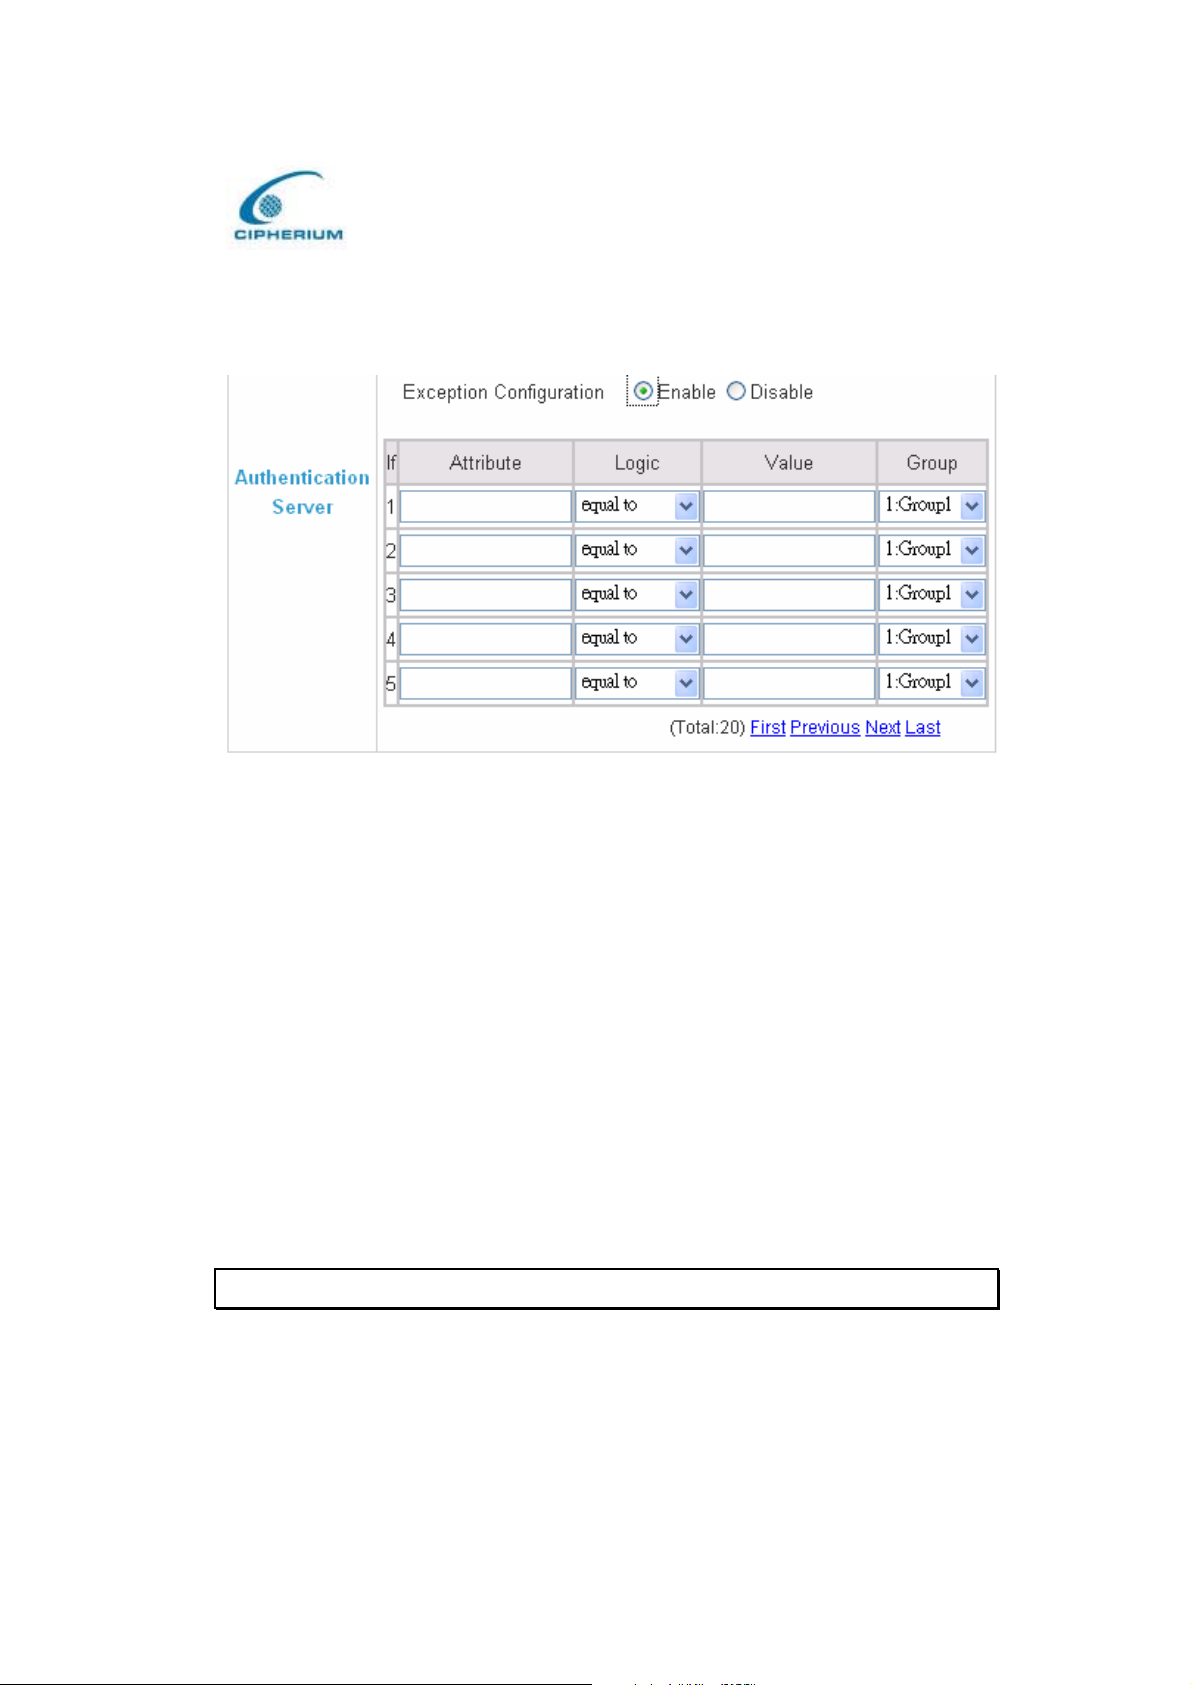
Cipherium bonalinx-W 1300
Administrator’ s Manual
specified accounts as shown in the following figure without being limited by the restrictions
above.
Figure 5-47 Exception Configuration
Attribute : After the Public LAN, the bonalinx-W 1300 will obtain the user’s attributes related
to the authenticated server. The Administrator can use certain attributes as the management
rule for the setup.
Logic: It has equal to, not equal to, larger than, smaller than, and include for your choice.
Value: Please fill in the desired value after the Attribute and Logic are matched.
Group: It specifies the priority of the user group for the user matching such management rule.
Default Group: After a user does not match the management rule login, the priority of this
default group will be applied.
Warning: Policy Name cannot use those words : GRIC, MAC, IP
63
Page 73
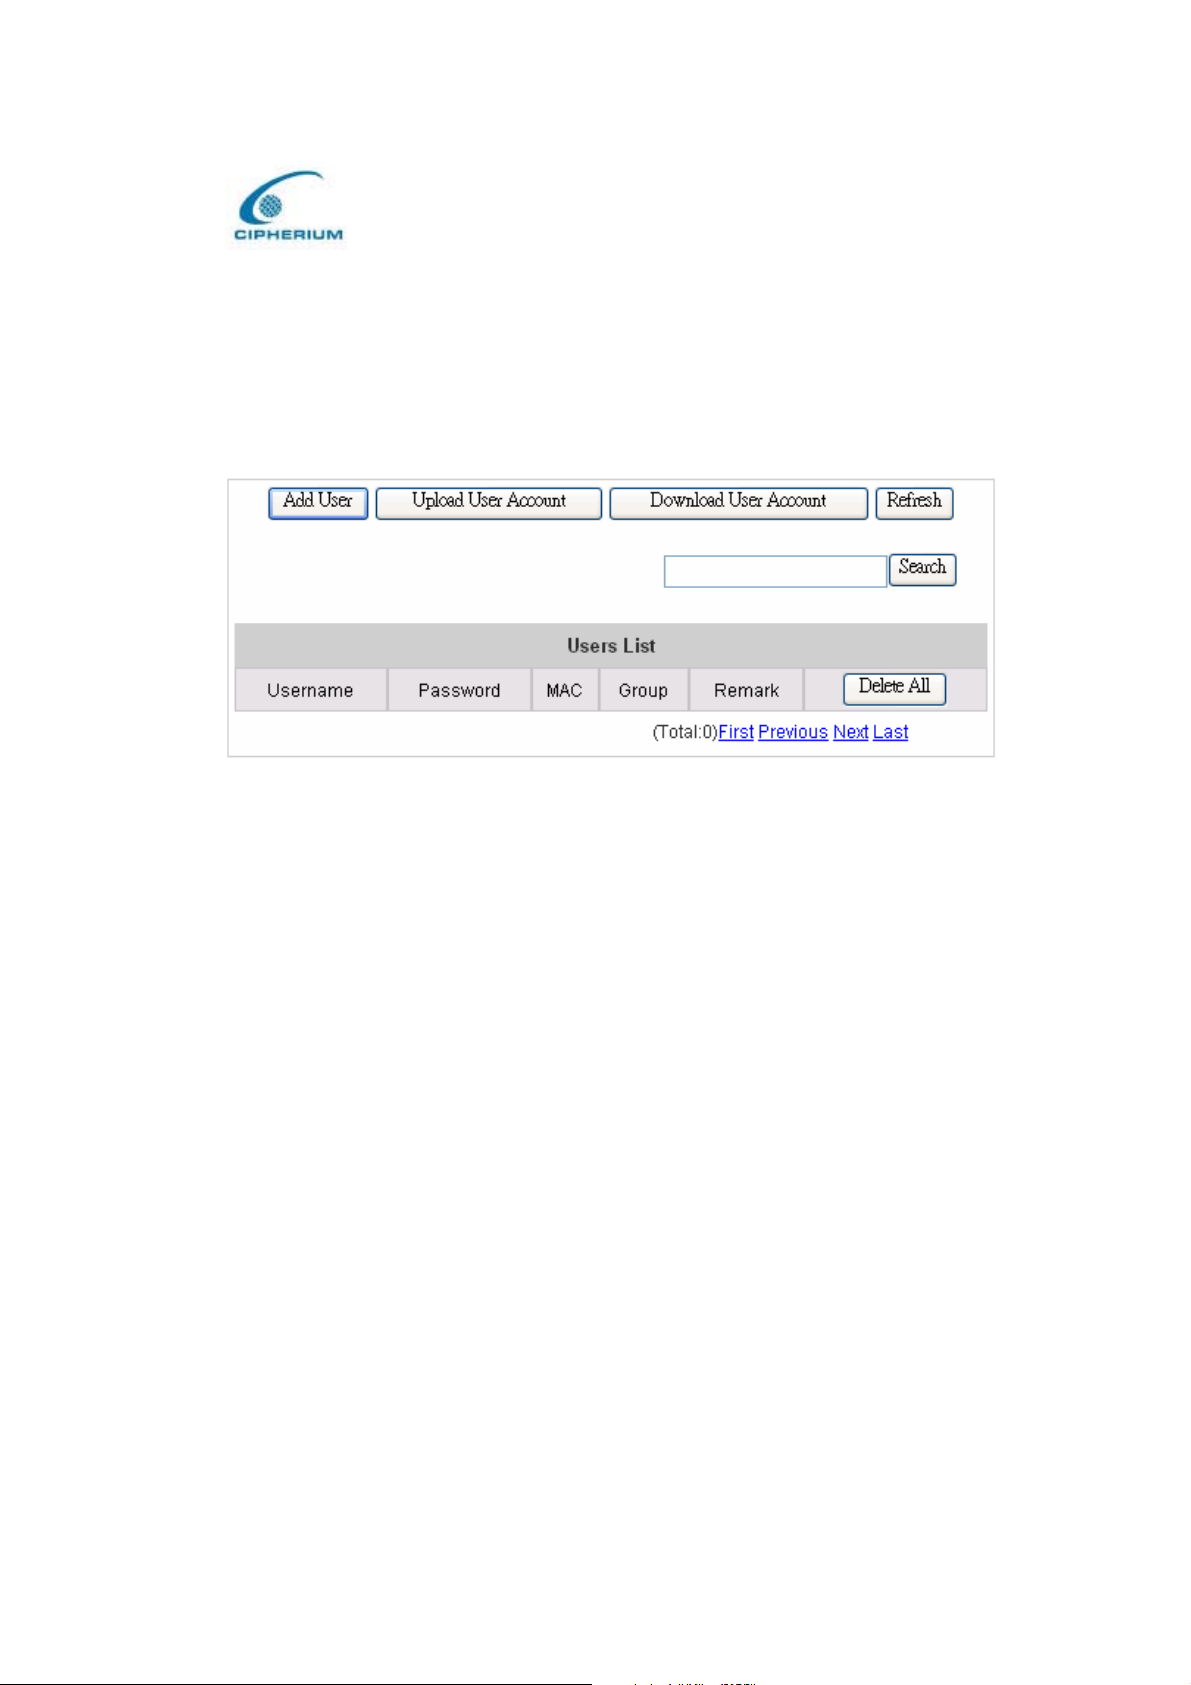
Cipherium bonalinx-W 1300
Administrator’ s Manual
Five Authentication Methods:
1. Local
The user’s account information is stored in bonalinx-W 1300. If you need to manage the user’s
account, please click the hyperlink Local Users List on the Authentication Server interface to
enter into the Account Management Interface .
Figure 5-48 Local User List
User List: It provides a complete list of existing user accounts as shown in Figure 5-48 and
includes the viewing of information such as Username, Password, MAC, Group, and Remark.
The Administrator can delete or search a single user from this management interface. You
can also use the “Delete All” function key to delete all user accounts. If you want to edit the
content of individual user account, please directly click the hyperlink of the desired user
account to enter into the Edit Account Interface. Click the “Refresh” button to show the
most updated data.
Add User: Click “Add Users” on the User List to enter into the Add User interface, and key
in your desired information such as new username, password (compulsory), MAC, an Remark
(not compulsory). Then, click on the “Apply” button to complete adding users. (Figure 5-49
and Figure 5-50)
Edit Account: Click the desired username that you want to modify from the User List to enter
into the User Account Interface, and then key in your desired information such as username
and password (compulsory), MAC, and Remark (optional). Then, click “Submit” to complete
the modification. (Figure 5-51)
64
Page 74
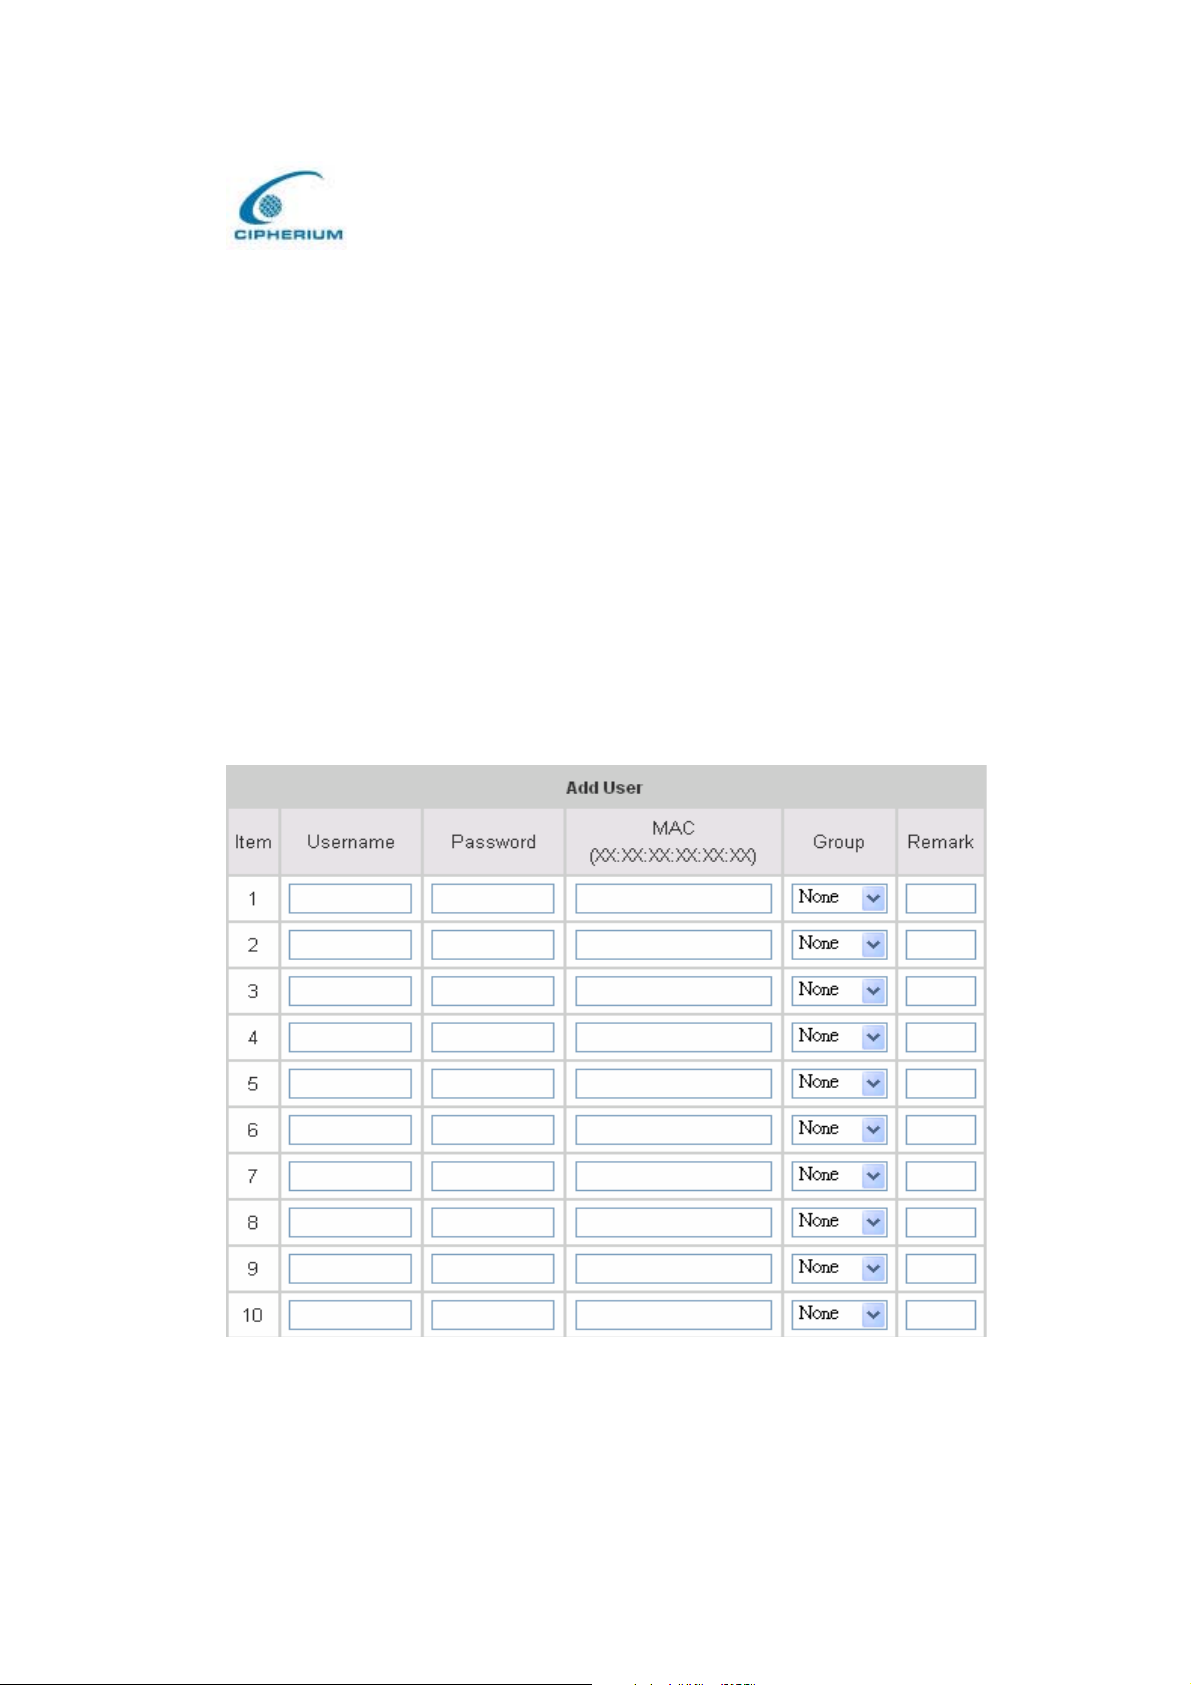
Cipherium bonalinx-W 1300
Administrator’ s Manual
Upload User Account: Click “Upload User Accounts” to enter into the Upload User
Accounts interface. Click the browser button to select the text file for the user account.
Then click “Submit” to complete the upload. The format of the uploading file is text file,
and each line represents a User Account, FormatÆ Username,Password,MAC,Remark each
parameter is separated by a comma, and no space is allowed between MAC Remark but the
comma is still needed. (Figure 5-52)
Download User Account: Click “Download User Accounts” in the User List to enter into
the Download User Accounts interface, and the system will directly list all created user
accounts, and show a hyperlink for the download at the bottom of the screen. Move the
cursor of the mouse to such hyperlink and press the right button of the mouse to save as new
file. Then, you can list the user accounts and load them into your computer. (Figure 5-53)
Figure 5-49 Example of Adding User Accounts
65
Page 75
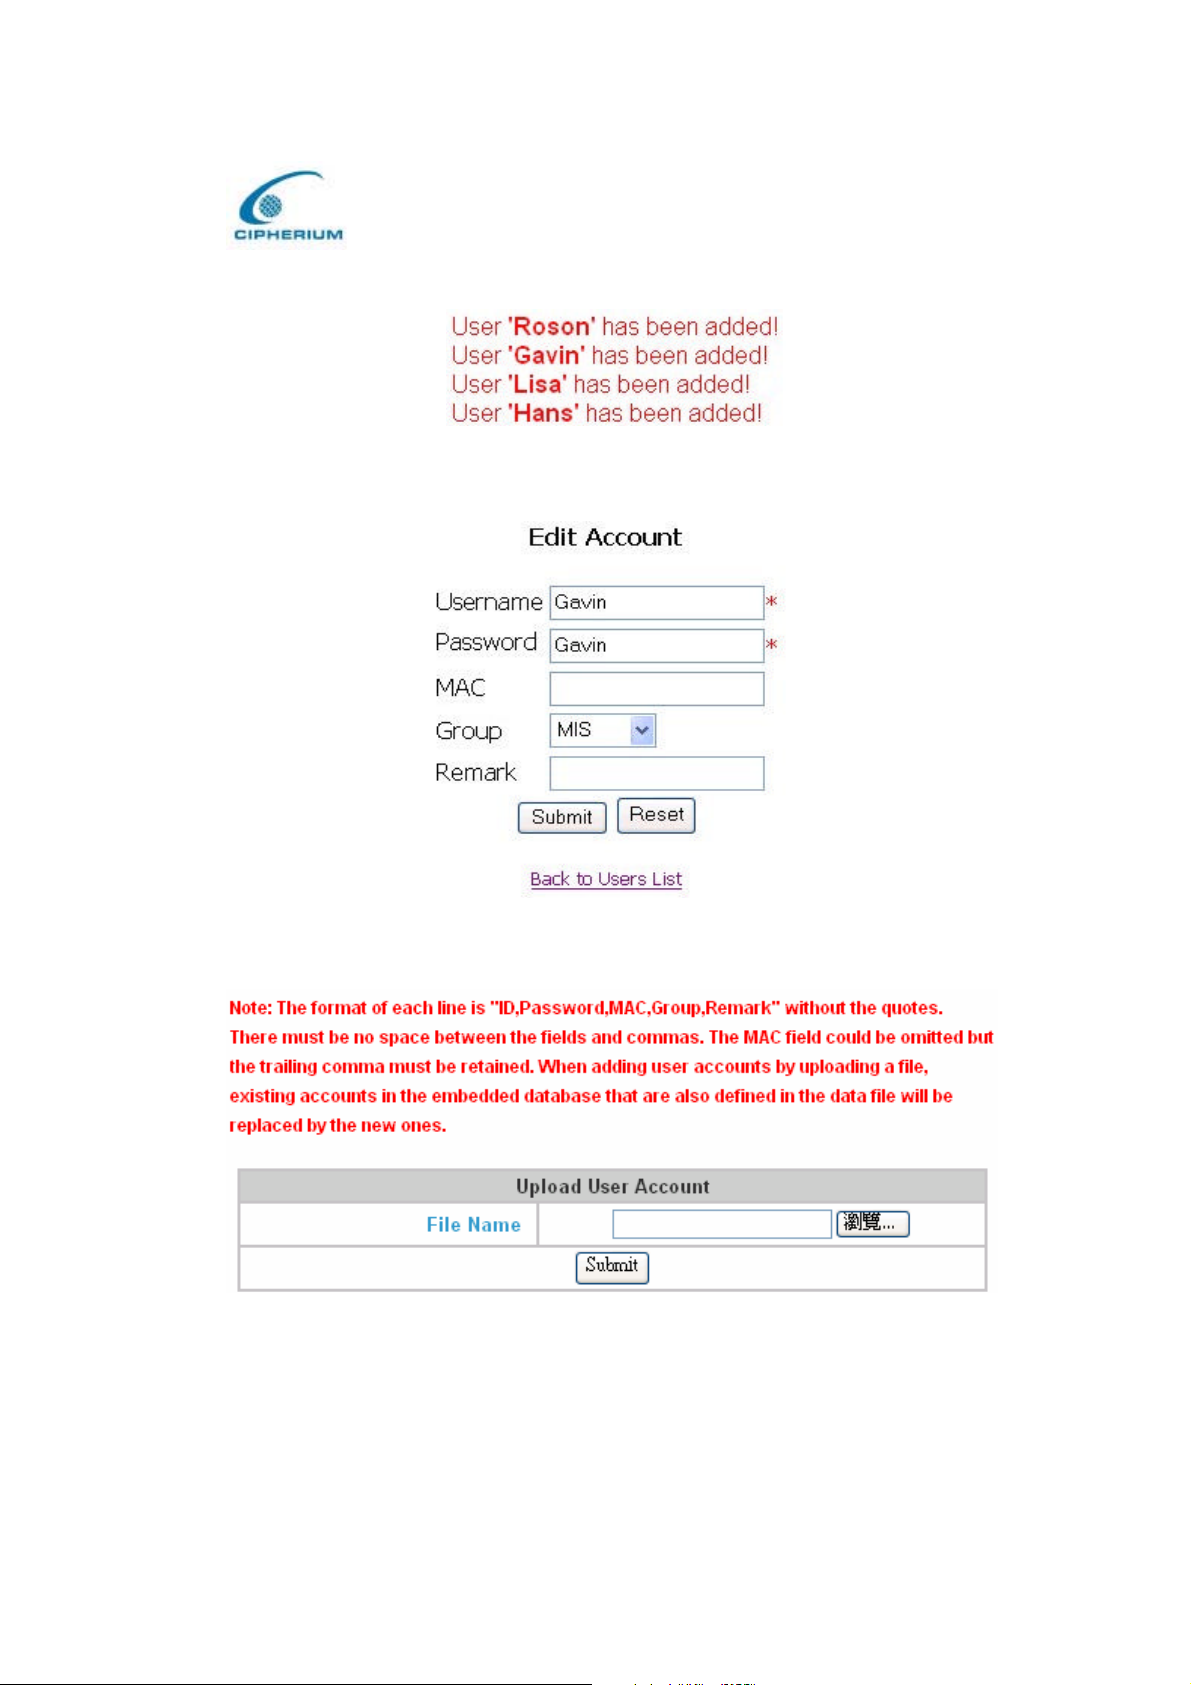
Cipherium bonalinx-W 1300
Figure 5-50 Added User Accounts Screen
Figure 5-51 Example of Editing User Accounts
Administrator’ s Manual
Figure 5-52 Example of Upload User Account Interface
66
Page 76
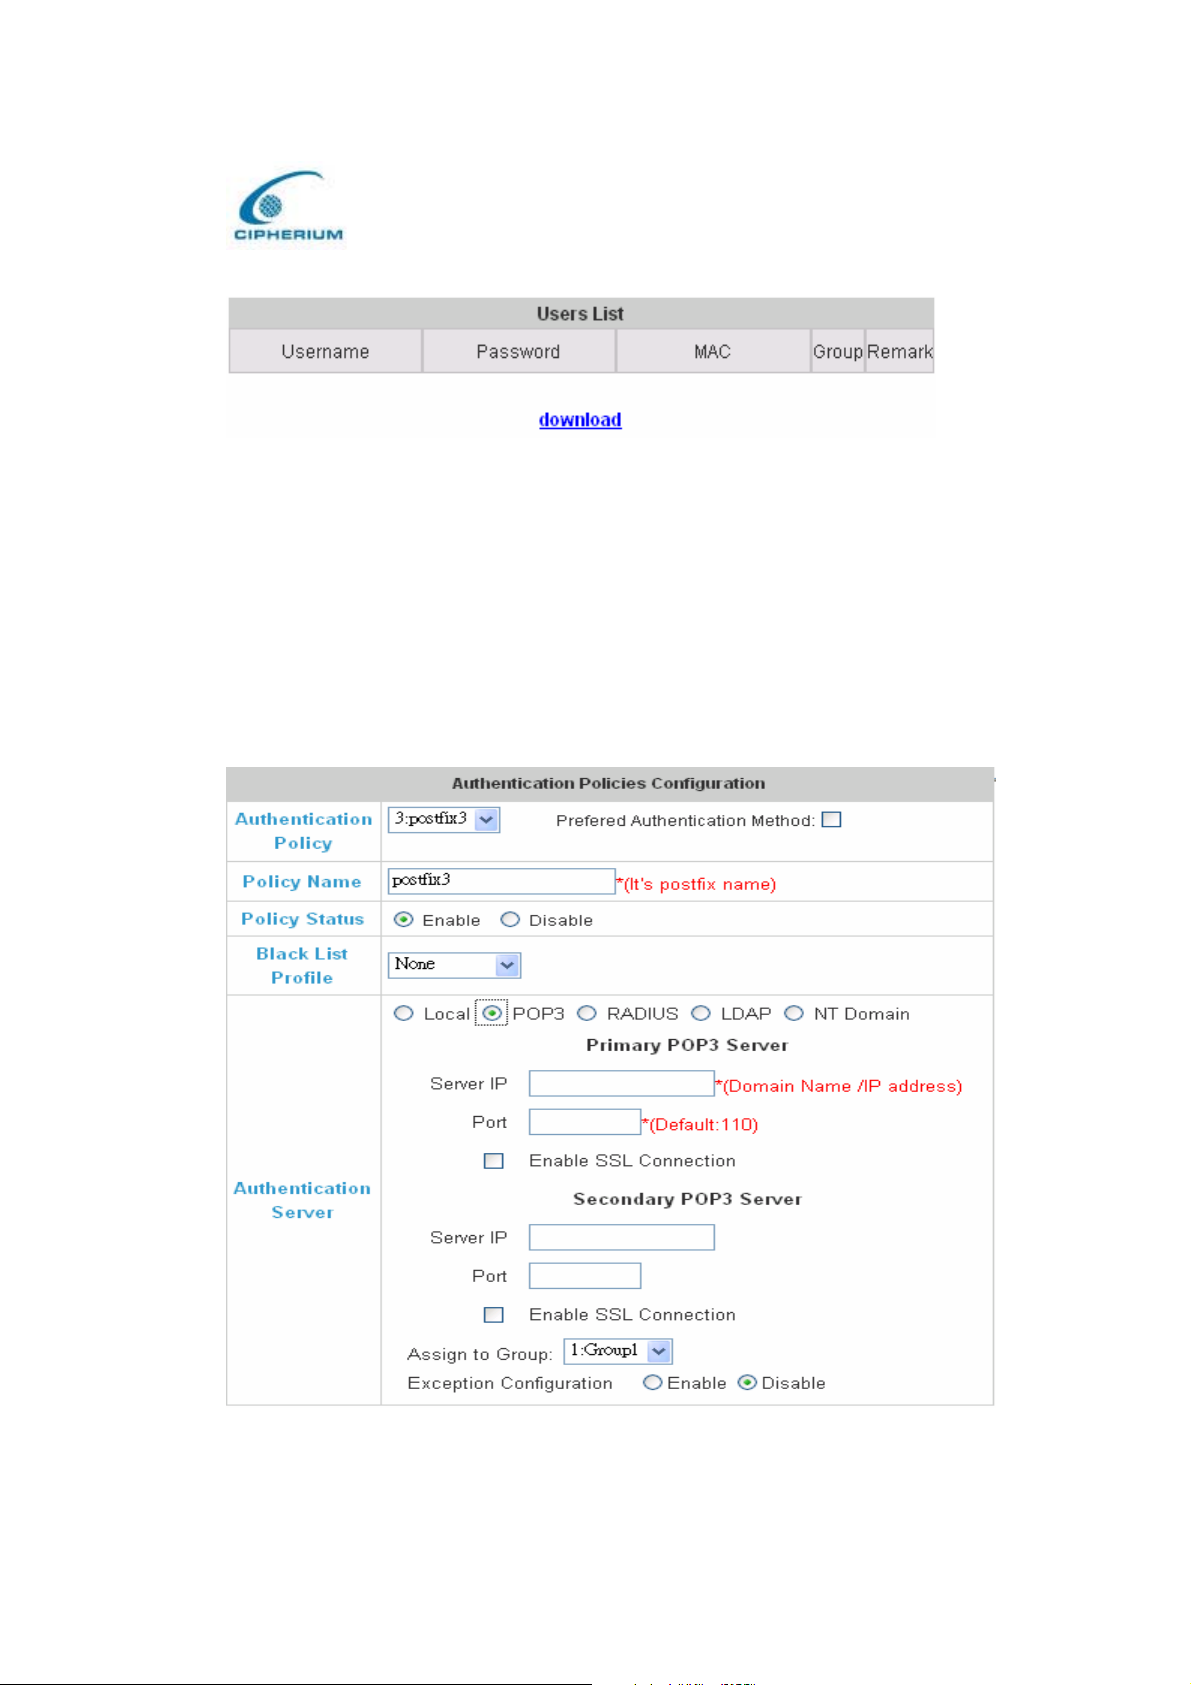
Cipherium bonalinx-W 1300
Administrator’ s Manual
Figure 5-53 Example of Download User Account Interface
2. POP3
If POP3 is used for the Public LAN, you just need to set the Public LAN mechanism to POP3.
The setup for primary server or secondary server is available. Enter the IP address or domain
name of the Primary POP3 Server and its Primary POP3 Server port. Such setup will be
enabled immediately after you click the “Apply” button. (It is not compulsory to set up the
Secondary POP3 Server).
Figure 5-54 POP3 Setup Screen
67
Page 77

Cipherium bonalinx-W 1300
Administrator’ s Manual
Enable SSL Connection: If you select this option, the Authentication will be done by POP3
Protocol.
3. RADIUS
The external Authentication for user accounts is set by the RADIUS server. The setup for
primary server or secondary server is available, and such setup will be enabled immediately.
802.1X Public LAN: Select to enable 802.1X as needed. Click the hyperlink “Edit” to
enter into the edit interface of the 802.1X.
Server IP: Key in the location of the RADIUS server by its IP Address or Domain Name.
Authentication Port: It is the Authentication port for RADIUS server.
Accounting Port: It is the port reading the accounting information.
Secret Key: It is used for encryption and decryption.
Accounting Service: Select to enable Accounting Service as needed.
Authentication Method: CHAP and PAP are for your choice.
68
Page 78
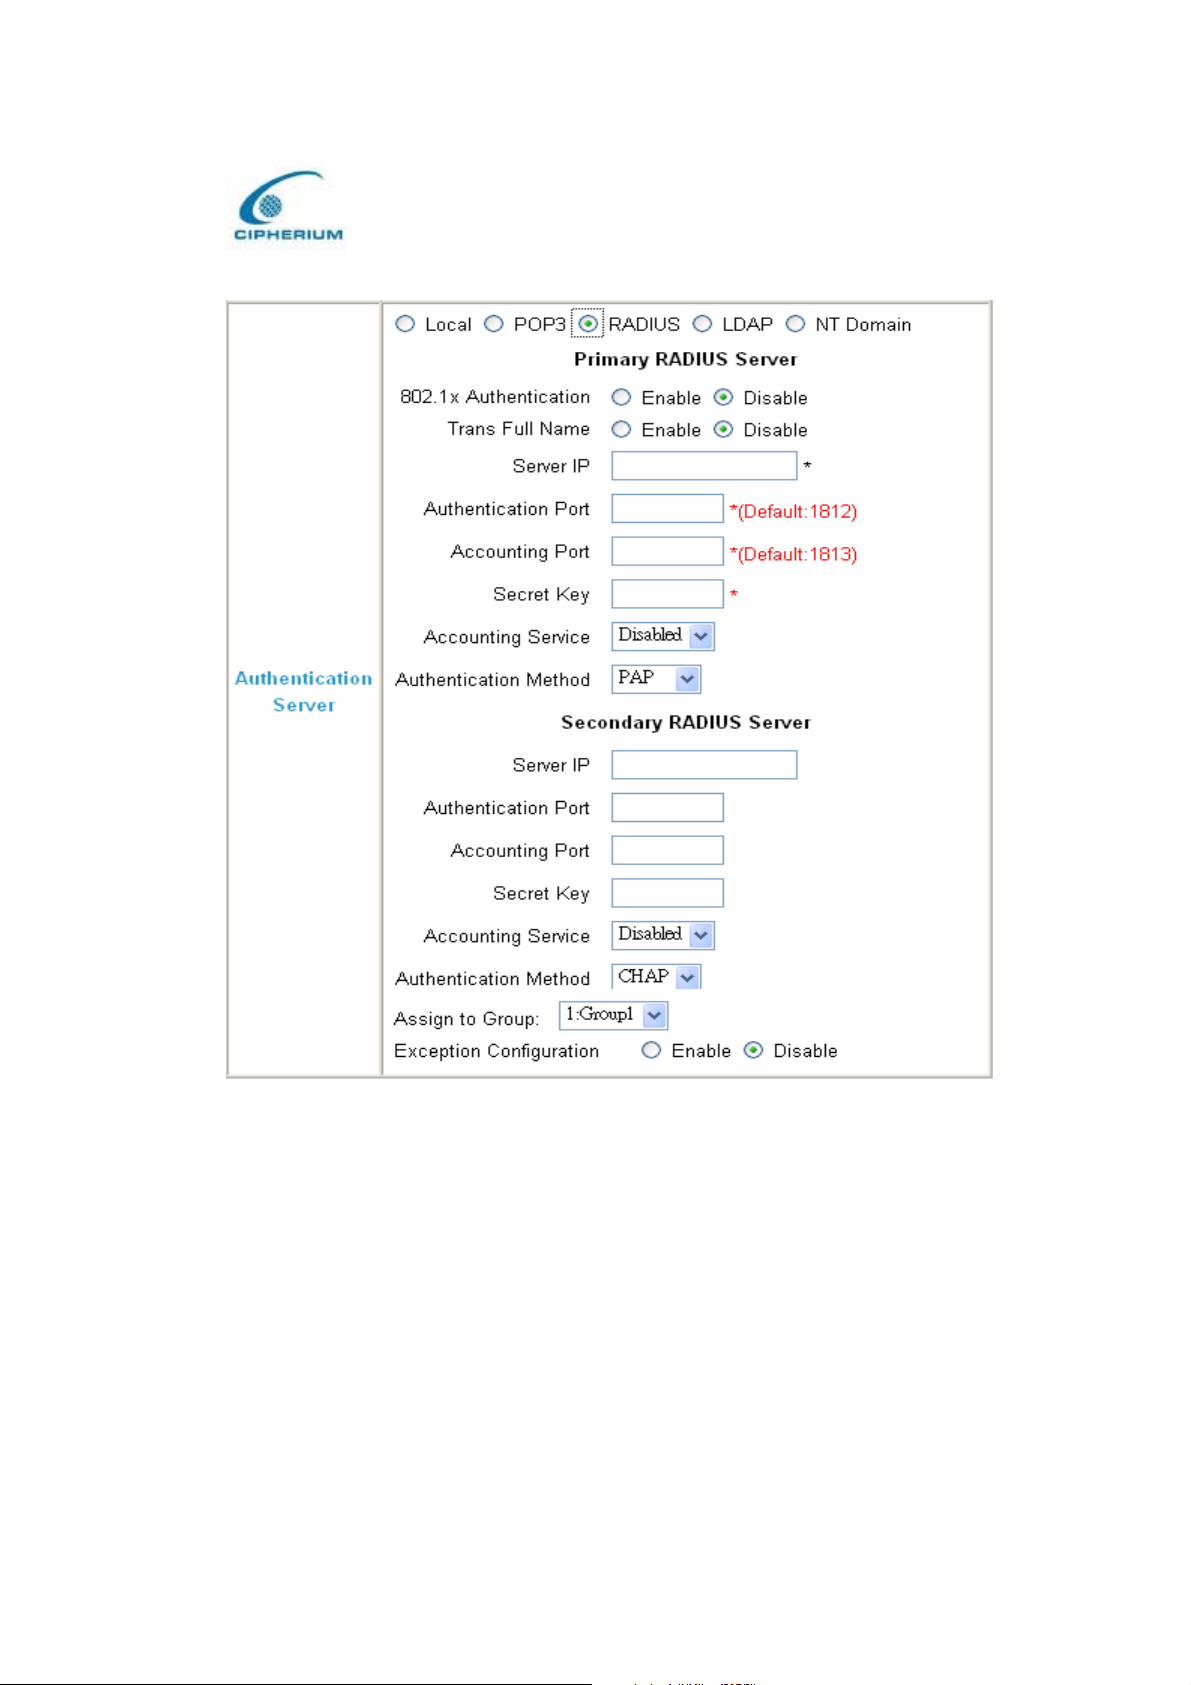
Figure 5-55 RADIUS Setup Screen
Cipherium bonalinx-W 1300
Administrator’ s Manual
4. LDAP
You can select a primary server or secondary server as the LDAP server for Public LAN. If
you select the LDAP Authentication method, it is necessary to key in the IP Address (Domain
Name ), Port number, Base DN Data of LDAP Server. After you confirm the data, please
click“Apply”.
69
Page 79
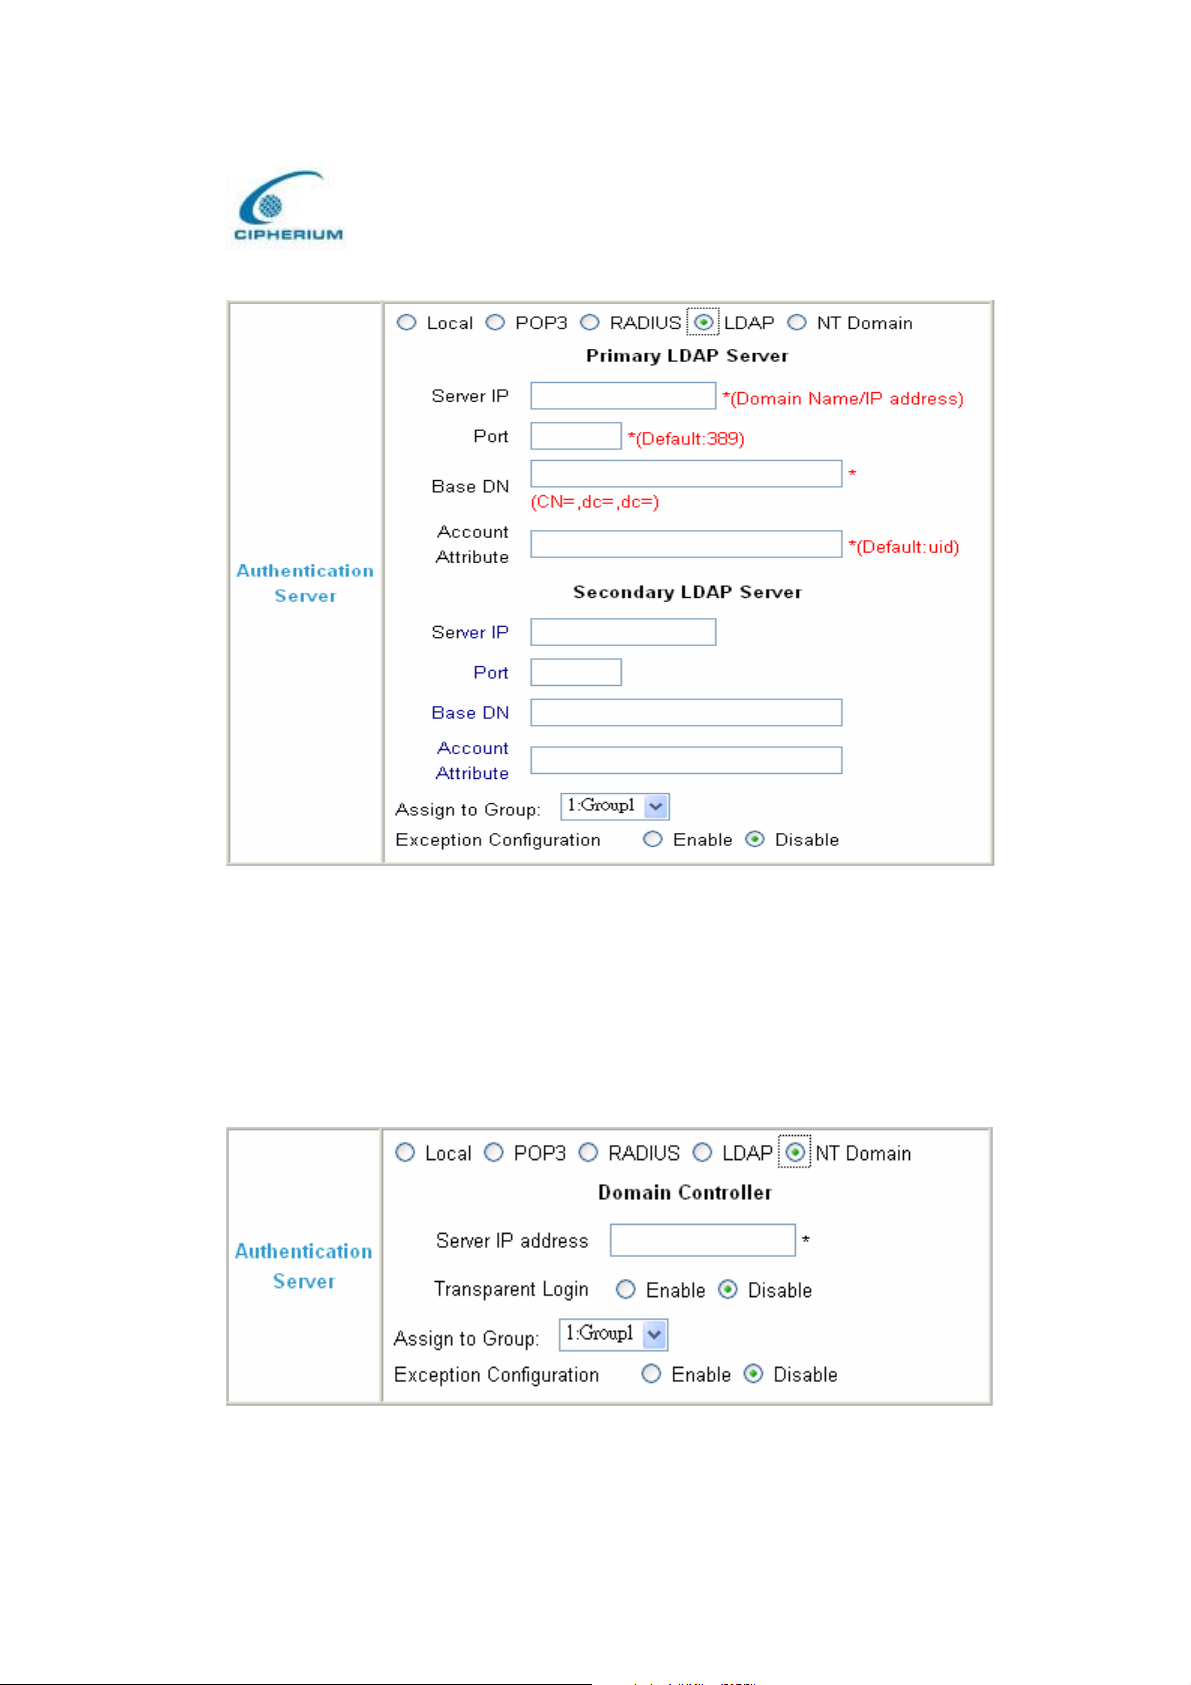
Figure 5-56 LDAP Setup Screen
Cipherium bonalinx-W 1300
Administrator’ s Manual
5. NT Domain
You just need to key in the IP address of the Domain Controller Server and determine
whether or not to enable the Transparent Login function to use the NT Domain server for
Authentication.
Figure 5-57 NT Domain Setup Screen
70
Page 80
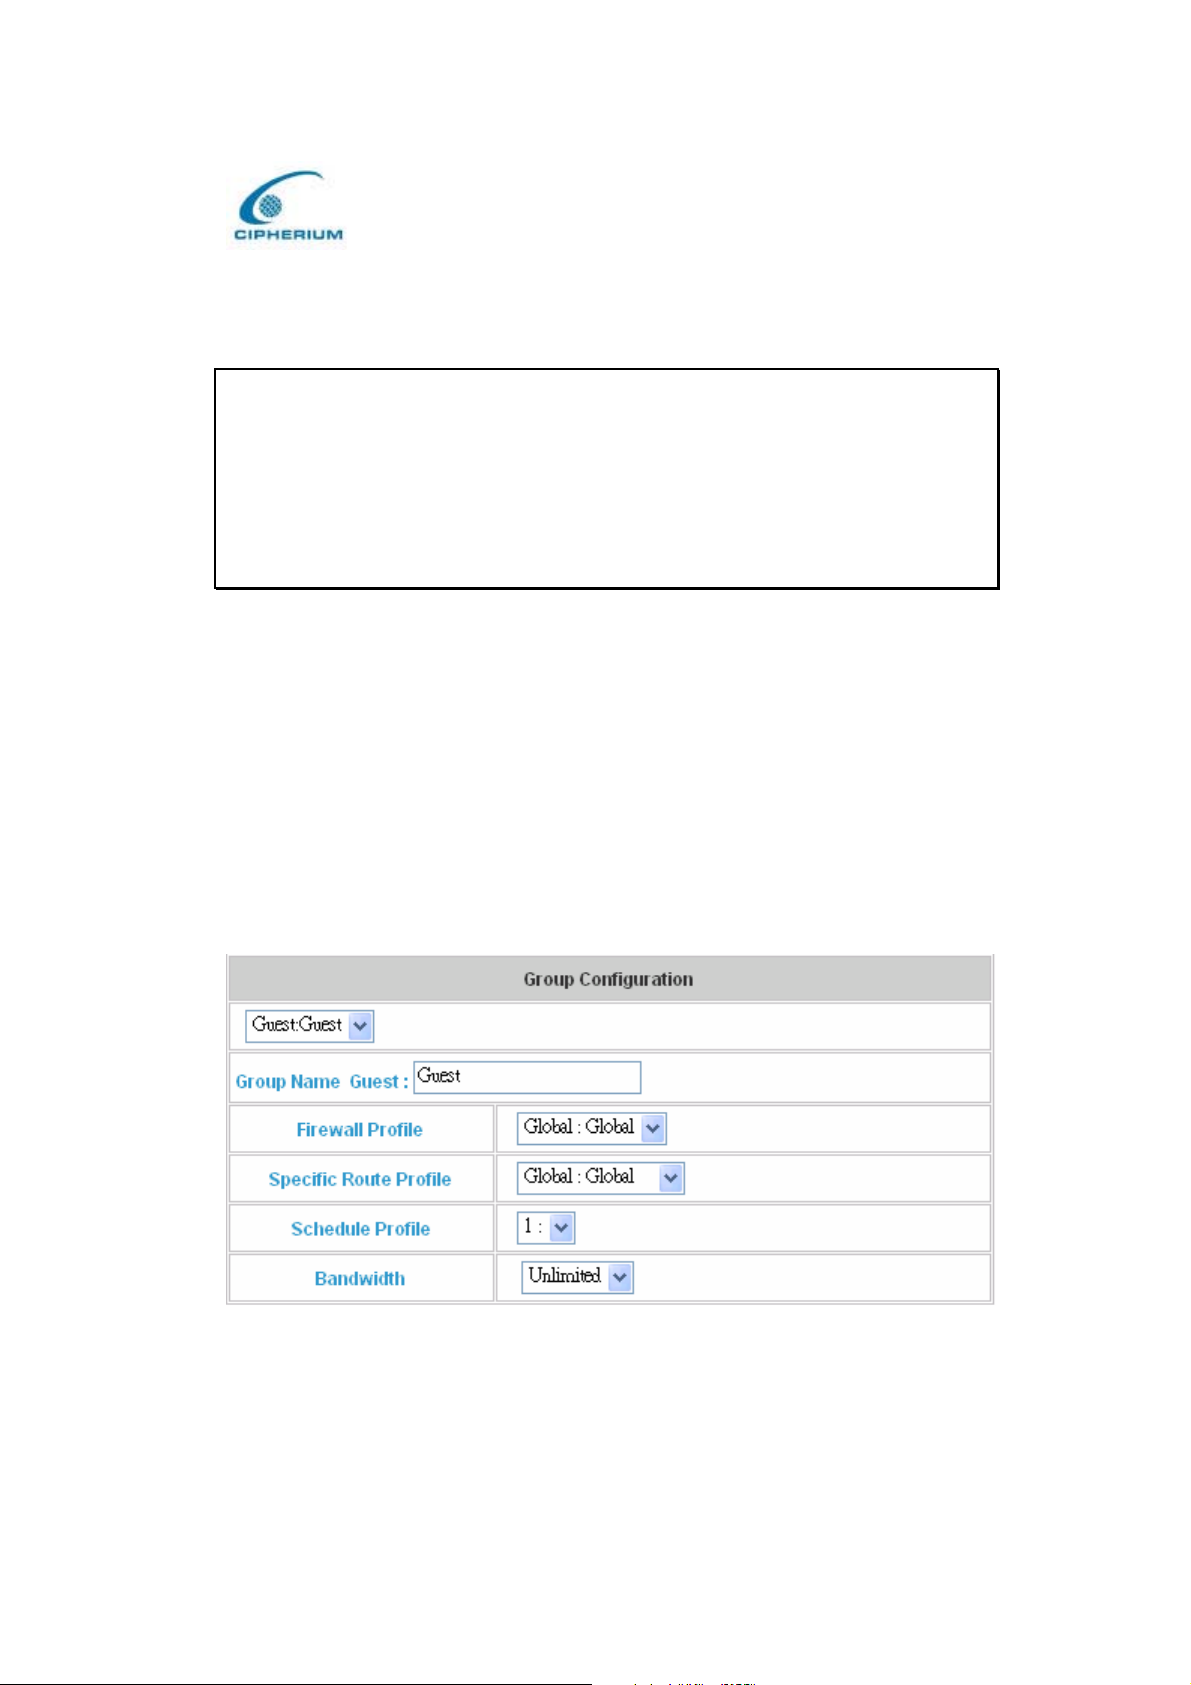
Cipherium bonalinx-W 1300
Administrator’ s Manual
Transparent Login: It sets up whether or not to log in the bonalinx-W 1300 after a user logs
in the Windows Domain.
Caution: 1. At present, it only supports
2. If you want to use NT Domain Autheneication, Please make sure
2.1 WAN port Preferred DNS Server IP address is Domain Controller Server IP
address
2.2 Walled Garden List is also key in Domain Controller Server IP address.
2.3. Policy Name is Your complete Domain Name
win2000 domain controller.
5.2.2 Group Configuration
In the bonalinx-W 1300 system, there are Guest and 5 other user groups for the Administrator
to use with the firewall profile and route profile and the online connection speed in order to
control the users. The Administrator can use the pull-down menu to select the desired route
profile to go with the firewall profile and the route profile with the bandwidth control.
Figure 5-58 Group Configuration Screen
Group Name 1 : Named this Group.
71
Page 81
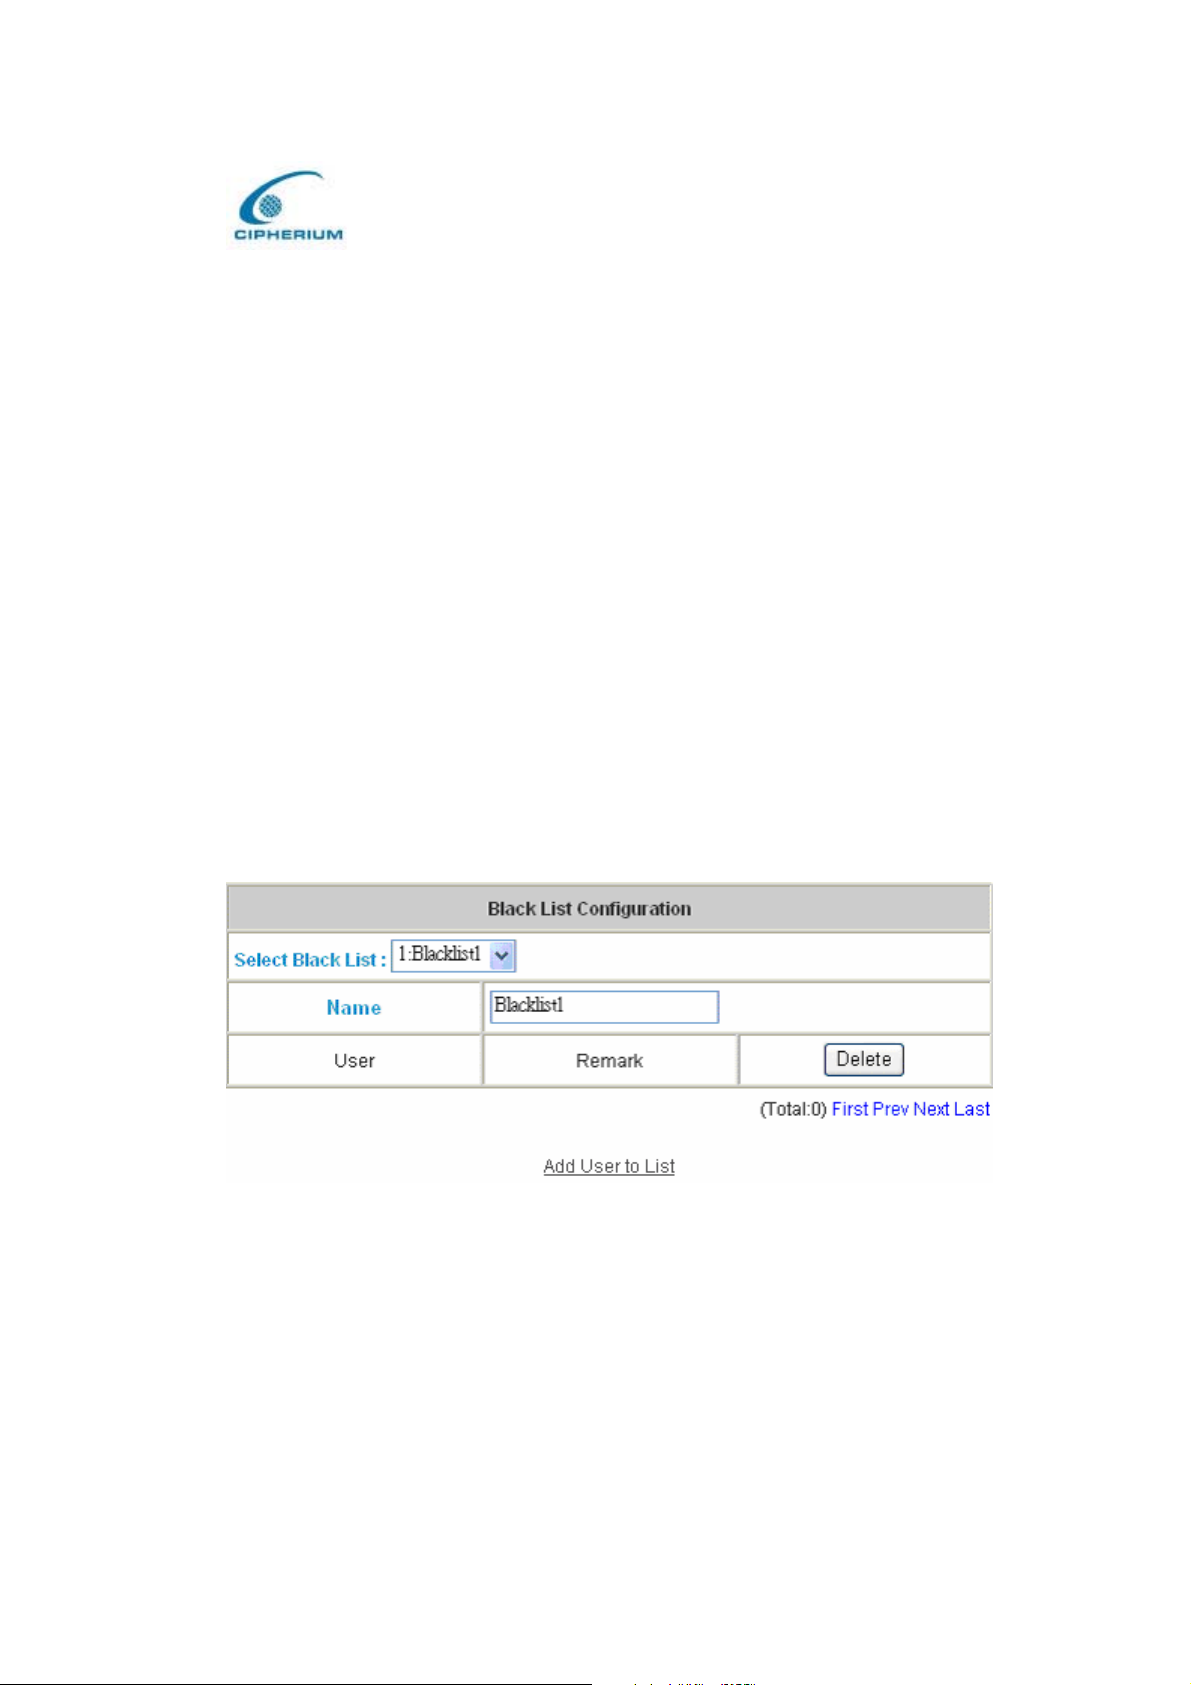
Cipherium bonalinx-W 1300
Administrator’ s Manual
Firewall Profile: The firewall profile that goes with the system.
Specific Route Profile: The route profile that goes with the system.
Schedule Profile: It sets up the schedule that goes with logging in to the system.
Bandwidth: The bandwidth that goes with the system.
5.2.3 Black List Configuration
The bonalinx-W 1300 provides a black list function for the system. The Administrator can add,
delete, or edit a specific black list. Each black list at most has 40 users. If a user logs into the
system and such user is on the black list, then such user cannot login. The Administrator can
use the pull-down menu to select the desired black list.
Figure 5-59 Example of Black List
If you click the hyperlink of “Add User to List”, the Add Black List will appear.
72
Page 82
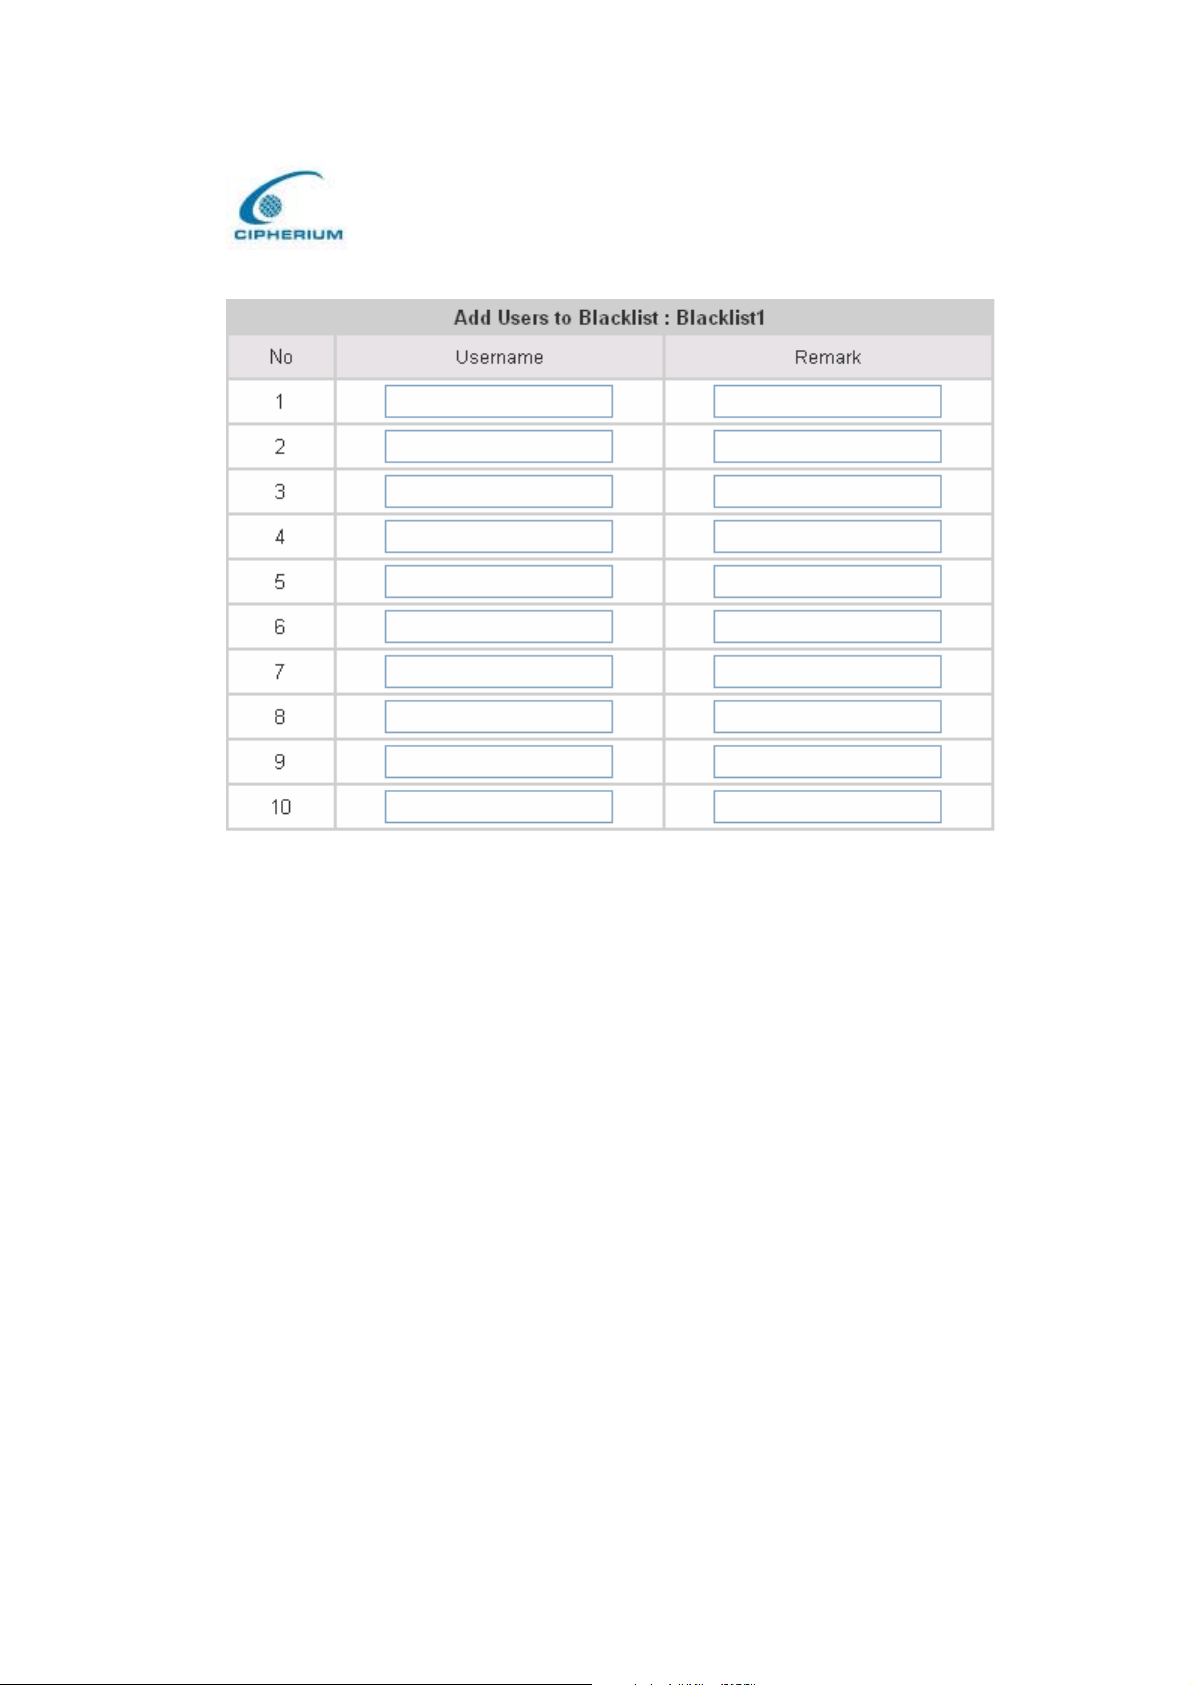
Cipherium bonalinx-W 1300
Administrator’ s Manual
Figure 5-60 Example of Adding User to Black List
After you enter the ID of a user into the black list, click “Apply”.
For example, If you successfully add the user b1 into the black list, the system will display a
message to inform the Administrator.
User ‘b1’ has been added!
After clicking “Previous”, you will return to the Black List Configuration.
If you want to delete a user from the black list, select the delete check box and then click the
“Delete ” button.
Caution: After you delete a user, no message or request for confirmation will appear.
73
Page 83
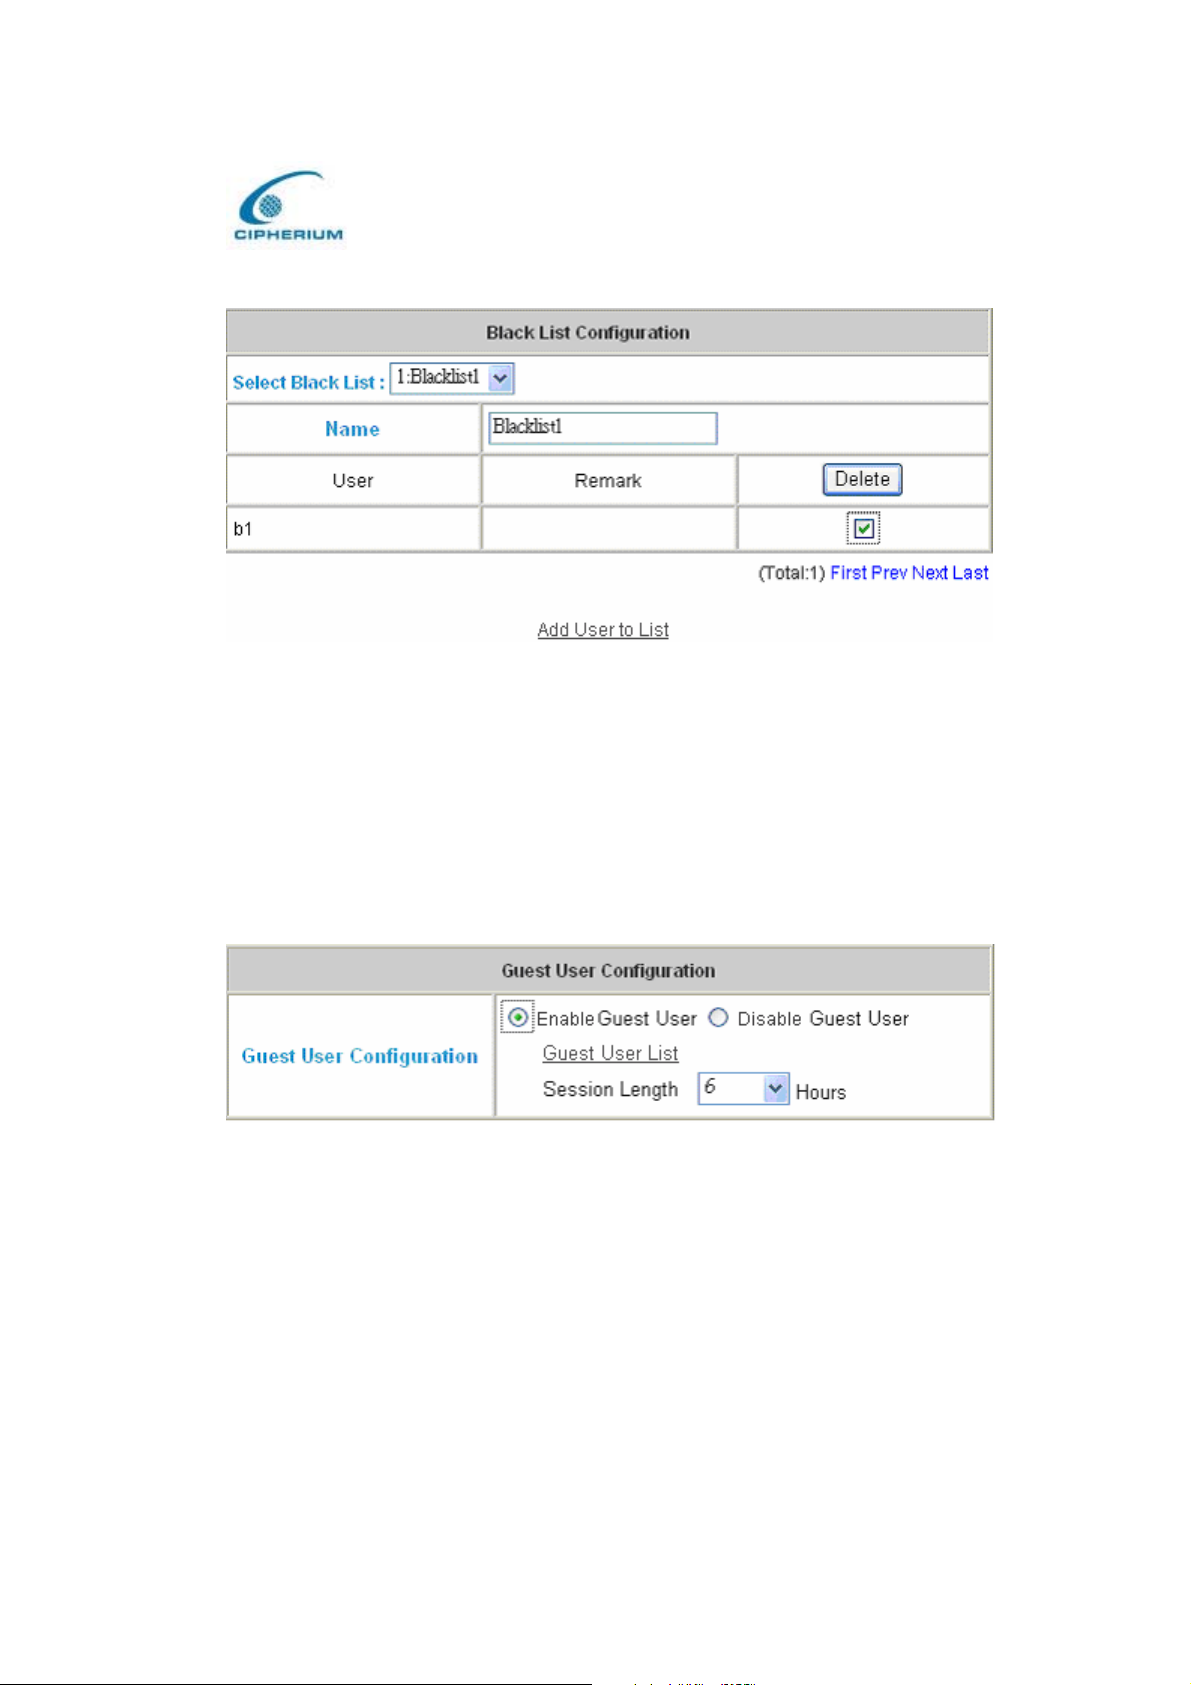
Figure 5-61 Example of Deleting a User from Black List
5.2.4 Guest User Configuration
Cipherium bonalinx-W 1300
Administrator’ s Manual
When you select Active Guest User, you can open the Guest User Configuration as shown
in the following figure.
Figure 5-62 Guest User Configuration Management Interface
Guest User List: The bonalinx-W 1300 provides 10 groups for the Guest User List. If you
want to open a certain Guest User List, you just need to key in the corresponding Password in
the password column, and then click “Apply” to complete the setup for the Guest User
Configuration as shown in Figure 5-62.
Session Length: It restricts the session used by the Guest User List. The default session length
is setted to 6 hours , and the limit ranges from 1 to 12 hours. After you select the Active Guest
74
Page 84
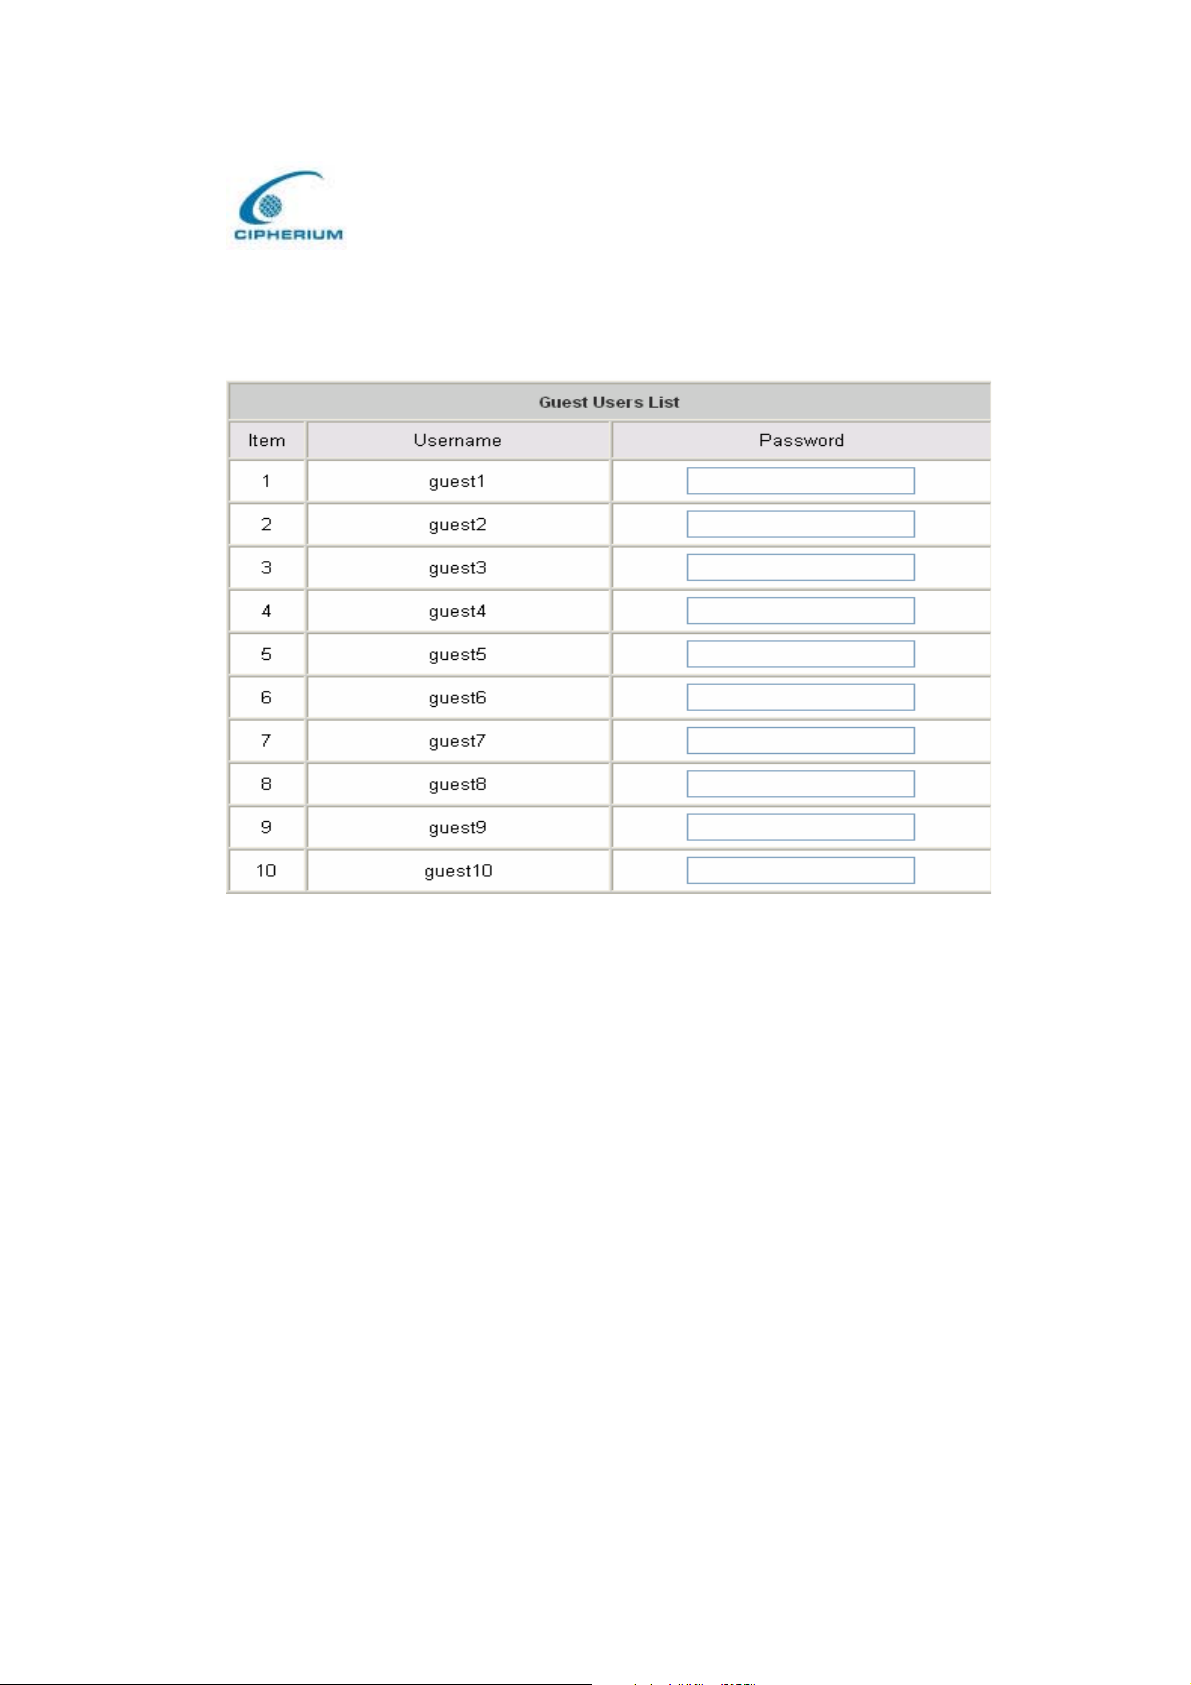
User, it is necessary to click “Apply” to enable this function.
Figure 5-63 Example of Guest User Management Interface
Cipherium bonalinx-W 1300
Administrator’ s Manual
5.2.5 Roaming Configuration
The system provides bonalinx-W 1300 and GRIC Server for roaming, and you only need to set
up the related parameter in this page to let the user of the GRIC Server use the bonalinx-W
1300. These settings will be effective immediately after you click the “Apply” button.
The GRIC user will be able to use the webpage gric.shtml, and is provided with username,
password, IP, and MAC, so that the bonalinx-W 1300 will provide the Authentication and
authorization functions.
75
Page 85
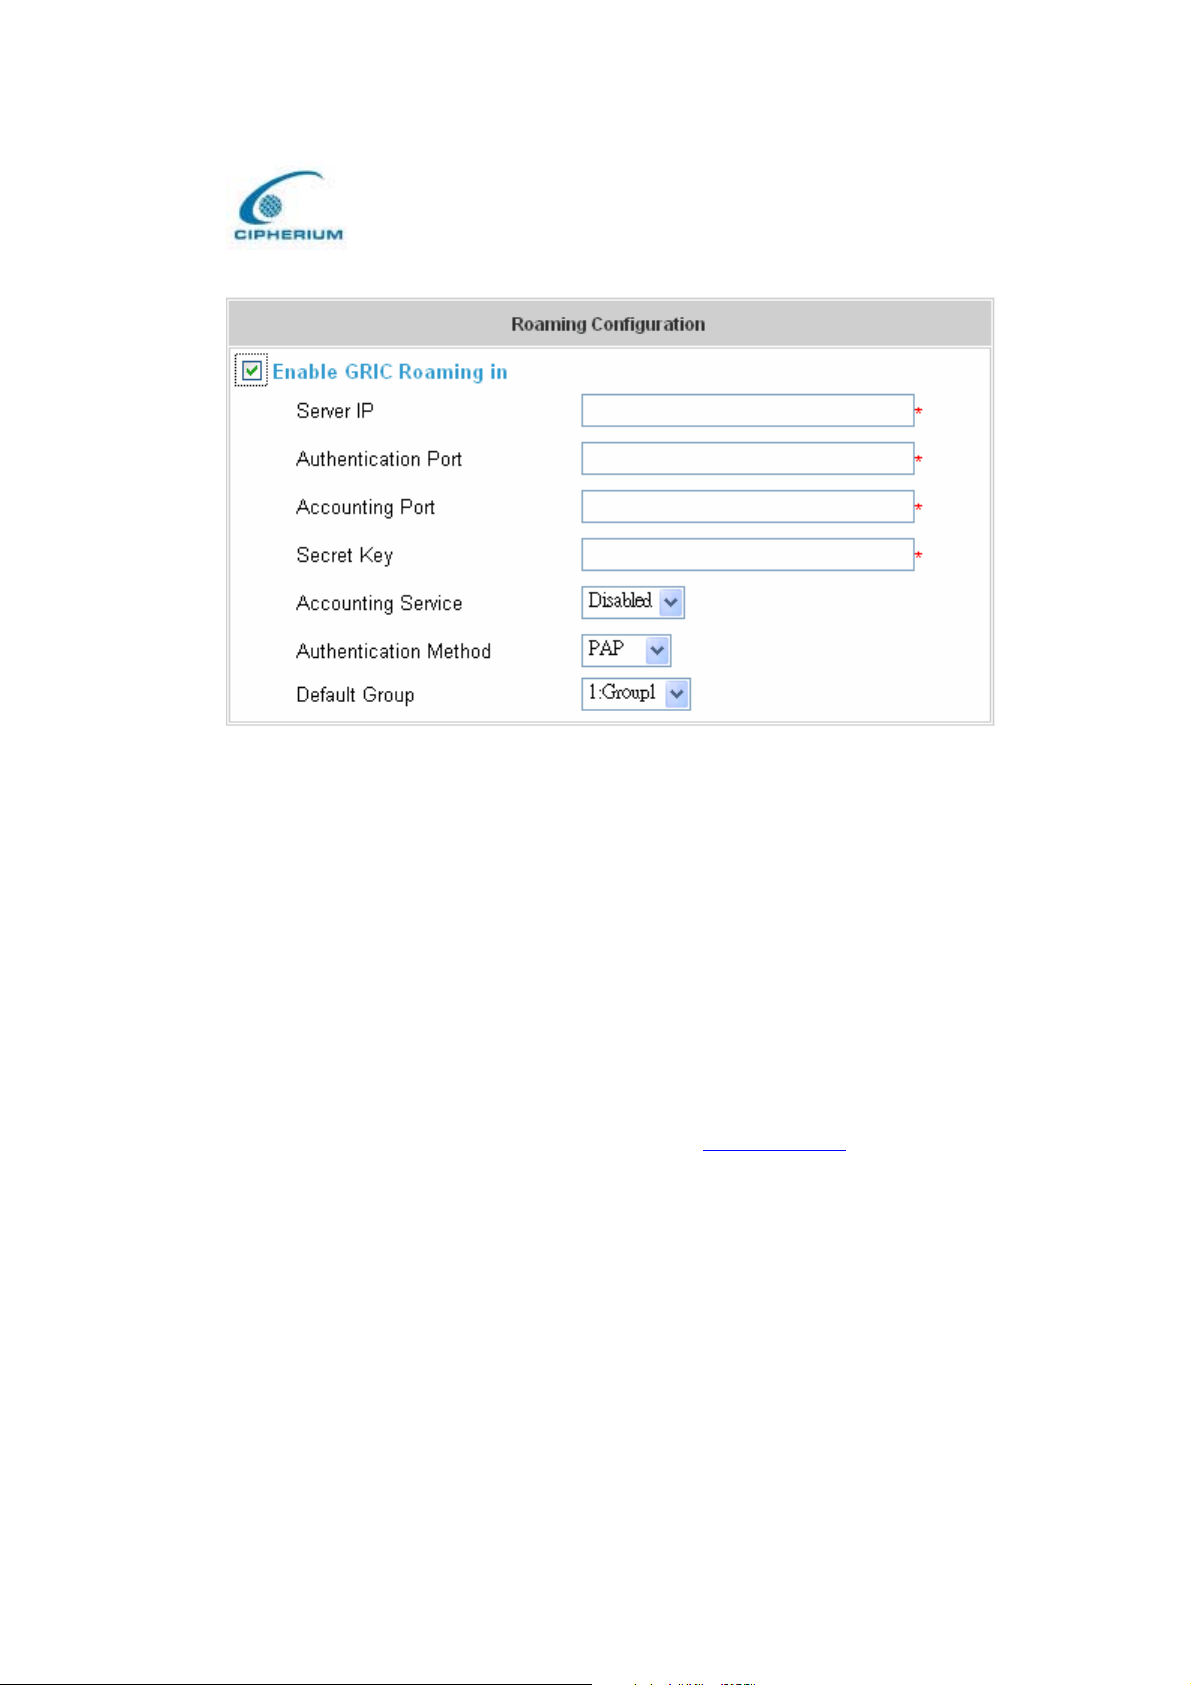
Figure 5-64 Roaming Configuration
Below is a GRIC example:
Cipherium bonalinx-W 1300
Administrator’ s Manual
bonalinx-W 1300 Authentication Port IP address: 192.168.1.254
Username: xyz, and his IP address: 192.168.1.100
Password: xyz
MAC address: 01:23:45:67:89:ab
The gric.shtml example should like this:
https://192.168.1.254/loginpages/gric.shtml?uname=xyz&uip=192.168.1.100&up
wd=xyz&umac=01:23:45:67:89:ab
User can also use browser to key in GRIC\username or username@GRIC
on ID field and
user’ s password of the login webpage to be Public LAN.
76
Page 86
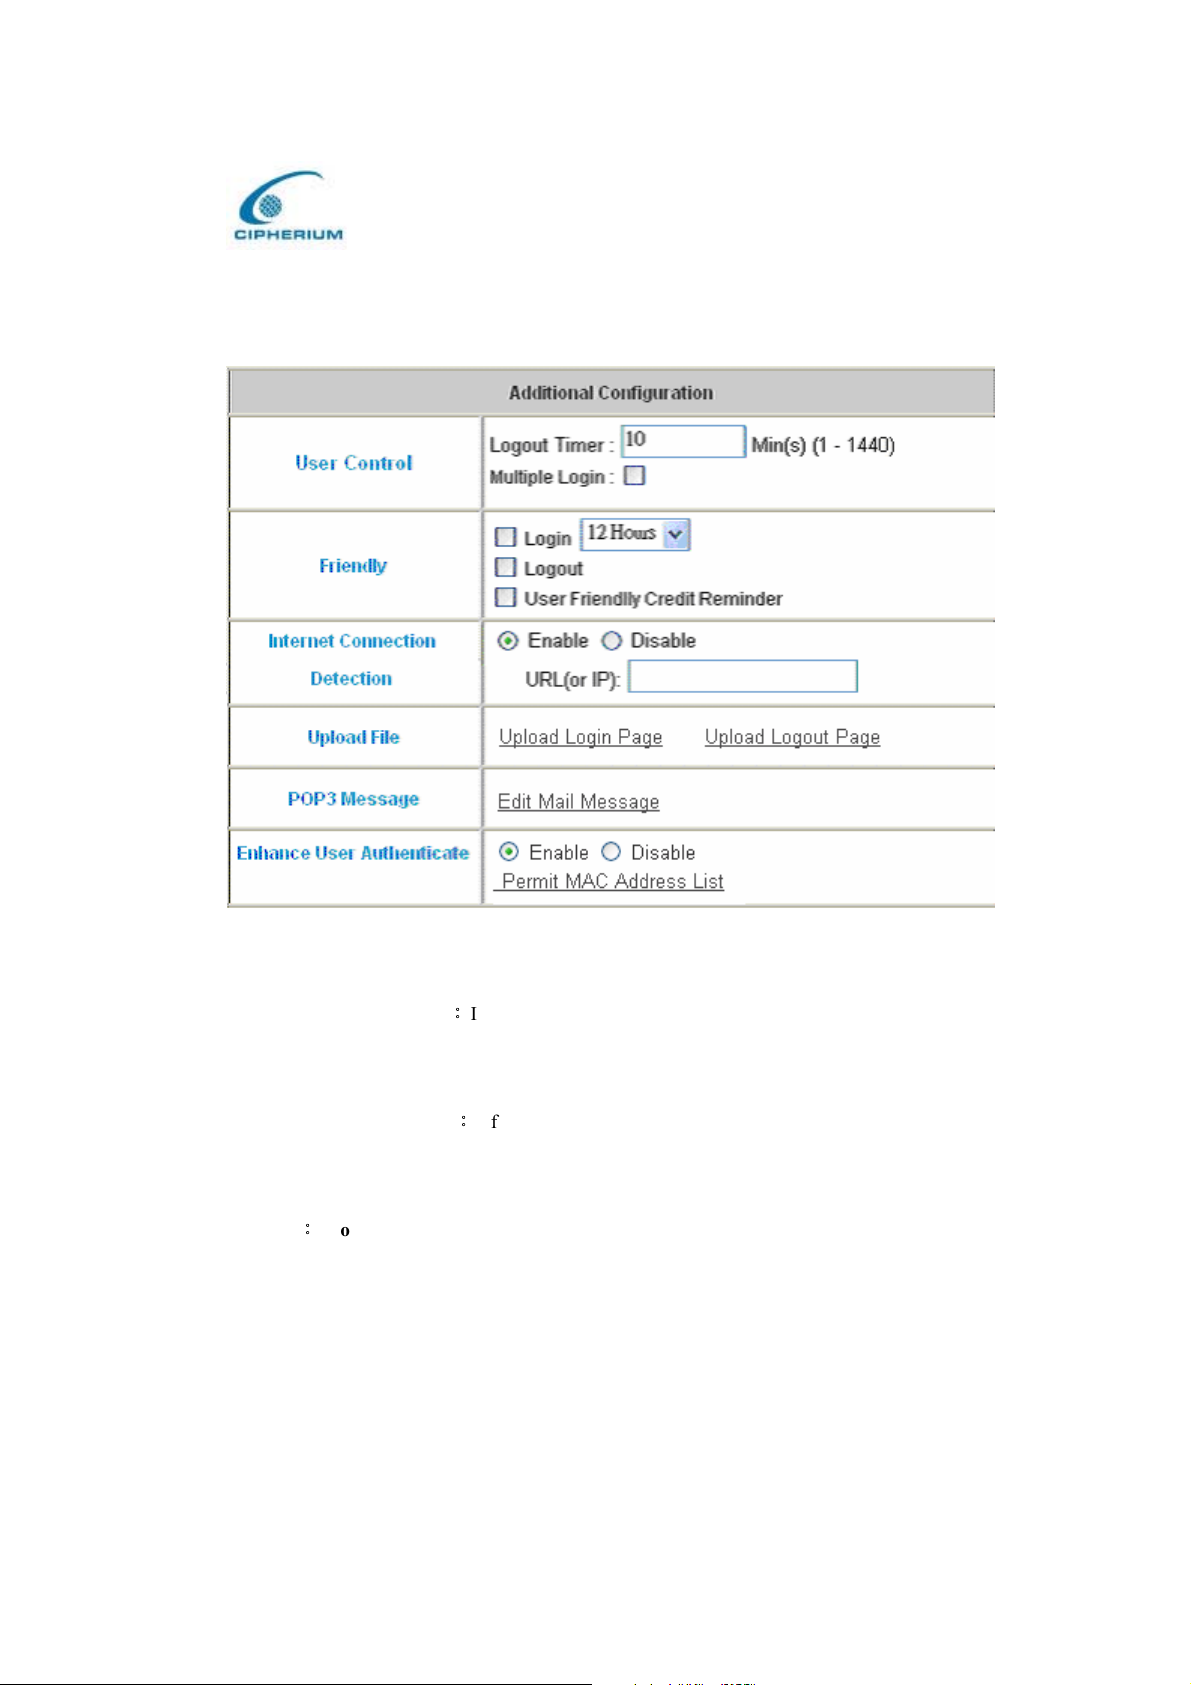
5.2.6 Additional Configuration
Figure 5-65 Addition al Configuration
Cipherium bonalinx-W 1300
Administrator’ s Manual
User Control: It is applied to the rules for setting general users.
Logout TimerǺIf a user has idled and not used the network for a while, the
system will automatically log out the user. Such logout time can be set in the
range of 1~1440, and the default logout time is 10 minutes.
Multiple LoginǺAfter you have selected this function, the user with the same ID
can log in from several computers.
FriendlyǺ Login: After you select this function, the login page will automatically obtain the
username and password from previous login for the Public LAN directly. The
user no longer needs to click the button, for login. If this option is not selected,
the user has to click the “Login” button for the login. The username and
password for login will be saved for 12 hours.
Logout: When a user login, a small window will appear and show the user’s
77
Page 87
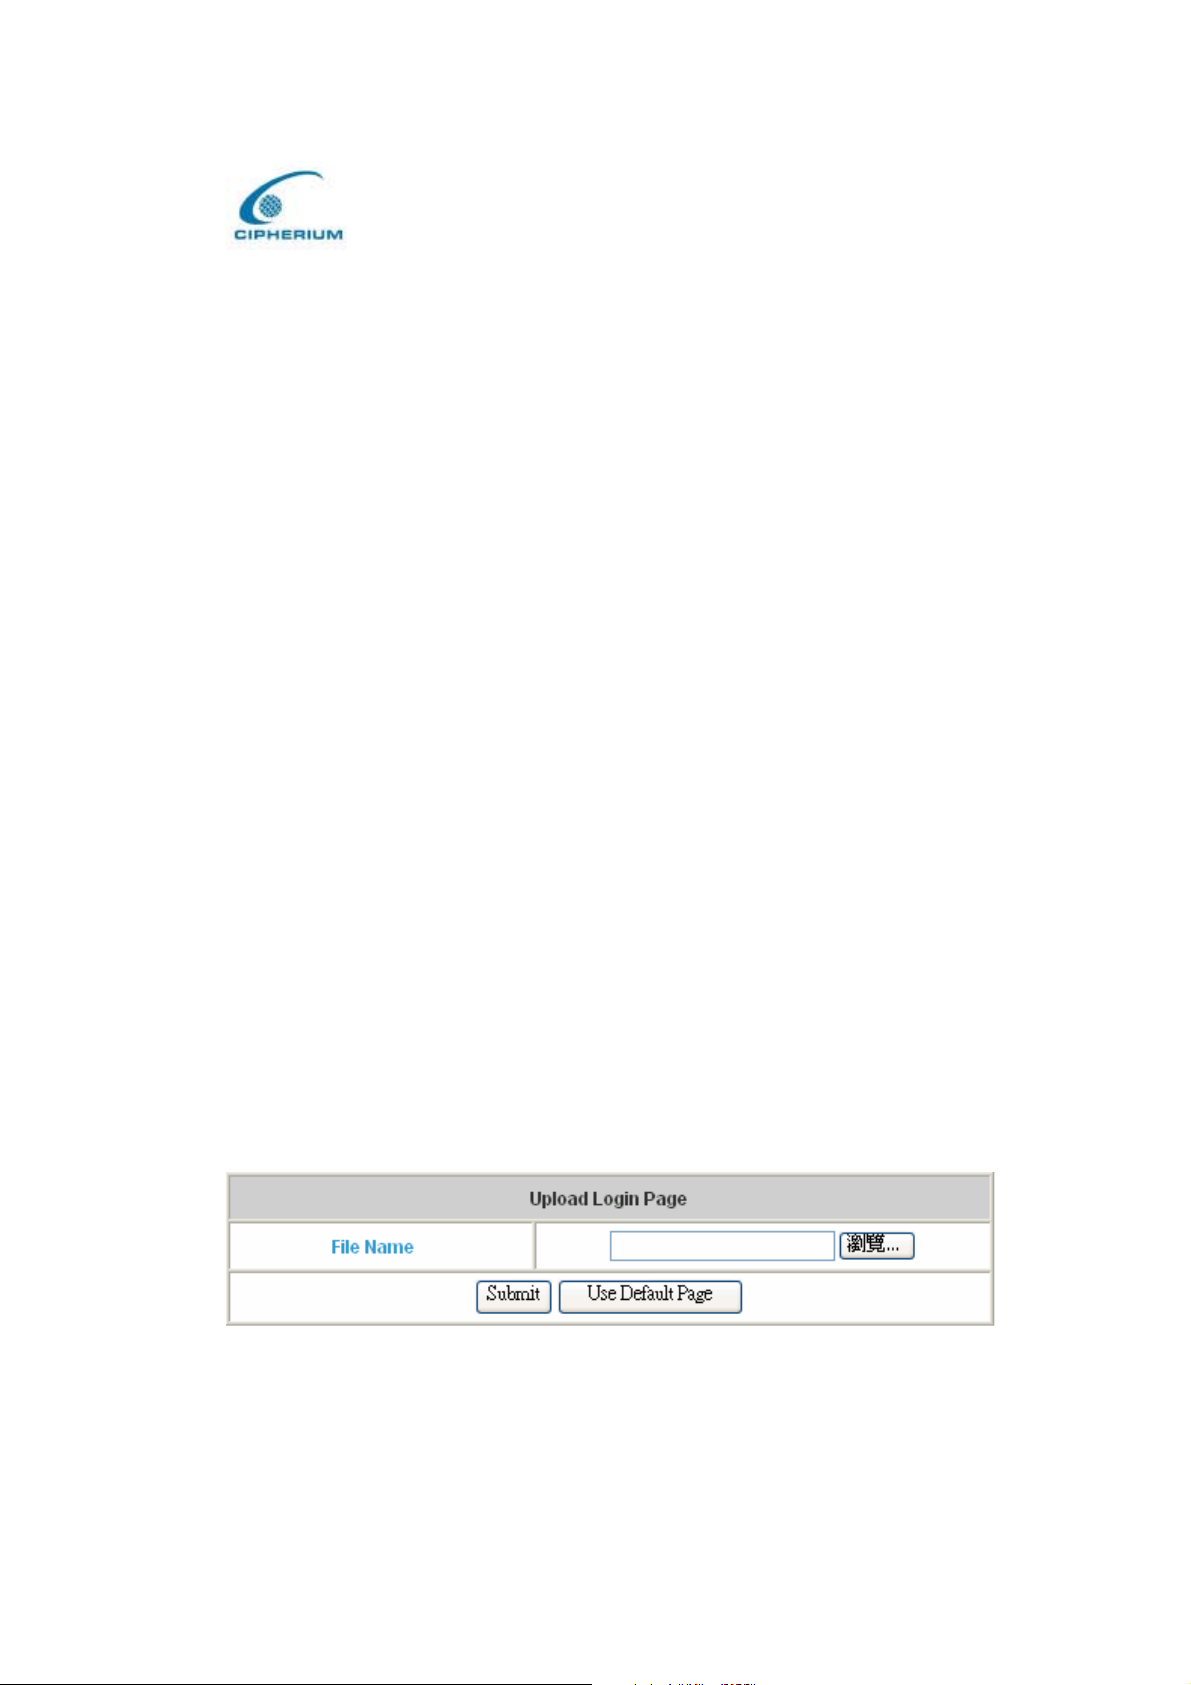
Cipherium bonalinx-W 1300
Administrator’ s Manual
information and provide you with a logout button for the logout. If you click this
option, it will close such window and provide a logout function. If you do not
select this option, closing the window will not log out the user.
User Friendly Credit Reminder: For On-Demand User who have paied before
they access internet, they can check how many time they still left from the login
window, and if they only left 10 mintues, the screen will show some message as
below “You only left 10 minutest, if we still want to access internet, please
check counterjumper “
Internet connection detection: bonalinx-W 1300 detects if The Internet connection is
functioning properly by dropping direct packet to the predetermined URL (or IP address).
URL or IP address: this predetermine URL will be used as a target address for
bonalinx-W 1300 to check the Internet connection.
Upload File:
1. Upload Login page
There are three frames with blue edges, which represent 3 sections for the user to define the
user interface.
If you want to use user-defined interface on the bonalinx-W 1300, please enter the filename of
the login webpage in the first part of the interface, or browse and click such file. If you want to
recover the factory default setting of the login interface, click the “Use Default Page” button.
After the upload is completed, click the “Preview” at the bottom of this page to preview your
user-defined login user interface.
Figure 5-66 Upload User-defined Login Interface
The user-defined login interface must include the following HTML codes to provide a channel
78
Page 88
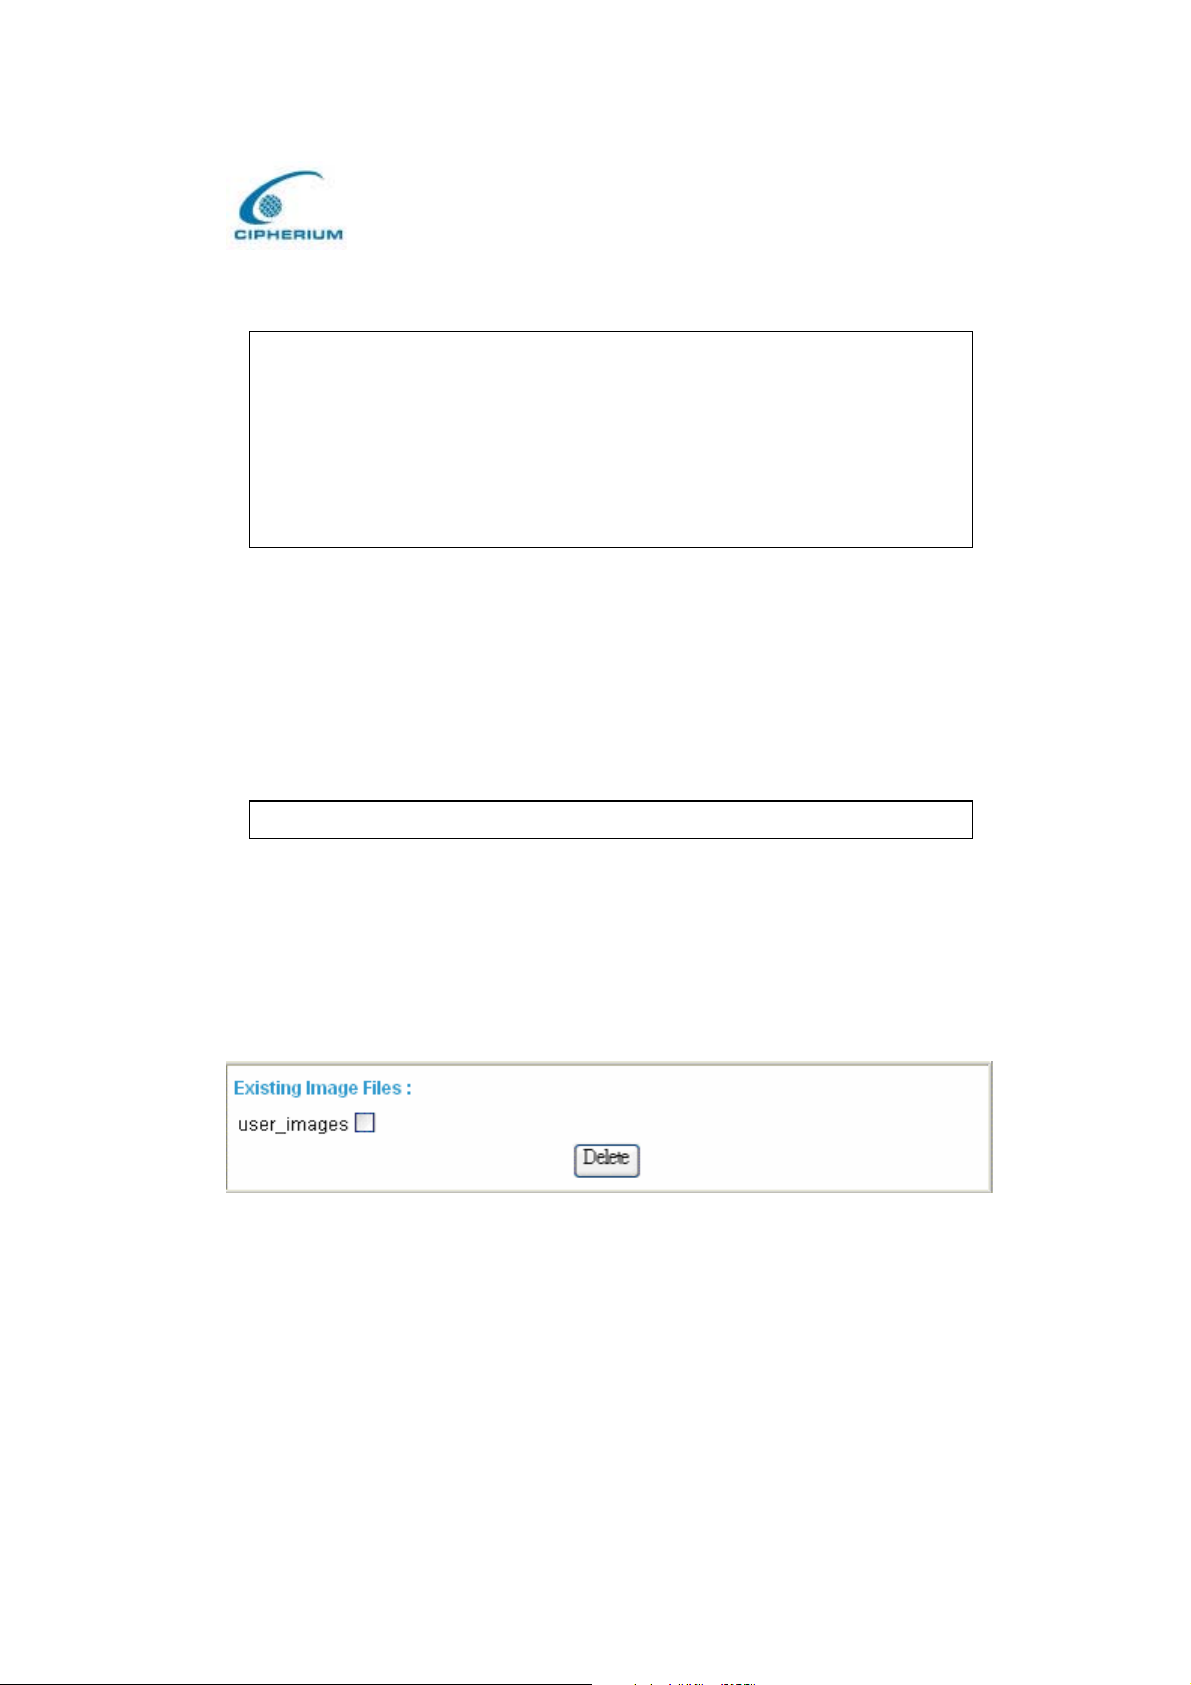
Cipherium bonalinx-W 1300
Administrator’ s Manual
for the user to key in username and password.
Figure 5-67 HTML Instructions Required for Using User-Defined Interface
<form action="userlogin.shtml" method="post" name="Enter">
<input type="text" name="myusername">
<input type="password" name="mypassword">
<input type="submit" name="submit" value="Enter">
<input type="reset" name="clear" value="Clear">
</form>
If the user-defined login interface includes a graphic file, the HTML code of the graphic file
path must be the upload graphic file. In the Upload Image at the third section of this
interface Upload Image File, key in the path and file name of such graphic file or browse to
select such file. The maximum size of the graphic file is 512K.
Figure 5-68 Path of Graphic File in User Login Interface
<img src="images/xx.jpg ">
After the graphic file is uploaded, the second section Existing Image Files of this page will
list the graphic files uploaded to the bonalinx-W 1300. You can select or delete any graphic
file, and the system will list the using space of the graphic file in the third section.
Figure 5-69 Graphic File Description
After the web page and graphic files are uploaded, you can click “Preview” at the bottom of
this page to preview your user interface.
79
Page 89
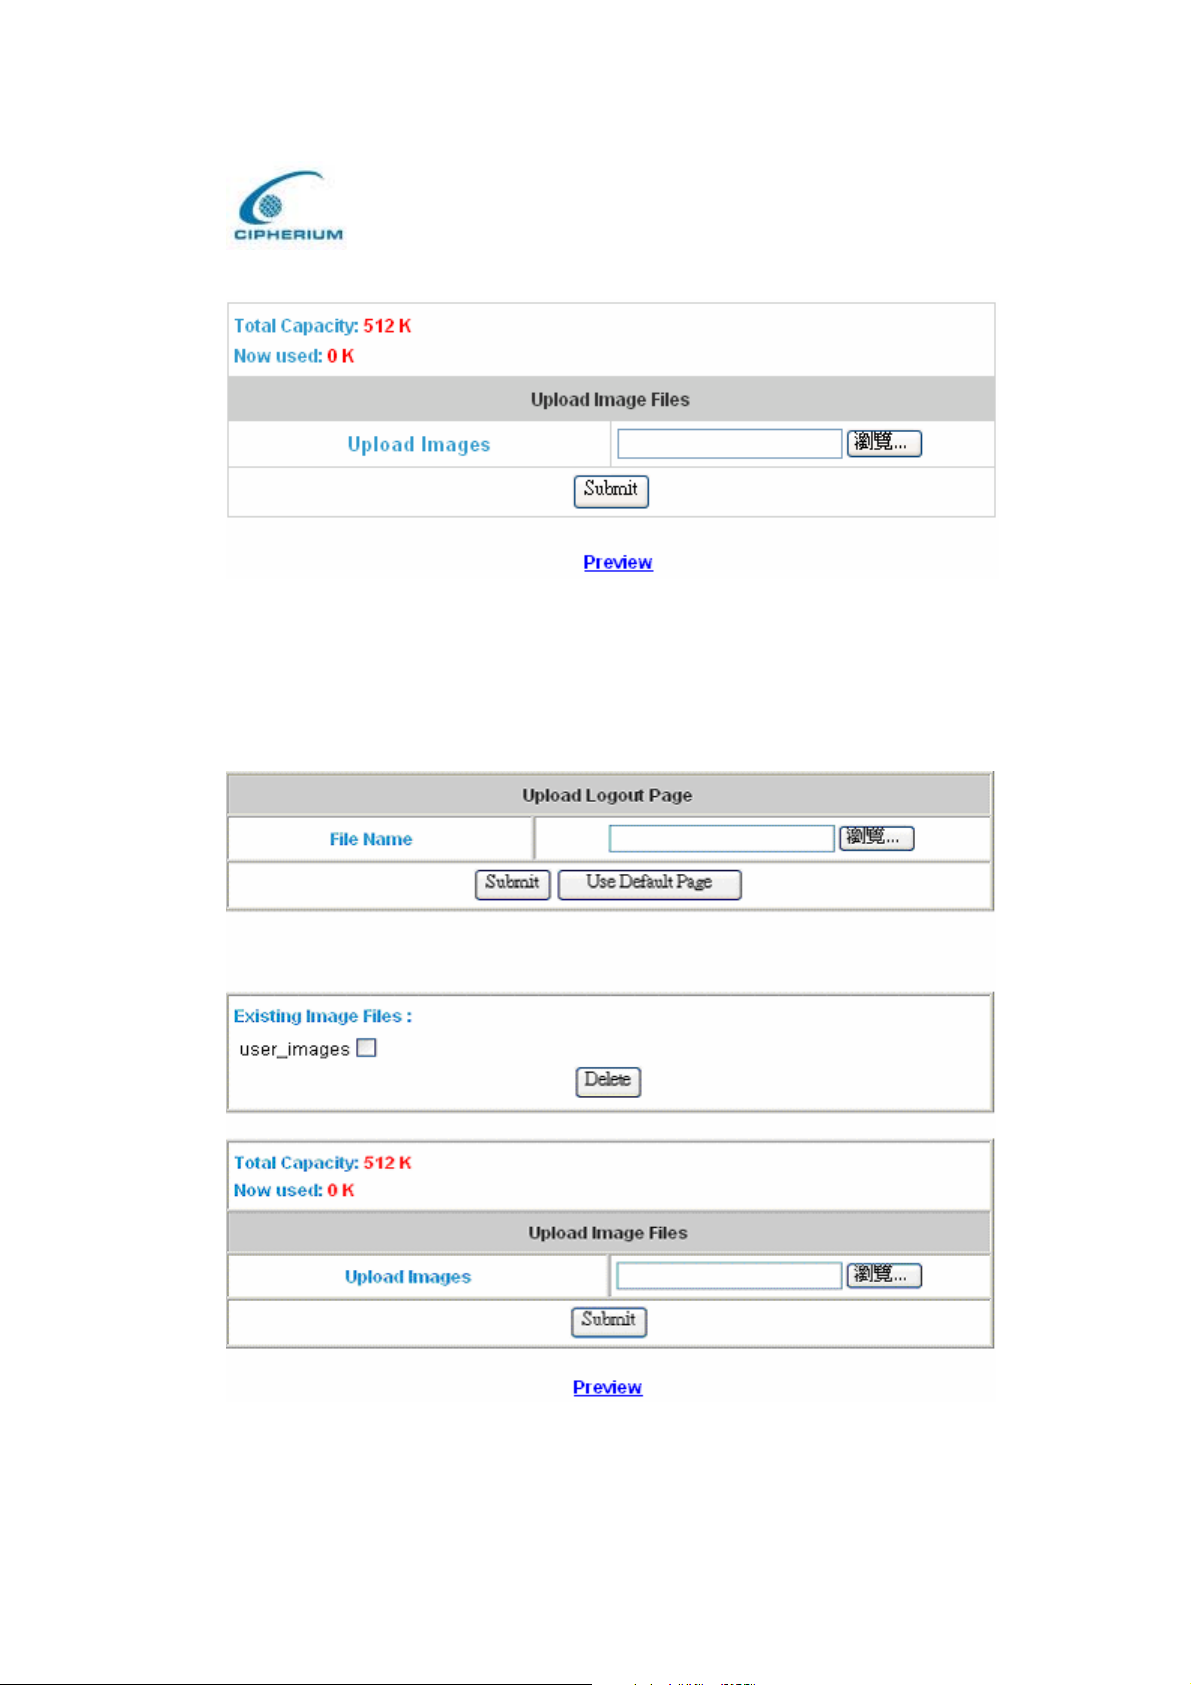
Cipherium bonalinx-W 1300
Administrator’ s Manual
Figure 5-70 Path of Graphic File for User Logout Interface
2. Upload Logout Page
The system will provide you with the user-defined logout interface, which is similar to
the user login interface.
Figure 5-71 Upload User Logout Interface
80
Page 90
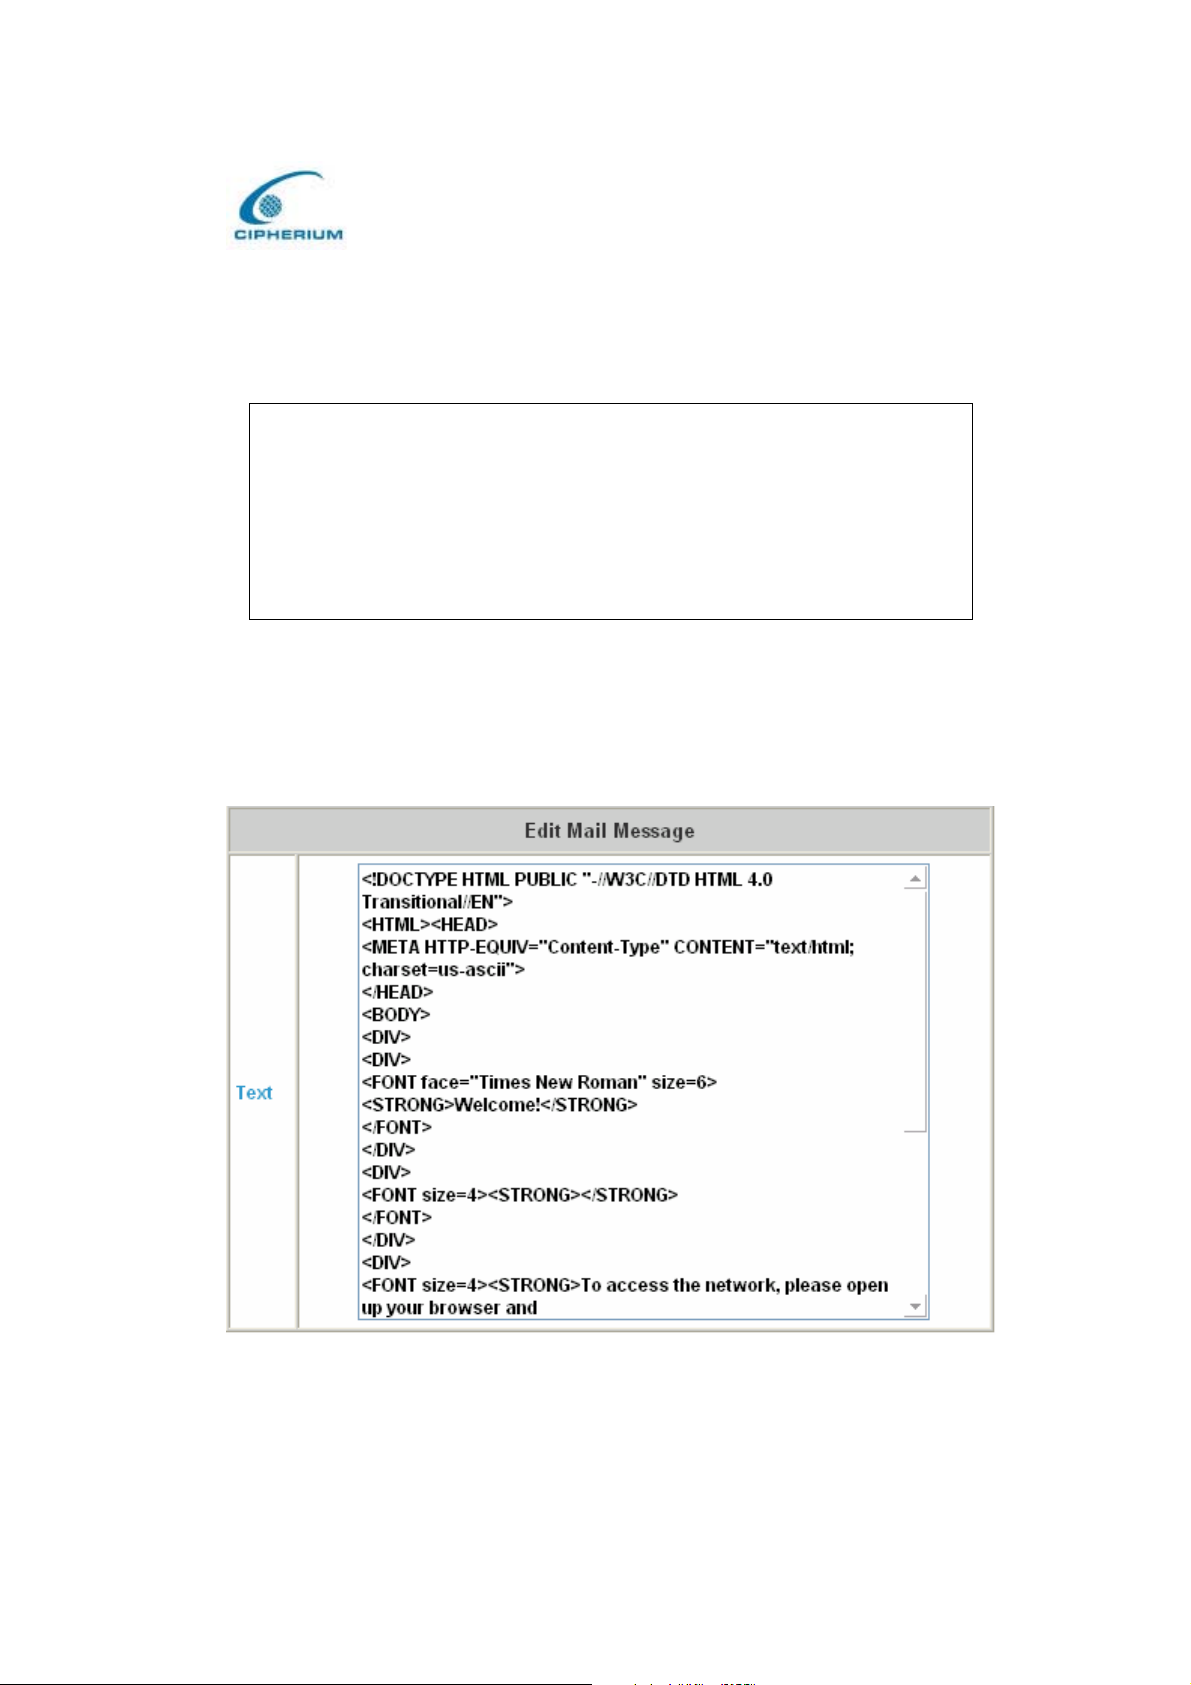
Cipherium bonalinx-W 1300
Administrator’ s Manual
The difference resides on that your user-defined user logout interface must include the
following HTML codes to provide users a channel to enter the username and password.
Figure 5-72 HTML Codes Required for User Logout Interface
<form action="userlogout.shtml" method="post" name="Enter">
<input type="text" name="myusername">
<input type="password" name="mypassword">
<input type="submit" name="submit" value="Logout">
<input type="reset" name="clear" value="Clear">
</form>
POP3 Message: the system can allow administrator to edit its own warning mail to user who
has opened a mail browser without logging on to the internet beforehand.
Figure 5-73 POP3 Message
81
Page 91
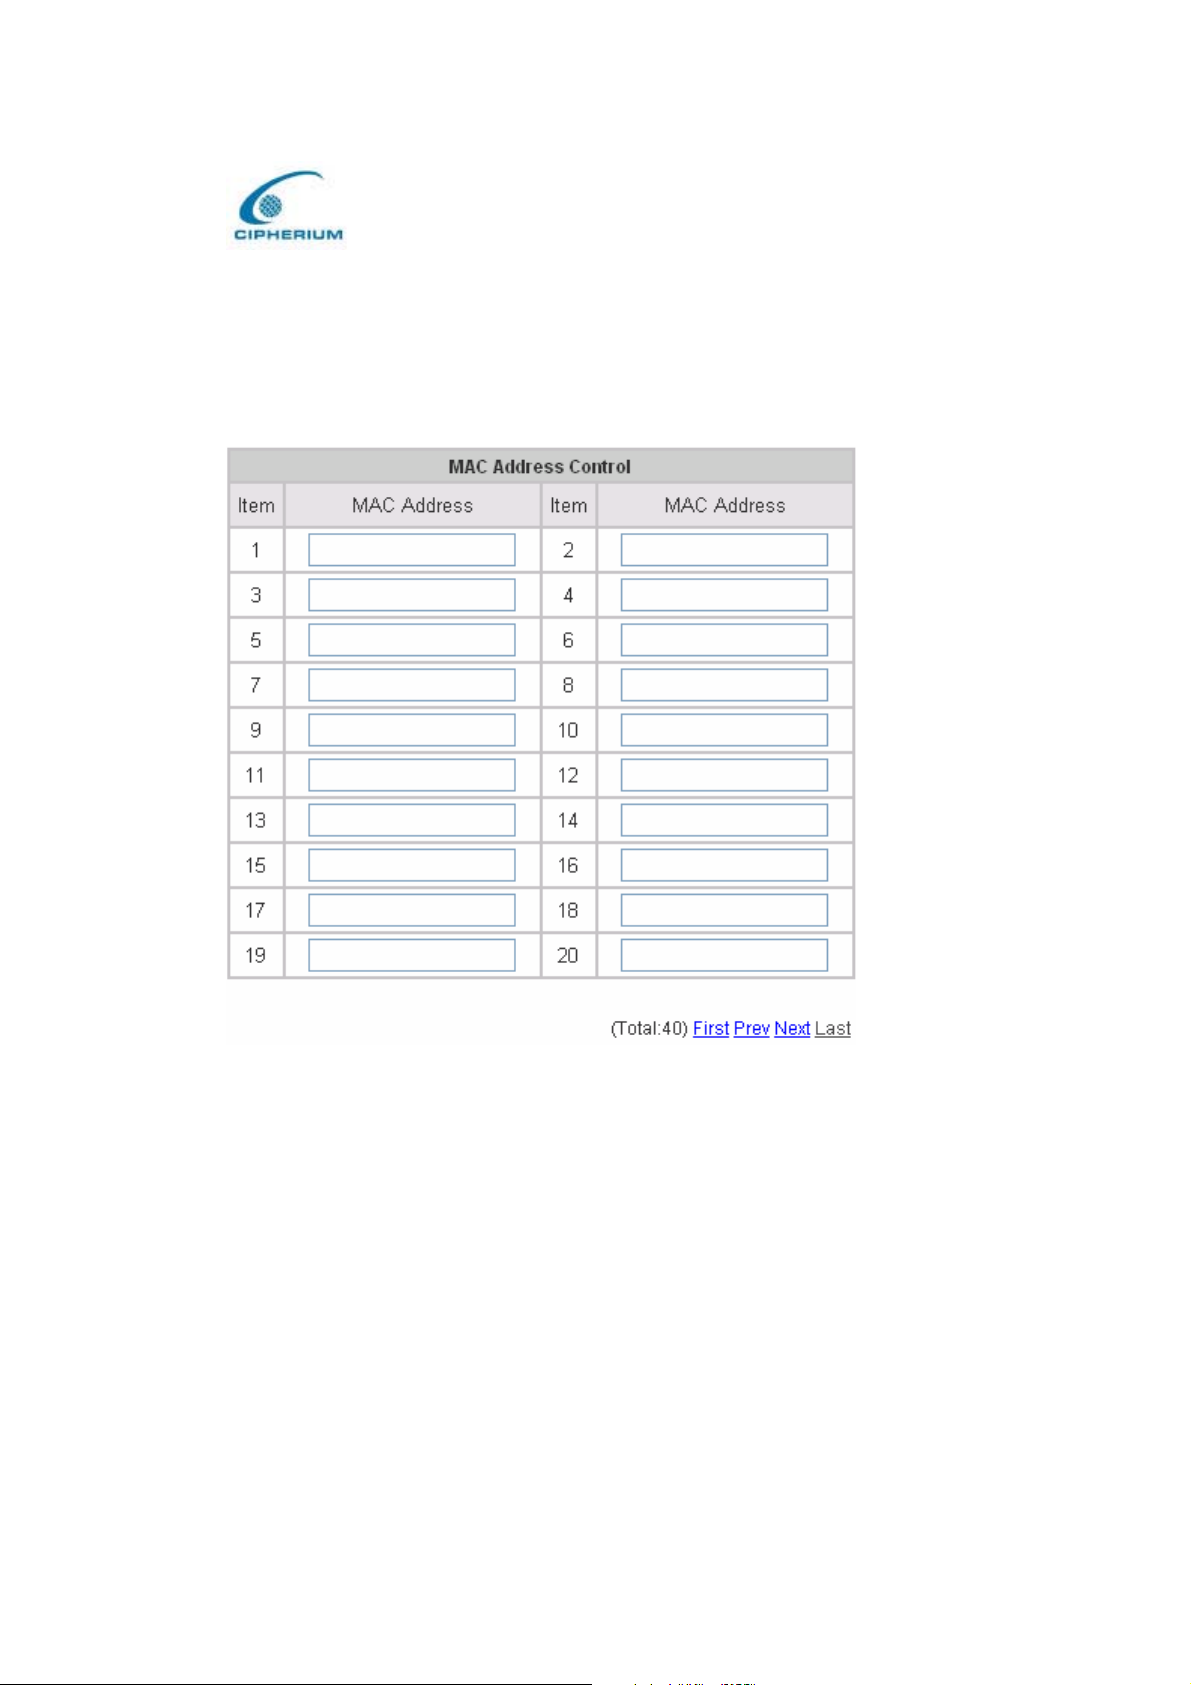
Cipherium bonalinx-W 1300
Administrator’ s Manual
Enhance User Authenticate : the system allow administrator to enter at most 40
predetermined MAC addresses, only the user come from these MAC addresses will be able to
reach the login page.
Figure 5-74 MAC Address Control Interface
5.2.7 On-demand User Configuration
On-Demand user: When you connect the Printer to the bonalinx-W 1300’s console port,
there is 2000 On-demand users could be used. By default, the On-demand user database is
empty. While you press the Printer’s button, the On -demand user will be create, then printing a
receipt (Figure 5-75) which will contain this On-demand user’ s information. (Figure 5-76)
(Figure 5-77).
82
Page 92

Figure 5-75 Receipt Information
Welcome!
------------------------
Username: Cipher
Password: q6m34m3b
Price: US$2
Usage: 60 minute(s)
------------------------
ESSID:
dlink
Shared WEP Keys
(HEX 40 bit):
------------------------
Valid to use until:
Cipherium bonalinx-W 1300
Administrator’ s Manual
2003/09/09 12:46:56
------------------------
Thank You!
2004
83
Page 93
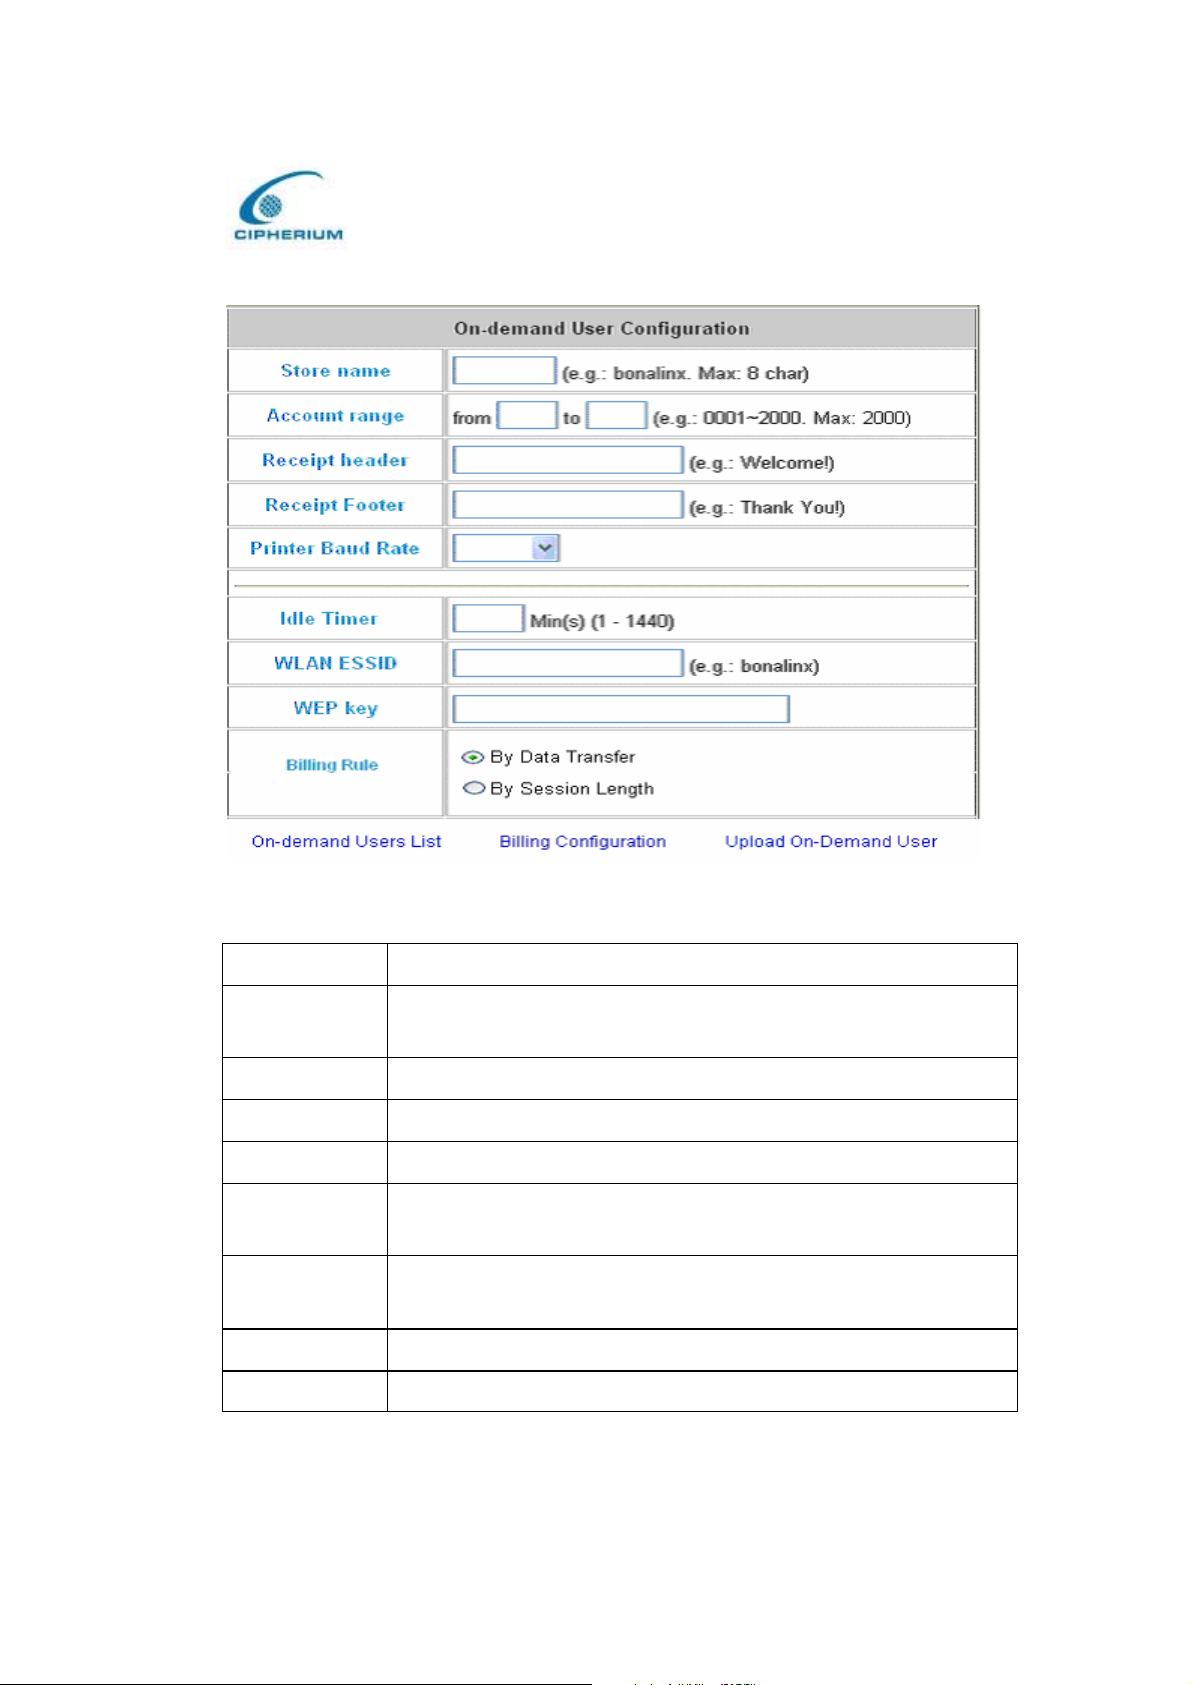
Cipherium bonalinx-W 1300
Figure 5-76 On-demand User Configuration
Administrator’ s Manual
Figure 5-77 On-demand User Page Field and Description
Field
Description
You can specify the prefix of the user name, max is 8 char. , for
Store Name
example: D-Link.
Account Range
You can specify the max user amount, max is 2000
Receipt Header You can configure the receipt’ s header in this filed.
Receipt Footer You can configure the receipt’ s footer in this filed.
Printer Baud
Rate
You can specify the baud rate to support specific printer,The default
setting is 9600.
You can specify how long can this account remain idle when he (she)
Idle Timer
login successful.
WLAN ESSID You can specify the AP’ s ESSID in this filed.
WEP Key You can specify the AP’ s WEP key in WEP Key filed.
84
Page 94
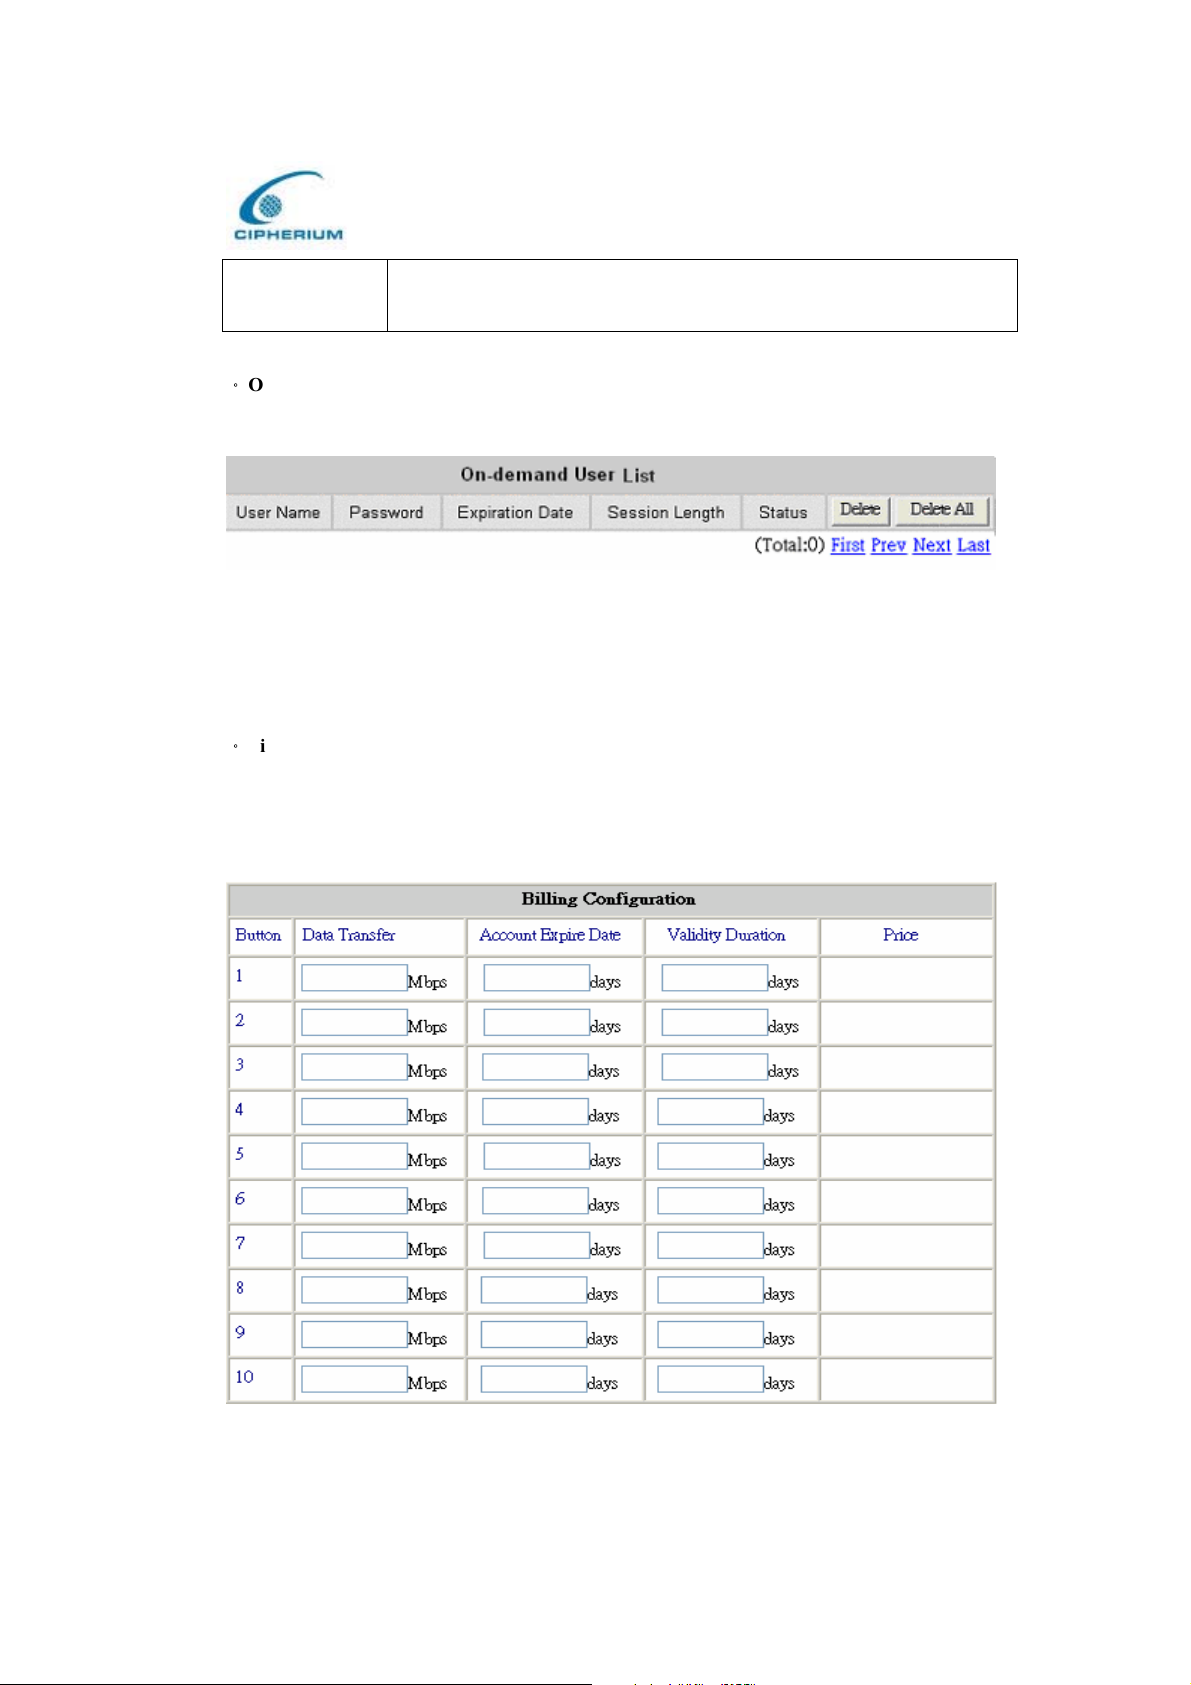
Cipherium bonalinx-W 1300
Administrator’ s Manual
Billing Rule
You can specify the billing rule for on-demand user, either by data
transfer or session length for user’s online access.
Ƿ
On-demand User List: A list about on-demand user. A sample list is shown below.
Figure 5-78 O n-demand User List
To delete specific users accounts, click on the checkboxes besides those user accounts then
click the Delete button. To delete all user accounts, click Delete All.
Ƿ
Billing Configuration: Depends on what you choose on Billing Rule,
By Date Transfer: Figure 5-79 will display.
By Session Length: Figure 5-80 will display.
Figure 5-79 Billing Configuration by Data Transfer
85
Page 95
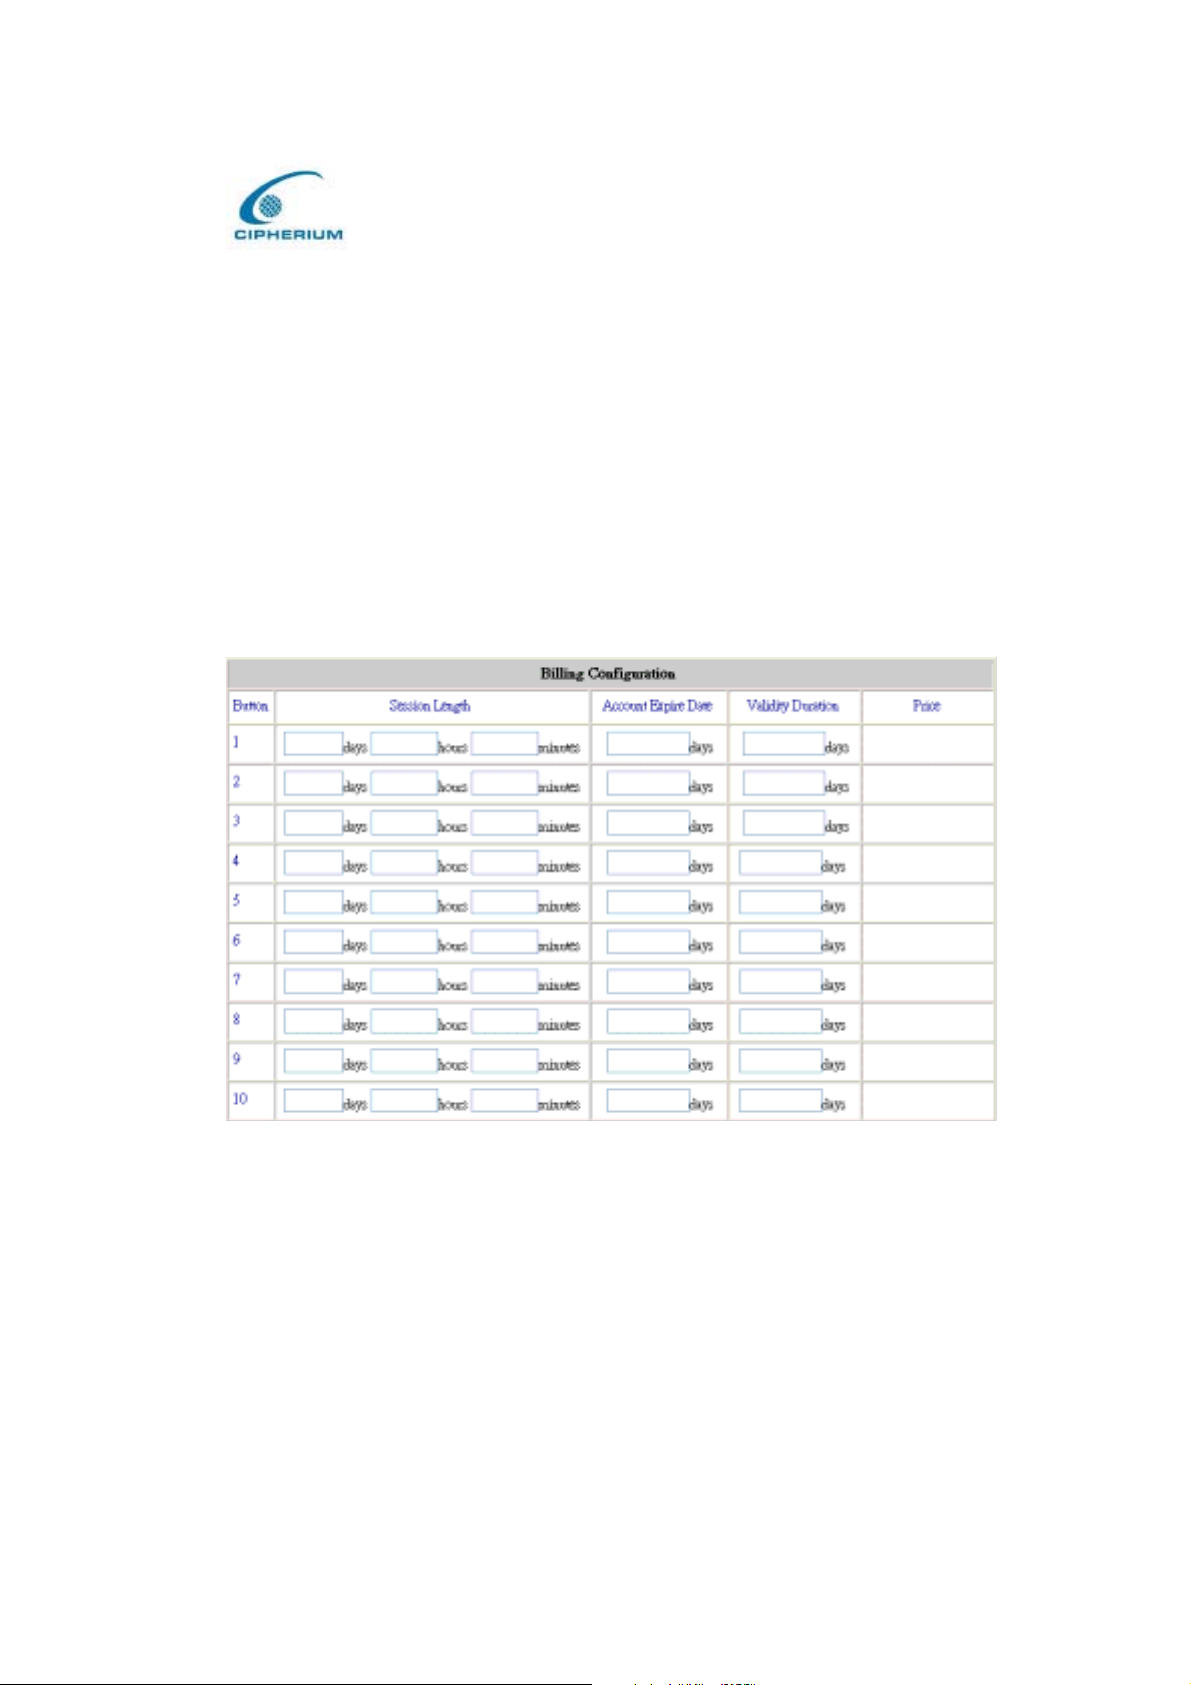
Cipherium bonalinx-W 1300
Administrator’ s Manual
Data Transfer: The total of data size for on-demand user.
Account Expire Date: The number of days for user to activate his/her account, after issue of
the account number.
Validity Duration: The account will remain valid after this number of days; prior that user
has activated his/her account.
Price: Price for the online access.
Figure 5-80 Billing Configuration by Session Length
Session Length: If user decide to use session length for the billing system, the price and
validity of account will depend on the number of logon hours (or days, or minutes) as per
user’s call.
86
Page 96
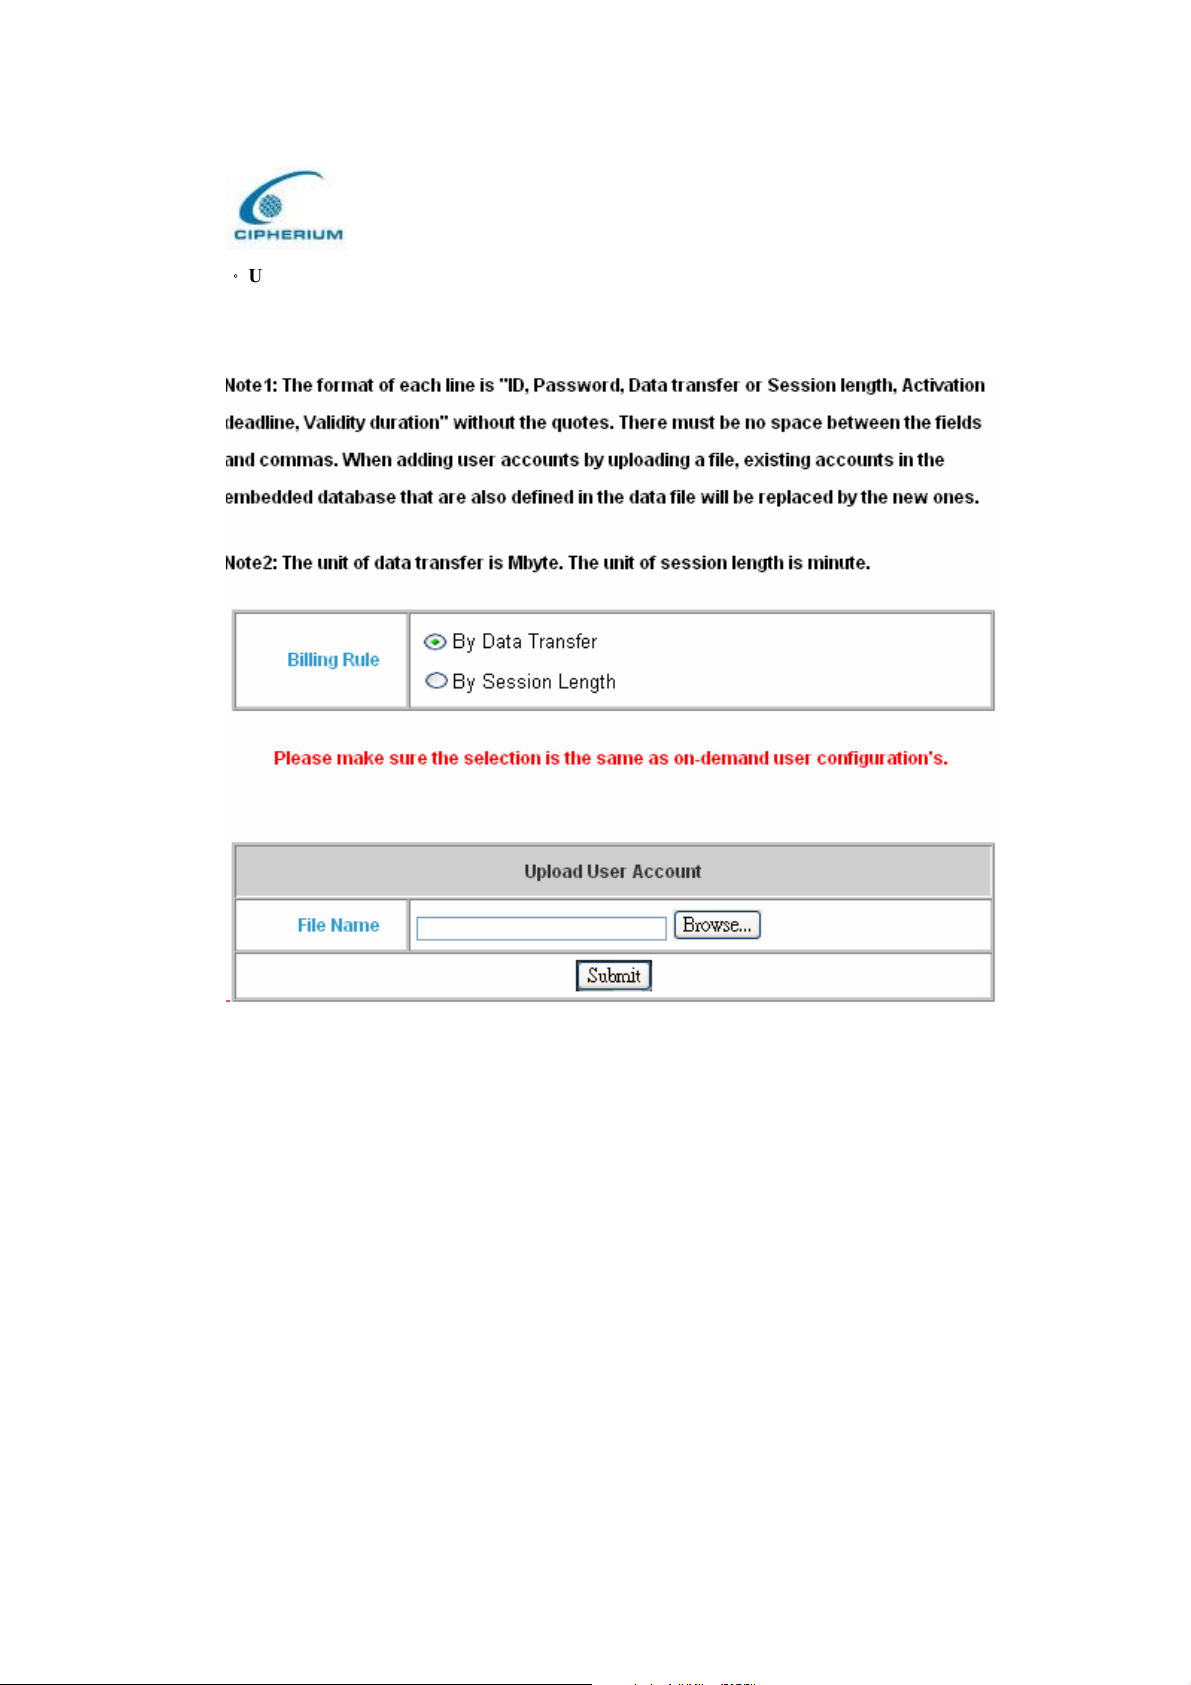
Ƿ
Upload On-demand User:
Cipherium bonalinx-W 1300
Administrator’ s Manual
Figure 5-81 Upload On- demand User
Billing rule: By data transfer: the size of transfer data.
By session length: the logon hours.
Remark: The billing rule while uploading a user account must be identical to the one
previously setup for on-demand user.
Upload User Account: upload a user account.
87
Page 97
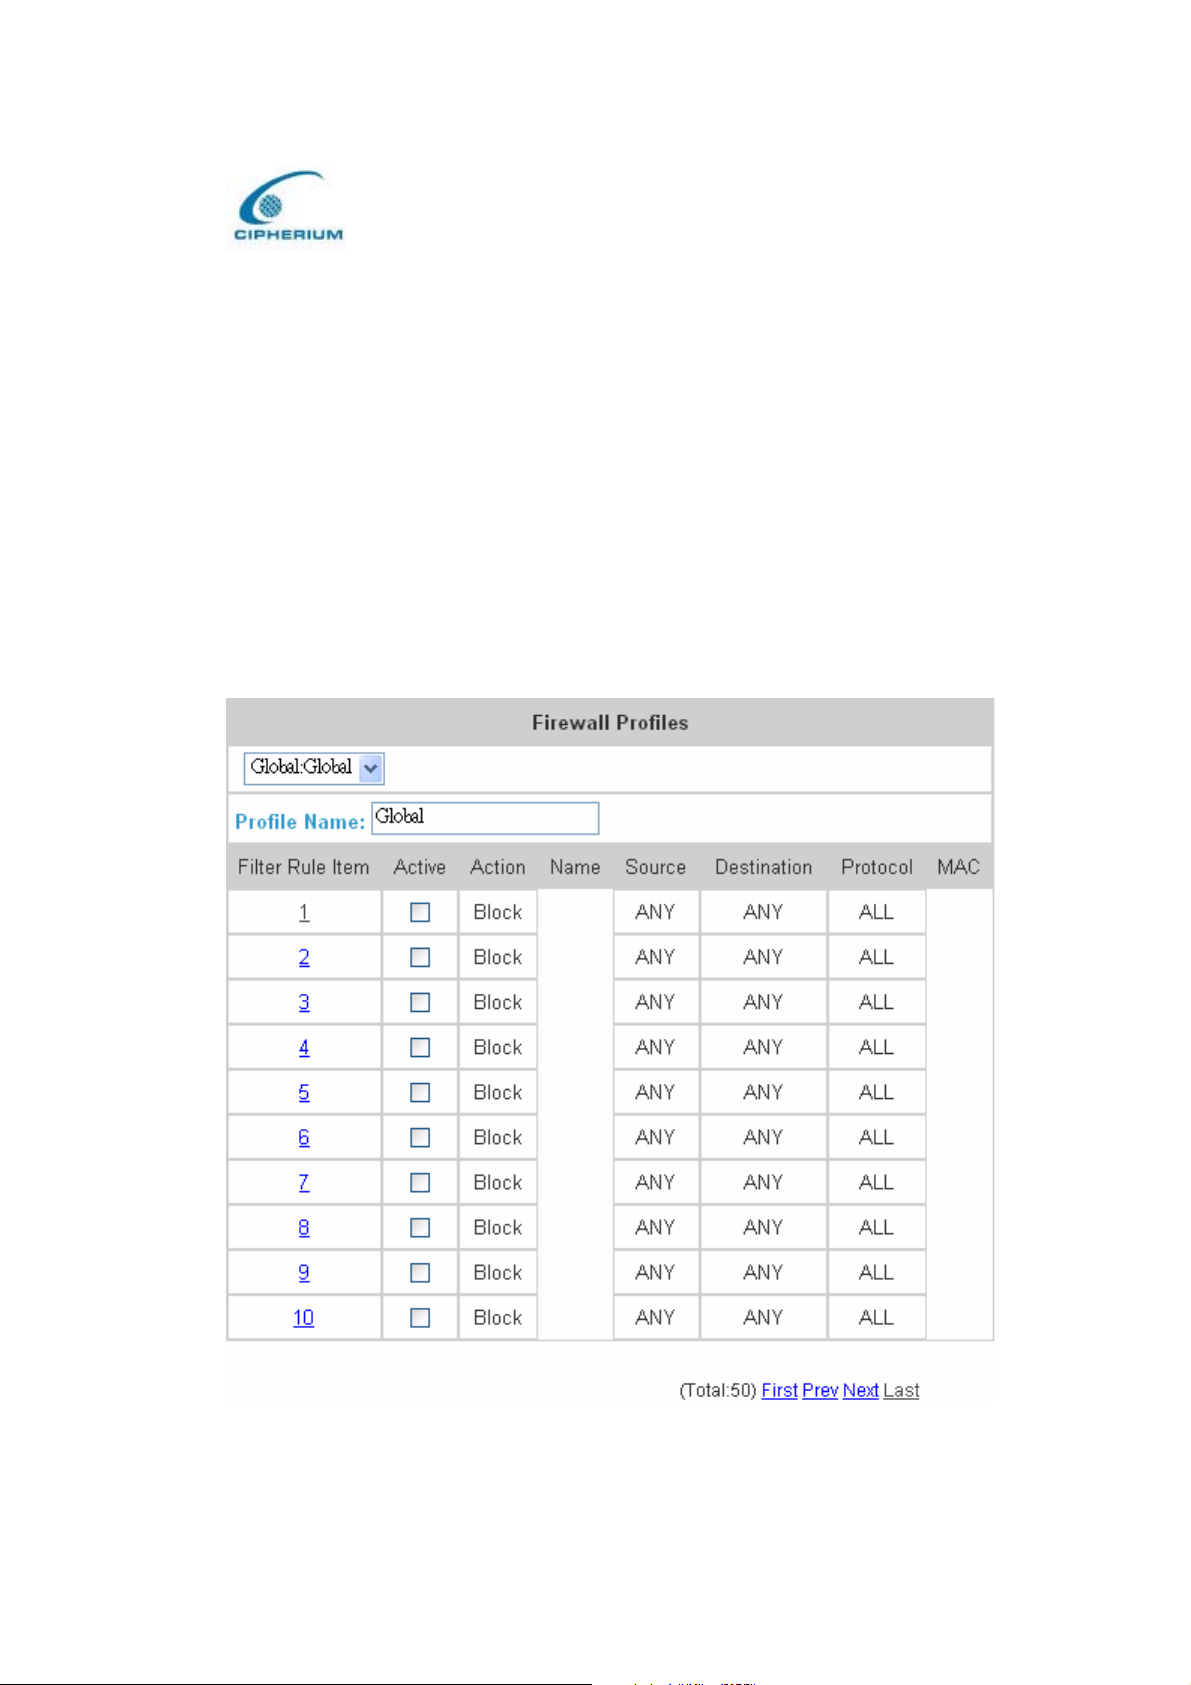
Cipherium bonalinx-W 1300
Administrator’ s Manual
5.3 Group Profile
The bonalinx-W 1300 provides three kinds of Profile configurations, including Firewall
Profile, Specific Route Profile, and Login Schedule Profile.
5.3.1 Firewall Profile
The system has a default for Global and 5 firewall profiles. If you want to set up the firewall
rules to suit all users, you can set such firewall profile in Global, and the other 5 firewall
profiles can be set without affecting each other.
Figure 5-82 Example of Firewall Profile
88
Page 98
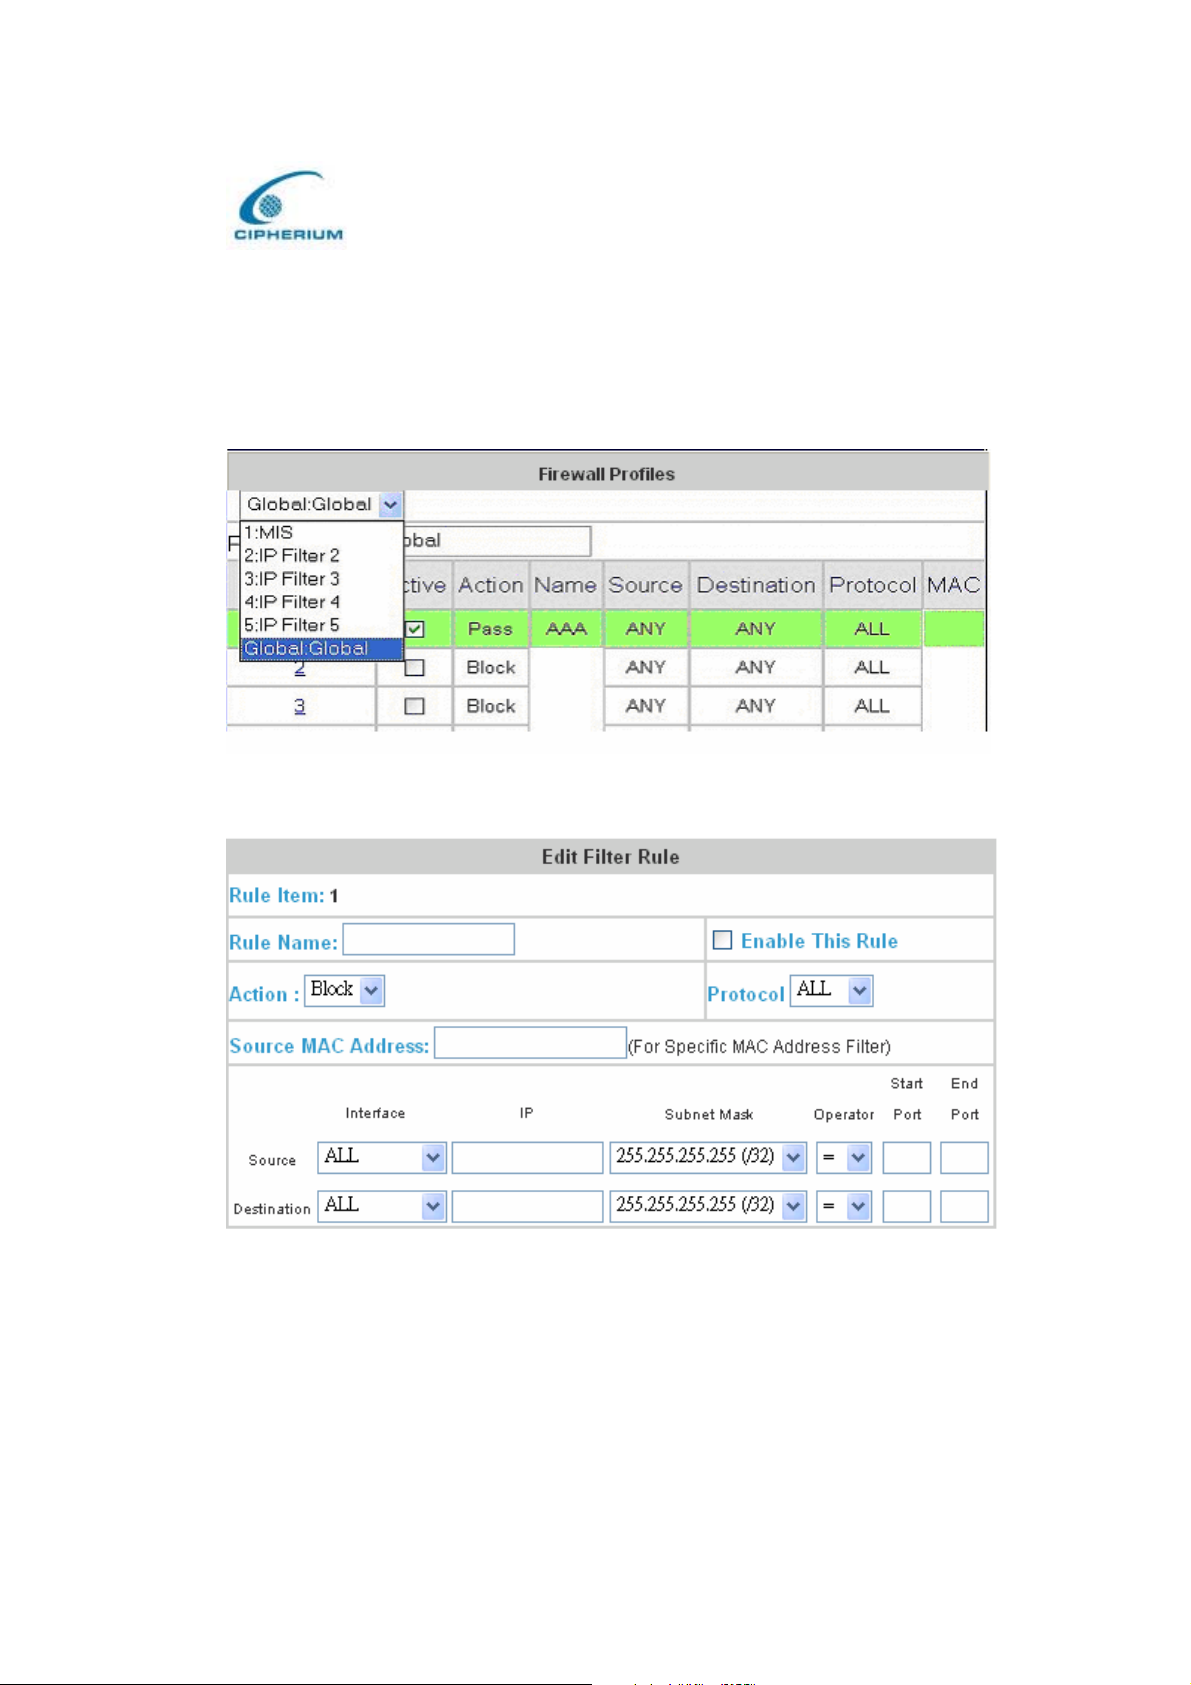
Cipherium bonalinx-W 1300
Administrator’ s Manual
Filter Rule Item: The filter rule uses a serial filter to determine the permission for the
transmission from the source address to the target address or examine whether there is a data
loss. Please click Index Number for the detailed information.
Figure 5-83 Select the Group for Applying Firewall Profile Rules
Figure 5-84 Example of Edit Filter Rule
The figure above sets up the first IP Filter rule for the first firewall profile, in which all of its
contents are sent from 192.168.1.1Ǵand the destination is 192.168.1.100; Port=54 packets,
which will be blocked directly by the system regardless of TCP, UDP, or ICMP.
89
Page 99

Cipherium bonalinx-W 1300
Administrator’ s Manual
Rule Name : Name this IP Filter rule.
Enable this Rule: Such rule will be effective when selected.
Action: If your set rule is matched,
PassǺThe packet passes successfully.
BlockǺThe packet is blocked.
Protocol : Provides three kinds of protocols: TCP, UDP, and ICMP for your choice. All stands
for all three protocols chosen.
Source MAC: Source Address of the MAC Address.
Source(Destination) IF: Source ( Destination) Interface includes 4 interfaces: WAN,
Public LAN, Private LAN and wireless for your choice. ALL stands for all four interfaces
chosen.
Source(Destination) IP Address: IP address of Source (Destination).
Source(Destination) Subnet Mask: Subnet Mask of Source (Destination).
Source(Destination) Operator: Provides the comparison rules: =(Equal), != (Not Equal),
>(Larger Than), and <(Less Than).
Source(Destination) Start Port: Start Port of Source (Destination)Ƕ
Source(Destination) End Port: Start Port of Source (Destination)Ƕ
90
Page 100
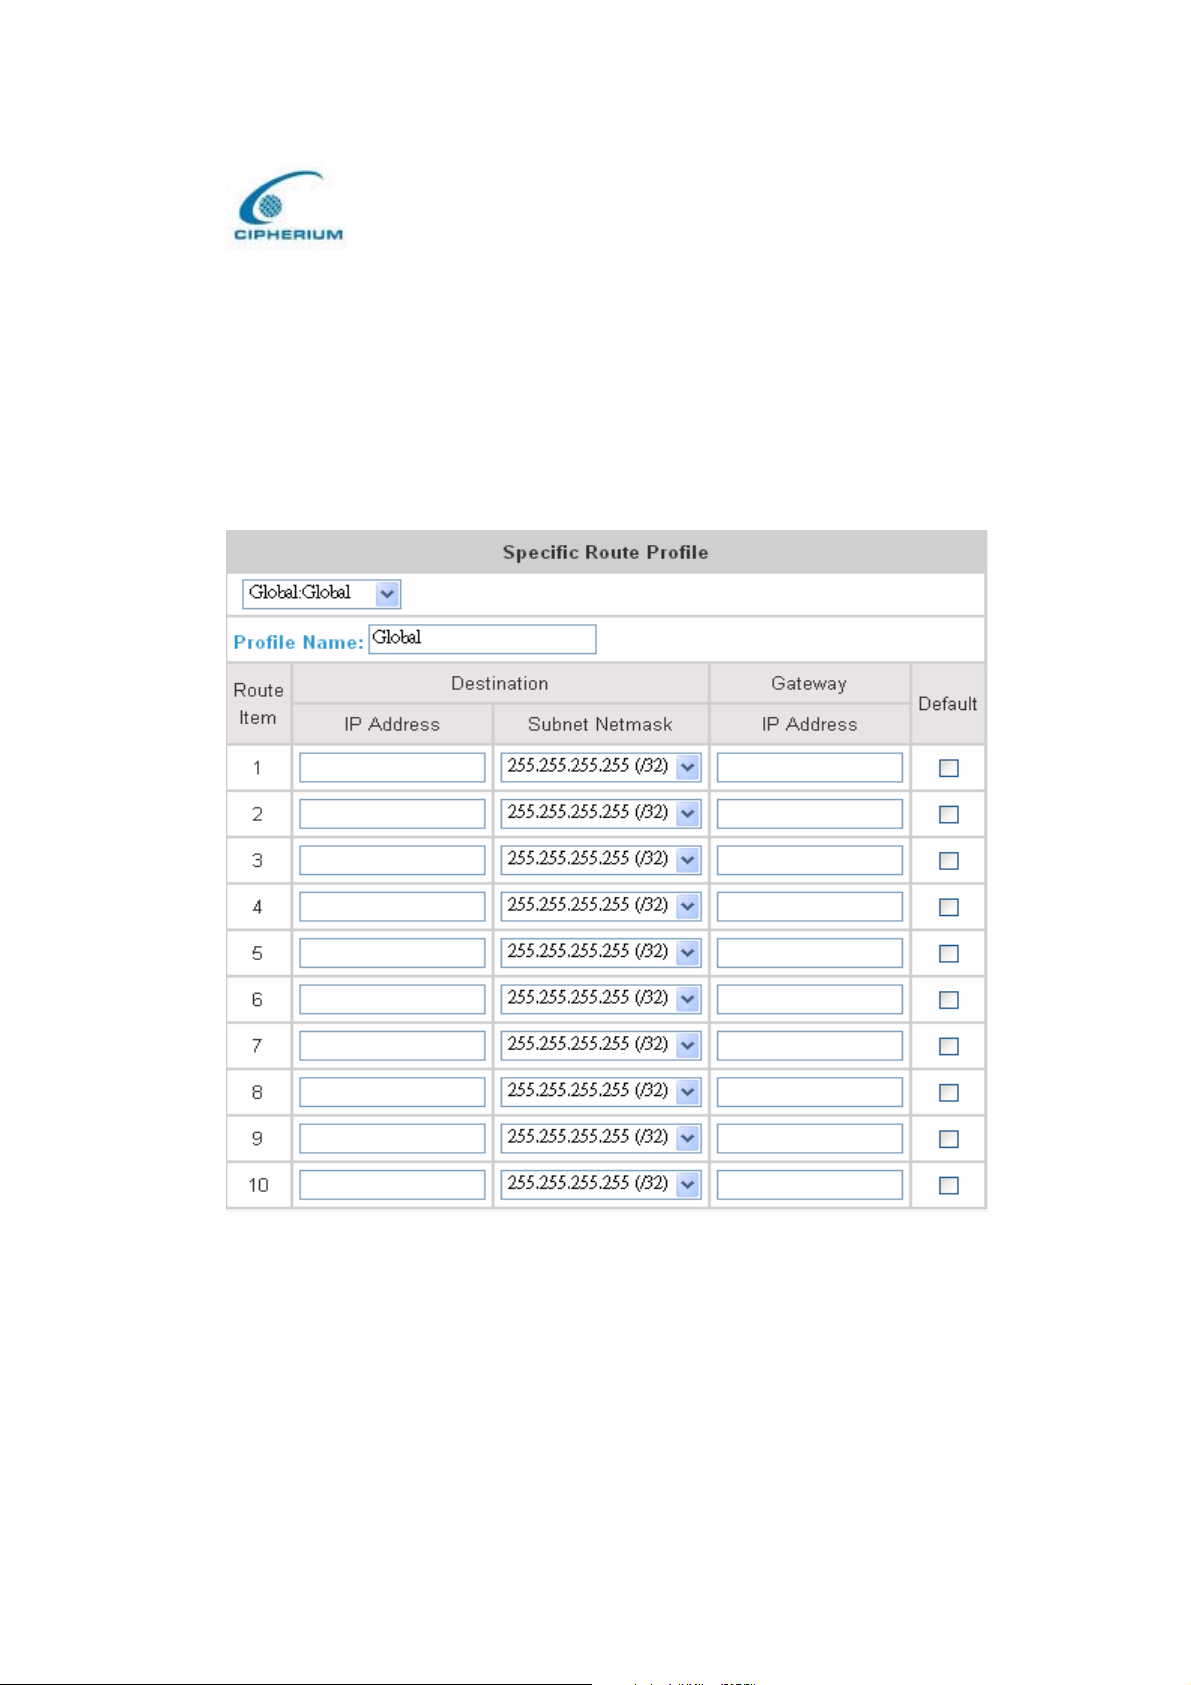
Cipherium bonalinx-W 1300
Administrator’ s Manual
5.3.2 Specific Route Profiles
The bonalinx-W 1300 system provides the route profile setup function to let the Administrator
use the route profile to determine the network path which suits all routers best and send the
packet to the destination through the network. The Administrator can use the pull-down menu
to select and set your desired route profile.
Figure 5-85 Example of Editing Specific Route Profile
Profile Name: Name this Specific Route Profile.
Destination IP Address: It is the network or Server IP that specifies the destination of the
connection. The IP 192.168.202.0 is used as the destination of the connection.
91
 Loading...