

Page 1

VERSAJET
MOBILE PRINTER
Micro2 Series
Quick Start GuideQuick Start Guide
Page 2
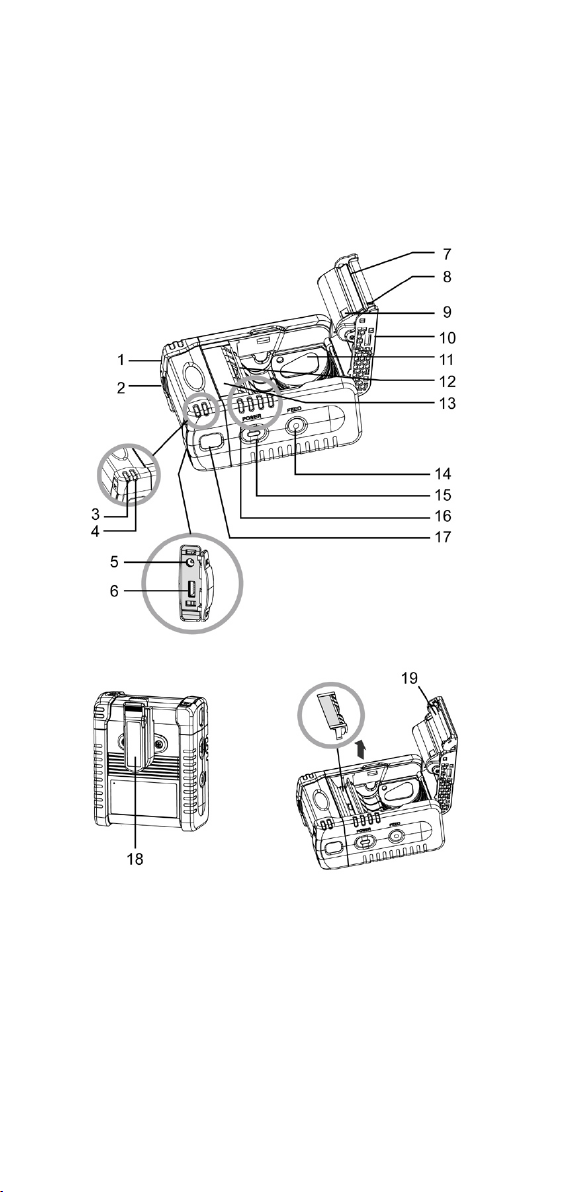
Getting Familiar with Your Micro2
Thank you for choosing Cino VersaJet Micro2 Series Mobile Printer. These
rugged printers will become productive and efficient additions to your
workplace thanks to their innovative design.
This document provides an easy reference for operating and maintaining the
Micro2 Series Mobile Printer. A complete documentation for this printer series
is provided by the VersaJet Micro2 Series User Guide available on the
Internet at http://www.cino.com.tw.
1. Battery Door
2. Battery Door Latch
3. Battery Charging Indicator
4. Communication Indicator
5. DC Power Jack
6. Host Interface Connector
7. Print Head
8. Present Sensor
9. Paper Sensor
10. Media Compartment Cover
11. Media Width Adjustment Spacer
12. Platen Roller
13. Cosmetic Panel
14. FEED Button
15. POWER Button
16. Status Indicators
17. IrDA Window
18. Belt Clip
19. Peeler (Optional)
Remove the Cosmetic Panel if
peeler is installed.
1
Page 3
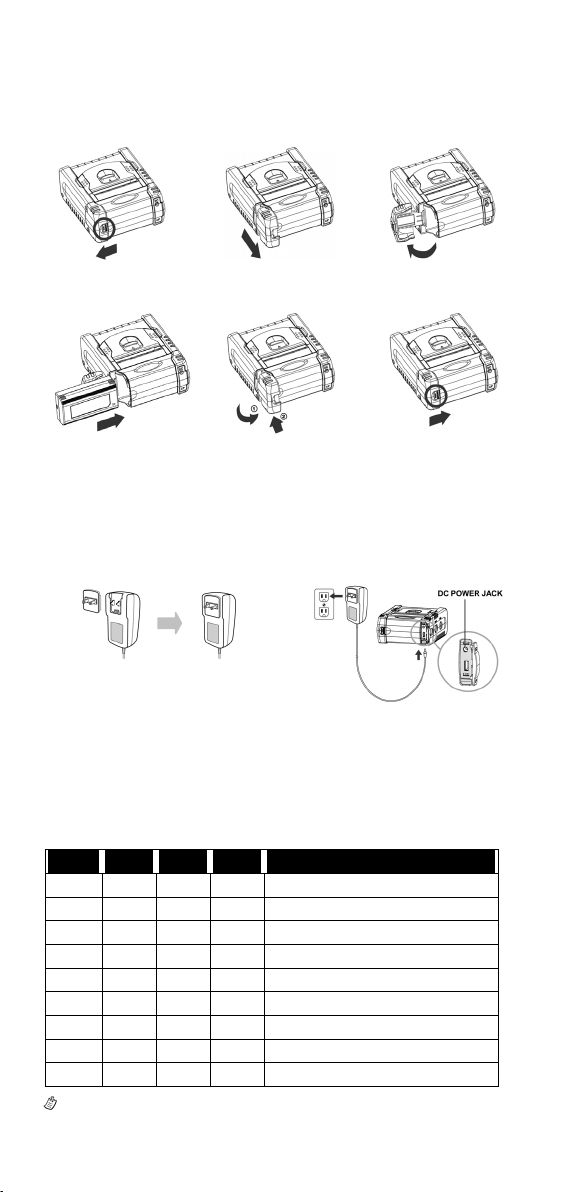
Installing and Charging the Battery
Ins talling the Battery
1. 2. 3.
Push the battery
to the left.
4. 5. 6.
Slide the battery pack into
the battery compartment.
Charging the Battery
door latch
Pull up the battery door. O
Close the battery door. Push the battery door
1. There are four different power plugs packed in power supply kit, choose
the suitable plug for your region and stick it into the receptacle cavity until
it is locked.
1. 2~3
2. Plug the AC plug of the power supply
unit into the appropriate AC wall socket.
3. Connect the DC Plug of the power supply unit to the printer.
4. The charging indicator will go on steady red after connecting the power
supply unit if the battery hasn’t been fully charged. When the battery is
fully charged, the charging indicator will go off. Please refer to the table
below for the battery status indications by powering on Micro2.
Battery Status Indications (LED1~LED4)
LED1 LED2 LED3 LED4 Battery Status
Green Green Green Green
Green Green Green
Green Green Green
Green Green Red
Green Green
Green Red
Green
Orange
Red
The new battery has to be fully charged prior to the first use.
More than 90% of battery remains
Red
More than 70% of battery remains
More than 60% of battery remains
More than 50% of battery remains
More than 40% of battery remains
More than 30% of battery remains
More than 20% of battery remains
Less than 20% of battery remains
Less than 10% of battery remains
pen the battery
latch to the right.
door.
2
Page 4
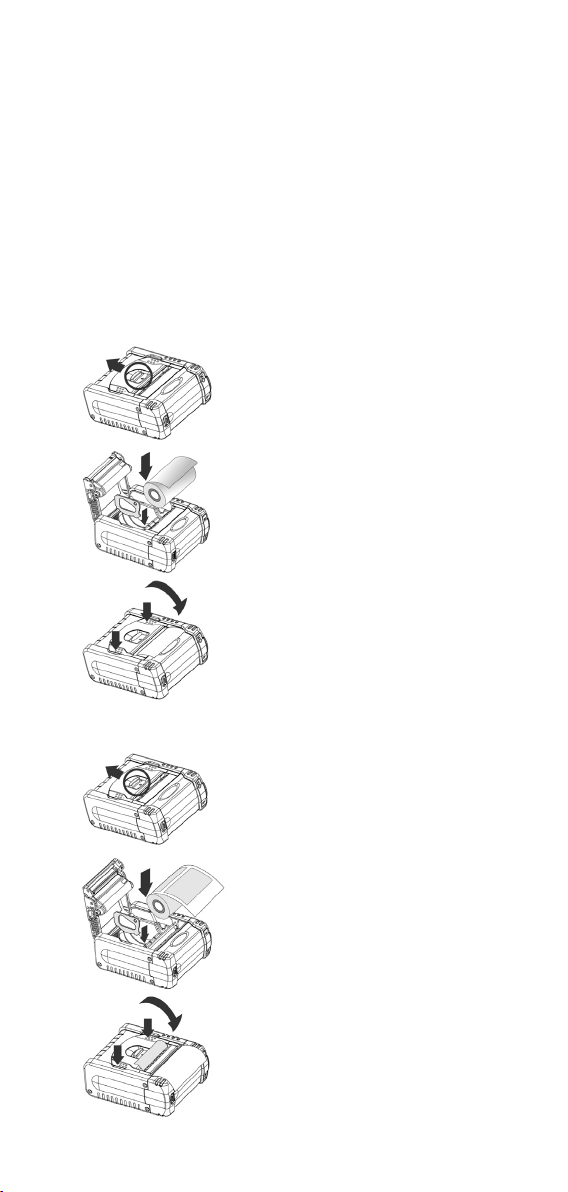
Loading the Media Roll
The Micro2 is designed to print either receipt or label. Please decide the
printing mode, media type and sensor type before loading the media roll.
Printing Mode
The Micro2 supports both line (default) mode and page mode.
Media Type
Continuous Receipt, I-Mark Media and Gap Label can be applied to Micro2.
Sensor Type
Both Transmissive sensor and Reflective sensor are available for page
ode. m
Loading Media Without Peeler
1.
2.
3.
Loading Media With Peeler
1.
2.
3.
Push down the media cover knob to
open the media cover.
Make sure the direction of the media roll
is correct. Adjust and insert the media
width adjustment spacer to fit the width
of the media roll, and then load the
media.
Pull the media out of the printer and lay
across the exit. Assure accurate close of
The media compartment cover by pushing
both sides of the media compartment cover.
Push down the media cover knob to
open the media cover.
Make sure the direction of the media roll
is correct. Adjust and insert the media
width adjustment spacer to fit the width of
the media roll, and then load the media.
Tear the first label of the media roll. Pull the
backing material out of the printer and lay
across the exit. Assure accurate close of
the media cover by pushing both sides of
the media cover. Press FEED button, the
printer will forward one label and remain
ready in the next printing position.
3
Page 5

Conduct Length Measurement
You can conduct length measurement by using reflective sensor (default
etting) for I-Mark media roll or transmissive sensor for gap label roll. s
Please refer to the VersaJet Programming Reference for changing the sensor
from reflective to transmissve, if the gap label roll is used.
1. Open the media compartment cover, the LED1 will light up orange, and
LED2, LED3 will light up green respectively, and then start flashing after 10
seconds.
2 . Load the media roll.
3 . Press the FEED button and release it.
4. Close the media compartment cover, the LED3 flashes green 3 times. The
Micro2 will feed several labels to execute length measurement. After the
length measurement is completed, the Micro2 will be ready in the next
printing position and the LED1 will flash green at 2 seconds intervals.
If the length measurement is failed or executed without setting the correct
media roll, the Micro2 will issue a paper jam error. Please conduct length
measurement once again. On condition that the length measurement is done
successfully, the value will be stored into the flash memory. When you load
the same media roll next time, the Micro2 will perform top-of-form by feeding
one label or one measured length of the receipt paper right after you close the
edia compartment cover in power-on state. m
The Micro2 will also feed one label or one measured length of the receipt
paper while pressing the FEED button. However, if you load a different media
roll, you will have to re-conduct length measurement.
Revert to Standard Mode
The printing mode will be switched to page mode after the length
measurement is completed. If you would like to revert it to standard mode,
please follow the steps indicated below:
1. Open the media compartment cover, the LED1 will light up orange, and
LED2, LED3 will light up green respectively, and then start flashing after 10
seconds.
2. Load the receipt roll (without I-Mark), then press the FEED button and
release it.
3. Close the media compartment cover, the LED3 flashes green 3 times. The
Micro2 will feed about 16 cm receipt paper and remain ready for the next
printing position. The Micro2 will give two beeps, the LED1 and LED2 will
light up orange and green respectively.
4. Press “FEED” button, the LED1 of Micro2 will flash green at 2 seconds
intervals.
5. The Micro2 is now ready for standard mode operation.
4
Page 6

Verify Micro2 is Working
After fully charging the battery pack and loading the receipt roll, you can
print a configuration message to verify Micro2 is in proper working condition.
A configuration message will be printed after executing the self-test
procedure.
Steps:
1. Make sure the Micro2 is power off.
2. Press and hold the FEED Button and then press POWER Button.
3. Release both POWER and FEED buttons. The LED1-4 will flash 5 times
to indicate the battery status firstly, then the LED1 gives short orange
blinks 10 times. The Micro2 will start printing a configuration message.
4. Pull one edge of the receipt paper against the tear bar to tear the
configuration message down.
This message provides information on firmware version, communications,
power management, printer control setting, general specifications head
resistance and odometer.
Using Your Micro2
Connecting the Printer Via Bluetooth
Please refer to the VersaJet Micro2 User’s Guide on the Internet at
www.cino.com.tw
Connecting the Printer Via RS232
1. Plug the connector of the RS232 cable into the Host Interface Connector
of the printer.
2. Power on the printer. The LED1-4 will flash 5 times to indicate the battery
status. Then the LED1 indicator will flash green at 2 seconds intervals.
3. The printer is now ready to print.
for establishing Bluetooth connection.
Host Interface Connector
5
Page 7

Using the Accessories
Using the Belt Clip
This belt clip accommodates the users to carry the printer by wearing it on
the belt. Before locking the belt clip to the printer, please screw the belt
buckle to the back of the printer first. Then follow the step 2-4 to lock the belt
clip to the printer.
1. 2. 3. 4.
Using the Peeler Option
The optional peeler allows the user to peel off the labels from the backing
material for label printing. To install the peeler, please follow the steps below.
1. 2.
Push down the media cover knob to open
the media compartment cover. Use the
flat blade screwdriver to flip the cosmetic
panel.
3. 4.
Install the peeler to the printer. Close the media compartment cover.
Remove the cosmetic panel from
the main support body.
6
Page 8

Indications
Beeping Indications
No. Beeping Indications Description
1
2
3
4
5
6
7
8
9
Battery Status Indications (LED1~LED4)
LED1 LED2 LED3 LED4 Battery Status
Green Green Green Green
Green Green Green
Green Green Green
Green Green Red
Green Green
Green Red
Green
Orange
Red
a. The Micro2 gives 1 warning beeps at 5 seconds intervals when the battery
power is less than 20%~30%.
b. The Micro2 gives 2 warning beeps at 5 seconds intervals when the battery
power is less than 10%~20%.
c. You may check the battery status by pressing the POWER button.
Wireless Communication Indicator
When Micro2 is ready to be connected or is connected by RS232 interface,
the LED1 will become green, and blinking at two seconds intervals. The
LED5 will go on flash blue when the radio link between the printer and host
device is built. Once the radio link is discontinued, the LED5 will go off and
the LED1 will flash green again.
Battery Charging Indicator
The LED6 will go on steady red after connecting the power supply unit if the
battery hasn’t been fully charged. When the battery is fully charged, the LED6
will go off.
3 short beeps in ascending tone Power on indication
3 short beeps in descending tone Power off indication
1 beep at 5 seconds intervals 20%~30% of battery remains
2 beeps at 5 seconds intervals 10%~20% of battery remains
2 long beeps Error warning
1 short beep Radio link built
3 short beeps in descending tone Radio link lost
1 short beep Press POWER or FEED button
1 short beep Close the compartment cover
More than 90% of battery remains
Red
More than 70% of battery remains
More than 60% of battery remains
More than 50% of battery remains
More than 40% of battery remains
More than 30% of battery remains
More than 20% of battery remains
Less than 20% of battery remains
Less than 10% of battery remains
7
Page 9

Warning and Error Messages
LED1 LED2 LED3 LED4 Description
Orange Green
Start blinking after steady on for 10 seconds
Orange Green Green
Start blinking after steady on for 10 seconds
Orange Green Green Green
Start blinking after steady on for 10 seconds
Orange Green Green Orange
Start blinking after steady on for 0.5 seconds
Orange Orange
Start blinking after steady on for 10 seconds
Orange Red
Start blinking after steady on for 10 seconds
Orange Orange Orange
Start blinking after steady on for 10 seconds
Orange Orange Red
Start blinking after steady on for 10 seconds
Red Red
Start blinking after steady on for 10 seconds
(*) Please refer to the following resolutions.
1. Paper Jam:
Open the media compartment cover and reload the media roll.
2. Label Length Measurement Error:
Check whether the sensor type and media type are correct.
Re-conduct paper length measurement.
3. Media Compartment Cover Opened:
Close the media compartment cover.
4. No Paper:
Load the media roll.
5. Command error:
Reset Micro2.
Resend a correct command.
6. Print Head or Motor Overcooled:
The printer will automatically resume operation after the print head or
motor comes to the normal temperature.
7. Print Head or Motor overheated:
The printer will automatically resume operation after the print head or
motor cools down to the normal temperature.
8. Print Head Broken:
Call a qualified service technician to replace the print head.
Paper jam (*1), or
Label length measurement error (*2)
Media compartment cover opened (*3)
No Paper (*4)
Command Error (*5)
Motor over cooled (*6)
Motor over heated (*7)
Print head overcooled (*6)
Print head overheated (*7)
Print head broken (*8)
8
Page 10

Maintenance and Troubleshooting
Cleaning Instructions
Please refer to following procedures and figures to clean the printer.
1. Power off Micro2.
2. Open the Media Compartment Cover.
3. Remove the Media Roll.
Print Head
Tear Bar
Platen Roller
Interior
Exterior
1. Never use sharp objects to clean the print head. This may result in
2. Let the print head cool to room temperature prior to cleaning,
3. The tear bar has sharp edges. Please be careful when cleaning
Troubleshooting
Platen Roller
Areas Methods
damage to the printer.
protecting yourself from burns.
the tear bar to avoid possible injury.
Use the cleaning pen or a cotton swab moistened with isopropyl
alcohol to clean the surface of the print head from end to end.
Use the cleaning pen or a cotton swab moistened with isopropyl
alcohol to clean the tear bar.
Rotate the platen roller and clean the surface of the platen
roller with cleaning pen or a cotton swab thoroughly.
Blow the paper dust by using a can of compressed air or by
vacuuming. Ensure the paper sensor windows are free of dust.
Use soft cloth moistened with water to clean the exterior
of the printer.
Please review the following information to solve the common problems that
you may encounter with Micro2. If the problems are not covered in this
section, please consult your supplier for technical support.
Problems Solutions
No power
Media does not feed
Poor print quality
Communication
Error
No print
Make sure the battery pack is installed properly.
Recharge the battery pack.
Ensure media cover is closed completely.
Remove the obstruction in paper path.
Clean print head.
Check and recharge the battery pack.
Check the quality of media.
Check if the media is loaded.
Check baud rate.
Replace cable to terminal.
Make sure the sensor and the media are set correctly.
Verify if the communication between the host system and
the printer is established correctly. Then replace the battery
pack.
Print Head
Tear Bar
9
Page 11

Important Information
Caution
The discharge of electrostatic energy can damage or destroy the print
head or electronic components used in this device. Do not touch the print
head or any exposed electronic components.
Never operate the printer in a location where near liquid or inflammable
substances. It might cause personal injury.
The print head and motor get hot during use. Never touch them until they
recover cool.
Always turn POWER OFF before: (1) connecting any cables (2)
performing any cleaning or maintenance operations.
Battery
Extending Battery Life
The battery storage temperature is 40∘F to 104∘F (4∘C to 40∘C).
Don’t store a fully charged battery pack at temperature above this range
for a long period.
Don’t disassemble or modify a rechargeable battery pack. Otherwise, it
will leak, overheat or crack.
Always use a Cino charger to charge. The use of any other kind of charger
may damage the battery pack.
Remove the battery pack from the printer if you will not use it for a long
time.
Battery Disposal
Don’t dispose the used battery packs in unsorted waste. Please recycle them
according to your local regulations.
Product Disposal
The Micro2 complies with Directive 2002/69/EC of the European Parliament
and of the Council of 27 January 2003 on Waste Electrical and Electronic
Equipment (WEEE). In order to avoid the dissemination of those substances
in our environment and to diminish the pressure on the natural resources, we
encourage you to use the appropriate take-back systems for product
disposal.
Agency Approvals and Regulatory Information
FCC part 15B, FCC part 15C
EN 55022, EN 55024, EN 301 489-1 & 489-17, EN 300328
CNS13438, CNS14336
LP0002
IEC60950-1
CB
TELEC STD-66
GB9254, GB4943
SRRC
10
Page 12

 Loading...