

Page 1

WAV E C E N T R E
Quick Reference Guide
International Edition, Rev. A3
Page 2

Revision History
Rev. No. Released Date Description
z Page10 Add message alignment
Rev. A3 August 31, 2012
z Page13 Add HID output setting
Page 3

Table of Contents
About This Guide ......................................................................................................... 1
Overview.................................................................................................................... 1
Chapter Descriptions................................................................................................. 1
Chapter 1: Getting Familiar with WaveCentre............................................................ 2
Chapter 2: Preparation before Use............................................................................. 3
Install and Setup WaveCentre................................................................................... 3
Configure Wi-Fi Scanner ........................................................................................... 4
Connect the Wi-Fi Scanner........................................................................................ 4
Chapter 3: Getting Started ......................................................................................... 6
Console...................................................................................................................... 6
Logs........................................................................................................................... 8
Remote Control.......................................................................................................... 9
Remote Indicator....................................................................................... 9
Remote Message ...................................................................................... 10
Remote Lock/Unlock ................................................................................. 11
Save Batch Data........................................................................................................ 12
HID Outputs............................................................................................................... 13
Page 4

About This Guide
Overview
The WaveCentre is a useful Window-based wireless management utility together with an IP virtual COM software driver.
Once you installed WaveCentre into your host machine, it can create a virtual COM port for each connected Wi-Fi
scanner corresponding to its IP address. Then the Wi-Fi scanner will work as a local serial device of the remote host.
This document provides related information for using Cino Wi-Fi scanner together with WaveCentre.
Chapter Descriptions
Topics covered in this guild are as follows:
z Chapter 1, Get Familiar with WaveCentre
z Chapter 2, Preparations before Use
z Chapter 3, Get Started
1
Page 5
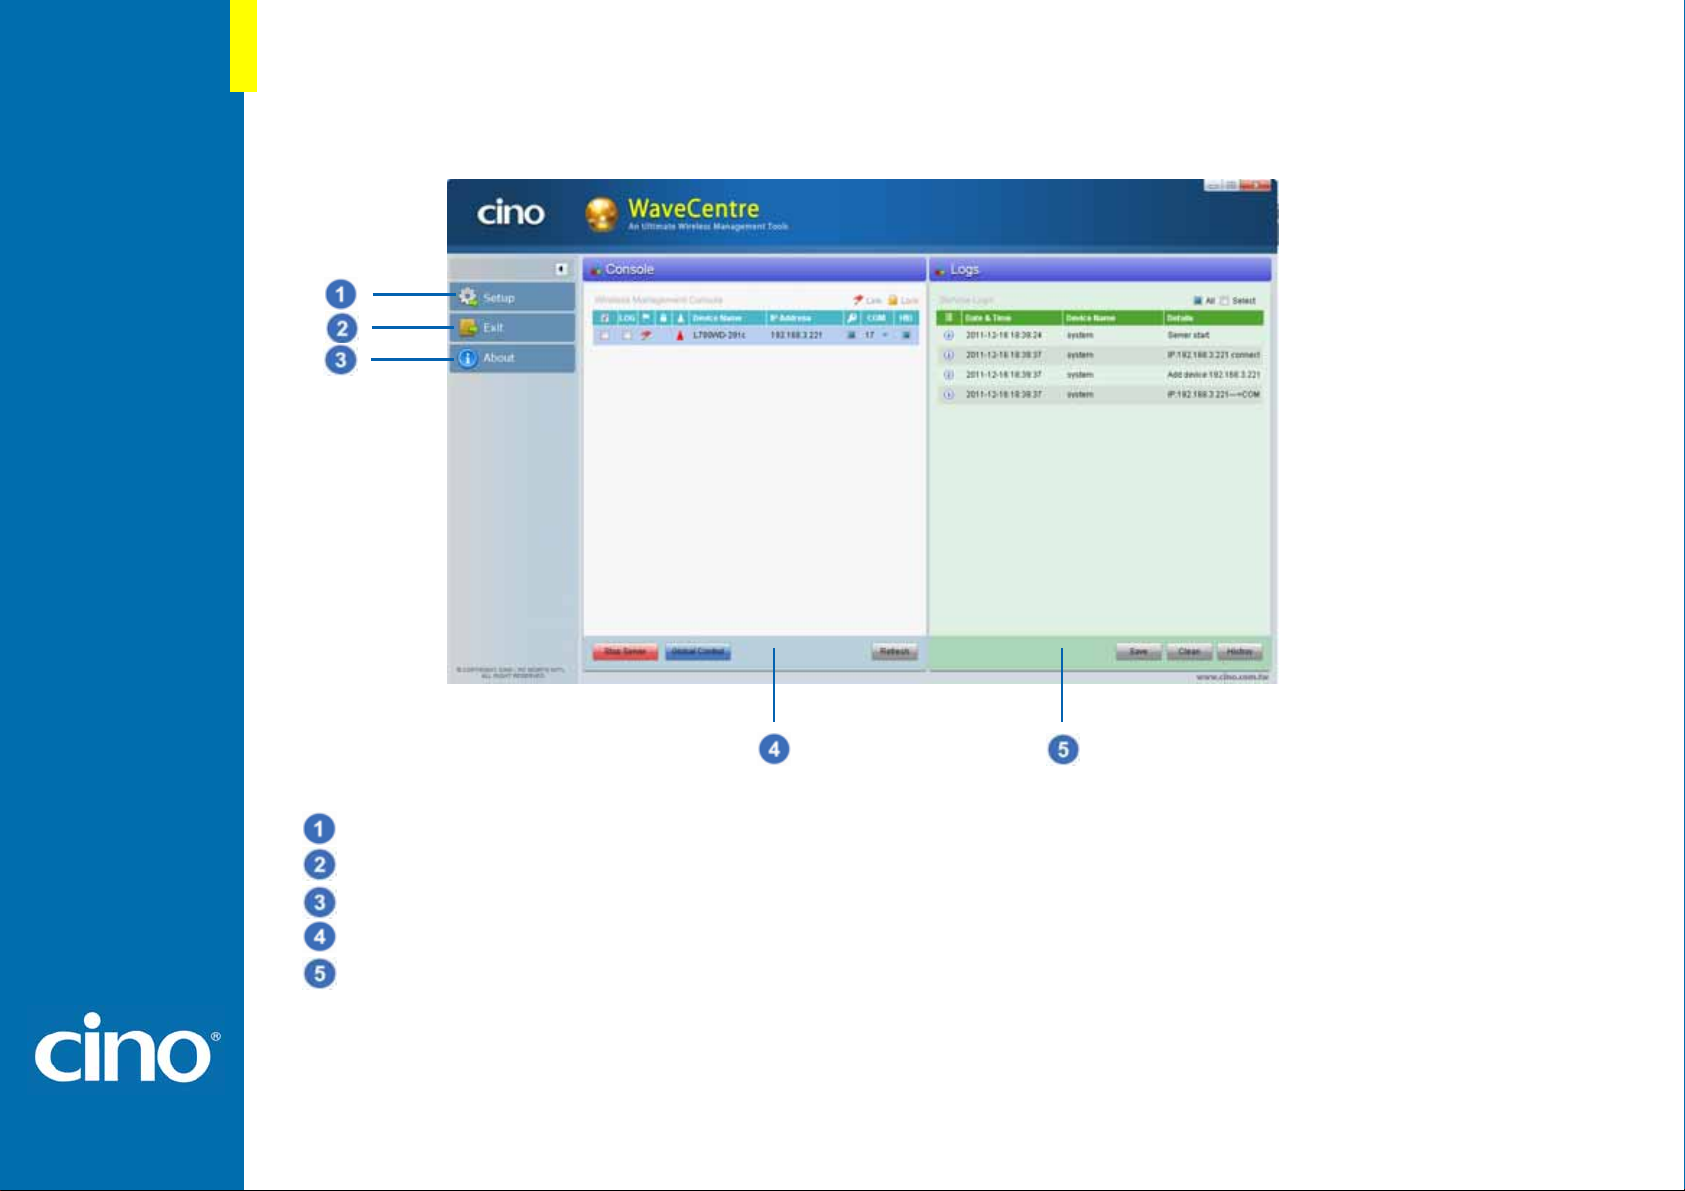
Chapter 1: Getting Familiar with W aveCentre
Setup: You can make general settings of the WaveCentre and batch data file saving.
Exit: You can exit WaveCentre program.
About: You can review WaveCentre revision.
Console: You can perform WaveCentre specific functions.
Logs: You can review, clear and save logs of WaveCentre.
2
Page 6

Chapter 2: Preparation before Use
Install and Set up WaveCentre
Make sure the WaveCentre software has been installed in your host machine properly.
Make sure to turn off the firewall of Windows/Access Point and turn on the communication listen port of your host
machine to allow network connections.
Double click WaveCentre’s icon shown on the desktop to launch WaveCentre.
Enter Setup to configure the general settings.
Automatically run WaveCentre when Windows starts.
By default, the WaveCentre will run automatically when Windows starts.
Automatically start server when WaveCentre launches.
By default, the WaveCentre server will start automatically when WaveCentre launches.
Auto Refresh Interval
By default, the server will refresh every 30 seconds automatically.
Comm. Listen Port
By default, the communication listen port is set to 63000.
COM port bound to
By default, the COM port is bound to IP address.
3
Page 7

Configure Wi-Fi Scanner
Please make sure to fully charge the scanner. Then power on and configure the scanner before connecting it to your
remote host.
Please refer to FuzzyScan Wi-Fi CORDLESSS Quick Start Guide for details.
Connect the Wi-Fi Scanner
Before you connect the Wi-Fi scanner to a remote host, you have to create a correct Wi-Fi profile for the Wi-Fi
connection. There are two ways to create Wi-Fi profiles. The easy way is to use the scanner “SETUP” to create a new
profile. If you want to create multiple profiles at the same time, you may consider using Cino FuzzyScan Wi-Fi
PowerTool.
Once you collected all required information for network setting, please follow the steps below to establish the connection
between the Wi-Fi scanner and the remote host.
Ensure the scanner is activated within radio range then enter “SETUP” from the Desktop main menu. Select “Wi-Fi
Profiles”, then press “New” (L key) to add a Wi-Fi Profile. Select “Auto Search”, the scanner will perform
“Searching” to find out all discoverable Access Points and Independent Wireless Hosts, and provide you a list.
For “Infrastructure” mode, select a suitable AP which is able to connect to your remote host then complete the
profile setting. If you want to build a peer-to-peer connection by using Ad-Hoc mode, please select your desired
remote host then complete the profile setting as well.
4
Page 8

Once you completed the 1st Wi-Fi profile setting, the scanner will try to connect the remote host automatically. If
you set several Wi-Fi profiles, please enter “ONLINE” from the main menu of Desktop, the scanner will try to
connect the default profile. You will see the “Connecting to ……” screen, the scanner will give continuous short
clicks and the link indicator of scanner will flash blue quickly during connecting process.
If your Wi-Fi setting is correct and there is no mistake during link process, the link process will be completed and
you will hear 4 beeps in ascending tone. You will see the link indicator of scanner giving 1 blue blink per 2.5
seconds to indicate the scanner is in radio-connected state.
Once the scanner is connected to remote machine, your will see the device name and IP address of scanner
shown on the console of WaveCentre. A red flag icon will be displayed to indicate the scanner is connected to
the host machine.
5
Page 9

Chapter 3: Getting Started
Console
6
Page 10

Global Control Options: You can check the box to choose the scanners which you desire to perform global remote
control..
LOG: You can choose desired scanner’s logs to be shown on Service Logs by selecting the check box, then
choose “Select” shown on the upper right corner of the service logs. If you would like to see all scanners’ logs, you
don’t have to check the box, but make sure the “All” shown on the upper right corner of the service logs is selected.
Link Status: A read flag icon will be displayed to indicate the scanner is connected to the host machine.
Scanner Lock Status: A lock icon will be displayed to indicate the scanner is remote locked.
COM Port Status: A red triangular pyramid icon will be displayed to indicate the COM port is closed. A green
triangular pyramid icon will be displayed to indicate the COM port is open.
COM Port Binding Status: The different COM port might be assigned to the scanner when you rebuild the
connection to the host machine. If you would like to bind the scanner to the same COM port, you can select the
check box.
COM Port: This is the COM port assigned to the scanner.
HID Conversion: All incoming data will be converted as HID keyboard inputs if you enable this feature by selecting
the check box.
7
Page 11

Stop/Start Server: You can stop/start the server by clicking this button.
Global Control: You can perform the global control on the scanners you choose by clicking this button.
Refresh: You can refresh the server by clicking this button.
Logs
You can see the selected scanners’ logs from Service Logs.
8
Page 12

Remote Control
You can use the Remote Control commands to control the scanne r(s) from the remote host either by left clicking the
connected scanner’s device name directly or clicking the “Global Control” button after you choose the scanner(s)
desired to be remote controlled.
Remote Indicator
This command allows you to page, send remote beeping, remote vibration or both beeping and vibration to the
scanner(s) from the remote host.
Paging: This paging function is helpful to locate the scanner. Once you clicked the “Paging” button, the scanner will
gives 6 “Di-Do-Di-Do” paging sounds.
Remote Beeping: You can set up the beeping type and the number of beep first, then click the “Remote
Beeping” button to send the remote beeping to the scanner(s).
9
Page 13

Remote Vibration: You can set up the vibration duration and the number of vibration first, then click the “Remote
Vibration” button to send the remote vibration to the scanner(s).
Both: You can set up the beeping type, number of beep, vibration duration and number of vibration first, then clic k
the “Both” button to send the remote beeping and remote vibration to the scanner(s).
Remote Message
This command allows you to send remote message together with remote beeping and vibration to the scanner(s) from
the remote host.
10
Page 14

Lock/Unlock
You can use this command to lock or unlock the scanner(s) remotely. Once you locked the scanner(s), the scanner can’t
work till you send unlock command.
11
Page 15

Save Batch Data
For batch scanning, all data transmitted via Wi-Fi interface can be saved as TXT or CSV file into your desired
destination (folder) of the remote machine. Please enter Setup, and then go to “Save Data” to configure related
settings.
Data Folder: You can save the transmitted batch data file into your designated folder.
Destination: You can save the transmitted batch data file into the same folder, the subfolder by device or the
subfolder by date.
File Format: You can save the transmitted batch data file as TXT or CSV file.
12
Page 16

HID Outputs
Please enter Setup, then go to “HID Outputs” to configure USB HID Outputs related settings as follows.
Language & Keyboard Layout
Caps Lock Control
Function Key Emulation
Key Pad Emulation
Upper/Lower Case
13
Page 17

FuzzyScan WaveCentre Reference Manual
CINO GROUP
PC WORTH INT’L CO., LTD.
www.cino.com.tw
 Loading...