

Page 1
cino eC PRO
type: compact
espresso
INST A LLATION AND MAINTENANCE MANUAL
Translation of the original in str uctio ns
MAN1010119 rel. 01 dated 30.01.2014
___________________________________
www.rheavendors.com
Page 2

cino eC PRO by
preliminary
safety
information
before using the machine, carefully read this information that helps you
behave properly and guarantee a safe use;
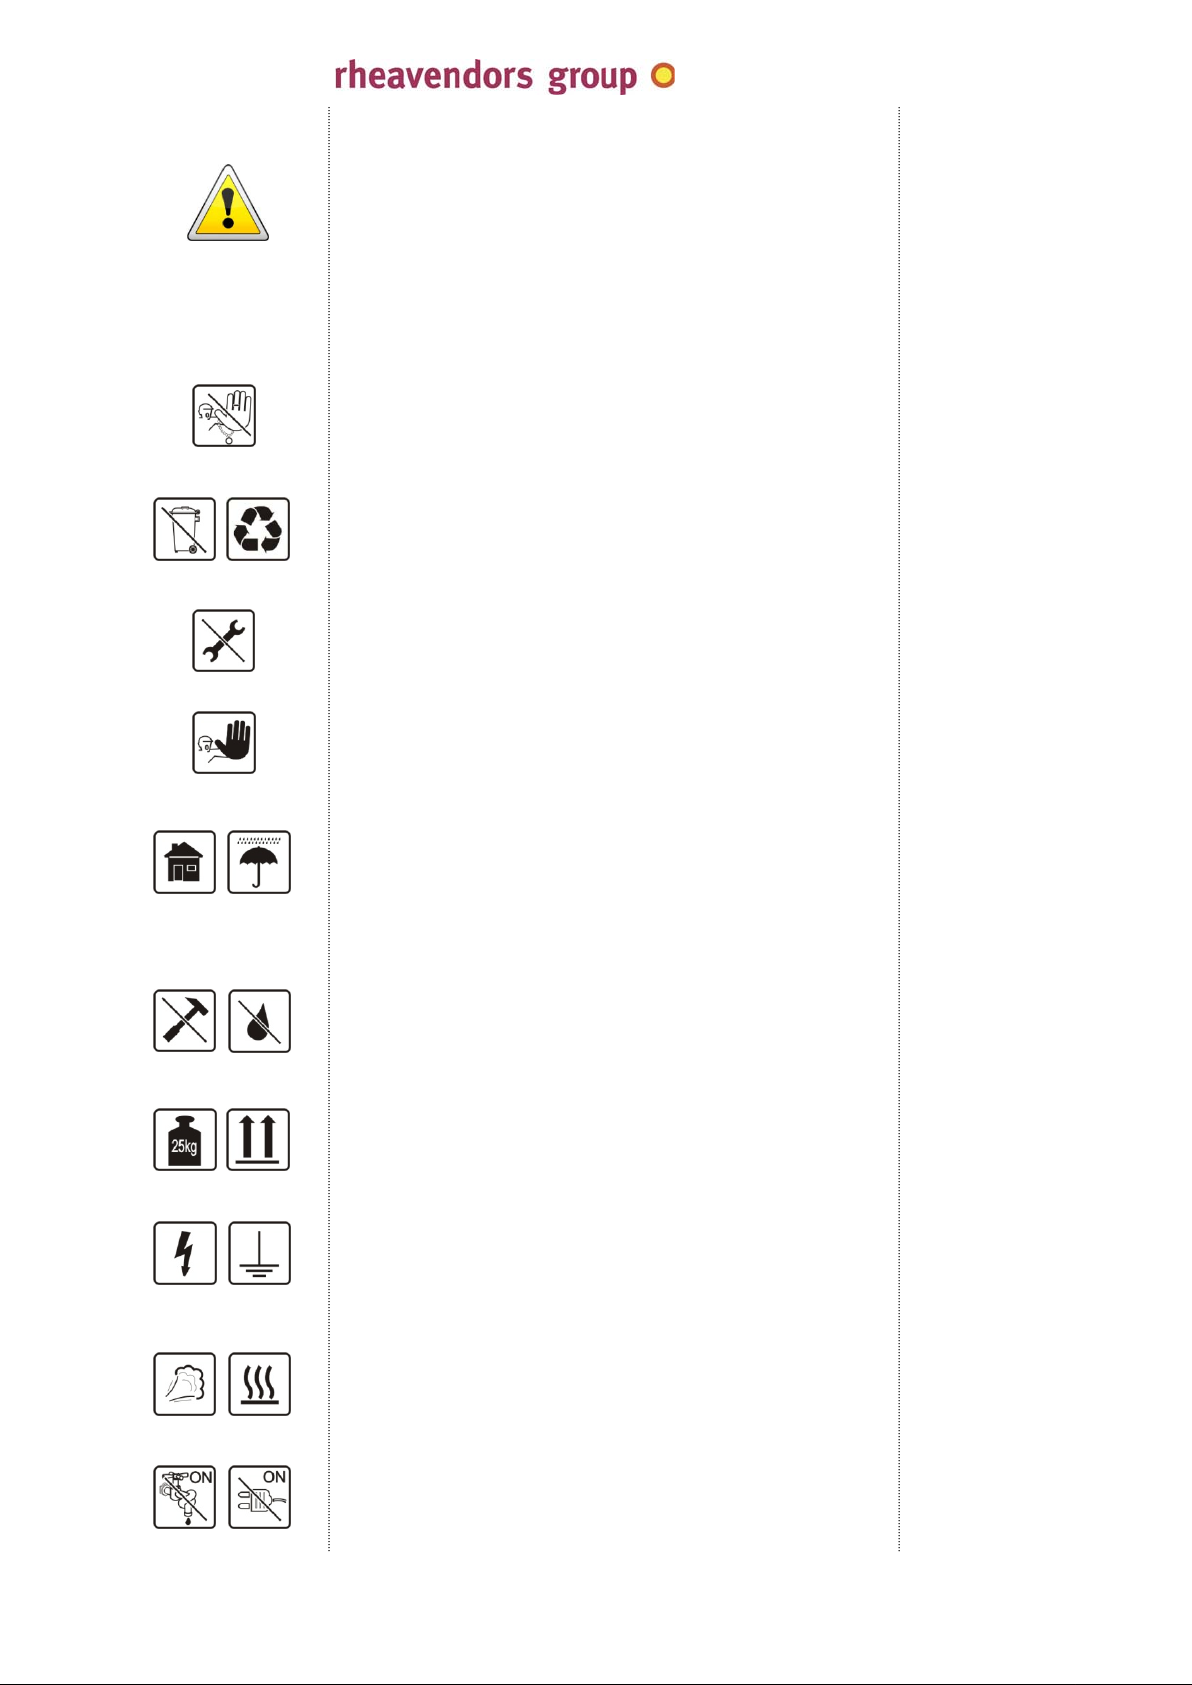
the following pages use the symbols listed here below, whose meaning is
of attention:
GENERAL;
if the text is highlit by this symbol, it is recommended to pay special
attention to the performance of the procedures described; if not carefully
performed on safe conditions, they can be source of general danger;
HIGH VOLTAGE;
if not properly performed, the actions marked by this symbol may expose
to accidental contacts with electric voltage;
DANGEROUS TEMPERATURE;
if not properly performed, the actions marked by this symbol may expose
to accidental contacts with high-temperature parts;
MOVING MEMBERS;
if not properly carried out, the actions marked by this symbol may expose
to accidental contacts with moving members;
the same symbols are placed inside the vending machine to indicate the
parts on which to act with the utmost caution;
SERVICE KEY IN USE;
the symbol recommends the utmost attention during the actions
described; the use of the service key intended to activate all machine
functions when the door is open
is only reserved to the technical operators
who know the operation of the vending machine, who are aware of
potential risks and who make sure they are operating on totally safe
conditions;
the use of the service key shall be strictly limited to the time necessary to
perform the actions requiring the use thereof; users shall be informed of
the prohibition on using and approaching the vending machine;
WEIGHT:
the symbol reminds the user to consider the machine weight carefully for
handling and placing it definitively.
WATER SUPPLY;
it marks the parts duly requiring caution in case of leakage, if connected
with the hydraulic network;
SUPPORT SURFACE;
it reminds the user to install the machine on a support surface, the max.
inclination of which is 2°;
MAN1010119 rel. 01 dated 30.01.2014 page no. 2 of 52 page
www.rheavendors. c om tel: 0039 02 966 551 fax: 0039 02 96 55 086 e mail: rheavendors@rheavendors.com
rheavendors group's sole property
Page 3

cino eC PRO by
***
***
***
***
***
***
***
***
***
***
***
***
pay special attention to the chapters and notes high lit by the symbols of
alert; strictly observe
and users’ safety;
the vending machine may be used by children who are at least 8 years old
and by people having reduced physical, sensory or mental capacities or not
having all necessary experience and knowledge, provided that they are
under supervision or after they have received all necessary instructions for
using the machine on safe conditions and for understanding the dangers
related thereto; children must be supervised and prevented from playing
with the vending machine;
cleaning and servicing shall not be carried out by children;
if you should find out a water leak or the presence of smoke, immediately
detach
try to restore its operation and apply to skilled technicians;
the vending machine from the electric and hydraulic network, never
the machine shall be installed according to national rules; pay special
attention to the rules about the machines directly connected with the
hydraulic network;
room (during storage and operatio n):
temperature: 5 °C ÷ 35 °C
relative humidity: max 80 %
the inclination of the vending machine support surface shall not exceed 2°;
if the hydraulic connection tube is not supplied with the machine or in case
of replacement, the connection must be carried out only with:
- new tube;
- of type-approved material for food use;
- compliant with “IEC 61770 Electric appliances connected to the
water mains”;
-
it can support the working pressure;
the user is not allowed
shall be properly signalled;
never remove protections
modify the machine or its components;
tools necessary to act with this vending machine:
- a pair of scissors for electricians, a Phillips PH2 cross screwdriver for 4/6
mm self-threading screws, a set of wrenches up to 13 mm, a set of
Allen wrenches from 2 to 8 mm;
- it may be of use to procure some expendables, such as disposable
paper, single-use gloves, clean cloths, cups and a bucket for the
collection of waste water;
never wash the machine by using water je ts;
for cleaning at regular intervals refer to chapter 12;
safety rul es for using the vending machine
the rules concerning, in particular, the operators’
to access the maintaining and servicing area that
, never override safety devices and never
MAN1010119 rel. 01 dated 30.01.2014 page no. 3 of 52 page
www.rheavendors. c om tel: 0039 02 966 551 fax: 0039 02 96 55 086 e mail: rheavendors@rheavendors.com
rheavendors group's sole property
Page 4

cino eC PRO by
the symbol means that it is forbidden to dispose of
the equipment as urban waste and compulsory to
provide for separate collection in order to prevent
any potential effect on the environment and human
health; strictly follow the provisions of the
European Parliament’s 2002/96/EC Directive;
MAN1010119 rel. 01 dated 30.01.2014 page no. 4 of 52 page
www.rheavendors. c om tel: 0039 02 966 551 fax: 0039 02 96 55 086 e mail: rheavendors@rheavendors.com
rheavendors group's sole property
Page 5
cino eC PRO by
residual risks
a residual risk is understood as a potential danger
that can not be eliminated and it persists despite all
precautions in use since it is related to the intrinsic
features of the product and it also includes nonidentifiable risks;
the actions and behaviours listed here below are
intended to reduce residual risks and you shall
always adopt them when interacting with the
machine;
wear clothes that can properly avoid any accident
(never wear rings, chains, clothes with laces or
excessively long sleeves, …);
carefully evaluate the treatment of residues from
installation (wood, plastics, …) and utilisation
(product powder, bags, …);
never repair or carry out any technical action if you
have not been properly trained;
signal that a technical action is in progress on the
machine (barriers against approach, signs, …),
carry it out quickly without leaving the station;
install the machine in a sheltered, illuminated,
ventilated and noiseless environment; keep it clean
and never place tools or any other object on it;
never install it outdoors or, anyway, never expose
it to atmospheric agents;
make sure it can be neither reached by water
sprays or
vapours nor hit by objects that might
damage it;
carefully consider the machine weight and stability
during the installation and in the final working
position;
supply the machine within voltage, temperature,
pressure and hydraulic limits, … as it is detailed on
the following pages and provide for an effective
earthing;
even if detached from supply, the machine may
contain hot pressurised water at a high
temperature;
never detach hydraulic and electric supplies when
they are active;
MAN1010119 rel. 01 dated 30.01.2014 page no. 5 of 52 page
www.rheavendors. c om tel: 0039 02 966 551 fax: 0039 02 96 55 086 e mail: rheavendors@rheavendors.com
rheavendors group's sole property
Page 6

cino eC PRO by
general guarantee
conditions
1st
2nd
3rd
4th
5th
6th
7th
these conditions regulate Rheavendors Industries S.p.A.’s
obligations with reference to guarantee and repair; any other term
or condition, either verbal or written, is not applicable, including
those in the purchaser’s purchase orders, if not explicitly accepted
and signed by Rheavendors Industries S.p.A.; if the guarantee
terms here below should be held not to be valid and/or lawful in
the Country where the product is sold, they will not be effective
whereas all the other clauses will remain valid and applicable;
the mechanical and electronic components of the machine are
guaranteed for twelve months, starting from the sales date certified
by the fiscal receipt;
the guarantee shall be understood as the free replacement or
repair of any part of the machine that – at the manufacturer’s
unquestionable discretion – should prove to be originally
defective due to manufacturing defects; the cost of sending the
manufacturer machines, defective pieces and spare parts will be
totally charged to the user’s account; the manufacturer reserves
the right to use new or reconditioned components for repair; if
replaced, original components will be guaranteed for 12 months;
the parts replaced under guarantee will become the
property of
RhevVendors Services S.p.A. (request for “Form PO 19.01/2b”
Materials under guarantee – Authorisation to return);
in case of irreparable failure or if a failure of the same origin is
repeated, the manufacturer may – at its unquestionable discretion
– replace the machine with another one, the model of which is
either the same or an equivalent one; the guarantee of the new
machine will be extended up to the original term of guarantee of
the replaced machine;
all the parts that should prove to be defective due to negligence or
carelessness (non-observance of the instructions for the operation
of the machine), incorrect installation or maintenance by
unauthorised personnel, transport damage or any circumstance –
anyway – not due to the manufacturing defects of the machine are
not covered by guarantee; the installation and connection with
supply plants as well as the maintenance operations mentioned by
the installation manual are also excluded from any performance
under guarantee; the guarantee will not cover payment systems
either; whether installed on the machine or supplied as an
accessory, they are subject to their manufacturer’s guarantee
whereas Rheavendors Industries S.p.A.
will just act as a broker;
all changes made to the machine and not agreed with the
manufacturer in writing will involve the immediate termination of
the guarantee period and anyway fall under the Customer’s total
responsibility;
the guarantee is excluded in all cases of improper use of the
machine;
Rheavendors Industries S.p.A. will disclaim all responsibility for any
damage that may be directly or indirectly caused to people,
animals or things as a result of:
improper use of the vending machine; incorrect installation;
improper energy or water supply; serious maintenance deficiency;
actions or changes not explicitly authorised; use of non original
spare parts;
in case of failure, Rheavendors Industries S.p.A. is obliged neither
to compensate any economic damage due a forced stop of the
machine nor to extend the guarantee period;
if the machine should be transferred to a centre designated by the
manufacturer for overhaul or repair, the relative transportation
risks and costs will be charged to the user’s account. The freight
charges of machines, defective pieces and spare parts are always
understood as charged to the user’s account;
MAN1010119 rel. 01 dated 30.01.2014 page no. 6 of 52 page
www.rheavendors. c om tel: 0039 02 966 551 fax: 0039 02 96 55 086 e mail: rheavendors@rheavendors.com
rheavendors group's sole property
Page 7
cino eC PRO by
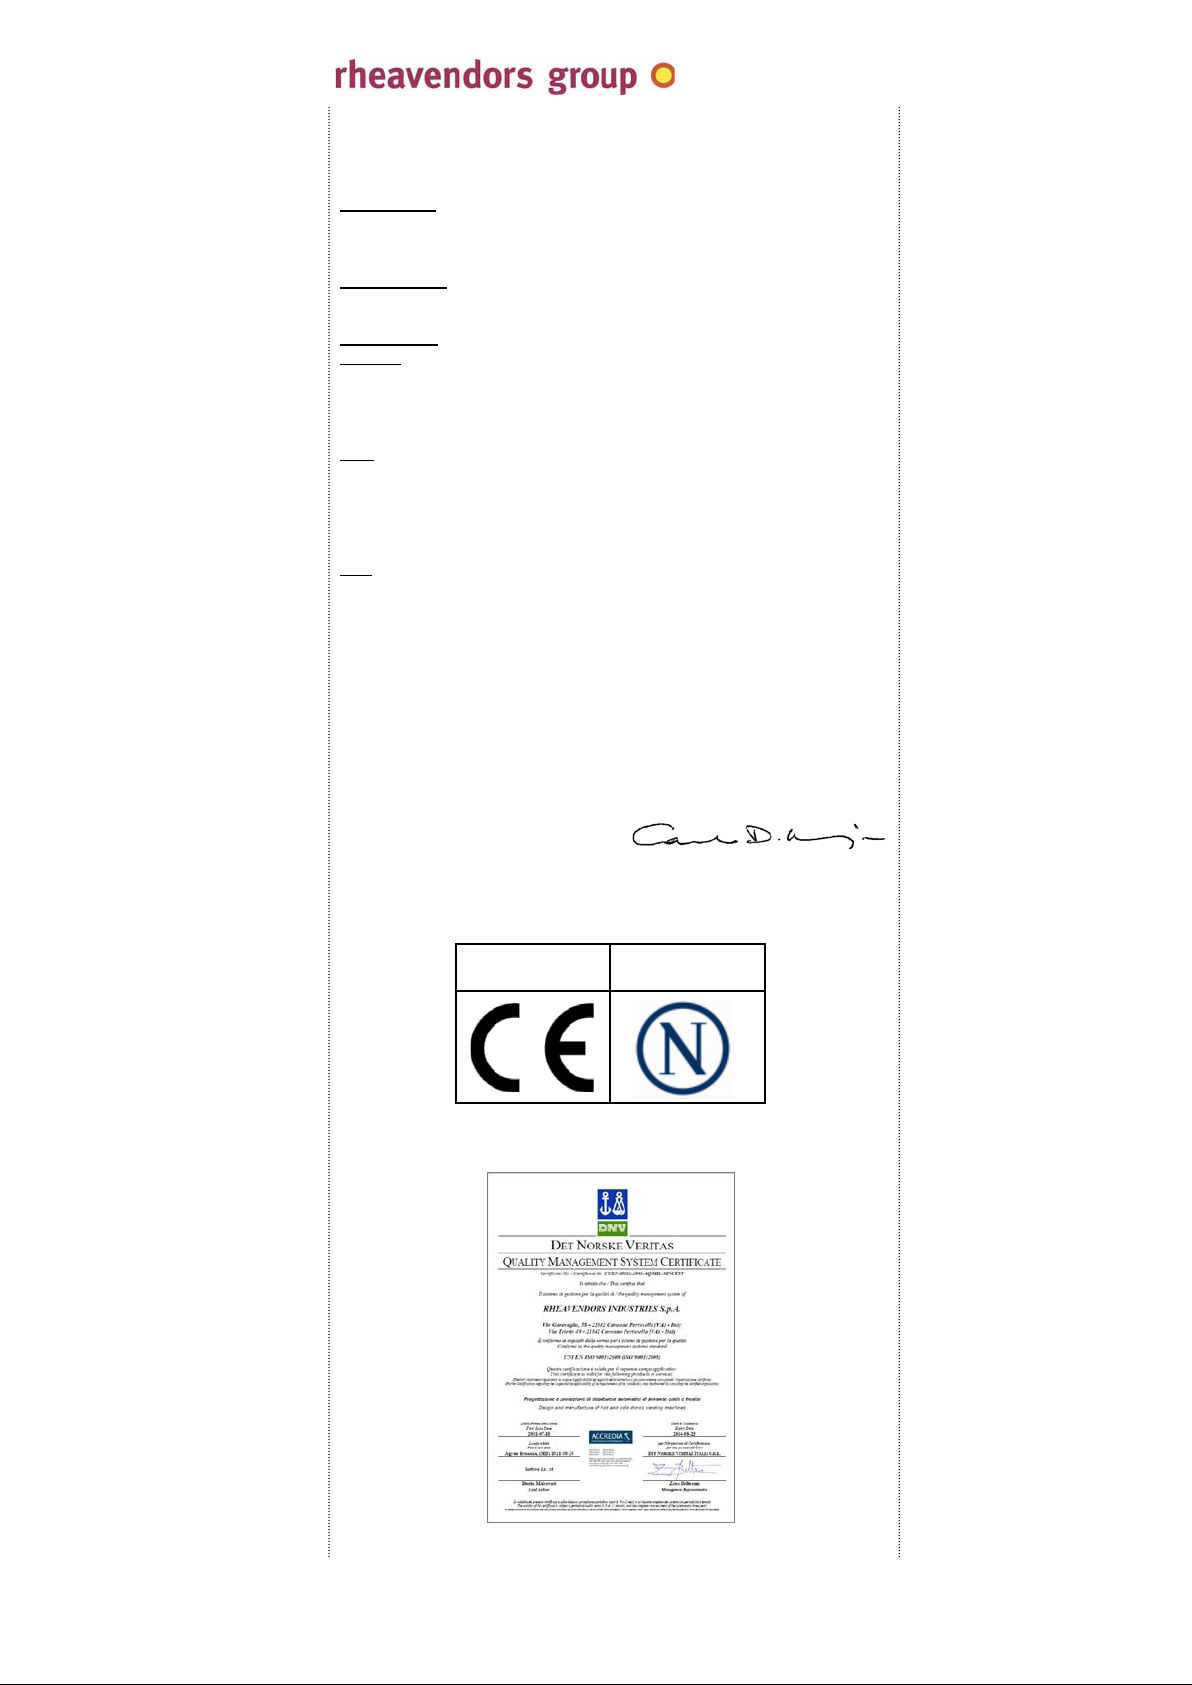
declaration of
conformity
marking
ISO 9001 certification
Rheavendors Industries S.p.A. declares that this drink vending
machine has been designed and manufactured in compliance with
the following directives and safety standards:
Directives:
2004/108/EC; 2006/42/E C; 97/23/EC;
2011/65/EC (RoHS); 2002/96/EC (RAEE);
Regulations
:
1907/2006/EC (REACH); 1935/2004/EC;
Standards:
SAFETY
:
EN 60335-1: 2012
EN 60335-2-75: 2004 + A1: 2005 + A11: 2006 + A2: 2008 +
A12: 2010;
EMC
:
EN 55014-1: 2006 + A1: 2009 + A2:2011;
EN 55014-2: 1997 + A1: 2001 + A2: 2008;
EN 61000-3-2: 2006 + A1: 2009 + A2: 2009;
EN 61000-3-3: 2008;
EMF
:
EN 62233: 2008;
manufacturer
Rhea Vendors Group S.p.A.
Via Valleggio, 2/bis – 22100 Como – (CO) - Italia
factory
Rheavendors Industries S.p.A.
Via Garavaglia, 58 - 21042 Caronno Pertusella – (VA) – Italy
CEO & Legal Representative
(C. D. Majer )
conformity quality
MAN1010119 rel. 01 dated 30.01.2014 page no. 7 of 52 page
www.rheavendors. c om tel: 0039 02 966 551 fax: 0039 02 96 55 086 e mail: rheavendors@rheavendors.com
rheavendors group's sole property
Page 8
cino eC PRO by
table of contents
01.
02.
03.
04.
05.
06.
07.
08.
09.
10.
11.
12.
13.
14.
legend
introduction
technical data
configurations
presentation
preliminary actions
connections
installation and first power on
programming
parameters
solution of problems
maintenance
how to do to…
hydraulic diagram
in the listed chapters, the manual describes a
cino eC PRO
vending machine in its hardware and software components for a
complete and fully-aware use of all machine functions; due to the
large variety of available options and the constant technical update
of our vending machines, some special device or function might be
indicated and described not in the manner you expect; in this case,
do not hesitate to contact us;
telephone: 0039 02 966 551
fax: 0039 02 96 55 086
e mail: rheavendors@rheavendors.com
ATTENTION: this label applied next to the serial number label
inside the vending machine points out that the instructions
supplied by this manual must be carefully read before the
installation and operation of the vending machine;
please, print this manual only if necessary; environmental
protection is our common interest;
page 09
page 09
page 10
page 12
page 13
page 21
page 22
page 23
page 26
page 39
page 42
page 45
page 49
page 52
01 30.01.2014 s up plement EN60335 5th edition and d e c laration of conformity; A4
00 28.11.2013 First issue;
rel. date description
this document is made available elec tronically on site www.rhe avendors.com
MAN1010119 rel. 01 dated 30.01.2014 page no. 8 of 52 page
www.rheavendors. c om tel: 0039 02 966 551 fax: 0039 02 96 55 086 e mail: rheavendors@rheavendors.com
rheavendors group's sole property
Page 9
cino eC PRO by
01.
legend
01.01. abbreviations and
pictograms
=
=
02.
introduction
02.01. copyright
information
02.02. contacts
02.03. serial number
labels
E =
A =
R =
=
VSF =
=
§
=
=
some general instructions that may be of use for reference to this
manual;
dispensing cycle of drinks based on instant products and coffee
beans;
machines with internal water tank;
machines with external water supply;
mixer for mixing the instant product with water;
worm screw pitch in the product canister;
product shaker of instant canisters;
espresso coffee brewer
hot water dispenser
maximum operating pressure of the boiler;
water supply pressure range of the vending machine;
© Rheavendors Industries S.p.A.; all rights reserved;
this document contains some confidential information of
Rheavendors Industries S.p.A.’s exclusive property; the content of
this document can be neither disclosed in favour of third parties,
nor copied or reproduced in any form whatsoever, either fully or
partially, without Rheavendors Industries S.p.A.’s prior
authorisation in writing; the utilisation, reproduction or disclosure
of the technical information in this document can be protected by
Rheavendors Industries S.p.A. according to the Law;
this manual is intended for the owner of the vending machine; it is
an integral
the information supplied by this manual are intended to achieve
the best performances of the vending machine within the scope of
application established by the Manufacturer; Rheavendors
Industries S.p.A. reserves the right to improve future production
without serving any prior notice and without assuming any
obligation to update the products on the market; the manufacturer
will disclaim all responsibility for any inaccuracy due to misprints;
Rheavendors Services S.p.A. is at disposal for any kind of
support and information on this vending machine;
for any reference about our partners all over the world please visit
site : www.rheavendors.com
to be able to identify the vending machine rapidly and univocally as
well as to get the best support, please specify the data of the serial
number label;
silvery serial number labels are applied inside and outside the case
of the machine;
part of the machine and it shall be kept with it;
telephone: + 39 02 966 551
e mail: rheavendors@rheavendors.com
fax: +39 02 96 55 086
code : D12345A67890
s/n: 1234 56 7890
(example)
MAN1010119 rel. 01 dated 30.01.2014 page no. 9 of 52 page
www.rheavendors. c om tel: 0039 02 966 551 fax: 0039 02 96 55 086 e mail: rheavendors@rheavendors.com
rheavendors group's sole property
Page 10

cino eC PRO by
03.
technical data
03.01. dimensions
03.02. mass
03.03. supply
water
energy
03.04. sound pressure
03.05. keyboard
03.06. display
03.07. dispensing cpt.
03.08. drip tray
03.09. dispenser
03.10. safety
water
energy
heat
software
03.11. grinder motor
03.12. millstones
03.13. coffee brewer
03.14. air break
03.15. pump
03.16. product moto rs
03.17. mixing bowl
03.18. mixer motor
03.19. boiler
height:
height (including opened water door):
width:
depth:
depth (including opened door):
values and indications for standard mac hine
anyway refer to serial number label data
- connection by means of a solenoid valve with 3/8“ gas male face:
- supply by a submersible pump:
- connection from internal tank;
- 230 V ac, 50/60 Hz; single-phase and ground;
-
- cable of the following type: H05VV-F 3G 1 mm² 300/500 V;
- 100 V ac, 50/60 Hz; single-phase and ground;
-- cable of the following type: HVCTF 2.00 mm² x 3 C;
A-weighted sound pressure level:
ten selection buttons;
two sixteen-character lines; graphic; three colors;
open; folding cup support (useful height 85 mm);
drip tray beneath the cup surface:
a fixed dispensing place;
overflow sensor and pressure relief valve;
water inlet solenoid valve with anti-flood sensor;
a main switch, a door switch;
- in 230 V ac machine: two 6.3x32 mm fuses:
- in 100 V ac machine: two 6.3x32 mm fuses:
manually resettable sensors:
time limits for water dispensing cycles;
- in 230 V ac machine:
-
in 100 V ac machine:
conical;
variable-volume brewing chamber;
motor:
air break with overflow and level switch;
a vibration pump with bypass;
- in 230 V ac machine:
- in 100 V ac machine:
max. two, according to the machine configuration;
one;
one:
one single pressurised boiler:
- in 230 V ac machine:
- in 100 V ac machine:
560 mm
625 mm
315 mm
530 mm
780 mm
26 kg
see 02.03.
from 0.1 MPa to 0.8 MPa;
24 V dc, 1.2 A max.;
2.2 litres capacity;
1,600 W;
1,400 W;
less than 70 dB(A);
64 x 128 pixel resolution;
maximum 140 mm;
capacity 750 ml;
230 V ac; 12 A delayed;
100 V ac; 16 A fast;
127 °C;
230 V dc;
120 V dc;
Ø 45 mm; 8 ÷ 15 gr.
24 V dc; 30 W;
230 V ac; 1.0 MPa;
100 V ac; 1.0 Mpa;
95 r.p.m.; 24 V dc;
15,000 r.p.m.; 24 V dc;
0.4 litres; 230 V; 1,500 W;
0.4 litres; 100 V; 1,300 W ;
Maximum 1,0 MPa
MAN1010119 rel. 01 dated 30.01.2014 page no. 10 of 52 page
www.rheavendors. c om tel: 0039 02 966 551 fax: 0039 02 96 55 086 e mail: rheavendors@rheavendors.com
rheavendors group's sole property
Page 11
cino eC PRO by
width 55 mm
width 110 mm
capacity 1.7 litres
capacity 3.5 litres
milk
0.38 kg
milk
0.80 kg
chocolate
0.94 kg
chocolate
2.20 kg
03.20. product canisters
03.21. miscellaneous
03.22. notes
max. two instant, according to the machine configuration; single
(55 mm) or double (110 mm) width; dispensing worm screws 9
mm or 18 mm in pitch; with mixer gear and product shaker, if
arranged by the configuration and with standard or reduced
product slide outlet (see 05.23.);
-
instant canister capacity:
- coffee beans canister (or hopper) capacity: 0.8 kg
machine parameters programmable by means of a flash key or
selection keyboard; NRI G13 or similar payment system
compartment; protocols: serial, parallel, executive, MDB; data
collection by means of a flash key (see 09.06.);
the water and energy supply tolerance limits that can ensure a
good and proper operation of the cino eC PRO machine are:
water:
- total hardness:
- recommended conductivity:
(*) if harder, please use anti-limestone filters;
energy:
- nominal voltage:
room (during storage and operation):
- temperature:
- relative humidity:
electric consumption:
- power (vending phase):
the power supply cable supplied with the vending machine
shall not be altered under any circumstance; in case of loss
or damage replace it by using an original component only;
make sure that the electric installation can deliver the power
suitable for the machine (see 03.03.);
a good ground connection is not only a legal obligation for the
protection of users and operators, but it can also provide
for
correct power supply;
from 10 °f to 25 °f (*)
400 μS @ 20 °C
+10 % /- 15 %
5 °C ÷ 35 °C
max 80 %
340 Wh
MAN1010119 rel. 01 dated 30.01.2014 page no. 11 of 52 page
www.rheavendors. c om tel: 0039 02 966 551 fax: 0039 02 96 55 086 e mail: rheavendors@rheavendors.com
rheavendors group's sole property
Page 12
cino eC PRO by
04.
configurations
04.01.
a. product canisters
b. water supply
c. numbering
04.02. examples of
configurations
04.03. accessories
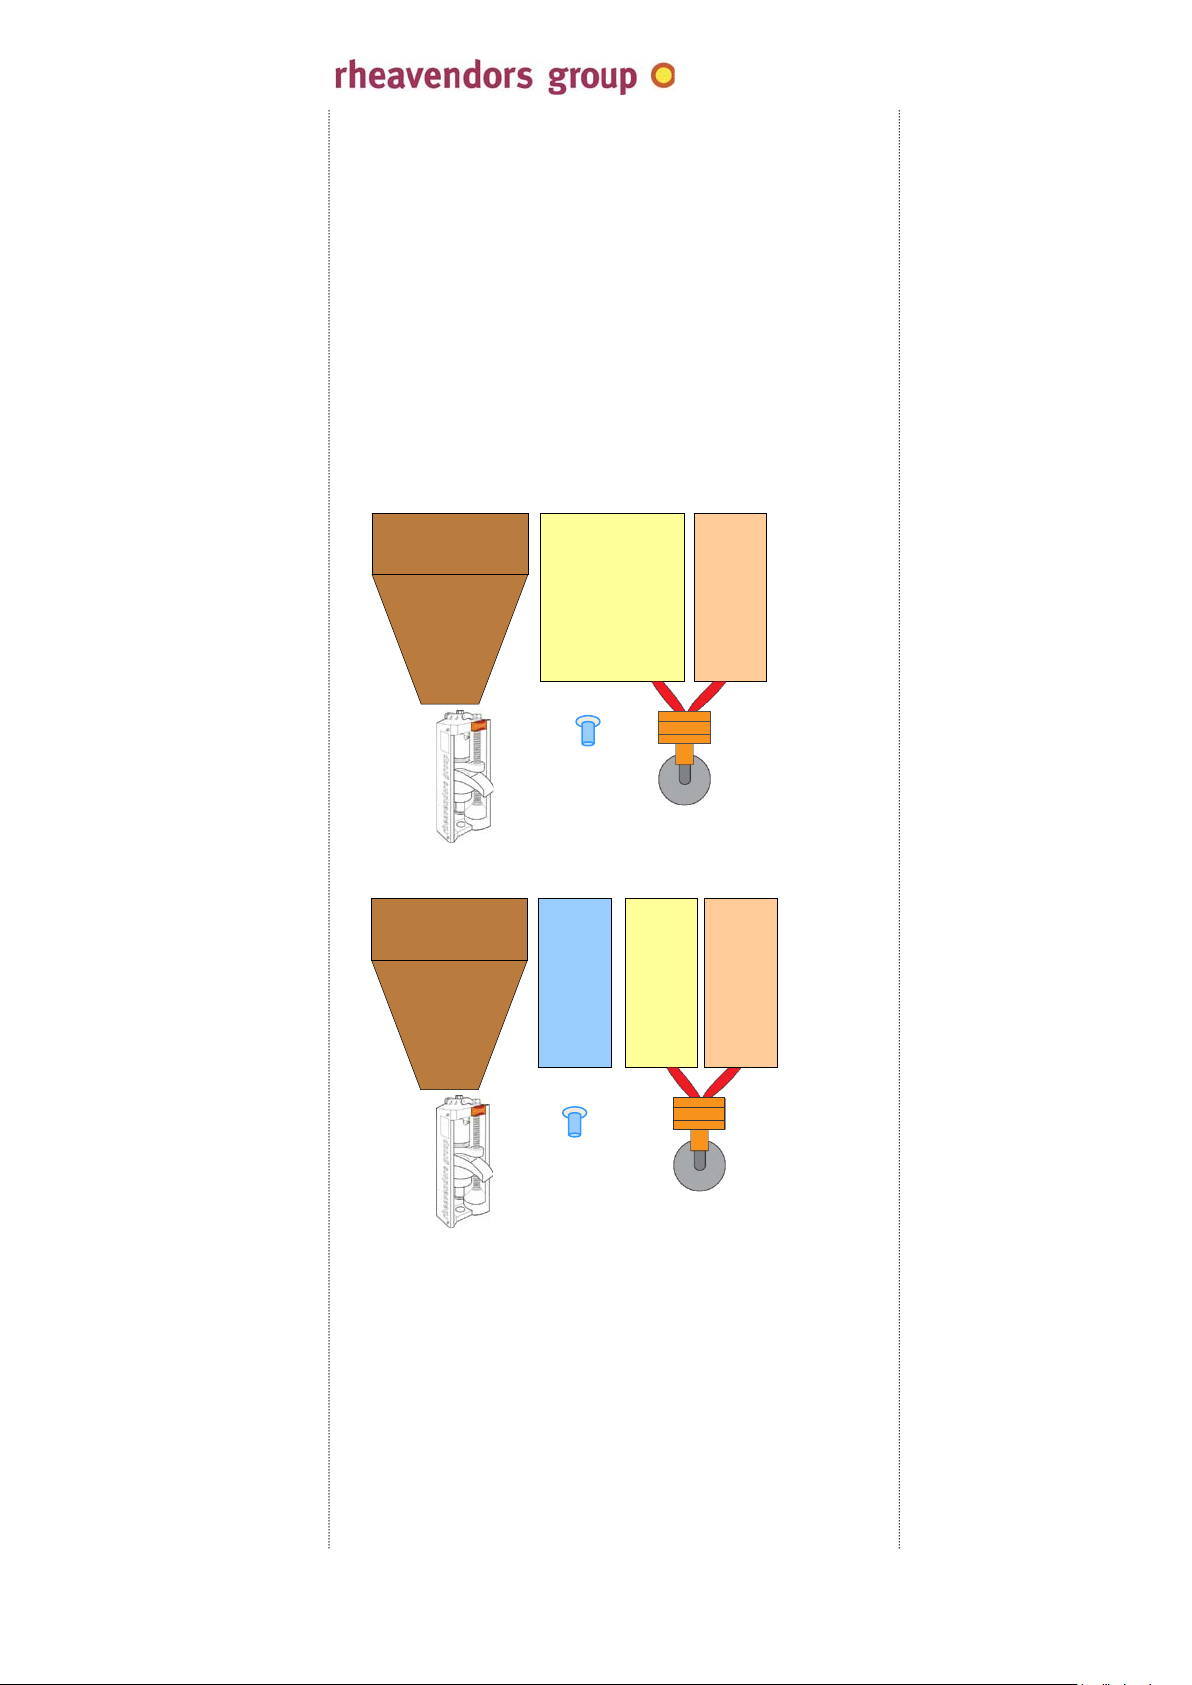
cino eC PRO configurations are numerous; they are coded by
means of some categories exemplified here below in the
abbreviation of the machine:
number of instant products and coffee beans :
- external, by means of the inlet solenoid valve:
- internal, from the internal tank to the vending machine:
product canisters, mixing bowls and mixers are numbered in
progression, from the left to the right, as it is shown later on; this
numbering is used in the chapter on how to programme (see 09.)
drinks;
V.M. cino eC PRO E/3 R
800
grams
800
grams
§
VSF18
1
940
grams
VSF 18
2
COFFEE BEANS
MILK
water 1
CHOCOLATE
mixer 1
V.M. cino eC PRO E/3 A
800
grams
2,2
litres
380
grams
VSF 18
1
940
grams
§
VSF 18
2
COFFEE BEANS
WATER
MILK
water 1
mixer 1
CHOCOLATE
the configurations above are just some of possible cino eC PRO
configurations, considering the vending machine releases and
programmability; the principles of operation and information are
anyway universal and applicable to all machines of the cino eC
PRO range;
to complete and supplement the vending machines of the cino eC
PRO range, Rheavendors Industries S.p.A. has got a series of
accessories manufactured
for these machines, such as cabinets,
autonomous water supply kits, anti-limestone filters, payment
systems, … ;
Rheavendors Services S.p.A. is at disposal for any kind of support
and information on special configurations (see 02.02.);
cino eC PRO E/3
cino eC PRO E/3 R
cino eC PRO E/3 A
keyboard selections
1. Short coffee
2. Long coffee
3. Short white coffee
4. Cappuccino
5. Preselection big cup
6. Milk
7. Latte macchiato
8. Mocaccino
9. Chocolate
10. Choko-milk
keyboard selections
1. Espresso
2. Espresso Long
3. Espresso with milk
4. Cappuccino
5. Mocaccino
6. Milk
7. White coffee
8. Choko-milk
9. Chocolate
10.
Hot water
MAN1010119 rel. 01 dated 30.01.2014 page no. 12 of 52 page
www.rheavendors. c om tel: 0039 02 966 551 fax: 0039 02 96 55 086 e mail: rheavendors@rheavendors.com
rheavendors group's sole property
Page 13
cino eC PRO by
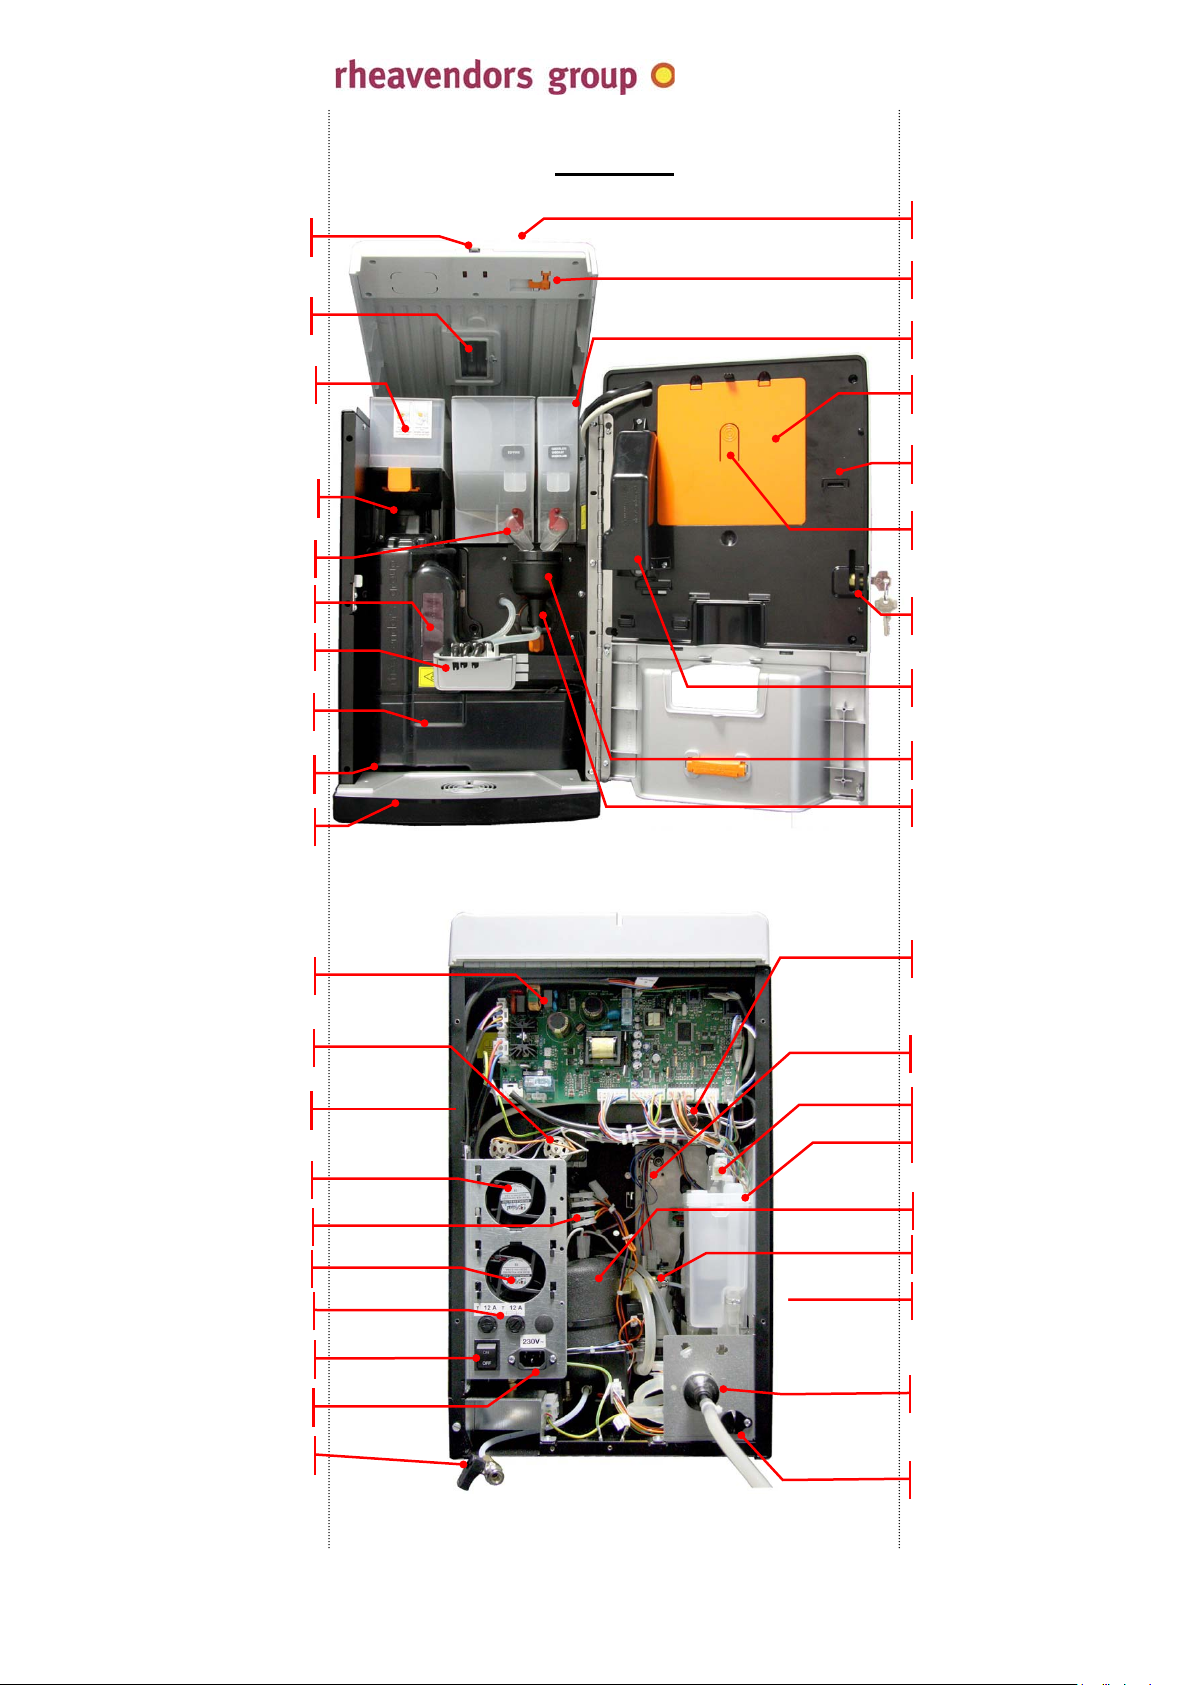
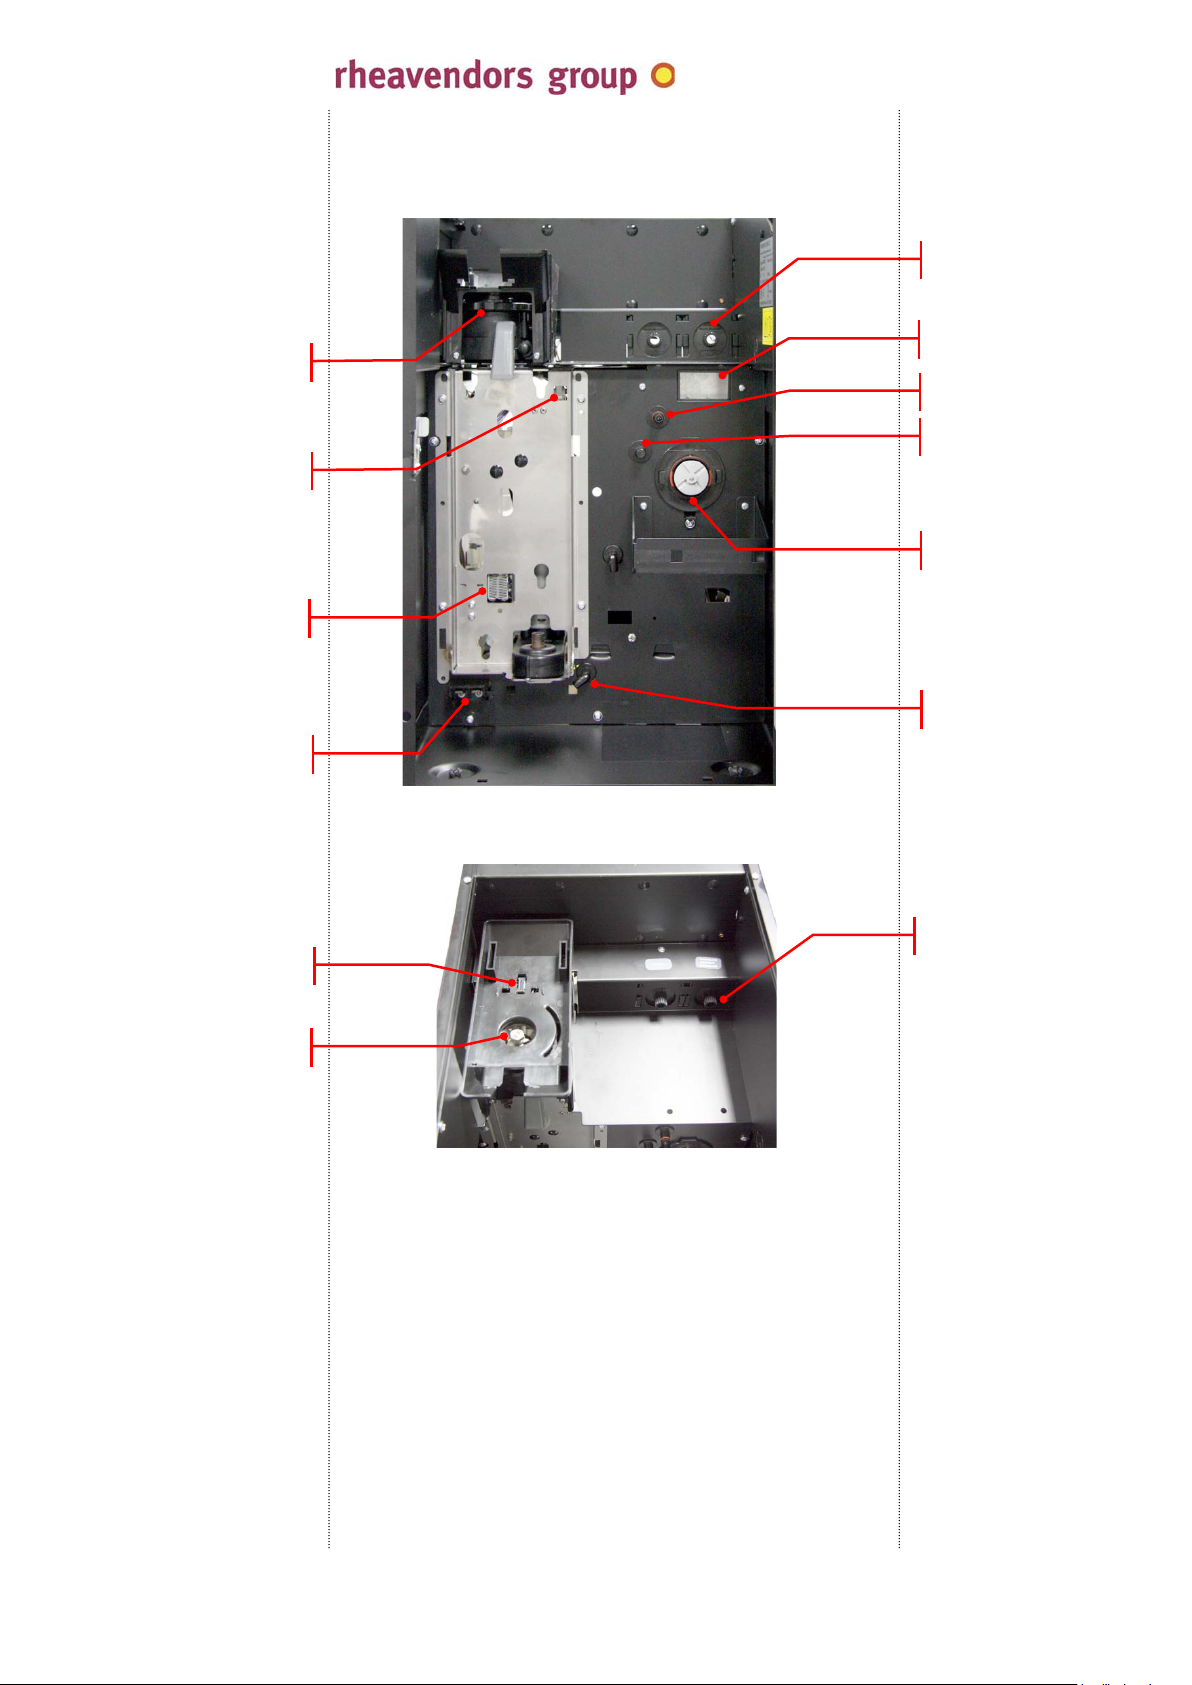
05.
presentation
05.13.
door switch
05.24.
water door
05.23.
coffee beans canister
05.21.
grinder
05.23. product slide
and closing blade
05.17.
coffee brewer
05.27.
nozzle support
05.22.
grounds container
05.06.
level sensors
05.06.
drip tray
espresso
machine cover
05.13.
service key
05.23.
instant product canister
protection carter
05.15.
flash key housing
05.14.
internal button (PROG )
05.05.
door lock
05.33.
coin box housing
05.26.
mixing bowl
05.28.
mixer motor
05.37.a.
CPU
05.25.
product motor
05.28.
mixer motor
05.29.
powder aspirator
05.36.
instant solenoid valve s
05.30.
air aspirator
05.09.
fuses
05.08.
power on switch
05.07.
electric connection
05.11.
drain tap
05.21.
grinder motor
05.31. coffee brewer
presence switch
05.31.
switch floater
05.31.
air break
05.36.
pressure boiler
05.20.
coffee brewer motor
05.32.
volumetric counter
05.12. water inlet
solenoid valve
05.10.
water drain plug
MAN1010119 rel. 01 dated 30.01.2014 page no. 13 of 52 page
www.rheavendors. c om tel: 0039 02 966 551 fax: 0039 02 96 55 086 e mail: rheavendors@rheavendors.com
rheavendors group's sole property
Page 14
cino eC PRO by
05.21.
grinder
05.18. coffee brewer
presence switch
05.19.
heater coffee brewer
05.06.
level sensors
05.25.
product motor
05.29. powder extraction
drawer housing
05.35.
water 1
05.35.
hot water
05.28.
mixer motor
05.06.
waste water discharge
05.23. coffee hopper
presence switch
05.21.
grinder
05.25.
product motor
MAN1010119 rel. 01 dated 30.01.2014 page no. 14 of 52 page
www.rheavendors. c om tel: 0039 02 966 551 fax: 0039 02 96 55 086 e mail: rheavendors@rheavendors.com
rheavendors group's sole property
Page 15
cino eC PRO by
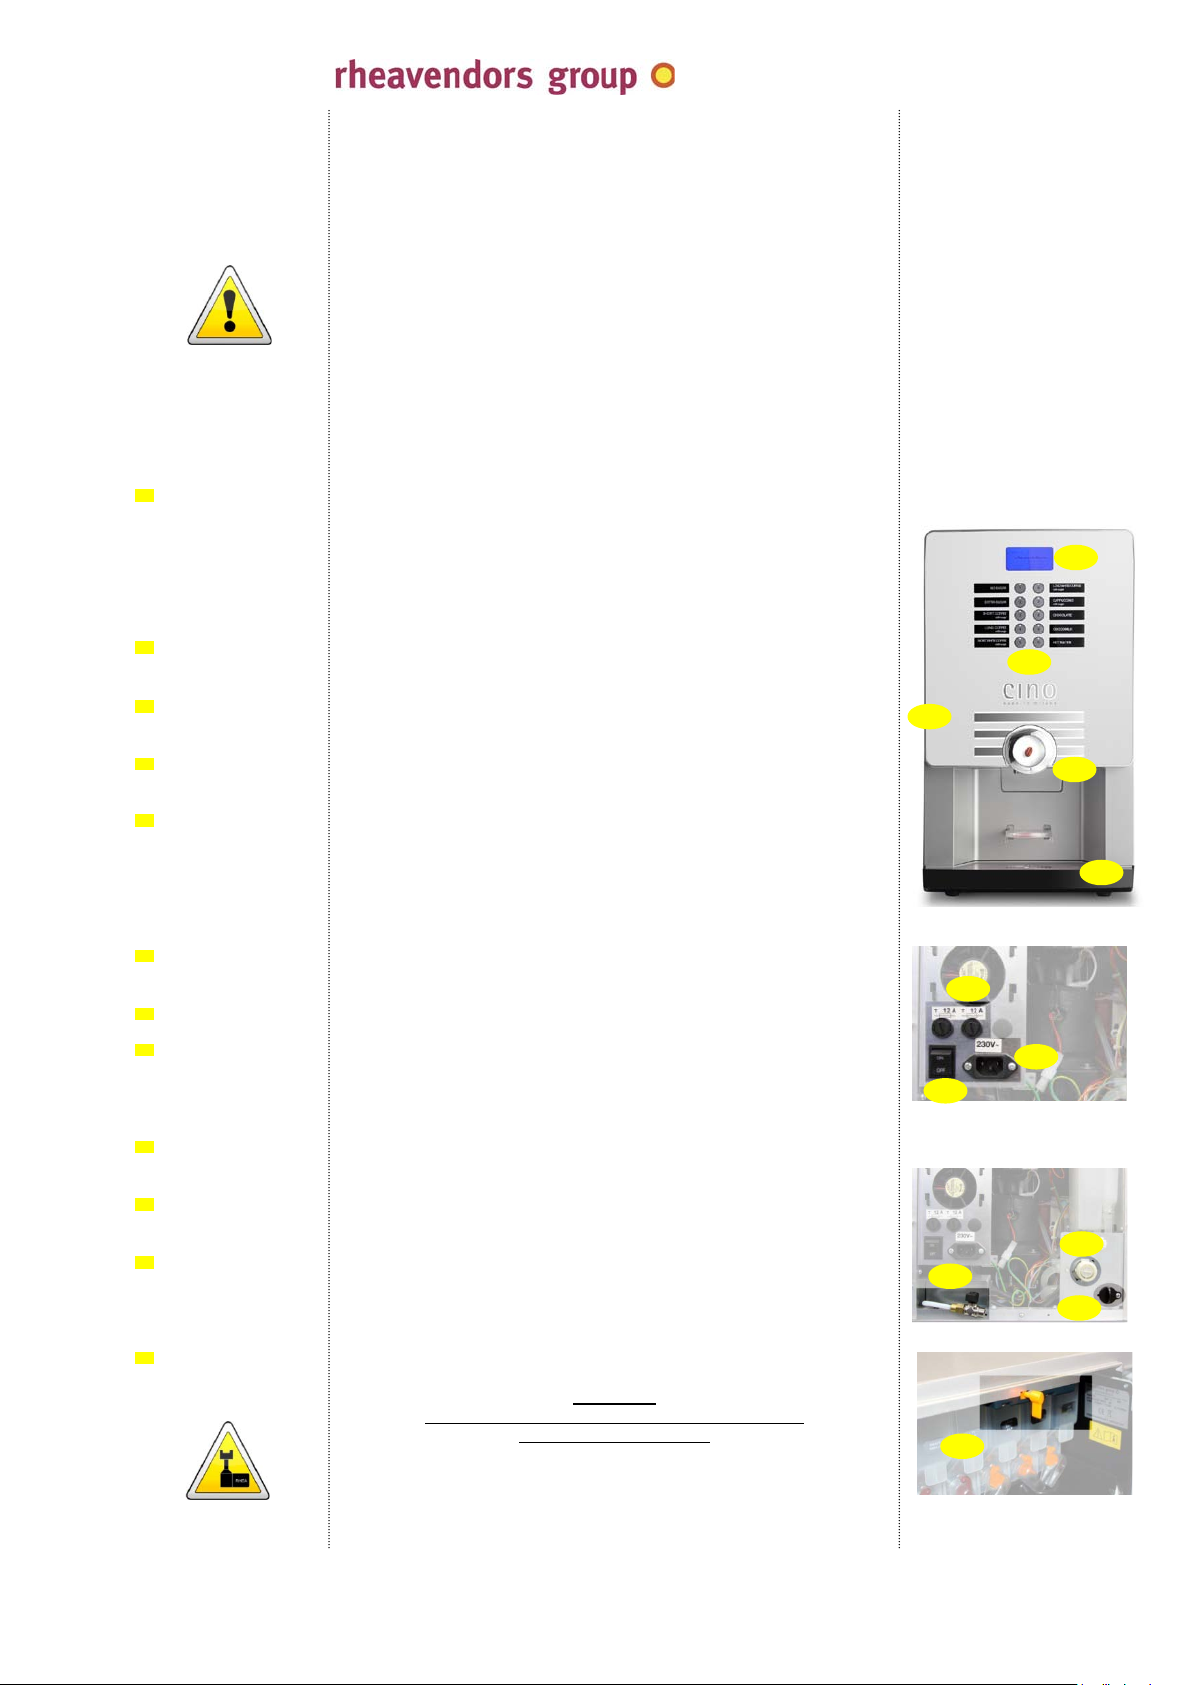
05.01. general
information
05.02. selection keyboard
05.03. display
05.04. dispenser
05.05. door lock
05.06. drip tray
05.07. electric connection
05.08. power on switch
05.09. fuses
05.10. water drain plug
05.11. pressure boiler
drain tap
05.12. water inlet
solenoid valve
05.13. door switch
the Rhea cino eC PRO vending machine is a machine explicitly
designed for being easily used by all users since no specific
competence is required in preparing drinks;
the function consists in dispensing drinks by mixing food products
and water at a proper temperature; the correct operation of the
vending machine occurs in closed rooms in normal environmental
conditions and at a room temperature between 5 °C and 35°C, the
relative humidity below 80%;
use only specific ingredients for vending machines;
dispense by briefly pressing a key of the selection keyboard
(see 05.02.); make sure that the cup has been properly positioned
at the dispensing station, if necessary by using the flap support for
caps (see 03.06.);
after having closed the door, press the buttons to dispense; all
buttons are lighted in standby mode whereas they turn off during
the dispensing cycle and only the selected button turns on; keys
will assume various functions in the programming mode (see 09.)
and enable the user to modify the machine parameters; keys are
numbered progressively from the top: 1, 2, … and from the left;
the display messages inform
users and operators about the
operation state of the vending machine;
the cino eC PRO vending machine has got a fixed drink dispenser
on the cup support surface;
the door is closed by means of a lock; the key is mapped and
numbered for identification;
it collects possible residual drops from the dispenser and, if
necessary, the waste water in excess from the three-way valve; it
is slided at the bottom of the machine case, in the front, and it is
composed by a covering drawer and a grilled cover that can be
washed by running water; an electric contact is intended to control
the filling level (see 11. and 13.03.).
a three-terminal socket is arranged at the back of the case for the
connection of the mains cable;
to power on and off the machine;
installed on the mains power supply to protect the machine (see
03.10.); fuses must be necessarily replaced by specialised technical
personnel only;
from where to let the silicone tube from the air break come out for
emptying; (see 13.20.);
open it to let
water come out of the air break and empty it; (see
13.20.);
the water inlet solenoid valve on R machines only has got an anti-
flood safety device intended to stop the water inlet in case of
failures; to its electrical pins can be connected in parallel an any
submersible pump (see 03.03.);
to power off the machine when the door is open;
some parts remain anyway network-connected
attention
act extremely carefully;
use the service key to supply the vending machine if it is necessary
to activate the machine when the door is open;
the key is housed in the cover;
05
08
09
11
13
1
2
3
4
5
10
02
07
03
6
7
8
9
04
06
12
10
MAN1010119 rel. 01 dated 30.01.2014 page no. 15 of 52 page
www.rheavendors. c om tel: 0039 02 966 551 fax: 0039 02 96 55 086 e mail: rheavendors@rheavendors.com
rheavendors group's sole property
Page 16
cino eC PRO by
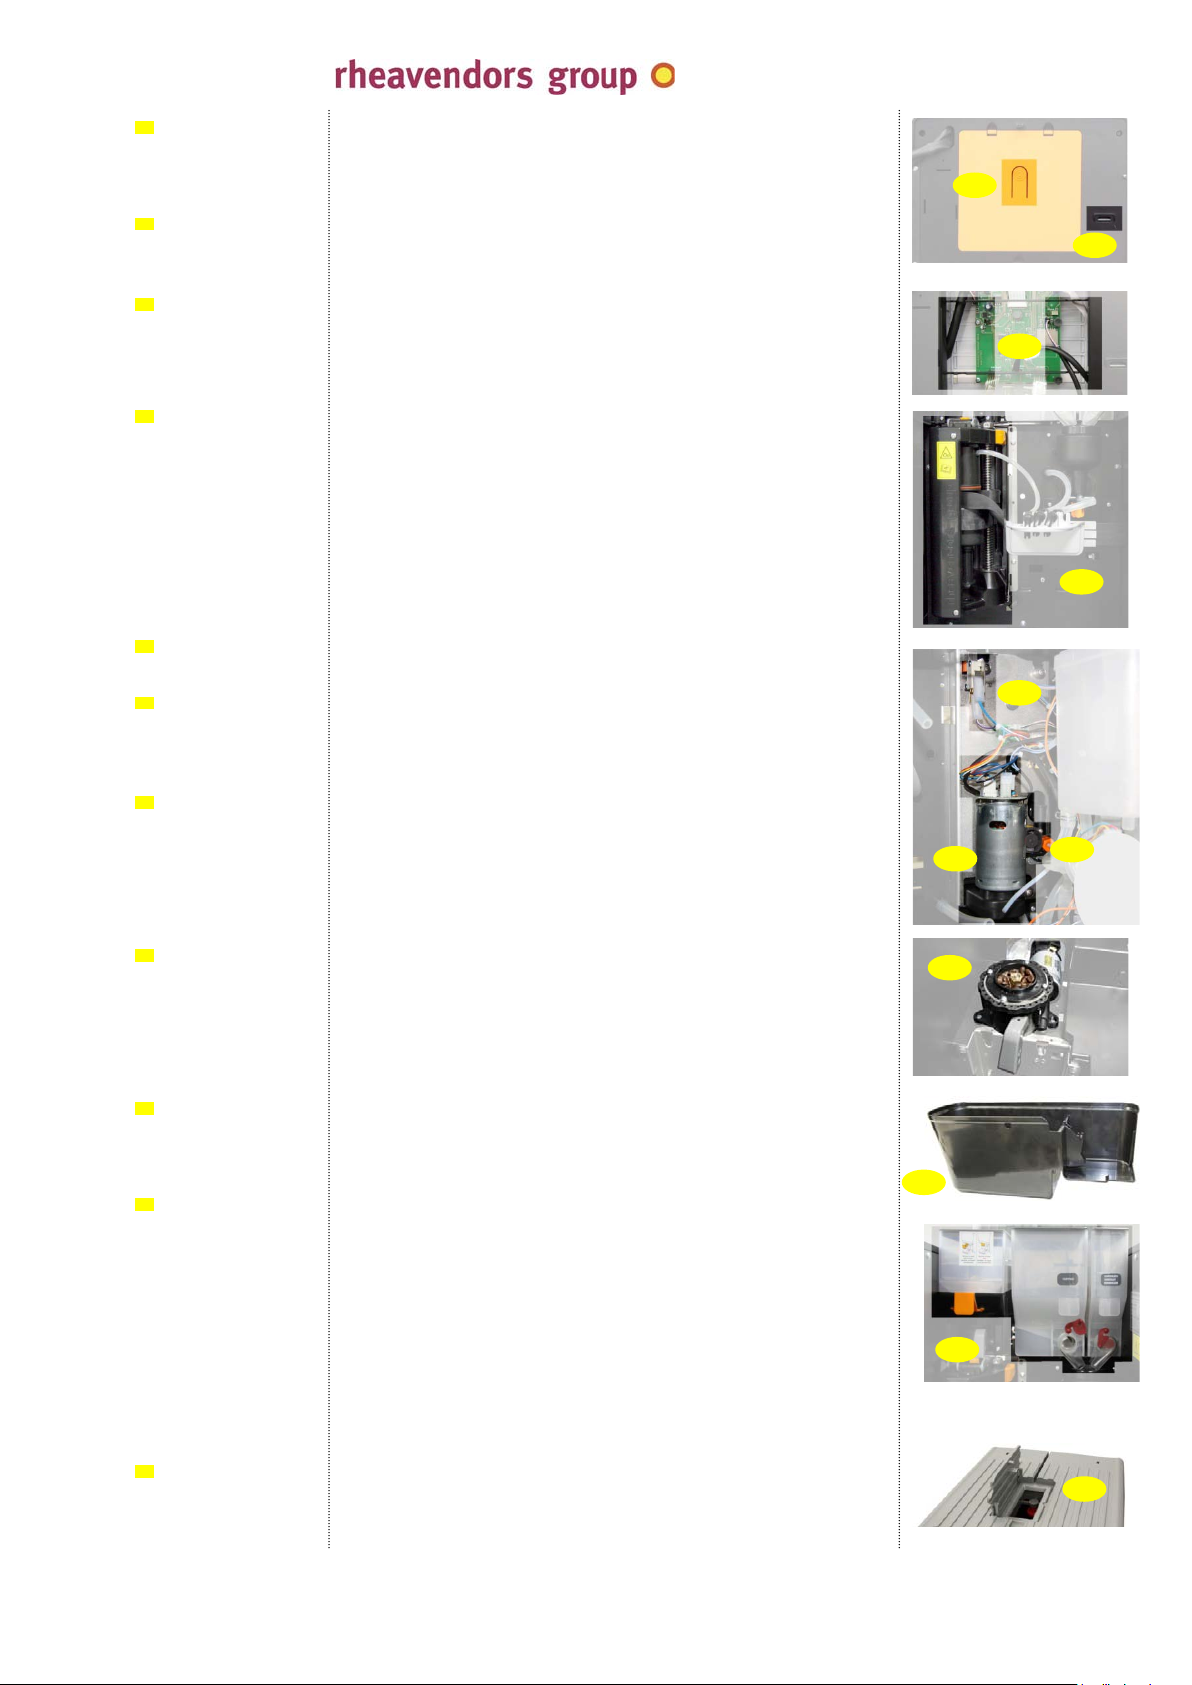
05.14. internal button
(PROG)
05.15. flash key housing
05.16. label slot
05.17. coffee brewer
05.18. brewer presence
switch
05.19. coffee brewer
heater
05.20. coffee brewer
motor
05.21. grinder
05.22. grounds container
05.23. product canisters
05.24. water door
MAN1010119 rel. 01 dated 30.01.2014 page no. 16 of 52 page
www.rheavendors. c om tel: 0039 02 966 551 fax: 0039 02 96 55 086 e mail: rheavendors@rheavendors.com
the button giving access to the machine programming mode is
arranged on the orange protection carter inside the door;
programming flash keys are arranged in the carter inside the door
(see 09.06.);
product labels are arranged inside the door panel, beneath the
orange carter;
insert the labels into the pockets by observing the machine
configuration (see 13.02.);
after receiving the coffee dose from the grinder and compressing it,
percolation occurs in the coffee brewer with the water from the
pump; the used dose is conveyed towards the slide and the drawer
at the bottom of the machine; the structure of the brewer is kept at
the correct temperature by a hot air heating system programmable
via software (see 09.01.e.);
the coffee brewer presence is controlled by a micro-switch that can
inhibit the selections including coffee beans, if it is not present;
a safety cover is intended not only to protect the operator against
moving parts, but also to keep the coffee brewer at the correct
temperature through an air heater preserving the drink quality
even after a long vending machine pause
the variable coffee brewer motor is intended to regulate the
chamber closing and compressing phases in order to compress
ground coffee for its percolation; its action is controlled by an
encoder that informs the CPU on the brewer position;
it grinds the coffee beans in the canister to pour it in the coffee
brewer chamber; the grinding degree can be manually adjusted by
means of the wheel you can access after removing the coffee
canister whereas the ground quantity is determined by a software
parameter (see 09.01.a “grinder time”) that establishes the grinder
work time;
it collects over thirty ground doses after having used them in the
coffee brewer; a software option (see 09.01.o.) will show a warning
message as soon as the tray is full;
instant product canisters dispense their content in the underlying
mixing bowls; an internal worm screw driven by the product motor
will push the instant product to the product slide; they can be
equipped with a wheel and a product shaker for constant
dispensing; the outlet, the dimension of which can be either
standard or smaller, has got a closing
the coffee beans canister (hopper) has a closing blade; pull it
before lifting the container; the presence of the coffee beans
canister is detected by a switch;
to protect the products, containers are closed by a cover; a water
tank is intended for supply in the versions not connected with the
water network (see 01.01.); this tank can be filled through a hatch
of the vending machine cover;
in A machines, a door on the vending machine cover will enable
you to access to the internal water tank and fill it in;
an internal water tank is complete with a float signalling by means
of a red strip if you have filled it in excess;
rheavendors group's sole property
;
baffle;
22
20
21
23
14
16
18
19
15
17
24
Page 17

cino eC PRO by
05.25. product motors
05.26. mixing bowls
05.27. nozzle support
05.28. mixer motors
05.29. powder aspirat or
05.30. air aspirator
05.31. air break
05.32. volumetric counter
05.33. coin box
05.34. door lighting
they are intended to rotate the worm screws inside instant product
canisters to pour the product quantity necessary for selection in the
mixing bowls;
the mixing bowls of the mixer will accommodate the instant
products you have poured to mix them with water; the fan of mixer
motor will act at the bottom and the drink outflow to the dispenser
occurs by means of a silicone tube; mixing bowls and outlet tubes
can be washed with lukewarm running water;
a fixed support on the cup station is intended to house the
dispensers from the coffee brewer, the mixer bowl and the direct
hot water unit;
press the release lever to move it to the right to clean or to remove
the coffee brewer;
the motors of mixers help you mix instant products with water by
means of the rotation of the fan mounted on their axis; the
rotation speed can be adjusted (see 09.01.a.) to the features of the
various products;
an aspirator will eject suspended product residuals from the
vending machine; the aspirator is connected with a drawer beneath
product slides to intercept the residual impalpable
from selections; the action time of the aspirator is programmable
by means of a software parameter (see 09.01.f.); aspirated air is
ejected through the slots of the rear panel;
to aspirate the air from the internal environment of the machine to
avoid any condensate;
it accumulates water for sending to the pressure boiler; the level is
controlled by a float and – if above the established level – it will
flow back to the inlet solenoid valve safety device, thus preventing
the inlet of new water;
it supplies the CPU the water quantity running through the coffee
brewer to establish its volume; the water quantity of instant
selections is established by the time set in the “water N” parameter
only (see 09.01.a.);
the components intended to support the payment system (not
supplied) are made available in some versions, inside the door; the
coin box is equipped with a lock and the payment system cable
shall be connected with the CPU board; (see 05.37.a.);
- each selection key is lighted by a led mounted on the display
board (see 05.37.b.);
- the front transparent stud, the dispensing compartment and the
door panel are lighted by a led mounted on printed circuits inside
the door;
the dispensing compartment is lighted by four leds in standby
mode and during a dispensing cycle;
leds of different colours turn on alternatively to signal the end of
a dispensing cycle;
powder coming
25
26
27
28
31
29
30
32
33
34
MAN1010119 rel. 01 dated 30.01.2014 page no. 17 of 52 page
www.rheavendors. c om tel: 0039 02 966 551 fax: 0039 02 96 55 086 e mail: rheavendors@rheavendors.com
rheavendors group's sole property
Page 18

solenoid valve
name sw
outlet
E1
water 1
mixing bowl 1
E2
water 2
hot water 2
EX
coffee water
coffee brewer
cino eC PRO by
05.35. pressure boiler
pump
05.36. pressure boiler
pressure boiler pump
MAN1010119 rel. 01 dated 30.01.2014 page no. 18 of 52 page
water inlet
drain tap
www.rheavendors. c om tel: 0039 02 966 551 fax: 0039 02 96 55 086 e mail: rheavendors@rheavendors.com
these components may be very hot evenif the machine is off;
a vibration pump with bypass conveys water to the solenoid valves
block for instant and three-way valve for espresso;
pressure boiler complete with a temperature probe and protection
clicsons; the drain tap may be used to empty the hydraulic circuit
(see 09.01.f.);
the water quantity of instant selections is established by the time
set in the “water N” parameter (see 09.01.a.);
rheavendors group's sole property
attention
E2
E1
solenoid valve
to hot water
solenoid valve
to mixing bowl
to coffee brewer
EX
three-way valve
water outlet
Page 19

cino eC PRO by
05.37. electronics
05.37.a. CPU
DL5 - pressured boiler
heating element led
pressured boiler
heating element
IN 230 V ac
or IN 100 V ac
DL4 - led pump
grinder motor 2A fuse
grinder motor connector
DL1 - led 24 V dc
05.37.b. display board
CPU board
connector
supply connector
internal button
PROG
right keyboard
connector
05.37.c. RFID
the CPU board governs the operation of the machine, it is the seat
of the machine programmes and it is secured to the frame by
means of turrets;
the temperature probe cable is separated from the machine wiring
to avoid hampering any removal of the probe itself;
it collects and processes the signals necessary to display the
messages for the user and the operator; it receives the signals
from the two selection keyboards and supplies the lighting leds of
the cup compartment;
the RFID card is a hardware option that can equip the machine; it
is housed inside the cover, it enables the operator to programme
the product decounters (see 09.01.n.) and/or it can be used as a
payment system (see 09.01.p.);
temperature probe
connector
display board connector
RFID connector
DL3 - led 5 V CPU
MDB payment system
connector
executive payment
system
connector
USB port
DL2 - led 5 V dc
flash key connector
dispensing cpt.
led supply
left keyboard
connector
MAN1010119 rel. 01 dated 30.01.2014 page no. 19 of 52 page
www.rheavendors. c om tel: 0039 02 966 551 fax: 0039 02 96 55 086 e mail: rheavendors@rheavendors.com
rheavendors group's sole property
Page 20

cino eC PRO by
05.38. software
05.39. rheAction
the software installed in cino eC PRO can be subdivided into two
different chapters called:
- master:
it is the software determining the machine cycles, the links
between the functions, the order of execution of operations;
this software can not be modified by the operator, but it can be
replaced in the CPU by means of a flash key written at works or
by means of rheAction (see 09.06. and 05.39.);
- configuration:
it is the software determining the times and the
succession of dispensing drinks, the payment system protocol,
the display modes, …; variables may be modified by the operator
either manually aboard the machine or by means of rheAction
(see 09.06. and 05.39.) to adapt the machine behaviour to the
final users’ needs (product quantities and mixtures, warning
messages …) (see 09.);
if it is necessary to update one of the software programmes above
on the machine, the flash key may be of great use; the key can
contain either software or both of them and provide for a rapid and
safe transfer;
please note that the flash key used for these software handlings
must have been previously initialised (with RheAction for
example);
in general, the transfer procedure is:
- power off the machine;
- insert the flash key into the corresponding connector (see
05.15.);
- power on the machine by means of the service key (see 05.13.);
- wait for the message on the machine display;
- answer the messages on the display;
- power off the machine and remove the flash key;
please note: if the flash key should contain a master software, the
transfer will certainly occur from the key to the machine, whereas
it will be necessary to follow the steps described by 09.06 in case
of a configuration software;
a system called rheAction is intended to complete and supplement
the programming executable in the machine; it is composed by a
software and hardware, installable in a pc, capable of storing,
modifying and writing the configuration data of Rhea machines;
Rheavendors Services S.p.A. is at disposal for any kind of support
and information on the RheAction system (see 02.02.);
MAN1010119 rel. 01 dated 30.01.2014 page no. 20 of 52 page
www.rheavendors. c om tel: 0039 02 966 551 fax: 0039 02 96 55 086 e mail: rheavendors@rheavendors.com
rheavendors group's sole property
Page 21

cino eC PRO by
06.
preliminary actions
06.01. handling
06.02. unpacking
06.03. positioning
06.04. preparation
the vending machine may be transported, handled and positioned
by skilled and trained personnel only; while handling, never
overturn the machine; observe the orientation arrows on the
package;
attention
handle the machine carefully to prevent the authorised personnel
from being injured; considering the weight and overall dimensions
of the vending machine, it is recommended to use a truck at low
speed;
- approach the packed vending machine to its work position;
- cut the two plastic belts;
- lift the external package;
- extract the protection bag up;
-
lift the vending machine and arrange it on the work surface;
attention
the materials composing the package shall never be left within the
reach of people from outside, in particular of children, because they
represent a potential source of danger;
only specialised companies may be charged to provide for the
disposal of package components;
the vending machine shall be arranged for work in a sheltered
room by using a support suitable for the weight of the machine
(see 03.02.); its distance from the walls shall provide for good air
circulation and easy access;
any inclination of the surface shall not exceed 2°;
it is recommended to arrange an easily cleanable impermeable
protection beneath the vending machine to collect any accidental
product fall;
when the machine is in its final working position:
- cut the clamp securing the door key to the drip tray grilled cover;
- insert the door key into the lock (see 05.05.), rotate it and open
the door;
- remove the envelope of documents and labels;
- take the power supply cable and the water union; the water union
can be used for water connection with the network;
- lift the machine cover and remove the guards intended to fasten
product containers for transport;
- insert the labels by observing the order of selections determined
by the machine configuration (see 04.02.);
MAN1010119 rel. 01 dated 30.01.2014 page no. 21 of 52 page
www.rheavendors. c om tel: 0039 02 966 551 fax: 0039 02 96 55 086 e mail: rheavendors@rheavendors.com
rheavendors group's sole property
Page 22

cino eC PRO by
07.
connections
07.01. water
07.02. energy
make sure that the water used to supply the vending machine has
all proper features for human consumption;
make sure that there is no sign of impurity and check the degree of
hardness; if necessary, contact an analysis lab;
if necessary, use a softening filter and replace the cartridge at
regular intervals, in observance of the manufacturer’s instructions,
to preserve the machine components;
make sure that the network pressure is the one preset for the
machine (see 03.03.); use a pump or a reducer in case of noncompliance; it is recommended to install a tap to detach the
machine from the network; connection shall occur by means of:
- new tube;
- of type-approved material for food use;
- compliant with “IEC 61770 Electric appliances connected to
the water mains”;
-
it can support the working pressure;
if the tube is not supplied with the machine or in case of
replacement use tubes featured as above only;
if the machine is supplied by an internal water tank, make sure
that the tank is properly positioned in its seat and fill it;
for the drinkability features of “waters intended for human
consumption” refer to the following Internet address:
http://eur-lex.europa.eu/
directive 98/83/ EC of 03/11/1998
observe the rules on connections with the electric network, in
particular on grounding; connect the machine permanently without
using any reduction, adaptor, multiple socket or extension; use the
network connection cable supplied with the vending machine only;
it is recommended to install a switch detaching the machine from
the network;
it is recommended to install a differential current device operating
below 30 mA, detaching the machine from the mains and promptly
tripping in case of improper electric input in order to considerably
reduce the risks arising out of any short-circuit;
attention
check the power plant capacity to supply the power required by the
machine (see 03.03) and the observance of the rules in force;
strictly refer to the data of the serial number label (see 02.03.)
insert the cable into the connection socket (see 05.07.); then,
connect the plug with the socket and supply the vending machine;
for a correct and safe configuration of the electric power supply
installation refer to the following Internet address, if necessary:
http://eur-lex.europa.eu/
directive 2006/ 95/EC of 12/12/2006
MAN1010119 rel. 01 dated 30.01.2014 page no. 22 of 52 page
www.rheavendors. c om tel: 0039 02 966 551 fax: 0039 02 96 55 086 e mail: rheavendors@rheavendors.com
rheavendors group's sole property
Page 23

cino eC PRO by
08.
installation and first
power on
08.01. introduction
08.02. activity
after having unpacked the vending machine, arranged it firmly in
the work place and connected hydraulically and electrically, carry
out some actions to operate it;
wash hands thoroughly with water and soap befo re
handling the machine and the products; only use potable
water to clean the components;
open the door, lift the cover, power on the main switch of the
machine (see 05.08.);
pour a small quantity of coffee beans into the coffee hopper to
avoid displaying the no coffee message; remember to open the
hopper orange blade;
attention
arrange a cup beneath the nozzles, insert and rotate the service
key into the door switch (see 05.13.);
attention
the vending machine is supplied and running to all effects; the
mobile parts of the coffee brewer will be handled; act extremely
carefully;
at the end of assembly and final testing, the water used for testing
is discharged from the machine; at the first power-on at the
station, all circuits must be filled in before any other action; for this
reason, the machine will automatically load water;
the vending machine executes a diagnostic cycle for loading and
heating waters; the warning messages for the progress of these
phases appear on the display;
make sure that the machine is hydraulically supplied and that the
drip tray is inserted; while following the display messages, press
“10” to carry out the first installation;
the display shows:
wait for water to come out of the product nozzles for some
seconds; the flow will automatically stop after dispensing all
necessary water and the display will show:
the pressure boiler water starts heating to achieve the temperature
setpoint (see 09.01.e.);
at the end of this phase, ca. 3 minutes later, the display will
show
the standby messages:
no coffee beans
INSTALLATION
Water OK ?
10= START
driptray
inside? 10= START
first install.
starts automat.
switching on……
please wait
refilling water
wait
end installation
autom. reset
wait
temperature
Cino eC PRO
place your
cup
MAN1010119 rel. 01 dated 30.01.2014 page no. 23 of 52 page
www.rheavendors. c om tel: 0039 02 966 551 fax: 0039 02 96 55 086 e mail: rheavendors@rheavendors.com
rheavendors group's sole property
Page 24

cino eC PRO by
08.03. washing
transportation, storage and installation conditions can not provide
for immediate utilisation of the vending machine and it is
recommended to perform a complete wash cycle before using the
vending machine;
press the programming button (see 05.14.);
the display shows alternatively the messages:
the vending machine is supplied and running to all effects; the
mobile parts of the coffee brewer will be handled; act extremely
carefully;
arrange a cup beneath the nozzles; the machine will dispense a
pre-fixed water quantity for each wash cycle;
press “4” to enable the wash cycle of the water circuit (boiler,
tubes, mixing bowls, ….);
follow the display instructions that require the operator to must be
sure that the drip tray is empty and the machine is hydraulically
connected;
the display shows:
key “1=pb” will dispense water through the coffee brewer;
selection “2=mx1” will do it in the mixing bowls for instant
products; key “4=water” in the hot water outlet hole to the cup;
key “8=hc.” will carry out the sanitary wash cycle for the brewer
and then the wash cycles for the mixing bowls and the direct water
circuit; (see 09.04.);
repeat the operation for some times to rinse the whole water circuit
of the machine; during the wash cycles, the display will show the
circuit that is being washed;
a special wash cycle is intended to sanitise the coffee brewer by
using specific cleaning products in tabs; press key “8=hc. ”, the
display shows:
after having positioned the cup beneath the dispensing nozzles, put
a tab in the coffee brewer chamber; press “10”, follow the display
instruction and wait for the wash cycle to automatically come to an
end;
ca. 100 cc. water will be dispensed for each one of the six wash
cycles;
at the end of the sanitary wash cycle of the coffee brewer, the
machine will also wash the mixing bowls and the direct water
circuits; for this reason, make sure that at least a couple of cups
can be placed beneath the product nozzles;
power off the vending machine by means of the service key;
arrange it in its support (see 05.13.); power off the main switch at
the back of the machine (see 05.08.);
attention
attention
1= PROGRAMMING
3= TEST VEND
2= DATA 4= CLEAN
5= MAINTENANCE
Water OK ?
10= START
driptray
inside? 10= START
CLEANING
butt.: 1=pb 2=mx1
4=water 8=hc.
Cleaning
or
Cleaning
or
Cleaning
push P10=START
4:30min 1:15min
6 mal 1/6
Brewer
mixer “N”
water
CLEANING
butt.: 1=pb 2=mx1
4=water 8=hc .
put pastille and
tab dissolve
cleaning brewer
MAN1010119 rel. 01 dated 30.01.2014 page no. 24 of 52 page
www.rheavendors. c om tel: 0039 02 966 551 fax: 0039 02 96 55 086 e mail: rheavendors@rheavendors.com
rheavendors group's sole property
Page 25

cino eC PRO by
08.04.
08.05
prepare a chlorine-based anti-bacterial sanitising solution by
observing the instructions supplied with the product; remove and
immerse the following into the solution: the product canisters you
have disassembled, the trays of mixers, their fans and the silicone
tubes intended to dispense products; the time necessary to sanitise
is specified by the anti-bacterial product package; at the end,
remove all the parts you have sanitised from the solution, dry them
carefully by using clean cloths and reassemble them into the
machine; rotate the baffles of the product slides of instant canisters
to close them and load the canisters with reference to the machine
configuration (see 04.) and to the canister labels; fill in the coffee
hopper with coffee beans; close the canisters and the coffee hopper
with their upper covers;
rotate the baffles of the product slides (see 05.23.) to open them
and pull the orange blade intended to close the coffee hopper; (see
also 12.);
to clean and treat food products properly, refer to the content of
the following Internet address:
http://eur-lex.europa.eu//
regulation 2004/852/ EC of 29/04/2004
lower down the cover and close the door by means
of the lock key
(see 05.05.) and place it in a safe place;
power on the machine by means of the main switch; the display
will show in sequence following messages:
till the water temperature of the pressure boiler is suitable for the
value set in the memory (by default);
at the end of this phase intended to heat water in the pressure
boiler, the vending machine is ready to dispense on a free basis
and the display will alternatively show some stand-by messages:
Cino eC PRO
switching on…
please wait
wait
temperature
Cino eC PRO
place your
cup
MAN1010119 rel. 01 dated 30.01.2014 page no. 25 of 52 page
www.rheavendors. c om tel: 0039 02 966 551 fax: 0039 02 96 55 086 e mail: rheavendors@rheavendors.com
rheavendors group's sole property
Page 26

Key 1
to scroll the items fo rward
Key 6
to scroll the items bac k w a r d
Key 2
to scroll the variab le s o f items forward
Key 3
to scroll the variab le s o f items backward
Key 4
to increase the value of the variable on the scree n
Key 5
to decrease the value of the variable on the s c reen
cino eC PRO by
09.
programming
the vending machine is programmed by means of parameters
considered standard for the specific configuration required; values
forming the composition of recipes – written in the board memories
– enable the user to dispense drinks without requiring the installer
to set up special programmes; to modify these parameters to adapt
the drinks you have produced, refer to the following; at the end of
the chapter (see 09.07.), a summary table may help the user trace
back all the programming items;
to access the programming mode, open the front door of the
machine and use the service key in the safety switch;
access the programming
mode
quit the programming
mode
09.01. “progr”
09.01.a. key 1
…
key 10
09.01.b. prices
09.01.c. happy price
09.01.d. coins
09.01.e. temperatures
09.01.f. miscellaneous
09.01.g. diagnostics
09.01.h. sales audit
MAN1010119 rel. 01 dated 30.01.2014 page no. 26 of 52 page
09.01.i. MDB
www.rheavendors. c om tel: 0039 02 966 551 fax: 0039 02 96 55 086 e mail: rheavendors@rheavendors.com
the vending machine is supplied and running to all effects in this
mode of operation; act extremely carefully;
press the “PROG” key (see 05.14.);
the display shows alternatively the messages:
- “1” to access the programming mode of machine variables;
- “2” to display the drink quantities you have dispensed;
- “3” to dispense on a free basis;
- “4” to dispense water to wash the water circuits;
- “5” to schedule maintenance operations;
after having programmed, press “1” and then the key “PROG” to go
back to the usual operation of the vending machine and to store all
changes you have made; the display will show:
press the key “PROG”, press “1”; the buttons of the selection
keyboard will assume the following functions:
the items are (scroll by means of key “1”):
contains the variable composing selection 1;
…
contains the variables composing selection 10;
to establish the prices of every single dispensing cycle;
to establish the prices of every single dispensing cycle
special time bands;
to determine the values of coins;
to set up the pressure boiler water temperatures;
to programme different options;
to display some machine parameters;
to display the quantity of dispensing cycles you have performed;
it contains the programming of the MDB protocol parameters;
attention
rheavendors group's sole property
produced in
1= PROGRAMMING
3= FREE VEND
2= DATA 4= CLEAN
5= MAINTENANCE
END PROGRAMMING
wait ………
1= PROG.
PROGRAMMING
BUTTON N
PROGRAMMING
PRICES
PROGRAMMING
HAPPY PRICE
PROGRAMMING
COINS
PROGRAMMING
TEMPERATURE
PROGRAMMING
MISCELLANEOUS
DIAGNOSTICS
SALES AUDIT
PROGRAMMING
MDB
Page 27

cino eC PRO by
09.01.l. clock
09.01.m. out of service
09.01.n. product qty
09.01.o. maintenance
09.01.p. RFID CARD
09.01.q. tuning motors
09.01.r. calibration
product flux
09.01.s. product audit
09.01.t. id. machine
09.01.u. variflex brewer
09.01.a. button from 1
to 10
“functioning”
to set up the machine clock;
to record any failure that may have occ urred;
to check and enable product dispensing cycles;
it contains the maintenance control parameters of the machine;
to determine the RFID card parameters;
to regulate the time of product motors and the grinder motor;
programming of the product quantities delivered per unit of time;
products delivery data;
flux
it contains the machine identif ic ation parameters;
coffee brewer programming;
press key “2” when the display shows “key n” to scroll the variables
composing the function of that key (by pressing keys “4” and “5”);
- if you press “2” when “FUNCTIONING”, the key will perform the
function you have programmed (dispensing cycle of a drink);
see paragraph “functioning”;
- if you press “2” when “INHIBITED”, the key will be inhibited and
it will perform no function;
- if you press “2” when “PRESELECTION”, the key you have pressed
before the real selection will fulfil the function of the items listed
in the “preselection” paragraph (scroll by pressing key “4” and
“5”);
use key “2” to scroll the following items:
choose the “extended” option to display all variables and the
“reduced” option to display only the parameters, the values of
which are other than zero (use keys “4” and “5”
to change the
option);
PROGRAMMING
CLOCK
REGISTRATION
OUT OF SERVICE
PROGRAMMING
PRODUCT QTY
PROGRAMMING
MAINTENANCE
PROGRAMMING
RFID CARD
TUNING
MOTORS
CALIBRATION
PRODUCT FLUX
PRODUCT AUDIT
FLUX
PROGRAMMING
ID MACHINE
PROGRAMMING
VARIFLEX BREWER
FUNCTIONING
INHIBITED
PRESELECTION
programming:
TOTAL
programming:
PARTIAL
espresso coffee is the first product you can programme for each
selection key; there are two variables:
- the water quantity in the cup; change it by means of “4” and
“5”; if the variable is zero, no espresso will be dispensed (drink
COFFEE WATER EXP.
0= inhib. cc: 00
composed by instant products only);
- coffee will be dispensed before (value 1) or after (value 0) instant
products;
coffee sequence
1=coffee before N
- to allow the adjustment of the internal coffee group pressure
increasing the height of the chamber (from 0 to 10 mm);
Brewer pressure
0=max 10=min. 00
press “2” to display:
press keys “4” and “5” to change the rotation time of the N product
motor, thus changing the product quantity you have dispensed; if
time is zero, no product N will be dispensed; you can carry out a
PRODUCT N
0= inhib. 0.0
“time test” on the set-point; (see 13.18.);
MAN1010119 rel. 01 dated 30.01.2014 page no. 27 of 52 page
www.rheavendors. c om tel: 0039 02 966 551 fax: 0039 02 96 55 086 e mail: rheavendors@rheavendors.com
rheavendors group's sole property
Page 28

cino eC PRO by
if the time you have programmed is other than zero, the N product
motor will be activated at the expiry of the delay time you have
programmed; the delay time is increased or decreased by pressing
keys “4” and “5”;
the rotation time of the product motor can be briefly interrupted
one or two times during the dispensing cycle (0 = no break); (see
also 13.16.);
parameter used to adjust the amount of grounded coffee will be
dispensed and filled into the coffee brewer;
if you enable this option after having compressed the ground dose,
the pump will deliver a small water quantity to make it wet, stop
and restart the usual dispensing cycle; the stop time can be here
programmed from 01 to 15;
to determine the solenoid valve opening time and then the water
quantity it will deliver; you can carry out a “time test” on the setpoint; (see 13.18.);
water will be dispensed in the mixing bowls at the expiry of the
delay time you have programmed;
LM dispensing
LM dispensing
LM dispensing
LM dispensing
LM dispensing
LM dispensing
LM dispensing
LM dispensing
LM dispensing
LM dispensing
LM dispensing
the rotation time of the mixer fan can be changed by pressing
“4” and “5”; if time is equal to zero, the mixer will not rotate; you
can carry out a “time test” on the set-point; (see 13.18.);
if the rotation time is other than zero, the mixer fan will be rotated
at the expiry of this delay time;
the mixer rotation speed can be regulated between low, medium,
high by pressing keys “4” and “5”;
to establish the delay between the second milk and the espresso
coffee dispensing cycle in the “Latte macchiato” selection;
to establish the milk quantity of the second dispensing cycle;
to determine the delay of the second milk dispensing cycle;
to determine the breaks of the second milk dispensing cycle;
to establish the water quantity of the second milk dispensing cycle;
to determine the water quantity delay of the second milk
dispensing cycle;
to establish the mixer rotation time of the second milk dispensing
cycle;
if other than zero, the mixer power on will be delayed by the time
you have set up;
to determine mixer rotation speed of the second
cycle;
milk dispensing
to specify the product canister to be used for the milk dispensing
cycle;
to establish the water to be used for the second milk dispensing
keys
cycle;
MAN1010119 rel. 01 dated 30.01.2014 page no. 28 of 52 page
www.rheavendors. c om tel: 0039 02 966 551 fax: 0039 02 96 55 086 e mail: rheavendors@rheavendors.com
rheavendors group's sole property
start delay
PRODUCT N 0.0
breaks number
0-1-2 00
coffee time
grinder 0.0
T. AFTER PREINF.
0=NO SEC.:00
WATER N time
0= inhib. 0.0
start delay
WATER N 0.0
MIXER N
0= inhib. 0.0
start delay
MIXER N 0.0
MIXER speed N
medium
Latte-Macchiato
start brewer 0.0
PRODUCT LM
0= inhib. 0.0
start delay
PRODUCT LM 0.0
breaks number
0-1-2 00
WATER LM time
0= inhib. 0.0
delay water LM
0= inhib. 0.0
MIXER LM
0= disab. 0.0
start delay
MIXER LM 0.0
MIXER LM speed
medium
PRODUCT
MILK LM n: N
LM Milk water
Number= 0
Page 29

cino eC PRO by
“pre-selection”
“decaffeinated/barley”:
MAN1010119 rel. 01 dated 30.01.2014 page no. 29 of 52 page
“extra milk”
“espresso”
“no sugar”
“extra sugar”
“sugar”
www.rheavendors. c om tel: 0039 02 966 551 fax: 0039 02 96 55 086 e mail: rheavendors@rheavendors.com
to repeat the selection by N times automatically and produce drinks
of remarkable volume (jug);
press “4” and “5” to choose the drink name to display during the
dispensing cycle; options are listed here below:
- “standard”, the display will show “drink N under preparation”;
- “list of names” of drinks made available in the machine
memory; the display will show “drink name under preparation”;
-
“custom”: the display will show the user’s customised names; it
is necessary to create a configuration file with rheAction
(see 05.39.) and load it on the machine by means of a flash key
see 09.06.);
several pre-selection messages are made available according to the
various machine releases; they are supplied here below:
espresso coffee can be replaced with instant coffee (or barley) by
means of pre-selection; variables are listed here below:
- message appearing on the display during the dispensing cycle;
- decaffeinated product canister (keys “4” and “5”);
- mixing bowl and mixing water (keys “4” and “5”);
- price change with respect to the standard espresso drink (keys
“4” and “5”);
- keys for which preselection has effect (scroll by means of key
“2” and select enable or disable by means of key “4” and “5”);
this instruction is repeated in any preselection to enable the
effect in the key or not (*);
- to choose
- to determine by how many seconds to change the rotation time
of the product motor you have set up in the configuration;
to enable see (*);
- to decrease the NN water percentage to the water you have set
up in the espresso selections; to enable see (*);
- to choose the sugar canister; to enable see (*);
- to choose the sugar canister;
- to determine by how many seconds to change the rotation time
of the product motor you have set up in the configuration;
to enable see (*);
- to choose the sugar canister; to enable see (*);
the milk canister;
rheavendors group's sole property
JUG
0=no n:00
selection name N
------- n:00
preselection
DECAFEINATED
canister
DECAFEINATED n:N
ev-mixer
DECAFEINATED n:N
DECAFEINATED price
0=+ 1=- 00
enable presel.
button N: YES
PRODUCT
MILK n:N
extra milk
quantity + 0.0
water quantity
ESPRESSO -00 %
canister
SUGAR n:N
extra sugar
quantity + 0.0
canister
SUGAR n:N
(*)
Page 30

cino eC PRO by
09.01.b. prices
09.01.c. happy price
09.01.d. coins
09.01.e. temperature
09.01.f. miscellaneous
press key “2” to display:
each selection can be assigned a sales price; use “4” and “5” to
change the amount and “2” to scroll the price lines;
press key “2” to display:
every single selection may be assigned a sales price that will be
valid only in well-defined time ranges (see 09.01.l. “clock”); use
“4” and “5” to change the amount and “2” to scroll the price lines;
assign each channel its value for the parallel payment system;
press “2” to scroll the coins from A to J and use “4” and “5” to
change its value;
press key “2” to display:
use keys “4” and “5” to change the pressure boiler temperature;
press key “2” to display:
to establish how many minutes after the latest espresso to activate
the following parameter;
to establish the power on time of the pressure boiler heating
element to increase the water temperature;
to determine the temperature at which to heat the coffee brewer
during operation;
(see also 10.03.);
the
“miscellaneous” item includes some options (press keys “4”
and “5” to modify the values of these options):
- machine code A and B: you can number the machine to
distinguish it from others similar (data collection);
- message number: press keys “4” and “5” to choose the messages
to display on the screen when the machine is in standby mode;
-
coin mechanism programming options: press keys “4” and “5” to
display the options of communication with the payment system;
choose among:
- parallel single vend
- parallel multiple vend
- executive
- executive price holding
- MDB
MAN1010119 rel. 01 dated 30.01.2014 page no. 30 of 52 page
www.rheavendors. c om tel: 0039 02 966 551 fax: 0039 02 96 55 086 e mail: rheavendors@rheavendors.com
rheavendors group's sole property
PRICE N
0.00
PRICE N
0.00
COIN A
0.00
TEMPERATURE
espresso NN
DEFINITION
first coffee 00
heating time
sec.: 00
temperature
heater 00
machine code
A NN
machine code
B NN
message number
N
coin-mech type
PAR. SING. VEND
coin-mech type
PAR. MULT. VEND
coin-mech type
EXECUTIVE
coin-mech type
PRICE HOLDING
coin-mech type
MDB
Page 31

cino eC PRO by
09.01.g. diagnostics
- fan time: to determine for how many minutes after the latest
dispensing cycle the powder suction fan will remain active;
- beep time: beep time active at the end of each machine function;
- number of decimals: to determine how many decimals are
considered in the comparison between the selection price and the
credit you have inserted;
- language: to display the messages in one of the three languages
made available;
- display colour; to select the display aspect you wish;
- first installation: used to make sure that the water circuit will be
filled in at the next power on; if the value is zero, the machine
will perform the cycle just as for 08.02 at the next power on;
- deinstallation: to empty water circuits automatically:
- detach the water supply and press “10”;
- following the display’s messages, verify that the drip tray and
the grounds container are empty an press key “10”;
- insert an extension into the drain tap of the pressure boiler
(see 05.11. and 13.20.), remove the plug from the outlet hose
of the air break (see 05.10. and 13.20.), put them close to a
bucket and press “10”;
- open the pressure boiler tap and press “10”;
- the display shows:
- remove the tube, close the pressure boiler tap and reinsert the
drain plug of the air break when the display shows:
at the end of the uninstall cycle, the pressure boiler water
temperatures will be set to zero and the machine will be set to
“FIRST INSTALLATION=0”;
- to enable the summer time function (from the last Sunday in
March to last Sunday in October, the set time is automatically
increased by one);
-
if enabled, the operator can reset the water filter decounter by
pressing the “PROG” key; (see 05.14.);
press key “2” to access diagnostics and to enable the machine to
display (keys “4” and “5”) the standby message and the pressure
boiler water temperature, alternatively;
press “2” once again to display the voltage value intended to
supply devices at 24 V dc;
fan time
min. NN
Beep time
0.0
decimal number
N
language :
english
display color
00
first installat.
0=first N
Deinstallation
10=START
driptray
empty? 10=START
remove coffee
grounds 10=START
connect boiler
tube 10 = >
open boiler tap
P10= START
deinstallation
in progress..
END
Close boiler tap
Summer Time
1= yes N
activ. H2o filter
Reset 0=no 0
ENABLE DISPLAY
TEMPERA. 1=YES N
VOLTAGE
volt 00.0
MAN1010119 rel. 01 dated 30.01.2014 page no. 31 of 52 page
www.rheavendors. c om tel: 0039 02 966 551 fax: 0039 02 96 55 086 e mail: rheavendors@rheavendors.com
rheavendors group's sole property
Page 32

cino eC PRO by
09.01.h. sales audit this menu is intended to gather the quantities of the selections
made by the machine: names are assigned according to the EVADTS standard:
- VA 102
quantity of total vends (parameter not resettable);
- VA 104
quantity of the vends made after the reset;
- VA 101
total amount of receipts (parameter not resettable);
- VA 103
total amount of receipts after the reset;
- VA 202
quantity of total tests (parameter not resettable);
- VA 204
quantity of tests after the reset;
- VA 302
quantity of free vends (parameter not resettable);
- VA 304
quantity of free vends after the reset;
- CA 201
total amount sold by cash (parameter not resettable);
- CA 203
total amount sold by cash after the reset;
- CA 202
total amount of the selections sold by cash;
- CA 204
quantity of the selections sold by cash after the reset;
- CA 305
total amount of cash receipts;
- CA 301
partial amount of cash receipts;
- DA 401
total amount loaded on RFID cards;
- DA 402
total amount loaded on RFID cards after the reset;
- DA 201
total amount sold by means of a RFID card;
- DA 203
total amount sold by means of a RFID card after the reset;
- DA 202
quantity of selections sold by means of a RFID card;
-
DA 204
quantity of selections sold by means of a RFID card after the
reset;
- LA 1*1
selections sold at a standard price;
- LA 1*2
selections sold at a happy price;
- PA 403
free selections;
TOTAL SELECTIONS
NN
PART. SELECTIONS
NN
TOTAL MONEY
0.00
PARTIAL MONEY
0.00
TOTAL TESTS
00
PARTIAL TESTS
00
TOTAL FREE
00
PARTIAL FREE
00
TOTAL CASH
CASH 0.00
PARTIAL CASH
CASH 0.00
N. TOT. SEL. CASH
00
N. PAR. SEL. CASH
00
TOTAL CASH-BOX
0.00
PARTIAL CASH-BOX
0.00
total loaded on
card 0.00
part loaded on
card 0.00
total unloaded
card 0.00
part unloaded
card 0.00
TOTAL SEL. CARD
00
PARTIAL SEL. CARD
00
TOTAL SEL. N
00
TOTAL SEL. N
HAPPY 00
TOTAL SEL. N
FREE 00
MAN1010119 rel. 01 dated 30.01.2014 page no. 32 of 52 page
www.rheavendors. c om tel: 0039 02 966 551 fax: 0039 02 96 55 086 e mail: rheavendors@rheavendors.com
rheavendors group's sole property
Page 33

cino eC PRO by
09.01.i. MDB
09.01.l. clock
press “2” to display the variables necessary for the MDB protocol;
since cino eC PRO is unable to accommodate changegiver
payment systems, some of these variables will be of no
significance, even if made available; press keys “4” and “5” to
scroll the values;
- tube dispensing: to empty coins tubes;
- changegiver enable: to enable the coins change of the
changegiver
- maximum credit: to establish the maximum acceptable credit
amount;
- maximum change: to determine the maximum change amount;
- single/multiple vend: to keep the residual credit amount after a
dispensing cycle or not;
- token value: to quantify the value of the token;
- coins change N: to establish the coins to be used for the change
when the machine is able to give it; from A to P;
-
coins no change N: to establish the coins not to be accepted
when the machine is unable to give the change; from A to P;
- set “0” to enable the changegiver; “1” to enable the changegiver
only if the change made available is enough or if there is the
RFID card; “2” to enable the changegiver only if there is the RFID
card;
- tube value: to specify the value in the ensemble of coins tubes;
this chapter is intended to determine:
- current time;
- current day;
- current month;
- current year;
- day of the week;
use the three pairs of parameters (Start FN and End FN) to
establish three time bands during which the machine will apply
“happy prices” (see 09.01.c.);
for each day of the week you can establish a time band during
which the machine will accept no selection and reduce the water
temperature of the boiler;
to count the energy consumption of the machine;
the machine will perform a wash cycle
specified provided that it has performed at least five dispensing
cycles after the last cycle;
at the time you have
Ejection tubes
button: 9-10-11-12
escrow enable
0=enab. 1=dis. N
credit max
0.00
rest max
0.00
Sell type
0=sing. 1=mult. N
Token value
0.00
coin rest a N
0=acc. 1=disab. 0
coin no rest a N
0=acc. 1=disab. 0
Bill validator
enab.= 0,1,2 = 0
MDB tubes value
0.00
HOUR:
00:00
DAY:
00
MONTH:
00
YEAR:
00
day of week:
(ex.) Tuesday
START FN:
00:00
END FN:
00:00
SWITCHING ON:
xxxxx 00:00
SWITCHING OFF
xxxxx 00:00
Kilowatt hours:
0.0
CLEANING:
00:00
MAN1010119 rel. 01 dated 30.01.2014 page no. 33 of 52 page
www.rheavendors. c om tel: 0039 02 966 551 fax: 0039 02 96 55 086 e mail: rheavendors@rheavendors.com
rheavendors group's sole property
Page 34

cino eC PRO by
09.01.m. out of service
09.01.n. product qty
09.01.o. maintenance
09.01.p. rfid card
to display the recording of the twenty errors last occurred in the
machine; press key “2” to scroll the records and key “4” to reset
the recording (see 11.);
each product motor can be assigned a time credit in seconds that
will be decreased at each dispensing cycle of that product; after
having used up the credit, the machine will answer <<selection not
available>> whenever a request is made for that product; this
control is disabled at the beginning and the machine has got no
constraint; to programme the credit time of a product motor, set
the variable by pressing key “4” and “5”;
after having reached the time quantity you wish, press key
“PROG”; the value will be copied between parentheses on the left
of the display;
quit the programming mode as usual;
please note that the first warning threshold can be programmed; if
exceeded, the display will show an alarm message without
interfering with the operation of the machine;
after having used up the time credit, the operator may decide
whether to inhibit or not the dispensing cycle of the selections,
including that
product;
in this ensemble of parameters, key “2”, you can set up some
counters to trigger an alarm after a programmable number of
events (press “4” and “5” to set up and PROG to store):
- dispensing cycles before having to replace the cartridge of the
external filter, if any; as soon as 500 dispensing cycles are left,
the display will show “change water filter” and as soon as the
decounter has reached 0, it will display “out of service water
filter”, thus inhibiting the operation of the machine;
- espresso dispensing cycles before having to service the coffee
brewer; as soon as 5 dispensing cycles are left, the
display will show “make brewer cleaning” and as soon as the
decounter has reached 0, it will display “out of service cleaning
brewer”, thus inhibiting the operation of the machine;
- espresso dispensing cycles before having to empty the grounds
container ; as soon as the decounter has reached 5, it will display
the message “remove coffee grounds” until the decounter has
reached 0, thus inhibiting the operation of the
machine and the display will show “out of service coffee
grounds”;
- the maximum credit you can load from the RFID card;
- 0 for each coin (from A to J) that can be accepted when the RFID
card is available;
- 0 for each coin (from A to J) that can be accepted when the RFID
card is not available;
n. N off NN
hh:mm dd-mm-yyyy
product qty N
[ 0.0] 150.0
product qty N
[150.0] 150.0
prod. N warning
thresold: 15.0
enable stop prod. N
1=stop 0
water filter cnt
[ 00] 00
dec. cof. brewer
[ 00] 00
dec. cof. grounds
[ 00] 00
max credit card
0.00
coin A N
with card 0=acc.
coin A N
no card 0=acc.
MAN1010119 rel. 01 dated 30.01.2014 page no. 34 of 52 page
www.rheavendors. c om tel: 0039 02 966 551 fax: 0039 02 96 55 086 e mail: rheavendors@rheavendors.com
rheavendors group's sole property
Page 35

cino eC PRO by
09.01.q. tuning motors
09.01.r. calibration
product flux
the calibration
with respect to the setup in 09.01.a:
- the rotation time of every single product motor can be changed
(key “4” and “5”) by +/- 30%; the change concerns all the
activations of the product motors for all selections;
-
the time required to activate the grinder motor can be calibrated
by +/- 30%, according to the values set up for each selection;
once fixed, even this increase or decrease is constant for each
activation;
this procedure will convert the programming of the doses of
grounded coffee expressing in grams rather than, as usual, in
seconds of activation of the grinder motor;
to perform this procedure, you must have the following:
a container (cup) to collect the doses of ground coffee;
a balance with 50 grams scale (d = 0.01 gram);
before starting the calibration procedure, it is necessary to weigh
the container (cup) that will collect the grounded coffee;
press key “2” to enter, the display shows:
press PROG;
remove the variable coffee brewer (see 13.07.);
tuning motor N
+00 %
tuning grinder N
+00 %
CALIBRAT. BREWER
SEL >PROG< 0.0
REMOVE BREWER
AND PRESS >PROG<
put in place the coffee grounded conveyor and properly place the
cup to collect the dose;
press PROG; the machine performs two grinding cycles;
the grounded obtained must weigh 20 grams; if this is true, press
the key "1“; if not, set the amount weighed by pressing the keys
"4" and "5" to change the digits on the display in the lower right
readed grams 4=+
5=- 1=ok: 20
corner; at the end, press the key "1" (remember to subtract the
weight of the empty cup);
the display shows:
REINSTALL BREWER
AND PRESS >PROG<
reinstall the coffee group and all the others components (coffee
conveyor, carter, drip tray, ...) and press PROG;
the machine will store the data entered; wait for the end of this
automatic cycle, which also includes a switch off/switch on cycle
without manual intervention;
at the end of this procedure, the display will show the usual standby messages:
after that, in each recipe that includes the coffee beans, the dose
Cino ec PRO
place your
cup
will now be expressed in grams of grounded coffee and the
machine will compensate the variations of dose while maintaining
constant the quantity; the natural wear of the blades which over
time tends to decrease the amount of coffee poured into the group,
will be well automatically compensated without any outside
intervention;
MAN1010119 rel. 01 dated 30.01.2014 page no. 35 of 52 page
www.rheavendors. c om tel: 0039 02 966 551 fax: 0039 02 96 55 086 e mail: rheavendors@rheavendors.com
rheavendors group's sole property
Page 36

cino eC PRO by
for every soluble canister can be set the delivered grams’ quantity
by second (key “4” and “5”);
09.01.s. product audit
09.01.t. machine id.
09.01.u. variflex
09.02. “data”
09.03. “test vend”
09.04. “clean”
09.05. “maintenance”
09.06. data support
display the partial and the total quantity of delivered product; the
flux
partial audit can be erased by pressing the key “4” for some
seconds;
identification codes for data acquisition in EVA DTS:
- machine number;
- location number;
- machine configuration;
- address for the connection with the DDCMP protocol;
-
0 for the audit via telemetry; 1 to enable the IRDA acquisition; 2
to disable the acquisition;
to set the diameter of the coffee brewer installed in the machine;
it decides whether to keep the percolation chamber of the coffee
brewer inserted in the upper piston or not in the standby phase
(close);
to enable the grinder calibration time;
choose the option “data” to enable the display to show the data of
the dispensing cycles you have performed in succession, just as in
09.01.h.;
to dispense selections on a free basis; the selections made in this
mode are counted separately (see 09.01.h.);
choose this option and press “1=pb”, “2=mx1”, “4=water” or
“8=hc.” to enable the vending machine to dispense a pre-fixed
water quantity to wash the corresponding circuit (see 08.03.);
to carry out the same functions as those described by point
09.01.o.;
the values of the variables composing the machine programming
(configuration) can be transferred to an external support, i.e. the
flash key; to transfer the
machine parameters to the key:
- power off the machine;
- open the door;
- insert the flash key into the orange carter slot (see
05.15. and 05.37.c);
- power on the machine with the service key (see 05.13.);
- the display shows:
- press “2”;
- and wait for the display to show:
- power off the machine and remove the flash key;
now, the flash key contains all the parameters typical of the
machine from which they have been fetched. If you wish to
programme another vending machine with these data, the previous
procedure can be repeated by pressing key “1” instead of “2”: the
information will be transferred from the flash key to the vending
machine; both procedures will not alter the data contained in the
supports from which they have been fetched;
MAN1010119 rel. 01 dated 30.01.2014 page no. 36 of 52 page
www.rheavendors. c om tel: 0039 02 966 551 fax: 0039 02 96 55 086 e mail: rheavendors@rheavendors.com
rheavendors group's sole property
calibr. motor N
gr/sec
product N used
Parz. g. 00
product N used
Tot. g. 00
code ID 101
00
code ID 104
00
code ID 106
00
address VIDTS
00
Data Audit 0=TLMS
1=IRDA 2=off 00
BREWER DIAMETER
0=36 1=45 00
POSIT. STAND BY
0=close 1=open 00
Autom. Adjustment
f. Tuning 1=yes 0
TEST VEND
CLEANING
butt: 1=pb 2=mx1
4=water 8=hc.
1 from key to VMC
2 from VMC to key
END PROGRAMMING
wait ………
Page 37

cino eC PRO by
bill validator
mdb
ejection tubes
escrow enable
cre dit max
sell ty pe
token value
total sel happ y
partial cash box
sales aud it
totale sel free
part unloaded card
total sel card
part sel card
heating time
first insta llation
deinstallation
activ e h2o filte r
coins
coin n
voltage
total selections
total money
part. money
summer time
total free
partial cash
n tot sel cash
jug n
enab. presel.
message
no suga r
decaffeinated
selection na me
mixer N
start de lay mixer n
mixer speed n
water time n
start de lay water n
product n
start de lay p ro duct n
t. a fter prebrewing
breaks num ber
coffee time grinder
coffee water exp
coffee sequence
brewer pressure
1. PROG1button n
functioning
program m ing par tial
program m ing total
prices
price n
miscellaneous
fan time
inhibited
machine code a
pre-selection
display color
09.07. programming dia gram
MAN1010119 rel. 01 dated 30.01.2014 page no. 37 of 52 page
www.rheavendors. c om tel: 0039 02 966 551 fax: 0039 02 96 55 086 e mail: rheavendors@rheavendors.com
rheavendors group's sole property
Page 38

cino eC PRO by
data audit
code id 104
autom. ad j usment grinde r
tuning motor n
tuning grinder n
calibr. motor g r./sec .
audit flux
prod. N used part. g.
day
month
start fn
end fn
prod. n wa rning
1. PROG
1
button n
functioning
cleaning
kilowa tt hours
dec cof brewer
dec cof gr o unds
rfid card
max credit card
coin n ca rd
tuning motors
3. TEST
3
TEST vend
dec cof brewer
dec cof gr o unds
09.07. programming dia gram
MAN1010119 rel. 01 dated 30.01.2014 page no. 38 of 52 page
www.rheavendors. c om tel: 0039 02 966 551 fax: 0039 02 96 55 086 e mail: rheavendors@rheavendors.com
rheavendors group's sole property
Page 39

01. espresso
water exp.
35
02. long coff e e
water exp.
45
03. white coffe e
water exp.
45
prod. 2
8 delay prod. 2
7
water 1
20
mixer 1
40 delay mixer 1
3
04. cappuccino
water exp.
65
prod. 2
25 delay prod. 2
10
water 1
50
mixer 1
60
delay mixer 1
5
06. milk
prod. 4
35 delay prod. 4
10
water 1
110
mixer 1
115 delay mixer 1
5
07. latte macchiato
water exp.
30
prod. 1
36 delay prod. 1
8
water 1
50
mixer 1
65 delay mixer 1
3
08. mocaccino
water exp.
45
prod. 1
10 delay prod. 1
20
prod. 2
22 delay prod. 2
7
water 1
35
mixer 1
55 delay mixer 1
3
09. chocolate
prod. 2
45 delay prod. 2
15
water 1
120
mixer 1
135 delay mixer 1
5
cino eC PRO by
10.
parameters
10.01. configuration
the following tables are intended to supply some information on the
programmable parameters of the cino eC PRO software; if not
otherwise specified, the numeric time values of devices are
understood in tenths of a second (e.g. 27 corresponds to 2 seconds
and 7 tenths);
the generic parameters intended to dispense the drinks with the
different possible products are supplied here below, just by way of
example; these values enable the operator to program the
selections of reference and they can be used to obtain some
functional dispensing cycles even if it may be necessary to make
some slight changes to appeal to the users;
see 04.02.
product canisters
milk P1
chocolate P2
MAN1010119 rel. 01 dated 30.01.2014 page no. 39 of 52 page
P1
P2
COFFEE BEANS
MILK
water 1
mixer 1
CHOCOLATE
www.rheavendors. c om tel: 0039 02 966 551 fax: 0039 02 96 55 086 e mail: rheavendors@rheavendors.com
rheavendors group's sole property
Page 40

cino eC PRO by
PROGRAMMING BUTTON N FUNCTIONING PROGR. TOTAL
COFFE WA TER (200)
COFFE SEQUENCE
STEP DOWN BREWER
PRODUCT N (24)
START DELAY PRO DUCT N (5)
BREA KS NUMBER
COFFEE TIME
TIME AFTER PREINFUS.
WATER N TIME (60)
START DELAY WATER N (0)
MIXER N (60)
START DELAY MIXER N (3)
MIXER S PEED N (LOW)
LATTE M START BREWER
PRODUCT LM (24)
START DELAY PRO DUCT LM (200)
BREAKS NUMBER PROD LM
WA TER L M TIME (60)
START DELAY WATER LM (150)
MIXER LM (80)
START DELAY MIXER LM (180)
MIXER LM SPEED (HIGH)
PRODUCT MILK LM
LM MILK WATER NUMBER
JUG
SEL ECTION NAME
parameters
prod n
wa ter n
mixer n
prod LM
wa ter LM
mixer LM
coffee water
selection
1st milk
1s t de lay
2nd milk
2nd delay
time
10.02. LM selection
cino eC PRO can produce a drink called Latte Macchiato,
composed by milk and coffee and served in the cup in differently
coloured bands, typically milk, coffee and milk;
to get this special drink, refer to a specific package of instructions,
every step of which is called “LM dispensing cycle”;
le erogazioni di prodotto in sequenza sono:
- dispensing cycle of 1st mixed milk (at low speed rate);
10÷15 second pause;
- dispensing cycle of 2nd mixed milk (at high speed rate);
12÷20 second pause;
- dispensing cycle of espresso coffee;
the different milk consistency due to a different mixing treatment
enables coffee to remain in a central range, thus giving origin to
the “Latte Macchiato” drink;
act as follows in the programming menu:
flow diagram, “Latte Macchiato” selection;
the data supplied by the table provide for a “latte macchiato”
dispensing cycle and they can be adapted to achieve dispensing
cycles more suitable for the users’ wishes;
MAN1010119 rel. 01 dated 30.01.2014 page no. 40 of 52 page
www.rheavendors. c om tel: 0039 02 966 551 fax: 0039 02 96 55 086 e mail: rheavendors@rheavendors.com
rheavendors group's sole property
2° MILK
ESPRESSO
COFFEE
1° MILK
Page 41

m.u.
from
to
exp coffee water
n. 0 250
0 = no espresso;
product
sec. 0 20
0 = no product;
product start delay
sec. 0 20 0 = no delay;
number of product pau ses
n.
0
2 0 = no pause;
water time
sec. 0 20
0 = no water;
water start d
elay
sec.
0
20 0 = no delay;
mixer
sec. 0 20 0 = no mixer;
mixer start delay
sec. 0 20
0 = no delay;
mixer speed
low, medium, high
temperature pre ssure boile r
°C 0 105
first coffee temperature
°C 0 105
first coffee time
min. 0 20
heater temperature
min. 0 40
product decounter
sec. 0 6.000
0 = no limit;
machine code A e B
n. 0 65.535
message number
n. 0 7
fan delay
min. 0 180
beep time
sec.
0
1,5
number of decimals
n.
0
3
coin A ÷ J
n. 0 65.000
prices 1 ÷ 10
n. 0 65.000
tuning motor
+/- 30%
tuning grinder
+/- 30%
cino eC PRO by
10.03. limits
the table is intended to list the minimum and maximum values you
can assign to programmable variables;
MAN1010119 rel. 01 dated 30.01.2014 page no. 41 of 52 page
www.rheavendors. c om tel: 0039 02 966 551 fax: 0039 02 96 55 086 e mail: rheavendors@rheavendors.com
rheavendors group's sole property
Page 42

cino eC PRO by
11.
solution of problems
any event that may occur during the operation of a machine may
totally or partially compromise its functionality;
to help the operator restore the normal functionality of the vending
machine, the display shows an error code as an abbreviation that
identifies the malfunction and helps the operator find the faulty
device;
the content of this chapter is intended to collect, expand and
comment upon these abbreviations, which are forcedly concise, to
facilitate the solution of the failure;
please note:
1°
in the machine, the error may be signalled with or without a suffix
that – if present – is intended to specify the meaning better;
however, the number on the display identifies for sure the devices,
assemblies and functions in question;
2°
in the following table:
- the first column shows the machine number; any variant is
shown with the detail letters for more specification;
- the second shows the machine district or function affected by
the event;
- the third one contains a comment, the purpose of which is to
help find a solution; these notes are surely not exhaustive
because a malfunction may have several causes or
originated by an ensemble of factors, but they any way give
some hints on how to proceed;
3°
not all malfunctions are signalled by an error message since the
latter is generated by electric controls that are not made available
in all machine districts;
4°
this document is meant only for the technicians who are – at least
briefly - familiar with the technologies, machines, devices and
names generally used in the vending field; the wiring diagrams
supplied with the machine are absolutely necessary to understand
and solve the events described herein;
attention
while performing the actions necessary to restore the machine
functions, act with the utmost caution and strictly observe the
safety instructions for operators and users;
be
MAN1010119 rel. 01 dated 30.01.2014 page no. 42 of 52 page
www.rheavendors. c om tel: 0039 02 966 551 fax: 0039 02 96 55 086 e mail: rheavendors@rheavendors.com
rheavendors group's sole property
Page 43

cino eC PRO by
OFF 2
OFF 2 E
OFF 2 M
OFF 2 P
OFF 3
OFF 5
OFF 6
OFF 6 C
OFF 6 D
OFF 6 G
OFF 7
OFF 7 A
OFF 8
OFF 8 A
OFF 8 B
OFF 8 C
MAN1010119 rel. 01 dated 30.01.2014 page no. 43 of 52 page
payment system
protocol
executive
MDB
parallel
drip tray
EAROM
water supply
air break
air break
pressure boiler
espresso circuit
pressure boiler pump
coffee brewer
piston
presence
piston
www.rheavendors. c om tel: 0039 02 966 551 fax: 0039 02 96 55 086 e mail: rheavendors@rheavendors.com
no communication between the payment system and the vending machine
CPU; it might be caused by improper power supply, false programming or
payment system malfunction;
the contact controlling the liquid level in the drip tray is closed because
liquid level;
those integrated in the CPU board fail to operate properly;
air break filling time too long; the water supply might be totally lacking, its
pressure might be not enough or some obstacle might slow down the
regular water flow (filter grilled cover, load pipes either choked or
clogged); the water inlet solenoid valve safety has tripped;
the pressure boiler circuit has been refilled with water, but no drink has
been dispensed; the supply circuit might have a leakage;
during the first installation phase, water inlet error in the machine; after
having opened the water inlet solenoid valve and activated the pump, the
volumetric counter shall send the CPU a sequence of pulses to give
evidence that water is flowing; if this does not occur, error 6G is triggered;
the power-on time of the espresso circuit pump has exceeded the limit; the
water flow has encountered more resistance than usual and the pulses
produced by the volumetric counter have required a time interval deemed
to be too long for a dispensing cycle within proper limits; also check the
grinding amount and degree of coffee beans poured into the coffee brewer
chamber;
initial positioning error;
the machine fails to recognise the presence of the coffee brewer in its
correct working position;
the brewing chamber is not moving properly;
rheavendors group's sole property
Page 44

cino eC PRO by
OFF 10
OFF 14
OFF 16
OFF 17
OFF 14 B
OFF 17 A
pressure boiler
programming keyboard
selection
OFF 24
OFF 24 A
OFF 24 B
24 V dc
24 V dc
OFF 31
espresso coffee water
OFF 31 A
OFF 31 B
OFF 31 C
OFF 31 D
temperature
temperature
pressure boiler probe
time
OFF 77
OFF 80
OFF 80 4
OFF 80 6
OFF 80 7
OFF 80 8
OFF 80 C
OFF 80 D
MAN1010119 rel. 01 dated 30.01.2014 page no. 44 of 52 page
pipes
validator
pipe
memory
coin
coin
www.rheavendors. c om tel: 0039 02 966 551 fax: 0039 02 96 55 086 e mail: rheavendors@rheavendors.com
EAROM
water inlet
keyboards
power supply unit
CPU
MDB change giver
stored data are not consistent (reading or writing error) and the overall
operation of the vending machine may be otherwise than expected;
if water is not reloaded after six dispensing cycles, error 14 is triggered;
even a water inlet pressure value other than the pre-set one, may cause
this error, thus filling in the pressure boiler in excess and providing for a
number of dispensing cycles higher than the pre-set one; if selections are
dispensed with a limited water quantity, the error is more likely to occur;
the programming keyboard inside the machine has a short-circuited key or
it has been pressed too long; if pressed too long, the manual release
button of cups turrets may cause this error;
a button appears as if it were constantly pressed;
the actual 24 V dc voltage value is higher than the tolerated one;
the measured 24 V dc voltage value is below the admitted threshold or
totally absent, e.g. because a fuse has tripped; find out and remove the
causes that have produced this error before powering on the machine
again;
the pressure
boiler water temperature is higher than the programmed
value;
water fails to achieve the set temperature;
the temperature probe is interrupted or its electric connector is detached;
the temperature fails to achieve the programmed value within the admitted
time limit;
the "clock" function is not properly performed; the buffer battery might be
low; after having restored the function, carefully check the clock-related
machine functions: happy hour, time bands, ... that might have been
compromised by the lack of time references;
a pipe sensor is not properly working;
validator not inserted or disconnected;
a coin pipe is not properly working;
ROM with reading/writing error;
coin locked in the acceptance path;
attempt at fraud and coin removal;
rheavendors group's sole property
Page 45

cino eC PRO by
12.
maintenance
the cino eC PRO vending machine requires no special maintenance
procedure to do its job; however, if you provide for careful and
frequent cleaning, this may help the machine keep its performance
constant, prevent failures and ensure the high quality of dispensed
drinks; the frequency of cleaning operations largely depends upon
the number of dispensing cycles and the hardness of water in use
(use a softener system) and it shall be adjusted to the working
conditions of the vending machine;
the actions described are intended to prevent the bacterial growth
in the machine areas directly in contact with foodstuffs and to keep
the parts conveying drink-composing products clean; after having
disassembled the parts of the machine listed here below, use
plenty of lukewarm water to remove any residue that might build
up;
the support of a bacterialstatic or bactericidal solution may
strengthen a deep cleaning action, provided it is compatible with
human health and the supply of foodstuffs; reassemble all the
parts you have cleaned after having dried them by means of a
clean piece of cloth;
refer to the content of the Internet address:
http://ec.europa.eu/food/food/biosafety/
hygienelegislation/index_en.htm
this site is intended to supply the European Parliament
recommendations for properly and safely processing foodstuffs;
consult also the 2004/852/EC European Community regulation
http://eur-lex.europa.eu/LexUriServ/LexUriServ.do?uri
=OJ:L:2004:139:0001:0054:IT:PDF
before accessing the machine for each maintenance operation, it is
recommended to warn the users by means of boards properly
positioned that it is forbidden to approach the vending machine
and to use it;
attention
never wash the machine by using water jets;
wash hands thoroughly with water and soap befo re
handling the machine and the products;
only use potable water;
all components must only be cleaned with warm running
water;
MAN1010119 rel. 01 dated 30.01.2014 page no. 45 of 52 page
www.rheavendors. c om tel: 0039 02 966 551 fax: 0039 02 96 55 086 e mail: rheavendors@rheavendors.com
rheavendors group's sole property
Page 46

cino eC PRO by
12.01. weekly
drip tray
grounds container
product slides
dispensing system
inner side of the machine
external body
power off the machine; detach the power supply cable and
carefully make sure that there is no sign of wear; carefully check
the stability and efficiency of the internal connections of the mains
supply;
extract the drip tray (a), remove the upper grilled cover and wash
with plenty of water; open the door and clean the drip tray housing
and the nozzle holder spout inside the machine (e);
after having opened the door and removed the drip tray, pull the
left side of the drawer forward and remove it; observe the position
of the water inlet tube of the brewer;
the residual coffee grounds shall be disposed of in observance of
turn the baffles of product slides (c) into a close-position, remove
them from the canisters and wash them with plenty of lukewarm
water (product slides are plug-in secured);
turn the fixing levers of mixing bowls clockwise (d), remove the
product nozzles from the holder by releasing them, pull the mixing
bowl and the dust extraction ring; wash the assembly of
disassembled parts with plenty of lukewarm water;
remove all residues from the internal surfaces of the machine and
the door, above all in the proximity of the cup station and clean
with a piece of wet cloth;
dry the parts carefully and re-mount them on the machine;
after opening the door, re-connect the supply cable and power on
the main switch;
use the service key;
the vending machine is supplied and running to all effects; the
mobile parts of the coffee brewer will be handled; act extremely
carefully;
perform some wash cycles of the hydraulic machine circuits (see
08.03.);
remove the service key, put it into its housing, close the door;
clean outside the machine by using a piece of non-abrasive cloth,
dampened with lukewarm water; use a neutral, non-foamy
detergent, only if necessary;
use neutral detergent products only; never use abrasive cloths,
steel sponges, aggressive or foamy detergents and other solvents,
hot water and acids;
the sanitary obligations in force in the country;
attention
attention
act extremely carefully;
attention
a
b
c
d
e
MAN1010119 rel. 01 dated 30.01.2014 page no. 46 of 52 page
www.rheavendors. c om tel: 0039 02 966 551 fax: 0039 02 96 55 086 e mail: rheavendors@rheavendors.com
rheavendors group's sole property
Page 47

cino eC PRO by
12.02. monthly
MAN1010119 rel. 01 dated 30.01.2014 page no. 47 of 52 page
dispensing system
products canister
coffee brewer
environmental and
powder aspirators
www.rheavendors. c om tel: 0039 02 966 551 fax: 0039 02 96 55 086 e mail: rheavendors@rheavendors.com
besides fulfilling the tasks already specified by chapter 12.01.
weekly, it is also recommended to act in the following districts:
disassemble all components of the dispensing system:
- extraction drawer (f)
- water dispensing ring (g)
- mixing bowl (h)
- mixer (l)
- dispensing tubes (m)
-
product dispensing nozzle holder (n)
extract the mixer fan just by pulling it; check the wear state of the
w ring (i) sheathing the mixer motor shaft; wash the assembly of
disassembled parts with plenty of lukewarm water;
remove the product canisters (o) by lifting them in the front and by
pulling them; remove the cover and empty the product residue;
turn the baffles of product slides into a close-position; remove
them from the canisters and wash them with plenty of lukewarm
water, as it is described by chapter 12.01. weekly;
at the back of the product canister turn the black ring nut clockwise
and remove it; extract the worm screw by pulling the black bush;
to facilitate disassembly, push the stirring wheel in the correct
direction;
lift the two fastening clips (one for each side) from the inside of the
product canister and remove the two red plugs from the outside;
remove the stirring wheel; wash the disassembled parts with plenty
of lukewarm water;
the whole coffee brewer can be cleaned and washed with running
water since it has
the coffee brewer, first remove the coffee dispensing tube from the
nozzle holder, release the carter (p) by pressing on each side and
by pulling it to the outside, remove the ground grey conveyor just
by pulling it, remove the coffee brewer (q) by pressing the orange
release button, by lifting it slightly and by pulling it;
carefully check that the rotors of the two aspirators on the rear
panel of the vending machine can freely rotate without any
hindrance or stoppage; make sure that the corrugated tube for
connection between the powder aspirator and the extraction drawer
is clean and free of any product deposit;
no component that may be damaged; to extract
rheavendors group's sole property
i
l
m
f
g
h
n
o
p
q
Page 48

cino eC PRO by
12.03. yearly
12.04. out of order
MAN1010119 rel. 01 dated 30.01.2014 page no. 48 of 52 page
dispensing system
products canister
powder aspirator drawer
silicone tubes
coffee brewer
pressure boiler
air break
temporary
definitive
www.rheavendors. c om tel: 0039 02 966 551 fax: 0039 02 96 55 086 e mail: rheavendors@rheavendors.com
replace the gasket at the base of the mixing bowl of the mixer;
remove the mixer motor fan by pulling it; replace the gasket of the
mixer motor shaft ;
disassemble the products canister from the machine; empty them,
disassemble them in their basic components and wash them
carefully as already described by chapter “12.02. monthly”;
disassemble the mixing bowls; pull out the extraction drawers (r);
wash them with plenty of lukewarm water;
make sure that the water transport tubes are intact and that they
have kept their transparency, replace them, if necessary;
- replace the three sealing rings (s) of the compression chamber
and lower piston guide;
- replace the upper and lower filters (t);
- check the state of the compression chamber;
disassemble the pressure boiler; separate the pressure boiler from
the solenoid valves block (u) and check the seal o-ring; clean the
instant and espresso outlet water circuits; check the third way of
the espresso valve drain by removing any trace of residue (v);
empty and clean the air break tank (z); carefully check the micro
switch functionality operated by the floater rod and make sure that
it can freely slide without any hindrance;
if the vending machine should be inactive for a long period, please
act as follows:
- perform the uninstall cycle (see 09.01.f.);
- detach the water and energy supply;
empty the liquid waste tray and the internal water tank;
- empty and clean the product canisters;
- clean the internal and external surfaces by using a wet piece of
cloth;
- cover the machine by means of a cloth;
- store it in a sheltered place, at a temperature not below 5 °C, at
a relative humidity not above 80%;
if you should definitively set the vending machine out of
commission and provide for the disposal of some parts thereof,
after having carried out the operations above, disassemble the
vending machine by separating every single component and
subdividing the parts according to the nature of materials; the
applied symbol means that the components of the vending machine
shall be not processed as home rubbish, but delivered to the
collection points capable of recycling electric and electronic
equipment; refer to the 2002/96/EC Directive and to the relative
rules;
the complete text of the European directive about this specific
subject-matter is made available on the Internet site:
http://eur-
lex.europa.eu/LexUriServ/LexUriServ.do?uri
=CELEX:32002L0096:IT:HTML
rheavendors group's sole property
r
s
t
u
v
z
Page 49

cino eC PRO by
13.
how to do to:
13.01. get an espresso
selection
espresso coffee “Italian
style”
(50 cc. in a cup)
espresso coffee
“American style”
(200 cc. in a cup)
13.02. insert labels
13.03. empty the drip
tray
MAN1010119 rel. 01 dated 30.01.2014 page no. 49 of 52 page
www.rheavendors. c om tel: 0039 02 966 551 fax: 0039 02 96 55 086 e mail: rheavendors@rheavendors.com
the parameters that determine the quality and quantity of an
espresso selection in a cup are:
- the temperature and quantity of percolation water;
- the coffee grinding degree;
- the ground coffee quantity;
- the ground compression;
- the features of coffee beans;
considering the great variability of these factors, it is important to
establish which are the features of the espresso most in demand by
the final user and to programme the vending machine components
to achieve the best result for this choice;
many of the variables contributing to dispense an espresso can be
regulated via software and autonomously programmed for each
selection, except for :
- the water temperature that – once set up – is constant;
- the grinding degree of the coffee beans that is manually
established and – once set up – is constant;
the boiler water temperature is generally set to 92 °C ÷ 94 °C in a
vending machine installed in a room where the temperature is as
prescribed (5 °C ÷ 35 °C);
the grinding degree of the coffee beans – fundamentally
established by the distance between the grinding wheels – can be
manually adjusted by rotating the regulation ring nut;
it is assumed that a grinder with new blades is basically regulated
as follows:
- by turning the regulation ring nut clockwise as far as the stop
(minimum distance between the grinding wheels);
- by turning the same ring nut counterclockwise by one complete
turn plus 5/8 notches;
the resulting grinding degree can be considered of reference; you
can certainly adapt it to the espresso you wish by varying the
distance between the grinding wheels;
guide lines
boiler water temperature: as above;
grinding degree: as above;
grinding time (for ~ 8.0 gr.) 6 sec.;
percolation water time: 15 sec.;
step down brewer: no
boiler water temperature: as above;
grinding degree: as above;
grinding time (for ~ 12.0 gr.) 9 sec.;
percolation water time: 35 sec.;
step down brewer: 1;
the cup results can be certainly adapted to the final user’s requests
better by changing the parameters above;
open the door and remove the orange protection carter, slightly
lowering the two fixing lugs; insert the labels into the pockets by
observing the machine configuration;
the drip tray is arranged in its work seat and retained by the
notches in the structure; pull to remove it;
rheavendors group's sole property
see 05.06.
Page 50

cino eC PRO by
13.04. empty the
grounds container
13.05. remove the coffee
hopper
13.06. remove the
instant canister
13.07. remove the coffee
brewer
13.08. regulate the
grinding degree
13.09. regulate the
ground dose
13.10. replace the o-ring
of mixing bowls
13.11. replace the mixer
motor
13.12. replace the
product motor
13.13. determine water
and product times
13.14. programme delays
MAN1010119 rel. 01 dated 30.01.2014 page no. 50 of 52 page
www.rheavendors. c om tel: 0039 02 966 551 fax: 0039 02 96 55 086 e mail: rheavendors@rheavendors.com
after having opened the door and removed the drip tray, pull the
left side of the drawer forward and remove it; observe the position
of the water inlet tube of the brewer;
pull the orange closing baffle and lift the coffee hopper; pay
attention not to spill the content thereof;
rotate the dispensing slide closure and pull the canister by lifting it
slightly; to reassemble it, insert the rear bush into the motor gear
and the lower pin into the horizontal surface hole; ; the product
slides are plug-in mountedand removed from the canisters by
turning them clockwise;
after opening the machine, press on each side of the protection
carter (a) and remove it by letting the espresso nozzle through the
groove after removing it from the nozzle holder (b);
remove the ground grey conveyor by pulling it (c);
pull the brewer release button (d), lift and extract it;
remove the coffee canister; turn the grinder ring nut (clockwise for
a finer degree); the effect produced by the regulation is shown by
the drink after three or four dispensing cycles;
see software “09.01
espresso selection”;
remove the silicone tubes intended to dispense the product; turn
the orange ring nut clockwise; pull the mixing bowl body and
extract the mixer fan; you can now access the w-ring of the motor
shaft, the water inlet gaskets of the mixing bowl and the mixing
bowl gaskets , as already described by chapter 12.02. monthly;
remove the silicone tubes intended to dispense the product; turn
the orange ring nut clockwise and pull the mixing bowl body;
unscrew the crosshead by using a PH2 screwdriver and extract the
motor; the power supply wires can be removed without any tool;
remove the product canister; access the rear part of the machine;
extract the two small electric cables from the motor, hold the body,
push it to the bottom to release it from the bayonet connection of
the structure; the power supply wires can be removed without any
tool (observe the polarities);
the times specified by table 10.01. can be referred to as the times
functional for the machine and the products to be dispensed
however, they can be adapted to the capacity of the user’s cups
(by changing “time water N”) and its tastes (by changing “product
N”); please, never forget to make sure that the dispensing time of
the instant product is always lower than the one of corresponding
water;
(if accepted) dispensing starts as soon as the user presses a
selection key; the order in which instant products are poured into
the cup depends upon the values of delays (e.g. the one, the delay
value of which is zero, will be dispensed before the one, the value
of which is 40, dispensed four seconds after the user has pressed
the selection key); pay special attention when programming the
delays in dispensing a product and the water diluting it in the
mixing bowl; except for the instant coffee product, for which just
the opposite is applicable, it is recommended to dispense water
before the product to enable the latter to drop on the water film
already present in the mixing bowl for a better mix; espresso is
dispensed before and after any instant product by programming
the variable “coffee sequence”;
.a. grinder time” and also “13.01. get an
rheavendors group's sole property
open close
c
;
a
b
c
d
Page 51

cino eC PRO by
13.15. regulate the speed
of mixers
13.16. choose the
quantity of break
numbers
13.17. determine the
suction fan time
13.18. time tests
13.19. access to the rear
13.20. remove water
13.21. install a payment
system
13.22. return some
material under guarantee
the rotation speed of the motors of product mixers can be adjusted
between 15,000 r.p.m. and 5,000 r.p.m.; the drink quality of
instant products depends a lot upon the action of the fans of
mixers: instant chocolate generally requires a long mixing time at
the maximum speed for dissolution in water whereas instant tea
shall not be mixed to get a drink quality without any bubble on the
surface;
if instant products can be hardly dissolved in water, it may be of
use to stop the product dispensing cycle from the product canister
for a short time; the water flowing into the mixing bowl will have
the time necessary to remove any product build-up;
to remove the residual powder of instant products from inside the
machine, it is recommended to use the value in minutes you have
already programmed (three); if you should use particularly volatile
products, increase the time to five (and more) minutes;
to check the rotation time of a product motor and a mixer fan or
the activation time of a solenoid valve during the programming
phase, when the display shows “PRODUCT N”
or “WATER N time”
or “MIXER N”, press the “PROG” key: the device will be activated
for the programmed time;
attention
make sure that the power supply cable has been detached
from the mains before
unscrew the six screws intended to fasten the metal panel ( );
lift slightly and extract the panel;
all internal components of the machine can be now accessed;
prepare a bucket beneath the support surface of the machine; after
having removed the back of the machine, remove the plug closing
the drain tube of the air break by unscrewing the screw ( ),
access the drain tap of the boiler by unscrewing the two screws
( ) and open it; activate the “deinstallation” cycle (see 09.01.f.);
there is a kit including all the parts necessary to install a payment
system in cino eC PRO; after having installed the components of
this kit, refer to the above to programme the system functionality;
Rheavendors Services S.p.A. is at disposal for any kind of support
and information on the installation of payment systems; (see
02.02.);
if you should return any material under guarantee that is either
defective or not in compliance with your requirements, fill in the
form “MOD. PO 19.01/2B Materials under guarantee –
Authorisation to return” and send
it to the fax number above to
apply for authorisation; only after having received the authorisation
form signed and numbered, you are permitted to send the goods at
your expenses to the address specified by the form;
see 09.01.a.
see 09.01.a.
see 09.01.f.
see 09.01.a.
MAN1010119 rel. 01 dated 30.01.2014 page no. 51 of 52 page
www.rheavendors. c om tel: 0039 02 966 551 fax: 0039 02 96 55 086 e mail: rheavendors@rheavendors.com
rheavendors group's sole property
Page 52

schema idraulico
7
7
665
5
4
4
3
3
221
1
name
silicone hose 05/08T
silicone hose 06/09T
silicone hose 06/11T
silicone hose 07/11T
ptfe hose 02/04T
ptfe hose 04/06T
symbolT1T2T3T4T5T6
column
/////
/
name
coffe e unit
mixer 1
nozzle s up p ort
drip tray
90° joint
short insert
symbolGCM1ERVRG
IN9
IFC
column
67776
7
name
by pass
pressure boiler
drain tap
three-way valve
soluble solenoid v alve 1
soluble solenoid v alve 2
symbolBPCARSEXE1E2
column
45455
5
name
water in let solen oid va lve
water in let valve
wa ter internal tank
air break
volumetric counter
pump ex 5
non return valve
symbol
EVA
VIASAABCVMP
NR
column
1112344
L
E
G
E
N
D
IFC
IFC
VRG
T2
T2
ER
T1
T2
T2
IN9
T2
GC
T3
T2
T1
T5
EX
E1 E2
CA
E1 E2
T2
T2
GC
T5
T3
EX
CA
T6
T6
BP
RS
T6
BP
VRG
ER
IN9
T3
T6
RS
NR
MP
T1
T1
CV
T1
T3
AB
T4
T4
NR
MP
T1
T4
esclusiva proprietà di rheavendors group
T1
T1
CV
www.rheavendors.com tel: 0039 02 966 551 fax: 0039 02 96 55 086 e mail: rheavendors@rheavendors.com
T3
AB
T4
T4
VIA
T4
T4
cino eC PRO by
14. hydraulic diagram
EVA
SA
T2
R
A
MAN1010119 rel. 01 dated 30.01.2014 page n. 52 of 52 page
Page 53

 Loading...