

Cineroid Metal Series, Flexible FL400, Flexible Series, Flexible FL800, Metal ML800 User Manual
Page 1

fl400 / fl800 / mL800
Important Safety Instructions
User's Manual
Page 2

Thank you for purchasing CINEROID LED Light.
The Cineroid LED employs a very high color rendering index (CRI).
It displays a very stable color temperature and brightness so that both motion
pictures and still images can be taken in their most natural color tones.
Please read this user manual thoroughly before using the Cineroid LED.
Important Safety Instructions
Do not use batteries, power cord, or accessories that are not specied in this document.
When using a power cord, be sure to plug it in completely.
Do not handle power plugs when your hands are wet.
When unplugging the power cord, grasp the plug body or adapter instead of the cord.
Power cords that are scratched, heavily bent or twisted can potentially be hazardous and a
source of electric shock and/or re.
Do not insert foreign objects into the product's electric or cable components.
Do not place the power cord near sources of heat as this may melt or cause damage to the cord
potentially causing re or electric shock.
Do not disassemble or modify the product.
This may damage the product and cause danger due to a malfunction.
Please keep the product out of reach of young children. Injuries may occur due to damage to the
product.
When using the product in an airplane or hospital setting, it is recommended to acquire
authorization rst as signals or electro-magnetic waves from the product may cause other
equipment to malfunction.
Do not store the product in a dusty or humid environment as damage may occur.
When the product is mounted on a camera, do not lift or move the camera by grabbing the
product. This may cause damage to the product or the camera mount.
Do not clean the product with paint thinner, benzene, or other volatile solvents.
Controller and AC adapter are not water proof.
If the products are dropped in water, contact the service center immediately.
Design by Seculine
Made in Korea
Page 3

Specfications
Flexible LED Panel Metal LED Panel
Model
Dimension
Weight
Dimming
Photometric
Color Temperature
LED Cells
CRI
Consumption
Model
Battery Mount
Dimension
Weight
Dimming
CCT
Display
Cable Length
Control Lock
Consumption
DMX
Model
Dimension
Weight
Input
Output
PN-FL400
240 x 240 mm
160 g
0~100%
2000 lux
2700~6500ºK
400
94 or above
65W
FL-DN
170 x 87 x 50 mm
500 g
0~100%
2700ºK ~ 6500ºK
Mono LCD
2m (can be extended)
Yes
240W
512 Channel
AC 400
130 x 55 x 30 mm
300 g
AC 100~240V 50/60Hz
DC 12V, 6.0A, 72W
Model
Dimension
Weight
Dimming
Photometric
Color Temperature
LED Cells
CRI
Consumption
Controller
Model
Battery Mount
Dimension
Weight
Dimming
CCT
Display
Cable Length
Control Lock
Consumption
DMX
AC Adapter
FL-DV
V-Mount Battery
170 x 87 x 63 mm
650 g
0~100%
2700ºK ~ 6500ºK
Mono LCD
2m (can be extended)
Yes
240W
512 Channel
Model
Dimension
Weight
Input
Output
Model
Dimension
Weight
Dimming
Photometric
Color Temperature
LED Cells
CRI
Consumption
Model
Battery Mount
Dimension
Weight
Dimming
CCT
Display
Cable Length
Control Lock
Consumption
DMX
AC 800
170 x 70 x 40 mm
700 g
AC 100~240V 50/60Hz
DC 16V, 8.5A, 150W
PN-ML800
460 x 240 mm
580 g
0~100%
3400 lux
2700~6500ºK
800
94 or above
120W
FL-DG
Gold-Mount Battery
170 x 87 x 63 mm
650 g
0~100%
2700ºK ~ 6500ºK
Mono LCD
2m (can be extended)
Yes
240W
512 Channel
Page 4

Package Contents
LED Panel
X-Bracket
Extension Cable
Controller
AC Adapter
Diuser Set Manual
Page 5

ML800V
ML800G
ML800N
LED Panel (PN-ML800) / Controller (V-Battery Mount) / H-Bracket /
Extension Cable (3m) / AC Adapter / Diuser Set / Manual
LED Panel (PN-ML800) / Controller (Gold-Battery Mount) / H-Bracket /
Extension Cable (3m) / AC Adapter / Diuser Set / Manual
LED Panel (PN-ML800) / Controller / H-Bracket /
Extension Cable (3m) / AC Adapter / Diuser Set / Manual
ML800-3V
ML800-3G
ML800-3N
FL400V
FL400G
FL400N
FL400-3V
FL400-3G
FL400-3N
FL800V
FL800G
FL800N
FL800-3V
FL800-3g
FL800-3n
LED Panel (PN-ML800) x3 / Controller (V-Battery Mount) x3 / H-Bracket x3 /
Extension Cable (3m) x3 / AC Adapter x3 / Diuser Set x3 / Manual / Carrying Bag
LED Panel (PN-ML800) x3 / Controller (Gold-Battery Mount) x3 / H-Bracket x3 /
Extension Cable (3m) x3 / AC Adapter x3 / Diuser Set x3 / Manual / Carrying Bag
LED Panel (PN-ML800) x3 / Controller x3 / H-Bracket x3 /
Extension Cable (3m) x3 / AC Adapter x3 / Diuser Set x3 / Manual / Carrying Bag
LED Panel (PN-FL400) / Controller (V-Battery Mount) / X-Bracket /
Extension Cable (3m) / AC Adapter / Diuser Set / Manual
LED Panel (PN-FL400) / Controller (Gold-Battery Mount) / X-Bracket /
Extension Cable (3m) / AC Adapter / Diuser Set / Manual
LED Panel (PN-FL400) / Controller / X-Bracket /
Extension Cable (3m) / AC Adapter / Diuser Set / Manual
LED Panel (PN-FL400) x3 / Controller (V-Battery Mount) x3 / X-Bracket x3 /
Extension Cable (3m) x3 / AC Adapter x3 / Diuser Set x3 / Manual / Carrying Bag
LED Panel (PN-FL400) x3 / Controller (Gold-Battery Mount) x3 / X-Bracket x3 /
Extension Cable (3m) x3 / AC Adapter x3 / Diuser Set x3 / Manual / Carrying Bag
LED Panel (PN-FL400) x3 / Controller x3 / X-Bracket x3 /
Extension Cable (3m) x3 / AC Adapter x3 / Diuser Set x3 / Manual / Carrying Bag
LED Panel (PN-FL800) / Controller (V-Battery Mount) / X-Bracket /
Extension Cable (3m) / AC Adapter / Diuser Set / Manual
LED Panel (PN-FL/800) / Controller (Gold-Battery Mount) / X-Bracket /
Extension Cable (3m) / AC Adapter / Diuser Set / Manual
LED Panel (PN-FL800) / Controller / X-Bracket /
Extension Cable (3m) / AC Adapter / Diuser Set / Manual
LED Panel (PN-FL800) x3 / Controller (V-Battery Mount) x3 / X-Bracket x3 /
Extension Cable (3m) x3 / AC Adapter x3 / Diuser Set x3 / Manual / Carrying Bag
LED Panel (PN-FL800) x3 / Controller (Gold-Battery Mount) x3 / X-Bracket x3 /
Extension Cable (3m) x3 / AC Adapter x3 / Diuser Set x3 / Manual / Carrying Bag
LED Panel (PN-FL800) x3 / Controller / X-Bracket x3 /
Extension Cable (3m) x3 / AC Adapter x3 / Diuser Set x3 / Manual / Carrying Bag
Page 6
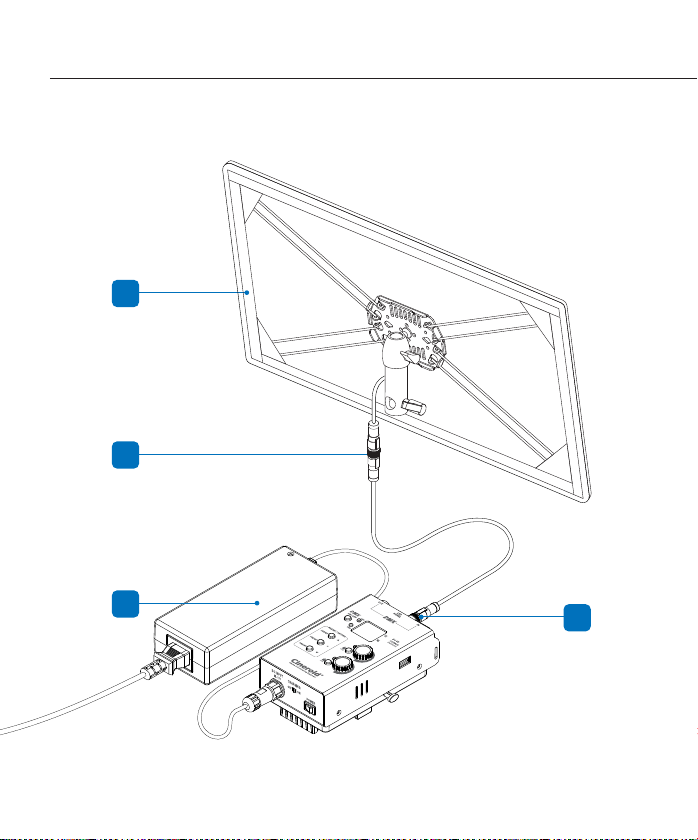
Setting Flexible LED Light
1
2
3
2
Page 7
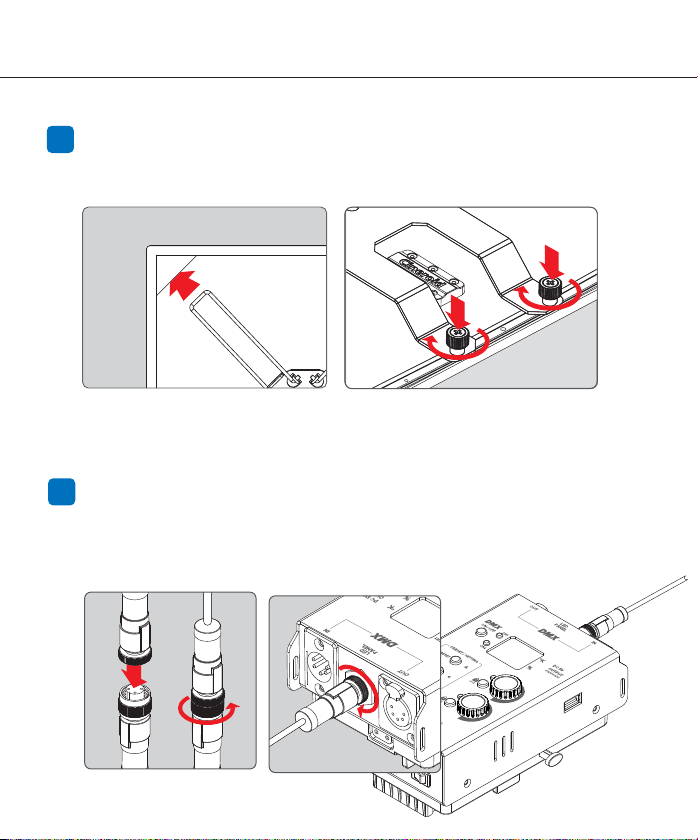
Set the LED Panel on the Bracket
1
Push down 4 mount arms on 4 coners of bracket to set LED
panel with X-bracket.
PN-FL400 / PN-FL800 PN-ML800
2
Connect LED Panel to the Controller
Connect the LED panel and control box connectors.
And then screw thenut to tight. It can be used extensioncable
between connectors.(optional)
Page 8
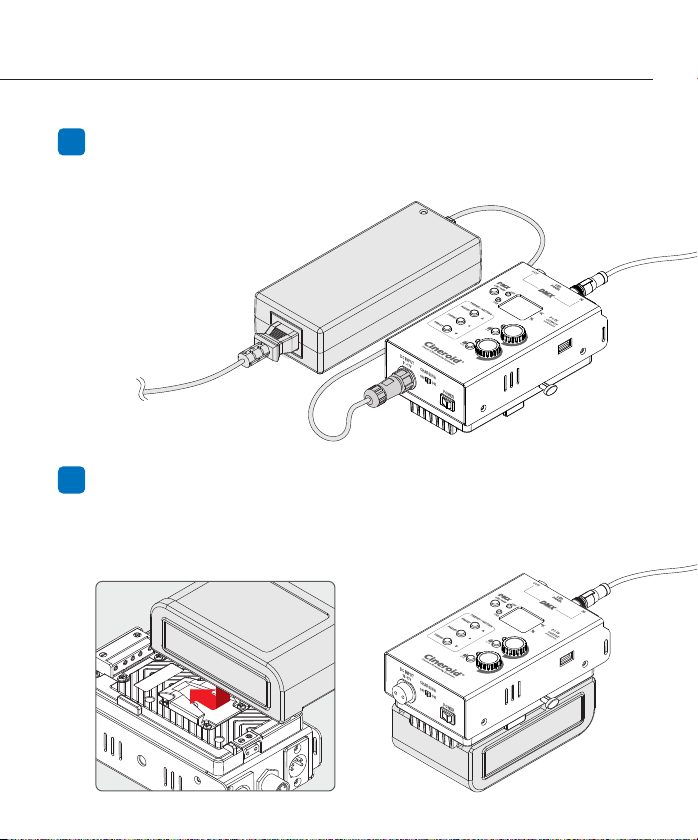
Input the Power by AC Power
3
1. Connect the power source using the AC cable supplied with the package.
2. Turn on the power button to check the LCD.
3. DC power is available also.
Input the Power by Battery (FL-DV/FL-DG)
4
1. Insert the V battery to the battery port.
2. Turn on the power button to check the LCD.
3. When removing the battery, press the detach latch and
remove the battery in reverse order of mounting.
Page 9
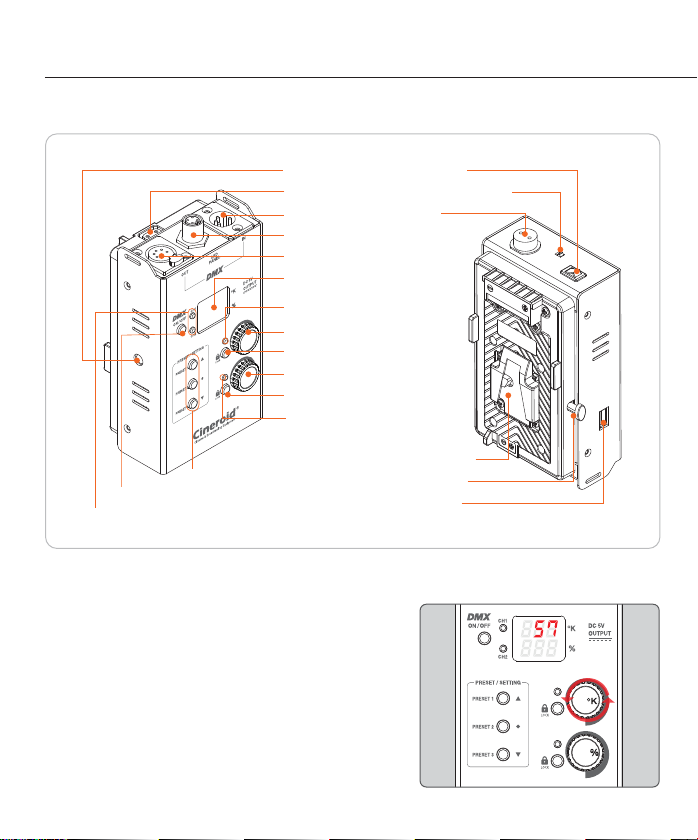
Operating Controller
Name of each part
1/4” Mount
D-Tap Output
DMX In
LED Panel Port
DMX Out
Display
Color temperature Lock Lamp
Color temperature Dimmer
Color temperature Lock Button
Brightness Dimmer
Brightness Lock Button
Brightness Lock Lamp
DMX Setting / Preset Buttons
DMX On/O Button
DMX Channel Lamp
1. Adjust the Color Temperature
Turn the dial to the right increases Color temperature and left
decreases Color temperature. You can adjust color temperature
from 2700°K to 6500°K.
Power Switch
Battery Charge Switch
DC Input
Battery Mount
Battery Latch
USB Output
Page 10
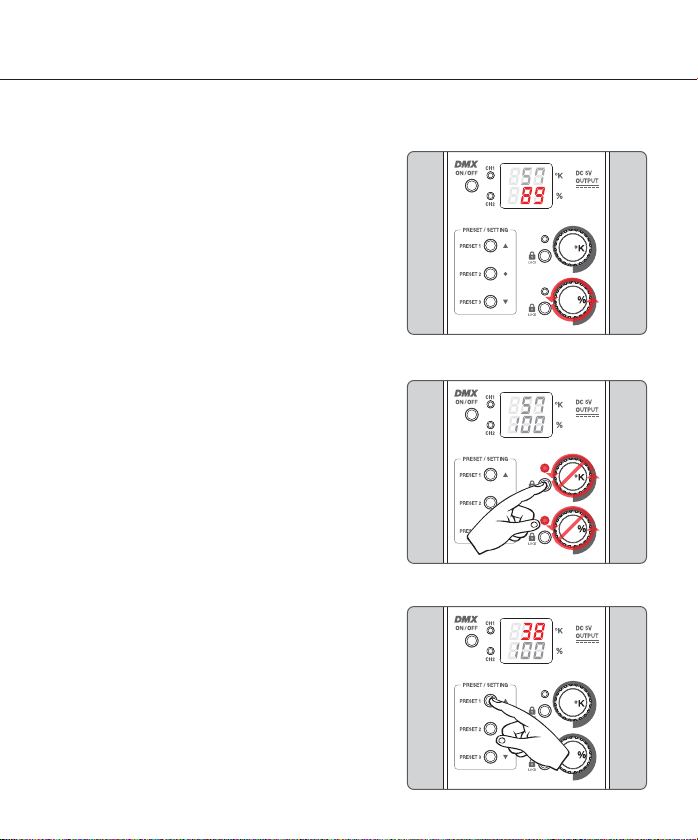
2. Adjust Brightnes
Turning the brightness dial to the right to increases brightness.
Turn the dial to the left decreases brightness. You can adjust the
Brightness by 0~100% dimming.
3. Lock the change of the value
Press the button to lock the color temperature dimmer.
The LED will light up red and the dimmer cannot work.
You can also unlock by pressing it again.
4. Preset
Up to three Color Temperature values can be saved.
Press and hold the Preset button to save current value.
Press the button briey to recall the set value.
Page 11
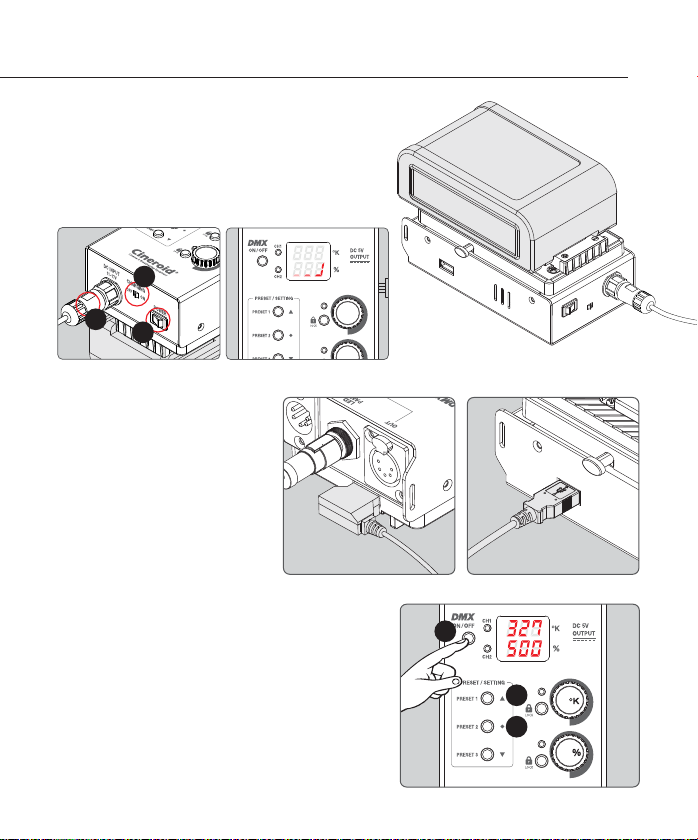
5. Charging the Battery
You can use the controller to charge the battery(FLV or FLG).
Controller connected to the AC is turned o and the Battery
Charging Switch is operated, charging of the battery starts.
During the charging, the LCD shows status of charging.
3
1
2
6. USB and D-Tap Output
The controller can be used as USB or D
tap output. Connect the power to the
controller and use it with the switch
turned on.
7. DMX Channel Setting
Press DMX on/o button 1 second in order to set channel.
DMX LCD will be shown blinking.
Change the channel 000~511 by setting the buttons.
Press Preset 1 or 3 button to charge channel.
Press preset 2 button for 1 second, channel setting is
completed.
1
3
4
Page 12

 Loading...