


Cineroid
E l e c t r o n i c V i e w F i n d e r
User Manual
Model : EVF 4Le
EVF 4Be
English Korean
Cineroid

SECULINE Co., Ltd
Thank you for purchasing the Cineroid EVF.
The Cineroid EVF (hereafter referred to as“EVF”) is a view finder that can be mounted
on any video camera with a HDMI output signal. Please thoroughly read the user
manual for best operation and understanding of all of the functions of the EVF.
Test Before Operating
It is recommended to test the EVF before operating. Check if the EVF can be turned on
once powered, and check if the information/menu is being properly displayed on the
LCD.
Copyrights and Prohibitions
The use of images of people, property, and places can without permission can be
prohibited by law. Please refer to your region’s laws regarding copyrights.
○ Canon and EOS are registered trademarks of Canon.
○ Nikon is a registered trademark of Nikon.
○ Sony is a registered trademark of Sony.
Safety Precautions
21
1. Do not face the eyecup directly into the sun as it may damage the LCD.
2. The shadow disk is installed on EVF at factory.
This shadow disk can be removed by disassembling eyecup from loupe.
02 03
EVF4

SECULINE Co., Ltd
Safety Precautions
Please observe the following safety precautions as they are meant for the
safe and proper use of the product to reduce the risk of accidents. Upon
reading the user manual, keep it in a safe and available place.
◎ Do not use any batteries, power cord, or accessories that are not specified in this
document.
◎ When using a power cord, be sure to plug it in completely. Do not handle power plugs
when your hands are wet. When unplugging the power cord, grasp the plug body
or adapter instead of the cord.
◎ Power cords that are scratched, heavily bent or twisted can potentially be hazardous and
a source of electric shock and/or fire.
◎ Do not insert foreign objects into the product’s electric or cable components.
◎ Do not place the power cord near sources of heat as this may melt or cause damage to
the cord potentially causing fire or electric shock.
◎ Do not disassemble or modify the product. This may damage the product and cause
danger due to a malfunction.
◎ Please keep the product out of reach of young children. Injuries may occur due to damage
to the product.
◎ When using the product in an airplane or hospital setting, it is recommended to acquire
authorization first as signals or electro-magnetic waves from the product may cause other
equipment to malfunction.
◎ Do not store the product in a dusty or humid environment as damage may occur.
◎ When the product is mounted on a camera, do not lift or move the camera by grabbing
the product. This may cause damage to the product or the camera mount.
◎ Do not clean the product with paint thinner, benzene, or other volatile solvents. This may
cause damage to the product and become a fire hazard.
◎ This product is not waterproof. If the product is dropped in water, contact the service
center immediately.
English
EVF4

SECULINE Co., Ltd
Table of Contents
Safety Precautions
Table of Contents
Configuration
Parts
Before Using the EVF
Detachable Optical Viewfinder
Installing the Battery
Connecting External Power
Powering On/Off
Adjusting the Diopter
Connecting a HDMI Cable
Connecting a Composite Cable
Connection a Monitor
Basic Features
Operating the Menu
Input Selection
Adjusting Color
Adjusting the Screen
Adjusting the Volume
03
04
06
07
08
08
09
09
10
10
11
11
12
13
13
14
14
04 05
EVF4

SECULINE Co., Ltd
Shooting Features
Peaking
Anamorphic
Crop Guide
Over Scaling
Center Maker
Clip guide
False color
Firmware Upgrade
Screen Flip
Pixel to Pixel
Underscan
Monochrome
Custom Button Functions
Setting User Controls
OSD Setting
Parameter save and restore
Factory reset
Product Specifications
Optional Products
MEMO
15
16
16
17
17
18
18
19
19
20
20
21
21
22
22
22
23
24
26
English
EVF4

SECULINE Co., Ltd
Components
Please ensure all parts are present after opening the box.
B. Battery Cover
A. LCD VF + Optical Loupe
D. Battery Charger
F. Mini Shoe Mount Adapter
G. User Manual
06 07
EVF4
H. Cineroid EVF Carrying Case
C. Battery
E. Mini HDMI Cable

SECULINE Co., Ltd
Parts
Feature Buttons
Eye Cup
Menu Button
Battery Cover
English
Analog A/V input
Power Switch
External Speaker
3.5φHeadphone Jack
1/4”Screw Mount
Diopter Adjuster
3.2 inch LCD screen
HDMI In
HDMI Out
(EVF4L only)
EVF4

SECULINE Co., Ltd
Before Using the EVF
Detachable Optical Loupe
1. The optical loupe attached to the EVF body can be flipped open 180 degrees or
detached completely.
2. To open the optical loupe, firmly grasp the loupe and flip upwards. When it is fully open,
the loupe will stay fixed on top of the body.
3. To completely detach the loupe from the body, simply slide the small latch to the left and lift
up the loupe. To replace the loupe, slide the small latch to the left and place the loupe
back into place.
2
180
Installing the Battery
1. The Cineroid EVF can be used with small, medium or large sized batteries. The battery
cover can only be used with the small sized batteries.
2. Remove the battery cover.
3. Push the battery in towards the direction of the arrow making sure the battery is properly
aligned in place.
4. The battery or the connectors may be damaged if not aligned properly.
5. The Canon LP-E6 battery can only be used in conjunction with the PA01 adapter.
3
2
08 09
EVF4
3

SECULINE Co., Ltd
Before Using the EVF
Connecting External Power
1. External power is supplied through the use of the PA01 adapter.
2. Proper voltage for external power is 6-17V.
3. To install the PA01 adapter, first remove the battery from the body.
4. Connect the external power cable to the PA01 adapter, as illustrated in the picture below.
5. Install the PA01 adapter to the body using the same method as installing the battery.
6. You can use the Canon LP-E6 battery with the PA01 adapter installed.
Powering On/Off
1. Install the battery or connect external power.
2. Turn the power switch to the ON position.
3. A red light will indicate that the power and LCD is turned ON.
4. If you have an external input, you will see the image displayed from that signal. If there is
no external input, you will see the default screen.
5. Turn the power switch to the OFF position to turn off.
English
ON
OFF
EVF4

SECULINE Co., Ltd
Before Using the EVF
Adjusting the Diopter
1. When viewing through the optical loupe, the user can adjust the diopter accordingly.
Turn on the EVF and verify the LCD image output.
2. Rotating the dial to the right will bring the eye cup towards you and rotating it to the left
will move the eye cup away from you.
3. Rotate the dial in either direction until the image becomes clear.
Connecting a HDMI Cable
1. Make sure the EVF input selection is set to HDMI. Please refer to 'Input Selection' on
page 13.
2. First connect the mini-HDMI cable to a camera, and then connect the other end into the
HDMI IN connection on the EVF.
3. Check whether the image on the LCD is correctly displaying the image on the camera. If
the image on the LCD is not displaying correctly, check the cable connections and/or
the camera to ensure all settings are correct.
10 11
EVF4

SECULINE Co., Ltd
Before Using the EVF
Connecting a Composite Cable
1. Make sure the EVF input selection is set to Composite. Please refer to 'Input Selection'
on page 13.
2. You can purchase a composite cable from Cineroid or use your own cable if it is similar
to the illustration below.
3. Insert the 3.5mm dia 4-pole plug into the rear of the EVF marked A/V in.
4. Check the image.
3.5mm dia 4-pole plug
Connecting an External Monitor (EVF4Le)
1. The EVF4Le model provides a HDMI loop-through function. The image on the LCD
can be directly looped to an external monitor via a separate mini-HDMI cable.
2. Connect the mini-HDMI input cable to the EVF HDMI in.
3. Connect a separate mini-HDMI cable from the EVF HDMI out to an external monitor.
4. If there is no input signal into the EVF, then there will be no image to the external
monitor.
5. The EVF4Be model does not come with a loop-through function.
Left Audio
Video
Ground
Right Audio
English
EVF4

SECULINE Co., Ltd
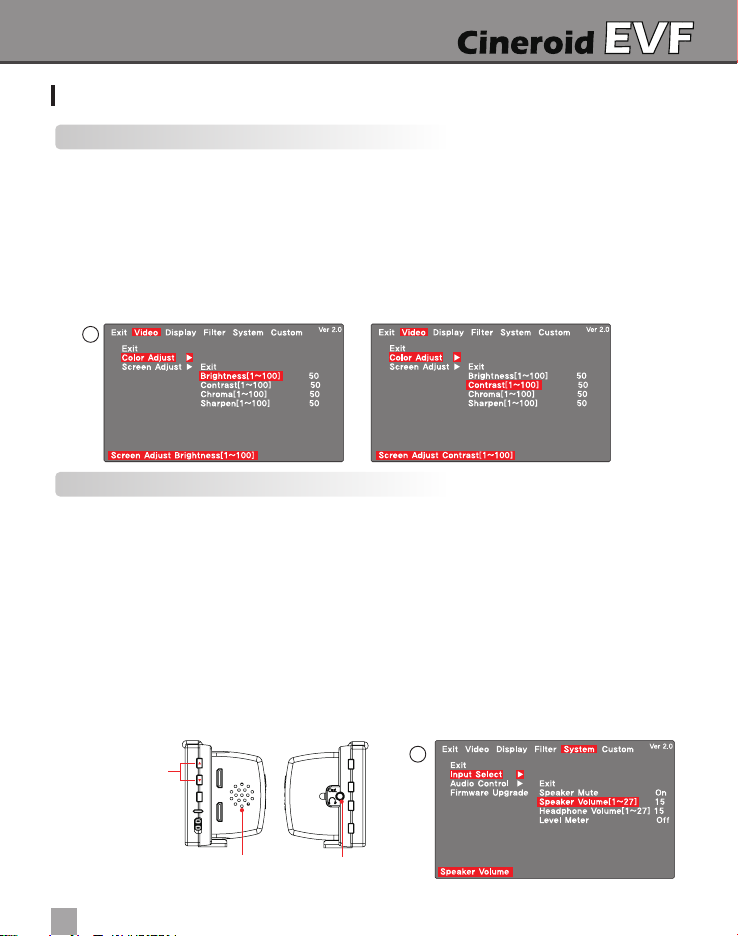
Basic Features
Operating the Menu
1. Access the setting and features by pressing the menu button on the left side of the EVF.
2. Press the M button to select the main menu. When not in the menu, you can adjust
the speaker volume by pressing the up and down arrow keys.
21
Up
Down
M
Menu
ON
OFF
3. Once the main menu is selected, press the up and down arrow keys to navigate
through the menu. The cursor is highlighted in red.
4. Move the cursor to the feature you want to select/change and press the M button
to access that feature.
5. Press the up and down arrow keys to change the value of the feature.
6. Move the cursor to Exit and press the M button to return to the previous menu.
7. To exit the main menu, Select Exit or press PA button.
Exit Video Display Filter System Custom
Exit
Color Adjust ▶
Screen Adjust ▶
Ver 2.0
Exit Video Display Filter System Custom
Exit Video Display Filter System Custom
Exit
Color Adjust ▶
Screen Adjust ▶
Ver 2.0
Ver 2.0
Exit Video Display Filter System Custom
Exit
Color Adjust ▶
Screen Adjust ▶
4
On or off Color Adjust
Exit
Red Gain[1~100] 50
Red Offset[1~100] 50
Green Gain[1~100] 50
Green Offset[1~100] 50
Blue Gain[1~100] 50
Blue Offset[1~100] 50
Ver 2.0
6
5
12 13
EVF4

SECULINE Co., Ltd
Basic Features
Input Selection
1. You can choose between composite and HDMI for your external input selection.
2. The HDMI input can receive 480i, 480p, 576p, 720p and 1080i signals.
3. Press the M button for the main menu. Move the cursor to INPUT SELECT and press
the M button. Choose either HDMI or Composite.
4. Analog audio is audioable even HDMI input is selected if Analog Audioi priority is ON.
3
Adjusting Color
1. You can adjust the color of the LCD screen. Choose 1-100 for the color levels.
2. Press the M button for the main menu.
3. Select COLOR ADJUST and choose between Red, Green or Blue to adjust your colors.
4
English
Exit Video Display Filter System Custom
2
Exit
Color Adjust ▶
Screen Adjust ▶
Color Adjust Red Gain
Exit
Red Gain[1~100] 50
Red Offset[1~100] 50
Green Gain[1~100] 50
Green Offset[1~100] 50
Blue Gain[1~100] 50
Blue Offset[1~100] 50
Ver 2.0
EVF4
SECULINE Co., Ltd
Basic Features
Adjusting the Screen
1. You can adjust the LCD brightness, contrast, and sharpness. Choose between 1-100
for the brightness and contrast and 1-10 for the sharpness.
2. Press the M button for the main menu.
3. Select SCREEN ADJUST to choose among BRIGHTNESS, CONTRAST, and SHARPEN
to adjust your screen.
4. A preview window will appear on the lower right portion of the screen as you adjust
your screen.
2
Volume Control
1. The EVF has a built-in speaker on the left side of the body and a headphone jack on the
right side.
2. You can adjust the master volume by pressing the up and down arrows on the left side of
the EVF when not in the main menu screen. You can also adjust the master volume within
the menu. Press the M button for the main menu. Select VOLUME and adjust with the
arrow keys.
3. The speaker and headphone volumes can be adjusted independently. To do so, you must
adjust the volume within the menu.
4. Audio Level meter is displayed on screen if it is turned on.
2
Master Volume
M
14 15
EVF4
PK
F1
F2
SA
Headphone JackExternal Speaker

SECULINE Co., Ltd
Shooting Features
Peaking
1. The EVF provides the peaking feature in both the Red and Sharpness mode. The Red
mode displays in red and the Sharpness mode displays an outline in white.
2. To activate the peaking feature, simply press the PK button on the left side of the EVF
body. The peaking will show in the mode that is currently selected.
3. To change the peaking mode, press the M button for the main menu. Select PEAKING
from the menu and then select PEAKING MODE. Select Red or Sharp mode.
You can also adjust the peaking threshold by selecting PEAKING THRESHOLD
and adjusting accordingly. The threshold range is 1-5 with 5 being the highest.
4. The peaking feature works only with HDMI input. It does not work with Analog input.
English
2
Exit
Input Select
Color Adjust
Screen Adjust
Exit
Volume
Peaking Mode [R,S] R
Peaking
Threshold
Saturation(Zebra)
Under Scan
4:3 Guide Bar
Pixel to Pixel
Peaking Mode Set
PK
F1
F2
SA
[1~5] 05
3
Peaking Red OFF
Peaking Red ON
Peaking Sharpness OFF Peaking Sharpness ON
EVF4

SECULINE Co., Ltd
Shooting Features
Anamorphic
1. The screen size can be changed for anamorphic lens.
2. The screen size is set for each input resolution.
3. The position of center is adjustable at Offset menu.
Crop guide
1. The crop guide information is displayed on screen.
2. Ratio can be selected from 4:3, 1.85:1, 16:9, 2:1, 2.35:1, Custom.
3. The size of crop guide can be reduced at Reduce menu. Its range is 0.500~1.000.
4. Guide Line display is optional and transparent(Background) range is 0~8.
16 17
EVF4
SECULINE Co., Ltd
Shooting Features
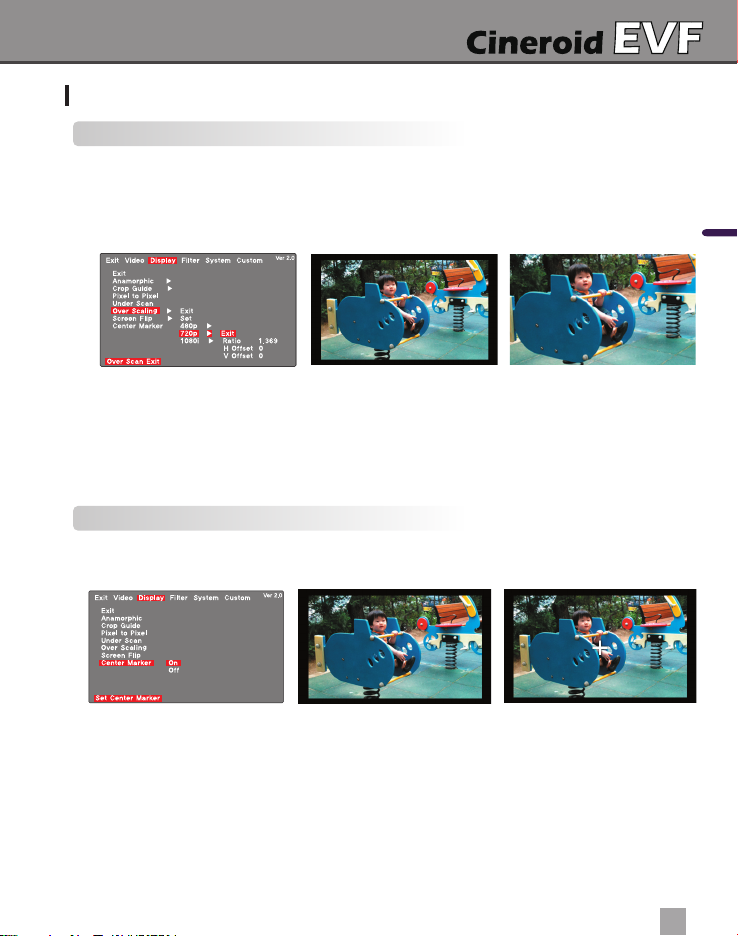
Over Scaling
1. The image can be stretched to 1.5 times.
2. The aspect ratio of image is not changed. Also, it is set for each resolution, 480p, 720p,
1080i.
3. Image can be moved to vertical or horizontal.
Center Marker
1. The center of screen is marked with cross.
2. Color is white and it is changed to black if image is white.
English
EVF4

SECULINE Co., Ltd
Shooting Features
Clip guide
1. There are three Clip guide modes, Color and Zebra, both.
2. Zebra range is selectable among 3%, 5%, 8%, 11%. Also, Zebra mark has two types,
moving or fixed.
3. There is three kinds of threshould, High, Middle, Low.
False color
1. False color shows exposure rate with 6 kinds of colors.
2. There are two kinds of False color.
18 19
EVF4

SECULINE Co., Ltd
Shooting Features
Firmware Upgrade
1. Firmware is upgradable by special cable.
2. Connect EVF and computer by cable.
3. Select On of Firmware Upgrade. The screen is changed to waiting message.
4. EVF starts firmware upgrade.
Screen Flip
1. You can flip the video image on the LCD screen 180 degrees vertically or horizontally
by activating the screen flip feature.
2. To flip the image horizontally, from the main menu select SCREEN FLIP then turn MIRROR
on.
3. To flip the image vertically, from the main menu select SCREEN FLIP then turn ROTATE on.
English
Mirror OFF / Rotate OFF
Rotate ON / Mirror ON
Mirror ON
Rotate ON
EVF4

SECULINE Co., Ltd
Shooting Features
Pixel to pixel
1. Enabling pixel to pixel eliminates the need for you to zoom in/out of your native video.
2. If the native video is larger than the LCD resolution then that creates a zooming effect.
Conversely, if the native video is smaller than the LCD resolution then that creates
a scale-down effect.
3. The pixel to pixel feature only maps the center of the video image.
Pixel to Pixel OFF Pixel to Pixel ON
Underscan
1. You can view every corner of the image on the LCD by activating the underscan feature.
You can select the underscan feature from within the main menu or by custom setting the
F1 or F2 button.
2. When the underscan feature is activated, the entire image is slightly decreased in size
from the original.
Underscan OFF Underscan ON
20 21
EVF4

SECULINE Co., Ltd
e
Shooting Features
Monochrome (B/W, Blue, Red, Green)
1. You can view the image on the LCD in B/W by activating the monochrome feature.
The color mode is B/W, Blue, Red, Green.
2. To activate the monochrome feature, press the M button for the main menu, select
MONOCHROME and turn the feature on. You can also assign this feature to one of the
custom buttons, F1 or F2, in order to activate the feature immediately.
Monochrome (B/W) ONMonochrome (B/W) OFF
Custom Button Functions
1. The left side of the EVF body contains the buttons PK, F1, F2, SA. The factory default for
these buttons are peaking (PK), Pixel to pixel (F1), False color 1 (F2), and Clip guide (SA).
2. Each button can be customized to a particular feature by selecting CUSTOM SETUP on
the main menu.
3. Press the M button for the main menu then select CUSTOM SETUP.
4. Select one of the buttons (PK, F1, F2, SA) you wish to customize. Select from one of the
features listed to assign that feature to the selected button.
5. Exit out of the menu.
English
1 3
PK
F1
F2
SA
Peaking
Peaking
Pixel to pixel
Monochrom
False color 1
Underscan
Clip Guide
Saturation
Inital functions
EVF4

SECULINE Co., Ltd
Setting User Controls
Custom Display Settings
1. You can select to view the current state of the battery usage, volume, etc. on the LCD.
2. Press the M button for the main menu and select STATUS DISPLAY to view the options.
3. Select ON or OFF for each item you want to view or not view on the LCD.
4. The pixel to pixel display only appears when the feature is activated.
OSD Peaking ONPixel to Pixel ON
Parameter save and restore
1. The all parameters of function can be stored on bank0 or bank1.
2. The parameters can be restored from bank0 or bank2.
3. Factory is the initial parameter of factory.
Factory reset
1. Powering on the EVF while pressing down the PK button will reset the EVF to its original
default settings.
2. Once the factory reset is complete, fully power off the EVF before powering on for further
22 23
EVF4

SECULINE Co., Ltd
Product Specifications
LCD
Input
Video output
Audio out
Power
Operating Temperature
Storage Temperature
Power consumption
Size
Resolution
Color
Viewing angle
Display area
HDMI
Composite
HDMI
Phone Jack
Internal speaker
Battery
External
3.2inch TFT LCD
800 x 480
16.7M
H: 180 degrees, V: 180 degrees
69.6(H) x 41.76(V)mm
(480i/480p/576p/720p/1080i)
Video/Stereo Audio
(480i/480p/576p/720p/1080i)
3.5φ Analog stereo
Mono Output
Small, Medium, Large
DC 6.0 ~ 17V by DC adapter(PA01)
-10℃ to 60℃
-20℃ to 70℃
3.5W(4hours with 2200mAH battery)
English
EVF4

SECULINE Co., Ltd
FCB044
FCB043
Power Adapter + DC plug with D-tap
Power Adapter
DC plug only for PA01
DC plug with D-tap for PA01
PA01 SET
(PA01+FCB043)
(6inch)
(10inch)
○External power adapter
Form
○Articulating Arm
Model Length Material
Optional Products
24 25
EVF4

SECULINE Co., Ltd
Mini ball head MBH-P
Mini ball head MBH-M
○HDMI Cable
Model Length
○Mini ball head
Reinforced plastic
Metal
Model Weight MaterialForm
RCA x 3EA
Plug form
Length Plug formModel
Optional Products
English
EVF4

SECULINE Co., Ltd
Optional Products
○별매품
Form Model
EVF Remote controller RM01
Trigger functions of EVF by wired
Functions are assigned in EVF menu
EVF Remote controller RM01
Trigger functions of EVF by wired
Functions are assigned in EVF menu
L-clamp
Extends ¼” screw mount to 3 positions for EVF4L/B
Clamp mini HDMI cable
26 27
EVF4

SECULINE Co., Ltd
MEMO
English
EVF4

Cineroid
E l e c t r o n i c V i e w F i n d e r
We will strive to create the best products
and provide superb service.
Cineroid
Customer Support Center
Seculine Co., LTD.
Tel +82.2.850.3021 / Fax +82.2.850.3027
Rm.510, Kolon Science Valley #2, Guro-dong, 811, Guro-gu, Seoul, 152-878, Korea
Homepage www.cineroid.com
E-mail sales@secu-line.com
EVF1.0
Printed in Korea
 Loading...