

Page 1
TECHNICAL DATA SHEET
FIXED ORIFICE
BALANCING VALVE
747
PN 25
Main features:
technological solutions
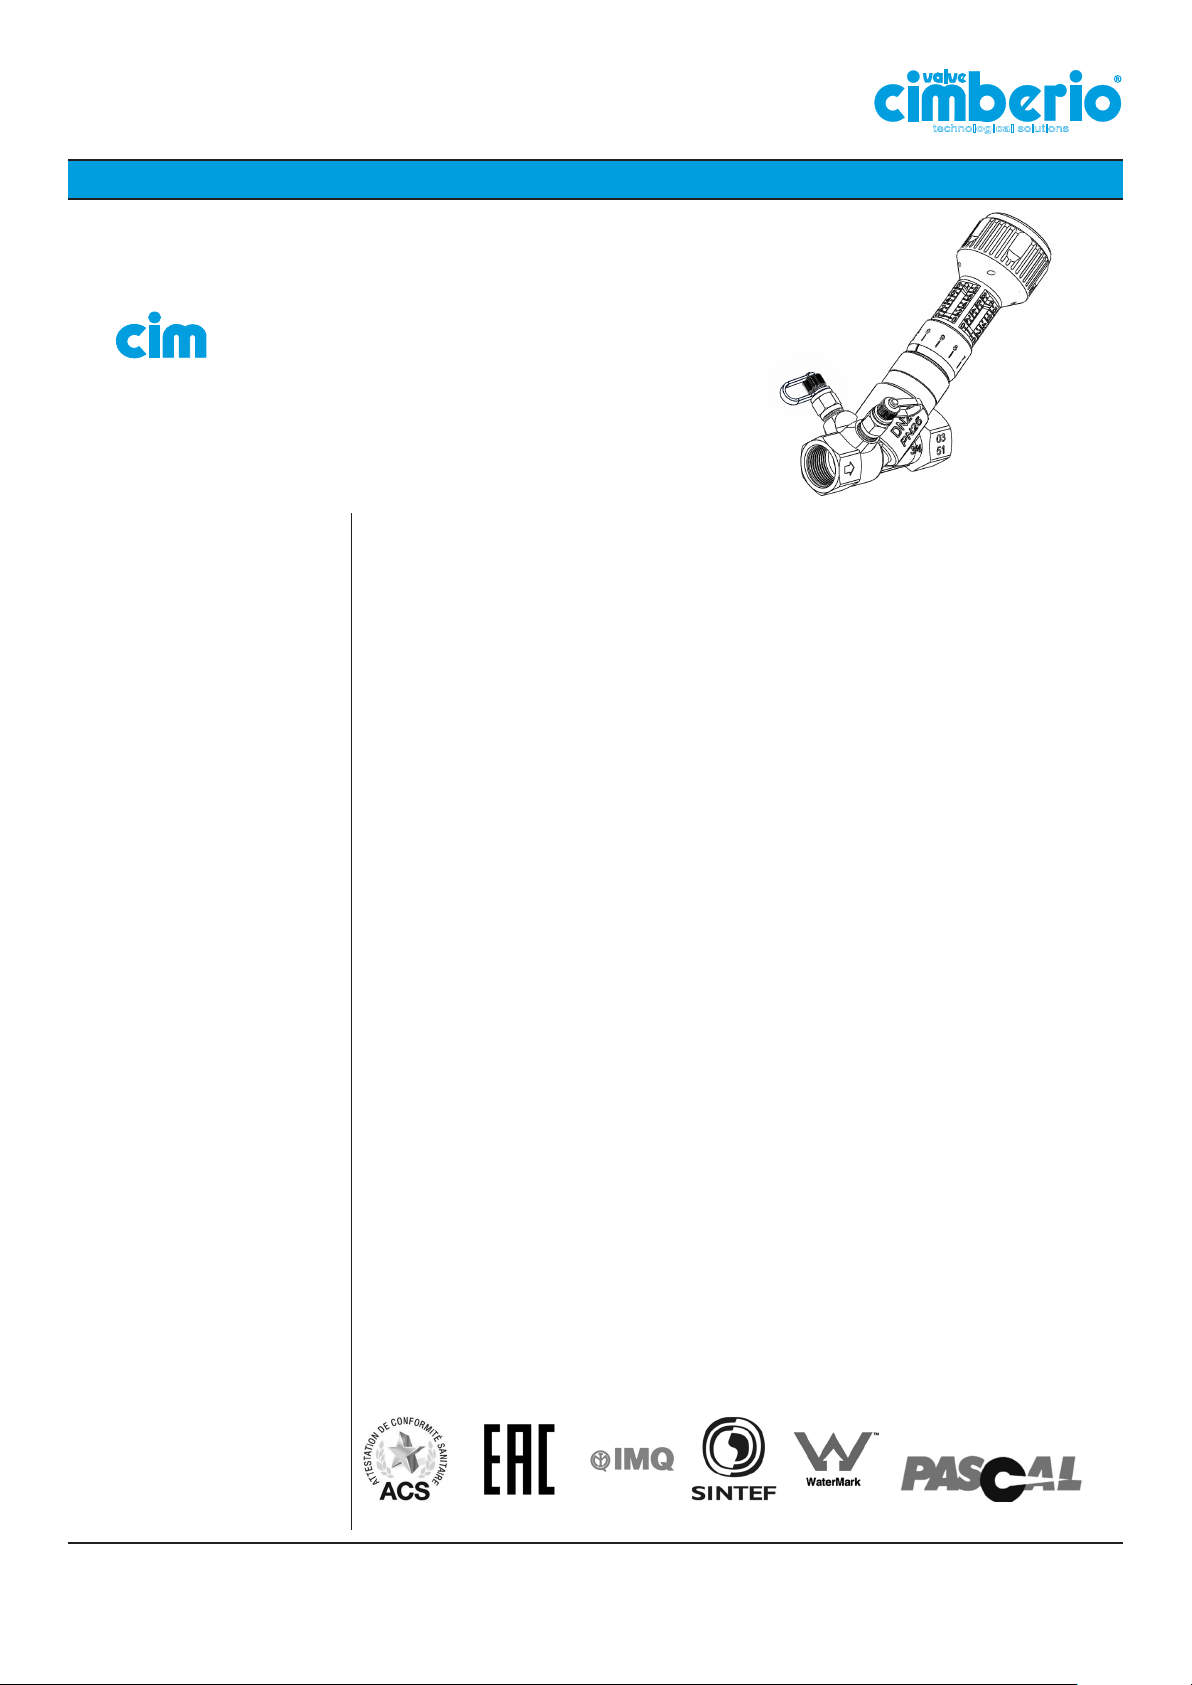
Cim 747 is used for balancing the flow in cooling, heating and domestic water systems.
Cim 747 is a combined manual presetting valve with following features:
• Fixed measurement orifice;
• Supplied with 2 pcs. of measuring nipples for needles;
• Handwheel with shut-off function and clear 360° reading;
• Digital scale with lock function;
• Measuring accuracy of fixed orifice ± 5%.
Technical data:
It is supplied with internal thread.
It is made of standard brass, “CR” brass (“CR” - Corrosion Resistant) and “NL” brass (“NL” No lead).
This article is made in compliance with the quality management requirements of ISO
9001:2008 standard.
All articles are tested according to the EN 12266-1:2003 standard.
It can be used in a wide variety of sectors: heating, air conditioning, water, sanitary systems
and generally with any non corrosive liquid.
Max. static working pressure 25 bar
Max. flow temperature 120 °C - 150°C (Cim 747OTS)
Min. temperature -10°C
Fluids: Water and Glycol
Material of parts in contact with water:
Valve body;
Spindle;
Cone, etc.
Materials:
“CR”Brass (EN 1982-CC752S)
Standard Brass (EN 1982-CC754S)
“NL” Brass (EN 1982-CC752S low lead)
O-rings: EPDM Perox
Threads: ISO 7
Approved by*:
Cav. Uff. Giacomo Cimberio S.p.A.
*Cim 747
1
Rev. 1 del 11/2013
Page 2
TECHNICAL DATA SHEET
Models:
technological solutions
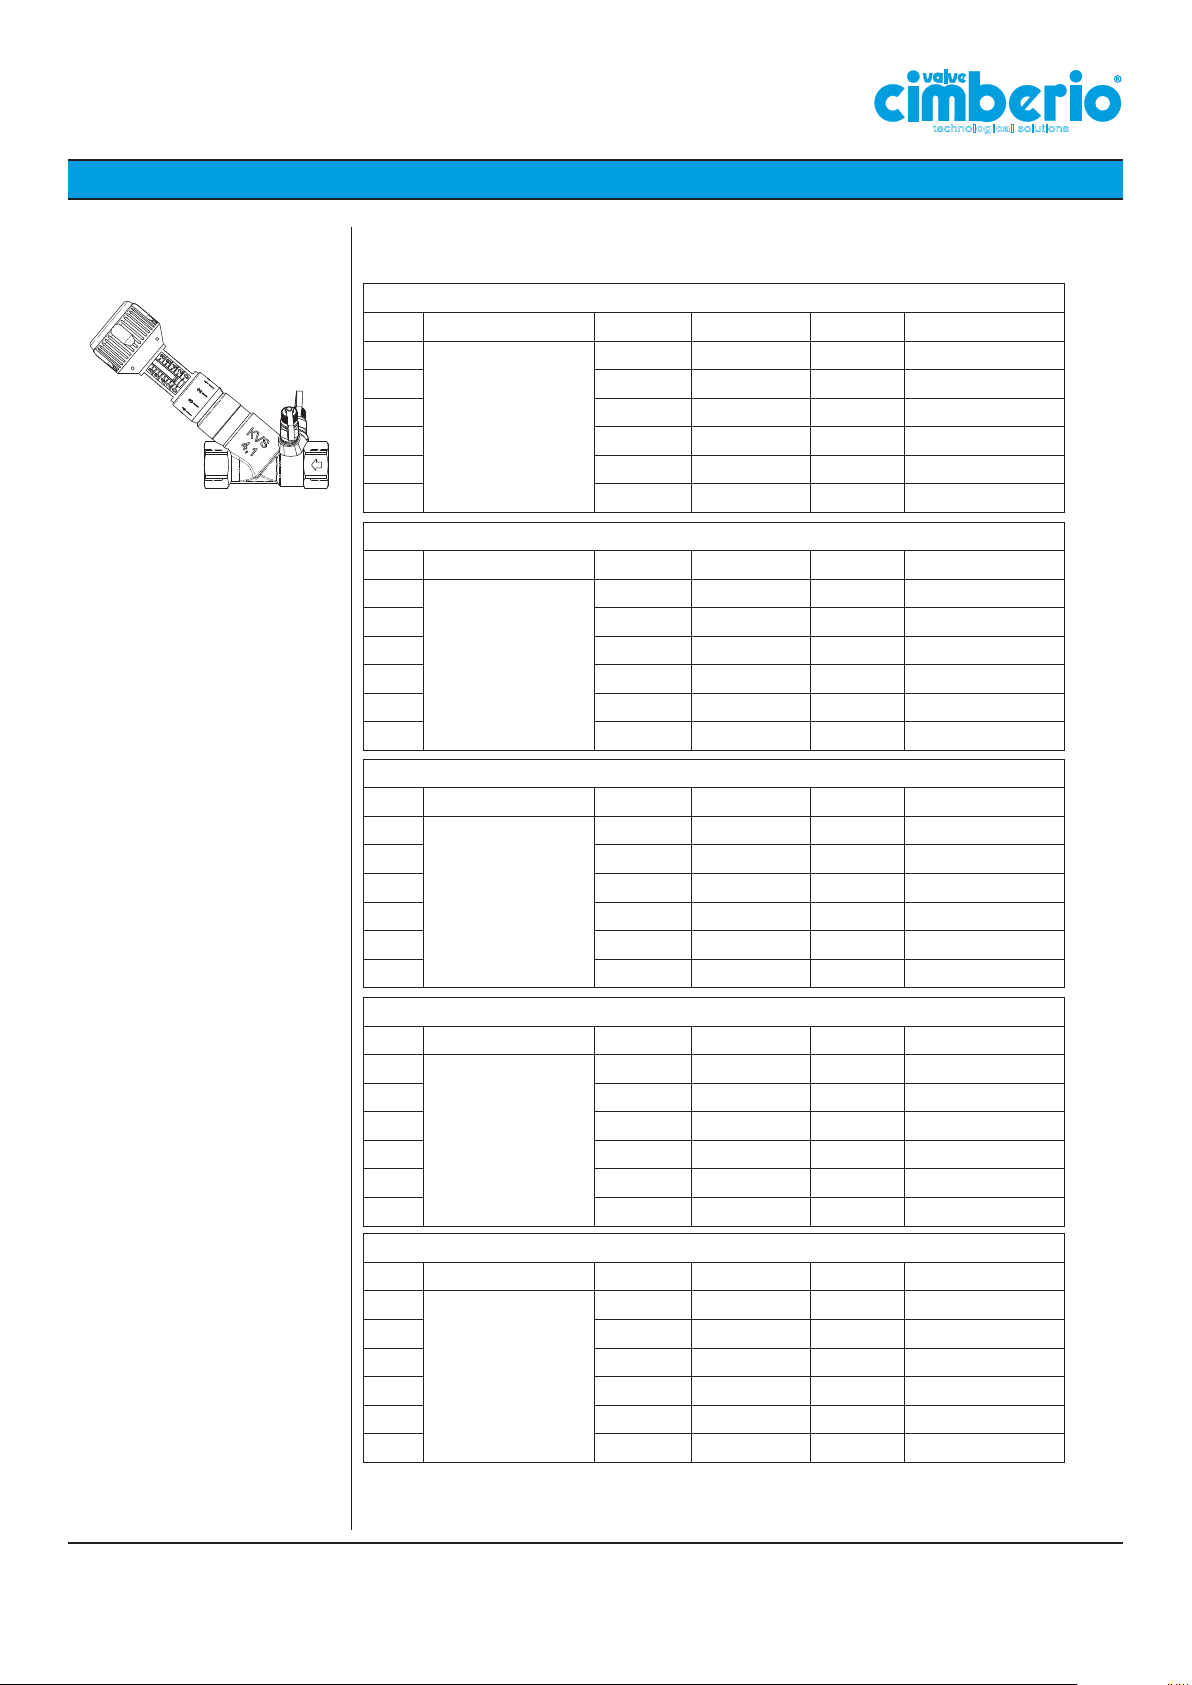
Cim 747 - Balancing valve - Fixed orifice - PN 25 - “CR” Brass
DN Material Thread Kv Kvs Technical Code
15
20 3/4” Rp 0.842 ÷ 3.77 4.10 DA02771020
25 1” Rp 0.943 ÷ 6.96 7.50 DA02771025
32 1”1/4 Rp 1.316 ÷ 15.83 16.60 DA02771032
40 1”1/2 Rp 2.22 ÷ 21.05 23.00 DA02771040
50 2” Rp 2.51 ÷ 43.90 47.40 DA02771050
Cim 747OT - Balancing valve - Fixed orifice - PN 25
DN Material Thread Kv Kvs Technical Code
15
20 3/4” Rp 0.842 ÷ 3.77 4.10 DA02851020
25 1” Rp 0.943 ÷ 6.96 7.50 DA02851025
32 1”1/4 Rp 1.316 ÷ 15.83 16.60 DA02851032
40 1”1/2 Rp 2.22 ÷ 21.05 23.00 DA02851040
50 2” Rp 2.51 ÷ 43.90 47.40 DA02851050
CR Brass
EN 1982-CC752S
Standard Brass
EN 1982-CC754S
1/2” Rp 0.515 ÷ 1.75 1.80 DA02771015
1/2” Rp 0.515 ÷ 1.75 1.80 DA02851015
Cim 747NL - Balancing valve - Fixed orifice - PN 25 - “NL” Brass
DN Material Thread Kv Kvs Technical Code
15
20 3/4” Rp 0.842 ÷ 3.77 4.10 DA03491020
25 1” Rp 0.943 ÷ 6.96 7.50 DA03491025
32 1”1/4 Rp 1.316 ÷ 15.83 16.60 DA03491032
40 1”1/2 Rp 2.22 ÷ 21.05 23.00 DA03491040
50 2” Rp 2.51 ÷ 43.90 47.40 DA03491050
Cim 747H - Balancing valve - Fixed orifice - PN 25 - “CR” Brass - High flow
DN Material Thread Kv Kvs Technical Code
15
20 3/4” Rp 1 ÷ 5.66 7.50 DA03501020
25 1” Rp 0.95 ÷ 11.10 16.60 DA03501025
32 1”1/4 Rp 1.16 ÷ 18.01 23.00 DA03501032
40 1”1/2 Rp 2.27 ÷ 27.81 44.00 DA03501040
50 2” Rp 1.82 ÷ 48.01 64.00 DA03501050
Cim 747OTS - Balancing valve for solar heating system - Fixed orifice - PN 25
DN Material Thread Kv Kvs Technical Code
15
20 3/4” Rp 0.842 ÷ 3.77 4.10 DA02831020
25 1” Rp 0.943 ÷ 6.96 7.50 DA02831025
32 1”1/4 Rp 1.316 ÷ 15.83 16.60 DA02831032
40 1”1/2 Rp 2.22 ÷ 21.05 23.00 DA02831040
50 2” Rp 2.51 ÷ 43.90 47.40 DA02831050
NL Brass
EN 1982-CC752S
low lead
CR Brass
EN 1982-CC752S
Standard Brass
EN 1982-CC754S
1/2” Rp 0.515 ÷ 1.75 1.80 DA03491015
1/2” Rp 0.67 ÷ 3.19 4.10 DA03501015
1/2” Rp 0.515 ÷ 1.75 1.80 DA02831015
Cav. Uff. Giacomo Cimberio S.p.A.
2
Page 3
TECHNICAL DATA SHEET
technological solutions
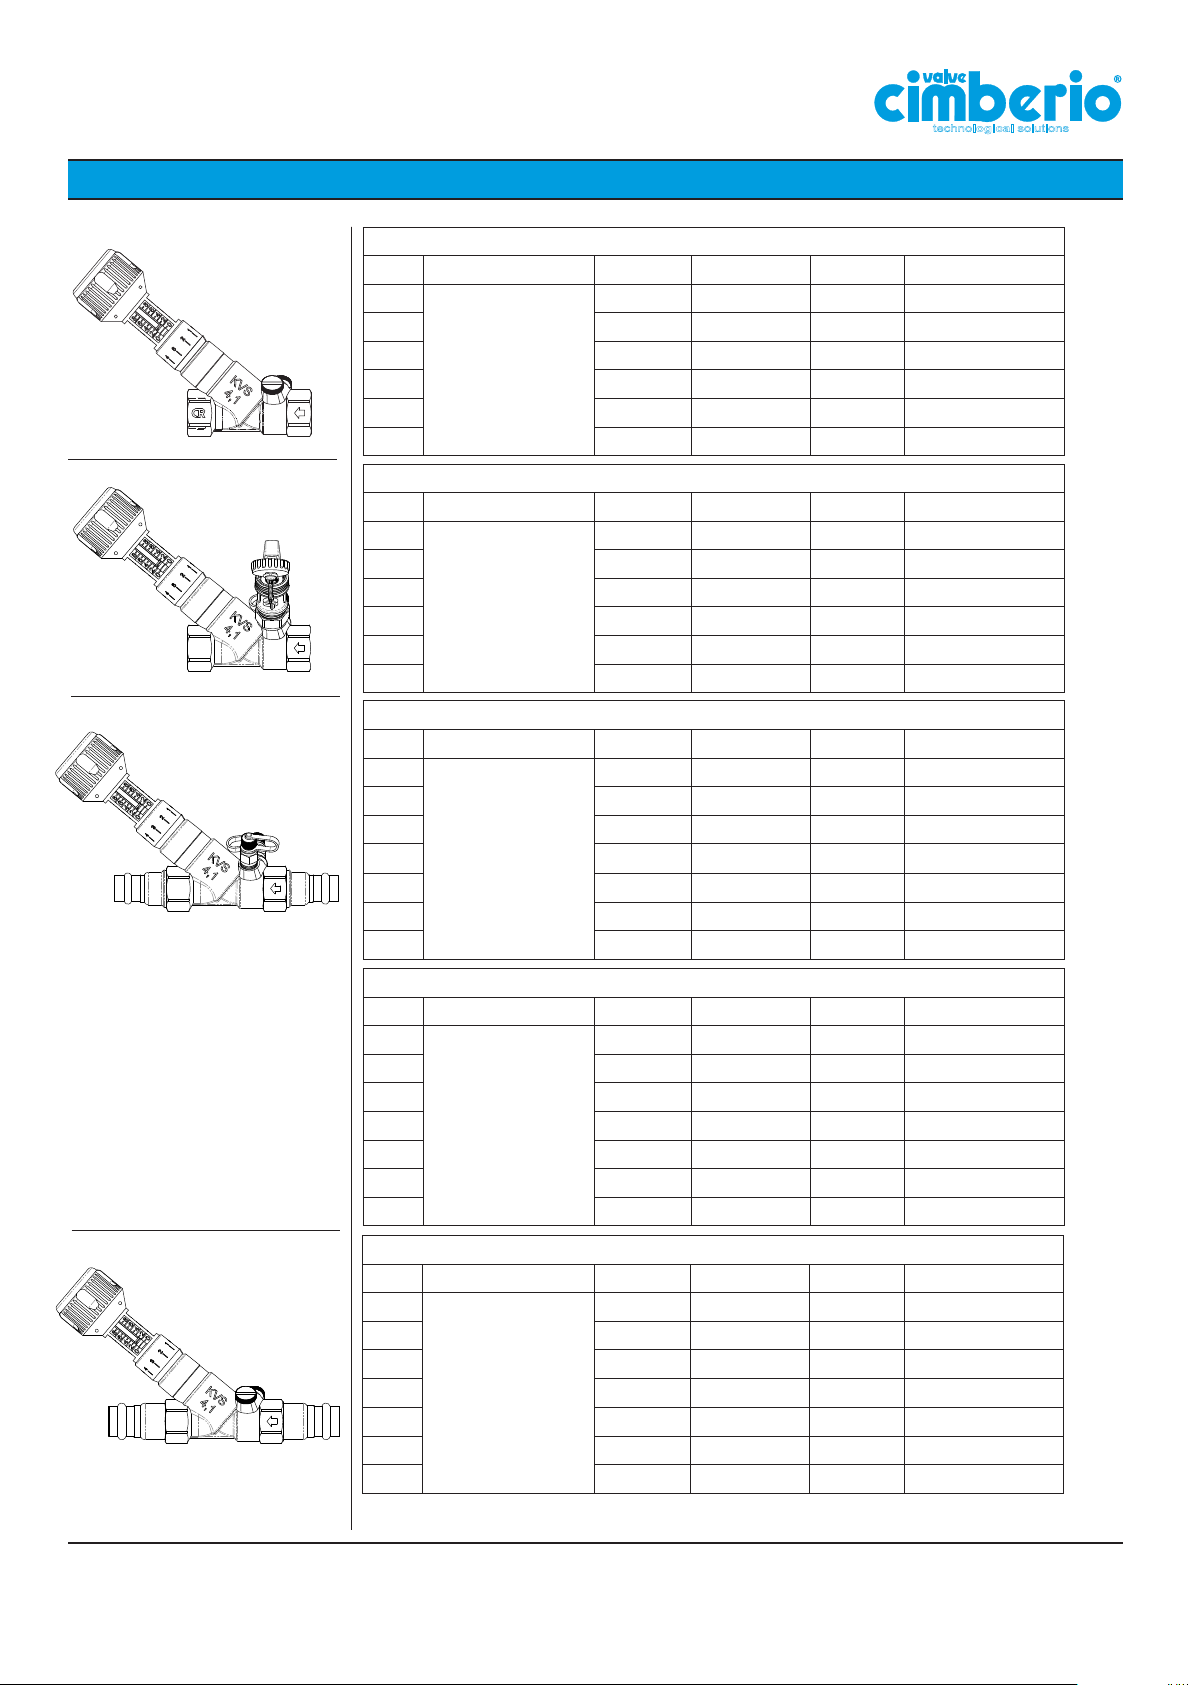
Cim 745 - Balancing valve - Fixed orifice - PN 25 - “CR” Brass - with two plugs
DN Material Thread Kv Kvs Technical Code
15
20 3/4” Rp 0.842 ÷ 3.77 4.10 DA02761020
25 1” Rp 0.943 ÷ 6.96 7.50 DA02761025
32 1”1/4 Rp 1.316 ÷ 15.83 16.60 DA02761032
40 1”1/2 Rp 2.22 ÷ 21.05 23.00 DA02761040
50 2” Rp 2.51 ÷ 43.90 47.40 DA02761050
Cim 748 - Balancing valve - Fixed orifice - PN 25 - “CR” Brass - with test point and drain
DN Material Thread Kv Kvs Technical Code
15
20 3/4” Rp 0.842 ÷ 3.77 4.10 DA02781020
25 1” Rp 0.943 ÷ 6.96 7.50 DA02781025
32 1”1/4 Rp 1.316 ÷ 15.83 16.60 DA02781032
40 1”1/2 Rp 2.22 ÷ 21.05 23.00 DA02781040
50 2” Rp 2.51 ÷ 43.90 47.40 DA02781050
CR Brass
EN 1982-CC752S
CR Brass
EN 1982-CC752S
1/2” Rp 0.515 ÷ 1.75 1.80 DA02761015
1/2” Rp 0.515 ÷ 1.75 1.80 DA02781015
Cim 747PRS - Balancing valve - Fixed orifice - PN 25 - “CR” Brass - Press-fitting end
DN Material Press-fitting Kv Kvs Technical Code
15
20 18x18 0.842 ÷ 3.77 4.10 DA02935018
20 22x22 0.842 ÷ 3.77 4.10 DA02935022
25 28x28 0.943 ÷ 6.96 7.50 DA02935028
32 35x35 1.316 ÷ 15.83 16.60 DA02935035
40 42x42 2.22 ÷ 21.05 23.00 DA02935042
50 54x54 2.51 ÷ 43.90 47.40 DA02935054
Cim 747OTPRS - Balancing valve - Fixed orifice - PN 25 - Press-fitting end
DN Material Press-fitting Kv Kvs Technical Code
15
20 18x18 0.842 ÷ 3.77 4.10 DA02935018
20 22x22 0.842 ÷ 3.77 4.10 DA02935022
25 28x28 0.943 ÷ 6.96 7.50 DA02935028
32 35x35 1.316 ÷ 15.83 16.60 DA02935035
40 42x42 2.22 ÷ 21.05 23.00 DA02935042
50 54x54 2.51 ÷ 43.90 47.40 DA02935054
Cim 745PRS - Balancing valve - Fixed orifice - PN 25 - “CR” Brass - with two plugs -Press-fitting end
DN Material Press-fitting Kv Kvs Technical Code
15
20 18x18 0.842 ÷ 3.77 4.10 DA02995018
20 22x22 0.842 ÷ 3.77 4.10 DA02995022
25 28x28 0.943 ÷ 6.96 7.50 DA02995028
32 35x35 1.316 ÷ 15.83 16.60 DA02995035
40 42x42 2.22 ÷ 21.05 23.00 DA02995042
50 54x54 2.51 ÷ 43.90 47.40 DA02995054
CR Brass
EN 1982-CC752S
Standard Brass
EN 1982-CC754S
CR Brass
EN 1982-CC752S
15x15 0.515 ÷ 1.75 1.80 DA02935015
15x15 0.515 ÷ 1.75 1.80 DA02935015
15x15 0.515 ÷ 1.75 1.80 DA02995015
Cav. Uff. Giacomo Cimberio S.p.A.
3
Page 4
TECHNICAL DATA SHEET
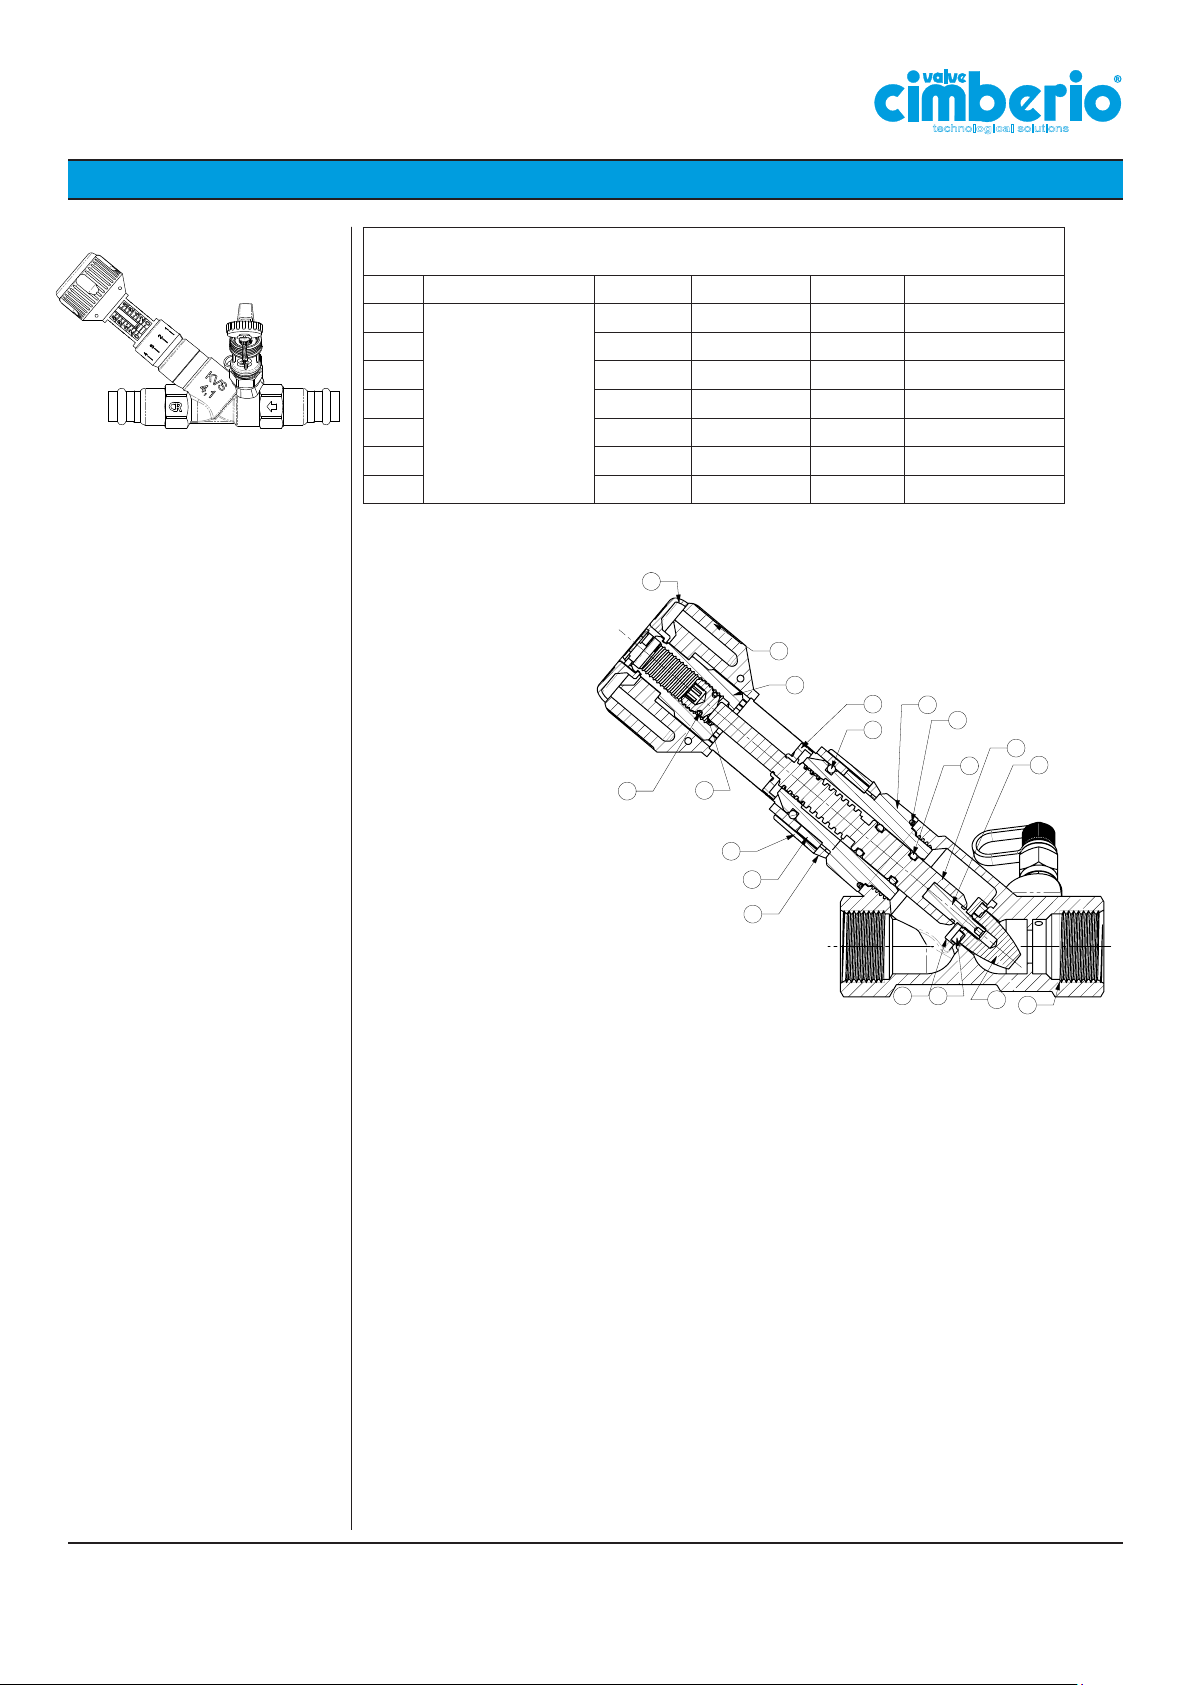
Cross section:
technological solutions
Cim 748PRS - Balancing valve - Fixed orifice - PN 25 - “CR” Brass - with test point and drain -Pressfitting end
DN Material Press-fitting Kv Kvs Technical Code
15
20 18x18 0.842 ÷ 3.77 4.10 DA02955018
20 22x22 0.842 ÷ 3.77 4.10 DA02955022
25 28x28 0.943 ÷ 6.96 7.50 DA02955028
32 35x35 1.316 ÷ 15.83 16.60 DA02955035
40 42x42 2.22 ÷ 21.05 23.00 DA02955042
50 54x54 2.51 ÷ 43.90 47.40 DA02955054
CR Brass
EN 1982-CC752S
15x15 0.515 ÷ 1.75 1.80 DA02955015
Installation procedure:
1. Valve body
2. Bonnet
3. Gasket support
4. Gasket
5. Stem for shutter
6. Shutter
7. Stem
8. O-ring
9. O- ring
10. Turn index
11. Spacer
12. Tenths turn index
13. Knob
14. Pin
15. Index
16. Entrainer
17. O-ring
18. Memory
19. Cup
20. Blue binder point
21. Red binder point
19
13
16
17
18
12
11
10
15
14
2
9
7
8
4
3
6
5
1
Cav. Uff. Giacomo Cimberio S.p.A.
Before installation of Cim 747, check that inside the valve and the pipes there are no foreign
matters which might damage the tightness of the valve.
When installing the valve, please make sure to have a pipe length 5 times the DN upstream
the valve and 2 times the DN downstream, and pay attention to the arrow direction casted
on the valve body, which shall be the same as the flow one.
Burr pipe connections after having threaded them and distribute the sealing material on
pipe threads only and not on valve threads.
For assembly purposes, use a spanner, not a pipe wrench, by applying necessary working torque only on the valve end nearest the pipe. This helps get a firmer grip and avoids
potential damages to valve body.
Make sure that pipe threading length is not longer than valve threads.
4
Page 5
TECHNICAL DATA SHEET
Regulating:
technological solutions
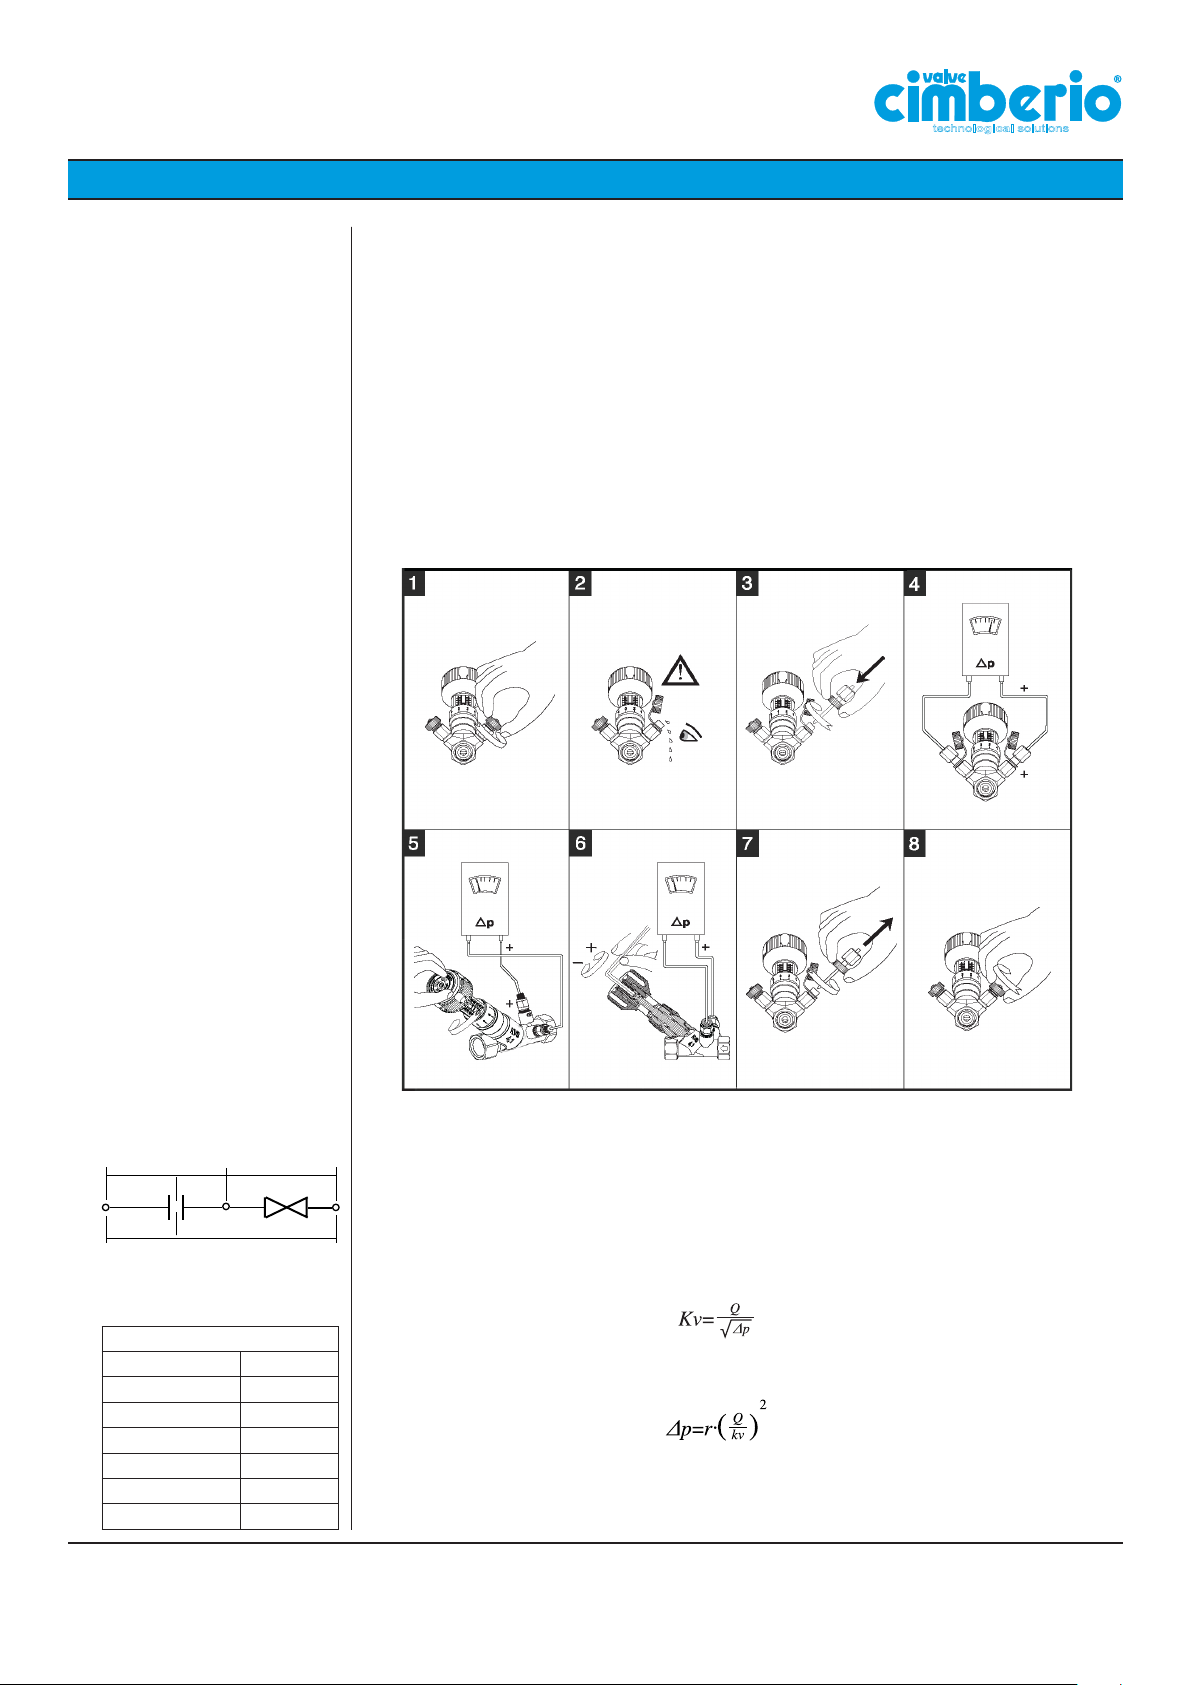
To close the valve, rotate clockwise the handle until the stop. Looking at the data showed
in the herewith attached diagrams, it is possible to regulate the flow by rotating the handle
anticlockwise until the required flow rate is reached.
The reading of this flow rate can be done by using the differential manometer Cim 726.
This interfaces with the balancing valve through two sensors inserted in the binder points
(Kvs) placed before and after the calibrated diaphragm of the valve.
The main index scale showing values from 0 up to 8 of the handle, states the turns of
opening of the obturator, while the second circular one from 0 up to 9 registers the tenths
of one turn.
The position of the handle for the required flow rate can be memorized by an Allen Key 6
mm.
Sizing:
K
VS orifice
Kvs valve - Kv across the cone
Kvs orifice - Kv across orifices
Kv - Kv include orifice and cone.
Relative density
Fluid r
Water 1.000
Water and glycol 10% 1.012
Water and glycol 20% 1.028
Water and glycol 30% 1.040
Water and glycol 40% 1.054
Water and glycol 50% 1.067
K
VS valve
K
V
Cav. Uff. Giacomo Cimberio S.p.A.
FLOW COEFFICIENT
Kv, in metric system represents the flow in m3/h of water at the temperature of 15.5°C
(density =998 kg/m3) which causes a pressure drop of 1 bar. In the USA flow coefficient is
called Cv (Kv = 0.865 Cv).
It is possible calculate the pressure drop across a valve with a generic flow rate and fluid:
where:
r is the relative density, Q is the flow rate in m3/h.
5
Page 6
TECHNICAL DATA SHEET
p
Δ
m
technological solutions
EXAMPLE
Q
p
Δ
b
=
Δpb + Δpc + Δp
a
p
Δ
m
c
p
Δ
Δ
p
a
p
Pressure drop across Cim 747
Δ
b
p
Pressure drop across the control valve
Δ
m
p
Necessary pressure for the circuit
Δ
c
p
Available pressure for the riser
Δ
a
SUGGESTED VALUES AND TIPS:
• Pressure drop across the valve:
Max = 50 kPa
• Pressure drop across the binders:
Max = 50 kPa
Min = 1 kPa
• Velocities in the pipeline:
Max = 1.15 m/s
Min = 0.75 m/s
For the preliminary sizings where the
value of pressure drop across the valve
is not known, use a value of 10 kPa.
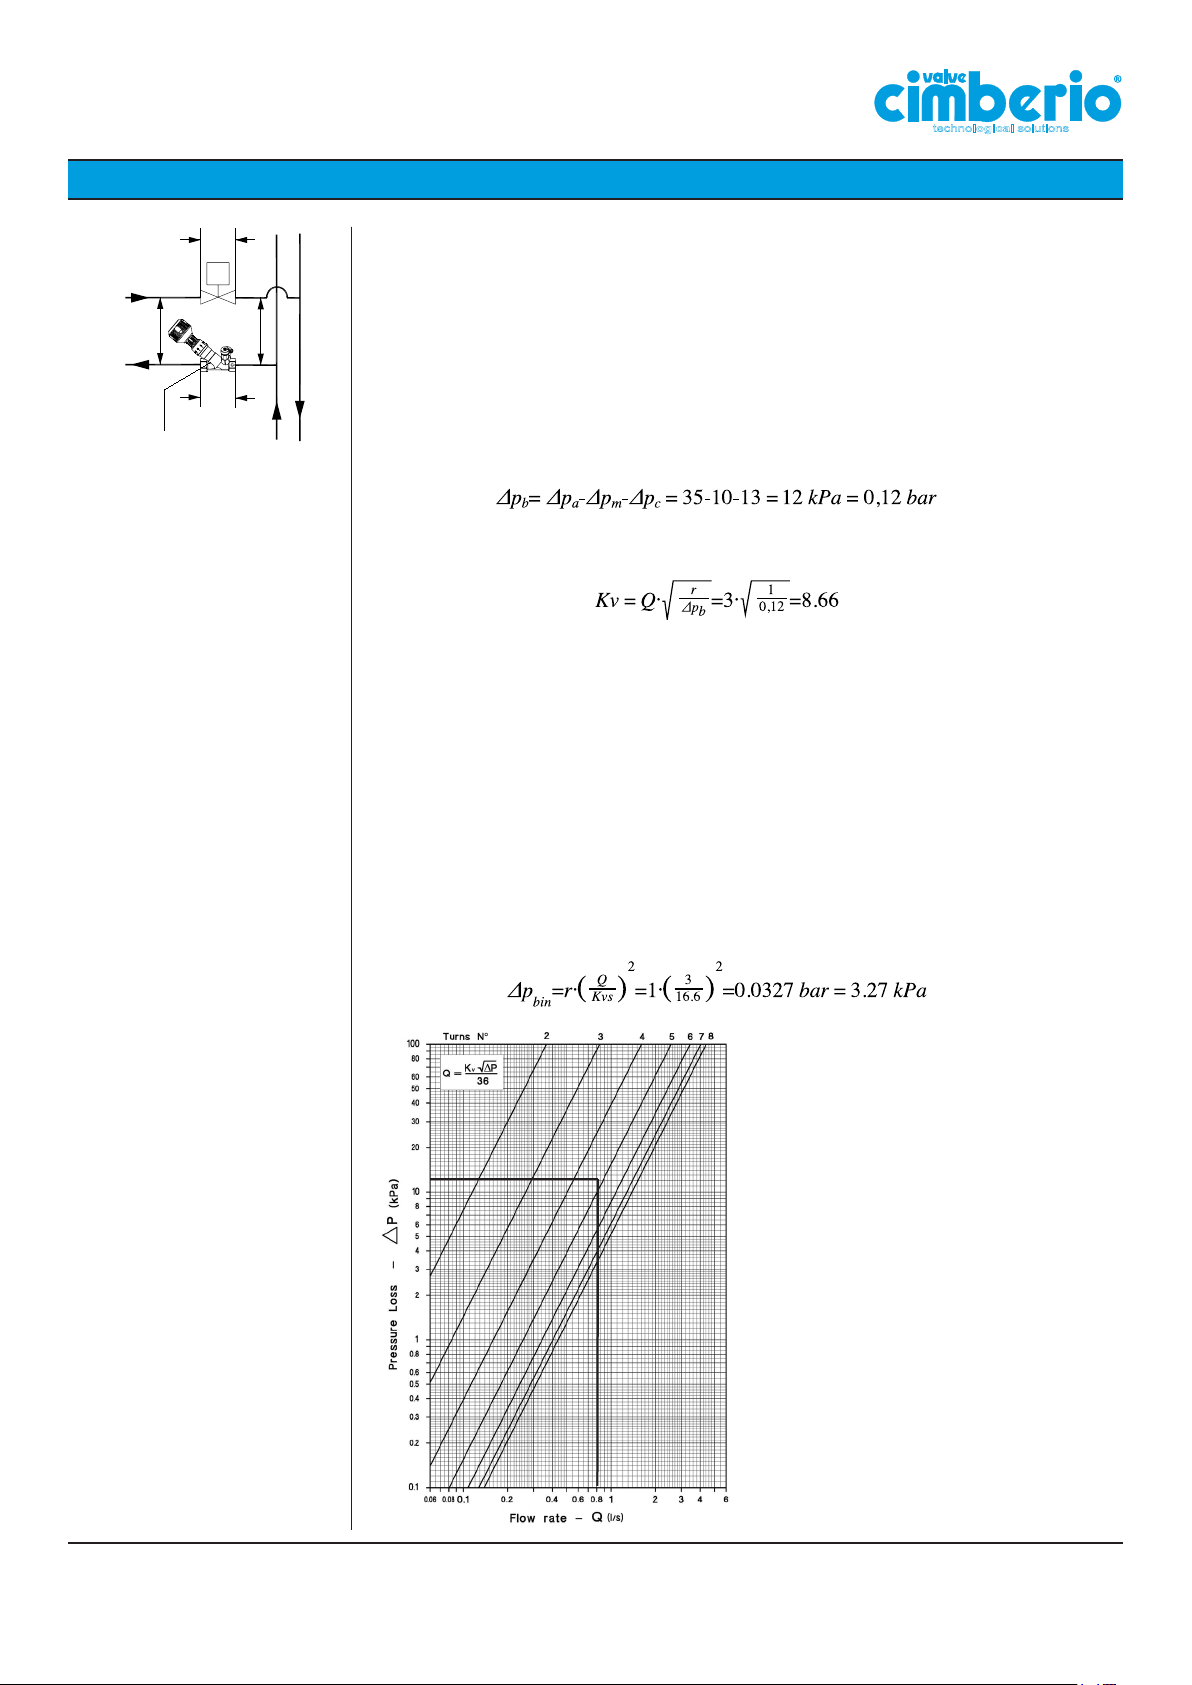
It is required to balance the circuit in the figure, the given data are:
• Necessary pressure for the circuit: ∆pc=13 kPa;
• Available pressure for the riser: ∆pa=35 kPa;
• Pressure drop across the control valve: ∆pm= 10 Kpa;
• Flow rate: Q= 3 m3/h=0.833 l/s.
The required differential pressure across the balancing valve can be calculated using the
following relation:
the required Kv is:
Using the attached tables to this datasheet, it is possible to find the following available
valves with the relative position of the handle:
• Cim 747 DN 32 --> Preset: 4.8 (Kv=8.49);
• Cim 747 DN 40 --> Preset: 4.0 (Kv=8.86);
• Cim 747 DN 50 --> Preset: 3.0 (Kv=8.84);
The three selected models are comparable. As a general rule, it is better to choose the
valve with the smallest diameter, in this way the valve will be quite opened and there will
be no problem with noises and cavitations.
Measuring the pressure drop across the binders of the Cim 747 DN 32, the operator will
find this value:
Cav. Uff. Giacomo Cimberio S.p.A.
Example
6
Page 7
TECHNICAL DATA SHEET
Pressure
Len
FROM
MULTIPLY BY
TO OBTAIN
Pa, Pascal 0,001 kPa, kiloPascal
Pa, Pascal 0,000001 MPa, Mega Pascal
Pa, Pascal 0,00001 bar
Pa, Pascal 0,00010972 m
H2O
, metres of water
Pa, Pascal 0,000145038 psi, pound per square inch
bar 1,01325 atm, atmosphere
bar 0,980665
Kg/cm2, kilograms per square centimetre
bar 10,1972 m
H2O
, metres of water
bar 14,5038 psi, pound per square inch
atm, atmosphere 1,03323
Kg/cm2, kilograms per square centimetre
atm, atmosphere 10,3323 m
H2O
, metres of water
atm, atmosphere 14,6959 psi, pound per square inch
Kg/cm
2
10 m
H2O
, metres of water
Kg/cm
2
14,2233 psi, pound per square inch
m
H2O
1,42233 psi, pound per square inch
TO OBTAIN
DIVIDE BY
FROM
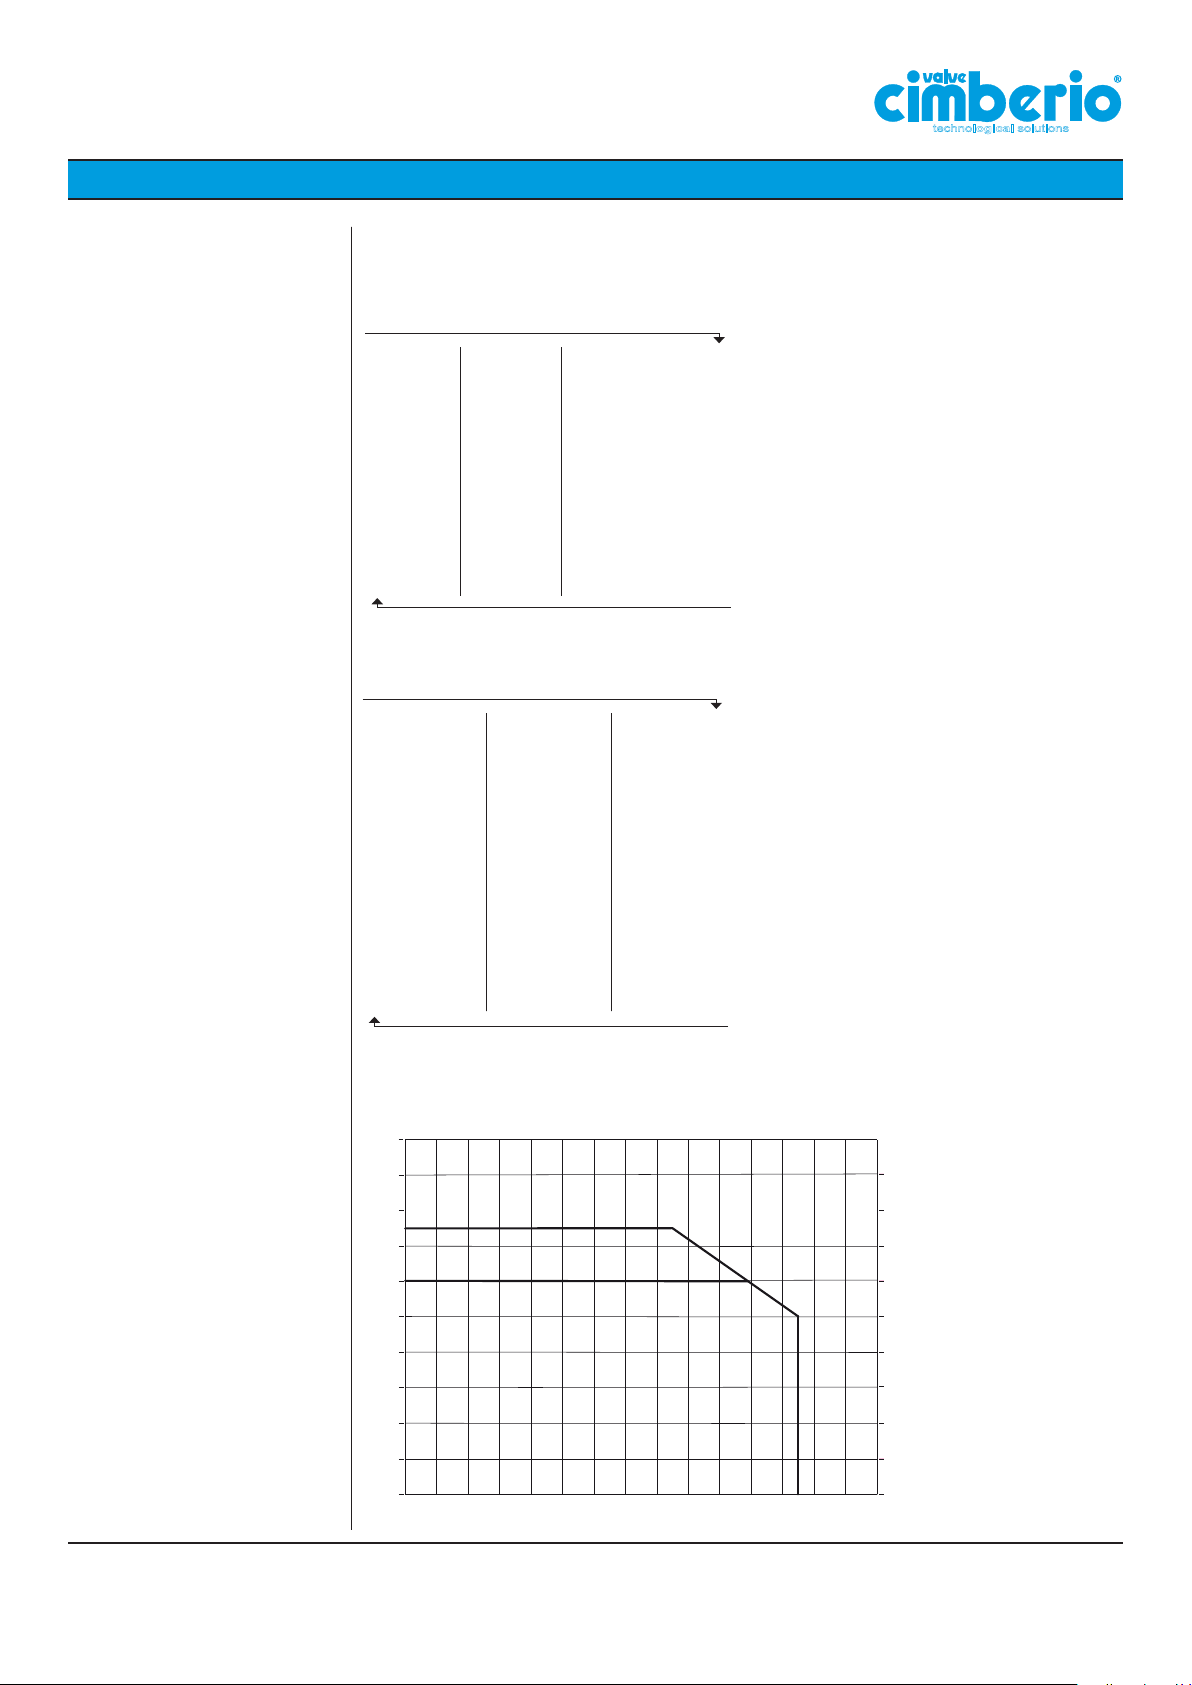
Measurement conversion
chart:
Pressure-temperature
ratings:
Pressure
FROM
MULTIPLY BY
Pa, Pascal 0,001 kPa, kiloPascal
Pa, Pascal 0,000001 MPa, Mega Pascal
Pa, Pascal 0,00001 bar
Pa, Pascal 0,00010972 m
Pa, Pascal 0,000145038 psi, pound per square inch
bar 1,01325 atm, atmosphere
bar 0,980665
bar 10,1972 m
bar 14,5038 psi, pound per square inch
atm, atmosphere 1,03323
atm, atmosphere 10,3323 m
atm, atmosphere 14,6959 psi, pound per square inch
2
Kg/cm
Kg/cm
m
H2O
TO OBTAIN
2
10 m
14,2233 psi, pound per square inch
1,42233 psi, pound per square inch
DIVIDE BY
, metres of water
H2O
Kg/cm2, kilograms per square centimetre
, metres of water
H2O
Kg/cm2, kilograms per square centimetre
, metres of water
H2O
, metres of water
H2O
gth, Area, Volume, Density
FROM MULTIPLY BY
inches 0,0254 m, metres
inches 2,54 cm, centimetres
feet 0,3048 m, metres
feet 30,48 cm, centimetres
yards 0,9144 m, metres
square inches 0,00064516 m
square feet 0,09290304 m
square inches 6,4516 cm
square feet 929,0304 cm
square yards 0,8361274 m
l, litres 0,001 m
gallons 0,003789412 m
cubic yards 0,7645549 m
cubic feet 0,02831685 m
cubic inches 0,0000164 m
cubic inches 16,38706 cm
cubic feet 28,31685 l, litres
gallons
TO OBTAIN
180
160
140
58 116 174 232 290 349
29
0
3,875412 l, litres
DIVIDE BY
87
Cim 747OTS only
TO OBTAIN
2
, metri quadrati
2
, square metres
2
, square centimetres
2
, square centimetres
2
, square metres
3
, cubic metres
3
, cubic metres
3
, cubic metres
3
, cubic metres
3
, cubic metres
3
, cubic centimetres
145 203 261 319
TO OBTAIN
FROM
FROM
technological solutions
2
p
[lbf/in ]
406
377
356
320
284
Cav. Uff. Giacomo Cimberio S.p.A.
120
100
T [°C]
80
60
40
20
0
0
4
8 12 16 20 24 282 6 10 14 18 22 26
p [bar]
248
212
T [°F]
176
140
104
38
32
7
Page 8
TECHNICAL DATA SHEET
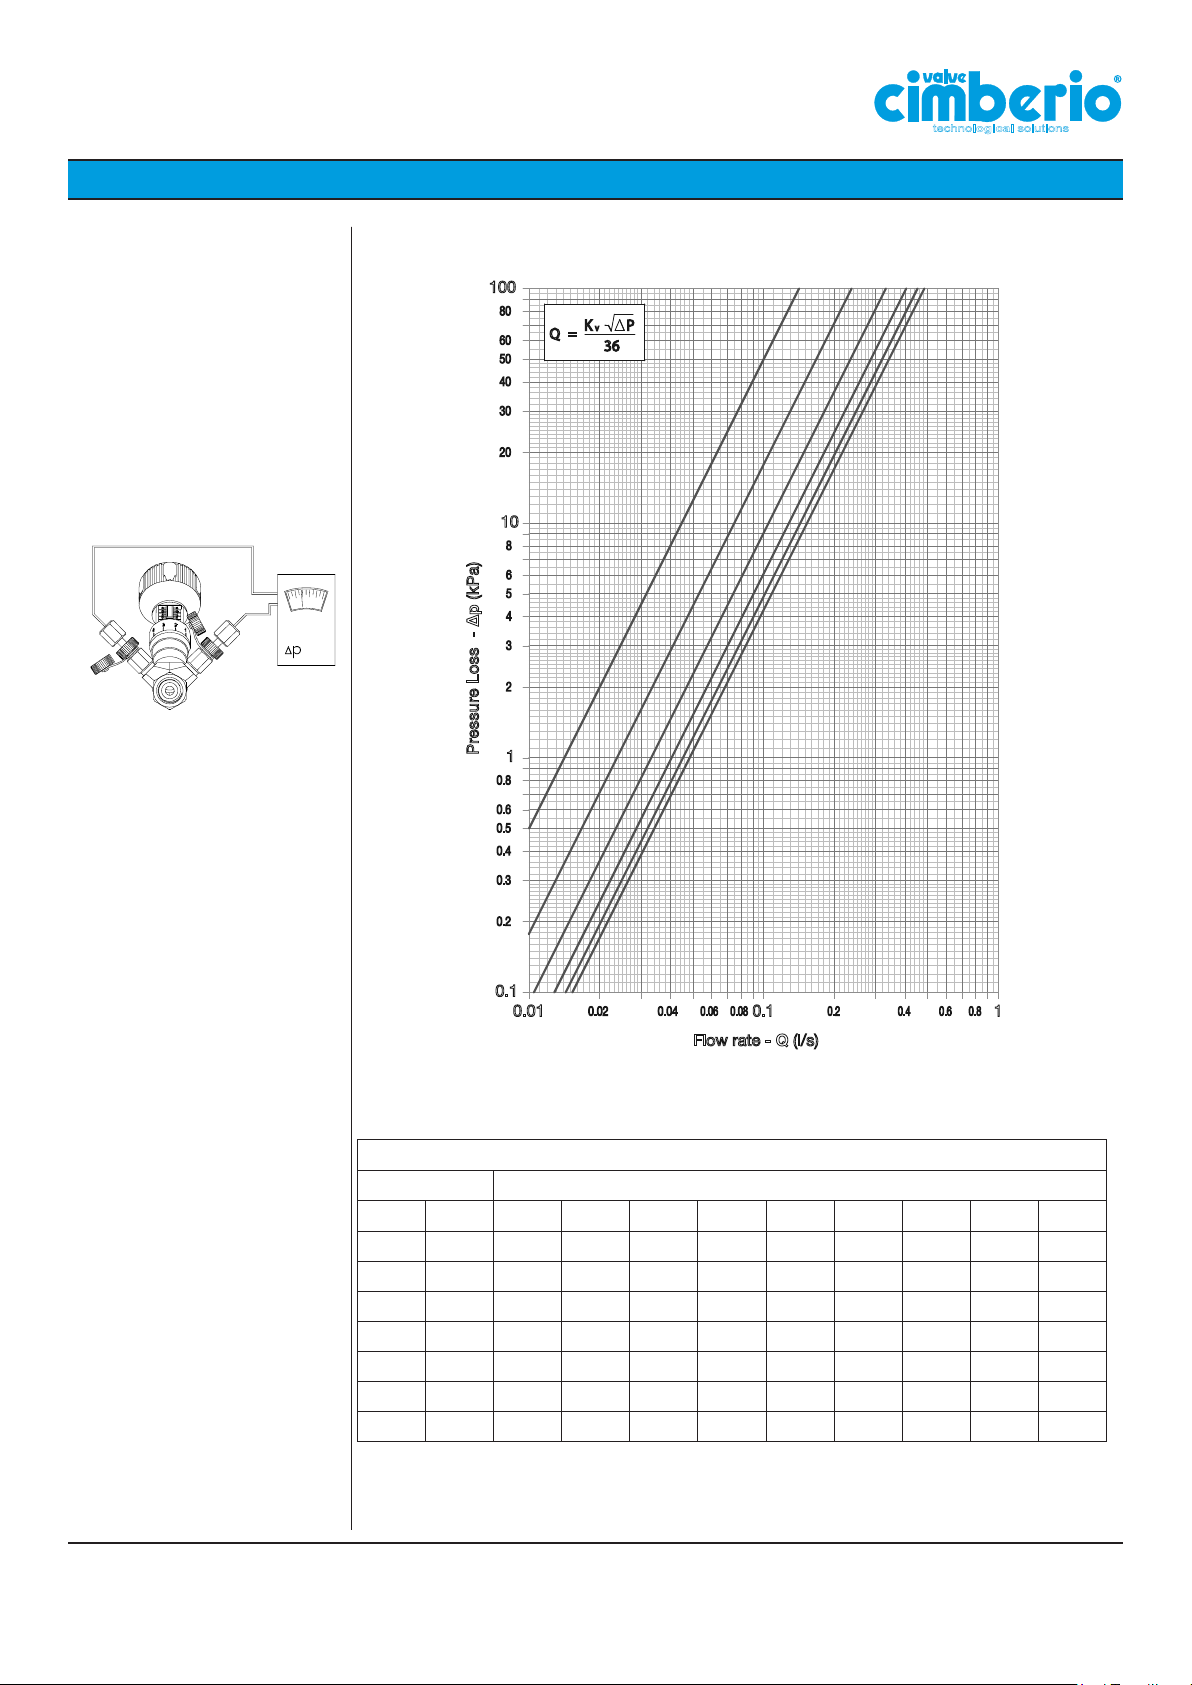
Kv Values - DN 15
technological solutions
Cim 747
Cim 747OT
Cim 747NL
Cim 747OTS
Cim 745
Cim 748
Cim 747PRS
Cim 747OTPRS
Cim 745PRS
Cim 748PRS
Kvs=1.80
100
80
60
50
40
30
20
10
8
6
5
4
3
2
Pressure Loss - ∆p (kPa)
1
0.8
0.6
0.5
0.4
0.3
Turns N° 7-865432
P
K
V
=
Q
36
0.2
0.1
0.01
0.040.02
0.08 0.80.60.40.2
0.06
0.1
Flow rate - Q (l/s)
Kv (Flow rate in m3/h @ 1 bar pressure drop)
Full turn Tenths of turn
0.0 0.1 0.2 0.3 0.4 0.5 0.6 0.7 0.8 0.9
2
0.515 0.549 0.583 0.617 0.650 0.684 0.718 0.752 0.786 0.820
3
0.854 0.888 0.922 0.956 0.989 1.023 1.057 1.091 1.125 1.159
4
0.193 1.219 1.245 1.271 1.297 1.324 1.350 1.376 1.402 1.428
5
1.454 1.473 1.491 1.510 1.528 1.547 1.565 1.583 1.602 1.620
6
1.639 1.647 1.656 1.664 1.672 1.681 1.689 1.698 1.706 1.715
7
1.723 1.726 1.729 1.732 1.735 1.738 1.741 1.744 1.747 1.750
8
1
Cav. Uff. Giacomo Cimberio S.p.A.
8
Page 9
TECHNICAL DATA SHEET
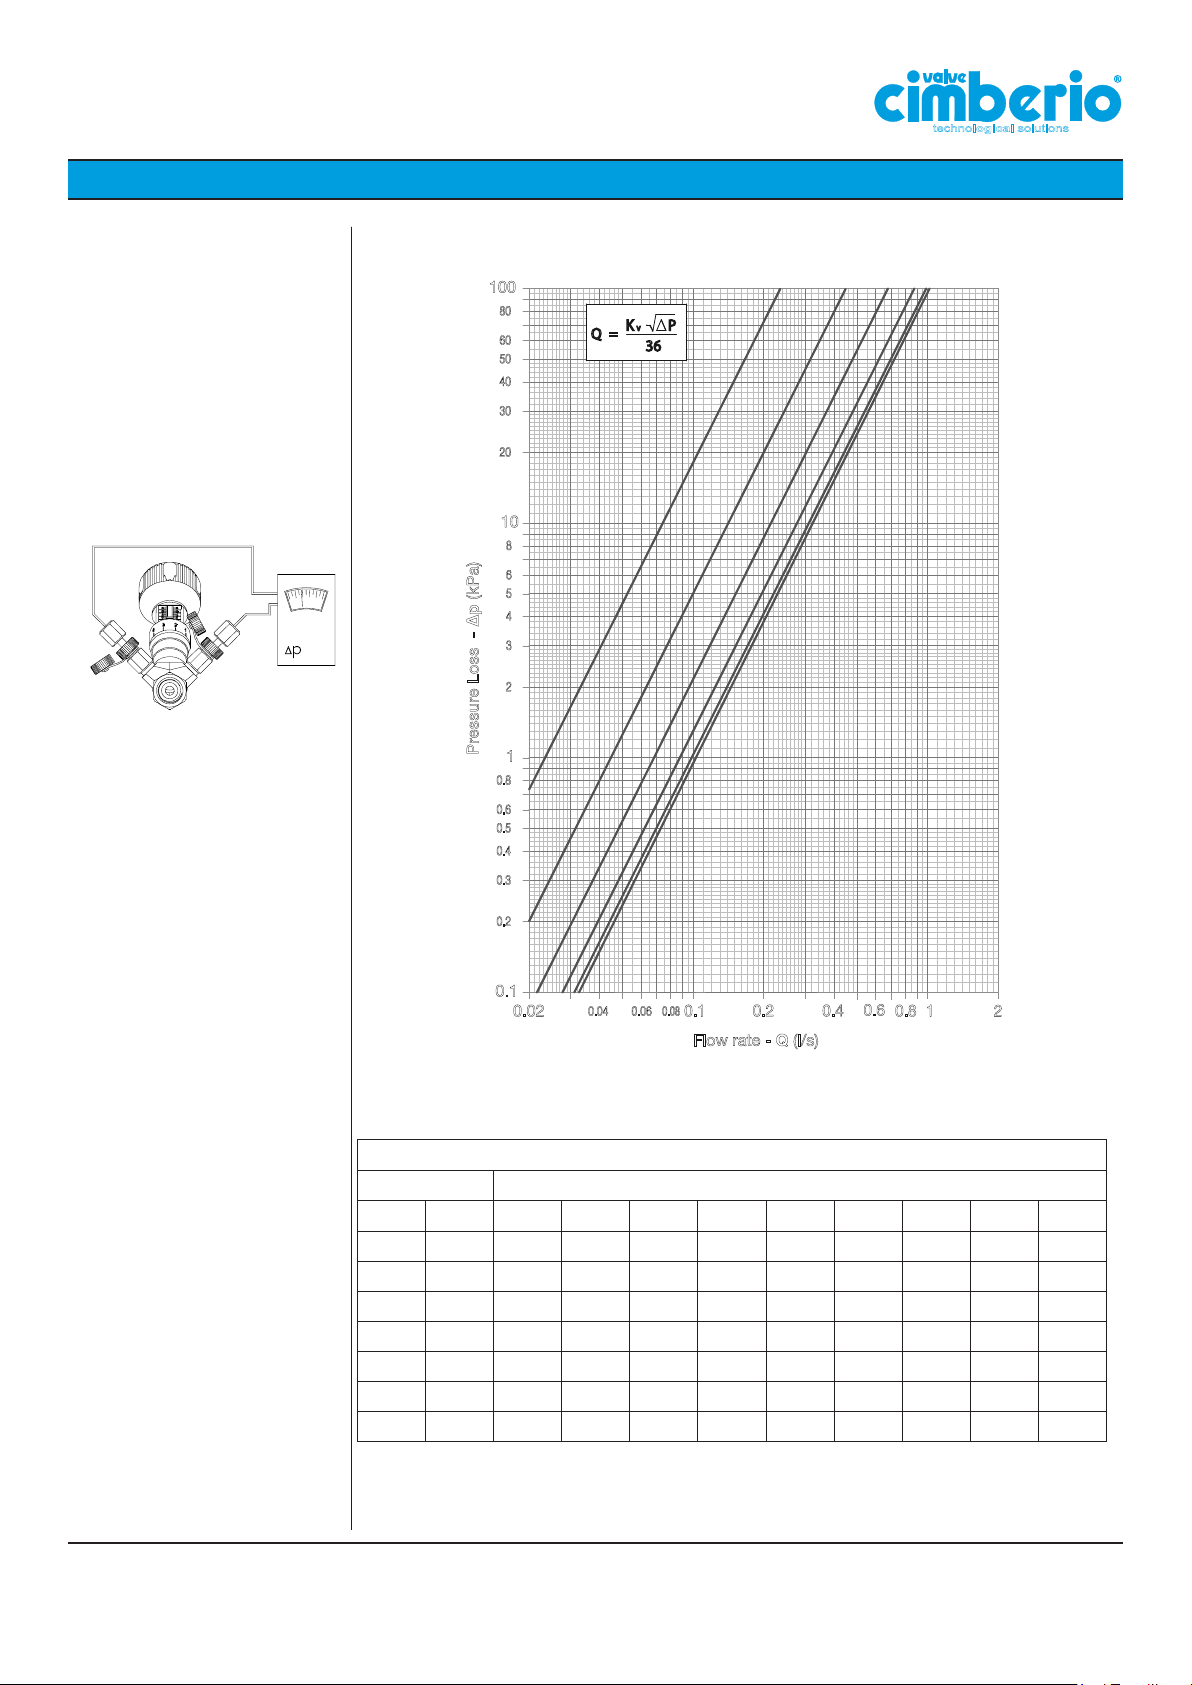
Kv Values - DN 20
technological solutions
Cim 747
Cim 747OT
Cim 747NL
Cim 747OTS
Cim 745
Cim 748
Cim 747PRS
Cim 747OTPRS
Cim 745PRS
Cim 748PRS
Kvs=4.10
100
80
60
50
40
30
20
10
8
6
5
4
3
2
Pressure Loss - ∆p (kPa)
1
0.8
0.6
0.5
0.4
0.3
Turns N° 7-865432
K
V
=
Q
36
P
0.2
0.1
0.02
0.08
0.060.04
0.1
0.2 0.4
Flow rate - Q (l/s)
0.6
0.8 1
Kv (Flow rate in m3/h @ 1 bar pressure drop)
Full turn Tenths of turn
0.0 0.1 0.2 0.3 0.4 0.5 0.6 0.7 0.8 0.9
2
0.842 0.918 0.993 1.069 1.144 1.220 1.295 1.370 1.446 1.521
3
1.597 1.684 1.771 1.858 1.945 2.033 2.120 2.207 2.294 2.381
4
2.468 2.535 2.602 2.669 2.736 2.804 2.871 2.938 3.005 3.072
5
3.139 3.179 3.220 3.261 3.301 3.342 3.382 3.423 3.464 3.504
6
3.545 3.559 3.574 3.588 3.602 3.616 3.631 3.645 3.659 3.674
7
3.688 3.696 3.705 3.713 3.722 3.730 3.738 3.747 3.755 3.764
8
3.772
2
Cav. Uff. Giacomo Cimberio S.p.A.
9
Page 10
TECHNICAL DATA SHEET
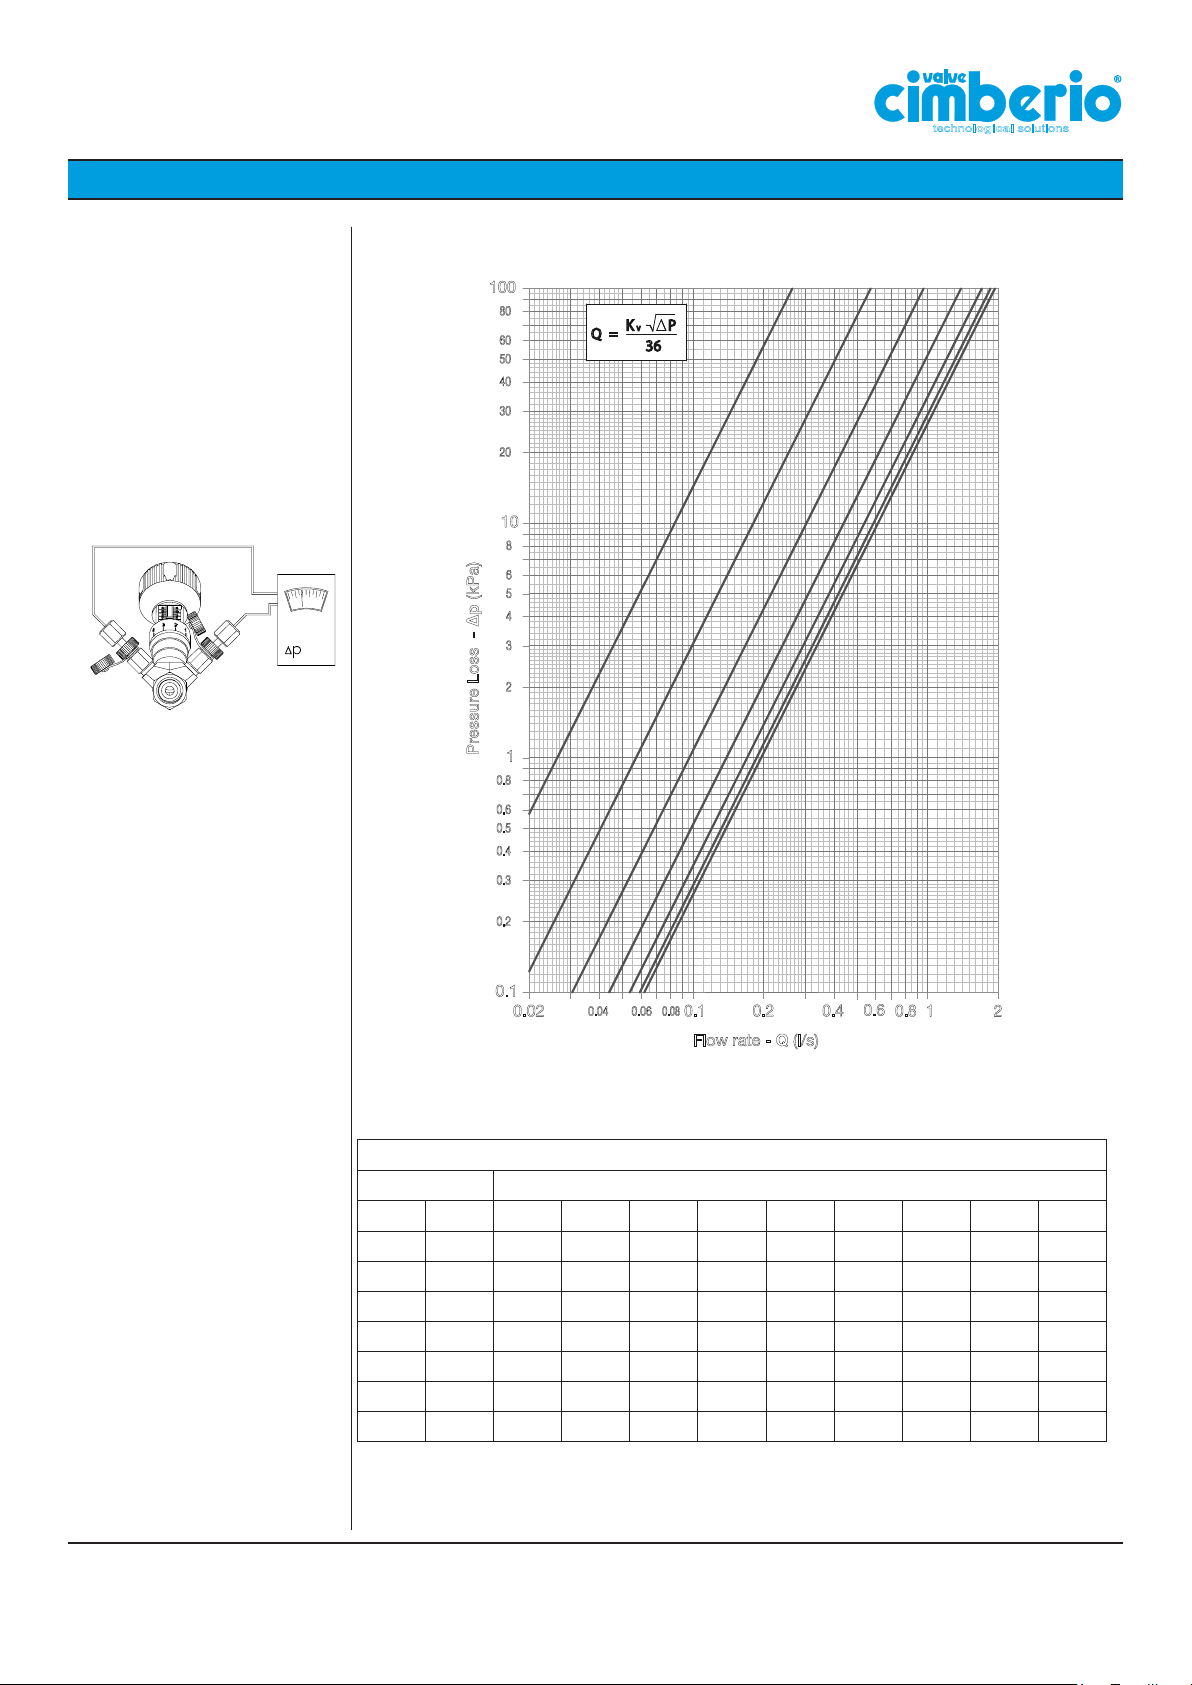
Kv Values - DN 25
technological solutions
Cim 747
Cim 747OT
Cim 747NL
Cim 747OTS
Cim 745
Cim 748
Cim 747PRS
Cim 747OTPRS
Cim 745PRS
Cim 748PRS
Kvs=7.50
100
80
60
50
40
30
20
10
8
6
5
4
3
2
Pressure Loss - ∆p (kPa)
1
0.8
0.6
0.5
0.4
0.3
Turns N° 8765432
P
K
V
=
Q
36
0.2
0.1
0.02
0.08
0.060.04
0.1
0.2 0.4
Flow rate - Q (l/s)
0.6
0.8 1
Kv (Flow rate in m3/h @ 1 bar pressure drop)
Full turn Tenths of turn
0.0 0.1 0.2 0.3 0.4 0.5 0.6 0.7 0.8 0.9
2
0.943 1.052 1.162 1.271 1.380 1.490 1.599 1.709 1.818 1.927
3
2.037 2.179 2.322 2.465 2.607 2.750 2.892 3.035 3.178 3.320
4
3.463 3.615 3.767 3.919 4.072 4.224 4.376 4.528 4.681 4.833
5
4.985 5.099 5.213 5.327 5.441 5.554 5.668 5.782 5.896 6.010
6
6.124 6.183 6.241 6.300 6.358 6.417 6.476 6.534 6.593 6.651
7
6.710 6.735 6.761 6.786 6.811 6.837 6.862 6.887 6.913 6.938
8
6.963
2
Cav. Uff. Giacomo Cimberio S.p.A.
10
Page 11
TECHNICAL DATA SHEET
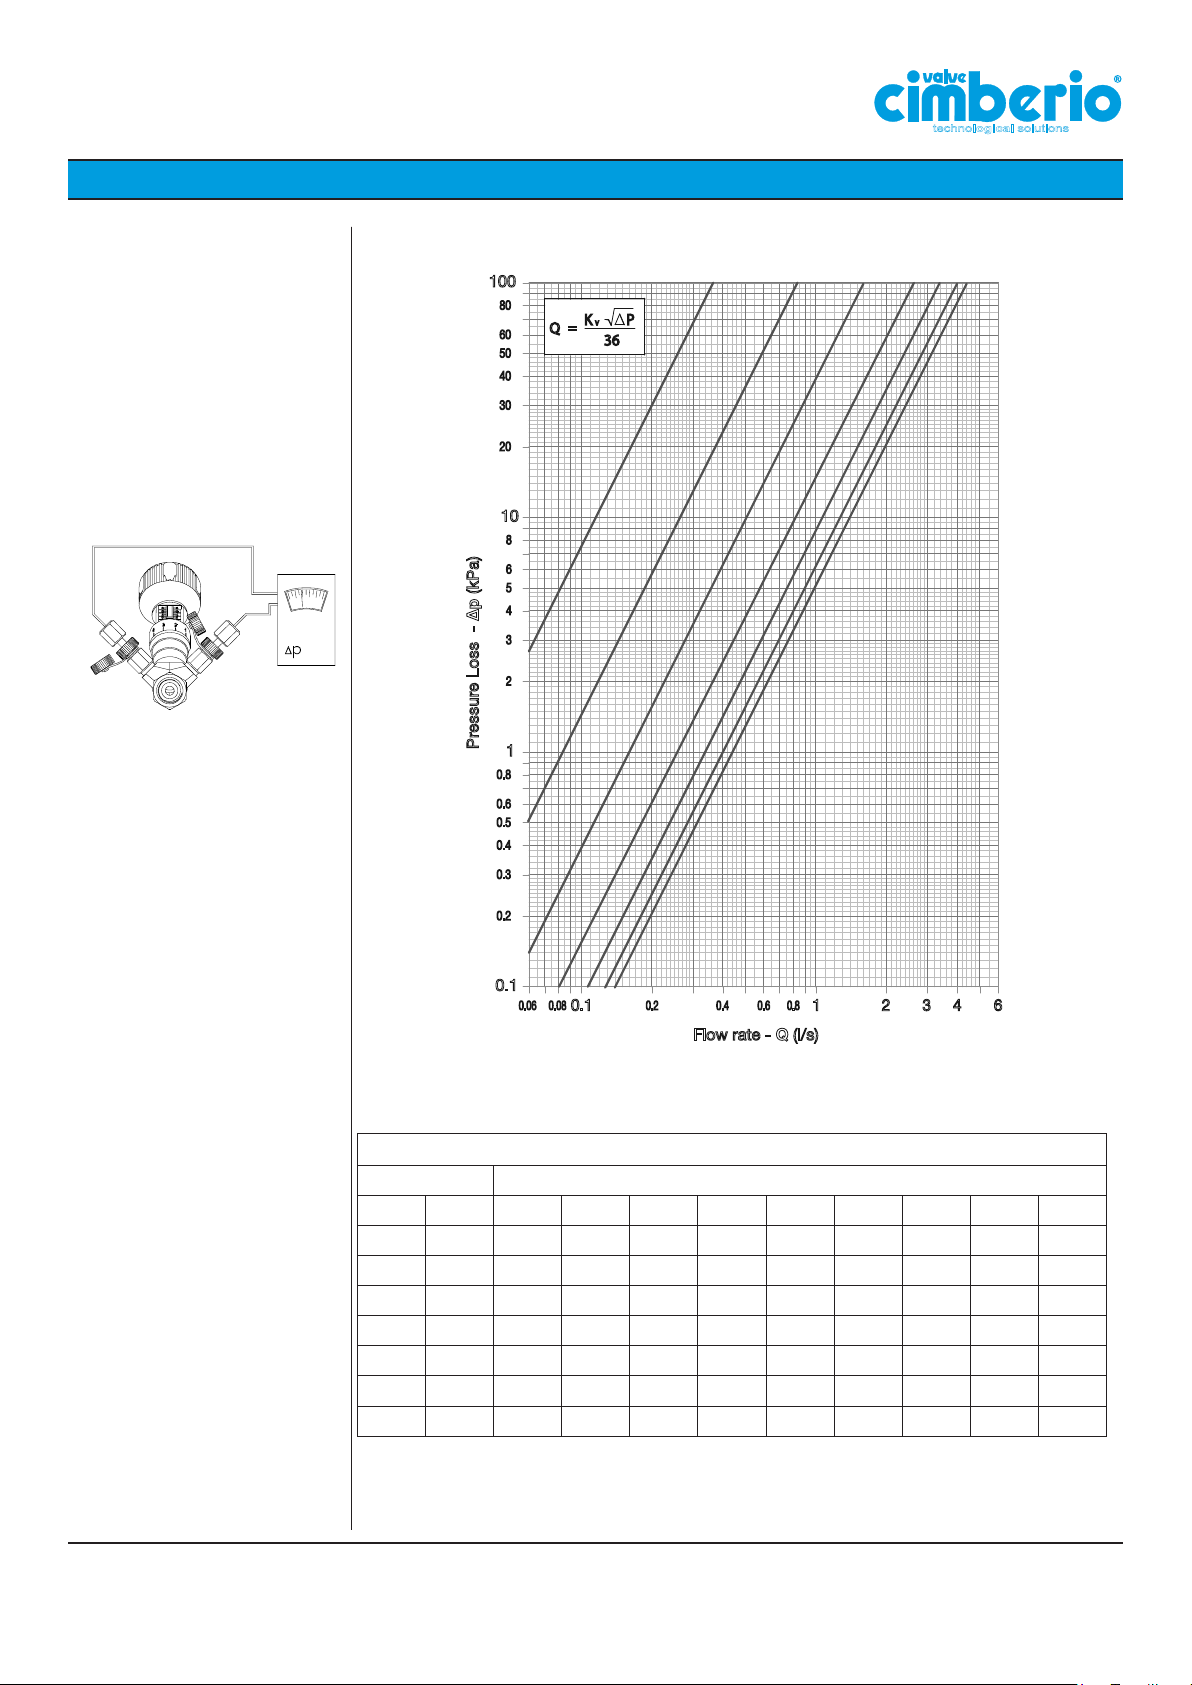
Kv Values - DN 32
Cim 747
Cim 747OT
Cim 747NL
Cim 747OTS
Cim 745
Cim 748
Cim 747PRS
Cim 747OTPRS
Cim 745PRS
Cim 748PRS
100
80
60
50
40
30
20
10
technological solutions
Turns N° 8765432
P
K
V
=
Q
36
8
6
5
4
3
Kvs=16.6
2
Pressure Loss - ∆p (kPa)
1
0.8
0.6
0.5
0.4
0.3
0.2
0.1
0.08 0.80.60.40.20.06
0.1
Flow rate - Q (l/s)
1
2 3 4 6
Kv (Flow rate in m3/h @ 1 bar pressure drop)
Full turn Tenths of turn
0.0 0.1 0.2 0.3 0.4 0.5 0.6 0.7 0.8 0.9
2
1.316 1.486 1.655 1.825 1.995 2.165 2.334 2.504 2.674 2.843
3
3.013 3.228 3.564 3.839 4.115 4.390 4.666 4.941 5.217 5.492
4
5.768 6.108 6.449 6.789 7.129 7.469 7.810 8.150 8.490 8.831
5
9.171 9.484 9.797 10.110 10.423 10.736 11.048 11.361 11.674 11.987
6
12.300 12.526 12.752 12.978 13.204 13.430 13.656 13.882 14.108 14.334
7
14.560 14.687 14.814 14.941 15.068 15.195 15.322 15.449 15.576 15.703
8
15.830
Cav. Uff. Giacomo Cimberio S.p.A.
11
Page 12
TECHNICAL DATA SHEET
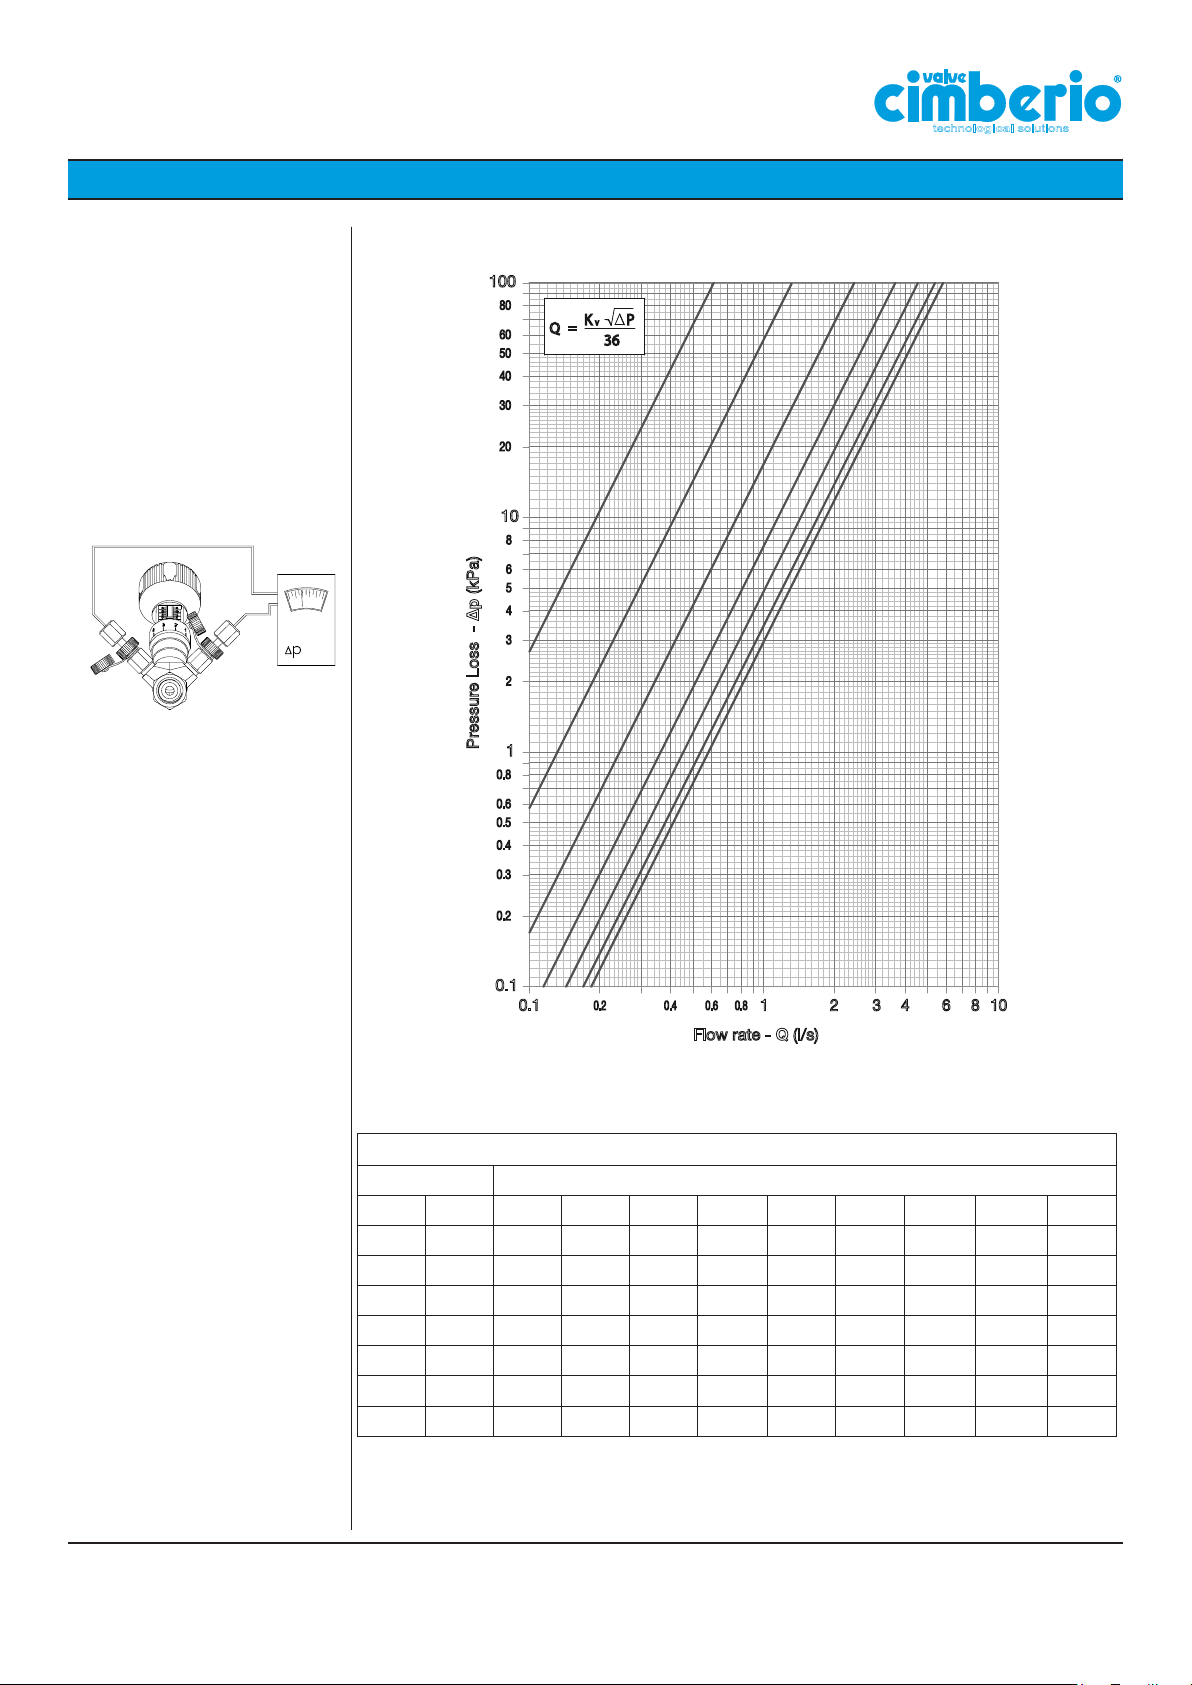
Kv Values - DN 40
Cim 747
Cim 747OT
Cim 747NL
Cim 747OTS
Cim 745
Cim 748
Cim 747PRS
Cim 747OTPRS
Cim 745PRS
Cim 748PRS
100
80
60
50
40
30
20
10
technological solutions
Turns N° 8765432
P
K
V
=
Q
36
8
6
5
4
3
Kvs=23.00
2
Pressure Loss - ∆p (kPa)
1
0.8
0.6
0.5
0.4
0.3
0.2
0.1
0.1
0.80.60.40.2
1
Flow rate - Q (l/s)
2 3 4 6 8 10
Kv (Flow rate in m3/h @ 1 bar pressure drop)
Full turn Tenths of turn
0.0 0.1 0.2 0.3 0.4 0.5 0.6 0.7 0.8 0.9
2
2.220 2.473 2.726 2.979 3.232 3.485 3.738 3.991 4.244 4.497
3
4.750 5.161 5.572 5.983 6.394 6.805 7.216 7.627 8.038 8.449
4
8.860 9.294 9.728 10.162 10.596 11.030 11.464 11.898 12.332 12.766
5
13.200 13.523 13.846 14.169 14.492 14.815 15.138 15.461 15.784 16.107
6
16.430 16.717 17.004 17.291 17.578 17.865 18.152 18.439 18.726 19.013
7
19.300 19.475 19.650 19.825 20.000 20.175 20.350 20.525 20.700 20.875
8
21.050
Cav. Uff. Giacomo Cimberio S.p.A.
12
Page 13
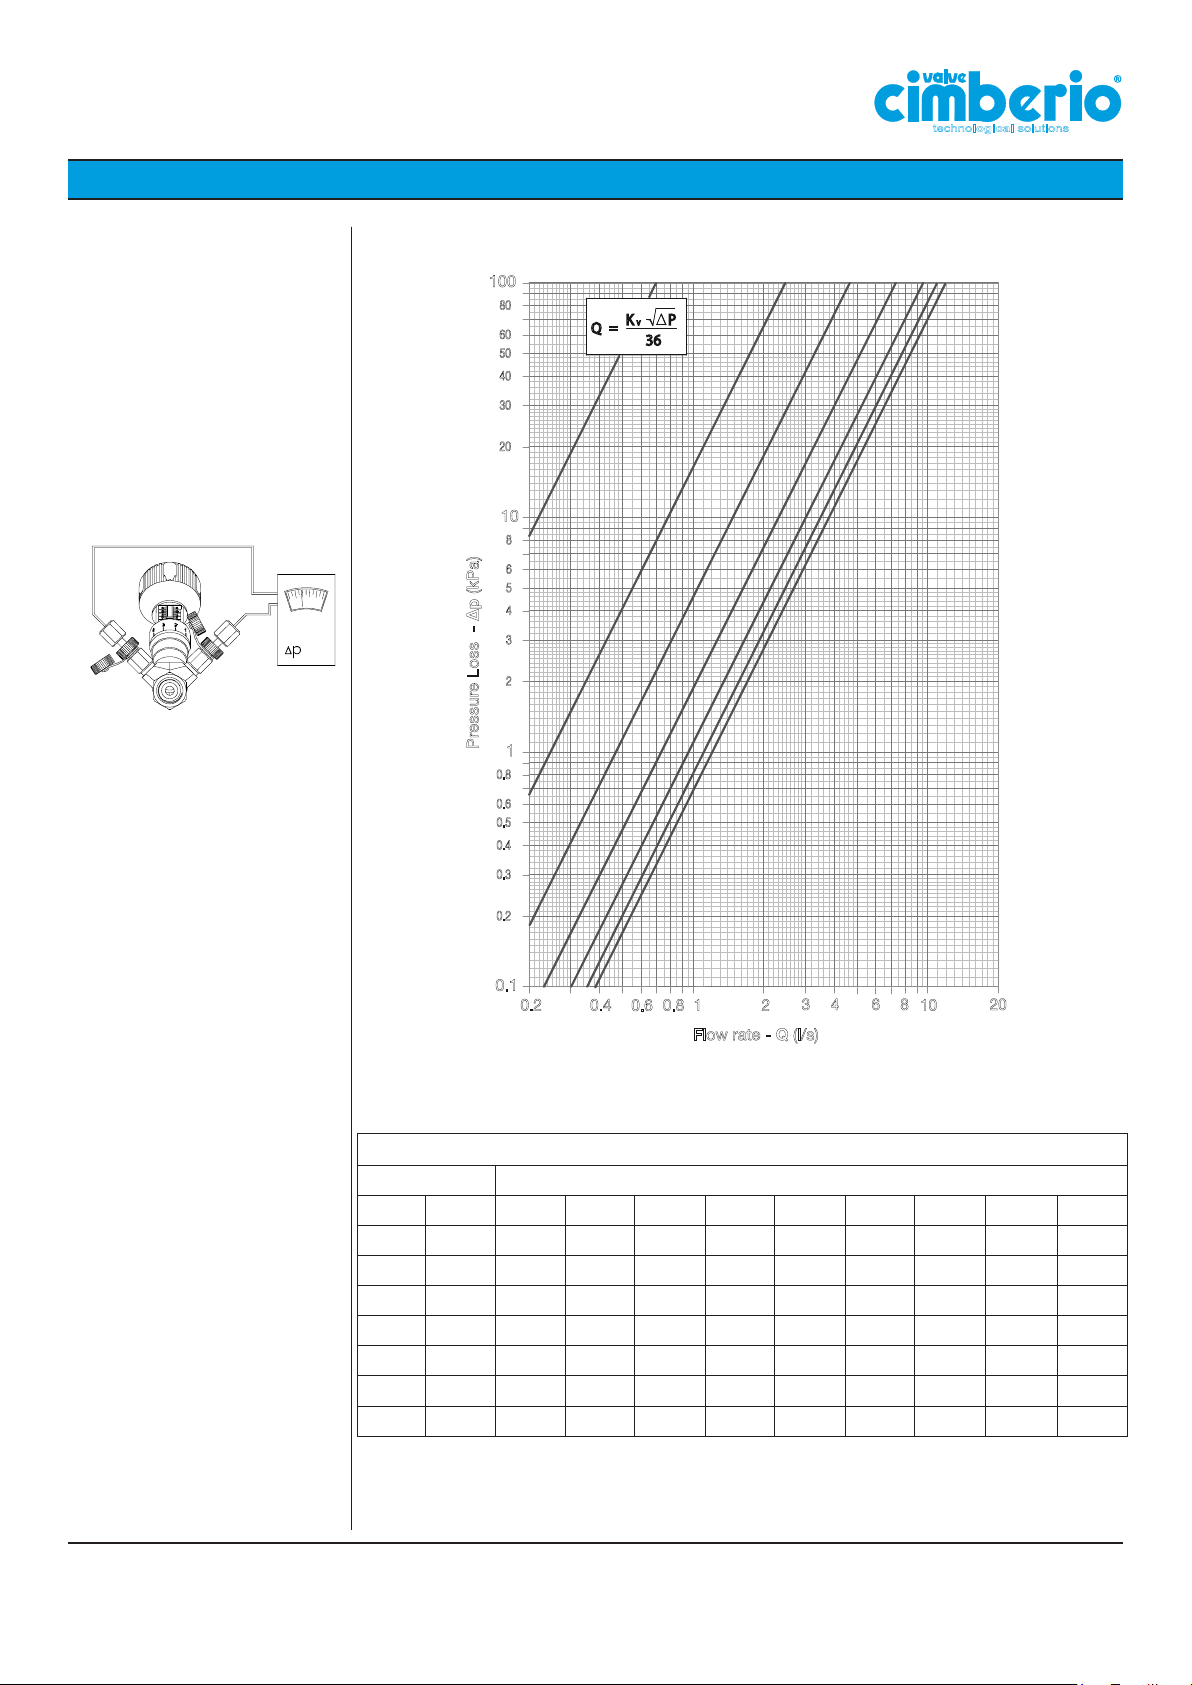
TECHNICAL DATA SHEET
Kv Values - DN 50
Cim 747
Cim 747OT
Cim 747NL
Cim 747OTS
Cim 745
Cim 748
Cim 747PRS
Cim 747OTPRS
Cim 745PRS
Cim 748PRS
100
80
60
50
40
30
20
10
technological solutions
Turns N° 8765432
P
K
V
=
Q
36
8
6
5
4
3
Kvs=47.40
2
Pressure Loss - ∆p (kPa)
1
0.8
0.6
0.5
0.4
0.3
0.2
0.1
0.2 0.4
0.6
0.8 1
Flow rate - Q (l/s)
3 4 6 8
2
10
20
Kv (Flow rate in m3/h @ 1 bar pressure drop)
Full turn Tenths of turn
0.0 0.1 0.2 0.3 0.4 0.5 0.6 0.7 0.8 0.9
2
2.510 3.143 3.776 4.409 5.042 5.675 6.308 6.941 7.574 8.207
3
8.840 9.656 10.472 11.288 12.104 12.920 13.736 14.552 15.368 16.184
4
17.000 17.924 18.848 19.772 20.696 21.620 22.544 23.468 24.392 25.316
5
26.240 27.063 27.886 28.709 29.532 30.355 31.178 32.001 32.824 33.647
6
34.470 35.048 35.626 36.204 36.782 37.360 37.938 38.516 39.094 39.672
7
40.250 40.615 40.980 41.345 41.710 42.075 42.440 42.805 43.170 43.535
8
43.900
Cav. Uff. Giacomo Cimberio S.p.A.
13
Page 14
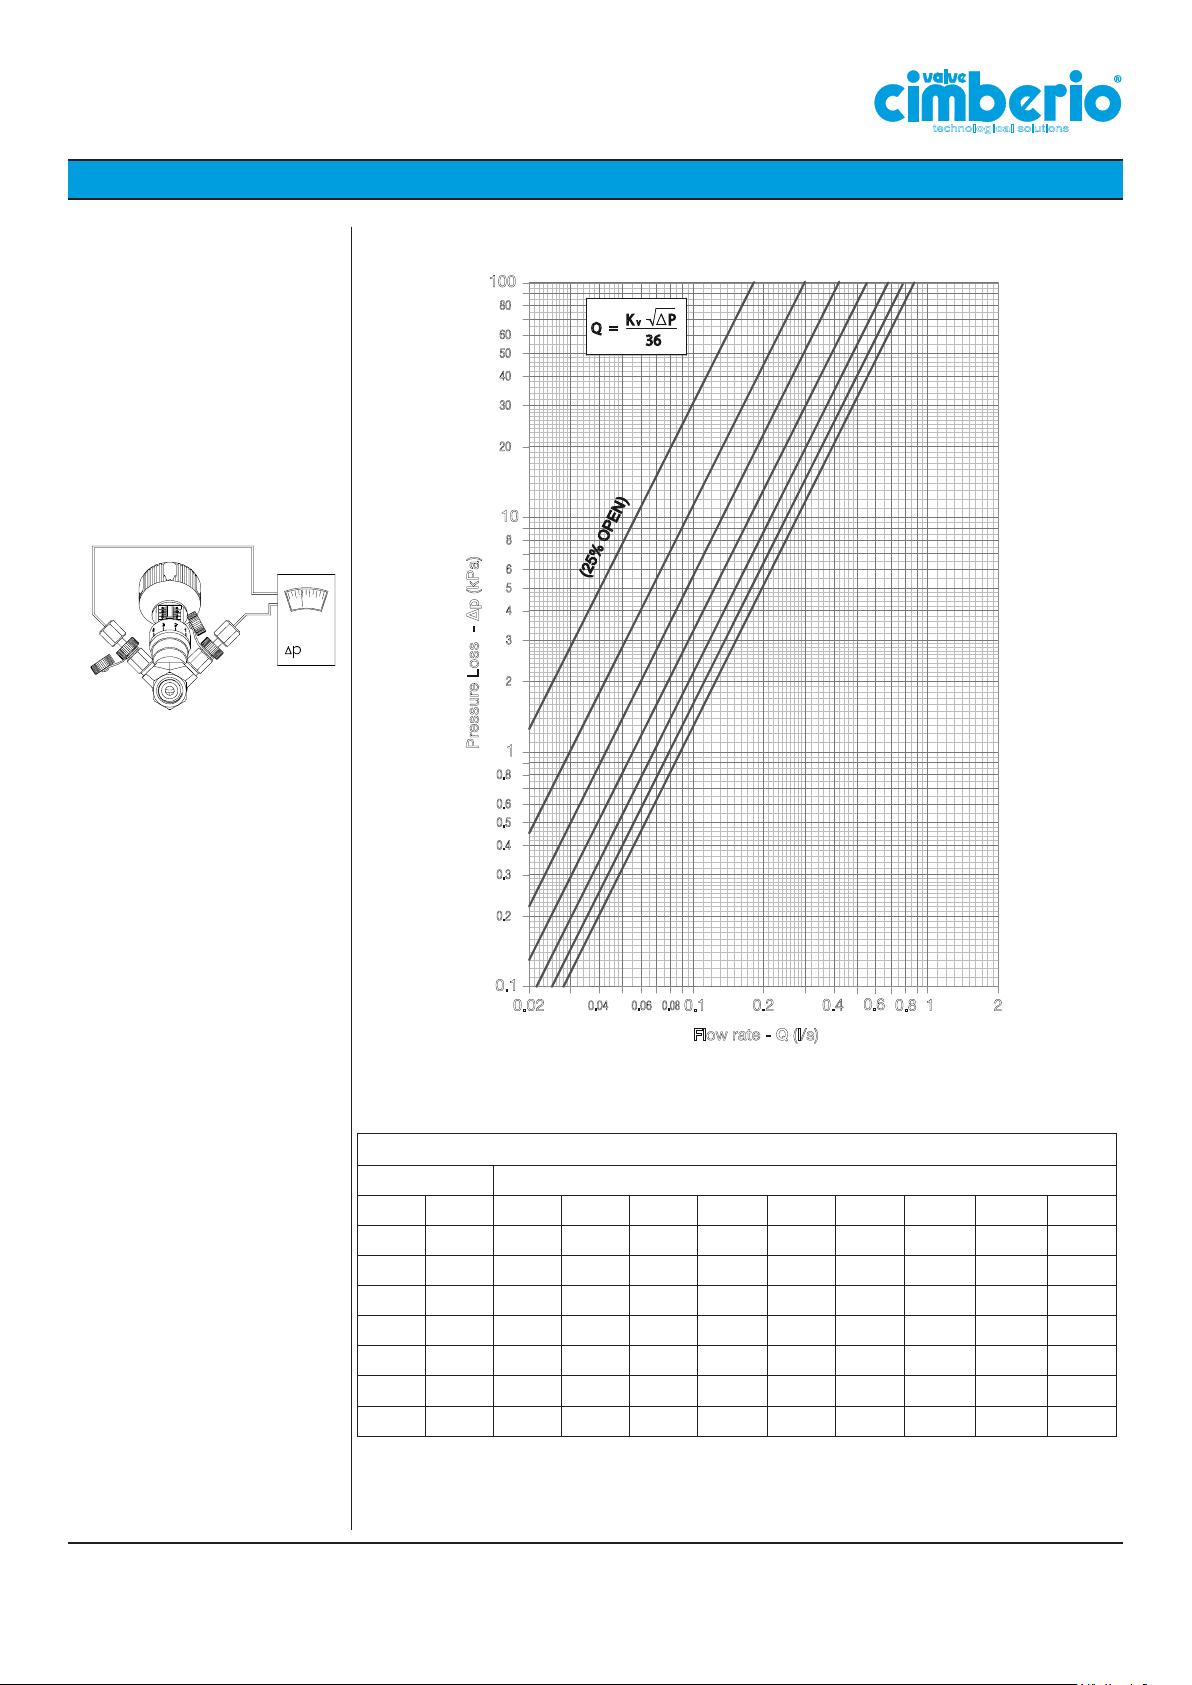
TECHNICAL DATA SHEET
Kv Values - DN 15
Cim 747H
100
80
60
50
40
30
20
10
technological solutions
Turns N° 8765432
P
K
V
=
Q
36
8
6
5
4
3
(25% OPEN)
Kvs=4.10
2
Pressure Loss - ∆p (kPa)
1
0.8
0.6
0.5
0.4
0.3
0.2
0.1
0.02
0.060.04
0.1
0.2 0.4
0.6
0.8 1
0.08
Flow rate - Q (l/s)
Kv (Flow rate in m3/h @ 1 bar pressure drop)
Full turn Tenths of turn
0.0 0.1 0.2 0.3 0.4 0.5 0.6 0.7 0.8 0.9
2
0.67 0.71 0.75 0.78 0.82 0.86 0.90 0.95 0.99 1.03
3
1.08 1.13 1.17 1.21 1.25 1.31 1.35 1.41 1.45 1.50
4
1.54 1.59 1.63 1.68 1.72 1.77 1.83 1.88 1.92 1.97
5
2.00 2.04 2.08 2.13 2.18 2.23 2.28 2.32 2.37 2.40
6
2.44 2.48 2.52 2.55 2.59 2.62 2.67 2.71 2.75 2.79
7
2.82 2.91 2.94 2.99 3.02 3.06 3.08 3.11 3.15 3.18
8
3.19
2
Cav. Uff. Giacomo Cimberio S.p.A.
14
Page 15
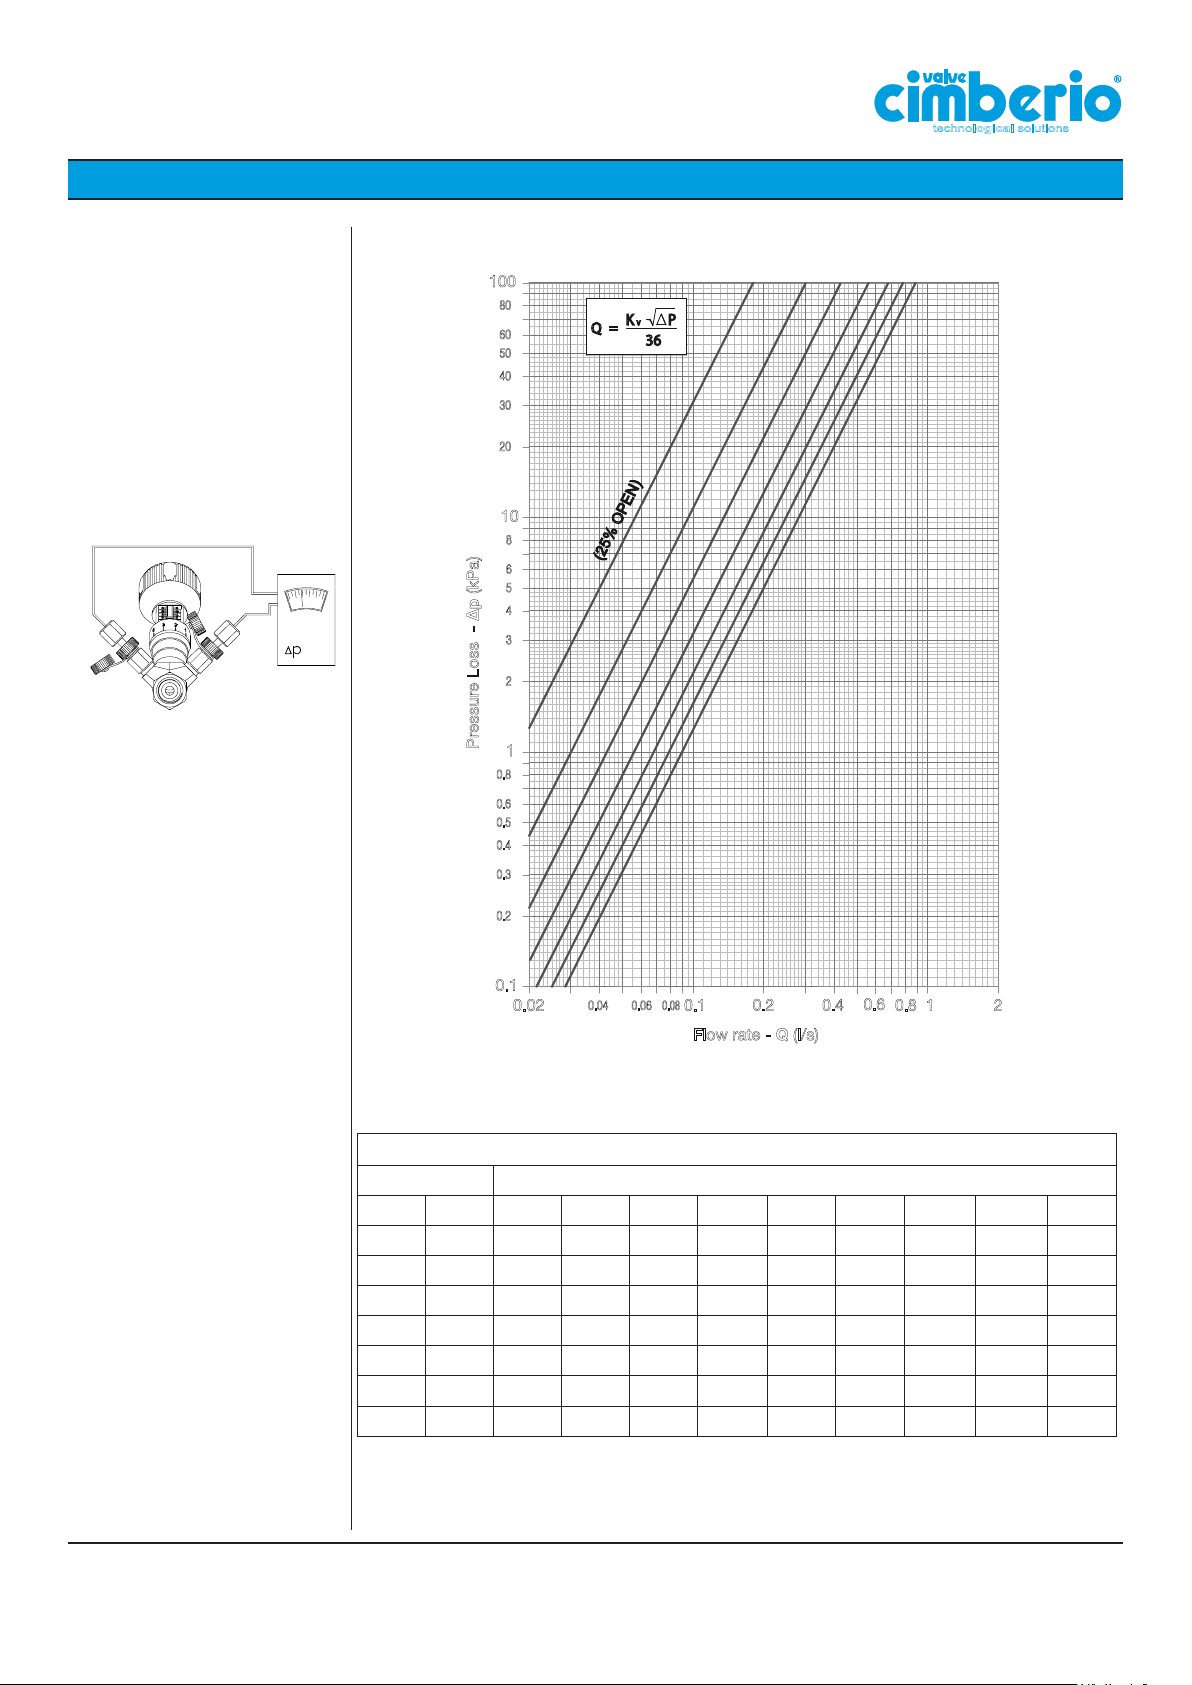
TECHNICAL DATA SHEET
Kv Values - DN 20
Cim 747H
100
80
60
50
40
30
20
10
technological solutions
Turns N° 8765432
P
K
V
=
Q
36
8
6
5
4
3
(25% OPEN)
Kvs=7.50
2
Pressure Loss - ∆p (kPa)
1
0.8
0.6
0.5
0.4
0.3
0.2
0.1
0.02
0.060.04
0.1
0.2 0.4
0.6
0.8 1
0.08
Flow rate - Q (l/s)
Kv (Flow rate in m3/h @ 1 bar pressure drop)
Full turn Tenths of turn
0.0 0.1 0.2 0.3 0.4 0.5 0.6 0.7 0.8 0.9
2
1.00 1.09 1.16 1.24 1.31 1.41 1.50 1.60 1.69 1.78
3
1.87 1.96 2.06 2.16 2.25 2.38 2.48 2.60 2.68 2.78
4
2.88 2.96 3.08 3.19 3.29 3.42 3.52 3.62 3.72 3.77
5
3.88 3.96 4.06 4.17 4.25 4.35 4.44 4.54 4.61 4.69
6
4.74 4.80 4.88 4.94 5.02 5.10 5.17 5.24 5.29 5.31
7
5.34 5.37 5.43 5.44 5.49 5.54 5.57 5.60 5.63 5.64
8
5.66
2
Cav. Uff. Giacomo Cimberio S.p.A.
15
Page 16
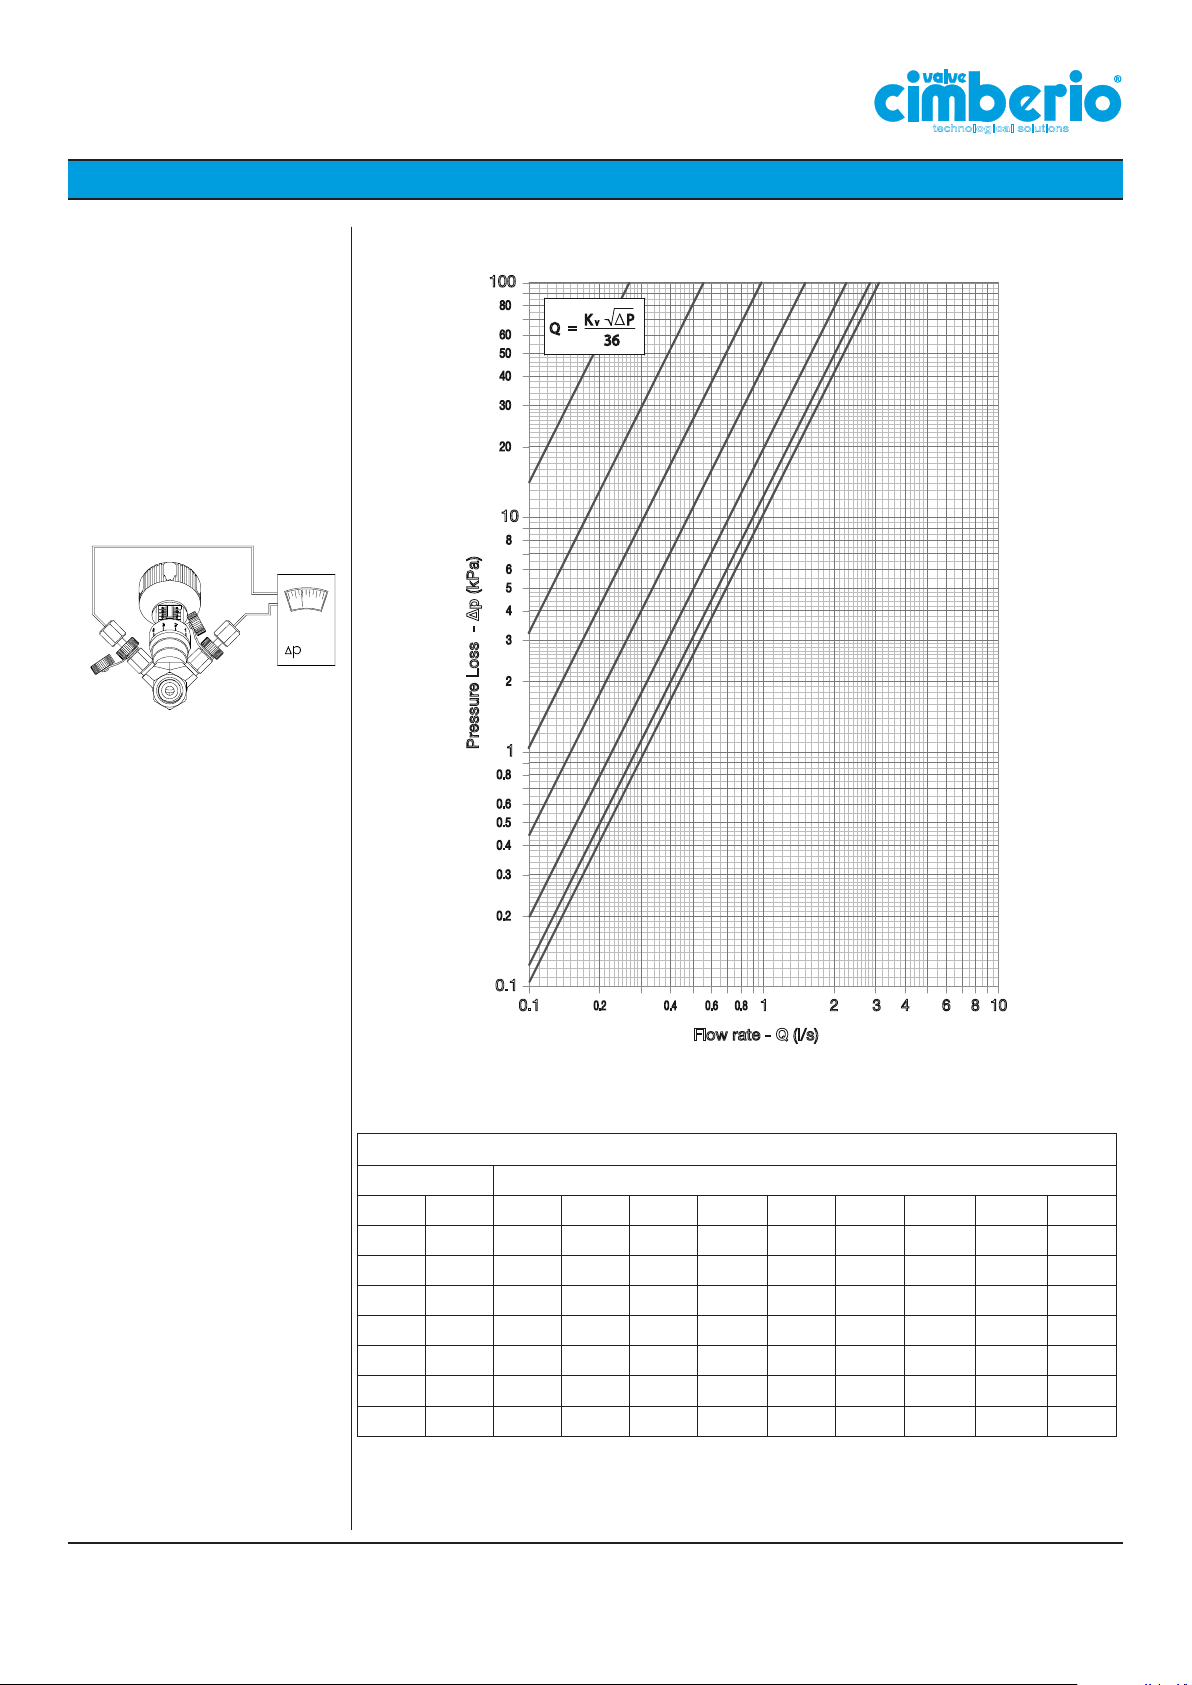
TECHNICAL DATA SHEET
Kv Values - DN 25
Cim 747H
Turns N° 8765432
100
80
60
50
40
30
20
10
8
6
5
4
3
technological solutions
P
K
V
=
Q
36
Kvs=16.60
2
Pressure Loss - ∆p (kPa)
1
0.8
0.6
0.5
0.4
0.3
0.2
0.1
0.1
0.80.60.40.2
1
2 3 4 6 8 10
Flow rate - Q (l/s)
Kv (Flow rate in m3/h @ 1 bar pressure drop)
Full turn Tenths of turn
0.0 0.1 0.2 0.3 0.4 0.5 0.6 0.7 0.8 0.9
2
0.95 1.02 1.10 1.20 1.31 1.40 1.50 1.62 1.74 1.87
3
2.00 2.11 2.26 2.40 2.57 2.73 2.88 3.06 3.21 3.39
4
3.55 3.74 3.92 4.07 4.29 4.49 4.69 4.88 5.10 5.34
5
5.51 5.74 5.97 6.25 6.52 6.79 7.08 7.33 7.56 7.81
6
8.05 8.23 8.42 8.64 8.82 9.16 9.38 9.52 9.77 9.90
7
10.00 10.15 10.24 10.37 10.55 10.68 10.79 10.96 11.03 11.06
8
11.10
Cav. Uff. Giacomo Cimberio S.p.A.
16
Page 17
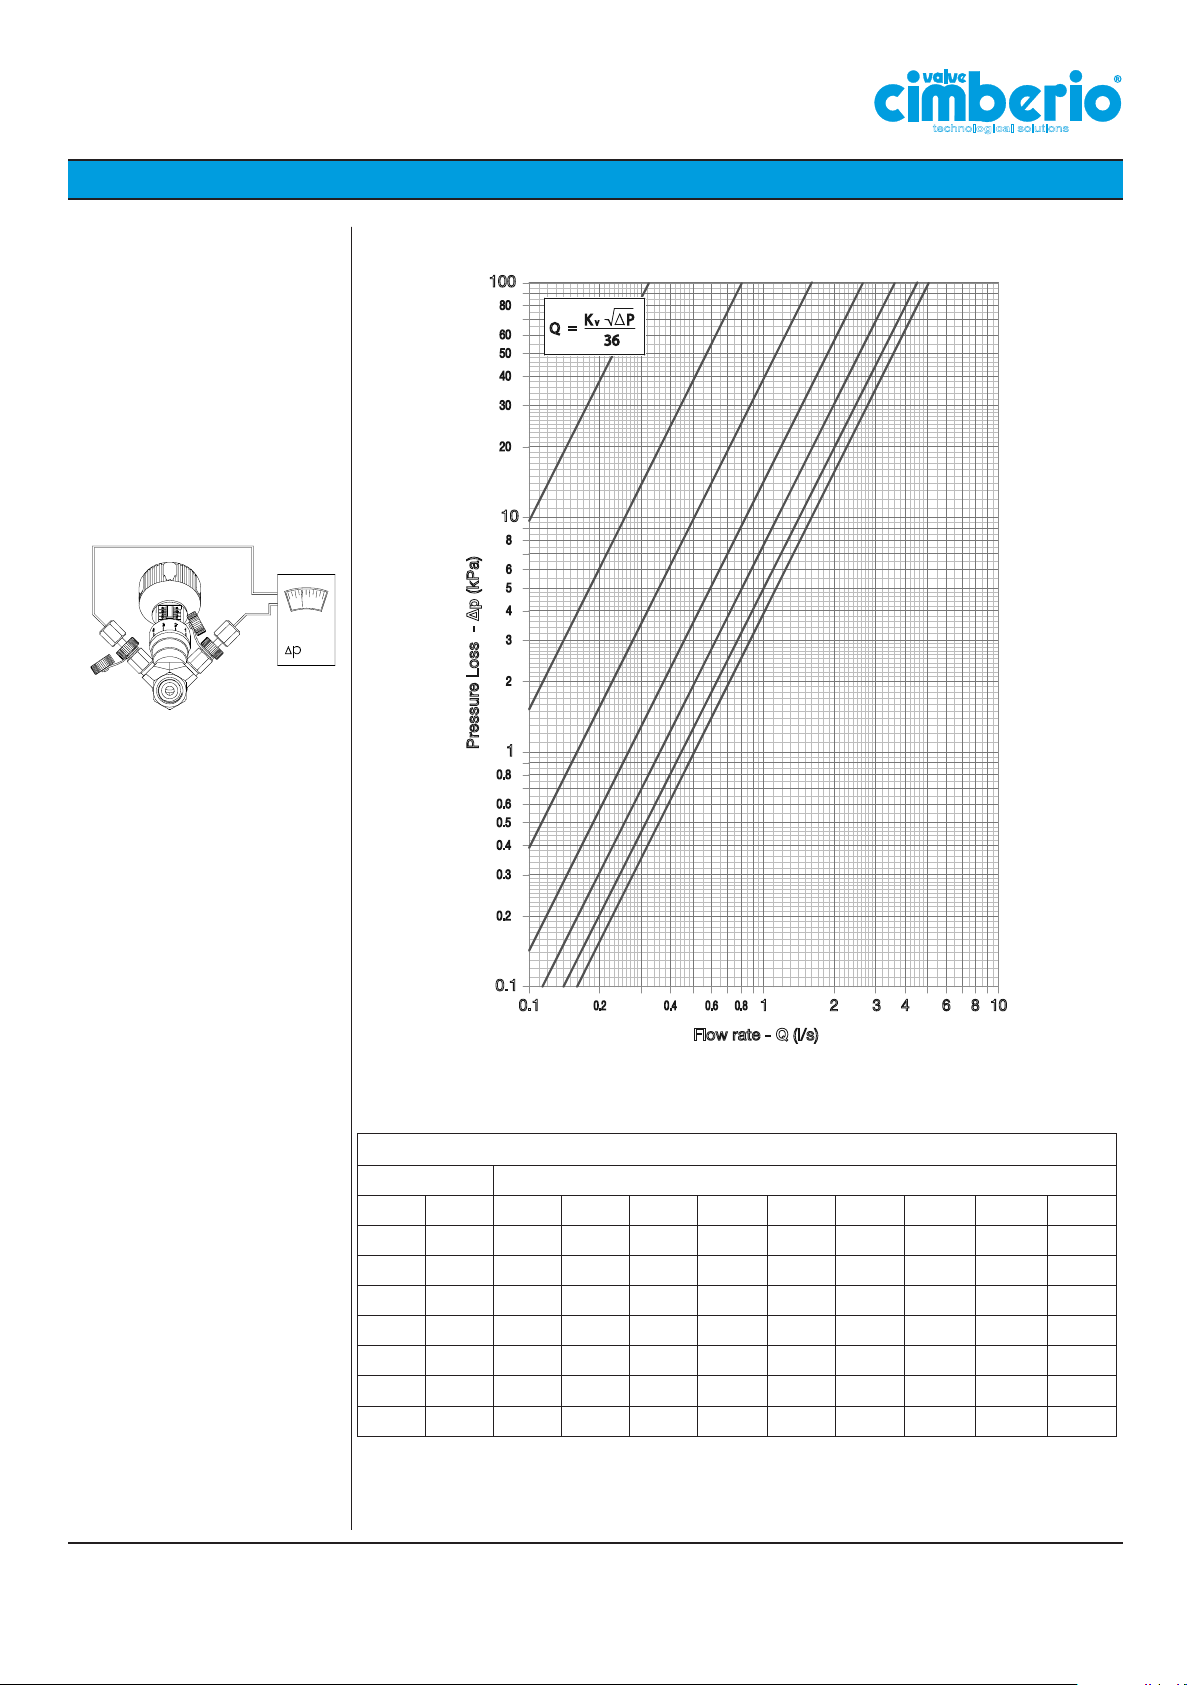
TECHNICAL DATA SHEET
Kv Values - DN 32
Cim 747H
100
80
60
50
40
30
20
10
Turns N°
8
6
5
4
3
technological solutions
2
P
K
V
=
Q
36
3
4
8765
Kvs=23.00
2
Pressure Loss - ∆p (kPa)
1
0.8
0.6
0.5
0.4
0.3
0.2
0.1
0.1
0.80.60.40.2
1
2 3 4 6 8 10
Flow rate - Q (l/s)
Kv (Flow rate in m3/h @ 1 bar pressure drop)
Full turn Tenths of turn
0.0 0.1 0.2 0.3 0.4 0.5 0.6 0.7 0.8 0.9
2
1.16 1.28 1.42 1.57 1.73 1.88 2.07 2.24 2.45 2.69
3
2.91 3.15 3.42 3.68 3.95 4.21 4.50 4.80 5.10 5.41
4
5.76 6.08 6.39 6.70 7.06 7.44 7.81 8.11 8.48 8.84
5
9.27 9.67 10.00 10.45 10.86 11.23 11.65 12.02 12.44 12.75
6
13.16 13.48 13.84 14.21 14.49 14.85 15.15 15.30 15.65 15.87
7
16.22 16.41 16.63 16.88 17.15 17.36 17.49 17.75 17.80 17.89
8
18.01
Cav. Uff. Giacomo Cimberio S.p.A.
17
Page 18
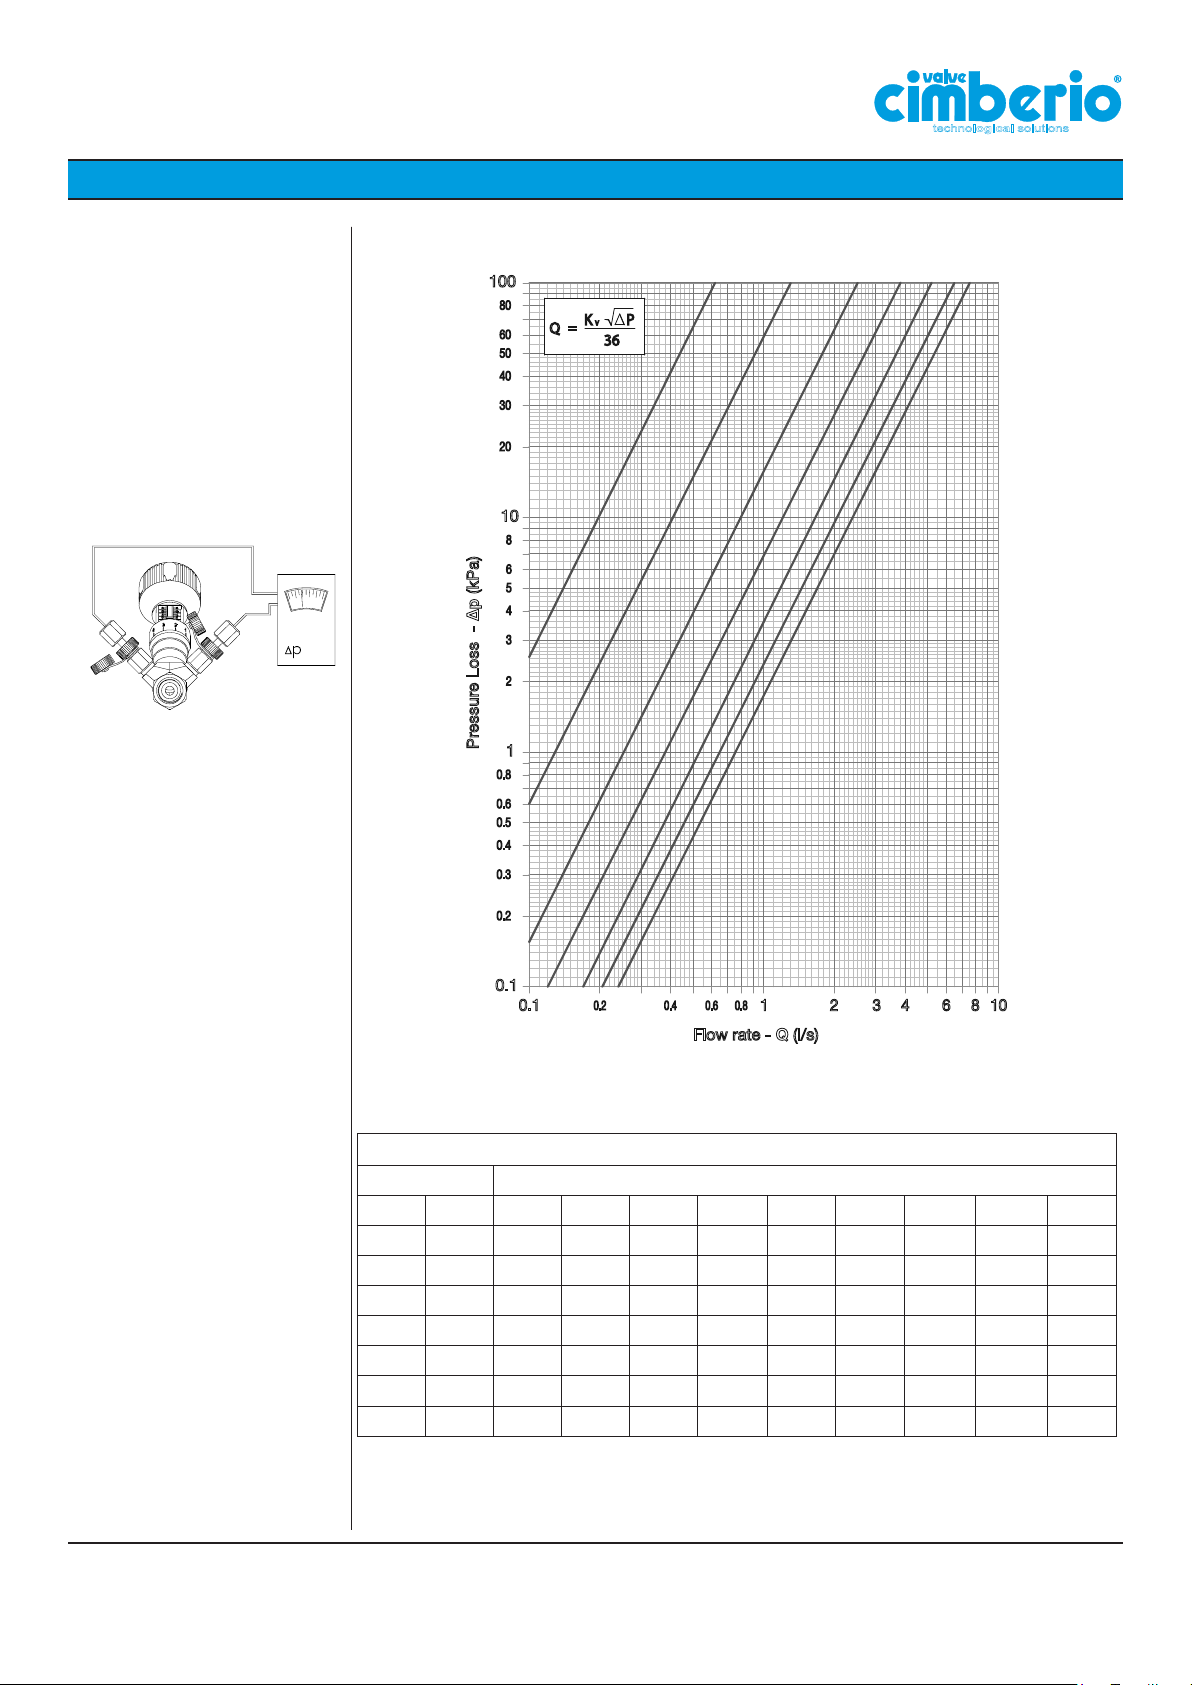
TECHNICAL DATA SHEET
Kv Values - DN 40
Cim 747H
100
80
60
50
40
30
20
10
technological solutions
Turns N° 8765432
P
K
V
=
Q
36
8
6
5
4
3
Kvs=44.00
2
Pressure Loss - ∆p (kPa)
1
0.8
0.6
0.5
0.4
0.3
0.2
0.1
0.1
0.80.60.40.2
1
2 3 4 6 8 10
Flow rate - Q (l/s)
Kvs (Flow rate in m3/h @ 1 bar pressure drop)
Full turn Tenths of turn
0.0 0.1 0.2 0.3 0.4 0.5 0.6 0.7 0.8 0.9
2
2.27 2.44 2.62 2.81 3.04 3.27 3.52 3.76 4.11 4.43
3
4.78 5.12 5.49 5.91 6.29 6.72 7.15 7.57 8.06 8.48
4
8.92 9.49 9.91 10.39 10.92 11.36 11.92 12.46 12.95 13.37
5
13.91 14.36 14.86 15.38 15.88 16.40 16.87 17.65 18.36 18.92
6
18.96 19.48 19.81 20.30 20.77 21.22 21.78 22.34 22.80 23.29
7
23.73 24.03 24.53 24.83 25.30 25.78 26.23 26.59 27.12 27.41
8
27.81
Cav. Uff. Giacomo Cimberio S.p.A.
18
Page 19
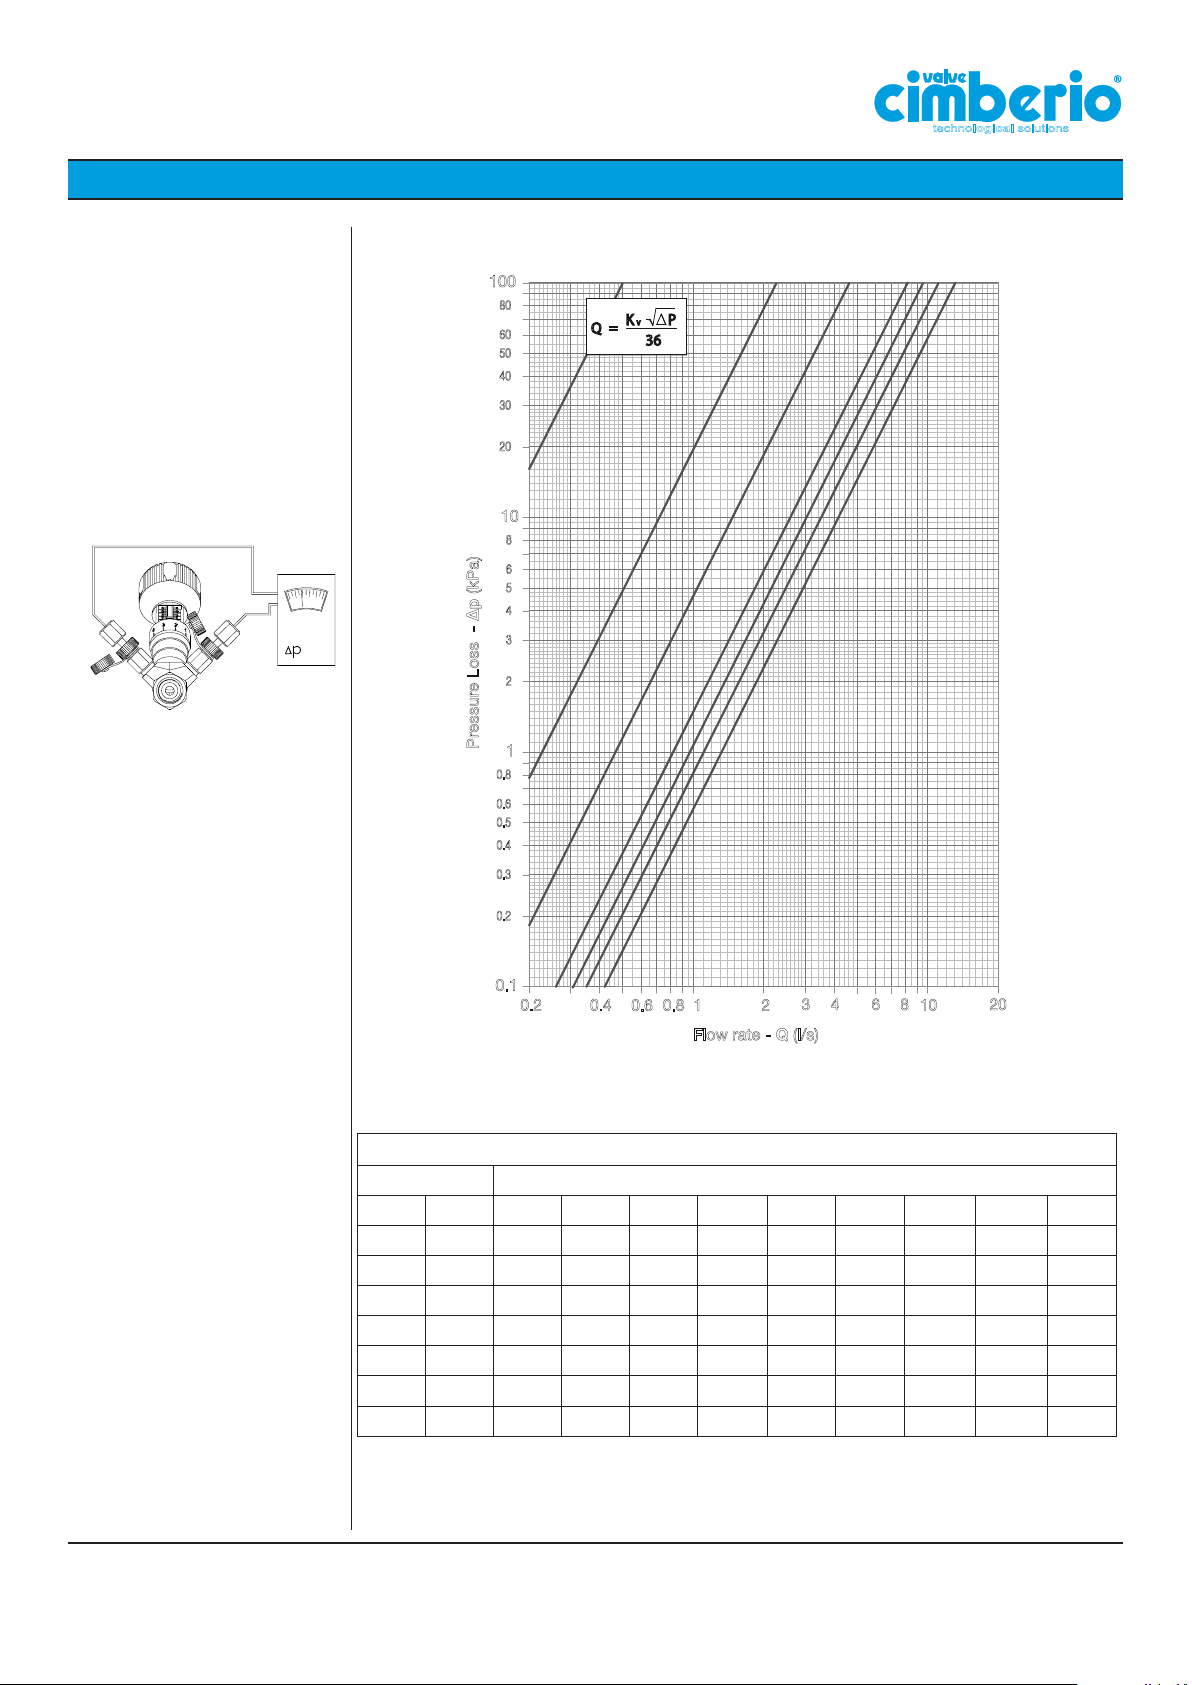
TECHNICAL DATA SHEET
Kv Values - DN 50
Cim 747H
Turns N° 8765432
100
80
60
50
40
30
20
10
8
6
5
4
3
technological solutions
P
K
V
=
Q
36
Kvs=64.00
2
Pressure Loss - ∆p (kPa)
1
0.8
0.6
0.5
0.4
0.3
0.2
0.1
0.2 0.4
0.6
0.8 1
3 4 6 8
2
10
Flow rate - Q (l/s)
Kv (Flow rate in m3/h @ 1 bar pressure drop)
Full turn Tenths of turn
0.0 0.1 0.2 0.3 0.4 0.5 0.6 0.7 0.8 0.9
2
1.82 2.29 2.87 3.42 4.04 4.61 5.28 5.90 6.61 7.29
3
8.01 8.86 9.59 10.45 11.21 12.09 13.05 13.98 14.98 15.79
4
16.52 17.50 18.52 19.44 20.36 21.43 22.50 23.41 14.33 25.30
5
26.28 27.21 28.19 29.28 30.21 31.13 32.00 33.05 33.94 34.84
6
35.80 36.09 36.66 37.52 38.41 39.42 40.12 40.83 41.46 42.16
7
42.77 43.37 44.04 44.52 45.15 45.83 46.33 46.93 47.39 47.75
8
48.01
20
Cav. Uff. Giacomo Cimberio S.p.A.
19
Page 20
TECHNICAL DATA SHEET
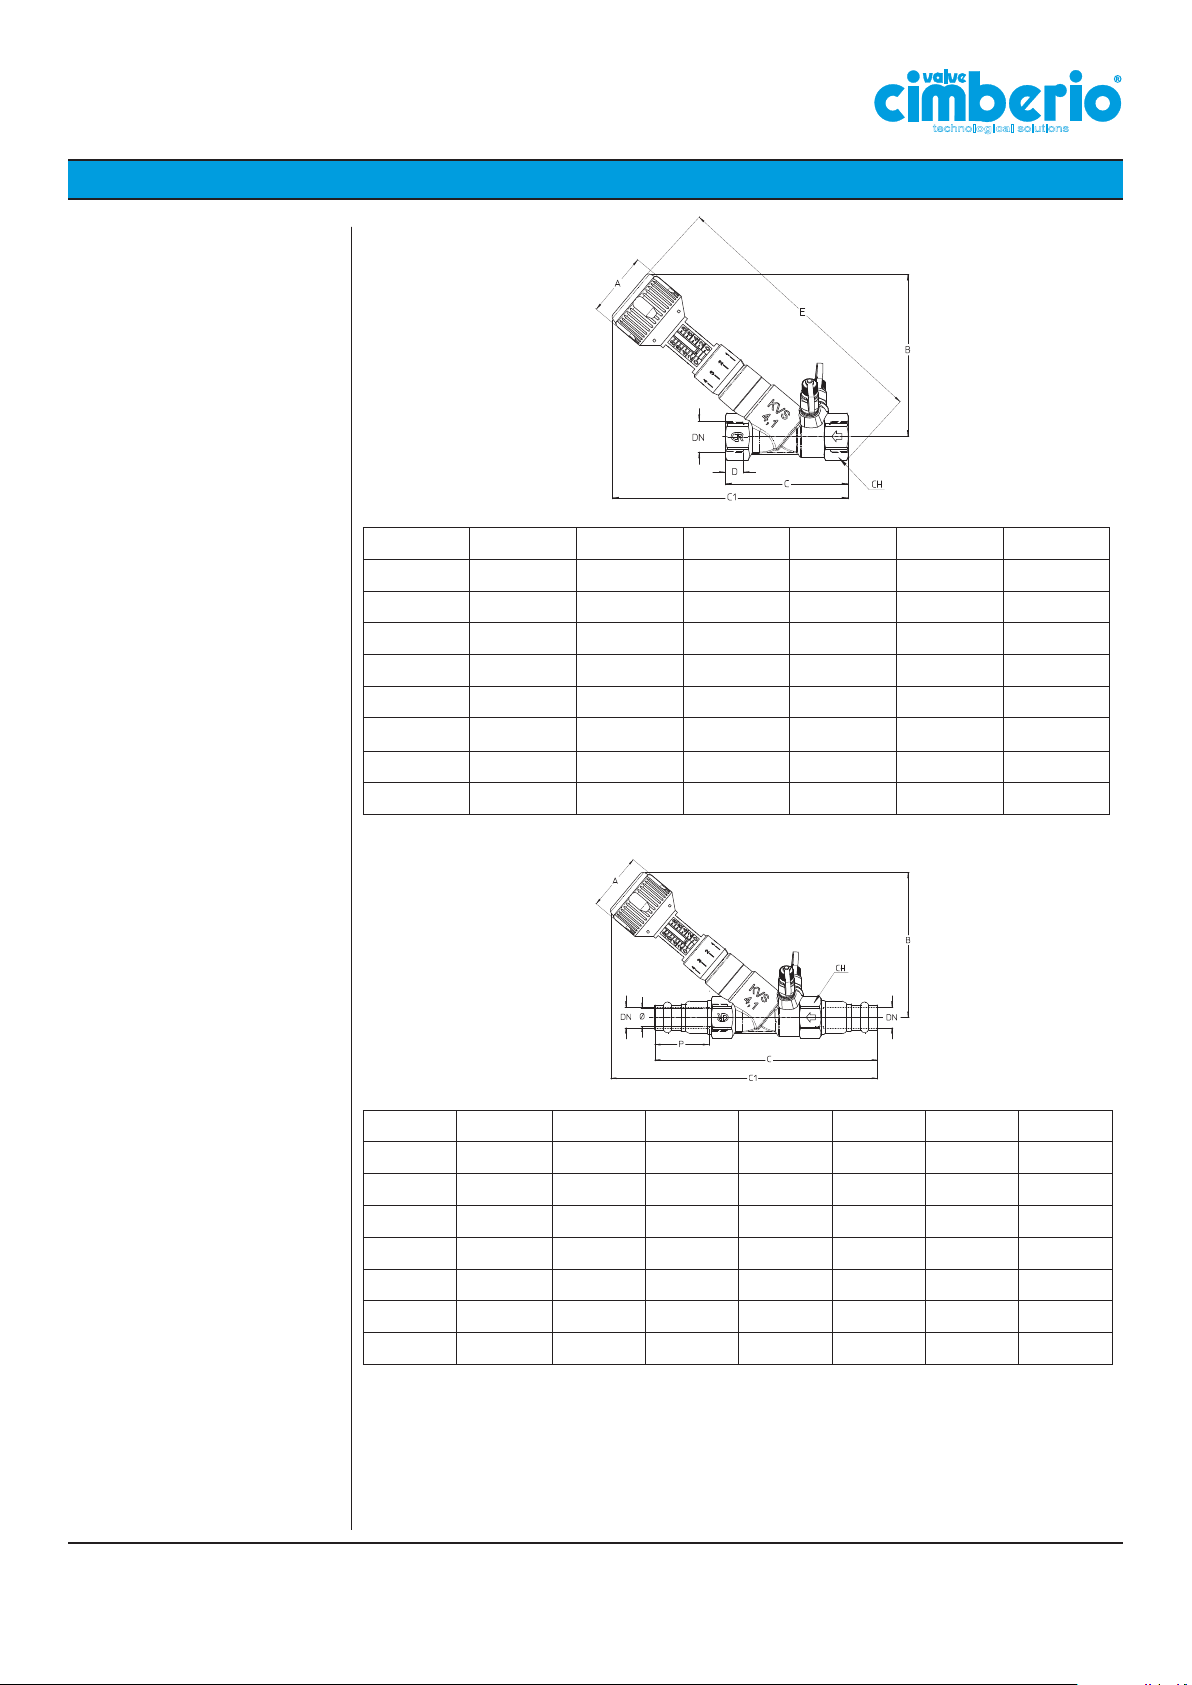
Main dimensions:
Cim 747
Cim 747OT
Cim 747NL
Cim 747 H
Cim 747OTS
Cim 745
Cim 748
technological solutions
DN 15 20 25 32 40 50
Grms. 700 980 1140 1660 2500 3740
A 51 51 51 51 57 57
B 111 128 138 141.5 181 190.5
C 85 97 113 144 163 193
C1 163 187 188 208.5 260 281.5
D 16.5 18 21 23 23 28
E 184 215 223 244 308 337
CH 28 33 40 51 56 71
Main dimensions:
Cim 747PRS
Cim 747OTPRS
Cim 745PRS
Cim 748PRS
DN 15x15 18x18 22x22 28x28 35x35 42x42 50x50
Grms. 865 1175 1200 1480 2145 3090 4760
A 51 51 51 51 51 57 57
B 111 129 129 138 142 181 190
C 169 182 190 207 238 266 313
C1 205 229 233 235 256 307 329
P 39.8 41.3 44 44 43 48 54
CH 28 33 33 40 43 56 71
Cav. Uff. Giacomo Cimberio S.p.A.
20
Page 21
TECHNICAL DATA SHEET
Maintenance:
technological solutions
As a rule, the balancing valve does not need any maintenance.
In case of replacement or need of disassembling of some components of the valve, make
sure that the installation is not under service or pressure.
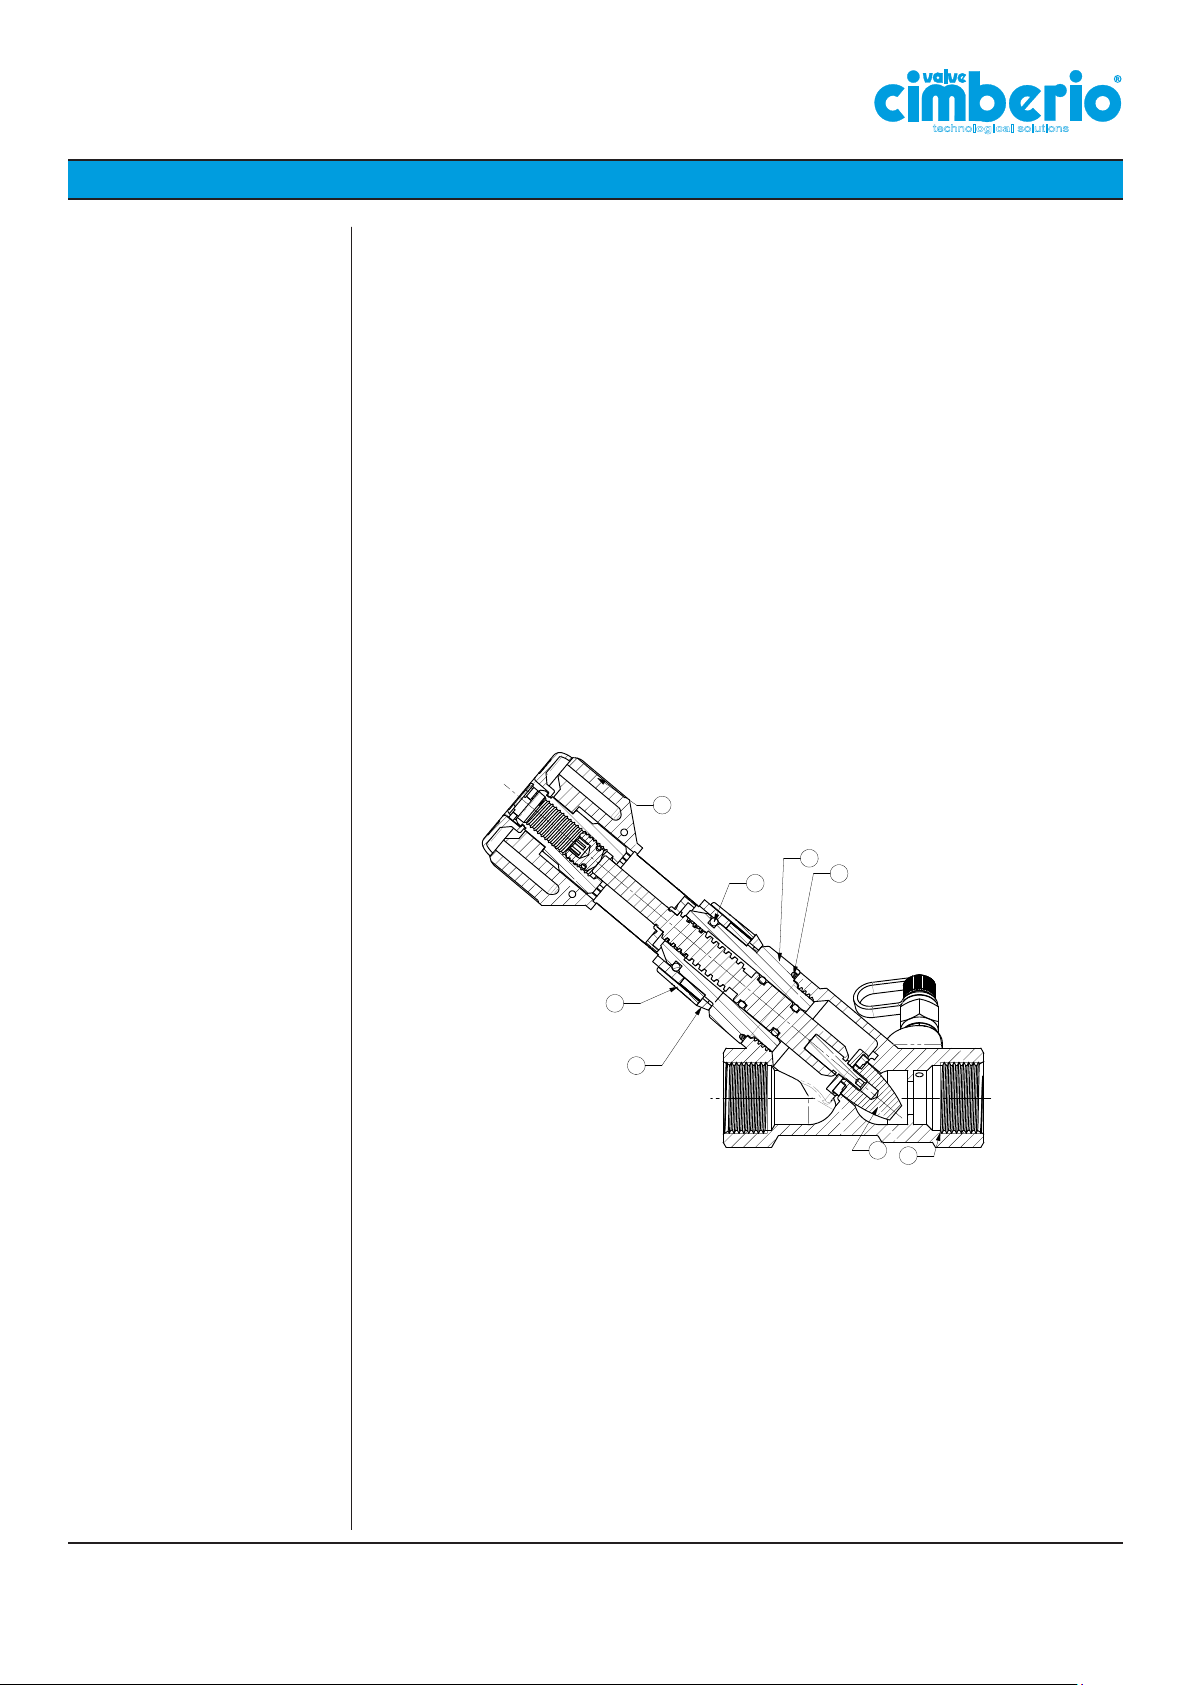
Should you need to replace the tightening OR (3) between body (2) and bonnet (4), follow
the instructions given here below:
• Open the obturator partially (1)
• Lift the index scale (6) placed over the bonnet (4), remove the pins (7) using the suitable
tool,unthread the handle (8) and the reference ring (5);
• Unscrew the bonnet (4) with a key, acting on the hexagonal side;
• Replace the Oring (3)
• Open the obturator (1) until the maximum opening;
• Screw the bonnet (4) on until its fastening on the valve body (2) with a key acting on
the hexagonal side;
• Insert the reference ring (5), the handle (8) and the relating fixing pins (7) in their site;
• Close the valve completely by turning the handle clockwise;
• When the valve is closed, the index scale (6) shall be placed with the “0” value in cor-
respondence with the sign marked on the reference ring (5).
8
4
7
6
5
3
1
2
Cav. Uff. Giacomo Cimberio S.p.A.
21
Page 22

®
28017 San Maurizio d’Opaglio (NO) - Italy - Via Torchio, 57 - C.P. 106
Tel. +39 0322 923001 - Fax: +39 0322 967216 / 967755
skype: cimberiosk1, cimberiosk2
www.cimberio.com
© Copyright - Cav. Uff. GIACOMO CIMBERIO S.p.A. - All rights reserved. Tutti i diritti riservati.
IMR 562637 FM 01820 SA 551551 EMS 551553 OHS 551552 ENMS 577357
 Loading...