

Page 1
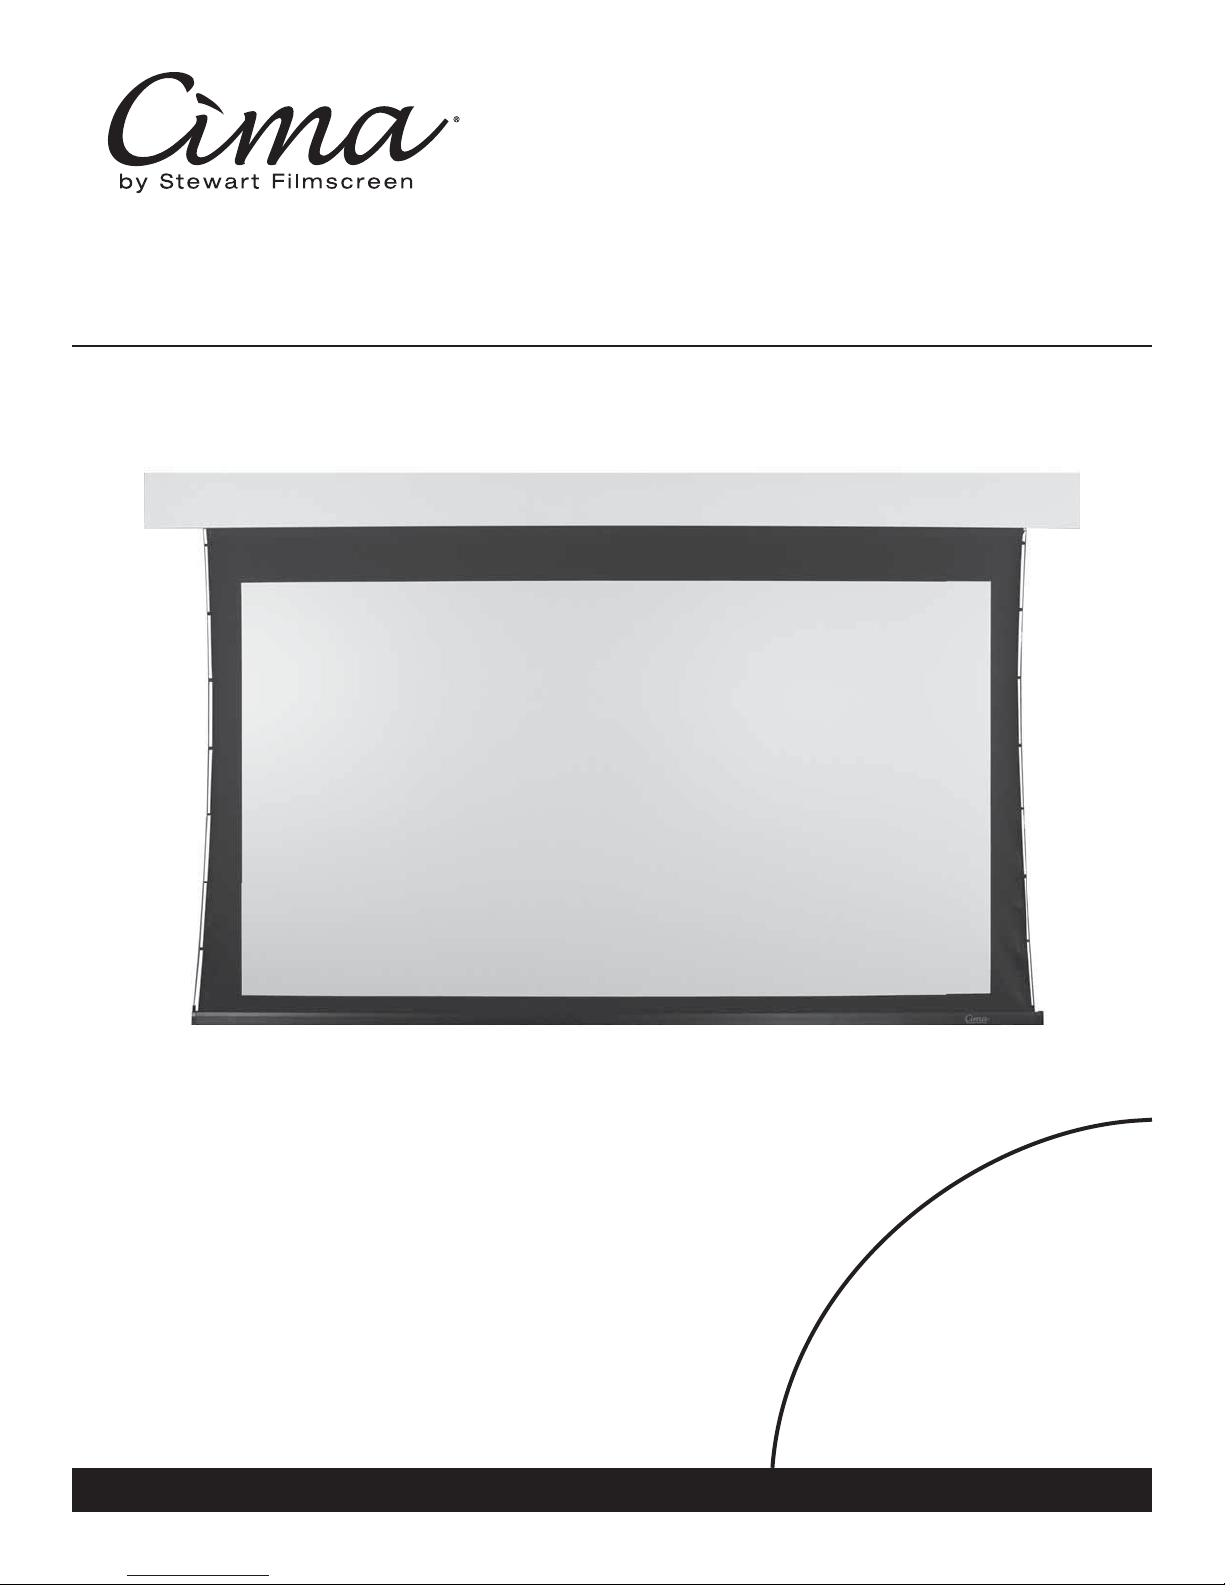
Below Ceiling ElectriScreen
Owner’s Manual
CFS-111315-BC
TO THE INSTALLER: BE SURE TO LEAVE THIS MANUAL WITH THE OWNER.
To the Owner
Installation Instructions
Screen Care
Maintenance
Page 2

Stewart Filmscreen reserves the right to make changes to the product specified in this document.
Sizes and specifications subject to change without notice at Manufacturer’s discretion. From time to time, this
document is updated. Current versions of documentation are posted on the Stewart Filmscreen website at:
© 2015 Stewart Filmscreen Corporation
Printed in U.S.A.
www.stewartfilmscreen.com
Page 3
Below Ceiling ElectriScreen
Owner’s Manual
Contents
To the Owner . . . . . . . . . . . . . . . . . . . . . . . . . . . . . . . 4
Preparing the Installation . . . . . . . . . . . . . . . . . . . . . . . . . 5
Product Dimensions . . . . . . . . . . . . . . . . . . . . . . . . . . . . 6
Mounting the Screen . . . . . . . . . . . . . . . . . . . . . . . . . . 7-8
Wall-Mounting the Screen . . . . . . . . . . . . . . . . . . . . . 7
Ceiling-Mounting the Screen . . . . . . . . . . . . . . . . . . . 8
Standard Controls . . . . . . . . . . . . . . . . . . . . . . . . . . . . 9-11
Keypad Control . . . . . . . . . . . . . . . . . . . . . . . . . . 9
Projector Trigger Control . . . . . . . . . . . . . . . . . . . . . 10
Keypad & Projector Trigger Control . . . . . . . . . . . . . . . . 11
Optional Controls . . . . . . . . . . . . . . . . . . . . . . . . . . . 12-16
Cima-Link Infrared Package . . . . . . . . . . . . . . . . . . . . 13
Cima-Link Ethernet Package . . . . . . . . . . . . . . . . . . . 14
Cima-Link RS232 Package . . . . . . . . . . . . . . . . . . . . 15
Operating the Screen . . . . . . . . . . . . . . . . . . . . . . . . . . . 16
Adjusting the Screen Extension . . . . . . . . . . . . . . . . . . . . 17-18
Adjusting the Screen Tension . . . . . . . . . . . . . . . . . . . . . . . 19
Caring for & Cleaning the Screen . . . . . . . . . . . . . . . . . . . . . 20
Troubleshooting . . . . . . . . . . . . . . . . . . . . . . . . . . . . 21-22
Product Warranty . . . . . . . . . . . . . . . . . . . . . . . . . . . . . 23
Page 4

TO THE OWNER
Congratulations on your purchase of one of our highly versatile Cima projection
screens representing “Top of the Class” in standard commercial and residential
projection screens. Please take a moment to review this manual as it will help
ensure you many years of trouble-free service from your new Cima by Stewart
Filmscreen product.
About your Cima Below Ceiling ElectriScreen
The Cima Below Ceiling ElectriScreen is designed for ease of installation. The Cima
Below Ceiling features a self-finishing face-plate. There are no user-servicable parts
contained within the unit.
IMPORTANT SAFETY INFORMATION
SAFETY PRECAUTIONS
♦ Carefully read the instructions appropriate for your needs.
♦ This screen must be installed by a qualified electrician.
♦ For supply connections, use wires rated for at least 75 C.
♦ Use copper or aluminum conductors.
♦ For indoor use only.
♦ Do not connect low-voltage to line-voltage power.
♦ Article 725-54(a), (1) Exception No. 3 (NEC) or Canadian CE Code Handbook, Rule
16-212, Sub Rule (4) requires segregation between line-voltage and Class 2
(low-voltage) circuits. Low-voltage / network wires should enter enclosure boxes through
separated openings. Also, conductors shall be separated by at least 1/4" or segregated
by barriers. Check with your local electrical inspector for compliance with local / national
codes and wiring practices.
♦ Earth ground terminal connection must be made as shown in wiring diagrams.
♦ Proper short-circuit and overload protection must be provided at the circuit breaker
distribution panel. You can use up to a 20A maximum circuit breaker with adequate
short-circuit breaking capacity for your installation.
4
© 2015 Stewart Filmscreen Corporation
Page 5
PREPARING THE INSTALLATION
Description
The Cima Below Ceiling product can be controlled through a number of remote
control devices, including keypads, dry contact outputs, and low-voltage trigger
outputs. With the optional Cima-Link Controller Packages, your Cima screen can be
controlled by local and remote Infrared, IP ethernet, and computer-based signaling
sources such as those manufactured by Control4, AMX, Crestron, Elan Home
Systems with RS-232-C or RS-485 interfaces.
Caution
To be installed and/or used in accordance with appropriate electrical codes and
regulations.
You will need:
♦ Enough ladders for the personnel supporting the screen during the mounting process
♦ A level
♦ Fasteners appropriate for the surface on which the screen is being mounted
Note: This manual refers to “AC” to represent electrical power. Your location may
use 120 V, 220 V, or other electrical power. Screen systems are manufactured using
the electrical power type specified for the location. Use appropriate power sources
for your location.
Unpacking
1. Remove the outer plastic covering and white wrapping paper surrounding the screen
case.
2. Do not remove the wrapping paper surrounding the screen roller. You should remove it
only after the unit is hung and all electrical connections have been made.
Motor Wiring
The Cima Below Ceiling's screen motor is pre-wired at the factory. No additional
motor assembly is required.
Caution
During installation, do not place the unit on an unstable cart, stand, table, or
ladder. The unit may fall, causing injury and damage to the unit.
© 2015 Stewart Filmscreen Corporation
5Cima Below Ceiling ElectriScreen: Owner’s Manual
Page 6
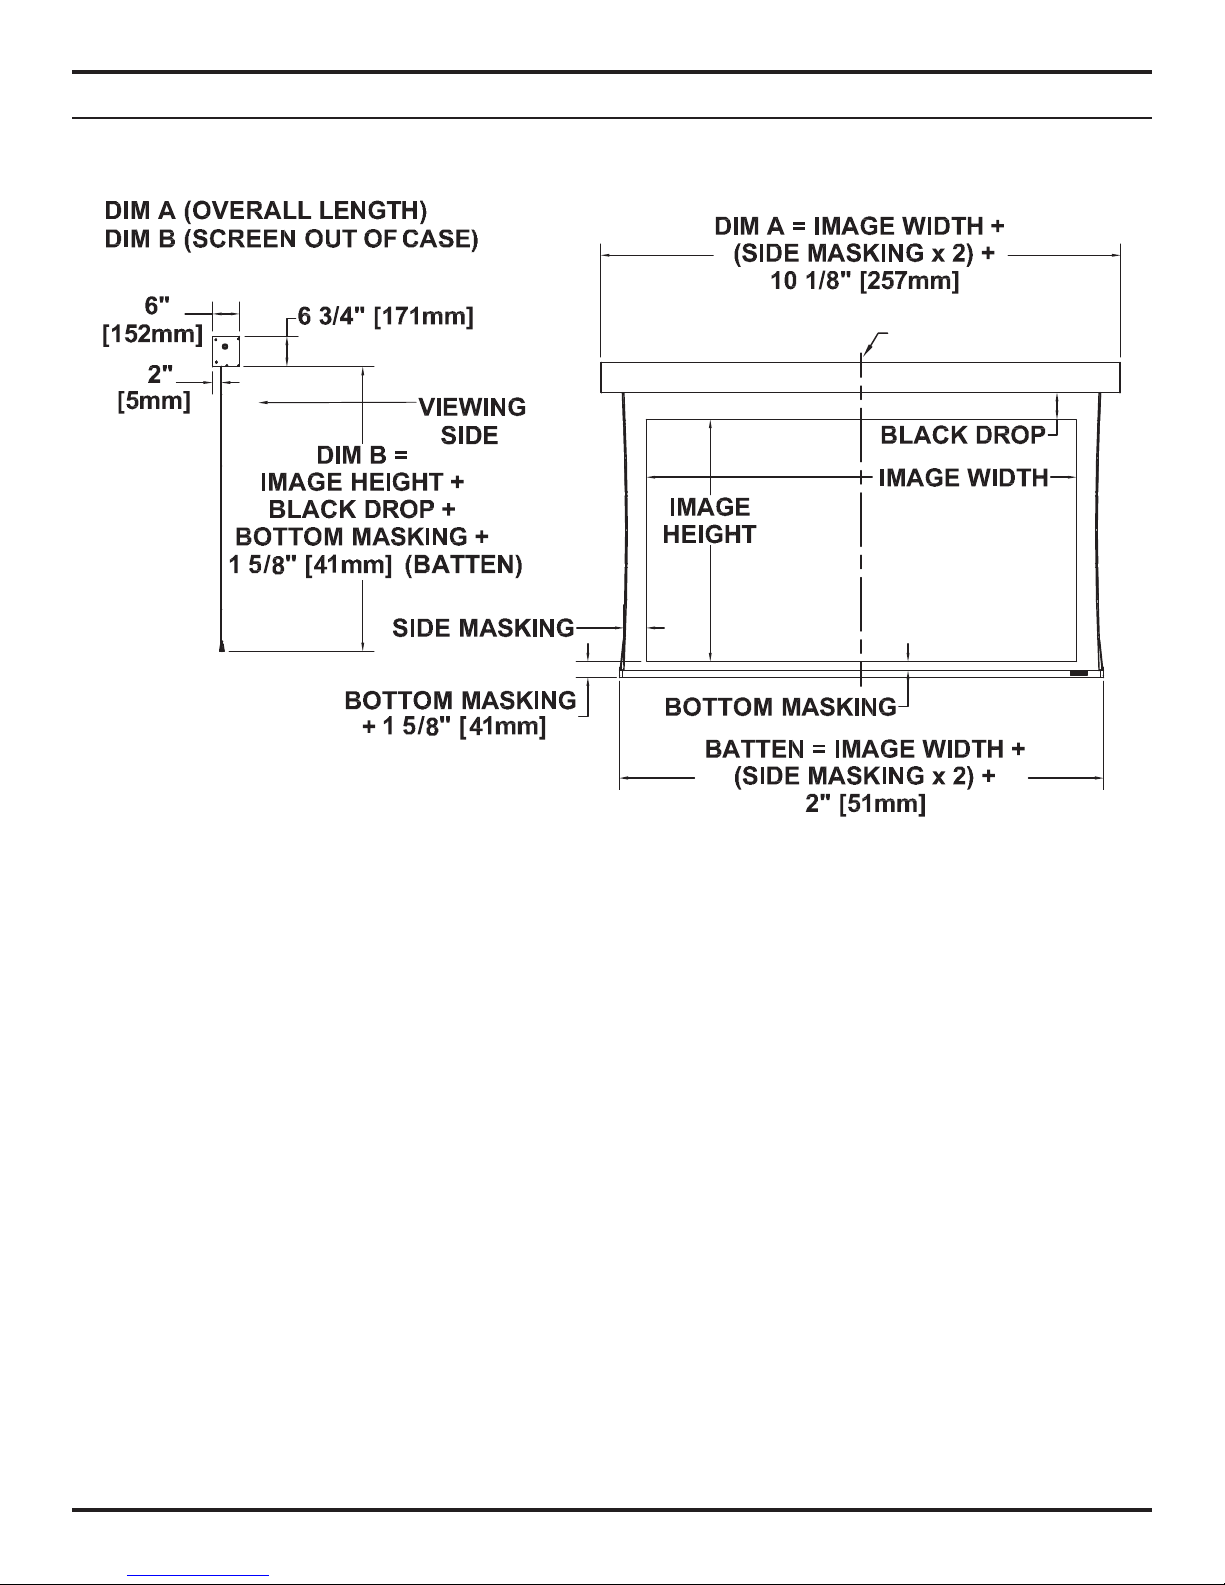
PRODUCT DIMENSIONS
C
CASE & SCREEN
L
6
© 2015 Stewart Filmscreen Corporation
Page 7
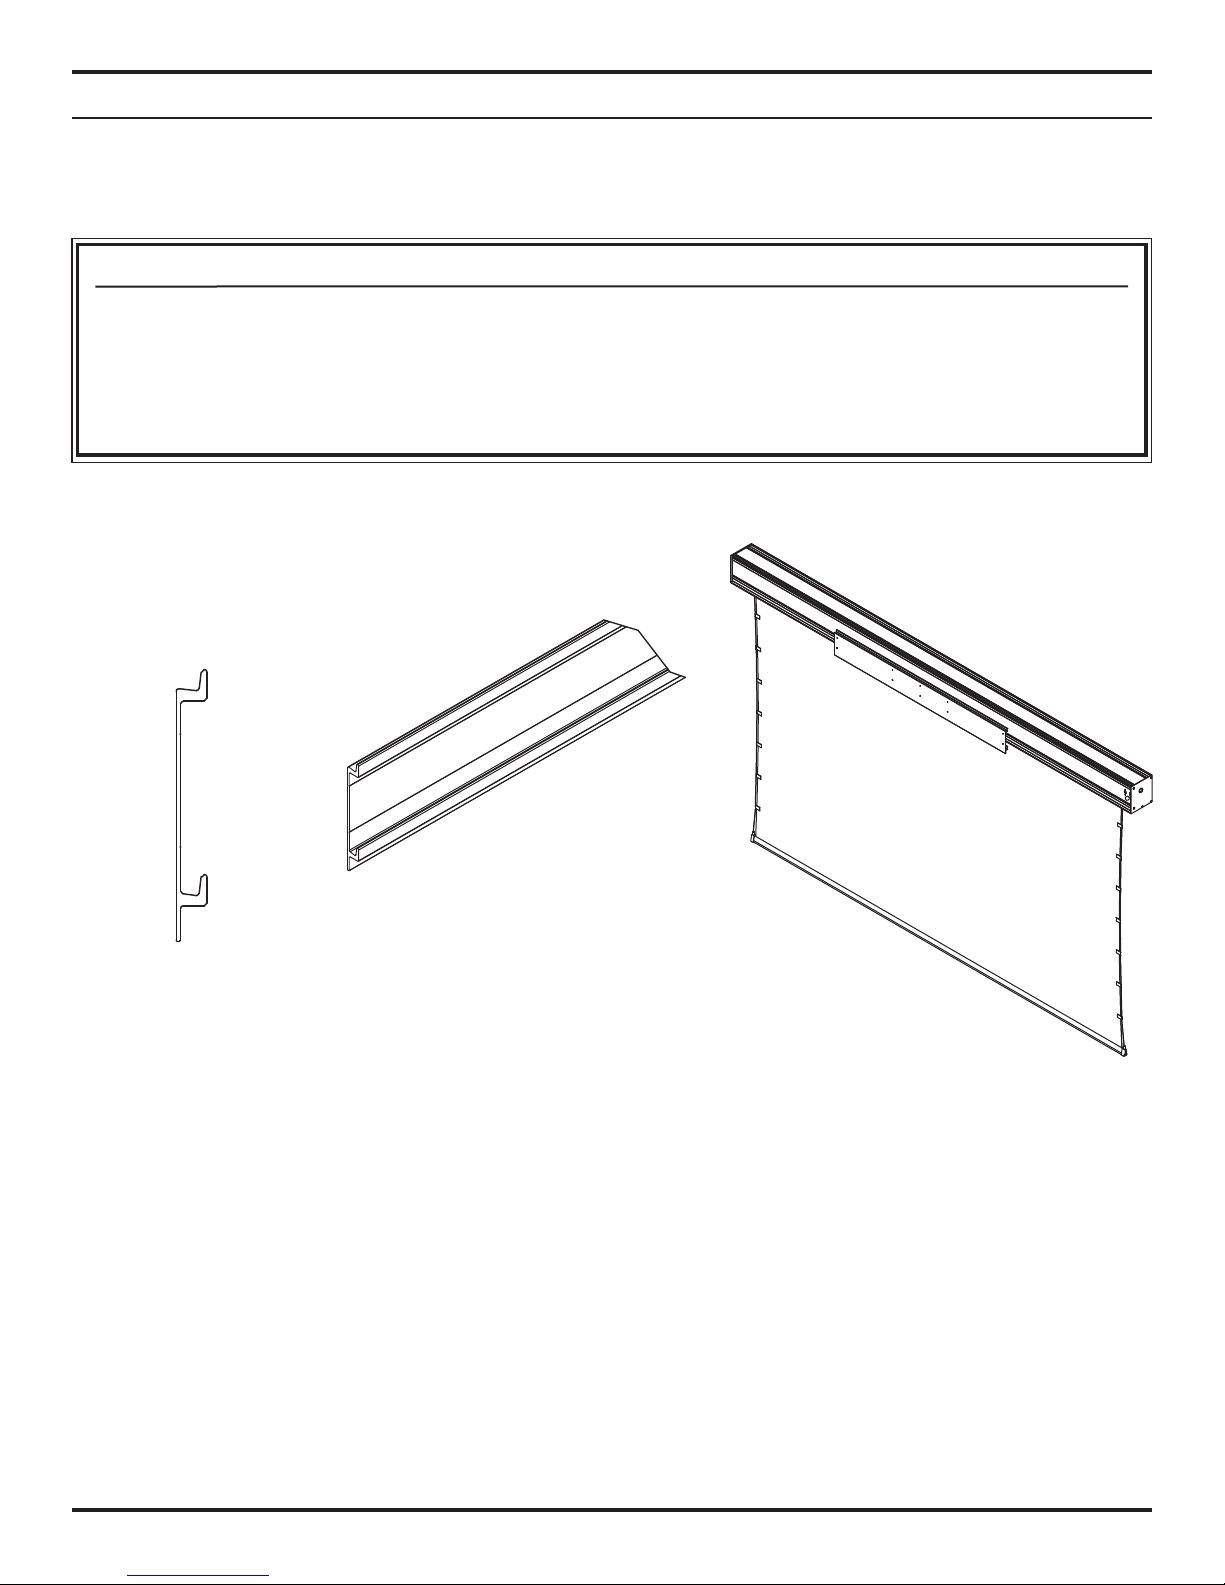
WALL-MOUNTING THE SCREEN
Professional mounting techniques should be used. Stewart Filmscreen cannot be liable for substandard
or faulty installations.
Caution
Proper handling of the Cima Below Ceiling ElectriScreen is required during installation to avoid possible
damage to the screen. Perform the following actions to avoid damage:
♦ Wear clean gloves throughout the installation process to prevent damage to the screen housing or screen
material.
♦ Make sure that the screen batten never contacts or strikes any objects as damage may occur.
Figure 1: Mounting Bar -
Side View
1. Securely install the mounting bar onto the wall, making sure the bar is level. (The preset holes in the mounting bar
are 16” apart for residential applications and 24” apart for commercial applications.)
2. Properly hang the case onto the mounting bar, making sure it is level.
Front View (Length Varies)
Figure 3: Case with Mounting Bar - Back ViewFigure 2: Mounting Bar -
© 2015 Stewart Filmscreen Corporation
7Cima Below Ceiling ElectriScreen: Owner’s Manual
Page 8
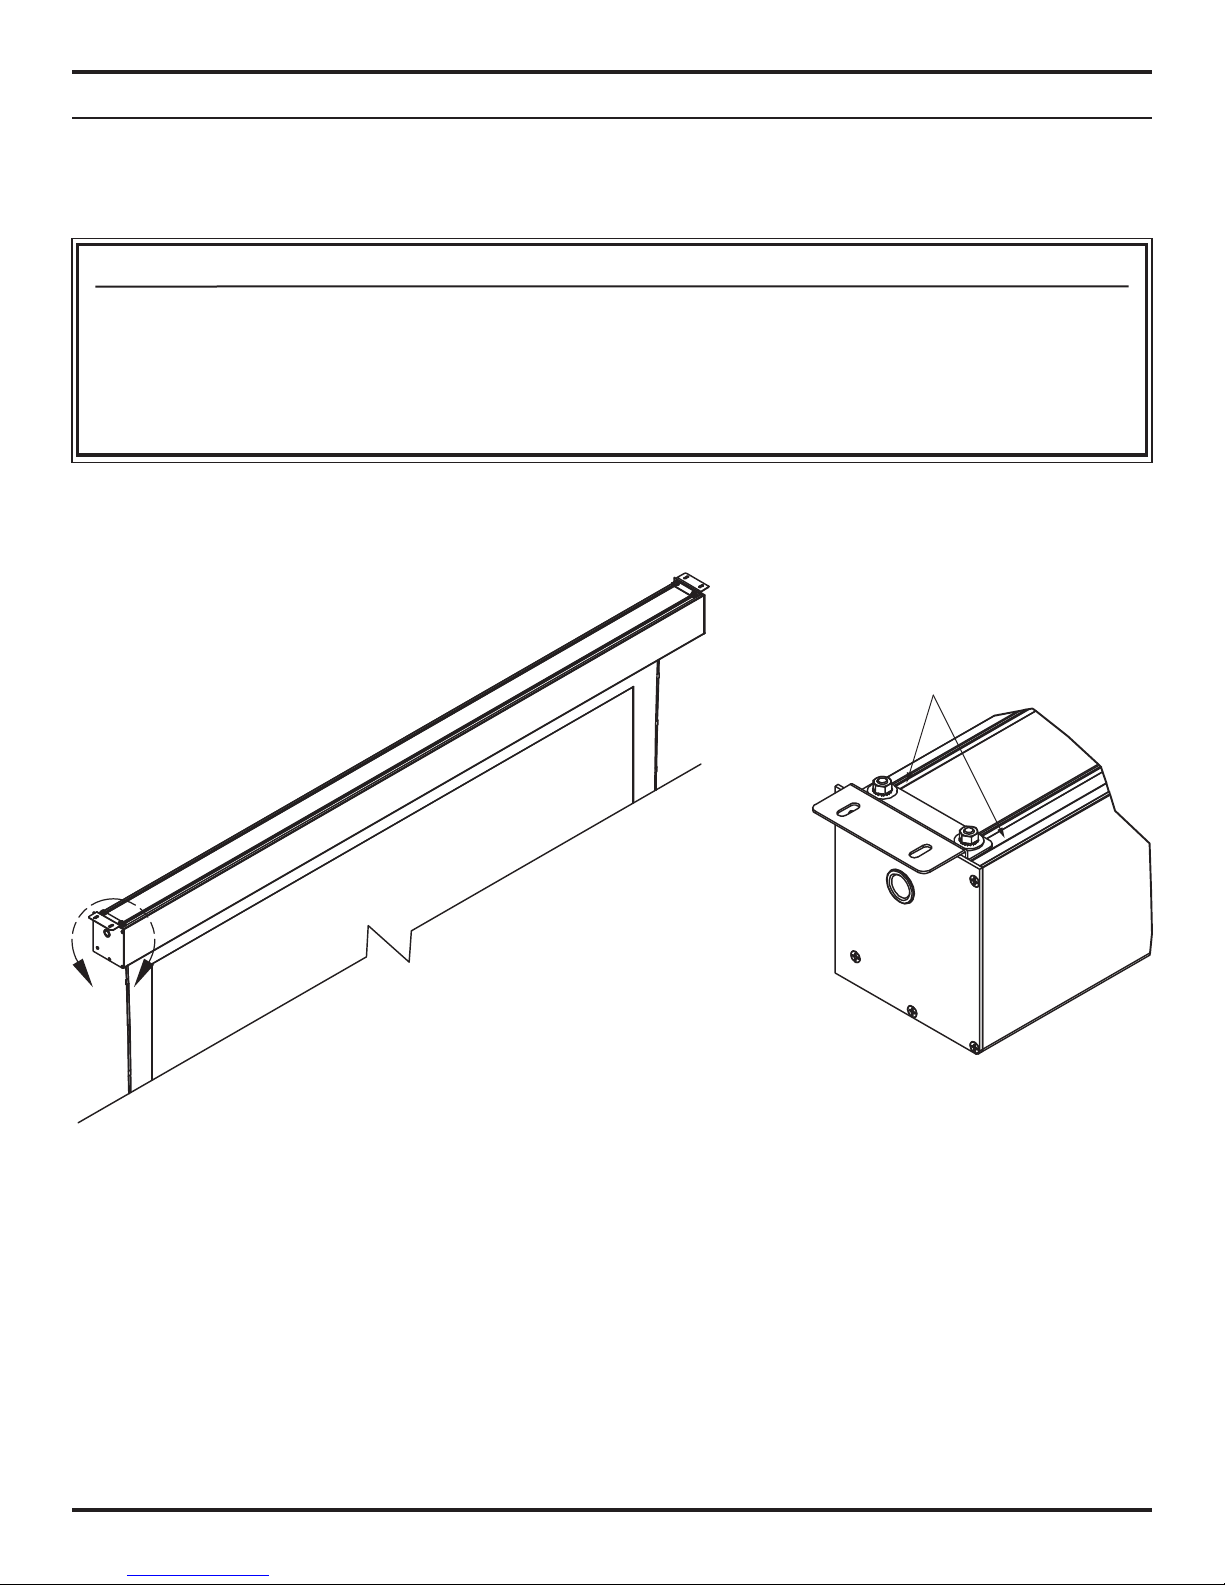
CEILING-MOUNTING THE SCREEN
Professional mounting techniques should be used. Stewart Filmscreen cannot be liable for substandard or faulty installations.
Caution
Proper handling of the Cima Below Ceiling ElectriScreen is required during installation to avoid possible
damage to the screen. Perform the following actions to avoid damage:
♦ Wear clean gloves throughout the installation process to prevent damage to the screen housing or screen
material.
♦ Make sure that the screen batten never contacts or strikes any objects as damage may occur.
Note: A false ceiling is not intended to support the weight of a Cima Below Ceiling ElectriScreen.
CHANNELS
B
Detail B: Bracket DetailFigure 4: Ceiling Mounted Screen - Front View
1. Insert a provided drop-in t-bolt into each channel on the top of the case on each end (two per side) and turn
clockwise 90 degrees.
2. Place a bracket on each end of the case over the t-bolts.
3. Place a provided washer on each t-bolt and screw a provided lock nut securely onto each t-bolt.
4. Properly mount the case on the ceiling using the brackets now screwed on the case.
8
© 2015 Stewart Filmscreen Corporation
Page 9
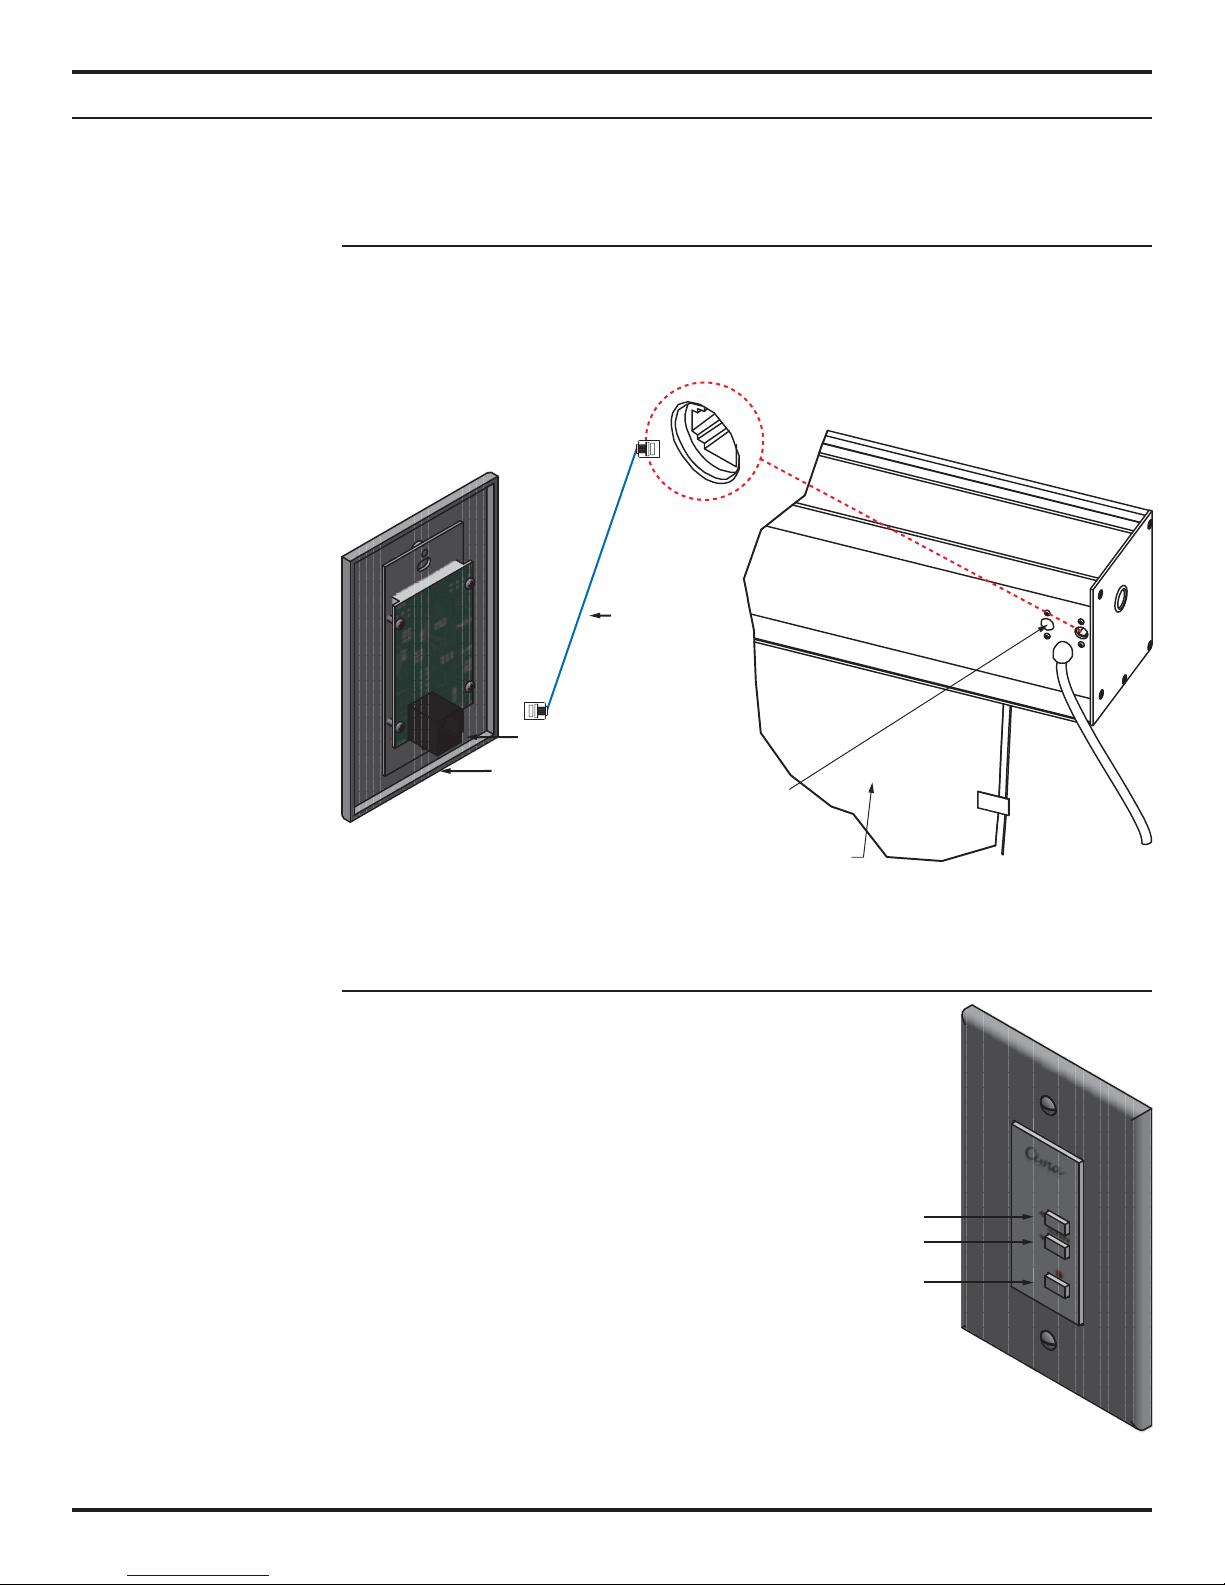
STANDARD CONTROL - KEYPAD CONTROL
A standard 3-button low-voltage keypad is supplied for both the standard controller
and the optional Cima-Link Controller Accessories.
Making the Connections
1. Connect the RJ25 cable to the keypad.
2. Connect the other end of the RJ25 cable to the Cima unit.
Note: The maximum length of the RJ25 cable shall not exceed 50’.
RJ25 CABLE
RJ25 JACK
RJ25 JACK
KEYPAD - BACKSIDE
ADDITIONAL
RJ25 JACK FOR
OPTIONAL CONTROLS
SCREEN
(BACKSIDE)
Figure 5: Keypad Connection
Operation
Press the "Down" button once and the Cima screen will
automatically extend fully to its pre-set limit, and then will
power itself off. Press the "Up" button once and the Cima
screen will automatically retract back into the case and
power itself off. If a custom position is desired, simply
press the "Stop" button at any time during the screen's
deployment or retraction. (See Figure 6)
DOWN
STOP
UP
Note: See page 18 for information regarding the default
limits to which the screen can be adjusted up or down
from the factory pre-set.
Figure 6: Keypad Face
© 2015 Stewart Filmscreen Corporation
9Cima Below Ceiling ElectriScreen: Owner’s Manual
Page 10
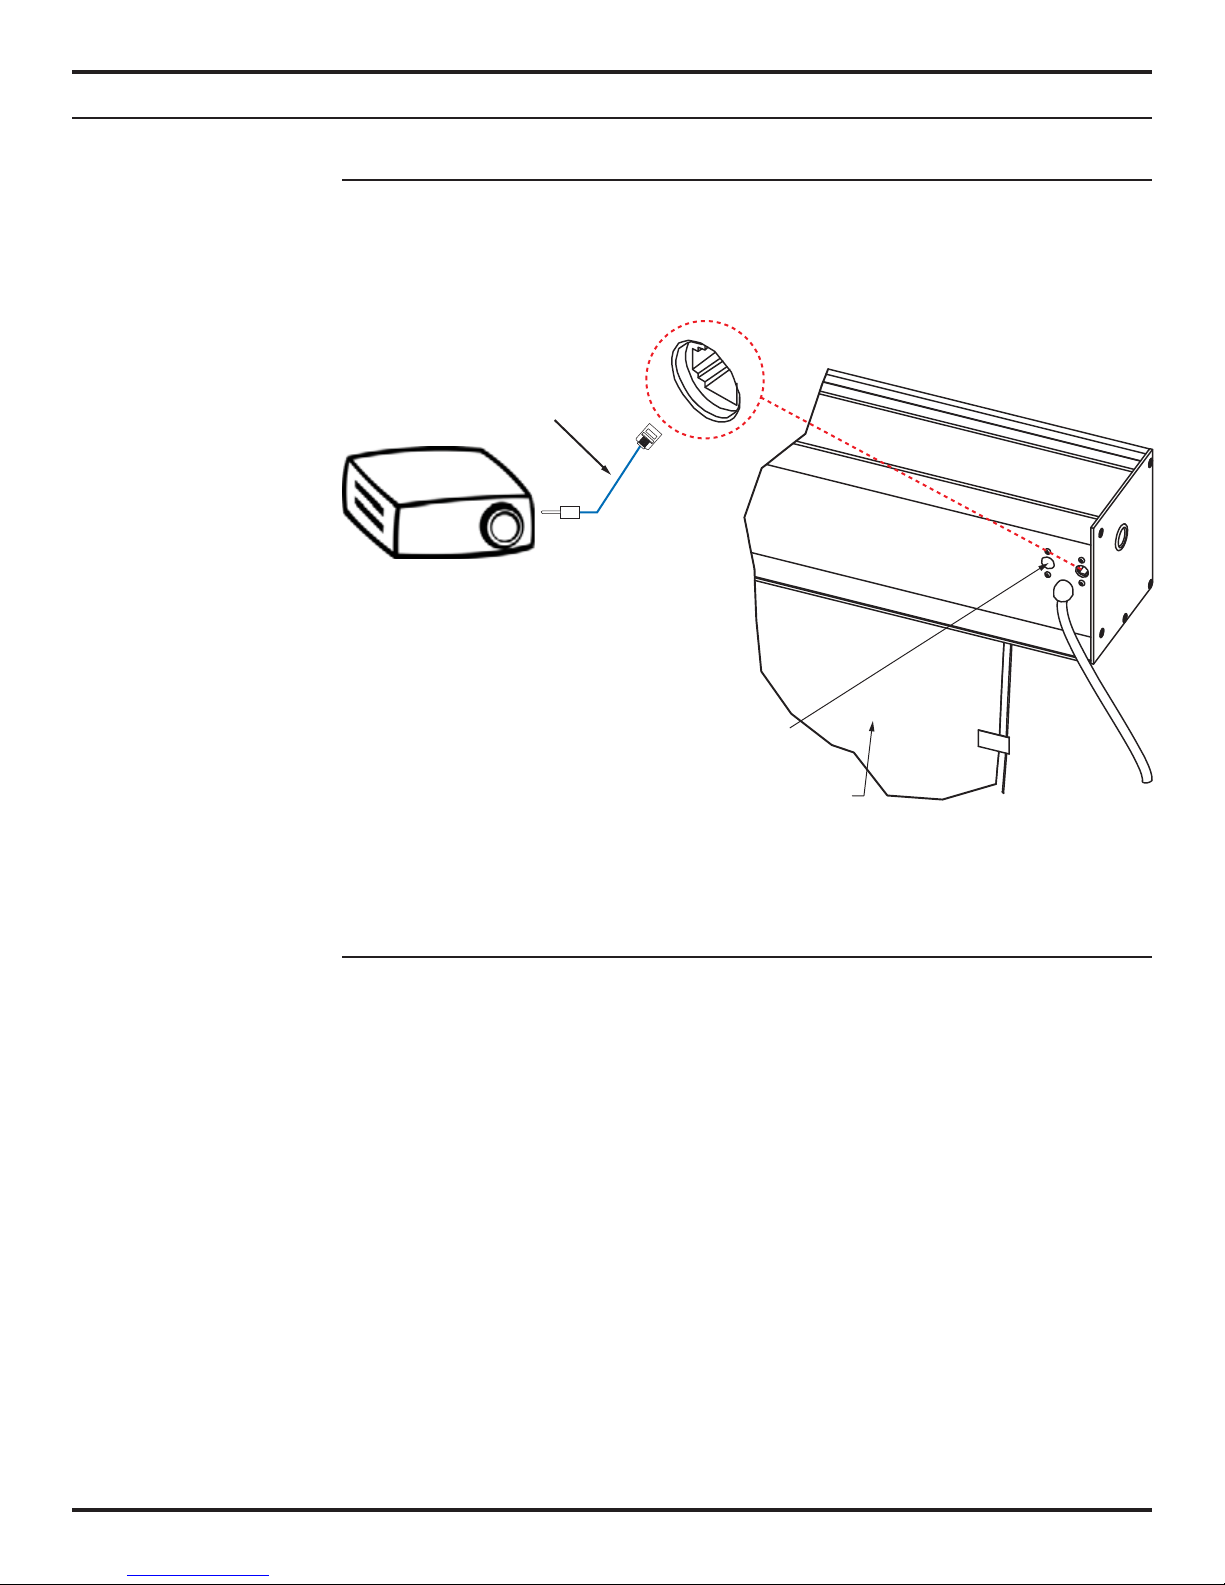
STANDARD CONTROL - PROJECTOR TRIGGER CONTROL
Making the Connections
1. Connect a projector trigger cable to the projector. (Note: projector trigger cable not
provided – the installer needs to make the cord from a RJ25 cord, cut one end off
and add the mono plug onsite.)
2. Connect the other end of the trigger cable to the Cima unit. (RJ25 plug)
PROJECTOR
TRIGGER CABLE
(NOT INCLUDED)
RJ25 JACK
ADDITIONAL
RJ25 JACK FOR
OPTIONAL CONTROLS
SCREEN
(BACKSIDE)
Figure 7: Projector Connection
How it Works
When the projector is turned on or off a signal is sent to the controller within the
motor and will trigger the screen to move up or down.
If there is a sudden change in direction, the motor is paused for 1/2 second before
reversing direction. This is to prevent strain on the motor mechanism, and to prevent
damage to any material controlled by the motor. Relays are automatically
de-energized after 120 seconds of operation to reduce power consumption.
10
© 2015 Stewart Filmscreen Corporation
Page 11
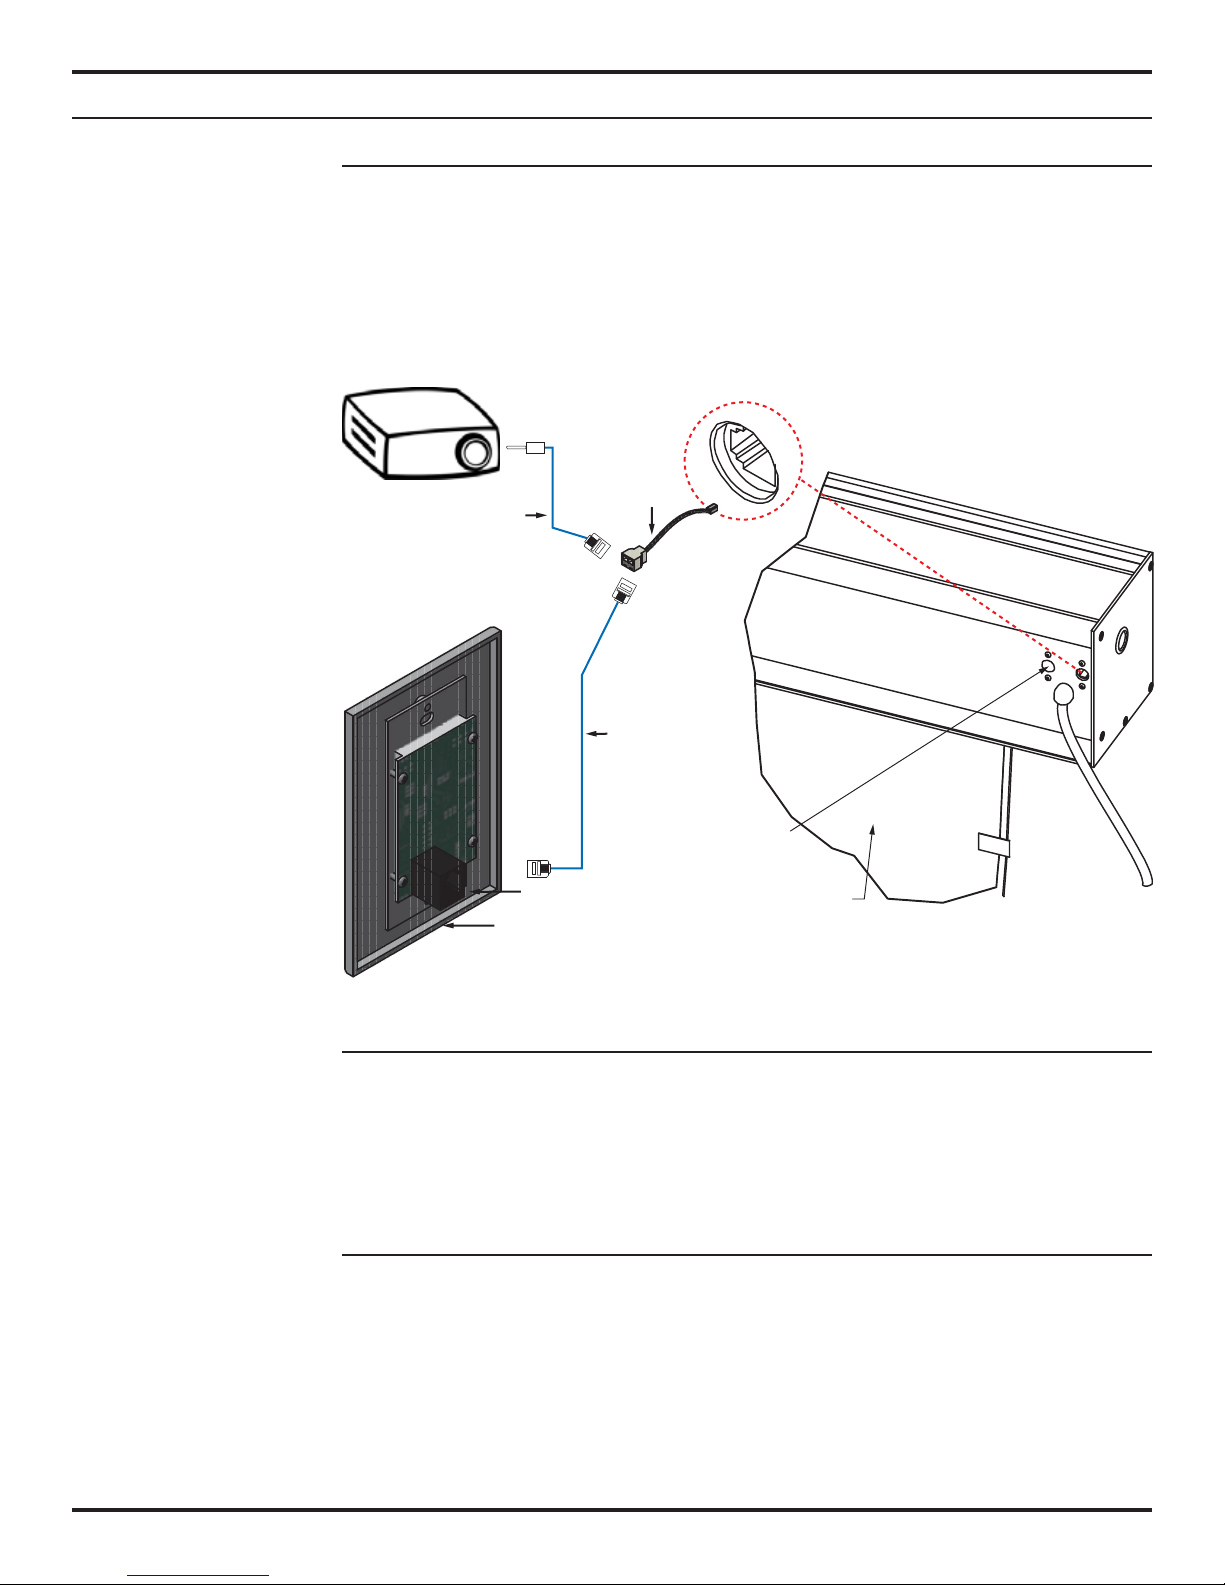
STANDARD CONTROL - KEYPAD & PROJECTOR TRIGGER CONTROL
Making the Connections
1. Connect the RJ25 cable splitter to the RJ25 jack in the Cima unit.
2. Connect the RJ25 cable and projector trigger cable to each jack in the splitter. (Note:
projector trigger cable not provided – the installer needs to make the cord from a RJ25
cord, cut one end off and add the mono plug onsite.)
3. Connect the other end of the RJ25 cable and trigger cable to the jack on the projector
and keypad.
PROJECTOR
TRIGGER CABLE
(NOT INCLUDED)
RJ25 JACK
KEYPAD - BACKSIDE
Keypad Operation
RJ25
SPLITTER
RJ25 JACK
RJ25 CABLE
ADDITIONAL
RJ25 JACK FOR
OPTIONAL CONTROLS
SCREEN
(BACKSIDE)
Figure 8: Keypad & Projector Connection
Press the "Down" button once and the Cima screen will automatically extend fully to
its pre-set limit, and then will power itself off. Press the "Up" button once and the
Cima screen will automatically retract back into the case and power itself off. If a
custom position is desired, simply press the "Stop" button at any time during the
screen's deployment or retraction. (See Figure 6)
Projector Operation
When the projector is turned on or off a signal is sent to the controller within the
motor and will trigger the screen to move up or down.
If there is a sudden change in direction, the motor is paused for 1/2 second before
reversing direction. This is to prevent strain on the motor mechanism, and to prevent
damage to any material controlled by the motor. Relays are automatically
de-energized after 120 seconds of operation to reduce power consumption.
© 2015 Stewart Filmscreen Corporation
11Cima Below Ceiling ElectriScreen: Owner’s Manual
Page 12
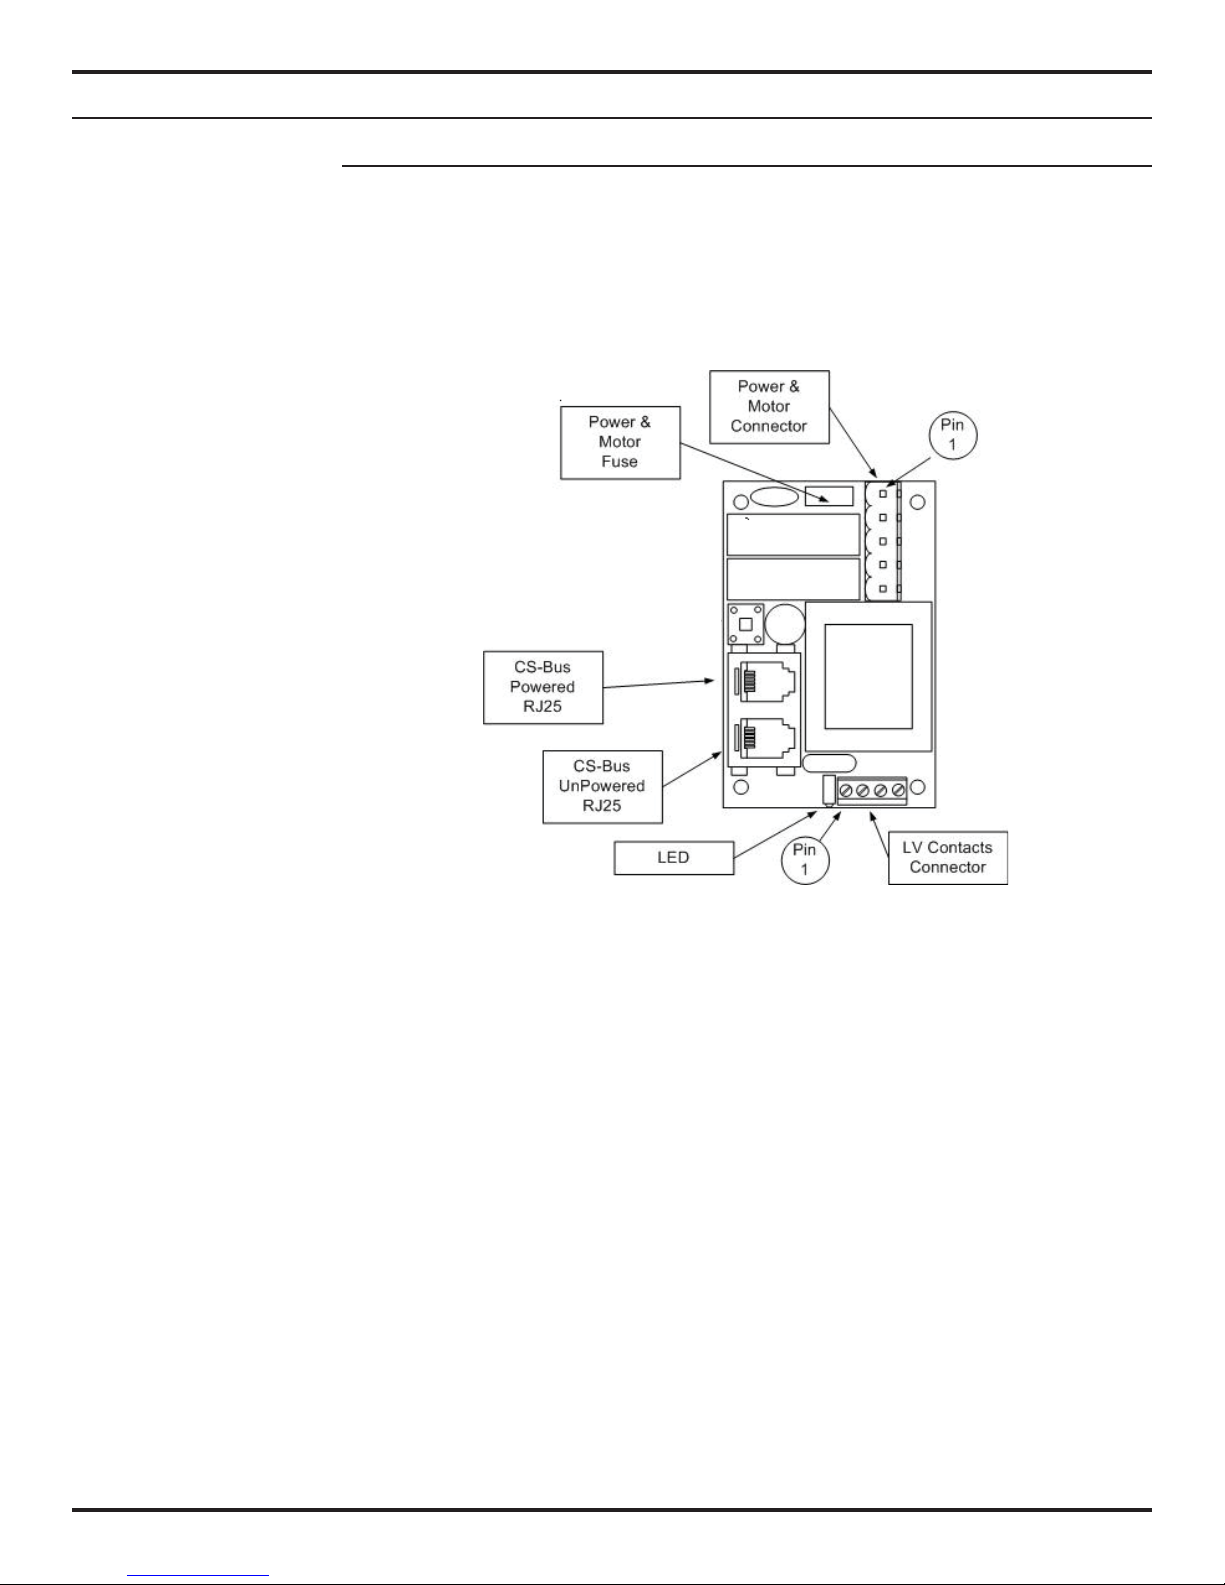
OPTIONAL CONTROLS - CIMA-LINK CONTROLLER DESCRIPTION
Description
The optional Cima-Link Controller (IMC-100C) is a state-of-the art bi-directional
communication AC motor controller designed to control your Cima projection screen
and integrate with optional infrared remote, additional Cima screens, and 3rd party
applications. Up to 255 Cima ElectriScreens can be linked together on any one span
when connected together via the optional Cima-Link RS-232 Serial Package or
Cima-Link Ethernet Package.
12
Figure 9: Cima-Link Controller (Located Inside Case)
Note: The Cima-Link Controller is installed at the factory when ordered with a screen. In
the event of an aftermarket installation, contact factory for instructions for mounting the
controller. Call Toll-Free 800-762-4999 or 310-784-5300.
© 2015 Stewart Filmscreen Corporation
Page 13
E
E
CONN
(S
INFRARED EYE
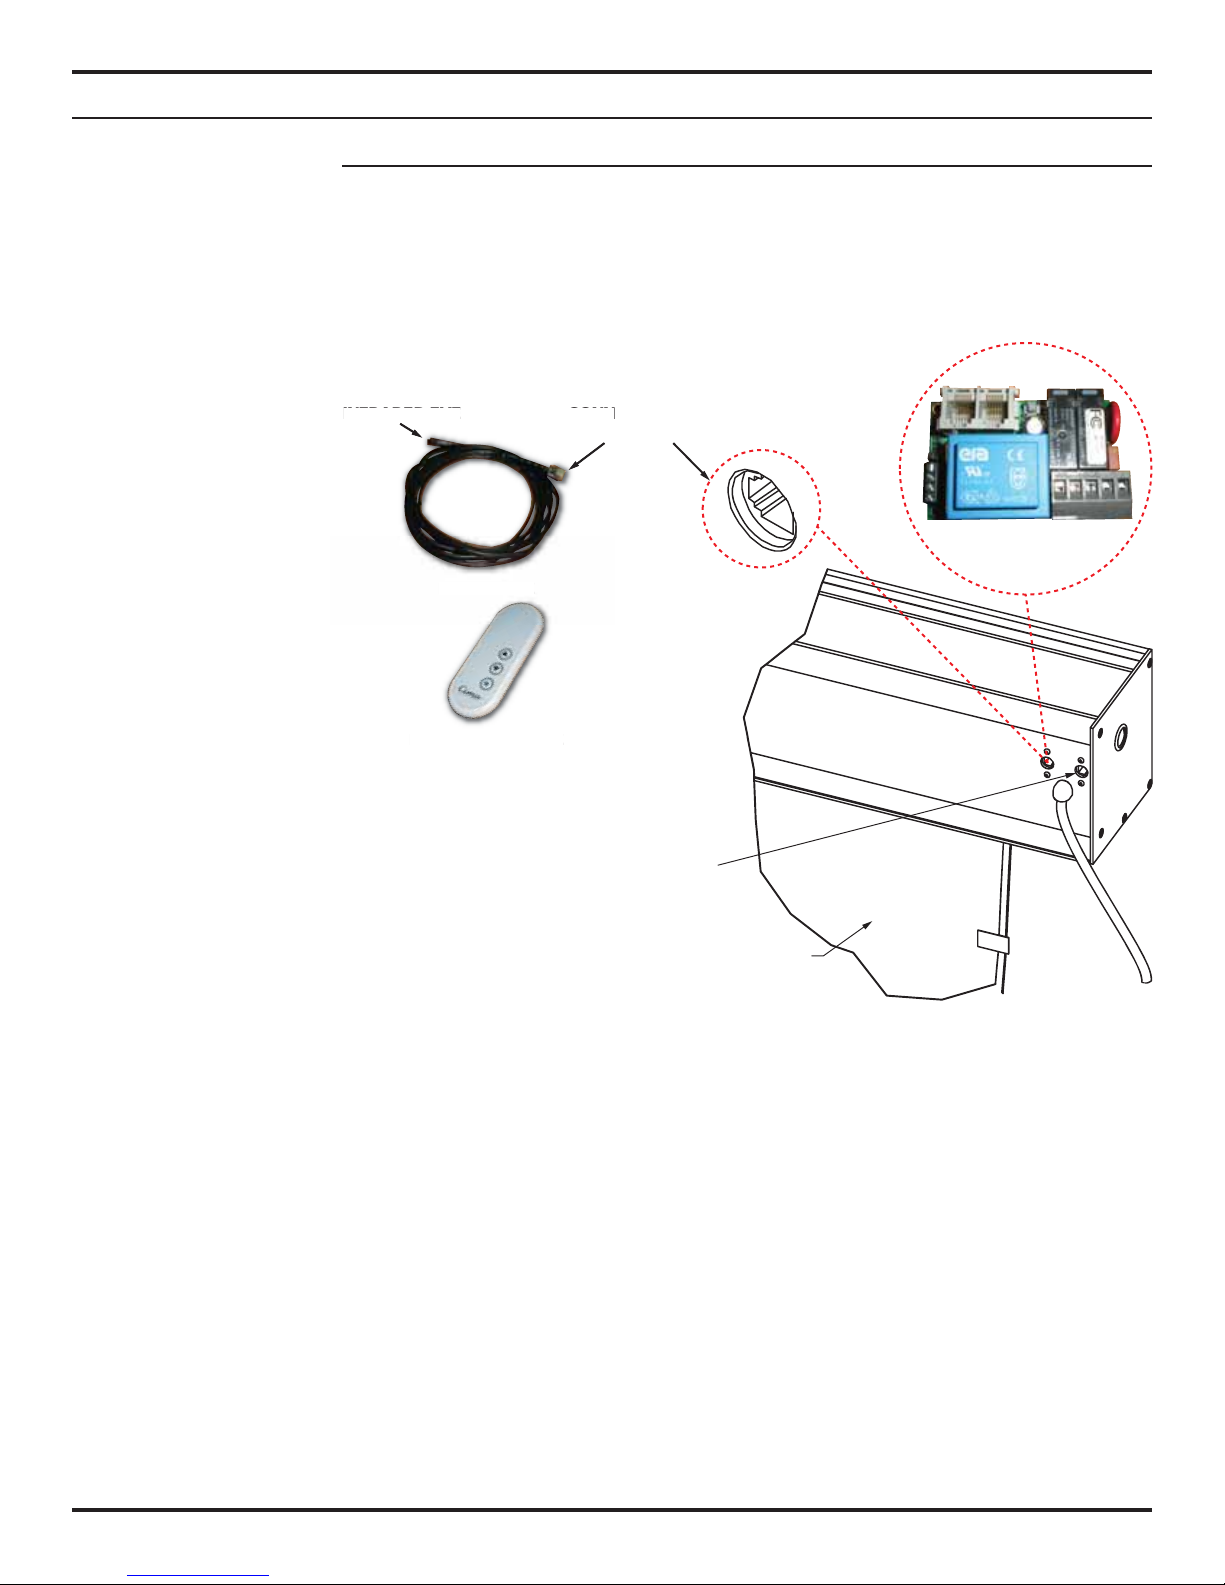
OPTIONAL CONTROL - CIMA-LINK INFRARED PACKAGE CONNECTION
Making the Connection
1. Connect the RJ25 cable to the right RJ25 jack located in the back of the Cima unit.
2. Place infrared eye in line of sight of remote.
Note: The maximum length of the RJ25 cable shall not exceed 50’.
INFRARED EYE
RJ25 CABLE
RJ25 CABL
INFRARED REMOTE
INFRARED REMOT
CONNECT CABLE
(STEP 1)
RJ25 JACK FOR
STANDARD
CONTROLS
RJ25 JACK
SCREEN
(BACKSIDE)
CIMA-LINK
CONTROLLER
LOCATED
INSIDE CASE
Figure 10: Cima-Link Infrared Package Connection
© 2015 Stewart Filmscreen Corporation
13Cima Below Ceiling ElectriScreen: Owner’s Manual
Page 14
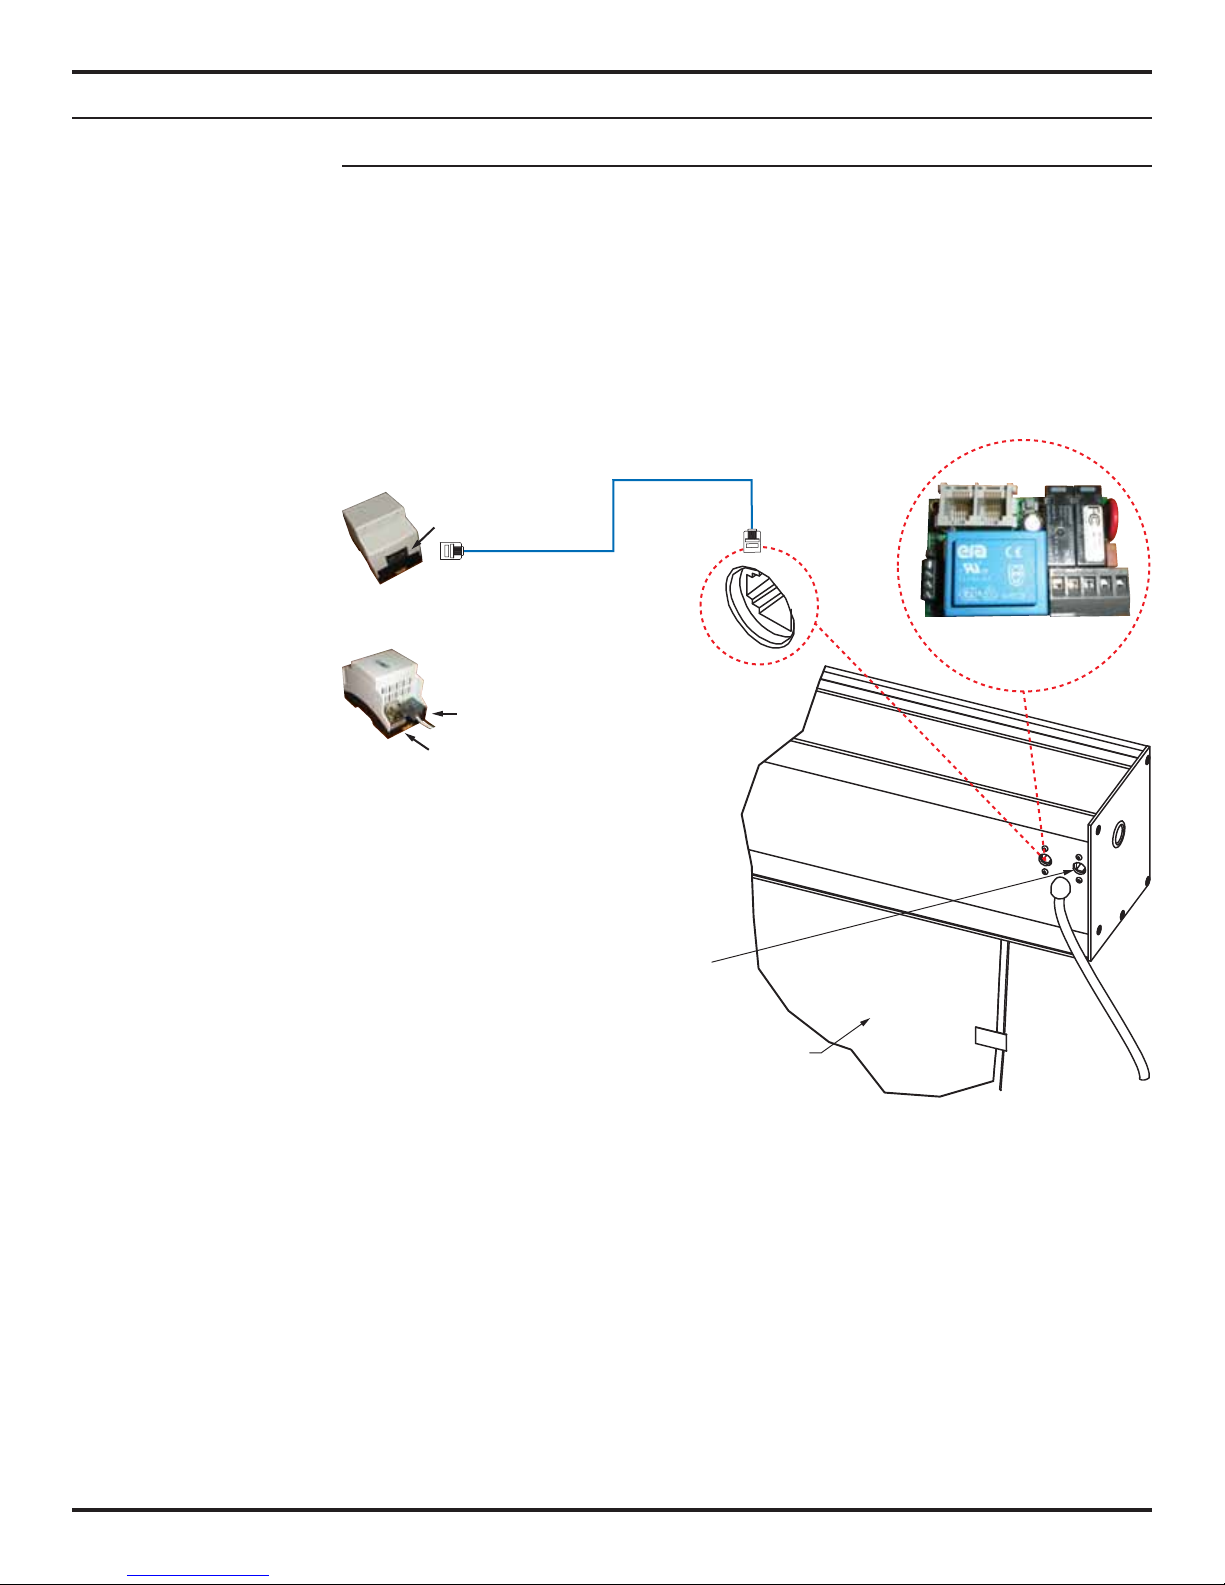
OPTIONAL CONTROL - CIMA-LINK ETHERNET PACKAGE CONNECTION
Making the Connection
1. Connect the RJ25 cable to the right RJ25 jack located in the back of the Cima unit.
2. Place the other end of the RJ25 cable to the RJ25 jack in the IP device.
3. Place the RJ45 cable in the RJ45 jack in the IP Device.
4. Place the other end of the RJ45 cable in the end-user device.
Note: The maximum length of the RJ25 cable shall not exceed 50’.
RJ25 CABLE
RJ25 JACK
IP DEVICE
(FRONT)
RJ25 JACK
POWER
SUPPLY
RJ45 JACK
IP DEVICE
(BACK)
CIMA-LINK
CONTROLLER
LOCATED
INSIDE CASE
RJ25 JACK FOR
STANDARD
CONTROLS
SCREEN
(BACKSIDE)
Figure 11: Cima-Link Ethernet Package Connection
© 2015 Stewart Filmscreen Corporation
14
Page 15
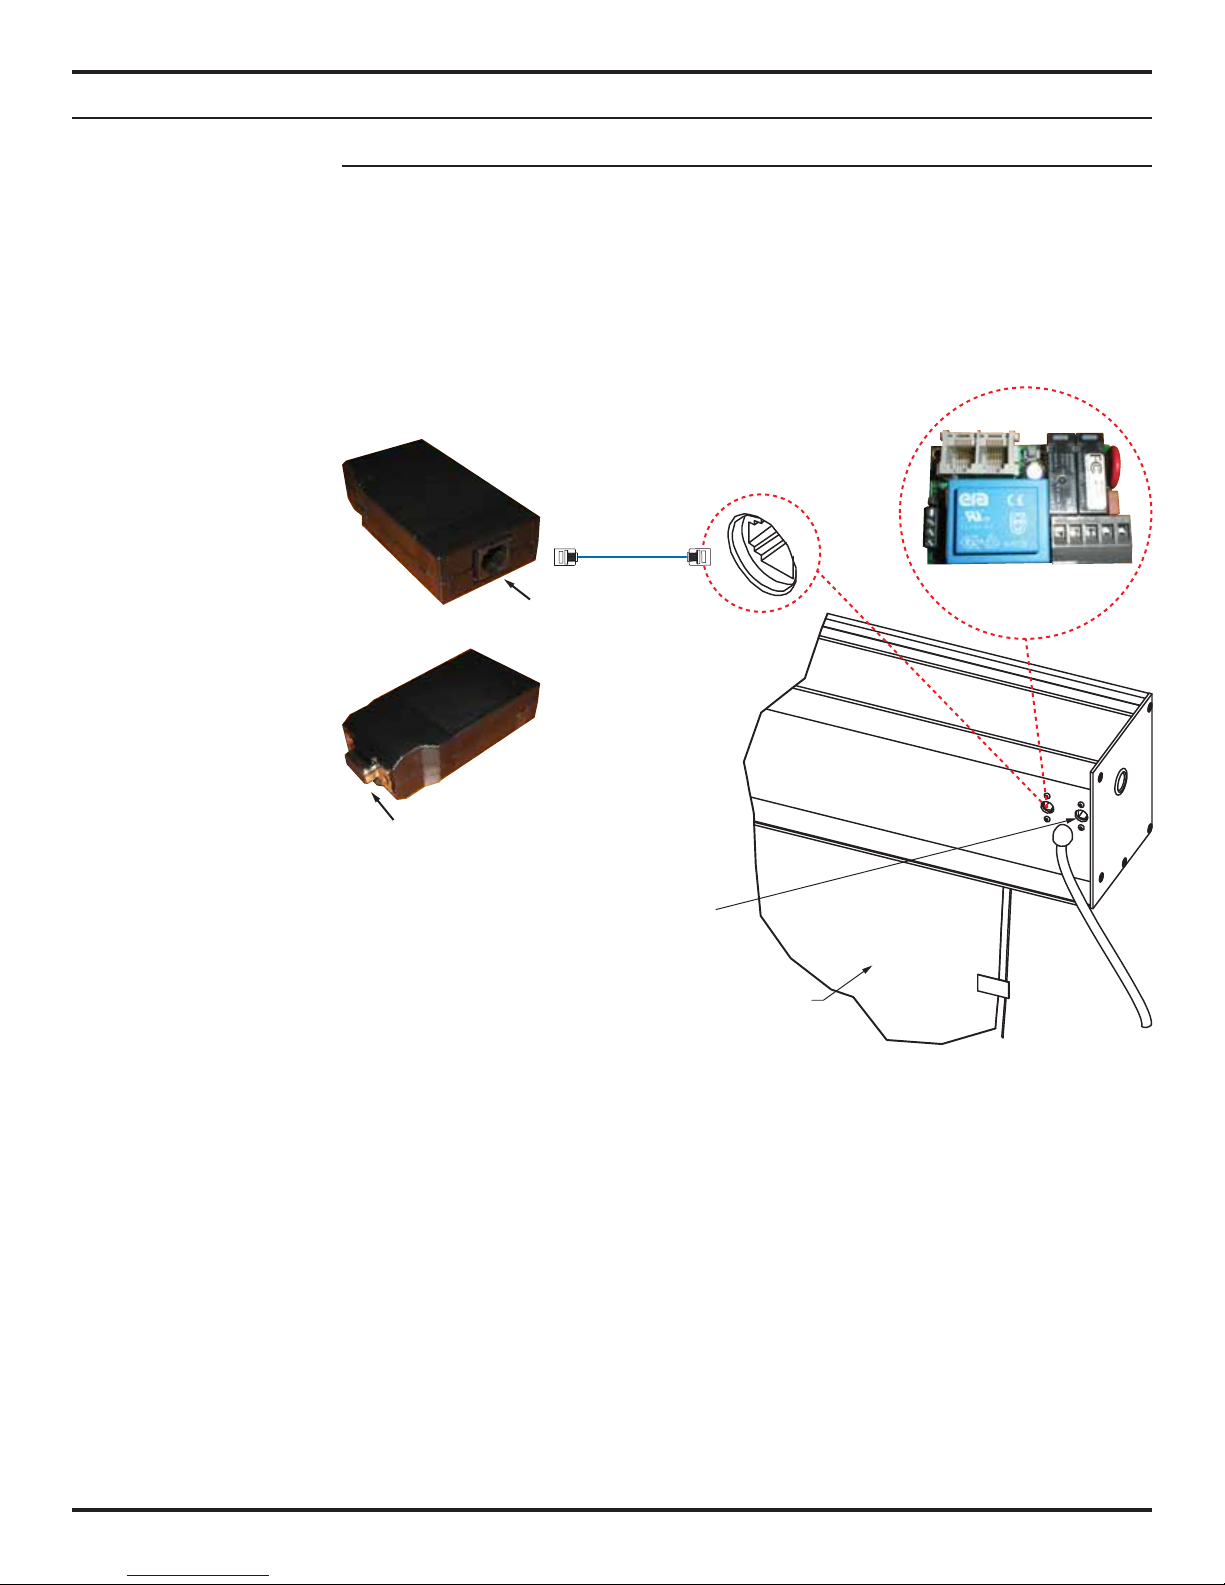
OPTIONAL CONTROL - CIMA-LINK RS232 PACKAGE CONNECTION
Making the Connection
1. Connect the RJ25 cable to the right RJ25 jack located in the back of the Cima unit.
2. Place the other end of the RJ25 cable to the RJ25 jack in the RS232.
3. Connect the 9-pin end of the RS232 to the 9-pin jack in the end-user device.
Note: The maximum length of the RJ25 cable shall not exceed 50’.
RJ25 CABLE
RJ25 JACK
RS232
RJ25 JACK
CIMA-LINK
CONTROLLER
LOCATED
INSIDE CASE
RS232
9-PIN
CONNECTS
RJ25 JACK FOR
STANDARD
CONTROLS
SCREEN
(BACKSIDE)
Figure 12: Cima-Link RS232 Package Connection
Note: For RS-485 connection protocol, installer may need to provide an adapter to interface
with the control system. This adapter is not included.
© 2015 Stewart Filmscreen Corporation
15Cima Below Ceiling ElectriScreen: Owner’s Manual
Page 16
OPERATING THE SCREEN
Description
The method you use to raise and lower the screen depends on the type of switch
control device you have selected.
When you lower or retract the screen, it will stop at its preset limit. If an obstacle
(such as a person or furniture) is in the path of the screen as it is lowered, use the
switch control to stop the screen's motion (it will not automatically stop if it hits an
obstacle).
The motor is designed to be used for short operations such as lowering the screen
in preparation for viewing. The motor is not designed for continuous duty. If the motor
operates continually for more than a few minutes, it may automatically shut off to
prevent damage from overheating. If the motor occasionally needs to be run more
than normal, for example during initial setup and positioning, allow time for the motor
to cool down.
In general, when the screen is not in use, you should store it in the fully retracted
position.
Caution
Do not operate the motor when any of the following occurs:
♦ The unit emits any smoke, heat, abnormal noise or unusual odor.
♦ The unit is damaged in some way, such as damage from a water leak.
If any of these situations occurs, call a qualified service person.
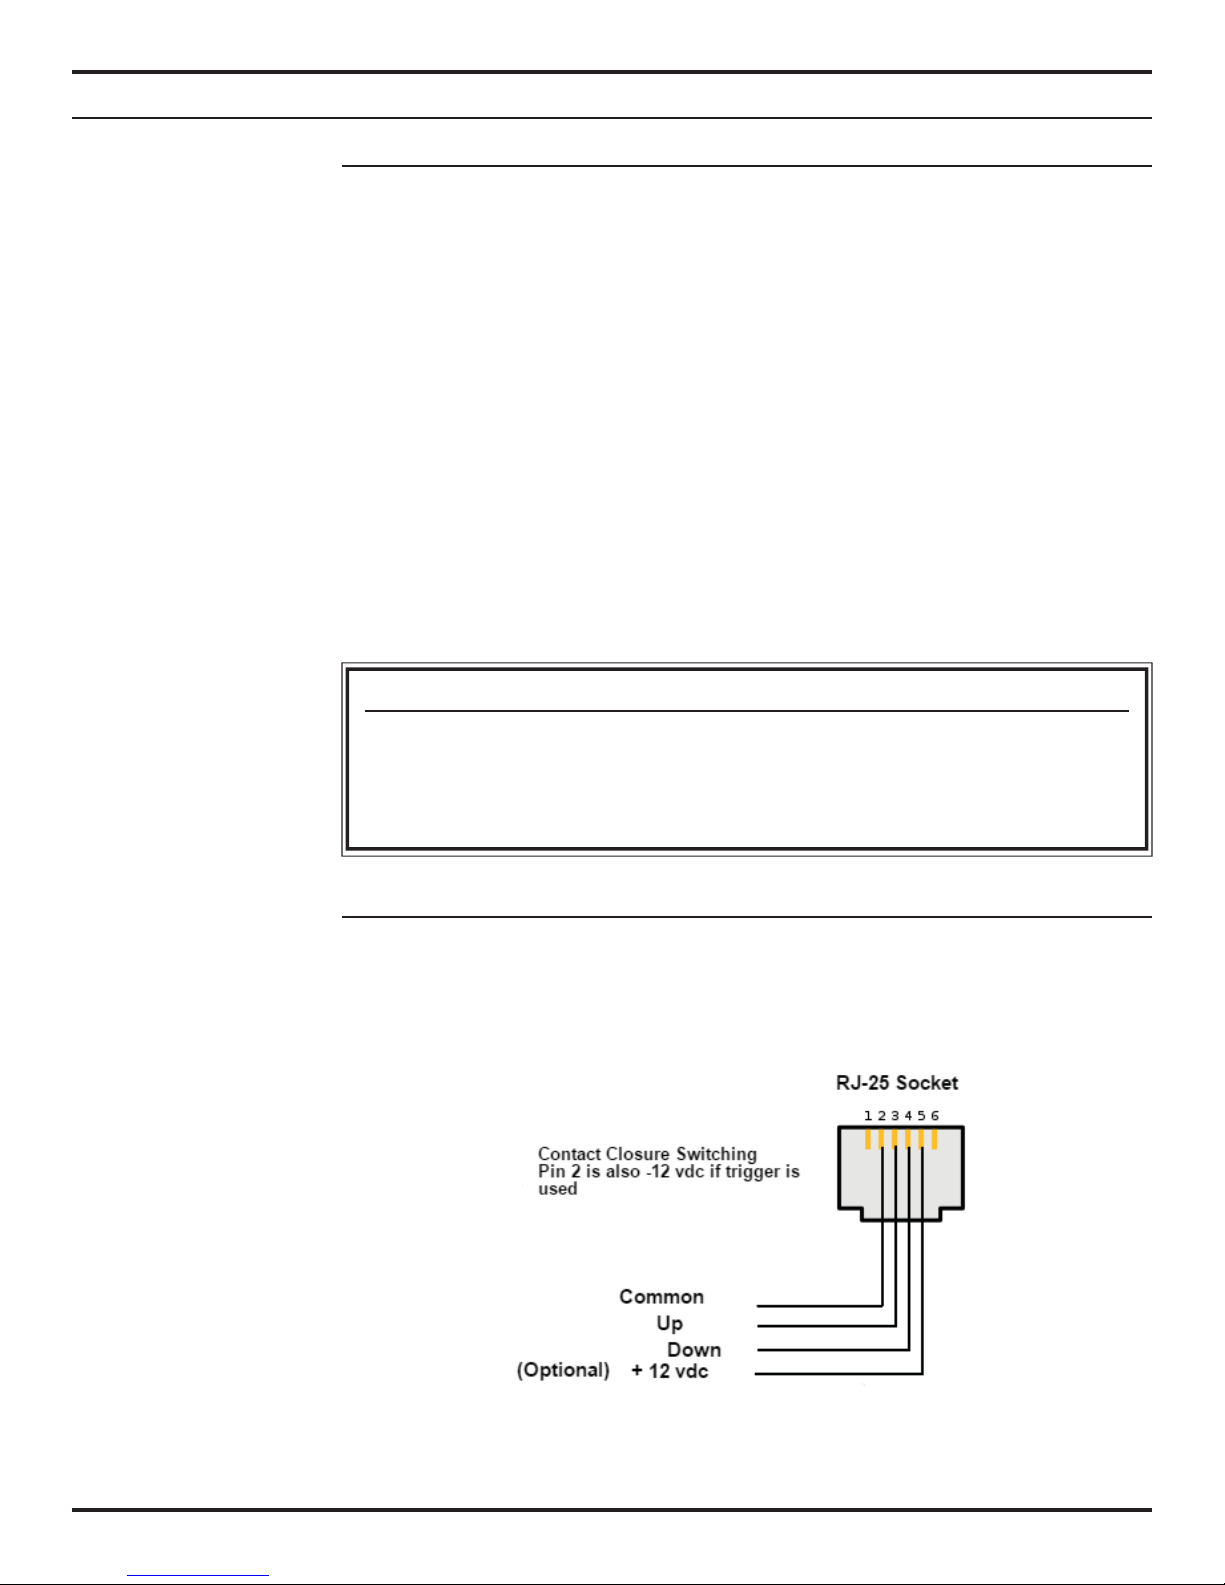
Switch & Trigger Wiring
The 3-button low-voltage keypad operates with only 3 conductors; common, up &
down. The “Stop” function shorts both directions internally to common. You can use
both switching functions simultaneously by simply connecting a splitter to the Cima
RJ Input jack. The trigger input is only a 2 conductor connection.
16
Figure 13: Pinout Diagram
© 2015 Stewart Filmscreen Corporation
Page 17
ADJUSTING THE SCREEN EXTENSION
Caution
Improper adjustment of the limit switches can cause irreparable damage to the
screen itself, resulting in voiding the factory warranty.
Description
The extension and retraction limit switches have been preset at the factory. In
general, we advise you to avoid readjusting these switches.
In some cases, to enable proper alignment of the displayed image on the screen,
you may need to adjust the extension of the screen. If adjustment to the extension is
necessary, carefully follow these instructions.
Warning!
The screen is fully retracted when the batten is flush with the bottom of the
case. Do not attempt adjustments with the yellow retraction (UP) limit switch
that will further retract the screen. Incorrect adjustment of the switch will
cause severe screen damage. Please consult the factory if you have any
questions.
Adjusting the Screen Extension
You can increase the extension of the screen up to 3" (7.5 cm) past the factory
preset stop, or you can decrease the extension by approximately 4-6" (10 - 15 cm)
from the factory preset stop. Do not attempt to modify the screen extension beyond
these recommended amounts.
The limit switches are located on the left side (audience left) of the screen roller tube
inside the case.
To increase the screen's fully extended (screen down) stop position:
1. Lower the screen to its current stop position.
2. Locate the white extension (down) limit switch on the left side of the screen tube
(audience left). Use a small electrician’s style screwdriver or a 5/32” (.4 cm) hex
wrench to turn the switch in a counterclockwise direction. If the power is still on, the
screen will drop incrementally as the switch is turned.
Note: One complete turn of the switch will make approximately a 3/4" (2 cm)
change in the screen's stop position.
© 2015 Stewart Filmscreen Corporation
17Cima Below Ceiling ElectriScreen: Owner’s Manual
Page 18

ADJUSTING THE SCREEN EXTENSION (CONTINUED)
To decrease the screen extension:
1. Lower the screen until it is extended about halfway down.
2. Locate the white extension (down) limit switch on the left side of the screen tube
(audience left). Use a small electrician’s style screwdriver or a 5/32” (.4 cm) hex wrench
to turn the switch in a clockwise direction.
Note: One complete turn of the switch will make approximately a 3/4" (2 cm) change in
the screen's stop position.
3. Activate the screen in the down direction until it reaches the newly reduced stop
position. Repeat this procedure until the desired stop position is reached.
Once you have made the adjustment, whenever you lower the screen, it will
automatically stop at the new position.
Note: The yellow "UP" limit switch is to stop the motor in the retracted position. We
advise not adjusting this switch as to avoid possible screen damage should the
switch get mis-adjusted.
It is recommended that you make a note of any changes made to the factory preset.
18
© 2015 Stewart Filmscreen Corporation
Page 19
ADJUSTING THE SCREEN TENSION
To correctly adjust the batten setting position and side line length on your Cima
screen, it may be necessary to loosen the existing side line attachment screws. After
the adjustment has been completed, the batten weight will be increased on the
screen while decreasing the side line tension.
This procedure can improve the overall flatness of the screen primarily in the lower
section of the image area. In many instances, the screen's factory deployment
setting has been reduced at the site and therefore this batten adjustment is
necessary.
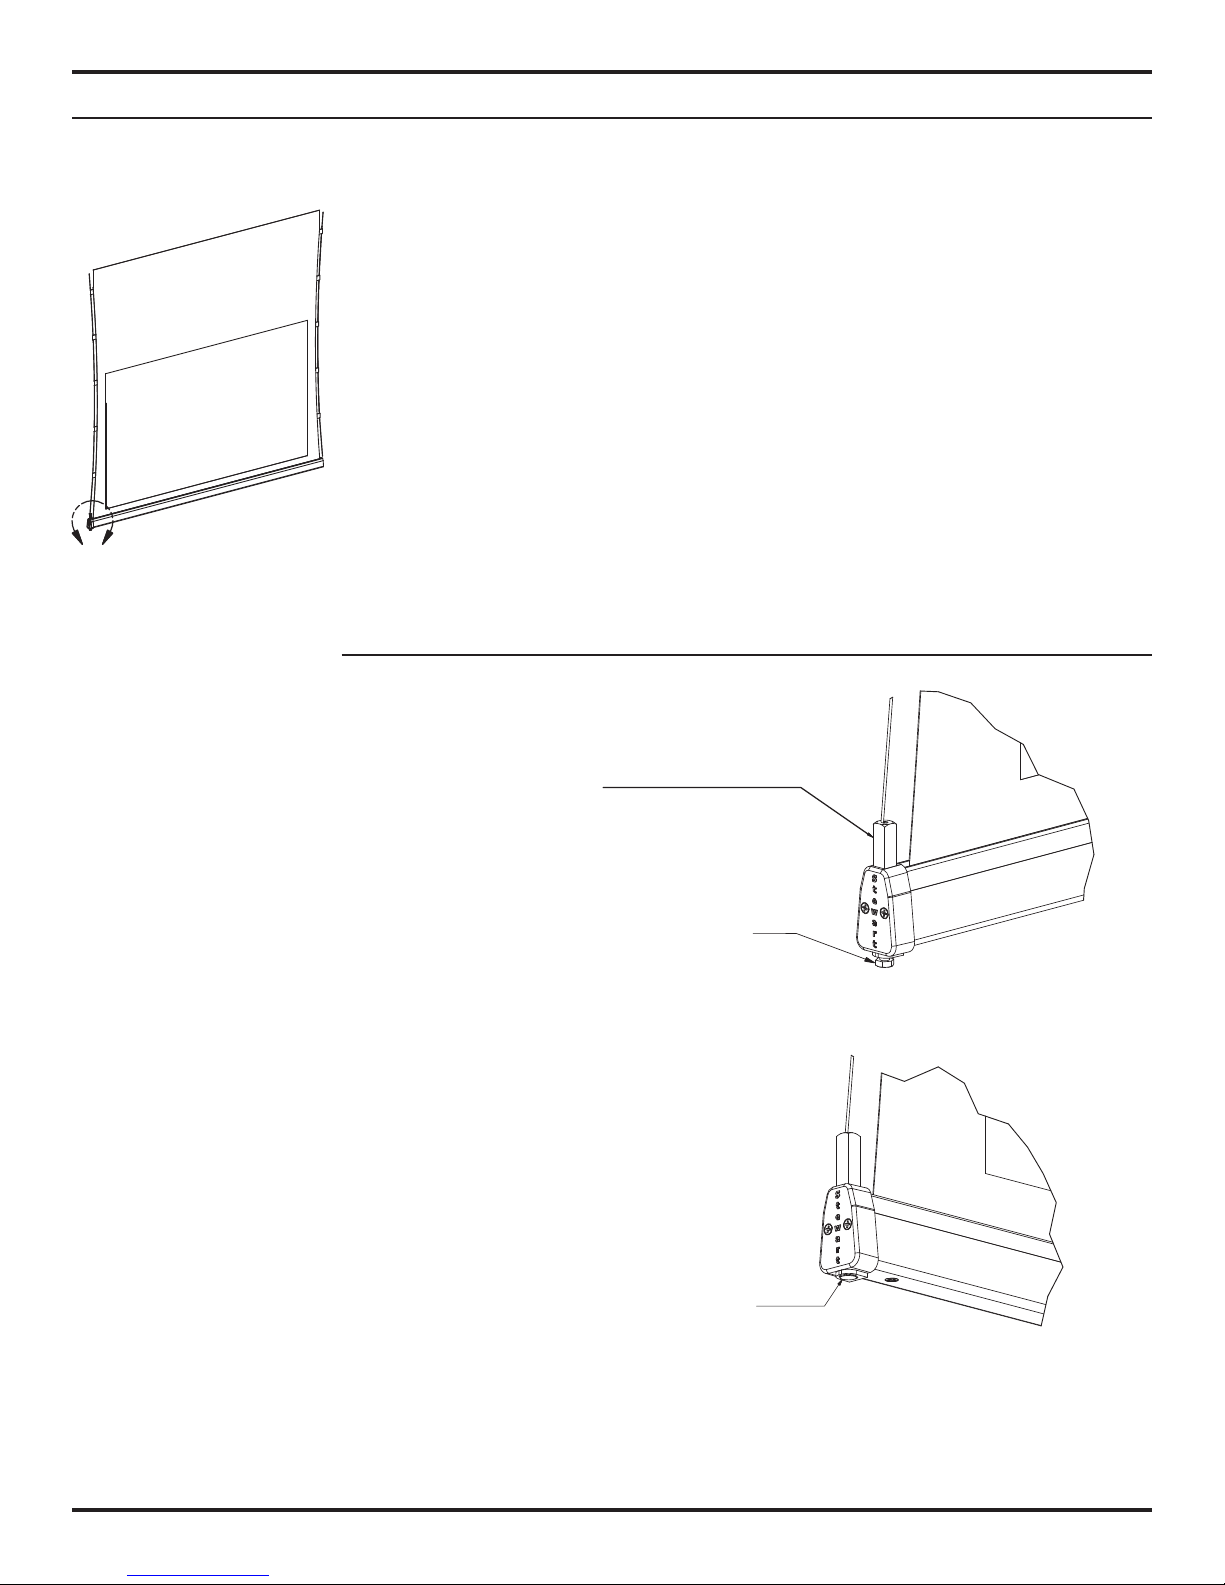
The objective is to thread the screw into the ferrule just enough to get a very low
amount of side line tension (approximately 3 to 4 turns). The side lines will now have
less tension which is desirable. The result is that more batten weight will be
distributed on the screen once this adjustment is completed. You should see a slight
C
Figure 14: Cima Screen
improvement when finished; however, it will take some time for this adjustment to
fully take effect (stretching screen) thereby eliminating any wrinkles, waves, or
puckers.
Screen Tension Adjustment Procedure
1. Push the ferrule down.
2. Turning the screw counter-clockwise
will lengthen the side line, adding batten
weight / tension to the screen. Turning it
clockwise will shorten the side line and
decrease batten weight / tension on the
screen.
3. Align the bottom screw to the recessed
pocket and release it to move the ferrule
back in place and complete adjustment.
Detail C: Batten Overview
Detail C: Batten Underside
© 2015 Stewart Filmscreen Corporation
19Cima Below Ceiling ElectriScreen: Owner’s Manual
Page 20

SCREEN CARE AND CLEANING
With reasonable care, you may expect many years of dependable use of your
Stewart projection screen.
We encourage you to keep your screen clean. To protect your screen when it is not
in use, store it in the fully retracted position.
Avoid getting any foreign material on the screen, as cleaning may prove very
difficult. It may not be possible to remove scratches, paint, ink, etc.
General Maintenance
Treat your screen surface delicately. Special attention to these instructions should
be followed when cleaning.
♦ A draftsman-style brush may be used to lightly whisk away any loose dirt or dust
particles. (This type of brush is usually available at office supply stores.) Stewart
Filmscreen has an optional screen cleaning kit that contains the proper type of
brush. Contact your dealer if you would like to obtain this cleaning kit.
♦ Particles left on the screen when it is retracted into the case may form an
impression on the screen surface. Periodically wipe the back of the screen with a
clean damp cloth.
♦ For tougher spots, you can make a cleaning solution using a water-based detergent and
warm water. To make the solution, mix one part Simple Green, 409, or other water based
industrial cleaner with three parts warm water. Moisten a clean cotton cloth or Q-Tip with
this solution, moisten the stained area, and gently lift off the stain. Never use an
aggressive scrubbing action as you could damage the screen surface by removing the
optical coating. Remoisten the area with clean water and dab dry with a clean sponge or
cotton cloth. Any residual watermarks will evaporate on their own in a few minutes.
Do not use any other cleaning materials on the screen. Contact the factory if
you have questions about removing difficult spots.
Weekly Maintenance
To maximize the longevity of your Cima screen we recommend the screen be
deployed overnight at least once a week.
If using a 3rd party control system to deploy your Cima screen, you may be able to
program the 3rd party system to automatically deploy your Cima screen once a
week.
Replacement Parts & Service
No user-serviceable parts are contained within the unit. Contact your dealer or the
factory if you require part replacement or service.
20
© 2015 Stewart Filmscreen Corporation
Page 21
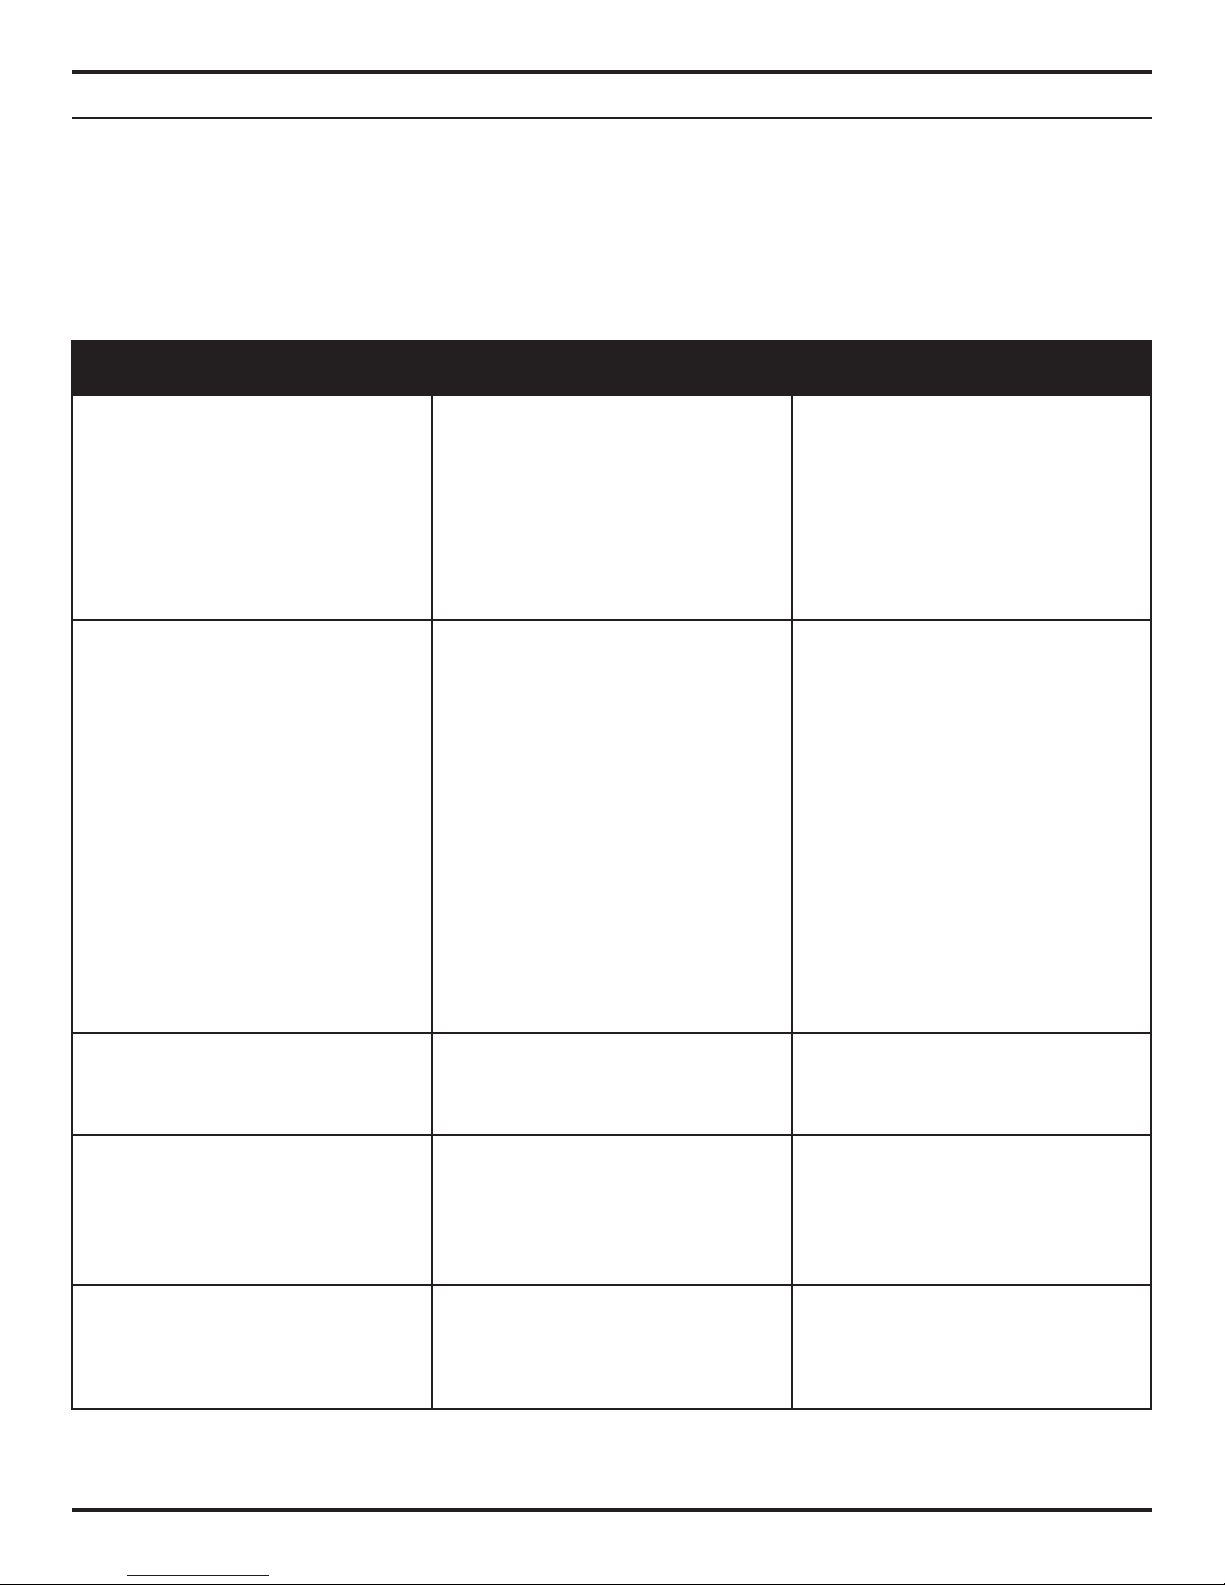
TROUBLESHOOTING
Refer to the following guidelines if you encounter a difficulty in the operation of your Cima by Stewart Filmscreen
product. Problems related to electrical or motor function may require a qualified service person or electrician.
Should you have a problem that is not addressed here, call Stewart Filmscreen Corporation (1-800-762-4999).
Problem Description Probable Cause Action To Take
Screen won’t operate.
Screen won’t roll up or down (even
though power is available).
No AC power available. Check to see if the circuit breaker has
switched off. Reset if needed.
Check outboard switching apparatus.
Check voltage availability.
Contact an electrician.
Bad connection at switch.
Polarity of STI / IMC line may be bad.
Have an electrician or qualified service
person check the connection as
follows:
♦ If you have a high voltage
control switch, check switchline
connections.
♦ If you have a low voltage control
unit, check switch-line connections.
♦ Check STI / IMC module's line
connections, or the miniplugs at the
screen input or projector output.
Check 12V DC line for correct polarity.
Contacts may be sticking. Tap relay to
free contacts.
Screen roller chatters when power is
activated.
Unit hums in up mode. (Screen has
already retracted.)
Screen drops when up direction is
activated (grinding noise occurs).
Can be caused by voltage drop, bad
connections, or a defective switch.
The screen batten is retracting too far
into the case. Failure to correct can
damage motor and screen. Do not use
the unit until this problem is resolved.
Drop in voltage. Screen motor requires full voltage.
Have an electrician or qualified service
person check all hookups including all
outboard wiring.
Have a qualified service person adjust
the yellow UP limit switch. Turn the
adjusting screw clockwise.
Have an electrician or qualified service
person check available voltage.
© 2015 Stewart Filmscreen Corporation
21Cima Below Ceiling ElectriScreen: Owner’s Manual
Page 22
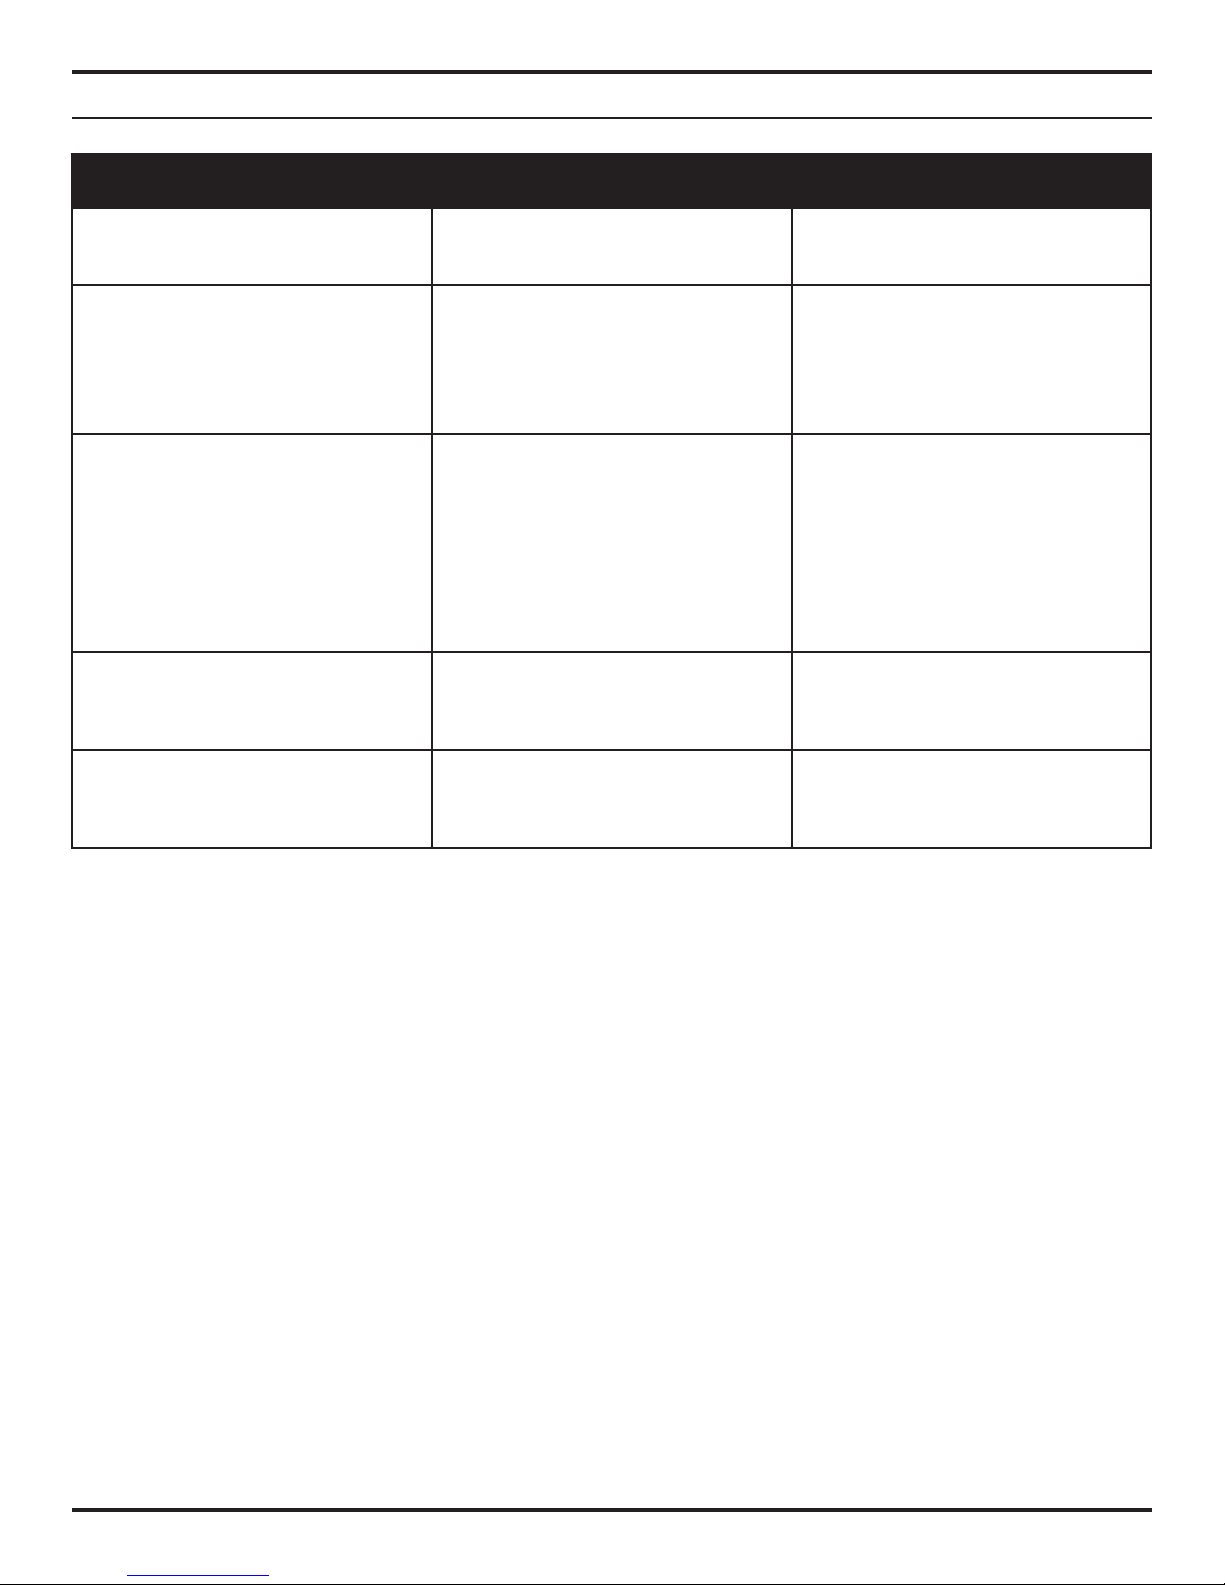
TROUBLESHOOTING (CONTINUED)
Problem Description Probable Cause Action To Take
Screen continues past bottom stop
position.
Batten retracts too far into case.
Motor shuts off. Motor has been in use
for more than 2 minutes.
Dirt, fingerprints, marks, etc. on
screen surface.
Indentations appear on screen
surface.
White limit switch is out of adjustment. Readjust the white DOWN limit switch.
See pp. 18-19 of this manual.
Y ellow limit switch is out of adjustment.
Failure to correct can damage motor
and screen. Do not use the unit until
this problem is resolved.
Motor is designed for short operations
(lowering and retracting), not
continuous duty. Longer operation,
causes the motor to overheat and shut
off.
Improper handling of screen. Lightly brush off or use a mild deter-
Debris or particles adhering to screen
due to static cling.
Have a qualified service person readjust the yellow UP limit switch.
Allow the motor to cool down.
Complete cooling can take an hour or
more. Heat gain is cumulative and
takes time to dissipate. If motor use is
initiated before it has cooled
completely, the motor will shut down
again when it reaches maximum
temperature.
gent solution with a clean rag or cotton
swab.
Check back of screen; gently brush
debris away with a draftsman-style
brush.
22
© 2015 Stewart Filmscreen Corporation
Page 23
LIMITED ONE YEAR WARRANTY
STEWART FILMSCREEN CORPORATION (Stewart) warrants its Cima by Stewart Filmscreen products to the
original purchaser only, to be free from defects in materials and workmanship for a period of one (1) year from
the date of purchase by the original purchaser or eighteen (18) months from date of manufacture, as defined in
the serial number, provided they are properly operated and maintained according to Stewart instructions and are
not damaged due to improper handling or treatment after shipment from the factory . This warranty does not apply
to equipment showing evidence of misuse, abuse, or accidental damage, including neglect caused by improper
installation (i.e. proximity to hot lights, exposure to extreme heat or cold, exposure to excessive humidity, etc.).
Stewart on-site warranty repair services are not available for this product.
Stewart’s sole obligation under this warranty shall be to repair or to replace (at Stewart’s sole discretion) the
defective part of the merchandise. This warranty expressly does not cover any costs of removal, installation,
framing, or other costs incident to replacing the screen or returning it to Stewart. Returns for service should be
made to your Stewart dealer. If it is necessary for the dealer to return the screen or part to Stewart, transportation
(freight) expenses to and from Stewart are payable by the purchaser. Stewart is not responsible for damage in
shipment. To protect yourself against damage or loss in transit, insure the product and prepay all transportation
expenses.
This warranty is in lieu of all other warranties, expressed or implied, including warranties as to fitness for use and
merchantability . Any implied warranties of fitness for use, or merchantability , that may be mandated by statute or
rule of law are limited to the one (1) year warranty period. This warranty gives you specific legal rights, and you
may also have other rights which vary from state-to-state. In no event will Stewart be liable for sums in excess of
the purchase price of the product. No liability is assumed by Stewart for expenses or damages resulting from
interruption in operation of equipment, or for incidental, direct, or consequential damages of any nature.
In the event that there is a defect in materials or workmanship of a Cima by Stewart Filmscreen, you may contact
our Customer Service Department at 1 161 W Sepulveda Blvd, Torrance, California 90502- 2797 (310-784-5300)
Toll free (800-762-4999).
IMPORTANT: This warranty shall not be valid and Stewart shall not be bound by this warranty if the product
is not operated and maintained in accordance with Stewart’s written instructions. Stewart Filmscreen
Corporation shall not be liable for any and all consequential damage(s) occasioned by the breach of any written
or implied warranty pertaining to the sale of Cima by Stewart Filmscreen product in excess of the purchase price
of the product sold.
Printed in USA. Rev. 11/13/15
resolution
23Cima Below Ceiling ElectriScreen: Owner’s Manual © 2015 Stewart Filmscreen Corporation
Page 24

1-800-762-4999 ♦ Fax (310) 326-6870
www.stewartfilmscreen.com
16103
 Loading...