

Page 1

User’s Guide
K300 Optima
User’s Manual Rev. 07.99
Page 2
WARRANTY INFORMATION
73/23/EEC modified
by 93/68/EEC
EMC Directive
EN 500082-1,1992
Immunity to
Electromagnetic
Disturbances
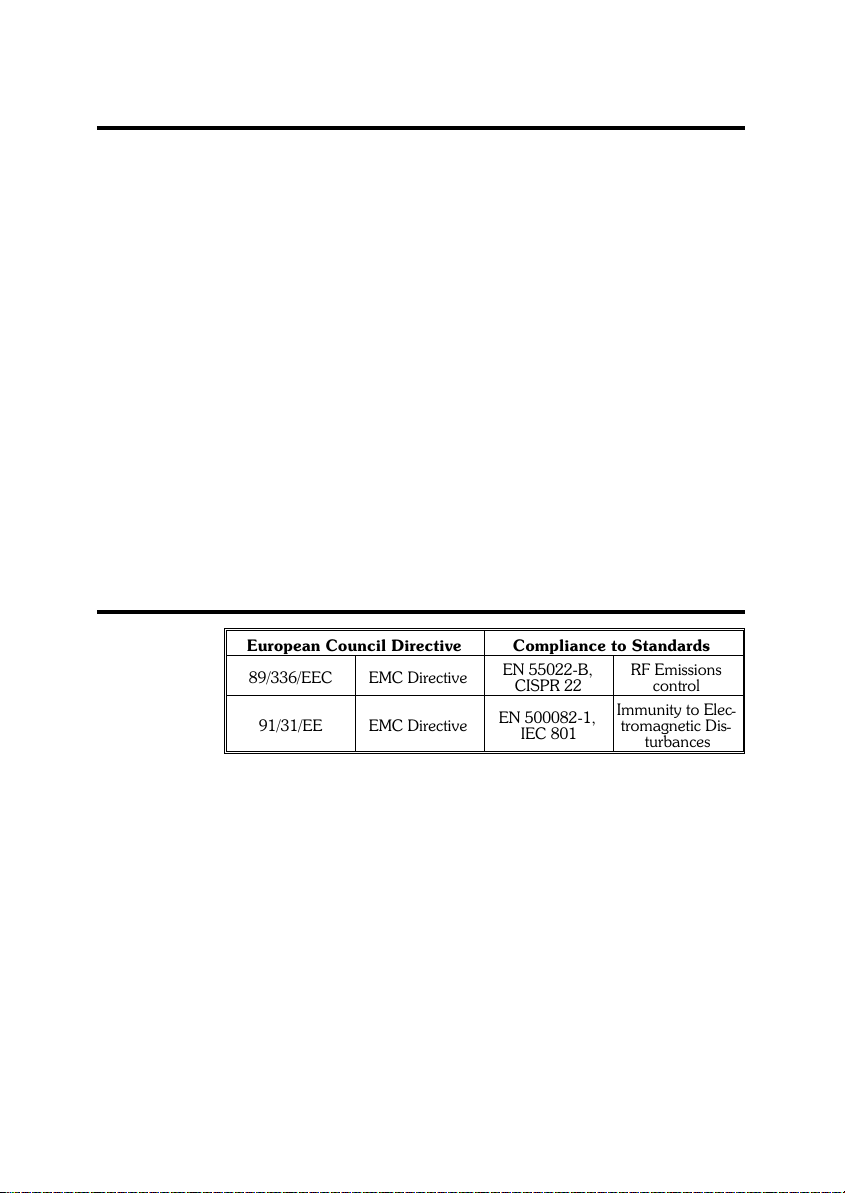
European Council Directive
Compliance to Standards
89/336/EEC
modified by
92/31/EEC and
93/68/EEC
RF Emissions
control
Low voltage
Directive
EMC Directive
EN 60950
EN 55022-B
Product safety
WE NEED TO HEAR FROM YOU!
To Establish Your Warranty Period And Provide Access To Technical Support, Send Us your
Product Registration Card Today!
CIM S.p.A. warrants the mechanism, control electronics and power supply, under normal use and
service, to be free from defects in material and workmanship for a period of twelve (12) months
from the date of purchase by the end user. CIM S.p.A. warrants the print head, under normal use
and service, to befreefrom defects in material and workmanship fora period of twelve (12) months
or 100k passes (whichever occurs first) fromthedateofpurchasebythe end user. Proof of purchase
or product registration is required. If proof of purchase or product registration cannot be estab
lished, shipment date to the original buyer (dealer or distributor) will be used to establish the war
ranty period.
Failure to exercise caution to protect the equipment from electrostatic discharge damage, adverse
temperature and humidity conditions or physical abuse, including, but not limited to, improper
packaging, shipping, service or repairs performed by personnel not authorized by CIM S.p.A. may
void the warranty. Failure to use only CIM S.p.A. approved media may void the warranty. CIM
S.p.A. will, at its option, repair or replace the equipment or any parts which are determined to be
defective within this warranty period, and which are returned to CIM S.p.A. F.O.B. factory of ori
gin.The warranty set forth above is exclusive and no other warranty, whether written or oral, is ex
pressed or implied. CIM S.p.A. specifically disclaims the implied warranties of merchantability and
fitness for a particular purpose.
DECLARATIONS OF CONFORMITY
European Council Directive Compliance to Standards
89/336/EEC EMC Directive
91/31/EE EMC Directive
EN 55022-B,
CISPR 22
EN 500082-1,
IEC 801
RF Emissions
control
Immunity to Elec
tromagnetic Dis
turbances
-
-
-
-
-
-
Supplemental Information:
This device complies with Part 15 ofthe FCC Rules. Operation is subject to the followingTwo Con
ditions: (1) This device may not cause harmful interference , and (2) this device must accept any
interference received, including interference that may cause undesired operation.
Note: This equipment has been tested and found to comply with the limits for a class A digital de
vice, pursuant to Part 15 ofthe FCC Rules. Theselimits are designed to provide reasonable protec
tion agaist harmful interference when the equipment is operated in a commercial environment.
This equipment generates, uses, and can radiate radio frequency energy and, if not installed and
used in accordance with the instruction manual, may cause harmful interference to radio commu
nications. Operation of this equipment ina residential area islikely to cause harmfulinterference in
which case the user will be required to correct the interference at his own expense.
Model: K300 Optima conforms to the following specification:
FCC Part 15, Subpart A, Section 15.107(a) and Section 15.109(a)
Class A digital device
-
-
-
-
Page 3

INTRODUCTION
Thank you for choosing the Cim K300 Optima Plastic Card Printer.
These printers producecards ideal for personalized identification, access control, visitor,
membership, promotion and luggage card, badges and tags.
This manual guides youto an efficient start up andoperation of your new Card Printer.
K300 Optima Rev.07.99 iii
Page 4
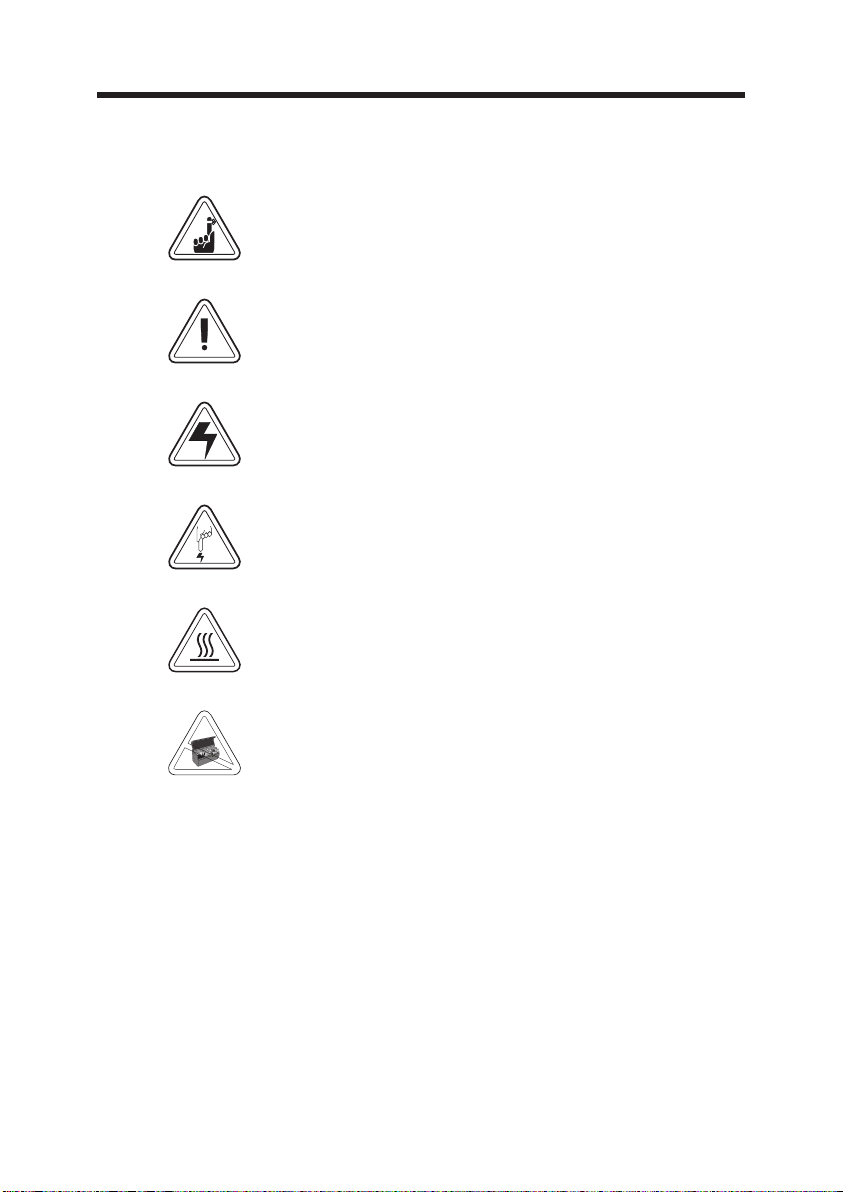
ICONS Throughout this manual, different icons high-
light important information, as follows:
Important general information
Mechanical hazard, such as one associated with
moving parts, capable of resulting in equipment
damage or personal injury.
Electrical hazard, such as an exposed voltage
point, capable of causing electrical shock and
personal injury.
An area where electrostatic discharge (ESD)
can cause component damage. Use a grounding wrist band.
Elevated temperature hazard, capable of producing a burn.
iv
Keep Card Printer clean by minimizing cover
open time.
K300 Optima Rev.07.99
Page 5

Table of Contents
ICONS.............................vi
GETTING STARTED .....................1
UNPACKING YOUR CARD PRINTER.............1
INDICATORS AND CONTROLS ...............3
PRINTER INSTALLATION ..................4
OPERATION.........................5
K300 Optima PRINTER FEATURES..............5
LOADING RIBBONS .....................6
LOADING CARDS ......................8
FEEDING ONE CARD AT A TIME ..............10
REMOVING CARD CARTRIDGE ...............10
PRINTING A TEST CARD ...................11
PRINTING A SAMPLE CARD ................13
CLEANING .........................17
CARD CLEANING CARTRIDGE ...............18
TROUBLESHOOTING ....................21
TECHNICAL SPECIFICATIONS ...............25
APPENDIX A - MAGNETIC CARD STRIPE
ENCODER .........................29
APPENDIX B - SMART CARD CONTACT STATION .....31
INTRODUCTION .......................31
K300 Optima Rev.07.99 v
Page 6

vi K300 Optima Rev.07.99
Page 7

1
GETTING STARTED
UNPACKING
YOUR CARD
PRINTER
Your K300 Optima printer ships in a carton and
protective anti-static bag. Keep all packing material in case you need to move or re-ship the
printer.
While unpacking, inspect the carton to ensure
that no damage occurred during shipping.
Please ensure that you have a clean and nearly
dust free environment for proper operation and
storage of the printer.
K300 Optima Rev.07.99 1
Page 8
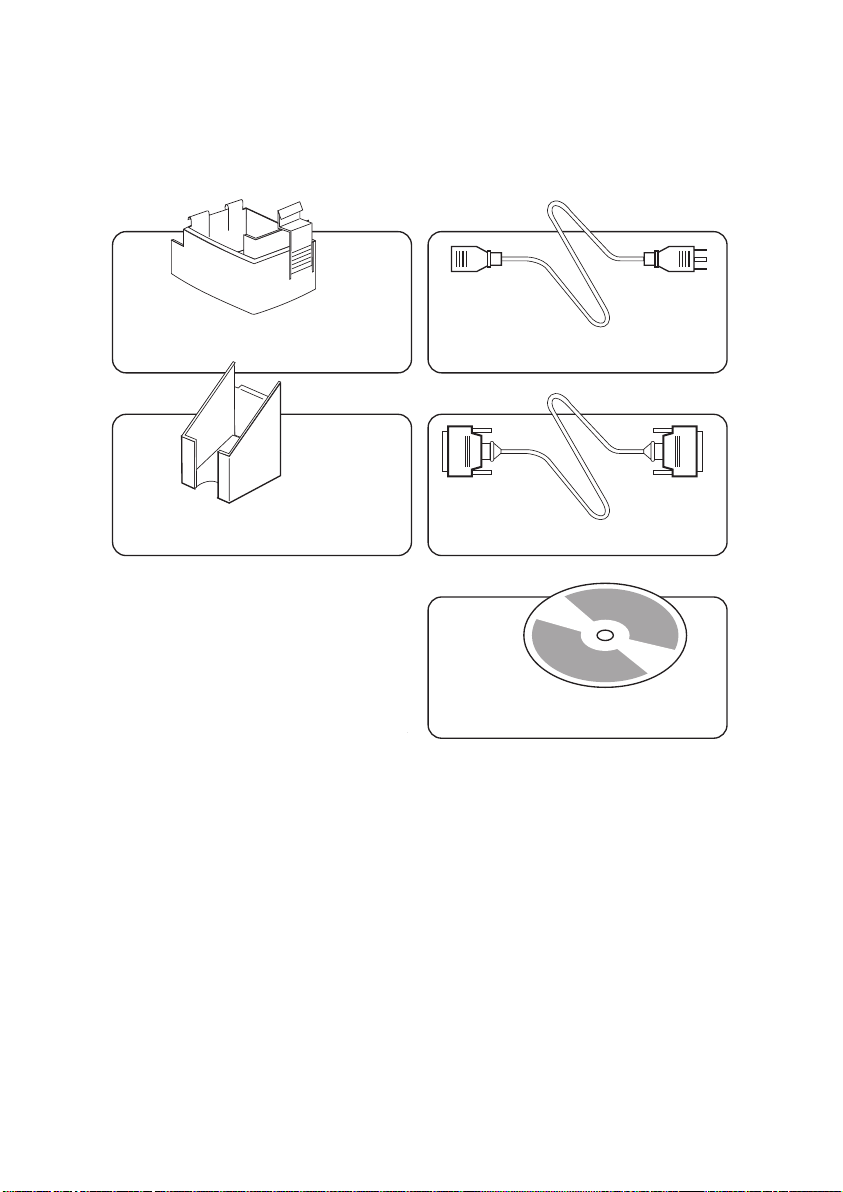
In addition to user documentation, make sure
the following items are included with your K300
Optima printer:
CARD CARTRIDGE POWER CABLE
CARD OUTPUT HOPPER
SWABS & SATURATED CLEANING CARDS
INTERFACE CABLE
CD ROM (OPTIONAL)
CARD CLEANING CARTRIDGE and PRINTER QUICK REFERENCE
(Not Shown)
If any items are missing, please contact your dealer.
2
K300 Optima Rev.07.99
Page 9
INDICATORS
AND CONTROLS
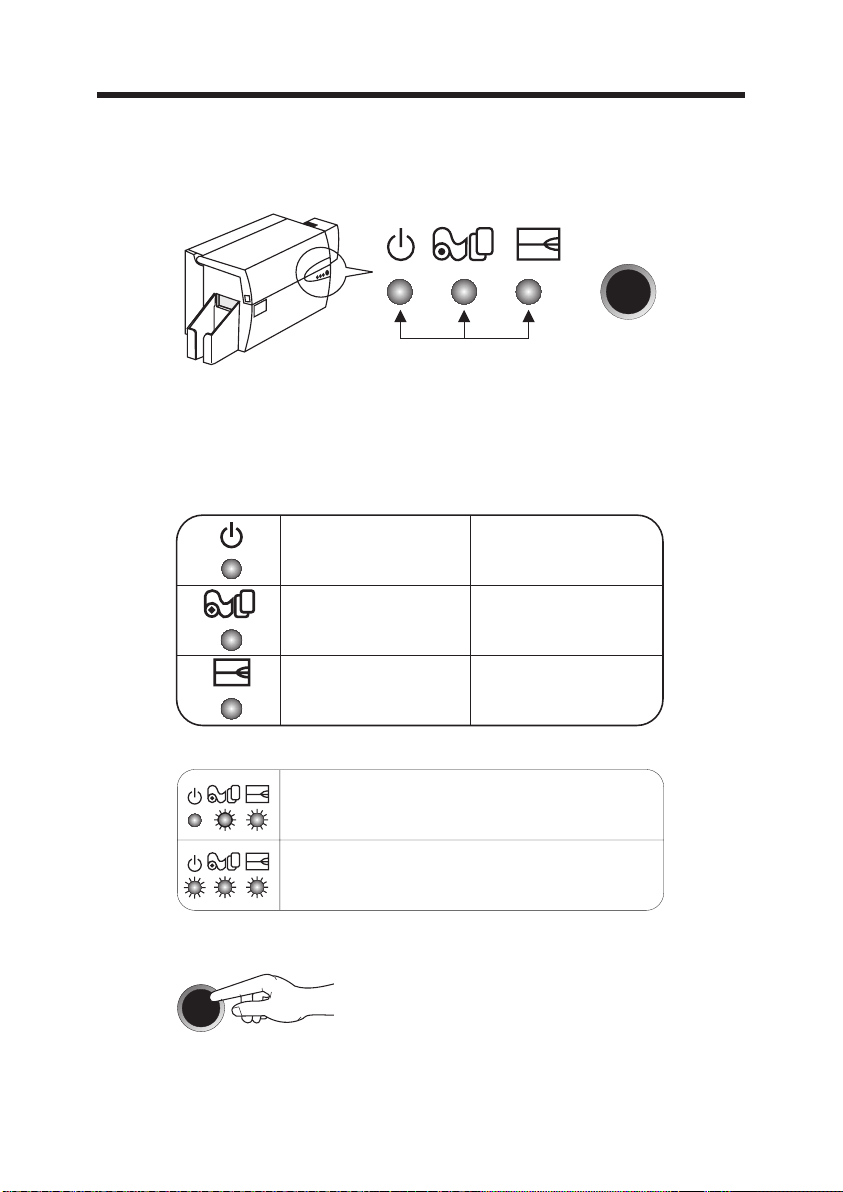
INDICATOR ON FLASHING
Your K300 OptimaPrinter has three Status indicators and a panel button on the front and a
power switch on the rear:
PANEL
INDICATORS
BUTTON
INDICATORS (green, amber & red) signal
printer activity by illuminating or flashing, as
follows:
POWER ON
PRINTER ALERT
REFER TO TROUBLESHOOTING
OTHER ALERTS
AMBER & RED
FLASHING
ALL FLASHING
PANEL BUTTON This is a push button to operate the printer for:
- CLEAR ERROR
- CLEANING PROCESS
SEE CHAPTER 4
- TEST CARD
{
SEE CHAPTER 2
PROCESSING
REPLACE RIBBONLOAD CARDS
ENCODER ALERT
REFER TO TROUBLESHOOTING
PRINTER CLEANING
PROCESS REQUIRED
PRINT HEAD COOL DOWN MODE
PRINTING WILL RESTART SHORTLY
K300 Optima Rev.07.99 3
Page 10
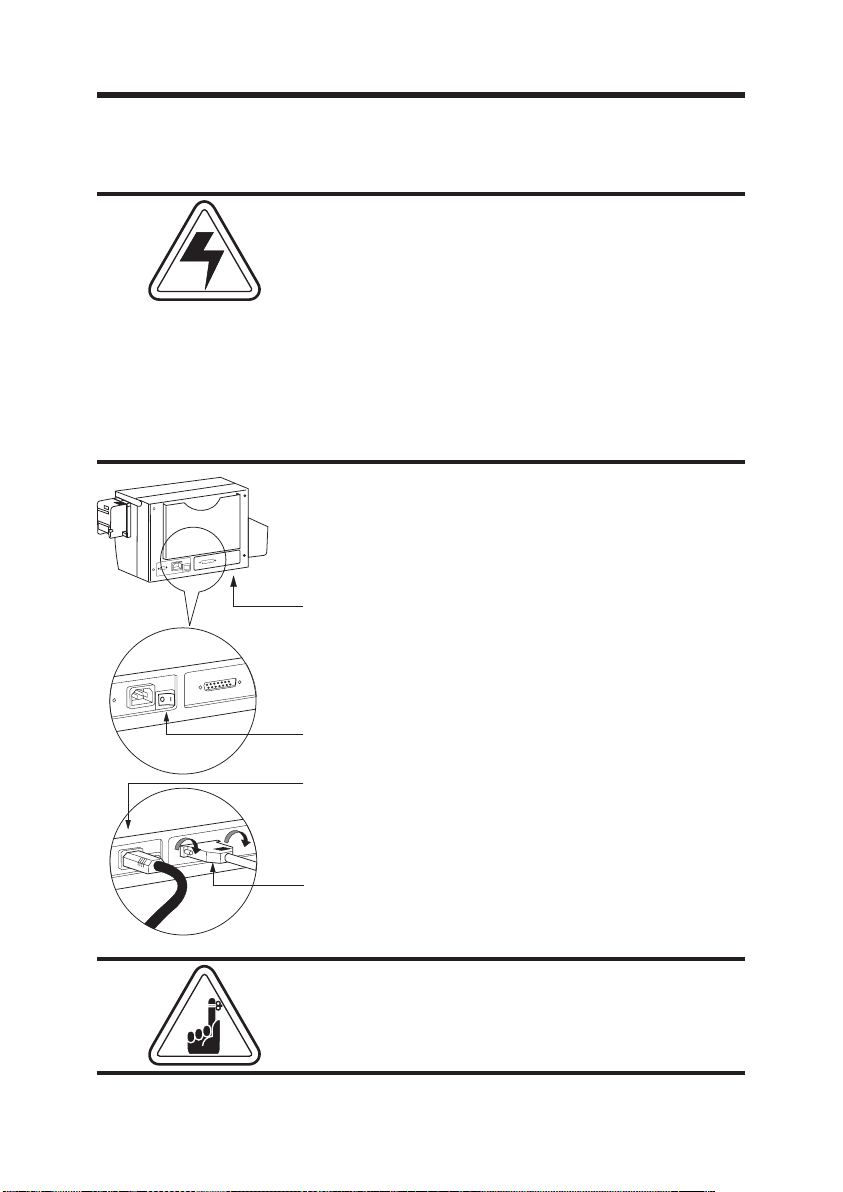
PRINTER
INSTALLATION
The following will guide you through the installation of your K300 Optima Printer.
CAUTION: Limit AC power supplied to the
K300 Optima to 110 ~ 230 volts, 60 ~ 50
Hertz,foranassociated800 ~400 milliamps.
Limit excess current draw to 16 amps or less, using an associated circuit breaker or other such
device. Never operate the printer in a location
where operator, computer, or printer can get
wet. Personal injury could result. The electrical
security of the printer is based on the reliability
of the mains power source.
1. Place the printer in a location that allows easy access
to all sides. The printer should never be operated while
resting on its side or upside down.
2. Place the printer’s power switch in the OFF (0)
position.
3. Insert the power cable into the printer power
socket and attach to grounded electrical socket of the
proper voltage and type.
4. Attach interface cable to printer and computer and
then secure.
5. Switch power on.
CAUTION: Intermittent or unpredictable operation may occur from unsecured connectors. If
damaged, the power cable must be replaced by
an exact equivalent.
4
K300 Optima Rev.07.99
Page 11

2
OPERATION
K300 Optima
PRINTER
FEATURES
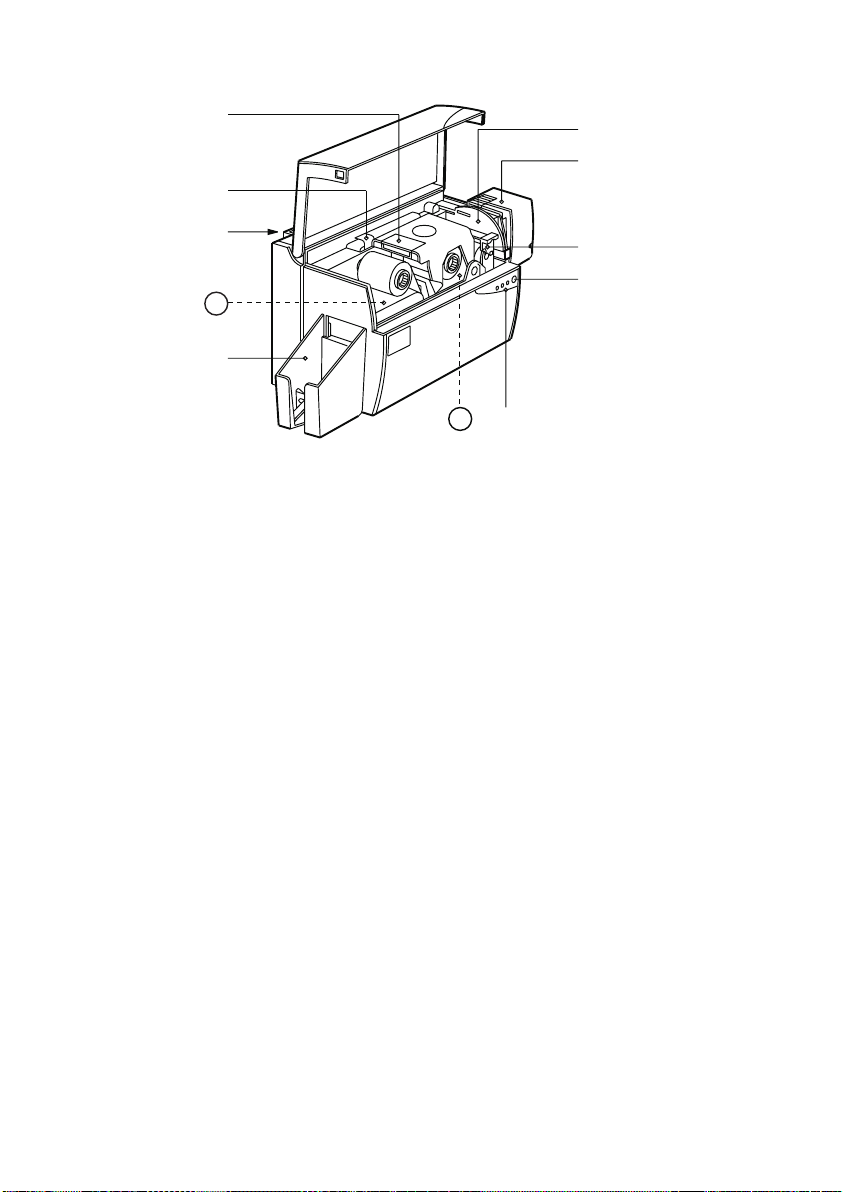
The following shows the features found on your
K300 Optima Printer:
K300 Optima Rev.07.99 5
Page 12
À
Á
È
Ç
Â
Æ
Å
A
Ã
B
Ä
PLEASE NOTE: Any blue items inside the printer can be operated by the user.
STANDARD FEATURES
1. Print Head
2. Print Head Unlock Lever
3. Manual Holder
4. Card Output Hopper
OPTIONAL FEATURES
A. Magnetic Encoding Station
B. Smart Card Contact Station
5. Status Indicators
6. Panel Button
7. Card Cleaning Cartridge
8. Card Cartridge
9. Card Thickness Control
6 K300 Optima Rev.07.99
Page 13
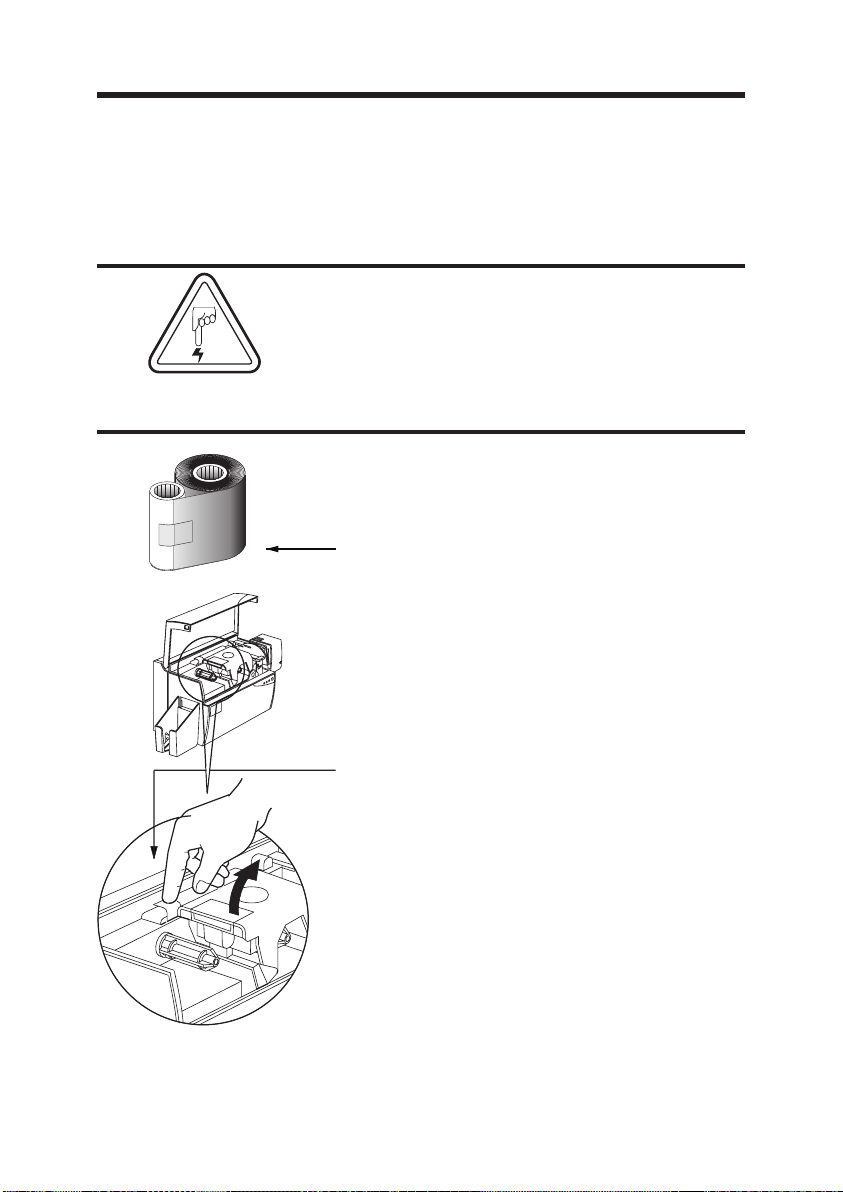
LOADING
RIBBONS
The K300 Optima Printer requires approved
ribbons (See Appendix C). The Resin Thermal
Transfer and Dye Sublimation ribbons are specifically designed for your K300 Optima Printer.
For optimum performanceand printer life(Print
Head), always use approved ribbons.
DO NOT TOUCH the print head or the electronic components on the print head carriage.
Discharges of electrostatic energy that accumulates on the surface of the human body or other
surfaces can damage the print head and other
electronic components used in this device.
1. Remove ribbon from packaging.
2. Open cover and press down on the print
head unlock lever to open the print head
carriage. The print head carriage will pop
open.
Continued on next page ..........
K300 Optima Rev.07.99 7
Page 14
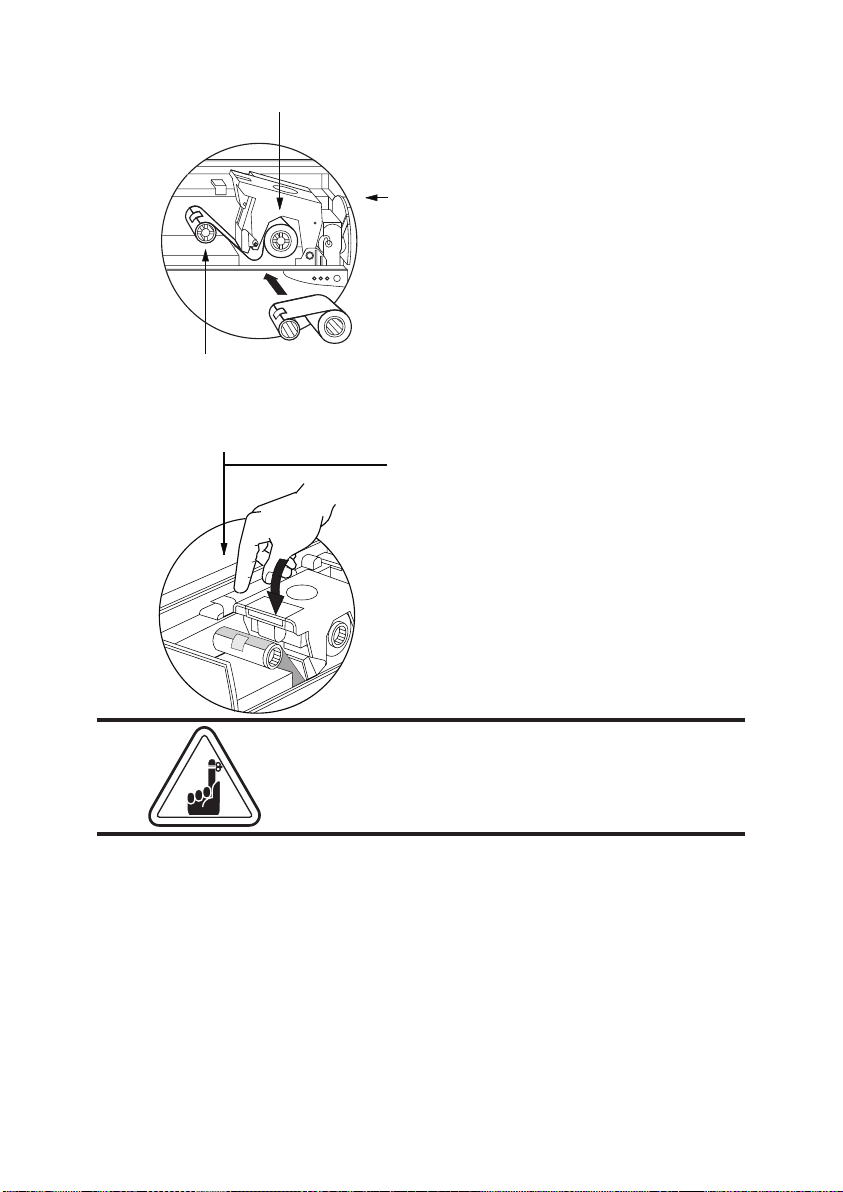
SUPPLY SPINDLE
TAKE-UP SPINDLE
‘CLICK’
3. Load ribbon onto the supply
spindle (under print head
carriage) and empty core (with
tape attached) onto the take-up
spindle. Make sure the ribbon
comes off of the top of the
supply spindle and feeds to the
top of the take-up spindle.
4. Push down on the Print Head
Lock Lever until an audible ‘click’
signals the locked-down
5. Close Cover.
Please note that the ribbon automatically
synchronizes whenever the print head lock
down occurs.
8
K300 Optima Rev.07.99
Page 15
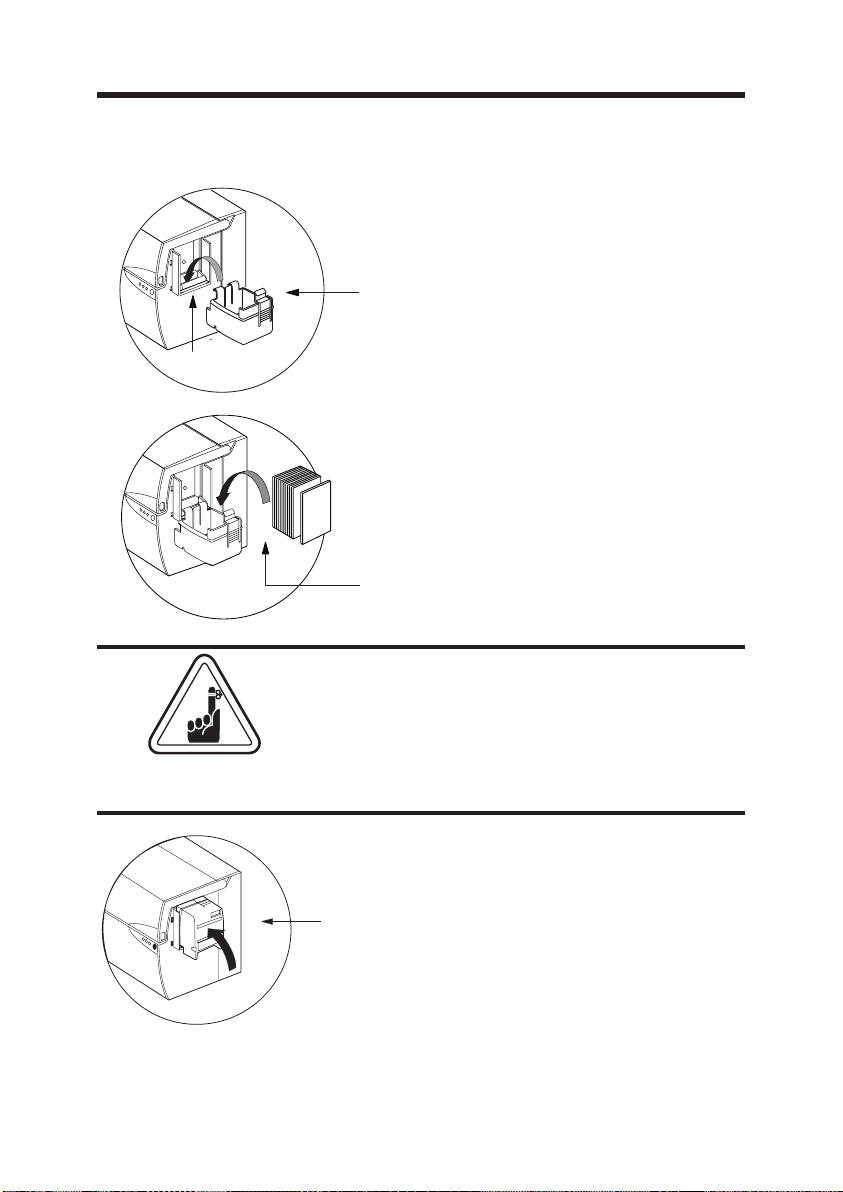
LOADING CARDS To help you load, print, and collect cards, the
K300 Optima has with the following items:
A - CARD CARTRIDGE
For loading cards.
1. Install Card Cartridge by hooking onto
printer as shown and clicking down.
‘CLICK’
2. Install cards into Cartridge.*
DO NOT bend cards or touch print surfaces as
this can reduce print quality. The surface of the
cards must remain clean and dust free. Always
store cards in an enclosed container. Ideally,
use cards as soon as possible. If cards stick together, carefully shuffle them.
3. Close Cartridge.
* See Chapter 6, Technical Specifications, for card requirements
and capacities.
K300 Optima Rev.07.99 9
Page 16
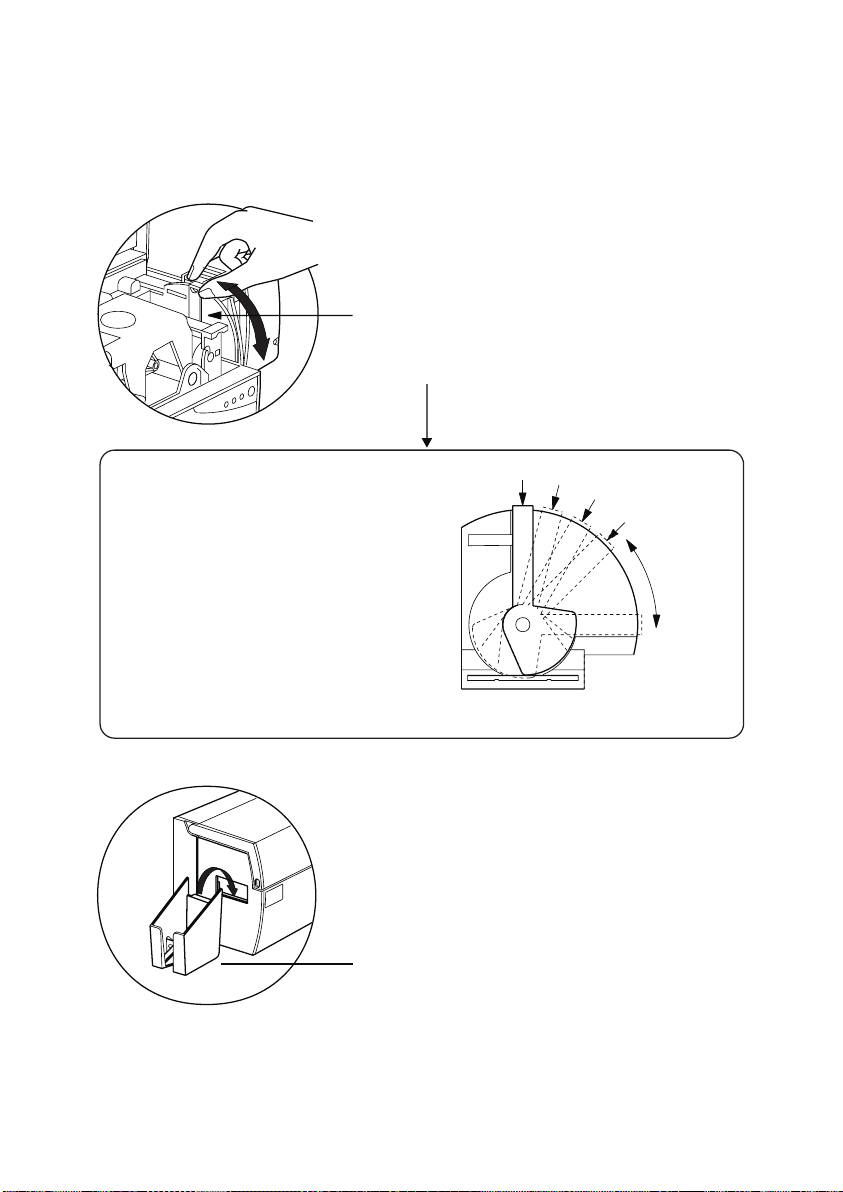
B - CARD THICKNESS CONTROL LEVER
This item is operated by the user to
prevent more than one card feeding
into the printer at the same time and
Open Cover, and adjust lever to
correct position. Repeat for different
card thickness. (Factory setting is for
30mil (0.762mm) card thickness. See
diagram below:
Card Thickness:
A - 60mil (1.524mm) to 50mil (1.27mm)
B - 40mil (1.016mm)
C - 30mil (0.762mm)
D - 20mil (0.508mm)
E*- Less than 20mil (0.508)
* Start at lowest position and move lever
up to match card thickness.
For other card thickness, start lever at
lowest position and move up until cards
feed.
A
B
C
D
E*
C - CARD OUTPUT HOPPER
For collecting printed cards
Install Card Output Hopper onto printer
by hooking over bottom edge of card
exit aperture.
10 K300 Optima Rev.07.99
Page 17
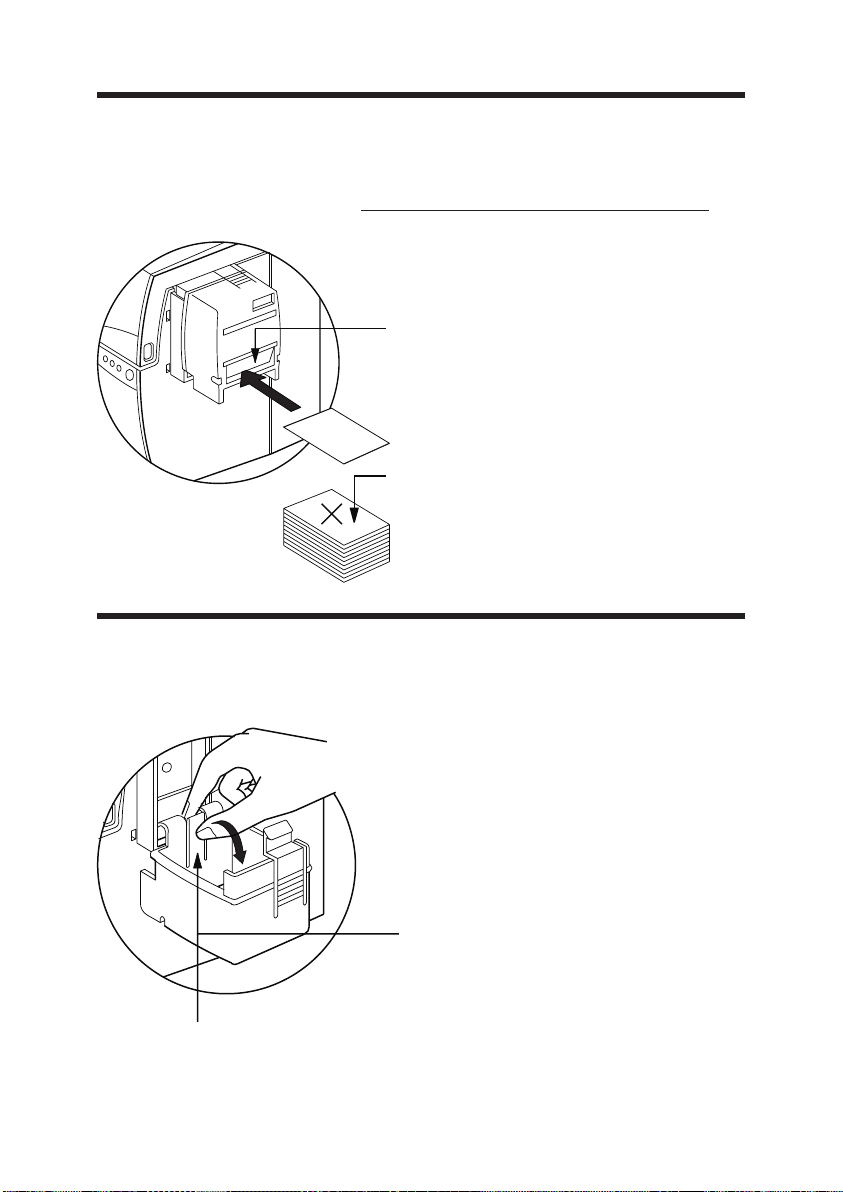
FEEDING ONE
CARD AT A TIME
A Manual Feed Slot is available on the sise of
the Card Input Hopper for feeding single cards.
Cleaning Cards are fed manually throught this
slot. The Card Cartridge must be empty for
manual card feeding to work properly.
For one-at-a-time printing, feed
cards through slot on side of
Do not feed more than one card
at a time.
REMOVING CARD
CARTRIDGE
Remove the Card Cartridge prior to packaging
the printer for shipment.
To remove, pull hook back,
and lift hopper out.
HOOK
K300 Optima Rev.07.99 11
Page 18
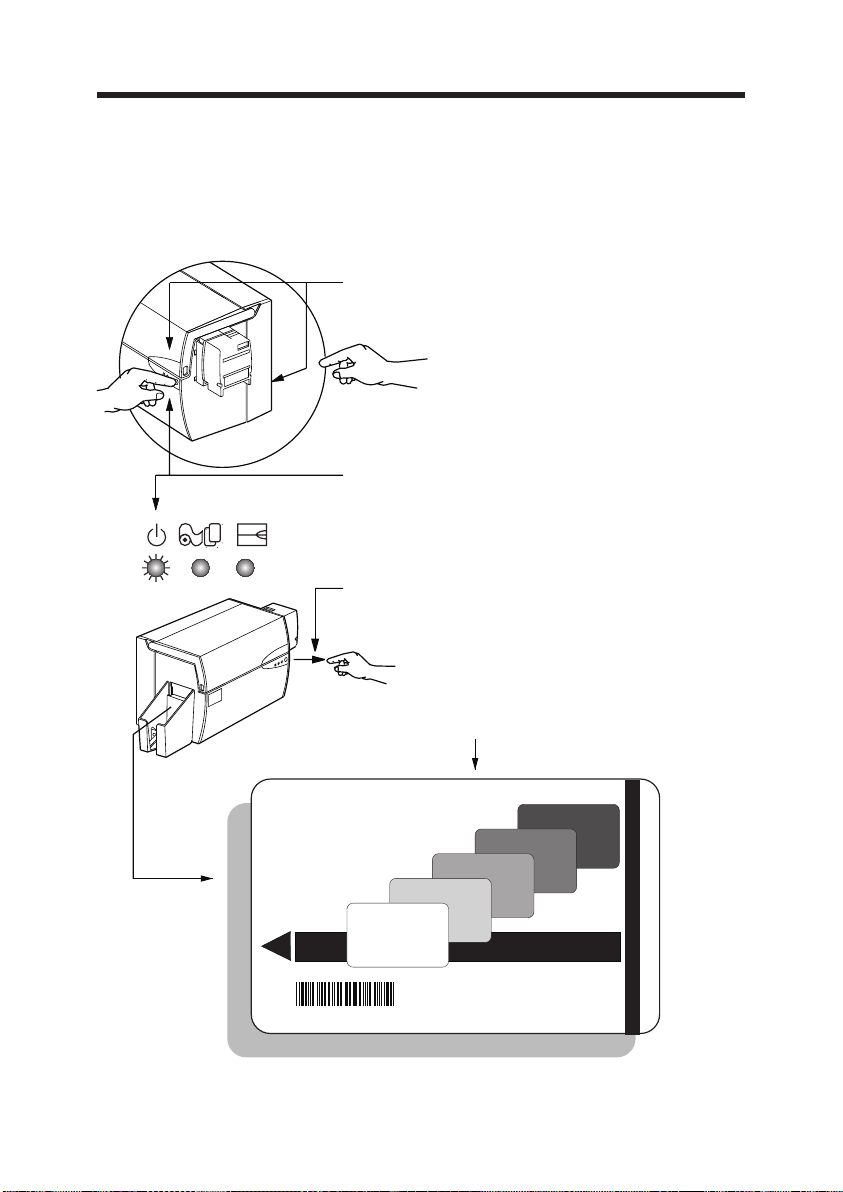
PRINTING A TEST
CARD
With ribbon and cards loaded, your K300 Optima printer is ready to print. To check the operation of theprinter you should print a test card.
12. Place the printer’s power switch in the
OFF (0) position..
. While pressing the panel button, switch
printer on. Green indicator will show.
3. Keep pressing panel button until green
indicator starts flashing.
4. Release panel button and a test card will
print after a few seconds.
12
This is an example of the test card.
PLASTIC CARD PRINTER
PRINTER: P310CEM
Serial Number 23666
Firmware: 4.00
300 dpi
TEST CARD
Head resistance: 1234
23666
Printing Counter: 123456
Offset: X12 - Y12
EC: 12
K300 Optima Rev.07.99
Page 19

3
PRINTING A SAMPLE CARD
Printing with the K300 Optima Printer requires
the Windows printer driver, the WindCard software, or printer command level programming
through the printer interface.
The K300 Optima Card Printer can be used
with any Windows 95/98 and Windows NT 4.0
software application program, using the drivers
provided with the printer.
This section contains information on the printing of a sample card in color (using the 5-Panel
color ribbon YMCKO) and the Windows printer
driver.
BEFORE installing updated printer driver versions, always delete the existing printer driver
version from your computer.
K300 Optima Rev.07.99 13
Page 20

TO INSTALL THE K300 Optima PRINTER DRIVER INTO WINDOWS 95, USE THE
FOLLOWING STEPS:
1. Start your computer and then Windows.
2. Insert either theCD ROM or Diskette containgthe Windows Driver into theassociated
drive.
3. Under Windows click the Start button, Select Settings, then Printers.
4. Double-click on the Add Printer icon. The Add Printer Wizard will display a list of
printers. Select Have Disk and locate the K300Optima Drivers on the CD.For more information about how to install a Windows driver please consult the appropriate
Microsoft documentation.
Once the printer driver has been successfully installed, you will need to configure it for
you printer. This driver provides control of several printer features when printing from
Windows applications. These features are accessed through the K300 Optima Plastic
Card Printer Properties. To access these properties select the Cim K300 Optima
Card Printer icon in Printers. Then click File Menu and select Properties.
The K300 Optima Printer screen appears. Change the options as follows:
1.OnthePrinter Tab configure the magnetic encoder feature. If your printer is
equipped with a Magnetic Encoder option, select With Magnetic Encoder option.
2.OntheCard Tab select card orientation:
Landscape or Portrait - Select ‘Landscape.’
3.OntheRibbon Tab, select the Ribbon Type. Select YMCKO for the standard
5-panel ribbon.
4. In the sametab, go to Black Panel area and selectText Only. This option allowsthe
text printing using the Black Resin Panel from the Color Ribbon.
5. Close the Cim K300 Optima Printer Properties screen.
Now that you have loaded media and set up theprinter driver, the K300 Optima Printer
is ready to print.
EXAMPLE: FOLLOW THESE STEPS TO PRINT YOUR FIRST CARD:
1. Go to the Microsoft Word Software.
2. If the printer was not selected as the default printer, go to the File menu and point
Printer Setup and choose Cim K300 Optima Card Printer in the list. Then press
Close button.
14 K300 Optima Rev.07.99
Page 21
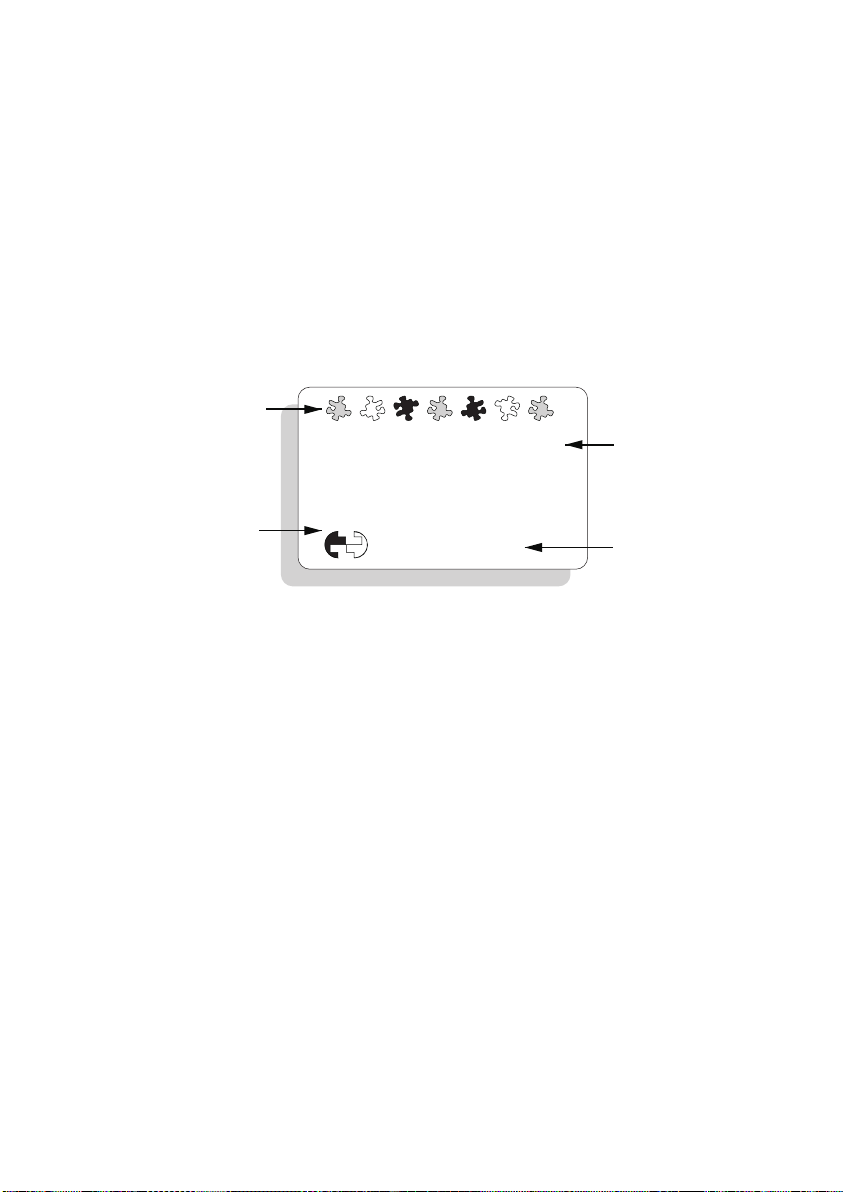
3. Come back to File menu and point Page Setup.
4. Select Size Tab and in Paper Size choose Card. Then select the orientation:
‘Landscape.’
5.GotoMargins Tab, put the top, bottom, left and right margins with 0 values.
6. Press OK to close Page Setup Window.
7. The card appears on the screen.
8. Design a card with both black and colored text and with colored pictures, i.e.:
Symbols in Color
SAMPLE CARD
Text in Red
M. JOHN JONES
Logo in Black
ATR
and White
9. Once you are ready to print, go to File and point Print.
10. The printer will feed ina card and start printing (the data downloading time willvary
depending on the complexity of the card design and the processing speed of your computer).
11. Once the printing job is achieved the card is ejected from the printer.
Sales Director
Build the World with us!
Http://@atrworld.com
Text in Black
K300 Optima Rev.07.99 15
Page 22

16 K300 Optima Rev.07.99
Page 23

4
CLEANING
PROTECT YOUR FACTORY WARRANTY!
The recommended maintenance procedures
must be performed to maintain your factory
warranty.
Other than the recommended cleaning procedures described in this manual, allow only CIM
S.p.A. authorized technicians to service the
K300 Optima Printer
NEVER loosen, tighten, adjust, or bend, etc. a
part or cable inside the printer.
NEVER use a shop air compressor to remove
particles in the printer.
K300 Optima Rev.07.99 17
Page 24
CARD CLEANING
CARTRIDGE
Your K300 Optima Printer also has a Card
Cleaning Cartridge. This item cleans the cards
entering the printer. To ensure print quality, the
cleaning roller requires periodic replacements.
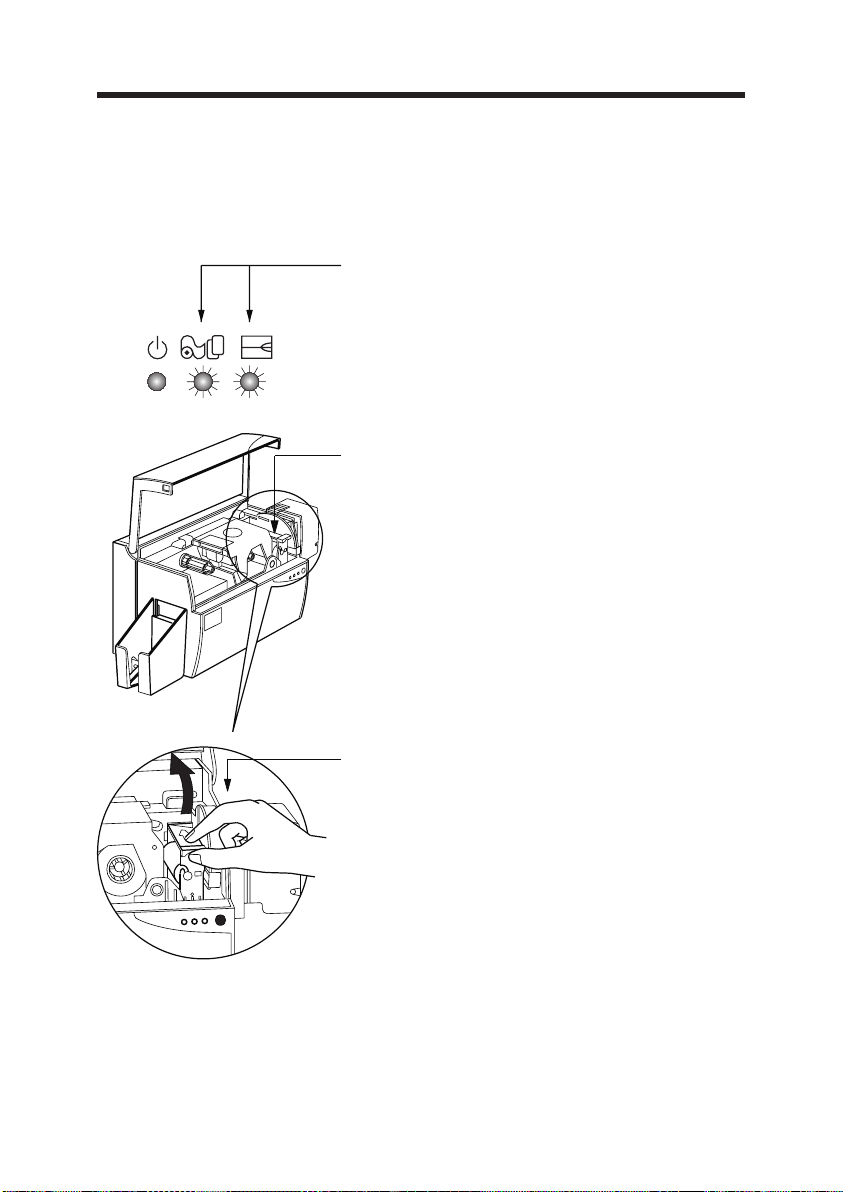
WHEN TO MAINTAIN
When the amber & red indicators flash.
(Every 1000 cards* approx)
*Using 5-panel color ribbon (YMCKO)
*Optional factory setting.
HOW TO MAINTAIN
1. Turn power off. Open Cover and locate
Cleaning Cartridge..
18
2. Gently remove by rotating up and away
from printer.
Continued on next page...
K300 Optima Rev.07.99
Page 25
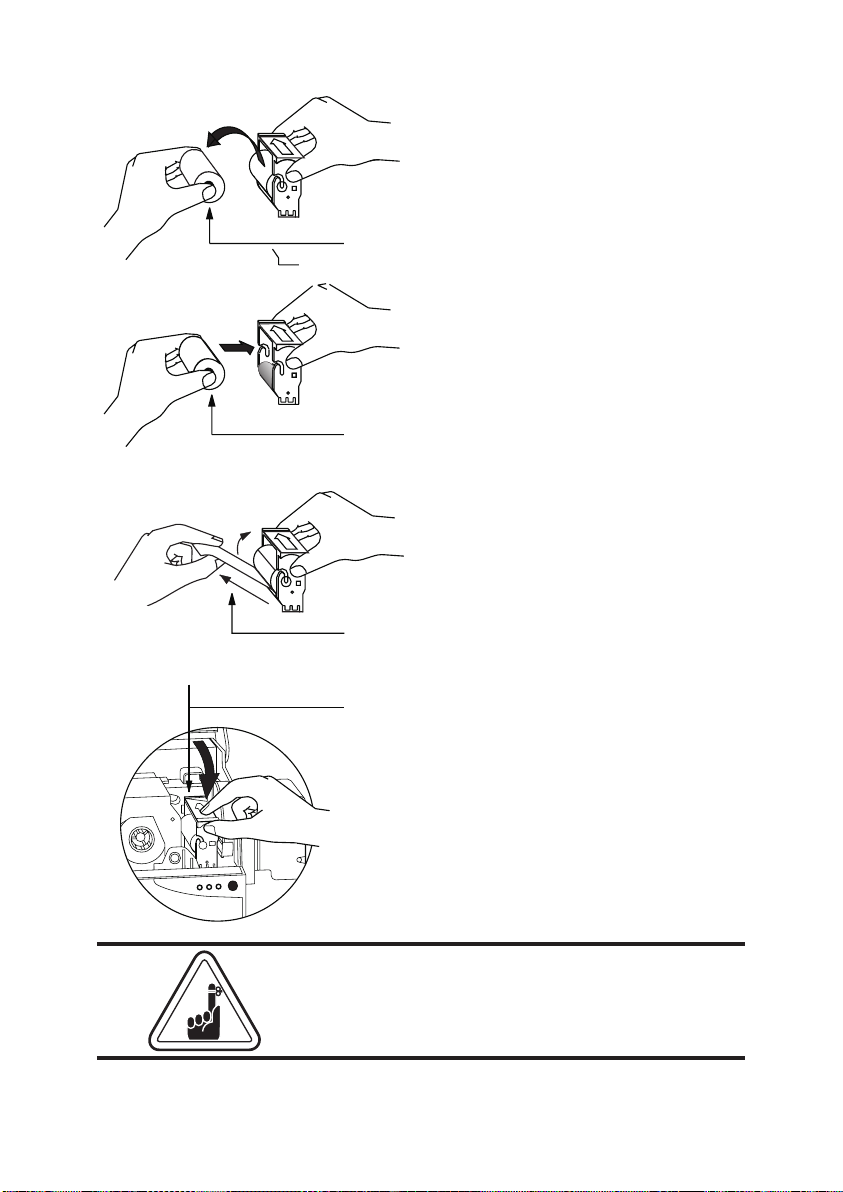
SLOT
3. Remove Cleaning Roller from Cartridge
and discard.
4. Install new Cleaning Roller into Cartridge*.
To avoid contamination, always hold the
Cleaning Roller assembly by the ends.
5. Carefully peel off wrapper from new
Cleaning Roller while in Cartridge.
6.7.To replace Cartridge into printer:
Make sure the arrow on top of the assembly
is facing toward the rear of the printer.
Hook assembly into slot on printer and rotate
down. Ensure the assembly locks in place.
DO NOT touch the roller surface that contacts
the cards.
Close Cover.
* See Appendix C for replacement Cleaning
Rollers.
Although the amber and red indicators will keep
flashing until maintenance has been performed,
the printer will continue to operate.
K300 Optima Rev.07.99 19
Page 26

20 K300 Optima Rev.07.99
Page 27
TROUBLESHOOTING
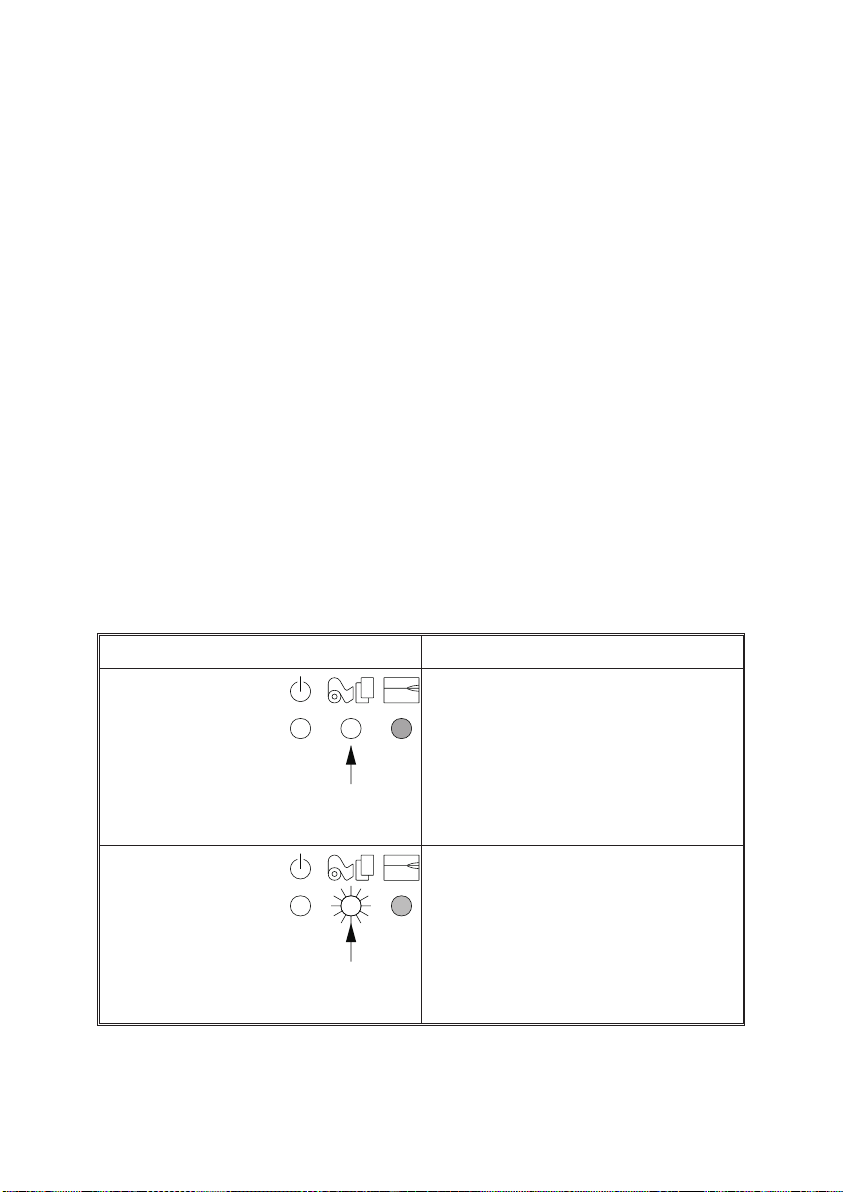
The following offers causes or solutions to
symptoms related to improper operation.
Check this table when experiencing any loss of
operation or print quality. Note that the LEDs
appear white for ON, dark for OFF, and circled
with radial lines for FLASHING.
SYMPTOMS / DESCRIPTION REASON / SOLUTION
AMBER
INDICATOR
ILLUMINATES
Media alert: Cards
The Printer stops and an error comes up in
the Windows application program or in
WindCard Software.
AMBER
INDICATOR
FLASHES
Media alert: Ribbon
The Printer stops and an error comes up in
the Windows application program or in
WindCard Software.
1. Check for Cards in Card Cartridge.
2. Check Card Thickness Control setting.
3. Press the Panel Button for 1 second.
The printing job will restart.
1. Check ribbon.
2. Load new ribbon.
3. Ribbon will automatically synchronize
and printing will restart with new card.
5
K300 Optima Rev.07.99 21
Page 28
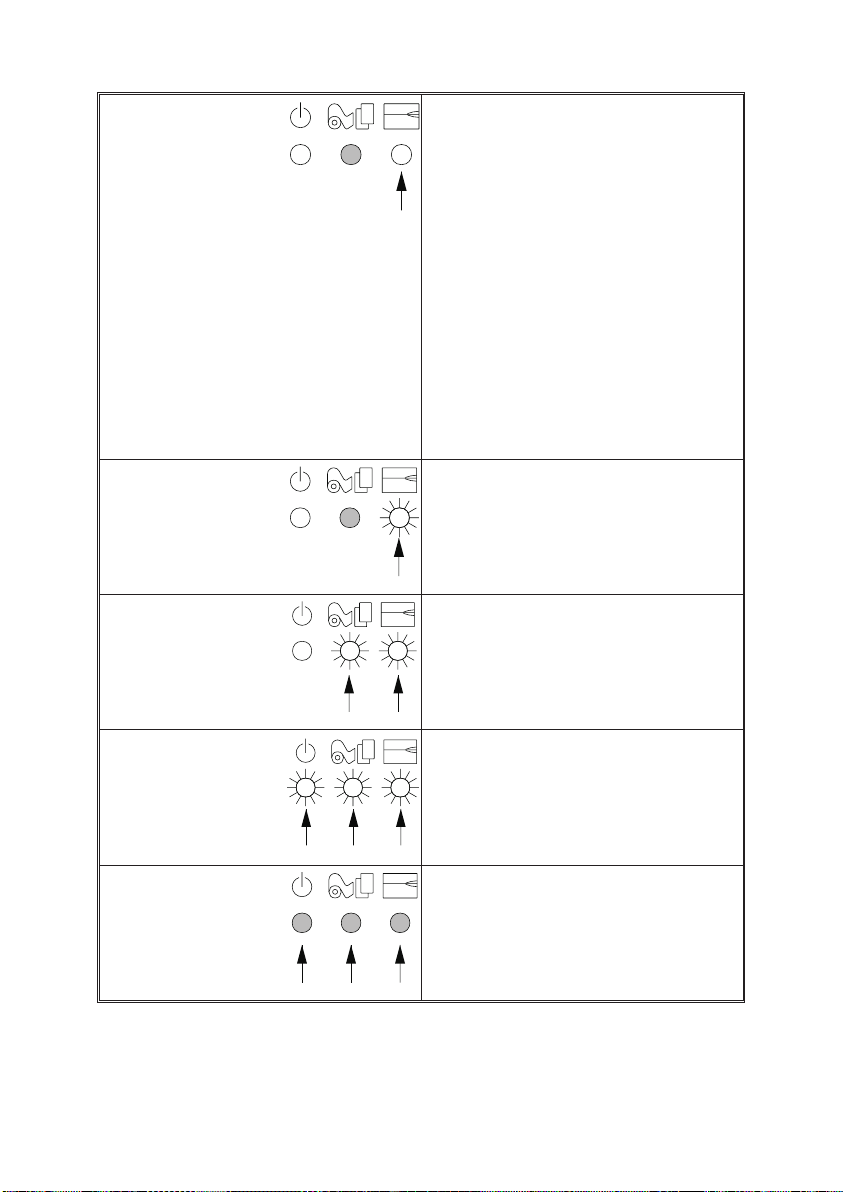
RED INDICATOR
ILLUMINATES
Printer alert: Ribbon
Print Head Bracket open
Card Jam
Ribbon Jam
Command Error
The printer stops working
RED INDICATOR
FLASHES
Magnetic Encoder alert:
The Printer ejects card and stops.
AMBER & RED
INDICATORS
FLASH
1. Check Print Head Bracket is closed.
2. Check if you are using correct card type
(see Technical Specifications).
3. Check Card Thickness Control Lever is
properly adjusted for correct card
thickness (see Chapter 2- Loading Cards).
4. If two cards are fed into printer at same
time:
- Open cover & remove Card Cleaning
Cartridge, empty feeder, pull jammed
cards out. Replace Card Cleaning
Cartridge.
- Remove cards from Card Cartridge,
shuffle them and replace.
5. Check ribbon is loaded correctly inside
printer.
6. Check command.
1. Check that you are using correct magnetic card type (for low or high coercivity
encoding).
2. Verify Command Syntax.
3. Call technical support.
1. Printer cleaning required. See Chapter
4.
Cleaning alert:
The Printer needs cleaning.
ALL INDICATORS
FLASH
Print head alert:
Cool down mode
Printing stops
NO INDICATOR
ILLUMINATES
Power cord
The power switch is ON.
1. Printing will restart automatically after a
few seconds.
1. Make sure power cord is plugged in
properly at both ends.
2. Call technical support.
22 K300 Optima Rev.07.99
Page 29

CARDS HAVE ‘SCRATCH LINES’
MISSING PRINTING.
Incorrect rolled ribbon
Dust
Print head
There are non-printed horizontal lines
(white) on card surfaces.
POOR PRINTING QUALITY
Dust on print head.
Contrast & Intensity values.
Printing shows very pale or inconsistent
results.
PRINTING HAS VOIDS
Dust inside printer
Contamination on card surface
Small spots on the printed card with a
non-printed area or a different printed
color.
1. Incorrect position of ribbon. Check ribbon is properly rolled onto the ribbon core
and there are no pleats.
2. There may be dust on the print head
(see Chapter 4, Cleaning).
3. An element on the print head may be
scratched or burnt. Contact technical support for print head replacement information.
1. There may be dust or embedded contaminations on elements of the print head.
Clean print head (see Chapter 4,
Cleaning.
2. Contrast and/or intensity colors may be
set to high values. Adjust contrast and intensity values in software or with
programing.
1. This may be caused by dust inside the
printer and/or a dirty Cleaning Roller Assembly (see Chapter 4, Cleaning).
2. This may be caused by contaminations
on the card surface. Check that cards are
stored in a dust free environment.
K300 Optima Rev.07.99 23
Page 30

24 K300 Optima Rev.07.99
Page 31

TECHNICAL SPECIFICATIONS
6
TECHNICAL SPECIFICATIONS
General • High speed printing, over 140 cards/hour edge
to edge in full color (YMCKO) throughput
• Small footprint
• Easy to use Wind Card Classic utility tool (option)
• Windows Drivers for 95 and NT 4.0 (option)
• One year printer warranty
• One year (100k passes) print head warranty
• Powerful EPCL (Cim Printer Program Command Language)
Color Printing • Color dye sublimation or monochrome thermal
transfer printing
• 25 seconds per card edge to edge in full color
(YMCKO)
• 300 dpi (11.8 dots/mm) print resolution
• Edge to edge printing standard
Bar Codes • Code 39
• Code 128B&Cwith & without check digit
• 2of5&2of5industrial
• UPCA
• EAN8 & EAN 13
• PDF 417 2D bar code and other symbologies
available via WindCard Classic utility tool (option)
K300 Optima Rev. 07.99 25
Page 32
TECHNICAL SPECIFICATIONS
Fonts • Resident: Arial Normal 100, Arial Bold 100
• True Type fonts available via Windows Driver
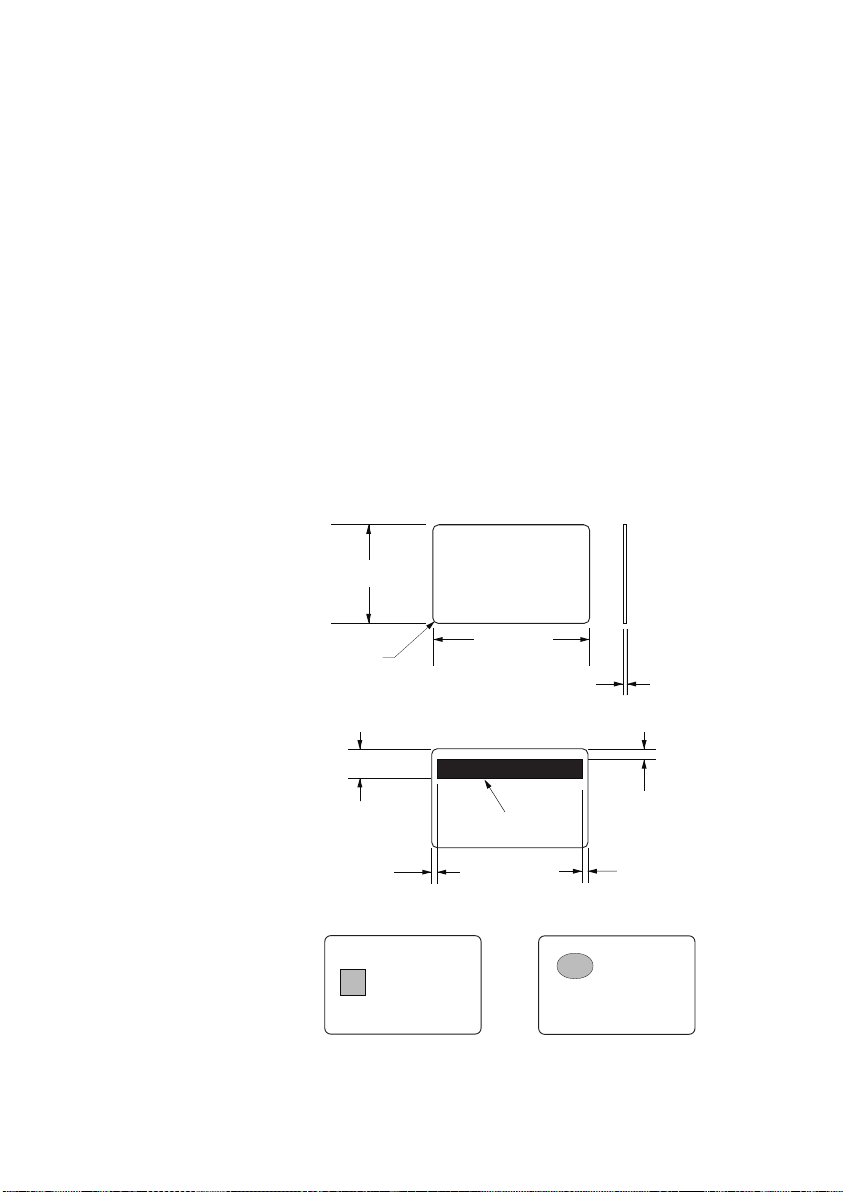
Cards* • Types PVC, Composite
• Card width/length: ISO CR-80 - ISO 7810,
• Option: Magnetic Stripe - ISO 7811
• Option: Smart Card - ISO 7816-2
• Card thickness: 10 mil (0.25mm) to 60 mil
• Card Cartridge capacity: Up to 210 cards (10
• Card Output Hopper capacity: up to 210 cards
CARD DIMENSIONS
ISO STANDARD DIMENSIONS FOR PLAIN CARD
and WindCard Classic utility tool (option)
2.125” (54mm) by 3.385” (86mm)
(1.524mm)
mil), up to 75 cards (30 mil)
(10 mil), up to 75 cards (30 mil)
2.125 ±0.002in
(53.98 ±0.050mm)
Radius
0.125in
(3.18mm)
ISO STANDARD DIMENSIONS FOR MAGNETIC STRIPE CARD
0.623in (15.82mm) min
0~0.115in (2.92mm)
CHIP POSITION FOR SMART CARD
ISO STANDARD AFNOR STANDARD
3.375 ±0.010in
(85.72 ±0.25mm)
0.009~0.034in
(0.23~0.84mm)
MAGNETIC STRIPE
218in (5.54mm) max
0~0.115in (2.92mm)
* Use CIM S.p.A./Cim approved media only.
26 K300 Optima Rev. 07.99
Page 33

Ribbons* • Monochrome: 1500 cards/roll
• Monochrome colors: black, red, blue, green, silver, gold, white, scratch-off grey
• K-resin + O: 800 cards/roll
• K-dye + O: 800 cards/roll
• YMCKO: 350 cards/roll
Overlay Varnish • Thermal transfer
• 4 microns thick
• Clear and holographic options:
- Clear
- Genuine/Secure Hologram
- Pcard Hologram
- Custom Hologram
Interfaces • Parallel Standard (cable included)
• RS-232C Serial (option)
Mechanical • Width: 11.8” (315mm)†
• Depth: 7.75” (198mm)†
• Height: 8.7” (220mm)†
• Weight: 13.4lbs (6.1kg)
Electrical • 110 ~ 230 Volts AC, 60 ~ 50 Hz
• FCC Class A, CE, UL, and CUL approved
Environmental • Operating Temperature: 60to 86°F (15 to30°C)
• OperatingHumidity: 20 to 65%non condensing
• StorageTemperature: -23 to 158°F(-5 to 70°C)
• Storage Humidity: 20 to 70% non condensing
• Ventilation: Free air
* Thermal transfer (Resin) ribbons offer more dura-
bility than dye sublimation, with greater resistance to scratches and UV-induced fading.
Dye Sublimation printing requires dye sublimation ribbons, with either black or cyan, magenta,
and yellow (plus black resin) panels.
† Measured without card feeder and card hopper
K300 Optima Rev.07.99 27
Page 34

Options • RS-232C serial port
• Smart Card Contact Station (30 mil cards only)
• Magnetic Encoder (30 mil cards only)
• Extended Warranty program
• Hot Swap Warranty program
• Cleaning supplies
• Service Manual
• WindCard design software
Use only CIM S.p.A.-approved card and ribbon
media. Using non-approved card or ribbon media can void your warranty.
Refer to the Accessories section for more information about Cardand Ribbon Media available
from CIM S.p.A..
28
K300 Optima Rev.07.99
Page 35
APPENDIX A - MAGNETIC CARD STRIPE
ENCODER
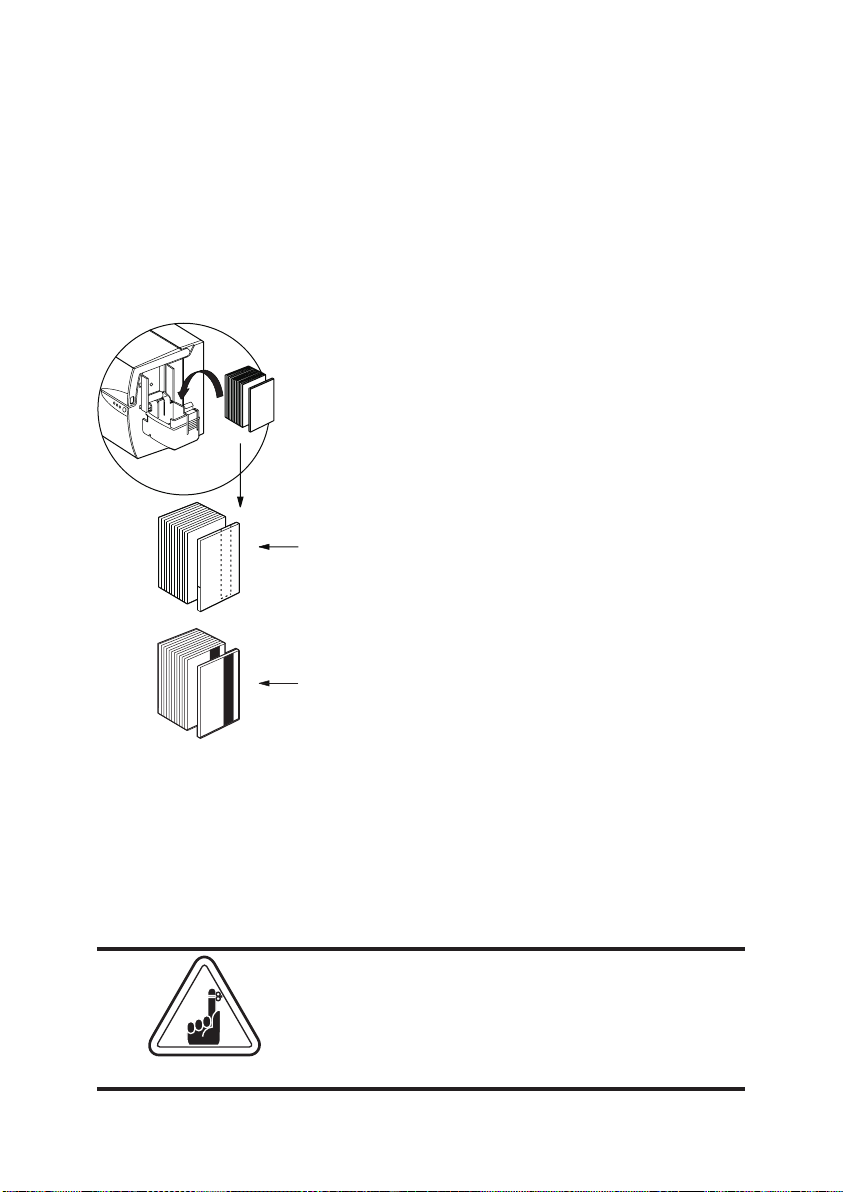
Operation and maintenance requirements for the K300 Optima Printer with the optional magnetic card stripe encoder. (See Chapter 2 for location). The magnetic encoder can be set for either high and low coercivity.
The magnetic encoder is a factory installed item
with the read/write head positioned below the
card path, available with HICO encoding
(P310CM1 or (P310CEM1) or LOCO encoding
(P310CM2 or P310CEM2).
When loading cards into the Card Cartridge,
STRIPE
DOWN
STRIPE
UP
please ensure the magnetic stripe is facing
towards the printer and closest to the rear.
Also available are Printer models with the
Magnetic Read/Write head positioned above the
card path, with HICO encoding (P310CM3 or
P310CEM3) or LOCO encoding (P310CM4 or
P310CEM4).
NOTE:
M1 - HICO encoding - stripe down M3 - LOCO encoding - stripe up
M2 - HICO encoding - stripe down M4 - LOCO encoding - stripe up
Approved HICO & LOCO PVC cards are available. (See Appendix C.)
SAMPLE ENCODING PROGRAM
Refer to Programmer’s manual (Part number 980081-001)
ONLY USE cards that comply with ISO 7810 &
7811 standards for magnetic stripe cards. The
magnetic stripe must be flush to the surface of
the card to work properly. Never use taped-on
magnetic stripes.
K300 Optima Rev.07.99 29
Page 36
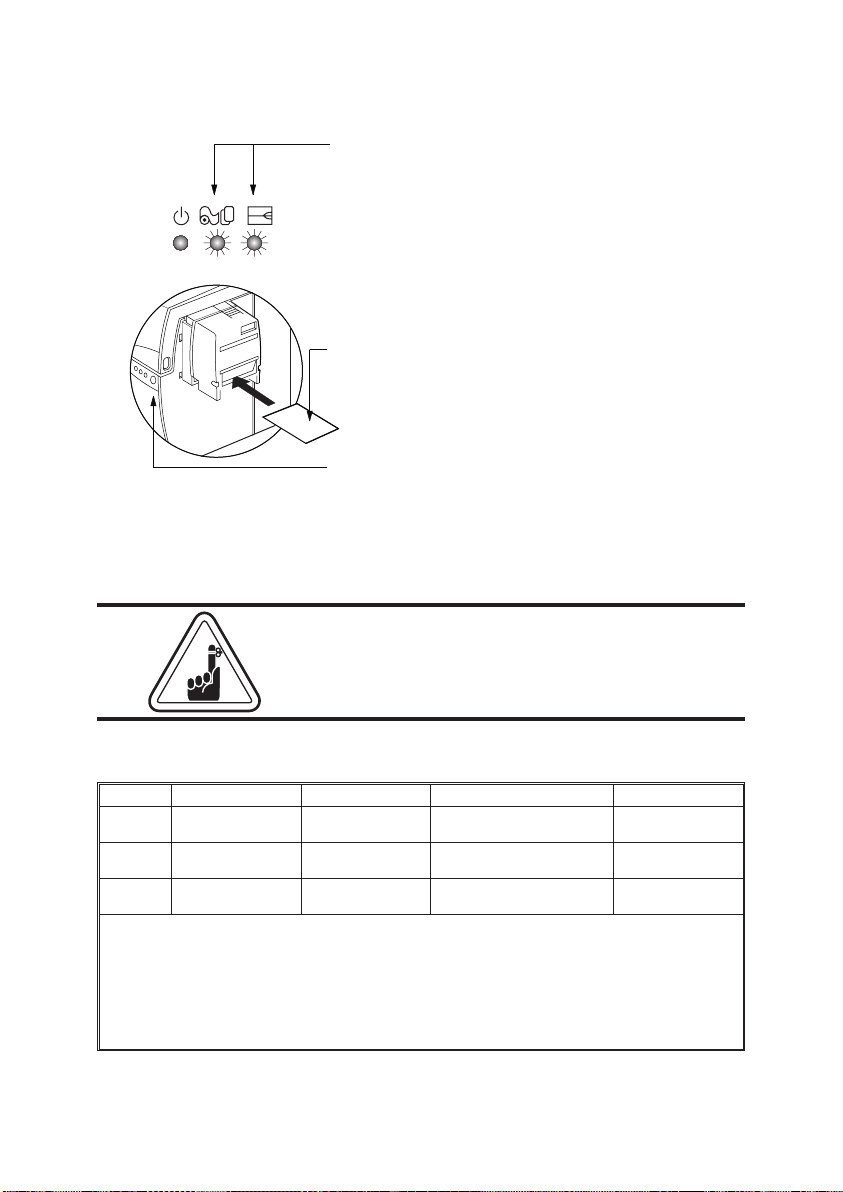
The read/write head requires periodic cleaning to maintain error-free encoding
WHEN TO CLEAN
When the amber & red indicators flash
(Every 1000 cards* approx.)
*Using 5-panel color ribbon (YMCKO).
*Optional factory setting.
HOW TO CLEAN
1.
Leave power on.
Open Cover and release Print Head Bracket
to remove ribbon.
Close Print Head.
Close Cover. Remove cards from Card Cartridge.
2.
Insert one Pre-saturated Cleaning Card
(provided) through slot on the side of the
Card Cartridge.
3.
Press the Panel Button for a few seconds.
The Card will feed into printer and carry out
the cleaning process.Repeat the process with
a new Cleaning Card if necessary.
Note: For cleaning prior to the WHEN TO CLEAN signal, press the Panel
Button for 3 seconds to start the cleaning process.
Although the amber and red indicators will keep
flashing until the cleaning process has been performed, the printer will continue to operate.
ISO STANDARD ENCODING
Track # Field Separator Track Density Valid Characters # of Characters
1 ^ 210BPI*
2 = 75BPI*
3 = 210BPI*
Alphanumeric
(ASCII 20~95†)
Numeric
(ASCII 48~62)
Numeric
(ASCII 48~62)
79‡
40‡
107‡
* Bit per inch
†Except the ‘?’ character
‡ Including Start, Stop and LRC characters. Also note thatthese 3 characters are automatically managed by the magnetic encoder according to the ISO Standard Norms.
NOTE: Refer tothe Card Printer Programmer’s Manual for complete programming information.
30 K300 Optima Rev.07.99
Page 37

APPENDIX B - SMART CARD CONTACT
STATION
This section contains information on the additional operations of the K300 Optima Printers
with Smart Card Contact Stations. (See Chapter 2 for location.)
INTRODUCTION Smart Cards can have a built-in microcomputer
and a battery. Card Memory can store fingerprints, voice recognition patterns, medical records and other such data. The K300 Optima
may be equipped with an optional contact station for programming Smart Cards (ISO 7816).
This printer model responds to commands that
position the cards at the contact station, where
the printer connects to the contacts on the
Smart Cards. All other printer operations remain the same as the standard K300 Optima
model.
K300 Optima Rev.07.99 31
Page 38
MEDIA LOADING ORIENTATION
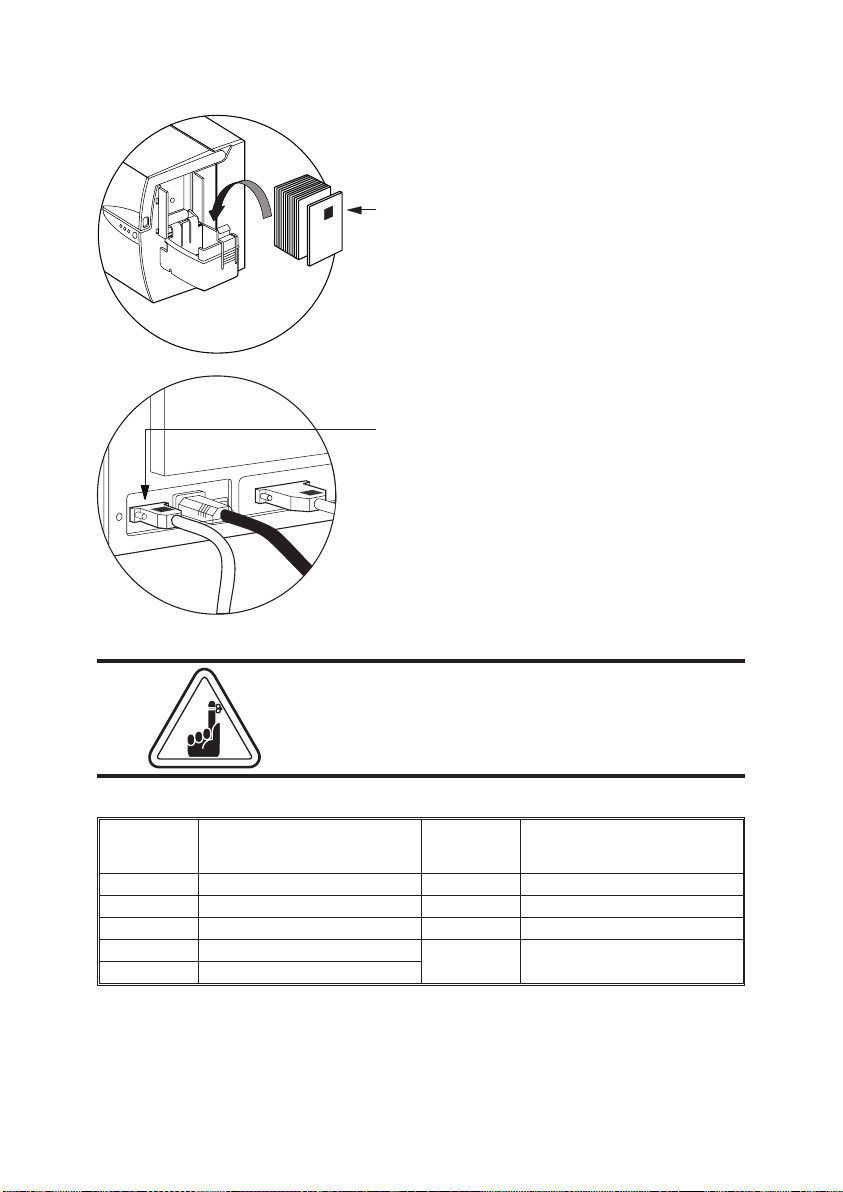
Orient the cards with the Smart Card Chip
at the top of the card and facing away from
the printer.
SMART CARD CONTACT STATION INTERFACE
When a command to the parallel printer
interface sends a card to the Smart Card
Contact Station, the printer connects the
Smart Card Contact Station to the female
DB-9 connector on the rear of the printer.
An attached external Smart Card Programmer
can be used to program Smart Card chips.
DO NOT position printing over the Smart Card
Chip
DB-9
PINS
1 C1 (Vcc) 6 C6 (Vpp)
2 C2 (Reset) 6 C7 (I/O)
3 C3 (Clock) 7 C8 (RFU)
4 C4 (RFU)
5 C5 (GND)
Refer to the Card Printer Programmer’s Manual for complete programming information.
SMART CARD
CONTACT POINTS
DB-9
PINS
9
SMART CARD
CONTACT POINTS
(GND when chip
is at station)
32 K300 Optima Rev.07.99
 Loading...