

Page 1

USER MANUAL
IP67 WATERPROOF
OUTDOOR HD LCD TV / DISPLAY
MODEL No.:
CL-3267
www.cilltech.com
Page 2

CONTENTS
GENERAL SAFETY PRECAUTIONS 4
SYSTEM INSTALLATION AND ELECTRICAL REQUIREMENTS 7
Power Source 7
Declaration of Conformity 8
Safety Instructions 8
PREPARATION 10
Preparing Your LCD Display For Wall Mounting 10
Battery Installation & Replacement 11
Connect to the Power Source 12
Power On/Off Your New LCD Display 12
Source Connection Guide 13
PC Control of the TV 15
Communication Conditions 15
Communication Procedure 15
OPERATION INSTRUCTIONS 16
Power Mode Status 16
Using the Back Control Panel 16
Using the Remote Control 17
Picture Format For Each Input Source 17
NAVIGATING THE ON-SCREEN MENU 18
Video Menu 18
Audio Menu 19
TV Menu 19
Set Up Menu 19
Parental Controls Menu 20
TIPS 21
Care of Screen 21
Mobile Telephone Warning 21
End of Life Directives 21
License Agreement & Trademark Notice 21
PRODUCT SPECIFICATIONS 22
BEFORE CALLING SERVICE 23
GLOSSARY 24
WARRANTY 25
2 3
Page 3

SAFETY WARNING
CAUTION
RISK OF ELECTRIC SHOCK
TO REDUCE THE RISK OF ELECTRIC SHOCK,
DO NOT REMOVE TV/DISPLAY EXTERIOR COVERS
UNDER ANY CIRCUMSTANCES.
NO USER SERVICEABLE PARTS INSIDE.
ALL PRODUCT SERVICES SHOULD BE DONE
BY THE CIIL CERTIFIED SERVICE PERSONNEL.
Thank you for purchasing Ciil product.
For customer service or technical support,
please contact us at 1-877-355-CIIL (2445)
or visit us at: www.ciiltech.com
or write us at: [email protected]
Page 4

GENERAL SAFETY PRECAUTIONS
READ BEFORE OPERATING EQUIPMENT
Thank you for purchasing our product. Before using it, please read this user manual carefully and follow
the instructions correctly for safe operation. Please keep this manual handy for future reference. Also,
please be sure to always include this user manual in the packaging when transferring or transporting this
product to a different location.
The lamps in this product contain mercury. Please dispose according to state, local or federal law.
Batteries Installed Warning
Caution
or equivalent type. The batteries shall not be exposed to excessive heat such as sunshine, re or
the like.
CAUTION:
These servicing instructions are for use by qualied service personnel only. To reduce the risk of
electric shock, do not perform any servicing other than that contained in the operating instructions
unless you are qualied to do so.
- Danger of explosion if batteries are incorrectly re-placed. Replace only with the same
1. Read these instructions.
2. Keep these instructions.
3. Heed all warnings.
4. Follow all instructions.
5. Do not defeat the safety purpose of the polarized or grounding- type plug A polarized plug has two
blades with one wider than the other. A grounding type plug has two blades and a third grounding
prong. The wide blade or the third prong are provided for your safety. If the provided plug does not t
into your outlet, consult an electrician for replacement of the obsolete outlet.
6. Protect the power cord from being walked on or pinched particularly at plugs, convenience recepta cles, and the point where they exit from the apparatus.
7. Refer all servicing to qualied service personnel. Servicing is required when the apparatus has been
damaged in any way, such as power-supply cord or plug is damaged, does not operate normally, or
has been dropped.
8. Only use attachments/accessories specied by the manufacturer.
9. In case of emergency such as re or electric shock caused by the product, immediately contact 911
or proper emergency police / re service agencies in your country.
10. If monitor or glass is broken, do not come in contact with the liquid crystal and handle with care.
11. Follow instructions for wall, shelf or ceiling mounting as recommended by the manufacturer.
4 5
Page 5

12. An outdoor antenna should not be located near overhead power lines or any electrical circuits.
13. If an outside antenna is connected to the receiver, conrm that the antenna system is grounded to
protect against voltage surges and built up static charges Section 810 of the National Electric Code,
ANSI/NFPA No 70-1984, provides information with respect to proper grounding for the mast and
supporting structure, grounding of the lead-in wire to an antenna discharge unit, size of grounding
connectors, location of antenna discharge unit, connection to grounding electrodes and requirements
for the grounding electrode.
14. Use properly rated power voltage. Use of non-rated voltage may cause re, electric shock and severe
damages to the product.
15. Under no circumstances, do NOT open the cabinet or the exterior covers. High voltage inside of this
product may cause electric shock.
16. Under no circumstances, do NOT modify or disassemble this product as it may cause re, electric
shock, or severe damages to the product. Also any unauthorized modications made to the product
automatically void product warranty.
17. Never touch antenna lines or wires, if applicable or power cables or power plugs in such circumstances
as lightning and thunder as it may cause electric shock.
18. Any severe physical impact on the product may cause certain components to fall out of place within or
to break, which may cause re or electric shock. In such event, do not operate the product. Contact
the manufacturer for support.
19. Clean dust off the power plug, periodically, to keep it clean and dry, ensuring proper and safe operation
of the product.
20. Do NOT destroy, process, or place the product close to any heating device; do NOT bend or twist
power cords, power plugs, cables, or wires with excessive force; do NOT place any heavy object on
the product as all of the above may cause damages to the product and result in re or electric shock.
21. Do NOT touch power plugs with wet hands.
22. Always make sure to plug in the power plug rmly and completely. Incompletely placed power plugs
may cause re or electric shock due to built up heat emission.
23. Do NOT use any non-rated power sockets or power strips with many other devices jointly plugged in.
The wire of non-designated capacity may cause re due to built up heat emission. Try to use a single,
directly dedicated and rated GFI power socket for the product for safe operation.
24. In case of product malfunction or unusual events such as electrical burning smell, smoke, or loss of
content signals on TV/Display due to internal overheating, immediately turn off and unplug the power
and contact the manufacturer.
Page 6

GENERAL SAFETY PRECAUTIONS CONT’D
25. When installing, leave enough room behind the product (at least 2.36 inches or 60mm) from the wall
for air ow. Insufcient air ow or accumulated heat inside the product may cause re.
26. Do NOT install the product at such unstable locations as moving objects, constantly vibrating props, or
uneven surfaces. Improper installation may cause products to fall off. Follow mounting instructions
properly for safe operation of the product.
27. Do NOT install the product near any poisonous gas or chemically unstable atmosphere as it may
cause re.
28. Do NOT install the product near any strong magnetic or electrical current eld. It may cause re,
electric shock, or severe damages to the product. The product may be subject to any electromagnetic
radiation, causing deterioration of content picture quality.
29. Do NOT leave any re source such as candles close to or on the product as it may be a cause for re
or damages to the product.
30. Do NOT move or transport the product with any cables (power cables, content connectivity cables)
plugged in to the source devices. Damages may occur to the cables, plugs, or jointing connectors
of the cables due to forcible bending and stress, which may cause damages to the waterproof seal
of the product, making it subject to re, electric shock, or shorted circuit.
31. When unplugging, always grab the plugs of power cords or cables. Improper pulling of the cords or
cables may cause damages to the waterproof seal of the product, making it subject to re, electric
shock, or shorted circuit.
32. Do NOT climb on the product.
33. Two persons or more shall transport the product.
34. Do NOT use any other power cords or connection cables than what is provided with the product
or from the manufacturer directly. Use of untested, unauthorized, or substituted power cords or
connection cables may be a cause for malfunction, re, electric shock, or severe damages to the
product. Also such use of improper or undesignated power cords or connection cables will void
product warranty.
35. Always leave the Power Off when plugging or unplugging the power cords or connection cables
to avoid electric shock or damages to the product.
36. Do NOT use any chemical such as paint thinner or benzene to clean the product’s exterior. It may
cause scratches on the surface, erasing proper indications, identication labels, or instructions on
the exterior, which may be a cause for misuse and improper operation of the product.
37. When cleaning the exterior cabinet (contaminated or stained spot cleaning), use diluted neutral
detergent water (at least 5 or 6 times diluted) on smooth cloth and use dry cloth to remove such
stain spots.
6 7
Page 7
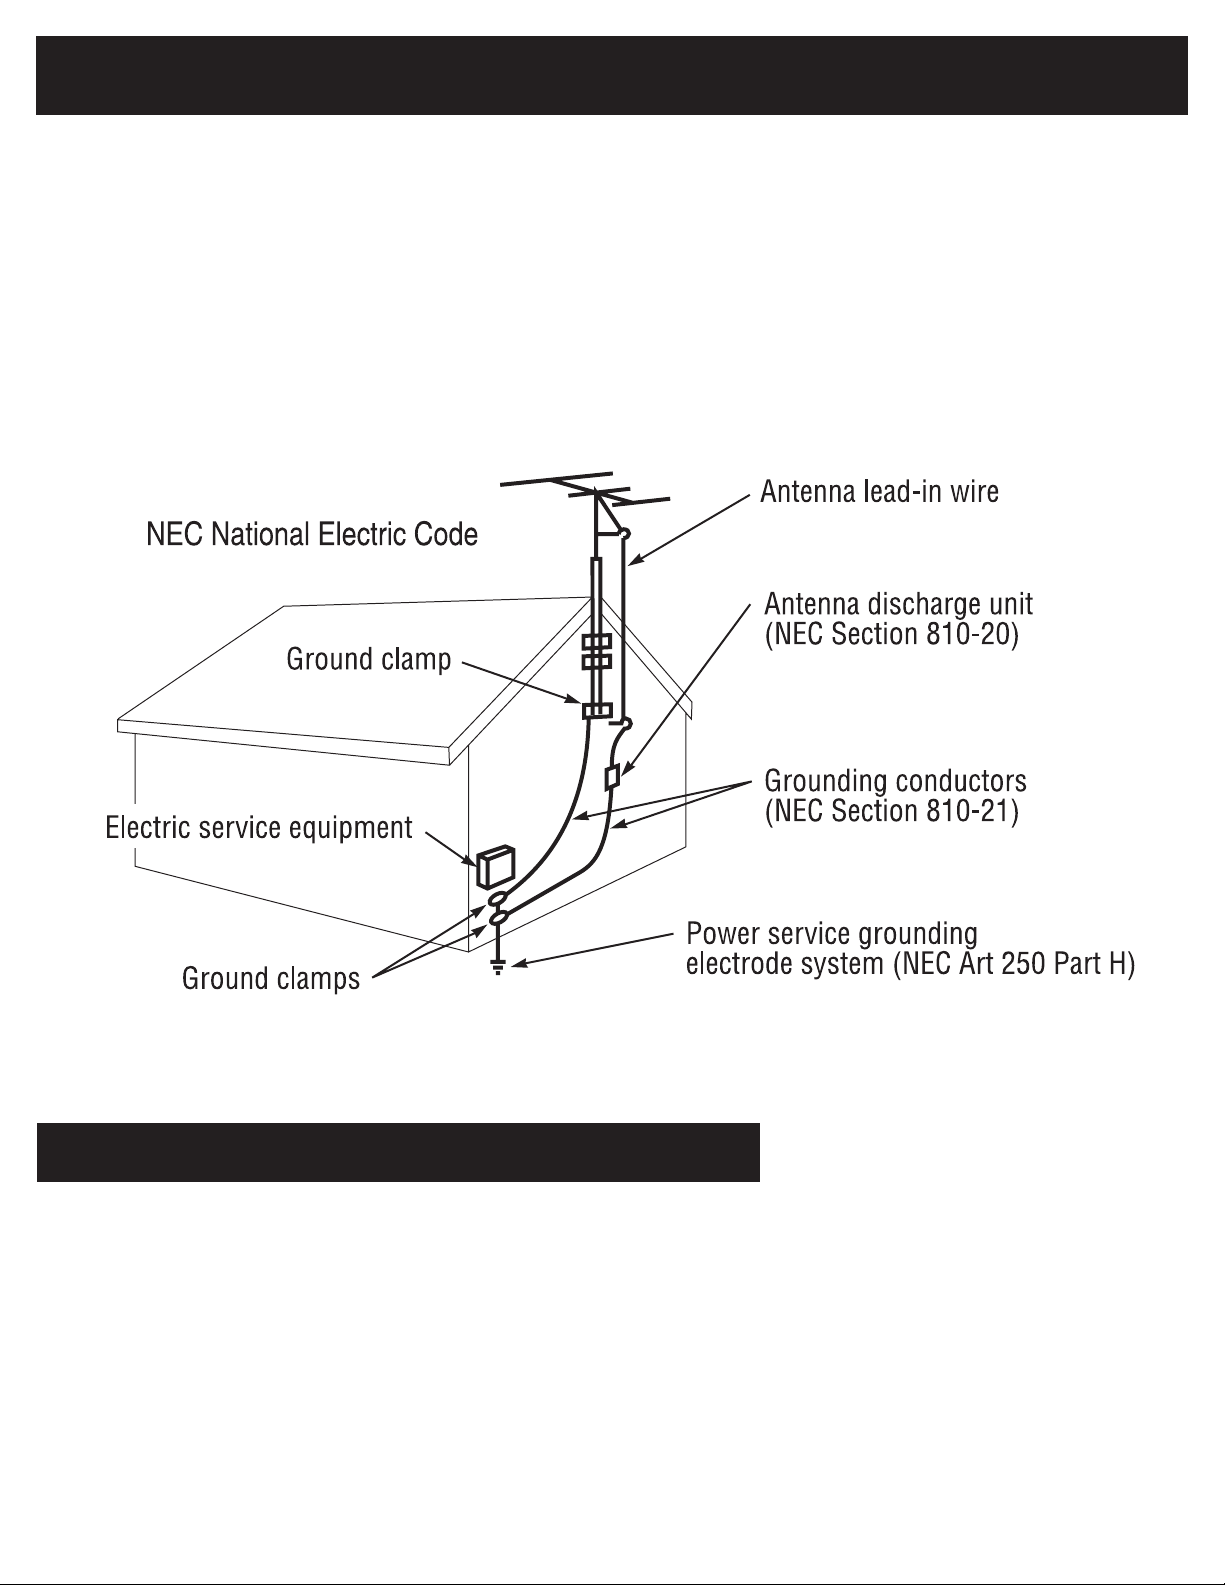
SYSTEM INSTALLATION AND ELECTRICAL REQUIREMENTS
NOTE TO THE DISPLAY SYSTEM INSTALLER:
This reminder is provided to call attention to Article 820-44 of the National Electric Code that
provides guidelines for proper grounding and, in particular, species that the cable ground shall
be connected to the grounding system of the facility, as reasonably close to the point of cable
entry as possible
POWER SOURCE
This LCD display operates on 120 volts 60 Hz, AC current. Insert the power cord into a 120 volts 60
Hz outlet. The main plug is used as the disconnect device and shall remain readily operable.
To prevent electric shock from the display, do not use with an extension cord, receptacle, or other
outlet unless the blades and ground terminal can be fully inserted to prevent blade exposure.
Never connect the LCD display to 50 Hz, direct current, or anything other than the specied voltage.
CAUTION: Never remove the back cover of the LCD display as this can expose you to very
high voltages and other hazards If the display does not operate properly, unplug the LCD
display and call your authorized dealer or service center
Page 8

This device complies with Part 15 of FCC Rules Operation is subject to the following two conditions: (1) This
English
Important Information
WARNING
TO PREVENT FIRE OR SHOCK HAZARDS, DO NOT EXPOSE THIS
UNIT TO RAIN OR MOISTURE� ALSO, DO NOT USE THIS UNIT’S
POLARIZED PLUG WITH AN EXTENSION CORD RECEPTACLE OR
OTHER OUTLETS UNLESS THE PRONGS CAN BE FULLY INSERTED�
REFRAIN FROM OPENING THE CABINET AS THERE ARE HIGH
VOLTAGE COMPONENTS INSIDE�
REFER SERVICING TO QUALIFIED SERVICE PERSONNEL�
CAUTION
CAUTION:
TO REDUCE THE RISK OF ELECTRIC SHOCK, MAKE SURE
POWER CORD IS UNPLUGGED FROM WALL SOCKET�
TO FULLY DISENGAGE THE POWER TO THE UNIT,
PLEASE DISCONNECT THE POWER CORD FROM THE AC
OUTLET� DO NOT REMOVE COVER (OR BACK)� NO USER
SERVICEABLE PARTS INSIDE� REFER SERVICING TO
QUALIFIED SERVICE PERSONNEL�
This symbol warns user that uninsulated voltage within the
unit may have sufcient magnitude to cause electric shock.
Therefore, it is dangerous to make any kind of contact with any
part inside this unit�
This symbol alerts the user that important literature concerning
the operation and maintenance of this unit has been included�
Therefore, it should be read carefully in order to avoid any
problems�
CAUTION: Please use the power cord provided with this display in
accordance with the table below� If a power cord is not supplied with this
equipment, please contact your supplier�
device may not cause harmful interference, and (2) this device must accept any interference received, including
interference that may cause undesired operation.
U.S. Responsible Party: Ciil Technologies LLC,
Address: 1950 Hawthorne Ave. Melrose Park, IL 60160
Tel. No.: (708) 343 - 0600
Type of Product: Digital Display
Equipment Classication: Class B Peripheral
Model: CL-3267
We hereby declare that the equipment specied above conforms to the technical standards as
specied in the FCC Rules.
Canadian Department of Communications Compliance Statement
DOC: This Class B digital apparatus meets all requirements of the Canadian Interference-Causing
Equipment Regulations
C-UL: Bears the C-UL Mark and is in compliance with Canadian Safety Regulations according to
CAN/CSA C222 No 60065-03
SAFETY INSTRUCTIONS
SAFETY INSTRUCTIONS
FCC STATEMENT
This equipment has been tested and found to comply with the limits for a Class B digital device,
pursuant to Part 15 of the FCC Rule. These limits are designed to provide reasonable protection
against harmful interference in a residential installation. This equipment generates, uses and can radiate radio frequency energy and, if not installed and used in accordance with these instructions, may
cause harmful interference to radio communications. However, there is no guarantee that interference
will not occur in a particular installation. If this equipment does cause harmful interference to radio or
television reception, which can be determined by turning the equipment off and on, the user is encourage to try to correct the interference by one or more of the following measures:
1. Reorient or relocate the receiving antenna.
2. Increase the separation between the equipment and receiver.
3. Connect the equipment into an outlet on a circuit different from that to which the receiver is
connected.
4. Consult the dealer or an experienced radio/display technician for help.
This device complies with Part 15 of the FCC Rules Operation is subject to the following two conditions:
1. This device may not cause harmful interference.
2. This device must accept any interference received, including interference that may cause
undesired operation.
8 9
Page 9
English
Important Information
WARNING
TO PREVENT FIRE OR SHOCK HAZARDS, DO NOT EXPOSE THIS
UNIT TO RAIN OR MOISTURE� ALSO, DO NOT USE THIS UNIT’S
POLARIZED PLUG WITH AN EXTENSION CORD RECEPTACLE OR
OTHER OUTLETS UNLESS THE PRONGS CAN BE FULLY INSERTED�
REFRAIN FROM OPENING THE CABINET AS THERE ARE HIGH
VOLTAGE COMPONENTS INSIDE�
REFER SERVICING TO QUALIFIED SERVICE PERSONNEL�
CAUTION
CAUTION:
TO REDUCE THE RISK OF ELECTRIC SHOCK, MAKE SURE
POWER CORD IS UNPLUGGED FROM WALL SOCKET�
TO FULLY DISENGAGE THE POWER TO THE UNIT,
PLEASE DISCONNECT THE POWER CORD FROM THE AC
OUTLET� DO NOT REMOVE COVER (OR BACK)� NO USER
SERVICEABLE PARTS INSIDE� REFER SERVICING TO
QUALIFIED SERVICE PERSONNEL�
This symbol warns user that uninsulated voltage within the
unit may have sufcient magnitude to cause electric shock.
Therefore, it is dangerous to make any kind of contact with any
part inside this unit�
This symbol alerts the user that important literature concerning
the operation and maintenance of this unit has been included�
Therefore, it should be read carefully in order to avoid any
problems�
CAUTION: Please use the power cord provided with this display in
accordance with the table below� If a power cord is not supplied with this
equipment, please contact your supplier�
SAFETY INSTRUCTIONS CONTINUEDDECLARATION OF CONFORMITY
FCC CAUTION
To assure continued compliance and possible undesirable interference, ferrite cores may be used
when connecting this LCD display to video equipment; and maintain at least 400mm spacing to other
peripheral device.
CANADIAN NOTICE
This Class B digital apparatus complies with Canadian ICES-003
CAUTION: Please use the power cord provided with this display in accordance with the table below If a
power cord is not supplied with this equipment, please contact your supplier
Only plug equipment into receptacles with GFI.
Important: Ciil Technologies is not responsible for any issues created by water present at the
plug/receptacle insertion point.
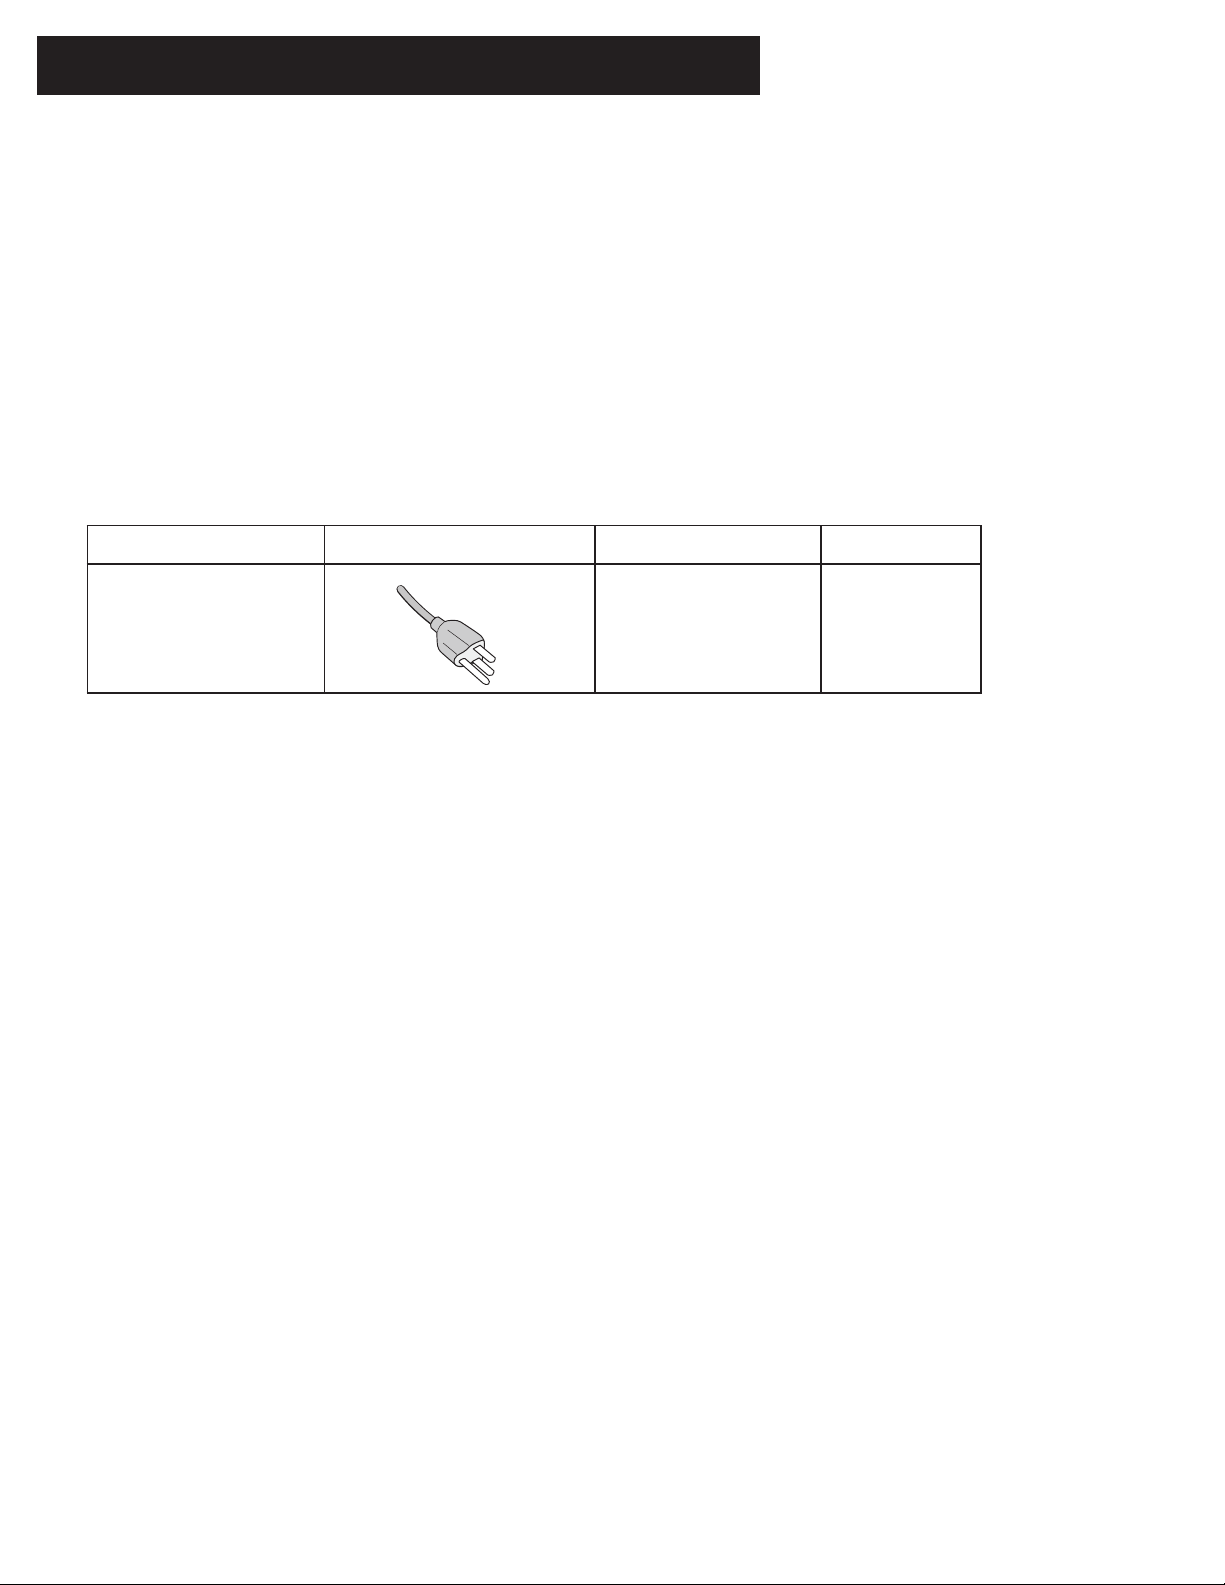
Plug Type Plug Shape Region Voltage
North America
U�S�A�/Canada AC 120 V
Page 10

PREPARATION
IMPORTANT: Do not apply pressure to the screen display area which may compromise the integrity
of the display. The manufacturer’s warranty does not cover user abuse or improper installations.
PREPARING YOUR LCD DISPLAY FOR WALL MOUNTING
1. Remove protective lm from the screen. Be careful not press on the screen.
2. Clean the screen with an approved screen cleaner or Isopropyl alcohol. Do not use any window
cleaners or anything containing ammonia.
We suggest that you keep your display at least 2.36 inches (60mm) from the wall to prevent cable interference. For your safety, only mount with an UL listed wall mount bracket that supports the weight
of the display. When mounting the display outdoors or in harsh environments, only use wall mounts
that are designed to resist water, rust and wind.
Do not mount screen so that it is facing into direct sunlight. Direct sunlight can cause the screen to
temporarily go black. While designed to withstand all-weather environments, the LCD screen is not
designed to operate while facing into direct sunlight.
Ciil Techologies provides a variety of all-weather mounting solutions. The CL-3267 32” all-weather
TV uses a 200mm x 200mm mounting hole pattern that is compatible with all universal all-weather
mounts designed to hold a 32” all-weather TV.
Note: Wall mounting solution is not included with the unit and is sold separately. Contact your Ciil
representative for all-environment mounting solutions.
10 11
Page 11
BATTERY INSTALLATION AND REPLACEMENT
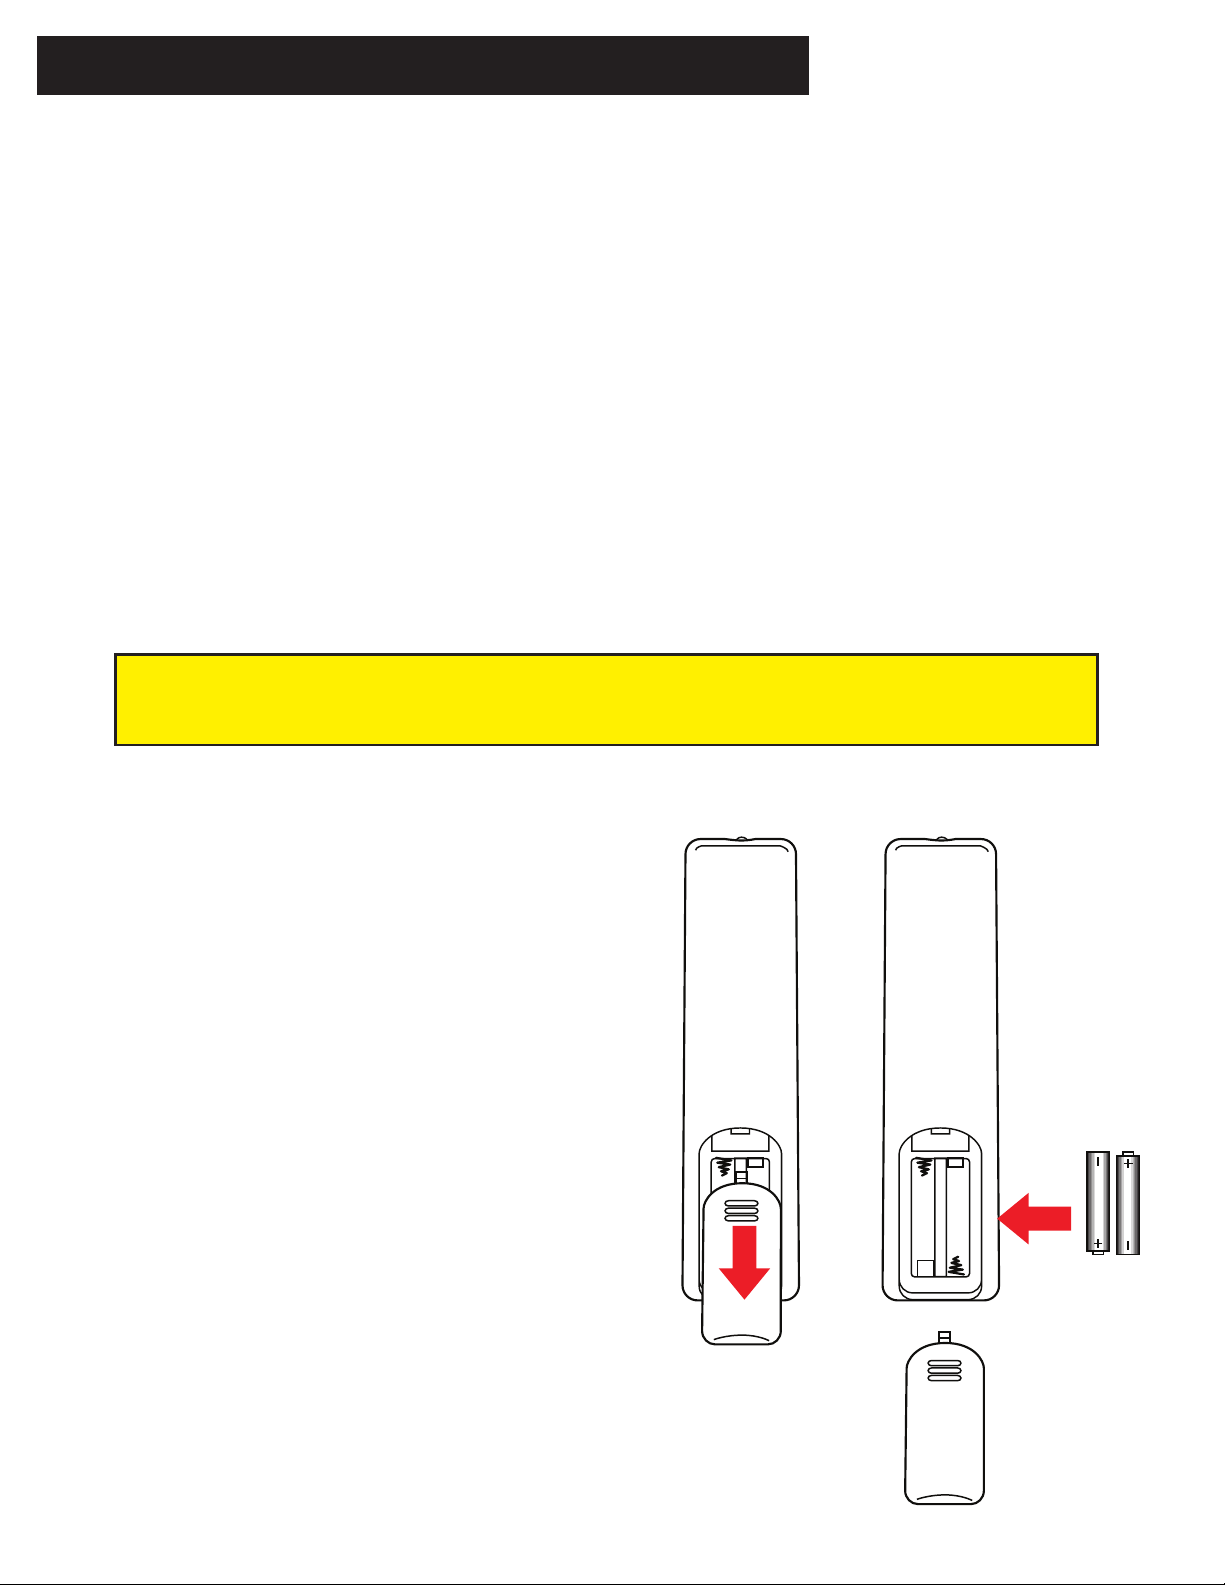
The remote control is powered by two 15V AAA batteries. To install or replace batteries:
1. Open the battery cover of the remote control by pushing and pulling it in the direction of the arrow.
2. Insert two new “AAA” size batteries for the remote control When replacing old batteries, push
them towards the springs and lift them out.
3. Match the batteries to the (+) and (-) marks in the battery compartment.
4. Insert the bottom of the battery, the (-) side, into the battery compartment rst, push towards the
springs and insert the top of the battery, the (+) side, into place. Do not force the battery into the
battery compartment.
5. Close the battery cover making sure the tabs rest in the corresponding holes and push down the
cover until it clicks shut.
CAUTION: Incorrect usage of batteries can result in leaks or bursting.
Ciil recommends the following battery use:
• Do not mix battery brands.
• Do not combine new and old batteries.
This can shorten the battery life or cause liquid
leakage of the batteries.
• Remove dead batteries immediately to prevent
battery acid from leaking into the battery
compartment.
• Do not touch exposed battery acid as it may
injure skin.
• Remove the batteries if you do not intend to use
the remote control for a long period of time.
Page 12
①
1. SPEAKERS
2. POWER CORD
3. HDMI
4. HD COMPONENT
CONNECT TO THE POWER SOURCE
English
or
+
VOL
-
CH
INPUTMENU
GROUP RM
Roxtec RM modules
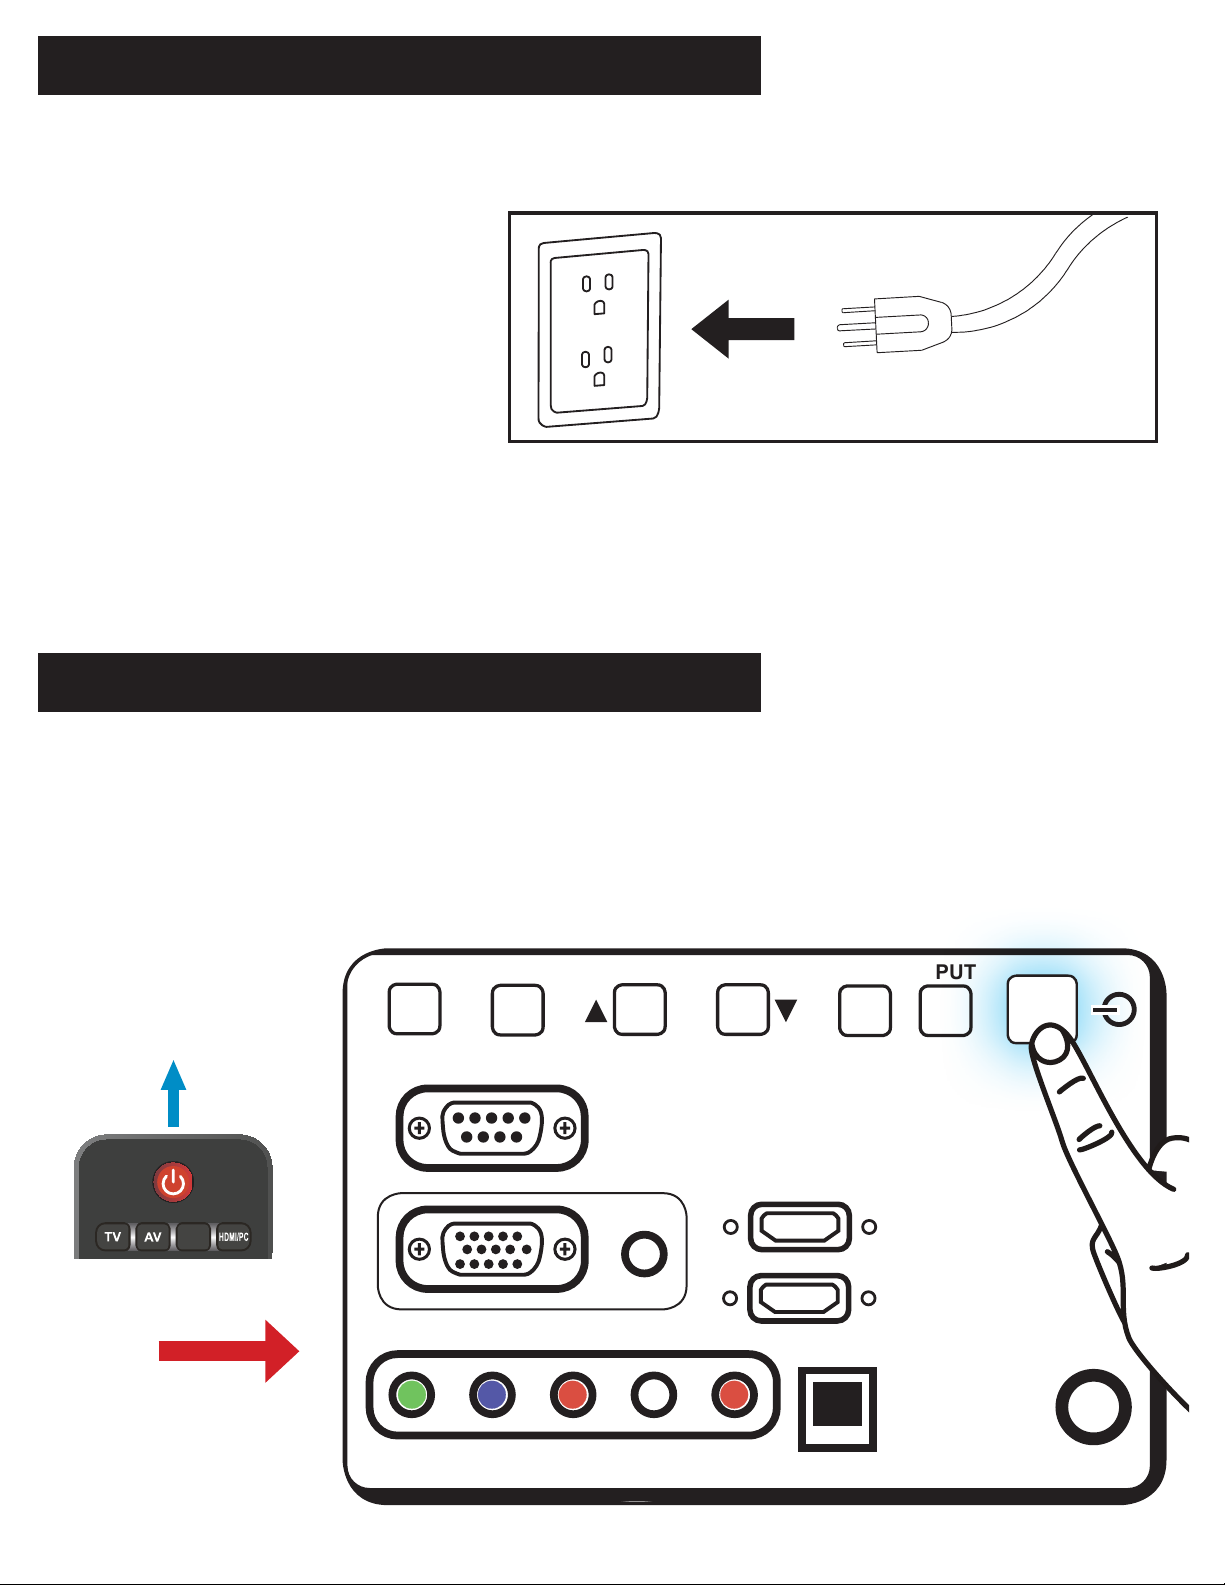
The display should be installed close to an easily accessible power outlet. Fully insert the prongs into
the power outlet socket. A loose connection may cause image degradation.
Only plug TV into an electrical outlet
that has a GFI receptacle. If you run
an extension cord, make sure it is an
outdoor rated cord and plug. Insure
that is placed safely and out of the
way of people and animals.
POWER ON/OFF YOUR NEW LCD DISPLAY
Press the power key on the remote control or press the
power button located inside the back of the TV, behind the
protective cover. The display will power on.
Power Key
DPNQ
– OR –
12 13
Page 13
1. SPEAKERS
2. POWER CORD
3. HDMI
4. HD COMPONENT
SOURCE CONNECTION GUIDE
GROUP RM
Roxtec RM modules
0.1-1.0 mm
0.004-0.039”
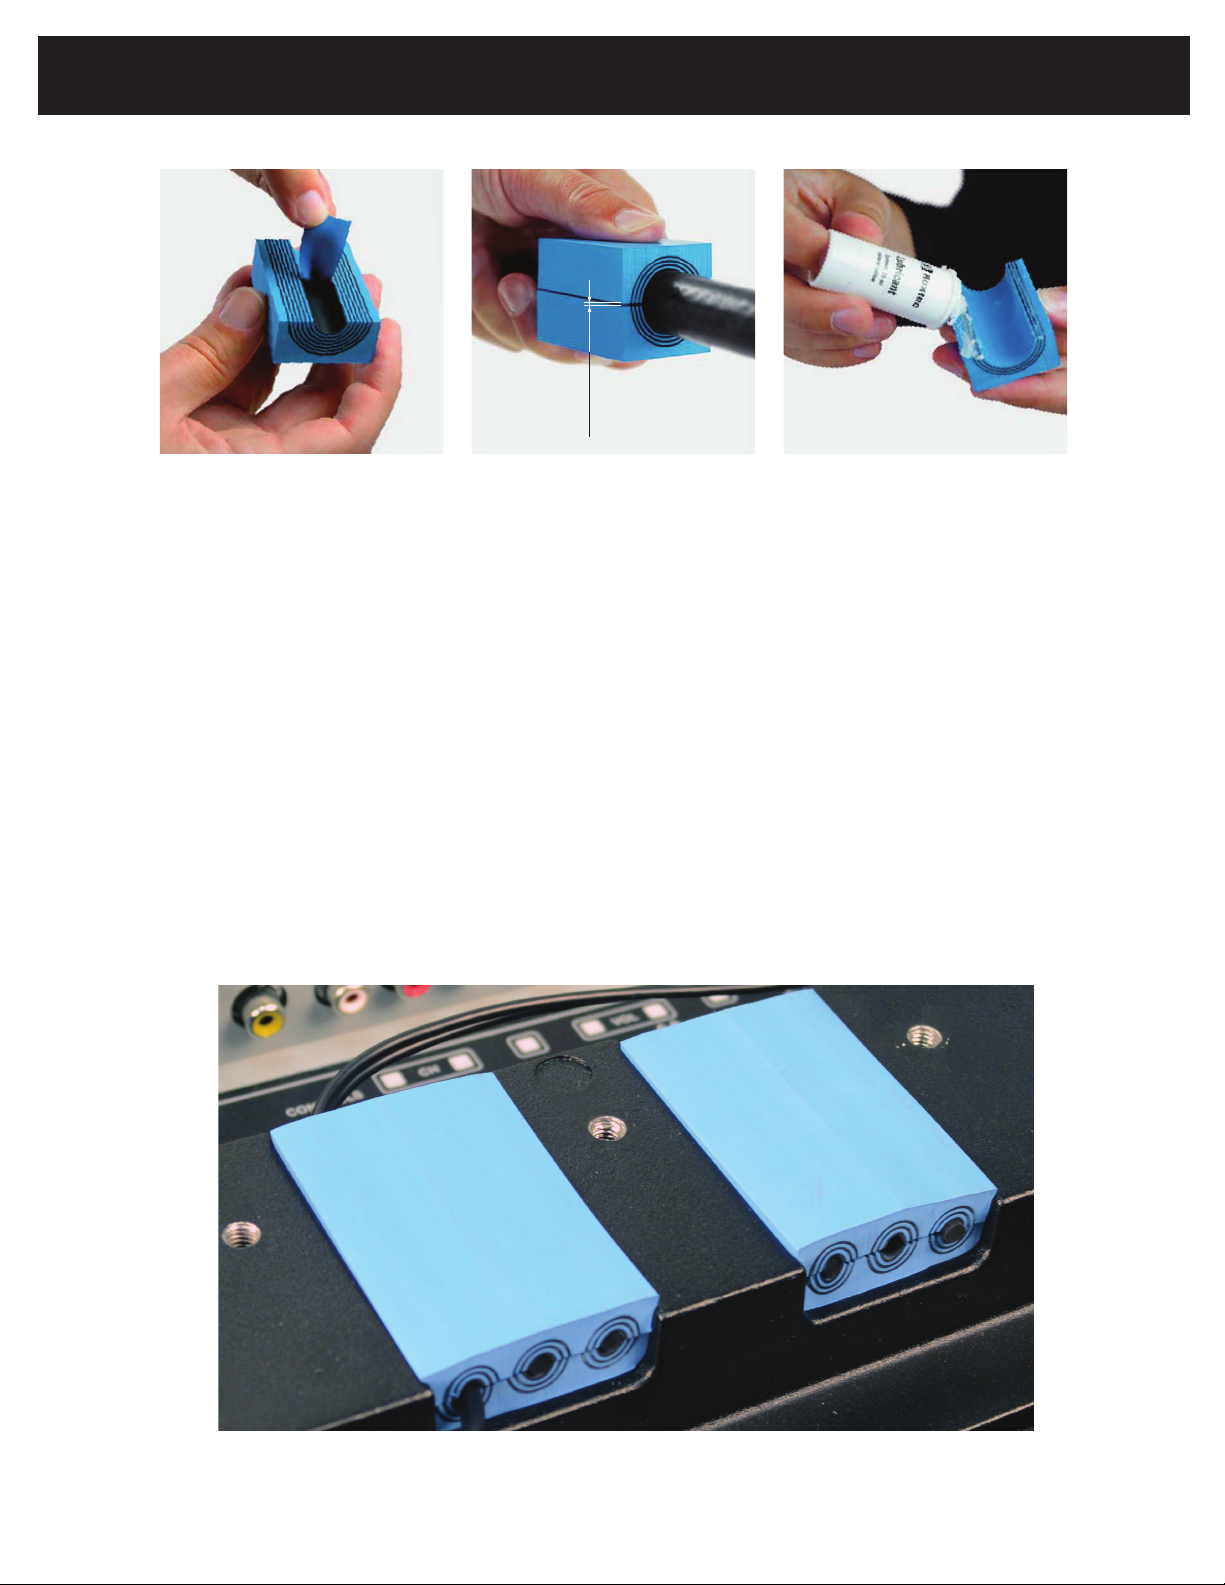
To secure cables from the interior of the unit to the outside, use the Roxtec RM module as follows:
1. Place cord into module. The sealing module is designed with removable layers for perfect
adaptation to cables of varying sizes. If more room is needed, simply remove a layer and try again.
Be careful not to remove too many layers. The t must be snug.
2. Fit the module over the cable.
3. Apply the only Roxtec RM module lubricant that comes included with the UltraView TV.
4. Place the sealed module back into the UltraView TV (as shown below).
Page 14
+
VOL
-
CH
INPUTMENU
1
NEC Display Solutions of America, Inc.
E322 Installation Guide
32” LCD Display Rev 1.2
Control Codes
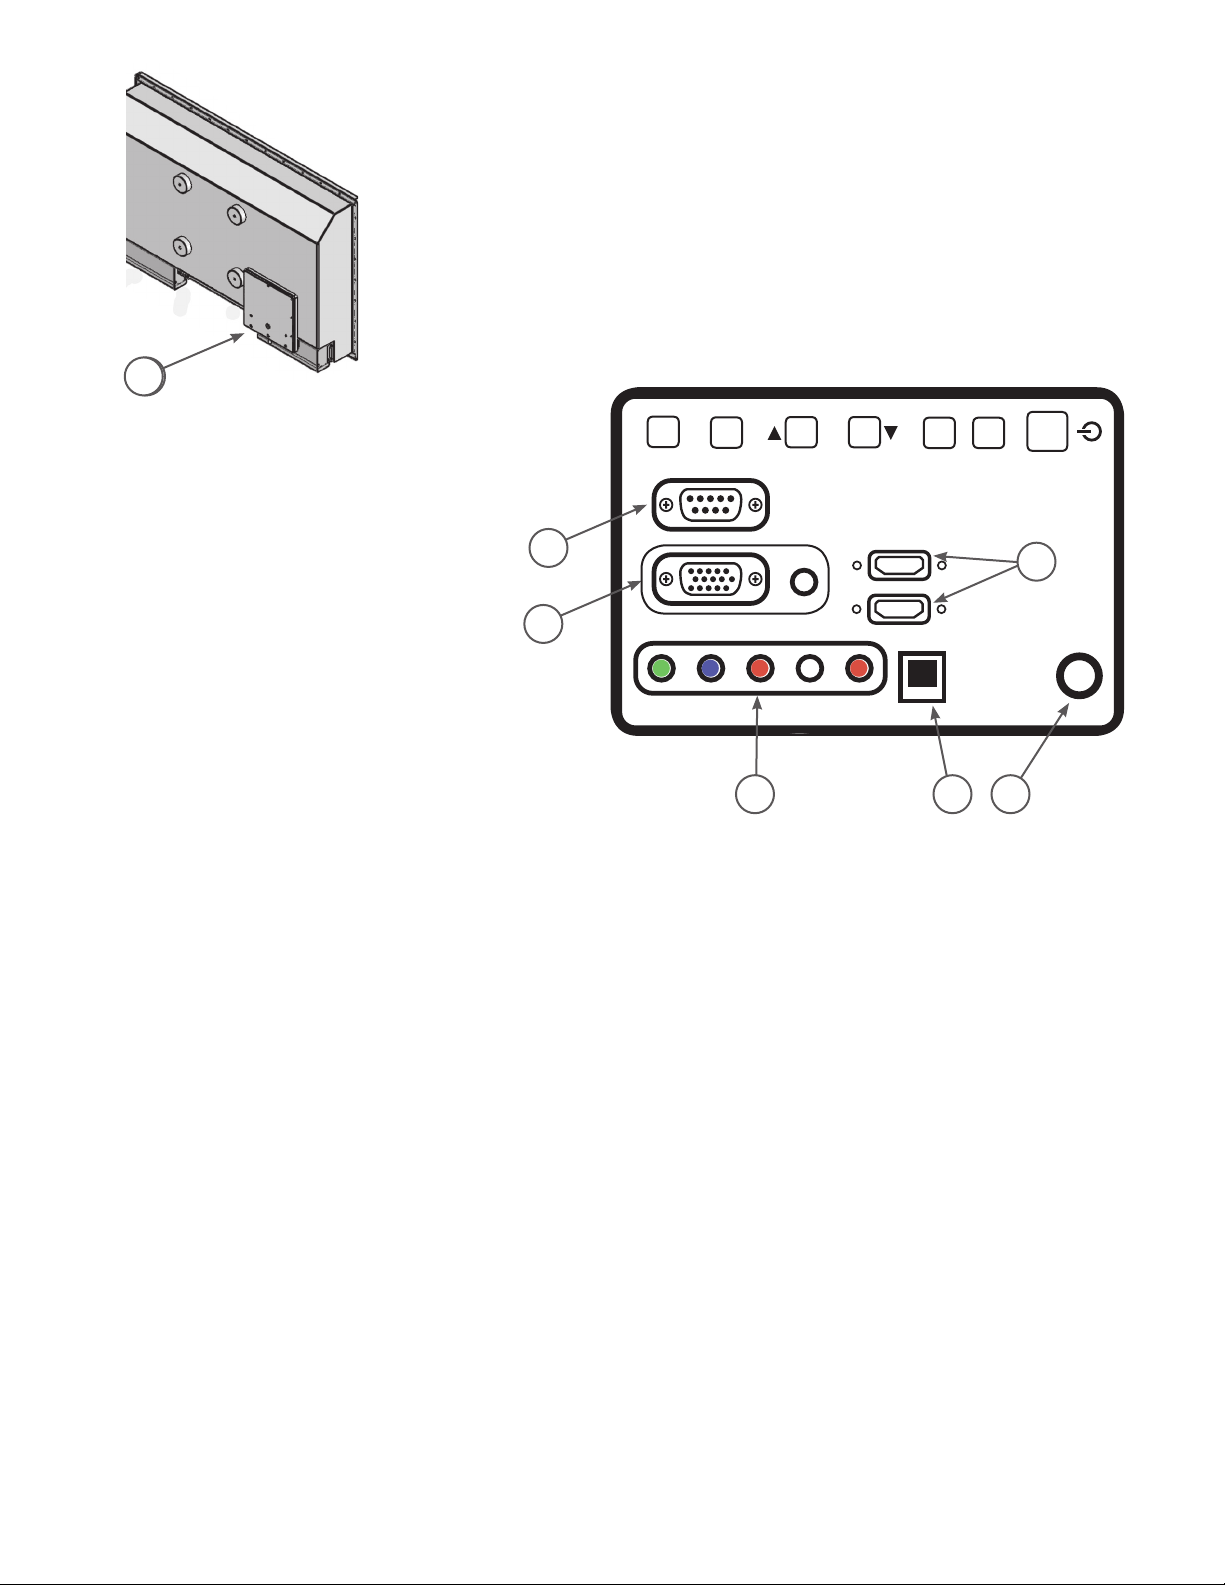
1. REMOVE PANEL TO
ACCESS CONNECTION AND
CONTROL PANELS
6
1
2
43 5
1. HDMI – Connect the primary source for digital video such as a DVD multimedia player or set top box
through this all digital connector.
2. RGB/AUDIO – Connect the video and audio cables from a computer here.
3. COMPONENT (Y-PbPr with Audio L/R) – Connect the primary source for component video devices
such as a DVD Player or set top box here. Use red for Pr, blue for Pb, green for Y, red for right audio
(R) and white for left audio (L) inputs.
4. AIR/CABLE – Connect to an antenna or digital cable (out of-the-wall, not from Cable Box) for the
digital tuner.
5. DIGITAL OUT – When a digital audio signal is associated with the input selected for viewing, the
digital audio will be available on this DIGITAL OUT connection to your home theater system.
6. RS-232C – Input from external equipment such as a PC or AV control system in order to control
RS-232C functions.
Once your AV device is connected, press the Source button on the remote control to select the relevant source to
view (ex: Press COMP button to select “Component” if you have connected a source to the Component input).
14 15
Page 15
NEC Display Solutions of America, Inc.
E322 Installation Guide
32” LCD Display Rev 1.2
Control Codes
PC CONTROL OF THE TV
Attach an RS-232C cable cross-type (commercially available) to the supplied Din/D-Sub RS-232C
for the connections.
Note: This operation system should be used by a person who is accustomed to using computers.
Function Code Data
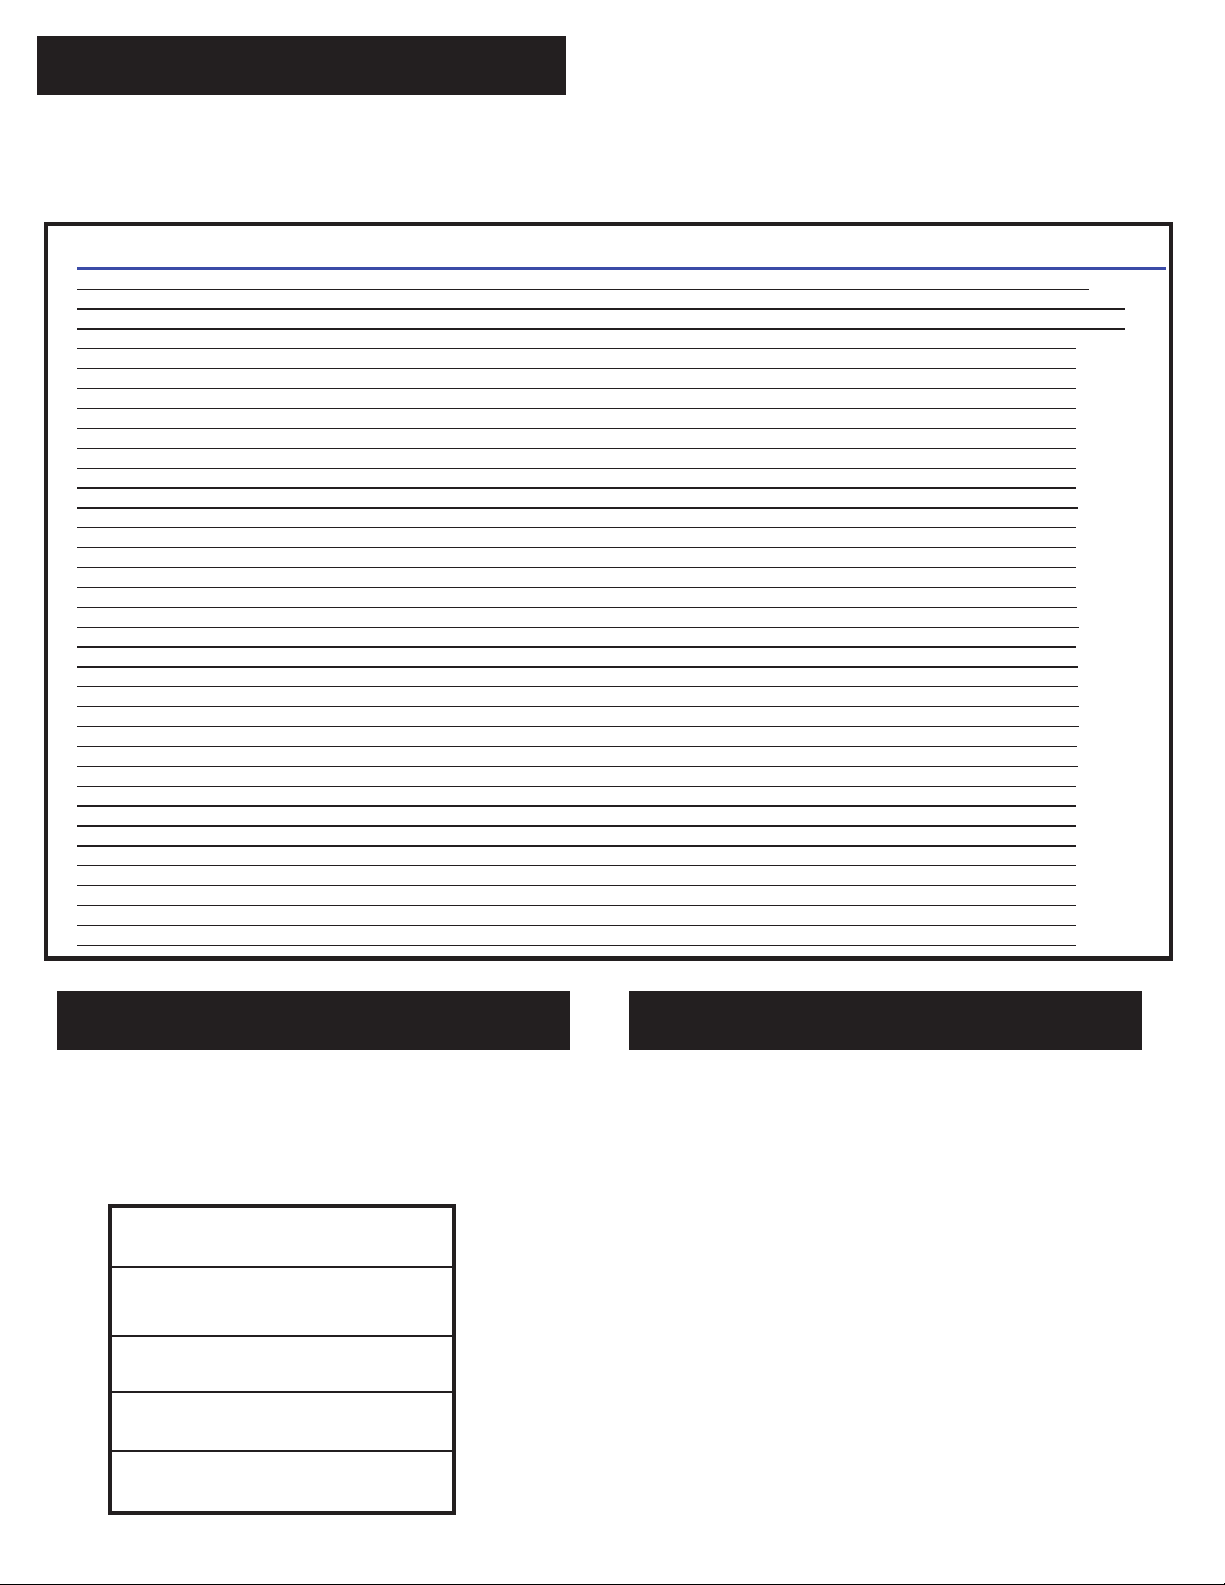
POWER ON 01 30 41 30 41 30 43 02 43 32 30 33 44 36 30 30 30 31 03 73 0D
OFF 01 30 41 30 41 30 43 02 43 32 30 33 44 36 30 30 30 34 03 76 0D
INPUT SWITCH VGA (15pin HD) 01 30 41 30 45 30 41 02 30 30 36 30 30 30 30 31 03 73 0D
HDMI1 01 30 41 30 45 30 41 02 30 30 36 30 30 30 31 31 03 72 0D
HDMI2 01 30 41 30 45 30 41 02 30 30 36 30 30 30 31 32 03 71 0D
HDMI3_________ 01 30 41 30 45 30 41 02 30 30 36 30 30 30 31 33 03 70 0D
Video (Composite) 01 30 41 30 45 30 41 02 30 30 36 30 30 30 30 35 03 77 0D
TV 01 30 41 30 45 30 41 02 30 30 36 30 30 30 30 41 03 03 0D
AUDIO MUTE ON 01 30 41 30 45 30 41 02 30 30 38 44 30 30 30 31 03 09 0D
OFF 01 30 41 30 45 30 41 02 30 30 38 44 30 30 30 32 03 0A 0D
KEY LOCK All Buttons 01 30 41 30 45 30 41 02 30 30 46 42 30 30 30 32 03 72 0D
Control Buttons Only 01 30 41 30 45 30 41 02 30 30 46 42 30 30 30 31 03 71 0D
Unlock 01 30 41 30 45 30 41 02 30 30 46 42 30 30 30 30 03 70 0D
VGA AUTO SETUP 01 30 41 30 45 30 41 02 30 30 31 45 30 30 30 31 03 01 0D
TV CHANNEL Up 01 30 41 30 45 30 41 02 30 30 38 42 30 30 30 31 03 0F 0D
Down 01 30 41 30 45 30 41 02 30 30 38 42 30 30 30 32 03 0C 0D
Analog Closed Caption Off 01 30 41 30 45 30 41 02 31 30 38 34 30 30 30 31 03 78 0D
CC1 01 30 41 30 45 30 41 02 31 30 38 34 30 30 30 32 03 7B 0D
CC2 01 30 41 30 45 30 41 02 31 30 38 34 30 30 30 33 03 7A 0D
CC3 01 30 41 30 45 30 41 02 31 30 38 34 30 30 30 34 03 7D 0D
CC4 01 30 41 30 45 30 41 02 31 30 38 34 30 30 30 35 03 7C 0D
TT1 01 30 41 30 45 30 41 02 31 30 38 34 30 30 30 36 03 7F 0D
TT2 01 30 41 30 45 30 41 02 31 30 38 34 30 30 30 37 03 7E 0D
TT3 01 30 41 30 45 30 41 02 31 30 38 34 30 30 30 38 03 71 0D
TT4 01 30 41 30 45 30 41 02 31 30 38 34 30 30 30 39 03 70 0D
Digital Closed Caption Off 01 30 41 30 45 30 41 02 31 30 41 31 30 30 30 31 03 04 0D
Srv1 01 30 41 30 45 30 41 02 31 30 41 31 30 30 30 32 03 07 0D
Srv2 01 30 41 30 45 30 41 02 31 30 41 31 30 30 30 33 03 06 0D
Srv3 01 30 41 30 45 30 41 02 31 30 41 31 30 30 30 34 03 01 0D
Srv4 01 30 41 30 45 30 41 02 31 30 41 31 30 30 30 35 03 00 0D
Srv5 01 30 41 30 45 30 41 02 31 30 41 31 30 30 30 36 03 03 0D
Srv6 01 30 41 30 45 30 41 02 31 30 41 31 30 30 30 37 03 02 0D
Video (Component) 01 30 41 30 45 30 41 02 30 30 36 30 30 30 30 43 03 01 0D
COMMUNICATION CONDITIONS COMMUNICATION PROCEDURE
Set the RS-232C communication settings
on the PC to match the TV’s communication
conditions. The TV’s communication
settings are as follows:
Baud Rate: 9,600 bps
Data Length: 8 bits
Parity Bit: None
Stop Bit: 1 bit
Flow Control: None
Send the control commands from the PC via the
RS-232C connector.
The TV operates according to the received command and sends a response message to the PC.
Do not send multiple commands at the same time
- wait until the PC receives the response before
sending the next command.
Page 16
OPERATING INSTRUCTIONS
8� USB/SERVICE – Insert USB storage device to view photos and listen to
the music� /This USB slot is for future software upgrades�
9� RS-232C – Input from external equipment such as a PC or AV control
system in order to control RS-232C functions�
Once your AV device is connected, press the Source button on the remote
control to select the relevant source to view� (ex: Press COMP button to select
“Component” if you have connected a source to the Component input�)
RS-232C Port Specifications
PC control of the TV
Attach an RS-232C cable cross-type (commercially available) to the supplied
Din/D-Sub RS-232C for the connections�
Note: This operation system should be used by a person who is accustomed
to using computers�
Communication conditions
Set the RS-232C communication settings on the PC to match the TV's
communication conditions�
The TV's communication settings are as follows:
Baud rate: 9,600 bps
Data length: 8 bits
Parity bit: None
Stop bit: 1 bit
Flow control: None
Communication procedure
Send the control commands from the PC via the RS- 232C connector�
The TV operates according to the received command and sends a response
message to the PC�
Do not send multiple commands at the same time� Wait until the PC receives
the response before sending the next command�
Power Mode Status
English
Operating Instructions
1
2
3
5
6
4
7
5
6
1
3
4
2
7
E322/E422/E462 E552
Using The Side Panel Controls
English
Color buttons
Follow the on-screen instruction to
operate�
EPG
Press to display the Electronic
Program Guide in TV mode� It shows
the current channel name, program
name, time, rating, and summary,
depending on the information
provided by the broadcaster�
Freeze
Press to freeze the displayed picture�
MTS
Press to activate the NTSC tuner
sounds such as Stereo, SAP, Mono-
tone, and languages of the digital
tuner�
Wide
Press to choose the display aspect
ratio: Wide Screen/4:3/Panorama/
Zoom/Automatic/Dot by Dot� (Ratio
availability varies by video inputs�
Refer to the Picture Format Table
below for details�)
Picture
Press to choose the picture mode:
Sports/Standard/Movie/Power Saver/
User�
Audio
Press to choose sound mode: Rock/
Pop/Live/Dance/Techno/Classic/Soft/
Off�
Ch-List
Press to display the Channel List�
C.C.
Press to activate the Closed Caption�
Picture Format for Each Input Source
POWER MODE STATUS
Power saving support automatically power on when signal appear Standby to power on by touch
Mode
On Blue v v v v v
Power
Saving
Standby Red v v v v v
LED
Status
VGA AV Component HDMI 1-3 TV
HDMI 1-2
Purple v - - - -
up remote or keypad power button.
USING THE BACK
CONTROL PANEL
+
1 2 3 4 5 6 7
VOL
-
CH
VOL
+
CH
-
INPUTMENU
MENU INPUT
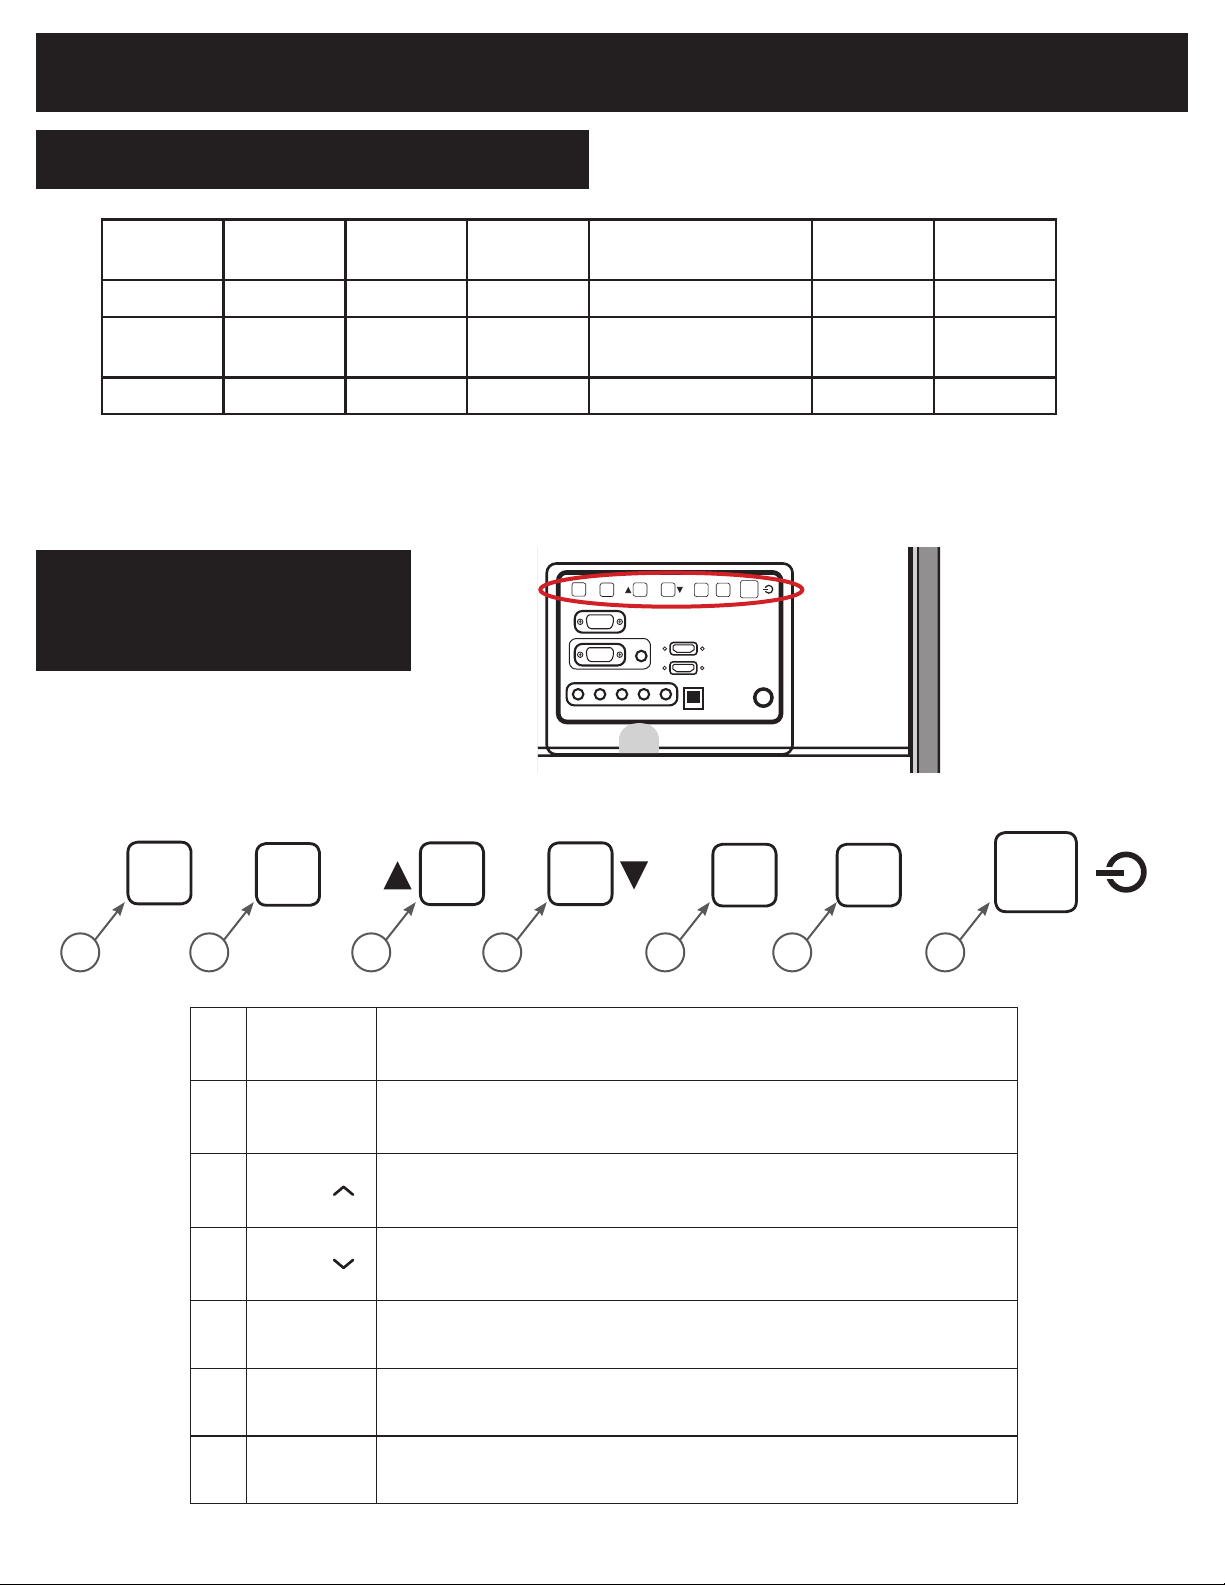
1� VOL +
2� VOL -
3� CH ▲/
4� CH ▼/
Press to increase the volume�
Press this key to shift Right in the OSD menu�
Press to decrease the volume�
Press this key to shift Left in the OSD menu�
Press to increase the channel number�
Press this key to shift up in the OSD menu�
Press to decrease the channel number�
Press this key to shift down in the OSD menu�
5� MENU Press to open or exit the OSD (On-Screen Display) menu�
6� INPUT Press to select the input source�
7� POWER Press to turn on / off (standby) the display�
16 17
Page 17
English
Color buttons
Follow the on-screen instruction to
operate�
EPG
Press to display the Electronic
Program Guide in TV mode� It shows
the current channel name, program
name, time, rating, and summary,
depending on the information
provided by the broadcaster�
Freeze
Press to freeze the displayed picture�
MTS
Press to activate the NTSC tuner
sounds such as Stereo, SAP, Mono-
tone, and languages of the digital
tuner�
Wide
Press to choose the display aspect
ratio: Wide Screen/4:3/Panorama/
Zoom/Automatic/Dot by Dot� (Ratio
availability varies by video inputs�
Refer to the Picture Format Table
below for details�)
Picture
Press to choose the picture mode:
Sports/Standard/Movie/Power Saver/
User�
Audio
Press to choose sound mode: Rock/
Pop/Live/Dance/Techno/Classic/Soft/
Off�
Ch-List
Press to display the Channel List�
C.C.
Press to activate the Closed Caption�
Picture Format for Each Input Source
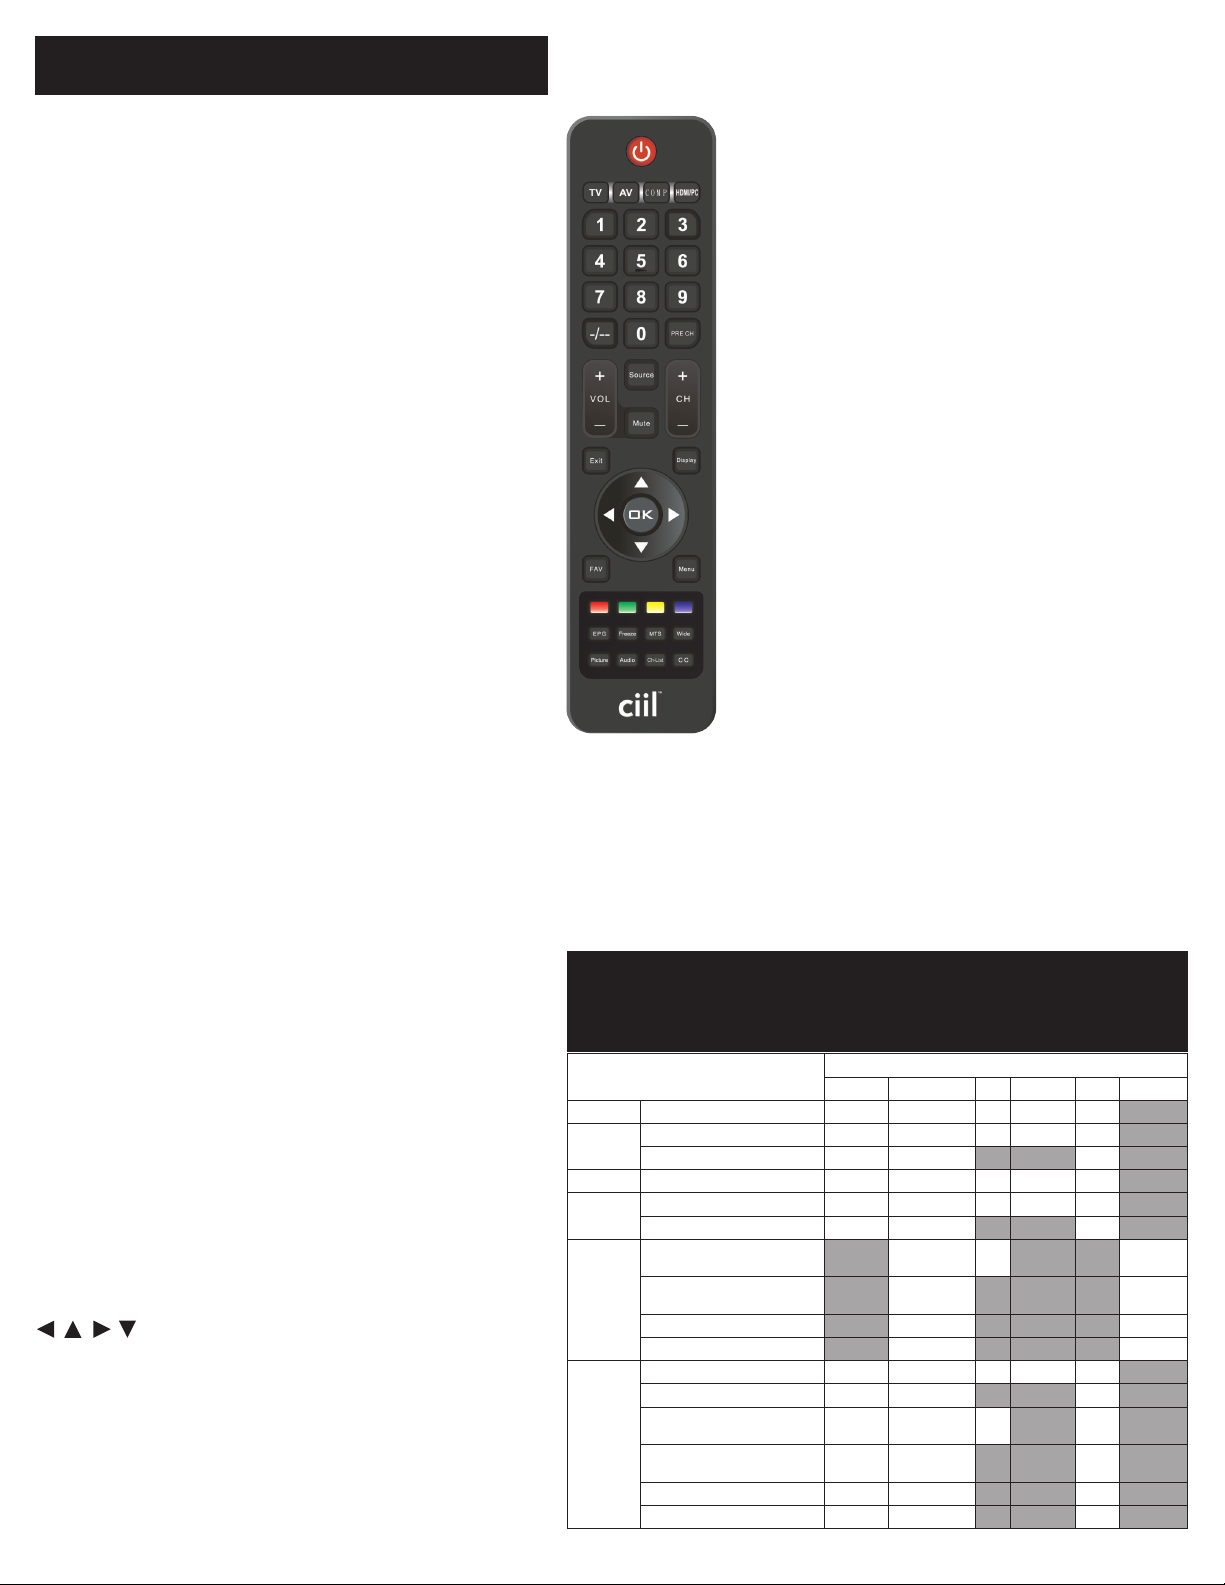
USING THE REMOTE CONTROL
POWER
Press to turn On/Off (standby) the power (Note: To
completely turn off the power, unplug the AC cord
from the power outlet).
EPG
Press to display the Electronic Program
Guide in TV mode It shows the current
channel name, program name, time, rating,
and summary, depending on the information provided by the broadcaster
TV
Press to choose ATSC/NTSC tuner source mode.
AV
Press to choose Composite source mode.
COMP
Press to choose Component source mode.
HDMI/PC
Press repeatedly to choose PC IN or HDMI source
mode.
0 – 9 / - NUMBER
Press to enter the tuner channel number to select
channel (Press ‘-’ to choose the sub-channel).
PRE CH
Press to display the previous channel.
SOURCE
Press repeatedly to choose the various input sources.
MUTE
Switch the sound On/Off.
VOL+ / VOL-
Press + or - to adjust the volume.
CH+ / CH-
Press + or - to browse through the channels.
FREEZE
Press to freeze the displayed picture
MTS
Press to activate the NTSC tuner sounds
such as Stereo, SAP, Mono- tone, and languages of the digital tuner
WIDE
Press to choose the display aspect ratio:
Wide Screen/4:3/Panorama/ Zoom/Automatic/Dot by Dot (Ratio availability varies
by video inputs Refer to the Picture Format
Table below for details)
PICTURE
Press to choose the picture mode: Sports/
Standard/Movie/Power Saver/ User
AUDIO
Press to choose sound mode: Rock/ Pop/
Live/Dance/Techno/Classic/Soft/ Off
CH-LIST
Press to display the Channel List
C.C.
Press to activate the Closed Caption
PICTURE FORMAT FOR EACH
Exit
Press to exit the OSD menu.
DISPLAY
Press to show the information about the input
source and tuner channel.
FAV
Press to display the Favorite List.
MENU
Press to open the OSD menu.
, , , , OK
Press to select or conrm the various function
items on the menu.
Color Buttons
Follow the on-screen instruction to operate.
INPUT SOURCE
Input Signal
ATV Yes Ye s Yes Ye s Ye s No
DTV
Composite Yes Ye s Yes Ye s Ye s No
Component
PC IN
HDMI 1
HDMI 2
HDMI 3
SD Yes Ye s Yes Ye s Ye s No
HD Yes Yes No No Ye s No
480i, 480p Yes Ye s Yes Ye s Ye s No
720p, 1080i, 1080p Ye s Yes No No Ye s No
640x480, 800x600, 1024x768,
1280x1024
720x400, 1280x720, 1280x800,
1440x900, 1680x1050
1366x768 (For E322 model) No Ye s No No No Ye s
1920x1080 No Yes No No No Ye s
480i, 480p Yes Ye s Yes Ye s Ye s No
720p, 1080i, 1080p Ye s Yes No No Ye s No
640x480, 800x600, 1024x768,
1280x1024
720x400, 1440x900, 1280x720,
1280x800, 1680x1050
1366x768 (For E322 model) Yes Ye s No No Ye s No
1920x1080 Ye s Ye s No No Ye s No
Aspect
Automatic Wide Screen 4:3 Panorama Zoom Dot by Dot
No Ye s Ye s No No Ye s
No Ye s No No No Ye s
Yes Ye s Yes No Yes No
Yes Ye s No No Ye s No
Page 18
NAVIGATING THE ON-SCREEN MENU
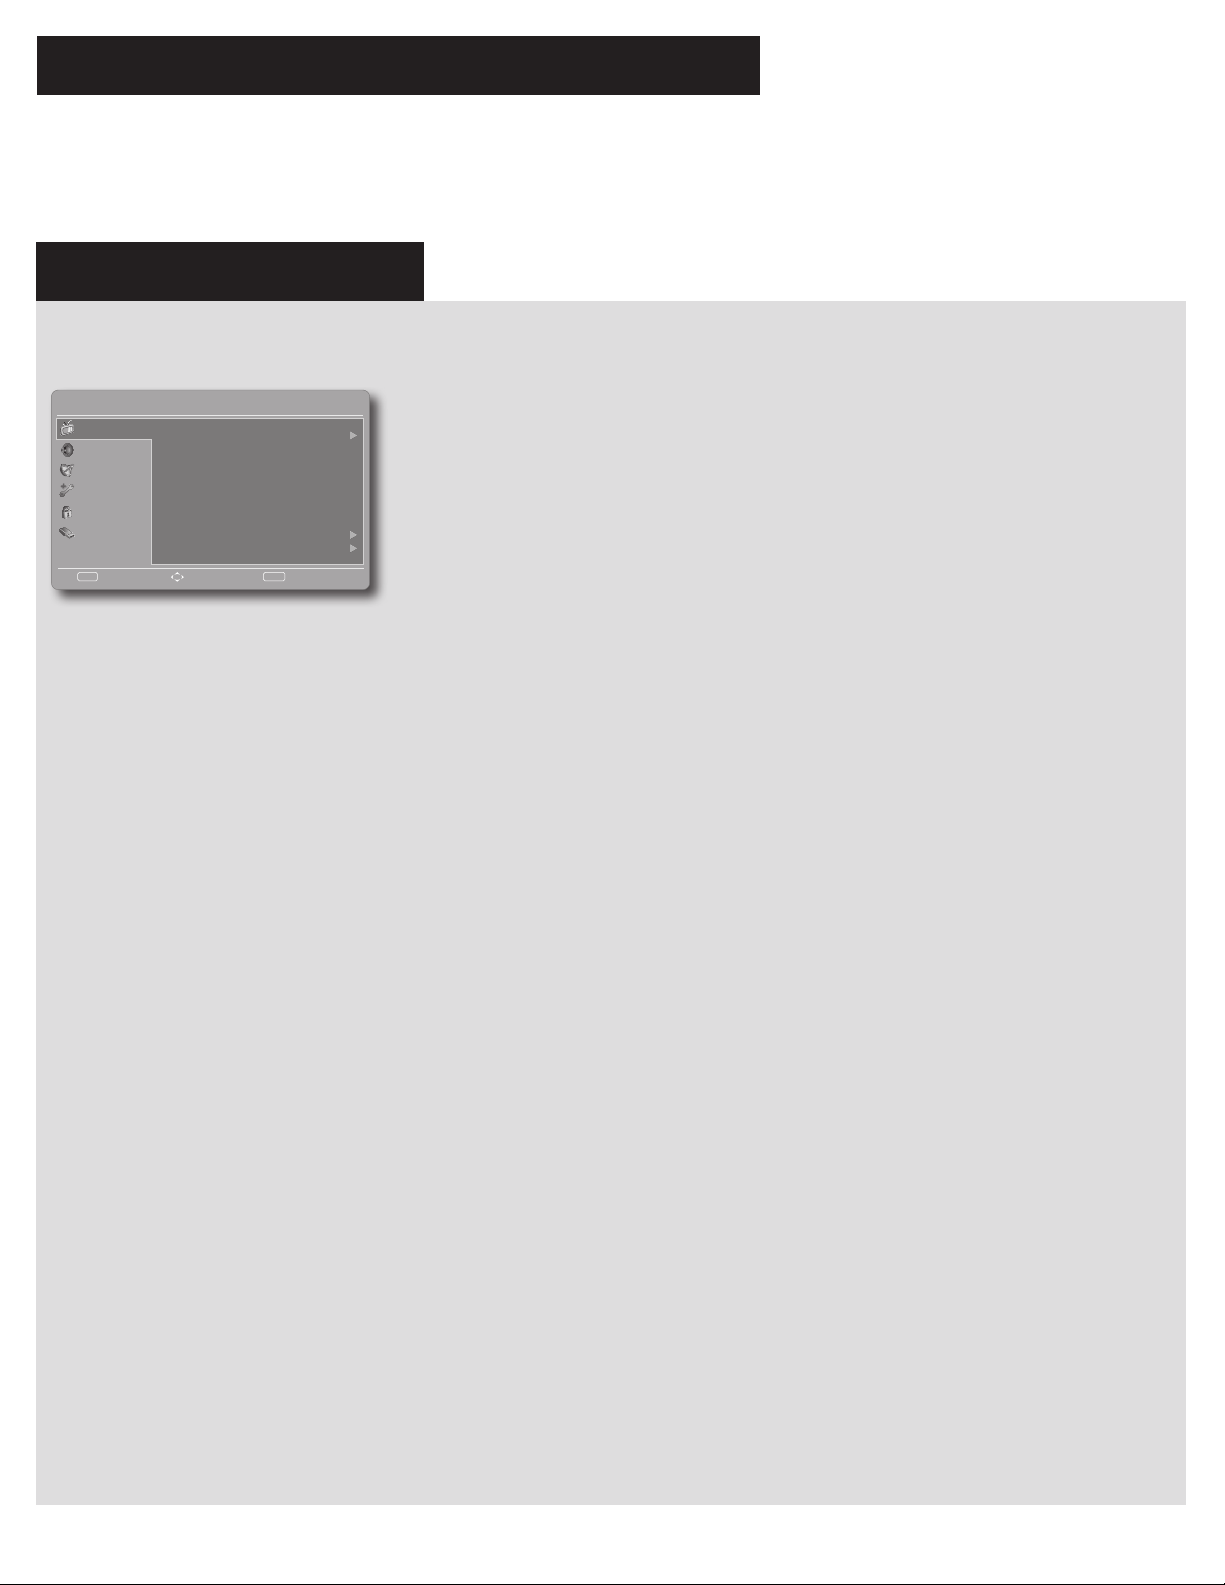
Navigating The On-Screen Menu
Press the Menu button to display and
Exit to close the main menu�
Use the Navigation Ring to navigate,
select, adjust or conrm an item on
the OSD (On Screen Display) menu�
Note: Some features may only be
available in a particular source mode�
Video Menu
This menu adjusts video items�
7� Sharpness
Control the display sharpness
from 0 ─ 20.
8� Color Temperature
Four color temperature modes
(Warm / Normal / Cool / User)�
9� Advanced Video
Provide various advanced
functions for optimizing the
picture quality�
[DNR]
DNR (Digital Noise Reduction)
enables you to reduce the noise
effect without degrading picture
quality (Off/Low/Medium/Strong)�
[MPEG NR]
Reduce MPEG grained noise
from receiving signal�
[Adaptive Luma Control]
Setup Menu
The Setup menu in TV mode is
shown below� According to various
requirements in different source
modes, certain features could be
hidden (disabled) on the menu�
English
Audio Menu
The Audio menu provides an audio
adjustment for user to modify the
audio setting�
TV Menu
The channel menu sets your signal
source options�
Setup Menu
The Setup menu in TV mode is
shown below� According to various
requirements in different source
modes, certain features could be
hidden (disabled) on the menu�
OSD Language
Blue Mute
Time Setup
Version Info
Caption
Location
English
On
Home
Video
Setup
Parental
Audio
TV
Picture Size Wide Screen
Press tthe Menu button to display and Exit to close the main menu. Use the Navigation Ring to navigate, select,
adjust or conrm an item on the OSD (On Screen Display) menu.
Note: Some features may only be available in a particular source mode.
VIDEO MENU
This menu adjusts video items.
ADVANCED VIDEO
Provide various advanced functions for
Video
Audio
TV
Setup
Parental
USB
Enter Select Exit
Picture Mode
Backlight
Brightness
Contrast
Saturation
Hue
Sharpness
Color Temperature
Advanced Video
Standard
100
50
50
50
0
10
EXITOK
optimizing the picture quality.
• [DNR]
DNR (Digital Noise Reduction) enables
you to reduce the noise effect without
degrading picture quality
(Off/Low/Medium/Strong).
• [MPEG NR]
Reduce MPEG grained noise from
PICTURE MODE
Adjust the picture appearance by
choosing one of the preset picture
modes: Standard, Movie, Power
Saver, User, Sports.
BACKLIGHT
Adjust the backlight strength from
0 – 100. Only available when the
Adaptive Backlight is set to “Off”.
BRIGHTNESS
Control display brightness from
0 – 100.
CONTRAST
Control the display contrast from
0 – 100.
SATURATION
Adjust the color intensity from
0 –100.
HUE
Adjust the skin tones from
-50 –100.
SHARPNESS
Control the display sharpness from
0 – 20.
COLOR TEMPERATURE
Four color temperature modes:
Warm / Normal / Cool / User.
receiving signal.
• [Adaptive Luma Control]
Automatically adjusts the brightness
and contrast after analyzing the input
signal. This function enriches the colors
and the depth of the picture.
• [FLESH TONE]
Adjust the skin color to be more natural.
• [BLUE STRETCH]
Level down the brightest part of the
screen to reduce the saturation.
• [HDMI MODE]
Only available when HDMI device is
connected. Select from Auto, Graphic,
or Video.
NOTE:
• AUTO: The input timing is set to
Video or Graphic mode automatically.
• GRAPHIC: The input timing is set
to Graphic mode (PC). The image is
full scan.
• VIDEO: The input timing is set to
Video mode. The image is over scan.
• HDMI MODE is only workable
for HDMI Video & Progressive timing
as followed: 1920x1080p,
1280x720p, 720x480p, 720x576p.
[ADAPTIVE BACKLIGHT]
Optimize the backlighting levels for dark
scenes automatically.
VGA
The VGA adjustment is only
available when the TV is receiving a computer signal.
• [Auto Adjust]
Adjust the PC timing to t full
screen display automatically.
• [H.Position]
Adjust the horizontal positioning.
• [V.Position]
Adjust the vertical positioning.
• [Phase]
Adjust the Phase frequency.
• [Clock]
Adjust the Clock frequency
18 19
Page 19
Setup Menu
The Setup menu in TV mode is
shown below� According to various
requirements in different source
modes, certain features could be
hidden (disabled) on the menu�
English
Audio Menu
The Audio menu provides an audio
adjustment for user to modify the
audio setting�
TV Menu
The channel menu sets your signal
source options�
Setup Menu
The Setup menu in TV mode is
shown below� According to various
requirements in different source
modes, certain features could be
hidden (disabled) on the menu�
OSD Language
Blue Mute
Time Setup
Version Info
Caption
Location
English
On
Home
Video
Setup
Parental
Audio
TV
Picture Size Wide Screen
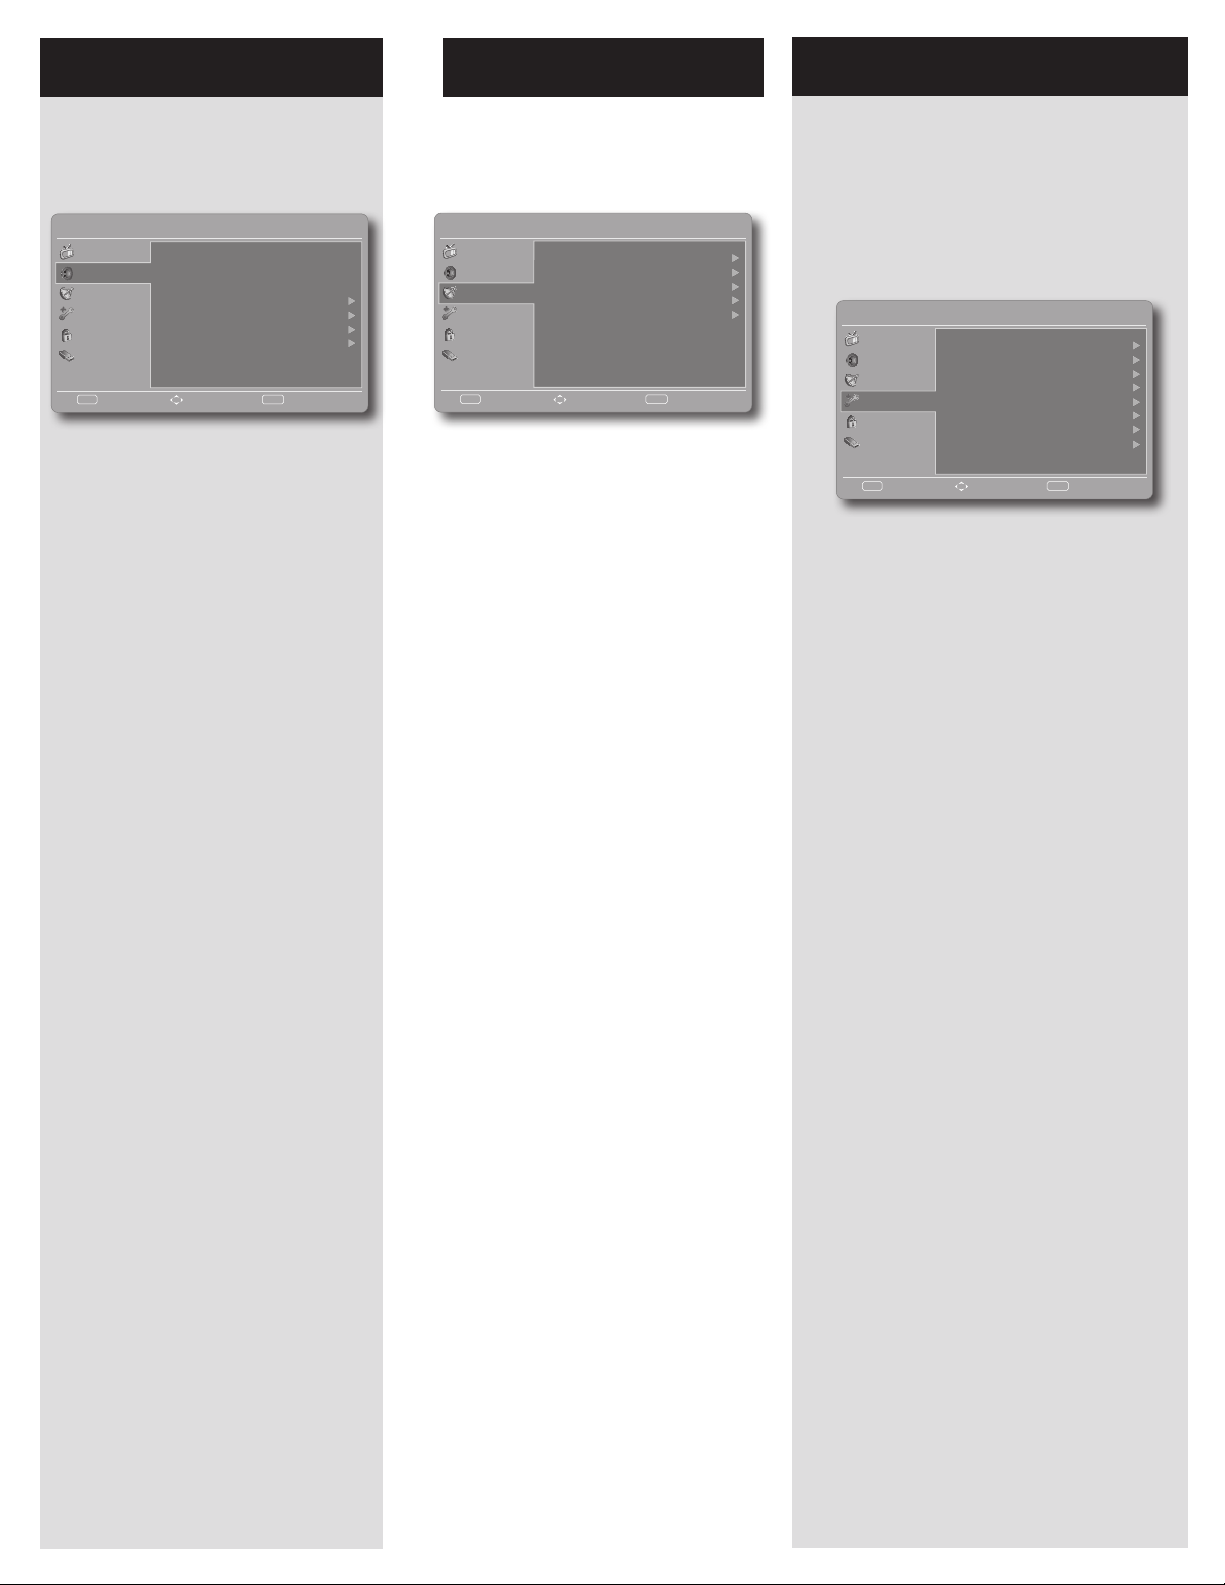
AUDIO MENU
TV MENU
SETUP MENU
The Audio menu provides an
audio adjustment for user to
modify the audio setting.
Video
Audio
TV
Setup
Parental
USB
Enter Select Exit
Balance
Bass
Treble
Equalizer
Speaker
SPDIF Type
Auto Volume Control
PCM
0
50
50
Off
On
Off
EXITOK
BALANCE
Audio balance adjustment, the
tuning range is -50 – 50.
BASS
Control the bass tone from
0 – 100. (The default of 50 is
enabled)
TREBLE
Control the treble tone from
0 – 100. (The default of 50 is
enabled)
EQUALIZER
Select the preset audio mode
from Off, Rock, Pop, Live,
Dance, Techno, Classic, or Soft.
SPEAKER
Turn on/off the internal speakers.
The digital audio output signals
and earphone output signals will
not be turned off even though
the speaker is off.
PDIF TYPE
Digital audio output format. Select from Dolby Digital or PCM.
AUTO VOLUME CONTROL
Automatically adjust the volume
to be consistent across programs
and channels.
The channel menu sets
your signal source options.
Video
Audio
TV
Setup
Parental
USB
Enter Select Exit
Tuner Mode
Channel Scan
Channel Skip
MTS
Audio Language
Cable
Stereo
English
EXITOK
TUNER MODE
Select TV source signal from the
air (antenna) or cable (CATV).
CHANNEL SCAN
Automatically scans all NTSC/
ATSC tuner channels and then
stores them in the channel table.
CHANNEL SKIP
Skip the selected channel to
prevent certain programs from
being watched by pressing CH+/
CH- buttons on the remote
control.
Note: The skipped channel
can be access by pressing
number buttons.
MTS
Select the audio mode from
Stereo, SAP, or Mono.
AUDIO LANGUAGE
Swap between main and alternative language when it is available
in digital channel.
The Setup menu in TV mode
is shown below. According to
various requirements in different
source modes, certain features
could be hidden (disabled) on
the menu.
Video
Audio
TV
Setup
Parental
USB
Enter Select Exit
OSD Language
Picture Size Wide Screen
Blue Mute
Time Setup
Caption
Location
Version Info
Monitor ID
Reset
English
On
Home
1
EXITOK
OSD LANGUAGE
Select the menu display language.
(English/Español/Français)
PICTURE SIZE
Change the display aspect ratio:
Wide Screen/4:3/Panorama/Zoom/
Automatic. (Ratio availability varies
by video inputs. Refer to the Picture
Format Table on page 19 )
BLUE MUTE
When no signal is received, the
screen will turn blue and the sound
will be muted.
TIME SETUP
Set current time.
• [Time Zone]
Set your current location.
• [Time]
• Auto Synchronization:
Set Auto Synchronization to
“On” to set the time
automatically
based on the broadcaster, or
set to “Off” to set the date and
time manually.
• Timer: Set the timer to switch
the TV on/off automatically at a
preset time.
• [Sleep Timer]
Set a time when the TV switches to standby automatically.
• [Auto Sleep]
Set the TV to put itself to sleep
after it has not been used for 1,
2, or 5 hours.
Page 20
PARENTAL MENU
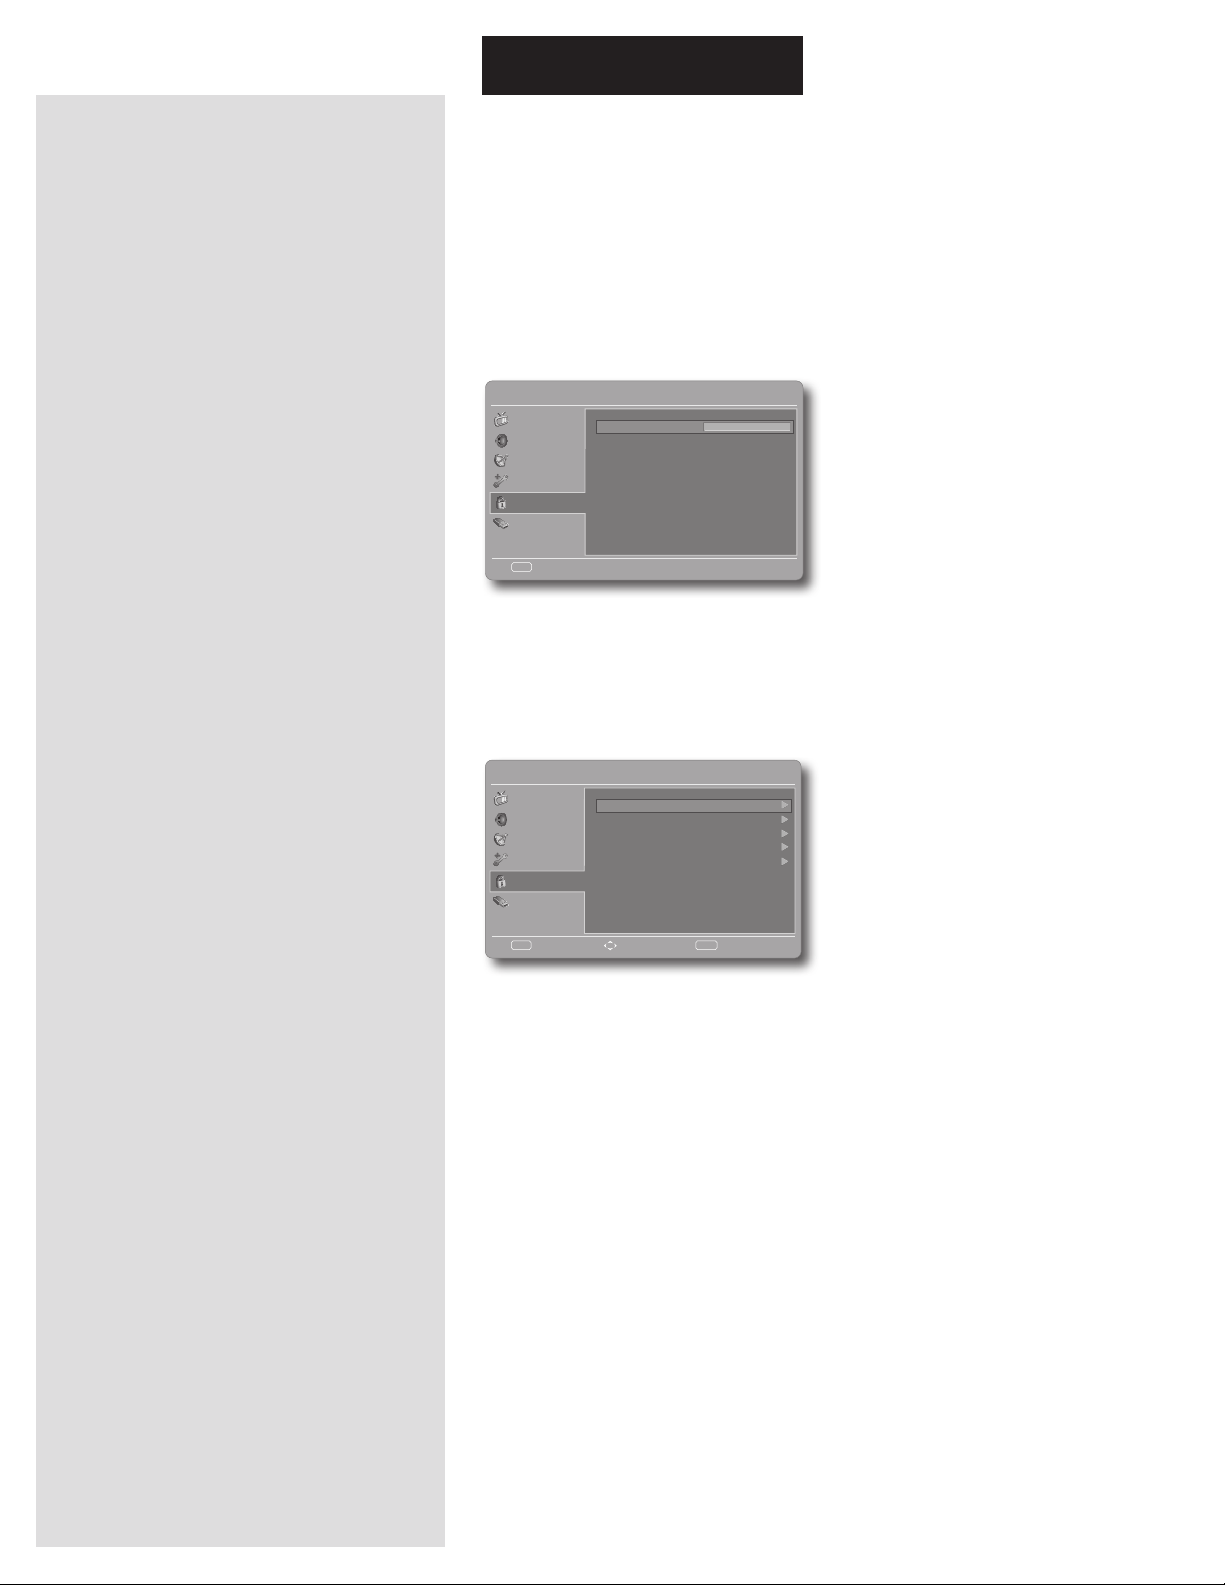
Parental Menu
User has to key in the four digit
password before entering the
Parental Control sub-menu� User
can modify the restricted table after
entering the parental sub-menu�
While exiting the sub-menu, the
parental control function is activated�
3� Program Block
Control access to specic
programs based on the age and
content ratings� The program
content advisory data are
provided by the broadcaster�
[Rating Enable]
Set to "On" to activate the
program rating system�
[U.S. TV Ratings]
You set-top box or cable receiver
box must be connected through
RF or AV connectors to use U�S
TV ratings function�
[U.S. Movie Ratings]
Control viewing of movies based
Password
****
Back
EXIT
Enter the password to access
the parental sub menu�
Note:
• The default password is [0000]�
3� Program Block
Control access to specic
programs based on the age and
content ratings� The program
content advisory data are
provided by the broadcaster�
[Rating Enable]
Set to "On" to activate the
program rating system�
[U.S. TV Ratings]
You set-top box or cable receiver
box must be connected through
RF or AV connectors to use U�S
TV ratings function�
[U.S. Movie Ratings]
Control viewing of movies based
on the Motion Picture Association
of America (MPAA) rating�
[Canadian English Ratings]
Block the viewing movies by
Canadian English ratings�
[Canadian French Ratings]
Block the viewing movies by
Canadian French ratings�
[Open V-Chip]
Unlock the inhibitive channels or
source signals�
[Block Unrated]
The unrated program will be
®
HDMI, the HDMI logo and High-Denition Multimedia Interface are
trademarks or registered trademarks of HDMI Licensing LLC in the United
®
HDMI, the HDMI logo and High-Denition Multimedia Interface are
trademarks or registered trademarks of HDMI Licensing LLC in the United
States and other countries�
Manufactured under license from Dolby Labortories� Dolby and the double-D
symbol are trademarks of Dolby Laboratories�
CAPTION
• [Analog Closed Caption]
Select an analog closed caption
option. (CC 1-4 / TEXT 1-4)
• [Digital Closed Caption]
This function sets captions for
digital programs and sets avail able languages.
• [Digital Caption Style]
Provides numerous options for
setting the digital closed caption
style in the sub-menu.
• Caption Style: Set to As
Broadcaster or Custom mode. If
Custom mode is selected, user
can modify the detail styles
described below. The setting
result will be shown immediately
on the bottom of the submenu OSD.
Note: This feature is only
available in Digital TV
(ATSC) mode.
• Font Size: Selects this option to
choose a caption display size
according to your own prefer ence. Select “Small”, “Normal”,
or “Large”.• Font Style: Select
digital closed caption font style.
• Font Color: Choose the caption
display text color
• Font Opacity: Select the text
opacity.
• Background Color: Choose
caption display character back ground color.
• Background Opacity: Choose
one of the background opacity
options.
• Window Color: Choose one of
the display windows color.
• Window Opacity: Select one of
the display windows color.
LOCATION
Select from Store or Home mode.
Store mode is recommended for
displaying in a retail showroom, and
Home mode is recommended for normal home use for Energy Saving.
VERSION INFO
Display the software information.
RESET
Restore all the default Setup settings.
User has to key in the four
digit password before entering the Parental Control submenu. User can modify the
restricted table after entering
the parental sub-menu. While
exiting the sub-menu, the
parental control function is
activated.
Video
Audio
TV
Setup
Parental
USB
EXIT
Back
Password
PASSWORD
Enter the password to access the
parental sub menu.
Note: The default password
is [0000].
Video
Audio
TV
Setup
Parental
USB
Enter SelectBack
Channel Block
Program Block
Input Block
Change Password
Clean All
CHANNEL BLOCK
Prevents children from watching
certain channels.
Note: If you access the
blocked channel from the
number buttons on the
remote control, a prompting
window appears asking for
the password.
20 21
PROGRAM BLOCK
Control access to specic
programs based on the age and
content ratings. The program
content advisory data are
provided by the broadcaster.
• [Rating Enable]
Set to “On” to activate the
program rating system.
• [U.S. TV Ratings]
You set-top box or cable
****
receiver box must be
connected through RF or AV
connectors to use U.S TV
ratings function.
• [U.S. Movie Ratings]
Control viewing of movies
based on the Motion Picture
Association of America
(MPAA) rating.
• [Canadian English Ratings]
Block the viewing movies by
Canadian English ratings.
• [Canadian French Ratings]
Block the viewing movies by
Canadian French ratings.
• [Open V-Chip]
Unlock the inhibitive channels
or source signals.
• [Block Unrated]
The unrated program will be
EXITOK
blocked.
INPUT BLOCK
Disable the specic external input
source.
CHANGE PASSWORD
Change the 4-digit parental control password.
CLEAN ALL
Clean all the parental ratings to
default setting
Page 21
®
HDMI, the HDMI logo and High-Denition Multimedia Interface are
trademarks or registered trademarks of HDMI Licensing LLC in the United
®
HDMI, the HDMI logo and High-Denition Multimedia Interface are
trademarks or registered trademarks of HDMI Licensing LLC in the United
States and other countries�
Manufactured under license from Dolby Labortories� Dolby and the double-D
symbol are trademarks of Dolby Laboratories�
TIPS – CARE OF THE SCREEN
Do not rub or strike the screen with anything hard as this may scratch, mar, or even damage the
screen permanently .
Never use ammonia or any cleaner containing ammonia, as it will damage the anti-glare coating
on the screen. Only use Isopropyl alcohol or an approved screen cleaner to clean the screen.
Protective covers are available for Cill all-weather TVs. Contact your Ciil representative to get the
right cover for your screen.
Unplug the power cord before cleaning the screen Dust the display by wiping the screen and the
cabinet with a soft, clean cloth If the screen requires additional cleaning, use a clean, damp cloth
Do not use liquid cleaners, aerosol cleaners, or solvents of any kind.
MOBILE TELEPHONE WARNING
Keep your mobile telephone away from your display to avoid disturbances in the picture or sound,
possibly causing permanent damage to your display.
END OF LIFE DIRECTIVES
In an effort to produce environmentally friendly products, your new display contains materials that
can be recycled and reused. At the end of your displays life, specialized companies can minimize
display waste by separating the reusable materials from non-reusable materials. Please ensure
you dispose of your display according to local regulations.
LICENSE AGREEMENT AND TRADEMARK NOTICE
® HDMI, the HDMI logo and High-Denition Multimedia Interface are trademarks or registered trademarks of HDMI Licensing LLC
in the United States and other countries
Manufactured under license from Dolby Labortories Dolby and the double-D symbol are trademarks of Dolby Laboratories
Page 22
PRODUCT SPECIFICATIONS
This model complies with the specications listed below.
Designs and specications are subject to change without notice.
This model may not be compatible with features and/or specications that may be added in the future.
Model Name: CL-3267
Screen Technology: LCD
Viewable: 32”
Television system: NTSC Standard, ATSC Standard (8-VSB, Clear QAM)
Channel Coverage: VHF: 2 through 13
UHF: 14 through 69
Cable TV: Mid-band (A-8 through A-1, A through I)
Super Band (J through W)
Hyper Band (AA through ZZ, AAA, BBB)
Ultra Band (65 through 94, 100 through 125
Video: (2) HDMI
RGB (PC)
Component In
Antenna/Cable In (Coaxial)
RS-232 In - (for control and service)
DISPLAY
CONNECTIONS
Audio: Audio In, 1/8” Stereo (for RGB)
Audio In, Stereo RCA (for Component in)
Audio Out, Digital Optical
DIMENSIONS
Height: 20.03” (508.9mm)
Width: 32.08” (814.8mm)
Depth: 6.22” (158.9mm)
Diagonal: 31.70” (805.1mm)
Weight: 48 Lbs. (21.8 Kg)
WALL MOUNTING
VESA- Compatible Hole Pattern: 200mm x 200mm
OPERATING ENVIRONMENT
Temperature Range: -13º to +113º
PACKAGE CONTENTS
(1) CL-3267 UltraView TV, (1) Remote Control, (2) Remote Contorl Batteries,
(1) Gland Pack, (1) D-Sub Cable, (1) User Manual
22 23
Page 23
BEFORE CALLING SERVICE
Please make these simple checks before calling service. These tips may save you time and money
as charges for receiver installation and adjustments of customer controls are not covered under
your warranty.
Symptoms Items to Check and Actions to Follow
“Ghost” or double image
when using the tuner
No power
No picture
Good picture but no sound
Good sound but poor color
Poor picture
Snowy picture and noise
when using the tuner
•
This may be caused by an obstruction to the antenna due to high rise buildings or
hills. Using a highly directional antenna may improve the picture.
•
Check to see if the display’s AC power cord in plugged into the outlet.
•
Unplug the display and after 60 seconds reinsert the plug into the outlet and power
on the display.
•
At the rear of the display, make sure the each connection is properly attached.
•
Check to see if there is a station broadcast problem by trying multiple channels.
•
Adjust the contrast and brightness settings.
•
Check the Closed Caption settings as some text modes may block the visibility of the
images on the display.
•
Increase the VOLUME.
•
Conrm that the display is not muted by pressing the MUTE button on the remote
control.
•
Adjust the contrast, color and brightness settings.
•
Poor picture quality may occur when an activated S-VHS camera or camcorder is
connected to your display and another peripheral at the same time. Switch off one
of the peripherals.
•
Check all connections and signal.
Presence of a horizontal
dotted line
Display not responding via
the remote control
Display has gone black
and won’t come on.
•
This may be caused by electrical interference (e.g. hairdryer, nearby neon lights, etc.).
•
Power cycle the equipment by turning off and then turning b ack on.
•
Determine if the batteries are working and replace batteries if necessary.
•
Clean the remote control sensor lens on the display.
•
If necessary, utilize the buttons located inside the back access panel.
•
Select the TV mode to ensure your remote control is set in the TV mode.
•
Make sure screen is not facing directly into the sun. The LCD screen is not intended
to face directly into the sun as it is like a large solar collector and the build up of heat
in the LCD panel due to the sunlight directly hitting the screen causes the LCD uid
to stop responding, causing black spots to appear and then spread until the screen is
moved out of the direct sun or the sun moves off of the screen. Turn the screen away
from facing the direct sunlight and the picture will return.
Page 24

GLOSSARY
Waterproof / Weatherproof Outdoor HD LCD TV/Display Models;
CL-3267, CL-4067, CL-4667, CL-5567
TWO YEAR PARTS & LABOR LIMITED WARRANTY
Terms of Ciil Technologies, LLC.
Limited Warranty:
The Ciil™ UltraView™ Outdoor LCD TV is warranted to be free
of defects and workmanship from the time of purchase by the
original owner. If this product is found and proved to be defective
under the terms and conditions of this warranty, Ciil will repair or
replace defective parts with new and/or reconditioned parts at no
charge for the parts and labor to the original owner, subject to the
terms and conditions of this Limited Warranty. This Limited
Warranty covers failures due to defects in material or workmanship
that occurs during normal residential or commercial use as follows:
1. Parts - The warranty period for parts are: Two (2) years
from the date of the original purchase. During the
applicable limited warranty period for parts, defective
parts will be replaced at no charge. Parts used for the
replacement will be warranted for the remainder of the
original warranty period for those parts.
2. Labor - the warranty period for labor is: Two (2) years
from the date of the original purchase. During the
applicable limited warranty period for labor, Ciil will
provide the labor for warranty repair at no charge for a
period of two (2) years from the date of original purchase.
3. Original owner must provide verification of the date of
purchase when requesting Limited Warranty Services. A
copy of the original Dated Sales Receipt is required
together with product to obtain service under this Limited
Warranty. Product Registration at the time of purchase
is required. (www.ciiltech.com).
4. All repairs must be performed by a Ciil Authorized
Service Provider.
5. Customer is responsible for returning (including any
freight and shipping cost) defective unit to a Ciil
Authorized Service Provider. If the product is found to
have no defects, the customer will be responsible for
return shipping cost as well.
THIS LIMITED WARRANTY DOES NOT COVER:
• Shipping damage.
• Damage caused during customer unpacking, and/or removal
of packing materials.
• Damage due to improper, incorrect or insufficient AC voltage.
• Damage due to power surges or lightning strike.
• Damage which results from fire, flood, lightning, tornado,
hurricane, large hail, extremely gusty winds, sand storms,
vandalism, terrorism or other acts of nature.
• Any unit which has been modified, or damaged due to
improper installation or failure to obey the operating
instructions provided in the User's Manual.
• Any failure, loss, damage, or personal injury due to accident,
neglect, misuse, abuse, improper operation, improper
maintenance, improper storage, alteration to the unit, or
failure by the consumer to follow operating instructions
provided in the User's Manual.
• Any owner other than the original owner.
• Any unit purchased from an unauthorized seller.
• If the original product serial number has been removed,
defaced, or tampered with any way.
• Any transportation charges incurred in the connection with
warranty service
• Indirect, consequential, or special damages, except as required
by federal or state laws.
• Any unit tampered with, modified, adjusted, or repaired by
any party other than the Ciil authorized.
• Any cosmetic damages to the surface or exterior that has been
defaced or faded, or caused by normal wear and tear or
exposure to chemicals, acid rain, large hail, or adverse
weather conditions.
• Because the TV cabinet and components are hand assembled
and altered, we do not cover minor cabinet blemishes or minor
scratches to the exterior TV unit.
• Picture quality when installed in direct sunlight and uncovered
where sun is shining directly on screen.
• Any damage, scratches, or blemishes to the LCD screen
and/or exterior cabinet due to end user cleaning.
• Dirty air waves, and/or unusual signal interference due to
weak signal from multi-wire runs or weak signal from cable
or satellite service providers or unusual signal interference or
lack of distance when using the Digital Wireless Video/Audio
Package.
• Return shipping when no defect is found.
Ciil and its representatives or agents shall in no event be liable for
any general, indirect, or consequential damages arising out of/or
caused by the use of/or the inability to use this product.
This warranty is made in lieu of all other warranties, expressed or
implied, and all other liabilities on the part of Ciil. And other
warranties, including the warranties of merchantability and fitness
for a particular purpose are hereby disclaimed by Ciil and its
representatives and/or agents.
The laws of some states do not allow exclusion of implied
warranties; therefore, this warranty shall be deemed modified to be
consistent with such laws. This Limited Warranty gives you
specific legal rights. You may also have other rights that may vary
from state to state.
All warranty inspections and repairs must be performed by Ciil or
its authorized service representatives.
Customer Care: 1-877-355-2445
Website: www.ciiltech.com
HDTV
HDTV displays are technically dened as being capable of displaying a minimum of 720p or 1080i
active scan lines.
HDMI Inputs
High-Denition Multimedia Interface Audio / Video Inputs are located on the rear of the receiver
These connectors are used for the input of audio and video signals Designed to receive higher
picture resolution and offer sound connection options.
Menu
An on-screen listing of features shown on the display screen is made available for user
adjustments.
MPAA
Motion Picture Association of America.
Multichannel Television sound (MTS)
The broadcasting standard, which allows stereo sounds to be transmitted with the display picture.
RF
Radio Frequency or modulated signal design used by the carrier for television broadcasts.
Second Audio Program (SAP)
Another or additional audio channel provided for in the Multichannel Television Sound (MTS)
broadcast standard A monaural soundtrack included within the recorded or video signal (usually
containing a second language translation for the displayed program).
Sleep Timer
You can set a time period for which the display will automatically turn off.
24 25
Page 25

WARRANTY
Waterproof / Weatherproof Outdoor HD LCD TV/Display Models;
CL-3267, CL-4067, CL-4667, CL-5567
TWO YEAR PARTS & LABOR LIMITED WARRANTY
Terms of Ciil Technologies, LLC.
Limited Warranty:
The Ciil™ UltraView™ Outdoor LCD TV is warranted to be free
of defects and workmanship from the time of purchase by the
original owner. If this product is found and proved to be defective
under the terms and conditions of this warranty, Ciil will repair or
replace defective parts with new and/or reconditioned parts at no
charge for the parts and labor to the original owner, subject to the
terms and conditions of this Limited Warranty. This Limited
Warranty covers failures due to defects in material or workmanship
that occurs during normal residential or commercial use as follows:
1. Parts - The warranty period for parts are: Two (2) years
from the date of the original purchase. During the
applicable limited warranty period for parts, defective
parts will be replaced at no charge. Parts used for the
replacement will be warranted for the remainder of the
original warranty period for those parts.
2. Labor - the warranty period for labor is: Two (2) years
from the date of the original purchase. During the
applicable limited warranty period for labor, Ciil will
provide the labor for warranty repair at no charge for a
period of two (2) years from the date of original purchase.
3. Original owner must provide verification of the date of
purchase when requesting Limited Warranty Services. A
copy of the original Dated Sales Receipt is required
together with product to obtain service under this Limited
Warranty. Product Registration at the time of purchase
is required. (www.ciiltech.com).
4. All repairs must be performed by a Ciil Authorized
Service Provider.
5. Customer is responsible for returning (including any
freight and shipping cost) defective unit to a Ciil
Authorized Service Provider. If the product is found to
have no defects, the customer will be responsible for
return shipping cost as well.
THIS LIMITED WARRANTY DOES NOT COVER:
• Shipping damage.
• Damage caused during customer unpacking, and/or removal
of packing materials.
• Damage due to improper, incorrect or insufficient AC voltage.
• Damage due to power surges or lightning strike.
• Damage which results from fire, flood, lightning, tornado,
hurricane, large hail, extremely gusty winds, sand storms,
vandalism, terrorism or other acts of nature.
• Any unit which has been modified, or damaged due to
improper installation or failure to obey the operating
instructions provided in the User's Manual.
• Any failure, loss, damage, or personal injury due to accident,
neglect, misuse, abuse, improper operation, improper
maintenance, improper storage, alteration to the unit, or
failure by the consumer to follow operating instructions
provided in the User's Manual.
• Any owner other than the original owner.
• Any unit purchased from an unauthorized seller.
• If the original product serial number has been removed,
defaced, or tampered with any way.
• Any transportation charges incurred in the connection with
warranty service
• Indirect, consequential, or special damages, except as required
by federal or state laws.
• Any unit tampered with, modified, adjusted, or repaired by
any party other than the Ciil authorized.
• Any cosmetic damages to the surface or exterior that has been
defaced or faded, or caused by normal wear and tear or
exposure to chemicals, acid rain, large hail, or adverse
weather conditions.
• Because the TV cabinet and components are hand assembled
and altered, we do not cover minor cabinet blemishes or minor
scratches to the exterior TV unit.
• Picture quality when installed in direct sunlight and uncovered
where sun is shining directly on screen.
• Any damage, scratches, or blemishes to the LCD screen
and/or exterior cabinet due to end user cleaning.
• Dirty air waves, and/or unusual signal interference due to
weak signal from multi-wire runs or weak signal from cable
or satellite service providers or unusual signal interference or
lack of distance when using the Digital Wireless Video/Audio
Package.
• Return shipping when no defect is found.
Ciil and its representatives or agents shall in no event be liable for
any general, indirect, or consequential damages arising out of/or
caused by the use of/or the inability to use this product.
This warranty is made in lieu of all other warranties, expressed or
implied, and all other liabilities on the part of Ciil. And other
warranties, including the warranties of merchantability and fitness
for a particular purpose are hereby disclaimed by Ciil and its
representatives and/or agents.
The laws of some states do not allow exclusion of implied
warranties; therefore, this warranty shall be deemed modified to be
consistent with such laws. This Limited Warranty gives you
specific legal rights. You may also have other rights that may vary
from state to state.
All warranty inspections and repairs must be performed by Ciil or
its authorized service representatives.
Customer Care: 1-877-355-2445
Website: www.ciiltech.com
Page 26

Page 27

Page 28

Ciil Technologies, LLC
1950 Hawthorne Ave.
Melrose Park, IL 60160
Phone: 708-343-0600
www.ciiltech.com
© 2012, Ciil Technologies, LLC. All rights reserved.
 Loading...