

Page 1

Optional Accessories
Circulation Fans - Plug the circulation fans into remote and locate them
at the furthest point possible in the humidor from the water tank. Face
them towards the middle of the humidor at a 45 degree angle / \.
Linked MAGNA - To add a linked MAGNA for larger cabinets, set up the
unit using the instructions above. Then plug the linking cable into the
plug to the right of the remote (OUT) on the MAGNA with the remote
attached. Plug the other end of the cable into the left of the remote port
(IN) on the linked MAGNA. See Diagram 1.
Wi-Fi - For instructions on the operation of the Smart Humidor Wi-Fi
Connector please refer to the Wi-Fi manual.
For warranty information & registration go to www.cigaroasis.com.
79 Heisser Court
Farmingdale, NY 11735
516.520.5258
www.cigaroasis.com
v8.16
Cigar Oasis…the Finest in Electronic Cigar Humidification
Page 2
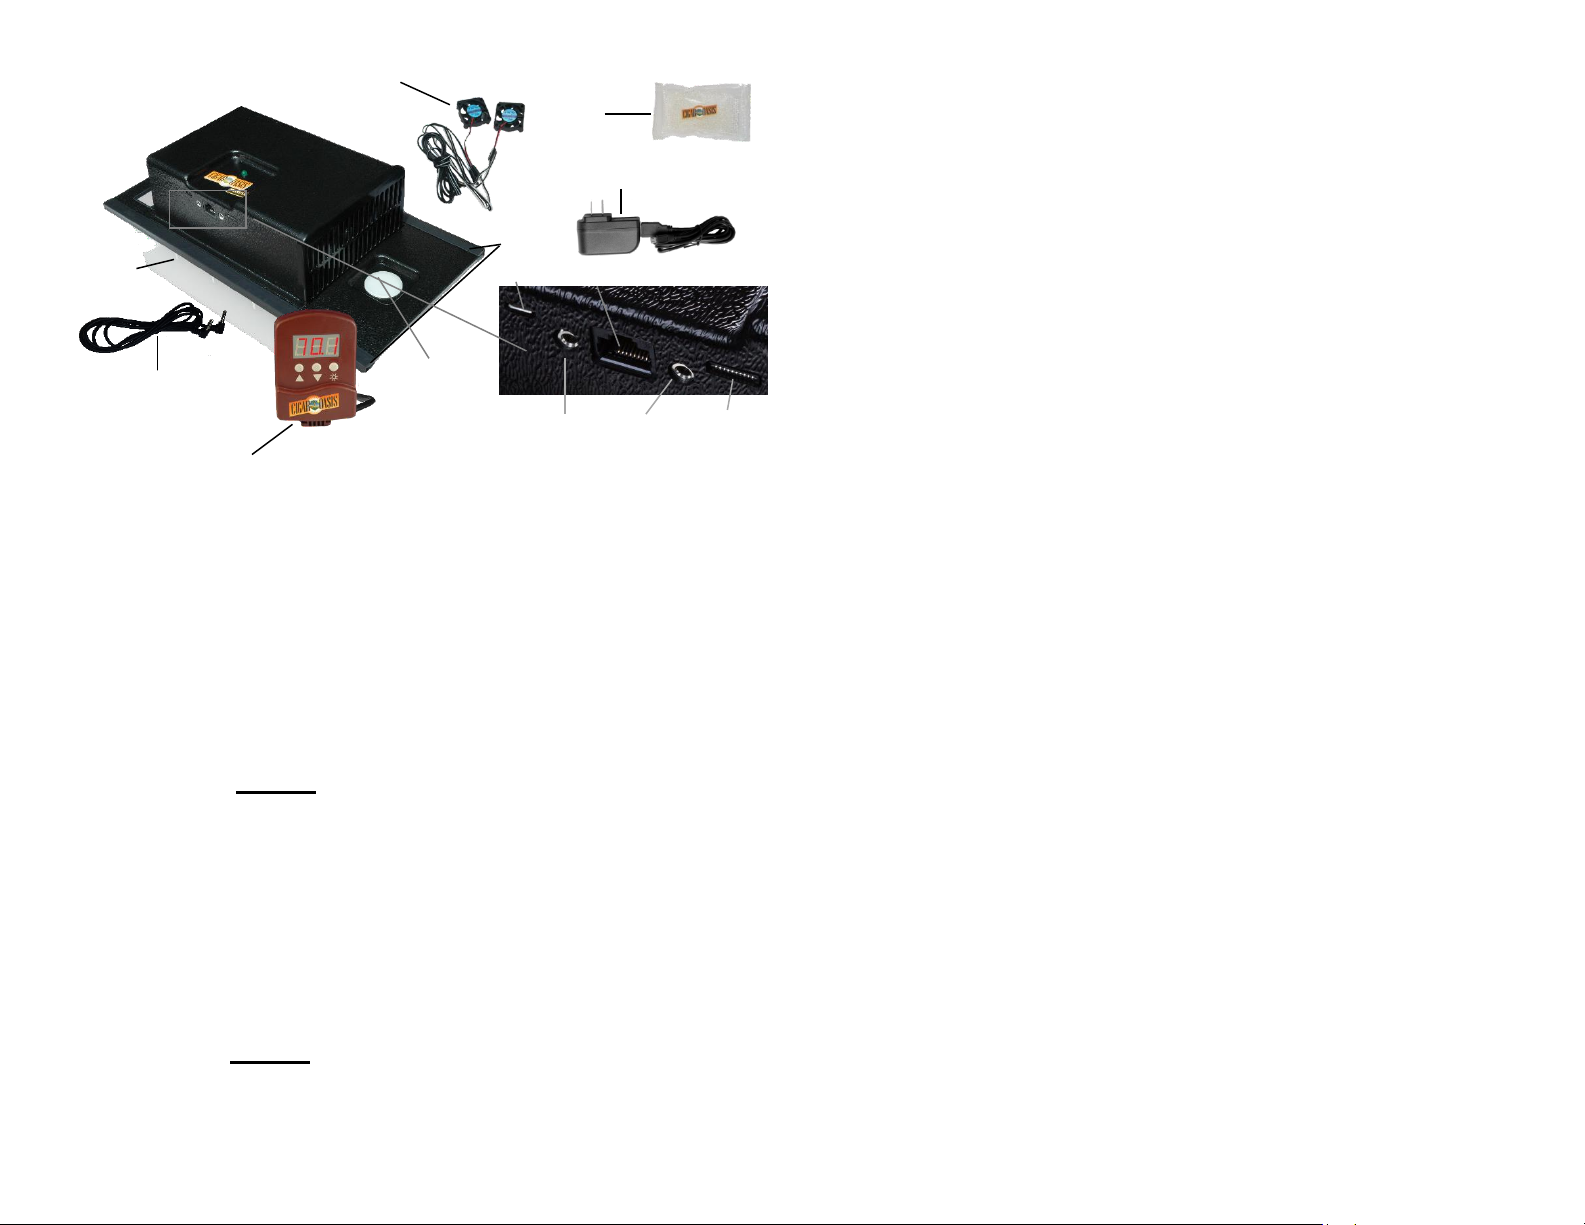
White
Plastic Cap
Link In Link Out Wi-Fi
Linking Cable
Only included with
Linked MAGNA
Power Adapter with
Micro USB Connector
Water Tank
Circulation Fans
Optional Accessory
Rails
USB & Remote Connections
Remote
Diagram 1
Water
Beads
PLACEMENT
It is best to place the Cigar Oasis with the rear air vents facing the back wall
leaving about two inches for air to travel upward. Keep the back wall clear
of any boxes to allow air to flow freely and never block or cover the vent.
ASSEMBLY & STARTING YOUR CIGAR OASIS MAGNA 2.0
1. Remove all contents from the box.
2. Remove the white plastic cap from the front of the unit.
3. Locate the water beads and pour through the hole into the white
water tank. Fill the water tank up to the bottom of the vertical lines
using distilled water only.
4. Place the white plastic cap over the hole in front of the unit.
5. Plug the micro USB connector into the side of the unit, then plug
the adapter into the wall to power up the unit. Only use the
supplied power adapter.
6. Locate the remote (digital readout) inside the cabinet and plug
into the unit.
WATER TANK REFILL INSTRUCTIONS
1. Remove the white plastic cap from the front of the unit.
2. Pour distilled water through the hole into the water tank.
3. Place the white plastic cap over the hole in front of the unit.
4. It will take up to 24 hours for the beads to fully absorb the water,
however the unit may be used immediately. The beads are
refillable, but should be replaced at least one time per year.
5. For best efficiency, base should be about ¾ full with water beads
or a combination of both, but never overfilled (blocking airflow).
USING YOUR CIGAR OASIS MAGNA 2.0
Once the MAGNA is put together and plugged in, it turns on and will
read the current humidity. The unit is factory preset at 70% humidity.
To raise or lower the humidity settings use the UP or DOWN arrows
on the remote. A few seconds after the adjustment the unit will go
back to showing the current humidity level.
When the unit needs to be refilled, it will flash Lo H2O.
By pressing the SUN button you can view the following information:
Press 1 time to view TEMPERATURE. Use UP and DOWN arrows
to select Celsius or Fahrenheit. To save your selection press the
SUN button again.
Press 2 times to view Average Humidity (the unit will start at 0 until it
has enough information to give an accurate reading).
Press 3 times to view LOW Humidity over 3 days (the unit will start
at 0 until it has enough information to give an accurate reading).
Press 4 times to view HIGH Humidity over 3 days (the unit will start
at 0).
Continue pressing the SUN button until the screen returns to the
current humidiy.
CALIBRATION INSTRUCTIONS
To set the unit to match another hygrometer, you may adjust the reading by
up to 9% (+ or -) on your Cigar Oasis MAGNA 2.0.
1. Determine if you need to increase or decrease the reading on the
Cigar Oasis Humidifier to match the reading on your separate digital
hygrometer.
2. Press the UP and SUN button simultaneously and hold for 3 seconds
to enter the Calibration Mode (Displays U 0).
3. Press UP button if you need to increase the reading on the humidifier
to match the reading on your separate hygrometer OR Press the
DOWN button if you need to decrease the reading on the humidifier
to match the reading on your separate hygrometer.
4. Press SUN button to leave the Calibration Mode.
5. Allow the humidifier to run for at least an hour before you check if
humidity level matches the other hygrometer.
If further re-calibration is required, repeat the above procedures.
 Loading...