

Page 1
TITLE:
CL980-01
English and Spanish Manual
DOC NO.
REVISION
DATE
SHEET 1 OF
:
102230-01
A
:
06/16/99
:
3
:
Contact________________
Modem________________
PAPER
Text stock______________
Cover stock____________
1 Sided ❑ 2 Sided ❑
INK
Black ❑
BINDING
Saddle stitch ❑ Perfect ❑
Jeanine Healy
(408)776-8063
60 lb glossy
self-cover
x
289
PMS _______
Phone___________
E-mail address: [email protected]
Text stock (Asia)______________ or Engineering Approved Equivalent
Insert stock_______________
Color _______
x
Wire O ❑ GBC ❑
(408) 778-8061
108 g
Spot color ❑
jeanine.healy
5.5X8.5
Color separations ❑
(408)776-2631
Fax___________
Sample attached ❑Finished size ________
Staple ❑
FINISH
x
SOURCE
x
Film ❑ Adobe PDF ❏
SPECIAL INSTRUCTIONS
PDF provided for Document Control. 1 set of film for the factory.
FILM/FILES CHECKED BY:________________________________________________
DATE:__________________________________________________________________
05/16/99
Fold ❑Wrap-around ❑
Collate ❑ Slip sheet ❑
Jeanine Healy
X
Drill ❑ Score ❑ Perf ❑
Page 2
DOC NO.
REVISION
TITLE:
CL980-01 (CIDCO logoed)
cover FCC TOC Copyright Getting to
iii iiiiv 12 34
SHEET OF
know
2
102230-01
:
A
:
3
Setting Up
Your
Phone
56 78 910 1112
13 14 15 16 17 18 19 20
21 22 23 24 25 26 27 28
Personalizi
ng Your
Phone
Using
Diagram
Your
Custom
Using
Your
Phone
Using the
Directory
29 30 31 32 33 34 35 36
Troubleshooting
37 38 39 40 41 42 43 44
Indice Index Resolucio
44 43 42 41 40 39 38 37
Index
n de
problemas
Page 3
TITLE:
CL980-01 (CIDCO logoed)
DOC NO.
REVISION
SHEET OF
:
:
2
102230-01
A
3
Como usar
los
servicios
36 35 34 33 32 31 30 29
Uso del
Directorio
28 27 26 25 24 23 22 21
Como
Usar Su
telefono
20 19 18 17 16 15 14 13
blank
Instalacion
su de
telefono
12 11 10 9 8 7 6 5
Conozca
su neevo
telefono
4 3 2 1 iv iii ii i
Contenido FCC Spanish
cover
Page 4
Cidco980.book Page 1 Thursday, June 3, 1999 6:39 PM
CL-980
CL-980
CL-980
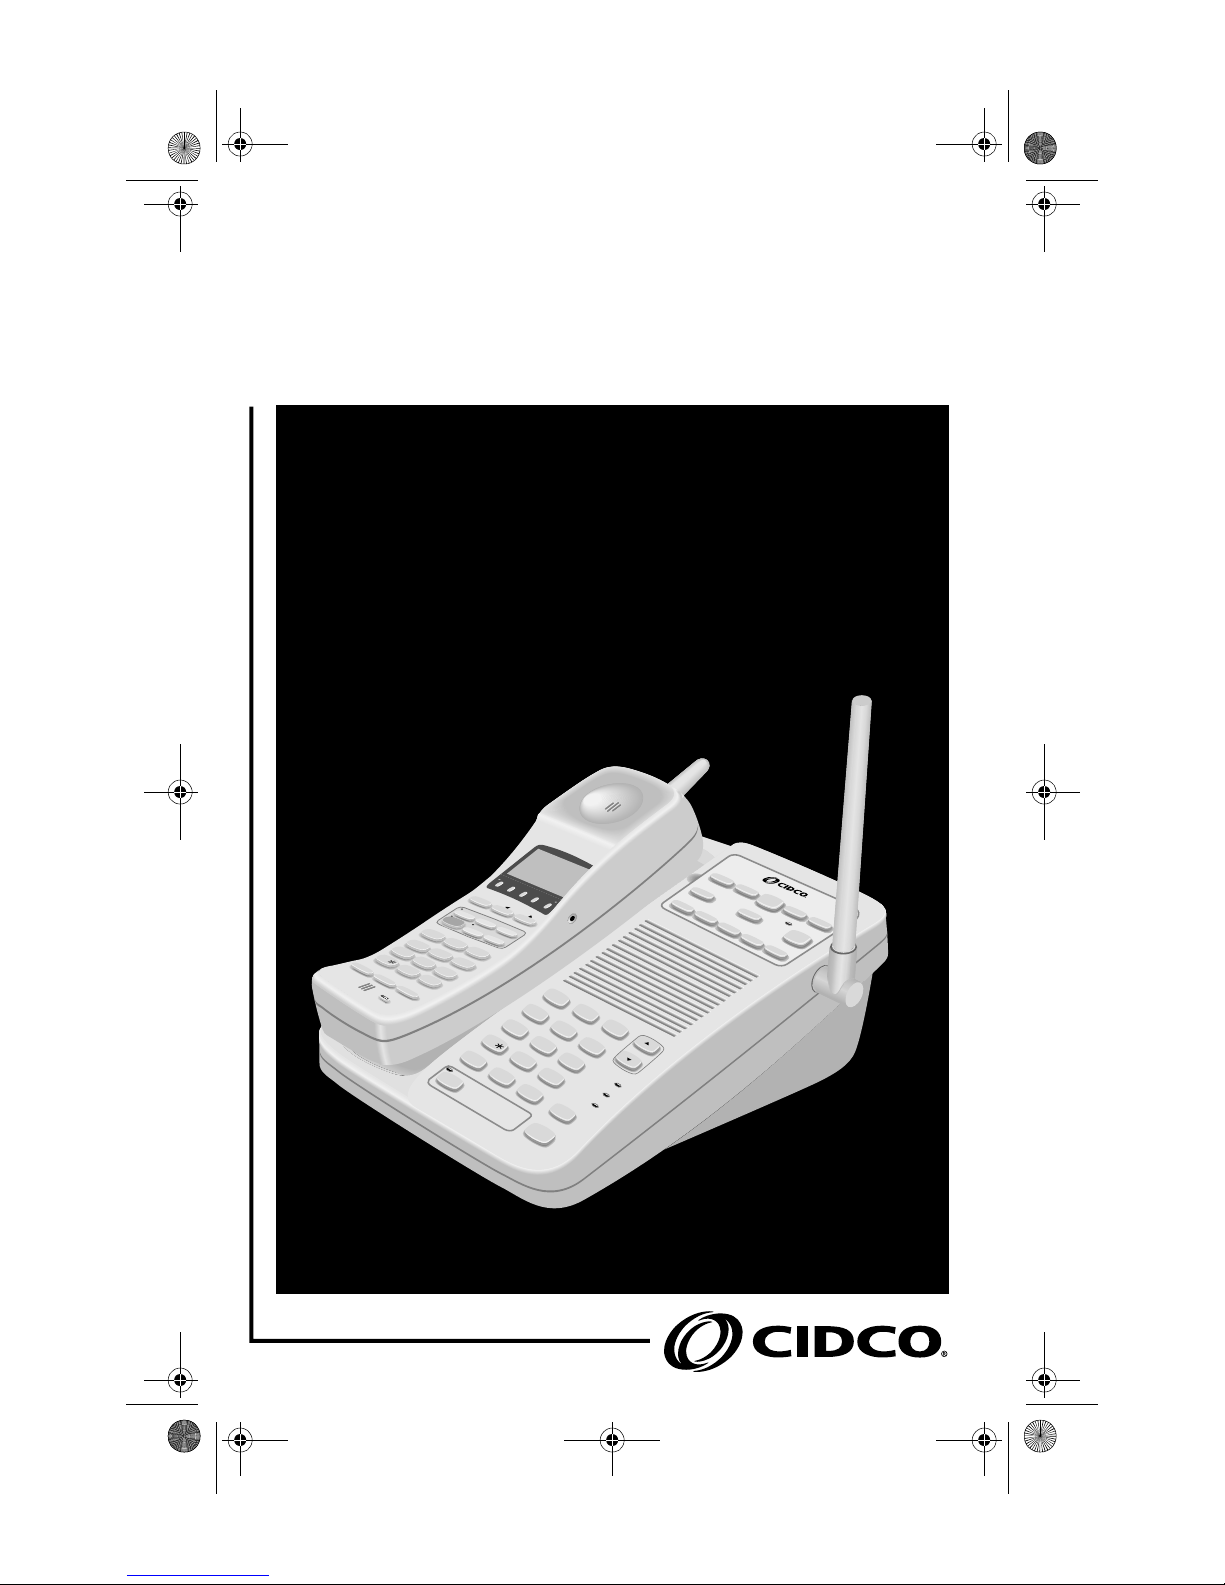
CORDLESS TELEPHONE
CORDLESS TELEPHONE
CORDLESS TELEPHONE
PRS
7
FLASH HOLD REDIAL
OPER
ON OFF—RING
PWR—ON OFF
9:18
AM
PM
9:16
LINE 1 &
408 - 555-1212
LINE 2
SMITH JOHN
CALL
DIR
CALL BACK
GHI
0
DIRECTORY
PAGE/FIND
18
INTERCOM
HOLD
MEMORY
3-WAY
DIAL
FLASH
1
ABC
2
4
TUV
DEF
JKL
8
#
REDIAL
3
5
MNO
6
CHARGE
9
INTERCOM
VOLUME
LINE IN USE
WXYZ
CALLERS
SEND TO VM
DELETE
REVIEW
VOICE MAIL
3-WAY
TALK
REPEAT
CALL
DIAL
CALL FWD.
1
ABC
GHI
2
4
DEF
JKL
3
5
TUV
MNO
8
6
WXY
0
9
#
PQRS
7
FLASH
OPER
MUTE HOLD
SPEAKERPHONE
REPLAY
ERASE MSG
BACK
REPEAT
DIAL
SAVE MSG
PLAY
CALL FORWARD
ON
FWD
SKIP
VOICE MAIL
OFF
3-WAY
CALL
CALL
RETURN
Page 5
Cover.fm Page 2 Tuesday, June 15, 1999 11:20 AM
This equipment has been tested and found to comply with the limits for a Class B
digital device, pursuant to Part 15 of the FCC Rules. These limits are designed to
provide reasonable protection against harmful interference in a residential installation. This equipment generates, uses, and can radiate radio frequency energy, and
if not installed and used in accordance with the instructions, may cause harmful interference to radio communications. However, there is no guarantee that interference will not occur in a particular installation. If this equipment does cause harmful
interference to radio or television reception, which can be determined by turning
the equipment off and on, the user is encouraged to try to correct the interference
by one or more of the following measurements:
❑ Reorient or relocate the receiving antenna.
❑ Increase the separation between the equipment and receiver.
❑ Connect the equipment into an outlet on a circuit different from that to
which the receiver is connected.
❑ Consult the dealer or an experienced radio/TV technician for help.
! CAUTION
Changes or modification to this device not expressly approved by CIDCO
Inc. could void the user’s authority to operate this equipment.
Page 6

Cidco980.book Page 3 Thursday, June 3, 1999 6:39 PM
TABLE OF CONTENTS
❑ TABLE OF CONTENTS 3
❑ GETTING TO KNOW YOUR NEW PHONE 1
❑ U
❑ L
OCATING KEYS, LIGHTS, AND SWITCHES 2
❑ SETTING UP YOUR PHONE 5
❑ P
❑ E
❑ D
❑ USING YOUR PHONE 17
❑ U
❑ U
❑ U
❑ A
❑ U
❑ U
❑ U
❑ A
❑ U
❑ T
❑ G
ETTING TEMPORARY TONE SERVICE 23
❑ G
❑ L
❑ U
❑ R
NPACKING YOUR PHONE 1
ERSONALIZING YOUR PHONE 7
ASY SETUP 8
ETAILED SETUP 10
SING TRADITIONAL DIALING 17
SING PRE-DIALING 17
SING SPEED DIALING 18
NSWERING CALLS 18
SING FLASH 21
SING MUTE 21
SING THE SPEAKERPHONE 22
DJUSTING THE VOLUME 22
SING HOLD 23
IMING CALLS 23
OING OUT OF RANGE 23
OCATING A LOST HANDSET 23
SING THE INTERCOM 24
EADING DISPLAY MESSAGES 24
❑ USING THE DIRECTORY 27
❑ C
❑ E
❑ D
❑ R
REATING YOUR DIRECTORY LIST 27
NTERING CHARACTERS & SYMBOLS 29
IALING FROM DIRECTORY RECORDS 30
EVIEWING DIRECTORY RECORDS 30
Page 7

Cidco980.book Page 4 Thursday, June 3, 1999 6:39 PM
Table of Contents
❑ DELETING DIRECTORY RECORDS 31
❑ MAINTAINING BATTERIES 31
❑ USING YOUR CUSTOM CALLING SERVICES 32
❑ 3-W
❑ C
❑ C
❑ C
❑ C
ALLER ID AND CALL WAITING ID 34
❑ R
❑ V
AY CALLING 32
ALL FORWARDING 32
ALL RETURN 33
ALL WAITING 34
EPEAT DIALING 36
OICE MAIL 37
❑ TROUBLESHOOTING 38
❑ INDEX 41
Copyright © 1998-99 by CIDCO Incorporated. All rights reserved.
©1998 CIDCO Incorporated. No part of this publication may be reproduced,
transcribed, stored in a retrieval system, or translated into any language in any form,
by any means, without the written permission of CIDCO Incorporated.
Patents pending.
102230-01 Rev A
Page 8
Cidco980.book Page 1 Thursday, June 3, 1999 6:39 PM
Getting to Know Your New Phone
GETTING TO KNOW YOUR NEW PHONE
Your new CL980 telephone incorporates all the best features of a cordless tele-
phone and blends them with your local telephone company’s best calling features,
such as Caller ID, Voice Mail and Call Waiting ID.
If this is your first cordless telephone, you’ll soon discover that your cordless is similar to regular telephones, except without the cord. If you’ve owned a cordless in
the past, you’ll discover that the CL980 telephone is the most powerful and fullfunction Caller ID cordless telephone on the market. Some key features are:
❑ 20 channel, digital spread spectrum 900 MHz handset with
speakerphone
❑ 50 Caller ID memory and 50 Directory Records
❑ Dedicated Voice Mail keys
®
❑ Large One Time Viewing (OTV
❑ Hearing-aid compatibility
❑ Messages in English or Spanish
❑ Call timer for outgoing calls
❑ Single key redialing
❑ Preprogrammed for your local telephone company’s network services,
such as 3-Way Calling.
) display
Unlike regular telephones, your cordless does not work during power failures. Because of this restriction, we do not recommend you have only cordless telephones
in your residence.
UNPACKING YOUR PHONE
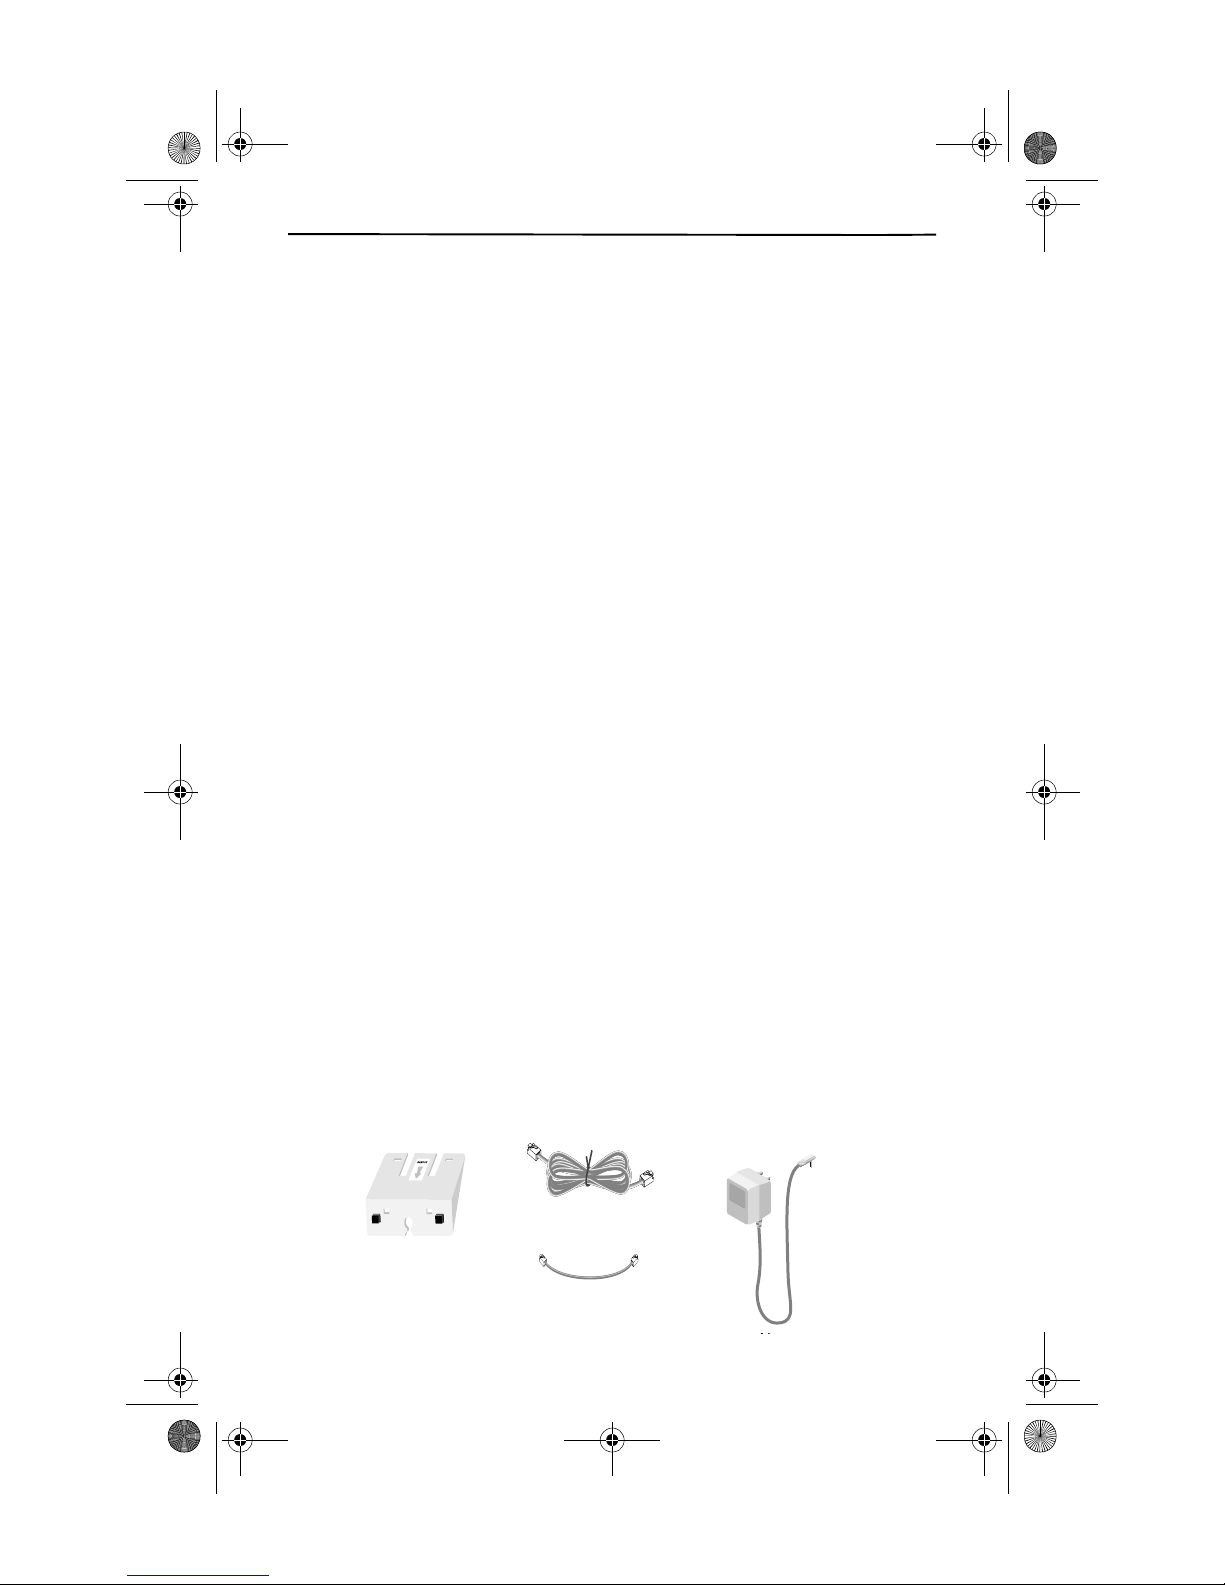
In addition to this handbook, check that you have:
❑ Telephone base
❑ Telephone handset
❑ 6 ft. line cord
❑ 5 inch line cord for wall mounting
❑ Wall-mount/desk-mount wedge
❑ AC Adapter
6 FOOT LINE CORD
MOUNTING WEDGE
5 INCH LINE CORD
OR WALL MOUNTING
F
AC A DA PTER
1
Page 9
Cidco980.book Page 2 Thursday, June 3, 1999 6:39 PM
Getting to Know Your New Phone
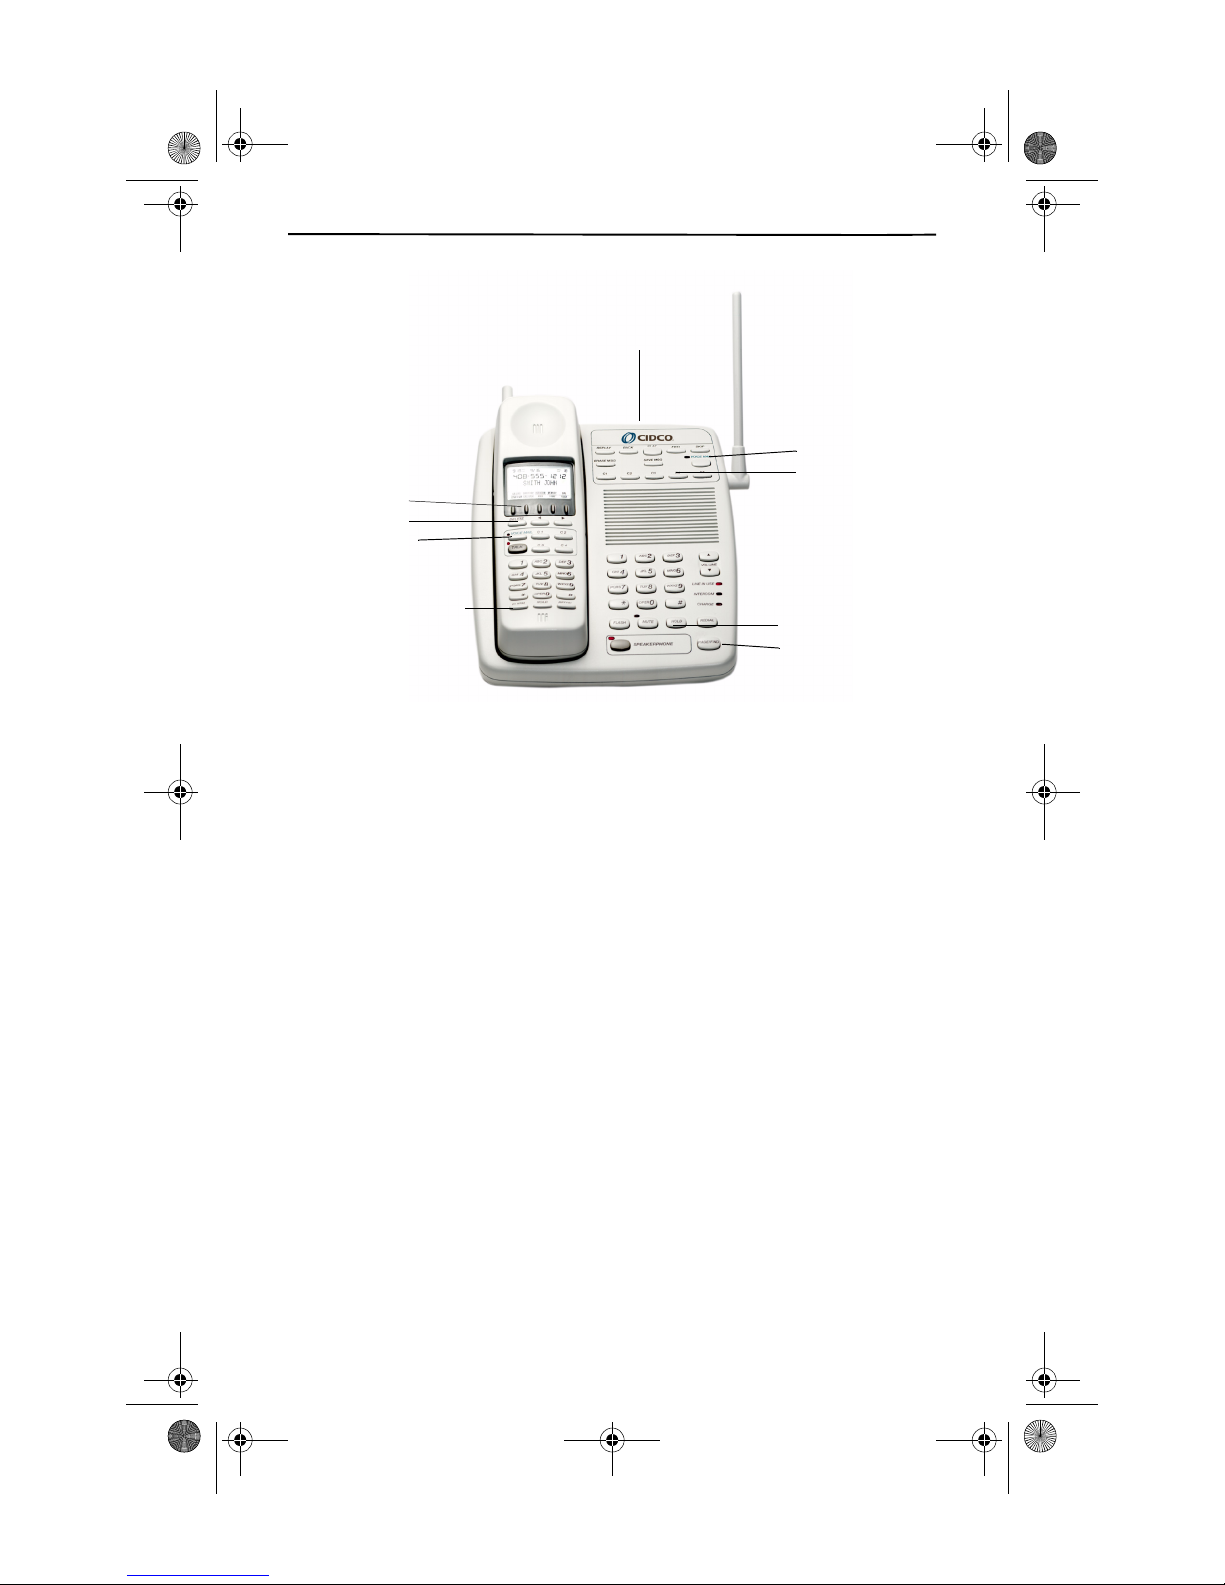
Voice Mail Navigation Keys
Voice Mail Light
Custom Calling Keys
Function Keys
Caller ID Keys
Custom Calling Keys
Flash/Hold/Redial Keys
LED Indicators for:
- Voice Mail Msgs
- Line In Use
- Intercom
- Charge
- Mute
- Speakerphone
Flash/Mute/Hold/
Redial Keys
Page/Find Key
to locate a misplaced
handset
LOCATING KEYS, LIGHTS, AND SWITCHES
BASE KEYS
The Page/Find key is a homing system for finding the handset. If you press the
Page/Find key, the handset beeps for 15 seconds. By pressing the intercom function key on the handset you can answer the page and use the phone as an intercom. For details on using Page/Find and intercom, see Using the Intercom on page
24.
Voice Mail keys allows you to access your Voice Mail features.
Custom Calling keys allows you one touch access to your local telephone compa-
ny calling features.
BASE LIGHTS
Voice Mail light comes on if you subscribe to Voice Mail service from your local
telephone company, and you have messages in your mailbox.
Line in Use light comes on whenever this phone, or any other telephone on the
line, is being used.
Intercom light comes on when the base is a communicating with the handset as
an intercom.
Charge light is a tri-colored light that comes on when the handset is in the base, or
when a spare battery is being charged.
Mute light indicates that the microphone for the speakerphone is currently turned
off.
2
Page 10
Cidco980.book Page 3 Thursday, June 3, 1999 6:39 PM
Getting to Know Your New Phone
Speakerphone light indicates that the speakerphone is in use.
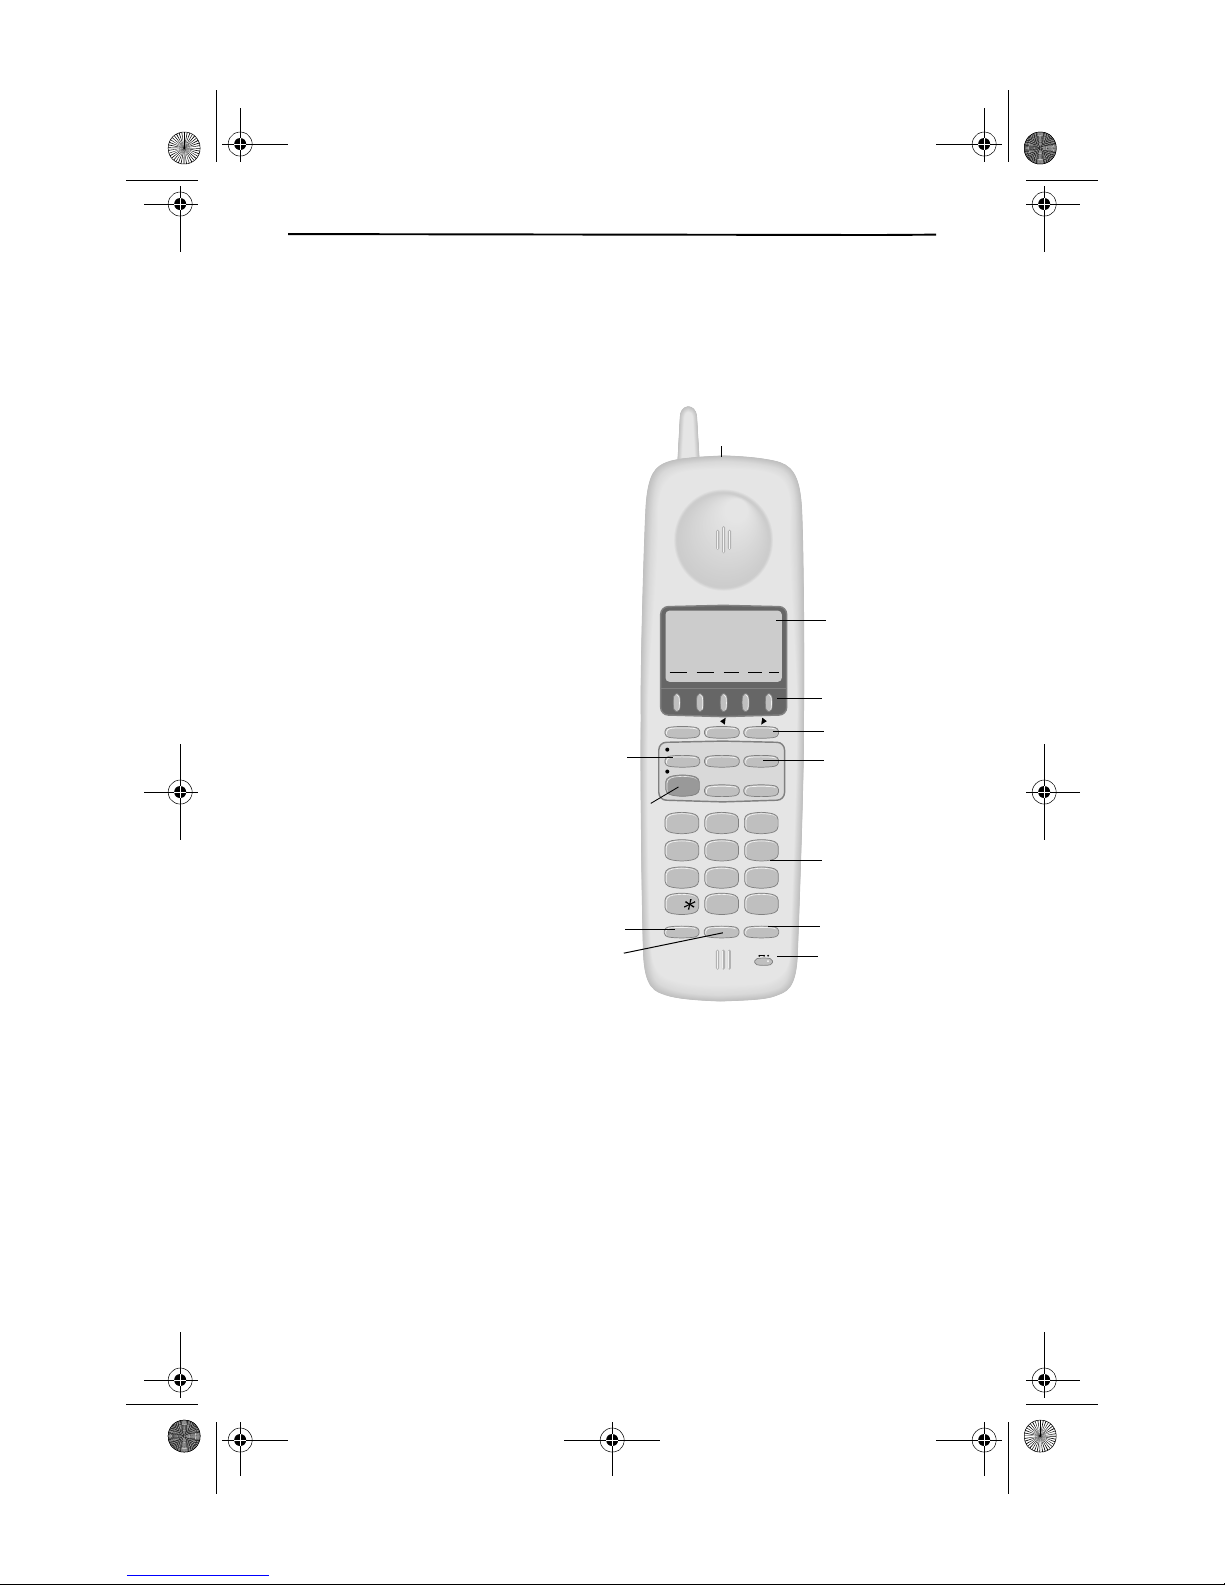
ON THE HANDSET
There are three lights, eight types of keys, and a switch on the handset.
Lights
New Calls light–Tells you
when you have ne w Caller ID
information to review. It
flashes until you review your
calls using the Caller ID keys.
Talk light–Tells you that
your phone is ready to dial
when on solid. This light
blinks when the speakerphone is in use, or when a
call is on hold.
Voice Mail light–Blinks
when you have Voice Mail
messages, if you subscribe
to your local telephone com-
pany’s Voice Mail service.
Keys
Function keys–Are multifunction keys that allow you
to use your: call records, directory, and intercom. Additionally, these keys support
different kinds of dialing and
future Custom Calling features.
Voice Mail
Key/Light
Talk Ke y/Li ght
Flash Key
Hold Key
New Calls Light
(on back)
AM
PM
9:18 10/16 18
1-
408 - 555-1212
LASTNAME FIRST
CALLERS
DIRECTORY
SEND TO VM
CALL BACK
DELETE REVIEW
VOICE MAIL
TALK
12
4
GHI5JKL6MNO
7
PQRS
FLASH HOLD REDIAL
IN USE 1 2
INTERCOM
PLS HOLD
3-WAY
CALL
REPEAT
DIAL
ABC3DEF
8
TUV9WXYZ
OPER
0
PWR—OFF ON
CALL
DIR
MEMORY
CONFERENCE
CALL
RETURN
CALL FWD
ON
OFF ON—RING
DIAL
DROP
#
Backlit Display
Function Keys
Caller ID Keys
Custom Calling
Keys
Dialing Keys
Redial Key
Power/Ringer
Switch
Caller ID keys–Control Call
Records. For more details on Call Records, see Receiving New Calls on page 34.
Custom Calling keys–Control your other telephone subscription services.
Tal k ke y–Turns the phone on or off.
Dialing keys–Control manual dialing.
Quick Dialing keys–Dials out previously stored information. Pressing DIAL dials
the number showing on the display. REDIAL allows you to recall and dial the last
phone number.
Call Control keys–Are the HOLD and FLASH keys. The HOLD key places the exist-
ing call on hold, while the FLASH key allows Call Waiting subscribers to switch between two calls.
3
Page 11
HEADSET
Headset
jack
Cidco980.book Page 4 Thursday, June 3, 1999 6:39 PM
Getting to Know Your New Phone
Volume Control keys—–Adjust the loudness of
the handset earpiece, or the ringer. The higher/lower arrows are located on the side of the
handset.
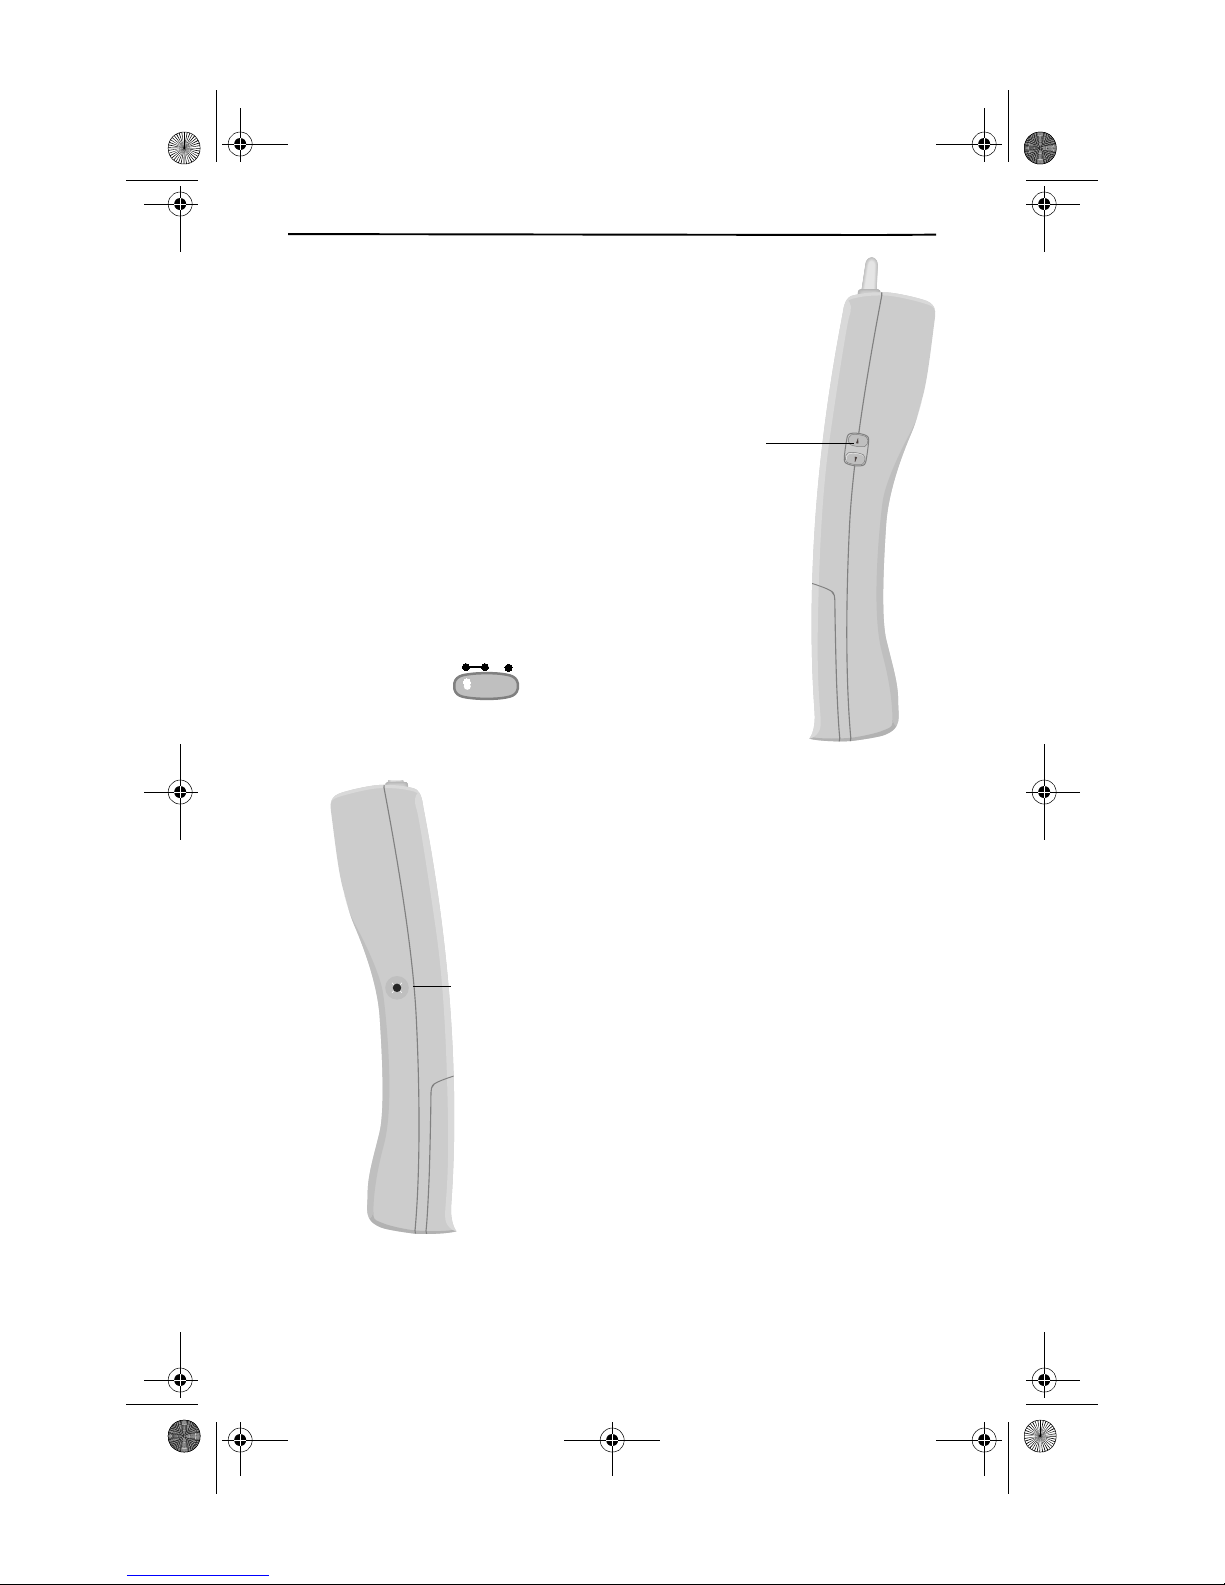
3-Position Switch
This multi-position switch controls both the
power and the ringer for the handset.
Far left position—Both the power to the handset and the ringer are off.
Middle position—The handset is on but does
not ring.
Far right position—The handset and ringer are
both on.
RING
ON—
OFF
PWR—OFF ON
Handset
volume
VOLUME
Headset Jack
The CL980 telephone has a jack on the side of the handset to attach an optional headset for hands-free operation.
4
Page 12
Cidco980.book Page 5 Thursday, June 3, 1999 6:39 PM
Setting Up Your Phone
Setting Up Your Phone
It only takes a few steps to set up your phone. Now that you’ve checked the contents of the carton, you are ready to put the phone together.
1. CHOOSE A CENTRAL LOCATION FOR THE BASE UNIT
The base should be away from all other electronic equipment such as a personal
computer, microwave, stereo, or television. It is also a good idea to place the unit
away from noisy areas, or from heat sources such as a radiator or direct sunlight.
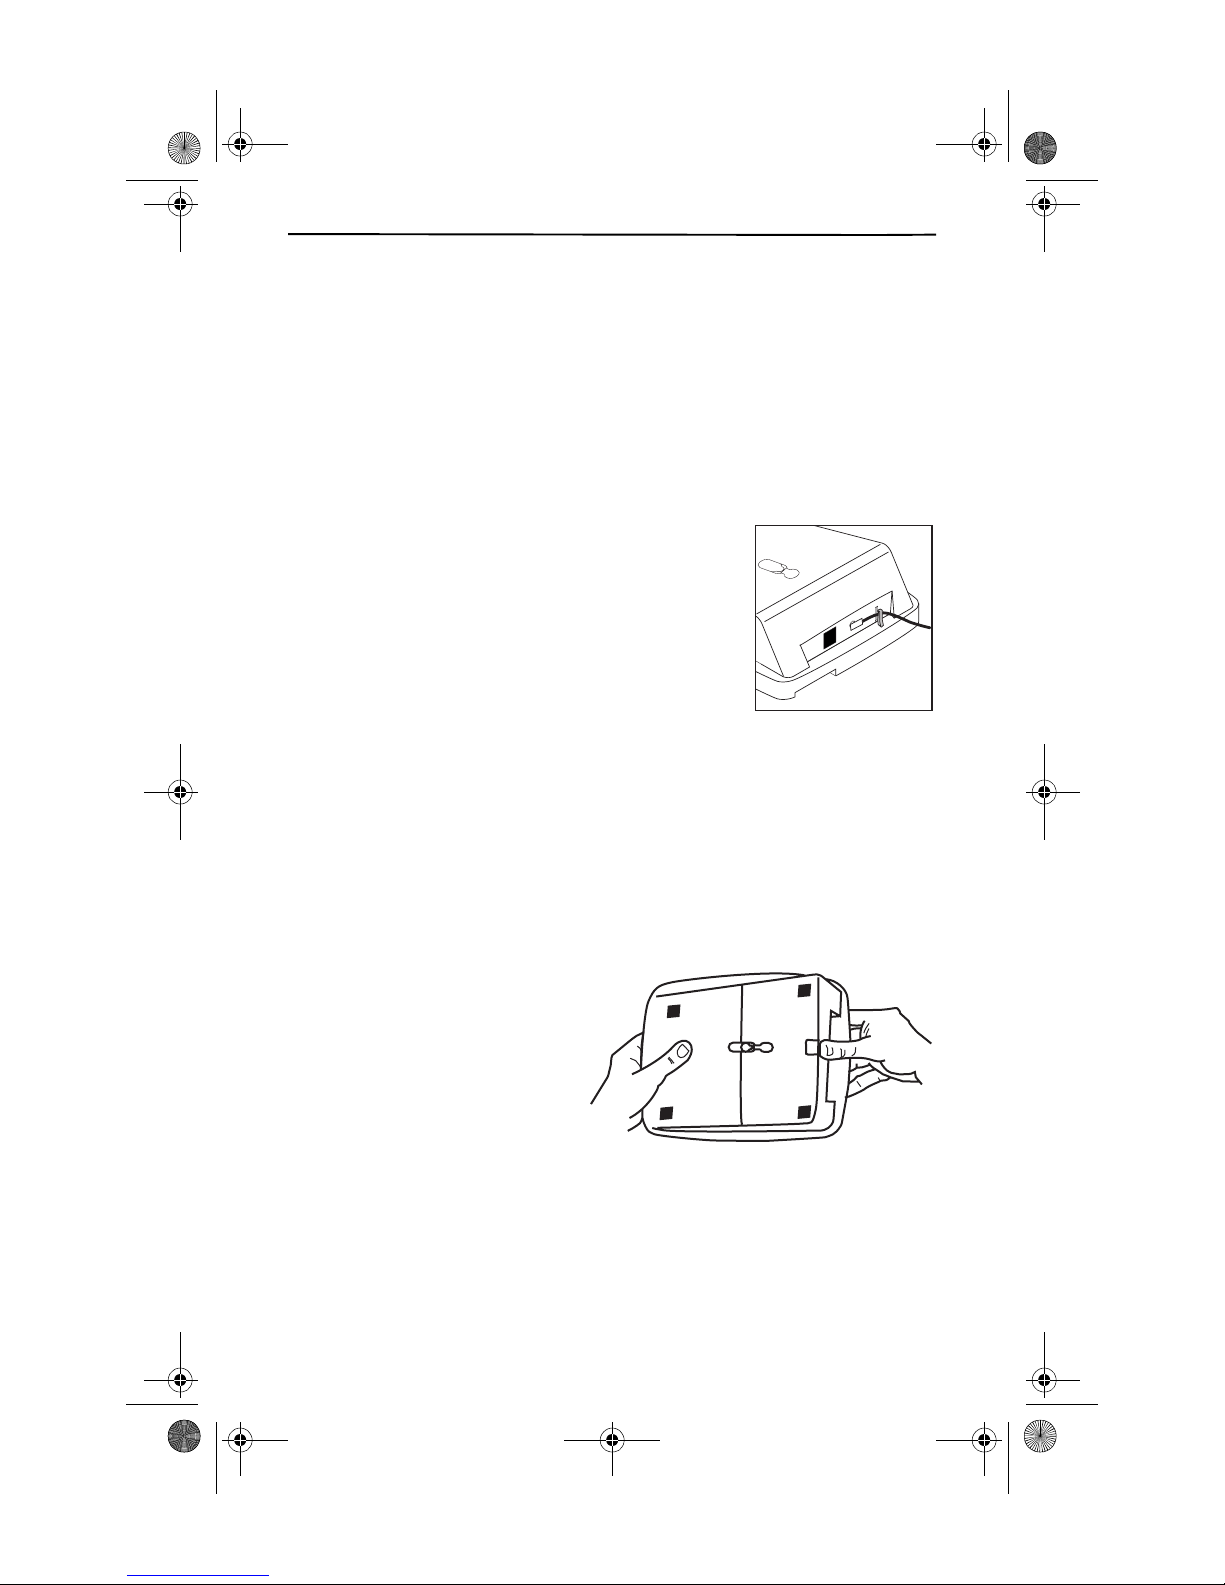
2. PLUG IN THE ADAPTER
1. Plug the adapter tip into the round jack on the
base and the other end into an electrical outlet.
Without AC power, your phone cannot operate.
2. Thread the cord through the clip on the housing to
prevent the cord from becoming loose.
3. INSTALL THE LINE CORD
You can set your CL980 telephone on a tabletop or you can mount the phone on a
wall.
To use on a tabletop or desk:
1. Take the long telephone line cord that comes with the phone and plug one
end into the jack labeled TEL LINE.
2. Take the remaining end and plug it into the wall jack.
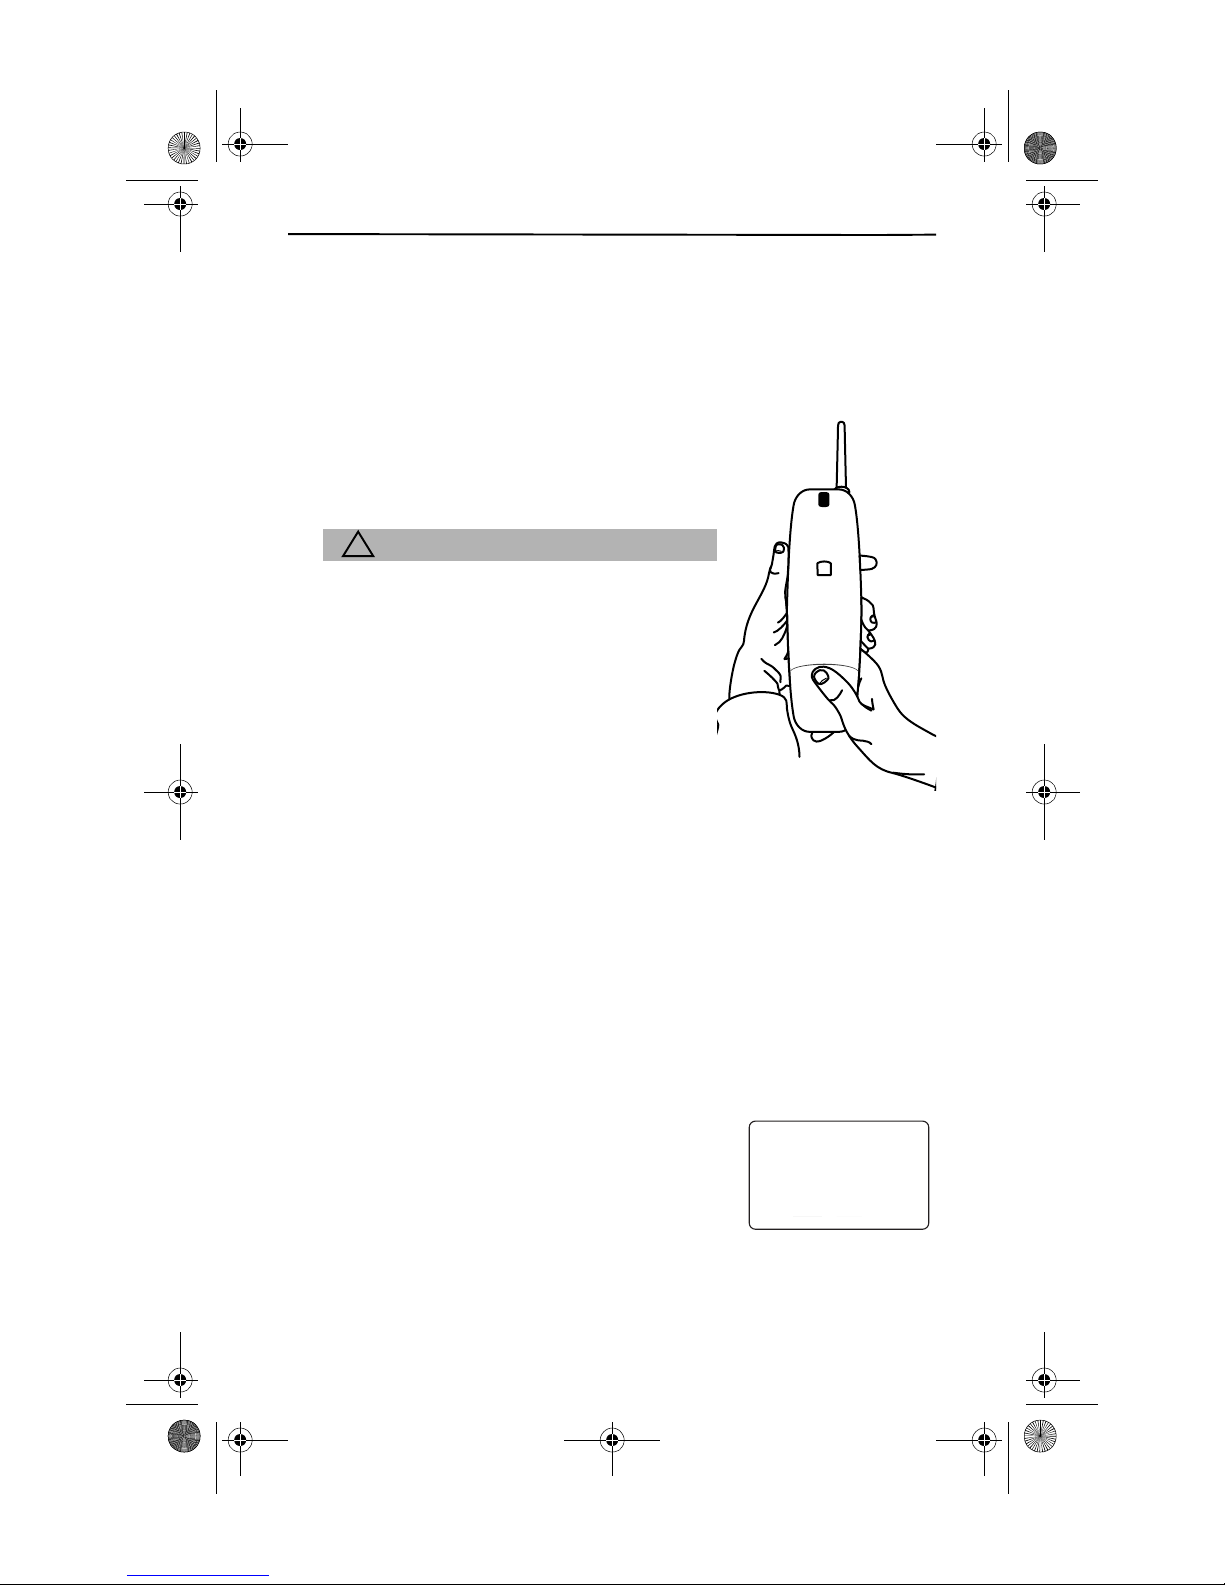
To mount on a wall:
1. Remove the mounting
wedge from the bottom of
the base. Place your thumb
at the top of the arrow and
press down in the direction
of the arrow.
2. Turn the wedge around and
place it over the lower
portion of the base. Reinstall
the wedge by placing your thumb over the arrow and by pressing
downwards and backwards until it snaps into place.
3. Plug the five inch line cord into the phone jack marked TEL LINE.
4. Thread the line cord through the open channel in the base.
5
Page 13
Cidco980.book Page 6 Thursday, June 3, 1999 6:39 PM
5. Plug the other end of the line cord into the wall jack.
6. Use the gap on the underside of the base to gather any excess cord.
7. Hang the base over the installation hooks.
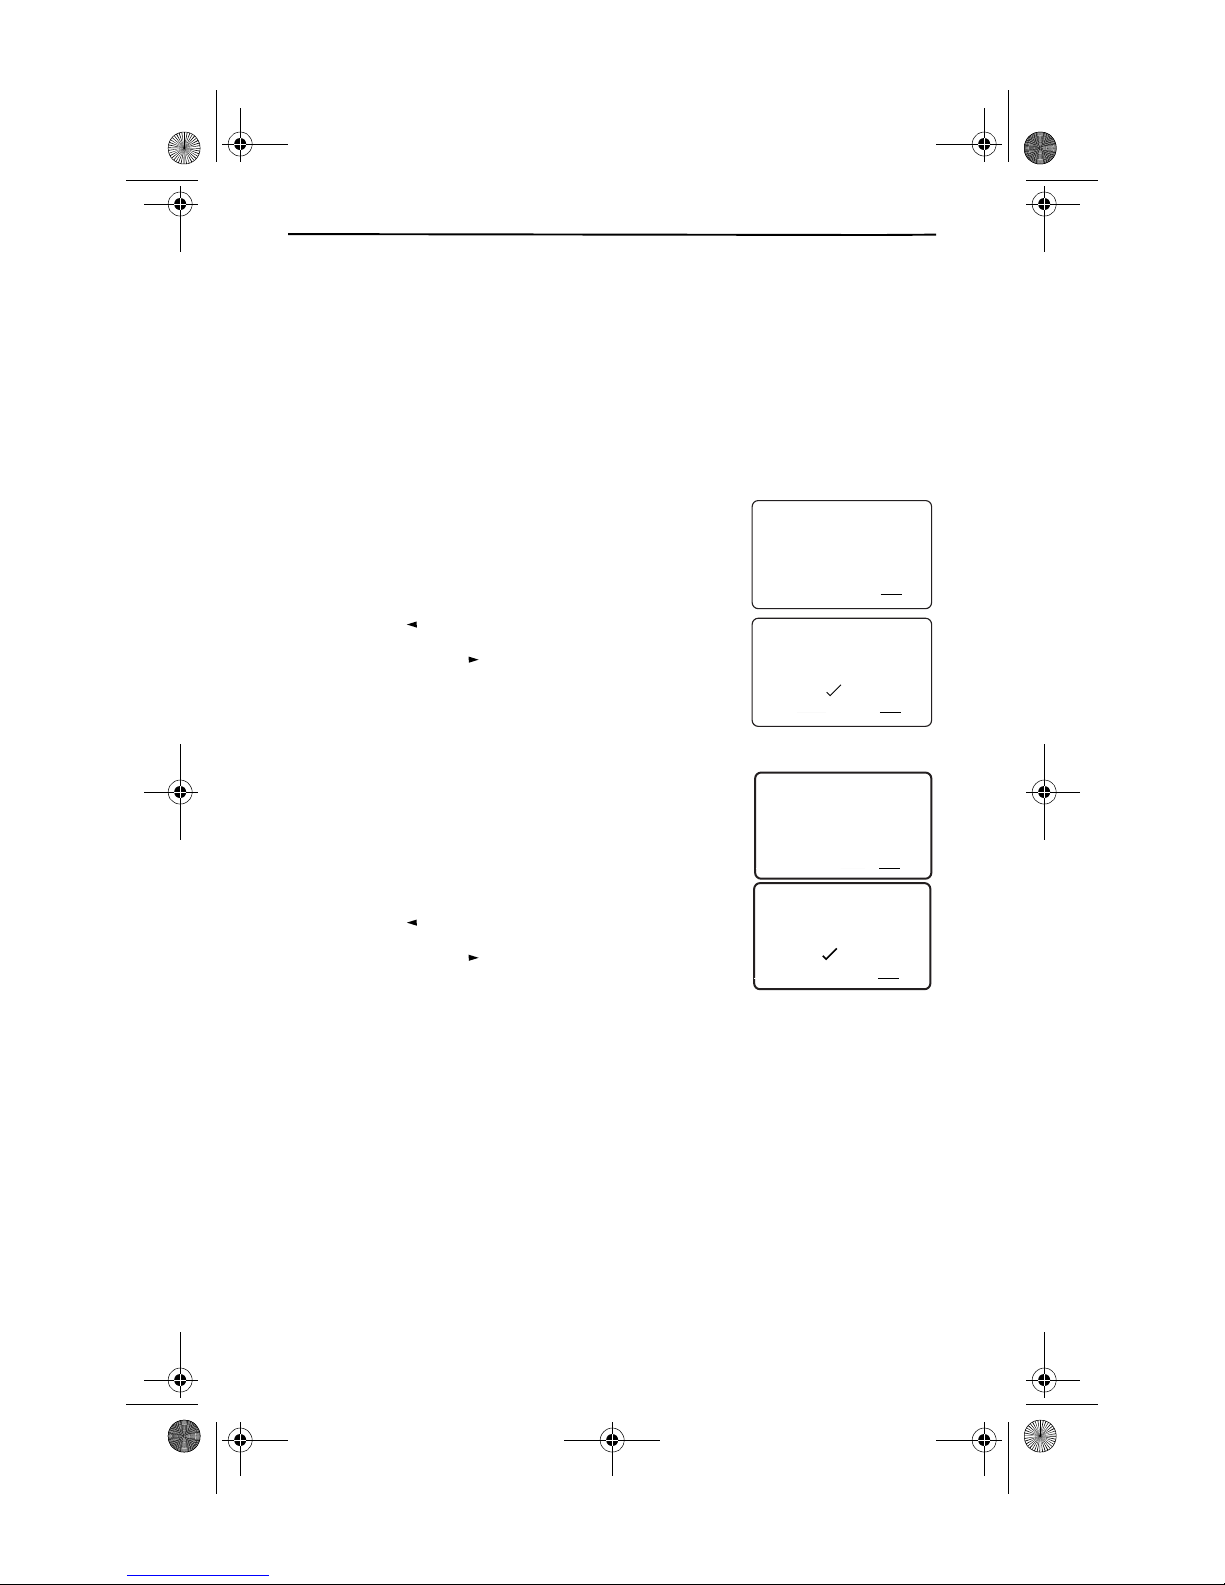
4. INSERT THE BATTERY INTO THE HANDSET
Use this procedure to install or to replace a battery.
Be sure you follow the battery specifications and
safety instructions outlined in your safety instruction booklet.
! CAUTION
Use only nickel cadmium (Ni-Cad) batteries in this
phone.
1. Press down on the battery cover and slide the
cover down to expose the battery
compartment.
2. Locate the battery terminals inside of the
battery compartment and the corresponding
terminals on the battery pack. If you are
replacing a dead battery, first remove the old
battery pack.
3. Align the pack’s terminals with the terminals in the battery well.
4. Replace the battery door.
5. CHARGE THE HANDSET
Before you use the phone for the first time:
1. Ensure the handset is turned off.
2. Place the handset in the cradle and charge the battery for at least 12 hrs.
The charge light on the base comes on to tell you that the handset is
charging.
Whenever you see the RECHARGE BATTERY message,
you need to recharge your handset by placing the
handset in the cradle.
6
AM
10/315:55
IN USE 1 2
PM
408-555-1234
RECHARGE BATTERY
CALLERS DIRECTORY INTERCOM MEMORY DIAL
CALLERS
DIRECTORY
CALL BACK
INTRERCOM
PLS HOLD
SEND TO VM
MEMORY
CONFERENCE
CALL
DIR
21
DIAL
DROP
Page 14
Cidco980.book Page 7 Thursday, June 3, 1999 6:39 PM
Setting Up Your Phone
PERSONALIZING YOUR PHONE
After setting up your phone and fully charging the battery, you can tailor your
phone for additional performance and preferences. Press and hold the
MEMORY key until the first screen appears.
If you make a mistake anywhere in the process you can back up using the
DELETE key, or end the programming sequence by pressing the MEMORY key
again.
1. SELECT YOUR LANGUAGE
The CL980 telephone displays text in both English and
Spanish. The first screen asks whether you would like
your messages in Spanish (ESP) or English (ENG)?
❑ Press to choose English.
❑ Press to choose Spanish.
REVIEW
REVIEW
2. SELECT BETWEEN EASY OR DETAILED SETUP
With the exception of your Voice Mail access number
and PIN, your CL980 is already setup for you. However if
you would like to turn off some features, or add additional area codes, you may do so using the Detailed Setup. Use the following chart to determine which
procedure to use to finish programming your phone.
❑ Press to choose Easy Setup.
❑ Press to choose Detailed Setup.
REVIEW
REVIEW
IN USE 1 2
CALL
DIR
AM
10/315:55
PM
408-555-1234
SELECT LANGUAGE
CALLERS DIRECTORY INTERCOM MEMORY DIAL
CALLERS
DIRECTORY
INTRERCOM
SEND TO VM
CALL BACK
AM
10/315:55
PM
PLS HOLD
IN USE 1 2
MEMORY
CONFERENCE
CALL
DIR
DROP
408-555-1234
AM
PM
DIRECTORY
CALL BACK
10/315:55
ENG ESP
INTRERCOM
MEMORY
PLS HOLD
CONFERENCE
CALL
IN USE 1 2
DIR
DROP
CALLERS DIRECTORY INTERCOM MEMORY DIAL
CALLERS
SEND TO VM
408-555-1234
EASY SETUP?
CALLERS
DIRECTORY
INTRERCOM
CALLERS DIRECTORY INTERCOM MEMORY DIAL
SEND TO VM
CALL BACK
AM
10/315:55
PM
PLS HOLD
IN USE 1 2
MEMORY
CONFERENCE
CALL
DIR
DROP
408-555-1234
DIRECTORY
CALL BACK
YES NO
INTRERCOM
MEMORY
PLS HOLD
CONFERENCE
DIAL
DROP
CALLERS
CALLERS DIRECTORY INTERCOM MEMORY DIAL
SEND TO VM
21
DIAL
21
DIAL
21
DIAL
21
7
Page 15
Cidco980.book Page 8 Thursday, June 3, 1999 6:39 PM
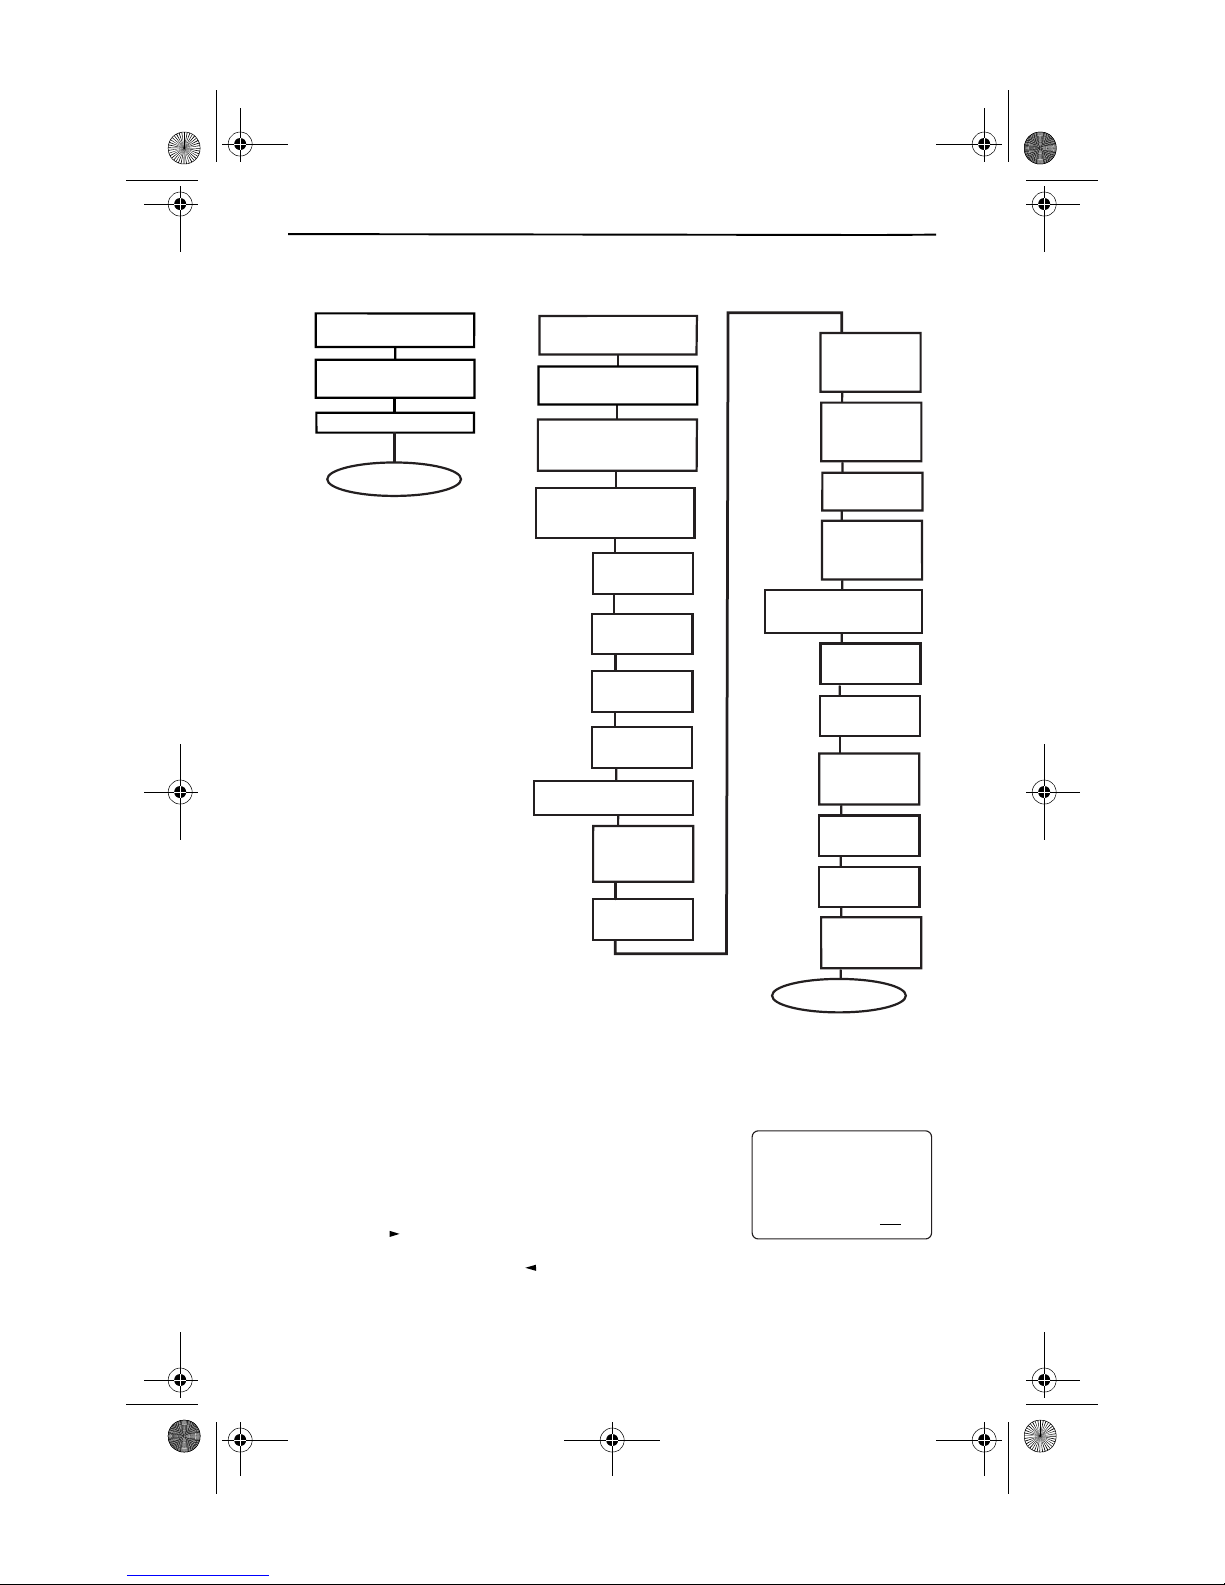
Easy Setup
EASY SETUP
Enter your Voice Mail
1.
Access Number
Enter your Voice Mail
2.
passcode
3.
Set your Area Code
4.
Setup Complete
Choose between
Tone or Pulse Dialing
1.
Select Ring Sound
2.
between 0 and 9 (5)
Select Phone for Manual
3.
Answer (NO) or
Auto Answer (YES)
Create or Change
4.
Voice Mail Setup
(YES) or (NO)
T urn V oice Mail
ON or OFF
Enter Voice Mail
Access Number
Add Pauses (2)
Add Voice Mail
Passcode
Setup or Change
5.
Caller ID (YES) or (NO)
Turn Caller ID
On (YES) or
Off (NO)
Turn Call Light
ON or OFF
DETAILED SETUP
Setup or Change Area
6.
Codes (YES) or (NO)
Set Advanced
Functions
(YES) or (NO)
Restore
Defaults (YES)
or (NO)
Turn Call Waiting
ON or OFF
Use Call Waiting
Disposition (ON)
or (OFF)
Set your Area
Code
Select Dialing
Digits (7) or (10)
Add More
Area Codes
(YES) or (NO)
Select Dialing
Digits (7) or (10)
Add Another
Area Code
Add 1 Before
Area Code (ON)
or (OFF)
Default settings are shown in BOLD
Easy setup begins below, while the detailed procedure begins on page 10.
EASY SETUP
1. ENTER THE ACCESS NUMBER FOR VOICE MAIL
Your access number is the telephone number you dial
to get to Voice Mail. This screen prompts you to use the
dialing keypad to enter your access number. Press
REVIEW
If you make a mistake, use to erase a digit.
8
to enter the number when you are finished.
REVIEW
Setup Complete
IN USE 1 2
CALL
DIR
AM
10/315:55
PM
5555555
VM ACCESS #?
CALLERS DIRECTORY INTERCOM MEMORY DIAL
CALLERS
DIRECTORY
INTRERCOM
MEMORY
SEND TO VM
CALL BACK
PLS HOLD
CONFERENCE
DIAL
DROP
21
Page 16
Cidco980.book Page 9 Thursday, June 3, 1999 6:39 PM
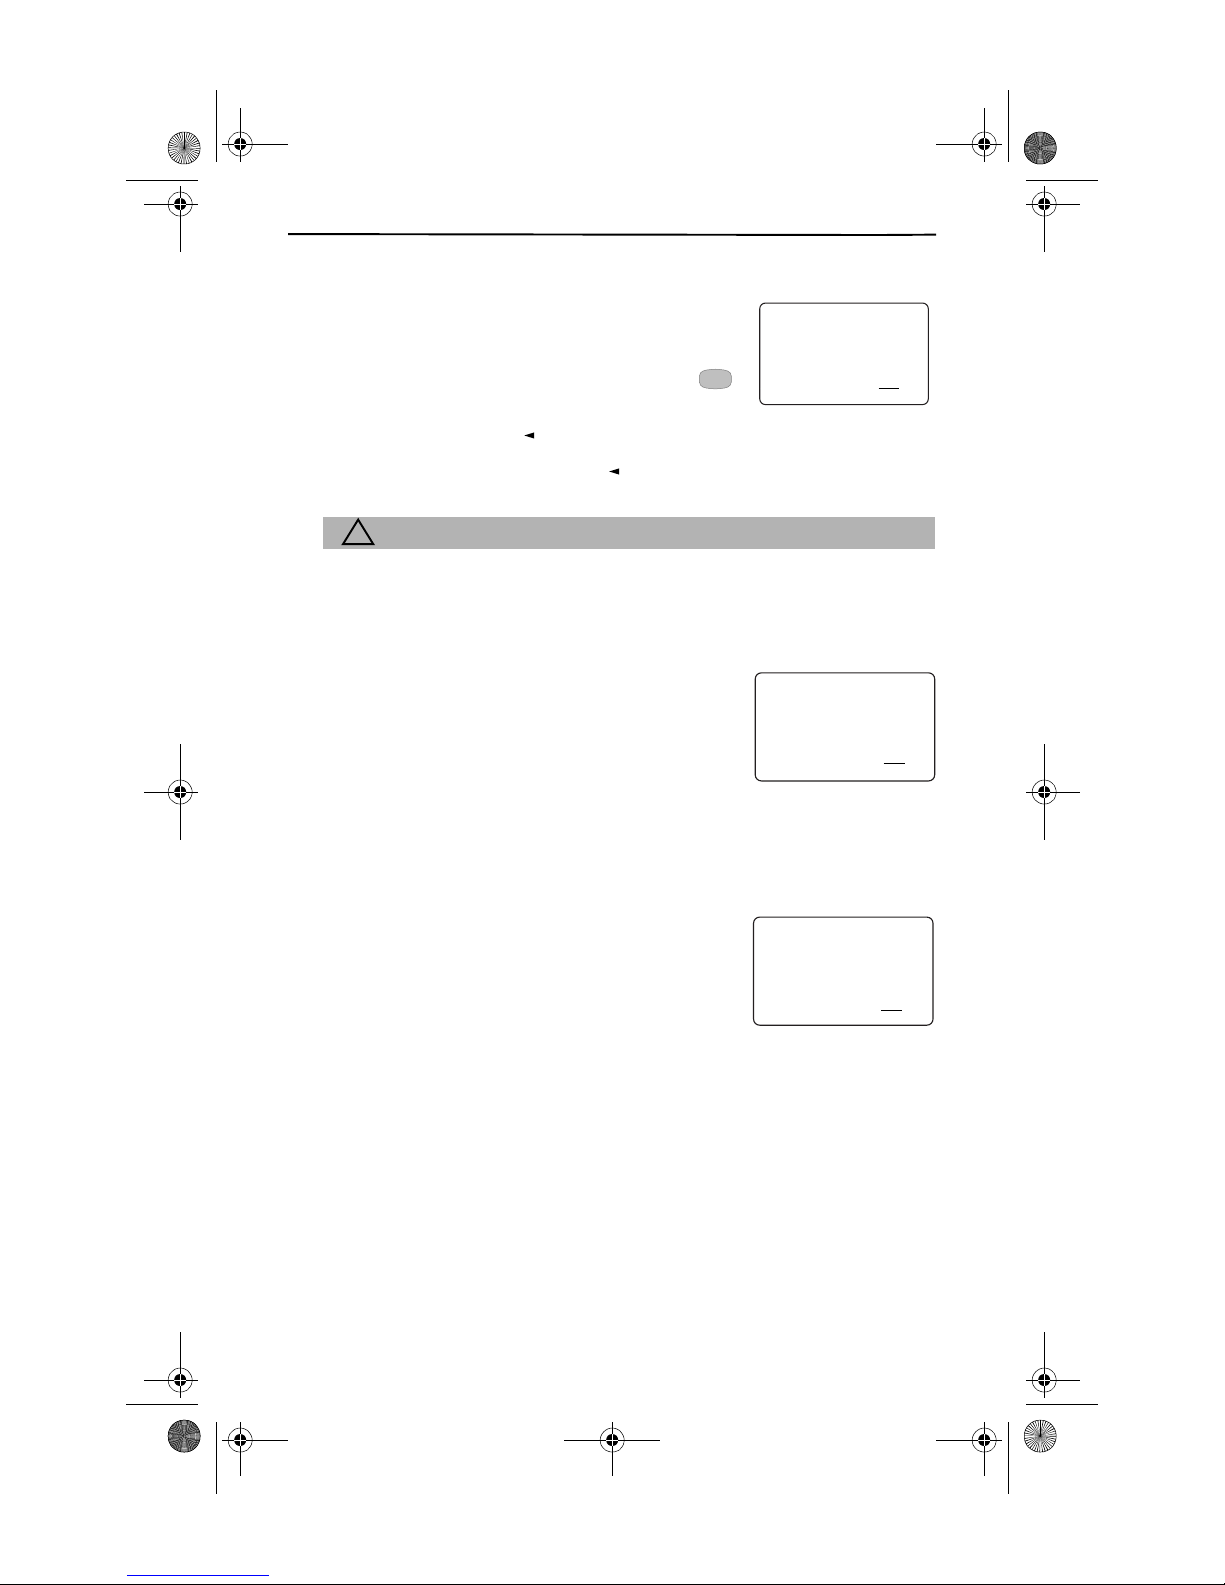
2. ENTER YOUR PIN FOR VOICE MAIL
Setting Up Your Phone
This screen prompts you to use the dialing keypad to
enter your Voice Mail PIN.
You can enter up to 32 characters and/or digits total for
these three fields. You can also add any necessary
#
keys or flashes.
If you make a mistake, use to erase a digit.
You can skip this step by pressing the key.
REVIEW
REVIEW
AM
10/315:55
PM
VM PASSWORD?
CALLERS DIRECTORY INTERCOM MEMORY DIAL
CALLERS
DIRECTORY
CALL BACK
INTRERCOM
PLS HOLD
SEND TO VM
! CAUTION
Your PIN number is what keeps your voicemail private. If you
enter your PIN into the CL980, anyone who has access to this
phone has access to your messages and PIN. It’s advisable to
not use the same PIN as your ATM card or other services.
3. SET AREA CODE
AM
10/315:55
PM
Using the dialing keypad, enter your primary 3-digit
area code. If you have additional local area codes, that
don’t require you to first dial a “1” first, use the detailed
setup procedure below.
MY AREA CODE
CALLERS DIRECTORY INTERCOM MEMORY DIAL
CALLERS
DIRECTORY
CALL BACK
INTRERCOM
PLS HOLD
SEND TO VM
4. COMPLETE EASY SETUP
You are now finished setting up your phone. The SETUP COMPLETE message ap-
pears. We hope you enjoy your new phone.
IN USE 1 2
IN USE 1 2
CALL
DIR
1234
MEMORY
CONFERENCE
CALL
DIR
214
MEMORY
CONFERENCE
21
DIAL
DROP
21
DIAL
DROP
Initially, the screen only shows the function labels for
the function keys.
After receiving the first call record, Caller ID and Call
Waiting ID customers additionally see the time and date
on the screen when the phone is not in use. Non-Caller
ID customers do not have the date and time function.
IN USE 1 2
CALL
DIR
AM
10/315:55
PM
408-555-1234
SETUP COMPLETE
CALLERS DIRECTORY INTERCOM MEMORY DIAL
CALLERS
DIRECTORY
INTRERCOM
MEMORY
SEND TO VM
CALL BACK
PLS HOLD
CONFERENCE
DIAL
DROP
21
9
Page 17
TALK
Cidco980.book Page 10 Thursday, June 3, 1999 6:39 PM
Detailed Setup
DETAILED SETUP
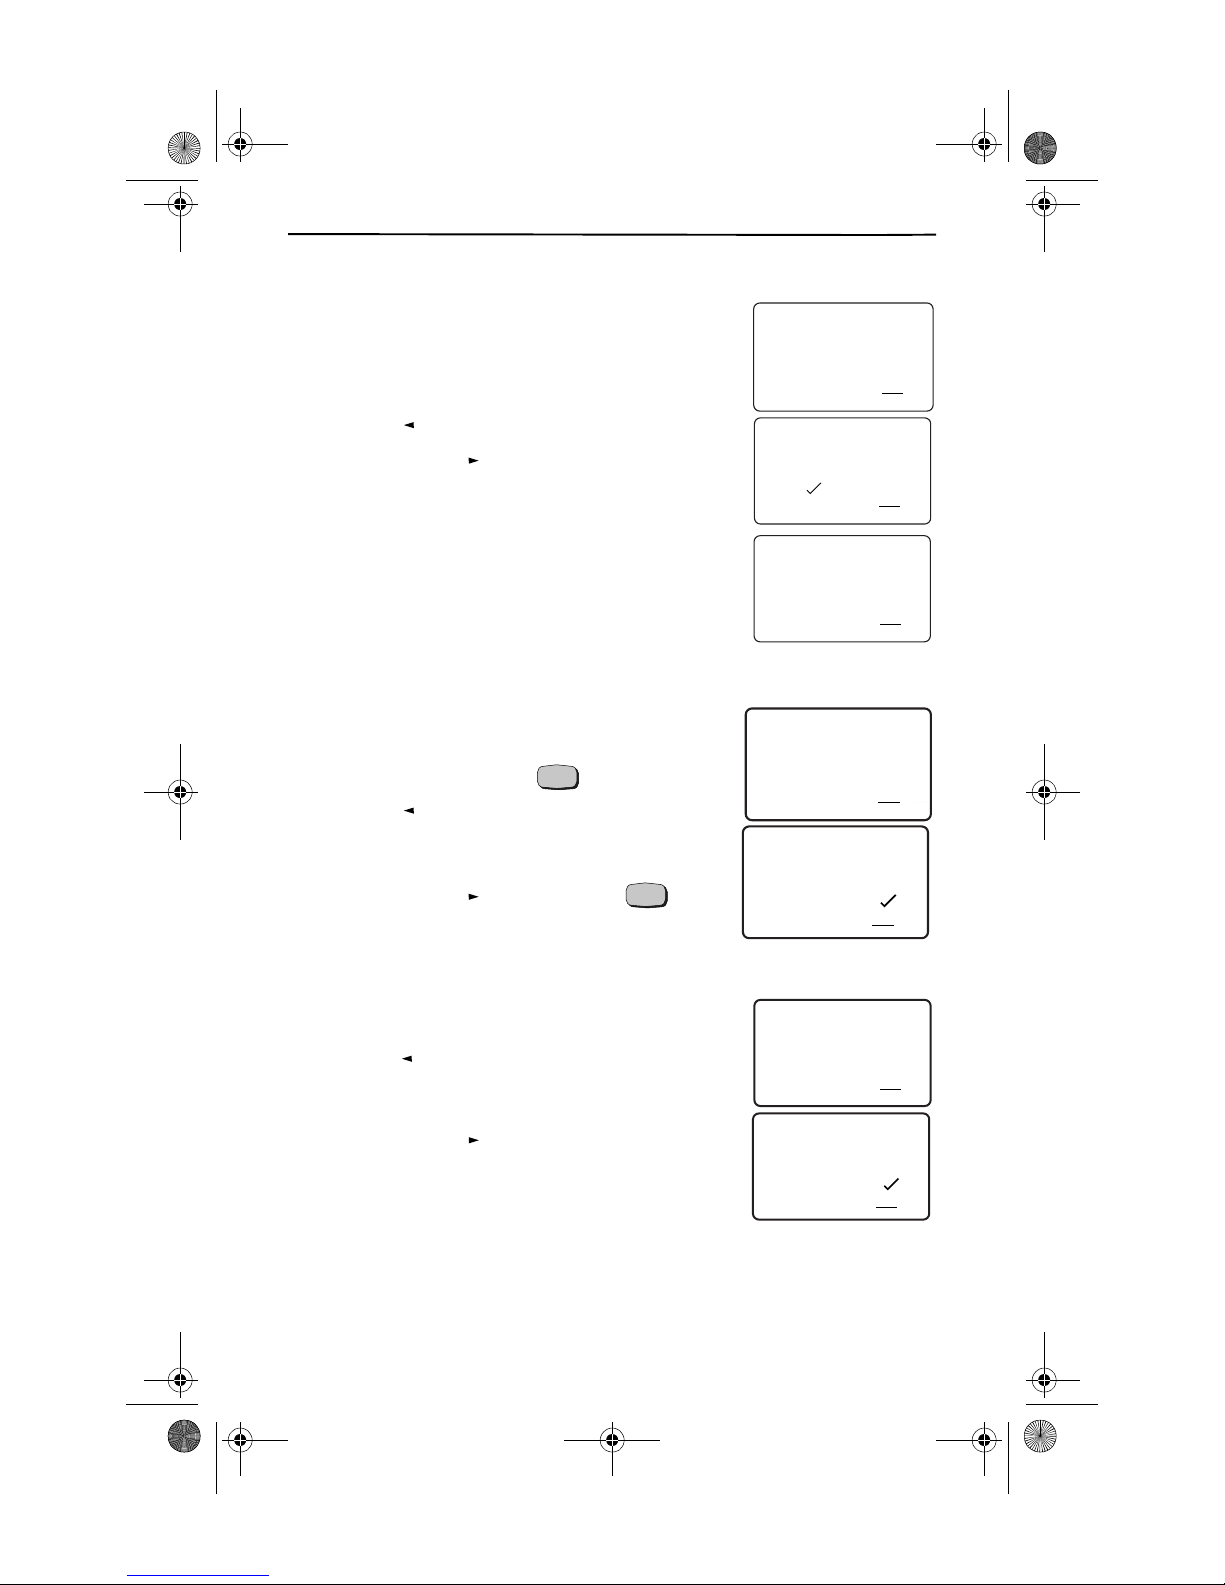
1. SELECT BETWEEN TONE AND PULSE
If you are using the detailed setup method, you next see
the dialing method screen. The CL980 can dial in either
tone or pulse/rotary mode.
❑ Press to select TONE.
❑ Press to select PULSE.
REVIEW
REVIEW
2. SELECT RINGING SOUND
You can choose from one of ten different ringing
sounds. Use the keypad to choose a number
between 0 and 9. The speakerphone then gives a sample ring. You can continue to experiment with different
ring sounds. The phone keeps your latest setting.
3. ANSWER PHONE WHEN PICKED UP
There are two ways that the CL980 can answer a call.
The CL980 can instantly answer incoming calls when
you remove it from the cradle, or the phone can be set
to answer after pressing the key.
❑ Press
REVIEW
answer incoming calls when removed from the
cradle.
❑ Press to choose to press before
REVIEW
answering incoming calls.
to choose to automatically
TALK
IN USE 1 2
CALL
DIR
AM
10/315:55
PM
408-555-1234
DIALING METHOD
CALLERS DIRECTORY INTERCOM MEMORY DIAL
CALLERS
DIRECTORY
AM
PM
CALL BACK
10/315:55
INTRERCOM
PLS HOLD
IN USE 1 2
CALL
DIR
SEND TO VM
408-555-1234
CALLERS DIRECTORY INTERCOM MEMORY DIAL
SEND TO VM
CALLERS DIRECTORY INTERCOM MEMORY DIAL
SEND TO VM
TONE PULSE
CALLERS
DIRECTORY
INTRERCOM
PLS HOLD
IN USE 1 2
INTRERCOM
PLS HOLD
IN USE 1 2
MEMORY
CONFERENCE
MEMORY
CONFERENCE
CALL
DIR
CALL
DIR
CALL BACK
AM
10/315:55
PM
RING SOUND 0-9
CALLERS
DIRECTORY
CALL BACK
AM
10/315:55
PM
408-555-1234
ANSWER ON PICKUP
CALLERS DIRECTORY INTERCOM MEMORY DIAL
CALLERS
DIRECTORY
INTRERCOM
SEND TO VM
CALL BACK
AM
10/315:55
PM
PLS HOLD
IN USE 1 2
MEMORY
CONFERENCE
CALL
DIR
408-555-1234
DIRECTORY
CALL BACK
YES NO
INTRERCOM
MEMORY
PLS HOLD
CONFERENCE
CALLERS DIRECTORY INTERCOM MEMORY DIAL
CALLERS
SEND TO VM
21
DIAL
DROP
21
DIAL
DROP
21
5
DIAL
DROP
21
DIAL
DROP
21
DIAL
DROP
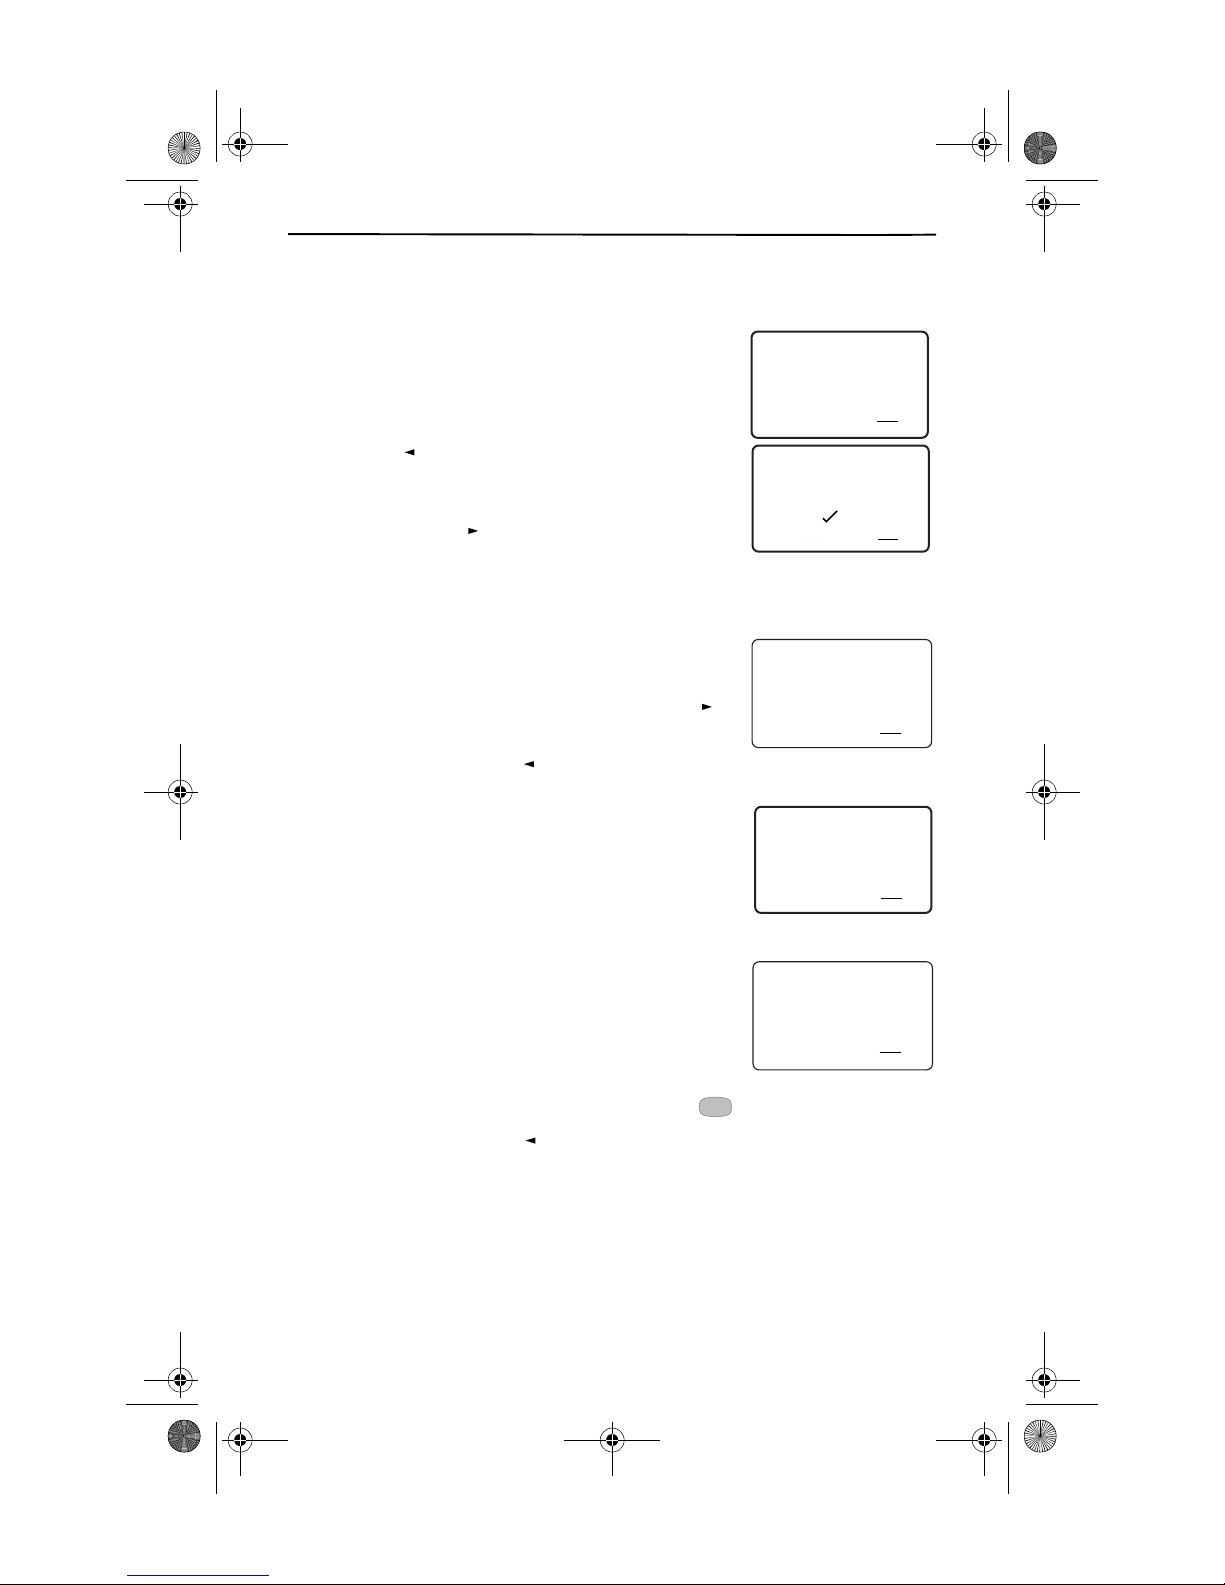
4. CREATE OR CHANGE VOICE MAIL SETUP
This series of prompts, allowVoice Mail subscribers to
setup or change Voice Mail keys.
REVIEW
❑ Press
screens that allow you to create or change your
access number and PIN for Voice Mail.
❑ Press to choose NO, if either you do not
REVIEW
subscribe to this service, or you do not want to
create or change Voice Mail settings. If you select
this setting, skip to Set Up or Change Caller ID
Settings on page 12.
10
to choose YES, to see other
IN USE 1 2
CALL
DIR
AM
10/315:55
PM
408-555-1234
SETUP VOICE MAIL
CALLERS DIRECTORY INTERCOM MEMORY DIAL
CALLERS
DIRECTORY
INTRERCOM
SEND TO VM
CALL BACK
AM
10/315:55
PM
PLS HOLD
IN USE 1 2
MEMORY
CONFERENCE
CALL
DIR
408-555-1234
DIRECTORY
CALL BACK
YES NO
INTRERCOM
MEMORY
PLS HOLD
CONFERENCE
CALLERS DIRECTORY INTERCOM MEMORY DIAL
CALLERS
SEND TO VM
21
DIAL
DROP
21
DIAL
DROP
Page 18
Cidco980.book Page 11 Thursday, June 3, 1999 6:39 PM
Turn Voice Mail On or Off
If you choose to set SETUP VOICE MAIL to NO, this screen does not appear.
Setting Up Your Phone
If you subscribe to Voice Mail from your local telephone
company, ensure that this setting is set to ON. Programming this feature does not provide or cancel services.
You must contact your local telephone company representative to request a change in services.
❑ Press
REVIEW
to choose ON, which indicates
that you subscribe to the service. Continue with
Enter Your Voice Mail Access Number below.
❑ Press to choose OFF, which indicates
REVIEW
that you do not subscribe to the service. If you
choose to set VOICE MAIL to OFF, skip to Set Up or
Change Caller ID Settings, on page 12.
Enter Your Voice Mail Access Number—
Your access number is the telephone number you dial to get to
Voice Mail. This screen prompts you to use the dialing
keypad to enter your access number. Press
REVIEW
to
enter the number when you are finished.
If you make a mistake, use to erase a digit.
Enter How Many Pauses—
REVIEW
The CL980 telephone allows you to enter multiple pauses, or intervals between
the access number and the Voice Mail PIN. These pauses
allow the Voice Mail system time to ring and answer before submitting your PIN. Each pause is three seconds
long. The default is two pauses (six seconds).
IN USE 1 2
CALL
DIR
21
AM
10/315:55
PM
408-555-1234
VOICE MAIL?
CALLERS DIRECTORY INTERCOM MEMORY DIAL
CALLERS
DIRECTORY
INTRERCOM
MEMORY
SEND TO VM
AM
PM
CALL BACK
10/315:55
PLS HOLD
IN USE 1 2
CONFERENCE
CALL
DIR
DIAL
DROP
408-555-1234
AM
PM
DIRECTORY
CALL BACK
10/315:55
ON OFF
INTRERCOM
MEMORY
PLS HOLD
CONFERENCE
CALL
IN USE 1 2
DIR
DIAL
DROP
CALLERS DIRECTORY INTERCOM MEMORY DIAL
CALLERS
SEND TO VM
5555555
VM ACCESS #?
CALLERS DIRECTORY INTERCOM MEMORY DIAL
CALLERS
DIRECTORY
INTRERCOM
SEND TO VM
AM
PM
CALL BACK
10/315:55
PLS HOLD
IN USE 1 2
MEMORY
CONFERENCE
CALL
DIR
02
# 3 SEC PAUSES?
CALLERS DIRECTORY INTERCOM MEMORY DIAL
CALLERS
DIRECTORY
INTRERCOM
SEND TO VM
CALL BACK
PLS HOLD
MEMORY
CONFERENCE
21
21
DIAL
DROP
21
DIAL
DROP
Enter Your Voice Mail PIN—
you to use the dialing keypad to enter your Voice Mail
This screen prompts
AM
10/315:55
PM
PIN. Your PIN can be from 4 to 10 digits. Please be
aware that anyone who has access to this pho ne now
has access to your messages and PIN.
VM PASSWORD?
CALLERS DIRECTORY INTERCOM MEMORY DIAL
CALLERS
DIRECTORY
SEND TO VM
CALL BACK
You can enter up to 32 characters and/or digits total for
these three fields. You can also add any necessary keys or flashes.
If you make a mistake, use to erase a digit.
REVIEW
#
IN USE 1 2
INTRERCOM
PLS HOLD
CALL
DIR
1234
MEMORY
CONFERENCE
21
DIAL
DROP
11
Page 19
W
Cidco980.book Page 12 Thursday, June 3, 1999 6:39 PM
Detailed Setup
5. SET UP OR CHANGE CALLER ID SETTINGS
This series of prompts, allow Caller ID and Call Waiting ID
subscribers to setup or change their settings.
❑ Press to choose YES. You then see other
REVIEW
screens that allow you to create or change Caller ID
and Call Waiting ID settings.
❑ Press
REVIEW
to choose NO, if either you do not
subscribe to either of these services, or you do not
want to create or change Caller ID and Call Waiting
ID settings.
If you select this setting, skip to Step Set
Up or Change Area Codes on page 14.
Turn Caller ID On or Off—
Most people want to see
Caller ID data. But if you live in an area that does not yet
support Caller ID, or do not subscribe to the service, you
might want to turn off this setting.
REVIEW
❑ Press to turn on or enable Caller ID.
❑ Press to turn off Caller ID.
REVIE
REVIEW
REVIEW
Programming this feature does not provide or cancel
services. You must contact a your local telephone company representative to request a change in services.
Turn the Call Light On or Off —
The next screen asks
Caller ID/Call Waiting ID customers if they want the red
light to flash after receiving a new call.
REVIEW
❑ Press if you have Caller ID and you want
REVIEW
to see the call light.
REVIEW
❑ Press if you don’t subscribe to Caller ID
REVIEW
or if you want to turn off the call light permanently.
Set Advanced Functions
This series of prompts, allow you to:
■ Restore the phone to its original
programming settings
■ Turn
■ Tailor
Call Waiting ID
Call Wai ting Disposition
future offering from your local telephone
company.)
❑ Press
REVIEW
to choose YES. You then see other
screens that allow you to create or change
advanced settings.
on or off
(a possible
IN USE 1 2
CALL
DIR
AM
10/315:55
PM
408-555-1234
SETUP CALLER ID?
CALLERS DIRECTORY INTERCOM MEMORY DIAL
CALLERS
DIRECTORY
INTRERCOM
SEND TO VM
CALL BACK
AM
10/315:55
PM
PLS HOLD
IN USE 1 2
MEMORY
CONFERENCE
CALL
DIR
408-555-1234
AM
PM
DIRECTORY
CALL BACK
10/315:55
YES NO
INTRERCOM
MEMORY
PLS HOLD
CONFERENCE
IN USE 1 2
CALL
DIR
CALLERS DIRECTORY INTERCOM MEMORY DIAL
CALLERS
SEND TO VM
408-555-1234
ENABLE CALLER ID
CALLERS DIRECTORY INTERCOM MEMORY DIAL
CALLERS
DIRECTORY
INTRERCOM
SEND TO VM
CALL BACK
AM
10/315:55
PM
PLS HOLD
IN USE 1 2
MEMORY
CONFERENCE
CALL
DIR
408-555-1234
AM
PM
DIRECTORY
CALL BACK
10/315:55
YES NO
INTRERCOM
MEMORY
PLS HOLD
CONFERENCE
CALL
IN USE 1 2
DIR
CALLERS
CALLERS DIRECTORY INTERCOM MEMORY DIAL
SEND TO VM
408-555-1234
CALL LIGHT?
CALLERS DIRECTORY INTERCOM MEMORY DIAL
CALLERS
DIRECTORY
INTRERCOM
SEND TO VM
AM
PM
CALL BACK
10/315:55
PLS HOLD
IN USE 1 2
MEMORY
CONFERENCE
CALL
DIR
408-555-1234
AM
PM
DIRECTORY
CALL BACK
10/315:55
ON OFF
INTRERCOM
MEMORY
PLS HOLD
CONFERENCE
CALL
IN USE 1 2
DIR
CALLERS DIRECTORY INTERCOM MEMORY DIAL
CALLERS
SEND TO VM
408-555-1234
ADVANCED SETUP?
CALLERS DIRECTORY INTERCOM MEMORY DIAL
CALLERS
DIRECTORY
INTRERCOM
SEND TO VM
AM
PM
CALL BACK
10/315:55
PLS HOLD
IN USE 1 2
MEMORY
CONFERENCE
CALL
DIR
408-555-1234
DIRECTORY
CALL BACK
YES NO
INTRERCOM
MEMORY
PLS HOLD
CONFERENCE
CALLERS DIRECTORY INTERCOM MEMORY DIAL
CALLERS
SEND TO VM
21
DIAL
DROP
21
DIAL
DROP
21
DIAL
DROP
21
DIAL
DROP
21
DIAL
DROP
21
DIAL
DROP
21
DIAL
DROP
21
DIAL
DROP
12
Page 20
Cidco980.book Page 13 Thursday, June 3, 1999 6:39 PM
Setting Up Your Phone
❑ Press to choose NO, if you do not need to change these settings. If
REVIEW
you select this option, skip to Step Set Up or Change Area Codes on page 14.
Restore Programming Options—
you to restore th e original Custom Calling sett ings of the
telephone. It does not reset Voice Mail settings.
❑ Press
REVIEW
to choose YES to restore the
original programming.
❑ Press
REVIEW
to choose NO to keep the existing
programming setup.
Turn
Call Waiting ID
On or Off
If you subscribe to Call Waiting ID service, ensure that
this setting is set to ON.
Programming this feature does not provide or cancel
services. You must contact your local telephone company representative to request a change in services.
Programming this feature does not provide or cancel
services. You must contact your local telephone company representative to request a change in services.
❑ Press
REVIEW
to choose ON, if you subscribe to
This screen allows
IN USE 1 2
CALL
DIR
AM
10/315:55
PM
408-555-1234
RESTORE DEFAULTS
CALLERS DIRECTORY INTERCOM MEMORY DIAL
CALLERS
DIRECTORY
INTRERCOM
SEND TO VM
AM
PM
CALL BACK
10/315:55
PLS HOLD
IN USE 1 2
MEMORY
CONFERENCE
CALL
DIR
408-555-1234
DIRECTORY
CALL BACK
AM
10/315:55
PM
YES NO
INTRERCOM
MEMORY
PLS HOLD
CONFERENCE
CALL
IN USE 1 2
DIR
CALLERS DIRECTORY INTERCOM MEMORY DIAL
CALLERS
SEND TO VM
408-555-1234
CALL WAITING ID?
CALLERS DIRECTORY INTERCOM MEMORY DIAL
CALLERS
DIRECTORY
INTRERCOM
SEND TO VM
CALL BACK
AM
10/315:55
PM
PLS HOLD
IN USE 1 2
MEMORY
CONFERENCE
CALL
DIR
408-555-1234
DIRECTORY
CALL BACK
ON OFF
INTRERCOM
MEMORY
PLS HOLD
CONFERENCE
CALLERS DIRECTORY INTERCOM MEMORY DIAL
CALLERS
SEND TO VM
21
DIAL
DROP
21
DIAL
DROP
21
DIAL
DROP
21
DIAL
DROP
Call Waiting ID service.
❑ Press
REVIEW
to choose OFF, if you do not subscribe to Call Waiting ID
service. Skip to Step Set Up or Change Area Codes on page 14.
Select
Call Waiting Disposition
This service, a future extension to Call Waiting ID, allows
you to view options for handling incoming calls while on
existing calls. Because Call Waiting Disposition, is not yet
offered in your area, we recommend that you set this option to OFF, otherwise Call Waiting ID might not work as
expected.
❑ Press
REVIEW
to choose ON, only if Call Waiting
Disposition is available in your area, you’ve
subscribed to the service, and want to have
options for handling incoming calls.
❑ Press
REVIEW
to choose OFF, if Call Waiting Disposition is not available in
your area.
IN USE 1 2
CALL
DIR
AM
10/315:55
PM
408-555-1234
CWID DISPOSITION
CALLERS DIRECTORY INTERCOM MEMORY DIAL
CALLERS
DIRECTORY
INTRERCOM
SEND TO VM
CALL BACK
AM
10/315:55
PM
PLS HOLD
IN USE 1 2
MEMORY
CONFERENCE
CALL
DIR
DROP
408-555-1234
DIRECTORY
CALL BACK
ON OFF
INTRERCOM
MEMORY
PLS HOLD
CONFERENCE
DROP
CALLERS DIRECTORY INTERCOM MEMORY DIAL
CALLERS
SEND TO VM
21
DIAL
21
DIAL
13
Page 21
Cidco980.book Page 14 Thursday, June 3, 1999 6:39 PM
Detailed Setup
6. SET UP OR CHANGE AREA CODES
Everyone has at least one local area code. Many areas of
the country now have additional local area codes. These
local area codes are area codes, other than your own,
that do not require you to dial a “1” before the number.
The following series of progra mming prompts allow you
to set up your phone to recognize those local area
codes, which are particularly important for call records.
❑ Press to select YES to set up or modify
REVIEW
your area codes.
❑ Press to select NO to skip this option.
REVIEW
Continue to Step Complete Setup on page 16.
Set Initial Area Code
Using the dialing keypad, enter your primary 3-digit local area code.
Select Number of Dialing Digits—
In some areas of
the country, you dial 7 digits (for example, 555-1212)
within your local area code. In other areas, you must always dial the area code with the local number for every
call, such as (214) 555-1212.
❑ Press to select 7 digits for local dialing.
❑ Press to select 10 digits for local
REVIEW
REVIEW
dialing.
Set Additional Area Codes
In addition to your primary area code, the CL980 telephone allows you to add up to 10 additional local area
codes. If you add one of these area codes, your phone
treats it like your primary local area code.
❑ Press to add an additional local area
❑ Press to skip this option and go to Put a
REVIEW
code.
REVIEW
“1” before the Area Code on page 15.
IN USE 1 2
CALL
DIR
AM
10/315:55
PM
408-555-1234
SETUP AREA CODES
CALLERS DIRECTORY INTERCOM MEMORY DIAL
CALLERS
DIRECTORY
INTRERCOM
SEND TO VM
CALL BACK
AM
10/315:55
PM
PLS HOLD
IN USE 1 2
MEMORY
CONFERENCE
CALL
DIR
408-555-1234
AM
PM
DIRECTORY
CALL BACK
10/315:55
YES NO
INTRERCOM
MEMORY
PLS HOLD
CONFERENCE
CALL
IN USE 1 2
DIR
CALLERS DIRECTORY INTERCOM MEMORY DIAL
CALLERS
SEND TO VM
214
MY AREA CODE
CALLERS DIRECTORY INTERCOM MEMORY DIAL
CALLERS
DIRECTORY
INTRERCOM
SEND TO VM
CALL BACK
AM
10/315:55
PM
PLS HOLD
IN USE 1 2
MEMORY
CONFERENCE
CALL
DIR
408-555-1234
DIGITS TO DIAL?
CALLERS DIRECTORY INTERCOM MEMORY DIAL
CALLERS
DIRECTORY
INTRERCOM
SEND TO VM
CALL BACK
AM
10/315:55
PM
PLS HOLD
IN USE 1 2
MEMORY
CONFERENCE
CALL
DIR
408-555-1234
CALLERS DIRECTORY INTERCOM MEMORY DIAL
CALLERS
DIRECTORY
SEND TO VM
CALL BACK
AM
PM
7 10
INTRERCOM
MEMORY
PLS HOLD
CONFERENCE
IN USE 1 2
CALL
DIR
10/315:55
408-555-1234
ANY LOCAL AREAS?
CALLERS DIRECTORY INTERCOM MEMORY DIAL
CALLERS
DIRECTORY
INTRERCOM
SEND TO VM
CALL BACK
AM
10/315:55
PM
PLS HOLD
IN USE 1 2
MEMORY
CONFERENCE
CALL
DIR
408-555-1234
DIRECTORY
CALL BACK
YES NO
INTRERCOM
MEMORY
PLS HOLD
CONFERENCE
CALLERS DIRECTORY INTERCOM MEMORY DIAL
CALLERS
SEND TO VM
21
DIAL
DROP
21
DIAL
DROP
21
DIAL
DROP
21
DIAL
DROP
21
DIAL
DROP
21
DIAL
DROP
21
DIAL
DROP
14
Page 22
Cidco980.book Page 15 Thursday, June 3, 1999 6:39 PM
Setting Up Your Phone
Select Number of Dialing Digits for Additional
Area Codes—
In some areas of the country, you dial 7
digits for these other local area codes. In other areas,
you must always dial the area code with the local number for every call.
❑ Press to select 7 digits for these
REVIEW
additional area codes.
❑ Press to select 10 digits for these
REVIEW
additional area codes.
Enter Area Code Number—
Use the dialing keypad
to enter the 3-digit area code.
Add Another Area Code—
After adding the additional area code, you are asked whether you want more
codes. You can add up to 10 area codes in this way.
❑ Press to add more local area codes.
REVIEW
Afterwards you are prompted to add the 3-digit
code and then returned to this screen.
❑ Press when you have no more area
REVIEW
codes to add.
Put a “1” before the Area Code
IN USE 1 2
CALL
DIR
AM
10/315:55
PM
408-555-1234
DIGITS TO DIAL?
CALLERS DIRECTORY INTERCOM MEMORY DIAL
CALLERS
DIRECTORY
INTRERCOM
SEND TO VM
CALL BACK
AM
10/315:55
PM
PLS HOLD
IN USE 1 2
MEMORY
CONFERENCE
CALL
DIR
DROP
408-555-1234
CALLERS DIRECTORY INTERCOM MEMORY DIAL
CALLERS
DIRECTORY
SEND TO VM
CALL BACK
AM
PM
7 10
INTRERCOM
MEMORY
PLS HOLD
CONFERENCE
DROP
IN USE 1 2
CALL
DIR
10/315:55
816
LOCAL AREA CODE
CALLERS DIRECTORY INTERCOM MEMORY DIAL
CALLERS
DIRECTORY
INTRERCOM
SEND TO VM
AM
PM
CALL BACK
10/315:55
PLS HOLD
IN USE 1 2
MEMORY
CONFERENCE
CALL
DIR
DROP
408-555-1234
MORE LOCAL AREAS
CALLERS DIRECTORY INTERCOM MEMORY DIAL
CALLERS
DIRECTORY
INTRERCOM
SEND TO VM
AM
PM
CALL BACK
10/315:55
PLS HOLD
IN USE 1 2
MEMORY
CONFERENCE
CALL
DIR
408-555-1234
DIRECTORY
CALL BACK
YES NO
INTRERCOM
MEMORY
PLS HOLD
CONFERENCE
CALLERS DIRECTORY INTERCOM MEMORY DIAL
CALLERS
SEND TO VM
21
DIAL
21
DIAL
21
DIAL
21
DIAL
DROP
21
DIAL
DROP
In order to use the DIAL softkey with call records, you
must determine whether or not you normally dial 1 before long distance numbers. Then when you use DIAL
with a call record, the phone adds the 1 for you. This
feature is often called 1+ Dialing.
❑ Press to select ON, which inserts a “1”
REVIEW
before long-distance numbers when using DIAL.
❑ Press to select OFF, which then only
REVIEW
dials the area code and number.
IN USE 1 2
CALL
DIR
AM
10/315:55
PM
408-555-1234
1+ DIALING?
CALLERS DIRECTORY INTERCOM MEMORY DIAL
CALLERS
DIRECTORY
INTRERCOM
SEND TO VM
AM
PM
CALL BACK
10/315:55
PLS HOLD
IN USE 1 2
MEMORY
CONFERENCE
CALL
DIR
DROP
408-555-1234
DIRECTORY
CALL BACK
ON OFF
INTRERCOM
MEMORY
PLS HOLD
CONFERENCE
CALLERS DIRECTORY INTERCOM MEMORY DIAL
CALLERS
SEND TO VM
21
DIAL
21
DIAL
DROP
15
Page 23
Cidco980.book Page 16 Thursday, June 3, 1999 6:39 PM
Detailed Setup
7. COMPLETE SETUP
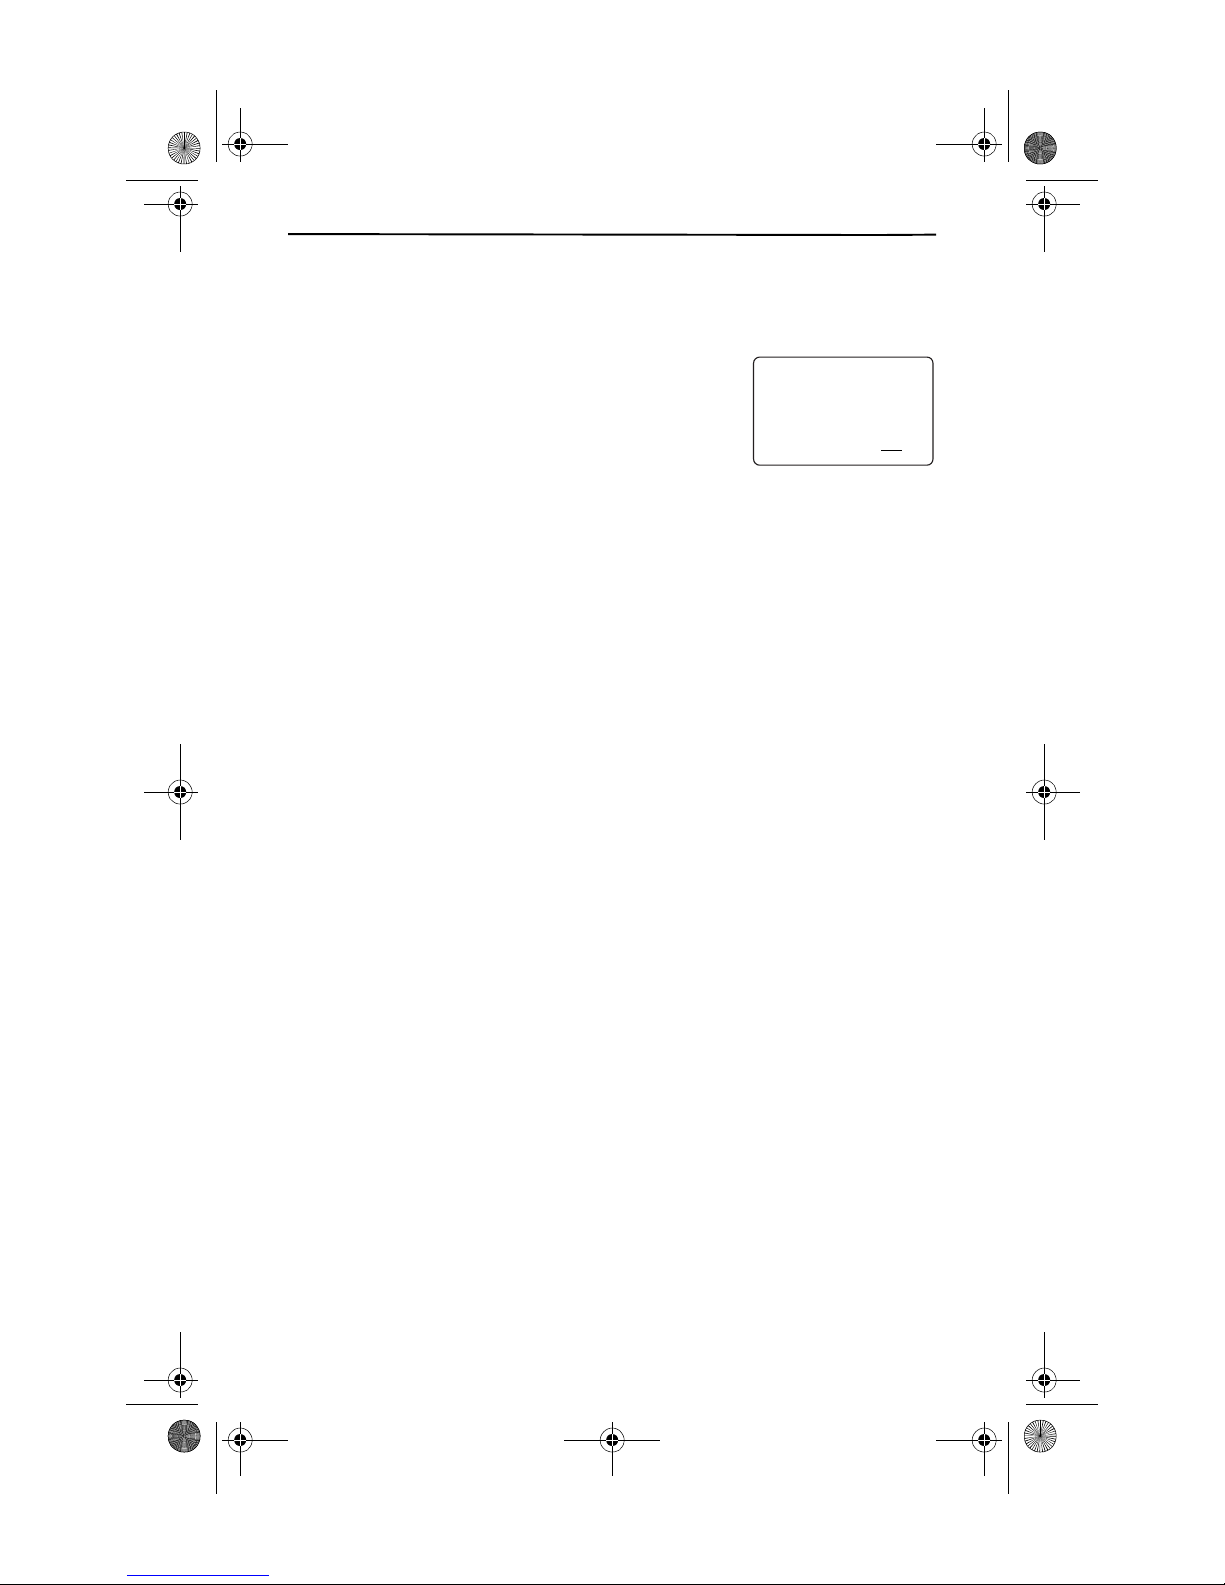
You are now finished setting up your phone. The SETUP COMPLETE message ap-
pears. We hope you enjoy your new phone.
Initially, the screen only shows the function labels for
the Call Waiting ID keys.
After receiving the first call record, Caller ID and Call
Waiting Disposition customers additionally see the time
and date on the screen when the phone is not in use.
Non-Caller ID customers do not have the date and time
function.
IN USE 1 2
CALL
DIR
AM
10/315:55
PM
408-555-1234
SETUP COMPLETE
CALLERS DIRECTORY INTERCOM MEMORY DIAL
CALLERS
DIRECTORY
INTRERCOM
MEMORY
SEND TO VM
CALL BACK
PLS HOLD
CONFERENCE
DIAL
DROP
21
16
Page 24

E
E
Cidco980.book Page 17 Thursday, June 3, 1999 6:39 PM
Using Your Phone
You can make calls several different ways with the CL980.
USING TRADITIONAL DIALING
TALK
1. Press on the handset or on the base.
TALK
Notice the timer on the display? It appears whenever you start a call and continues to run until you hang up the phone.
2. Use the number pad to dial the phone number.
The phone number appears on the display as you enter the number. You also
hear tones for each digit as you dial.
SPEAKERPHON
Using Your Phone
3. Press on the handset or on the base to end your call.
TALK
SPEAKERPHON
USING PRE-DIALING
Before you place a call, you can enter the telephone number and verify it on the display.
FROM THE BASE KEYPAD
1. Use the keypad on the base to enter a telephone number.
2. Check the number on the display.
If the number is wrong, press twice to erase the entire
number, or use the key to delete the last digit.
REVIEW
DELETE
3. Press the DIAL function key on the handset to dial the number.
FROM THE HANDSET KEYPAD
When no digits are showing in the display, you can pre-dial from the handset.
1. Press the DIAL function key.
2. Use the keypad on the handset to enter a telephone number.
3. Check the number on the display.
If the number is wrong, press twice to erase the entire
number, or use the key to delete the last digit.
REVIEW
DELETE
4. Press the DIAL function key on the handset to dial the number.
17
Page 25

REVIEW
REVIEW
Cidco980.book Page 18 Thursday, June 3, 1999 6:39 PM
Using Speed Dialing
USING SPEED DIALING
There are several types of speed dialing. You can dial using:
❑ Your call records
❑ Your directory records
❑ The key
REDIAL
❑ The MEMORY dial keys
❑ The Voice Mail keys
❑ The Custom Calling keys when they are reprogrammed as speed dial keys.
DIALING FROM CALL RECORDS
You can use the DIAL function key to dial any number in your Caller ID list.
1. Use the keys to find the call record you want.
2. Press DIAL to place the call.
DIALING FROM DIRECTORY RECORDS
You can use the DIAL function key to call any number in your directory.
1. Press DIRECTORY on the handset.
2. Use the keys to find the directory record you want.
3. Press DIAL to place the call.
REDIALING
REDIAL is a really fast method of calling your last number. When you press
on either the base or the handset, the phone dials the last number, whether you
dialed it manually or it was from a Call Record, speed dial key, or from the Directory.
For more information on dialing from call records, see Dialing From Call Records on
page 35.
ANSWERING CALLS
You can answer a call numerous ways:
1. Press any key on the handset.
2. Press speakerphone on the base.
3. Press to answer Call Waiting calls.
FLASH
REDIAL
18
Page 26
Cidco980.book Page 19 Thursday, June 3, 1999 6:39 PM
Using Your Phone
STORING NUMBERS IN YOUR PHONE FOR QUICK DIALING
In addition to dialing from call records or your directory, you can also dial from your
MEMORY keys or from any Custom Calling keys that are reprogrammed as speed
dialing keys. This section describes how to program up to 10 phone numbers in
memory locations and how to reprogram extra Custom Calling keys as speed dialing keys.
Creating a Memory Dial Key
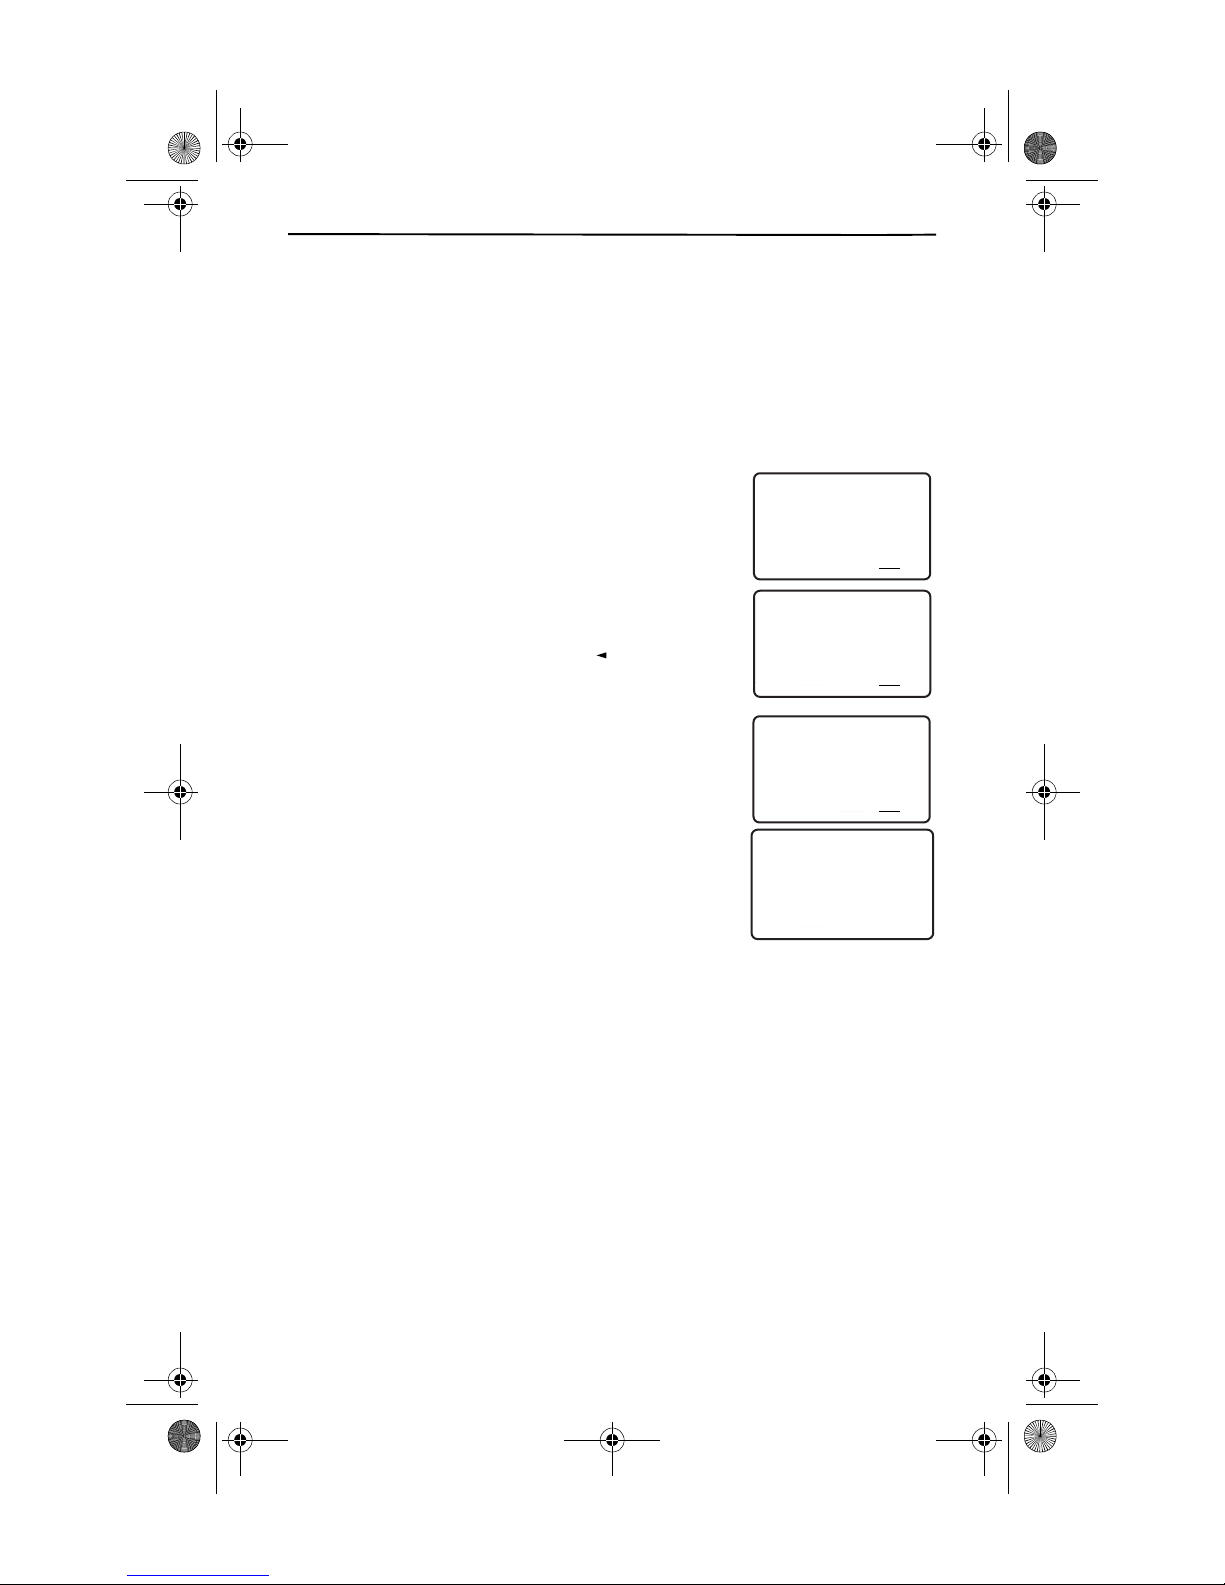
1. Push MEMORY twice. The message
ENTER PHONE NUM. appears on the screen.
2. Enter the telephone number. The message
changes to PUSH MEM TO SAVE.
If the number is wrong, use the key to
REVIEW
delete the number, digit-by-digit.
3. Press MEMORY to save the telephone number. The
message ENTER LOCATION appears on the
screen.
4. Press 0 to 9 to store the number of one of ten
memory locations. The message NUMBER STORED
displays.
IN USE 1 2
INTRERCOM
PLS HOLD
IN USE 1 2
MEMORY
CONFERENCE
CALL
DIR
CALL
DIR
AM
10/315:55
PM
ENTER PHONE NUM
CALLERS
DIRECTORY
CALLERS DIRECTORY INTERCOM MEMORY DIAL
SEND TO VM
CALL BACK
AM
10/315:55
PM
555-1212
PUSH MEM TO SAVE
CALLERS DIRECTORY INTERCOM MEMORY DIAL
CALLERS
DIRECTORY
INTRERCOM
SEND TO VM
CALL BACK
AM
10/315:55
PM
PLS HOLD
IN USE 1 2
MEMORY
CONFERENCE
CALL
DIR
555-1212
ENTER LOCATION
CALLERS DIRECTORY INTERCOM MEMORY DIAL
CALLERS
DIRECTORY
INTRERCOM
SEND TO VM
CALL BACK
AM
10/315:55
PM
NUMBER STORED
CALLERS DIRECTORY INTERCOM MEMORY DIAL
CALLERS
DIRECTORY
SEND TO VM
CALL BACK
PLS HOLD
IN USE 1 2
INTRERCOM
PLS HOLD
MEMORY
CONFERENCE
MEMORY
CONFERENCE
CALL
DIR
DROP
21
DIAL
DROP
21
DIAL
DROP
21
DIAL
21
DIAL
DROP
19
Page 27
Cidco980.book Page 20 Thursday, June 3, 1999 6:39 PM
Answering Calls
Reprogramming Custom Calling Keys for Speed Dialing
Your CL980 telephone comes preprogrammed with many of the most popular Custom Calling services. If you are not subscribing to all the services currently programmed into the phone, you might want to override the programming fo r those keys
and use them for speed dialing.
With the exception of the Voice Mail key, when you reprogram a key on the base, it
does not automatically reprogram the corresponding key on the handset. Likewise,
programming a handset key does not reprogram the base key.
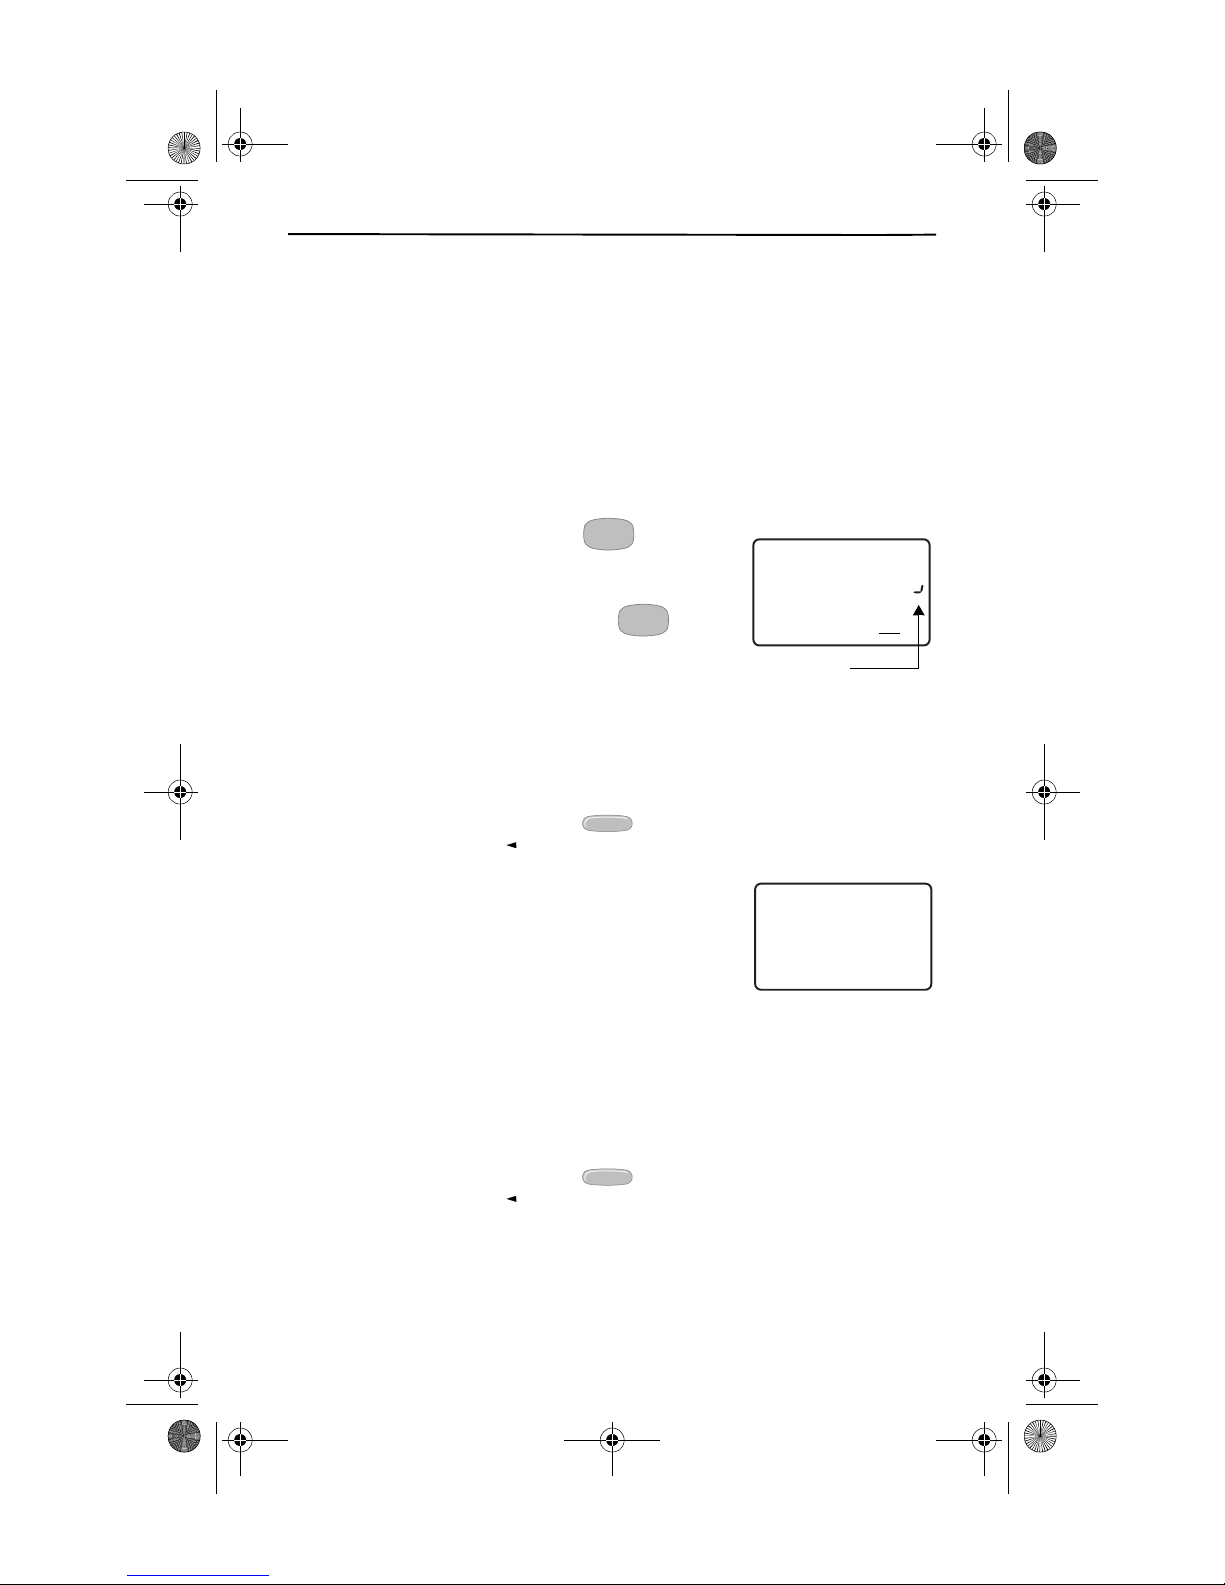
With all of the different reprogramming methods, you can add a flash or a pause
instead of a digit.
To add a pause—
Press and hold until you see
the pause mark on the screen. If you continue to press
and hold the key, additional pause marks appear.
To add a flash—
Press and release the key. The
letter F shows on the display to indicate a flash.
FLASH
FLASH
5:45
AM
5/31
PM
IN USE 1 2
CALL
DIR
555-5555
MOTHER GOOSE
CALLERS DIRECTORY INTERCOM MEMORY DIAL
CALLERS
DIRECTORY
INTRERCOM
SEND TO VM
CALL BACK
3-second delay
PLS HOLD
MEMORY
CONFERENCE
27
DIAL
DROP
Reprogramming Base Custom Calling Keys—
1. Place the handset in the cradle of the base with the display facing toward you.
2. Use the keypad to enter the telephone number you wish to save.
If the number is wrong, press twice to erase the entire
number, or use the key to delete the last digit.
REVIEW
3. Press and hold one of the five base Custom Calling
keys until the NUMBER STORED message displays.
Reprogramming Handset Custom Calling
DELETE
IN USE 1 2
INTRERCOM
PLS HOLD
MEMORY
CONFERENCE
CALL
DIR
AM
10/315:55
PM
NUMBER STORED
CALLERS DIRECTORY INTERCOM MEMORY DIAL
CALLERS
DIRECTORY
SEND TO VM
CALL BACK
21
DIAL
DROP
Keys—
When no digits are showing in the display, you can pre-dial from the handset.
1. Press DIAL.
2. Use the keypad to enter the telephone number you wish to save.
If the number is wrong, press twice to erase the entire
number, or use the key to delete the last digit.
3. Press and hold one of the four handset Custom Calling keys until the NUMBER
STORED message displays.
20
DELETE
REVIEW
Page 28
Cidco980.book Page 21 Thursday, June 3, 1999 6:39 PM
Using Your Phone
Reprogramming the Voice Mail Navigation Keys—
If you are not subscribing
to Voice Mail, you can additionally reprogram your navigation keys as Speed Dialing
keys. To reprogram any of the keys:
1. Place the handset in the cradle of the base with the display facing toward you.
2. Enter the number that you would like to store using the keypad.
If the number is wrong, press twice to erase the entire
number, or use the key to delete the last digit.
REVIEW
DELETE
3. Press and hold the key until the NUMBER STORED message appears.
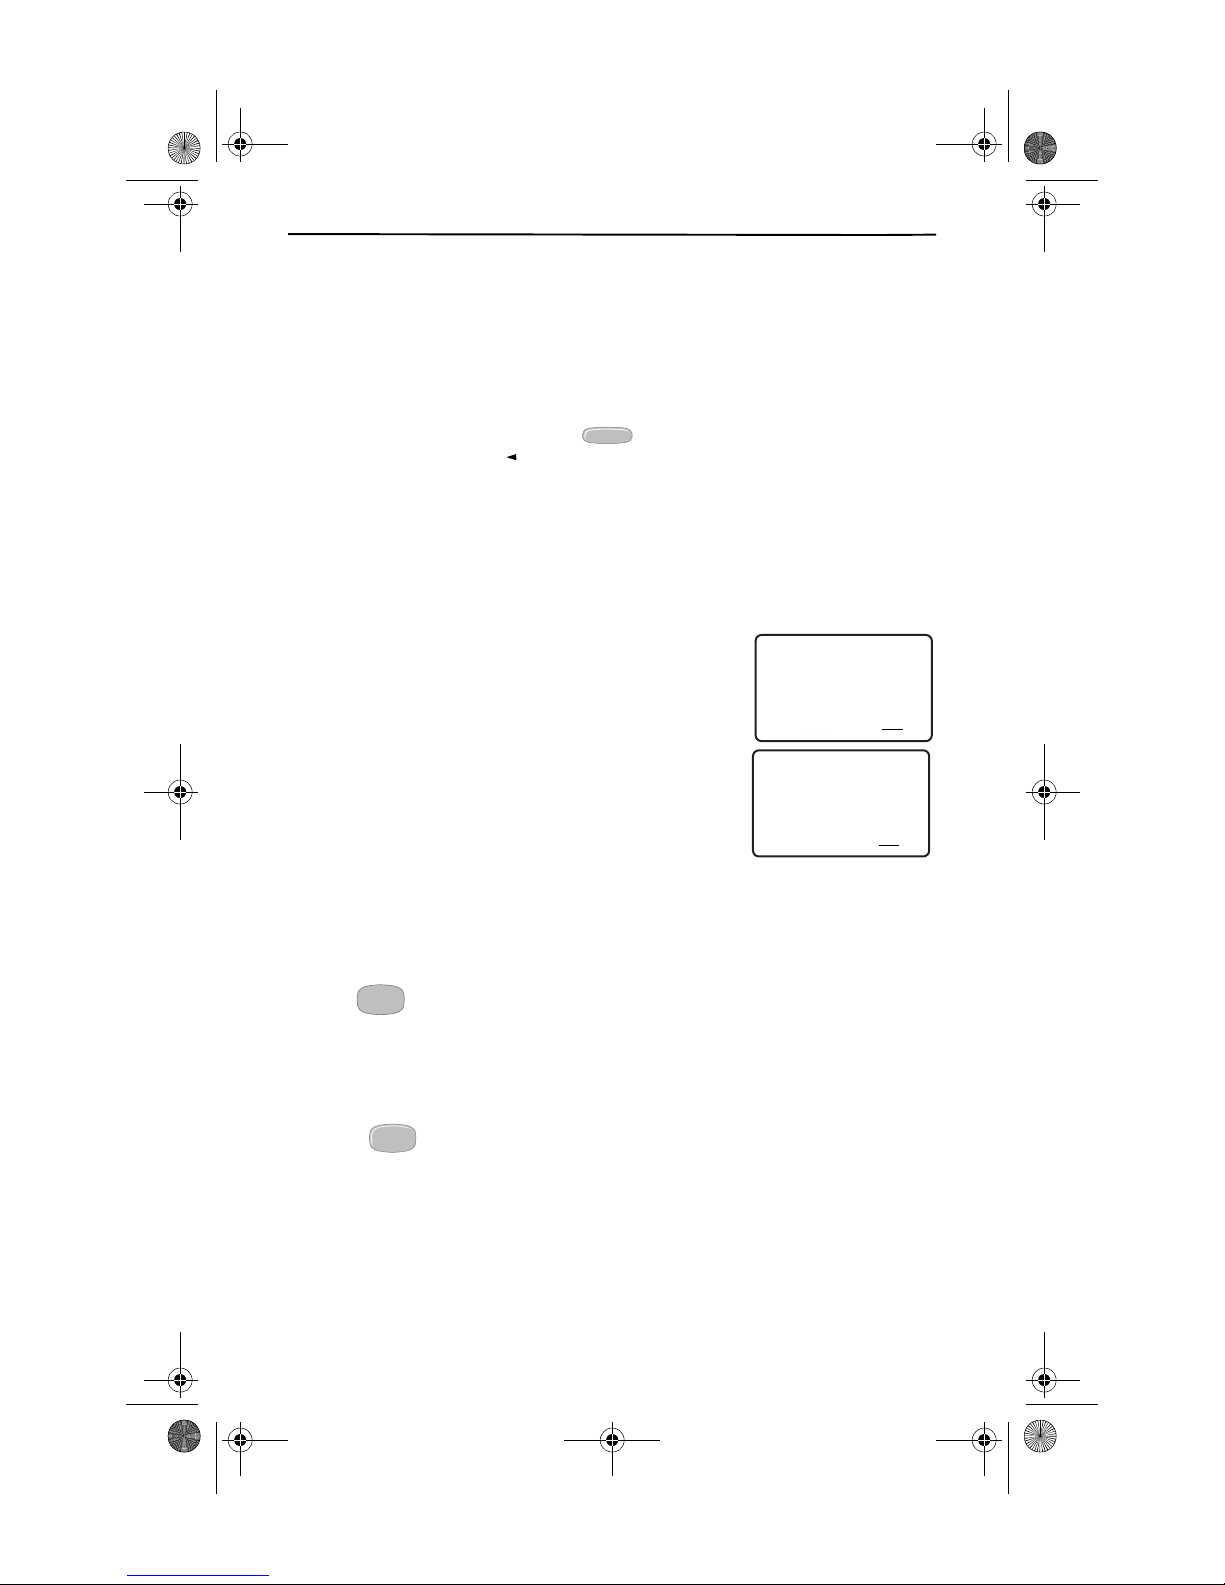
USING MEMORY DIALING
Once you have programmed your Memory Dial keys, you can automatically “speed
dial” that telephone number.
1. Press MEMORY on the handset. The message
MEMORY DIALING appears on the screen.
AM
10/315:55
IN USE 1 2
PM
408-555-1234
MEMORY DIALING
CALLERS DIRECTORY INTERCOM MEMORY DIAL
CALLERS
DIRECTORY
SEND TO VM
2. Press the corresponding location (0-9). The CL980
automatically dials that telephone number.
00:02
USING CUSTOM CALLING KEYS AND VOICE MAIL NAVI-
CALLERS DIRECTORY INTERCOM MEMORY DIAL
GATION KEYS FOR SPEED DIALING
If you have reprogrammed any Custom Calling keys or Voice Mail navigation keys
for Speed Dialing, you can dial directly from that key. It is not necessary to press the
MEMORY key.
CALLERS
SEND TO VM
INTRERCOM
CALL BACK
PLS HOLD
AM
10/31
IN USE 1 2
PM
5551212
DIRECTORY
INTRERCOM
CALL BACK
PLS HOLD
MEMORY
CONFERENCE
MEMORY
CONFERENCE
CALL
DIR
CALL
DIR
21
DIAL
DROP
21
DIAL
DROP
USING FLASH
FLASH
The key allows you to switch between calls, if you subscribe to Call Waiting.
USING MUTE
The mute function allows you to block your side of the conversation. Mute is only
available on the base speakerphone.
MUTE
Press to turn mute on or off. The light blinks when mute is on.
21
Page 29
E
E
SPEAKERPHONE
Cidco980.book Page 22 Thursday, June 3, 1999 6:39 PM
Using the Speakerphone
USING THE SPEAKERPHONE
You can hold a conversation using the base. Press to turn on or off
the speakerphone. The Speakerphone light comes on when the speakerphone is in
use. Be careful switching from handset to speakerphone mode. If you press
SPEAKERPHON
can stop the feedback by pressing again.
while talking on the handset, you might hear some feedback. You
TALK
SPEAKERPHON
ADJUSTING THE VOLUME
You can adjust the volume for the speakerphone, ringer, and the handset.
Adjusting the Speakerphone Volume
1. Press .
2. Press the keys on the base while in
AM
10/315:55
PM
408-555-1234
SPEAKER
CALLERS DIRECTORY INTERCOM MEMORY DIAL
CALLERS
DIRECTORY
SEND TO VM
CALL BACK
IN USE 1 2
INTRERCOM
PLS HOLD
MEMORY
CONFERENCE
CALL
DIR
speakerphone mode.
Adjusting the Handset Volume
1. Press .
TALK
2. Press the keys on the side of the handset to increase or decrease the
volume. The handset sounds an error tone when it reaches the upper or lower
limits.
Adjusting the Ringer Volume
You can adjust the ringer volume on the handset and the base.
Adjusting the Base Ringer Volume—
keys on the base while the phone is not in use. Con-
tinue pressing the key in order to turn the ringer
off.
Press the
IN USE 1 2
CALL
DIR
AM
10/315:55
PM
408-555-1234
RING
CALLERS DIRECTORY INTERCOM MEMORY DIAL
CALLERS
DIRECTORY
INTRERCOM
SEND TO VM
CALL BACK
AM
10/315:55
PM
PLS HOLD
IN USE 1 2
MEMORY
CONFERENCE
CALL
DIR
408-555-1234
RING OFF
CALLERS
DIRECTORY
INTRERCOM
CALLERS DIRECTORY INTERCOM MEMORY DIAL
SEND TO VM
CALL BACK
PLS HOLD
MEMORY
CONFERENCE
21
DIAL
DROP
21
DIAL
DROP
21
DIAL
DROP
Adjusting the Handset Ringer Volume—
while the phone is not in use. You hear the sound of the ringer as you adjust the volume between the two levels.
22
Press the keys on the handset
Page 30
E
Cidco980.book Page 23 Thursday, June 3, 1999 6:39 PM
USING HOLD
You can place a call on hold by pressing the key on the handset or the
HOLD
key on the base. The speakerphone LED and the Talk LED flash slowly while
calls are on hold.
To take a call off hold, you can:
HOLD
Using Your Phone
❑ Press or .
TALK
SPEAKERPHON
❑ Pick up the call on another extension.
TIMING CALLS
When you call someone, the clock on your display changes to a call timer. The timer counts the entire length of
the time you are on the phone. When the timer goes
past 99 minutes and 59 seconds, it starts over.
GETTING TEMPORARY TONE SERVICE
If you do not have Tone service in your area, you need to change the TONE/PULSE
during the programming mode. Please see Step 2. Select Between Easy or Detailed
Setup on page 7.
Whenever you need Tone service for interacting with bank and other automated
services, you can temporarily override your setting to Tone.
Press during the call and the phone switches to temporary Tone service for
the duration of the call. The phone returns to Pulse service when you hang up.
AM
10/31
00:02
CALLERS DIRECTORY INTERCOM MEMORY DIAL
CALLERS
SEND TO VM
IN USE 1 2
PM
5551212
DIRECTORY
INTRERCOM
CALL BACK
PLS HOLD
GOING OUT OF RANGE
Your CL980 handset is connected to its base through radio technology. It is possible
for the handset to be too far away from the base. If the handset is too far from the
base, you might have problems talking to your caller. Simply, walk back towards
the base until you are no longer out of range.
MEMORY
CONFERENCE
CALL
DIR
21
DIAL
DROP
LOCATING A LOST HANDSET
Should you misplace your handset, you can locate it quickly and easily by pressing
the PAGE/FIND key on the base. The handset rings for 15 seconds, or until you press
a key on the handset, or until you press the PAGE/FIND key again. The base responds with tones during the 15 seconds to indicate that paging is active. If the tones at the base stop right away, the handset is either turned off, out of range, or the
battery needs recharging.
23
Page 31
SPEAKERPHONE
Cidco980.book Page 24 Thursday, June 3, 1999 6:39 PM
Using the Intercom
USING THE INTERCOM
You can use the CL980 as an intercom.
To use the intercom from the handset—
Press the INTERCOM function key.
The display shows the INTERCOM ACTIVE message.
If someone is using the speakerphone when you attempt to contact them, your intercom rings the base for 15 seco nds. To answer the intercom, press the PAGE/FIND
key. The speakerphone call is placed on hold and you are connected with the handset. To rejoin both parties to the speakerphone call, press on the handset
TALK
and on the base.
To use the intercom from the base—
Press the PAGE/FIND key. The handset
rings and the display shows PAGING. Answer the page by pressing the
INTERCOM function key on the handset.
READING DISPLAY MESSAGES
The CL980 informs you of status by displaying the following messages:
M
ESSAGE DISPLAY
End of list: You have reached the end of the directory
or call records. Press either key to see
REVIEW
other records
AM
PM
10/315:55
408-555-1234
END OF LIST
CALLERS DIRECTORY INTERCOM MEMORY DIAL
CALL
DIR
21
Incomplete data: The Caller ID information is incom-
plete. This message usually indicates temporary interference. There is no problem with the phone.
Intercom active: The handset is attempting to communicate with the base.
Long distance: The message sent is a long distance
call. You might see this message alternate with other
messages.
24
IN USE 1 2
CALL
DIR
AM
10/315:55
PM
408-555-1234
INCOMPLETE DATA
CALLERS DIRECTORY INTERCOM MEMORY DIAL
CALLERS
DIRECTORY
INTRERCOM
SEND TO VM
CALL BACK
AM
10/315:55
PM
PLS HOLD
IN USE 1 2
MEMORY
CONFERENCE
CALL
DIR
DROP
408-555-1234
INTERCOM ACTIVE
CALLERS DIRECTORY INTERCOM MEMORY DIAL
CALLERS
DIRECTORY
INTRERCOM
SEND TO VM
CALL BACK
AM
PM
10/315:55
PLS HOLD
MEMORY
CONFERENCE
CALL
DIR
408-555-1234
LONG DISTANCE
CALLERS DIRECTORY INTERCOM MEMORY DIAL
21
DIAL
21
DIAL
DROP
21
Page 32
M
Cidco980.book Page 25 Thursday, June 3, 1999 6:39 PM
M
ESSAGE DISPLAY
Using Your Phone
Message waiting: (For Voice Mail Service Only) You
have a message in your voice mailbox.
Name unavailable: The person is calling from an area
that only provides number-only Caller ID service, or
you can be in a service area which only shows the
number.
No calls: There are no call records stored in memory.
No data sent: The phone did not receive Caller ID
information from the phone company.
Number only: The person is calling from an area that
only provides number-only Caller ID service, or you
can be in a service area which only shows number only
IN USE 1 2
CALL
DIR
AM
10/315:55
PM
408-555-1234
MESSAGE WAITING
CALLERS DIRECTORY INTERCOM MEMORY DIAL
CALLERS
DIRECTORY
INTRERCOM
SEND TO VM
5:45
CALL BACK
AM
5/31
PM
PLS HOLD
IN USE 1 2
MEMORY
CONFERENCE
CALL
DIR
DROP
27
555-5555
NAME UNAVAILABLE
CALLERS DIRECTORY INTERCOM MEMORY DIAL
CALLERS
DIRECTORY
INTRERCOM
MEMORY
SEND TO VM
CALL BACK
PLS HOLD
AM
PM
10/315:55
CONFERENCE
CALL
DIR
DIAL
DROP
408-555-1234
NO CALLS
CALLERS DIRECTORY INTERCOM MEMORY DIAL
AM
PM
10/315:55
CALL
DIR
408-555-1234
NO DATA SENT
CALLERS DIRECTORY INTERCOM MEMORY DIAL
5:45
AM
5/31
PM
IN USE 1 2
CALL
DIR
555-5555
MOTHER GOOSE
CALLERS DIRECTORY INTERCOM MEMORY DIAL
CALLERS
DIRECTORY
INTRERCOM
SEND TO VM
CALL BACK
PLS HOLD
MEMORY
CONFERENCE
21
DIAL
21
21
27
DIAL
DROP
Paging: The base is calling the handset.
Private call: The caller has purposely chosen to block
his/her phone number.
AM
PM
10/315:55
CALL
DIR
408-555-1234
PAGING
CALLERS DIRECTORY INTERCOM MEMORY DIAL
IN USE 1 2
CALL
DIR
21
AM
10/315:55
PM
408-555-1234
PRIVATE
CALLERS DIRECTORY INTERCOM MEMORY DIAL
CALLERS
DIRECTORY
INTRERCOM
MEMORY
SEND TO VM
CALL BACK
PLS HOLD
CONFERENCE
DIAL
DROP
21
25
Page 33
Cidco980.book Page 26 Thursday, June 3, 1999 6:39 PM
Reading Display Messages
ESSAGE DISPLAY
M
Recharge battery: The handset battery is getting low.
Place the handset in the base in order to recharge.
Unavailable: Caller ID information is not available
from the caller’s area.
IN USE 1 2
CALL
DIR
21
AM
10/315:55
PM
408-555-1234
RECHARGE BATTERY
CALLERS DIRECTORY INTERCOM MEMORY DIAL
CALLERS
DIRECTORY
INTRERCOM
MEMORY
SEND TO VM
CALL BACK
PLS HOLD
AM
PM
10/315:55
CONFERENCE
CALL
DIR
DIAL
DROP
21
408-555-1234
UNAVAILABLE
CALLERS DIRECTORY INTERCOM MEMORY DIAL
26
Page 34
REVIEW
Cidco980.book Page 27 Thursday, June 3, 1999 6:39 PM
Using the Directory
Using the Directory
With the CL980, you can create a personal phone directory containing the names
and numbers of the 50 people you contact the most. Once you create your personal
phone directory, you can automatically dial from the directory.
A directory record contains the name, the telephone number, and the directory
number.
AM
5/31
5:45
PM
IN USE 1 2
555-1234
RED RIDING HOOD
CALLERS DIRECTORY INTERCOM MEMORY DIAL
CALLERS
DIRECTORY
CALL BACK
INTRERCOM
PLS HOLD
SEND TO VM
CALL
DIR
MEMORY
CONFERENCE
DIAL
DROP
5
Directory Number Field
Telephone Number Field
Name Field
CREATING YOUR DIRECTORY LIST
You can create your directory list by:
❑ Copying call records to the directory.
❑ Creating a new directory record.
COPYING A CALL RECORD TO THE DIRECTORY
The easiest method of creating a directory entry is to copy a call record from the Caller ID list.
1. Press the CALLERS key.
2. Use the keys to find the correct call
record.
3. Press and hold the DIRECTORY key. The first letter
of the person’s name begins to flash.
You can choose to edit the name and number field. For details see
Editing a Directory Record on page 28. After you complete editing
the name field, press DIRECTORY to edit the number field.
AM
5/31
5:45
IN USE 1 2
PM
555-1234
RED RIDING HOOD
CALLERS DIRECTORY INTERCOM MEMORY DIAL
CALLERS
DIRECTORY
CALL BACK
INTRERCOM
PLS HOLD
SEND TO VM
MEMORY
CONFERENCE
CALL
CALL
5
DIAL
DROP
4. Press and hold DIRECTORY key until the message
NUMBER STORED appears on the display.
IN USE 1 2
CALL
DIR
21
AM
10/315:55
PM
555-1212
NUMBER STORED
DIRECTORY
CALLERS DIRECTORY INTERCOM MEMORY DIAL
CALLERS
SEND TO VM
CALL BACK
INTRERCOM
PLS HOLD
MEMORY
CONFERENCE
DIAL
DROP
27
Page 35
REVIEW
REVIEW
REVIEW
Cidco980.book Page 28 Thursday, June 3, 1999 6:39 PM
Creating your Directory List
CREATING A NEW DIRECTORY RECORD
Another method of creating directory records is to make a record from scratch,
using the technique described on Entering Characters & Symbols on page 29.
You can ente r up to 16 characters in the name field and 32 chara cters in the number
field.
1. Press and hold DIRECTORY. The DIR icon starts
flashing in the corner. The first letter in the name
field also starts to flash.
2. Use the number key pad to enter in characters.
Please see Entering Characters & Symbols on page
AM
5/31
5:45
IN USE 1 2
PM
555-1234
RED RIDING HOOD
CALLERS DIRECTORY INTERCOM MEMORY DIAL
CALLERS
DIRECTORY
CALL BACK
INTRERCOM
PLS HOLD
SEND TO VM
29.
■ Use the keys to move back and forth alon g the
field line.
■ Use the key to erase a letter.
DELETE
3. Press DIRECTORY to move to the number field. Use step 2 to enter the
telephone number.
4. Press and hold DIRECTORY until the message
NUMBER STORED appears.
AM
10/315:55
IN USE 1 2
PM
555-1212
NUMBER STORED
DIRECTORY
CALLERS DIRECTORY INTERCOM MEMORY DIAL
CALLERS
SEND TO VM
EDITING A DIRECTORY RECORD
After storing a directory record, you can modify the record to correct mistakes or to
personalize them.
1. Press DIRECTORY.
CALL BACK
INTRERCOM
PLS HOLD
MEMORY
CONFERENCE
MEMORY
CONFERENCE
CALL
DIR
CALL
DIR
5
DIAL
DROP
21
DIAL
DROP
2. Use the keys to find the record you want to modify.
3. Press and hold the DIRECTORY key until the phone beeps.
4. Use the keys to move to the incorrect character. Or press
to erase one character at a time.
5. Press DIRECTORY to move to the next field.
6. Use the number key pad to type in the correct letter.
28
DELETE
Page 36
FLASH
Cidco980.book Page 29 Thursday, June 3, 1999 6:39 PM
Using the Directory
7. Press and hold DIRECTORY key until the message
NUMBER STORED appears on the display.
AM
10/315:55
IN USE 1 2
PM
555-1212
ENTERING CHARACTERS & SYMBOLS
You can enter in different characters and symbols by
using the number key pad on the handset.
CREATING NAMES
Each number is assigned a set of letters. For example, to get an “A”, press on-
2
ce. To get a “C”, press three times. When you move to the next letter of the
ABC
name, the phone keeps the last setting of the key. For example,
to get the name MARIA, press
MNO
M
ABC
6
PQRS
A
7
PQRS
7
PQRS
7
GHI
R
4
GHI
4
I
However, if the next letter is on the same key, use to space over. For
ABC
4
GHI
A
REVIEW
2
example, to get the name CARLA, press
ABC
ABC
REVIEW
2
ABC
2
2
ABC
C
7
PQRS
2
A
PQRS
7
PQRS
R
SPECIAL SYMBOLS
NUMBER STORED
DIRECTORY
CALLERS DIRECTORY INTERCOM MEMORY DIAL
CALLERS
CALL BACK
SEND TO VM
2
.
7
JKL
JKL
5
5
JKL
L
INTRERCOM
PLS HOLD
5
ABC
A
MEMORY
CONFERENCE
ABC
2
CALL
DIR
2
21
DIAL
DROP
You can also use the and the to get the following symbols in the name
#
field:
*/@&‘(),-.#
ADDING SPECIAL CHARACTERS
You can add special characters by:
0
OPER
FLASH
1
AM
5/31
5:45
IN USE 1 2
PM
555-5555
MOTHER GOOSE
CALLERS DIRECTORY INTERCOM MEMORY DIAL
CALLERS
DIRECTORY
CALL BACK
INTRERCOM
PLS HOLD
SEND TO VM
3-second delay
❑ Pressing or to add a space in the name field.
❑ Pressing adds a flash in the number field.
❑ Pressing and holding adds a three second
delay (pause).
MEMORY
CONFERENCE
CALL
DIR
27
DIAL
DROP
29
Page 37
REVIEW
REVIEW
Cidco980.book Page 30 Thursday, June 3, 1999 6:39 PM
Dialing from Directory Records
DIALING FROM DIRECTORY RECORDS
You can use DIAL to call any number in your directory.
1. Press DIRECTORY on the handset.
2. Use the keys to find the call record you want.
3. Press the DIAL key on the handset.
It is important to note: The phone dials the number exactly as it is stored in
the directory. If the number is long distance, you should ensure that the first
digit is one. When you create directory records from call records, the one is
generated for you assuming you set up 1+ dialing and your area codes correctly.
REVIEWING DIRECTORY RECORDS
You can review directory records by using the keys or the number key
REVIEW
pad.
USING REVIEW TO FIND A DIRECTORY RECORD
1. Press DIRECTORY on the handset.
2. Use the keys to find the call record you want.
USING A QUICK LOOKUP METHOD
1. Press DIRECTORY on the handset.
2. Press a number key associated with the letter of
the directory record.
For example, if you want to find the directory
7
record for Red Riding Hood, press three
PQRS
times to go to the first record starting with the
letter “R.”
3. Press to see more records starting with the letter “R.”
REVIEW
AM
5/31
5:45
IN USE 1 2
PM
555-1234
RED RIDING HOOD
CALLERS DIRECTORY INTERCOM MEMORY DIAL
CALLERS
DIRECTORY
CALL BACK
INTRERCOM
PLS HOLD
SEND TO VM
MEMORY
CONFERENCE
CALL
DIR
5
DIAL
DROP
30
Page 38
REVIEW
REVIEW
REVIEW
REVIEW
REVIEW
Cidco980.book Page 31 Thursday, June 3, 1999 6:39 PM
Maintaining Batteries
DELETING DIRECTORY RECORDS
You can delete your directory records one-at-a-time or all-at-once.
DELETING A DIRECTORY RECORD
1. Press DIRECTORY.
2. Use the keys or the Quick Lookup Method to find the record you
want to delete.
3. Press DELETE twice.
The message DELETE? YES NO appears on the
screen.
■ Press to select YES.
■ Press to select NO.
AM
5/31
5:45
IN USE 1 2
PM
555-1234
DELETE? YES NO
CALLERS DIRECTORY INTERCOM MEMORY DIAL
CALLERS
DIRECTORY
CALL BACK
INTRERCOM
PLS HOLD
SEND TO VM
DELETING ALL DIRECTORY RECORDS
1. Press DIRECTORY.
2. Press and hold DELETE.
The message DELETE ALL? Y N appears on the
screen.
■ Press to select YES.
■ Press to select NO.
AM
5/31
5:45
IN USE 1 2
PM
555-1234
DELETE ALL? Y N
CALLERS DIRECTORY INTERCOM MEMORY DIAL
CALLERS
DIRECTORY
CALL BACK
INTRERCOM
PLS HOLD
SEND TO VM
Maintaining Batteries
Your CL980 telephone is designed for low maintenance and long battery life. For
added convenience, there is a spare battery charging compartment located in the
cradle of the handset. You can purchase an extra battery and store it in this compartment so that you always have a fully charged battery for the handset. To charge a spare battery:
1. Locate the compartment in the cradle of the base.
MEMORY
CONFERENCE
MEMORY
CONFERENCE
CALL
DIR
CALL
DIR
5
DIAL
DROP
5
DIAL
DROP
2. Press up and out on the latch to open the compartment.
3. Align the contacts in the compartment with the contacts on the battery.
When the battery is properly aligned and making good contact, the charge
light on the base comes on.
4. Charge the battery for at least 12 hours.
31
Page 39
G
G
G
E
E
R
Cidco980.book Page 32 Thursday, June 3, 1999 6:39 PM
3-Way Calling
USING YOUR CUSTOM CALLING SERVICES
The CL980 telephone is programmed for all the convenience of your local telephone
company’s Custom Calling Services at the touch of a button. You must subscribe to
each service in order for all of the features of your CL980 telephone to work. For
more information on these services and availability in your area, contact your local
telephone company representative for more details and package offerings.
3-WAY CALLING
3-Way Calling allows you to talk to two different callers at the same time. You can
use this service for local, regional, or long distance calls. However, you are only
charged for the calls you make. (Long distance charges might apply).
To Us e 3-Way Calling:
After placing a call to the first party,
1. Press to place the first call on hold.
2. Wait for the dial tone.
3. Dial the second number. Wait for the second party to answer.
4. Press to connect all three parties.
3 WA Y CALLIN
3 WA Y CALLIN
If the second number is busy or there is no answer, press to
3 WA Y CALLIN
reconnect to the original call. To end either call, ask one person to
hang up. You can continue the conversation with the other person.
To end both calls, you must press or to
TALK
SPEAKERPHON
hang up the telephone.
CALL FORWARDING
Call Forwarding allows you to send calls to another phone number. You can make
outgoing calls while Call Forwarding works. If you forward a call to a long-distance
number, local and long-distance charges might apply.
To Turn Call Forwarding On:
1. Press on the handset or on the base and listen for
TALK
dial tone.
CALL FORWA
ON
2. Press
3. Listen for the dial tone and dial the number where you want to forward your
calls. Two short tones followed by ringing confirms your request. If the person
answers or you receive a dial tone, Call Forwarding is on.
32
SPEAKERPHON
Page 40
E
E
Cidco980.book Page 33 Thursday, June 3, 1999 6:39 PM
Using Your Custom Calling Services
4. Repeat steps 1-3, if no one answers or if the number is busy. On the second
try, Call Forwarding is established even if there is no answer or if the line is still
busy.
To Turn Call Forwarding Off:
1. Press on the handset or on the base and listen for
TALK
SPEAKERPHON
dial tone.
CALL FORWARD
2. Press .
OFF
3. Listen for two short tones, followed by the dial tone. These tones confirm that
Call Forwarding is off.
CALL RETURN
Call Return remembers the number of the person who called you last and automatically dials that number. While Call Return works, you can place and receive calls. For
all calls placed using this service, local and long-distance charges might apply. If
you are calling a number that is in an area not served by Call Return, a recorded messages tells you that your call cannot be completed.
To Use
1. Press on the handset or on the base and listen for
2. Press .
3. You hear the call ringing.
4. Answer the phone when you hear the special ring (short-short-long). The
To Cancel
1. Lift the handset and listen for dial tone.
2. Press and listen for confirmation.
Call Return
TALK
:
SPEAKERPHON
dial tone.
CALL
RETURN
If the number is busy, a recorded message tells you the line is busy. Hang up.
the service keeps trying the number for 30 minutes.
special ring notifies you that the line is now available.
When you pick up the handset, you then hear your call ringing back, and the
connection is made. If you don’t pick up the phone, the special ring repeats
every few minutes for up to 30 minutes.
Call Return
TUV
If you have Rotary/Pulse service, use instead of .
:
8
9
WXY
1 1
3. Press on the handset to hang up.
TALK
33
Page 41

Cidco980.book Page 34 Thursday, June 3, 1999 6:39 PM
Call Waiting
CALL WAITING
Call Waiting Service from your local telephone company tells you when you have a
call while you are on the phone. Call Wa iting sends you the Call Waiting Tone, when
you have another call. If you don’t want to be disturbed during a call, you can temporarily Cancel Call Waiting before you dial or during a conversation.
To Us e Call Waiting:
1. Press and release when you hear the Call Waiting beep. The first call is
placed on temporary hold and you are connected to the new call.
FLASH
2. Press and release to return to the first call and put the second call on
FLASH
hold. You can alternate between calls as often as necessary.
CALLER ID AND CALL WAITING ID
One of the best features of your phone is the use of Caller ID and Call Waiting ID,
which allows you to see information about an incoming call before you pick up the
phone.
❑ Caller ID allows you to see information about a call BEFORE you pick up the
telephone.
❑ Call Waiting ID lets you know who is calling even when you are on the phone.
In addition to hearing the Call Waiting beep, you have the information you
need to choose whether or not to answer a waiting call. With Call Waiting ID
you use the key to transfer between calls. Call Waiting ID is not available
in all your local telephone company areas. Contact your your local telephone
company representative for details on availablity.
❑ Call Waiting Disposition is a future service that will allow you to route your
incoming call to 1 of 5 choices.
With these services from your local telephone company, the CL980 telephone displays and records information about the call.
Before you use these features on your CL980 telephone, you must first subscribe to
the services through your local telephone company. You need to also have the services turned on in the phone through the programming setup procedure. Both the
Easy Setup and the Detailed Setup have these options turned on as defaults. For
more details on setting installation options, Personalizing Your Phone on page 7.
FLASH
RECEIVING NEW CALLS
When you receive a new call, the new call light flashes and the call information
shows on the display. The new call light would not flash if you answered the call or
if you turned off the call light during programming setup.
34
Page 42
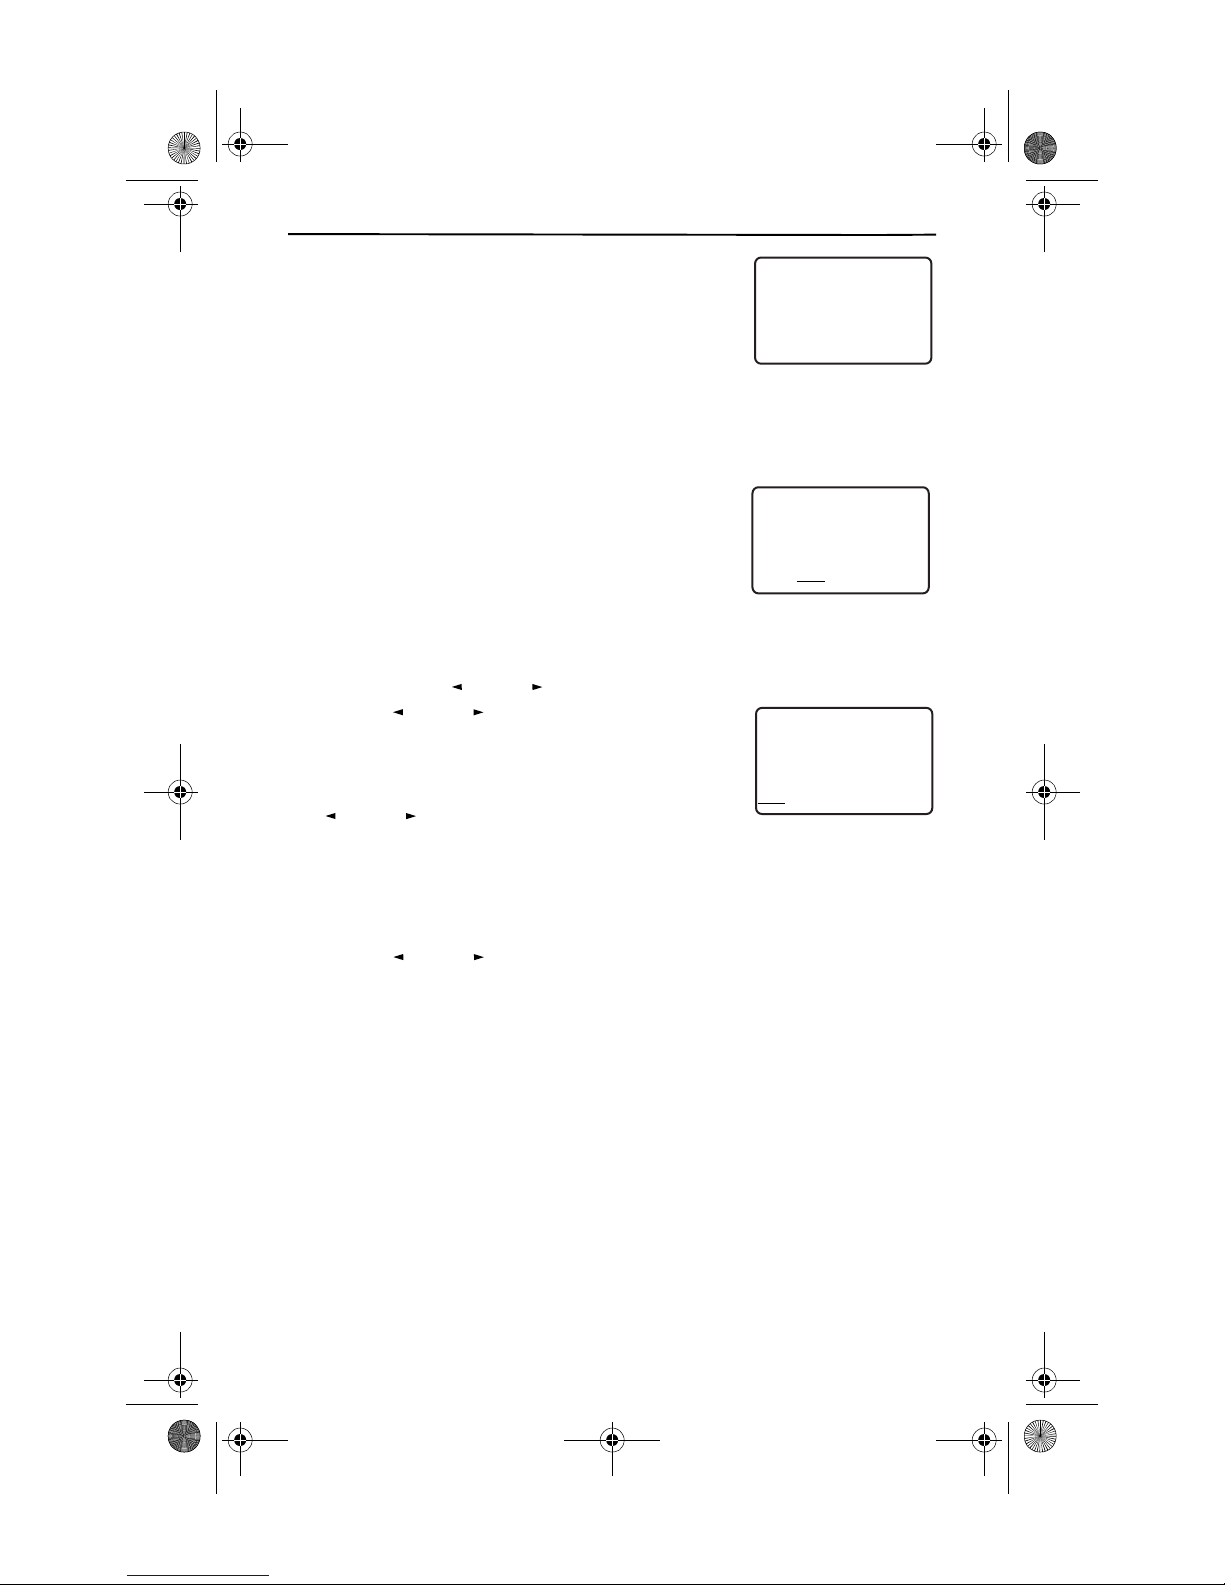
REVIEW
Cidco980.book Page 35 Thursday, June 3, 1999 6:39 PM
Using Your Custom Calling Services
❑ If you do not answer the call, the light continues to
flash and eventually the NEW CALL message
AM
PM
10/315:55
shows on the display. The light continues to flash
until you review a call record.
11 NEW CALLS
❑ The NEW CALL message acts as a counter adding
up the number of new calls.
When you receive a call, the CL980 telephone displays the caller information sent by
the telephone company, called a call record. The call record consists of the following information:
❑ The caller’s name (if available)
5:45
AM
5/31
IN USE 1 2
PM
❑ The caller’s telephone number
❑ The time and date of the call
❑ A record number to show the sequence of calls.
CALLERS DIRECTORY INTERCOM MEMORY DIAL
555-1234
RED RIDING HOOD
CALLERS
DIRECTORY
CALL BACK
INTRERCOM
PLS HOLD
SEND TO VM
VIEWING CALL RECORDS
To review a call record:
1. Press either key to see the latest call record.
2. Use to move though the call record
When you reach either end of the call record list, you see
an END OF LIST message. If you continue to press
REVIEW
REVIEW
list.
, you scroll through the list again.
AM
PM
10/315:55
408-555-1234
END OF LIST
CALLERS DIRECTORY INTERCOM MEMORY DIAL
MEMORY
CONFERENCE
CALL
DIR
CALL
DIR
CALL
DIR
21
5
DIAL
DROP
21
In some cases you might need to first press CALLERS.
DIALING FROM CALL RECORDS
You can use your call records as a short-cut method of dialing.
1. Use to find the desired call record.
REVIEW
2. Press DIAL on the handset.
The phone dials whatever number is shown on the display.
SAVING CALL RECORDS
Your phone stores up to 50 call records before the memory becomes full. When the
next call comes in, the oldest record drops off and makes room for the new call
record. To save specific calls, delete old and unnecessary call records to keep from
filling your phone’s memory.
DELETING CALL RECORDS
You can either delete a single record or you can delete all call records at one time.
35
Page 43
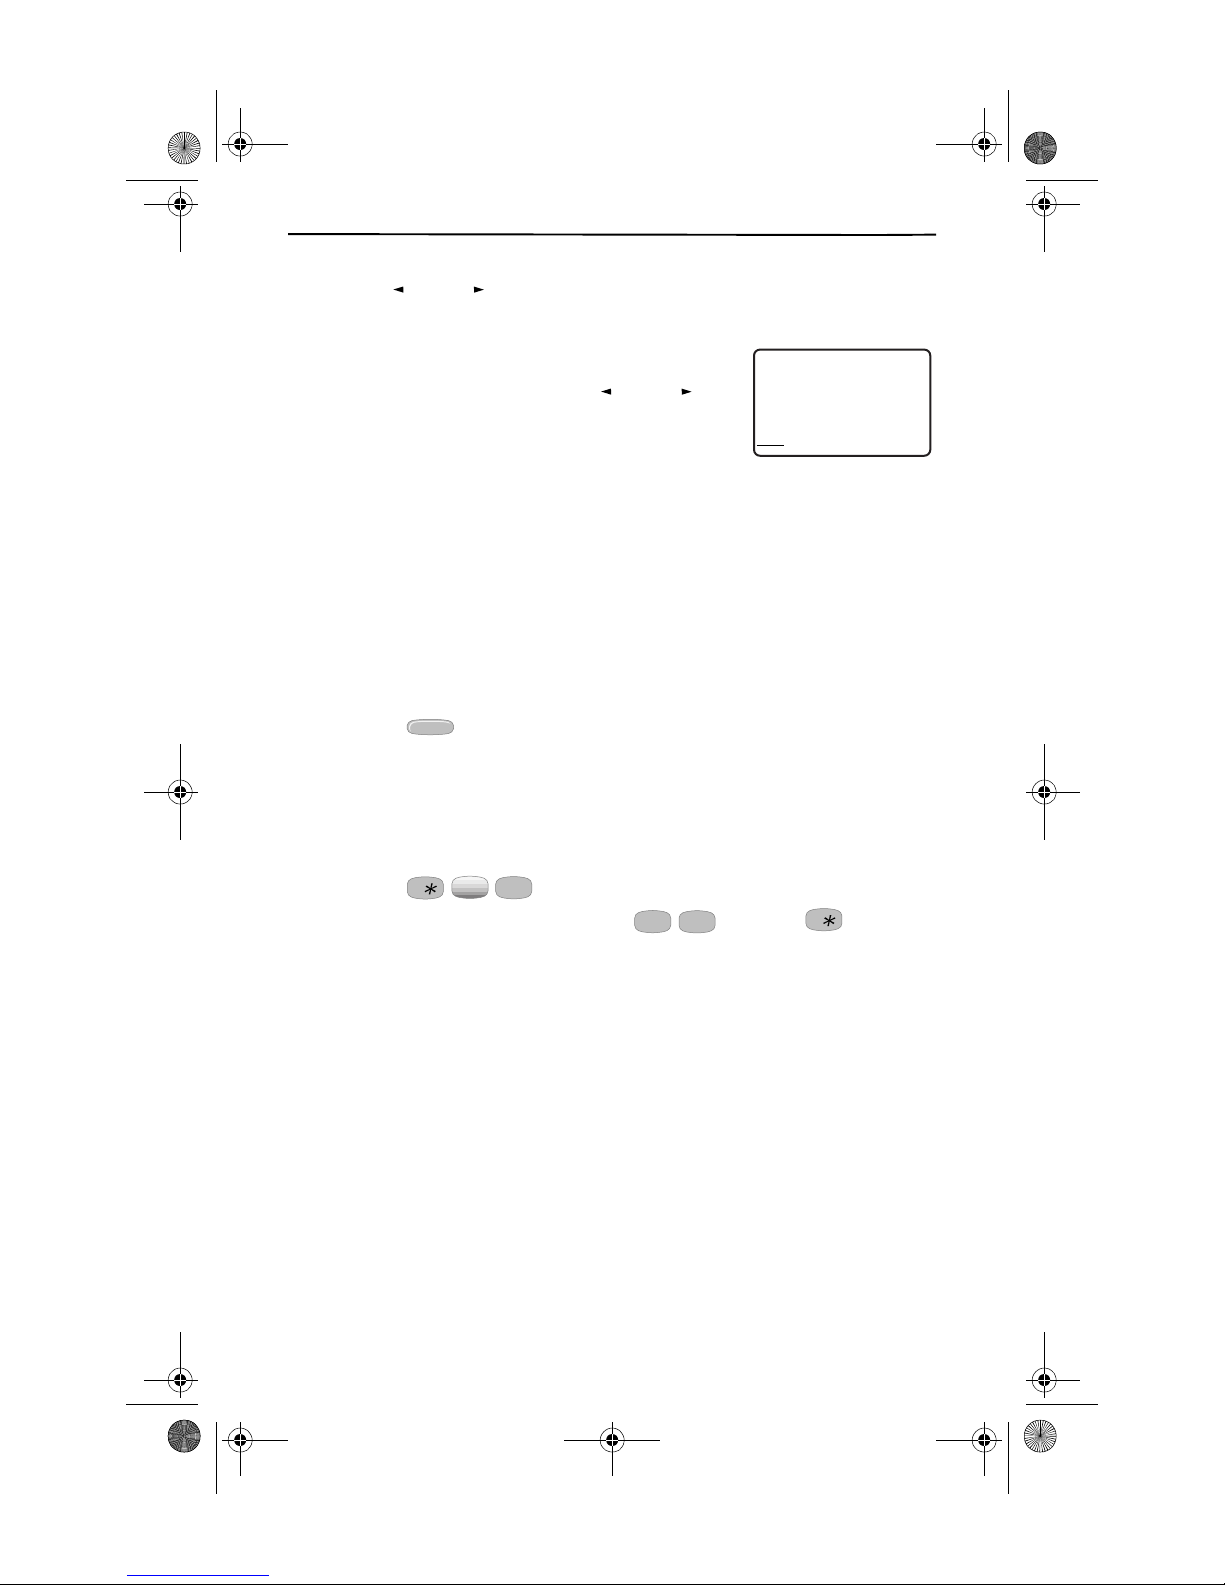
Cidco980.book Page 36 Thursday, June 3, 1999 6:39 PM
Repeat Dialing
To delete a single record:
1. Use to locate the call record you want to delete.
REVIEW
2. Press DELETE twice.
To delete all call records:
1. Locate any call record using the keys.
REVIEW
2. Press and hold DELETE until the display flashes
and you see the NO CALLS message. The NO
AM
PM
10/315:55
408-555-1234
NO CALLS
CALLERS DIRECTORY INTERCOM MEMORY DIAL
CALLS message means that the memory is clear.
R
EPEAT DIALING
your local telephone company offers this service which calls back the last number
that you dialed for up to 30 minutes. When the number is busy, Repeat Dialing monitors the busy number, and lets you know when the line is free with a special ring.
This service lets you call back more than one number at a time, and you can make
and receive calls while it works.
To Use
Repeat Dialing
:
1. Hang up the phone after hearing the busy signal.
REPEAT
2. Press Repeat Dialing keeps trying for 30 minutes.
DIAL*66
3. Lift the handset when you hear the special ring (short-short-long). You hear
the other phone ringing. If you don’t answer the special ring immediately, it
repeats every few minutes for up to 30 minutes.
To Cancel
Repeat Dialing
:
1. Lift the handset and listen for a dial tone.
8
2. Press .
TUV
If you have Rotary/Pulse service, use instead of .
MNO
6
1
1
CALL
DIR
21
36
Page 44
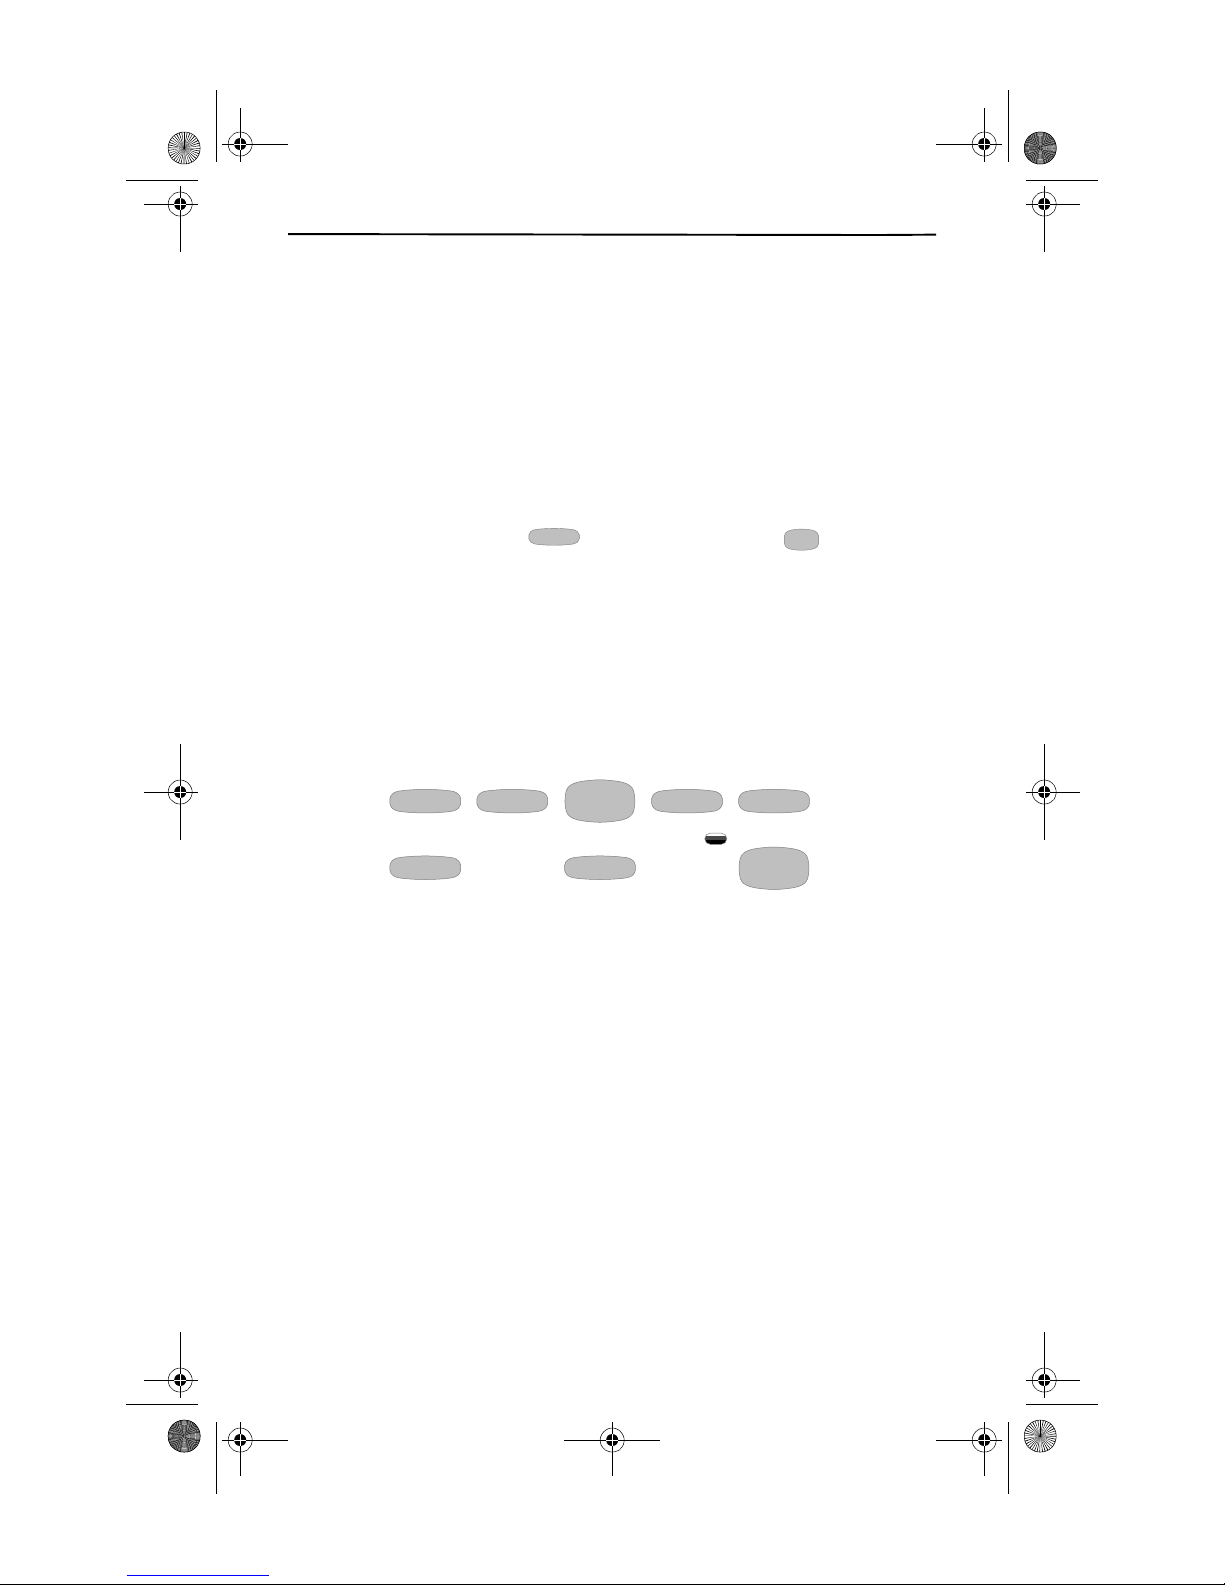
VOICE MAIL
L
L
Cidco980.book Page 37 Thursday, June 3, 1999 6:39 PM
Using Your Custom Calling Services
VOICE MAIL
Voice Mail Service takes your calls when you are away from your phone or even
while you are on the phone. The Indicator Light flashes whenever you have messages in your mailbox. And once you have programmed Voice Mail key with your
password, you can get your messages at the touch of a button. You must subscribe
to Voice Mail Service in order for this feature to work on your phone.
ACCESSING YOUR MAILBOX
After programming Voice Mail key during telephone setup, you can access your
mail box by pressing either of the two Voice Mail keys to dial your mailbox and pass-
word for you. Simply press on the handset, or press on the base.
The CL980 dials the phone number to your mail box and enters in your password. If
Voice Mail light is on, but there are no messages in your mailbox, you can manually
turn off the light through telephone setup.
Using Voice Mail
Once inside of the Voice Mail system, yo u can use the CL980’s special Voic e Mail keys
on the base.
REPLAY BACK
PLAY
FWD SKIP
VOICE MAI
ERASE MSG SAVE MSG
VOICE MAI
❑ REPLAY—Voice prompt 1, replays the last message.
❑ BACK—Voice prompt 11, rewinds back several seconds into the current voice
mail message.
❑ PLAY—Voice prompt 1, plays the new messages in your mailbox.
❑ FWD—Voice prompt 3, advances in intervals.
❑ SKIP—Voice prompt #, advances to the start of the next message.
❑ ERASE MSG—Voice prompt 7, deletes the message from your mailbox.
❑ SAVE MSG—Voice prompt 9, keeps the message in your mailbox.
❑ VOICE MAIL—dials Voice Mail telephone number and password.
37
Page 45
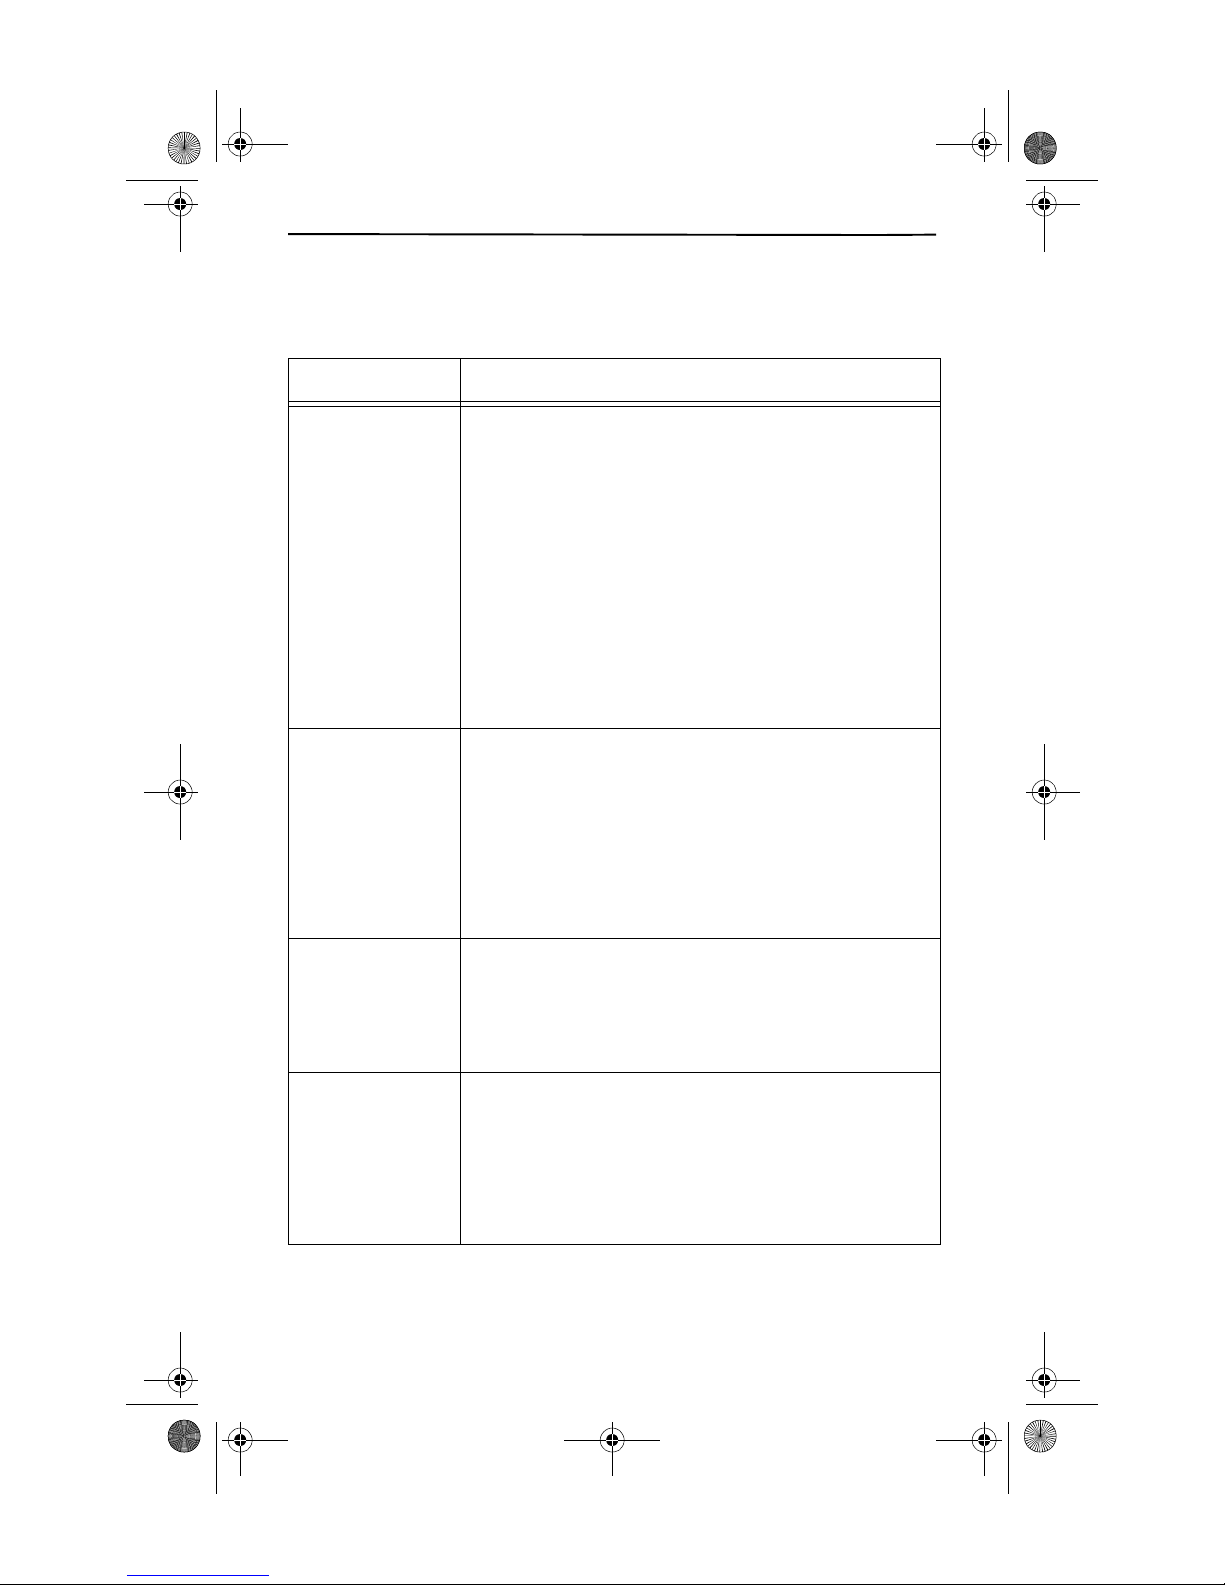
Cidco980.book Page 38 Thursday, June 3, 1999 6:39 PM
Troubleshooting
TROUBLESHOOTING
Are you having trouble with your phone? Here are some of the most common
problem areas and solutions.
S
YMPTOM CORRECTIVE ACTION
Blank or faint
screen
Caller ID/
Call Waiting ID
doesn’t work
properly
Charge Light does
not work
Turn the handset on and place it in the cradle for several seconds. Ensure the handset is making contact in the
cradle.
Check the AC adapter.Be sure that the adapter is not
damaged and that it is securely plugged into a working
outlet. Also check that the wall plug is not controlled by a
wall switch.
Recharge or replace the battery. See Charge the Handset
on page 6, for recharging details or Insert the Battery into
the Handset, on how to replace the battery.
Turn Caller ID function on. Call your local telephone
company’s Business Office to ensure that either Caller ID or
Call Waiting ID service is active. Your phone is shipped
with the service enabled, check that you didn’t change the
setting during setup. See Set Up or Change Caller ID Set-
tings on page 12.
Verify that Caller ID service is active. Call your local tele-
phone company’s Business Office to ensure that your services are active. You can verify that Call Waiting is working
by the double tones, indicating an incoming call. That is
provided that an extension is not being used.
Verify that you have turned on Caller ID as a setting.
See Set Up or Change Caller ID Settings on page 12. Also
check that the programming screen Call Waiting ID? is set
to YES as shown in Turn Call Waiting ID On or Off on page
13.
Check whether the handset is making contact in the
cradle.
Check the AC adapter. Be sure that the adapter is not
damaged and that it is securely plugged into a working
outlet. Also check that the wall plug is not controlled by a
wall switch.
Handset lights do
not work.
38
Verify that the handset is turned on.
Press the TALK key to test. The TALK light should come
on.
Check to see that you have turned on Call Lights as a
setting. See Set Up or Change Caller ID Settings on page 12
for instructions.
Recharge the battery. See Charge the Handset on page 6
for more details.
Page 46
Cidco980.book Page 39 Thursday, June 3, 1999 6:39 PM
SYMPTOM CORRECTIVE ACTION
Troubleshooting
INCOMPLETE
DATA
Call information was distorted before reaching the
unit. Normal static on the telephone line can cause a
INCOMPLETE DATA message. If this condition persists,
check with your local telephone company to ensure that
there is not a problem with your phone line.
No dial tone Verify that the line cord is connected and secure.
Check that the handset is fully charged.
Move the handset closer to the base. See Going Out of
Range on page 23.
Phone doesn’t
ring
Verify that the ringer is not turned off on the base.
Press the base volume keys with the phone on-hook.
Verify that the LINE CORD is plugged in correctly.
Verify the handset ringer on/off switch, located on the
underside of the handset, is set on. If the phone still
does not ring, you might have too many communication
devices hooked to a single line. A communication device
can be a phone, modem, or facsimile (FAX) machine. Contact your local telephone company business office for
help calculating the limit for your residence or business.
Move the handset closer to the base. See Going Out of
Range on page 23.
PAGE/FIN D key
does not page the
handset
Speakerphone
does not work
The handset is not communicating with the base. The
handset is either turned off, out of range, or the battery
needs recharging.
Check the AC adapter. Be sure that the adapter is not
damaged and that it is securely plugged into a working
outlet. Also check that the wall plug is not controlled by a
wall switch.
Verify that the line cord is connected and secure.
Handset does not
work
Voice Mail light is
on, when there are
no messages in
the mailbox
Voice Mail key
dials my passcode
before the system
is ready for it.
Check the AC adapter. Be sure that the adapter is not
damaged and that it is securely plugged into a working
outlet. Also check that the wall plug is not controlled by a
wall switch.
Verify that the handset is turned on.
Place the in the cradle for several seconds. Ensure the
handset is making contact in the cradle.
Recharge the battery. See Charge the Handset on page 6
for more details.
Turn the light off manually. Enter programming mode
and turn off Voice Mail as described in Turn Voice Mail On
or Off on page 11. Then turn the function back on using
the same method.
Add more pauses to the dialing number. See Enter the
Access Number for Voice Mail on page 8.
39
Page 47
Cidco980.book Page 40 Thursday, June 3, 1999 6:39 PM
Troubleshooting
SYMPTOM CORRECTIVE ACTION
Feature keys do
not work.
Check your service. Call your local telephone company to
ensure that you have the appropriate service turned on.
Check that the key hasn’t been reprogrammed as a
speed dialing key. If the key has been accidentally repro-
grammed, and you would like to reset this key and all the
other Custom Calling keys and Voice Mail navigation keys
to the original settings, enter the programming mode and
restore key to the default setting, as described in Set
Advanced Functions on page 12.
NO DATA SENT Check your service. Call your local telephone company to
ensure that you have Caller ID or Call Waiting ID service.
Check the answering machine. Ensure that your answering machine is set to answer after two rings.
Ensure you answer the call after two rings.
Check Call Forwarding. Ensure that Call Forwarding is
turned off.
Contact your local telephone company’s Service
Department, if the problem continues for more than
24 hours. Your your local telephone company central
office may be temporarily experiencing an overload.
We recommend that all service on your CL980 telephone be performed by CIDCO or
an authorized repair agent. The CIDCO Service Center is located at 220 Cochrane Circle, Morgan Hill, CA.95037.
40
Page 48

Cidco980.book Page 41 Thursday, June 3, 1999 6:39 PM
Index
INDEX
Symbols
1+ dialing 15
3-Way Calling 32
A
access number 11
accessing your mailbox 37
adapter 5
advanced functions 12
answering your phone 10
area codes
digits to dial
local area codes 14
setting up 14
B
BACK key 37
base 2
base volume 22
battery
recharging
replacing 6
blank screen 38
blocked calls 25
C
Call Control keys 3
call counter 35
Call Forwarding 32
call light 12, 35
call records 34–36
capacity 35
deleting 35
dialing from 18, 35
receiving 34
saving 35
viewing 35
Call Return 33
call timer 17
Call Waiting ID
overview
setting up 13
troubleshooting 38
Caller ID 12
advanced functions 12
call light 12
enabling 12
14
31
34
keys 3
overview 34
cancel Call Return 33
cancel Repeat Dialing 36
changing language 7
channel selection 1
characters 29
charge light 2
charging battery 6
clearing mistakes during programming 7
clock 23
components 1
Custom Calling keys 32–37
Custom Calling service 32–37
3-Way Calling 32
Call Forwarding 32
Call Return 33
Call Waiting 34
Call Waiting ID 34
Caller ID 34
Repeat Dialing 36
Voice Mail 37
D
delays 11
DELETE key 7
deleting
call records
directory records 31
desk-mount wedge 1
DIAL 3
dial method 10
dialing from
call records
directory records 18, 30
redial list 18
dialing from call records 18
dialing keys 3
digits to dial 14
directory 27–31
character entry 29
creating new records 28
deleting directory records 31
dialing from 18, 30
memory 1
reviewing records 30
symbols 29
transferring call records 27
display messages 24
35
18, 35
41
Page 49

Cidco980.book Page 42 Thursday, June 3, 1999 6:39 PM
Index
E
enabling Caller ID 12
end of list message 24, 35
English support 7
ERASE MSG key 37
F
faint screen 38
fast dialing
dialing from directory records
memory dial 21
redialing 18
FLASH key 3
flash, using 21
function keys 3
FWD key 37
H
handset 3
handset volume 22
headset jack 4
hearing aid compatibility 1
hold 23
hooking-up your phone 5–16
I
incomplete data message 24
installation 5–16
intercom 24
intercom active message 24
K
key
37
back
base 2
dial 3
erase msg 37
flash 21
FWD 37
handset 3
hold 23
memory 19
mute 21
PAGE/FIND 24, 39
page/find 23
play 37
redial 3, 18
replay 37
REVIEW 7, 35
18
save msg 37
SKIP 37
speakerphone 22
talk 3
voice mail 37
volume 22
L
language support 7
light
base
2
charge 2
message 3
new calls 3, 12, 34
TALK 3
troubleshooting 38
line cord 1
locating lost handset 23
long distance message 24
M
memory 1, 35
memory dial 21
MEMORY key 7, 19
message 24–26
end of list 24
incomplete data 24
intercom active 24
long distance 24
message waiting 25
name unavailable 25
no calls 25
no data sent 25
paging 25
private 25
recharge battery 26
unavailable 26
message light 3
message waiting 25
mounting wedge 1
MUTE key 3
mute, using 21
my area code 9, 14
N
name unavailable 25
new calls 35
new calls light 3, 34
no calls message 25
42
Page 50

Cidco980.book Page 43 Thursday, June 3, 1999 6:39 PM
Index
no data sent 40
no data sent message 25
no dial tone 39
no name in call record 25
O
out of range 23, 39
P
PAGE/FIND key
intercom
keys overview 2
locating lost handset 23
not responding 39
paging message 25
passcode 9
password 11
pauses 11
personalizing your phone 7
picking up your phone 10
PIN 9, 11
PLAY key 37
power failures 1
pre-dialing 17
private message 25
problem areas 38
programming your phone
1+ dialing
advanced functions 12
area codes 14
call light 12
Call Waiting ID 13
changing Caller ID 12
digits to dial 14
enabling Caller ID 12
local area codes 14
my area code 9, 14
pickup 10
pulse 10
restoring defaults 13
tone 10
voice mail setup 10
pulse 10
24
15
Q
Quick Dialing keys 3
Quick Dialing, storing numbers 19
R
reading display messages 24
recharge battery message 26
recharging battery 6
REDIAL key 3, 18
redialing 18
Repeat Dialing 36
replacing battery 6
REPLAY key 37
restarting programming sequence 7
restoring defaults 13
REVIEW key 35
reviewing call records 35
ringer volume 22
ringing 4, 39
rotary dialing 10
S
SAVE MSG key 37
saving call records 35
screen problems 38
setup 5–16
SKIP key 37
Spanish support 7
speakerphone 22
speed dial 21
speed dialing 18
switches 2, 4
symbols 29
T
TALK key 3
talk light 3
temporary tone service 23
timer 17, 23
timing calls 23
tone and pulse programming 10
tone service 10
tone, temporary 23
TONE/PULSE switch 23
troubleshooting 38–40
U
unavailable message 26
using memory dialing 21
using voice mail 37
using your phone 17–31
43
Page 51

Cidco980.book Page 44 Thursday, June 3, 1999 6:39 PM
Index
V
viewing directory records 30
viewing new calls 35
Visual Message Waiting Indicator Service
25
Voice Mail 37
voice mail
37
key
light 37
passcode 9
password 11
pauses 11
setup 10
telephone number 11
turning on/off 11
voice mailbox 25
volume 22
volume control 4
W
wall-mount wedge 1
44
 Loading...