

Page 1
Inhalt
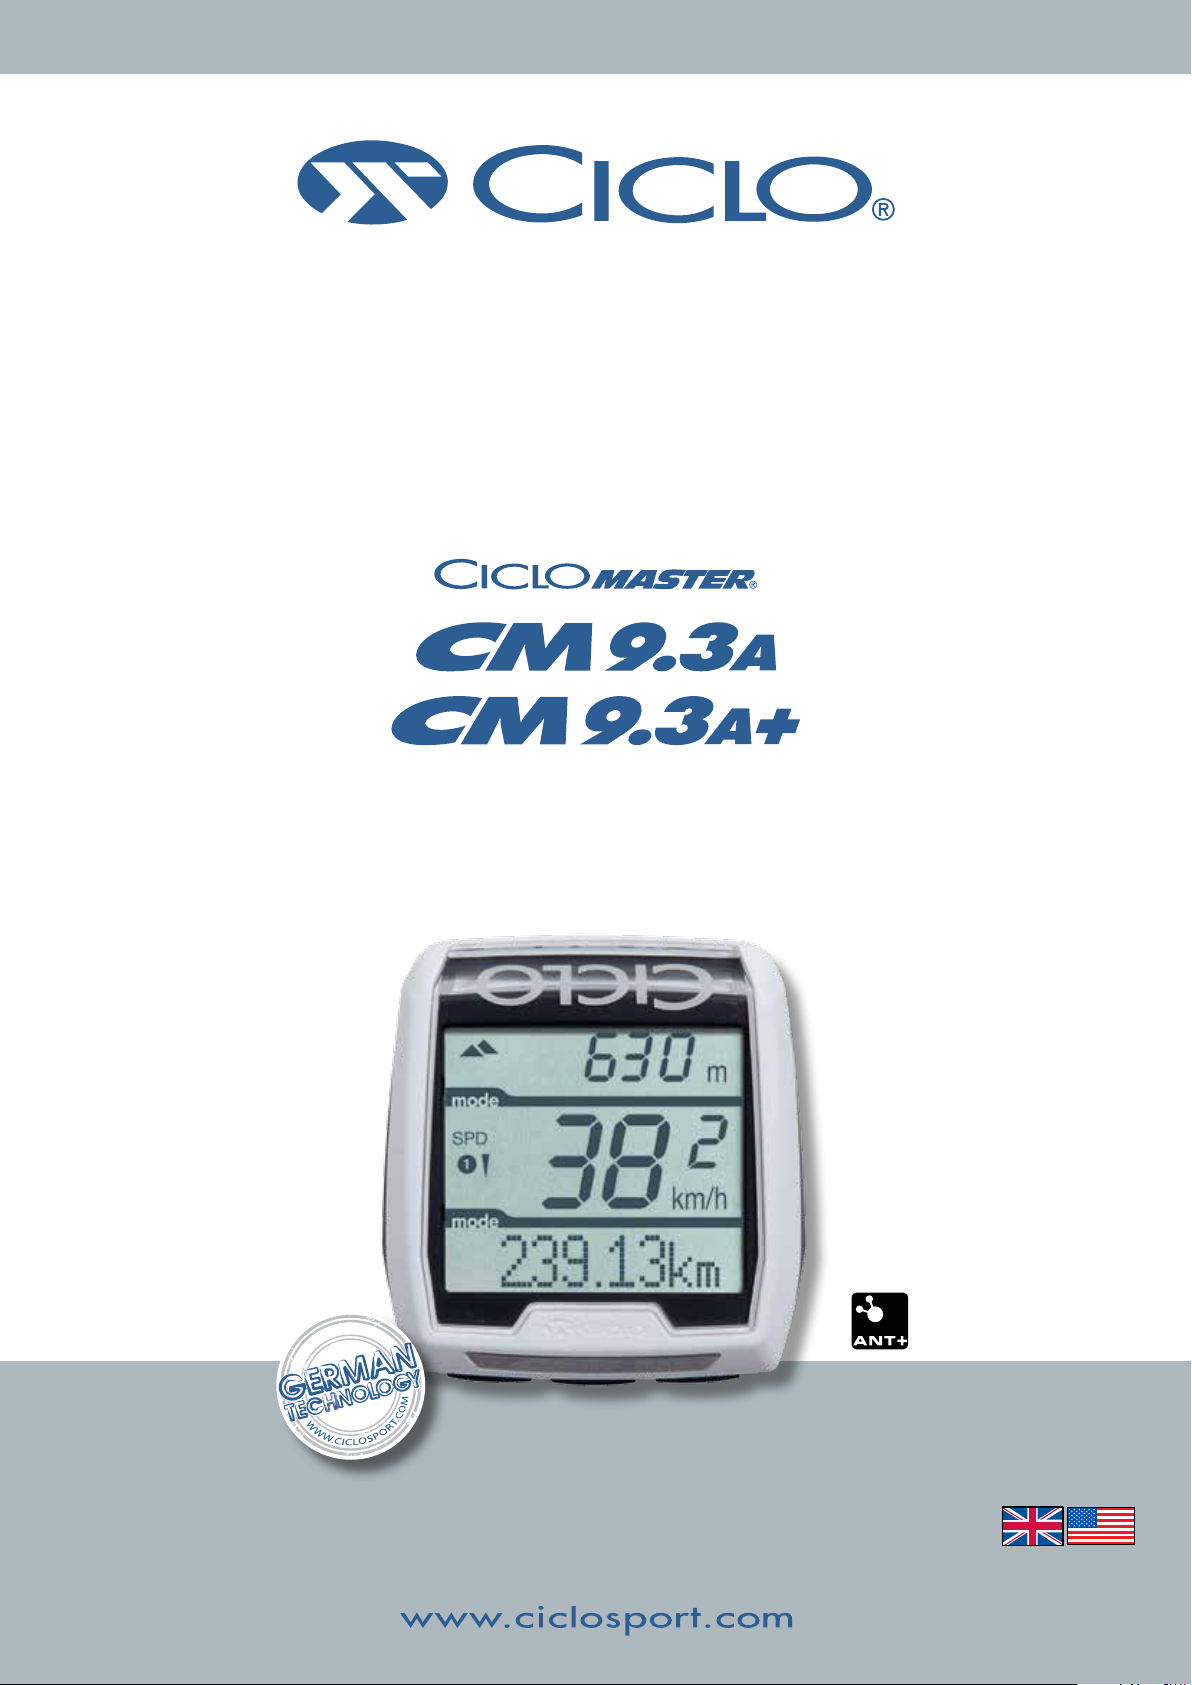
Wireless cycle computer using digital
transmission (BlueEye III)
including altimetry and PC-Analysis
20140214
Manual
|
1
Page 2
General InformatIons
D
D
D
D
CM
9.3 A
white/black
Art.-No.: 10104800
Wireless cycle computer
using digital transmission
including altimetry and
PC-Analysis (ANT+)
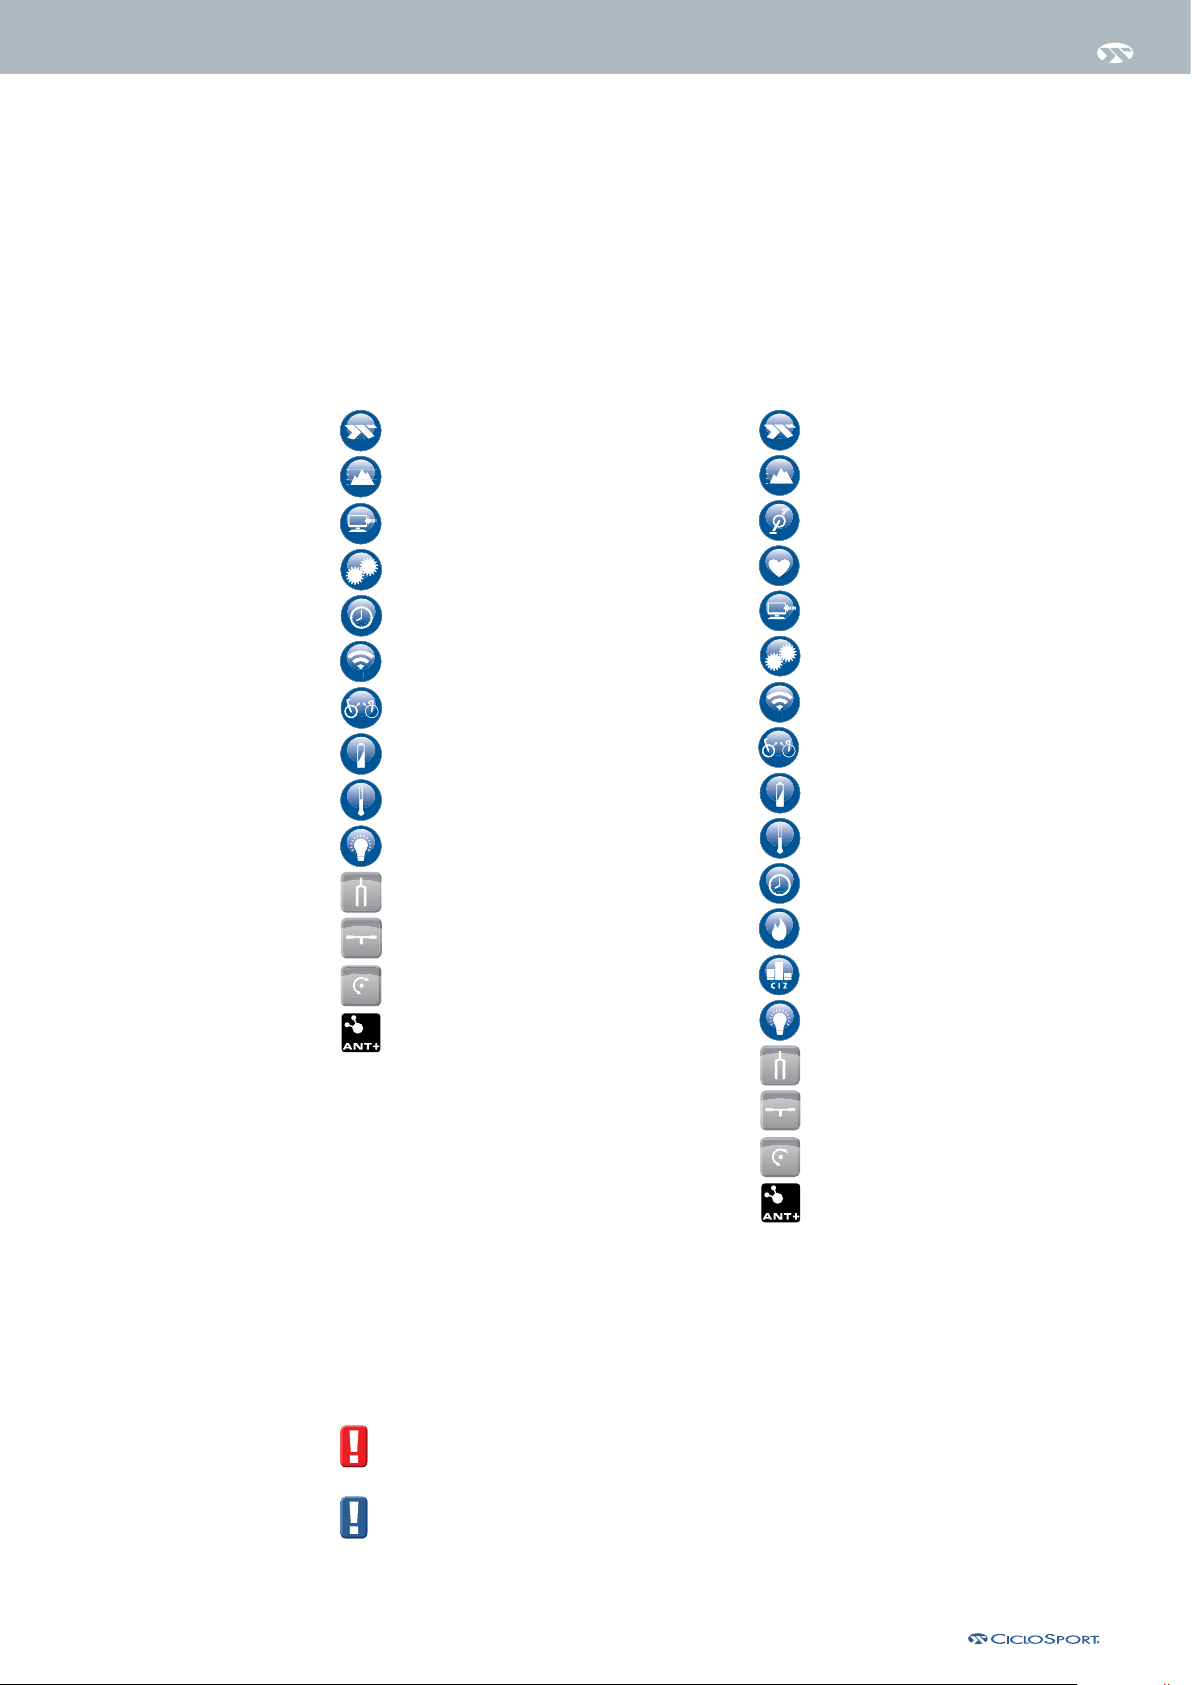
CYCLE FUNCTIONS
ALTIMETRY
PC ANALYSIS
PC CONFIGURABLE
TIME
WIRELESS
A
TWO IN ONE AUTOMATIC
SLEEP MODE
CM
9.3 A +
white/black
Art.-No.: 10104900
Wireless cycle computer
using digital transmission
including altimetry,
heart rate monitor,
cadence and PC analysis (ANT+)
CYCLE FUNCTIONS
ALTIMETRY
CADENCE
HEART RATE
PC ANALYSIS
PC CONFIGURABLE
WIRELESS
A
TWO IN ONE AUTOMATIC
TEMPERATURE
DISPLAY LIGHT
FAT FORK KOMPATIBEL
COCKPIT MULTILOCK
TWIST KLICK
SLEEP MODE
TEMPERATURE
TIME
BURNT CALORIES
®
CiclolnZone
DISPLAY LIGHT
FAT FORK KOMPATIBEL
COCKPIT MULTILOCK
TWIST KLICK
TRAINING ZONE
Symbols used in this manual
The red symbol marks functions which are only available in the CM 9.3 A (+).
(Also available with optional accessories and the CM 9.3 A)
The blue symbol marks important information that you should pay attention to.
Visit www.thisisant.com/directory for a list of compatible ANT+ products.
2
|
Page 3
Contents
Page
General Informations 2
1.1 The CM 9.3A (+) 4
1.2 Difference between the CM 9.3A and the CM 9.3A (+) 4
1.3 Included accessories 4
2 Chapter (2) How to use the CM 9.3A (+) 5
2.1 Overview 5
2.2 Key operation in Normal “Bike mode” 5
2.3 Status icons 5
2.4 Display Control 5
2.4.1 Upper display control 5
2.4.2 Lower display control 5
2.4.3 Menu navigation 6
3 Chapter (3) Settings & first start 7
3.1 Mounting 7
3.1.1 Handlebar bracket 7
3.1.2 Speed sensor 7
3.1.3 Cadence kit 7
3.1.4 Spoke magnet 7
3.1.5 Cadence magnet 7
3.1.6 Heart rate belt 7
3.2 Getting started 8
3.2.1 Batteries 8
3.2.2 Display 8
3.2.3 Menu 8
3.2.4 Languages 8
3.3 Settings 8
3.3.1 Daily distance 8
3.3.2 Total distance 8
3.3.3 Wheel 8
3.3.4 Bike weight 9
3.3.5 Unit 9
3.3.6 Cadence 9
3.3.7 Power measurement 9
3.3.8 Power measurement interval 9
3.3.9 Power measurement left & right 9
3.4 Time & Date 10
3.4.1 Time 10
3.4.2 Time setting 10
3.5 Altitude 10
3.5.1 Altitude 10
3.5.2 Home altitude 10
3.5.3 Unit of measurement altitude 10
3.5.4 Temperature 10
Page
3.6 Heart rate 10
3.6.1 Heart rate 10
3.6.2 Fitness level 11
3.6.3 Sex 11
3.6.4 Weight 11
3.6.5 Birthday 11
3.6.6 CICLOInZone
®
11
3.6.7 Lower HR limit 11
3.6.8 Upper HR limit 11
3.6.9 MAX HR limit 12
3.7 Sensors 12
3.7.1 How to initialize a sensor 12
3.7.2 Power measurement calibration 12
3.8 PC-Connection 13
3.9 Others / SET MISC 13
3.9.1 Power-saving mode 13
3.9.2 Reset all values 13
3.9.3 Recording interval 13
4 Chapter (4) Using the CM 9.3A (+) 14
4.1 Main functions 15
4.2 Bike mode 15
4.3 Light 15
4.4 Recording 15
4.5 Initializing a sensor 15
4.6 CicloInzone
®
15
4.7 Battery change 15
4.8 Sevice interval 15
5 Service 16
5.1 Service 16
5.2 Return the Unit 16
5.3 Trouble shooting 16
5.3.1 Display problems 16
5.3.2 No speed / cadence / HR / power 16
5.3.3 Speed is not displayed correctly 16
5.3.4 Wrong altitude
5.3.5 Heart rate is not displayed correctly
or does not work 16
5.3.6 The altitude keeps changing even
when I am at the same place 16
5.4 Guarantee 17
5.5 Technical Data 17
5.6 Guarantee certificate 18
|
3
Page 4
Chapter 1 – General InformatIon
1.1 The CM 9.3A (+)
1.2 Difference between the CM 9.3 A and the CM 9.3 A (+)
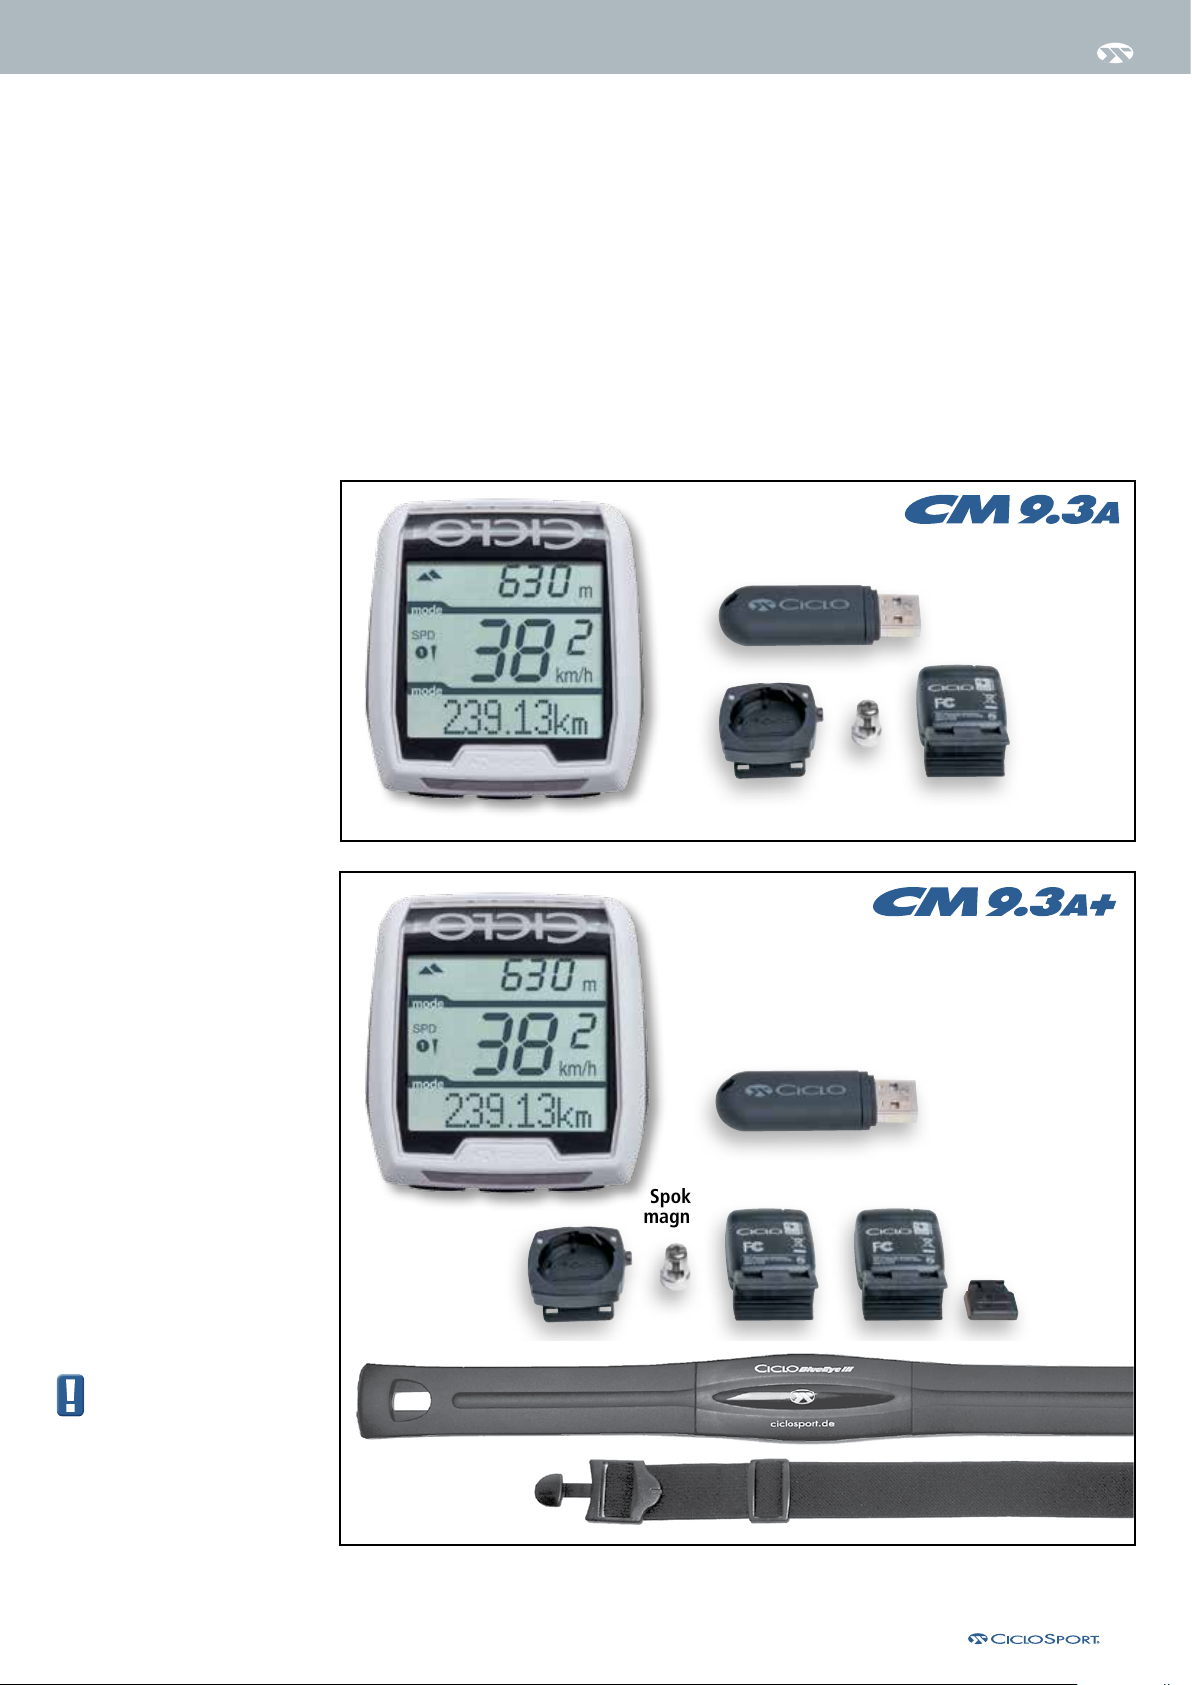
The CM 9.3 A and the CM 9.3 A (+) differ only in the included accessories. The CM 9.3 A (+) adds a cadence kit
and heart rate belt to the delivery scope of the CM 9.3 A. These accessories can however be purchased
separately to upgrade your CM 9.3 A.
To activate the related functions go to Chapter 3.
1.3 Included accessories
Mounting material
USB Dongle
Handlebar
bracket
Spoke
magnet
Handlebar
bracket
Speed
sensor
Spoke
magnet
USB Dongle
Cadence
sensor
Speed
sensor
Mounting material
Cadence
magnet
Please note that we are
constantly working on our
products and continue to
develop. You may have an older
version of this manual, the latest
version can be found here:
www.ciclosport.com/cm93a.
Heart rate belt
|
4
Page 5
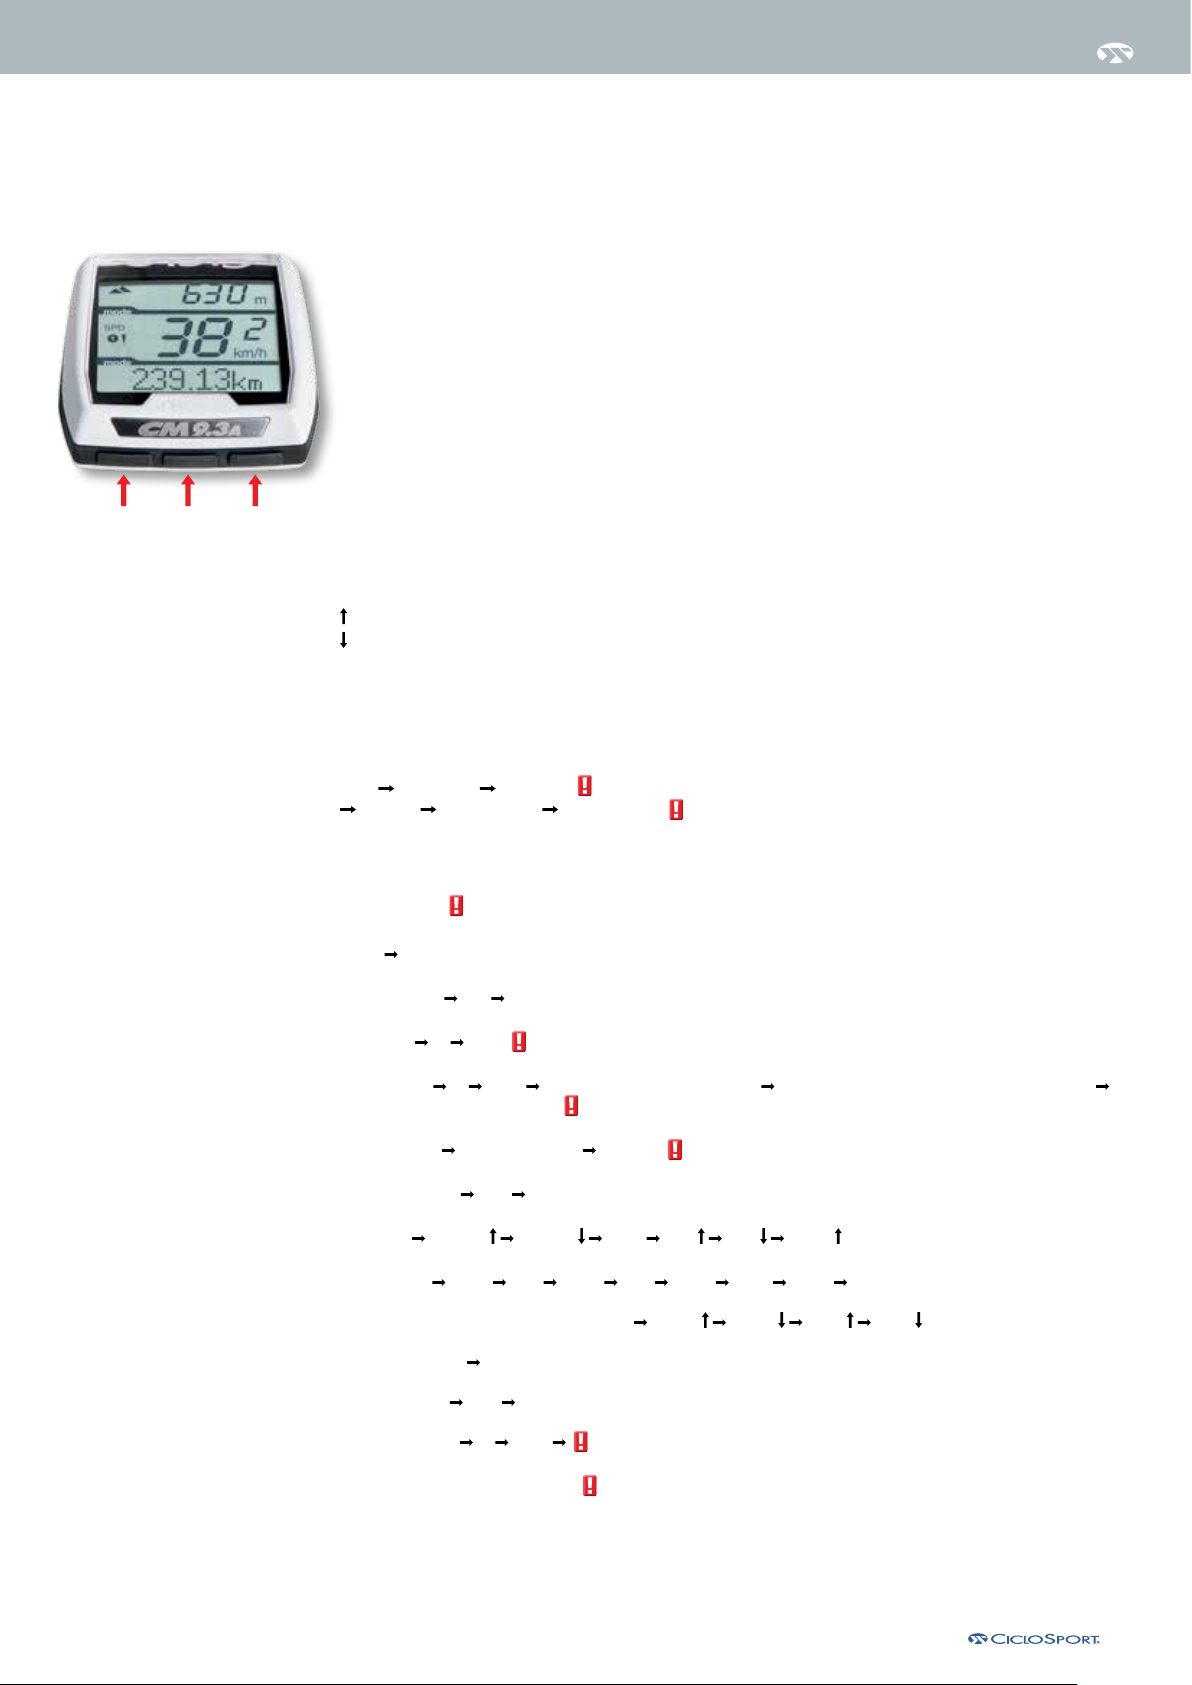
Chapter 2 – how to use your Cm 9.3a (+)
Here you will learn how to use the upper and lower display parts in bike mode.
2.1 Overview
2.2 Key operation in normal “Bike mode”
1 With the left button you can navigate through the main functions in the lower display.
2 With the middle button you can navigate through the sub functions in the lower display.
3 With the right button you can navigate through the upper display.
2.3 Status icons
TOT = Total value of the active bike mode
ΣTOT = Total value of both active bike modes
321
Ø = Average value
MAX = Maximum value achieved
MIN = Lowest value achieved
% = Percent
= Values ascending
= Values descending
2.4 Display control
2.4.1 Upper display control
Time riding time heart rate
Altitude daily distance Power in watt
2.4.2 Lower display control
Functions in bold are main functions.
Functions with need to be activated in the menu (Chapter 3).
Time Date
Riding time TOT Σ TOT
Cadence Ø MAX
Heart rate Ø MAX Time below the lower HR limit Time between the lower and upper HR Limit
Time above the upper HR limit
Kilocalories Fat burning in % TOT kcal
Daily distance TOT Σ TOT
Altitude Altitude Altitude MAX TOT TOT Σ TOT
Slope in % Slope in Ø Slope in Ø Slope MAX Slope MAX
Climb rate / fall rate in m per hour Ø m/h Ø m/h MAX MAX
Average speed MAX speed
Temperature MIN MAX
Power in watt Ø MAX *
Power for left and right foot
*If you don’t have a power measurement system, you can activate this function to obtain a power calculation.
Please note that his value is just an estimate and not a precise value.
|
5
Page 6
Chapter 2 – how to use your Cm 9.3a (+)
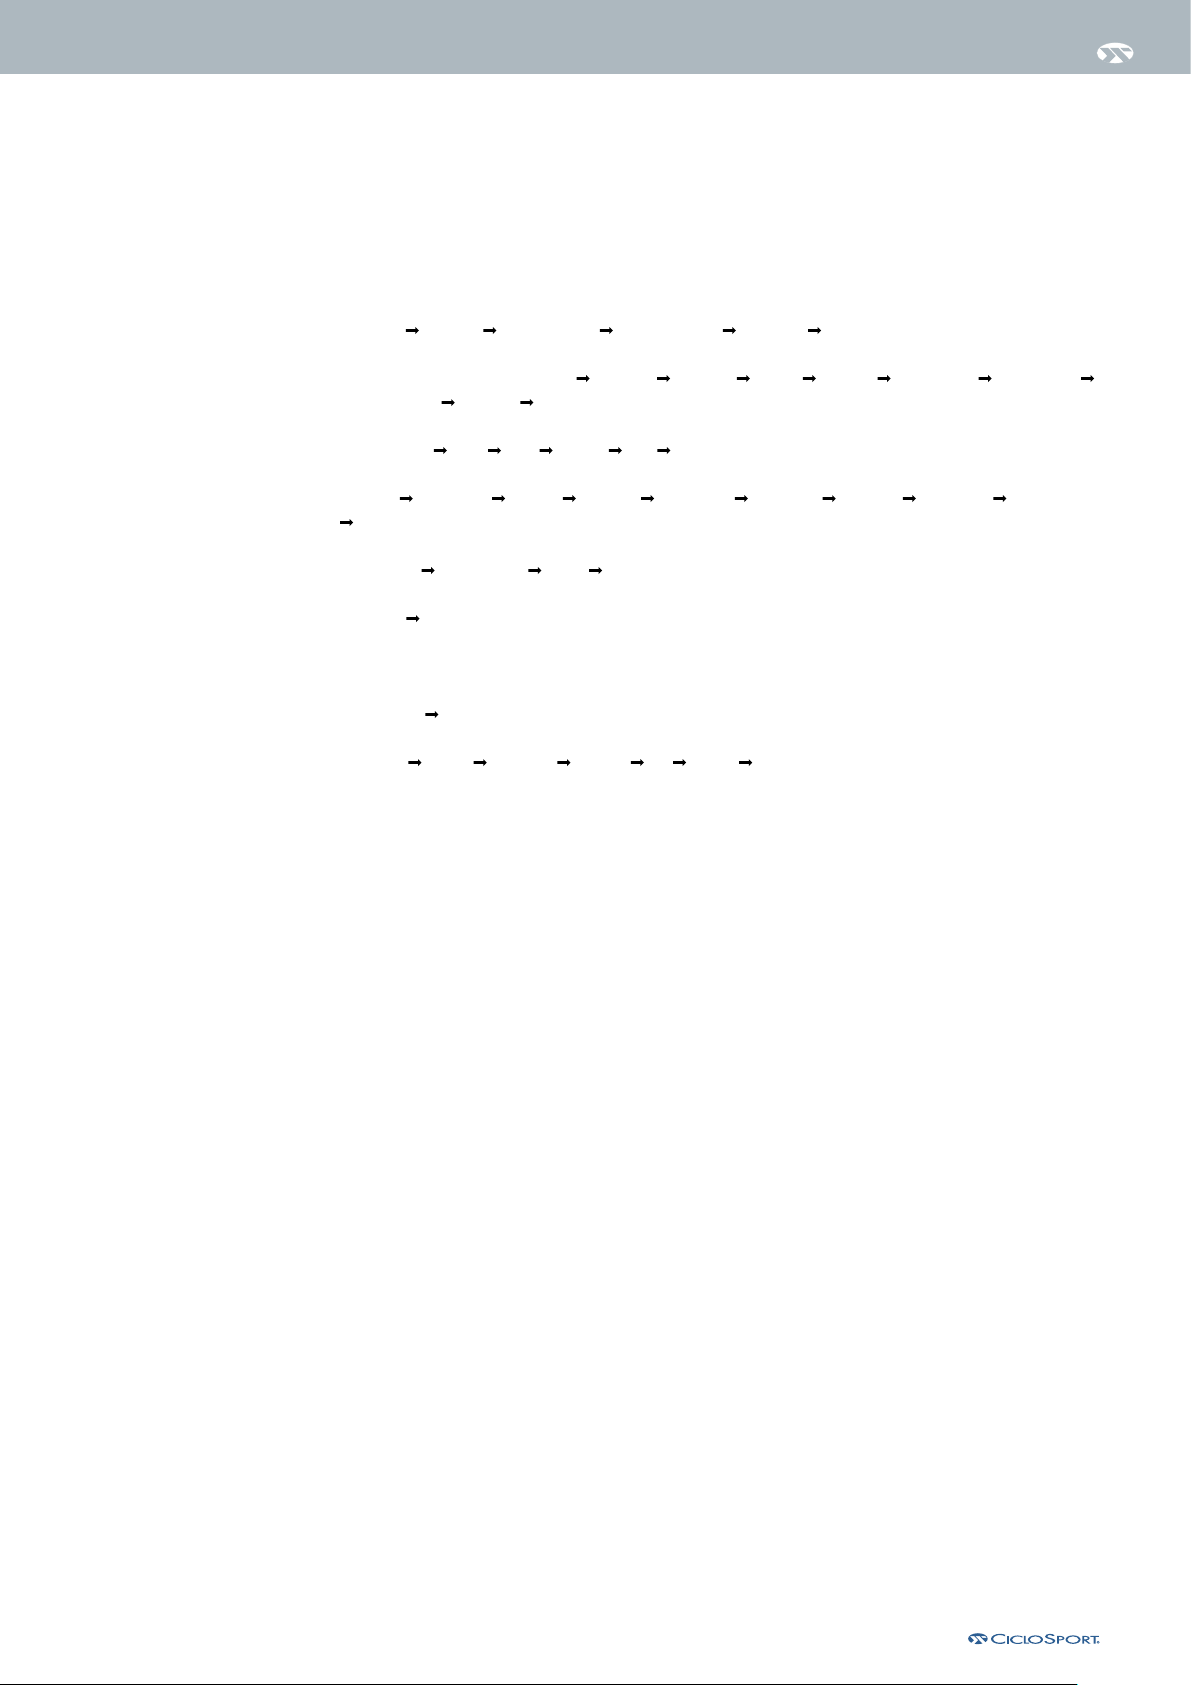
2.4.3 Menu navigation
Settings in bold are main settings. The main menu can be browsed with the left and right button. Middle
button enters the sub menu. Within the sub menus settings are changed with the middle and right button and
stored/entered with the left button.
SET ALT Altitude Home On/Off Home altitude Unit m/ft Unit °C/°F
SET Bike 1/2 (Symbol RAD ½) * Day Dst. Tot. Dst. Wheel Bike Kg Unit km/mi Cad On/Off
Power On/Off Poe Avg LR Pwr Off/On
SET CLOCK Time Year Month Day Clock 24/12
SET HF HR on/Off Fitness Sex M/F Weight kg Birthdate InZone® Lower HR Upper HR Max
HR
SET MISC Powerdown Reset Rec rate
PC-Link Link
Exit
Language Englisch/Deutsch
Sensors Speed Cadence Combo HR Power Exit
*Information about Bike 1 and 2 can be found in chapter 4.2.
|
6
Page 7
Chapter 3 – settInGs & fIrst start
In this chapter you will learn how to install and set up the CM 9.3 A (+) before the first ride. Please note that
functions with this Symbol are only available with the (+) Version or with the optional accessories.
1
2
3
3.1 Mounting
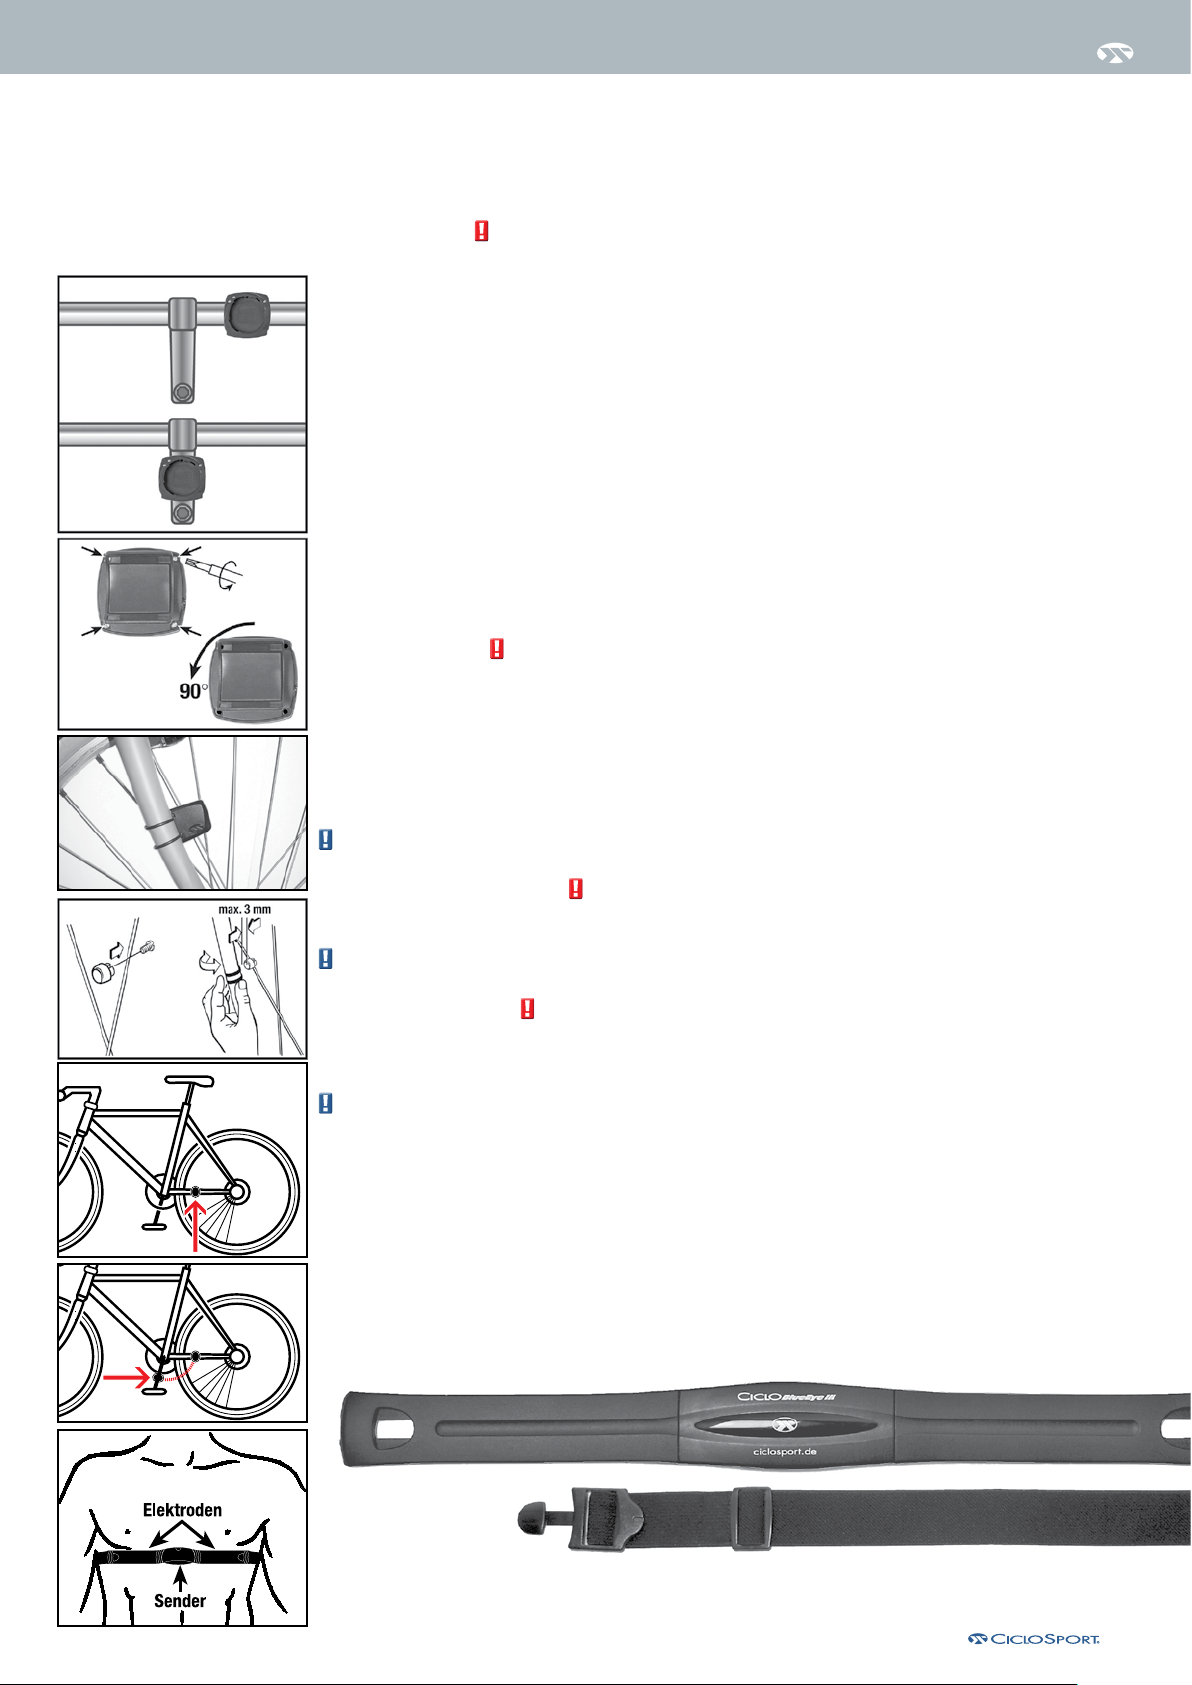
3.1.1 Handlebar bracket
You can mount the handlebar bracket on the handlebar or on the stem. For mounting it on the stem, unscrew
the four screws as shown in picture 1, turn the lower part of the handlebar 90° degrees and secure it again
with the screws.
Peel off the adhesive protection and attach the rubber pad to the bottom side of the handlebar bracket.
Run the cable ties through the eyelets and position the handlebar bracket on the handlebar or on the stem.
Fix the mount with the cable ties. The ends of the cable ties can be cut off with a clipper or scissors.
3.1.2 Speed sensor
Attach the transmitter to the fork or the left chain stay. Pull the cable ties through the eyelets of the transmitter, place it in the desired location and tighten the cable ties. The ends of the cable ties can be cut off with
a clipper or scissors.
3.1.3 Cadence kit
Mount the sensor as shown in picture 2 (do not tighten the cable ties, yet). Attach the cadence magnet as
described below and check the maximum distance of 3mm. Only after the cadence is initialized (Section
3.7.1), tighten the cable ties. The ends of the cable ties can be cut off with a clipper or scissors.
3.1.4 Spoke magnet
Attach the magnet to a spoke on the opposing of the transmitter.
Please note that the distance between the sensor and the magnet shall not be more than 3mm.
Please make sure to align the magnet on the markings on the sensor.
3.1.5 Trittfrequenz-Magnet
4
5
6
7
Attach the cadence magnet with a cable tie to the left crank arm, as described in picture 2. Please note that
the distance between the sensor and the magnet must not be more than 3mm.
Please make sure that the magnet is aligned with the marking on the sensor.
3.1.6 Heart rate belt
Attention: Every person who carries out sport should have a general medical checkup on his/her general
state of health Especially beginners, persons older than 35 years of age and anyone who has suffered from
illnesses or injuries in the past. It is recommended that a doctor is consulted in case of risk factors, such as
smoking, high blood pressure, high cholesterol values, diabetes, lack of exercise and excess weight.
Pacemaker wearers should consult their doctor before using any heart rate measurement
device!
Moisten the contacts on the harness and attach the transmitter belt. The chest strap should be worn centered
just below the nipples.
The heart rate can only be displayed if:
- The chest belt fits correctly
- The heart rate function is activated (Chapter. 3.7)
- The heart rate belt has been initialized with the CM 9.3 A (+)
|
7
Page 8
Chapter 3 – settInGs & fIrst start
3.2 Getting started
3.2.1 Batteries
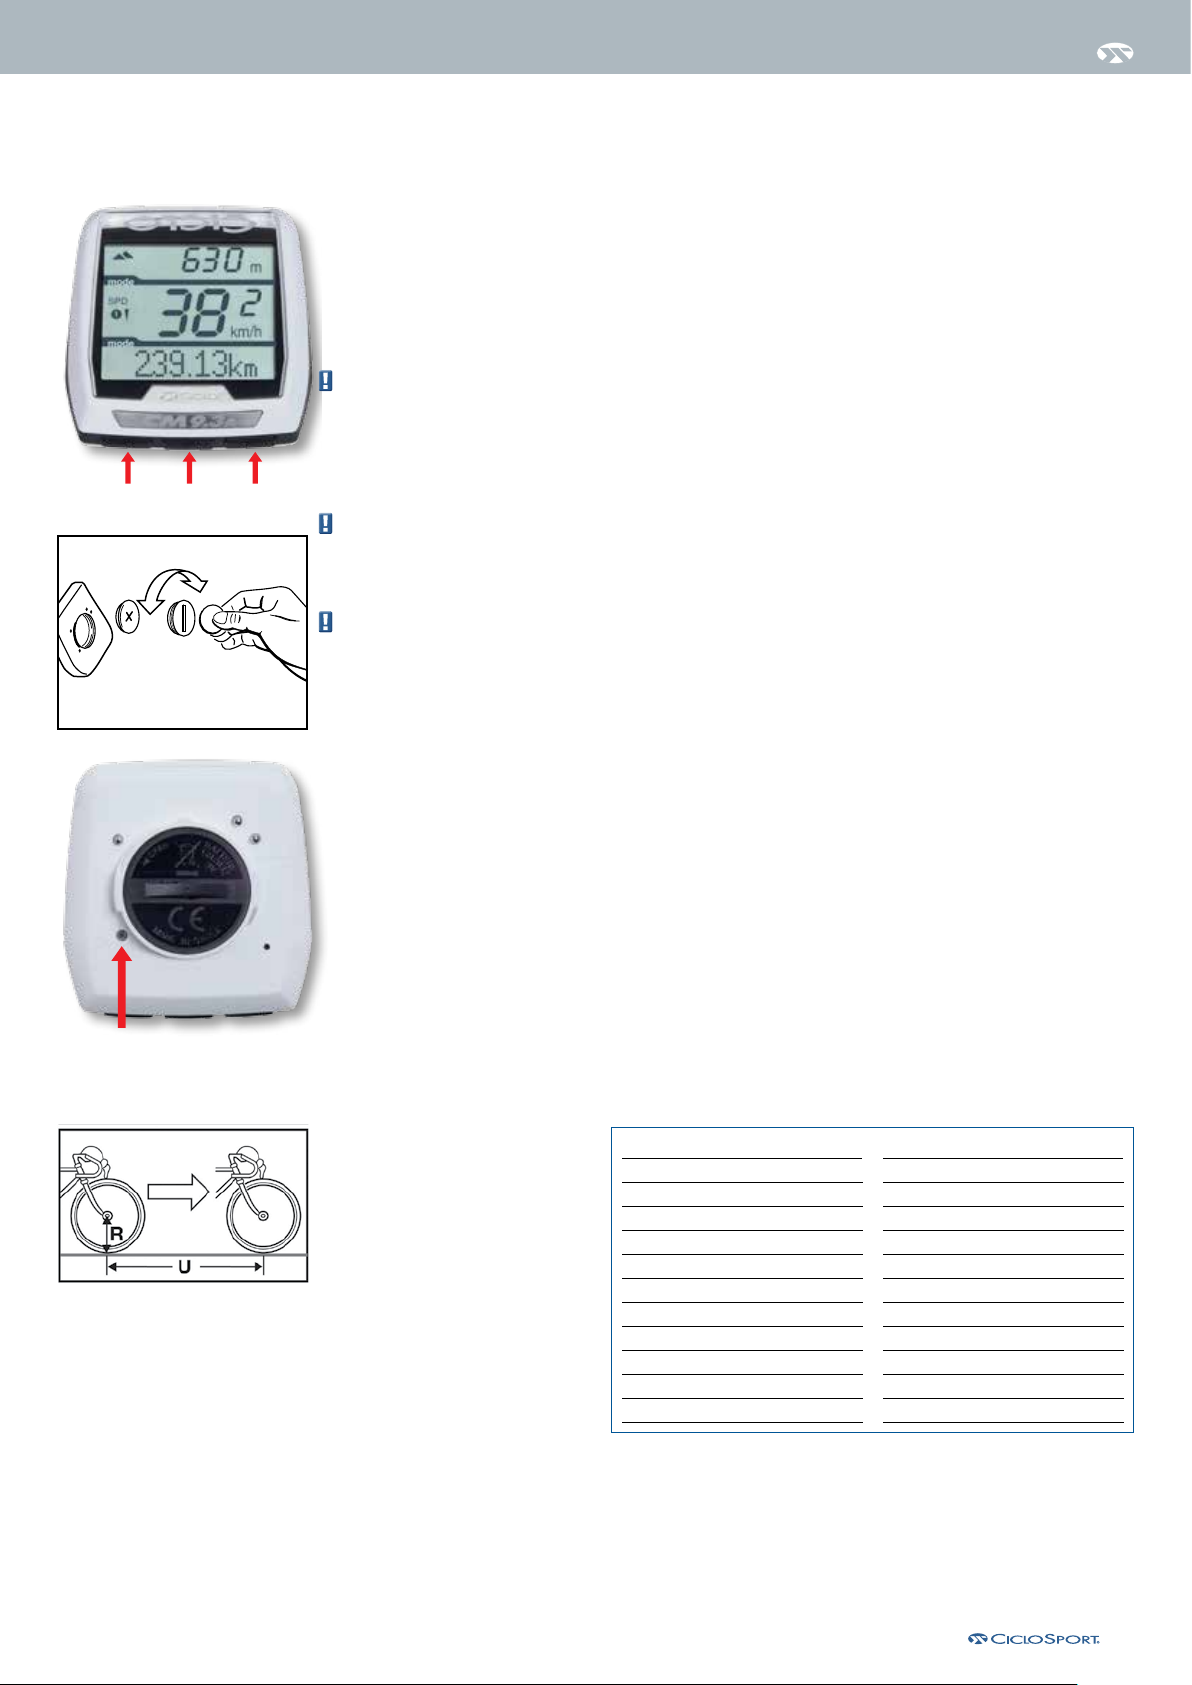
Insert the CR2032 battery with the positive side up. Place the O-ring, and close the battery cover with a coin.
3.2.2 Display
Now you see the normal bike 1 display mode.
If the display remains blank or weird values are shown, press the AC button on the back of the computer
with a pointed object like a pen to reset the unit.
3.2.3 Menu
Press the middle button 2 for 5 seconds to enter the menu. Use the left 1 and right 3 buttons to navigate
321
through the menu.
You can exit the menu, by selecting the EXIT menu item and confirm with the middle button. Alternatively,
you can always exit the menu by pressing the middle button for 5 seconds.
3.2.4 Languages
Attention: The CM 9.3A (+) offers two menu languages, German and English.
You can change the language under the menu item language/sprache. Select the desired language and
confirm by pressing the middle button.
AC button
3.3 Settings
3.3.1 Daily distance
In the main menu, press the left or the right button until SET BIKE ½ is displayed, confirm with the middle
button. Now you can set the daily distance.
Set with the middle and right button, store with left button.
3.3.2 Total Distance
Now Tot. Dst. is shown in the display and you can set the overall miles/kilometer.
Set with the middle and right button, store with left button.
3.3.3 Wheel
Now you can set the wheel circumference, the display will show Wheel
Set with the middle and right button, store with left button.
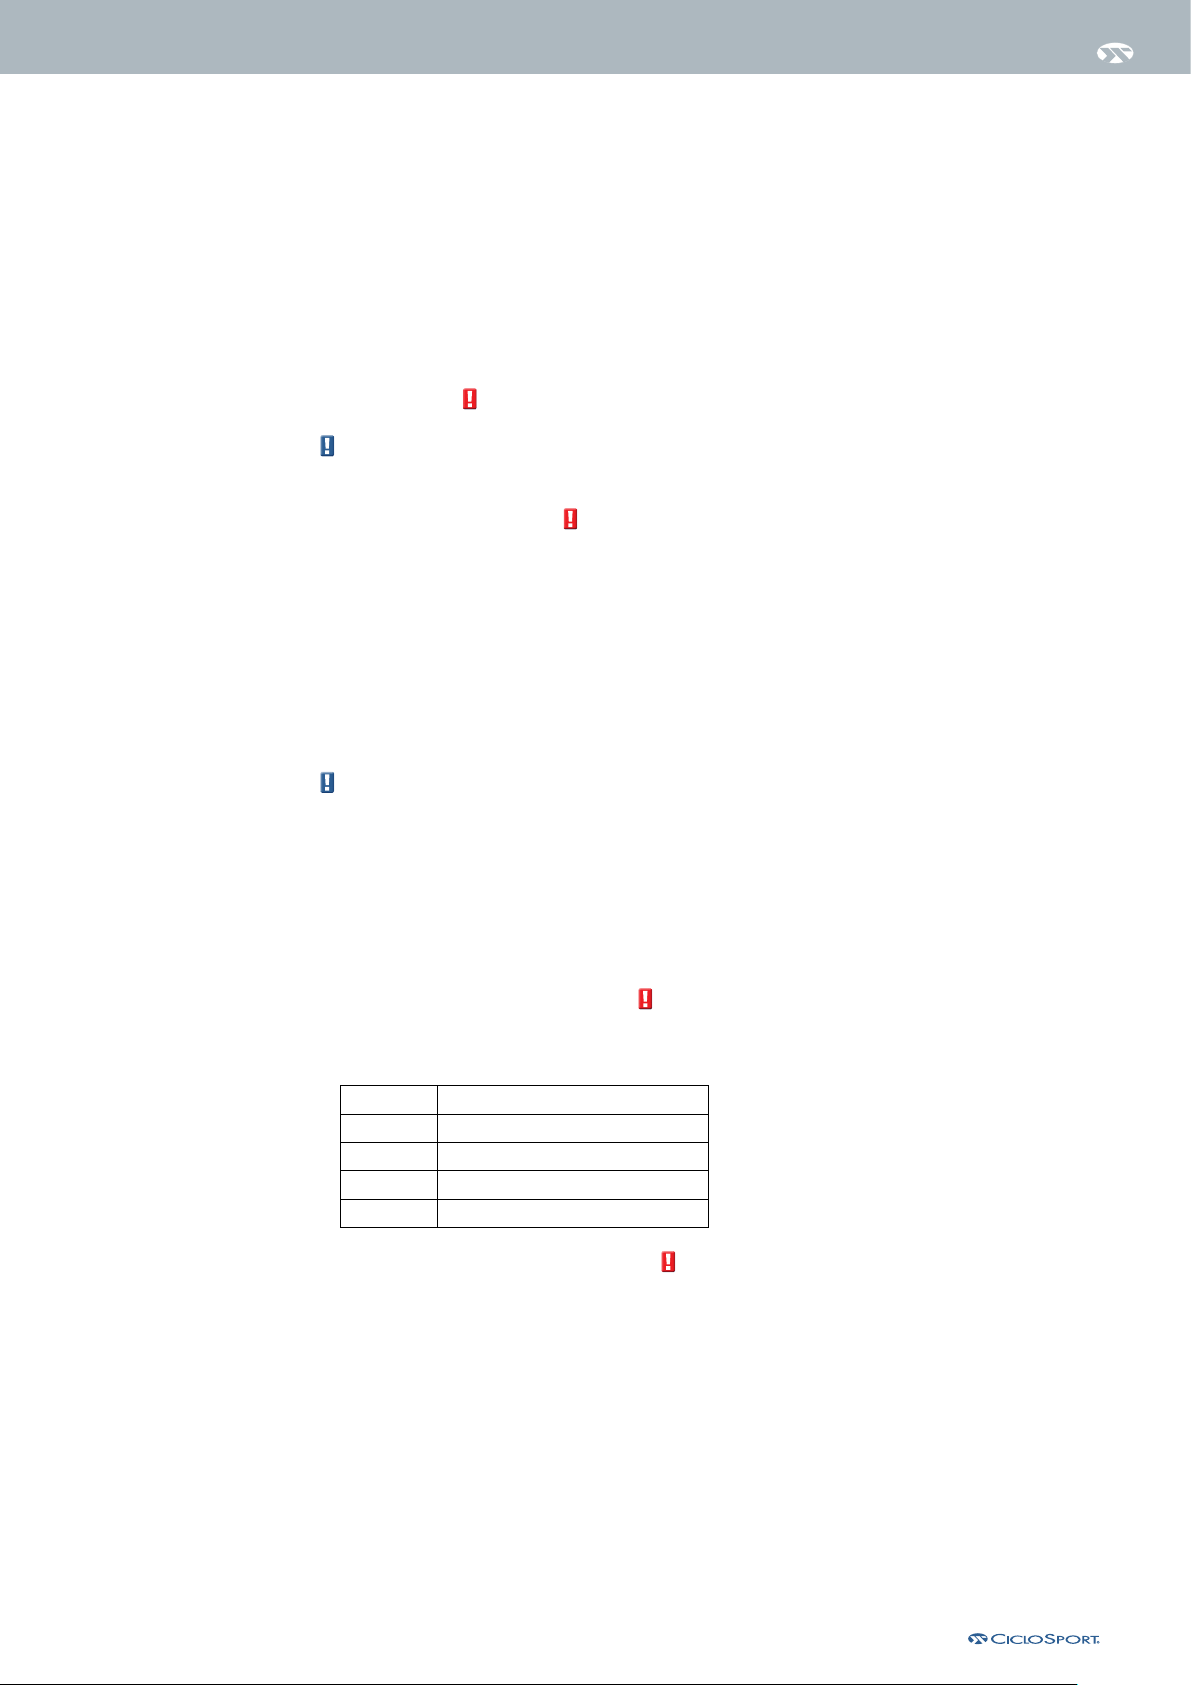
You can take the wheel
circumference from the table
(right) or measure it yourself.
Measuring the circumference of the
wheel (for a more precise setting):
Put a marking at the front-tire and
on the ground (e.g. with chalk).
Ride straight ahead exactly one
turn of a tire (for a very exact
measurement, check the pressure
of the tire before getting on your
bike) and mark this position on
the ground. Now measure the
exact circumference of the wheel
between the two markings at the ground (in mm).
Wheel size Circumference
40-559 26 x 1,5 2026 mm
44-559 26 x 1,6 2051 mm
47-559 26 x 1,75 2070 mm
50-559 26 x 1,9 2026 mm
54-559 26 x 2,00 2089 mm
57-559 26 x 2,125 2114 mm
37-590 26 x 1 3/8 2133 mm
32-620 27 x 1 1/4 2199 mm
40-622 28 x 1,5 2224 mm
47-622 28 x 1,75 2268 mm
40-635 28 x 1 1/2 2265 mm
Wheel size Circumference
37-622 28 x 1 3/8 2205 mm
50-622 29 x 2.00 2280 mm
54-622 29 x 2.10 2295 mm
57-622 29 x 2.25 2288 mm
60-622 28 x 2.35 2330 mm
23-571 650 x 23C 1973 mm
20-622 700 x 20C 2114 mm
23-622 700 x 23C 2133 mm
25-622 700 x 25C 2146 mm
28-622 700 x 28C 2149 mm
32-622 700 x 32C 2174 mm
|
8
Page 9
Chapter 3 – settInGs & fIrst start
3.3.4 Bike weight
Next you can adjust the weight of your bike in kilograms. This value is used for power calculation (see 3.3.7.)
Set with the middle and right button, store with left button.
3.3.5 Unit
Now you can set the unit used in the computer, km for kilometers or mi for miles.
Set with the middle and right button, store with left button.
3.3.6 Cadence
If you want to use the cadence, activate the cadence function.
Please note that you need a cadence sensor for this function.
Set with the middle and right button, store with left button.
3.3.7 Power measurement
The CM 9.3 A can display power in 2 ways. Actual measured power of an ANT+ power sensor or theoretically
calculated power.
Calculated power
In case the power function is activated and no ANT+ power sensor is initialized, the computer calculates the
power from the following values:
- Speed
- Bike and rider weight
- Rate of climb / rate of fall per hour
Please note that this calculation only shows approximate values.
Whenever the calculated power is shown in the lower display, the value is shown with a P for power.
Measured power
To display measured power you need an ANT+ compatible power sensor and initialize it (see 3.7.1)
If an ANT+ power sensor is connected and initialized, the CM 9.3A (+) will display the power values received
from this sensor.
Whenever the measured power is shown in the lower display, the value is shown with a W for Watts.
3.3.8 Power measurement interval
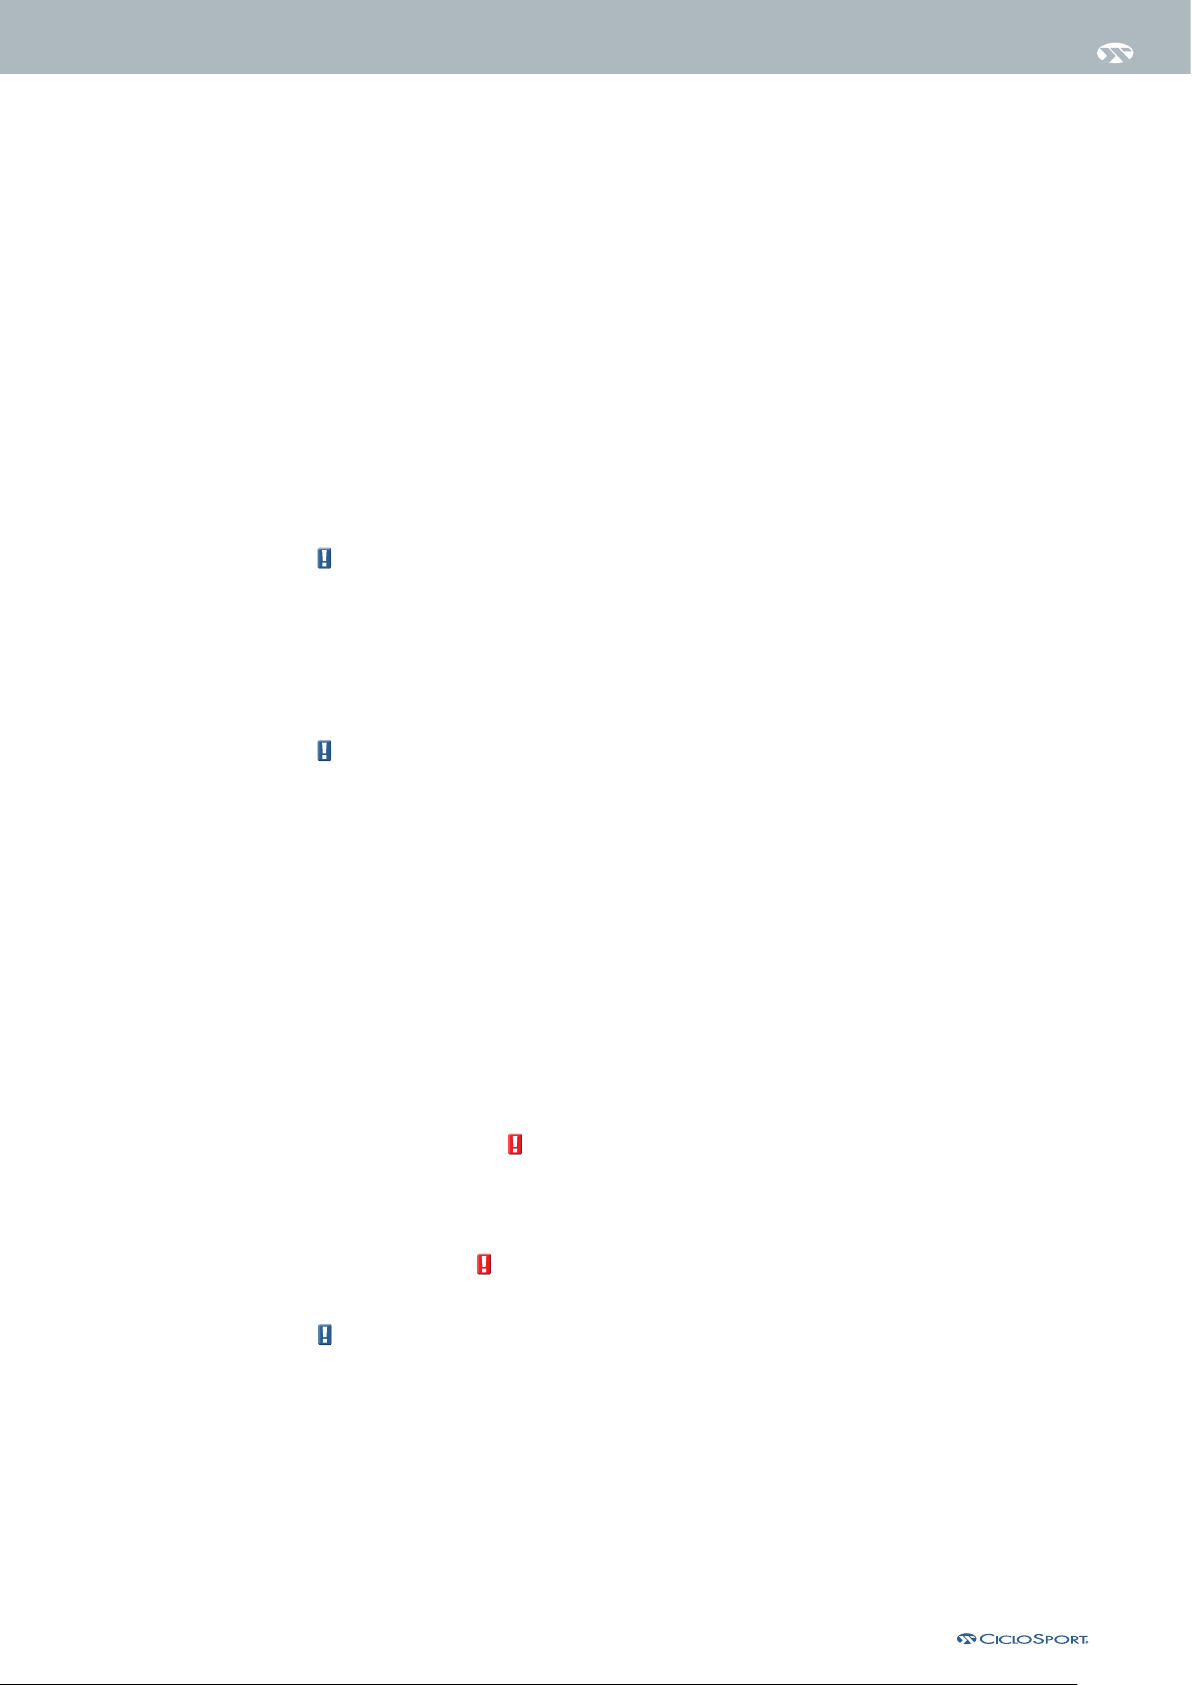
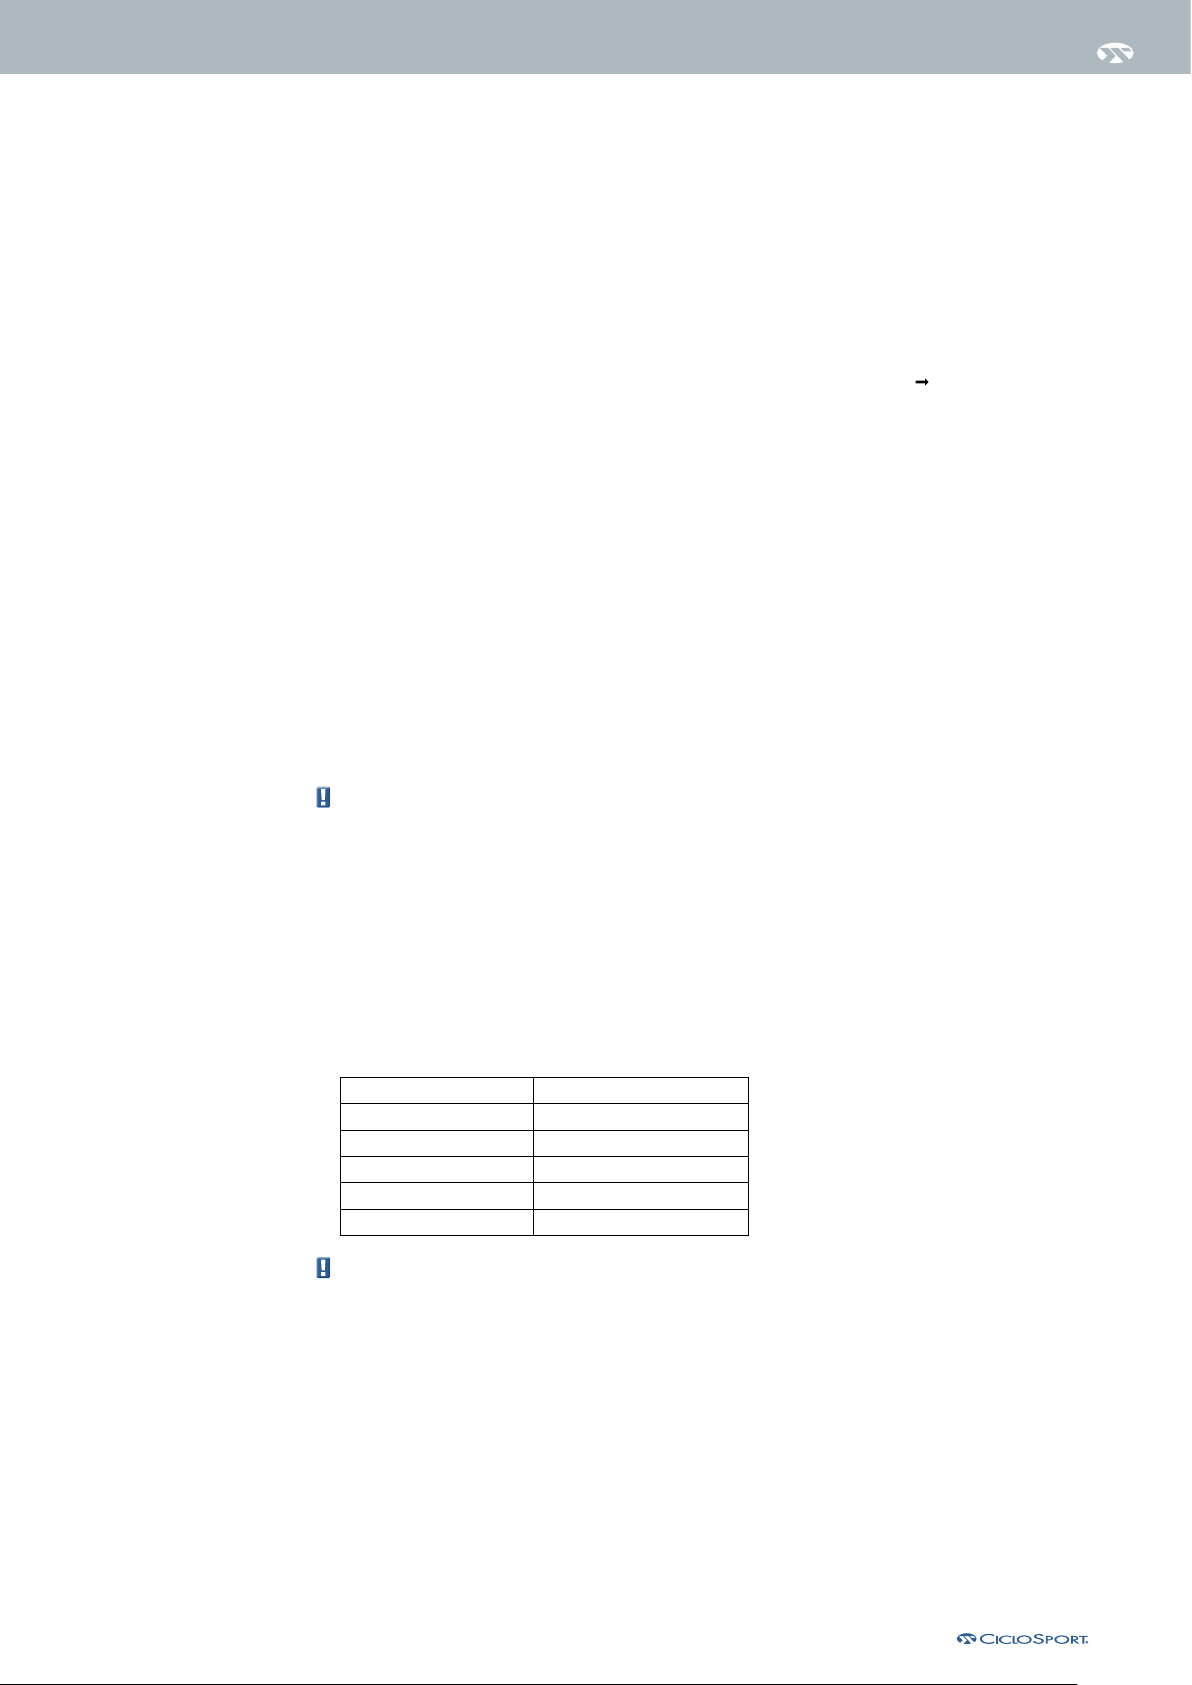
For better readability, the displayed, measured power can be averaged over different intervals. Please refer to
the following table for the available Pow Avg values.
Set with the middle and right button, store with left button.
Seconds Smoothing
1 Each measured value is displayed
3 Average of the last 3 seconds
10 Average of the last 10 seconds
30 Average of the last 30 seconds
3.3.9 Power measurement left & right
If you use a power measuring system which can measure the power of the left and right leg separately,
switch LR Pwr to ON. Otherwise leave it off. If provided by the power sensor, the left and right power can be
displayed in percent of the total power.
Set with the middle and right button, store with left button.
|
9
Page 10
Chapter 3 – settInGs & fIrst start
3.4 Time & Date
3.4.1 Time
Press the left or the right button till Set Clock is displayed. Continue with the middle button.
Set with the middle and right button, store with left button.
3.4.2 Time setting
Now you can set if you want to have a 24 or an AM / PM time display.
Set with the middle and right button, store with left button.
3.5 Altitude
3.5.1 Altitude
If you do not know your current altitude, you can search the Internet for your location.
Also topographic maps provide information on the altitude of your location.
Set with the middle and right button, store with left button.
3.5.2 Home altitude
Wenn Sie eine Heim-Höhe hinterlegen möchten, stellen Sie Heim auf AN.
Einstellen mit mittlerer und rechter Taste, weiter mit linker Taste.
The home altitude is the default altitude of your residence or location of your bike. When you
start a recording, the computer adjusts to this value. If you start from a different location,
switch the home level to OFF.
If you want to set a home altitude switch Home to ON
Set with the middle and right button, store with left button.
3.5.3 Unit of measurement Altitude.
Next you can select whether you want your altitude values to be displayed in meters or feet.
Set with the middle and right button, store with left button.
3.5.4 Temperature
Here you can choose between Celsius or Fahrenheit for the temperature display.
Set with the middle and right button, store with left button.
3.6 Heart rate
For the next settings, it is necessary that the heart rate belt is initialized and connected to the device (see
3.7.1).
3.6.1 Heart rate
In the main menu press the right or left button until the display shows SET HF, press the middle button to
select.
You need an ANT+ heart rate belt to get a heart rate signal.
Now, HR OFF is displayed. If you want use heart rate press the middle or right button to turn it to ON and
continue with left button.
|
10
Page 11
3.6.2 Fitness level
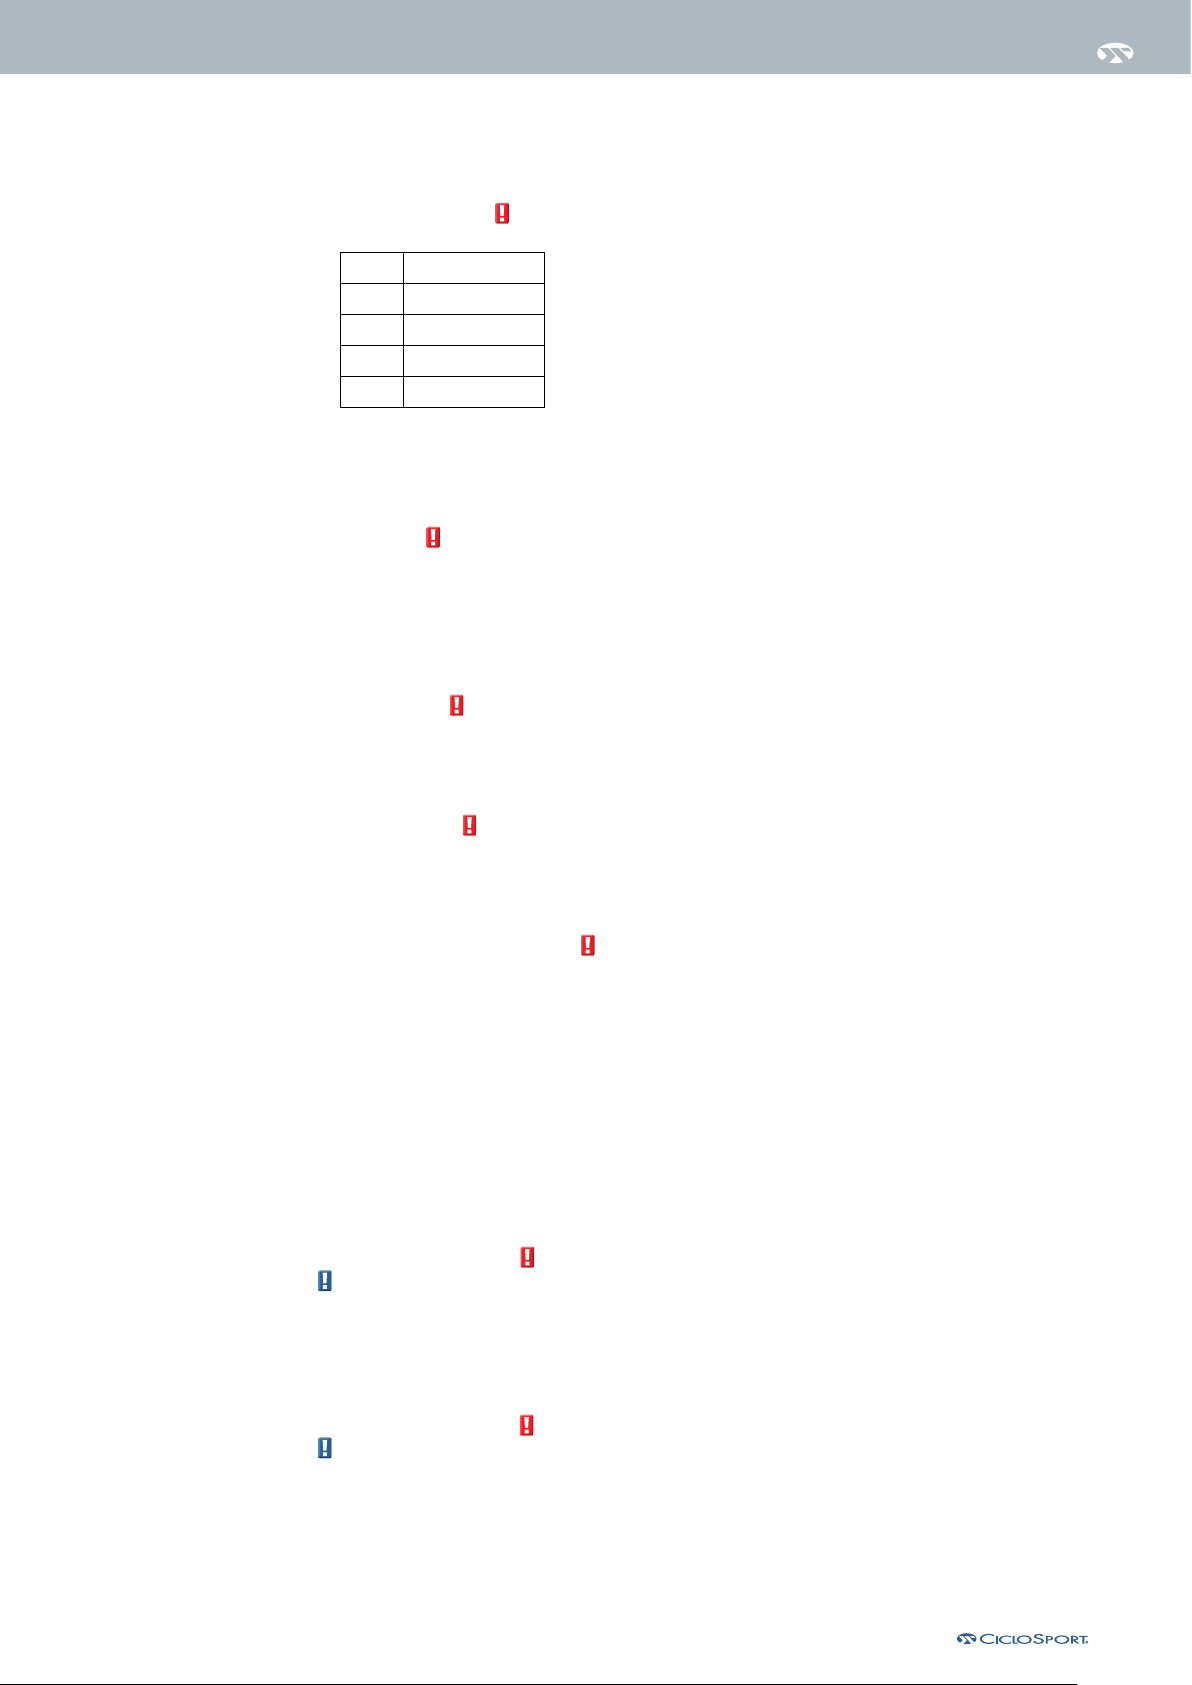
Level Fitness
1 Untrained
2 Little trained
3 Got in shape
4 Top form
Chapter 3 – settInGs & fIrst start
Now you can set your current fitness level according to the folloing table .
(This is required for the automatic calculating of the personal heart rate limits by CICLO
Set with the middle and right button, store with left button
3.6.3 Sex
Set your sex.
(This is required for the automatic calculating of the personal heart rate limits by CICLO
M = Male
F = Female
Set with the middle and right button, store with left button.
3.6.4 Weight
Now set your current weight
(This is required for the automatic calculating of the personal heart rate limits by CICLO
Set with the middle and right button, store with left button.
3.6.5 Birthday
Here you can set your date of birth.
(This is required for the automatic calculating of the personal heart rate limits by CICLO
Set with the middle and right button, store with left button.
3.6.6 CICLO
You can now start the CICLO
(You find more information about the CICLO
InZone
®
/ InZone
InZone
®
calculation by pressing the right and left button simultaneously.
InZone
®
in chapter 4.6).
InZone
InZone
InZone
InZone
®
)
®
)
®
)
®
)
If you don’t need CICLO
In order to obtain an exact calculation of one’s personal CICLO
InZone
®
just push the left button to skip the calculation.
InZone
®
it is necessary to insert the personal
fitness-level, sex, weight and birthdate and position the chest belt correctly.
Onde the CICLO
InZone
®
calculation is started, the CM 9.3A (+) will begin with a 5 minutes countdown.
During this time, stay seated, relaxed and calm, as the CM 9.3A will measure the minimum heart rate
reached during this period (heart rate at rest) and will store this value for the subsequent calculation.
After the 5 minutes, the lower value of the calculated personal
3.6.7 Lower HR limit
Please note: If you use CICLO
InZone
®
you don’t need to change the Lower/Upper/Max HR.
InZone
®
is shown in the display.
Here you can change the lower heart rate limit. If your heart rate goes below this limit, the displayed heart
rate value will start blinking.
Set with the middle and right button, store with left button.
3.6.8 Upper HR limit
Please note: If you use CICLO
InZone
®
you don’t need to change the Lower/Upper/Max HR.
Here you can change the upper heart rate limit. If your heart rate goes above this limit, the displayed heart
rate value will start blinking.
Set with the middle and right button, store with left button.
|
11
Page 12
Chapter 3 – settInGs & fIrst start
3.6.9 MAX HR limit
Please note: If you use CICLO
Here you can change the upper heart rate limit.
Set with the middle and right button, store with left button.
InZone
®
you don’t need to change the Lower/Upper/Max HR.
3.7 Sensors
You can connect different ANT+ sensors to the CM 9.3 A (+). To use an ANT+ sensor, you first have to
initialize it.
3.7.1 How to initialize a sensor
In the main menu press the left or the right button until SENSORS is displayed, continue with middle button.
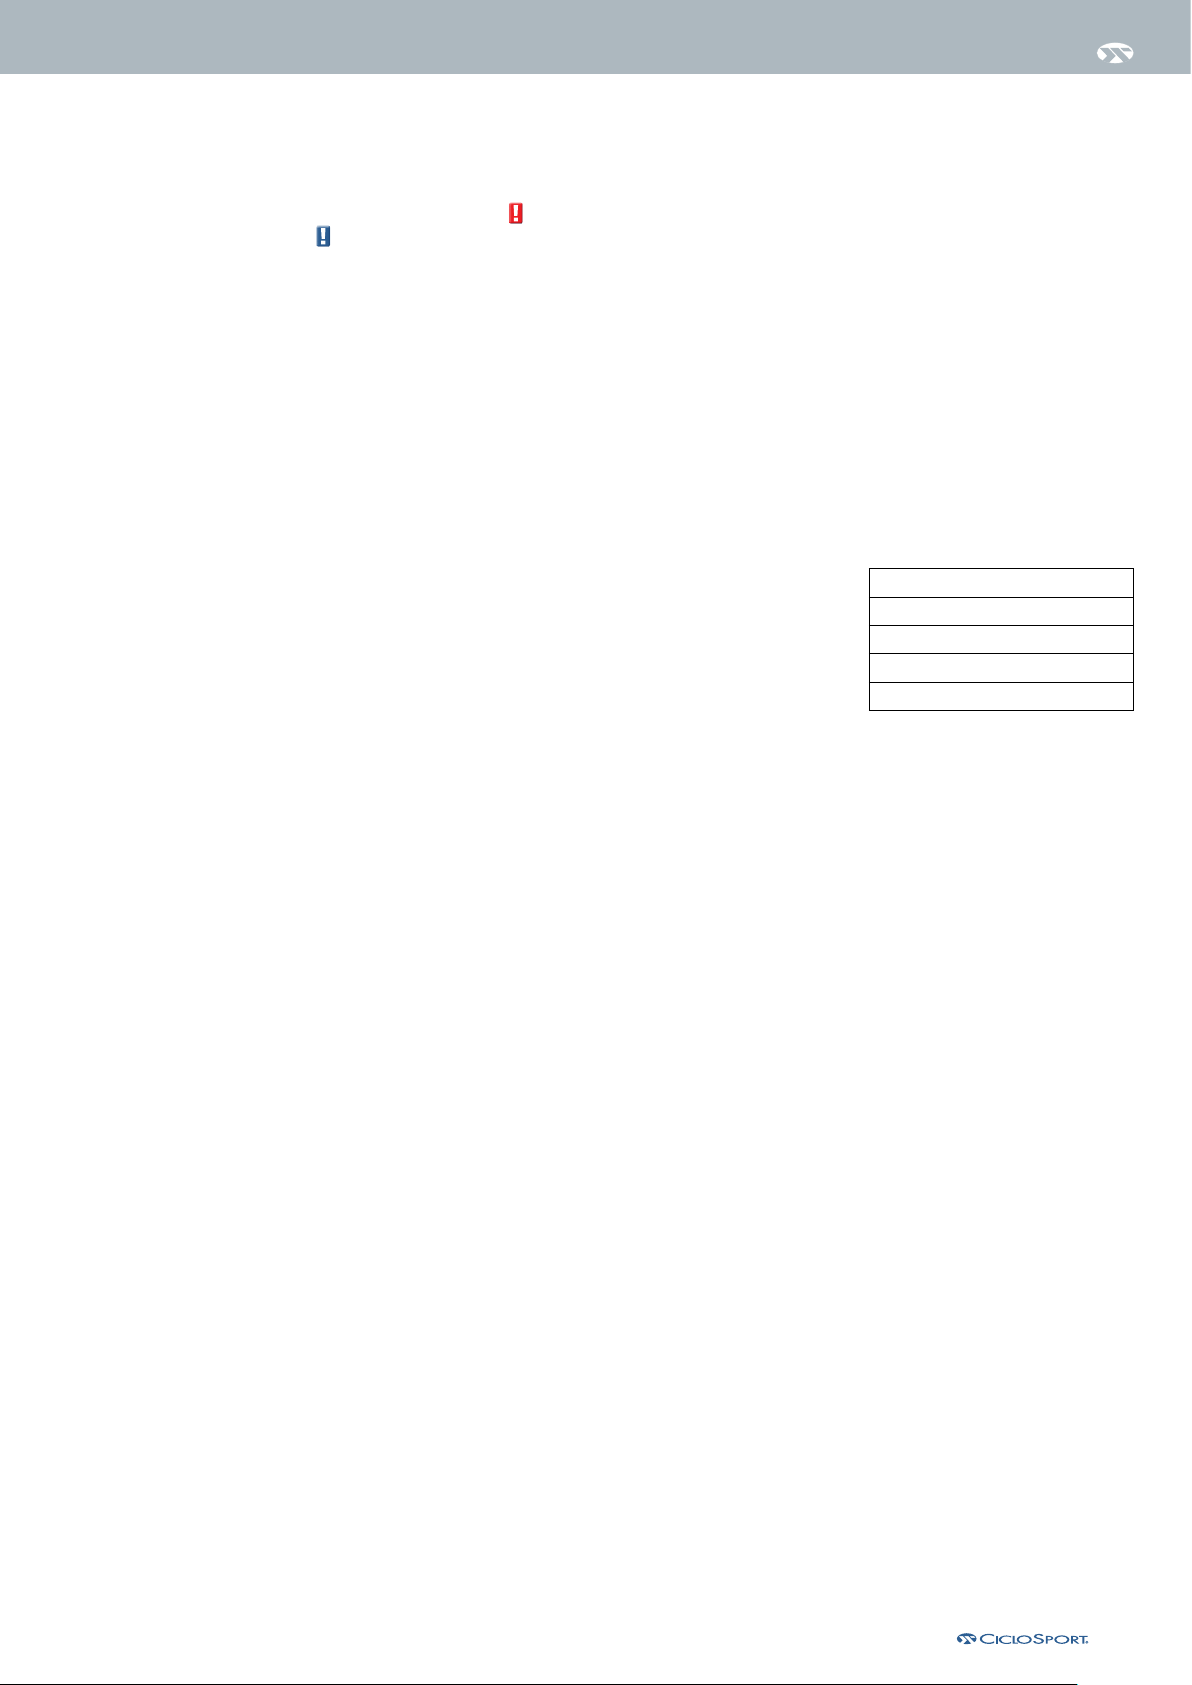
You can use the following sensor types with the CM 9.3 A
Select the sensor you want to initialize and press the middle button.
Now INISCAN is displayed in the lower display.
Now please make sure that the sensor starts to send. Put on the heart
rate sensor or move the crank or Wheel. Press the left and right button
simultaneously to start the sensor search. As soon as the sensor is found, the CM 9.3 A will display
“connected” in the bottom line. If no sensor of the selected type can be found it shows “fail”
Speed
Cadence
Combo Sensor (Speed./Cadence)
Heart rate
Power measurement
In the sensors menu a check mark after the sensor type shows that a sensor has been initialized.
To remove a sensor go through the above procedure and make sure that no sensor is near. After the search
failed the sensor that was initialized before will be deleted and the check mark disappears.
3.7.2 Power measurement calibration
If you use a power sensor that requires a calibration, select power in the sensor menu and press the middle
button. When INISCAN is displayed, press the right button to enter calibration mode. Press the middle but-
ton to start the calibration. The CM 9.3 A will show “Success” in case the calibration was successful.
|
12
Page 13
Chapter 3 – settInGs & fIrst start
3.8 PC-Connection
To analyze the data recorded by the CM 9.3 A (+) you require the program “CicloAgent pro” which can be
downloaded from our website “www.CicloSport.com/cm93a”. Download the file and start the installa-
tion process.
Once you have installed the software, plug the USB dongle into a free USB port on your PC or Mac. Take the
CM 9.3 A (+) and press the middle button until the menu appears. Press the left or right button until the
menu item PC-LINK is displayed. Press the middle button and the display reeds LINK. To start the transfer
process, press the left and right buttons simultaneously. The CM 9.3 A (+) is now looking for the USB dongle.
When connected, “Linked PC” will be displayed
The CicloAgent pro will guide you through the download process.
3.9 Others / SET MISC
3.9.1 Power-saving mode.
It is recommended to put the CM 9.3 A in power saving mode to conserve battery life.
If you want to put the computer into the power saving mode, press the left or right button in the main menu
until the lower display shows SET MISC is displayed, press the center button.
Power down is activated by pressing the left and the right button simultaneously. Pressing the left button
brings you to 3.9.2
The CM 9.3A (+) automatically enters a low power mode after approximately 6 minutes without signals received or buttons pressed.
3.9.2 Reset all values
Pressing the left button in the Power down menu brings you to the totals reset. Press the middle button to
reset all daily and all total values.
If you want to delete only the daily values without starting a recording, press all three keys simultaneously
for 5 seconds.
3.9.3 Recording interval
You can change the recording interval with the right button:
Intervall Max. recording time
1 Seconds 2 Hours
5 Seconds 10 Hours
10 Seconds 20 Hours
30 Seconds 60 Hours
60 Seconds 120 Hours
The CM9.3 A will overwrite older data if the memory is full without notice. When the current recording has
overwritten all older files and filled the entire memory of the CM 9.3a, the recording will be stopped and
“MEM F” will be displayed
|
13
Page 14
Chapter 4 – usInG the Cm 9.3 a (+)
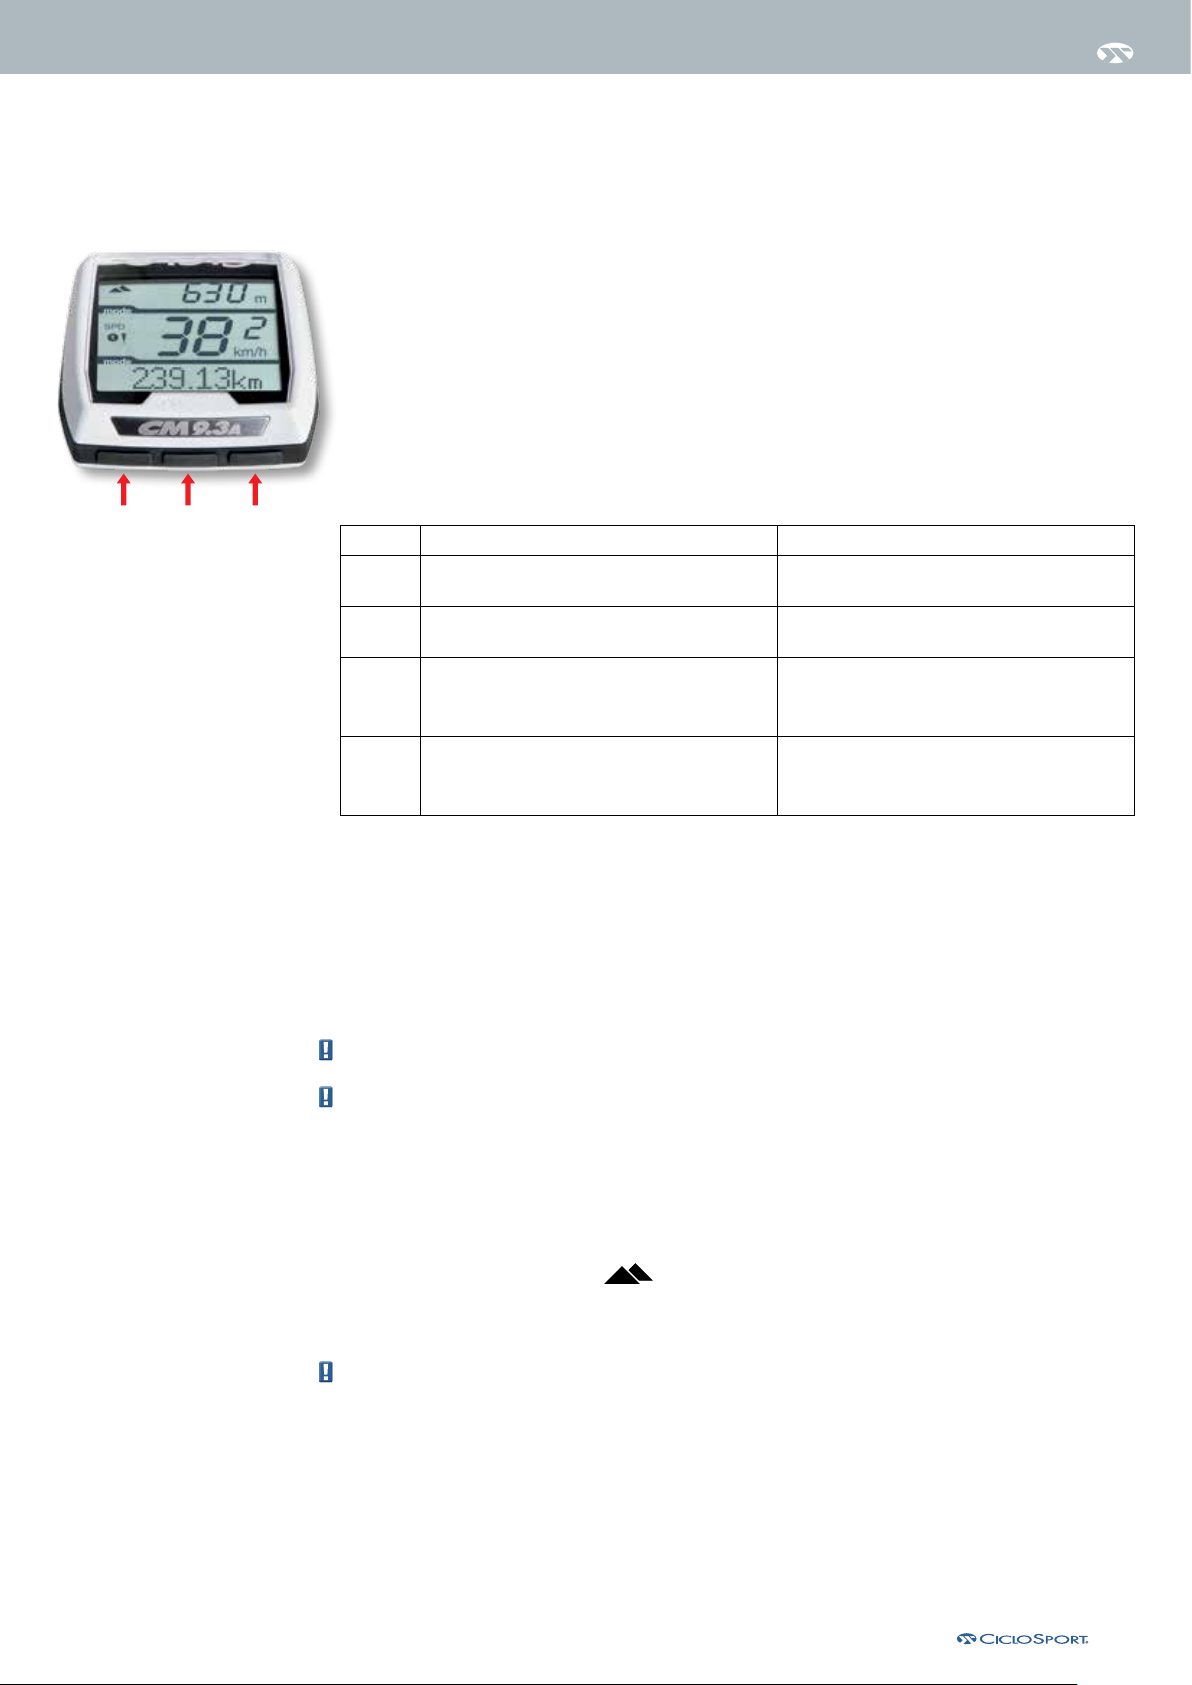
4.1 Main functions
Bike Mode
1 left = change lower display main functions
2 middle = display Lower display sub functions
3 right = change Upper display functions
Long press of the middle button = Menu
1+2 short press of the Left and right button = Bike 1 to Bike 2 to No Bike Mode
1+2 long press of the Left and right button = delete daily values and start recording
4.2 Bike mode
321
Mode Button Function
Bike 1 Simultaneously press the left and right button.
The middle display shows a 1.
Bike 2 Simultaneously press the left and right button.
The middle display shows a 2.
No Bike Simultaneously press the left and right button.
the middle display is off
Menu Press the middle button for 5 seconds Switch between the bike modes before entering
Sensors and settings for bike 1 are enabled.
Sensors and settings for bike 2 are enabled.
In this mode, no wheel sensors are aktiv, only
time, altitude and heart rate are active.
the menu to change the settings for the current
bike
4.3 Light
The backlight is activated by pressing the left button for 4 seconds. The light stays on for 5 seconds. Pressing
the left button for 10 seconds activates the light manager. The display will briefly display ON LIGHT MGR.
To turn the light manager off, press the left button for 10 seconds again, OFF LIGHT MGR will be displayed.
While the light manager is on, the backlight will be activated for 5 seconds with every button press.
The light manager remains active until it is deactivated by the user!
Please note that the backlight requires significant power thus reducing battery life.
4.4 Recording
If you want to start recording, press the left and right button simultaneously for 5 seconds.
This symbol blinks during recording .
To stop recording, press the left and right buttons simultaneously for five seconds.
Please note that the memory of the CM 9.3 A (+) will overwrite older recordings when the memory is full
without notice. Regularly upload your recording to your PC or Mac to clear the memory.
|
14
Page 15
Chapter 4 – usInG the Cm 9.3 a (+)
4.5 Initializing a sensor
The CM 9.3A (+) is a digital computer using the ANT+ transmission system. Every new sensor hast to be
initialized before use. Sensors will be stored until the battery is removed. The CM 9.3 A only supports ANT+
Sensors.
Please refer to 3.7.1 for how to initialize sensors.
If you have two bikes, you can connect designated sensors for each bike.
However, only one heart rate sensor can be initialized.
4.6 CICLO
CICLO
InZone
InZone
®
is a solution for the very best personalization of your training routine. It is possible to calculate
the optimum training threshold with the CICLO
resting heart rate. CICLO
®
®
InZone
®
InZone
is the ideal solution for personalized cardio training applied to any sport,
function based on your personal data and your
from jogging and cross-country running to road and indoor cycling.
Improve your fitness? – Lose weight? – Train whilst always taking your health into consideration? Everyone
will find the correct goal to follow in their training. But how do you train to achieve those goals in the most
efficient manner possible? How do you find the right intensity of effort during training? CICLO
InZone
®
is the
optimum training ZONE for effort, resistance and weight loss.
What does CICLO
InZone
®
do?
It calculates the optimum training zone for effort, resistance and weight loss. The values vary from person to
person and they offer a valid training support – always staying between 70 % and 85 % of the maximum
heart rate. (+/- 5 % of tolerance, taking into consideration the actual heart rate when at rest and the level of
training). The question of burning fat is seen in the “correct” light with CICLO
®
InZone
– on the basis of the
personal data collected.
4.7 Battery change
A battery symbol appearing on the left side of the middle display indicates that the battery is running flat and
a battery change is recommended.
Put the CM 9.3 A (+) into power saving mode (3.9.1). Open the battery cover with a coin and replace the
battery “CR2032“. Before you close the battery cover, make sure the O-ring is positioned correctly.
Otherwise, splash proofness may be compromised.
4.8 Service Interval
If “SERVICE” is displayed in the lower display after start up, your bike shop has set a mileage value in the
CM 9.3 A and recommends you to check with them for an inspection of your bike. Pressing the middle button
while SERVICE is displayed, turns this function off.
|
15
Page 16

Chapter 5 – servICe
5.1 Service
Do you have questions or a problem with the CM 9.3 A (+)?
You can call your local distributor or you send us an email to: [email protected]
5.2 Return the Unit
If you’re CM 9.3 A (+) is sent in for repair (or battery change) or if a guarantee claim is not valid, repairs up
to EUR 30. - will be carried out automatically. In case of higher repair costs you will be notified. The repaired
device will be sent back COD.
If you want to send in your device for repair, please fill out the warranty card at the end of this manual.
Please include the following ITEMS in the package:
- Copy of the invoice
- Warranty card
- Product
Our service address:
Fa. Ciclosport
Service
Einsteinstr. 39a
82152 Martinsried/Planegg
Germany
5.3 Trouble shooting
5.3.1 Display problems
Check the battery to the following points:
- Voltage> 3.0 V
- High quality battery
- Fit of the battery
5.3.2 No Speed/Cadence/HR/Power
- The sensor was not initialized correctly. Under 3.7.1
- Check the sensors if they are mounted CORRECTLY, see 3.1
- Check the distance between the transmitter and the magnet for a maximum of 3mm.
5.3.3 Speed is not displayed correctly.
- Check the wheel circumference.
- Check the correct unit of measurement.
5.3.4 Wrong altitude
- Air pressure has changed; you need to reset the height manually.
- Home altitude is incorrect.
5.3.5 Heart rate is not displayed correctly or does not work.
- Check if the sensor was initialized correctly. 3.7.1
- Check if the HR function is activated in the menu.
- Check the battery in the belt.
- Moisten the contacts on the chest strap
5.3.6 The altitude keeps changing even when I‘m at the same place?
The height measurement of the CM 9.3 A (+) is barometrically, which means that the height is measured by
the air pressure. When the air pressure changes due to weather changes, the altitude value in the computer
changes accordingly. By using the home altitude the height is reset to the default value whenever a recording
is started.
16
|
Page 17
Chapter 5 – servICe
5.4 Guarantee
We offer a guarantee of 2 years from the date of purchase on the CM 9.3 A. The guarantee is limited to
material and processing faults.
Broken transmitters, or damages of wasted parts of CM 9.3 A are excluded from the guarantee. The guarantee is valid only if the computer, with accessories, has been handled and maintained carefully and according
to operating instructions.
The guarantee will take place through changes of or repairing the defective parts. The guarantee doesn’t
cover direct, indirect or subsequent damages which are related to the product.
This guarantee doesn’t limit any rights of the consumer (considering relative national law) in respect to the
dealer.
To return the CM 9.3 A under conditions/terms of the guarantee, please refer to your dealer, your local
distributor or send the computer with the proof of purchase (date) and all accessories and with sufficient
postage to:
Fa. Ciclosport
Service
Einsteinstr. 39a
82152 Martinsried/Planegg
Germany
E-Mail: [email protected]
Before returning the product, please read the instruction manual again, and check the battery. For entitled
warranty claims, the repaired device or a replacement device will be returned free of charge.
Repair:
If you’re CM 9.3 A (+) is sent in for repair (or battery change) or if a guarantee claim is not valid, repairs up
to EUR 30. - will be carried out automatically. In case of higher repair costs you will be notified. The repaired
device will be sent back COD.
5.5 Technical Data
CM 9.3A (+) (receiver)
Water splash resistant
Operating temperature: - 10°C to + 50°C
Battery: CR 2032 Lithium
Speed transmitter / optional cadence transmitter
Range: up to 2 m
Operating temperature: -10°C to 50°C
Transmission frequency: 2,4 GHz Battery: CR2032 Lithium
Optional transmitter belt (heart rate transmitter)
Range: 5 m
Operating temperature: 0°C to50°C
Battery: CR2032 Lithium
Transmission frequency: 2,4 GHz
|
17
Page 18
Chapter 5 – servICe
5.5 Guarantee certificate:
Sender:
Name:
First Name:
Street/No:
Code/Location:
E-Mail:
Product name:
Accessoires:
Reason for return:
After expiry of the guarantee: Repairs should be carried out up to a value of Euro _______________
Disposal of Old Electrical & Electronic Equipment (Applicable in the European Union and other European countries
with separate collection systems).
This symbol on the product or on its packaging indicates that this product shall not be treated as household waste. In-
stead it shall be handed over to the applicable collection point for the recycling of electrical and electronic equipment.
By ensuring this product is disposed of correctly, you will help prevent potential negative consequences for the environment and
human health, which could otherwise be caused by inappropriate waste handling of this product. The recycling of materials will
help to conserve natural resources. For more detailed information about recycling of this product, please contact your local city
office, your household waste disposal service or the shop where you purchased the product.
Subject to technical alterations and fault.
18
|
 Loading...