

Page 1
10156
06 - 2017
User Manual
EREBA T-HT / He
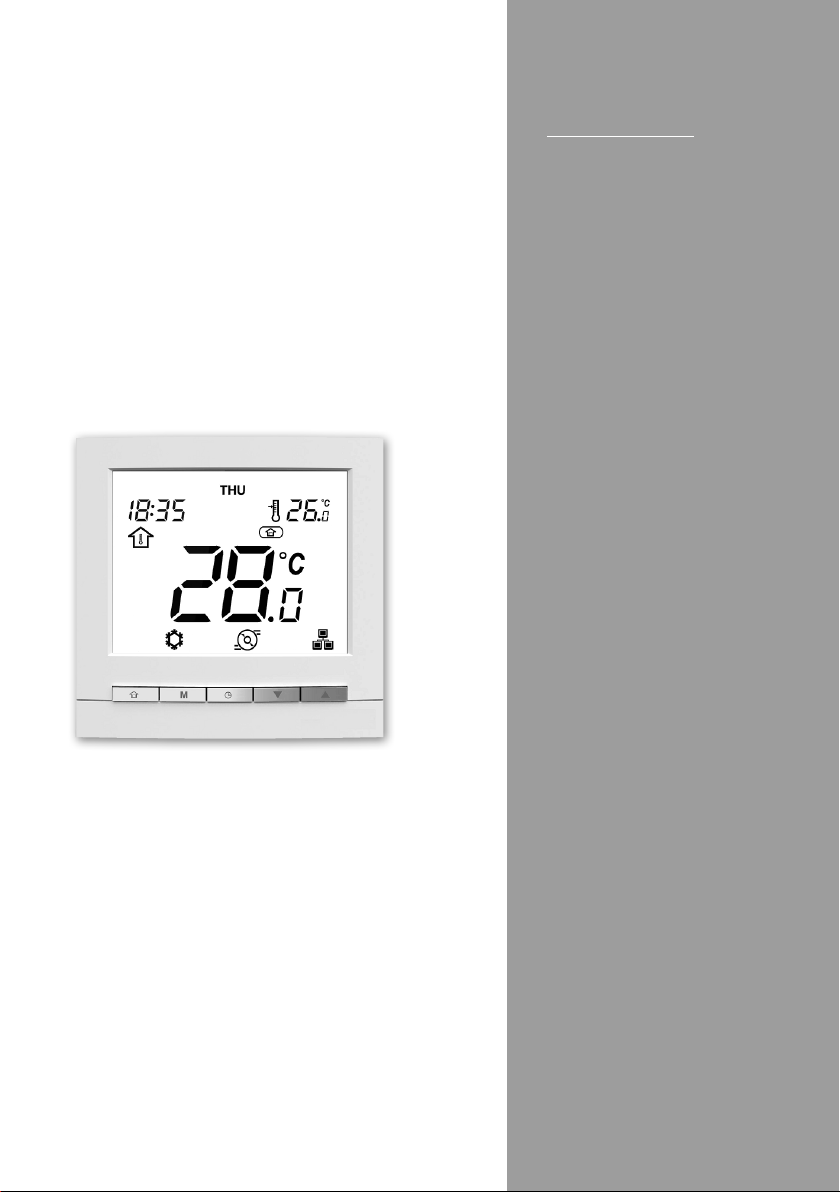
WALL-MOUNTED USER INTERFACE
Page 2

Contents
1 - QUICK START .......................................................................................................................................................3
1.1 Important ............................................................................................................................................................. 3
1.2 Key features ........................................................................................................................................................3
2 - WUI DISPLAY OVERVIEW .................................................................................................................................... 4
3 - OVERVIEW OF ICONS ..........................................................................................................................................5
4 - PROGRAMMING THE CONTROL.........................................................................................................................6
4.1 Clock/Day: Setting the time and day .................................................................................................................... 6
4.2 Heating/Cooling/DHWonly/O:Changingtheoperatingmode .....................................................................7
4.3 Home / Sleep / Away: Changing the comfort range .............................................................................................8
4.4 Current setpoint control: Changing the temperature ............................................................................................ 10
4.5 Additional data display: General status of the unit ............................................................................................... 11
4.6 Scheduling: Assigning schedules to heating and cooling modes ........................................................................12
5 - ADVANCED PROGRAMMING OPTIONS ............................................................................................................. 15
5.1 Advanced settings: Programming the Control ..................................................................................................... 15
5.2 Domestic Hot Water mode ..................................................................................................................................15
5.3 Pool Heating mode ..............................................................................................................................................15
5.4 Master / Slave control ..........................................................................................................................................16
6 - ALARMS AND ERRORS .......................................................................................................................................17
6.1 Alarms ................................................................................................................................................................. 17
6.2 Errors ..................................................................................................................................................................18
EREBA T-HT / He
EN-2
Page 3
1 - QUICK START
1.1 Important
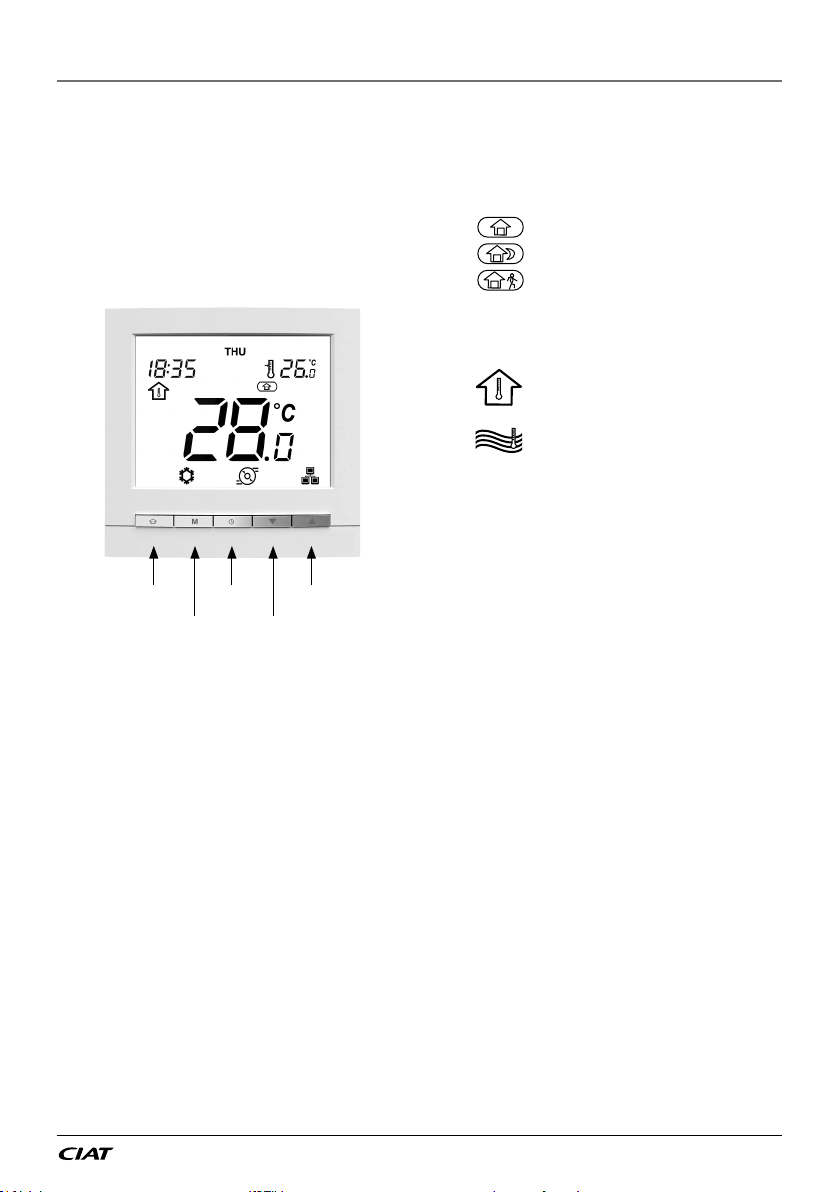
Your system is controlled by a Wall-Mounted User
interface (WUI) that can be installed inside your home.
This manual provides guidelines on how to use this
interface effectively.
If you have any questions regarding the display and
its configuration, please contact your installer for more
information.
Occupancy
Schedule Up
Mode Down
1.2 Key features
● Heating / Cooling: Depending on the unit, the
system may operate in Heating or Cooling.
● Occupancy control allows you to easily set the
system to operate in the following modes:
Home
Sleep
Away
● Easy temperature control: Depending on system
configuration, room temperature or water temperature
will be constantly displayed on the screen.
Room temperature icon indicates
that system control is based on room
temperature.
Water temperature icon means that
the system is controlled according to
water temperature.
● The setpoint which is the temperature to be
achieved is displayed in the upper-right corner of
the screen.
● Schedule control allows you to set the unit to
operate with a set of pre-defined parameters
(heating/cooling, occupancy, setpoint) in a specific
period of time. You can always modify the schedule
if necessary.
● Additional data display: In addition to the standard
display, you may easily check other parameters,
which provide information on the general status of
the unit.
● Home anti-freeze protection is used to maintain
the minimum room temperature. When the room
temperature goes below a user-defined threshold,
the unit starts heating in order to protect the building
against freezing. No user configuration is required.
● Water anti-freeze protection is used to protect
water pipes against freezing when the outdoor
air temperature is low. No user configuration is
required.
● Alarms are used to warn of potentially dangerous
situations that may result in the failure of the unit.
● Domestic Hot Water. The DHW mode allows for
controlling hot water production provided that the
heat pump system is equipped with a domesic water
tank and a diverting DHW valve.
● Master/Slave control allows you to control up to
four units at the same time.
● Pool heating mode allows for controlling pool water
temperature provided that the heat pump system
is equipped with a specific heat exchanger and a
diverting valve.
TIP To configure the advanced parameters of the unit,
please contact professional technicians.
EN-3 EREBA T-HT / He
Page 4
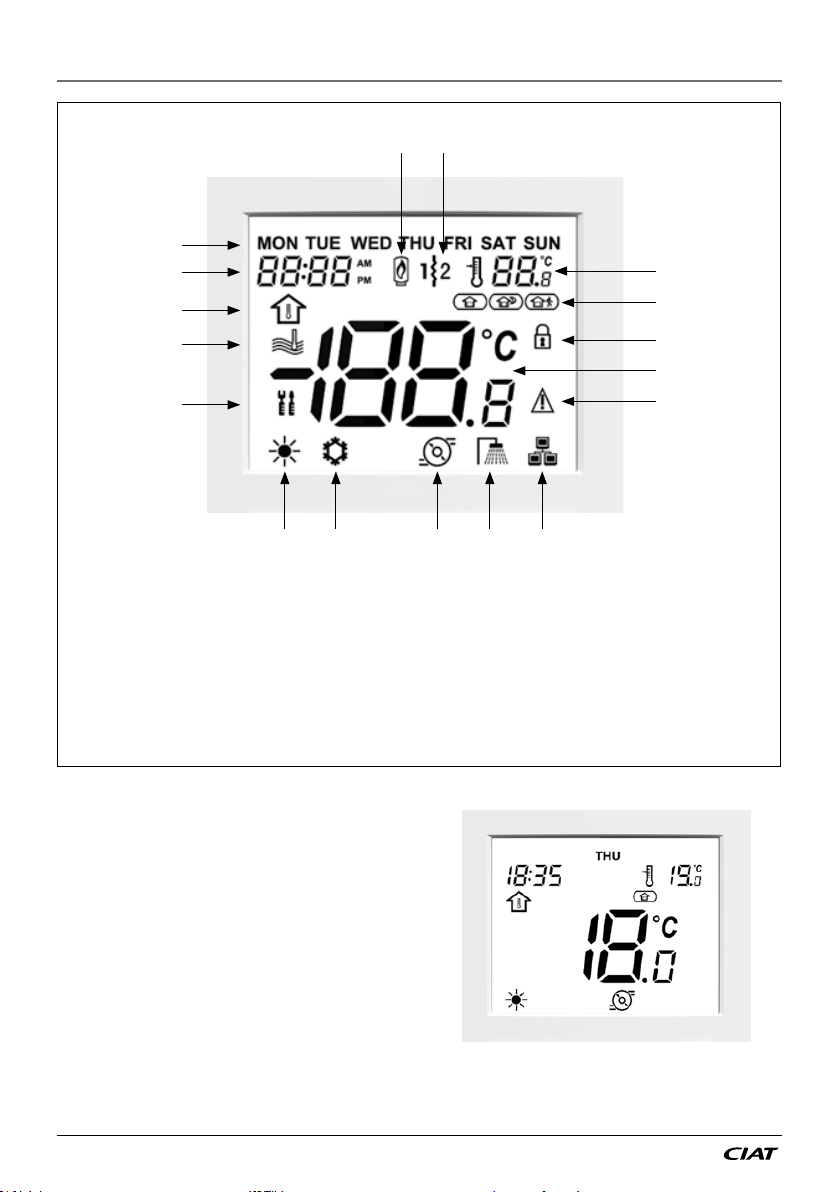
2 - WUI DISPLAY OVERVIEW
①
②
③
④
⑤
⑥ ⑦ ⑧ ⑨ ⑩
Legend:
①
②
③
④
⑤
⑥
Days of week
Clock
Room temperature
Water temperature
Advanced settings
Heating mode
Cooling mode
⑦
Pump running
⑧
Domestic Hot Water mode (DHW)
⑨
Master / Slave control
⑩
Alarm
⑪
Temp. display / Alarm code / Message
⑫
⑰ ⑯
⑬
⑭
⑮
⑯
⑰
⑮
⑭
⑬
⑫
⑪
Occupancy lock
Occupancy status
Setpoint
Electric heater stage
Boiler
Home Screen
Please note that the home screen display may vary
depending on unit configuration and screen settings:
● Heating / Cooling / DHW mode
● Additional heating: Boiler or electric heating
● Occupancy mode control: Home/Sleep/Away
● Air temperature control (room temp.)
● Water temperature control
● Time display: 12-hour clock or 24-hour clock
EREBA T-HT / He
EN-4
Page 5
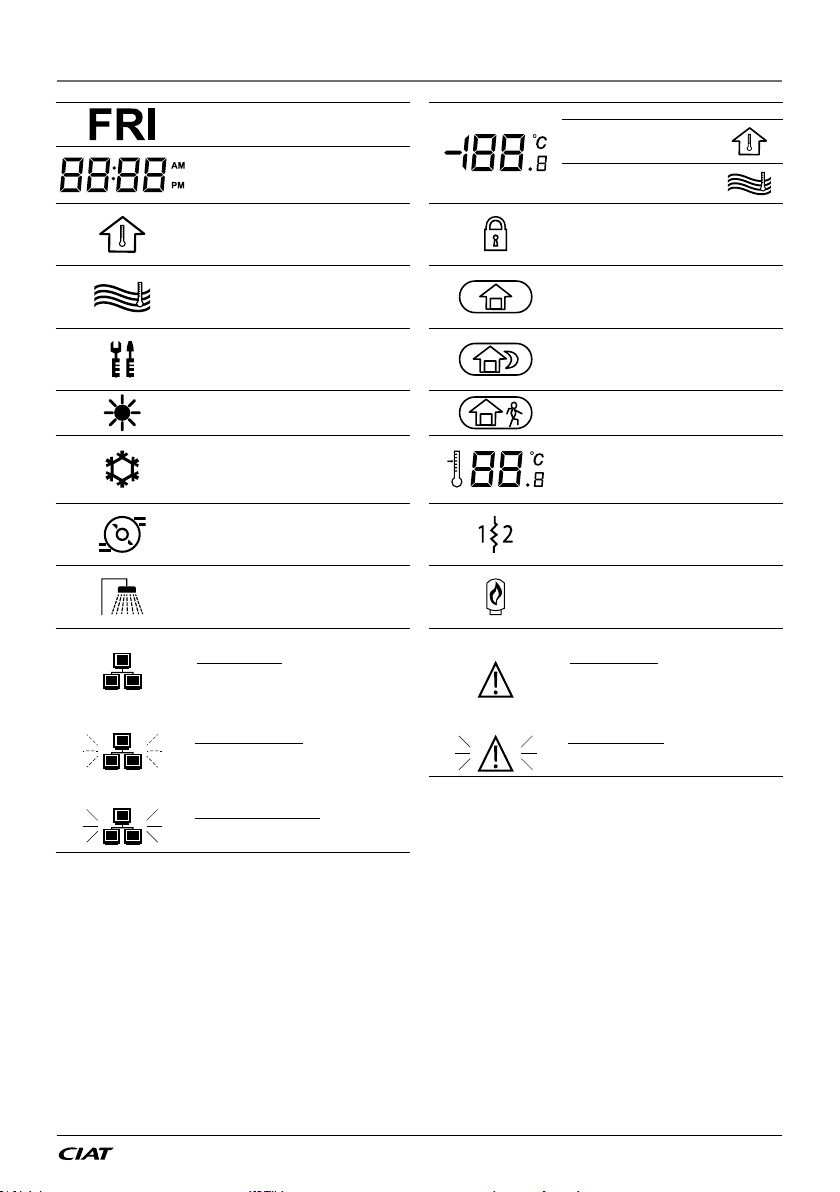
3 - OVERVIEW OF ICONS
Days of week: Temperature display:
Monday – Sunday Room temperature
Clock:
12-hour or 24-hour clock display
Room temperature: Occupancy lock:
System control is based on room
temperature
Water temperature: Occupancy:
System control is based on water
temperature
Advanced settings: Occupancy:
The icon is blinking when a password
is required
Heating mode: Occupancy:
HEATING mode is active AWAY mode is active
Cooling mode: Setpoint:
COOLING mode is active Temperature to be achieved
Pump status: Electric heater stage active:
Pump is running Used in the case of heat pump failure
Domestic Hot Water mode (DHW): Boiler active:
DHW mode is active Used in the case of heat pump failure
Master / Slave: Alarm:
Steady icon: This interface is
connected to the master unit and it is
used to control all units in the same
master/slave group
Fast flashing icon: This interface is
connected to the slave unit and it is
controlled by commands sent from the
Master
Slowly flashing icon: Master/Slave
communication failure
Water temperature
Occupancy is set manually by the user
(schedule control is disabled)
HOME mode is active
SLEEP mode is active
(room or water temperature)
or low outdoor air temperature
or low outdoor air temperature
Steady icon: Alarm condition
detected; the unit is stopped
Flashing icon: Alarm condition
detected; the unit is running
NOTE When the user interface backlight is switched off, press any key to turn on the display.
EN-5 EREBA T-HT / He
Page 6
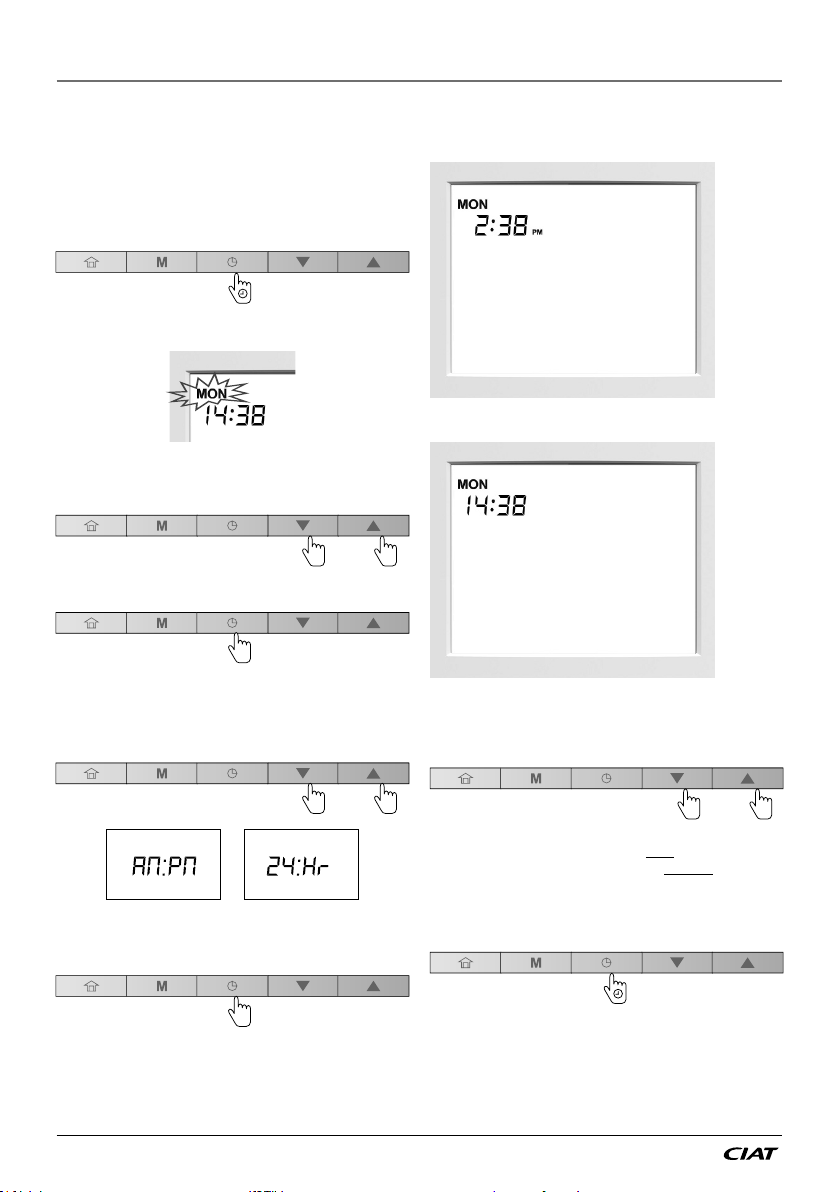
4 - PROGRAMMING THE CONTROL
4.1 Clock/Day: Setting the time and day
Before using any programming features of the WUI, it is
necessary to set the time and day of the control.
To configure time and day display
1. To access the time configuration menu, press and
hold the Schedule key for 2 seconds.
Day of week setting
2. The current day starts flashing.
3. If necessary, press the Down key or the Up key to
change the day of the week.
4. Press the Schedule key to confirm your selection
and go to the next parameter.
Time format setting
5. Once the day of the week has been confirmed, set
the time format.
6. Press the Down key or the Up key to change the
time format.
You may customise the clock to display time in a 12hour or 24-hour format.
Example: 12-hour clock display
Example: 24-hour clock display
Time setting
8. Once the time format has been confirmed, set the time.
9. Press the Down key or the Up key to set the time.
12-hour format
7. Press the Schedule key to confirm the time display.
EREBA T-HT / He
24-hour format
For 24-hour format: Set the hour and press the
Schedule key to confirm. Then, set minutes and press
the Schedule key to confirm.
10. To confirm all changes, press and hold the Schedule
key for 2 seconds.
EN-6
Page 7
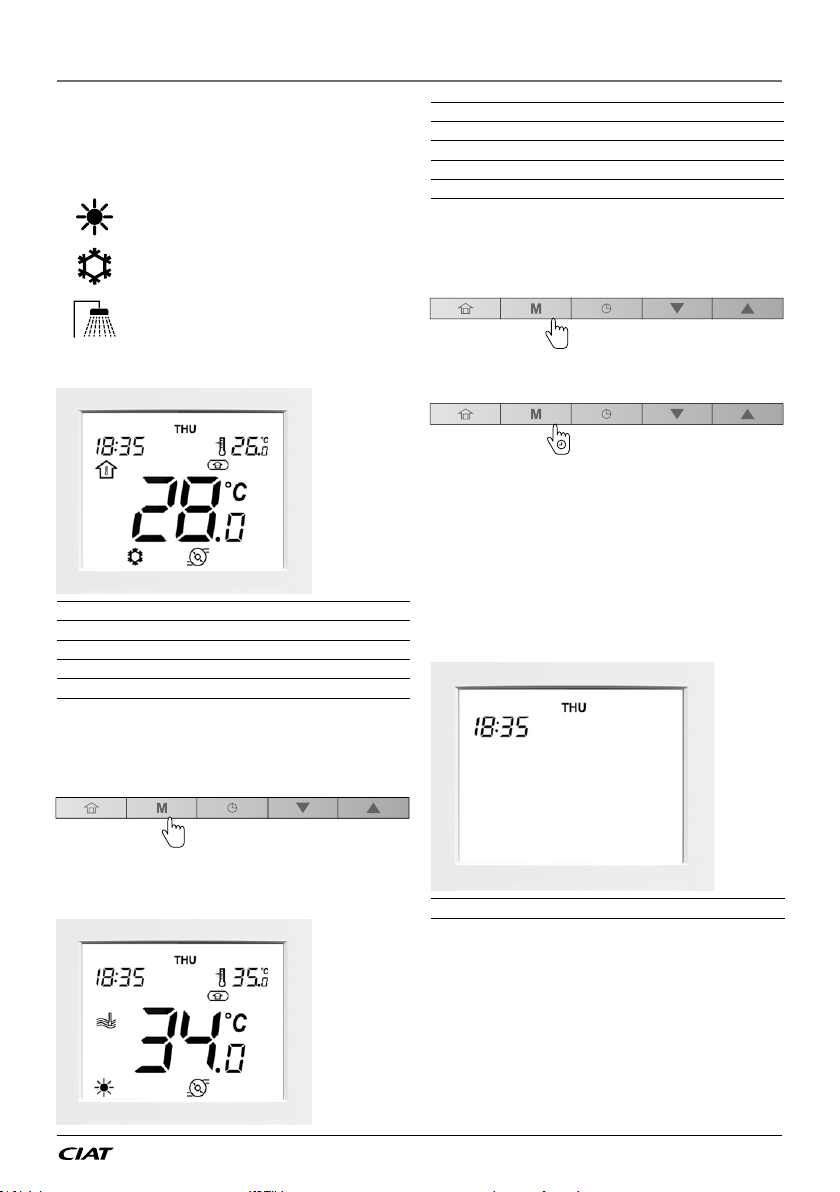
4 - PROGRAMMING THE CONTROL
4.2 Heating / Cooling / DHW only / Off:
Changing the operating mode
The operating mode display depends on the unit
configuration as well as user settings.
Heating: The heat pump heats the water
loop to the selected temperature setpoint.
Cooling: The heat pump or chiller cools
the water loop to the selected temperature
setpoint.
Domestic Hot Water only: The heat pump
is used to provide domestic hot water.
Cooling or Heating is disabled.
Example:
Mode
Occupancy
Temp. control
Room temp.
Setpoint
Cooling
Home
Air temp. control
28°C
26°C
Mode
Occupancy
Temp. control
Water temp.
Setpoint
To turn on the system
1. Press the Mode key to go from the OFF Mode to
any other mode.
To turn off the system
1. Press and hold the Mode key for 2 seconds.
2. The unit will be turned off, but the current time and
day will be still displayed on the screen.
When the unit is OFF, all operating modes described
above (cooling / heating / DHW only) are disabled.
Never turn the power off to your system in order to
ensure that the home anti-freeze protection and the
water anti-freeze protection are always available.
Example:
Heating
Home
Water temp. control
34°C
35°C
To set the operating mode
1. Press the Mode key successively to select the
required operating mode.
2. The icon corresponding to the selected mode will
be displayed.
Example:
1.
Mode
Off
EN-7 EREBA T-HT / He
Page 8
4 - PROGRAMMING THE CONTROL
4.3 Home / Sleep / Away: Changing the
comfort range
To optimise energy efficiency of the building while preserving
its occupants’ comfort, the controller is normally scheduled
according to occupancy hours.
If necessary, you can select the occupancy mode manually.
Each occupancy mode is associated with a pre-defined
temperature range.
Three methods used to define the comfort range
(occupancy mode) are as follows (A/B/C):
A. Scheduling
The user can set up to 8 steps where each step is defined
by the following parameters:
• Starting time
• Occupancy mode
• Day(s) of week when it is activated
For more information about occupancy control based on
scheduling, please see “Scheduling: Assigning schedules
to heating and cooling modes” on page 12.
B. Manual setting
The user can change occupancy directly on the screen.
This setting will be effective until the next scheduling step
becomes active.
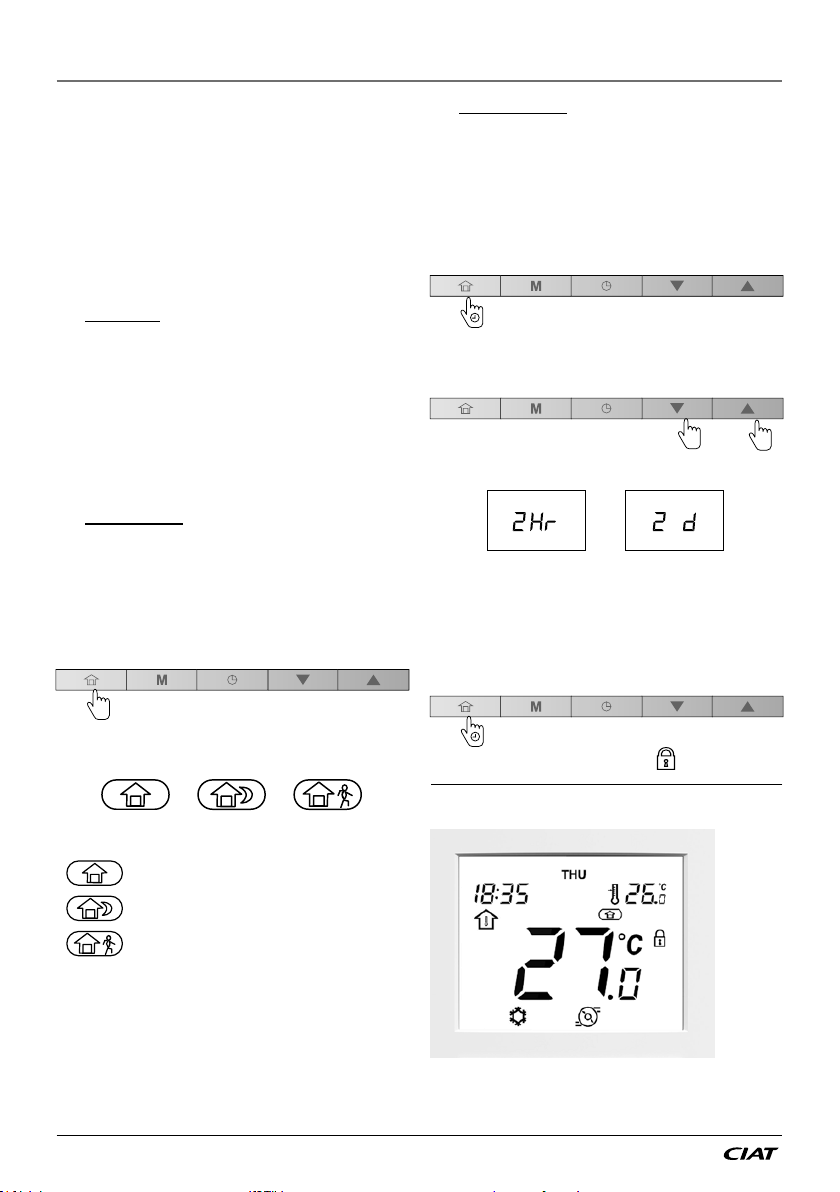
To set occupancy manually
1. Press the Occupancy key successively to select
the required occupancy mode.
C. Occupancy lock
The current occupancy can be locked during a period
specified by the user (“occupancy lock”). During this
time, the scheduling will be ignored. Once this period
has elapsed, occupancy returns to the scheduling
setting.
To set the time for the selected occupancy
1. Press and hold the Occupancy key for 2 seconds.
2. The length of Home / Sleep / Away period can be set
in hours or days. Press the Down key or the Up key
to set the required number of hours/days.
3.
Example: Occupancy period (2 hours / 2 days)
Note Upon “23 Hr”, the display switches to days
(“1 d”). When set in days, the defined occupancy will end
at exactly the same time it started. Afterwards, the mode
defined by the schedule will be in force.
3. To confirm the selected occupancy, press and hold
the Occupancy key for 2 seconds.
2. The icon corresponding to the selected mode will be
displayed.
Home Sleep Away
The heat pump or chiller is running in the Home mode
and the Home setpoint is used.
The heat pump or chiller is running in the Sleep mode
and the Sleep setpoint is used.
The heat pump or chiller is running in the Away mode
3.
Note To configure the setpoints of different occupancy
modes, refer to “ Current setpoint control: Changing the
temperature.
EREBA T-HT / He
and the Away setpoint is used.
4. The lock icon will be displayed
Example: Occupancy lock (Home)
EN-8
Page 9
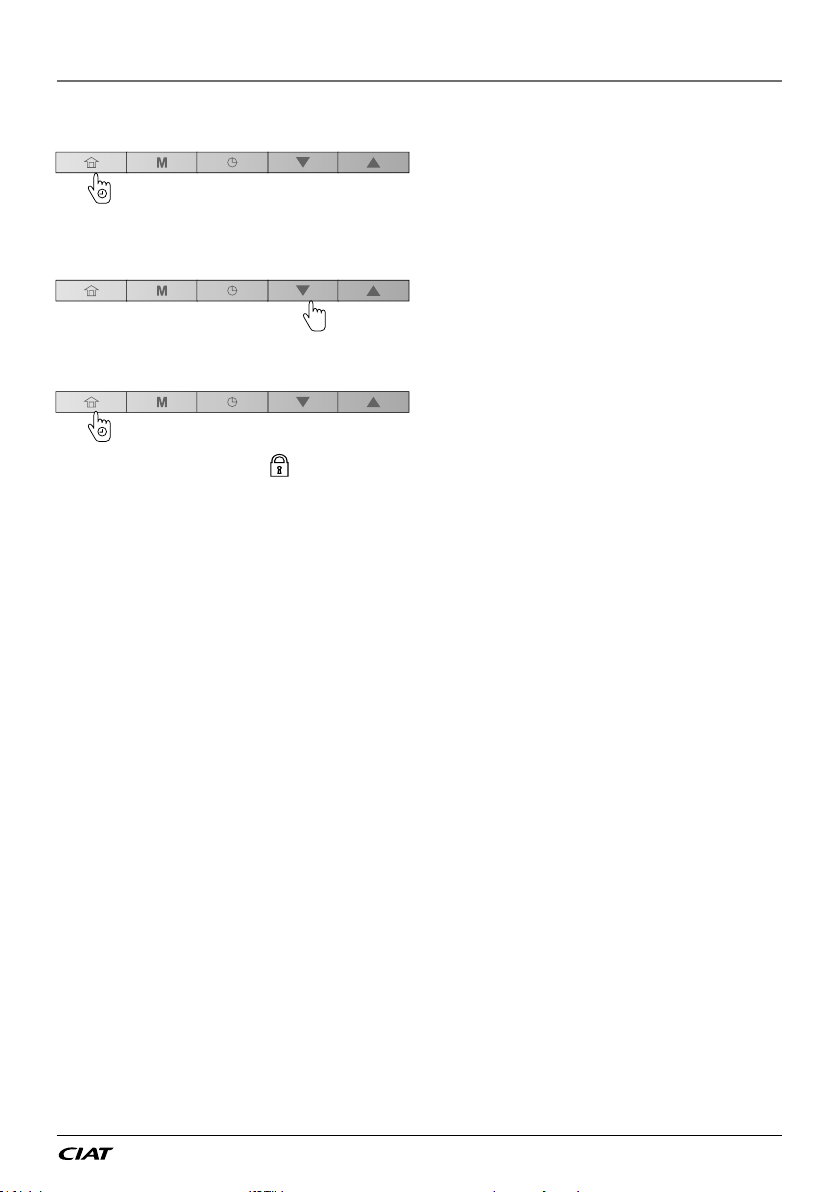
4 - PROGRAMMING THE CONTROL
To cancel the occupancy lock
1. Press and hold the Occupancy key for 2 seconds.
2. The display will show you the time remaining till the
end of the selected occupancy. Press the Down key
to set the counter to “0”.
3. To confirm your action, press and hold the
Occupancy key for 2 seconds.
4. The lock icon will disappear and the schedule
will be active again.
EN-9 EREBA T-HT / He
Page 10
4 - PROGRAMMING THE CONTROL
4.4 Current setpoint control: Changing
the temperature
Two different configurations could be available:
● If the user interface is installed on the unit (local
user interface), then the setpoint control is based
on the leaving water temperature.
● If the user interface is installed indoors (remote
user interface), then the setpoint control is based on
the room temperature.
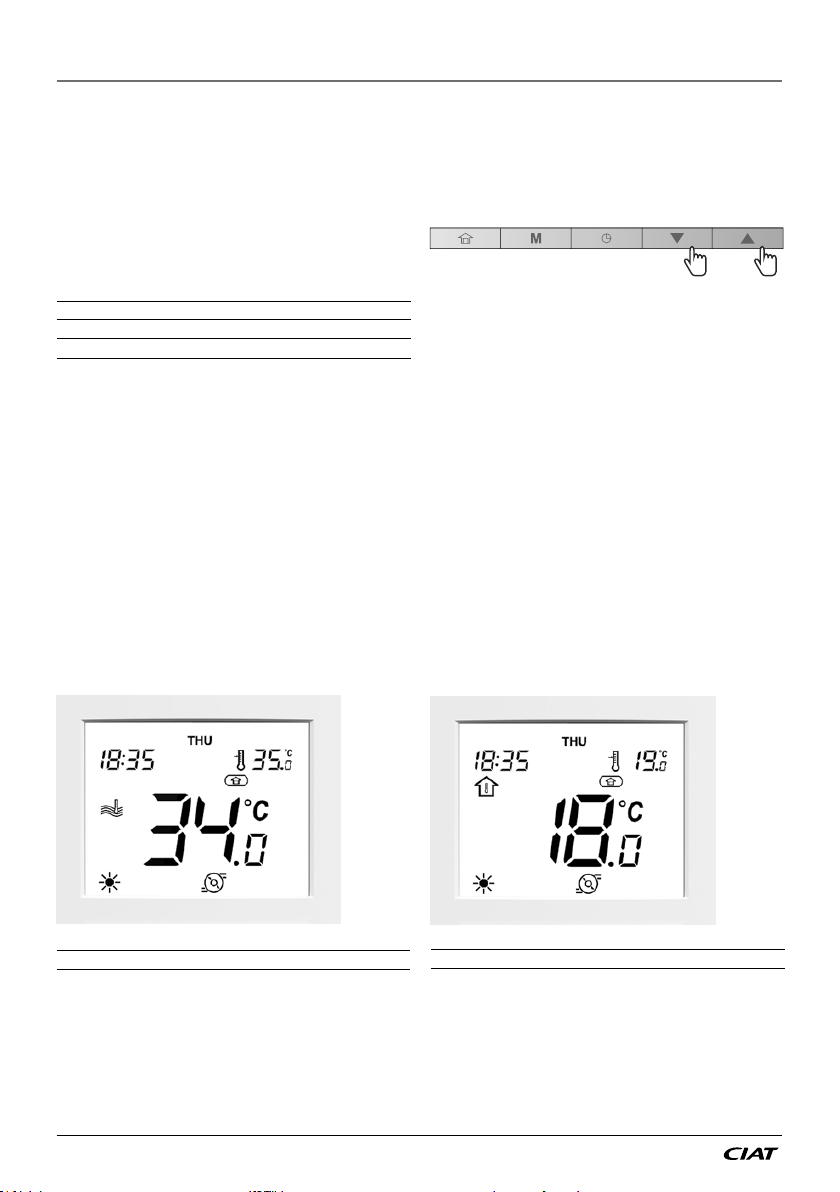
WUI type Current setpoint
Local Water setpoint
Remote Air setpoint
WATER TEMPERATURE CONTROL
Example (water temp. and water setpoint):
To achieve better comfort, it is possible to adjust the
current setpoint according to your needs.
To adjust the setpoint
1. Press the Down key to decrease the temperature.
2. Press the Up key to increase the temperature.
Please remember that the setpoint can be adjusted only
within a range defined for each occupancy mode.
Note 1 After a pre-defined period of inactivity (no key
is pressed), the setpoint information (air or water temp.
to be achieved) is dimmed. By default, the timeout is 10
minutes.
Note 2 With the method described in this section,
it is also possible to configure the setpoint for different
occupancy modes, except when setpoint control is
configured on leaving water setpoint and with the climatic
curves (depending on installer configuration). In this case,
the setpoints cannot be changed by user. If necessary,
please contact a professional technician to change the
configuration.
ROOM TEMPERATURE CONTROL
Example (room temp. and air setpoint):
Current setpoint 35°C
EREBA T-HT / He
Current setpoint 19°C
EN-10
Page 11
4 - PROGRAMMING THE CONTROL
4.5 Additional data display: General status of the unit
Normally when the user interface is installed indoors,
you have the current indoor air temperature and the air
setpoint displayed on the screen.
For units installed outdoors, the display normally shows
the current water temperature and the water setpoint.
No. Description Parameter number EREBA T/HT EREBA He
1 Outdoor Air Temp
2 Entering Water Temp P003 x x
3 Leaving Water Temp
4 Water Control Temp
5 Saturated Suction Temp P008 x N/A
6 Suction Temperature
7 Superheat Temperature
8 Superheat Target Temp
9 Discharge Temperature
10 Refrigerant Temperature
11 Requested Compressor Frequency
12 Actual Compressor Frequency
13 Water Control Point
14 Flow Switch Status
15 Safety Switch Status
16 DHW Tank Temperature
17 Pool Entering Water Temp
x = Value is displayed for this unit
o1 = Value is displayed only if DHW option is congured
o2 = Value is displayed only if Pool Heating option is congured
N/A = Value is not available for this unit (-40°C is displayed)
P001
P004
P044
P009
P015
P016
P010
P005
P022
P023
P043
P070
P069
P091
P117
In addition to these temperatures, WUI gives you the
option to check other parameters allowing you to monitor
the status of the unit (see the table given below). Please
note that these parameters (1-17) are in read-only
access.
x x
x x
x x
x x
x x
x x
x x
x x
x x
x x
x x
x x
x x
o1 o1
o2 o2
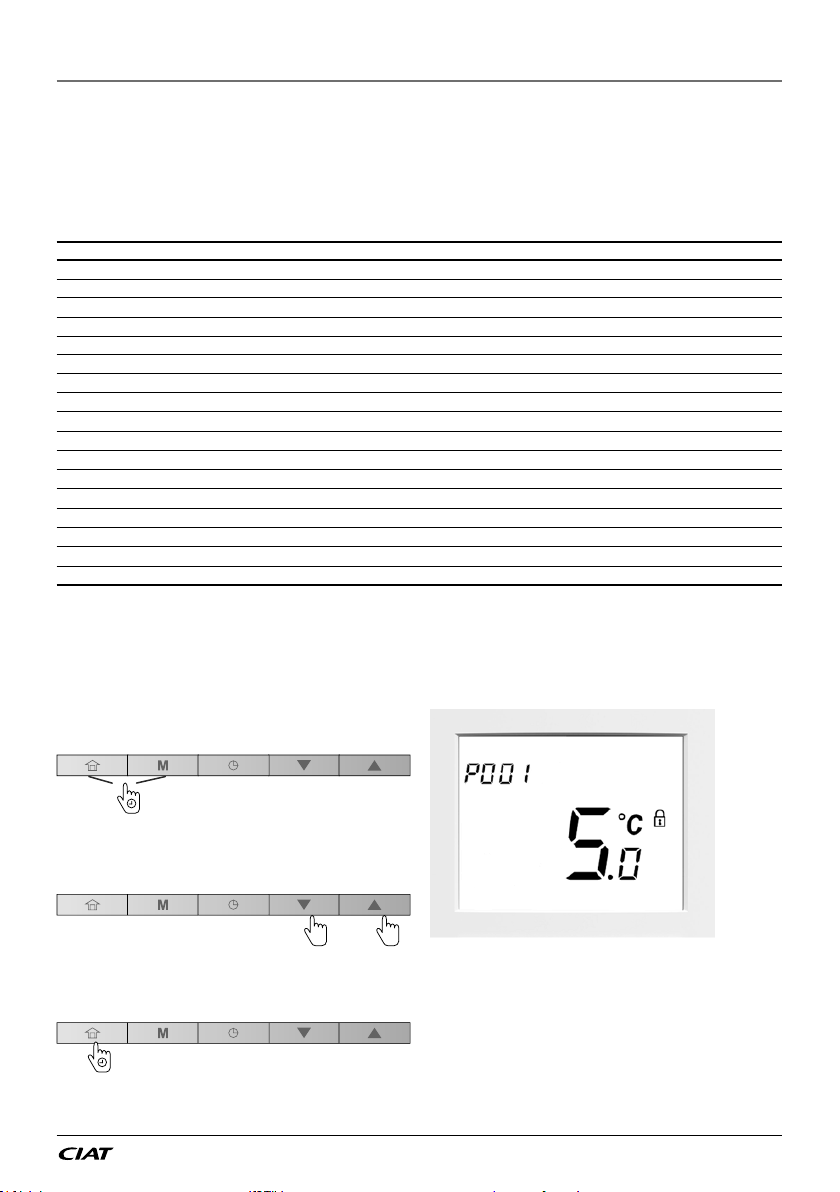
To display the required temperature
1. Press and hold the Occupancy key and the Mode
key simultaneously for 2 seconds.
2. The first parameter will be displayed.
3. Press the Down key or the Up key to switch between
all parameters listed in the table above.
4. To exit the current screen, press and hold
the Occupancy key until the home screen is
displayed or wait for 30 seconds (screen timeout).
Example: Outdoor Air Temp (Parameter: P001)
EN-11 EREBA T-HT / He
Page 12
4 - PROGRAMMING THE CONTROL
4.6 Scheduling: Assigning schedules to heating and cooling modes
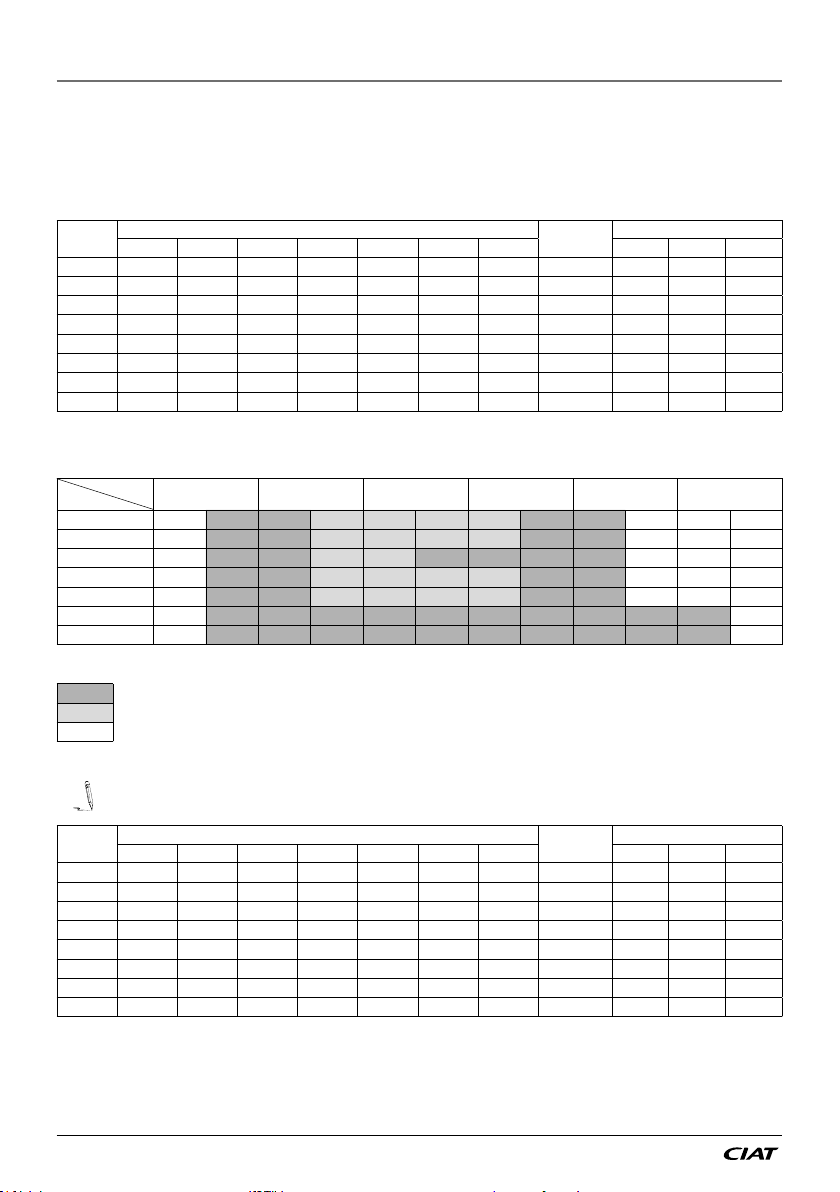
The scheduling functionality makes it possible to set the unit to operate in a specific mode during a pre-defined period
of time.The system allows you to modify eight steps, where each step is defined by the day(s) of the week, start time,
and occupancy.
Example of scheduling parameters
Step
Number
MON TUE WED THU FRI SAT SUN Home Sleep Away
Day of week
Start time
1 x x x x x x x 06:00 x
2 x x x x x 08:00 x
3 x 12:00 x
4 x x x x 17:00 x
5 x x x x x 22:00 x
6 x x 23:00 x
7 00:00
8 00:00
Hour (Start time)
Occupancy
Hour
Day
MON
TUE
WED
THU
FRI
SAT
SUN
Occupancy mode
Home
Away
●
Sleep
Complete the schedule according to daily routine and use it as you follow the instructions below.
Step
Number
06:00 08:00 12:00 17:00 22:00 23:00
●
●
●
●
●
●
●
MON TUE WED THU FRI SAT SUN Home Sleep Away
Day of week
Start time
● ● ●
● ● ●
● ● ●
● ● ●
● ● ●
Occupancy
1
2
3
4
5
6
7
8
●
●
EREBA T-HT / He
EN-12
Page 13
4 - PROGRAMMING THE CONTROL
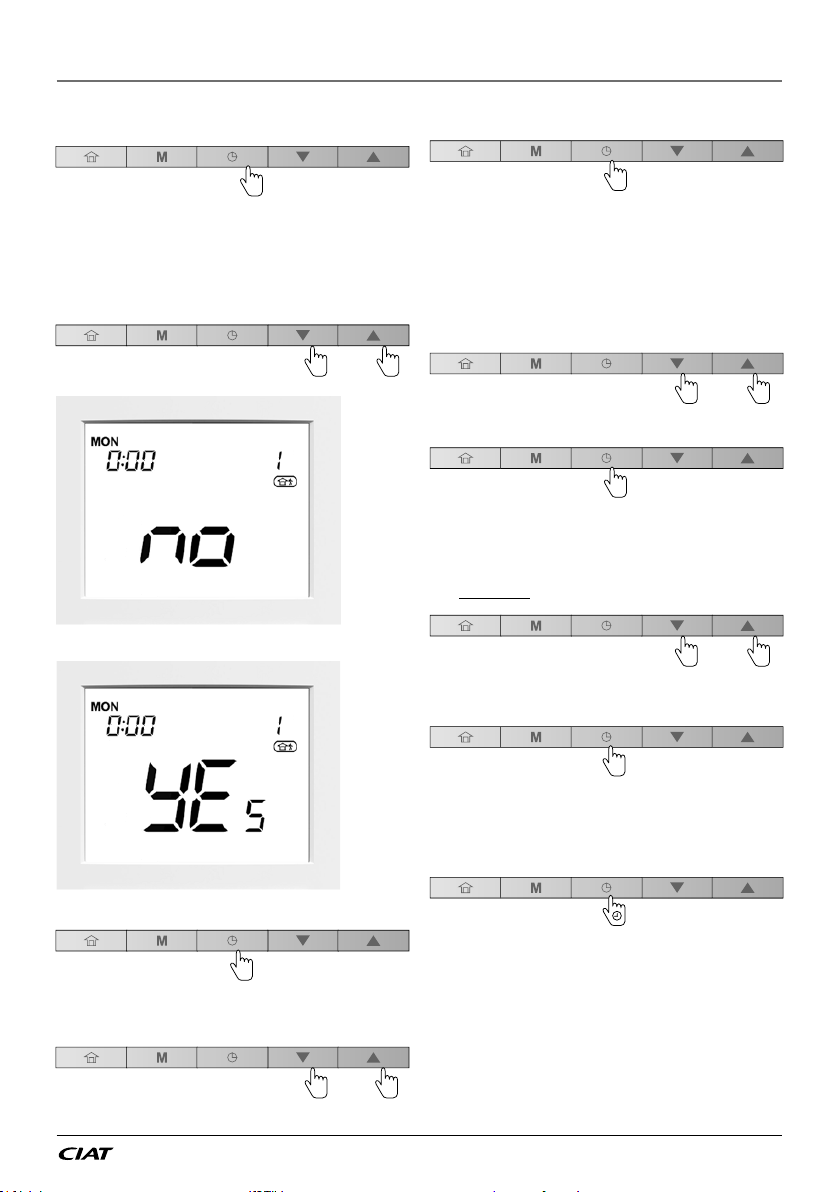
To modify the schedule (schedule steps)
1. Press the Schedule key to edit the schedule.
2. Upon entering the schedule menu, you will be able
to edit the first schedule step.
Day(s) of the week
3. The first day of the week (“MON”) will start flashing.
Press the Down key or the Up key to set ”Yes” (step
active on this day) or “no” (step inactive on this day).
Example: Monday (step inactive)
Example: Monday (step active)
6. Press the Schedule key to confirm your choice and
continue with the remaining days of the week.
Start time
7. Once the last day of the week (“SUN”) has been set,
the clock starts flashing.
8. Press the Down key or the Up key to set the start
time.
9. Press the Schedule key to confirm the start time.
OCCUPANCY
10. Once the start time has been set, the occupancy
icon starts flashing.
11. Press the Down key or the Up key to set the
occupancy for a given period.
12. Press the Schedule key to confirm the selected
occupancy.
13. The first day “MON” will start flashing. You can edit
your schedule settings again if necessary.
14. To validate the current schedule, press and hold the
Schedule key for 2 seconds.
4. Press the Schedule key to confirm your choice.
15. The next schedule step will be displayed (Schedule 2).
5. The following day (“TUE”) will start flashing.
Press the Down key or the Up key to set “Yes” (step
active on this day) or “no” (step inactive on this day).
EN-13 EREBA T-HT / He
Page 14
4 - PROGRAMMING THE CONTROL
Saving the schedule
At any time in the schedule menu, you can save the
current schedule step settings and go to the next
schedule step.
To save the current schedule and go to the next one
1. Press and hold the Schedule key for 2 seconds
(repeatedly) until the required schedule number
appears.
2. Perform all required steps as presented earlier in this
section.
Editing schedules
If necessary, you may easily modify any of 8 schedule
steps that are available.
To modify only one schedule, e.g. schedule “2”
1. Press the Schedule key to enter the schedule
menu.
2. Press and hold the Schedule key for 2 seconds
to validate schedule “1” without making any
modifications.
3. Schedule “2” will be displayed.
4. Perform all required steps as presented earlier in this
section.
Example:
To exit the schedule menu
1. To exit the schedule menu at any time, press and
hold the Occupancy key for 2 seconds.
2. The home screen will be displayed and changes
made to the currently modified schedule will NOT be
saved.
For example:
After having set and validated schedule “1”, you may
want to edit schedule “2”.
● When exiting schedule “2” without prior validation,
schedule “2” will NOT be saved (schedule “1” will
be saved).
● To validate a schedule, press and hold the Schedule
key for 2 seconds.
Deleting a schedule step
There are 8 schedule steps available; however, not all of
them have to be used.
To delete a schedule
1. Press the Schedule key to go to the Schedule menu.
2. Once you have navigated to the schedule step to be
deleted, you have to deselect all days of the week in
a given schedule.
3. Press the Down key or the Up key to set ”no” (step
inactive on this day).
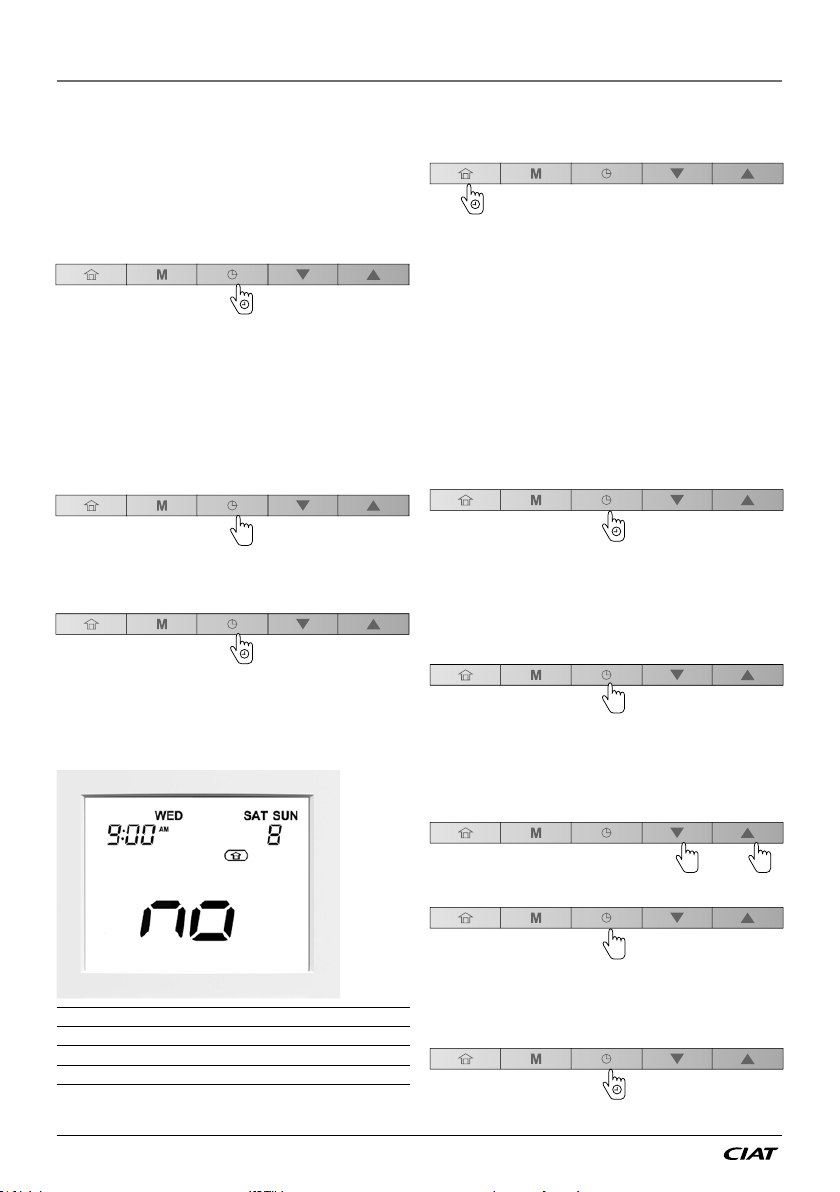
Start time 9:00
Days of week WED, SAT, SUN
Occupancy HOME
Schedule step 8
EREBA T-HT / He
4. Press the Schedule key to confirm your choice.
5. Follow steps given above (step 3 and 4) to deselect
all days of the week.
6. To confirm deleting the schedule step, press and
hold the Schedule key for 2 seconds.
EN-14
Page 15
5 - ADVANCED PROGRAMMING OPTIONS
5.1 Advanced settings: Programming the Control
The settings menu is used by technicians to configure
some advanced settings of the unit.
To access the settings menu
1. Press and hold the Occupancy key and the
Schedule key simultaneously for 2 seconds.
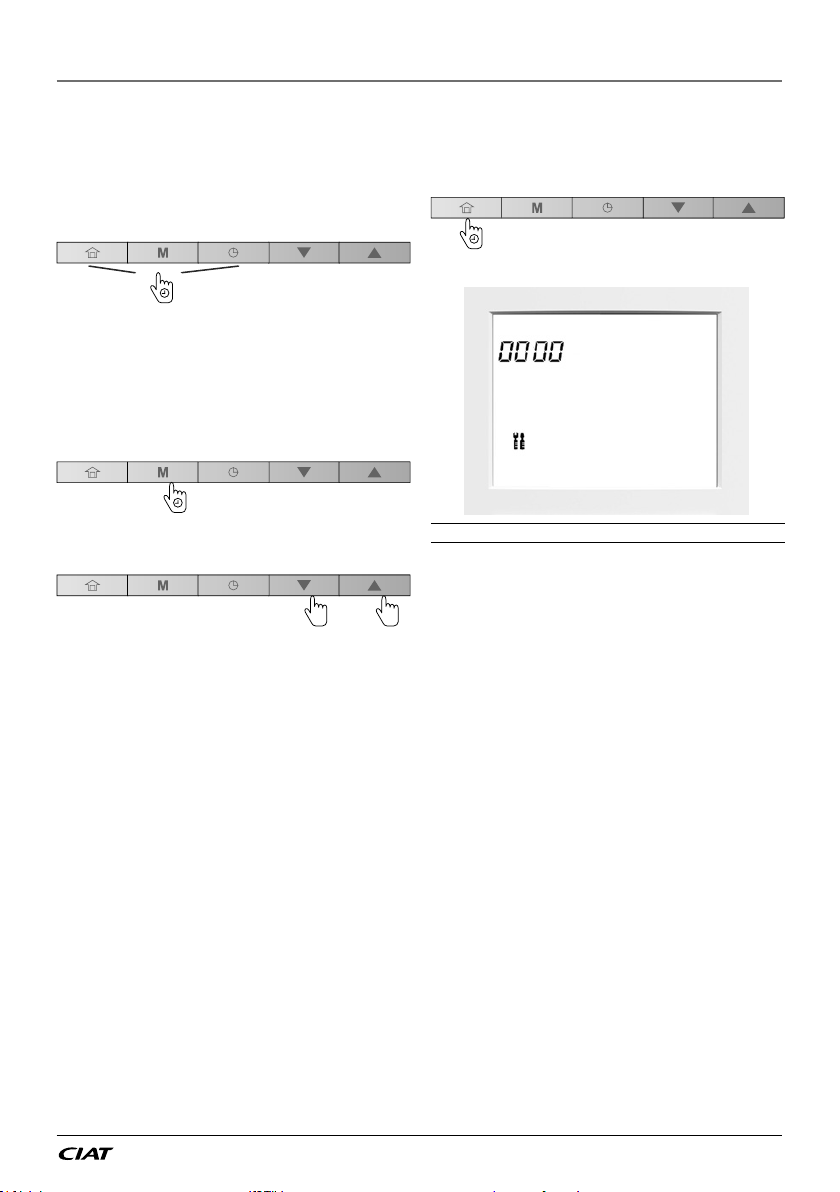
2. The password screen is displayed.
3. Provide the password.
For the user access, provide the following password:
0000.
4. To validate the password and access settings
configuration, press and hold the Mode key for 2
seconds.
To exit the password screen
1. Press and hold the Occupancy key until the home
screen is displayed.
5. Press the Down key or the Up key to navigate
across the screens.
5.2 Domestic Hot Water mode
Please remember that the Domestic Hot Water (DHW)
mode enabling hot water production is applicable only to
heat pumps that come with a domestic water tank.
Normally the Domestic Hot Water mode is triggered
whenever necessary and no further action from the user
is required.
The Domestic Hot Water schedule and the DHW
setpoint are set by the installer. For more information
about DHW schedule configuration, please refer to
the IOM Manual.
Password screen
For more information about advanced settings
configuration, please refer to the IOM Manual.
5.3 Pool Heating mode
Please remember that the Pool heating mode enabling
hot water production is applicable only to heat pumps that
come with a Pool heatting recommended heat exchanger.
Normally the Pool heating mode is triggered whenever
necessary and no further action from the user is required.
The Pool heating schedule and the Pool heating
setpoint are set by the installer. For more information
about Pool heating schedule configuration, please
refer to the IOM Manual.
EN-15 EREBA T-HT / He
Page 16
5 - ADVANCED PROGRAMMING OPTIONS
5.4 Master / Slave control
Building installations may require a few units to be
interfaced together in order to provide cooling / heating
on the same network.
The unit that is the decision point for the OPERATING
MODE and the CONTROL POINT is defined as the
Master, all other units belonging to the same group on
the same network are referred to as Slaves.
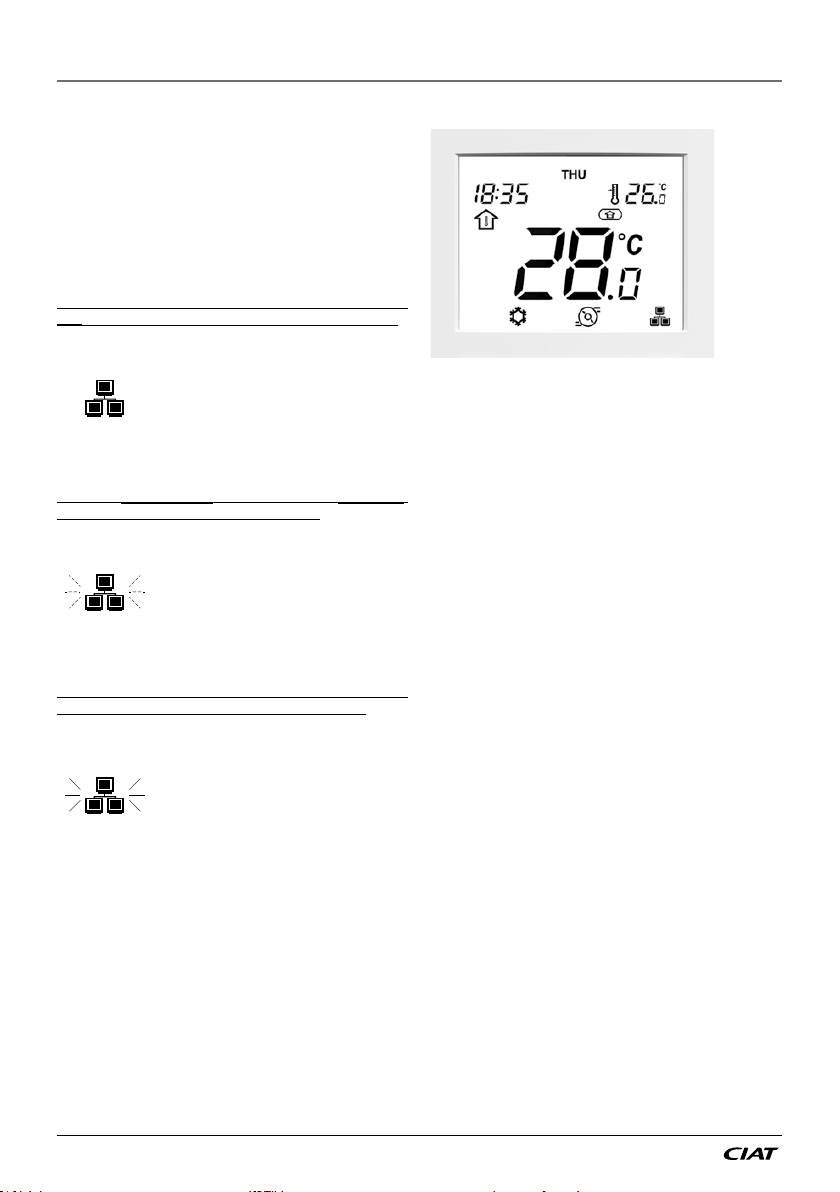
When the user interface is connected to the Master
unit, the Master / Slave icon is displayed on the screen.
If you change the operating mode or
define a new setpoint on your “master”
user interface, this command will be
sent to all slaves on the network.
The slaves will act according to the
command sent from the Master.
When the user interface is connected to the Slave unit,
the Master / Slave icon is flashing rapidly.
If you change the operating mode or
define a new setpoint on your “slave”
user interface, this command will be
ignored. The operating mode and
setpoint defined by the Master will be
active.
Example: Master / Slave mode
When the Master / Slave communication failure
occurs, the Master / Slave icon is flashing slowly.
In the case of master/slave
communication failure, the Master will
run in the standalone mode or it will
continue to operate with other Slave
units that are still communicating. The
affected Slave unit will stop all of its
operations.
Please contact a professional technician in order to set the Master/Slave assembly control.
EREBA T-HT / He
EN-16
Page 17
6 - ALARMS AND ERRORS
6.1 Alarms
Alarms are used to inform you of the failure of one of
the parts of the heat pump or chiller system.
In the case of an alarm, the alarm icon is displayed:
Steady icon: Alarm condition detected;
the unit is stopped
Flashing icon: Alarm condition
detected; the unit is running
To see the alarms
1. Press and hold the Mode key and the Schedule key
simultaneously for 2 seconds.
2. The alarms menu will be displayed.
3. Press the Down key or the Up key to display the
alarms (1 to 5).
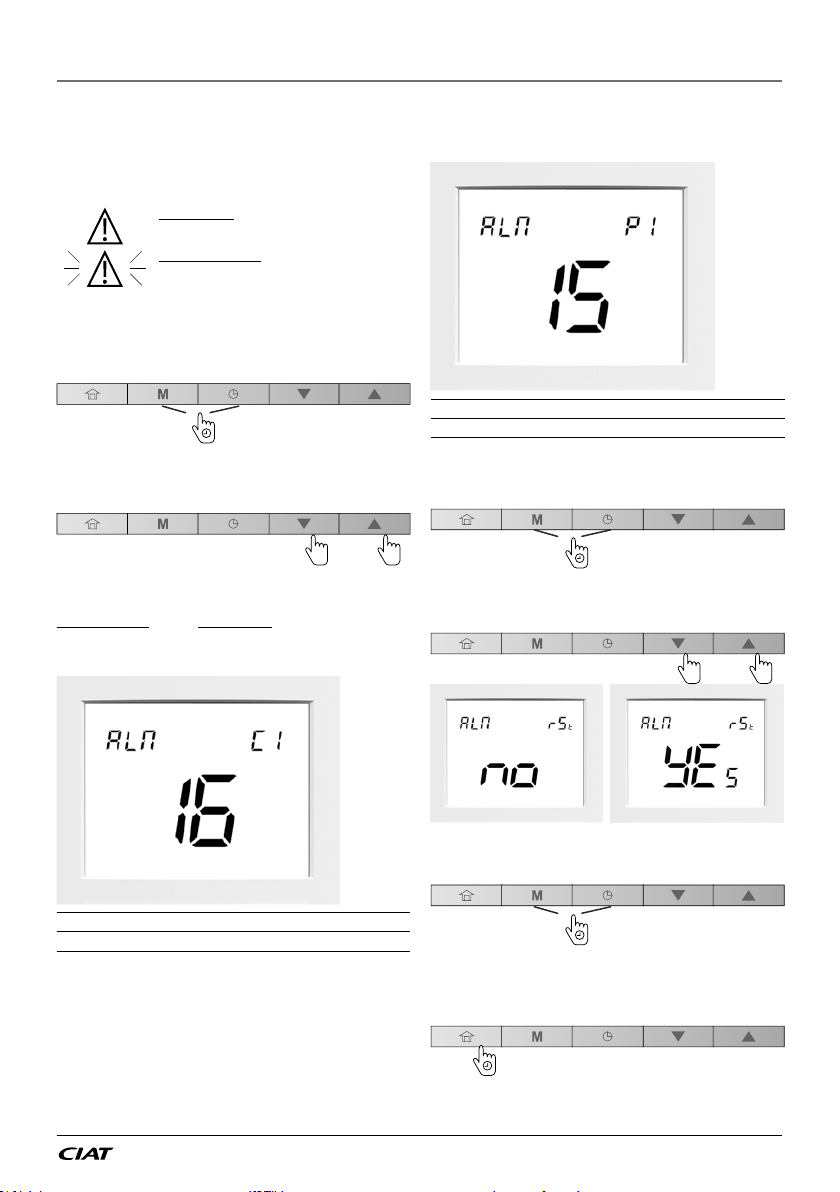
Example:
Past alarm P1
Alarm code 15
To reset alarms
1. In the alarm menu, press and hold the Mode key and
the Schedule key simultaneously for 2 seconds.
Two types of alarms are displayed:
Current alarms (C-X) / Past alarms (P-X).
Example:
2. The reset alarm menu will be displayed.
3. Press the Down key or the Up key to set the alarms
reset to “YES”.
Alarm reset: NO Alarm reset: YES
4. To confirm the alarms reset, press and hold the Mode
key and the Schedule key simultaneosly for 2 seconds.
Current alarm C1
Alarm code 16
To exit the alarm screen
5. Press and hold the Occupancy key until the home
screen is displayed.
For more information about alarms, please refer to
the IOM Manual.
EN-17 EREBA T-HT / He
Page 18
6 - ALARMS AND ERRORS
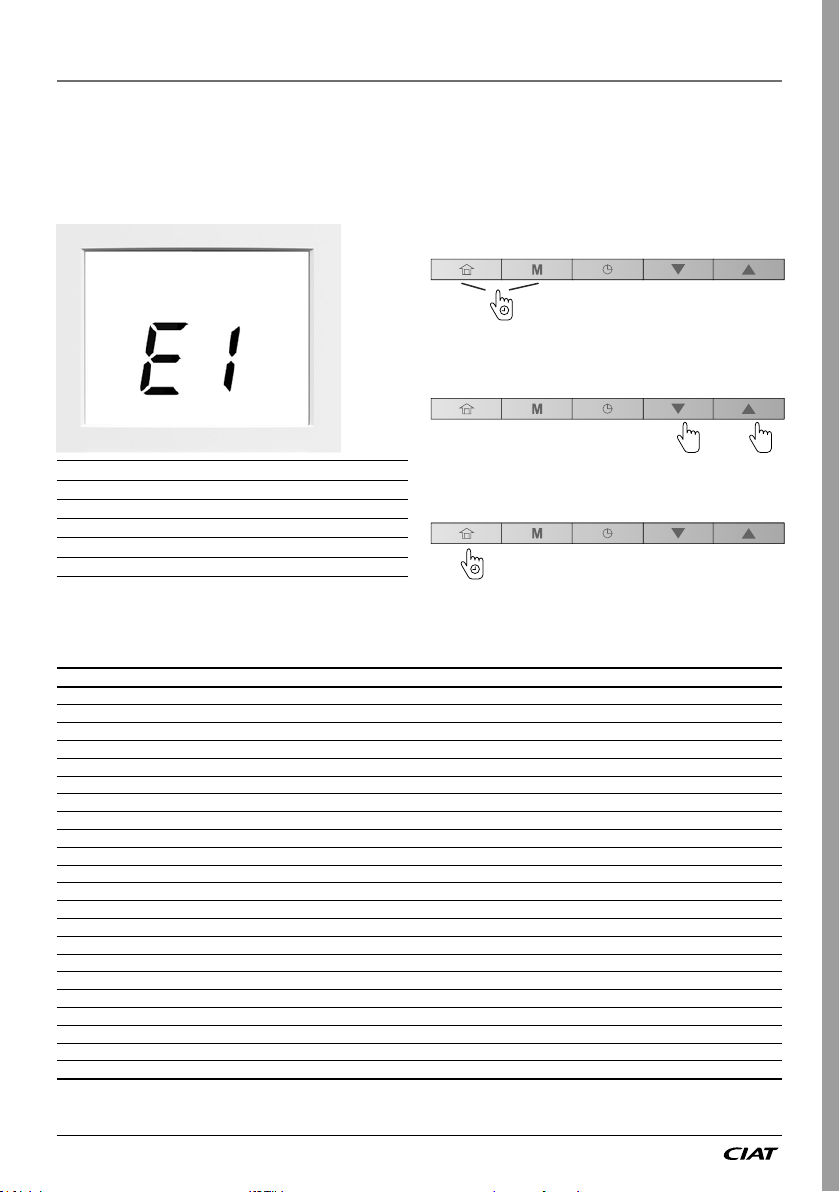
6.2 Errors
Some components failure may cause the user interface
to malfunction. In such cases, the error will be displayed
on the screen.
Example: E1, error 1
In case of error, please verify that all WUI local parameters
are correct, i.e. check the value of parameters given in
the table below.
To access local parameters
1. Press and hold the Occupancy key and the Mode
key simultaneously for 2 seconds.
2. The first parameter will be displayed.
3. Press the Down key or the Up key to switch between
all parameters listed in the table.
ID Description
1 Communication failure
2 Wrong configuration (Unit not configured to use WUI)
3 Profile table wrong size
4 Parameter not found but mandatory
5 Room sensor failure
For more information about errors, please refer to the
IOM Manual.
Local parameters
4. To exit the current screen, press and hold
the Occupancy key until the home screen is
displayed or wait for 30 seconds (screen timeout).
No. Description Parameter number Range Default value
1 Hour of Day P901 0 to 23 0
2 Minute of Hour P902 0 to 59 0
3 Day of Week & Holiday 1 P903 0 to 255 0
4 Day of Month P904 1 to 31 0
5 Month P905 1 to 12 0
6 Year P906 0 to 99 0
7 DAYLIGHT SAVING SELECT P920 No/Yes No
8 Hour of daylight saving period entering P921 0 to 22 2
9 Hour of daylight saving period leaving P922 1 to 23 3
10 Month P923 1 to 12 3
11 Day of week (1=Monday) P924 1 to 7 7
12 Week Number of Month P925 1 to 5 5
13 Month P926 1 to 12 10
14 Day of week (1=Monday) P927 1 to 7 7
15 Week Number of Month P928 1 to 5 5
16 CCN address of chiller P951 1
17 LCD display timeout1 P952 5 to 60 min 10 min
18 AM/PM Time format P953 No/Yes No
19 CCN Element Address P991 1 to 239 116
20 CCN Element Bus P992 0 to 239 0
21 Baud Rate P993 9600/19200/38400 38400
22 PIC Application SW Version Number P999 - -
EREBA T-HT / He
EN-18
Page 19

Siège social
Avenue Jean Falconnier B.P. 14
01350 Culoz - France
Tel. : +33 (0)4 79 42 42 42
Fax : +33 (0)4 79 42 42 10
[email protected] - www.ciat.com
Compagnie Industrielle
d’Applications Thermiques
S.A. au capital de 26 728 480 €
R.C.S. Bourg-en-Bresse B 545.620.114
Tel. : 08 11 65 98 98 - Fax : 08 26 10 13 63
Non-contractual document. With the thought of material improvement
always in mind, CIAT reserves the right, without notice
to proceed with any technical modification.
CIAT Service
(0,15 € / mn)
 Loading...