

Ciat AQUACIAT ILZHE 130, AQUACIAT ILZHE 15 User Manual

Installation
Fonctionnement
Mise en service
Maintenance
Installation
Operation
Commissioning
Maintenance
Notice d’utilisation
User’s brochure
Gebrauchsanweisung
01 - 2004
N 00.64b
Montage-
Betriebs-und
Wartungs-
Anweisung
kit PCR /
PCR kit /
PCR kit
AQUACIAT ILZHE 15 130
ARCHIVE LE 02 / 2007
Ce kit comprend :
❏ 1 Boîtier d’ambiance avec sonde et potentiomètre intégrés.
❏ 1 Thermostat à réarmement manuel de
départ d’eau chaude à 63°C avec sa filerie +
étiquette.
❏ Colliers plastiques + isolant.
Installation avec plancher
chauffant / rafraîchissant
Nous recommandons d’utiliser le programmateur ClimBOX2 et le kit Plancher Chauffant
/ Rafraîchissant (PCR), tous deux disponibles
(en option).
Le kit PCR comprend :
– 1 boîtier d’ambiance avec molette d’ajuste-
ment de la température ambiante (±3°C),
– 1 thermostat à réarmement manuel de
départ d’eau chaude à 63°C,
– une filerie, des colliers plastiques et de l’i-
solant.
Le kit PCR régule la température ambiante
de la maison et assure la protection de la
dalle.
• En mode chaud, la consigne sur le retour
d’eau tient compte de la température ambiante souhaitée P08 (description des paramètres
notice régulation MRS 5.1B “ Mise en route ”),
de la position de la molette du boîtier d’ambiance, et de la température extérieure.
• En mode rafraîchissement, le groupe se met
en route dès que la température ambiante
passe au dessus de P09. Le groupe régule
avec la consigne fixe sur le retour d ‘eau P36.
La molette du boîtier d’ambiance et la température extérieure n’ont aucune influence dans
ce mode.
Installation du Kit
Pour installer le thermostat à réarmement
manuel sur le groupe, vous devez :
1 - démonter le toit du groupe et retirer la
porte de la platine électrique.
2 - fixer le thermostat à réarmement manuel
à 63°C sur la platine électrique (position ), à
coté du thermostat à 78°C des appoints électriques.
This kit includes:
❏ 1 room unit with built-in sensor and potentiometer.
❏ 1 manually-reset thermostat for hot water
outlet at 63° C with wiring and label.
❏ Plastic clips + insulator.
Heating/cooling floor type
installation
We recommend using the Climbox 2 programme and the cooling/heating floor kit,
both of which are available in option.
The cooling/heating floor kit includes :
– 1 ambient box with ambient temperature
adjustment (+/- 3° C) thumbwheel.
– 1 manual reset thermostat for departure of
hot water at 63° C
– wiring, plastic clips and isolating material.
The PCR kit controls the house ambient temperature and ensures the protection of the
floor slab.
• In heating mode, the setting on water return
takes into account the desired P08 ambient
temperature (description of parameters in the
regulation brochure MRS 5.1B “ commissioning ”), the position of the ambient box
thumbwheel and the outside temperature.
• In cooling mode, the unit starts as soon as
the ambient temperature goes above P09.
The unit regulates with the fixed setting on
the P36 water return. The ambient box tumbwheel and the outside temperature have no
influence on this mode.
Kit installation
To install the manual reset thermostat on
the unit, you must :
1 - dismount the unit roofing and withdraw the electrical panel door.
2 - fix the 63° C manual reset thermostat
on the electrical panel (position 1, next
to the 78° C thermostat of the electrical
auxiliary devices)
Dieses Kit enthält :
❏ p 1 Raumbediengerät mit integriertem
Temperaturfühler und Potentiometer.
❏ p 1 Thermostat mit manueller Rücksetzung
für Warmwasser-Vorlauf um 63°C mit Kabeln
und deren Beschriftung.
❏ Plastik-Klips & E-Schaltschutz.
Anlagen Typ Heiz-/Kühlfussboden
Wir empfehlen, die ClimBOX2Programmiereinrichtung und das Heiz/Kühlfussboden-Kit (PCR) zu benutzen.
Dieses Kit enthält :
– 1 Raumbediengerät mit Potentiometer für
die Raumtemperatur (± 3°C),
– 1 Thermostat mit manueller Rücksetzung
am WW-Vorlauf (63°C),
– eine Verkabelung, Plastik-Klips und
E-Schaltschutz.
Das PCR-Kit regelt die Raumtemperatur des
Hauses und gewährleistet den
Fussbodenschutz.
• Im Heizbetrieb berücksichtigt der RücklaufSollwert die gewünschte Raumtemperatur
P08 (Beschreibung der Parameter in der
Broschüre MRS 5.1B " Inbetriebnahme "), der
Position des Potentiometers vom
Raumthermostat und der Aussentemperatur.
• Im Kühlbetrieb schaltet sich der
Flüssigkeitskühler ein, wenn die
Raumtemperatur über P09 steigt. Das Gerät
regelt mit dem Fest-Sollwert am Rücklauf
P36. Das Potentiometer am Raumgerät und
die Aussenlufttemperatur beeinflussen diesen Modus überhaupt nicht.
Installierung des Kits
Um das Thermostat mit manueller
Rücksetzung zu installieren, müssen Sie :
1 - Die Abdeckung des Gerätes und die Tür
der elektrischen Platine entfernen.
2 - Das Thermostat mit manueller
Rücksetzung (63°C) auf der elektrischen
Platine, neben dem Thermostat bei 78°C für
elektrische Zusatzheizung, einbauen.
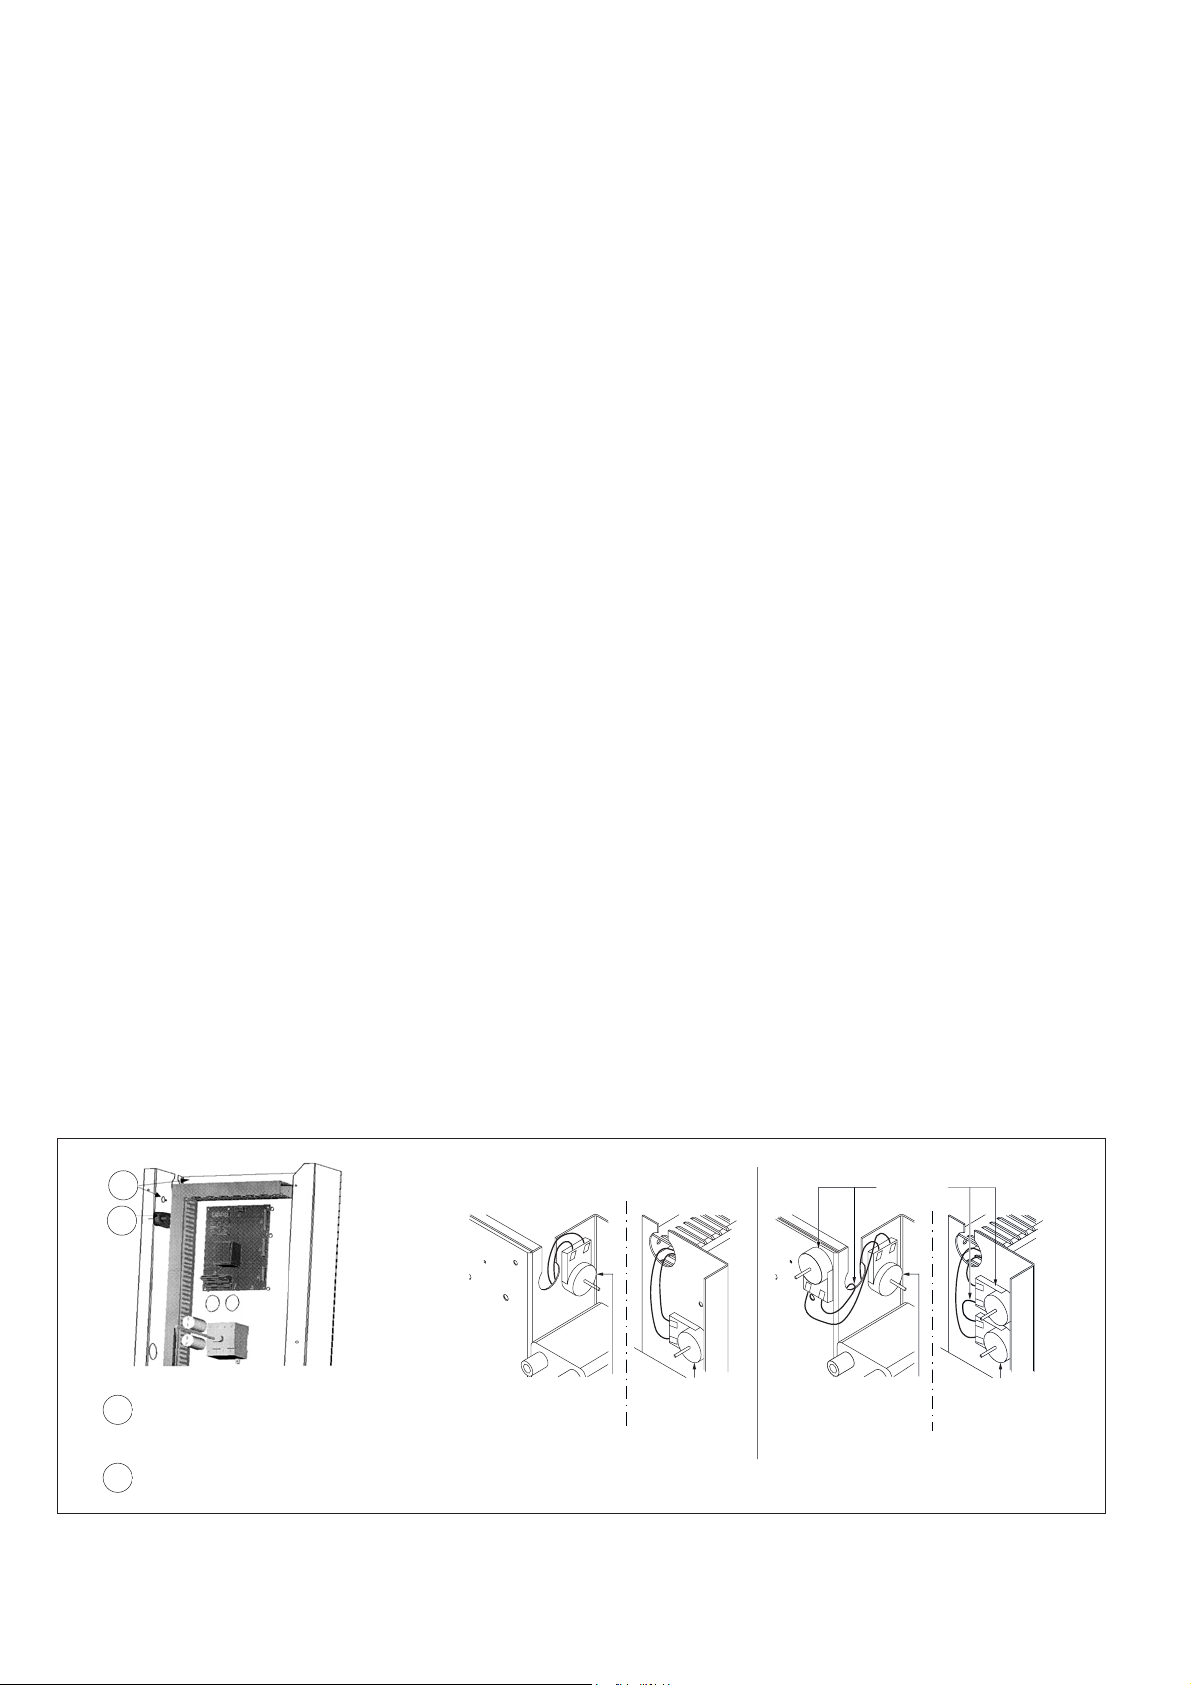
3 - Modifier le câblage des thermostats
63°C et 78°C comme indiqué ci-dessus
(voir le schéma électrique du groupe).
3 - modify the thermostats 63° C and 78°
C wiring as indicated above (see the
electrical diagram of the unit).
3 - Die Verkabelung der Thermostate
(63°C und 78°C) wie oben angezeigt
ändern (siehe E-Schema des Gerätes).
g
Emplacement du thermostat 63 °C
Location of 63° C thermostat
Lage des Thermostats für 63°C
Emplacement du thermostat 78 °C
Location of 78° C thermostat
Lage des Thermostats für 78°C
1
2
1
2
Thermostat 78˚C
Thermostat 78˚C
Thermostat 78˚C
Modèles 15 et 22
Models 15 and 22
Modelle 15 und 22
Avant modification
Before modification
Vor der Änderun
Thermostat 78˚C
Thermostat 78˚C
Thermostat 78˚C
Modèles 30 à 130
Models 30 to 130
Modelle 30 bis 130
Thermostat 63˚C et filerie fournie dans le kit PCR
Wiring supplied in the PCR kit
" 63˚C Thermostat und Verdrahtung mit dem Kit geliefert
Thermostat 78˚C
Thermostat 78˚C
Thermostat 78˚C
Modèles 15 et 22
Models 15 and 22
Modelle 15 und 22
Après modification
After modification
Nach Modifikation
Thermostat 78˚C
Thermostat 78˚C
Thermostat 78˚C
Modèles 30 à 130
Models 30 to 130
Modelle 30 bis 130
 Loading...