

Page 1
User Guide
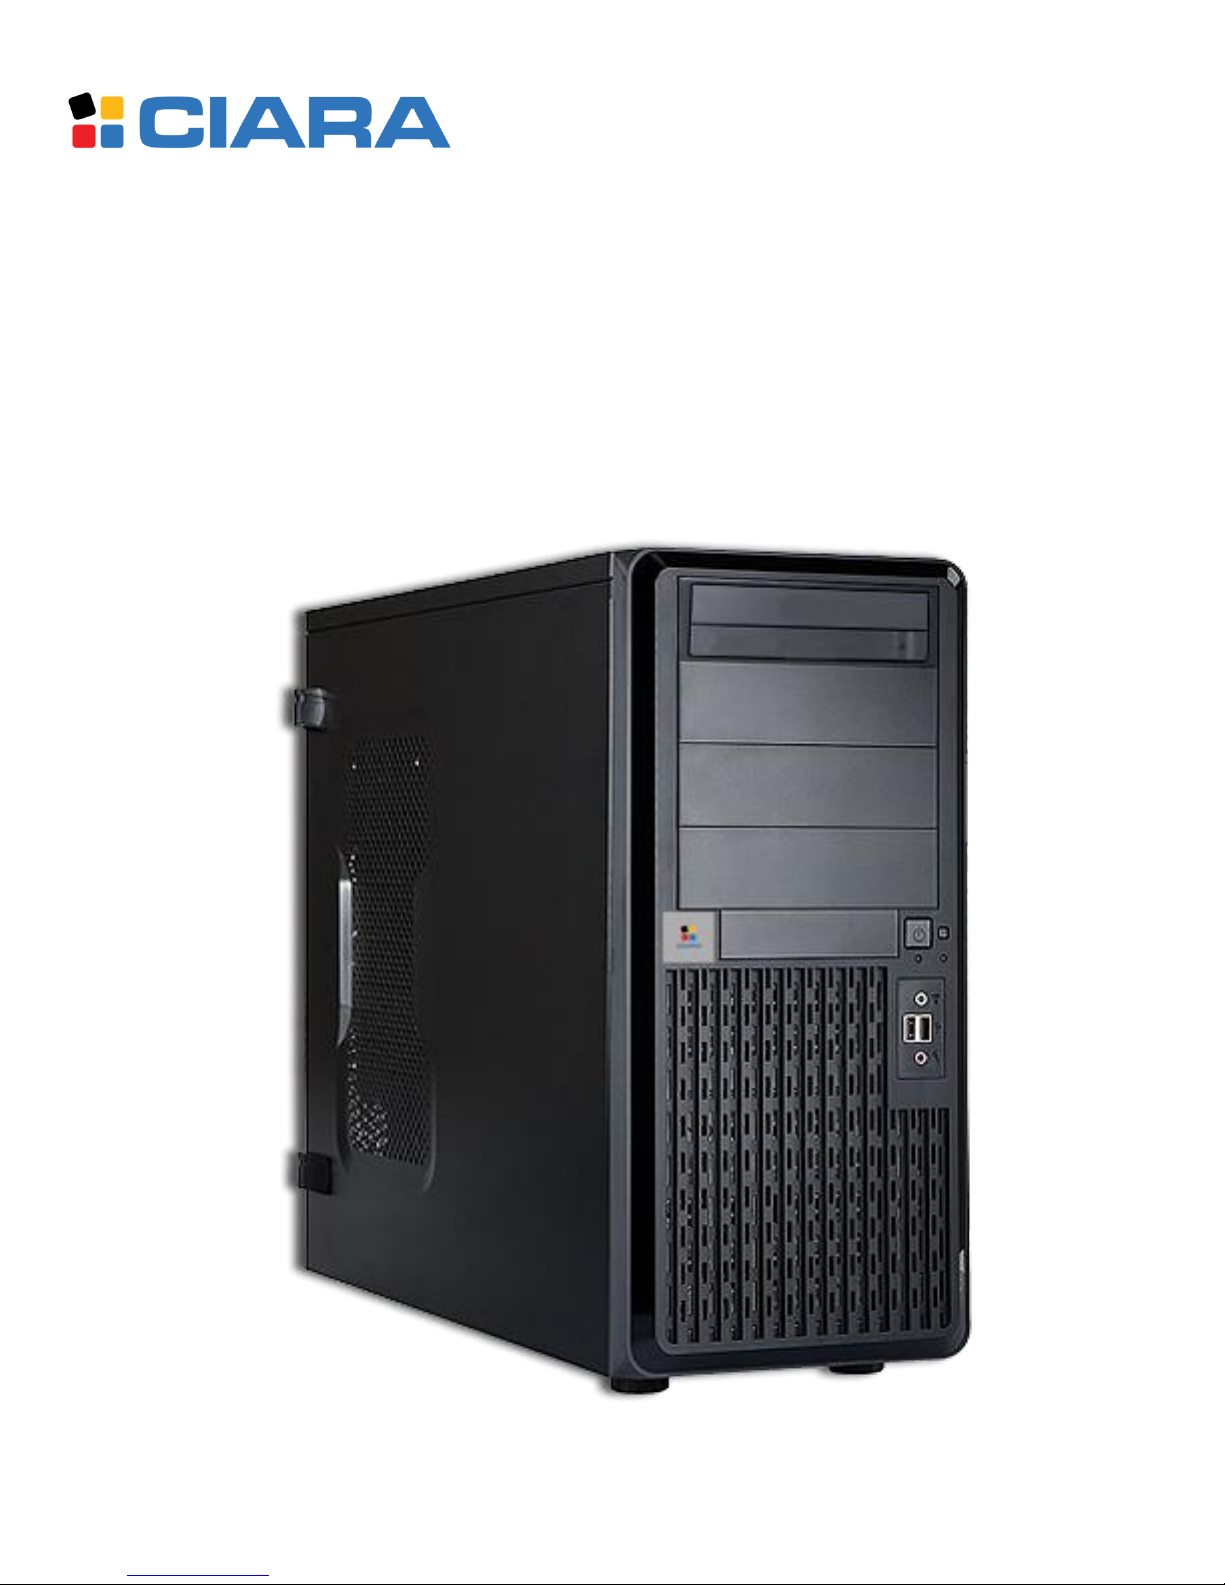
KRONOS 540 Workstation
Page 2
Intel and Core are trademarks or registered trademarks of Intel Corporation
All other names, brands, and trademarks are trademarks of their respective companies
CIARA KRONOS 540 Workstation
9300 Trans-Canada Highway
Montreal, Quebec H4S 1K5
Tel : (514) 798-8880
Fax : (514) 798-8889
Microsoft, Windows 10, Windows Server 2016
are registered trademarks of Microsoft Corporation
Asus is a trademark of ASUSTeK COMPUTER INC.
Third printing April 2018
Printed in Canada
- 2 -
Page 3

CIARA KRONOS 540 Workstation
Contents
ABOUT THIS GUIDE ....................................................................................................... 5
1.0 INSTALLING AND UPGRADING YOUR SYSTEM ......................................................... 6
1.1 Unpacking your workstation ........................................................................................................ 6
1.2 Choosing a site for the system ...................................................................................................... 7
1.3 Peripheric installation .................................................................................................................. 8
1.3.1 Recovery from CIARA recovery DVD .............................................................................................. 9
1.3.2 Windows 10 Recovery from Startup Settings .............................................................................. 11
1.3.3 Corrupted BIOS recovery ............................................................................................................. 13
1.3.4 System maintenance .................................................................................................................... 13
1.3.5 Using the CIARA KRONOS 540 ...................................................................................................... 14
1.4 Troubleshooting your system after first install ............................................................................ 15
1.4.1 Helpful hints ................................................................................................................................. 15
1.5 Solving general problems ........................................................................................................... 16
1.5.1 Solving power supply problems ................................................................................................... 17
1.5.2 Solving hard drive problems ........................................................................................................ 18
1.5.3 Solving display problems .............................................................................................................. 19
1.5.4 Solving audio problems ................................................................................................................ 20
1.5.5 Solving printer problems .............................................................................................................. 20
1.5.6 Solving keyboard and mouse problems ....................................................................................... 21
1.5.7 Solving hardware installation problems ...................................................................................... 22
1.5.8 Solving memory problems ........................................................................................................... 23
1.5.9 Solving processor problems ......................................................................................................... 23
1.5.10 Solving optical drive problems ................................................................................................... 24
1.6 Component installation guide .................................................................................................... 25
1.6.1 Precautions against static electricity............................................................................................ 25
1.6.2 Opening and accessing the chassis .............................................................................................. 26
1.6.3 Insertion of the processor ............................................................................................................ 27
1.6.4 Installation of the memory modules ............................................................................................ 30
1.6.5 Installation of the optical drive module ....................................................................................... 34
1.6.6 Installation of the hard drive ....................................................................................................... 35
1.6.7 Chassis Characteristics ................................................................................................................. 36
2.0 CERTIFICATION AND DECLARATION ...................................................................... 37
2.1 Radio interference precautions .................................................................................................. 37
2.2 Declaration of conformity .......................................................................................................... 38
2.3 FCC Information to User ............................................................................................................. 39
2.4 ENERGY STAR® ........................................................................................................................... 40
3.0 ONE YEAR LIMITED WARRANTY ............................................................................ 41
3.1 Procedures to be followed for service during the warranty period: ............................................. 42
3.2 Limited Warranty ....................................................................................................................... 43
3.3 Documenting your workstation .................................................................................................. 44
3.3.1 Base System Details ..................................................................................................................... 44
- 3 -
Page 4

CIARA KRONOS 540 Workstation
4.0 TECHNICAL PRODUCT SPECIFICATION CIARA KRONOS 540 .................................... 45
4.1 Upgrading .................................................................................................................................. 47
4.2 Networking ................................................................................................................................ 47
4.3 The CIARA KRONOS 540 BIOS ..................................................................................................... 48
4.3.1 BIOS configuration and installation ............................................................................................. 48
4.3.2 BIOS set-up program menu bar ................................................................................................... 48
4.3.3 BIOS menu screen ................................................................................................................... 49
4.3.4 PCI auto configuration ................................................................................................................. 51
4.3.5 Legacy USB support ...................................................................................................................... 51
4.3.6 BIOS updates ................................................................................................................................ 51
4.3.7 Language support......................................................................................................................... 51
4.3.8 BIOS recovery ............................................................................................................................... 52
4.3.9 Boot options ................................................................................................................................. 52
4.3.10 Adjusting boot speed ................................................................................................................. 53
4.3.11 BIOS security features ................................................................................................................ 54
4.4 Motherboard configuration & layout – KRONOS 540 main board ................................................ 55
4.4.1 Back panel connectors ............................................................................................................ 57
4.5 The PCI Express and PCI bus ....................................................................................................... 58
4.6 Storage ...................................................................................................................................... 61
4.6.1 Serial ATA interface ...................................................................................................................... 61
4.6.2 Optical drives ............................................................................................................................... 62
4.7 Keyboard ................................................................................................................................... 62
4.8 Graphics subsystem ................................................................................................................... 63
4.8.1 PCI Express 3.0 x16 256 bits graphics card ................................................................................... 63
4.8.2 HDMI 2.0 port .............................................................................................................................. 63
4.8.3 DisplayPort 1.4 ............................................................................................................................. 63
4.8.4 Dual link Digital Visual Interface (DVI) ......................................................................................... 63
4.9 Audio subsystem ........................................................................................................................ 64
4.10 I/O Port set-up ......................................................................................................................... 64
4.11 LAN subsystem ......................................................................................................................... 65
4.11.1 Intel® I210-AT 1 Gigabit Ethernet controllers ............................................................................ 65
4.11.2 RJ-45 LAN connectors LEDs ........................................................................................................ 65
4.12 Trusted Platform Module (TPM) ............................................................................................... 66
4.13 Intrusion detector .................................................................................................................... 66
4.14 Replacing the system battery ................................................................................................... 66
4.15 Installing an upgrade CPU ......................................................................................................... 67
4.16 Configuration jumper block ...................................................................................................... 67
4.16.1 Setting the BIOS configuration jumper ...................................................................................... 67
4.16.2 Clearing or changing passwords................................................................................................. 67
4.17 Installing an upgrade flash BIOS ............................................................................................... 68
GLOSSARY ................................................................................................................... 69
- 4 -
Page 5

CIARA KRONOS 540 Workstation
ABOUT THIS GUIDE
Please read this User's Guide before using your CIARA KRONOS 540 workstation.
This User's Guide is divided into four chapters that provide information on Installation, trouble shooting, certification, detailed
description and a Glossary. Please remember to fill out the Equipment Log and keep a copy in a safe place.
With proper care and operating procedures your CIARA KRONOS 540 will give you many years of service and high performance
computing.
- 5 -
Page 6
CIARA KRONOS 540 Workstation
1.0 Installing and upgrading your system
1.1 Unpacking your workstation
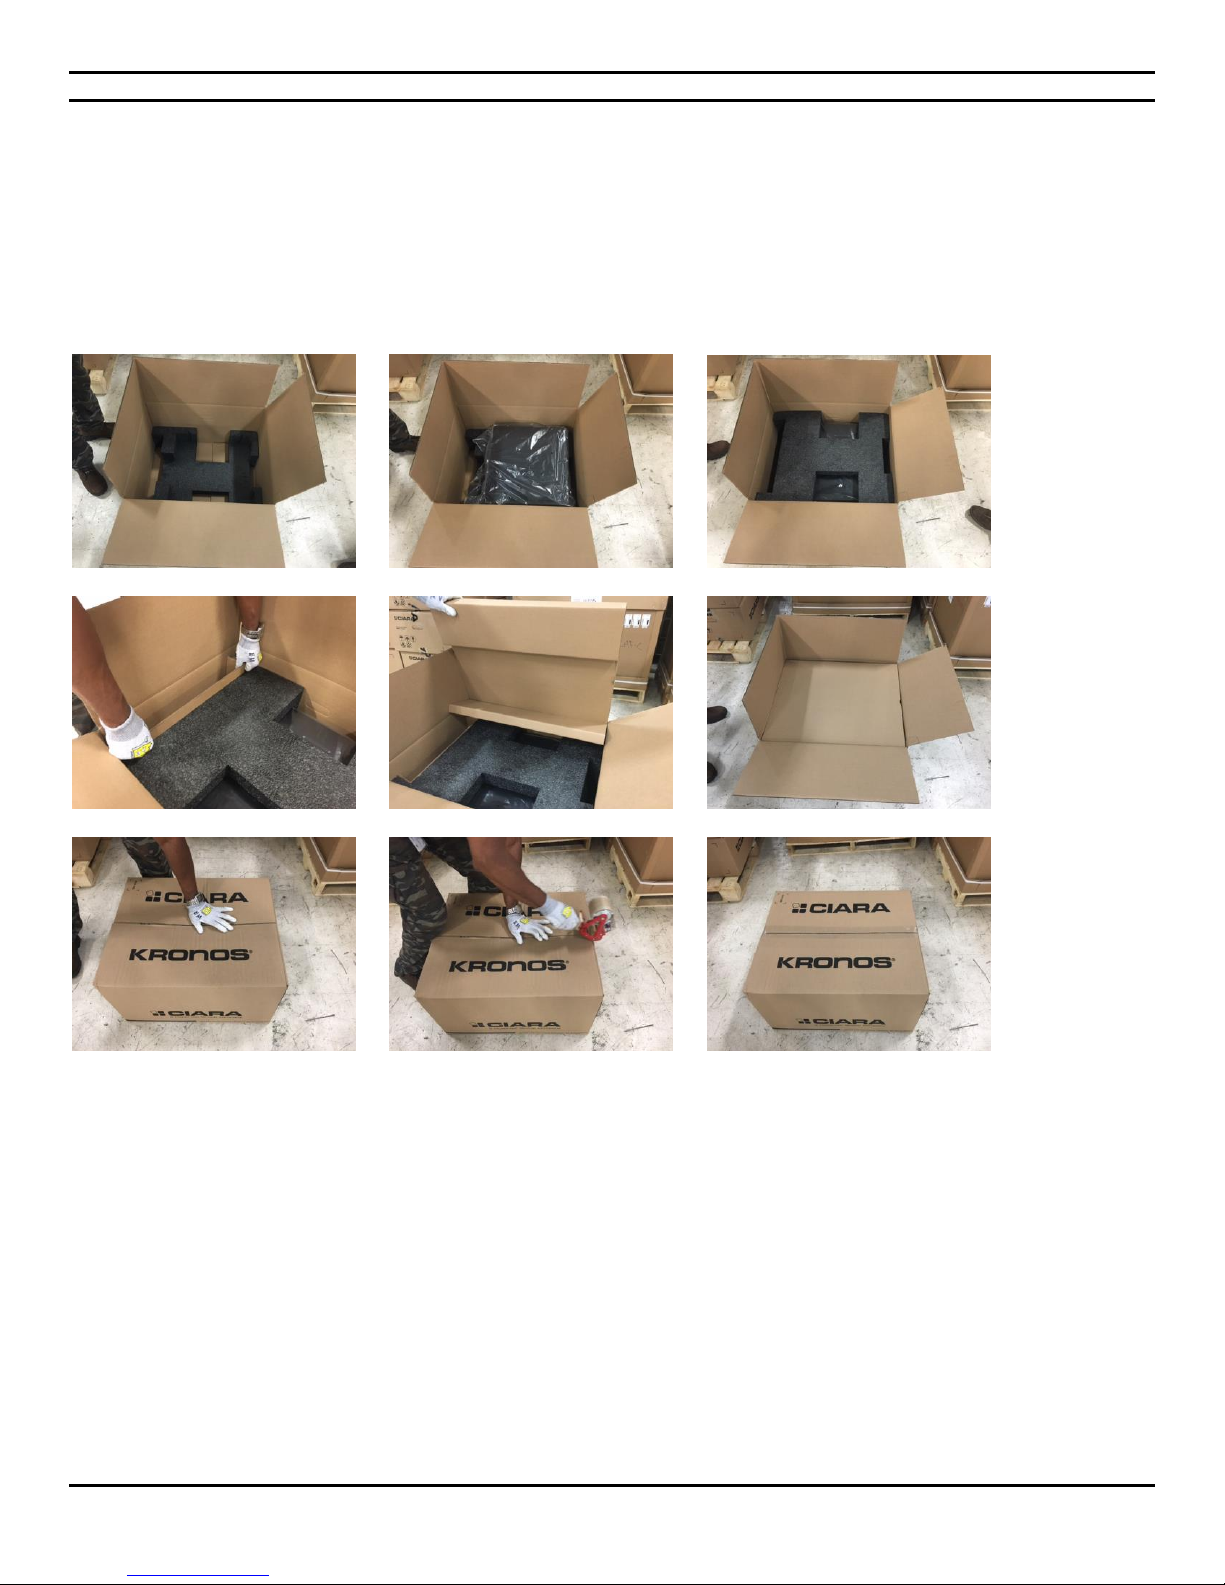
Your workstation is packed with ecologic moulded recycled newspaper end caps to keep it in place during transit.
The keyboard is on the side of the box, the other accessories are completely on the top.
Carefully unpack your workstation and be sure to save all boxboards and moulded end caps for future shipping and transportation.
To repack the workstation it may be easier to place the moulded cushioning on the ends of the workstation, and then slide the box
over the workstation together with the cushioning, rather than lifting the workstation.
- 6 -
Page 7
CIARA KRONOS 540 Workstation
1.2 Choosing a site for the system
All CIARA workstations operate reliably in a typical office or home environment. Choose a location that is readily accessible and meets
the following requirements :
Is near a grounded, three pronged power outlet.
The socket-outlet shall be installed near the equipment and shall be easily accessible.
Is clean and dust free.
Is well-ventilated and lighted and away from sources of heat.
Is isolated from strong electromagnetic fields produced by electrical devices.
(I.e. air conditioners, large fans, large electric motors, radio and TV transmitters)
Has an appropriate table or desk that will allow you to work without physical discomfort and strain.
The power supply input should be 120 V, 10 A and 60 Hz.
A few general precautions should always be observed :
Never connect any peripheral such as a monitor to the system unit if the power is turned "ON". Always shut down the system
first.
Never remove any internal adapter cards in the system unit if the power is turned "ON" as this will ruin the Card/Workstation
and Void the Warranty.
Never install and connect more peripherals than available power supply plugs to avoid exceeding the maximum power of the
system.
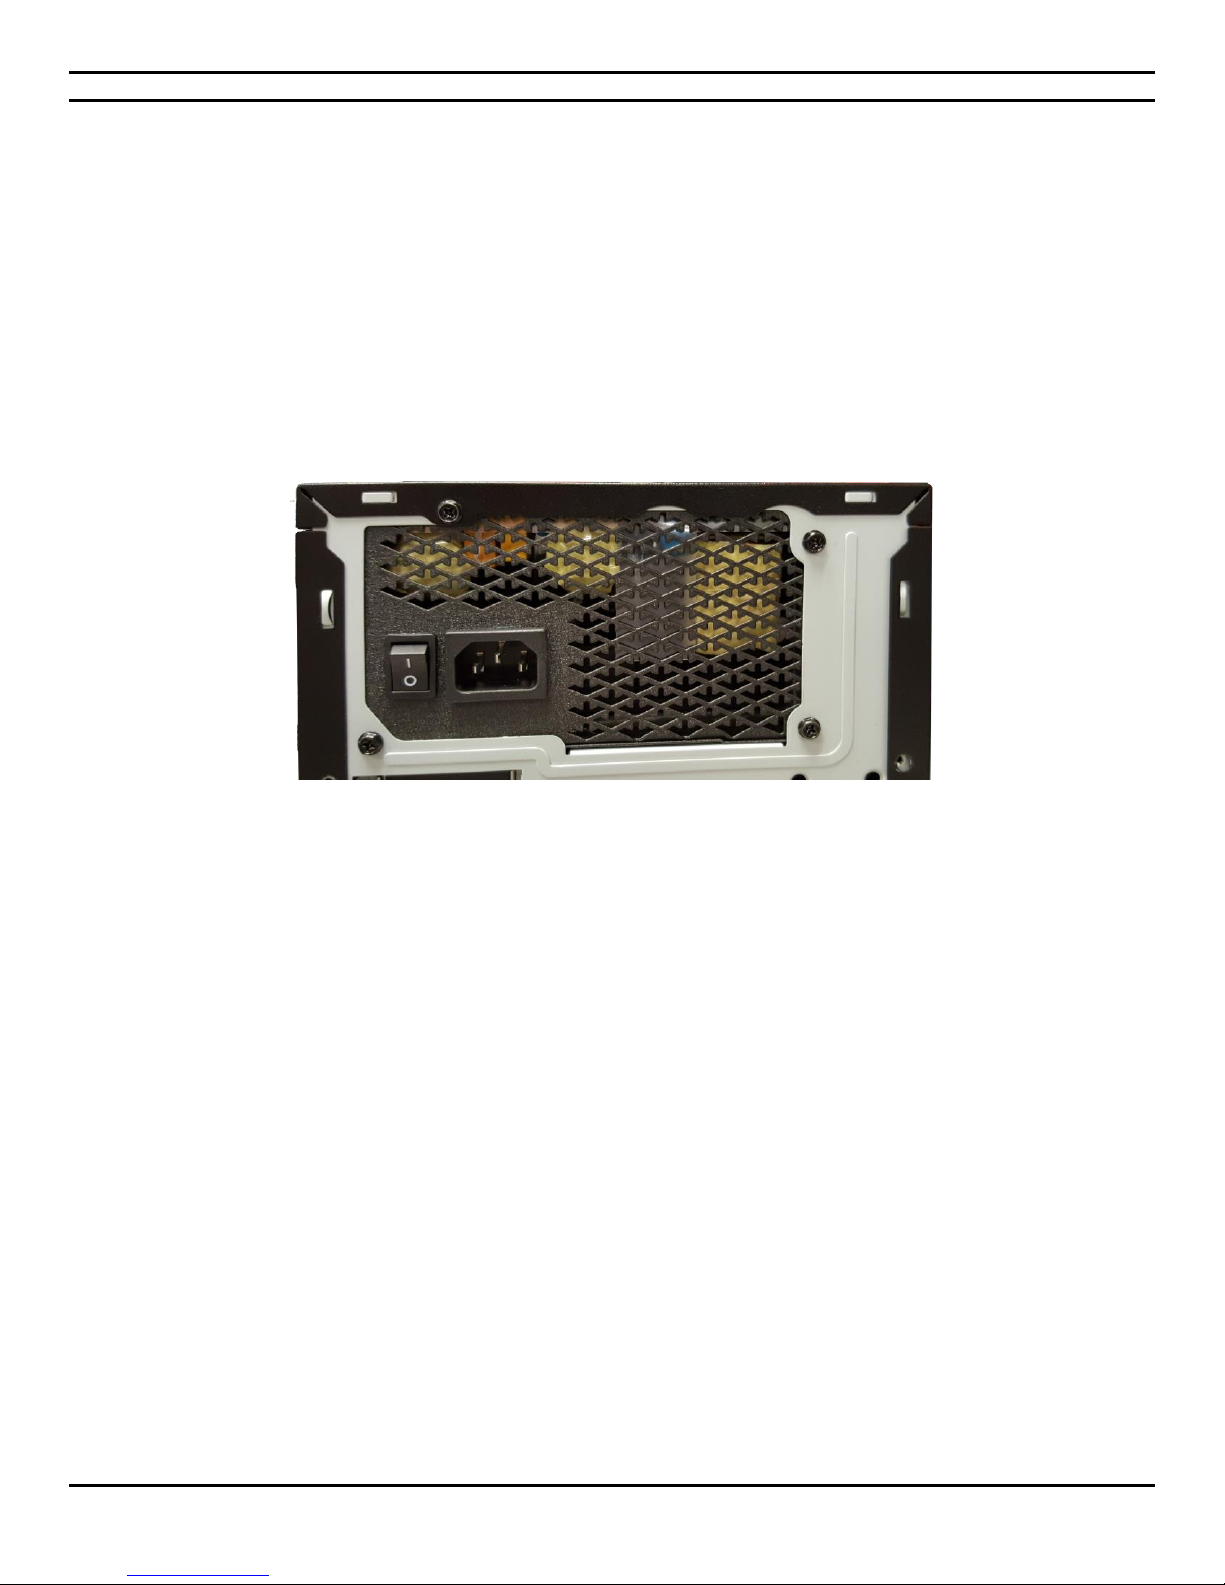
NOTE The KRONOS 540 model comes either with or without a power supply On/OFF switch. For those systems that do not have a
switch, make sure to shut down the system through Windows before proceeding to any repair or replacement work inside the system.
- 7 -
Page 8
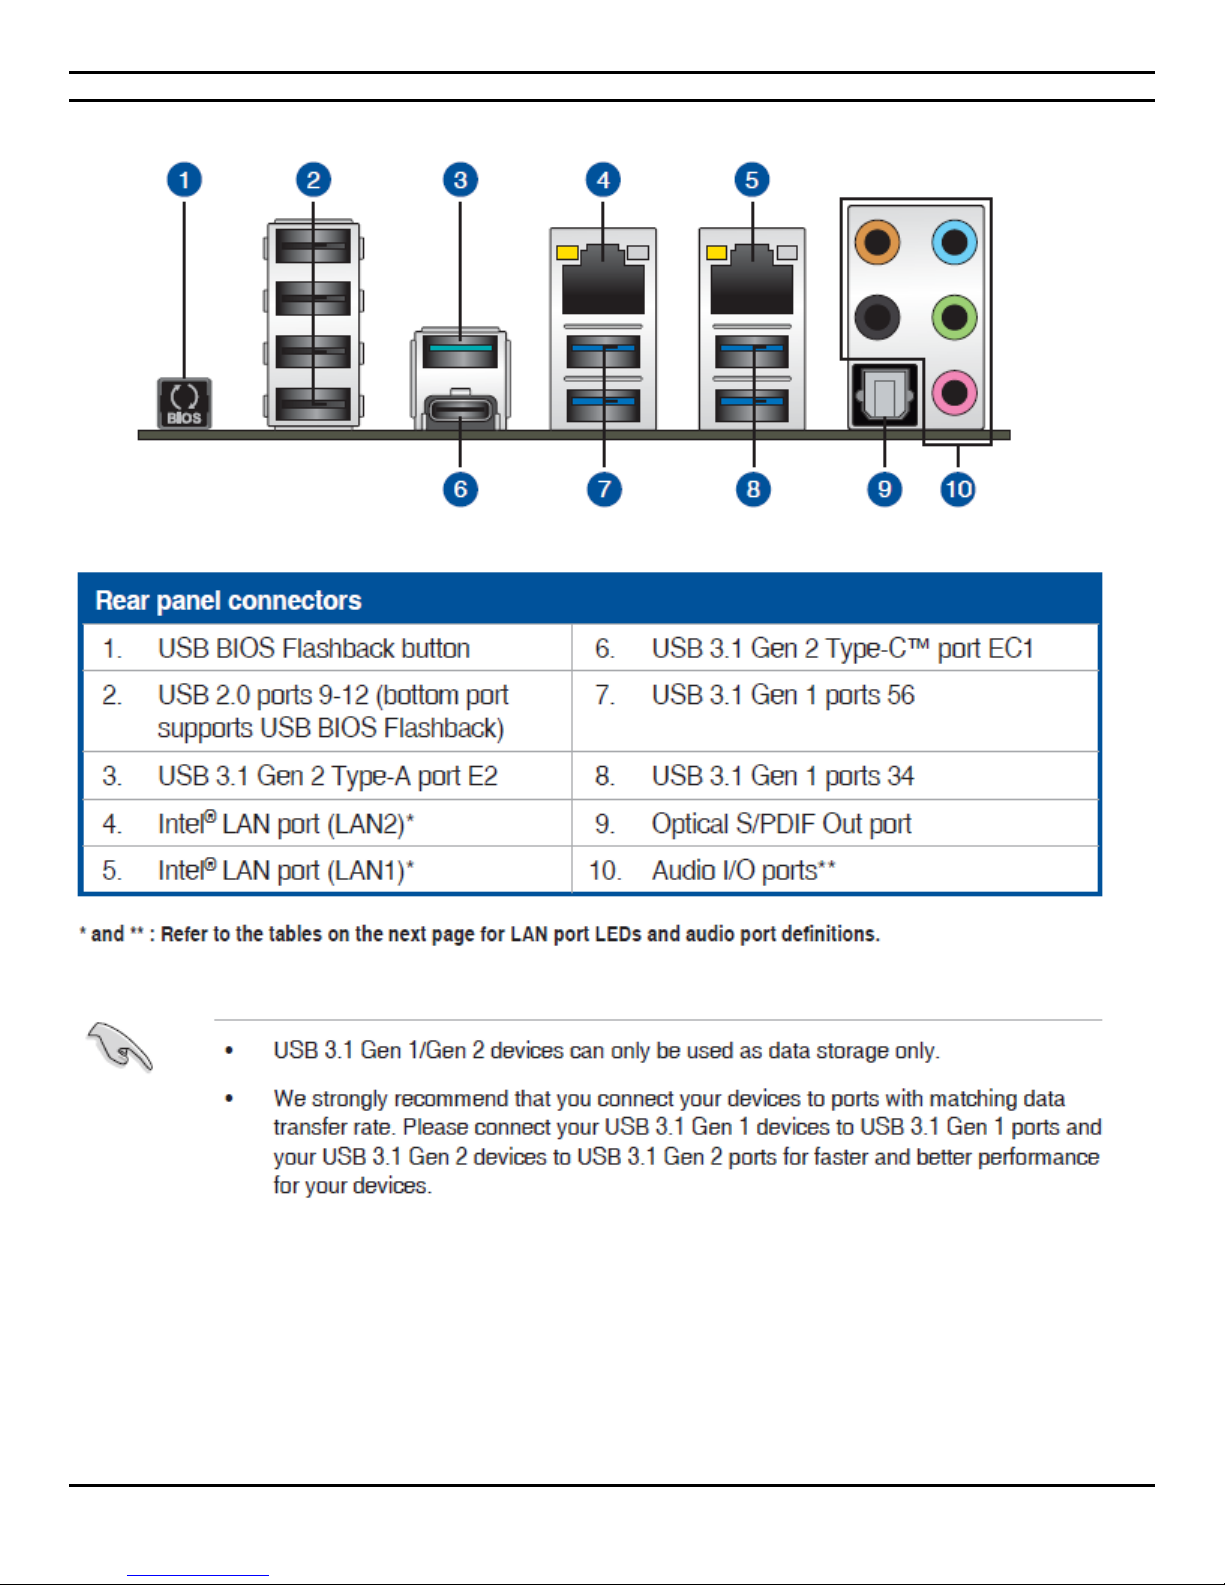
1.3 Peripheral installation
CIARA KRONOS 540 Workstation
- 8 -
Page 9
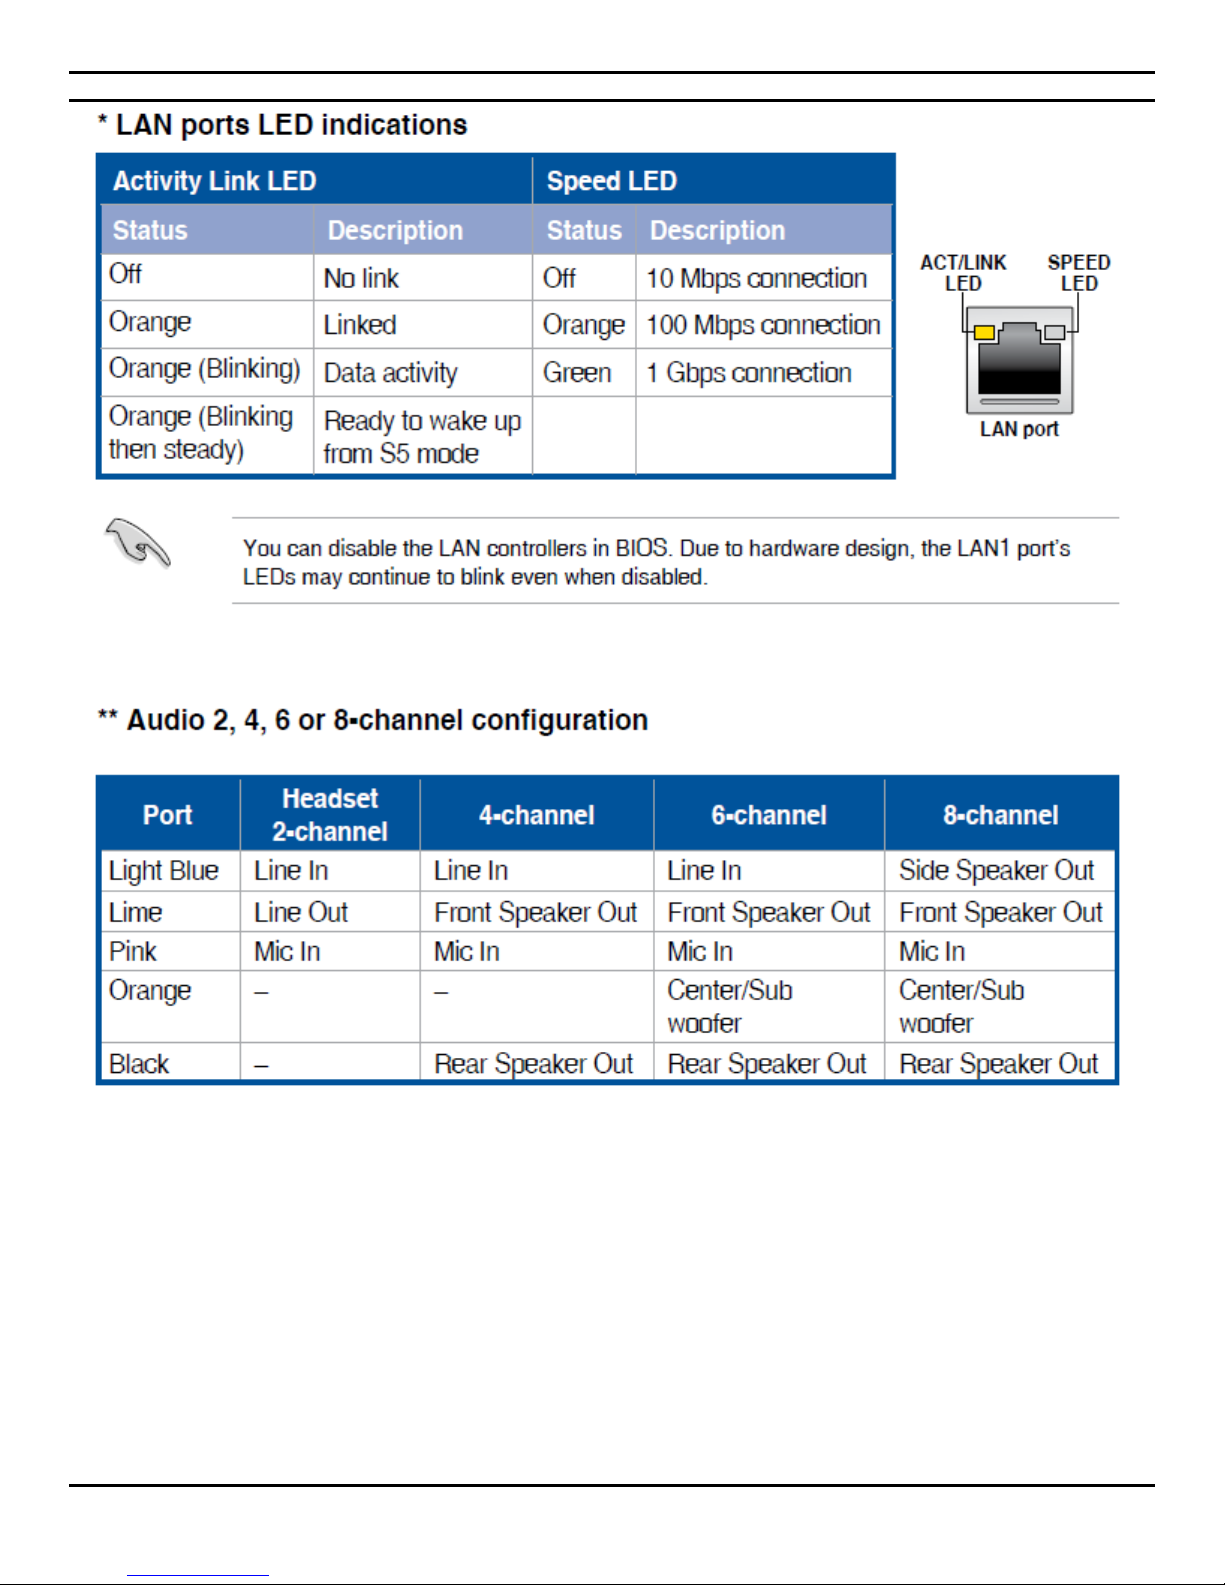
CIARA KRONOS 540 Workstation
- 9 -
Page 10
CIARA KRONOS 540 Workstation
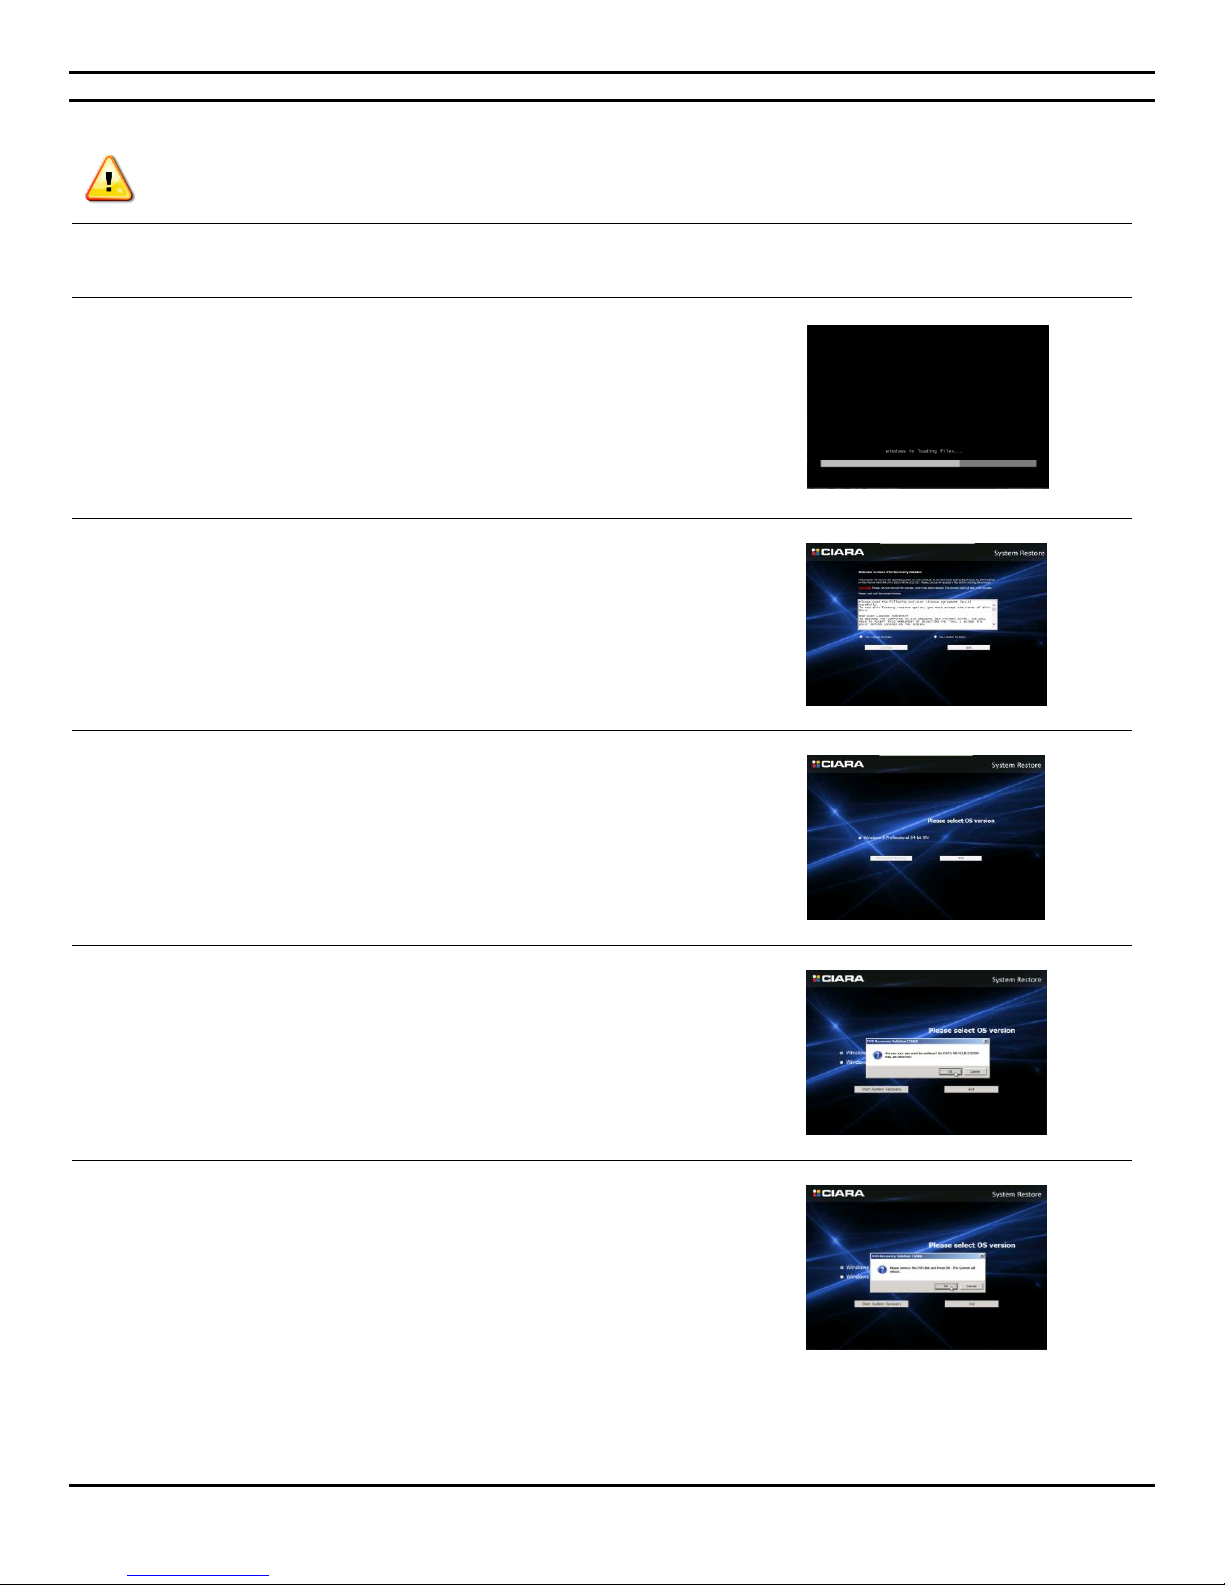
Insert the Recovery DVD and restart the system.
1- When prompted, press any key to boot from the DVD.
The recovery image will then start.
2- Accept the EULA and press on Continue.
3- Select 32 bit or 64 bit and press Start System Recovery
4- A pop up will then open warning you that all the data will be lost.
If all your files are already saved, press OK.
5- The recovery will take around 30 minutes to complete. A window
will show you the process of the recovery, once completed Eject the
DVD then press OK. The system will then reboot.
NOTE: All drivers required for your system will be already installed except
for components that were not part of your original purchase
1.3.1 Recovery from CIARA recovery DVD
Before you start this procedure please back up all your important information, the recovery media will erase all data on HDD
before installation.
- 10 -
Page 11
CIARA KRONOS 540 Workstation
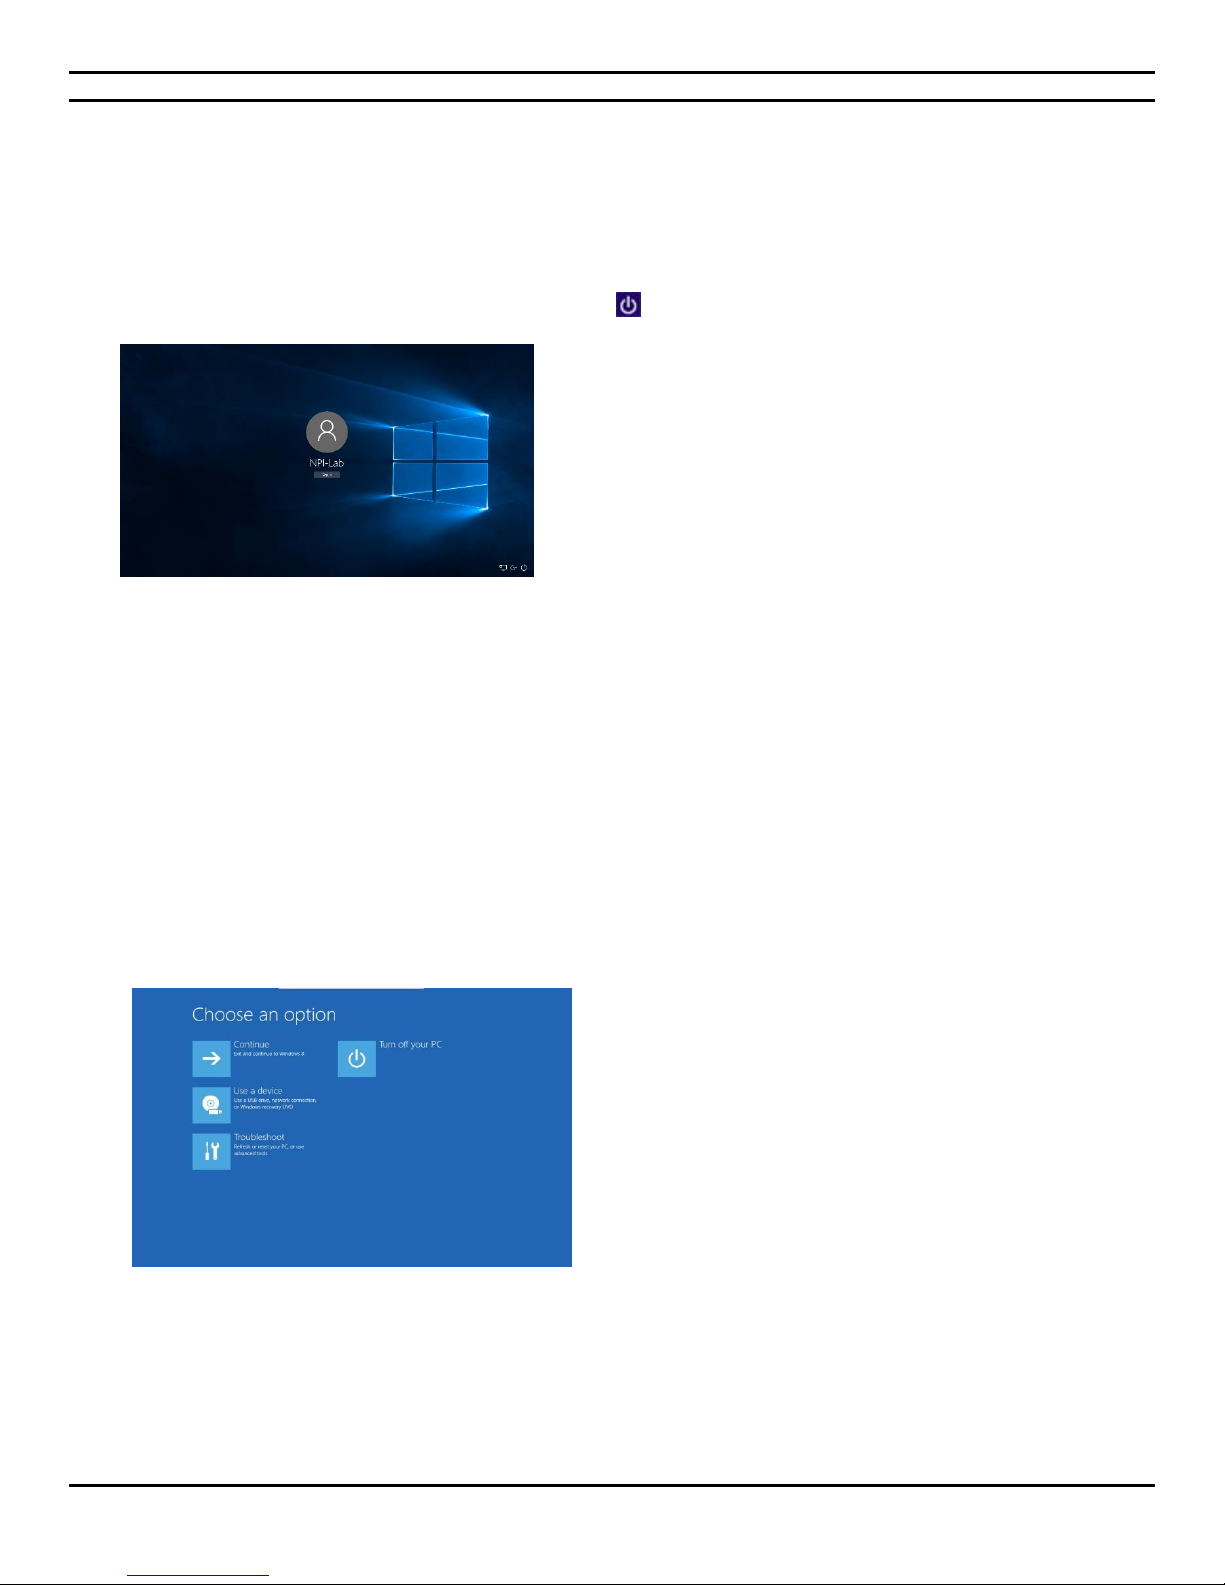
1.3.2 Windows 10 Recovery from Startup Settings
With the Windows Startup Settings screen (formerly advanced boot options) you can start Windows in different advanced
troubleshooting modes so you can find and fix problems on your PC. In previous versions of Windows, you could get to this screen by
pressing F8 before Windows started up. Windows 10 PCs start up quickly so there's not enough time to press F8.
There are two ways to get to the Windows Startup Settings screen in Windows 10 :
If you're not signed in to Windows, tap or click the power icon from the sign-in screen, hold Shift, and then tap or click Restart.
Or, if you're already signed in:
1. Click on Windows button, select Settings, and then select Update security.
2. From left select Recovery.
3. Under Advanced startup, tap or click Restart now.
4. On the Choose an option screen, tap or click Troubleshoot.
5. Select Advanced options and then Startup Settings
6. Tap or click Restart.
7. On the Startup Settings screen, choose the startup setting you want.
8. Sign in to your PC with a user account that has administrator rights.
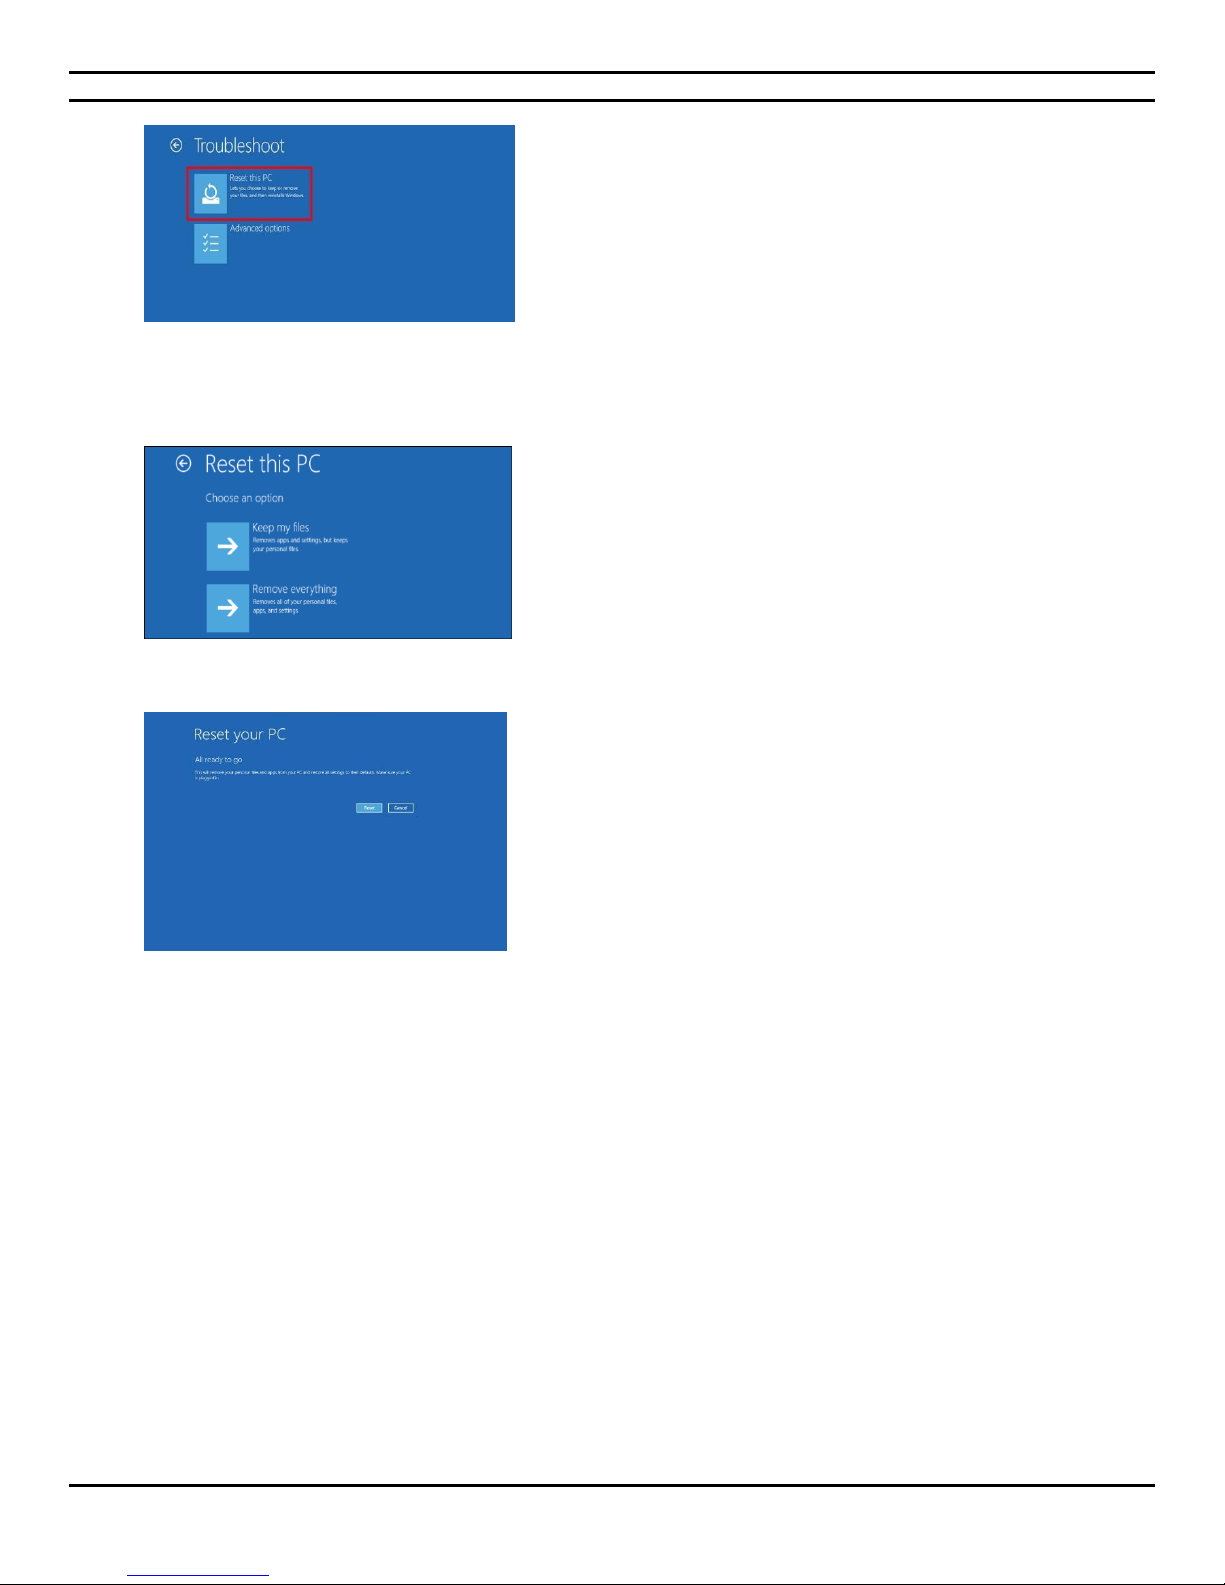
Choose Troubleshoot
Choose Reset your PC
- 11 -
Page 12
CIARA KRONOS 540 Workstation
Choose Remove everything
Press next
Then follow the regular Windows 10 Installation process.
- 12 -
Page 13

CIARA KRONOS 540 Workstation
1.3.3 Corrupted BIOS recovery
The ASUS CrashFree BIOS 3 is an auto recovery tool that allows you to restore the BIOS file when it fails or gets corrupted during the
updating process. You can restore a corrupted BIOS file using the motherboard support DVD or a USB flash drive that contains the
updated BIOS file.
NOTE: Before using this utility, rename the BIOS file in the removable device into X299WS1.CAP
Download the latest BIOS file from the ASUS website at https://www.asus.com/us/Motherboards/WS-X299-PRO-SE/HelpDesk_BIOS/
.
Recovering the BIOS
To recover the BIOS :
1. Turn on the system.
2. Insert the support DVD to the optical drive or the USB flash drive that contains the BIOS file to the USB port.
3. The utility automatically checks the devices for the BIOS file. When found, the utility reads the BIOS file and enters ASUS EZ Flash
3 utility automatically.
4. The system requires you to enter BIOS Setup to recover BIOS settings. To ensure system compatibility and stability, we
recommend that you press <F5> to load default BIOS values.
DO NOT shut down or reset the system while updating the BIOS! Doing so can cause system boot failure.
1.3.4 System maintenance
Read and follow carefully all the instructions and warnings in this manual and on these products!
Only use a damp cloth to clean your system unit and monitor case. Do not use detergents!
Position your system unit, monitor and cables/wires away from direct sunlight, moisture, dust, oil, and thoroughfares.
Ensure that all ventilation outlets are always free from obstruction.
In the event of mechanical/power failure or damage, do not attempt to repair the system unit, monitors, cables /wires. Refer all such
problems to experienced service personnel.
Ensure that the back of the system unit is at least 6" away from anything that might obstruct the ventilation outlets and cause
overheating.
Ensure that the power source is grounded correctly. This product is equipped with a 3-wire grounding-type plug. This plug will only fit
into a grounded power outlet.
- 13 -
Page 14

CIARA KRONOS 540 Workstation
1.3.5 Using the CIARA KRONOS 540
1.3.5.1 Introduction
The CIARA KRONOS 540 is a powerful workstation that has the ability to run a variety of operating systems. Unless you have specified
something different, your system comes configured with a Windows operating system pre-loaded onto the hard drive. Each operating
system comes with its own user manuals, and you should refer to these for information specific to your system.
1.3.5.2 A caution about viruses
Due to the prevalence of computer viruses, we strongly recommend that you take precautions to protect your workstation from them.
Purchase and use a reputable virus-checking program. Ensure that the program is kept up to date by registering the program, and
installing updates as they become available. Please be aware, however, that even the best virus checking programs cannot be
regarded as the perfect solution. It is possible for even the best program to fail, particularly if it is not updated. Please contact your
CIARA account representative for more information.
1.3.5.3 Windows
Windows is a Graphical User Interface (GUI) that provides a screen composed of icons. You select or “click” on the icons to run
programs. As noted above, Windows has been installed on your workstation. For further information about using Windows, please
consult the appropriate Microsoft software manual provided with your CIARA KRONOS 540.
1.3.5.4 Windows Server 2016 and Linux
Windows Server 2016 and Linux are operating systems that provide sophisticated networking capabilities to Windows based
computers. The onboard Network Interface Card (NIC) in the workstation allows the user to connect the CIARA KRONOS 540 to a
network server computer running Windows 2016 Server or Linux.
Microsoft and Linux provide workstations on the network with access to files and applications stored on the file server (a dedicated
computer running the Windows Server 2016 or Linux operating systems), as well as access to shared printers on the network.
Sophisticated tools are built into the Windows Server 2016 and Linux operating systems to manage the network, and to restrict access
to resources on the file server.
For further information about Windows Server 2016 or Linux, please consult the manuals provided with the network operating system
(NOS), or speak to your service representative.
- 14 -
Page 15

CIARA KRONOS 540 Workstation
1.4 Troubleshooting your system after first install
1.4.1 Helpful hints
If you encounter some minor problems with the workstation, monitor, or software, see the following list of general suggestions before
taking further action:
Check that the workstation and monitor are plugged into a working electrical outlet.
When available check to see if power supply button is switched on.
Check to see that the workstation is turned on and the power light is on.
Check to see that the monitor is turned on and the monitor light is on.
Turn up the brightness and contrast controls of the monitor if the monitor is dim.
Press and hold any key. If the system beeps, then the keyboard should be operating correctly.
Check all cable connections for loose connections or incorrect connections.
Wake the workstation by pressing any key on the keyboard or pressing the power button. If the system remains in suspend
mode, shut down the workstation by pressing and holding the power button for at least four seconds then press the power
button again to restart the workstation. If the system will not shut down, unplug the power cord, wait a few seconds, and
then plug it in again. The workstation will restart if automatic start on power loss is set in the BIOS. If it does not restart, press
the power button to start the workstation.
Be sure that all the needed device drivers have been installed. For example, if you are using a printer, you need a driver for
that model of printer.
If you have installed an operating system other than the factory-installed operating system, check to be sure that it is
supported on the system.
The system has multiple video sources, the monitor must be plugged into one of the five video connectors of the system, i.e.
DVI, mini HDMI or mini DisplayPort. Your system can support four independent monitors using any of the five available video
connectors. This type of configuration will require adjustments to the BIOS parameters.
- 15 -
Page 16
CIARA KRONOS 540 Workstation
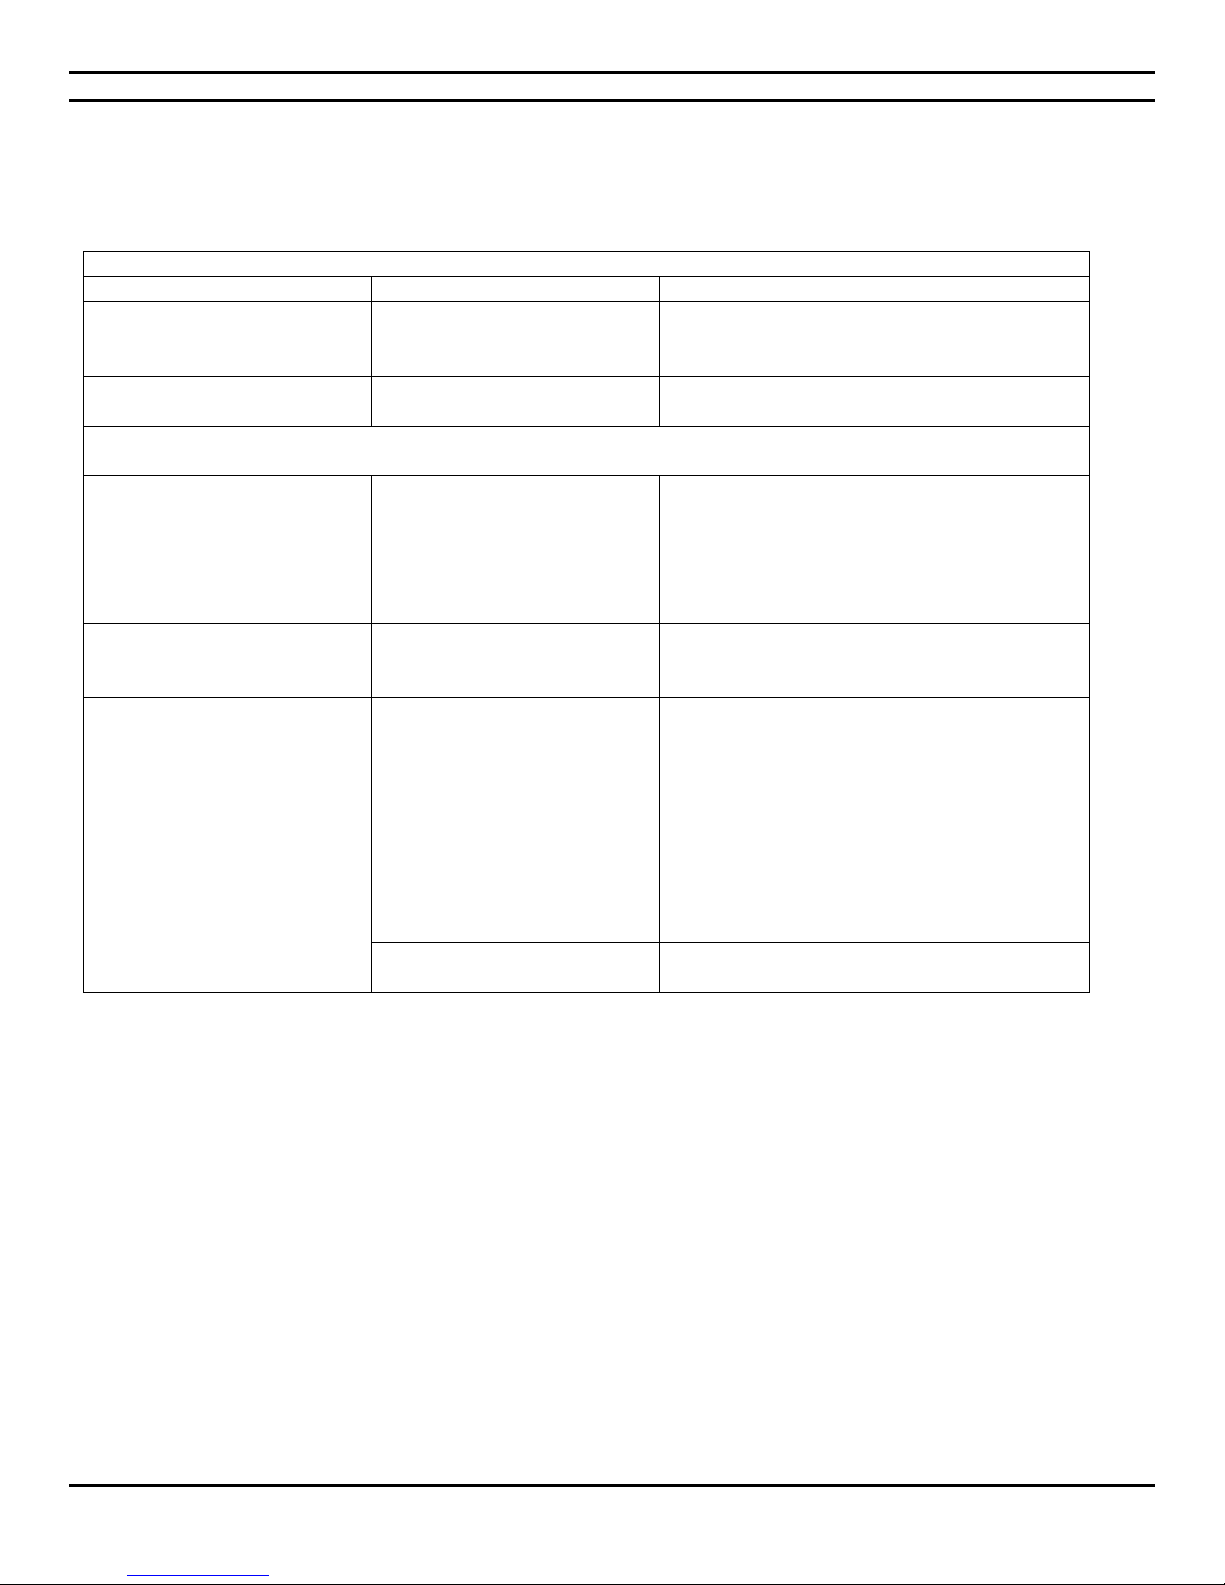
Solving general problems
Problem
Cause
Solution
Workstation appears locked up
and will not turn off when the
power button is pressed.
Software control of the power
switch is not functional.
Press and hold the power button for at least four
seconds until the workstation turns off.
Workstation will not respond to
USB keyboard or mouse.
Workstation is in Last State
mode.
Press the power button to resume from Last State
mode.
CAUTION : When attempting to resume from Last State mode, do not hold down the power button for more than four
seconds. Otherwise, the workstation will shut down and you will lose your data.
Workstation date and time
display is incorrect.
RTC (real-time clock) battery
may need to be replaced.
► Connecting the workstation
to a live AC outlet prolongs the
life of the RTC battery.
Reset the date and time under Control Panel
(Workstation Setup can also be used to update
the RTC date and time). If the problem persists,
replace the RTC battery.
Cursor will not move using the
arrow keys on the keypad.
The Num Lock key may be on.
Press the Num Lock key. The Num Lock light
should not be on if you want to use the arrow
keys.
Poor performance is
experienced.
Processor is hot.
1. Make sure the airflow to the workstation is
not blocked.
2. Make sure the fans are connected and
working properly (some fans only operate
when needed)
3. Make sure the processor heat sink is installed
properly.
4. The system might be infected with a virus
and that it would need to be cleaned with an
antivirus software.
Hard drive is full.
Transfer data from the hard drive to create more
space on the hard drive.
1.5 Solving general problems
You should be able to easily resolve the general problems described in this section. If a problem persists and you are unable
to resolve it, or if you feel uncomfortable about performing the operation, contact CIARA at 1-877-242-7272 and ask for the
Customer Service department.
- 16 -
Page 17

1.5.1 Solving power supply problems
Solving power supply problems
Problem
Cause
Solution
Power supply shuts down
intermittently.
Power supply will not turn
on because of internal power
supply fault.
Contact CIARA for the replacement of the power supply.
Workstation powered off
automatically and the Power LED
flashes two times, once every
second, followed by a two second
pause.
Processor thermal protection
activated : A fan may be
blocked or not turning.
OR
The heat sink/fan assembly is
not properly attached to the
processor.
Ensure that the workstation air vents are not blocked and
the processor-cooling fan is running.
Open hood, press the power button, and see if the
processor fan spins. If the processor fan is not spinning,
make sure the fan's cable is plugged onto the system
board header. Ensure the fan is fully/properly seated or
installed.
If fan is plugged in and seated properly, but is not
spinning, then replace the processor fan. (See article 1.6.3
of this Guide)
Reseat processor heat sink and verify that the fan
assembly is properly attached.
Power LED flashes, once every
two seconds.
OR
Power LED flashes four times,
once every second, followed by a
two second pause.
Power failure (power supply
is overloaded)
Check the power supply voltage. Proper voltage setting
depends on your region. (See section 1.2)
Open the hood (See article 1.6.2) and ensure the 4-wire
power supply cable is seated into the connector on the
system board.
Check if a device is causing the problem by removing ALL
attached devices (such as hard or optical drives, and
expansion cards). Power on the system. If the system
enters the POST, then power off and replace one device
at a time and repeat this procedure until failure occurs.
Replace the device that is causing the failure. Continue
adding devices one at a time to ensure all devices are
functioning properly.
If the problem persists, contact CIARA since the problem
may necessitate the replacement of the power supply or
the motherboard.
System does not power on and
LEDs are not flashing.
The system is unable to
power on.
Press and hold the power button for more than 4
seconds. If the hard drive LED turns on, check if the
voltage selector located on the rear of the power supply,
is set to the appropriate voltage. Proper voltage setting
depends on your region.
OR
Press and hold the power button for less than 4 seconds.
If the hard drive LED does not turn on then :
1. Check that the unit is plugged into a working AC
outlet.
2. Open hood and check that the power button harness
is properly connected to the system board.
3. Check that both power supply cables are properly
connected to the system board.
4. Ensure the 4-wire power supply cable is seated into
the connector on the system board.
5. If the problem persists, contact CIARA since the
problem may necessitate the replacement of the
power supply or the motherboard.
CIARA KRONOS 540 Workstation
- 17 -
Page 18
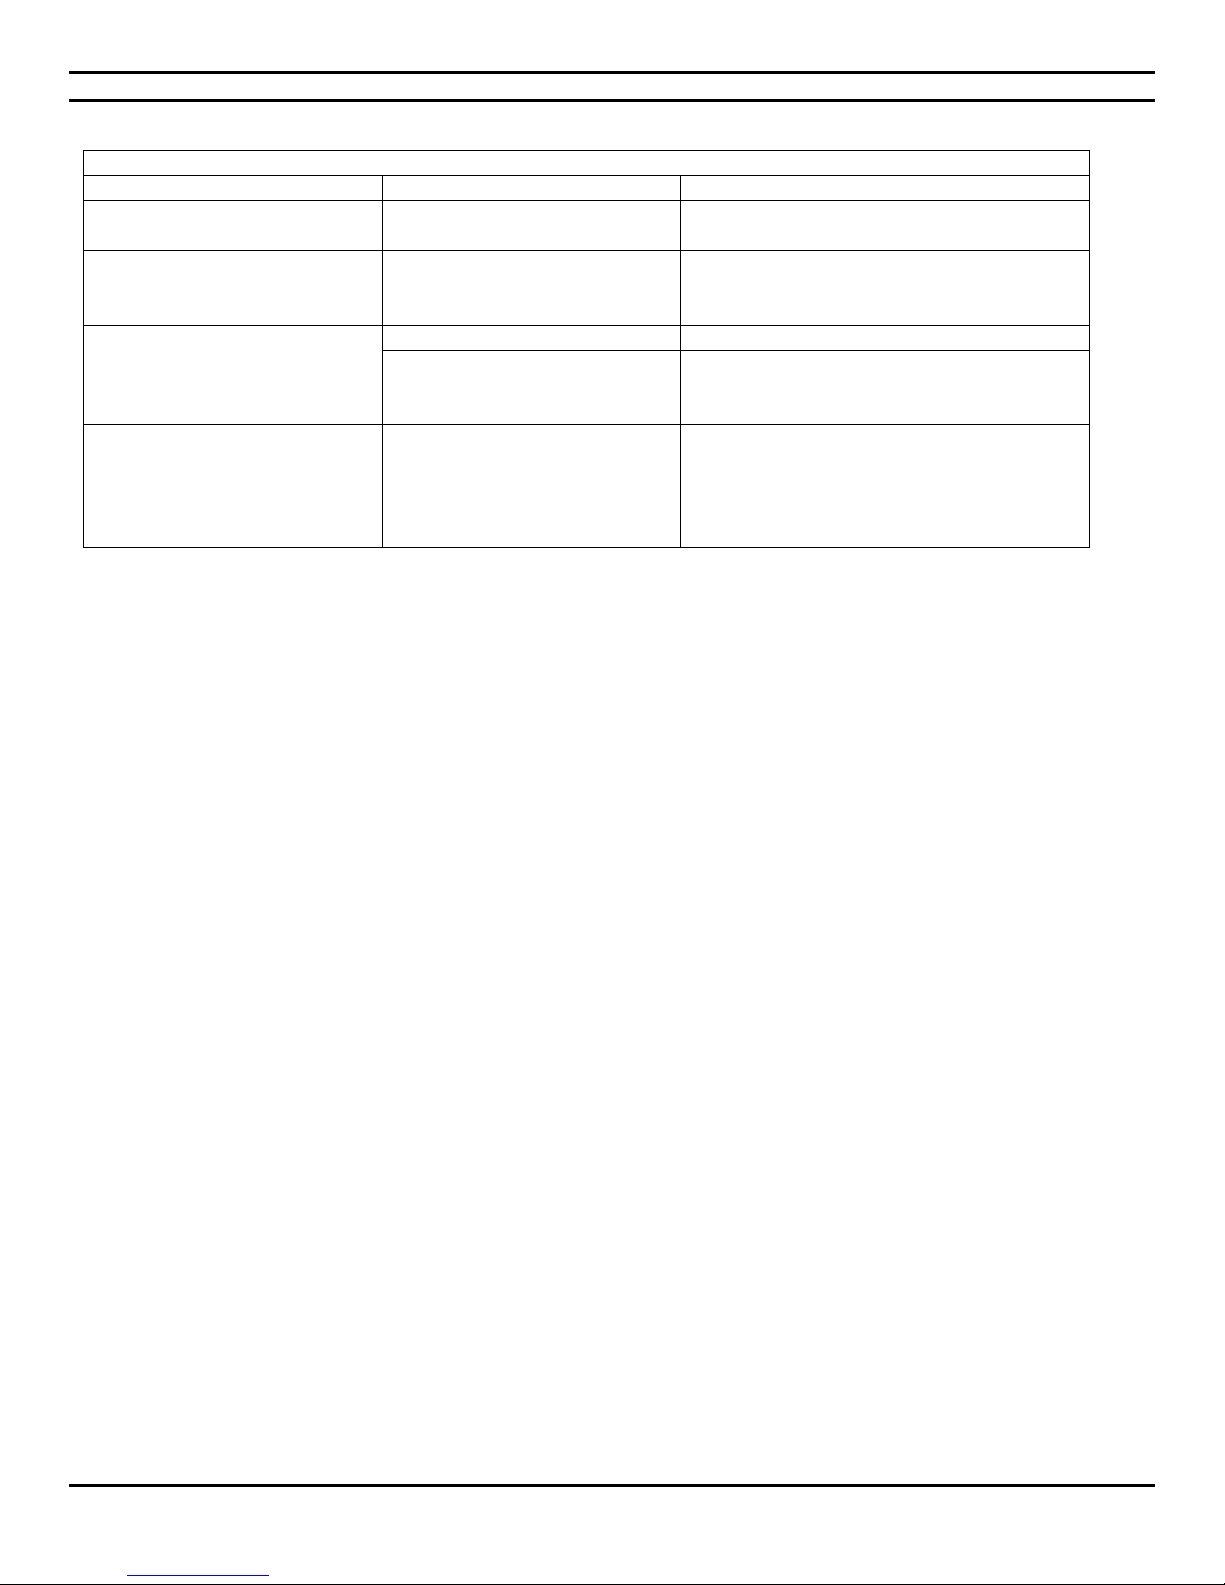
1.5.2 Solving hard drive problems
Solving hard drive problems
Problem
Cause
Solution
Hard drive error occurs.
Hard disk has bad sectors or has
failed.
Use a utility to locate and block usage of bad
sectors. If necessary, reformat the hard disk.
Disk transaction problem.
Either the directory structure is
bad or there is a problem with a
file.
In Windows, right-click Start, click Explore, and
select a drive. Select File > Properties > Tools.
Under Error-checking, click Check Now.
Drive not found.
Cable could be loose.
Check cable connections.
System files missing or not
properly installed.
For Windows 7, the system will need to be
booted with a system DVD and the repair
option selected to try and fix problems.
Workstation seems to be locked
up.
Program in use has stopped
responding to commands.
Attempt the normal Windows “Shut Down”
procedure. If this fails, press the power button
for four or more seconds to turn off the power.
To restart the workstation, press the power
button again.
CIARA KRONOS 540 Workstation
- 18 -
Page 19
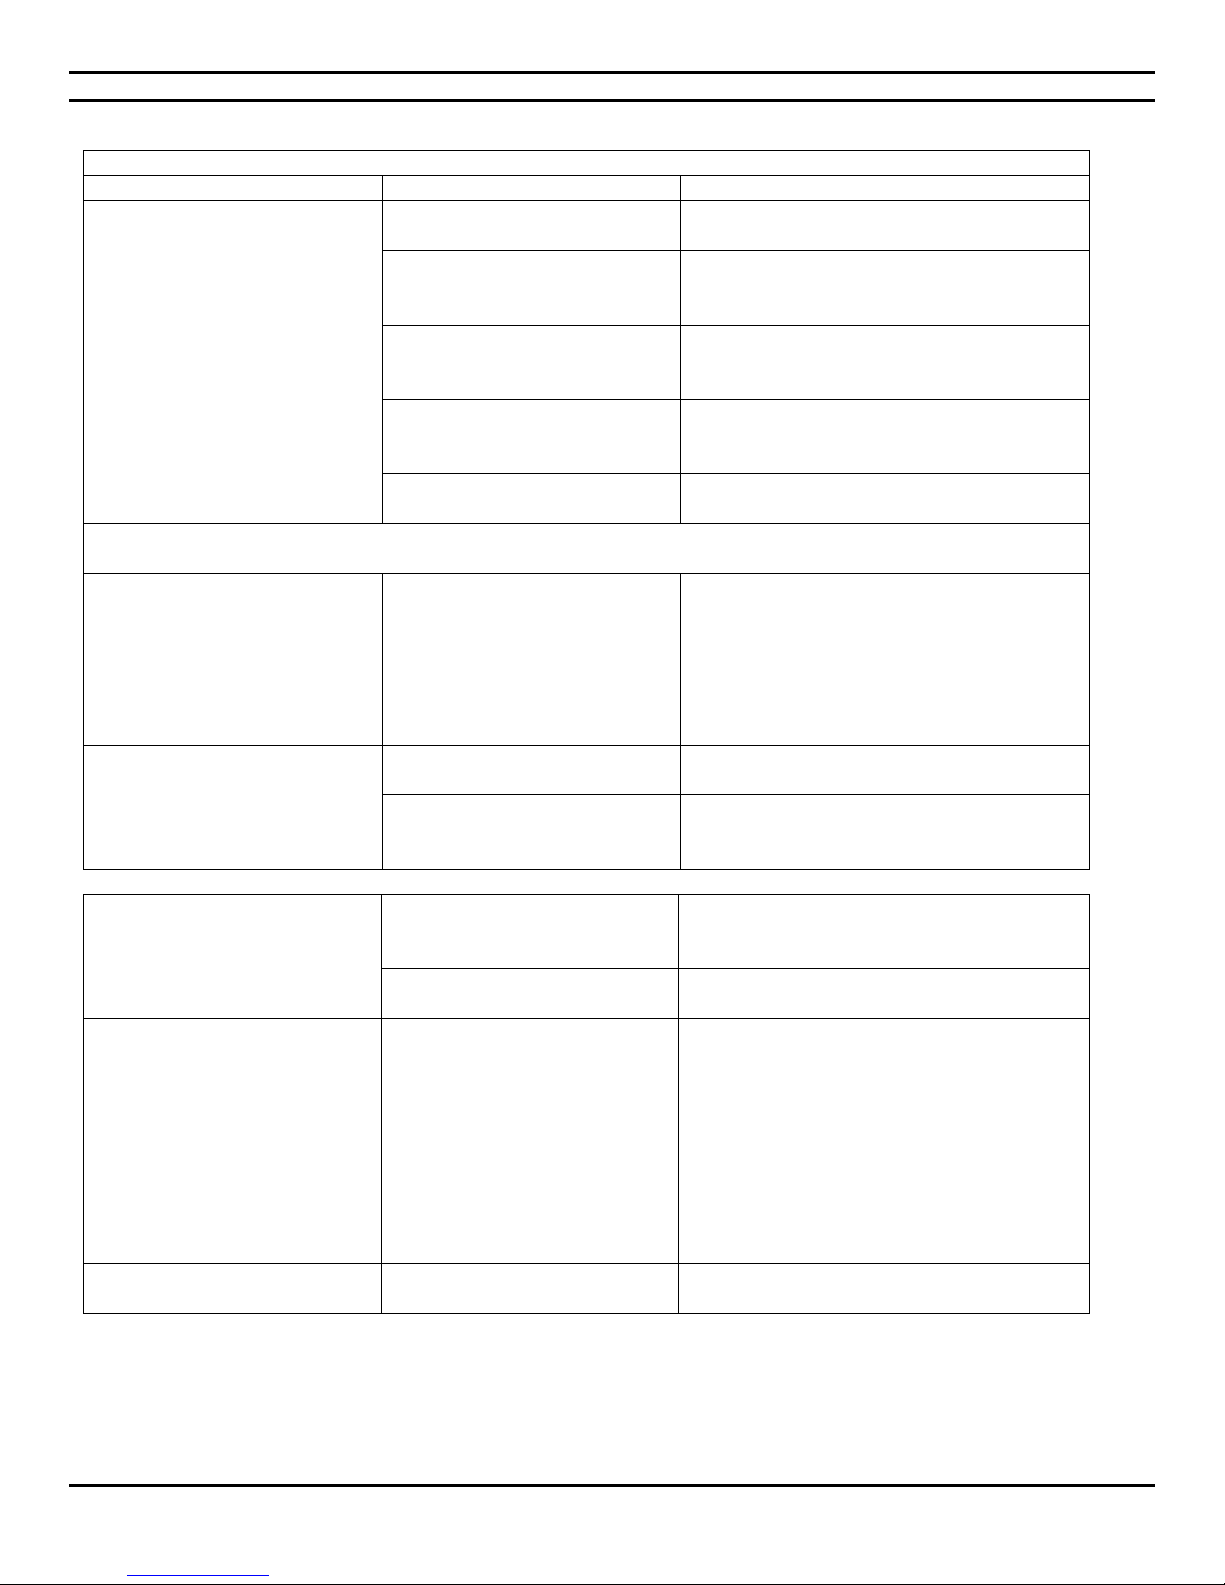
1.5.3 Solving display problems
Solving display problems
Problem
Cause
Solution
Blank screen (no video).
Monitor is not turned on and the
monitor light is not on.
Turn on the monitor and check that the
monitor light is on.
The cable connections are not
correct.
Check the cable connection from the monitor
to the workstation and to the electrical outlet.
See section 1.3.
You may have a screen blanking
utility installed or energy saver
features are enabled.
Press any key or click the mouse button and, if
set, type your password.
You are using a fixed-sync
monitor and it will not sync at the
resolution chosen.
Be sure that the monitor can accept the same
horizontal scan rate as the resolution chosen.
Workstation is in Last State
mode.
Press the power button to resume from Last
State mode.
CAUTION : When attempting to resume from Last State mode, do not hold down the power button for more than four
seconds. Otherwise, the workstation will shut down and you will lose your data.
Power LED flashes six times, once
every second, followed by a two
second pause, and the
workstation beeps six times.
Pre-video graphics error.
For systems with a graphics card :
1. Reseat the graphics card. Power on the
system.
2. If the problem persists, contact CIARA
since the problem may necessitate the
replacement of the graphics card or the
motherboard.
Dim characters.
The brightness and contrast
controls are not set properly.
Adjust the monitor brightness and contrast
controls.
Cables are not properly
connected.
Check that the graphics cable is securely
connected to the graphics card and the
monitor. See section 1.3
Blurry video or requested
resolution cannot be set.
If the graphics controller was
upgraded, the correct graphics
drivers may not be loaded.
Install the video drivers included in the upgrade
kit.
Monitor is not capable of
displaying requested resolution.
Change requested resolution.
The picture is broken up, or it
rolls, jitters, or flashes.
The monitor connections may be
incomplete or the monitor may
be incorrectly adjusted.
1. Be sure the monitor cable is securely
connected to the workstation. See section
1.3
2. In a two-monitor system or if another
monitor is in close proximity, be sure the
monitors are not interfering with each
other’s electromagnetic field by moving
them apart.
3. 3. Fluorescent lights or fans may be too
close to the monitor.
High-pitched noise coming from
inside a flat panel monitor.
Brightness and/or contrast
settings are too high.
Lower brightness and/or contrast settings.
CIARA KRONOS 540 Workstation
- 19 -
Page 20
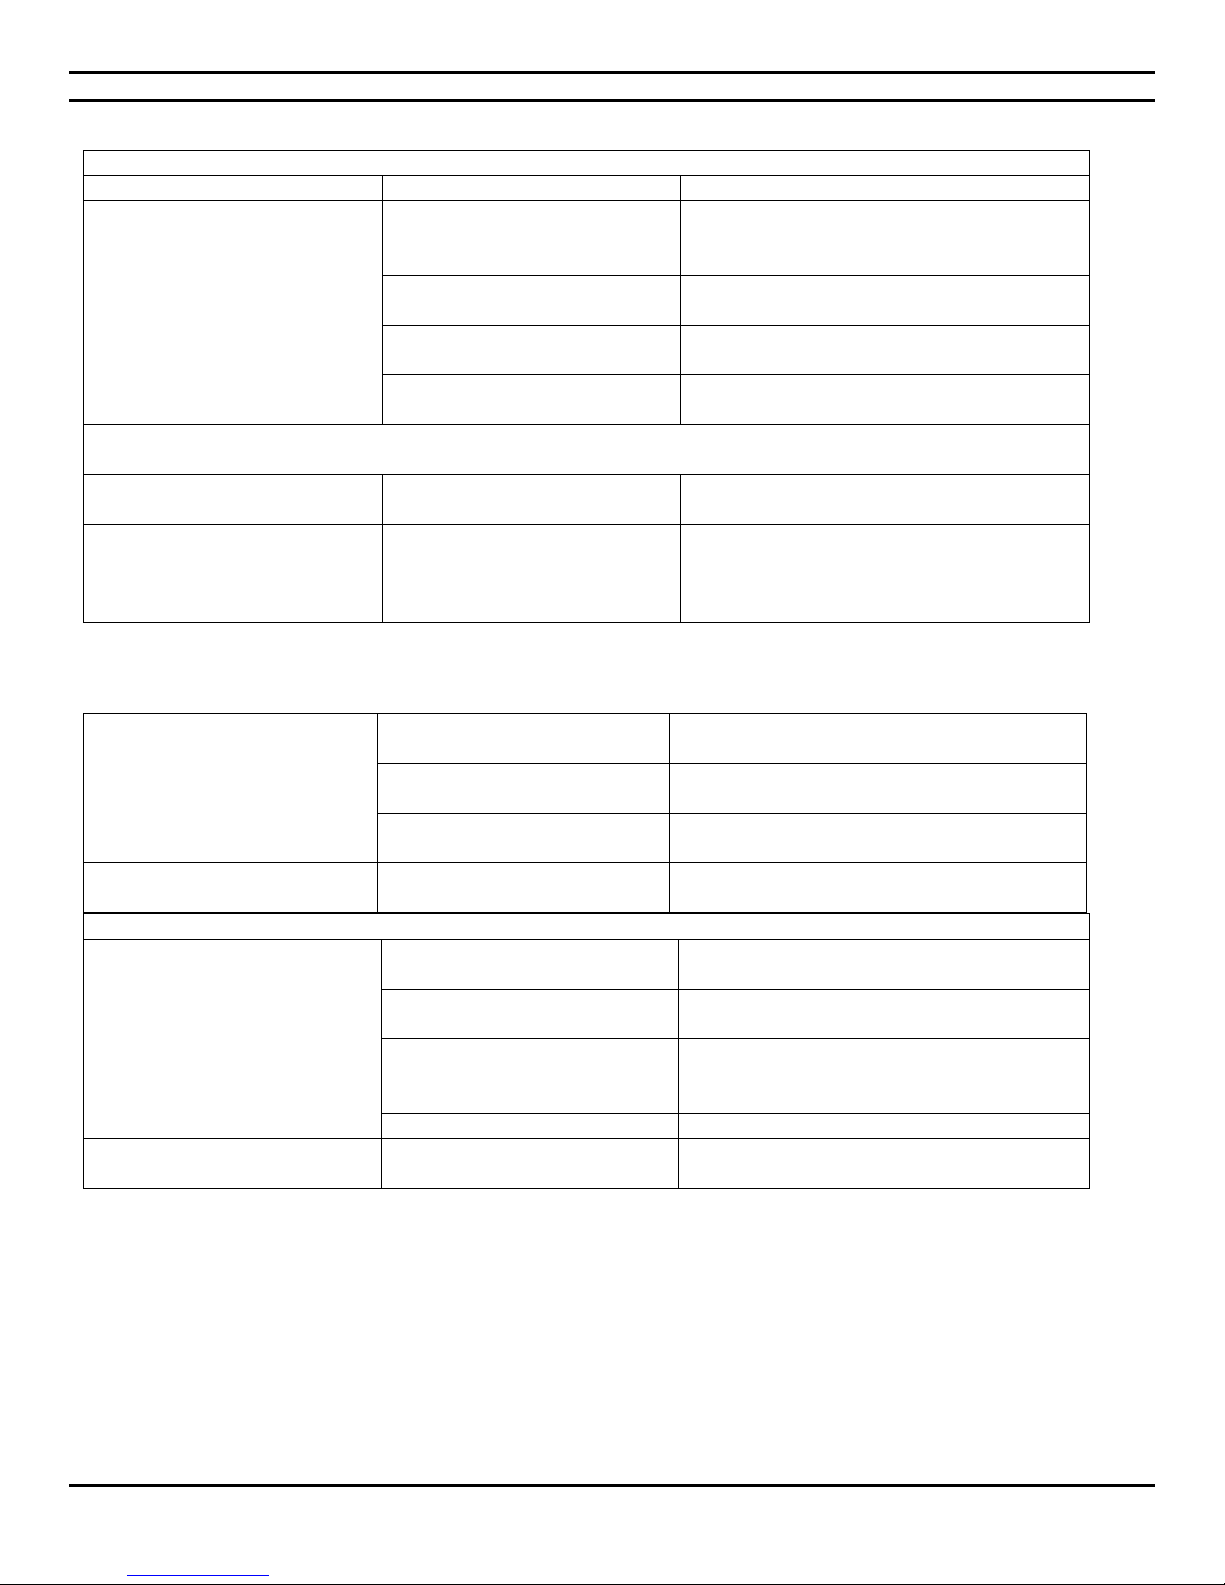
1.5.4 Solving audio problems
Solving audio problems
Problem
Cause
Solution
Sound does not come out of the
speaker or headphones.
Software volume control is
turned down.
Double-click the Speaker icon on the taskbar,
and then make sure that Mute is not selected
and use the volume slider to adjust the volume.
The external speakers are not
turned on.
Turn on the external speakers.
External speakers plugged into
the wrong audio jack.
Only one of the three audio ports is reserved
for speakers.
Workstation is in Last State
mode.
Press the power button to resume from Last
State mode.
CAUTION : When attempting to resume from Last State mode, do not hold down the power button for more than four
seconds. Otherwise, the workstation will shut down and you will lose your data.
Sound cuts in and out.
Processor resources are being
used by other open applications.
Shut down all open processor-intensive
applications.
Workstation appears to be locked
up while recording audio.
The hard disk may be full.
Before recording, make sure there is enough
free space on the hard disk. You can also try
recording the audio file in a compressed
format.
Printer will not print.
Printer is not turned on and
online.
Turn the printer on and make sure it is online.
The correct printer drivers for the
application are not installed.
Install the correct printer driver for the
application.
If you are on a network, you may
not have made the connection to
the printer.
Make the proper network connections to the
printer.
Printer may have failed.
Run printer self-test.
Printer will not turn on.
The cables may not be connected
properly.
Reconnect all cables and check the power cord
and electrical outlet.
Printer prints garbled
information.
The correct printer driver for the
application is not installed.
Install the correct printer driver for the
application.
The cables may not be
connected properly.
Reconnect all cables.
Printer memory may be
overloaded.
Reset the printer by turning it off for one
minute and then turn it back on.
Printer is offline.
The printer may be out of paper.
Check the paper tray and refill it if it is empty.
Select online.
1.5.5 Solving printer problems
CIARA KRONOS 540 Workstation
- 20 -
Page 21
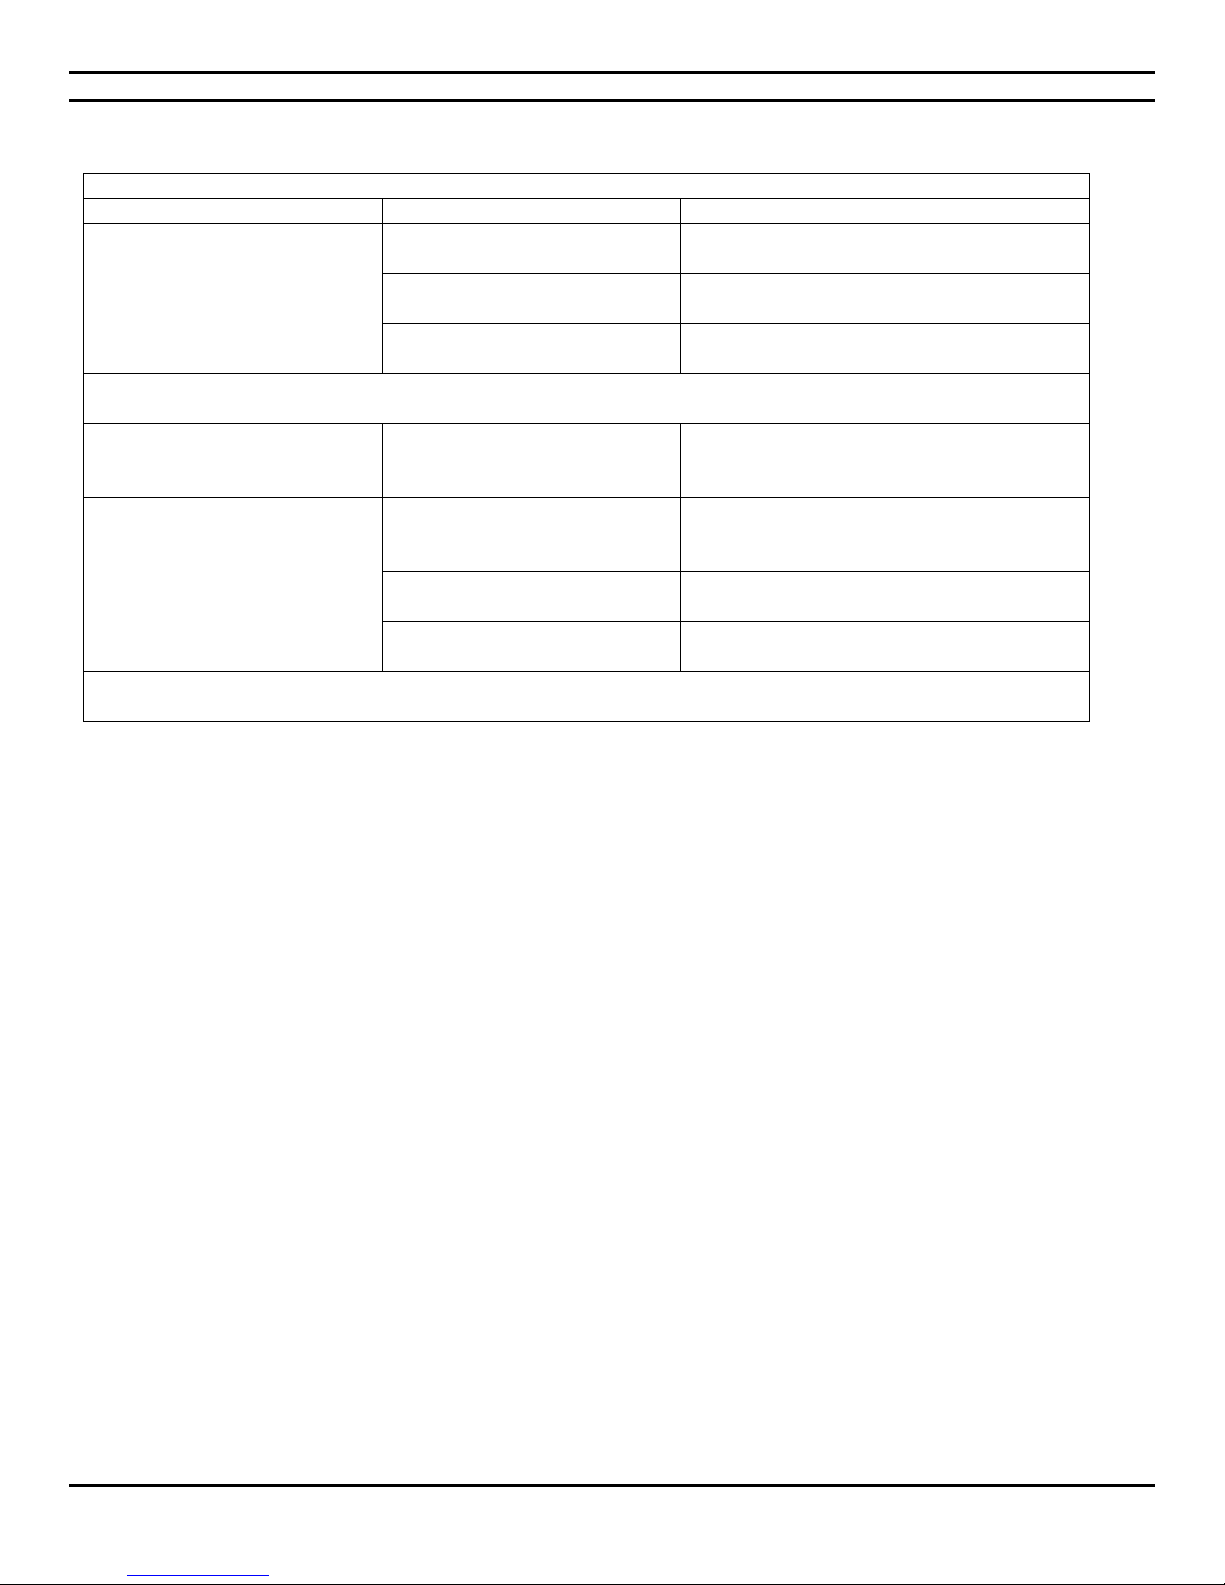
CIARA KRONOS 540 Workstation
Solving keyboard and mouse problems
Problem
Cause
Solution
The workstation does not
recognize keyboard commands
and typing.
Keyboard connector is not
properly connected.
Connect keyboard correctly.
Keyboard needs repairs.
Contact CIARA so that we may proceed to
repairs.
Workstation is in Last State
mode.
Press the power button to resume from Last
State mode.
CAUTION : When attempting to resume from Last State mode, do not hold down the power button for more than four
seconds. Otherwise, the workstation will shut down and you will lose your data.
Cursor will not move using the
arrow keys on the keypad.
The Num Lock key may be on.
Press the Num Lock key. The Num Lock light
should not be on if you want to use the arrow
keys.
Mouse does not respond to
movement or is too slow.
Mouse connector is not properly
plugged into the back of the
workstation.
Connect mouse properly.
Mouse needs repairs.
Contact CIARA so that we may proceed to
repairs.
Workstation is in Last State
mode.
Press the power button to resume from Last
State mode.
CAUTION : When attempting to resume from Last State mode, do not hold down the power button for more than four
seconds. Otherwise, the workstation will shut down and you will lose your data.
1.5.6 Solving keyboard and mouse problems
- 21 -
Page 22
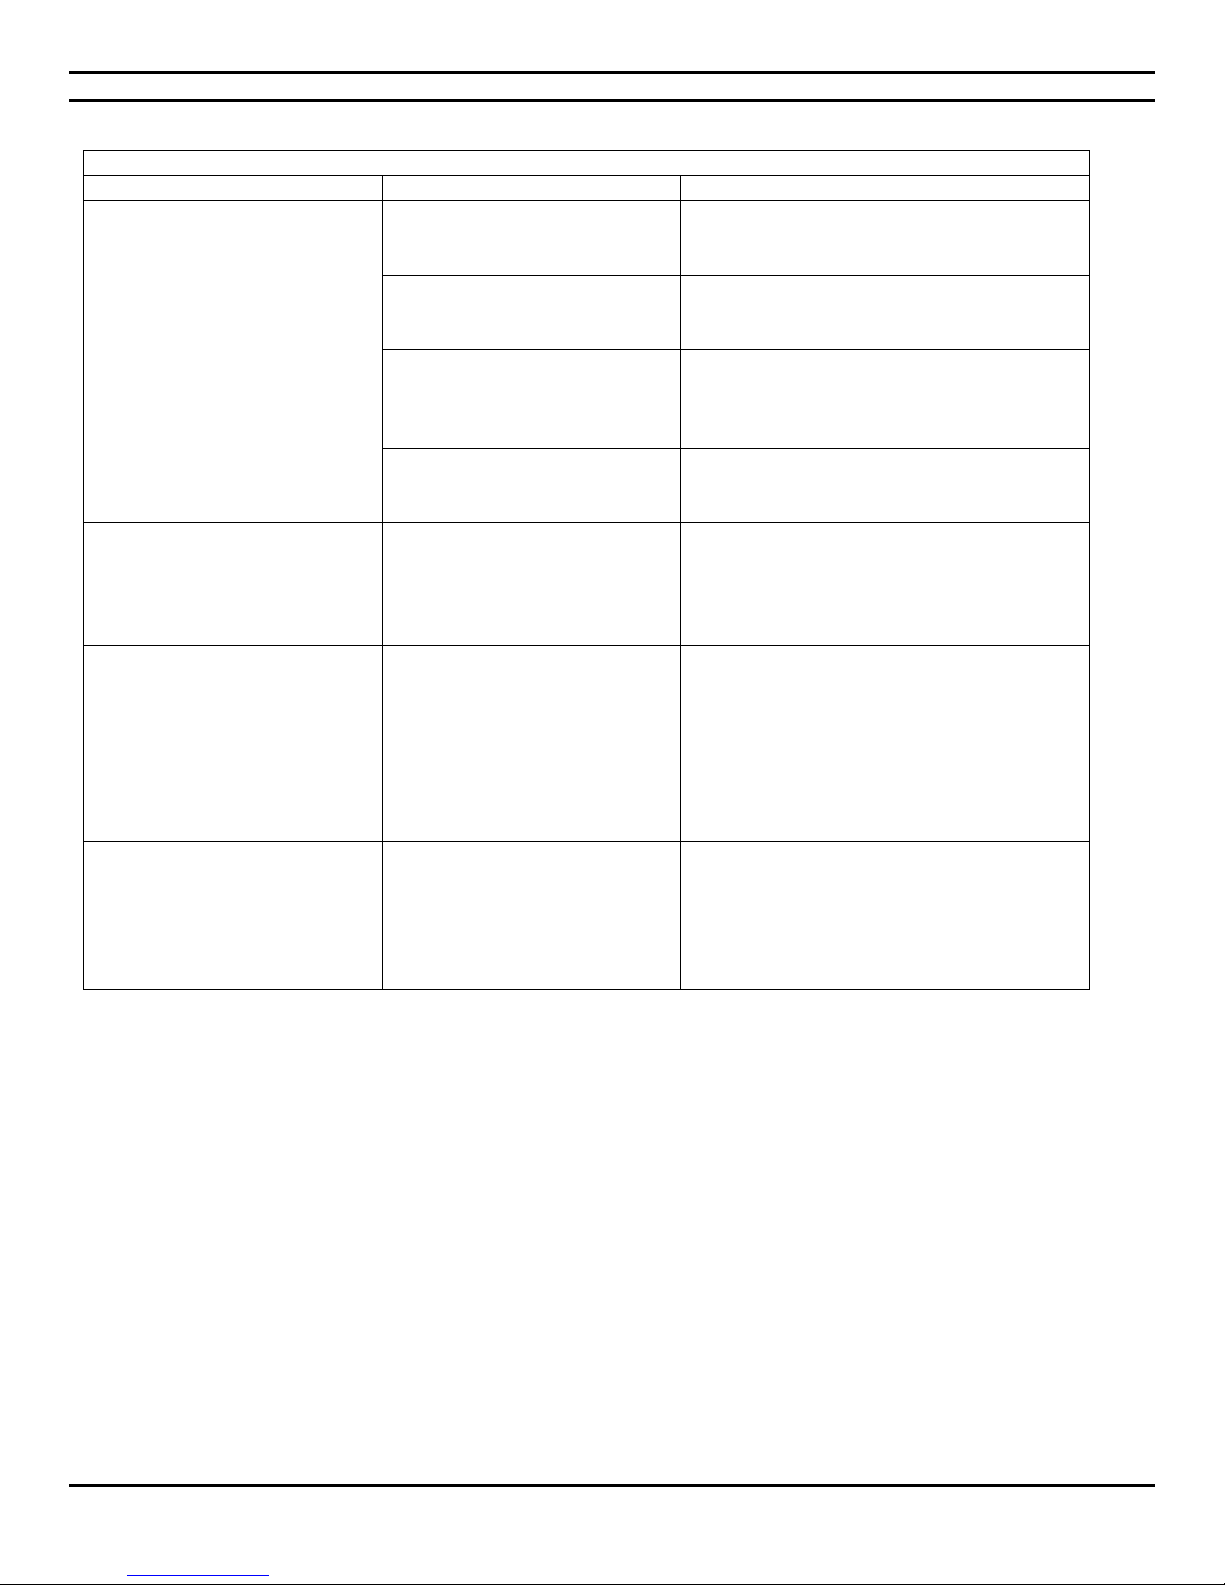
CIARA KRONOS 540 Workstation
Solving hardware installation problems
Problem
Cause
Solution
A new device is not recognized as
part of the system.
Device is not seated or connected
properly.
Ensure that the device is properly and securely
connected and that pins in the connector are
not bent down.
Cable(s) of new external device
are loose or power cables are
unplugged.
Ensure that all cables are properly and securely
connected and that pins in the cable or
connector are not bent down.
Power switch of new external
device is not turned on.
Turn off the workstation, turn on the external
device and then turn on the workstation to
integrate the device with the workstation
system.
When the system advised you of
changes to the configuration, you
did not accept them.
Reboot the workstation and follow the
instructions for accepting the changes.
Workstation will not start.
Wrong memory modules were
used in the upgrade or memory
modules were installed in the
wrong location.
See Sections 1.6.4 and 4.23 of the present
Guide to verify if you have installed memory
modules compatible to your system and if they
were installed correctly.
If the problem persists, Contact CIARA.
Power LED flashes five times,
once every second, followed by a
two second pause, and the
workstation beeps five times.
Memory is installed incorrectly or
is bad.
1. Reseat DIMMs. Power on the system.
2. Replace DIMMs one at a time to isolate
the faulty module.
3. If a faulty module is found, Contact CIARA
for the replacement of the module.
4. 4. If the problem persists, Contact CIARA
for this may necessitate the replacement
of the motherboard.
Power LED flashes six times, once
every second, followed by a two
second pause, and the
workstation beeps six times.
Video card is not seated properly
or is bad, or system board is bad.
For systems with a graphics card :
1. Reseat the graphics card. Power on the
system.
2. If the problem persists, Contact CIARA for
this may necessitate the replacement of
the video card or the motherboard.
1.5.7 Solving hardware installation problems
- 22 -
Page 23
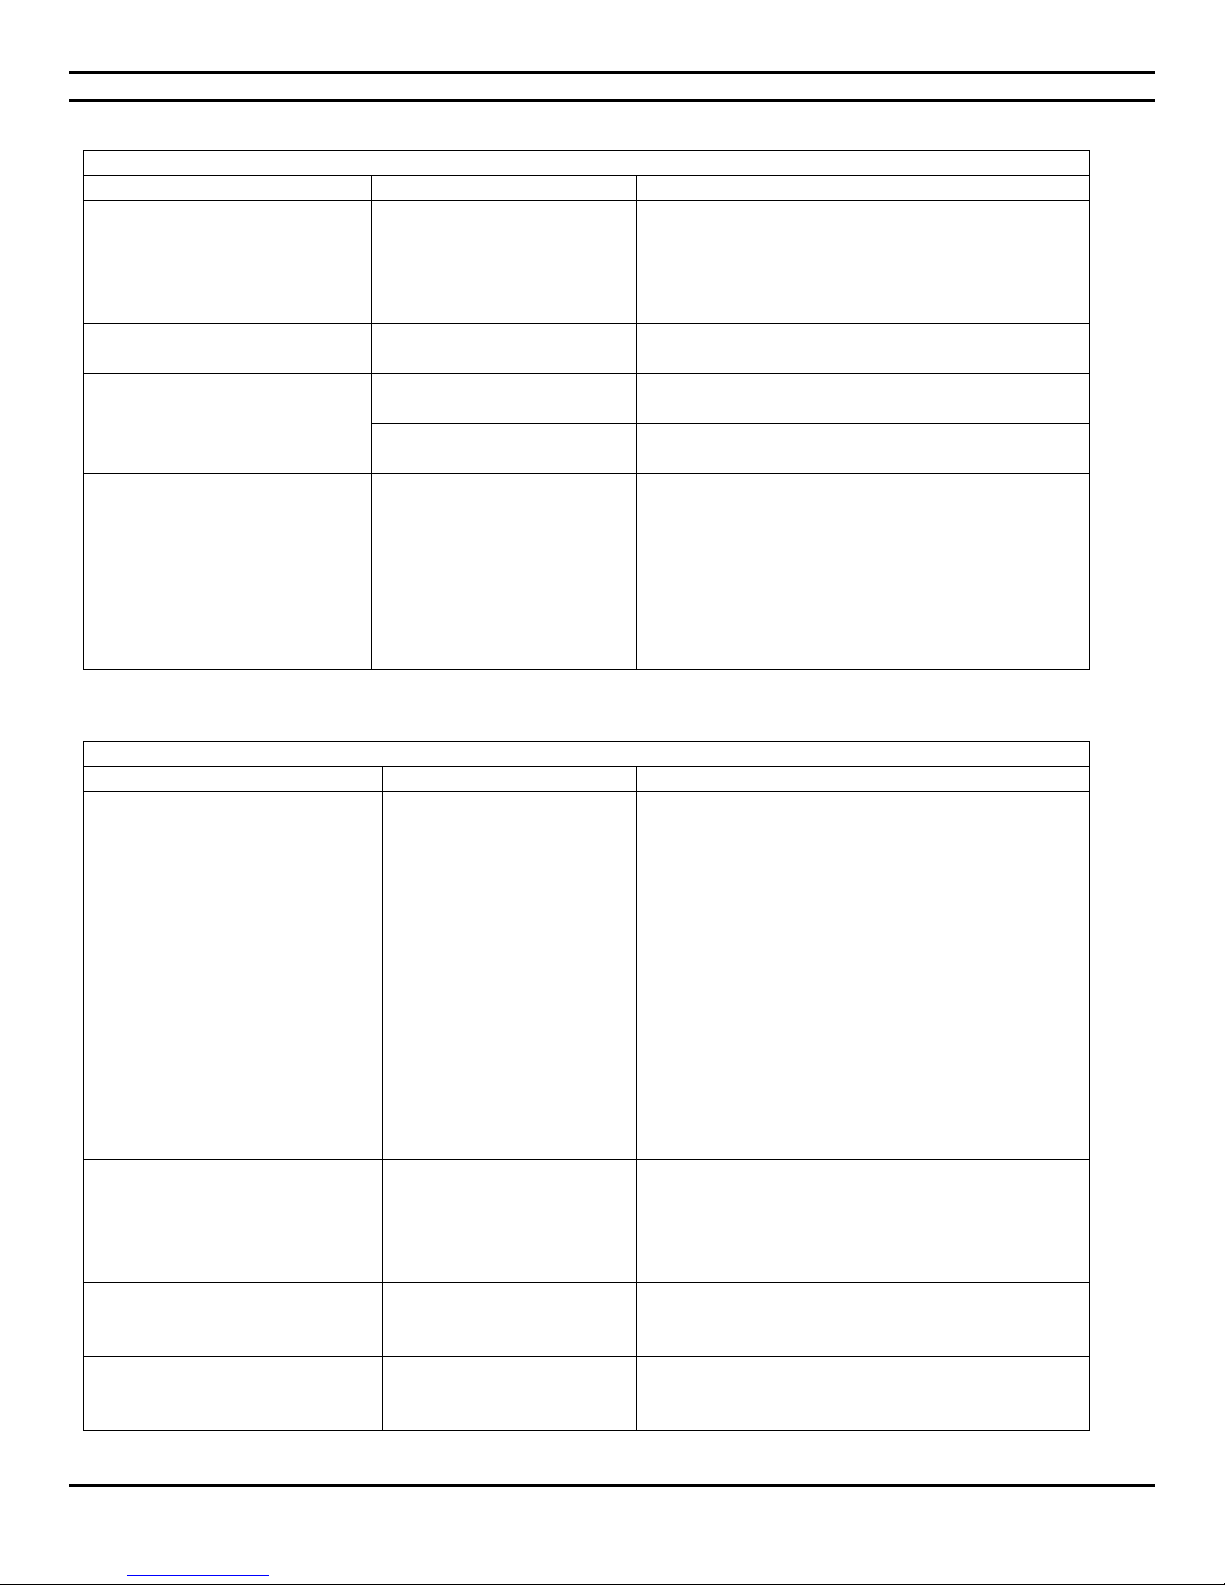
1.5.8 Solving memory problems
Solving memory problems
Problem
Cause
Solution
System will not boot or does not
function properly after installing
additional memory modules.
Memory module is not the
correct type or speed grade
for the system or the new
memory module is not seated
properly.
Replace memory module with a module approved
for your system. See Sections 1.6.4 and 4.23 of the
present Guide to verify if you have installed memory
modules compatible to your system and if they were
installed correctly.
Out of memory error.
You have run out of memory
to run the application.
Check the application documentation to determine
the memory requirements.
Insufficient memory error
during operation.
Too many programs are being
used.
Close any programs that you do not need.
You have run out of memory
for the application.
Check the memory requirements for the application
or add more memory to the workstation.
Power LED flashes five times,
once every second, followed by
a two second pause, and the
workstation beeps three times.
Memory is installed
incorrectly or is bad.
1. Reseat DIMMs. Power on the system.
2. Replace DIMMs one at a time to isolate the
faulty module.
3. If a faulty module is found, Contact CIARA for
the replacement of the module.
4. 4. If the problem persists, Contact CIARA for this
may necessitate the replacement of the
motherboard.
Solving processor problems
Problem
Cause
Solution
Poor performance is experienced.
Processor is hot.
1. Make sure the airflow to the workstation is not
blocked.
2. Make sure the fans are connected and working
properly (some fans only operate when needed)
3. Make sure the processor heatsink is installed
properly.
4. Make sure the processor fan connector is
properly connected to the CPU_FAN header on
the motherboard.
5. Make sure sufficient thermal compound has
been applied on the processor before the heat
sink is put in place. This ensures that heat is
drawn away from the processor to the heat sink.
6. 6. Replace the heat sink with more efficient
model.
Power LED is always on
OR
Power LED flashes three times,
once every second, followed by a
two second pause.
Processor is not seated
properly or not installed.
1. Check to see that the processor is present.
2. Reseat the processor. See section 1.6.3 of the
present Guide for more information.
Workstation does not start.
4-pin ATX12V power
connector is not connected
to the motherboard.
Connect the 4-pin ATX12V power connector to the
motherboard.
Power supply does not meet
the power requirements of
the processor.
Replace power supply with a compatible model that
meets or exceeds the power requirements of the
processor.
CIARA KRONOS 540 Workstation
1.5.9 Solving processor problems
- 23 -
Page 24
CIARA KRONOS 540 Workstation
Solving optical drive problems
Problem
Cause
Solution
System will not boot from an
optical drive.
Non-bootable CD or DVD in drive.
Try a bootable CD or DVD in the drive.
Optical drive is not detected by
the system.
Drive is not connected properly
or not properly configured.
Verify if the drive is correctly seated in the
chassis. Verify if all cables have been correctly
connected.
Movie will not play in the DVD
drive.
Decoder software is not installed.
Install decoder software.
Note : All CIARA systems equipped with a DVD
drive at plant assembly include the necessary
Decoder software.
Cannot eject disc from tray.
Disc not properly seated in the
drive.
Turn off the workstation and insert a thin metal
rod into the emergency eject hole and push
firmly. Slowly pull the tray out from the drive
until the tray is fully extended, then remove
the disc.
The optical drive cannot read a
disc or takes too long to start.
CD or DVD has been inserted
upside down.
Re-insert the CD or DVD with the label facing
up.
The DVD drive takes longer to
start because it has to determine
the type of media played, such as
audio or video.
Wait at least 30 seconds to let the DVD drive
determine the type of media being played such
as audio or video.
CD or DVD disc is dirty.
Clean CD or DVD with a CD cleaning kit,
available from most workstation stores.
Recording audio CDs is difficult or
impossible.
Wrong or poor quality media
type.
1. Try using a slower speed when recording.
2. Verify that you are using the correct media
for the drive.
3. Try a different brand of media. Quality
varies widely between manufacturers.
1.5.10 Solving optical drive problems
In this User Guide, an optical drive is defined as a DVD-ROM or a DVD-R/RW.
- 24 -
Page 25
CIARA KRONOS 540 Workstation
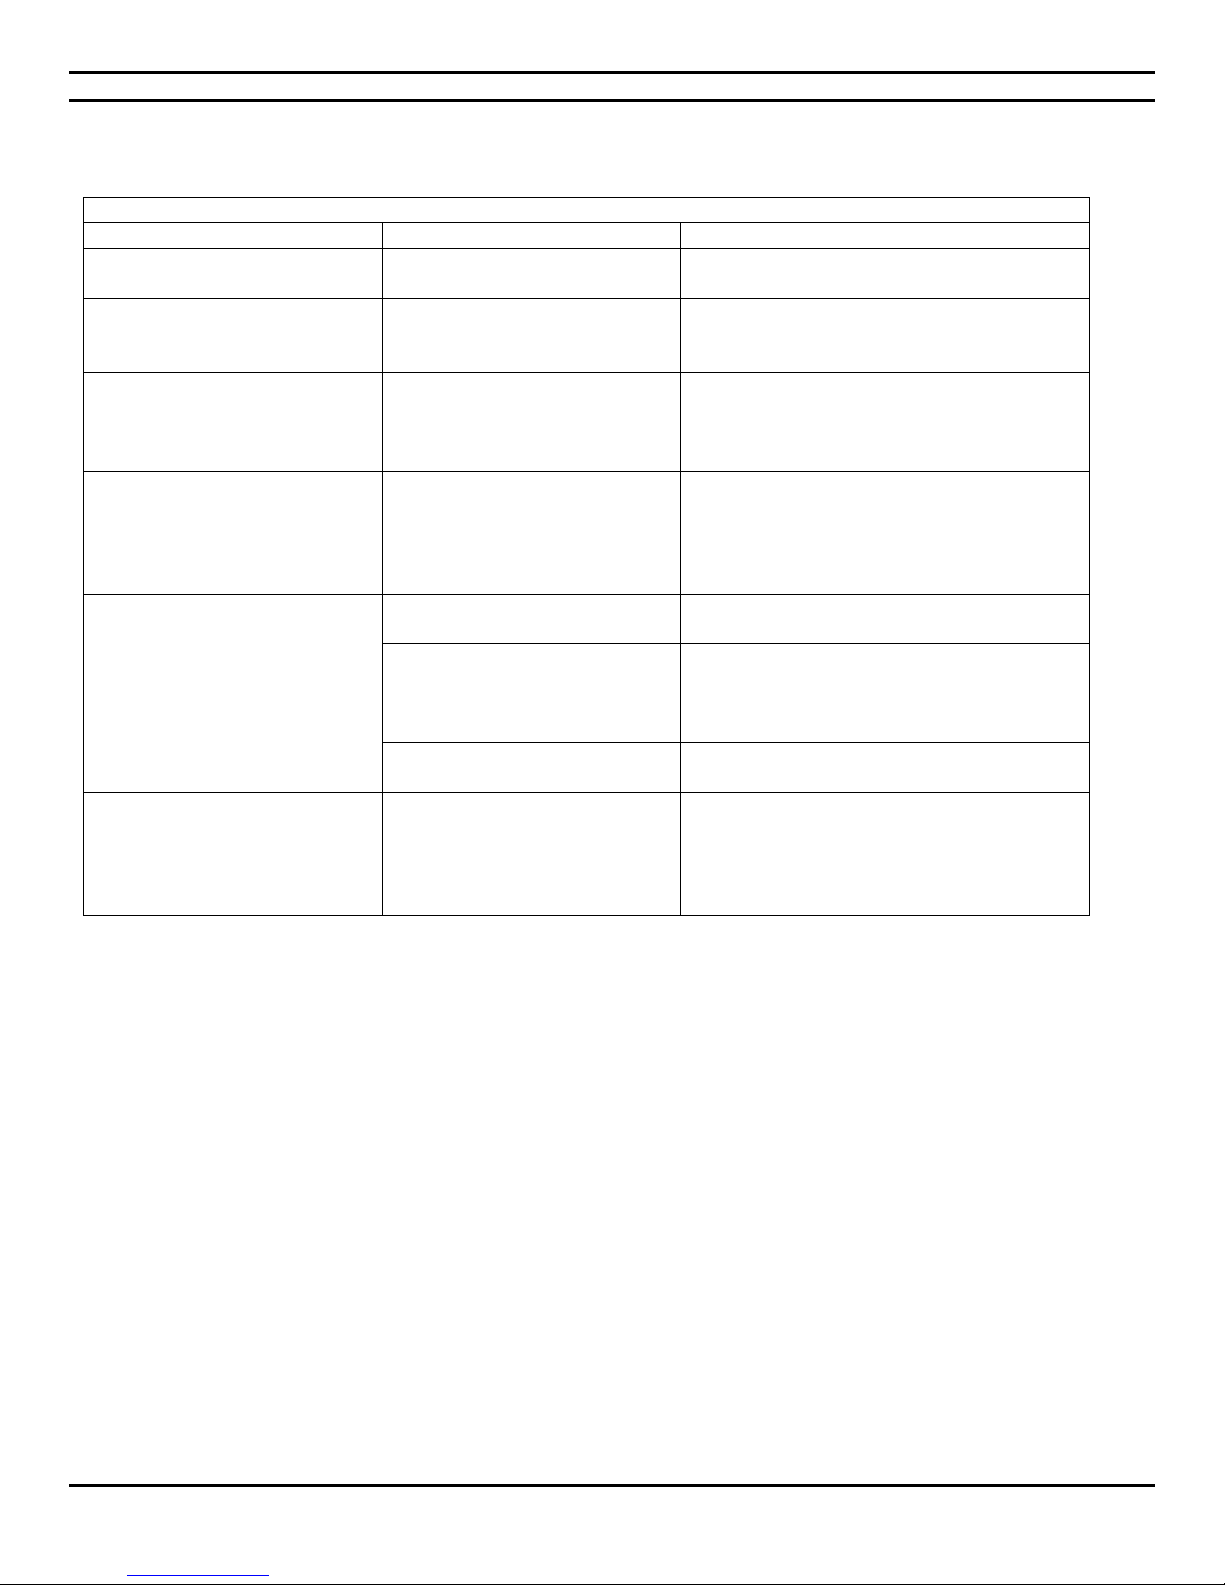
Typical antistatic foot ground device.
Antistatic shoes with foot ground device.
Note that the floor surface is also antistatic.
Antistatic smock and gloves.
Note that the table surface is also antistatic.
1.6 Component installation guide
1.6.1 Precautions against static electricity
ATTENTION: Components such as processors and memory may be permanently damaged by shocks
arising from static electricity. It is hence important to wear antistatic, smock, gloves, shoes and ankle
during the installation process. Here are a few examples of protective equipment.
- 25 -
Page 26
CIARA KRONOS 540 Workstation
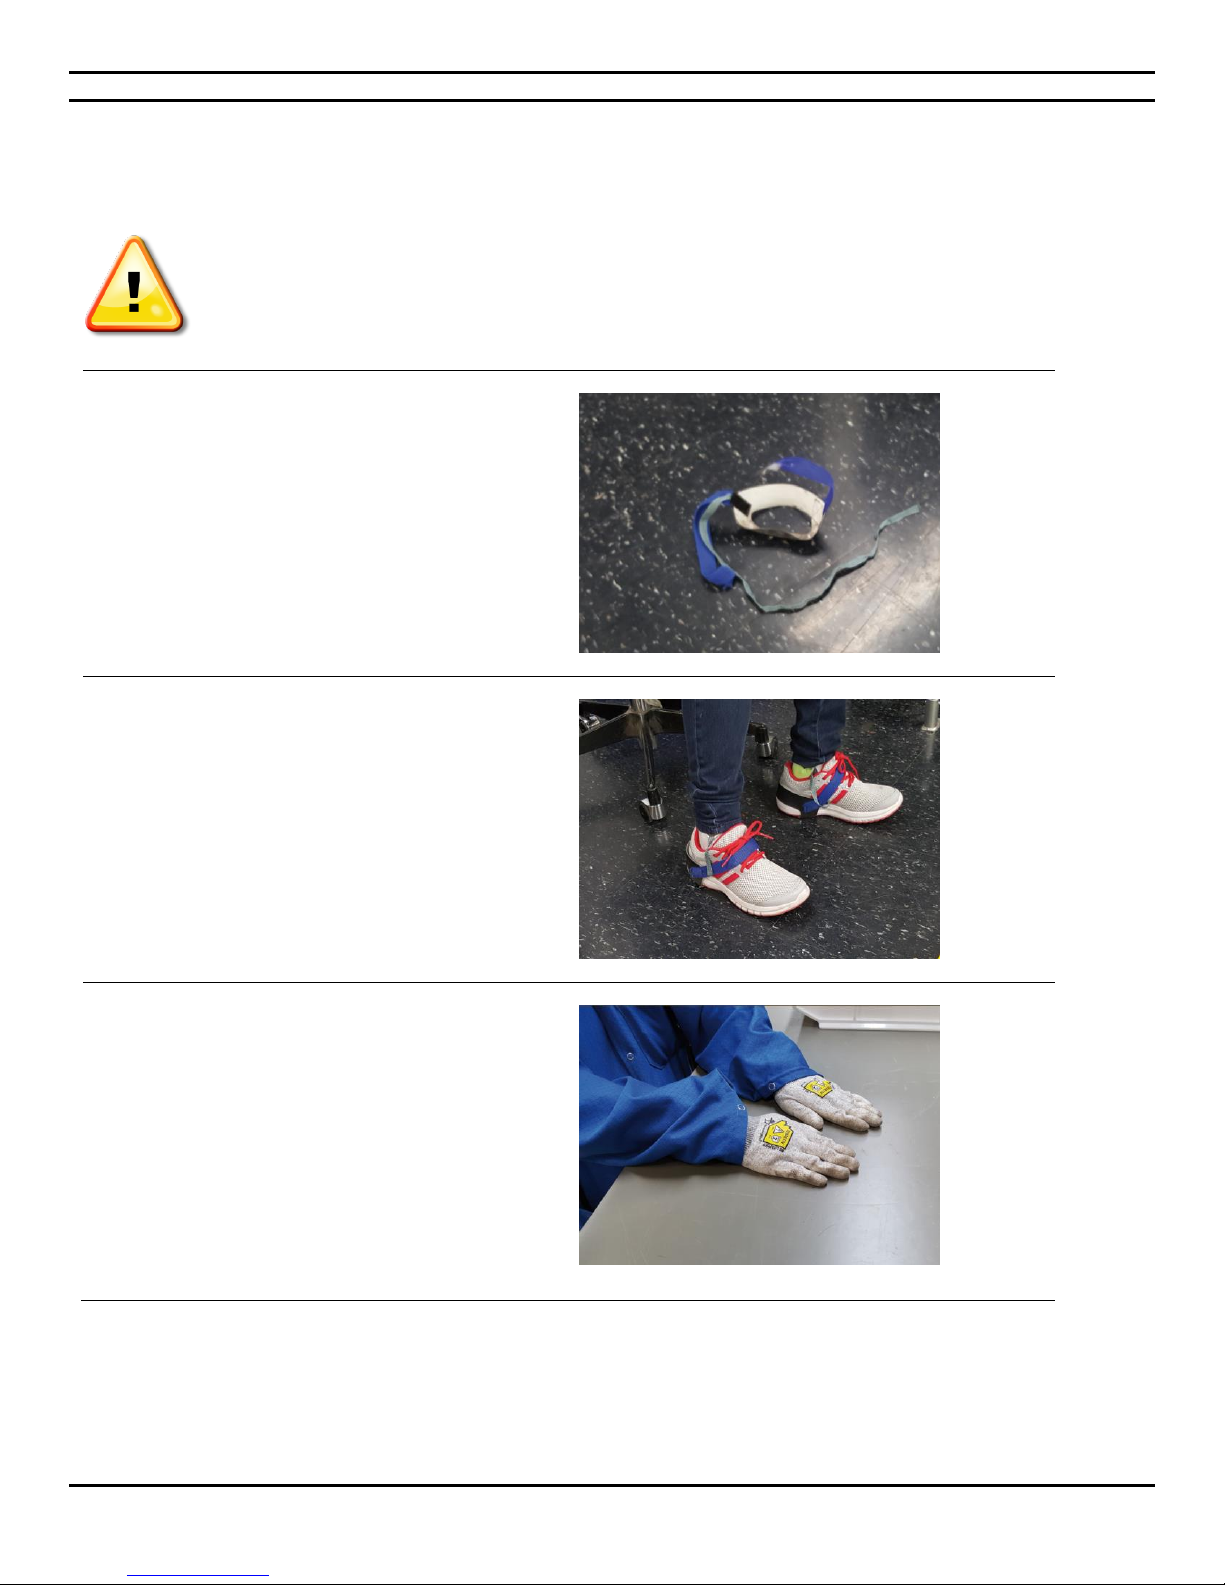
To open the side panel, lift the two latches.
Pull the panel backward and remove it.
The side panel is then removed from the chassis
allowing for modular installation and chassis
preparations.
1.6.2 Opening and accessing the chassis
1.6.2.1 Opening and accessing the KRONOS chassis
- 26 -
Page 27
CIARA KRONOS 540 Workstation
1.6.3 Insertion of the processor
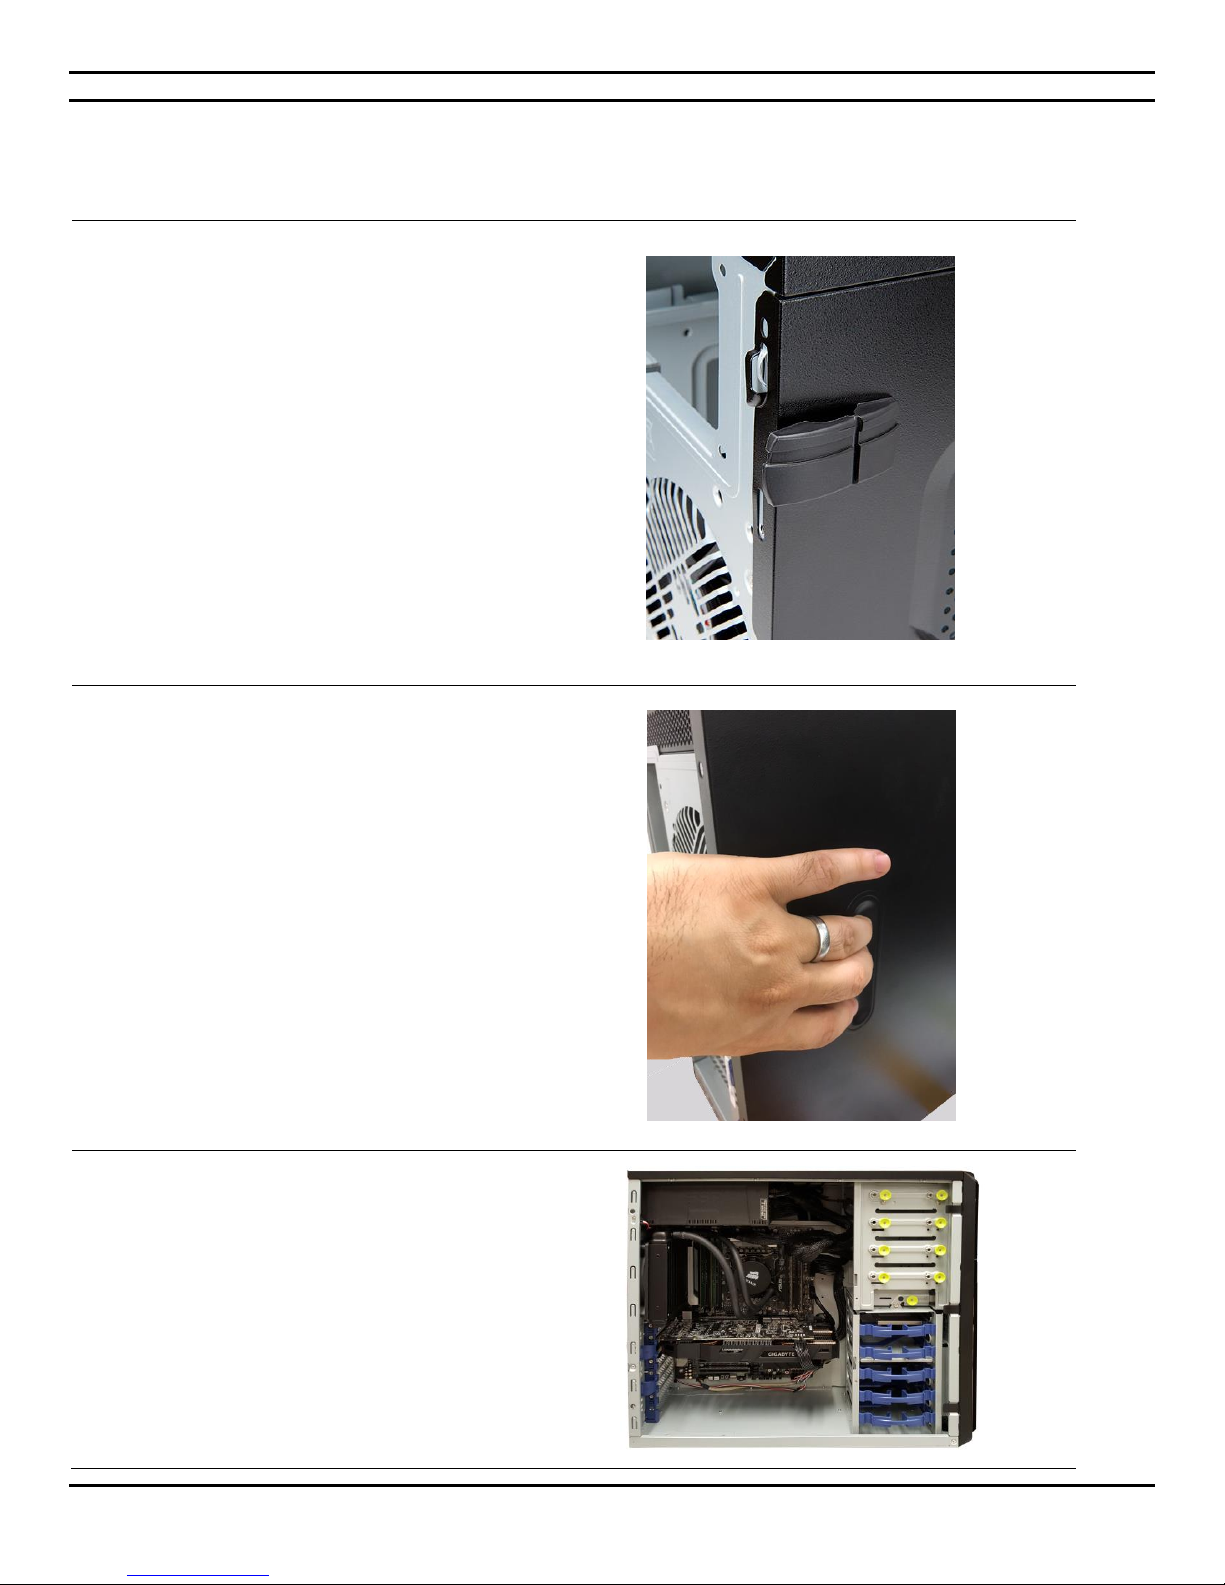
ATTENTION : Components such as the processor may be permanently damaged by shocks arising from static electricity. It is hence
important to wear an antistatic bracelet during the installation process.
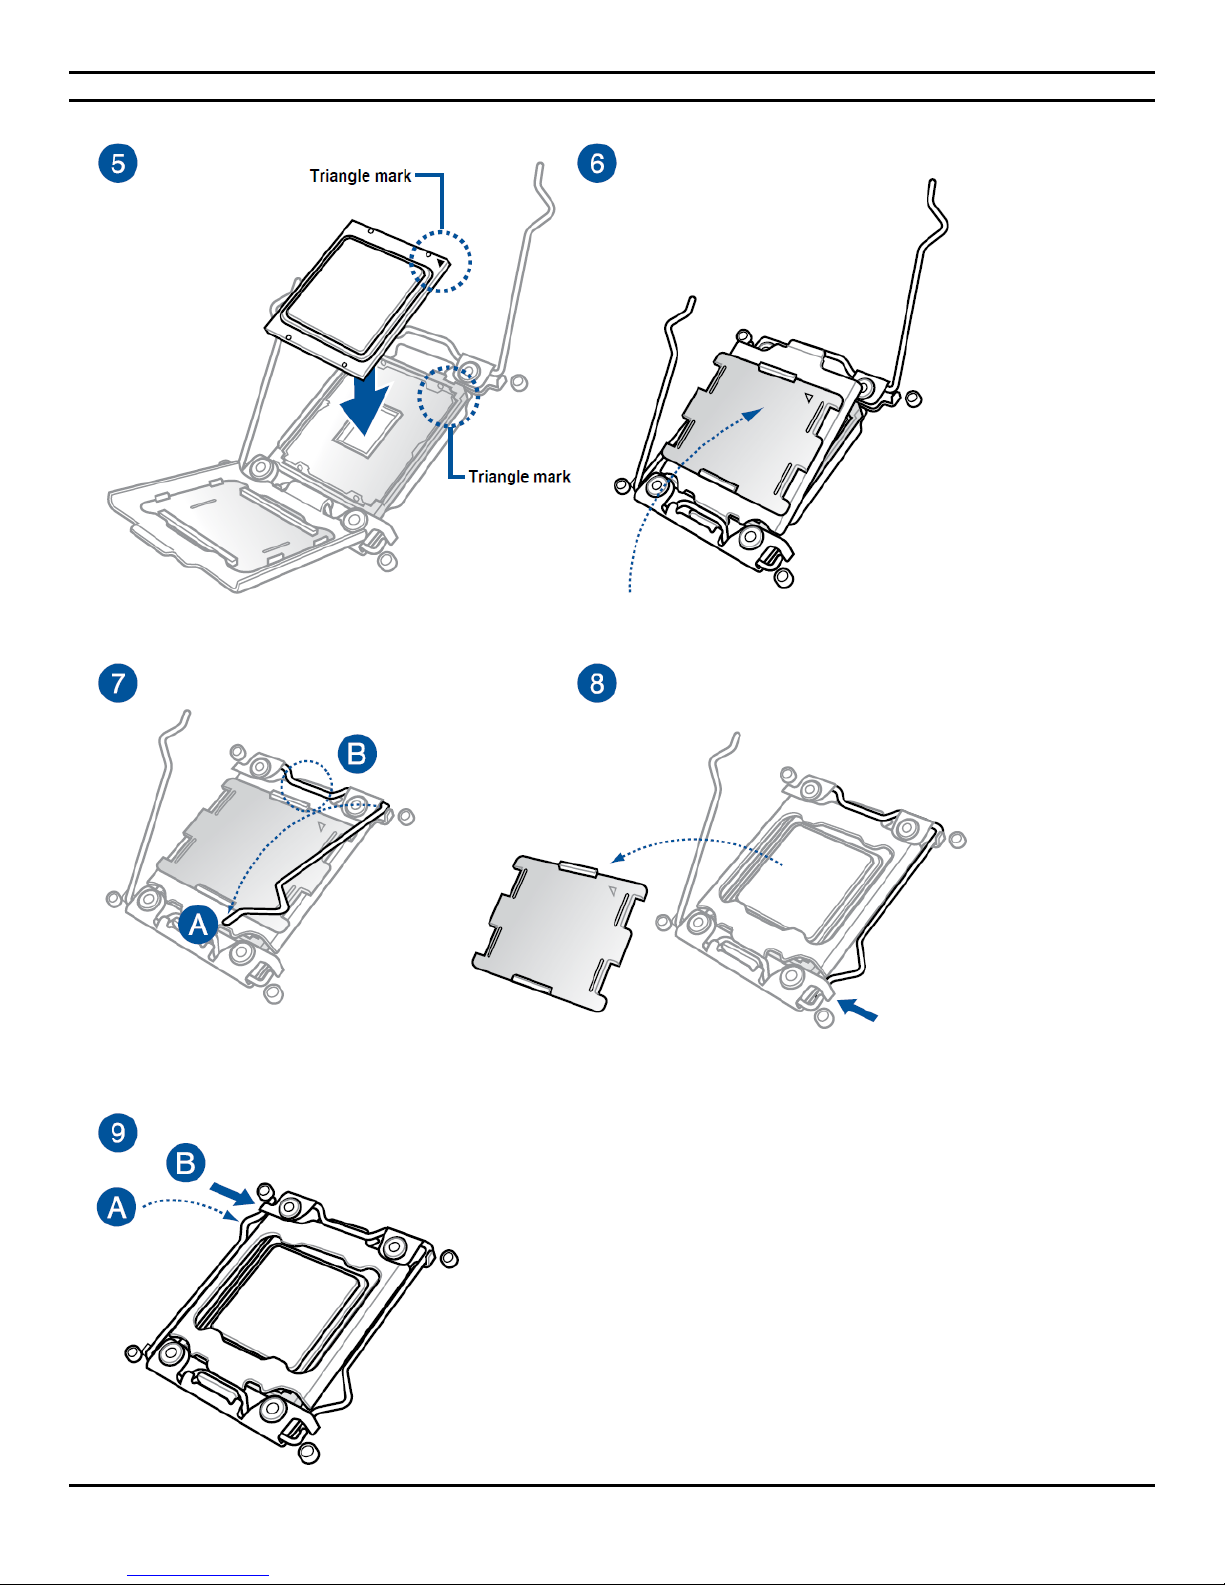
1. Please note the order in opening/ closing the double latch. Follow the instructions printed on the metal sealing hatch or the
illustrations shown below in this manual. The plastic cap will pop up automatically once the CPU is in place and the hatch properly
sealed down.
- 27 -
Page 28
CIARA KRONOS 540 Workstation
- 28 -
Page 29
CIARA KRONOS 540 Workstation
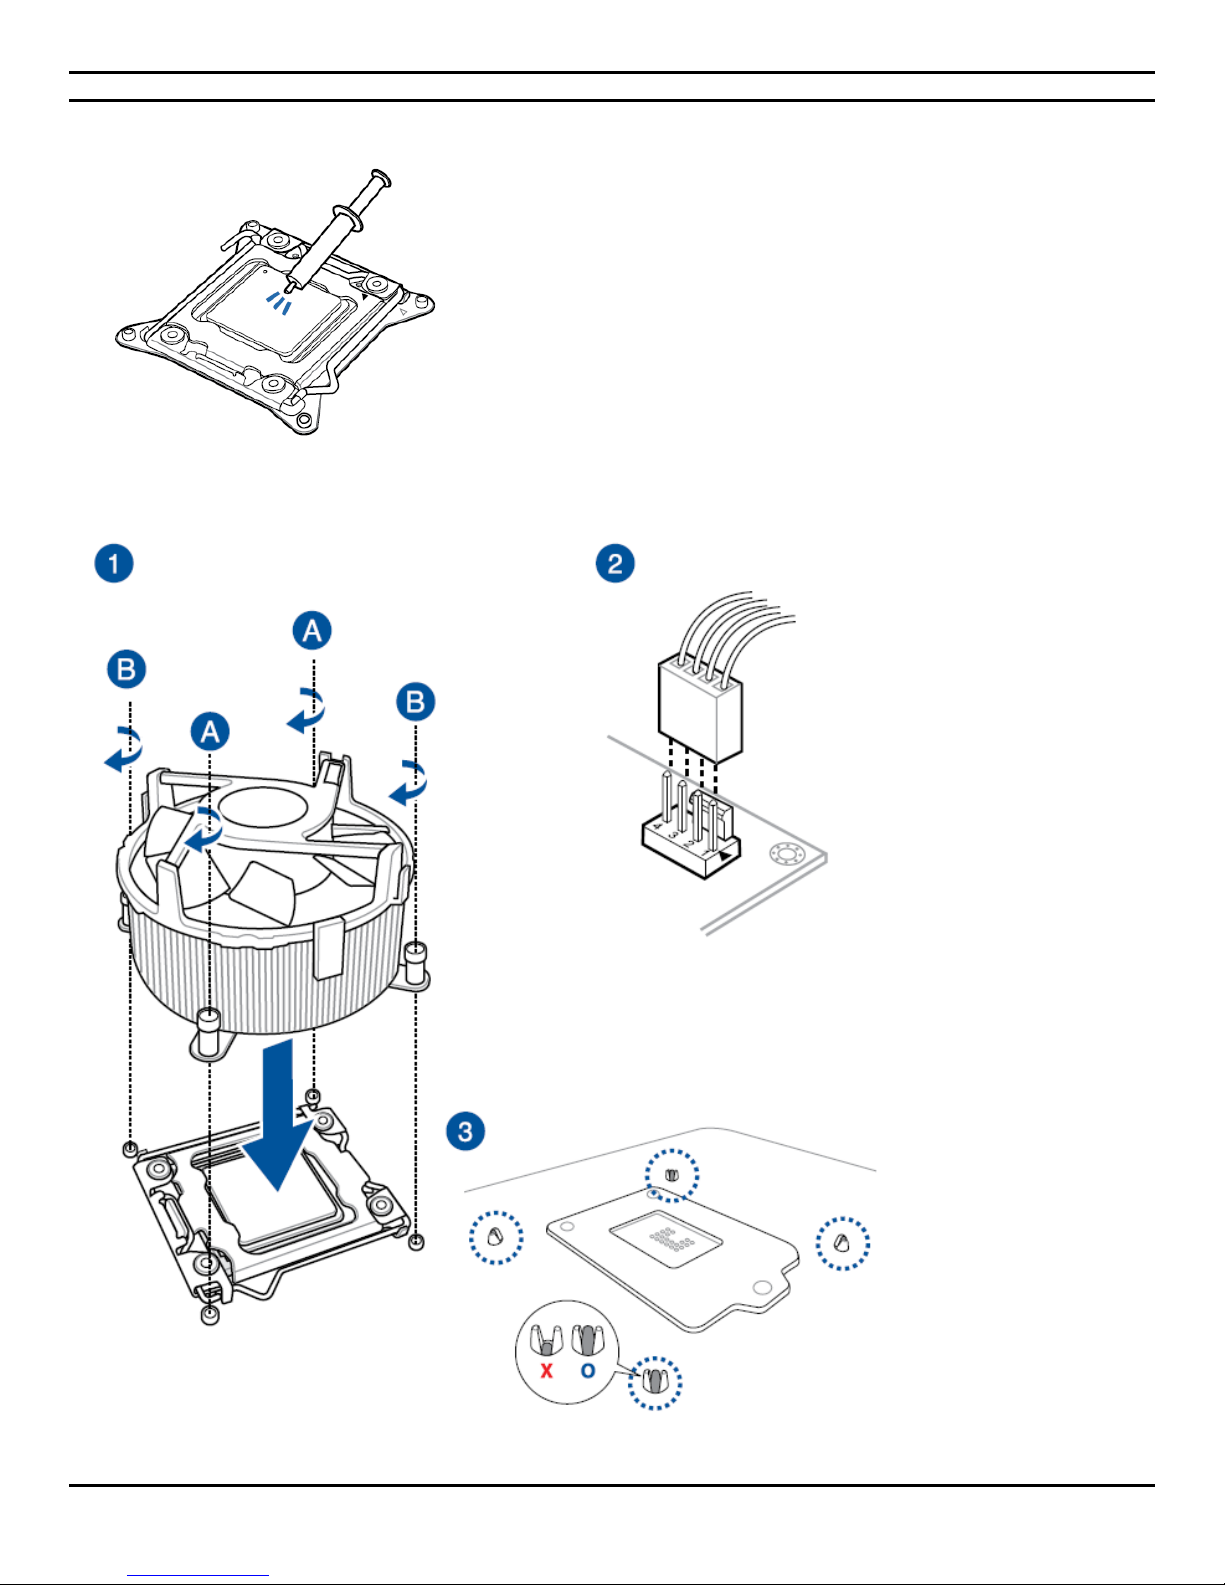
2. Apply the Thermal Interface Paste to the CPU heatsink and CPU before you install the heatsink and fan, if necessary.
3. Install the CPU heatsink and fan assembly
- 29 -
Page 30
CIARA KRONOS 540 Workstation
1.6.4 Installation of the memory modules
Increasing the amount of system memory is the most common "on-site" enhancement that is likely to be made to your CIARA KRONOS
540 workstation. Increasing your workstation’s memory usually involves adding main memory. DDR4 Synchronous Dynamic Random
Access Memory (DDR4 SDRAM) is packaged only in 288-pin Dual In-Line Memory Modules (DIMMs).
Your CIARA KRONOS 540 uses only DIMM memory modules. Each DIMM module can have a capacity of 4 GB, 8 GB or 16 GB. The
minimum system capacity is 4 GB and the maximum system capacity is 128 GB for 6-core processor and 64 GB for 4-core processor.
Your system supports only DDR4 2666 MHz memory speeds. Furthermore, the memory has to be of the SPD type (Serial Presence
Detect) to insure optimal operation. Only non-ECC memory is supported.
NOTE
If you are planning to increase your workstation’s memory please contact us to ensure that you select the memory that meets our
specifications, otherwise errors could result.
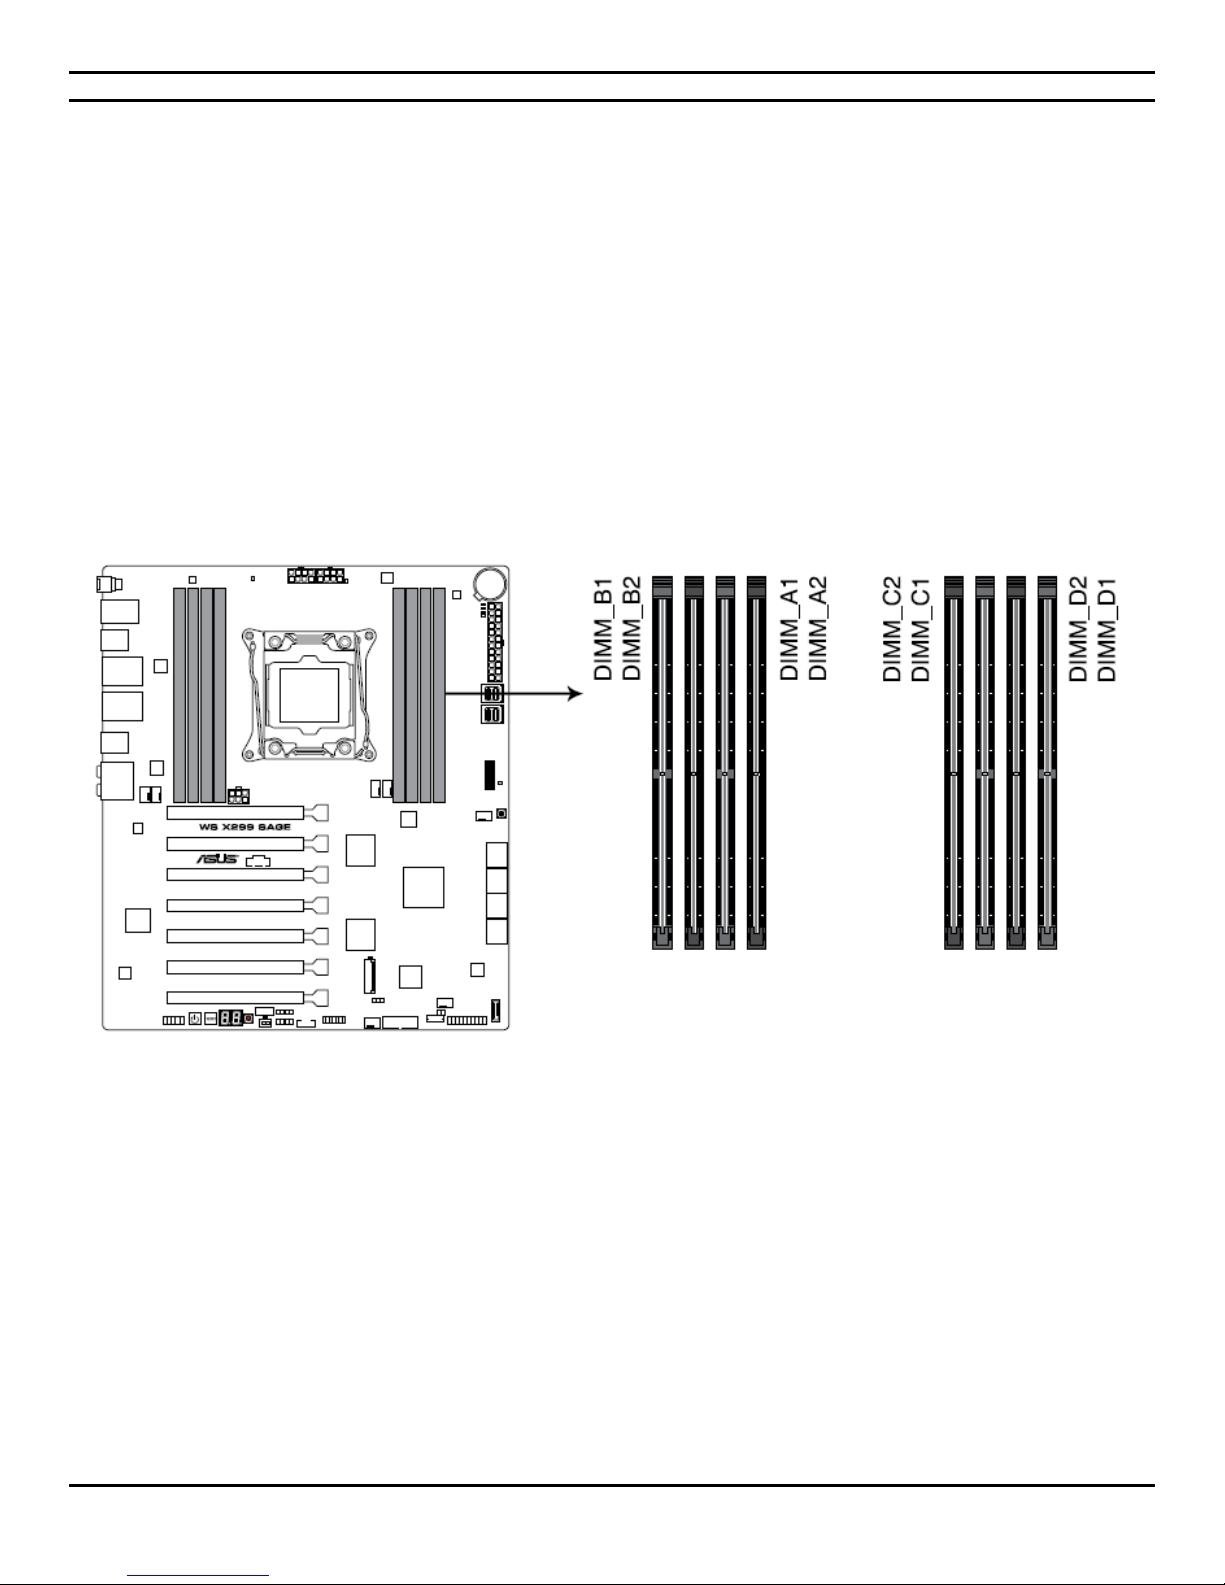
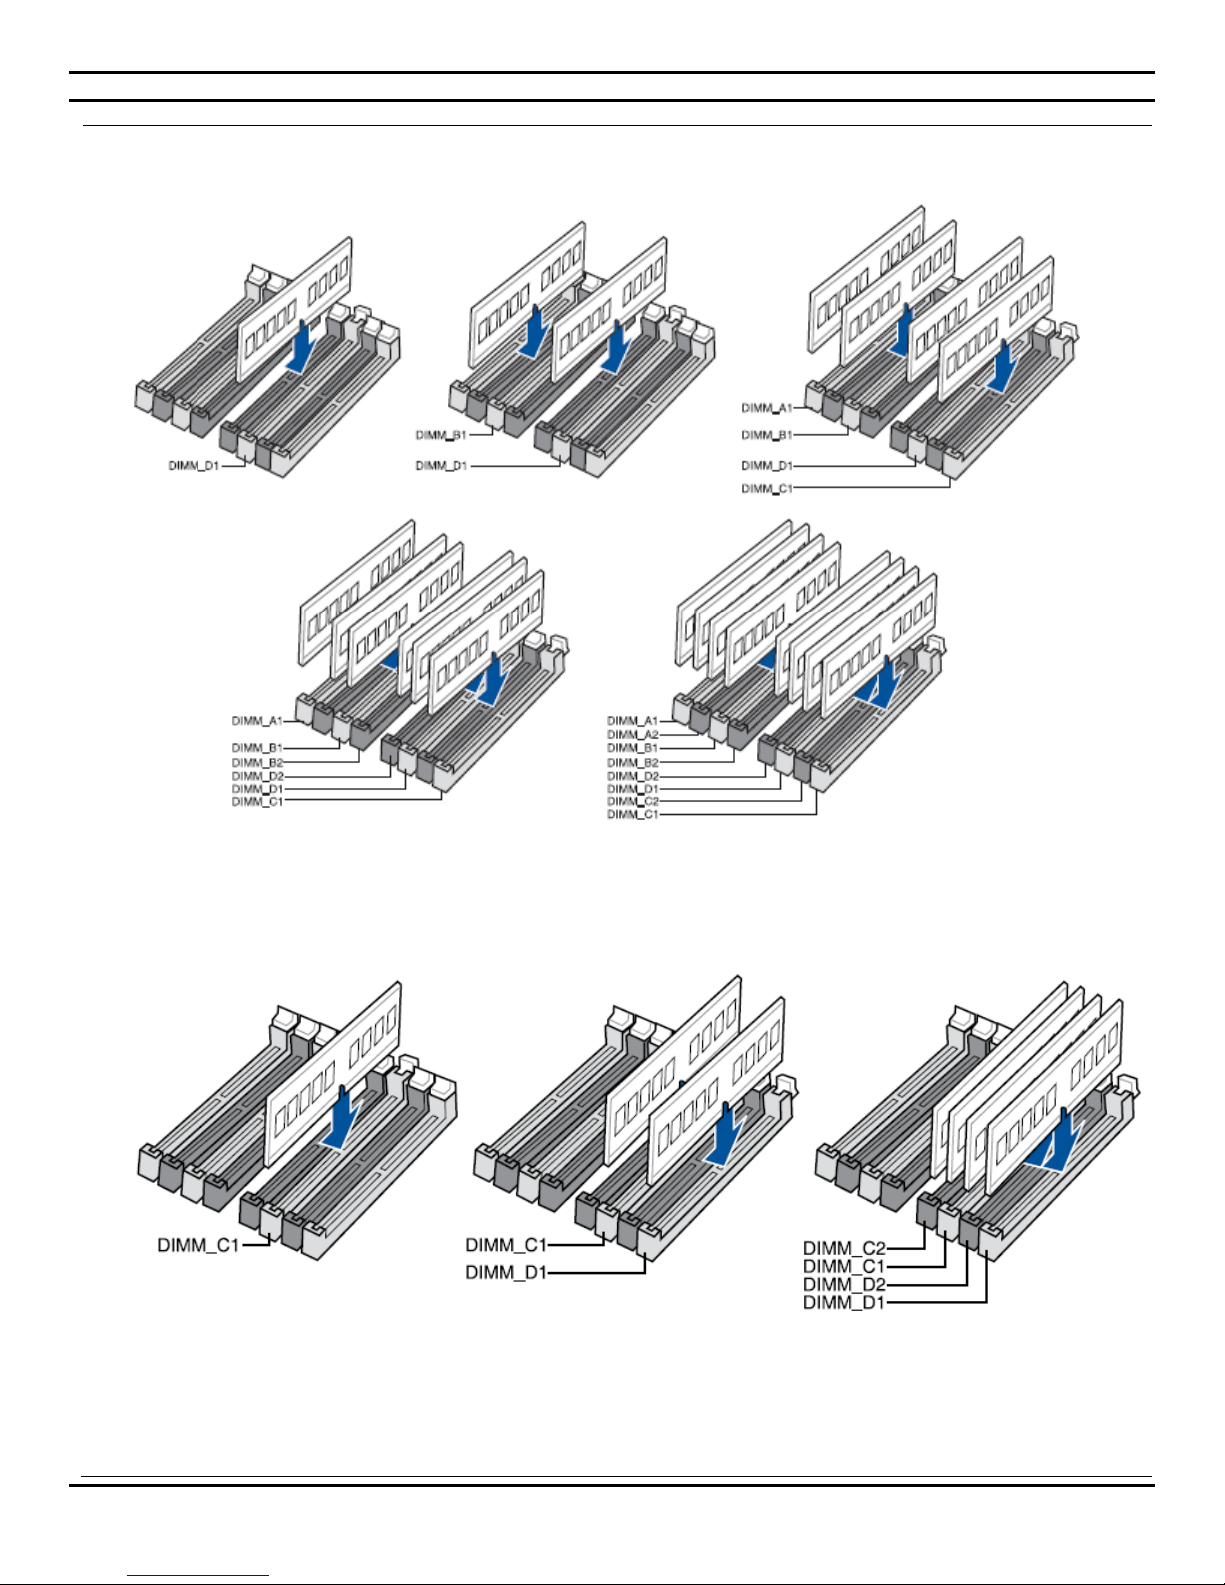
For 6-core or above processor, install two matched pairs of DIMMs equal in speed and size in the gray sockets (DIMM A1), (DIMM
B1), (DIMM C1) and (DIMM D1) as shown below.
If additional memory is to be used, install two other matched pairs of DIMMs in the black sockets (DIMM A2), (DIMM B2), (DIMM C2)
and (DIMM D2) as shown above.
If you want to use six DIMMs in a quad-channel configuration, install two matched pairs of DIMMs equal in speed and size in DIMM
A1, DIMM B1, DIMM C1 and DIMM D1. Then install another DIMM equal to the speed and total size of the DIMMs installed in channel
DIMM B2 and DIMM D2.
If you ignore this recommendation, the system will operate in single channel or dual channel mode without taking advantage of the
quad channel technology.
For 4-core processor, install DIMMs only in C and D DIMM sockets.
You may install 4 GB, 8 GB or 16 GB unbuffered non-ECC DDR4 DIMMs into the DIMM sockets.
- 30 -
Page 31

CIARA KRONOS 540 Workstation
The CIARA KRONOS 540 workstation supports the following types of memory configurations :
• Quad channel (Interleaved) mode. This mode offers the highest throughput for real world applications. Quad channel mode is
enabled when the installed memory capacities of the four DIMM channels are equal. Technology and device width can vary from one
channel to the other but the installed memory capacity for each channel must be equal. If different speeds DIMMs are used between
channels, the slowest memory timing will be used.
• Dual channel (Interleaved) mode. This mode is equivalent to dual channel bandwidth operation real world applications. Dual channel
mode is enabled when the installed memory capacities of both DIMM channels are equal. Technology and device width can vary from
one channel to the other but the installed memory capacity for each channel must be equal. If different speeds DIMMs are used
between channels, the slowest memory timing will be used.
• Single channel (Asymmetric) mode. This mode is equivalent to single channel bandwidth operation for real world applications. This
mode is used when only a single DIMM is installed or the memory capacities are unequal. Technology and device width can vary from
one channel to the other. If different speeds DIMMs are used between channels, the slowest memory timing will be used.
Minimum memory configuration for the system is 4 GB. The maximum memory configuration is 128 GB.
Due to the memory address limitation on 32-bit Windows® OS, when you install 4 GB or more memory on the motherboard, the actual
usable memory for the OS can be about 3 GB or less. For effective use of memory, we recommend that you do any of the following :
- Use a maximum of 4 GB system memory if you are using a 32-bit Windows® OS.
- Install a 64-bit Windows® OS if you want to install 4 GB or more on the motherboard.
Install a DIMM module into a memory socket on the system main board, as follows :
First, make sure the power is turned Off and the power cord is unplugged. Then remove the case cover.
Align the module so that the pin 1 marking on the module corresponds to the DIMM socket pin 1 marking. The module can only fit in
the socket in one way ; you cannot insert the DIMM incorrectly.
Slide the module into the socket at a 90-degree angle to the main board. (See figure below)
After inserting the DIMM module completely into the socket, push up on the socket latches securing the DIMM into place.
NOTE
To release the memory module, push both latches down and carefully rock the module away from the main board. You should then be
able to pull the module up and out of the socket.
ATTENTION : Components such as memory may be permanently damaged by shocks arising from static electricity. It is hence important
to wear an antistatic bracelet during the installation process.
- 31 -
Page 32
CIARA KRONOS 540 Workstation
(6-core or above processor) -You can install one, two, four, six or eight DIMM of DDR4 memory.
(4-core processor) -You can install one, two or four DIMM of DDR4 memory.
- 32 -
Page 33
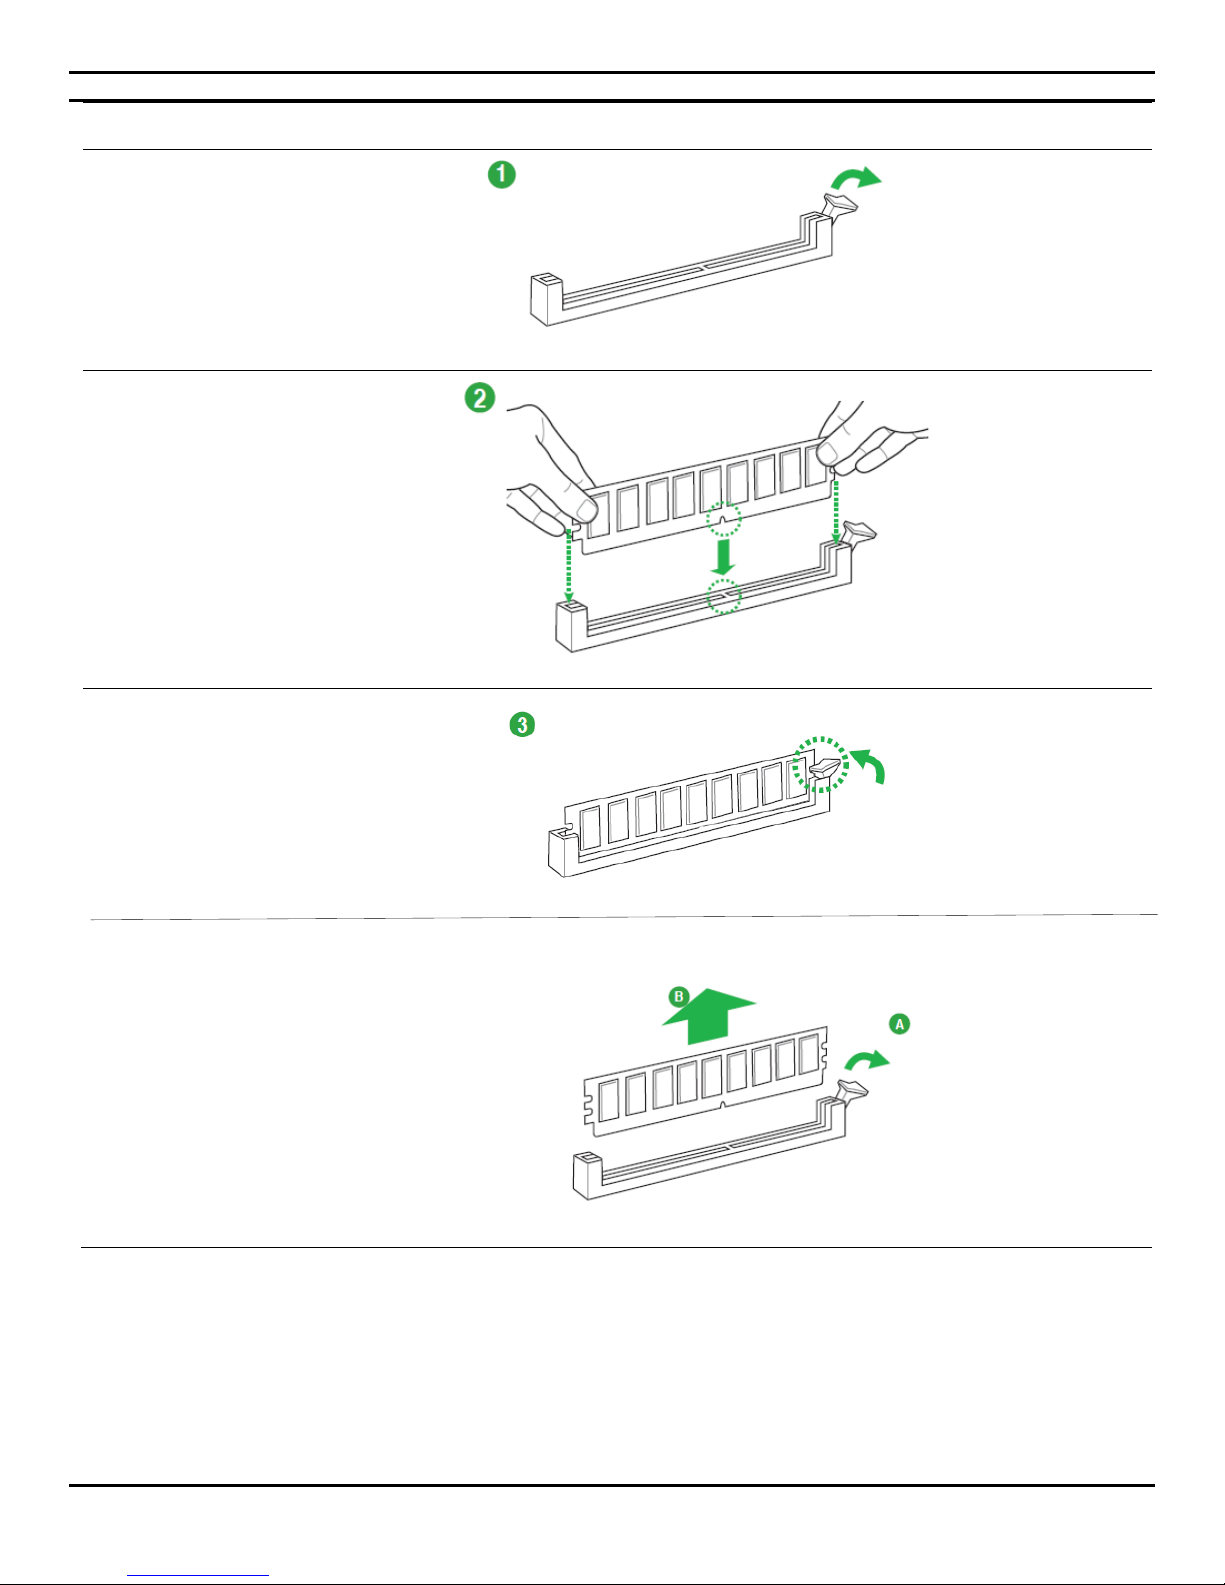
CIARA KRONOS 540 Workstation
1. To install a DIMM, first release
the locking tab.
2. Slide the module into the socket at
a 90-degree angle to the main
board. Align the module so that
the pin 1 marking on the module
corresponds to the DIMM socket
pin 1 marking. The module can
only fit in the socket in one way ;
you cannot insert the DIMM
incorrectly.
3. After inserting the DIMM module
completely into the socket, push
up on the socket latches securing
the DIMM into place.
4. To remove a DIMM, release the
locking tab and pull out the
DIMM.
- 33 -
Page 34
CIARA KRONOS 540 Workstation
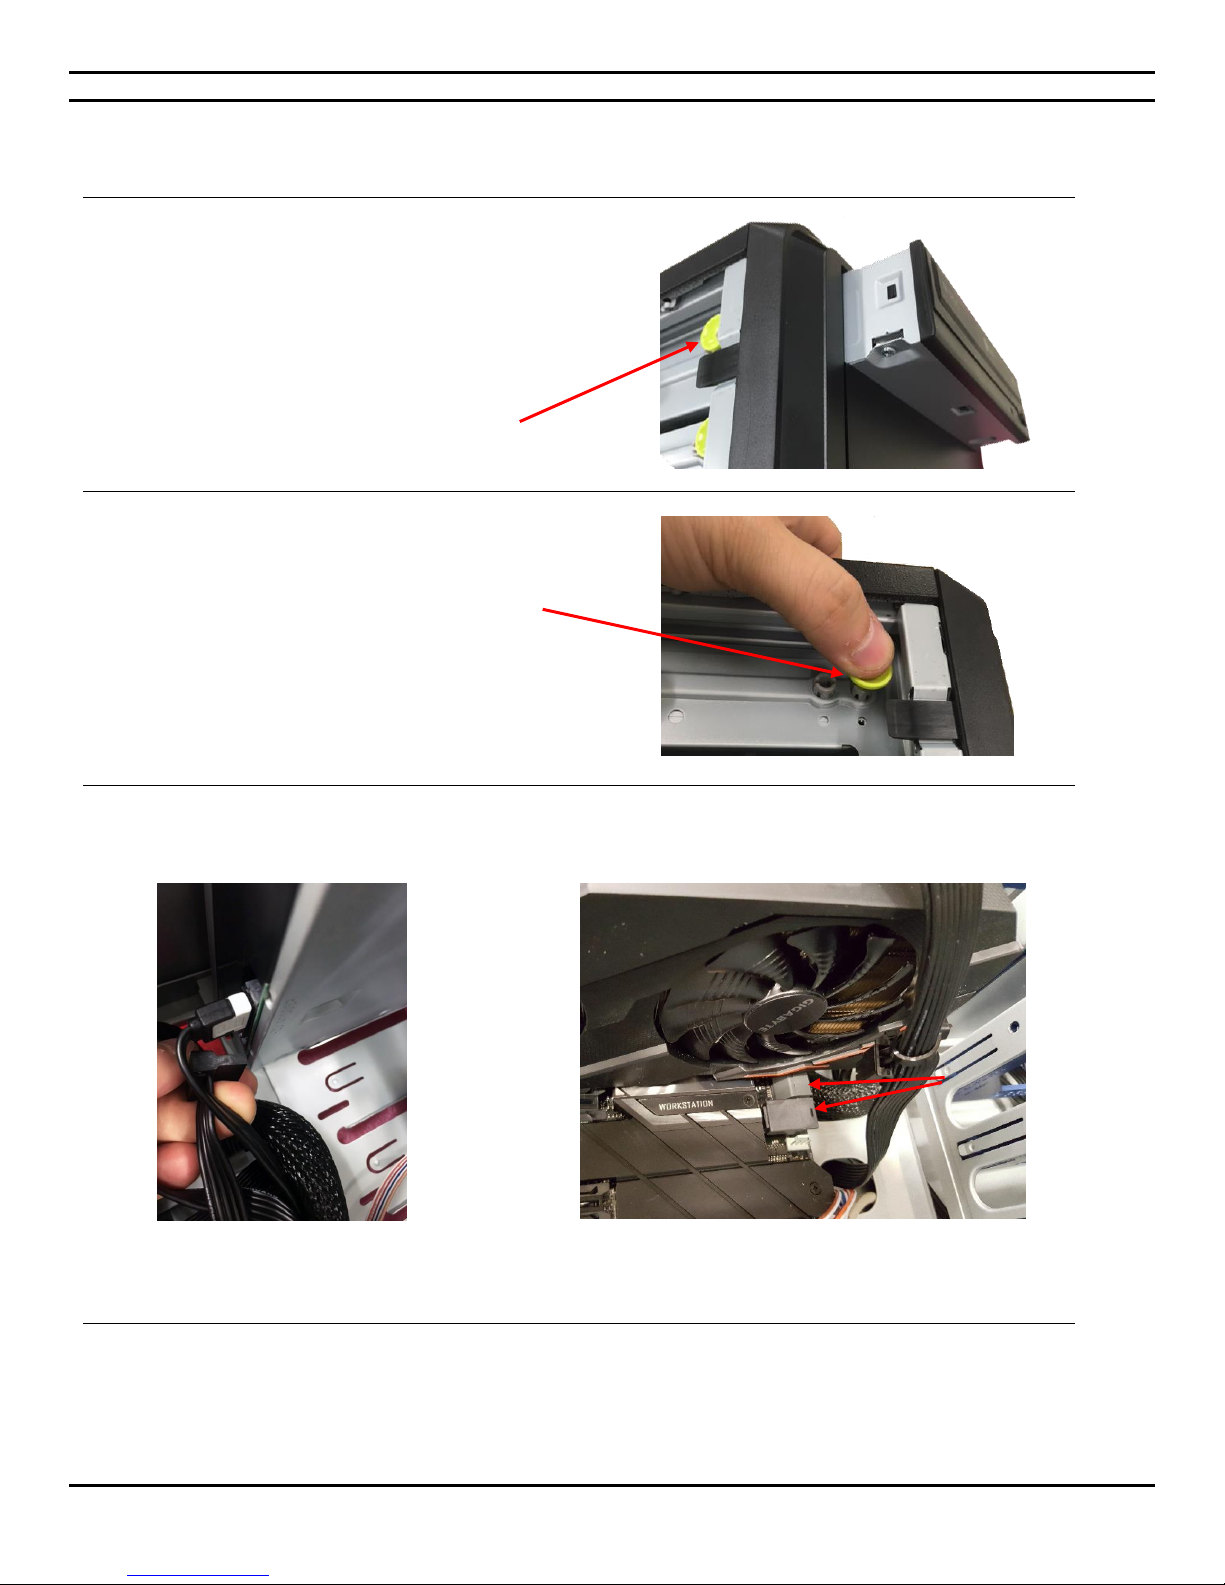
The optical drive is removed or inserted into the front
end of the chassis.
To remove the drive, pull the locking tabs. To secure the
drive, push down the locking tabs.
Connect the power and SATA cables to the drive and to
the motherboard.
SATA cable must be connected to one of the six SATA
ports.
1.6.5 Installation of the optical drive module
- 34 -
Page 35
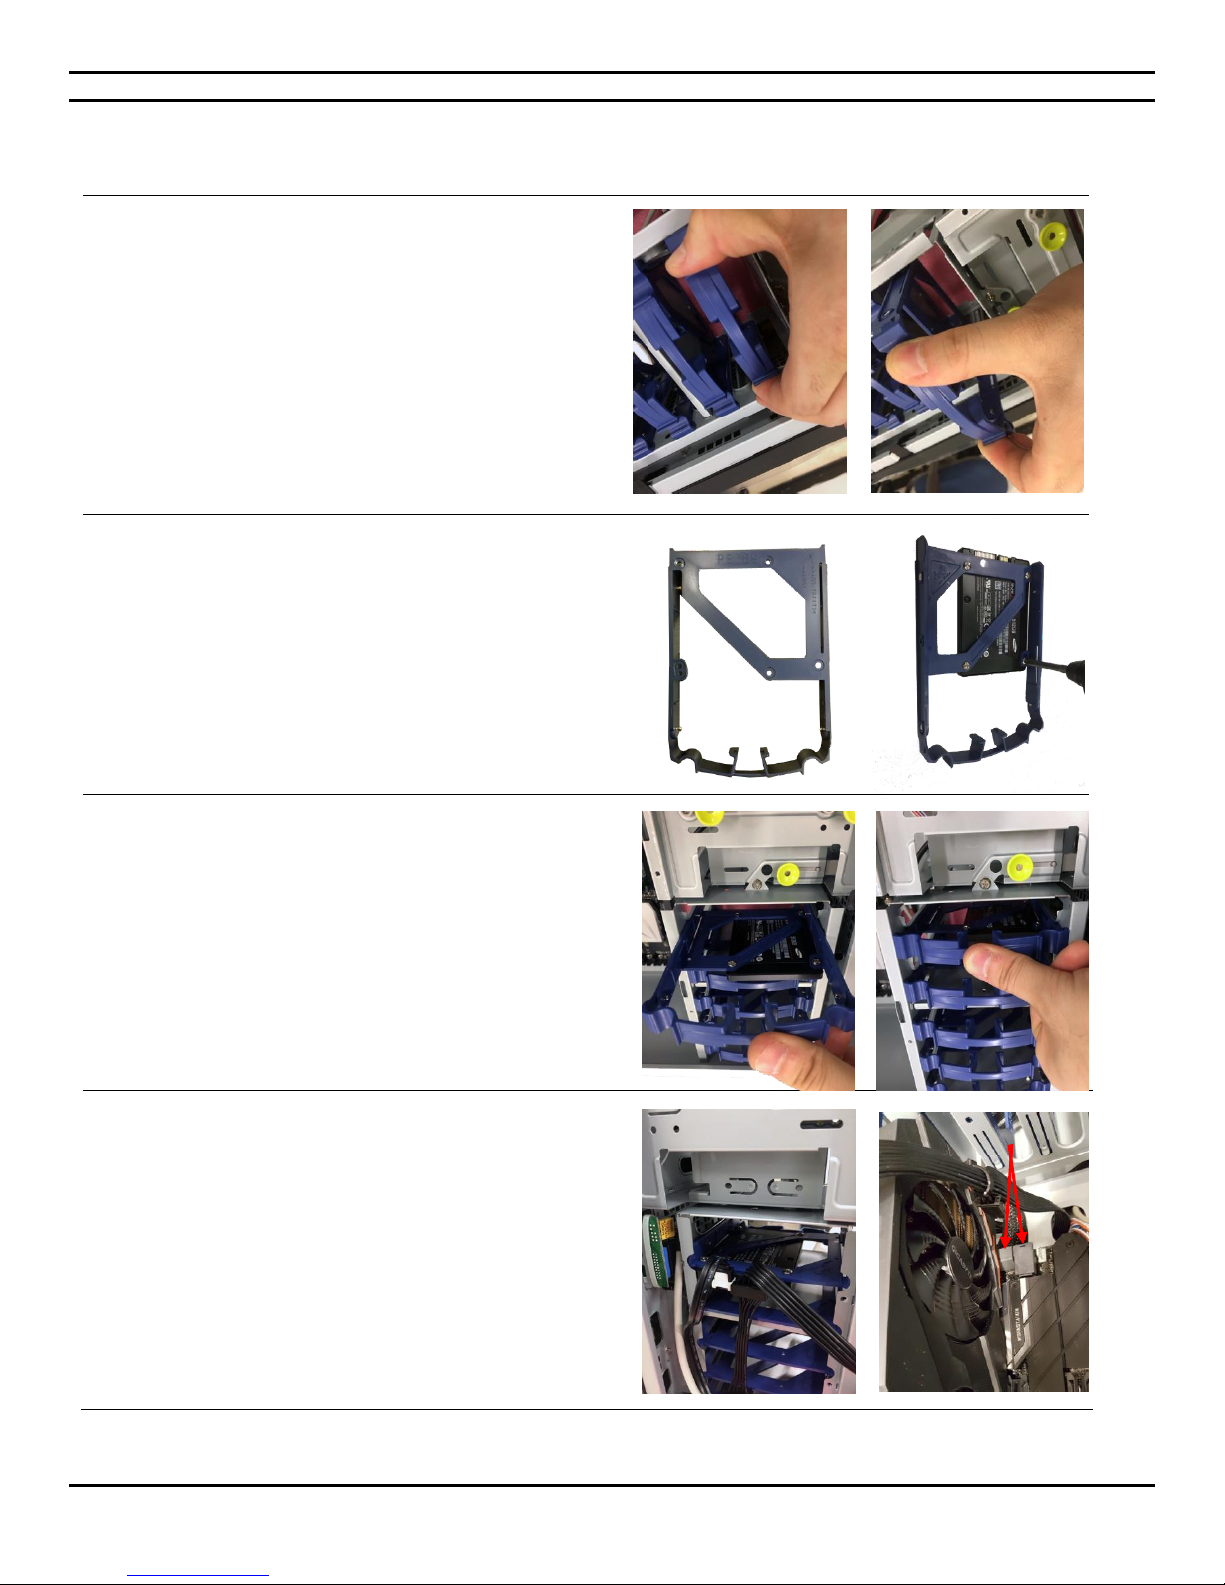
First pull out and remove the disk holder from the drive
bay.
Install the drive the disk holder with the included screws.
Reinsert the disk holder in the appropriate bay.
Connect the hard drive to the power supply. Then connect
one end of a SATA data cable to the hard drive.
Connect the other end of the SATA data cable to one of
the six SATA ports.
1.6.6 Installation of the hard drive
CIARA KRONOS 540 Workstation
- 35 -
Page 36
CIARA KRONOS 540 Workstation
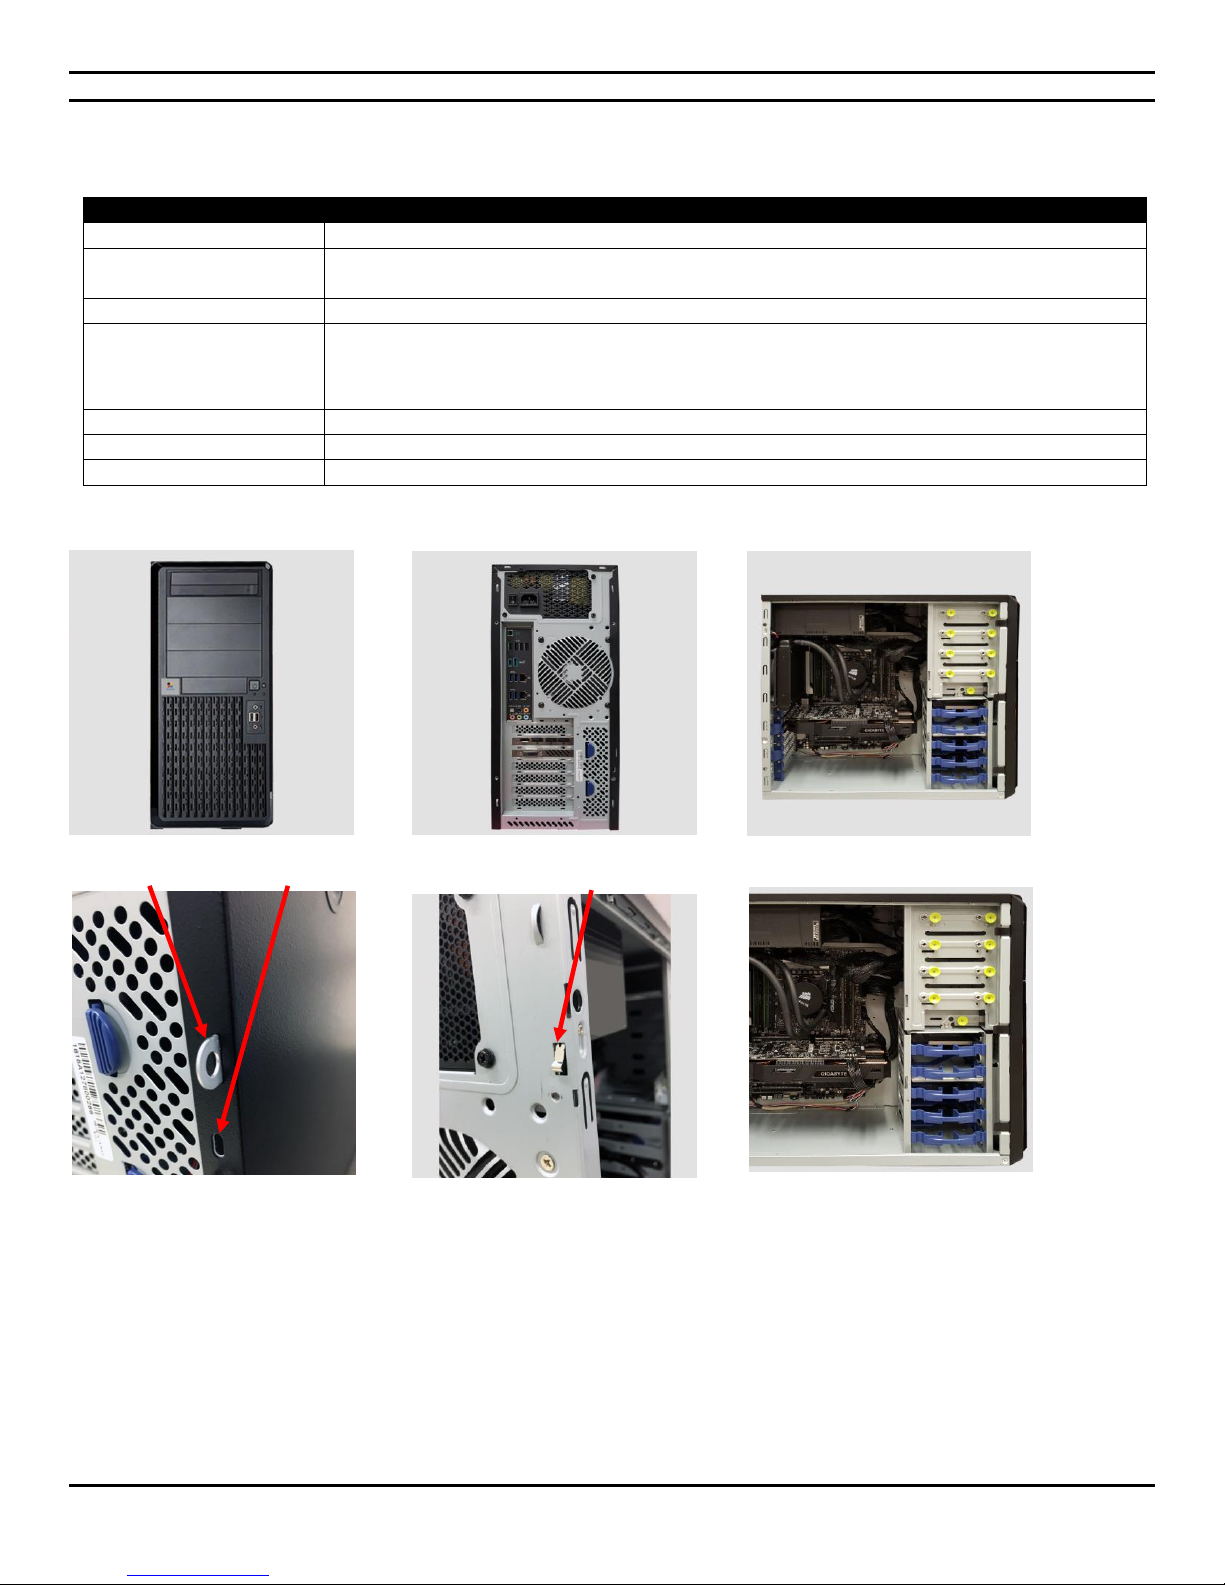
Mid-Tower Specifications
Motherboard Type :
ATX (305 x 244 mm) ( 12"x 9.6")
Drive Bay Space :
Ext. 4 x 5.25" and 1 x 3.5"
Int. 5 x 3.5" or 5 x 2.5"
Power Source :
1200 W (80 PLUS® Platinum)
Peripheral Space
44-lane CPU : 4 PCIe 3.0 x16 ( 2 x16 mode, 1 x8 mode, 1 x4 mode) ; 1 PCIe 3.0 x4 (x4 mode) ;
28-lane CPU : 3 PCIe 3.0 x16 ( 1 x16 mode, 1 x8 mode, 1 x4 mode) ; 1 PCIe 3.0 x4 (x4 mode) ;
16-lane CPU : 3 PCIe 3.0 x16 ( 1 x8 mode), (2 x4 mode) ; 1 PCIe 3.0 x4 (x4 mode)
Dimensions :
430 mm(H) x 200 mm(W) x 465 mm(D)
Casing fan :
120 mm / 120 mm
Security :
Kensington slot, padlock loop and intrusion detector
1.6.7 Chassis Characteristics
Front Rear Open side
Padlock loop & Kensington slot Intrusion switch Drive bays
- 36 -
Page 37

CIARA KRONOS 540 Workstation
2.0 Certification and declaration
All CIARA KRONOS 540 models run the following operating systems software :
Microsoft® Windows 10.
RedHat® Linux
CIARA KRONOS 540 models will operate on Windows Server 2016 and all Linux based networks, provided that appropriate network
adapter cards and application software have been installed.
CIARA is licensed to supply the Windows 10 operating systems software with its CIARA KRONOS 540 workstations. A package of the
latest version of Windows software and a manual is included with the CIARA KRONOS 540.
If you have purchased a Windows license with your CIARA KRONOS 540 system, please abide by the Copyright and License terms and
conditions that are enclosed with this software package. These require that the Windows software may only be used and installed on
the CIARA KRONOS 540 workstation with which they were purchased.
You may make copies of this Windows software solely for your own back-up purposes.
All CIARA KRONOS 540 series workstations are certified by the TÜV SÜD Canada inc., and meet or exceed the Class B limitations for
Radio noise emissions from digital apparatus as set out in the Radio Interference Regulations of Industry Canada.
2.1 Radio interference precautions
To minimize the likelihood of interference being caused to any radio or TV equipment, CIARA recommends that shielded cables with
metal RFI/EMI connector hoods be used to connect all peripheral devices to the CIARA KRONOS 540 workstation.
In the event that perceptible interference occurs, then please ensure that a ground connection is made from any peripheral devices
to the workstation chassis. However, a separate ground connection is not necessary if a shielded cable is used to connect the
workstation with any peripheral device.
Very often, simply moving the workstation equipment to another location a few feet away will remove any signs of interference to
television reception.
Under no circumstances should any "radio-type" modems be attached to the workstation, unless a license has been obtained from
the appropriate regulatory authorities (in Canada - the Department of Communications of Industry Canada, and in the U.S.A. - the
Federal Communications Commission).
- 37 -
Page 38

2.2 Declaration of conformity
Is in conformity with the ICES-003 Canadian Standard and Part 15 of the FCC Rules.
CIARA KRONOS 540 Workstation
We, Manufacturer/Importer
CIARA
9300 Trans-Canada Highway
Montreal, Quebec H4S 1K5
Tel : (514) 798-8880
Fax : (514) 798-8889
Declare that the product
Workstation System
CIARA KRONOS 540
Robert Ahdoot, President
CIARA
- 38 -
Page 39

CIARA KRONOS 540 Workstation
2.3 FCC Information to User
This equipment has been tested and found to comply with the limits for a Class B digital device, pursuant to Part 15 of FCC Rules.
These limits are designed to provide reasonable protection against harmful interference in a residential installation. This equipment
generates, uses, and can radiate radio frequency energy and, if not installed and used in accordance with the instruction guide, may
cause harmful interference to radio communications. However, there are no guarantees that radio interference will not occur in a
particular installation. If this equipment does cause harmful interference to radio or television reception, which can be determined by
turning the equipment off and on, the user is encouraged to try to correct the interference by one or more of the following measures:
Reorient or relocate the receiving antenna.
Increase the distance between the equipment and the receiver.
Connect the equipment into an outlet on a circuit different from that to which the receiver is connected.
Consult the vendor or an experienced radio/TV technician for help.
Warning
Changes or modifications not expressly approved by CIARA could void the user’s authority to operate the equipment.
This equipment is equipped with a shielded 3-wire power cord and plug. Use this power cord in conjunction with a properly grounded
electrical outlet to avoid electrical shock and to reduce radio frequency interference that may emanate from the power cord.
We recommend you use shielded remote I/O cables, with properly grounded shields and metal connectors in order to reduce radio
frequency interference, which may emanate from these cables.
- 39 -
Page 40

CIARA KRONOS 540 Workstation
2.4 ENERGY STAR®
CIARA KRONOS 540 workstations are ENERGY STAR® 6.1 qualified.
ENERGY STAR® is the trusted, government-backed symbol for energy efficiency helping us all save money and protect
the environment through energy-efficient products and practices. Get more information at :
http://www.energystar.gov/
The ENERGY STAR® label was established to :
Reduce greenhouse gas emissions and other pollutants caused by the inefficient use of energy ; and
Make it easy for consumers to identify and purchase energy-efficient products that offer savings on energy bills without
sacrificing performance, features, and comfort.
To earn the ENERGY STAR® label CIARA KRONOS 540 workstations meet the energy efficiency requirements set forth in
ENERGY STAR® product specifications. EPA establishes these specifications based on the following set of key guiding principles
:
The CIARA KRONOS 540 workstations contribute significant energy savings nationwide.
The CIARA KRONOS 540 workstations deliver the features and performance demanded by consumers, in addition to increased
energy efficiency.
If the CIARA KRONOS 540 workstations cost more than a conventional, less-efficient workstation, purchasers will recover
their investment in increased energy efficiency through utility bill savings, within a reasonable period of time.
Energy efficiency can be achieved through broadly available, non-proprietary technologies offered by more than one
manufacturer.
Product energy consumption and performance can be measured and verified with testing.
Labeling would effectively differentiate CIARA KRONOS 540 workstations and be visible for purchasers.
NOTE : The default power management settings have been selected for compliance with ENERGY STAR® (within 10 minutes of user
inactivity for the display, within 30 minutes of user inactivity for the workstation) and are recommended by the ENERGY STAR® program
for optimal energy savings.
- 40 -
Page 41

CIARA KRONOS 540 Workstation
3.0 ONE YEAR LIMITED WARRANTY
CIARA customarily provides a one (1) year, 100% parts and labour non-transferable and limited warranty to all Original Purchasers of
its KRONOS 540 series workstations. The warranty terms are normally Return-to-Depot. This one-year limited warranty starts on the
"Date of Delivery". The warranty covers any optional product(s) manufactured and sold by CIARA and installed by CIARA in a KRONOS
540 series System Unit. This one-year limited warranty, however, does not apply to any other item not internally installed in the system
unit by CIARA, or to any subsequent owners.
All CIARA customers may elect to purchase an extended three year warranty additional to the standard one year warranty. If you are
interested in purchasing a warranty extension, please contact your CIARA representative within one month of receipt of your system.
If you have purchased a different type of warranty, or an extension to the standard warranty, you will need to provide the CIARA
Service Contract Number to the Customer Support representative when placing a call for service or support. It is advisable to affix this
Contract Number to the machine in the event that service is required.
In lieu of either the On-Site or Return-to-Depot portions of the warranty, CIARA reserves the right to directly ship certain customer
replaceable components as replacement products for failed components. When this option is invoked, the customer will be asked to
replace the component(s) and return the original failed component to CIARA within five (5) working days.
- 41 -
Page 42

CIARA KRONOS 540 Workstation
3.1 Procedures to be followed for service during the warranty period :
Refer to the back of the casing and record the model number and serial number from the Machine Identification Label.
Make sure that you know the name and version number of the operating system that you are using, what accessory expansion cards
you have installed in your system, and that you have the system Owner’s and User’s Guides ready at hand.
Call CIARA Support Centre at 877-242-7272.
Provide the workstation system’s model number and serial number. If you have purchased an extended warranty, please provide the
Service Contract number as well. The Customer Service Representative will verify your warranty status immediately, and then pass
the call to the dedicated PC Support Group for further action.
Answer any questions from the support personnel to the best of your ability : The support group may ask you to provide additional
information, run specific commands, change or verify parameter settings, etc.
The service support personnel may be able to rectify the problem over the telephone, at which time you should ask for and record the
unique call number for your own records. If the support group is unable to resolve the problem remotely, an On-Site call may be
generated or additional information will be provided to you to obtain a Returned Merchandise Authorization Number (RMA),
depending upon the type and current status of your warranty.
Make a back-up copy of all of the files on your hard disk before returning your workstation for service. CIARA is not responsible for
the loss or damage of any data on the returned system. In some cases, hard disks may need to reformatted or replaced. It is the
responsibility of the user to ensure data is backed up prior to shipment to CIARA.
Use the original box with its foam protective inserts whenever you return your workstation to us for service. CIARA is not responsible
for shipping damage due to poor packaging. Include your phone number and a list of times when you may be contacted.
If you have any questions please contact us using our web site at :
http://www.ciaratech.com
- 42 -
Page 43

CIARA KRONOS 540 Workstation
3.2 Limited Warranty
CIARA warrants the product (“Product”) you have purchased from CIARA or from an authorized CIARA reseller to be free from defects
in materials and/or workmanship under normal use during the warranty period applicable to the product as defined by the standard
warranty purchased with the Product, or any additional warranties and/or warranty extensions purchased through CIARA or an
authorized CIARA reseller. The warranty period commences on the date of delivery. This warranty extends only to you, the original
Purchaser. It is not transferable to anyone who subsequently purchases leases or otherwise obtains the Product from you. It excludes
expendable (consumable) parts.
During the warranty period, CIARA will, at no additional charge, repair or replace defective parts with new or serviceable used parts
that are equivalent to new parts in performance, form, fit and function. All exchanged parts and Products replaced under this warranty
will become the property of CIARA. If after repeated efforts, CIARA is unable to restore the Product to good working order, you may
claim the purchase price of the Product. This Limited Warranty also does not extend to any Product that has been damaged or
rendered defective (i) as a result of the use of the Product other than for its intended use, failure to use the Product in accordance
with the User’s Guide which accompanies the Product or other misuse, abuse or negligence to the Product ; (ii) by the use of parts not
manufactured or sold by CIARA ; (iii) by modification of the Product ; (iv) as a result of service by anyone other than CIARA or an
Authorized CIARA Service Provider ; or (v) improper transportation or packaging when returning the Product to CIARA or an authorized
CIARA Service Provider.
This Limited Warranty does not extend to expendable (consumable) parts. Expendable parts are those items that during the normal
course of product usage will require periodic replacement, e.g., printer cartridges, batteries, diskette/tape head cleaning kits, etc.
Regarding any CIARA supplied software which accompanies the Product, CIARA warrants the media (e.g., hard disk, CD ROM) upon
which this software is delivered to be free from defects in material and/or workmanship for a period of ninety (90) days from the date
of purchase by the end-user. In the event of defective media, as your exclusive remedy and the sole liability of CIARA, CIARA will
replace the defective media at no charge to you if you return the defective media, with prepaid shipping, to CIARA within the warranty
period.
Except for this media warranty, this software is provided “As is” and CIARA disclaims any and all warranties, express or implied,
including but not limited to any implied warranty of non-infringement of third party rights, merchantability or fitness for a particular
purpose. CIARA does not warrant that the operation of this software will be uninterrupted or error free or that this software will meet
your requirements.
CIARA is not responsible for damage to or loss of any programs, data, or removable storage media. You are responsible for saving
(backing up) any programs, data or removable storage media.
EXCEPT FOR THE WARRANTIES SET FORTH HEREIN, CIARA DISCLAIMS ALL OTHER WARRANTIES, EXPRESS OR IMPLIED OR STATUTORY,
INCLUDING BUT NOT LIMITED TO THE IMPLIED WARRANTIES OF MERCHANTABILITY OR FITNESS FOR A PARTICULAR PURPOSE. ANY
IMPLIED WARRANTIES THAT MAY BE IMPOSED BY APPLICABLE LAW ARE LIMITED TO THE TERMS OF THIS LIMITED WARRANTY. IN NO
EVENT SHALL CIARA BE LIABLE FOR ANY INCIDENTAL, SPECIAL, OR CONSEQUENTIAL DAMAGES, INCLUDING BUT NOT LIMITED TO LOSS
OF BUSINESS, PROFITS, DATA OR USE, WHETHER IN AN ACTION IN CONTRACT OR TORT OR BASED ON A WARRANTY, ARISING OUT OF
OR IN CONNECTION WITH THE USE OR PERFORMANCE OF THE PRODUCT OR ANY CIARA SUPPLIED SOFTWARE WHICH ACCOMPANIES
THE PRODUCT, EVEN IF CIARA HAS BEEN ADVISED OF THE POSSIBILITY OF SUCH DAMAGES. YOU AGREE THAT REPAIR, REPLACEMENT
OR REFUND, AS APPLICABLE, UNDER THE WARRANTY SERVICES DESCRIBED HEREIN ARE YOUR SOLE AND EXCLUSIVE REMEDIES WITH
RESPECT TO ANY BREACH OF THE CIARA LIMITED WARRANTY SET FORTH HEREIN.
Some provinces (or states) do not allow the exclusion or limitation of incidental or consequential damages for consumer products,
and some provinces (or states) do not allow limitations on how long an implied warranty lasts. In such provinces (or states), the
exclusions or limitations of this Limited Warranty may not apply to you.
This Limited Warranty gives you specific legal rights. You may also have other rights that vary from province to province and state to
state. You are advised to consult applicable provincial or state laws for a full determination of your rights.
- 43 -
Page 44
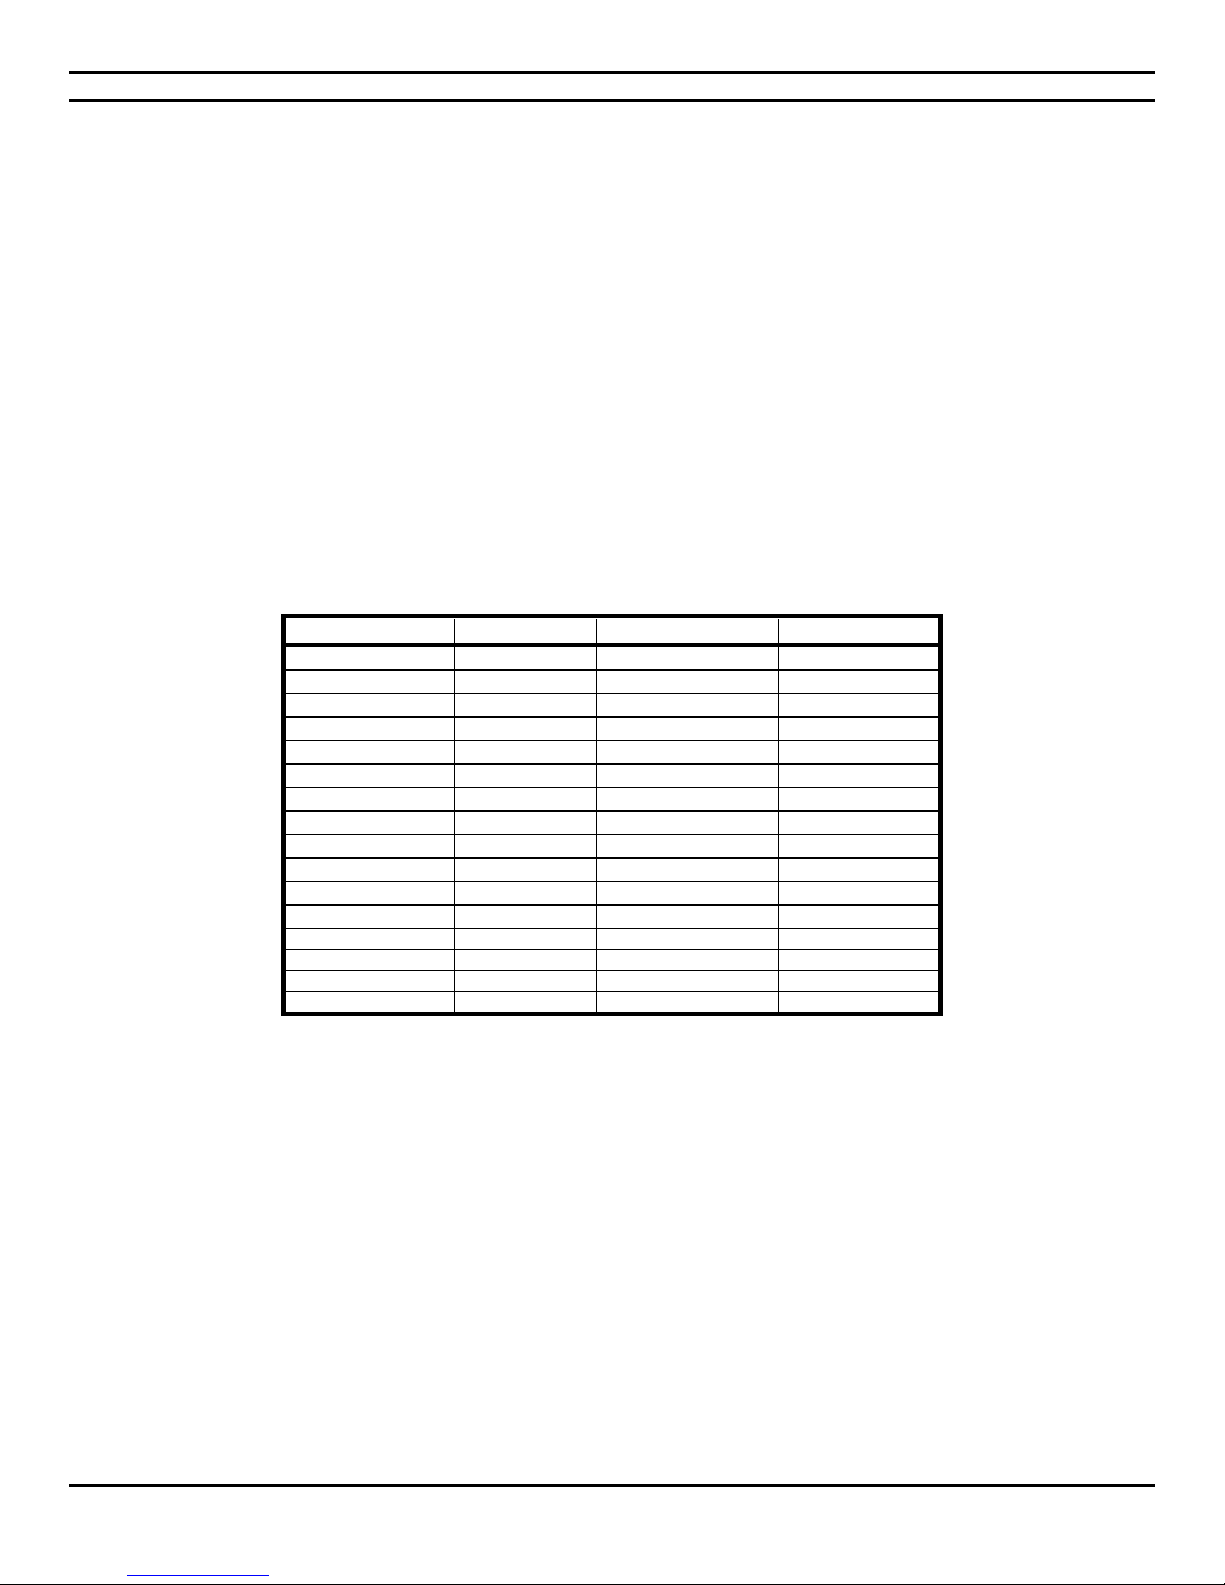
CIARA KRONOS 540 Workstation
Component
Purchase date
Model
Serial number
System Unit
Motherboard
Memory
Processor
Video Card
Sound Card
LAN Card
Hard Drive
DVD-ROM Drive
DVD-Writer
Mouse
Keyboard
Monitor
Power supply
Chassis fan(s)
3.3 Documenting your workstation
CIARA recommends that you record the information about your workstation and keep a copy of this in a safe but readily accessible
location.
Please keep your equipment log up to date and include a copy of it whenever your equipment is returned to CIARA for servicing.
The equipment log is also helpful if your CIARA workstation is lost, stolen, or damaged. It can serve as your record of when the
equipment was placed in service, and the dates of all equipment upgrades and configuration changes.
Record the model and serial numbers of the system components, dates of component removal and/or replacement. Be sure to
include the same information for any components added to the system, such as fixed disk, add-in boards, or printers. Record the
model and serial numbers of the CIARA System. The model and serial numbers of the System Unit are recorded on the label attached
to the rear cover.
The location of serial numbers on add-in boards, fixed and floppy disk drives, and external equipment, such as video displays or
printers, varies from one manufacturer to another, but should be easily recognizable.
3.3.1 Base System Details
- 44 -
Page 45
CIARA KRONOS 540 Workstation
4.0 Technical product specification CIARA KRONOS 540
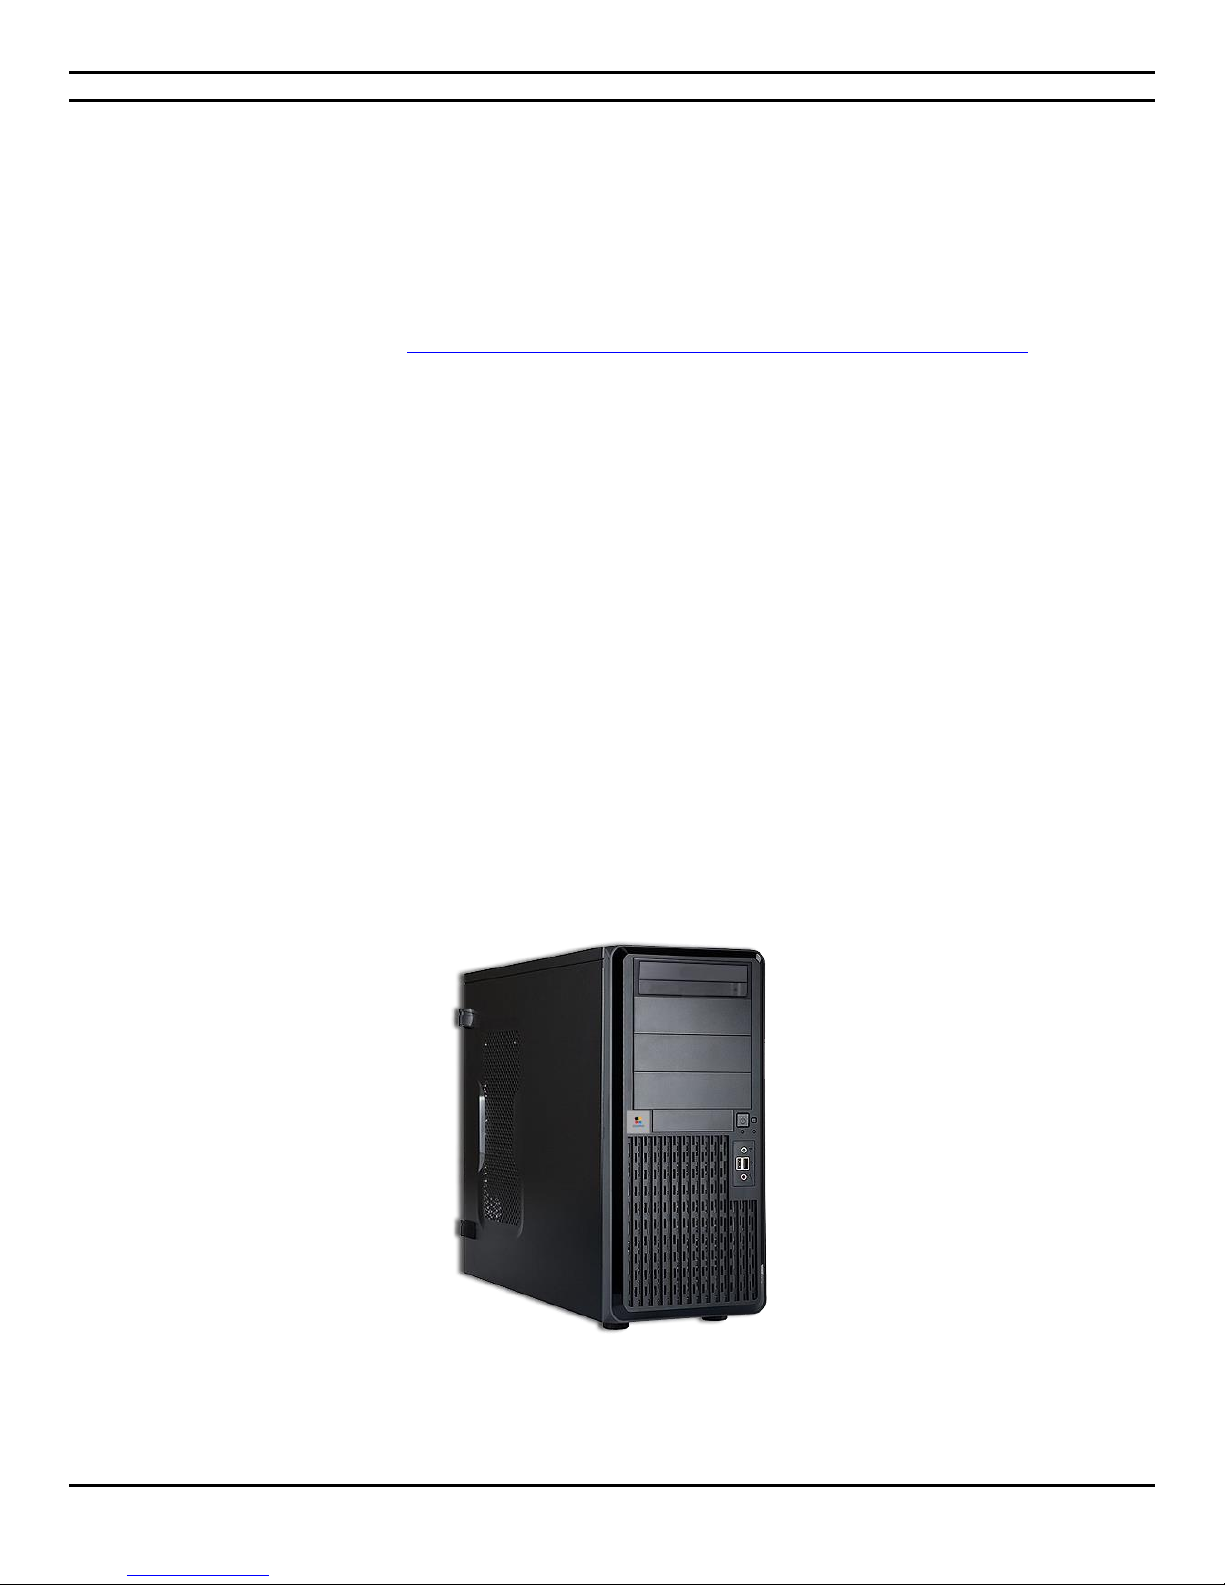
This is the User's Guide for the CIARA KRONOS 540 family of workstations. The KRONOS 540 is a series PCI Express bus workstations
that use seventh generation Intel® Core™ i5 X-series or Intel® Core™ i7 X-series Intel® Core™ i9 X-series or Intel® Core™ i9 Extreme
edition all in the LGA2066 package.
While supplied as standard in a mini tower case, CIARA can supply the CIARA KRONOS 540 in a full range of cases that include smaller
desktop models as well as larger tower models that are suitable for applications that require a greater expansion capacity.
View all compatible Intel® processors at : https://www.asus.com/us/Motherboards/WS-X299-PRO-SE/HelpDesk_CPU/ .
All versions utilize essentially the same Set-Up and configuration procedures and the same Asus BIOS.
Other processors may be supported in the future. This board is designed to support processors with a maximum wattage of 165 W.
The processors listed are only supported when falling within the wattage requirements of the WS X299 PRO/SE board.
With care and proper operating procedure, all CIARA KRONOS 540 workstations will give many years of trouble-free service. The CIARA
KRONOS 540 can be configured for a wide range of special purpose, business, industrial and scientific applications.
The information provided in this guide is all that you should need to set up and use your CIARA KRONOS 540 workstation. We offer
Technical Reference Manuals for sale to knowledgeable users.
Please note that any modifications or additions not made by CIARA or our authorized personnel, to any CIARA KRONOS 540 that is
under Warranty, such as your insertion or removal of adapter cards not supplied and installed by CIARA could cause damage and may
void the Warranty.
Please do not experiment if you are unsure, and remember we are ready to answer your questions. Please call us first.
- 45 -
Page 46
CIARA KRONOS 540 Workstation
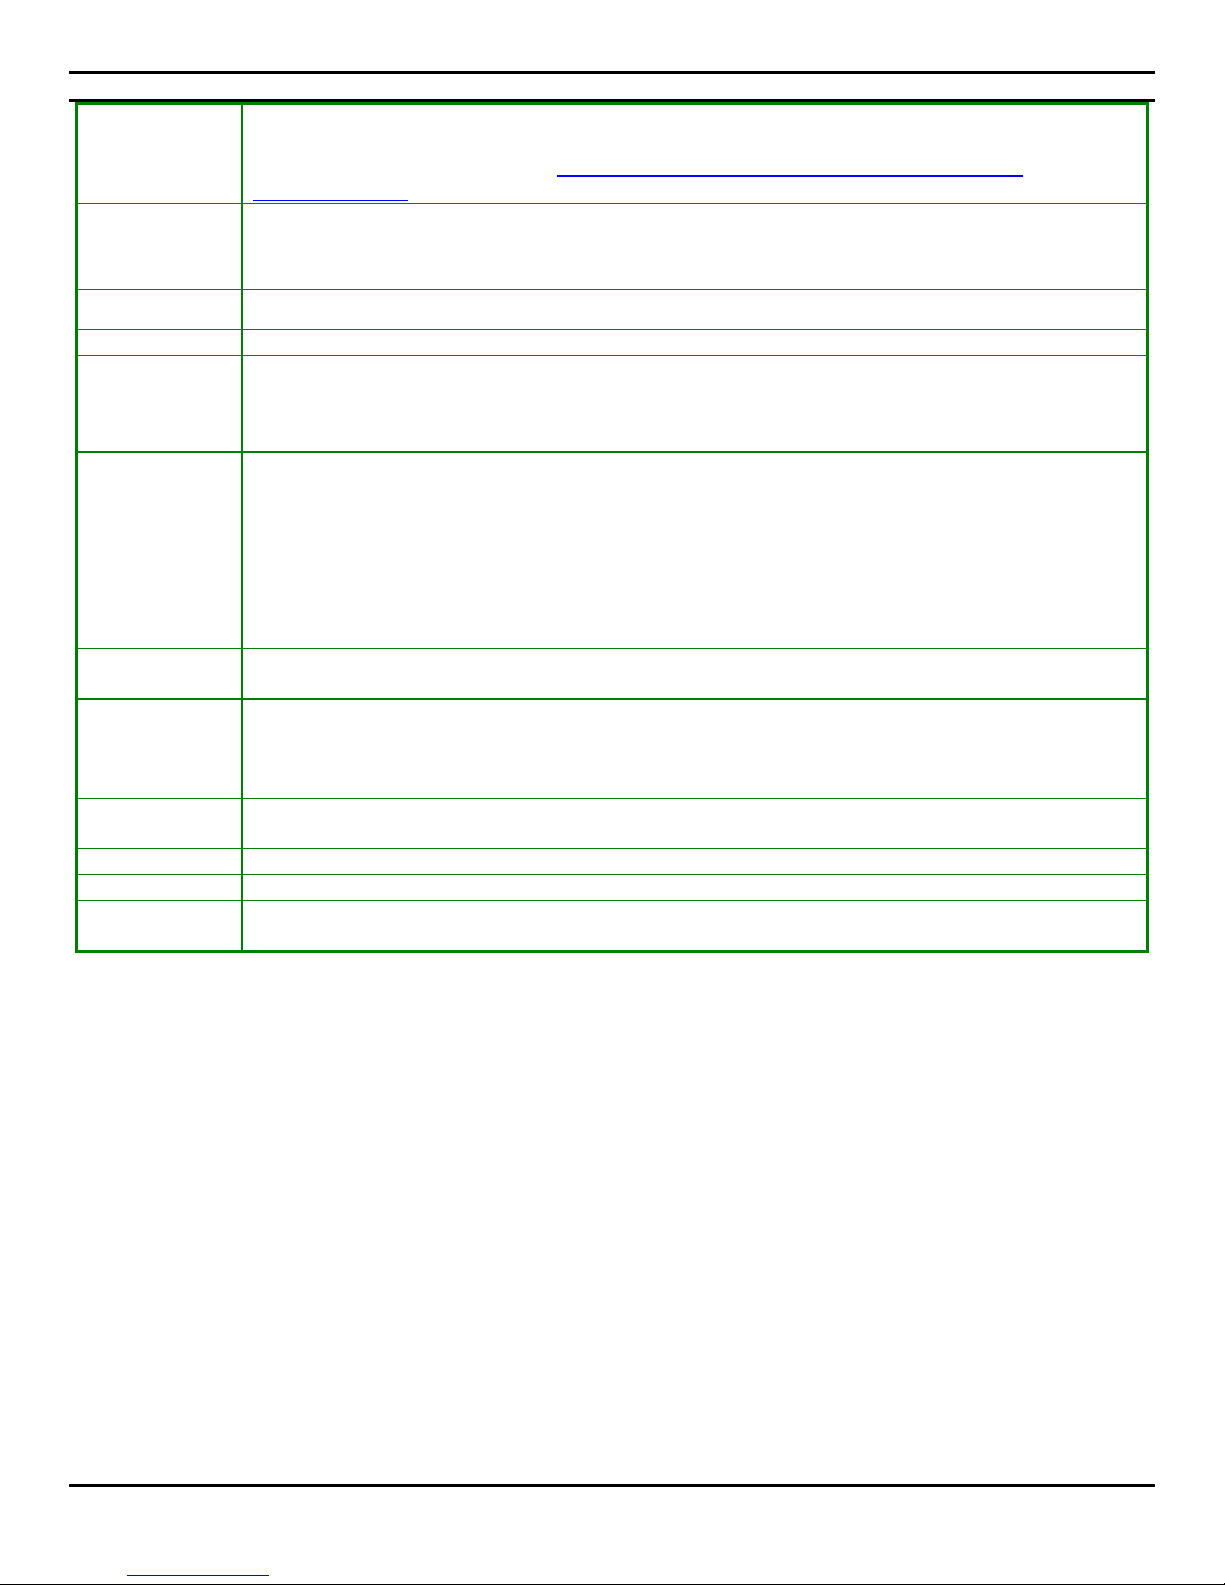
Processor :
Intel® 7th generation Core™ i5 X-series, Core™ i7 X-series, Core™ i9 X-series or Core™ i9 Extreme edition
all in the LGA2066 package.
View all compatible Intel® processors https://www.asus.com/us/Motherboards/WS-X299-PRO-
SE/HelpDesk_CPU/
Bus :
44-lane CPU : 4 PCIe 3.0 x16 (2 x16 mode), (1 x8 mode), (1 x4 mode) ; 1 PCIe 3.0 x4 (x4 mode) ;
28-lane CPU : 3 PCIe 3.0 x16 (1 x16 mode), (1 x8 mode), (1 x4 mode) ; 1 PCIe 3.0 x4 (x4 mode) ;
16-lane CPU : 3 PCIe 3.0 x16 (1 x8 mode), (2 x4 mode) ; 1 PCIe 3.0 x4 (x4 mode)
System Board :
Asus® WS X299 PRO/SE ATX form factor main board uses Intel X299 chipset
BIOS :
Asus Flash BIOS standard, with ACPI, APM, ENERGY STAR®, DMI, Plug & Play and SMBIOS features.
RAM :
DDR4 288 pin Type 2666 MHz SDRAM.
Up to 128 GB, 8 DIMM (6 -core above) or up to 64 GB, 4 DIMM (4-core)
SPD (Serial Presence Detect) memory is mandatory.
Only Non-ECC memory is supported.
Ports :
2 network port (RJ45) ;
1 USB 3.1 gen 2 type C (rear), 2 USB 3.1 gen. 2 type A (1 rear, 1 int. header) ;
6 USB 3.1 gen 1 ports (2 front, 4 rear) ;
6 USB 2.0 (4 rear, 2 int. header)
1 optical S/PDIF out, 5 audio jacks ;
1 serial port header ;
2 M.2 Socket 3 with M key ; 1 U.2 port ;
6 SATA 6 Gb/s ports
Drives :
Vast choice of optical drives.
SATA hard disk and SSD drives ; M.2 or U.2 SSD drive.
Casing :
Mid-tower, 1200 W power supply (80 PLUS® Platinum) ;
three external 5 ¼” bays ;
four internal 3 ½” bays ;
four internal 2.5” bays.
Video :
GeForce GTX1070 video controller with 8 GB of DDR5 video memory. – 256 bits PCI Express 3.0 X16 ;
one dual link DVI port, one HDMI 2.0 port and three DisplayPort 1.4 (4 concurrent screens).
Audio :
Integrated Realtek® ALC S1220A, 8-channel high definition audio codec
Network :
2 Ethernet 1 Gigabit controllers : Intel® I210-AT
Certification :
UL (60950-1), FCC Class B, Microsoft® Windows® 10 WHQL, Red Hat Linux, EPEAT Gold, compliant with
ENERGY STAR® 6.1 guidelines for energy efficiency.
- 46 -
Page 47
CIARA KRONOS 540 Workstation
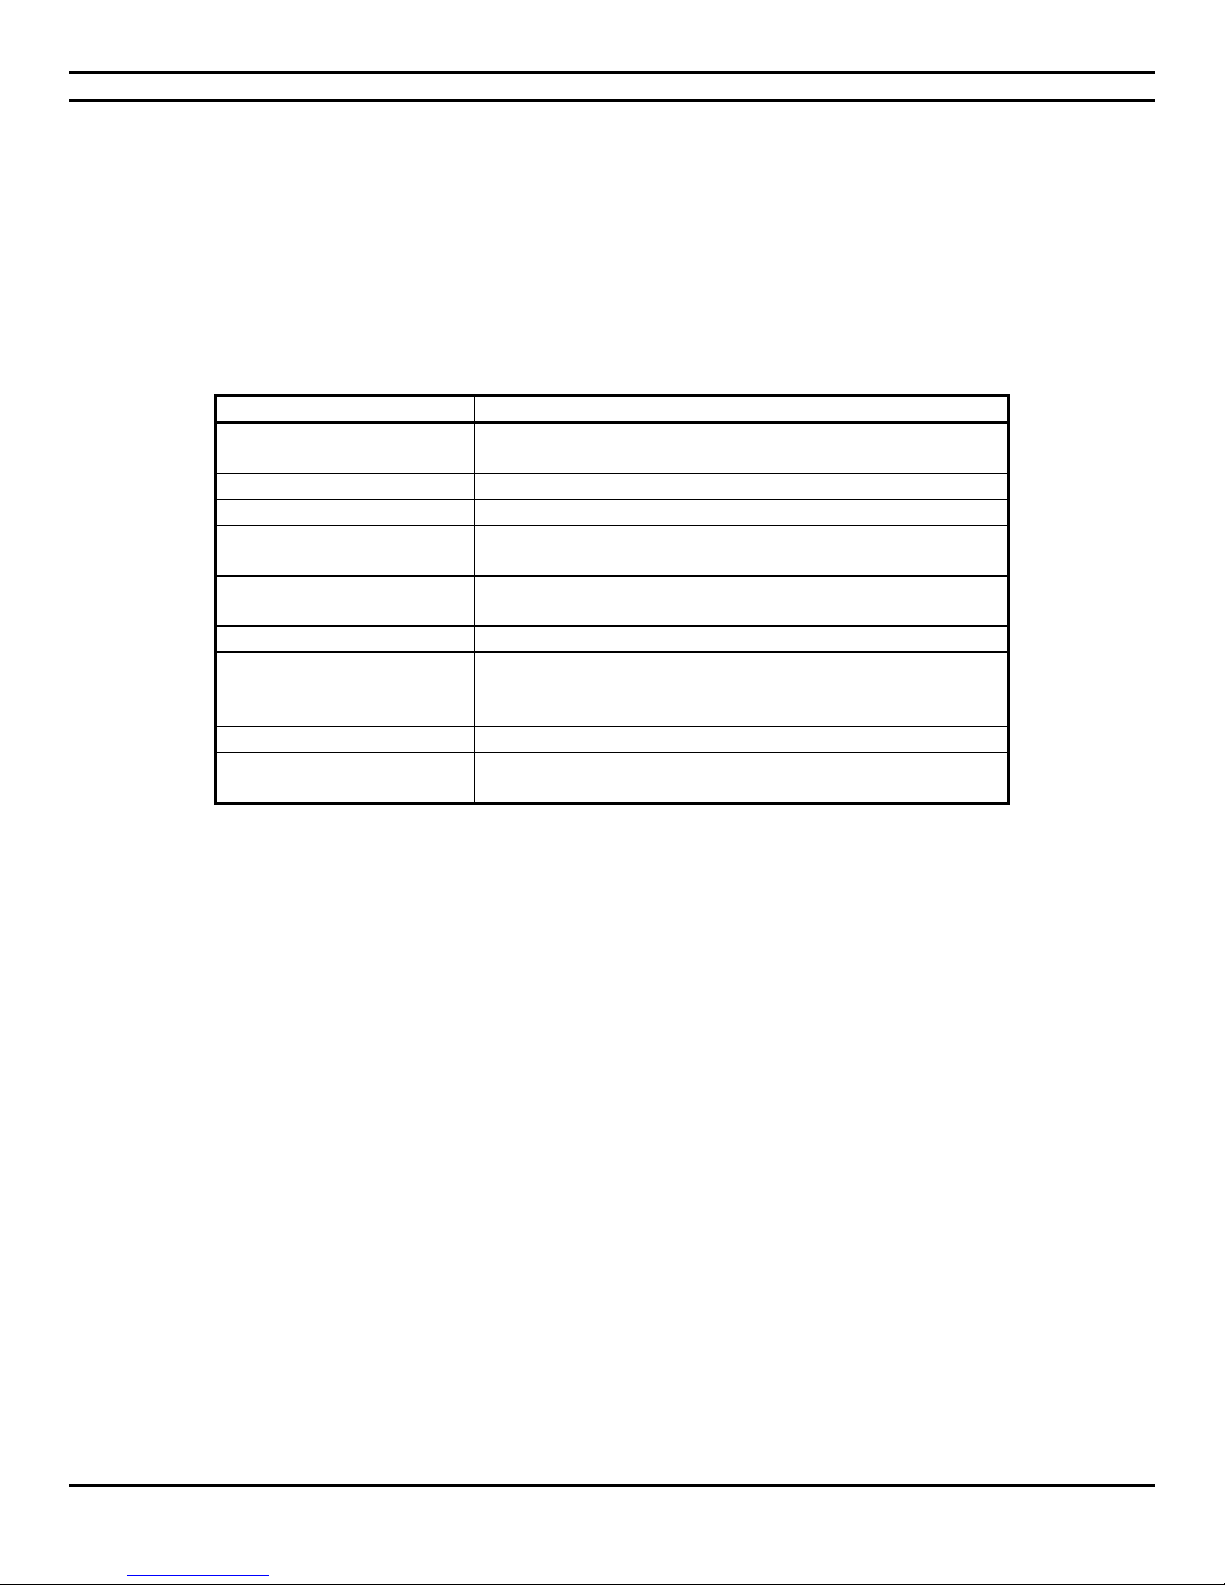
UPGRADES AVAILABLE
CIARA KRONOS 540
Serial ATA Hard Disk Drives
6 Gb/s
Several hard disks ranging from 500 GB to 12 TB
Solid State Disk Drives (SSD)
Several SATA 6 Gb/s SSD disks ranging from 128 GB to 4 TB
M.2 Solid Stat Drives
Several SATA 6 Gb/s SSD disks ranging from 250 GB to 2 TB
Optical Drives
Internal & external Blu-ray drives, Blu-ray writers, DVD drives
and DVD writers may be added.
PCI Express x16 Video
Controller
Video controllers compliant with the PCI Express x16 standard,
Gen 3 and Gen 2.
System Memory
Up to 128 GB DDR4, 288 pin, 2666 MHz.
Disk Controllers
Eight SATA 6 Gb/s ports.
SATA RAID (0, 1, 10 and 5) supported
Several PCI Express bus RAID adapter cards are available.
Hi Res. Monitors
23 to 27 inches LCD monitors with LED backlighting.
Network Adapters
Several PCI Express bus network adapter cards for Ethernet
transmission media are available.
4.1 Upgrading
As the purchaser of a powerful state of the art CIARA KRONOS 540 workstation you have no doubt decided on the features and upgrade
capabilities that you might wish to add to your workstation. There are many exciting possibilities for upgrading your CIARA KRONOS
540. CIARA has extensively tested a range of potential upgrade and enhancement options that range from hard disks to various optical
drives. Some of these work much better than others and we are able to recommend the ones that work best with your CIARA KRONOS
540 workstation.
CIARA will be pleased to help you choose the most reliable and compatible system components when the time comes to upgrade and
enhance your CIARA KRONOS 540 workstation in a manner that will preserve the Warranty. Table below summarizes the general
features of the various types of upgrades and enhancements that may be added to any CIARA KRONOS 540.
4.2 Networking
Among the more exciting applications for extending the power and utility of CIARA KRONOS 540 workstations is to connect them
(using communication links and adapter cards) with other workstation systems to form workstation / communication networks in
order to share software resources (such as databases) and hardware resources (such as printers and scanners). This is referred to as
Local Area Networking (LAN) and Wide Area Networking (WAN).
All CIARA KRONOS 540 workstations can be networked running the Microsoft Windows and Linux Operating Systems.
CIARA System Integration and Networks Group would be pleased to provide you with turnkey solutions for all your Windows Server
2016 and Linux networking needs. We have trained and certified experts on staff to help you.
- 47 -
Page 48
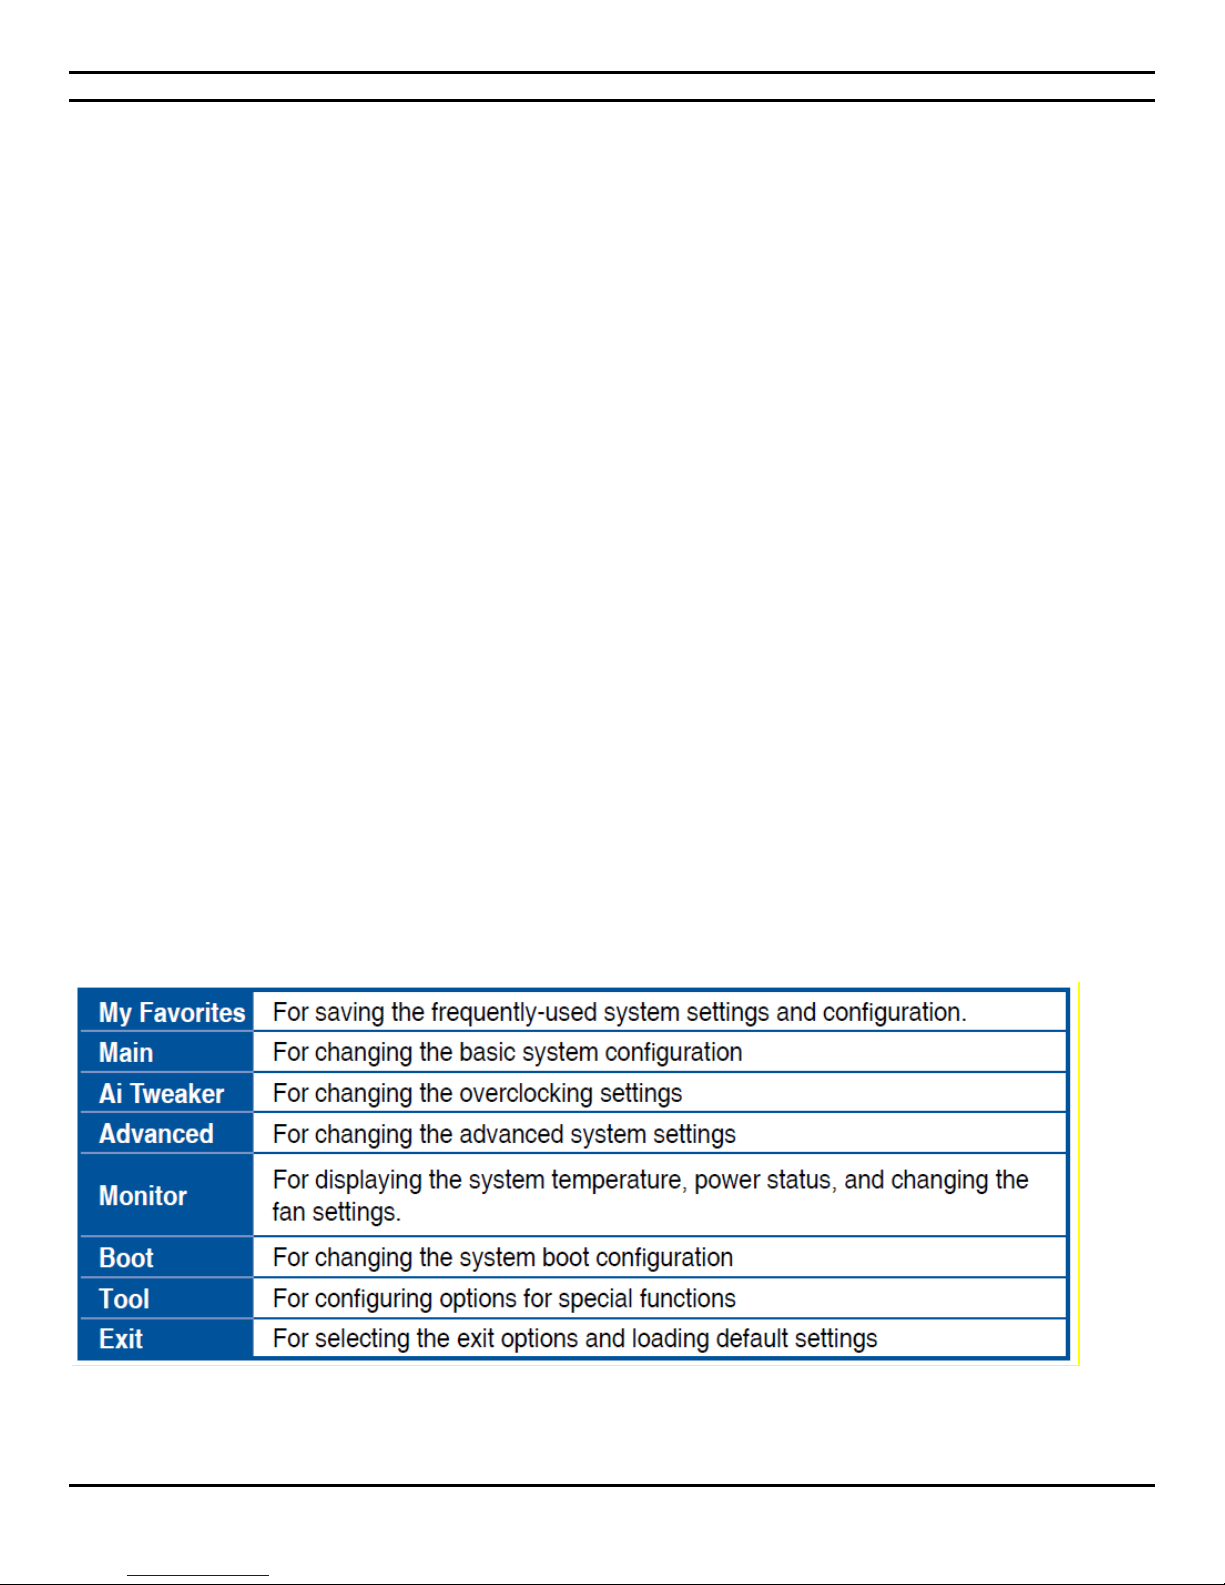
CIARA KRONOS 540 Workstation
4.3 The CIARA KRONOS 540 BIOS
4.3.1 BIOS configuration and installation
The purpose of this section is to describe the procedures to set up the BIOS configuration options of your CIARA KRONOS 540
workstation. All this work is done for you at the CIARA factory enabling the system to be ready to start on Power on. However, we are
describing this procedure as a means of transparency.
Every CIARA KRONOS 540 is now delivered with the latest version of the Asus BIOS (as of the manufacturing date). The Asus BIOS is a
set of permanently recorded software that gives the CIARA KRONOS 540 its fundamental operational characteristics.
The Asus BIOS is made up of code that provides the device-level control for the major I/O devices in the CIARA KRONOS 540 workstation
system. It contains a set of routines (called POST, for Power-On Self-Test) that tests your CIARA KRONOS 540 system when you turn it
on.
It will be necessary to run the Set-Up program if you do any of the following:
Replace the battery,
Replace the processor,
In any of these cases you must use the Set-Up program to modify the system parameters to reflect the options actually installed in
your system.
To use the Set-Up program proceed as follows:
Turn on or re-boot (press simultaneously <Ctrl>, <Alt>, <Del>) your CIARA KRONOS 540 system. After the Asus BIOS performs a series
of diagnostic checks, the following message appears:
Press <Del> to enter Set-Up.
Once in Bios Menu choose a Set-Up option with the arrow keys and press < > to select.
4.3.2 BIOS set-up program menu bar
- 48 -
Page 49
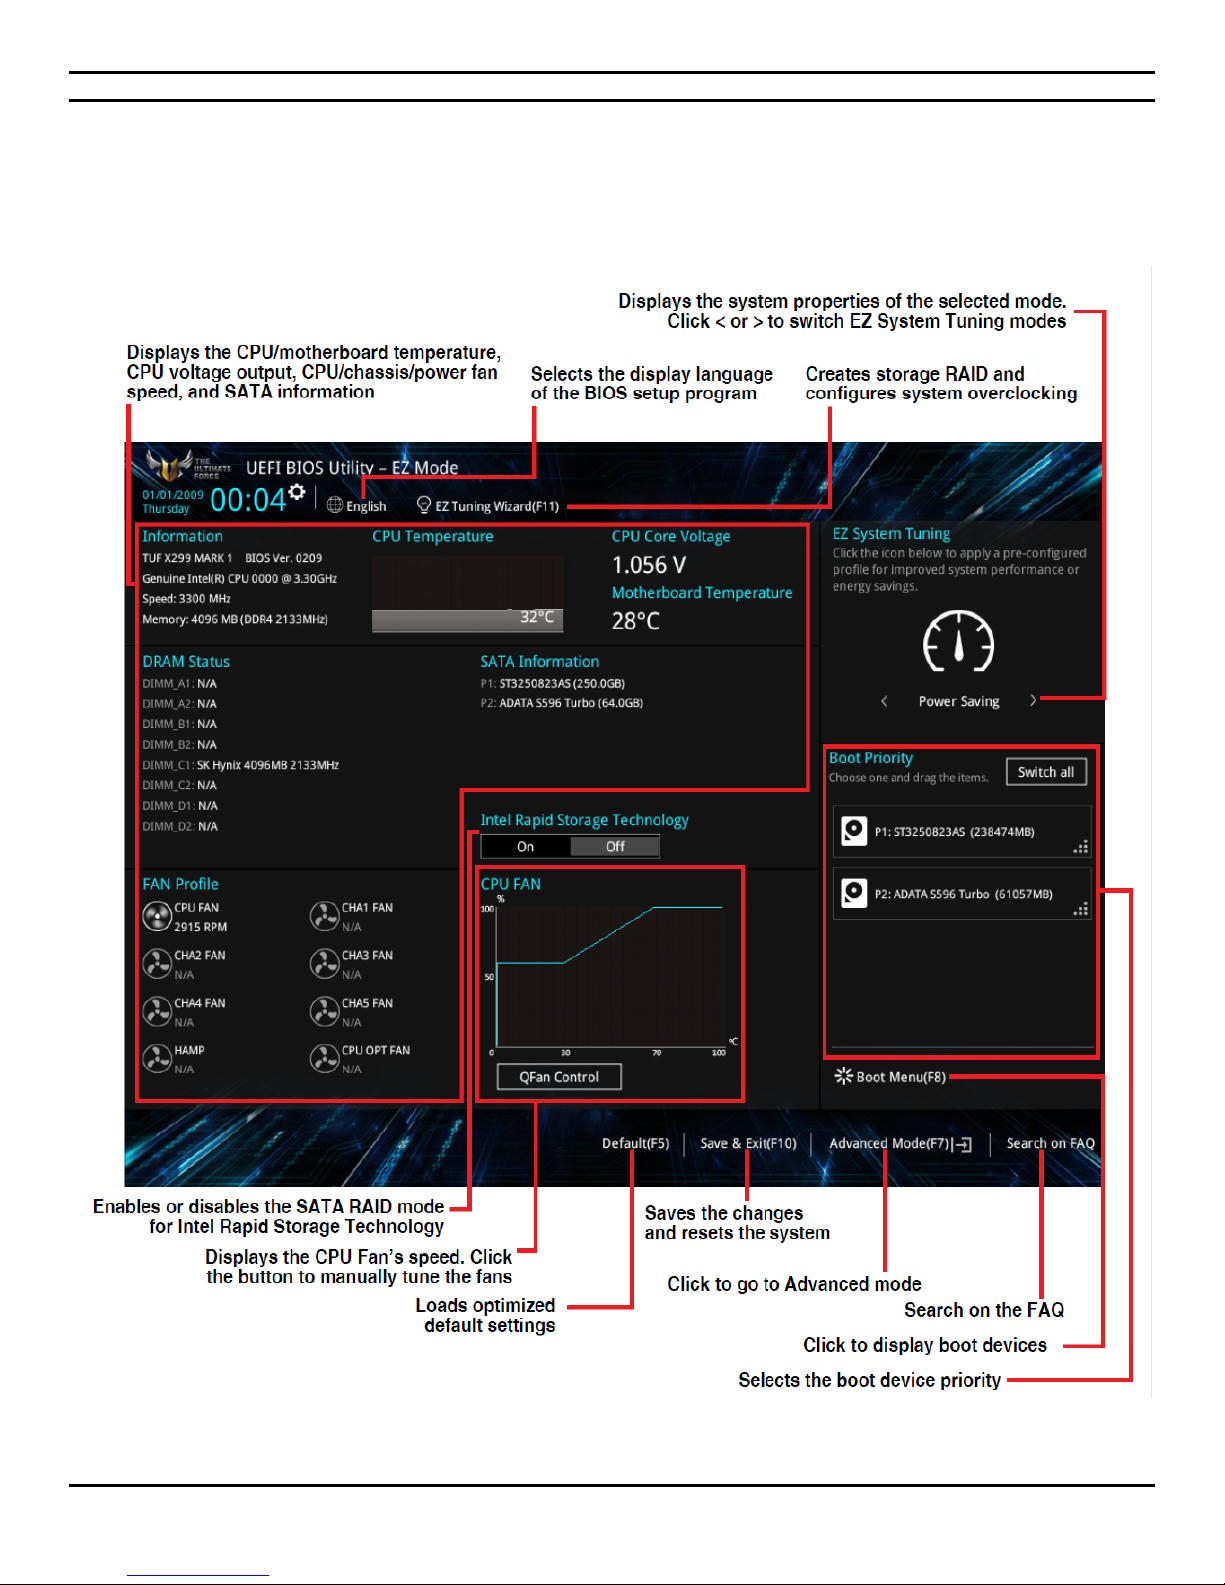
CIARA KRONOS 540 Workstation
4.3.3 BIOS menu screen
The BIOS Setup program can be used under two modes: EZ Mode and Advanced Mode. You can change modes from Setup Mode in
Boot menu or by pressing the <F7> hotkey.
4.3.3.1 EZ Mode
- 49 -
Page 50
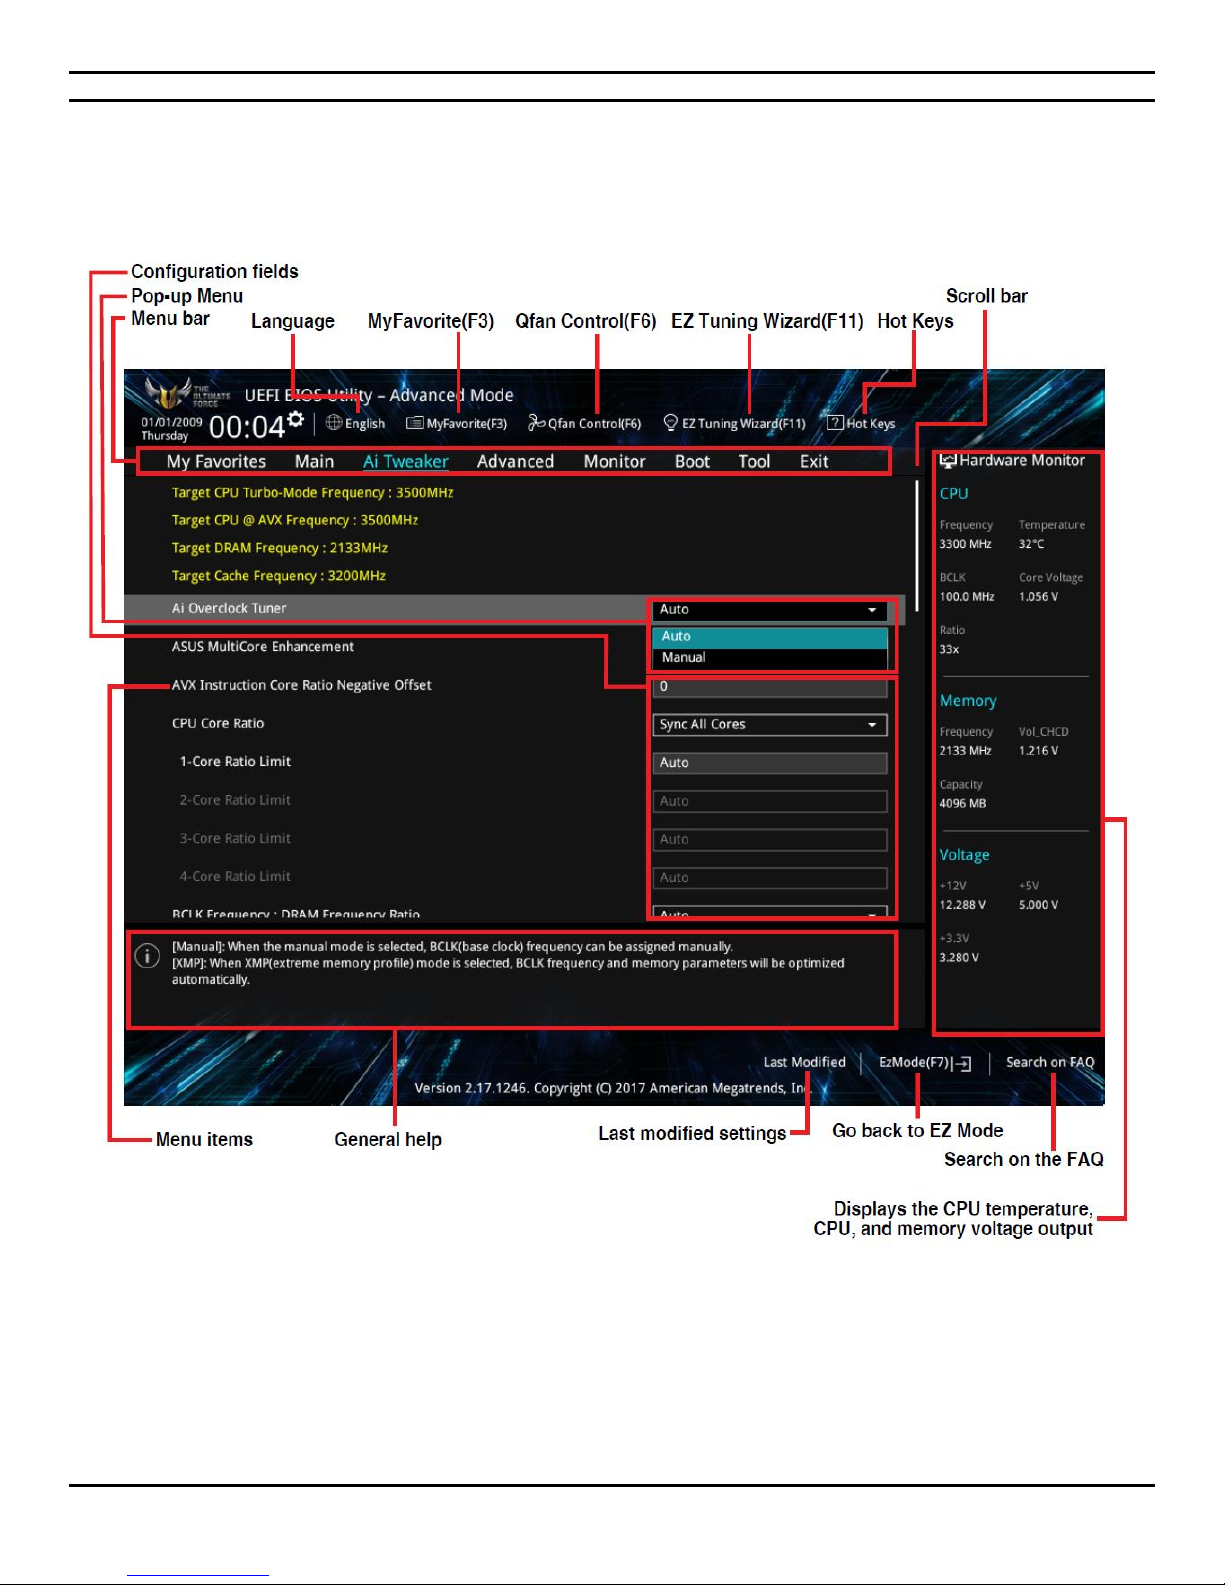
CIARA KRONOS 540 Workstation
4.3.3.2 Advanced Mode
The Advanced Mode provides advanced options for experienced end-users to configure the BIOS settings. The figure below shows an
example of the Advanced Mode. Refer to the following sections for the detailed configurations.
- 50 -
Page 51

CIARA KRONOS 540 Workstation
4.3.4 PCI auto configuration
The BIOS can automatically configure PCI devices. PCI devices may be onboard or add-in cards. Auto configuration lets a user insert or
remove PCI cards without having to configure the system. When a user turns on the system after adding a PCI card, the BIOS
automatically configures interrupts, the I/O space, and other system resources. Any interrupts set to Available in Setup are considered
to be available for use by the add-in card.
4.3.5 Legacy USB support
Legacy USB support enables USB devices to be used even when the operating system’s USB drivers are not yet available. Legacy USB
support is used to access the BIOS Setup program, and to install an operating system that supports USB. By default, Legacy USB support
is set to Enabled.
Legacy USB support operates as follows :
1. When you apply power to the workstation, legacy support is disabled.
2. POST begins.
3. Legacy USB support is enabled by the BIOS allowing you to use a USB keyboard to enter and configure the BIOS Setup program
and the maintenance menu.
4. POST completes.
5. The operating system loads. While the operating system is loading, USB keyboards and mice are recognized and may be used
to configure the operating system. (Keyboards and mice are not recognized during this period if Legacy USB support was set
to Disabled in the BIOS Setup program.)
6. After the operating system loads the USB drivers, all legacy and non-legacy USB devices are recognized by the operating
system, and Legacy USB support from the BIOS is no longer used.
To install an operating system that supports USB, verify that Legacy USB support in the BIOS Setup program is set to Enabled and
follow the operating system’s installation instructions.
NOTE
It is recommended to connect USB keyboard and mouse devices to USB 2.0 ports (black) as the operating system installation may be
interrupted if keyboard and mouse devices are connected to the Super Speed USB 3.0 ports (blue) due to the lack of native USB 3.0
driver support from the operating system. The device driver for the USB 3.0 host controller is installed separately and is required to be
operational in the operating system.
4.3.6 BIOS updates
The BIOS can be updated using either of the following utilities :
The ASUS BIOS Updater allows you to update BIOS in a DOS environment. This utility also allows you to copy the current BIOS
file that you can use as a backup when the BIOS fails or gets corrupted during the updating process.
The ASUS EZ Flash 3 feature allows you to update the BIOS without using an OS‑based utility
NOTE
Review the instructions distributed with the upgrade utility before attempting a BIOS update.
4.3.7 Language support
The BIOS setup program and help messages are supported in English, French, Deutsch, Spanish and more.
- 51 -
Page 52
CIARA KRONOS 540 Workstation
Acceptable Drives/Media Types for BIOS Recovery
Media Type
Can be used for BIOS recovery?
DVD-ROM drive connected to the Serial ATA interface
Yes
USB removable drive (a USB Flash Drive, for example)
Yes
USB diskette drive (with a 1.44 MB diskette)
No
USB hard disk drive
No
Legacy diskette drive (with a 1.44 MB diskette) connected to
the legacy diskette drive interface
No
Boot Device Menu Function Keys
Description
<> or <>
Selects a default boot device.
< >
Exits the menu and boots from the selected device.
<Esc>
Exits the menu without saving changes.
4.3.8 BIOS recovery
It is unlikely that anything will interrupt a BIOS update; however, if an interruption occurs, the BIOS could be damaged. The following
table lists the drives and media types that can and cannot be used for BIOS recovery. The BIOS recovery media does not need to be
made bootable.
4.3.9 Boot options
In the BIOS Setup program, the user can choose to boot from a SATA optical drive, hard drive, USB drive, USB flash drive, USB Floppy
drive, or the network. The default setting is for the SATA optical drive to be the first boot device, the hard drive second, and a
removable drive third (such as USB drive, USB flash or USB floppy drive) and the network last.
NOTE
Optical devices, USB devices and network will only appear in the boot menu if they are enabled.
4.3.9.1 SATA optical drive boot
Booting from optical drive is supported in compliance to the El Torito bootable CD/DVD format specification. Under the Boot menu in
the BIOS Setup program, a SATA optical drive is listed as a boot device. Boot devices are defined in priority order. Accordingly, if there
is no bootable CD or DVD in the optical drive, the system will attempt to boot from the next defined drive.
4.3.9.2 Network boot
The network can be selected as a boot device. This selection allows booting from the onboard LAN or a network add-in card with a
remote boot ROM installed. Pressing the <F12> key during POST automatically forces booting from the LAN. To use this key during
POST with a user password set, the User Access Level in the BIOS Setup program's Security menu must be set to Full Access and the
boot to Network option in the BIOS Setup program’s Boot menu must be enabled.
4.3.9.3 Booting without attached devices
For use in embedded applications, the BIOS has been designed so that after passing the POST, the operating system loader is invoked
even if the following devices are not present:
• Video adapter
• Keyboard
• Mouse
4.3.9.4 Changing the default boot device during POST
Pressing the <F8> key during POST causes a boot device menu to be displayed. This menu displays the list of available boot devices (as
set in the BIOS setup program’s Boot Device Priority Submenu). The following table lists the boot device menu options.
NOTE
All boot devices such as Optical, Removable and network will always appear in the <F8> boot menu unless an administrator password
has been set, even if Boot to Optical Devices, Boot to Removable Devices and Boot to Network have been disabled in the BIOS Setup
program's Boot menu.
- 52 -
Page 53

CIARA KRONOS 540 Workstation
4.3.10 Adjusting boot speed
This factor affects system boot speed
• Selecting and configuring peripherals properly
4.3.10.1 Peripheral selection and configuration
The following techniques help improve system boot speed:
Select an optical drive with a fast initialization rate. This rate can influence POST execution time.
Eliminate unnecessary add-in adapter features, such as logo displays, screen repaints, or mode changes in POST. These
features may add time to the boot process.
Try different monitors. Some monitors initialize and communicate with the BIOS more quickly, which enables the system to
boot more quickly.
4.3.10.2 BIOS boot optimizations
Use of the following BIOS setup program settings reduces the POST execution time.
In the Boot Menu, set the hard disk drive as the first boot device. As a result, the POST does not first seek an optical drive,
which saves about one second from the POST execution time.
In the Peripheral Configuration submenu, disable the LAN device if it will not be used. This can reduce up to four seconds of
option ROM boot time.
- 53 -
Page 54
CIARA KRONOS 540 Workstation
Administrator and User Password Functions
Password Set
Administrator
Mode
User Mode
Setup Options
Password to
Enter Setup
Password
During Boot
Neither
Can change all
options (note)
Can change all
options (note)
None
None
None
Administrator
only
Can change all
options
Can change a
limited number
of options
Administrator Password
Administrator
None
User only
N/A
Can change all
options
Enter Password
Clear User Paswword
User
User
Administrator
and User
Can change all
options
Can change a
limited number
of options
Administrator
Password
Entrer Password
Administrator or
User
Administrator or
User
4.3.11 BIOS security features
The BIOS includes security features that restrict access to the BIOS Setup program and who can boot the workstation. A supervisor
password and a user password can be set for the BIOS Setup program and for booting the workstation, with the following restrictions
:
The supervisor password gives unrestricted access to view and change all the Setup options in the BIOS Setup program. This
is the supervisor mode.
The user password gives restricted access to view and change Setup options in the BIOS Setup program. This is the user
mode.
If only the supervisor password is set, pressing the <Enter> key at the password prompt of the BIOS Setup program allows
the user restricted access to Setup.
If both the supervisor and user passwords are set, users can enter either the supervisor password or the user password to
access Setup. Users have access to Setup respective to which password is entered.
Setting the user password restricts who can boot the workstation. The password prompt will be displayed before the
workstation is booted. If only the supervisor password is set, the workstation boots without asking for a password. If both
passwords are set, the user can enter either password to boot the workstation.
For enhanced security, use different passwords for the supervisor and user passwords.
Valid password characters are A-Z, a-z, and 0-9. Passwords may be up to 16 characters in length.
The following table shows the effects of setting the administrator password and user password. This table is for reference only and is
not displayed on the screen.
Note : If no password is set, any user can change all Setup options.
- 54 -
Page 55
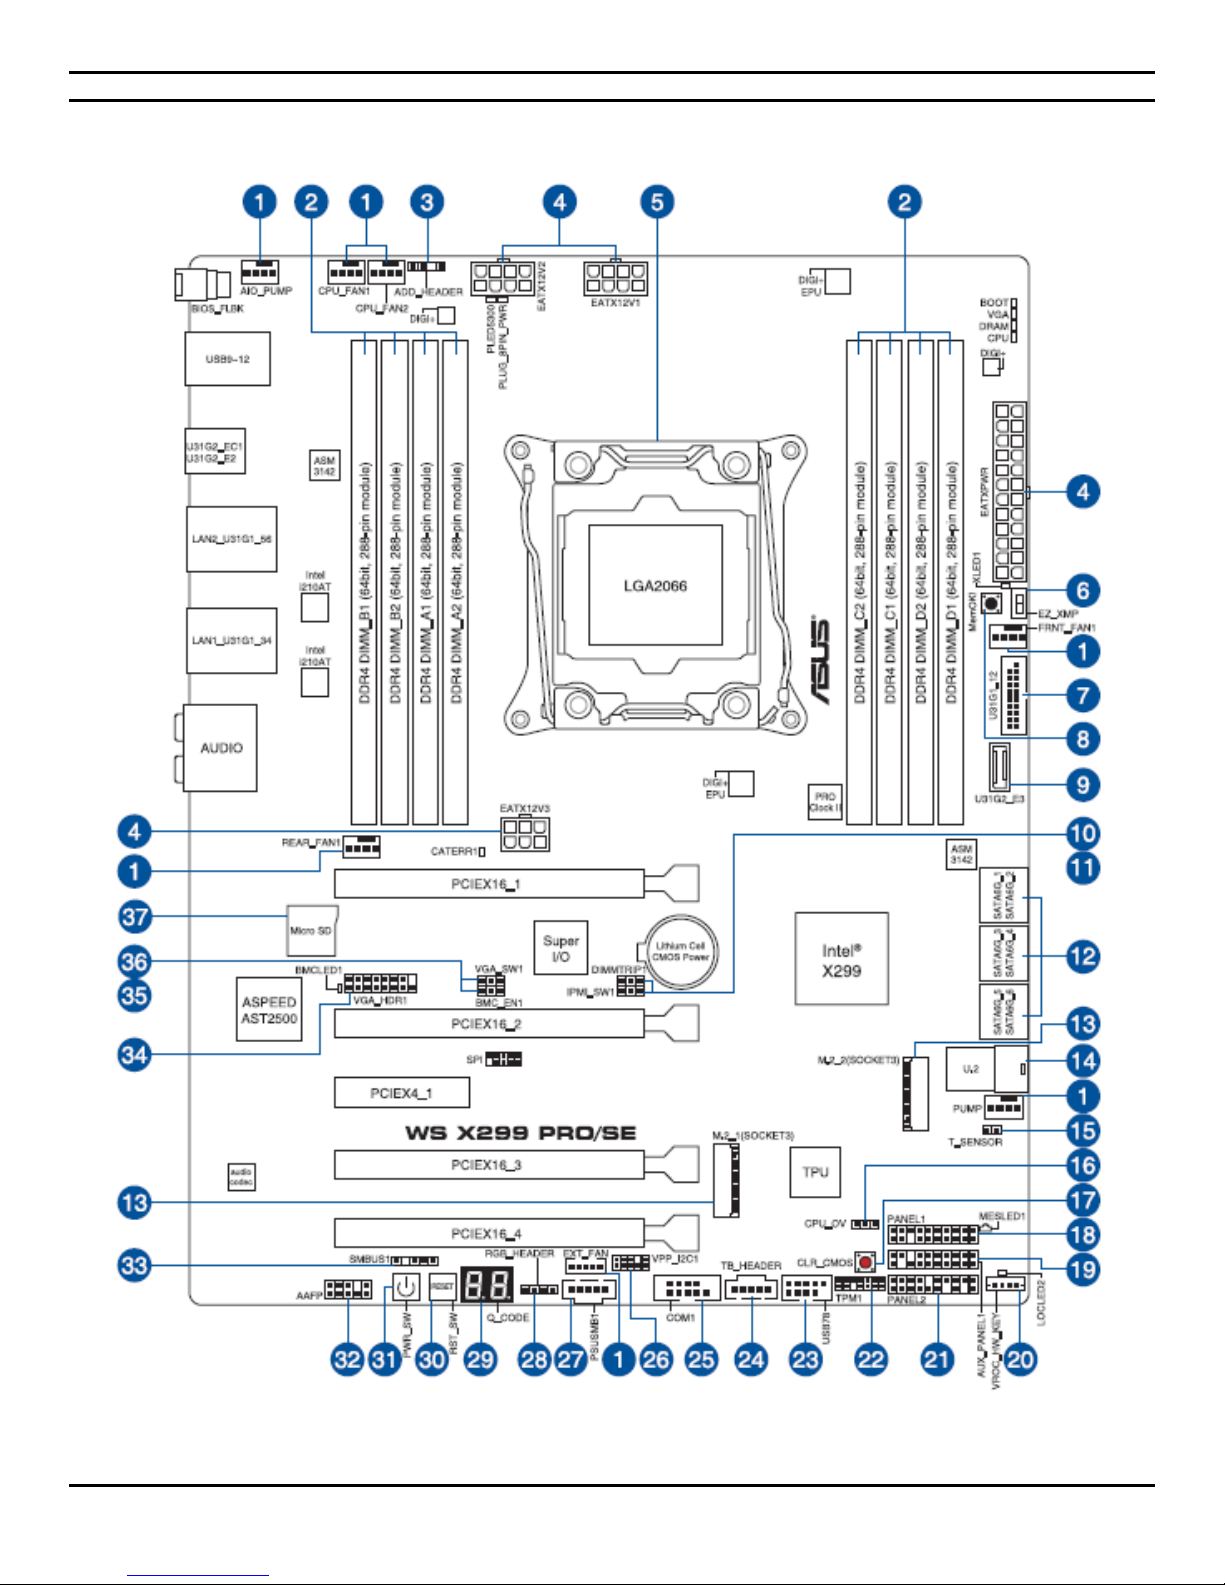
CIARA KRONOS 540 Workstation
4.4 Motherboard configuration & layout – KRONOS 540 main board
Figure 4.4 Major board components
- 55 -
Page 56
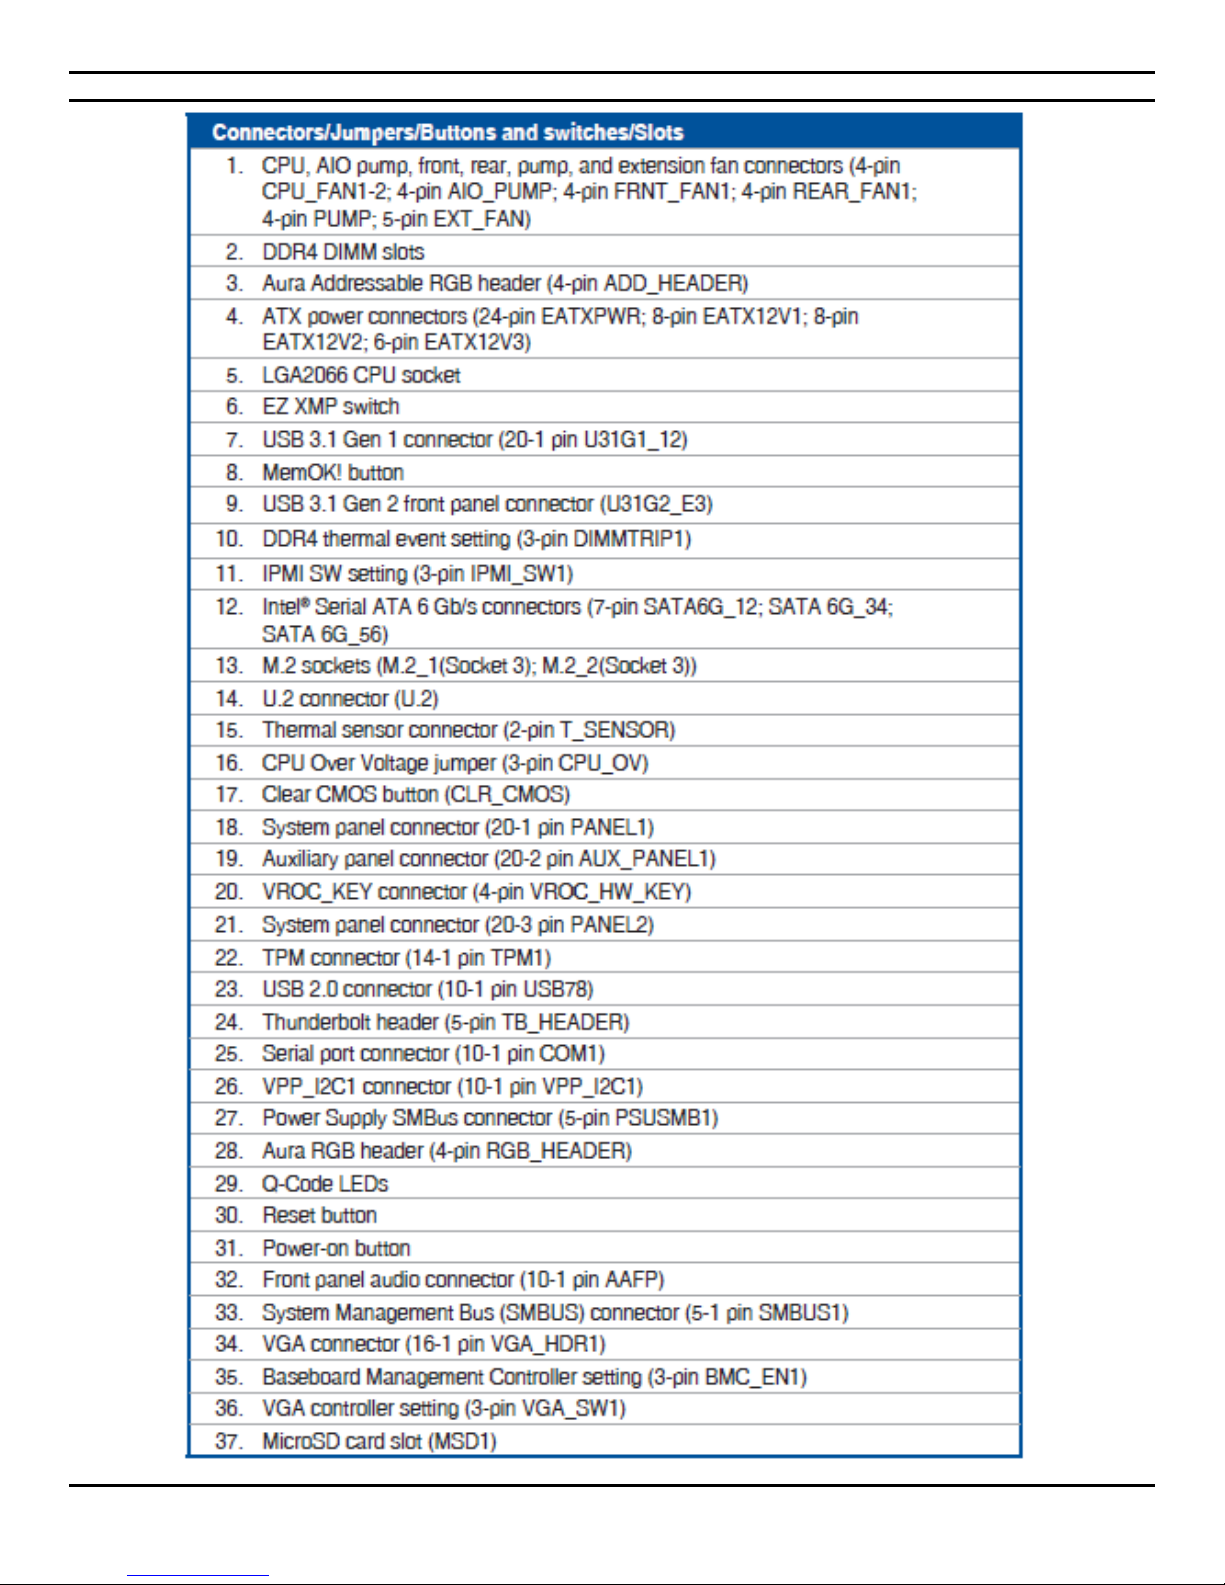
CIARA KRONOS 540 Workstation
- 56 -
Page 57
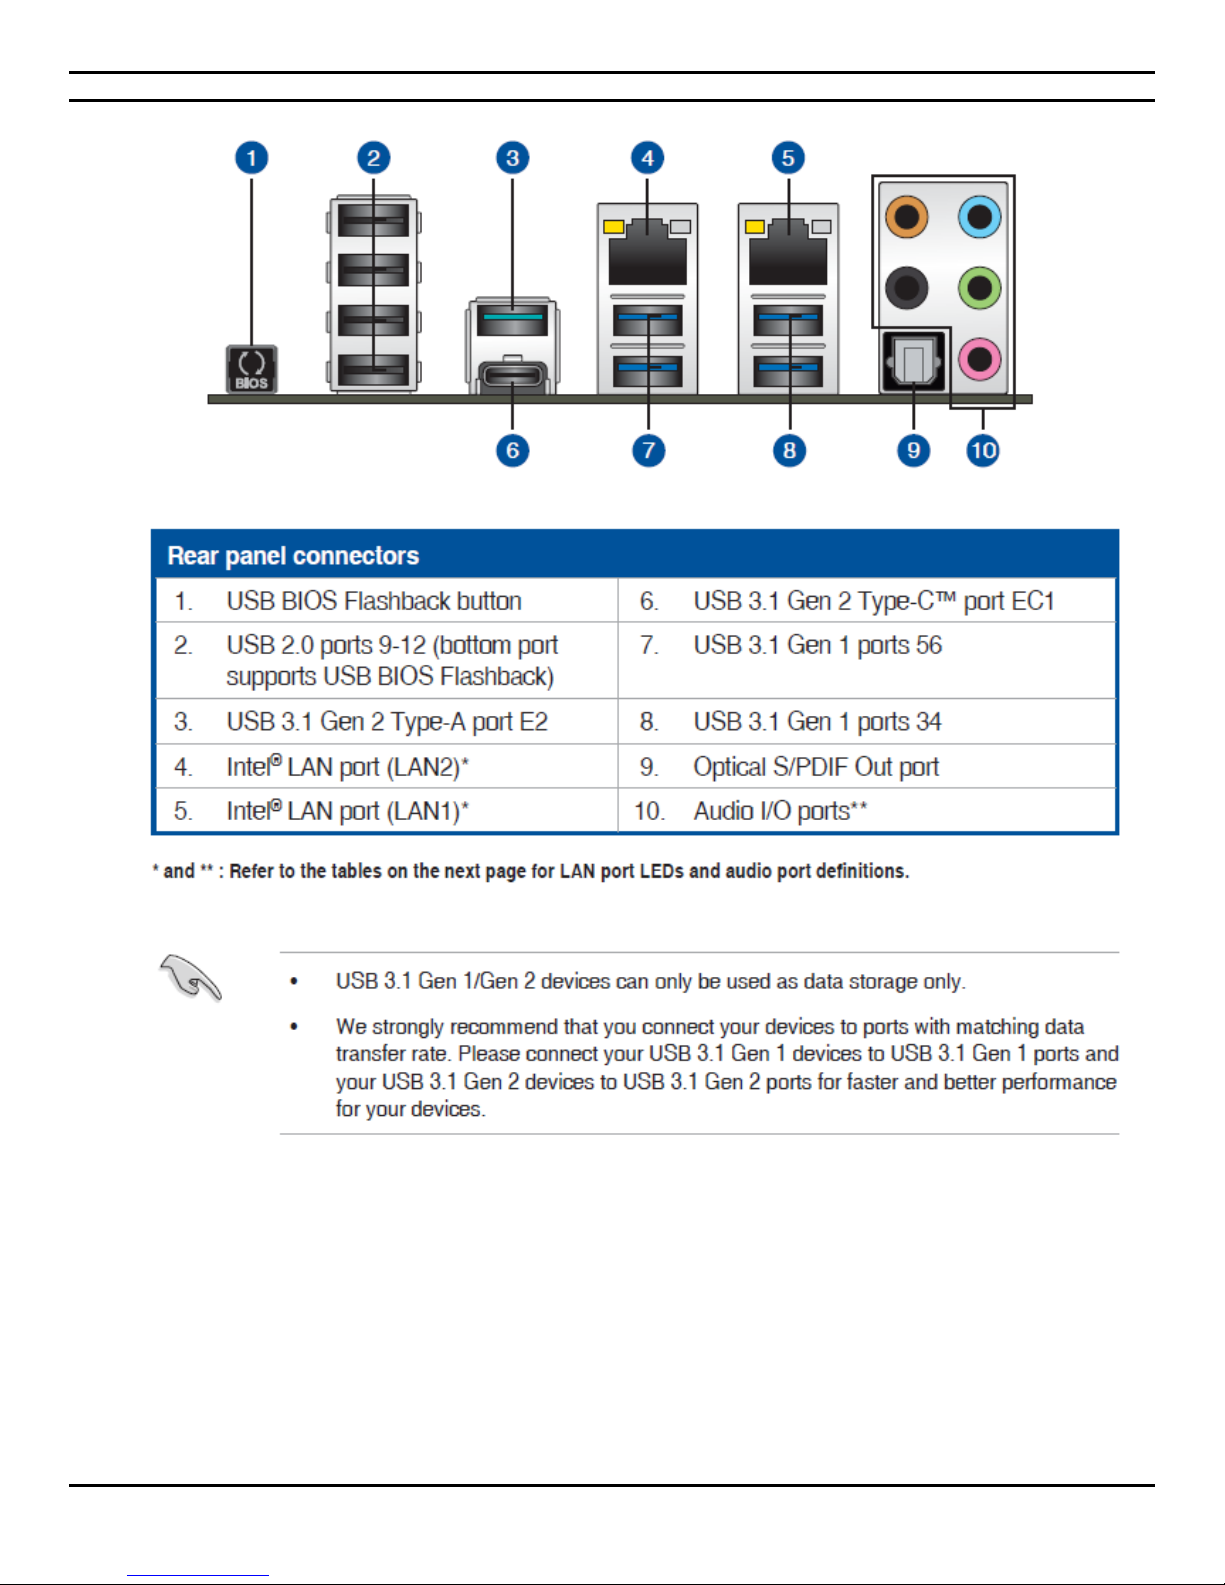
4.4.1 Back panel connectors
CIARA KRONOS 540 Workstation
- 57 -
Page 58
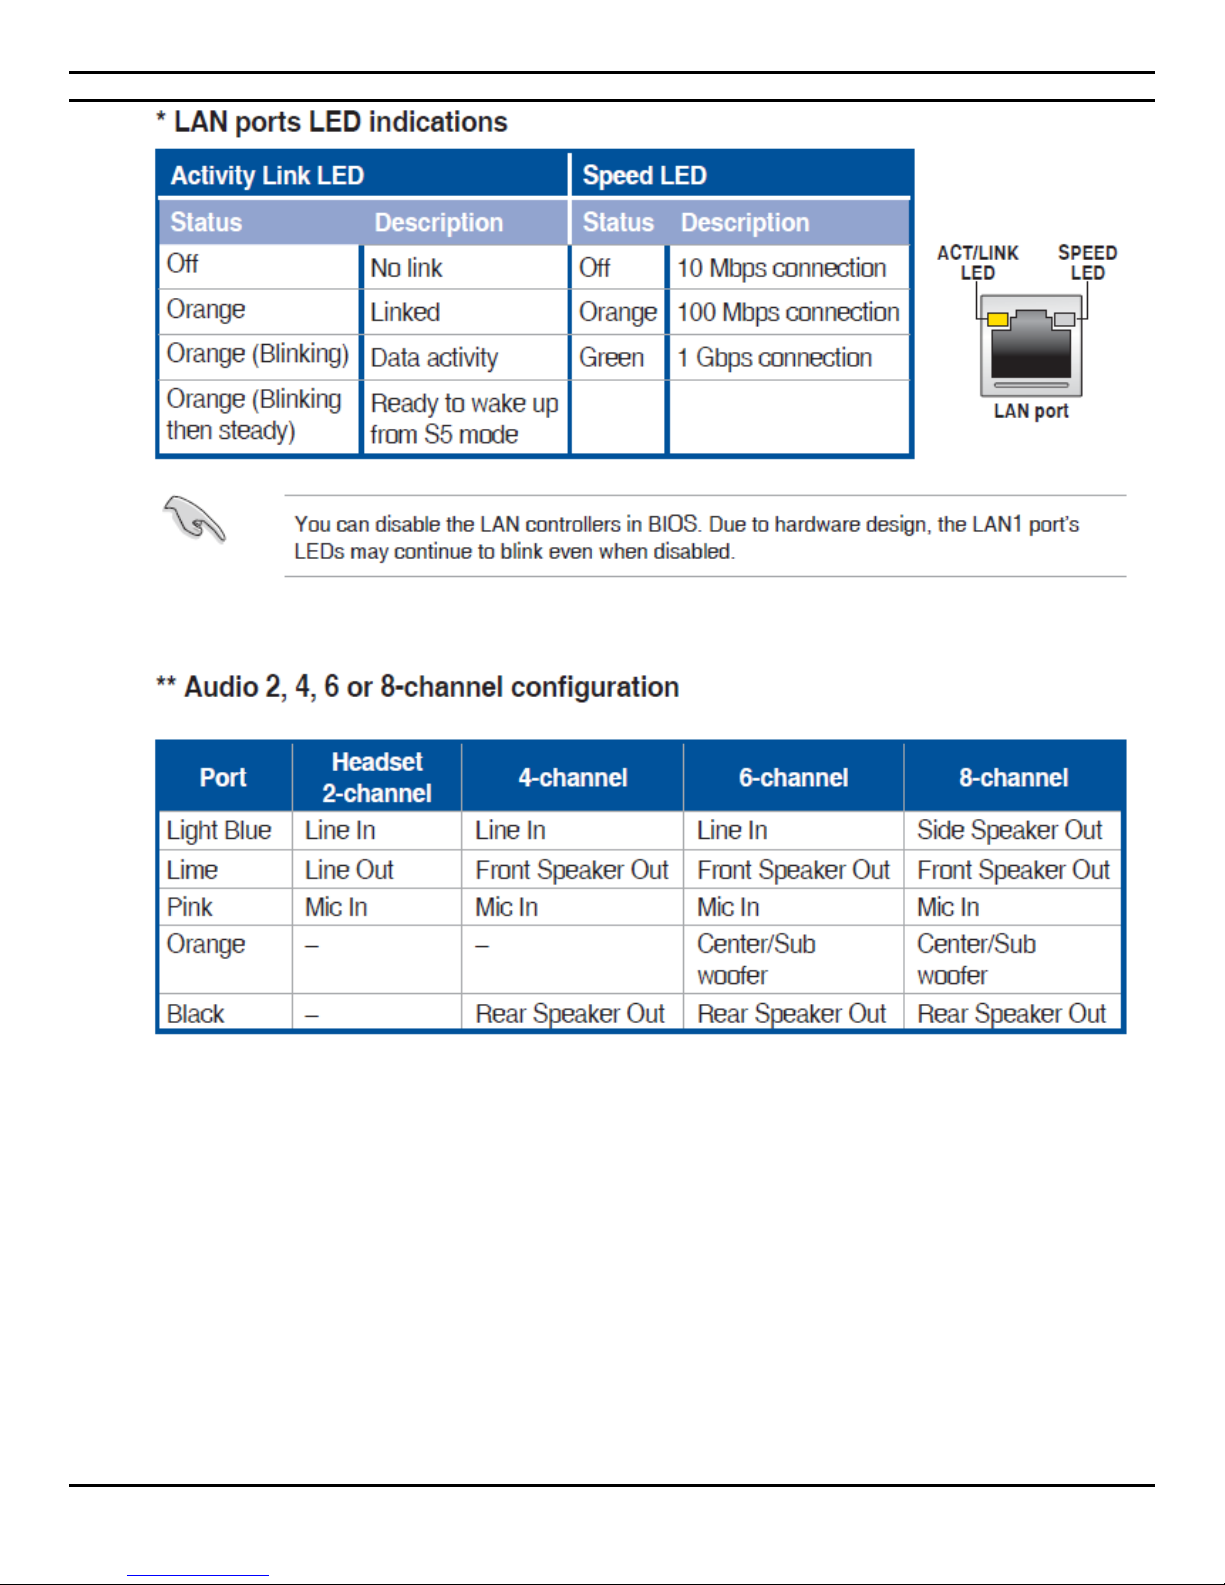
CIARA KRONOS 540 Workstation
- 58 -
Page 59
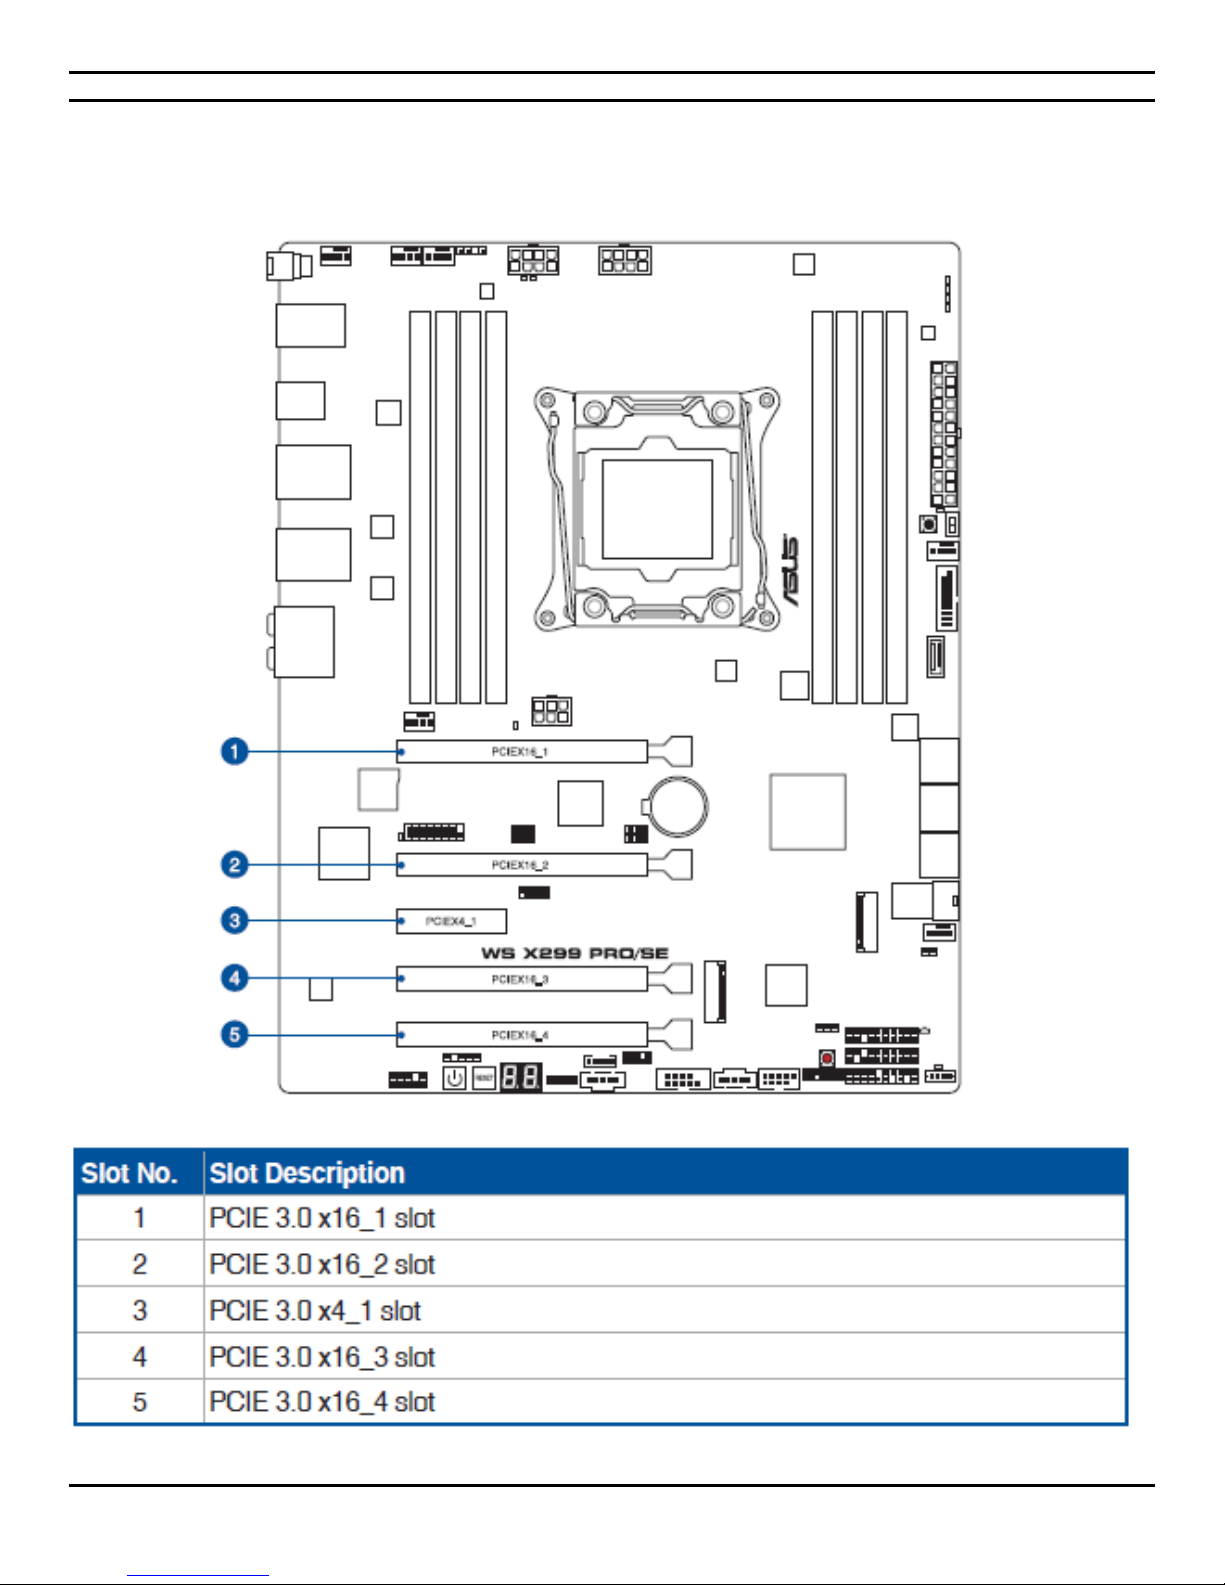
CIARA KRONOS 540 Workstation
4.5 The PCI Express bus
The board has the following add-in card connectors :
- 59 -
Page 60
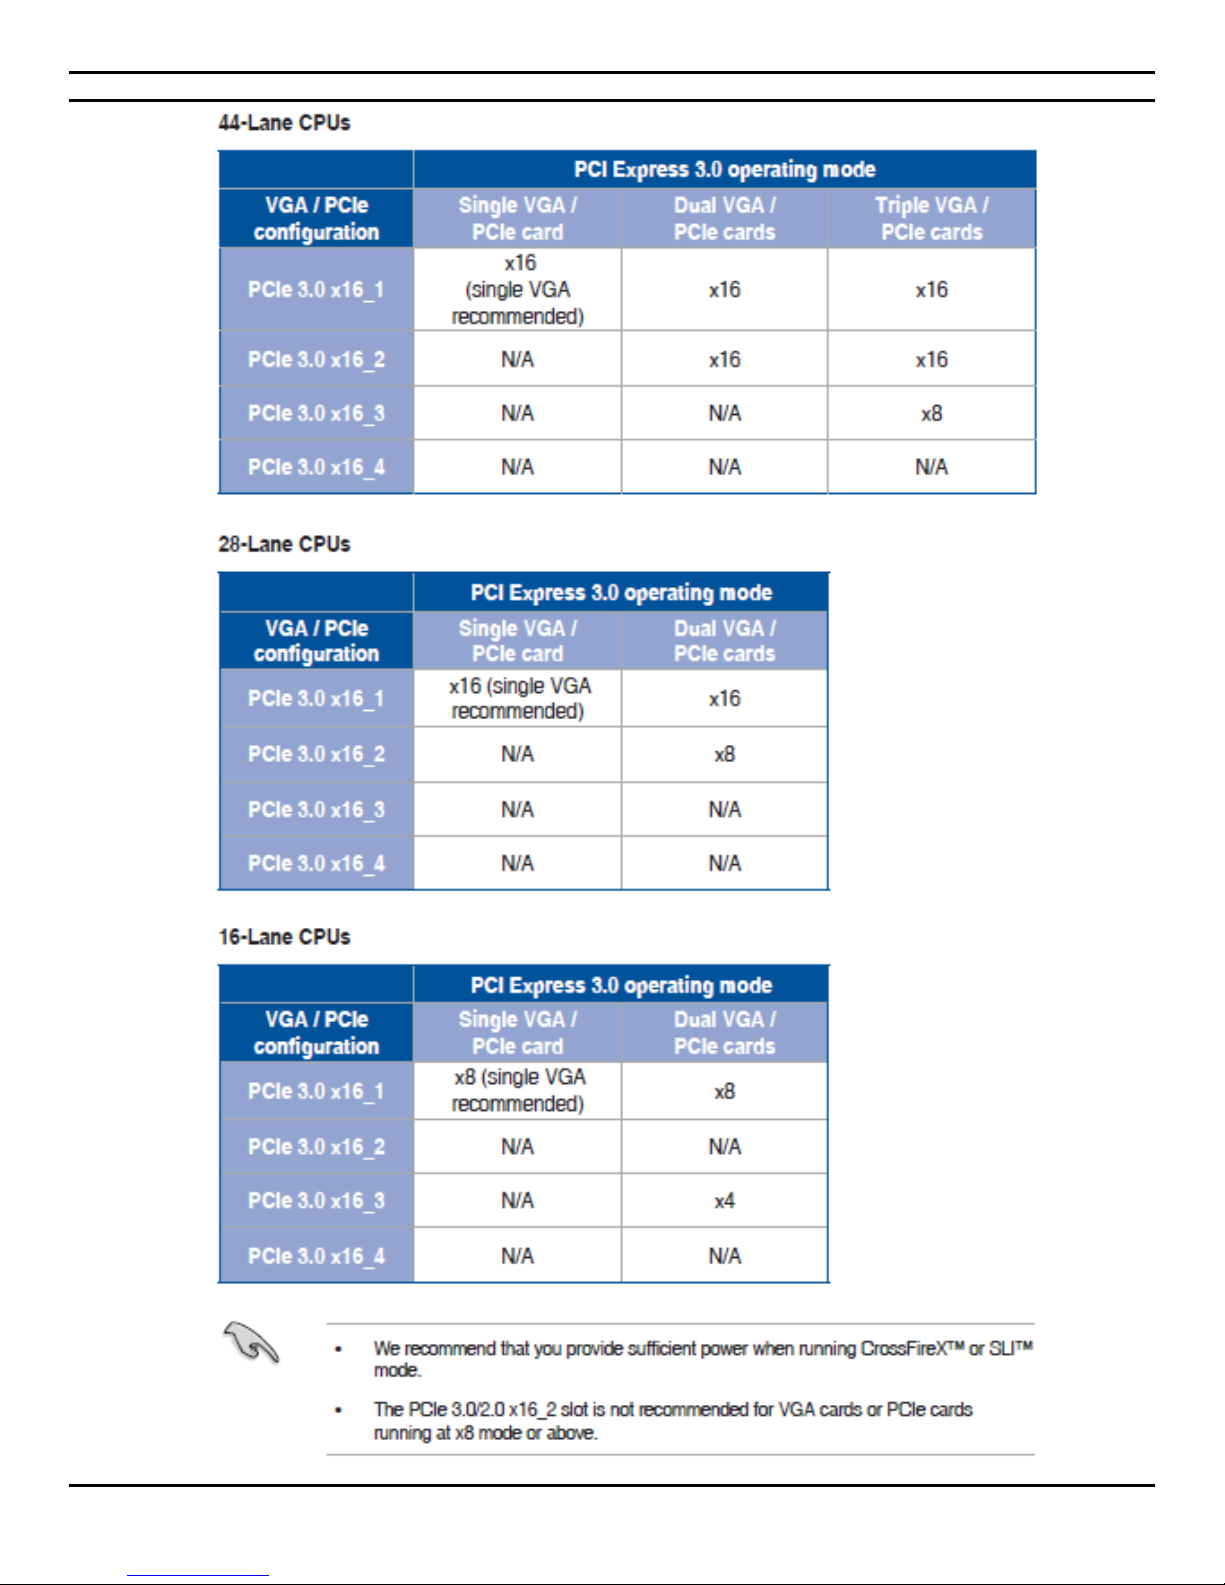
CIARA KRONOS 540 Workstation
- 60 -
Page 61

CIARA KRONOS 540 Workstation
4.6 Storage
4.6.1 Serial ATA interface
The board provides six Serial ATA (SATA) 6.0 Gb/s connectors which support one device per connector, one M.2_1 Socket 3 with M
key, type 2242/2260/2280/22110 storage devices support (PCIE 3.0 x 4 mode), one M.2_2 Socket 3 with vertical M Key, type
2242/2260/2280 (SATA & PCIE mode) and one U.2 connector.
- Ready for Intel® Optane™ Memory
4.6.1.1 Serial ATA RAID
The CIARA KRONOS 540 supports the following RAID (Redundant Array of Independent Drives) levels :
• RAID 0 - data striping
• RAID 1 - data mirroring
• RAID 0+1 (or RAID 10) - data striping and mirroring
• RAID 5 - distributed parity
4.6.1.2 Intel® Rapid Storage Technology
Intel® Rapid Storage Technology offers new levels of protection, performance and expandability for desktop and mobile platforms.
Whether using one or multiple hard drives, users can take advantage of enhanced performance and lower power consumption. When
using more than one drive, the user can have added protection against data loss in the event of a hard drive failure.
The Intel Rapid Storage Technology user interface makes creating and managing your storage simple and intuitive. Combined with
Intel® Rapid Recover Technology, setting up data protection can be done easily with an external drive.
Valuable digital memories are protected against a hard drive failure when the system is configured for any one of three fault-tolerant
RAID levels: RAID 1, RAID 5 or RAID 10. By seamlessly storing copies of data on one or more additional hard drives, any hard drive can
fail without data loss or system downtime. When the failed drive is removed and a replacement hard drive is installed, data fault
tolerance is easily restored.
Intel® Rapid Storage Technology can also improve the performance of disk intensive retrieval applications such as editing home video.
By combining from two to six drives in a RAID 0 configuration, data can be accessed on each drive simultaneously. This configuration
speeds up response time on data-intensive applications. Also, due to drive load balancing, even systems with RAID 1 can take
advantage of faster boot times and data reads.
Intel® Rapid Storage Technology provides benefits to users of single drives as well. Through AHCI, storage performance is improved
with Native Command Queuing (NCQ). AHCI also delivers longer battery life with Link Power Management (LPM), which can reduce
the power consumption of the chipset and Serial ATA (SATA) hard drive.
4.6.1.3 Intel® Smart response Technology
Intel® Smart Response Technology is a feature of Intel® Rapid Storage Technology (Intel® RST) that enables either a dual drive—lowercost, small-capacity SSD used in conjunction with a low-cost, high-capacity hard disk drive (HDD)—or a solid state hybrid drive (SSHD)
to provide a high-performance, cost-effective storage solution.
For dual drive storage solutions, Intel Smart Response Technology recognizes and automatically stores your most frequently used
applications and data into the SSD, while giving you full access to the large storage capacity of an HDD. You can create, work, and play
faster than ever before without paying more for a larger SSD to store your entire digital library.
SSHDs are a new type of HDD with a built-in high performance SSD. Intel Smart Response Technology boosts SSHD performance by
informing the drive which data you use the most so it can store it into the built-in SSD.
- 61 -
Page 62
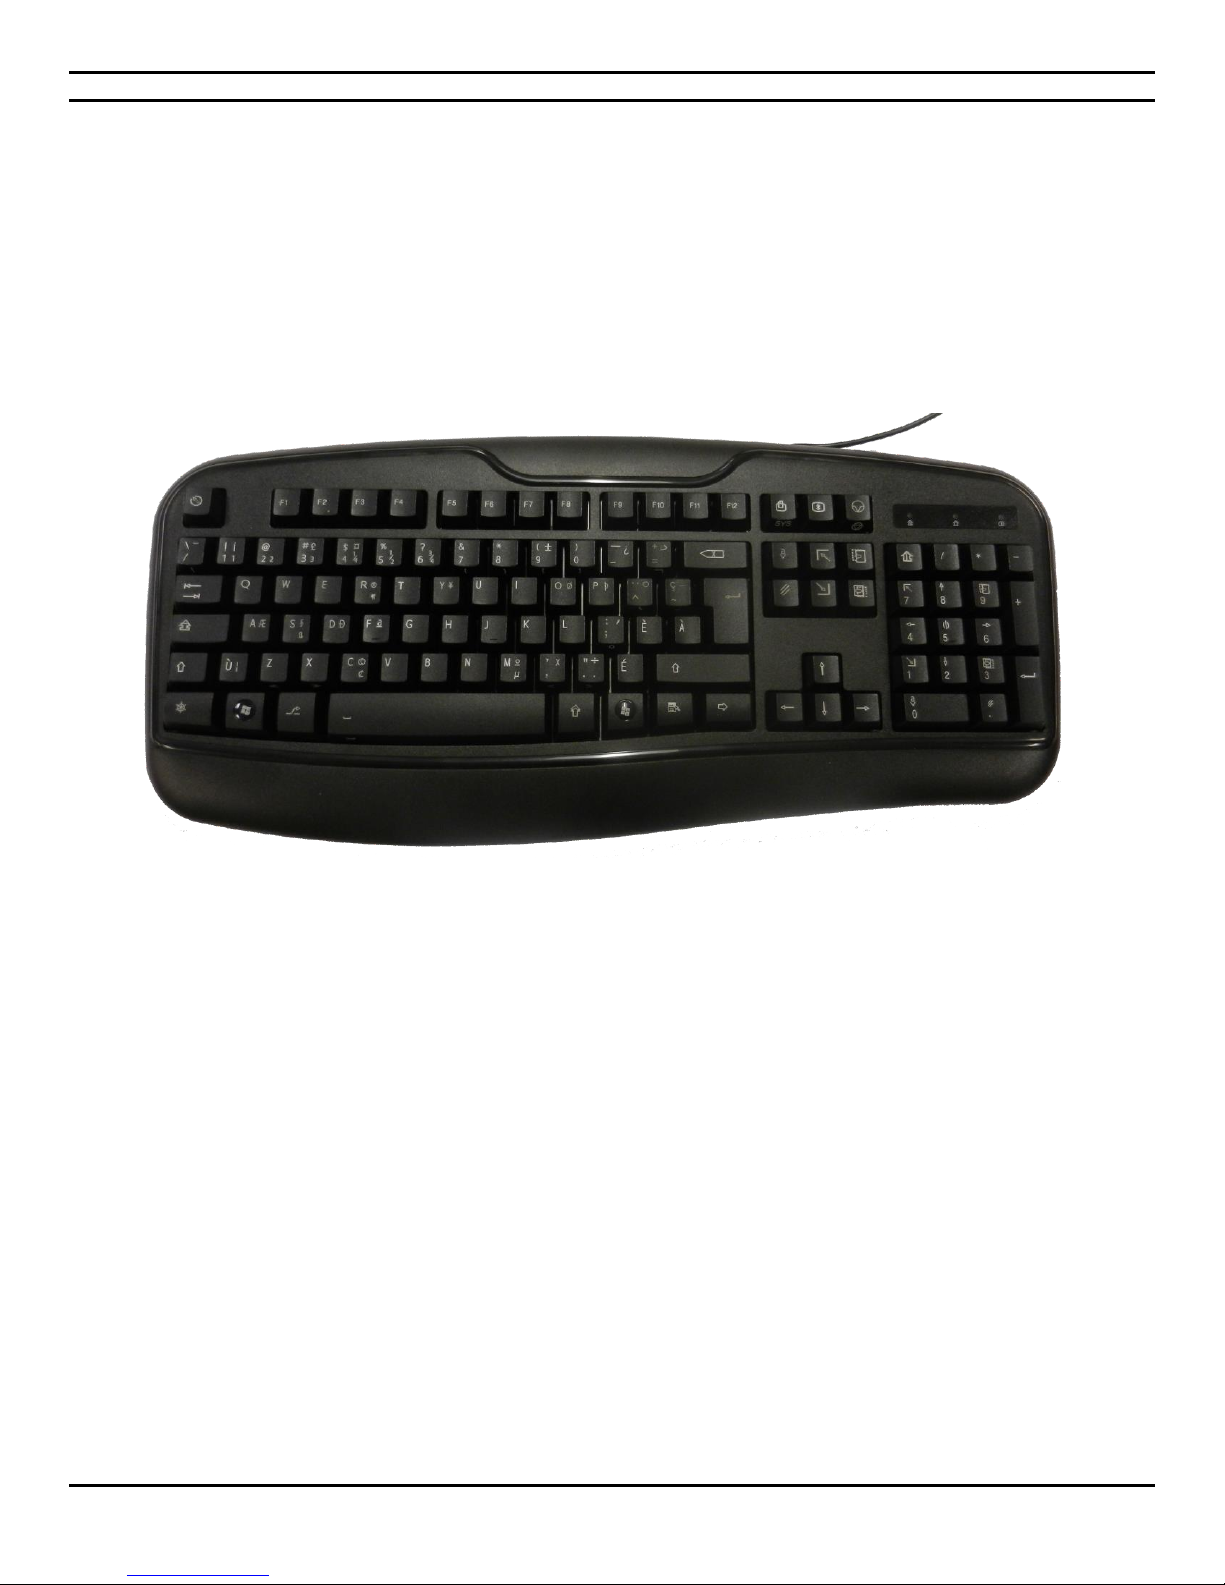
CIARA KRONOS 540 Workstation
4.6.2 Optical drives
The CIARA KRONOS 540 may be supplied with a SATA DVD drive. The DVD drive is a half-height 5-¼ inch wide storage device, capable
of holding 4.7 to 8.5 Gbytes of data. The system may be equipped with either a DVD-ROM drive, a DVD writer, a Blu-ray drive or Bluray writer.
4.7 Keyboard
Your keyboard has a set of function keys, cursor keys and a numeric keypad. The figure below shows a typical keyboard. Under the
rear of the keyboard are two small legs that can be pulled out or pushed in to change the keyboard angles.
Figure 4.6 : Typical keyboard layout
- 62 -
Page 63
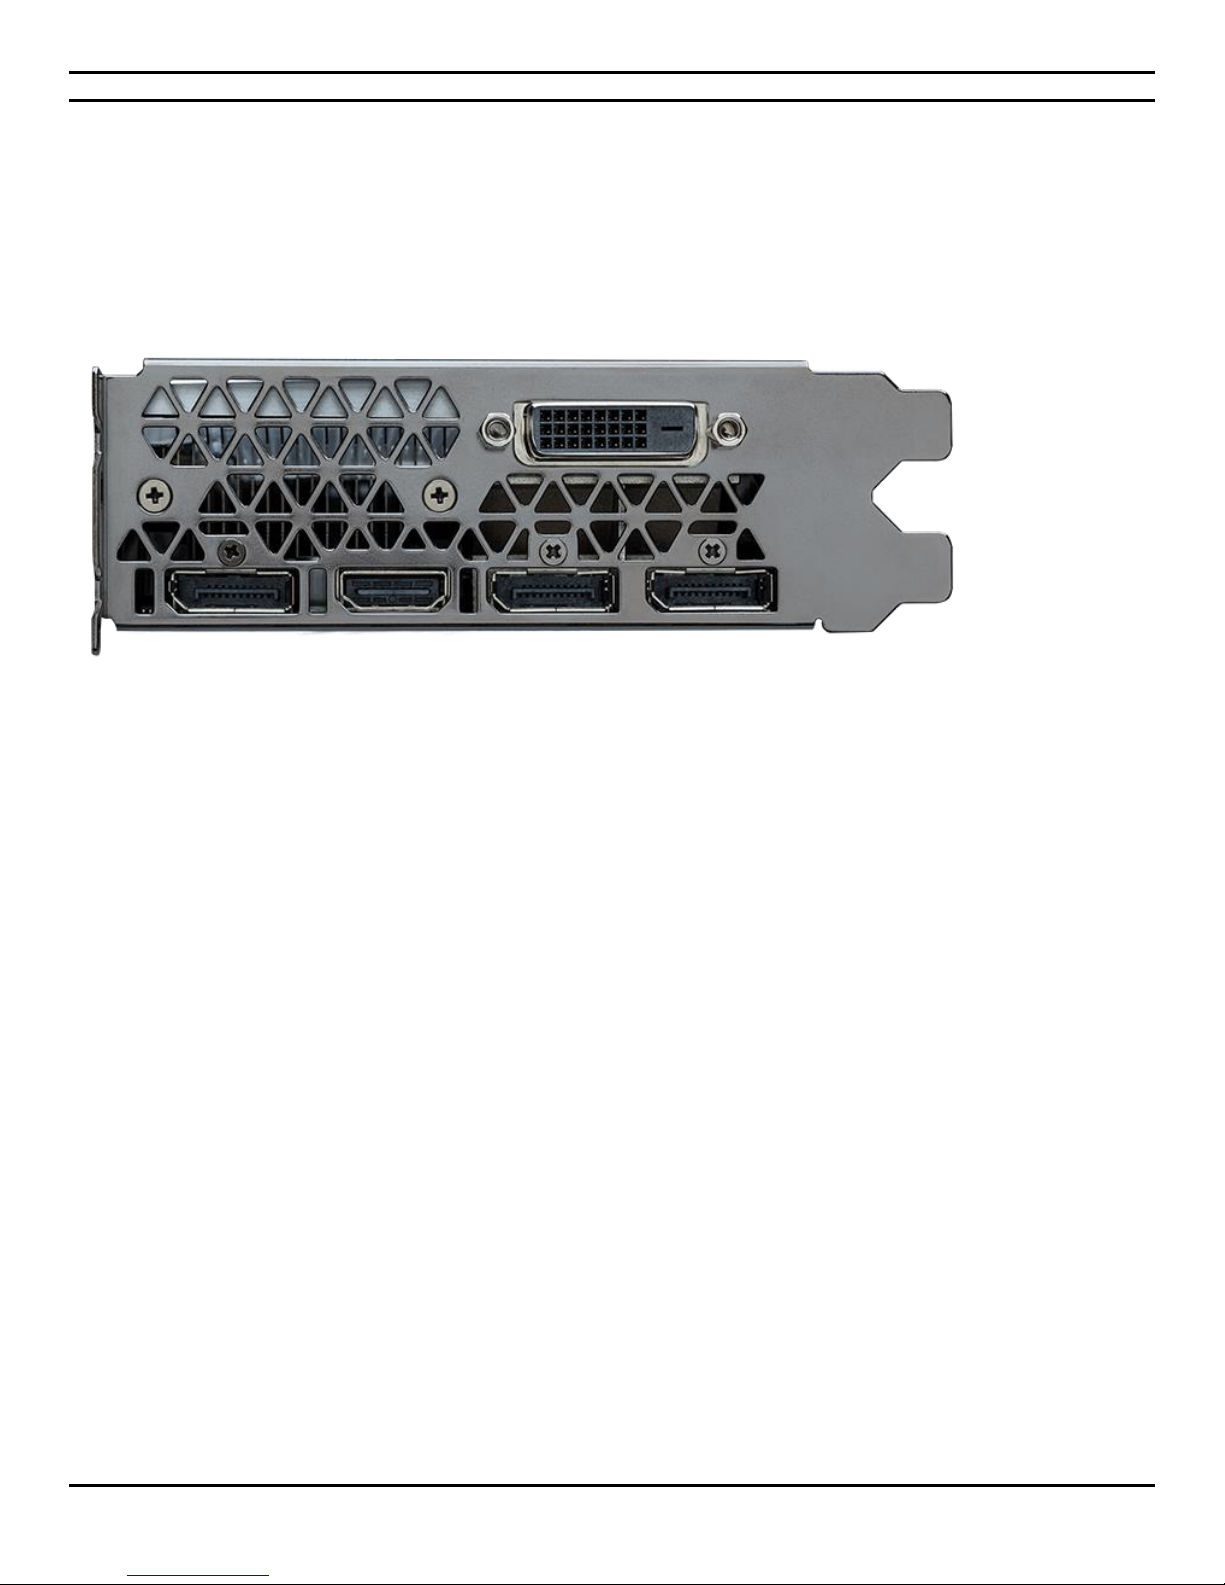
CIARA KRONOS 540 Workstation
4.8 Graphics subsystem
The board supports a PCI Express 3.0 x16 add-in graphics card.
4.8.1 PCI Express 3.0 x16 256 bits graphics card
The CIARA KRONOS 540 workstation is equipped with a GeForce GTX1070 graphics card with 8 GB of DDR5 video memory, a dual link
DVI port, three DisplayPort 1.4 ports and one HDMI 2.0 port. It can support up to four concurrent screens (nVIDIA 3D Surround).
4.8.2 HDMI 2.0 port
Support for HDMI includes GPU-accelerated Blu-ray 3D support (Blu-ray 3D playback requires the purchase of a compatible software
player from CyberLink, ArcSoft, Corel, or Sonic), x.v.Color, HDMI Deep Color, and 7.1 digital surround sound.
Maximum resolution : 4096 x 2160 @ 24 Hz / 2560 x 1600 @ 60 Hz
4.8.3 DisplayPort 1.4
This port is for a DisplayPort-compatible devices.
Maximum resolution : 7680 x 4320 @ 60 Hz
4.8.4 Dual link Digital Visual Interface (DVI)
This port is for any DVI- compatible device.
Maximum resolution : 1920 x 1200 @ 60 Hz
- 63 -
Page 64
CIARA KRONOS 540 Workstation
4.9 Audio subsystem
The CIARA KRONOS 540 workstation supports Intel High Definition Audio through a Realtek® S1220A audio codec.
The Realtek® S1220A-based audio subsystem provides the following features :
Power pre-regulator reduces power input noise to ensure consistent performance
Separate layer for left and right track, ensuring both sound deliver equal quality
Impedance sense for front and rear headphone outputs
Audio shielding ensures precise analog/digital separation and greatly reduced multi-lateral interference
Internal audio Amplifier to enhance the highest quality sound for headphone and speakers
Unique de-pop circuit to reduce start-up popping noise to audio outputs
Premium Japan-made audio capacitors provides warm, natural, and immersive sound with exceptional clarity and
fidelity
High quality 120dB SNR stereo playback output (Line-out@back) & 113dB SNR recording input (Line-in) support
Supports up to 32-Bit/192kHz playback*
DTS® Headphone:X
DTS® Connect
Supports jack-detection, multi-streaming, front panel jack-retasking (MIC)
Optical S/PDIF out port at back I/O
* Due to limitations in HDA bandwidth, 32-Bit/192kHz is not supported for 8-Channel audio.
Audio software and drivers are available from :
https://www.asus.com/ca-en/Motherboards/WS-X299-PRO-SE/HelpDesk_Download/ or from your private CIARA Website.
4.10 I/O Port set-up
Each CIARA KRONOS 540 workstation system includes built-in multi-I/O capabilities. These provide your workstation with two
To configure these I/O ports use the BIOS configuration screens. Please refer to the paragraphs in section 2.0, “BIOS Configuration and
installation” for more information on this subject.
NOTE
All USB ports along with serial port can be enabled or disabled in the BIOS.
- 64 -
Page 65
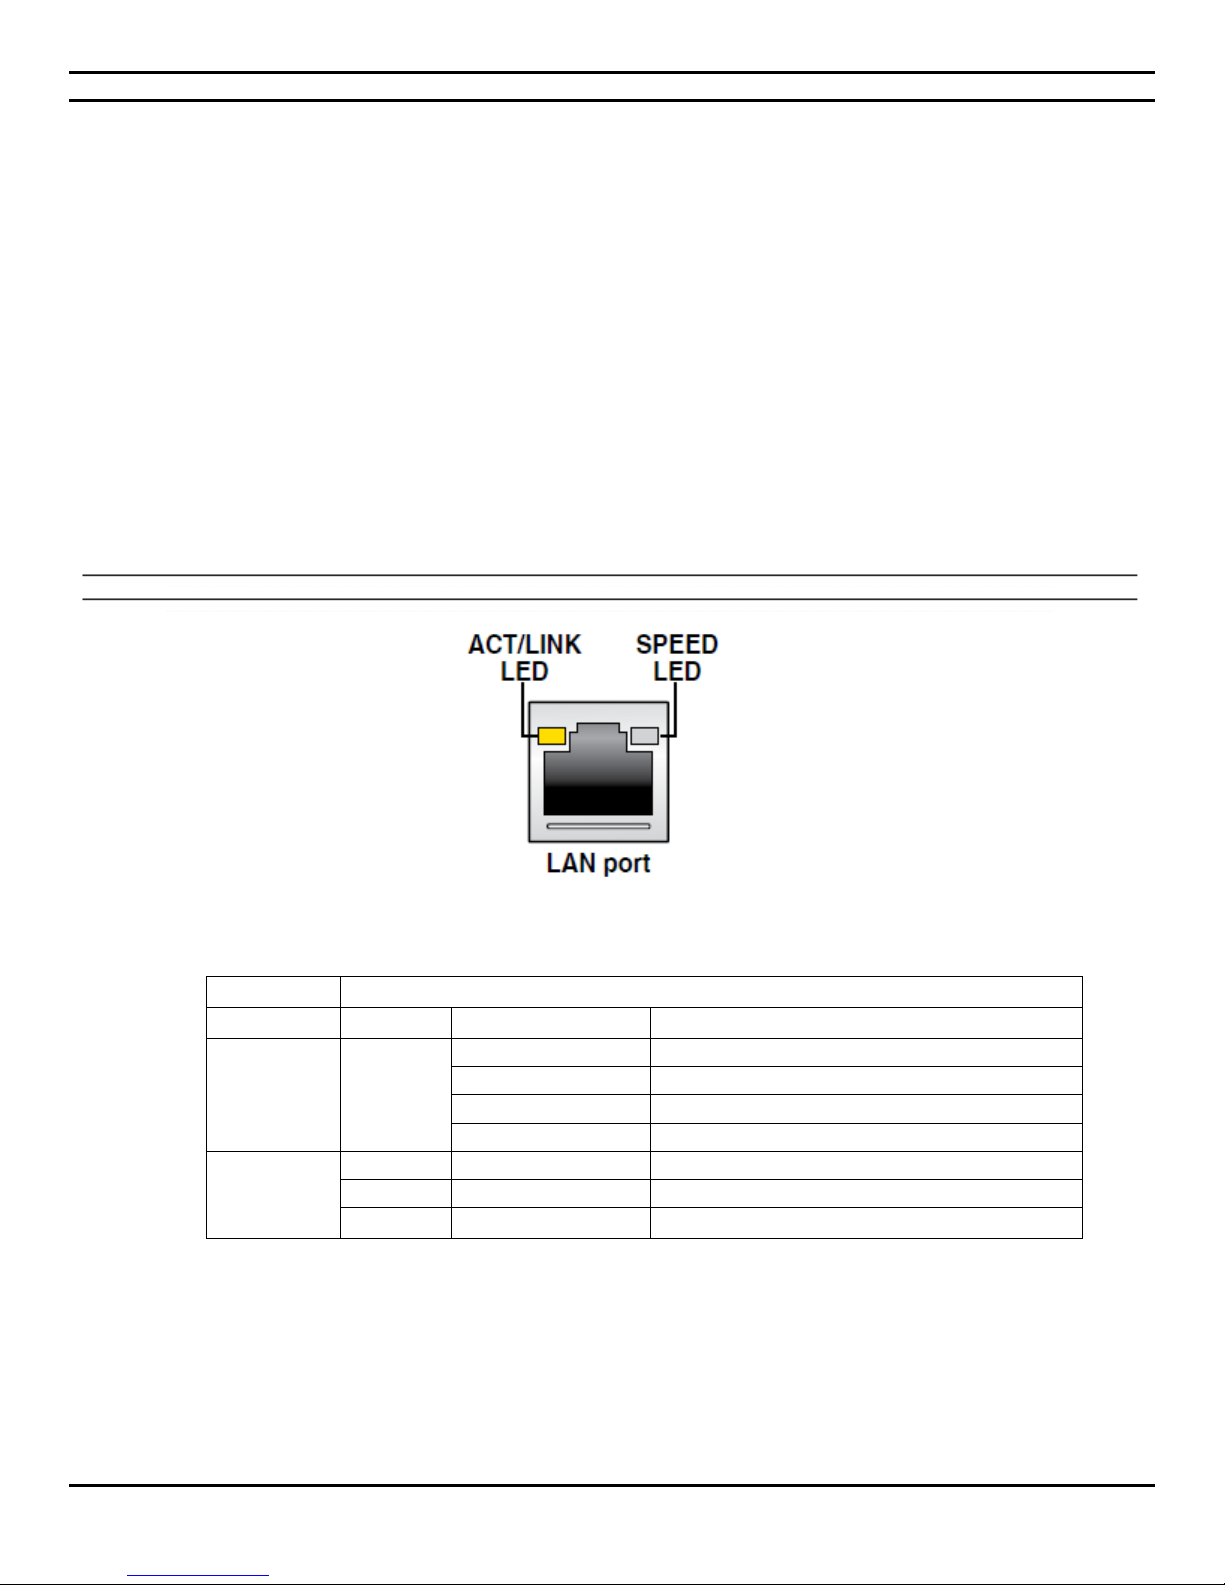
CIARA KRONOS 540 Workstation
Table 3.9
LAN Connector LED States
LED
LED color
LED state
Condition
Link/Activity
Left
Orange
Off
LAN link is not established
On
LAN link is established
Blinking
LAN link is occurring
Blinking then steady
Ready to wake from S5 mode
Link speed
Right
Off
10 Mbits/s data rate is selected or negotiated.
Orange
On
100 Mbits/s data rate is selected or negotiated.
Green
On
1000 Mbits/s data rate is selected or negotiated.
4.11 LAN subsystem
The LAN subsystem consists of the following :
• Two Intel I210-AT Gigabit Ethernet controllers (10/100/1000 Mbits/s)
• Two RJ-45 LAN connector with integrated status LEDs
4.11.1 Intel® I210-AT 1 Gigabit Ethernet controllers
The Intel I210-AT 1 Gigabit Ethernet controllers support the following features :
• 10/100/1000 BASE-T IEEE 802.3 compliant
• Energy Efficient Ethernet (EEE) IEEE802.3az
• Compliant to IEEE 802.3u Auto-Negotiation
• TCP, IP, and UDP checksum offload (for IPv4 and IPv6)
• Full device driver compatibility
4.11.2 RJ-45 LAN connectors LEDs
Two LEDs are built into the RJ-45 LAN connectors located on the back panel (see Figure). These LEDs indicate the status of the LAN.
Table 3.9 describes the LED states when the board is powered up and the LAN subsystem is operating.
- 65 -
Page 66

CIARA KRONOS 540 Workstation
4.12 Trusted Platform Module (TPM)
The Asus® TPM-M module version 2.0 component is FIPS140-2 certified and specifically designed to enhance platform security aboveand-beyond the capabilities of today’s software by providing a protected space for key operations and other security critical tasks.
Using both hardware and software, the TPM protects encryption and signature keys at their most vulnerable stages—operations when
the keys are being used unencrypted in plain-text form. The TPM shields unencrypted keys and platform authentication information
from software-based attacks.
NOTE
The Intel® TPM uses the onboard coin-cell battery (CR2032) to maintain its monotonic counters. One major function of the monotonic
counters is for anti-replay protection of the internal Intel® TPM data. If the battery is removed or exhausted, the Intel® TPM data will
be deleted in accordance with Trusted Computing Group guidelines. Please back-up TPM keys and data before removing the battery.
4.13 Intrusion detector
Each CIARA KRONOS 540 workstation system includes a casing intrusion detector. When the casing is opened, the DASH or DMI agent
receives a casing intrusion alert. If the customer installs in our system a Landesk, Unicenter or equivalent type agent, our system will
report a configuration modification, including memory capacity or number of memory cards change, hard disk drive change, optical
device or processor change. These changes will also generate a configuration change signal, transmitted to the DASH or DMI agent.
4.14 Replacing the system battery
In all CIARA KRONOS 540 workstations the battery is a standard 3.3 V Lithium battery model CR-2032. This type of battery should last
at least 3 years, if the system is not in use. When the workstation is plugged in, the standby current from the power supply extends
the life of the battery. If the battery wears out, your system will no longer retain BIOS information when turned off. For example, you
will get a message stating that the time and date are invalid. If this happens, you should replace the battery, or call your CIARA service
representative.
CAUTION :
There is a danger of explosion if the battery is incorrectly replaced. Replace only with the same type as recommended by CIARA. The
disposal of used batteries is subject to environment issues and we recommend that this work be done by a qualified CIARA technician
who will dispose safely of the used battery.
NOTE
The Intel TPM uses the onboard coin-cell battery (CR2032) to maintain its monotonic counters. One major function of the monotonic
counters is for anti-replay protection of the internal Intel TPM data. If the battery is removed or exhausted, the Intel TPM data will be
deleted in accordance with Trusted Computing Group guidelines. Please back-up TPM keys and data before removing the battery.
To replace the battery, follow these steps :
1. Observe the precautions.
2. Turn off all peripheral devices connected to the workstation. Disconnect the workstation’s power cord from
the AC power source (wall outlet or power adapter).
3. Remove the workstation cover.
4. Locate the battery on the board.
5. With a medium flat-bladed screwdriver, gently pry the battery free from its connector.
Note the orientation of the < + > and < - > on the battery.
6. Install the new battery in the connector, orienting the < + > and < - > correctly.
7. Replace the workstation cover.
- 66 -
Page 67
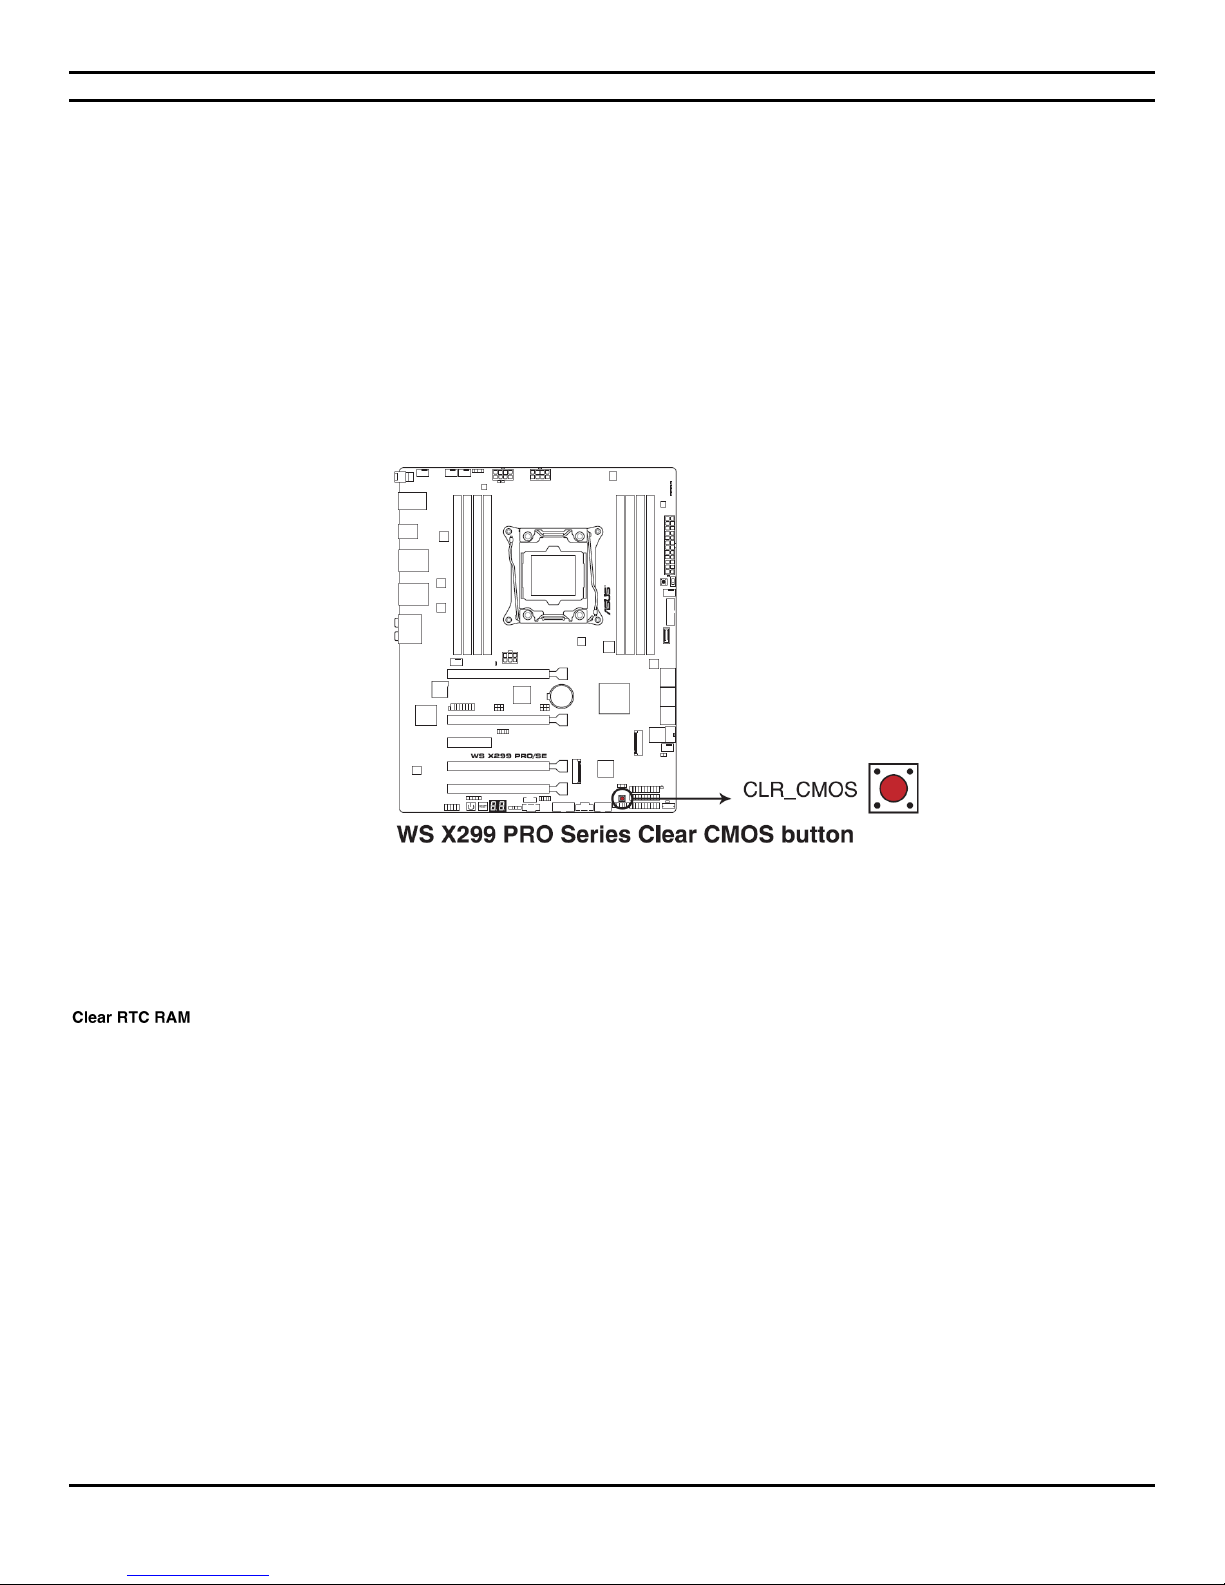
CIARA KRONOS 540 Workstation
4.15 Installing an upgrade CPU
All CIARA KRONOS 540 models may be enhanced by the installation of a higher performing CPU. Since this upgrade necessitates a lot
of care and attention, it should be carried out by a CIARA authorized service centre. Please take a note that the CIARA KRONOS 540
models use exclusively LGA2066 processor technologies and are not compatible with other types of processors.
4.16 Clear CMOS button
4.16.1 Clear CMOS button location
Figure shows the location of the Clear CMOS button.
Location of the Clear CMOS button
If the system fails to boot after changing any BIOS setting, try to clear the CMOS and reset the motherboard to the default value.
4.16.2 Clearing or changing passwords
The Clear CMOS button allows you to clear the Real Time Clock (RTC) RAM in CMOS. You can clear the CMOS memory of date, time,
and system setup parameters by erasing the CMOS RTC RAM data. The onboard button cell battery powers the RAM data in CMOS,
which include system setup information such as system passwords.
To erase the RTC RAM :
1. Turn OFF the workstation and unplug the power cord.
2. Press the Clear CMOS button for about 5-10 seconds.
3. Plug the power cord and turn ON the workstation.
4. Hold down the <Del> key during the boot process and enter BIOS setup to reenter data.
Except when clearing the RTC RAM, never press the Clear CMOS button. Pressing the button will cause system boot failure!
- 67 -
Page 68

CIARA KRONOS 540 Workstation
4.17 Installing an upgrade flash BIOS
Before any new BIOS is programmed into the system, be very careful to ensure that the BIOS is intended for use with your specific
system board. If not, you may completely disable your system, and require CIARA service assistance to restore the system to working
order.
You may obtain the latest BIOS revision for your CIARA KRONOS 540 system on Asus web site at
https://www.asus.com/ca-en/Motherboards/WS-X299-PRO-SE/HelpDesk_BIOS/ .
Several methods exist to update the BIOS of your CIARA KRONOS 540 system, and they are as follows :
Recovery BIOS Update - A .CAP file to be used for BIOS recovery process, regardless of operating system. In the unlikely event that
a BIOS update is interrupted, it is possible the BIOS may be left in an unusable state. Use the Recovery BIOS update to recover
from this condition. It requires a blank CD and a read/writeable CD drive or a USB flash device.
The ASUS EZ Flash 3 feature allows you to update the BIOS without using an OS‑based utility. This function supports USB flash
disks formatted using FAT32/16 on a single partition only.
Bupdater.exe BIOS Update / Integrator Toolkit BIOS ZIP Files - A DOS-based utility to update the BIOS regardless of operating
system. It requires a CD and a read/writeable CD drive or a USB flash device.
Make sure to download the appropriate BIOS update file, and follow the installation instructions found in the readme file for the BIOS
update. It is also recommended to read the release notes file for the BIOS update to know the changes that have been made in the
version of the BIOS.
- 68 -
Page 69

CIARA KRONOS 540 Workstation
GLOSSARY
32-Bit -- In computer architecture, 32-bit integers, memory addresses, or other data units are those that are at most 32 bits (4 octets)
wide. Also, 32-bit CPU and ALU architectures are those that are based on registers, address buses, or data buses of that size. 32-bit is
also a term given to a generation of computers in which 32-bit processors were the norm.
The range of integer values that can be stored in 32 bits is 0 through 4,294,967,295 or -2,147,483,648 through 2,147,483,647 using
two's complement encoding. Hence, a processor with 32-bit memory addresses can directly access 4 GB of byte-addressable memory.
The external address and data buses are often wider than 32 bits but both of these are stored and manipulated internally in the
processor as 32-bit quantities.
64-Bit -- In computer architecture, 64-bit integers, memory addresses, or other data units are those that are at most 64 bits (8 octets)
wide. Also, 64-bit CPU and ALU architectures are those that are based on registers, address buses, or data buses of that size. 64-bit is
also a term given to a generation of computers in which 64-bit processors were the norm.
Without further qualification, a 64-bit computer architecture generally has integer and addressing registers that are 64 bits wide,
allowing direct support for 64-bit data types and addresses. However, a CPU might have external data buses or address buses with
different sizes than the registers, even larger (the 32-bit Pentium had a 64-bit data bus, for instance). The term may also refer to the
size of low-level data types, such as 64-bit floating-point numbers.
Adapter card -- A printed circuit board that gives your computer some added capability, such as more memory, or control of a new
device. A card plugs into an expansion slot on the system board.
Analog monitor -- A type of video display that uses a continuously variable analog voltage to display a large number of colours at
resolutions up to 1024 x 768 and beyond. The voltage levels on the red, green and blue lines on the VGA connector determine colours.
Auto switching -- The ability of a video display to detect the video display mode for a given application program and automatically
switch to that mode.
BIOS -- Basic Input Output System. Programs permanently stored in the system board's ROM chips that provide the fundamental
processes or functions of the system, such as the Power On Self Test (POST). The VGA circuitry has its own video BIOS. See also ROM.
Bit -- A bit is the basic unit of information in computing and telecommunications ; it is the amount of information that can be stored
by a digital device or other physical system that can normally exist in only two distinct states. In computing, a bit can also be
defined as a variable or computed quantity that can have only two possible values. These two values are often interpreted as binary
digits and are usually denoted by the Arabic numerical digits 0 and 1. Indeed, the term "bit" is a contraction of binary digit. The two
values can also be interpreted as logical values (true/false, yes/no). algebraic signs (+/−), activation states (on/off), or any other twovalued attribute. In several popular programming languages, numeric 0 is equivalent (or convertible) to logical false, and 1 to true. The
correspondence between these values and the physical states of the underlying storage or device is a matter of convention, and
different assignments may be used even within the same device or program.
Bus -- A set of address or data lines used to transfer information between different components within a computer (such as memory,
the microprocessor, and slots).
Cache -- A device that contains high-speed memory and permits higher speed accesses than general-purpose memory.
Cache hit rate -- The percentage of time data is delivered from the cache rather than from main memory.
Central processing unit (CPU) -- An integrated circuit chip that performs the actual computing functions of the computer. Other chips
perform support functions like storing data and controlling peripherals. See also microprocessor.
Chip -- An electronic device that combines thousands of transistors on a small sliver of silicon. See also
integrated circuit.
Chip set -- The logic devices on the motherboard that connects the microprocessor and other board functions.
Clock -- A circuit that sends a consistent, periodic signal that is used to step logic information through a computer circuit.
CMOS RAM -- Complementary Metal Oxide Semiconductor. CMOS RAM stores basic configuration information about your computer.
- 69 -
Page 70

CIARA KRONOS 540 Workstation
Colour display -- A video display capable of displaying colours based on the RGB (Red, Green, and Blue) colour-mixing scheme.
Configuration -- The way in which a computer and peripheral equipment (such as printers and display monitors) are interconnected
and programmed to operate as a system.
Default -- The initial setting when the system left the factory.
Digital monitor -- A type of monitor in which display colour is controlled by digital colour control lines that switch on and off ; the
number of colours that can be displayed depends on the selected display mode.
DIMM -- Dual In-Line Memory Module. RAM chips installed on a small circuit board module, having a single row of connectors (240
pins) on the bottom of the module where it is plugged into the main system board.
DisplayPort -- A digital display interface standard put forth by the Video Electronics Standards Association (VESA) since 2006. It defines
a new royalty-free, digital audio/video interconnect, intended to be used primarily between a computer and its display monitor, or a
computer and a home-theater system.
DMA (Direct Memory Address) -- A method for transferring data directly to and from system memory, bypassing the microprocessor.
DVI-D and DVI-I -- (Digital Visual Interface- integrated) is the connection, or interface used between monitors and computers or home
theatre systems. DVI-I is used to interface with an LCD monitor display for digital video output. DVI-I supports both digital and analog.
However, it will not use both at the same time. DVI-I detects and chooses digital or analog depending on the connected display.
Contrast with DVI-D, which is a digital-only interface and DVI-A which is an analog-only interface.
Driver -- A utility program accompanying the motherboard that permits application programs to use the extended resolutions of the
VGA circuitry.
eSATA -- Standardized in 2004, eSATA (e=external) provides a variant of SATA meant for external connectivity. It has revised electrical
requirements in addition to incompatible cables and connectors : Minimum transmit potential increased : Range is 500–600 mV
instead of 400–600 mV. Minimum receive potential decreased : Range is 240–600 mV instead of 325–600 mV. Identical protocol and
logical signaling (link/transport-layer and above), allowing native SATA devices to be deployed in external enclosures with minimal
modification. Maximum cable length of 2 metres (6.6 ft).
Expansion slot -- A connector on the motherboard for holding an adapter card.
Gigahertz (GHz) -- A frequency of 1 billion cycles per second.
HDMI -- (High-Definition Multimedia Interface) is a compact audio/video interface for transmitting uncompressed digital data. It
represents a digital alternative to consumer analog standards, such as radio frequency (RF) coaxial cable, composite video, S-Video,
component video, or VGA. HDMI connects digital audio/video sources—such as upconvert DVD players, HD DVD players, Blu-ray Disc
players, personal computers (PCs), video game consoles and AV receivers—to compatible digital audio devices, computer monitors,
and digital televisions.
Hertz (Hz) -- A unit of frequency equal to one cycle per second.
Horizontal frequency -- The rate, at which monitor displays each scan line, usually measured in kilohertz (kHz).
I/O -- An abbreviation for "input/output", a generic term that refers to the devices and processes involved in the computer's reading
and writing data.
Integrated circuit -- An electronic device that combines thousands of transistors on a small chip of silicon. Such devices are the building
blocks of computers.
Interleaving -- A technique for improving the performance of system memory by splitting the memory into two or four sections that
alternately process information. While one memory section goes through a refresh cycle, the microprocessor sends information to
another section for processing.
- 70 -
Page 71

CIARA KRONOS 540 Workstation
Jumper -- On a printed circuit board, a patch connector, wire, or cable used to establish a circuit.
LCD -- A liquid crystal display (LCD) is a thin, flat electronic visual display that uses the light modulating properties of liquid crystals
(LCs). LCs do not emit light directly. As LCD panels produce no light of their own, they require an external lighting mechanism to be
easily visible. On most displays, this consists of a cold cathode fluorescent lamp that is situated behind the LCD panel. Passive-matrix
displays are usually not backlit, but active-matrix displays almost always are. Recently, two types of LED backlit LCD displays have
appeared in some screens as an alternative to conventional backlit LCDs. In one scheme, the LEDs are used to backlight the entire LCD
panel. In another scheme, a set of red, green and blue LEDs is used to illuminate a small cluster of pixels, which can improve contrast
and black level in some situations. For example, the LEDs in one section of the screen can be dimmed to produce a dark section of the
image while the LEDs in another section are kept bright. Both schemes also allows for a slimmer panel than on conventional displays.
LED -- A light-emitting diode is a semiconductor light source. LEDs are used as indicator lamps in many devices, and are increasingly
used for lighting.
Megahertz (MHz) -- A frequency of 1 million cycles per second.
Memory -- Semiconductor chips used to hold information and programs while they are being accessed by the microprocessor. See
also RAM and ROM.
Microprocessor -- An integrated circuit that contains the circuits the computer needs to calculate and to communicate with the other
parts of the system. See also central processing unit.
Multi-frequency monitor -- A monitor (also known by the trade names MultiSync or MultiScan) that, due to its ability to scan at various
horizontal and vertical frequencies, is capable of displaying a wide variety of resolution modes.
Parity bit -- An additional non-informational bit appended to a group of bits to make the number of ones in the group of bits either an
odd or even number ; an elementary mechanism for error checking.
Peripheral -- A hardware device (such as a keyboard, monitor, or printer) that connects to a computer.
Pin -- Any of the leads on a device, such as a chip, that plug into a socket and connect it to a system.
Pixel -- Short for "picture element", the smallest single dot displayable on the display.
Power-On Self Test (POST) -- Internal test procedures that the BIOS runs automatically when the system is turned on. These
procedures verify that the entire computer's hardware is functioning properly. If the test detects problems, the computer displays
error codes before (or instead of) starting the operating system. The error codes can help a service person determine what is wrong
with your computer.
RAM -- An acronym for "random-access memory." The type of computer memory used to store information while a program is running.
All data stored in RAM is lost when the computer is turned off or power is lost.
Refresh -- Periodic rewrite of system memory contents to the same memory locations by the microprocessor so that the contents do
not decay beyond redemption.
Resolution -- A measure of the quality of the image that can be shown on a particular display ; usually expressed as the number of
pixels that can be displayed horizontally across the display screen by the number of pixels that can be displayed vertically on the
display screen.
ROM -- An acronym for "read-only memory." The type of computer memory that is used to permanently store the information vital
to computer operation, including some parts of the operating system. ROM is permanent and the contents will not be lost when the
computer is turned off.
SAS -- (Serial Attached SCSI) is a computer bus used to move data to and from computer storage devices such as hard drives and tape
drives. SAS depends on a point-to-point serial protocol that replaces the parallel SCSI bus technology that first appeared in the mid
- 71 -
Page 72

CIARA KRONOS 540 Workstation
1980s in data centers and workstations, and it uses the standard SCSI command set. SAS offers backwards-compatibility with secondgeneration SATA drives. SATA 3 Gb/s drives may be connected to SAS backplanes, but SAS drives may not be connected to SATA
backplanes.
SATA or Serial ATA -- Serial ATA (SATA) is a computer bus interface for connecting host bus adapters to mass storage devices such as
hard disk drives and optical drives. Serial ATA was designed to replace the older ATA (AT Attachment) standard (also known as EIDE).
It is able to use the same low level commands, but serial ATA host-adapters and devices communicate via a high-speed serial cable
over two pairs of conductors. In contrast, the parallel ATA (the redesignation for the legacy ATA specifications) used 16 data conductors
each operating at a much lower speed. First-generation SATA interfaces, now known as SATA 1.5 Gb/s, communicate at a rate of
1.5 Gb/s (150 MB/s). Second generation SATA interfaces running at 3.0 Gb/s (300 MB/s) are prevalent in all SATA disk drives and the
majority of PC and server chipsets. The SATA III standard (6 Gb/s) (peak throughput about 600 MB/s) was released on May 27, 2009.
Serial interface -- An interface that transmits and receives data in a serial manner, transmitting or receiving data one bit at a time.
Set-up -- The arrangement of connections between an assembly of individual computing units, and the adjustments needed for the
computer to operate.
SRAM -- Static Random Access Memory. A type of memory that does not need to be refreshed. Data stored in the SRAM remains
until changed or until the computer is turned off.
System -- An assembly of components united by some form of regulated interaction to form an organized whole.
System board -- The large printed-circuit board in a computer on which most electronic devices are mounted ; the primary board in a
computer. All other interfaces receive control signals or information from the system board. Also commonly referred to as a
"motherboard" or "main board".
USB -- Universal Serial Bus. USB 1.1 is a hot pluggable daisy chained 1.5 or 12 Mb/s (1.5 MB/s) serial bus. USB 2.0 is a hot pluggable
daisy chained 480 Mb/s (60 MB /s) serial buses. USB 3.0 is a hot pluggable daisy chained 4.8 Gb/s (600 MB /s) serial buses. USB 3.0
receptacles are electrically compatible with USB 2.0 device plugs if they can physically match. Most combinations will work, but there
are a few physical incompatibilities. However, only USB 3.0 Standard-A receptacles can accept USB 3.0 Standard-A device plugs.
Devices may be plugged in or out without turning off the system. USB devices include mice, scanners, keyboards, and digital cameras.
Wait states -- A delay in the computer's information processing cycle caused by a difference in speed between a faster processor and
slower memory, which holds data. Zero wait states means the processor does not have to "wait" for memory, and can access data as
fast as it is needed.
Word -- The set of bits comprising the largest unit that the computer can handle in a single operation.
- 72 -
Page 73

NOTES :
CIARA KRONOS 540 Workstation
- 73 -
 Loading...