

Page 1
ENG
ITA
DESCRIPTION: -
PREPARED BY: M.CHIARAVALLOTTI
DOC.COD.: N470010186
CHECKED BY: C.UGUCCIONI
APPROVED BY: A.ROSATI
REV.Nr.: 1.0
DATE: 09/01/2015
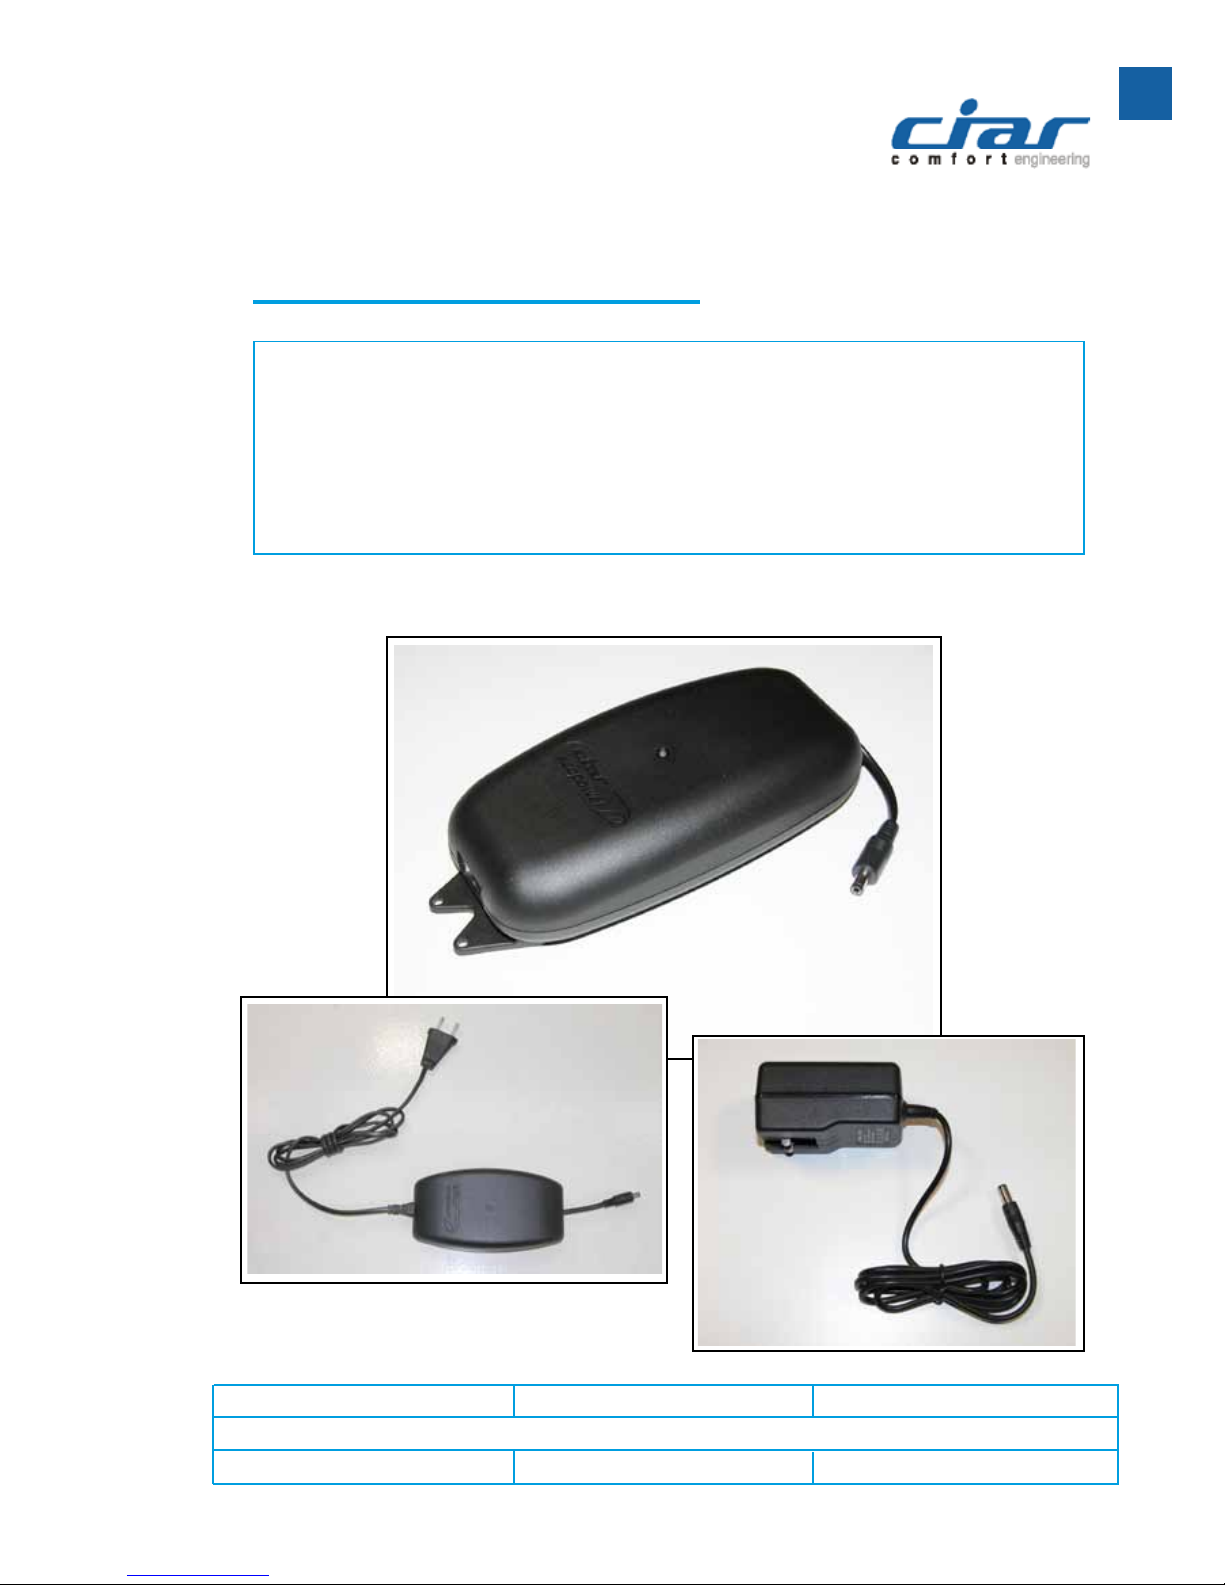
Kit PS10BSA 2,2Ah - Li-Ion
Instruction Manual / Manuale d’istruzione
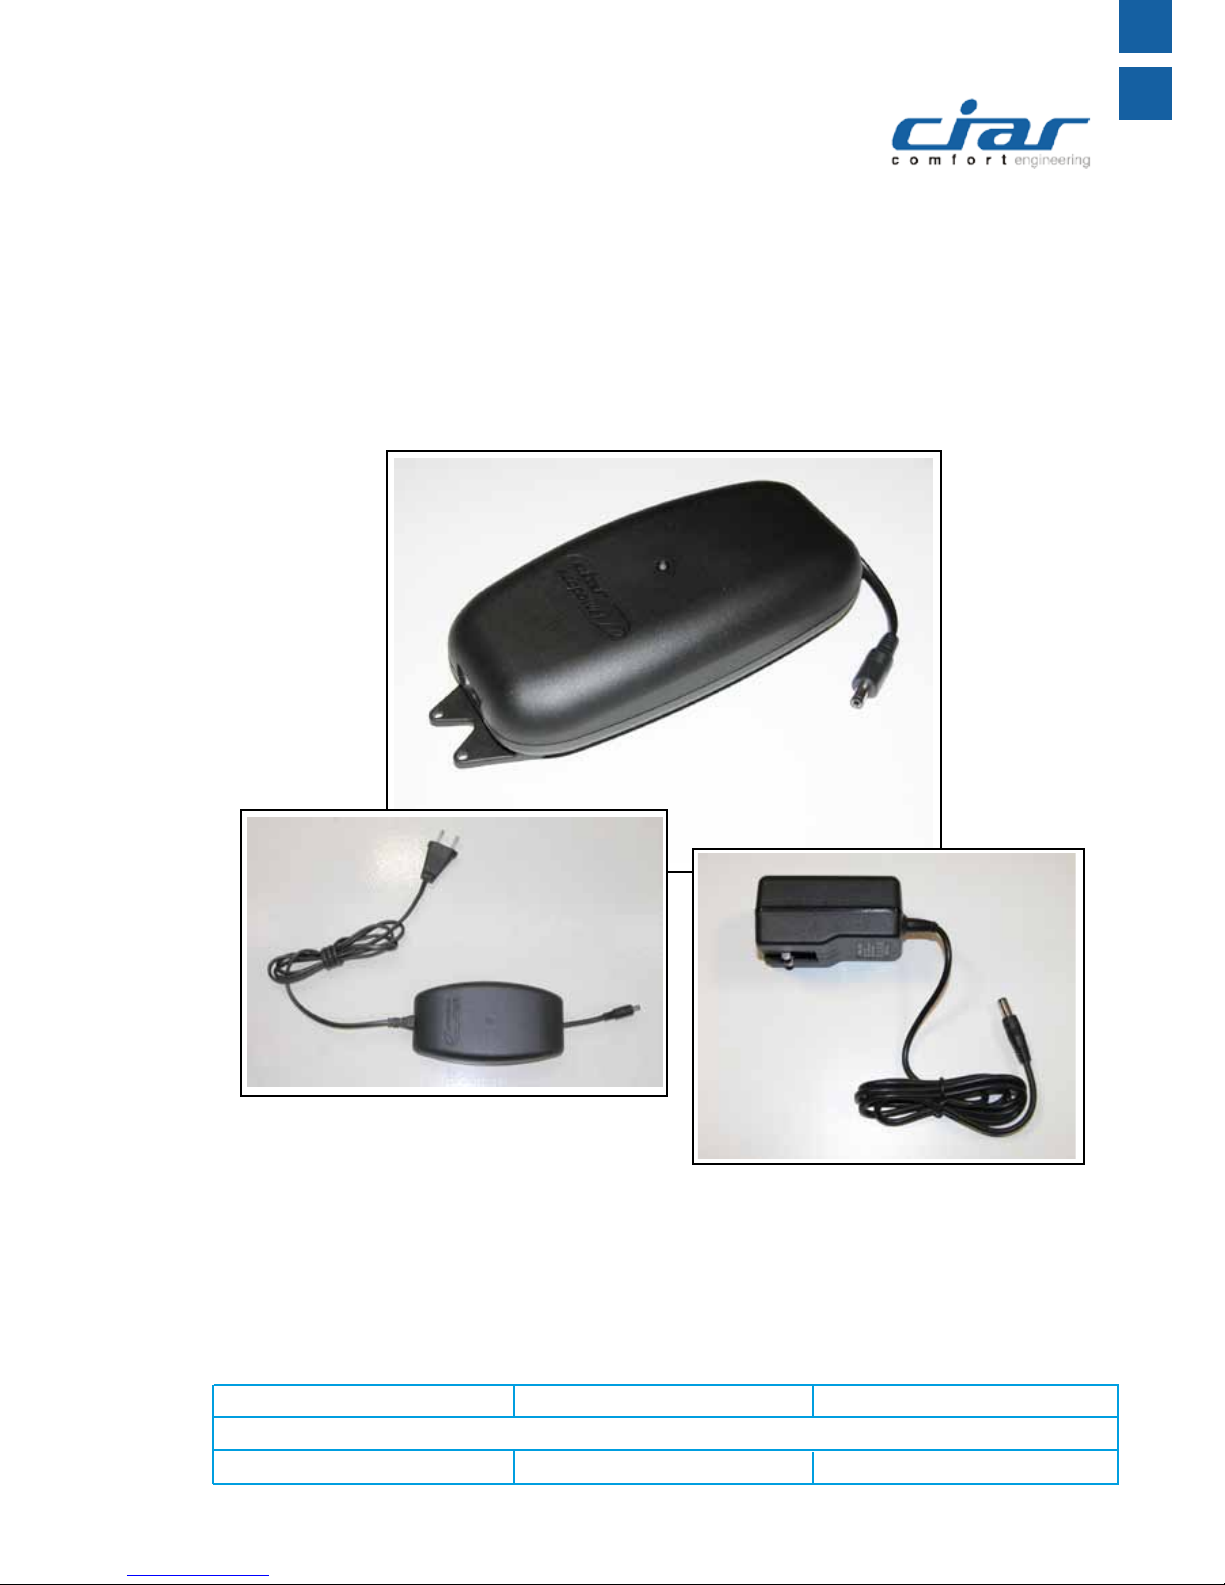
PS10BSA
Power supply unit
PS05
for PS10BSA
Power supply unit
PS10 for PS10BSA
Page 2

Page 3
ENG
DESCRIPTION: -
PREPARED BY: M.CHIARAVALLOTTI
DOC.COD.: N470010174
CHECKED BY: C.UGUCCIONI
APPROVED BY: A.ROSATI
REV.Nr.: 1.2
DATE: 06/11/2014
Kit PS10BSA 2,2Ah - Li-Ion
Instruction Manual
Thank you for having purchased one of our products.
Before using the device, read the instruction manual carefully,
paying particular attention to the Precautions for Use.
Always keep the manual close at hand.
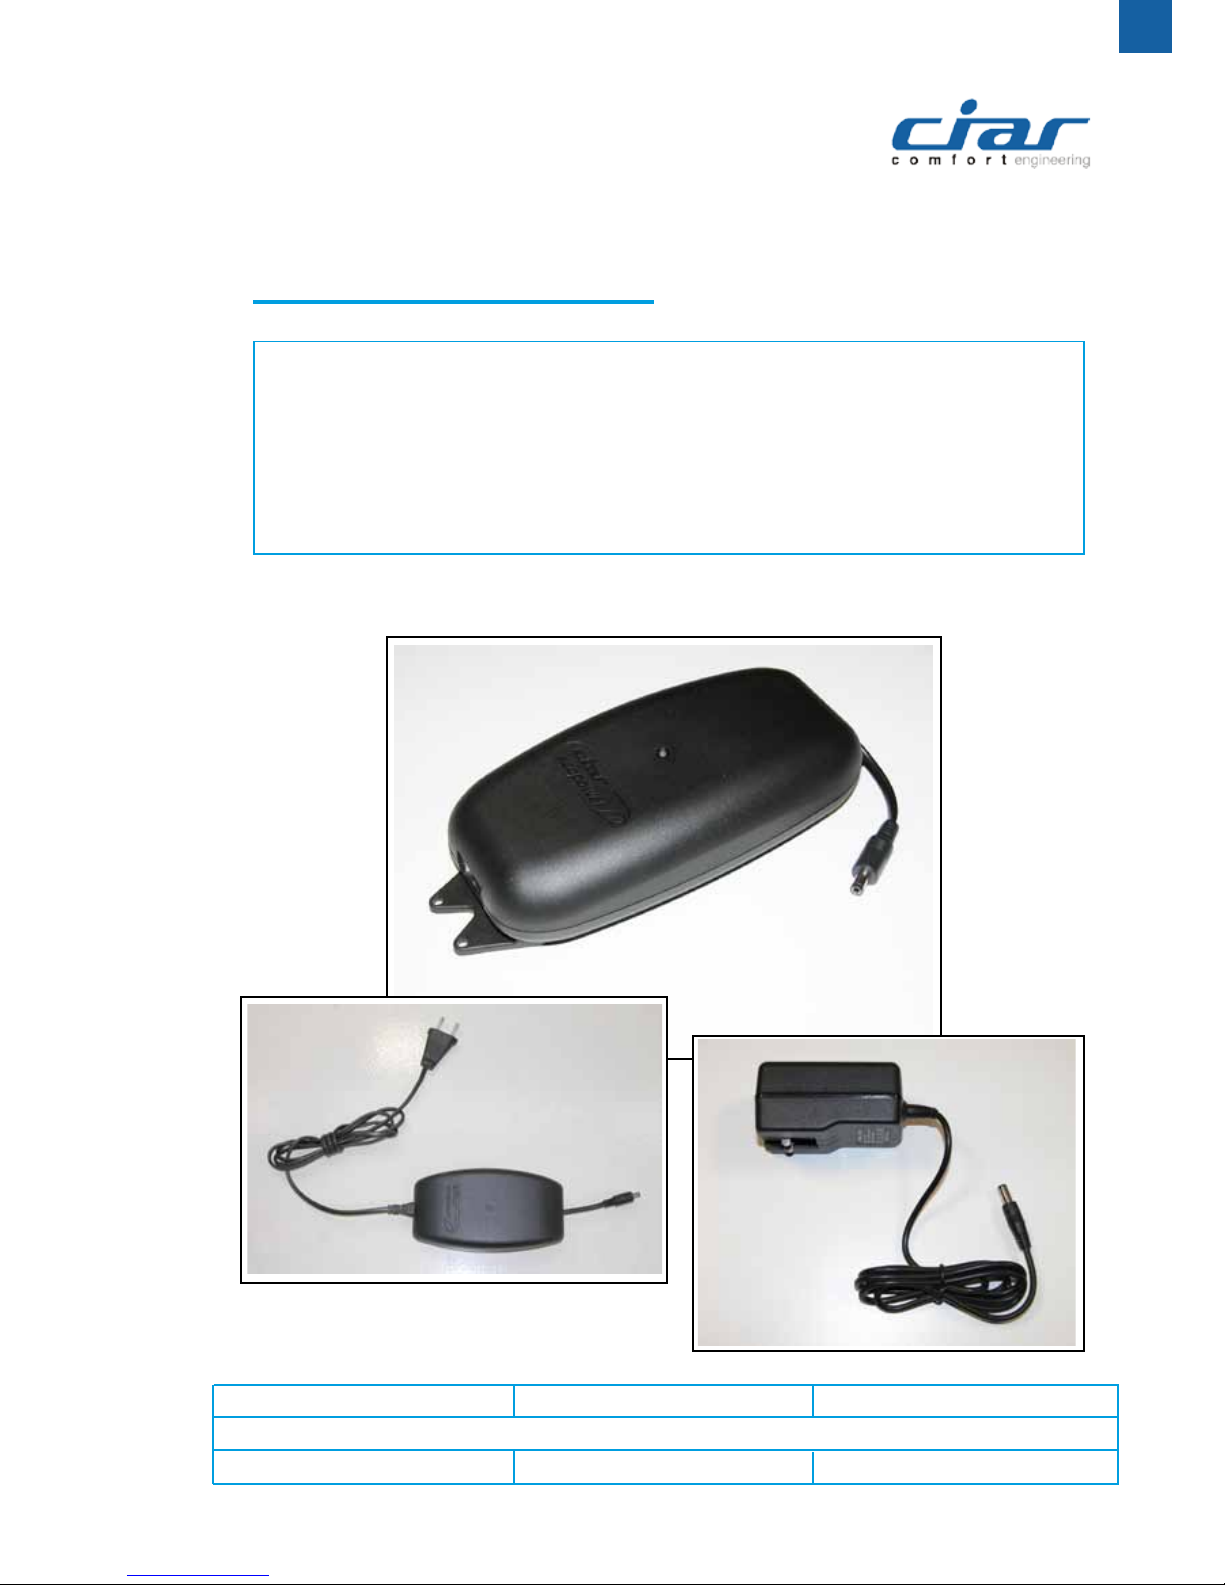
PS10BSA
Power supply unit
PS05
for PS10BSA
Power supply unit
PS10 for PS10BSA
Page 4

Contents
Precautions for use 6
General 6
Disclaimer 6
Storage and usage conditions 6
Warning 6
Recommendations for the nal user 7
Guarantee 8
PS05 power supply for charging 9
Fitting the plug 9
Removing the plug 9
Characteristics of supply unit type PS05 for PS10BSA 10
Precautions for use of the supply unit for PS10BSA 11
Precautions for use 11
Characteristics of transformer type: PS10 12
Instruction for PS10BSA recharging 13
Preamble 13
Standard charging procedure 13
Under Discharge 14
Auxiliary accessoires for the battery kit 14
Kit Power On/Off 14
Kit Power Selector 14
Assembly of Kit PS10BSA 15
PS10BSA Floor version 15
PS10BSA Surface-mounted version 15
Characteristics of battery type: PS10BSA 2.2Ah - Li-Ion 17
Procedura di ricarica standard 30
Sotto scarica 31
Accessori ausiliari per il kit batteria 31
Kit Power On/Off 31
Kit Power Selector 31
Assemblaggio Kit PS10BSA 32
PS10BSA Versione a pavimento 32
PS10BSA Versione ssabile ad una supercie 32
Caratteristiche batteria tipo: PS10BSA 2.2Ah - Li-Ion 34
Page 5
ENG
Important
The purpose of the list of precautions reported below is to prevent injury and/or damage
and must be read carefully.
The following WARNING symbols are used to illustrate the degree of danger or damage/
injury.
Symbols and their meanings
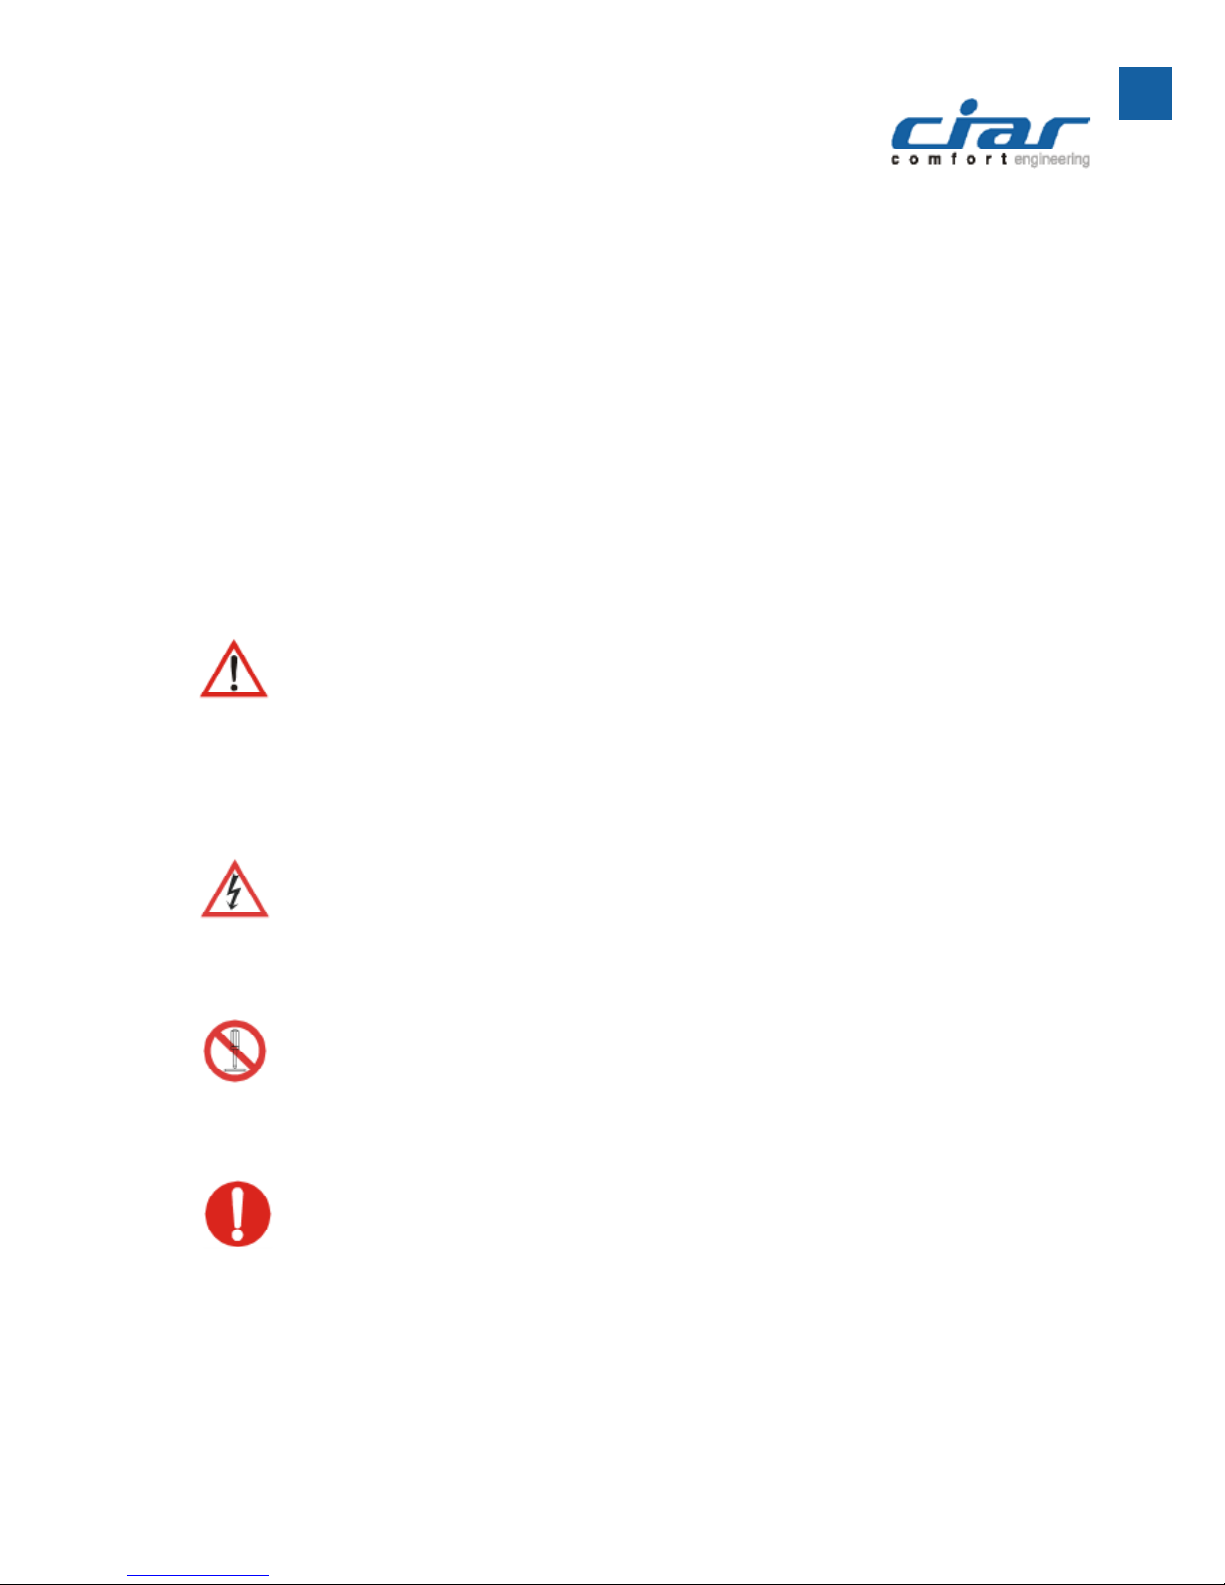
DANGER — Possibility of serious injury or death.
WARNING — Possibility of damage or injury.
Damage is intended as that caused to furniture while injury refers to
persons and animals in general.
Examples of symbols
The triangular symbol indicates a “Warning”. The warning is explained by
means of a written explanation or images inside or near to the symbol. In
this specic case, the symbol on the left indicates "Danger of electrocution”.
The circle with diagonal line indicates a "Prohibition" or "No" sign. The
warning is explained by means of a written explanation or images inside
or near to the symbol. In this specic case, the symbol on the left indicates
"Do not dismantle the product”.
This symbol signies “Requirements that must be respected”. The
warning is explained by means of a written explanation
or images inside or near to the symbol.
In this specic case the symbol indicates “General requirements”.
Page 6
page 6
Precautions for use
Storage and usage conditions
General
Disclaimer
Warning
The device is not suitable for use by children or disabled persons unless appropriately supervised by a
responsible adult able to use the device itself in complete safety. Children must not be allowed to play with the
device.
C.I.A.R. will not be held liable for its product if its use does not comply with the following requirements:
- The working cycle when used with Ciar actuators is 2 minutes work with 5 minutes pause.
- Only C.I.A.R. authorised personnel can dismantle the various parts of the kit.
- Do not cut or touch any wires in the kit with sharp objects.
- Do not connect the kit other than in the manner described in this manual.
- Do not use any parts of the kit with devices other than those indicated in this manual.
- Do not connect the power supply cable to a mains supply of voltage different to that indicated in
this manual and on the labels attached to the device.
- Do not wet the parts making up the kit.
- Do not place any metal objects near any parts of the kit while it is plugged into the mains.
- Do not use the device other than in a domestic environment.
- Do not open the device for any reason. Any faulty or broken parts must be returned to the
manufacturer or an authorised service centre or placed in the hands of
a person possessing similar qualications, avoiding all possible risks.
- Do not use in damp environments or in the presence of heat sources (ovens or direct sunlight).
- In the case where the power cable is not detachable from the device and has been
damaged, it can be replaced by the manufacturer, an authorised service centre or
a person possessing similar qualications, avoiding all possible risks.
STORAGE AND USAGE CONDITIONS
Working environment:
Temperature: between 0°C and 45°C
Humidity: between 20 and 70% (without condensation)
Storage environment:
Temperature: between -20°C and +45°C
Humidity: between 10 and 70% (without condensation)
- If the device is to be left unused for a long period of time, the batteries will slowly self-discharge and
the resulting over-discharge may damage the batteries themselves. It is advisable to fully charge the batteries
at least once every 3 months.
- If a new battery is not used for approximately one month after the last recharge, the remaining charge is
approximately half the nominal charge.
The constructor of the nished product in which the motor kit and eventual battery kit will be installed must
compile an instruction manual for the use of his own product.
The content and safety notes of this manual can be freely used for the nal product.
Please keep the PS10BSA disconnected from load and / or control devices during storage or transportation to
avoid undesired action or discharge.
Page 7

page 7
ENG
Recommendations for the nal user
Do not separate, open or dismantle secondary cells, batteries or the device as a whole.
Do not expose the cells or batteries to heat or re. Avoid storage in direct sunlight.
Do not short-circuit the cells, batteries or the device itself.
Do not install the cells, batteries or the device itself in a closed container (boxes, metal containers, wooden
containers, etc.) without protecting the positive or negative poles of the cells or the metal connector of the
battery pack, in that these could lead to accidental short-circuits.
Do not remove the cells or batteries from the battery pack for other uses.
Do not subject the cells, batteries or the device itself to mechanical shocks (avoid dropping the battery pack,
hitting it when on the ground and do not place any objects on top).
Should any chemical substances leak from the battery pack, avoid all contact with the substance. In the case of
contact, wash the affected parts immediately in abundant quantities of water and seek medical help.
Do not use chargers or power supply units other than those specied in this manual.
Keep the battery container out of reach of children.
Only use components approved by Ciar.
Keep the battery pack clean and dry.
Avoid soiling the connections on the device. If necessary, clean using a dry cloth.
The batteries must be charged before use. To charge the batteries, follow the instructions written in this manual.
Do not leave the battery pack connected when not being used for long periods.
After a long period of storage, several charging cycles may be necessary to obtain the maximum duration
of the charge.
The batteries perform at their best between 5 and 20°C.
Page 8

page 8
Guarantee
C.I.A.R. guarantees its product against manufacturing defects for a period of two years from the date of
purchase by the nal user. During the guarantee period, the company will, at its own discretion, repair or
replace the defective product.
The kit is not guaranteed against defects resulting from:
- Unsuitable or inappropriate maintenance by the customer
- Modications, improper or unauthorised use
- Use of the kit under unsuitable operating conditions
- Abuse of the specied work cycle
- Damage during shipment caused by unsuitable packaging.
Due to their nature, rechargeable batteries have a limited life-span and are characterised by a gradual loss of
power over time.
This natural degradation in performance and the progressive loss of power are not covered by any form of
guarantee.
STANDARDS
The product has been designed and manufactured in accordance with:
2004/108/EC AND SUBSEQUENT AMENDMENTS “EMC”
- CEI EN55014-1
- CEI EN 55014-2
- CEI EN 61000-3-3
- CEI EN 61000-3-2
- EN 62233
2006/95/EC AND SUBSEQUENT AMENDMENTS “LOW VOLTAGE”.
- EN 60950-1
- EN 62133
Directive 2006/66/EC of 06/09/2006 and amendment 2008/103/EC of 19/11/2008.
Battery registration number IT12090P00002923
Page 9
page 9
ENG
PS05 power supply for charging
Warning
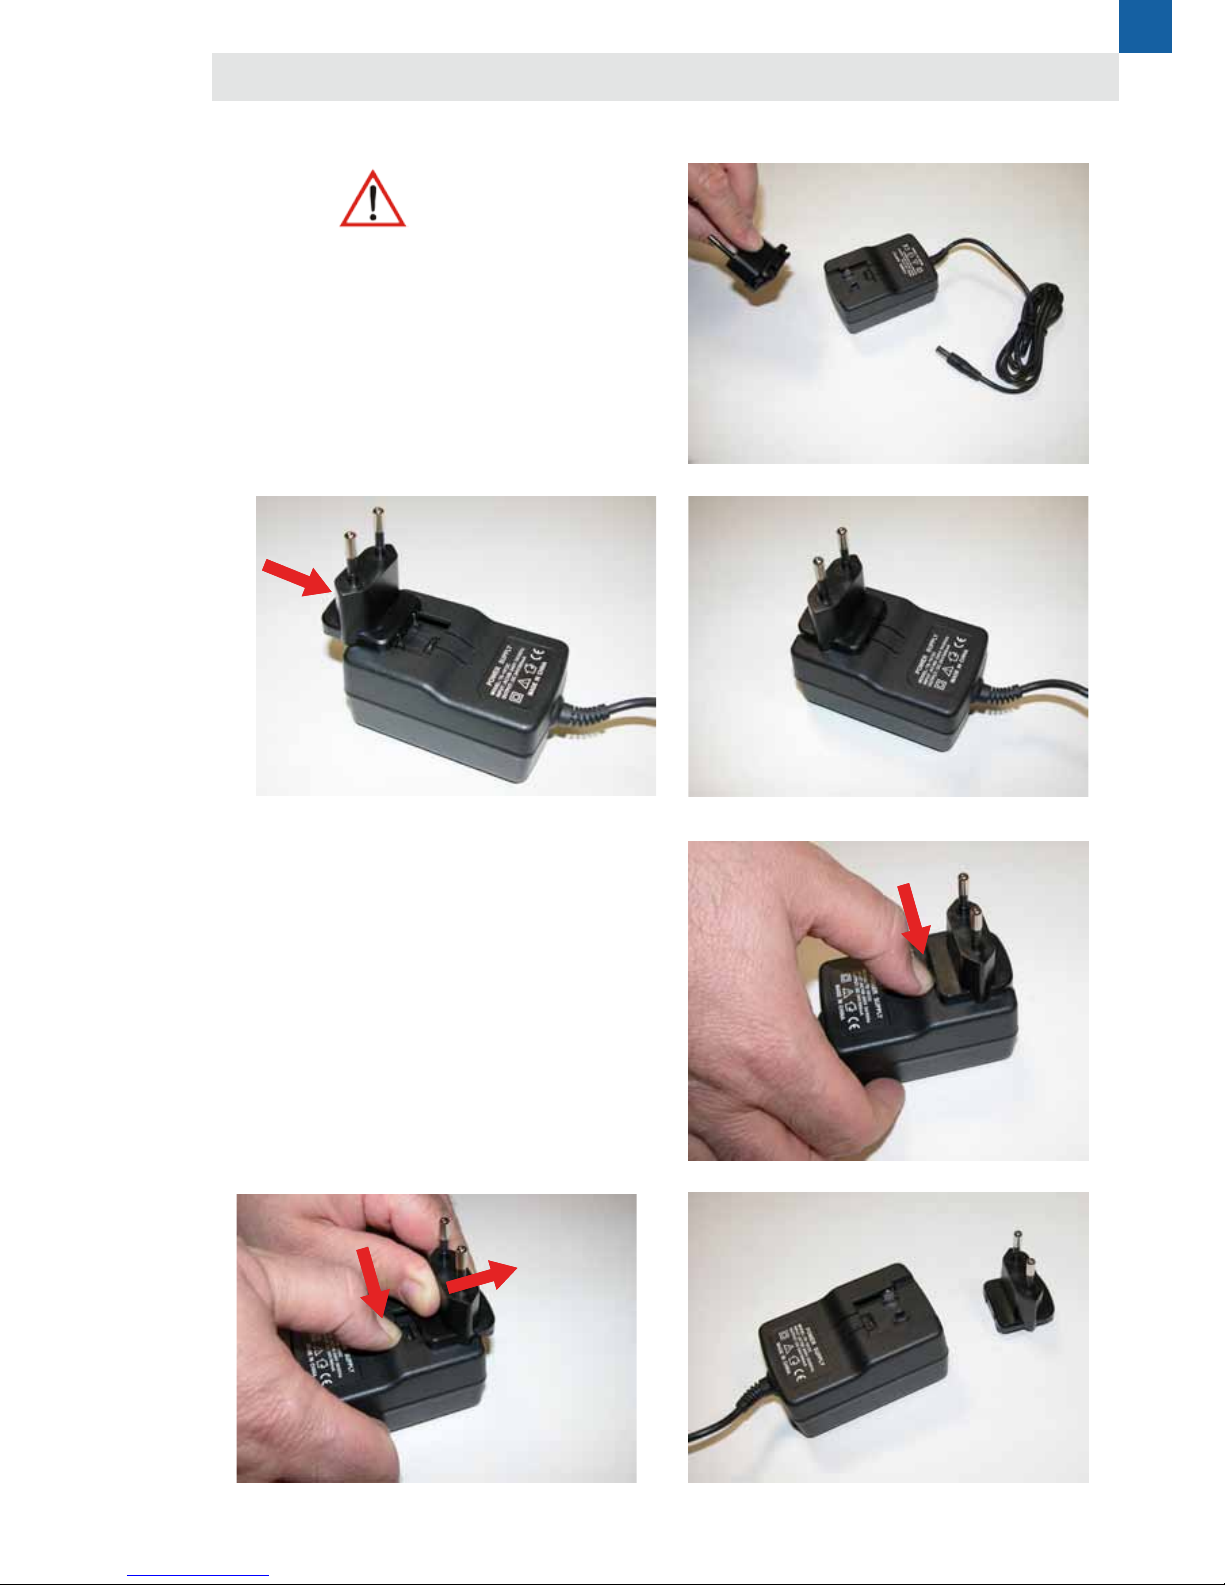
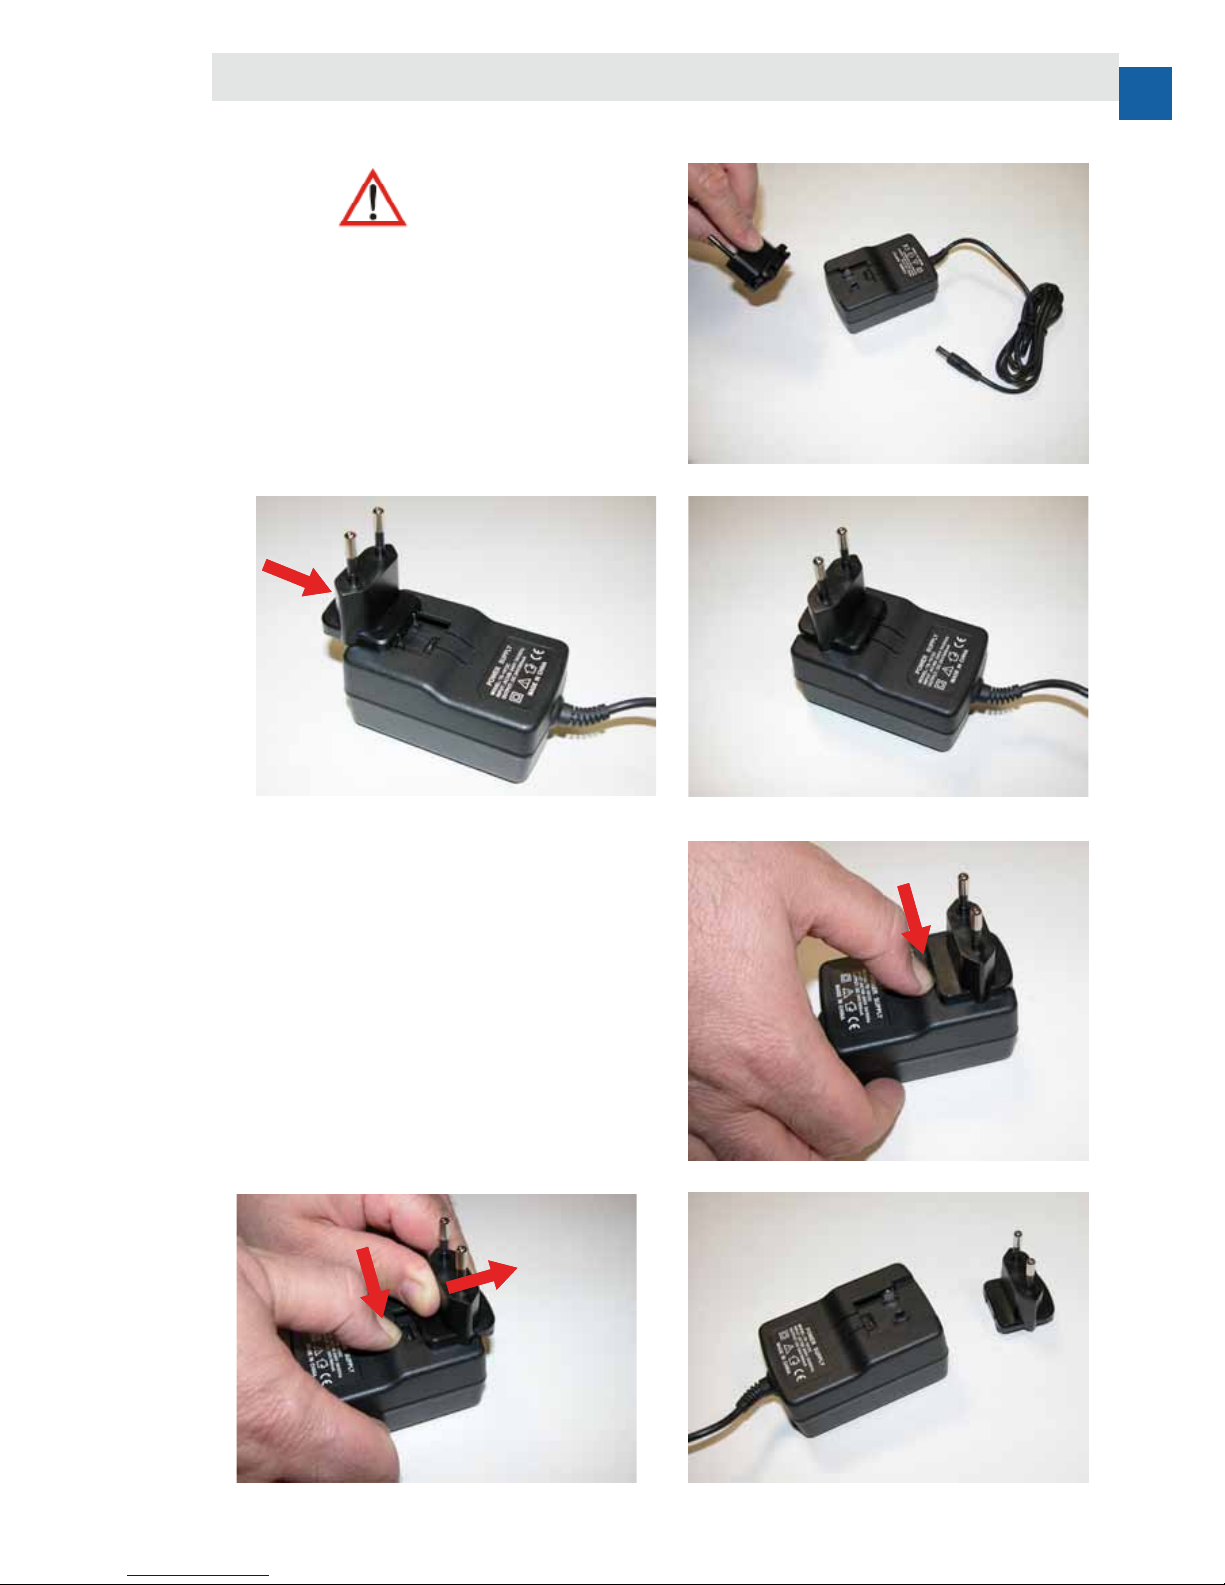
Before tting the mains plug to the device, select the plug
type appropriate to the country of use (see chapter Main
Power Supply Unit Characteristics for the PS10BSA).
1 - Fully insert the selected plug in the housing of the
power supply unit until it clicks into position (photo 1, 2
and 3).
2 - Press the plug locking tab (photo 4)
3 - Keeping the tab pressed, push the plug outwards
(photo 5) until it completely separates (photo 6).
photo 1
photo 4
photo 2
photo 5
photo 3
photo 6
Removing the plug
Fitting the plug
Page 10
page 10
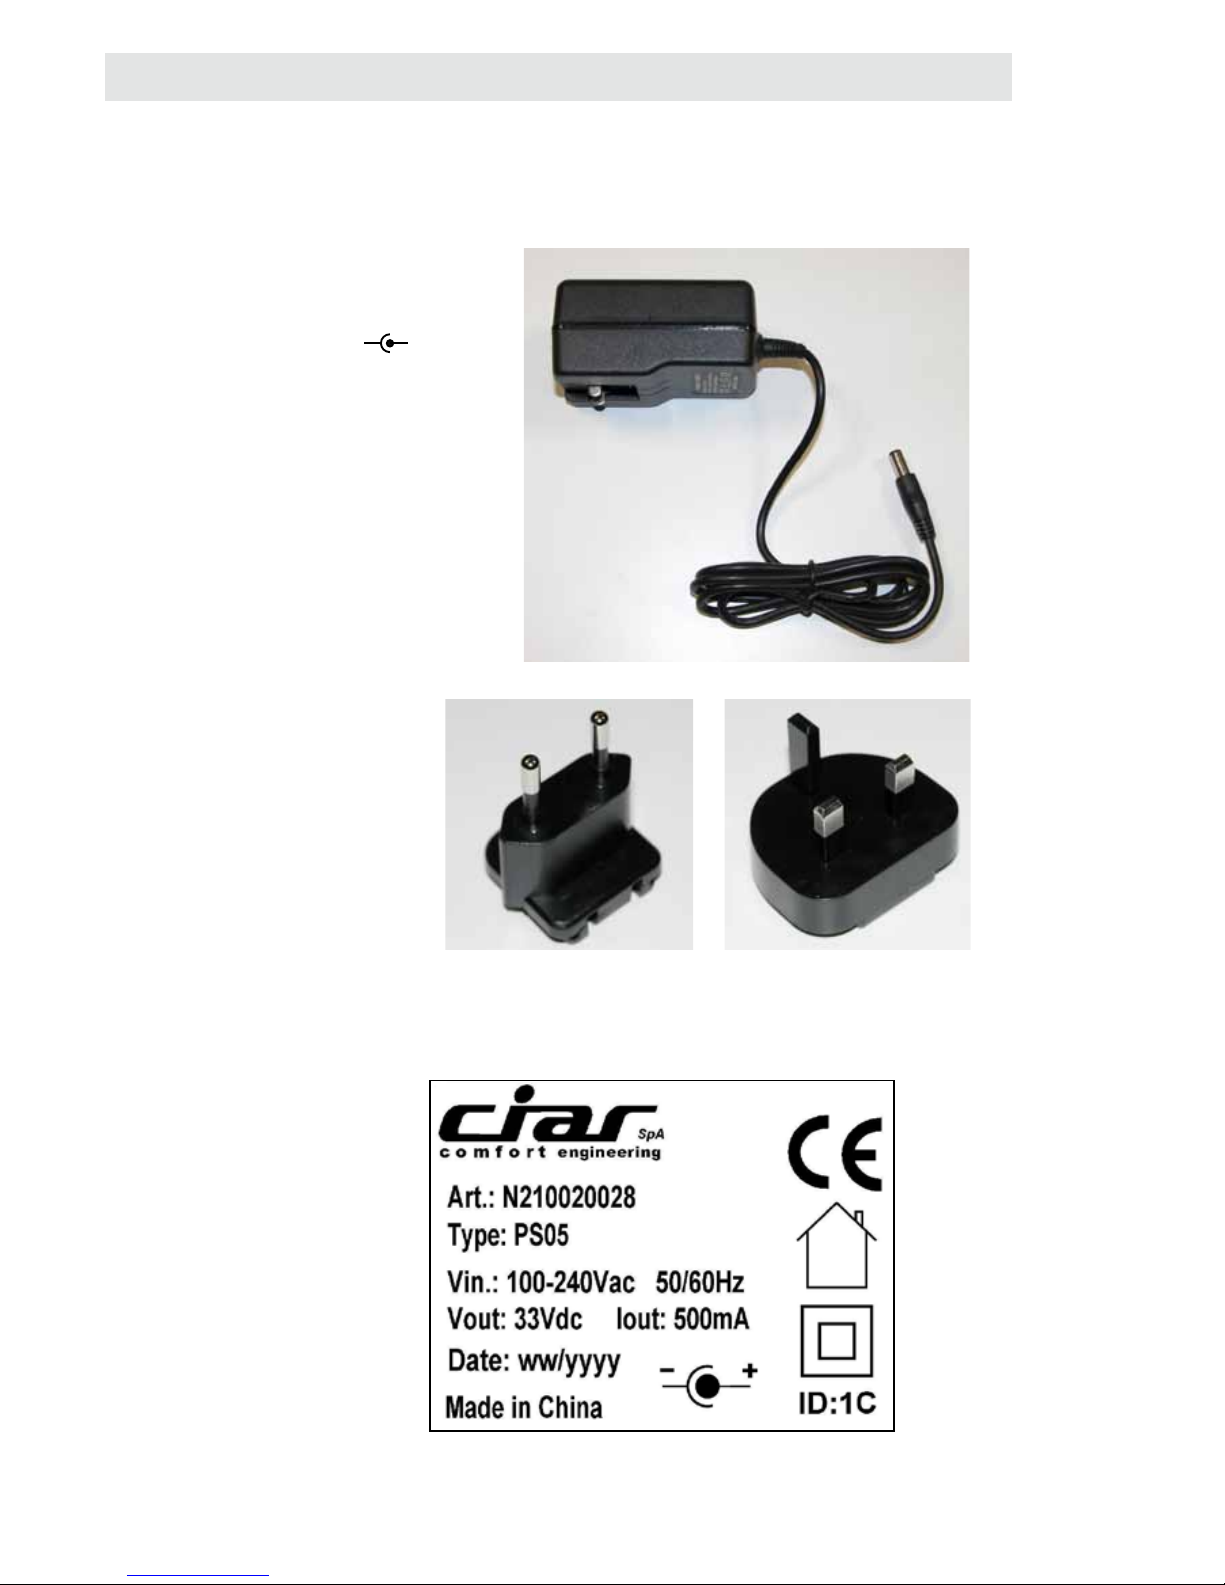
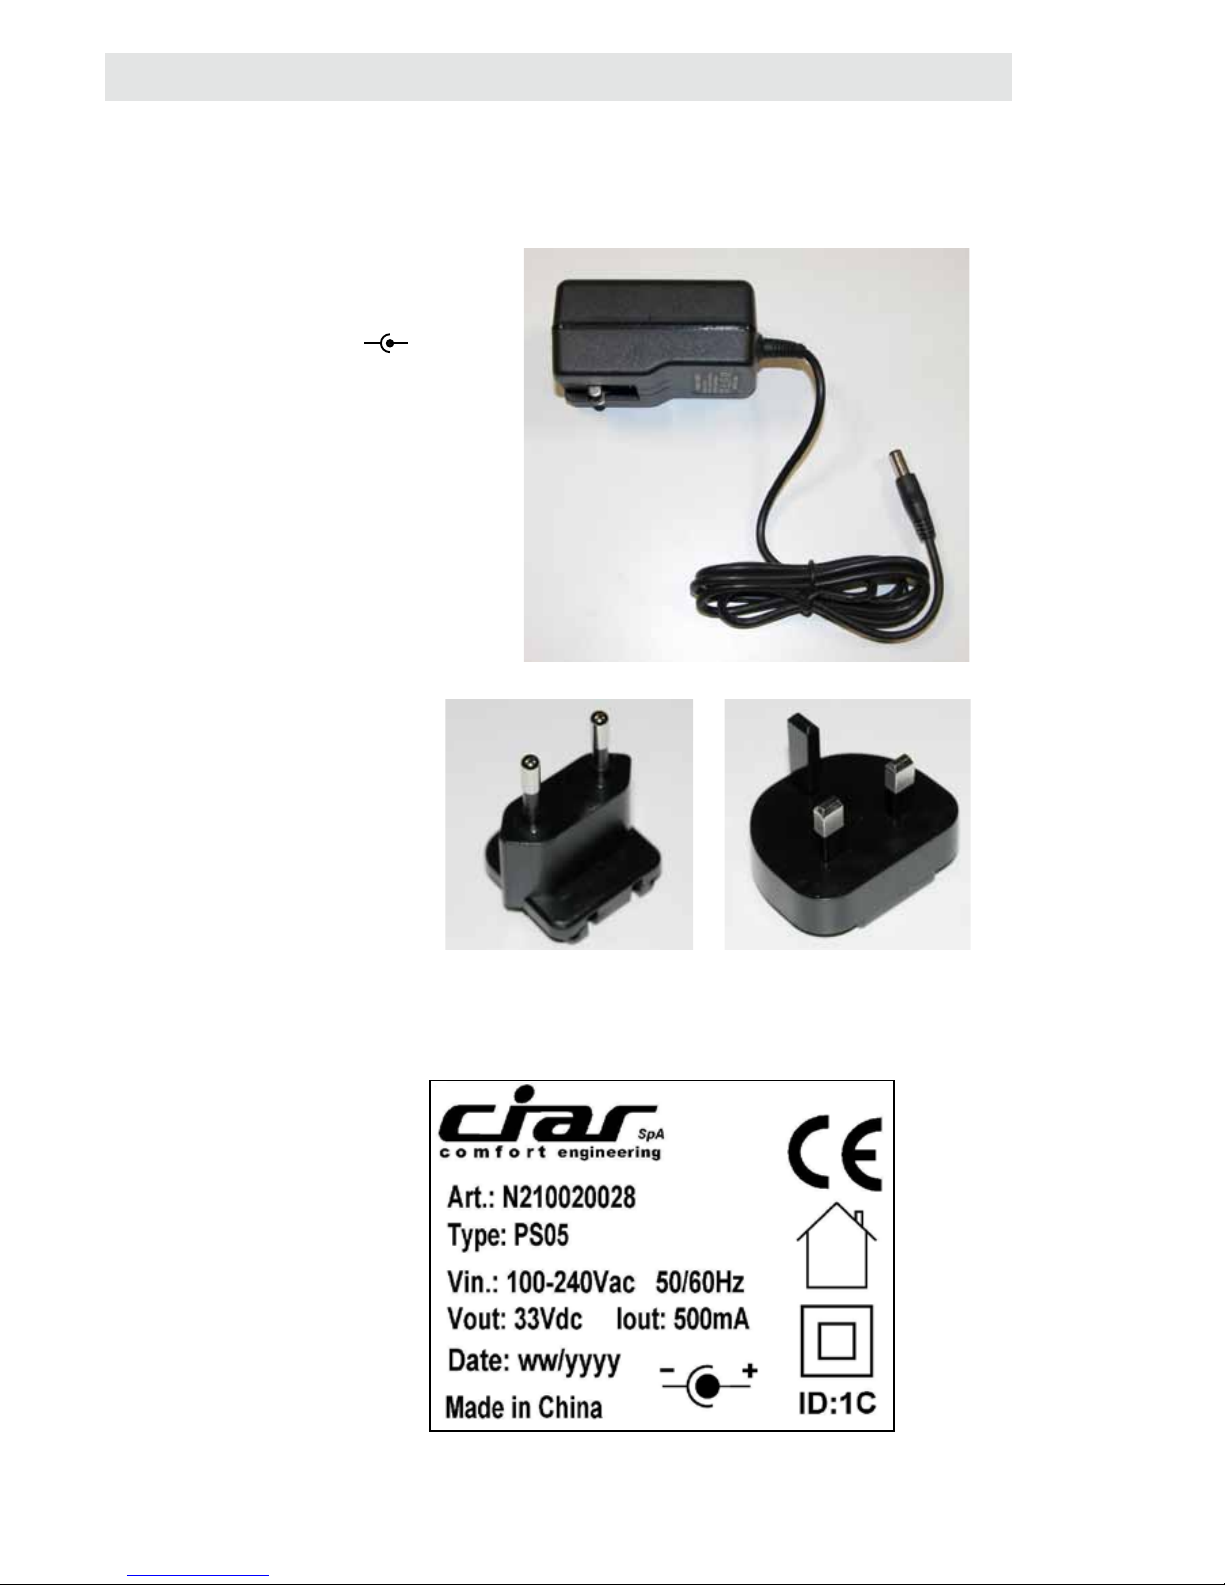
Technical characteristics:
Input voltage: 100-240 Vac
Input frequency: 50/60Hz
Output voltage: 33Vdc
Output current: 500mA
Output connection:
Output cable: 150 cm with DC plug 5.5x2.5
Power supply unit: switching type
Device dimensions: 5 x 7.7 x 4 cm
Characteristics of supply unit type PS05 for PS10BSA
European
plug
Label
English
plug
-
+
Page 11
page 11
ENG
Precautions for use of the supply unit for PS10BSA
Precautions for use
The device is not suitable for use by children or disabled persons unless appropriately supervised by a
responsible adult able to use the device itself in complete safety. Children must not be allowed to play with the
device.
C.I.A.R. will not be held liable for its product if its use does not comply with the following requirements:
- Only C.I.A.R. authorised personnel can dismantle the various parts of the kit.
- Do not cut or touch any wires in the kit with sharp objects.
- Do not connect the kit other than in the manner described in this manual.
- Do not use any parts of the kit with devices other than those indicated in this manual.
- Do not connect to any mains electricity supplies other than those indicated in this manual or on the
label afxed to the device.
- Do not wet the parts making up the kit.
- Do not place any metal objects near any parts of the kit while it is plugged into the mains.
- Do not use the device other than in a domestic environment.
- Do not open the device for any reason. Any faulty or broken parts must be returned to the
manufacturer or an authorised service centre or placed in the hands of
a person possessing similar qualications, avoiding all possible risks.
- Do not use in damp environments or in the presence of heat sources (ovens or direct sunlight).
- In the case where the power cable is not detachable from the device and has been
damaged, it can be replaced by the manufacturer, an authorised service centre or
a person possessing similar qualications, avoiding all possible risks.
Warning
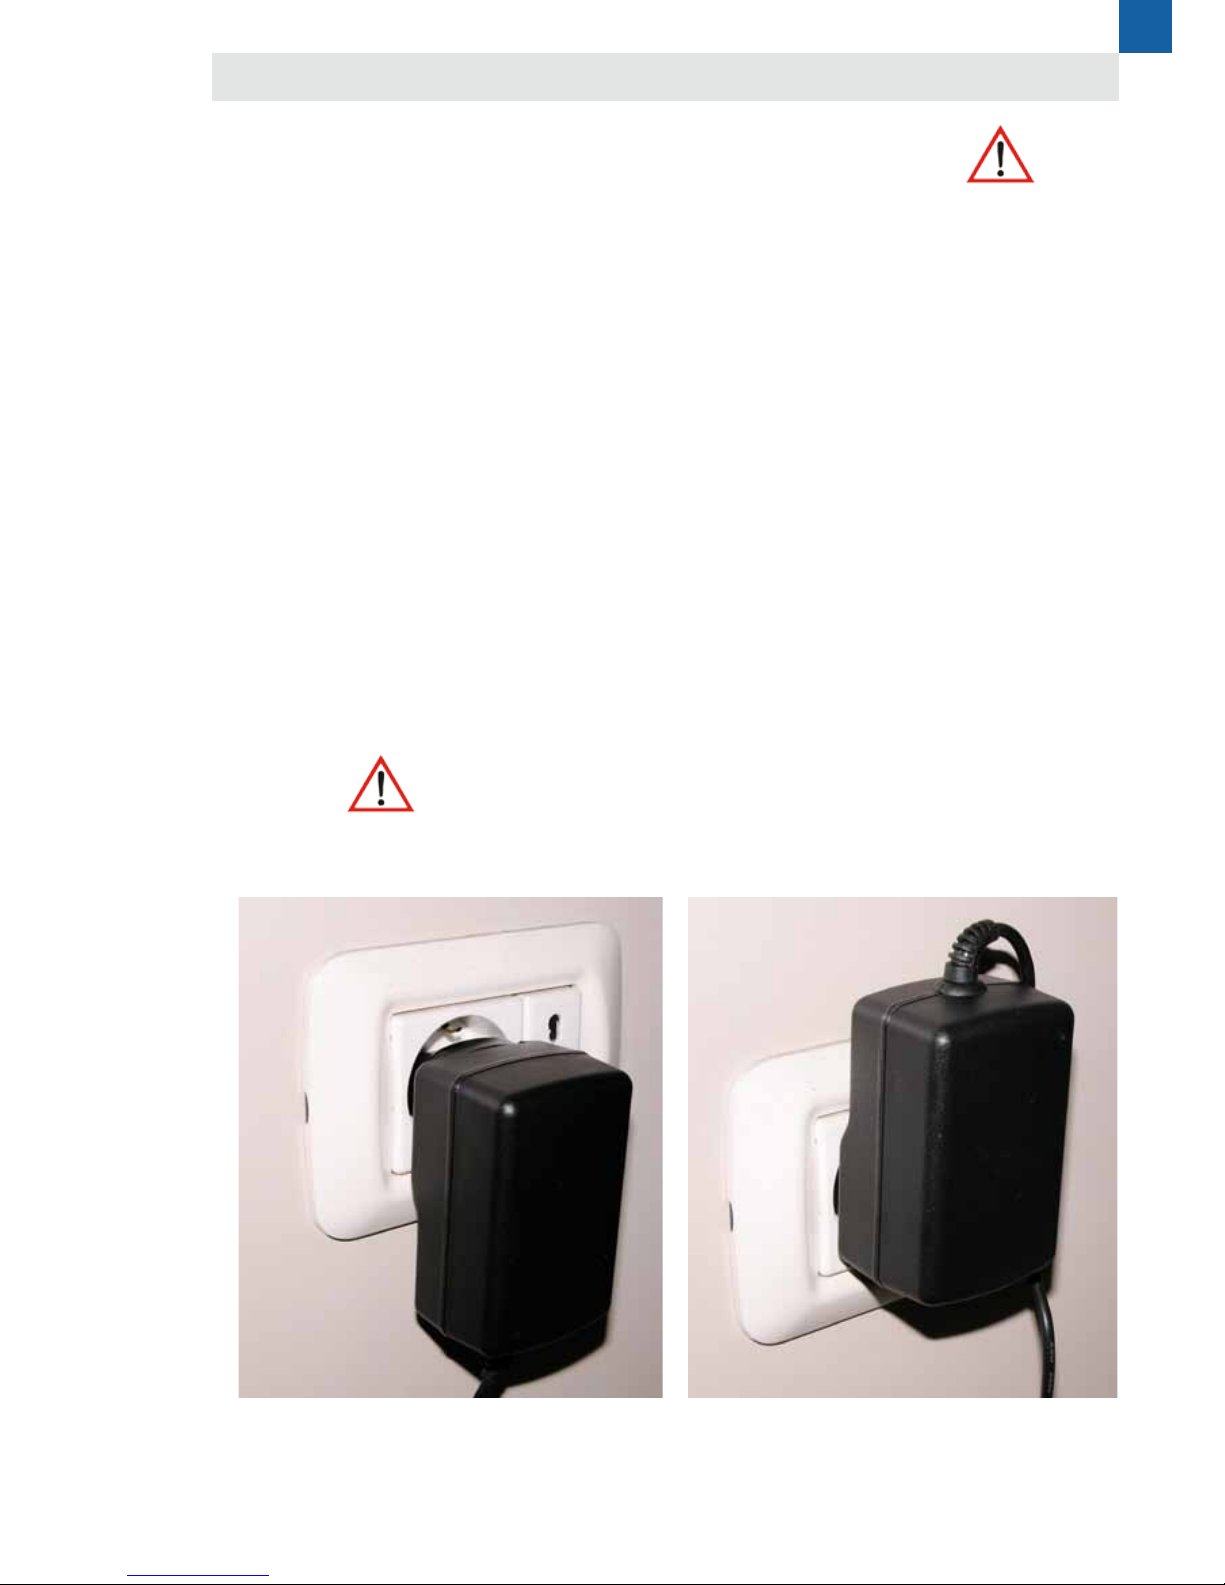
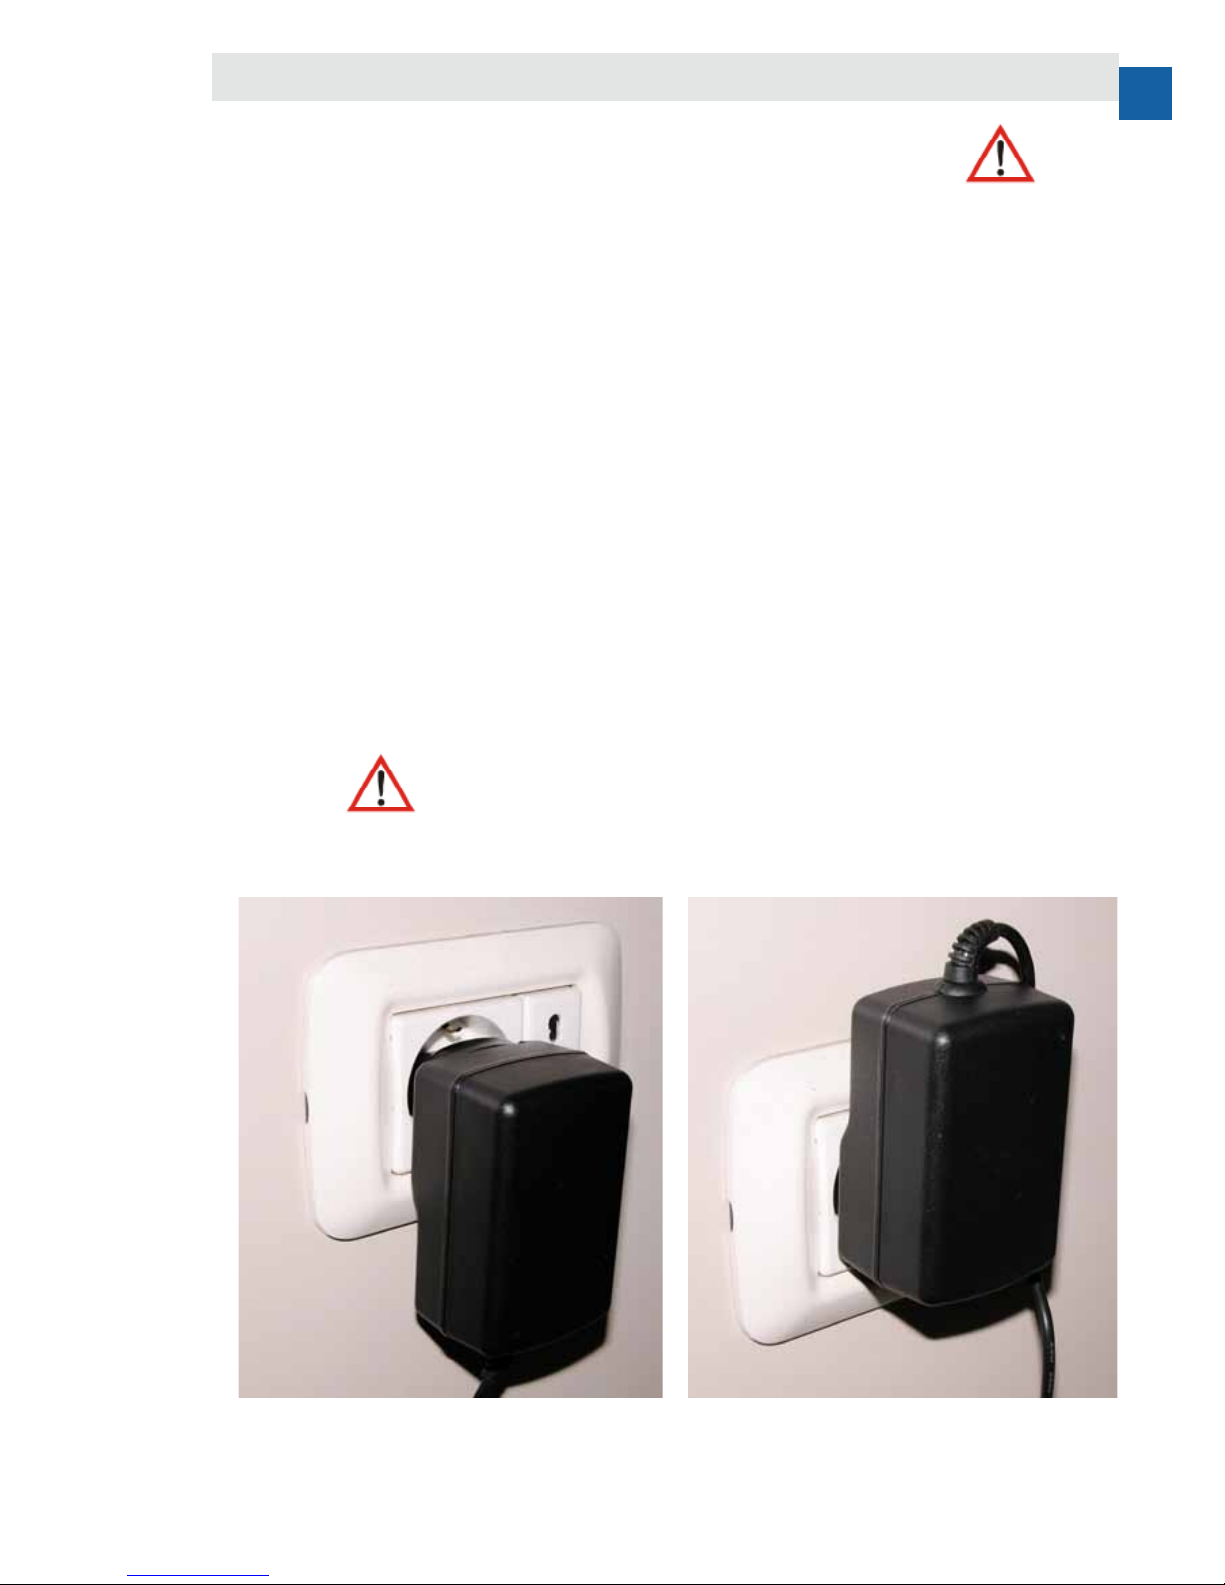
- Plug the unit into the mains electricity supply socket vertically as shown in photo 1
Photo 1
Correct position
Photo 2
Incorrect position
Page 12
page 12
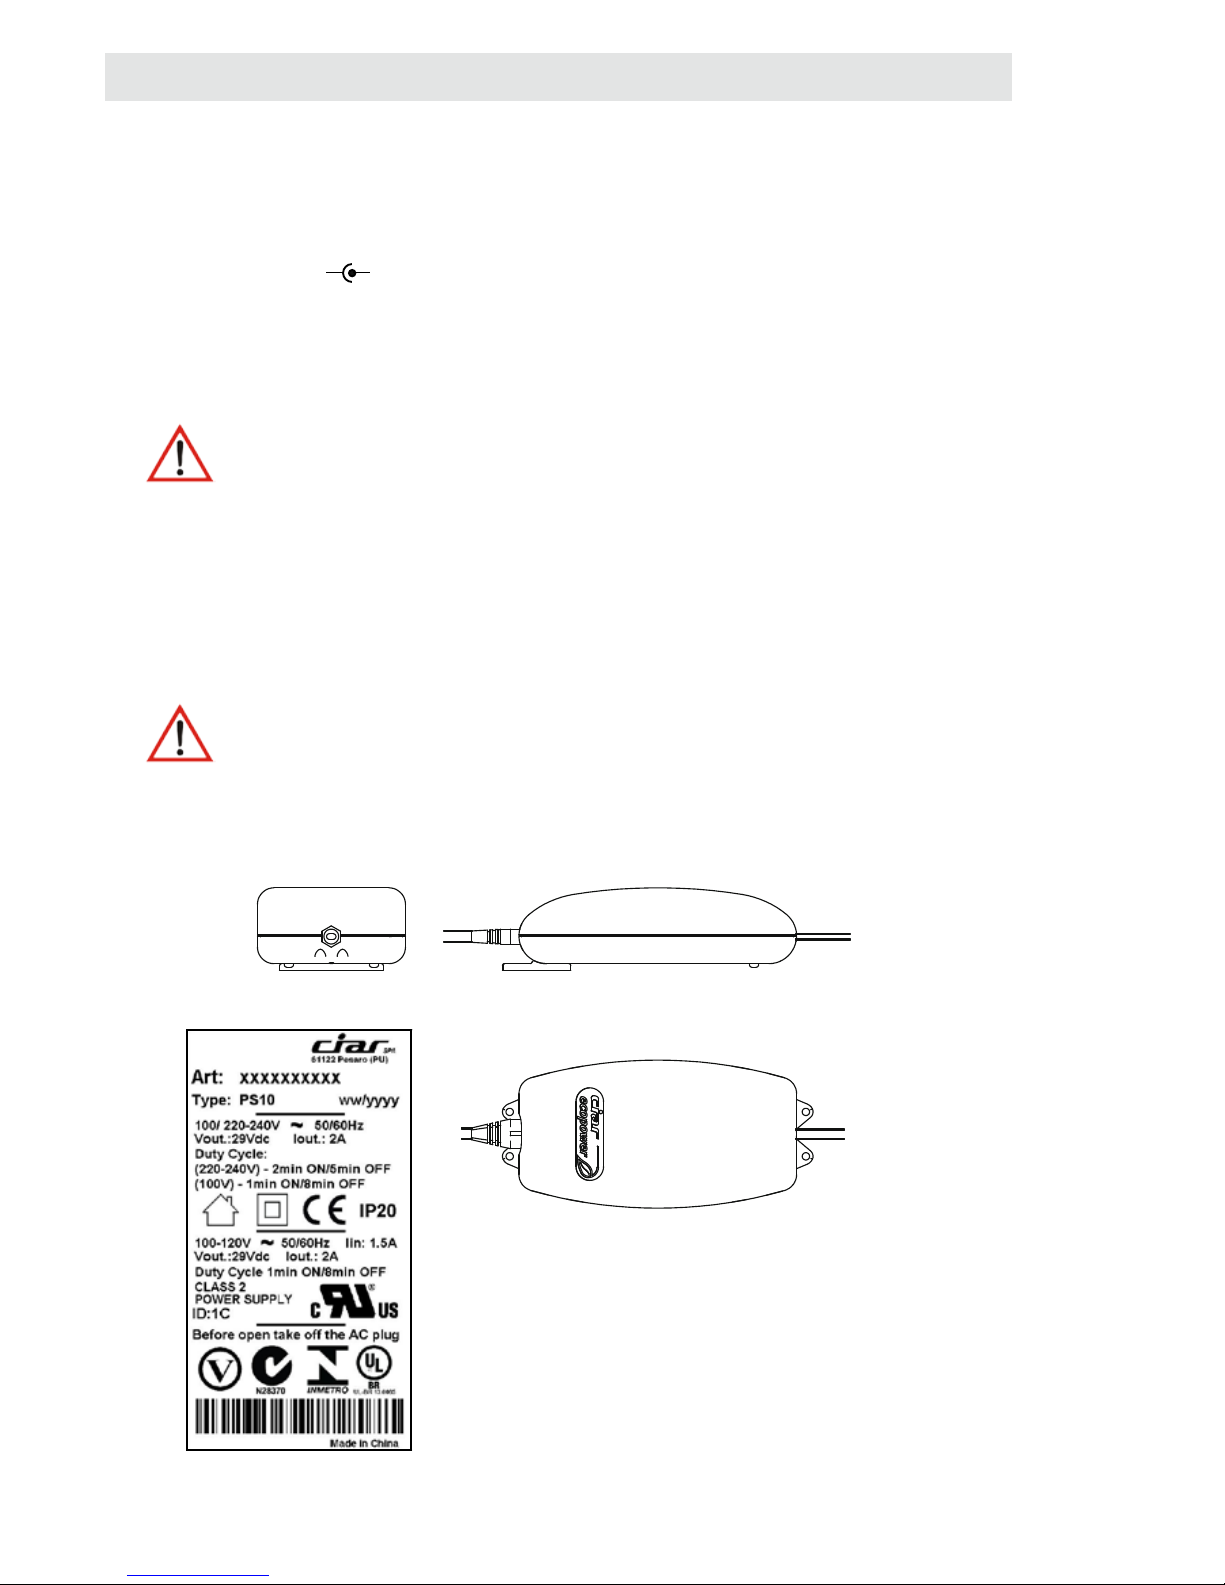
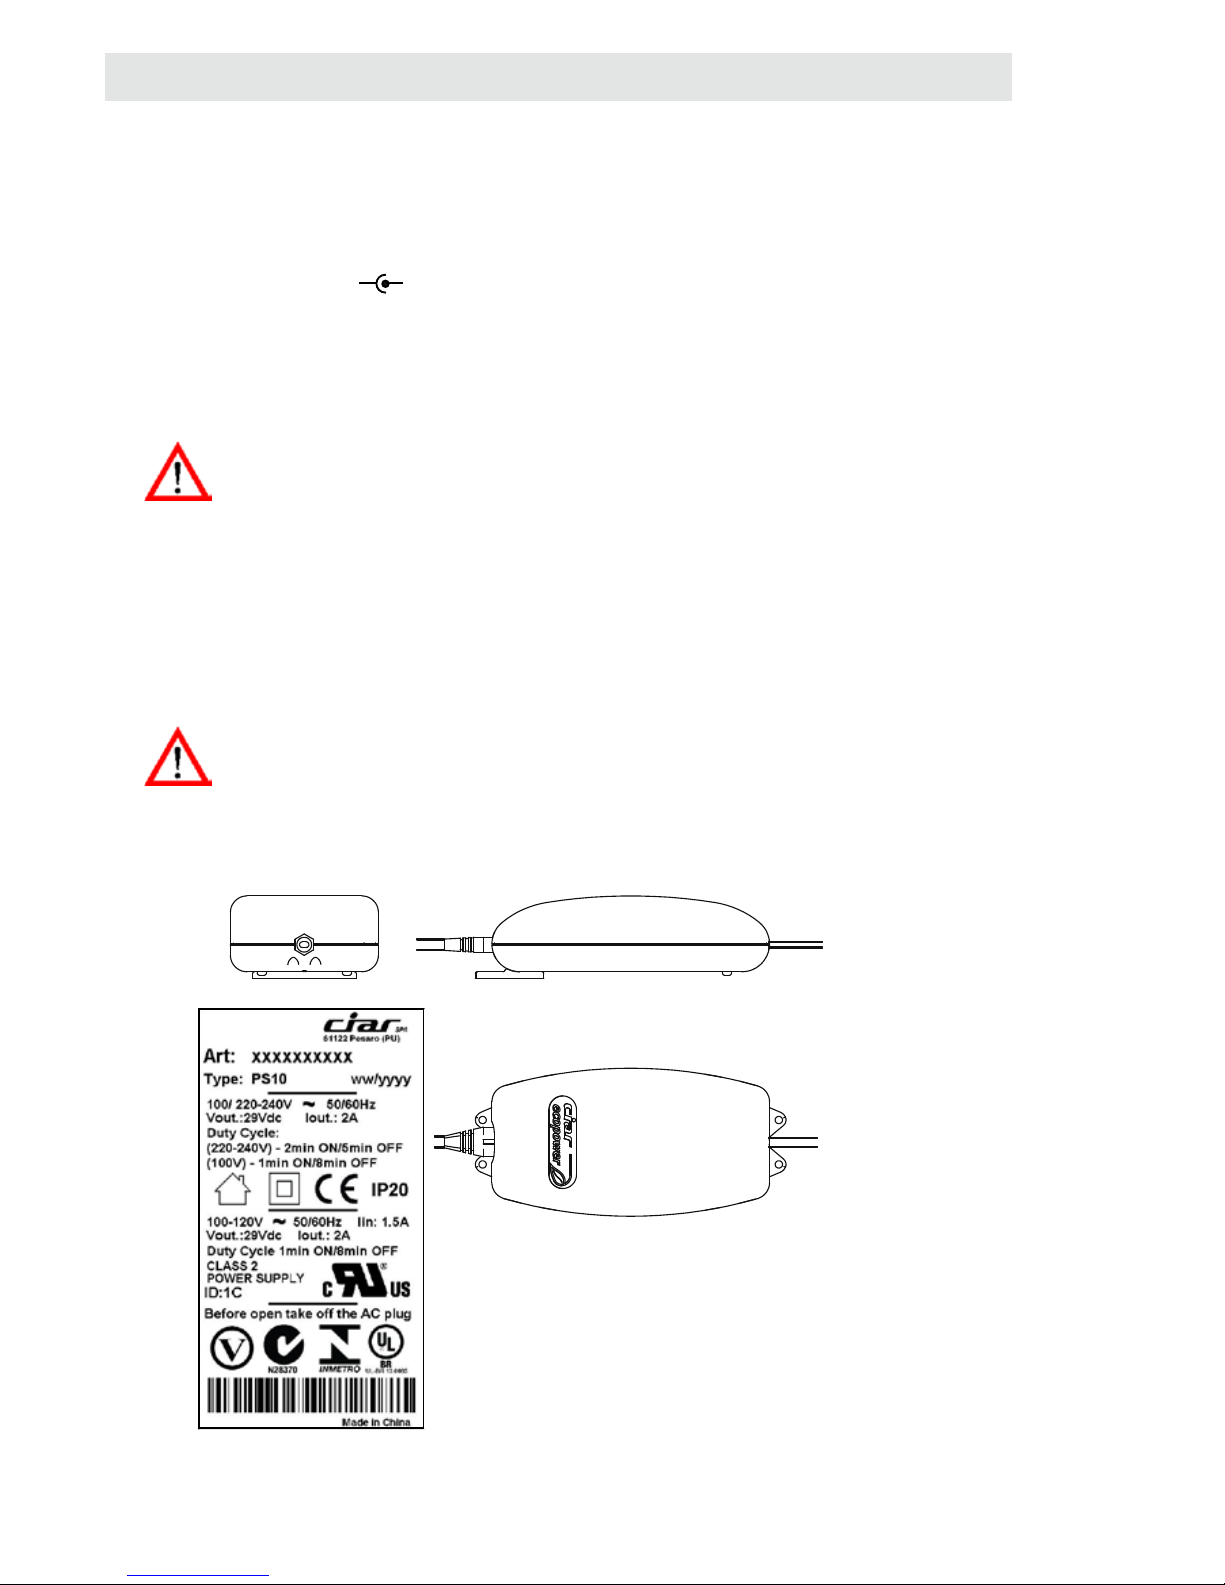
Example of a PS10 label
gure A
WARNINGS
PRECAUTIONS FOR ASSEMBLY:
Fix the components using the holes formed in the box.
Replacement parts for this type of product must be identical to those being replaced.
If the power supply cable has a permanent connection to the power supply unit (see gure A) and is
damaged, in order to avoid any risks it must be replaced by the manufacturer, by its technical aftersales service or a person with similar qualications.
IMPORTANT
Before connecting the socket to the mains supply, check that the feed voltage on the label corresponds
to that of the country of use.
Characteristics of transformer type: PS10
Technical characteristics:
Input voltage: 100-240 Vac
Input frequency: 50/60Hz
Output voltage: 29Vdc
Output current: 2A
Output connection:
Output cable: 8 cm with DC plug 5.5x2.5
Power supply unit: switching type
Device dimensions: 80 x 150 x 44.5 cm
-
+
Page 13
page 13
ENG
Instruction for PS10BSA recharging
Preamble
For a correct use of the battery and in order to maximize its life is necessary to keep it in its best conditions. Therefore
is highly recommendable that the battery doesn’t reach the “under discharge” condition.
Based on the typology of the devices used with the battery (mechanical switches, sensor switches, radio kit, digital
supply units, etc...) there are different power consumption while in stand-by mode that can lead to the “under discharge”
condition.
It is advisable to fully charge the batteries at least once every 3 months.
Please contact CIAR for detailed information about the autonomy and consequent denition of the charging intervals in
combination with a particular conguration and/or in conjunction with the different devices.
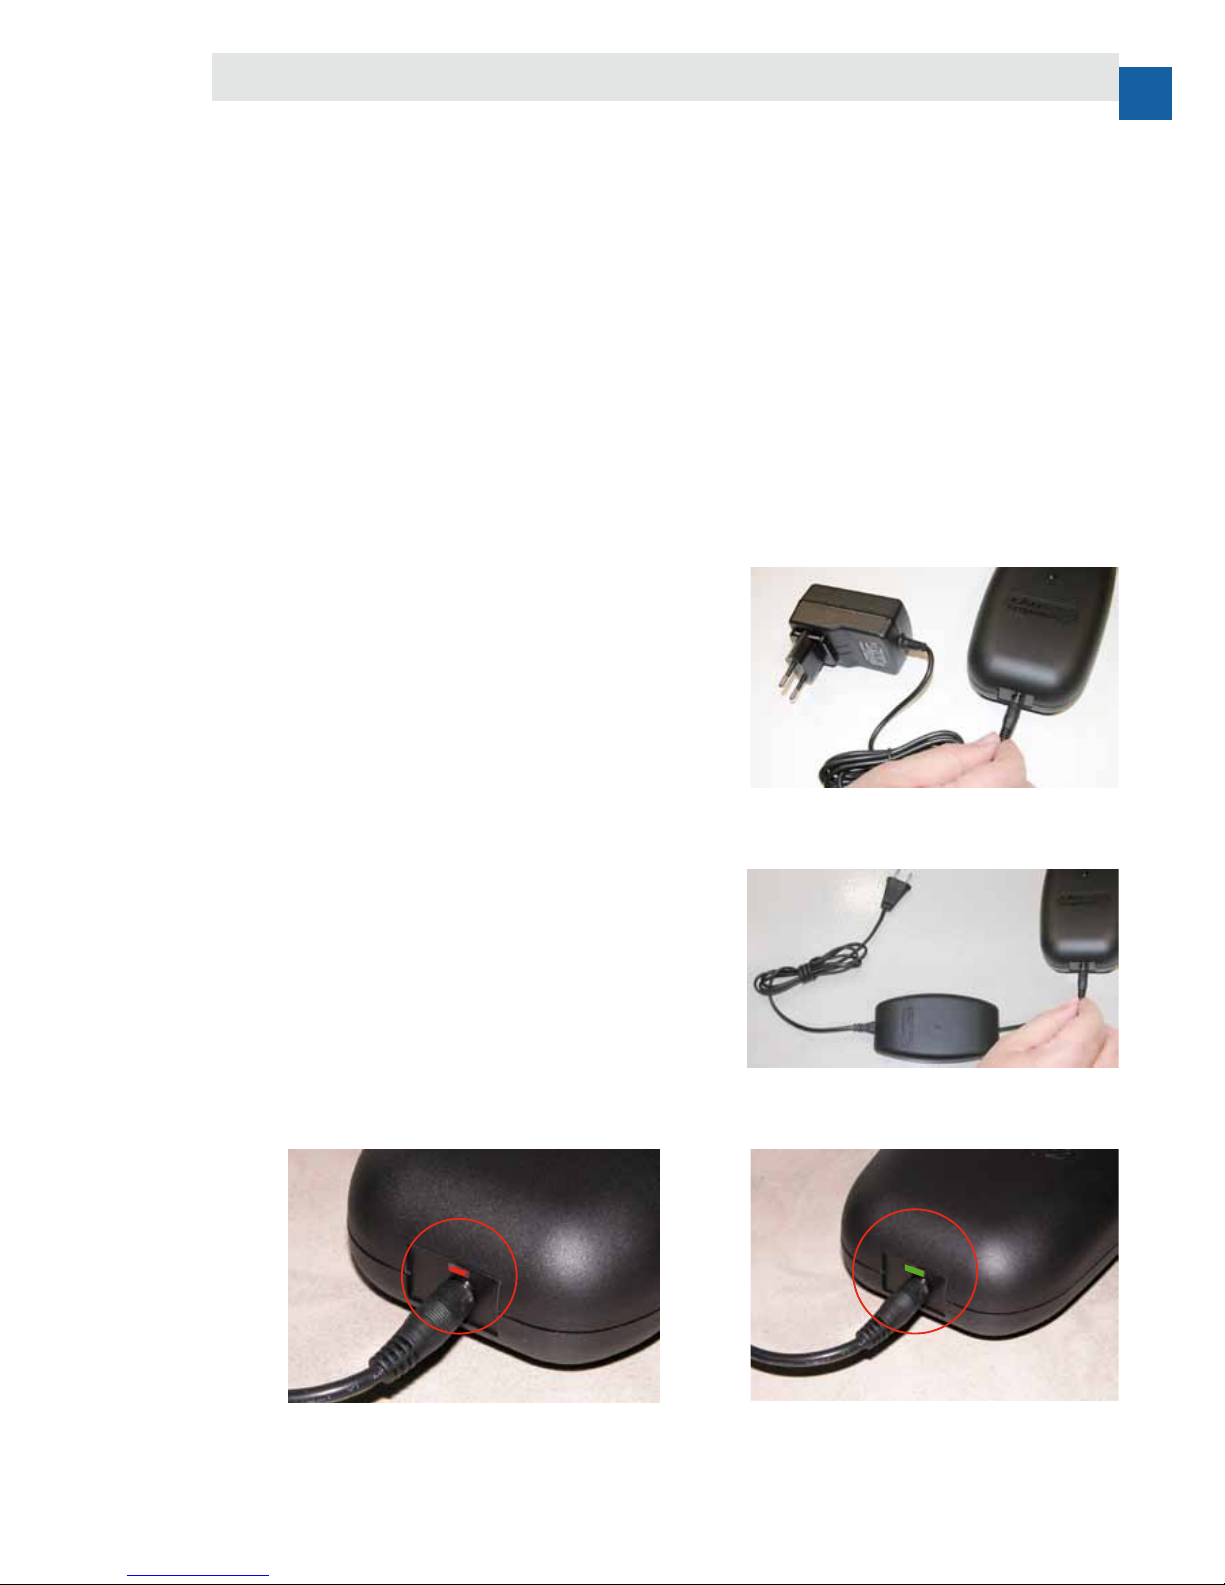
3
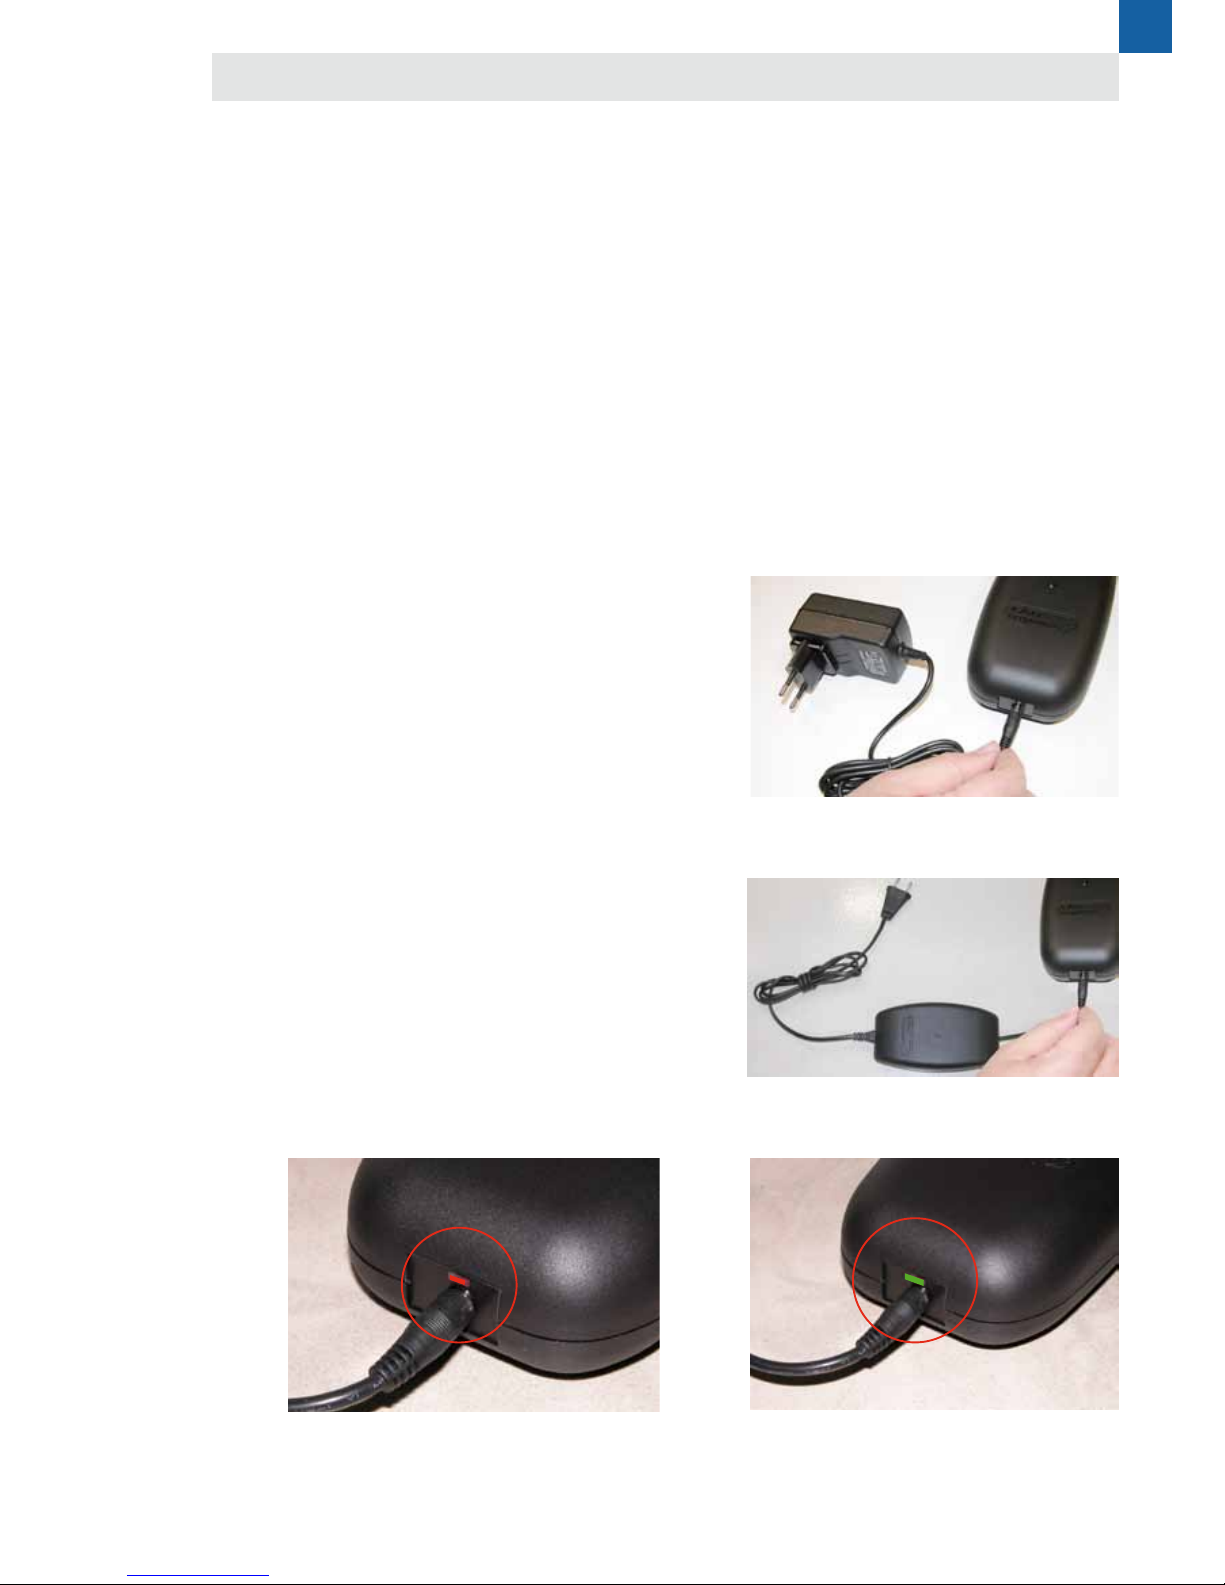
1 - Connect the DC plug of the power supply unit PS05 or PS10 to
the DC sochet of the PS10BSA (photos 1a, 1b).
2 - Connect the PS05 or the PS10 to the domestic net socket.
3 - The led positioned above the DC socket of the battery will show
2 brief ashes (if the battery pack is a PS10BSA 2.2Ah - Li-ion) or 1
ash (if the battery pack is a PS10BSA 1.2Ah - NiMH)
Then the led will light up red indicating that the battery is under
charge (photo 2)
NOTE for the PS05: The PS05 is also provided with a led that just
indicates that the device is correctly connected to the domestic net
power. It doesn’t indicates a charging status.
4 - When the led on the battery became green then the charge is
completed (photo 3). Disconnect the power supply from the domestic
net socket and subsequently disconnect the DC plug from the the DC
socket of the battery.
Standard charging procedure
2
1a
1b
Page 14

page 14
In case the battery has reached the “under discharge” condition, the standard charging procedure may be not sufcient. It
is anyhow possible to try a battery recover in the two following ways:
1) If the led indicator starts to blink (red) about 5mins after the connection of the power supply (PS05 or PS10) to the
battery pack, this means that there’s been an error during the charge. Please disconnect the power, wait about 1min and
connect again the power. Repeat this sequence 3 or 4 times
2) disconnect completely the battery from the chair or sofa and try again the procedure described in point (1)
If the event of the red led blinking persist after 3 or 4 attempts, this means that the cells of the battery pack are damaged
and/or have reached the end of their life, therefore the whole PS10BSA pack must be replaced.
Using the PS10
This device allow the use of the motors of the chair or sofa also when the battery is fully discharged and is in the phase of
charging through the PS10 power supply.
Using the PS05
The PS05 can provide only a small quantity of current necessary to charge the battery but not enough to provide the
quantity of energy to a motor kit. Therefore the use of the chair/sofa is not possible during the charge. It is necessary that
after the charge of the PS10BSA is completed (green led) the PS05 is disconnected from the battery before using the chair
or sofa. Anyhow, tanks to this device, it is possible to try to perform the sequence indicated above (“Under Discharge”)
without physically disconnecting the battery from the chair or sofa.
PLEASE CONSIDER THAT CIAR S.P.A. CAN PROVIDE PS10BSA WITH THE POWER SELECTOR KIT ALREADY INSTALLED INSIDE THE PS10BSA BATTERY PACK (only 2.2Ah-Li-ion battery)
CIAR SpA can provide to the customers some accessories intended to improve the performance and to increase the battery
life when they are used in combination with touch sensors, radio kit, digital supply units or whichever other device that
need a minimum, constant, energy adsorption from the battery.
This device, composed of a stylish push button, allow the end user to switch completely off the battery thus maximizing
its autonomy. For further information please refer to the specic user manual:
- “Kit Power Off - Mono light” (for PS10BSA-1.2Ah-NiMH and PS10BSA-2.2Ah-Li-Ion)
- “Kit Power Off - Dual light / Battery low indication” (for PS10BSA-2.2Ah-Li-Ion)
Furthermore, tanks to this devices it is possible to try to perform the sequence indicated above (“Under Discharge”) without physically disconnecting the battery from the chair or sofa.
Under Discharge
Auxiliary accessoires for the battery kit
Kit Power On/Off
Kit Power Selector
Page 15
page 15
ENG
Assembly of Kit PS10BSA
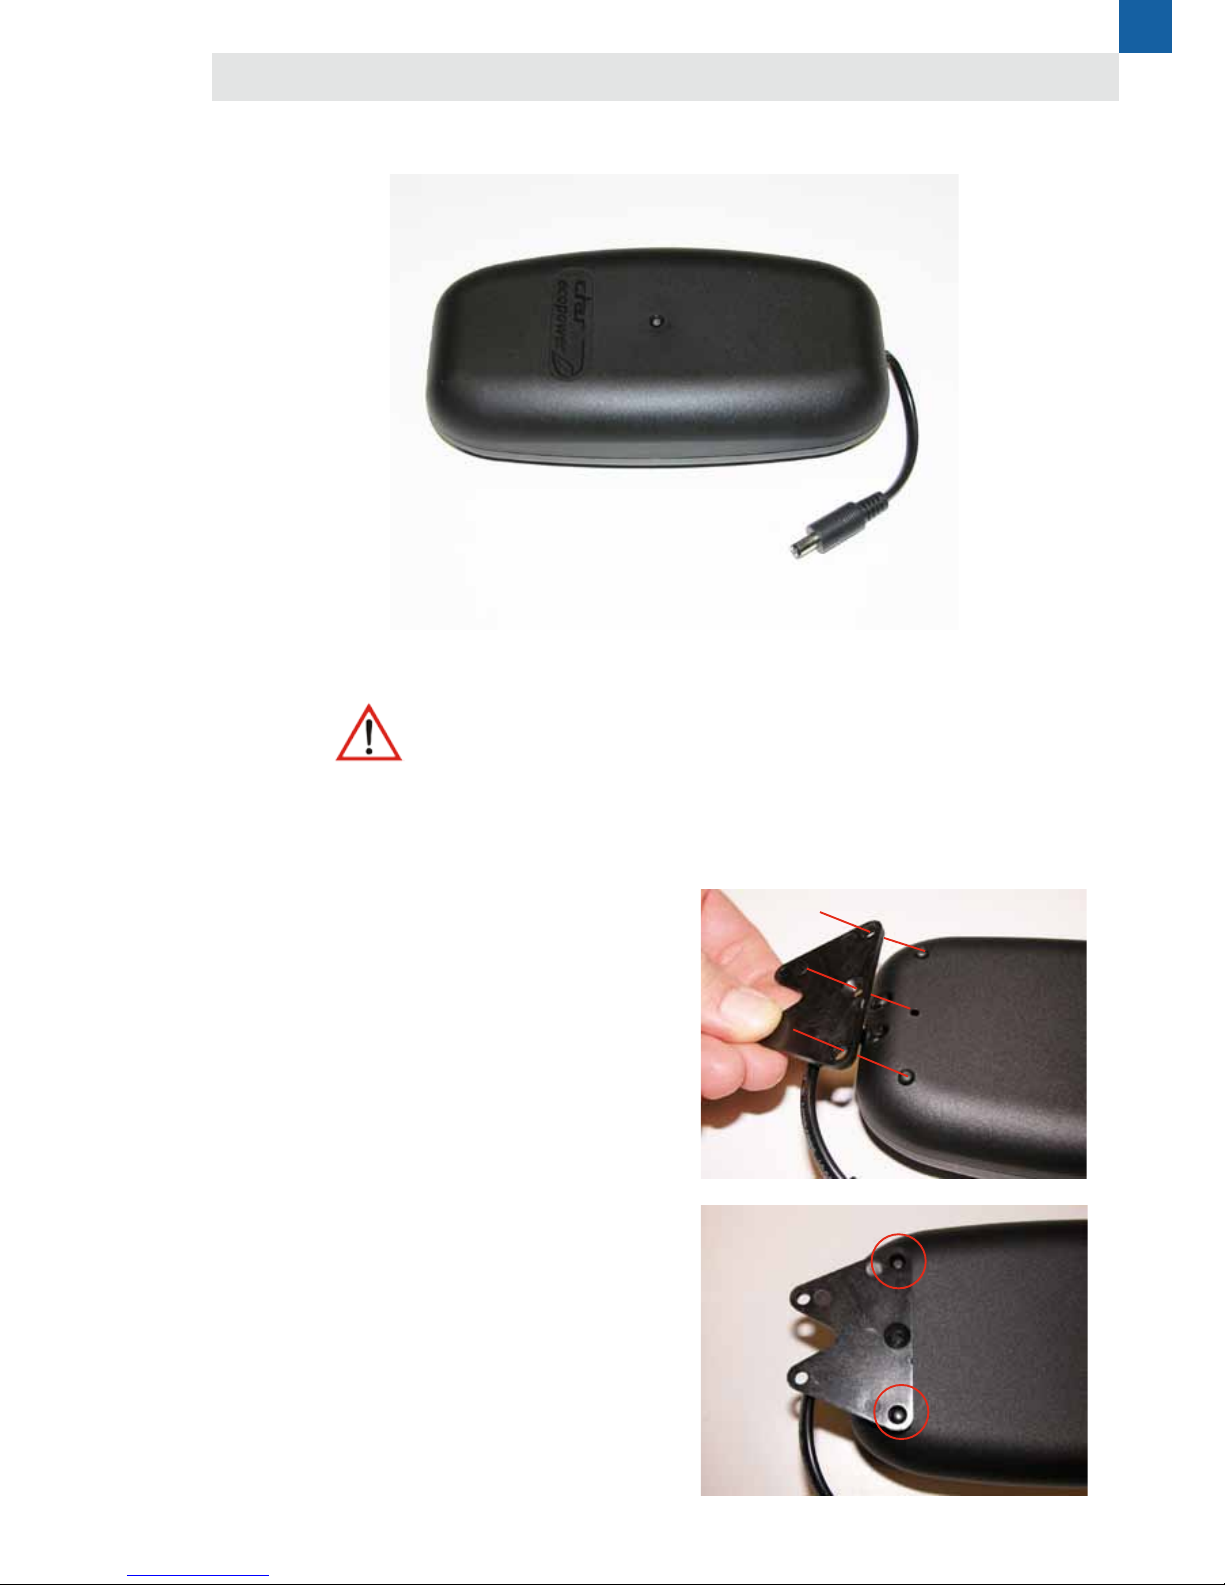
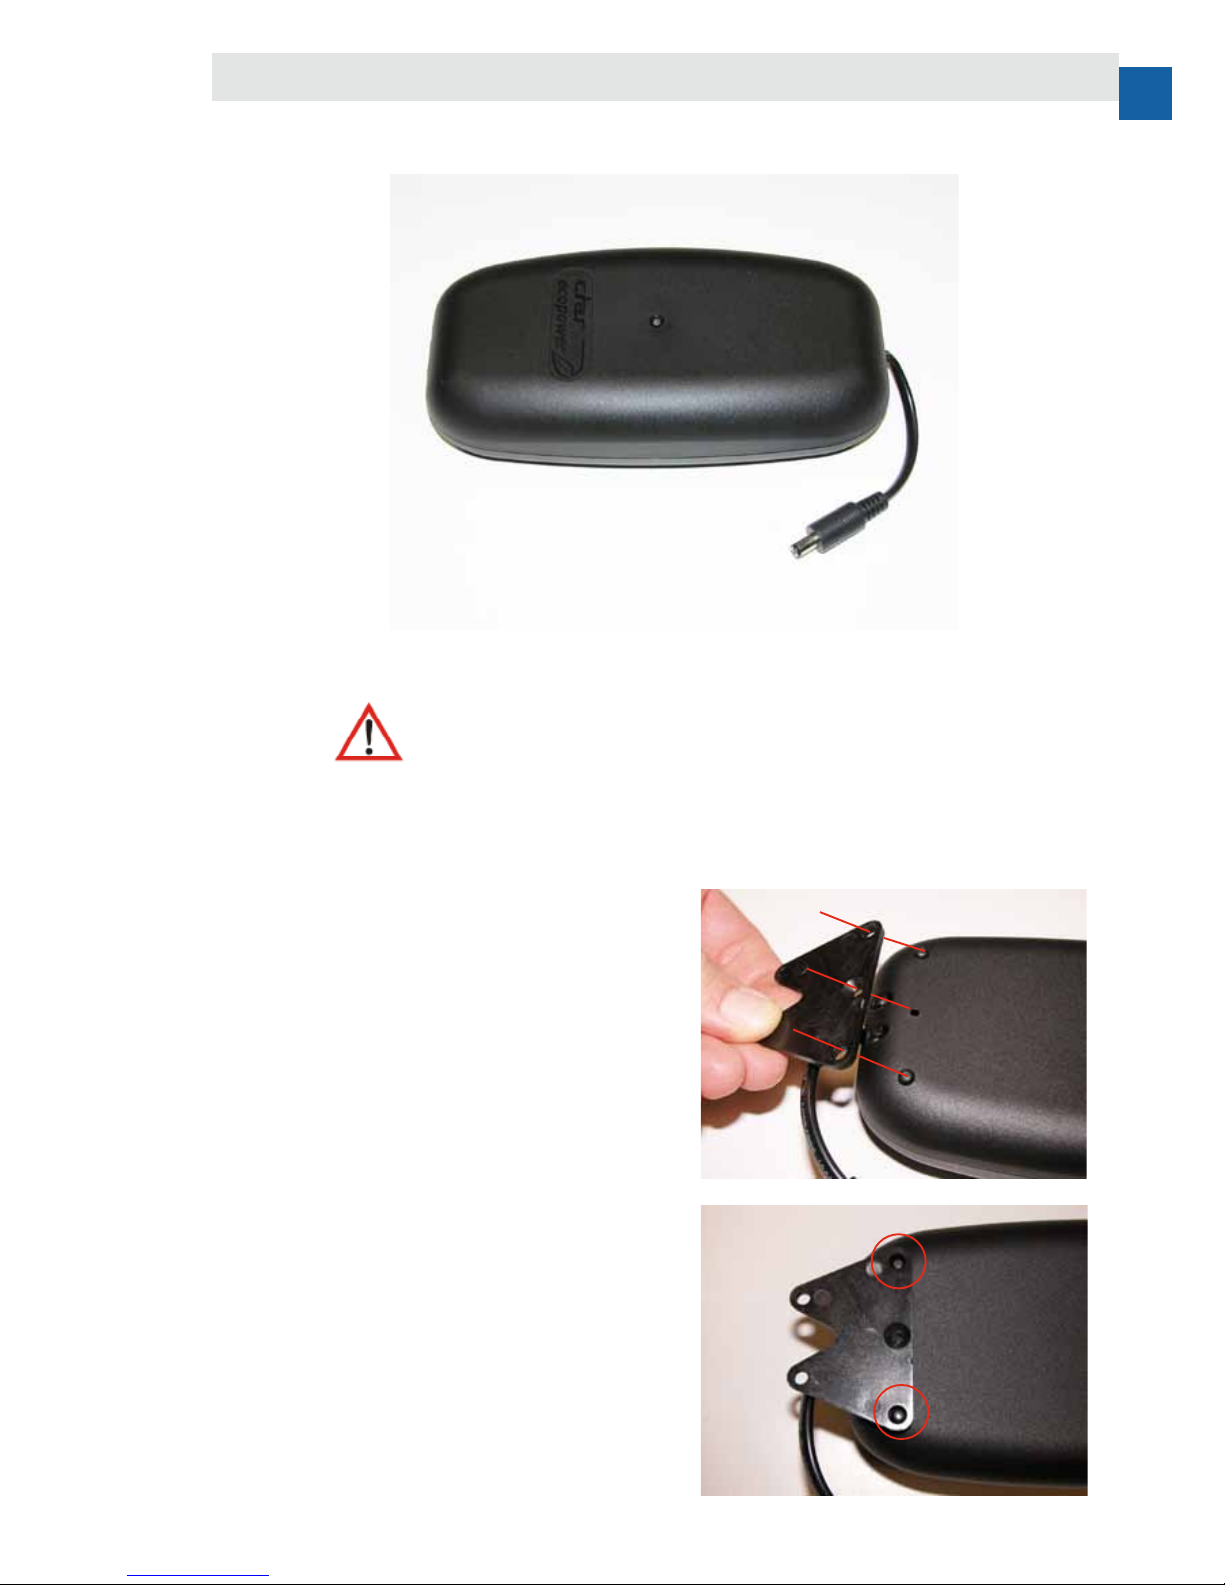
1 - Device PS10BSA is used on the oor as an ancillary device and does not require
any installation (photo 1).
Warning
- Do not tread on the output connector or plastic casing and do not place any heavy objects on top.
1 - If the device is still connected, disconnect it.
2 - Overturn the device and position the bracket as shown
in photos 2 and 3, making sure that the holes on the
longest side correspond to those on the underside of the
casing.
photo 1
PS10BSA Floor version
PS10BSA Surface-mounted version
photo 2
photo 3
Page 16
page 16
Warning
Please keep the PS10BSA disconnected from load and / or control devices during storage or transportation to
avoid undesired action or discharge.
Warning
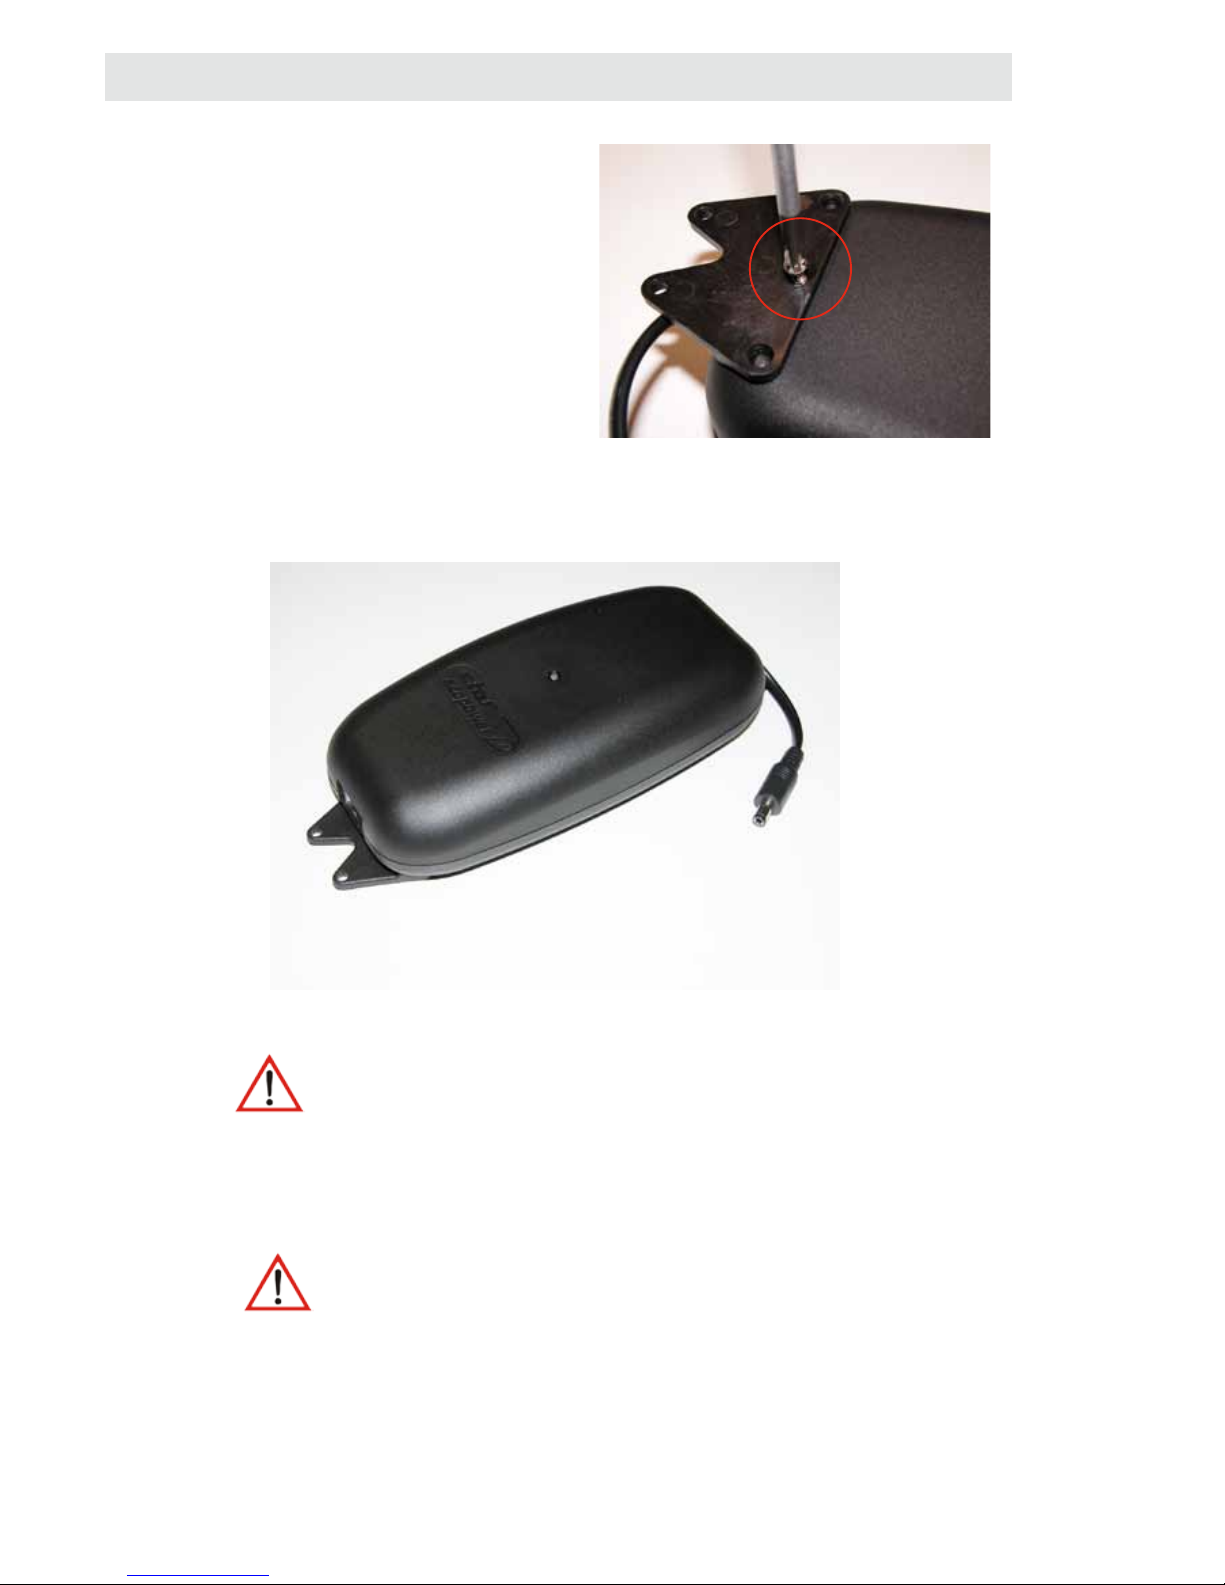
- Before reconnecting the device, after tting the brackets, check that the casing is
still fully intact.
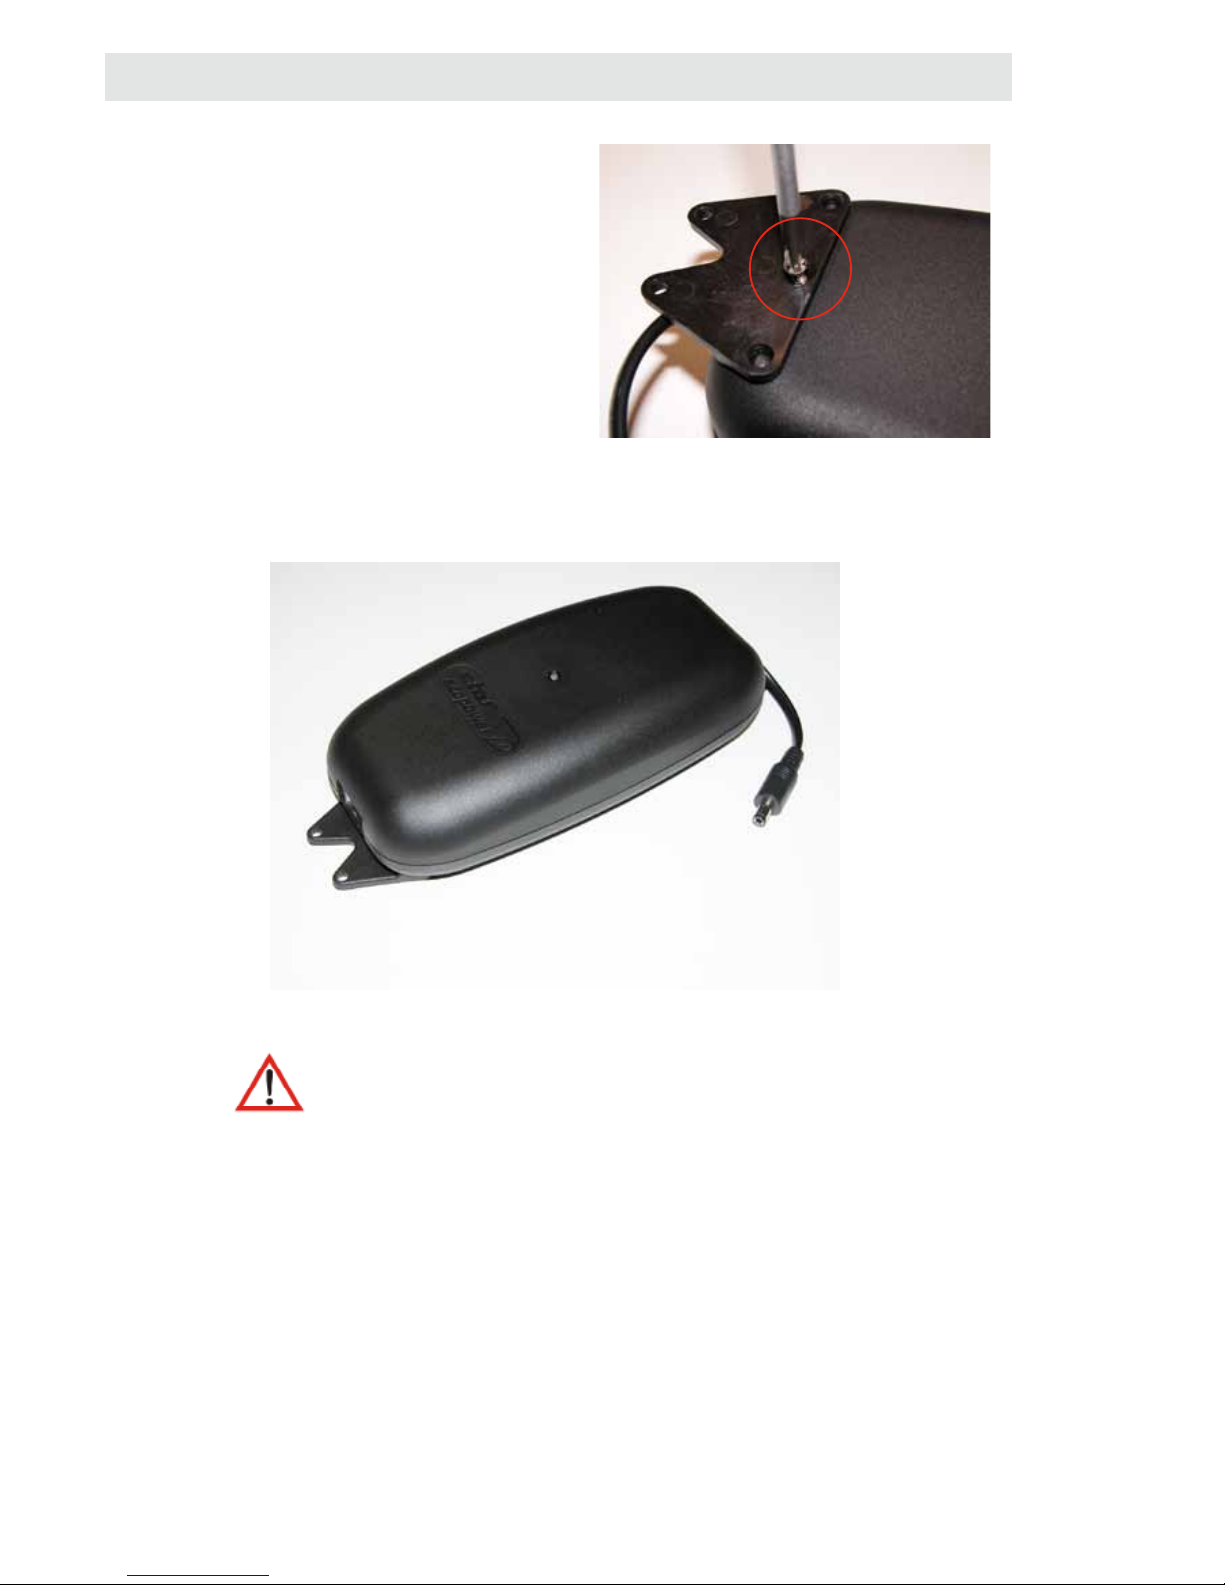
3 - Insert the screw in the centre hole and tighten using a
screwdriver.
4 - Repeat the operations in points 2 and 3 to install the
second bracket on the opposite side of the device.
photo 5
photo 4
Page 17
page 17
ENG
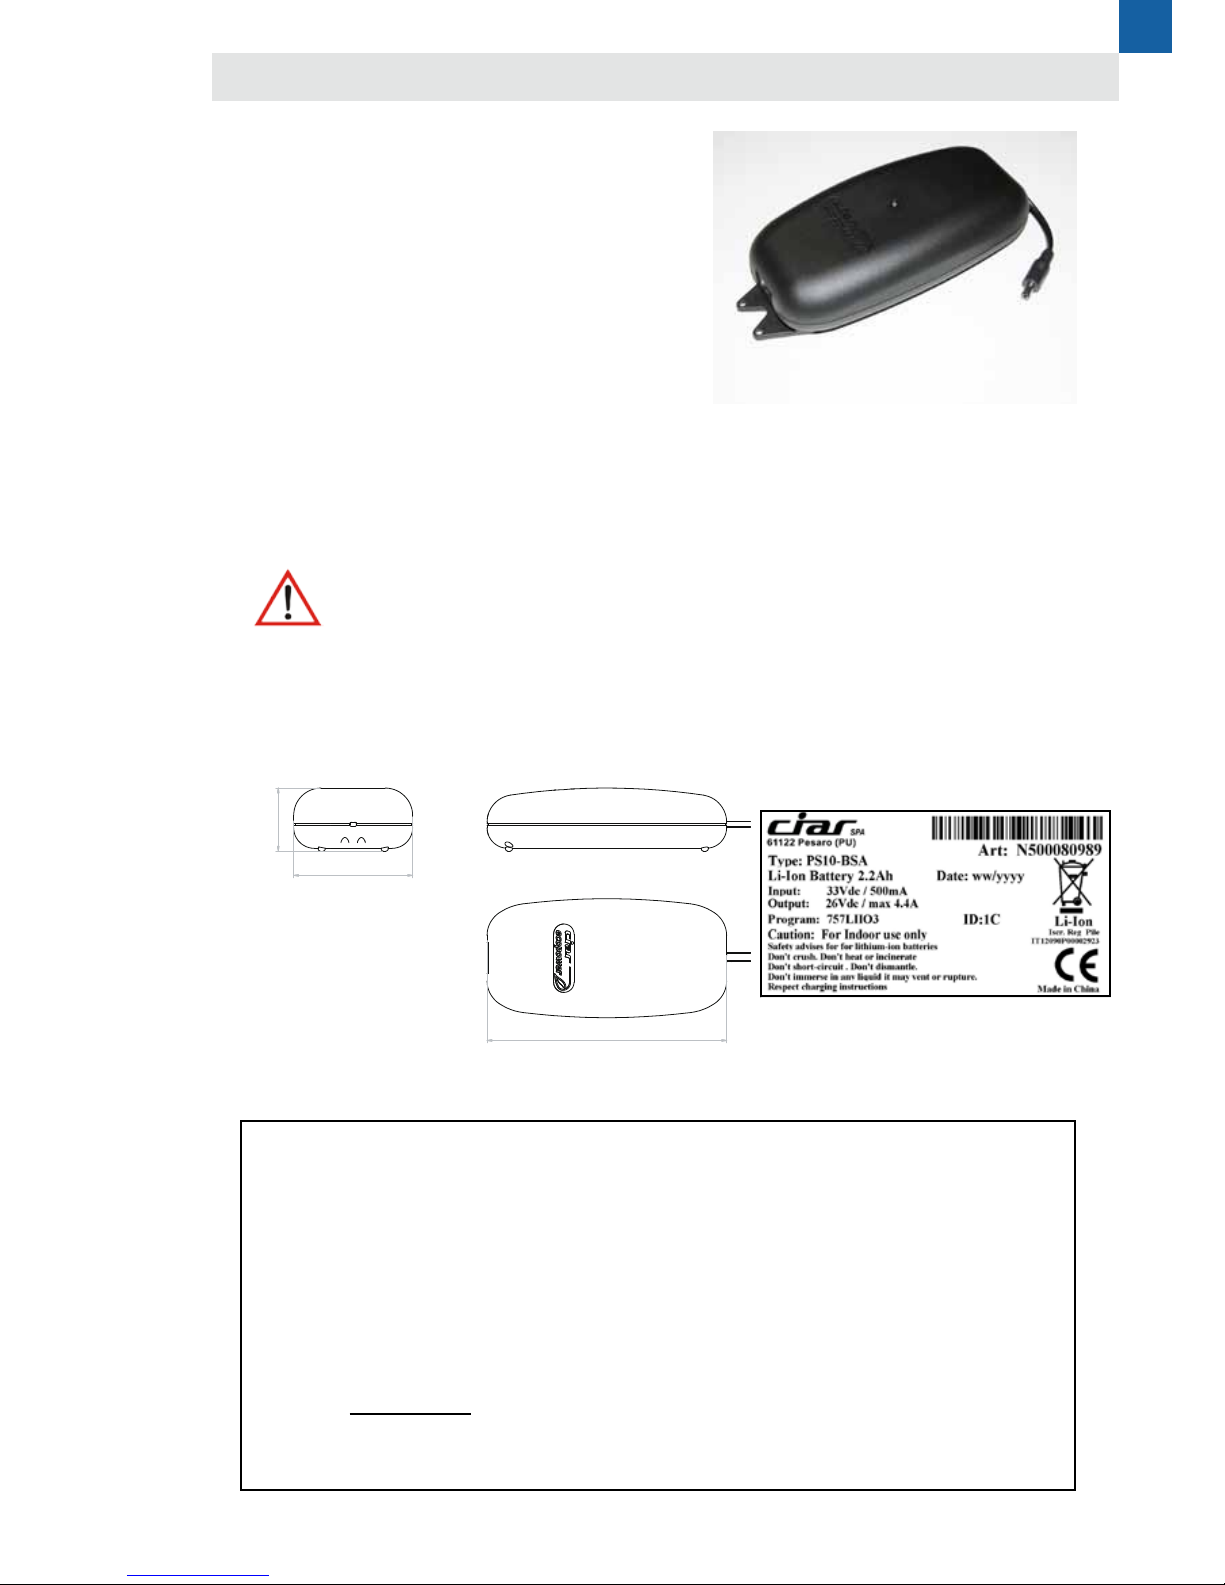
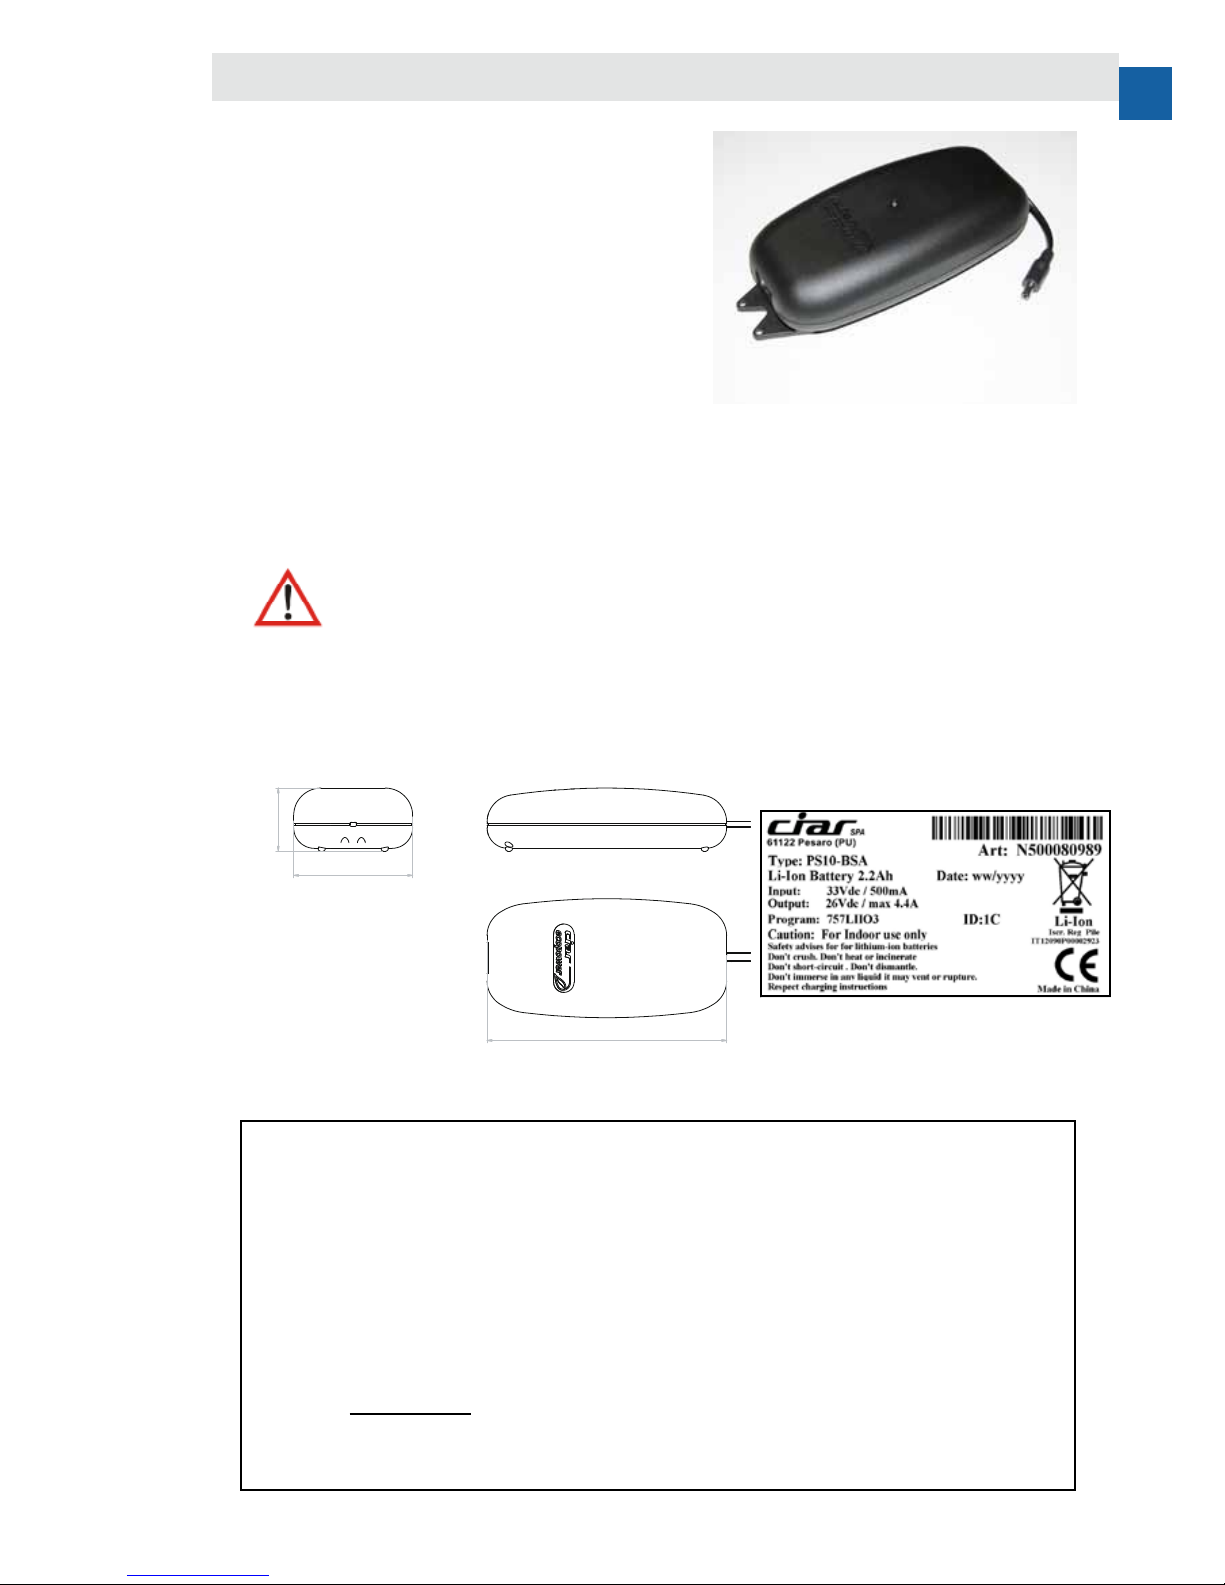
label for PS10BSA 2.2Ah
Technical characteristics:
Input voltage: 29 ÷ 33Vdc
Input current: 500mA
Output voltage 26Vdc
Battery capacity: 2.2Ah
Battery type: Li-Ion
Charge time: Approx. 6 hours
(using the PS05 or PS10 power supply unit provided)
Life cycles: 300 (minimum number of cycles)
Work cycle coupled to all Ciar actuators: 2 min. ON 5 min. OFF
Charge duration:
The number of complete work cycles depends highly on the intensity of use
and environmental conditions. Refer to Table 1 for an example of a cycle calculation.
Warning:
When using for the rst time, fully charge the batteries. A full charge is indicated by the green led near
to the charger connection (see “Chapter: Instruction for PS10BSA recharging” of this manual).
Characteristics of battery type: PS10BSA 2.2Ah - Li-Ion
46
87
175mm
Chair CF56LR03
Weight on chair: 120kg including padding
average current consumed from the Relax to the Lift position: 2A for a duration of 50 seconds
average current consumed from the Lift to the Relax position: 1.2A for a duration of 43 seconds
cycle calculation: 2.2Ah x 3600 sec. = 7920 A sec.
2A x 50 sec. = 100A sec.
1.2A x 43 sec. = 51A sec.
7920 A sec.
Table 1
(100+51)A sec.
= 52 cycles
Example of calculation of autonomy mechanism CIAR
Page 18

Page 19

ENG
As part of the continuous improvement of its products, CIAR SpA reserves the right to modify
the content of this manual without any prior notication.
CIAR SpA will not be held responsible for any problems caused by
improper use of the information supplied in this manual.
Page 20

Page 21
ITA
DESCRIPTION: -
EDITED: M.CHIARAVALLOTTI
DOC.COD.: N470010165
CHECKED: A.ROSATI
APPROVED BY: A.ROSATI
REV.Nr.: 4.2
DATE: 09/01/2015
Kit PS10BSA 2,2Ah - Li-Ion
Manuale d’istruzione
Vi ringraziamo per aver acquistato uno dei nostri prodotti .
Prima di procedere con l’utilizzo leggere attentamente il manuale delle
istruzioni facendo particolare attenzione alle precauzioni d’uso.
Tenere sempre il manuale a portata di mano.
PS10BSA
Alimentatore PS05
per PS10BSA
Alimentatore PS10
per PS10BSA
Page 22

Sommario
Generale 24
Precauzioni d’uso 24
Esclusione di Responsabilità 24
Garanzia 24
Condizioni d’immagazinamento 24
Attenzione 24
Raccomandazioni all’utente nale 25
Garanzia 26
Alimentatore PS05 per ricarica 27
Assemblaggio alimentatore PS05 per PS10BSA 27
Montaggio spina 27
Smontaggio spina 27
Caratteristiche alimentatore tipo: PS05 per PS10BSA 28
Precauzioni d’uso alimentatore per PS10BSA 29
Alimentatore PS10 per ricarica 30
Caratteristiche alimentatore tipo: PS10 30
Istruzioni ricarica PS10BSA 31
Premessa 31
Procedura di ricarica standard 31
Sotto scarica 32
Accessori ausiliari per il kit batteria 32
Kit Power On/Off 32
Kit Power Selector 32
Assemblaggio Kit PS10BSA 33
PS10BSA Versione a pavimento 33
PS10BSA Versione ssabile ad una supercie 33
Caratteristiche batteria tipo: PS10BSA 2.2Ah - Li-Ion 35
Page 23
ITA
Importante
L’elenco delle precauzioni qui riportate servono ad evitare danni a persone o ad oggetti e
si prega di prestarvi la massima attenzione.
Per illustrare i gradi di pericolo o danno verranno utilizzati i seguenti simboli di
ATTENZIONE e MASSIMA ATTENZIONE.
Simboli e loro signicato
MASSIMA ATTENZIONE—Possibilita‘ di grave danno o decesso.
ATTENZIONE—Possibilita‘ di danni a persone o ad oggetti.
Si intendono come “danni a oggetti” : mobili, suppellettili e animali in
generale.
Esempi di simboli
Il simbolo del triangolo indica “Attenzione”. Il contenuto del messaggio sara`
chiarito da una spiegazione, scritta o per immagini, posta dentro o vicino
al simbolo. Nel caso specico qui a sinistra si segnala “pericolo di scossa
elettrica”.
Il cerchio con la barra traversa indica “Divieto”. Il contenuto del messaggio
sara` chiarito da una spiegazione, scritta o per immagini, posta dentro o
vicino al simbolo. Nel caso specico qui a sinistra si segnala “ divieto di
smontare il prodotto”.
Questo simbolo indica “Le norme da rispettare assolutamente”. Il contenuto
del messaggio sara‘ chiarito da una spiegazione, scritta o per immagini,
posta dentro o vicino al simbolo.
Nel caso specico a sinistra si segnalano “le norme generali”.
Page 24
pag.24
Generale
Condizioni d’immagazinamento
Precauzioni d’uso
Esclusione di Responsabilità
Garanzia
Attenzione
Il dispositivo non è adatto per l’uso da parte di bambini o persone disabili se non adeguatamente controllati da
persona responsabile che possa assicurare l’uso del dispositivo stesso in sicurezza. I bambini devono essere
controllati afnché non giochino con il dispositivo.
La C.I.A.R. non risponde del proprio prodotto se non usato secondo le seguenti disposizioni:
- Il ciclo di lavoro è stabilito in 2min lavoro 5 min pausa in abbinamento agli attuatori Ciar
- Solo il personale autorizzato da C.I.A.R. può smontare i componenti del kit
- Non tagliare o toccare con oggetti acuminati i cavi del kit
- Non collegare il kit in maniera diversa da quella esposta nel presente manuale
- Non usare gli elementi del kit con dispositivi diversi da quelli indicati nel presente manuale
- Non collegare il cavo di alimentazione in rete con tensioni diverse da quelle indicate nel
presente manuale e nelle etichette sui dispositivi
- Non bagnare i componenti del kit
- Non avvicinare oggetti metallici ai componenti del kit con la spina inserita nella rete di
alimentazione
- Non usare in ambienti diversi da quelli domestici.
- Non aprire il dispositivo per alcun motivo, le unità mal funzionanti o rotte devono essere restituite al
costruttore o al suo servizio assistenza tecnica o comunque da una persona con qualica similare, in
modo da prevenire ogni rischio.
- Non usare in ambienti umidi o in presenza di sorgenti di calore (es.: forni o raggi solari diretti)
- Nel caso in cui il cavo d’alimentazione è indissolubilmente collegato al dispositivo e risulta
danneggiato, esso dev’essere sostituito dal costruttore o dal suo servizio assistenza tecnica o
comunque da una persona con qualica similare, in modo da prevenire ogni rischio.
Ambiente operativo:
Temperatura: da 0C° a 45C°
Umidità: da 20 a 70% (senza condensazione)
Ambiente di immagazzinamento:
Temperatura: da -20C° a +45C°
Umidità: da 10 a 70% (senza condensazione)
- Se il dispositivo rimane inutilizzato per lungo tempo, a causa della scarica intrinseca delle batterie,
la stessa si scarica lentamente e potrebbe danneggiarsi. E’ raccomandato provvedere alla ricarica completa
almeno ogni 3 mesi.
- Con batteria nuova, dopo circa 1 mese dalla ultima ricarica, in mancanza di utilizzo, la carica residua è
circa la metà di quella nominale per batterie NiMH e circa 80% per batterie Li-Ion.
Il costruttore del prodotto nito nel quale verrà installato il kit motore e l’eventuale kit batteria, deve creare in
autonomia un manuale operativo per il proprio prodotto.
Il contenuto e le note di sicurezza contenuti nel presente manuale possono essere liberamente utilizzate per il
prodotto nito.
Le batterie ricaricabili per loro natura hanno una vita limitata e sono caratterizzate da una graduale perdita di
potenza con il passare del tempo.
Il naturale degrado delle prestazioni e la progressiva perdita di potenza non sono coperti da alcuna garanzia.
Si prega di tenere il PS10BSA scollegato dal carico e / o da dispositivi di controllo durante la conservazione e il
trasporto, per evitare impropri azionamenti pericolosi e/o conseguente scarico della batteria.
Page 25

pag.25
ITA
Raccomandazioni all’utente nale
Non smontare, aprire o scomporre celle secondarie, batterie o il dispositivo completo.
Non esporre celle o batterie a caldo o fuoco, evitare di immagazzinare alla luce diretta del sole.
Non corto-circuitare celle, batterie o il dispositivo intero.
Non chiudere celle, batterie o il dispositivo intero all’interno di luoghi chiusi (cartoni, contenitori metallici,
contenitori in legno..., ecc.) senza proteggere i poli positivi o negativi delle celle o il connettore metallico del
pacco batterie, in quanto si potrebbero creare cortocircuiti accidentali
Non rimuovere celle o batterie dal suo pacco batterie per utilizzarli per altri scopi.
Non sottoporre celle, batterie o il dispositivo intero a colpi meccanici (evitare di far cadere un pacco batterie,
colpirlo quando allocato a terra e evitare di caricarlo con oggetti).
Nel caso di fuoriuscita di sostanze chimiche dal pacco batterie, evitare di entrare in contatto con tali sostanze e
se dovesse succedere lavare immediatamente le parti con quantità cospicue di acqua e richiedere suggerimenti
medici.
Non utilizzare caricatori / alimentatori diversi da quelli prescritti nel presente manuale.
Mantenere il dispositivo batterie fuori dalla portata dei bambini.
Utilizzare solo componenti autorizzati da Ciar.
Mantenere il pacco batteria pulito e asciutto .
Evitare di sporcare le connessioni del dispositivo ed in caso questo avvenisse ripulirli con un panno asciutto.
Le batterie devono essere caricate prima dell’uso, per la carica utilizzare le istruzioni contenute nel presente
manuale.
Non lasciare il pacco batteria connesso durante lunghi periodi di inattività.
Dopo lunghi periodi di immagazzinamento possono rendersi necessari più cicli di carica per ottenere la
massima durata della carica.
Le batterie danno la loro miglior resa quando funzionano a temperature fra i 5 e i 20°C.
Page 26

pag.26
Garanzia
La C.I.A.R. garantisce il proprio prodotto contro difetti di fabbricazione per due anni dalla data di acquisto
dell’utente nale. Durante il periodo di garanzia acconsente, a propria discrezione, a riparare o sostituire i
prodotti che dovessero risultare difettosi.
Il kit non è garantito contro difetti derivanti da:
- Manutenzione impropria o non adeguata da parte del cliente
- Modiche o utilizzo improprio non autorizzato
- Utilizzo del kit in condizioni di impiego non adeguate
- Abuso del ciclo di utilizzo
- I danni di spedizione derivanti da imballaggio non adeguato.
A causa della loro natura, le batterie ricaricabili hanno una durata limitata e sono caratterizzate da una
progressiva perdita di potenza nel tempo.
Questo degrado naturale delle prestazioni e la progressiva perdita di potere non sono coperti da alcuna forma
di garanzia.
STANDARDS
Il prodotto è progettato e costruito conformemente alla:
2004/108/EC AND SUBSEQUENT AMENDMENTS “EMC”
- CEI EN55014-1
- CEI EN 55014-2
- CEI EN 61000-3-3
- CEI EN 61000-3-2
- EN 62233
2006/95/EC AND SUBSEQUENT AMENDMENTS “LOW VOLTAGE”.
- EN 60950-1
- EN 62133
Directive 2006/66/EC of 06/09/2006 and amendment 2008/103/EC of 19/11/2008.
Battery registration number IT12090P00002923
Page 27
pag.27
ITA
Alimentatore PS05 per ricarica
Attenzione
Prima di montare la spina di rete nel dispositivo,
selezionare il tipo che è permesso nel paese in cui viene
utilizzato il dispositivo (vedi capitolo Caratteristiche
Generali Alimentatore per PS10BSA).
1 - Inserire la spina scelta dentro l’alloggiamento
dell’alimentatore, no a battuta (foto 1, 2 e 3).
2 - Premere sull’aletta di bloccaggio della spina (foto 4)
3 - Tenendo sempre premuto spingere verso l’esterno la
spina (foto 5) no alla completa disconnessione (foto 6).
foto 1
foto 4
foto 2
foto 5
foto 3
foto 6
Smontaggio spina
Assemblaggio alimentatore PS05 per PS10BSA
Montaggio spina
Page 28
pag.28
Caratteristiche tecniche:
Tensione di ingresso: 100-240 Vac
Frequenza di ingresso: 50/60Hz
Tensione di uscita: 33Vdc
Corrente di uscita: 500mA
Connessione di uscita:
Cavo di uscita: 150cm. con spina DC 5.5x2.5
Alimentatore: switching
Dimensioni dispositivo: 5 x 7.7 x 4 cm.
Spina
Europea
Etichetta
Spina
Inglese
-
+
Caratteristiche alimentatore tipo: PS05 per PS10BSA
Page 29
pag.29
ITA
Precauzioni d’uso alimentatore per PS10BSA
Il dispositivo non è adatto per l’uso da parte di bambini o persone disabili se non adeguatamente controllati da
persona responsabile che possa assicurare l’uso del dispositivo stesso in sicurezza. I bambini devono essere
controllati afnché non giochino con il dispositivo.
La C.I.A.R. non risponde del proprio prodotto se non usato secondo le seguenti disposizioni:
- Solo il personale autorizzato da C.I.A.R. può smontare i componenti del kit
- Non tagliare o, toccare con oggetti acuminati, i cavi del kit
- Non collegare il kit in maniera diversa da quella esposta nel presente manuale
- Non usare gli elementi del kit con dispositivi diversi da quelli indicati nel presente manuale
- Non collegare ad alimentazioni di rete diverse da quelle indicate nel presente manuale o nella
etichetta sul dispositivo
- Non bagnare i componenti del kit
- Non avvicinare oggetti metallici ai componenti del kit con la spina inserita nella rete di
alimentazione
- Non usare in ambienti diversi da quelli domestici.
- Non aprire il dispositivo per alcun motivo, le unità mal funzionanti o rotte devono essere restituite al
costruttore o al suo servizio assistenza tecnica o
comunque da una persona con qualica similare, in modo da prevenire ogni rischio.
- Non usare in ambienti umidi o in presenza di sorgenti di calore (es.: forni o raggi solari diretti)
- Nel caso in cui il cavo d’alimentazione è indissolubilmente collegato al dispositivo e risulta
danneggiato, esso dev’essere sostituito dal costruttore o dal suo servizio assistenza tecnica o
comunque da una persona con qualica similare, in modo da prevenire ogni rischio.
Attenzione
- Inserire l’unità dentro la presa d’alimentazione in posizione verticale come mostrato nella foto 1
Foto 1
Posizione corretta
Foto 2
Posizione sbagliata
Page 30
pag.30
Esempio etichetta per PS10
Figura A
AVVERTENZE
PRECAUZIONI DI MONTAGGIO:
Fissare il componente utilizzando i fori previsti sulla scatola.
Le parti in sostituzione per questo tipo di prodotto, devono essere uguali a quelle che vengono
sostituite.
Se il cavo di alimentazione ha una connessione permanente per l’unità di alimentazione (vedi gura A)
ed è danneggiato, per evitare ogni rischio deve essere sostituito dal produttore, dal suo servizio tecnico
post-vendita o una persona con qualiche analoghe .
IMPORTANTE
Prima di collegare la presa di corrente alla rete elettrica, vericare che la tensione d’alimentazione
riportata sull’etichetta corrisponda con quella del paese d’utilizzo.
Alimentatore PS10 per ricarica
Caratteristiche alimentatore tipo: PS10
Caratteristiche tecniche:
Tensione di ingresso: 100-240 Vac
Frequenza di ingresso: 50/60Hz
Tensione di uscita: 29Vdc
Corrente di uscita: 2A
Connessione di uscita:
Cavo di uscita: 8 cm. con spina DC 5.5x2.5
(prolunghe di diverse lunghezze disponibili)
Alimentatore: switching
Dimensioni dispositivo: 80 x 150 x 44.5 mm.
-
+
Page 31
pag.31
ITA
Istruzioni ricarica PS10BSA
Premessa
Per un corretto utilizzo della Batteria e per massimizzare la sua vita, è necessario che essa sia mantenuta nelle sue
condizioni ottimali. Pertanto è raccomandabile che non si giunga per qualsivoglia motivo alla “sottoscarica” delle celle
in essa contenute.
In base agli elementi con cui viene abbinata (interruttori meccanici, kit a soramento, Radio kit, centraline di tipo
digitale, ecc...) si hanno diversi consumi in Standby che se prolungati possono portare al fenomeno della sottoscarica.
Per evitare ciò è necessario rispettare opportuni intervalli di ricarica.
E’ raccomandato provvedere alla ricarica completa almeno ogni 3 mesi.
Per indicazioni più dettagliate sull’autonomia e la conseguente denizione degli intervalli di ricarica in base a
particolari congurazioni e/o associazioni di dispositivi si prega di contattare CIAR.
foto 1a
foto 1b
foto 3
foto 2
1 - Collegare la spina DC dell’alimentatore PS05 o PS10 alla presa
DC del PS10BSA (foto 1a, 1b)
2 - Connettere l’alimentatore PS05 o PS10 alla presa elettrica
domestica.
3 - Il led presente sopra la presa DC sulla batteria farà 2 brevi
lampeggi arancioni (PS10BSA Li-Ion) oppure 1 breve lampeggio
arancione (PS10BSA NiMH).
A questo punto si accenderà il led rosso sso, indicando che la
batteria si stà ricaricando (foto 2)
Nota per PS05: Anche il PS05 è provvisto di led ad indicare che il
dispositivo è correttamente connesso alla rete elettrica domestica.
4 - Quando il led diventa verde, la carica è terminata (foto 3).
Disconnettere l’alimentatore dalla presa di corrente e sucessivamente
disconnettere la presa DC dal PS10BSA.
Procedura di ricarica standard
Page 32

pag.32
Nel caso in cui la batteria ha raggiunto la condizione di “sotto scarica”, la procedura di carica standard potrebbe non essere
sufciente. È comunque possibile tentare il recupero della batteria in uno dei due seguenti modi:
1) Se il led inizia a lampeggiare (rosso) circa 5 minuti dopo il collegamento della tensione di alimentazione (PS05 o PS10)
per la batteria, questo signica che c’è stato un errore durante la carica. Si prega di scollegare l’alimentazione, attendere
circa 1 minuto e collegare di nuovo l’alimentazione. Ripetete questa sequenza 3 o 4 volte
2) scollegare completamente la batteria dalla poltrona o divano e riprovare la procedura di cui al punto (1)
Se l’evento del led rosso lampeggiante, persiste dopo 3 o 4 tentativi, ciò signica che le celle della batteria sono danneggiate e / o hanno raggiunto la ne della loro vita, quindi l’intera confezione PS10BSA deve essere sostituita.
Utilizzando il PS10
Questo dispositivo permette l’impiego dei motori della poltrona o divano anche quando la batteria è completamente scarica ed è in fase di carica attraverso l’alimentatore PS10.
Utilizzando il PS05
Il PS05 può fornire solo una piccola quantità di corrente necessaria per caricare la batteria, ma non sufciente a fornire la
quantità di energia per un kit motore. Pertanto, l’uso della poltrona / divano non è possibile durante la carica.
Completata la carica (led verde) del PS10BSA, scollegare il PS05 dalla batteria prima di utilizzare la poltrona o divano.
In ogni caso, grazie a questo dispositivo è possibile provare a eseguire la sequenza sopra indicata (“Sotto scarica”) senza
scollegare sicamente la batteria dalla poltrona o divano.
Ricordiamo che CIAR S.P.A. Può fornire PS10BSA CON IL KIT POWER SELECTOR già installato
all’interno del PS10BSA BATTERIA (batteria solo 2.2Ah-Li-ion)
CIAR SpA è in grado di fornire ai clienti alcuni accessori destinati a migliorare le prestazioni e aumentare la durata della
batteria quando vengono utilizzati in combinazione con sensori a soramento, kit radio, kit unità di alimentazione digitali
o qualsiasi altro dispositivo, che ha bisogno di un minimo assorbimento costante di energia dalla batteria.
Questo dispositivo, costituito da un elegante pulsante, permette all’utente nale di spegnere completamente la batteria
massimizzando così l’autonomia. Per ulteriori informazioni si prega di consultare il manuale utente specico:
- “Kit Power Off - Mono luce” (per PS10BSA-1.2Ah-NiMH e PS10BSA-2.2Ah-Li-Ion)
- “Kit Power Off - light Dual / Indicazione batteria scarica” (per PS10BSA-2.2Ah-Li-Ion)
Inoltre, grazie a questi dispositivi è possibile cercare di eseguire la sequenza sopra indicata (“Sotto scarica”) senza scollegare sicamente la batteria dalla poltrona o divano.
Sotto scarica
Accessori ausiliari per il kit batteria
Kit Power On/Off
Kit Power Selector
Page 33
pag.33
ITA
Assemblaggio Kit PS10BSA
1 - Il dispositivo PS10BSA è utilizzato a pavimento come un dispositivo di accompagnamento senza alcun
montaggio richiesto (foto 1).
Attenzione
- Non calpestare il connettore di uscita e l’involucro di plastica e non appoggiarci sopra oggetti pesanti.
1 - Scollegare il dispositivo qualora fosse ancora
connesso.
2 - Ribaltare il dispositivo e posizionare il piedino come
mostrato in foto 2 e 3, facendo in modo che i fori del lato
più lungo corrispondano ai riferimenti presenti sul fondo
della scatola.
foto 1
PS10BSA Versione a pavimento
PS10BSA Versione ssabile ad una supercie
foto 2
foto 3
Page 34
pag.34
Attenzione
- Prima di riconnettere il dispositivo, dopo l’operazione di montaggio dei piedini, vericare che l’involucro sia
ancora completamente integro.
3 - Inserire la vite nel foro centrale e con un cacciavite
avvitare completamente.
4 - Ripetere le operazioni dei punti 2 e 3 per montare il
secondo piedino, sul lato opposto del dispositivo.
foto 5
foto 4
Page 35
pag.35
ITA
label for PS10BSA 2.2Ah
Caratteristiche batteria tipo: PS10BSA 2.2Ah - Li-Ion
46
87
175mm
Chair CF56LR03
Peso sulla poltrona: 120kg comprensiva di imbottitura
corrente media consumata da posizione Relax a posizione Lift: 2A per una durata di 50 secondi
corrente media consumata da posizione Lift a posizione Relax: 1.2A per una durata di 43 secondi
calcolo cicli: 2.2Ah x 3600 sec. = 7920 A sec.
2A x 50 sec. = 100A sec.
1.2A x 43 sec. = 51A sec.
7920 A sec.
Tabella 1
(100+51)A sec.
= 52 cicli
Caratteristiche tecniche:
Tensione di ingresso: 29 ÷ 33Vdc
Corrente di ingresso: 500mA
Tensione di uscita 26Vdc
Capacità delle batterie: 2.2Ah
Tipo di batteria: Li-Ion
Tempo di carica: Appross. 6 ore
(usando l’alimentatore in dotazione PS05 o PS10)
Cicli di vita: 300 (numero minimo di cicli)
Ciclo di lavoro abbinato a tutti gli attuatori Ciar: 2 min. ON / 5 min. OFF
Durata della carica:
Il numero di cicli completi di lavoro, dipende fortemente dalle condizioni di uso più o meno intensivo
e dalle condizioni ambientali. Per un esempio di calcolo di cicli, vedi tabella 1
Attenzione:
Al primo utilizzo ricaricare completamente le batterie, la carica completa è segnalata dal led verde
vicino al connettore del caricabatterie (vedi paragrafo 7.3 del presente manuale).
Esempio di calcolo autonomia su meccanismo CIAR
Page 36

Page 37

ITA
Per il continuo miglioramento dei propri prodotti, la ditta CIAR SpA si riserva il diritto di modicare
il contenuto del manuale senza alcun preavviso.
La ditta CIAR SpA non si assume alcuna responsabilità per eventuali problemi che potrebbero
sorgere nell’utilizzo improprio delle informazioni contenute in questo manuale.
 Loading...