

CIAAT CTC-940 User Manual
user manual
CTC-940
CONTENTS
PREFACE
Announcements
Chapter 1. Getting ready
1.1 Checking box contents
1.2 Appearance of the printer and key functions
1.3 Installation
1.3.1 Ribbon Installing
1.3.2 Printer Connecting (Power & USB)
1.3.3 Card Placing
Chapter 2. Start Printing
2.1 Printer driver installation
2.2 Print settings
Chapter 3. Printer maintenance
3.1 General warranty information notice announcement
3.2 Routine / Regular printer cleaning
3.2.1 Using cleaning card
3.2.2 Using dust arrester
3.2.3 Cleaning TPH (Thermal Print Head)
Chapter 4. Help diagnosis
4.1 Warnings / Error messages and diagnosis
4.1.1 LCM control panel
4.1.2 Control panel warning messages
4.2 Identify installed driver software version
4.3 Troubleshooting
4.3.1 Printing problems
4.3.2 Releasing from card jams
4.4 Technical support
Appendix A: Technical Specifications
01
03
03
04
06
06
07
08
10
10
11
12
12
13
14
15
16
17
17
17
18
19
20
20
21
22
23
English
user manual
CTC-940
Copyright
CIAAT CTC-940 Card Printer © 2011. All rights reserved.
Trademarks acknowledgement
CIAAT CTC-940 Card Printer is a trademark of CIAAT Co.,Ltd. product. All other trademarks belong to their
respective holders.
Warranty
Refer to the warranty card supplied with your card printer package box for warranty terms, conditions
and limitations.
Copyright notice
01
English
Users must comply with the copyright regulations applicable in their own country. This manual must not be
reproduced, translated, photocopied, transmitted or any kind to be duplicated in whole or in part, for any
reasons and by any electronic or mechanical means whatsoever without the express a written consent of the
CIAAT Co.,Ltd.
All the information contained in this document is subject to changed without prior notice.
CIAAT Co.,Ltd. cannot be held liable for any errors that may be found in this manual, or for any loss or
damage arising accidentally or as a result of dissemination or use of this manual.
user manual
CTC-940
Knowing your new printer
Warranty Registration
Please do take time to register online at www.ciaat.net and you will be rewarded with a special offer after
registration is completed.
Assistant Icons
The following assistant icons will show up in this guide to indicate important information to be noticed.
02
We thank you for choosing CIAAT CTC-940 card printer, the beginning of our long term successful association with you together. With CIAAT CTC-940 card printer, you will be able to enjoy easy operating, high
quality plastic cards printing conveniently for personalized ID card, credit cards, membership cards and
badges from various level of thickness and color style. Please ensure CIAAT CTC-940 card printer to use the
original consumables from CIAAT Co.,Ltd. For more details, visit our website at www.ciaat.net .
Getting ready to start
The main purpose of this user guide is to guide you to set up your printer step by step. Please take time
to read through this carefully and complete the installation before start operating. This will save you time
during installation and use, help you to understand more about this printer and its features. Should you
discover any errors in this guide, please do help us by emailing us at info@ciaat.net.
English
Special warning notice More in-depth information notice
user manual
CTC-940
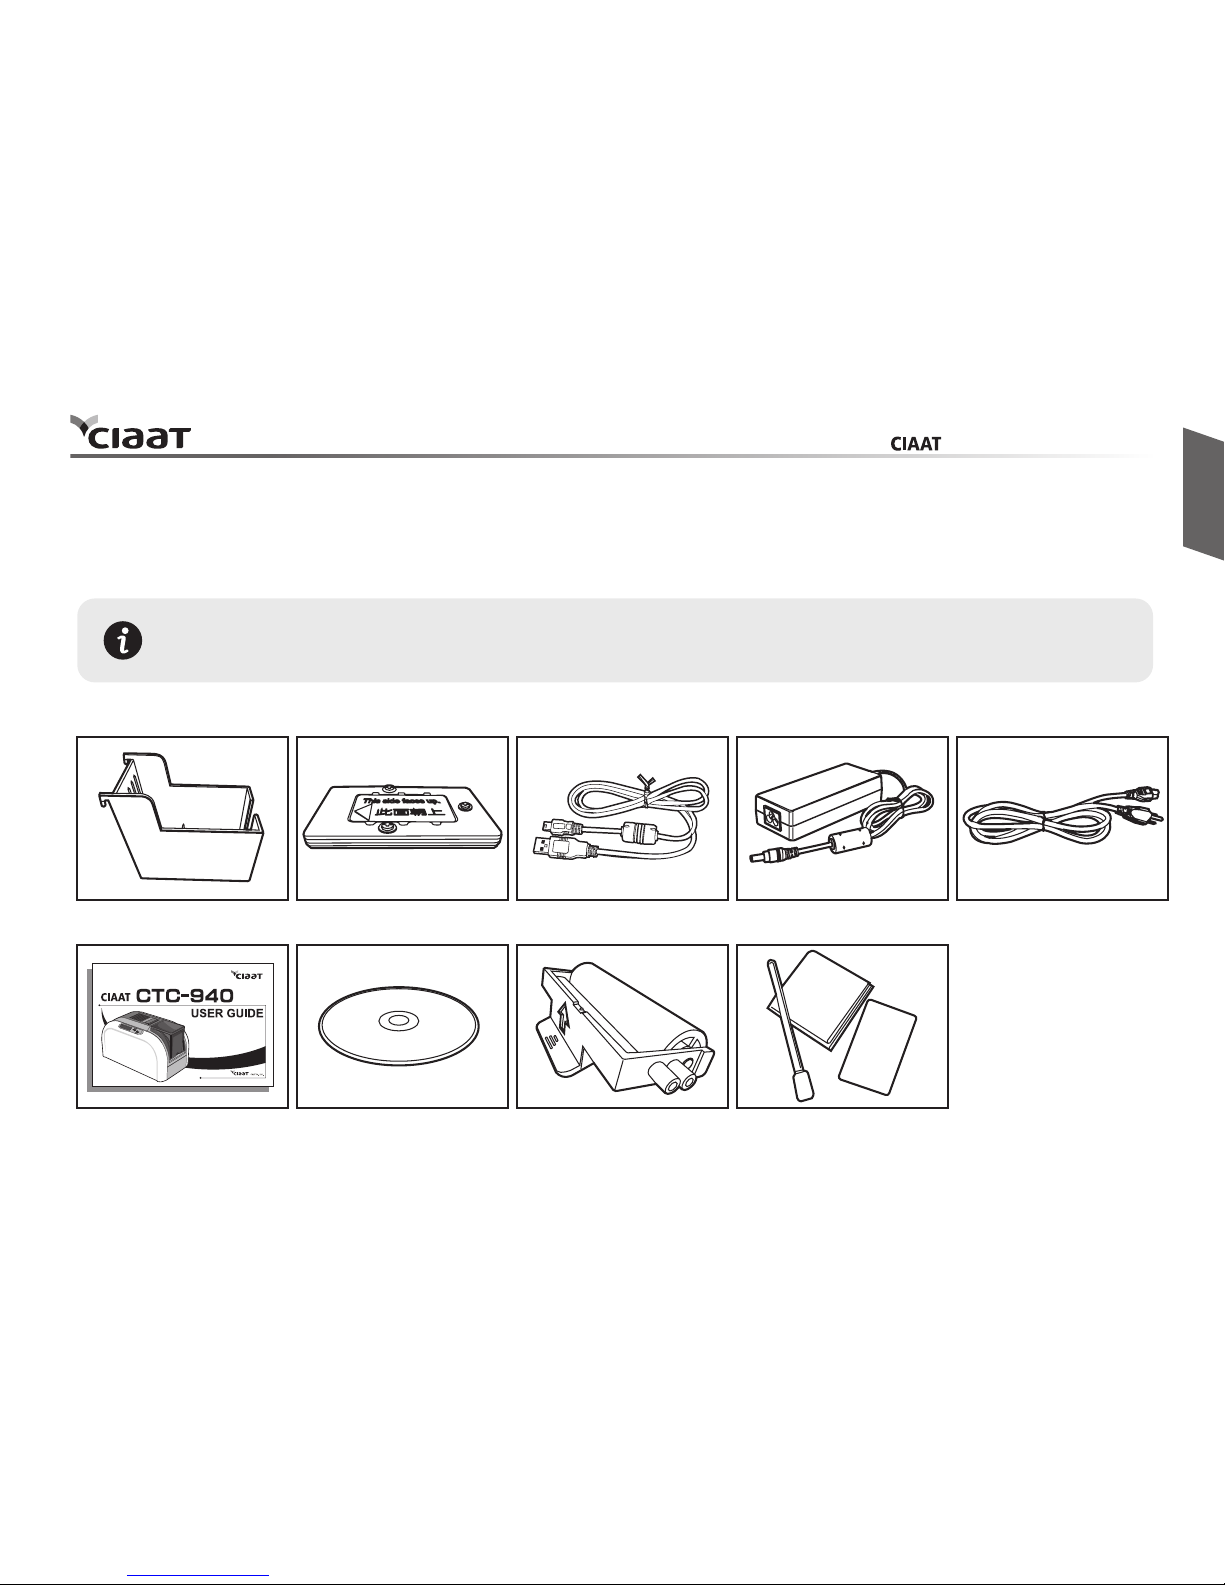
1.1 Checking box contents
Accessories provide with your CIAAT CTC-940 card printer:
Chapter1. Getting ready
CIAAT CTC-940 card printer is supplied with several accessories and please do take time to check it closely.
The accessories contents list may vary depending from your region/location.
Card output hopper Weight module USB cable Power adaptor Power cord
User guide Master CD
Dust arrester
with cleaning roller
Cleaning kit
03
English
If any of below item is missing, please contact your nearest CIAAT customer support facility of
your local CIAAT CTC-940 card printer distributor.
user manual
CTC-940

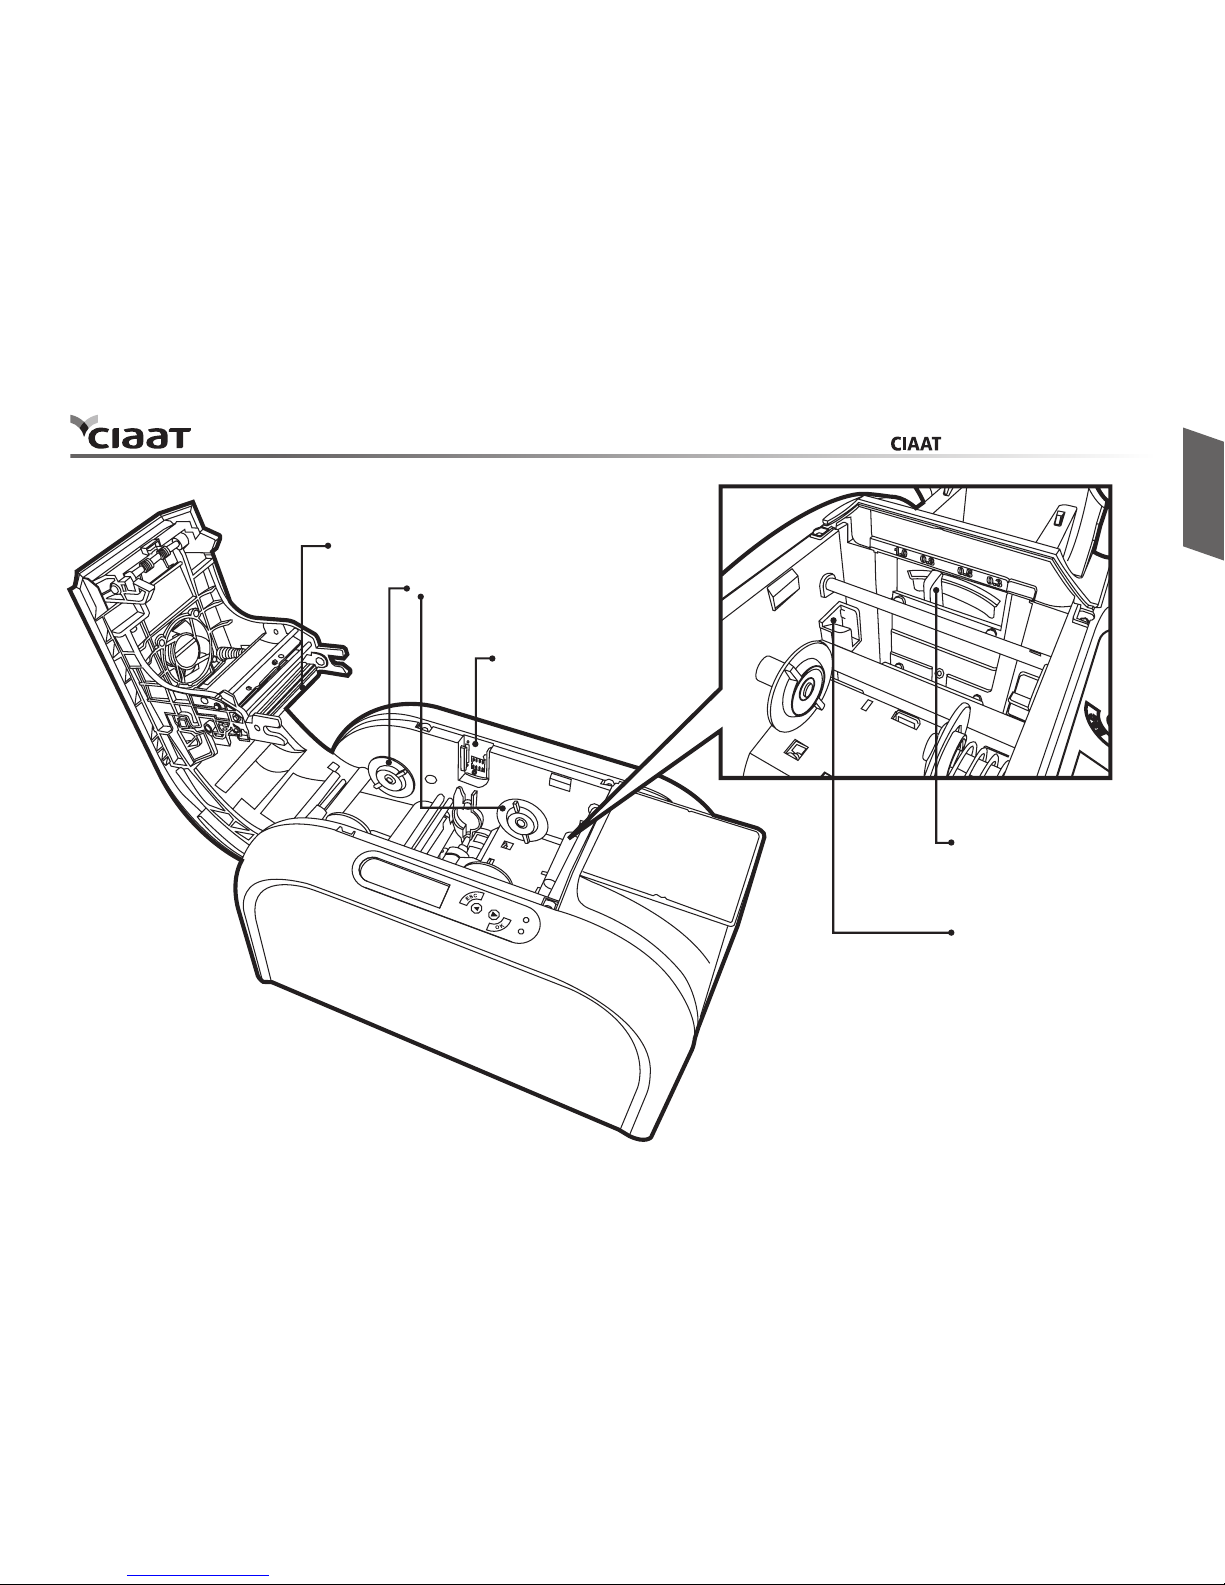
1.2 Appearance of the printer and key functions
Top cover opening button
LCM control panel
Input card cover
Input card feeder (100cards)
Spec. label
Manual releasing card
jam screw socket
(flathead screwdriver)
Smart IC encoding expansion socket (Optional)
Manual card feed
input location
Ethernet expansion socket (Optional)
Power socket
USB cable connection socket
ON / OFF
hard power switch button
04
English
user manual
CTC-940
05
English
Thermal print head
Ribbon ID key socket
Card thickness adjustor
Dust arrester socket
Ribbon spool fitting position
(color coded)
user manual
CTC-940
1.3 Installation
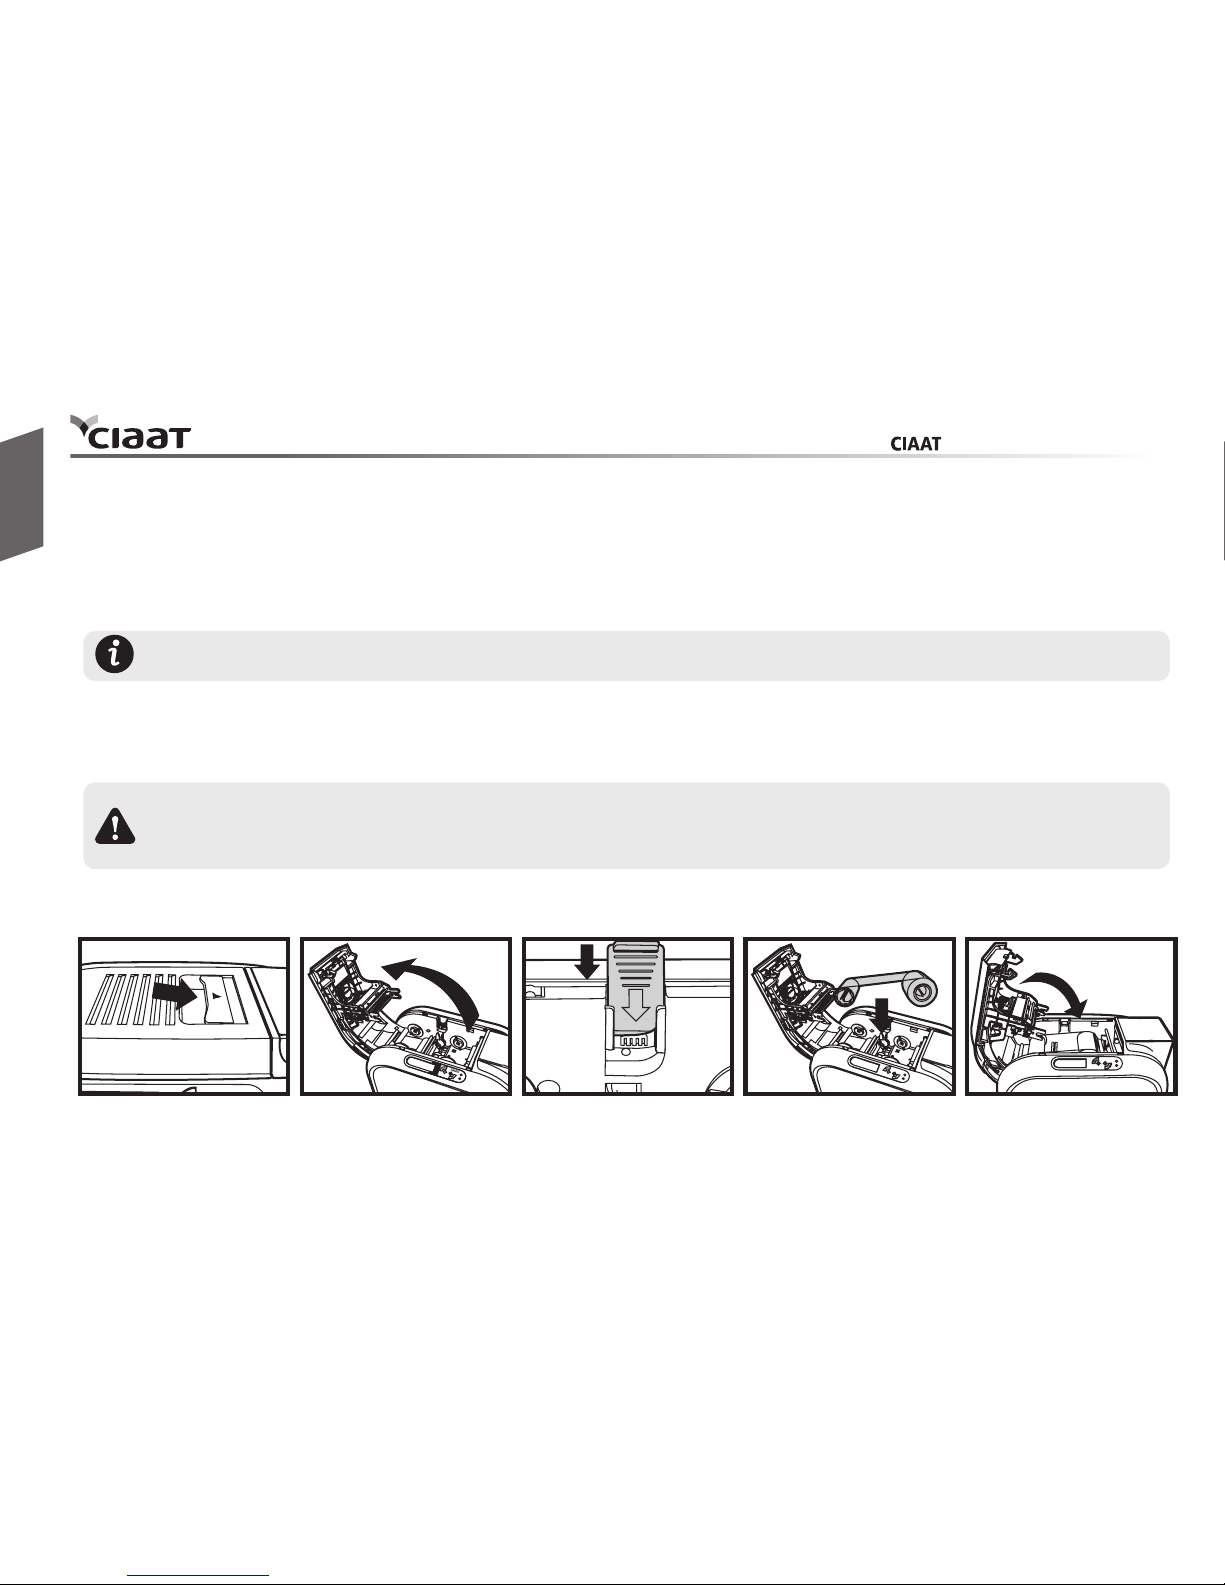
1.3.1 Ribbon Installing
a. Open the top cover.
b. Place the ribbon ID key into ID key socket.
c. Insert the ribbon as shown.
abcd
d. Close the top cover slowly and press until a click sound is heard.
06
Using the original CIAAT CTC-940 Card Printer Ribbon consumables will optimize your printer’s performance and avoid causing damages to it. Use of non CIAAT original consumables will void the
manufacturer’s warranty policy for the printer.
English
Please ensure your ribbon format is corresponded to installed ribbon ID key’s label.
Please make sure your ribbon film is facing top side during installation and also ensure the color
of ribbon spool/core is matching to the ribbon adapter/holder.
To optimize printing quality, please engage in printer cleaning every time when the ribbon is changed.
user manual
CTC-940
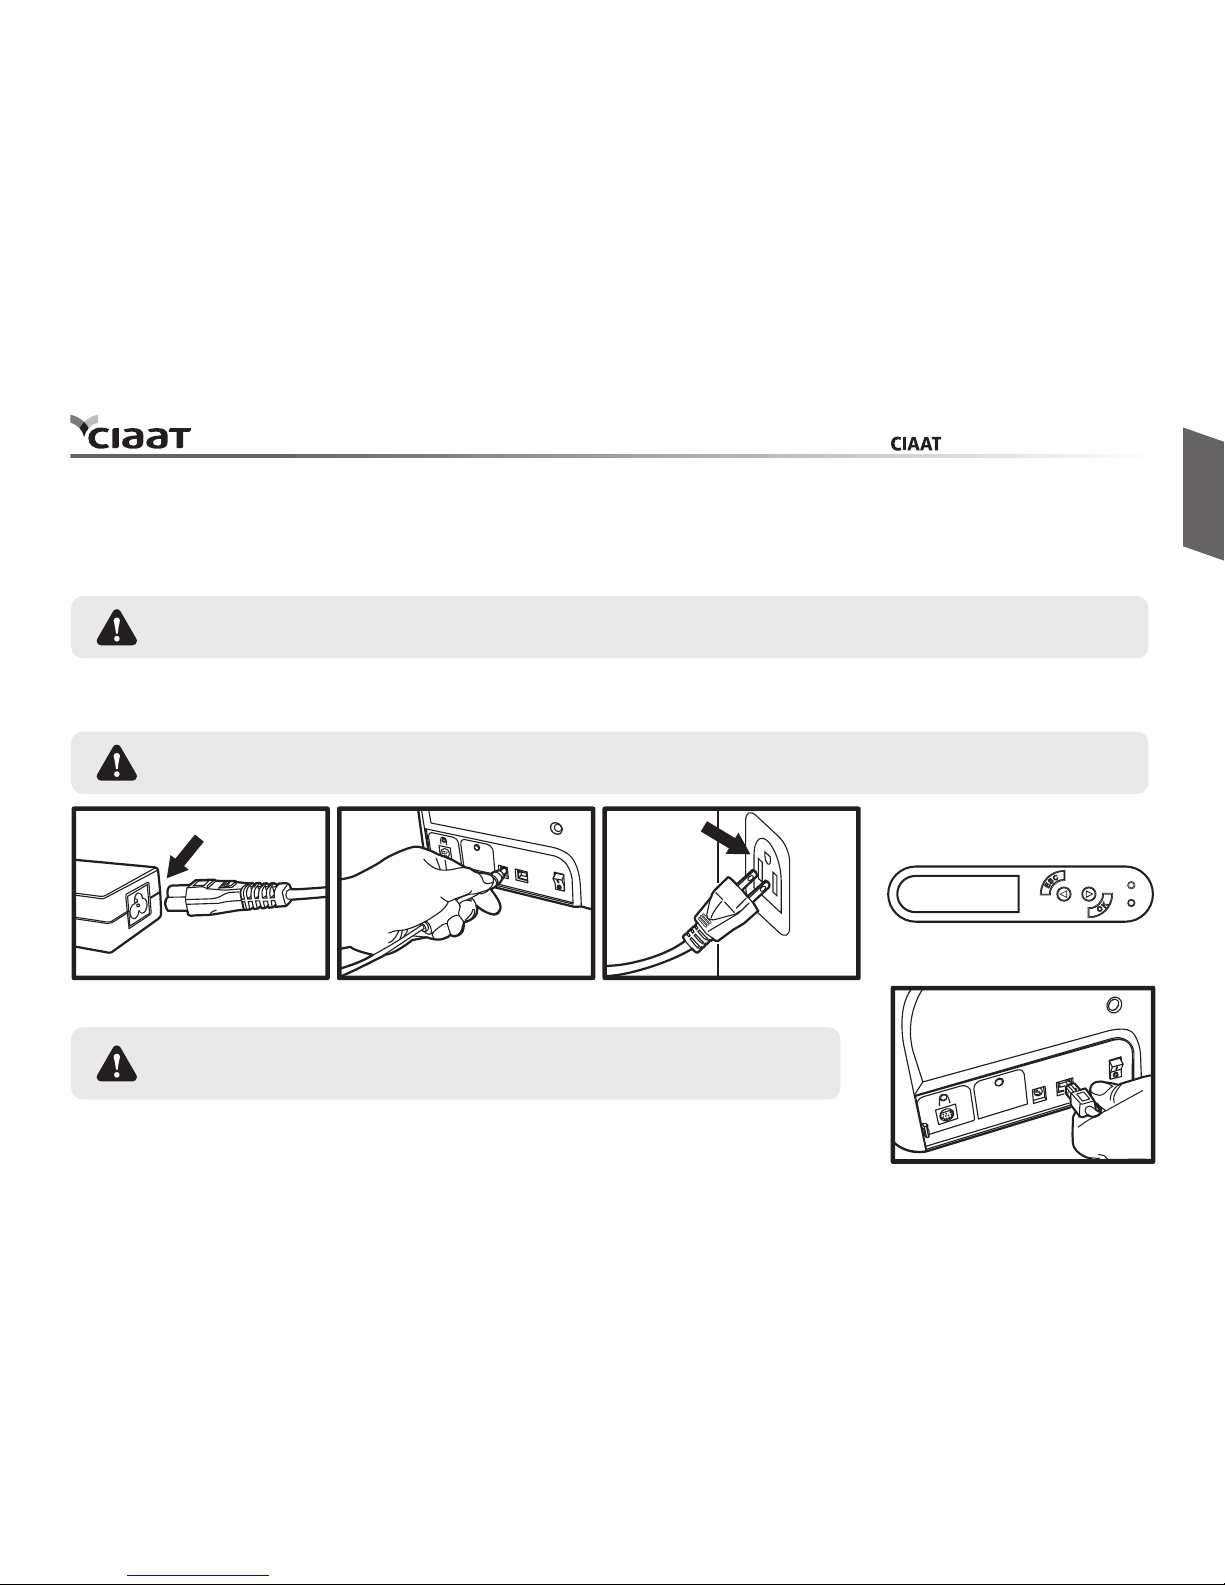
1.3.2 Printer Connecting (Power & USB)
Power
USB
a. Connect power cable to power adaptor, then plug the power connector to printer’s power socket
b. Plug the power plug to an earthed power socket
c. Switch ON from the ON/OFF button to power up the printer, then the LCM control panel should light up
and display “ready” message which indicates the printer is under working condition.
Refer to the print driver installation section of this user guide for more details,
and follow the instruction carefully.
07
English
Please make sure the power plug is connected into a properly protected and earthed
electrical source.
Please make sure the print driver software is fully installed before
connecting the USB cable to your printer device.
For your own safety, please make sure the power cable is always unplugged before attempting
any service maintenance work.
ab c
d
READY
user manual
CTC-940
 Loading...