

Page 1
DIGITAL PHOTO PRINTER
Operation Manual
Page 2

● Keep this manual near the printer and operators can refer to this manual
periodically.
● In case, lost or damaged this manual, contact your dealers.
● In the case of transfer, do not forget to put this manual together with the printer.
Notice
Handling of this Manual
1. All rights reserved. No part of this operation manual covered by the copyright herein
maybe reproduced or copied in any form or by any means, including translation, without
the written permission of CIAAT Co., Ltd.
2. The specifications in this operation manual are subject to change without prior notice.
3. In case of having any difficulties or finding the fault in this manual, your information to
CIAAT Co., LTD will be highly appreciated.
Introduction
This manual describes detailed instructions for handling of and basic operation of Digital
Photo Printer BRAVA21.
We will describe this product as “the printer” in the manual.
Read this manual thoroughly to understand how to install and operate the printer before
using it.
Page 3

CONTENTS
PREFACE
Chapter 1. Important Safety Instruction ・・・・・・・・・・・・・・・・・ 1
Environments ・・・・・・・・・・・・・・・・・・・・・・・・・・・・・・ 1
Handling Instruction ・・・・・・・・・・・・・・・・・・・・・・・・・・ 2
Handling Instruction for Consumable and Printed Output ・・・・・・ 3
Chapter 2. Installing and Set Up ・・・・・・・・・・・・・・・・・・・・・ 4
Unpacking and Checking the Accessories ・・・・・・・・・・・・・・・・ 4
Parts Name and Function ・・・・・・・・・・・・・・・・・・・・・・・・ 5
Printer Status Lamps Name and Printer Status ・・・・・・・・・・・・ 6
Fixing An ti-tip Plate ・・・・・・・・・・・・・・・・・・・・・・・・・・ 6
Connecting Power Cable ・・・・・・・・・・・・・・・・・・・・・・・・・ 7
Connecting USB Cable ・・・・・・・・・・・・・・・・・・・・・・・・・ 7
Installing Paper Guide ・・・・・・・・・・・・・・・・・・・・・・・・・・ 7
Setting Ink Ribbon ・・・・・・・・・・・・・・・・・・・・・・・・・・・・ 8
Loading Paper ・・・・・・・・・・・・・・・・・・・・・・・・・・・・・・ 9
Installing Tray ・・・・・・・・・・・・・・・・・・・・・・・・・・・・・・ 10
Installing Dust Box ・・・・・・・・・・・・・・・・・・・・・・・・・・ 10
Transporting the Printer ・・・・・・・・・・・・・・・・・・・・・・・・ 10
Chapter 3. Routine Maintenance ・・・・・・・・・・・・・・・・・・・・・ 11
Cleaning of Thermal Head, Platen ・・・・・・・・・・・・・・・・・・・ 11
Cleaning of Outer Cover ・・・・・・・・・・・・・・・・・・・・・・・・・ 12
Cleaning of Filter ・・・・・・・・・・・・・・・・・・・・・・・・・・・・ 12
Chapter 4. Error Handling ・・・・・・・・・・・・・・・・・・・・・・・・ 13
Printer Status Lamps are displayed in red ・・・・・・・・・・・・・・・・ 13
Failure Symptoms ・・・・・・・・・・・・・・・・・・・・・・・・・・・・ 13
Paper Jam ・・・・・・・・・・・・・・・・・・・・・・・・・・・・・・・・ 14
Power Supply Interrupted during Printing ・・・・・・・・・・・・・・・ 14
When the Ribbon is snapped ・・・・・・・・・・・・・・・・・・・・・・・ 14
Chapter 5. In order to more comfortably use ・・・・・・・・・・・・・・・・ 15
Paper Pre-Cut function can be turned off through the printer driver・・・ 15
For longer Printer usage ・・・・・・・・・・・・・・・・・・・・・・・・・ 15
For the Customers・・・・・・・・・・・・・・・・・・・・・・・・・・・・・・16
Chapter 6.Specifications・・・・・・・・・・・・・・・・・・・・・・・・・・・ 17
After-sales Service ・・・・・・・・・・・・・・・・・・・・・・・・・・・・・ 18
Page 4

Page 5
Attention: Explanation about the cause of
the trouble and the environmental
condition.
Caution: Inappropriate handling
can cause the wound for the users
and/or cause the physical damage.
Warning: Inappropriate handling
can cause the death or serious
wound.
Attention: Do not place the printer under
the low temperature such as ski resort,
skating rink or open-air with direct
sunlight.
Warning: Do not block the
openings of the printer. In case,
the opening blocked, the heat will
remain inside and it can cause
the fire.
Caution: Do not place the printer
on rickety place and/or inclined
place.
Printer may fall down or tumble
and it can cause injury.
Caution: Do not place the printer
under humid or dusty place.
It can cause a fire, electric shock
or printer problem.
Do not place the printer with
dust, sand and high humidity
such as bathing place, bathroom,
hot spring, on the street.
Warning: Do not put vase,
flowerpot, and cup with water
inside or metric items.
In case the water spilt or metric
items fall into the printer, it can
cause the fire and electric shock.
Warning: Do not insert or fall the
metallic items or flammable items
into the printer through the
openings of the printer, it can
cause the fire and electric shock.
Caution: Do not let children to
touch the printer or the cables.
It can cause accidents or electric
shock.
Chapter 1. Important Safety Instruction
This manual provides detailed instructions for
the safety use of the printer.
Read this manual before operating the printer
to ensure to have proper use.
◆In this manual, there are notes that require
special attention.
◆ For your safety operation, Safety notices are
separated as follows;
◆It is difficult to forecast all the danger in
setting and use of the printer.
Therefore, warnings in this Operation
Manual, in the other documents on the
printer cannot cover all the cases.
In case of performing the operation or
maintenance which are not described in this
manual, all the concern for the safety have to
be taken care of at the customer side.
◆Operations and the notification for the
maintenance described in this manual and
other documents are for the proper use of the
printer.
In case of using the printer for the other
purpose, all the concern for the safety has to
be taken care of at the customer side.
◆Do not perform the operation which are
prohibited in this manual and other
documents.
◆The contents that cannot be printed due to a
failure while using the use of this printer are
not guaranteed.
1
Environments
To use the printer safety, please pay attention
to the followings:
Page 6

Attention: At installation, appropriate
interface cable will be required with your
computer.
Warning: Secure the power cable
firmly.
Warning: The thermal head
reaches high temperature during
operation but this is normal. Do
not touch the thermal head.
Warning: Do not attempt to
service the printer beyond the
instruction specified in this
document. In case, impossible to
recover from the problem, please
contact to the dealers or service
center.
Warning: This product must be
grounded, and always used with
only the specified power cable or
the power cable accompanying
this product.
If the product is used without
ground, and current leakage
occurs, fire or electrical shock is
most likely to result, and also
cause signal-receiving
interference to a radio, a
television receiver, and other
similar electric appliances.
If the proper grounding
connection is not possible, please
contact to the dealers or service
center.
Warning: Do not dismantle or
remodel the printer.
Some sections of the printer
contain a high voltage or become
very hot. Ignoring this warning
may cause electric shock, fire, or
burns.
Warning: Lift the printer from its
box and put it onto a flat table or
desk.
Warning: Be careful when you
transport the printer on the
slippery floor.
Warning: In case you drop the
printer, firstly turn off the power
of the printer and remove the
power cable, then contact the
dealers or service center. To use
the printer without any checking,
can cause the fire or electric
shock.
Warning: At nearly 10Kg, the
printer is too heavy to be lifted by
one person.
Also please take a good care of
your hands and fingers when
lifting the printer from the box.
Attention: Touching the surface of the
thermal directly can cause the damage to
thermal head. When a hard object get
into the printer, it can cause the damage to
the printer mechanism. In such case,
please do not use the printer.
Chapter 1. Important Safety Instruction
Handling Instruction
In handling the printer, please pay attention to
the followings;
2
Page 7
Attention: Paper Handling
・Use the paper specified by CIAAT Co.,
LTD.
・Store the paper flat.
・ Store the paper in a dry and dark place
to avoid the direct Sunlight.
(Temperature less than 30C, Humidity
less than 60%).
・Do not touch the paper surface before
Attention: Ink Ribbon Handling
・ Use the ink ribbon specified by CIAAT
Co., LTD.
・ Store the ink ribbon in cool place to
avoid the direct sunlight.
(Temperature less than 30C, Humidity
less than 60%)
Attention: Printed Output Handling
・Store the printed output in a dark place to
avoid the direct sunlight.
・Store the printed output away from the
organic fluid such as benzene, thinner
and alcohol which may change or
deteriorate the colors.
Caution: When abandon the ink
ribbon, please handle it as harmful
industrial waste.
Caution: Be careful not to injure
your hands with the paper edge
when handling paper.
Chapter 1. Important Safety Instruction
Handling Instruction for Consumable and
Printed Output
In handling the ink ribbon, paper and printed
output, please pay attention to the followings;
3
Page 8
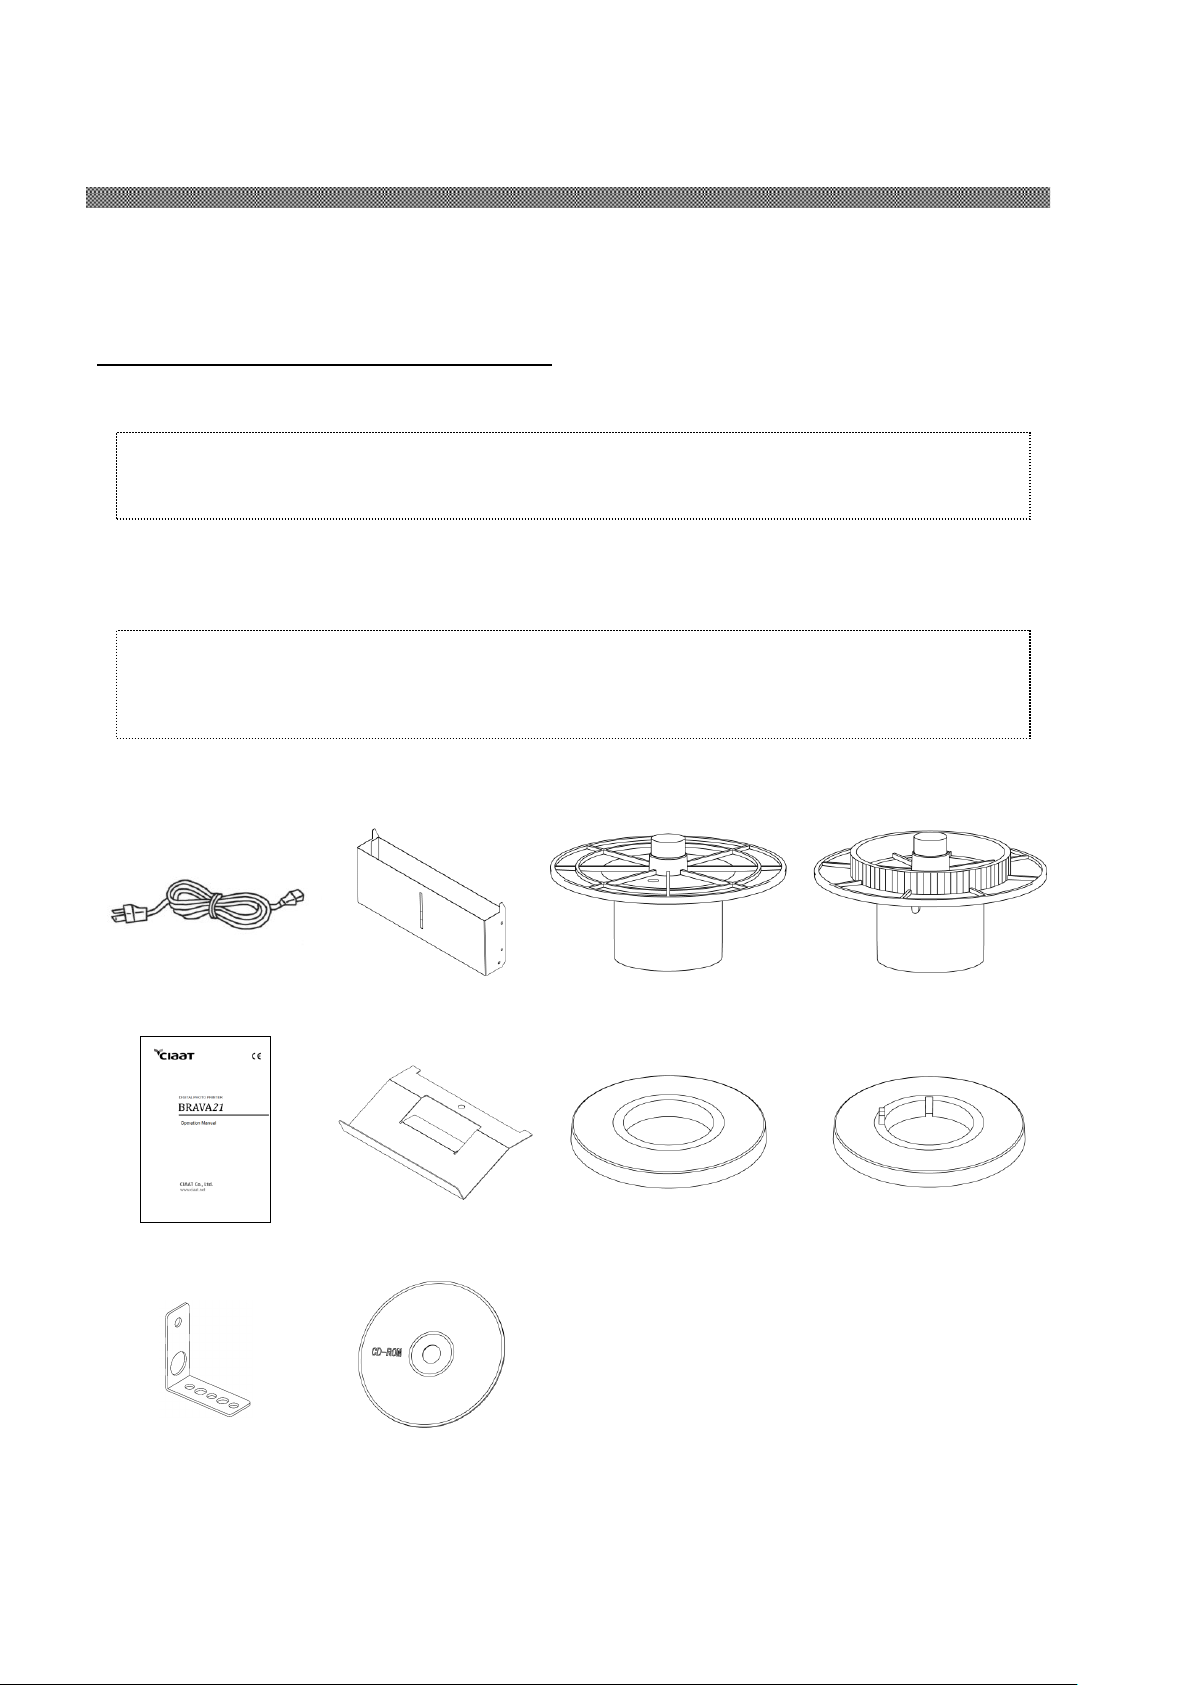
Power Cable
Dust Box
Paper Flange(Whit e )
Paper Flange (Blu e )
Operation Manual
Tray
Spacer(White)
Spacer(Blue)
Anti-tip Plate
Driver CD
Attention: Keep the packaging materials. The box and protection materials are necessary
when moving or transporting the printer. Make sure that they are retained.
Caution: This printer weighs about 10Kg. Please handle it carefully.
When lifting the printer, always hold bottom of printer. Otherwise, the printer
may be damaged.
Chapter 2. Installing and Set Up
This chapter explains the unpacking and set up of the printer.
Before proceeding to this chapter, please make sure to read Chapter 1. Important Safety
Instruction.
Unpacking and Checking the Accessories
1. Open the box and remove the box containing the accessories and protection materials.
2. Take out the printer by holding bottom of the printer.
3. Take out the accessories from the accessory box and check the contents.
4
Page 9
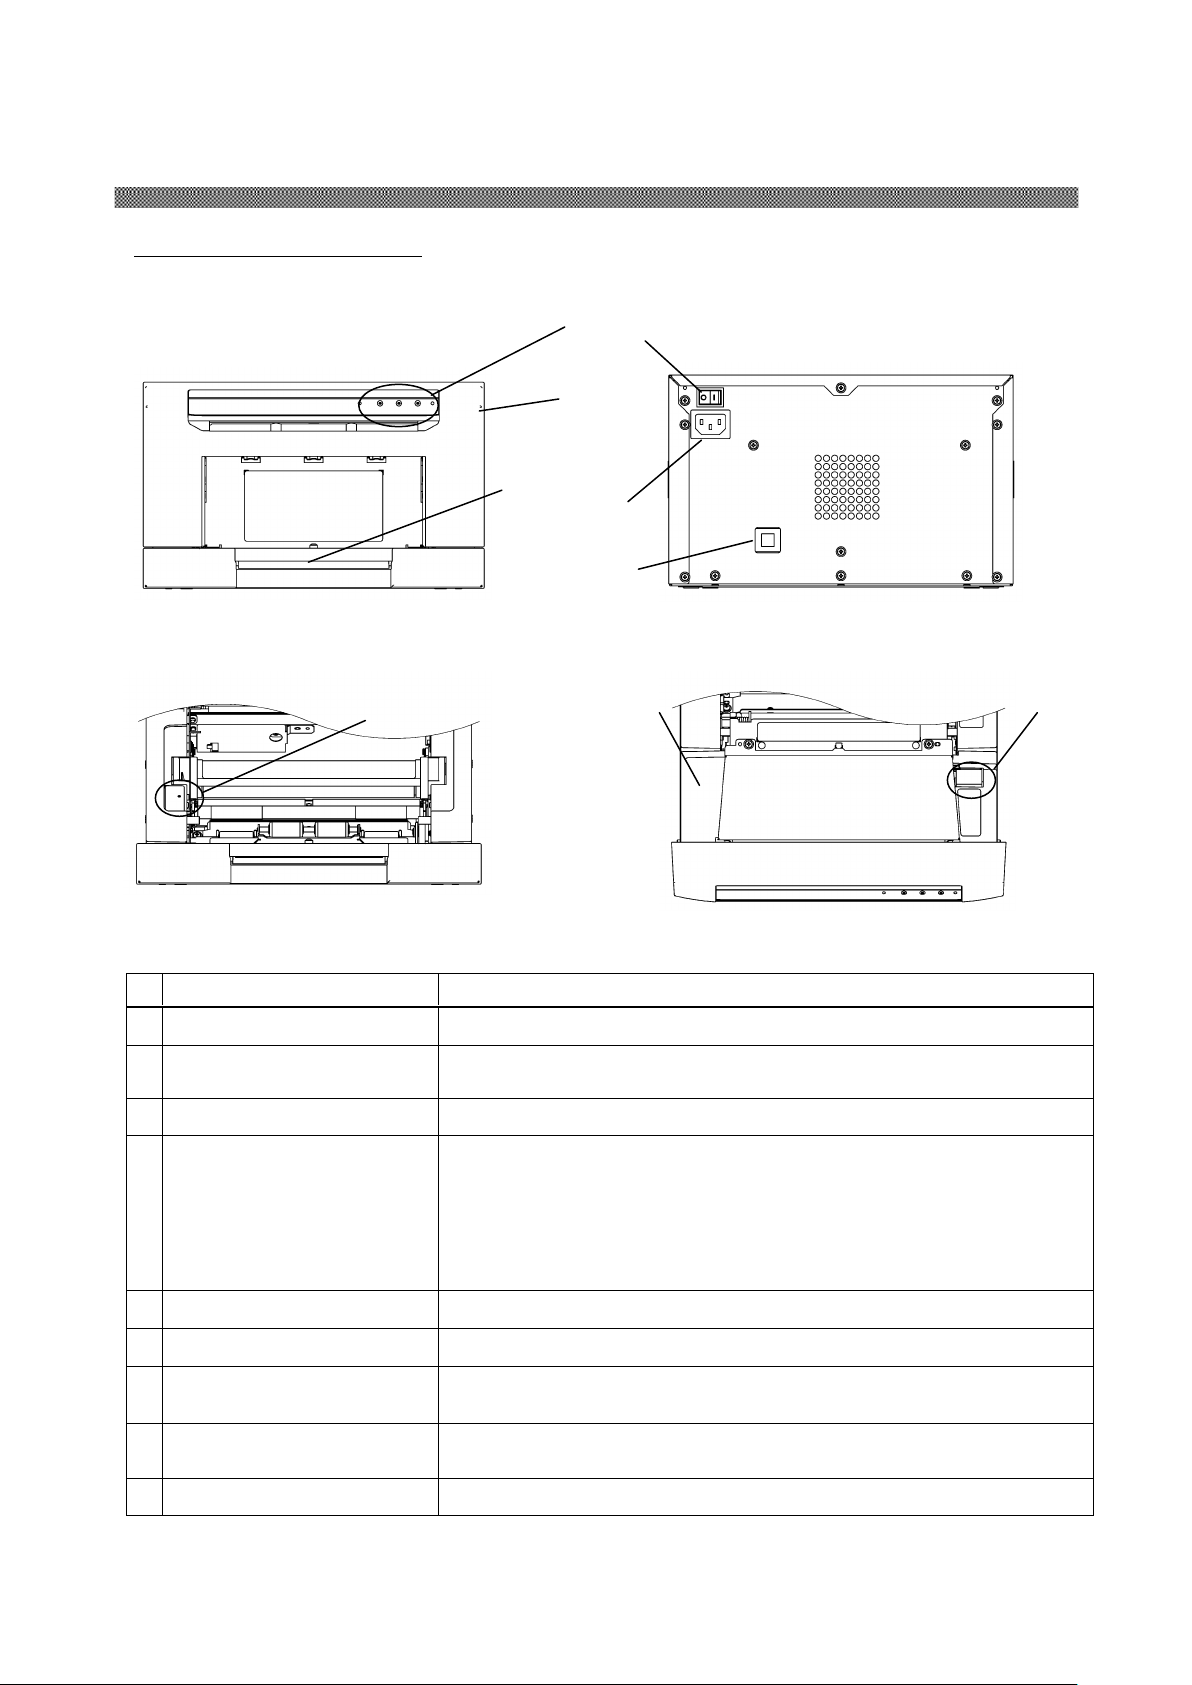
№
Name
Function
①
Printer Status Lamps
Printer status display lamps are located on the panel.
②
Drawer Un i t
Open the drawer unit when replacing an ink ribbon or paper, or
when performing maintenance.
③
Drawer L ev er
When open the drawer unit, hold this lever.
④
Power Switch
This switch turns on/off the power of the printer. When the “|”
marked side of the switch is pressed, the power is turned on.
When the “○” marked side of the switch is pressed, the power is
turned off.
<Caution> Once the printer is turned off, wait at least 3 seconds
before turning it on again.
⑤
Power Connector
To be used to connect the power cable.
⑥
USB Connector
To be used to connect the USB cable.
⑦
Paper Setting Lamp
When setting the paper, insert the paper until the lamp is lit.
When the lamp blinks, remove the paper until the lamp goes off.
⑧
Open Gu id e Unit
Open the drawer unit when replacing paper, or when performing
maintenance.
⑨
Open Gu id e Le ver
When open the open guide unit, hold this lever.
① ② ③
④ ⑤ ⑥
⑦
⑨
⑧
Chapter 2. Installing and Set Up
Parts Name and Function
(Front View) ( Rear View)
(Front Internal View) (Upper Internal View)
5
Page 10
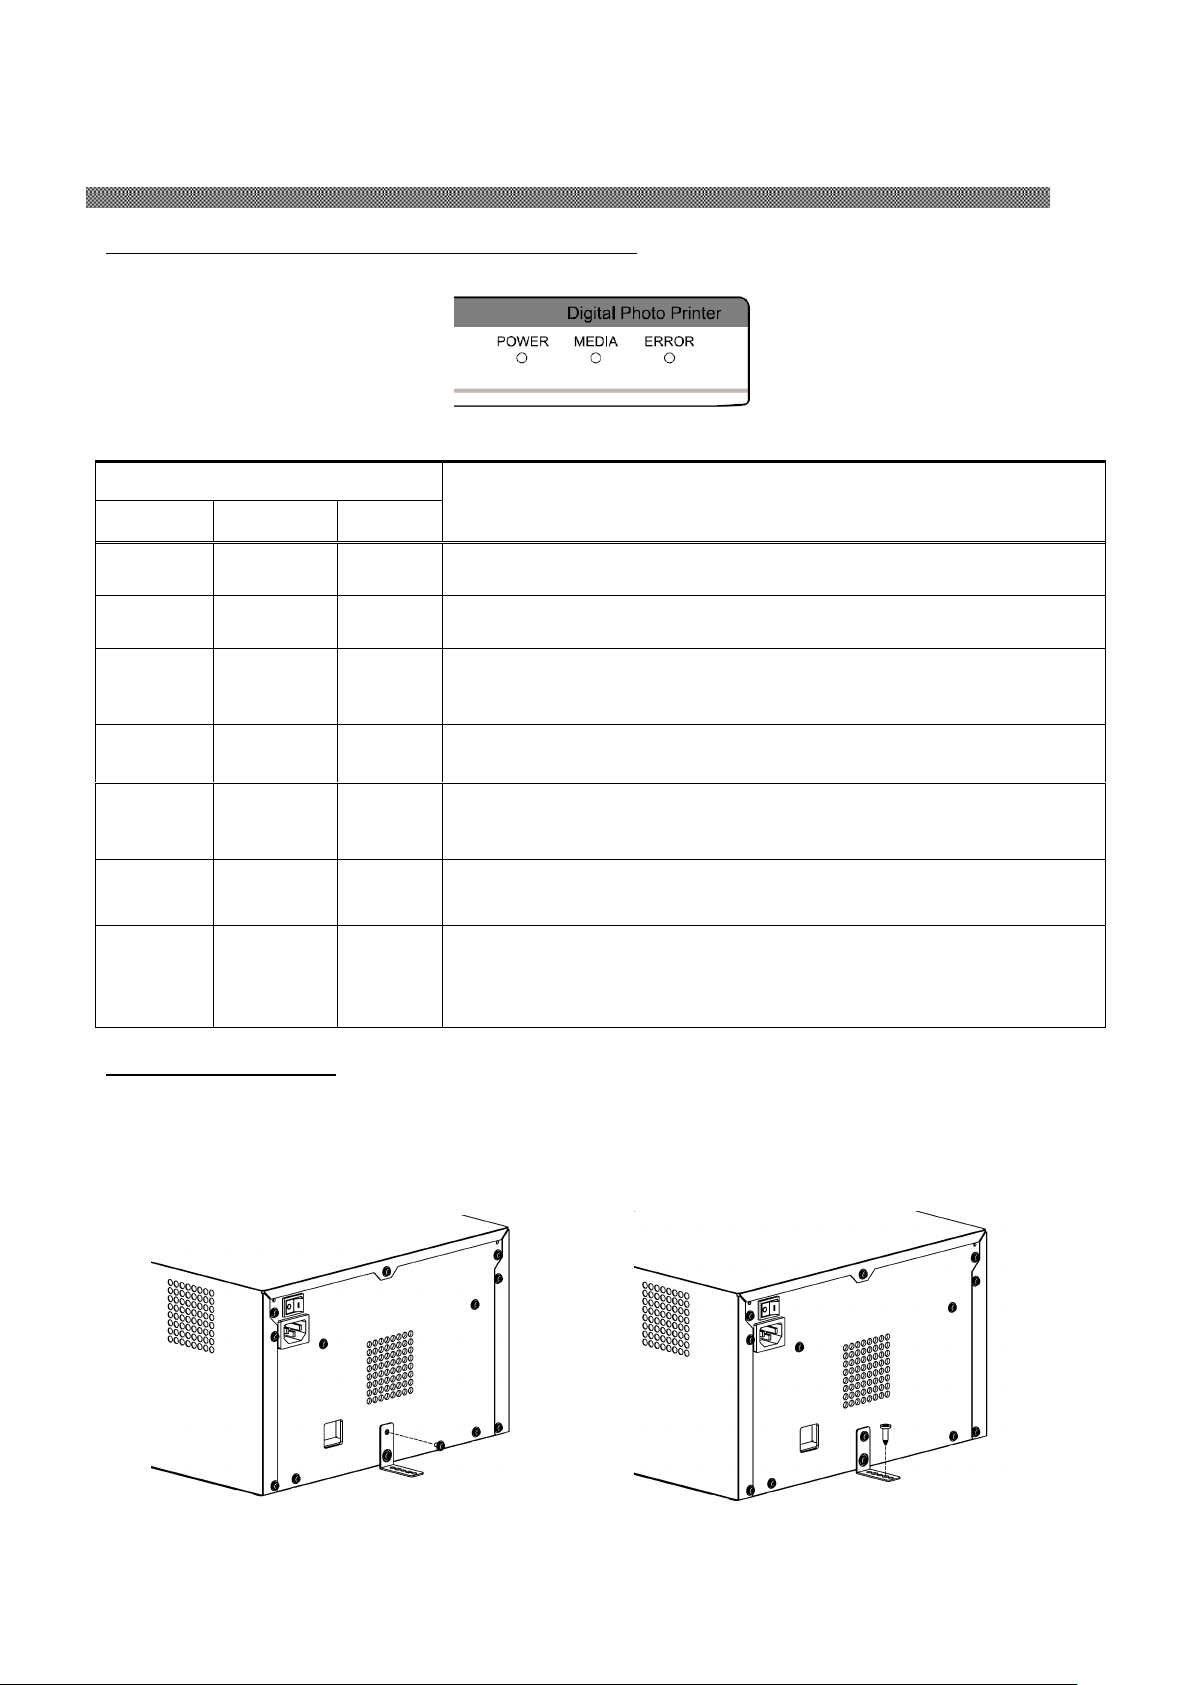
LED Display
Description
POWER
MEDIA
ERROR
○ ○ ○
The power of printer is off.
*
○
○
The printer is initializing after turn on the power
Thermal head is cooled/heated on printing.
● ○ ○
The printer is ready
If you leave the printer of ready state for 5 minutes, the printer
goes into standby mode automatically.
●
○
*
The drawer unit is opened.
● ○ ●
Paper jam occurred.
The printer mechanical section is faulty.
Trouble of printer control board.
● * ●
The ink ribbon loaded is not supported.
● ● ●
Paper is not set.
Out of paper.
The ink ribbon is not loaded.
The ink ribbon is empty.
2. Install the printer with the
anti-tip place and fix it onto the
wooden.
1. Use a Phillips screwdriver to fix
the anti-tip place to the back of
the printer.
Chapter 2. Installing and Set Up
Printer Status Lamps Name and Printer Status
Printer status lamp display ●:on, ○:off, *:flashing
Fixing Anti-tip Plate
6
Page 11
Warning: Make sure to turn off
the power of the printer before
inserting the power cable.
Warning: Make sure to insert the
power cable correctly. If not, it
can cause the fire or the printer
problem.
Warning: Do not insert or remove
the power cable with wet hands.
It can cause the electric leakage.
Warning: Do not make any
damage or any modification to
the power cable. Put the heavy
items on the power cable, give a
strong pull to the power cable and
twist the power cable can cause
the fire and electric shock.
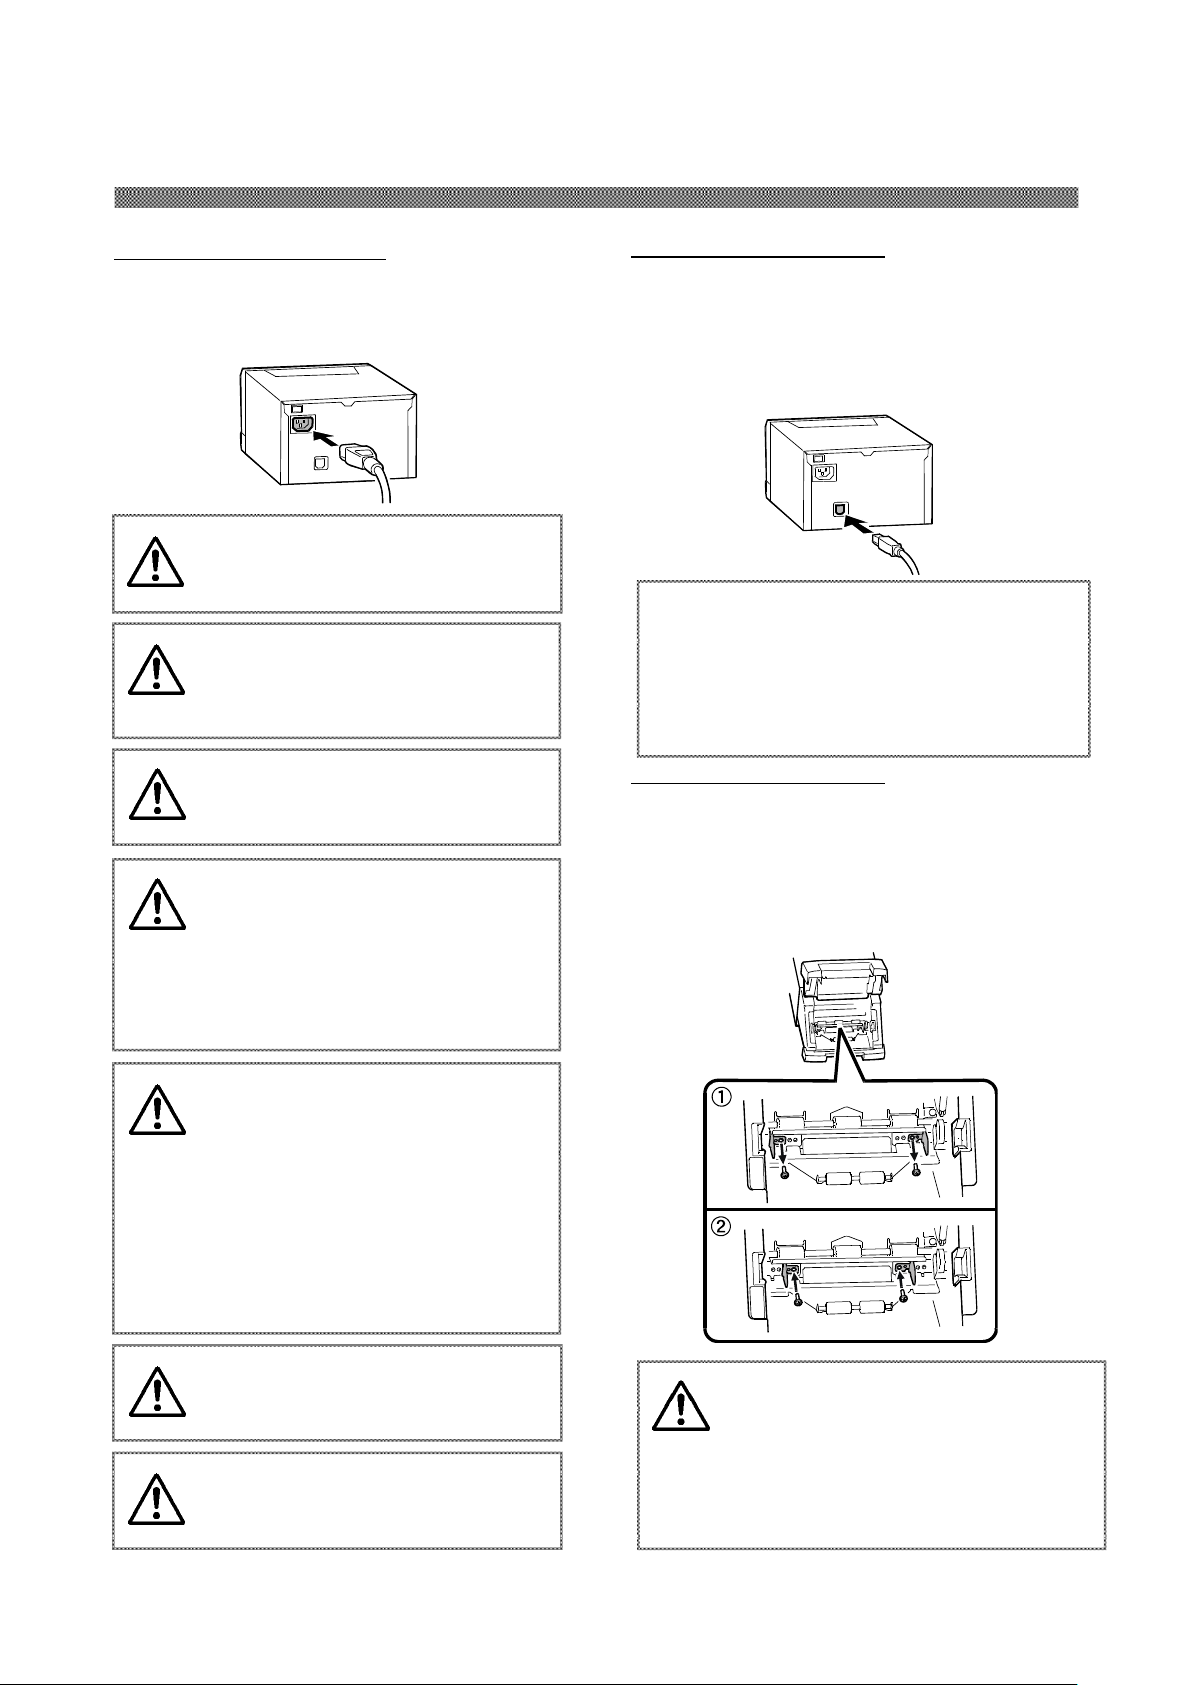
Insert the power cable attached to the
printer into the power connector located on
the rear of the printer.
Warning: In case of not using the
printer for a long time, remove
the power cable for safety.
Warning: Avoid “piled up”
connection. It can cause the fire
and electric shock.
Warning: When moving the
printer, make sure to turn off the
power of the printer, remove the
power cable in order to have no
connection with other devices.
Otherwise, the power cable might
be damaged and it can cause the
fire and electric shock.
Also there is a possibility to fall
down caught by the cable.
Attention: To remove the USB cable, make
sure that the printer is in the waiting
status.
Removing the USB cable during data
transfer may not be able to print data
correctly.
Connect the USB cable from the personal
computer to the USB connector located on
the left rear side of the printer.
Be sure to insert the USB cable all the way.
The first setting from the factory is for
4×6 size.
If you use 5× 7 size, use a Phillips screw
driver, change the setting position of
paper guide.
Warning:If you print 4×6 or 6× 8
size after printing 5×7 size, it may
cause uneven density and out of
color registration. After using 5×7
size, do not print 4×6 or 6× 8 size.
Chapter 2. Installing and Set Up
Connecting Power Cable
7
Connecting USB Cable
Installing Paper Guide
Page 12
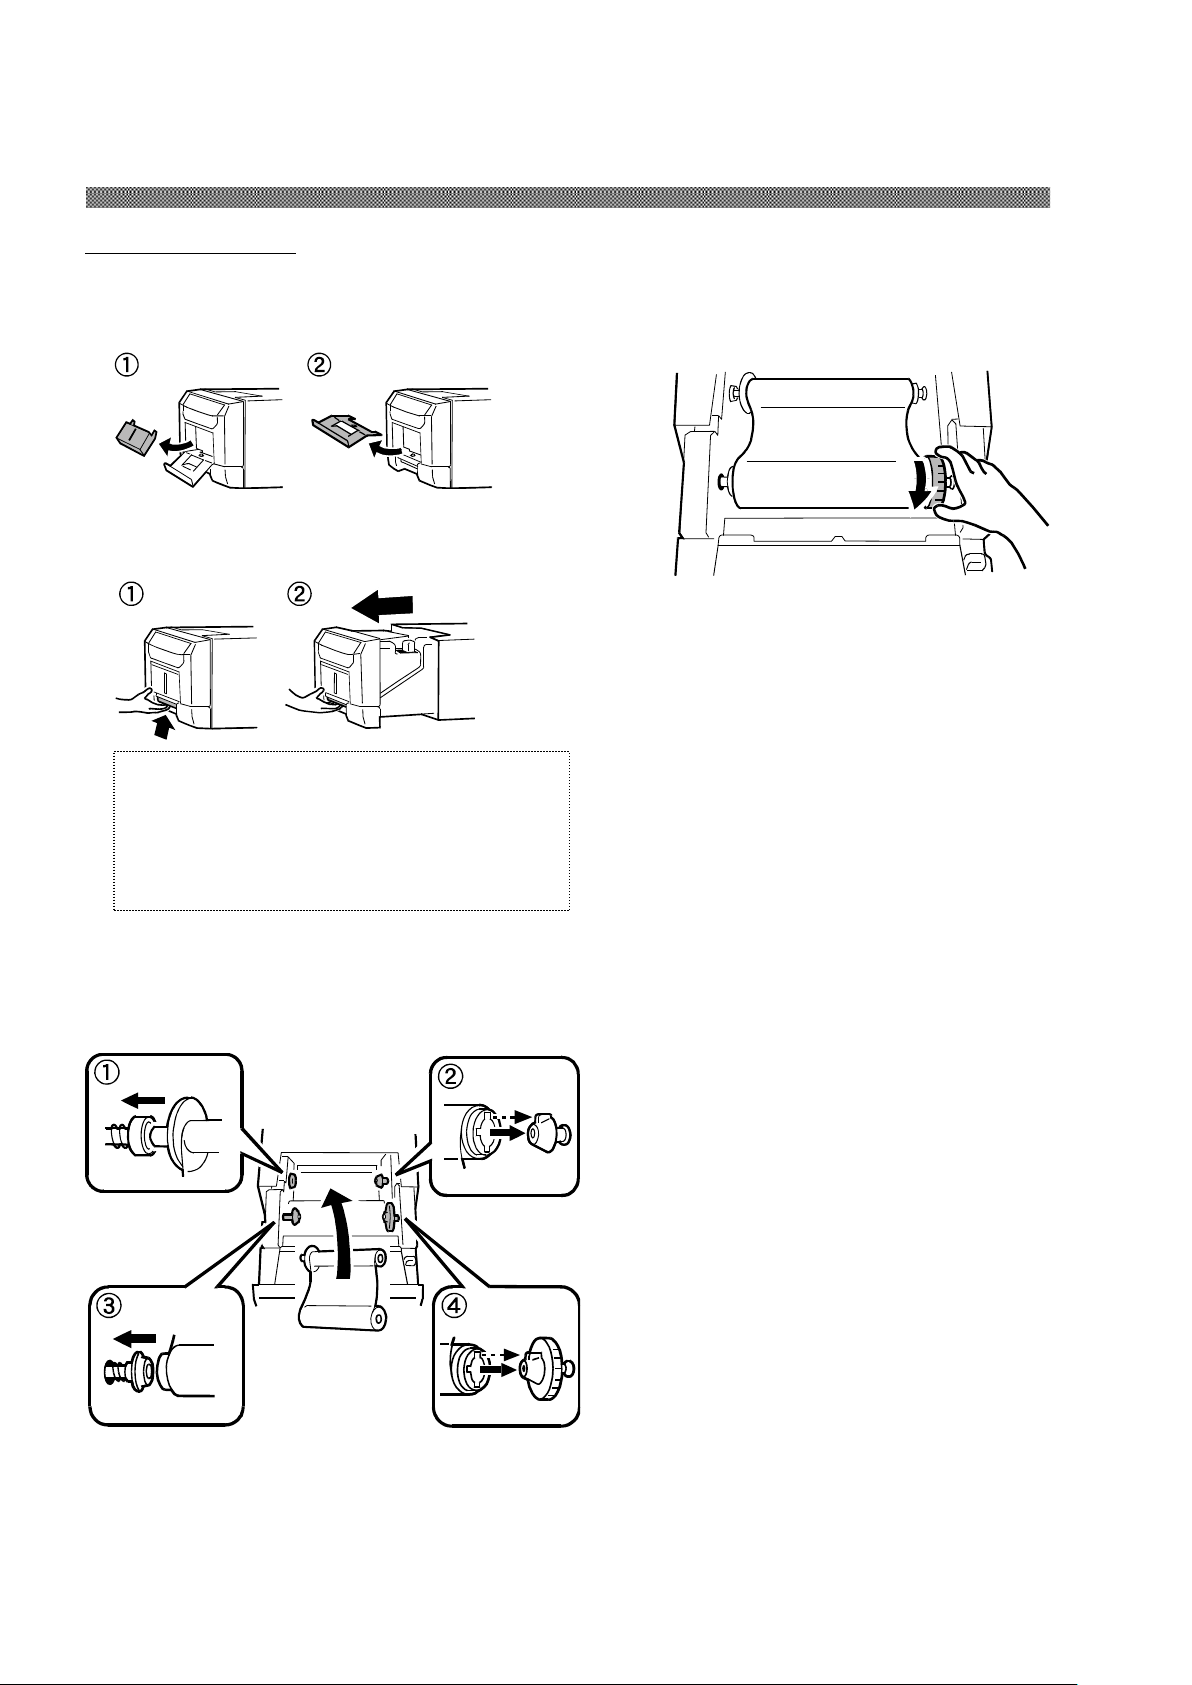
2. Carefully lift the drawer lever and pull
the drawer unit.
3. Set the ink ribbon to drawer unit as shown
4. Take the slack the ink ribbon by turning
the ink ribbon supply core.
Attention: Do not open the drawer unit
quickly or with unnecessary force.
Do not press the drawer unit or place a
heavy object other than paper after opening
the drawer unit.
1. Remove dust box and tray.
Chapter 2. Installing and Set Up
Setting Ink Ribbon
8
Page 13
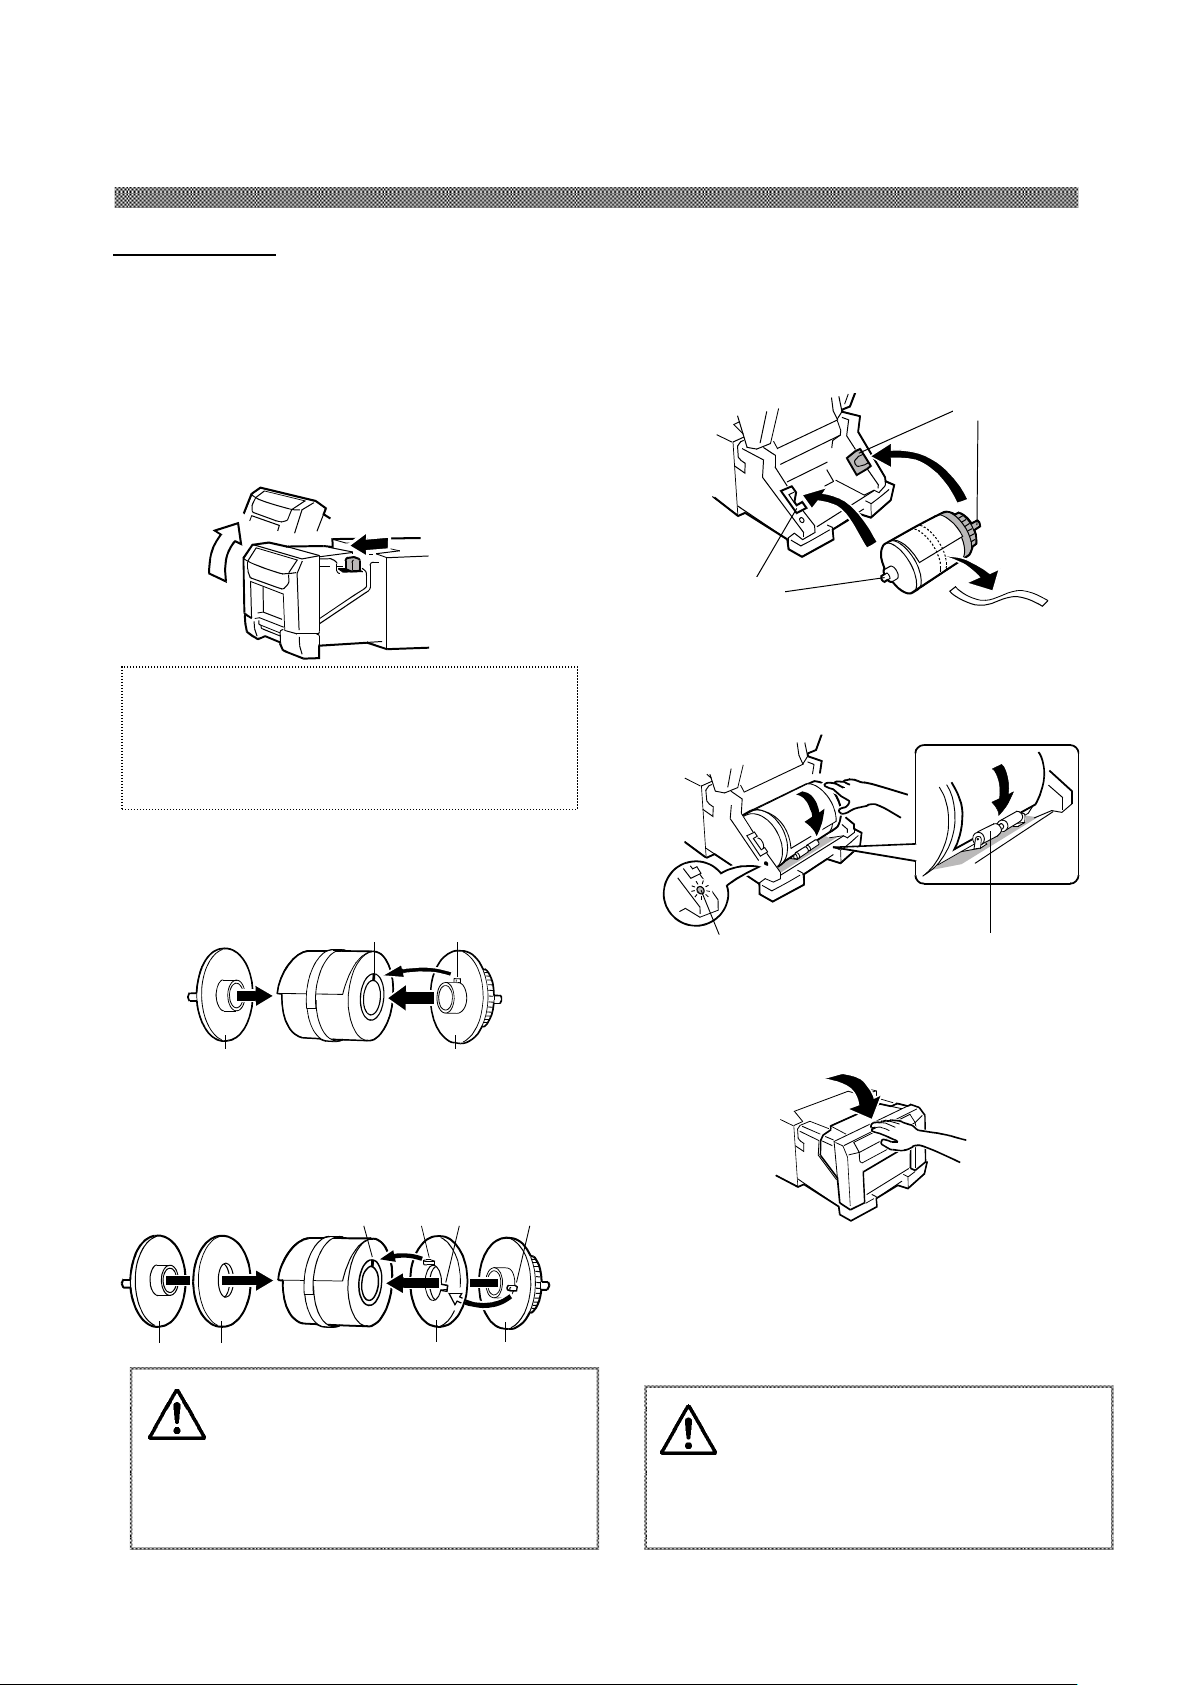
1. In the drawer unit pull out, pull the
lever to open the open guide unit.
Pull out the drawer unit and pull the
lever to open the open guide unit.
3. Set the paper in the printer.
Set the paper by matching the color of the
paper flange and the color of the holder.
After setting the paper, remove the seal
from the paper.
Turn on the power of the printer by
pressing "|" on the power switch.
2. Install the paper flange (white) and paper
flange (blue) in the paper. 4× 6 size,
6× 8size as shown.
5. Close the open guide unit.
When close the open guide unit, press on the
center of the open guide unit.
Caution: Close the front cover
carefully so as not to catch your
fingers.
Close the drawer unit and later to
close the open guide unit.
Attention: Do not open the drawer unit
quickly or with unnecessary force.
Do not press the drawer unit or place a
heavy object other than paper after opening
the drawer unit.
Install spacers in the paper flanges first when
using L size paper or 5× 7 size paper. When
using 4×6 size paper or 68 size paper, proceed
with Step 3 without installing the spacers.
Caution: The paper is not set correctly if
there is a gap of about 10mm between the
paper flange and paper. Match the notch
of the paper flange and the notch of the
paper core by rotating the paper flange.
4. Insert the edge of paper under the guide
roller by rotating the paper flanges.
Insert the paper until the Paper Setting
Lamp is lit.
6. Close the drawer unit.
When the drawer unit is closed,
initialization starts and four sheets of paper
are ejected automatically.
Blue
White
Notch
PAPERSET lamp
Guide Roller
Blue
White
White
Spacer (white)
Spacer (Blue)
Blue
Notch
Notch
Notch
Notch
Notch
Chapter 2. Installing and Set Up
Loading Paper
9
Page 14
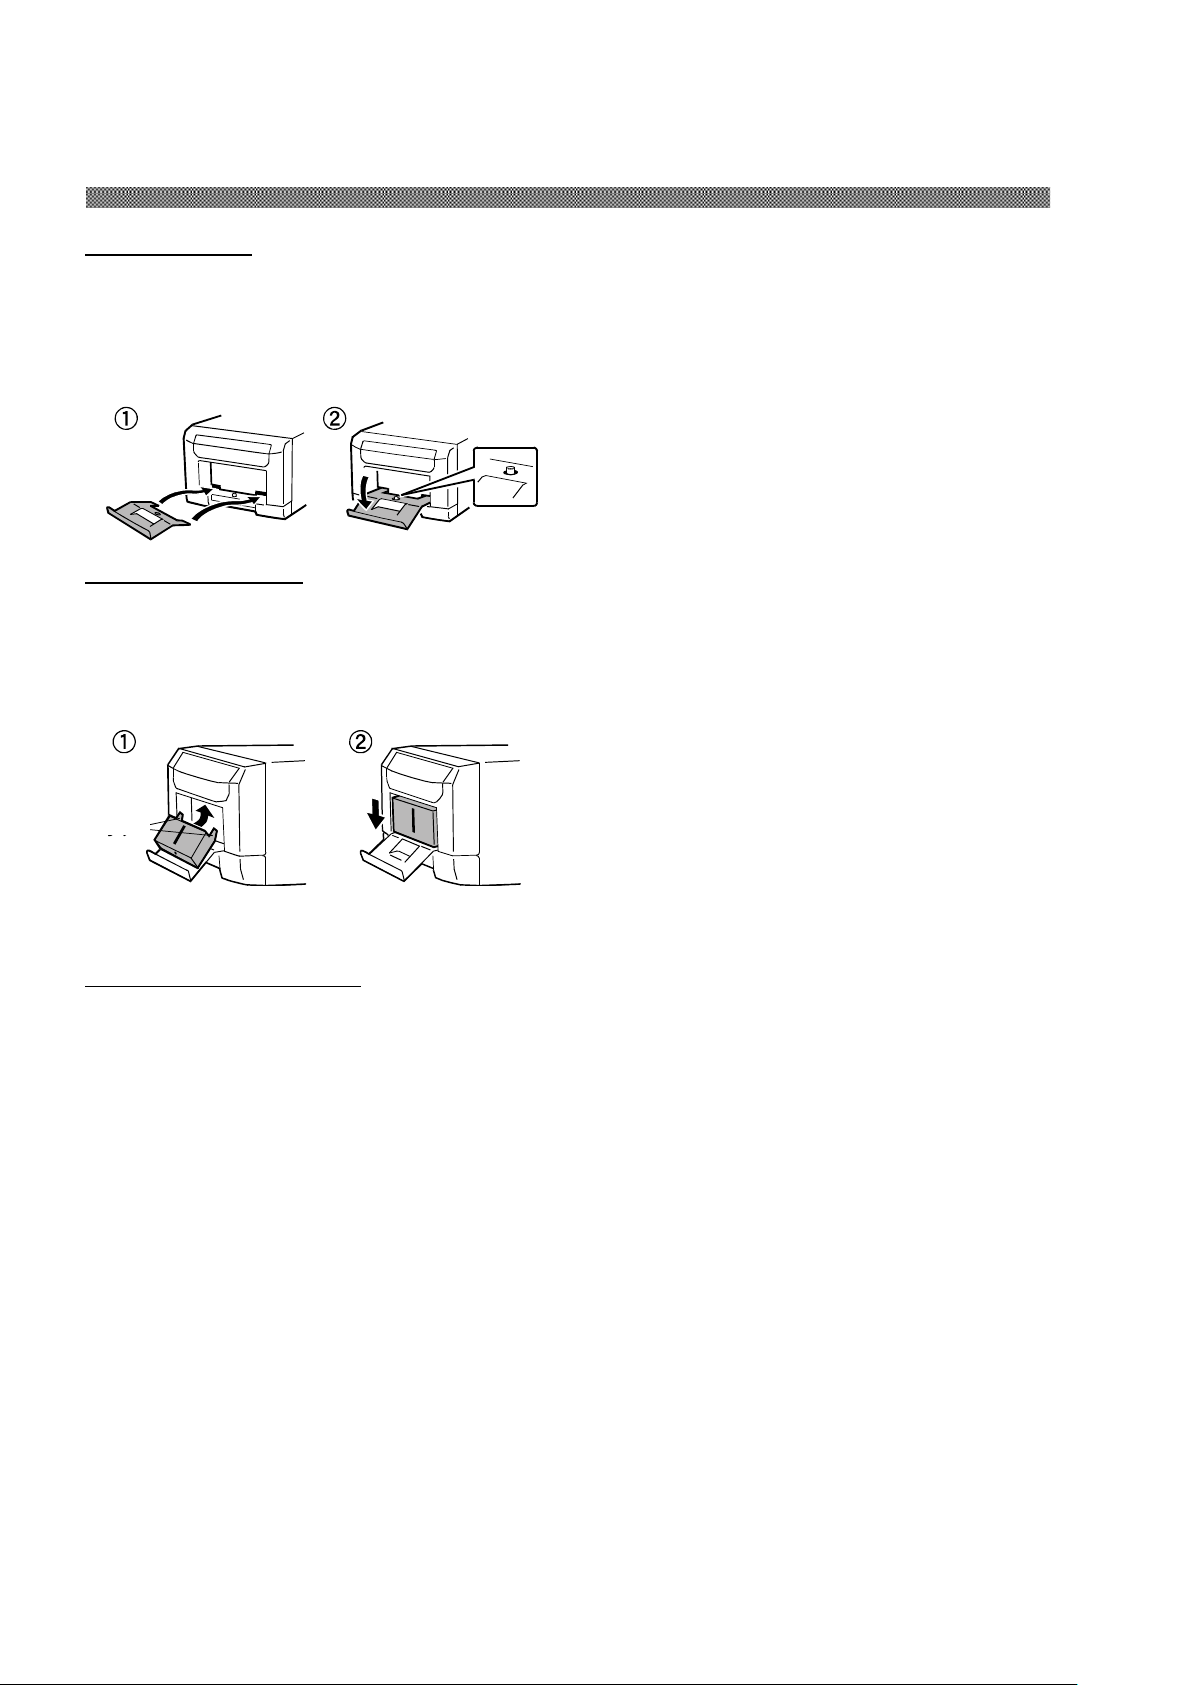
Insert the claw of the tray first and insert the
projected section of the printer in the hole at
the tray.
Insert the claw of the dust box first and insert
the projected section of the printer in the hole
at the bottom of the dust box.
The following cautions are necessary in
transportation of the printer.
Since an incorrect transportation method
causes a printer fault, follow the correct
method.
1. Remove the ink ribbon and paper from
the printer before transporting the
printer.
If the ink ribbon or paper cannot be
removed due to a fault, consult with the
distributor.
2. Use a genuine box.
If the box used at the purchase cannot
be used, consult with your distributor
and purchase a new box.
Chapter 2. Installing and Set Up
Installing Tray
Installing Dust Box
Transporting the Printer
10
Page 15
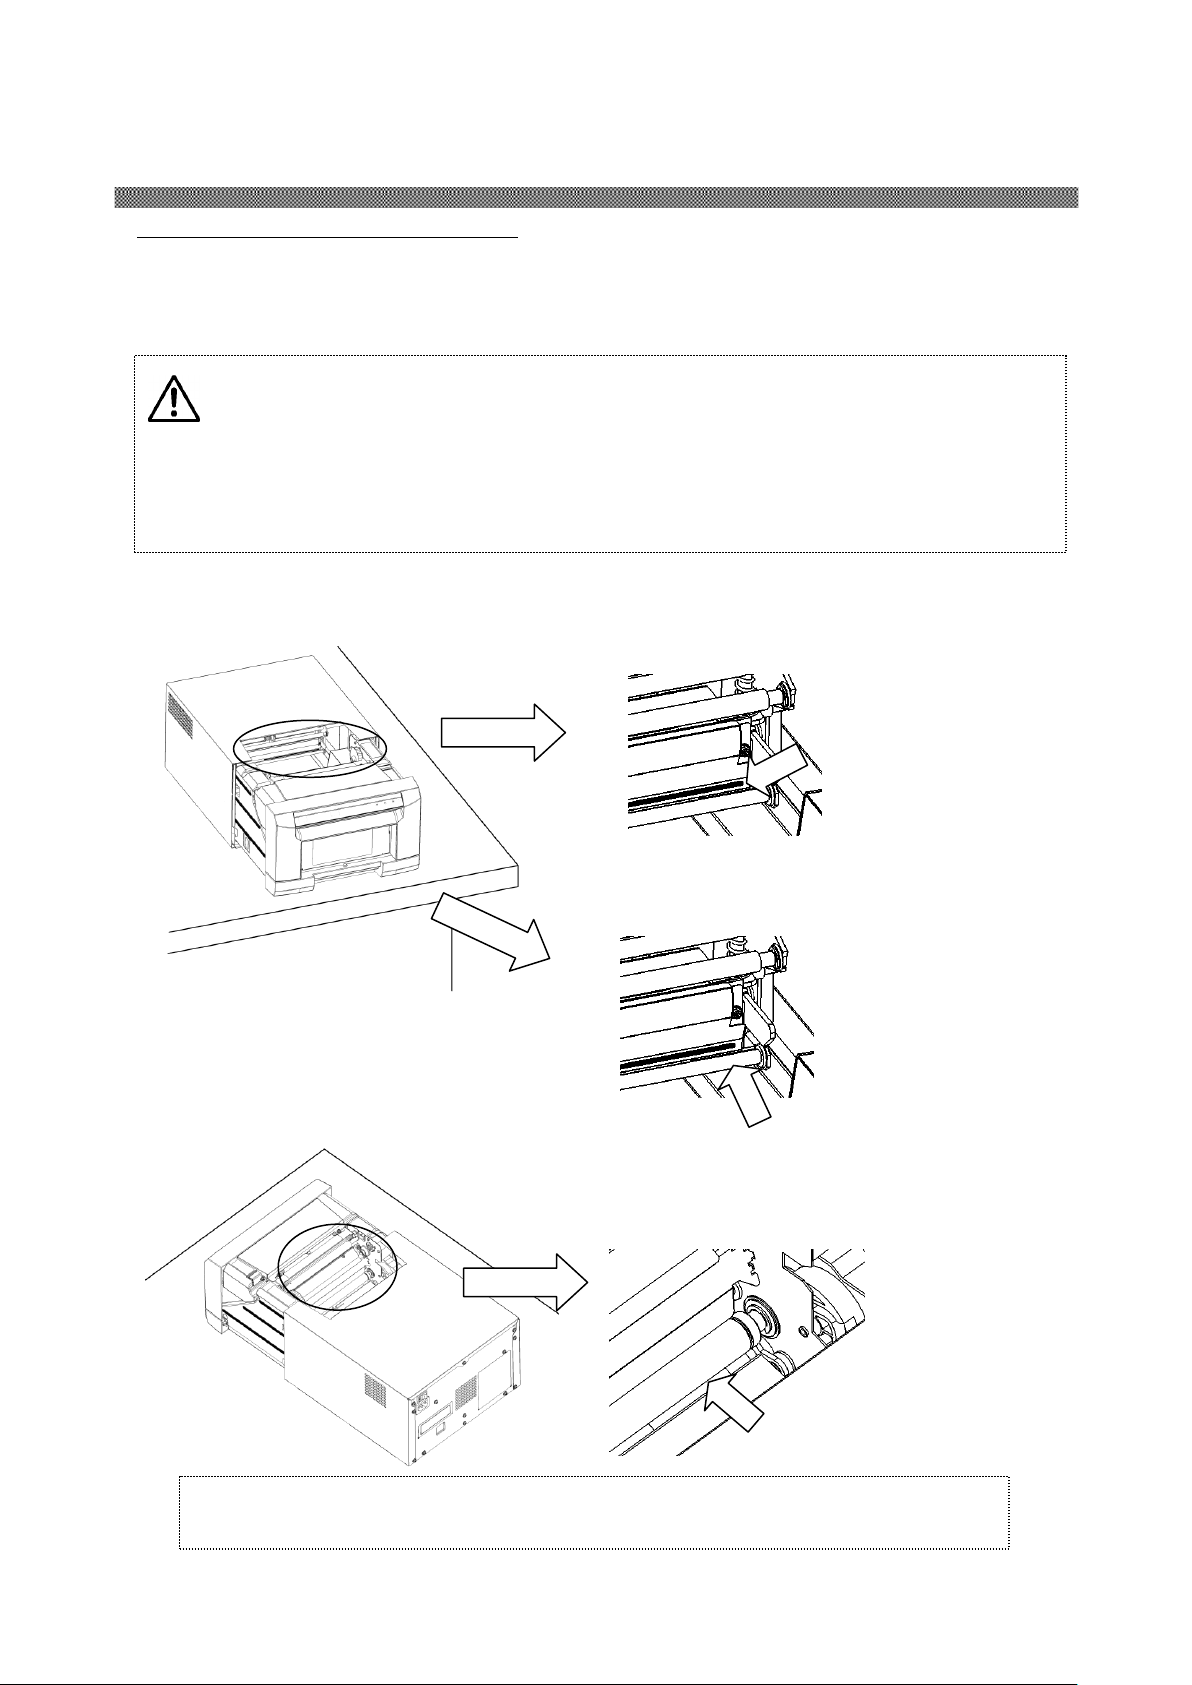
1. Using gauze, clean the heat element (glass
bar) of the thermal head with isopropyl
alcohol or ethyl alcohol.
2. Using gauze dipped with isopropyl alcohol or
ethyl alcohol, clean the edge of the peeling
roller.
3. Using gauze dipped with isopropyl alcohol or
ethyl alcohol, clean the rubber section of the
platen roller
Caution: Make sure that the power is turned off before starting cleaning.
Thermal Head reaches high temperature just after printing. Do not touch directly
by hand. Make sure that the thermal head has been sufficiently cooled down before
starting cleaning.
When fingerprint stick to the heat element, it can damage the Thermal Head. Do
not touch directly by hand.
Be careful not to be hurt by the projections of the printer.
Attention: Printing should be performed after the alcohol dried up completely
(approx. 5 minutes)
Chapter 3. Routine Maintenance
Cleaning of Thermal Head, Platen
By using thermal transfer technology, daily maintenance is not really necessary if the printer is
being use properly.
However, in order to keep the best print quality, it is recommended to do the cleaning of Thermal
Head and Platen once in a month.
11
Page 16
Caution: Do not use volatile solvents or spray insecticide on the printer outer
cabinet. Otherwise, discoloration or crack may result.
Warning: Continuous use under the abnormal condition such as high
temperature, smoke and strange smell can cause the fire and electric
shock. Turn off the power and make sure to remove the power cable,
then contact the dealers or service center.
Warning: In case, the foreign substance get into the printer, turn off the power
of printer, remove the power cable and contact the dealers or service
center. Continuous use of the printer under such condition can cause
the fire and electric shock.
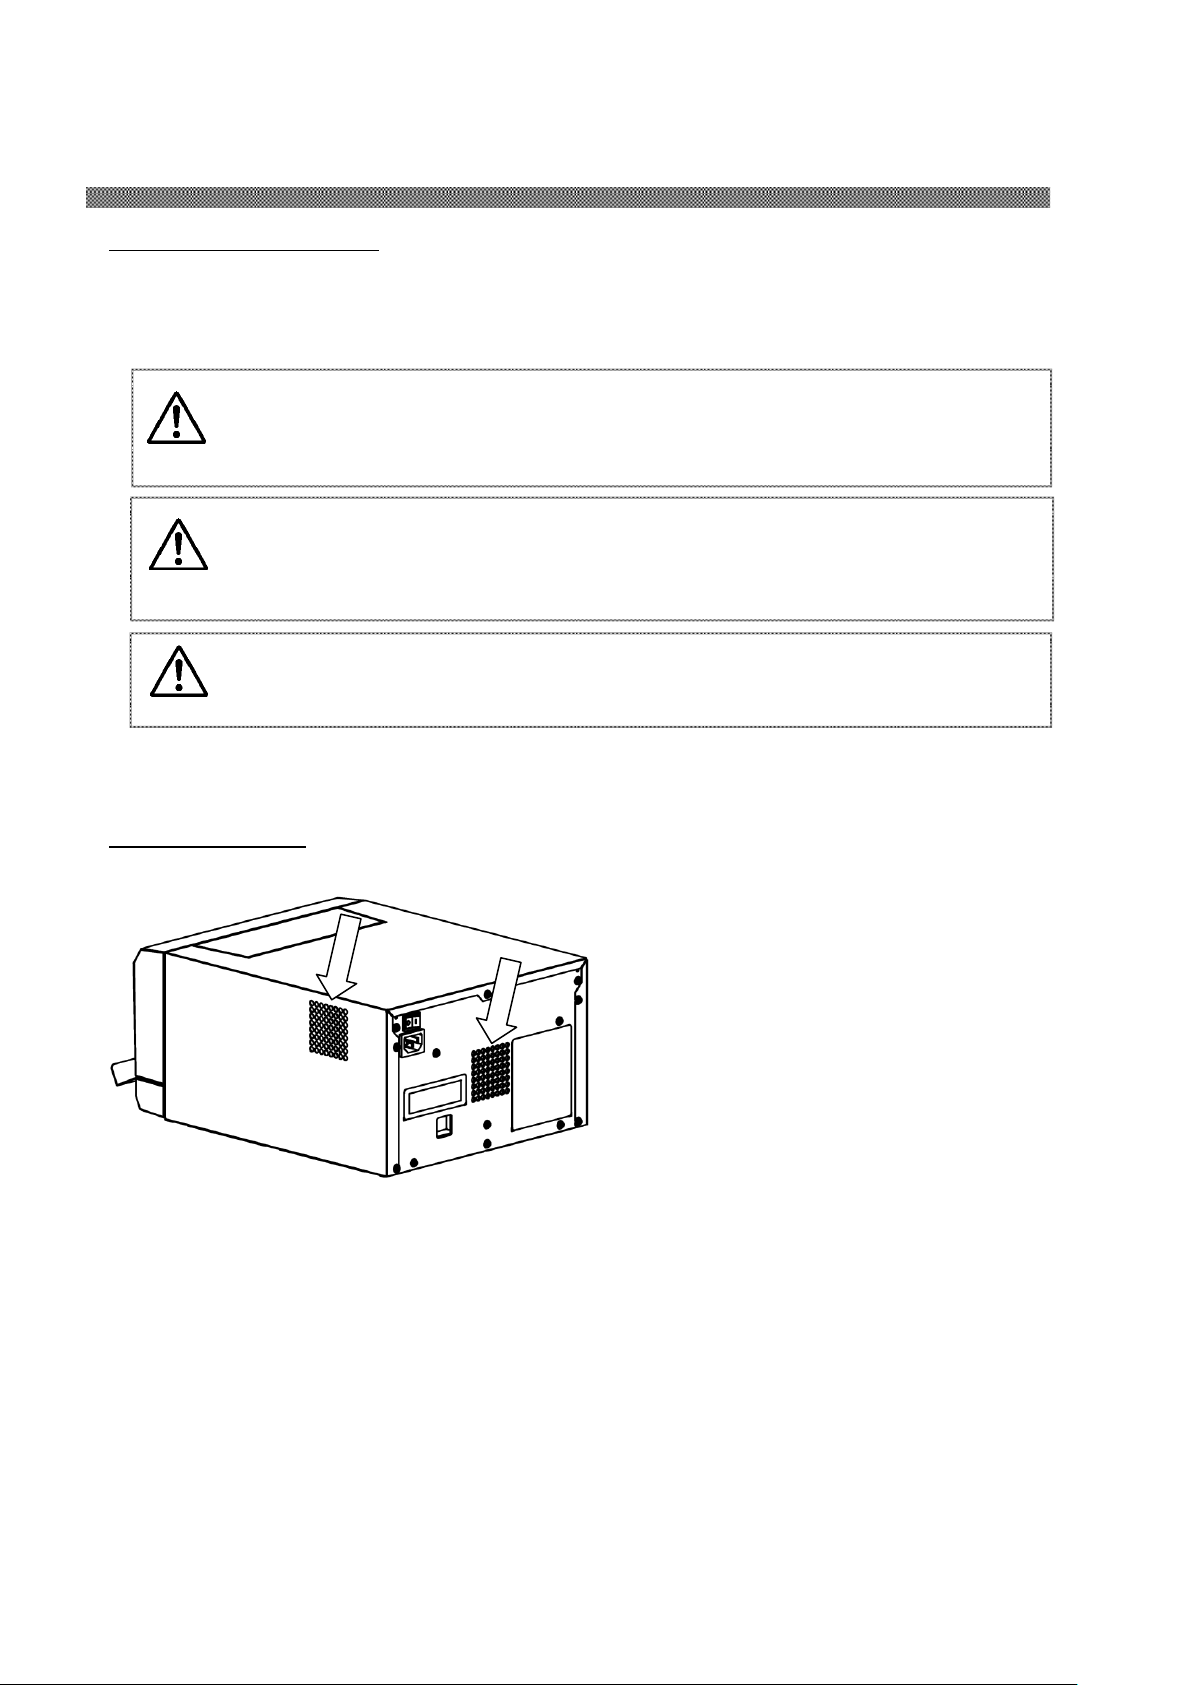
If the dust collects on the openings, clean it
with vacuum cleaner
Chapter 3. Routine Maintenance
Cleaning of Outer Cover
Wipe the printer outer cabinet with a soft cloth.
If the stains are not removed, wet the cloth and apply weakened neutral Detergent to it.
Cleaning of Filter
12
Page 17
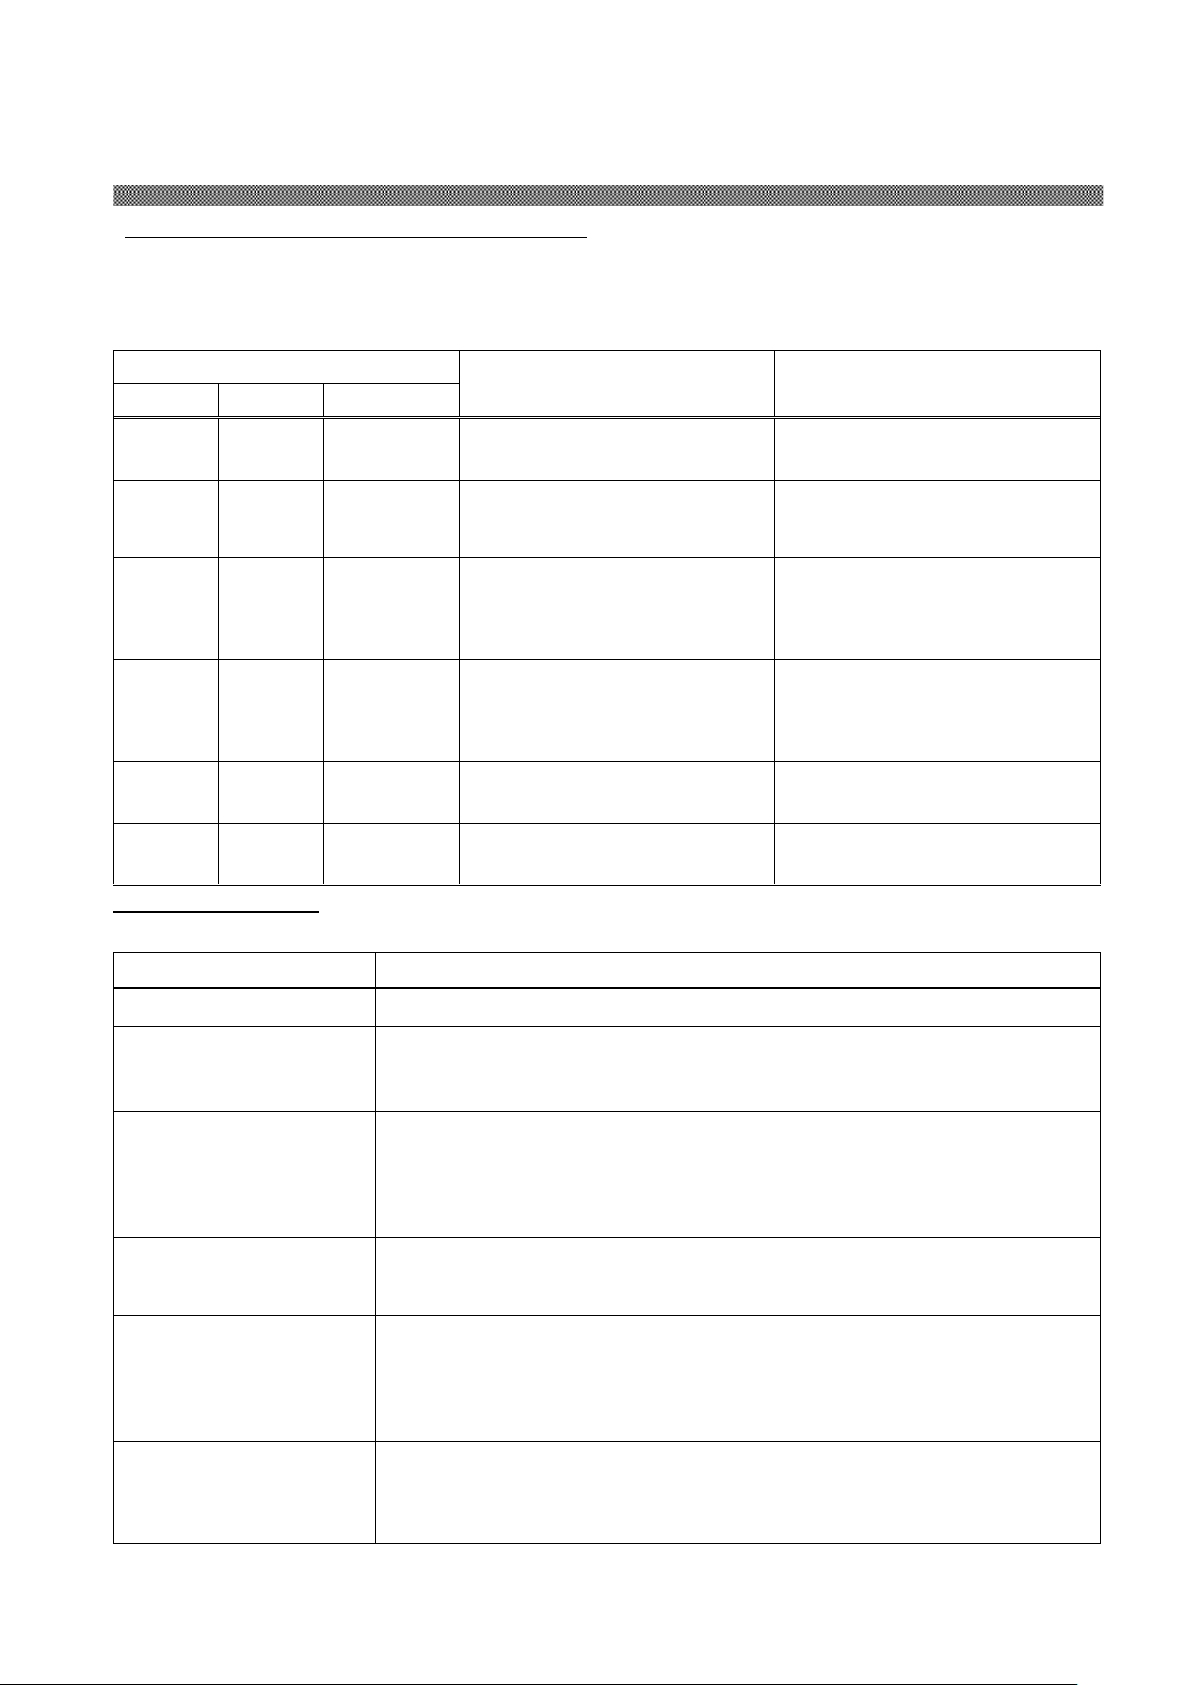
LED Display
Status
Corrective Action
MEDIA
ERROR
PAPERSET
/ * /
The drawer unit is opened.
Close the drawer unit.
○
●
*
Paper jam occurred.
Remove the paper. If paper
jam occurs frequently, consult
with the service center.
○ ● ●
Trouble of printer control
board.
The printer mechanical
section is faulty.
If it occurs frequently, consult
with the service center.
* ● /
The ink ribbon set is not
supported.
Ink ribbon or printer
abnormality is assumed.
Consult with the Service
Department.
● ● ○
Paper is not set.
Out of paper.
Set paper.
Replace paper.
● ● ●
The ink ribbon is not loaded.
Ribbon Empty.
Set the ink ribbon.
Replace the ink ribbon.
Symptom
Action
Power is not turned on.
Check if the power cable is connected to the plug socket or the printer.
The personal computer
does not recognize the
printer.
Check if the USB cable is connected to the personal computer or
printer.
The printer does not
become ready.
Check if the drawer unit is closed.
Check if paper is jammed in the printer.
When the paper setting lamp is blinking, remove the edge of the
paper until the paper setting lamp goes off.
The drawer unit does
not open.
Check if the printer is installed in a flat location.
Check if any object is placed in front of the front cover.
A straight stripe area is
not printed.
The thermal head may be dirty. Clean the thermal head as
described in Chapter 3, "Routine Maintenance".
If the blank area remains after cleaning the thermal head, the head
may have been disconnected. Consult with the Service Department.
Dotted areas are not
printed.
The cleaning roller may be dirty. Clean the thermal head as described
in Chapter 3, "Routine Maintenance".
Chapter 4. Error Handling
Printer Status lamps are displayed in red
When the error happens, the details of the error can be confirmed with the printer status lamps.
Printer Status Lamps and Paper Setting Lamp display ●:on、○:off、*:flashing
/ : Indicates that irrespective lit
Failure Symptoms
When detecting a failure symptom, check the printer using the following table.
13
Page 18

Page 19
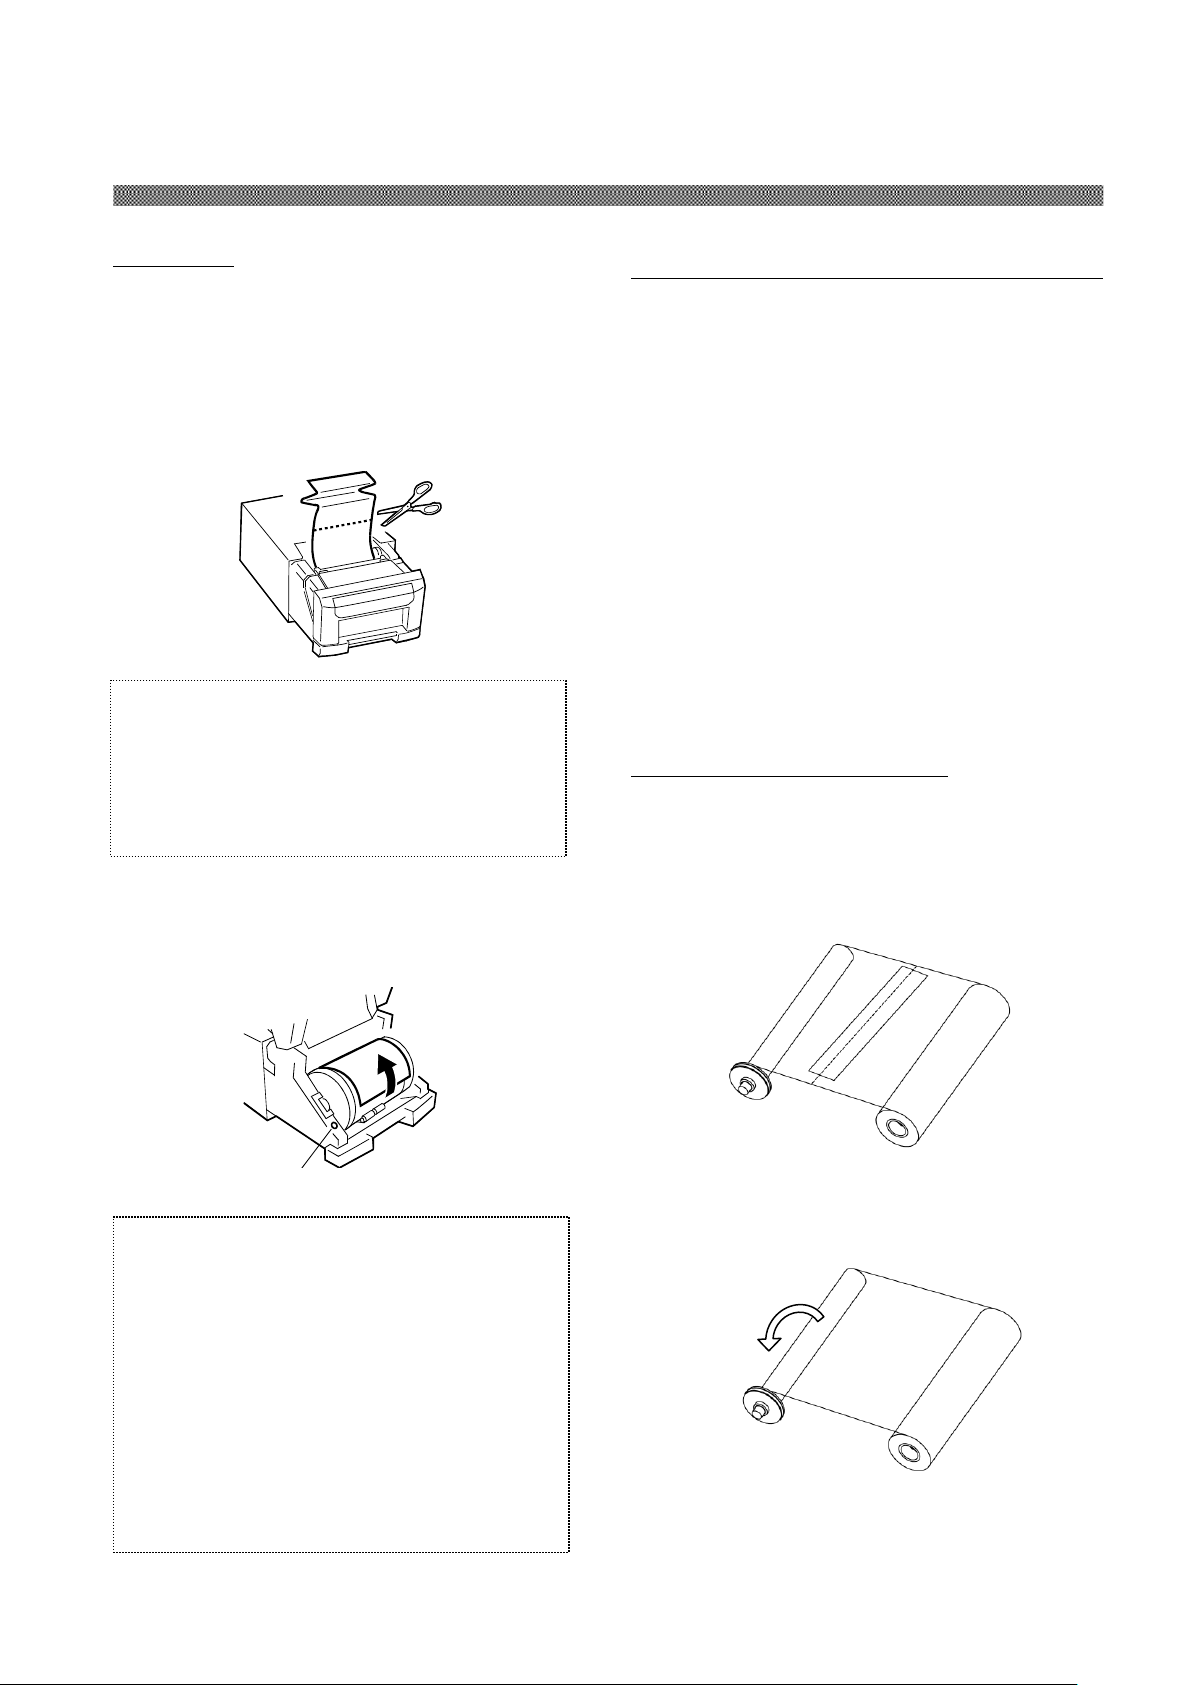
Attention:
・If the paper is used without cutting off the
folded section or printed section, paper jam
occurs again or the ink ribbon may snap
during printing. Always cut off the
creased section or printed section of the
paper.
・Cut off the paper straight and at right
angles to the roll paper direction.
・If paper jam occurs frequently, a defect in
the mechanical section is assumed.
Consult with the service center.
PAPERSET lamp
Attention: If the paper is can not pulled out
to the Ribbon side, pull out it to the Roll
paper side following the instruction in Step
3 and Step 4.
If the paper is pulled out to the Ribbon side
by force, the printer may break down.
Chapter 4. Error Handling
Paper Jam
1. Open the drawer unit.
2. Cut off the folded section or printed section
with scissors.
When the paper is folded inside of the printer,
pull it out slowly.
3. Open the open guide unit.
4. Pull out the paper until the paper setting
lamp goes off.
Power Supply Interrupted during Printing
In case, power supply interrupted during the
printing, Thermal Head will be kept pushing to
Platen. Leaving this situation for a long time,
shape of Platen can be warped. In order to avoid
this situation, please follow the instruction
below.
1. Turn off the power of the printer.
2. Turn on the power for 3 or more seconds
after turning off the power.
3. Paper Jam is displayed on the printer
status lamps, open the front cover and
take the necessary action according to
the instruction provided in 4-2, "Paper
Jam".
When the Ribbon is snapped
1. Remove the ink ribbon.
2. Stick the broken part of the ribbon with a
tape.
3. Turn the ribbon on the rewinding side and
rewind the taped section completely.
14
Page 20

Page 21
Caution: Dust on the surface of the paper may damage the thermal head.
Clean the dust on the paper surface and install the paper roll into the printer.
Caution: Clean the finger print on the paper surface to avoid the finger print
on the print image.
Caution: Paper may be installed and fixed on improper direction, but maybe
oblique direction.
Caution: Not straight cut of paper edge may cause paper jam. To prevent
paper jam, recommend to use pre-cut function of paper roll. In case of paper
jam or print incompletion, reinstall the paper roll and use pre-cut function.
Caution: Printing continuous pattern of high density image in limited part
may cause uneven density print. Recommend not to print those images
continuously.
Chapter 5. In order to more comfortably use
Paper Pre-Cut function can be turned off through the printer driver.
For longer Printer usage
15
Page 22
FCC WARNING
Changes or modifications not expressly approved by the party responsible for compliance
could void the user’s authority to operate the equipment.
Note: This equipment has been tested and found to comply with the limits for a Class A
digital device, pursuant to part 15 of the FCC Rules. These limits are designed to provide
reasonable protection against harmful interference when the equipment is operated in a
commercial environment. This equipment generates, uses, and can radiate radio
frequency energy and, if not installed and used in accordance with the instruction
manual, may cause harmful interference to radio communications. Operation of this
equipment in a residential area is likely to cause harmful interference in which case the
user will be required to correct the interference at his own expense.
This device complies with Industry Canada licence-exempt RSS standard(s). Operation is
subject to the following two conditions: (1) this device may not cause interference, and (2)
this device must accept any interference, including interference that may cause
undesired operation of the device.
Le présent appareil est conforme aux CNR d'Industrie Canada applicables aux appareils
radio exempts de licence.
L'exploitation est autorisée aux deux conditions suivantes : (1) l'appareil ne doit pas
produire de brouillage, et (2) l'utilisateur de l'appareil doit accepter tout brouillage
radioélectrique subi, même si le brouillage est susceptible d'en compromettre le
fonctionnement.
This product shall not be used in the residential area.
This is a Class A product. In a domestic environment, this product may cause radio
interference in which case the user may be required to take adequate measures.
Sinfonia Technology Co., Ltd. hereby declares that this CHC-S6145-5 is in compliance
with the essential requirements and other relevant provisions of Directive 1999/5/EC.
The manufacturer of this product is Sinfonia Technology Co., Ltd.
1-1-30, Shiba-daimoncho, Minato-ku, Tokyo, Japan.
The importer of this product is CIAAT Co., LTD.
926, Woljeon-dong,Gwangsan-gu,Gwangju,Metropolitan City, 506-501, Korea.
If you want to dispose this product, do not mix with general household
waste. There is a separate collection system for used electronics products
in accordance with legislation under the WEEE Directive
(Directive 2002/96/EC) and is effective only within European Union.
For details, consult your dealer.
Chapter 5. In order to more comfortably use
For the Customers in the U.S.A.
For the Customers in Canada
For the Customers in Europe
16
Page 23
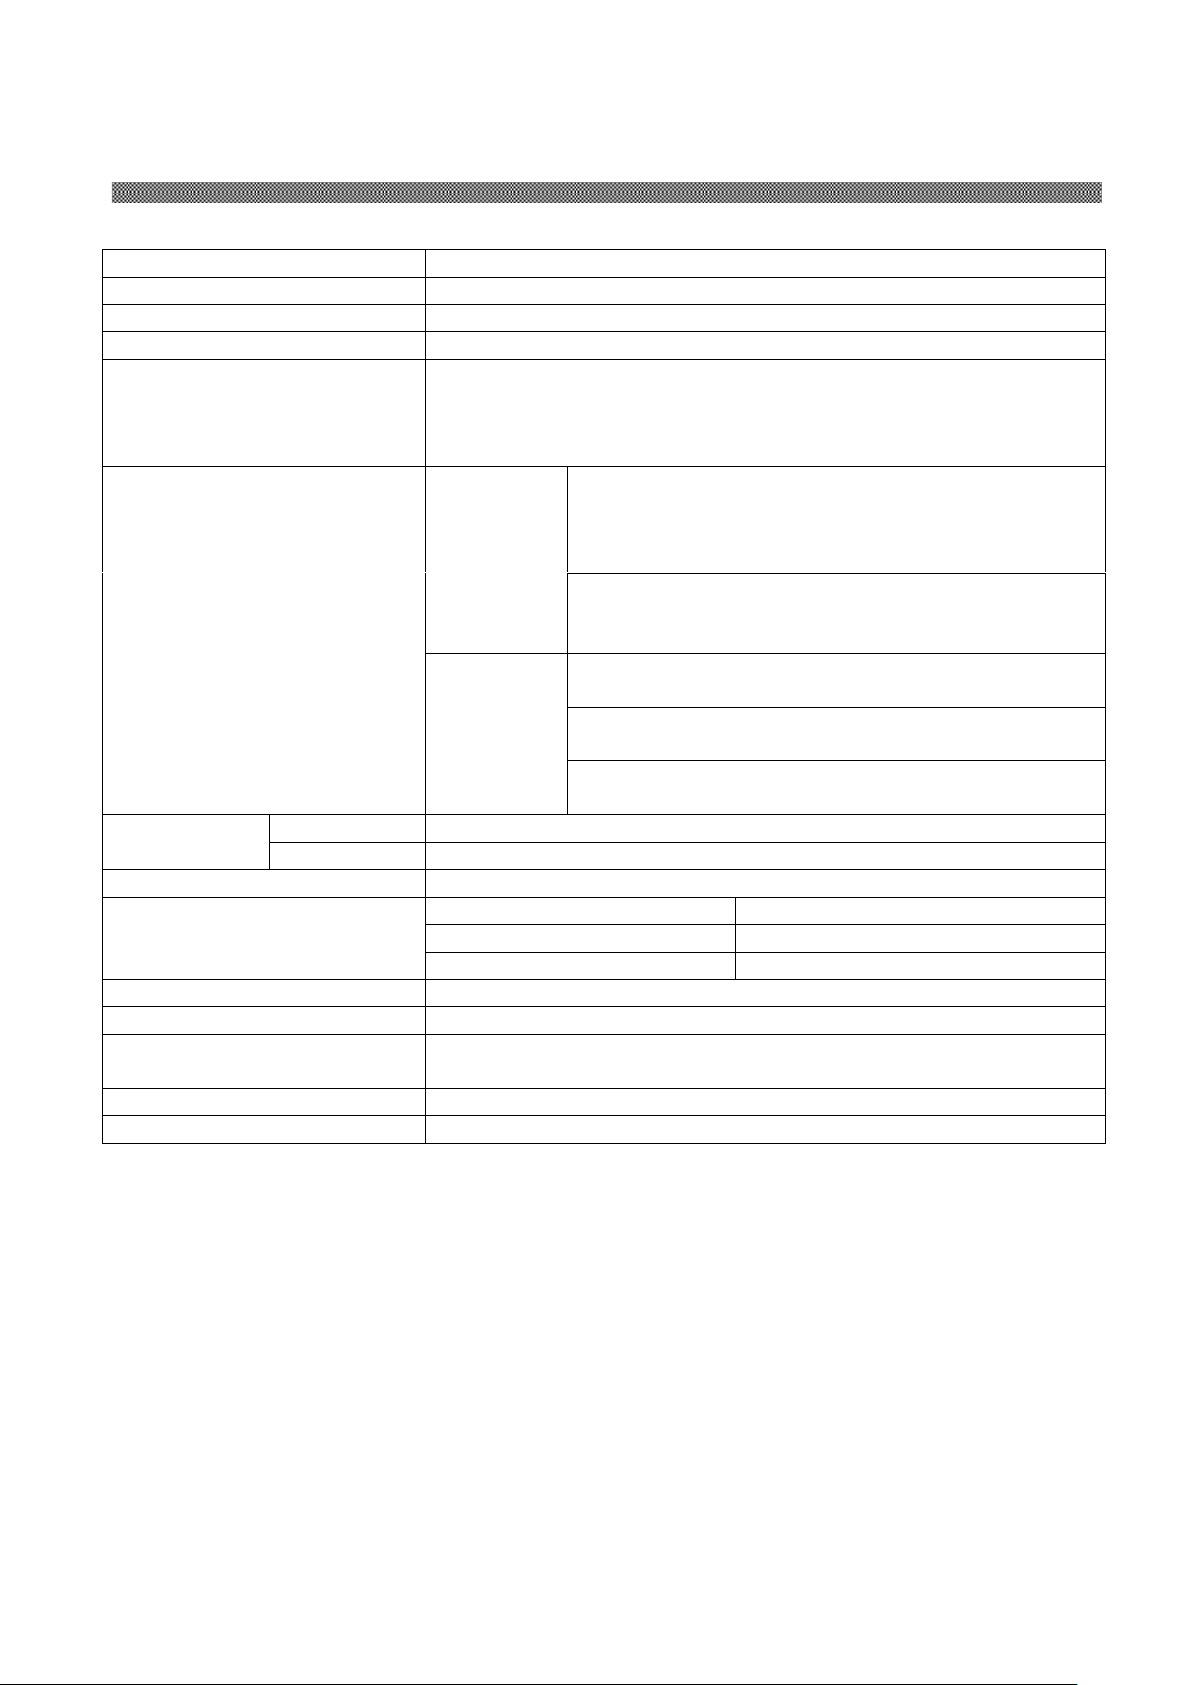
Product name
BRAVA21
Model name
CHC-S6145-5
Printing method
Dye sublimation thermal transfer
Resolution
12 dots/mm (300 dpi)
Print sizes
51 mm x 152 mm (2 x 6 size)
102 mm x 152 mm (4 x 6 size)
152 mm x 203 mm (6 x 8 size)
127 mm x 178 mm (5 x 7 size)
Print media
Paper
152 mm (6 in.) width roll paper for print
300 sheets/roll (in case of 4 x 6 size prints)
150 sheets/roll (in case of 6 x 8 size prints)
(Same as each printable size of dye-sub print.)
127 mm (5 in.) width roll paper for print
170 sheets/roll (in case of 5 x 7 size prints)
(Same as each printable size of dye-sub print.)
Ink ribbon
4 x 6 size ink ribbon
300 images/roll
6 x 8 size ink ribbon
150 images/roll
5 x 7 size ink ribbon
170 images/roll
Operating
environment
temperature
10 to 35 degrees C
humidity
20% to 80% (RH) (There must be no condensation in both cases)
Paper feeding
Roll paper feed (Roll to Cut method)
Dimensions, with casters
Width,
272 mm
Depth
351 mm
Height
168 mm
Weight
10 kg or less (Excluding consumables and accessories)
Power voltage
100 to 240 V AC (Automatic switching)
Power consumption
Less than 280 W / 3.1 A at 100 V AC
Less than 280 W / 1.3 A at 220 V AC
Interface
USB 2.0
Buffer Memory
32 MB
Chapter 6. Specifications
The above specifications are subject to change without notice.
17
Page 24

YTE8-J0561
Prepared date : Feb 8, 2013
Revision date : Feb 27, 2013
Revision Number : Revision 1
The manufacturer of this product is CIAAT Co., LTD
926,Woljeon-dong,Gwangsan-gu,Gwangju,
Metropolitan City, 506-501, Korea
Ⓒ 2013
After-sales Service
Contact your dealers or service center for the details about after-sales service.
18
Page 25

 Loading...