

Page 1
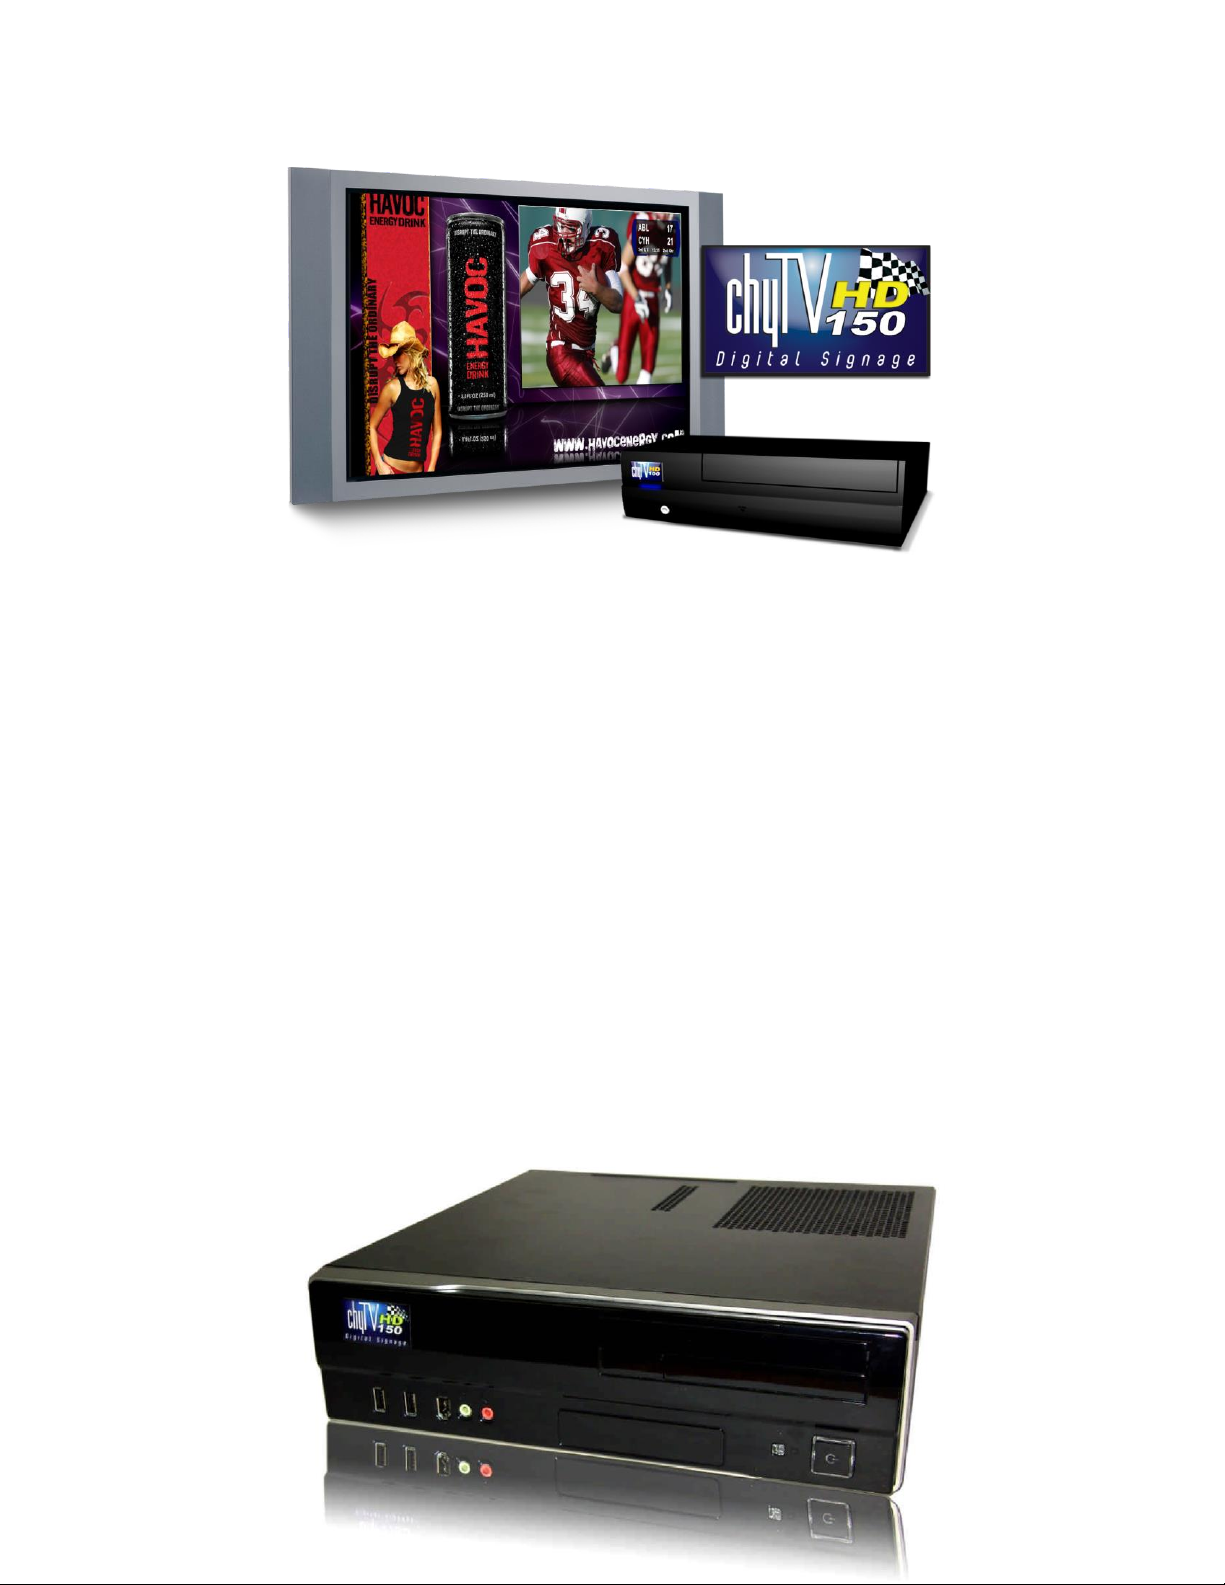
ChyTV HD 100 / 150
Quick Start Guide
Rev. 8 12/7/17
Note: All references to the ChyTV HD 100 also apply to the ChyTV HD 150.
The HD 150 is operationally the same as an HD 100. Extra features of the HD
150 include an internal standard definition live video capture card (composite
and S-Video input).
Please see HD 150 notes at the end of this document.
Note that the chassis is subject to small changes depending on availability.
Thank you for your interest in the ChyTV HD 100. At the time of this
shipment, the HD 100 specific revisions to the ChyTV User Guide
have not yet gone to print. While most of the information in the current
ChyTV User Guide is applicable to the HD 100, this addendum
includes brief descriptions of HD 100 specific information not included
in the current manual. Please contact ChyTV Customer Support with
any questions at 631-845-3880.
Page 2
Power Supply
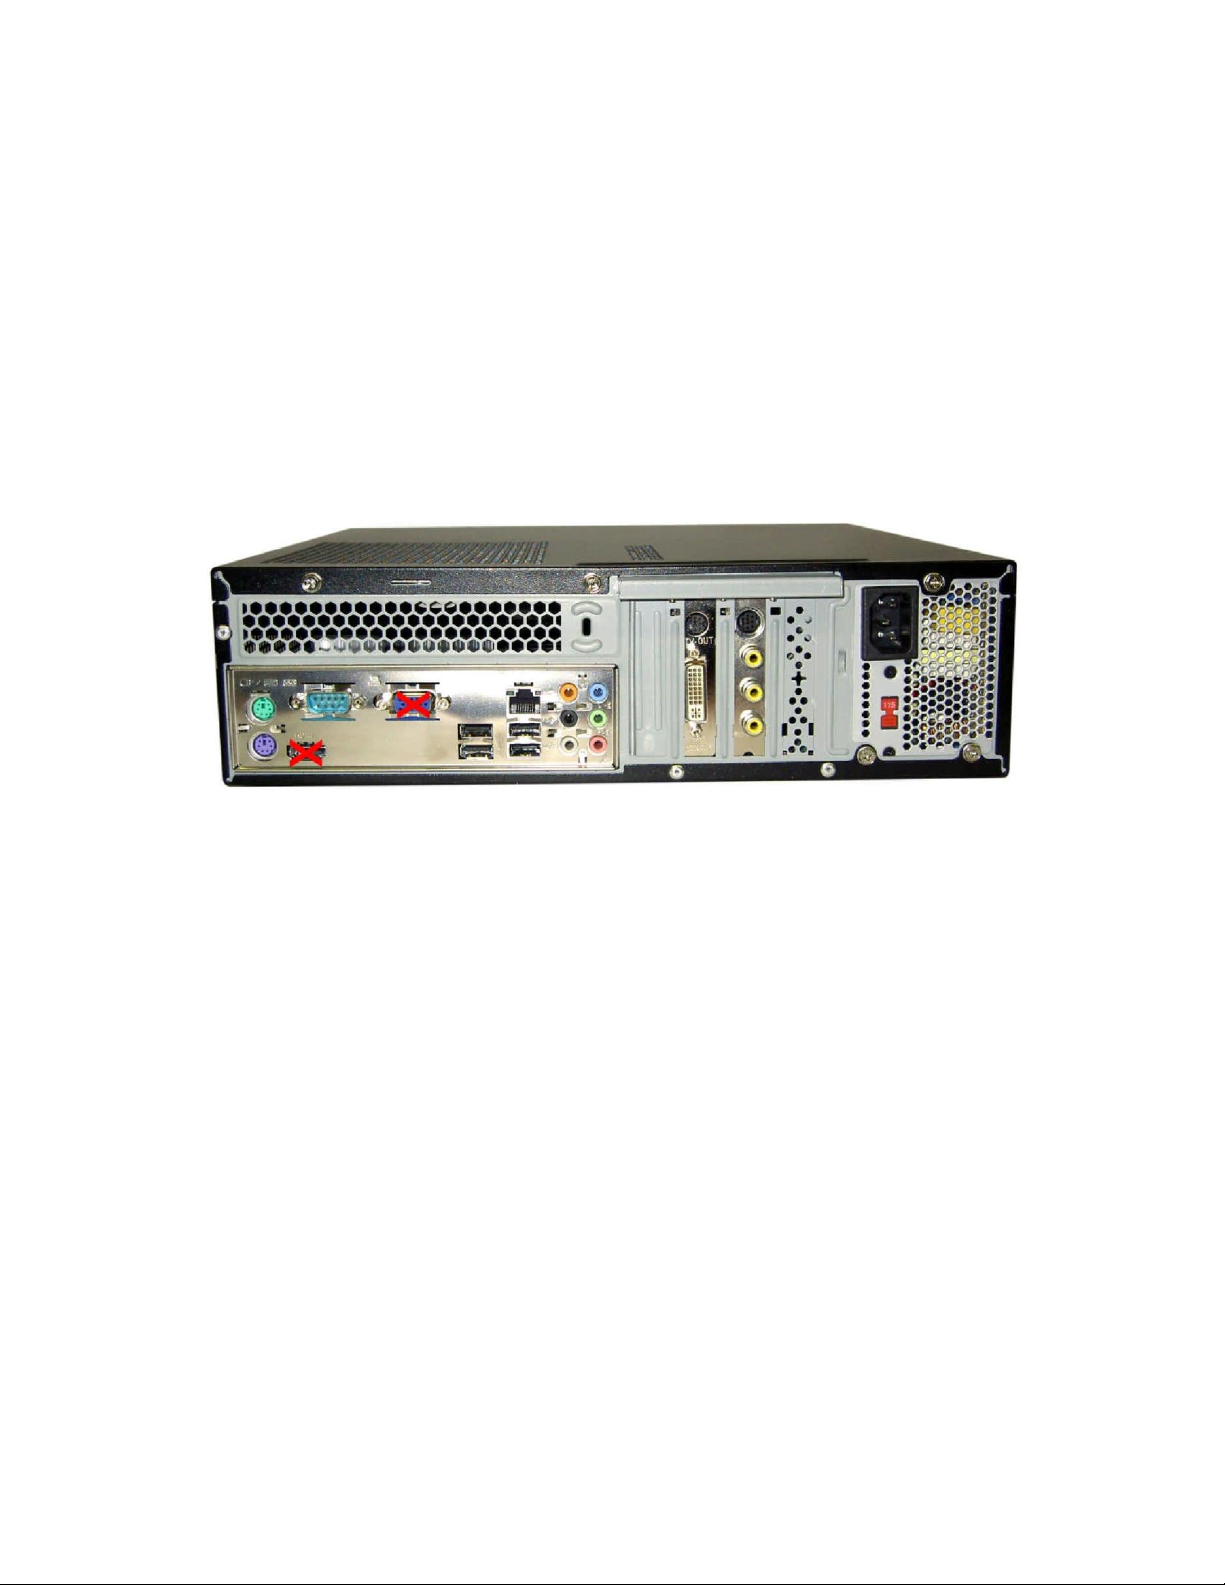
Before operation, please check the HD 100’s power supply voltage
switch. The HD 100 power supply is switchable between 110 volts and
220 volts. The switch is located on the rear of the device near the line
cord receptacle. By default the HD 100 may come set for 220 with a
sticker covering it that says “Switch for 110”. This is to protect the
system from damage when shipped overseas.
Plugging a 220 set device into 110 voltage will not function correctly, but will not
damage components. Plugging a 110 device into 220 voltage will damage
components.
Turning On / Off
The HD 100 operates simply by pressing the power button on the front panel.
After pressing the power button, the device takes 20 seconds or so to boot. It will
immediately begin playing the current Project. Press the power button again to
turn off. The device takes 20 seconds or so to shut down completely.
Occasionally (every 30 drive mountings), some extra time booting will be
required verify drive consistency. In this case, booting may take several minutes
to complete.
Video Output
The DVI and S-Video are the only active video outputs. The HDMI and WXVGA
outputs on the mother board are disabled.
Video Input
Either the S-Video or any of the three yellow RCA composite video inputs can be
assigned as the active video input. By default, the middle yellow composite input
is active. The input source can be set using the HD Configuration Manager
application.
Audio In / Out
The green 1/8 audio jack is the audio output. The blue is the audio input. Think
“green to the screen”. Input and output volumes can be set using the HD
Page 3

Configuration Manager in ChyTV Tools.
General Work Flow
Like all standard ChyTV devices, content is created, updated and managed using
the ChyTV Tools interface. The ChyTV Tools software is run on a separate PC
and connects to the ChyTV HD device via the network.
Alternately, content can be delivered across the Internet to the ChyTV HD
device via the ChyTV.net web service. In this case, the content is still authored
and managed off-line on a separate Windows PC. When completed, the project
is packaged and uploaded to the ChyTV.net server’s appropriate account and
group. Complete ChyTV.net operations are described elsewhere. Contact
ChyTV Customer Support for more information.
Setting the IP Address
Before the ChyTV HD device can be connected to directly across the network
from ChyTV Tools, it must be configured with a valid IP address. Since the
ChyTV HD device is a stand-alone appliance, configuring custom parameters
such as the IP address are achieved using the included USB thumb drive. By
default, the ChyTV HD device leaves the factory set to DHCP for dynamic IP
allocation. However, it can also be set to a static IP which will ensure consistent
connections with ChyTV Tools going forward.
Upon boot-up, a gray informational screen is displayed for several seconds that
shows the system’s IP Address along with MAC Address, software version,
screen resolution and other information. If the system is set for DHCP the IP
address should be noted.
To modify the ChyTV HD device’s network settings, please take the following
steps:
1. Using a Windows PC, insert the included ChyTV HD device USB thumb
drive into an empty USB slot.
2. Using Notepad, open the file IP.TXT for editing.
3. Modify the above networking parameters to their appropriate settings.
Note that in the IP.TXT file, a ‘#’ symbol as the first character on a line
indicates that the line is “commented out” (i.e. ignored).
4. Save IP.TXT file and properly stop and eject USB thumb drive.
5. Power on ChyTV HD device. Wait for complete boot.
6. On the ChyTV HD device, insert the USB thumb drive into an empty USB
slot. Note that only USB 2.0 is currently supported. Therefore, the best
choice would be one of the USB slots on the rear panel next to the Ethernet
port. The ‘blue’ USB 3.0 slots should not be used.
7. Wait approximately 20 seconds. The ChyTV HD device will automatically
collect the new networking parameters from the IP.TXT file.
8. Remove the USB thumb drive and restart the ChyTV HD device by
turning off and on again.
Page 4
The new IP address can be confirmed by ‘pinging’ from a PC on the network.
Installing the Software
The ChyTV management and creation applications can be found on the included
USB thumb drive. The drive also includes several Sample Projects and utilities
and can be used to initialize the ChyTV device IP address.
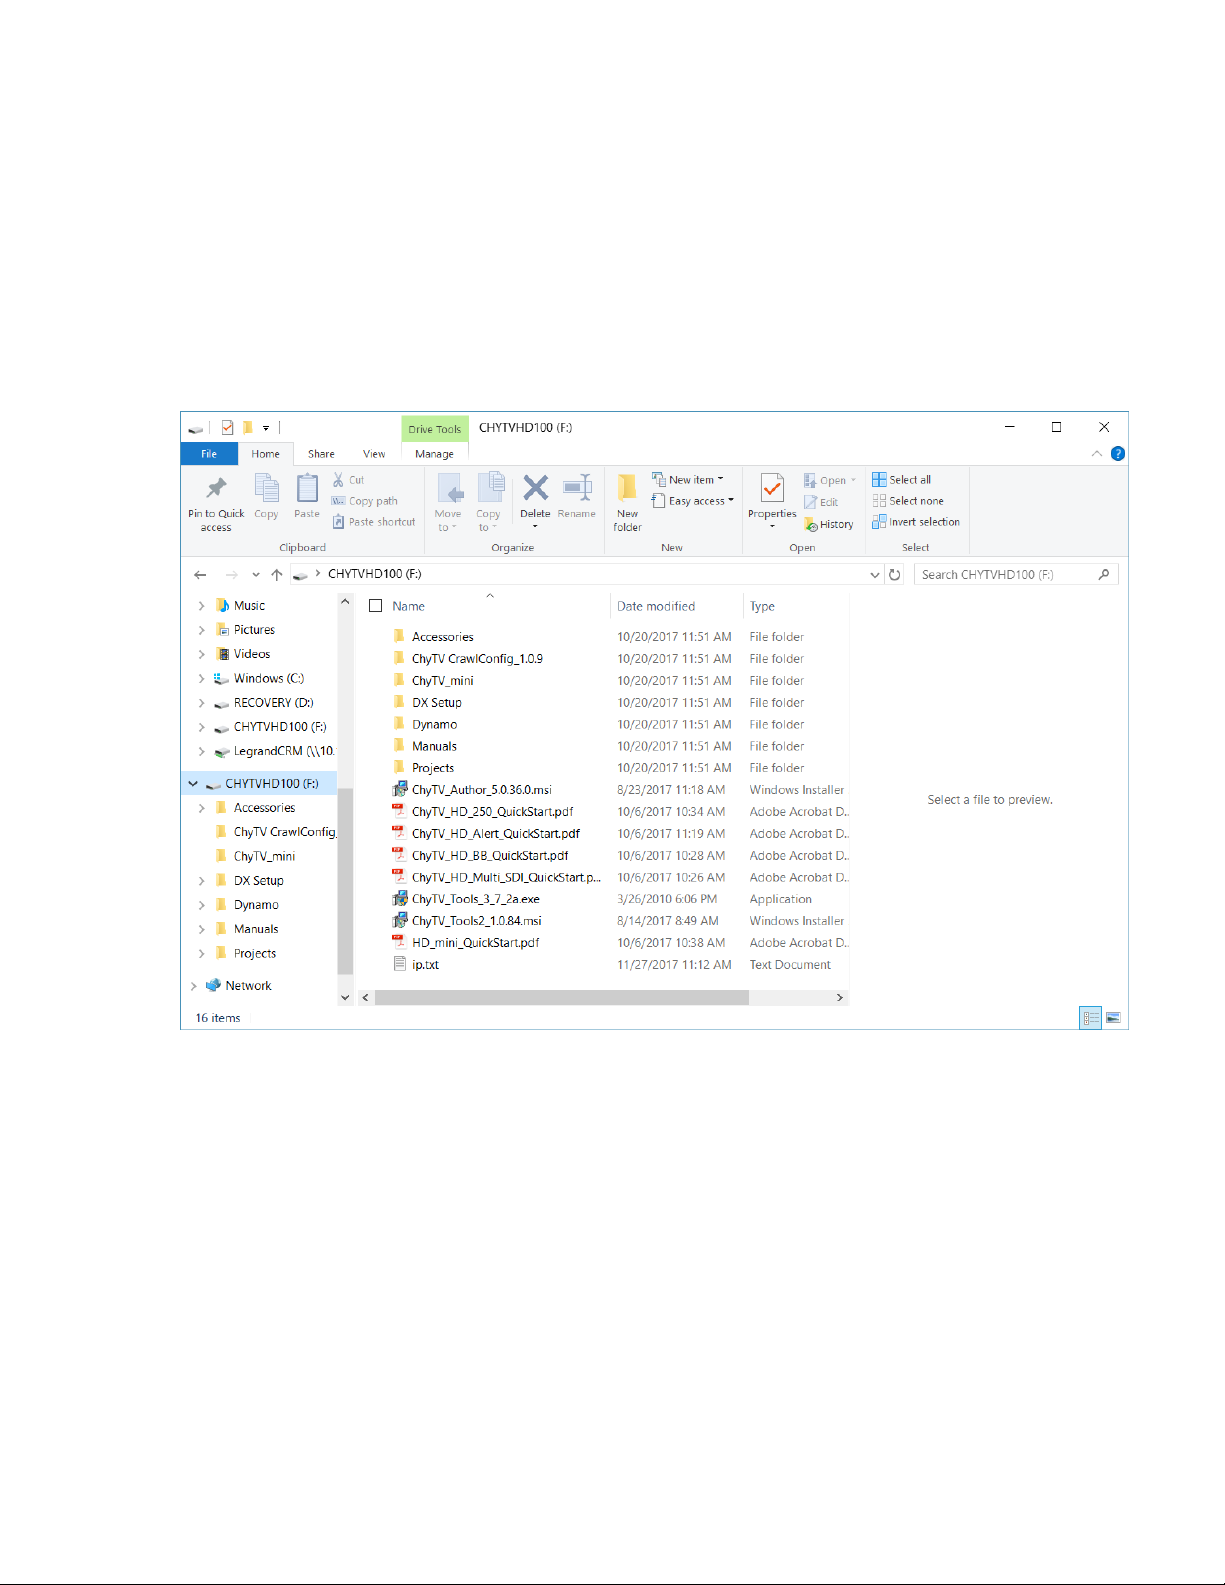
Opening the USB drive on a PC will show something like the following:
The same exact thumb drive image is used for all of our products. The
CHYTVHD100 volume label is actually used a ‘precaution’ for using the thumb
drive for configuration updates. The IP.TXT file on the thumb drive can be
modified for a variety of commands to the device, most commonly is to change
the networking parameters. When a thumb drive is inserted in the device, it first
checks for the CHYTVHD100 volume name, otherwise no action is taken.
The standard files to be installed are ChyTV_Author_xxxx.msi and
ChyTV_Tools2_xxxx.msi. ChyTV CrawlConfig is only required for a ChyTV
HD-Alert system and Dynamo is only for certain legacy purposes.
Note:
Some versions of Windows may generate the error below if an “msi” installation
script is executed directly from the USB drive.
Page 5
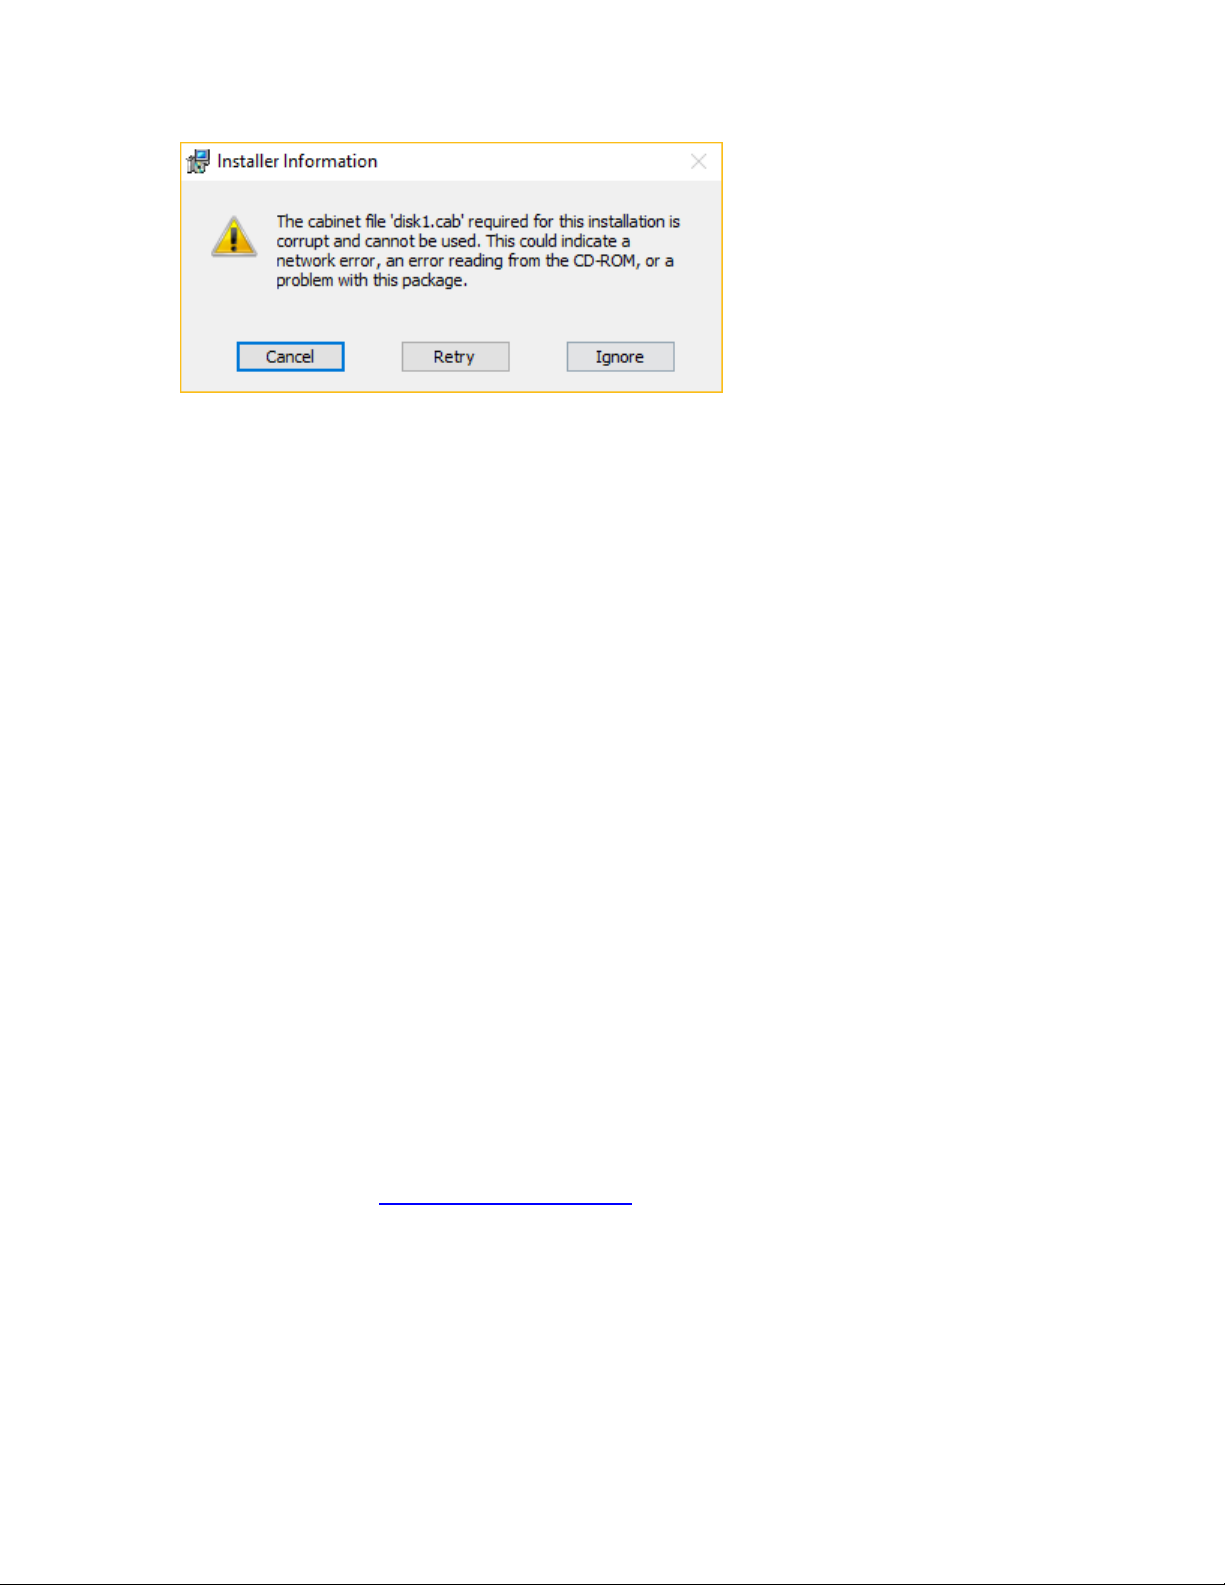
If this error occurs, simply copy the “msi” files from the USB drive to a temporary
folder on the PC and re-execute.
ChyTV Tools
Standard with all ChyTV products, ChyTV Tools is an extremely intuitive
software utility to create, manage, schedule and distribute content for the
ChyTV Video Graphics Information Display Systems. ChyTV Tools enables
integration of dynamic graphic and text content with a variety of animations. All
graphic pages can be individually controlled via a schedule that permits looping
on duration or specific days of the week and time of day. For multiple device
deployments, ChyTV Tools enables you to control many IP devices from a
single location over the network. ChyTV Tools combines powerful graphic,
video, and audio capabilities with an easy to use interface. Page layout and
design are readily composed with the also include ChyTV Author WYSIWYG
tool.
Having set the IP address on the ChyTV HD device, the device can be
connected to via any Windows PC on the network using ChyTV Tools. A newer
version of ChyTV Tools is is available on the shipped USB drive and is called
ChyTV_Tools2_1.0.xxxx.msi. At the time of this Quick Start’s writing, the
ChyTV User Guide still reflects the earlier version of ChyTV Tools (ver 3.7.2).
The newer version is very similar and has number of enhancements, including
improved compatibility with newer versions of Windows such as Windows 10.
However, there are some subtle differences. Later Versions will be available
for download from www.chytv.com/support.
To install ChyTV Tools, double-click the installation msi file:
ChyTV_Tools2_1.0.xxxx.msi.
Please contact ChyTV customer support at 631-845-2092 for help and training.
Page 6
Configuring IP Addresses in ChyTV Tools
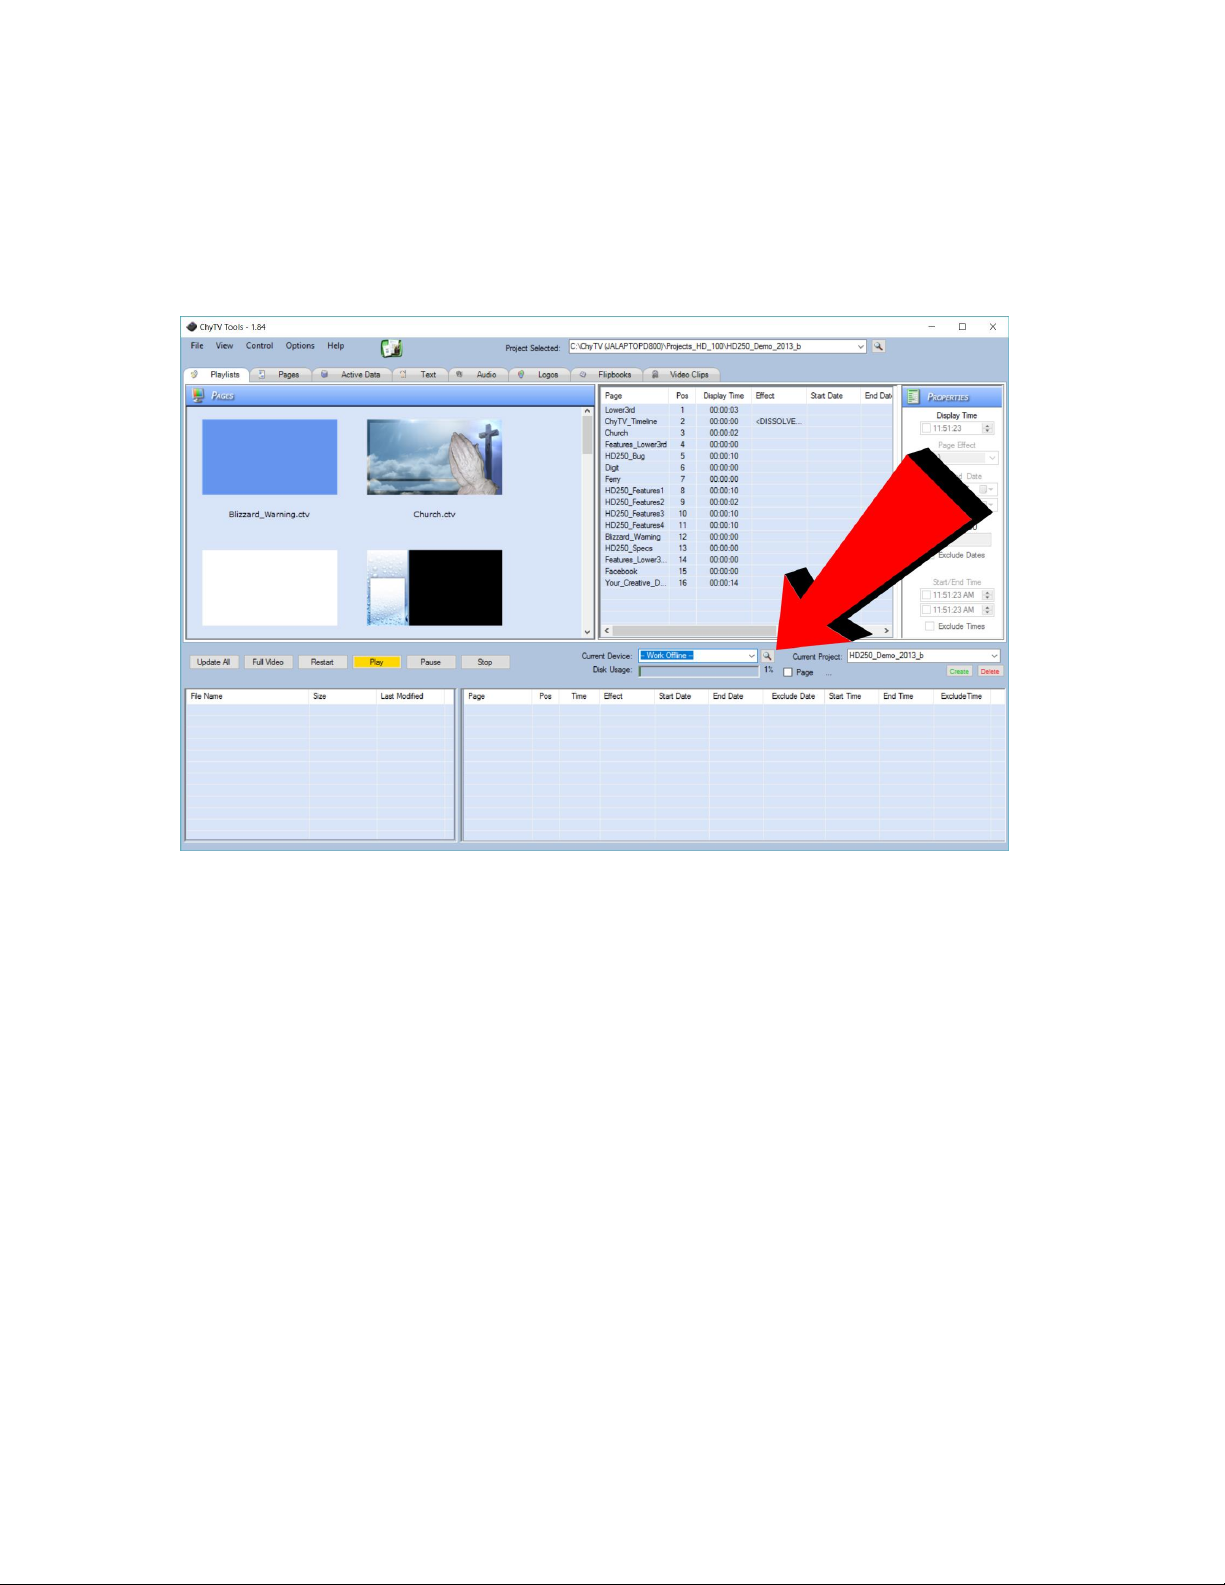
To connect to one or more ChyTV devices, the IP addresses must be configured
in ChyTV Tools. To add IP Addresses, select the magnifying glass next to the
Devices drop-down on the middle Tools menu bar. See image below:
Next give the device and name and enter its IP address. See image
below:
Page 7
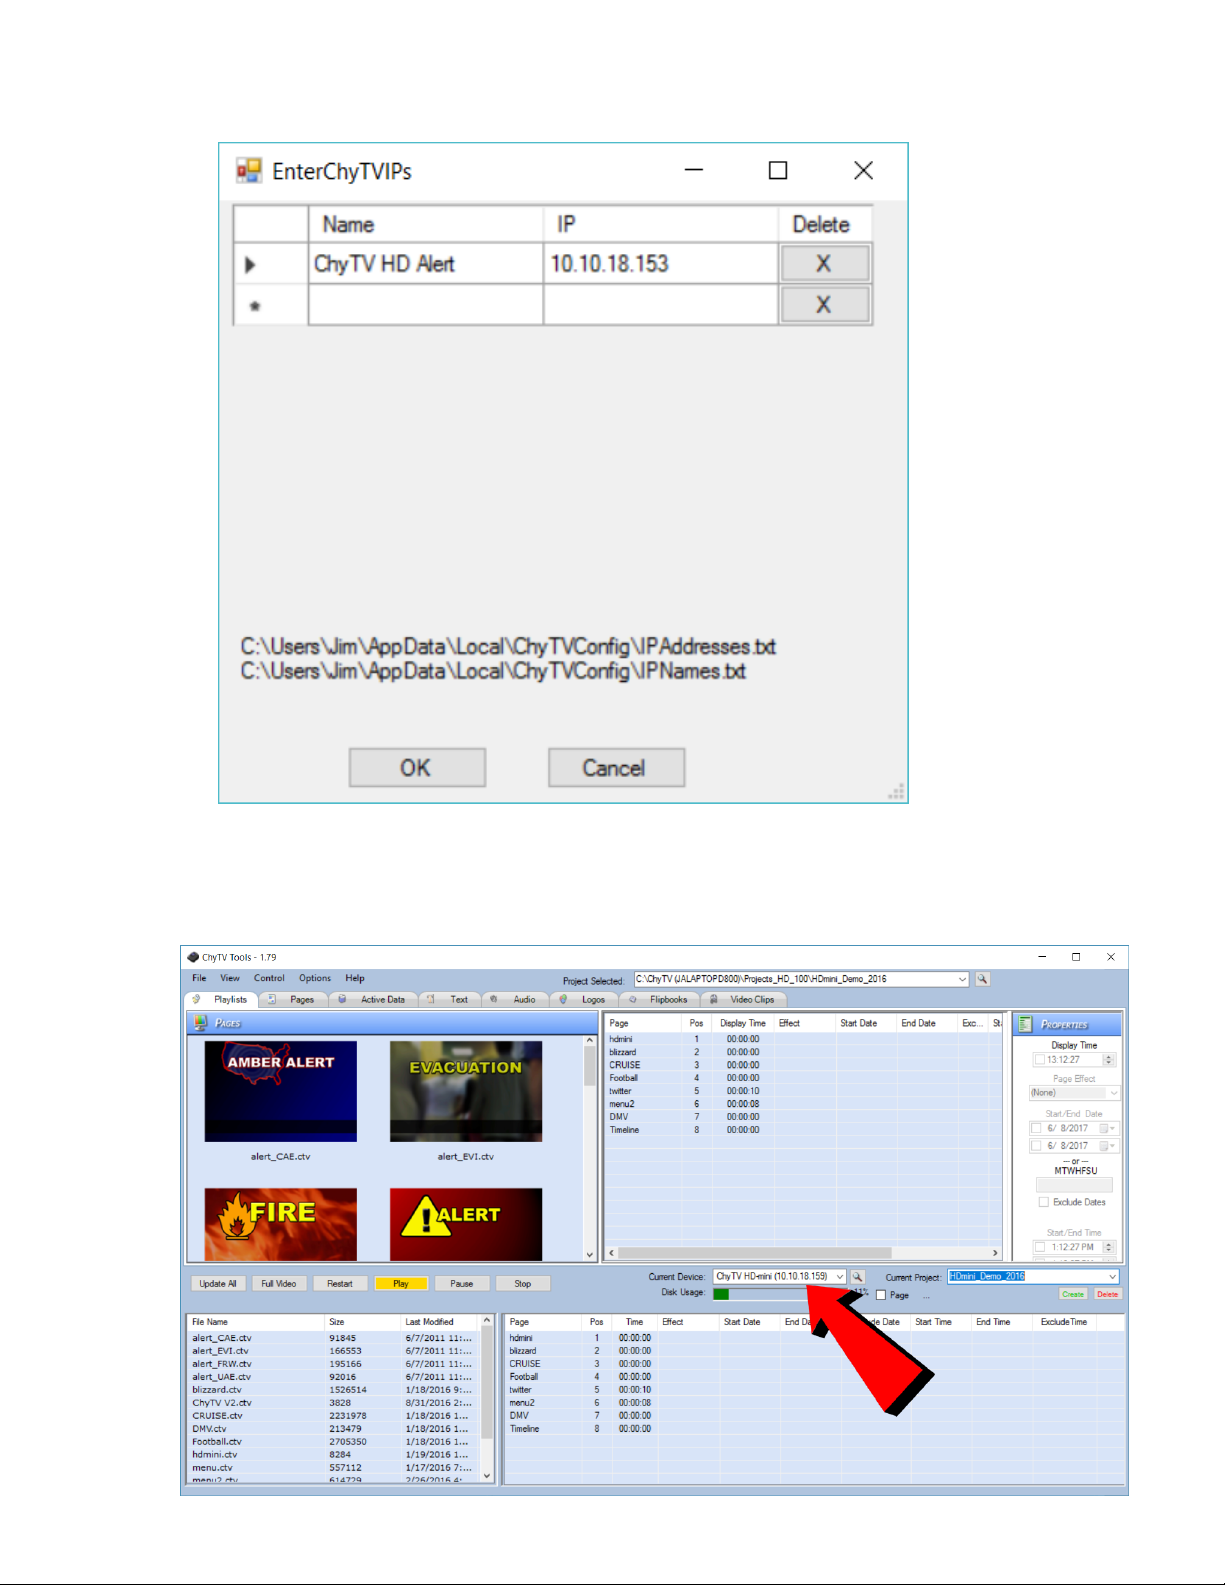
The device can now be selected from the Device drop-down. See
image below:
Page 8
Note that alternate projects can be selected to be the current project
from the Current Project dropdown.
Configuring Projects Using ChyTV Tools
A ChyTV Project is a folder that includes all content, assets and schedule
information for playback. A project is resident on a PC and managed using
ChyTV Tools. When appropriate, ChyTV Tools is used to transfer the project
from the PC to the HD-mini device. Multiple projects can exist on the PC side as
well as on the HD-mini device. However, there is always a concept of the
Current Project. This is the schedule and content that the HD-mini is currently
playing.
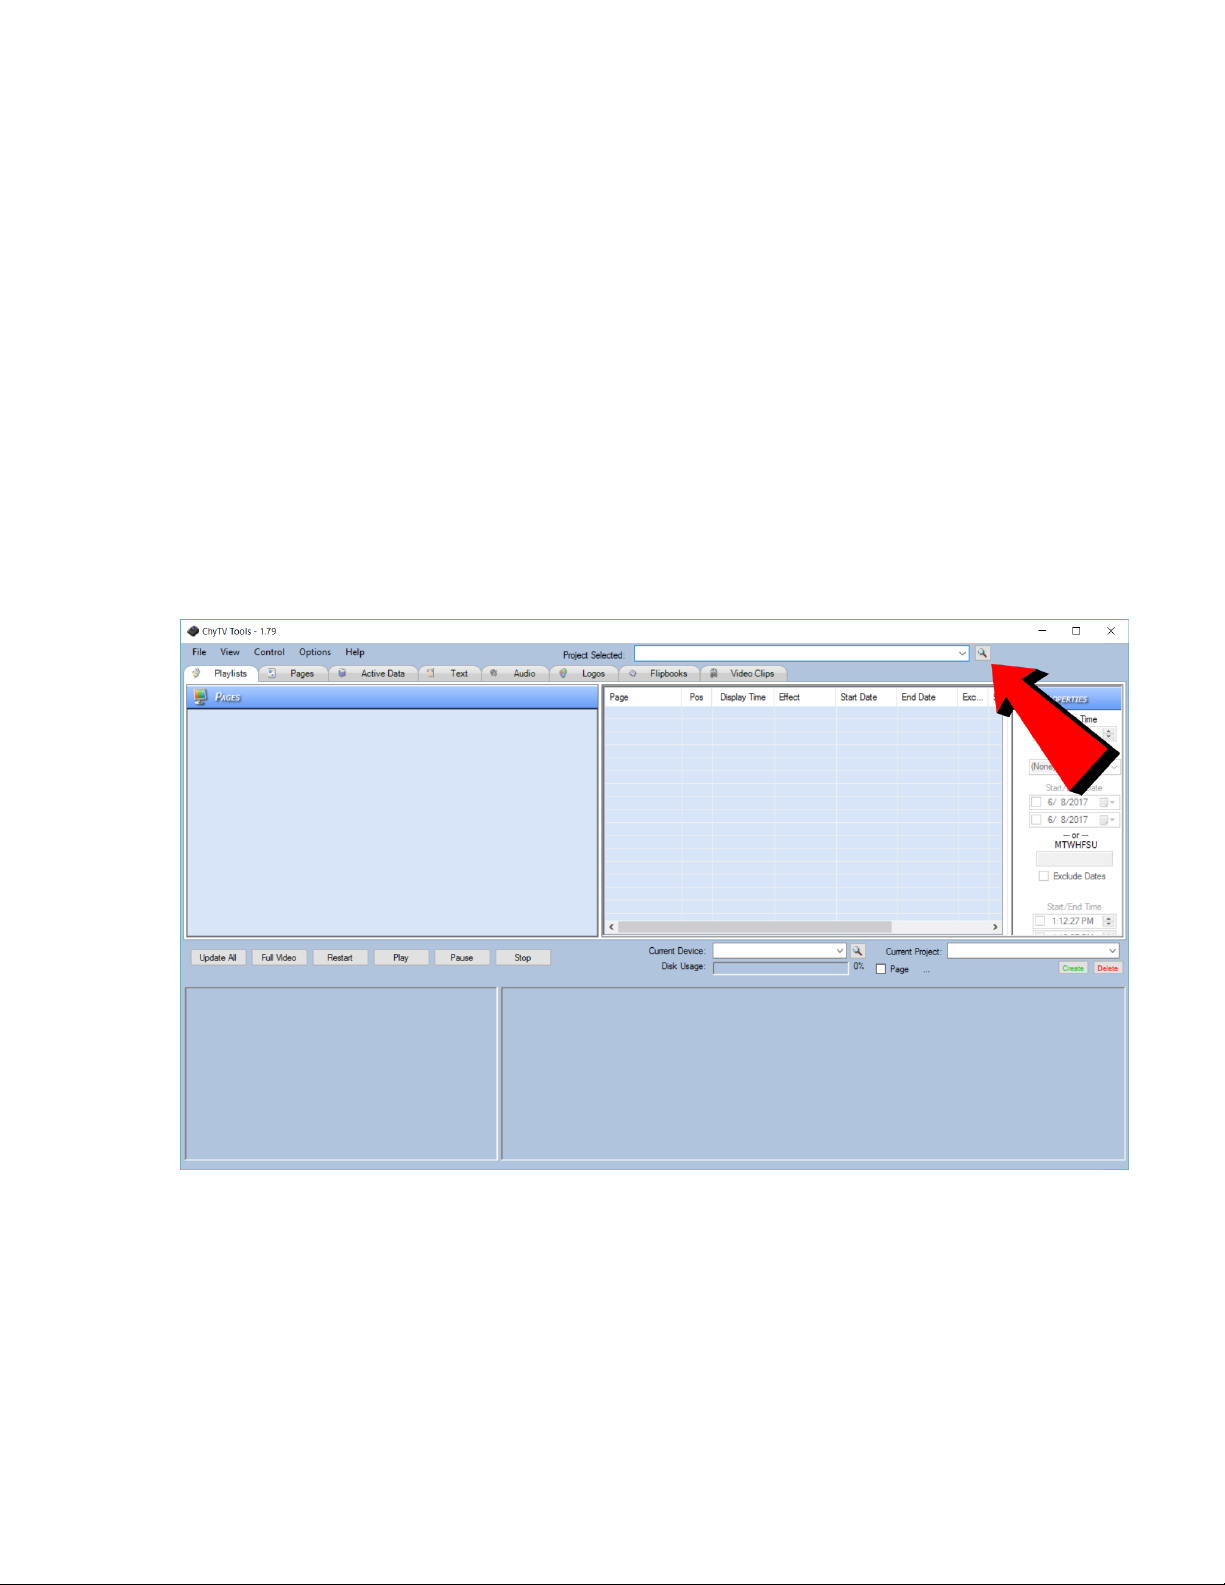
To Create a new project, or to add an existing one to the Project Selected list,
click on the magnifying glass icon next to the Project Selected list drop-down
box.
This will bring up the Project Add / Create box.
Page 9
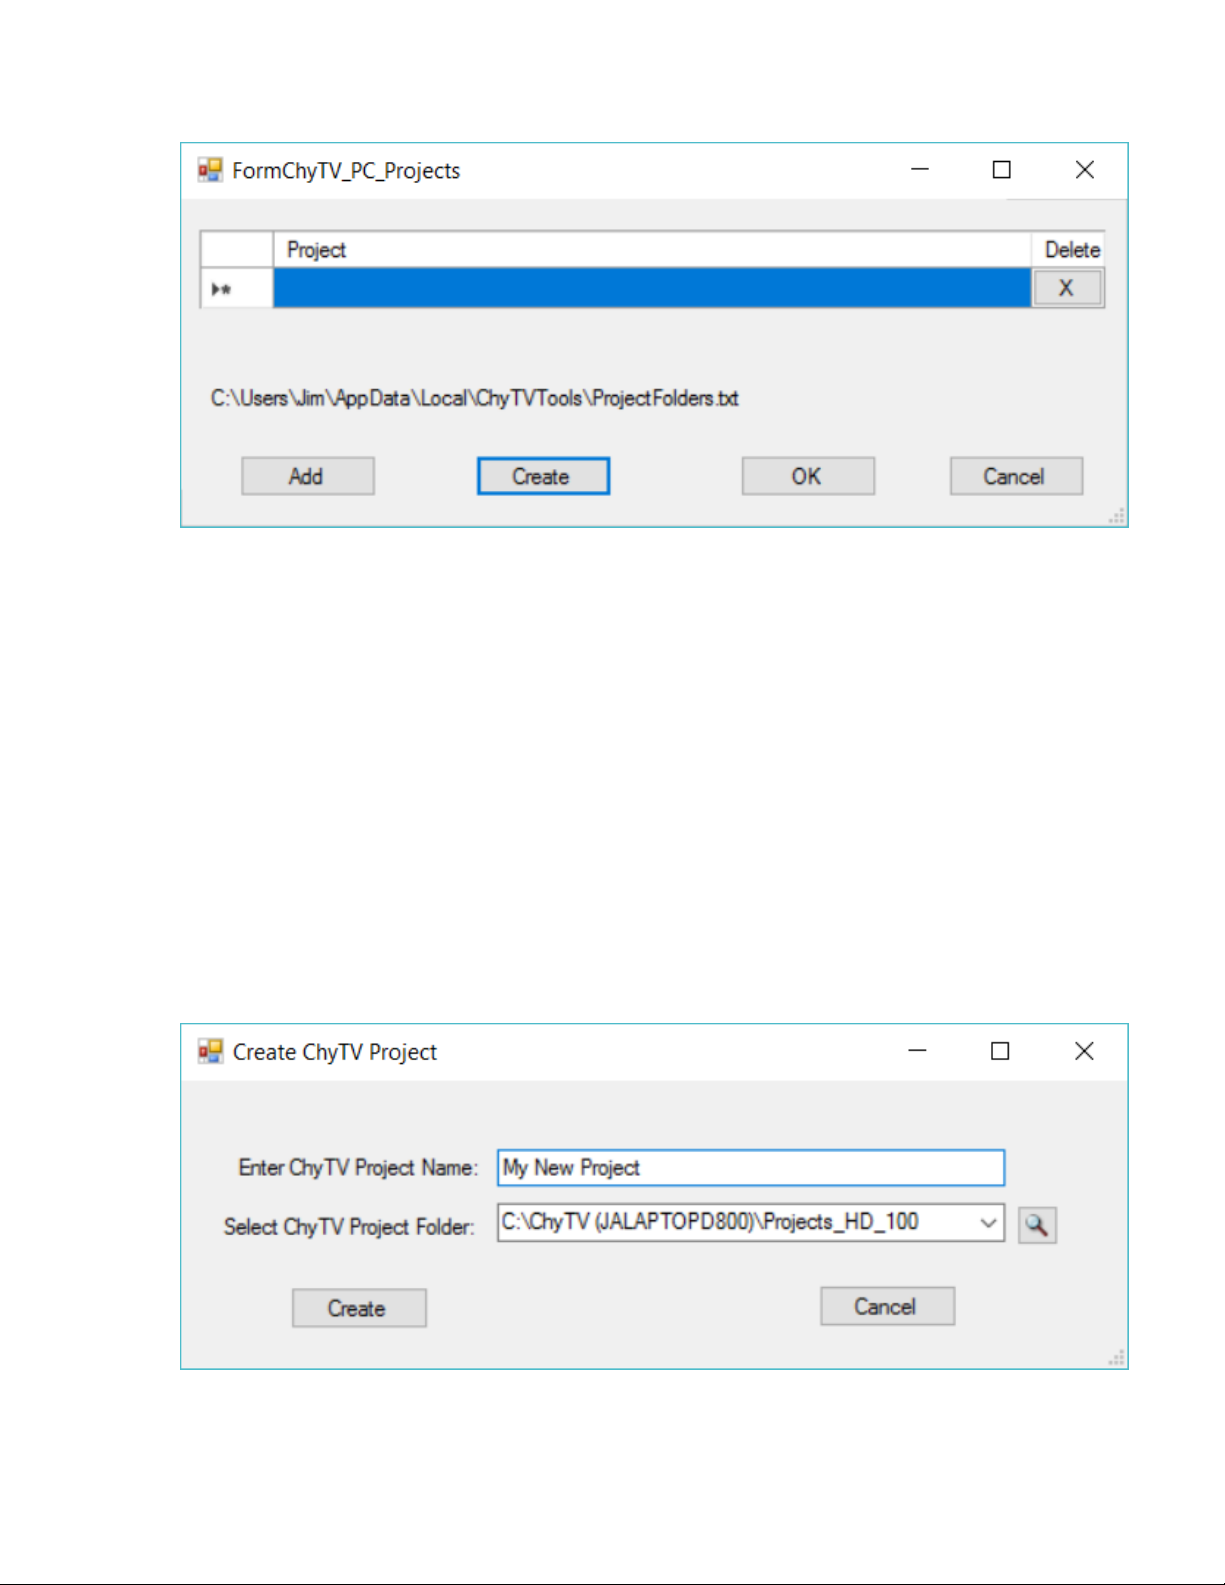
To select an existing project, select Add and navigate to the desired project.
Note that there are several sample projects include under the Projects folder on
the included USB drive. These can be copied to the PC hard-drive to a location
of your choice. Typically, though not necessarily, the Projects reside under:
C:\Program Files (x86)\ChyTV\ChyTV Tools2\Projects.
Our ChyTV devices do ship with several demos pre-installed that match the
system’s particular capabilities. However, there is no direct correlation between
the thumb drive projects and the ones pre-installed on the system.
To Create a new project, select Create. Use the Magnifying Glass button to
navigate to a location on the PC for your projects to go. As you develop new
projects, you may want to keep them together in the same place. Different
Projects will have their own unique name. Enter the new Project Name. In the
example below, upon clicking Create, and new blank project called “My New
Project” will be created under:
C:\ChyTV (JALAPTOPD800)\Projects_HD_100
The Update All button is used to transfer the currently selected project from the
PC to the ChyTV device. Users will generally want their computer project (top
half of Tools) to match the device project (bottom half of Tools). If there is any
kind of mismatch in the two project names, Tools will generate the following
Page 10
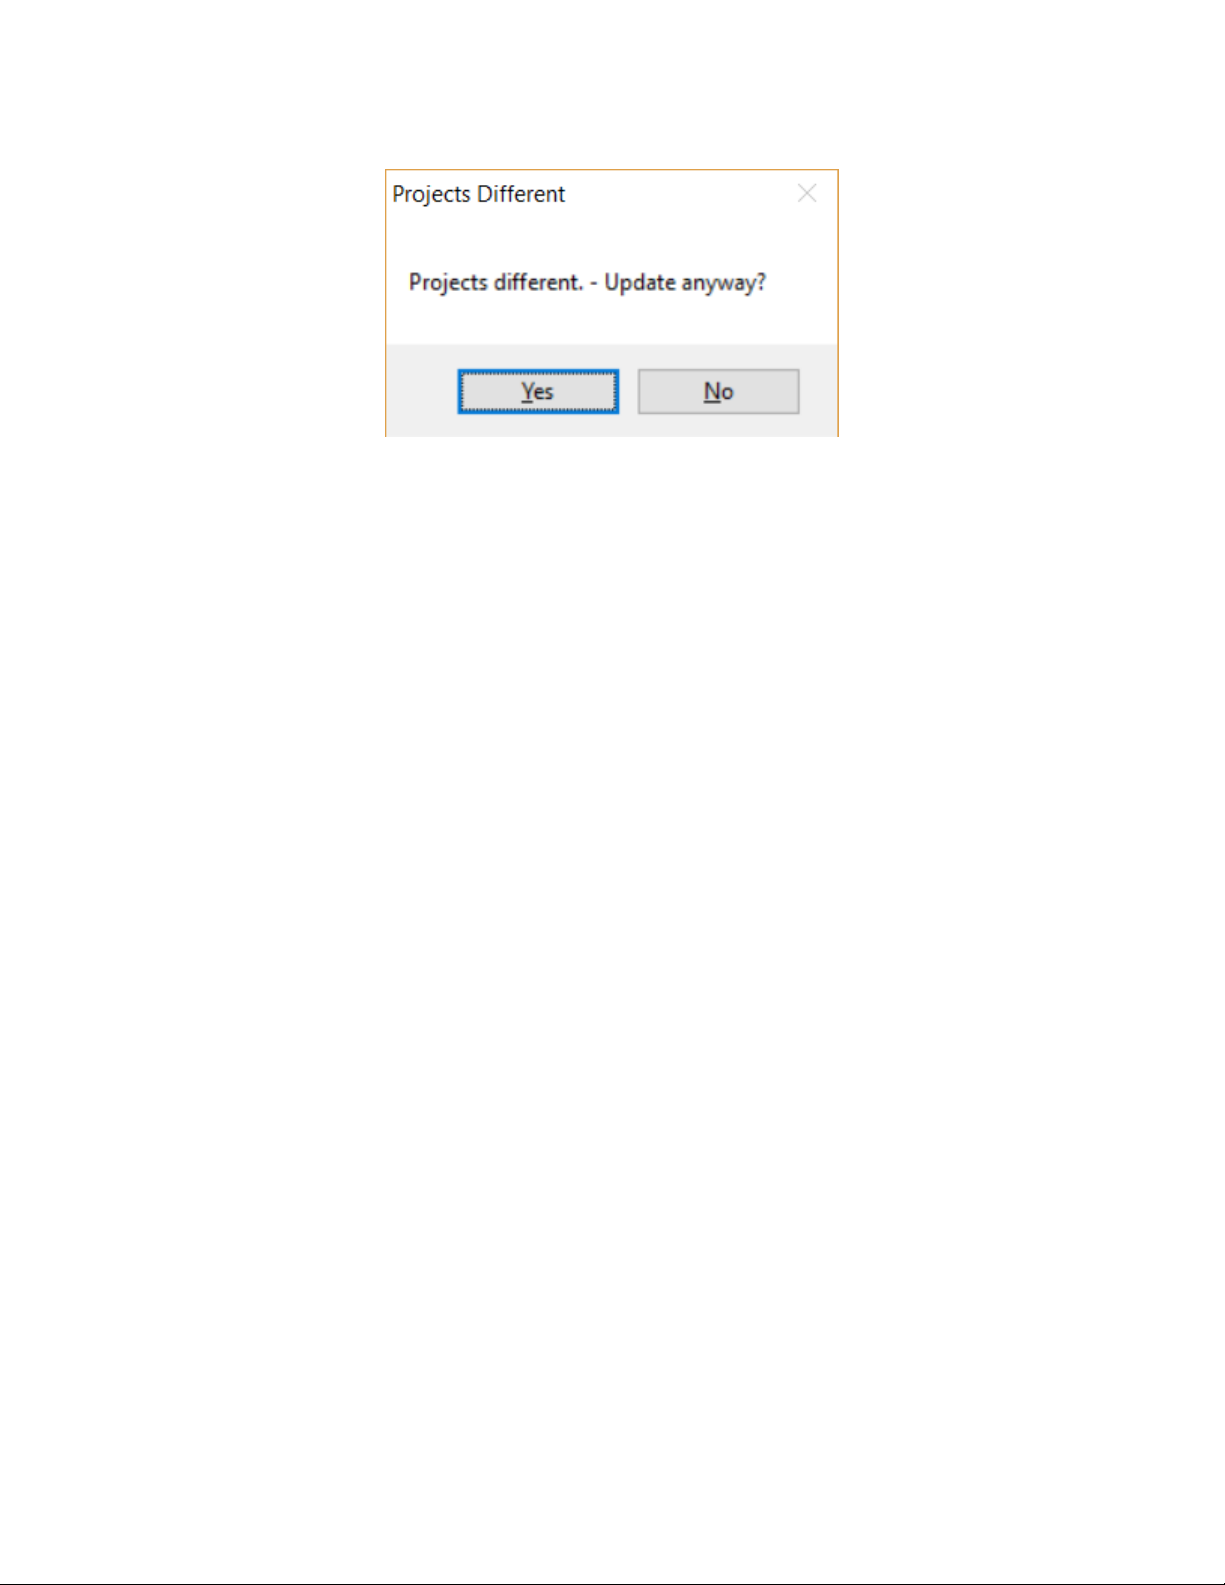
warning.
This prevents content and the schedule from the computer project inadvertently
overwriting the project on the device. What would typically be done is to click the
green Create button below the device’s Current Project drop-down. The user is
then prompted to name the new project, but it is pre-loaded with the same name
as the computer project. Selecting OK will create a new, blank project on the
device that matches the computer project name. Then Update All will download
all content and the projects will be ‘synchronized’.
Configuring the Hardware
The Hardware Configuration Manager has been incorporated into
ChyTV Tools. It is used to set a variety of system settings, including:
• Audio volume levels for Line In, Video Clip and Line Out.
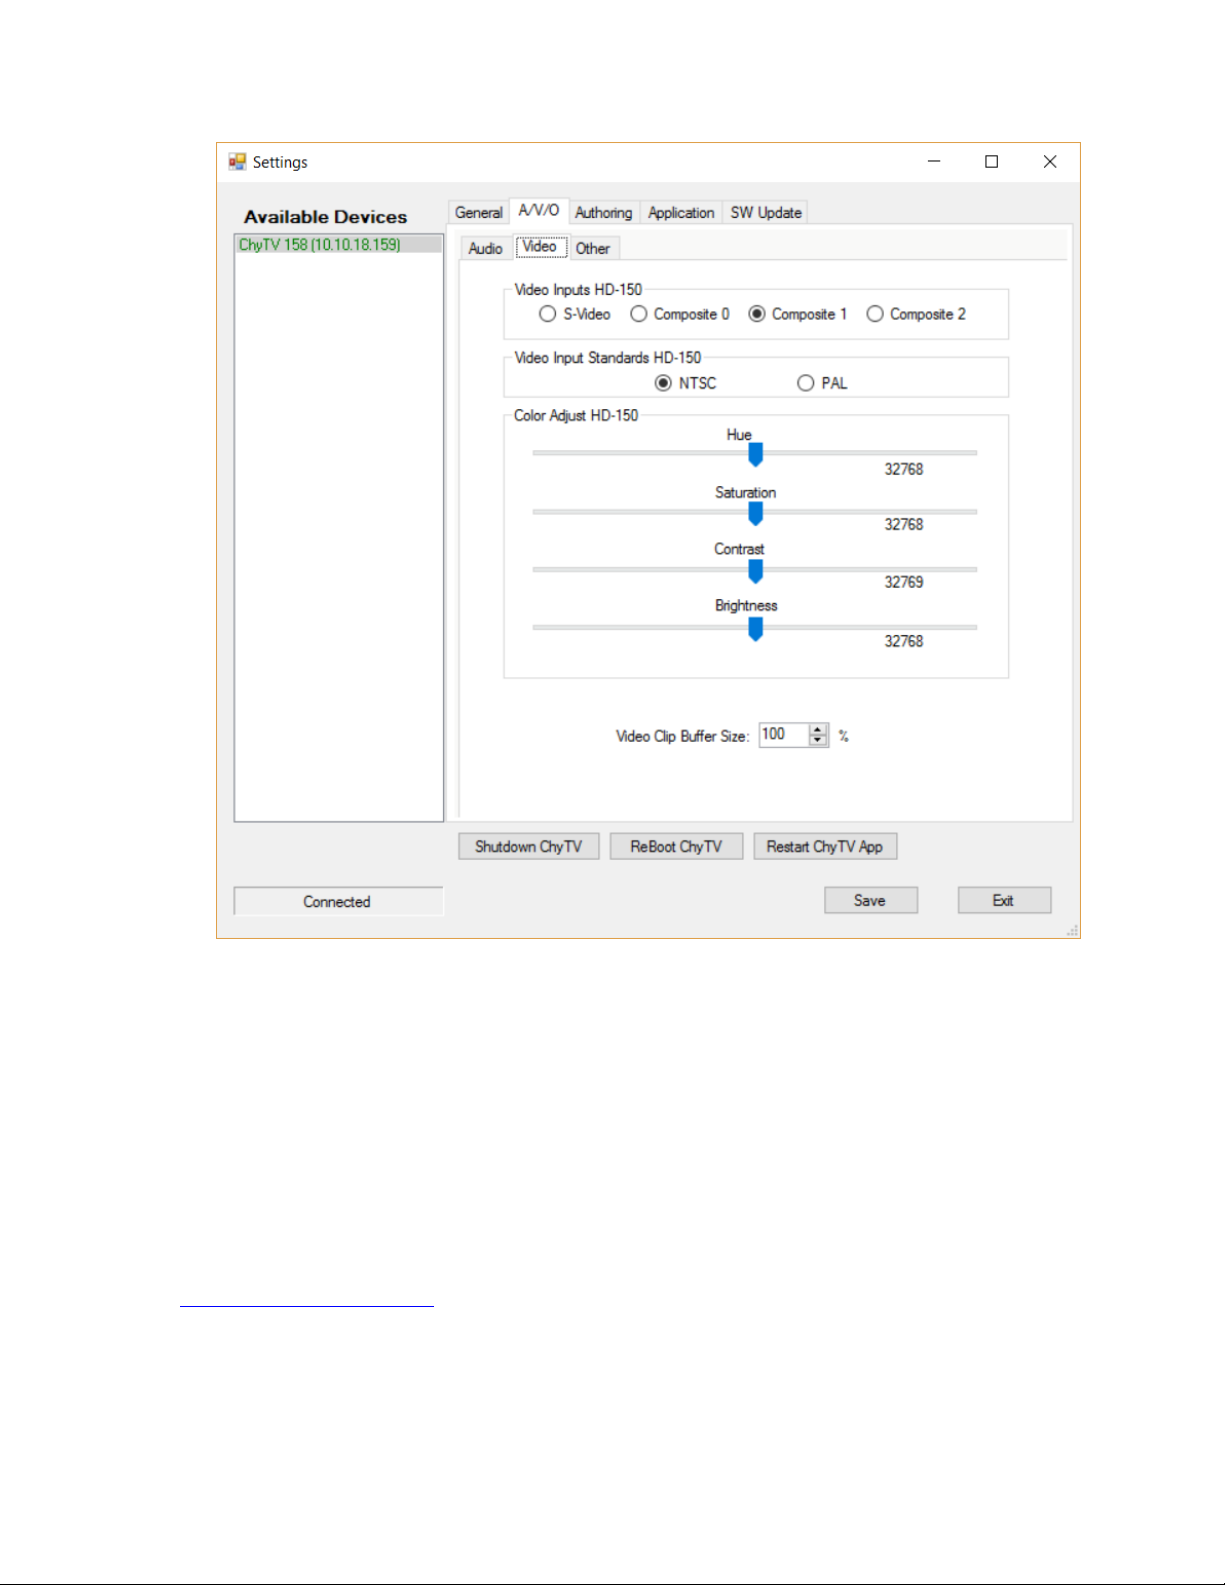
• Video Settings for Input Source.
• Landscape or Portrait mode display.
To use the Hardware Configuration Manager select Options / Settings
from the top menu bar in Tools. Then left click on the desired device.
See image below:
Page 11
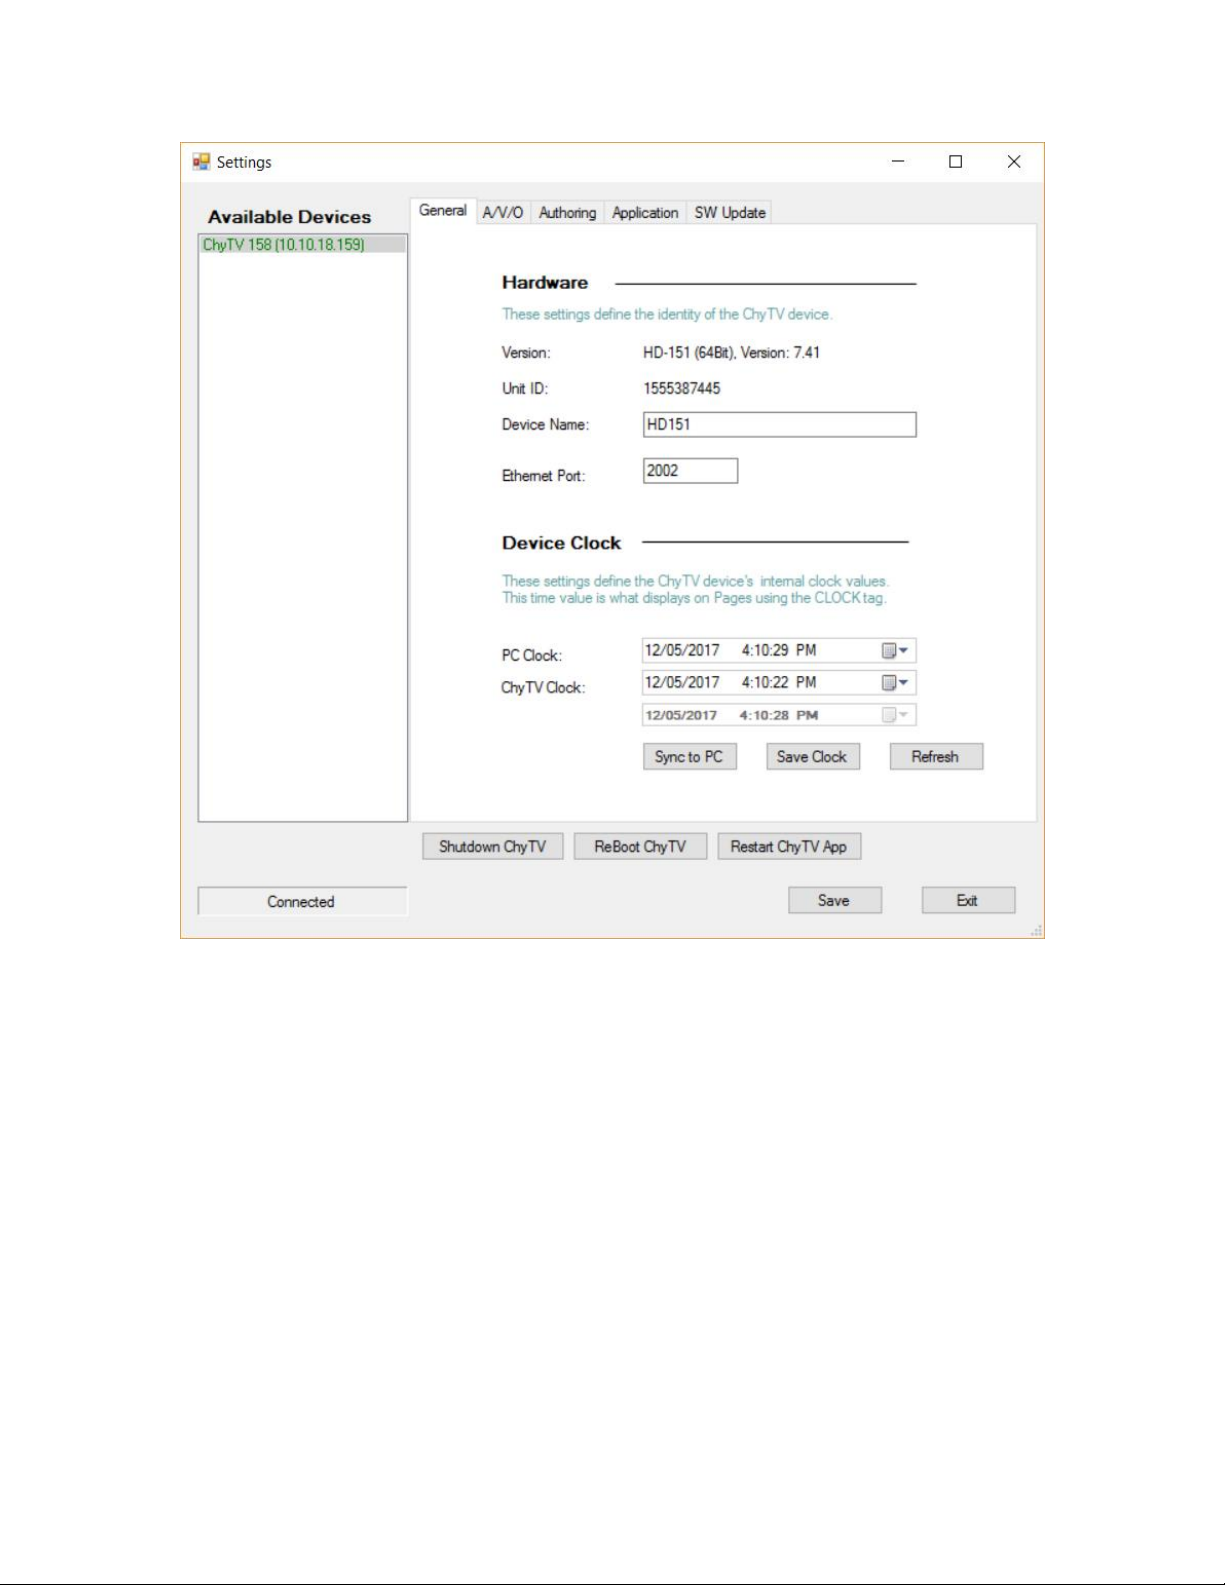
Select A/V/O menu. See image below:
Page 12
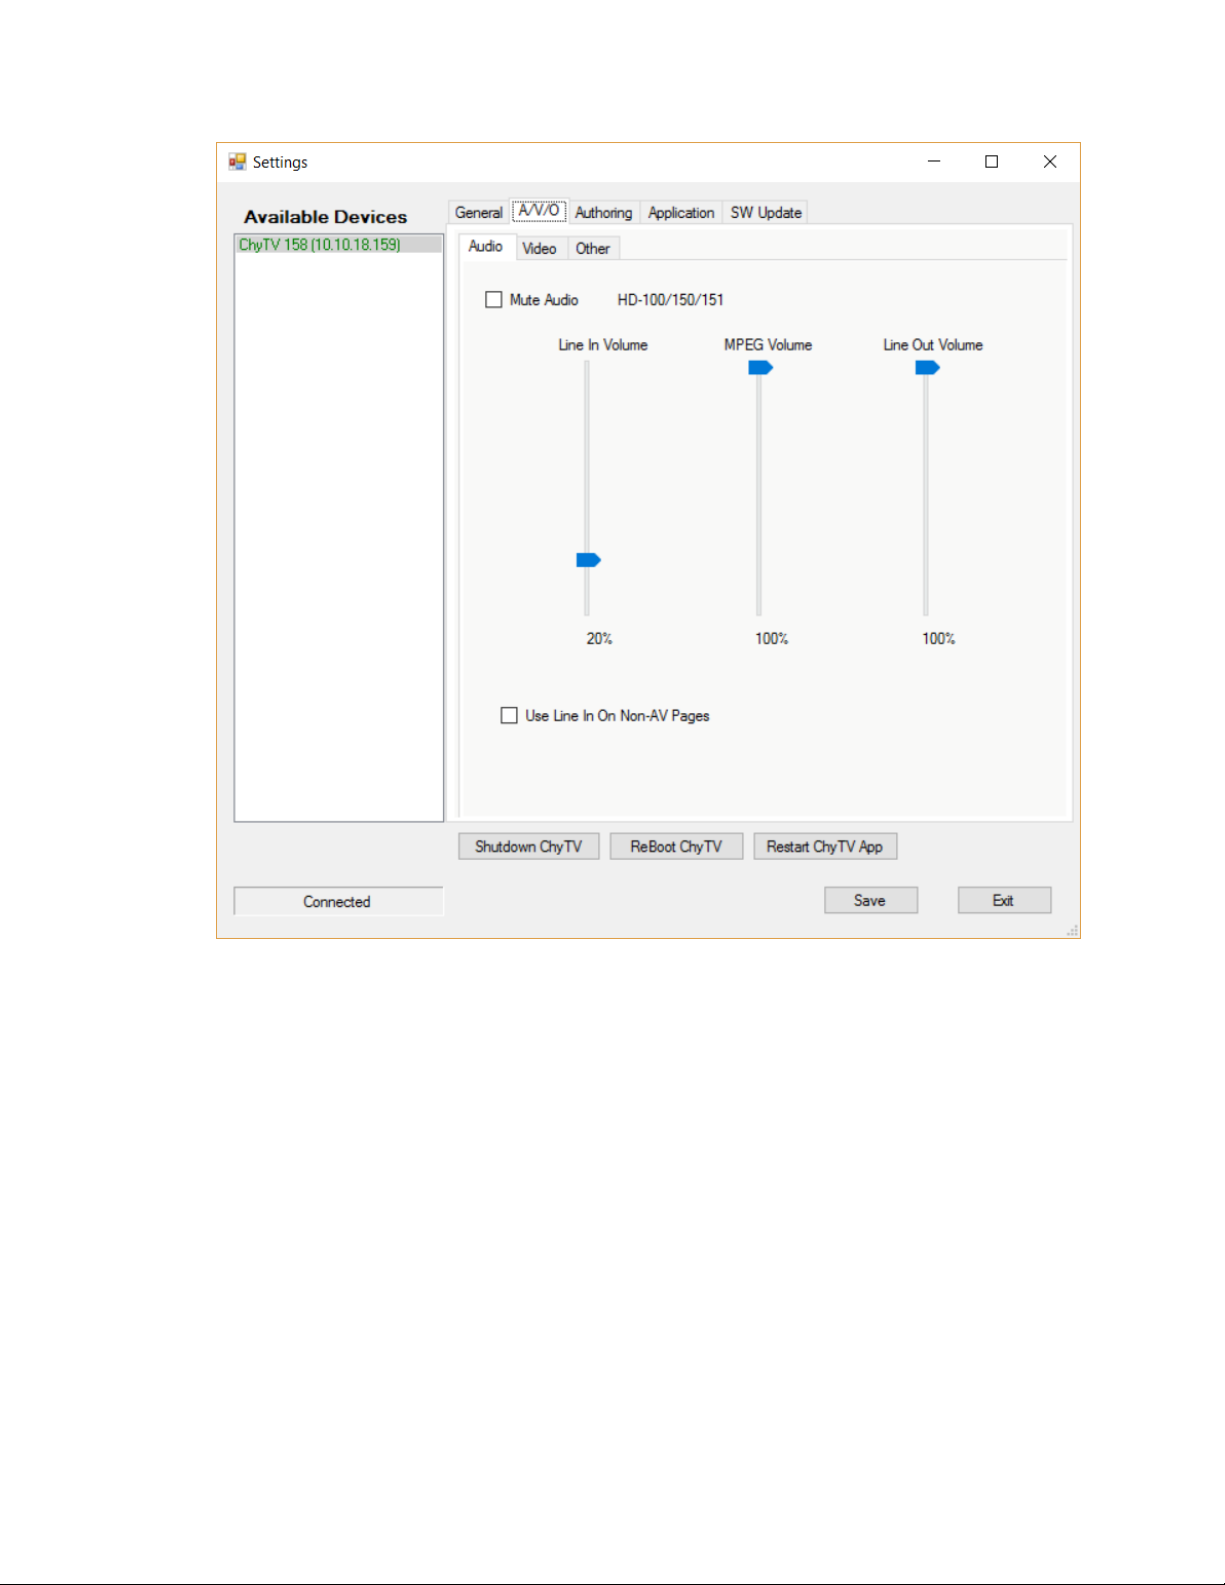
To modify audio settings, modify the settings to desired values and
press Save to send the settings to the ChyTV device. Select Restart
ChyTV App to apply the settings.
To modify video settings, select the Video Tab and modify settings
to desired values and press Save to send the settings to the ChyTV
device. Select Restart ChyTV App to apply the settings. See image
below:
Page 13
To modify other settings, select the Other Tab and modify settings
to desired values and press Save to send the settings to the ChyTV
device.
Authoring Content
ChyTV Author is a WYSIWG authoring that works in conjunction with ChyTV
Tools. Version ChyTV_Author_5.0.34.0.msi or later is included on the USB
drive. Later Versions will be available for download from
www.chytv.com/support.
To install ChyTV Tools, double-click the installation msi file:
ChyTV_Tools2_1.0.xxxx.msi.
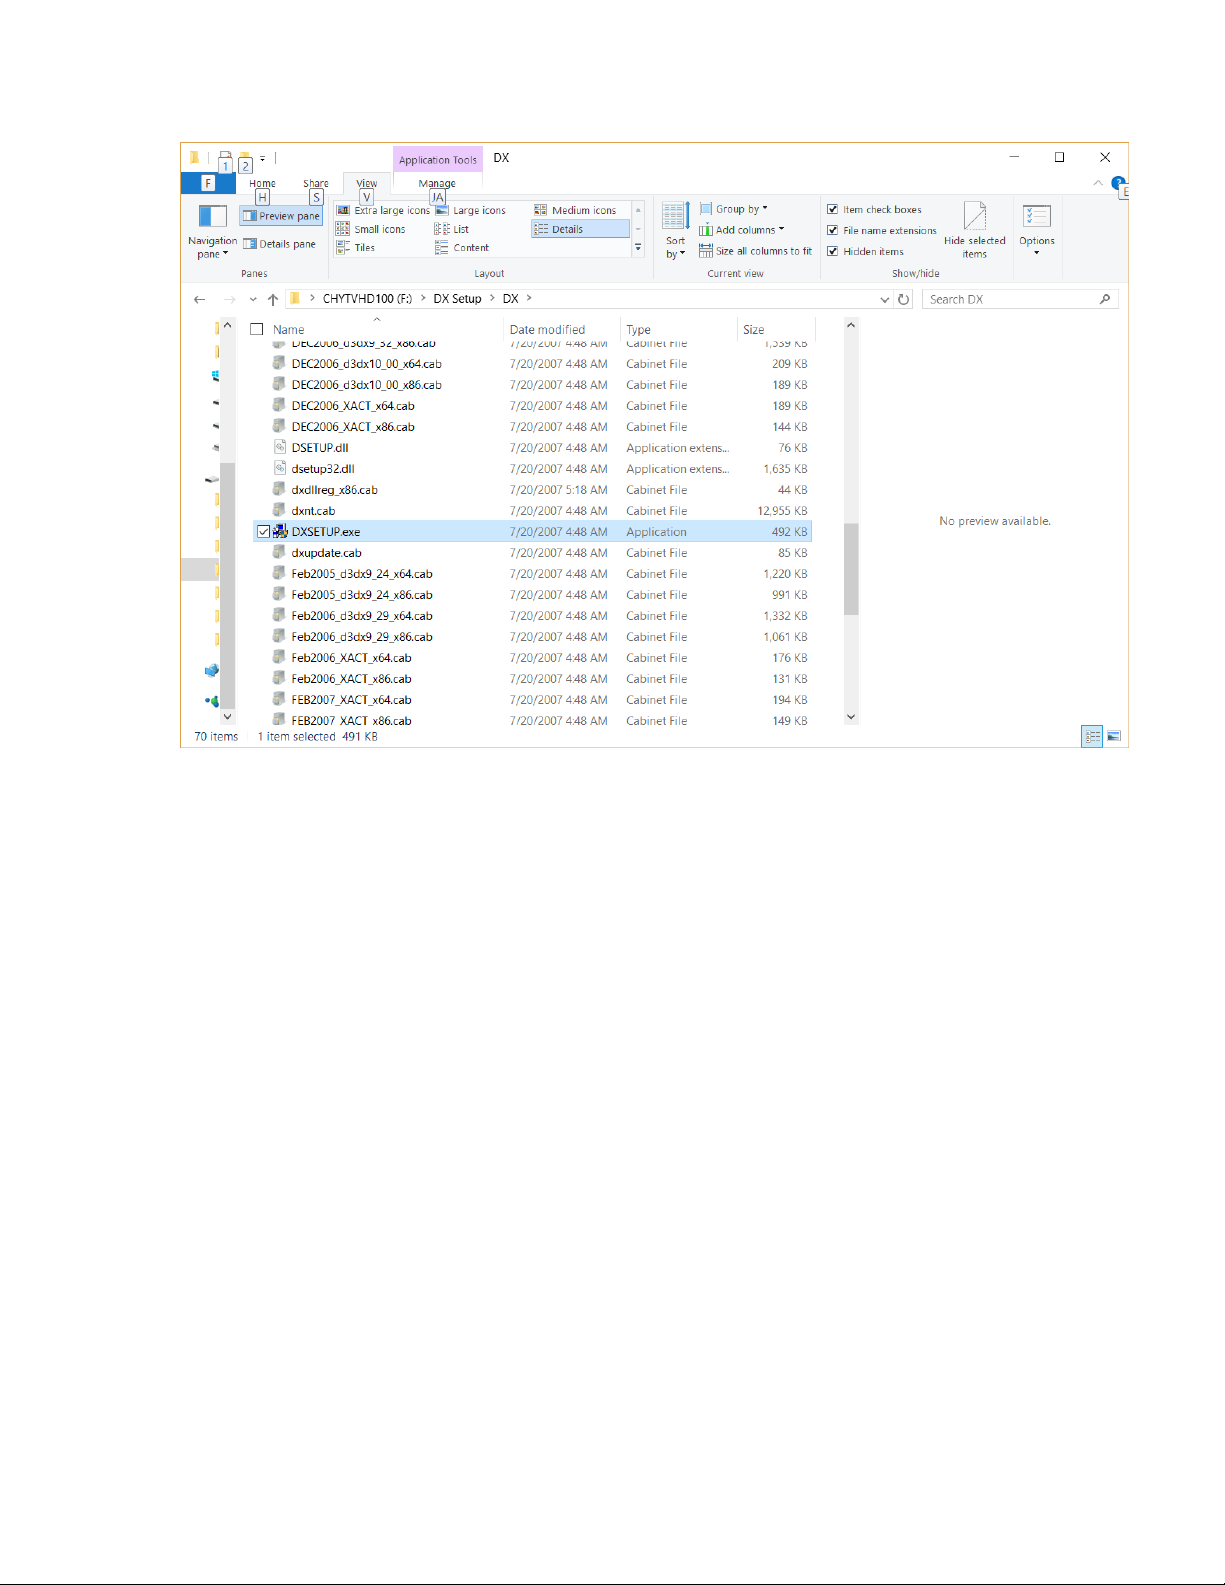
ChyTV Author also requires version 9.03C of DirectX. This can be found on the
USB drive in the “DX Setup / DX” folder. Navigate there and run the
“DXSETUP.exe” application. See image below:
Page 14
ChyTV Author is a WYSIWYG content authoring tool for creating ChyTV pages.
An alternative to ChyTV’s PowerPoint based interface, ChyTV Author works
hand in hand with ChyTV Tools project management software to create
stunning content with sophisticated animations and crisp, dynamic text from any
TrueType font. The ChyTV Author canvas can be configured in a variety of
formats, including NTSC, PAL, HD 720 and HD 1080, all in 4 x 3 or 16 x 9 and
landscape or portrait. ChyTV Author imports a wide variety of graphic,
animation and video clip formats, including jpg, png, tif, tga, bmp, mpg, mov,
quick-time and more.
 Loading...