

Page 1
Pub. No 2A02234, 1/28/08
Page 2

Table of Contents
1 INTRODUCTION..................................................................................................1
1.1 G ETTING STARTED..............................................................................................1
1.2 CREATING CONTENT ..........................................................................................1
1.2.1 Section 6: ChyTV Overview......................................................................1
1.2.2 Section 7: ChyTV Author Quick Start Tutorial......................................1
1.2.3 Section 8: PowerPoint Quick Start Tutorial..........................................1
1.2.4 Section 9: Manually Creating a Page Using PowerPoint..................1
1.2.5 Section 10: ChyTV Elements Reference.................................................1
1.2.6 Section 11: ChyTV Tools Reference........................................................2
2 CHYTV HARDWARE SETUP ..........................................................................3
2.1 INTRODUCTION....................................................................................................3
2.2 HARDWARE CONNECTION .................................................................................4
2.2.1 USB Version Connection Diagram..........................................................4
2.2.2 Ethernet Version Connection Diagram...................................................4
2.2.3 Connector Descriptions.............................................................................5
2.3 OPERATION..........................................................................................................6
2.3.1 Controls and Indicators.............................................................................6
3 CHYTV PLUS HARDWARE SETUP..............................................................7
3.1 INTRODUCTION....................................................................................................7
3.2 HARDWARE CONNECTION .................................................................................8
3.2.1 Connection Diagram..................................................................................9
3.2.2 Connector Descriptions.............................................................................9
3.3 OPERATION........................................................................................................11
3.3.1 Controls and Indicators..........................................................................11
3.3.2 Selecting a Video Input...........................................................................12
4 CHYTV HD 100 / HD 150 SETUP..................................................................13
4.1 INTRODUCTION..................................................................................................13
4.2 HARDWARE CONNECTION ...............................................................................13
4.2.1 Power Supply Voltage Selector.............................................................13
4.2.2 Connection Diagram...............................................................................14
4.2.3 Connector Descriptions.......................................................................... 14
4.3 OPERATION........................................................................................................15
4.3.1 Turning On / Off.......................................................................................15
4.3.2 Setting the IP Address.............................................................................15
4.3.3 “Phoning Home”.....................................................................................16
4.3.4 Connecting with ChyTV Tools...............................................................16
4.4 AUTHORING CONTENT .....................................................................................17
4.4.1 ChyTV Tools.............................................................................................17
Page 3

4.4.2 ChyTV Author........................................................................................... 17
4.4.3 PowerPoint...............................................................................................18
5 PC SOFTWARE INSTALLATION...............................................................19
5.1 PC REQUIREMENTS...........................................................................................19
5.2 CHYTV SOFTWARE OVERVIEW......................................................................19
5.3 INSTALLING CHYTV TOOLS............................................................................19
5.4 CONFIGURING THE IP ADDRESS OF A CHYTV UNIT ....................................21
5.4.1 Overview....................................................................................................21
5.4.2 IP Address Configuration....................................................................... 21
5.5 ADDITIONAL IP.TXT ENTRIES........................................................................24
5.5.1 Display Information................................................................................24
5.5.2 Name and Password................................................................................24
5.5.3 FTP Off ......................................................................................................24
5.5.4 Network Priority......................................................................................24
5.6 INSTALLING THE USB DRIVER.......................................................................25
5.6.1 USB Installation Tips..............................................................................26
5.7 MANUALLY INSTALLING CHYTV ELEMENTS...............................................27
5.7.1 Adding the Elements Add-In to PowerPoint.......................................27
5.8 INSTALLING CHYTV AUTHOR........................................................................28
6 CHYTV OVERVIEW.........................................................................................31
6.1 HOW CHYTV WORKS ......................................................................................31
6.2 HOW PAGES ARE CREATED.............................................................................31
6.2.1 Page Elements..........................................................................................31
6.2.2 Pages..........................................................................................................32
6.3 HOW PAGES ARE PROGRAMMED FOR DISPLAY............................................32
6.4 HOW PROJECTS ARE ORGANIZED AND STORED...........................................32
6.4.1 CF Folder..................................................................................................33
6.4.2 HTML Folder............................................................................................33
6.4.3 Images Folder...........................................................................................33
6.4.4 Thumbnail Folder....................................................................................33
6.5 CREATING AND DISPLAYING PAGES ON CHYTV.........................................34
6.5.1 Page Elements..........................................................................................34
6.6 STORING AND REFERENCING DATA...............................................................35
6.6.1 Embedding ................................................................................................ 35
6.6.2 File Referencing.......................................................................................35
6.6.3 Active Data................................................................................................ 36
7 CHYTV AUTHOR QUICK START TUTORIAL.....................................37
7.1 OPENING AND TRANSFERRING A PROJECT TO THE CHYTV UNIT..............37
7.2 CREATING AND SAVING A NEW PAGE ...........................................................38
7.3 ADDING A BACKGROUND IMAGE TO THE NEW PAGE..................................39
7.4 ADDING A CRAWL TO THE PAGE ....................................................................41
7.5 ADDING V IDEO TO THE PAGE..........................................................................44
7.6 SAVING AND TESTING Y OUR PAGE ................................................................46
7.7 ADDING ACTIVE DATA TO Y OUR PROJECT ...................................................46
7.8 USING ACTIVE DATA IN TAGS........................................................................49
Page 4

7.9 ADDING PAGES TO THE SCHEDULE................................................................54
7.10 TIPS FOR USING CHYTV TOOLS......................................................................55
8 POWERPOINT QUICK START TUTORIAL ...........................................56
8.1 OPENING AND TRANSFERRING A PROJECT TO THE CHYTV UNIT..............56
8.2 CREATING AND SAVING A NEW PAGE ...........................................................57
8.3 ADDING ACTIVE DATA TO THE PAGE............................................................61
8.4 ADDING CRAWL DATA TO PAGES..................................................................66
8.5 ADDING ARTISTIC ELEMENTS TO PAGES. .....................................................68
8.6 ADDING PAGES TO THE SCHEDULE................................................................72
8.7 TIPS FOR TWEAKING YOUR PAGE ..................................................................72
9 MANUALLY CREATING A PAGE USING POWERPOINT...............73
9.1 POWERPOINT OBJECTS.....................................................................................73
9.1.1 Slides..........................................................................................................73
9.1.2 Backgrounds.............................................................................................73
9.1.3 Picture Boxes............................................................................................73
9.1.4 Text Boxes.................................................................................................73
9.2 THE POWERPOINT USER INTERFACE .............................................................74
9.2.1 The Menu...................................................................................................74
9.2.2 The Toolbar............................................................................................... 76
9.2.3 The Slide List............................................................................................76
9.2.4 The Slide Layout Area.............................................................................76
9.2.5 The Notes Area.........................................................................................76
9.2.6 Context Sensitive Menus......................................................................... 76
9.3 ADDING POWERPOINT OBJECTS TO A SLIDE................................................76
9.3.1 Creating a New Presentation................................................................. 76
9.3.2 Setting the Background Color...............................................................76
9.3.3 Setting the Background Image...............................................................77
9.3.4 Placing an Image ..................................................................................... 77
9.3.5 Moving and Resizing an Image.............................................................78
9.3.6 Adding Text to a Page.............................................................................78
9.3.7 Formatting the Text Font, Font Style, Size or Color.........................78
9.3.8 Adding Shadow and Underline Effects to Text...................................79
9.3.9 Adding a Border or Fill to the Text Box..............................................79
9.3.10 Moving and Resizing the Text Box........................................................79
9.4 ADDING TAGS TO A SLIDE...............................................................................80
9.4.1 How the Image Engine Displays Tags.................................................80
9.4.2 Rules for Using Tags...............................................................................81
9.4.3 Adding a Tag in PowerPoint..................................................................81
9.4.4 Creating a 4x3 Fixed Aspect Ratio Video Tag.................................... 82
9.5 SAVING THE PRESENTATION AS HTML ........................................................82
9.6 PLACING TEXT AND G RAPHICS OVER FULL SCREEN VIDEO......................82
9.6.1 Keying Defined.........................................................................................82
9.6.2 Keying in ChyTV......................................................................................83
10 CHYTV ELEMENTS REFERENCE............................................................. 84
10.1 POWERPOINT CONFIGURATION......................................................................84
Page 5

10.2 BASIC OPERATION ............................................................................................84
10.3 CREATE NEW PAGE ..........................................................................................84
10.4 SET BACKGROUND............................................................................................85
10.5 V IDEO WINDOW ................................................................................................85
10.6 GRAPHICS...........................................................................................................85
10.7 CRAWL................................................................................................................85
10.7.1 Crawl Parameters....................................................................................85
10.7.2 Crawl Data Source..................................................................................86
10.8 AUDIO.................................................................................................................86
10.9 TEXT EFFECT .....................................................................................................87
10.10 CLOCK.............................................................................................................87
10.11 ACTIVE DATA................................................................................................88
10.12 LOGO ...............................................................................................................88
10.12.1 Logo File Name ....................................................................................89
10.12.2 Active Data............................................................................................89
10.13 FLIPBOOK.......................................................................................................89
10.13.1 FlipBook File Name.............................................................................89
10.13.2 Active Data............................................................................................90
10.14 CHYTV PLUS (FOR CHYTV PLUS UNITS ONLY) ......................................90
10.14.1 RS-232 .................................................................................................... 90
10.14.2 GPIO.......................................................................................................92
10.15 SAVE AS CHYTV...........................................................................................93
11 CHYTV TOOLS REFERENCE...................................................................... 94
11.1 PROJECT SELECTOR..........................................................................................94
11.2 MENU BAR.........................................................................................................94
11.2.1 File..............................................................................................................94
11.2.2 View............................................................................................................95
11.2.3 Control.......................................................................................................95
11.2.4 Options.......................................................................................................95
11.2.5 Help............................................................................................................ 98
11.3 PROJECT TOOL BAR..........................................................................................98
11.3.1 Project Button...........................................................................................98
11.3.2 Data Selector Buttons.............................................................................99
11.3.3 Preview Button.........................................................................................99
11.4 PROJECT DATA WINDOW...............................................................................100
11.4.1 Pages........................................................................................................100
11.4.2 Data..........................................................................................................101
11.4.3 Text...........................................................................................................102
11.4.4 Audio........................................................................................................102
11.4.5 Logos........................................................................................................103
11.4.6 Flip Books...............................................................................................103
11.5 PROJECT SCHEDULE WINDOW ......................................................................103
11.5.1 Adding ChyTV Pages to the Schedule................................................104
11.5.2 Adding a Page Tag to the Schedule....................................................104
11.5.3 Changing the Order of Pages in the Schedule..................................104
11.5.4 Project Schedule Command Buttons..................................................104
11.6 DEVICE SELECTOR..........................................................................................107
Page 6

11.7 CHYTV TOOLBAR CONTROLS......................................................................107
11.7.1 Update All...............................................................................................107
11.7.2 Display Controls....................................................................................107
11.7.3 Drive.........................................................................................................108
11.8 CHYTV DATA WINDOW ................................................................................108
11.8.1 Pages........................................................................................................108
11.8.2 Data..........................................................................................................108
11.8.3 Text...........................................................................................................109
11.8.4 Audio........................................................................................................109
11.8.5 Logos........................................................................................................110
11.8.6 Flip Books...............................................................................................110
11.9 CHYTV SCHEDULE WINDOW........................................................................110
11.9.1 ChyTV Schedule Command Buttons...................................................110
12 TAG REFERENCE...........................................................................................112
12.1 SUPPORTED TAGS ...........................................................................................112
13 APPENDIX ..........................................................................................................122
13.1 WARNINGS AND DISCLAIMERS.....................................................................122
13.2 TROUBLESHOOTING........................................................................................124
13.3 CHYTV PLUS RACK MOUNT INSTALLATION..............................................125
13.3.1 Single Unit Rack Mount Installation..................................................125
13.3.2 Double Unit Rack Mount Installation................................................125
13.4 CHYTV HARDWARE S PECIFICATIONS.........................................................127
13.5 CHYTV PLUS HARDWARE SPECIFICATIONS...............................................129
13.6 CHYTV PLUS GPIO INTERFACE ...................................................................131
13.6.1 ChyTV Plus GPIO Pinout Diagram...................................................131
13.7 CHYTV PLUS RS232 INTERFACE.................................................................132
13.7.1 ChyTV Plus RS232 Pinout Diagram..................................................133
13.8 CHYTV PROGRAMMERS G UIDE....................................................................134
13.8.1 ChyTV Programming Overview..........................................................134
13.8.2 ChyTV Commands.................................................................................134
13.9 INTERNATIONAL APPENDIX...........................................................................143
13.9.1 Changing the Text Used for the Clock Day of Week and Month...143
13.10 WARRANTY..................................................................................................145
Page 7

1 INTRODUCTION
1
1 Introduction
Welcome to ChyTV™, the next generation in digital signage! This Hardware/Software Setup
Guide illustrates the three main phases of ChyTV setup. When setup is complete, ChyTV is ready
to display your custom-created pages.
With ChyTV, you're up and running in a flash. CompactFlash®, that is. Your ChyTV comes from
the factory pre -loaded with a variety of demonstration pages. Once the ChyTV is connected to the
incoming video source and the display TV/monitor, the looping demo can then guide you through
a variety of ChyTV samples and features.
1.1 Getting Started
There are three main setup procedures that must be performed to run ChyTV:
Hardware Connections – Explained in Section 2 (ChyTV), Section 3 (ChyTV Plus) and Section
4 (HD 100 / HD 150).
Software Installation – Explained in Section 5.
Project Setup – Explained in Section 6.
1.2 Creating Content
This user guide contains alot of information about creating content for your ChyTV. The
following sections provide tutorials and reference information about using CyhTV Tools, ChyTV
Elements and Microsoft PowerPoint to create pages for display on ChyTV units:
1.2.1 Section 6: ChyTV Overview
This section describes how the ChyTV unit displays pages, how pages are created and organized,
and the various elements that are used in ChyTV pages. Recommended to provide a basic
understanding of the whole process.
1.2.2 Section 7: ChyTV Author Quick Start Tutorial
For those who want to jump right in, the Quick Start Tutorial is a step-by-step guide that takes you
from creating a project through creating a page in ChyTV Author, then scheduling the page for
display on the ChyTV unit.
1.2.3 Section 8: PowerPoint Quick Start Tutorial
The PowerPoint Quick Start Tutorial is a step-by-step guide that takes you from creating a project
through creating a page using Microsoft PowerPoint and ChyTV Tools, then scheduling the page
for display on the ChyTV unit.
1.2.4 Section 9: Manually Creating a Page Using PowerPoint
This section describes, in depth, the procedures used to create pages in the Quick Start Tutorial.
Recommended for a deeper understanding of how data and tags are used in PowerPoint.
1.2.5 Section 10: ChyTV Elements Reference
The ChyTV Elements Reference describes in detail all of the buttons in the ChyTV Elements
PowerPoint Plug -in.
Page 8

1 INTRODUCTION
2
1.2.6 Section 11: ChyTV Tools Reference
This section describes in detail all of the menus, windows and controls available in ChyTV tools.
Page 9
2 CHYTV HARDWARE SETUP
3
2 ChyTV Hardware Setup
2.1 Introduction
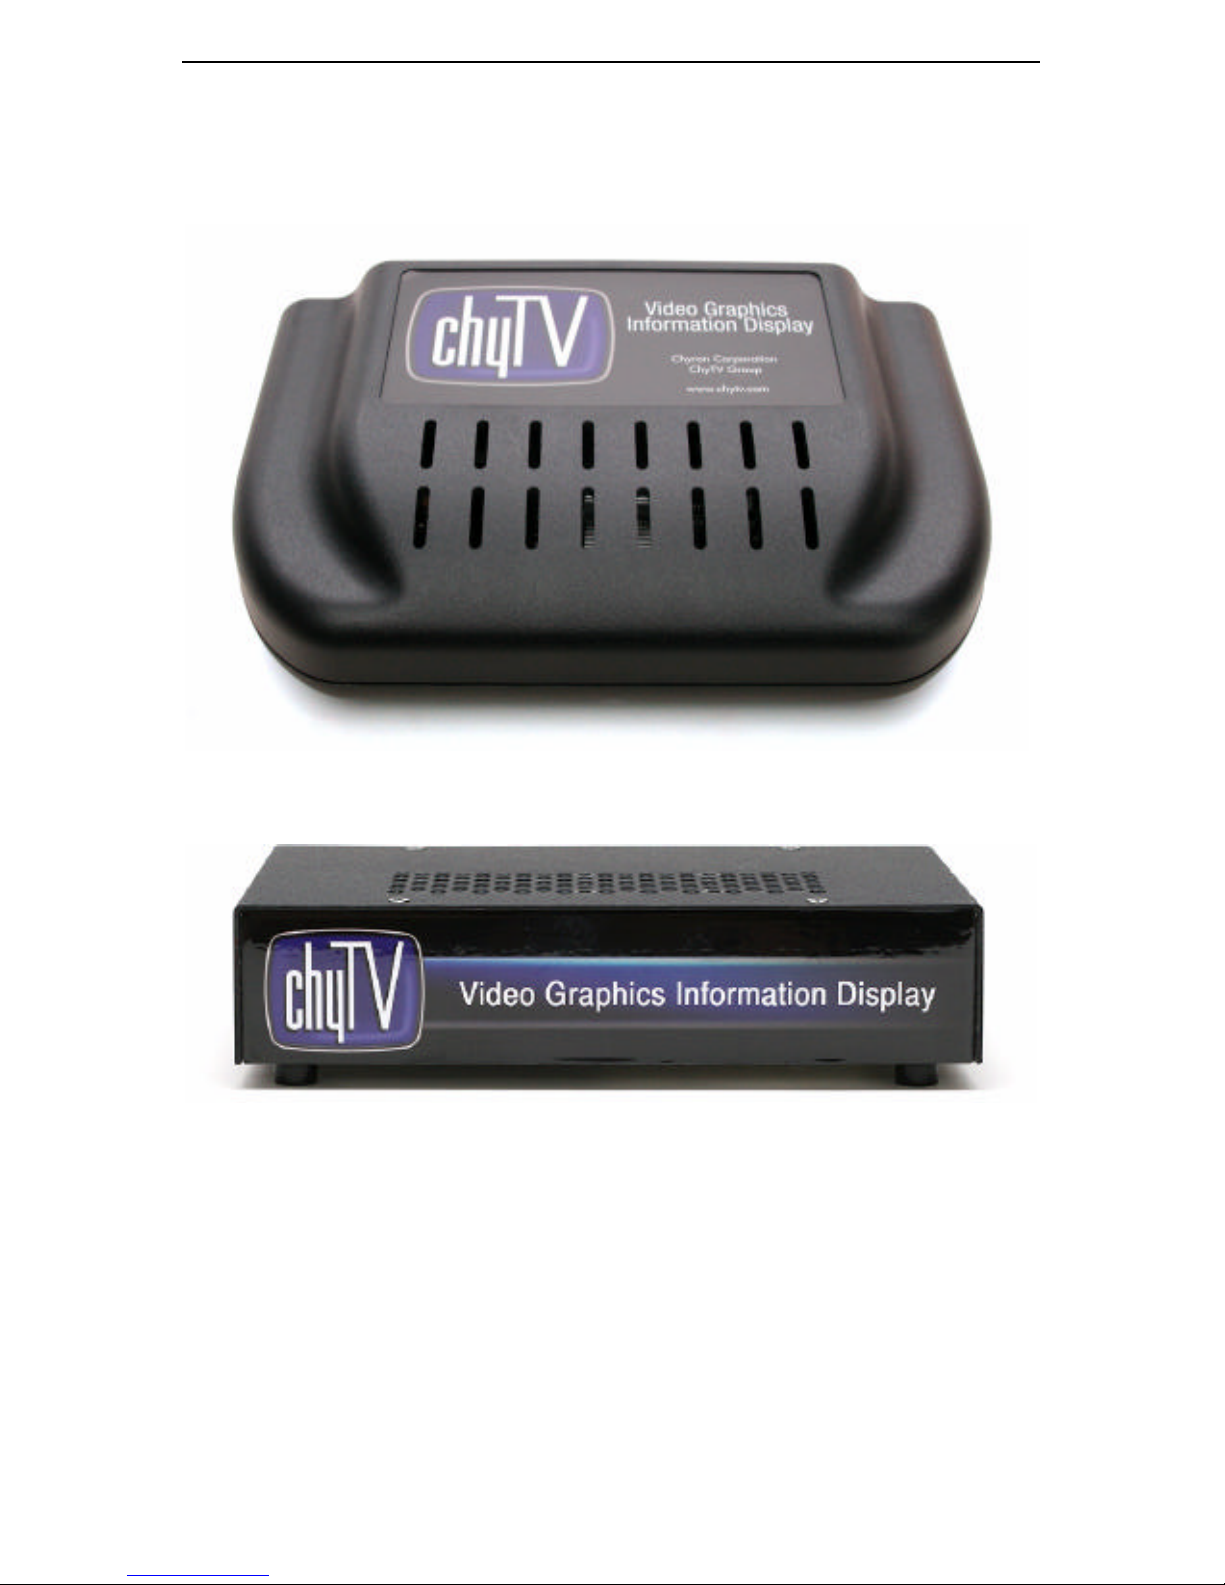
ChyTV-IP
ChyTV-IP2
The ChyTV system mixes incoming video with graphics created using ChyTV Tools, and outputs
the mixed video to a television set or video monitor. The ChyTV system should be connected
between an external TV tuner, such as a cable box or VCR, and a television set or video monitor.
It can also be connected between a direct composite video source , such as a DVD player or VCR,
and the television or video monitor.
IMPORTANT!!!! Please note that an RF (antenna), cable or satellite source cannot be connected
directly into the ChyTV system! The signal fed to the ChyTV system must be a video source from
a cable/satellite box or a VCR/DVD player, or originate from a direct composite source such as
VCR/DVD playback output, a video camera or some other type of composite video feed.
Page 10
2 CHYTV HARDWARE SETUP
4
2.2 Hardware Connection
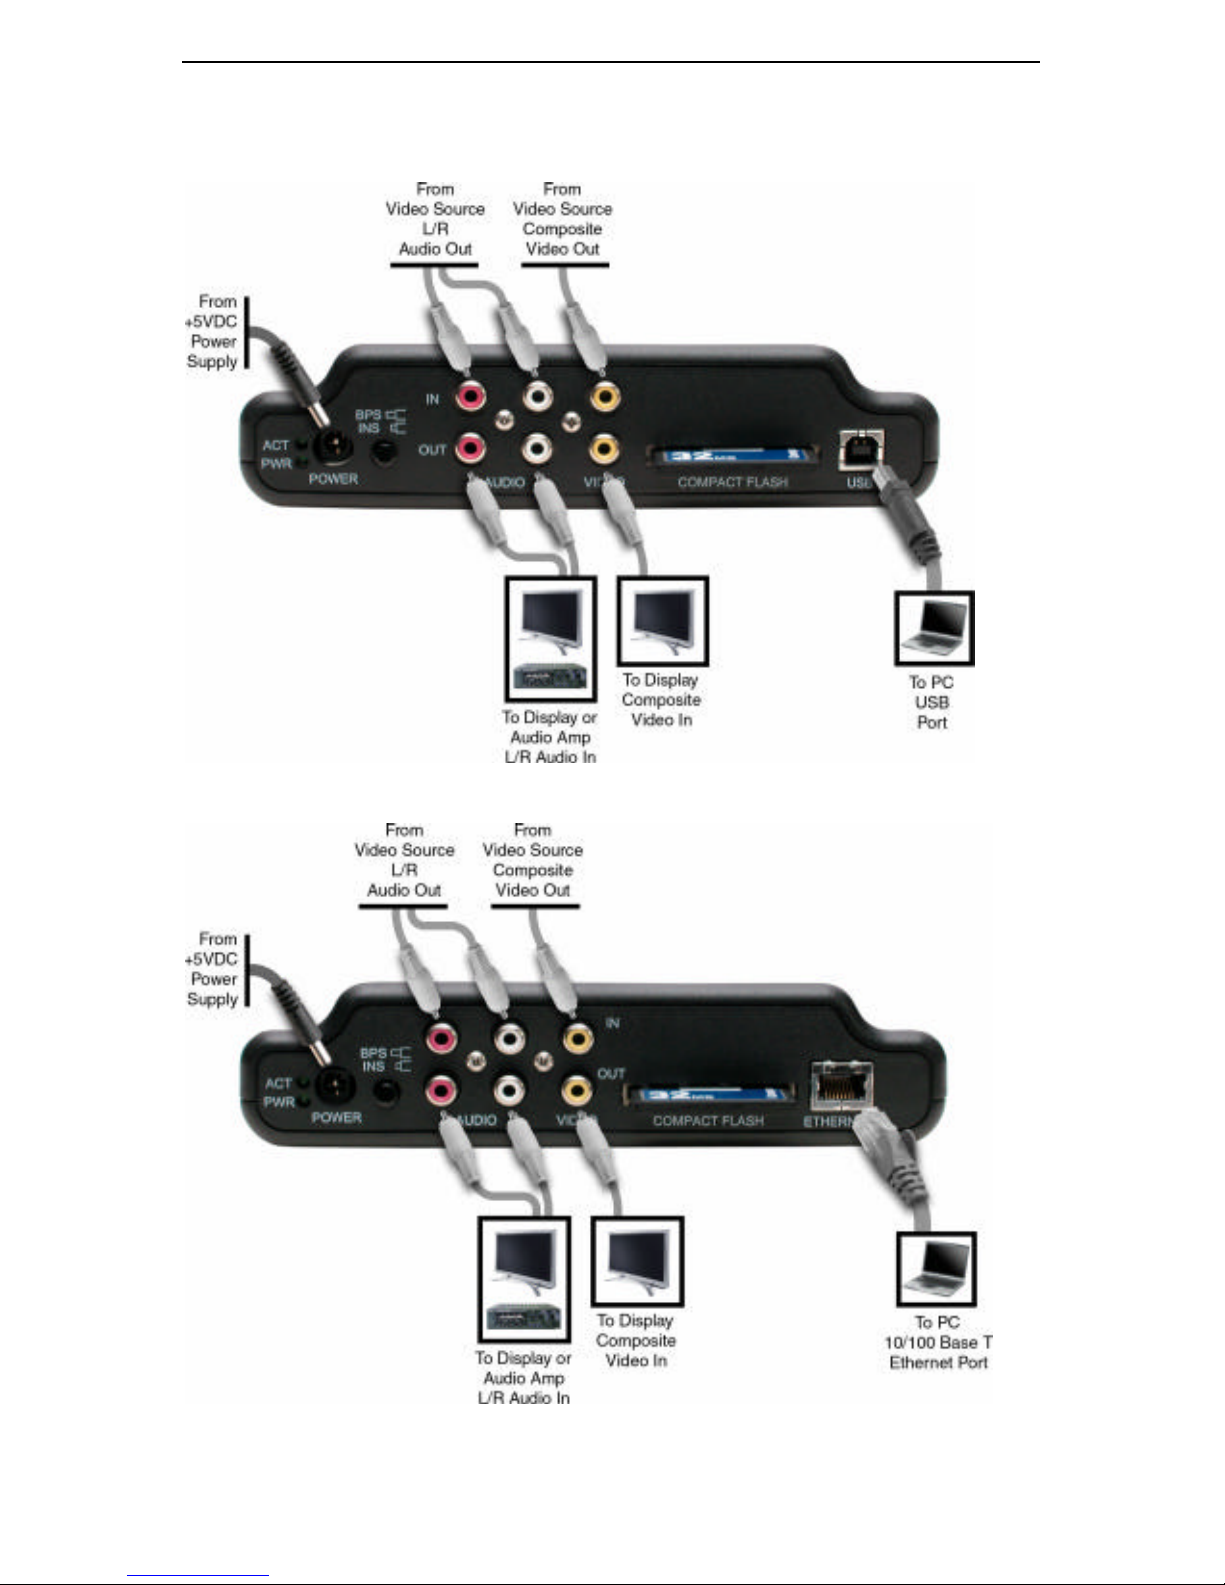
2.2.1 USB Version Connection Diagram
2.2.2 Ethernet Version Connection Diagram
When using an RF video source, such as cable or satellite, an external tuner is required. A
television's internal tuner cannot be used. This is because the ChyTV unit must be provided with a
Page 11

2 CHYTV HARDWARE SETUP
5
single incoming composite video feed. In addition, if the television speakers or other external
speakers are used for audio, the stereo audio pair must also pass through the tuner and the ChyTV
box to the television. RCA cables are used for the video and audio connections between the tuner
and the ChyTV, as well as between the ChyTV and the television.
Many cable and satellite set-top boxes, have RCA video and audio connectors. Older or low-end
tuners, however, may not. In the absence of a tuner or RCA connectors, a VCR or DVD player
can usually substitute for t he missing tuner. They typically contain an internal tuner, the correct
RCA connectors, and are generally inexpensive.
2.2.3 Connector Descriptions
2.2.3.1 POWER Connector
Connector for external power supply. Green LED on indicates that the unit is plugged in and
turned on. Connect the supplied power cable first to the ChyTV unit, and then to the AC outlet.
2.2.3.2 AUDIO IN (Red/White)
Analog stereo audio in, right and left. Sources can include an external TV tuner set-top box, a
DVD player, or a VCR.
Connect the supplied red and white RCA cables from the right and left audio outputs, respectively,
of the set-top box, DVD player or VCR to the right (red) and left (white) audio inputs,
respectively, of the ChyTV unit.
2.2.3.3 AUDIO OUT (Red/White)
Analog stereo audio out, right and left.
Connect the supplied red and white RCA cables from the right (red) and left (white) audio outputs,
respectively, of the ChyTV system to the right and left inputs, respectively, of a speaker system or
the television.
2.2.3.4 VIDEO IN (Yellow)
Composite video in (CVBS). This is an RF demodulated signal. Sources can include an external
TV tuner set-top box, a DVD player, or a VCR.
Connect the supplied yellow RCA cable from the video output of the external TV tuner set-top
box, a DVD player, or a VCR to the VIDEO input (yellow) of the ChyTV unit.
2.2.3.5 VIDEO OUT (Yellow)
Composite video out (CVBS). This is an RF demodulated signal. Connect the supplied yellow
RCA cable from the VIDEO output (yellow) of the ChyTV unit to the video input of the television
or video monitor.
2.2.3.6 COMPACT FLASH
Slot for CompactFlash card. This CompactFlash disk is the storage medium for the ChyTV pages,
Playlists and other files necessary for ChyTV display. The ChyTV unit should arrive with the
CompactFlash card already inserted. If the card is not in t he COMPACT FLASH slot, then the
CompactFlash card must be carefully inserted.
2.2.3.7 ETHERNET
The Ethernet port enables direct connection of the ChyTV Plus unit to a PC network, permitting
direct operation, live data updates, file downloads, and other advanced functions.
Page 12

2 CHYTV HARDWARE SETUP
6
Connect an RJ-45 network cable between the ChyTV Plus Ethernet connector and an Ethernet
connector on the PC.
IMPORTANT: A unique IP address must be assigned to each ChyTV unit in order for it to
be recognized on the network. See section 5.4 for information on configuring the IP address
of a ChyTV Plus unit.
2.2.3.8 USB
The USB port enables direct connection of the ChyTV unit to a PC. This permits direct operation,
live data updates, file downloads, and a variety of other advanced functions.
Connect the su pplied USB cable from the USB port of the ChyTV unit to a USB port on the PC.
The USB driver, which is a software component, must be installed on the PC before connecting
the USB cable. The USB driver is included on the installation CD. Instructions for USB driver
installation are found in Section 4.6.
Advanced Users: If the ChyTV unit is not connected to the PC via the USB cable, and the ChyTV
unit is not turned on, then the USB device is not shown in the list of devices in the Windows
Device Manager. The USB device is displayed in the list when the ChyTV is connected to the PC
via the USB cable, and the ChyTV unit is turned on.
2.3 Operation
2.3.1 Controls and Indicators
2.3.1.1 ACT (ACTivity) Indicator
Indicates Compact Flash activity.
2.3.1.2 PWR Indicator
Connector for external power supply. Green LED on indicates that the unit is plugged in and
turned on. Connect the supplied power cable first to the ChyTV unit, and then to the AC outlet.
2.3.1.3 BPS/INS (ByPasS/INSert) Switch
When the BPS/INS switch is depressed, the ChyTV unit inserts the ChyTV graphics into the
video stream. When the BPS/INS switch is not depressed, ChyTV processing is bypassed, and
external video is displayed without ChyTV graphics inserted.
Caution: If, when the BPS/INS switch is depressed, the output of the ChyTV unit looks black,
check to confirm that the video input and output cables are correctly connected to the ChyTV unit.
Make sure that the video cable connected to the video source (tuner, VCR, DDR, camera, etc.) is
connected to the yellow VIDEO IN connector on the ChyTV unit, and that the video cable
connected to the TV or monitor is connected to the yellow VIDEO OUT connector on the ChyTV
unit. They may have accidentally been switched.
Page 13
3 CHYTV PLUS HARDWARE SETUP
7
3 ChyTV Plus Hardware Setup
3.1 Introduction
ChyTV Plus, based on the popula r ChyTV Video Graphics Information Display system, extends
the product line to include S -video and component video inputs and outputs, serial and GPI control
interfaces and both Ethernet and USB connectivity all in a rugged ½ rack unit chassis. Ideal for
any professionally installed video messaging system, ChyTV Plus utilizes the same ChyTV Tools
utilities to manage the projects and is completely compatible with existing ChyTV units. The
additional features enable more flexible system integration and enhanced video capabilities.
Video Graphics Image Engine As with all ChyTV versions, ChyTV Plus features the ability to
manipulate a video source, either in a window that is surrounded by graphics and text or to
superimpose the message over the video background. In addition, full screen graphics can be
displayed with dynamic text, logos and animations. A versatile play -list scheduler allows for
dynamic programming. The supplied ChyTV Tools user interface allows for control of up to 20
ChyTV Plus units. Additional Network Content Management solutions facilitate larger enterprises
of up to thousands of ChyTV’s.
Easy Integration The ChyTV system is easy to configure in a display system or integrated into an
existing video infrastructure. The graphic and text information coupled with programmable audio
clips may be displayed on a single TV screen or broadcast throughout the facility. Easy and
intuitive content creation, scheduling, distribution and display of graphic content to flat panel and
television monitors is pos sible with ChyTV’s dynamic display controller. Users can opt to show
either full screen images or video graphics and text combined with an external video feed. Video
regions can be resized and positioned from page to page with smooth dynamic transitions, while
dynamic graphic and text regions can be assigned to surround or overlay the video window. Audio
WAV files may be integrated seamlessly for sound clips and audio alerts.
Flexible and Reliable Standard format animations can be imported from various file types such as
GIF, AVI, TGA sequences, etc. These animations can be positioned anywhere on the screen either
superimposed over the video source or surrounding a video window. All graphic pages can then be
scheduled from a simple, intuitive scheduling interface for either automatic looping or date/time
playout. Content is transferred to ChyTV via a standard Compact Flash interface, USB, or
Ethernet connection. Running our own proprietary Operating System, this self-contained device is
virtually virus-proof, requires no external computer connection and ensures utmost reliability and
ease of use.
Page 14

3 CHYTV PLUS HARDWARE SETUP
8
Advanced Features:
§ Create graphic and text pages using standard applications or supplied templates
§ Squeeze and position live video window, including dynamic transiti ons
§ Dynamic broadcast quality effects such as text pushes, fades and crawls
§ Animated Text, Graphics and Logos using GIF, AVI, TGA, and more
§ Multiple text and graphic zones may be independently sized and positioned
§ Play audio WAV files
§ Page scheduling, including looping durations or specific day, date and time control
§ USB and Ethernet external data interfaces for real-time data updates such as news, sports,
stock and weather
§ Serial and GPI control interface
§ Compact, stand-alone system for optimum reliability
§ External video and audio bypass
§ Scalable from individual use to large-scale enterprise networks
3.2 Hardware Connection
The ChyTV Plus system mixes incoming video with graphics created using ChyTV Tools, and
outputs the mixed video to a television set or video monitor. The ChyTV Plus system should be
positioned between an external TV tuner, such as a cable box or VCR, and a television set or video
monitor. It can also be positioned between a direct composite video source, such as a DVD player
or VCR, and the television or video monitor.
IMPORTANT: RF, cable or satellite sources cannot be cabled directly into a ChyTV system. The
signal fed to the ChyTV system must be a tuned to a particular channel via a cable/satellite box or
a VCR/DVD player, or originate from a direct composite source such as VCR/DVD playback
output, a video camera or some other type of composite video feed.
Page 15
3 CHYTV PLUS HARDWARE SETUP
9
3.2.1 Connection Diagram
3.2.2 Connector Descriptions
3.2.2.1 COMPOSITE IN
Composite video in (CVBS). BNC Connector. This is an RF demodulated signal. Sources can
include an external TV tuner set-top box, a DVD player, or a VCR.
Note: Only one of the 3 video inputs (Composite, Component, or S -Video) may be selected as the
video input to ChyTV Plus. Typically, the video input is automatically detected on power up. See
Section 3.3.2 for more information about manually selecting the video input for ChyTV Plus.
3.2.2.2 COMPOSITE OUT
Composite video out (CVBS). BNC Connector. This is an RF demodulated signal. Connect to the
composite input of a television or video monitor.
3.2.2.3 Y, Pb, Pr IN
Component Video in. 3 BNC Connectors. This is an RF demodulated component video signal.
Sources can include an external TV tuner set-top box, a DVD player, or a VCR.
Note: Only one of the 3 video inputs (Composite, Component, or S -Video) may be selected as the
video input to ChyTV Plus. Typically, the video input is automatically detected on power up. See
section 3.3.2 for more information about manually selecting the video input for ChyTV Plus.
Page 16

3 CHYTV PLUS HARDWARE SETUP
10
3.2.2.4 Y, Pb, Pr OUT
Component Video out. 3 BNC Connectors. This is an RF demodulated component video signal.
Connect to the Y, Pb, Pr inputs of a television or video monitor.
3.2.2.5 S-VIDEO IN
S-Video in. 4 pin mini DIN connector. This is an RF demodulated S-Video signal. Sources can
include an external TV tuner set-top box, a DVD player, or a VCR.
Note: Only one of the 3 video inputs (Composite, Component, or S -Video) may be selected as the
video input to ChyTV Plus. Typically, the video input is automatically detected on power up. See
section 3.3.2 for more information about manually selecting the video input for ChyTV Plus.
3.2.2.6 S-VIDEO OUT
S-Video in. 4 pin mini DIN connector S-Video out. 4 pin mini DIN connector. This is an RF
demodulated S-Video signal. Connect to the S-Video input of a television or video monitor.
3.2.2.7 AUDIO IN R/L (Red/White)
Analog stereo audio in, right and left. RCA Connectors. Sources can include an external TV tuner
set-top box, a DVD player, or a VCR.
Connect the RCA cables from the right and left audio outputs, respectively, of the set-top box,
DVD player or VCR to the right (red) and left (white) audio inputs, respectively, of the ChyTV
Plus unit.
3.2.2.8 AUDIO OUT R/L (Red/White)
Analog stereo audio out, right and left. RCA Connectors.
Connect the supplied red and white RCA cables from the right (red) and left (white) audio outputs,
respectively, of the ChyTV Plus system to the right and left inputs, respectively, of a speaker
system or the television.
3.2.2.9 RS232 DCE
Digital Communications Equipment Interface. 9 Pin Male D Connector. Interface for serial
command data. See Sections 10.14.1 and 13.7.
3.2.2.10 GPI x 8
General Purpose Interface. 9 Pin Female D Connector. Interface for 8 General Purpose Interface
contact closures. See Sections 10.14.2 and 13.6.
3.2.2.11 USB
The USB port enables direct connection of the ChyTV Plus unit to a PC, permitting direct
operation, live data updates, file downloads, and other advanced functions.
Connect the supplied USB cable from the USB port of the ChyTV Plus unit to a USB port on the
PC.
Important: The USB driver, which is a software component, must be installed on the PC
before connecting the USB cable. The USB driver is included on the installation CD.
Instructions for USB driver installation are found in Section 5.6.
Advanced Users: If the ChyTV Plus unit is not connected to the PC via the USB cable, or the unit
is not turned on, the USB device will not be shown in the list of devices in the Windows Device
Page 17
3 CHYTV PLUS HARDWARE SETUP
11
Manager. The USB device is displayed in the list only when the ChyTV Plus is connected to the
PC via the USB cable and the unit is turned on.
3.2.2.12 10/100 BASE T Ethernet
The Ethernet port enables direct connection of the ChyTV Plus unit to a PC network, permitting
direct operation, live data updates, file downloads, and other advanced functions.
Connect an RJ-45 network cable between the ChyTV Plus Ethernet connector and an Ethernet
connector on the PC.
IMPORTANT: A unique IP address must be assigned to each ChyTV Plus unit in order for
it to be recognized on the network. See section 5.4 for information on configuring the IP
address of a ChyTV Plus unit.
3.2.2.13 POWER Connector
Connector for external power supply. Connect the supplied power cable first to the ChyTV Plus
unit, then to the AC outlet.
3.2.2.14 COMPACT FLASH Card
Slot for Compact Flash card. This Compact Flash disk is the storage medium for the ChyT V
pages, Playlists and other files necessary for ChyTV Plus display. The ChyTV Plus unit should
arrive with the Compact Flash card already inserted. If the card is not in the COMPACT FLASH
slot, then the Compact Flash card must be carefully inserted.
3.3 Operation
3.3.1 Controls and Indicators
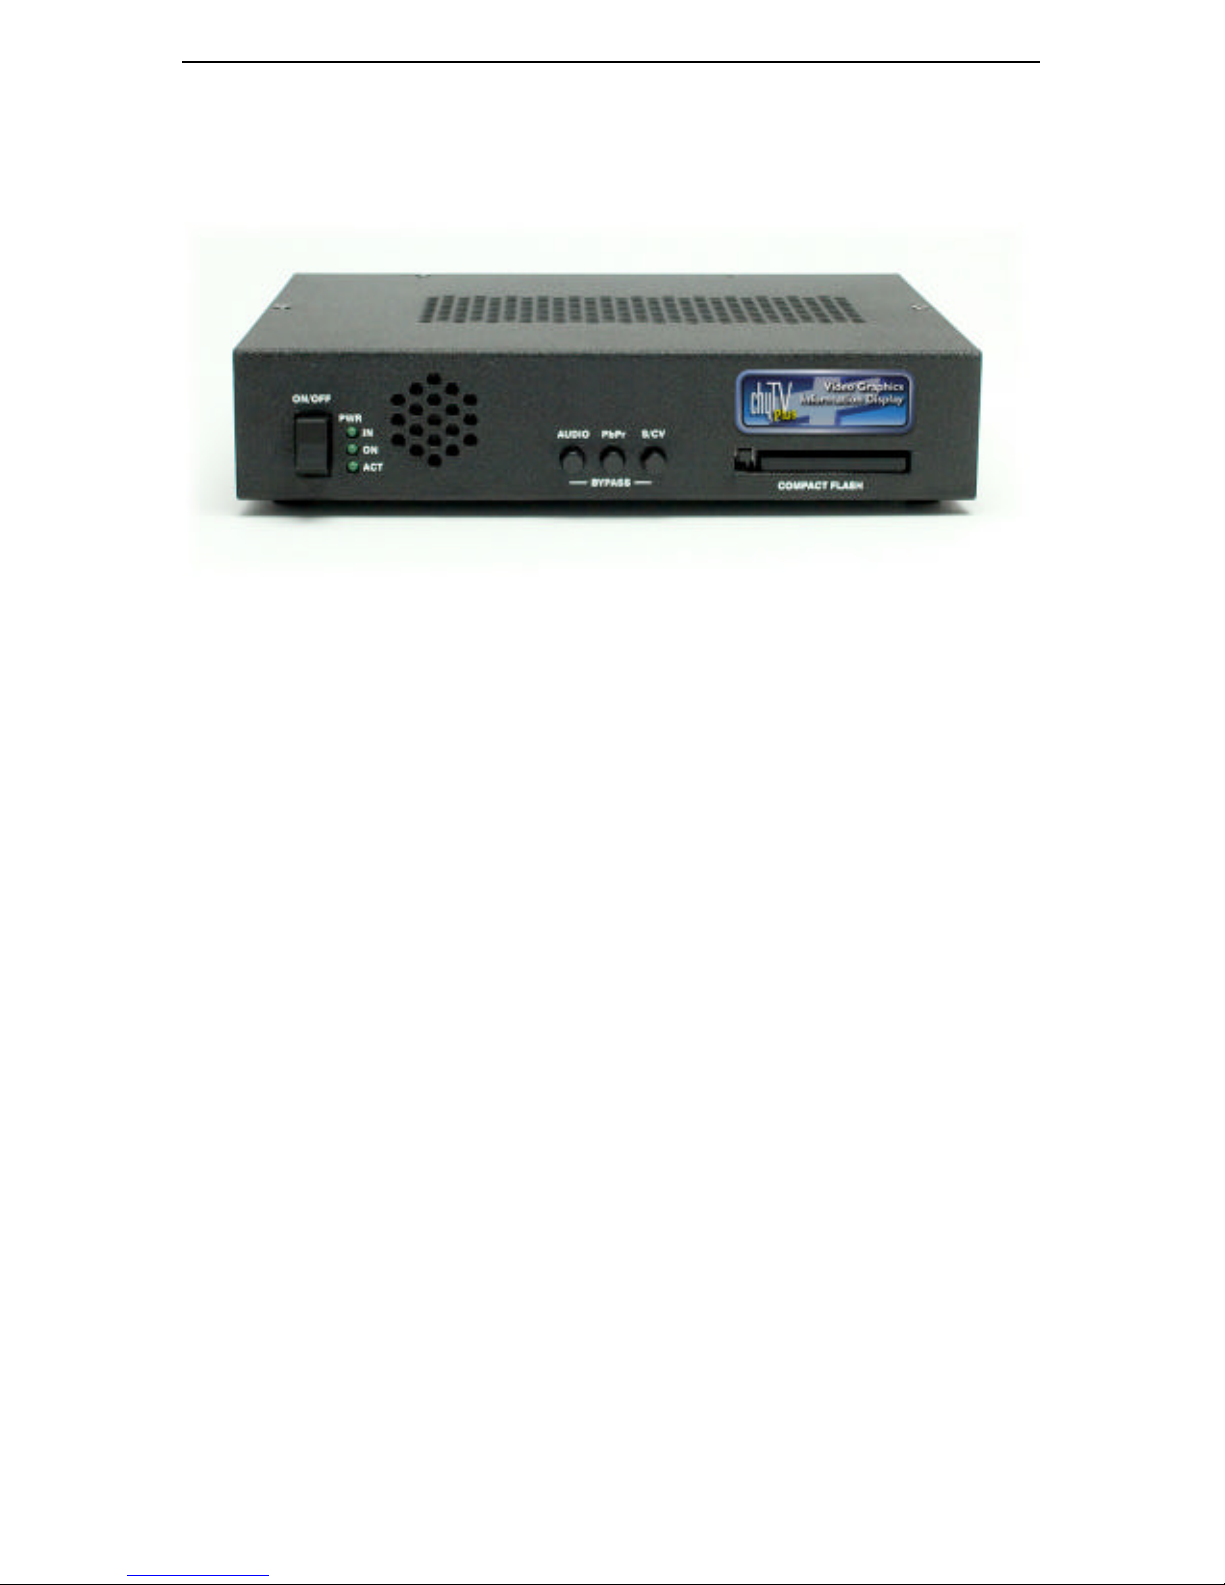
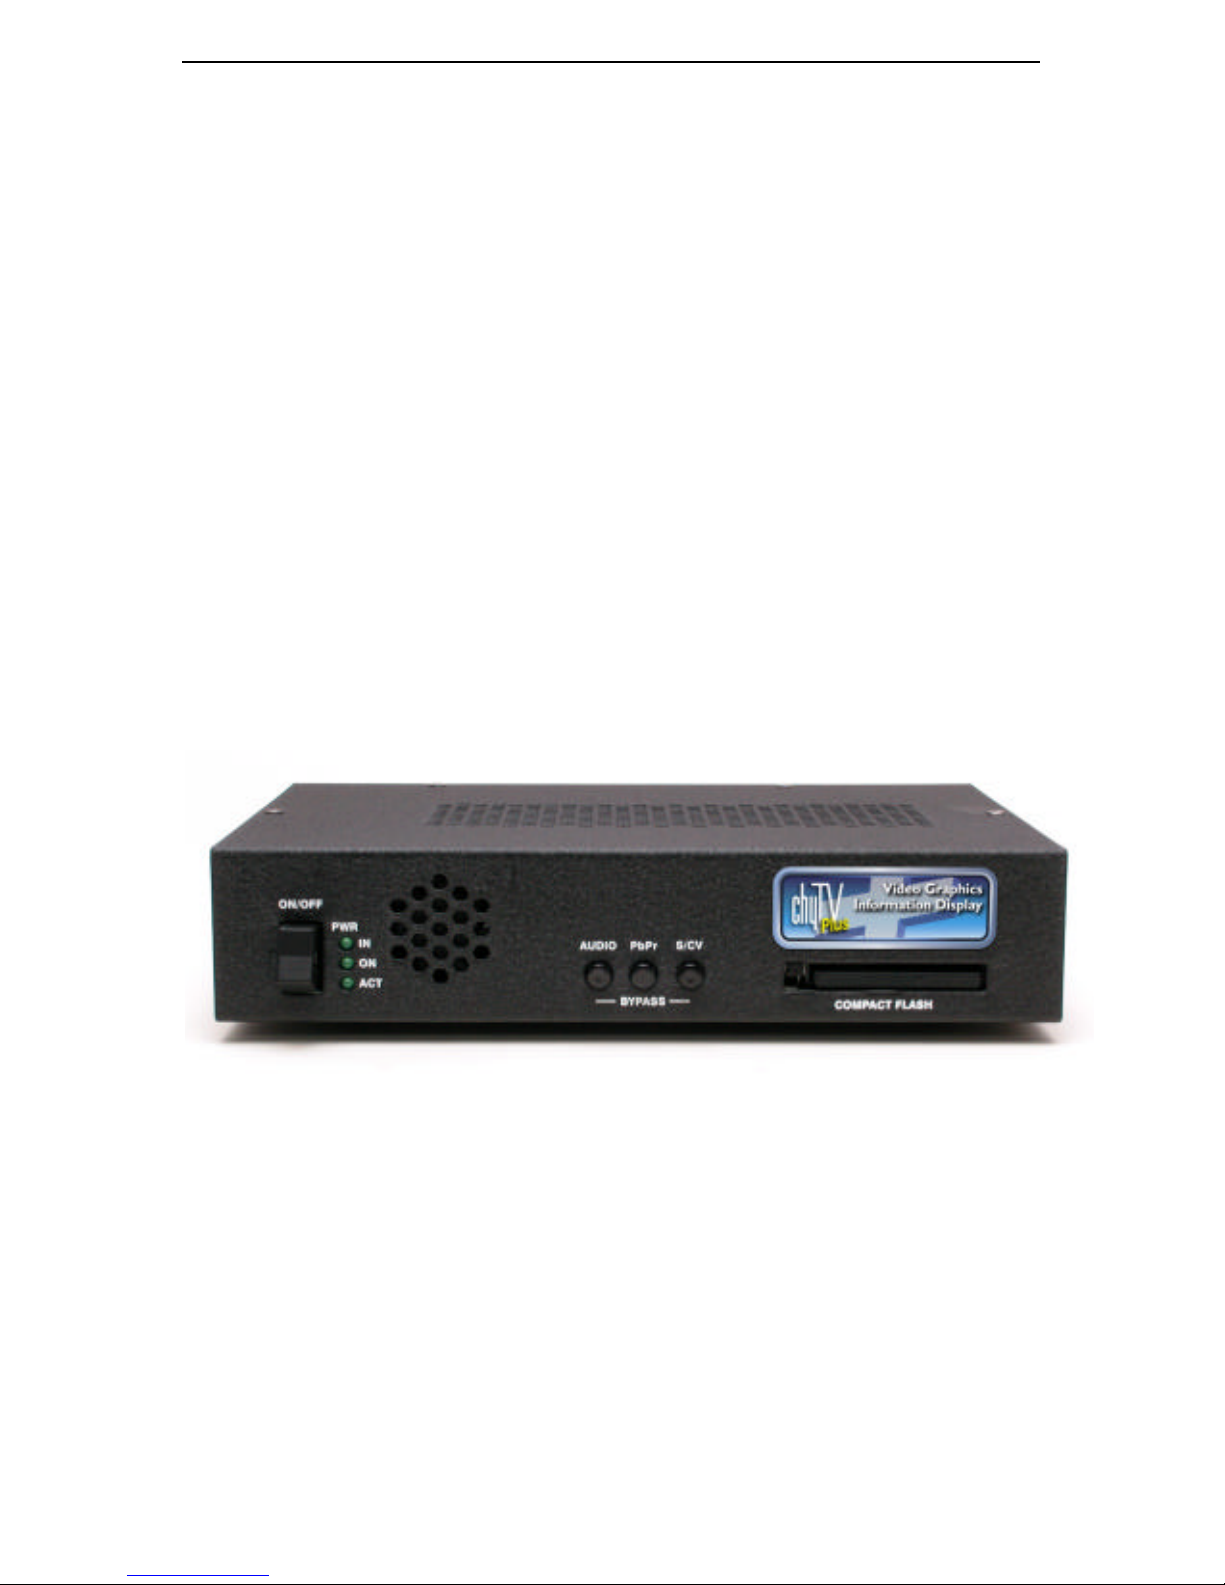
3.3.1.1 ON/OFF Switch
The ON/OFF switch turns the ChyTV Plus unit on and off.
3.3.1.2 PWR IN Indicator
The PWR IN green LED on indicates that the unit has +5VDC supplied at it’s power connector.
Connect the supplied power cable first to the ChyTV Plus unit, and then to the AC outlet.
3.3.1.3 PWR ON Indicator
The PWR ON green LED on indicates that the unit is turned on.
3.3.1.4 ACT (ACTivity) Indicator
The ACT green LED flashes when the Compact Flash is read or written to.
Page 18
3 CHYTV PLUS HARDWARE SETUP
12
3.3.1.5 AUDIO BYPASS
When the AUDIO BYPASS switch is depressed, audio generated by the ChyTV Plus unit is
added to the source audio. When the AUDIO BYPASS switch is not depressed, ChyTV Plus
audio processing is bypassed, and only external audio is output.
3.3.1.6 PbPr BYPASS
When the PbPr BYPASS switch is depressed, the ChyTV Plus unit inserts the ChyTV Plus
generated graphics into the Component (Y, Pb, Pr) video stream only. When the PbPr BYPASS
switch is not depressed, ChyTV Plus processing is bypassed, and external video is displayed on
the component video outputs without ChyTV Plus graphics inserted.
3.3.1.7 S/CV BYPASS
When the S/CV BYPASS switch is depressed, the ChyTV Plus unit inserts the ChyTV Plus
generated graphics into the S-Video and Composite video streams only. When the S/CV BYPASS
switch is not depressed, ChyTV Plus processing is bypassed, and external video is displayed on
the S-Video and Composite video outputs without ChyTV Plus graphics inserted.
3.3.1.8 COMPACT FLASH SLOT
The COMPACT FLASH slot holds the unit’s Compact Flash memory.
3.3.1.8.1 Ejecting the Compact Flash Card
Using the tip of a ballpoint pen, depress the Eject button, located in the left side of the slot, until it
projects forward.
Depress the extended Eject button to eject the Compact Flash card from the slot.
3.3.1.8.2 Inserting the Compact Flash Card:
Insert the card, brand label side up, completely into the slot until it is firmly seated. The card fits in
one direction only, do not force the card if there is resistance.
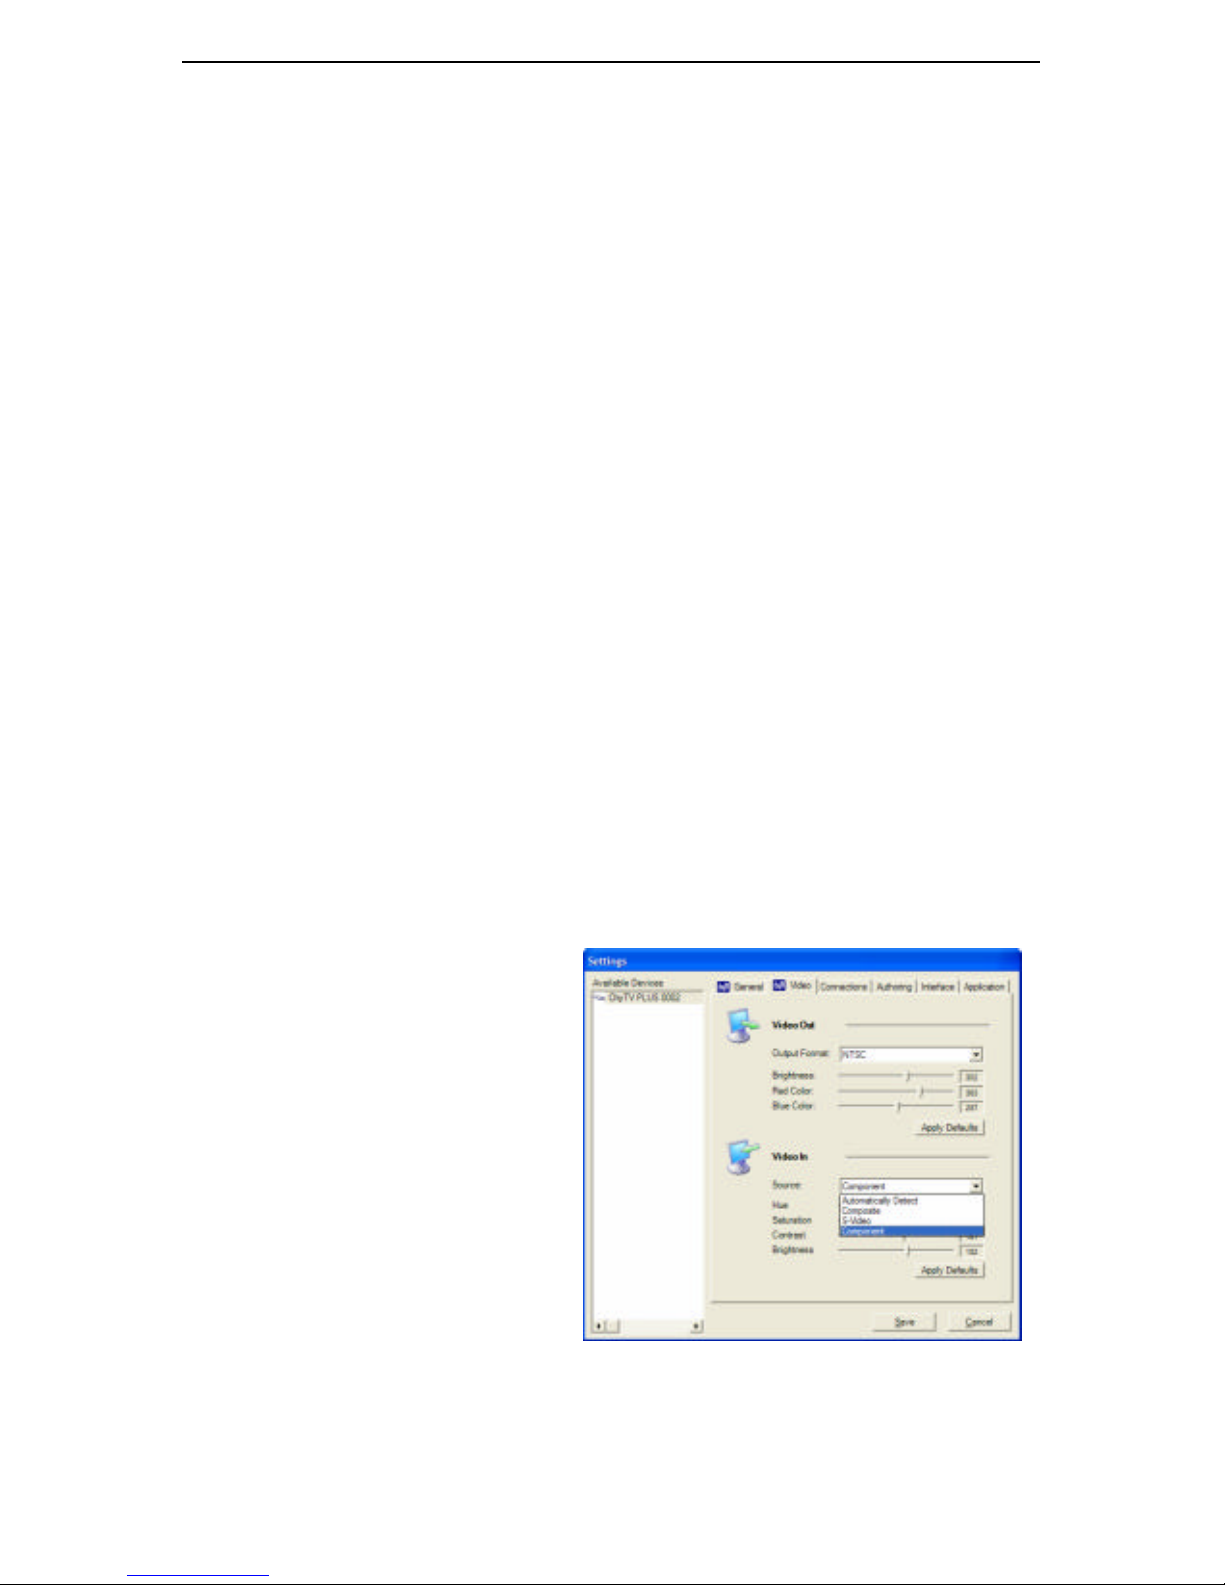
3.3.2 Selecting a Video Input
Only one of the three video inputs
(Composite, Component, or S-Video)
may be selected to input video to the
ChyTV Plus unit. Typically, when
booted, the unit will scan the video
inputs and select the active input
automatically.
Input selection can also be configured
using the ChyTV Tools application. If,
for some reason, the video input must be
selected manually, do the following:
4. Launch the ChyTV Tools
application and select Settings from
the Options menu.
5. Click the Video tab to display the
Video Out and Video In options.
By default, the Source is set to Automatically Detect. From the Video In Source pull-down
menu select Composite, S -Video, or Component (Y, Pb, Pr) for the video source as desired.
Selecting a Video Input in ChyTV Tools
Page 19

4 CHYTV HD 100 / HD 150 SETUP
13
4 ChyTV HD 100 / HD 150 Setup
4.1 Introduction
While most of the information in this User Guide is applicable to the HD 100 and HD 150, this
section includes information specific to the HD 100 and HD 150 only.
ChyTV HD 100, the latest generation of the popular ChyTV Video Graphics Information Display
systems, extends the product line to include High-Definition outputs and clip playout. Ideal for
any large-size digital signage, ChyTV HD 100 utilizes the familiar ChyTV Tools utility to manage
the projects and is completely compatible with existing ChyTV units. Like all ChyTV products,
the HD 100 features the highest quality dynamic text and effects, even in Portrait display mode.
The HD 100 also features 3D dynamic text and effects, 3D animated objects and more. Unlike
pre-rendered clips that can’t be modified, the 3D text can be changed on the fly in real-time using
live data.
ChyTV HD 150, the latest generation of the popular ChyTV Video Graphics Information
Display systems, extends the product line to include High-Definition outputs and clip
playout along with live SD video. The HD 150 gives you full control over each element on
the page. You can have a full motion HD clip as a background with layered graphics, text
and animations on top, along with a live video window of any size and position, or a variety
of other arrangements.
The ChyTV HD 150 is based on the HD 100, but also gives you the ability to include a live NTSC
or PAL video window in your pages, much like the standard ChyTV products. In addition, the HD
150 includes faster memory and a faster CPU.
The HD 150 supports live video input via the standard definition composite RCA connector on the
dedicated PCI board. Note that there is also a coaxial connection, but this is inactive. The live
video-in works with base -band video only. Tuner functionality is not currently implemented.
Please contact ChyTV Customer Support with any questions you may have about HD 100 and
HD 150 operation.
4.2 Hardware Connection
4.2.1 Power Supply Voltage Selector
Before operation, please check the HD 100 / HD 150’s power supply voltage switch. The HD 100
/ HD 150 power supply is switchable between 110 volts and 220 volts. The switch is located on
the rear of the device near the line cord receptacle. By default the HD 100 / HD 150 may come set
for 220 with a sticker covering it that says “Switch for 110”. This is to protect the system from
damage when shipped overseas. Plugging a 220 set device into 110 voltage is not a problem, but
plugging a 110 device into 220 voltage will damage components.
Page 20
4 CHYTV HD 100 / HD 150 SETUP
14
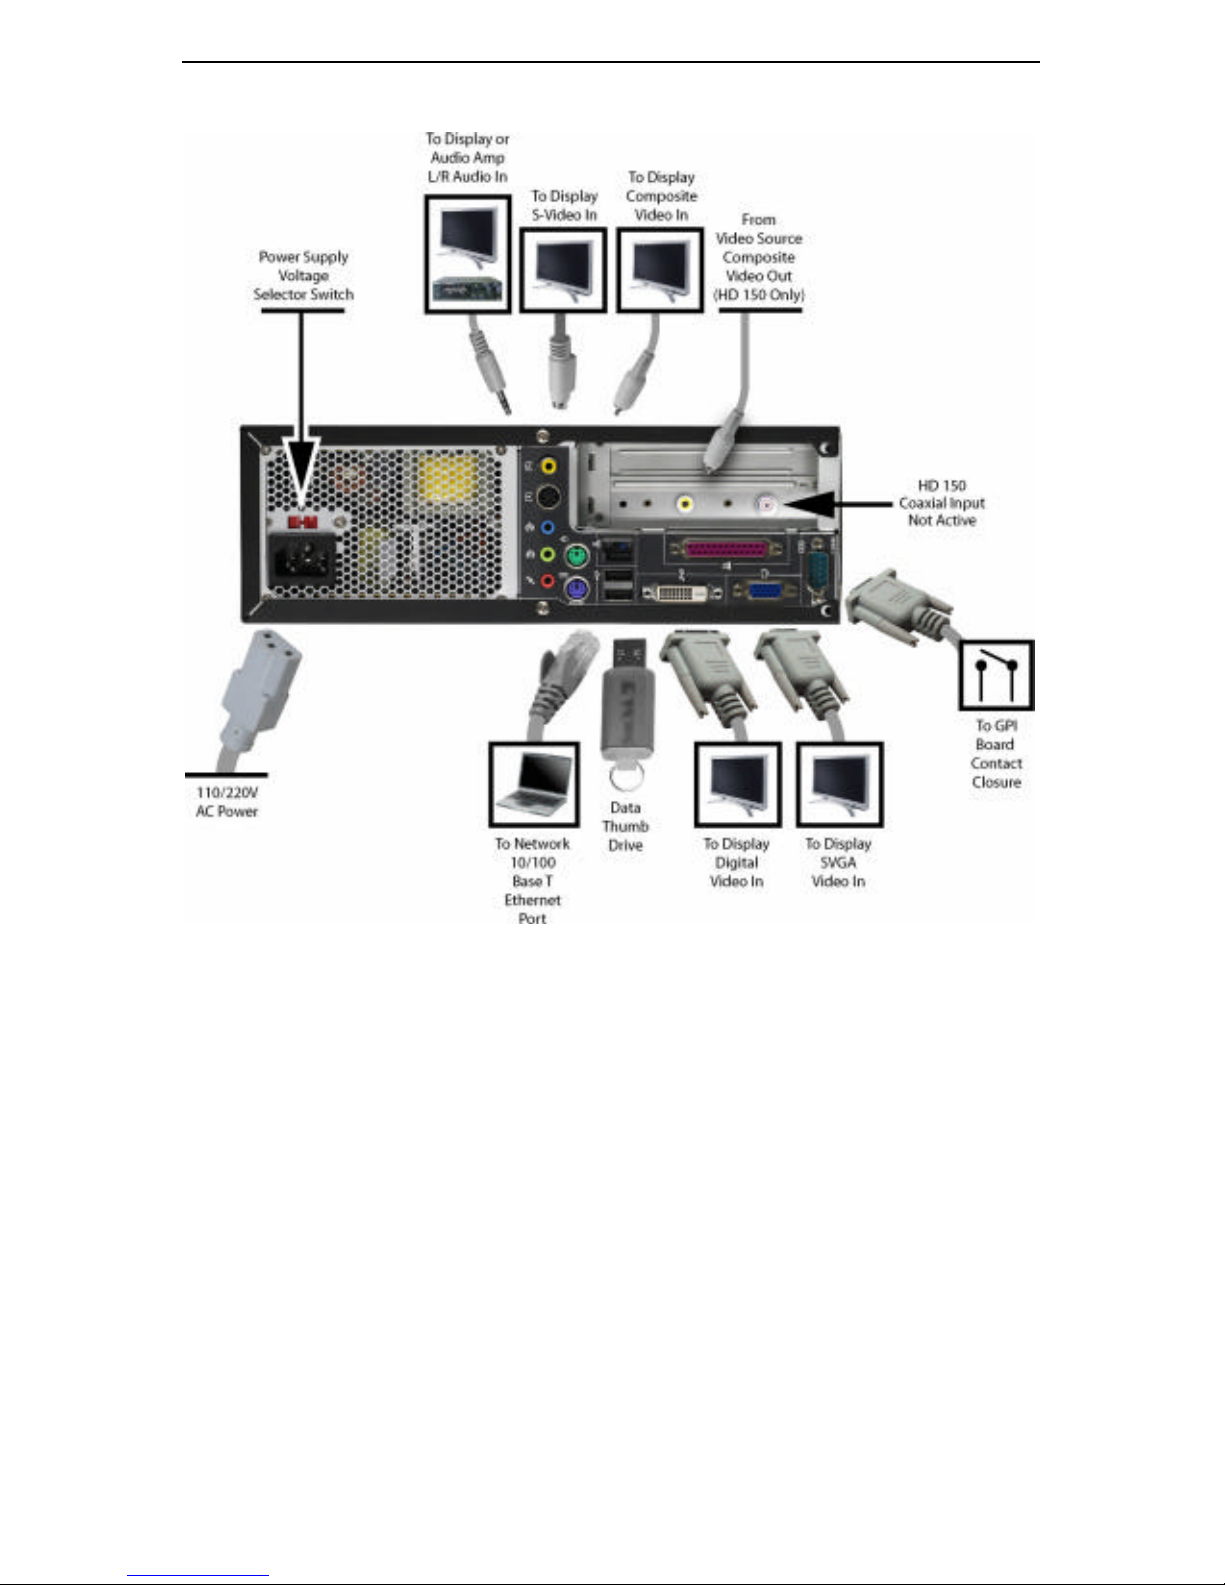
4.2.2 Connection Diagram
4.2.3 Connector Descriptions
4.2.3.1 COMPOSITE VIDEO IN (HD 150 Only)
Composite video in (CVBS). RCA Connector. This is an RF demodulated signal. Sources can
include an external TV tuner set-top box, a DVD player, or a VCR.
Connect an RCA cable from the video output of the external TV tuner set-top box, a DVD player,
or a VCR to the VIDEO input (yellow) of the ChyTV unit.
4.2.3.2 COMPOSITE VIDEO OUT
Composite video out (CVBS). RCA Connector. This is an RF demodulated signal. Connect to the
composite input of a television or video monitor.
4.2.3.3 S-VIDEO OUT
S-Video in. 4 pin mini DIN connector S-Video out. 4 pin mini DIN connector. This is an RF
demodulated S-Video signal. Connect to the S-Video input of a television or video monitor.
4.2.3.4 AUDIO OUT R/L
Analog stereo audio out, right and left. Mini Phone Plug.
Page 21

4 CHYTV HD 100 / HD 150 SETUP
15
Connect to the rig ht and left inputs of a speaker system or the television.
4.2.3.5 RS232 DCE / GPI x 8 (Software Selectable)
Digital Communications Equipment Interface. 9 Pin Male D Connector. Interface for serial
command data. See Sections 10.14.1 and 13.7.
General Purpose Interface. 9 Pin Female D Connector. Interface for 8 General Purpose Interface
contact closures. See Sections 10.14.2 and 13.6.
4.2.3.6 USB
The USB port enables connection with the supplied “Thumb Drive” for software and
configuration updates, and other advanced functions.
4.2.3.7 10/100 BASE T Ethernet
The Ethernet port enables direct connection of the ChyTV Plus unit to a PC network, permitting
direct operation, live data updates, file downloads, and other advanced functions.
Connect an RJ -45 network cable between the ChyTV Plus Ethernet connector and an Ethernet hub
or connector on a PC.
IMPORTANT: A unique IP address must be assigned to each ChyTV unit in order for it to
be recognized on the network. See section 4.3.2 for information on configuring the IP
address of a ChyTV H D 100 / HD 150 unit.
4.2.3.8 POWER Connector
Cable for AC power. Connect the supplied power cable first to the ChyTV unit, then to the AC
outlet.
4.3 Operation
4.3.1 Turning On / Off
The HD 100 / HD 150 operates simply by pressing the power button on the front panel. After
pressing the power button, the device takes 20 seconds or so to boot. It will immediately begin
playing the current Project. Press the power button again to turn off. The device takes 20 seconds
or so to shut down completely.
4.3.2 Setting the IP Address
Before the HD 100 / HD 150 can be connected to via a network from ChyTV Tools, it must be
configured with a valid static IP address. It is also possible to run as a DHCP device, however this
makes operation with ChyTV Tools more difficult since the IP address is dynamic. Since the HD
100 / HD 150 is a stand-alone appliance, configuring custom parameters such as the IP address are
achieved using the included USB thumb drive. By default, the HD 100 / HD 150 leaves the
factory with the following settings:
IP=192.168.1.2 (IP Address)
DG=192.168.1.1 (Default Gateway)
MASK=255.255.255.0 (Subnet Mask)
NS=192.168.1.1 (Name Server)
To modify the HD 100 / HD 150’s network settings, do the following:
Page 22

4 CHYTV HD 100 / HD 150 SETUP
16
1. Using a Windows PC, insert the included HD 100 / HD 150 USB thumb drive into an empty
USB slot.
2. Using Notepad, open the file IP.TXT for editing.
3. Modify the above networking parameters to their appropriate settings. Note that in the
IP.TXT file, a ‘#’ symbol as the first character on a line indicates that the line is “commented
out” (i.e. ignored).
4. Save IP.TXT file and properly stop and eject USB thumb drive.
5. Power on HD 100 / HD 150. Wait for a complete boot which may take a minute or more.
6. On the HD 100 / HD 150, insert the USB thumb drive into an empty USB slot.
7. Wait approximately 20 seconds. The HD 100 / HD 150 will automatically collect the new
networking parameters from the IP.TXT file.
8. Remove the USB thumb drive and restart the HD 100 / HD 150 by turning off and on again.
The new IP address can be confirmed by ‘pinging’ from a PC on the network.
4.3.3 “Phoning Home”
The included USB thumb drive can also be used to “Phone Home” to Chyron for customer
support purposes. The following line is included in the IP.TXT file described in the previous
section:
#help
By removing the ‘#’ sign in front of ‘help’ and inserting the UBS thumb drive into the HD 100 /
HD 150, the device will automatically send an email to ChyTV support containing the device’s
contact information. This enables ChyTV support to connect directly to the HD 100 / HD 150 for
troubleshooting or software updates.
Follow the steps in the previous section to update the HD 100 / HD 150 with new help settings.
Please contact Chyron customer support in advance of ‘phoning home’ so we can be prepared.
4.3.4 Connecting with ChyTV Tools
Like all standard ChyTV devices, HD 100 / HD 150 content is created, updated and managed
using the ChyTV Tools interface. The ChyTV Tools software is run on a separate PC and
connects to the HD 100 / HD 150 via the network.
Having set a static IP address on the HD 100 / HD 150, the device can be connected to via any
Windows PC on the network using ChyTV Tools. Adding IP address to the IP table in ChyTV
Tools, connecting and operating are all described in the ChyTV User Guide and are applicable to
the HD 100 / HD 150.
Note: The ChyTV User Guide frequently refers to the ChyTV compact flash card. On standard
definition products such as the ChyTV Plus and ChyTV IP, the storage medium for content is a
compact flash card. While the HD 100 / HD 150 may have a CF card drive bay, the content is
stored on the hard drive of the device. The CF card drive on the HD 100 / HD 150 is only used for
media transfer.
4.3.4.1 ChyTV.net
Alternately, content can be delivered across the Internet to the HD 100 / HD 150 via the
ChyTV.net web service. In this case, the content is still authored and managed off-line on a
separate Windows PC. When completed, the project is packaged and uploaded to the ChyTV.net
Page 23
4 CHYTV HD 100 / HD 150 SETUP
17
server’s appropriate account and group. Complete ChyTV.net operations are described elsewhere.
Contact ChyTV Customer Support for more information.
4.4 Authoring Content
Authoring content for the HD 100 / HD 150 follows the same principles as the standard ChyTV
products. Pages are created using Microsoft PowerPoint, and converted and managed using
ChyTV Tools. However, some specific settings in PowerPoint and ChyTV Tools are required to
accommodate HD content creation.
4.4.1 ChyTV Tools
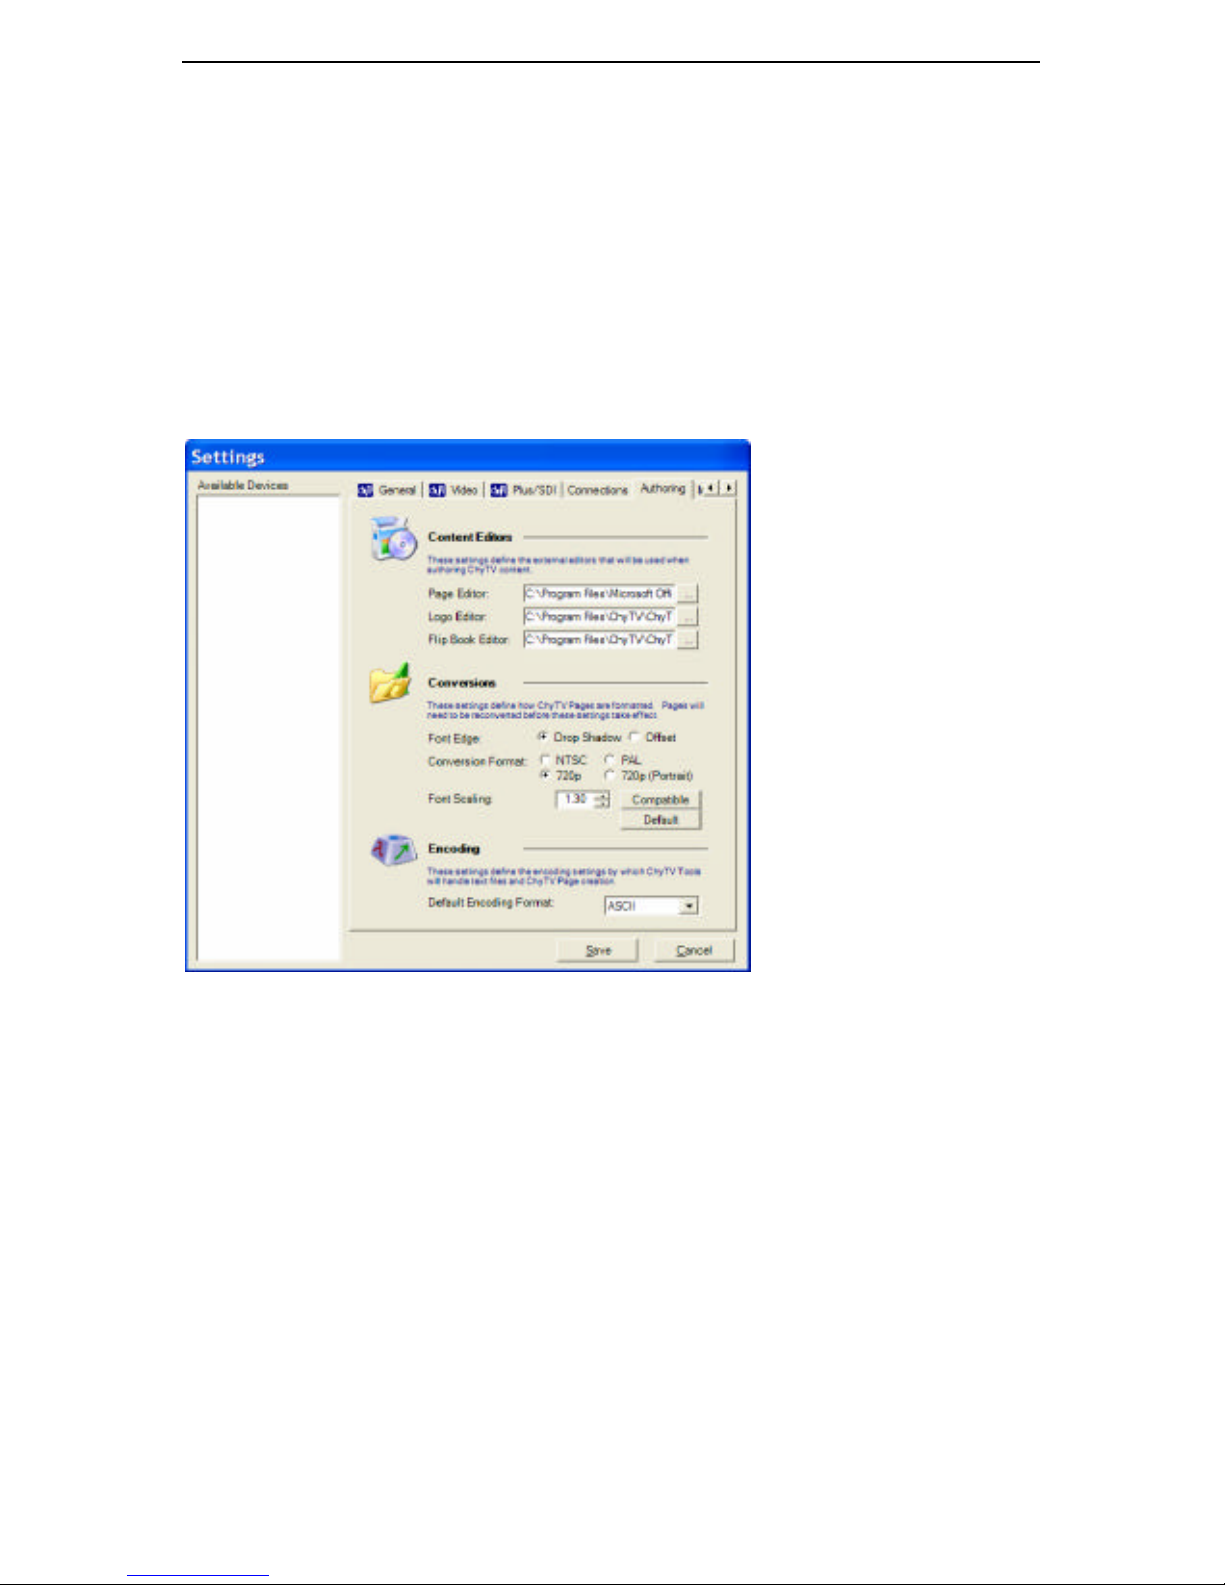
In ChyTV Tools, the Options / Settings / Authoring menu’s Conversions setting needs to be set
for either 720p or 720p (Portrait), rather than NTSC or PAL.
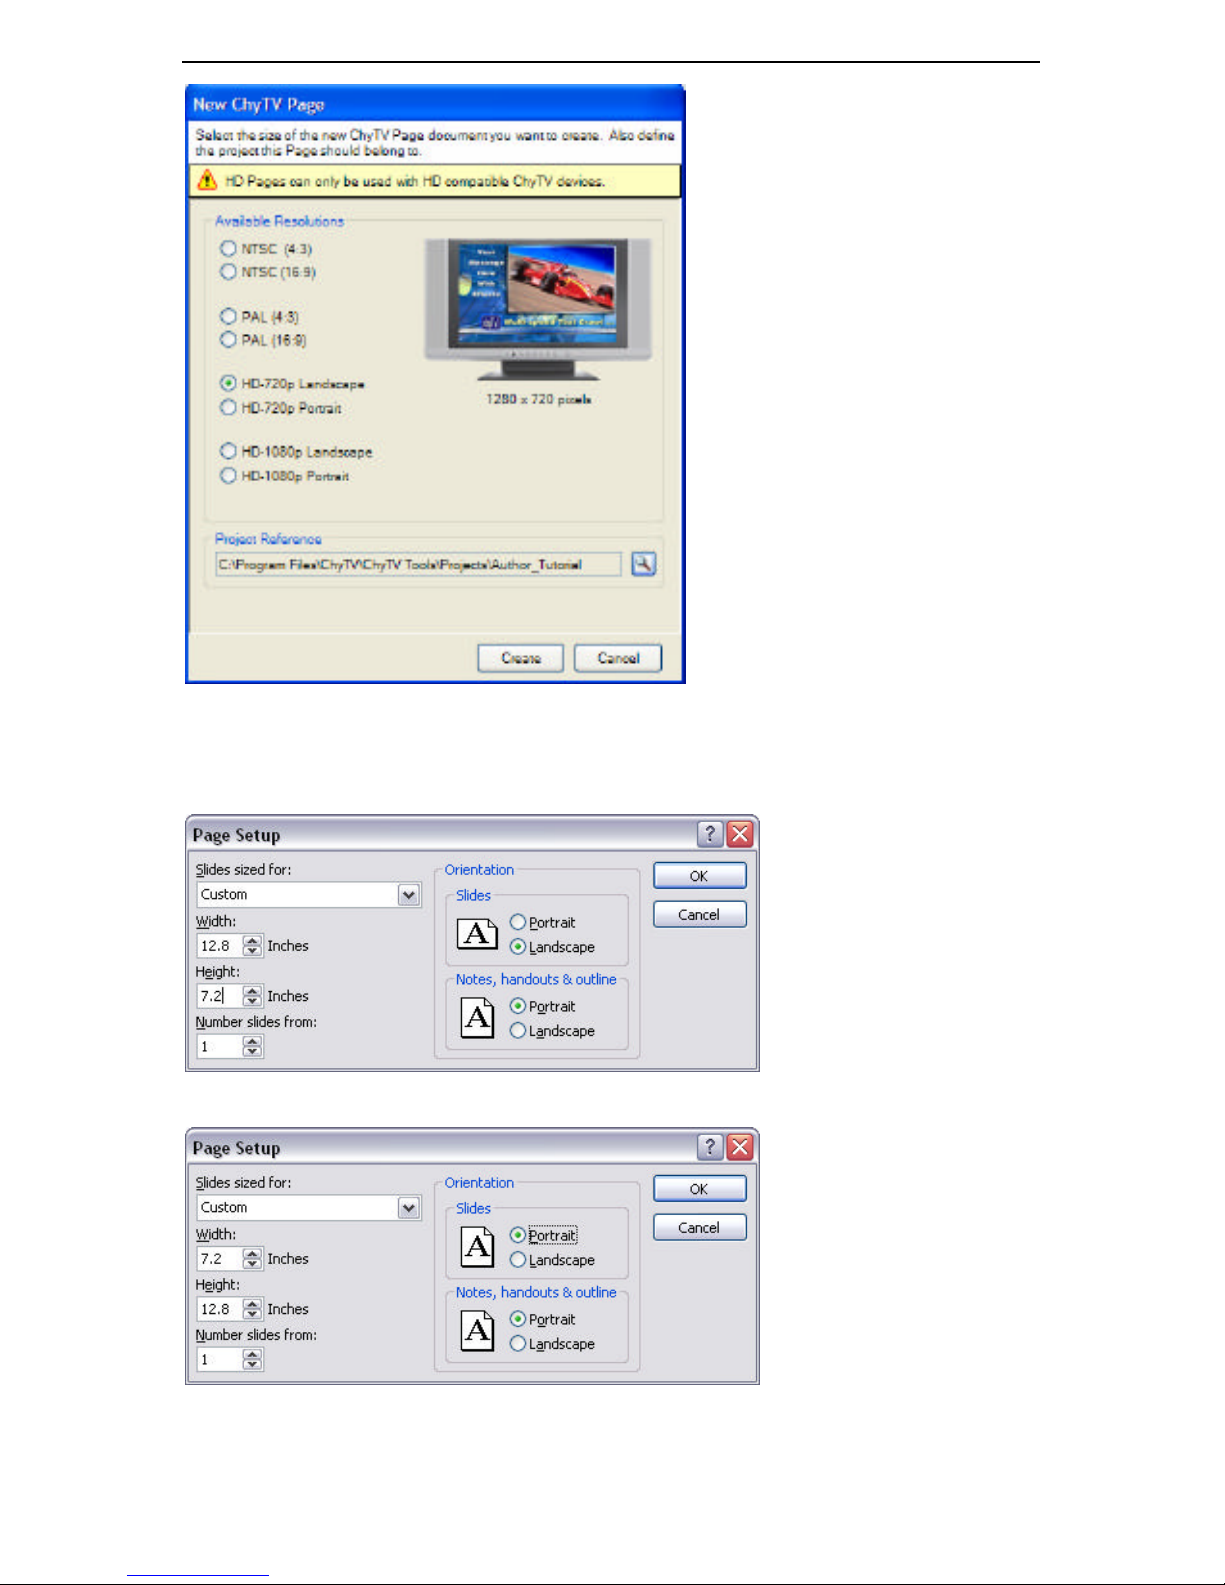
4.4.2 ChyTV Author
In ChyTV Author, the New ChyTV Page dialog box needs to be set to one of the four HD
settings available.
Page 24
4 CHYTV HD 100 / HD 150 SETUP
18
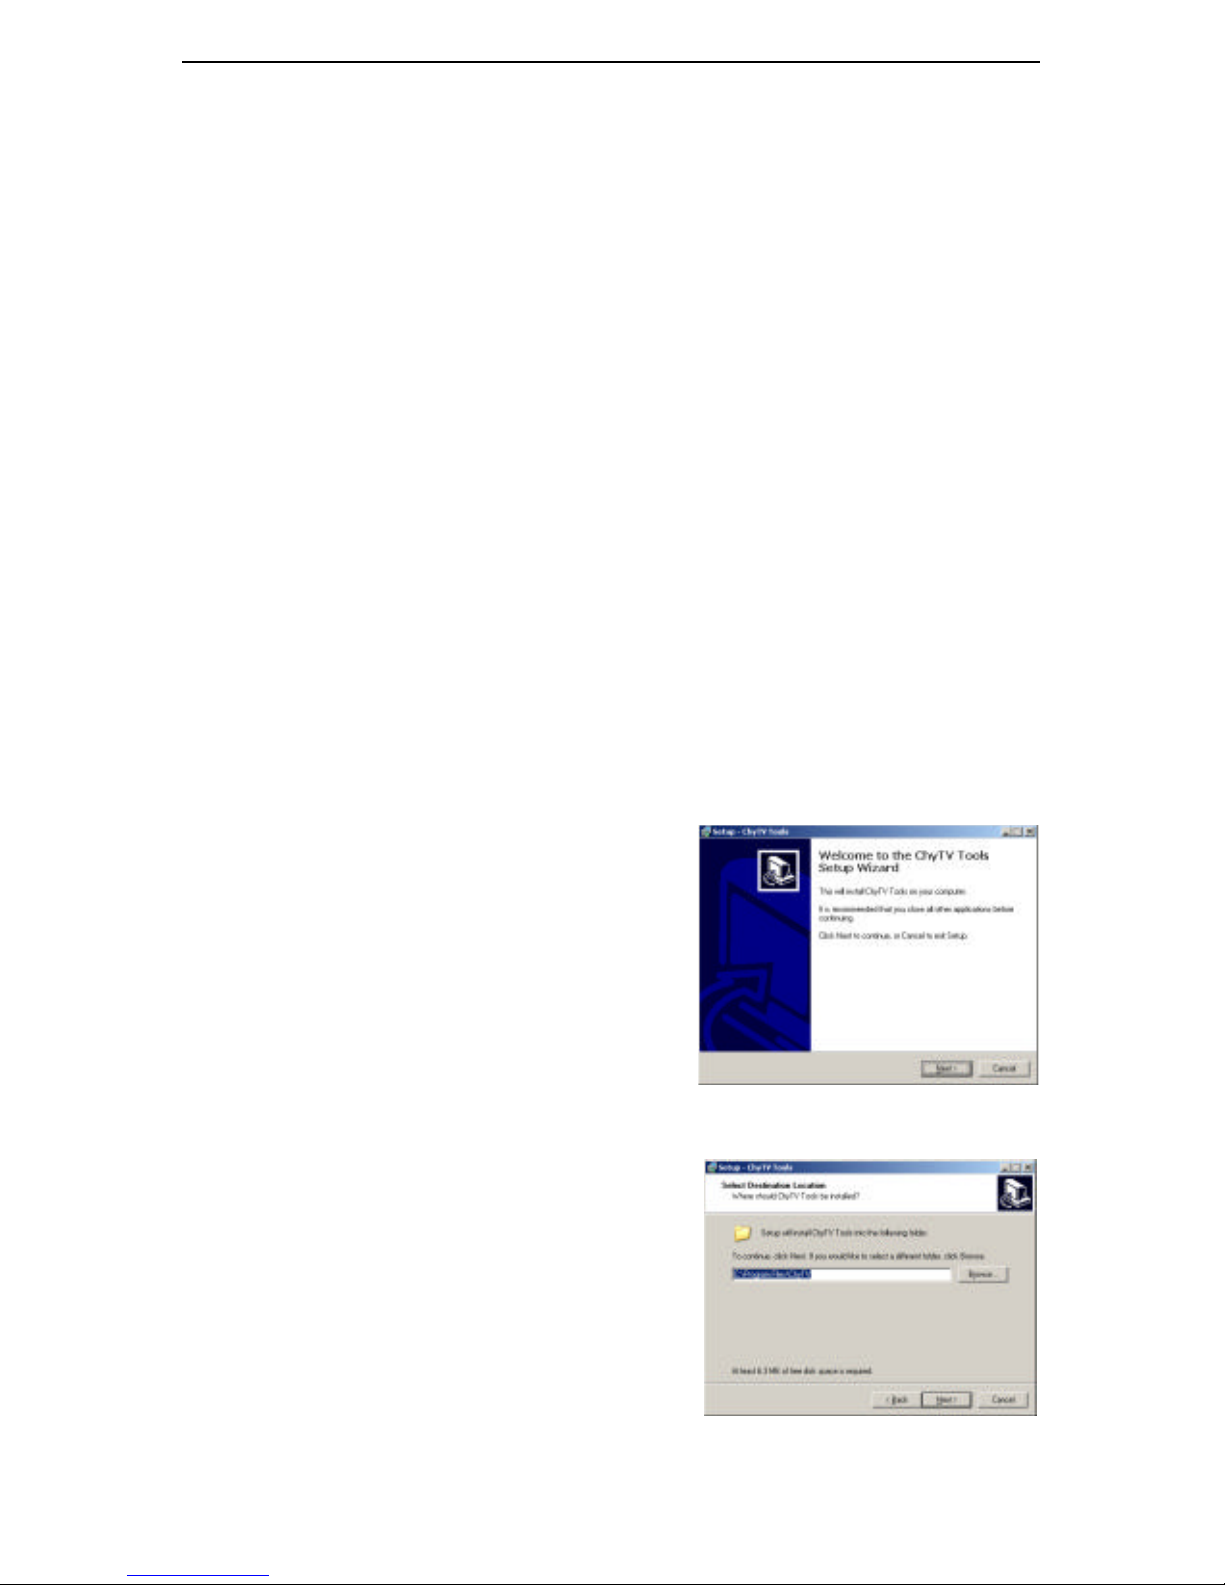
4.4.3 PowerPoint
In PowerPoint, the File / Page Setup menu needs to be configured with a custom Width and
Height as follows. Note that the HD 100 / HD 150 can run in either Landscape or Portrait modes.
Page 25
5 PC SOFTWARE INSTALLATION
19
5 PC Software Installation
5.1 PC Requirements
ChyTV software runs only on PCs using Microsoft® Windows® 2000 and Windows® XP operating
systems. A 32-bit graphics card is required. If using PowerPoint to author ChyTV pages,
Microsoft PowerPoint 2000 or newer is required.
5.2 ChyTV Software Overview
The following software is provided with your ChyTV unit:
ChyTV Tools – A utility used to import, organize and schedule pages and their page elements for
display by the ChyTV unit. It is also used to transfer files between the PC and ChyTV’s CF card,
and control the unit remotely while updating pages and Active Data.
ChyTV USB Drivers – The Windows drivers used to connect USB equipped ChyTV units to a
PC’s USB port.
ChyTV Elements – A Microsoft PowerPoint “Add-In” that automates the creation of page
elements for ChyTV pages while using PowerPoint.
ChyTV Tools and Elements are designed to work with Microsoft PowerPoint, the recommended
program for composing ChyTV pages.
IMPORTANT!!!!! Plasma display users please refer to the section on Refresh Settings in Section
9.4.2.1, for information on burn-in!!!
5.3 Installing ChyTV Tools
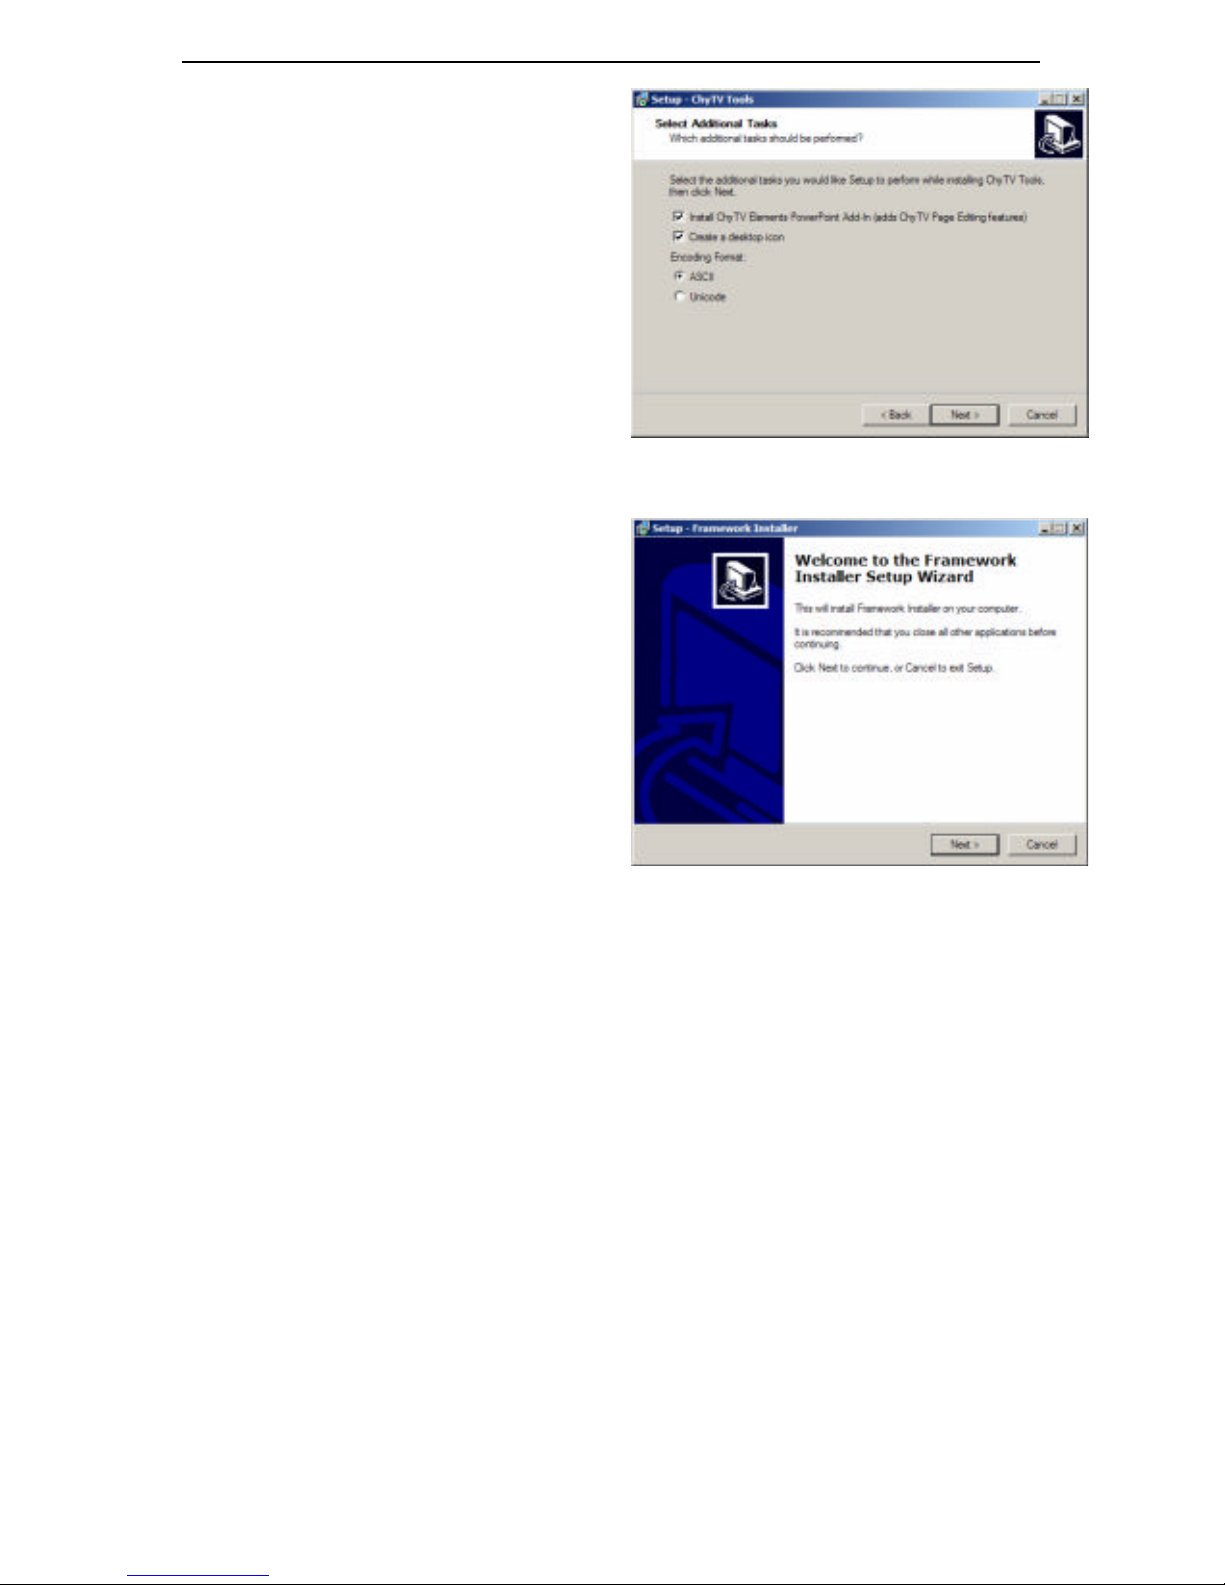
1. Insert the ChyTV Installation CD in a CD drive
on the PC. The welcome window is automatically
displayed. Click Next. Follow the instructions in
each screen to perform the installation.
2. The Destination Location is the folder (directory)
where the ChyTV Tools application will be
installed. Use the folder that is shown, or click
Browse to select a different folder. When
selection is complete, click Next.
3. The next step creates a shortcut to ChyTV Tools
in the specified Start menu folder. Use the folder
that is shown, or click Browse to select a different
folder. When selection is complete, click Next.
4. The ChyTV Elements PowerPoint Add -In can be
automatically installed during ChyTV Tools
installation. Be sure that Install ChyTV
Elements PowerPoint Add_In (the default) is
checked in the Select Additional Tasks
window.
5. A ChyTV Tools icon can be placed on the desktop
for easy access. To place the icon on the desktop,
Installation Welcome Window
Destination Location
Page 26
5 PC SOFTWARE INSTALLATION
20
click the Create a Desktop Icon
checkbox in the same window. Click
Next.
6. Review the settings that have been
selected, and then click Back to modify,
or Install to proceed. The ChyTV Tools
files start installing.
7. If ChyTV Tools has been previously
installed, a message may displayed asking
if you want to overwrite existing files. The
files it is requesting to overwrite are demo
files that had been copied to same location
during the earlier ChyTV Tools install. If
you have modified the demo files and
wish to keep them, click No to leave the
specified file intact and not perform an
overwrite. Otherwise, Yes to All should
be selected in order to update the system
with new software.
8. The install continues to copy any
additional files to the PC.
9. After installing ChyTV Tools, the installer
runs the Framework installer required for
network ChyTVs. Follow the installer
instructions to complete installation.
10. Installation is now complete. If desired,
click the Show Readme and/or
Launch ChyTV Tools checkboxes to
display the ReadMe file and/or start ChyTV Tools immediately after the window is closed.
Click Next . The Setup window closes.
USB ChyTV Users: Proceed to Section 4.6 for instructions on how to install the ChyTV USB
drivers.
Network ChyTV Users: Proceed to Section 5.4 for instructions on how to configure the IP
address of your ChyTV unit.
Select Additional Tasks Window
Framework Installer
Page 27
5 PC SOFTWARE INSTALLATION
21
5.4 Configuring the IP address of a ChyTV Unit
5.4.1 Overview
When using a ChyTV with an Ethernet connection, you
must configure the ChyTV with the appropriate network
settings to control the unit or send new content to it.
Note: At the time of this manual’s writing, DHCP
(Dynamic Host Configuration Protocol) support is not
available. Instead, it uses fixed IP addresses, requiring
network configuration at installation time. DHCP support
will become available in early 2007 with the release
of ChyTV.net. Please check www.chytv.com for up
to date information.
It is best to enlist the help of the Network Administrator for
the facility in which the ChyTV is being deployed, as you
will need:
§ A compact flash reader/writer.
§ A fixed IP Address for the ChyTV unit.
§ A default Gateway for the local network.
§ The subnet mask for the local network.
IP Address: A 32-bit number comprised of a host number and a network prefix (eg. 192.168.0.0),
both of which are used to uniquely identify each node within a network. Simply put, the IP address
is a location on the network that uniquely identifies the device with that address.
Default Gateway: A device used to connect networks when using the IP protocol. In order to
communicate with a host on another network, an IP host must be configured with a route to the
destination network. If a configuration route is not found, the host uses the gateway to transmit the
traffic to the destination host. The default gateway is where the IP sends packets that are destined
for remote networks. If no default gateway is specified, communication is limited to the local
network.
Subnet Mask: Characters used to mask a portion of the IP address, so that TCP/IP can tell the
difference between the network ID and the host ID. TCP/IP uses the subnet mask to determine
whether the destination is on a local or remote network.
5.4.2 IP Address Configuration
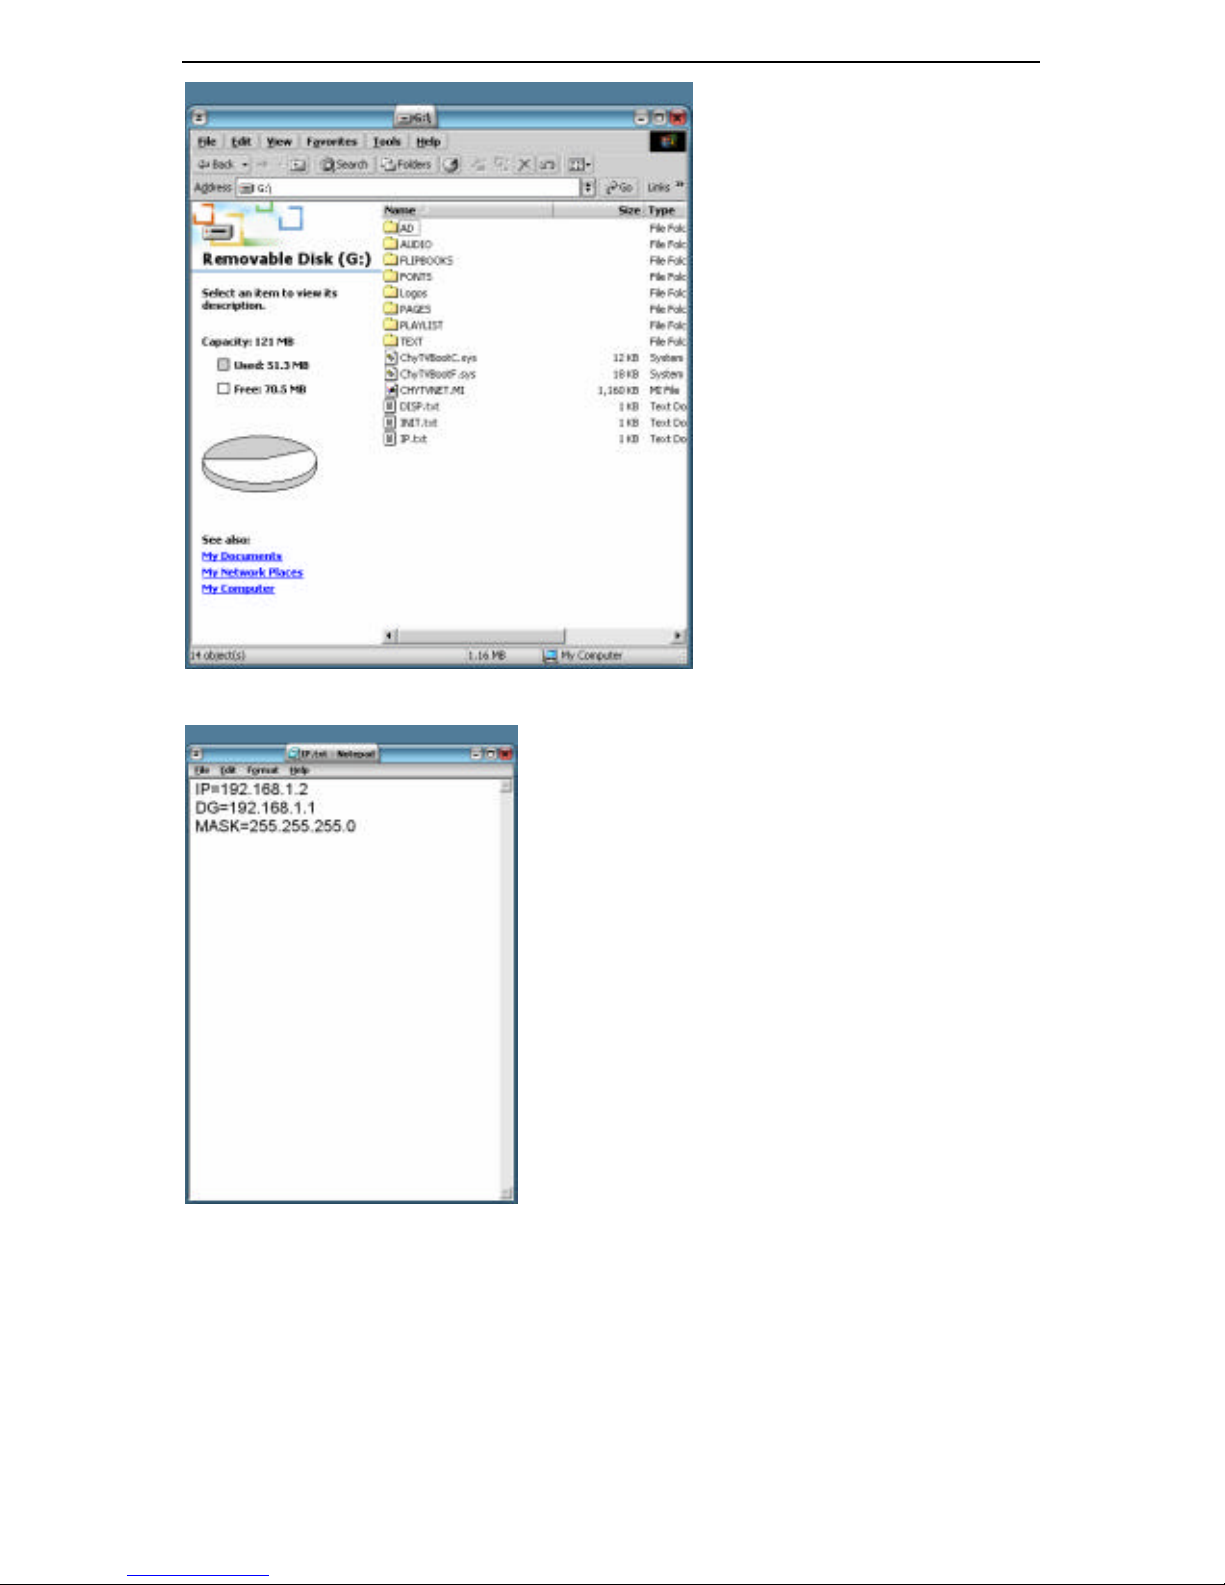
9. Insert the ChyTV Compact Flash card into the reader/writer and find the appropriate drive
letter associated with it. (In this example we use G: )
PowerPoint Options Menu
Page 28
5 PC SOFTWARE INSTALLATION
22
10. Locate the “IP.txt” file and double-click to edit it in Notepad.
11. Change the value for the IP Address (IP), Default Gateway (DG) and Subnet Mask (MASK).
12. Save your changes and remove the compact flash from the reader/writer. Once the compact
flash disk is reloaded into the ChyTV and the ChyTV is booted, it will then have the IP
Address, Default Gateway and Subnet Mask as entered above.
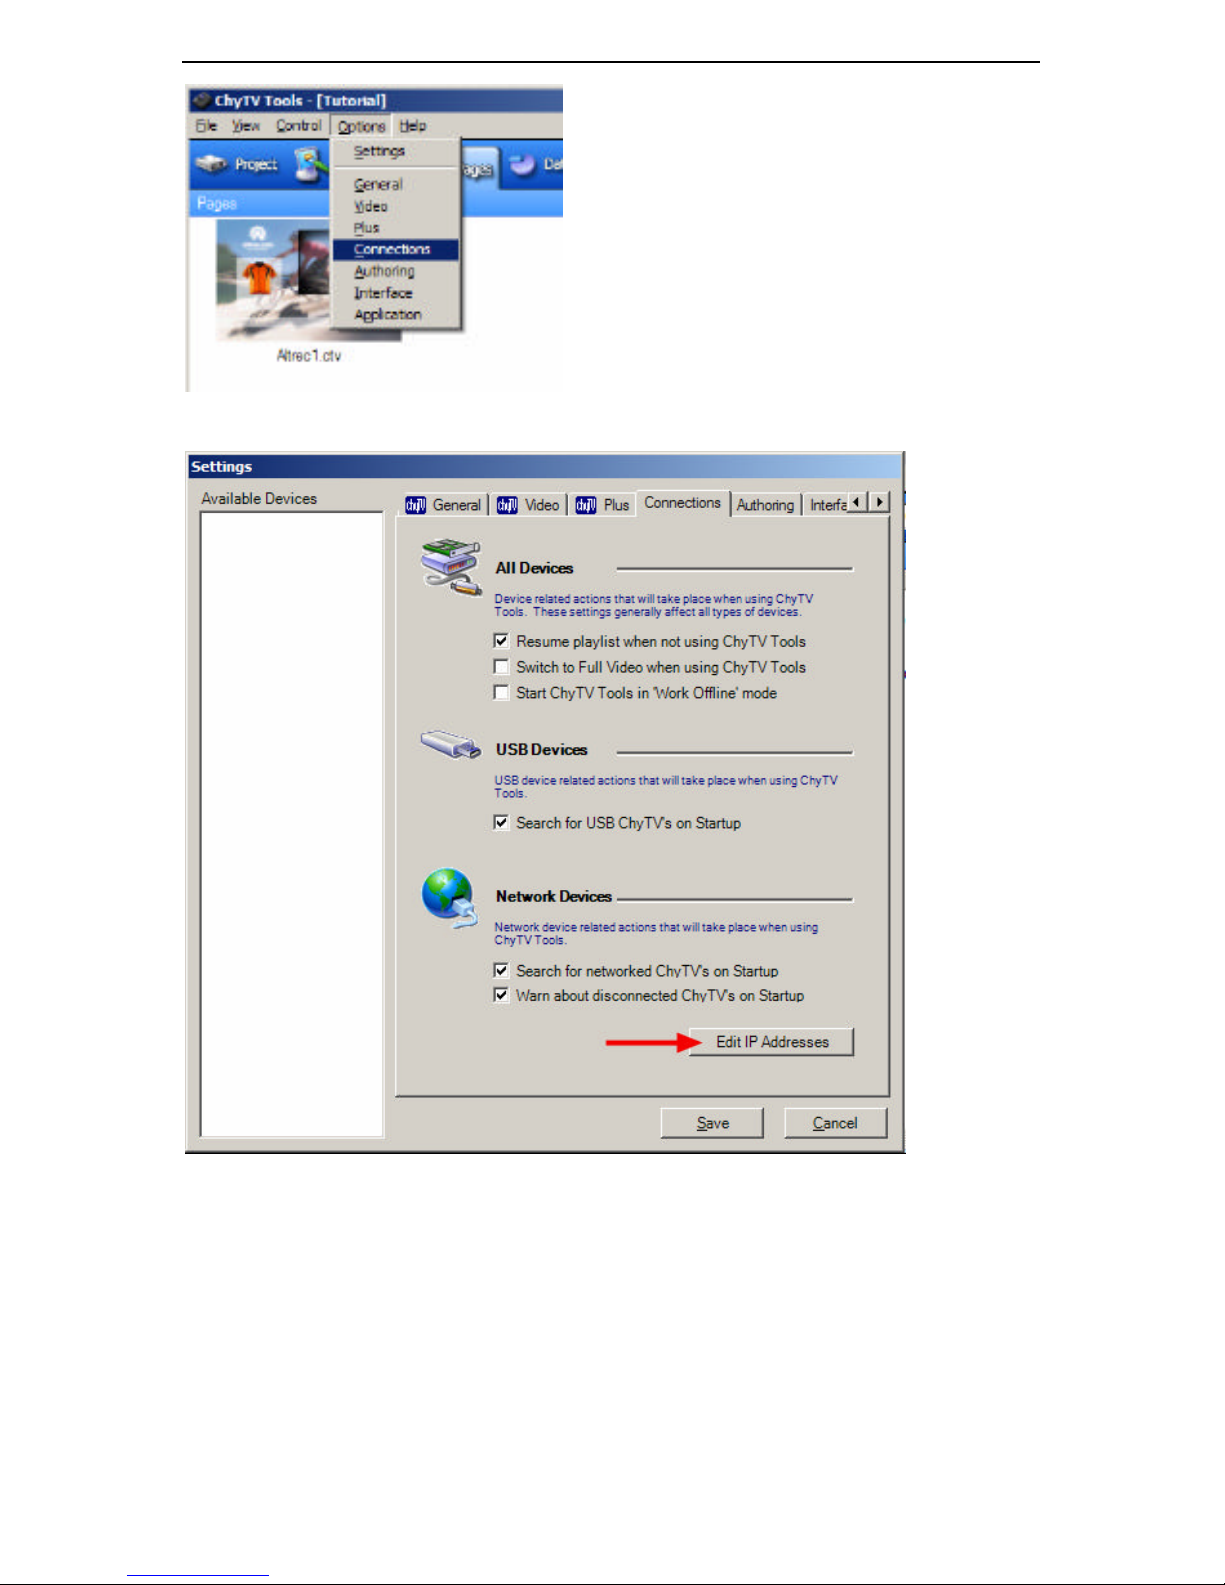
13. In ChyTV Tools, you will need to identify the IP address of the unit you just configured. In
the ChyTV Tools software, Find the Options Menu and select Connections .
Page 29
5 PC SOFTWARE INSTALLATION
23
14. You will be viewing the Connections tab in the Settings window.
15. Click Edit IP Addresses in Network Connectivity
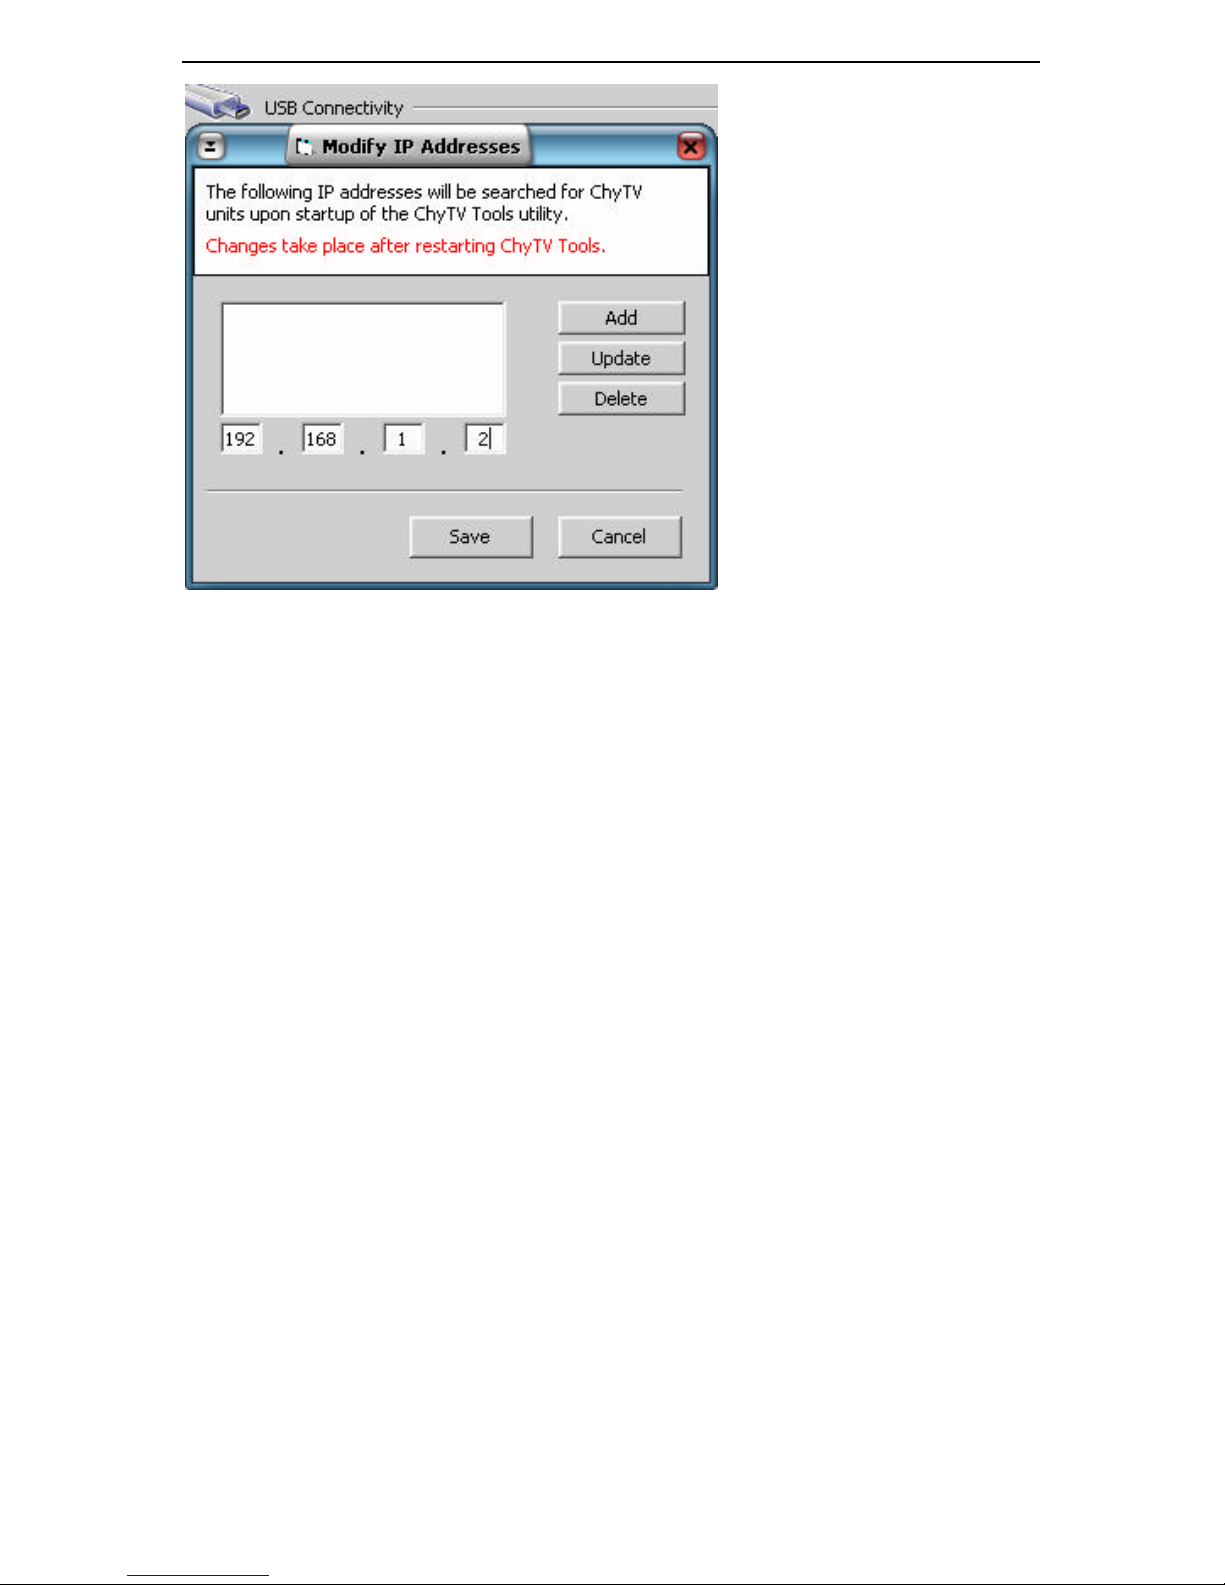
In the Modify IP Address dialog box, type in the address for the unit as you configured it on the
Compact Flash.
Page 30
5 PC SOFTWARE INSTALLATION
24
16. Click Add.
17. Click Save to complete your changes.
18. You must re-start ChyTV tools to ensure the software will connect to each ChyTV IP unit you
have entered on this screen.
5.5 Additional IP.TXT Entries
The following entries may be added to the IP.TXT file to custom configure the network
installation.
5.5.1 Display Information
DSPETH,5
When this line is included in IP.TXT, a ‘blue’ screen of information regarding IP info, version
info, etc. is displayed when ChyTV is first powered on. The 5 means 5 seconds. Note that it may
say #DSPETH,5 The ‘#’ mark means the command is ‘commented out’ and not applied. It’s the
equivalent of being deleted.
5.5.2 Name and Password
FTP-NAME=chytv
FTP-PWD=chytv
Assigns a name and password to the FTP server for validation.
5.5.3 FTP Off
FTP=off
Turns the FTP server off completely for security.
5.5.4 Network Priority
NET=p
Page 31
5 PC SOFTWARE INSTALLATION
25
Gives networking the highest priority for updates. Can possibly interfere with larger crawls and
flipbooks.
5.6 Installing the USB Driver
The USB driver enables the ChyTV unit and the PC to communicate with each other via the USB
connection. To install the USB driver:
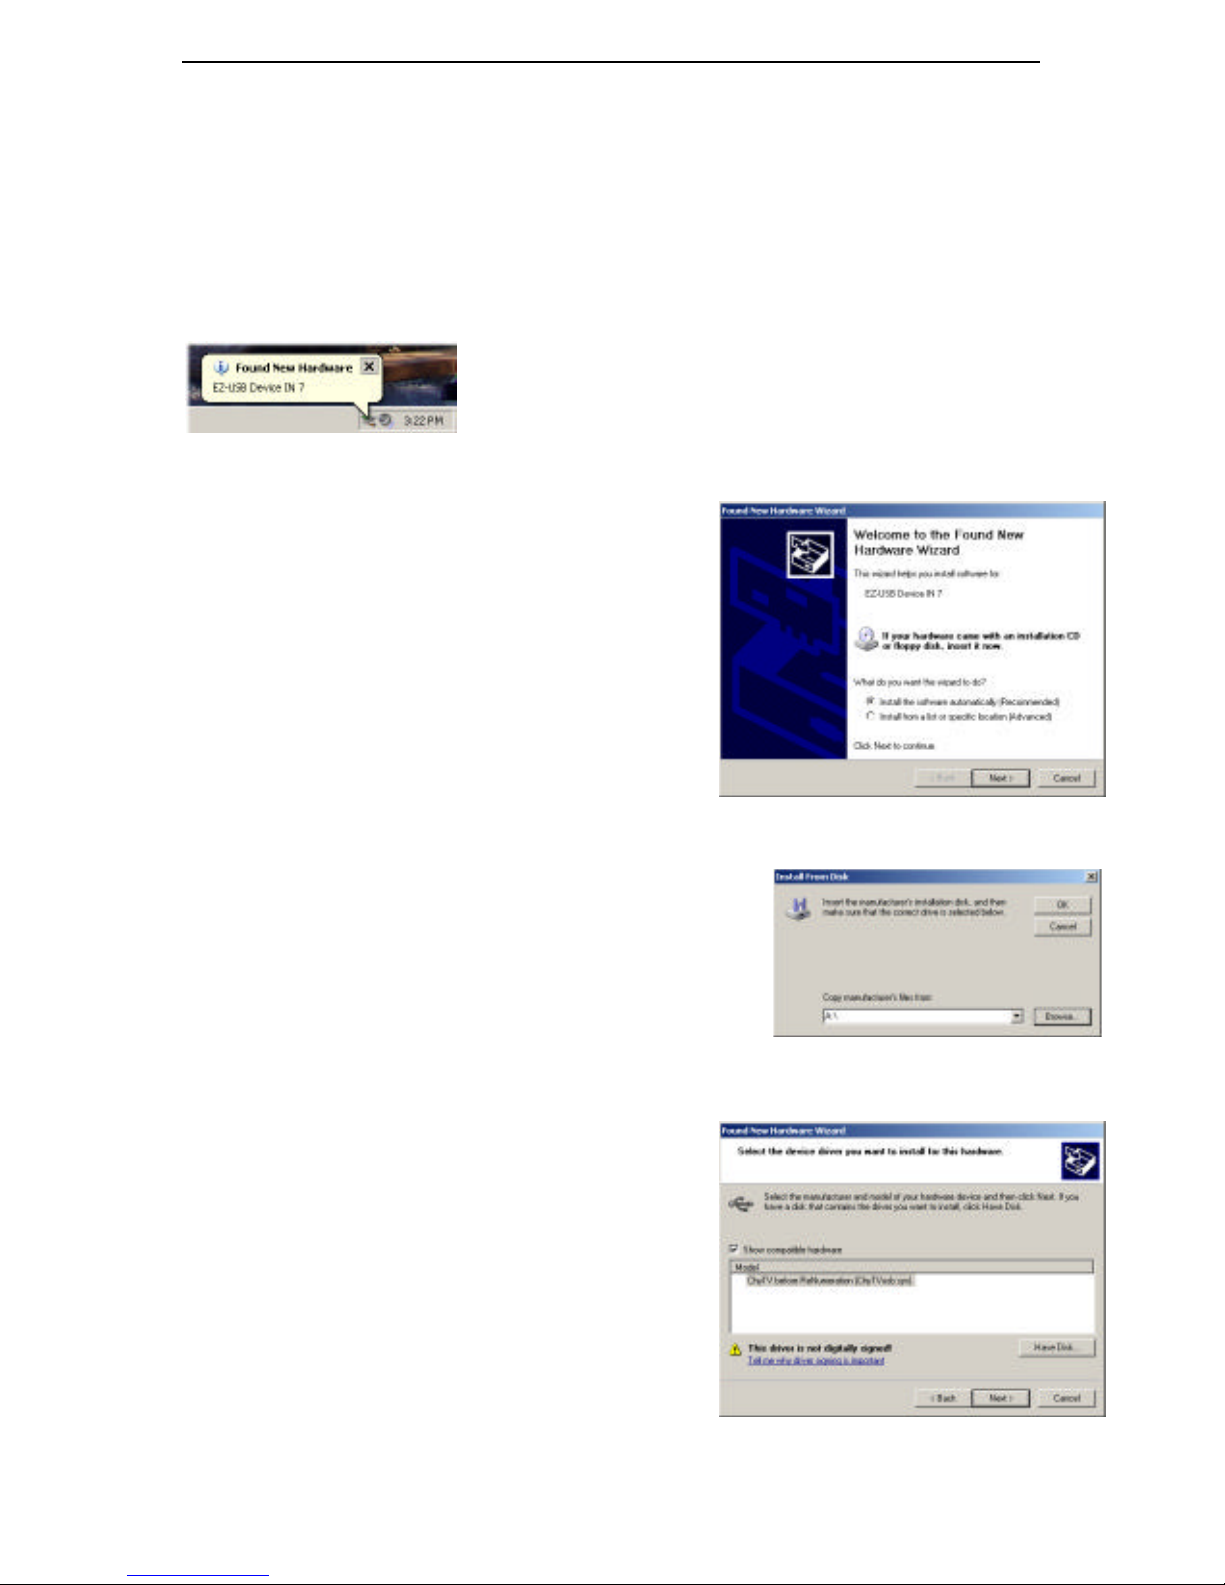
1. When the ChyTV is connected to the PC for the first time, the Found New Hardware message
is displayed:
Shortly thereafter, the Found New Hardware Wizard dialog box opens.
2. Automatic installation procedures can now be used.
Click the Install this software automatically
(Recommended) radio button, and then follow
the instructions displayed on the screen until the
software is installed.
In the event that the automatic installation is
unsuccessful, the driver can also be installed manually
by restarting the installation procedure, and then
performing the following procedure:
1. When the Found New Hardware Wizard appears,
click the Install from a list or a specific
location (Advanced) radio button, and then click
Next.
2. The Found New Hardware Wizard displays the Search and
Installation Options. Click the Don't Search radio
button, and then click the Next button.
3. The Found New Hardware Wizard displays the Device
Selection window. Click the Have Disk button.
4. The Install from Disk dialog box is now displayed. Click
the Browse button.
5. The Locate File dialog box is now displayed.
Navigate to and select the file ChyTV.inf. If the
ChyTV software has been copied to the hard drive
of the PC, the file should be found in the
ChyTV\ChyTV USB Driver folder on the hard drive
of the PC. Otherwise, the file should be found in
the ChyTV\ChyTV USB Driver folder on the
installation disk.
6. Click Open. The Install from Disk dialog box is
displayed again. The selected file is displayed in the
Copy from manufacturer's files from field. Click the
OK button.
Found New Hardware Wizard
Install From Disk Dialog Box
Device Selection Window
Page 32
5 PC SOFTWARE INSTALLATION
26
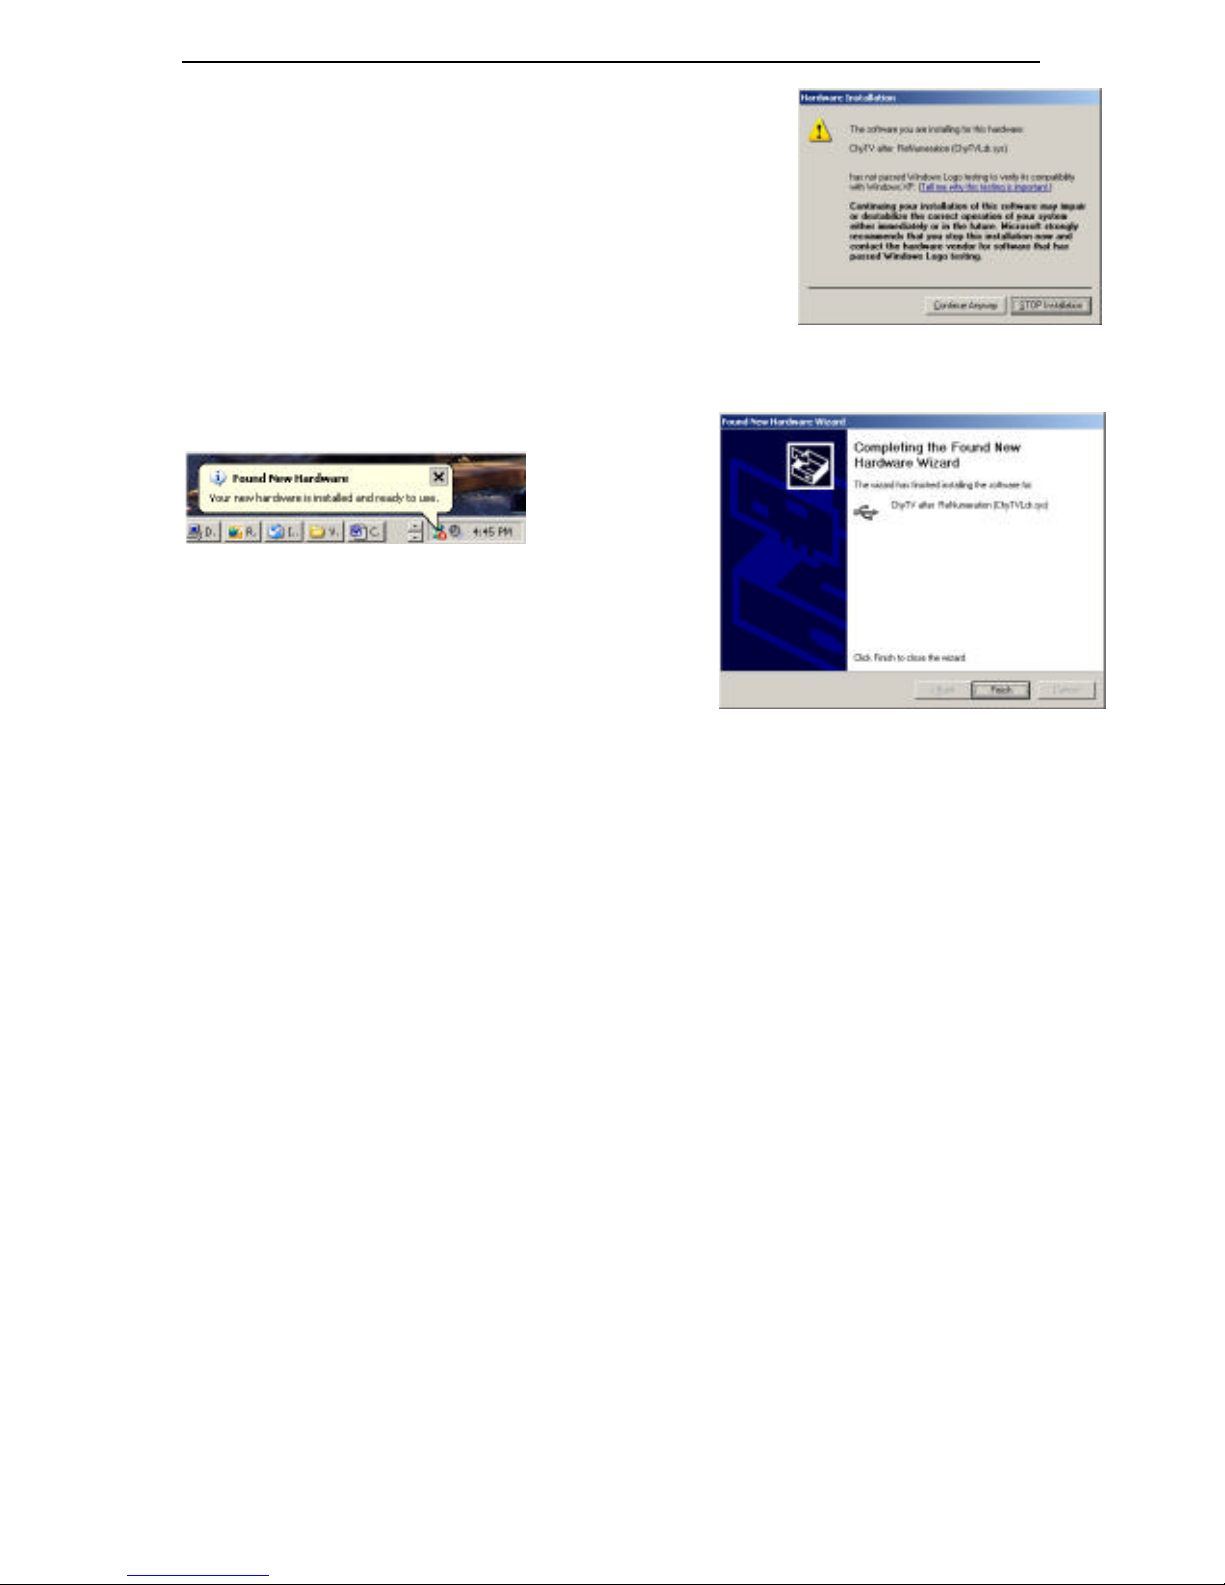
7. The Select Device Driver dialog box is now displayed. Click
ChyTV before ReNumeration (ChyTVusb.sys), and
then click the Next button.
8. The installation process starts, and then a dialog box is
displayed indicating that the software has not passed
Windows logo testing to verify compatibility.
Verification of compatibility with Windows XP is not
necessary. Click Continue Anyway. Installation
continues.
9. When installation is complete, the Found New Hardware Wizard Completion prompt is
displayed:
10. Click Finish. The Found New Hardware Wizard
Completion dialog box closes. The completion
window is displayed.
5.6.1 USB Installation Tips
When USB devices launch Windows plug and play, they
can be temperamental. Most of us have experienced at
one time or another a USB device such as a mouse, hub,
read/writer, etc. that has required some sort of reset. The
following sections discuss diagnosing a USB problem and steps to follow when USB installation
problems are encountered.
5.6.1.1 ChyTV USB Driver Installation
When any USB device is connected, a message is sent to Windows identifying the new USB
device with a unique ‘ID’ code (for ChyTV Plus, this is 15F2). This causes Windows to invoke the
‘Found New Hardware’ wizard. In most cases, letting Windows automatically search for an
appropriate driver will find the driver on the ChyTV Install CD and install it.
However, it seems that sometimes the ‘ID’ code is not transmitted correctly, perhaps due to a
timing issue, cable, or some other unknown factor. This may result in an error such as ‘Driver not
found’. In general, the problem is not that the software can’t be found, but that the software’s ID
and the ID returned from the device are not matching.
Taking the following steps in order will usually rectify the situation:
1. Power down both the ChyTV unit and the PC.
2. With USB cable detached from both the ChyTV unit and the PC, power up the ChyTV unit.
3. After color bars display on the display connected to the ChyTV unit, plug in the USB cable to
the ChyTV unit only.
4. Power up the PC. Wait for Windows to load completely.
5. Plug in the USB cable to the PC.
Windows Logo Testing Window
Completing the Found New Hardware
Window
Page 33
5 PC SOFTWARE INSTALLATION
27
At this point, the ‘Found New Hardware’ wizard should run, and should have the correct ID.
Follow normal driver installation procedures.
5.6.1.2 Checking the ChyTV
USB Driver
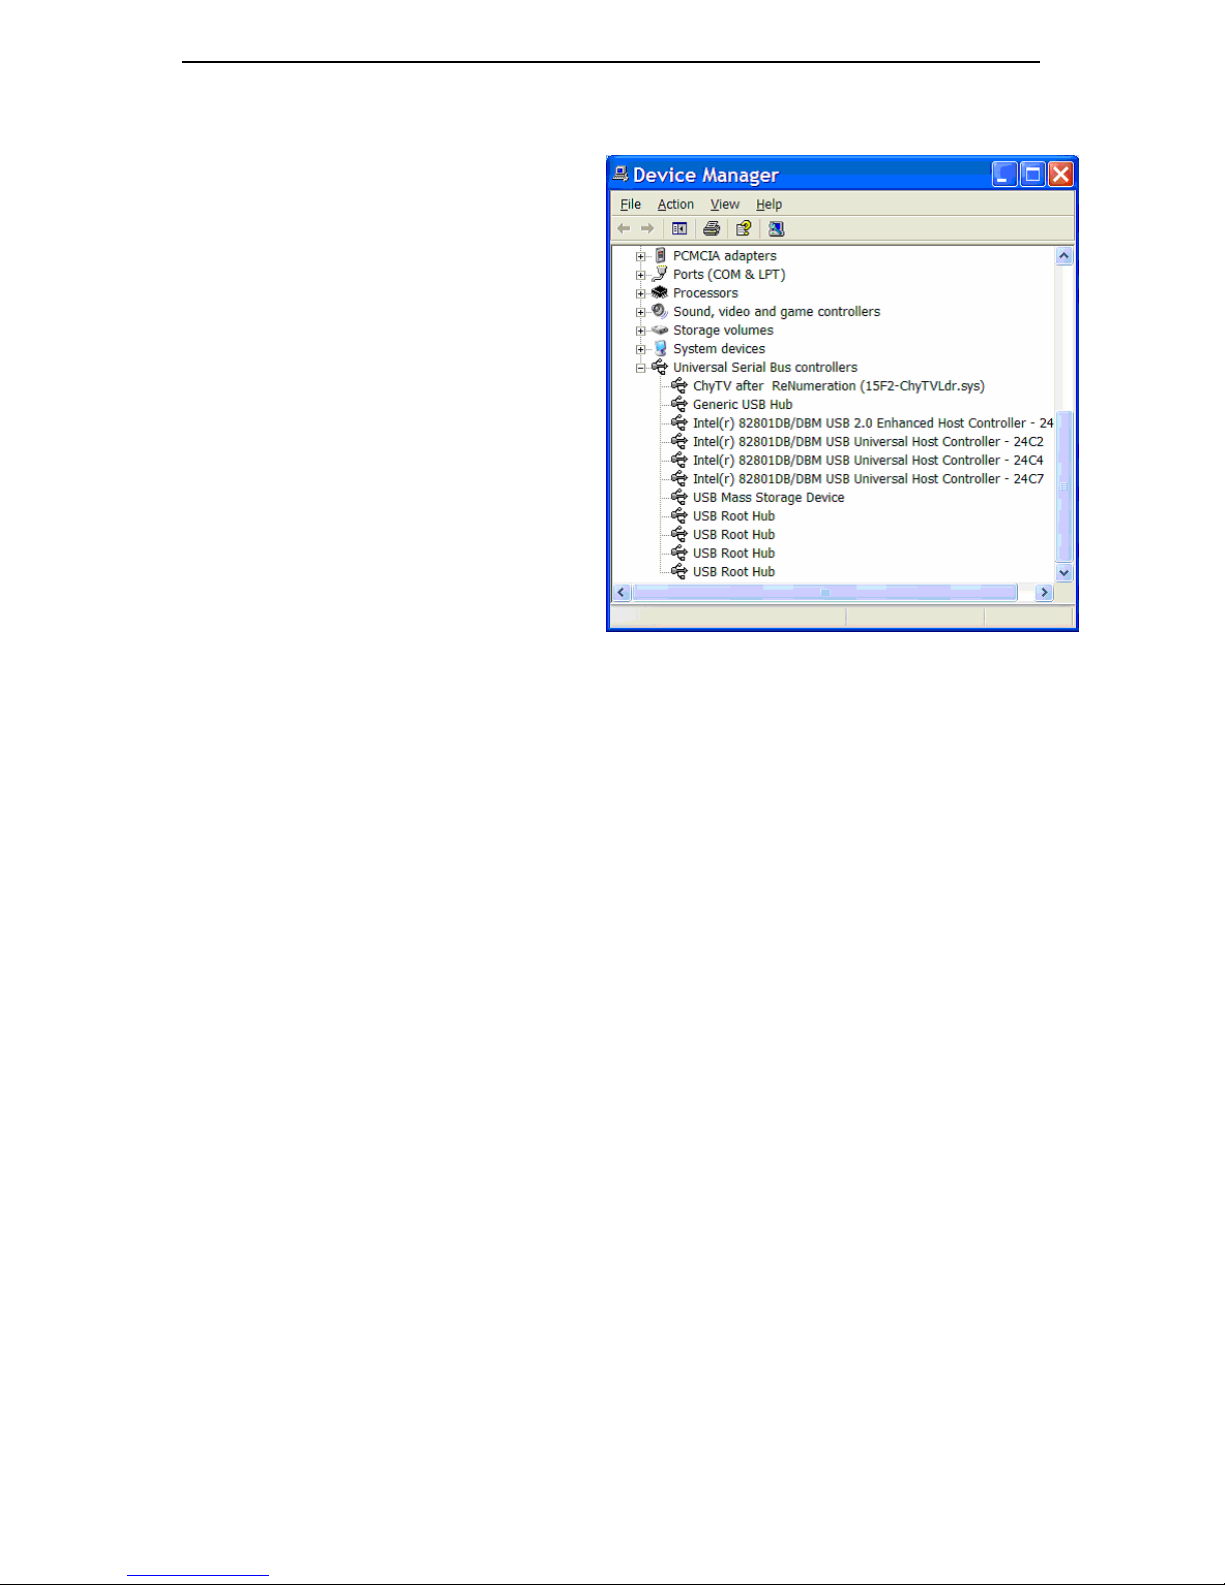
The ChyTV USB driver installation can be
verified independently of ChyTV Tools.
View the Windows Device Manager by
navigating to Start> Settings> Control
Panel> System> Hardware> Device
Manager and expand the Universal Serial
Bus controllers directory. When correctly
installed and functional, the first entry in the
USB list should read:
ChyTV after ReNumeration (15F2ChyTVLdr.sys)
If this is not the case, the driver has not
been successfully installed. Do not expect
to run ChyTV Tools successfully.
5.6.1.3 USB Communication
with ChyTV Tools
When ChyTV Plus unit is running, USB commands from ChyTV Tools ut ility have a lower
priority than the ChyTV Plus unit’s executing schedule. Therefore, when the ChyTV Tools utility
is run, a command is first issued to the ChyTV Plus unit to pause the schedule.
If a schedule is running, delays may be noticeable in the ChyTV Tools interface updates.
Depending on the complexity of animations and crawls and such, there may be too little
bandwidth on the ChyTV Plus unit to process USB commands, and the application may appear
‘hung’, when in fact, it’s waiting for the command completions.
Note: To improve interface performance of the ChyTV Tools interface, always click the
Stop button to pause the running schedule whenever performing updates.
Some users may wish to use Task Manager to stop the ChyTV Tools application if the response
time is taking particularly long. This is OK, however it may be necessary to unplug the USB cable
for Windows to complete terminating the application.
5.7 Manually Installing ChyTV Elements
Note: Normally, ChyTV Elements is installed automatically during ChyTV Tools installation. It
may be necessary to install ChyTV Elements manually if the automatic install ation was
unsuccessful, which can occur if PowerPoint’s security level is set to High.
5.7.1 Adding the Elements Add -In to PowerPoint
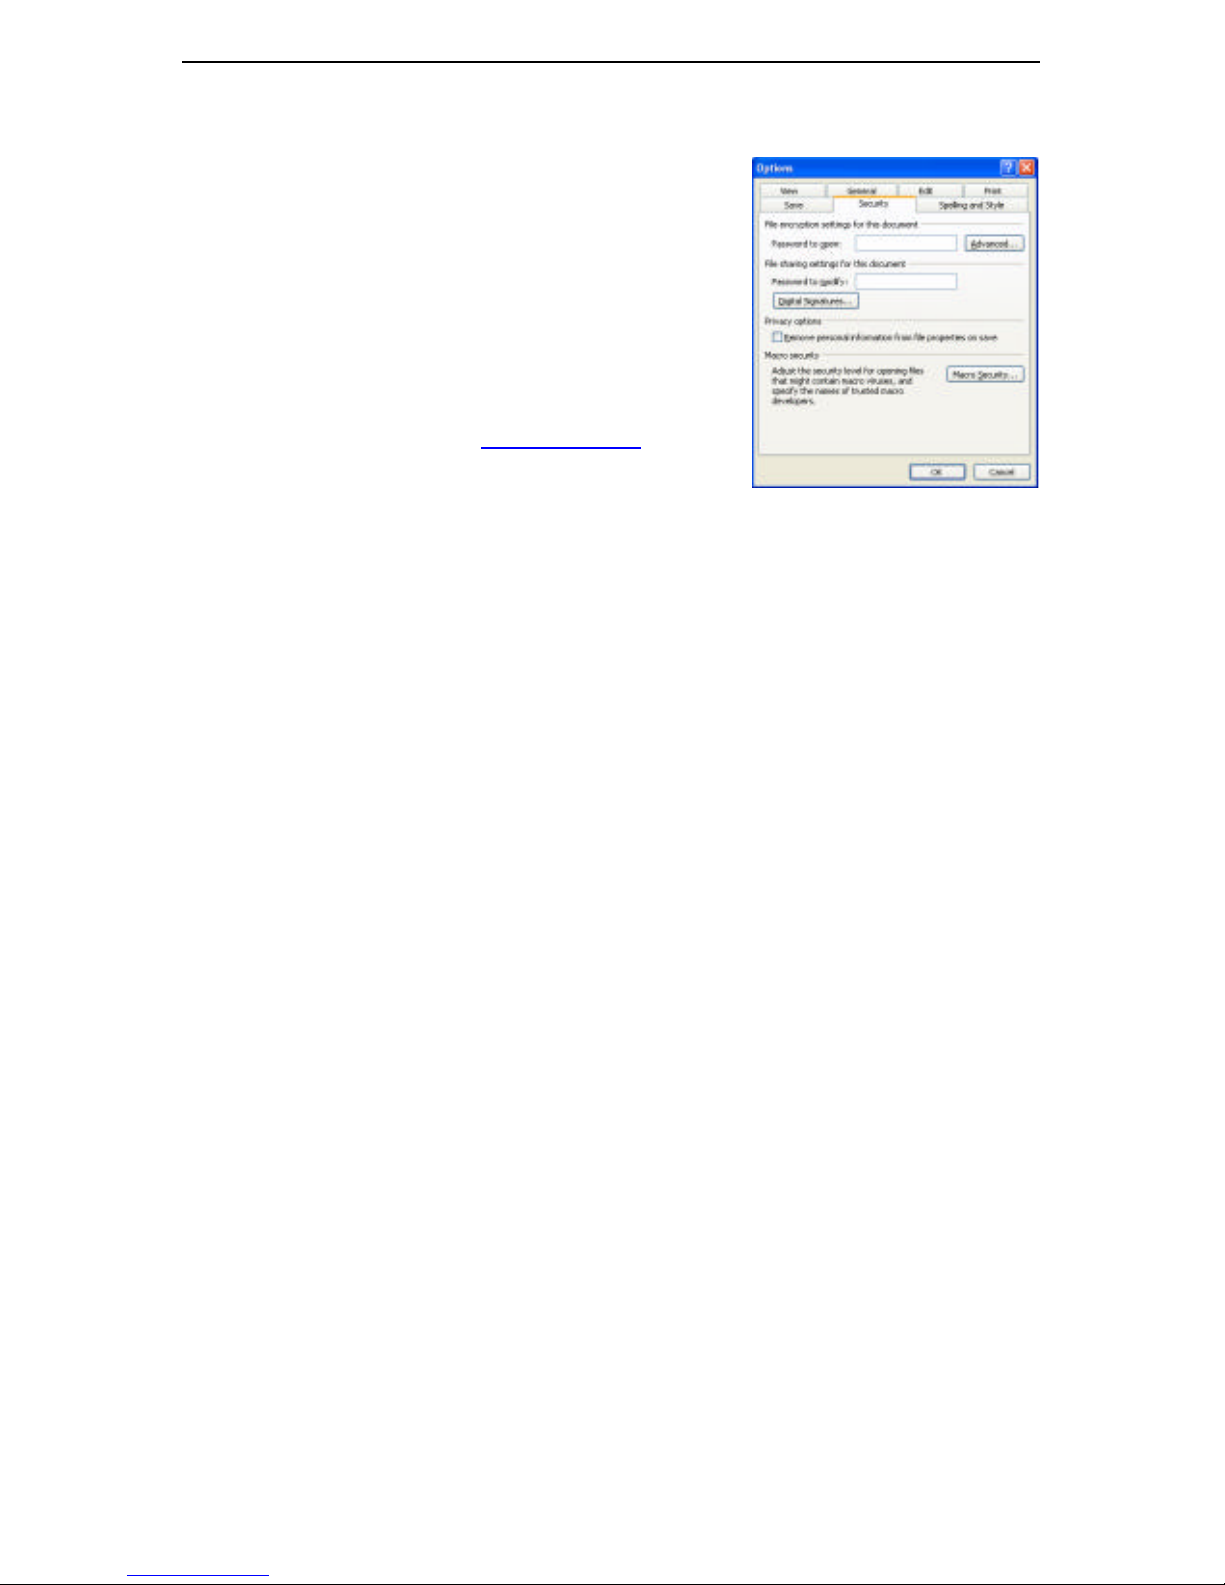
1. From the PowerPoint Tools menu, select Options…. In the Security tab, click on the
Macro Security button. On older PowerPoint versions this may be found under menu item
Tools> Macros> Security…
2. In the Security Level tab, select Medium. Click OK.
Windows XP Device Manager
Page 34
5 PC SOFTWARE INSTALLATION
28
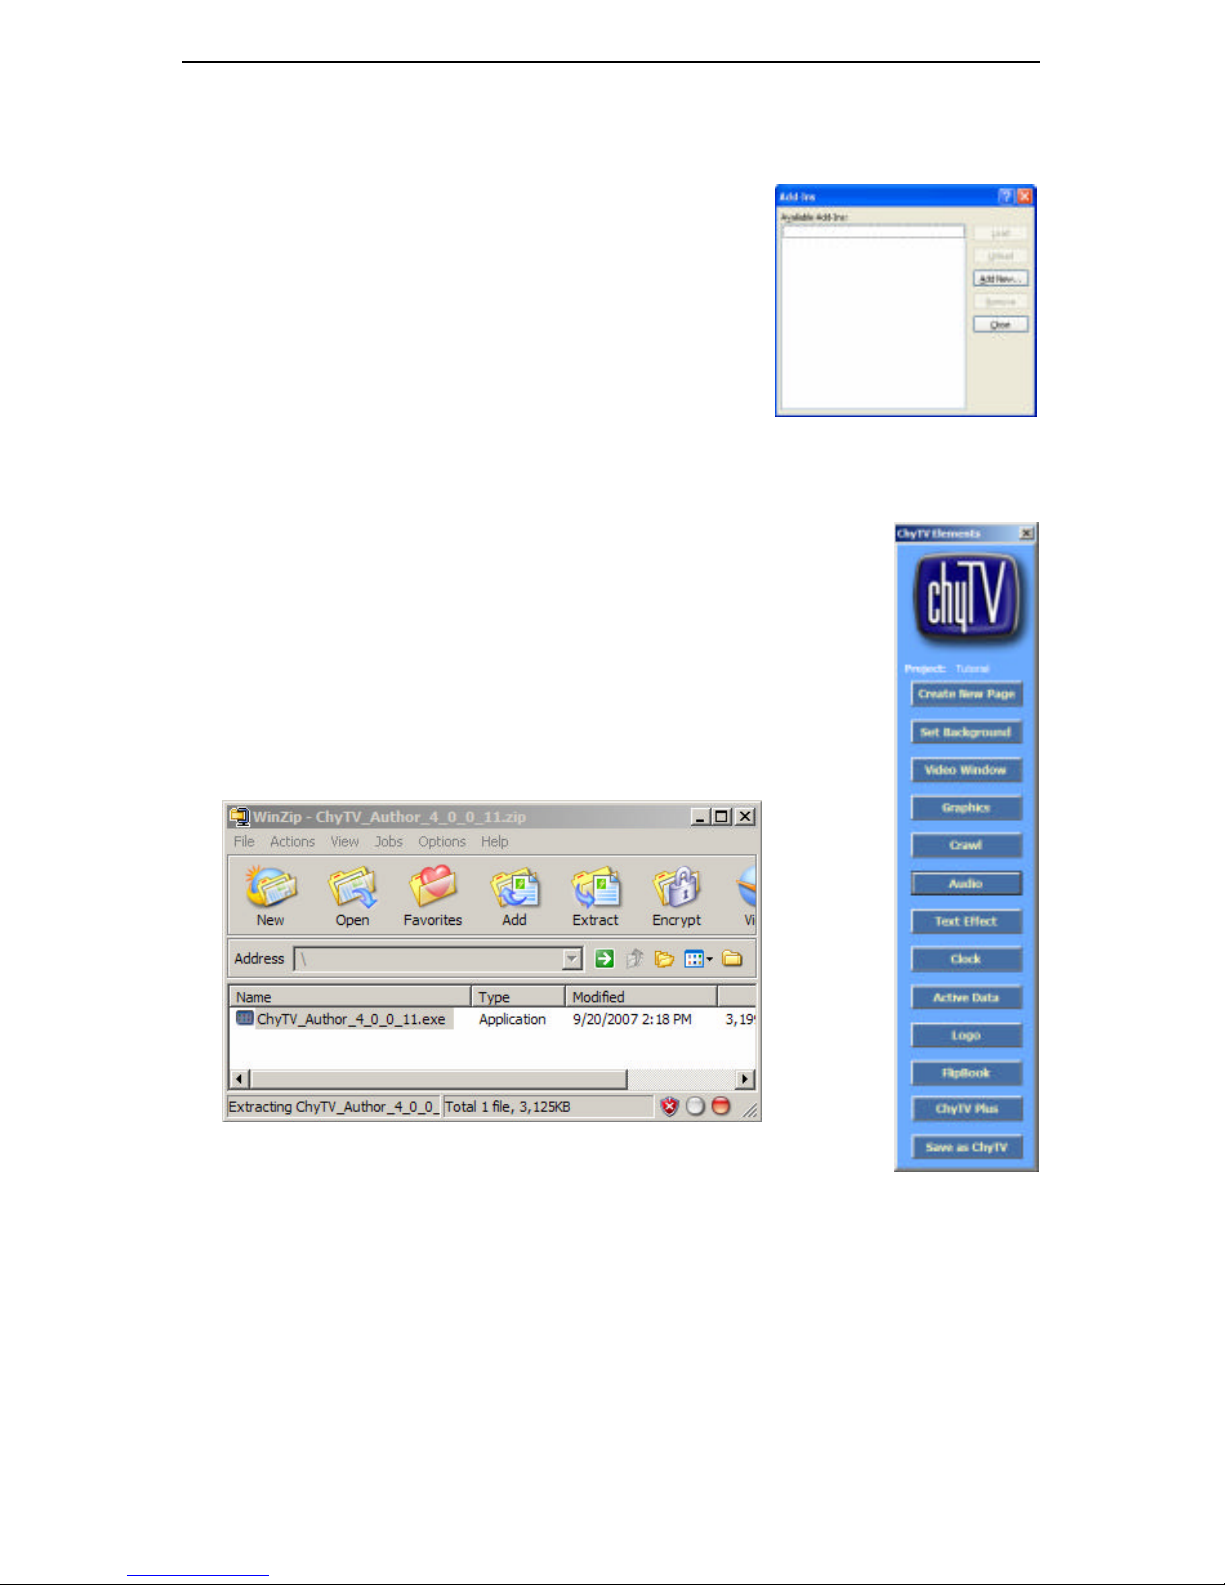
3. From the PowerPoint Tools menu, select Add-Ins….
4. If you are updating to a newer version of the Elements add-in, select the existing ChyTV Add-
In then click Remove. There should be no instances of the
ChyTV Add -In left in the Add-Ins list.
5. Click Add New…
6. Browse to the location of the Elements Add-in file,
ChyTV.ppa. Typically the file is located in C:\Program
Files\ ChyTV\ChyTV Tools.
7. Select the ChyTV.ppa file then click OK.
8. You will be prompted about the security of enabling
macros. Enabling macros is REQUIRED to load the
ChyTV Elements Add-in. Be sure to click Enable Macros!
9. Close the Add-in Menu. You should now see the ChyTV Elements
menu.
To display the ChyTV Elements add-in at any time, select ChyTV
Elements from the PowerPoint Tools menu.
5.8 Installing ChyTV Author
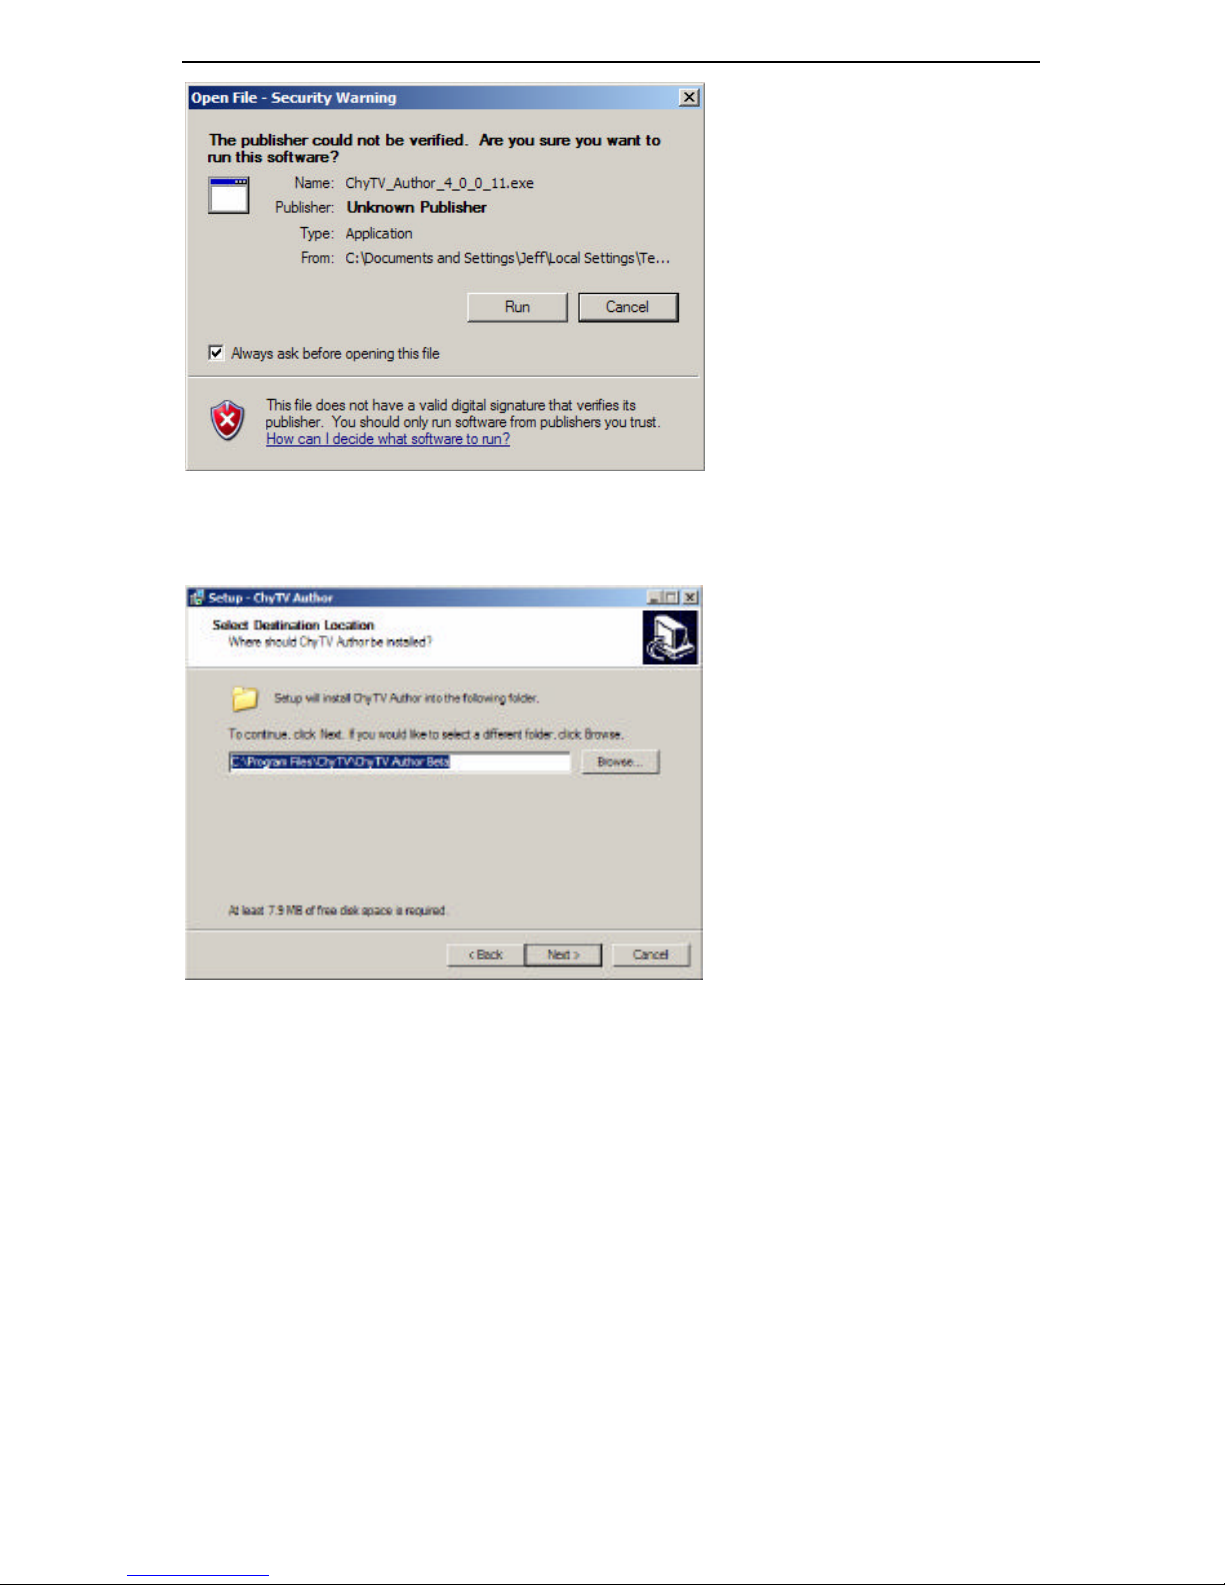
1. Double-click the ChyTV Author .exe installation file to launch the
installer. Follow the instructions in each screen to perform the
installation.
2. First, a warning is displayed. Click Run to proceed with the installation.
PowerPoint Add-Ins List
ChyTV
Elements Menu
Page 35
5 PC SOFTWARE INSTALLATION
29
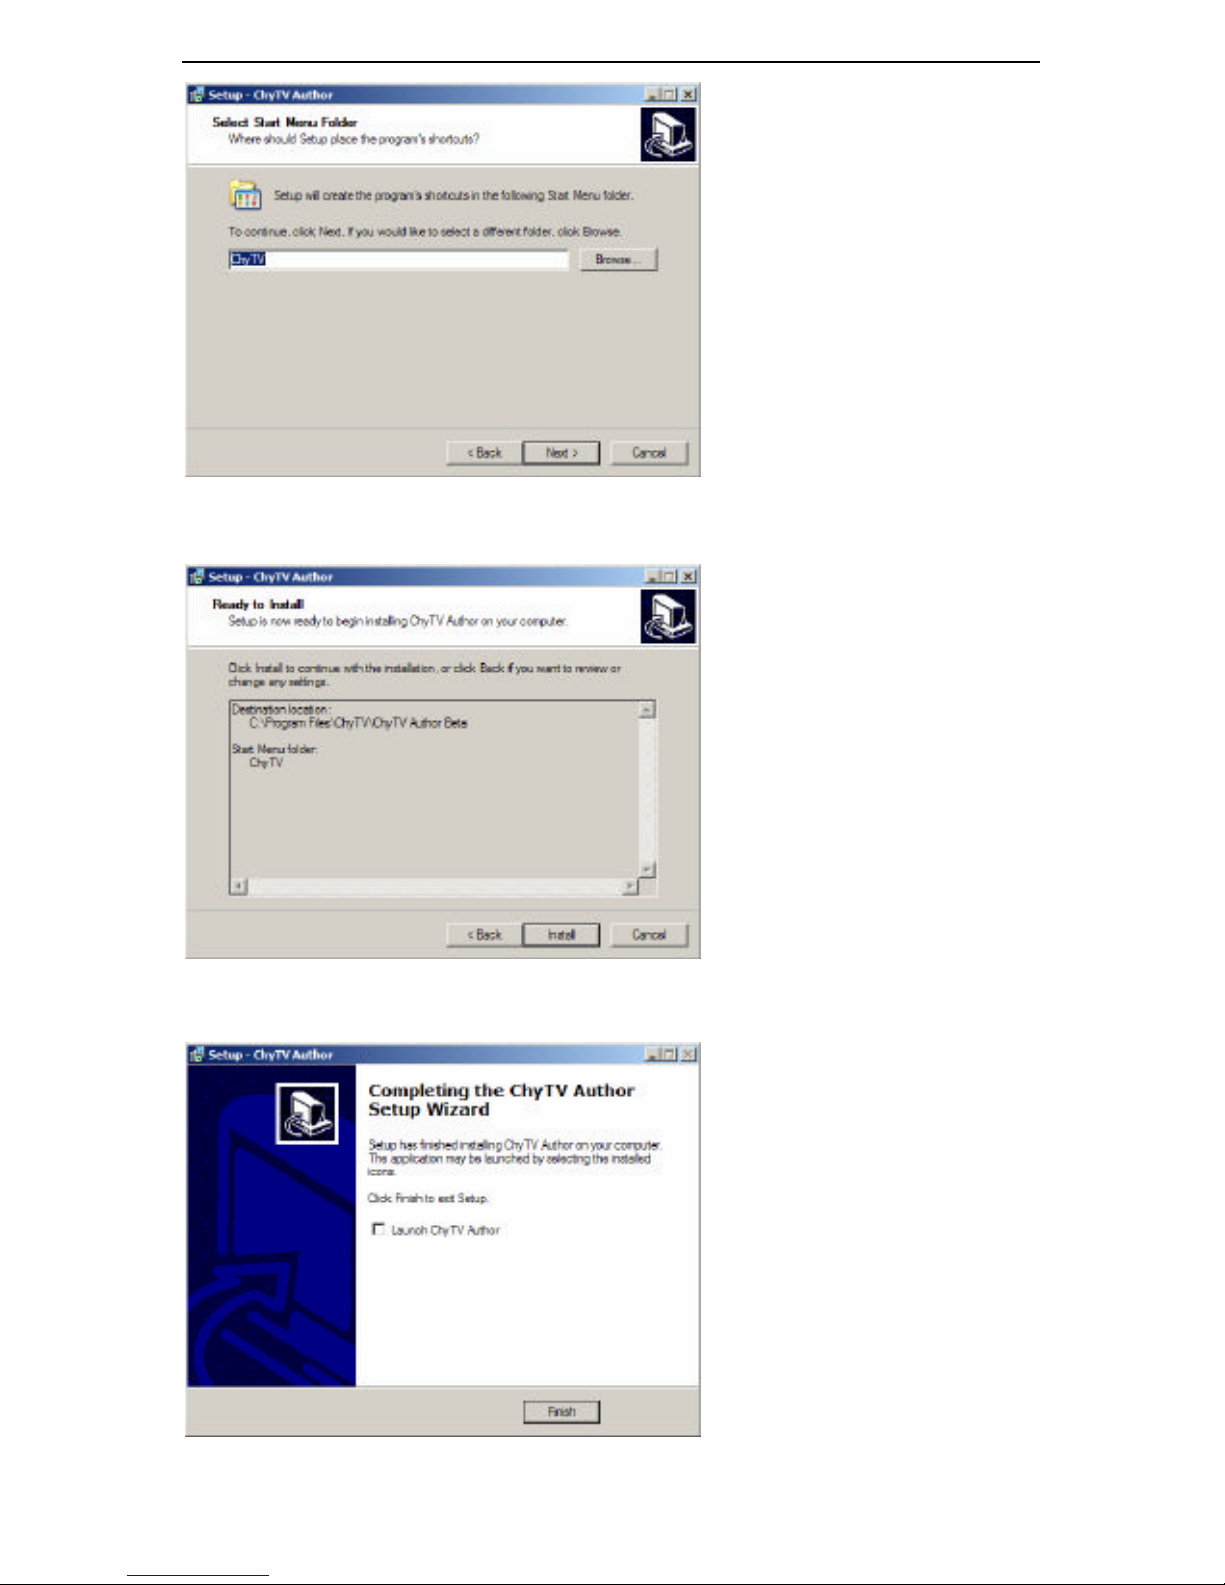
3. The Destination Location is the folder (directory) where the ChyTV Author application will
be installed. Use the folder that is shown, or click Browse to select a different folder. When
selection is complete, click Next.
4. The next step creates a shortcut to ChyTV Author in the specified Start menu folder. Use the
folder that is shown, or click Browse to select a different folder. When selection is complete,
click Next.
Page 36
5 PC SOFTWARE INSTALLATION
30
5. You are now asked to confirm the install information entered. Click Install to proceed with
the installation.
6. A progress page is diplayed as the program files are copied to your PC. A window is
displayed after the program is successfully installed. Click Finish to exit the install program.
Page 37

6 CHYTV OVERVIEW
31
6 ChyTV Overview
This section provides an overview of how the ChyTV system works, how content is created and
describes the elements used to create pages for display.
6.1 How ChyTV Works
ChyTV is a stand -alone device that outputs video and audio as defined by pages stored in the
unit’s CF (compact flash) card. These pages are basically scripts that tell the ChyTV Image
Engine where to place graphics, text and data as well as the video and audio connected to the
unit’s inputs.
Pages draw their content from data that is also stored in the unit’s on-board memory. The types of
data that can be used in a page are:
§ Typed text
§ Text from a file
§ Text as Active Data
§ Still images
§ Animated images
§ Audio
§ Video Clips (HD 100 / HD 150 only)
A schedule or playlist displays the stored pages sequentially according to the duration, date and
time defined for each page. Pages can be set to display for a specific length of time and only
during certain hours or days.
The ChyTV unit must be connected to a PC by USB or Ethernet in order to add or update pages,
data and the schedule stored in the unit’s on-board memory. Program data can also be copied
directly to a unit’s CF card using a Compact Flash Reader/Writer. Once the unit’s CF card is
updated, the unit can remain connected to the PC for real-time updates or disconnected for stand alone operation.
6.2 How Pages are Created
6.2.1 Page Elements
Text, images and audio elements used in ChyTV pages can be created using imaging and sound
applications or obtained from sources such as the Internet, clip art disks or sound effects disks.
Text for display can be typed directly onto a page or referenced as a file or Active Data. Typed
text is also used to create special tags , which access the advanced features of the ChyTV Image
Engine.
Text files used as data can be created and edited using Windows Notepad, Microsoft Word or
other word processing applications. The file must be saved in generic text (.txt) format.
Text used as Active Data is typed into Active Data Slots using the ChyTV Tools application.
Still images can be JPEG (.jpg), GIF (.gif), Windows Bitmap (.bmp), PNG (.png) or the ChyTV
Logo format (.ctl). The PNG and ChyTV Logo formats support alpha channels, or transparency.
Animated images can be GIF (.gif) or the ChyTV Flipbook format (.ctf) converted from Targa
Sequences, AVI and other animation formats.
Page 38
6 CHYTV OVERVIEW
32
Video Clips (HD100 only) can be AVI (.avi), Quicktime (.mov), RealPlayer, or MPEG format
(.mpg).
Live Video can be displayed full screen or as a “Squeeze-back” on ChyTV units that support
video inputs.
Audio must be Wave format (.wav) saved as 44.1KHz, 16-bit stereo.
6.2.2 Pages
To create pages for display on ChyTV, either ChyTV Author or Microsoft PowerPoint may be
used. ChyTV Author is a stand -alone page composition application that creates pages in native
ChyTV format for scheduling by the ChyTV Tools application. PowerPoint is industry-standard
presentation software that is used to create slides in HTML format that are converted into pages by
the ChyTV Tools application.
PowerPoint is designed to create presentations for display on monitors with the same resolution
(dots per inch) and aspect ratio (shape) as TV monitors. It also has the ability to store pages in
HTML (web page) format, which can be imported into the ChyTV Tools application. Using
PowerPoint, images, text and tags are placed on a slide, which is then saved as HTML for
conversion and scheduling by the ChyTV Tools application.
ChyTV Author is designed to create pages by placing page elements on a stage and setting their
display parameters using prompts and pull-down menus. The pages are saved as native .ctv page
files which are then scheduled using the ChyTV Tools application.
6.3 How Pages are Programmed for Display
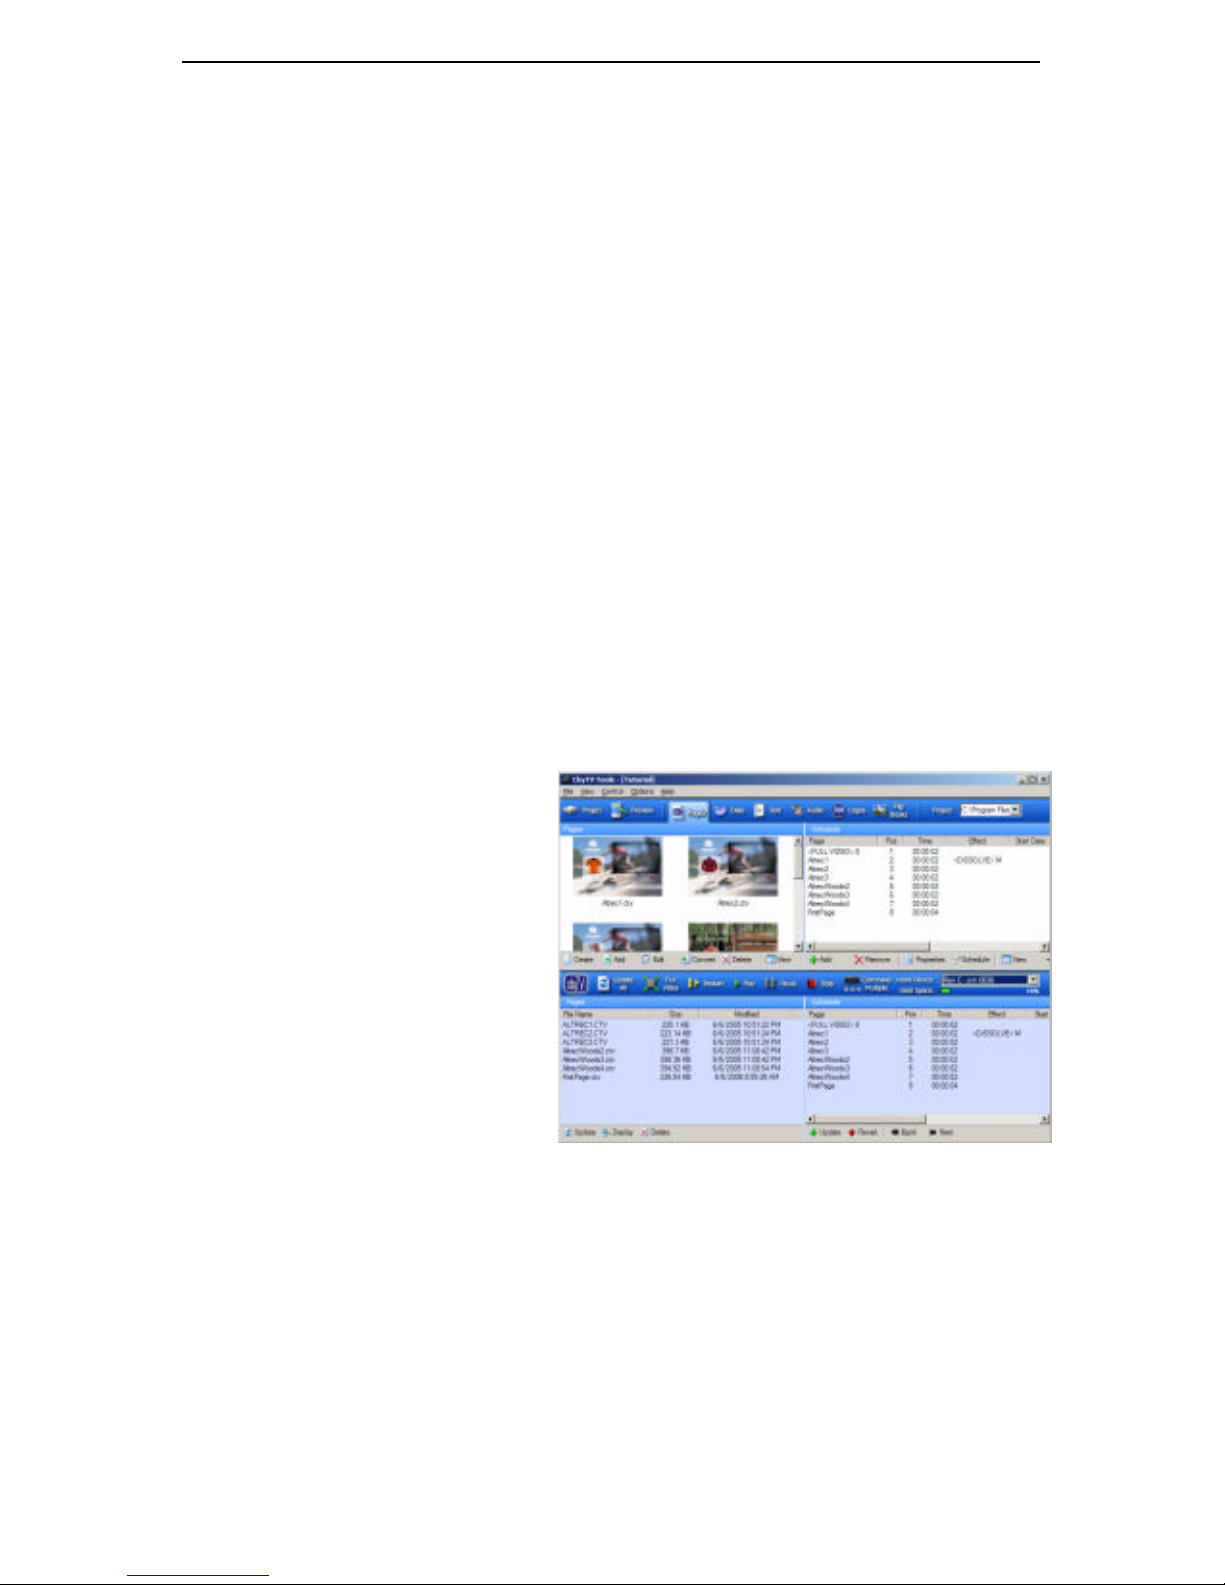
Pages and their linked elements are
organized and scheduled for display
using the ChyTV Tools application.
ChyTV Tools provides these
functions:
§ Creates and manages projects on
the PC for downloading to the
ChyTV hardware.
§ Imports and organizes elements
referenced by page elements in
ChyTV pages. These elements
include text files, active data,
video clips, audio files, “logos”
and “flipbook” animations.
§ Imports and converts pages from
PowerPoint HTML (.htm) format
to native ChyTV (.ctv) format.
§ Configures the page schedule and allows reordering of the schedule and setting of page
display duration, page transitions, and date and time options.
§ Uploads and downloads pages, elements and the schedule between the PC and the ChyTV on-
board memory.
6.4 How Projects are Organized and Stored
By default, ChyTV projects are stored in project folders under the Projects directory in the
ChyTV Tools folder located in the ChyTV folder that was created during installation. In most
ChyTV Tools application
Page 39
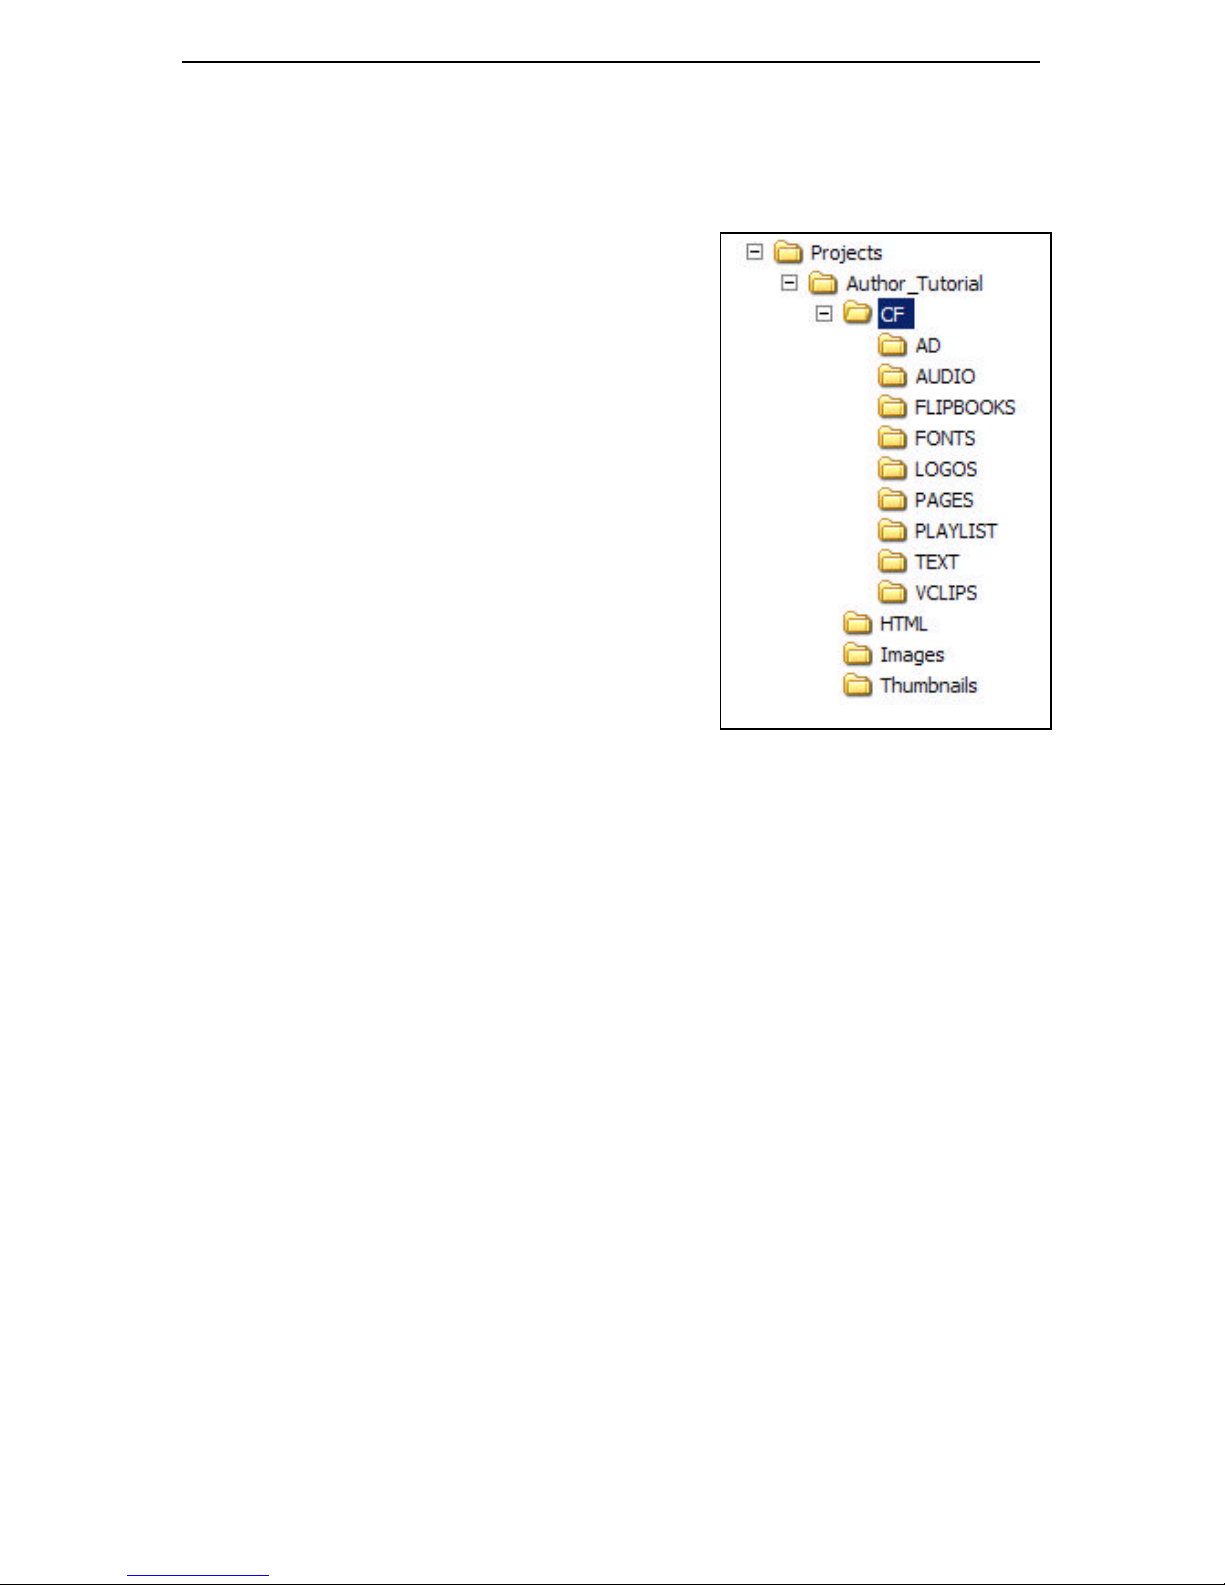
6 CHYTV OVERVIEW
33
cases, the ChyTV folder is in the Program Files directory of your C: drive. As long as the
contents of a project folder remain intact, it can be stored anywhere on your PC.
The following file list shows the folders in the ChyTV directory created during installation. The
Projects folder contains two projects, Author_Tutorial and Tutorial.
Important: ChyTV Tools requires that the folders
contained in a particular project folder have specific names
and folder hierarchies (eg. CF, HTML, Images,
Thumbnails). Do not rename or move these folders. Entire
project folders may be duplicated and renamed to create
new projects, if desired.
The following sections describe the folders and files stored
in the Author Tutorial project folder, included with
ChyTV Tools:
6.4.1 CF Folder
The CF folder contains all of the items that will be
downloaded to ChyTV’s on-board memory or CF card
during an update. This includes ChyTV pages and their
elements, and the Schedule that directs how the pages are
displayed by ChyTV.
The AD (Active Data), AUDIO, FLIPBOOKS, LOGOS ,
TEXT and VCLIPS folders contain the page elements
required by the ChyTV pages during real-time playback.
These files are typically referenced from page elements in the pages.
The PAGES folder contains the converted ChyTV pages for display, stored in .CTV format.
The PLAYLIST folder contains the schedule for displaying pages stored in the PAGES folder.
6.4.2 HTML Folder
The HTML folder contains the PowerPoint slides and support files that are imported into ChyTV
Tools to create ChyTV .ctv pages. These source files are used by PowerPoint and ChyTV Tools
only during the HTML to .ctv page conversion process and are not downloaded to ChyTV’s CF
card. The HTML folder is not used by ChyTV Author.
6.4.3 Images Folder
The Images folder contains the still images used to compose ChyTV pages in ChyTV Author
and PowerPoint. These images are embedded in the .CTV pages during conversion, and therefore
are not downloaded to ChyTV’s on-board memory.
6.4.4 Thumbnail Folder
This folder is used by ChyTV Tools to store and cache page and image thumbnails. It is not
downloaded to ChyTV’s on -board memory.
ChyTV Program Directory
Page 40

6 CHYTV OVERVIEW
34
6.5 Creating and Displaying Pages on ChyTV
6.5.1 Page Elements
This section describes the various page elements that are used to create pages for display on
ChyTV. References are made to objects used in PowerPoint. If you are unfamiliar with using
PowerPoint, a step-by-step tutorial on creating pages follows this chapter.
6.5.1.1 Text
Basic text for display on a page is typed directly into a Text Box using Insert>Text Box in
PowerPoint or by using the “Create Text Tag” dialog in ChyTV Author.
6.5.1.2 Images
6.5.1.2.1 Background Images
Images that cover the entire background of a page are added using Format>Background in
PowerPoint. In ChyTV Author, background images are added using the Insert>New Background
or by clicking the Background button.
6.5.1.2.2 Placed Images
Images for display on a page are placed using Insert>Picture in PowerPoint. In ChyTV Author,
images are placed on the stage using Insert>New Graphic Tag or by clicking the Graphic button.
6.5.1.3 Tags
Note: In ChyTV Author, “Tags” are individual page elements placed on the stage. The text-based
tags described below are defined for each page element using prompts and pull-down menus, and
are not visible to the user when composing pages. Understanding how tags work, however, is
central to understanding how pages are displayed by the ChyTV hardware.
Note: When using PowerPoint to compose pages, the ChyTV Elements Add-In for PowerPoint
automates the creation of tags, as can be seen in the Chapter 8 PowerPoint Quick Start Tutorial.
Tags are specially formatted text that is interpreted by the ChyTV Image Engine as an instruction.
When using PowerPoint to compose pages, Tags are typed into a Text Box and are always
enclosed by left and right angle brackets (< >). For example, one of the simplest tags is:
<VIDEO>
When the Image Engine encounters this tag in a Text Box, it knows not to display the word
“VIDEO”, but instead to use the Text Box boundaries as the area for displaying the video content
connected to ChyTV’s video input.
Value Parameters are used to define the value for a specific feature of a tag. Each value
parameter is enclosed in curly brackets ({ }) and placed after the tag it is defining. For example:
<VIDEO>{B}{ST 5}
tells the Image Engine that the video’s Key Value is Black {B} and that text or graphics placed
over the video will be at 50% transparency {ST 5}. Value Parameters will be revisited in the
Tutorial and Reference sections following this chapter.
Font, color and justification of text created by a tag are determined by the font style, color
and justification of the text that the tag is typed in.
Page 41

6 CHYTV OVERVIEW
35
The positioning and extents of text, images and video created by the Image Engine are
determined by the border of the Text Box that the tag is typed in. Tags in Text Boxes are discussed
further in the PowerPoint tutorial following this chapter.
6.5.1.3.1 Tags with text as a file
The <Crawl> tag references text saved as a text (.txt) file. For example:
<Crawl>Todays_Specials.txt
causes the text saved in Todays_Specials.txt to “tickertape” or scroll across the area inside the
Crawl tag’s Text Box.
6.5.1.3.2 Tags with text as Active Data
ChyTV reserves 1000 “data slots” in memory to hold text that can be referenced by tags. Each slot
can hold up to 512 characters of text, including spaces.
Active data is useful for setting up generic pages that reference text in specific data slots, then
updating the data in those slots to change the text being displayed by the pages. For example:
<AD 1>{EF 3,S,1}
displays the text stored in data slot 1. The EF value parameter causes the text to slide up (Effect 3)
at a slow rate (S). The last “1” in the tag parameters refers to the tag’s display priority in a page
with more than one Active Data tag, when the Staggered Display parameter {S} is used.
6.5.1.3.3 Tags with an image as a Active Data
Data slots can also be used to store the filenames of Logo (.ctl) or FlipBook (.ctf) files referenced
by tags. The data type of the Active Data slot must be changed in order to do this.
Please refer to section 9.4.2 for more information about using Active Data Slots.
6.6 Storing and Referencing Data
Text, images and video that are displayed in ChyTV pages can be stored and referenced in a
variety of ways according to how they will be used in your signage. In some cases you have a
choice of where the data is stored and how it is referenced in a page. This section explains those
methods and the pros and cons of each.
6.6.1 Embedding
Embedding means that text or graphics placed in a page are actually stored in the native ChyTV
page file. This is the simplest way of adding text and graphics to a page and is useful when
creating “template” pages with graphics and text that will distributed widely, as no additional files
need to be distributed with the .ctv page file.
The disadvantage of embedding text and images is that the page file size increases as more images
and text are added and the page itself must be edited to update an embedded graphic or text tag.
6.6.2 File Referencing
File Referencing refers to text, audio and video in a page that are referenced by filename. When
the tag is placed on a page, a File: parameter is used to “point” to the file that will be displayed in
the page.
With file referencing, when the file referenced by a page is updated, the data displayed by the page
is updated as well, with no changes to the native .ctv page. Another advantage is that the file’s data
is not stored in the .ctv file and therefore does not add to the page’s file size.
Page 42

6 CHYTV OVERVIEW
36
A disadvantage of file referencing is that files pointed to by a page must be present in the
referenced file location or they will not be displayed.
6.6.3 Active Data
Active Data provides a method of both storing and referencing data that is most useful for pages
that are updated frequently and in real time.
The Active Data area of a project contains 1000 “data slots” that may be used to store text, tag
parameters and file references. When adding a tag to a page, the text, image or video to be
displayed is simply referenced by pointing to the active data slot number that contains the
information needed.
Using Active Data, file references, text and page behavior for an entire project can be changed by
updating the Active Data only. As with file referencing, however, files pointed to by Active Data
must be present in the referenced file location or they will not be displayed.
Page 43
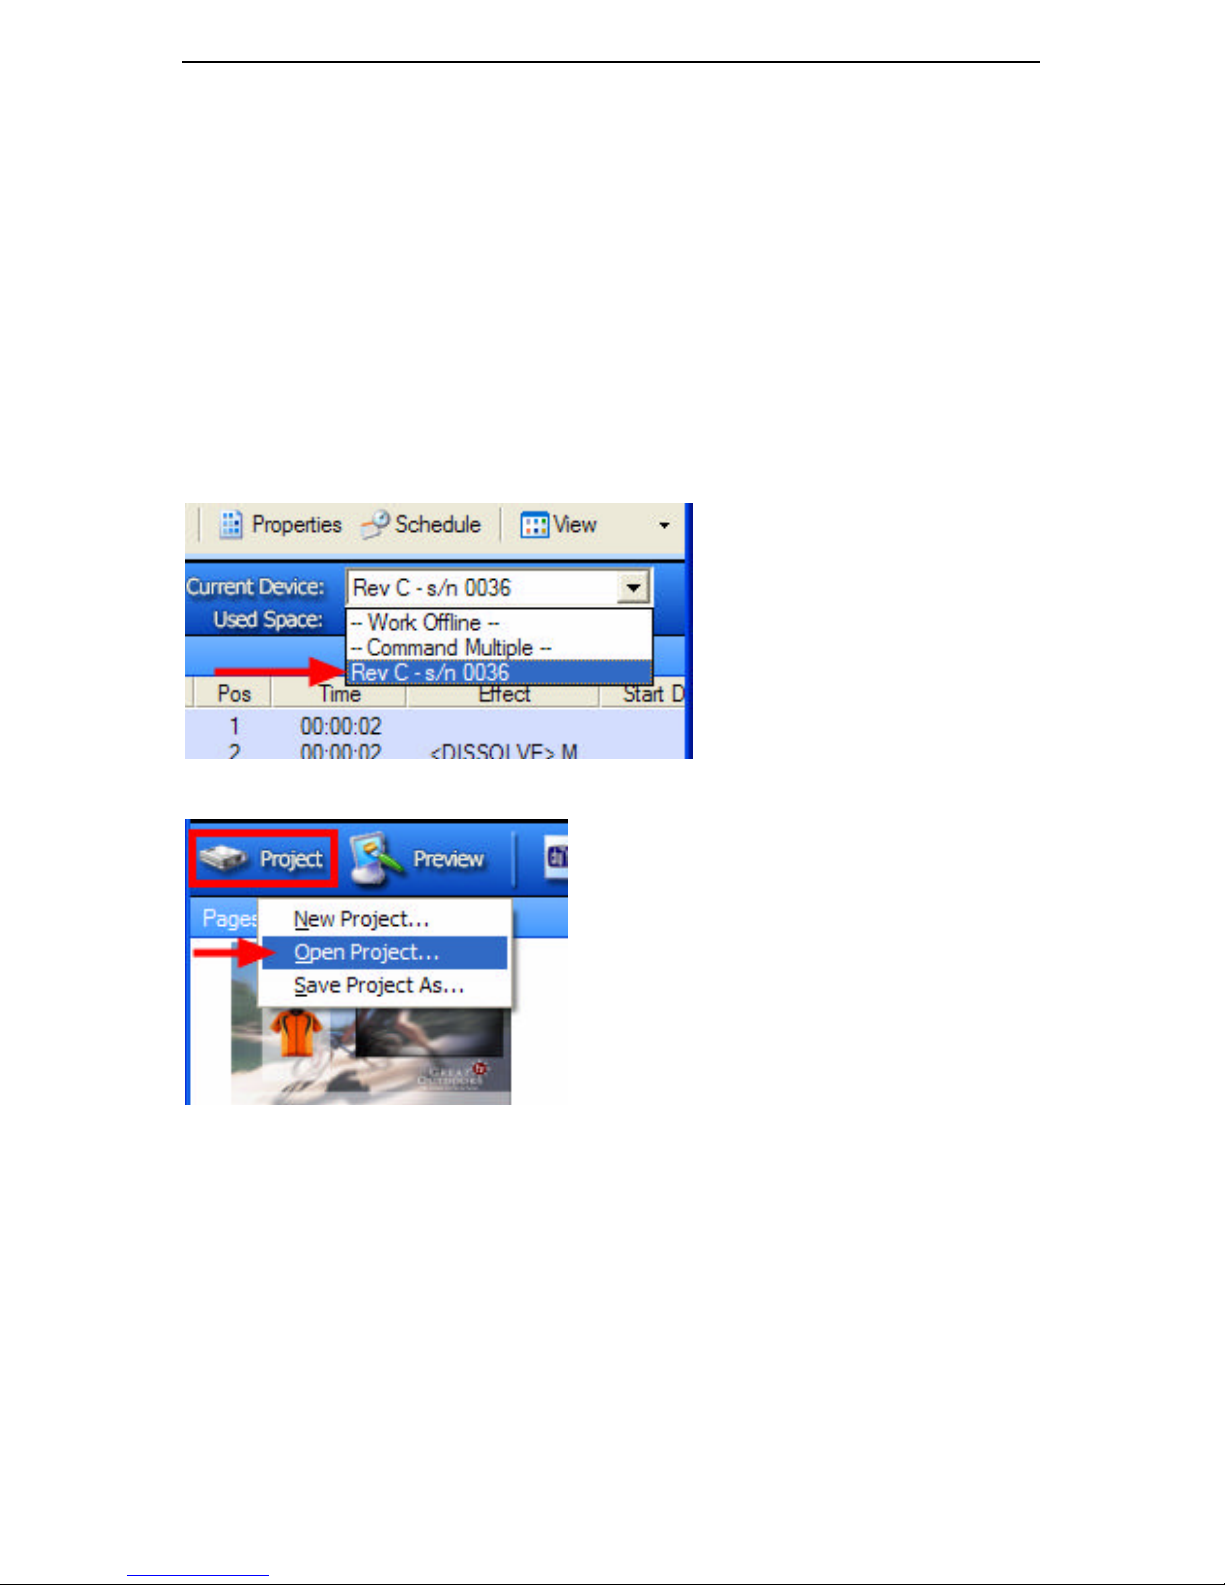
7 CHYTV AUTHOR QUICK START TUTORIAL
37
7 ChyTV Author Quick Start Tutorial
Using ChyTV Author and ChyTV Tools to create and manage your ChyTV projects is
easy. This chapter teaches you how to create a page in ChyTV Author then schedule the
page for display by ChyTV Tools. During this tutorial many common concepts are
covered that will be useful as you move to more advanced topics. Everything used in
this tutorial was included with your ChyTV Tools installation and can be found in the
ChyTV Tools / Projects folder.
7.1 Opening and Transferring a Project to the ChyTV Unit
1. Launch ChyTV Tools.
2. From the Device List pulldown, select the ChyTV unit that will be used during this tutorial.
3. Click Project and select Open Project.
4. Select the Author_Tutorial project from the file dialog box. Click OK.
The full path for the Author tutorial is C:\ Program Files \ChyTV \ ChyTV Tools \Projects
\Author_Tutorial.
Page 44
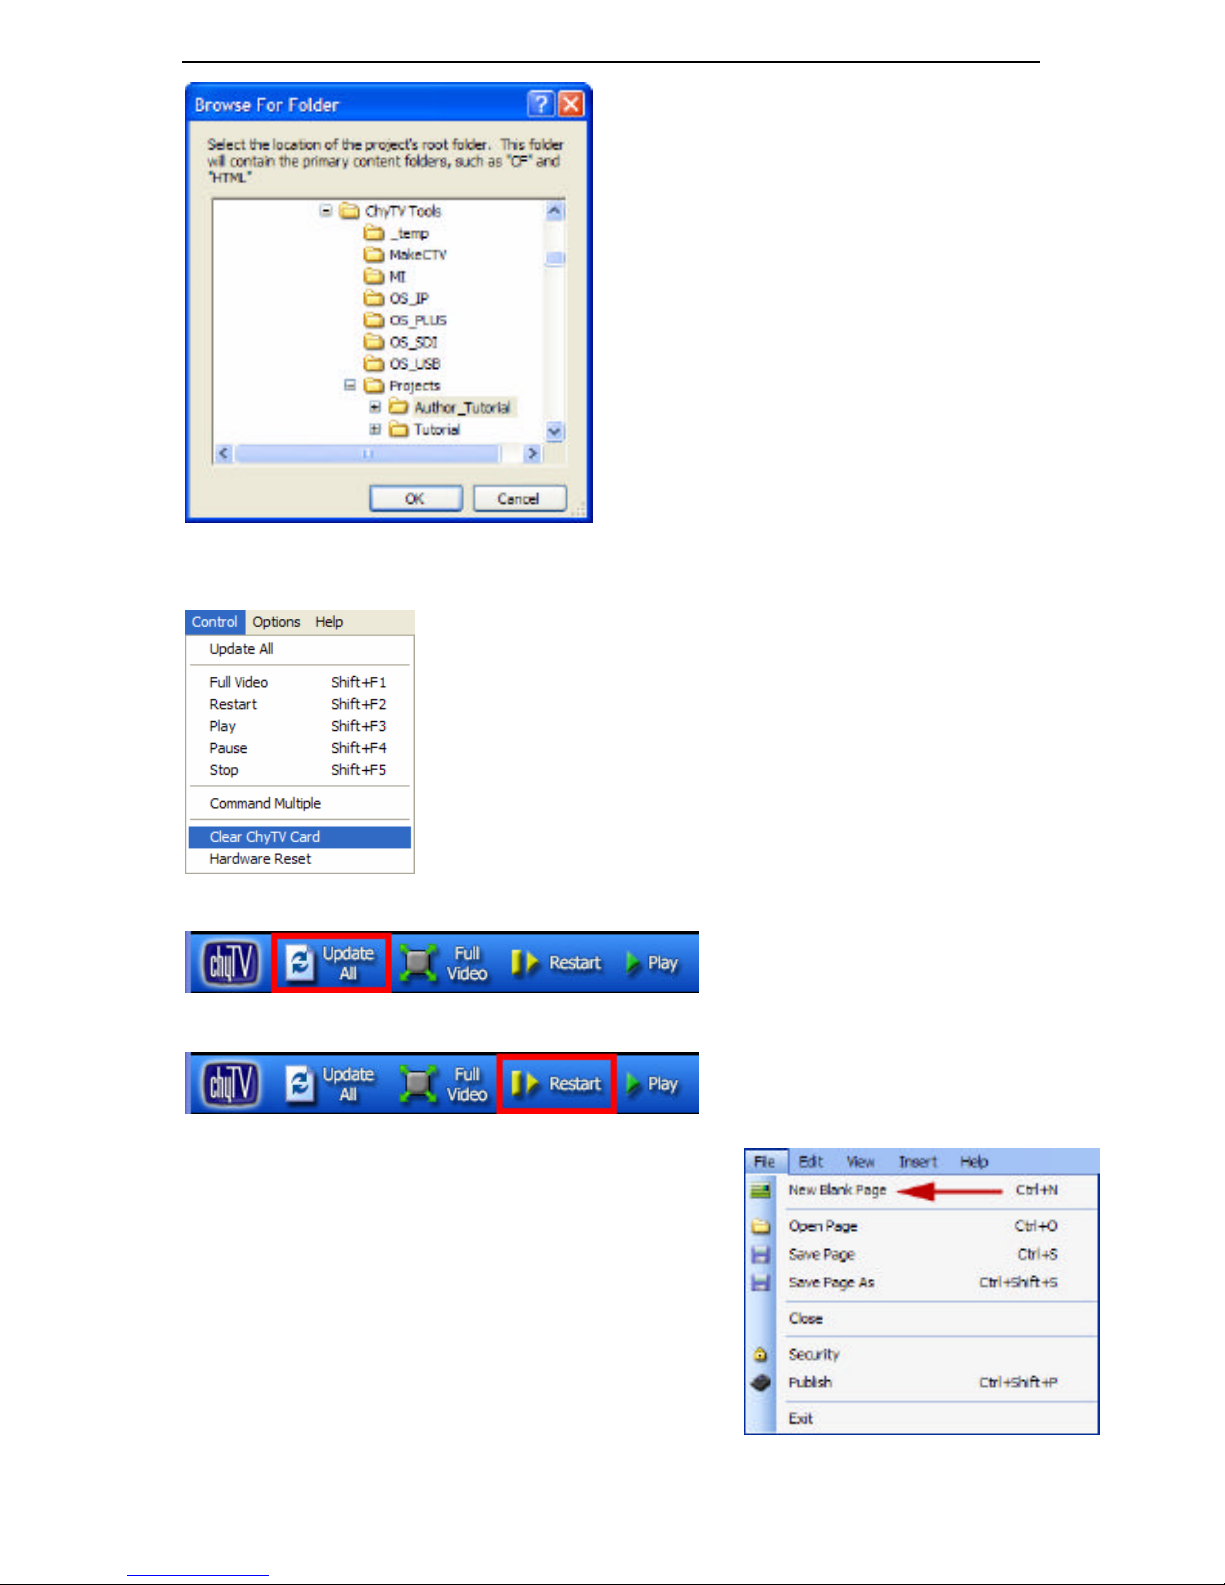
7 CHYTV AUTHOR QUICK START TUTORIAL
38
5. From the Control menu, select Clear ChyTV Card. This erases all previously stored data
on the ChyTV unit.
6. Click Update All to transfer the tutorial data to the ChyTV unit.
7. Click Restart to start the tutorial playlist.
7.2 Creating and Saving a New Page
1. Launch ChyTV Author.
2. From the File menu, select New Blank Page.
3. In the New ChyTV Page dialog box, select the video
standard and aspect ratio of the page you would like to
create. The format you select must be supported by your
ChyTV hardware.
Page 45
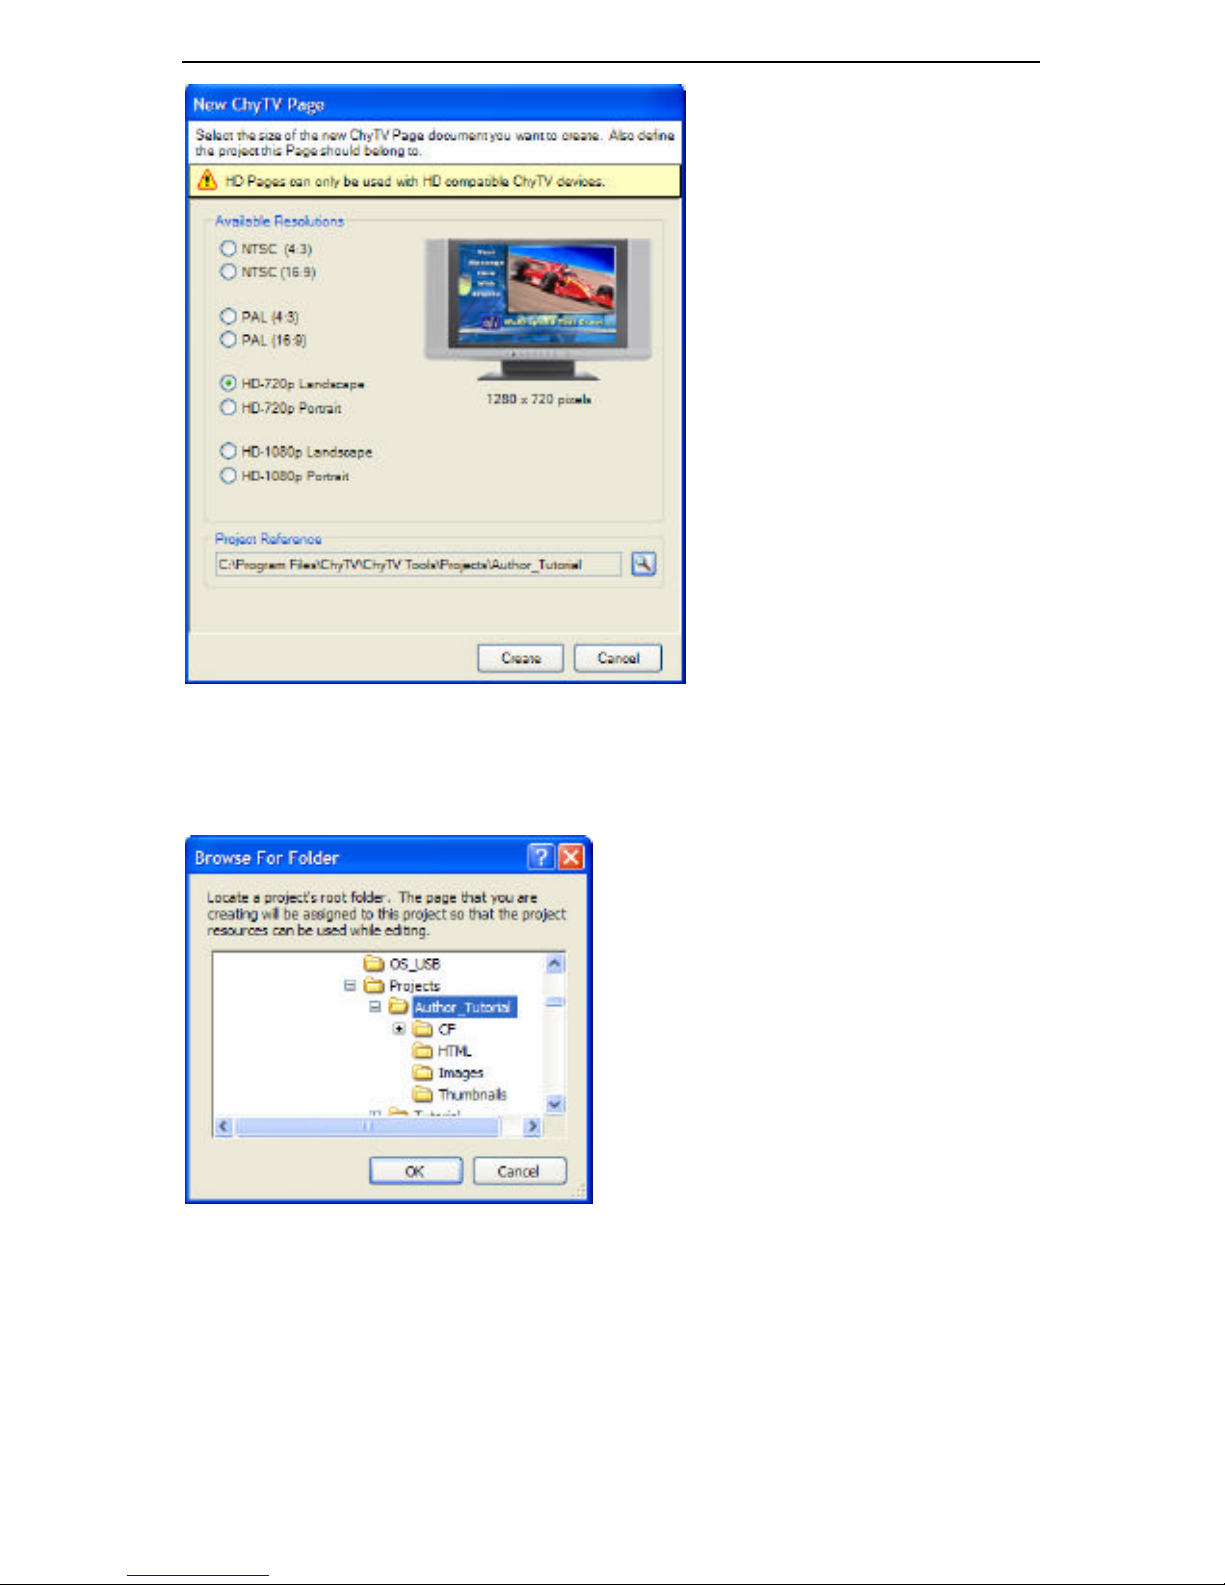
7 CHYTV AUTHOR QUICK START TUTORIAL
39
4. Click the Project Reference Magnifying Glass icon to select the project directory where
your page will be stored. The directory for the ChyTV Author tutorial is: C:\Program Files
\ChyTV \ChyTV Tools \ Projects \Author_Tutorial. Click OK to close the file window, then
click Create to create the new page.
7.3 Adding a Background Image to the New Page
1. From the Insert Menu, select New Background, or click the Background button on
Author’s toolbar.
Page 46
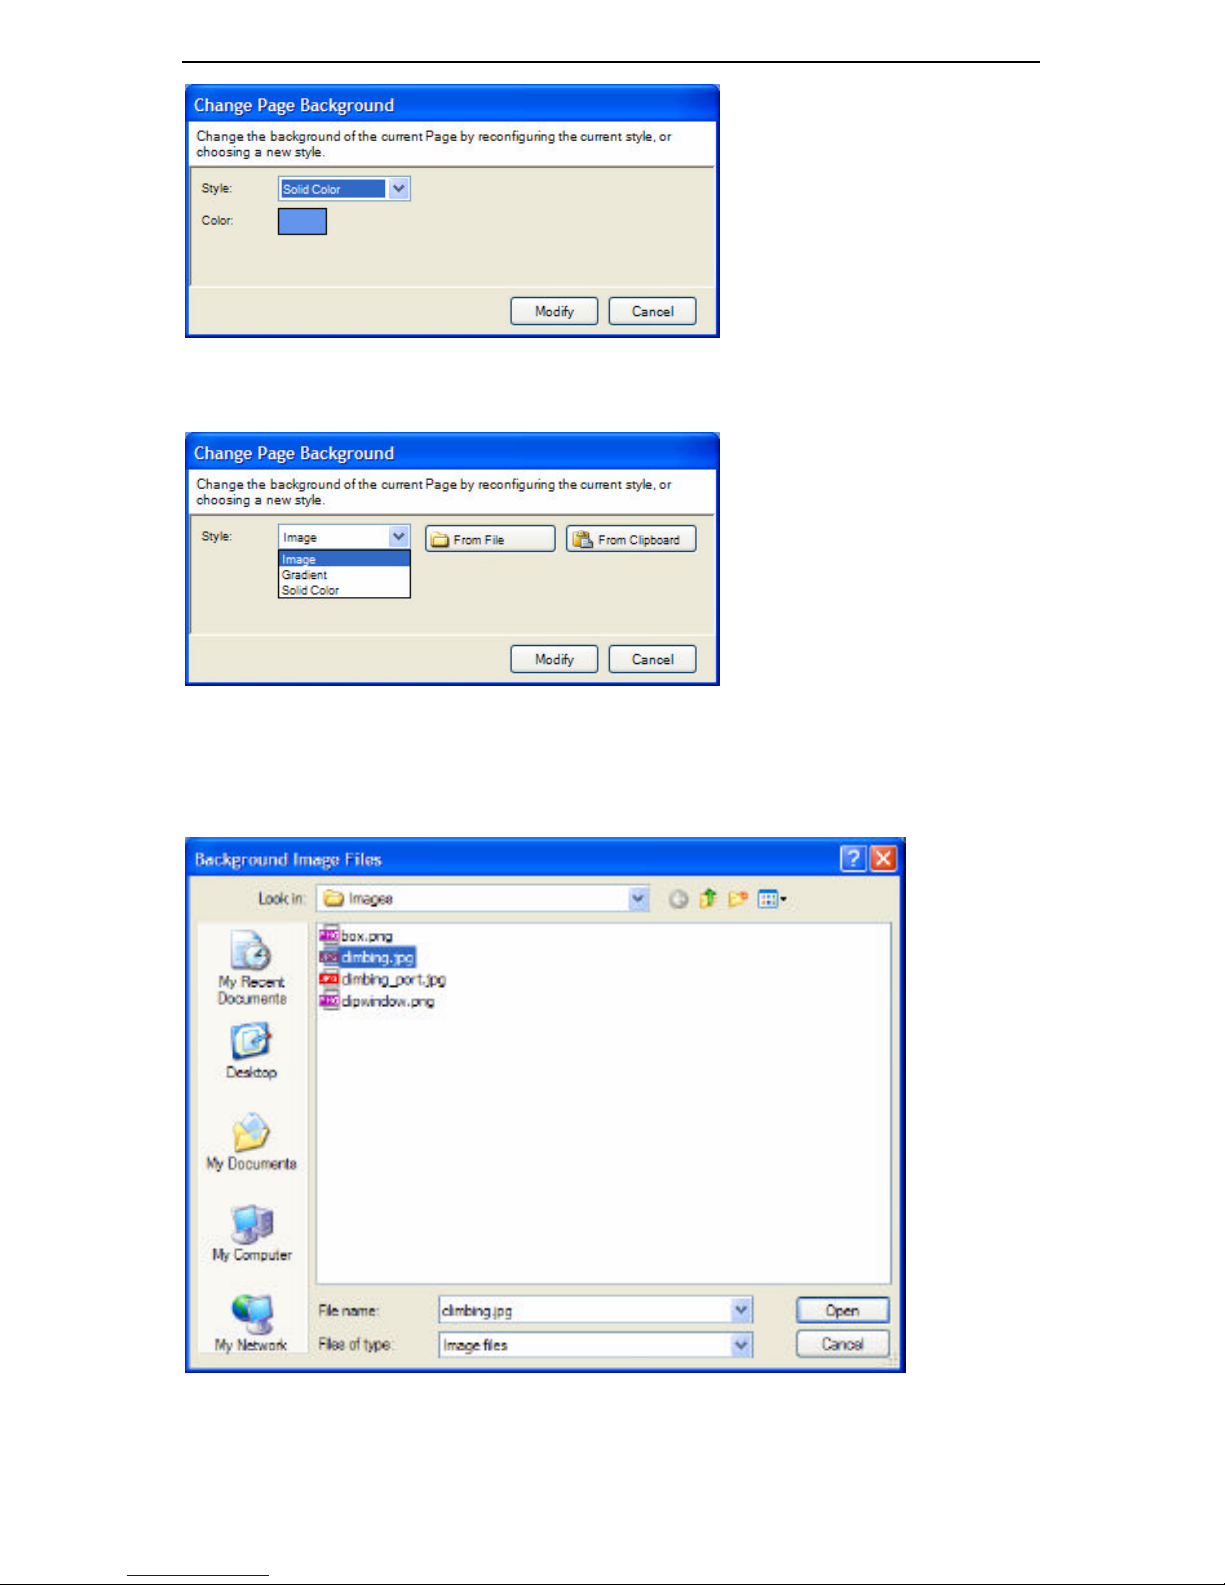
7 CHYTV AUTHOR QUICK START TUTORIAL
40
2. From the Style pull-down menu, select Image, then click the From File button that
appears.
3. Navigate to /Program Files /ChyTV /ChyTV Tools /Projects /Author_Tutorial /Images. Select
climbing.jpg and click Open. To view thumbnails of the images while browsing, select the
thumbnail view in the View toolbar of the Windows file dialog box. When the image appears
on the page, click Modify to confirm the change and close the dialog box.
Page 47
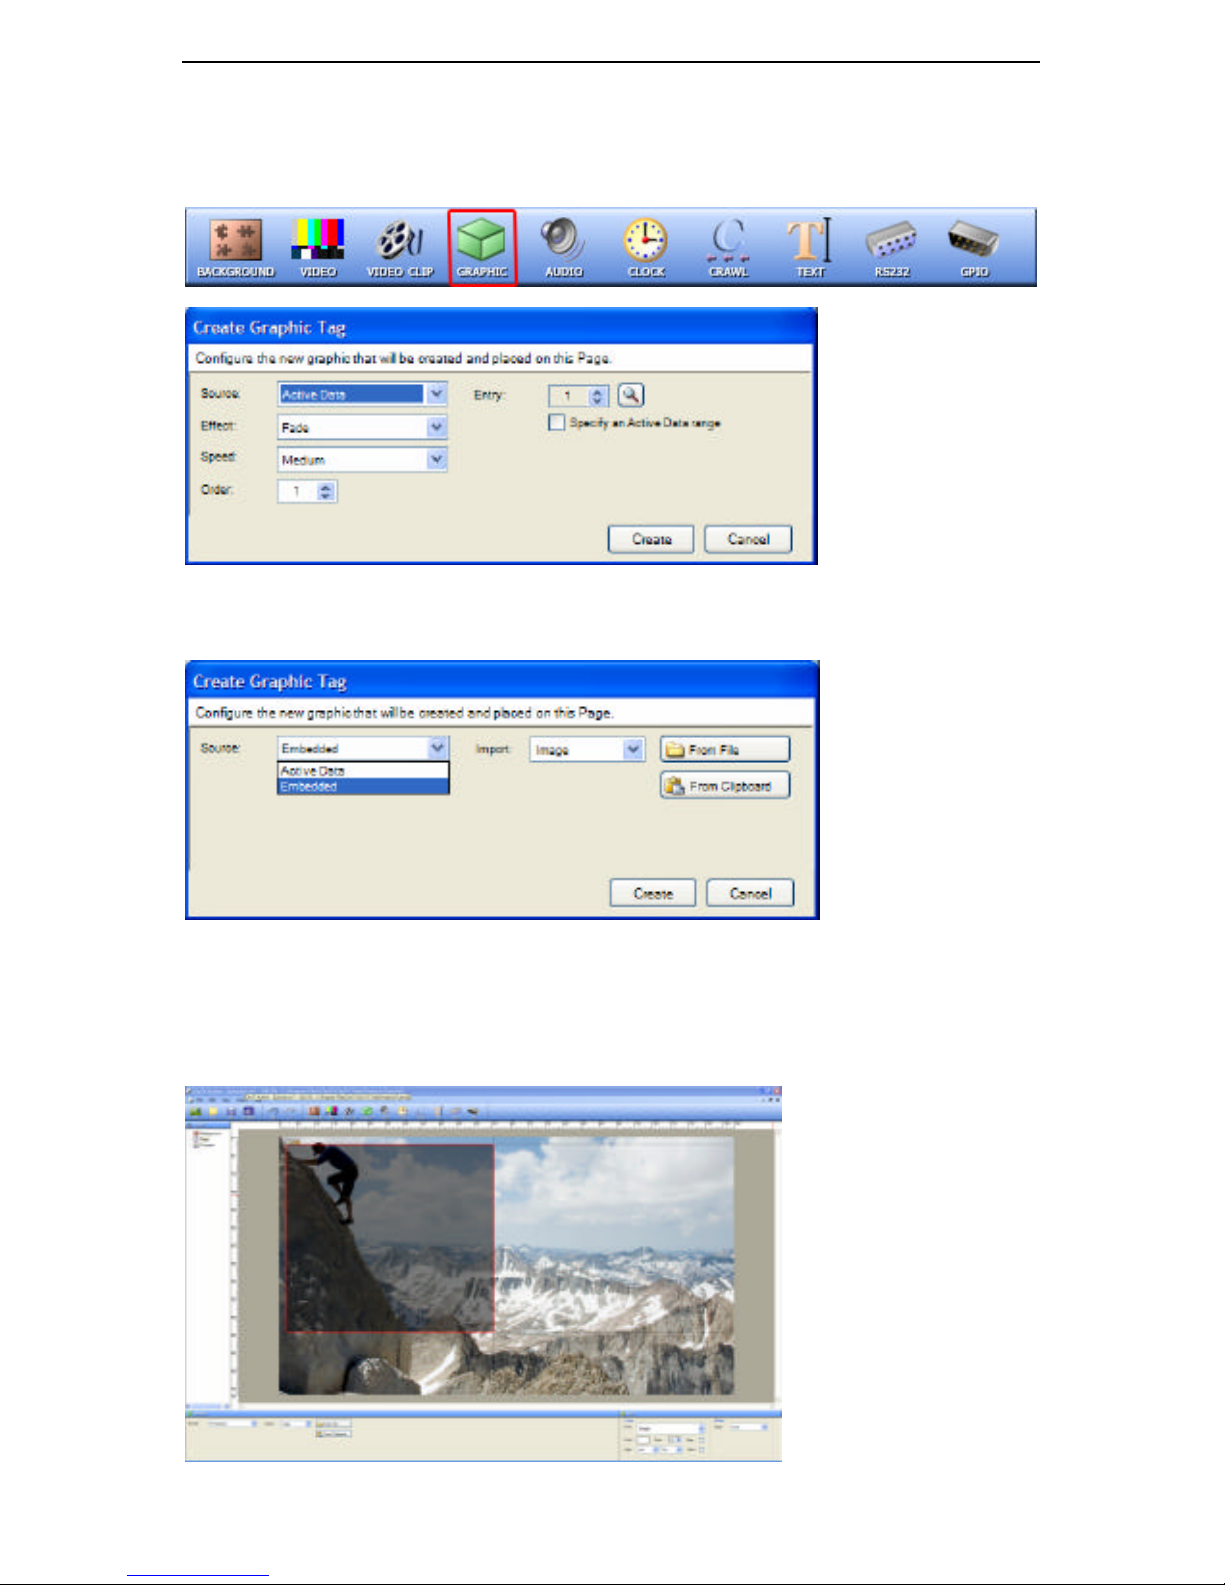
7 CHYTV AUTHOR QUICK START TUTORIAL
41
7.4 Adding a Crawl to the Page
1. We will start by adding a shaded area where our crawl will be displayed. Click the GRAPHIC
button on Author’s toolbar.
2. From the Source pull-down menu, select Embedded, then from the Import pull-down
menu, select Image. Click the From File button that appears.
3. Navigate to the Projects /Author_Tutorial /Images folder, select box.png and click Open.
When the image appears on the page, click Create to add the image and close the dialog box.
The box.png image is a black rectangle with its transparency set to 50%. When placed on
top of another graphic on the page, it will shade the underlying graphic by 50%.
Page 48
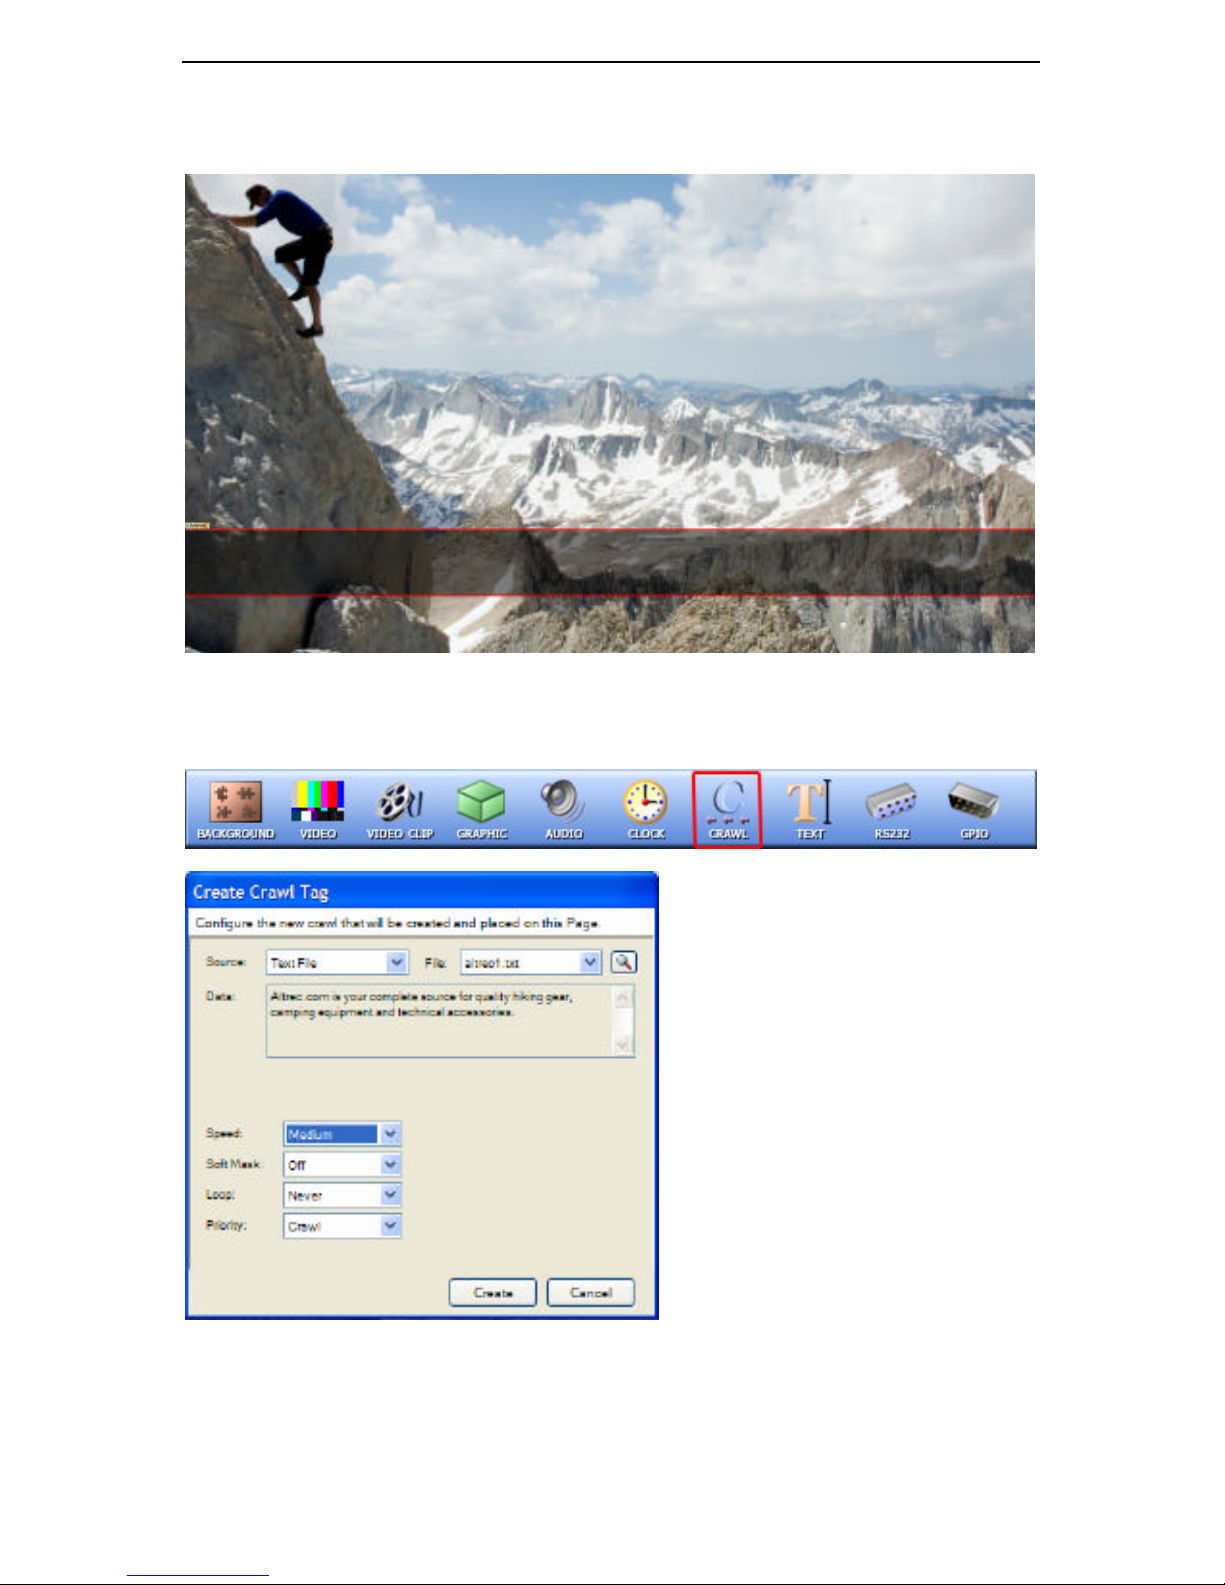
7 CHYTV AUTHOR QUICK START TUTORIAL
42
4. Click on the box graphic to select it (red borders showing), then drag the red borders to
reshape the graphic into a long rectangle. Drag the center of the graphic to place it as shown.
5. Now we will place the crawl on the shaded area. Click the CRAWL button on Author’s
toolbar.
6. From the Source pull-down menu, select Text File. When Text File is selected, the File
pull-down menu displays the text files resident in the project’s /CF /TEXT folder . Select
altrec1.txt from the menu and click Create. Your page should now look like this:
Page 49
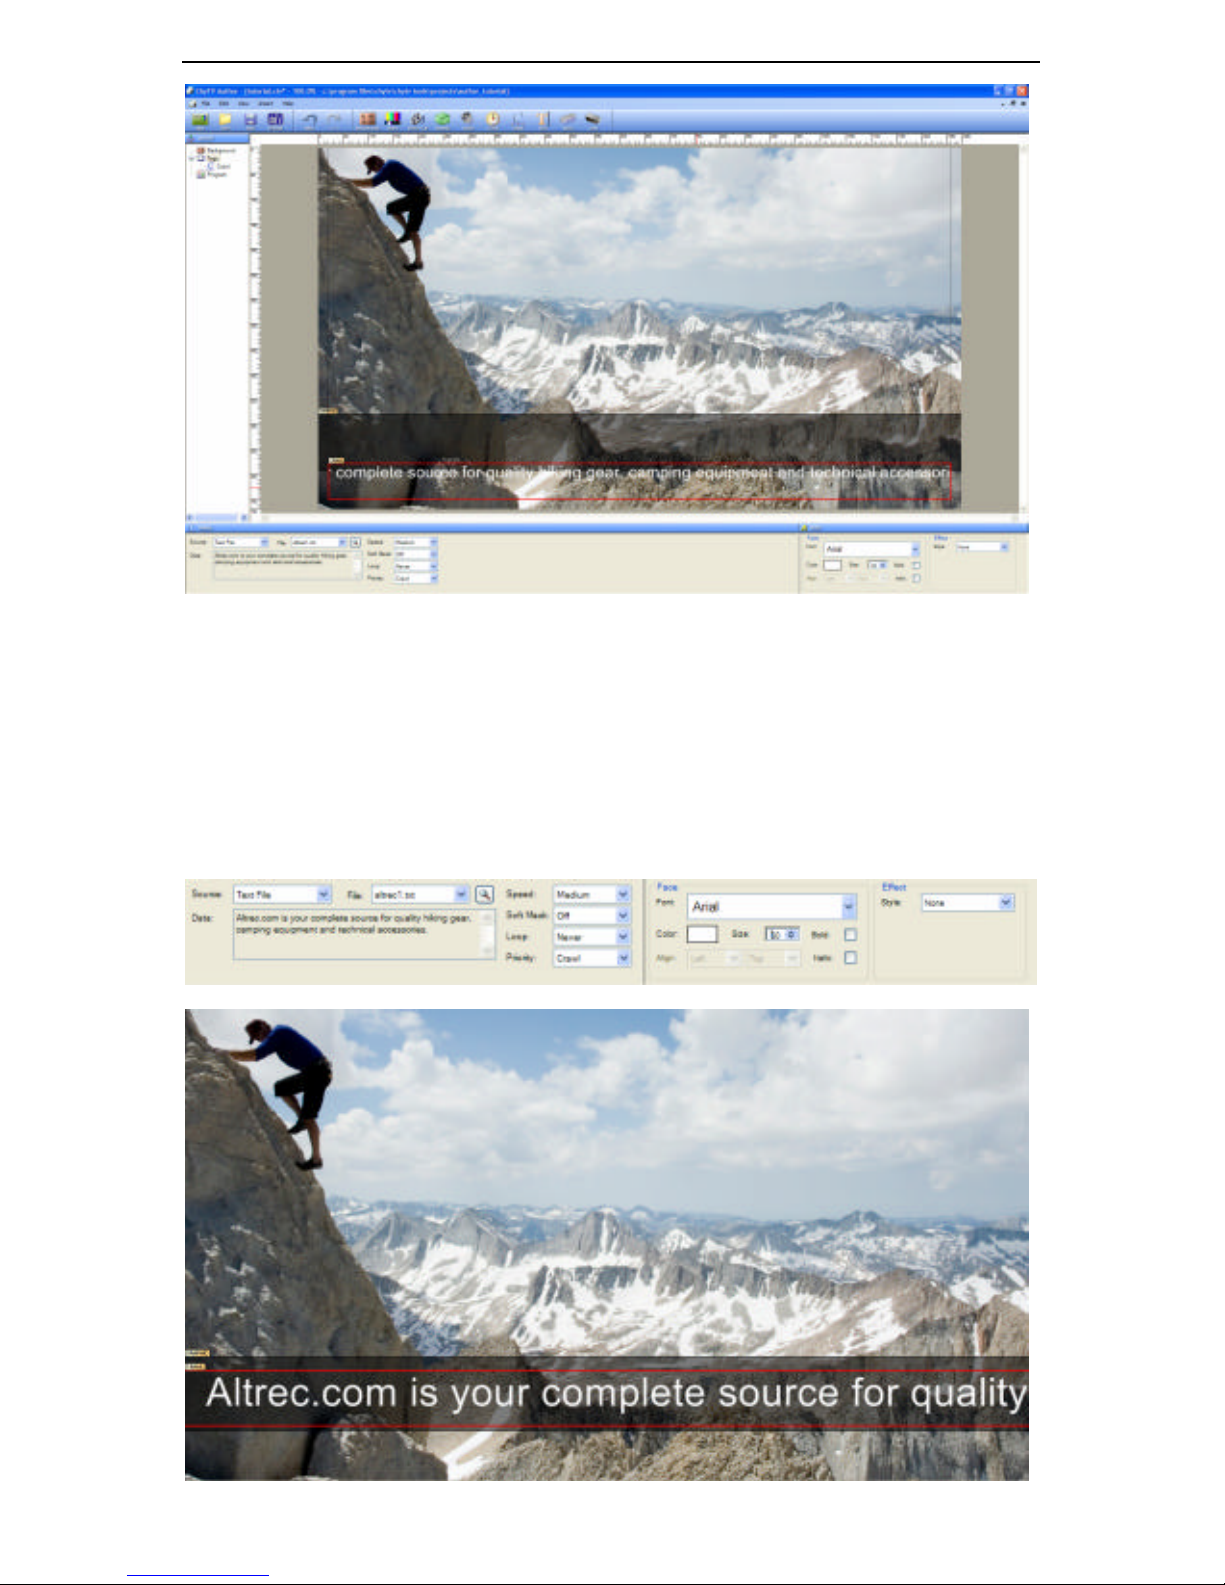
7 CHYTV AUTHOR QUICK START TUTORIAL
43
7. Click on the crawl to select it (red borders showing). Drag the borders so that the crawl is
placed inside the shaded box. The left and right edges can extend slig htly beyond the edges of
the stage.
8. Below the stage area, set these crawl parameters as follows: Font: Arial, Size: 60. Adjust
the crawl’s borders until the crawl is centered in the shaded box like to the example below.
Feel free to experiment with any of the parameters to see the effect they have on the crawl,
keeping in mind that the preview in Author is only a representation of how the page will
actually be displayed by ChyTV.
Page 50
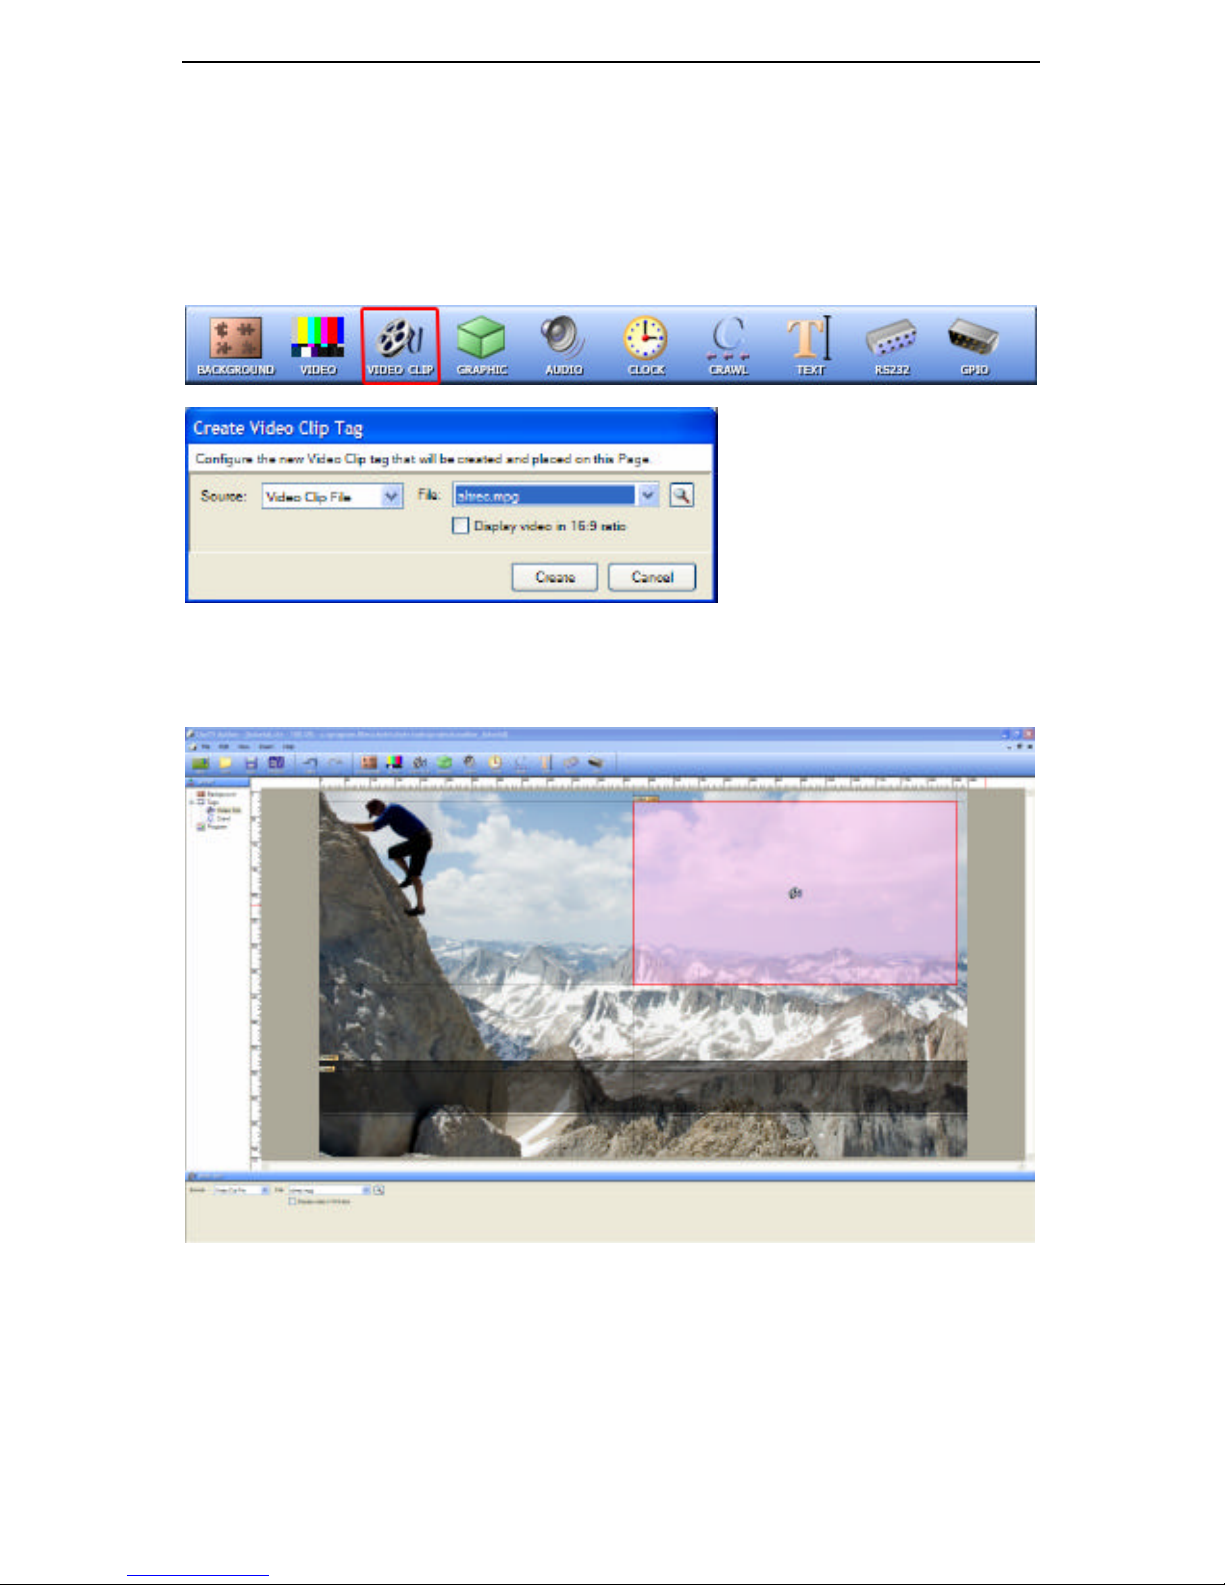
7 CHYTV AUTHOR QUICK START TUTORIAL
44
7.5 Adding Video to the Page
1. Click the VIDEO CLIP button on Author’s toolbar.
Note: In this example a video clip file is added to the page. If your ChyTV supports display of
a live video source, you can click the VIDEO button instead to add a live video window to
your page. Select Squeeze-back from the Video Style pull-down menu for a resizable
video window.
2. From the Source pull-down menu,, select Video Clip File . The File: pull-down menu lists
the video clips stored in the project’s VCLIPS directory. Select altrec.mpg and click
Create to add the video clip to the page.
3. Click the Video Clip window to select it (red border showing). You can now drag the video
clip to a new location or resize it by dragging the borders while holding the Shift key.
Note: Holding the Shift key while resizing constrains the aspect ratio of the video clip.
Resizing the video clip without constraining the aspect ratio will cause the video to stretch or
shrink to fill the borders during playback.
Page 51
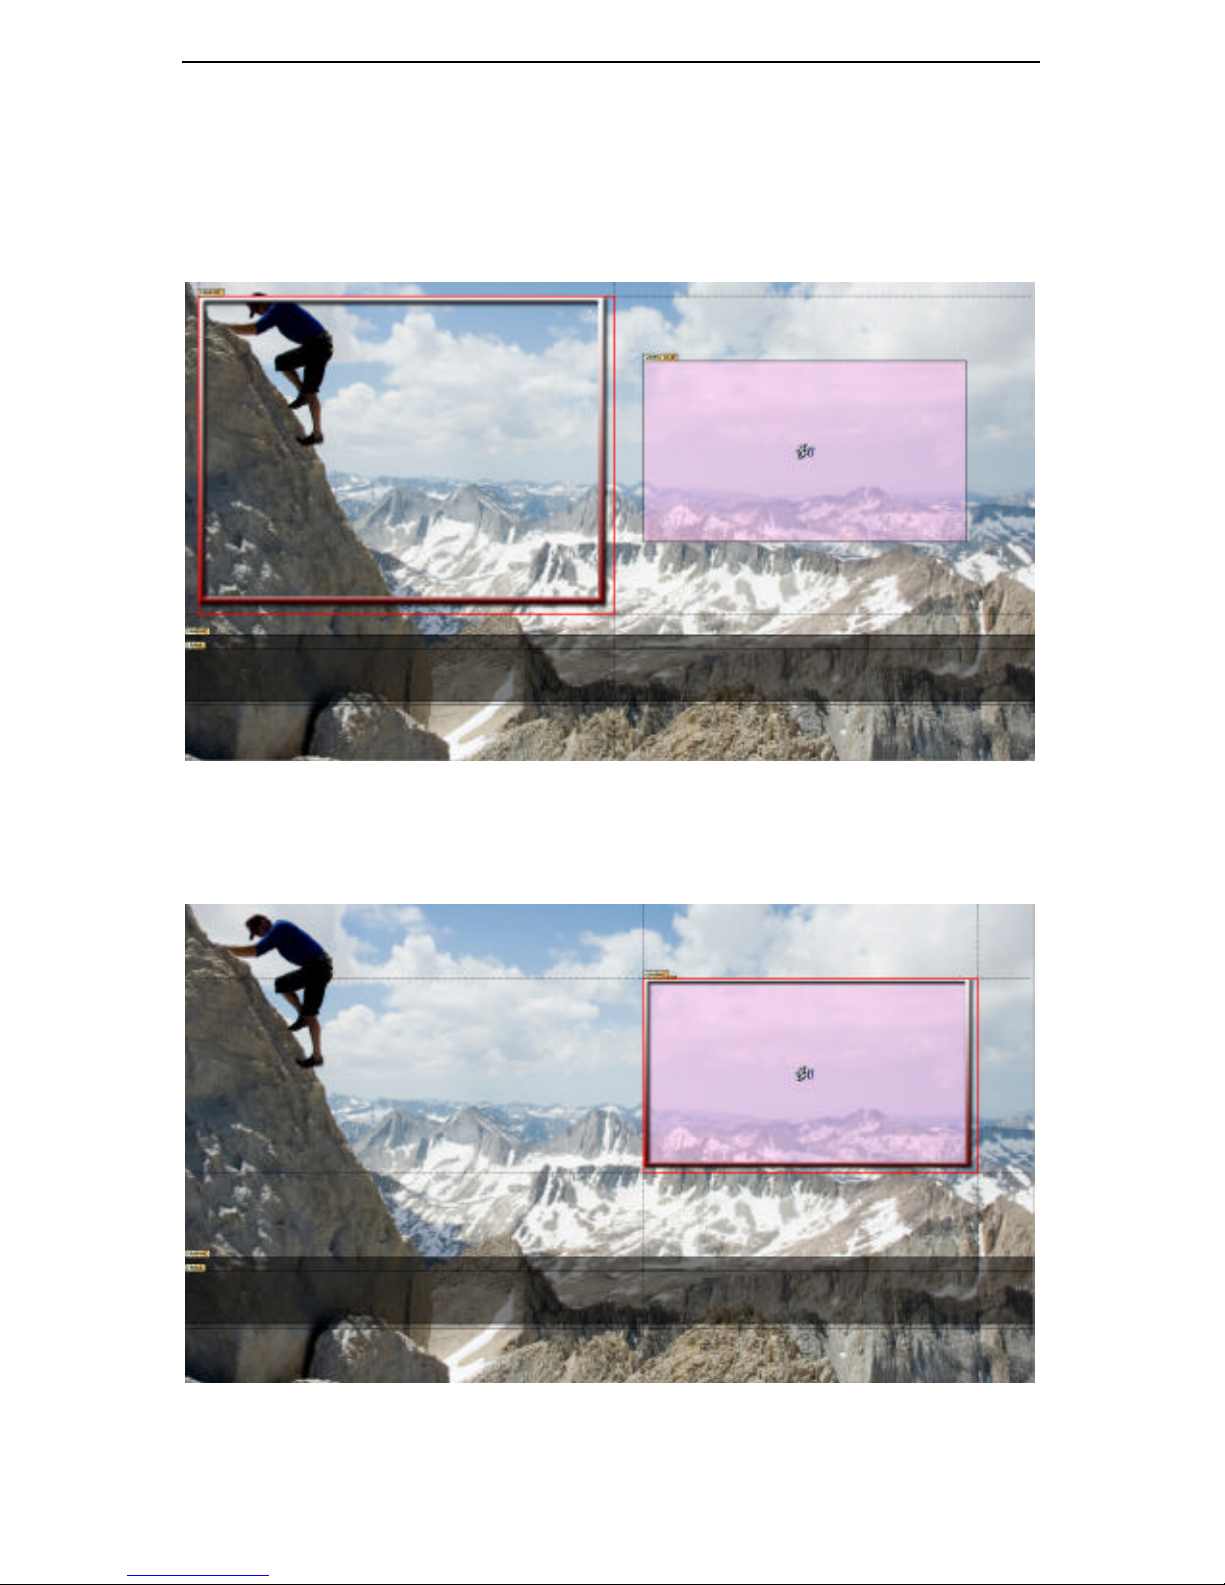
7 CHYTV AUTHOR QUICK START TUTORIAL
45
4. Now to dress up the page a bit, we are going to add a frame to the video clip. As before, click
the GRAPHIC button and select: Source: Embedded, Import: Image , then click the
From File button.
5. If you are not already there, navigate to the Projects /Author_Tutorial /Images folder, select
clipwindow.png and click Open. When the image appears on the page, click Create to
add the image and close the dialog box. Your page should now look something like this:
6. Click the clipwindow.png graphic window to select it (red border showing) then drag the
graphic and resize it so that the frame covers the video clip borders. It’s not necessary to
constrain the aspect ratio of the frame graphic, our goal is to conceal the edges of the video
clip window.
Page 52
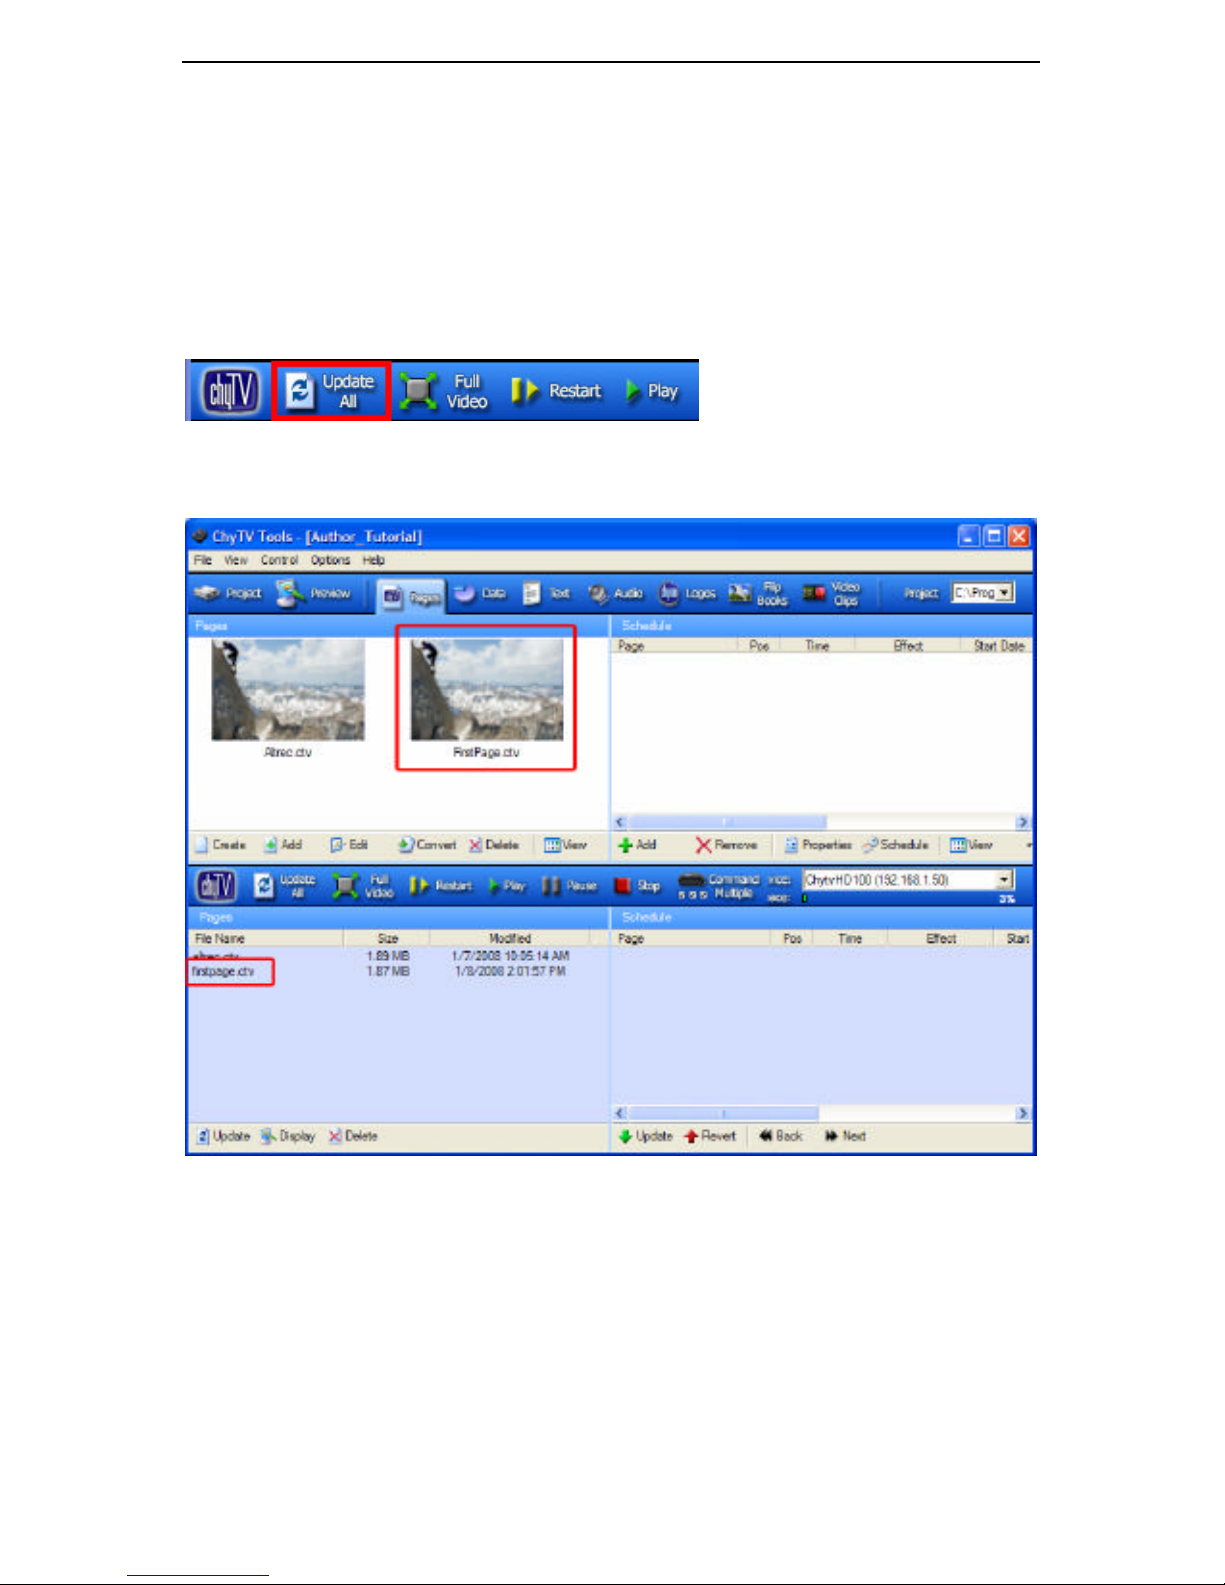
7 CHYTV AUTHOR QUICK START TUTORIAL
46
7.6 Saving and Testing Your Page
1. Select Save As… from the File menu. Save the file as FirstPage.ctv. This will save
your page to the /CF /PAGES directory of your project.
2. Return to ChyTV Tools. If not already selected, click Pages in the ChyTV Tools toolbar.
The FirstPage.ctv file should appear in the upper right area of the Pages window.
3. Click Update All. This transfers all modified content to the ChyTV’s on-board
memory.
4. In the lower left ChyTV Pages window, double-click FirstPage.ctv to preview
your page on ChyTV’s video output.
5. Quit ChyTV Author before moving on to the next section.
7.7 Adding Active Data to Your Project
Active Data provides a method of both storing and referencing data that is most useful for pages
that are updated frequently and in real time. The following examples in this tutorial will use Active
Data as their source, so we need to create the data that will be referenced.
The Active Data area of a project contains 1000 “data slots” that may be used to store text, tag
parameters and file references. When adding a tag to a page, the text, image or video to be
Page 53
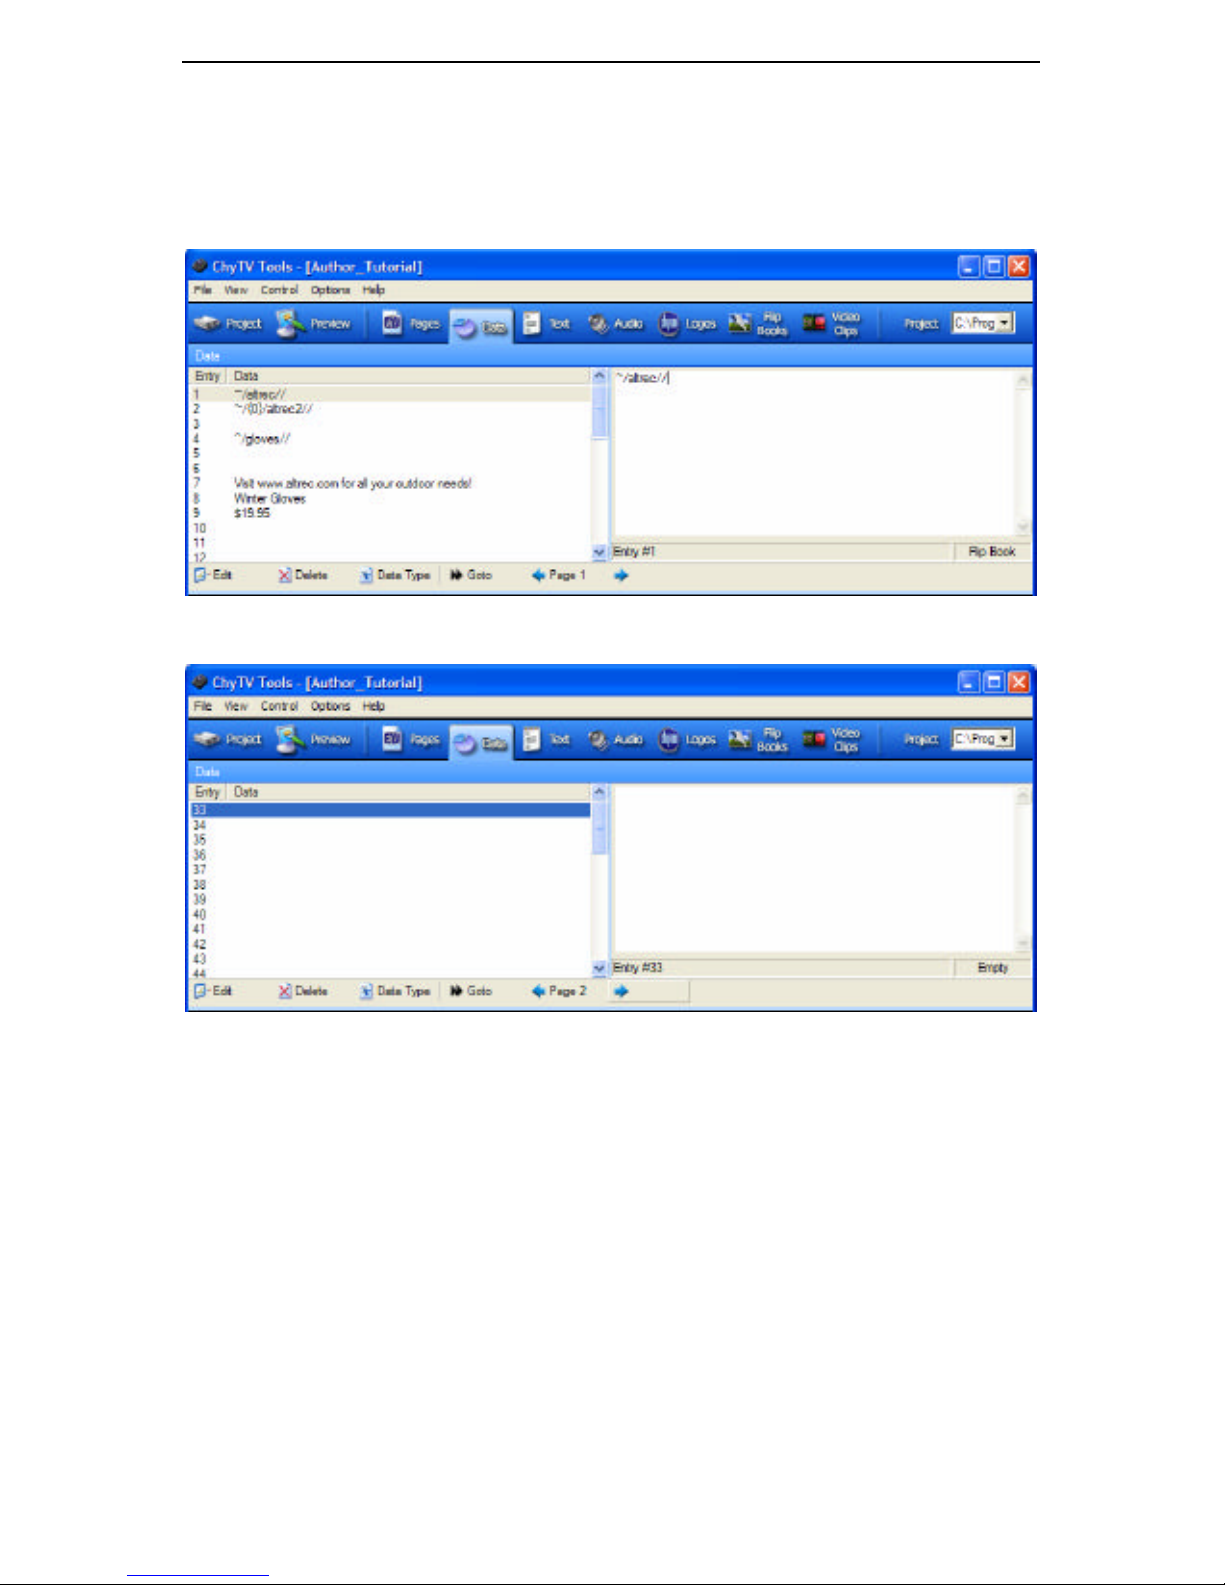
7 CHYTV AUTHOR QUICK START TUTORIAL
47
displayed is simply referenced by pointing to the active data slot number that contains the
information needed.
1. In ChyTV Tools, click the Data tab in the toolbar. Page 1 of the Active Data area is
displayed. The data that appears on Page 1 is used by the Altrec.ctv page, so we will create
Active Data for FirstPage.ctv on page 2.
2. Click on the Right Arrow next to Page 1 to display Page 2.
3. Click Entry 34 to select it, then click the Data Type button. The Altrec spinning animation
is a Flip Book file, so select Flip Book from the Data Type pull-down menu then select
altrec2 from the Data Files list.
The animation will loop for the duration of the page display, so set Loop to 0 and check the
Infinite checkbox. Click OK to close the dialog box.
Page 54
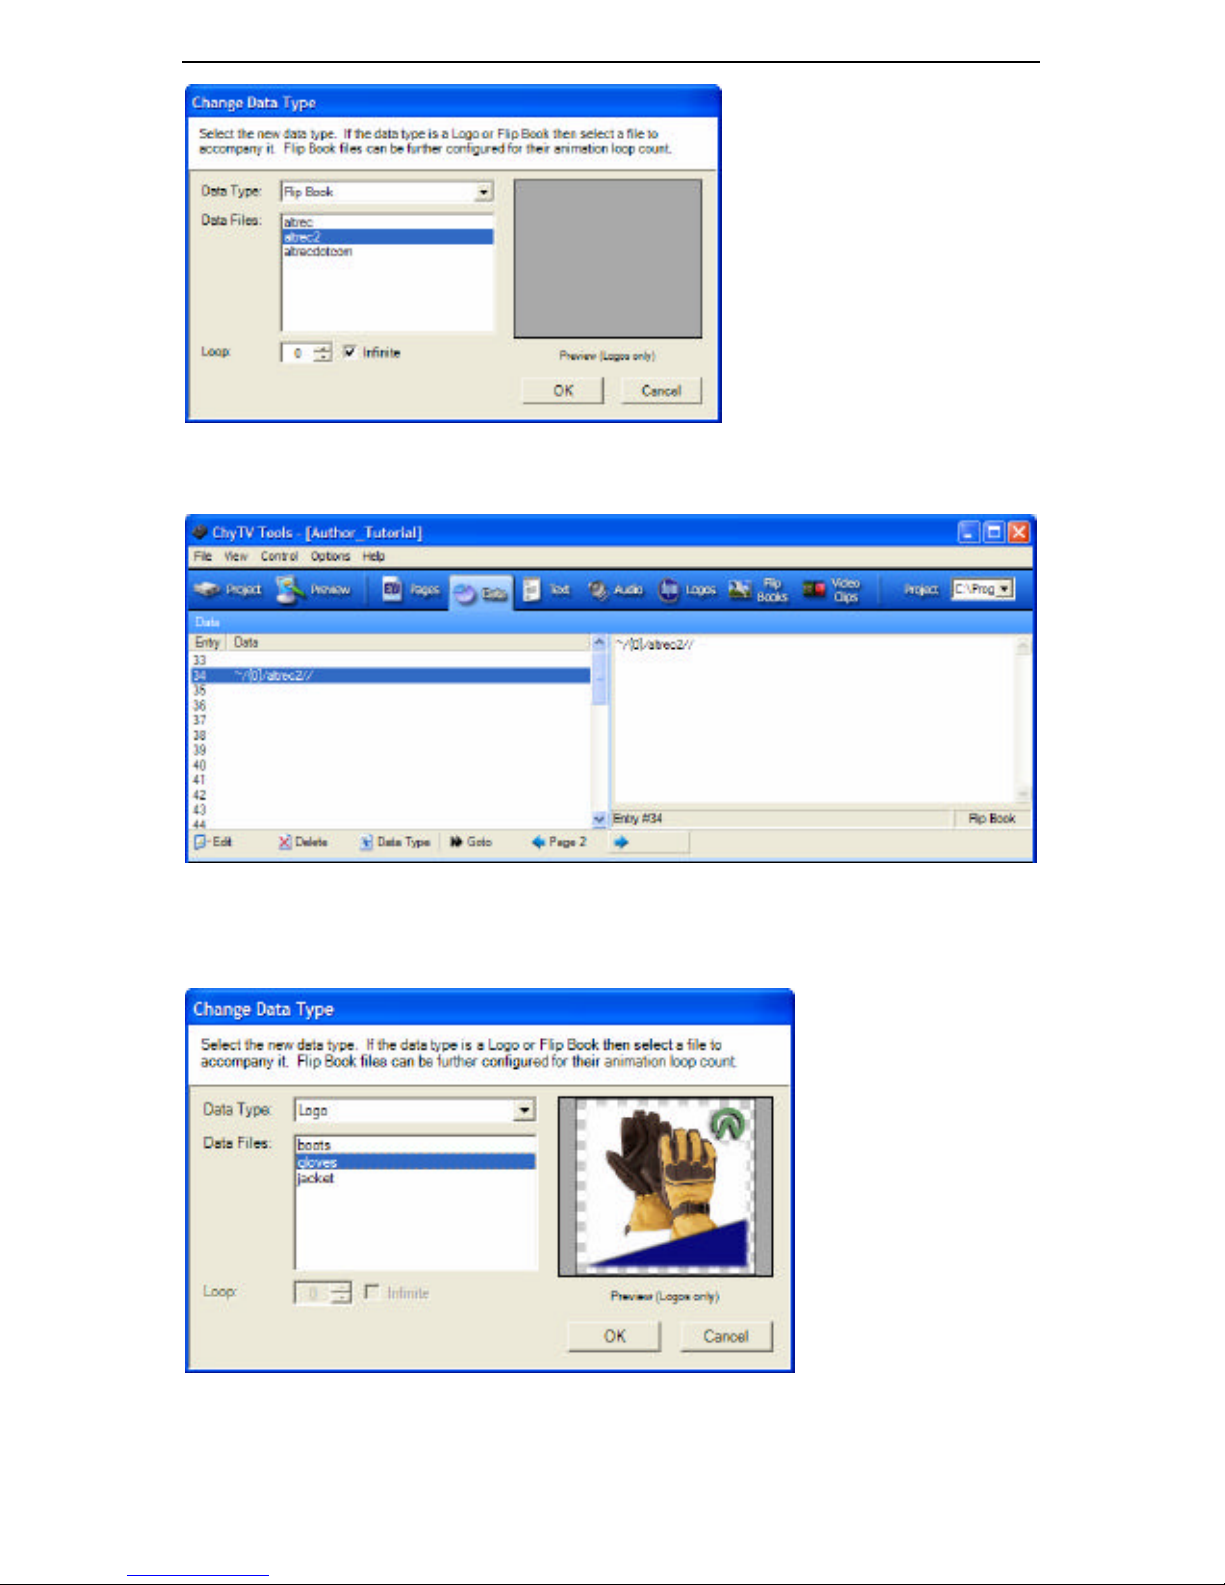
7 CHYTV AUTHOR QUICK START TUTORIAL
48
4. Again, your Active Data should now look like the picture below. The cryptic text is Active
Data representation indicating that altrec2 is a Flip Book file and will loop forever.
5. Click Entry 36 to select it, then click the Data Type button. The Altrec Gloves image is a
Logo file, so select Logo from the Data Type pull-down menu then select gloves from the
Data Files list.
6. Again, your Active Data should now look like the picture below. The cryptic text is Active
Data representation indicating that gloves is a Logo file.
Page 55
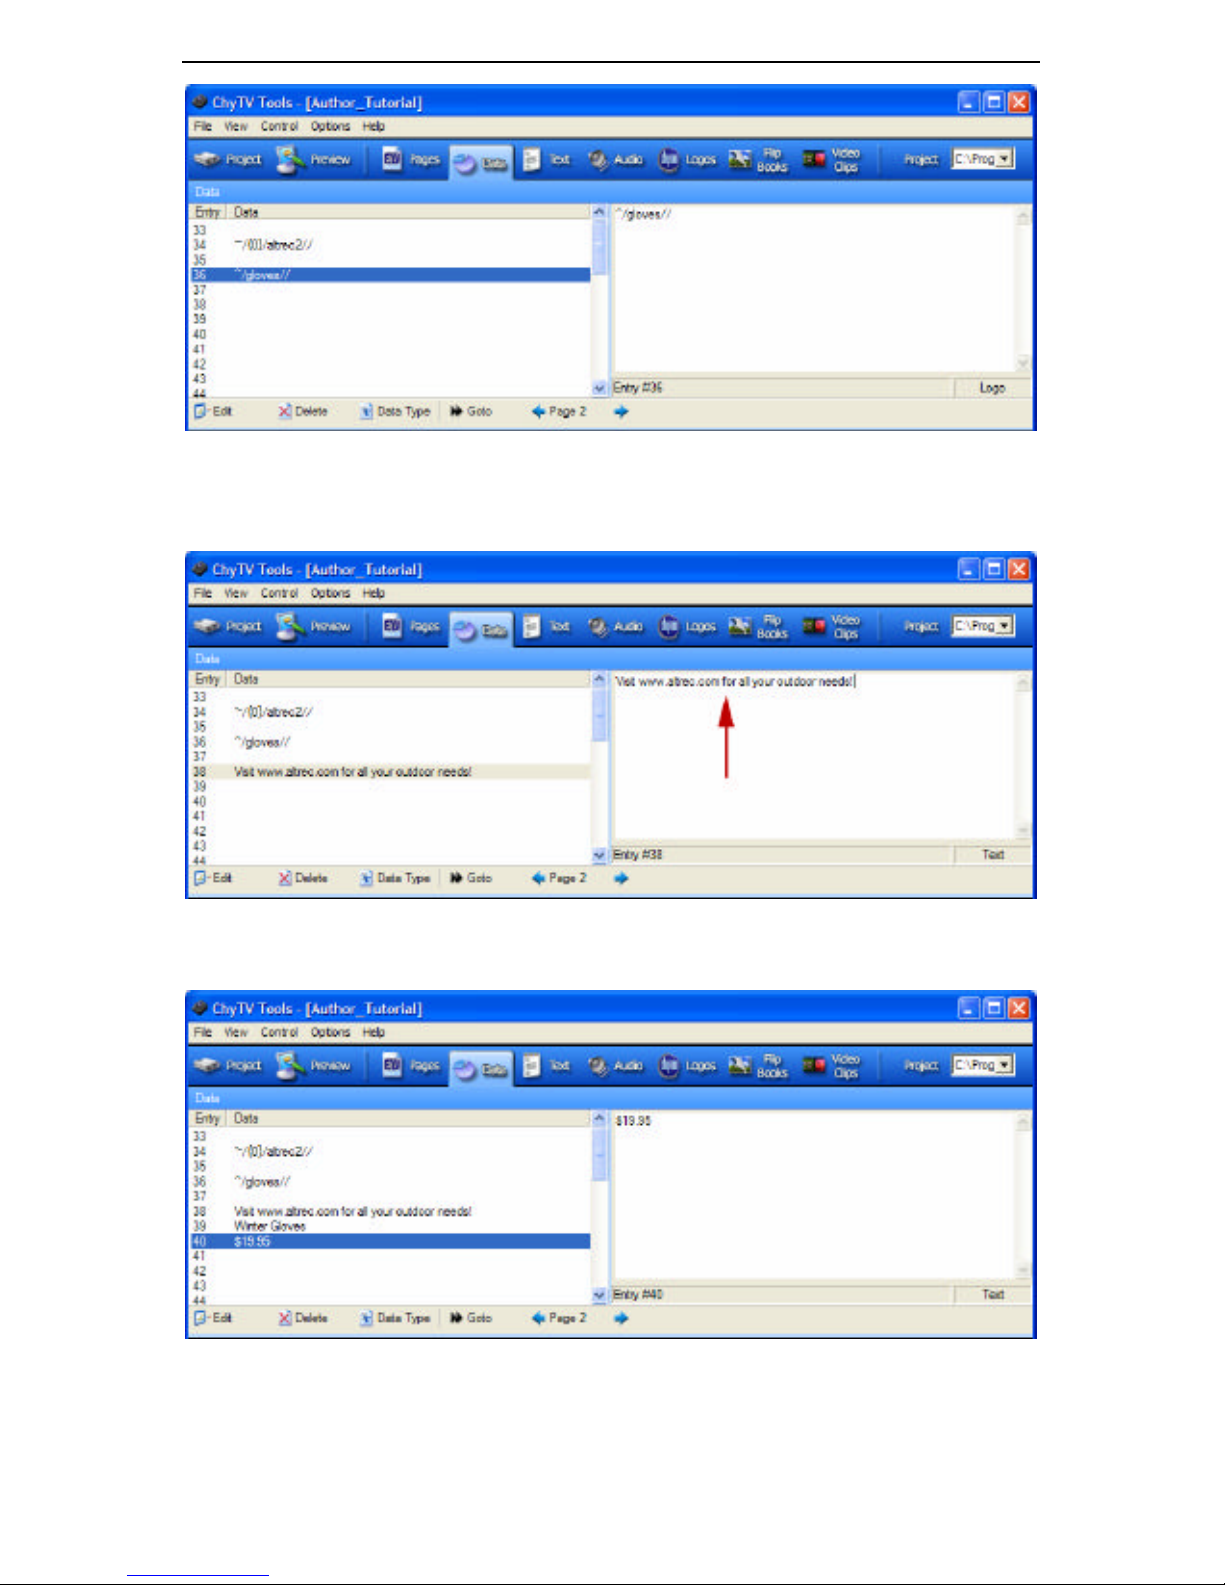
7 CHYTV AUTHOR QUICK START TUTORIAL
49
7. Now we’ll add some text to th e Active Data area. Click Entry 38 to select it, then, in the right
data entry area, enter the sentence “Vist www.altrec.com for all your outdoor needs". The text
will appear in slot 38 on the left.
8. Do the same for slots 39 and 40, entering “Winter Gloves” in slot 39 and “$19.95” in slot 40.
Your page 2 Active Data should now look like the picture below.
7.8 Using Active Data in Tags
1. Launch ChyTV Author. Click the Open button in Author’s toolbar and select
FirstPage.ctv for editing.
Page 56
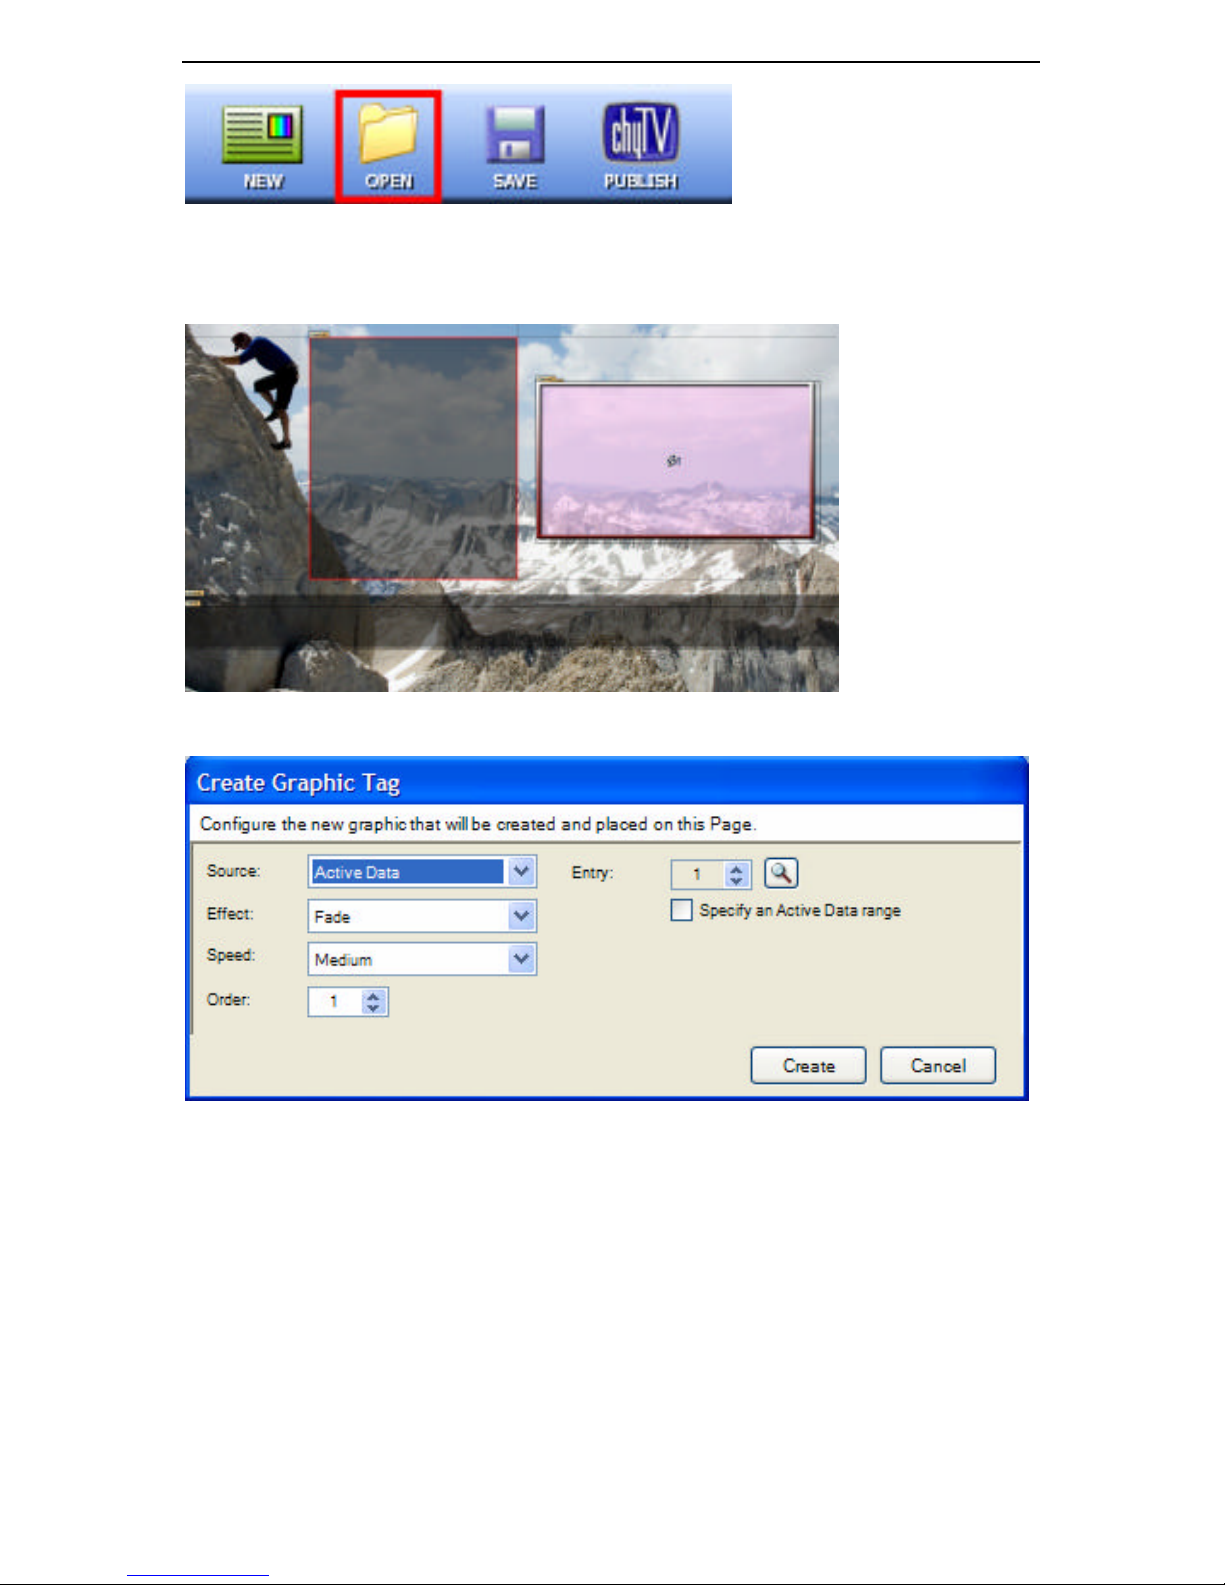
7 CHYTV AUTHOR QUICK START TUTORIAL
50
2. In preparation for the next example, place the same shading graphic used for our crawl at the
location shown below. Embed the box.png file as you did before. Your page should now
look like this:
3. Click the GRAPHIC button on Author’s toolbar.
4. Select Active Data from the Source pull-down menu then click the magnifying glass icon.
The Active Data Options dialog appears.
Page 57
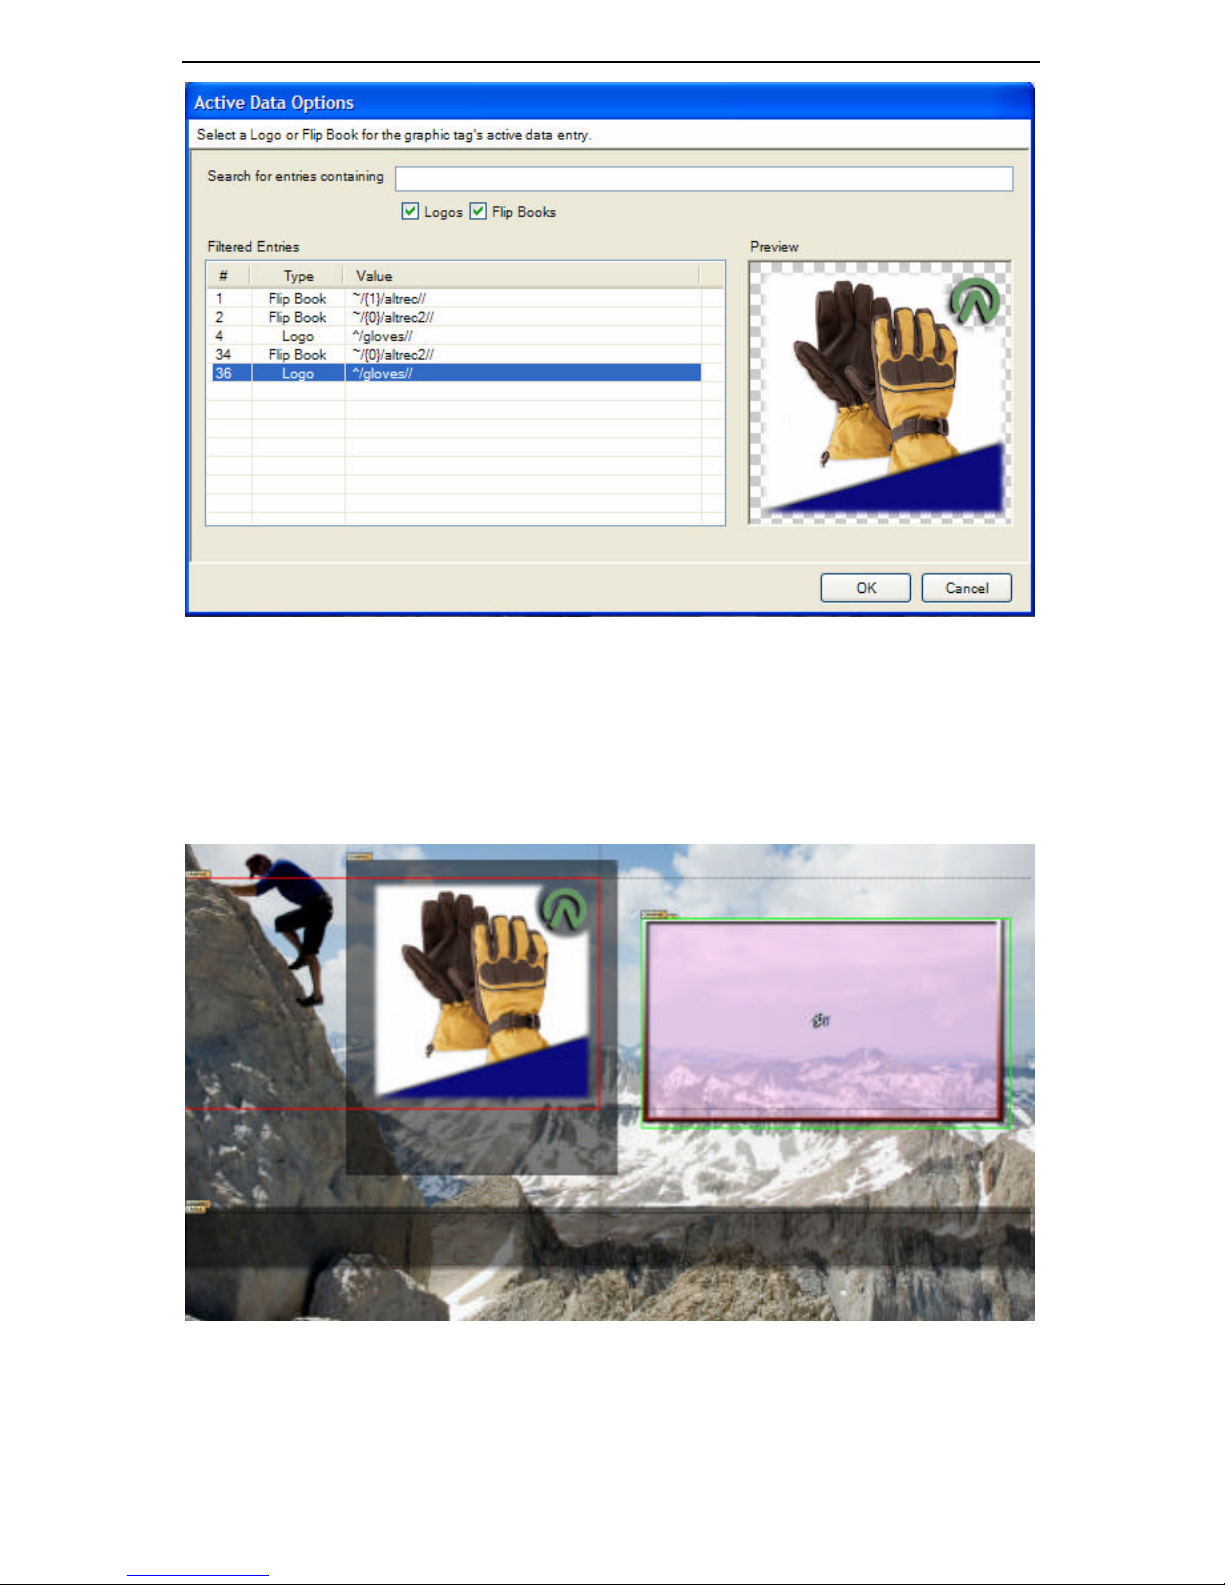
7 CHYTV AUTHOR QUICK START TUTORIAL
51
5. Select the gloves Logo file that we added to Active Data slot 36. Click OK, then click
Create.
6. Set the gloves graphic tag parameters as follows: Effect: Enter Left, Exit Right, Speed:
Fast, Order: 1, Align: Right, Top.
7. Place the gloves graphic as shown with the left box border extending to the left edge of the
stage.It cannot be resized.
8. Next, click the TEXT button on Author’s toolbar. Again, select Active Data from the
Source pull-down menu and click the magnifying glass icon. The Active Data Options
dialog appears.
Page 58
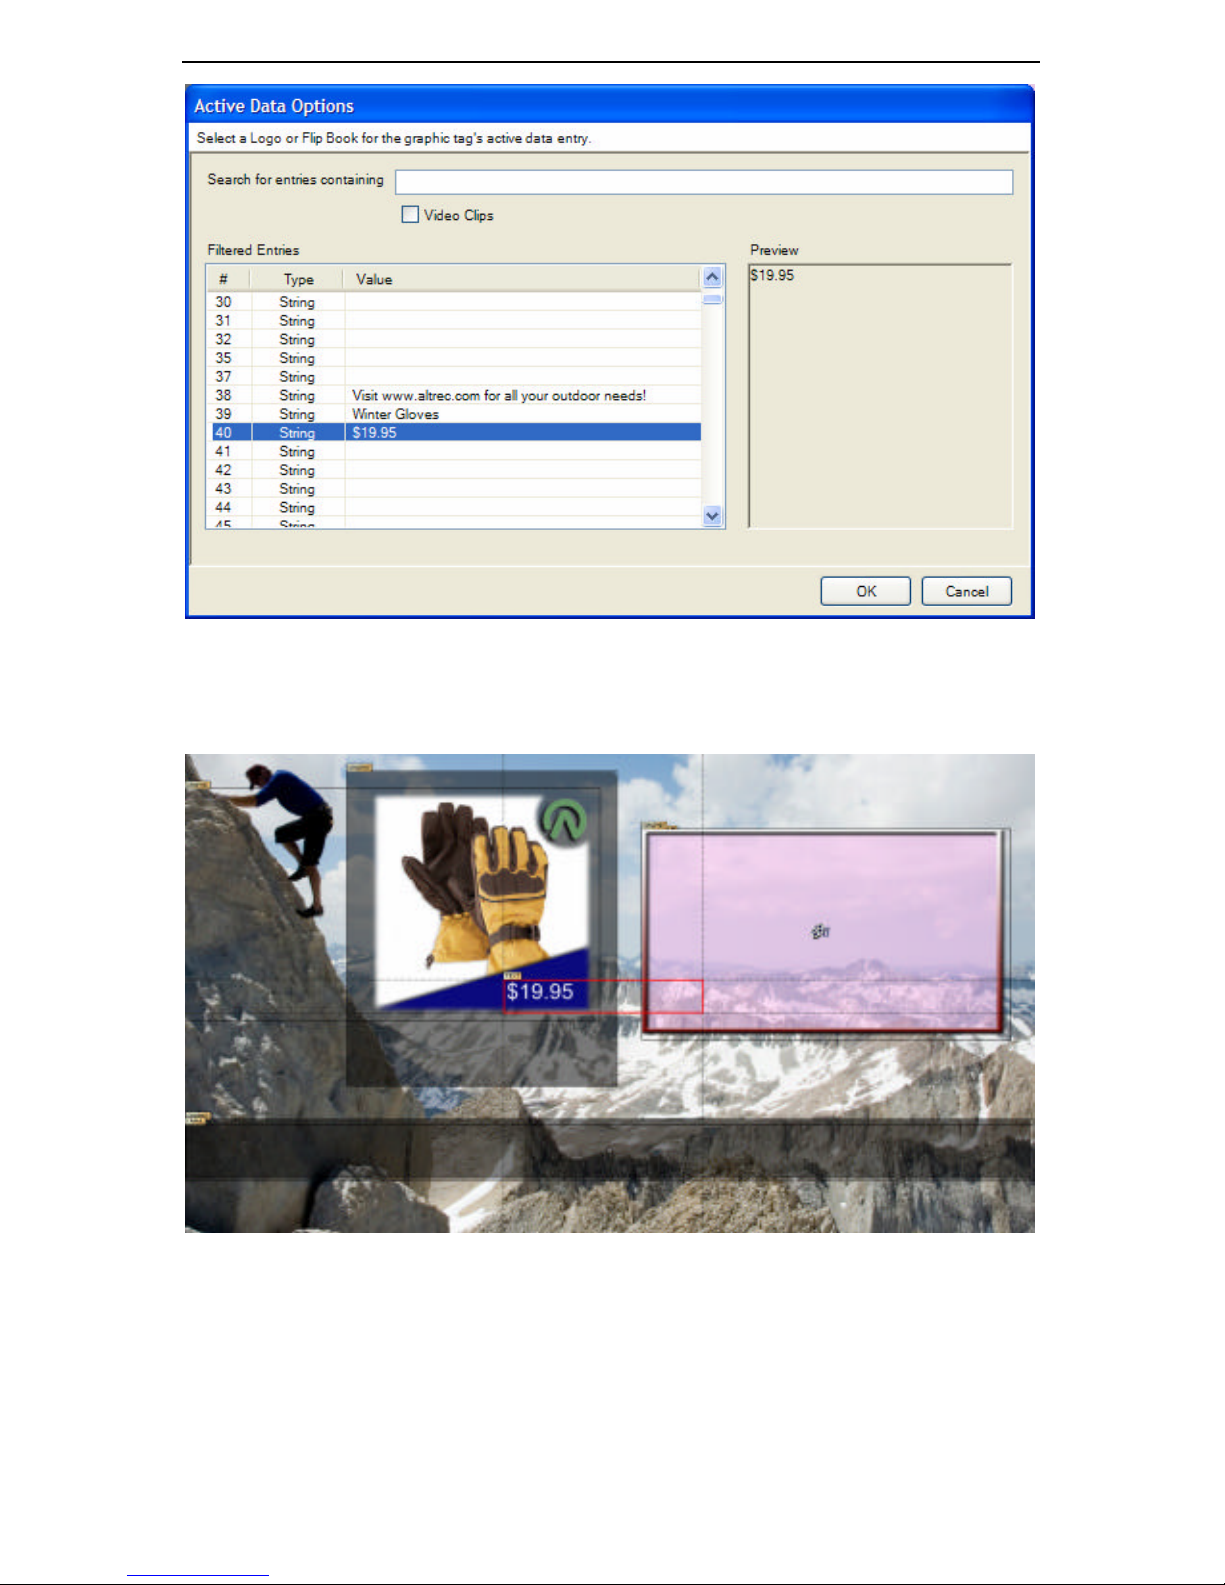
7 CHYTV AUTHOR QUICK START TUTORIAL
52
9. Select the $19.95 String that we added to Active Data slot 40. Click OK, then click Create.
Place the $19.95 as shown and adjust the text size to your liking. set the text tag parameters as
follows: Effect: Fade, Speed: Fast , Order: 2.
10. Again, click the TEXT button on Author’s toolbar. Select Active Data from the Source
pull-down menu then click the magnifying glass icon. From the Active Data Options
dialog, select the Winter Gloves String that we added to Active Data slot 39. Click OK,
then click Create.
11. This time, set the text tag parameters as follows: Effect: Enter Bottom, Exit Top ,
Speed: Fast , Order: 3, Font: Arial, Size: 46, Align: Center, Top.
Page 59
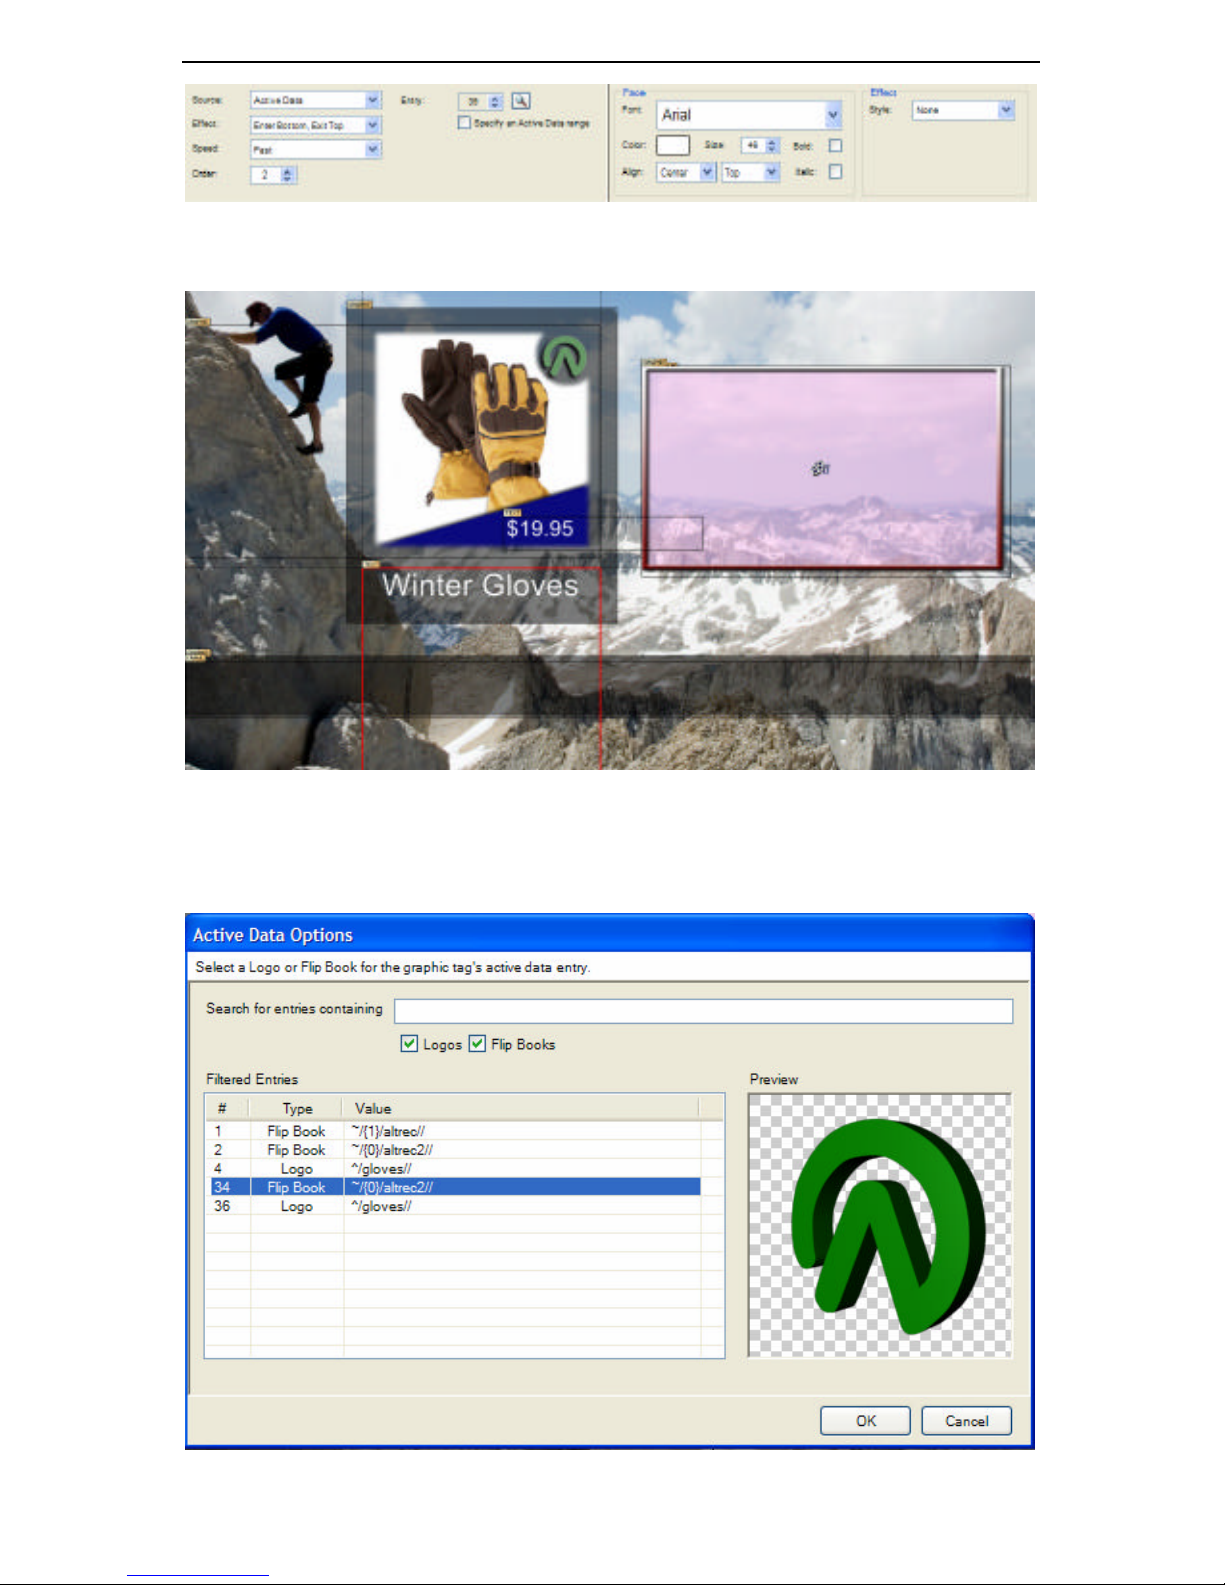
7 CHYTV AUTHOR QUICK START TUTORIAL
53
12. Place the Winter Gloves String as shown below. The bottom of the text tag box should extend
to the bottom of the stage.
13. For the finishing touch, click the GRAPHIC button on Author’s toolbar. Select Active Data
from the Source pull-down menu then click the magnifying glass icon. From the Active Data
Options dialog, select the altrec2 spinning logo that we added to Active Data slot 34. Click
OK, then click Create.
Page 60
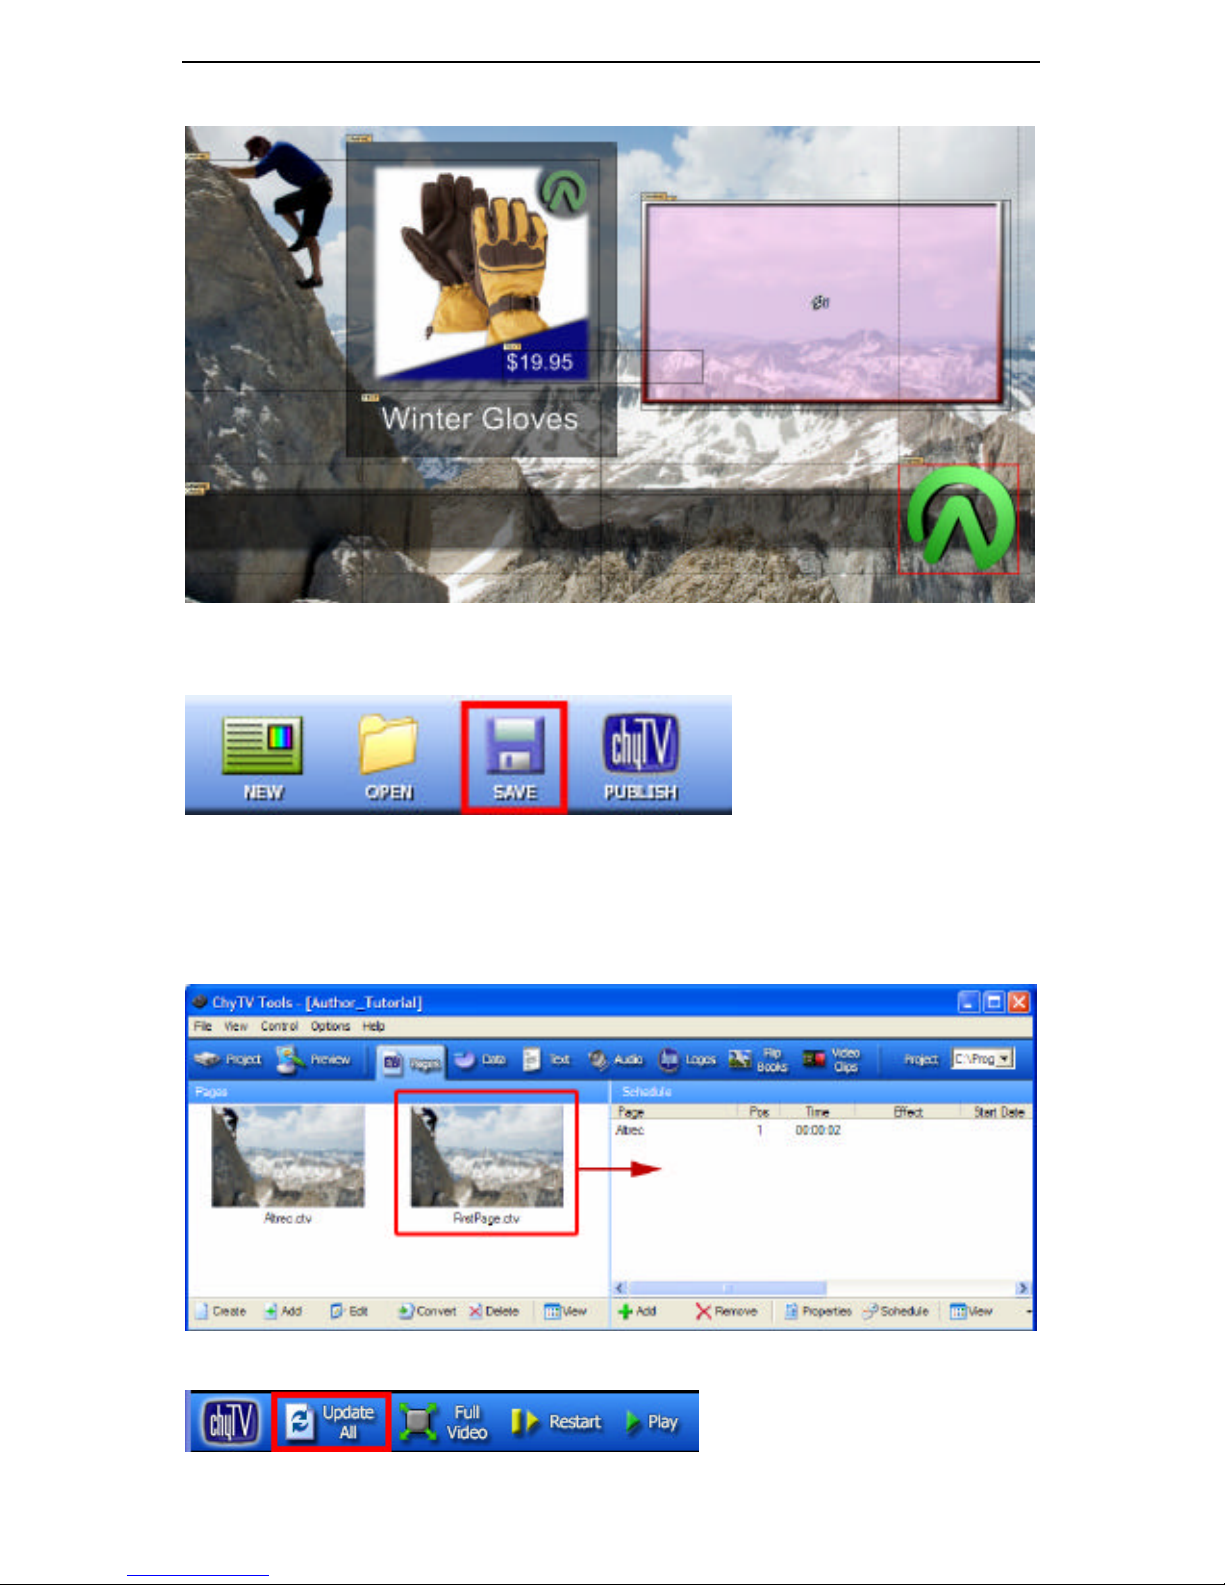
7 CHYTV AUTHOR QUICK START TUTORIAL
54
14. Place the spinning logo as shown. The tag parameters can remain unchanged.
15. Click the Save icon on Author’s toolbar to save the page. Return to ChyTV tools and test the
results as you did before.
7.9 Adding Pages to the Schedule.
1. In ChyTV Tools, select the Pages tab. Left-click and hold FirstPage.ctv in the Project /
Pages window. Drag the thumbnail straight across into the Project / Schedule window and
release the mouse button.
2. Click Update All to transfer the new schedule to the ChyTV unit.
Page 61
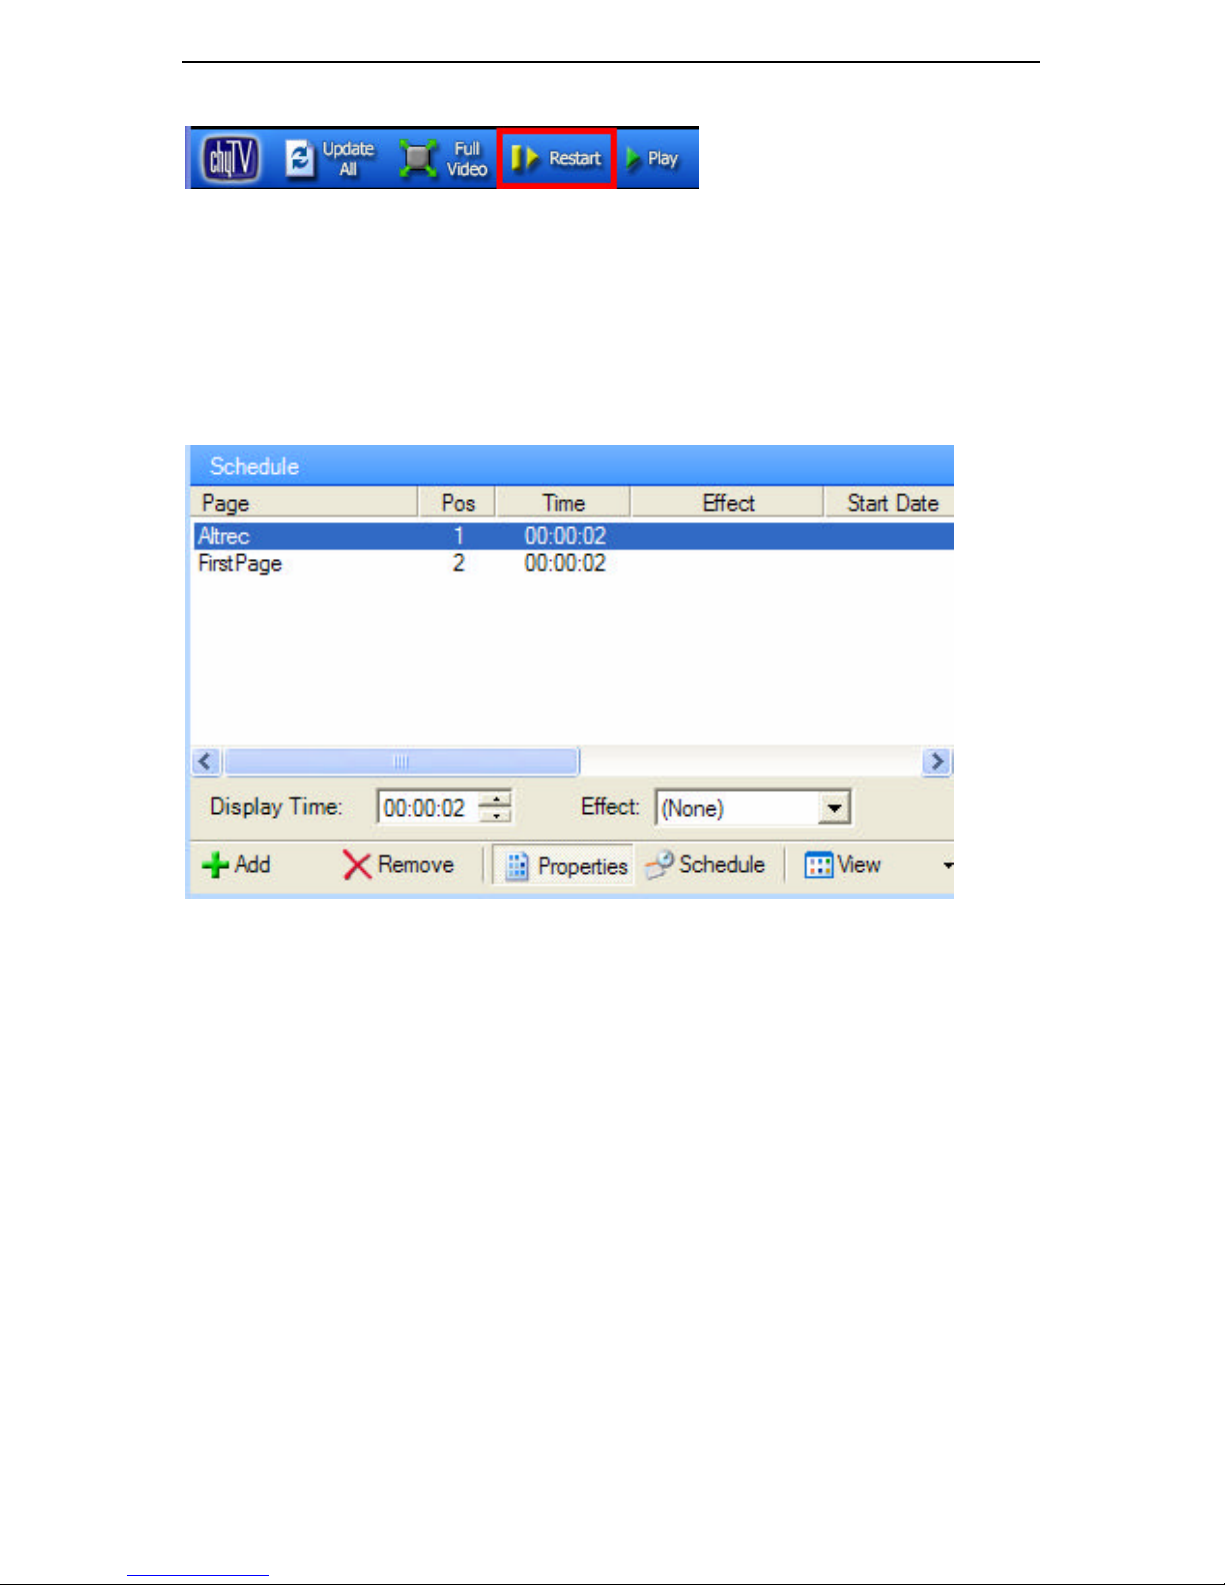
7 CHYTV AUTHOR QUICK START TUTORIAL
55
3. Click Restart to load the new schedule information into memory and run the playlist.
7.10 Tips for using ChyTV Tools
1. Each page in the playlist is displayed for the duration of the crawl then the next page in the
playlist is displayed. When the playlist completes, the first page is played again.
2. For pages without a crawl, the page is displa yed for the duration displayed in the Time column
of the playlist or the length of time it takes all tags on the page to execute. The page’s display
time, as well as it’s transition effect, can be adjusted by selecting the page and clicking
Properties in the Playlist toolbar.
Page 62
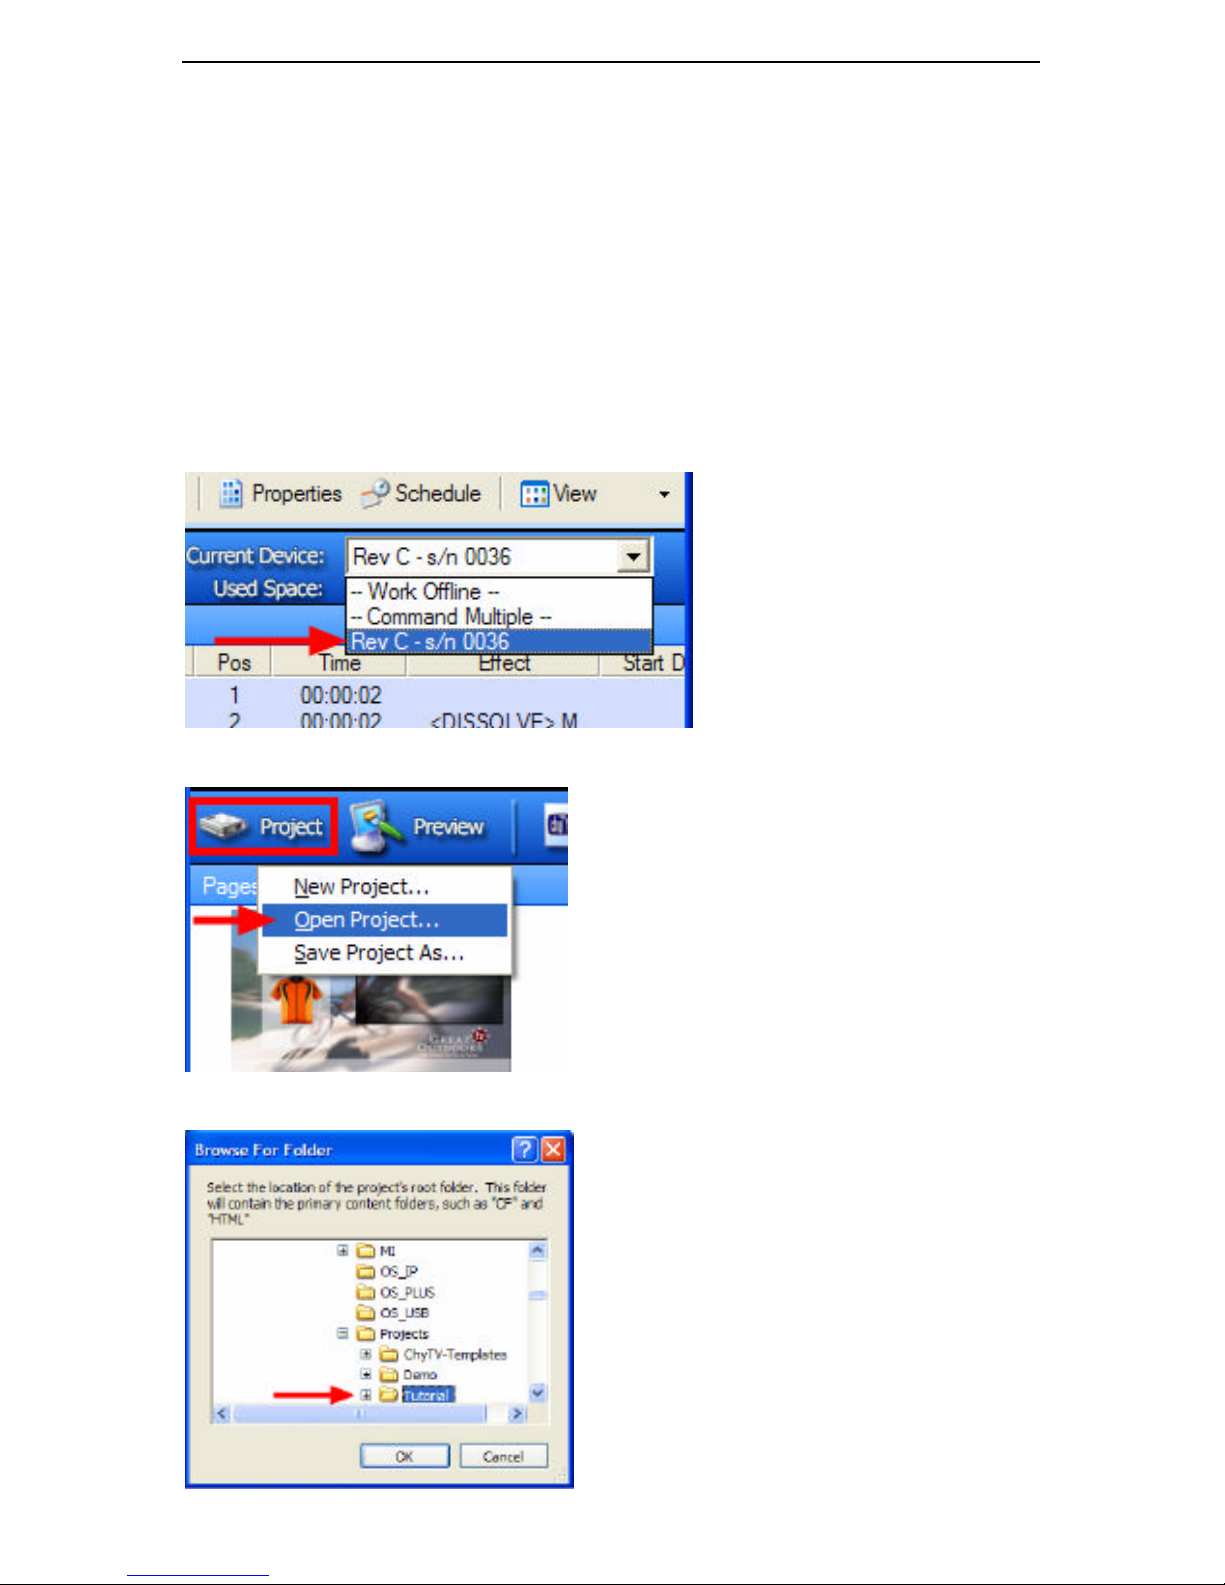
8 POWERPOINT QUICK START TUTORIAL
56
8 PowerPoint Quick Start Tutorial
Using PowerPoint and ChyTV Tools to create and manage your ChyTV projects is
much easier than you may think. This chapter quickly takes you through the page
creation process from start to finish and introduces you to many common concepts.
Everything used in this tutorial was included with your installation ChyTV Tools
installation and can be found in the ChyTV Tools / Projects folder.
8.1 Opening and Transferring a Project to the ChyTV Unit
8. Open ChyTV To ols.
9. From the Device List pulldown, select the ChyTV unit that will be used during this tutorial.
10. Click Project and select Open Project.
11. Select the Tutorial project from the file dialog box. Click OK.
Page 63
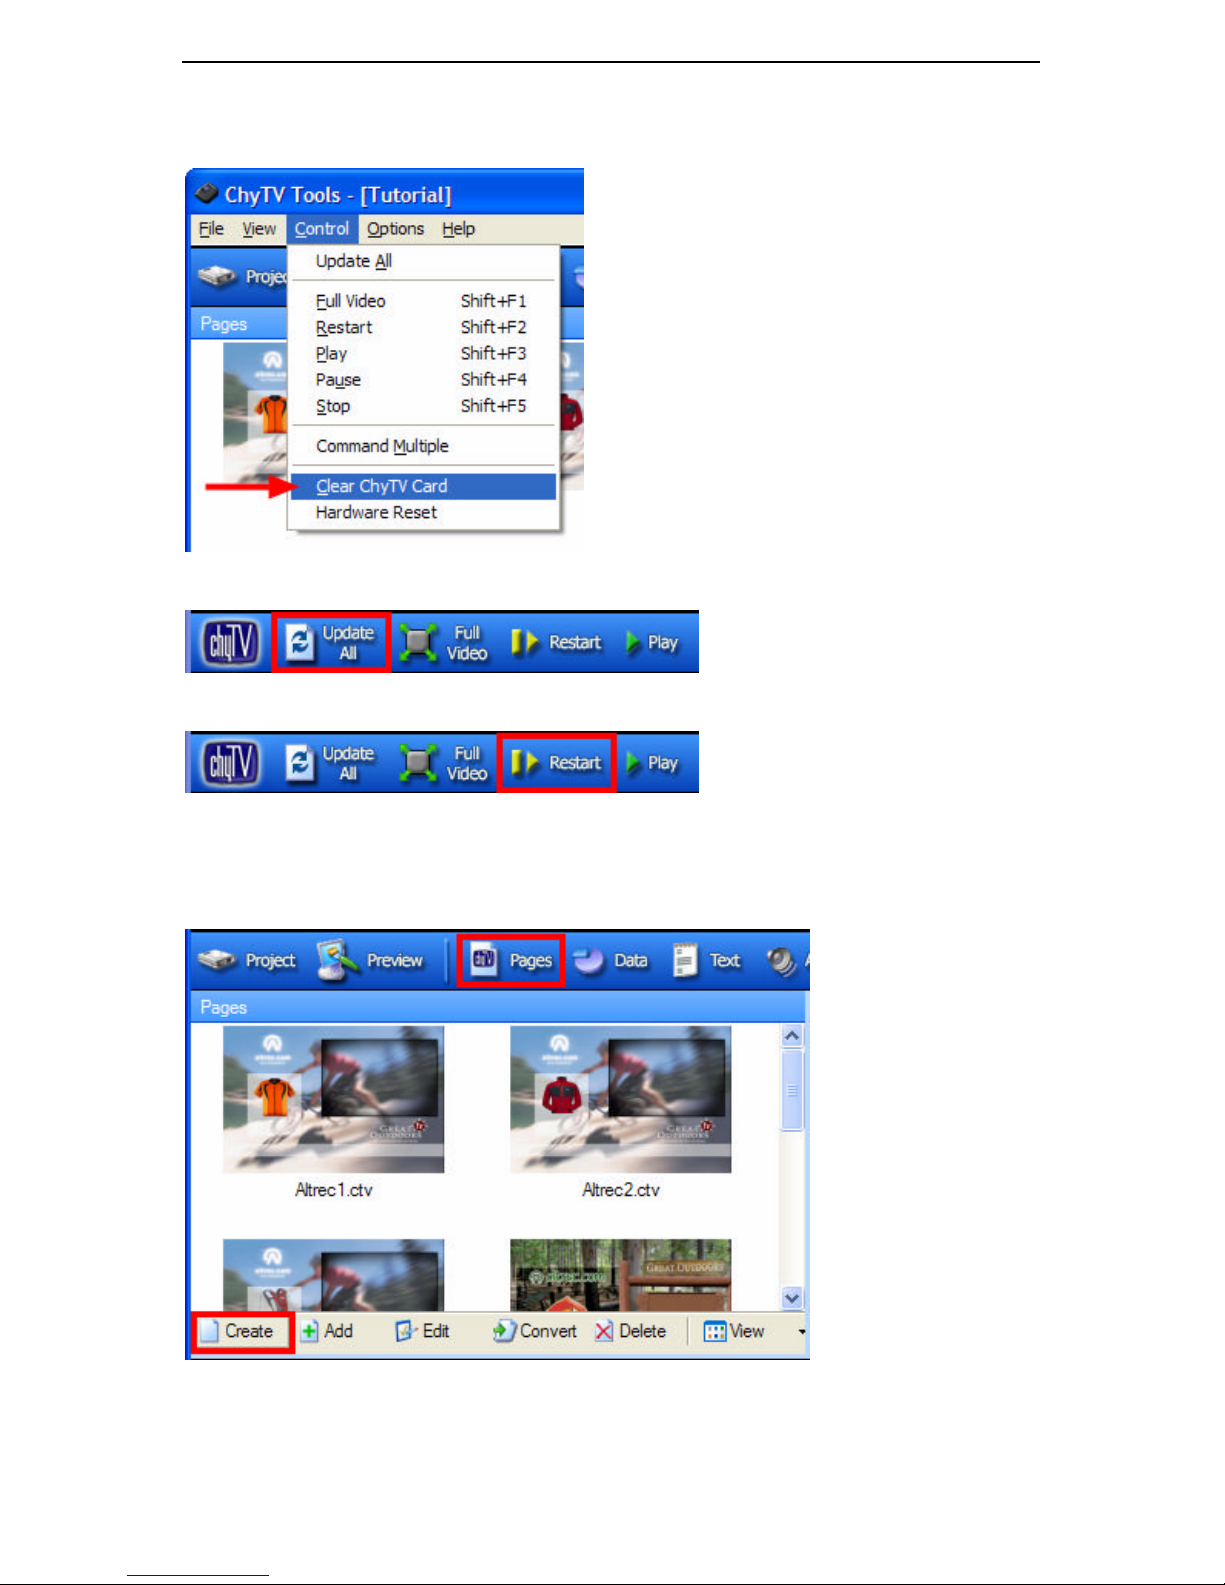
8 POWERPOINT QUICK START TUTORIAL
57
The full path for Tutorial is C:\Program Files \ ChyTV \ ChyTV Tools \ Projects \ Tutorial.
12. From the Control menu, select Clear ChyTV Card.
13. Click Update All to transfer the tutorial data to the ChyTV unit.
14. Click Restart to start the tutorial playlist.
8.2 Creating and Saving a New Page
6. In the ChyTV Tools Project / Pages window, click Create. PowerPoint with the Elements
add-in will launch.
7. In Elements, click Create New Page, then click Blank Page.
Page 64
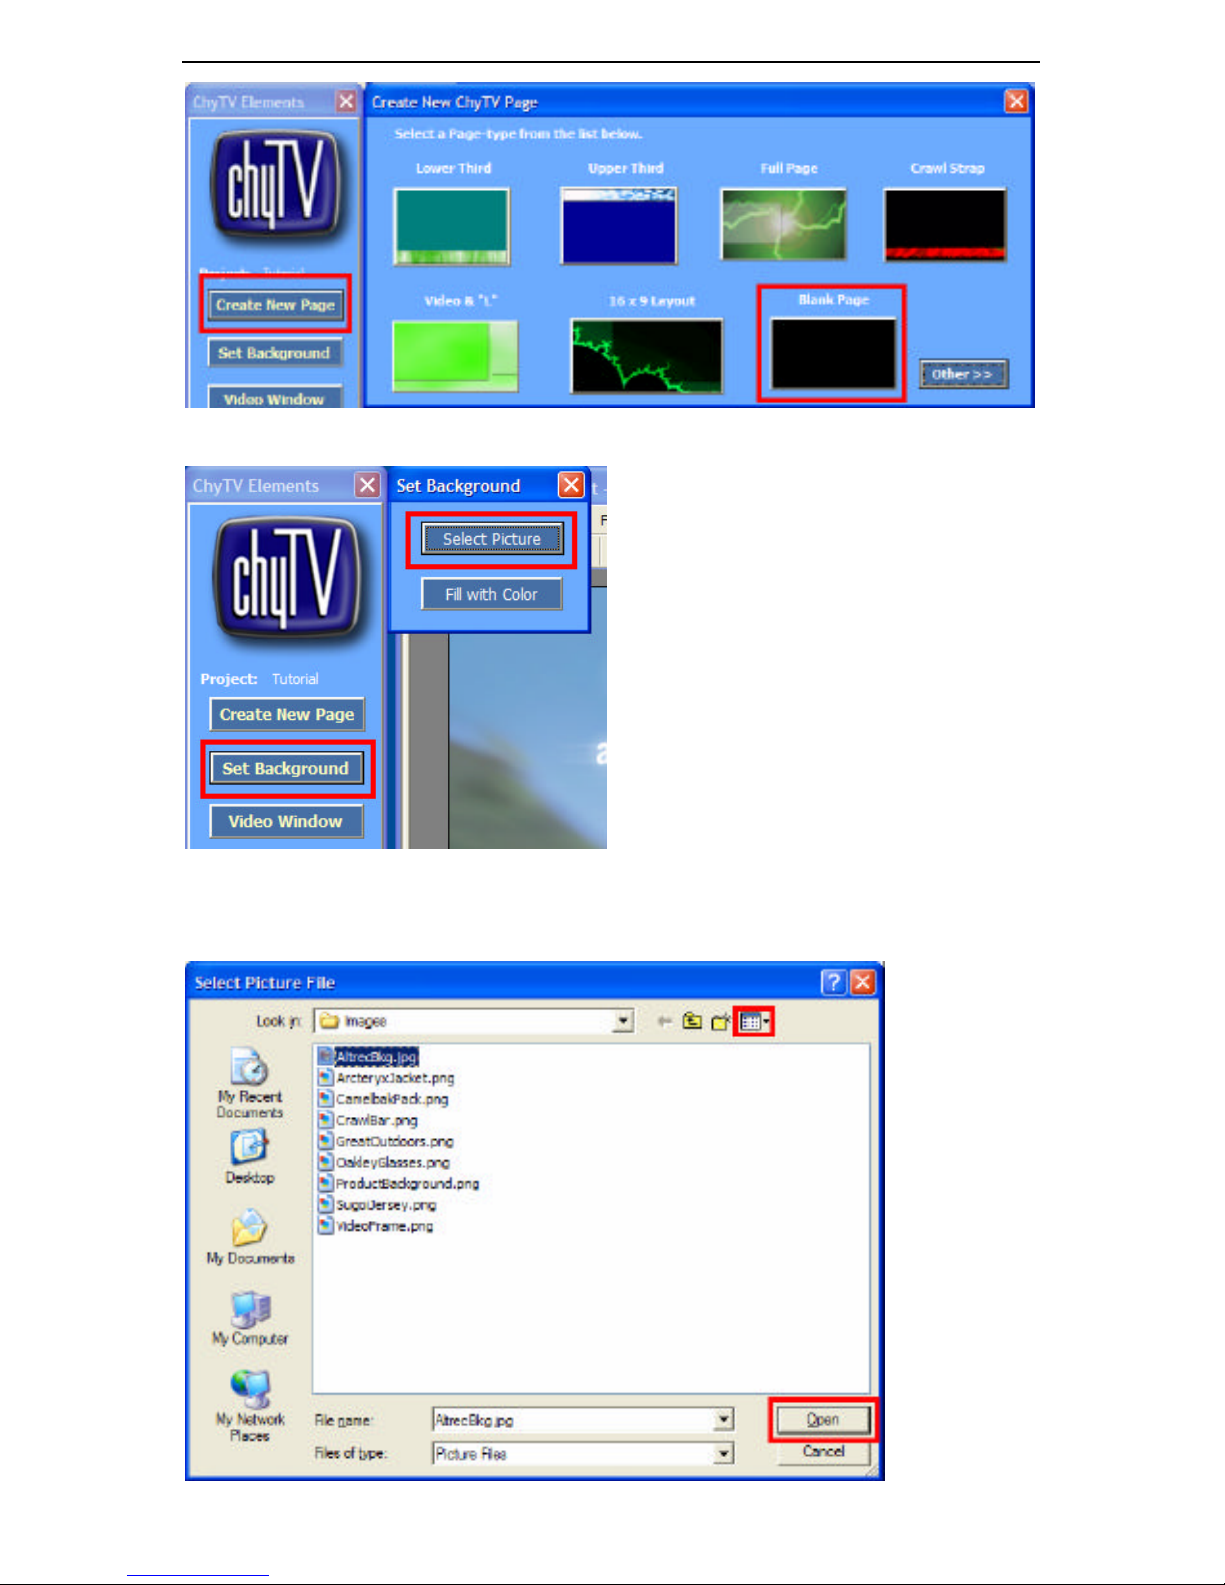
8 POWERPOINT QUICK START TUTORIAL
58
8. In Elements, click Set Background. Then click Select Picture.
9. Navigate to Program Files / ChyTV / ChyTV Tools / Projects / Tutorial / Images. Select
AltrecBkg.jpg and click Open. To view thumbnails of the images, select the thumbnail
view in the View toolbar of the Windows file dialog box.
Page 65
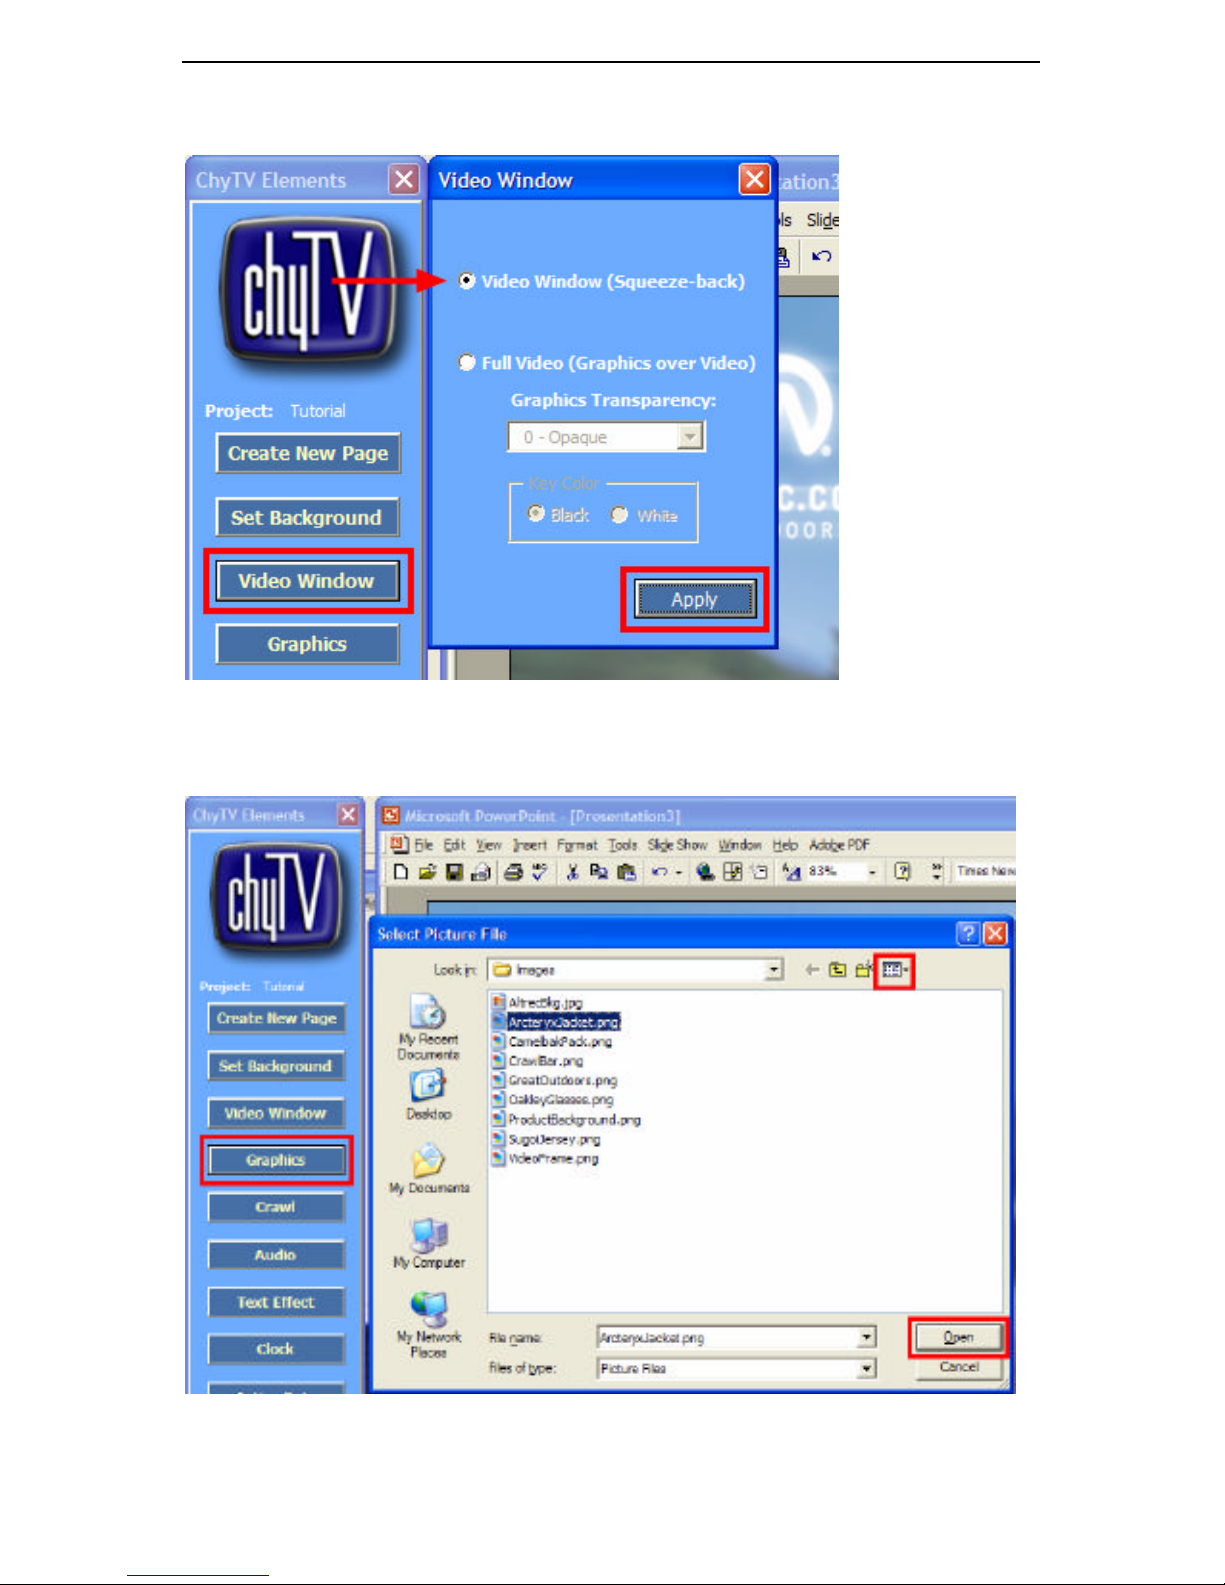
8 POWERPOINT QUICK START TUTORIAL
59
10. In Elements, click Video Window, select Video Window (Squeeze-back), then click
Apply.
11. In Elements, click Graphics. Select ArcteryxJacket.png from the file dialog box, then
click Open. Again, to view thumbnails of the images, select the thumbnail view in the
Windows dialog box.
12. Place the ArcteryxJacket.png graphic below the altrec.com logo. Your new page should now
look something like this:
Page 66
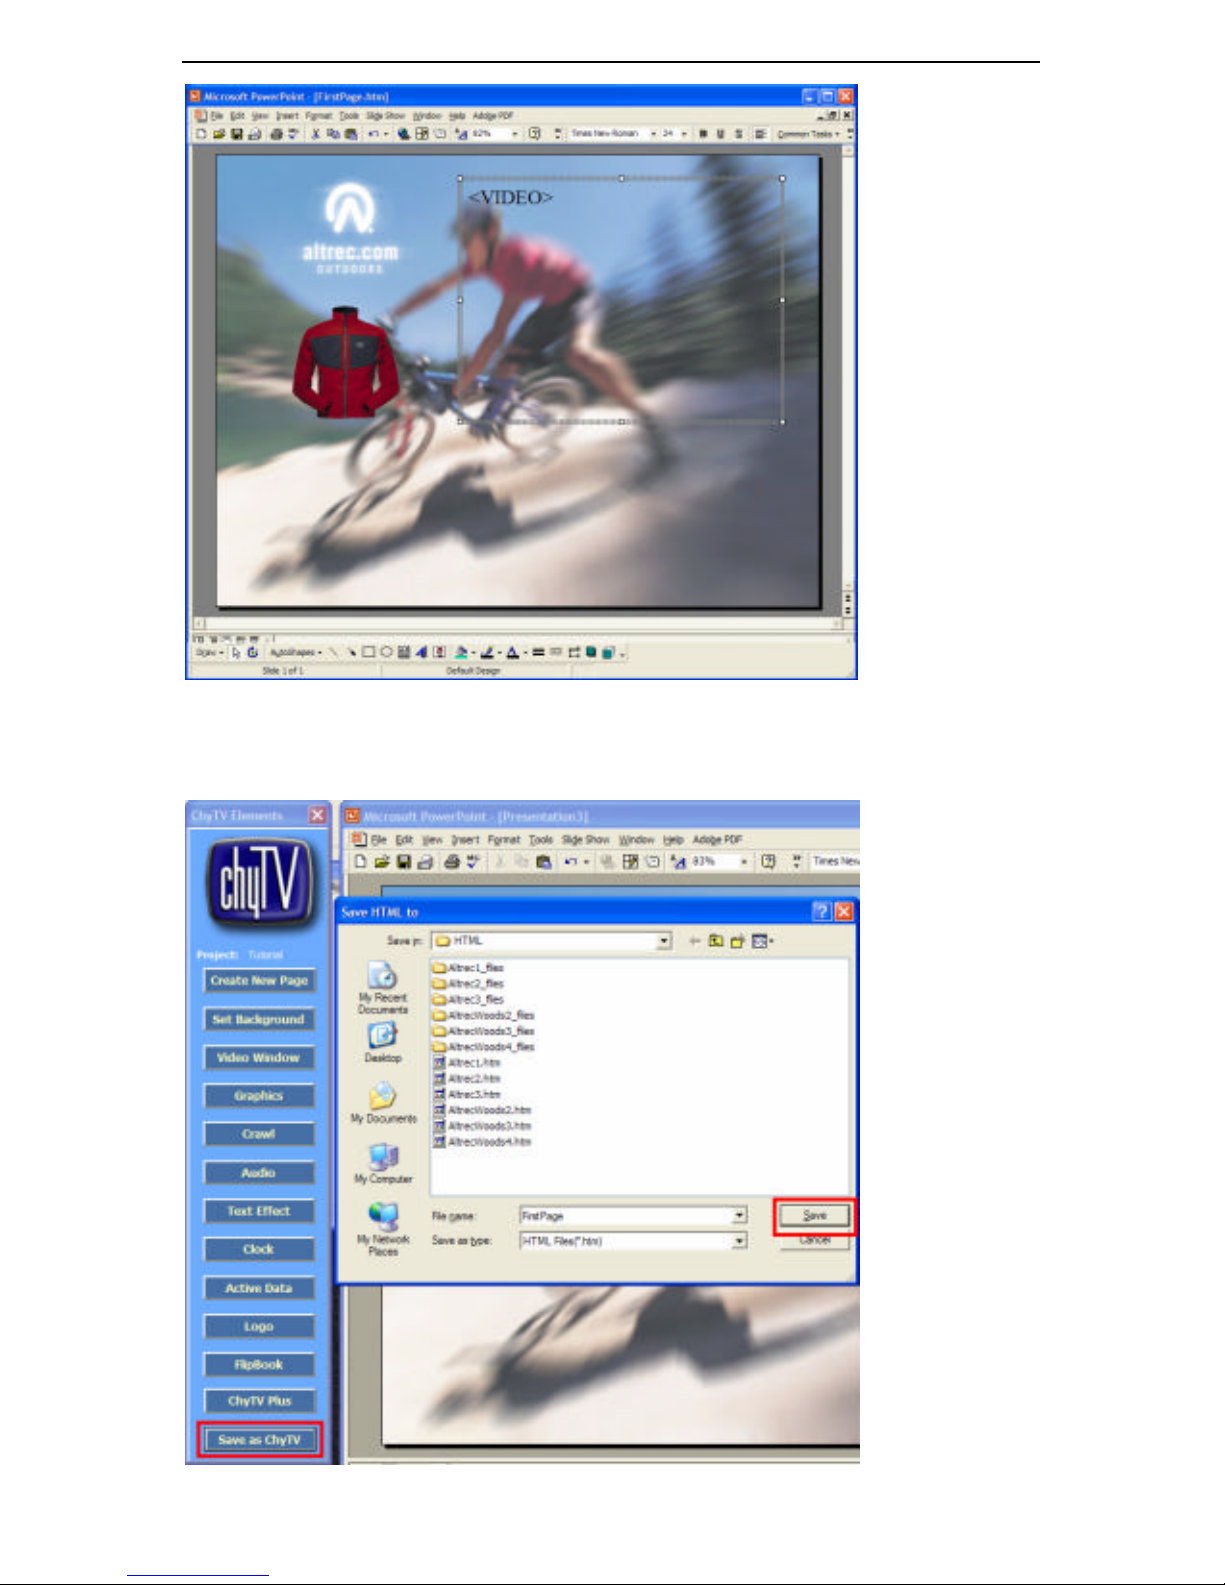
8 POWERPOINT QUICK START TUTORIAL
60
13. In Elements, click Save As ChyTV. Save the file as FirstPage.htm. This will save
your PowerPoint html page, convert your it to a ChyTV .ctv page, and add it to your
project.
Page 67
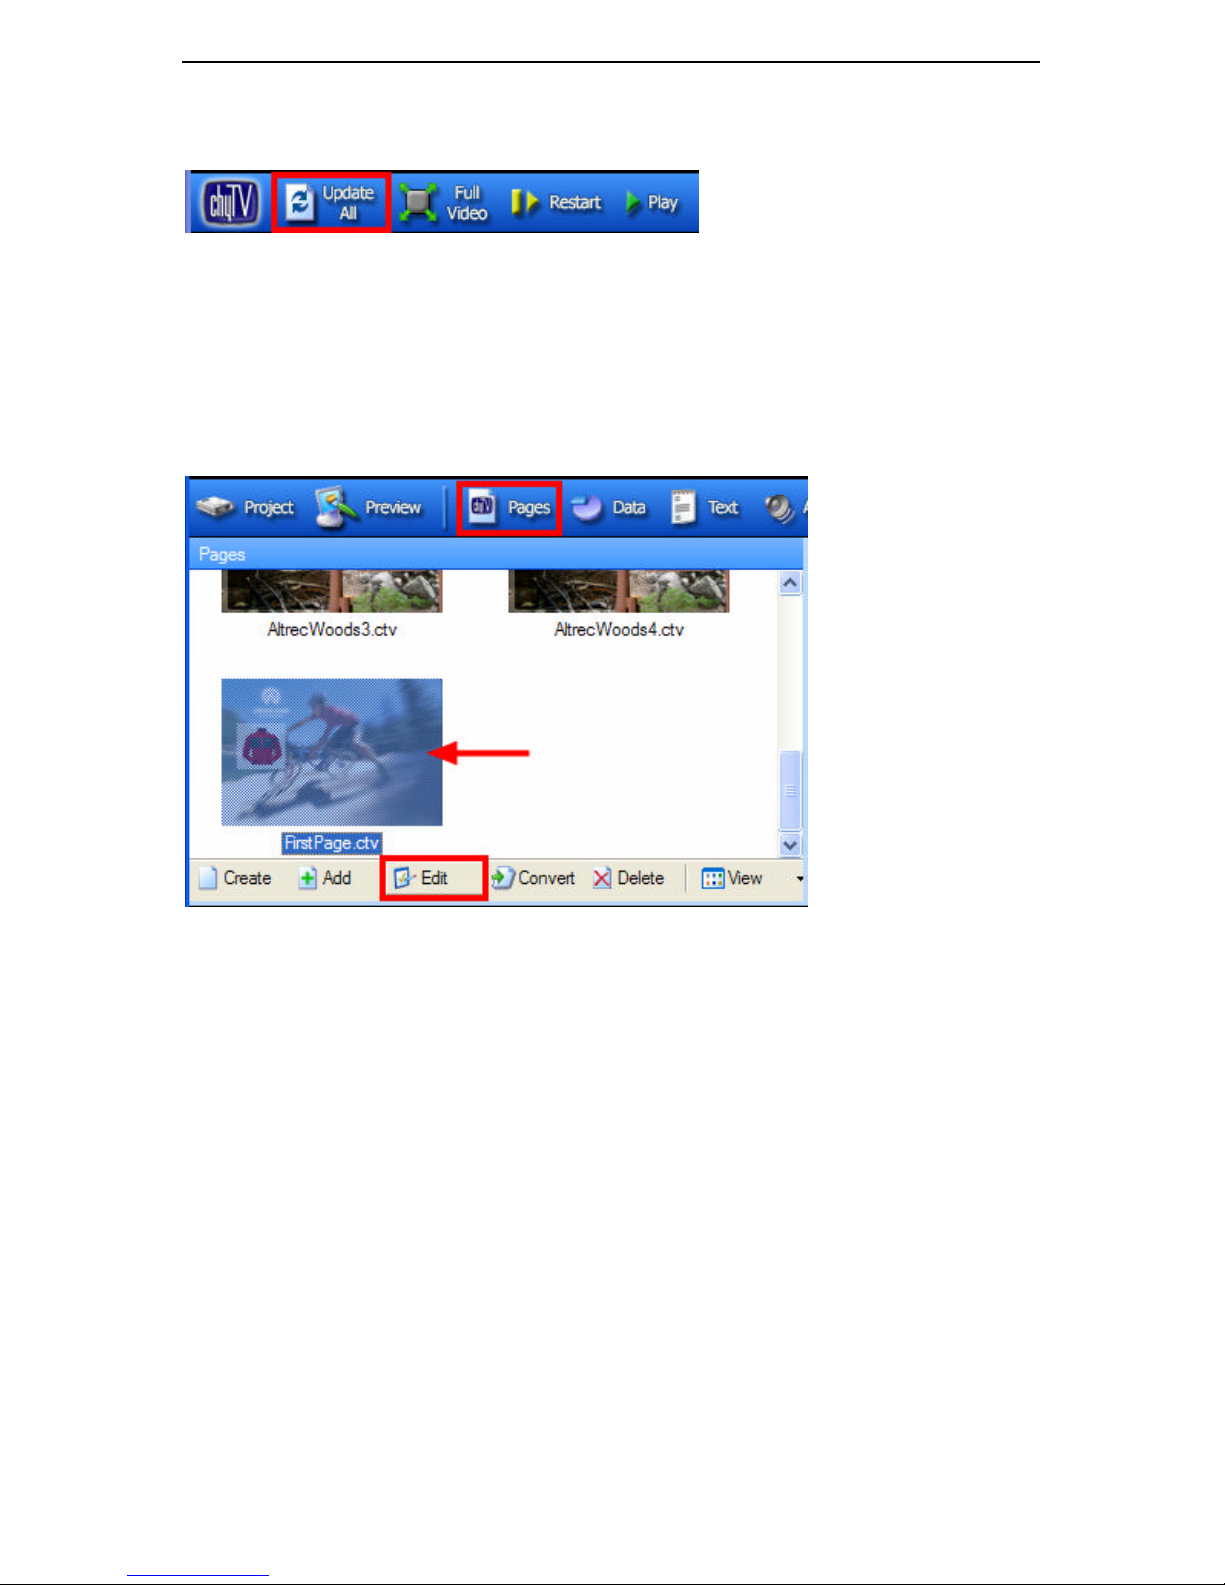
8 POWERPOINT QUICK START TUTORIAL
61
14. Return to ChyTV Tools.
15. In Tools, click Update All. This transfers all modified content directly to the ChyTV.
19. Double-click FirstPage.ctv in the lower left “ChyTV Pages” window to preview
your page on ChyTV’s video output.
8.3 Adding Active Data to the Page
9. If FirstPage.htm is not already open in PowerPoint, in the Project/Pages window of ChyTV
Tools, click on FirstPage.ctv then click Edit. Otherwise, simply flip back to
PowerPoint from ChyTV Tools by clicking on PowerPoint’s task bar.
10. In Elements, click Active Data. Enter Slot#: 10, Effect: 4-Slide Down, Speed: 3
Medium . Click Apply.
Page 68
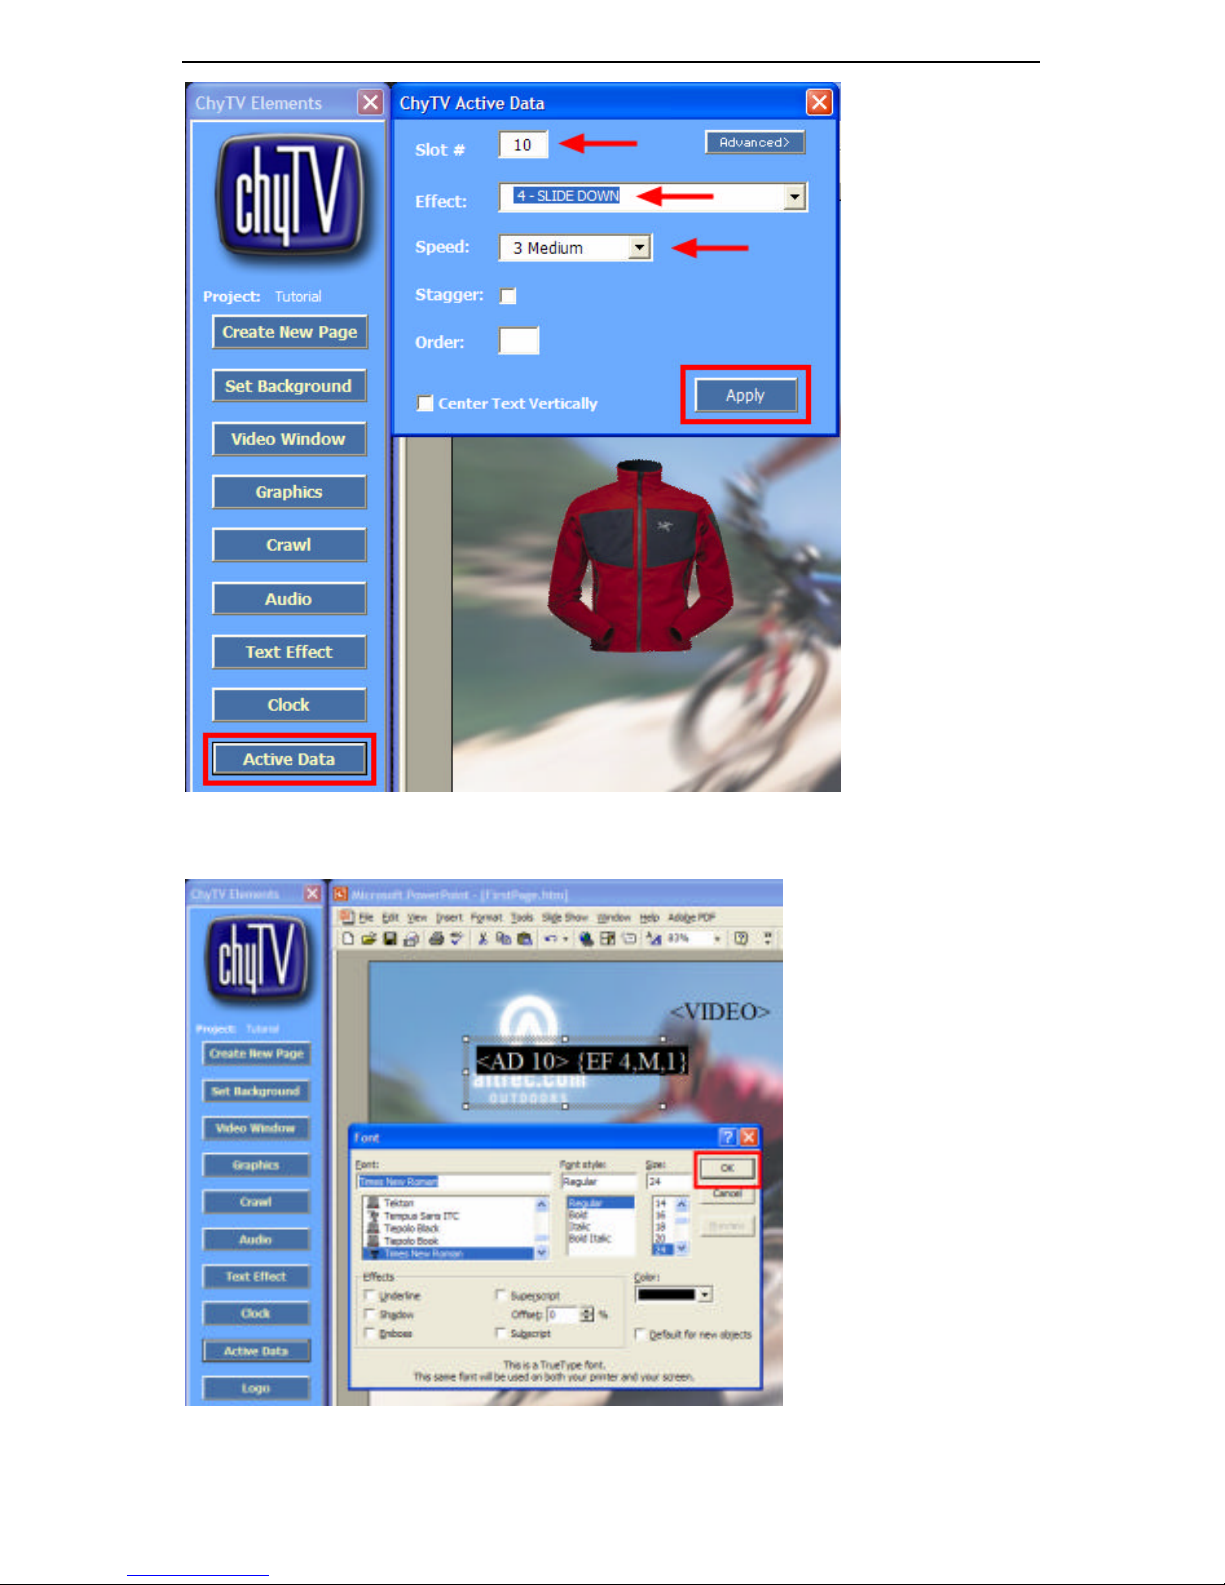
8 POWERPOINT QUICK START TUTORIAL
62
11. After clicking Apply, the Font Properties dialog box appears. Keep the font defaults and click
OK.
12. In PowerPoint, position and center the text box under the Jacket graphic. Select Alignment >
Center Justify from the Format menu.
Page 69
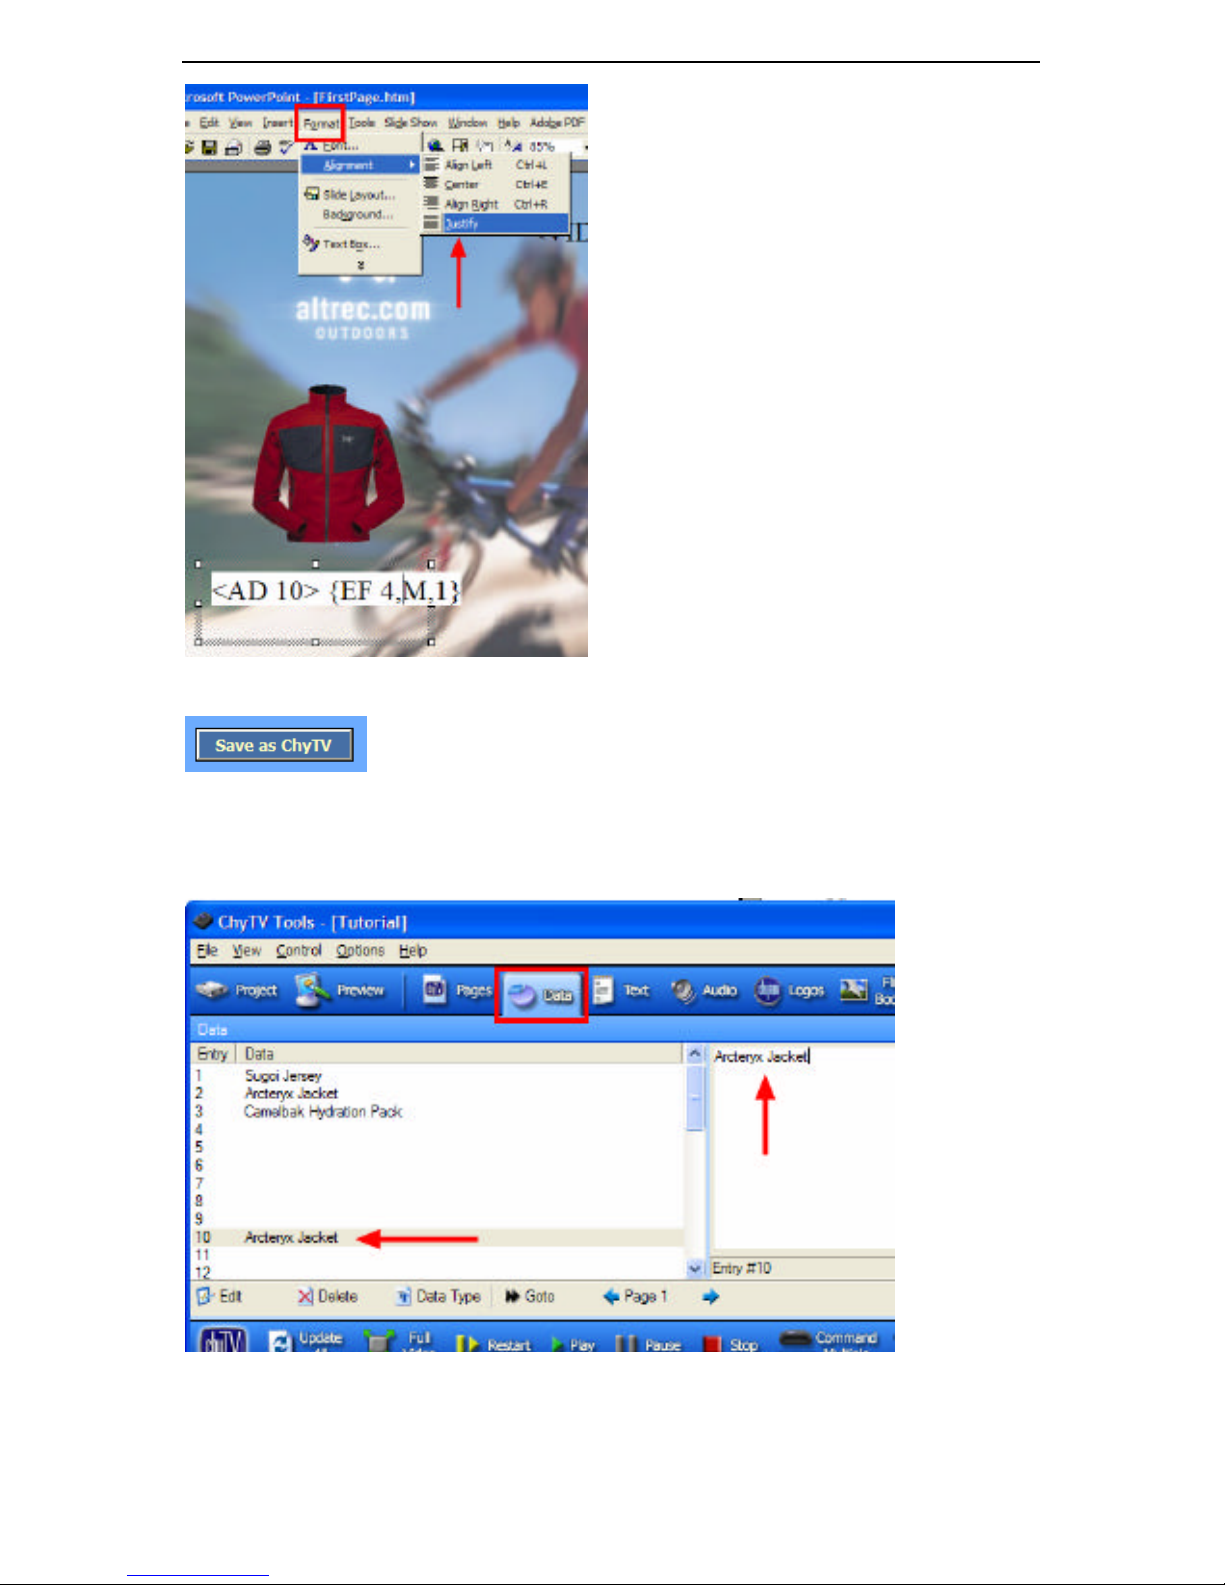
8 POWERPOINT QUICK START TUTORIAL
63
13. In Elements, select Save As ChyTV. Then click Save.
14. Return to ChyTV Tools.
15. Select the Data view tab. Select Data slot 10 and enter “Arcteryx Jacket” (no
parenthesis) in the text edit window.
16. Click Update All. Verify that Active Data slot# 10 on the ChyTV unit has been updated.
Page 70
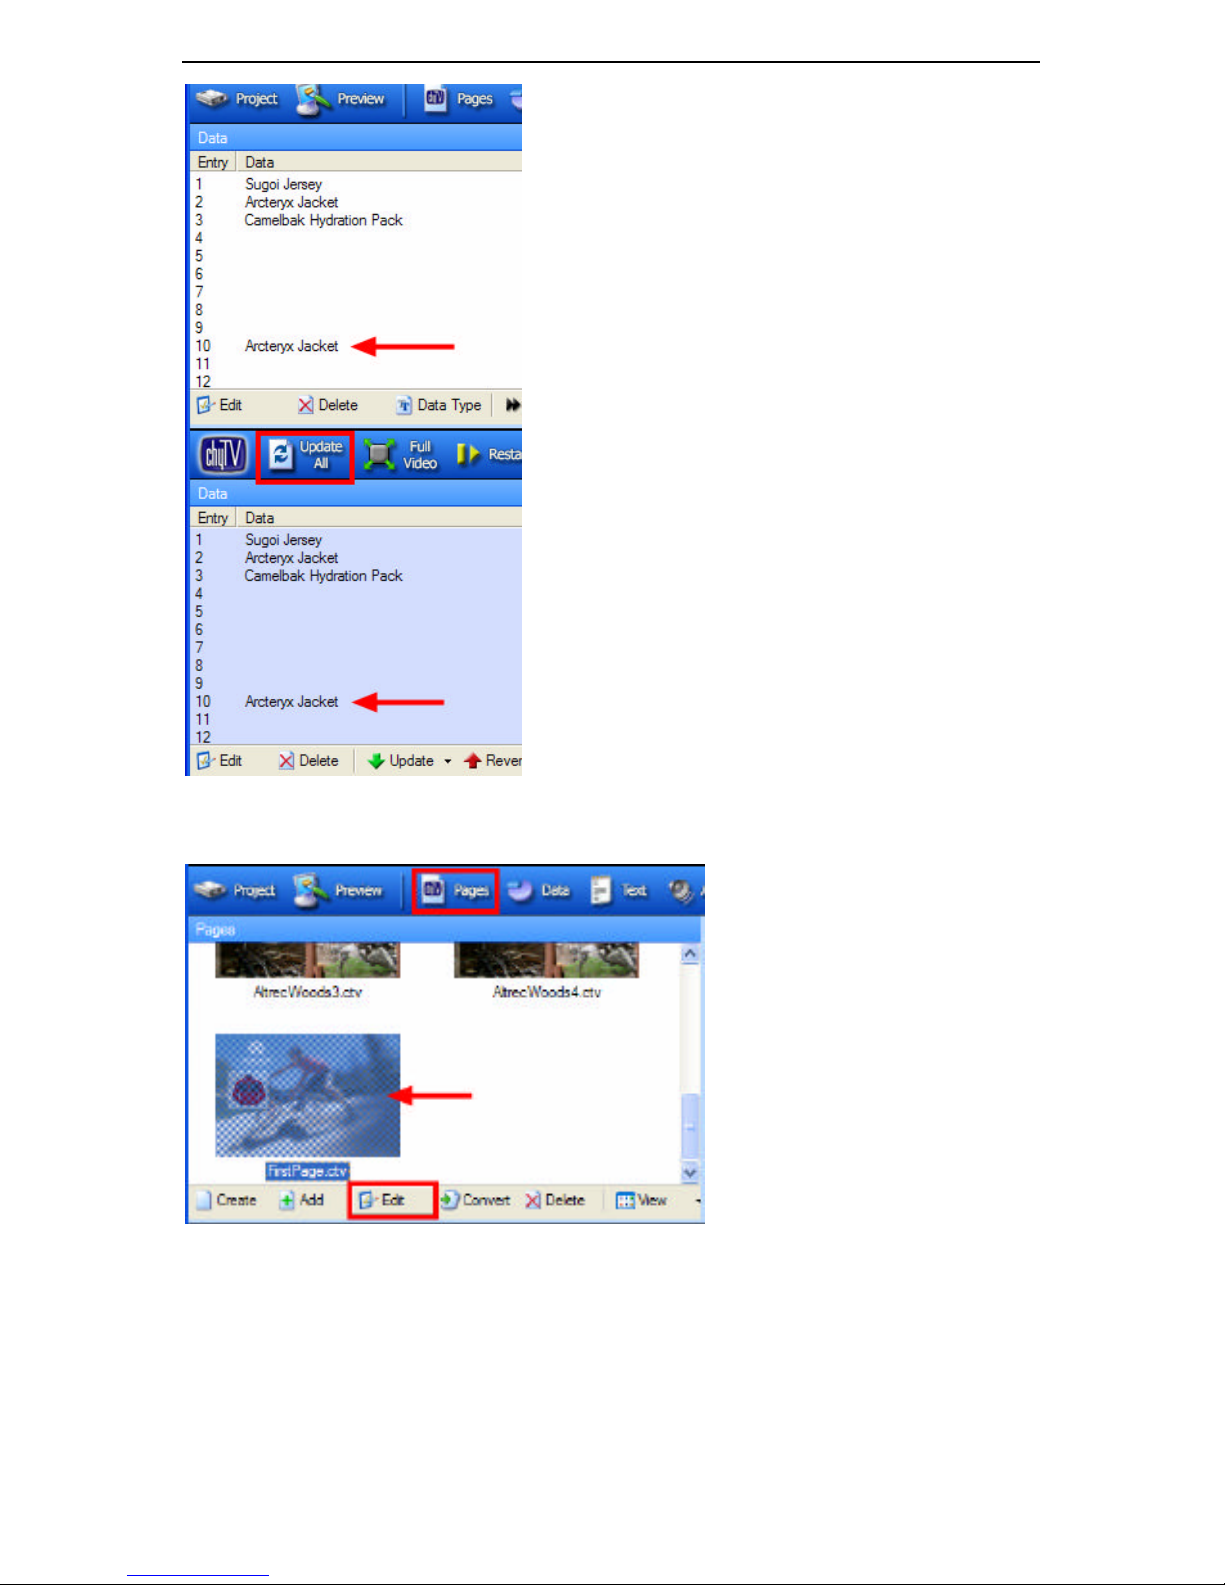
8 POWERPOINT QUICK START TUTORIAL
64
17. Select the Pages view tab. Double-click FirstPage.ctv to preview your page on
ChyTV’s video output.
18. If FirstPage.htm is not already open in PowerPoint, in the Project/Pages window of ChyTV
Tools, click on FirstPage.ctv then click Edit, as in step 1.
19. In PowerPoint, click the border of the <AD 10> text box to select it. Select Arial or another
font and a new color using the Font and Font Color toolbars.
Page 71
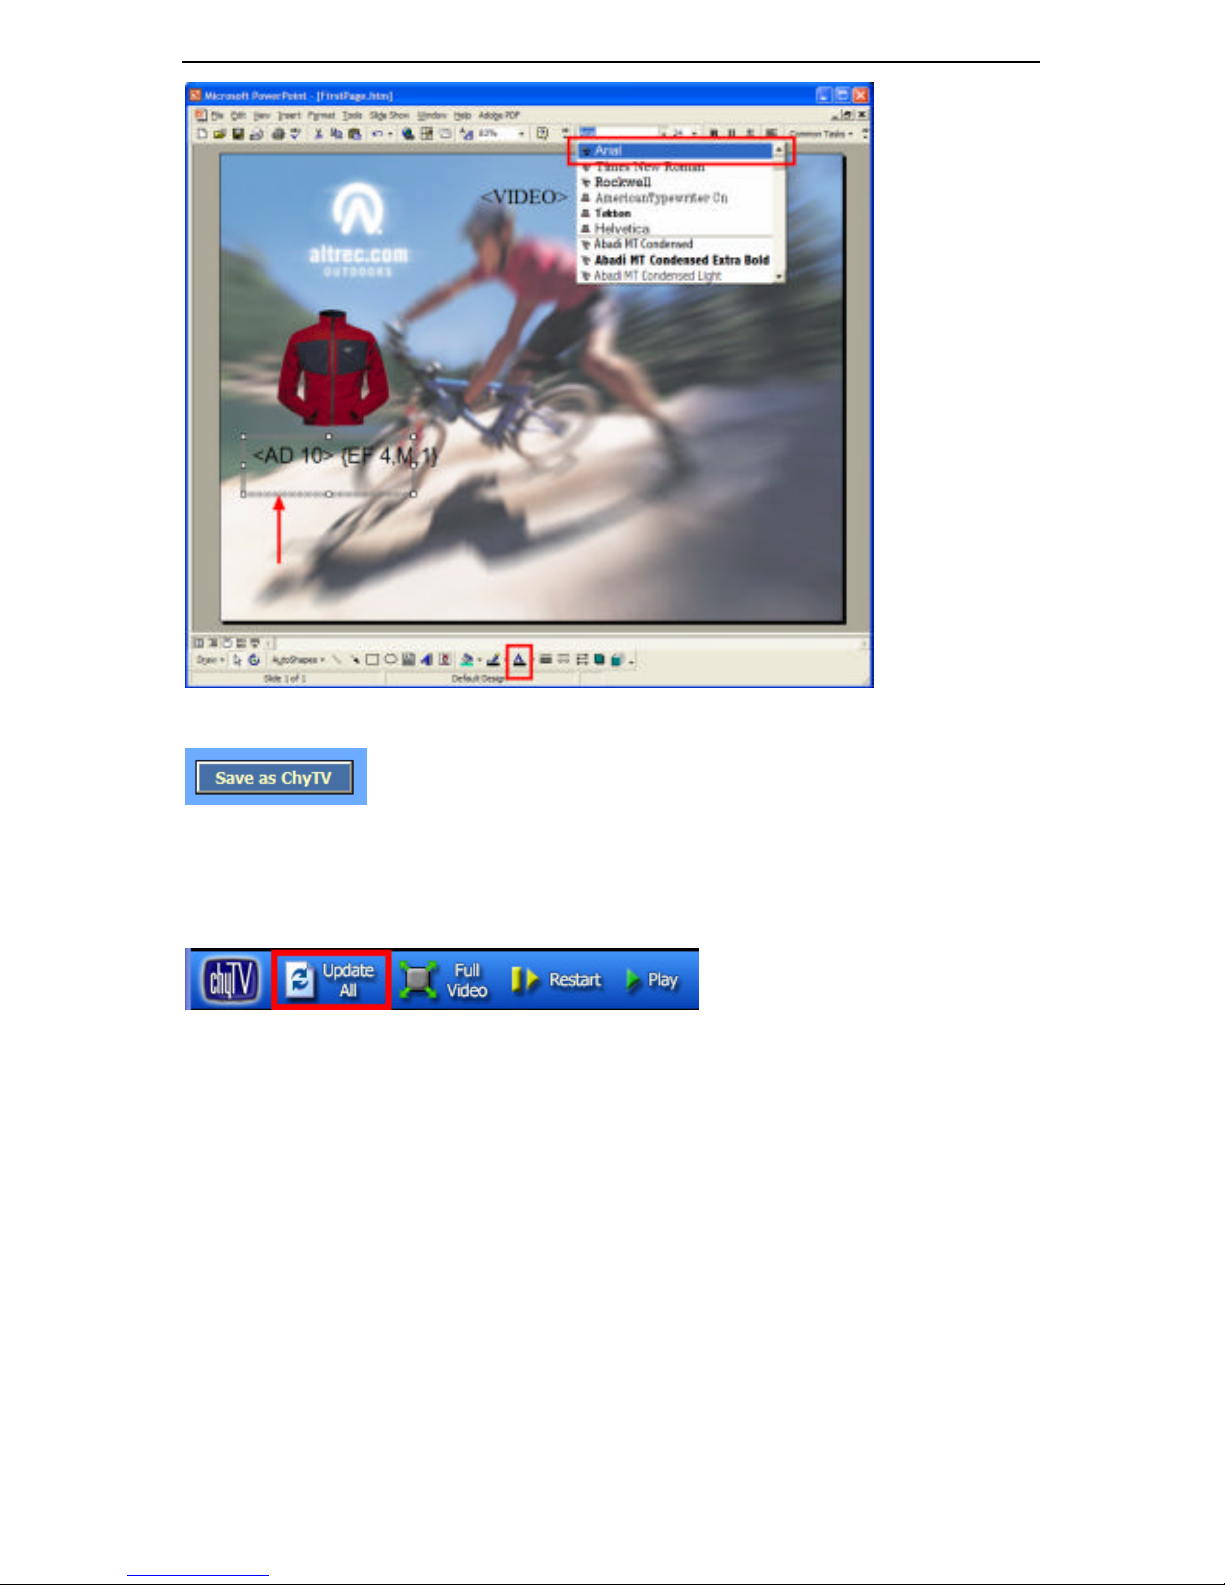
8 POWERPOINT QUICK START TUTORIAL
65
20. In Elements, click Save As ChyTV. Then click Save.
21. Return to ChyTV Tools.
22. Click Update All.
23. Double-click FirstPage.ctv to preview your page on the ChyTV’s video output.
Page 72
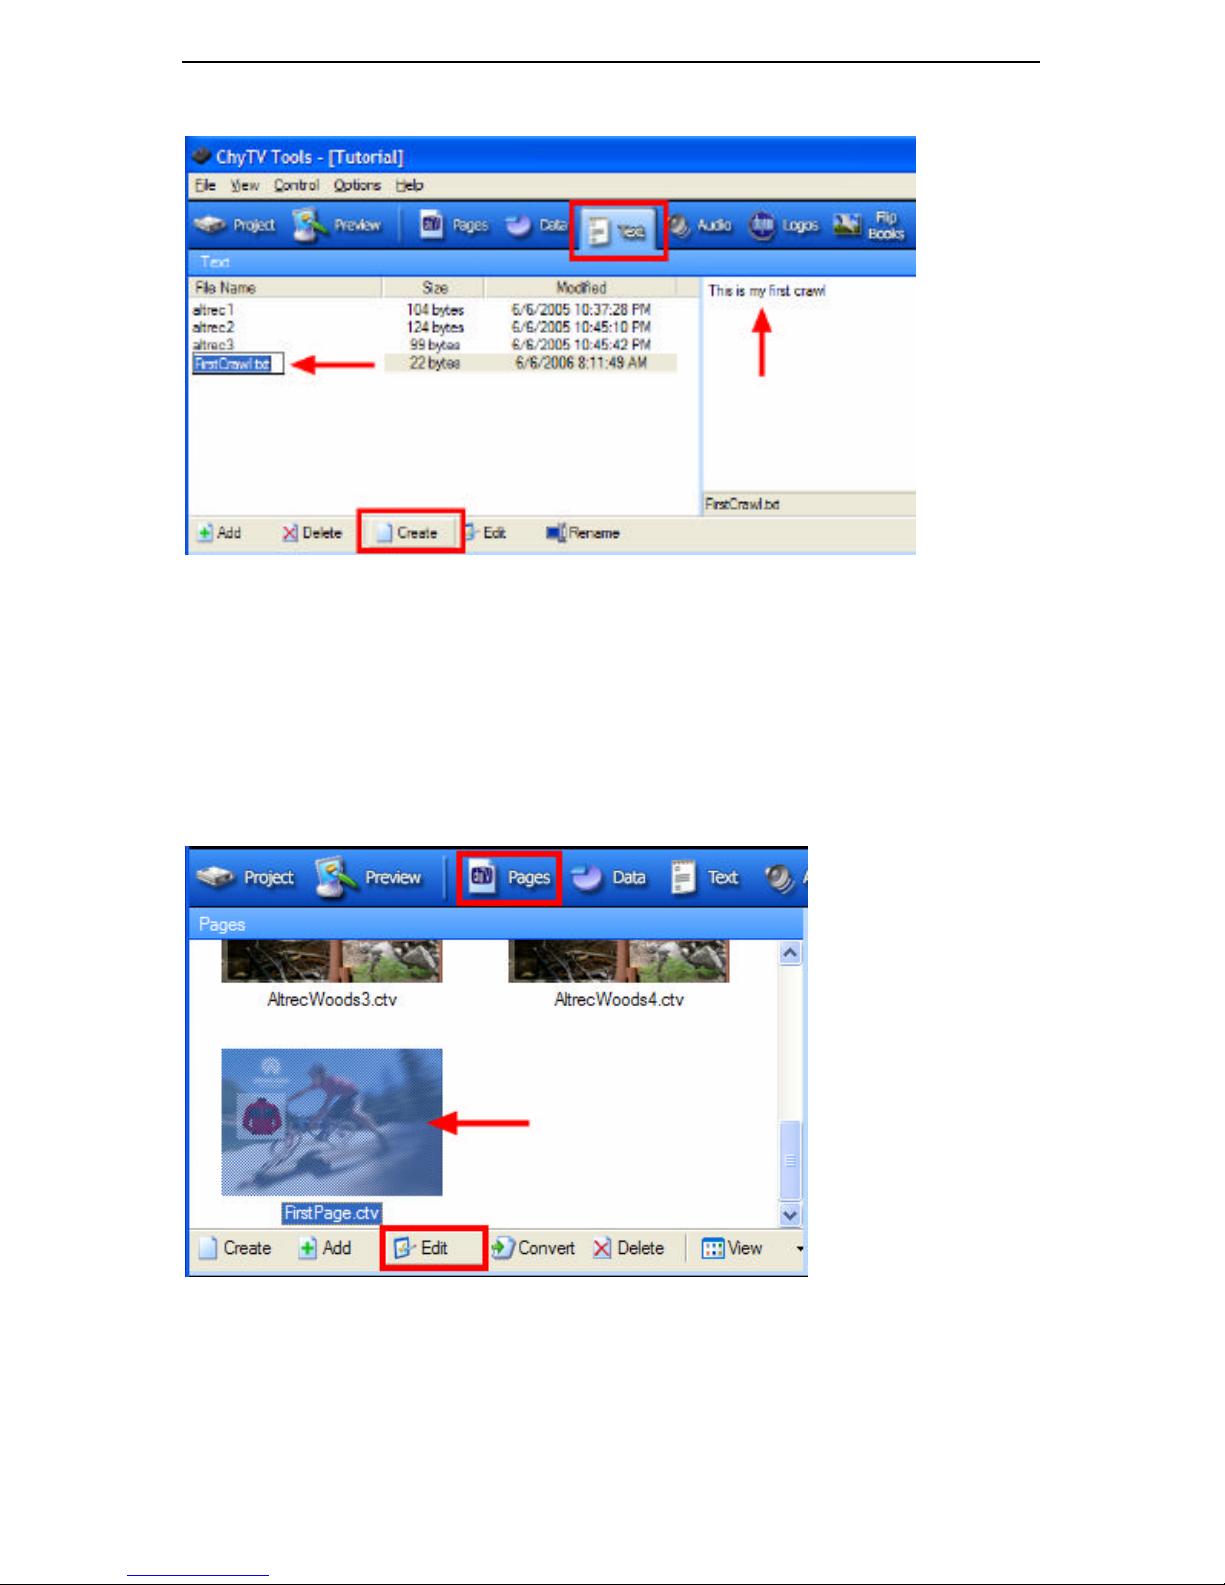
8 POWERPOINT QUICK START TUTORIAL
66
8.4 Adding Crawl Data to Pages
1. In Tools, select the Text view tab.
2. In the Project / Text window, click Create.
3. Type a new text filename, ‘FirstCrawl.txt’ (no parenthesis).
4. Click in the Edit window and type “This is my first crawl” (no parenthesis). Click on the
filename when finished editing the text.
5. Select the Pages view tab. If FirstPage.htm is not already open in PowerPoint, in the
Project/Pages window of ChyTV Tools, click on FirstPage.ctv then click Edit.
6. In Elements, click Crawl. In the Crawl dialog box, select Speed: Medium. Check the
Soft Mask checkbox.
7. Click Set Crawl File. Select FirstCrawl.txt. Click Open.
Page 73
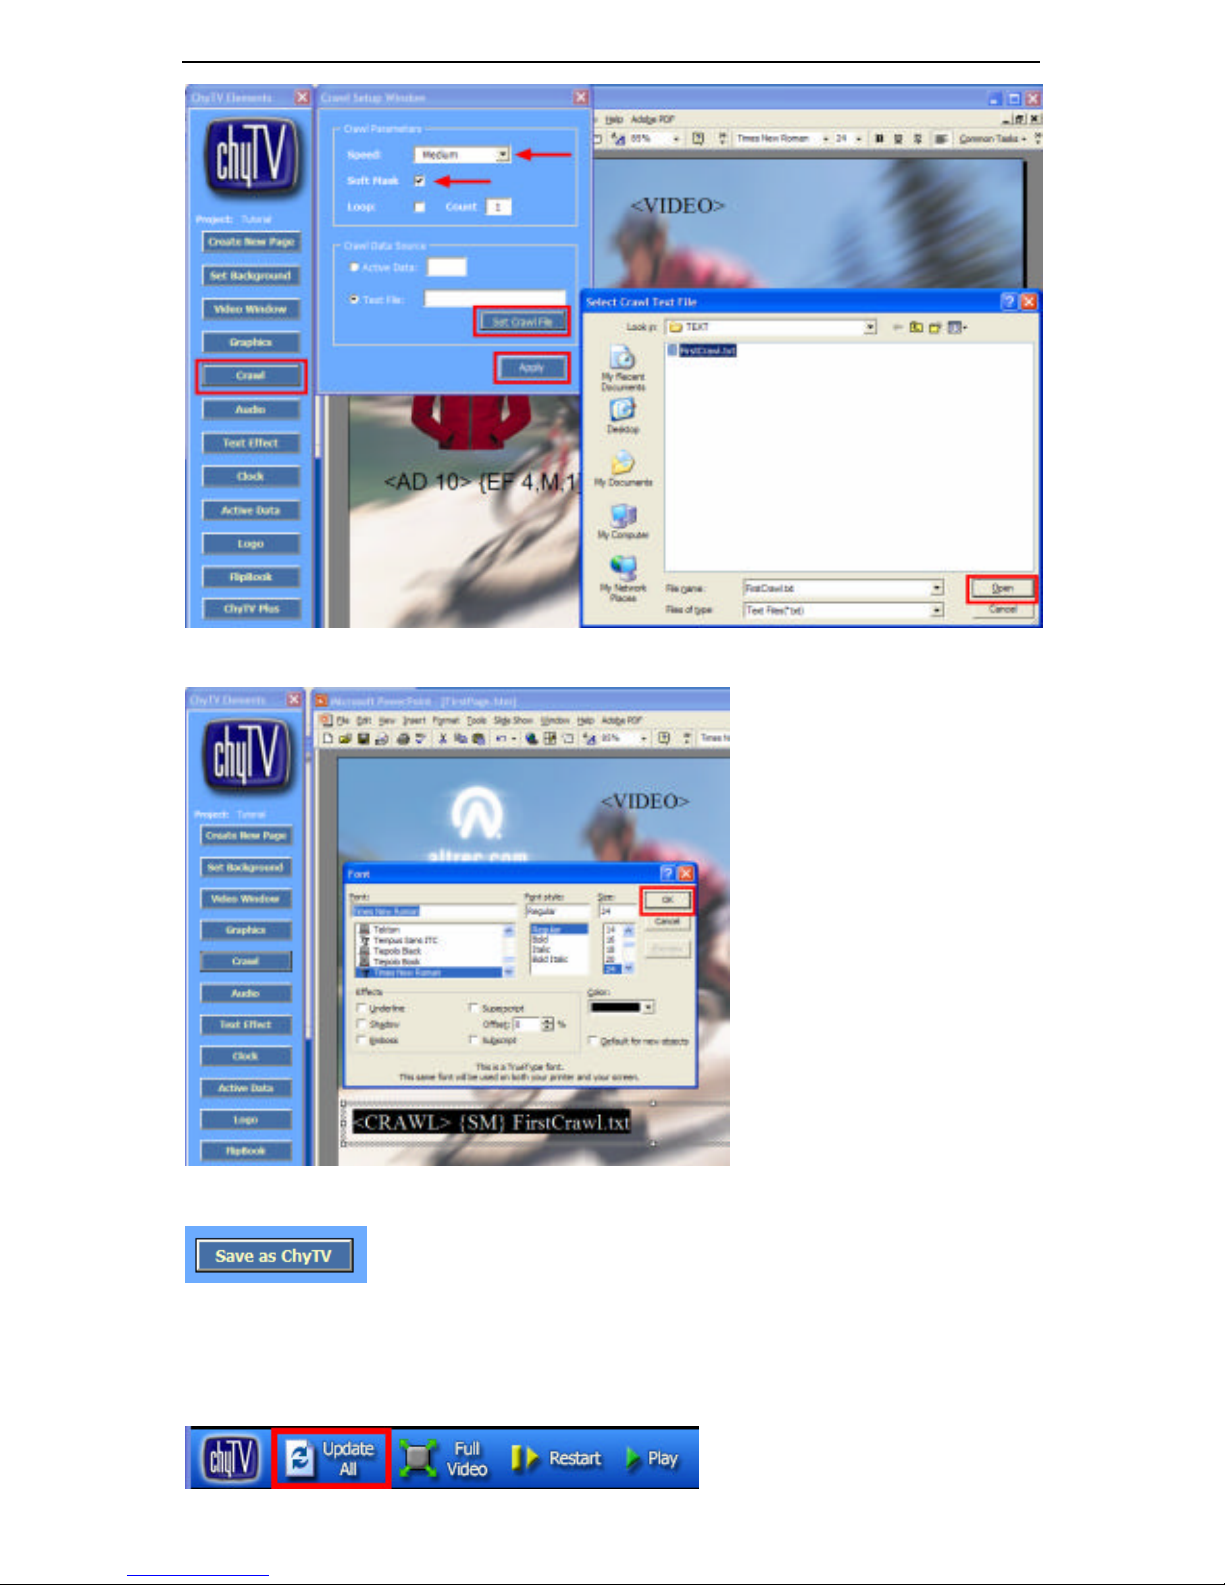
8 POWERPOINT QUICK START TUTORIAL
67
8. From the Font dialog box, select the desired font, font size, and font color. Click OK.
9. In Elements, click Save As ChyTV. Then click Save.
10. Return to ChyTV Tools.
11. Click Update All.
12. Double-click FirstPage.ctv to preview your page on the ChyTV’s video output.
Page 74
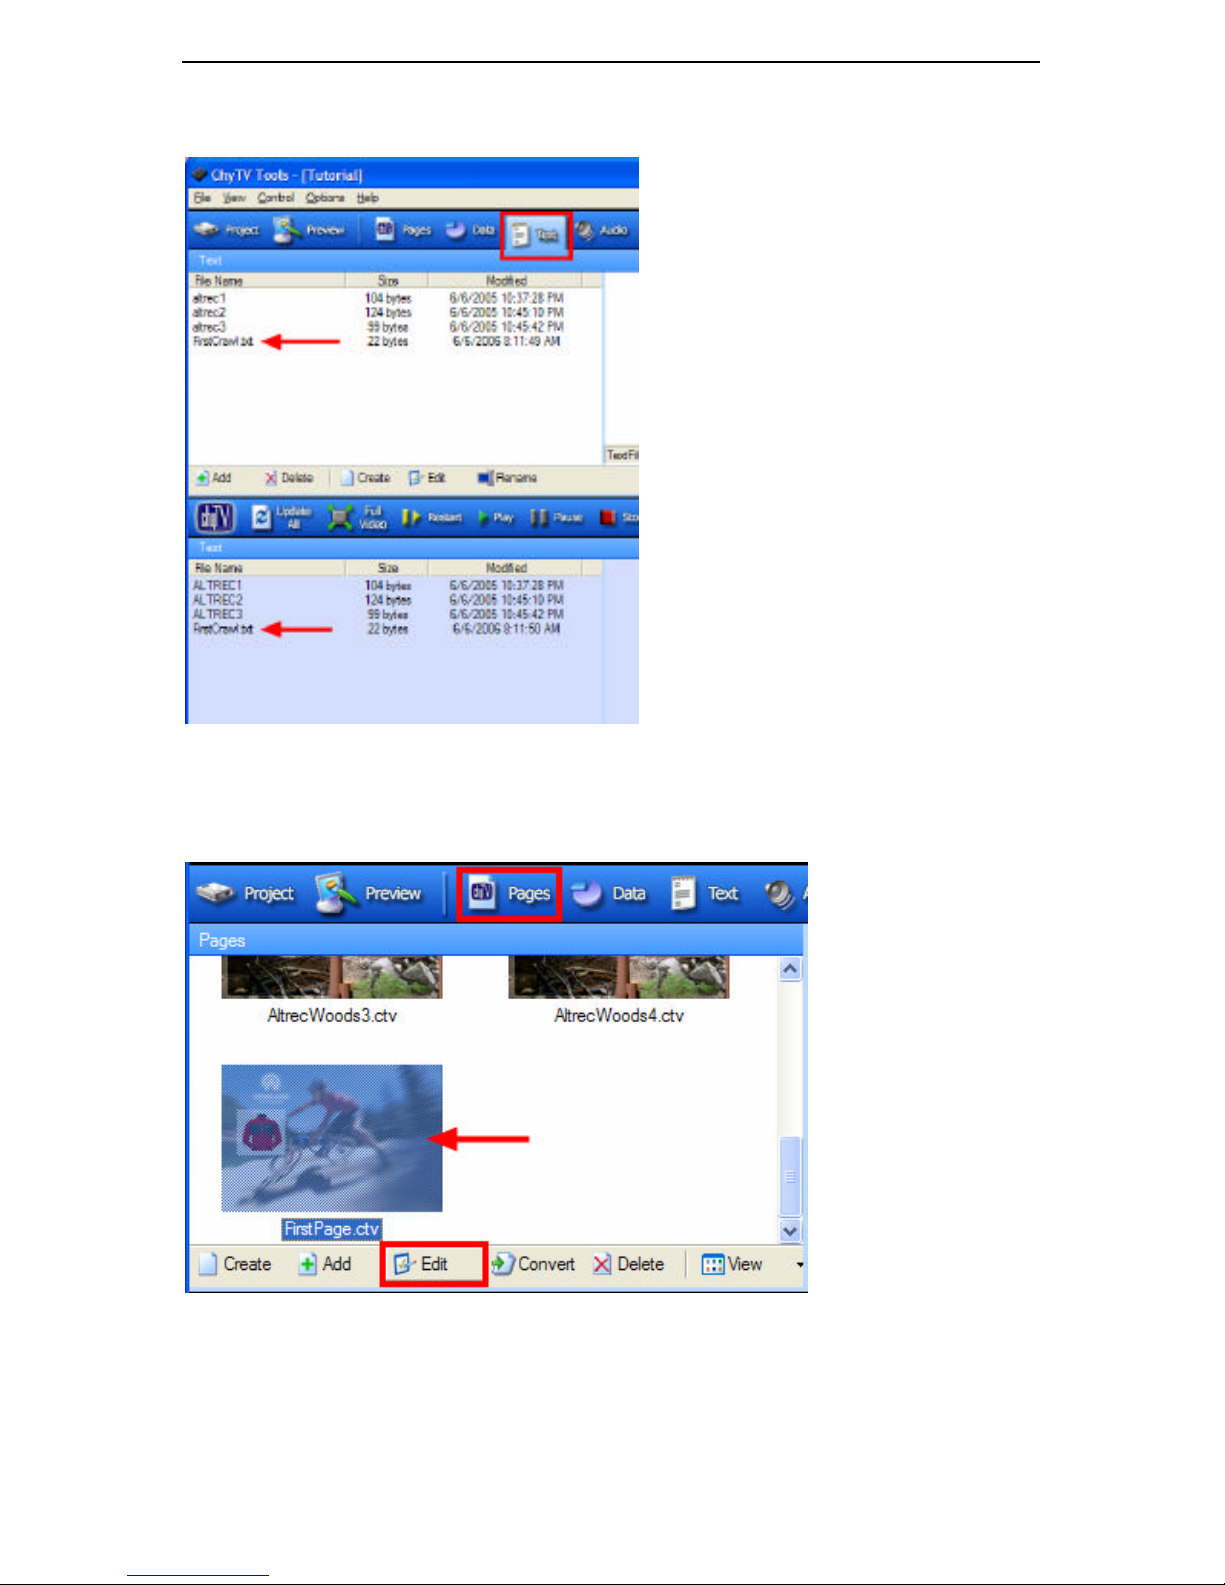
8 POWERPOINT QUICK START TUTORIAL
68
13. You can confirm that the text file has been added by clicking the Text tab and seeing
FirstCrawl.txt in both the Project and ChyTV Text windows.
8.5 Adding Artistic Elements to Pages.
16. If FirstPage.htm is not already open in PowerPoint, in the Project/Pages window of ChyTV
Tools, click on FirstPage.ctv then click Edit.
Page 75
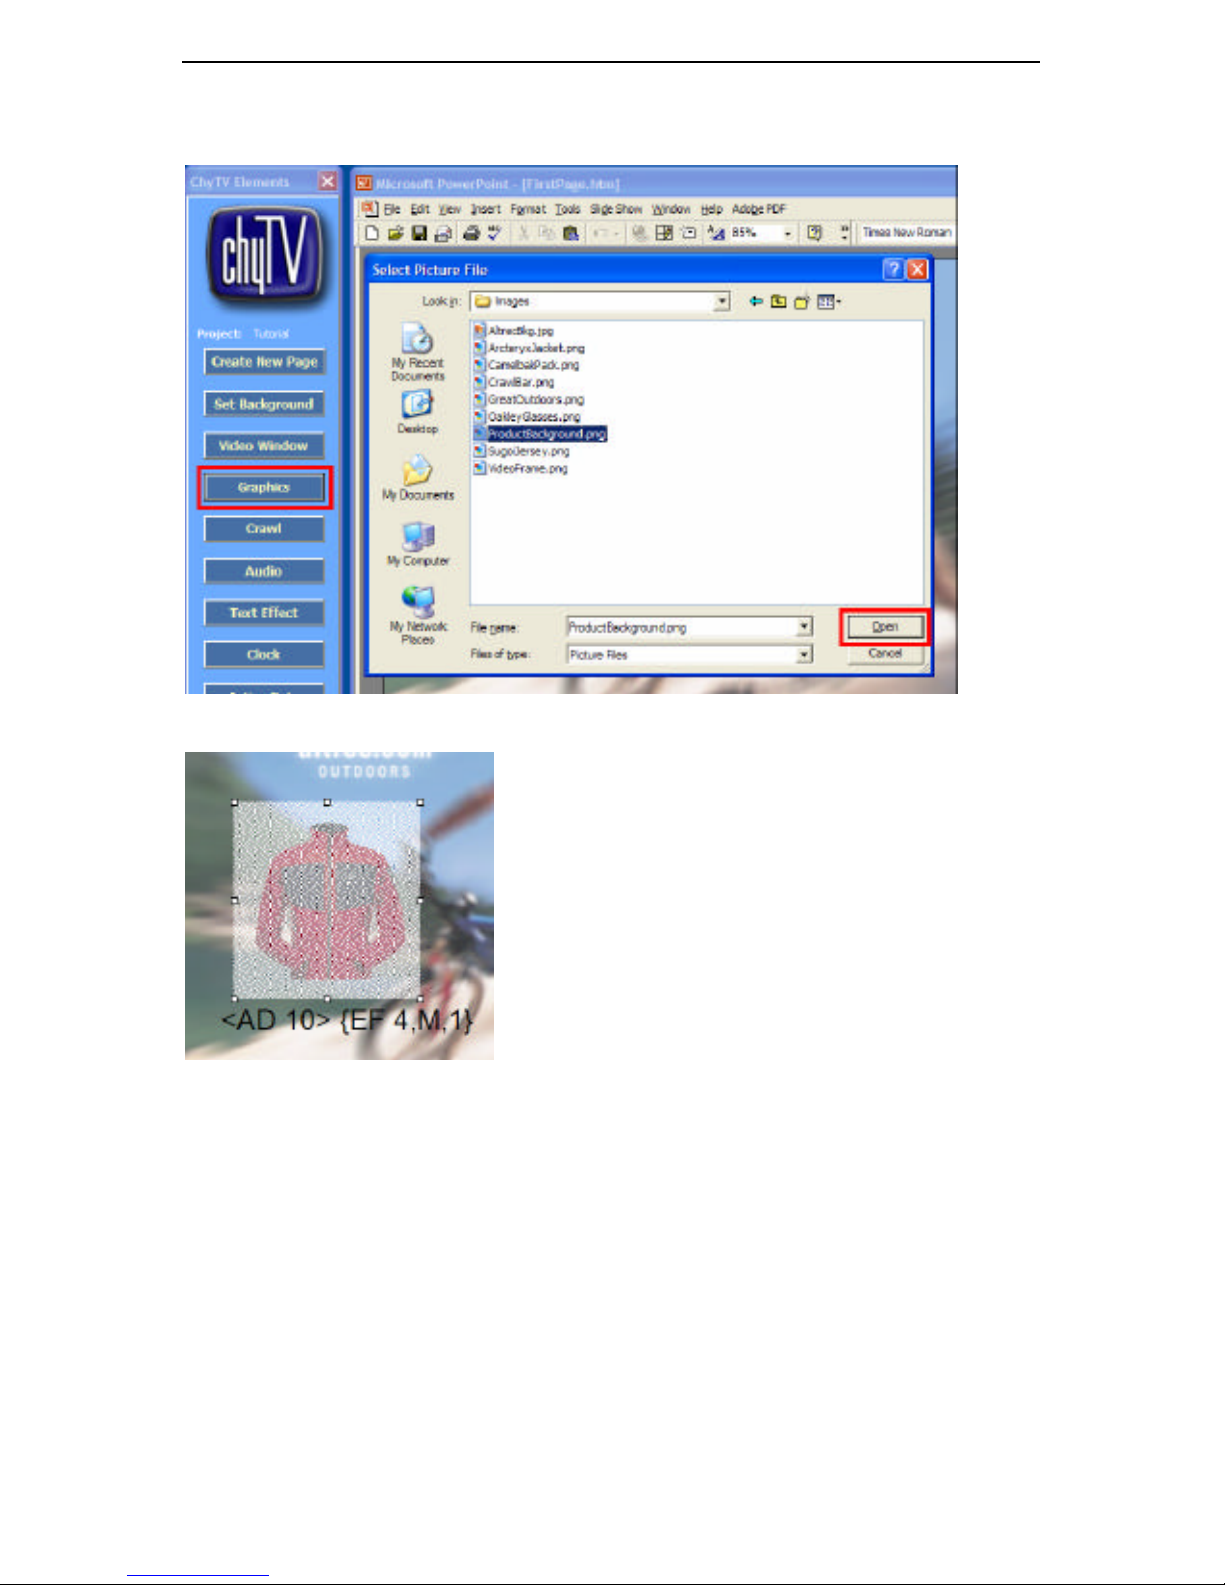
8 POWERPOINT QUICK START TUTORIAL
69
17. In Elements, click Graphics. Select ProductBackground.png. Click Open.
18. Position and resize the ProductBackground.png graphic over the jacket graphic.
19. Right-click on the ProductBackground.png graphic and select Order > Send To Back to
place the background graphic behind the shirt graphic.
Page 76
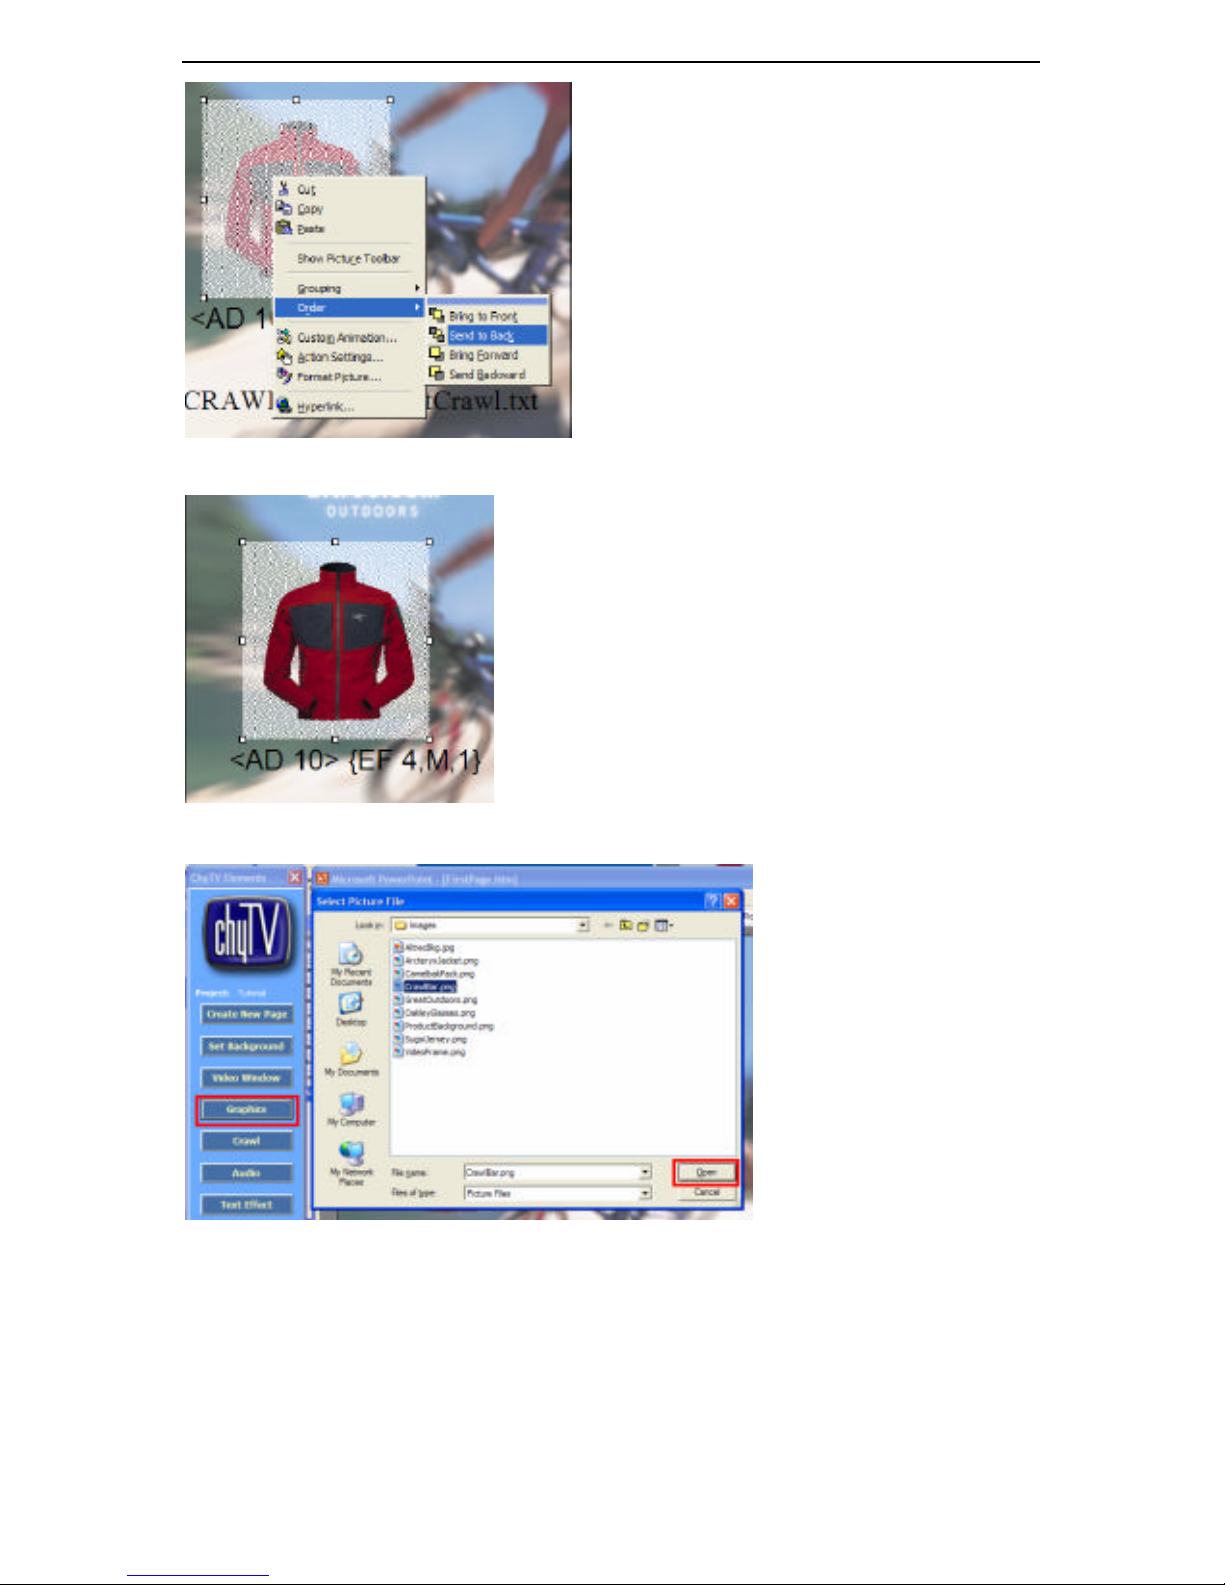
8 POWERPOINT QUICK START TUTORIAL
70
This is what the shirt graphic looks like after sending ProductBackground.png to the back:
20. In Elements, select Graphics . Select CrawlBar.png, Click Open.
21. Position and resize the CrawlBar.png graphic over the Crawl text box.
Page 77
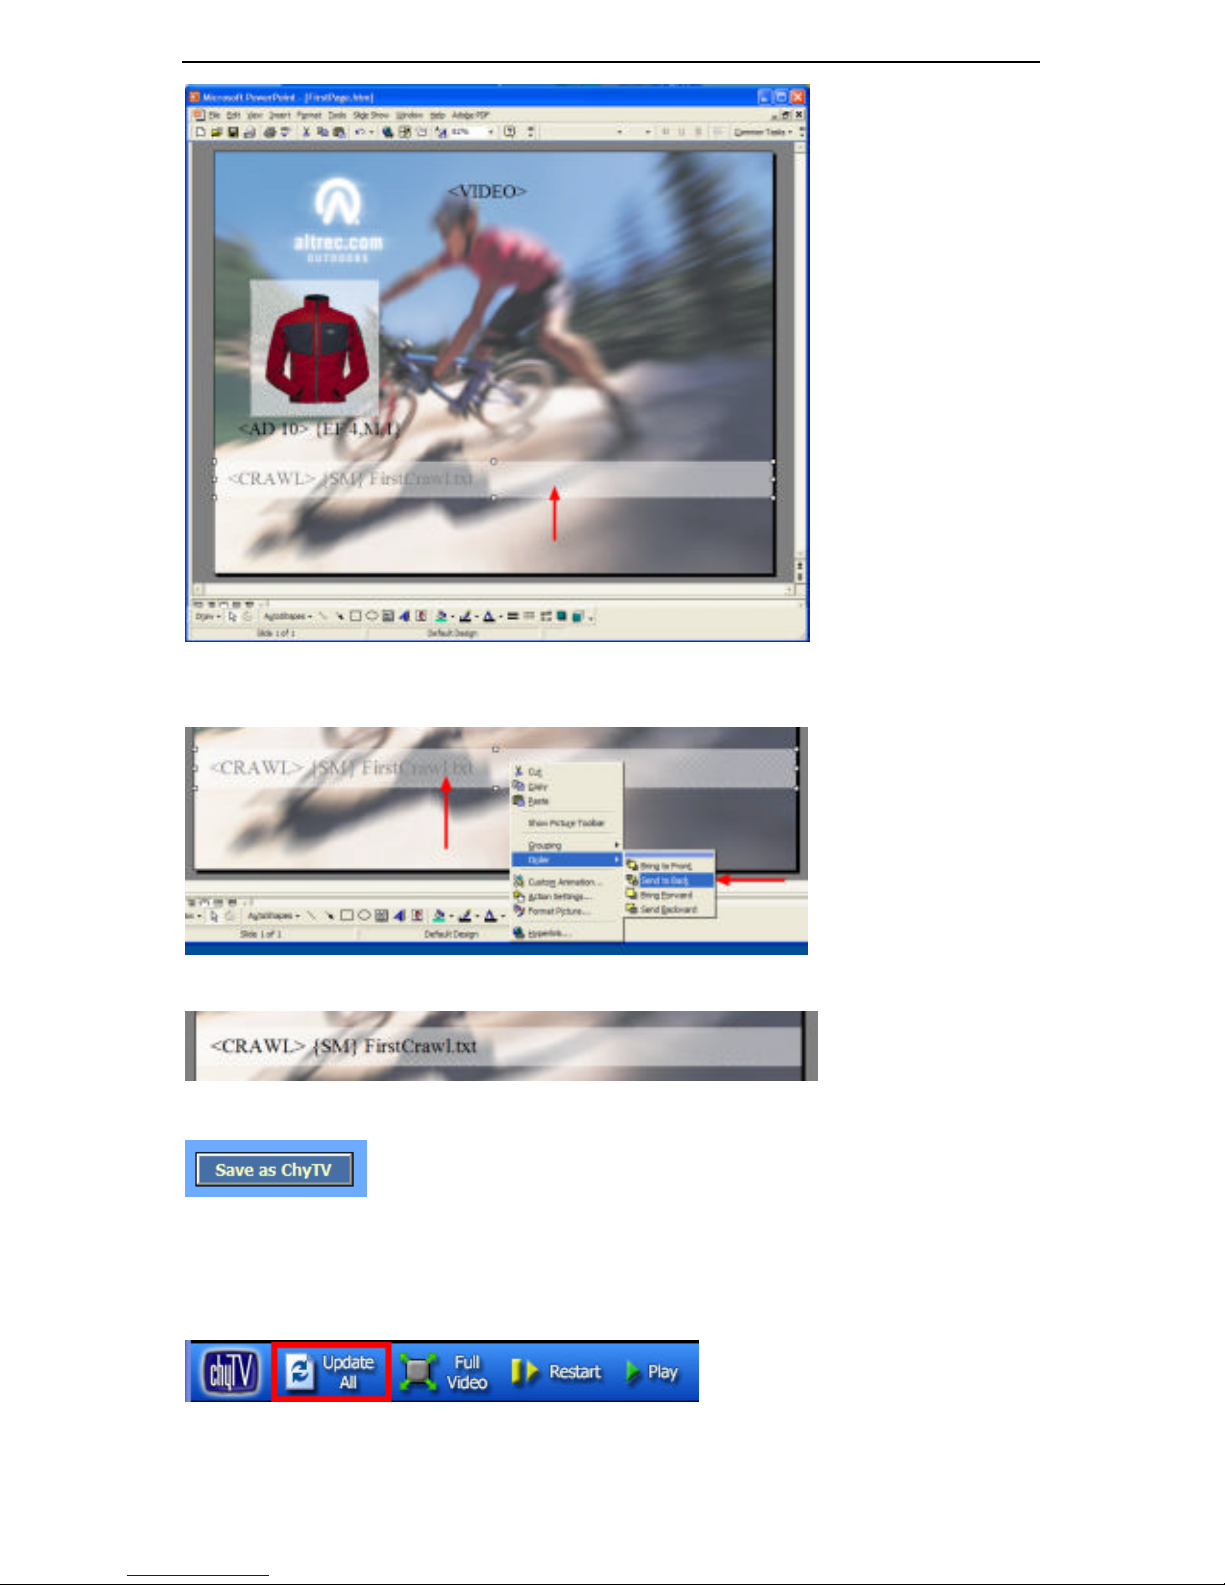
8 POWERPOINT QUICK START TUTORIAL
71
22. Again, right -click on the CrawlBar.png graphic and select Order > Send To Back to place
the background graphic behind the Crawl text box.
This is what the Crawl looks like after sending CrawlBar.png to the back:
23. In Elements, select Save As ChyTV. Then click Save.
24. Return to ChyTV Tools.
25. Select Update All.
26. Double-click FirstPage.ctv to preview your page on the ChyTV’s video output.
Page 78
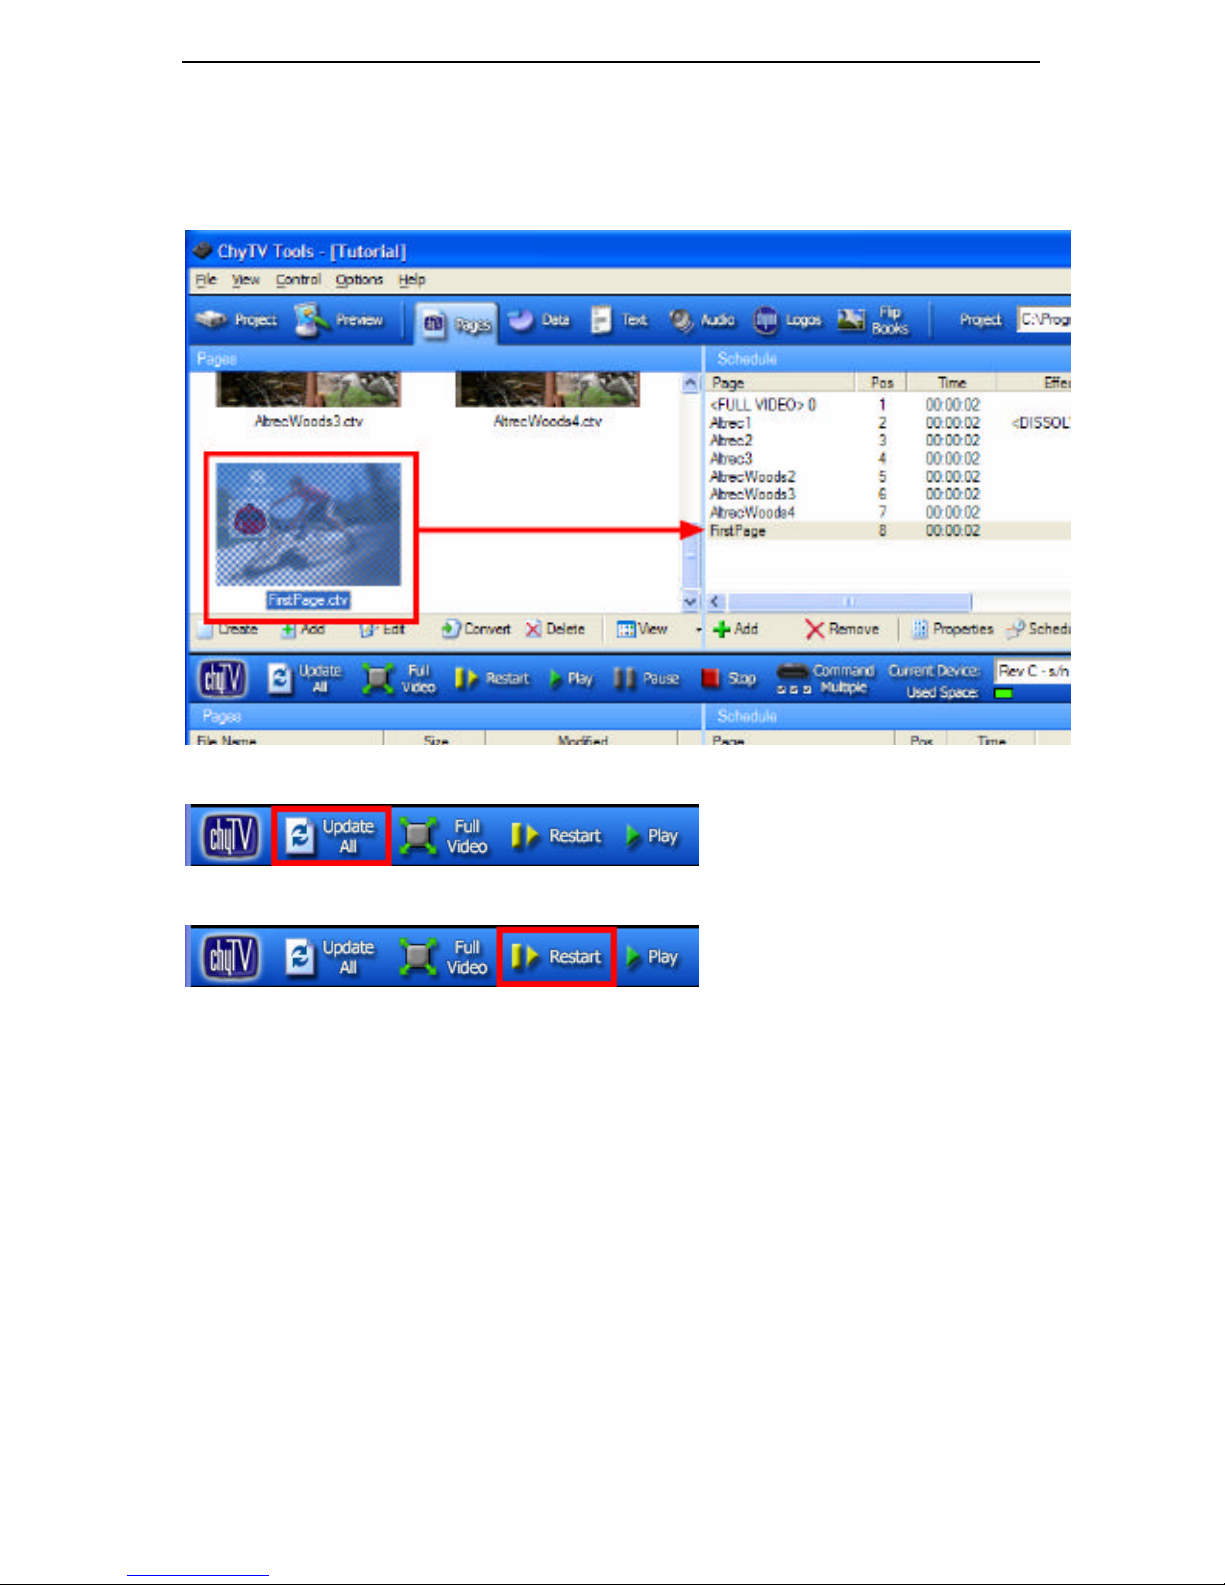
8 POWERPOINT QUICK START TUTORIAL
72
8.6 Adding Pages to the Schedule.
3. In ChyTV Tools, select the Pages tab. Left-click and hold FirstPage.ctv in the Project /
Pages window. Drag the thumbnail straight across into the Project / Schedule window and
release the mouse button.
4. Select Update All to transfer the new schedule to the ChyTV unit.
5. Select Restart to load new schedule information into memory and run.
6. Each page in the playlist is displayed for the duration of the crawl then the next page in the
playlist is displayed.
8.7 Tips for Tweaking Your Page
If you would like to change the way text and graphics appear on the displayed page, remember the
following:
§ In a Text box, changing the content’s font style, size and color determines how the results will
appear when displayed by the ChyTV unit.
§ Adjust the Text box’s boundaries to place Crawl and Effect text precisely on the page.
§ Resize your graphics by dragging the corner handles of the picture box. Hold down Shift
when dragging to constrain the graphic’s aspect ratio (proportions).
Page 79

9 MANUALLY CREATING A PAGE USING POWERPOINT
73
9 Manually Creating a Page Using PowerPoint
To create pages, ChyTV recommends the use of
Microsoft PowerPoint. PowerPoint is industrystandard presentation software that is used to create
slides that are converted into pages by the ChyTV
Tools application.
While the ChyTV Elements Add-In for PowerPoint
(covered in Chapter 8) is the primary user interface
within PowerPoint, it is useful to have an underlying
knowledge of PowerPoint and its conventions and operation. In fact, although it makes content
development easy and efficient, ChyTV Elements does not need be used at all; PowerPoint can be
used exclusively to create ChyTV pages. This chapter gives you a basic overview of PowerPoint
operation as it pertains to ChyTV.
Using PowerPoint, images, text and tags are placed on a slide, which is then saved in HTML
format for import, conversion and scheduling by the ChyTV Tools application.
Important: ChyTV is not a PowerPoint player! Other than inserting animated .gif files in pages,
PowerPoint slide animations and page transitions are not supported by ChyTV Tools. Page
animations in ChyTV are performed using Tags while page transitions are programmed using the
Schedule window of the ChyTV tools application.
9.1 PowerPoint Objects
For the purpose of creating pages for import into ChyTV Tools, only a few of PowerPoint’s
objects are utilized. These are: Slides, Backgrounds, Pi cture Boxes and Text Boxes.
9.1.1 Slides
A Slide is the blank page on which text and graphics are placed. When used for the purpose of
creating pages for import into ChyTV each “presentation” you create will only have one slide.
9.1.2 Backgrounds
A slide’s Background can be a solid color, a color effect or an image. The color, color effect or
image used as a background covers the entire area of the slide without borders. Any image format
supported by PowerPoint can be used for background images, including .jpg, .gif, .bmp or .png.
While not a requirement, images created for use as backgrounds should have a 4 x 3 (width x
height) aspect ratio and the resolution of the video monitor that will display the final page, usually
720 x 480 pixels for NTSC or 720 x 576 pixels for PAL. Images other than these sizes will either
stretch or shrink to fit the background area.
9.1.3 Picture Boxes
A Picture Box is used to place images, such as logos or product photos, on a slide. Any image
format supported by PowerPoint can be used, including .jpg, .gif, .bmp and .png.
9.1.4 Text Boxes
A Text Box is used to place text and tags on a slide. There is no difference between a Text Box
holding text and a Text Box holding a tag except the control characters < > or { } surrounding the
text. Tags and their Value Parameters are enclosed in angle and curly brackets, text for display is
not.
ChyTV is not a PowerPoint
player! Presentations must
contain only a single slide.
Multi-slide slide shows will not
import correctly into the
ChyTV Tools application.
Page 80
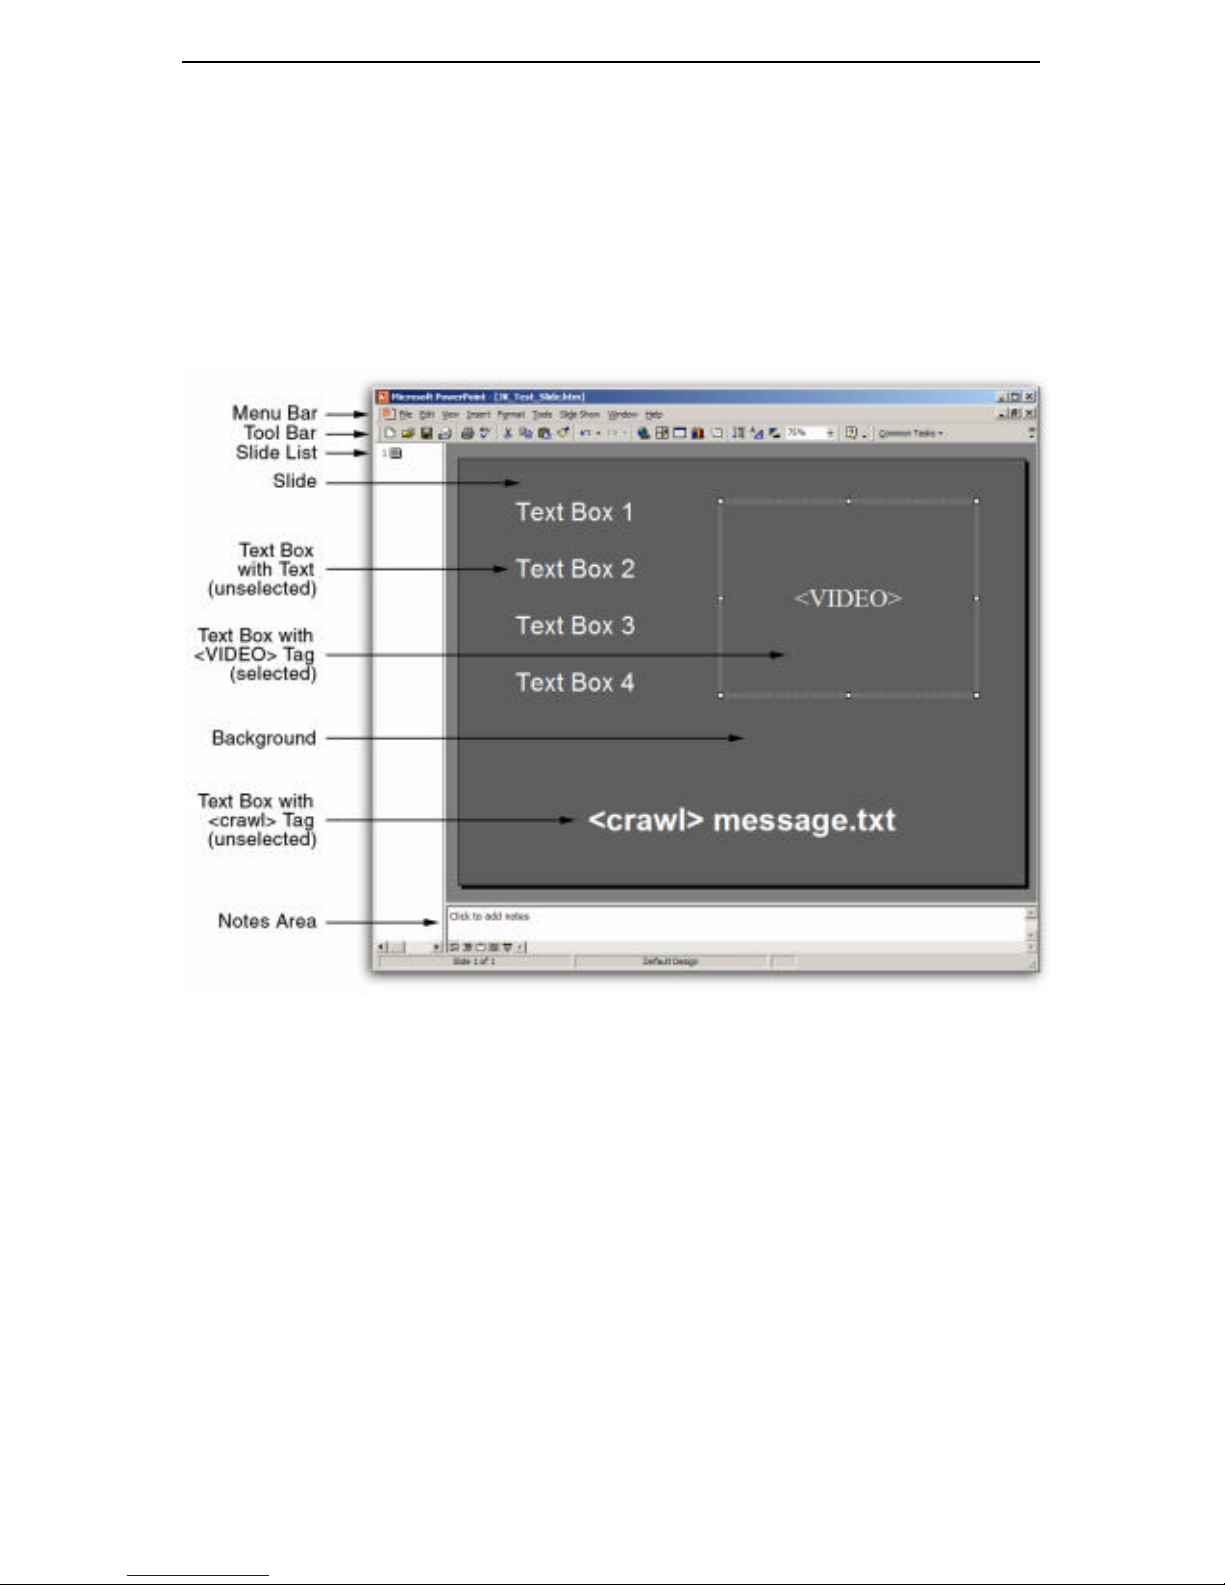
9 MANUALLY CREATING A PAGE USING POWERPOINT
74
9.2 The PowerPoint User Interface
PowerPoint is powerful application designed to create multi-page slide presentations for display on
electronic media. When used to create pages for ChyTV, however, only a small subset of
PowerPoint’s features are used.
This section describes the main PowerPoint tools and the commands most commonly used to
create pages for ChyTV.
Note: Depending on how PowerPoint is configured, your version may not look exactly as the
examples shown here.
PowerPoint User Interface
9.2.1 The Menu
Menu options allow you to insert page elements as well as open and save slides as presentations.
The following is a list of all menu items necessary for creating slides for import into ChyTV
Tools. A keyboard or mouse shortcut to the menu item is listed if one exists:
Page 81
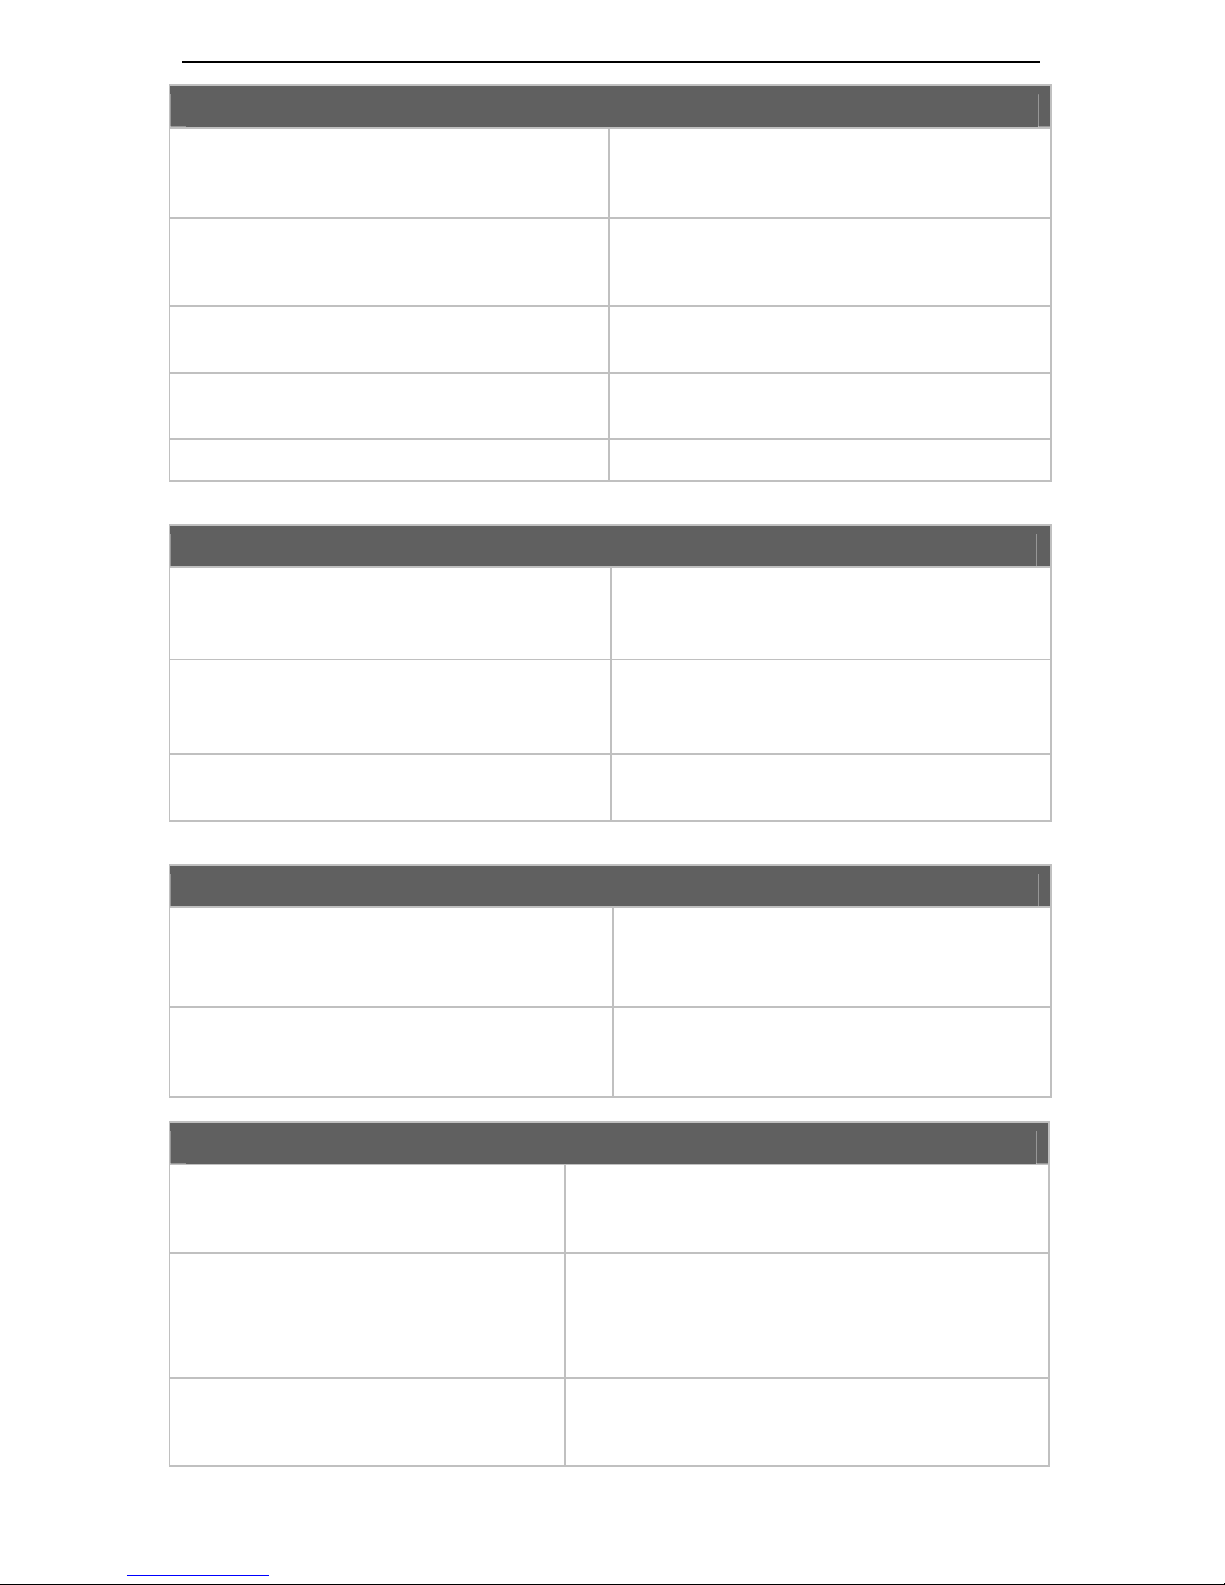
9 MANUALLY CREATING A PAGE USING POWERPOINT
75
FILE MENU
File>Save As Web Page... Saves the current presentation in HTML
format for import and conversion by ChyTV
Tools.
File>Save
(Ctrl + s)
Saves the current presentation in HTML
format after it has already been saved as a
web page.
File>New
(Ctrl + n)
Creates a new presentation for creating a
slide.
File>Open
(Ctrl + o)
Opens an existing presentation for editing a
slide.
File>Close Closes the current presentation.
EDIT MENU
Edit>Cut
(Ctrl + x)
Deletes the currently selected Text or Picture
Box and stores it for recall using the Paste
command.
Edit>Copy
(Ctrl + c)
Copies the currently selected Text or Picture
Box and stores it for recall using the Paste
command.
Edit>Paste
(Ctrl + v)
Places the last cut or copied Text or Picture
Box on the Slide Layout Area.
INSERT MENU
Insert>Picture>From Clip Art…
Insert>Picture>From File…
Creates a Picture Box from the clip art or file
selected. Used to place images on the slide.
Insert>Text Box Creates a Text Box. Used to type text for
display or tags for executing advanced
ChyTV features.
FORMAT MENU
Format>Font
(Right-Click in Text Box)
Used to set the text font, font style, font size and
font color of selected text. Also applies shadow
effects to selected text.
Format>Text Box
(Right-Click in Text Box)
Format>Picture Box
(Right-Click in Picture Box)
Used to set border and fill colors of the selected
Text or Picture box. Also used to configure the
box size and aspect ratio (shape) as well as its
“AutoShape” options.
Format>Background
(Right-Click Background Area)
Used to select the slide’s background color or to
select an image to be used as the slide’s
background.
Page 82
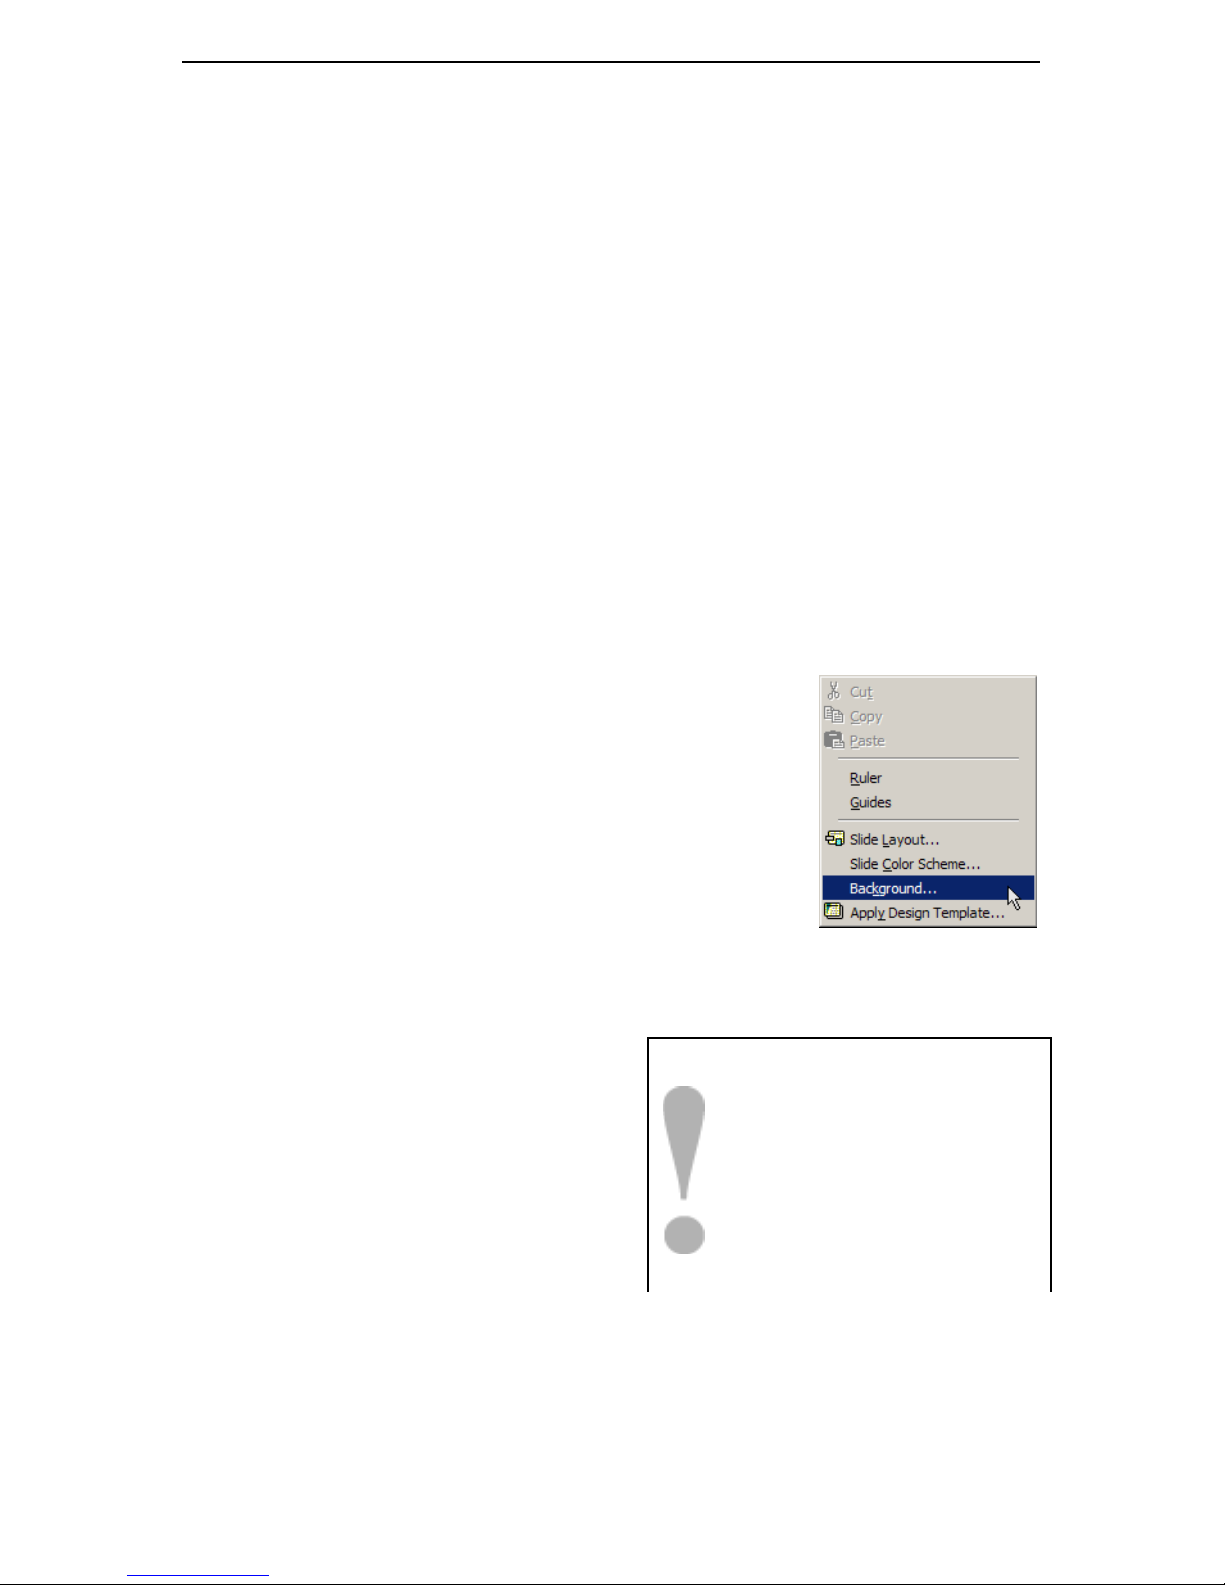
9 MANUALLY CREATING A PAGE USING POWERPOINT
76
9.2.2 The Toolbar
The Toolbar consists of buttons that are shortcuts to items found in the Menus. Rolling your
mouse cursor over a tool button displays a “tool tip” describing the button’s function.
9.2.3 The Slide List
The Slide List is used when PowerPoint is used to create complex presentations. Presentations
used to compose ChyTV pages, however, are very simple, consisting of only a single page. When
saving pages as HTML, only one slide should be present in the Slide List.
9.2.4 The Slide Layout Area
This is where page elements are placed and arranged on the slide. Depending on how your video
monitor displays composite video, the full extents of the slide layout area may or may not be
visible. After creating your first ChyTV page, it is important to establish a “Safe Zone” on your
slides to insure that text and graphics are completely displayed on your video monitor.
9.2.5 The Notes Area
This area can be used to annotate remarks or details about the slide currently being worked on. It is
not used by ChyTV Tools during page conversion.
9.2.6 Context Sensitive Menus
Right-clicking your mouse on a PowerPoint object displays a menu
with options specific to the object being clicked on. These are the
same menu items available in the Menu Bar, except only the menu
items applicable to the selected o bject are displayed.
9.3 Adding PowerPoint Objects to a Slide
Section 8 provides a step -by-step tutorial for creating pages using
the PowerPoint interface. Included with ChyTV Tools versions 2.1
and later is the “ChyTV Elements” PowerPoint Add-In that
automates many of the tasks described in this section. For
instructions on using the ChyTV Elements AddIn, please refer to section 10.
9.3.1 Creating a New Presentation
When PowerPoint is launched, you are given the
option to create a new presentation or open an
existing one.
1. To create a new presentation, select Blank
presentation and click OK.
2. You are now presented with a choice of
Autolayout templates. Select Blank and click OK. You are now ready to add page elements
to the Layout area.
9.3.2 Setting the Background Color
PowerPoint lets you set a solid color or a color effect as the slide’s background. The color or effect
used as a background covers the entire area of the slide without borders.
Context Sensitive Menu
Included with ChyTV Tools
versions 2.1 and later is the
“ChyTV Elements” PowerPoint
Add-In that automates many of
the tasks described in this section.
For instructions on using the
ChyTV Elements Add-In, please
refer to section 8.
Page 83
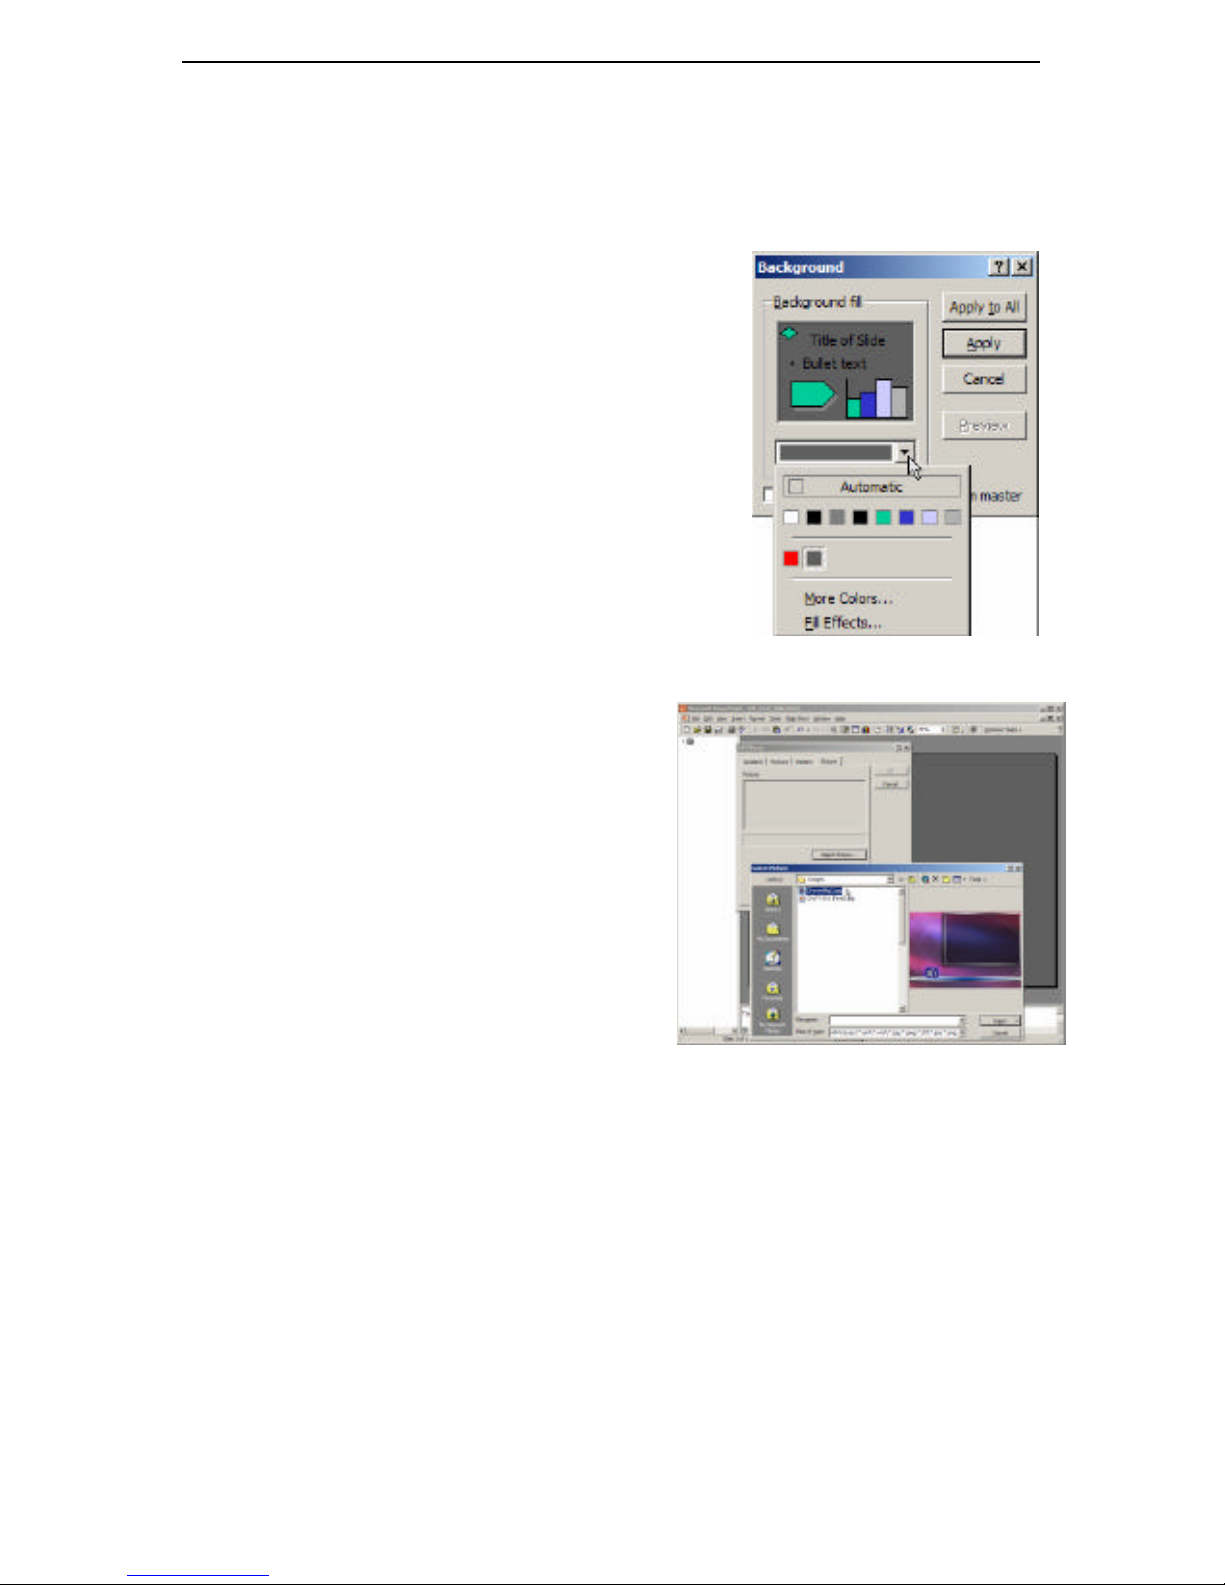
9 MANUALLY CREATING A PAGE USING POWERPOINT
77
If you plan on overlaying text and graphics over full screen video, you will want to set the
background color to black or white (see “Placing Text and Graphics Over Full Screen Video” later
in this section).
To set a solid color or color effect as the background, do the following:
1. From the Format menu, select Background…. The
Background dialog box appears.
2. From the Background Fill pull down menu, select
one of the displayed color swatches, More Colors… or
Fill Effects… . More Colors… allows you to specify
a custom color as the background, Fill Effects…
allows you to specify a gradient, texture or pattern as the
background.
3. Select a custom color from the color palette or specify a
fill effect by choosing the Gradient, Texture or
Pattern tab in the Fill Effects dialog box.
4. After specifying a custom color or fill effect, click OK.
5. Click the Apply button to set the background.
9.3.3 Setting the Background
Image
Images for use a backgrounds should have a 4x3
(width x height) aspect ratio and the resolution of
the video monitor that will display the fi nal ChyTV
page. This is usually 720 x 480 pixels for NTSC or
720 x 576 pixels for PAL. Aspect ratios other than
4x3 will appear stretched or pinched when applied
to the background, resolutions less than those stated
above may appear aliased (ie. “the jaggi es”) when
applied.
To set the background image, do the following:
1. From the Format menu, select
Background…. The Background dialog box
will appear.
2. From the Background Fill pull down menu, select Fill Effects…. Select the Picture tab in
the Fill Effects dialog box.
3. Click Select Picture… and navigate to the desired image file then click the Insert button,
then click OK.
4. Click the Apply button to set the image as the background.
9.3.4 Placing an Image
Placed images should have a resolution of at least 72 dpi when they are viewed at actual size.
Resolutions less than 72 dpi may not appear sharp when the image is expanded to the desired size
on the slide.
Setting the Background Color
Setting the Background Image
Page 84
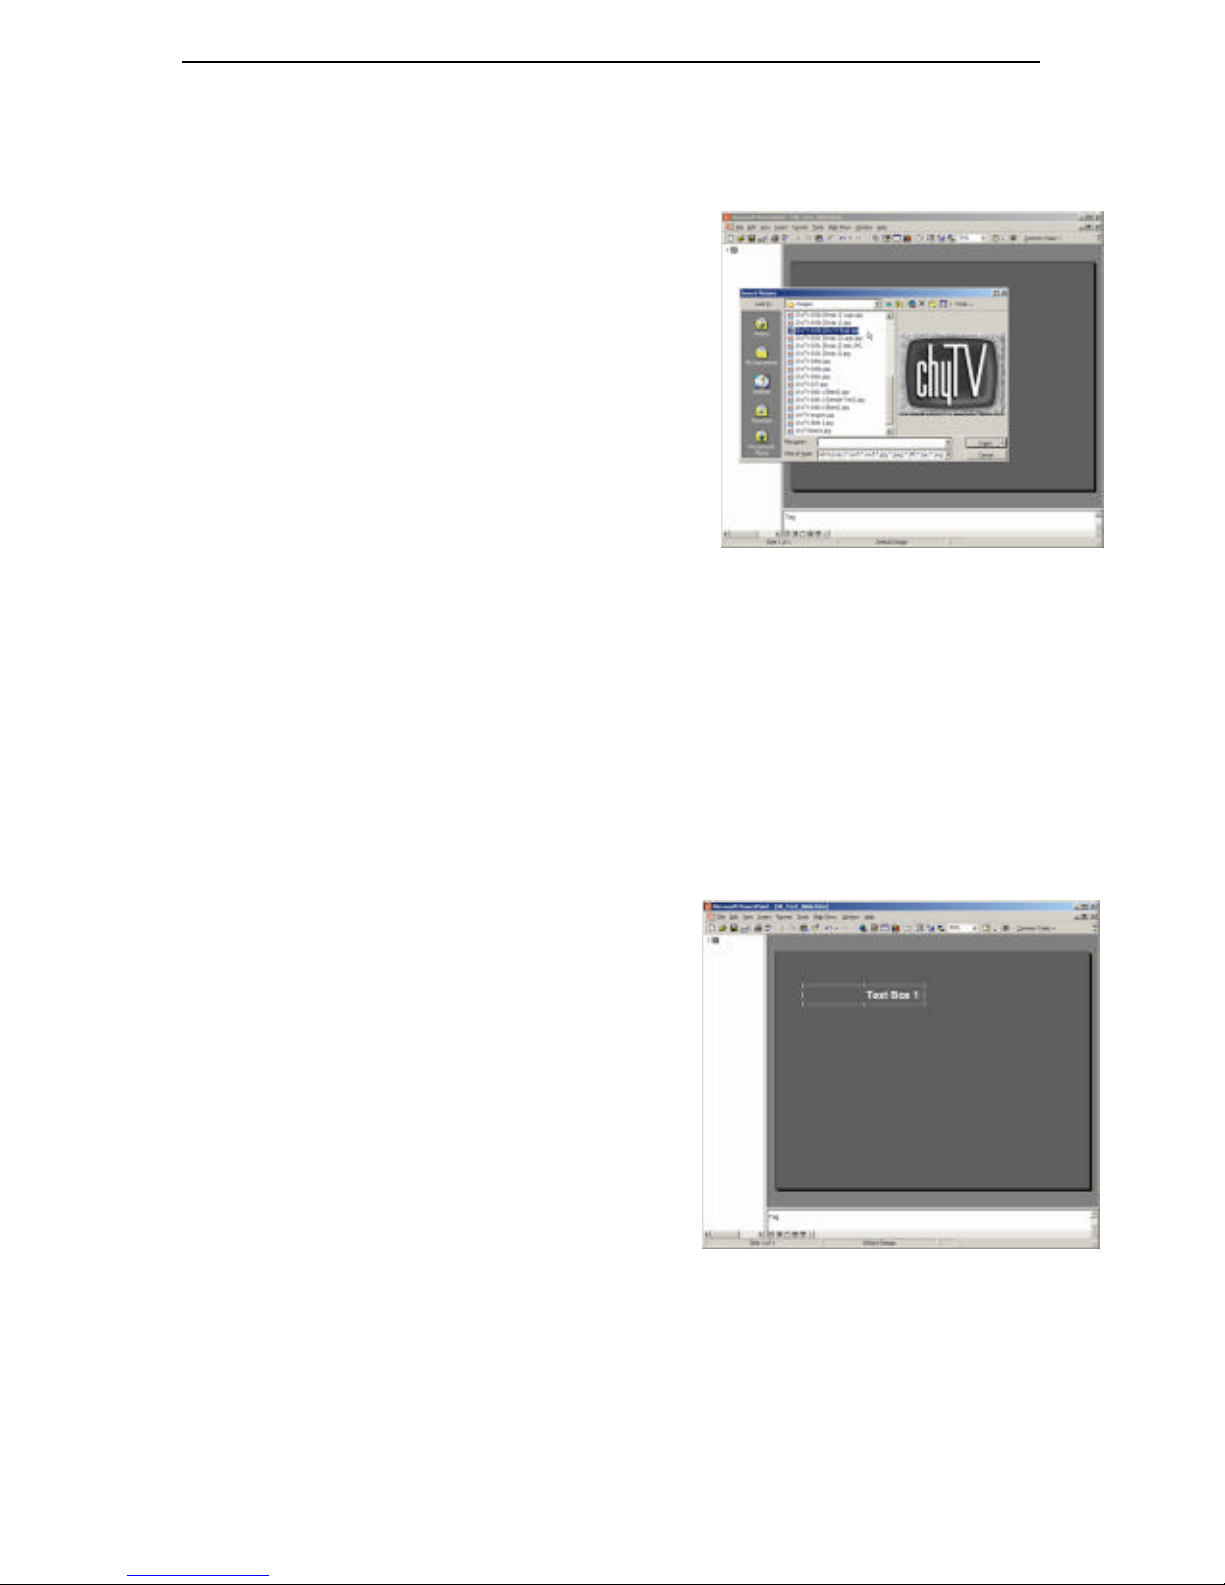
9 MANUALLY CREATING A PAGE USING POWERPOINT
78
Note: ChyTV does not support picture borders applied using Format Picture… in PowerPoint.
Instead, add a border to your image using your image editing application or add an empty text box
with a border to act as the border for the image. See Section 9.3.9 for more information about
adding fills and borders to text boxes.
To place an image on the sl ide, do the following:
1. From the Insert menu, select Picture, then select
From File… from the pop-up menu that appears.
2. Navigate to the desired image file then click the
Insert button, then click OK.
3. Click the Apply button to place the image on the
slide.
9.3.5 Moving and Resizing an Image
When first placed, an image is located in the center of the
slide.
To move the image:
1. Click on the image to select it. The mouse cursor changes to the Move tool.
2. Drag the image to desired location on the slide.
To resize the image:
1. Click on the image to select it.
2. Drag the corner handles to resize the image and maintain its aspect ratio.
3. Drag the top, bottom or side handles to resize the image and change its shape.
9.3.6 Adding Text to a Page
Text for display on slides is added using the “Text
Box” option in the Insert Menu. To add text to the
slide, do the following:
1. From the Insert menu, select Text Box. The
mouse cursor changes to the Text Box drawing
tool.
2. Place the cursor on the slide, then drag the cursor
to create the Text Box. The size and shape of the
box is not important right now.
3. Type the desired text. The Text Box will
automatically expand downward to accept the text
as it is typed.
9.3.7 Formatting the Text Font, Font
Style, Size or Color
Note: By default, text boxes are set to “Wrap and Resize” text as it is typed. This feature
sometimes interferes setting the text size as desired. To turn off this feature:
1. Right-click the Text Box. Select Format Text Box… from the menu that appears.
Placing an Image
Adding Text to a Page
Page 85
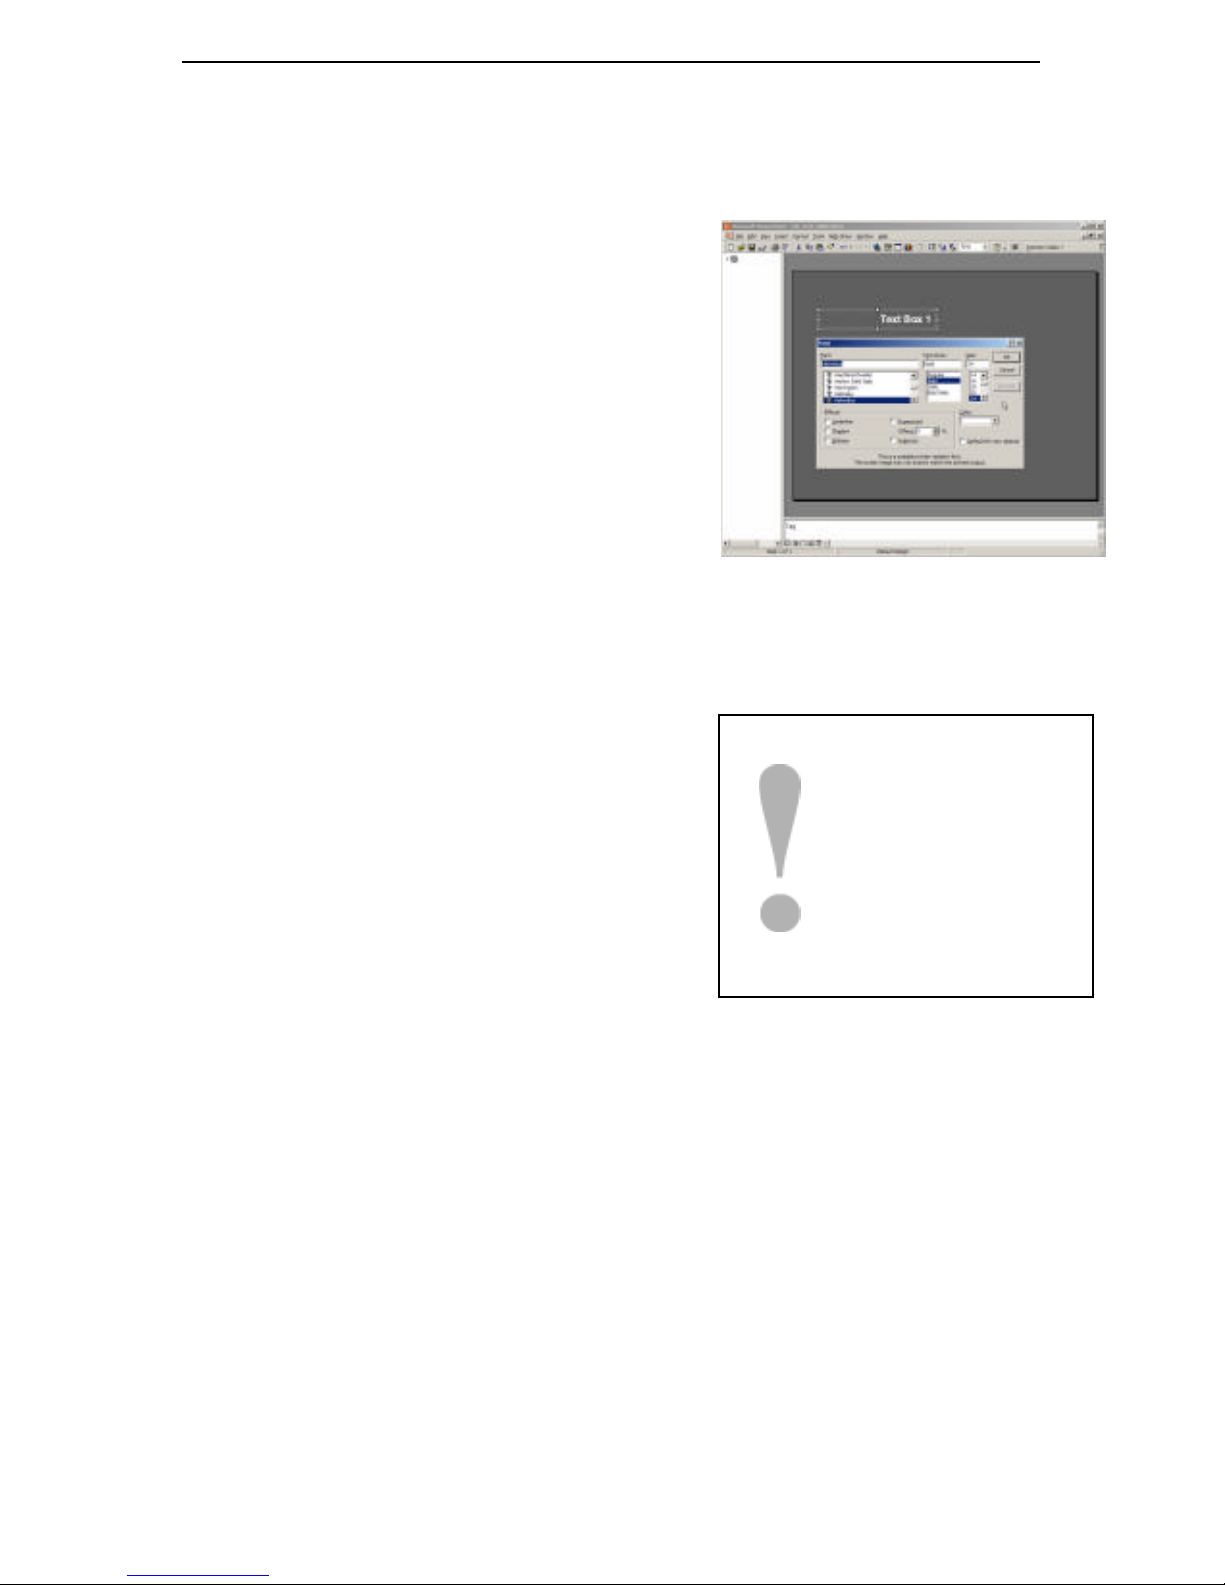
9 MANUALLY CREATING A PAGE USING POWERPOINT
79
2. Click the Text Box tab and uncheck Word wrap text in Autoshape and Resize
AutoShape to fit text.
3. Click OK.
To change the text font, font style, size or color, do the
following:
1. Place the mouse cursor over the Text Box to be
changed. The cursor changes to a text cursor.
2. Select the text to be formatted by dragging the
cursor, highlighting the text to be changed.
3. From the Format menu, select Font… . The Font
dialog box appears.
4. Select the font, font style, size and color desired.
5. Click OK
9.3.8 Adding Shadow and Underline
Effects to Text
An underline or shadow effect may be added to displayed text. To set the text effect, do the
following:
1. Place the mouse cursor over the Text Box to be
changed. The cursor changes to a text cursor.
2. Select the text to be formatted by dragging the cursor,
highlighting the text to be changed.
3. From the Format menu, select Font…. The Font
dialog box appears.
4. In the Effects area, check the box next to the text
effects desired.
5. Click OK.
9.3.9 Adding a Border or Fill to the Text Box
To add a border or fill to the Text Box:
1. Place the mouse cursor over the Text Box to be moved. The cursor changes to a text cursor.
Click to select the Text Box.
2. From the Format menu, select Format Text Box…
3. After selecting the Colors and Lines tab, select a border style and width or a fill color for
the Text Box.
4. Click OK.
9.3.10 Moving and Resizing the Text Box
To move the Text Box:
Formatting Text
The Font Edge option in
the ChyTV Tools
Authoring Options menu
determines how shadows
appear when the HTML
page is converted to
ChyTV (.ctv) page format.
See section 9.2.4.5 for
more information.
Page 86
9 MANUALLY CREATING A PAGE USING POWERPOINT
80
1. Place the mouse cursor over the Text Box to be moved. The cursor changes to a text cursor.
Click to select the Text Box.
2. Place the mouse cursor over the Text Box’s border until the cursor changes to the Move tool.
3. Drag the Text Box to desired location on the slide.
To resize the Text Box:
1. Place the mouse cursor over the Text Box to be
moved. The cursor changes to a text cursor. Click to
select the Text Box.
2. Drag the corner handles to resize the Text Box and
maintain its aspect ratio.
3. Drag the top, bottom or side handles to resize the
text and change its shape.
9.4 Adding Tags to a Slide
As mentioned before, a tag is specially formatted text
that instead of being displayed, tells the ChyTV Image
Engine to perform a command. For example:
<AD 1>{EF 3,M,1}{VC}
displays the text stored in active data slot 1. The EF value parameter causes the text to slide up
(Effect 3) at a medium rate (M) to the vertical center (VC) of the Text Box area.
Tags are added to a slide in the same manner as placed text. The Image Engine uses the tag’s text
font, font style, size, color, justification and effects to determine how generated text will be
displayed. Value parameters can also be added to control how the Image Engine displays the tag’s
content. A list of all supported tags and value parameters can be found in the Reference section at
the end of this manual.
9.4.1 How the Image Engine Displays Tags
Because a tag’s text is surrounded by special characters, the Image Engine knows to use the Text
Box borders to determine where text, images or video specified by the tag are placed on the
resulting ChyTV page.
§ Regardless of a Text Box’s Text Anchor Point or Margin, the text output of a tag ends up
flush with the top border of the Text Box unless overridden using the {VC} (vertical center) or
{VB} (vertical bottom) value parameters.
§ Slide motion effects use the extents of the tag’s Text Box to determine where the motion
begins and ends. Motion begins outside of the text box and ends flush with the top border
unless overridden using the {VC} (vertical center) or {VB} (vertical bottom) value
parameters.
§ Crawl motion effects use the extents of the tag’s Text Box to determine where the motion
begins and ends. Motion begins outside of the Text Box’s right border and ends outside of the
left border. The text is flush with the top border of Text Box.
Resizing a Text Box
Page 87
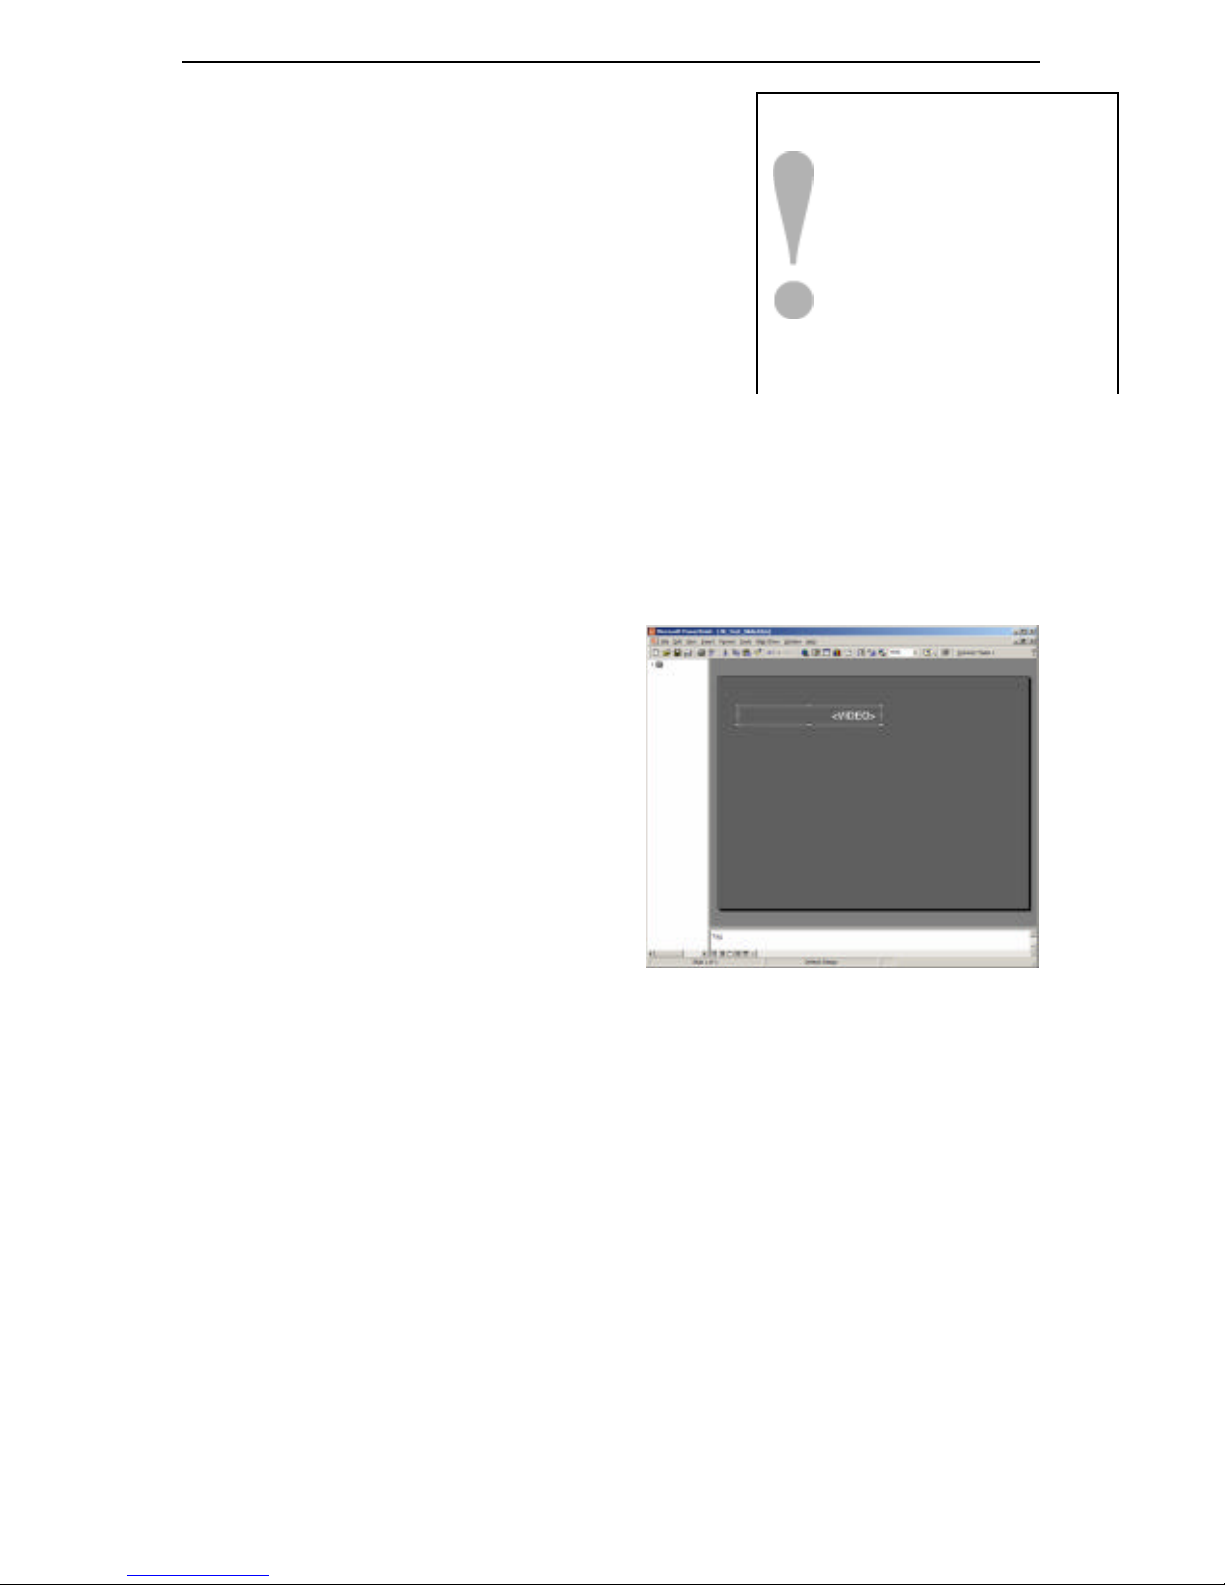
9 MANUALLY CREATING A PAGE USING POWERPOINT
81
9.4.2 Rules for Using Tags
Observe the following rules when creating tags to prevent
unpredictable operation:
§ Each Text Box can contain only one tag.
§ A Text Box must be larger than the output of the tag it
contains. The tag’s output is cropped by the Text Box
borders.
§ Text Boxes containing tags should not overlap.
Overlapping Text Boxes will obscure each other in the
order in which the tags are displayed
§ A <Video> tag is always the top most layer displayed on a ChyTV page. The output of all
other tags and placed objects is obscured by displayed video.
§ Picture Boxes are the second most layer displayed on a ChyTV page. The output of all other
tags except <Video> is obscured by images in Picture Boxes.
§ Placed text in Text Boxes is the lowermost layer displayed on a ChyTV page. All other tags
and page elements obscure placed text.
9.4.3 Adding a Tag in
PowerPoint
Tags, like text, are added using the “Text Box”
option in the Insert Menu. To add a tag to the
slide, do the following:
1. From the Insert menu, select “Text Box”.
The mouse cursor changes to the Text Box
drawing tool.
2. Place the cursor on the slide, then drag the
cursor to create the Text Box. The size and
shape of the box is not important right now.
3. Type the desired tag. Tags must be
surrounded by angle brackets (< >), Value
Parameters must be surrounded by curly
brackets ({ }). The Text Box will
automatically expand downward to accept the text as it is typed.
4. Resize the Text Box to conform with the content that will be executed by the tag when
ChyTV displays the page.
Included with ChyTV Tools
versions 2.1 and later is the
“ChyTV Elements”
PowerPoint Add-In that
automates many of the tasks
described in this section. For
instructions on using the
ChyTV Elements Add-In,
please refer to Section 10.
Adding a Tag to a Page
Page 88
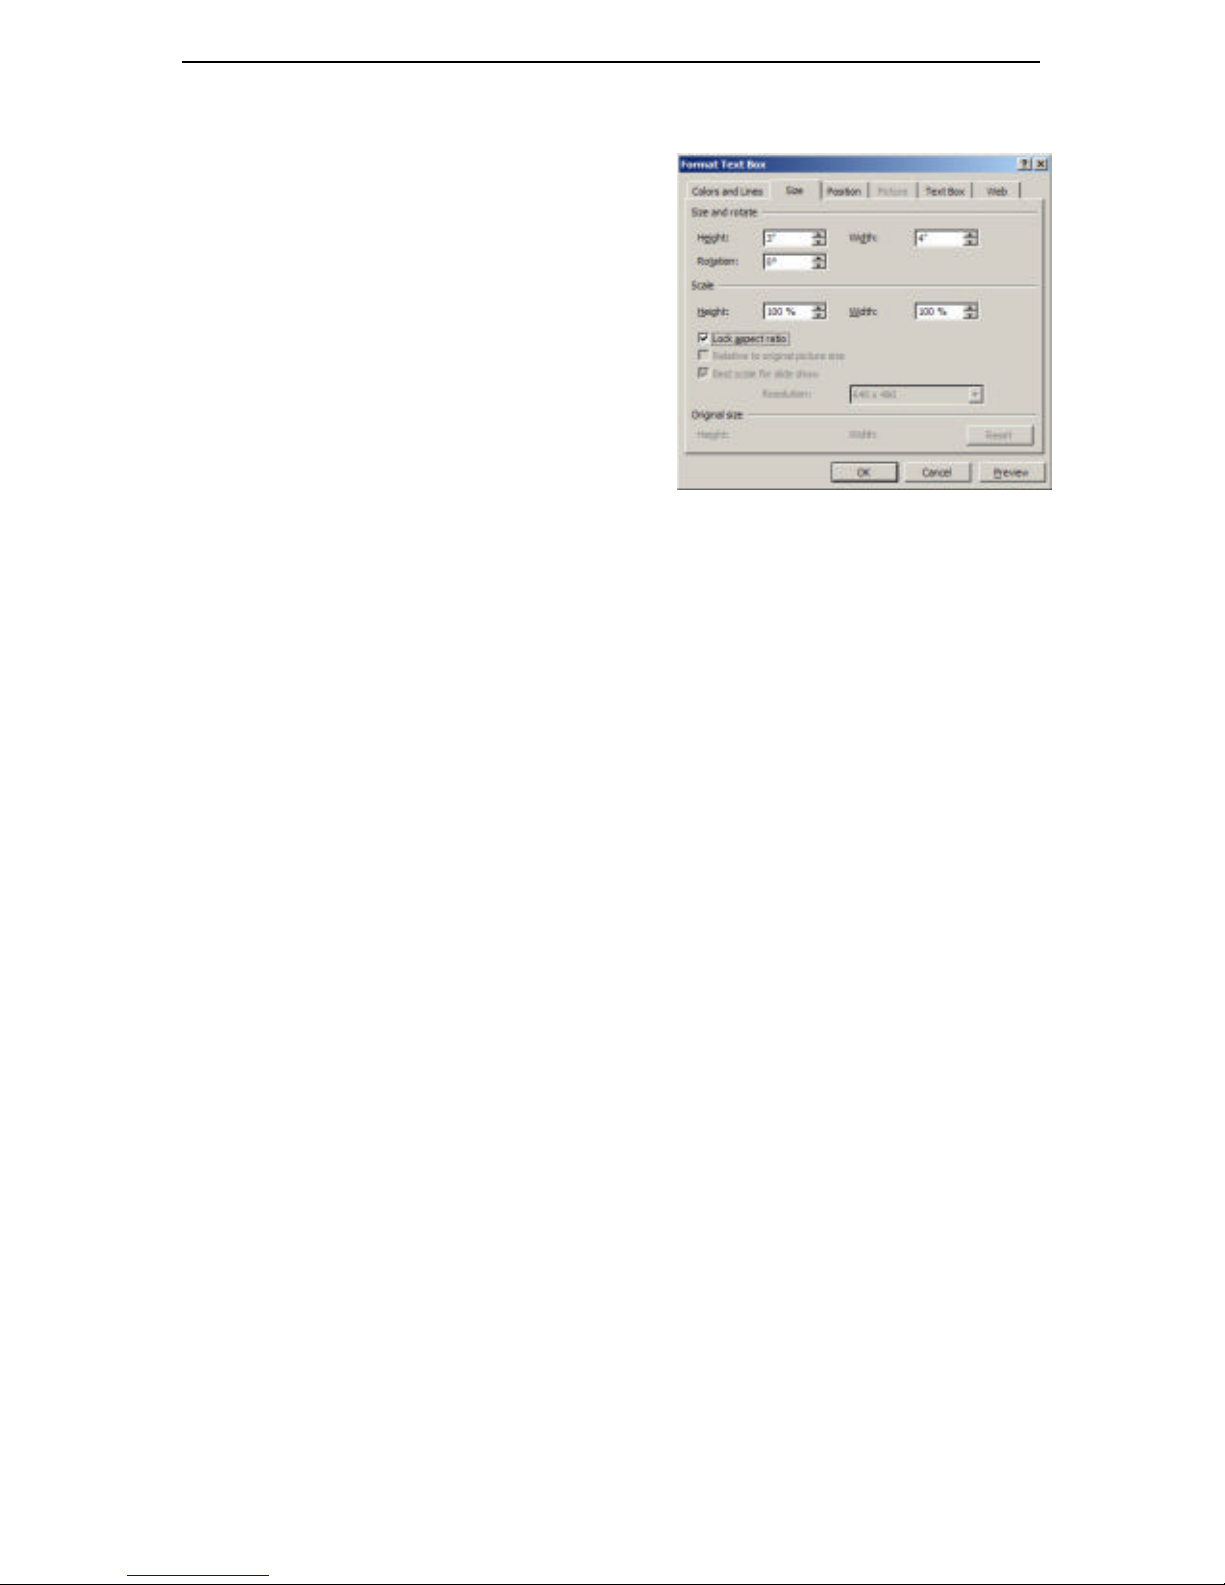
9 MANUALLY CREATING A PAGE USING POWERPOINT
82
9.4.4 Creating a 4x3 Fixed Aspect Ratio Video Tag
Placed video conforms to the shape of the <video>
tag’s text box borders. This means that the
displayed video will stretch or pinch if the tag’s text
box shape is not a perfect 4x3 aspect ratio. The
following steps describe how to create a Video tag
text box that will maintain its 4x3 aspect ratio when
resized using the text box corner handles.
1. Create a Text Box and enter <Video> as the tag
text.
2. Right-click on the Text Box border and select
“Format Text Box…” from the menu that
appears.
3. Click the “Size” tab to display the Text Box
Size properties.
4. Under “Size and Rotate”, enter 3 as the Height and 4 as the Width. Click the “Preview” button
to set the height and width.
5. Under “Scale”, check the “Lock Aspect Ratio” checkbox. Click OK.
6. Resize and move the Text Box as desired. A 4 x3 aspect ratio is maintained at all times.
9.5 Saving the Presentation as HTML
PowerPoint presentations intended for import into ChyTools must be saved in HTML format and
stored in the HTML folder of your ChyTV project folder (see section 6.4.2). To save your project:
1. Be sure that there is only one slide listed in the PowerPoint Slide List. Delete any others.
2. From the File menu, select Save as Web Page…. This can also be done by selecting Save
and choosing Web Page (.htm, .html) from the Save as Type Pull-down menu.
3. Navigate to the HTML folder in your ChyTV project folder.
4. If desired, type a new filename in File Name prompt. Click Save.
9.6 Placing Text and Graphics Over Full Screen Video
For some projects you may wish to place text, graphics or a crawl over full screen video being
displayed on your video monitor. This is accomplished using the <Video Full> tag followed by the
Key value parameter {B}.
9.6.1 Keying Defined
Keying is an effect commonly used in broadcast news weather segments where the weatherman
appears in front of a life-size weather map. In reality, the weatherman is standing in front of a
bright green backdrop and the weather map video is electronically set to display only where green
exists in the video image. If the weatherman were to wear a bright green tie, the weather map
would appear there as well!
Maintaining Video Aspect Ratio
Page 89

9 MANUALLY CREATING A PAGE USING POWERPOINT
83
9.6.2 Keying in ChyTV
ChyTV uses the keying effect to display text and graphics over full screen video. By setting the
slide’s background color to black and setting the <Video Full> Key value parameter to {B}
(black), any placed object that is not black will appear over the video.
To create a simple crawl in a black bar over full screen video, do the following:
1. You will need a text file containing the text for your crawl saved as in .txt format. This must
be stored in the Text fol der of your ChyTV project.
2. Set the background color of the slide to 100% black (0R, 0G, 0B).
3. Create a Text Box for the <Video Full> tag. Type the following in the Text Box:
<VIDEO FULL>{B}
You may want to set the text color to white so it easier to see.
4. Create a Text Box for the <crawl> tag in the lower third of the slide. It should extend the full
width of the slide. Format the Text Box’s fill color to dark gray (8R, 8G, 8B), it should not be
100% black.
5. Type the following in the Text Box:
<CRAWL>message.txt{VC}
and set the text color to white.
6. Save the presentation as a web page (HTML) for import into ChyTV tools.
To review, after creating the source text file for the crawl in step 1, the slide’s background color is
set to 100% black, creating the key colo r that the video will appear on.
In step 3, the <VIDEO FULL> tag is created to tell the Image Engine to display ChyTV’s input
video full screen. The {B} (black) Key value parameter tells the Image Engine to only display
video where there is 100% black colo r.
§ In steps 4 and 5, we create a Text Box containing both the crawl background and the tag for
creating the crawl. Since the Text Box fill is not 100% black it will not display the video, but
because it is almost black, it will appear black when displayed on the video monitor. The text
color is then set to white so it will appear on top of the dark gray text box.
Page 90
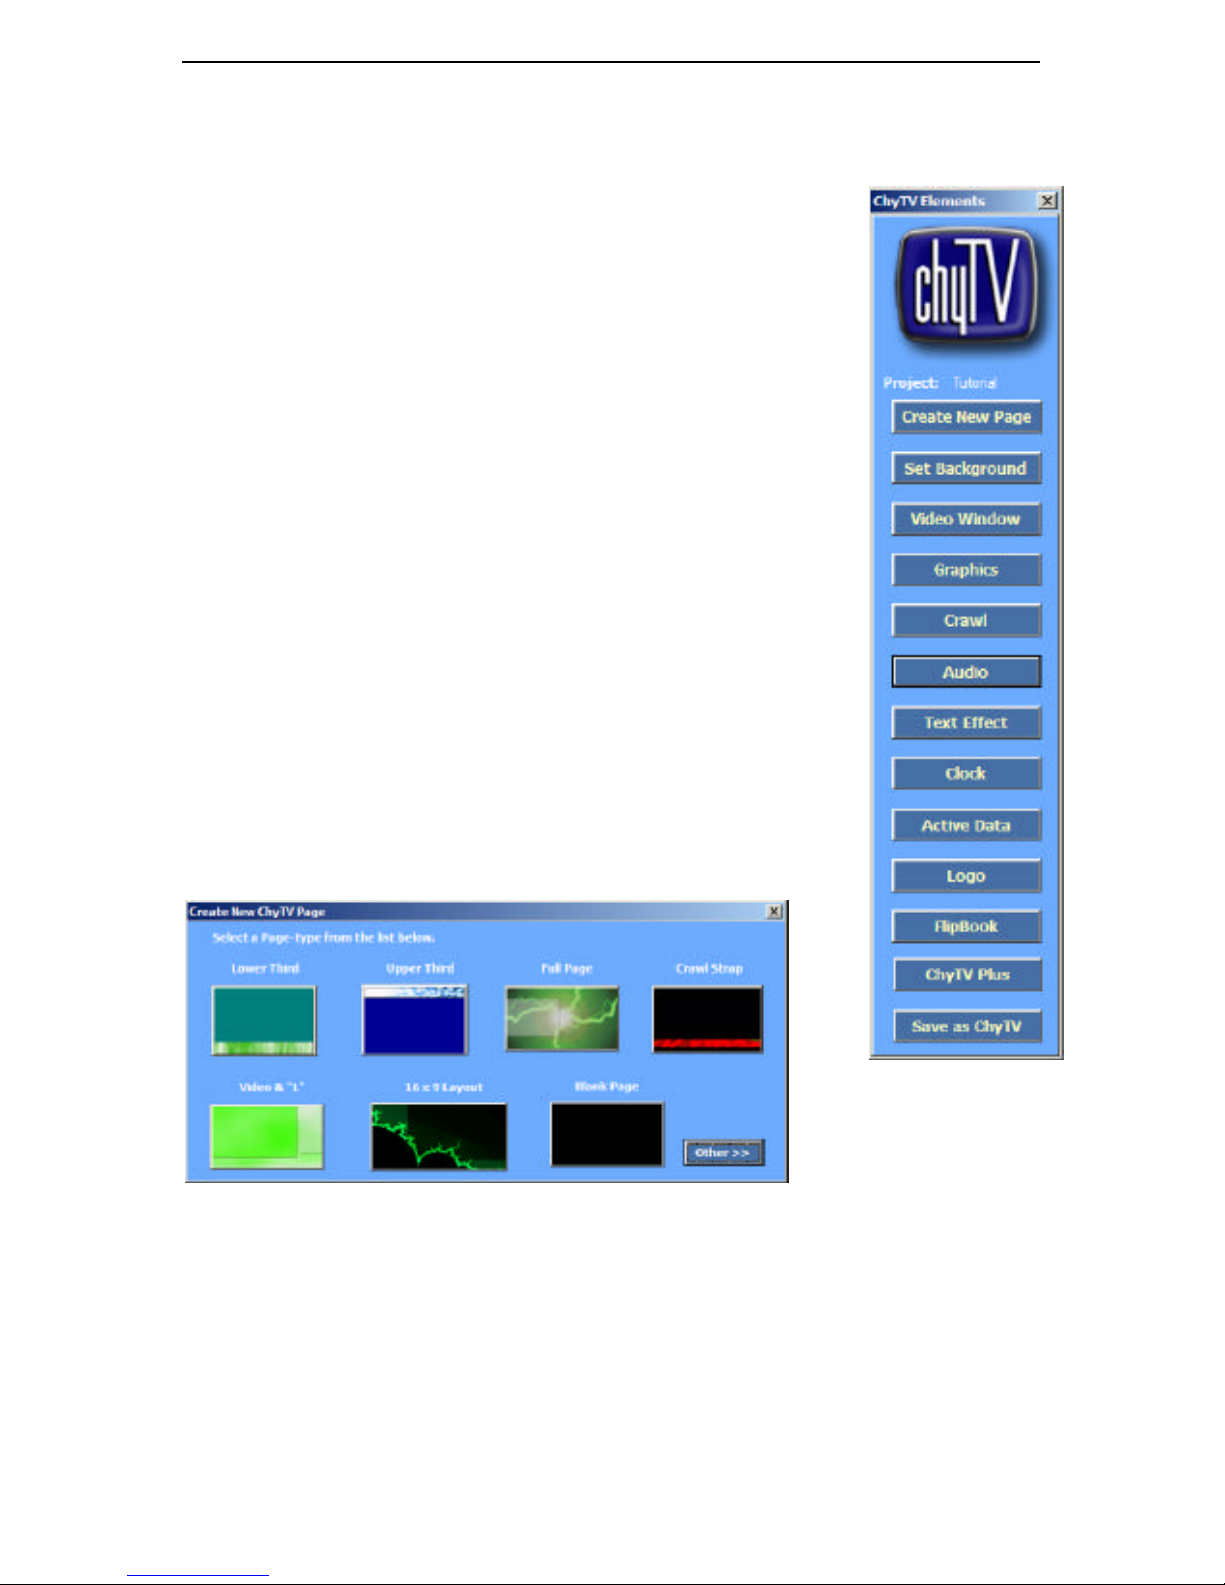
10 CHYTV ELEMENTS REFERENCE
84
10 ChyTV Elements Reference
The ChyTV Elements Add-In minimizes the time and thought required to
create page elements for ChyTV pages in PowerPoint. For more
information about page elements and their use, see section 5.2. For more
information about manually creating page elements in PowerPoint, see
section 9.
10.1 PowerPoint Configuration
The ChyTV Elements Add -In must be added to PowerPoint’s list of AddIns before it can be displayed and used. Please refer section 10.1 of this
manual for information on how to configure PowerPoint to use the
ChyTV Elements Add-In.
10.2 Basic Operation
The ChyTV Elements Add-In consists of a row of buttons that create
commonly used page elements on a PowerPoint slide. Clicking a button
displays a setup window that is used to configure the parameters of the
selected page element. After entering the required parameters and clicking
OK, the page element is placed on the slide where it can be resized or
moved as desired.
10.3 Create New Page
Create New Page lets you create a new page or edit an existing HTML
page in the current project.
When Create New Page is clicked, a menu of page templates is
displayed for selection.
1. Click the desired template to place it in PowerPoint. If you’re planning on adding your own
background, you may just select “Blank Page”.
To edit an existing page click Other>> to display the current project’s HTML directory:
1. Select the .htm file that you wish to edit or duplicate. Click OK. A new presentation is created
containing the selected page.
The new presentation can be saved using the Save as ChyTV button.
ChyTV Elements
PowerPoint
Add-In
Page 91
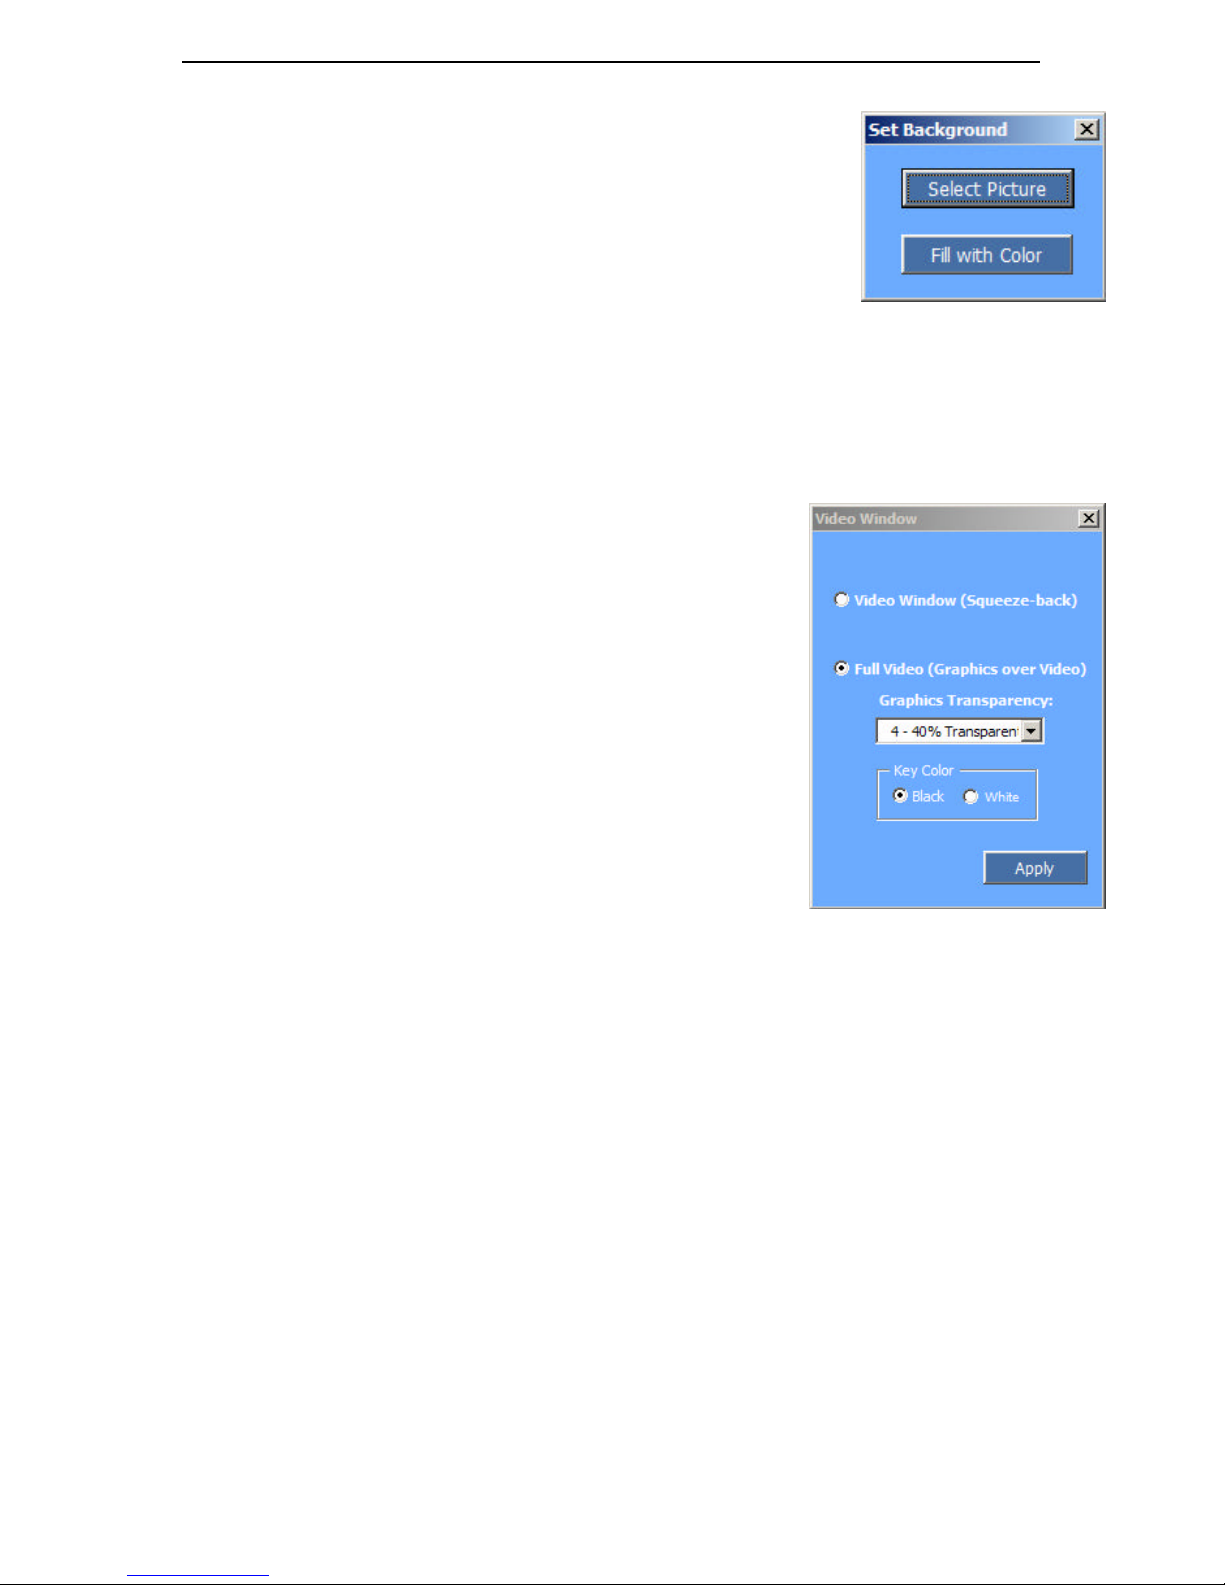
10 CHYTV ELEMENTS REFERENCE
85
10.4 Set Background
The Set Background button is used to automate applying a
background color or background image to the PowerPoint slide.
Clicking Set Background displays two buttons:
Clicking Select Picture displays the PowerPoint dialog box for
selecting a background image. Navigate to the desired image and click
OK. For more information about placing background images, see section
9.3.3
Clicking Fill with Color displays the PowerPoint dialog box for selecting background fill color.
For more information on selecting a fill color, see section 9.3.2.
10.5 Video Window
Clicking Video Window displays a window for selecting the type
of video tag desired. Selecting Video Window (Squeeze-
back) creates a Text Box containing the <Video> tag when
applied, which can be resized and moved as desired. For more
information on the Video tag, see section 9.4.4.
To configure a Full Video tag:
1. Select Full Video (Graphics over Video)
2. From the Graphics Transparency pull-down menu, select the
transparency level of graphics and text placed on top of the
video.
3. From the Key Color radio buttons, select black or white as the
video key color. This is the color on which video will display.
4. Click Apply to create the tag.
For more information about placing text and graphics over full
screen video, see section 9.6.
10.6 Graphics
Clicking the Graphics button displays the PowerPoint dialog box for placing a graphic on the
slide. Navigate to the graphic file desired and click OK. For more information on placing, moving
and resizing graphics, see sections 9.3.4 and 9.3.5.
10.7 Crawl
The Crawl button creates a Text Box with a <Crawl> tag configured to the parameters you select.
Clicking Crawl displays a parameter setup window.
10.7.1 Crawl Parameters
The Crawl Parameters determine how the crawl text will appear.
Set Background Window
Video Setup Window
Page 92
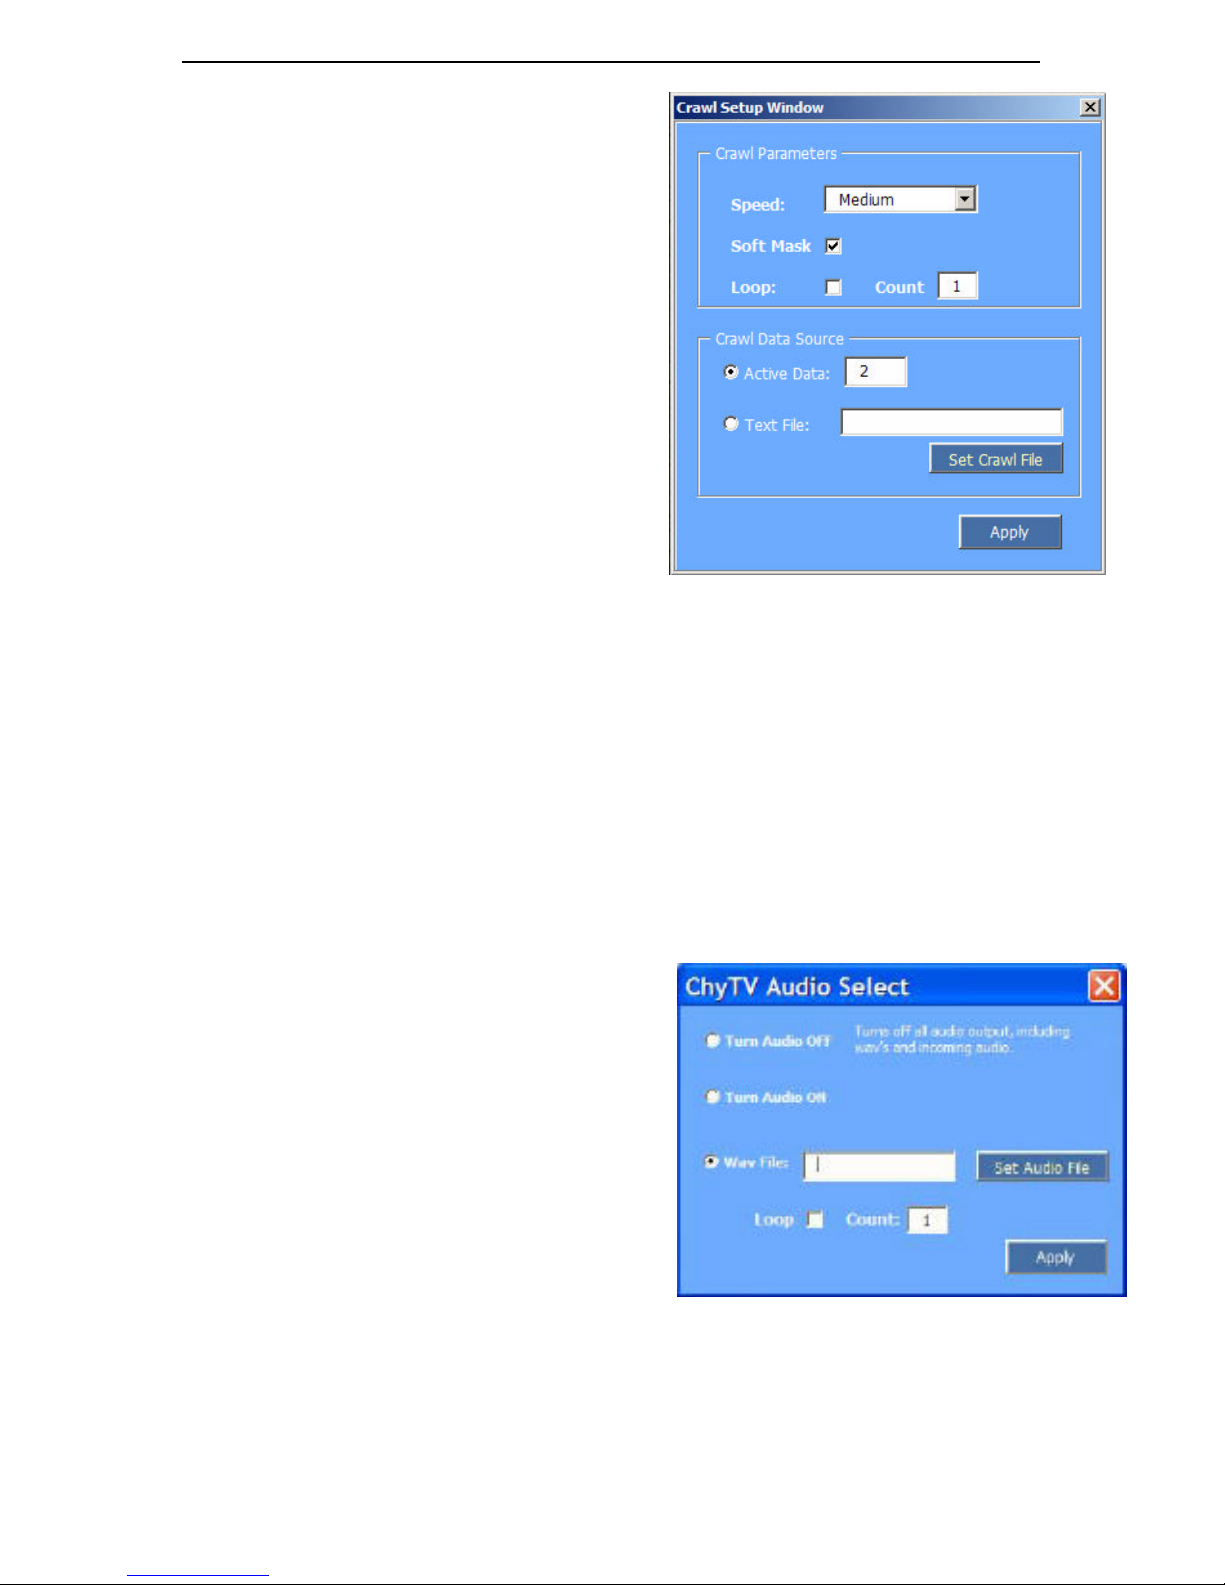
10 CHYTV ELEMENTS REFERENCE
86
1. Select the crawl speed from the Speed:
pulldown menu.
2. Check the Soft Mask checkbox for
transparent soft edges at the beginning and end
of the crawl text.
3. Check Loop: to repeat the crawl text, then
enter the number of repetitions in the Count
prompt.
10.7.2 Crawl Data Source
The Crawl Data Source points to where the text
used for the crawl resides.
Note: The text used for the crawl must already
exist in an Active Data slot or Text file. See
sections 9.4.2 and 9.4.3 for more information about
creating text as Active data and Text files.
1. Click the Active Data: radio button to use
text stored in an Active Data slot for the crawl
text. Enter the Active Data slot number in the
adjacent text prompt.
2. Click the Text File: radio button to use text stored in a Text file for the crawl text. Enter the
name of the text file in the adjacent text prompt or click Set Crawl File to select a text file
from the current project’s TEXT directory.
3. Click Apply. The Format>Font dialog box is displayed. Select the font, size and color
desired.
4. Click OK.
10.8 Audio
The Audio button creates a Text Box with an
<Audio> tag configured to the parameters you
select. Clicking Audio displays a parameter setup
window.
Note: The audio file referenced by the audio tag
must already exist in the AUDIO folder of the
current project. Audio must be Wave format (.wav)
saved as 44.1KHz, 16-bit stereo.
1. Select the Turn Audio On or Turn Audio
Off radio button. This setting affects both
incoming and wav audio when the page is
displayed by the schedule. This setting remains
in effect until changed by an audio command in
a subsequent page.
2. Enter the name of the audio file in the File: text box or click Set Audio File to select a file
from the AUDIO directory of the current project.
Crawl Setup Window
Audio Setup Window
Page 93
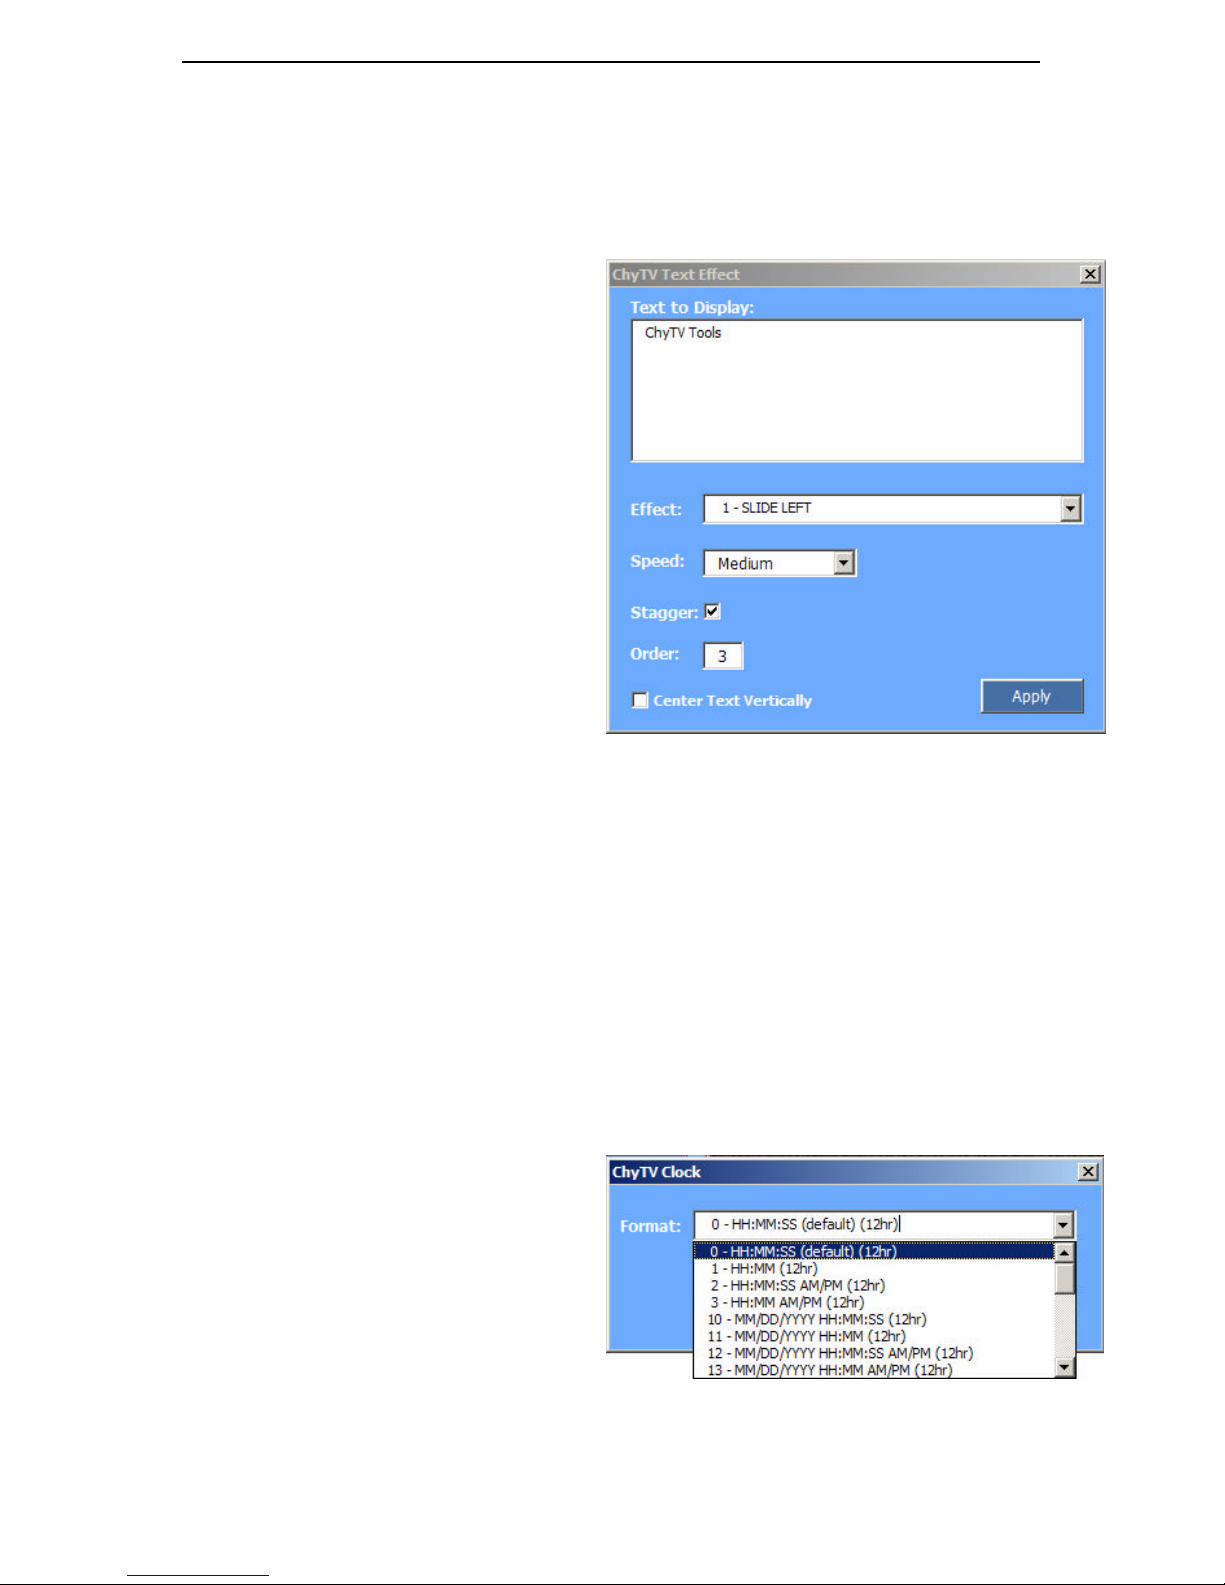
10 CHYTV ELEMENTS REFERENCE
87
3. Check Loop to repeat the audio, then enter the number of repetitions in the Count: prompt.
10.9 Text Effect
The Text Effect button creates a Text Box with an <EF> tag that displays explicit text animated
to the parameters you select. Clicking Text Effect displays a parameter setup windo w:
1. Enter the desired text in the Text to
Display: text box. This text will be
included as a parameter in the <EF>
tag.
2. Select the entrance effect desired from
the Effect: pull-down menu. One of
17 effects may be selected.
3. Select the entrance speed from the
Speed: pull -down menu.
4. Check Stagger: to sequence the
display of this text with other <EF>
tags on the page that have Stagger:
checked. The display order is
determined by the number entered in
the Order: checkbox. If Stagger: is
not checked, the text will be displayed
immediately after the page is displayed.
5. Order: determines the order that <EF>
tags with Stagger: checked will be displayed on the page. This parameter has no effect if
Stagger: is not checked. <EF> tags with the same order number will be displayed
simultaneously.
6. Check the Center Text Vertically checkbox to display the text in the vertical center of the
Text Box. If unchecked, the text will display at the text box.
7. Click Apply. The Format>Font dialog box is displayed. Select the font style, size and color
desired.
8. Click OK.
10.10 Clock
The Clock button creates a Text Box with
a <Clock> tag that displays the time and/or
date in the format you select. Clicking
Clock displays a parameter setup window:
1. Select a time/date format from the
Format: pull -down menu.
2. Click Apply. The Format>Font dialog
box is displayed. Select the font style,
size and color desired.
3. Click OK.
Text Effect Setup Window
Clock Format: Pulldown Menu
Page 94
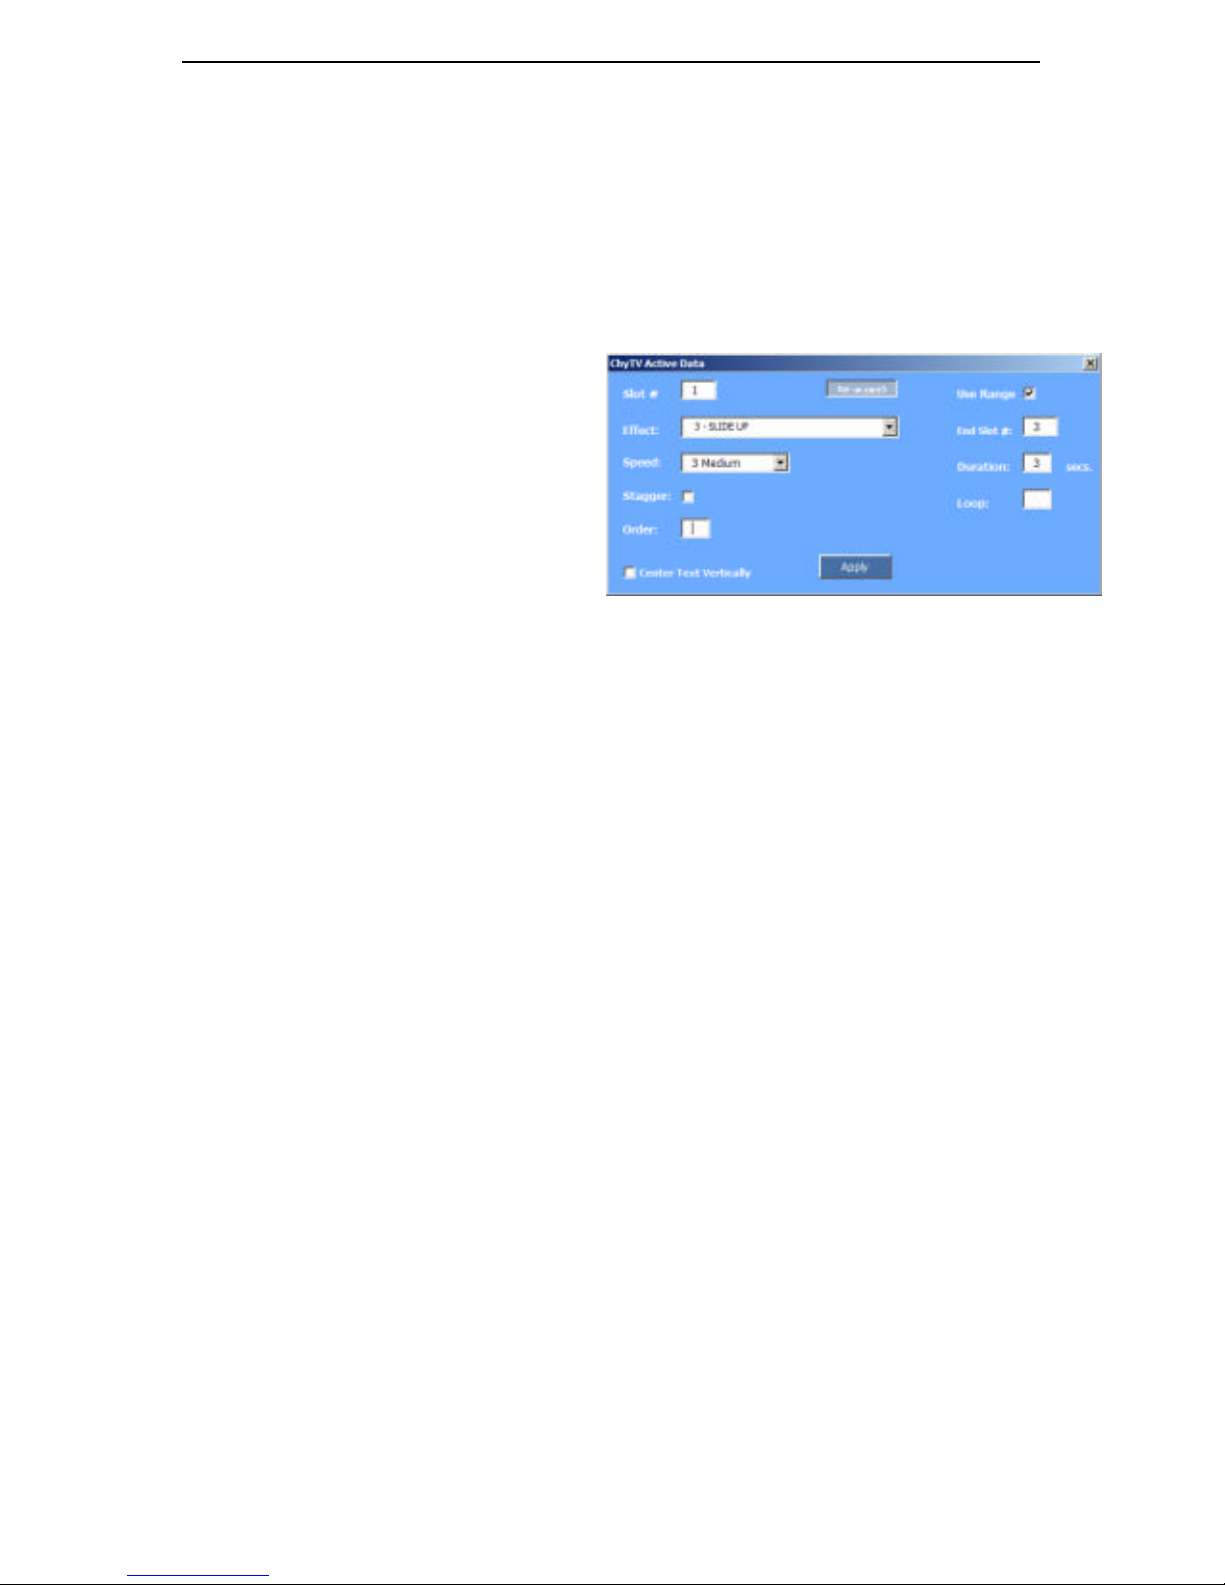
10 CHYTV ELEMENTS REFERENCE
88
Note: at the time of this manual’s writing, not all clock formats have been added to the ChyTV
Elements interface. Please see Section 12.1, Display Clock for additional clock formats.
10.11 Active Data
The Active Data button creates a Text Box with an <AD> tag that displays Active Data text
animated to the parameters you select. Clicking Active Data displays a parameter setup window.
Note: The text used for the <AD> tag must already exist in an Active Data slot. See sections 7.4.2
for more information about creating text as Active data.
1. Enter the slot number of the Active
Data text in the Slot # text box.
2. Select the entrance effect desired from
the Effect: pull-down menu. One of
17 effects may be selected.
3. Select the entrance speed from the
Speed: pull -down menu.
4. Check Stagger: to sequence the
display of this text with other <AD>
tags on the page that have Stagger:
checked. The display order is determined by the number entered in the Order: checkbox. If
Stagger: is not checked, the text will be displayed immediately after the page is displayed.
5. Order: determines the order that <AD> tags with Stagger: checked will be displayed on the
page. This parameter has no effect if Stagger: is not checked. <AD> tags with the same
order number will be displayed simultaneously.
6. Check the Center Text Vertically checkbox to center the text in the vertical center of the
Text Box. If unchecked, the text will display at the text box boundaries.
7. The Advanced> button provides access to advanced features of the Active Data tag. Check the
Use Range checkbox to sequence the display of text from sequential Active Data Slots. In
the End Slot #: text box, enter the last Active Data slot in the sequence. In the Duration:
text box enter the number of seconds the text in each Active Data slot should display. In the
Loop: text box, enter the n umber of times the sequence should loop.
8. Click Apply. The Format>Font dialog box is displayed. Select the font style, size and color
desired.
9. Click OK.
10.12 Logo
The Logo button creates a Text Box with an <AD> tag that displays a Logo file (.ctl) animated to
the parameters you select. Clicking Logo displays a parameter setup window.
Note: ChyTV Dynamo software is required for creating ChyTV Logo and Flipbook files.
Note: The Logo file used for the <AD> tag must already exist in the LOGOS directory of the
current project.
Active Data Setup Window
Page 95
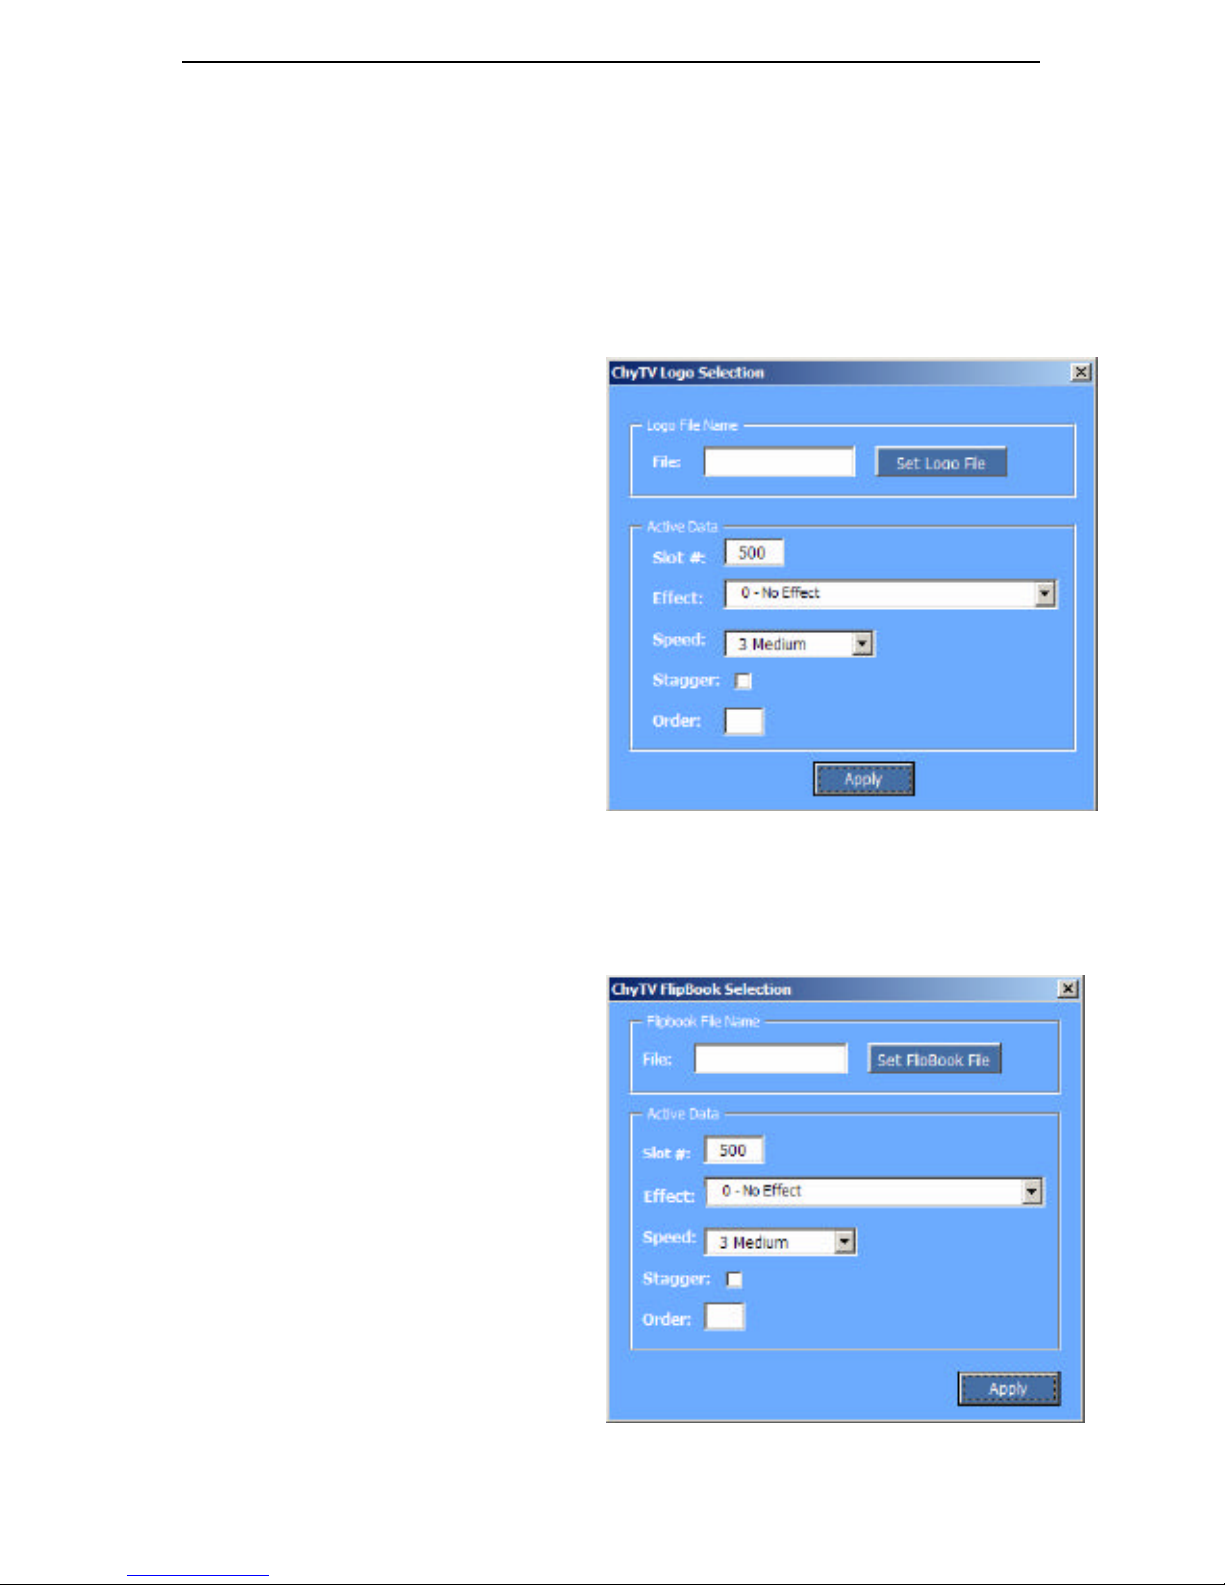
10 CHYTV ELEMENTS REFERENCE
89
10.12.1 Logo File Name
1. Enter the file name of the Logo file in the File: text box or click Set Logo File to select
from all files in the LOGOS directory of the current project. If a filename is specified, it will
be entered in the Active Data slot number of the current project specified next.
10.12.2 Active Data
1. In the Slot #: text box, enter the Active Data slot number where the Logo file name will
reside.
2. Select the entrance effect desired from
the Effect: pull-down menu. One of 17
effects may be selected.
3. Select the entrance speed from the
Speed: pull -down menu.
4. Check Stagger: to sequence the
display of this text with other <AD>
tags on the page that have Stagger:
checked. The display order is
determined by the number entered in
the Order: checkbox. If Stagger: is
not checked, the text will be displayed
immediately after the page is displayed.
5. Order: determines the order that
<AD> tags with Stagger: checked
will be displayed on the page. This
parameter has no effect if Stagger: is
not checked. <AD> tags with the same
order number will be displayed simultaneously.
6. Click Apply.
10.13 FlipBook
The FlipBook button creates a Text Box
with an <AD> tag that displays a FlipBook
file (.ctf) animated to the parameters you
select. Clicking FlipBook displays a
parameter setup window.
Note: ChyTV Dynamo software is required
for creating ChyTV Logo and Flipbook
files.
Note: The FlipBook file used for the <AD>
tag must already exist in the FLIPBOOKS
directory of the current project.
10.13.1 FlipBook File Name
1. Enter the file name of the FlipBook file
in the File: text box or click Set
FlipBook File to select from all files
Logo Setup Window
FlipBook Setup Window
Page 96

10 CHYTV ELEMENTS REFERENCE
90
in the FLIPBOOKS directory of the current project. If a filename is specified, it will be
entered in the Active Data slot number of the current project specified next.
10.13.2 Active Data
1. In the Slot #: text box, enter the Active Data slot number where the FlipBook file name will
reside.
2. Select the entrance effect desired from the Effect: pull-down menu. One of 17 effects may be
selected.
3. Select the entrance speed from the Speed: pull -down menu.
4. Check Stagger: to sequence the display of this text with other <AD> tags on the page that
have Stagger: checked. The display order is determined by the number entered in the Order:
checkbox. If Stagger: is not checked, the text will be displayed immediately after the page is
displayed.
5. Order: determines the order that <AD> tags with Stagger: checked will be displayed on the
page. This parameter has no effect if Stagger: is not checked. <AD> tags with the same
order number will be displayed simultaneously.
6. Click Apply.
10.14 ChyTV Plus (For ChyTV Plus Units Only)
The ChyTV Plus button allows ChyTV Plus owners to create tags that
command the GPIO and RS-232 ports of the ChyTV Plus unit. GPIO
and RS-232 tag syntax can be found in Section 12 of this user guide,
connector pinouts and technical information can be found in Section
13.
Clicking the ChyTV Plus button displays a window for selecting the
type of command to be created. Click RS-232 to create tags to
command the RS -232 port or click GPIO to create tags to set the pins
on the GPIO port.
10.14.1 RS-232
Note: See Section 13.7 for information about ChyTV Plus RS232
Protocol and Connector Pinout.
ChyTV Plus
Port Selection Buttons
Page 97
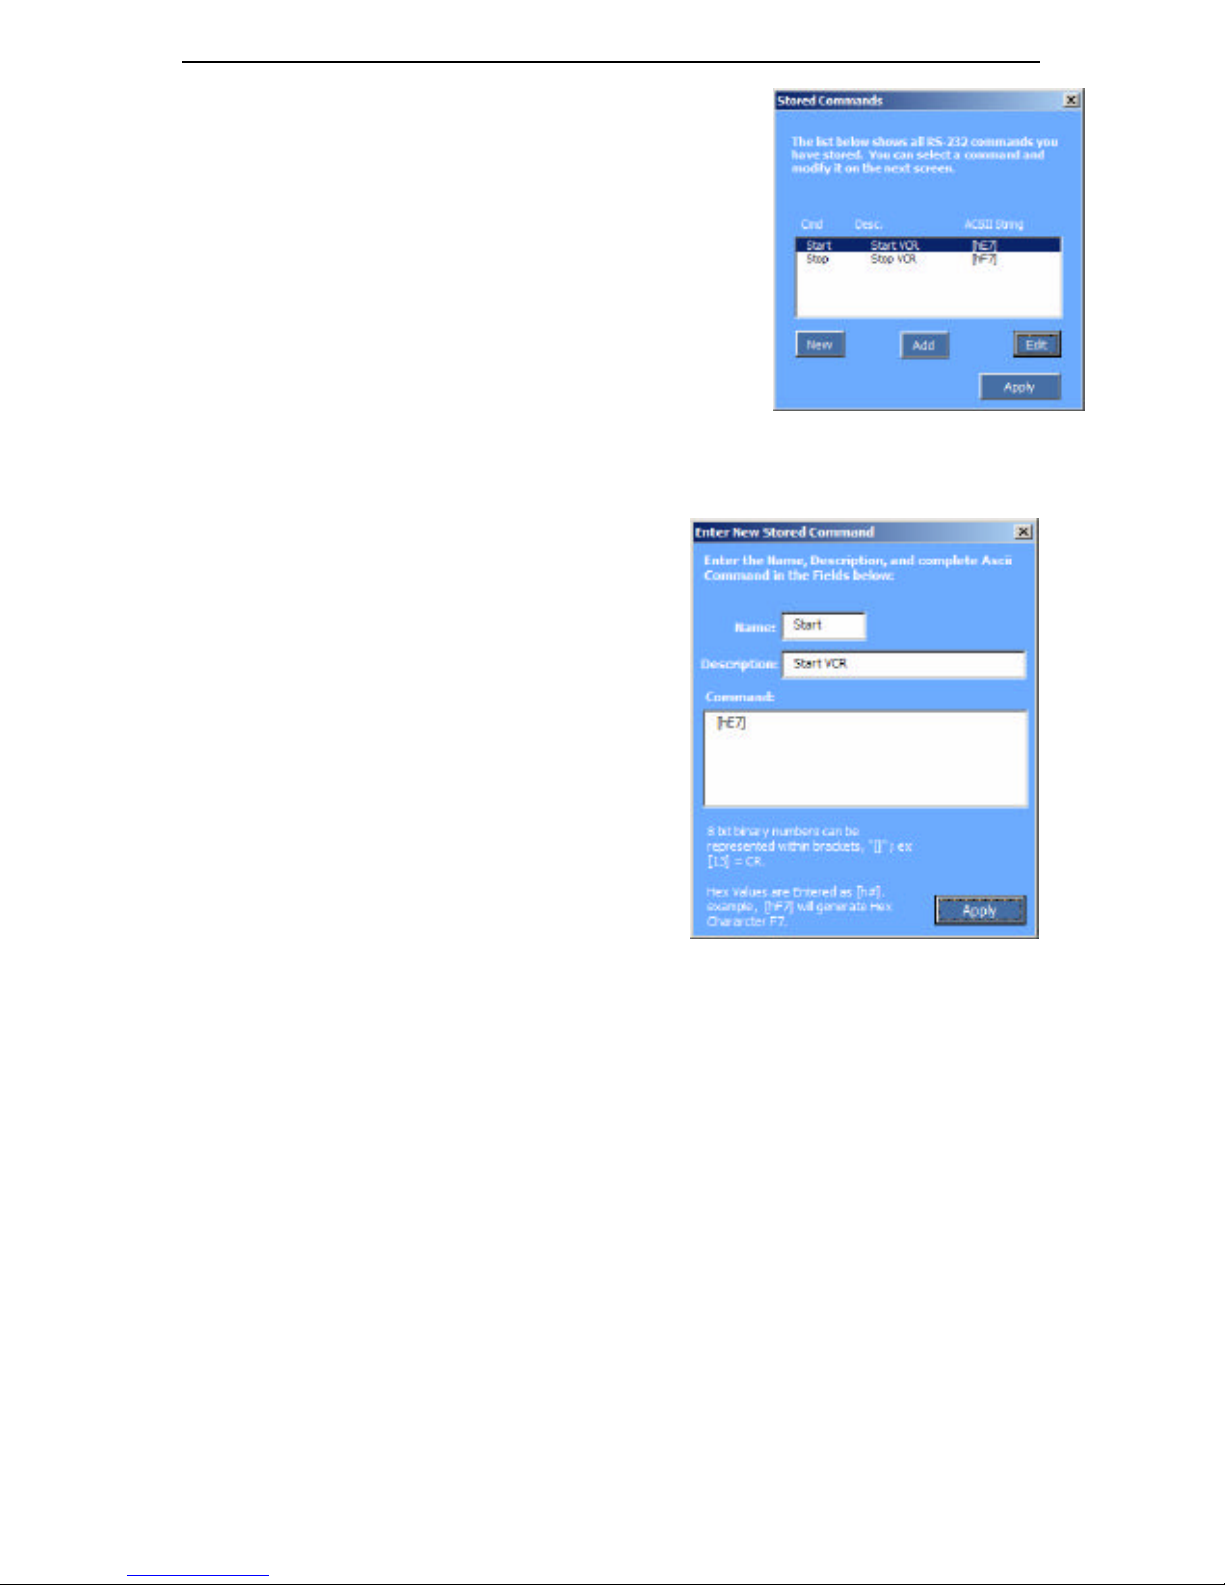
10 CHYTV ELEMENTS REFERENCE
91
Selecting RS-232 displays a window with a command list of
all previously entered RS-232 commands. This command list
is automatically stored by the Elements plug-in so that user created commands can be easily added to new ChyTV pages.
10.14.1.1 Editing Commands in the Command
List
1. To create a new command, click New. To add a
command based on a previously entered command, select
the desired command in the command list and click Add.
To edit an existing command, select the desired command
and click Edit. The RS-232 Command Edit window is
then displayed.
2. In the Name: text box, enter the command name.
3. In the Description: text box, enter any
information desired, such as the controlled
device name or other specific technical
information.
4. In the Command: text box, enter the command
string to be transmitted by the RS -232 port when
the page is displayed by the playlist. Each
command is enclosed in square brackets. 8-bit
binary numbers are entered without a prefix (eg.
[13]), Hex numbers are preceded by an “h” (eg.
[hF7]).
5. Click Apply to add or replace the selected
command in the command list and close the Edit
window.
10.14.1.2 Creating the RS-232 Command
Tag
1. To create the RS -232 command tag in your page,
click on the desired command in the command
list to select it, then click Apply.
ChyTV Plus
RS-232 Command List
ChyTV Plus
RS-232 Command Edit Window
Page 98
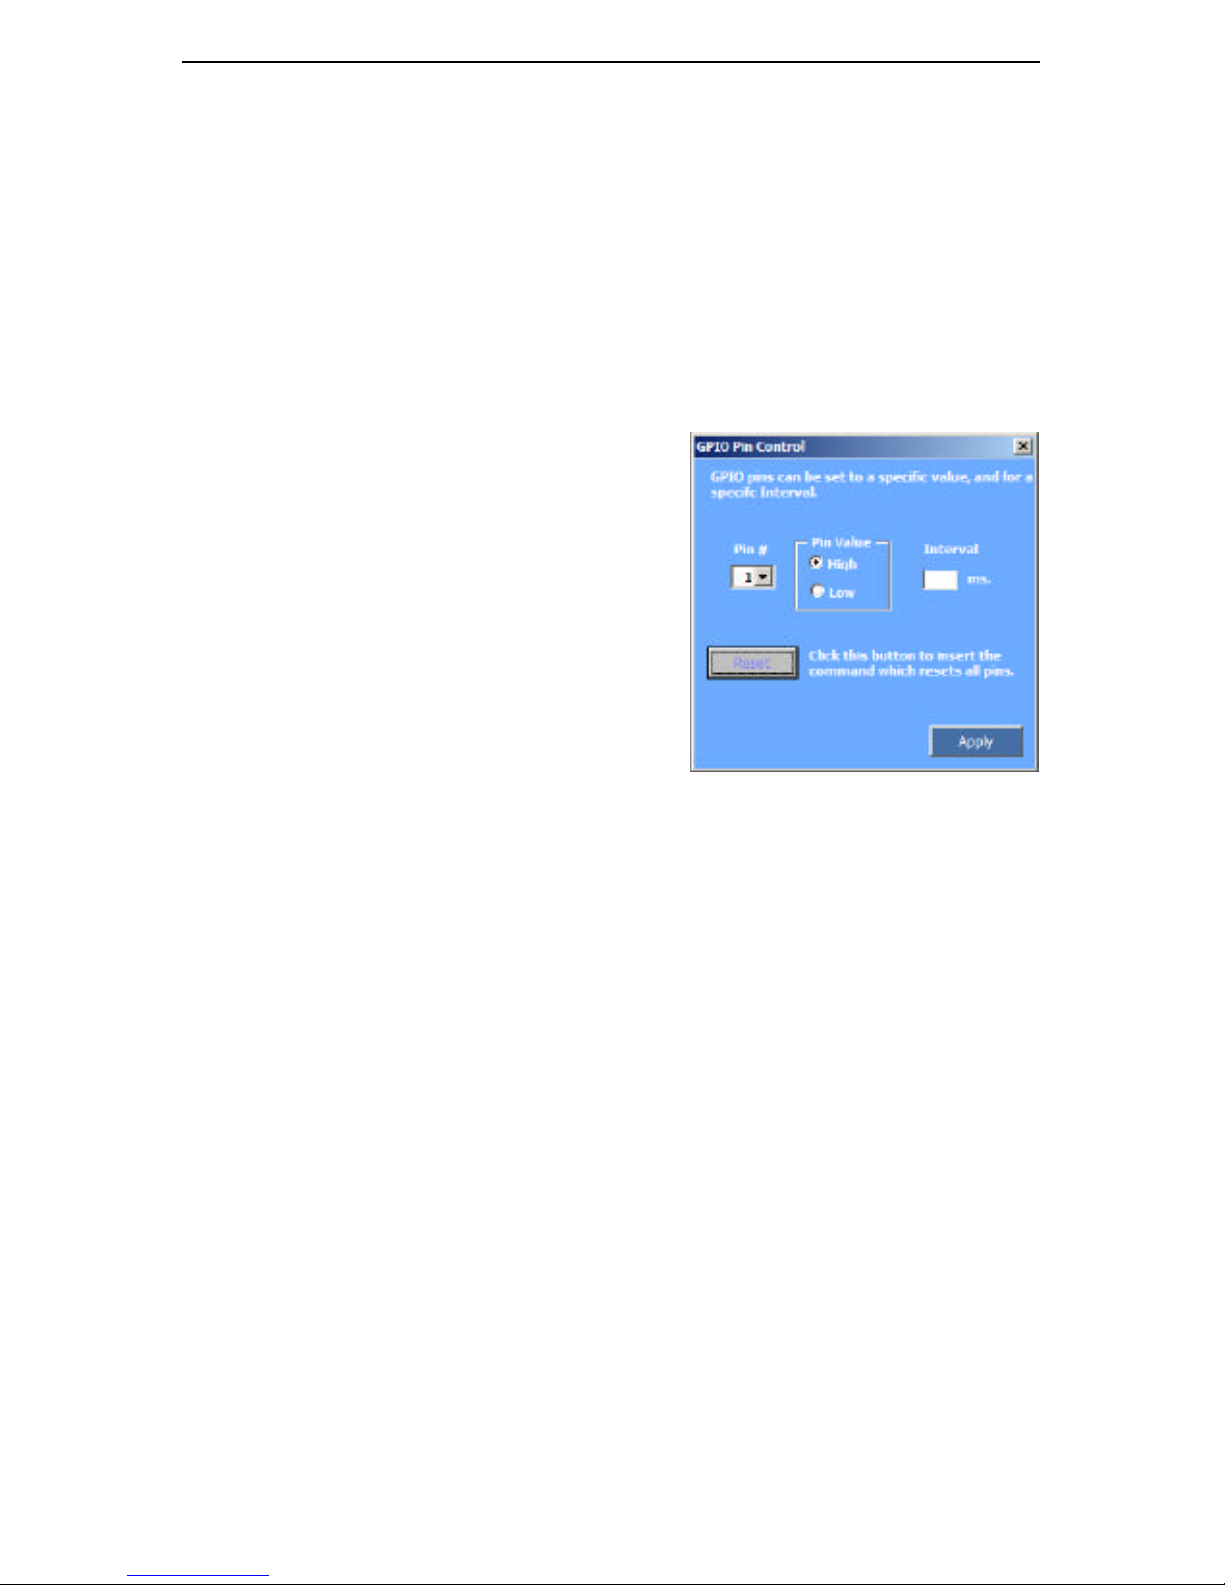
10 CHYTV ELEMENTS REFERENCE
92
10.14.2 GPIO
Note: See Section 13.6 for information about the ChyTV Plus GPIO and GPIO Connector Pinout.
Selecting GPIO displays the GPIO Command Edit window for configuring the pins on the
ChyTV Plus GPIO port.
10.14.2.1 Creating a GPIO Pin Command Tag
1. In the Pin# pull down box, enter or select the GPIO connector pin to be controlled.
2. From the Pin Value radio buttons, select the voltage value that the pin will toggle to when
the tag is executed.
3. In the Interval text box, enter the amount of
time in milliseconds that the Pin Value should
remain in the toggled state before returning to its
original state. If no value is entered, the pin will
remain in the toggled state until reset by a Reset
tag.
4. Click Apply to add the GPIO command tag to
your page.
10.14.2.2 Creating a GPIO Port Reset Tag
When executed, the GPIO port Reset tag resets all
pins of the GPIO to their default value.
1. Click the Reset button to add the GPIO port
Reset tag to your page.
ChyTV Plus
GPIO Edit Window
Page 99

10 CHYTV ELEMENTS REFERENCE
93
10.15 Save as ChyTV
Save as ChyTV saves the current page as HTML in the HTML directory of the current project.
When Save as ChyTV is clicked, the current project’s HTML directory is displayed. Enter the
file name desired and click Save.
Page 100
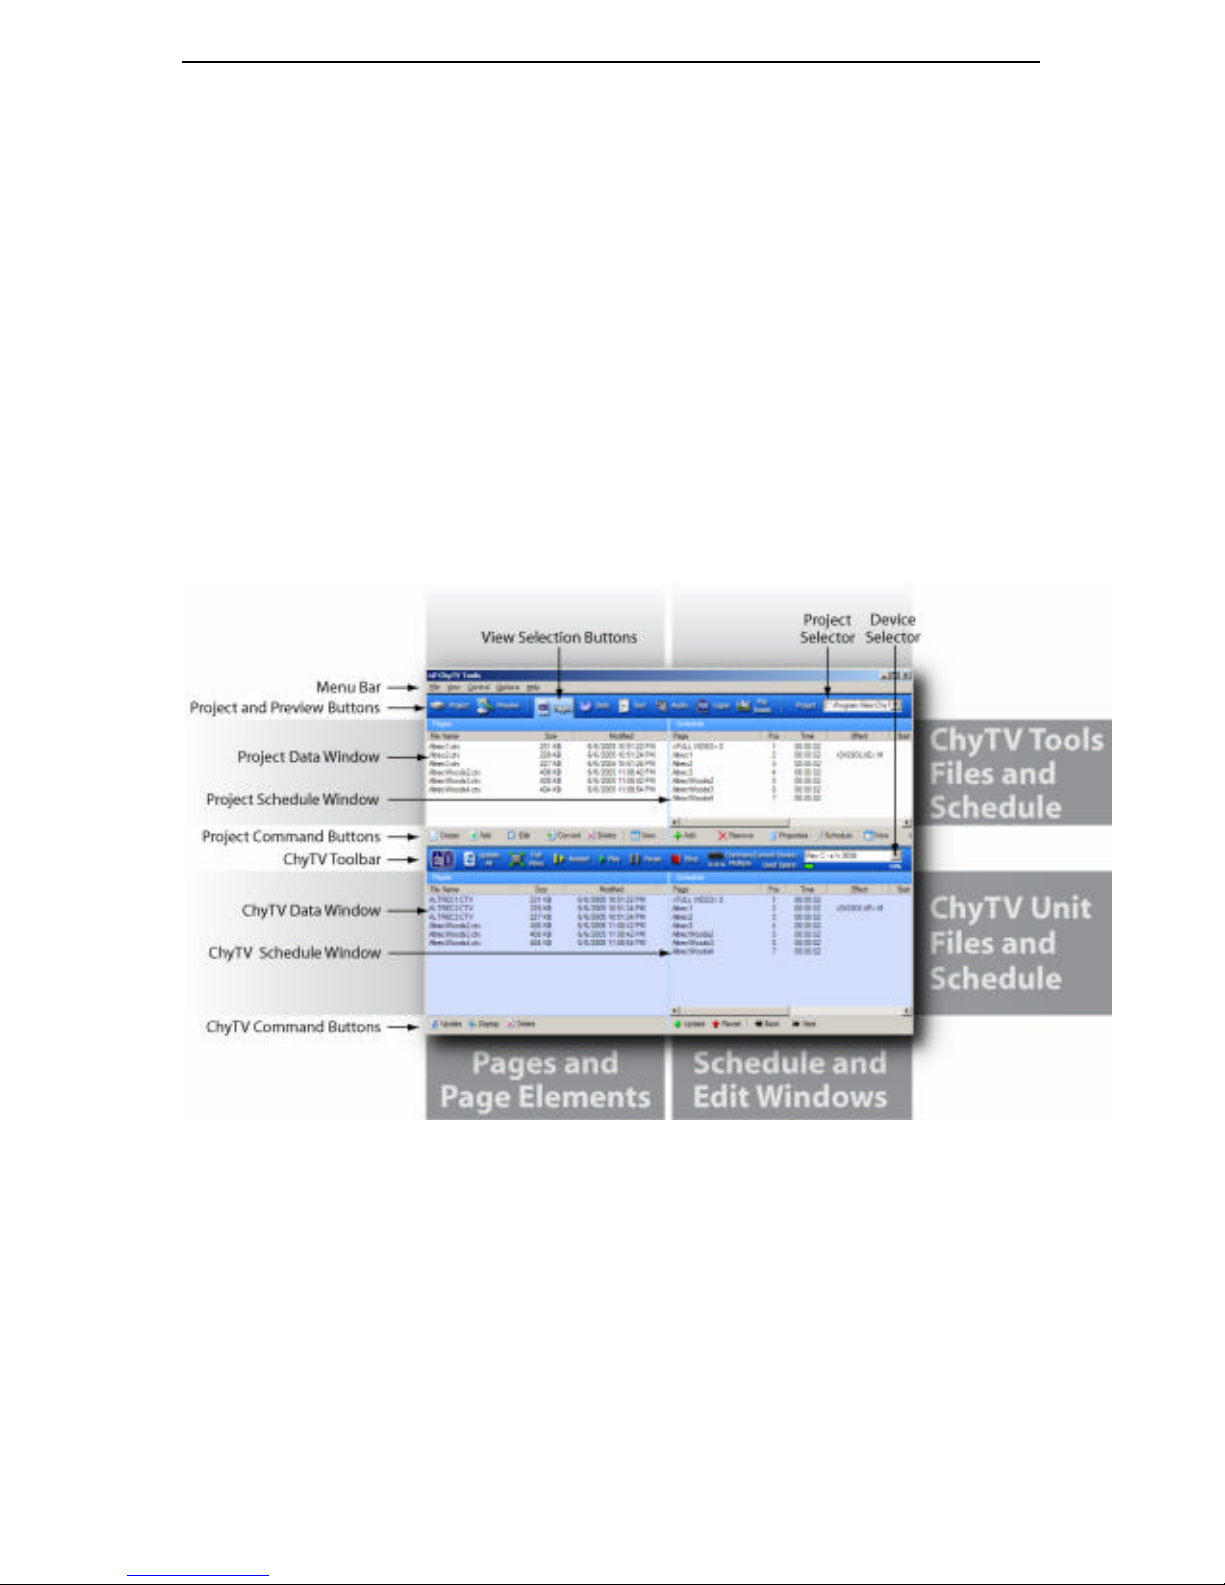
11 CHYTV TOOLS REFERENCE
94
11 ChyTV Tools Reference
ChyTV Tools is th e utility used to import, organize and schedule pages and their page elements for
display by the ChyTV unit. It is also used to transfer files between the PC and ChyTV’s CF card,
and control the unit remotely while updating pages and Active Data.
Using ChyTV tools, you can:
§ Create new project folders in the format required by the ChyTV unit.
§ Import and convert PowerPoint .htm pages to ChyTV .cvt format.
§ View thumbnail previews of converted .cvt pages.
§ Add pages to the schedule and change their sequence, duration, transition effects and the date
and time they are displayed.
§ Upload and download project files between the ChyTV unit and PC.
§ Pause, play or restart the schedule, or display full screen video while updating pages or Active
Data
11.1 Project Selector
The Project Selector is a pull-down menu that may be used to select one of the last 8 projects
opened in ChyTV tools.
11.2 Menu Bar
11.2.1 File
Contains menu items for creating, opening and saving projects. Recent projects can also be opened
from the Project Tool Bar button (see 11.3.1) and the Project Selector (see 11.1).
ChyTV Tools User Interface
 Loading...