

Page 1
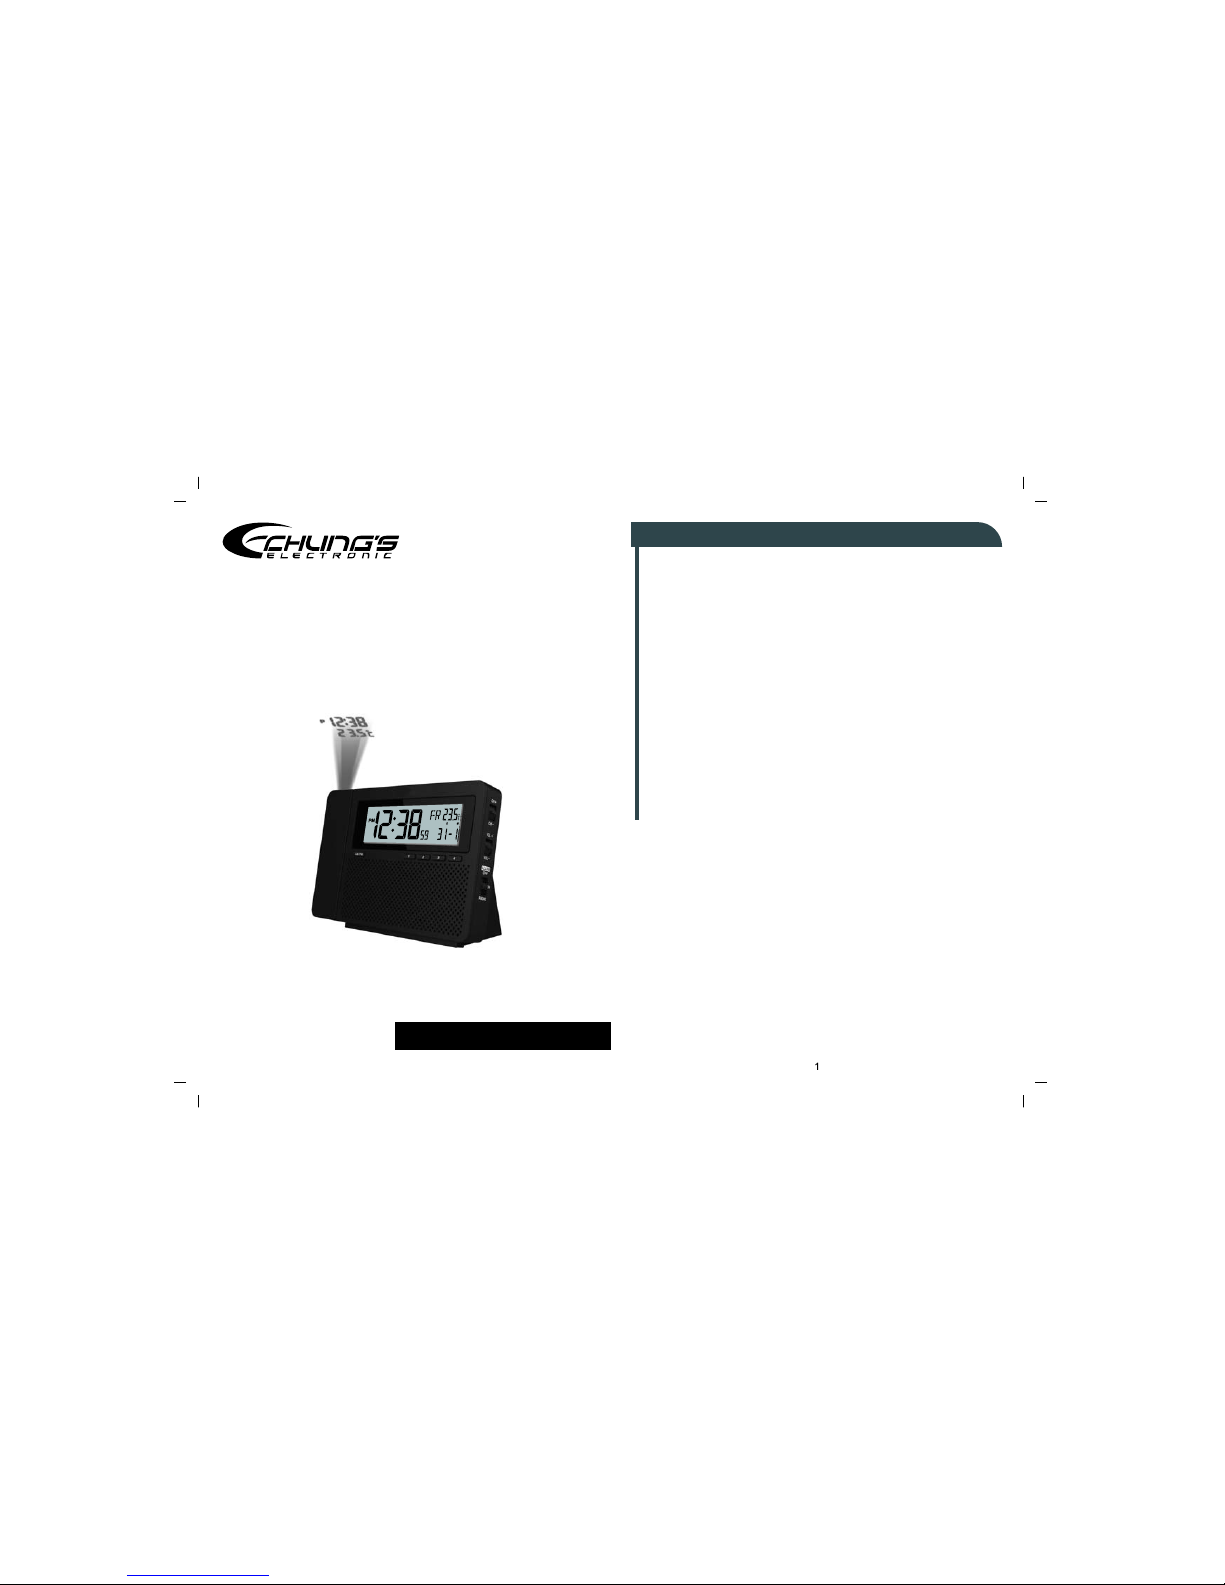
C6057-PD14432M (DCF / MSF / JJY / WWVB) Size: 100x141 mm
AM/FM RADIO
RC CLOCK
C6057
USER MANUAL
WITH PROJECTION
CONTENT
1. INTRODUCTION.......................................................................................2
2. FEATURES............................................................... ................................2
3. OVERVIEW OF THE RADIO......................... ...........................................2
4. GETTING STARTED.................................................................................7
5. DAYLIGHT SAVING TIME (DST)..............................................................8
6. CLOCK OPERATION................................................................................8
6.1 Time and Calendar Setting..................................................................8
6.2 Alarm Time Setting..............................................................................9
6.3 Using the Alarm and Snooze.............................................................10
7. RADIO OPERATION-AM & FM MODE...................... .............................11
7.1 Power on Radio............................................................ .....................11
7.2 Auto Scanning................................. ............................................ ......11
8. DIRECT MEMORY STATION.............. .................................. .................11
9. SETTING THE SLEEP TIMERR-AM & FM MODE..................................12
10. ABOUT THE TEMPERATURE DISPLAY..............................................12
11. USING THE PROJECTOR AND BACKLIGHT......................................13
12. BATTERY REPLACEMENT...................................................... ............13
13. BATTERY SAFETY WARNINGS................................................... .......13
14. PRECAUTIONS.....................................................................................14
Page 2
1. INTRODUCTION
Thank you for your purchase of this AM/FM Radio with RC clock. The utmost
care has gone into the design and manufacture of your radio. This manual is
used for Germany (DCF77) / UK (MSF) / Japan (JJY) / USA (WWVB)
version, but the LCD and temperature use DCF&MSF version for reference.
So please read the manual carefully according to the version you purchase
and keep the manual well for future reference.
2. FEATURES
● Display of Time, Calendar, Day of the week, Temperature
● 12/24 Hour format selectable
● Auto time update function
● Alarm and snooze
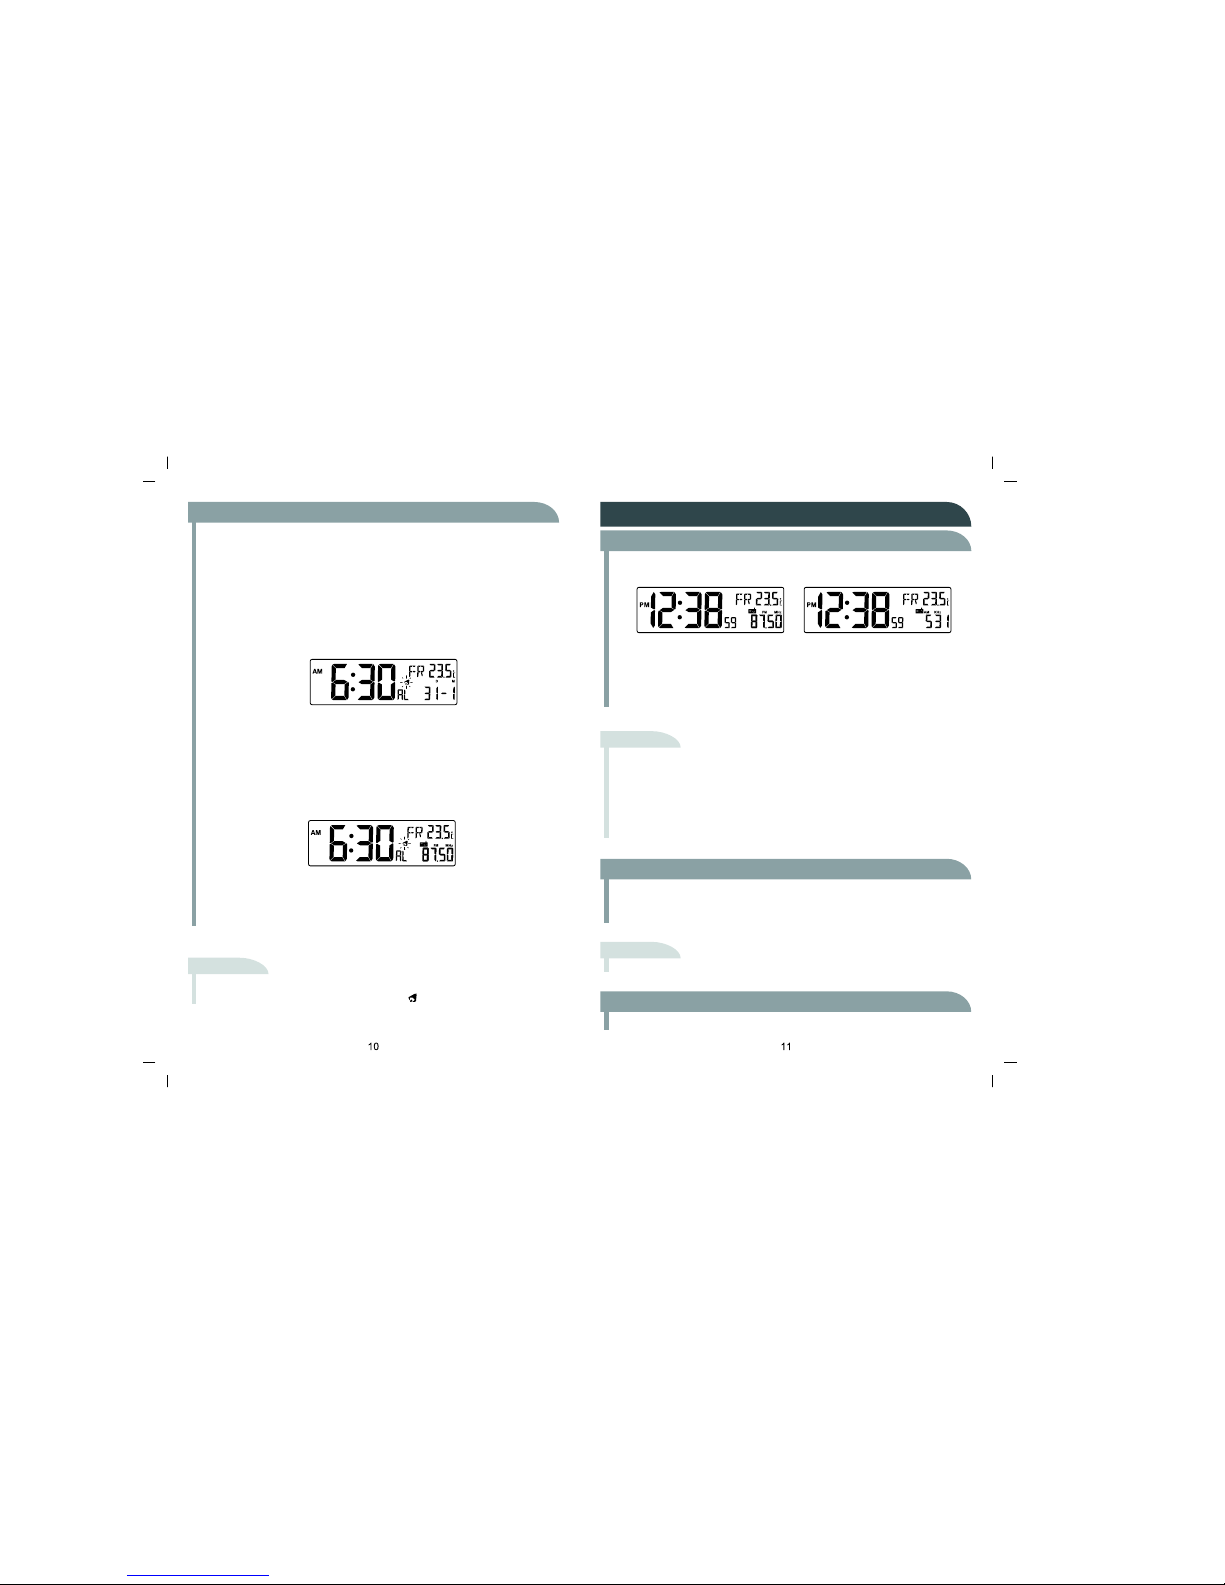
● FM Reception: 87.5MHz~108MHz
● AM Reception:
531kHz~1710kHz (DCF / MSF / JJY version)
530kHz~1710kHz (WWVB version)
● Sleep mode (15/30/60/00 (OFF) minutes Timer)
● 8 Direct Preset Stations keys (4 AM + 4 FM)
● Backlight LCD display with dimmer
● Projector rotating angle 180°
● Low battery indicator
● DC power in
3. OVERVIEW OF THE RADIO
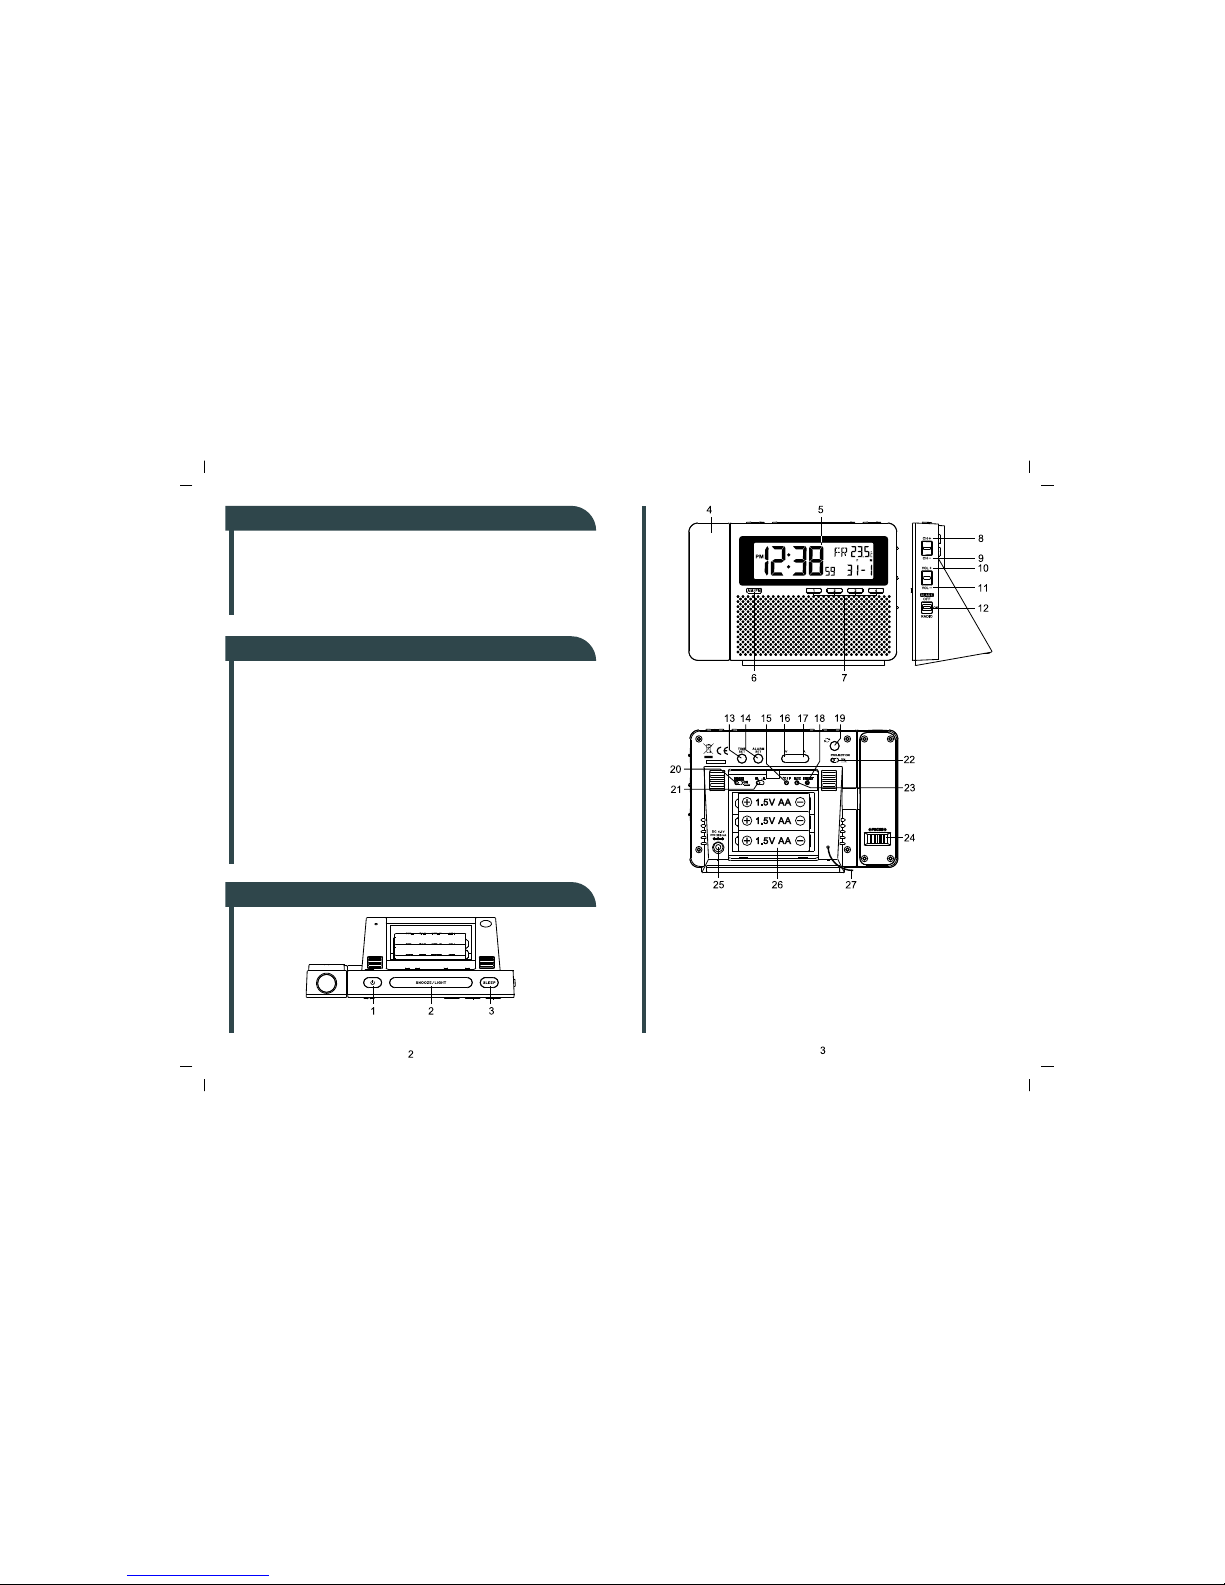
1. [ RADIO ON/OFF ] key:
- Press and hold it for 1 second to turn on or turn off the radio. (It is ineffective
when alarm sounds)
2. [ SNOOZE/LIGHT ] key:
Powered by batteries:
- Press it to turn on backlight and projection for 5 seconds.
Powered by AC adaptor:
Page 3

- In n orma l mo de, when the [ PROJ ECTI ON ] slide s witch is
<OFF >,
press and hold it for 4 seco nds to turn on the projectio n on continuou sly
for 30 minutes . Durin g the project ion, pr ess it to tur n on ba cklight for 5
seconds and turn off the projection.
- When the backlight is continuous ly on and projection of f, press it once to
turn on pr ojection for 5 sec onds. Pre ss and ho ld it for 4 second s to turn
on the p rojectio n on co ntinuous ly for 30 minut es. Aft er the projecti on is
off, the backlight will still be on.
- When the alarm sounds, press it once to enter snooze mode and turn on
the backlight and projection for 5 seconds.
- When the radio alarm so unds, pr ess it once to enter s nooze mo de and
turn on the backlight and projection for 5 seconds.
3. [ SLEEP ] key:
It is effective only in radio mode.
- Press it to displa y sleep time and “ SLEEP” icon, press it again to set the
sleep time.
4. Projector
5. LCD
6. [ AM/FM ] key:
It is effective only in radio mode.
- Press it to switch between AM and FM.
7. Memory ( [ M1 ]/ [ M2 ]/ [ M3 ]/ [ M4 ] ) key:
It is effective only in radio mode.
- Press it to turn on the preset station.
- Press and hold it for 2 seconds to preset the current station.
8. [ CH+ ]
key:
It is effective only in radio mode.
- Press it towards
[ CH+ ]
position to increase the frequency.
- Press and hold it to wards [ CH + ] positi on fo r 0.5 second to spee d up
scan ning. D uring s canning , p ress it tow ards [ CH+ ] positio n to st op
scanning.
9. [ CH- ] key:
It is effective only in radio mode.
- Press it towards [ CH- ] position to decrease the frequency.
- Press and hold it to wards
[ CH- ] po sitio n for 0.5 secon d to speed up
scan ning. Dur ing sc anni ng, pr ess it to war ds
[ CH - ] po sition to sto p
scanning.
10. [ VOL+ ] key:
It is effective only in radio mode and alarm sounding duration for [ALARM
RADIO ] position.
- Press it towards [ VLO+ ] position to increase the volume of radio.
11. [ VOL- ]
key:
It is effective only in radio mode and alarm sounding duration for [ALARM
RADIO ] position.
- Press it towards [ VLO- ] position to decrease the volume of radio.
12. [ ALARM ON/OFF/ALARM RADIO ] slide switch
- Slide it to <ON> position to turn on alarm function, alarm time displays for
5 seconds. Alarm will turn on at the set alarm time with “beep” sound.
- Slide it to
<OFF> position to turn off the alarm.
- Slide i t to <ALARM RADIO > posi tion t o turn on al arm fu nction, alarm
time displays for 5 seconds. Alarm will tu rn on at the s et alarm time with
radio sound.
13.
[ TIME SET ] key:
It is effective in both time mode and radio mode.
- Press and hold it for 2 seconds to enter time and calendar setting.
- In setting mode, press it to step the setting items.
- In setting mode, P ress and hold it for 2 seconds to s ave and exit setti ng.
Or press it to save and exit setting after setting the last item.
14. [ ALARM SET ]
key:
It is effective in both time mode and radio mode.
- Press and hold it for 2 seconds to enter alarm time setting mode.
- In alarm tine setting mode, press it to step the setting items.
Page 4

- Press it to save and exit setting after setting the last item.
- In normal mode, press it to display the alarm time for 5 seconds.
15.
[ °C/°F ] key:
- Press it to select temperature unit between Celsius and Fahrenheit.
(for DCF / MSF / WWVB version only)
16. [ DOWN ] key:
- In setting mode, press it to adjust the value of flashing digit downwards.
And press it without releasing to speed up adjusting.
17. [ UP ] key:
- In setti ng mode, press i t to adj ust the value of flashin g digit upwards.
And press it without releasing to speed up adjusting.
18. [ RESET ] key:
- In case of mal-function, press it to reset all the values.
19.
[ ROTATE ] key:
- Press it to rotate the angle of the projection.
20. [ BACKLIGHT ON/OFF ] slide switch:
When the clock is powered by batteries:
Slide to either
<ON> or <OFF> position:
- Press [ SNOOZE/LIGHT ] key to turn on backlight for 5 seconds.
When the clock is powered by DC adaptor:
Slide to <ON> position:
- Backlight will be on all the time.
Slide to <OFF>
position:
- Backlight will be o ff. Press [ SNOO ZE/LIGHT ] key to turn on b acklight
for 5 seconds.
21. [ L/H ] slide switch
Set backlight brightness.
- Slide to <L>
position for dimmer backlight.
- Slide to <H>
position for brighter backlight.
22. [ PROJECTION ON/OFF ] slide switch:
When the clock is powered by batteries:
Slide to either <ON> or <OFF> position:
- Press [ SNOOZ E/LIGH T ] ke y to tu rn on backlig ht and projec tion for 5
seconds . Press and ho ld
[ SNOOZ E/LIGHT ]
key fo r 5 sec onds to turn
on backlight for 5 seconds and projection for 30 minutes.
When the clock is powered by DC adaptor:
Slide to
<ON>
position:
- Projection will be on all the time.
Slide to <OFF> position:
- Projection wi ll be off. Pr ess [ SNOO ZE/LIGHT ] k ey to turn o n backlight
and projection for 5 seconds. Press and hold [ SNOOZE/LIGHT ] key for 4
seconds to turn on backlight for 5 seconds and projection for 30 minutes.
23. [ RCC ] key:
It is effective only in time mode.
- In normal mode, press it to manually turn on or turn off the RC reception.
- During t he RC re ception , press and hol d it for 8 seco nds to t urn off the
RC auto reception function. Pre ss and hold it for 8 seconds again to turn
on RC auto reception function.
- During the RC reception, press and hold it for 3 seconds to change the
signal frequency between 40k and 60k. (JJY version only)
24. FOCUS knob
- Adjust the quality of the projected data.
25. DC jack
26. Battery compartment
27. Telescopic aerial
4. GETTING STARTED
● If using batteries to power the unit, remove t he batter y door at the back
of the unit.
● Insert 3 AA size ba tteries into the bat tery compart ment. E nsure all the
Page 5
Year setting
enoz emiTedom emit lamro
N
Language setting
Second setting
gnittes etaDgnittes etuniM
12/24 Hour format settingHour setting
Month setting
Minute settingHour setting
batteries are inserted with the correct polarity as shown inside the battery
compartment. Replace the battery door.
●
Press [ RESET ] key to reset the unit.
● If usin g DC ad aptor t o powe r the u nit, pl ug the DC ada ptor in to the DC
jack, and connect another end of the adaptor to the main power.
● Once y ou pow er/rep ower t he clo ck, a ll the segme nt of the LC D will be
shown for 2 seconds and turn to time mode.
NOTE:
●
The
initial time is12:00 am when you use the clock first time, or repower the clock.
●
The signal reception will last for about 6~16 minutes.
●
The AM/FM r adio ma y consu me more power, so you can use the ma in powe r
when you use the radio, and use the batteries to retain the clock.
5. DAYLIGHT SAVING TIME (DST)
The clock has been programmed to automatically switch when daylight
saving time is in effect. Your clock will display “
DST” on the LCD during the
summer.
6. CLOCK OPERATION
6.1 Time and Calendar Setting
If the clock does not receive the time signal successfully, you can set the time
manually. As soon as the transmitter is received, the clock will automatically
synchronize with the received time.
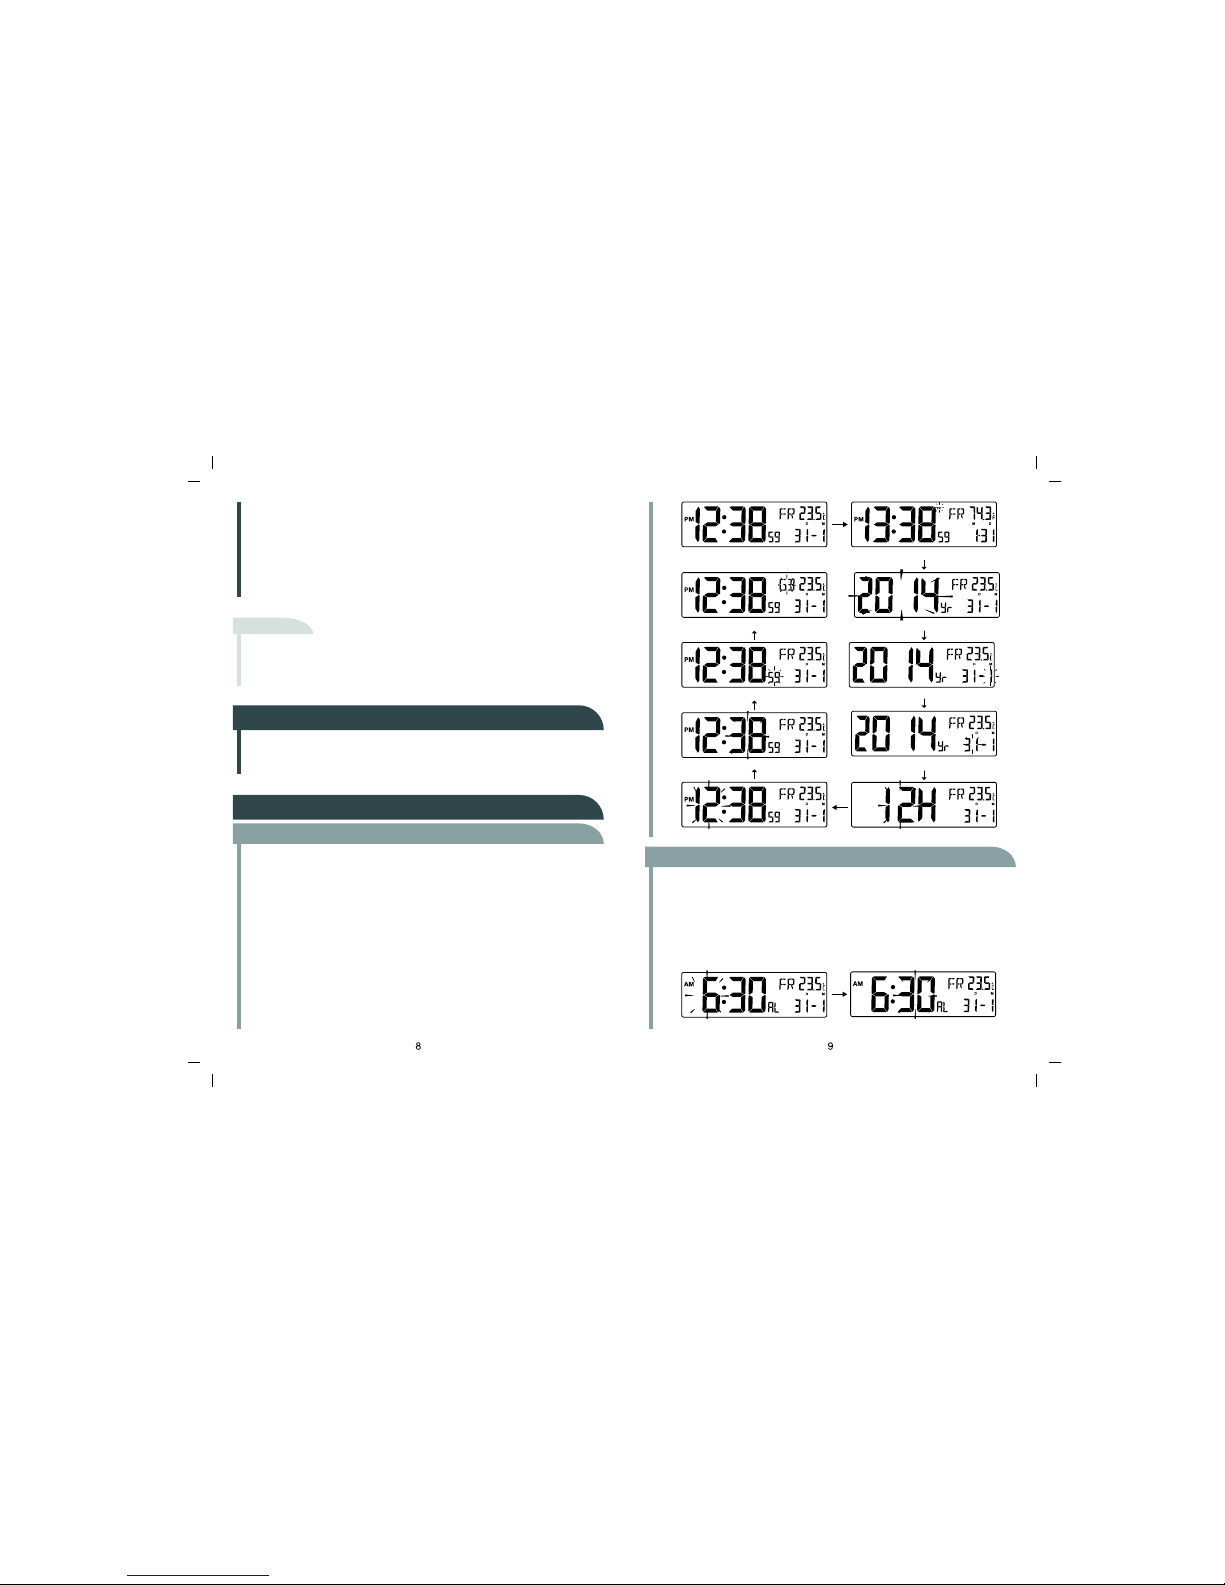
● Pres s an d hold [ TI ME SET ] ke y for 2 sec onds to ent er t ime set ting
mode with Time Zone digit flashing. (WWVB version only)
● Press [ UP ]/[ DOWN ]
key to adjust the value of flashing digit.
● Press
[ TIME SET ]
key to step to Year setting, and press
[ UP ]
/[ DOWN ]
keyto adjust it.
Setting sequence will be: Time zone>Year>Month>Date>12/24 Hr format>
Hour>Minute>Second>Day Language.
● Press [ TIME SET ] key to save and exit setting.
6.2 Alarm Time Setting
● Press and hold [ ALARM SET ] key f or 2 seco nds t o enter a larm time
setting mode with Hour digit flashing.
● Press
[ UP ]
/[ DOWN ] key to a djust the value fl ashing dig it. (Pres s the
key without releasing to speed up adjusting)
● Press [ ALARM SET ]
key to step to Minute setting. Press [ UP ]/ [ DOWN ]
key to adjust the value of Minute.
● Press
[ ALARM SET ] key to save and exit setting.
Page 6
edom M
A
edom MF
6.3 Using the Alarm and Snooze
● Set the desired alarm time as described in 5.2.
● Slide the [ ALARM ON/OFF/ ALARM RADIO ] slide switch to <ALARM ON>
or
< ALARM RADIO > position.
●
When the clock reaches the alarm time, alarm sound will start.
It can be stopped by following operation:
For
<ALARM ON> position:
●
Auto-stop after 1 minute alarming if without any operation and it will re-alarm
by the next day.
● Press [ SNOOZE/LIGHT ] key to enter snooze, and the alarm will turn on
with “beep
” sound after 5 minutes.
● Slide the [ ALARM ON/OFF/ AL ARM RADIO ]
switch to <OFF> position
to turn off the alarm function.
For
<ALARM RADIO > position:
● Auto-stop after 30 minutes alarming if without any operation and it will re-alarm
by the next day.
● Press [ SNOOZE/LIGHT ] key to enter snooze, and the alarm will turn on
with radio sound after 5 minutes.
● Slide the [ ALARM ON/OFF/ AL ARM RADIO ] switch to <OF F> position
to turn off the alarm function.
NOTE:
●
The snooze can be used continuously in 24 hours.
● During the alarm and snooze, the alarm icon “ ” will keep flashing.
7.RADIO OPERATION-AM & FM MODE
7.1 Power on Radio
● Press and hold [ RADIO ON/OFF] key for 0.5 second to turn on the radio.
● Press
[ AM/FM ] key to select AM mode or FM mode.
● Press [ CH+ ]/[ CH- ] key to select your favorite station, and press [ VOL+]
/
[ VOL- ]
key to adjust the volume of your radio.
● Press and hold [ RADIO ON/OFF] key for 0.5 second again to turn off the
radio.
NOTE:
● In FM mod e, the frequency will increase/d ecrease 0.05 MHz by every press of
[ CH+ ]/
[ CH- ] key.
● In AM mode, the frequency is factory set to increase/decrease 9 kHz by every press
of [ CH+ ]/[ CH- ] key for DCF / MSF / JJY version, but increase/decrease 10 kHz for
WWVB version.
● Press [ AM/FM ] and [ RESET ] key at the same time to reset the radio, the changing
frequency of AM mode will switch between 9 kHz and 10 kHz for all of the versions.
7.2 Auto Scanning
● In AM /FM mode, you can press and hold [ C H+ ]/[ CH- ]
key to enter
auto-scan mode and the radio will search station automatically.
● The radio will not stop searching until it searches a station.
NOTE:
●
Once the radio searches a station, it will broadcast the station automatically.
8. DIRECT MEMORY STATION
When you liste n to a station on AM/FM, pre ss and hold th e
Memory([ M1]/
Page 7
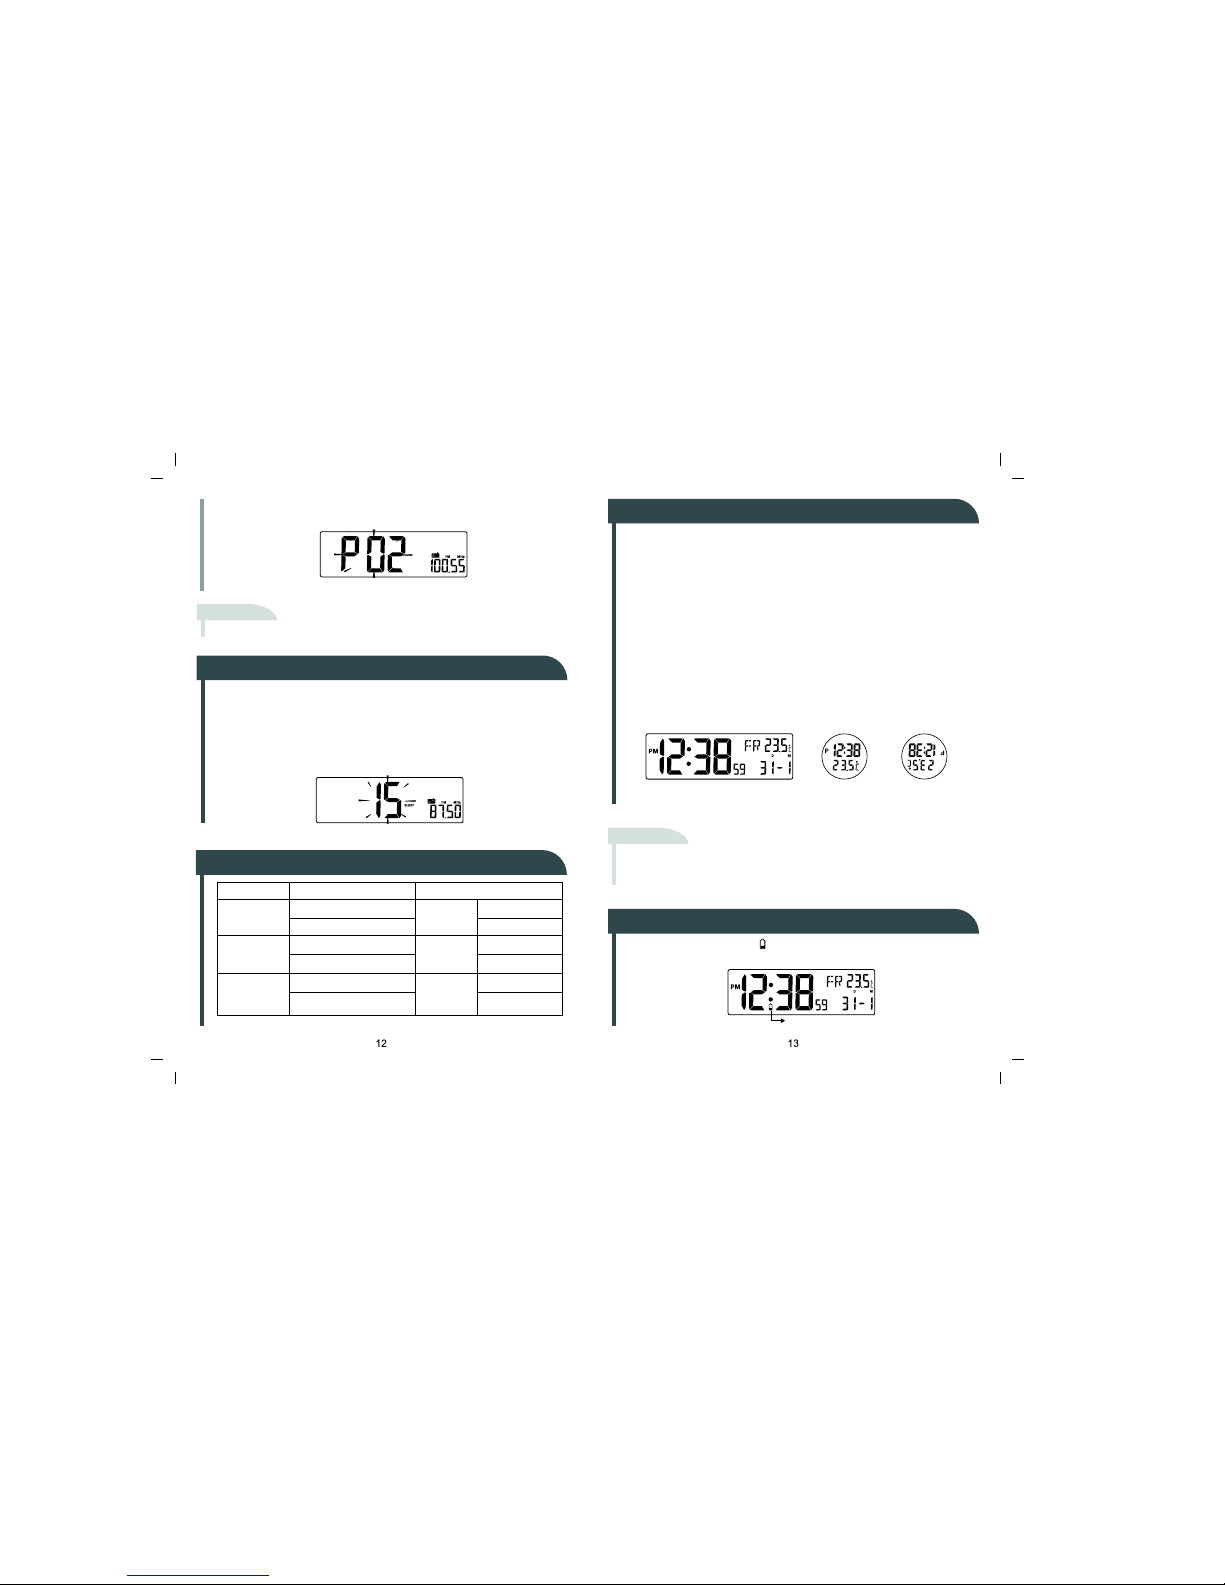
Save a station
Unit
Condition Temperature display
Temp.≤-10°C
Temp.≤
-40°C(-40°F)
Temp.≥70°C(158°F)
1°C
0.1°C
1°F
0.1°F
Accuracy
Accuracy
Icon
Lo
Hi
Temp.≥-9.9°C
-9.9°F≤Temp.≤
99.9°F
Temp.≥
100°F
Celsius
Fahrenheit
Celsius/
Fahrenheit
Normal display Projected data
(normal)
Projected data
(reversed)
Low battery indicator
[ M2 ]/[ M3 ]/[ M4 ])
key for 2 seconds to preset the current station. And you
can press the keys to turn to the station directly next time.
NOTE:
● There are 4 preset station keys separately for AM and FM.
9. SETTING THE SLEEP TIMER-AM & FM MODE
● When you listen to the radio (AM/FM), press [ SLEEP ]
key to enter sleep
timer setting with the digit “15” flashing.
● Pres s [ SLEEP ] key to aga in t o select the de sire d sleep tim e. E ach
press chan ges the s etting ti me as fol lowing: 1 5>30>45>6 0>00 minu tes.
● When i t rea ches t he time you set, the A M/FM radio will turn o ff
automatically.
10. ABOUT THE TEMPERATURE DISPLAY
11. USING THE PROJECTOR AND BACKLIGHT
A. When the clock is powered by battery:
● When the clo ck is power ed by batter y, press [ SNOOZE/LI GHT ]
key to
turn on the projector and backlight for 5 seconds.
●
Or pres s and h old
[ SNOOZ E/LIGHT ] key for 4 seconds to tu rn on t he
projection for 30 minutes. During the projection, press [ SNOOZE/LIGHT ]
key again to turn off the projection.
B. When the clock is powered by DC adaptor:
● Slide the [ PROJECTION ON/OFF ]
switch to
<ON>
position, the projection
will be on al l the time, or sli de it to < OFF> p ositio n to r eturn to nor mal
mode (refer to section A above).
● Slide the [ LIGHT ON/OFF ] switch to <ON>
position, the backlight will be
on all the time, or slide it to <OFF> position to return to normal mode (refer
to section A above).
NOTE:
● During the projection, press [ REVERSE ] key will reverse the projected data.
● The rotate angle of the projector is ±90º.
● Adjust the quality of the projected data by adjusting the
FOCUS knob.
12. BATTERY REPLACEMENT
If the low battery indicator “ ” displays on the LCD, please replace with 3
new AA size batteries at once.
Page 8
© 2013 Chung’s Electronic Co., Ltd. All rights reserved.
Rev-1 2016.5.24 9:13
13. BATTERIES SAFETY WARNINGS
● Please read all instructions carefully before use.
● Use only alkaline batteries, not rechargeable batteries.
● Install batteries correctly by matching the polarities (+/-).
● Always replace a complete set of batteries.
● Never mix used and new batteries.
●
Remove exhausted batteries immediately.
●
Do not recharge and do not dispose of batteries in fire
●
Battery shall not be exposed to excessive heat such as sunshine, fire or
the like.
●
Attention should be drawn to the environment aspects of the battery
disposal.
14. PRECAUTIONS
● This main unit is intended to be used only indoors.
●
The use of the apparatus in moderate climates.
● Do not subject the unit to excessive force or shock.
● Do not expos e the unit to extreme t emperatures , direct sun light, dust or
humidity.
● Do not immerse in water.
● Avoid contact with any corrosive materials.
● Do not dispose this unit in a fire as it may explode.
● Do not open the inner b ack case or tamper with any compone nts of this
unit.
 Loading...