

Page 1
Wheelchairs for young people
User Manual
for
Chunc Junior, Junior 45°, Spica, Adapt and Accessories
Page 2

Chunc Wheelchairs
Specmat Limited
Tarsmill Court
Rotherwas
Hereford HR2 6JZ
UK
Chunc Wheelchairs
Specmat Technologies Inc.
215 Dunavant Drive
Rockford
Tennessee TN 37853
USA
www.chunc.com
Page 3
Page 3
Contents
Chapter Page
Welcome 4
Chunc Junior and Junior 45° 8
Chunc Spica and Adapt 10
Chunc Junior and Junior 45° setup 13
Chunc Spica setup 17
Chunc Adapt setup 19
Accessory setup and use 21
Everyday use 26
Safe transportation in a motor vehicle 32
Cleaning 35
Extended life, re-use, recycling and disposal 35
Mechanical maintenance 36
Product warranty and disclaimer 37
Product specication table 38
Page 4

Page 4
Welcome
Congratulations on the purchase of your Chunc wheelchair. It has been designed and manufactured with the utmost care and attention. At Chunc we believe in continuous improvement.
If you have any questions or comments about our customer service, product literature or
products we would be pleased to receive them.
Getting started
It is recommended you do not remove your Chunc wheelchair from the box or assemble it
without a Chunc representative, your distributor/dealer or a trained healthcare professional in
attendance.
Take care when unpacking your Chunc wheelchair and ask somebody to assist you with the
heavier parts. Check all ordered parts are present, in working order and are free from damage.
In the unlikely event you nd a fault, contact your supplier immediately.
Intended use, including transportation
The Chunc Junior, Junior 45° and Spica are manual attendant controlled paediatric wheelchairs.
The Chunc Adapt is a manual attendant controlled wheel base for use with a surrogate seating
system. A range of accessories is available which are intended to provide additional mobility,
postural management and adjustable seating solutions. The Chunc Spica caters for occupants
in ‘hip spica casts’ and can also be used for other requirements such as radial leg extension
braces.
All Chunc wheelchairs are intended for a single occupant including children and young adults
with moderate to specialist needs such as cerebral palsy and whose mass does not exceed
54kg /125lb. The maximum load capacity (including an occupant up to 54kg) and any auxiliary
equipment (such as communication and respiratory aids) and, if applicable, surrogate seating
for the Adapt, should not exceed 75kg/165lb.
The wheelchairs are designed for indoor and outdoor use; however they are not intended for
use on rough terrain.
The Chunc Junior, Junior 45°, Spica and Adapt are suitable for use as a forward facing seat in a
motor vehicle when used in conjunction with 4 point tie down restraints (WTORS); see section
“Safe transportation in a motor vehicle”.
For your safety
At Chunc, safety is paramount in the product’s design, development and manufacture.
However, misuse and adverse environments can lead to potentially hazardous situations that
could result in injury or even death. It is therefore essential that this manual is read by all users
before use and kept with the wheelchair for future reference.
Users of Chunc wheelchairs; please distribute copies of this manual around your home, care
Page 5

Page 5
home or school if you believe it will improve the usage of your Chunc wheelchair. This manual
can be downloaded from www.chunc.com
Before use
Before transferring the user, an inspection should be made of the wheelchair, ensuring all •
required parts are secured and in good working order.
Special attention should be paid to the orange hand tightened components and particu-•
larly the backrest xing caps and the caution label at the base of the backrest.
Ensure the wheelchair rolls freely, without excessive noise or vibration; if you are uncertain •
of the wheelchair’s performance, it should not be used.
Occupant safety
Never leave an occupied Chunc wheelchair unattended.•
Never exceeded the wheelchair’s occupant weight limit, or maximum load capacity, or use •
for any purpose outside the manufactures instructions.
Any non-upholstered surfaces may become uncomfortably hot or cold if the chair is left in •
extreme conditions or direct sunlight for extended periods of time. The seat surface may
also become heated and in extreme conditions giving a risk of injury.
Postural Management
Chunc wheelchairs are Class 1 medical devices and must not be used to seat any person •
without prior consultation of a qualied health care professional.
A qualied health care professional should be present when tting or adjusting the Chunc •
wheelchair and accessories to an occupant.
The occupant’s seating posture and the positioning of adjustable parts and accessories •
should be monitored closely and adjusted as directed by a health care professional in accordance with the instructions in this manual.
Ensure harnesses are tted to the manufacturer’s instructions and their adjustment moni-•
tored closely.
Any adjustments should be as directed by a health care professional and in accordance •
with the manufacturer’s instructions.
Page 6

Page 6
Stability
Consider the stability of the wheelchair and occupant at all times, especially when en-•
countering slopes and uneven ground.
Movement of the user and the occupant’s body position can aect stability. Keep the user •
in a seated position whenever possible, with their back rmly against the backrest.
Do not place bags or any other unauthorized equipment on the framework.•
Ensure the anti-tip levers are engaged at all times where practical.•
When placing an occupant in a fully reclined Chunc Spica, consider their body position’s •
aect on stability.
Transportation
For transportation, it is recommended the occupant is transferred to a normal vehicle seat •
or surrogate car seat whenever possible.
The Chunc Junior and Junior 45°, and Spica can be used as a forward facing seat in a suit-•
ably adapted motor vehicle in conjunction with a 4 point tie down system with integrated
lap belt and vehicle-mounted shoulder belt.
The Chunc Adapt wheelbase with drop hook interface can also be used as detailed above. •
However, you should rst check the suitability of the surrogate seating system with your
provider.
Chunc wheelchairs have been crash tested with the tilt in space set to horizontal (seating) •
and with a Chunc headrest. We advise a Chunc headrest is tted during transportation.
Chunc have successfully crash tested to ISO 7176 19 and ANSI/RESNA WC/vol.1 section 19 •
using a 54Kg crash test dummy. This test replicates a 30mph head on collision. Full guidance is detailed in the transportation section of this user manual and must be read and
followed at all times.
Lifting
A minimum of two people should only attempt this operation.•
Ensure the handle grips are as high as possible and tightened, resting against the xed •
end caps.
If the Chair and occupant need to be lifted, lift using the front tie down points and the rear •
handle grips.
Do not lift the wheelchair by the footrests.•
Page 7

Page 7
Wheel locks
The wheel locks are not intended to stop the wheelchair when in motion.•
Always apply wheel locks when the chair is stationary.•
To maintain brake eciency the tires should be replaced before they become tread-bare.•
Finger traps
Be careful operating the wheelchair, remaining aware of nger traps around moving parts, •
when removing and replacing parts or making adjustments.
Take extra care when operating the orange locking collet of the backrest and armrests.•
Observe the potential nger trap for both the occupant and operator between the rear •
wheel and chassis plates. It is possible to purchase a wheel guard from your supplier.
IMPORTANT UPDATE MAY 2008
CSK_484 15-05-2008 C/N 5569
INTENDED USE AND TRANSPORTABILITY
The Chunc 4554 and Chunc 4575 are intended for users whose weight does not exceed
54kg/125lb and 75kg/165lb respectively.
The maximum load capacity (including the occupant, Chunc options and any other auxiliary
equipment should not exceed 75kg/165lb for the Chunc 4554 and 95kg/210lb for the Chunc
4575.
When used as a forward facing seat in a motor vehicle, where possible, the seat (tilt in space)
should be set to a near horizontal position with a slight rearward bias (similar to normal vehicle
seat). The front castors should be positioned in a trialing (wheelchair forward running) position.
GENERAL SAFETY
Under certain set up conditions the footplates may foul with the front castors. This could initiate a forward tip. Exercise caution when manoeuvring the wheelchair when set in an extreme
forward tilt.
Do not operate the wheel locks by hand unless the wheelchair is tted with a Chunc Pushing &
Braking aid. Ensure the wheelchair is on level ground, stable and supported.
Never leave an occupied Chunc wheelchair unattended. You should not park or let go of an
occupied wheelchair on a slope.
Beware of the occupants hands near the rear wheels when the Chunc 45 is in full rearward tilt.
CHUNC 4575 TILT IN SPACE
Operate the tilt in space using the right hand lever attached to the backrest underneath the
headrest mounting bar. Exercise caution when removing the backrest ensuring the cable is not
stretched or damaged. The backrest can then be placed on the seat when compacting for storage.
Page 8
Page 8
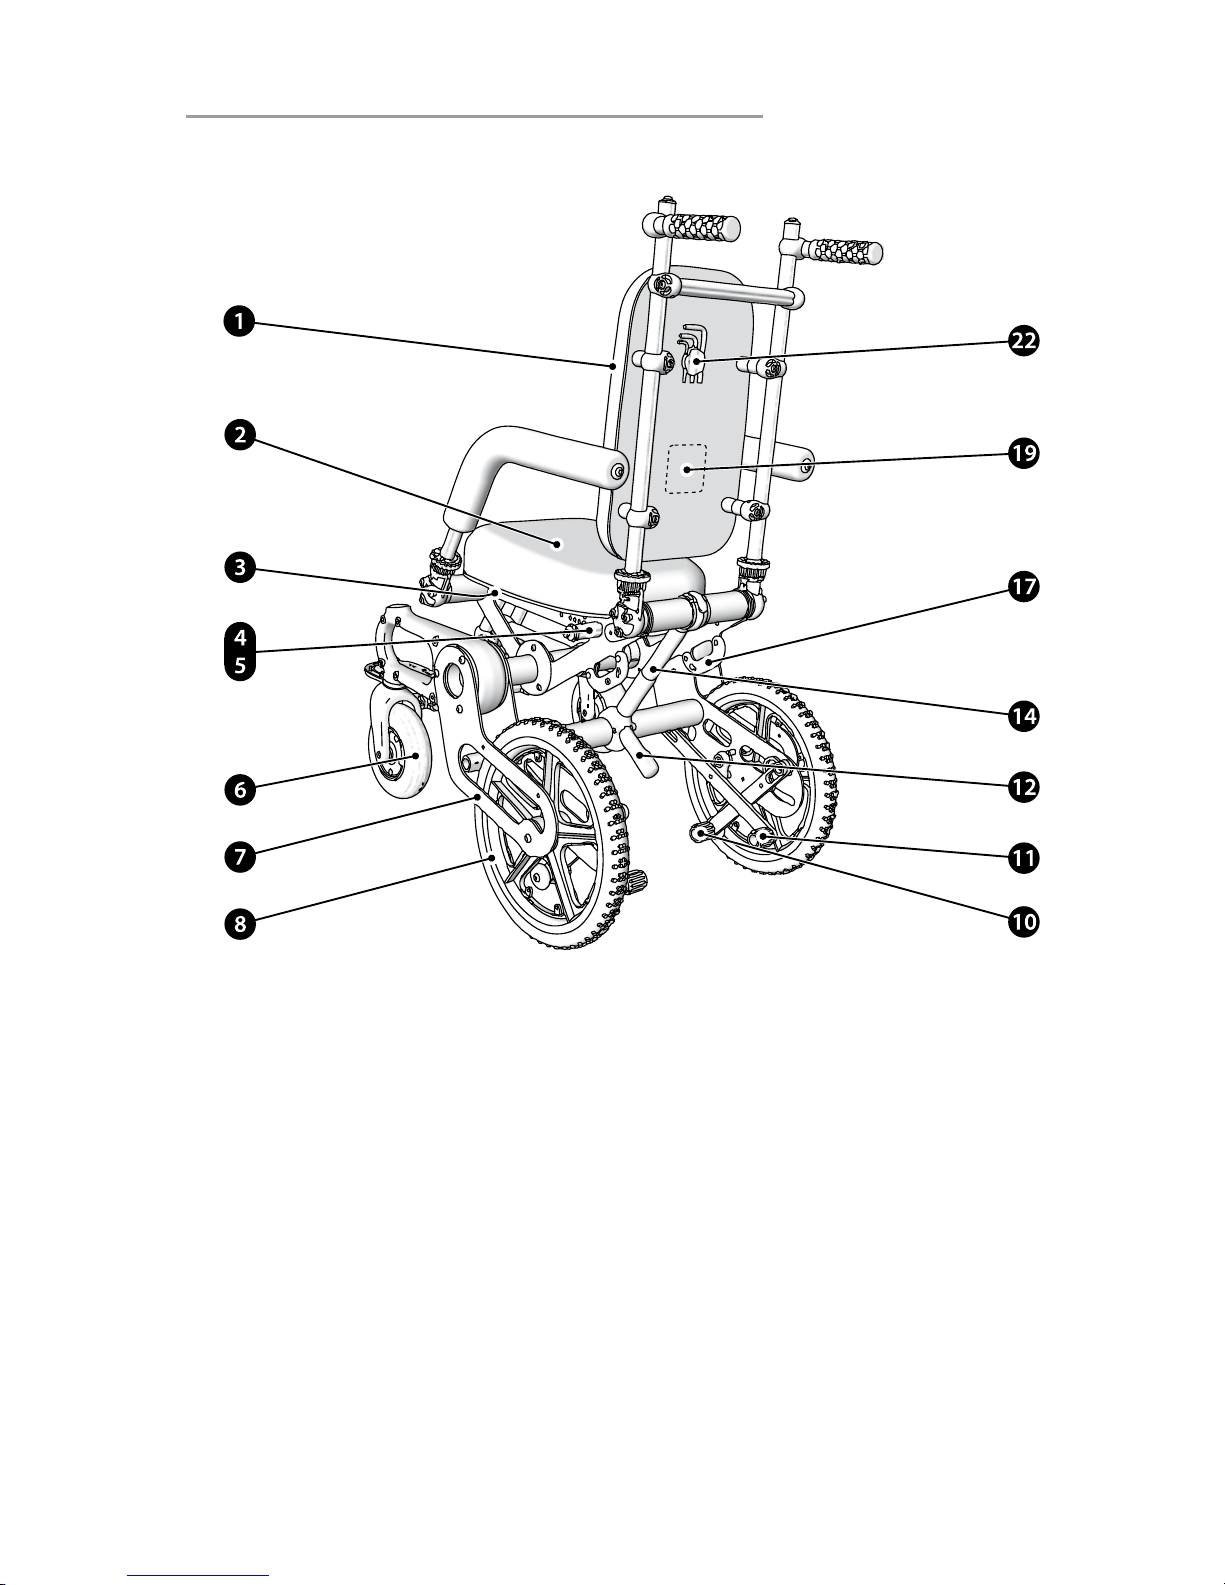
Back cushion1.
Seat cushion2.
Seat pan bracket3.
Harness attachment 4.
Wheelchair anchored pelvic belt attachment5.
Castor6.
Chassis plate7.
Rear wheel8.
Footplate9.
Anti tip lever10.
Wheel lock / tip assist11.
Tilt in space on/o lever12.
Snap over bracket13.
Gas strut14.
Chunc Junior and Junior 45°
Model shown: Chunc Junior
Page 9
Page 9
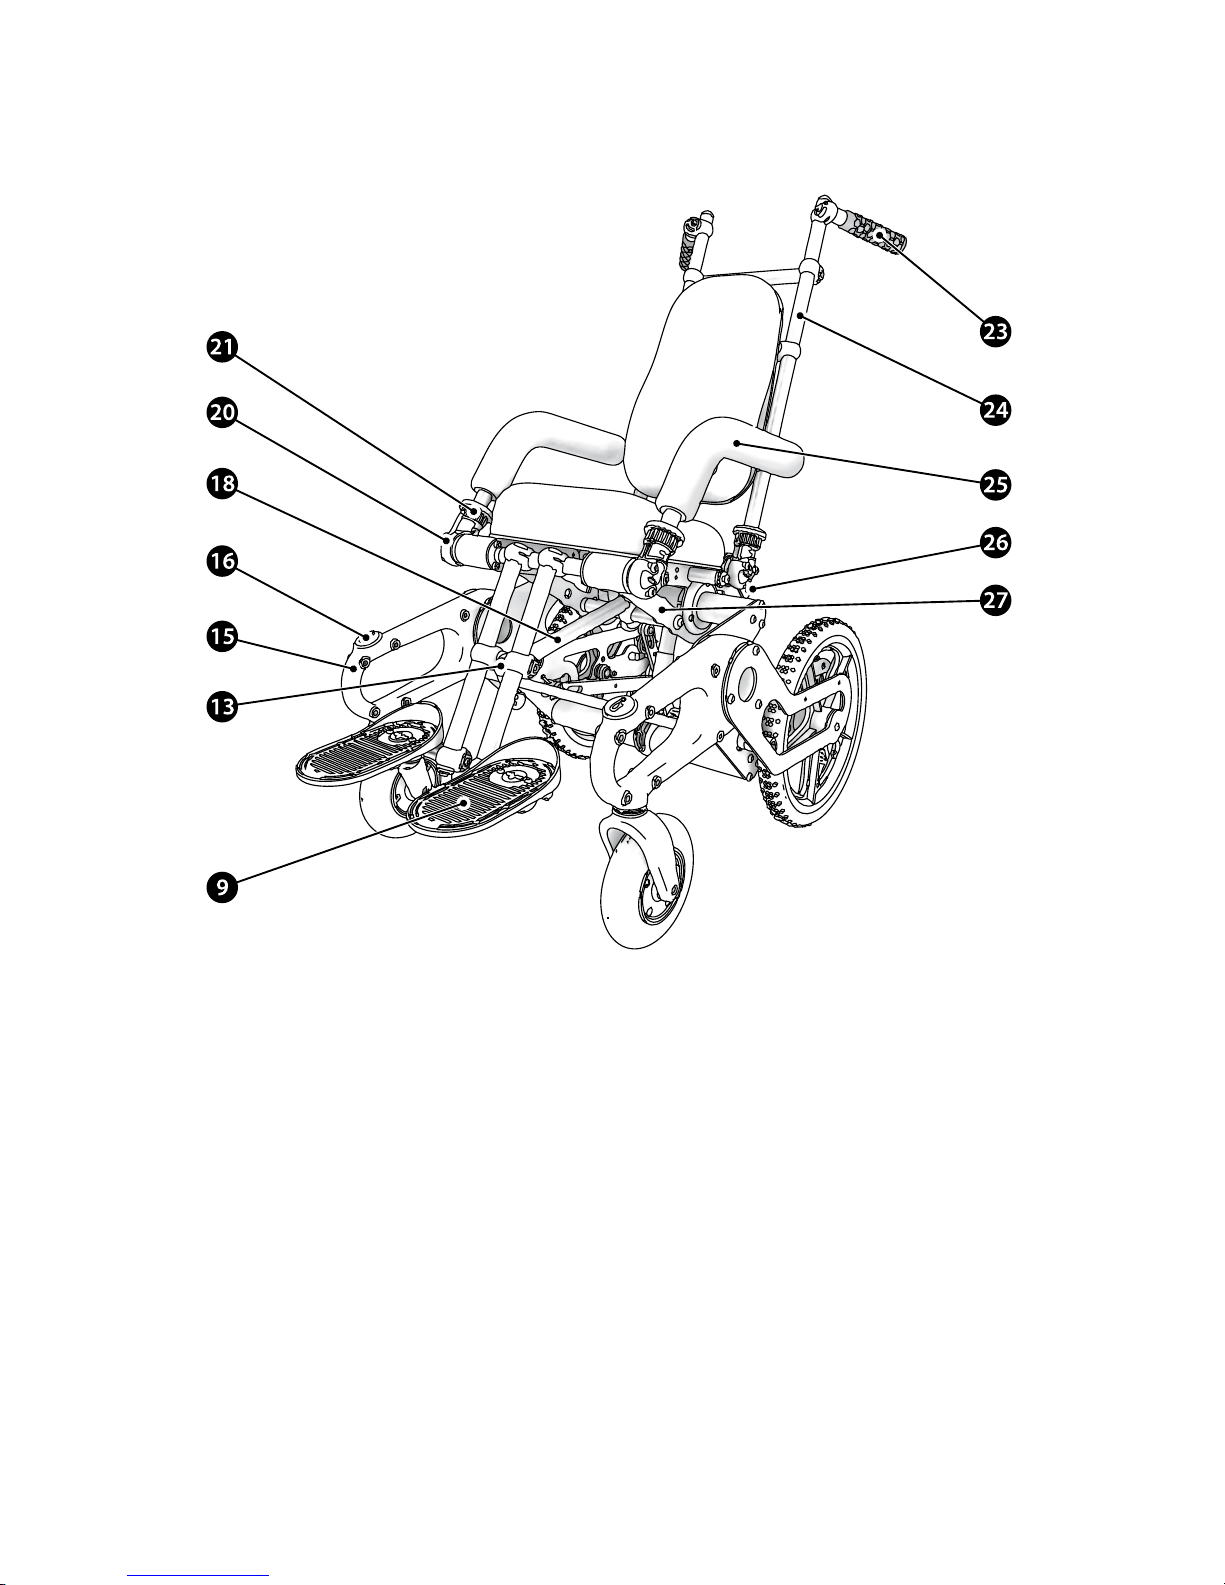
Chassis moulding / front tie down15.
Front tie down symbol16.
Rear tie down17.
Leg rest brace tube 18.
User manual19.
Collet bracket20.
Collet locking sleeve21.
Allen key holder22.
Hand grip23.
Back rest poles24.
Bent armrest25.
Indexing plate26.
Upper frame plate27.
Model shown: Chunc Junior 45°
Page 10
Page 10
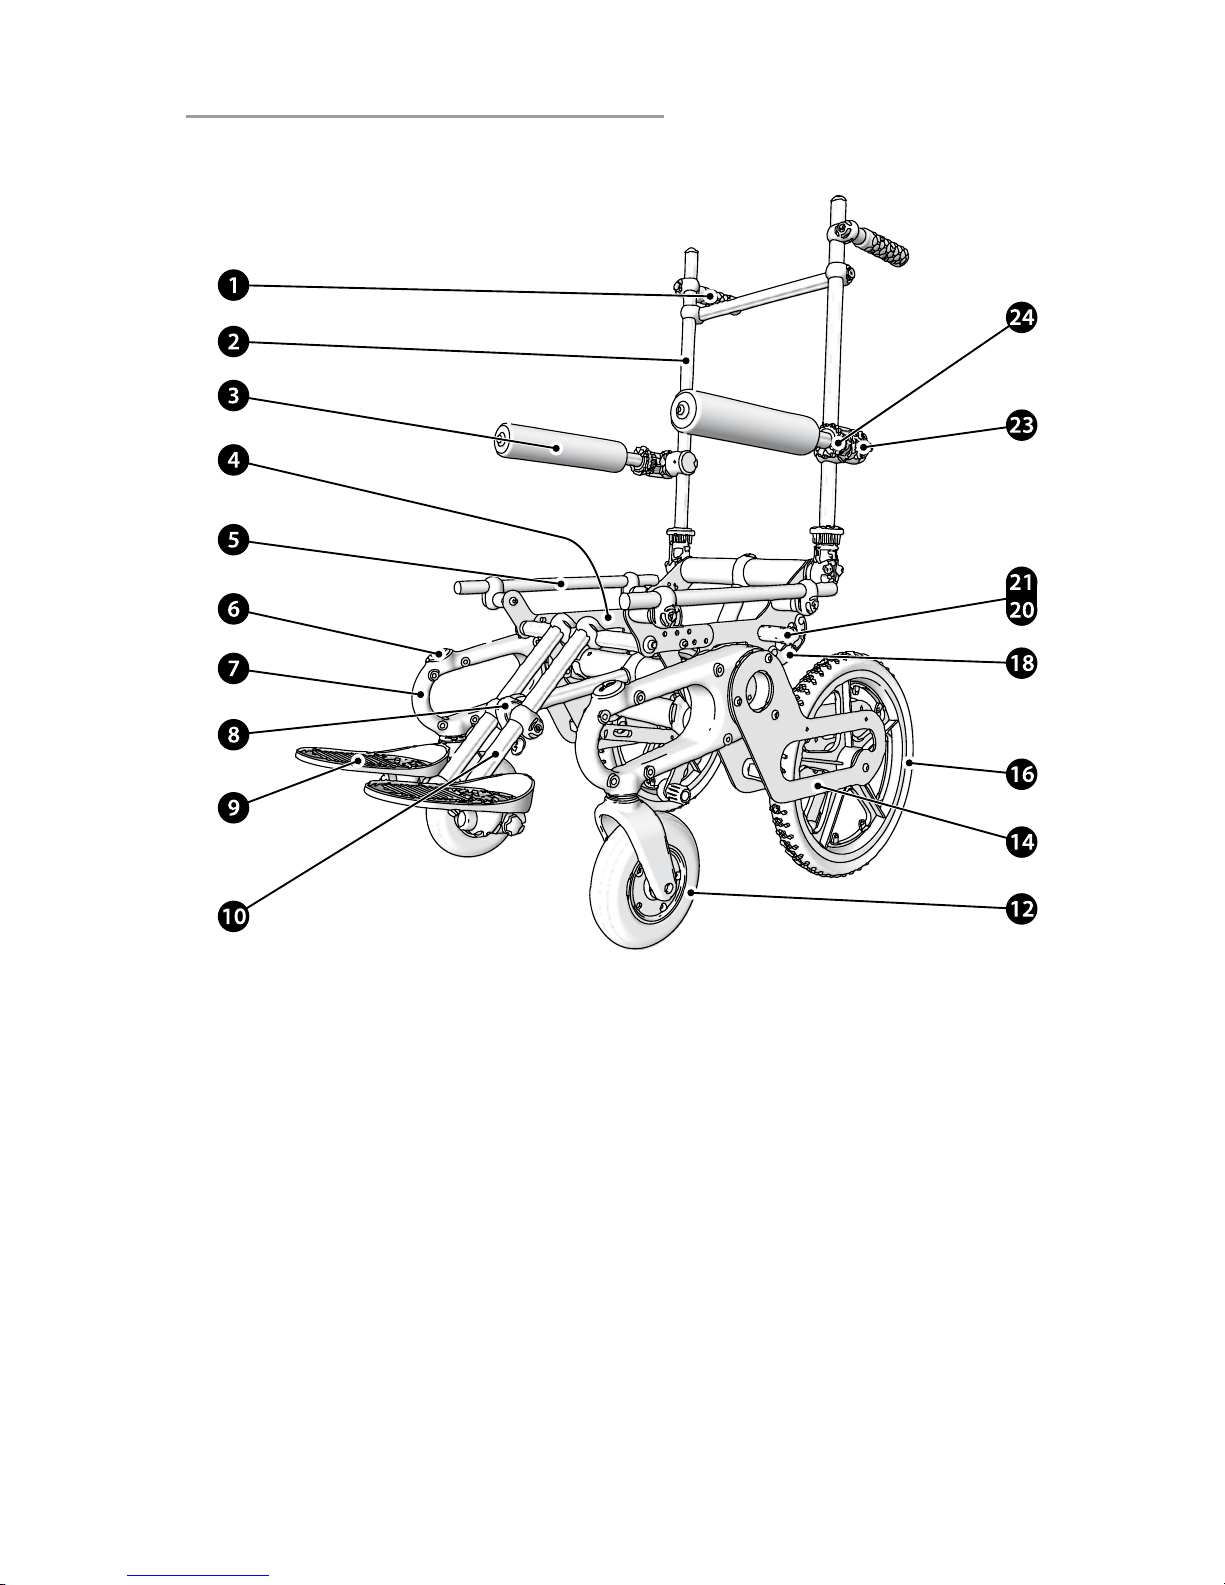
Hand grip1.
Back rest poles2.
Straight armrest3.
Upper frame plate4.
Drop hook rail5.
Front tie down symbol6.
Chassis moulding / front tie down7.
Snap over bracket8.
Footplate9.
Leg rest down poles10.
Anti tip lever11.
Castor12.
Wheel lock / tip assist13.
Chassis plate14.
Tilt in space on-o lever15.
Chunc Spica and Adapt
Model shown: Chunc Adapt
Page 11
Page 11
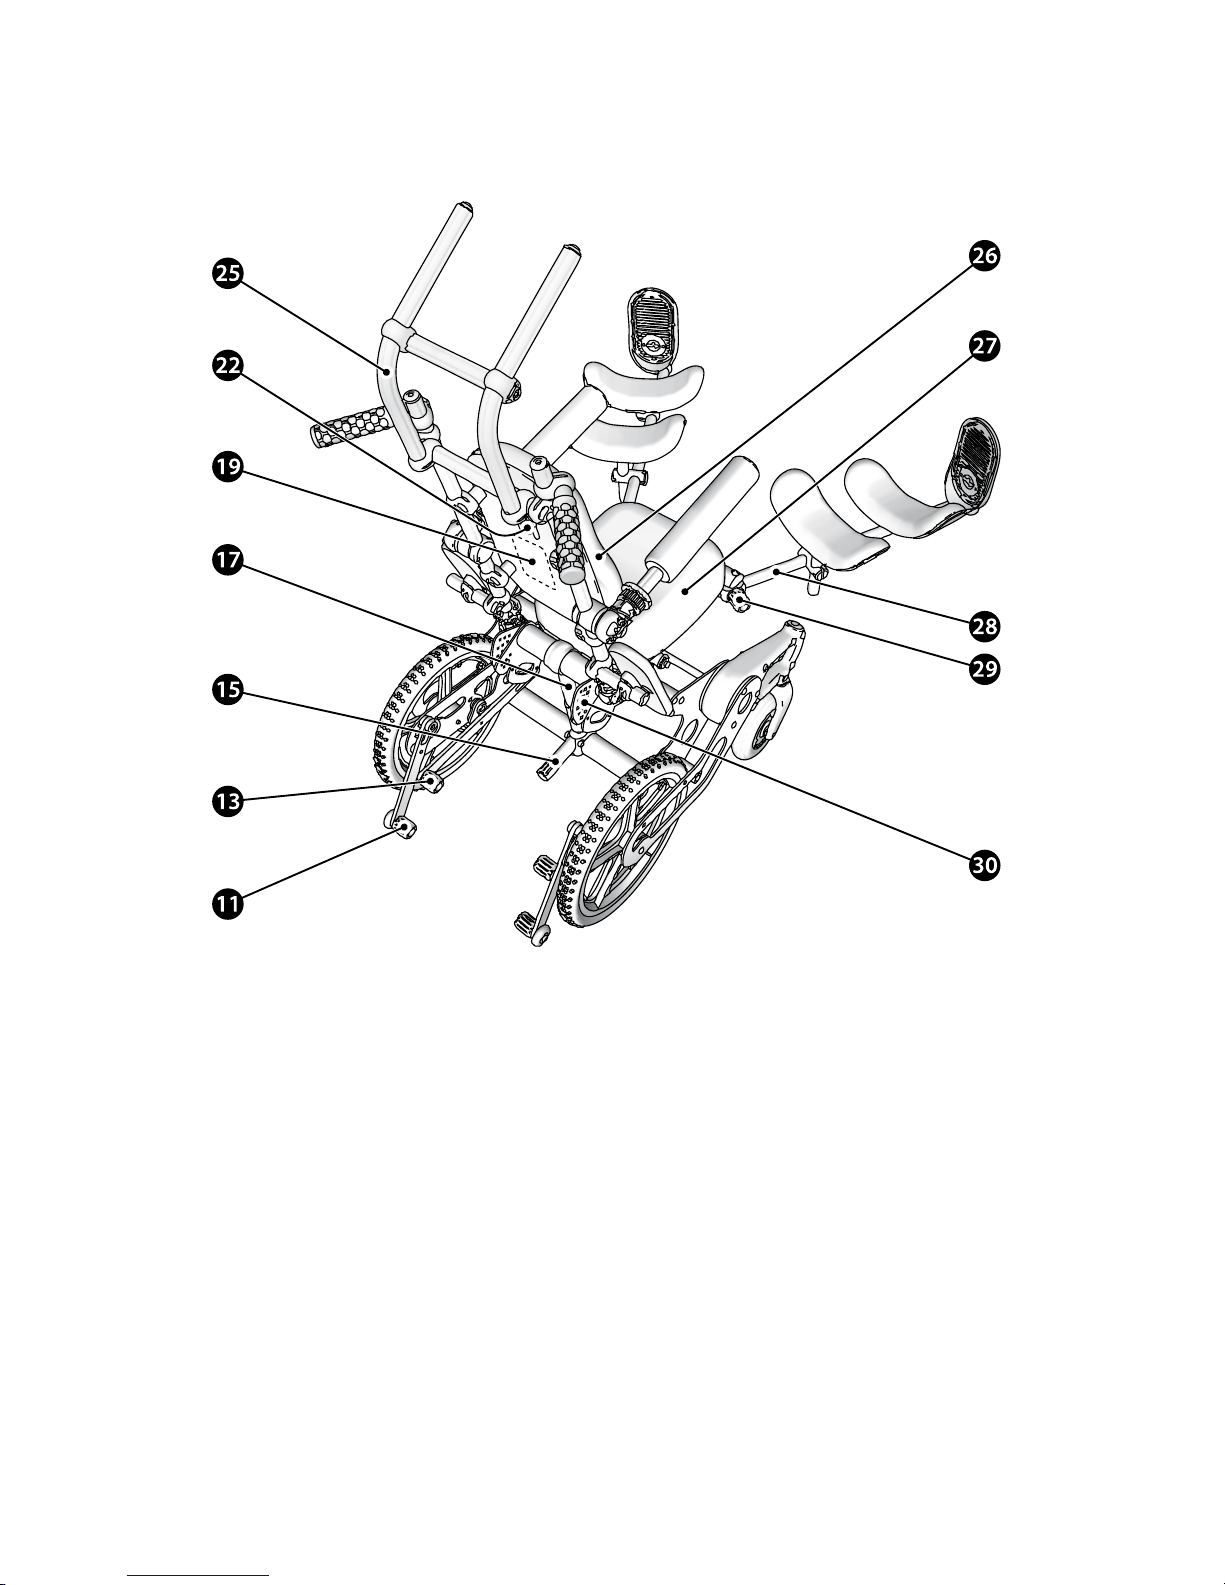
Rear wheel16.
Gas strut17.
Rear tie down18.
User manual19.
Harness attachment 20.
Wheelchair anchored pelvic belt attachment21.
Allen key holder22.
Collet bracket23.
Collet locking sleeve24.
Handle bar extensions25.
Back cushion26.
Seat cushion27.
Spica leg supports28.
Leg support release29.
Indexing plate30.
Model shown: Chunc Spica
Page 12
Page 13

Page 13
Chunc Junior and Junior 45° setup
Safety note: A qualied health care professional should be present when tting the Chunc
wheelchair and accessories to an occupant.
i
To make adjustments to the wheelchair’s setup, you may need to loosen a number of
indicated bolts, perform the adjustment and then re-tighten the bolts. An Allen key set is
located on the backrest to aid this.
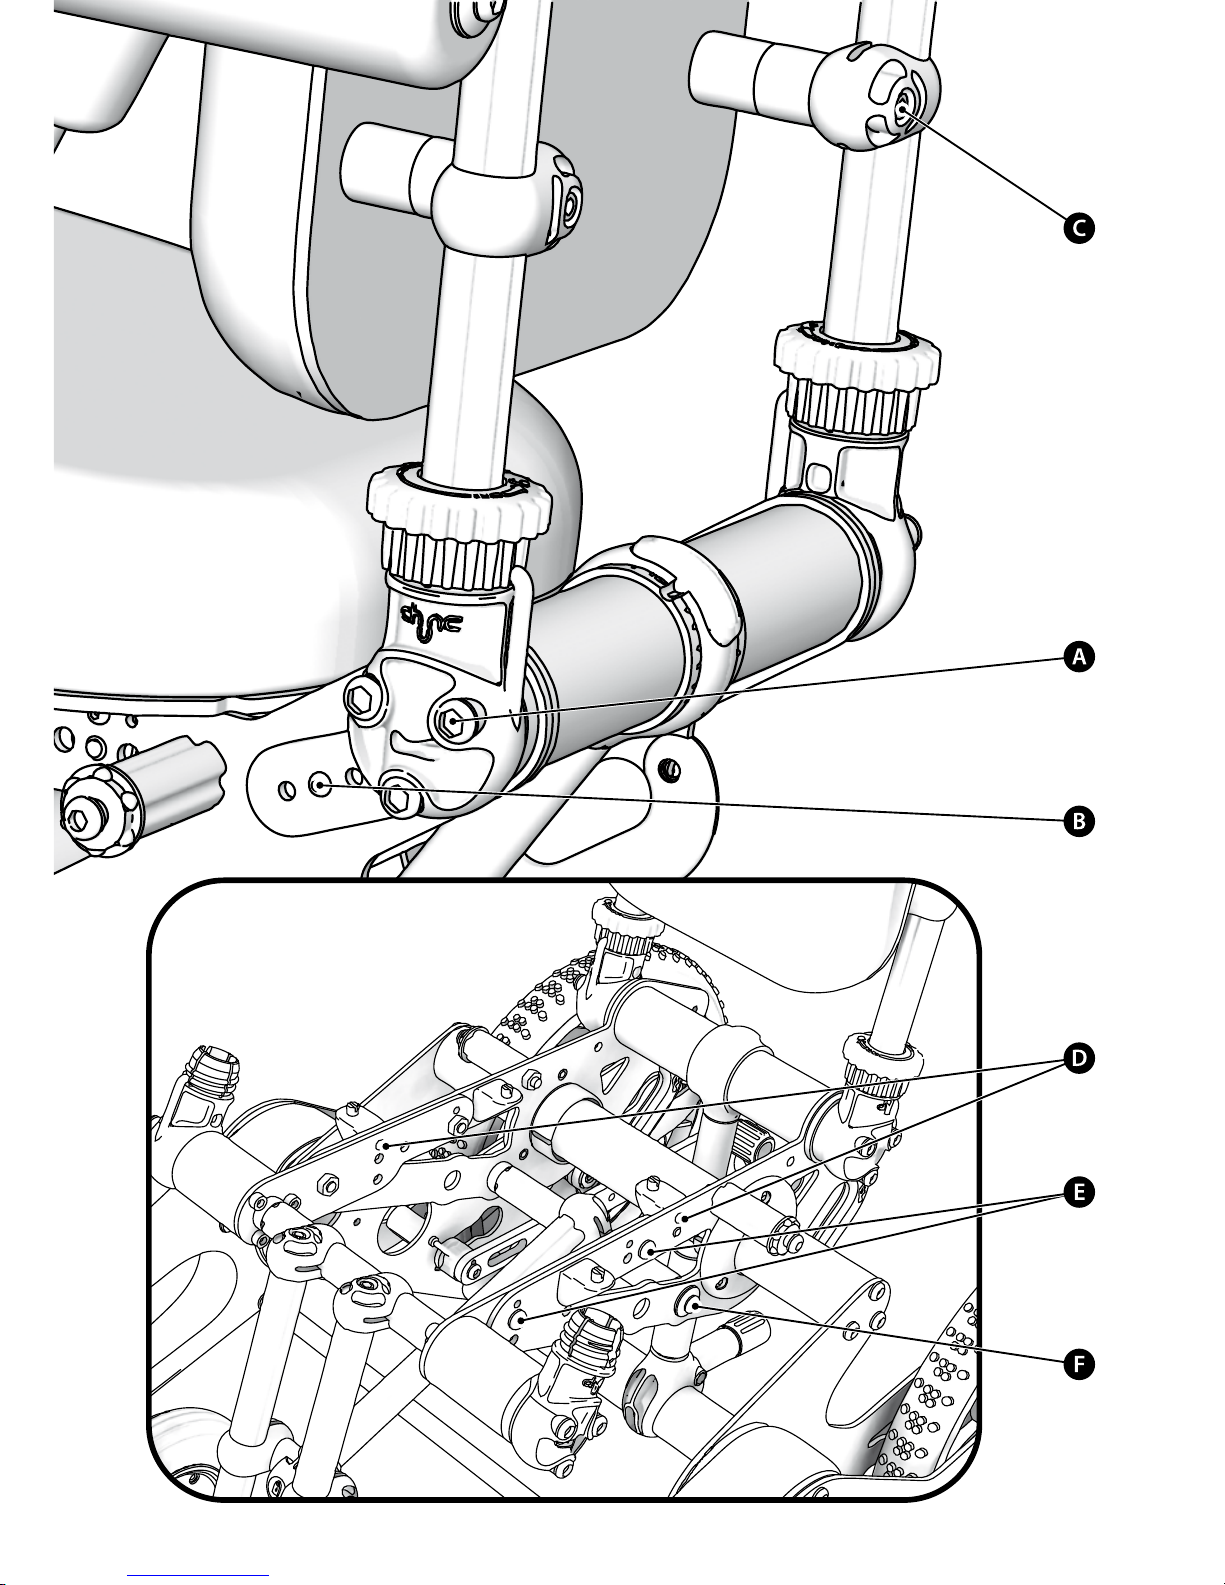
Back recline• : Loosen 3 bolts (A) on both sides of the chair and reposition bolt (B) within
the indexing plate to determine the new recline angle. Re-tightened bolts (A).
Back height• : Adjust using 4 bolts (C).
Lumbar support• : A lumbar support can be located between the back pan and back foam.
This can be adjusted in height by removing the back cover and foam and positioning
where necessary.
Seat growth• : Remove seat cushion and lift the seat pan from 4 orange seat pan brackets.
Reposition 4 pan brackets using bolts (D).
Junior 45° only: For additional seat growth, remove 4 bolts (E) to allow side plate movement back and forth.
Junior and Junior 45°: Snap seat pan back into place.
Chunc Junior and Junior 45° setup continued overleaf...
Page 14

Page 14
Chunc Junior and Junior 45° setup (cont’d)
Safety note: A qualied health care professional should be present when tting the Chunc
wheelchair and accessories to an occupant.
i
To make adjustments to the wheelchair’s setup, you may need to loosen a number of
indicated bolts, perform the adjustment and then re-tighten the bolts. An Allen key set is
located on the backrest to aid this.
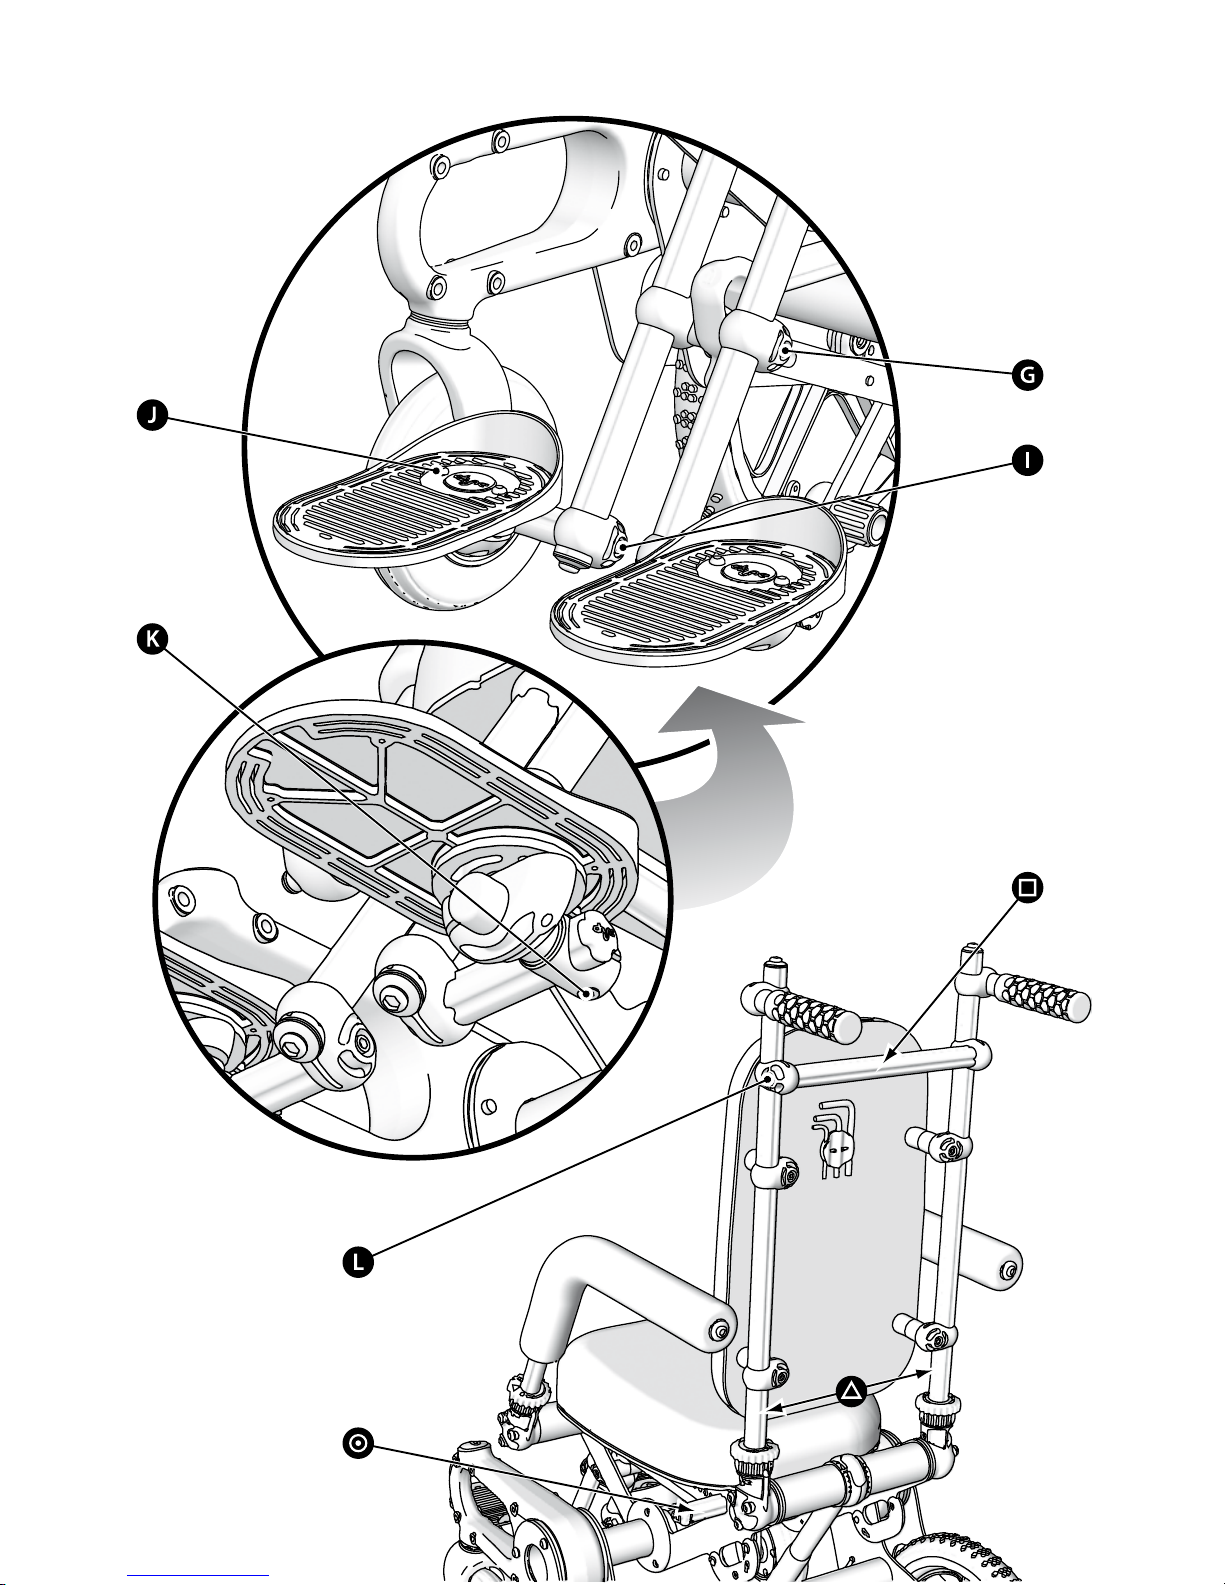
Leg rest angle• : Adjust using bolts (G) on both brackets. With the orange snap-over clip
secured, slide the brackets up or down. Re-secure the bolts.
Junior 45° only: It may also be necessary to reposition the leg rest brace tube by removing
bolt (F - on previous page) on both sides and repositioning backwards or forwards.
Safety note: You should not perform this adjustment on an occupied wheelchair.
Footplate height• : Adjust using bolts (I).
Safety note: Placing excessive weight on the footplates could lead to damage and cause
the wheelchair to tip forwards.
Footplate adjustment• : Adjust angle using bolts (J) and tilt using bolts (K).
Harness mounting points• : The wheelchair incorporates adjustable harness mounting
areas for positioning belts.
Lower harness mounting points• : Adjustable positioning is available on the lower por-
tion of the backrest framework (r). The harness attachment tube () mounted to the
upper frame plate can also be repositioned along the upper frame by removing Nyloc
nut, repositioning to desired hole in frame and re-fastening.
Harness upper mounting point• : The upper mounting area (o) can be adjusted verti-
cally using bolts (L) on both sides.
Safety note: Ensure harnesses are tted to the manufacturer’s instructions and their
adjustment monitored closely. Any adjustments should be as directed by a health care
professional and in accordance with the manufacturer’s instructions.
US customers only• : When used as a wheelchair anchored pelvic belt attachment,
ensure that any repositioning of the harness attachment tube () does not contravene
positional requirements as detailed in the safe transportation section of this manual.
Page 15
Page 16
Page 17

Page 17
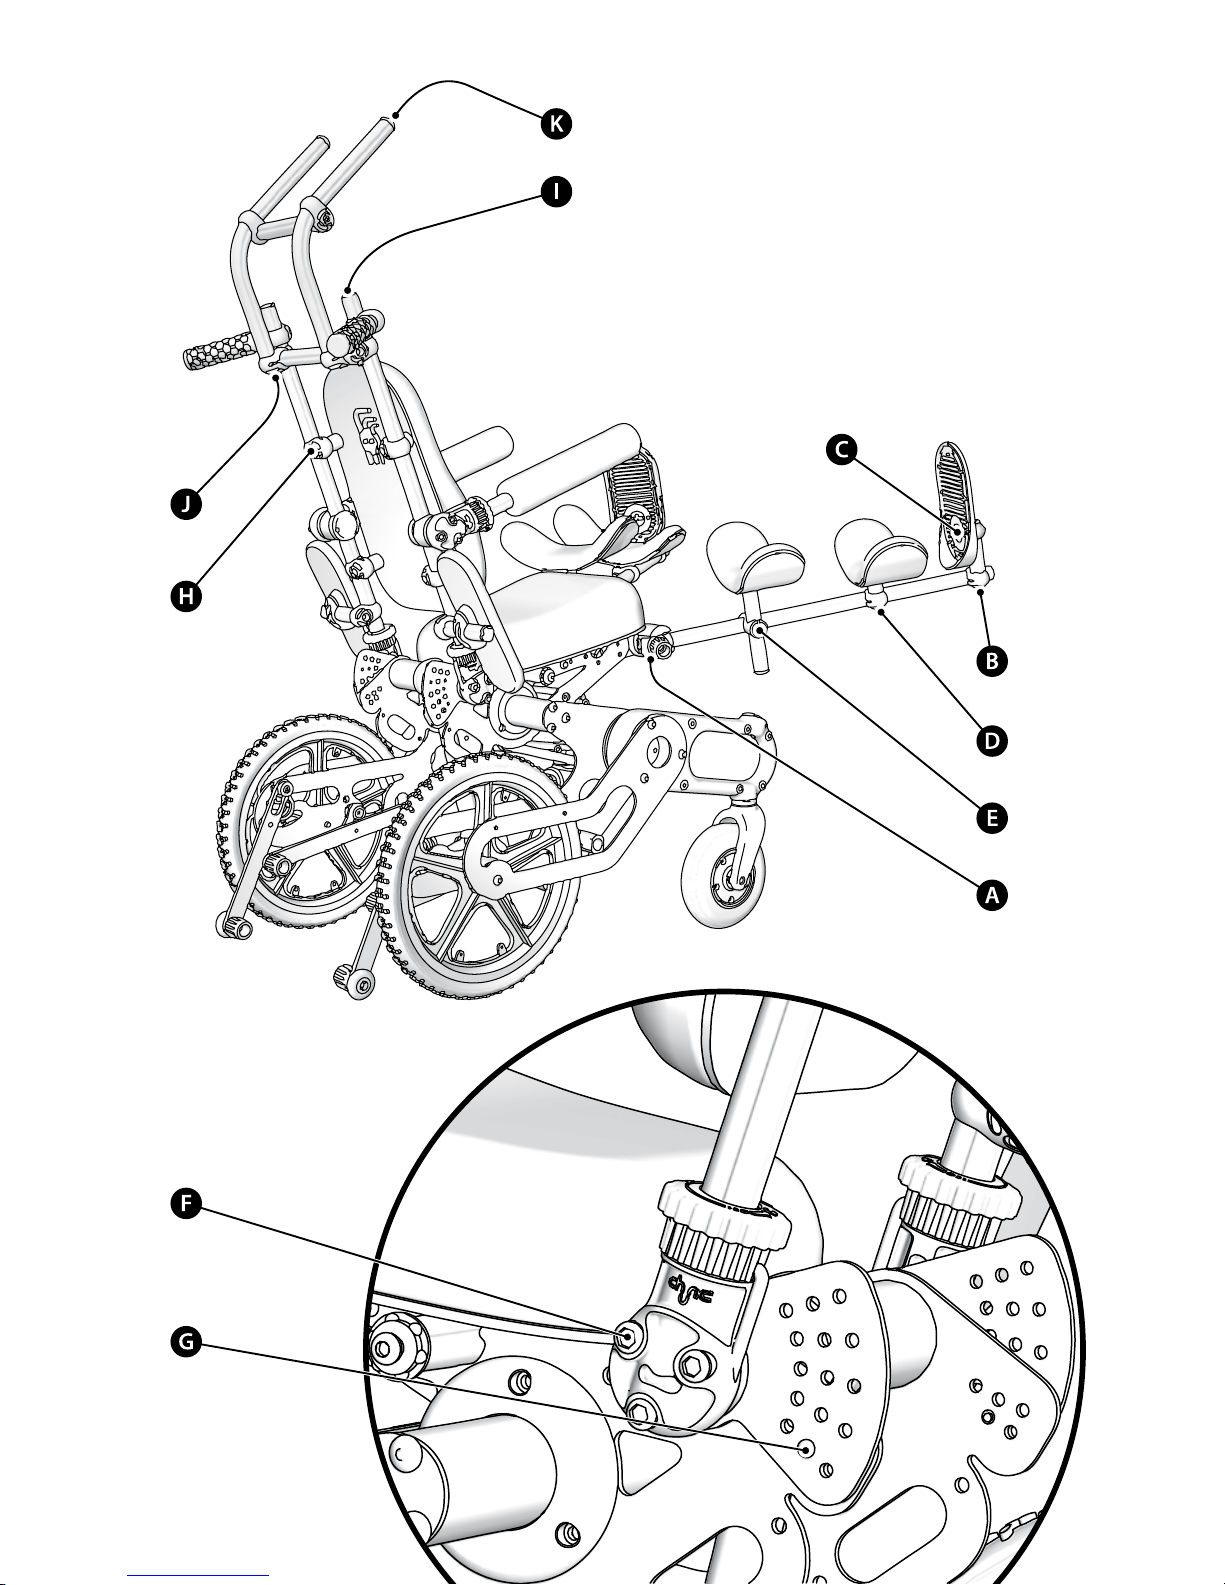
Chunc Spica setup
Safety note: A qualied health care professional should be present when tting the Chunc
wheelchair and accessories to an occupant. In addition, the back rest recline and leg splint casts
introduce uncertainties in weight distribution. When placing an occupant in a Chunc Spica and
operating it, consider carefully their body position and weight distribution, especially when in
the reclined position.
i
To make adjustments to the wheelchair’s setup, you may need to loosen a number of
indicated bolts, perform the adjustment and then re-tighten the bolts. An Allen key set is
located on the backrest to aid this.
Leg support adjustment:•
Angle of the leg supports• : Loosen, adjust and re-tighten bolt (A) located on underside
of leg support bracket.
Footplate along length of leg support• : Adjust using bolt (B).
Footplate height and angle• : Adjust using two bolts (C).
Leg supports (fore and aft)• : Adjust positions of either leg support using bolts (D) and / or
(E).
Back recline• : Loosen 3 bolts (F) on both sides of the chair and reposition bolt (G) within
the indexing plate to determine the new recline angle. Ensure bolts (F) are re-tightened
thereafter.
Back height• : Adjust using 4 bolts (H).
Handlebar attachment• : The handlebar attachment may be necessary when the wheel-
chair is in its reclined position. To t or remove the handlebar attachment, you will need
to reposition the handgrips. To enable this, twist the grip anticlockwise to loosen and
clockwise to tighten.
Safety note: Check the handgrips are secure before maneuvering the wheelchair.
Fitting the handlebar attachment• : Remove the bolts (I) and xed end caps. Slide the
handgrips o the back poles, secure the handlebar attachment with 2 bolts (J) supplied. Ret the xed end caps. Remove the two bolts (K) and associated xed end caps.
Slide the handgrips on the handlebar attachment and re-secure xed end caps.
Seat growth• : Refer to Chunc Junior and Junior 45° setup.
Harness mounting points• : Refer to Chunc Junior and Junior 45° setup.
Page 18
Page 19

Page 19
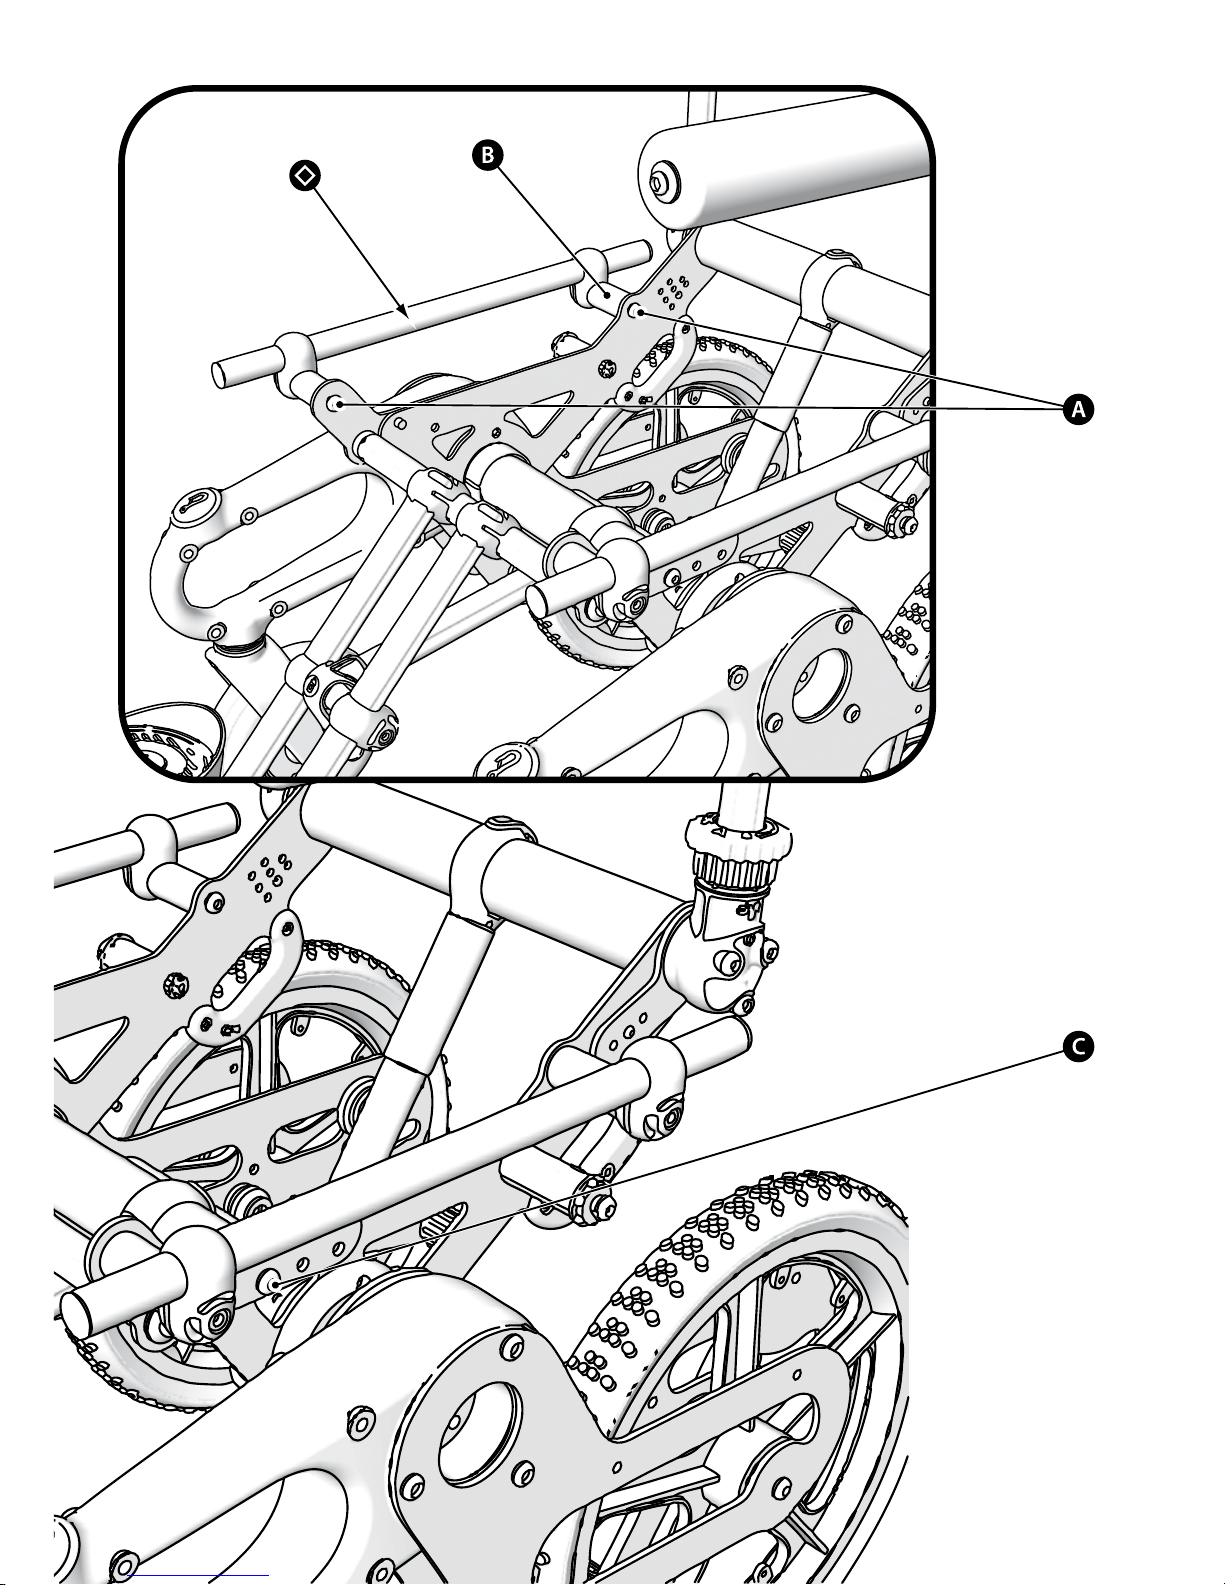
Chunc Adapt setup
Safety note: A qualied health care professional should be present when tting the Chunc
wheelchair and accessories to an occupant. Ensure the wheelbase / surrogate seating combination has been passed by a qualied health care professional for stability before use. Please pay
attention to the safety label situated on the rail.
i
To make adjustments to the wheelchair’s setup, you may need to loosen a number of
indicated bolts, perform the adjustment and then re-tighten the bolts. An Allen key set is
located on the backrest to aid this.
Back recline• : Refer to Chunc Junior and Junior 45° setup.
Rail width adjustment• : Both 15” and 18” rail width models are available. To adjust, remove
the 4 bolts (A), add or remove spacers (B) and re-secure with the appropriate length bolts
from the kit provided.
Safety note: You should not perform this adjustment on an occupied wheelchair.
Rail length adjustment• : Loosen the 4 bolts (A). Use the 4 bolts (C) to adjust the position of
both side plates. Ensure bolts (A) are re-tightened thereafter. The back recline should also
be re-adjusted to support the back of a surrogate seating system.
Safety note: You should not perform this adjustment on an occupied wheelchair.
Harness mounting points• : Refer to Chunc Junior and Junior 45° setup.
Additional lower harness mounting• : Extra mounting is oered on the drop hook rails
().
Page 20
Page 21

Page 21
Accessory setup and use
Please refer to the product specication matrix at the back of this manual for accessory / model
availability.
Safety note: A qualied health care professional should be present when tting the Chunc
wheelchair and accessories to an occupant.
i
To make adjustments to the accessory’s setup, you may need to loosen a number of
indicated bolts, perform the adjustment and then re-tighten the bolts. An Allen key set is
located on the wheelchair backrest to aid this.
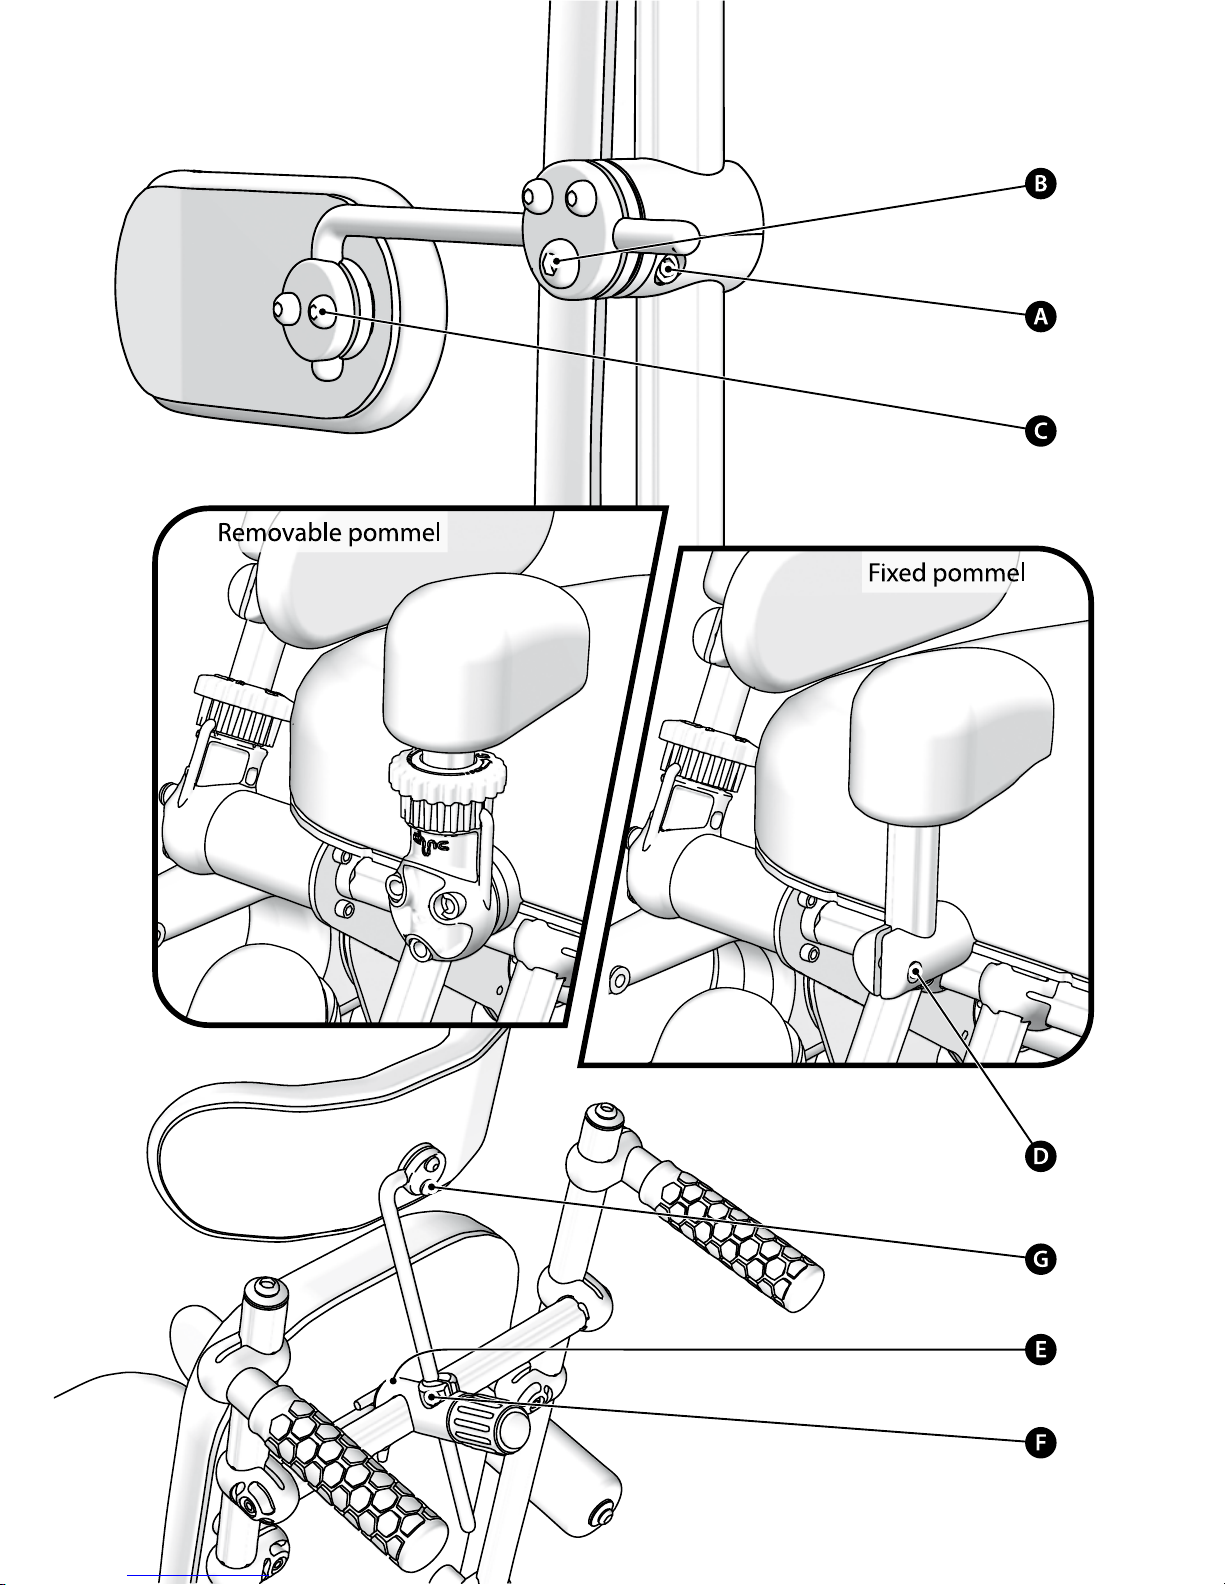
Thoracic support (xed and swing-away)• :
Adjust angle and height using bolt (A). Reach and angle of pad can be adjusted using •
bolts (B) and (C).
Swing-away model: To swing support away, lift by backrest pole bracket and rotate. To •
replace, swing support back into position and press rmly back into bracket.
Pommel support (removable)• :
This may be removed using the orange collet.•
Pommel support (xed)• :
This is height and angle adjustable using bolt (D).•
Headrest (removable and xed)• :
Adjust location and tilt using bolt (E). Reach and angle can be adjusted using bolts (F) •
and (G).
Removable model: To remove headrest, unscrew orange handle and draw headrest out •
of bracket.
Accessory setup and use continued overleaf...
Page 22

Page 22
Accessory setup and use (continued)
Please refer to the product specication matrix at the back of this manual for accessory / model
availability.
Safety note: A qualied health care professional should be present when tting the Chunc
wheelchair and accessories to an occupant.
i
To make adjustments to the accessory’s setup, you may need to loosen a number of
indicated bolts, perform the adjustment and then re-tighten the bolts. An Allen key set is
located on the wheelchair backrest to aid this.
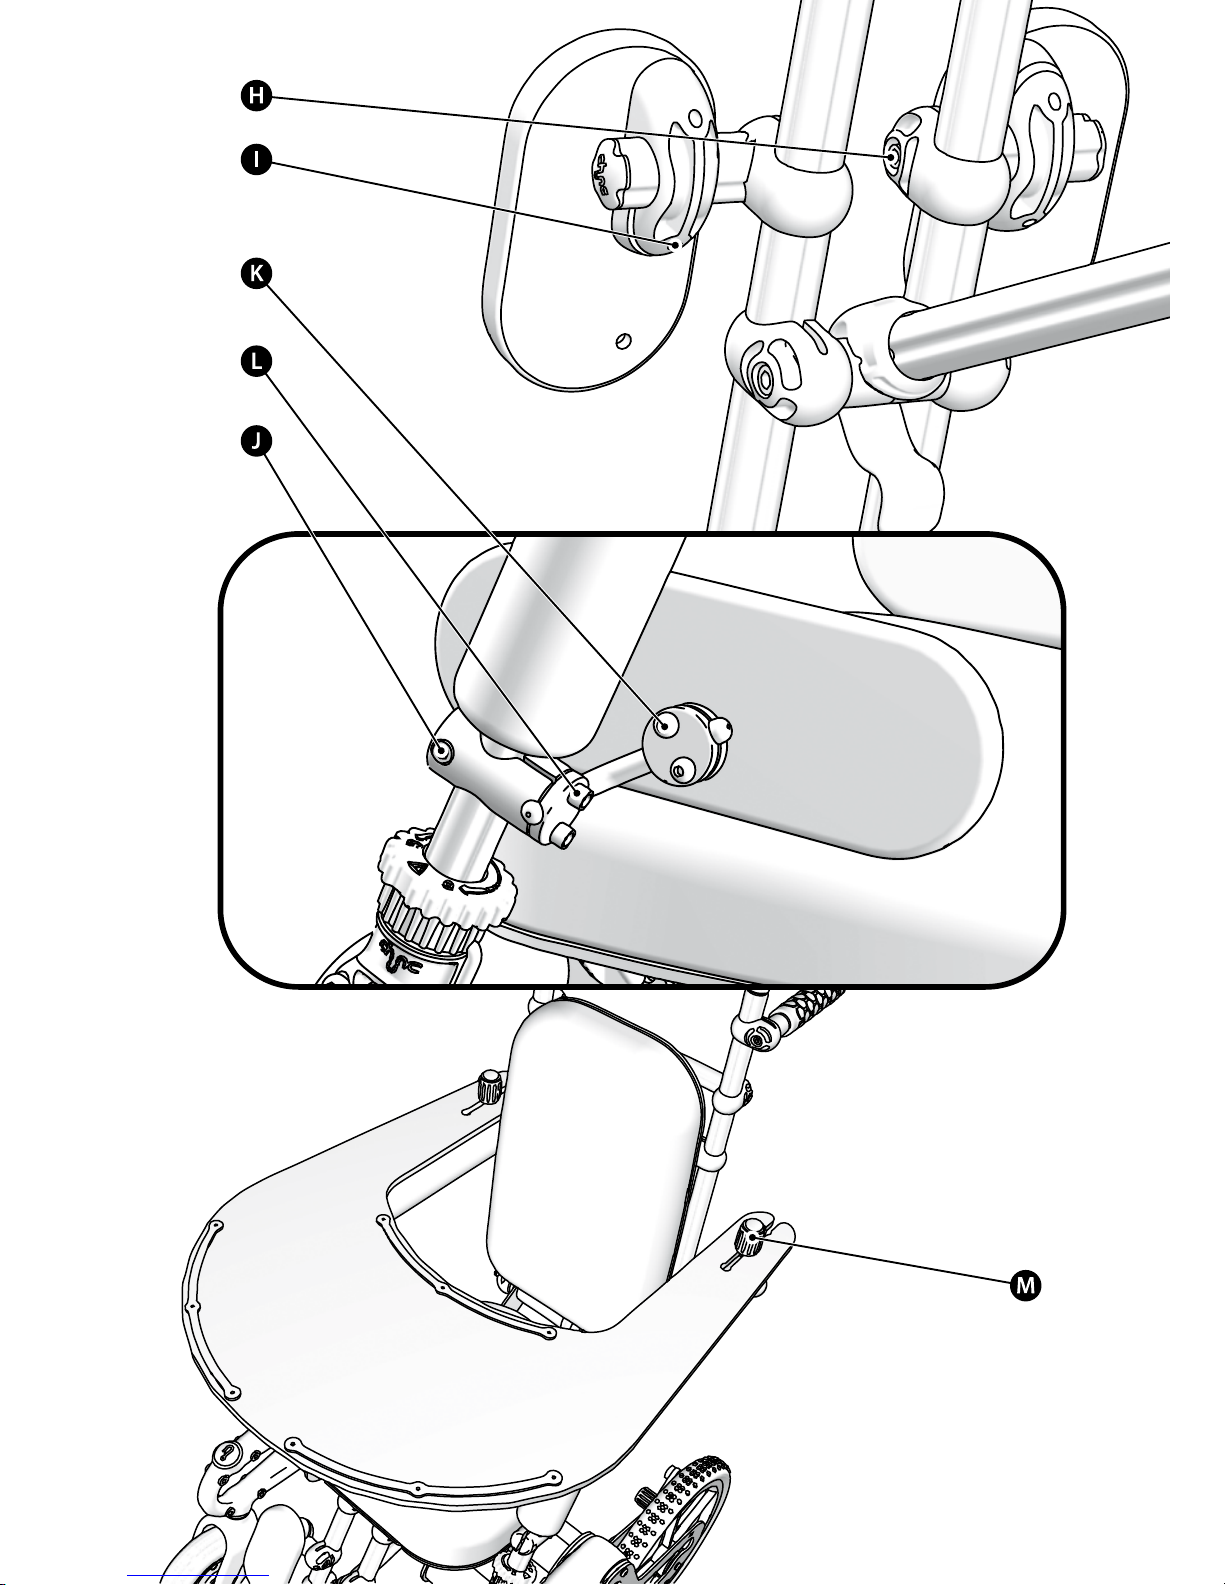
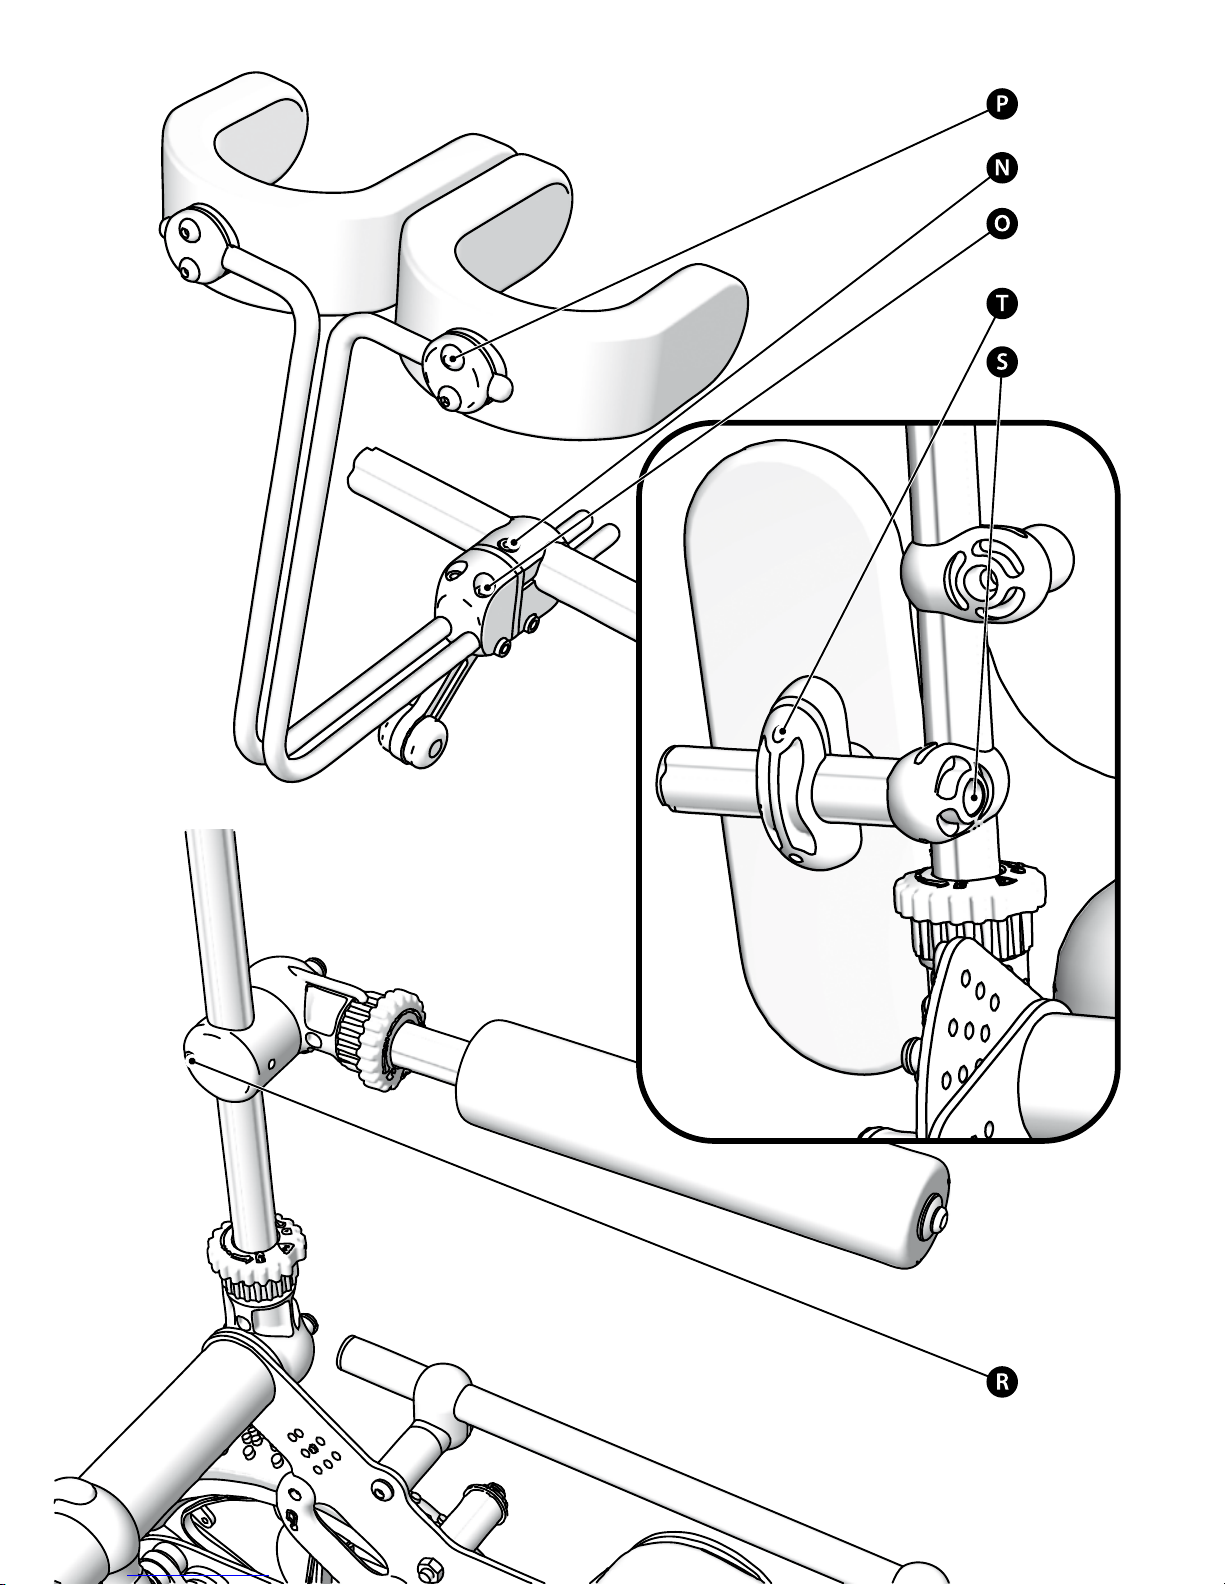
Calf pads• :
Adjust height individually using bolt (H). For adjustment to lateral position and angle, •
remove the cover and foam and use bolts (I).
Hip abductor• :
Adjust general position using bolts (J) and (L). Further adjustment of the pad is pos-•
sible using bolts (K) and (L).
Removal: These may be removed with armrests in a procedure described in the “Every-•
day use” section.
Tray• :
To adjust depth or remove, use orange knobs (M), slide tray and re-tighten knobs.•
Accessory setup and use continued overleaf...
Page 23
Page 24
Page 25

Page 25
Accessory setup and use (continued)
Please refer to the product specication matrix at the back of this manual for accessory / model
availability.
Safety note: A qualied health care professional should be present when tting the Chunc
wheelchair and accessories to an occupant.
i
To make adjustments to the accessory’s setup, you may need to loosen a number of
indicated bolts, perform the adjustment and then re-tighten the bolts. An Allen key set is
located on the wheelchair backrest to aid this.
Knee blocks• :
Adjust general position using bolt (N) and reach individually using bolts (O). For angle •
adjustment, remove bolts (P), relocate pad cups to the appropriate holes and move the
cup assembly to new sideways position.
Removal and tment: To remove, pull the lever located on the underside of the as-•
sembly and withdraw the assembly from the wheelchair. To ret, align the 2 bars with
the knee block mount holes and push the bars in until they reach a stop. Push the lever
downwards until it clicks to secure rmly in place.
Height-adjustable armrests• :
To adjust height, use the bolt (R).•
The armrests may be removed using the orange collet.•
Swing-away foot rests• :
Refer to “Chunc Junior and Junior 45° setup” and “Everyday use” section.•
Spica wing support• :
Adjust height using bolt (S). For lateral position and angle adjustment, remove cover •
and pad and use both bolts (T).
Harnesses• :
Refer to specic product setup sections and manufacture’s instructions.•
Page 26

Page 26
Everyday use
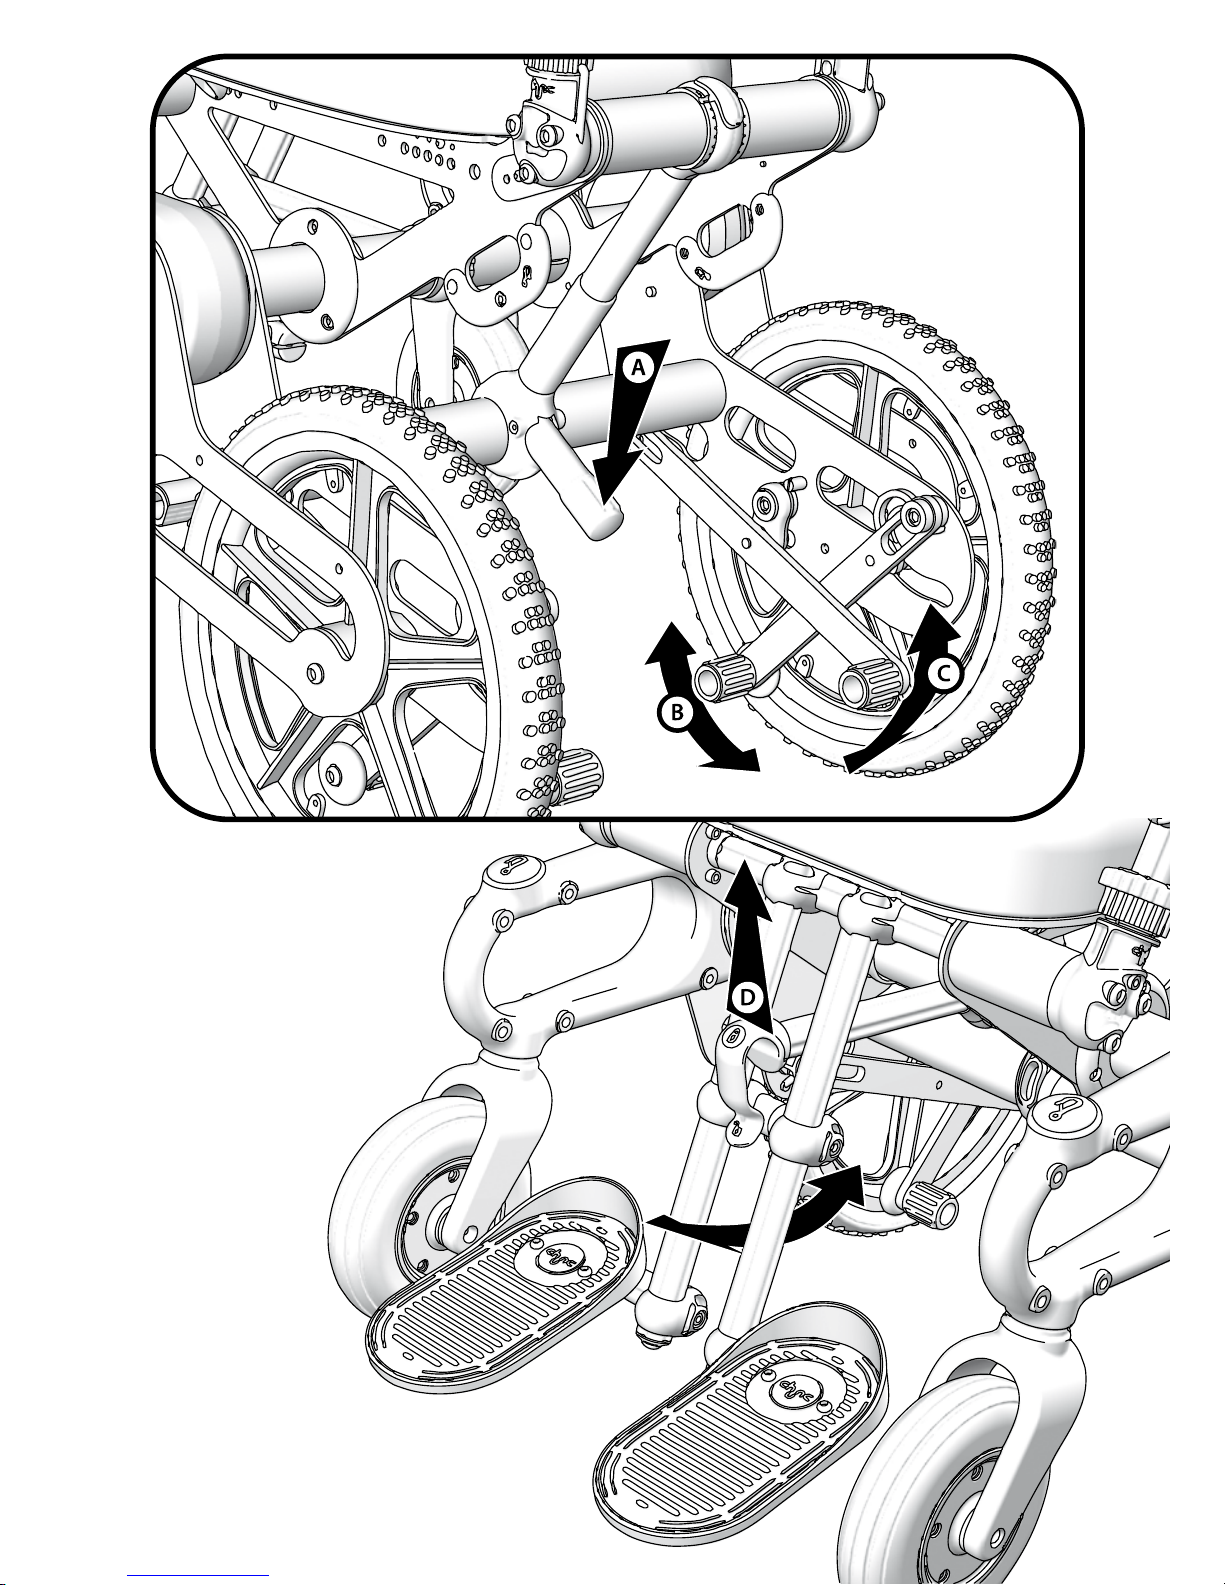
Wheel locks• :
They are designed to prevent a stationary wheelchair from rolling and should NEVER be
used as brakes to slow a moving chair. The wheel locks can be foot engaged, by lifting the
levers (C) to a stop. The locks are disengaged by pressing down on the levers (C) until they
hit a stop.
Safety note: Before disengaging the wheel locks, ensure the wheelchair is under control.
Always apply wheel locks when the chair is stationary. The wheel locks are less eective on
worn tyres.
Tip assist• :
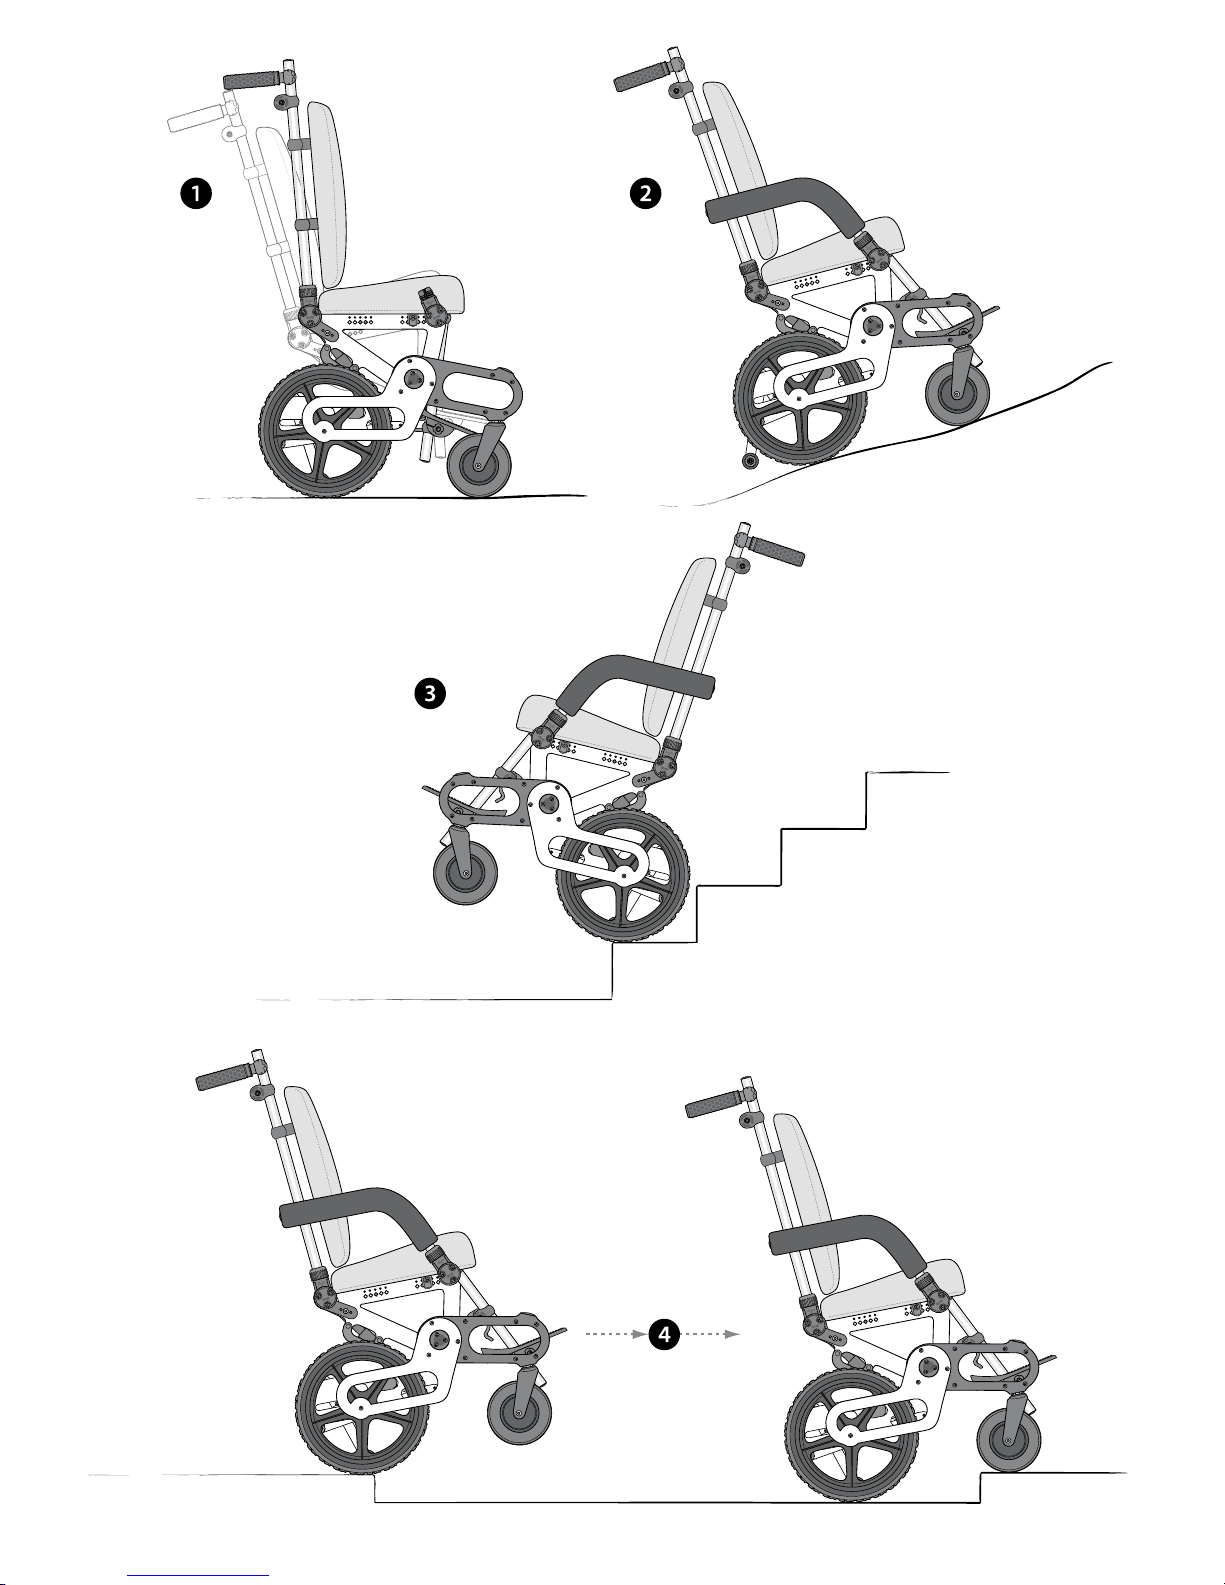
The wheelchair can be tipped onto its rear wheels, allowing it to traverse steps and curbs.
To perform this, press down on the wheel lock lever (C). Using the handlebars, rotate the
wheelchair about the rear wheel to lift the castors.
Safety note: Ensure you have full control of your chair when you perform this operation.
Anti-tip levers• :
These are designed to reduce the possibility of a tip. To increase wheelchair stability, move
the anti-tip levers (B) to their rearmost position. To disengage, push the levers (B) to their
foremost position.
Safety note: Both anti-tip levers should be used together to avoid potential instability.
Tilt in space• :
The angle of the chair can be adjusted by pressing down on the tilt lever (A) and using the
handlebars to adjust the seat’s angle.
Safety note: It is advised that the wheel locks are engaged during this operation. The
wheelchair may be less stable when tilted.
Swing-away footrests• :
To swing under, pull the lower handle of the orange snap clip (D) towards the front of the
chair. The bar it grips will be released, and the foot rests can swing away under the chair.
To re-secure, bring the footrest’s central bar to the clip, and push together rmly until they
click into place.
Safety note: Beware of the potential nger trap between the snap clip and the leg rest
down tubes.
Everyday use continued overleaf...
Page 27
Page 28
µ
Height adjustable handgrips
Collet brackets
µ
Seat pan removal
Page 29
Page 29
Everyday use (continued)
Collet brackets• :
Armrests, the backrest and certain accessories can be removed with ease using the orange
collet caps. To free these components, unscrew the orange cap which allows them to be
drawn away from the wheelchair. To replace these components, insert the metal pole into
the bracket, locating the bolt head into the collect groove. Finally, screw the orange cap
down onto the bracket until it is fully secured.
Safety note: It is important that the components are checked before use to ensure they are
xed securely in position. A caution label has been provided to remind attendants of this
procedure, and is located at the base of the backrest. Take care when performing this task,
as there is a potential nger trap between the orange cap and the locking lever.
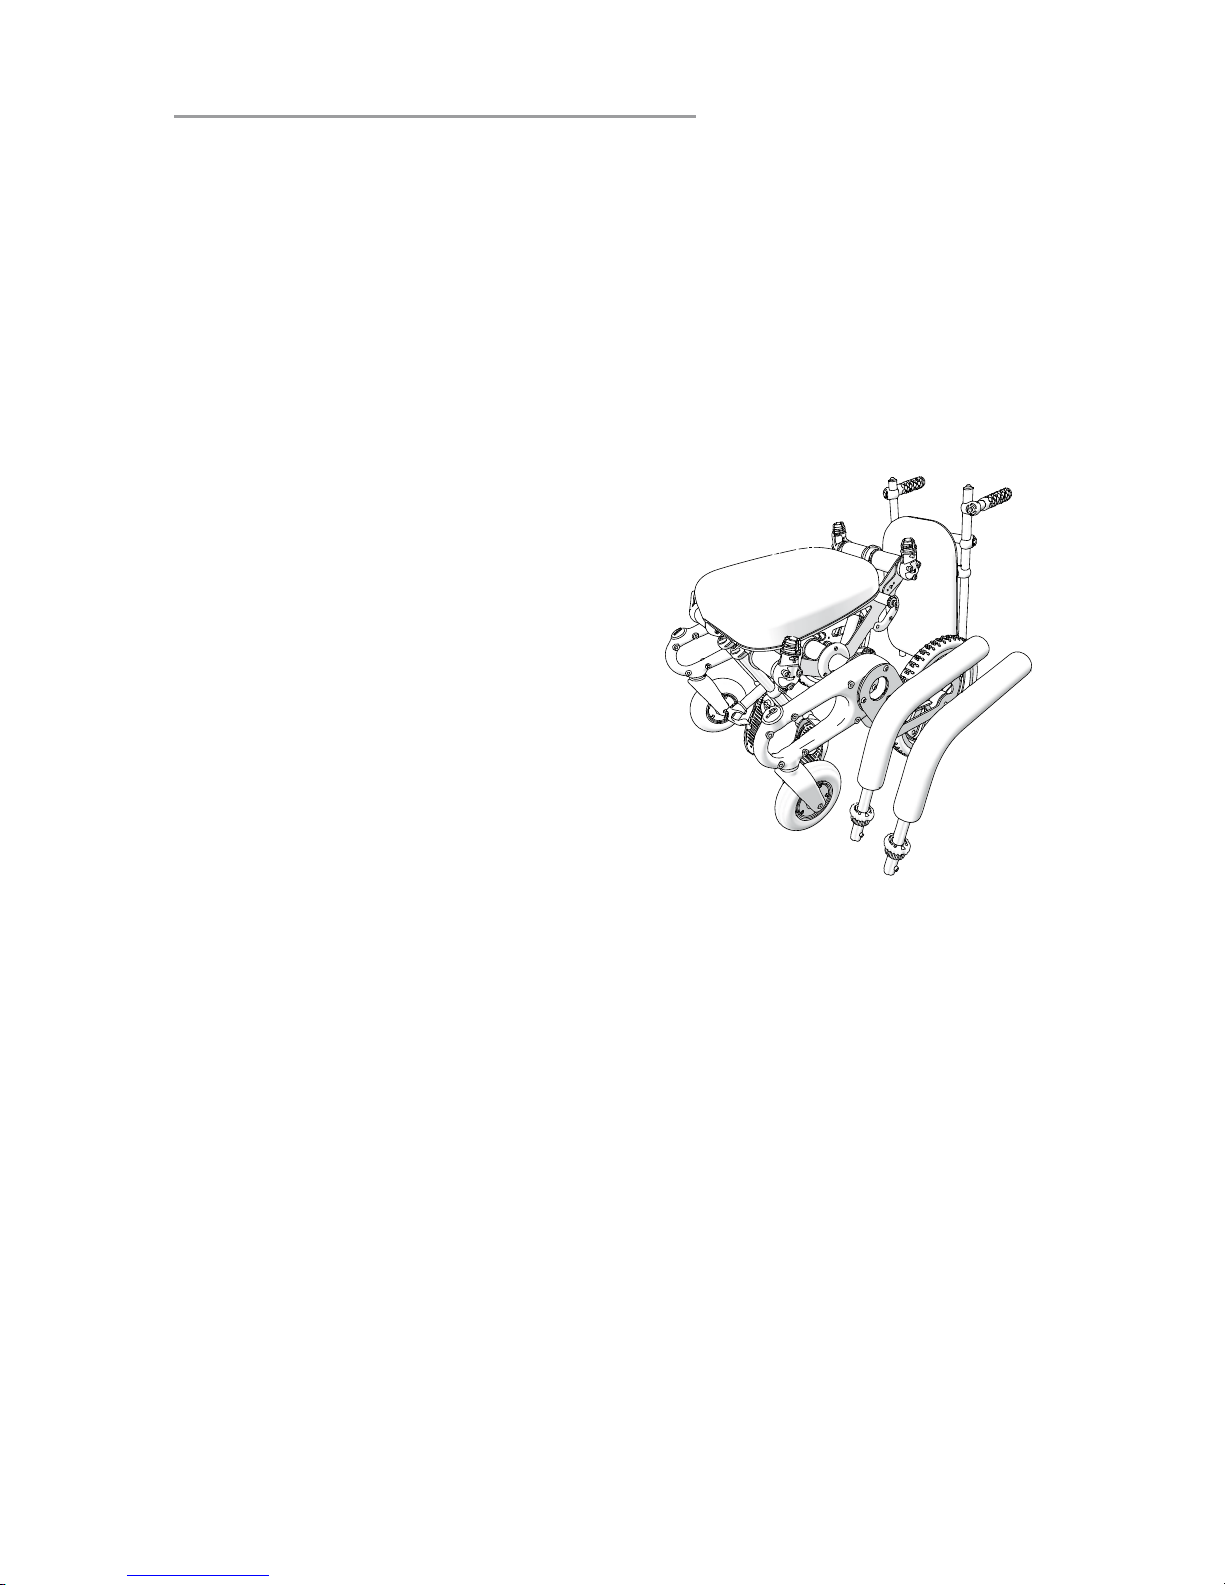
Compacting for transport / storage• :
To transport or store, remove the backrest, both armrests and swing the footrest
under the chair. A minimum of two people should only attempt to lift the main
assembly.
Safety note: Always apply the wheel locks
to prevent the chair from rolling. When an
unoccupied wheelchair is transported in
a vehicle, ensure all of its components are
securely xed in position. This reduces the
risk of damage to the chair, and prevents
it from becoming a hazard in the event of
an accident.
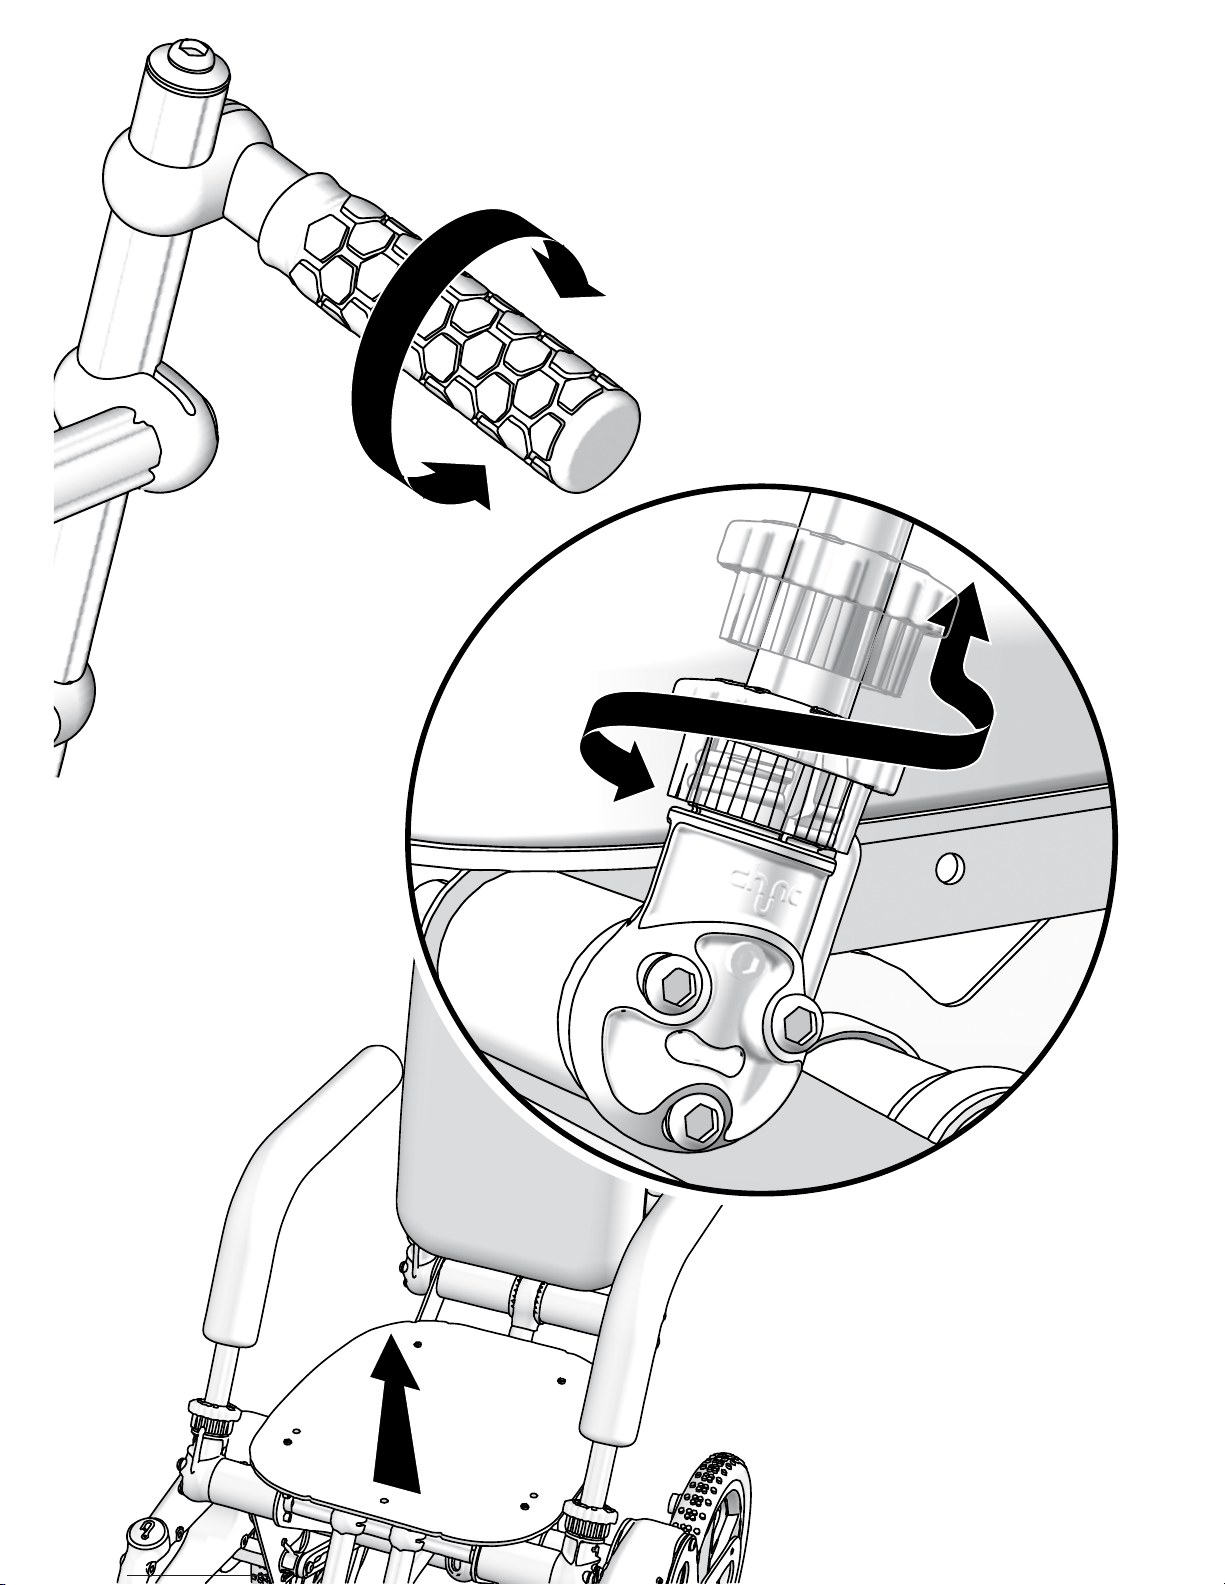
Seat pan removal• :
Once the seat cushion has been removed, it is possible to remove the seat pan for cleaning etc. By pulling the front of the seat pan upwards, it will release from the wheelchair. To
replace the seat pan, align its holes with the orange seat pan brackets and press down to
snap into place.
Height adjustable handgrips• :
To adjust, twist the grip in an anti clockwise direction until the bracket slackens, allowing
the handlebar to slide up and down the backrest poles. To x in position, twist the handgrip in a clockwise direction.
Safety note: Check the handgrips are fully secured before manoeuvring the wheelchair.
Upholstered parts• : To remove, unzip or unhook Velcro fasteners and peel away from inner
core. For washing instructions, refer to care label attached to cover and / or “Cleaning”
section.
Safety note: The upholstered parts meet the European and U.S. standards for resistance to
ammability. However extreme care should always be exercised near open ames or with
burning cigarettes.
Everyday use continued overleaf...
Page 30

Page 30
Everyday use (continued)
User transfer1. :
To safely transfer the user to and from the wheelchair, rst engage the wheel locks and
anti-tip levers. The tilt in space adjustment should be set to a suitable angle and the front
castors rotated as far forward as possible. One or both armrests can then be removed as
required and the foot rests swung away (if possible).
It is suggested standing transfers should only be performed when the tilt in space is
adjusted to its foremost setting. When transferring with a sling, the tilt in space should be
adjusted to a reclined angle.
When all transfers are complete, the armrests and footrests should be replaced to their
original position (if applicable).
Safety note: It is important to check all remaining attendant-adjustable components are
secure before the user is transferred to the chair, and to check after the transfer that the
items removed are securely replaced.
Ramps / steep terrain2. :
The wheelchair will become less stable when on a slope. Travel directly up / down the
slope where possible, avoiding exposing the chair to a sideways tilt. Before ascending
ramps or steep terrain, apply the anti-tip levers. The tilt in space angle may also be adjusted to improve stability. When descending, adjust the tilt in space to a suitable angle.
Steps3. :
Before attempting to ascend or descend steps, ensure the anti-tip levers and wheel locks
are deactivated and all hand-tightened components are fully secured; in particular the
backrest collet brackets and handgrips.
When pulling up stairs, reverse the chair into position so the rear wheels are in contact
with the 1
st
step. Tip the chair on its rear wheels and pull up and over the step(s). A second
person must stand below the chair, holding it through the chassis mouldings, supporting
it as it travels up.
When descending stairs, approach the step front on, and pivot the chair on its rear wheels
using the tip levers. Push up to the step edge and gently roll the wheels down, maintaining contact with the surface at all times. A second individual should stand below the chair
supporting the chair.
Curbs4. :
Before attempting to ascend or descend a curb, ensure the anti-tip levers and wheel locks
are disengaged. To ascend, approach the curb front on, tip the wheelchair on its rear
wheels, and push the castors onto the top of the curb. The wheelchair can then be pushed
up the curb.
To descend, position the wheelchair with its front castors close to the edge of the curb and
tip the chair on its rear wheels using the tip levers. The chair can then be rolled over and
down the curb on its rear wheels. Only when the curb has been cleared should the front
castors be lowered to the ground.
Safety note: Before attempting any of these operations consider stability carefully, as well
as the safety of both the operator(s) and occupant. If you are unsure or believe the operation will compromise stability, you should not attempt the operation.
Page 31
Page 32
Page 32
Safe transportation in a motor vehicle
Transfer to vehicle seat• :
Wheelchair occupants should transfer to vehicle seats wherever possible. An occupied
wheelchair should be adequately secured within a motor vehicle with the wheel locks on.
Chunc wheelchairs should not be carried behind a folding seat, such as the rear seat of a
car, unless it is restrained by luggage straps. The wheelchair can be compacted for storage
as described in the every day use section of this manual.
Appropriately tie-down and forward facing• :
The Chunc Junior, Junior 45° and Spica can be used as a forward facing seat in a suitably
adapted motor vehicle and should be used in conjunction with a 4 point, tie down system
with integrated lap belt and vehicle-mounted shoulder belt. The Chunc Adapt Wheelbase
with drop hook interface can also be used in the same manner, however you should rst
check the suitability of the surrogate seating system with your provider.
Tie-down points• :
The Chunc Junior, Junior 45° and Spica wheelchairs and Adapt wheelbase are equipped
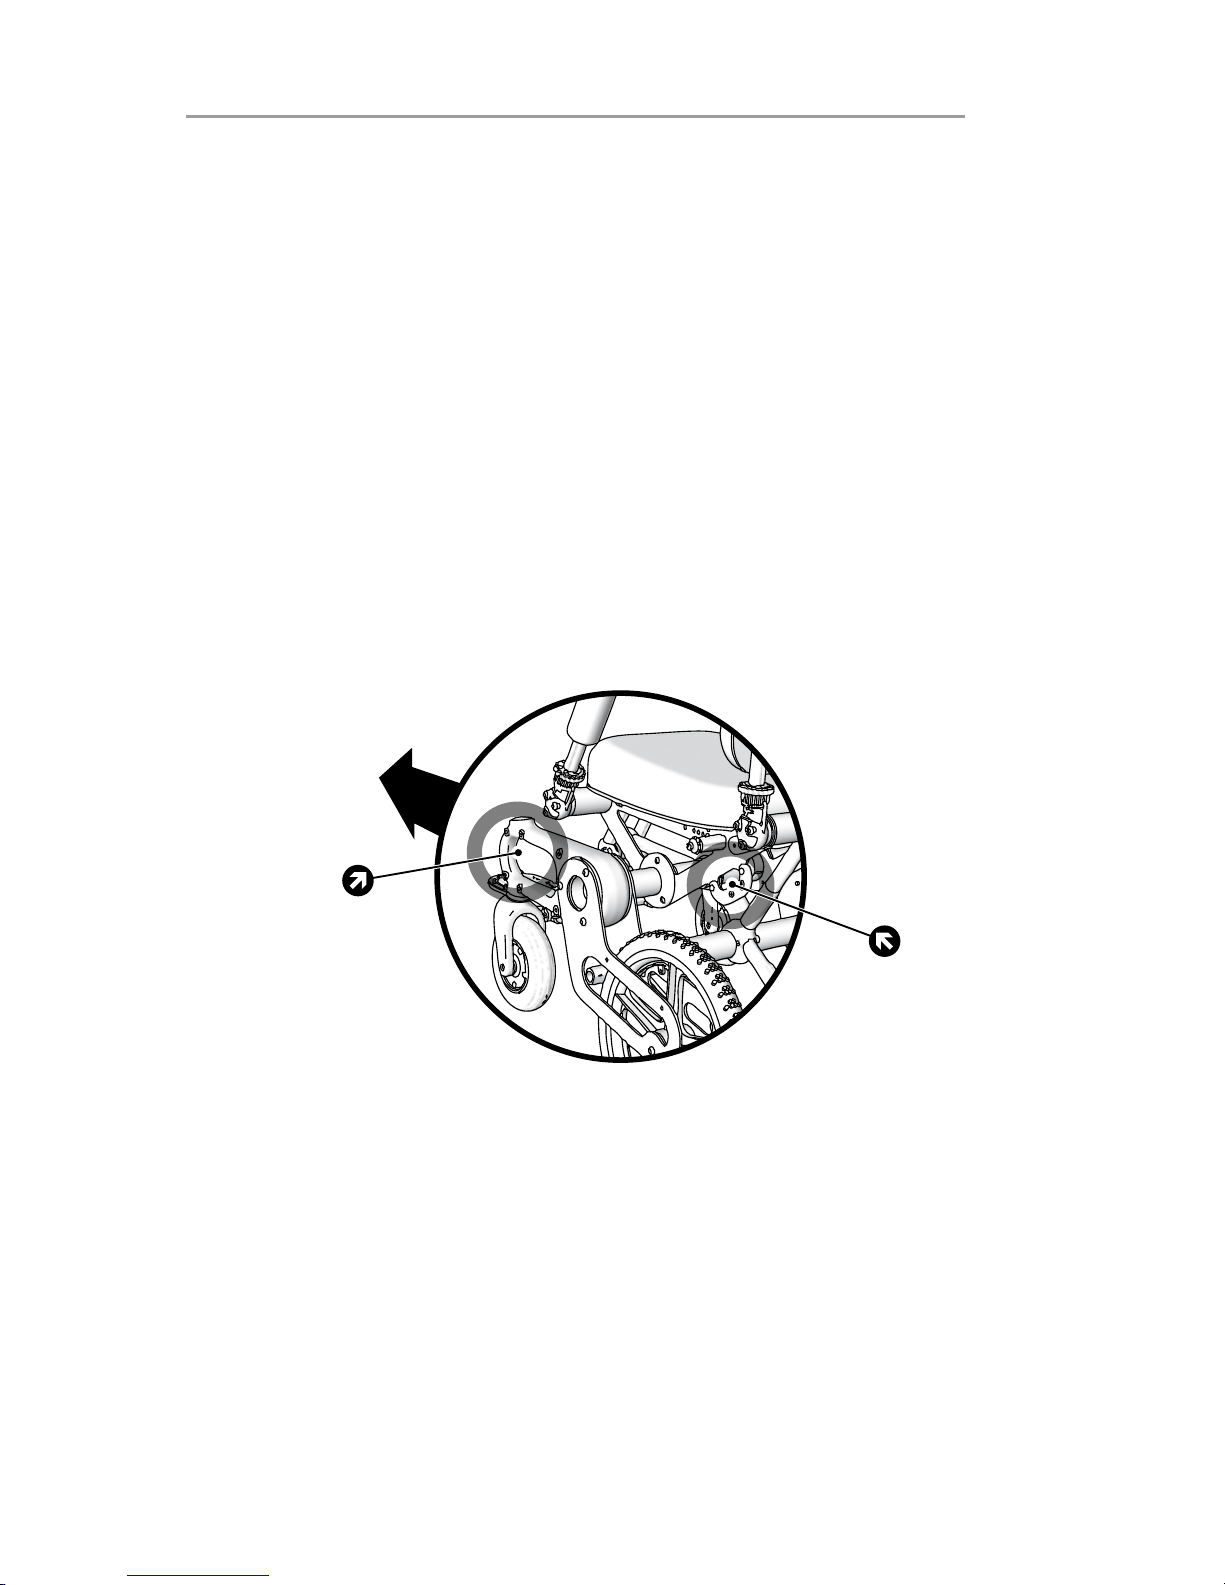
with 4 tie down points. The front tie down points () can be found within both front chassis mouldings. The rear tie downs () can be located on the back of the upper frame plate.
Direction
of travel
A strap style tting is recommended for use on the front tie down and a karabiner tting is
recommended for the rear tie down. The tie down belt should have a clear path from the
wheelchair to the rail anchor point and should not be interfered with by any part of the
vehicle, wheelchair, seating or accessory. If you spot any visible damage to any of the tie
down areas, do not transport a Chunc wheelchair in a motor vehicle without rst contacting a Chunc representative.
Belt restraints• :
Postural supports and belts may be used in a moving vehicle in addition to the occupant
belt restraint, but should not be relied upon to replace occupant restraints that have been
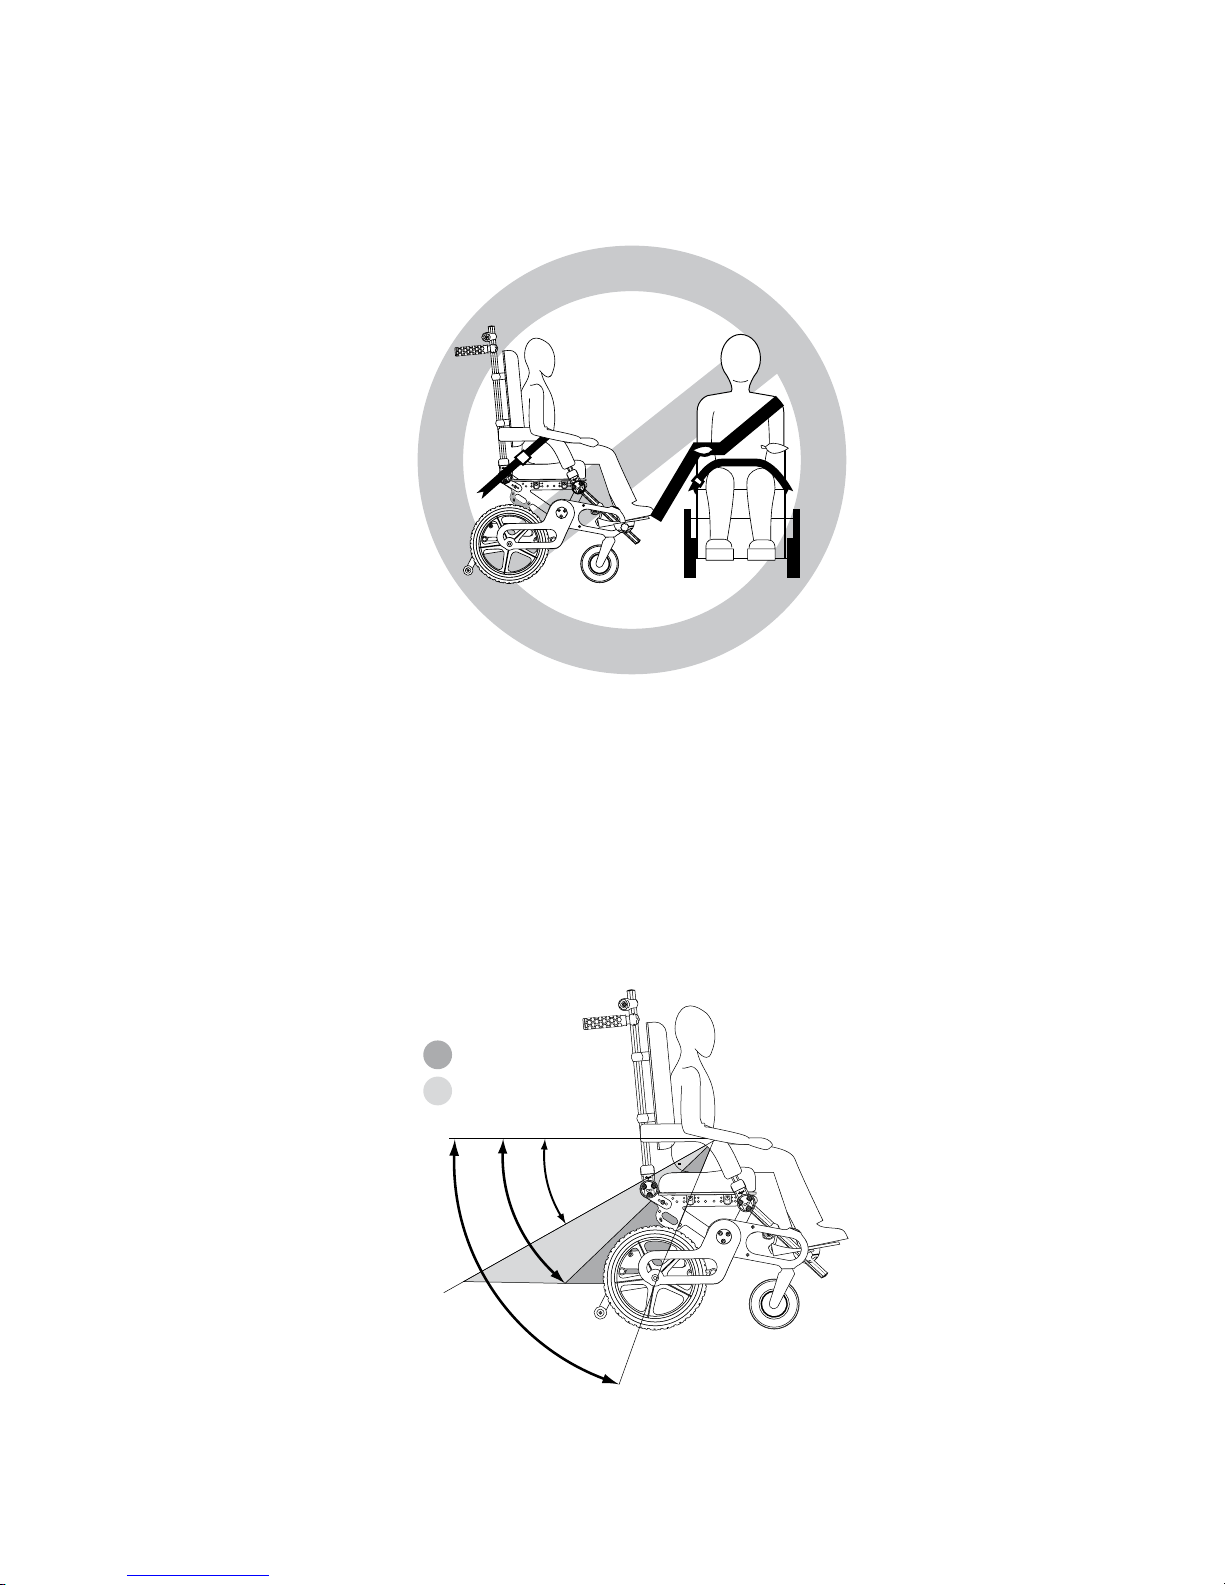
designed for this purpose. Restraints should not be held away from the body by wheelchair components or parts such as the wheelchair armrests or wheels. Pelvic restraints
Page 33
Page 33
should make full contact across the front of the body near the junction of the thigh and
pelvis. Upper torso belts should t over the shoulder. Belt restraints should be adjusted as
snugly as possible but with enough slack so as not to interfere with the occupant’s breathing or create isolated pressure. Belt webbing should not be worn twisted in a manner that
signicantly reduces the area of contact of the belt.
Wheelchair-mounted pelvic belt• :
An attachment is provided (USA customers only) on the upper frame of the wheelchair to
locate a wheelchair mounted pelvic belt.
Safety note: Any pelvic belt should be worn low across the front of the pelvis, so that the
angle of the pelvic belt is within the preferred zone of 45° to 75° to the horizontal, or the
optional zone of 30° to 45° to the horizontal as shown below. Steeper belt angles also
reduce the tendency for upper torso belts to pull the pelvic belt onto the abdomen during
frontal impact loading.
30°
45°
75°
Preferred zone
Optional zone
Safe transportation in a motor vehicle continued overleaf...
Page 34
Page 34
Safe transportation in a motor vehicle (cont’d)
Wheelchair conguration• :
Wheelchairs should have their wheel locks applied during vehicle movement. Postural
supports and belts may be used in a moving vehicle in addition to the occupant belt
restraint, but should not be relied upon to replace occupant restraints that have been
designed for this purpose. Where possible, auxiliary wheelchair equipment should be
secured to the wheelchair, or removed from the wheelchair and secured in the vehicle,
during transit so it does not break free and cause injury to vehicle occupants in a crash.
Safety note: Where possible, it is recommended that knee blocks are removed prior to
transportation.
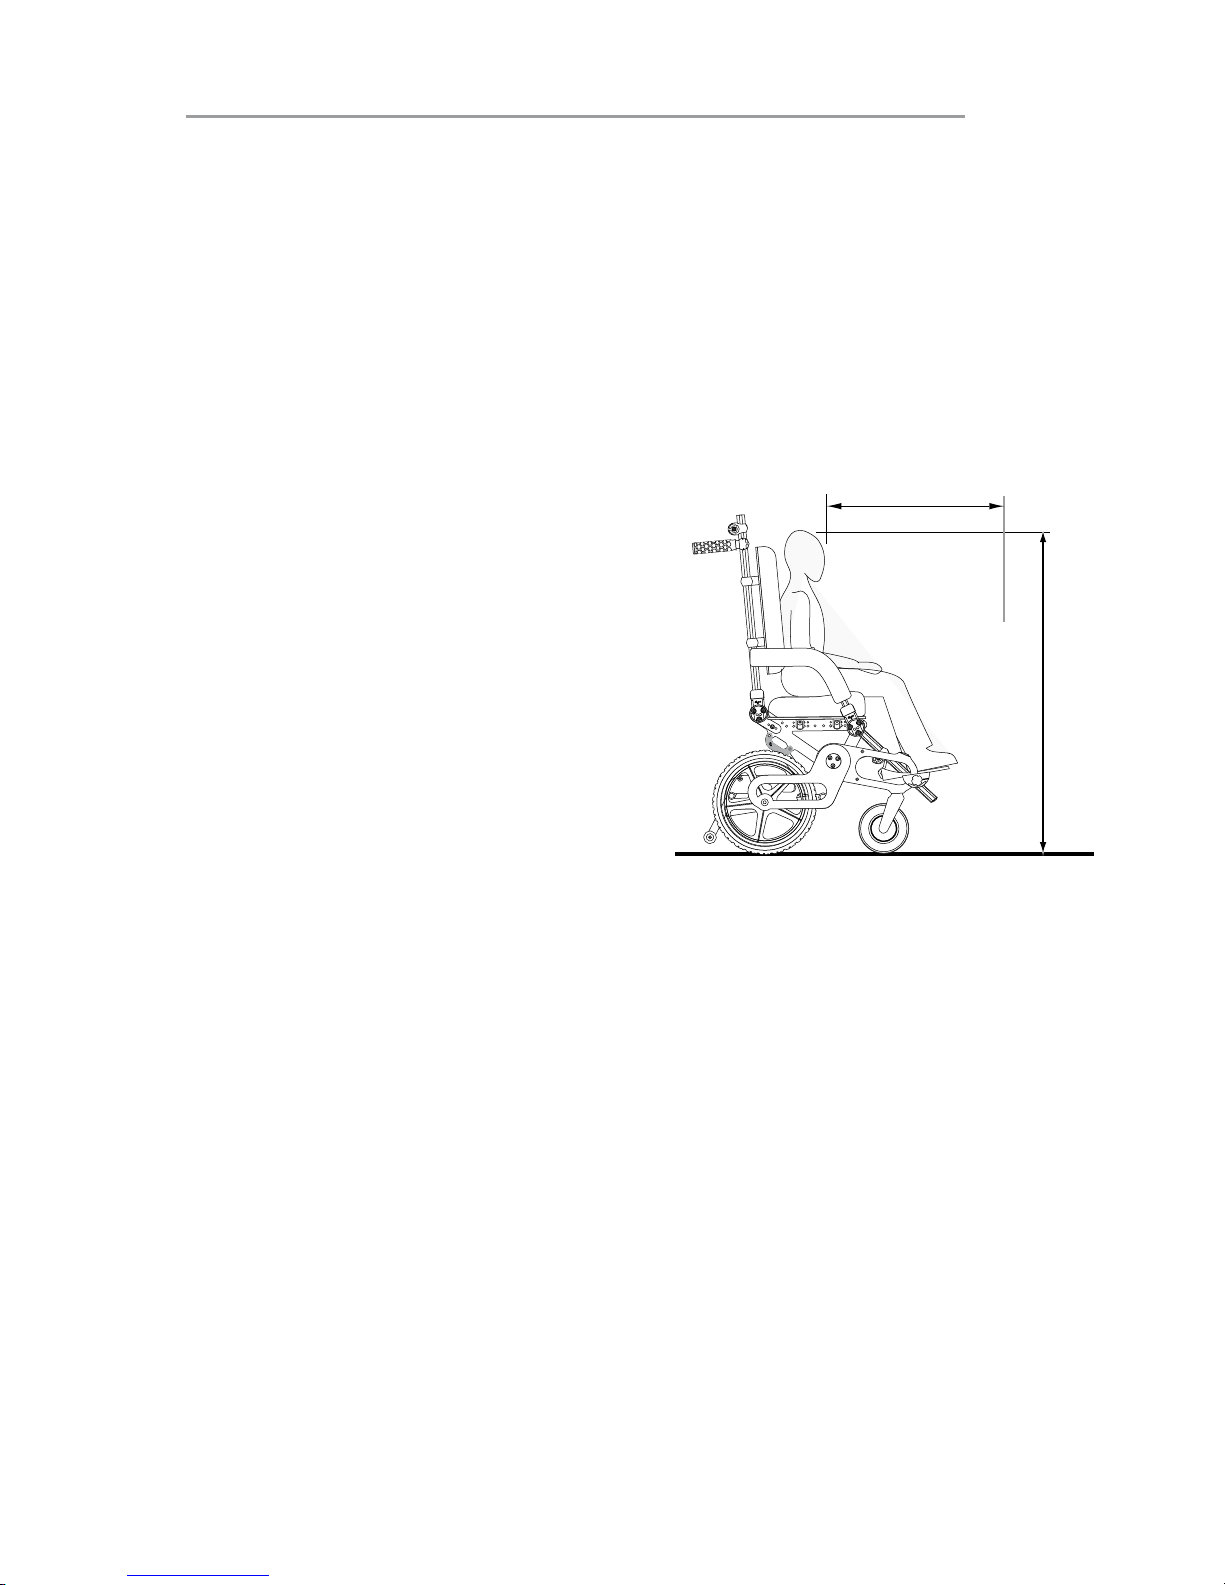
The rear clear zone• :
There should be sucient free space around
the wheelchair and occupant to avoid them
making contact with other vehicle occupants,
unpadded parts of the vehicle, wheelchair
accessories or WTORS anchor points. This is
measured from the rear-most point on the
occupant’s head. The front clear zone is measured from the front-most point on the occupant’s head. HHT is the estimated seat height
from the wheelchair ground plane to the top
of wheelchair-seated occupant’s head. The
HHT should range from about 120cm / 47” for
a small female adult to about 155cm / 61” for
a tall male adult. FCZ = 65cm / 26” with pelvic
and upper torso belts = 95cm / 37” with only
a pelvic belt.
Safety note: It is strongly recommended that both pelvic and upper torso belts are used
to achieve eective restraint and optimum protection in a crash situation. Wheelchairs
should not block gangway and exits for other passengers in the vehicle.
Qualication• :
The Chunc Junior, Junior 45°, Spica and Adapt have been dynamically tested to ISO 7176
19 and ANSI/RESNA WC/vol.1 section 19 in a forward-facing mode in conjunction with a 4
point tie down system with integrated lap belt and vehicle-mounted shoulder belt with a
54kg / 125lb. ATD (crash test dummy). This test replicates a 30mph head-on collision. The
Chunc Adapt wheelbase was tested in combination with a drop hook rail interface and a
12kg / 28lb surrogate seating system. These Chunc wheelchairs are ‘A’ rated for application
of user restraints for transport.
Alterations• :
Alterations or substitutions should not be made to the wheelchair securing points, or to
structural and frame parts or components, without consulting the manufacturer.
Questions• :
A Chunc representative should be consulted in case of questions about using the wheelchair for seating in a motor vehicle. You should also refer to the MHRA bulletin “Guidance
on safe transportation of wheelchairs” MDA DB2001(03).
FCZ
HHT
Side view
Page 35
Page 35
Cleaning
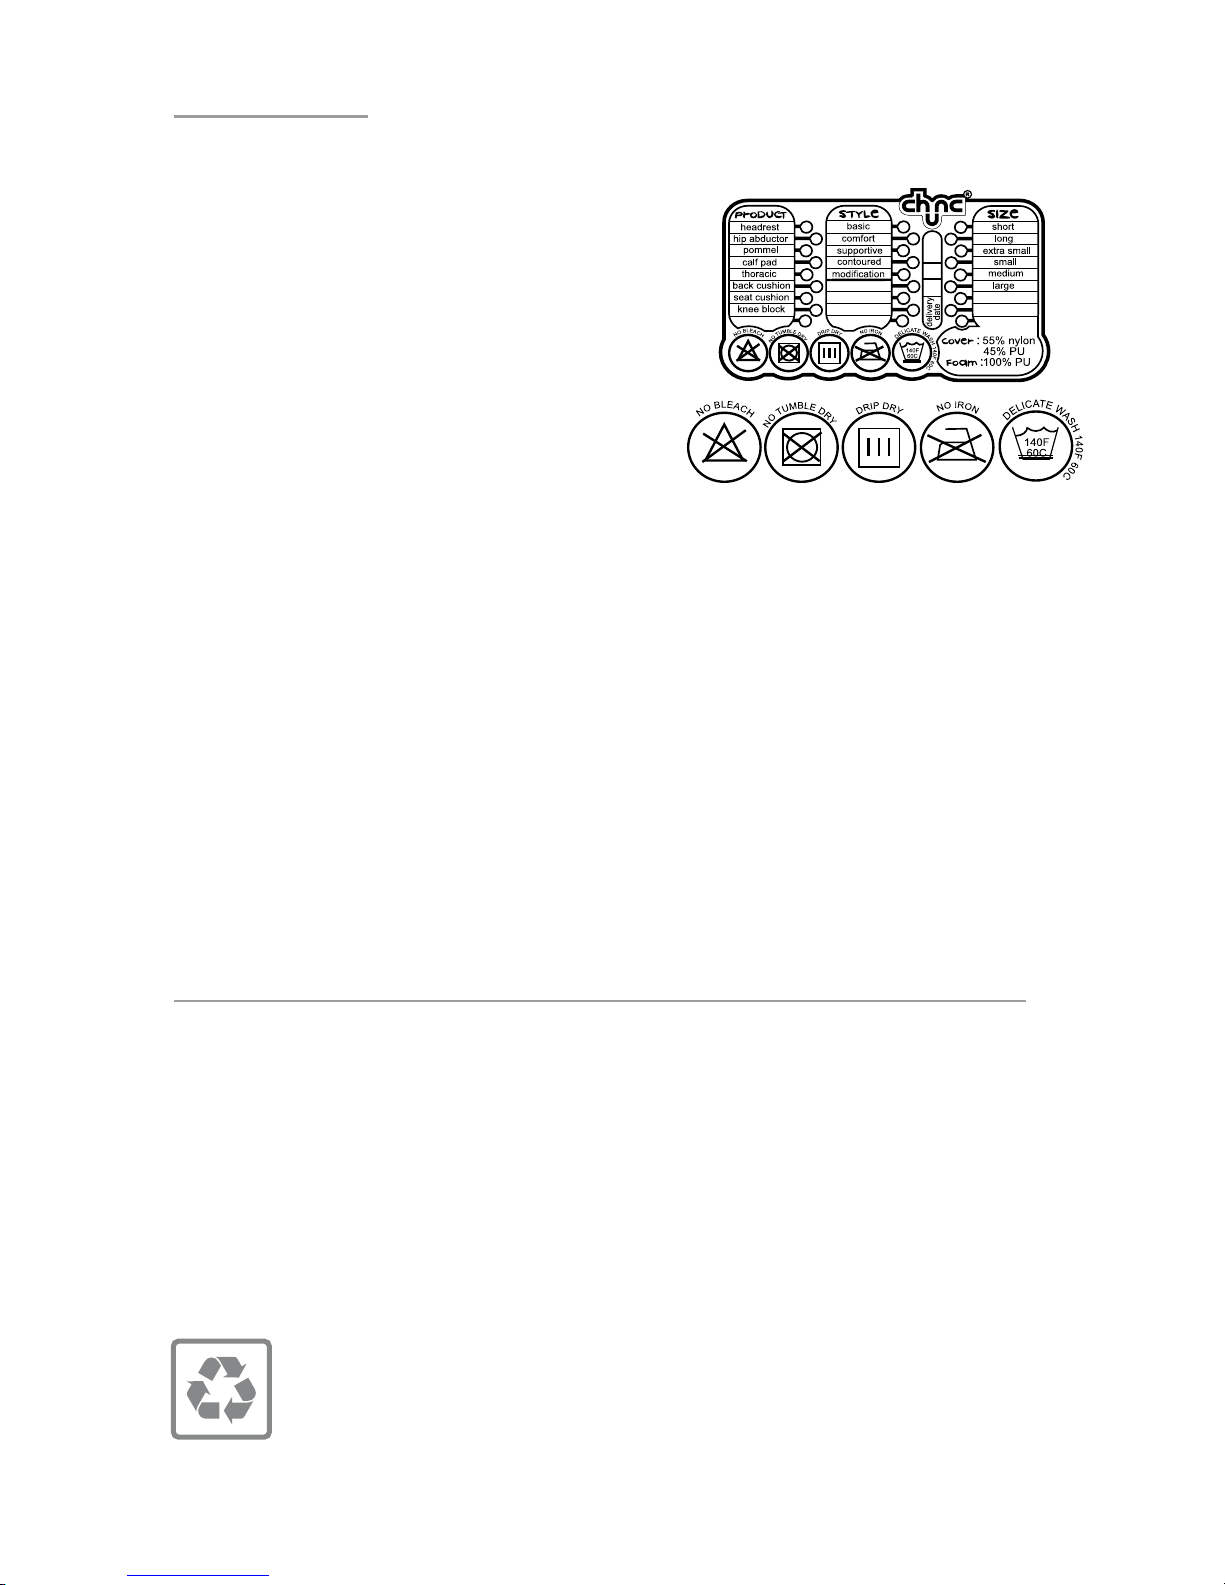
The upholstered parts are made from a breathable,
water resistant, anti-bacterial light-weight fabric. All
Chunc upholstered parts must be cleaned following the
care label stitched into the cover. They can be cleaned
using water and commercially available fabric washing
detergents and non-toxic soap (neutral soap). The padding inside the upholstery should not be cleaned with
any liquid; only lightly brush to refresh the surface.
Always ensure all mating Velcro parts are pressed
together prior to washing. Exposed hooked Velcro
can cause damage to items in a wash cycle.
The armrests are covered with closed cell foam. They can be wiped clean using a damp cloth.
We do not recommend the use of detergents on these parts.
The wheelchair frame is constructed from high quality engineering materials including powder-coated aluminum, plastic mouldings and stainless steel fasteners. It can be cleaned using
water and commercially available household detergents and non-toxic soap (neutral soap).
Before cleaning the wheelchair, all upholstery, including the armrests should be removed. It
may be necessary to use a brush or cloth to remove embedded dirt or remove deposits from
sheltered areas. Do not pressure wash or direct hosed water at bearings.
Safety note: Failure to comply with these washing instructions may result in the reduction of
performance of your product. Over a prolonged period this could constitute a safety hazard.
Extended life, re-use, recycling and disposal
The modular design and the use of high-grade materials on the Chunc range of wheelchairs
allows ease of maintenance and replacement of parts. An extensive spare parts list and the
availability of growth kits extends the wheelchair’s life for the original purchaser or for recondition and re-use. These are all detailed in the maintenance manual.
Your product is designed and manufactured with high quality materials and components,
which can be recycled and reused. When the wheelchair’s life can be prolonged no further, it
can be easily dismantled into its respective material groups. Approximately 90% of the wheelchair by weight is recyclable.
Consider the environment when disposing of your old product. Ensure it is
recycled where applicable by giving it to a recycling organization at the end of
its life.
Page 36

Page 36
Mechanical maintenance
Non-authorized or unqualied individuals should not attempt any mechanical maintenance
other than that detailed in this manual. Fitting or modications of wheelchair components,
whether repair, maintenance or adjustment must only be undertaken by / or as directed by
heath care professionals, Chunc approved engineers or appropriately qualied personnel. Failure to comply with these instructions may invalidate the warranty and endanger the occupant
and attendant.
Safety note: If at any time you suspect a fault or any of the equipment is damaged or behaves
erratically or you are uncertain of the wheelchair’s performance it should not be used until it
has been deemed t for use by your service provider.
Pre-use
Before transferring the user, an inspection should be made of the wheelchair, ensuring all required parts are xed securely in position, and in good working order. Special attention should
be paid to the orange hand tightened components; particularly the back rest xing caps and
the caution label at the base of the backrest. Ensure the wheelchair rolls freely, without excessive noise or vibration.
3 monthly
Visually inspect your wheelchair checking for damage or excessive wear. Check the security of
fasteners using the standard Allen keys provided with your wheelchair (located on the back of
the backrest). If you have to tighten any particular fastener regularly, bring it to the attention of
your service provider.
Annually and as required
The annual maintenance schedule is detailed in the maintenance manual. Any maintenance,
other than that detailed in this manual, should be carried out by authorized and qualied
personnel.
Page 37

Page 37
Product warranty and disclaimer
UK, Europe, Rest of World (excluding USA)
The warranty period is 24 months from date of delivery from the manufacturers. Any defect
found within the warranty period will be corrected without charge by the manufacturer.
However, the warranty is dependent on the product having been used, handled, stored, maintained, installed and operated in accordance with sound practice, including any instructions issued by the manufacturer. Any misuse or unauthorized alterations will invalidate this warranty.
The manufacture is not responsible for any modications made by any third party.
Any individual who is to operate or maintain this wheelchair must have read the user and
maintenance manual in its entirety.
In the event of any breach of the Manufacturer’s warranty (whether by reason of defective
materials, production faults or otherwise) the Manufacturer’s liability shall be limited to the
replacement of the Products in question or at the Manufacturer’s discretion, repayment of the
purchase price (where this has been paid).
Page 38
Page 38
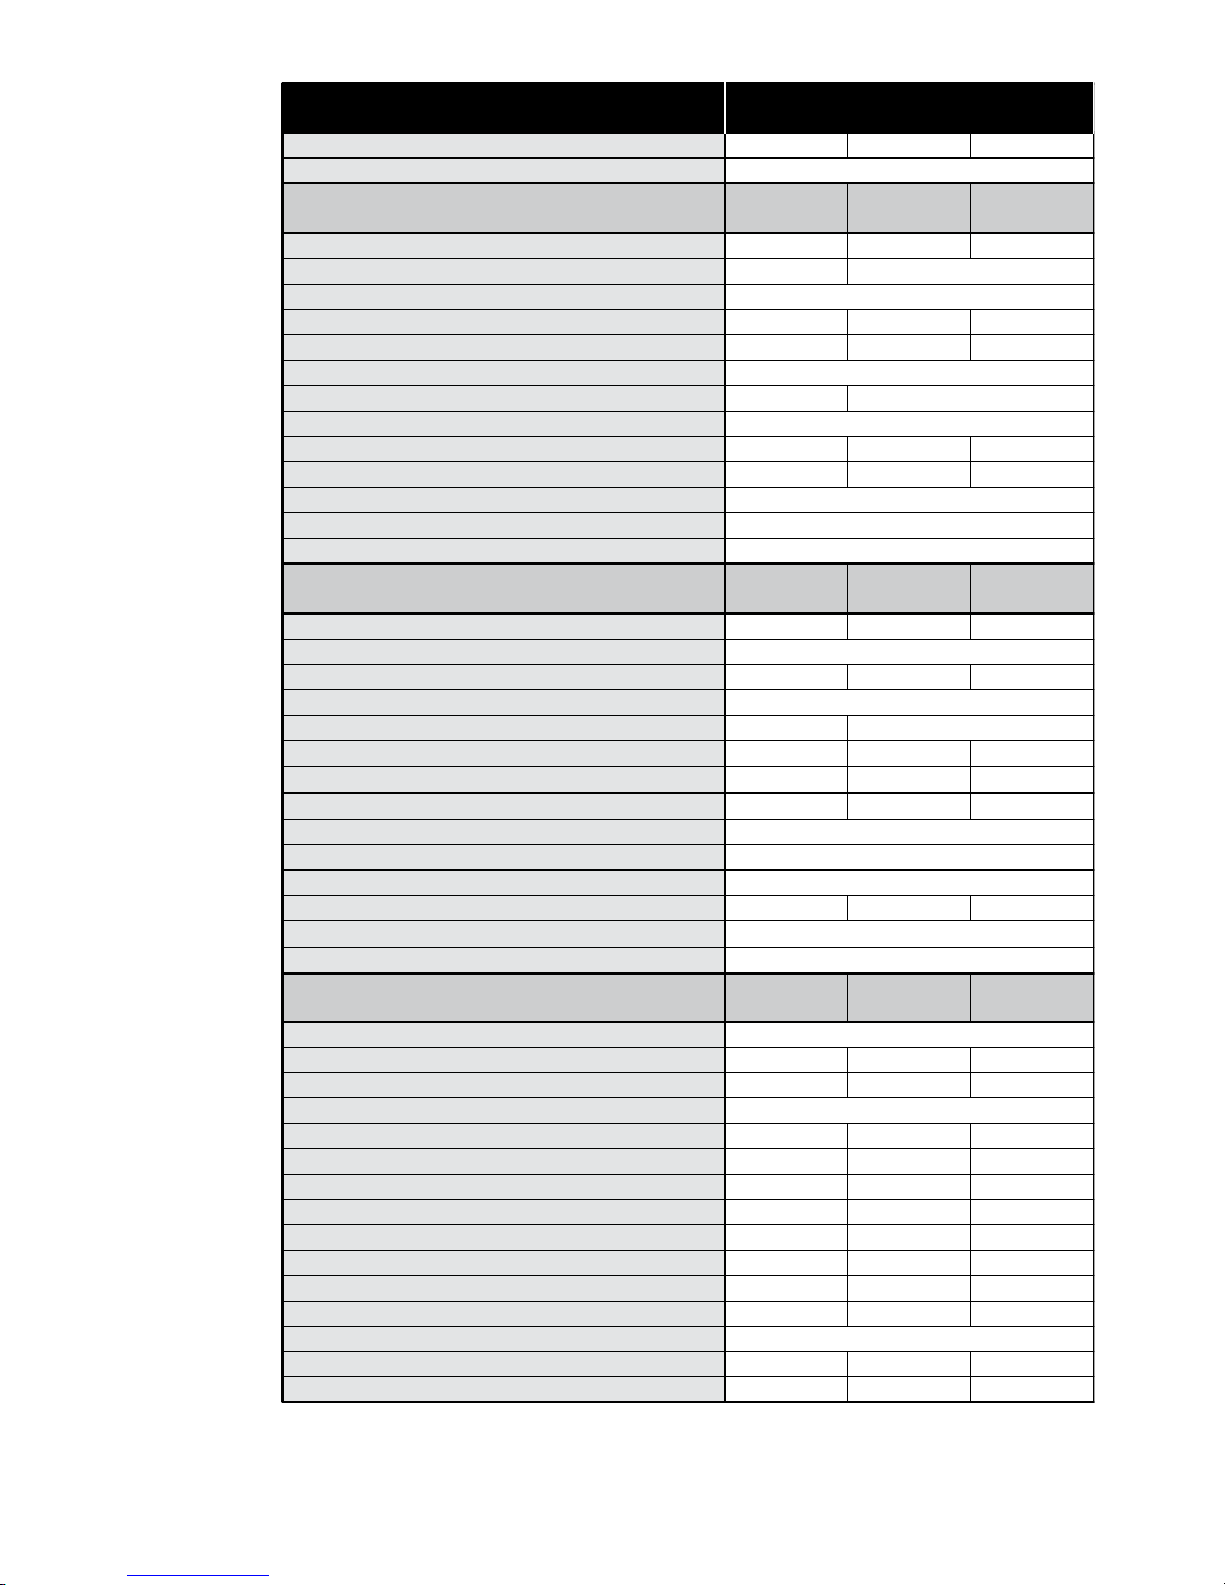
Overall Dimensions
Seating Dimensions
Options
Chunc Product Specication Chunc AdaptChunc Junior Chunc Junior 45° Chunc Spica
Maximum user mass
Overall operational length inc. footrests or *leg splints
Overall operational width *inc. fully splayed leg splints
Overall operational height
Overall operational mass
Overall operational mass including accessory pack
Dismantled length
Dismantled width
Dismantled height
Mass of heaviest dismantled part
Minimum turning radius
Wheel diameter (front)
Wheel diameter (back)
Wheel base
Seat depth range or *rail depth range
Seat depth growth or *depth adjust. or **rail depth adjust.
Seat width range or *rail width range
Seat width growth or *rail width growth
Seat height or *rail height
Back rest height range
Back rest height growth
Back rest width
Leg rest angle range *as accessory or **leg splint angle range
Leg rest length range *as accessory or **leg splint length
Leg rest length growth *as accessory
Arm rest height *as accessory
Back rest recline angle range
Tilt in space angle range
Basic Seat Cushion
Contoured Seat Cushion
Ischial Block Seat Cushion
Basic Back Cushion
Supportive Back Cushion
Removable Head Rest (two sizes in two styles)
Swing Away Thoracic Supports (two sizes)
Removable Hip Abductors (two sizes)
Removable Pommel (two sizes)
Removable Knee Blocks (two sizes)
Calf Supports (two sizes)
Removable Tray (three sizes)
Swing Away Footrests
Removable Height Adjustable Arm Rests
Spica Wing Support
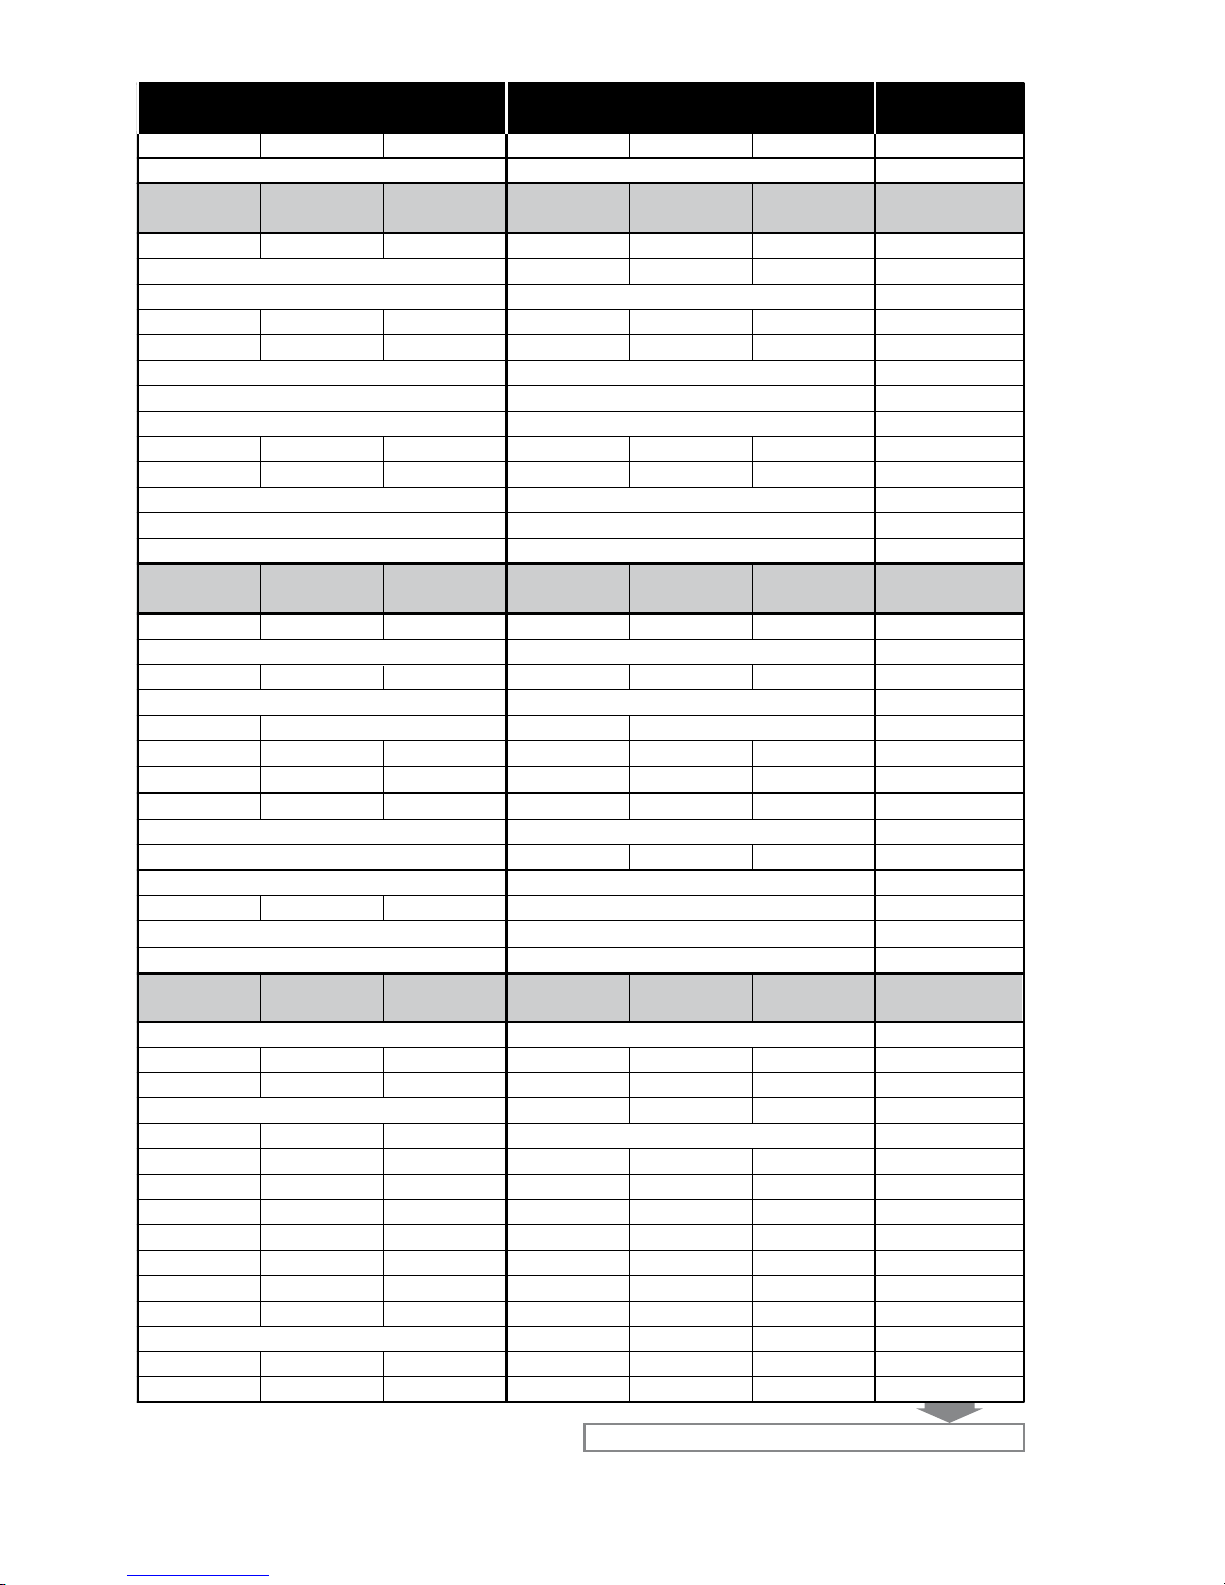
Extra Small Small Medium Extra Small Small Medium Extra Small Small Medium 15" or 18"
84cm 89cm 94cm 97cm 102.5cm 107.5cm * 129cm * 134cm * 139cm 94cm
56cm * 93cm
19Kg 19.5Kg 20Kg 20Kg 20.5Kg 21Kg 24.5Kg 25Kg 25.5Kg 16Kg
22Kg 23Kg 24Kg 23Kg 24Kg 25Kg 27.5Kg 28.5Kg 29.5Kg 19.5Kg
56cm
16Kg 16.25Kg 16.5Kg 16.25Kg 16.5Kg 16.75Kg 16.25Kg 16.5Kg 16.75Kg 16Kg
130cm 140cm 150cm 148cm 158cm 168cm 200cm 220cm 240cm 150cm
25 - 30cm 31 - 36cm 36 - 41cm 20 - 30cm 26 - 36cm 31 - 41cm 24 - 30cm 30 - 36cm 35 - 41cm * 35 - 40cm
18 - 26cm 23 - 31cm 28 - 36cm 18 - 26cm 23 - 31cm 28 - 36cm 26cm 31cm 36cm * 38.1 - 45.7cm
55cm 53.5cm
36 - 44cm 42 - 52cm 48 - 60cm 36 - 44cm 42 - 52cm 48 - 60cm 36 - 44cm 42 - 52cm 48 - 60cm –
8cm 10cm 12cm 8cm 10cm 12cm 8cm 10cm 12cm
21cm 25cm 29cm 21cm 25cm 29cm 21cm 25cm 29cm
** 42cm ** 47cm ** 52cm * 20 - 40cm
14.5cm 18cm 22cm 14.5cm 18cm 22cm * variable * variable
– – – – – –
– – – – – – –
standard
standard
standard standard standard
standard standard
+2° to -45°
90° - 102°
+2° to -20°
90° - 102°
20cm
53cm
10cm
8cm
55cm
57.5cm
57.5cm 57.5cm
118.5cm
83cm
51.5cm
17cm
37.5cm
80° - 170°
20 - 40cm
20cm
44.5cm
5cm
8cm
57.5cm
80° - 170°
20 - 40cm
58.5cm
53.5cm
17cm
37.5cm
58.5cm
115cm
76cm
54kg 54kg 54kg
* * * * * * * * *
* * * * * * * * *
* * * * * *
* * * * * * * * * *
* * * * * * * * *
* * * * * * * * *
* * * * * * * * *
* * * * * * * * *
* * * * * * * * *
* * * * * * * * *
Page 39
Page 39
All values for Chunc Adapt do not include surrogate seatAll information correct at time of publication (May 2006)
54kg
* 108cm * 120cm
58.5cm
115cm
76cm
58.5cm
53.5cm
17cm
37.5cm
44.5cm
** 5cm
* 7.6cm
53.5cm
* 48.5cm
–
* 80° - 170°
** 42cm ** 47cm ** 52cm * 20 - 40cm
* 20cm
90° - 111°
+2° to -20°
–
–
–
–
–
–
–
–
–
–
–
** 0° - 45°
* 20cm
90° - 160°
+2° to -20°
standard
standard
+2° to -45°
90° - 102°
83cm
* 10cm
–
55cm
20cm
53cm
10cm
8cm
55cm
57.5cm
57.5cm 57.5cm
118.5cm
53cm
51.5cm
17cm
37.5cm
118.5cm
83cm
51.5cm
17cm
37.5cm
80° - 170°
20 - 40cm
* * *
* * * *
* * * *
* * *
–
Page 40

The Chunc range of wheelchairs and accessories are designed and manufactured to meet the
requirements of the Medical Devices Directive 93/42/EEC for Class 1 medical devices.
Specmat Limited holds the British Standard Quality Approval to BS EN ISO 9001:2000 for the design
and manufacture of medical devices.
All products FDA approved: site registration number 3004709721.
Patents pending include EP 03251925, Design Registration includes USD 475952, EC 000080627.
Granted Patent U.S. 6,994,364
Chunc is a trademark of Specmat Ltd, part of the HR Smith Group of Companies.
© Copyright Specmat Ltd 2006
All rights reserved. All technical information is subject to alteration without notice.
THIS USER MANUAL IS AVAILABLE IN LARGE PRINT
Chunc user manual (ROW) issue 2, 17th September 2007. Specmat document no. HRS 1056-02-06
BS EN ISO 9001:2000
 Loading...