

Page 1
Product Overview
The stro be outdoor sire n can be used as a wir eless si ren by connect ing to the c ontrol pa nel as well as a
stand alone al arm sys tem to work w ith wireless a ccesso ries in s ame freq uency by l earnin g.
The sol ar-pow ered sir en is a tota lly wire less sir en, desi gned to he lp prote ct yards , drivew ays, gar dens
and all t ypes of ot her exte rnal loc ations . The strobe sire n is battery po wered an d kept re-c hargin g by
the bui lt-in so lar panel. The s ignal tr ansmi ssion is a ll by wire less rad io frequency w hich ach ieves
signi ficant ly wiref ree tran smiss ion and en hances t he flexibili ty to install. U sers ca n instal l some ou tdoor
strobe s irens to deter th e intruders i n Omni-d irecti onal gua rd.
SPS-260
Solar-Powered Siren
User Manual
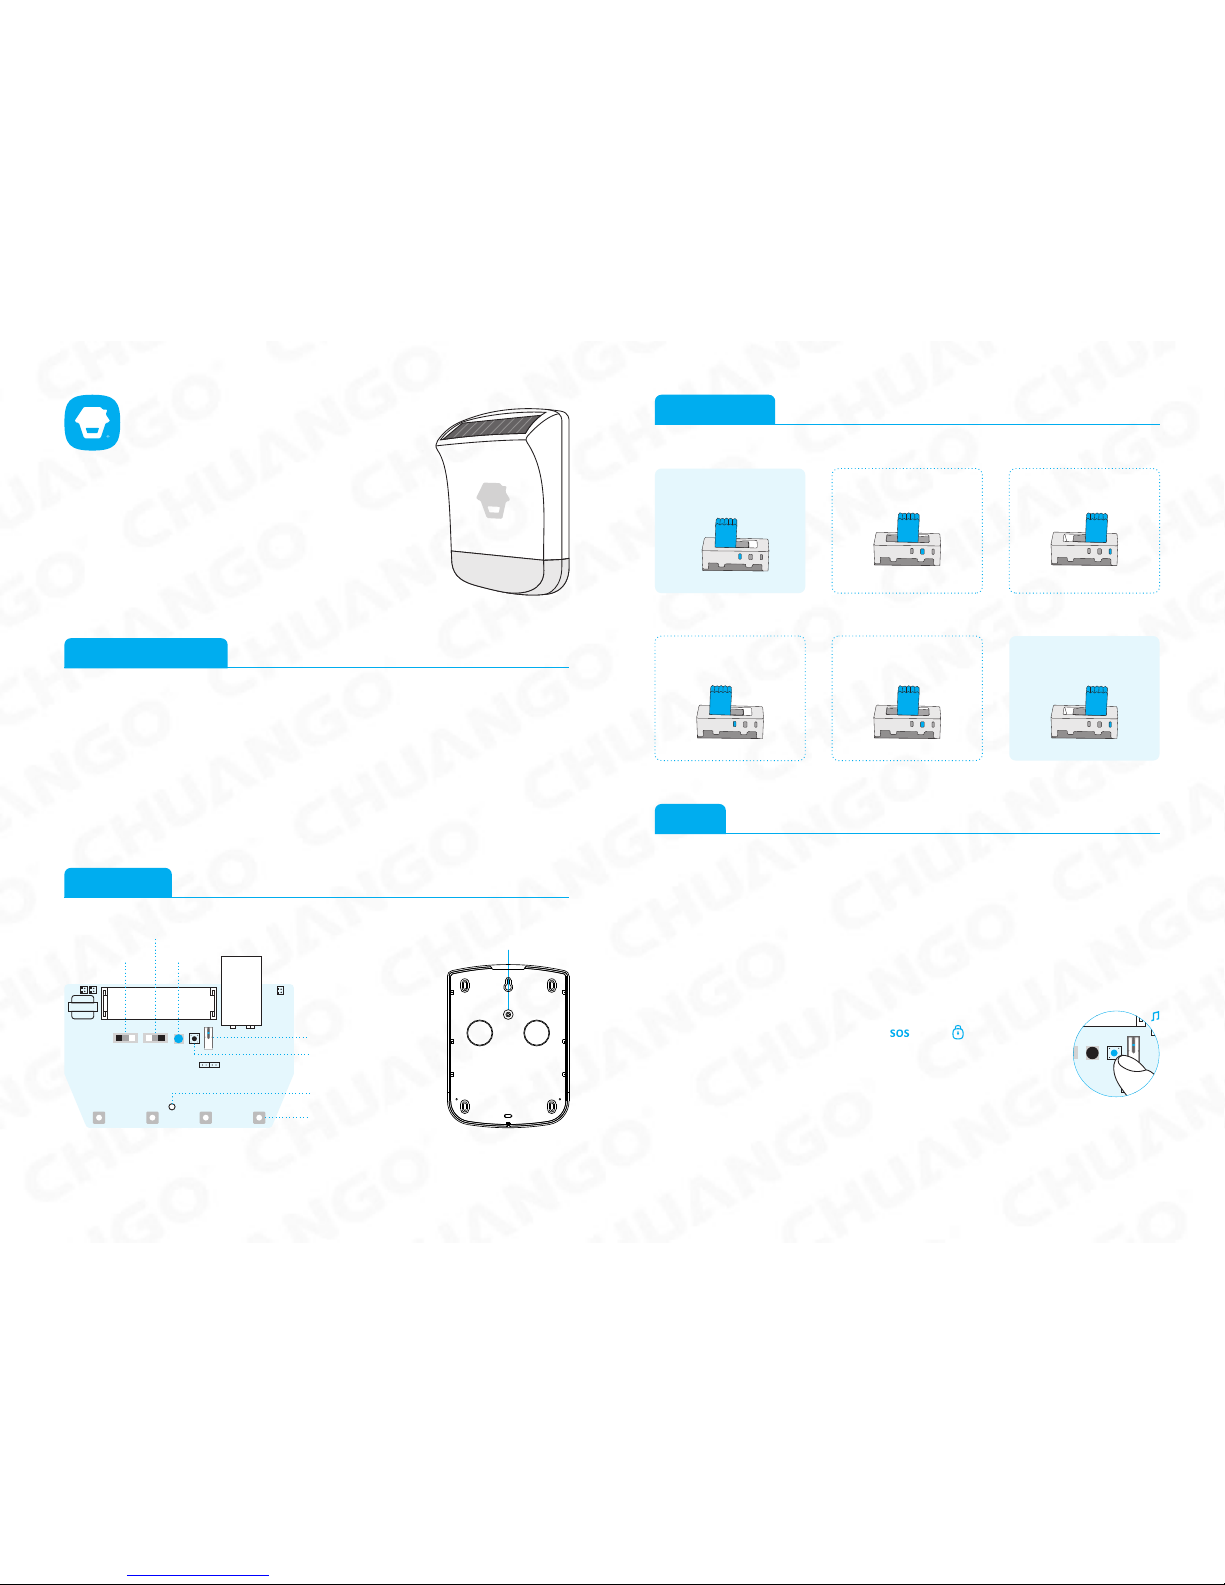
PCB Layout
2minu tes
Siren D urati on Sett ing
5minu tes
5MIN 2 MIN 30S 5MIN 2 MIN 30S
Volume Se tting
High ( defau lt)
Mute
HIGH M UTE LOW
HIGH M UTE LOW
HIGH M UTE LOW
Low
Jumper Setup
30se conds (d efaul t)
5MIN 2 MIN 30S
1. Load th e 9V battery.
2. Set th e volume a nd durat ion of the siren.
3. Star t to use by pre ssing the powe r button o n.
Conne ct to Ala rm Panel
Press th e learning but ton (0.5 secon ds), the w ireless siren g oes into
conne cting st atus af ter one beep is he ard. Pres s or butto n on Arm
the pane l. The wireles s siren is c onnect ed succe ssfully with t he control
panel af ter another b eep.
To give up the co nnecti on, press the le arning b utton ag ain to exi t.
Note: P lease do n't trigge r any acce ssor y during conn ecting w ith alar m panel.
Usage
Work as a Wireless Siren
After c onnec ted to the al arm panel, the s iren wil l hoot and t he strob e light w ill flas h when the a larm
panel al arms.
Getti ng Star ted
Exter nal Tamper Swi tch
Note: T he statu s LED will f lash once ever y 5 seconds i n arm stat us. It wil l not flash when i n disarm statu s.
The sire n will so und imme diatel y if the tamper sw itch is trigge red.
Learn ing Butt on
Inter nal Tamper Swi tch
Status L ED Indic ator
Alarm L ED Indic ators
Volume Se tting
Siren Du ration Setti ng
Power On/ Off
186 50
9V 6F 22
Page 2
Installation
Note: N o matter t he siren w orks as a wi reless s iren or an al arm panel, if di sarm is not oper ated af ter the
siren du ratio n time, th e status i ndicator of sir en will fl ash once e very 2 seco nds to inf orm user o r patrol
polic e that the a larm sy stem has b een trig gered. This LE D indica tion las ts for 1 hour.
Work as an Alarm Panel
Service Mo de
When th e siren is w orking a s a stand alone al arm syst em and ins talled on the wa ll, newly purc hased
acces sories m ay not easy to con nect wit h the siren. Wit h this fun ction, user ca n easil y connec t the
acces sories t o the sire n withou t dismountin g the siren from th e wall.
Press on t he remote cont rol 3 time s (withi n 5 second s) to enter ser vice mo de.
Then pre ss 3 times (with in 5 seconds) to e nter con necti ng statu s.
A longe r beep is he ard from t he siren m eans it en ters con necting stat us, press test b utton on t he newly
purcha sed accessor y or trigger t he acces sory o nce. Ano ther beep is hea rd from the siren , the acce ssory
has bee n succes sfully conne cted with the si ren.
Press on r emote co ntrol to e xit conn ecting s tatus after a s hort be ep.
Enter /Exit C onnec ting Sta tus by Co nnect ed Remot e Control
Ver: S PS-26 0-EN- 1407- V2.0- 1
2014 C huang o. All Ri ghts Re serv ed.
Specifications
Backu p Power
Solar Pa nel Outp ut Curre nt
Maxim um Alarm C urrent
Wirele ss Receiving Di stance
Opera tion Con ditio n:
Maxim um Siren Vol ume
Static C urrent
Standb y Time
Wirele ss Receiving Fr equenc y
Housi ng Mater ial
Size (L x W x H )
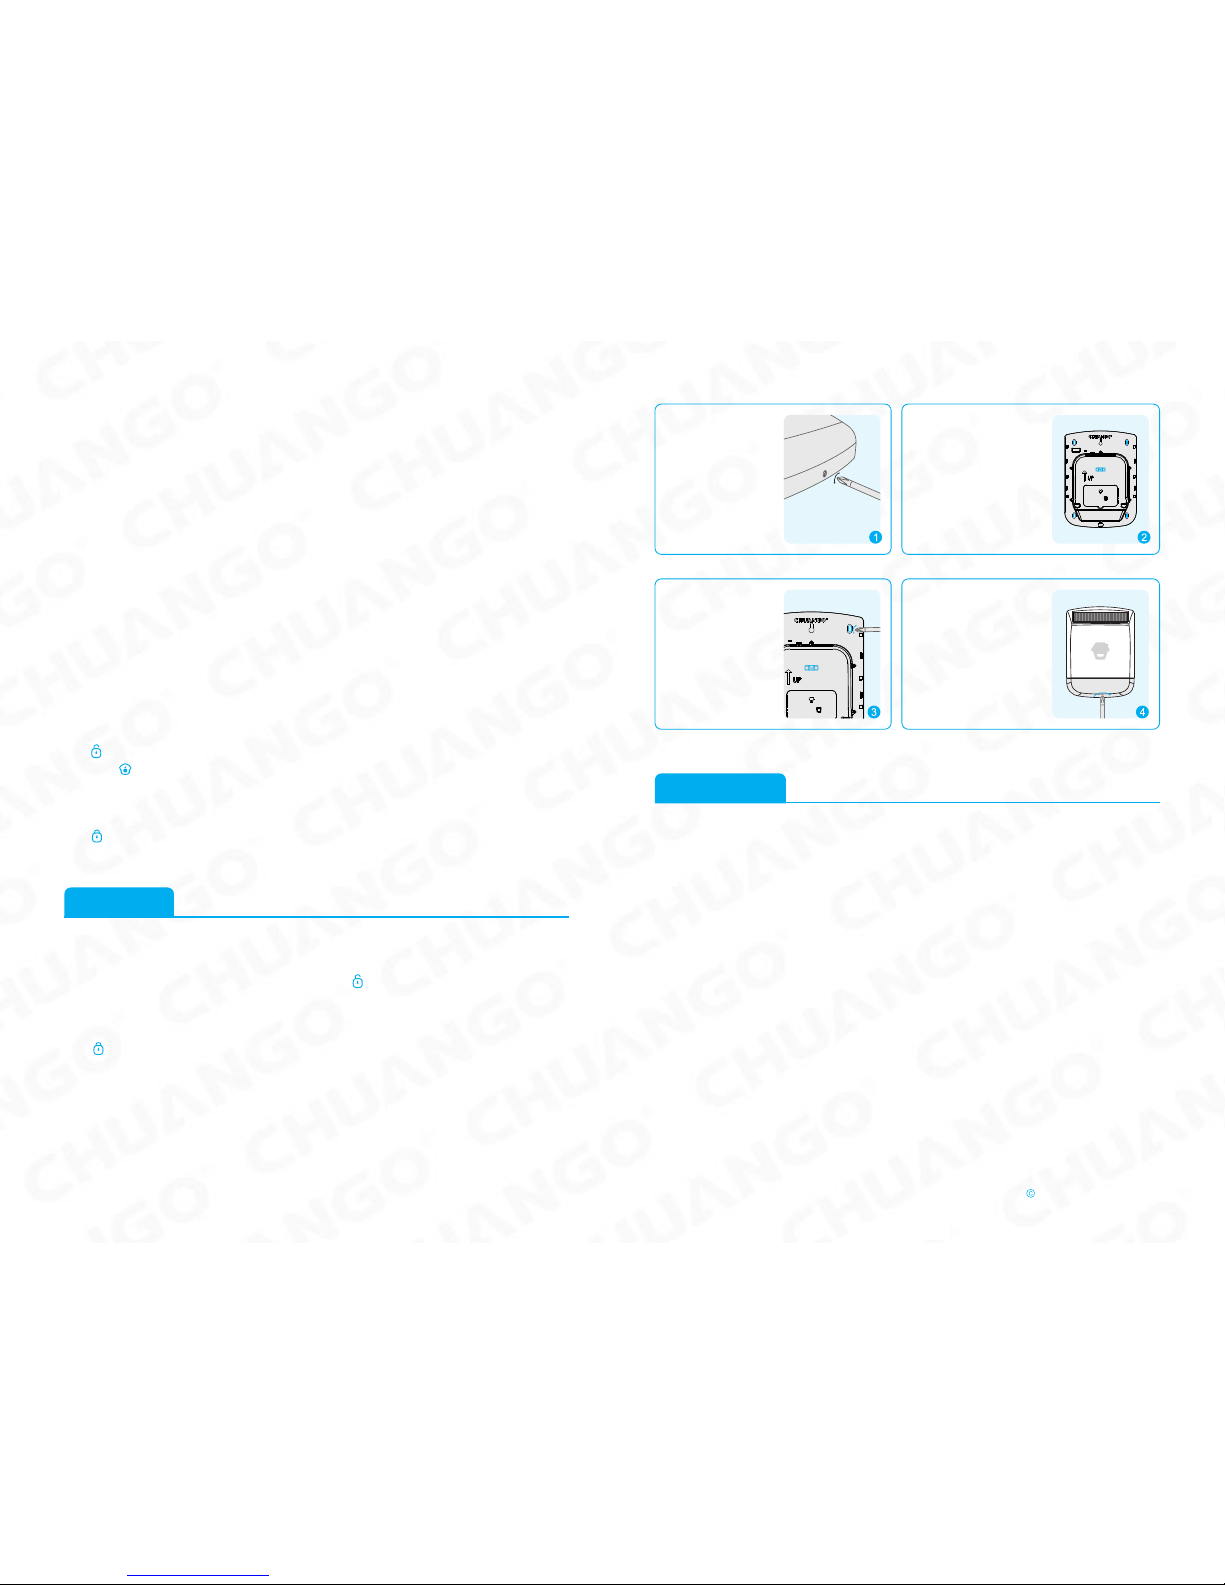
Drill f our hole s and
fit the w all plug s,
and the n fit
suppl ied fixi ng
screws i n the
holes .
Hinge t he front c over
locat ing tabs o ver the to p
edge of th e back pla te and
carefu lly push the bas e of
the sire n cover into pla ce.
Secure t he siren cover i n
place b y refitt ing the fi xing
screw in t he bottom edge
of the cov er.
After c onnec ted with w ireles s access ories , the siren w ill hoot and the s trobe light wi ll flash t o deter th e
burgla r on site when the a ccesso ries detect in trusi on.
Hold th e mounti ng
plate i n positi on and
mark th e positi ons of
the fou r mounti ng
holes . A spirit l evel
place d on the wat erproof ca sing wil l ensure
a perf ect leve l.
Remove t he fixin g
screw fr om the bot tom
edge of th e siren
housi ng and car efully
remove f ront cov er.
Conne ct with Wirele ss Acce ssori es
Press th e learning but ton (0.5 secon ds), the s ystem goes int o connec ting st atus af ter one be ep is hear d.
Press te st butto n on acce ssorie s or trigg er the accesso ry once. The w ireles s access ory is c onnect ed
succe ssfull y after anoth er beep. To give u p the conn ection, pres s the lear ning bu tton aga in to exit
conne cting st atus af ter one beep.
1.
2.
18650 3 .7V 1200 mAh rech argeab le lith ium batte ry x 1
9V 6F22 ba ttery x 1
2000LU X illuminati on ≥4mA (in sunli ght)
≤500mA
≤80m (in o pen area )
Temperatu re -10℃~+5 5℃
Relati ve Humid ity ≤80% ( non-co ndensi ng)
110dB
≤1mA
≤30 days ( in case of n o sunlig ht)
315MH z or 433.9 2MHz ( ±7 5KHz)
PC + ABS + AN TI-UV
309 x 230 x 7 9.7mm
The ser vice mode is to p revent t rigger ing the a larm whe n you moun t the sire n on the wal l.
When th e remote c ontrol is c onnected wit h the sire n, press o n remote c ontrol 3 t imes (wi thin 5
secon ds), the s iren goe s into ser vice mode wh en a long be ep is hea rd. Duri ng this pe riod, th e siren wi ll
not ala rm but bee p even if th e tamper switc h or the sen sors co nnecte d are trig gered. T his brin gs you
conve nience o n insta llatio n.
Press on r emote co ntrol to e xit ser vice mode aft er a shor t beep.
Page 3
产品型号
SPS-260
林寿
说明书
设 计
印刷尺寸
工 艺
部件名称
材 料
版 本
注:
双色、双面印刷
成品尺寸
210X142.5mm
80克书写纸
折页
210X285mm
Ver: SPS- 260-EN-140 7-V2.0-1
 Loading...