

Page 1
Printed in Hong Kong
PA: OI-KP700/EN-2013V1.0
KP-700
Keypad
Operation Manual
Please read this manual carefully before use.
Please keep it properly for further reference.
Page 2

1
2
3- 4
5
6
6- 7
8
8
11
12
10
15
16
13 -14
17
18
9
Table of Contents
Introduction
Foreword
Parts List
Appearance
Preparation before Use
Power on
Connect Keypad to Control Panel
Connect RFID Tag to Keypad
Connect Electronic Door Lock
Installation
Settings
Enter Setup State
Delay Arm
Speed SOS Dial
Keyboard Clicks
Disarm by RFID Tag
Power Saving Mode
Change User Code
Change Admin Code
Reset
Usage
19
20
21
22
22
Arm
Disarm
Stay Mode
Emergency Call
Mute Mode
23
24
Care and Maintenance
Usage Notices
Maintenance
FAQ
FAQ
23
Instructions of Wired Cables Interface
25
Technical Specifications
26
Technical Specifications
Instructions of Wired Cables Interface
Page 3
AAA
AAA
AAA
1 2
Foreword
Thank you for purchasing this wireless keypad. It is
recommended to install outside the entr y door and users can
achieve operations such as arm, disarm, stay mode after
inputting passcode. Moreover, the keypad can connect with
an electronic door lock to work as an access control system
for homes and offices. When users are leaving rooms, just
close the door, the electronic lock will be locked
automatically. Before entering house, just input the passcode
and then press [Disarm] key or put RFID tag purchased
separately close to the RFID reader to disarm the system. By
this way, the door will be opened easily, which is very
convenient.
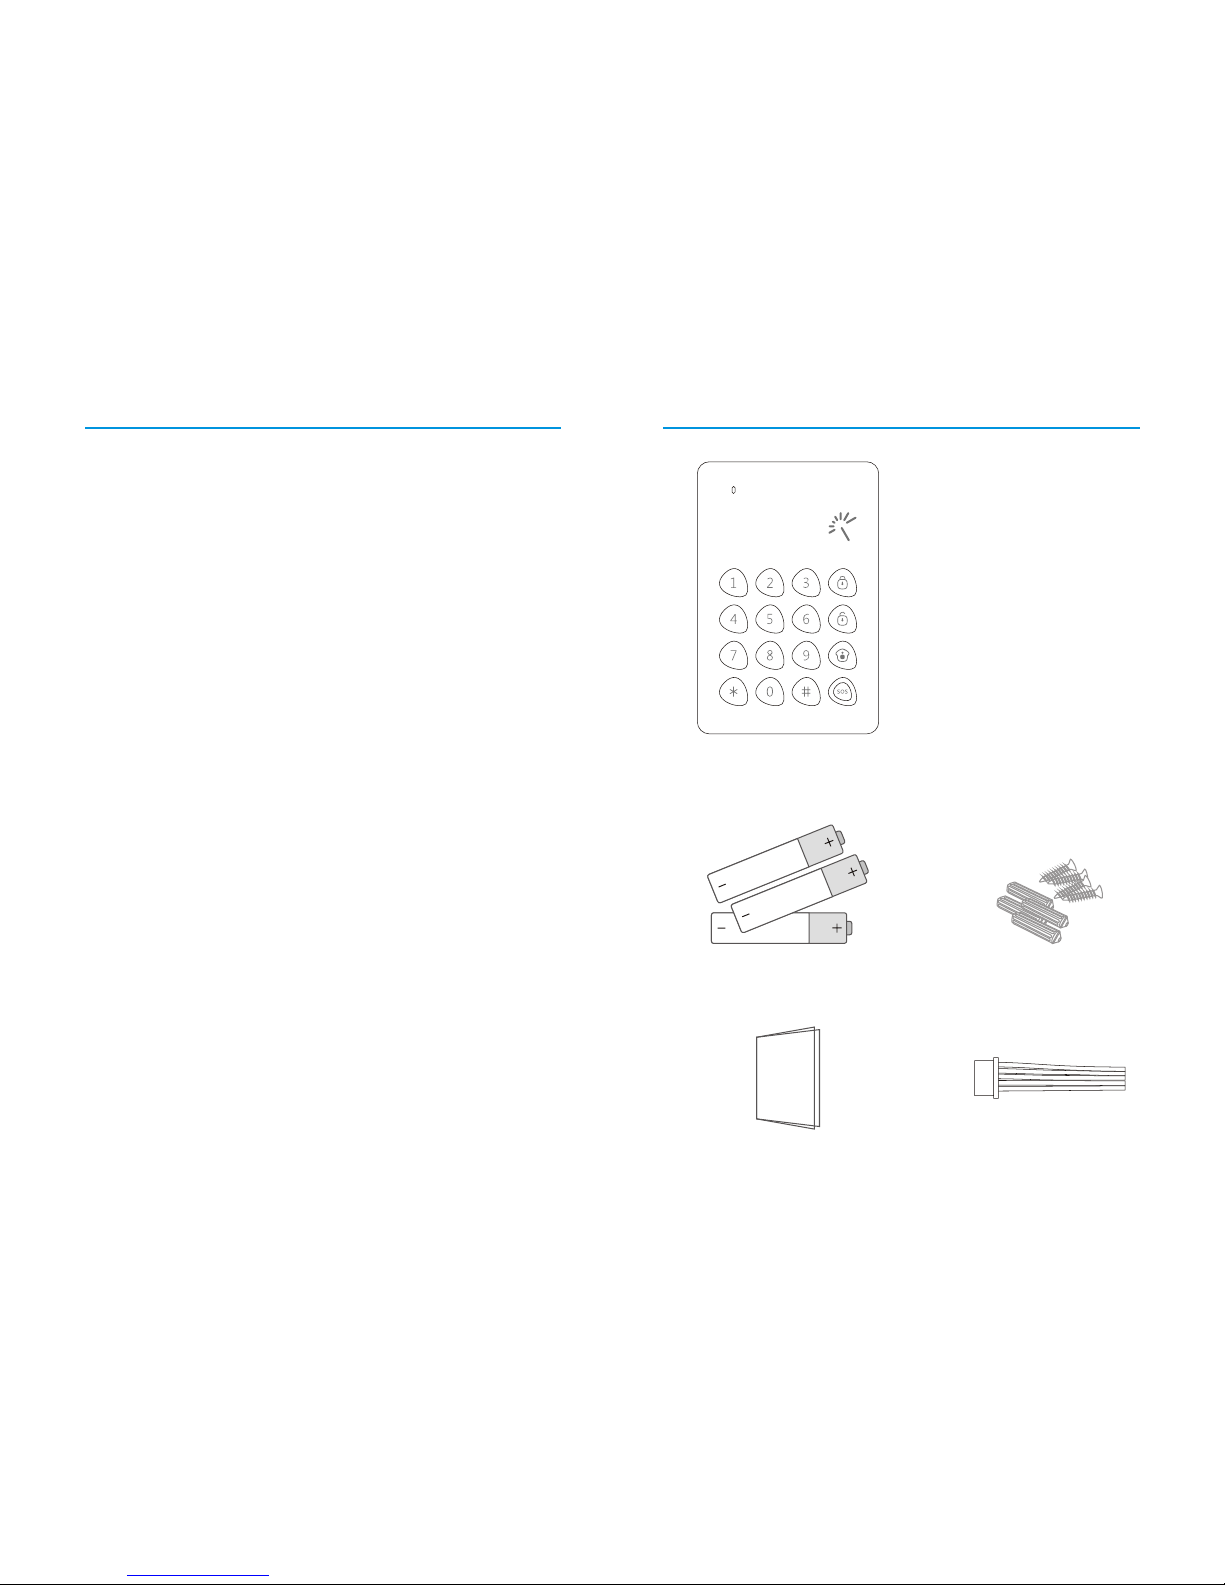
Parts List
Keypad x 1
AAA 1.5V battery x 3
Screw x 4
Manual x 1 Wired Cables x 1
Page 4
+
+
++ ++
++
AAA
3 4
RFID Tag
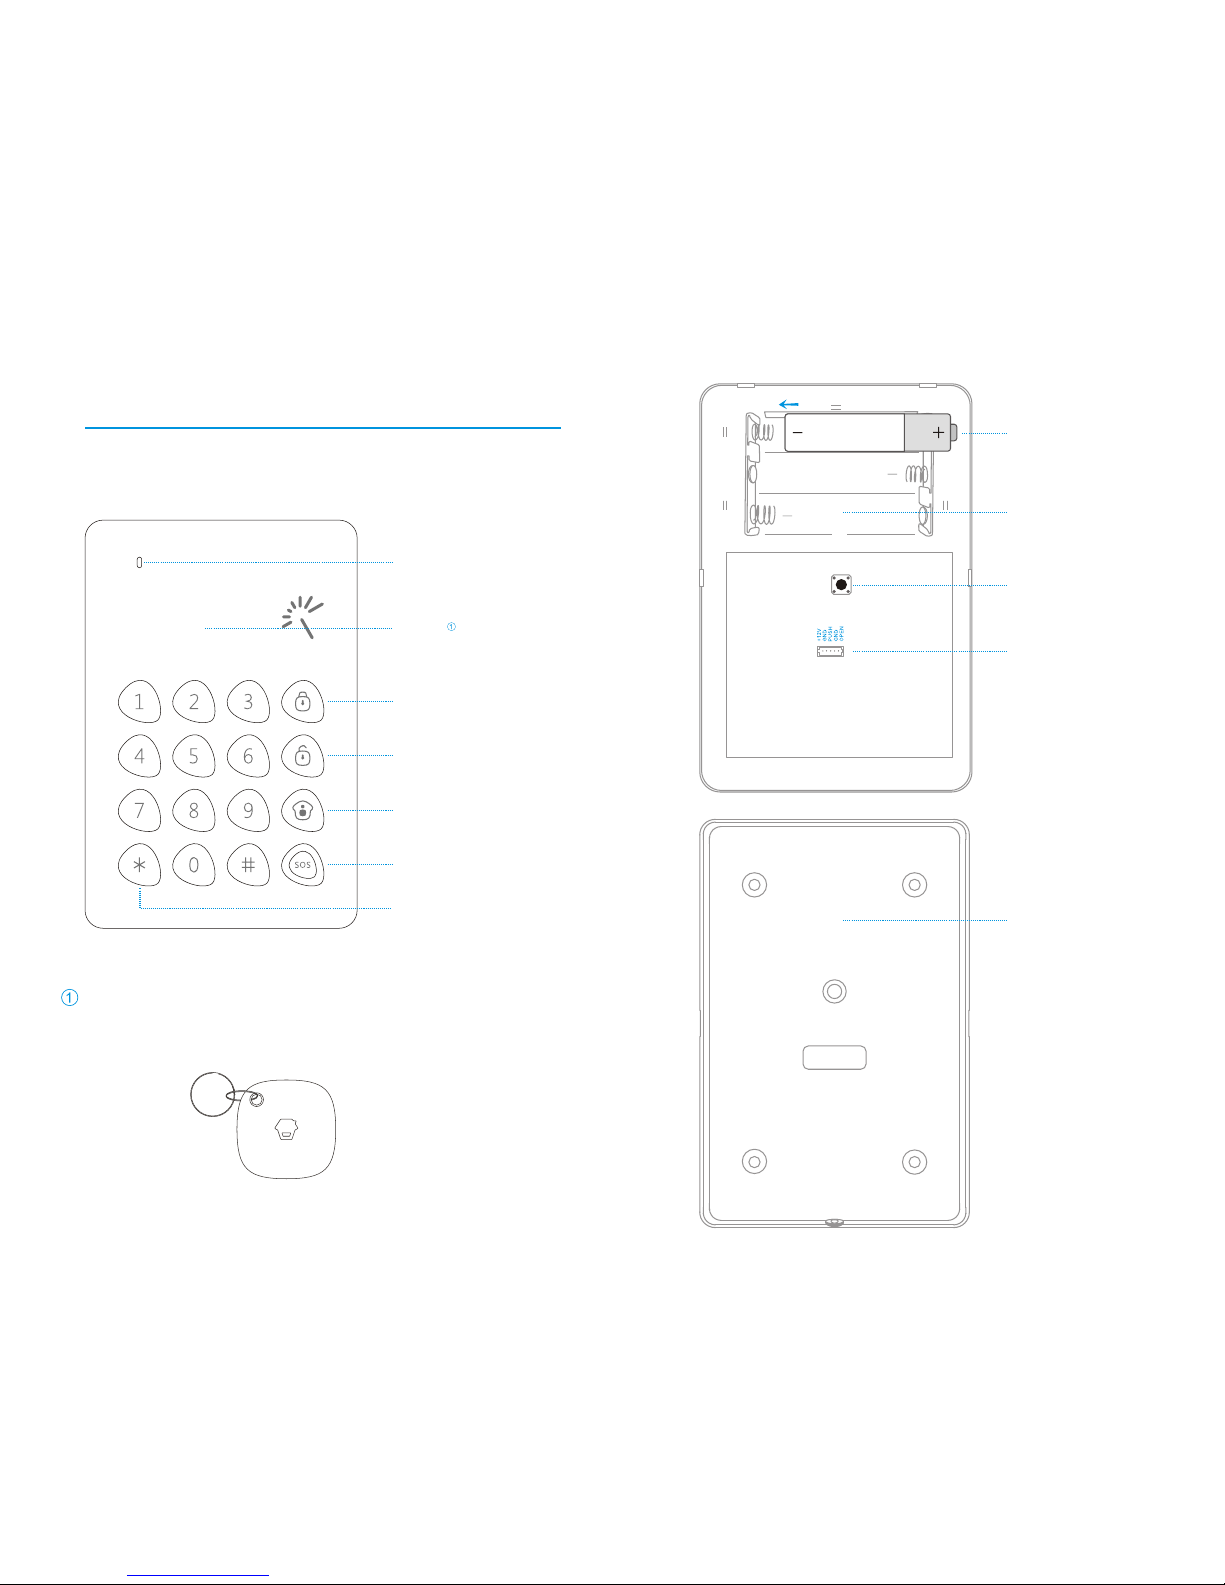
Appearance
LED Indicator
RFID reader
Arm
Disarm
Stay mode
SOS key
RFID wake-up key
RFID tag / card (125KHz) can be purchased separately.
Max. 50 pcs are supported.
Positive and
negative
terminals
for battery
Battery slot
Rear cover
Tamper Switch
Wired Cables
Interface
Page 5
1.
5 6
①
②
③
2.
AAA
+
+
1.
Preparation before Use
Power on
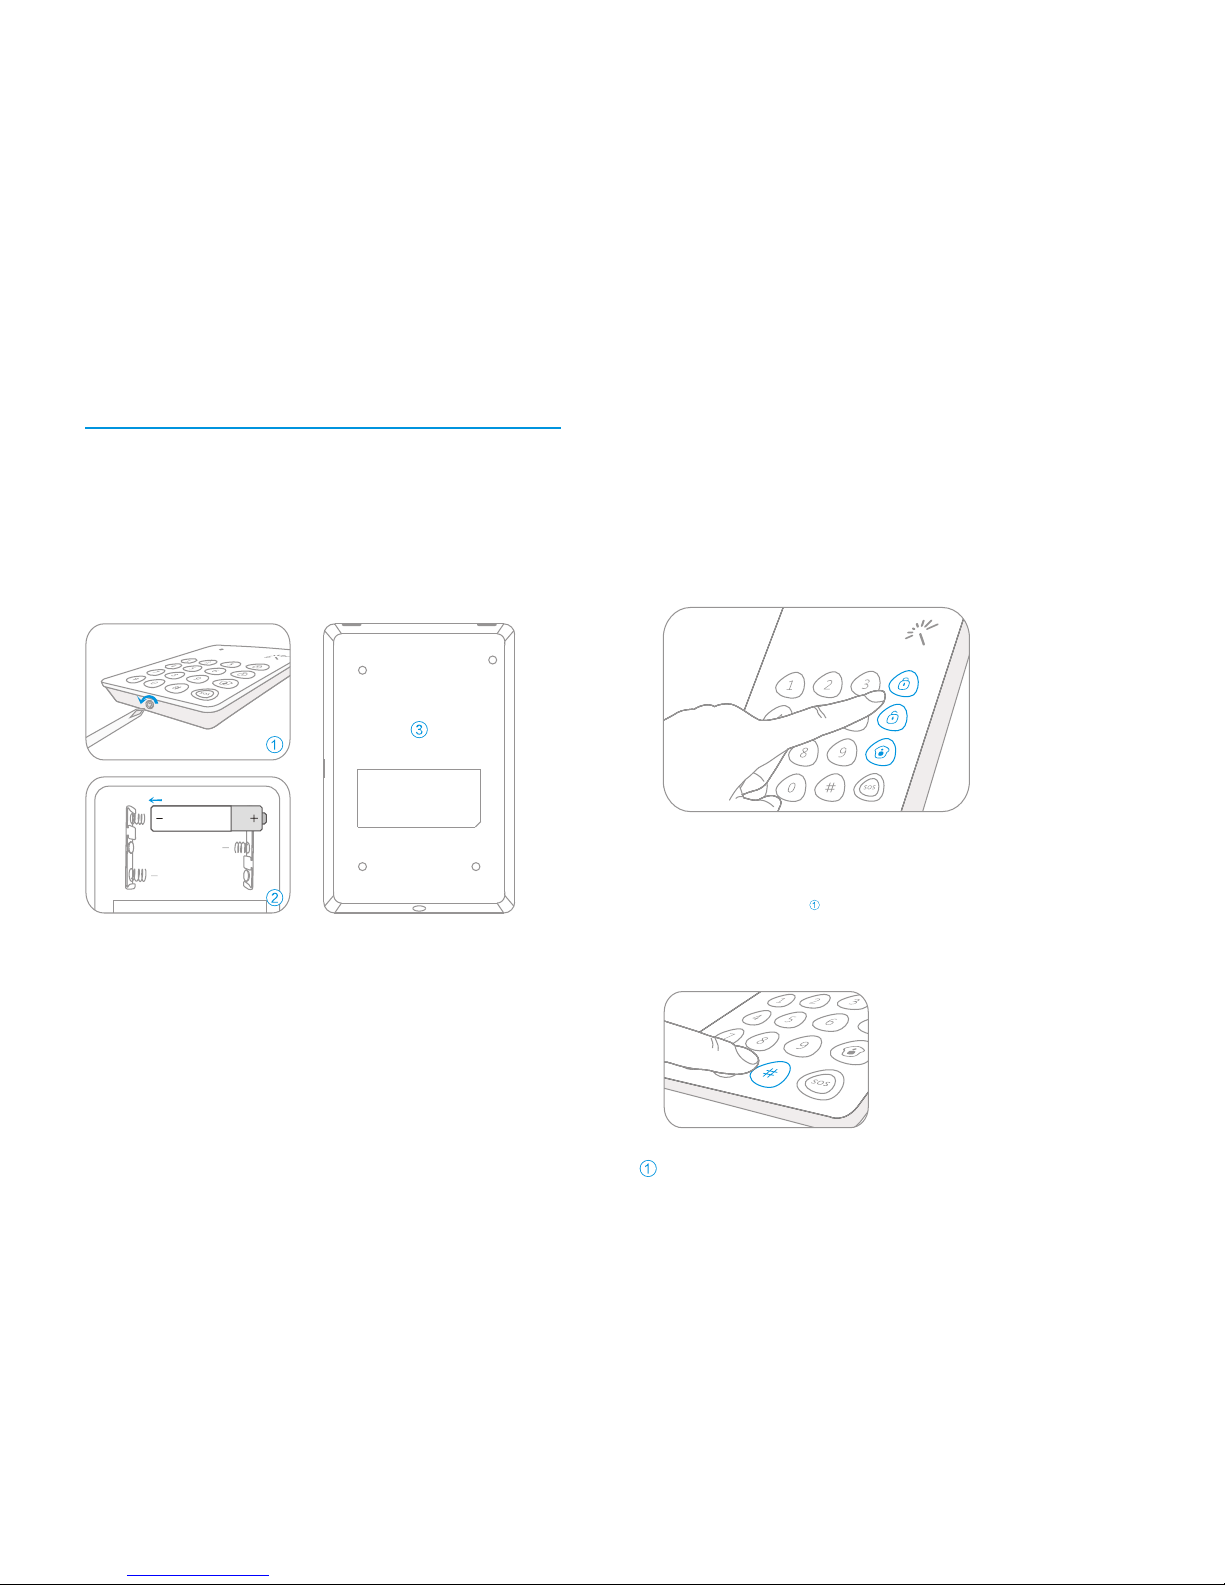
Keypad uses 3pcs of AAA batteries.
Loose the screw, open the case
Put in batteries according to the positive and negative signs
Close the rear cover and screw on
Remove the insulating strip for first time.
Note! Open the rear cover of keypa d will trigger tamper switc h, please
dismiss the alarm by following the disarm instruction in page 20.
When connected with electronic door lock as an access control,
keypad is suggested to use the specific power supply for access
control.
To know connection steps, please refer to the instruction manual of electronic
door lock. The electronic door lock and specific power supply for access control
should be purchased respectively.
Connect Keypad to Control Panel
Make sure the control panel is in connecting state, input user
code or admin code on keypad, and then press any key of
. The connection succeeds after
one beep.
[Arm] [Disarm] [Stay Mode]
User can remotely control the panel via the keypad after connection.
(To know connection steps, please consult the panel’s manual.)
Connect Keypad with RFID Tag
Input to wake up keypad.
Three beeps mean wrong input.
[admin code + #]
Wrong input for 6 times continuously, the keypad will be locked for 20 seconds.
Default admin code: 123456
Page 6
3.
2.
7 8
①
②
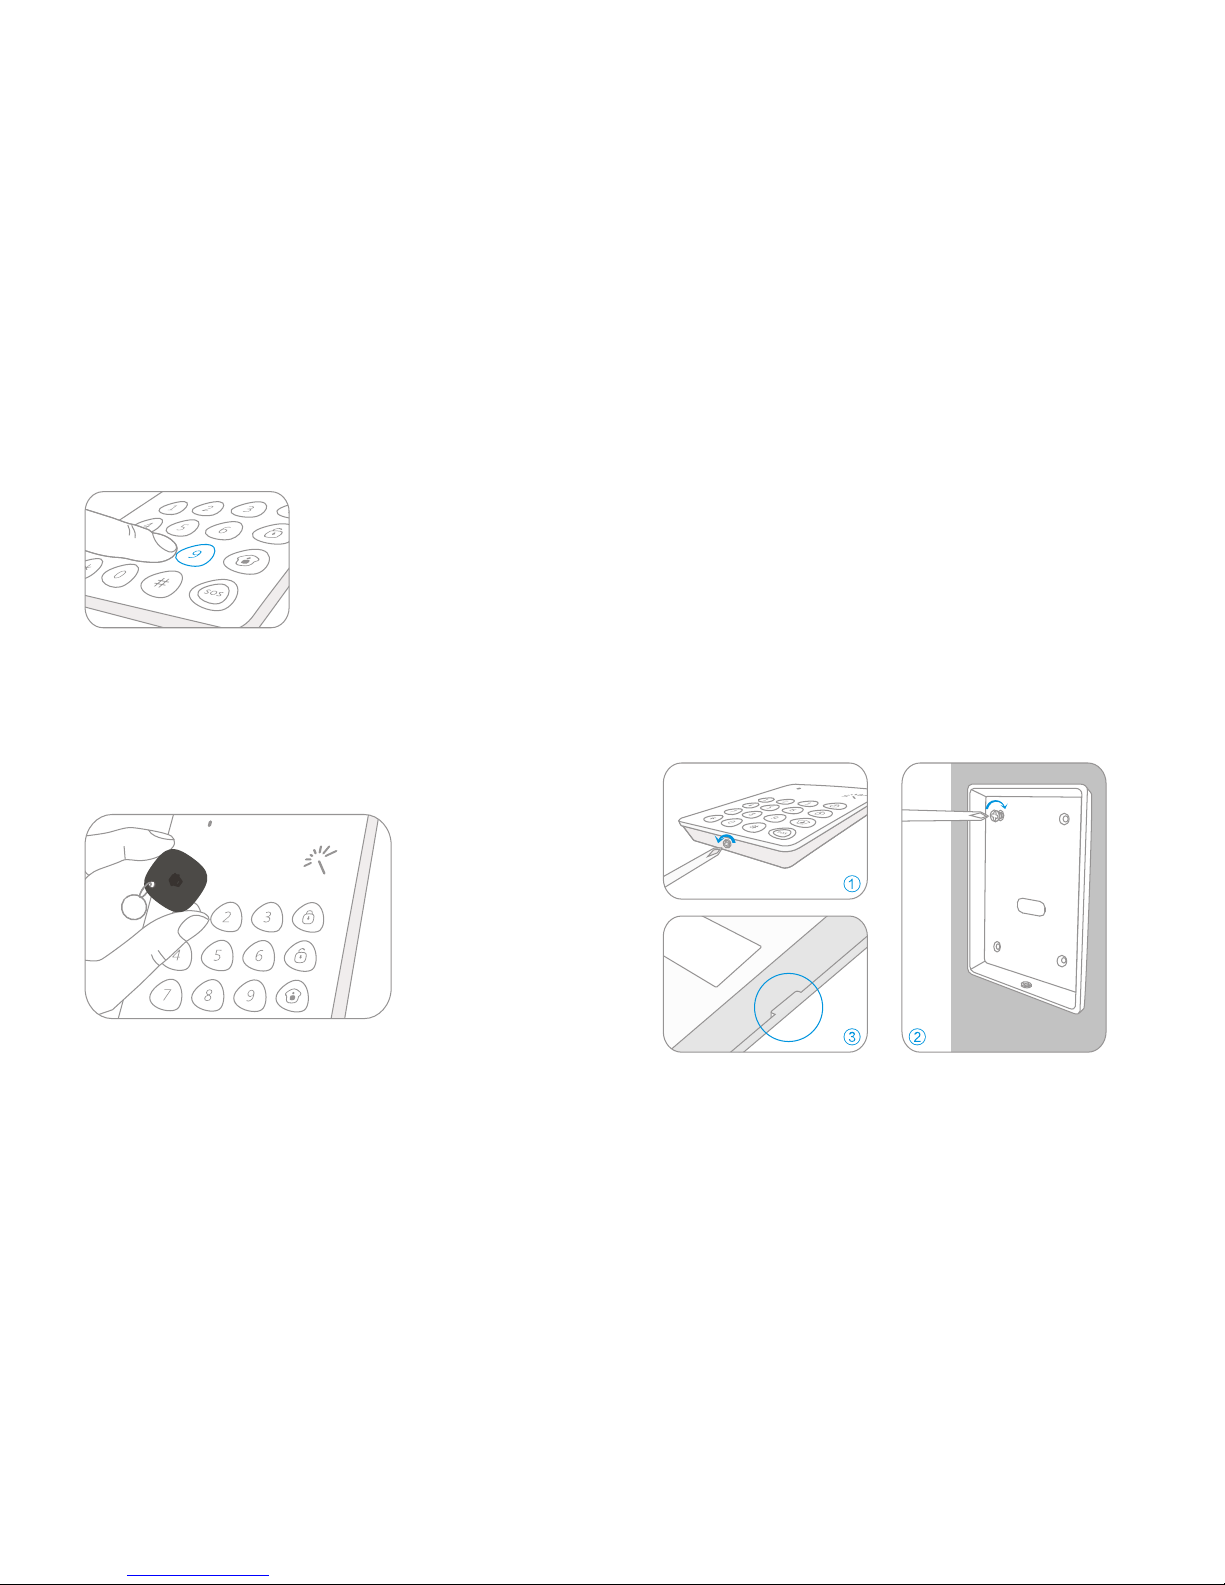
Press , one beep is heard and the LED indicator is on.
Keypad enters the learning state.
[9]
Put RFID tag close to the RFID reader, the connection
succeeds after one beep and the LED indicator goes out.
If two beeps are heard, it indicates the RFID tag has been connected before.
To clear the connection of RFID tags, input to wake up the
keypad and then press down for six seconds. RFID tags are all cleared after
one beep.
[admin code + #]
[9]
Connect Electronic Door Lock
To know connection steps, please refer to the instruction
manual of electronic door lock.
Installation
Fix the keypad on the door frame or the wall before use.
Loose the screw, open the case
Fix the rear cover on the door frame or the wall by screws
③
④
Fasten the front cover of keypad on the rear cover. Secure two
covers into place
Screw on
Note! Opening the rear cover of keypad will trigger tamper switch,
please disarm the alarm by following the disarm instruction in page 20.
Page 7
Input to wake up keypad.[admin code + #]
9 10
Settings
The keypad should enter setup state before all settings.
Enter Setup State
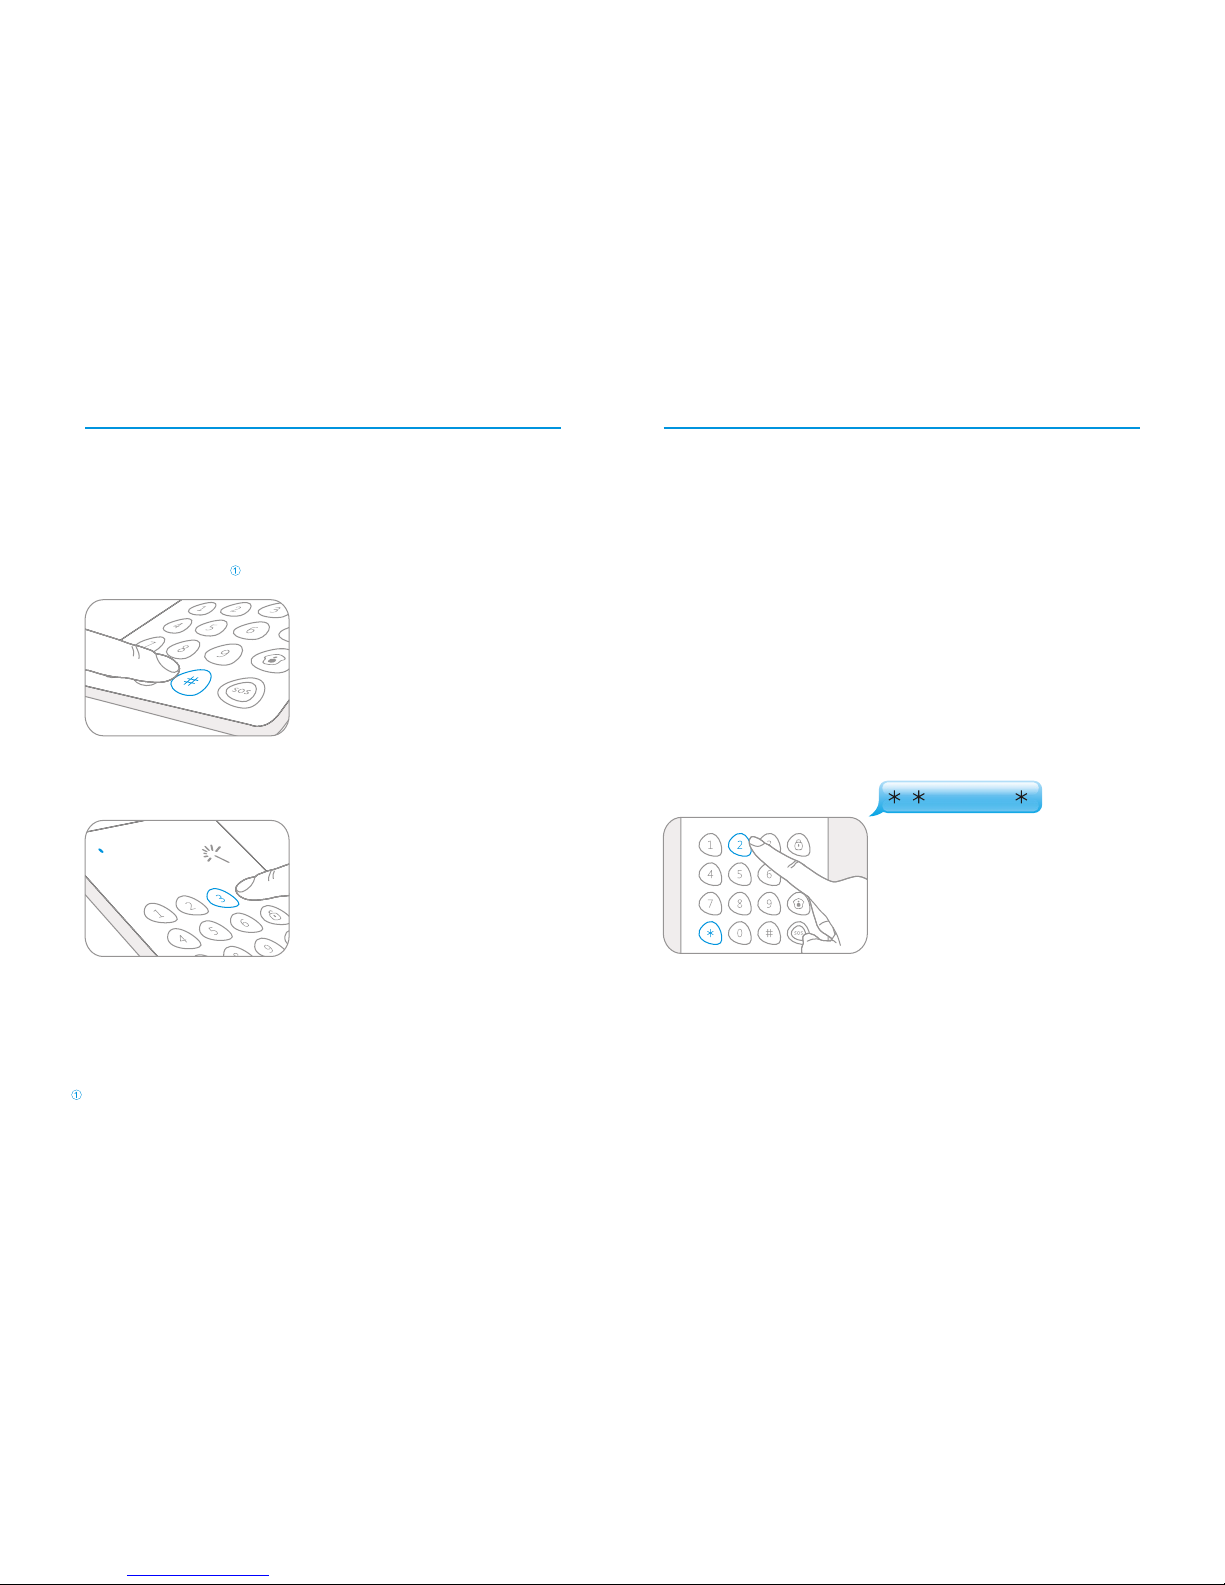
Press to enter setup state, the LED indicator is on. [3]
Under setup state, if there is no operation within 10 seconds, the keypad will
exit setup state automatically. You can also press to exit. [#]
Default admin code: 123456
Delay Arm
When the alarm system is armed, detectors will start working
immediately. At that time, if you still stay at home, it will
trigger an alarm. After setting delay arm, press on the
keypad, the arm signal will be sent to the control panel after
the set time.
[Arm]
This setting does not apply to Stay Mode.
If both control panel and keypad are set delay time respectively, the actual
delay time is the total of both times.
Delay Arm
Enter setup state, input:
When one beep is heard and the LED indicator keeps on for
10 seconds, the setup is successful.
Once the delay time is set, when you arm the keypad, it will beep once
every two seconds to remind you to leave. The reminding rhythm will
speed up in the last 15 seconds. After the delay time, the control panel
enters arm state.
Note! User can input digital 0-250 which refers to 0-250 seconds.
Default setting: 0, no delay.
2
delay time
Page 8
3 0
11 12
Speed SOS Dial
User can choose to enable or disable speed SOS dial. If speed
SOS dial is enabled, the control panel will alarm immediately
when user holds the key for 3 seconds. If it is disabled,
user needs to input user code or admin code before holding
the SOS key for 3 seconds. This function is to prevent false
operation or trick.
[SOS]
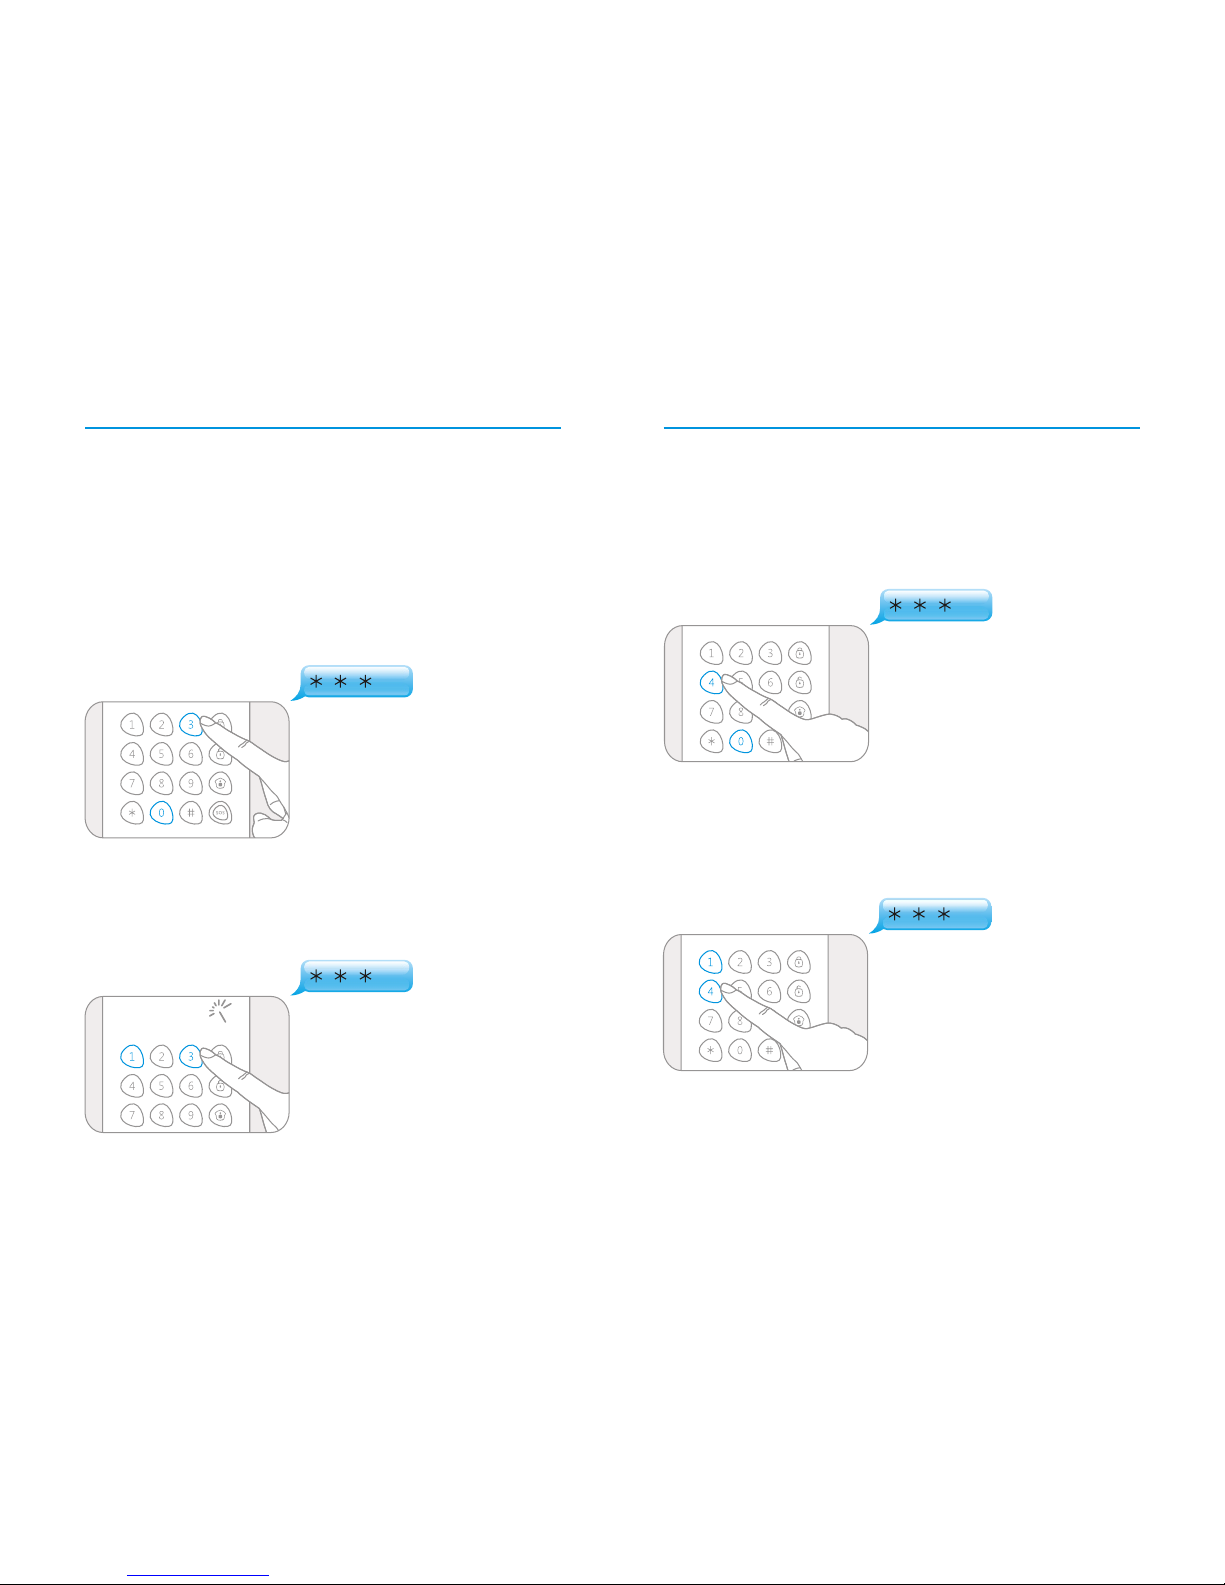
Disable Speed SOS Dial
Enter setup state, input:
When one beep is heard and the LED indicator keeps on for
10 seconds, the setup is successful.
Enable Speed SOS Dial
Enter setup state, input:
When one beep is heard and the LED indicator keeps on for
10 seconds, the setup is successful.
Note! Default setting: 0, speed SOS dial is disabled.
Keyboard Clicks
Keyboard clicks can be turned on or off.
If it is off, the successful setup tone will be closed too.
Turn off Keyboard Clicks
Enter setup state, input:
When one beep is heard and the LED indicator keeps on for
10 seconds, the setup is successful.
Turn on Keyboard Clicks
Enter setup state, input:
When one beep is heard and the LED indicator keeps on for
10 seconds, the setup is successful.
Note! Default setting: 1, turn on the keyboard clicks.
4 0
4 1
3 1
Page 9
1413
Disarm by RFID tag
User can enable or disable the function of disarming by RFID
tag, or disarming silently by RFID tag.
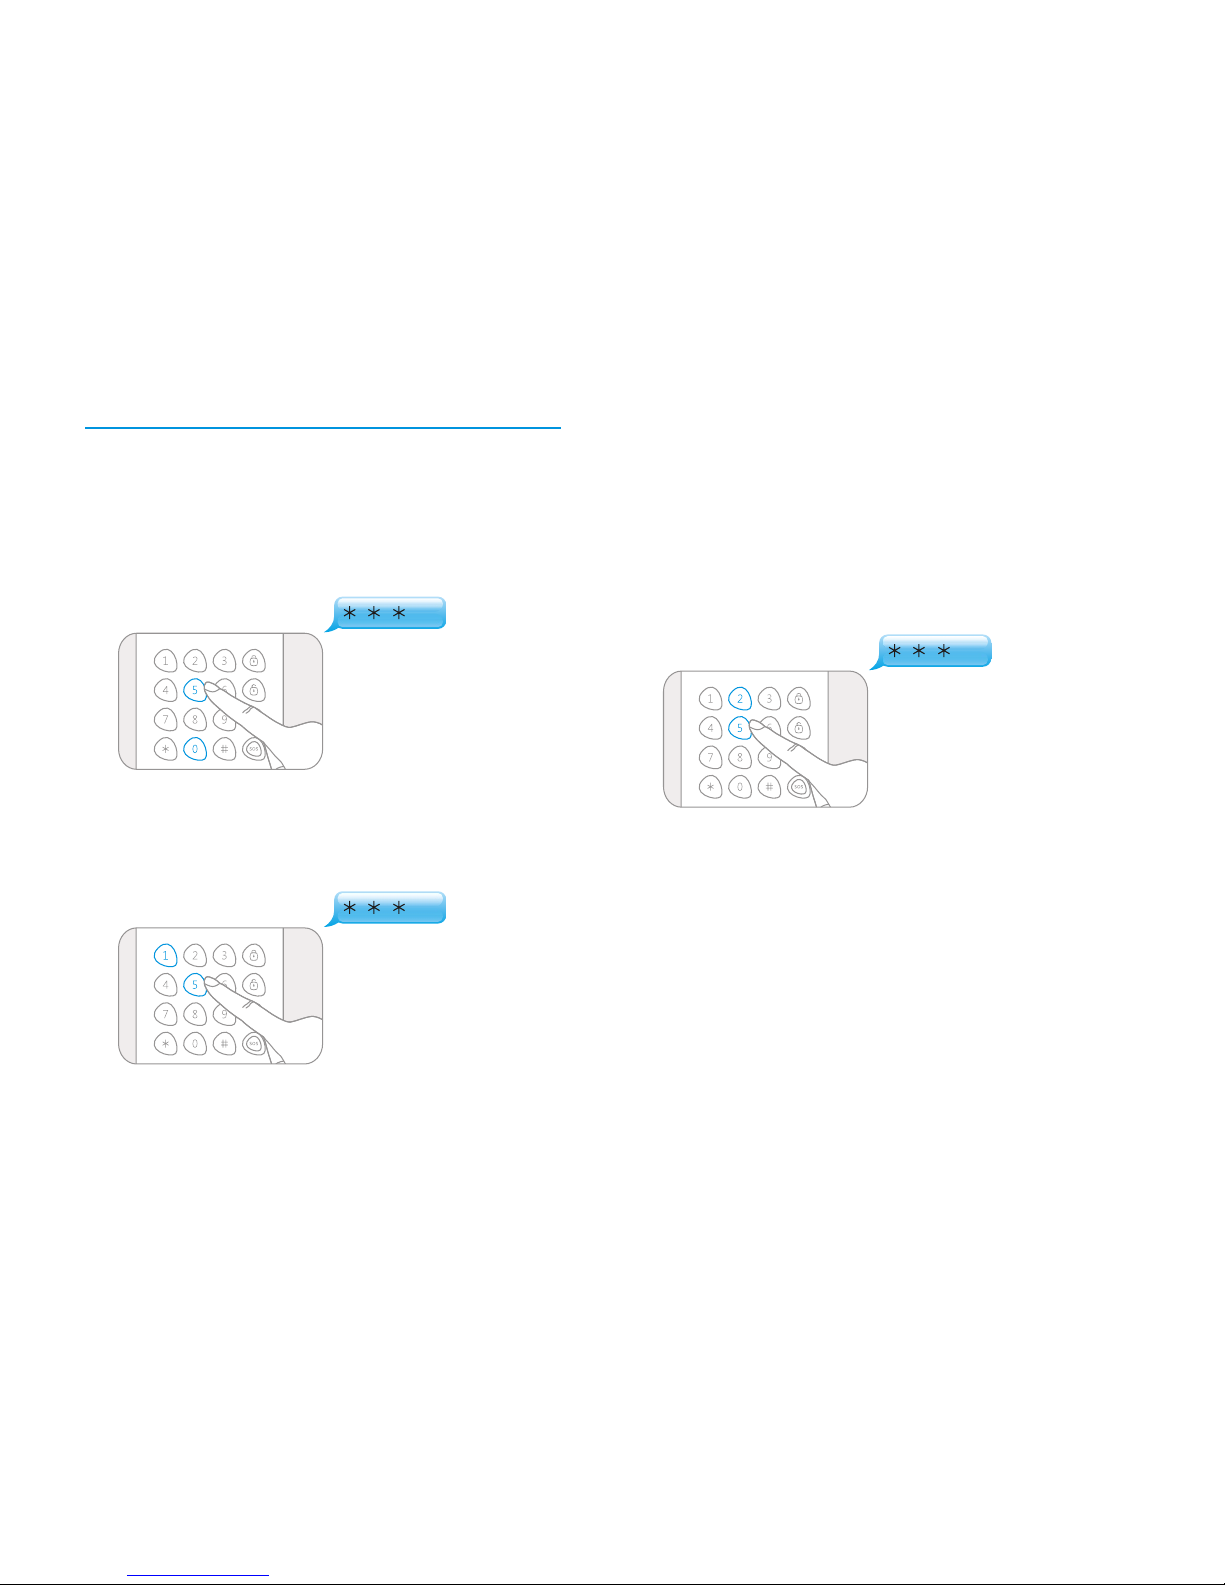
Enable Disarming by RFID Tag
Enter setup state, input:
When one beep is heard and the LED indicator keeps on for
10 seconds, the setup is successful.
Disable Disarming by RFID Tag
Enter setup state, input:
When one beep is heard and the LED indicator keeps on for
10 seconds, the setup is successful.
Disarming Silently by RFID Tag
The control panel and siren will hoot twice when disarming
by RFID tag. If set disarming silently by RFID tag, the control
panel and siren will keep silent to finish disarming without
disturbing neighborhood.
Enter setup state, input:
When one beep is heard and the LED indicator keeps on for
10 seconds, the setup is successful.
Note! Default setting: 1, turn on disarm by RFID tag and the siren will
hoot when disarming.
5 0
5 2
5 1
Page 10
16
15
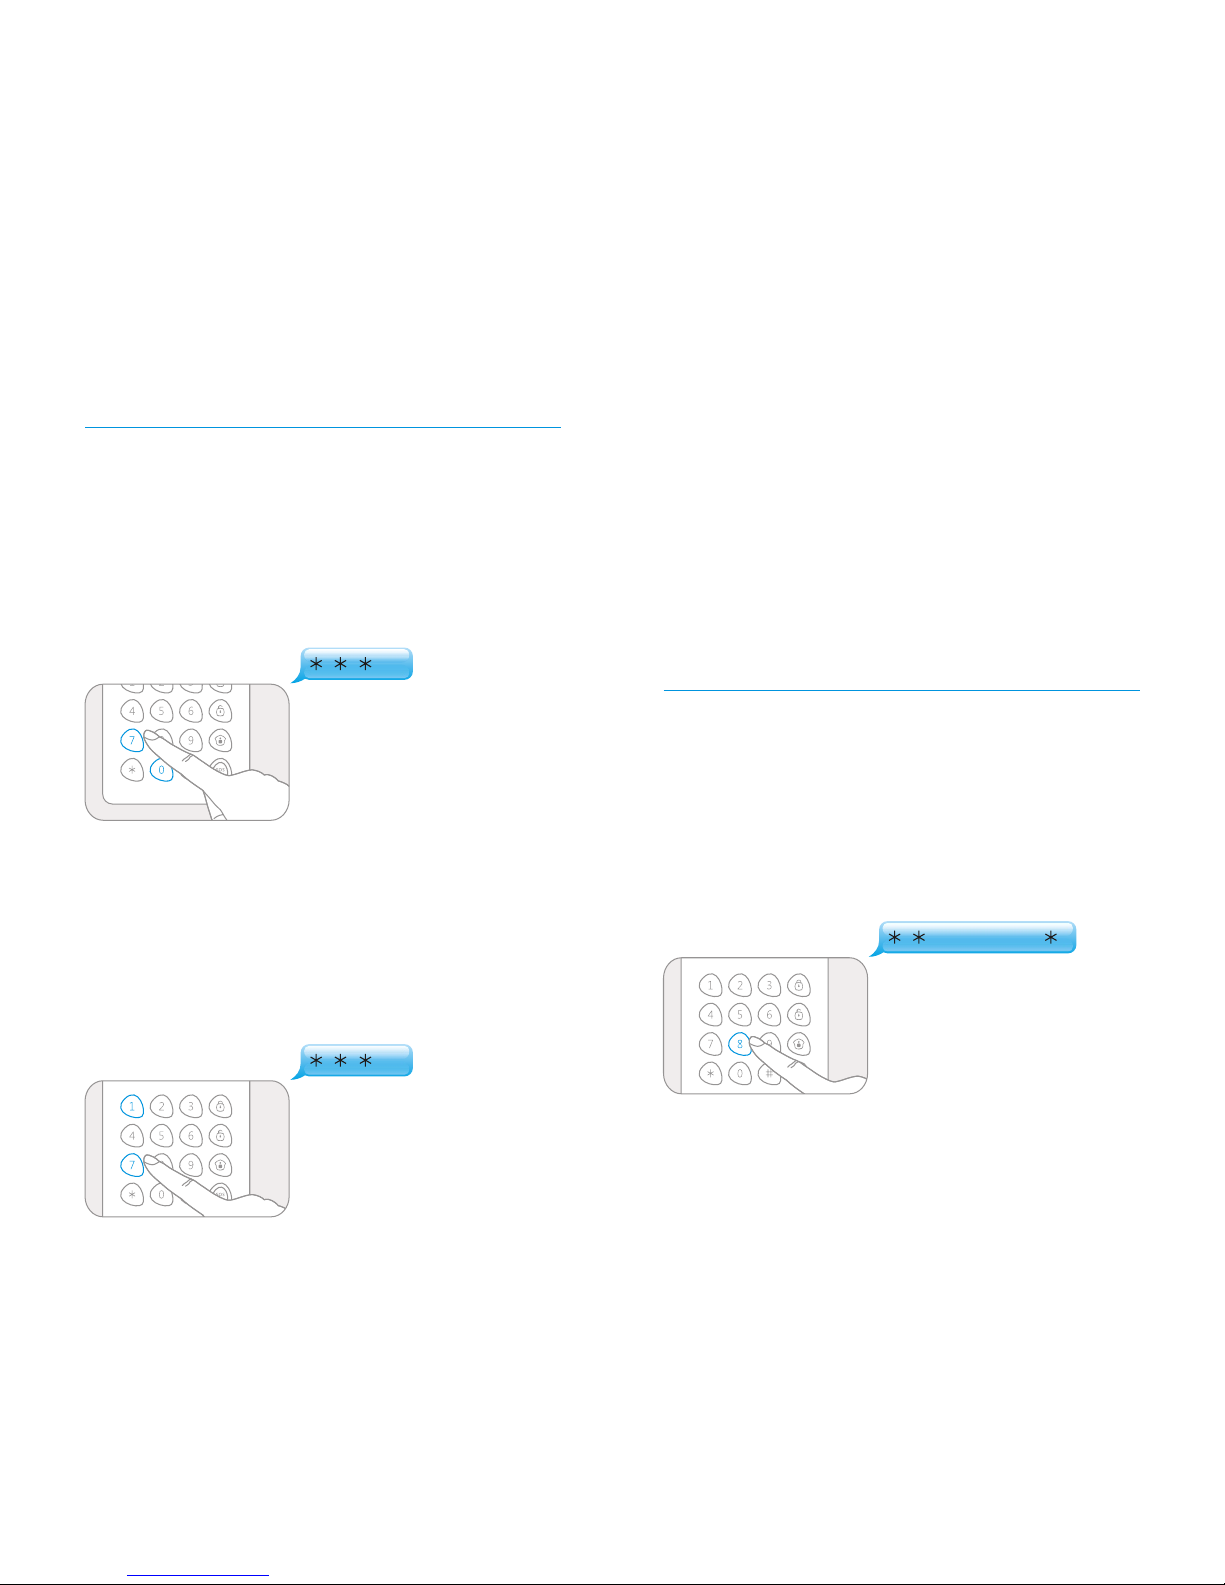
Power Saving Mode
If the keypad is powered by batteries, power saving mode is
recommended. In power saving mode, the keypad is in
sleeping status when standby, user needs to press to wake
up the keypad and then put RFID tag close to the reader to
disarm or unlock the door.
[*]
Turn on Power Saving Mode
Enter setup state, input:
When one beep is heard and the LED indicator keeps on for
10 seconds, the setup is successful.
Turn off Power Saving Mode
If the keypad is powered by DC 12V power, normal mode is
recommended. User can disarm the system by RFID tag
directly, which is more convenient.
Enter setup state, input:
When one beep is heard and the LED indicator keeps on for
10 seconds, the setup is successful.
Note! Default setting: 0, turn on power saving mode. User needs to
press [*] to wake up the keypad and then put RFID tag close to the
reader to disarm or unlock the door.
Change User Code
Using user code can wake up keypad, open electronic door
lock, or send Arm, Disarm, Stay Mode commands to the
control panel.
To avoid passcode reveal, please change user code when first time use.
Change User Code
Enter setup state, input:
When one beep is heard and the LED indicator keeps on for
10 seconds, the setup is successful.
Note! User code is 4 digits; default code is “1234”.
7 0
7 1
8
new user code
Page 11
1817
Change Admin Code
Using admin code can wake up keypad, send Arm, Disarm,
Stay Mode commands to the control panel, and also change
any settings of the keypad.
To avoid passcode reveal, please change admin code for first
time.
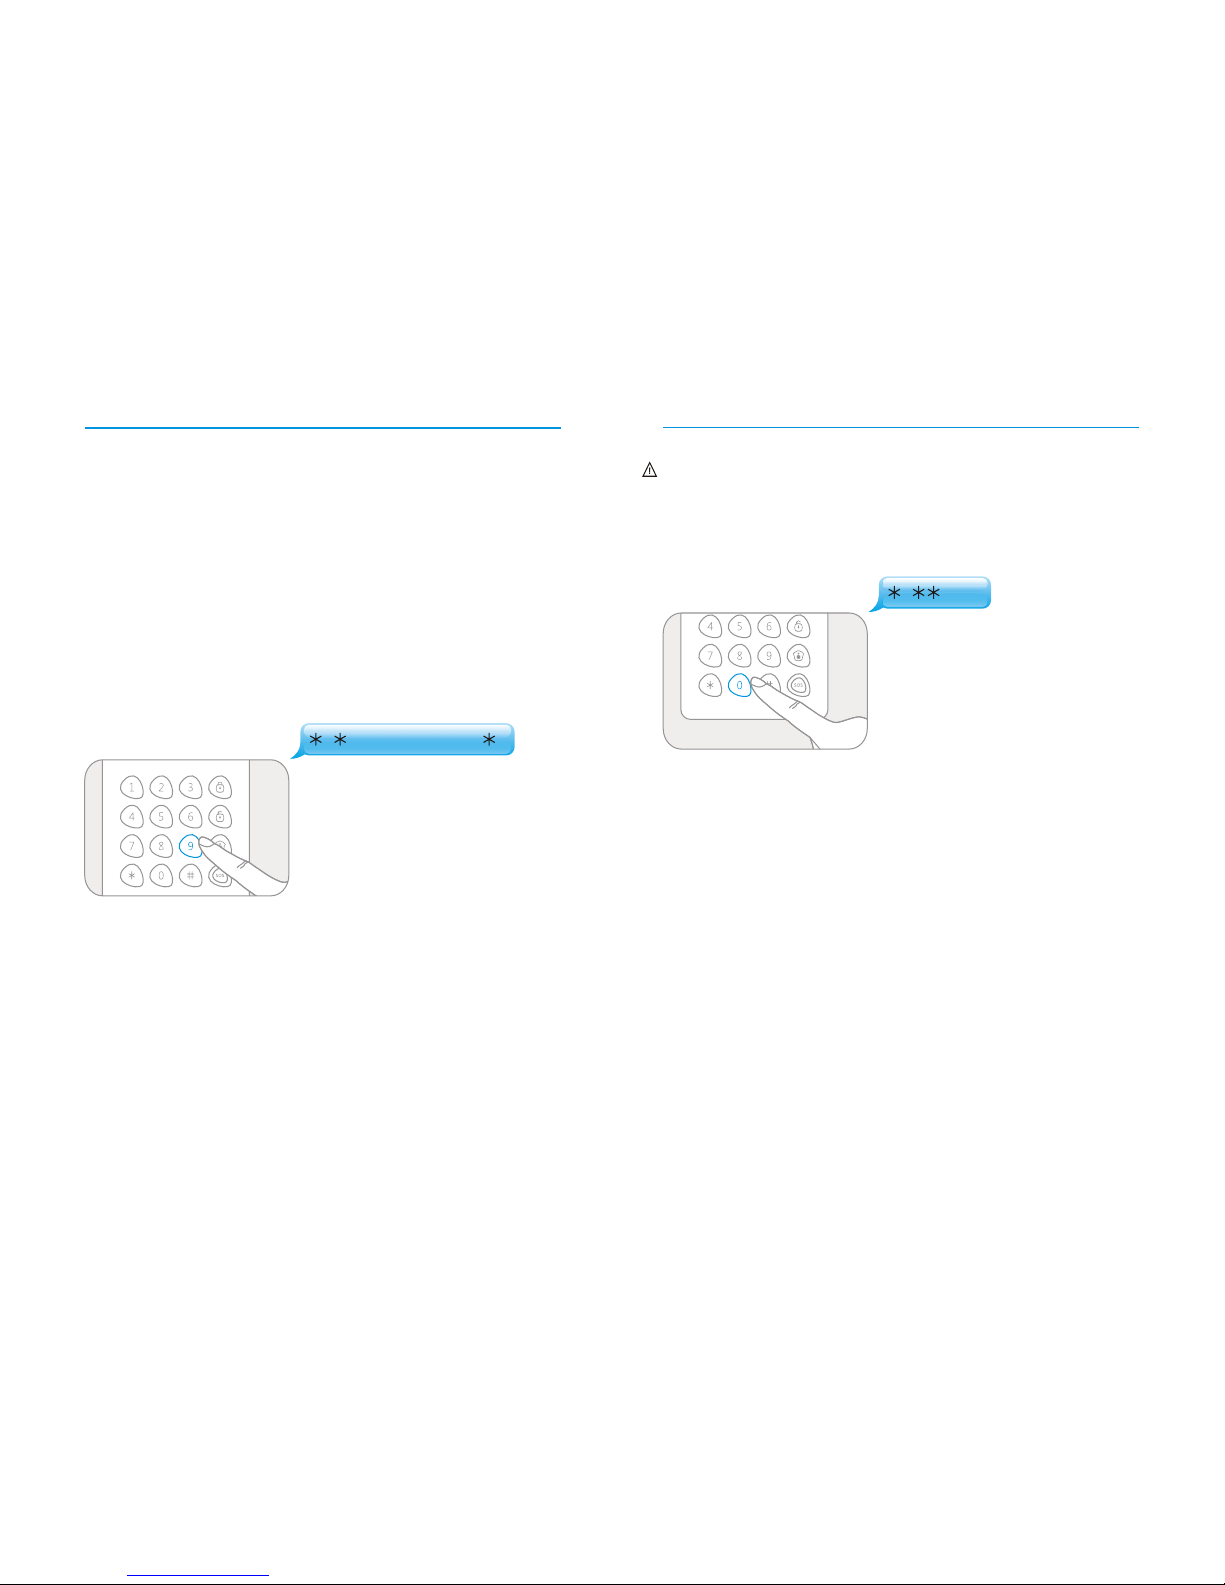
Change Admin Code
Enter setup state, input:
When one beep is heard and the LED indicator keeps on for
10 seconds, the setup is successful.
Note! Admin code is 6 digits; default code is “123456”.
Reset
After reset, the user code, admin code, and other settings will
restore to default except that the connected RFID tags can
still disarm and open electronic door lock.
Enter setup state, input:
When one beep is heard and the LED indicator keeps on for
10 seconds, the setup is successful.
0
9
new admin code
Page 12

20
19
Usage
The keypad can be used as a remote control. User code or
admin code should be input before the operation of Arm,
Disarm, Stay Mode, and Mute Mode.
Arm
When the alarm panel receives the signal, the siren will beep
once and the Arm indicator will light on. The alarm system
enters armed state.
If there is an intrusion, the alarm system will be triggered, the
siren will hoot and the control panel will send SMS and auto
dial to pre-stored phone numbers to notify users. (SMS
notification is applicable only for GSM alarm systems.)
Disarm
Users can disarm alarm system by using keypad or by using
RFID tags.
Using Keypad to Disarm
Input user code or admin code, and press key, the
LED indicator flashes once and the keypad beeps once and
sends Disarm command to the control panel.
[Disarm]
When the alarm panel receives the signal, the siren will beep
twice and the Disarm indicator will light on, the alarm system
enters disarmed state. In this state, the sensors being
triggered will not cause an alarm.
Using RFID Tag to Disarm
In power saving mode, user needs to press to wake up the
keypad and then put RFID tag close to the reader to disarm or
unlock the door.
In non power saving mode,
user can put RFID tag close
to the reader to disarm or
unlock the door directly.
[*]
Input user code or admin code, and press key, the
LED indicator flashes once and the keypad beeps once and
sends Arm command to the control panel.
[Arm]
Page 13
2221
Stay Mode
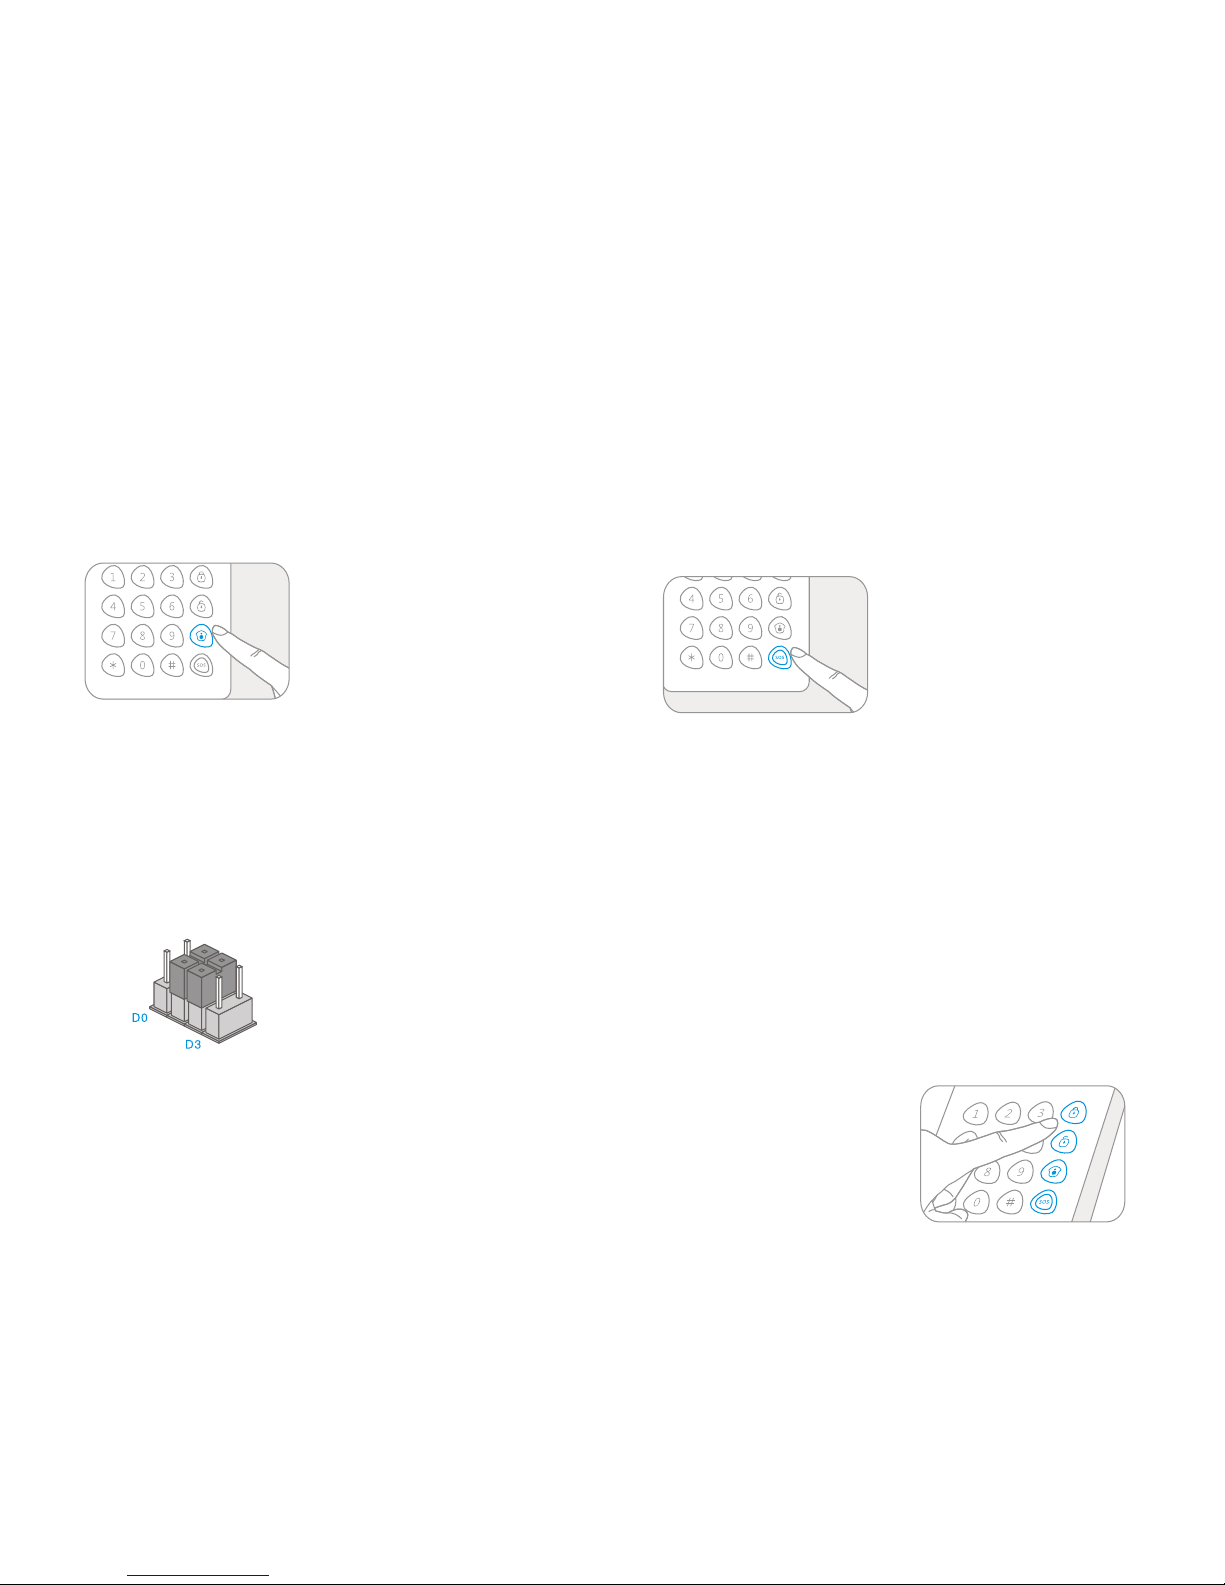
Input user code or admin code, and press key,
the LED indicator flashes once and the keypad beeps once
and sends Stay Mode command to the control panel.
[Stay Mode]
When the alarm panel receives the signal, the siren will beep
once and the Stay Mode indicator will light on, the alarm
system enters stay mode state.
All the sensors in other zones are armed to prevent the
intruder except that the motion detector in Home Mode Zone
is disarmed, so that people can move freely at home.
Home Mode Zone
(Jumpers setting for accessories)
Emergency Call
When the keypad is in Speed SOS Dial mode, user just holds
the key for 3 seconds, the LED indicator flashes once,
the keypad beeps once, and the control panel alarms
immediately.
[SOS]
When the keypad is not in Speed SOS Dial mode, user needs
to input user code or admin code before holding the
key for 3 seconds to send an alarm.
[SOS]
Mute Mode
Mute mode means that the LED indicators of control panel
flash, but the siren does not beep, to avoid disturbing the
neighborhood.
Input user code or admin code, and hold any key of
for 2 seconds, the LED indicator
flashes once, the keypad beeps once and sends
corresponding command to the control panel.
[Arm]
[Disarm] [Stay Mode]
When the alarm panel receives
the signal, the LED indicator
lights on or off, but the siren
does not beep.
Page 14

24
23
Care and Maintenance
In order to avoid any harm to the users or others during
usage and prolong the usage life, please abide by the
following notices.
Maintenance
You can get most dust or fingerprint off with a dry, sof t cloth
or tissue. If there is dirt on the keypad, please wipe the
surface by a soft cloth with a little dilute alkaline detergent
and then wipe again with a dry cloth.
Problem
FAQ
Cause
Solution
No response
from keypad
Low bat ter y
The pos itiv e and
negat ive te rminals
are reve rsed
Keypad is lock ed by
input ting w rong
passc ode co ntinually
more than 6 time s
Pleas e chan ge the batter y
Follo w the ri ght termina l direc tion and
iner t the batter y again
Keypad will be u nloc ked af ter
non-o pera tion for 20 sec onds
Keypad
cannot
connect to
control panel
No response fro m
alarm p anel
Alarm p anel b eeps
twice
Make su re the al arm panel is
powere d on
Make su re the al arm panel ent ers
learn ing st ate
Keypad has bee n learned
No response
from the
control panel
by operating
on keypad
Keypad is not le arned
to cont rol pan el
Dista nce be tween
keypa d and co ntrol
panel i s too fa r
Pleas e conn ect the keypa d to the
contro l pane l by fol lowing the ma nual
instr ucti on
Pleas e move t he keypad in a pro per
dista nce wh ere con trol panel can
receive the si gnal of k eypad
It’s recommende d to buy signal
repeater to ex tend the distance
Cannot
disarm by
RFID Tags
The RFI D tags a re not
learn ed to ke ypad
Disar m by RFI D tag
funct ion is d eactivate d.
Keypad is in pow er
savin g mode
Pleas e conn ect the RFID ta g to
contro l pane l by fol lowing the
manua l inst ruction
Enter s etup s tate and acti vate t he
funct ion of di sarm by RFID ta g
Disar m after pressing [* ] key
Keypad
cannot be
programmed
Keypad is not wa ked
up
Keypad doesn ’t ent er
setup s tate
Pleas e inpu t [admin code +#] to w ake
up the ke ypad
Pleas e inpu t [admin code +#], a nd
press [3] to ent er set up state
Keypad
cannot be
armed,
disarmed and
in stay mode
Haven't input us er
code or a dmin c ode
before o pera tion
Pleas e inpu t the user code o r admi n
code be fore op eration
Usage Notices
The keypad should be co nnec ted to co ntrol pa nel be fore us e.
The pow er supply of key pad wil l probably impa ct on the tran smitting di stan ce
of wirel ess si gnal.
The keypad can be powere d by 3 pcs of A AA batterie s, or wired by DC 12V.
The keypad is compati ble for any our a larm system .
Pleas e remove the batter y insulating stri p before use.
Do not pre ss SOS key if the re's no emergency to avoid distu rbin g the
neigh borh ood.
Check t he keypa d regu larly to ensure the sy stem wo rks pro perl y in case of
emerg ency.
The keypad is neither w aterproof no r moisture- proof, ple ase install i t in a
shady, cool and d ry pl ace.
The cas e of keypa d is made of ABS. Please ke ep it aw ay from s trong light to
ensure t he lifetim e.
The keypad is non explosion-proof. Please keep it away from fire, flame sources.
Insta ll the ke ypad aw ay from objec ts such as heate r, air conditioner,
micro wave ov en etc. t hat pro duce s heat or elect ric-magne tic.
Take the keypad for dis posal of recyc ling according to th e local regulation.
Do not ta ke apar t the pro duct if you are n ot a prof essional te chnician.
General instruction
Forbiddance
Forbiddance of decomposition
Page 15

26
25
Instructions of Wired Cables
Interface (from Left to Right)
+12V (RED WIRE):
GND (BLACK WIRE):
PUSH (YELLOW WIRE):
GND (WHITE WIRE):
OPEN (GREEN WIRE):
Positive of power
Negative of power
Signal output for electronic lock
Negative of power
Signal input for exit switch
Technical Specifications
Product Name:
Model No.:
Power Supply:
Static Current:
Transmitting Current:
RFID Tags Supported:
Transmitting Distance:
Radio Frequency:
Housing Material:
Operating Temperature:
Relative Humidity:
Dimensions:
Net Weight:
Keypad
KP-700
3 pcs of AAA batteries or DC 12V
3uA (powered by batteries)
10mA
50pcs
80m ( in open area)
315MHz or 433MHz
ABS plastic
-10℃~55℃
80%RH (non-condensing)
135 x 90 x 15mm
90g
≤
≤
≤
≤
 Loading...