

Chuango H4 PLUS User Manual

H4 PLUS
GSM/WiFi Smart Home System
User Manual
Printed in China
PA: H4 Plus-UM-EN-V1.0
© 2017 Chuango. All Rights Reserved.

Contents
Things to Note before Getting Started -------------------------------------------------------------- 1
In the Box ------------------------------------------------------------------------------------------- 2
How the Alarm System Works ---------------------------------------------------------------------- 3
Getting to Know Your System -------------------------------------------------------------------4~10
Hub ------------------------------------------------------------------------------------------- 5~6
Remote Control ---------------------------------------------------------------------------------- 7
Door/Window Sensor ---------------------------------------------------------------------------- 8
Pet-immune PIR Motion Detector ------------------------------------------------------------9~10
Getting Started ---------------------------------------------------------------------------------11~15
Downloading App -------------------------------------------------------------------------------11
Signing Up/In ------------------------------------------------------------------------------------11
Adding Device -------------------------------------------------------------------------------11~15
Account Management -------------------------------------------------------------------------16~18
Editing Your Account -----------------------------------------------------------------------------16
My Devices ---------------------------------------------------------------------------------------16
My Shares ------------------------------------------------------------------------------------17~18
App Control -----------------------------------------------------------------------------------18~20
System Statuses ----------------------------------------------------------------------------------19
Quick Switch between Alarm and Cameras ------------------------------------------------------20
History -------------------------------------------------------------------------------------------- 20
Settings ----------------------------------------------------------------------------------------21~29
My Hub --------------------------------------------------------------------------------------21~22
Notications -------------------------------------------------------------------------------------23
Accessory Settings ---------------------------------------------------------------------------24~25
Wireless Siren (sold separately) ------------------------------------------------------------------26
Auto Arm / Disarm -------------------------------------------------------------------------------27
Delay Settings --------------------------------------------------------------------------------27~28
Time Settings ------------------------------------------------------------------------------------28
Others -------------------------------------------------------------------------------------------29
Remote Phone Operation --------------------------------------------------------------------------30
Key Commands ----------------------------------------------------------------------------------30
Installation -------------------------------------------------------------------------------------31~34
Hub ----------------------------------------------------------------------------------------------31
Door/Window Sensor ----------------------------------------------------------------------------32
PIR Motion Detector -------------------------------------------------------------------------33~34
Restoring to Factory Settings-----------------------------------------------------------------------34
Specications --------------------------------------------------------------------------------------35
Hub ----------------------------------------------------------------------------------------------35
Remote Control ----------------------------------------------------------------------------------35
Door/ Window Sensor ----------------------------------------------------------------------------36
PIR Motion Detectorr -----------------------------------------------------------------------------36
Disclaimer
This manual has been reviewed thoroughly and designed to ensure that your product
setup will be quick and easy with our easy to follow guide. All statements, technical
information and recommendations in this manual are believed to be reliable, but the
accuracy and completeness thereof are not guaranteed or warranted.
The specications and information regarding the products in this document are subject
to change without further notice.
Photocopy, copy, reproduction, translation to any language, modication, storage in a
retrieval system or retransmission, in any form or by any means, electronic, mechanical
or otherwise, is strictly prohibited without written permission.
In no event we are liable for any indirect, special, incidental or consequential damages,
including, without limitation, monetary loss or data loss arising out of the use or
inability to use this document, even if the product has been advised of the possibility
of such damages.
Foreword
Thank you for choosing this alarm system. The H4 Plus is a self-monitored system
designed to actively involve users in their home security. We aim to provide a safe,
easy & cost effective solution for you to protect your home & loved ones 24/7/365.
We recommend you to take some time and familiarize yourself with the device and its
accessories before installation.

01 02
Things to Note before Getting Started
WiFi Network Connection
- One critical factor affecting the performance of your hub is the relative position/
distance of your home WiFi router and the hub. Place your hub in an open area (DO
NOT place it directly on the oor); the closer the hub is to the router, the stronger the
WiFi signal.
- A slow network speed will also affect the performance of your hub. It is
recommended that you have an upload speed of at least 2Mbps or faster.
- Please be sure to connect your hub to WiFi using the 2.4GHz band as this provides
longer range, and better reception through walls. The hub does not support the 5GHz
option. Selecting the 5GHz band instead of the 2.4GHz band is the most common
mistake when setting up the hub for the rst time.
For more information about your network quality, we recommend www.speedtest.net
or the speedtest app by Ookla.
Your WiFi Network and Password
- Check for your WiFi network’s name and password and write them down for easy
reference. The WiFi network name is commonly referred to as the SSID. The password
or security ID is normally the next line or two down from the WiFi/SSID network name.
Unless you’ve changed your network’s name and password, you can usually nd them
printed on the side of your router box, for example:
- WiFi/SSID Network Name: XXXX
- WiFi/SSID Network Password/Security Key: XXXXX
System Requirements
-iOS 8.0 or later with iPhone 5 or later
-Android 5.0 or later
In the Box
Smart Hub x1 Pet-immune PIR Motion
Detector x 1
Door/Window Sensor
x 2
Remote Control x 2
AC Adapter x 1
Hub Bracket x 1
PIR Motion Detector
Bracket x 1
Double-sided Tap
for Door/Window
Sensor x 4
Quick Guide
03 04
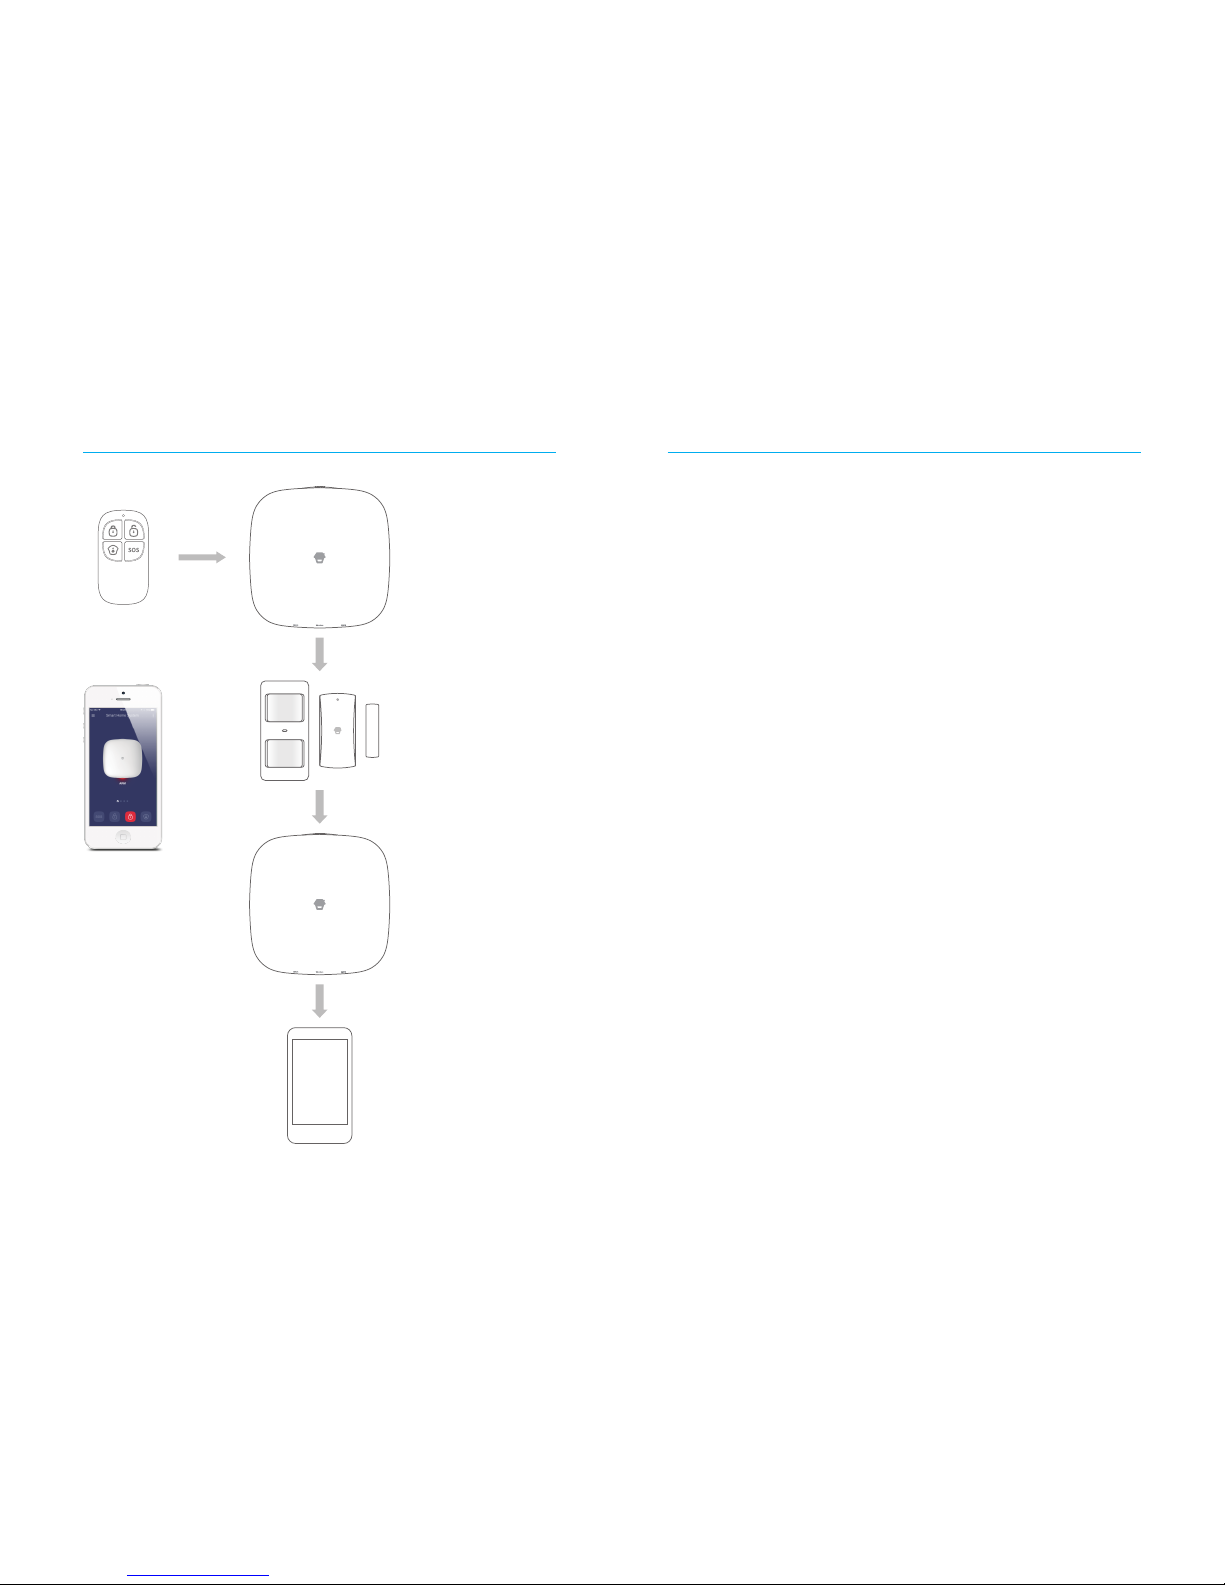
How the Alarm System Works
Arm the system
using the remote
control or the App.
The Hub receives the
command and enters
“Armed” mode.
When a Door/Window
Sensor detects a door/
window opening, the sensor
sends a signal to the Hub
letting the Hub know there
has been an intrusion.
The Hub sends a push notication
and text message to your phone.
You will also receive an email
when a sensor is triggered if you
enable the notication function
located in your app settings. After
that the hub will also make phone
calls to each pre-set phone
numbers.
The Hub sounds at 93dB
on-site.
The Hub is set to Arm
Mode (The red Status
Indicator is on) .
Getting to Know Your System
This is a dual network system that utilizes both WiFi and GRPS. When the WiFi is
in use, the GRPS network will be in standby status (make sure the GPRS function is
activated from “Settings“- ”My Hub“-”GPRS“) ,In the event of AC power loss or WiFi
disconnection, the GRPS network will be implemented until power or WiFi connection
is reestablished.
All sensors are wirelessly linked to the hub. In the event of alarm activation, for
example, when a sensor is triggered, a push notication will automatically be sent and
an alarm call will be made to all registered users.
The system can be controlled and monitored both on-site by using the remote control
supplied or remotely from anywhere in the world with our free dedicated mobile
application.
The system can be expanded to include up to 50 wireless sensors and 10 remote
controls.
05 06
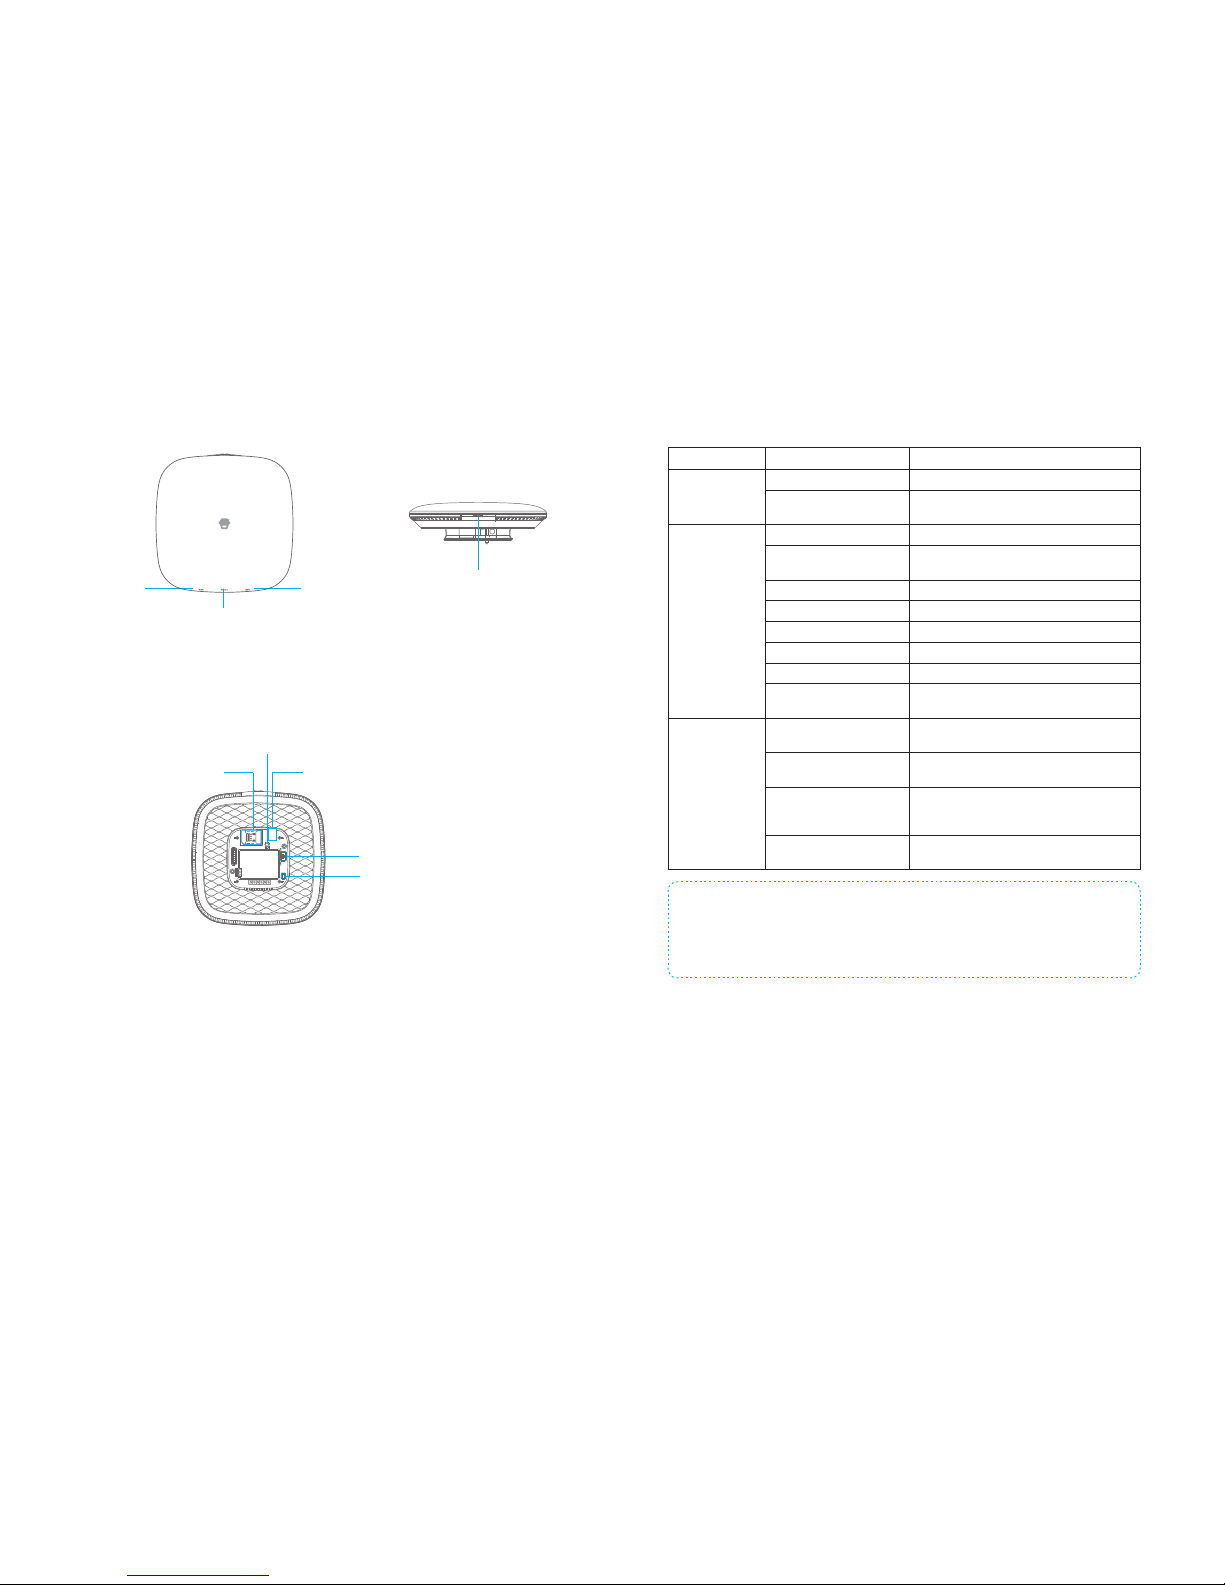
Hub
WiFi
Indicator
Light
GSM Indicator Light
Status Indicator Light
Front Side
SOS Button
Top Side
Tamper Switch
SIM Card Slot
AC Adapter Port
Power Switch
Pairing Button
Back Side
Description of Indicator Light
Indicator Light Status Meaning
WiFi Indicator
Light
Blinking Searching for WiFi network
Yellow
Booting up after power on or WiFi network is
connected
Status Indicator
Light
White Powered on
Blinking White
Hub is in low battery condition. Please
connect with AC power.
Blue Home mode
Green Disarm mode
Red Arm mode
Blinking Red Alarm/panic mode
Alternating Red and Blue Hub is in connecting status
off
Hub is not powered on, or not powered with
the adapter
GSM Indicator
Light
Blinking (once per second)
GPRS network is connected and the system is
using the GPRS network
Blinking (once per 3
seconds)
Searching for the GPRS network
Solid blue
Booting up after power on or GPRS network
is connected, but the system is using the WiFi
network
Off
No SIM card or GPRS has been deactivated
on the App
Note: The hub must be always be connected to AC power in order to maintain a WiFi
connection. When AC power is lost, the speaker will beep for 30 seconds and the Hub will
stay online for 2 minutes; long enough to send out push notications to users alerting them
of the power disconnect. The system will remain active and continue to monitor during a
power outage. If the system is armed, it will activate its onsite alarm if a sensor is triggered.
How to identify if the system is working through WiFi or GPRS?
Working through WiFi: The WiFi indicator and the GSM indicator are on.
Working through GPRS: The WiFi indicator and the GSM indicator blink quickly..
07 08
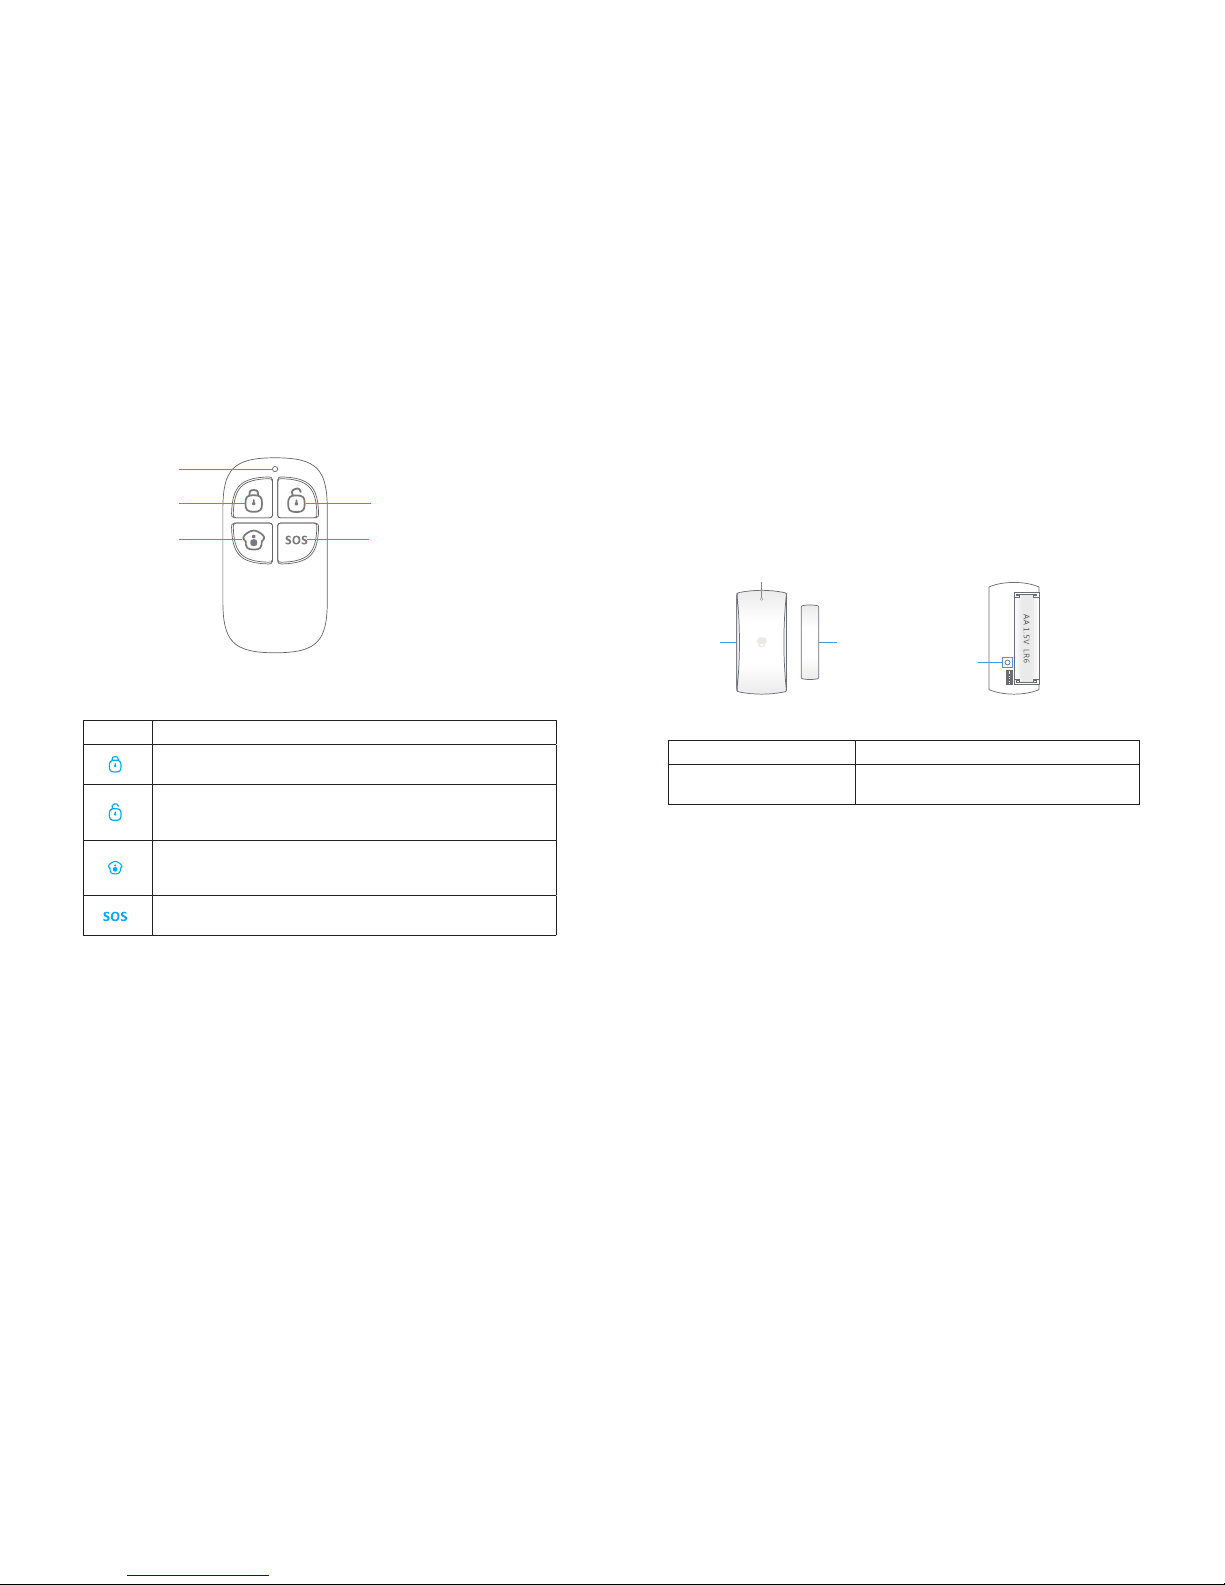
Remote Control
Arm Button
LED Indicator
Disarm Button
SOS Button
Home Arm Button
Description of Indicator Light
Buttons System Status
All sensors will be armed. This mode is used when the property is
unoccupied.
All sensors will be disarmed.
Note: When the system is set to ‘Disarm’, sensors in 24-Hour Zone (ood
sensors, smoke detectors, etc) will remain active.
Sensors which are set to the Home Zone will be disarmed. All other
sensors will be armed. This mode allows for movements within the
property without triggering the Home Zone sensor(s), such as motion.
This will trigger an ‘emergency’ alert notication to registered users
regardless of the hub mode.
Door / Window Sensor
Door/window sensors are set to ‘Normal Zone’ by default and are ideal for protecting
entry/exit points, such as front/back doors and all windows. When the system is armed
and a sensor is triggered (magnet separated from the transmitter), a push notication
including the sensor name will automatically be sent to the registered users, and the
hub’s internal siren will sound immediately.
Transmitter
Magnet
LED Indicator
Tamper Switch
Blinks once Door/window opening detected
Blinks once per 3 seconds
Low battery indication, please change the
battery immediately
Tamper Switch
The tamper switch (small black lever underneath the back cover) will trigger an alarm
notication if an unauthorized attempt is made to remove the sensor from its installed
location.
 Loading...