

Page 1
Page 2

XT Series Timer ChronTrol
IMPORTANT SAFEGUARDS
Always follow basic safety precautions when operating electrical equipment.
Please observe the following safeguards:
• Read and save all instructions.
• To avoid electrical shock, do not immerse timer in water or other liquids,
and do not operate when wet.
• All equipment controlled by this timer must have wattage ratings within the
capacity of this timer, as stated in the SPECIFICATIONS AND
INSTALLATION instructions. Exceeding the rated capacity may result in
overheating and damage.
• Do not use this timer where flammable gas or fumes exist.
• Do not use this timer to control equipment that is damaged or
malfunctions.
• Extreme external interference can, in rare situations, cause random
behavior of this device. Do not use this timer in applications where
random ON or OFF signals are potentially hazardous.
WARNING: If using this timing device in a situation or
environment that is critical to the welfare
and/or sustenance of laboratory specimens,
please test all programs by carefully
simulating or staging the critical events.
This document is furnished solely for the convenience of the authorized user without warranty
or obligation of any kind whatsoever. ChronTrol Corporation shall not be responsible for any
damages, including consequential, caused by reliance on information contained herein
including, without limitation, inaccuracies, errors, or omissions of any kind whatsoever.
© Copyright ChronTrol Corporation 2001
ChronTrol Corporation
6160 Fairmount Avenue
San Diego, California 92120
(619) 282-8686
User's Guide
Page 3

How to Use this Manual
The XT User’s Guide is divided into five sections.
Section 1: Introduction describes the XT’s physical characteristics
(keyboard, LED's, circuits, and input connector). It also briefly describes the
features and capabilities of the XT.
Section 2: Set Up describes step-by-step how to set system parameters (such
as the date and time) and how to program the XT to perform simple timing
operations (such as turning a circuit ON at a specific time and OFF at a
specific time).
Section 3: Programming Procedures provides XT programming strategies
and tips, explains how to enter a program into the XT, and how to take
advantage of its wide-ranging and powerful capabilities.
Section 4: Sample Programs includes step-by-step instructions for
programming the XT. These sample programs illustrate the most common
and direct programming techniques.
Appendix A: Special Programming Considerations discusses Interval
Timing, the difference between a day and a twenty-four hour period, Day
Omission, the Daylight Saving Time standard, and the effect each of these has
on programmed operations.
Conventions Used in the Manual:
BOLD CAPS Represent keyboard keys you should press. DAY ENTER
means press the DAY key and then the ENTER key.
MMDDYY Expresses how dates and times appear on the display:
HHMMSS Month/Day/Year is expressed as MMDDYY. For example,
December 3, 1998, displays as 120398. Hours and minutes
are expressed as HHMM. For example, 11:45 displays as
1145.
P–n Variables are expressed in italics. For example, an “n” in
italics indicates a number to be supplied by the user.
boldface type Identifies information that appears on the XT’s display and,
within text, indicates critical information.
Page 4

XT Series Timer ChronTrol
Table of Contents
Section 1 - Introduction
Introduction....................................................................................................5
XT Features.................................................................................................... 6
Physical Description ......................................................................................8
The XT Display ...................................................................................8
The XT LED Indicators.....................................................................11
Keyboard ...........................................................................................12
Section 2 - Setup
Set-up Procedure..........................................................................................13
Setting System Parameters.....................................................................13
Time...................................................................................................13
Change Between 12- and 24-Hour Format................................13
Date....................................................................................................14
Day of Week......................................................................................14
Lock Code.........................................................................................14
Set the Lock Code .......................................................................14
Lock the Keyboard ......................................................................14
Unlock the Keyboard...................................................................15
Change the Lock Code................................................................15
Clear the Lock Code....................................................................15
Manual Operation ........................................................................................16
Manually Switching a Circuit...........................................................16
Manually Activating a Program .......................................................16
Two Simple Programs..................................................................................17
Section 3 - Programming Procedures
Features ........................................................................................................18
On/Off and Interval Programs.....................................................................18
Circuits and Other Control Assignments....................................................19
Day Omission...............................................................................................19
Cycle Length.................................................................................................19
Calendar Feature..........................................................................................19
Entering a Program......................................................................................20
Program Number ..............................................................................22
Circuit Assignments..........................................................................22
Program Assignments.......................................................................22
Input Assignments.............................................................................22
2 User's Guide
Page 5

ChronTrol XT Series Timers
Interval Specification........................................................................23
On Time.............................................................................................24
On Date..............................................................................................24
Off Time............................................................................................24
Off Date.............................................................................................24
Day Omission....................................................................................25
Cycle Length......................................................................................25
Inputs (External Activation)........................................................................26
Setting Inputs.....................................................................................26
Manually Enabling and Disabling an Input......................................27
Functions......................................................................................................27
Function 1: Daylight Saving Time...................................................27
Function 2: Sequence Start...............................................................27
Creating and Editing the Holiday List.........................................................28
Review..........................................................................................................29
System Parameters Review..........................................................................30
Review Date......................................................................................30
Review the Day of Week...................................................................30
Review the Holiday List...................................................................30
Review the Seconds..........................................................................30
Program Review...........................................................................................32
Begin Program Review ....................................................................32
Step A: Program Status.....................................................................32
Step B: Control Assignments...........................................................32
Step C: On Time................................................................................32
Step D: Off Time...............................................................................33
Step E: Interval Length .....................................................................33
Step F: Omitted Days........................................................................33
Step G: Cycle Length........................................................................33
Step H: Exit Program Review .........................................................33
Input Review ................................................................................................34
Cross Review ...............................................................................................34
Countdown Timer........................................................................................35
Changing Program Entries...........................................................................36
Deleting Program Entries............................................................................36
Factory Settings (Defaults)..........................................................................36
User's Guide 3
Page 6

XT Series Timer ChronTrol
Section 4 - Sample Programs
Sample Program 1: Daylight Saving Time..................................................38
Sample Program 2: Sequence Start.............................................................38
Sample Program 3: On/Off Program with Day Omit.................................38
Sample Program 4: Interval Program with Cycle Length ..........................39
Sample Program 5: On/Off Program with Cycle Length...........................40
Sample Program 6: On/Off Program with Day-based Cycle.....................40
Sample Program 7: 24-hour based Program ..............................................41
Sample Program 8: Program Controlling Program ...................................42
Sample Program 9: Using Inputs.................................................................43
Sample Program 10: Re-trigger and Time Out...........................................44
Sample Program 11: School Bells ..............................................................45
Sample Program 12: Delay Program ..........................................................45
Appendix A: Special Programming Considerations
Interval Timing.............................................................................................46
Overlapping Midnight..................................................................................47
Cycles and Daylight Saving Time................................................................47
How to Set a Day-Based Program ...................................................48
4 User's Guide
Page 7

ChronTrol XT Series Timers
Section 1: Introduction
Congratulations on your purchase! Your ChronTrol XT is a programmable,
microprocessor-based timer that can control up to 16 devices (outputs) and
can receive inputs from up to 8 external devices. The XT can easily be
programmed to switch circuits on and off at specific times and dates, for
durations, on a cycle, or from external devices attached to its optional input
connector. 20 to 40 timing programs can be stored in the XT’s memory.
The XT can be programmed down to the second. Its versatile calendar
automatically adjusts for leap years, Daylight Saving Time and holidays.
Programs are easy to set, review, and change through the 24-pushbutton,
audible keyboard.
The XT family includes four basic models: table-top, wall-mount, expandable
wall-mount, and rack-mount. Table-top models are available with two or
four circuits, AC outlets or dry contacts. All other models are available in
two- to sixteen-circuit configurations with dry contact outputs rated up to 20
Amps. The SPECIFICATIONS AND INSTALLATION sheet for your
particular ChronTrol model is included with your unit. Specification sheets
for other types are available upon request. The features and programming
techniques described in this manual apply to all models of the XT.
User's Guide 5
Page 8

XT Series Timer ChronTrol
XT Features
The XT supports the following list of functions and programming features.
For complete operational descriptions of these functions, see Section 3:
Programming Procedures.
• Manual Operation. ChronTrol’s XT series is designed around its
advanced programming capabilities; however, you can manually override
programmed settings through the keyboard without waiting for or
disturbing programmed operations.
• Advanced Programming. The XT’s advanced programming features
open the door to many exciting possibilities. Through the XT keyboard,
you can enter up to 40 programs. Each program has a unique number
which identifies it when entering, reviewing, or changing its settings.
Programs can be set to control circuits, inputs, even other programs.
These are referred to as Control Assignments. Control Assignments can
switch on and off on a daily or weekly schedule, repeating at rates from
two seconds to one year. They can also switch on and off on specific
dates, or one time only, responding to either clock time or outside
signals.
• Program Review, Verification, and Change. The XT allows you to
review, verify, and change any and all of its settings. You can review
individual programs and input settings. You can also review specific
information, such as the activity of a Control Assignment, and the
programs or inputs to which it is assigned.
• Day Omission. The XT’s programming flexibility allows you to enter
programs that execute on a regular schedule yet automatically omit
specified days of the week, for example Saturday and Sunday.
• Holidays. Holidays can occur on any day of the year. The XT allows you
to create your own Holiday List. You may then specify, within each
program, whether or not that program will execute on the days you’ve
included in your Holiday List.
• Functions. Two special functions are provided for your convenience:
Daylight Saving Time (Function 1), which adjusts the Time of Day clock
by one hour; and Sequence Start (Function 2), which controls the rate at
which circuits are restored to the ON position following a power failure.
6 User's Guide
Page 9

ChronTrol XT Series Timers
• Inputs. On XT models equipped with the N8 Input Option (see
SPECIFICATIONS AND INSTALLATION sheet), programs, circuits, and
inputs can be switched based on external conditions. Through the input
connector, devices such as temperature and light detectors can be
connected to the XT. You may then specify that certain programs or
circuits be switched by a signal from these external devices. You can
program an input to ignore external signals as well.
• Locking Keyboard. The XT provides a locking keyboard. With a user-
programmable Lock Code, you can prevent unauthorized access to the
XT keyboard.
• Power Fail Protection. The Time of Day continues to operate, with
crystal accuracy, during power failure. A nine-volt battery keeps the
clock operating and protects the system memory to prevent the loss of
stored programs. When power returns, all ON and OFF times are saved.
Outputs are switched to the proper positions for the current time, in
sequence or all at once.
• Countdown Timer. The XT can count down the hours, minutes, and
seconds for any event you specify, such as the execution of a program or
the switching of a circuit.
User's Guide 7
Page 10
XT Series Timer ChronTrol
Physical Description
The following sections describe the physical characteristics of the XT
controller and define the function of each.
The XT Display
The XT’s display serves two functions: ordinarily it displays the current Time
of Day in hours, minutes, and seconds, but during programming it confirms
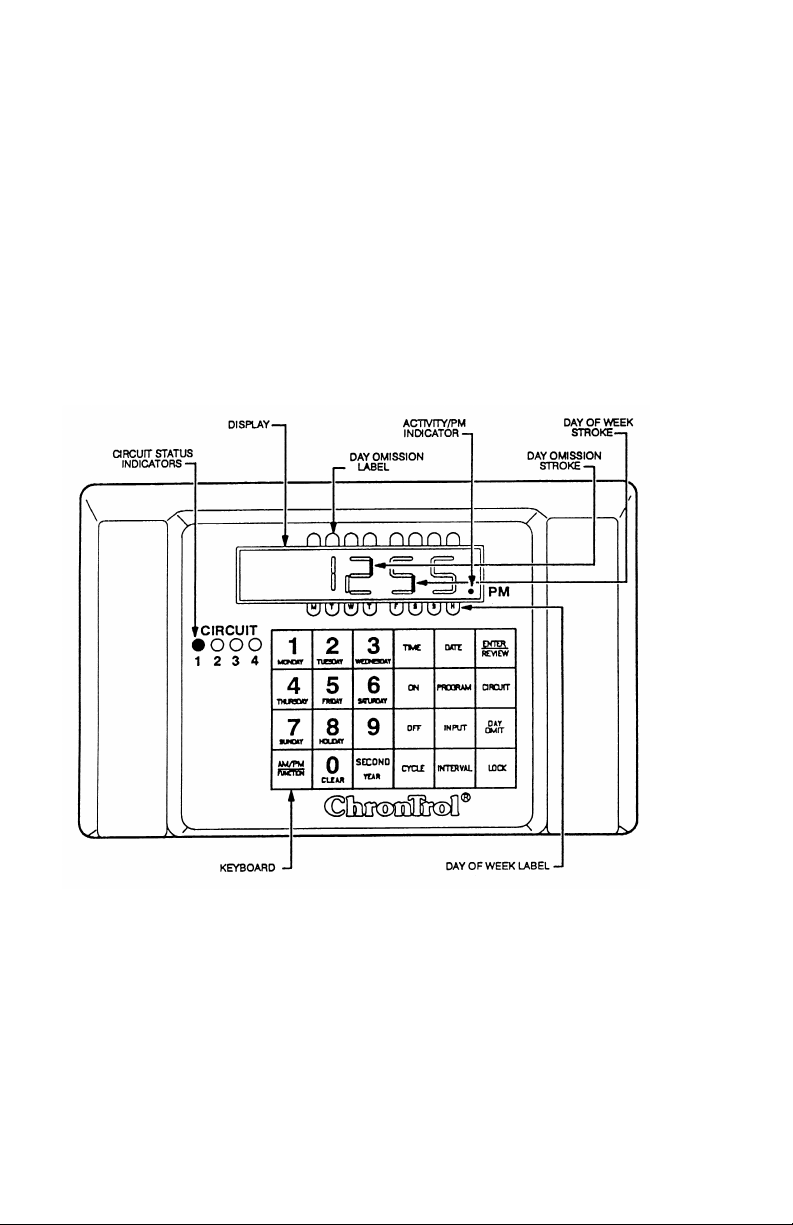
entries and reviews previous settings. Figure 1 illustrates the XT Display and
Indicators.
Figure 1: XT Display and Indicators
8 User's Guide
Page 11

ChronTrol XT Series Timers
If you look closely at the numbers comprising the Time of Day displayed in
Figure 1, each character has two vertical components, with a top segment and
a bottom segment. When lit individually, the top segments indicate days
omitted from a program; bottom segments indicate the current day of the
week and whether that day is a holiday. See The XT LED Indicators for
further information.
Numbers on the display express time, dates, durations, and control assignment
specifications (the number of a circuit, program, or input). Letters and
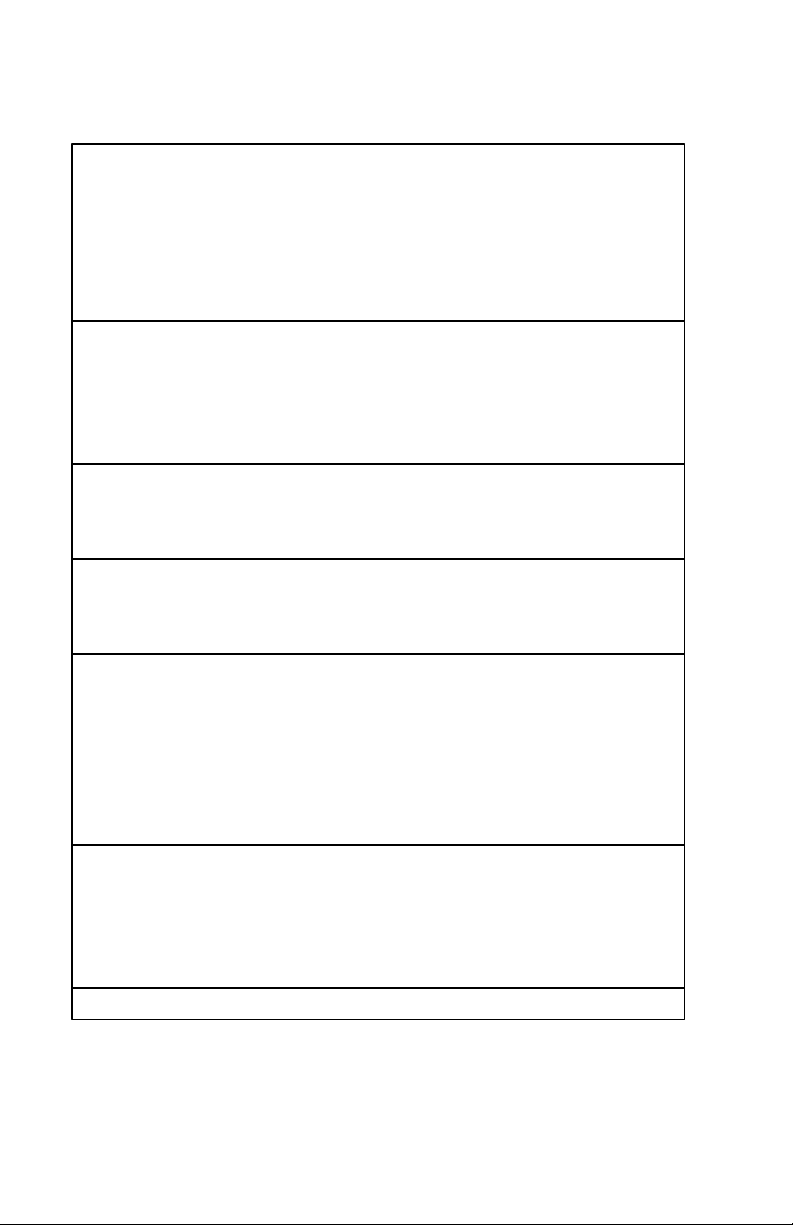
symbols, however, convey specific information to the XT user. See Table 1
on the following page for definitions of special XT display characters.
User's Guide 9
Page 12
XT Series Timer ChronTrol
P PROGRAM. This character displays when reviewing
the status of an ON/OFF program, when assigning a
Program to a list of control assignments, when
manually switching a program, or when a program is
identified in cross review. It is usually followed by a
number identifying the program.
C CIRCUIT. This character displays when assigning a
Circuit to a list of control assignments or when
manually switching a circuit. It is usually followed by
a number identifying the circuit. It also indicates daybased cycle.
E ENTER. This character displays after pressing the
"Enter" key from the Time display, which is the first
step in all programming sequences.
F FUNCTION. This character displays when setting or
reviewing the Sequence Start or Daylight Saving
Time functions.
– This character displays to separate key characters
from their identifying number, for example P–04
(Program #4), to indicate you reached the end of a
list of control assignments or Holidays, to show that
no value was previously assigned to a particular
parameter, or to indicate that an interval program
under review is currently executing.
– – INPUT. This character displays when reviewing the
status of an input, when assigning an input to a list of
control assignments, when manually switching an
input, or when an input is identified in cross review.
Usually followed by a number identifying the input.
H Introduces the Holiday List.
Table 1: Special Display Characters
10 User's Guide
Page 13

ChronTrol XT Series Timers
The XT LED Indicators
The following paragraphs define the function of the LED indicators on the
face of the XT. Refer to Figure 1 for an illustration.
Circuit Status There is a circuit status LED indicator for each
Indicators circuit on your XT model. When an LED
indicator is lit, it indicates that the circuit is ON.
Day of Week Label This label lists the first character of the
corresponding day of the week. M=Monday, T=
Tuesday, etc. The rightmost character, H
represents Holiday.
Day of Week Stroke The bottom segment of a display character (or
“stroke”), lit individually above a labeled day of
the week, indicates the current day of the week and
whether that day is also a Holiday.
Day Omission Label This label shows which Day of the Week is
omitted.
Day Omission Stroke The top segment of a display character (or
“stroke”), lit individually under the day omission
label, indicates which days are omitted from a
given program’s weekly schedule.
Activity/PM Indicator This indicator lights up under two conditions;
when the system clock registers PM hours and
when a program or other operation under review is
active.
User's Guide 11
Page 14

XT Series Timer ChronTrol
Keyboard
Use the keyboard to set, change, review, or clear parameters on the XT. To
enter a keystroke, press each character firmly in the center of the pad. The
keyboard responds with an audible “beep” tone. If you attempt to make an
invalid entry, the tone changes and the entry is not accepted.
Figure 1 on p. 8 illustrates the XT’s keyboard and Table 2 defines each key’s
function.
TIME Sets the Time of Day and changes the clock between 12-
and 24-hour format.
ON Sets and reviews a program’s ON time, switches a circuit
manually ON, or displays the countdown to an ON time.
OFF Sets and reviews a program’s OFF time, switches a circuit
manually OFF, or displays the countdown to an OFF time.
CYCLE Sets and reviews a program’s cycle length.
DATE Sets and reviews calendar functions.
PROGRAM Sets and reviews a program’s or input’s program
assignment.
INPUT Sets and reviews input definitions.
ENTER Reviews and stores program information.
REVIEW
INTERVAL Sets and reviews a program’s interval length.
CIRCUIT Sets and reviews a program's or input’s circuit assignment.
DAY Sets and reviews the current day of the week and a
OMIT program’s Day Omission schedule.
LOCK Locks the keyboard from unauthorized use.
AM/PM Changes AM settings to PM settings and back.
FUNCTION Also selects special functions.
0 / CLEAR Clears keyboard entries.
SECOND Sets and reviews a time setting to the second.
YEAR Also sets the year for the current date.
Table 2: XT Keyboard Definitions
12 User's Guide
Page 15

ChronTrol XT Series Timers
Section 2: Setup
Follow the separate SPECIFICATIONS AND INSTALLATION sheet included
with your ChronTrol for installation instructions.
This section includes basic instructions for programming the XT to perform
simple operations. Following a demonstration of how to set the System
Parameters are procedures for manually turning a circuit ON and OFF and
programming a circuit to turn ON and OFF on a schedule.
Setting System Parameters
Before any program can execute accurately, the System Parameters must be
set. The System Parameters are: Time, Date, Day of Week, and (optionally)
the Lock Code.
Time
1. Press TIME . The display goes blank.
2. Set the current time in hours and minutes. For example, to set the time
to 2:45 p.m., press 2 4 5 .
3. Optional - Press SECOND. Set the seconds. Seconds display in the two
rightmost digits of the display window.
4. The timer assumes a.m., so use the AM/PM key to specify p.m. Skip this
step if the time is a.m.
5. Press ENTER . The time is set and displayed in hours and minutes.
6. Optional - Press SECOND to view hours, minutes, and seconds.
NOTE: The moment you press ENTER , the time begins to advance.
Change Between 12- and 24-Hour Format
You can convert between 12-hour (a.m./p.m.) format and 24-hour
(Military) format whenever you like. Change between display formats
as follows:
1. Press TIME . The display goes blank.
2. Press ENTER . Time of Day changes to the opposite format.
User's Guide 13
Page 16

XT Series Timer ChronTrol
Date
1. Press DATE . 301 displays.
2. Set the current month and day. For example, to enter January 5th, press 1
0 5.
3. Press SECOND /YEAR . 00 displays.
4. Type the last two digits of the current year. For example, to enter 1998,
press 9 8. 98 displays in the two rightmost digits.
5. Press ENTER . The Date is set and the Time of Day displays.
Day of Week
1. Press DAY/OMIT. The current setting for the Day of Week is indicated
by a lighted stroke along the bottom of the display.
2. Press the number key corresponding to the current Day of Week.
3. Press ENTER . The Day of Week is set and the Time of Day is displayed.
Lock Code
You can set a Lock Code to prevent unauthorized or accidental entries. If the
keyboard is locked, the timer cannot be programmed without first entering the
Lock Code. The timer cannot be locked if a Lock Code has not been set.
Set the Lock Code
1. Press LOCK . The display is blank.
2. Set your own Lock Code (up to four digits). The Lock Code displays.
3. Press ENTER. The Lock Code is set and the Time of Day displays. The
keyboard remains unlocked until you press LOCK again, or there is a
power interruption.
Lock the Keyboard
1. Press LOCK. The keyboard is locked and the Time of Day displays.
Seconds can be display while the keyboard is locked by pressing
SECOND .
After a power interruption, the keyboard locks if a Lock Code was set. If no
Lock Code was set, the keyboard will be unlocked when power is restored.
14 User's Guide
Page 17

ChronTrol XT Series Timers
Unlocking, Changing, and Removing the Lock Code
The instructions for unlocking, changing, and removing the lock code assume
the keyboard is already locked. You have five seconds between each key
entry, or the display will return to Time of Day.
Unlock the Keyboard
1. Press LOCK . 000 displays.
2. Enter your Lock Code. The Lock Code displays.
3. Press ENTER . The keyboard is unlocked and the Time of Day displays.
Change the Lock Code
1. Press LOCK . 000 displays.
2. Enter your Lock Code. The Lock Code displays.
3. Press LOCK . The display is blank.
4. Set your new Lock Code (up to four digits). The new Lock Code
displays.
5. Press ENTER . The new Lock Code is set and the Time of Day displays.
6. Optional - Press LOCK . The keyboard locks and the Time of Day displays.
Remove the Lock Code
1. Press LOCK . 000 displays.
2. Enter your Lock Code. The Lock Code displays.
3. Press LOCK . The display is blank.
4. Press TIME. The Lock Code is removed and the Time of Day displays.
The timer cannot be locked until a new code is set.
NOTE: There is no “back door” to the Lock Code. If a Lock
Code is assigned and subsequently forgotten or
misplaced, you must electrically shut the timer down
and re-program it. All programs are lost.
User's Guide 15
Page 18

XT Series Timer ChronTrol
Manual Operation
This section shows you how to turn circuits ON and OFF and activate
programs through the keyboard.
Manually Switching a Circuit
You can turn any Circuit ON or OFF immediately, without waiting for or
disturbing program settings. When you manually switch circuits ON or OFF,
they remain in the switched position until a program automatically switches
them, or until you manually switch them back again.
Manually Switch a Circuit ON or OFF as follows:
1. Optional - Press CIRCUIT .
2. Type the circuit number to be switched. C–n displays, where n is the
number (1-16) of the circuit specified.
3. Press ON or OFF. The Circuit switches and the Time of Day displays.
Manually Activating a Program
You can activate or deactivate any program using the keyboard at any time.
At initial start-up, all of ChronTrol’s 20 or 40 available programs are active.
However, they can be turned off and left inactive but kept in memory.
While inactive, On/Off Programs will continue to cycle at the rate you
specified, but they will have no effect. Interval Programs with Cycle Length
stop cycling when de-activated.
Manually Switch a Program ON or OFF as follows:
1. Press PROGRAM .
2. Type the program number to be switched. P–n displays, where n is the
number of the program specified.
3. Press ON or OFF. The Program switches, and the Time of Day displays.
All control assignments for that program remain in their current position
until switched manually through the keyboard, or automatically by
another program.
16 User's Guide
Page 19

ChronTrol XT Series Timers
Two Simple Programs
The following instructions demonstrate how to program the XT to perform
simple timing operations.
First, set an On/Off Program to turn Circuit #1 ON at 1:00 p.m. and OFF at
1:02 p.m. each day as follows:
1. Press ENTER. E– displays in the window.
2. You could type in your own program number (1-40), OR you could press
ENTER again to display the next available program number. For this
demonstration, choose program #2 by pressing 2. E–02 displays.
3. Press CIRCUIT. C– displays.
4. Type 1. C–01 displays.
5. Press ON. A dash (–) displays.
6. Set the ON time. Press 1 0 0 AM/PM. 100. displays.
7. Press OFF. A dash (–) displays.
8. Set the OFF time. Press 1 0 2 AM/PM. 102. displays.
9. Press ENTER to store the last entry. P–02. displays.
10. Press TIME to exit the program and return to the Time of Day display.
Now, you could sit and wait for 1:00 p.m. to arrive. OR you could set an
Interval Program to turn Circuit #1 ON for 2 minutes RIGHT NOW:
Set an Interval Program to turn Circuit #1 ON for 2 minutes as follows:
1. Press ENTER. E– displays in the window.
2. Press ENTER again to display the next available program, or type in you
own program number. In this example, type 3. E–03 displays.
3. Press CIRCUIT. C– displays.
4. Press 1. C–01 displays.
5. Press INTERVAL. A dash (–) displays.
6. Set the duration. Press 2. 0002 displays.
7. Press ENTER to store the last entry. 0 03 displays.
8. Press TIME to exit the program and return to the Time of Day display.
Now activate the program as follows:
9. Press PROGRAM 3 ON. The Time of Day displays and Circuit #1
immediately turns ON for 2 minutes.
User's Guide 17
Page 20

XT Series Timer ChronTrol
Section 3: Programming Procedures
This section discusses how to enter a program into the timer, and how to
review and verify entered information.
Features
This discussion will provide you with a general working knowledge of the
XT’s features. The XT’s programming capabilities are very flexible. Plan
your programs carefully to maximize their usefulness.
On/Off Programs vs. Interval Programs
There are two types of programs: On/Off and Interval.
An On/Off Program uses ChronTrol's accurate internal clock as a reference
for real time settings. Specific On/Off program settings are made in hours
and minutes, a.m. or p.m., and seconds if desired. An On/Off Program repeats
at the same time every day unless the Day Omission or Cycle Length features
are used. Time settings can also be set to occur on a specific date in the
upcoming year, or to begin on one date and end on another. If your
application requires any of these settings, familiarize yourself with the Day
Omission, Cycle Length, and Calendar features.
An Interval Program does not use real time settings, but is activated only on
demand by an input, another program or a keyboard command. An interval
program is entered as a duration of time, like one hour, or two hours, etc. An
interval program occurs one time only, when activated, or it can repeat by
using the Cycle Length feature. For information on the four types of intervals
that can be set, see Appendix A: Special Programming Considerations.
Any On/Off Program or Interval Program can control circuits, inputs, or
other programs, which are called Control Assignments.
18 User's Guide
Page 21

ChronTrol XT Series Timers
Circuits and other Control Assignments
A circuit is an output that supplies switched 120V AC (Table Top AC Outlet
models) or a dry contact switch closure (all other models). Circuits are
numbered from 1 to 16 depending on your ChronTrol model.
Any circuit or circuits that are controlled by a given program are kept in a list
of Control Assignments with the program. Assignments can be made or
deleted in any order. They are stored in numerical order.
Programs and inputs can also be controlled by programs. They are assigned
and deleted in the same way as circuits.
Day Omission
The Day Omission feature is used to omit (skip) the execution of a program
on any days of the week, and on the holidays specified in the Holiday List.
The Holiday List is a list of dates. You decide which programs, if any,
should be omitted from the days in the Holiday List. Programs can also be set
to run only on holidays (by omitting Days 1 through 7).
Cycle Length
By using the Cycle Length feature, programs can be set to repeat at a rate as
short as every two seconds (one second ON and one second OFF) or as long
as every 365 days.
The Cycle Length feature is used to set an On/Off Program to repeat at a rate
other than every day, or to set an Interval Program to occur more than one
time. Cycle Length settings are made in hours, minutes, seconds, and days, to
a maximum of 365 days, if necessary. For example, a program with a 15
hour and 40 minute cycle repeats its operation every 15 hours and 40
minutes.
Calendar Feature
The Turn-On time and Turn-Off time in any of ChronTrol’s 20 or 40
programs can be set to occur on specific dates within the next 12 months. In
this case, the program repeats at the same time every year, unless the Day
Omission or Cycle Length features are used. You could use this feature to
set a window of operation around a daily schedule that changes every month
or every season, for example.
User's Guide 19
Page 22
XT Series Timer ChronTrol
Entering a Program
This section provides step-by-step instructions for programming the XT. At
first, you should follow this procedure from beginning to end. You may soon
discover that after Step 1, the sequence you follow is arbitrary, until you
perform Step 6, which exits the programming procedure. Between the first
and last steps, it isn't necessary to follow the sequence.
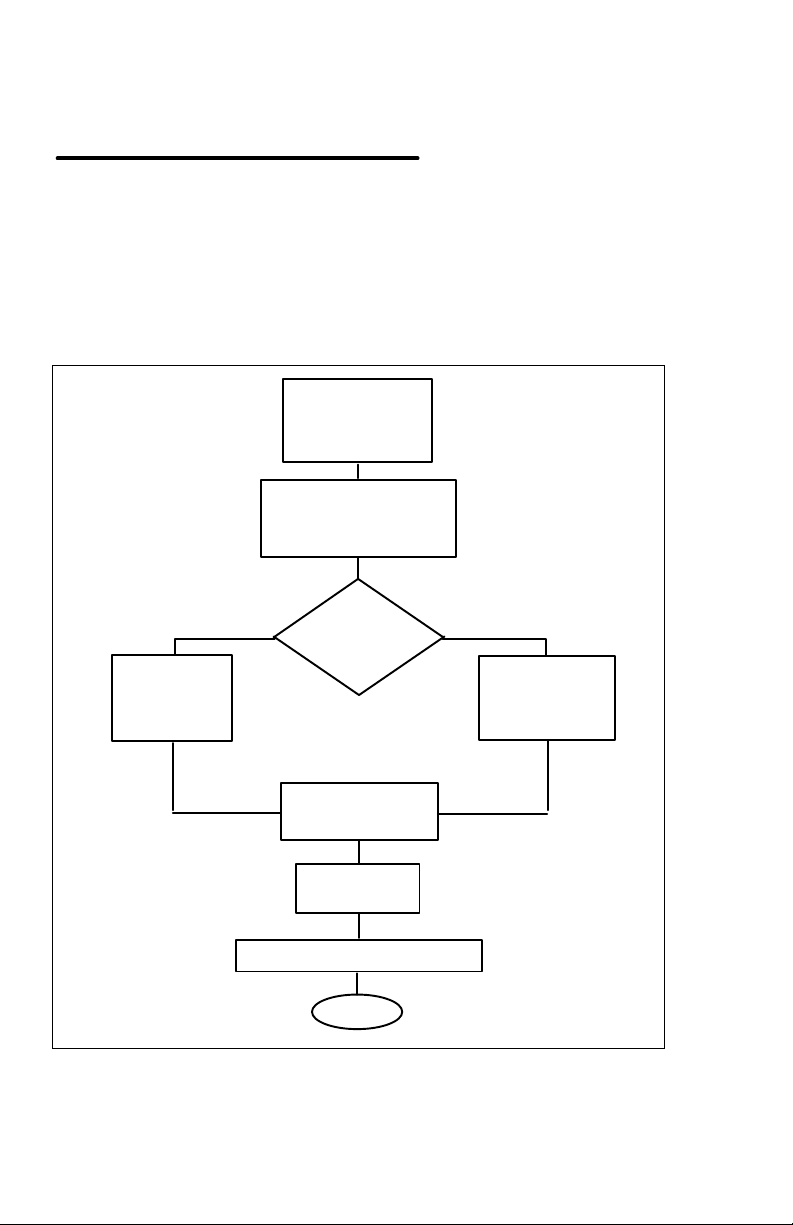
Figure 6 illustrates programming logic. It is a flowchart for program entry.
ASSIGN
PROGRAM
NUMBER
SPECIFY
CONTROL
ASSIGNMENTS
(INTERVAL) or (ON/OFF)
SPECIFY ? SPECIFY
INTERVAL ON AND OFF
TYPE AND TIMES AND
DURATION DATES
PRESS <ENTER> then <TIME>
ON/OFF
INTERVAL
SPECIFY
OMITTED DAYS
SPECIFY
CYCLE RATE
END
Figue 6: Programming Logic
20 User's Guide
Page 23

ChronTrol XT Series Timers
REMEMBER Begin all programming with the display showing Time of Day
(with or without Seconds displayed). If you become lost or confused during
any step, press TIME and start over. Be aware that pressing TIME does not
clear settings you've already made in an aborted programming attempt.
Settings remain in memory until corrected.
REMEMBER The Time of Day can be displayed in either a 12- or 24-hour
format, and all program settings display in the same format.
REMEMBER The timer will not accept an entry that's out of range.
User's Guide 21
Page 24

XT Series Timer ChronTrol
Set a program as follows:
Step 1 - Assign Program Number
Select the number for a new program as follows:
1. Press ENTER . E– displays.
2. Type the number of the program you want to set. E–n displays, where n
is the number you put in. NOTE: If you skip this step, ChronTrol will
automatically assign the next available program number.
3. Press ENTER. P–n displays, where n is the number of the program,
along with its status. A dash (–) displays if no program is available.
Step 2 - Specify Control Assignments
Decide if you want to switch circuits ON or OFF, enable or disable inputs, or
activate or deactivate other programs.
Circuits - If you want this program to switch any of the AC outlets or dry-
contact outputs ON or OFF, assign them to the program as follows:
1. Press CIRCUIT . C– displays.
2. Type the number of the circuit. C–n displays, where n is the number of
the circuit specified.
Repeat this procedure until all the circuits are assigned.
Program Assignment - If you want this program to activate or de-
activate other programs, assign them as follows:
1. Press PROGRAM . P– displays in the window.
2. Type the program number. P–n displays, where n is the number of the
program specified.
Repeat the above procedure until all the programs to be activated or deactivated by this program are assigned.
Input Assignment - If you want this program to enable or disable any of
the inputs, assign them as follows:
1. Press INPUT . – – displays.
2. Type the number of the input. – –n displays, where n is the number of
the input specified.
Repeat this procedure until all the inputs to be enabled or disabled by this
program are assigned.
22 User's Guide
Page 25

ChronTrol XT Series Timers
Step 3 - On/Off or Interval Program
If this program is an On/Off Program, skip to the On/Off procedure on page
24. If this program is an Interval Program, use the following steps to
specify the type of interval you wish to set. If the Interval is 24 hours or
more, specify the Interval in days, hours, minutes, and seconds.
Interval Program
See Appendix A: Special Programming Considerations for a discussion of
Interval types.
NOTE: Interval Programs will not switch until activated by an
input, by another program, or through the keyboard.
1. Decide which type of Interval Program (0-3) you want.
For Type 0 Interval (ON, then OFF after Interval), press ON OFF
INTERVAL , or INTERVAL only.
For Type 1 Interval (OFF after Interval), press OFF INTERVAL .
For Type 2 Interval (OFF, then ON after Interval), press OFF ON
INTERVAL .
For Type 3 Interval (ON after Interval), press ON INTERVAL .
2. Set the duration or interval length in hours and minutes (HHMM). The
interval length displays. Press 0 if Interval is less than one minute.
3. Optional - Press SECOND . 00 displays in the two rightmost digits.
4. Optional - Set the desired seconds. The seconds display in the two
rightmost digits.
5. Optional - Press DATE. A dash (–) displays if no previous setting was
made.
6. Optional - Enter the number of whole days within the interval length (1 to
365). The number of days displays.
7. Skip to Step 4 - Specify Omitted Days.
User's Guide 23
Page 26

XT Series Timer ChronTrol
On/Off Program
ON Time
Specify the time at which you want this program to turn on as follows:
1. Press ON. A dash (–) displays if no previous Turn On time has been set
for this program.
2. Set the desired Turn On time in hours and minutes (HHMM). The Turn
On time displays.
3. Optional - Press SECOND . 00 displays in the two rightmost digits.
4. Optional - Set the desired seconds. The seconds display in the two
rightmost digits.
5. Optional - The XT default time is a.m. To make the time setting p.m.,
press AM/PM. The PM indicator light turns on.
Specify the particular date, if any, on which you want this program to turn on
as follows:
6. Optional - Press DATE. A dash (–) displays if no previous setting has been
made.
7. Optional - Set the date by month and day (MMDD). (The year does not
need to be entered since the next occurrence of the date is assumed.) The
date displays.
OFF Time
Specify the time at which you want this program to turn off as follows:
1. Press OFF. A dash (–) displays if no previous Turn Off time has been set
for this program.
2. Set the desired Turn Off time in hours and minutes (HHMM). The Turn
Off time displays.
3. Optional - Press SECOND . 00 displays in the two rightmost digits.
4. Optional - Set the desired seconds. The seconds display in the two
rightmost digits.
5. Optional - The XT default time is a.m. To make the time setting p.m.,
press AM/PM. The PM indicator light turns on.
Specify the particular date, if any, on which you want this program to turn off
as follows:
6. Optional - Press DATE. A dash (–) displays if no previous setting has been
made.
7. Optional - Set the date by month and day (MMDD). (The year does not
need to be entered since the next occurrence of the date is assumed.) The
date displays.
NOTE: If you set an ON date, make sure you set an OFF date
or the OFF date will be today's date.
24 User's Guide
Page 27

ChronTrol XT Series Timers
Step 4 - Specify Omitted Days
A day begins at midnight (12:00 a.m.) and ends one second prior to midnight
(11:59:59 p.m.). Omitting days from a program that includes On or Off
times that overlap midnight requires special consideration. See Appendix A:
Special Programming Considerations for further information.
1. Press DAY/OMIT. The stroke for the current day of the week lights along
the bottom row of the display.
2. To omit execution of this program on specific days, type the number key
corresponding to each omitted day. The stroke for each day you enter
appears in the top row. See Figure 1.
NOTE: Pressing the number key again for a day which is
already omitted removes it from the Day Omission
list, re-enabling the program on those days. Pressing
0/CLEAR removes all days.
Step 5 - Specify Cycle Rate
Specify the rate, if any, at which you want this program to repeat. See
Appendix A: Special Programming Considerations for a discussion of cycle
lengths of 24 hours or more.
1. Press CYCLE . A dash (–) displays if no previous setting has been made.
If Cycle contains only a whole number of days (Day-based), skip to 5.
2. Set the desired cycle length in hours and minutes (HHMM). The cycle
length displays. Press 0 if Cycle is less than one minute.
3. Optional - Press SECOND . 00 displays in the two rightmost digits.
4. Optional - Set the desired seconds. The seconds display in the two
rightmost digits.
5. Optional - Press DATE. A dash (–) displays if no previous setting has been
made. 000 displays if On or Off date settings have been made.
6. Optional - Enter the number of whole days between 1 and 365.
Step 6 - Exit
When finished entering a program, always press ENTER to store the last entry
followed by TIME to exit the program and return to the Time of Day display.
User's Guide 25
Page 28

XT Series Timer ChronTrol
Inputs (External Activation)
An input is a signal sent to the ChronTrol by an external device or detector. If
your timer is equipped with the N8 Input Option, programs, circuits, or other
inputs can be switched On or Off by the input. When an input is enabled, it
does whatever it's been programmed to do. When an input is disabled, it
ignores what it has been programmed to do. Inputs can be enabled or disabled
by programs, by inputs, or through the keyboard. An input can even disable
itself.
For example, an independent temperature detector can signal a ChronTrol
input (to which it is connected) every time the room temperature exceeds 76°.
This input could then activate an Interval Program which would turn an air
conditioner on for twenty minutes. Additionally, an On/Off Program could
disable the input to prevent wasting energy outside business hours.
Wiring instructions for the input connector are contained in the
SPECIFICATIONS AND INSTALLATION sheet included with units equipped
with this option.
Setting Inputs
If your ChronTrol is equipped with the N8 option, you have eight inputs to
use to trigger switching events. The following procedure describes how to set
Inputs.
NOTE: Input settings do not reduce the number of available programs.
1. Press ENTER . E– displays.
2. Press INPUT . – – displays.
3. Type the number (1-8) of the Input you want to set. – –n displays.
4. Press CIRCUIT and a number (1-16). C–n displays. Or
press PROGRAM and a number (1-40). P–n displays. Or
press INPUT and a number (1-8). – – n displays.
5. Press ON or OFF. If you press ON, the activity indicator (decimal point)
lights on the display. If you press OFF, the activity indicator does not
light.
Repeat Steps 4 and 5 for each item to be controlled. When finished, press
ENTER followed by TIME to return to the Time of Day display.
26 User's Guide
Page 29

ChronTrol XT Series Timers
Each item will switch as specified when a signal is received by the input while
the input is enabled.
Manually Enabling or Disabling an Input
You can enable or disable any input using the keyboard at any time. At initial
start-up, all of ChronTrol’s eight inputs are enabled. However, they can be
disabled. While disabled, signals received by inputs will have no effect.
Manually enable or disable an Input as follows:
1. Press INPUT .
2. Type the input number (1-8) to be switched. – –n displays, where n is the
number of the input specified.
3. Press ON or OFF. The Input switches, and the Time of Day displays.
Functions
Functions are factory-programmed routines that are used by your ChronTrol
timer. Functions cannot be switched manually.
Currently there are two functions available:
• Function 1. Daylight Saving Time
• Function 2. Sequence Start
Function 1: Daylight Saving Time
Function 1 moves the Time of Day clock forward by one hour at 2 a.m. on the
first Sunday in April, and moves it back one hour at 2 a.m. on the last Sunday
in October. Function 1 is automatically enabled when you set the date during
the setup procedure. If you need to disable Daylight Saving Time, see Sample
Program 1 in Section 4.
Function 2: Sequence Start
After a power failure, Function 2 restores circuits to the ON position, in
order, at the rate you specify, until all circuits scheduled to be ON have been
restored. If Function 2 is not used, all circuits scheduled to be ON will
simultaneously switch ON when power is restored. See Sample Program 2
in Section 4 for the factory-recommended Function 2 Program.
User's Guide 27
Page 30

XT Series Timer ChronTrol
Creating and Editing the Holiday List
The Holiday List is the point of reference for all programs which omit
holidays (Day 8), or for programs which are set to execute only on holidays
(by omitting Days 1 through 7).
Dates can be entered in any order. The maximum number of holidays which
can be assigned is 366. Holidays are displayed with three or four digits,
depending on the month, and can be entered in any order, and removed or
inserted individually.
To create or edit the Holiday List, follow this procedure:
1. Press DAY/OMIT then DATE . H– appears on the display.
2. If creating a new list, type the month and day (MMDD) of each holiday.
Press ENTER after each date.
3. To delete a date from the Holiday List, press ENTER repeatedly to scroll
through the list until the date to be deleted is displayed. Then press
CLEAR followed by ENTER. The display now shows the next date in the
list, if any. Press TIME to return to the Time of Day display when you
are finished.
NOTE: If you pressed CLEAR for a date you wish to keep, and
you have not yet pressed ENTER, you may re-enter the
list by pressing DATE. The date will NOT be deleted
and you will be returned to the beginning of the list.
28 User's Guide
Page 31

ChronTrol XT Series Timers
Reviewing, Changing, and Deleting Entries
Review
ChronTrol’s XT model has powerful and flexible review capabilities. The
review section of this manual presents information that allows you to review
or verify programming information. The following categories of review are
available:
System Parameters Review – You can review the current date, day of the
week, the list of holidays, and display the seconds ticking on the clock in the
two rightmost digits of display.
Program Review – Any program can be reviewed by pressing the specific
keys which were used when first entering the program. As long as no new
values are entered, no changes are made to the program. You can review the
status of a program, what it controls, its On time, Off time, interval length,
list of omitted days, and cycle length.
Input Review – If your XT is equipped with inputs, you can review the status
of an input (enabled or disabled), and what it controls.
Cross Reference Review – This is a quick way to find out who controls
what. That is, for any given circuit, program, or input, you can identify which
programs and inputs control it.
Countdown Timer – You can review the time remaining until a programmed
event occurs. By leaving the XT in this mode, you can effectively use it as
countdown timer.
User's Guide 29
Page 32

XT Series Timer ChronTrol
Reviewing System Parameters
The following section explains how to review system parameters:
Review the Date
1. Press DATE . The current date setting appears in the display.
2. Optional - Press SECOND/YEAR to display the current year in the two
rightmost digits of display.
3. Press TIME to return to the Time of Day display.
Review the Day of the Week
1. Press DAY/OMIT . The stroke for the current Day of Week lights up.
2. Press TIME to return to the Time of Day display.
Review the Holiday List
1. Press DAY/OMIT, DATE, then REVIEW. The first date in the Holiday
List displays (month and day). If no holidays are set or you reach the end
of the list, a dash (–) appears on the display.
2. Press REVIEW repeatedly to move through the list one date at a time.
Holidays appear in numerical order beginning with March 1. Pressing
DATE followed by REVIEW at any time returns you to the first date in the
list.
3. Press TIME to return to the Time of Day display.
Review Seconds
1. Press SECOND . The seconds display in the two rightmost digits.
2. Press TIME . The display returns to hours and minutes.
Status Display for Program Review and Input Review
Figure 7 on the next page illustates the organization of Program Status and
Input Status information, which is described in the sections on Program
Review (Step A: Program Status on p. 32) and Input Review (p. 34). The
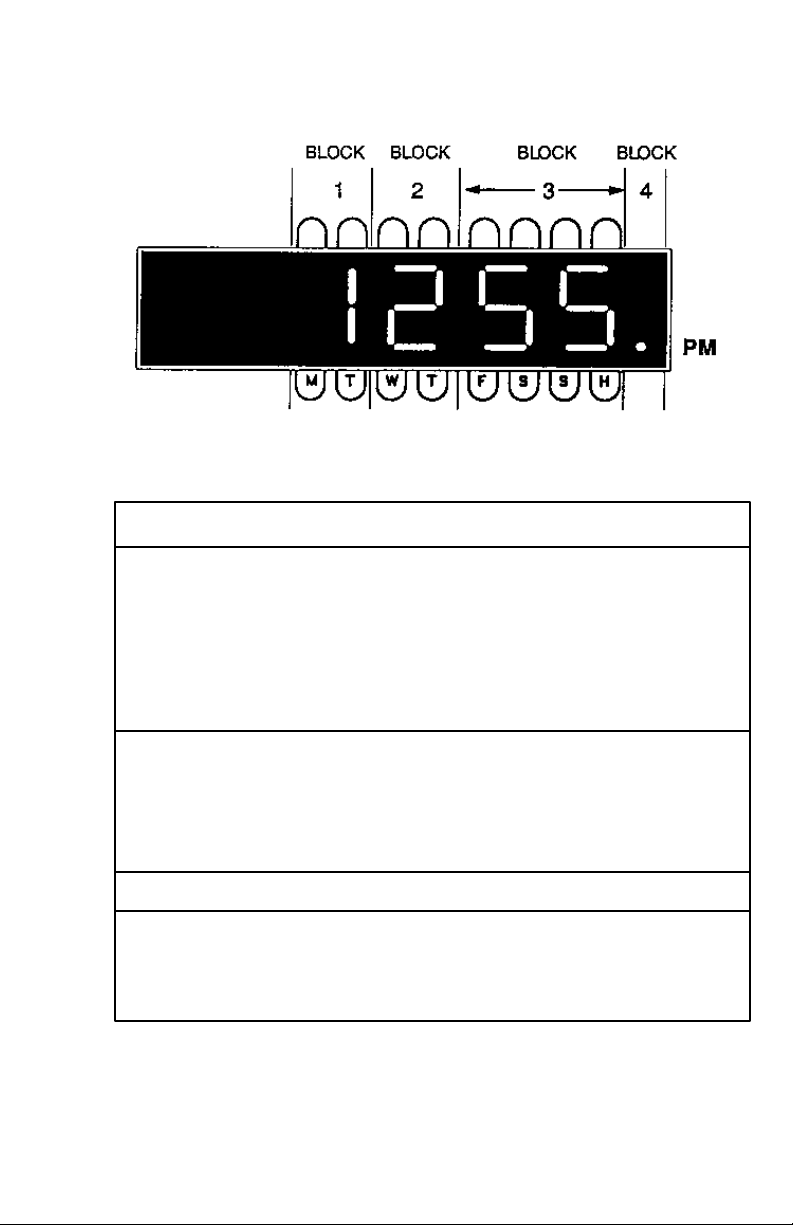
"Status Blocks" shown here are locations on the display where status
information appears. In particular, Blocks 1 and 2 consist of the two middle
digits of the display, Block 3 is the two rightmost digits, and Block 4 is
simply the decimal point. When these blocks contain the characters described
in the adjoining chart, they can tell you much about the program or input you
are reviewing.
30 User's Guide
Page 33
ChronTrol XT Series Timers
Figure 7: Status Blocks
BLOCK # DESCRIPTION
1 Type
– – Indicates Input
P – Indicates On/Off Program
0 – Indicates ON - then - OFF Interval Program
1 – Indicates OFF only Interval Program
2 – Indicates OFF - then - ON Interval Program
3 – Indicates ON only Interval Program
2 Interval Program Activity Indicator.
– (dash) Indicates Interval Program is executing.
However, a dash after a dash or P is only a
separator.
() (blank) Indicates Interval Program is not executing.
3 Program or Input Number.
4 Activity Indicator.
Lights when program under review is active or when
input under review is enabled.
For example, P – 04. indicates that the program under review is an ON/OFF
program; its program number is 4; and it is active.
User's Guide 31
Page 34

XT Series Timer ChronTrol
Program Review
You can review seven different types of program information. As with the
procedure for Setting a Program, you do not have to review in any particular
sequence.
Begin Program Review
1. Press REVIEW . E– displays.
2. Type the program number (1-40) you wish to review.
3. Proceed to any of Steps A - H.
Step A: Program Status
You can review the status of a program (active or inactive) and whether it is
an On/Off Program or Interval Program. If it is an Interval Program, you
can determine which of four types it is: ON - then - OFF, OFF - then - ON,
ON only, or OFF only.
1. Press REVIEW . Program status displays. See Figure 7 for status
information.
2. Proceed to any of Steps B - H.
Step B: Control Assignments
You can review the list of circuits, programs, and inputs controlled by this
program.
1. Press CIRCUIT, then REVIEW. The first assignment displays. If no
assignments are set or you reach the end of the list, a dash (–) appears on
the display.
2. Press REVIEW repeatedly to move through the list one entry at a time.
Assignments display in numerical order. Pressing CIRCUIT followed by
REVIEW at any time returns you to the beginning of the list.
3. Proceed to any of Steps B - H.
Step C: ON Time
1. Press ON to review the On time in hours and minutes.
2. Optional - Press SECOND to review hours, minutes, and seconds.
3. Optional - Press DATE to review the On date, if any.
4. Proceed to any of Steps A - H.
32 User's Guide
Page 35

ChronTrol XT Series Timers
Step D: OFF Time
1. Press OFF to review the Off time in hours and minutes.
2. Optional - Press SECOND to review hours, minutes, and seconds.
3. Optional - Press DATE to review the Off date, if any.
4. Proceed to any of Steps A - H.
Step E: Interval Length
1. Press INTERVAL to review the interval length in hours and minutes. If
the program is an On/Off Program, the display shows Program Status
(P–n) instead of interval length (see Step A: Program Status above).
2. Optional - Press SECOND to review hours, minutes, seconds.
3. Optional - Press DATE to review the interval length in days, if any.
4. Proceed to any of Steps A - H.
Step F: Omitted Days
1. Press DAY/OMIT to review skipped days. See LED Indicators in Section
1 for display information.
2. Proceed to any of Steps A - H.
Step G: Cycle Length
If no cycle length is set, an On/Off Program turns ON and OFF at the same
time each day (except skipped days). To review a cycle length, follow this
procedure:
1. Press CYCLE to review the cycle length in hours and minutes.
2. Optional - Press SECOND to review hours, minutes, and seconds.
3. Optional - Press DATE to review the cycle length in days, if any.
4. Proceed to any of Steps A - H.
Step H: Exit Program Review
To exit the review at any time, press TIME .
User's Guide 33
Page 36

XT Series Timer ChronTrol
Input Review
If your XT is equipped with inputs, you can review the status of an input
(enabled or disabled) and what circuits, programs, or other inputs it controls.
1. Press ENTER , then INPUT . – – displays.
2. Type the number (1-8) of the input you want to review.
3. Press ENTER . Status displays. See Figure 7 for status information.
You can review the list of circuits and other assignments controlled by this
input by stepping through each assignment in sequence.
4. Press REVIEW. The first assignment displays. If no assignments are set
or you reach the end of the list, a dash (–) displays.
NOTE: If the decimal point on the display is lit, the control
assignment is turned ON by this input. If the decimal
point on the display is unlit, the control assignment is
turned OFF by this input.
5. Press REVIEW repeatedly to move through the list one entry at a time.
Assignments display in numerical order. Pressing CIRCUIT followed by
REVIEW at any time returns you to the beginning of the list.
6. To exit the review at any time, press TIME .
Cross Reference Review
Cross Reference review is a quick way to identify which programs and inputs
control a given Control Assignment (circuit, program, or input).
1. Press CIRCUIT . C– displays, OR press
PROGRAM . P– displays, OR press
INPUT . – – displays.
2. Type the number of the Control Assignment you wish to find.
3. Press REVIEW. ChronTrol begins scanning all programs and inputs, and
displays the number of the first program or input that controls this
Control Assignment.
4. Press REVIEW repeatedly to search for more. A dash (–) indicates there
are no more.
5. Press TIME to return to the Time of Day display when you are finished.
NOTE: If you skip step 2, ChronTrol stops at all programs and
inputs that control anything.
34 User's Guide
Page 37

ChronTrol XT Series Timers
Countdown Timer
To view the time remaining until a program switches any given circuit,
program, or input, follow this procedure:
1. Press CIRCUIT . C– displays.
PROGRAM . P– displays.
INPUT . – – displays.
2. Type the number of the circuit, program, or input you wish to review.
If the control assignment is included in more than one program, press
ENTER repeatedly until the specific program you wish to view in
Countdown Mode displays.
3. Press TIME . The Time of Day displays.
4. Press ON to review the time remaining until the control assignment is
turned ON or press OFF to review time remaining until control
assignment is turned OFF
NOTE: For Interval Programs Type 2 and Type 3, press ON to
review the time remaining until the control assignment
is turned OFF, and OFF to review the time remaining
until the control is turned ON.
5. Press TIME to return to the Time of Day display when you are finished.
User's Guide 35
Page 38

XT Series Timer ChronTrol
Changing Program Entries
To change a program, use the setting procedure outlined in the section
Program Review above. As the value for each parameter displays (control
assignments, on and off times and dates, cycle length, day omission), type in
the new value followed by ENTER or followed by the key corresponding to
the next parameter to be changed (if more than one parameter is to be
changed). Press ENTER followed by TIME to return to the Time of Day
display when you are finished.
NOTE: If you begin to change the value of a parameter by
mistake, pressing the parameter key again restores
the original value.
Deleting Program Entries
Follow the procedure outlined in the section Program Review. As the value
for each parameter you want to delete is displayed (control assignments, on
and off times and dates or interval length, cycle length, day omission), press
CLEAR followed by ENTER. To remove a program from memory entirely,
continue to clear the remaining values.
Factory Settings (Defaults)
When you first install ChronTrol’s XT timer, the following parameters are in
effect:
• All programs are active
• All inputs are enabled (applies to XT’s equipped with N8 Input Option)
• Date is set to 30199 (March 1, 1999)
• Time is set at 12:00:00 a.m. and counting.
• No Lock Code is set or active
36 User's Guide
Page 39

ChronTrol XT Series Timers
Section 4: Sample Programs
Program 1: Daylight Saving Time 38
Program 2: Sequence Start 38
Program 3: On/Off Program with Day Omit 38
Program 4: Interval Program with Cycle Length 39
Program 5: On/Off Program with Cycle Length 40
Program 6: On/Off Program with Day-based Cycle 40
Program 7: 24-hour based Program 41
Program 8: Program Controlling Program 42
Program 9: Using Inputs 43
Program 10: Re-trigger and Time Out 44
Program 11: School Bells 45
Program 12: Delay Program 45
User's Guide 37
Page 40

XT Series Timer ChronTrol
Sample Program 1: Function 1 - Daylight Saving Time
In most cases it is advisable to let ChronTrol handle the change at Daylight
Saving Time automatically every year. However, it may be necessary or
desirable to disable it. Turn Automatic DST on and off as follows:
1. Press ENTER, FUNCTION, then 1. F–01 displays.
2. Press ENTER. The decimal point lights up if DST is enabled.
3. Press ON or OFF to enable or disable the function. The decimal point
lights accordingly.
4. Press ENTER. The function is set and the display shows Time of Day.
You may hit TIME to exit from this procedure at any point.
Sample Program 2: Function 2 - Sequence Start
You can specify the rate at which circuits restore to the ON position
following a power failure by setting the value of Function 2 in seconds (up to
99 seconds). The default value is 0 seconds, so all circuits turn back on at
once following a power failure. Adjust the Sequence Start rate as follows:
1. Press ENTER, FUNCTION, then 2. F–02 displays.
2. Press ENTER. The Sequence Start rate in seconds displays.
3. Type in the value you want for Sequence Start in seconds, up to 99.
4. Press ENTER. The function is set and the display shows Time of Day.
You may hit TIME to exit from this procedure at any point.
Sample Program 3: On/Off Program with Day Omit
Desired effect: Turn on the heat in building zones 1 and 2 between 6 a.m.
and 6 p.m., Monday through Friday, but zone 2 only on Saturday and Sunday
between 6 a.m. and 4 p.m.
Plan: Zone 1 is controlled by Circuit #1. Zone 2 is controlled by Circuit #2.
Set Program #1
1. Press ENTER, then 1. E–01 displays.
2. Press CIRCUIT, then 1. C–01 displays.
3. Press CIRCUIT, then 2. C–02 displays.
4. Press ON, then 6 0 0. 600 displays.
5. Press OFF, then 6 0 0 AM/PM. 600. displays.
6. Press DAY/OMIT, then 6 7. Strokes for Saturday and Sunday display.
7. Press ENTER to store the last entry followed by TIME to return to the
Time of Day display.
38 User's Guide
Page 41

ChronTrol XT Series Timers
Set Program #2
1. Press ENTER, then 2. E–02 displays.
2. Press CIRCUIT, then 2. C–02 displays.
3. Press ON, then 6 0 0. 600 displays.
4. Press OFF, then 4 0 0 AM/PM. 400. displays.
5. Press DAY/OMIT, then 1 2 3 4 5. Strokes for Monday through Friday
display.
6. Press ENTER to store the last entry followed by TIME to return to the
Time of Day display.
Sample Program 4: Interval Program with Cycle
Desired effect: To turn Circuit #3 ON for one second, then OFF for four
seconds, over and over again.
Plan: Make the next available program a 1-second On-Off Interval with a 5second Cycle Length. Start and stop the program through the keyboard.
Set Program #1.
1. Press ENTER ENTER. P–n. displays, where n is the number of the next
available program.
2. Press CIRCUIT, then 3. C–03 displays.
3. Press INTERVAL, then 0. 0000 displays.
4. Press SECOND, then 1. 000001 displays.
5. Press CYCLE 0 SECOND 5. 000005 displays.
6. Press ENTER to store the last entry, then press TIME to return to the
Time of Day display.
Start the Program.
1. Press PROGRAM n ON, where n is the same program number given
above. Time of Day displays and Circuit #3 starts clicking ON and OFF.
Stop the Program.
1. Press PROGRAM n OFF. Time of Day displays and Circuit #3 stops
clicking. NOTE: Circuit #3 will remain ON if you turned the program
OFF before it turned the circuit OFF.
User's Guide 39
Page 42

XT Series Timer ChronTrol
Sample Program 5: On/Off Program with Cycle Length
Desired Effect: To turn Circuit #4 On for 10 seconds every minute starting
at 2 p.m.
Plan: Set Program #4 to turn Circuit #4 ON at 2:00 p.m. and OFF at
2:00:10, on a 1 minute cycle.
Set Program #4
1. Press ENTER, then 4. E–04 displays.
2. Press CIRCUIT, then 4. C–04 displays.
3. Press ON, then 200 AM/PM. 200. displays.
4. Press OFF 200 SECOND 10 AM/PM. 20010. displays.
5. Press CYCLE, then 1. 0001 displays.
6. Press ENTER to store the last entry followed by TIME to return to the
Time of Day display.
When the clock reaches 2 p.m., Circuit #4 will begin turning ON for 10
seconds and OFF for 50 seconds, over and over. If you disable Program #4
(PROGRAM 4 OFF) you will observe that the switching stops. When you
enable the program once again (PROGRAM 4 ON), you will see the switching
resume, but not until the next whole minute is reached. In other words, the
program has remained in step with the clock while it was disabled.
Sample Program 6: Program with a Day-based Cycle
Desired Effect: To sample carbon monoxide emissions at the same time
during rush hour on Monday the first week, on Tuesday the second week, etc.,
that is, every eighth day.
Plan: Set Program #12 to switch Circuit #2 on for 1 minute at 7:30 a.m. on
an 8-day cycle.
1. Press ENTER, then 1 2. E–12 displays.
2. Press CIRCUIT, then 2. C–02 displays.
3. Press ON, then 7 3 0. 730 displays.
4. Press OFF, then 7 3 1 731 displays.
5. Press CYCLE, then DATE, then 8. 008 displays.
6. Press ENTER to store the last entry followed by TIME to return to the
Time of Day display.
40 User's Guide
Page 43

ChronTrol XT Series Timers
To review the cycle length:
1. Press ENTER, then 1 2. E–12 displays.
2. Press CYCLE. C displays.
3. Press DATE. 008 displays.
4. Press TIME to return to the Time of Day display.
NOTE: These times will not occur 192 hours apart during the
weeks that Daylight Saving Time starts and ends.
Sample Program 7: 24-hour based Program
Desired Effect: Have a circuit turn ON every day and not be affected by
Daylight Saving Time. A 24-hour-based program is used so that the time
between events is always 24 hours, regardless of DST.
Plan: Set Program #8 to turn on Circuit #1 every 24 hours beginning at 4:00
p.m. Depending on what day of the year the program is set, its setting will
shift to 3:00 p.m. or 5:00 p.m. at some point.
1. Press ENTER, then 8. E–08 displays.
2. Press CIRCUIT, then 1. C–01 displays.
3. Press ON, then 4 0 0 AM/PM. 400. displays.
4. Press OFF, then 4 0 0. 400 displays.
5. Press SECOND, then 3, then AM/PM. 40003. displays.
6. Press CYCLE, 0, DATE, then 1. 001 displays.
7. Press ENTER to store the last entry followed by TIME to return to the
Time of Day display.
User's Guide 41
Page 44

XT Series Timer ChronTrol
Sample Program 8: One Program Controlling Another
Desired Effect: To turn a circuit on for one second, at the same time every
day, for one month every year. Subsequently, another program may control it
for a different time.
Plan: Program #20 is an Interval program that turns on Circuit #1 for 1
second whenever the program is activated, and then repeats the operation
every 24 hours until it is stopped. Program #1 starts Program #20 at 6:15
a.m. on March 1 and stops it on April 1 at midnight.
Set Program #1.
1. Press ENTER, then 1. E–01 displays.
2. Press PROGRAM, then 2 0. P–20 displays.
3. Press ON. A dash (–) displays if no previous On time has been set for
this program.
4. Press 6 1 5. 615 displays.
5. Press DATE, then 3 0 1. 301 displays.
6. Press OFF. A dash (–) displays if no previous OFF time has been set for
this program.
7. Press 1 2 0 0. 1200 displays.
8. Press DATE, then 4 0 1. 401 displays.
9. Press ENTER to store the last entry, then press TIME to return to the
Time of Day display.
Set Program #20.
1. Press ENTER, then 20. E–20 displays.
2. Press CIRCUIT, then 1. C–01 displays.
3. Press INTERVAL 0 SECOND 1. 000001 displays.
4. Press CYCLE, then 0. 0000 displays.
5. Press ENTER to store the last entry, then press TIME to return to the
Time of Day display.
42 User's Guide
Page 45

ChronTrol XT Series Timers
Sample Program 9: Using Inputs
Desired Effect: When a Start signal is received, turn On Circuit #1 for 5
seconds and OFF for 5 seconds until a Stop signal is received. At the same
time, turn Circuit #2 ON for 10 seconds and OFF for 10 seconds until the
Stop signal is received.
Plan: The Start and Stop signals are presented to the ChronTrol through
Inputs #1 and #2 respectively. Circuits #1 and #2 are controlled by Programs
#1 and #2 respectively.
Set Input #1.
1. Press ENTER INPUT, then 1. – –01 displays.
2. Press PROGRAM, then 1. P–01 displays.
3. Press ON. P–01. displays.
4. Press PROGRAM 2 ON. P–02. displays.
5. Press ENTER to store the last entry, then press TIME to return to the
Time of Day display.
Set Input #2.
1. Press ENTER INPUT 2. – –02 displays.
2. Press PROGRAM 1 OFF. P–01 displays.
3. Press PROGRAM 2 OFF. P–02 displays.
4. Press CIRCUIT 1 OFF. C-01 displays.
5. Press CIRCUIT 2 OFF. C-02 displays.
6. Press ENTER, then press TIME.
Set Program #1.
1. Press ENTER, then 1. E–01 displays.
2. Press CIRCUIT, then 1. C–01 displays.
3. Press INTERVAL, then 0. 0000 displays.
4. Press SECOND, then 5. 000005 displays.
5. Press CYCLE 0 SECOND 1 0. 000010 displays.
6. Press ENTER, then press TIME.
Set Program #2.
1. Press ENTER, then 2. E–02 displays.
2. Press CIRCUIT, then 2. C–02 displays.
3. Press INTERVAL 0 SECOND 1 0. 000010 displays.
4. Press CYCLE 0 SECOND 2 0. 000020 displays.
5. Press ENTER, then press TIME.
User's Guide 43
Page 46

XT Series Timer ChronTrol
Sample Program 10: Re-trigger and Time Out
Desired Effect: To stop a motor when 10 seconds have elapsed without a
signal from a detector.
Plan: The detector provides a switch closure to Input #3 whenever an object
passes on a conveyer. The signal re-starts Program #7, a 10-second Off
Interval Program, so the conveyer motor on Circuit #2 won't turn off until 10
seconds have passed since the last signal.
Set Input #3
1. Press ENTER INPUT 3. – –03 displays.
2. Press CIRCUIT 2 ON. C–02. displays.
3. Press PROGRAM 7 ON. P–07. displays.
4. Press ENTER, then TIME to return to the Time of Day display.
Set program controlling Circuit #2.
1. Press ENTER, then 7. E–07 displays.
2. Press CIRCUIT, then 2. C–02 displays.
3. Press OFF INTERVAL, then 0. 0000 displays.
4. Press SECOND, then 1 0. 000010 displays.
5. Press ENTER. The display shows 1 07, indicating that Program #7 is a
Type 1 (Off only) Interval Program.
6. Press TIME to return to the Time of Day display.
Sample Program 11: School Bells
Desired Effect: To ring a bell at 7 a.m., 7:05 a.m., and various other times
throughout the day.
Plan: Program #15 is a 3-second interval that rings the bell on Circuit #1,
and skips Saturday, Sunday, and holidays. Programs #1-12 call upon
Program #15 at various times throughout the day.
Set Program #1.
1. Press ENTER ENTER. P–01. displays.
2. Press PROGRAM, then 15. P–15 displays.
3. Press ON, then 7 0 0. 700 displays.
4. Press ENTER, then TIME.
Set Program #2.
1. Press ENTER ENTER. P–02. displays.
2. Press PROGRAM, then 15. P–15 displays.
44 User's Guide
Page 47

ChronTrol XT Series Timers
3. Press ON, then 7 0 5. 705 displays.
4. Press ENTER, then TIME.
Repeat the above steps, substituting the time for each bell in step 3, until all
times have been entered.
Set Program #15.
1. Press ENTER 1 5. E–15 displays.
2. Press CIRCUIT 1. C–01 displays
3. Press INTERVAL 0 SECOND 3. 000003 displays.
4. Press DAY OMIT, then 6 7 8 to skip Saturday, Sunday, and holidays.
5. Press ENTER, then TIME to return to the Time of Day display.
Sample Program 12: Delay Program
Desired Effect: After a Start command, delay 45 seconds before turning
Circuit #2 ON for 15 seconds
Plan: Program #1 is an On-only Interval Program that turns on Program #2
after an interval of 45 seconds. Program #2 turns ON Circuit #1 for 15
seconds.
Set Program #1.
1. Press ENTER, then 1. E–01 displays.
2. Press PROGRAM, then 2. P–02 displays.
3. Press ON INTERVAL 0 SECOND 4 5. 000045 displays.
4. Press ENTER. The display shows 3 01, indicating that Program #1 is a
Type 3 (On only) Interval Program.
5. Press TIME.
Set Program #2.
1. Press ENTER, then 2. E–02 displays.
2. Press CIRCUIT, then 1. C–01 displays.
3. Press INTERVAL 0 SECOND 1 5. 000015 displays.
4. Press ENTER to store the last entry, then press TIME to return to the
Time of Day display.
5. When you’re ready, press PROGRAM 1 ON to give the Start command.
User's Guide 45
Page 48

XT Series Timer ChronTrol
Appendix A: Special Programming
Considerations
The following subsections discuss special programming considerations and
programming techniques for the XT.
Interval Timing
If your application requires an Interval Program, it is important to identify
how you want the program to affect its control assignments. Review the
corresponding type of Interval (0-3) from the list below before setting an
Interval Program. The key sequence is different for each type.
There are four ways an Interval Program can be used to switch its control
assignments:
Type 0 ON for a length of time, then OFF. Key sequence: ON OFF
INTERVAL (or INTERVAL alone; Type 0 Interval is
assumed), then the duration. Duration is the length of time
ON before switching OFF. Think of it as “ON, then OFF
after an INTERVAL of n”.
Type 1 OFF after a length of time, regardless of current condition.
Key sequence: OFF INTERVAL, then the duration.
Duration is the length of time before switching OFF. Think
of it as “OFF after an INTERVAL of n”.
Type 2 OFF for a length of time, then ON. Key sequence: OFF ON
INTERVAL and duration. Duration is the length of time
OFF before switching ON. Think of it as “OFF, then ON
after an INTERVAL of n”.
Type 3 ON after a length of time, regardless of current condition.
Key sequence: ON INTERVAL and duration. Duration is
the length of time before switching ON. Think of it as “ON
after an INTERVAL of n”.
46 User's Guide
Page 49

ChronTrol XT Series Timers
Overlapping Midnight
You may need to consider how the Day Omission feature affects a program
with ON and OFF times that overlap midnight.
For instance, suppose you enter a program schedule which begins at 9:30 p.m.
and ends at 12:30 a.m. Monday through Friday (omitting Saturday and
Sunday). The event which begins on Friday at 9:30 p.m. will not end at 12:30
a.m. the next day because the next day is Saturday, and Saturday has been
omitted. Since Sunday is also omitted, the next time the program will turn
OFF is 12:30 a.m. Monday morning,
If the program must finish its execution on the omitted day (Saturday), and
not turn ON that day, a second program must be entered. This program would
need to turn OFF at 12:30 a.m. and omit all days of the week but Saturday.
Cycles and Daylight Saving Time
This section discusses the difference between a day and a 24-hour period and
how Daylight Saving Time affects programmed events occurring during the
“changeover” hour.
A “day” begins at midnight (12:00:00 a.m.) and ends just before midnight
(11:59:59 p.m.) Ordinarily this is 24 hours, except when Daylight Saving
Time begins and ends. A “24-hour” period, on the other hand, is exactly that:
24 hours between occurrences of an event.
You may need to consider how Daylight Saving Time will influence both daybased programs and 24-hour-based programs whenever an event occurs
during the changeover hour.
Day-Based Programs at the Start of DST
On the first day of Daylight Saving Time (2 a.m. on the first Sunday in April),
a day-based program that occurs each day at 2:30 a.m. will occur at 3:30 a.m.
because the clock advanced 1 hour at 2 a.m. On the second day of Daylight
Saving Time the event will occur when the clock reads 2:30 a.m., but only 23
actual hours will have elapsed since its last occurrence.
Any event scheduled to occur later in the hour between 2 and 3 a.m. than
an event occurring between 3 and 4 a.m. will occur “out of order” in the
changeover hour. For instance, an event scheduled for 3:15 a.m. will occur
half an hour BEFORE an event occurring at 2:45 a.m. This happens because
ChronTrol runs these two hours at the same time.
User's Guide 47
Page 50

XT Series Timer ChronTrol
Day-Based Programs at the End of DST
When Daylight Saving Time ends at 2 a.m. on the last Sunday in October, the
event mentioned earlier will occur when the clock reads 2:30 a.m., even
though 25 actual hours will have elapsed since its last occurrence, because
the clock fell back one hour at 2 a.m.
Also, day-based programs scheduled to occur in the hour between 1:00 a.m.
and 2:00 a.m., the “repeated hour,” will occur only once, during the first
running of that hour.
24-Hour Based Programs at the Start of DST
A program set to occur every 24 hours starting at 2:30 a.m. will continue the
24-hour cycle regardless of the clock time. On the first day of Daylight
Saving Time, the event will occur 24 hours after the last occurrence, but the
clock will read 3:30 a.m. because it advanced 1 hour at 2 a.m. The next day
the event will also occur at 3:30 a.m. and each day thereafter.
24-Hour Based Programs at the End of DST
When Daylight Saving Time ends, the event will go back to occurring when
the clock reads 2:30 a.m. because the clock fell back one hour at 2 a.m., but
there will always be 24 hours between occurrences.
How to set a Day-Based Program
A day-based program is set by leaving out the hours and minutes in the Cycle
Length, and using only days.
By definition, a program with no cycle length is a day-based program; that is,
it will repeat at the same time every day, regardless of whether the day is 23,
24, or 25 hours long.
(Remember that a program with an On Date or Off Date will repeat once
every calendar year if no cycle length is set, regardless of whether the year is
365 or 366 days long).
Sample Programs 4 through 7 illustrate applications in which events repeat at
rates other than every day. When you review the cycle length of a day-based
program, a “C” displays. This is an indication to you that, even though no
hours and minutes of the cycle have been set, cycle days are set.
48 User's Guide
Page 51

ChronTrol Service
ChronTrol Service, during or after the warranty period, is available from ChronTrol
Corporation, 6160 Fairmount Ave., San Diego, CA 92120. (619) 282-8686.
Should you have difficulty with ChronTrol, return the unit postpaid with a description
of the problem experienced.
Enclose $5.00 to cover the shipping and handling charges on all returns. If under
warranty, no additional charges will be made. Non-warranty repair costs will be
advised for approval prior to correction and return.
CAUTION: There are no user-serviceable parts inside a ChronTrol Timer. Servicing
must be performed by a ChronTrol Corporation Authorized Service Technician.
Warranty
ChronTrol Timers are warranted to be free from defects in workmanship or material
under normal use and service for a period of one (1) year from the date of purchase
by the user.
ChronTrol Corporation’s obligation under this Warranty is limited to repairing or
replacing at its Factory Service Center any product which shall, within the time limit set
forth above, be received at its Factory Service Center with transportation charges
prepaid provided that ChronTrol Corporation’s examination discloses to its
satisfaction that such product is defective.
Any adjustment or replacement of defective parts made under this Warranty does not
void the Warranty; nor does it extend the original Warranty period.
This Warranty shall not extend to any ChronTrol product which has been tampered
with or repaired by someone other than ChronTrol Corporation’s Authorized Service
Technician, nor to any product which has been subject to misuse, neglect, accident or
damage, or which has not been properly installed and tested in operation.
Under no circumstances shall ChronTrol Corporation be liable to any purchaser or
third party for any loss of profits or other direct or indirect costs, expenses, losses or
consequential damages arising out of, or as a result of, any defects in, or failure of, its
products, or any part or parts thereof.
This Warranty is in lieu of any other warranty, either expressed or implied, as
to description, quality, merchantability, fitness for any particular purpose or
use, or any other matter.
Copyright 2001 ChronTrol Corporation
 Loading...