

Page 1
PQ402-6
161-049460-001
FEBRUARY, 1999
4 CES
SERVICE MANUAL
(Supersedes PQ402-5)
Chromalox Electric
Steam Boilers
© 2010 Chromalox, Inc.
Boiler does not heat:
1. Check power fusing.
2. Examine control circuit fuse.
3. Reset button on the Low Water Control must be depressed (for
states requiring a reset button).
4. Float valve in the Low Water Control is not functioning properly.
5. Elements and/or contactors faulty.
6. Mercury tube in Low Water Control has cracked and mercury
has escaped.
Boiler takes too long to reach operating pressure or
does not maintain desired pressure:
1. Check amperage on each supply leg of power harness. Reading
should correspond to a rating of not less than 10% of rated boiler amperage.
If considerable difference exists:
A. Available voltage is insufficient for boiler needs.
B. Heating element failure has occurred.
C. Fibre carrier in contactor requires replacement. On multi
contactor units, check contactors and coils to determine if
one is defective.
2. Check to determine whether boiler selected is underrated for
the application.
3. Additional Equipment added after initial installation, thus
undersizing boiler.
4. Steam piping not insulated.
Boiler continuously blows power fuses:
1. External fusing is not sized properly. Correct sizing is next size
larger than boiler rating.
2. Check lines between element and contactors with an ammeter
for uniform readings.
3. Check for evidence of charring which indicates loose connections.
4. A short circuit exists in the boiler.
Boiler does not fill with water automatically or does not
maintain constant pressure:
1. Check water supply line for closed valves.
2. Check power fusing.
3. For boiler without motor and pump assembly: check pressure
of water supply to insure that it is consistently a minimum of
10 psi greater than the desired boiler operating pressure.
4. Check water inlet check valve.
5. For boiler with motor and pump assembly: check mercury
tubes in the Low Water Control.
6. A. Check motor and pump for binding and over
heating. If caught in time, this can be observed
by a humming sound. Replace if defective.
B. Check for defective solenoid valve.
C. Make sure pump is running with correct rotation.
D. Check impeller adjustment on turbine type pumps.
Boiler appears to be leaking from beneath the jacket:
1. Check boiler fittings for looseness; tighten as required.
2. Check boiler fittings for cracks; replace as necessary.
3. Examine heating elements around boiler flange.
IMPORTANT: Leaking is a hazard, correct to prevent further
damage to other components.
Boiler overflows:
1. Float valve on the Low Water Control is stuck in the down
position.
2. Solenoid valve is not operating.
3. Check for defective mercury tube on the Low Water Control if
boiler has a motor and pump assembly.
Pressure increases beyond the preset limits causing
safety valve to blow:
1. Check bellows in the pressure control.
2. Check for clogged syphon tube.
3. Contactor points have fused.
4. Check pressure control setting against safety valve rating.
Manual reset button needs constant resetting (for
states requiring reset buttons only):
1. Boiler is not level; relocate if necessary.
The troubleshooting of Chromalox electric boilers can best be
placed into five major areas. These areas are: (1) fusing (2) contacts, elements and voltages (3) pressure control (4) low water cutoff (5) water feed mechanism.
WARNING: Hazard of Electric Shock and Thermal
Burns. These troubleshooting checks should only
be performed by qualified personnel after review
of the Installation and Operating Instructions for
your specific Chromalox Electric Steam Boiler.
For convenience, we have outlined a brief description of typical
malfunctions and the area that should be explored in order to make
the proper correction. This is followed by a detailed analysis of the
five areas listed above.
TYPICAL MALFUNCTIONS & PROPER CORRECTION
Page 2

Boiler syphons water:
1. Follow blowdown instructions.
Boiler with condensate system floods overnight:
1. Vacuum breaker is not operating.
Elements fail:
1. Low Water Cut-Off system has failed.
2. Lower equalizer tube on Low Water Cut-Off is clogged due to
lack of blowdown.
3. Contactor points have fused.
4. Lack of blowdown has allowed accumulation of foreign mate-
rial, which has smothered the heating elements.
5. Water softener is being used without an aeration device.
Motor runs too frequently and/or the boiler does not
maintain pressure:
1. Test check valve.
Motor runs continuously, but does not pump (CMB-10L
to CES-30):
1. Test flexible coupling on motor and pump.
2. Check water supply.
3. Blowdown valve partially open.
FUSING — The power fuses should be the first component of
equipment checked in any power failure. The fuses will be located in a panel near the boiler (or within the boiler on 72kW and
larger models).
Test each fuse with a test light or an ohmmeter. If the test
light glows or the ohmmeter reads infinite resistance, then the
fuse is defective and must be replaced. Fuses can be intermittent.
If all other boiler components appear to be in proper order,
replace all fuses with known good ones.
If a circuit breaker is used instead of fuses, check to see if all
breakers are in the “on” position. Reset if necessary.
If the fuses continue to blow or the circuit breakers continue
to trip off, then the internal circuits should be investigated for a
short circuit or ground.
CONTACTORS, ELEMENTS AND VOLTAGES
— The power supply voltage must be within ten percent of the
boiler voltage rating. The standard voltages are 120, 208, 240
and 480 volts; optional voltages are 190, 275, 380, 415 and 550
volts. All boilers rated at 275 volts and higher are supplied with a
separate control circuit of either 120, 208 or 240 volts.
To insure good current flow, it is important that all contacts
are mating properly. Contacts that appear burnt or charred must
be replaced.
DETAILED ANALYSIS
Page 3
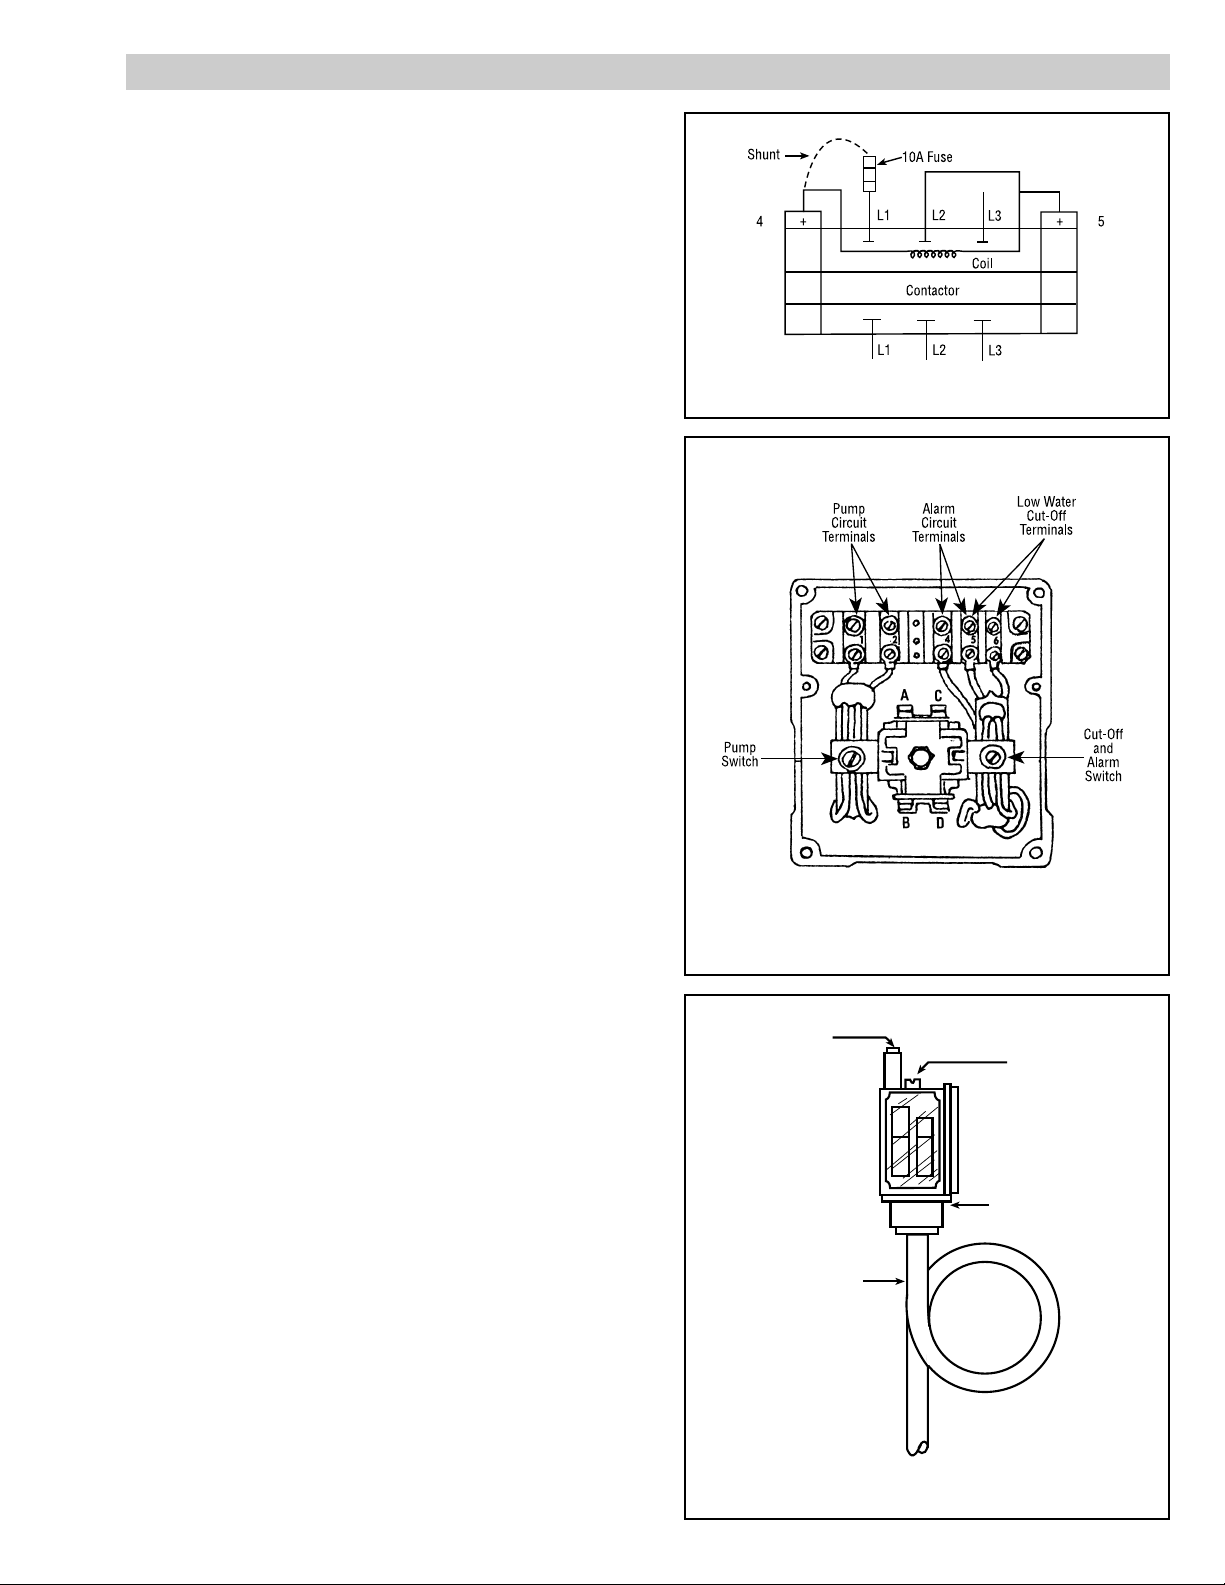
If the contactor fails to energize, check for blown fuses in
the control circuit. If the fuses are not blown, check the contactor holding coil. The holding coil can be checked by jumpering
Terminal L1 of the line and Terminal No. 4 (coil lead) on the
contactor. See Figure 1.
A. If the contactor fails to energize, then the coil is defective.
B. If the contactor energizes, it is an indication of failure in
either the Pressure Control or in the McDonnell-Miller three
wire mercury switch.
Pressure
Control
Setting
Differential
Control
Setting
Bellows
Syphon
Tube
Since the Pressure Control and the three wire mercury switch
are wired in series, they can be checked one at a time by placing
a jumper across each control. If the mercury switch or Pressure
Control fail to energize, check the McDonnell-Miller controls by
jumpering Terminals 5 and 6. See Figure 2.
At this point, the contactor should energize unless there is an
open wire in the control circuit.
PRESSURE CONTROL — Malfunctions in the pressure control
can be mechanical or electrical.
The bellows should be removed and the small orifice at the
bottom cleaned out. The bellows must be replaced if it is punctured. The syphon tubing should also be cleaned by steam while
the control is removed; it will be necessary to join the two loose
leads in order to activate the boiler. See Figure 3.
The electrical controls should be checked by referring to the
Contactors, Elements and Voltages section.
NOTE: If control is purchased locally, remove #8-32 orifice
screw.
Figure 3 — Pressure Control
Figure 2 — Low Water Cut-Off Junction Box
Figure 1
CONTACTOR FAILS TO ENERGIZE
Page 4

2150 N. RULON WHITE BLVD., OGDEN, UT 84404
Phone: 1-800-368-2493 www.chromalox.com
LOW WATER CUT-OFF — Like the pressure control, difficulties can be broken down into the mechanical and electrical
groups.
The mechanical difficulties can be corrected on the high pres-
sure 100 psig motor and pump units in the following manner:
1. Remove the cover and test the free movement of the float
valve. If the float valve is in the off or down position, then the
float is either punctured or dirt and sediment is encrusted in the
float chamber. Both of these problems will involve disassembly of the float chamber.
2. Check the electrical contacts to determine if they are defective.
Defective mercury tube contacts will cause the boiler to fill higher than normal. This occurrence will require replacement of the
mercury tube.
On low pressure feed units, the mechanical test is best made
by cleaning the valve seat beneath the float valve linkage to
assure that it is properly seated. If the valve seat is scarred or
defective, the entire valve seat must be replaced. Also, if the float
valve is in the down or “off” position, it may be punctured or
encrusted with dirt and the unit must be disassembled.
On all McDonnell-Miller cut-offs, restrictions in the equalizer
column can cause burnt out elements. The cause will appear to be
a low water condition. Regular blowdown procedures on the
equalizer column as well as the boiler will prevent this occurrence. Correction of the problem can be made by both removing
the plug from the side of the column and opening the Low Water
Cut-Off blowdown valves. A snake should be used to clean the
vertical and horizontal columns.
The electrical trouble shooting should be checked by referring
to the Contactors, Elements and Voltages section.
WATER FEED MECHANISMS — A common problem in this
area is boiler flooding, which may be caused by a defective float
or solenoid.
The Low Water Cut-Off must be disassembled to check the
float valve. The solenoid can be isolated by disconnecting the
union after the solenoid and energizing and de-energizing the
solenoid. If water comes out continuously or does not come out
at all, then the solenoid is defective.
A defective check valve can cause the pump motor to run
continuously or cause loss of water pressure. If the pipe between
the check valve and the water supply is hot, boiler water is backing up through the check valve and the check valve must be
replaced. A defective check valve can also prevent water from
entering the boiler.
The coupling between the motor and pump may be loose; the
entire pump must be replaced if the coupling is excessively worn.
Limited Warranty:
Please refer to the Chromalox limited warranty applicable to this product at
http://www.chromalox.com/customer-service/policies/termsofsale.aspx.
 Loading...