


Installation Instructions
DTS-HAZ
DTS-HAZ-DC
for use with Self-Regulating, Constant Wattage &
Mineral Insulated Electric Heating Cables
PJ944-13
161-562581-049
1
April, 2021

2

DTS-HAZ & DTS-HAZ-DC
1
2
5
4
7
11
3
8
12
6
10
9
Item Qty Description Item Qty Description
1 1 Control Unit / Junction Box 7 1 RTV
2 1 Line/Ambient Sensing RTD 8 1 O-Ring
3 1 Compression Fitting 9 1 Self-Regulating Cable Grommet
4 1 Locknut 10 1 Constant Wattage Cable Grommet
5 1 Silicone Termination Boot 11 1 9 VDC Battery Connector
6 1 Pipe Standoff 12 1 Protective Sleeve
Certifications & Approvals
Type 4X -60°C<Ta<+55°C
Ordinary areas
only
Ordinary & Hazardous Locations
Class I, Division 2 Groups A*,B,C&D
Class II, Division 2 Groups F & G
*CSA only
CE 0359 IIG Ex e IIC T* Gb Ta -60˚C to 195˚C
IECEx ITS 07.0018X
Ex e IIC T* Gb Ta -60˚C to 195˚C
*For T -Ratings, see heating cable
3

ound) terminal.
General
The DTS-HAZ and DTS-HAZ-DC units are used for
temperature control and electrical termination of selfregulating, constant wattage and mineral insulated (MI)
electric heating cables. Each kit contains the terminations needed to make all electrical connections.
Explanation of Symbols Used:
Means WARNING.
Means Protective Earth (gr
HAZARD OF ELECTRIC SHOCK. Disconnect all
power before starting. All installations must be
effectively grounded in accordance with the
National Electrical Code to eliminate shock
hazard.
Turn off power before removing junction box
cover at all times.
The DTS-HAZ (or DTS-HAZ-DC) digital thermostat kit
is a microprocessor based temperature control and
power connection kit used for freeze protection or process temperature maintenance of pipes or tanks protected by heat tracing products. This thermostat can
be used in ordinary areas as well as Class I, Div 2 or
IECEx/ATEX hazardous area locations.
Do not open when energized. Do not separate
when energized.
A disconnect device and circuit breaker should
be provided in the end installation. The installation and proximity for the disconnect device
must satisfy the electrical Authority having jurisdiction for the installation. Branch circuit
protection should be set for 40 amps or lower.
Users should install adequate controls and
safety devices with their electric heating
equipment. Where the consequences of failure
may be severe, back-up controls are essential.
Although the safety of the installation is responsibility of the user, Chromalox will be glad
to assist in making equipment rec ommendations.
In all cases where the symbol is used on the
product, consult the documentation to find out
the nature of the potential hazard and any actions to be taken.
4

Cable installation instructions: SRL, SRM/E, SRP
CWM cable special instructions denoted by *
WARNING: For pipe temperatures over 500˚F (260˚C) or use with MI cable, use High Temp Adapter Kit
1. Insert heating cable through
pipe standoff and proper grommet as shown. 8 inches of cable
should extend past the grommet. Strap pipe standoff to pipe
with pipe strap (Chromalox type
PS not included) and attach extra cable to pipe as appropriate. If the provided RTD is to be
fed through the standoff pipe, a
small slice will need to be made
to the outer edge of the top of
the grommet. For pipes smaller
than 1-1/2” diameter a small
pipe adapter (Chromalox model
SPA not included) is required.
2.
Score the outer insulation 7
inches from the end of the cable.
Lightly cut the outer jacket up
the center to the end of heating
cable and remove the outer jacket from the cable. WARNING:
DO NOT CUT METAL BRAID.
Note: If using over braid only
cable, skip this step.
3. Move braid back toward the
overjacket, creating a bulge. At
the bulge, separate the braid to
make an opening.
4. While bending the heating cable, work the cable through the
braid opening. Pull the braid
tight.
5.
Score the inner insulation 6 inches from the end. Lightly cut the
inner jacket up the center to end
of heating cable and remove the
inner jacket from the cable.
5
6. Use tin snips or similar tool to
cut excess material from between the buss wires.
*Separate CWM leads and strip
1/4” from each lead wire.

Compression Fitting
Grommet
7. Liberally apply RTV over the exposed matrix and leads. Push
the rubber boot over the heating
cable.
O-Ring
10. Seat O-Ring into compression
fitting groove at base of threads.
Ensure O-Ring is not twisted.
Assemble junction box to compression fitting as shown. Tighten locknut until the junction box
bottoms out against the lip of
the compression fitting.
8. Strip each bus wire so that no
black matrix material shows
above the end of the rubber
boot. Trim lead ends as needed.
9. Slide compression fitting over
cable. Grommet should be
placed inside pipe standoff.
Termination boot should be
spaced 1/2” from sealing grommet. Tighten compression fitting until it bottoms out against
pipe standoff.
3/4” Conduit Hub
with grounding lug
11. Please see the electric diagram for proper wiring for your application.
For over-jacketed cable with internally grounded braid: Grounding braid
shall have the included protective sleeve slid over it once inside the
enclosure. Then, insert grounding braid into grounding terminal. Attach
junction box cover to seal enclosure. Access hole on right is designed
for a 3/4” conduit hub. Note: The conduit hub shall be listed for Class
1, Div. 2; Class II Div. 1 & 2, Class III, Div. 1 & 2, and NEMA 4X rated by
a nationally recognized testing laboratory. For ATEX or IECEx installations, the conduit hub must be certified to ATEX or IECEx.
6

or better.
Up to 277 VAC may be
present at these terminals.
Use 14 AWG copper wire
or better.
Alarm
Contacts
L or L1
N or L2
G
Up to 277 VAC may be
present at these terminals.
Use 10 AWG copper wire
The maximum allowable length of the RTD wire
is 50ft. (15m) in order to remain UL/cUL compliant.
Enclosure lid must be properly sealed prior
to operating. Each of the four (4) screws are
to be evenly tightened by hand with appropriate screw driver ONLY until snug. It is recommended that the lid be secured with a torque
of 12-15 inch-lbs per screw. Overtightening or
uneven tightening may cause the lid to break
which would void all environmental and hazardous location approvals. Due to an electrical
shock hazard, do not operate thermostat if lid
is cracked, broken or uneven with enclosure.
Grounding braid shall have the included
protective sleeve slid over it once inside
the enclosure. Then, insert grounding
braid into grounding terminal.
Be sure to install this device vertically as pictured. This controller utilizes a heat sink which
is designed to cool the unit during operation.
Under no circumstance should air flow around
the controller be compromised in any way.
Failure to do so may result in the overheating
of the controller, product failure, product temperatures which exceed the Hazardous Area
maximum temperature limit and even fire.
7
Start-Up
For up to 30 amp loads, use minimum 10 AWG
wiring or better for 120/277 VAC power input.
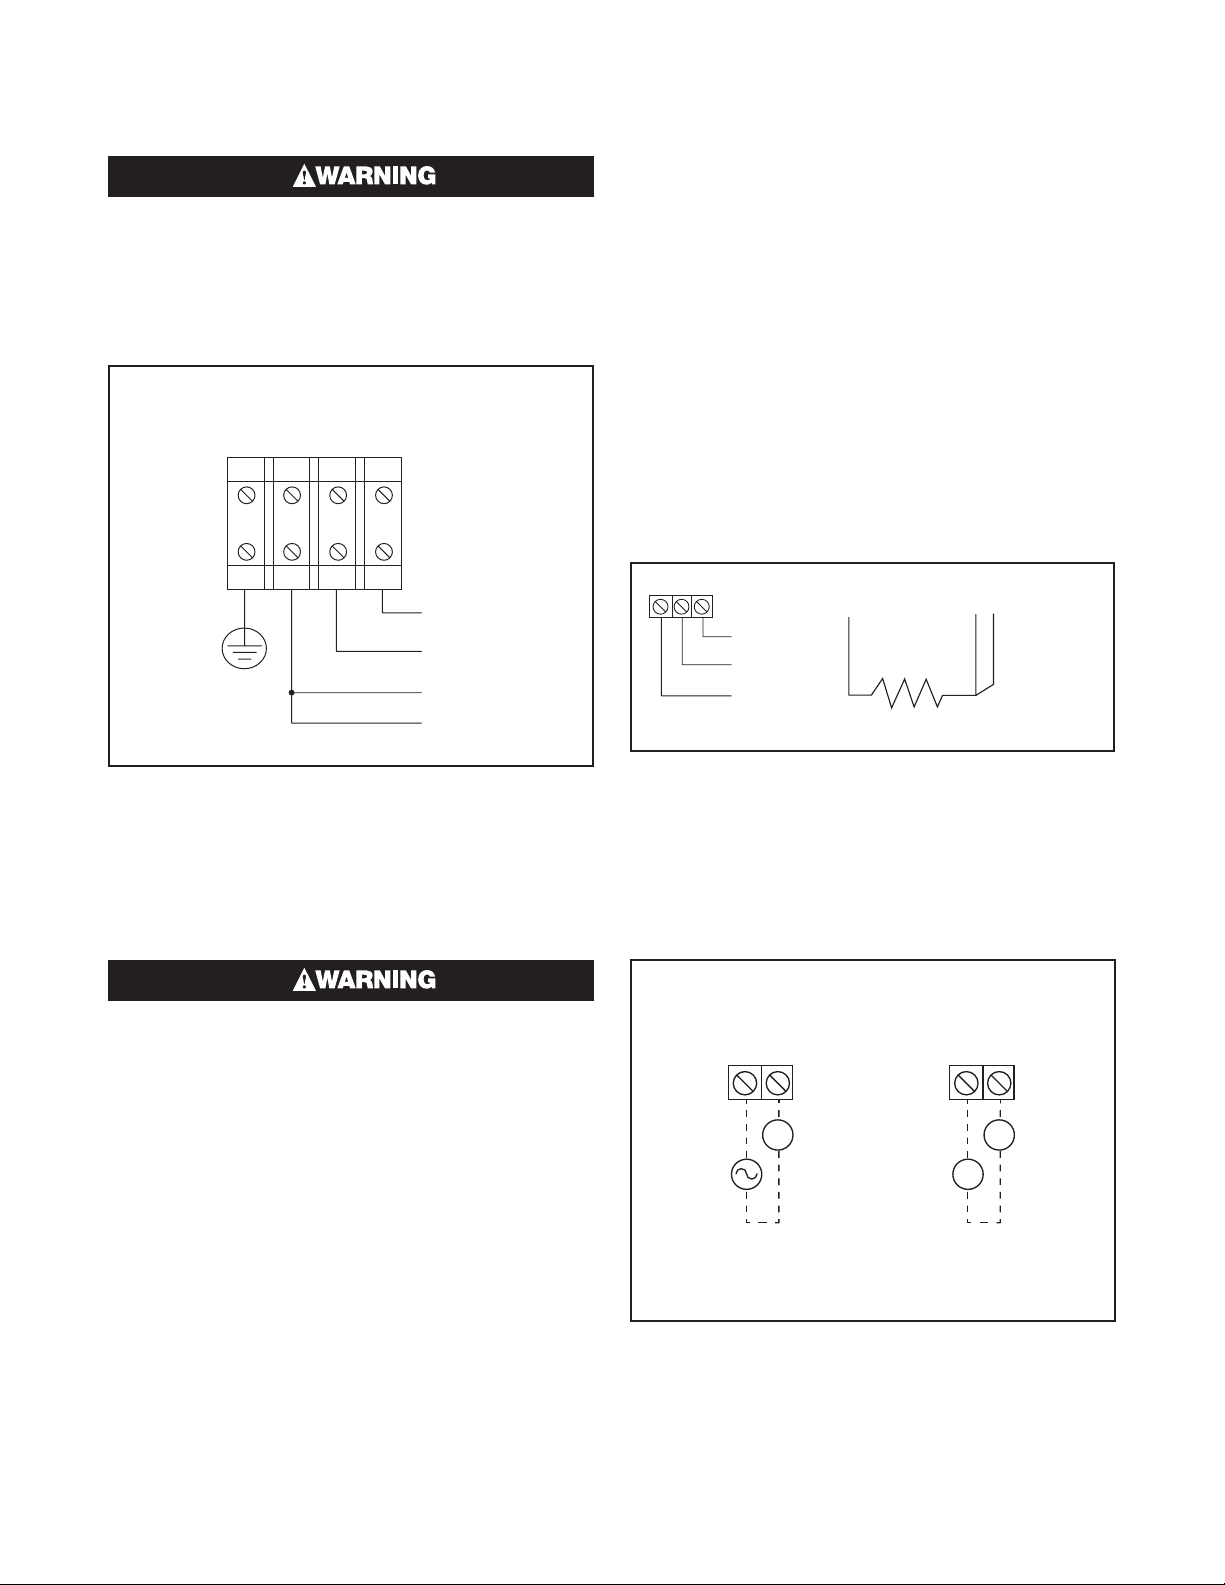
Connecting power to the unit.
1. Powering up with 120/277 VAC: To power up the
unit apply 120/277 VAC to the terminal block according to the schematic below:
Connections for Power, Cable and Earth Ground
AC Power, Earth & Heating Cable
Terminal Blocks
The Load is removed once the temperature is 1/2
way between the Setpoint and the upper limit of
the Deadband.
e. Temperature Units – selection between degrees
Fahrenheit or Celsius.
f. Soft Start Function – The soft start may be en-
abled or disabled. When enabled, the Soft start
algorithm initiates at power on & whenever low
end of dead band is realized. When initiated, 0%
- 100% Power is achieved over 167 seconds.
g. Alarm State – The FACTORY DEFAULT SETTING
IS NORMALLY CLOSED. You may toggle this
setting to Normally Open via the control push
buttons.
Connecting RTD Wire
1. Connect RTD wire according to the schematic:
L or L1 – IN
(AC High)
Cable OUT
Protective
Ground
Cable OUT
N or L2 – IN
(AC Low)
2. Programming with 9VDC battery:
The DTS-HAZ may be programmed with a 9VDC
battery should standard service line voltage be unavailable.
Note: Powering unit with 9VDC should only be used
for programming purposes and not operation of the
unit.
Programming of the 9 VDC battery shall not be
done in hazardous locations.
3. Programming and alarm overview
Digital Thermostat must have the following compo-
nents set to correctly control the temperature:
a. Setpoint – targeted temperature value that con-
troller will aim to reach
b. Hi Temperature Alarm – Temperature at which
the unit goes into high temperature alarm mode.
c. Lo Temperature Alarm – Temperature at which
the unit goes into low temperature alarm mode.
d. Deadband – The allowable temperature differen-
tial between the Set Point and the Sensed Temperature during normal operation. The Deadband
is centered on the Setpoint. The Deadband has a
range of 2 to 10 deg. in 2 degree increments.
RTD
Com
RTD
RTD +
+
White
-
3 Wire RTD
Red
-
COM
Red
Alarm Wiring
The alarm on the DTS unit is a non-arcing, solid state
relay. In order for it to properly function, it must be supplied with either AC or DC voltage, depending on which
model is selected. The alarm on the DTS-HAZ functions only with AC voltage. The alarm on the DTS-HAZDC functions only with DC voltage.
DTS Alarm Wiring Options
DTS-HAZ
Load
DTS-HAZ-DC
+
-
Load
+
=
AC
12-277 VAC
Customer Supplied
Customer Supplied
DC
0-42 VDC
8
Programming
To program the digital Thermostat follow the instructions below:
Press Parameter Display Action
MODE
MODE
MODE
MODE
MODE
MODE
MODE
Set Point
High Temp
Low Temp
Dead Band
Temp. Units
Soft Start
Alarm State
StpT
HItp
LotP
bAnd
UnIt
SSrt
ALrM
Press UP or Down to adjust
the Set Point Temperature
Press UP or Down to adjust
the High Temperature Alarm
Press UP or Down to adjust
the Low Temperature Alarm
Press UP or Down to adjust
the Dead Band From 2˚ to 100˚
Press UP or Down to toggle
between temp units: ˚F or ˚C
Press UP or Down to enable or
disable the Soft Start Function
Press UP or Down to toggle
Alarm State to be Normally Open
or Normally Closed
UP DOWN
UP DOWN
UP DOWN
UP DOWN
UP DOWN
UP DOWN
UP DOWN
Troubleshooting
Alarm Type Display Solution
Sensor Open Sens err Check if your sensor is correctly connected to the unit
Sensor Shorted Sens err Check if your sensor is correctly connected to the unit
Lo Temperature Blinking between sensed
temperature and “LotP”
Hi Temperature Blinking between sensed
temperature and “HitP”
EPR EEprom memory error Press UP & DOWN keys for 2 seconds. Unit will be loaded with
ERR1 Program memory error Program memory corrupt. Solution: Reprogram the unit.
Sensed temperature is below Lo Temp. Threshold. Alarm will be
cleared automatically when sens temp > lo threshold + 5 deg
Sensed temperature is above HI Temp. Threshold. Alarm will be
cleared automatically when sens temp < hi threshold - 5 deg
default settings
Consult Factory.
9
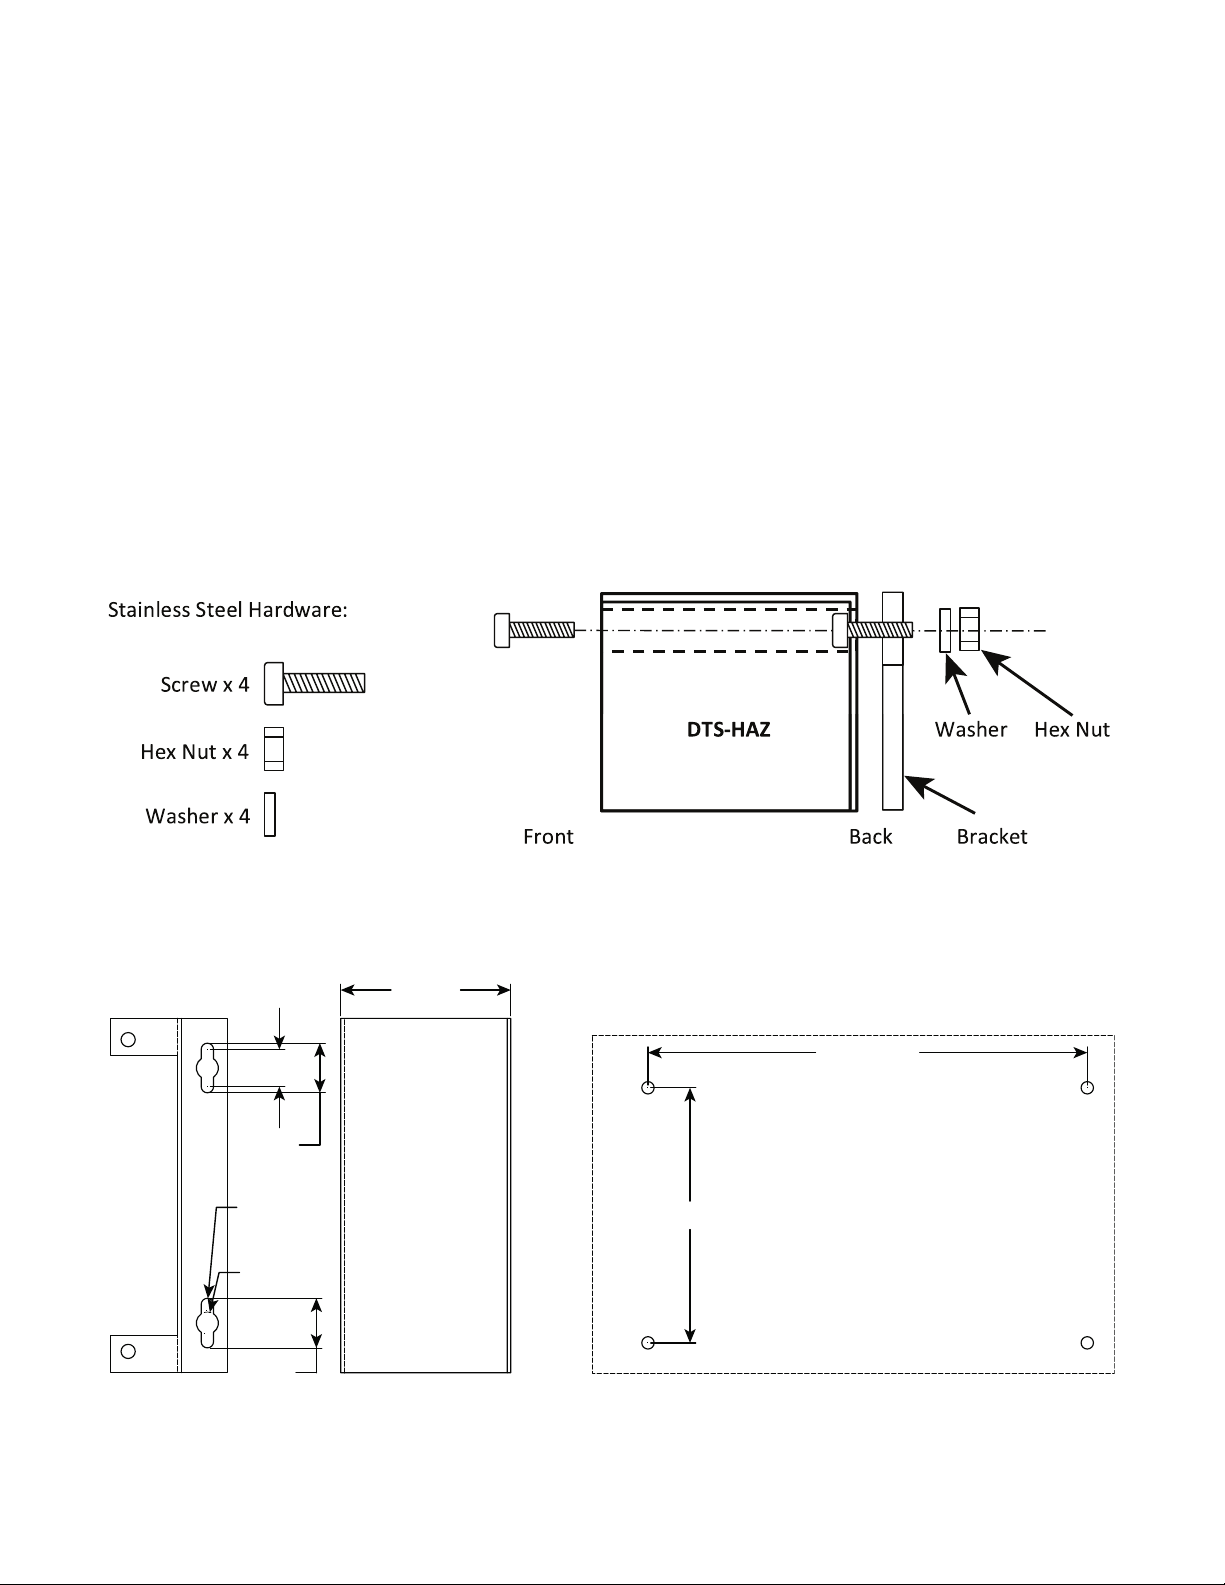
Optional Wall Mount Kit
The DTS-HAZ may be mounted on vertical surfaces. To
maintain UL/cUL and Class 1, Division 2 compliance,
the user must use the optional Wall Mounting Bracket
Kit (MP-2 DTS-HAZ Mounting Plate Kit, part number
5120-13015).
Considerations:
1. The kit comes complete with two stainless steel
mounting brackets and the necessary hardware to
mount the brackets to the DTS-HAZ.
2. Should the owner use other means to mount the
DTS to a vertical surface, a minimum of 3 inches
or 76 mm must be maintained from the rear of the
DTS-HAZ to the mounting surface. This is necessary to provide adequate airflow across the heat
sink at the rear of the DTS.
3. When installing the DTS on a vertical surface, the
Pipe Standoff is not used and is typically replaced
by rigid 1” NPT conduit. The conduit shall terminate
into the Compression Fitting.
Ordering Information:
Wall Mount Kit PCN (Part Number): 318043
.657
[16.69mm]
.875
[22.23mm]
Ø.218 [Ø5.54mm]
Ø.390 [Ø9.91mm]
.875
[22.23mm]
3.000
[76.20mm]
10
RECOMMENDED - WALL MOUNT LAYOUT
MAXIMUM #10 STUD
7.750 [196.85mm]
4.500
[114.30mm]
Bracket Material:
16 ga Stainless Steel
0.059 " (1.5mm) nominal
Product Maintenance & Care
The following inspections should occur upon receipt of
product and at least once every year.
a. Wiring
Inspect wiring for wear, fraying and evidence of
overheating. Repair minor defects with a high quality grade of electrical tape or replace if needed.
b. Hardware & Connectors
Inspect for loose electrical and mechanical connec-
tions. Tighten or replace all loose or missing hardware.
c. Cleaning
This product does not require cleaning. However,
the heat sink fins on back must routinely be inspected for any debris. Remove any debris with a
stiff brush or other careful means. Take care not to
break any fins. Should any of the fins break, the unit
should be replaced.
EXPLOSION HAZARD. Substitution of any component may impair suitability for Class 1, Div. 2.
Equipment Ratings:
Voltage Rating: 120-277 VAC, 50/60 Hz
Current Rating: 30 amps
Ambient Temp. Rating: -40°F to 104°F (-40˚C to 40˚C)
Alarm Rating:
• DTS-HAZ: 12-277 Vac and 1.8 Amps RMS
• DTS-HAZ-DC: 0-42 Vdc and 1.8 Amps RMS
VA rating on electronics: 4.0 Watts
The electronics are protected by a 0.125 Amp 350 VAC
2AG fuse
Maximum RTD output 1.25 volts, 7 milliamps
Temperature Rating: UL-T4a, IEC/ATEX-T4
Protection: IP66
Settings:
Setpoint: -80˚F to 1100˚F (-62˚C to 593˚C)
Alarms: High temp to 1150˚F (621˚C)
Low temp to -80˚F (-62˚C)
Deadband: 2˚F (or ˚C) to 100˚F (or ˚C)
+/- 1˚ to 50˚ around the setpoint
Alarm Function:
Mode Default Optional
Normal Operation Closed Open
Alarm Condition Open Closed
Power Off Open Open
Agency Approvals:
UL:
• UL/cUL - Hazardous area (Class I, Div. 2, Groups
A,B,C,D)
• Temperature Rating: T4A
• UL File number E347725 (Ordinary areas are covered by the hazardous area file)
IECEx & ATEX:
• II 3 G Ex nA nC IIC T4 Gc IP 66
• Ex nA nC IIC T4 Gc IP 66
• ITS15ATEX48203X
• IECEx ETL14.0012X
• Temperature Rating: T4
CE
Field Wiring Considerations:
Torque values for field wiring terminals.......11-15 in-lbs
(1.2 - 1.7 n-m)
Wire gauge range.............................................6 - 18 ga
Stripped insertion length............................ 1/2” (12mm)
Replacement Parts
Fuse
Specifications............................. 0.125A, 350V, 2 AG
Dimensions..................... 14.18 mm (L) x 4.5 mm (W)
Material............................................................. Glass
Vendor & Model........................ Bel Fuse, 2JS 125-R
Replacing Fuse:
HAZARD OF ELECTRIC SHOCK. Turn off power
before removing junction box cover.
1. Remove Cover.
2. Carefully remove display board from 4 nylon posts.
3. Fuse is in upper left corner of bottom board.
4. Carefully remove the bad fuse and replace with new
fuse.
11

Please refer to the Chromalox limited warranty applicable to this product at
http://www.chromalox.com/customer-service/policies/termsofsale.aspx.
© 2021 Chromalox, Inc. All rights reserved.
Limited Warranty:
Chromalox
103 Gamma Drive
Pittsburgh, PA 15238
(412) 967-3800
www.chromalox.com
12
 Loading...