

A
HSE03 Voice Siren & Strobe Light
Installation Instruction
GENERAL INTRODUCTION
The HSE03 is a two-way wireless alarm which functions
not only as a siren, but also has vocal alert sound and
strobe light. Unlike any other siren alone or strobe alone
products available in the market, this unique three-in-one
device integrates functions of siren, vocal alert and strobe
light into one unit.
The vocal alert sound can play high quality voice or
music to guide the user and the siren can generate 110dB
noisy sound in order to frighten the intruder。The unit is
sold individually, but its great compatibility with our UN e t
family security products makes it easier for you to add
additional accessories to suit your specific needs.
The HSE03 includes the following features:
Adopt UNet protocol to secure the success of wireless
two way communication
Can download 45 or 90 second of high quality voice
files from USB port
Different speak content of the HSE03 correspond to
different trig event.
110dB siren sound
With Red flashing strobe light
With Tamperproof protection
Visual and audible alarm indications
Low battery indication
Very low power consumption (3years battery life at
standby mode)
Either 4 x Battery or DC 6V adaptor for the power supply
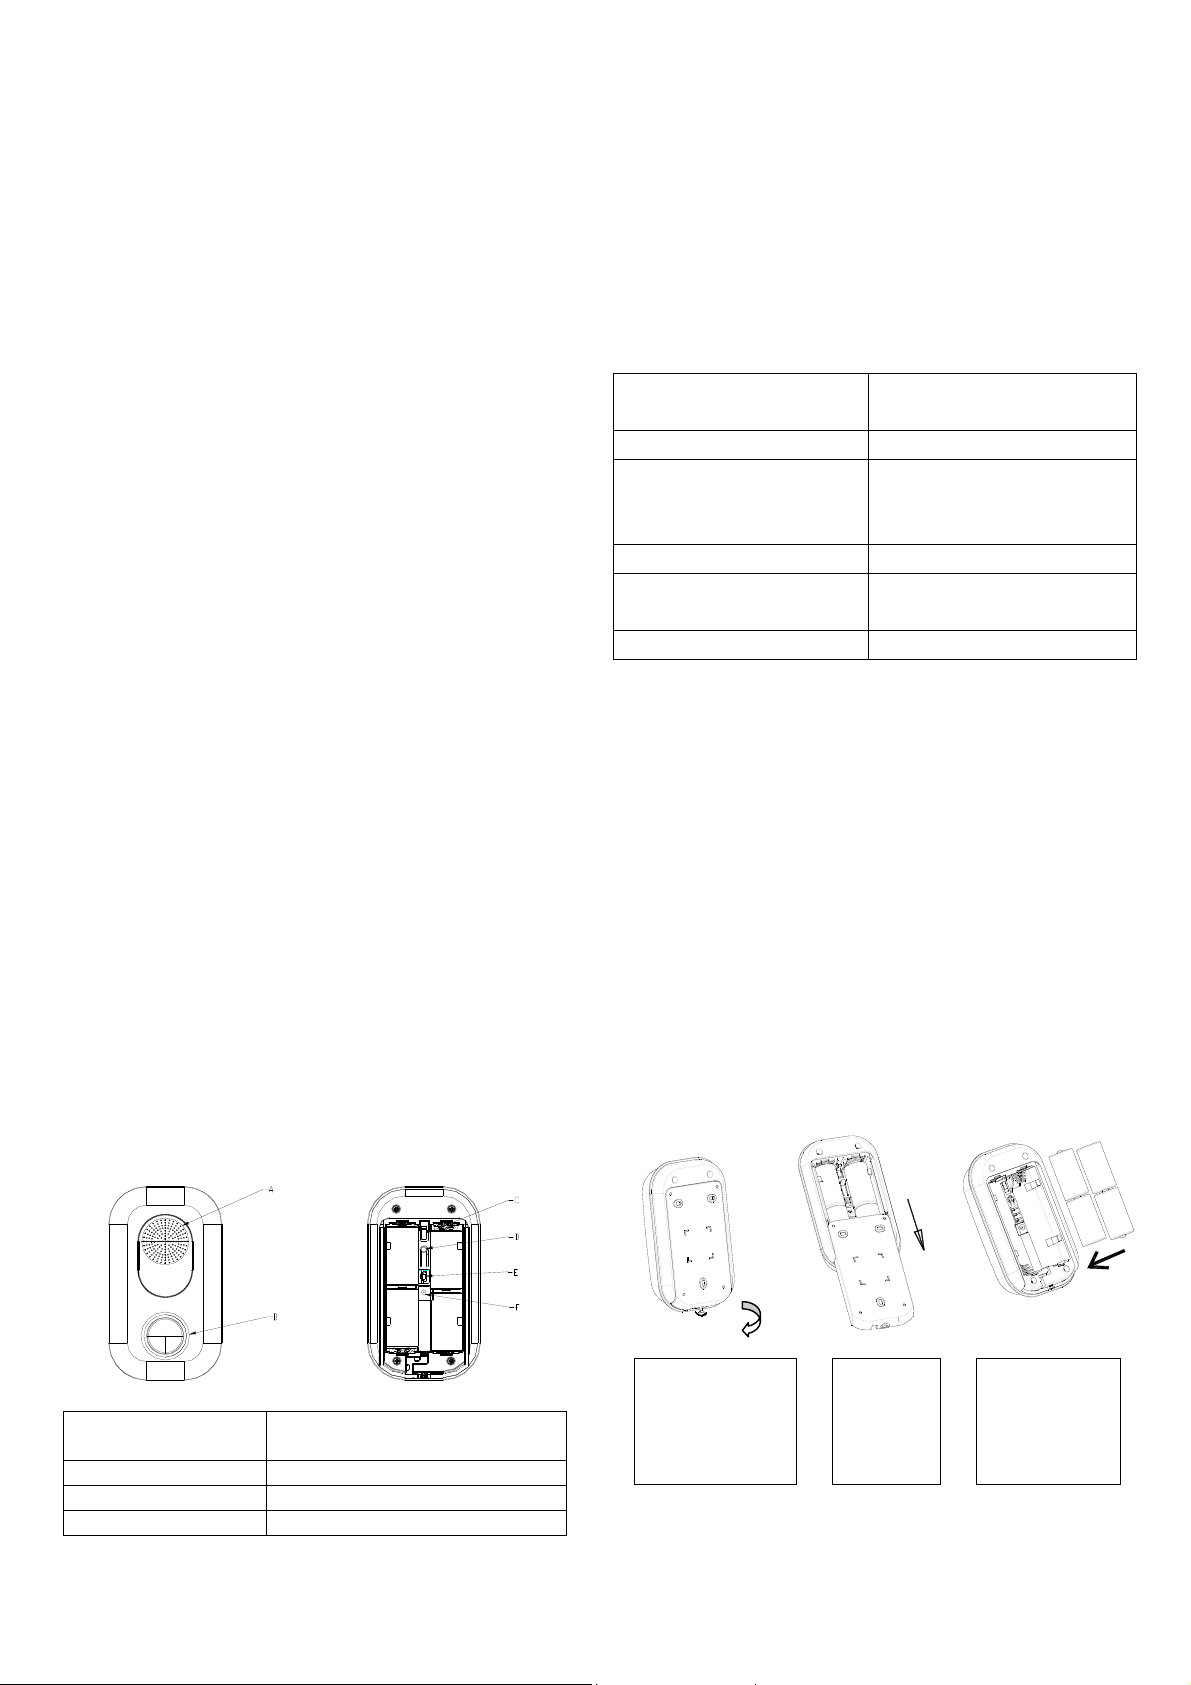
PRODUCT LAYOUT
Functions
A. Speaker and strobe LED
light indicator
B. Piezo Generate 110 dB siren sound
C. Tamper Switch A full alarm condition will be
D. Learning Key Learning and clearing ID codes.
E. USB To download the wav file from PC
F. DC Jack Socket for connecting DC adapter
Two color LED (red & green)
initiated if the unit is removed from
the wall.
to HSE03
POWER SUPPLY & BATTERY STATUS
Four pieces 1.5V Alkaline LR14 batteries are supplied in
the HSE03. An optional 600mA @ 6V DC power adapter
can be purchased if needed. If HSE03 is used as a
control unit, to ensure a sufficient power supply, a DC
adapter is strongly recommended. A red LED flashes at
every 30-second interval indicates the battery power is low.
When this situation occurs, replace the batteries as soon
as possible.
INSTALLATION
To Install Batteries
-
+
+
-
-
+
+
-
1.
A. Speaker and strobe
LED light indicator
B. Piezo F. DC Jack
C. Tamper Switch
D. Learning Key
E. USB
Loosen & remove
the locking screw
from the bottom
edge of the unit
counter clockwise.
To Install Power Adapter (Optional)
1
2.
Slide the
backplate
out of the
unit.
3.
Insert 4 x 1.5V
lkaline LR14
batteries with
correct polarity.
p
r
The power adapter is an optional accessory.
Nevertheless, a cable track is set inside the unit for you to
secure the power adapter. To install a power adapter:
1.
Connect the plug of powe
adapter to the DC jack
inside the unit.
2.
Route the cable along
the cable track.
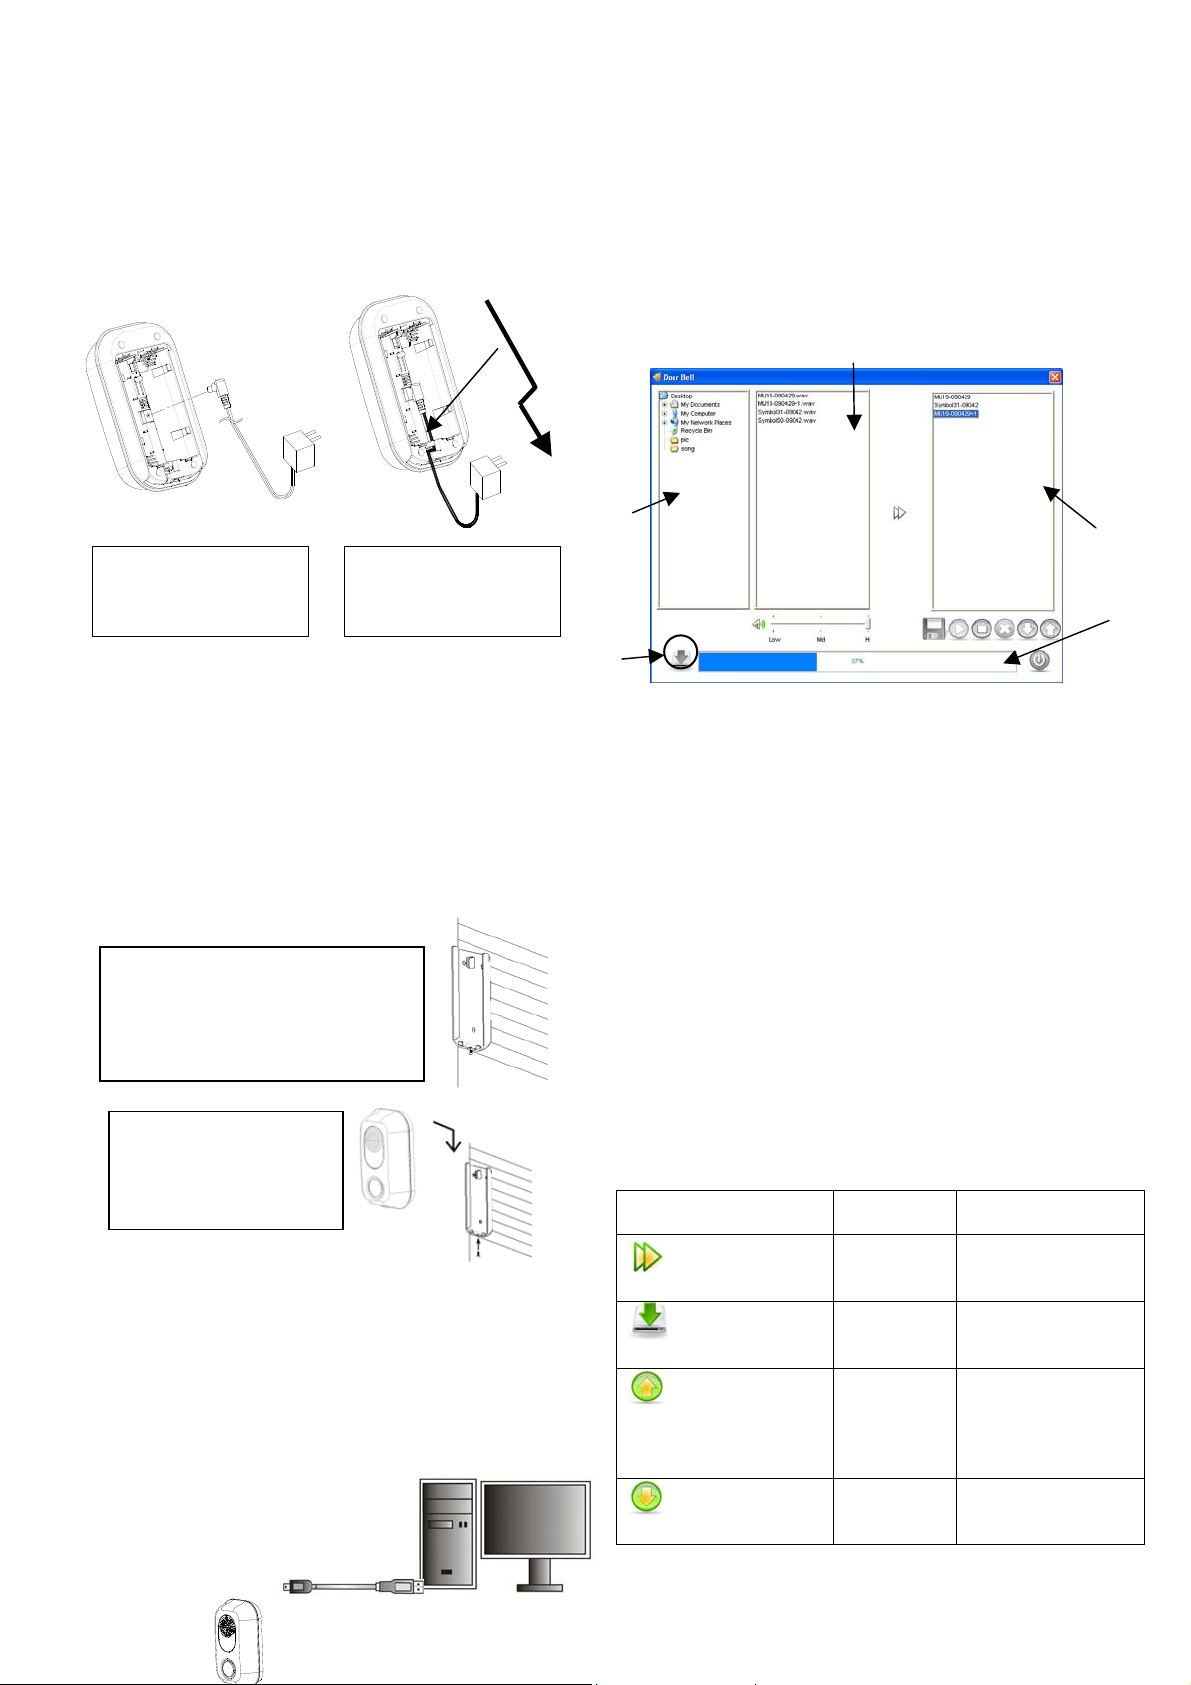
Navigation
Pane
To Mount HSE03
Download
The HSE03 should be mounted inside the building in a
position that is clearly visible and at a height which is
relatively inaccessible to an intruder. To get a supply of
electric power, mount the siren & strobe unit on a wall with
a DC electrical outlet nearby is suggested.
1.
Use the backplate as a template to mark
& drill the position of three mounting
holes on the wall. Fix the backplate to
the wall using the plastic wall plugs and
fixing screws provided.
2.
Slide the unit down to the
backplate and fasten the
locking screw clockwise.
Download wave file to HSE03
WAV is the only file type that can be played by HSE03 To
download songs to HSE03, please execute Door Bell.exe
which already been programed in the HSE03
Please follow the steps below in sequence to execute the
program.
1. Plug one end of USB cable into the Bell, and the other
end into an open USB port of your computer .
2
2. The HSE03.exe will auto run. If it doesn’t, please
double click on HSE03.exe under USB drive to
execute the program.
3. A user interface will display; it contains three parts of
panes: Navigation Pane, List Pane and Clipboard.
List Pane
Clipboard
Capacity
Indicator
Navigation Pane: Displays a list of files those are
placed on the desktop. In the Look
In drop-down list, select the folder
where the songs are stored.
List Pane: It unfolds the folder you’ve selected
in Navigation Pane; a list of songs
stored in the folder is displayed.
Clipboard: A temporary storage area for
selected songs. They will be
downloaded to the Bell once
Download Key (as shown in
FIGURE 10) is pressed.
The table below shows a list of keys and key functions.
Key Name of
Function
Key
Add Add a selected
song to the playlist
of Clipboard
Download Download songs
from Clipboard to
HSE03
Move Up Move selected
song/songs one
space up in the
playlist of
Clipboard
Down
Move
Move selected
song/songs one
ace down in the
s

playlist of
Clipboard
Stop Stop playing the
Play Play the selected
Delete Delete a song
Exit Exit HSE03.exe
Save As Save selected
Volume
Control
(Low / Mid /
Hi)
If you wish to keep the preset songs, it is recommended
you make a copy of them before carrying out the following
steps. To save the preset songs, press
download songs to HSE03:
1. Select a folder where the songs are stored in
Navigation Pane.
2. Select song/songs you wish to download to the Bell
from List Pane.
3. Press
Clipboard. If storage capacity in Clipboard has
exceeded the limit, a warning indication will be shown
(FIGURE 11); likewise, you can refer to the capacity
indicator for the percentage of being occupi ed storag e.
4. Once you’ve completed song selections, press
to download selected songs to the Bell. A saving
prompt box will appear while data is saving (FIGURE
12).
to add selected song/songs to the
selected song
(Clipboard only)
song
(Clipboard only)
from the playlist
(Clipboard only)
songs to another
directory or
location
Adjusts the
volume of songs; it
determines the
volume of HSE03
; to
SETTING
In order to communicate with other security accessories,
the HSE03 needs to learn the ID code of other accessori es,
and vice versa.
Learning ID Code
1. Press the learning key “D” (as shown in page 1) for
more than 3 seconds and release, during which the
green LED will flash at 2-second interval repeatedly.
This implies HSE03 is now entering the ID code
learning mode. Green LED will flash repeatedly
representing the unit is waiting for receiving the ID
code signal of another accessory.
2. Within 30 seconds, press the learning key of another
accessory (don’t press HSE03 learning key anymore).
This step allows HSE03 and the accessory to emit and
learn the ID code mutually. When a green LED keep
on 1 sec. and then stop flash it implies the ID code
learning procedure is completed and success
Examples of auxiliary
accessories (optional)
Note:
Only one accessory ID code can be learned at a time.
HSE03 can store up to 12 sets of ID codes (including its
own code). If there is more than one accessory ID code
needs to be learned, simply repeat the above steps.
Figure 3.
Illustration of ID code learning between SE802
and cooperative accessories.
HSE03
3. Learning outcome:
Indicator Status
Successful
Failed
Note:
No ID code has been preset when first time you operate
HSE03. After insert the batteries, Green LED will flash at
2-second interval repeatedly.
Operation Mode
The mode of HSE03 is accessory mode , and all control
command come from Controller like Gateway HSC06
LED
LED
Green LED illuminate for
1 seconds & turn off
Green LED flash 4 times
(0.1 second on, 0.1 second off)
3

Accessory Mode
(HSC06) Gateway
(SM801)
Accessory
(SF802)
Accessory
(ST804)
Accessory
Clearing ID Code
1. Press the learning key “D” (as shown in page 1) for
more than 3 seconds and release, during which the
green LED should be at 2-second interval. This
implies HSE03 is now entering the ID code learning
mode. Green LED will flash repeatedly representing
the unit is waiting for receiving the ID code signal of
another accessory.
Within 30 seconds, press the learning key again for more
than 6 seconds and release, during which green LED
flash at 2-second interval repeatedly. it implies the ID code
learning procedure is completed.
2. Clearing outcome:
Indicator Status
LED none
Note:
If ID code is cleared, green LED should flash at 2-second
interval repeatedly.
WARNING:
ID codes of all cooperative devices will be cleared after
executing ID code clearing function.
LED
Green LED flash 4 times
(0.1 second on, 0.1 second off)
OPERATION
HSE03 should be tested with all the Controller to ensure it
can communicate with each of them successfully. To test
the communication between HSE03 and other Controller,
simply activate the cooperative unit after ID code learning
procedure is completed. If the communication is
successful, HSE03 should be triggered in a full alarm
condition/by giving an indication. If the communication is
failed, no response will be given.
MAINTENANCE & USAGE
* Do not immerse this unit in water or any other liquid.
* Do not cooperate the unit with more than 11 accessories.
* Due to building constructions, the operating range may
vary from 250 meters to a shorter distance, such as the
unit can only receive signals from pool alarm system
within a distance of 50 meters. Please test the unit to
find out a best operating range before mounting it. It is
also suggested not to mount the unit in the basement to
avoid poor transmissions.
4

SPECIFICATION
Power adaptor (option) 600 mA@6V DC
Battery Type 1.5V LR14 x 4 pieces
Battery Life About 3 year, @25°C standby mode
Range Min 200 meter/656 feet line of sight
Operating Frequency 868.30 MHz (EU)/ 923.00 MHz (US)
** Specifications are subject to change and improvement without notice.
Federal Communication Commission Interference St atement
This equipment has been tested and found to comply with the limits for a Class B digital device, pursuant to Part 15 of the
FCC Rules. These limits are designed to provide reasonable protection against harmful interference in a residential
installation. This equipment generates, uses and can radiate radio frequency energy and, if not installed and used in
accordance with the instructions, may cause harmful interference to radio communications. However, there is no
guarantee that interference will not occur in a particular installation. If this equipment does cause harmful interference to
radio or television reception, which can be determined by turning the equipment off and on, the use r is encouraged to try to
correct the interference by one of the following measures:
- Reorient or relocate the receiving antenna.
- Increase the separation between the equipment and receiver.
- Connect the equipment into an outlet on a circuit different from that to which the receiver is connected.
- Consult the dealer or an experienced radio/TV technician for help.
This device complies with Part 15 of the FCC Rules. Operation is subject to the following two conditions: (1) This device
may not cause harmful interference, and (2) this device must accept any interference received, including interference that
may cause undesired operation.
FCC Caution: Any chan ges or modifications n ot expressly ap proved by the party respon sible for complia nce could void t he
user's authority to operate this equipment.
This transmitter must not be co-located or operating in conjunction with any other antenna or transmitter.
WARNING:
Do not dispose of electrical appliances as unsorted municipal waste, use separate collection facilities.
Contact your local government for information regarding the collection systems available.
If electrical appliances are disposed of in landfills or dumps, hazardous substances can leak into the groundwater and get
into the food chain, damaging your health and well-being.
When replacing old appliances with new once, the retailer is legally obligated to t ake back your old appliance for disposal
at least for free of charge.
FCC ID: ZGXHSE03
A501110909R
5
 Loading...