

Christie APS Series, WU650-APS, LWU530-APS User Manual

User’s Manual (Detailed)
Network Guide
020-001538-01
APS Series
LWU650-APS, LWU530-APS


LCD Projector
LWU650-APS/LWU530-APS
User's Manual (detailed)
Network Guide
Thank you for purchasing this product.
This manual is intended to explain only the network function. For proper use of this
product, please refer to this manual and the other manuals for this product.
WARNING
►Before using this product, be sure to read all manuals for this
product. After reading them, store them in a safe place for future reference.
Features
This projector has the network function that brings you the following main features.
ü Web Control : allows you to monitor and control the projector through a network from a
computer, smartphone and tablet device. (
ü Network Presentation : allows the projector to project computer, images transmitted
through a network. (
ü My Image : allows the projector to store up to four still images and project them. (
ü Messenger : allows the projector to display text sent from a computer through a network.
&82)
(
ü Network Bridge : allows you to control an external device through the projector from a
computer. (
NOTE
&85)
• The information in this manual is subject to change without notice.
&77)
• The illustrations in this manual are for illustrative purposes. They may differ
slightly from your projector.
• The manufacturer assumes no responsibility for any errors that may appear in
this manual.
• The reproduction, transfer or copy of all or any part of this document is not
permitted without express written consent.
&35)
&81)
LWU650-APS/LWU530-APS
User's Manual - Network Guide
1
020-001538-01 Rev. 1 (11-2018)
LIT GUID SET APS Series NET

Contents
Contents
&
Caution .......................................................................................... 5
1. Network Function ..................................................................... 6
1.1 Web Control ................................................................................................ 6
1.2 Network Presentation . ................................................................................ 7
1.3 My Image Function ..................................................................................... 8
1.4 Messenger Function ................................................................................... 9
1.5 Network Bridge Function ...........................................................................10
1.6 Other Functions ......................................................................................... 11
1.6.1 Email Alerts .................................................................................................................... 11
1.6.2 Projector Management using SNMP .............................................................................. 11
1.6.3 Event Scheduling ........................................................................................................... 11
1.6.4 Command Control via the Network ................................................................................ 11
2. Connection to the network .................................................... 12
2.1 Connection via wireless LAN .................................................................... 13
2.1.1 Connection in Simple Access Point Mode ..................................................................... 15
2.1.2 Connection in Infrastructure Mode ................................................................................. 16
2.2 Connection via wired LAN ......................................................................... 18
2.3 Applications .............................................................................................. 20
2.4 NETWORK Menu . .................................................................................... 21
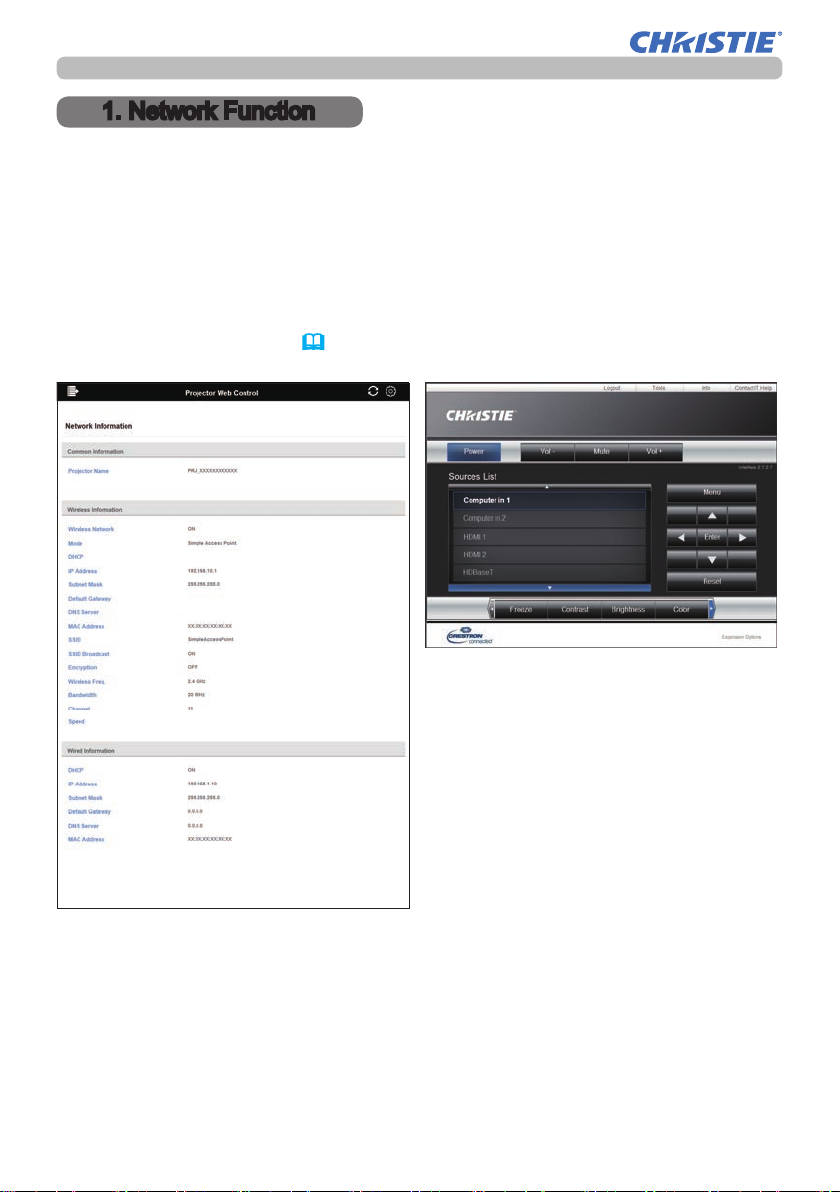
3. Web Control ............................................................................ 35
3.1 Projector Web Control ...............................................................................38
3.1.1 Login .............................................................................................................................. 38
3.1.2 Network Information ....................................................................................................... 40
3.1.3 Network Settings ............................................................................................................ 41
3.1.3.1 Common Setup ......................................................................................................... 41
3.1.3.2 Wireless Setup ......................................................................................................... 43
3.1.3.3 Wired Setup .............................................................................................................. 46
3.1.3.4 Other Setup .............................................................................................................. 47
3.1.4 Port Settings .................................................................................................................. 48
3.1.5 Mail Settings .................................................................................................................. 50
3.1.6 Alert Settings .................................................................................................................. 52
3.1.7 Schedule Settings .......................................................................................................... 53
3.1.7.1 Schedule Management ............................................................................................ 53
3.1.7.2 Program List ............................................................................................................. 54
3.1.7.3 Program Edit ............................................................................................................. 55
3.1.7.4 Program Copy .......................................................................................................... 56
LWU650-APS/LWU530-APS
User's Manual - Network Guide
2
020-001538-01 Rev. 1 (11-2018)
LIT GUID SET APS Series NET

Contents
3.1.8 Date/Time Settings ......................................................................................................... 57
3.1.9 Security Settings ............................................................................................................ 59
3.1.9.1 User Account ............................................................................................................ 59
3.1.9.2 Network Control ........................................................................................................ 60
3.1.9.3 Network Presentation ............................................................................................... 61
3.1.9.4 SNMP ....................................................................................................................... 62
3.1.10 Projector Control .......................................................................................................... 63
3.1.11 Remote Control ............................................................................................................ 64
3.1.12 Projector Status ........................................................................................................... 65
3.1.13 Connection T est ........................................................................................................... 66
3.1.14 Network Restart ........................................................................................................... 67
3.2 Crestron e-Control® .................................................................................. 68
&
3.2.1 Main window .................................................................................................................... 70
3.2.2 Tools window ................................................................................................................... 72
3.2.3 Info window ..................................................................................................................... 74
3.2.4 Help Desk window ........................................................................................................... 75
3.2.5 Emergency Alert .............................................................................................................. 76
4. Network Presentation ............................................................. 77
4.1 Outline ...................................................................................................... 77
4.2 Display Mode . ........................................................................................... 78
4.2.1 Single PC mode ............................................................................................................. 78
4.2.2 Multi PC mode ............................................................................................................... 78
4.3 Multi Projector Mode . ............................................................................... 79
4.4 Moderator Control Mode . ......................................................................... 79
4.5 Port Number . ............................................................................................ 80
5. My Image Function ................................................................. 81
6. Messenger Function ............................................................... 82
6.1 Outline ...................................................................................................... 82
6.2 Display Style ............................................................................................. 83
7. Network Bridge Function ....................................................... 85
7.1 Connecting devices .................................................................................. 85
7.2 Communication setup ............................................................................... 86
7.3 Communication port ................................................................................. 86
7.4 Transmission method ............................................................................... 87
7.4.1 HALF-DUPLEX .............................................................................................................. 87
7.4.2 FULL-DUPLEX ............................................................................................................... 88
LWU650-APS/LWU530-APS
User's Manual - Network Guide
3
020-001538-01 Rev. 1 (11-2018)
LIT GUID SET APS Series NET

Contents
&
8. Other Functions ...................................................................... 89
8.1 Email Alerts .............................................................................................. 89
8.2 Projector Management using SNMP ........................................................ 92
8.3 Event Scheduling ..................................................................................... 94
8.4 Command Control via the Network .......................................................... 98
®
8.5 Crestron Connected
.............................................................................. 103
9. Troubleshooting ................................................................... 104
10. Warranty and after-sales service ...................................... 113
LWU650-APS/LWU530-APS
User's Manual - Network Guide
4
020-001538-01 Rev. 1 (11-2018)
LIT GUID SET APS Series NET

Caution
Caution
• Be sure to conrm that the projector has been installed and connected safely
even if it is turned on automatically.
• If you connect the projector to an existing network, consult a network
administrator before setting server addresses.
• Attaching an optional wireless adapter to the projector enables wireless
connection. Follow the cautions below when you use the wireless adapter.
[Restriction on plugging and unplugging the wireless adapter (option)]
Before you insert or pull out the wireless adapter from the projector, turn off the
power of the projector and pull out the power cord’s plug from the outlet. Do not
touch the wireless adapter that is connected to the projector while the projector is
receiving AC power. Do not use any extension cable or device when connecting
the adapter to the projector.
[Security precautions when using wireless LAN (option)]
It is recommended that security settings, such as SSID and ENCRYPTION, are
specied when using wireless LAN communication. If the security settings are not
specied, the contents may be intercepted or it may cause unauthorized access
to the system. For details on wireless LAN security settings, refer to 3.1 Projector
Web Control. Although the projector has security functions, they do not always
guarantee prevention of the risks mentioned above.
CAUTION
►You do not need a radio license to use the adapter, but you
should be aware of the following:
• DO NOT USE NEAR THE FOLLOWING!
Microwave ovens
-
Industrial, scientic or medical devices
-
Designated low power radio stations
-
Premises radio stations
-
Using this projector near the above may cause radio interference, which
-
would result in a decrease in transmission speed or interruption, and even
lead to malfunctioning of devices such as pacemakers.
• Depending on the location where this projector is used, radio wave interference
may occur, which may result in a decrease in transmission speed or interruption
in communication. In particular, please be aware that using the wireless adapter
at locations where there is reinforced steel, other types of metals or concrete is
likely to cause radio wave interference.
• Available Channels
This projector uses the 5 GHz and 2.4 GHz radio frequency band, but
depending on the country or region you are in, the channels that you can use
might be limited. Please consult your dealer for information on the usable
channels.
• Bringing this projector out of the country or region you reside in and using it
there could lead to a violation of the radio laws of that country or region.
• The W52 is for indoor use only. Outdoor use is prohibited.
LWU650-APS/LWU530-APS
User's Manual - Network Guide
5
020-001538-01 Rev. 1 (11-2018)
LIT GUID SET APS Series NET
1. Network Function
1. Network Function
This chapter describes the outline of network function.
1.1 Web Control
Connecting the projector and the computer via the network, remote control and
status monitoring of the projector can be performed by Web browser.
®
Two types of interface, “Projector Web Control” and “Crestron e-Control
” are
available for this projector. (&35)
Crestron e-Control
®
Projector Web Control
LWU650-APS/LWU530-APS
User's Manual - Network Guide
6
020-001538-01 Rev. 1 (11-2018)
LIT GUID SET APS Series NET

1. Network Function
1.2 Network Presentation
The projector can display or play back the computer screen images and audio
data that are transmitted through the network.
To use Network Presentation, an exclusive application, "LiveViewer" is required.
The following application is required to use Network Presentation.
OS Application
Windows
®
LiveViewer
iOS(iPhone/iPad) Christie QuickConnect
Android
TM
Christie QuickConnect
LWU650-APS/LWU530-APS
User's Manual - Network Guide
7
020-001538-01 Rev. 1 (11-2018)
LIT GUID SET APS Series NET

1. Network Function
1
43
2
1.3 My Image Function
The projector can display still images transferred via the network.
It is possible to allocate up to 4 image les.
MY IMAGE transmission requires an exclusive application for your computer.
Use the application to transfer the image data.
Transfer image data
1
2
LWU650-APS/LWU530-APS
User's Manual - Network Guide
Display image data (ex.
43
)
8
020-001538-01 Rev. 1 (11-2018)
LIT GUID SET APS Series NET

1. Network Function
1
4
3
2
12
1.4 Messenger Function
The projector can display text data transferred using the network on the screen.
Up to 12 text data can be stored.
LWU650-APS/LWU530-APS
User's Manual - Network Guide
Transfer text data
1
2
3
4
12
Display text data (ex.
)
9
020-001538-01 Rev. 1 (11-2018)
LIT GUID SET APS Series NET

1. Network Function
1.5 Network Bridge Function
This projector is equipped with the NETWORK BRIDGE function to perform
mutual conversion of a network protocol and a serial interface.
By making use of the NETWORK BRIDGE function, a computer connected to the
projector via wireless or wired LAN is able to control an external device via
RS-232C communication using the projector as a network device.
Wireless
LAN
TCP/IP data Serial data
Wired LAN
LAN cable
Computer
LAN port or HDBaseT port
Protocol change
RS-232C
RS-232C cable
External device
CONTROL port
WIRELESS port
(Wireless adapter)
LWU650-APS/LWU530-APS
User's Manual - Network Guide
10
020-001538-01 Rev. 1 (11-2018)
LIT GUID SET APS Series NET

1. Network Function
1.6 Other Functions
1.6.1 Email Alerts
The projector can automatically send an alert message to the specied email
addresses when the projector detects a certain condition requiring maintenance
or detected an error. (&89)
1.6.2 Projector Management using SNMP
The SNMP (Simple Network Management Protocol) enables to manage the
projector information, which is a failure or warning status, from the computer on
the network. The SNMP management software will be required on the computer
to use this function. (
&92)
1.6.3 Event Scheduling
The scheduling function enables to setup scheduled events including
power on / power off. It enables to be “self-management” projector.
The schedule can be set in Projector Web Control or OPTION-SCHEDULE menu
in the projector. (
&94)
1.6.4 Command Control via the Network
You can congure and control the projector via the network using RS-232C
commands. (
LWU650-APS/LWU530-APS
User's Manual - Network Guide
&98)
11
020-001538-01 Rev. 1 (11-2018)
LIT GUID SET APS Series NET

2. Connection to the network
2. Connection to the network
The connection method of wireless LAN and wired LAN is as follows.
Wireless LAN (121-137102-01)
Item Description
Standard IEEE802.11a/b/g/n/ac
Channel
Encryption
Bandwidth 2.4 GHz : 20/40MHz
*1: Available channels may vary according to area.
*2: WEP is only for INFRASTRUCTURE mode.
Wired LAN
Standard 100BASE-TX / 10BASE-T
Port RJ-45
*1
*2
Item Description
2.4 GHz : 1~11ch
5 GHz :
WPA2-PSK(AES/TKIP), WPA-PSK(AES/TKIP),
WEP(64/128bit)
5 GHz :
36/40/44/48ch (W52)
149/153/157/161/165ch (W58)
20/40/80MHz
NOTE
• The network function is not available when STANDBY MODE is set
to NETWORK-WOL or POWER SAVE and the projector is in standby mode.
Connect the projector to the network after setting STANDBY MODE to QUICK
START or NORMAL. (&SETUP menu in the Operating Guide)
• Depending on the type of wireless network device and computer you are
using, the projector may not be able to communicate properly with your
computer, even if the computer is equipped with a built-in wireless LAN
function. To eliminate communication problems, use a Wi-Fi
®
certied wireless
network device.
•
Connect the optional wireless adapter (121-137102-01) to the WIRELESS port
of the projector when using the wireless LAN. (&12 in the Operating Guide)
LWU650-APS/LWU530-APS
User's Manual - Network Guide
12
020-001538-01 Rev. 1 (11-2018)
LIT GUID SET APS Series NET

2. Connection to the network
Connection via wireless LAN
2.1
Wireless LAN has two types of connection, Simple Access Point and
Infrastructure.
Fig. 2.2.a Without an access point communication (Simple Access Point)
Fig. 2.2.b With an access point communication (Infrastructure)
* Simple Access Point is a mode which connects to computers directly.
This projector can assign IP addresses to up to 10 devices.
* Infrastructure is one of the wireless LAN communication methods with having
an access point to communicate. If communicating with existing network, consult
with your network administrator.
LWU650-APS/LWU530-APS
User's Manual - Network Guide
13
020-001538-01 Rev. 1 (11-2018)
LIT GUID SET APS Series NET

2. Connection to the network
NOTE
• If using a wireless network function, please make sure that NETWORK WIRELESS NETWORK setting is ON.
• Network settings can also be changed in Network Settings of Projector Web
Control.
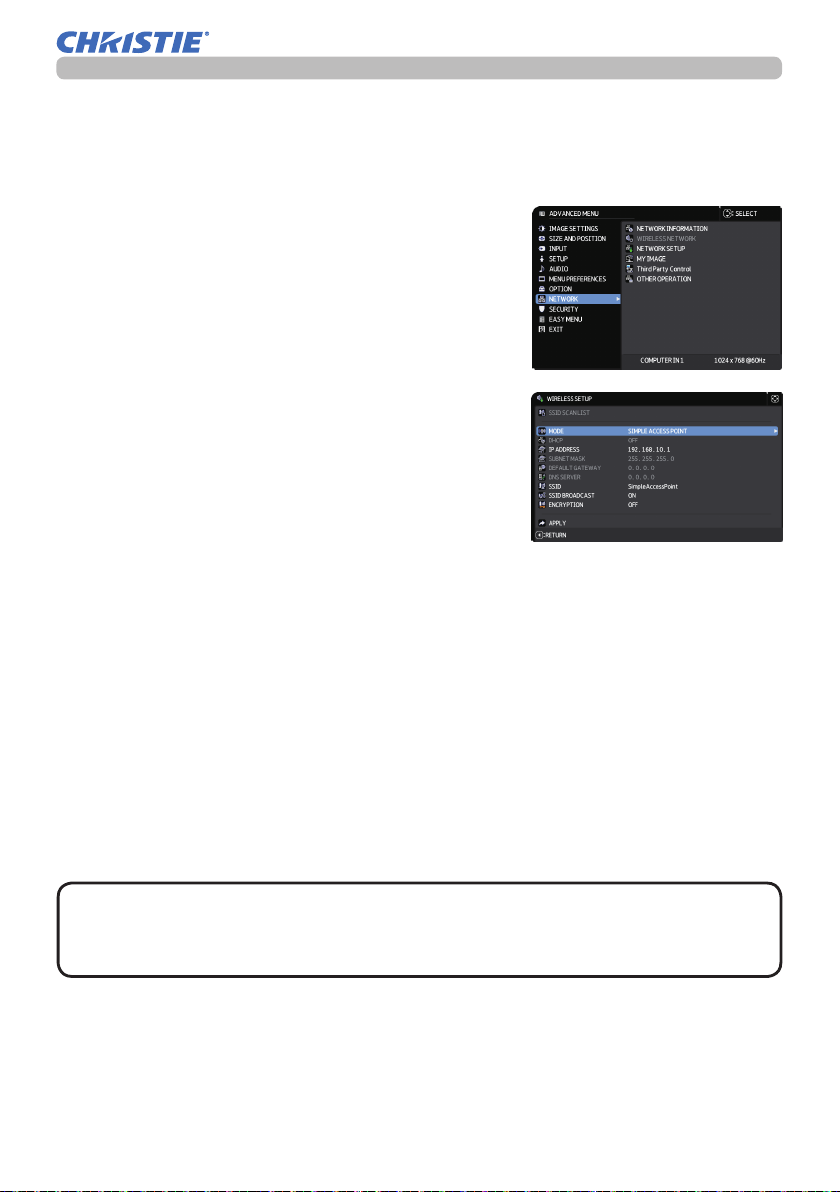
• Wireless LAN initial settings for the projector are as follows.
Mode: Simple Access Point
IP address: 192.168.10.1
Subnet Mask: 255.255.255.0
SSID: SimpleAccessPoint
SSID Broadcast: ON
Encryption: OFF
Wireless Freq.: 2.4 GHz
Channel: 11
• The same network address cannot be used for both wireless LAN and wired
LAN.
• Communication speed of the projector may be deteriorated in Simple Access
Point mode depending on the number of connected devices.
LWU650-APS/LWU530-APS
User's Manual - Network Guide
14
020-001538-01 Rev. 1 (11-2018)
LIT GUID SET APS Series NET
2. Connection to the network
2.1.1 Connection in Simple Access Point Mode
Set the following when connecting the projector and the computer in Simple
Access Point mode.
Projector setting
1) Turn on the projector.
2) Press the MENU button on the remote control
or the control panel of the projector.
The MENU you last used will appear.
Use the cursor button to select the following.
EASY MENU > ADVANCED MENU >
NETWORK > NETWORK SETUP >
WIRELESS SETUP
3) Set the following items in WIRELESS SETUP.
• MODE: SIMPLE ACCESS POINT
• IP ADDRESS
• SSID
• SSID BROADCAST
• ENCRYPTION
Select APPLY, then press the ENTER button to reect the settings.
About network settings
・ The fourth octet of the projector's IP address is xed to 1.
・ Subnet mask of the projector is xed to 255.255.255.0.
Computer setting
1) The DHCP server function of the projector is always enabled. Enable the DHCP
setting of the computer.
2) Select SSID set for the projector by following the procedure of wireless
connection of the computer. Enter encryption key by following the computer’s
instruction if it is encrypted.
NOTE
• As for the procedure of setting network and wireless connection for the
computer, refer to the manual of the computer or wireless LAN device.
• Up to 10 devices can be connected to the projector in Simple Access Point mode.
LWU650-APS/LWU530-APS
User's Manual - Network Guide
15
020-001538-01 Rev. 1 (11-2018)
LIT GUID SET APS Series NET

2. Connection to the network
2.1.2 Connection in Infrastructure Mode
Set the following when connecting the projector and the computer in Infrastructure
mode.
Projector setting
1) Turn on the projector.
2) Press the MENU button on the remote control or the control panel of the
projector.
The MENU you last used will appear.
Use the cursor button to select the following.
EASY MENU > ADVANCED MENU > NETWORK > NETWORK SETUP >
WIRELESS SETUP
3) Set the following items in WIRELESS SETUP.
• MODE: INFRASTRUCTURE
• DHCP
• IP ADDRESS
• SUBNET MASK
• DEFAULT GATEWAY
• DNS SERVER
• SSID
• ENCRYPTION
As for setting an IP address, refer to About IP address. (
&19)
Select APPLY, then press the ENTER button to reect the settings.
LWU650-APS/LWU530-APS
User's Manual - Network Guide
16
020-001538-01 Rev. 1 (11-2018)
LIT GUID SET APS Series NET

2. Connection to the network
Connection in Infrastructure Mode (continued)
SSID SCAN LIST function
The connection can be set up by selecting from SSID SCAN LIST without setting
SSID and ENCRYPTION in WIRELESS SETUP. The procedure of connecting by
SSID SCAN LIST is as follows.
1) Select SSID SCAN LIST in WIRELESS SETUP on NETWORK - NETWORK
SETUP.
The list of SSID in wireless network is displayed.
2) Select SSID in wireless network that you want to connect in SSID SCAN LIST.
The display to enter the encryption key appears if it is encrypted. Enter the
encryption key by using software keyboard.
3) The icon indicating connected (
) is displayed in SSID SCAN LIST screen
when the connection is complete.
NOTE
• Transmission speed may be slow depending on the settings of an access
point.
• If the projector and the computer exist in the same network (i.e., same
network address), you can leave the default gateway eld blank.
• When the projector and the computer exist in different networks, the default
gateway must be set. Consult with the network administrator in detail.
• Set wireless LAN for the projector by following the instructions of your network
administrator when connecting to the existing network.
• Open System Authentication is used for WEP encryption, and Shared Key
Authentication is not supported. The authentication with an access point
succeeds and it is regarded that the connection is established normally even
when entering illegal encryption key due to Open System Authentication, but
data cannot actually be transmitted.
• IP ADDRESS, SUBNET MASK, and DEFAULT GATEWAY should be set in
advance when DHCP is set to OFF.
• When DNS SERVER at DHCP OFF is set to other than "0.0.0.0", this
projector uses user setting at DHCP OFF as DNS server address even if DHCP
is set to ON and the projector can automatically obtain DNS SERVER setting
from DHCP server.
LWU650-APS/LWU530-APS
User's Manual - Network Guide
17
020-001538-01 Rev. 1 (11-2018)
LIT GUID SET APS Series NET

2. Connection to the network
Connection via wired LAN
2.2
The connection via wired LAN is available. Set wired LAN for the projector by
following the instructions of your network administrator when connecting to the
existing network.
hub
Connection setup of wired LAN
■
1) Connect the projector to the computer via a hub
with a LAN cable (CAT-5e or higher).
2) Press the MENU button on the remote control or
the control panel of the projector.
The MENU you last used will appear.
Use the cursor button to select the following.
EASY MENU > ADVANCED MENU > NETWORK
> NETWORK SETUP > WIRED SETUP
3) Set the following items in WIRED SETUP.
・ DHCP
・ IP ADDRESS
・ SUBNET MASK
・ DEFAULT GATEWAY
・ DNS SERVER
As for setting an IP address, refer to About IP address. (
&19)
Select APPLY, then press the ENTER button to reect the settings.
LWU650-APS/LWU530-APS
User's Manual - Network Guide
18
020-001538-01 Rev. 1 (11-2018)
LIT GUID SET APS Series NET

2. Connection to the network
[About IP address]
■ Setting manually
The Network address portion of the IP address setting on your computer must
be the same as the setting on the projector. Also, the entire IP address on the
computer must not overlap with that of the other devices on the same network,
including the projector.
The projector’s settings are as follows.
IP address: 192.168.1.254
Subnet mask: 255.255.255.0
(Network address: 192.168.1 in this case)
Therefore, specify the computer’s IP address as follows.
IP address: 192.168.1.xxx (xxx shows decimal number.)
Subnet mask: 255.255.255.0
(Network address: 192.168.1 in this case)
For example
Select from 1 to 254 for “xxx” not duplicating with any other equipments.
In this case, since the IP address of the projector is “192.168.1.254”, specify a
setting between 1 to 253 for the computer.
■ Setting automatically
When a DHCP server exists in the connected network, it assigns an IP address
to the projector and the computer automatically. If DHCP server is not available,
set IP ADDRESS, SUBNET MASK, DEFAULT GATEWAY and DNS SERVER.
NOTE
• Although HDBaseT and LAN port can be used for wired LAN, they cannot be
used simultaneously. Connect LAN cable to the port set in WIRED NETWORK
on OPTION - SERVICE - CONTROL TERMINAL.
•
The same network address cannot be used for both wireless LAN and wired LAN.
•
If the projector and the computer exist in the same network (i.e., same network
address), you can leave the default gateway eld blank.
• When the projector and the computer exist in different networks, the default
gateway must be set. Consult to the network administrator in detail.
• When DNS SERVER at DHCP OFF is set to other than "0.0.0.0", this
projector uses user setting at DHCP OFF as DNS server address even if DHCP
is set to ON and the projector can automatically obtain DNS SERVER setting
from DHCP server.
LWU650-APS/LWU530-APS
User's Manual - Network Guide
19
020-001538-01 Rev. 1 (11-2018)
LIT GUID SET APS Series NET

2. Connection to the network
2.3 Applications
The latest version of the application software can be downloaded from the website
below.
http://www.christiedigital.com
For iOS/Android Network Presentation software, refer to the URL below for the
details and downloads of Christie QuickConnect.
http://www.christiedigital.com
[System Requirements for Applications]
Application Hardware and Software
LiveViewer Refer to the manual of the
Christie QuickConnect
application for details.
Projector Image Tool (PJImg)
Projector Messenger Tool (PJMessenger)
LWU650-APS/LWU530-APS
User's Manual - Network Guide
20
020-001538-01 Rev. 1 (11-2018)
LIT GUID SET APS Series NET

2. Connection to the network
2.4 NETWORK Menu
Remember that incorrect network settings on this
projector may cause trouble on the network. Be sure
to consult with your network administrator before
connecting to an existing access point on your
network.
Select “NETWORK” from the main menu to access
to the following functions.
•
NOTE
The projector does not allow both wireless and wired LAN to be
connected to the same network.
• If you do not use SNTP, then you must set the DATE AND TIME during the
initial installation. (&OPTION menu in the Operating Guide)
• The network function is not available when STANDBY MODE is set to
NETWORK-WOL or POWER SAVE and the projector is in standby mode.
Connect the projector to the network after setting STANDBY MODE to QUICK
START or NORMAL. (&SETUP menu in the Operating Guide)
• When using wireless network function, set NETWORK - WIRELESS
NETWORK to ON.
• When using a wired LAN, select which function to use, LAN or HDBaseT,
in OPTION - SERVICE - CONTROL TERMINAL - WIRED NETWORK menu.
(&OPTION menu in the Operating Guide)
LWU650-APS/LWU530-APS
User's Manual - Network Guide
21
020-001538-01 Rev. 1 (11-2018)
LIT GUID SET APS Series NET

2. Connection to the network
Item Description
Displays the network information of the projector.
• WIRELESS INFORMATION
• WIRED INFORMATION
NETWORK
INFORMATION
• OTHER INFORMATION
NOTE
• IP ADDRESS, SUBNET MASK and DEFAULT
GATEWAY indicate “0.0.0.0” when DHCP is ON and the
projector has not gotten address from DHCP server.
WIRELESS
Switches ON/OFF of wireless network function.
NETWORK
(continued on next page)
LWU650-APS/LWU530-APS
User's Manual - Network Guide
22
020-001538-01 Rev. 1 (11-2018)
LIT GUID SET APS Series NET

Item Description
Congures wireless network.
Congured values are saved
after selecting "APPLY".
NOTE
• Congured values are not saved if Menu disappears before
selecting "APPLY".
• Be sure to execute "APPLY" after changing the settings.
Searches available wireless network and displays
NETWORK
SETUP
/
WIRELESS
SETUP
the list of SSID.
You can select SSID to connect from the list.
(1) SSID on available wireless network is displayed
after selecting SSID SCAN LIST and press the ►
button.
SSID SCAN
LIST
2. Connection to the network
(continued on next page)
LWU650-APS/LWU530-APS
User's Manual - Network Guide
NOTE
•
The wireless network using the encryption
method not supported by the projector is
not
displayed in the search list.
• A network device of Ad Hoc is not displayed
on SSID SCAN LIST.
23
020-001538-01 Rev. 1 (11-2018)
LIT GUID SET APS Series NET

2. Connection to the network
Item Description
Icon Description
T
he projector is connecting to the wireless
network.
The wireless network is encrypted.
The intensity of radio wave.
(2) Select SSID that you want to connect and
press the ► or ENTER button. The display to enter
the encryption key appears if SSID is encrypted.
Enter the characters by using software keyboard.
NETWORK
SETUP
/
WIRELESS
SETUP
SSID SCAN
LIST
(continued)
Move the cursor to OK and press the ►, ENTER
or
button after entering.
(continued)
(continued on next page)
LWU650-APS/LWU530-APS
User's Manual - Network Guide
NOTE
• If you select the [HIDE THE CHARACTERS]
checkbox, the characters are hidden.
24
020-001538-01 Rev. 1 (11-2018)
LIT GUID SET APS Series NET

Item Description
(3)
The OSD below is displayed while the connection
is in progress.
The keys other than RESET button are not
available while the connection is in progress.
The connection process is interrupted when
pressing the RESET button.
The OSD below is displayed when the connection
process is complete.
The message below is displayed when the
connection is not established correctly.
NETWORK
SETUP
/
WIRELESS
SETUP
(continued)
SSID SCAN
LIST
(continued)
NOTE
・ Encryption settings cannot be
changed when encryption lock is enabled
in Network Settings – Wireless Setup in
Projector Web Control. Refer to Encryption
Lock. (
&43)
• Open System Authentication is used for WEP
encryption, and Shared Key Authentication
is not supported. The authentication with an
access point is succeeded and it is regarded
that the connection is established normally
even when entering illegal encryption key
due to Open System Authentication, but data
cannot actually be transmitted.
2. Connection to the network
Connection
:
succeeded
Connection failed
:
Encryption Lock
:
enabled
(continued on next page)
LWU650-APS/LWU530-APS
User's Manual - Network Guide
The icon indicating the connection status
(4)
) is displayed in SSID SCAN LIST when the
(
connection is complete.
25
020-001538-01 Rev. 1 (11-2018)
LIT GUID SET APS Series NET

2. Connection to the network
Item Description
SSID SCAN
LIST
(continued)
This function is not available in SIMPLE ACCESS
POINT mode.
Switches between SIMPLE ACCESS POINT and
NETWORK
SETUP
/
WIRELESS
SETUP
(continued)
INFRASTRUCTURE.
Select the mode of the network communication
system. Select according to the settings of your
computer.
SIMPLE ACCESS POINT
INFRASTRUCTURE
MODE
NOTE
•
The setting changed before switching MODE
without selecting "APPLY" is cancelled.
•
When switching MODE, it takes 60 seconds to
be able to use wireless LAN. In the meantime,
the operating speed of the projector may be
decreased and NETWORK INFORMATION
may not be displayed correctly.
(continued on next page)
LWU650-APS/LWU530-APS
User's Manual - Network Guide
26
020-001538-01 Rev. 1 (11-2018)
LIT GUID SET APS Series NET

Item Description
Congures whether IP address is automatically
obtained or not.
DHCP
Use the ▲/▼ buttons to turn DHCP on/off.
ON OFF
This function is not available in SIMPLE ACCESS
POINT mode.
[MODE:SIMPLE ACCESS POINT]
Refer to "Connection in Simple Access Point
Mode".
(&15)
[MODE:INFRASTRUCTURE]
Congures the IP address when DHCP is
MODE:
[
SIMPLE ACCESS POINT]
This setting is xed to 255.255.255.0.
[
MODE:
INFRASTRUCTURE]
NETWORK
SETUP
/
WIRELESS
SETUP
(continued)
IP
ADDRESS
SUBNET
MASK
Congures the subnet mask when DHCP is OFF.
Congures the default gateway when DHCP is
DEFAULT
GATEWAY
OFF.
This function is not available in SIMPLE ACCESS
POINT mode.
Congures the DNS server when DHCP is OFF.
DNS SERVER
This function is not available in SIMPLE ACCESS
POINT mode.
2. Connection to the network
OFF.
(continued on next page)
LWU650-APS/LWU530-APS
User's Manual - Network Guide
27
020-001538-01 Rev. 1 (11-2018)
LIT GUID SET APS Series NET

2. Connection to the network
Item Description
Congures SSID for wireless network.
SSID
Enter SSID by using software keyboard. Refer
to PROJECTOR NAME (
software keyboard.
Congures SSID BROADCAST.
When this function is set to OFF, SSID of the
SSID
BROADCAST
projector is not displayed in wireless connection
list of the device.
This function is not available in INFRASTRUCTURE
mode.
Select the encryption method to be used.
WPA2-PSK(AES) WPA2-PSK(TKIP)
NETWORK
SETUP
/
WIRELESS
SETUP
(continued)
OFF WPA-PSK(AES)
WEP 64bitWEP 128bitWPA-PSK(TKIP)
WEP 64bit and WEP 128bit are available only in
INFRASTRUCTURE mode.
It is required to enter the encryption key when
selecting the encryption method other than OFF
and pressing the ► button.
ENCRYPTION
NOTE
• WPA2-PSK (AES) is recommended for
encryption method of IEEE802.11n/ac.
Transmission speed in IEEE802.11n/ac may
be slow when other encryption method (OFF,
WEP, WPA-PSK (TKIP), WPA-PSK(AES),
WPA2-PSK (TKIP)). Change the setting to
“AES” if encryption other than “AES” is set.
• Encryption method not included in the
selected item cannot be available.
&30) for how to use
(continued on next page)
LWU650-APS/LWU530-APS
User's Manual - Network Guide
28
020-001538-01 Rev. 1 (11-2018)
LIT GUID SET APS Series NET
 Loading...