

Christie D4K2560, Mirage 4K25 User Manual

D4K2560
Mirage 4K25
User Manual
020-101076-02


D4K2560
Mirage 4K25
User Manual
020-101076-02

NOTICES
COPYRIGHT AND TRADEMARKS
Copyright ©2013 Christie Digital Systems USA Inc. All rights reserved.
All brand names and product names are trademarks, registered trademarks or trade names of their respective holders.
REGULATORY
The product has been tested and found to comply with the limits for a Class A digital device, pursuant to Part 15 of the FCC Rules.
These limits are designed to provide reasonable protection against harmful interference when the product is operated in a
commercial environment. The product generates, uses, and can radiate radio frequency energy and, if not installed and used in
accordance with the instruction manual, may cause harmful interference to radio communications. Operation of the product in a
residential area is likely to cause harmful interference in which case the user will be required to correct the interference at the
user’s own expense.
CAN ICES-3 (A) / NMB-3 (A)
㧊 ₆₆⓪ 㠛ⶊ㣿(A ) 㦒⪲ 㩚㧦䕢㩗䞿❇⪳㦚 䞲 ₆₆㧊㡺┞ 䕦ⰺ㧦 ⡦⓪ ㌂㣿㧦⓪ 㧊㩦㦚 㭒㦮䞮㔲₆ ⧒Ⳇ , Ṗ㩫 㣎㦮 㰖㡃㠦㍲
㌂㣿䞮⓪ ộ㦚 ⳿㩗㦒⪲ 䞿┞┺ .
GENERAL
Every effort has been made to ensure accuracy, however in some cases changes in the products or availability could occur which
may not be reflected in this document. Christie reserves the right to make changes to specifications at any time without notice.
Performance specifications are typical, but may vary depending on conditions beyond Christie's control such as maintenance of
the product in proper working conditions. Performance specifications are based on information available at the time of printing.
Christie makes no warranty of any kind with regard to this material, including, but not limited to, implied warranties of fitness for
a particular purpose. Christie will not be liable for errors contained herein or for incidental or consequential damages in
connection with the performance or use of this material.
The product is designed and manufactured with high-quality materials and components that can be recycled and reused. This
symbol means that electrical and electronic equipment, at their end-of-life, should be disposed of separately from regular
waste. Please dispose of the product appropriately and according to local regulations. In the European Union, there are separate
collection systems for used electrical and electronic products. Please help us to conserve the environment we live in!
Canadian manufacturing facility is ISO 9001 and 14001 certified.
GENERAL WARRANTY STATEMENTS
For complete information about Christie’s limited warranty, please contact your Christie dealer. In addition to the other limitations
that may be specified in Christie’s limited warranty, the warranty does not cover:
a. Problems or damage occurring during shipment, in either direction.
b. Projector lamps (See Christie’s separate lamp program policy).
c. Problems or damage caused by use of a projector lamp beyond the recommended lamp life, or use of a lamp supplied by a
supplier other than Christie.
d. Problems or damage caused by combination of a Product with non-Christie equipment, such as distribution systems,
cameras, video tape recorders, etc., or use of a Product with any non-Christie interface device.
e. Problems or damage caused by the use of any lamp, replacement part or component purchased or obtained from an
unauthorized distributor of Christie lamps, replacement parts or components including, without limitation, any distributor
offering Christie lamps, replacement parts or components through the internet (confirmation of authorized distributors may
be obtained from Christie).
f. Problems or damage caused by misuse, improper power source, accident, fire, flood, lightening, earthquake or other natural
disaster.
g. Problems or damage caused by improper installation/alignment, or by equipment modification, if by other than Christie
service personnel or a Christie authorized repair service provider.
h. Problems or damage caused by use of a Product on a motion platform or other movable device where such Product has not
been designed, modified or approved by Christie for such use.
i. Problems or damage caused by use of a projector in the presence of an oil-based fog machine.
j. For LCD projectors, the warranty period specified applies only where the LCD projector is in “normal use.” “Normal use”
means the LCD projector is not used more than 8 hours a day, 5 days a week. For any LCD projector where “normal use” is
exceeded, warranty coverage under this warranty terminates after 6000 hours of operation.
k. Image retention on LCD flat panels.
l. Failure due to normal wear and tear.
PREVENTATIVE MAINTENANCE
Preventative maintenance is an important part of the continued and proper operation of your product. Please see the
Maintenance section for specific maintenance items as they relate to your product. Failure to perform maintenance as required,
and in accordance with the maintenance schedule specified by Christie, will void the warranty.

Addendum
Translated copies of this document are provided on the CD in the back of this document. The CD may also
contain additional product documentation. Read all instructions before using or servicing this product.
ᵜ᮷ẓⲴ㘫䈁࢟ᵜ൘ᵜ᮷ẓ㛼䶒Ⲵ CD кᨀDŽ䈕 CD ѝ䘈㜭ަԆӗ૱᮷ẓDŽ֯⭘ᡆ㔤؞ᵜӗ
૱ѻࡽ䈧࣑ᗵ䰵䈫ᡰᴹ䈤᰾DŽ
㔯ẞ側朊䘬䡇㍸ὃḮ㛔㔯ẞ䘬侣嬗∗㛔ˤ忁⻝䡇⎗傥⎎⢾⊭⏓℞Ṿ䓊⑩㔯ẞˤ婳教嬨㚱㊯
䣢ℵἧ䓐ㆾ復ᾖ㛔䓊⑩ˤ
Le CD au dos de ce document contient des traductions de celui-ci dans différentes langues. Ce CD peut
également contenir de la documentation supplémentaire sur le produit. Lisez toutes les instructions avant
d'utiliser ou d'entretenir ce produit.
Übersetzte Versionen dieses Dokuments werden auf der CD auf dem Vorsatzblatt dieses Dokuments
bereitgestellt. Die CD kann auch zusätzliche Produktdokumentation enthalten. Bitte lesen Sie diese
Anweisungen vor der Verwendung dieses Produkts oder vor der Ausführung von Wartungsarbeiten am
Produkt.
Le copie tradotte di questo documento sono fornite sul CD, sul retro di questo documento. Il CD potrebbe
anche contenere altra documentazione sul prodotto. Si prega di leggere tutte le istruzioni prima di
utilizzare questo prodotto o sottoporlo a manutenzione.
ࡇࡢࢻ࣓࢟ࣗࣥࢺࡢ⩻ヂ∧ࡀࡇࡢࢻ࣓࢟ࣗࣥࢺࡢ㠃ࡢ CD ࡛ᥦ౪ࡉࢀ࡚࠸ࡲࡍࠋCD ࡣ㏣ຍࡢ
〇ရ࣐ࢽࣗࣝࡶࡵࡽࢀ࡚࠸ࡲࡍࠋࡇࡢ〇ရࢆ⏝ࡋࡓࡾࠊᶵ⬟ࡉࡏࡓࡾࡍࡿ๓ࠊࡍ࡚ࡢ
ᣦ♧ࢆ࠾ㄞࡳࡃࡔࡉ࠸ࠋ
㧊 ⶎ㍲㦮 ⻞㡃♲ ㌂⽎㧊 㧊 ⶎ㍲ 䤚Ⳋ㦮 CD 㠦㍲ 㩲Ὃ♿┞┺ . 㧊 CD 㠦⓪ 㿪Ṗ 㩲䛞 ㍺ⳛ㍲Ṗ 䙂䞾♮
㠊 㧞㦚 㑮 㧞㔋┞┺ . 決 洢禎汊 斲殯穞其喞 朞庲穞匶 洊櫖 微姦 滆獮汊 筛汾穞柳柢欪 .
Copias traduzidas deste documento são fornecida no CD contido na parte de trás deste documento. O CD
pode conter documentação adicional do produto. Leia todas as instruções antes de usar ou prestar serviço
com este produto.
Перевод данного документа представлен на компакт-диске на оборотной стороне документа.
Компакт-диск может также содержать дополнительную
использованием или обслуживанием продукта ознакомьтесь со всеми инструкциями.
Las copias traducidas de este documento se proporcionan en el CD que se encuentra en la parte trasera. En
el CD también puede encontrar documentación adicional del producto. Lea todas las instrucciones antes
de utilizar o realizar el mantenimiento de este producto.
Перекладені екземпляри цього документа містяться на компакт-диску, який додано до цього
документа. На компакт-диску може також бути додаткова документація до виробу. Перш ніж
користуватися виробом або його обслуговувати, прочитайте всі інструкції.
документацию по продукту. Перед


Introduction ..................................................... 1
Safety and Warning Guidelines . . . . . . . . . . . . . . . . . . . . . . . . . . . . . . . . . . . . . . . 1
AC / Power Precautions . . . . . . . . . . . . . . . . . . . . . . . . . . . . . . . . . . . . . . . . . . 2
Lamp Precautions . . . . . . . . . . . . . . . . . . . . . . . . . . . . . . . . . . . . . . . . . . . . . . 2
Product Safety Labels . . . . . . . . . . . . . . . . . . . . . . . . . . . . . . . . . . . . . . . . . . . 3
Projector Overview . . . . . . . . . . . . . . . . . . . . . . . . . . . . . . . . . . . . . . . . . . . . . . . 4
Contact Your Dealer . . . . . . . . . . . . . . . . . . . . . . . . . . . . . . . . . . . . . . . . . . . . . . 4
Key Features . . . . . . . . . . . . . . . . . . . . . . . . . . . . . . . . . . . . . . . . . . . . . . . . . . . 5
How the Projector Works . . . . . . . . . . . . . . . . . . . . . . . . . . . . . . . . . . . . . . . . . . . 5
List of Components . . . . . . . . . . . . . . . . . . . . . . . . . . . . . . . . . . . . . . . . . . . . . . . 6
Installation and Setup ............................................. 7
Site Requirements . . . . . . . . . . . . . . . . . . . . . . . . . . . . . . . . . . . . . . . . . . . . . . . . 7
Tools Required for Installation . . . . . . . . . . . . . . . . . . . . . . . . . . . . . . . . . . . . . . . 7
Projector Components . . . . . . . . . . . . . . . . . . . . . . . . . . . . . . . . . . . . . . . . . . . . . 8
Installation Safety and Warning Guidelines . . . . . . . . . . . . . . . . . . . . . . . . . . . . . . . 9
Position the Projector . . . . . . . . . . . . . . . . . . . . . . . . . . . . . . . . . . . . . . . . . . . . 10
Connect to AC Power . . . . . . . . . . . . . . . . . . . . . . . . . . . . . . . . . . . . . . . . . . . . . 11
Adjust the Projector Tilt and Level . . . . . . . . . . . . . . . . . . . . . . . . . . . . . . . . . . . . 13
Install the Touch Panel Controller (TPC) . . . . . . . . . . . . . . . . . . . . . . . . . . . . . . . . 14
Connect External Exhaust Ducting . . . . . . . . . . . . . . . . . . . . . . . . . . . . . . . . . . . . 15
Projector Shroud . . . . . . . . . . . . . . . . . . . . . . . . . . . . . . . . . . . . . . . . . . . . . . . . 16
Lens Setup . . . . . . . . . . . . . . . . . . . . . . . . . . . . . . . . . . . . . . . . . . . . . . . . . . . . 17
Lamp Setup . . . . . . . . . . . . . . . . . . . . . . . . . . . . . . . . . . . . . . . . . . . . . . . . . . . 17
3D Setup for Mirage Projectors . . . . . . . . . . . . . . . . . . . . . . . . . . . . . . . . . . . . . . 18
3D Requirements . . . . . . . . . . . . . . . . . . . . . . . . . . . . . . . . . . . . . . . . . . . . . 18
Active Stereo 3D Configuration . . . . . . . . . . . . . . . . . . . . . . . . . . . . . . . . . . . . 19
Passive Stereo 3D Configuration . . . . . . . . . . . . . . . . . . . . . . . . . . . . . . . . . . . 20
3D System Timing . . . . . . . . . . . . . . . . . . . . . . . . . . . . . . . . . . . . . . . . . . . . 20
3D Input Video Configurations . . . . . . . . . . . . . . . . . . . . . . . . . . . . . . . . . . . . 21
Set Up a Single Mirage 4K to Display 3D Content . . . . . . . . . . . . . . . . . . . . . . . . . 21
Confirm the Emitter Setup . . . . . . . . . . . . . . . . . . . . . . . . . . . . . . . . . . . . . . . 21
Configure the Projector for the 3D Source . . . . . . . . . . . . . . . . . . . . . . . . . . . . 22
Connect Devices ................................................ 23
Connect a Video Source via 3G-SDI . . . . . . . . . . . . . . . . . . . . . . . . . . . . . . . . . . . 23
Connect a Video Source via DisplayPort . . . . . . . . . . . . . . . . . . . . . . . . . . . . . . . . 24
Connect a Video Source Using HDMI . . . . . . . . . . . . . . . . . . . . . . . . . . . . . . . . . . 25
Connect a Video Source via DVI . . . . . . . . . . . . . . . . . . . . . . . . . . . . . . . . . . . . . 25
D4K2560/Mirage 4K25 User Manual i
020-101076-02 Rev. 1 (11-2013)

Four-Port Input Video Quadrant Mappings . . . . . . . . . . . . . . . . . . . . . . . . . . . . . . . 26
3GIC, TDPIC, THIC Cards . . . . . . . . . . . . . . . . . . . . . . . . . . . . . . . . . . . . . . . . 26
DDIC Card . . . . . . . . . . . . . . . . . . . . . . . . . . . . . . . . . . . . . . . . . . . . . . . . . . 27
Connect Devices to the 3D Sync Ports . . . . . . . . . . . . . . . . . . . . . . . . . . . . . . . . . . 27
Connect a Computer or Server . . . . . . . . . . . . . . . . . . . . . . . . . . . . . . . . . . . . . . . 27
Ethernet Setup . . . . . . . . . . . . . . . . . . . . . . . . . . . . . . . . . . . . . . . . . . . . . . . . . 28
Adjust the Image ................................................. 29
Screen Image Orientation . . . . . . . . . . . . . . . . . . . . . . . . . . . . . . . . . . . . . . . . . . 29
Maximize Light Output . . . . . . . . . . . . . . . . . . . . . . . . . . . . . . . . . . . . . . . . . . . . 29
Image Alignment . . . . . . . . . . . . . . . . . . . . . . . . . . . . . . . . . . . . . . . . . . . . . . . . 29
Adjust Offset . . . . . . . . . . . . . . . . . . . . . . . . . . . . . . . . . . . . . . . . . . . . . . . . . . . 30
Adjust Horizontal Boresight . . . . . . . . . . . . . . . . . . . . . . . . . . . . . . . . . . . . . . . . . 30
Adjust Vertical Boresight . . . . . . . . . . . . . . . . . . . . . . . . . . . . . . . . . . . . . . . . . . . 31
Adjust DMD Convergence . . . . . . . . . . . . . . . . . . . . . . . . . . . . . . . . . . . . . . . . . . 31
Color Correction . . . . . . . . . . . . . . . . . . . . . . . . . . . . . . . . . . . . . . . . . . . . . . . . . 32
Adjust Color by Temperature . . . . . . . . . . . . . . . . . . . . . . . . . . . . . . . . . . . . . . 32
Adjust Color by Precise Chromaticity Values . . . . . . . . . . . . . . . . . . . . . . . . . . . 32
Adjust Color by Saturation . . . . . . . . . . . . . . . . . . . . . . . . . . . . . . . . . . . . . . . 33
Fold Mirror Adjustments . . . . . . . . . . . . . . . . . . . . . . . . . . . . . . . . . . . . . . . . . . . 33
Operation.......................................................35
Projector LED Status Indicators . . . . . . . . . . . . . . . . . . . . . . . . . . . . . . . . . . . . . . 35
Turn the Projector On . . . . . . . . . . . . . . . . . . . . . . . . . . . . . . . . . . . . . . . . . . . . . 35
Turn the Projector Off . . . . . . . . . . . . . . . . . . . . . . . . . . . . . . . . . . . . . . . . . . . . . 35
Work with Lamps . . . . . . . . . . . . . . . . . . . . . . . . . . . . . . . . . . . . . . . . . . . . . . . . 35
Adjust Lamp Power . . . . . . . . . . . . . . . . . . . . . . . . . . . . . . . . . . . . . . . . . . . . 36
Use LampLOC to Adjust the Lamp Position . . . . . . . . . . . . . . . . . . . . . . . . . . . . . 36
Calibrate the Lamp . . . . . . . . . . . . . . . . . . . . . . . . . . . . . . . . . . . . . . . . . . . . . 36
Manually Adjust the Lamp Position . . . . . . . . . . . . . . . . . . . . . . . . . . . . . . . . . . 36
View Lamp Information . . . . . . . . . . . . . . . . . . . . . . . . . . . . . . . . . . . . . . . . . . 37
Lamp Details . . . . . . . . . . . . . . . . . . . . . . . . . . . . . . . . . . . . . . . . . . . . . . . . . 37
Record New Lamp Information . . . . . . . . . . . . . . . . . . . . . . . . . . . . . . . . . . . . . 37
Work with Lenses . . . . . . . . . . . . . . . . . . . . . . . . . . . . . . . . . . . . . . . . . . . . . . . . 38
Select a Channel . . . . . . . . . . . . . . . . . . . . . . . . . . . . . . . . . . . . . . . . . . . . . . . . 38
Menus .........................................................39
Touch Panel Controller (TPC) . . . . . . . . . . . . . . . . . . . . . . . . . . . . . . . . . . . . . . . . 39
Tab Structure . . . . . . . . . . . . . . . . . . . . . . . . . . . . . . . . . . . . . . . . . . . . . . . . . . 40
ii D4K2560/Mirage 4K25 User Manual
020-101076-02 Rev. 1 (11-2013)

Menu Tab Details . . . . . . . . . . . . . . . . . . . . . . . . . . . . . . . . . . . . . . . . . . . . . . . 40
Status Tab Details . . . . . . . . . . . . . . . . . . . . . . . . . . . . . . . . . . . . . . . . . . . . . . . 41
Maintenance ................................................... 43
Maintenance Shutdown . . . . . . . . . . . . . . . . . . . . . . . . . . . . . . . . . . . . . . . . . . . 43
Ventilation and Cooling . . . . . . . . . . . . . . . . . . . . . . . . . . . . . . . . . . . . . . . . . . . 44
Inspect and Clean the Airflow Interlocks . . . . . . . . . . . . . . . . . . . . . . . . . . . . . 44
Inspect and Clean the Exhaust Duct . . . . . . . . . . . . . . . . . . . . . . . . . . . . . . . . 44
Inspect and Clean the Lamp Blower . . . . . . . . . . . . . . . . . . . . . . . . . . . . . . . . . 44
Inspect and Fill the Coolant Reservoir . . . . . . . . . . . . . . . . . . . . . . . . . . . . . . . 45
Filtration . . . . . . . . . . . . . . . . . . . . . . . . . . . . . . . . . . . . . . . . . . . . . . . . . . . . . 46
Replace the Light Engine Air Filter . . . . . . . . . . . . . . . . . . . . . . . . . . . . . . . . . . 46
Replace the Liquid Cooling Air Filter . . . . . . . . . . . . . . . . . . . . . . . . . . . . . . . . 46
Replace the Laminar Airflow Device (LAD) Filter . . . . . . . . . . . . . . . . . . . . . . . . 46
Lamps . . . . . . . . . . . . . . . . . . . . . . . . . . . . . . . . . . . . . . . . . . . . . . . . . . . . . . . 47
Inspect and Clean the Lamp . . . . . . . . . . . . . . . . . . . . . . . . . . . . . . . . . . . . . . 47
Inspect and Clean Optics . . . . . . . . . . . . . . . . . . . . . . . . . . . . . . . . . . . . . . . . . . 48
Remove Dust from the Projection Lens . . . . . . . . . . . . . . . . . . . . . . . . . . . . . . 48
Remove Fingerprints, Smudges, or Oil from the Projection Lens . . . . . . . . . . . . . 48
Projection Lens . . . . . . . . . . . . . . . . . . . . . . . . . . . . . . . . . . . . . . . . . . . . . . . . . 49
Removal . . . . . . . . . . . . . . . . . . . . . . . . . . . . . . . . . . . . . . . . . . . . . . . . . . . 49
Installation . . . . . . . . . . . . . . . . . . . . . . . . . . . . . . . . . . . . . . . . . . . . . . . . . 49
Calibrate the Lens Motors . . . . . . . . . . . . . . . . . . . . . . . . . . . . . . . . . . . . . . . 49
Troubleshooting ................................................ 51
Projector Does Not Power ON . . . . . . . . . . . . . . . . . . . . . . . . . . . . . . . . . . . . . . . 51
Lamp Does Not Ignite . . . . . . . . . . . . . . . . . . . . . . . . . . . . . . . . . . . . . . . . . . . . 51
Lamp Suddenly Turns OFF . . . . . . . . . . . . . . . . . . . . . . . . . . . . . . . . . . . . . . . . . 51
Flicker, Shadows Or Dimness . . . . . . . . . . . . . . . . . . . . . . . . . . . . . . . . . . . . . . . 52
LampLOC Not Working . . . . . . . . . . . . . . . . . . . . . . . . . . . . . . . . . . . . . . . . . . . . 52
Touch Panel Controller (TPC) . . . . . . . . . . . . . . . . . . . . . . . . . . . . . . . . . . . . . . . 52
Blank Screen, No Display of Image . . . . . . . . . . . . . . . . . . . . . . . . . . . . . . . . . . . 52
Cannot Communicate with Projector . . . . . . . . . . . . . . . . . . . . . . . . . . . . . . . . . . 52
Inaccurate Display Colors . . . . . . . . . . . . . . . . . . . . . . . . . . . . . . . . . . . . . . . . . . 53
Display is Not Rectangular . . . . . . . . . . . . . . . . . . . . . . . . . . . . . . . . . . . . . . . . . 53
Display has Suddenly Frozen . . . . . . . . . . . . . . . . . . . . . . . . . . . . . . . . . . . . . . . 53
The Display is Jittery or Unstable . . . . . . . . . . . . . . . . . . . . . . . . . . . . . . . . . . . . 53
Incoming Signal(s) Problems . . . . . . . . . . . . . . . . . . . . . . . . . . . . . . . . . . . . . . . 53
3D Synchronization Problems . . . . . . . . . . . . . . . . . . . . . . . . . . . . . . . . . . . . . . . 54
D4K2560/Mirage 4K25 User Manual iii
020-101076-02 Rev. 1 (11-2013)

Left and Right Eye are reversed . . . . . . . . . . . . . . . . . . . . . . . . . . . . . . . . . . . . . . 54
Specification ....................................................55
Display . . . . . . . . . . . . . . . . . . . . . . . . . . . . . . . . . . . . . . . . . . . . . . . . . . . . . . . 55
D4K2560 Signal Connectivity . . . . . . . . . . . . . . . . . . . . . . . . . . . . . . . . . . . . . . . . 56
Mirage Signal Connectivity . . . . . . . . . . . . . . . . . . . . . . . . . . . . . . . . . . . . . . . . . . 56
Control Signal Compatibility . . . . . . . . . . . . . . . . . . . . . . . . . . . . . . . . . . . . . . . . . 58
Temperature Sensor Thresholds . . . . . . . . . . . . . . . . . . . . . . . . . . . . . . . . . . . . . . 59
Warning Thresholds for Fans . . . . . . . . . . . . . . . . . . . . . . . . . . . . . . . . . . . . . . . . 60
Warning Threshold for Liquid Cooling Module . . . . . . . . . . . . . . . . . . . . . . . . . . . . . 60
Touch Panel Controller (TPC) . . . . . . . . . . . . . . . . . . . . . . . . . . . . . . . . . . . . . . . . 60
Power Requirements . . . . . . . . . . . . . . . . . . . . . . . . . . . . . . . . . . . . . . . . . . . . . . 61
Lamp . . . . . . . . . . . . . . . . . . . . . . . . . . . . . . . . . . . . . . . . . . . . . . . . . . . . . . . . 61
Physical Specifications . . . . . . . . . . . . . . . . . . . . . . . . . . . . . . . . . . . . . . . . . . . . 62
Regulatory . . . . . . . . . . . . . . . . . . . . . . . . . . . . . . . . . . . . . . . . . . . . . . . . . . . . 62
Safety . . . . . . . . . . . . . . . . . . . . . . . . . . . . . . . . . . . . . . . . . . . . . . . . . . . . . 62
Approvals . . . . . . . . . . . . . . . . . . . . . . . . . . . . . . . . . . . . . . . . . . . . . . . . . . . 62
Electro-Magnetic Compatibility . . . . . . . . . . . . . . . . . . . . . . . . . . . . . . . . . . . . . 63
Environment . . . . . . . . . . . . . . . . . . . . . . . . . . . . . . . . . . . . . . . . . . . . . . . . . . . 63
Accessories . . . . . . . . . . . . . . . . . . . . . . . . . . . . . . . . . . . . . . . . . . . . . . . . . . . . 63
iv D4K2560/Mirage 4K25 User Manual
020-101076-02 Rev. 1 (11-2013)
Introduction
This manual is intended for professionally trained operators of Christie high-brightness projection
systems. These operators are qualified to replace the lamp and air filter, but should not attempt to
install or service the projector.
Only qualified Christie technicians who are knowledgeable about the hazards associated with highvoltage, ultraviolet exposure, and the high temperatures generated by the projector lamp are
authorized to assemble, install, and service the projector.
Safety and Warning Guidelines
This projector must be operated in an environment that meets the operating range specification. Use
only the attachments and/or accessories recommended by Christie. Use of others may result in the
risk of fire, shock or personal injury.
Failure to comply may result in death or serious injury.
• Never look directly into the projector lens or at the lamp. The extremely high brightness
can cause permanent eye damage. For protection from ultraviolet radiation, keep all
projector housings intact during operation. Protective safety gear and safety goggles are
recommended when servicing.
• FIRE HAZARD! Keep hands, clothes, and all combustible material away from the
concentrated light beam of the lamp.
• Do not install the projector overhead.
Failure to comply could result in minor or moderate injury.
• Position all cables where they cannot contact hot surfaces or be pulled or tripped over.
• The American Conference of Governmental Industrial Hygienists (ACGIH) recommends
occupational UV exposure for an 8-hour day to be less than 0.1 microwatts per square
centimeters of effective UV radiation. A workplace evaluation is advised to assure
employees are not exposed to cumulative radiation levels exceeding the government
guidelines for your area. Be aware that some medications are known to increase
sensitivity to UV radiation. NOTE: During maintenance and cleaning operations, the
instructions define that the unit is not to be operational, thus the lamps will not be
active and there will be no emissions.
D4K2560/Mirage 4K25 User Manual 1
020-101076-02 Rev. 1 (11-2013)

Introduction
i
AC / Power Precautions
To correctly install this projector, a certified electrician must install a permanent connection to the
projector head. Operate the projector at the recommended voltage.
Disconnect projector from AC before opening any enclosure. Failure to comply results in
death or serious injury.
Failure to comply with the following could result in death or serious injury:
• Verify that the projector is using a line cord, socket and power plug that meets the
appropriate local rating standards. Use only an AC power cord recommended by Christie.
Do not attempt operation if the AC supply and cord are not within the specified voltage
and power range.
• DO NOT allow anything to rest on the power cord. Locate the projector where the cord
cannot be abused by persons walking on it or objects rolling over it. Never operate the
projector if the power cable appears damaged in any way.
• DO NOT overload power outlets and extension cords as this can result in fire or shock
hazards.
Lamp Precautions
Lamps used in the projector are under high pressure and must be handled with caution. Lamps can
explode and cause serious personal injury if they are dropped or mishandled.
Failure to comply with the following results in death or serious injury:
• Never attempt to access the lamp compartment while the lamp is On. Wait at least 10
minutes after the lamp turns Off before powering down, disconnecting from AC and
opening the lamp door.
• The arc lamp operates at a high pressure that increases with temperature. F ailure to allow
the lamp to sufficiently cool before handling, increases the potential for an explosion
causing personal injury or property damage.
• Always wear manufacturer approved protective safety clothing (gloves, jacket, face
shield) whenever the lamp door is open or when handling the lamp. Only qualified
technicians should install projector lamps.
Failure to comply with the following could result in death or serious injury:
• Possibly hazardous optical radiation emitted from this product. (Risk group 3)
• Thermal radiation emitted from this product may cause burns. (Risk group 3)
Recommended protective clothing includes, but may not be limited to a polycarbonate face
shield, protective gloves, and a quilted ballistic nylon jacket or a welder’s jacket. This
equipment is included in included in the Christie Protective Clothing Safety Kit
P/N: 598900-095.
Christie’s protective clothing recommendations are subject to change. Any local or federal
specifications take precedence over Christie recommendations.
2 D4K2560/Mirage 4K25 User Manual
020-101076-02 Rev. 1 (11-2013)

Product Safety Labels
Indicates the presence of a grounding point.
Indicates the presence of an earth grounding point.
Indicates the presence of a dangerous condition or situation.
Indicates the presence of a pinch hazard. To avoid personal injury, keep hands clear and loose clothing
tied back.
Indicates the presence of a hot surface. T o a void personal injury, always allow the projector to cool down
for a minimum of 10 minutes before performing maintenance or service procedures.
Introduction
Indicates the presence of a hot surface. T o a void personal injury, always allow the projector to cool down
for a minimum of 10 minutes before performing maintenance or service procedures.
Indicates the presence of an electrical shock hazard. To avoid personal injury, always disconnect all
power sources before performing maintenance or service procedures.
Indicates the presence of an electrocution hazard. To avoid personal injury, always disconnect all power
sources before performing maintenance or service procedures.
Indicates the presence of moving fan blades. To avoid personal injury, keep hands clear and loose
clothing tied back. Always disconnect all power sources before performing maintenance or service
procedures.
Indicates exposure to bright light. To avoid personal injury, do not look directly at the light source.
Indicates the presence of an explosion hazard. To avoid personal injury, always disconnect all power
sources and wear Christie approved protective clothing.
Indicates the presence of a fire hazard. To avoid personal injury and property damage, always adhere to
the instructions described in this manual.
D4K2560/Mirage 4K25 User Manual 3
020-101076-02 Rev. 1 (11-2013)

Introduction
Always disconnect all power sources before performing maintenance or service procedures.
See the product user manual for specific information and directions.
See the product service manual for specific information and directions.
Do not look directly into the lens.
Projector Overview
The D4K2560/Mirage 4K25 is a professional quality, easy-to-use projectors utilizing Digital Light
Processing (DLP™) technology from Texas Instruments. Integrating smoothly into traditional
projection environments; The D4K2560/Mirage 4K25 offers stunning wide screen, high-resolution 4K
images up to 120 frames per second.
Contact Your Dealer
If you encounter a problem with your Christie projector, contact your dealer. To assist with the
servicing of your projector, enter the information in the tables below and keep this information with
your records.
Purchase Record
Dealer:
Dealer or Christie Sales/Service Contact Phone Number:
Projector Serial Number:
Purchase Date:
Installation Date:
*The serial number can be found on the license label located on the front panel
Default Gateway
Projector IP Address
Subnet Mask
4 D4K2560/Mirage 4K25 User Manual
Ethernet Settings
020-101076-02 Rev. 1 (11-2013)

Introduction
Key Features
• 3-chip 4K DLP™ light engine
• 4096 x 2160 native pixel format
• 2.0 and 3.0 kW Xenon lamps available
• Supports screens up to approximately 100 feet in width
• Touch Panel Controller (TPC) for main projector interface. Verify you have the latest software by
visiting http://www.christiedigital.com
• 1x 10/100BaseT Ethernet port
• RS-232 ports for communication
• 4x Option slots accepting a variety of digital video input option cards
• 3D Sync input/output port
• LiteLOC™ feature for constant image brightness
• LampLOC™ feature for motorized three-axis lamp alignment
• Electronically operated “quick” douser
• Motorized lens mount
• LED indicators on the rear corners of the projector for easy-to-read status indication
• Replaceable air filters (no tools required)
• Optional Rack Mount Stand
• Choice of field-interchangeable zoom lenses
Model Name Part Number
D4K2560 129-009100-XX
Mirage 4K25 129-012104-XX
How the Projector Works
The D4K2560/Mirage 4K25 accepts a variety of input signals for projection on front or rear projection
screens, typical in commercial or other large screen applications. High-brightness light is generated
by a short arc Xenon lamp, then modulated by 3 Digital Micromirror Device (DMD) panels responding
to incoming data streams of digitized red, green and blue color information. As these digital streams
flow from the source, light from the responding “on” pixels of each panel is reflected, converged and
then projected to the screen through one or more projection lenses, where all pixel reflections are
superimposed in sharp full-color images.
D4K2560/Mirage 4K25 User Manual 5
020-101076-02 Rev. 1 (11-2013)

Introduction
List of Components
Verify the following components were received with the projector:
• Touch Panel Controller (TPC)
• Lens plug (required for shipping when lens is not installed to prevent contamination of critical
optical components)
• Light engine removal tool
• Convergence tool
• Nylon safety strap with clip (required to secure projector to tabletop or optional rack mount)
• Warranty Card
• Shroud
• Low Security Keys
• Web Registration Form
6 D4K2560/Mirage 4K25 User Manual
020-101076-02 Rev. 1 (11-2013)

Installation and Setup
i
This section explains how to install, connect and optimize the projector display.
Site Requirements
To safely install and operate the projector, the installation location must meet these minimum
requirements:
Physical Operating Environment
• Maximum Ambient Temperature (operating) 35°C (95°F)
• Minimum Ambient Temperature (operating) 10°C (50°F)
External Exhaust Ducting
The installation site must provide a minimum of 450 CFM (ft 3/min) external exhaust airflow to
ensure adequate cooling of the Xenon arc lamp at less than or equal to 25°C (77°F) ambient and less
than 3,000 ft (914.4 m) elevation. Above 25°C or 3,000 ft, 600 CFM is required. For CFM measuring
instructions, see Connect External Exhaust Ducting on page 15.
Power Connection
The requirements listed below are applicable for permanently wired installation or power
cord connection.
• Terminal block, electrician hard-wired to the projector head.
• Electrical rating: 200 - 240 VAC, 23 A max.
• This product can be connected to an IT power distribution system.
Tools Required for Installation
• 12” screwdrivers: Phillips #2 (magnetic) and flat
• 19mm and 7/8” wrenches
• Assorted Allen keys (metric)
• Christie approved protective safety clothing if working with the lamp
• Lens cleaning tissue and solution
D4K2560/Mirage 4K25 User Manual 7
020-101076-02 Rev. 1 (11-2013)

Installation and Setup
Projector Components
D
C
LAMP SIDE
E
F
B
A
G
J
LENS SIDE
H
I
ID Item Description
A Touch Panel Controller (TPC) The TPC is a touch-sensitive screen used to control and monitor operation.
For information about TPC controls and settings, see Menus on page 39.
B LED Status Indicators LED color and blinking rates provide information about the status of the
projector. For information about projector states and status, see Projector
LED Status Indicators on page 35.
C Manual Douser Override Closing the douser rotates a shutter blade in front of the lamp and reduces
the lamp power to 2.0 kW to conserve lamp life. The override is for
emergency use only.
D Lamp Door and Lamps The lamp door provides access to the lamp compartment and must remain
closed and locked for normal operation. Lamp replacement should only be
performed by qualified technicians. For a complete list of available lamp
types, see Accessories on page 63.
E Exhaust Duct and Vane Switch Extracts heated air from the lamp compartment. The vane switch mounted
inside the rigid port monitors airflow. See Site Requirements on page 7.
F Liquid Cooling Air Filter Cover
and Air Filter
G Shroud (2-piece) Covers the motorized lens mount assembly.
H Projection Lens A variety of lenses can be used with the D4K2560/Mirage 4K25. For a list of
I Air Filter Cover and Air Filter Filters the intake air before it circulates through the front compartment to
J Input Panel Faceplate Provides a variety of ports for connecting external devices. For information
Filters air before it circulates to cool the heat exchanger. For replacement
instructions, see Replace the Liquid Cooling Air Filter on page 46.
available lenses, see Accessories on page 63
cool the main electronics. For replacement instructions, see Replace the
Light Engine Air Filter on page 46.
about connecting devices and inputs, see Connect Devices on page 23.
8 D4K2560/Mirage 4K25 User Manual
020-101076-02 Rev. 1 (11-2013)

Installation and Setup
Installation Safety and Warning Guidelines
Failure to comply with the following results in death or serious injury:
• This product must be installed within a restricted access location which is normally
inaccessible by the general public, including workers, visitors and residents in the
immediate vicinity, by means of engineering or administrative control measures but is
accessible to authorized personnel that may not have specific safety training.
• This product must be located and positioned in a way as to restrict audience members
from direct access to enter the light beam path.
• The projector uses a high-pressure lamp that may explode if improperly handled. Always
wear manufacturer approved protective safety clothing (gloves, jacket, face shield)
whenever the lamp door is open or when handling the lamp. Failure to comply results in
death or serious injury.
Failure to comply with the following could result in death or serious injury:
• A qualified technician is required for all installations.
• SHOCK HAZARD. Never operate the projector without all of it’s covers in place.
• Use of the projector’s rear safety strap is mandatory to prevent the projector from
tipping. Secure the strap between the projector and the optional rack stand, or to any
other surface it is mounted.
• Four or more people are required to safely lift and hand-carry one projection head a short
distance. Recommend removing the lamp before transporting the projector.
Failure to comply with the following may result in equipment damage:
• Perform an automatic LampLOC adjustment when the lamp is moved, leveled, or a new
lamp is installed in the projector.
• Keep the projector level when lifting or transporting. Avoid tilting the projector to the
right. This can introduce an air bubble into the coolant hoses that can result in an air lock
and the overheating of the projector.
D4K2560/Mirage 4K25 User Manual 9
020-101076-02 Rev. 1 (11-2013)
Installation and Setup
i
Position the Projector
Keep the projector lens as parallel to the screen as possible, even if significantly above the
screen center. When a particularly short throw distance combines with a very wide screen,
you may have to forfeit some aim and stay more parallel to the screen. In such cases, some
lens offset can reduce the keystone distortion.
1. Position the projector at an appropriate throw distance (projector-to-screen distance) and
vertical position. Ideally, center the projector with the screen. If space is limited, aim the
projector slightly off-center. This increases side keystoning, but reduces the horizontal lens offset
required.
90°
If using an optional rack stand (P/N: 108-282101-02), assemble the rack stand using the instructions
provided with the rack stand. Use the hold down clamp (P/N: 116-100101-01) when securing the
projector to the rack stand.
≠90°
10 D4K2560/Mirage 4K25 User Manual
020-101076-02 Rev. 1 (11-2013)
Connect to AC Power
Failure to comply with the following could result in death or serious injury:
• Certified electrician required during installation. Ground (earth) connection is necessary
for safety. Never compromise safety by returning the current through the ground.
Connect ground FIRST to reduce shock hazard.
• Use an appropriate strain relief connector on the AC supply cable to prevent the cable
from rubbing against the LPS knockout plate and becoming damaged.
When connecting the projector directly to AC power, follow all electrical codes for your
location. In addition, follow these recommendations:
• Use 10AWG or 8AWG wiring. The distance between the wall circuit breaker and the
projector must not exceed 20 meters using 10AWG cables or 30 meters using 8AWG
cables.
• For North American installations, use at least 10AWG copper wires for the connection of
the main AC supply to the projector’s ground lug.
• Copper or aluminum are acceptable as conductor wiring material to the terminal block.
When connecting the projector to AC power with a pluggable type-B cable, follow all
electrical codes for your location. In addition, follow these recommendations:
• There must be easy access to the current protection device or breaker in the building.
• Use minimum 10AWG wiring, with a maximum length of 4.5 m for U.S and Canada. For
international installations the length should be based on the local electrical codes.
• The socket-outlet is installed near the equipment and is easily accessible.
• The plug can be used as the device disconnect and is near the unit and easily accessible.
The circuit breaker on the projector baseplate (located under the front lens-side corner)
can also be used as a means of disconnect.
Installation and Setup
1. On the bottom of the projector in the front lamp-side corner, loosen the 2 screws and slide the
access panel to expose the terminal block.
2. Remove 4 screws securing the knockout plate to the bottom right corner of the front bezel.
Remove the knockout plate. The AC supply is routed to the terminal block through an appropriate
strain relief mounted on this knockout plate.
2
1
D4K2560/Mirage 4K25 User Manual 11
020-101076-02 Rev. 1 (11-2013)
Installation and Setup
3. Connect to the terminal block. NOTE: The terminal block
accommodates up to an 8 AWG wire. If desired, a 90° strain relief
connector can be used to route the power cable in a downward
direction.
Always connect the ground lead first to reduce shock hazard.
• If connecting to permanent power, connect the AC power
source to the terminal block, beginning with the ground lead.
• If connecting to a pluggable type-B cable, connect the cable
to the terminal block, beginning with the ground lead.
• Use an appropriately sized strain relief connector with the
knockout plate provided to ensure adequate environmental sealing and to prevent the
cables from wear and accidentally being torn out.
3
4. Reinstall the knockout plate and secure it with 4 screws.
5. Reinstall the bottom access panel over the terminal block and secure it with 2 screws.
6. If using a pluggable type-B cable, connect to the building’s AC power source.
12 D4K2560/Mirage 4K25 User Manual
020-101076-02 Rev. 1 (11-2013)
Installation and Setup
Adjust the Projector Tilt and Level
The projector’s rear safety strap must be in place before adjusting the projector feet.
Do not over-extend the feet. Make sure several threads are engaged into the projector’s
baseplate to secure the projector from falling. Failure to comply could result in death or
serious injury.
The D4K2560/Mirage 4K25 lens should be centered and parallel with the screen. This orientation
ensures ideal lens performance with minimal offset. If this position is not possible (such as when the
projector is significantly higher than the center of the screen), it is better to rely on offset rather than
extra tilt.
Use a protractor to measure the degree of screen tilt and then extend or retract the projector feet to
match this angle.
The front-to-back tilt of the projector must not exceed 15 degrees. This limit ensures safe
lamp operation and the proper positioning of the liquid cooling reservoir. Failure to comply
may result in equipment damage.
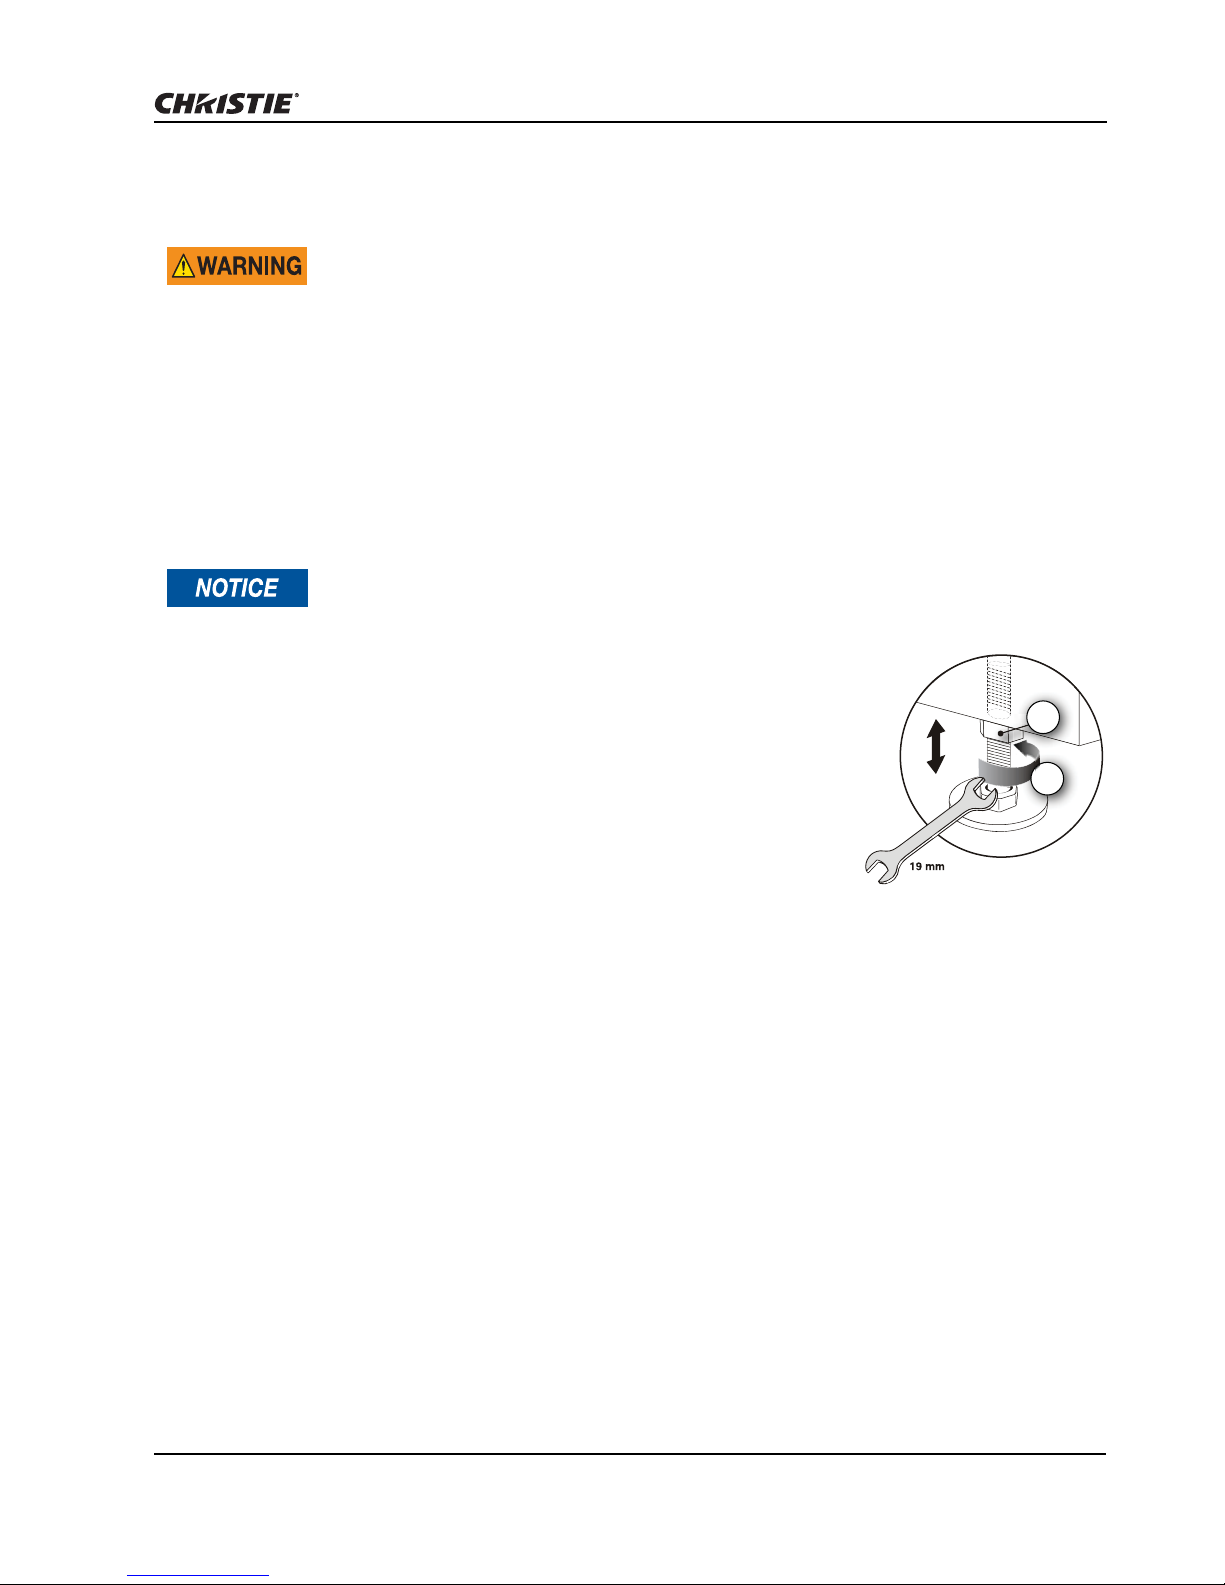
To adjust the vertical or horizontal position of the projector, extend or
retract the adjustable feet on the bottom of the projector by rotating them
(A). Once the required adjustment is made, tighten the lock nut (B).
The D4K2560/Mirage 4K25 projector provides 3.5 inches of adjustment at
the front and 11.5 inches of adjustment at the rear. If the vertical or
horizontal position of the projector requires more adjustment than the
standard feet allow, two 6-inch extension rods can be installed to increase
the amount of available adjustment.
B
A
Install the Foot Extension Rods
1. Prop up the rear of the projector to access the 2 rear feet.
2. Remove the feet by loosening the lock nut and rotating the each foot out of the projector.
3. Add the extension rods to the standard feet.
4. Thread the extended feet into the projector’s baseplate.
5. Adjust the feet until the desired tilt is achieved.
D4K2560/Mirage 4K25 User Manual 13
020-101076-02 Rev. 1 (11-2013)
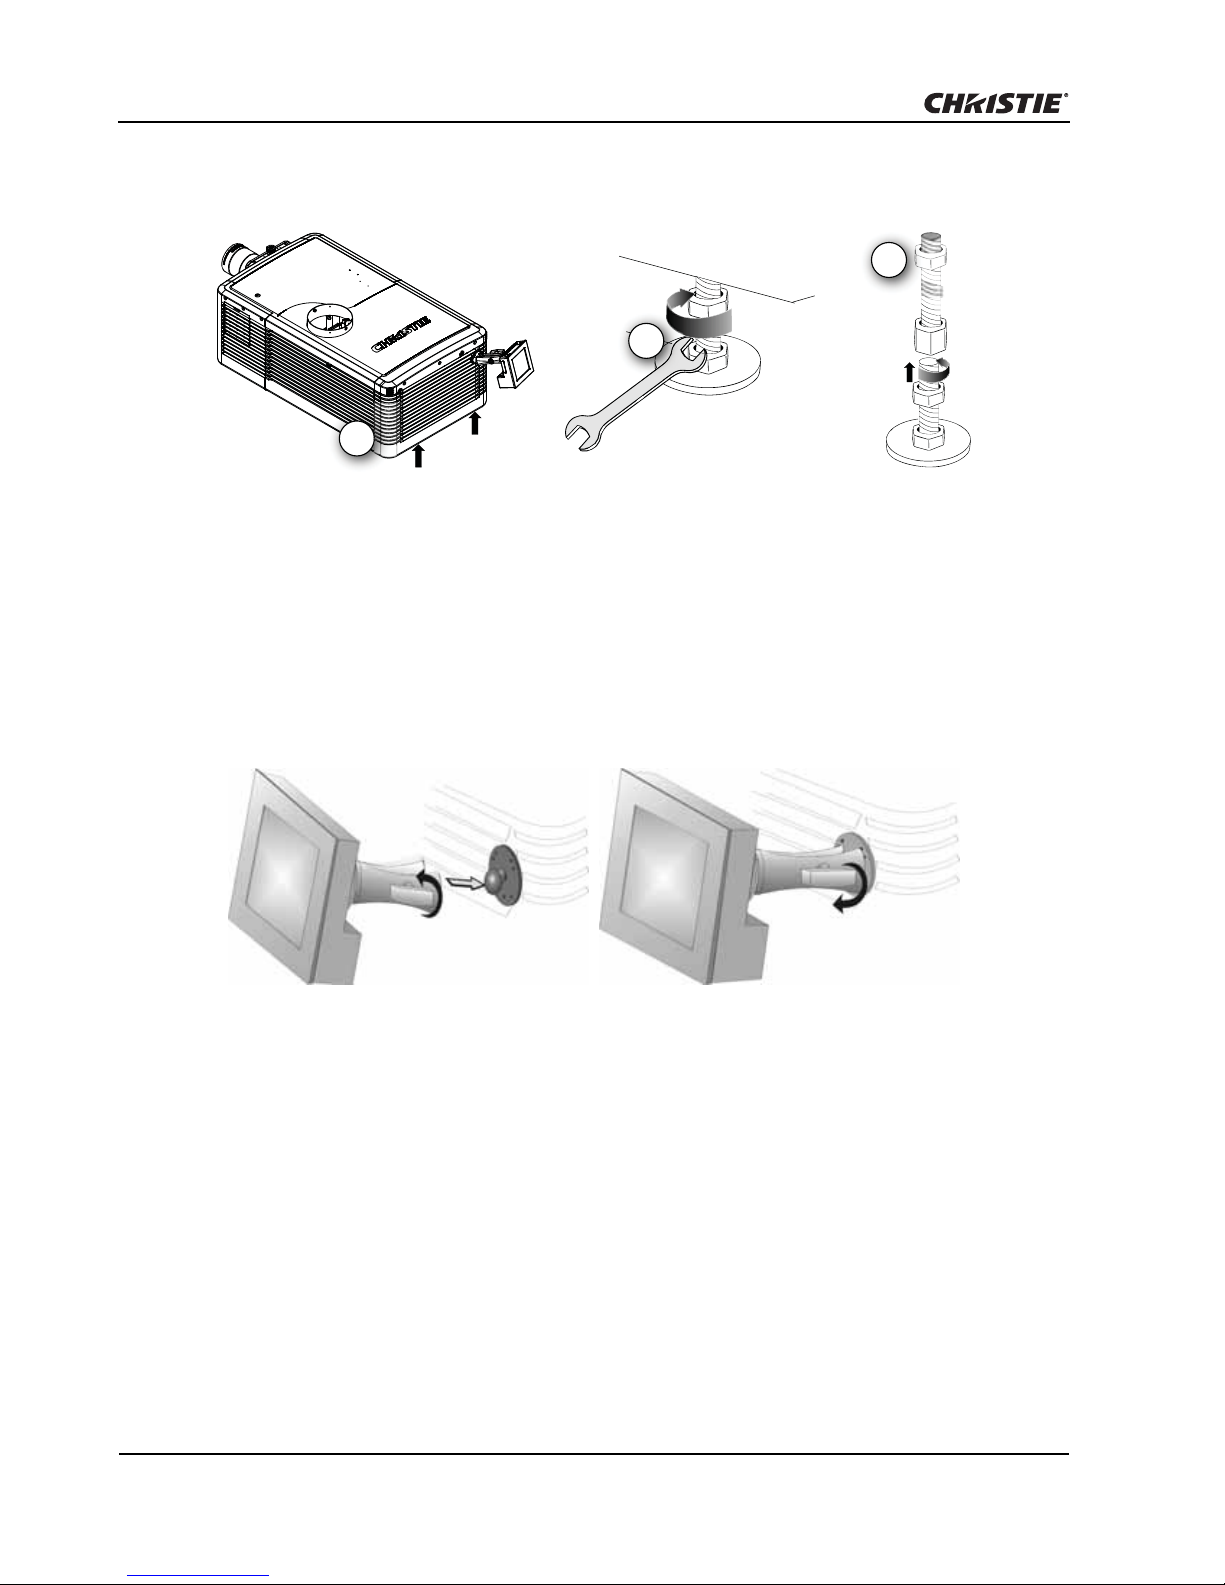
Installation and Setup
6. Lock the feet in place by turning each lock nut until it fits tight against the projector.
2
3
1
19 mm
Install the Touch Panel Controller (TPC)
1. Loosen the mounting arm just enough for the end to fit over the ball joint located on the rear
panel of the projector.
2. Tighten the mounting arm until it fits tightly on the joint.
3. Connect the cable from the TPC to the connector on the rear panel of the projector.
4. Adjust the TPC angle for optimal viewing.
14 D4K2560/Mirage 4K25 User Manual
020-101076-02 Rev. 1 (11-2013)
 Loading...