

Page 1
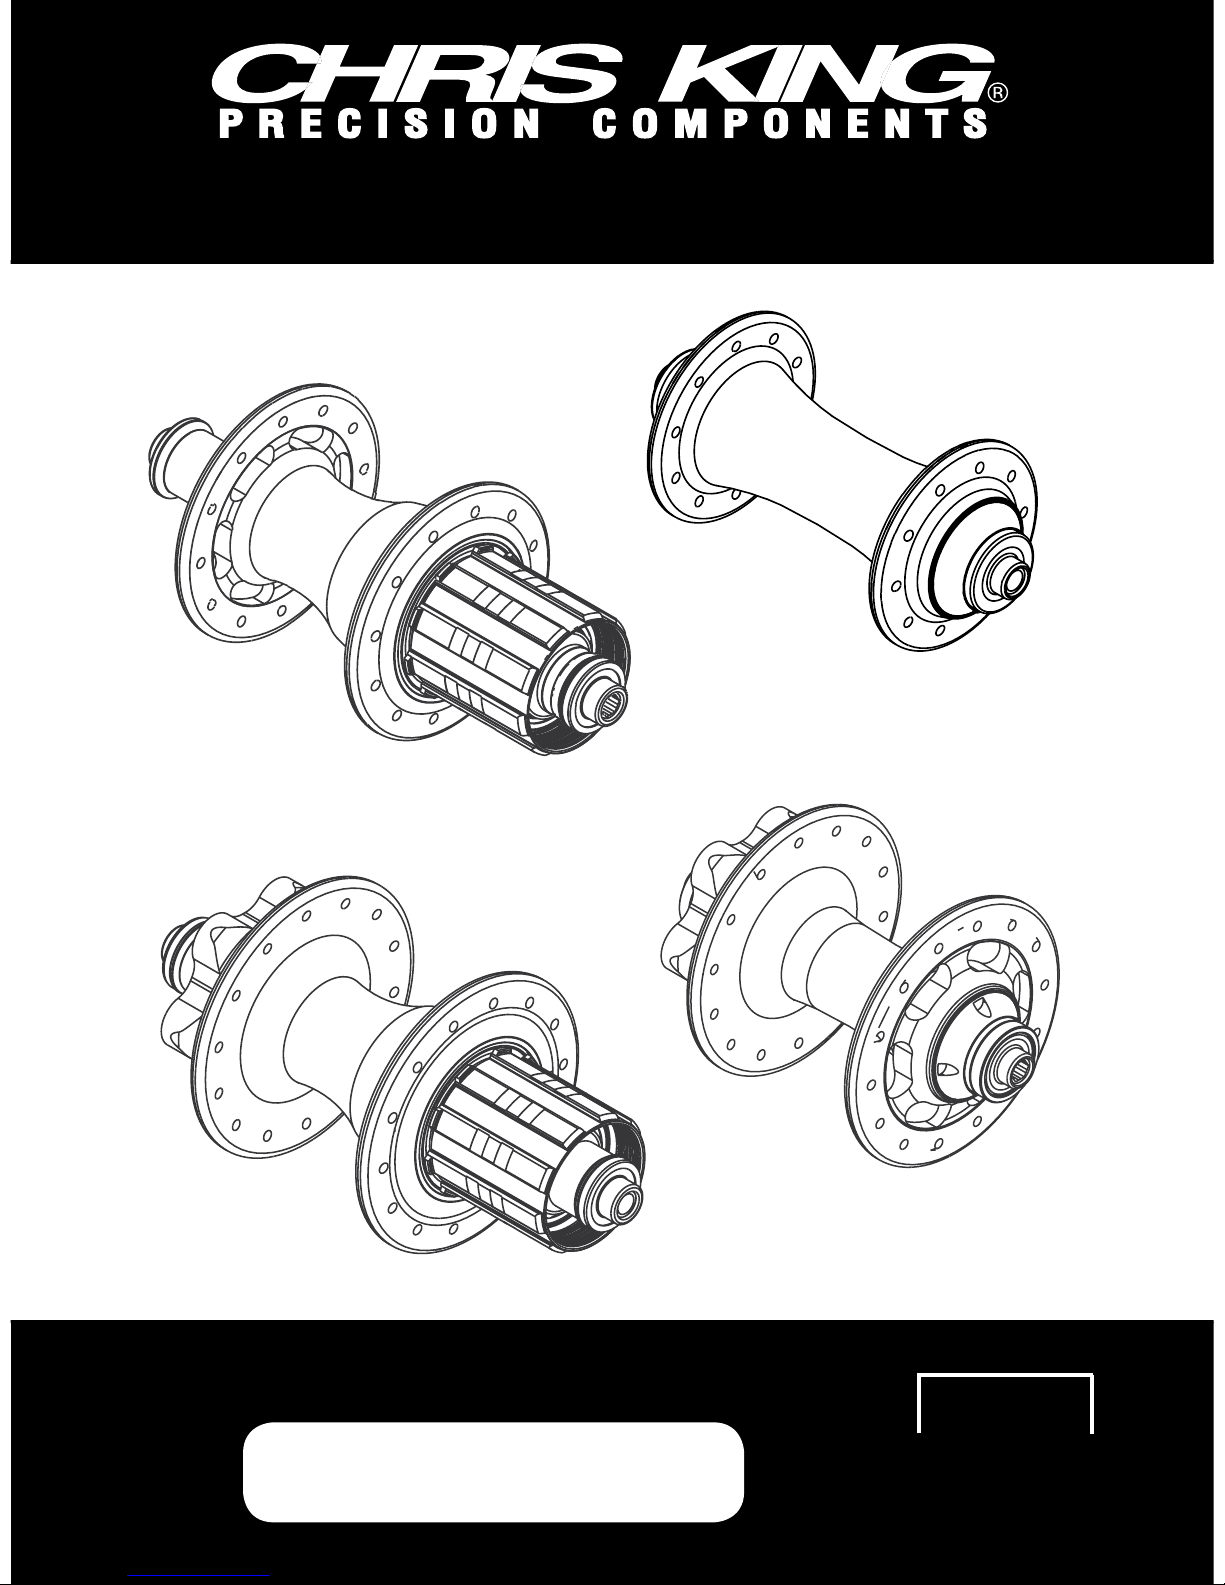
R45™& R45™ Disc Hub Manual
register online
chrisking.com/warranty
year warranty
5
serial number
Page 2

Contents
Introduction and Cautions..................................................................................................................1
Preparation and Setup
Wheel building....................................................................................................................1
Frame preparation....................................................................................................1
Hub identification and Attachment type................................................................2
Two Piece Axle..........................................................................................................2
One Piece Axle........................................................................................................2
Setup...............................................................................................................................2
R45 Front and R45 Disc Front..............................................2
R45 Rear and R45 Disc Rear..............................................2
Break-in............................................................................................................................3
Maintenance
Maintenance schedule...................................................................................................3
Notes on RingDrive maintenance............................................................................3
Lubrication: Normal/Cold/Wet conditions...................................4
Disassembly of two piece axle on front R45 and R45 Disc hub................................................5
Reassembly of two piece axle on front R45 and R45 Disc hub...............................................5
Disassembly of one piece axle on rear R45 and R45 Disc hub.................................................6
R45 and R45 Disc rear hub: basic maintenance, reassembly, and adjustment......7
Service of the bearings..................................................................................................................8
Front hub maintenance.................................................................................................10
Notes............................................................................................................11
Hub specifications and wheel building information................................12 & 13
Warranty and contact information......................................................................back cover
Helpful tools for precision servicing
Chris King hub cone adjusting tool
Pen Knife
2.5mm hex wrench
5mm hex wrench x 2
Dental pick
Small at head screwdriver
Chris King Ringdrive Lube
A light spray lubricant (e.g., WD-40™)
A quality 10w synthetic oil (such as Mobil 1® 10w-30 or equivalent)
A lightweight, low viscosity oil, with PTFE ( e.g. TriFlow ™)
Bench Vise
Page 3

Congratulations
You have just purchased the finest hubs available. With proper care and maintenance you
will enjoy many years of the legendary performance you have come to expect from all
Chris King Precision Components. This manual is designed to give you the information
needed for the setup, use, and basic maintenance of your new hubs.
As with all Chris King Precision Components, our hubs are superbly designed and
manufactured, responsibly light, and meticulously finished. Our hubs feature our patented
RingDrive
engagement system spinning around an aluminum axle on four sets of ball bearings. This combination, housed in an elegant aluminum shell, provides the performance
and reliability that serious cyclists demand. Like all of our components, our R45 and R45
Disc hubs are user serviceable.
Cautions
Chris King R45 and R45 Disc hubs are designed to be used in conjunction with quickrelease skewers. It is recommended that the skewer develop a minimum of 1100 lbs. of
clamping force when set. For best performance, use skewers with steel shafts. Titanium
shafted skewers are not recommended.
Do not use thread-locking compound on any part of your hub(s).
For the aluminum driveshells on the R45 rear hubs we recommend using “spidered”-
style cassettes. Avoid using individual cog-style cassettes with aluminum driveshells. We
recommend using our aluminum or Ti cassette lock rings when installing 9, 10,
and 11 speed drivetrains.
The Campagnolo-compatible R45 hub uses dedicated cassette lock rings. An 11-tooth
lock ring is included with each hub. A 12-tooth cassette lock ring is available from any
authorized Chris King dealer, or directly from Chris King Precision Components, www.
chrisking.com/store.
Chris King hubs feature adjustable bearing preload. The bearings should be kept in proper
adjustment for optimum product performance. Do not allow the adjustment to become
loose, as this may cause a loss of performance and could lead to damage to the hubs.
Preparation and Setup
Wheel building
Hub dimensions and restrictions for wheel building are available on pages 12 and 13.
Chris King R45 and R45 Disc hubs are designed to work with 13, 14 and 15 gauge spokes. We will
not be responsible for damaged or destroyed hubs, any consequential damages, or any resulting
labor costs due to improper lacing of your R45 and R45 Disc hub. Proper wheel building technique
is essential in creating a strong wheel. Wheel building is a skill that requires proper training and
specialized tools and should be done by a trained professional.
Frame Preparation
Check frame and fork dropouts to ensure that they are parallel to each other. Use an appropriate tool made by a reputable bicycle tool manufacturer.
Unparallel dropouts may damage or compromise the performance of your new hub.
1
Page 4
2
Hub Identication
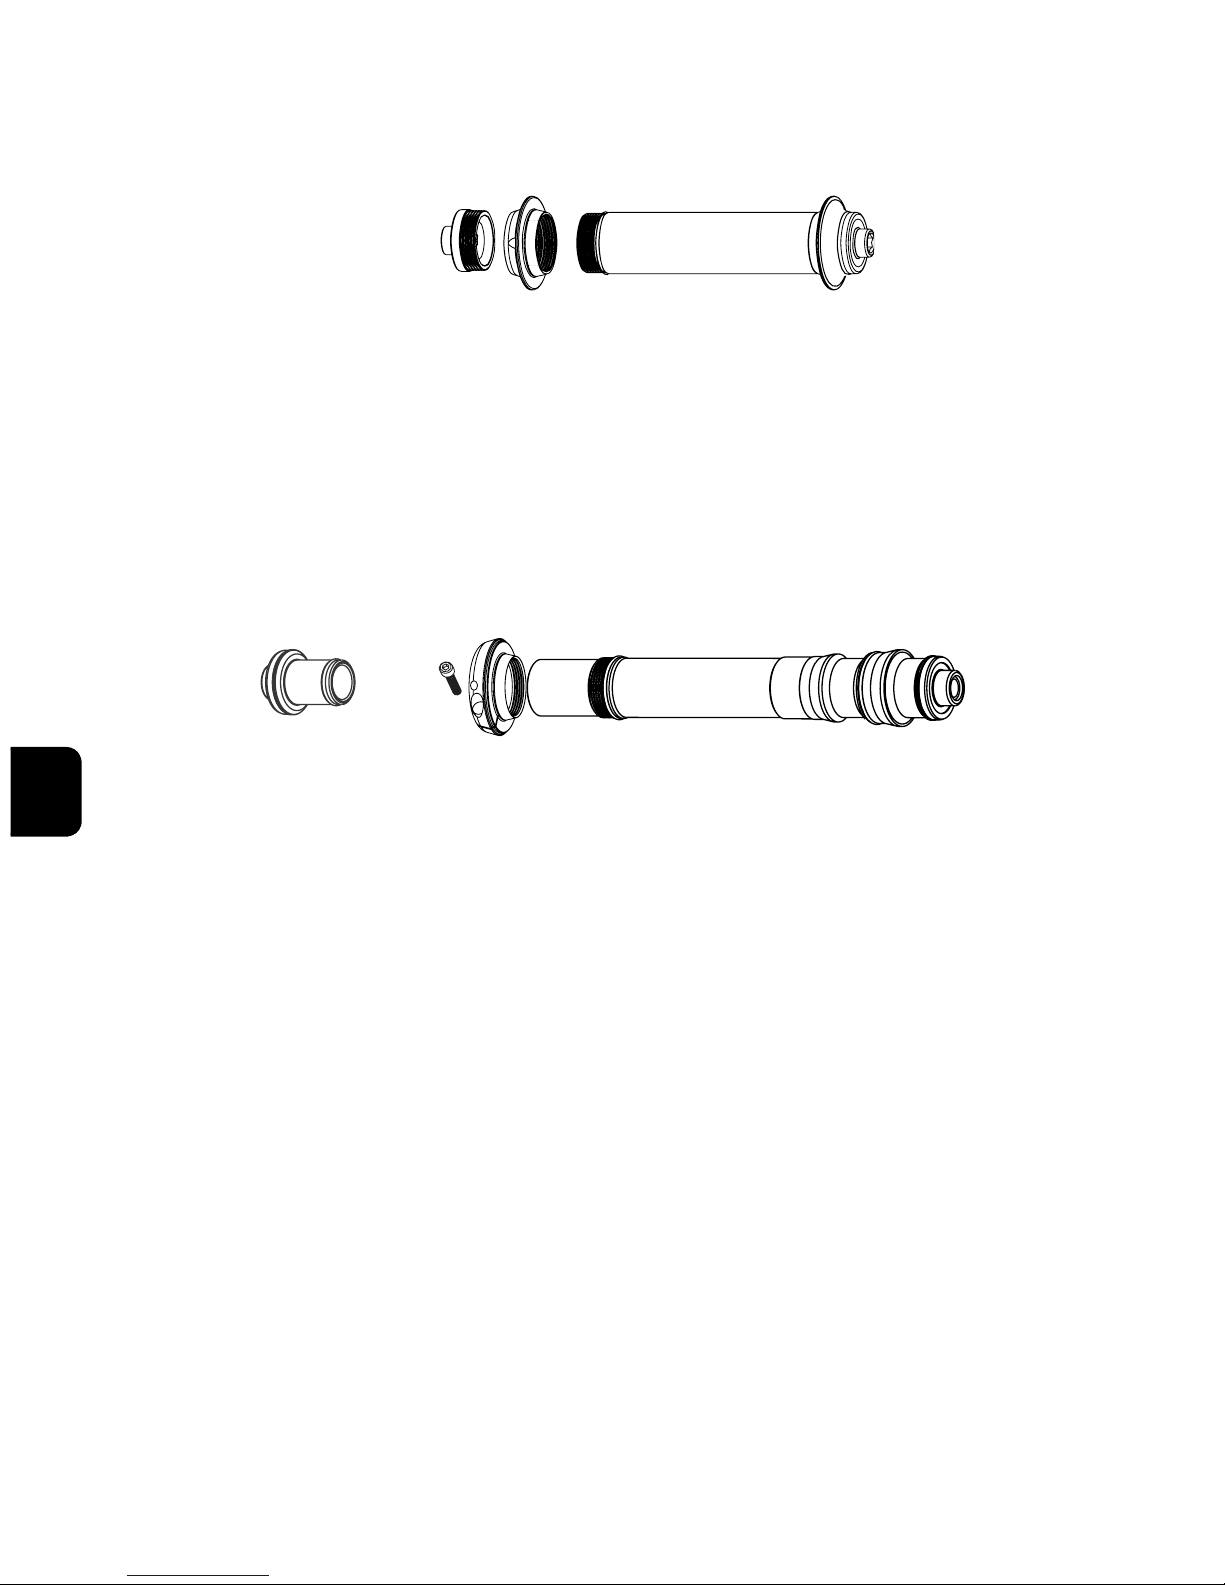
Two Piece Axle (see Figure 1)
The front R45 and R45 Disc hub uses a two piece axle and adjusting cone to adjust
bearing preload and an axle end to lock the preload adjustment. Two piece axle disassembly, reassembly and adjustment procedures can found on page 5 and 6.
One Piece Axle (see Figure 2)
The rear R45 and R45 Disc Hub uses a one piece axle (see Fig. 2, pg.2) and adjusting
clamp to adjust bearing preload.
One piece axle disassembly, reassembly and adjust-
ment procedures can be found on pages 6, 7, and 8.
Setup
R45 and R45 Disc front
Chris King R45 and R45 Disc front hubs are designed to work with 100mm fork
drop out spacing. Do not attempt to use your hub with any other dropout spacing.
R45 and R45 Disc rear
Chris King R45 rear hubs are designed to work with 130 frame spacing. Chris King
R45 Disc rear hubs are designed to work with 135mm frame spacing. Do not attempt
to use your hub with any other dropout spacing. .
The hub(s) come pre-adjusted from the factory. The adjustment has been made anticipating
spoke tension and skewer compression. Because of variations in wheel-building practices,
a minor adjustment should be performed upon completion of the wheel build. See the
appropriate “Adjustment” pgs. 6 and 8, and check the hub before using. Do not modify
or alter any Chris King axle system to accept thru-bolt or bolt-on rentention devices.
Axle
End
Adjusting
Cone
Two Piece Axle
Figure 1
Figure 2
2.5mm
hex bolt
Adjusting
Clamp
One Piece Axle
Q.R.
Insert
Page 5

Break-In
Once your new hub is placed in service, some settling may occur. Check adjustment by clamping
wheel into frame with a quick-release skewer. Ride for 5-10 minutes, check for play or binding,
and readjust clamp or cone if necessary. Recheck after the first 1-5 hours of riding. Check cassette lock ring on rear hubs after the first 20 hours of use, and tighten if necessary. Continue
monitoring for the rst 60 hours of use.
During the first 60 hours of use, above average amounts of drag may be noticed. This is normal
as the seals break in, and will soon diminish. If this causes chain sag in the rear while backpedaling, increase the B-tension (cage tension) on the rear derailleur.
A small amount of grease or oil may seep at the bearing seals during the break-in period.
Maintenance
Rear Hub Maintenance schedule
Chris King R45 and R45 Disc Hubs are designed to provide long life and high performance.
Beyond an occasional adjustment, the only maintenance necessary is cleaning and lubricating the RingDrive (see “The RingDrive”, pg. 8), and re-lubricating the bearings (see “Service of
the bearings”, pg. 10). Riding conditions will determine how often to service your hubs. As a
beginning guideline, your hubs should be serviced every 6-12 months in normal and
dry conditions and every 3 months in wet or muddy conditions.
The Chris King bearings in your new hub are of the highest quality. However angular contact
bearings will settle and eventually wear in with use. Since looseness or “play” in the bearing assembly can develop as a result of wear, Chris King hubs have been designed with
an adjustable bearing preload mechanism and any normal play can be eliminated (see the
appropriate “Adjustment” section, pgs.
6 and 8
).
Notes on RingDrive™ maintenance
Normal preventative maintenance of the RingDrive is simple and can be performed using
basic tools (see “The RingDrive”, pg. 8). In many cases, a minor cleaning and reapplication
of lubricant is all that may be necessary. Judging when to perform this basic maintenance
is determined by riding style and conditions. As a beginning guideline, your hubs should
be maintained every 6-12 months in normal and dry conditions and every 3 months in
wet or muddy conditions.
If foreign debris is detectable in the grease and/or the grease looks hard or dry, a complete
servicing (removal and cleaning) of the RingDrive should be performed. Complete service
includes the removal of the RingDrive engagement mechanism and requires the use of
our R45 Hub Service Tool. See any authorized Chris King dealer for complete service or
you may purchase a R45 Hub Service Tool Kit from your dealer or directly from Chris King
Precision Components. Chris King Precision Components provides overhaul services
at reasonable rates. Contact Chris King Customer Service at 800-523-6008 or email
us at [email protected] for details.
3
Page 6
Lubrication
Normal conditions
Lubrication of the R45 RingDrive
™
We recommend using a quality 10w synthetic oil (such as Mobile 1® 10w-30 or
equivalent) on the RingDrive assembly and helical splines on the driveshell.
Oil provides
optimal low drag, low viscosity lubrication for our R45 and R45 Disc RingDrive system.
RingDrive lube is also acceptable. Do not substitute other brands of grease as they may
be too sticky for the helix of the RingDrive and cause hub engagement problems and
premature wear.
Cold conditions
To ensure proper engagement in sub-freezing conditions, rst be sure that there is no water
or moisture inside the hubshell. The hub may require an overhaul to ensure that the hub
interior is completely water-free. A quality 10w synthetic oil (such as Mobil 1® 10w-30 or
equivalent) works well over a wide range of temperatures, even in subzero conditions. Do
not over ll.
Wet conditions
Riding in wet conditions necessitates more frequent service. Often this is as simple as removing
the axle and driveshell from the hub and removing any moisture from inside the hub shell. This
should not replace periodic complete disassembly and maintenance, especially in extreme or
prolonged wet conditions. Since it is nearly impossible to seal a hub from water and still have it
spin freely, we have designed our hubs to be able to operate normally with some water intrusion.
Although the bearings are stainless steel and will resist water-induced corrosion, the lubricant
will eventually deteriorate, leading to premature bearing wear and possible failure. High-pressure
spray washing, transporting or riding the bicycle in the rain, or submersion in water while riding
can all lead to lubricant contamination by water. Be aware of these situations and service more
frequently when they occur.
If you have any additional questions, please call our Technical Services Department at
800.523.6008, or check out our web site for tech info and videos: www.chrisking.com
4
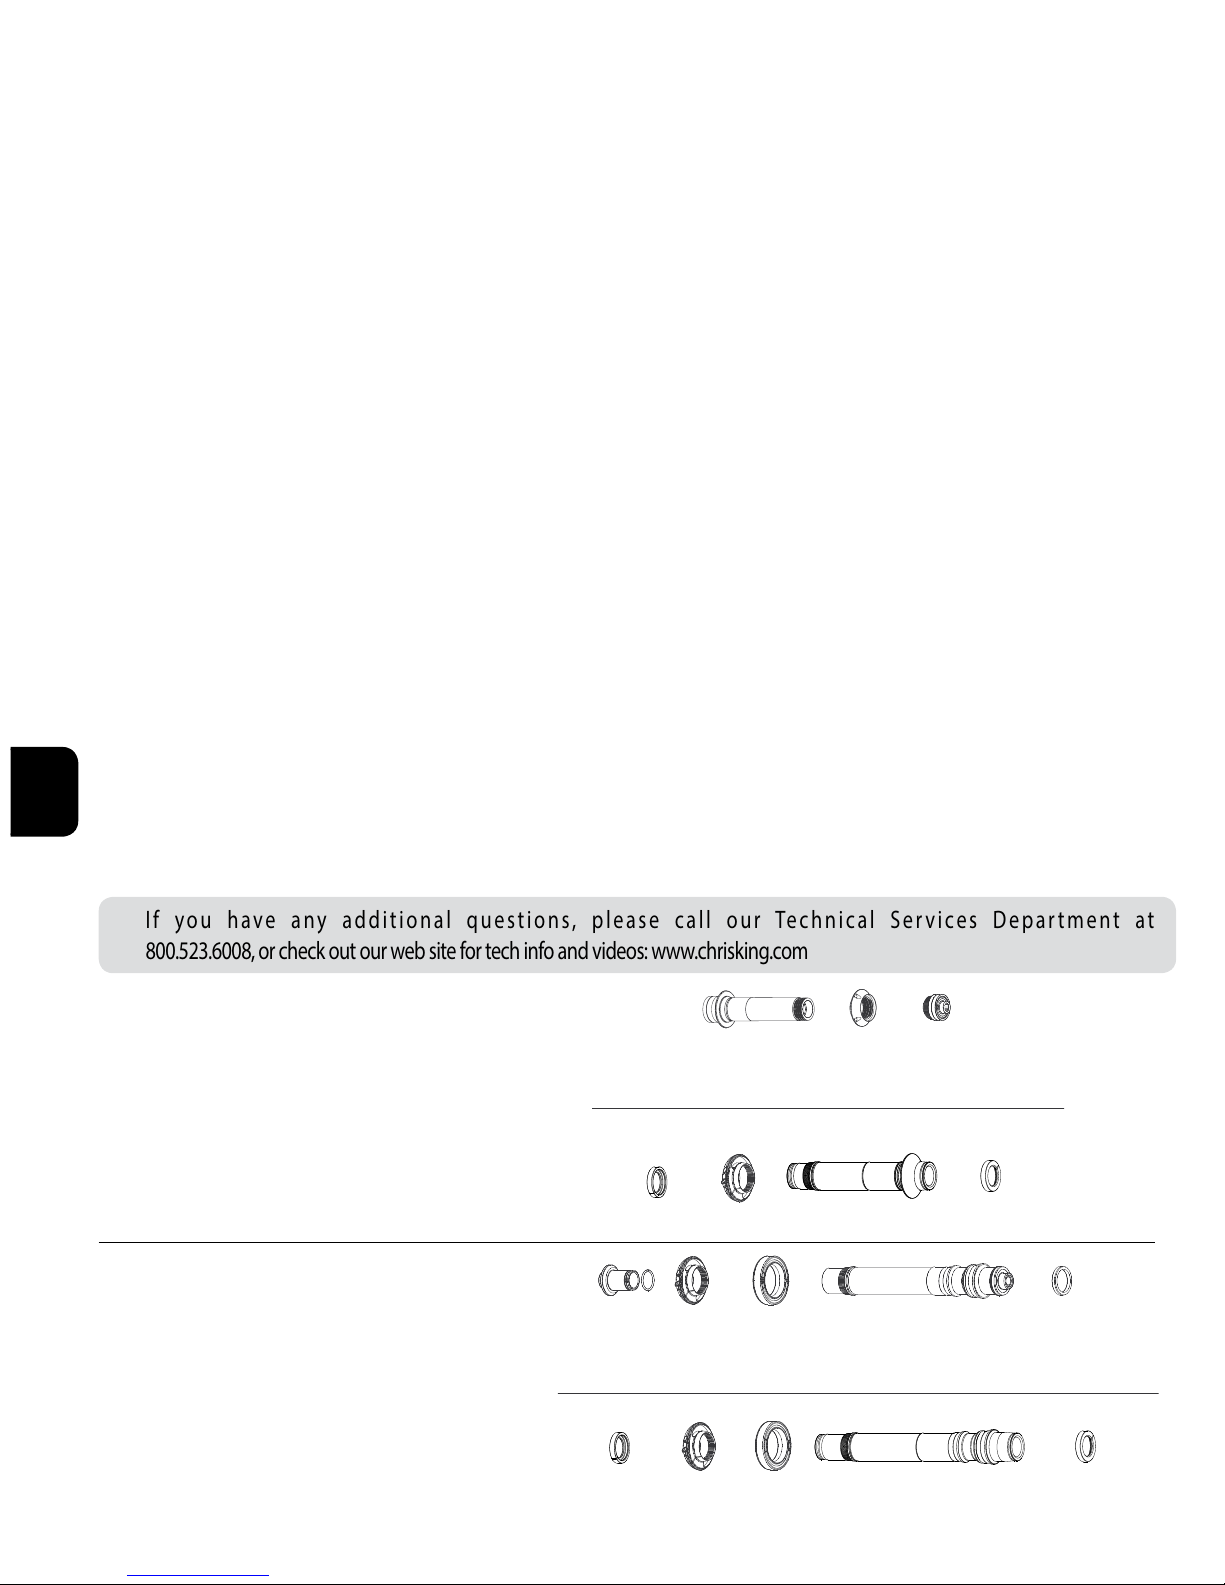
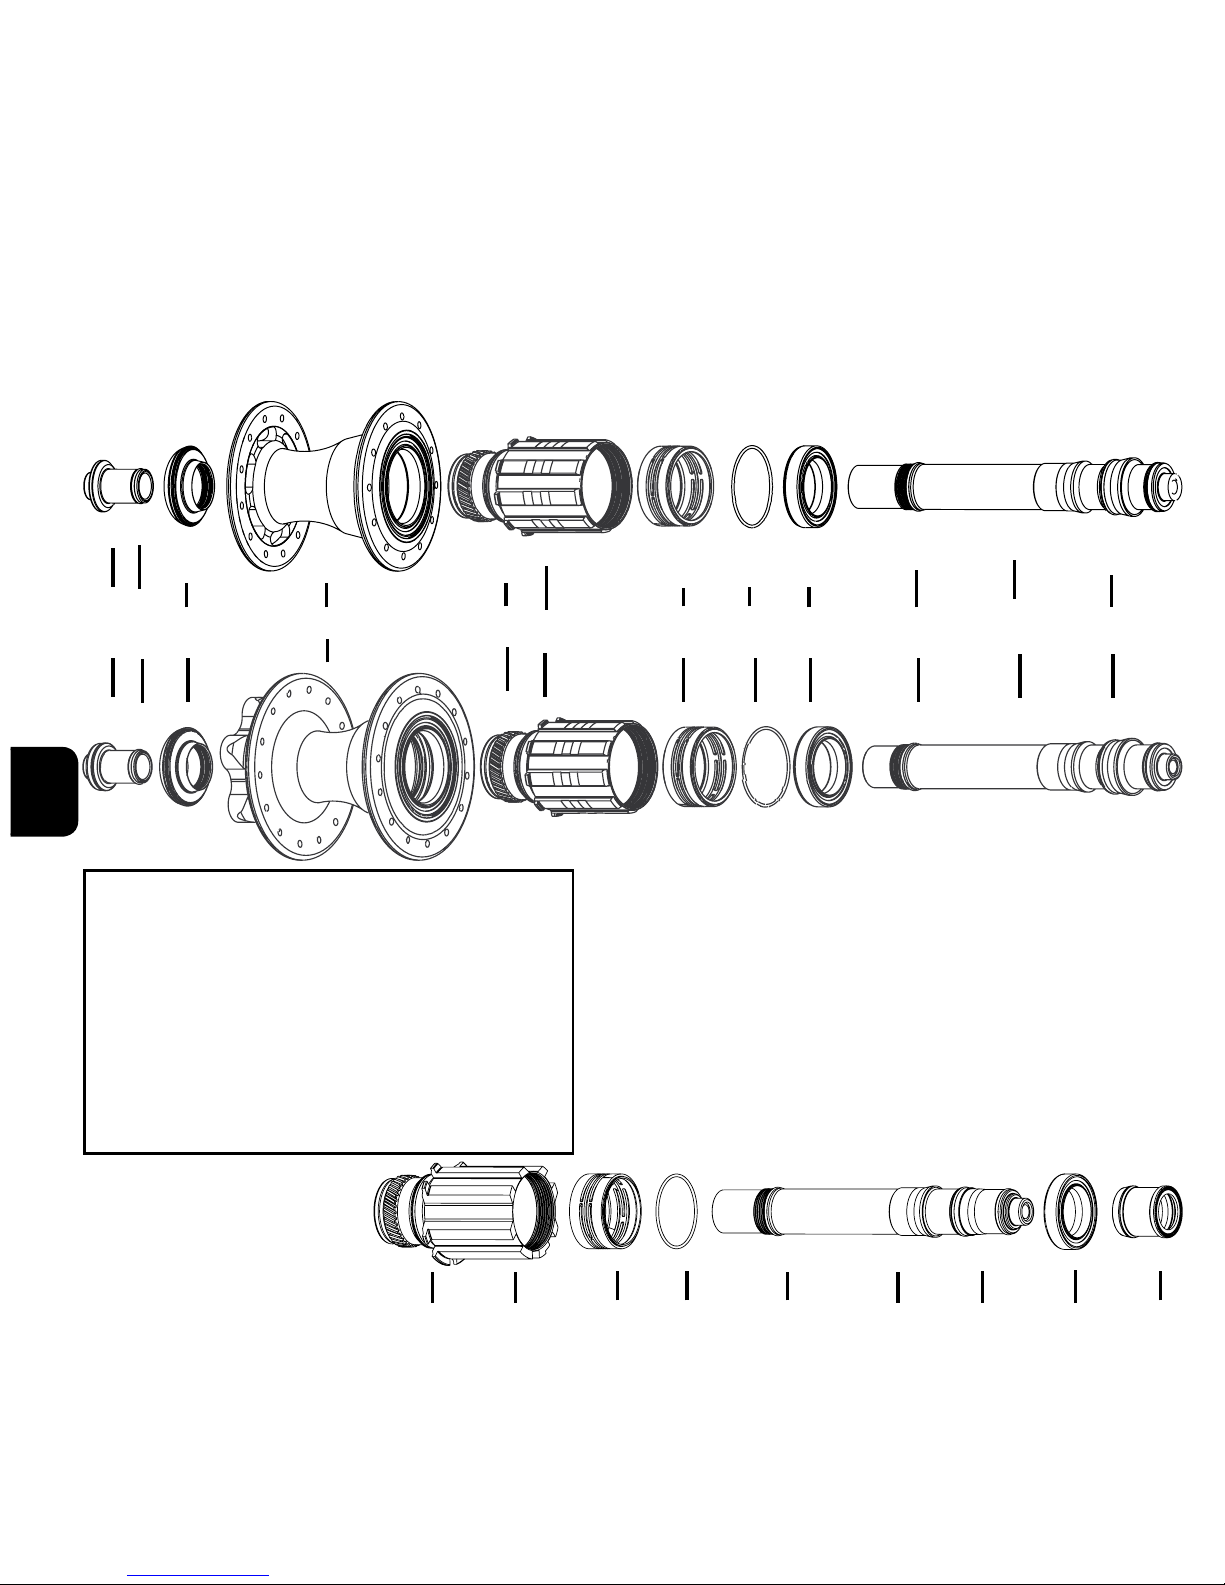
37606
RD ADJ CLAMP
17631 SCREW
17652 AXLE END R45D 12MM
18616 AXLE END CAP 142x12MM
37013 AXLE FT R45D 100x12MM
2 x 17009 AXLE O-RING RD SM
37011 AXLE FT R45D 2PC
2 x 17009 AXLE O-RING RD SM
18105 AXLE BITER
37012 AXLE END FT R45D
18105 AXLE BITER
17002 ADJ CONE RD FT
37633
RD QR INSERT
17639 O-RING
37651 AXLE RR R45D 142x12MM
17009 AXLE O-RING RD SM
17214 AXLE O-RING
37641 AXLE RR R45D 11SPD
17009 AXLE O-RING RD SM
17214 AXLE O-RING
57440 RD OB
DRIVESHELL BEARING
(DRIVESHELL-C)
57440 RD OB
DRIVESHELL BEARING
(DRIVESHELL-C)
37606
RD ADJ CLAMP
17631 SCREW
37606
RD ADJ CLAMP
17631 SCREW
17914 AXLE BITER
17652 AXLE END R45D 12MM 18616 AXLE END CAP 142x12MM
R45 Disc Front Axle Diagrams
R45 Disc Rear Axle Diagrams
R45 Disc 100mm x 12mm disassembly,
reassembly and adjustment follows
rear axle procedures
Page 7
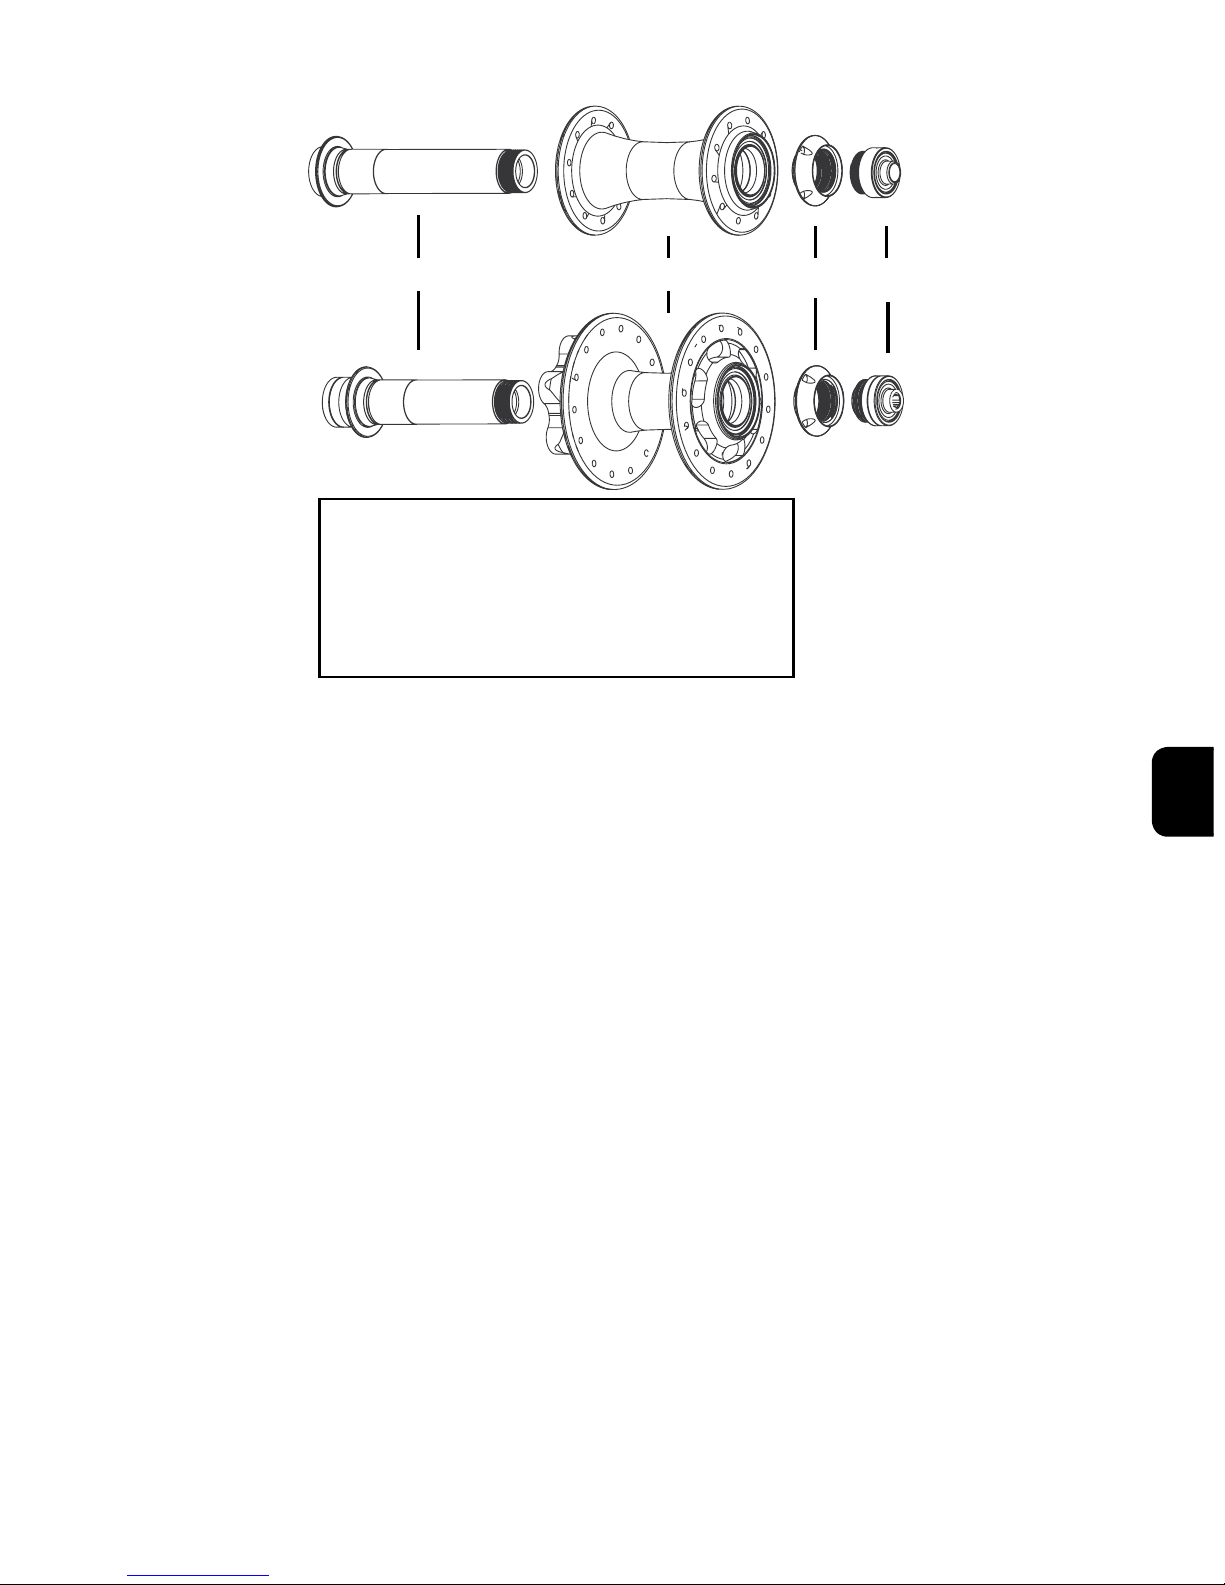
Disassembly of front R45 and R45 Disc hub
(see Figure 3)
A. R45 and R45 Disc hubshell assembly
B. R45 axle and R45 Disc front axle
C. R45 adjusting cone
D. R45 axle end and R45 Disc axle end
* R45 and R45 Disc hubshells, axles, and axle
ends are not cross compatible
A.B. C.
D.
Figure 3
1. Insert 5 mm hex wrenches into both ends of axle assembly.
2.
Hold right hand stationary and turn left hand counterclockwise 1/4 turn until assembly is loose.
3. Loosen and unscrew adjusting cone and axle end until they are free from main axle.
4. Slide out main axle.
5. Both hub shell bearing assemblies can now be accessed.
For bearing service information see “Service of the bearings”, pg. 8.
Reassembly of front R45 and R45 Disc Hub
(see Figure 3)
1. Lightly grease threads on axle, adjusting cone and axle end. Apply two drops of
lightweight,
low viscosity oil, with PTFE
( e.g. TriFlow ™) to axle O-rings.
2. Insert main axle into hub shell.
3. If axle end and adjusting cone are assembled as one unit, disassemble by threading axle
end out of adjusting cone and apply a thin layer of waterproof grease to the threads.
4. Thread adjusting cone onto the protruding threads of main axle.
5. Lightly snug adjusting cone up to bearing.
6. Thread axle end into adjusting cone until it stops.
7. Proceed to “Adjustment of two piece axle on front R45 & R45 Disc”, next.
Adjustment of two piece axle on front
R45 and R45 Disc
Hub
(see Figure 3)
1. Insert 5 mm hex wrenches into both ends of axle assembly.
2.
Hold right hand stationary and turn left hand counterclockwise 1/4 turn until assembly is loose.
3. Hold hex wrenches stationary and adjust bearing preload with adjusting cone.
4. Advance adjusting cone until it just contacts bearing, then back off approximately 1/16
5
Page 8
turn (this allows for axle compression while under skewer clamp pressure). For precise
adjustment the use of a Chris King Hub Cone Adjusting Tool may be necessary. Hub
cone adjusting tools are available from any authorized Chris King dealer, or directly from
Chris King Precision Components, www.chrisking.com/store.
5. Once preload is set, tighten axle assembly to 110 inch-pounds (12.4Nm).
6. Double check adjustment by clamping wheel into fork with quick-release. Check for play
or binding, and readjust if needed.
Disassembly of rear R45 and R45 Disc Hub
(
see Figure 4)
Shimano and SRAM Compatible
Campagnolo Compatible
I.
E.
B.
G.
F.
H.
B.B. I.
J.
*R45 and R45 Disc hubshells, axles and
axle ends are not cross compatible.
A. H.
G.
F.E.
D.
C.
B.
B.
B.
B.
A. R45 or R45 Disc QR insert
B. O-ring
C. R45 adjusting clamp
D. R45 and R45 Disc hubshell assembly
E. R45 driveshell assembly
F.
R45 bearing spacer spring
G.
Bearing spacer spring O-ring
H.
Outboard driveshell bearing
I. R45 or R45 Disc rear axle
J. Bearing retainer sleeve
Figure 4
130mm axle only
135mm axle only
6
Page 9

Campagnolo-compatible R45 rear hub
The Campagnolo-compatible R45 and R45 Disc rear hub operates in the same way as
the Shimano and Sram compatible R45 hub, with a few dierences. The Campagnolocompatible R45 hub uses dedicated driveshell, non-disc specic axle, disc specic axle,
spacer spring, outboard bearing, bearing sleeves and cassette lock rings. An 11-tooth
lock ring is included with each hub. A 12-tooth cassette lock ring is available from any
authorized Chris King dealer, or directly from Chris King Precision Components, www.
chrisking.com/store.
R45 and R45 Disc basic service
R45 and R45 Disc rear hub service
Follow these instructions for a basic cleaning, relubrication, and bearing preload procedure.
Refer to the schematics (see gure 4) of this manual for specic part listing.
For a more comprehensive service, including a thorough cleaning, inspection and replace
ment of parts, and removal of hub bearings, an R45 Hub Service Tool is required. R45 Hub
Service Tools are available from any authorized Chris King dealer, or directly from Chris
King Precision Components, www.chrisking.com/store.
R45 and R45 Disc rear hub disassembly
1. Remove skewer, cassette lock ring and cassette from hub.
2. Loosen 2.5mm hex bolt on adjusting clamp and then remove R45 QR insert from
main axle assembly by pulling it directly out of the non-driveside of axle.
3. Unscrew adjusting clamp and remove it from axle. [Tech Tip: if adjusting clamp is
difficult to remove, first insert a 5mm hex key into drive side axle end to keep axle
stationary. Then insert a 2.5mm hex key into helper hole on adjusting clamp adjacent
to 2.5mm hex bolt. Use 2.5mm hex key as a lever to unscrew adjusting clamp.]
4. Remove axle from the main hub assembly by pushing it through from the nondriveside. [Tech note: The outboard driveshell bearing of the Shimano-compatible
R45 may or may not remain on the axle as it is pushed out of the hubshell assembly.
It will be remain on the axle in the Campagnolo-compatible version.]
5. Remove driveshell by holding hubshell or wheel in one hand and with other hand
pull driveshell counter clockwise out of the hubshell assembly.
6. All rear hub bearing and RingDrive assemblies can now be accessed for basic
cleaning and relubrication.
Rear hub basic cleaning
1. Chris King sealed bearings have removable snap rings that hold the rubber seals
in place.
2. Carefully, using a very small screwdriver, pick, or penknife, remove the snap ring
by inserting tool into split of snap ring. Gently work one end of the snap ring toward
bearing center until it is out of its groove. Follow the ring around with the tool until
the snap ring is completely dislodged.
3. Lift and remove exposed rubber seal to access the interior of the bearing. Thoroughly
7
Page 10
flush the bearing and RingDrive assembly with a light solvent-based spray lubricant (e.g.,
WD-40™). Do not use citrus based cleansers as they are corrosive and will damage
hub parts. Some solvents, synthetic lubricants, and greases with high-pressure additives
may attack and damage seals and other nonmetallic materials. Minimize exposure to these
substances and thoroughly dry hub after cleaning.
4. Using a toothbrush, scrub bearing surfaces, RingDrive splines and teeth, and helical splines
on driveshell to remove hardened grease and contaminants.
5. Flush bearing and RingDrive assembly again with a light solvent-based spray lubricant.
6. Use compressed air to blow all spray lubricant, old grease and contaminants out of the
bearings and hubshell. If compressed air is not available, use a clean, lint-free towel to
thoroughly wipe out interior of hub assembly and bearing surfaces. Bearings, RingDrive
and hub interior must be completely dry and free of solvents before adding new lubrication.
7. Wipe dirt and other contaminants from the seals and snap rings. Avoid cleaning the seals
with heavy-duty solvent, which could cause deterioration.
Service of the bearings
(see gure 5)
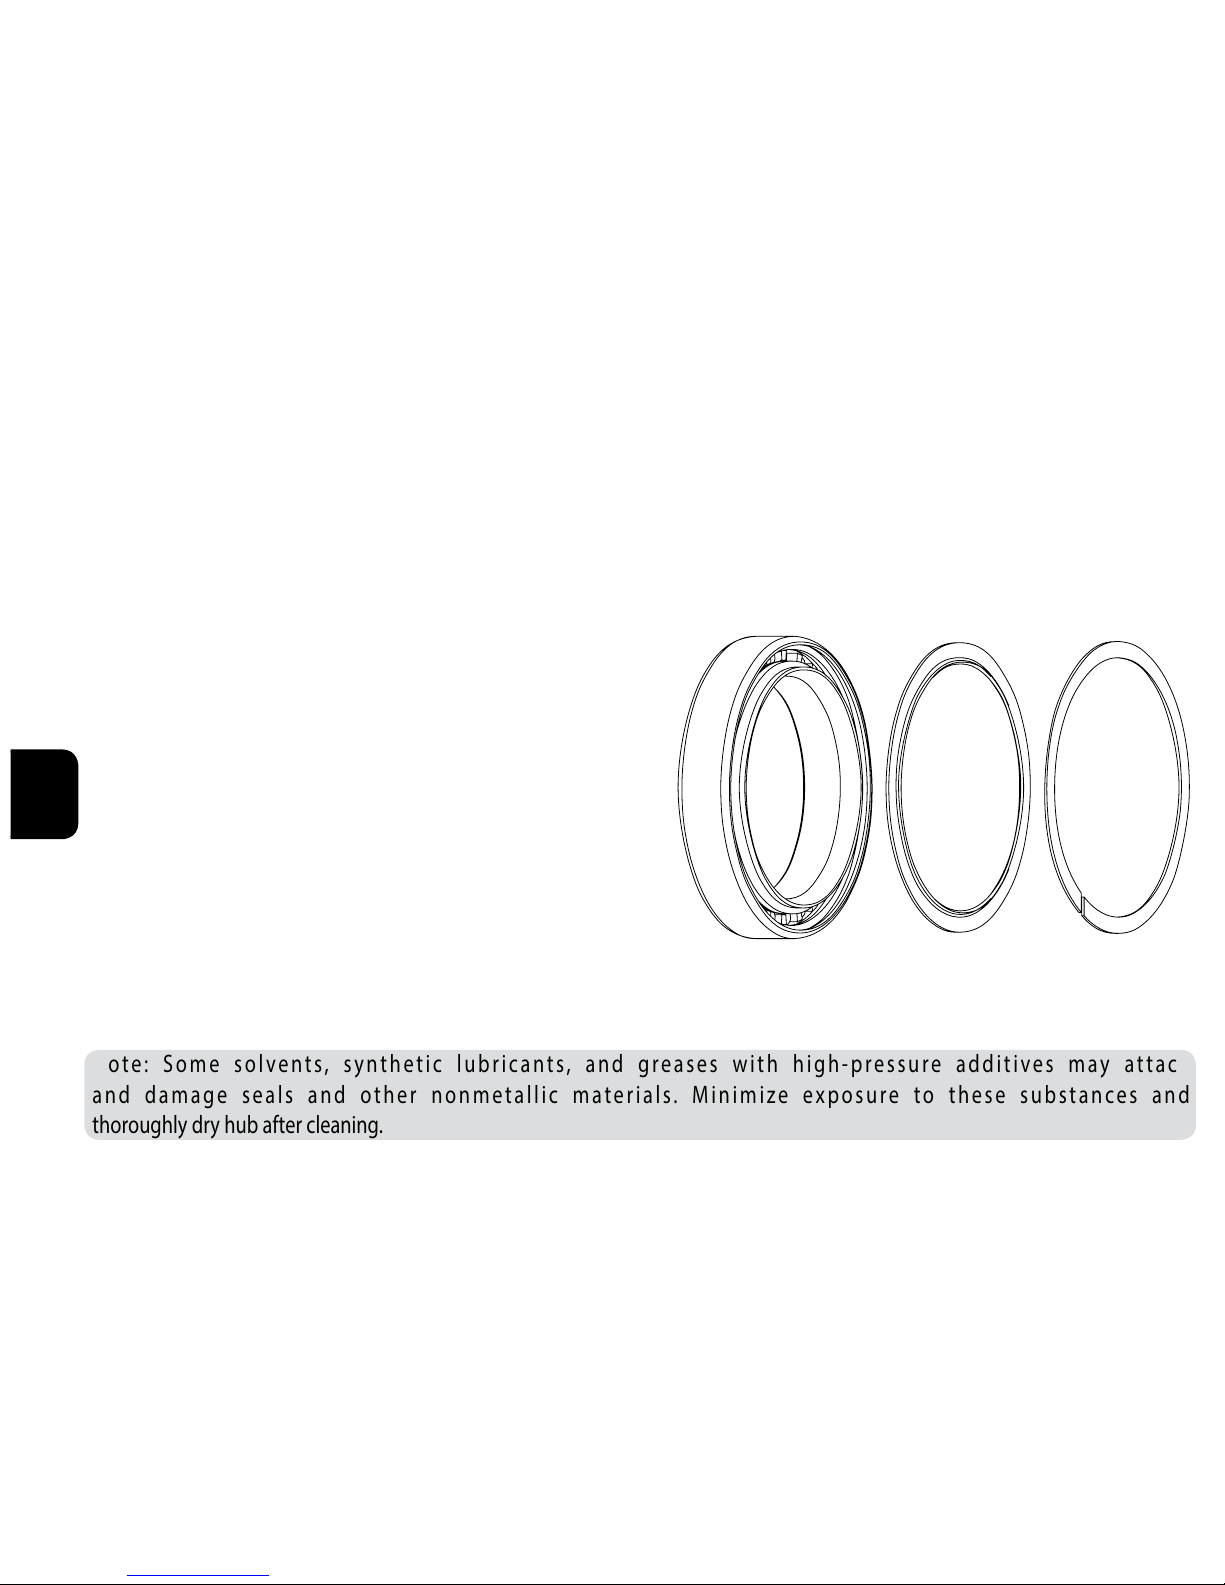
Chris King sealed bearings have removable snap
rings that hold the rubber seals in place.
1. Carefully, using a very small screwdriver,
pick, or penknife, remove the snap ring by
inserting tool into split of snap ring. Gently
work one end of the snap ring toward bearing
center until it is out of its groove. Follow the
ring around with the tool until the snap ring
is completely dislodged.
2. Lift and remove exposed rubber seal to
access the interior of the bearing. [Tech Tip:
Carefully note it’s orientation.]
3. Thoroughly flush the bearing with a light spray
lubricant (e.g., WD-40™) and blow dry.
Note: Some solvents, synthetic lubricants, and greases with high-pressure additives may attack
and damage seals and other nonmetallic materials. Minimize exposure to these substances and
thoroughly dry hub after cleaning.
4. Wipe dirt and other contaminants from the seals and snap rings. Avoid cleaning the seals
with solvent, which could cause deterioration.
5. Lubrication of the R45 bearings. For R45 bearings with stainless steel balls, apply enough
RingDrive Lube to lightly coat the balls inside the bearing (approximately .3ml) of RingDrive
Lube 1/4 to 1/2 way around the top of the hub bearings. For R45 bearings with ceramic
balls, apply enough RingDrive Lube to lightly coat the balls inside the bearing, using
approximately .1ml (a pea-sized amount) of lube. This can be accomplished by applying
a light bead of lube 1/8 to 1/4 of the way around the bearing. Rotate the inner race to work
the lube throughout the ball area. In wet and/or muddy conditions, apply more lube to the
bearings to help seal the bearings from contaminants.
6. Reinstall black rubber seal between inner and outer bearing race. If using the original seal,
Bearing
Assembly
Rubber Seal
Snap Ring
Figure 5
8
Page 11
reinstall using the same orientation as when they were originally installed, as this
will minimize drag.
7.
Turn inner race of bearing by hand to test for binding. If bearings do not run smooth,
repeat steps 1-7. Binding is often a result of improperly seated seals and/or snap rings.
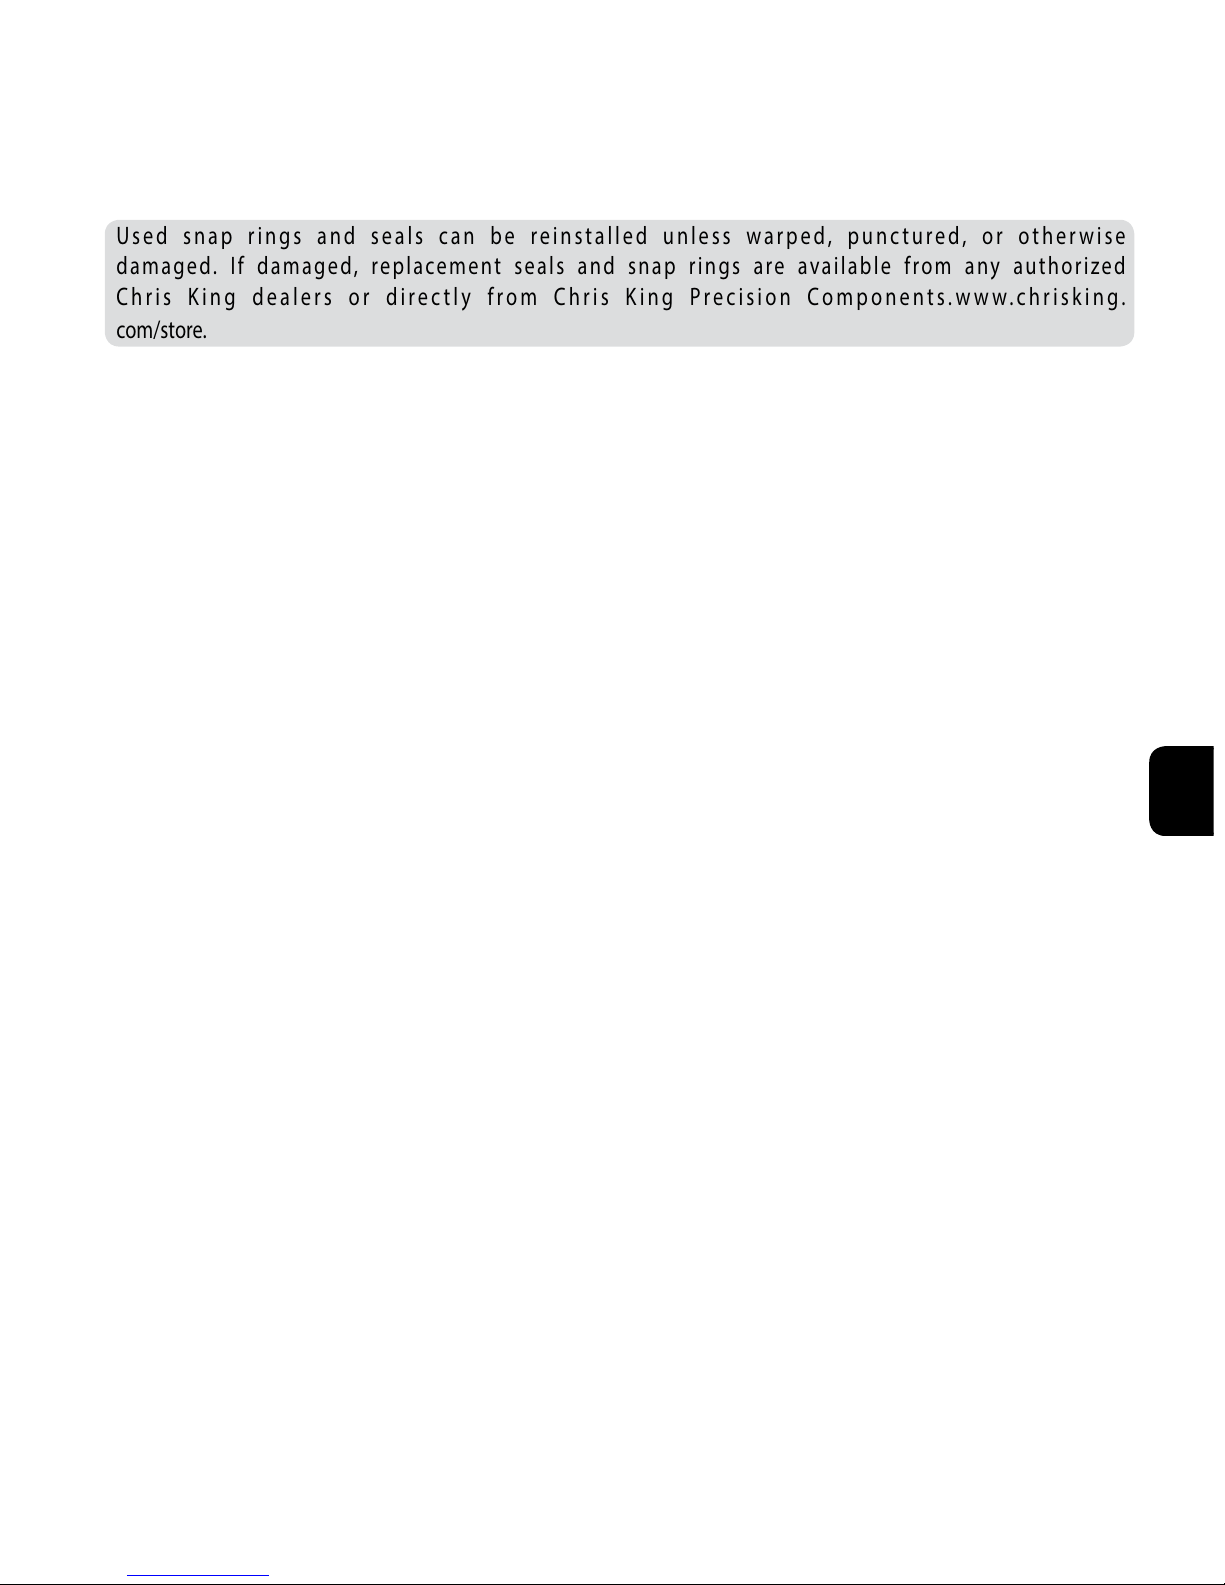
Used snap rings and seals can be reinstalled unless warped, punctured, or otherwise
damaged. If damaged, replacement seals and snap rings are available from any authorized
Chris King dealers or directly from Chris King Precision Components.www.chrisking.
com/store.
Rear hub basic lubrication
1. Apply 1 to 2 mL of 10w synthetic oil on the helical splines between the drive and
driven rings by depressing the drive ring spring inside the hubeshell assembly.
2. Apply a drop of l
ightweight, low viscosity oil, with PTFE
( e.g. TriFlow ™) onto O-ring on
driveshell, both O-rings on axle and O-ring on QR adaptor.
3. Apply a thin layer of grease onto clean threads on adjusting clamp and adjusting
clamp 2.5 mm hex screw.
Rear hub basic reassembly
1. Insert driveshell into the hub shell; turn in a clockwise motion while letting it pull
itself in. A distinctive click sound will indicate that the driveshell is rmly seated.
2. If outboard driveshell bearing is separated from axle, slide it onto axle with the
black seal and silver snapring facing the driveside and the white bearing retainer
facing the non-driveside.
3. Insert main axle, threaded (non-driveside) end first into driveshell. Continue until
axle is through the hub and driveside end is rmly seated in driveshell.
4. Thread adjusting clamp onto the protruding threads on the non-driveside of axle.
5. Insert R45 QR insert into non-driveside axle end.
6. Snug adjusting clamp up to bearing.
Rear hub adjustment
The R45 rear hub features an adjusting clamp and bearing spacer spring that maintain
proper bearing preload and seating.
1. Secure “L”-shaped 5 mm hex key in vice with shorter end of “L” facing up
2. With non-driveside facing up, insert hub onto 5 mm hex key so that hub can sit
freely on vice. If vice is not available, place the hub or wheel onto a flat, firm surface
with the non-driveside facing up.
3. Push downward on the hubshell. This compresses the bearing spacer spring i n
the drive shell and ensures proper bearing seating.
4. While maintaining firm downward pressure on the hubshell, tighten the adjusting
clamp onto axle until it stops against bearing. Do not overtighten.
5. Once adjusting clamp is in position, tighten adjusting clamp with a 2.5mm hex key
to 10 inch-pounds (1.1 Nm).
6. Double check adjustment by attaching wheel to bicycle frame. Check for bearing
play or binding, and readjust adjusting clamp if needed.
9
Page 12

Note: Correct adjustment of the rear hub is necessary for proper engagement of the
RingDrive. If the hub is run loose, the RingDrive may not engage properly and could
lead to permanent damage of the internal parts and hubshell.
R45 front hub maintenance
Follow “Disassembly, Reassembly and Adjustment of two piece axle on front R45 and R45
Disc hub” instructions on pages 5 and 6. Hub bearings can be lubricated with RingDrive
Lube.
For bearing service information see “Service of the bearings”, pg. 8.
Additional Support
Check our web site often for updated technical information produced in an effort to help
you, our customers, stay on your bike.
Additional questions? Please email us at [email protected] or call Chris King
Customer Service at 800-523-6008. Monday through Friday, 8am - 5pm Pacic time.
10
Page 13

NOTES:
11
Page 14
12
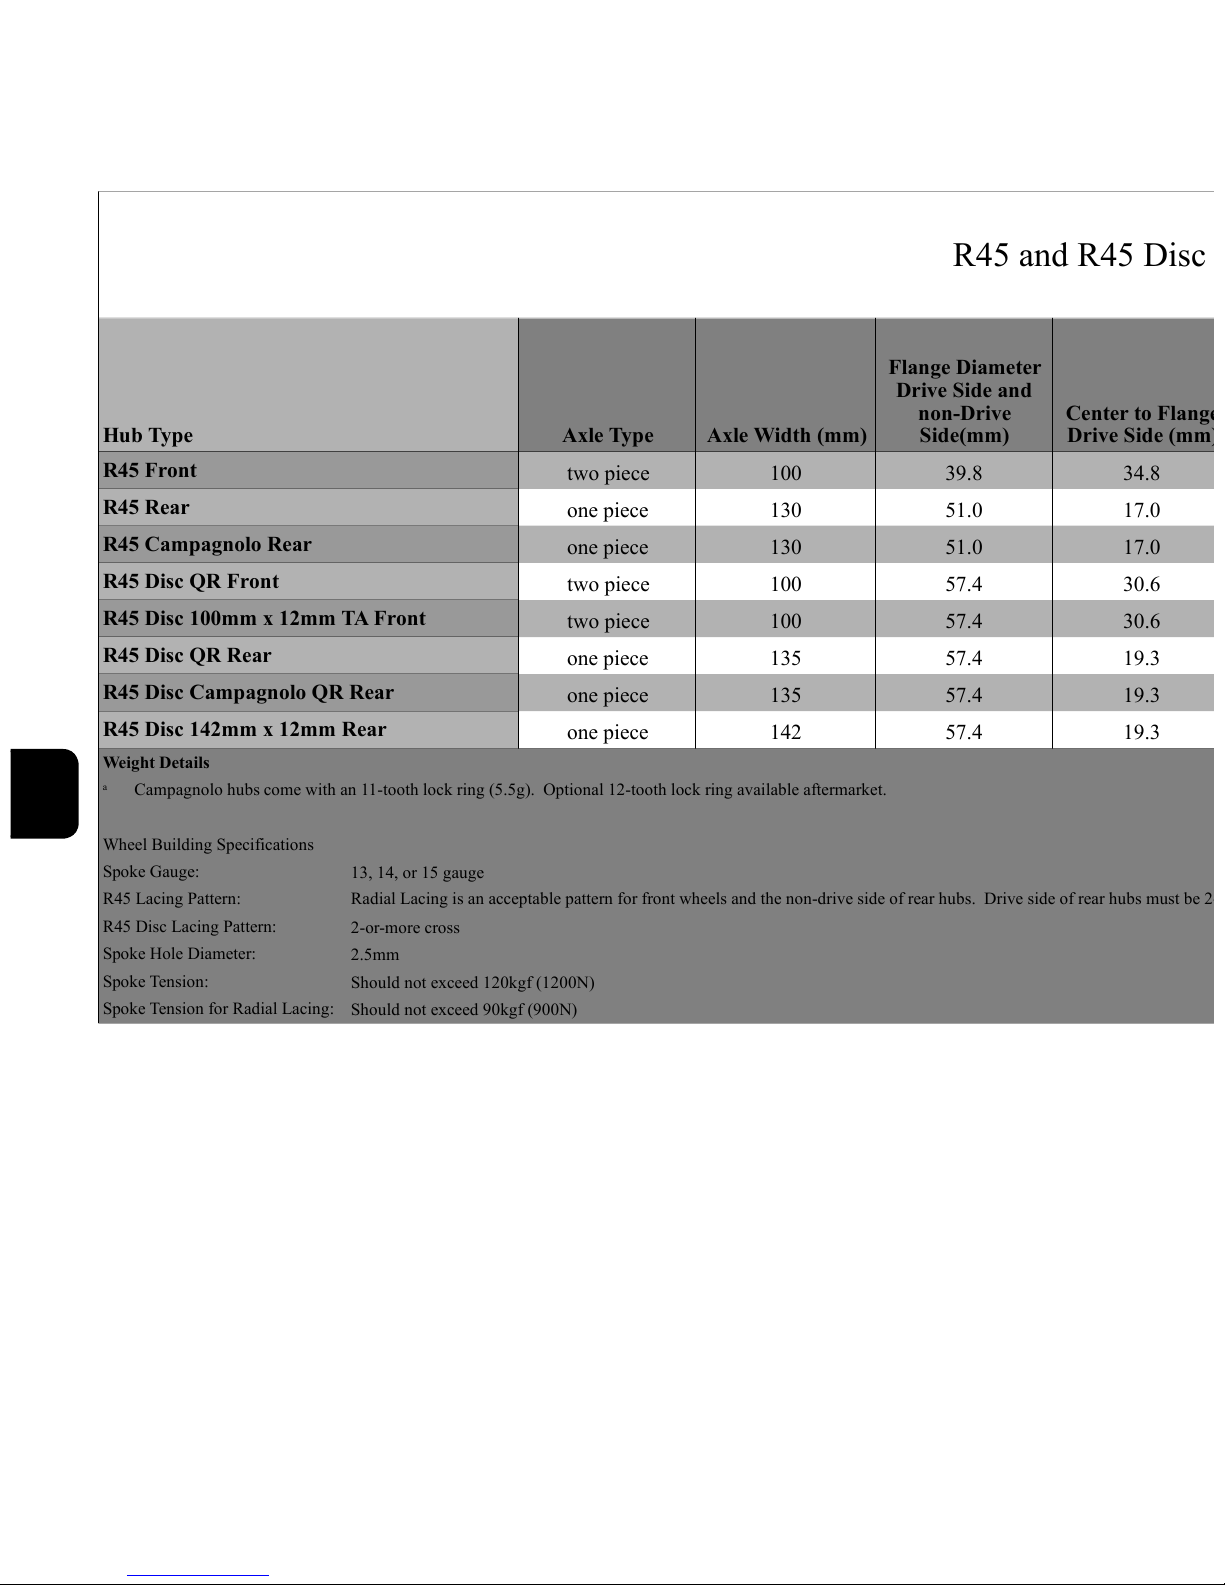
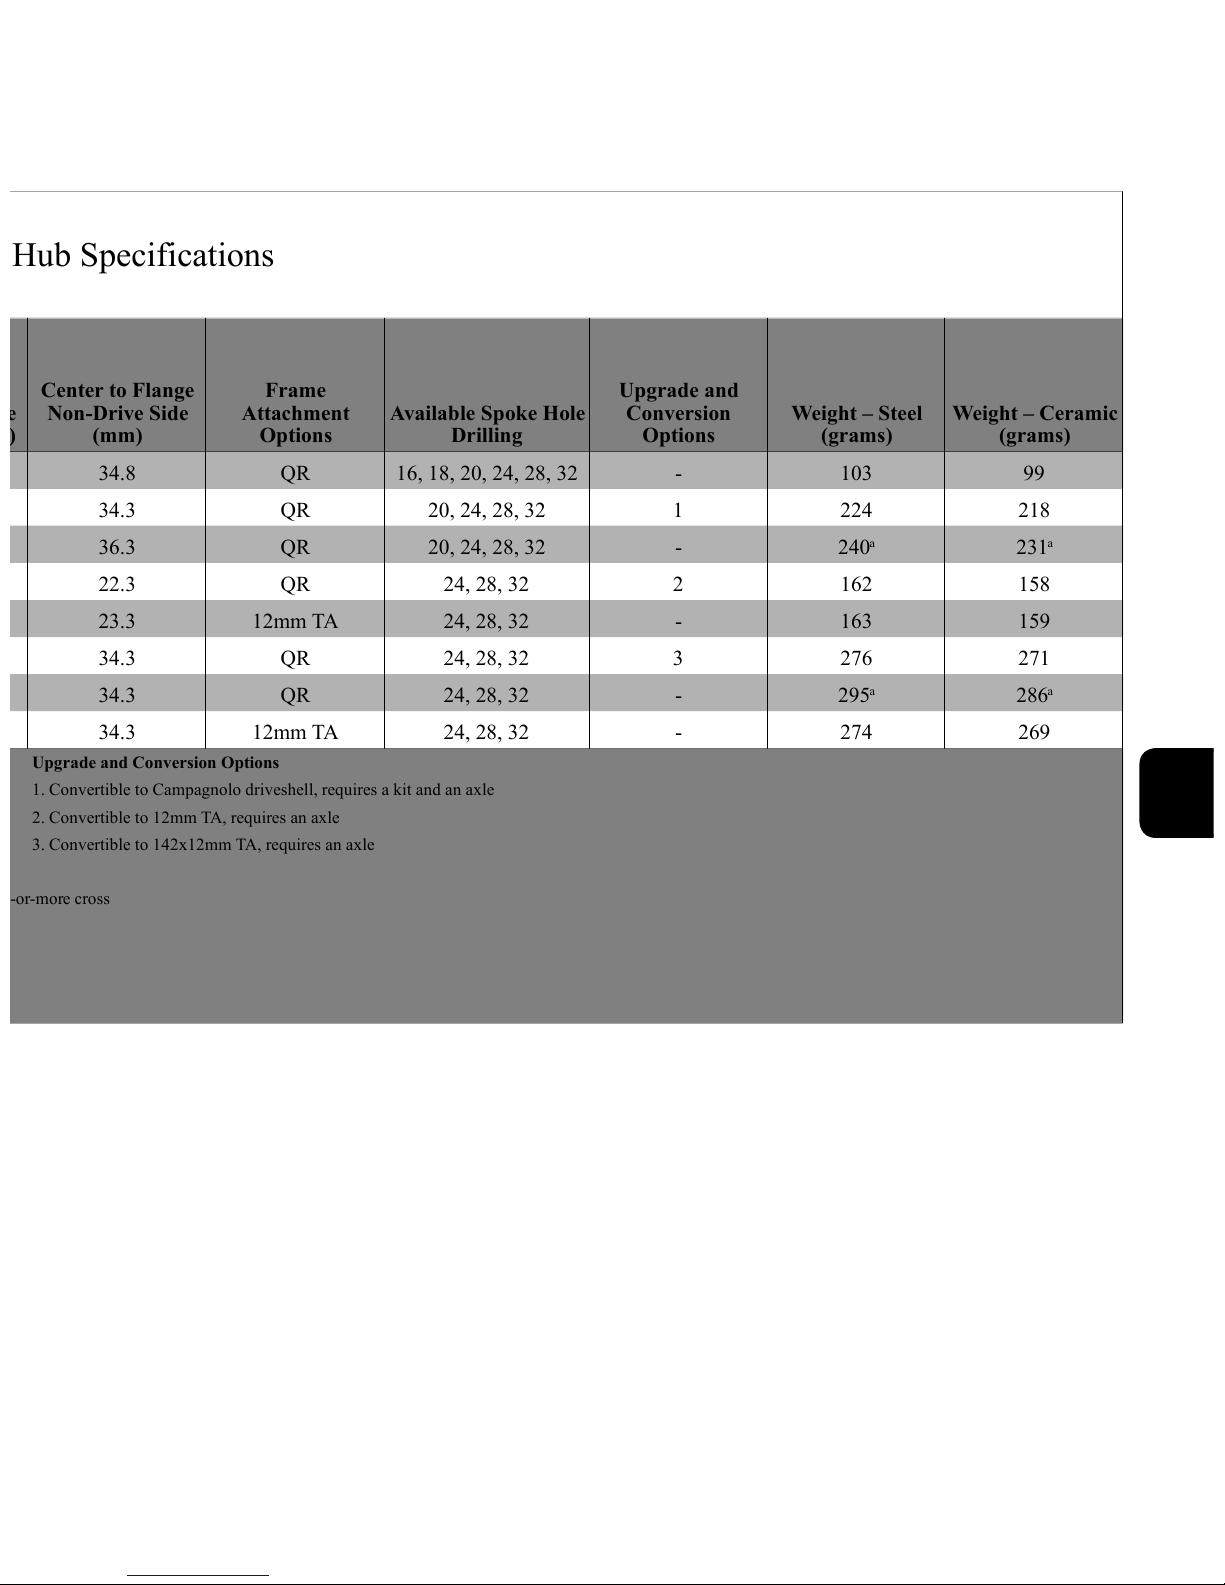
R45 and R45 Disc Hub Specifications
Hub Type Axle Type Axle Width (mm)
R45 Front
two piece 100 39.8 34.8 34.8 QR 16, 18, 20, 24, 28, 32 - 103 99
R45 Rear
one piece 130 51.0 17.0 34.3 QR 20, 24, 28, 32 1 224 218
R45 Campagnolo Rear
one piece 130 51.0 17.0 36.3 QR 20, 24, 28, 32 -
R45 Disc QR Front
two piece 100 57.4 30.6 22.3 QR 24, 28, 32 2 162 158
R45 Disc 100mm x 12mm TA Front
two piece 100 57.4 30.6 23.3 12mm TA 24, 28, 32 - 163 159
R45 Disc QR Rear
one piece 135 57.4 19.3 34.3 QR 24, 28, 32 3 276 271
R45 Disc Campagnolo QR Rear
one piece 135 57.4 19.3 34.3 QR 24, 28, 32 -
R45 Disc 142mm x 12mm Rear
one piece 142 57.4 19.3 34.3 12mm TA 24, 28, 32 - 274 269
Weight Details Upgrade and Conversion Options
Campagnolo hubs come with an 11-tooth lock ring (5.5g). Optional 12-tooth lock ring available aftermarket.
1. Convertible to Campagnolo driveshell, requires a kit and an axle
2. Convertible to 12mm TA, requires an axle
Wheel Building Specifications
3. Convertible to 142x12mm TA, requires an axle
Spoke Gauge:
13, 14, or 15 gauge
R45 Lacing Pattern: Radial Lacing is an acceptable pattern for front wheels and the non-drive side of rear hubs. Drive side of rear hubs must be 2-or-more cross
R45 Disc Lacing Pattern:
2-or-more cross
Spoke Hole Diameter:
2.5mm
Spoke Tension:
Should not exceed 120kgf (1200N)
Spoke Tension for Radial Lacing:
Should not exceed 90kgf (900N)
Flange Diameter
Drive Side and
non-Drive
Side(mm)
Center to Flange
Drive Side (mm)
Center to Flange
Non-Drive Side
(mm)
a
Page 15
13
34.8 QR 16, 18, 20, 24, 28, 32 - 103 99
34.3 QR 20, 24, 28, 32 1 224 218
36.3 QR 20, 24, 28, 32 -
22.3 QR 24, 28, 32 2 162 158
23.3 12mm TA 24, 28, 32 - 163 159
34.3 QR 24, 28, 32 3 276 271
34.3 QR 24, 28, 32 -
34.3 12mm TA 24, 28, 32 - 274 269
1. Convertible to Campagnolo driveshell, requires a kit and an axle
2. Convertible to 12mm TA, requires an axle
3. Convertible to 142x12mm TA, requires an axle
Center to Flange
Non-Drive Side
(mm)
Frame
Attachment
Options
Available Spoke Hole
Drilling
Upgrade and
Conversion
Options
Weight – Steel
(grams)
Weight – Ceramic
(grams)
240
a
231
a
295
a
286
a
Page 16

CHRIS KING PRECISION COMPONENTS
2801 NW Nela Street
Portland, OR 97210
phone: 800.523.6008
www.chrisking.com
email: [email protected]
part# 17988 rev. 7/24/15
Limited Warranty
Chris King Precision Components warrants its products to be free from defects in materials or workmanship for the following
periods from the original date of purchase:
Headsets: Ten (10) years
Hubs: Five (5) years
Bottom Brackets: Five (5) years
Wheels: The hubs only are warranted for a period of five (5) years. All other wheel components that are not manufactured by
Chris King Precision Components such as, but without limitation, rims, spokes, and nipples, are not warranted by Chris
King Precision Components.
Accessories: One (1) year
Soft Goods: Ninety (90) days
Any Chris King product that is found by Chris King Precision Components to be defective in materials or workmanship will be
repaired or replaced at the discretion of Chris King Precision Components. This warranty does not cover damage or failure
resulting from misuse, abuse, alteration, neglect, normal and reasonable wear and tear, crash or impact, failure to perform
routine maintenance as instructed, improper installation, or use other than that for which the product was intended.
In order to make a warranty claim, the Chris King product alone (i.e., not including any other equipment such as cassettes,
skewers, steering tubes, etc.), together with a copy of the original receipt showing the date of purchase of the product, must
be returned to Chris King Precision Components at the address set forth on its website (www.chrisking.com) postage prepaid.
If a defect is found, our entire liability and your sole remedy shall be, at our option, free repair or replacement of the Chris
King product. Chris King Precision Components shall not be held liable for any indirect, special, punitive, or consequential
damages. The warranty does not cover any Chris King Precision Components product where the serial number has been
altered or removed.
To the fullest extent permitted by applicable law, this written express limited warranty is in lieu of all other warranties, implied or
expressed, and does not cover any representation or warranty made by dealers beyond the provisions of this warranty. If
any implied warranties exist by applicable law, such implied warranties shall be limited to the duration of the express limited
warranty for the product. Some U.S. states and foreign countries provide rights in addition to those above or do not allow
the exclusion or limitation of certain warranties or limitation of liability for certain types of damages. Therefore, the above
limitations may not apply to you or there may be laws of a state or foreign country which supersede the above. Any clause
of this limited warranty or any disclaimer or limitation of liability contained herein that is declared invalid shall be deemed
severable and not aect the validity or enforceability of the remaining clauses.
You are strongly encouraged to register your Chris King product on the website within thirty (30) days of the original date of
purchase. Registration will assist us in processing your warranty claim and in expediting our response.
All trademarks, registered trademarks, and logos are of their respective holders.
©King Cycle Group, 2013. All rights reserved.
Printed with soy ink. Contains 100% post consumer recycled paper ber.
 Loading...