

Page 1

CHT-1001i Tablet PC
User Manual
Tab of Contents
Introducing your Device.................................................... 3
2. Battery ............................................................................ 5
3. Home screen and Application list.................................6
4. Micro SD card.............................................................. 10
5. HDMI............................................................................17
7. Manage Applications ................................................... 20
9. Photo ............................................................................. 22
10. Video............................................................................24
Page 2

1 1. W i-Fi............................................................................ 25
12. Browser.......................................................................26
13.Email......................................................................... 28
14. Camera........................................................................ 30
15. Products Description...................................................................30
Page 3
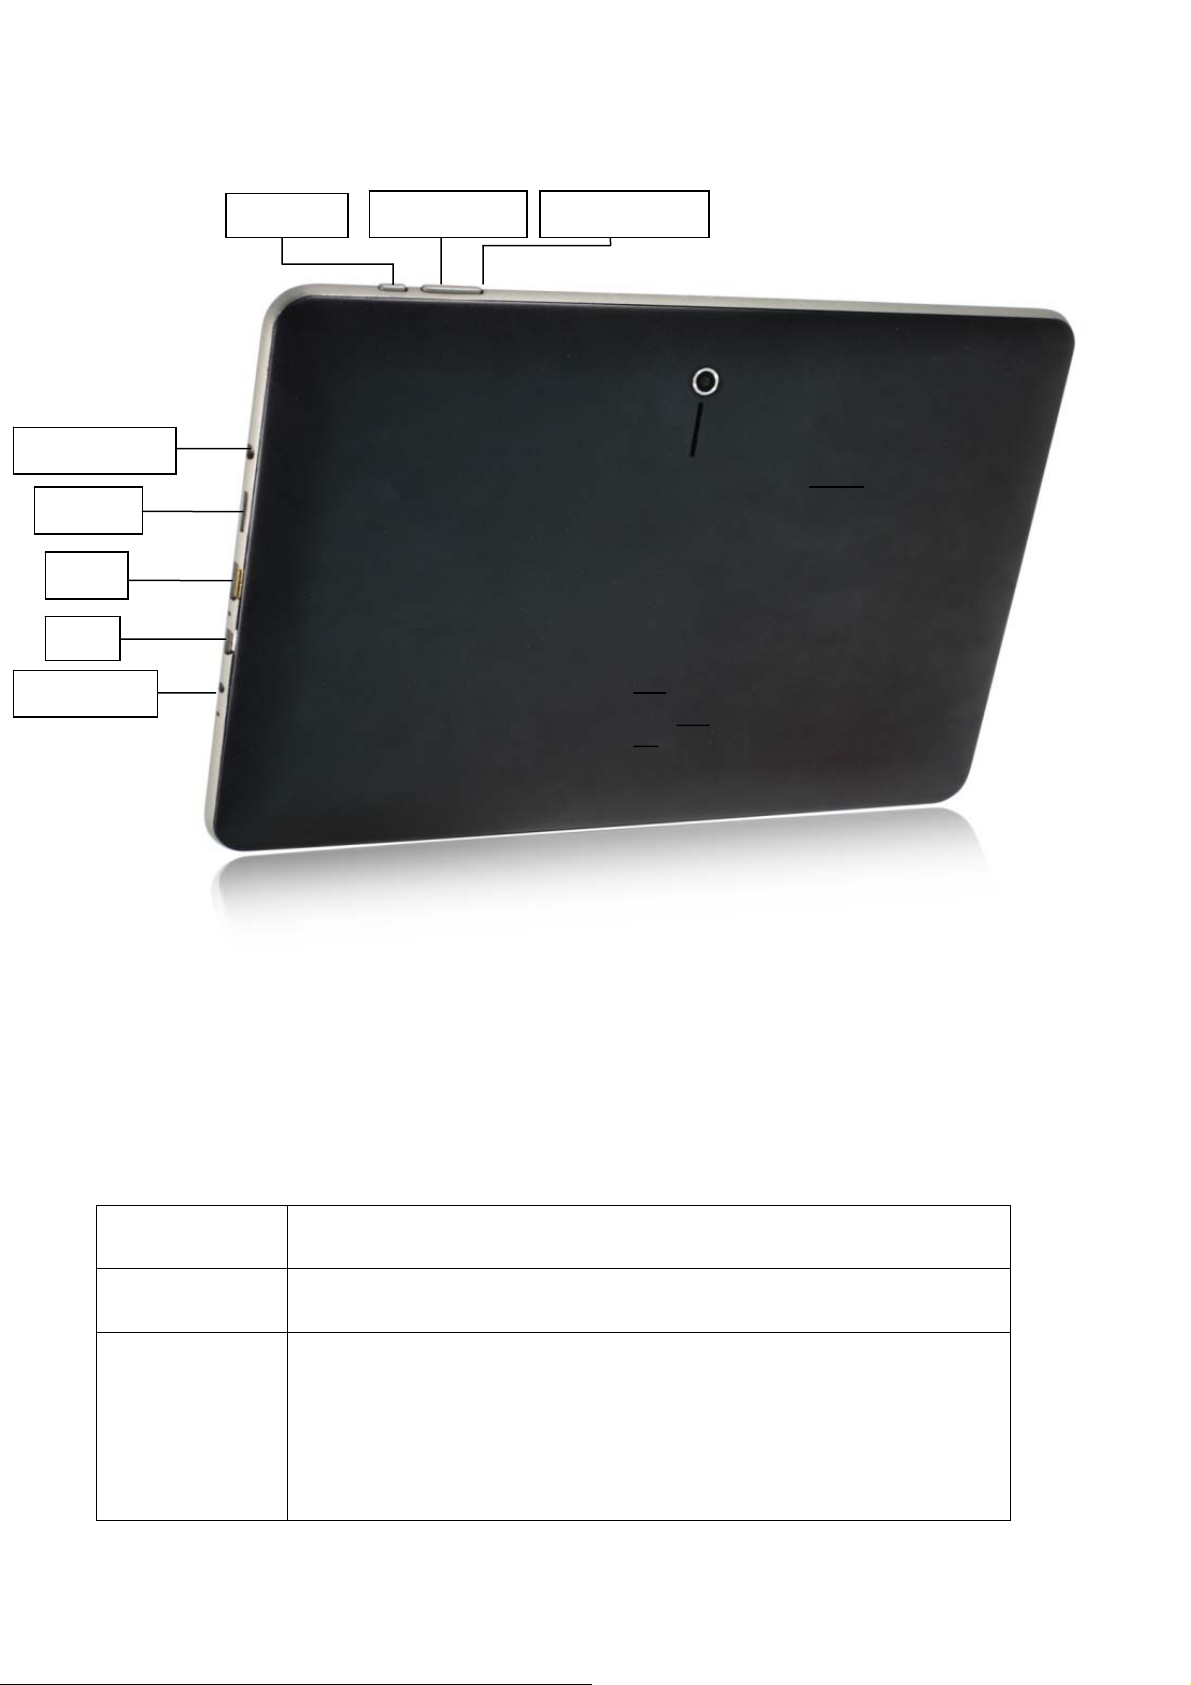
Introducing your Device
Earphone jack
TF Card
HDM
USB
Power Input
Power key
Volu me - key
Volu me + key
Features:
Volume + key
Volume - key
Power key
Volume + key Volume increasing
Volume - key Volume reducing
Power key Press 3 seconds to turn on the Tablet,wake up
when Tablet is idel after press one time, Entry to idel when
Tablet is working after press one time。Press 3 seconds appear
Page 4
Power Off,Press 10 seconds Tablet will shut off force when
Tablet system is halted.
Power Input
USB
HDMI
Earphone
jack
TF Card
Power Input 5V/2A
USB2.0 OTG in-put
1080P high definition output
3.5MM earphone out-put
TF card slot
Page 5

2. Battery
You can charge your Device via charger. Device has an internal charging battery. We
suggest to charge up the battery when the battery power is low.
A. Charge via the charger
Plug in the Power adapter to Power adaptor port of device, there will be
right corner of the device
The charging time will be longer when operating and charging at same time.
B. Charge via the mini USB Cable
Plug the mini usb cable to mini usb cable port of device, there will be
corner of the device
in the
in the right
Page 6
3. Home screen and Application list
The Home screen is your starting point for using all the applications on your
Device .You can customize your Home screen to display applications, shortcuts, and
widgets.
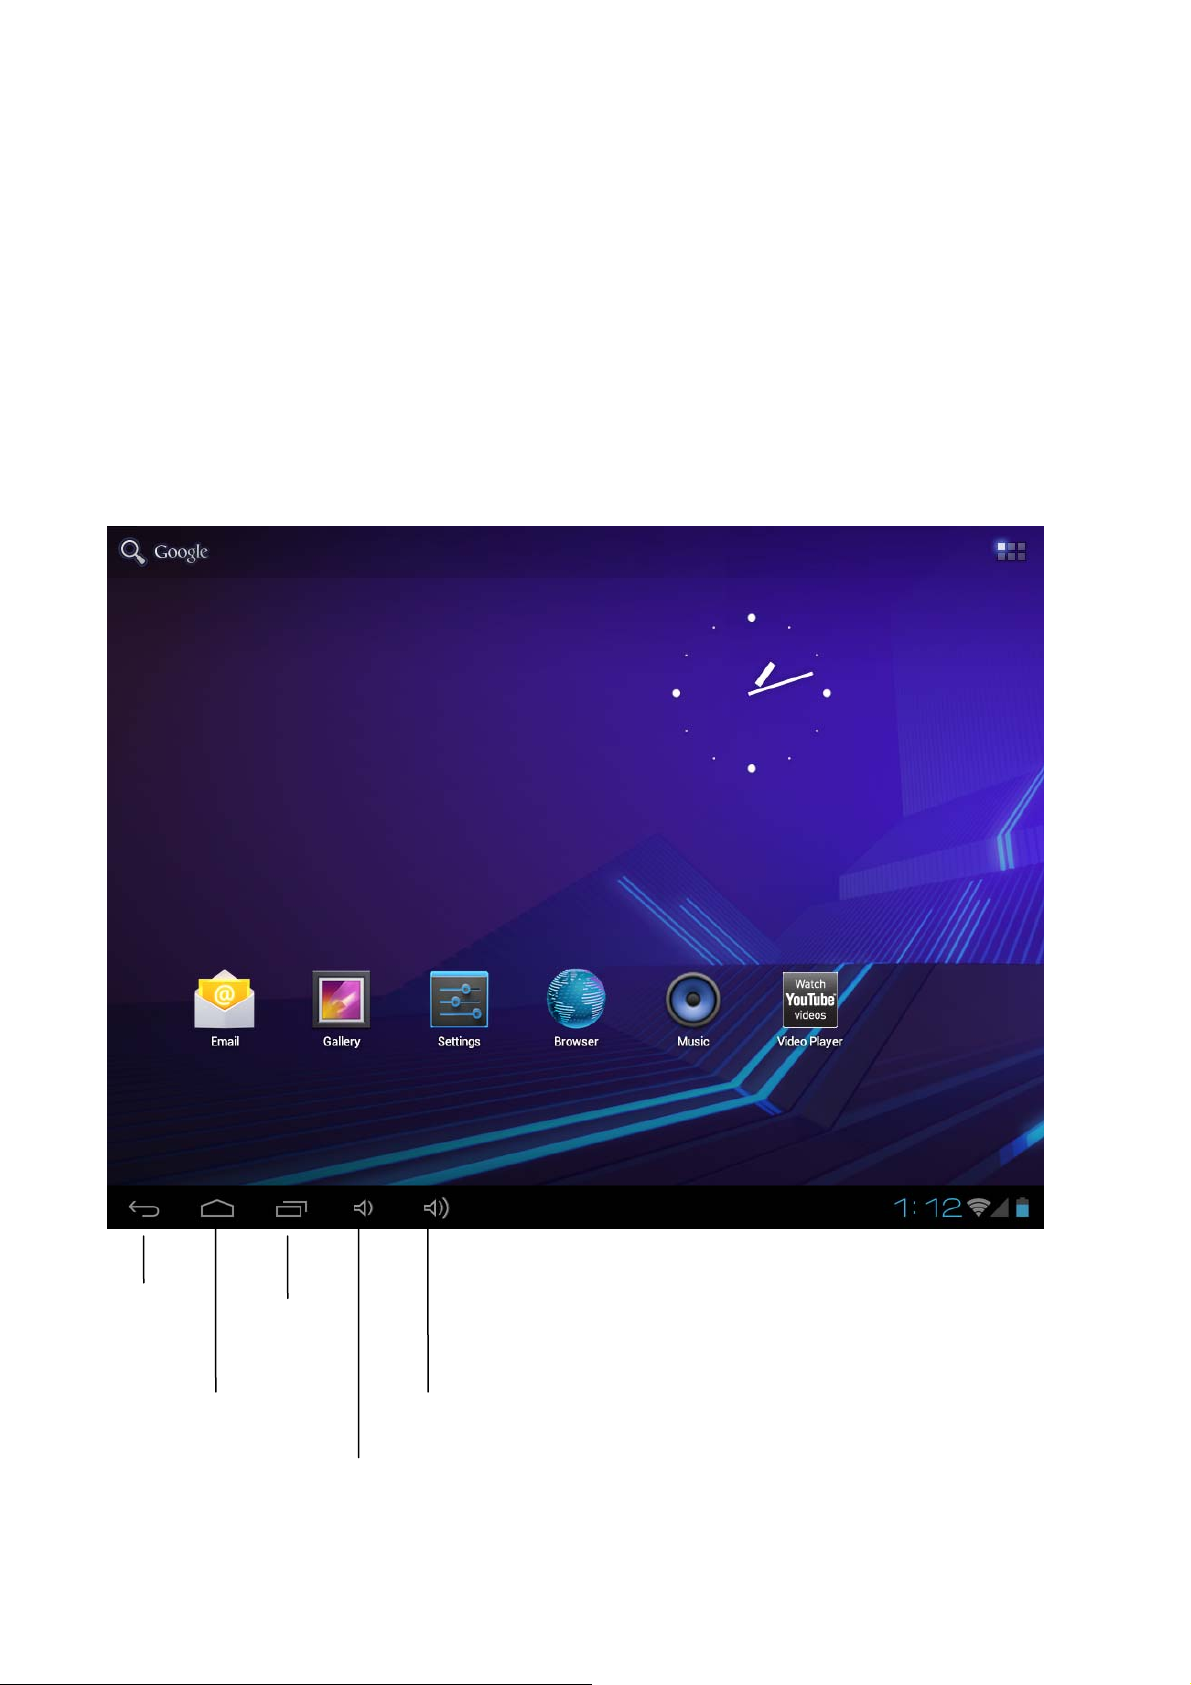
Open the power key , and scroll lock ,then you will see the home screen as below.
To open the application list, tap on the Home screen.
Return View Records
Home Screen Volume +
Volume -
Page 7
Notification and connection icons
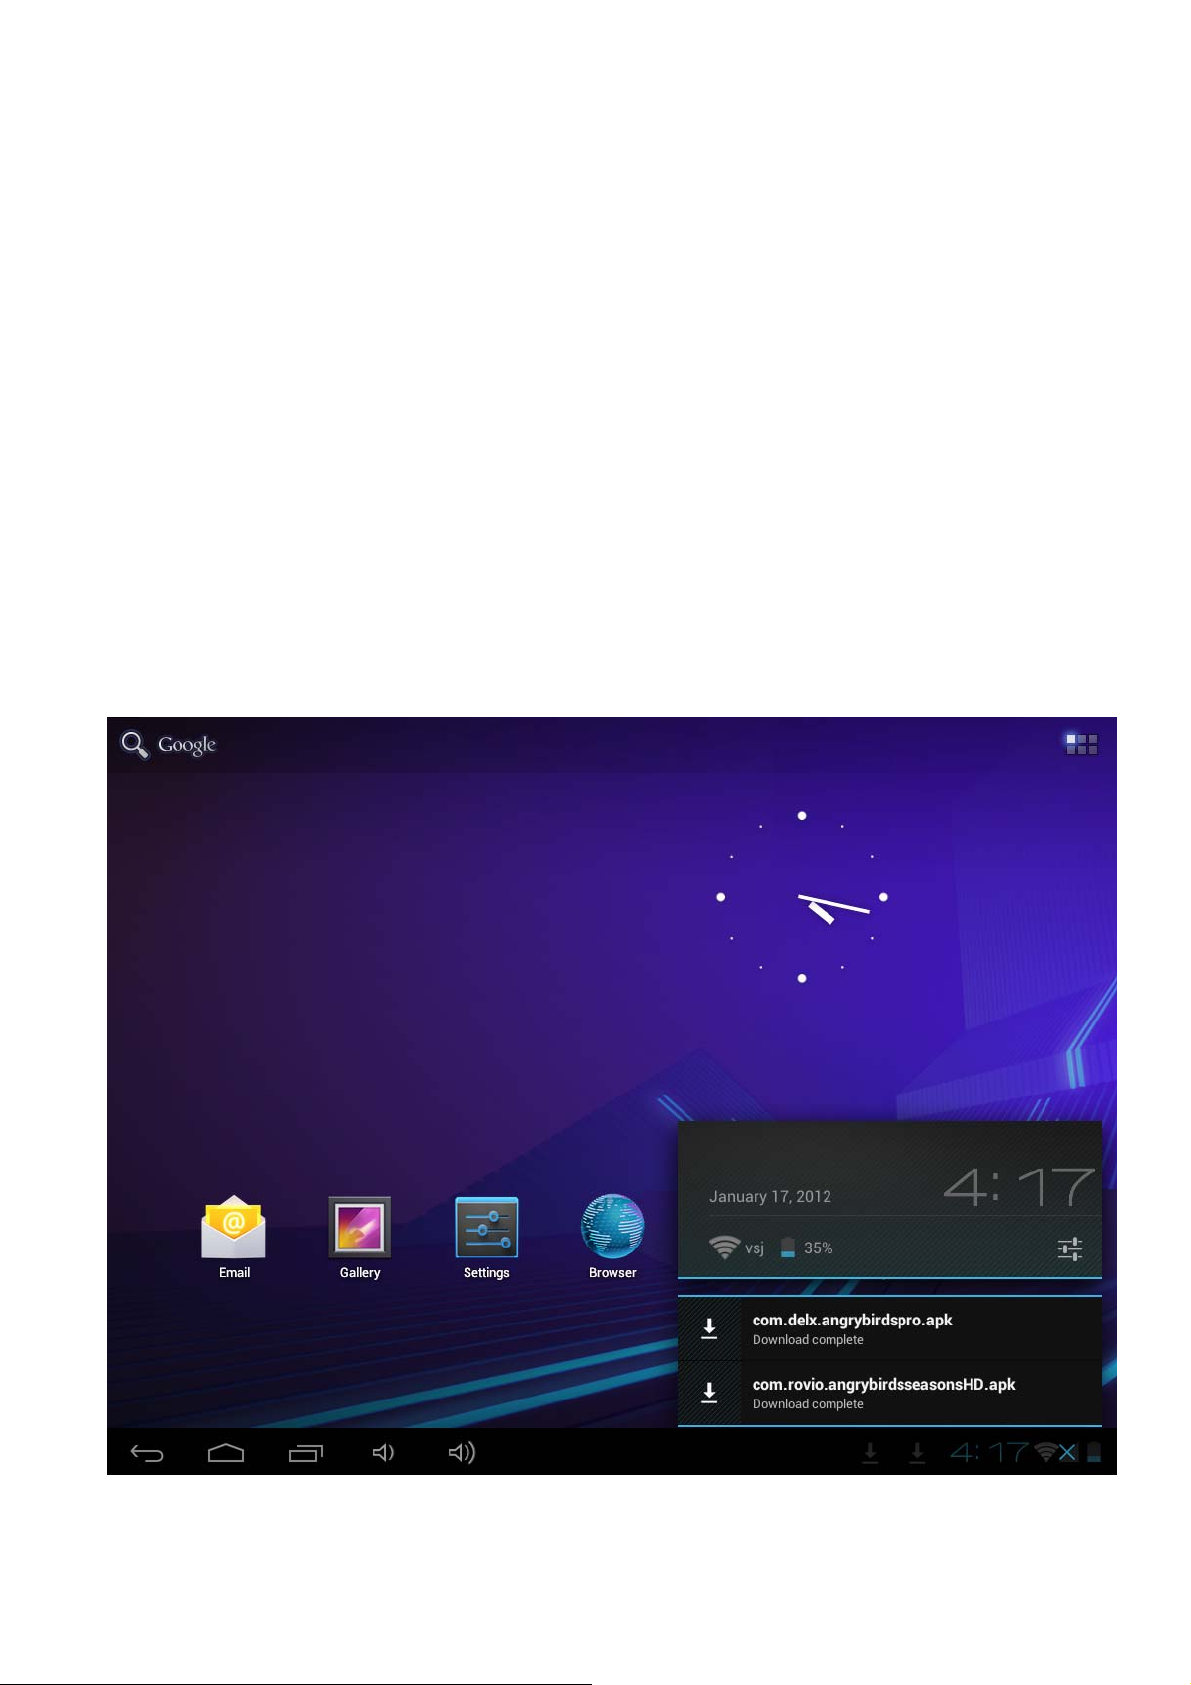
Along the under of your screen is the status bar. On the right side, icons will appear,
notify you of new messages, upcoming calendar events, alarms, apk downloading and
more. On the right side of the status bar, you will see the connection status icons.
Read notifications
When you see a notification in the status bar, tap the bar and slide your finger up the
screen to open the list of notifications.
To open the notification, tap the item.
Page 8
To close the notification window, slide your finger up the screen.
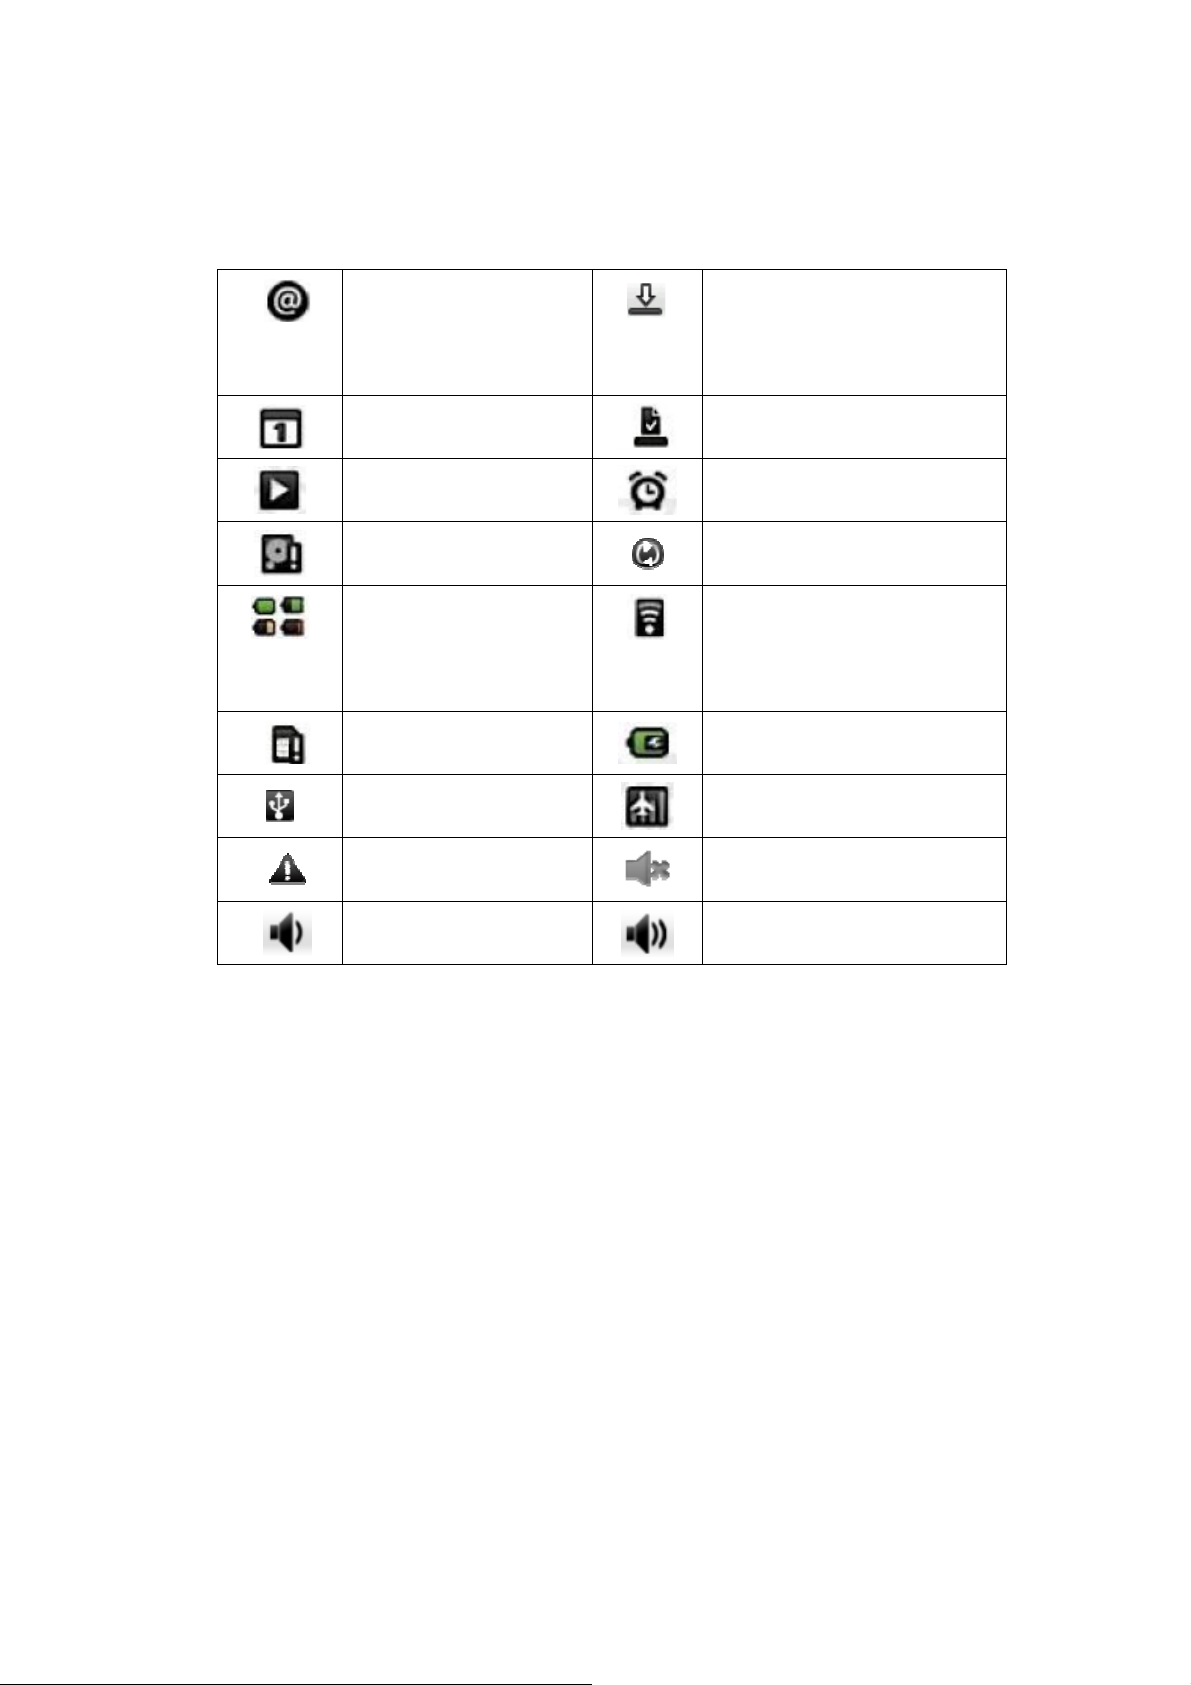
Icons of Status Bar:
New e-mail
message
Upcoming event
Song is playing
SD card is full
Battery change
indicators
No SD card
USB connected
warning
Downloading
Content downloaded
Alarm is set
Data is syncing
Wi-Fi service connected
Battery is charging
Wireless services are off
Silent mode
Volume reduction
Volume increase
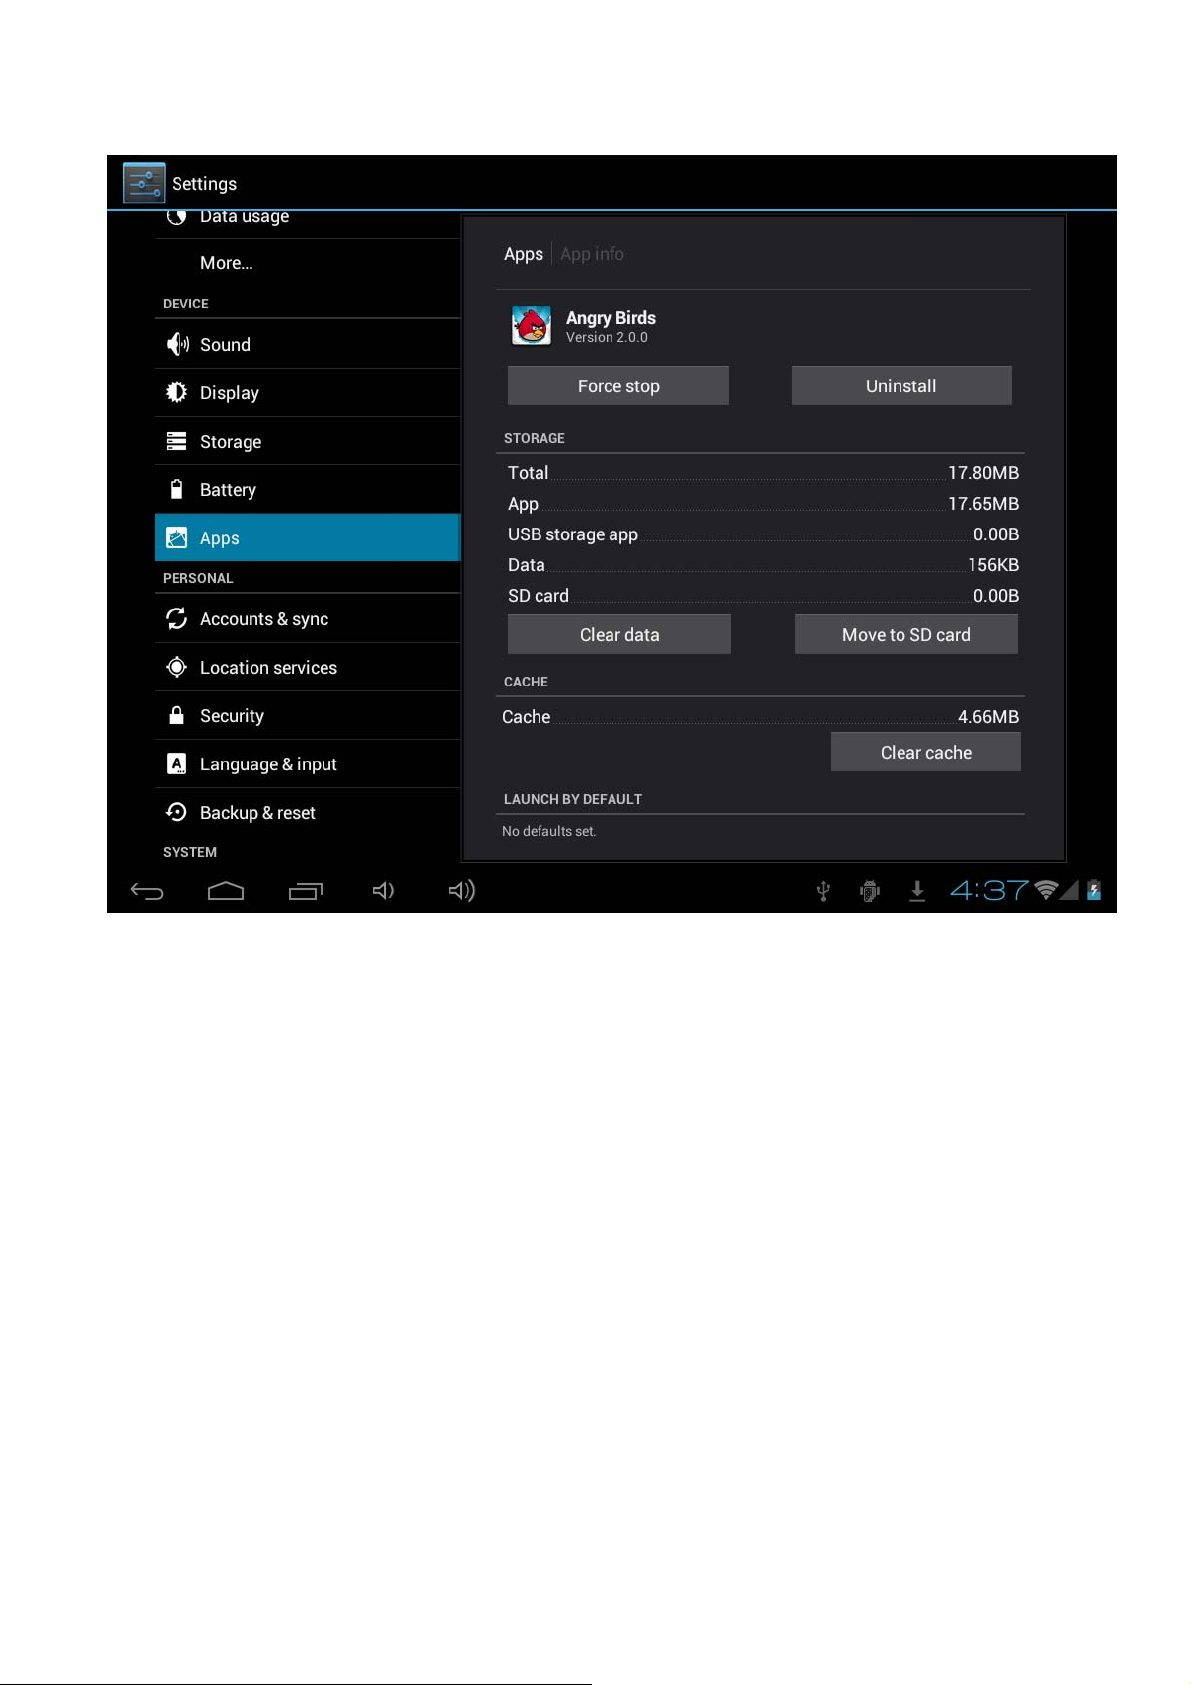
After you install the Application, but do not like it or no need them again and want to
cancel it from the device, please operate as below :
1>. Find the Setting Application
2>. Find the Apps in Setting Menu
3>. Find Download
4>. Click the Application which you want to install ,then you will see the information that
ask your to choose uninstall .
Page 9
Page 10
4. Micro SD card
Your device comes with a removable microSD memory card where you can store
multimedia files, such as video clips, music tracks, sound files, and images.
A. Copy files to the memory card
You can transfer files such as music and pictures between your Device and your
computer.
To view files on your MID, just launch the appropriate application and navigate to
the file within that application.
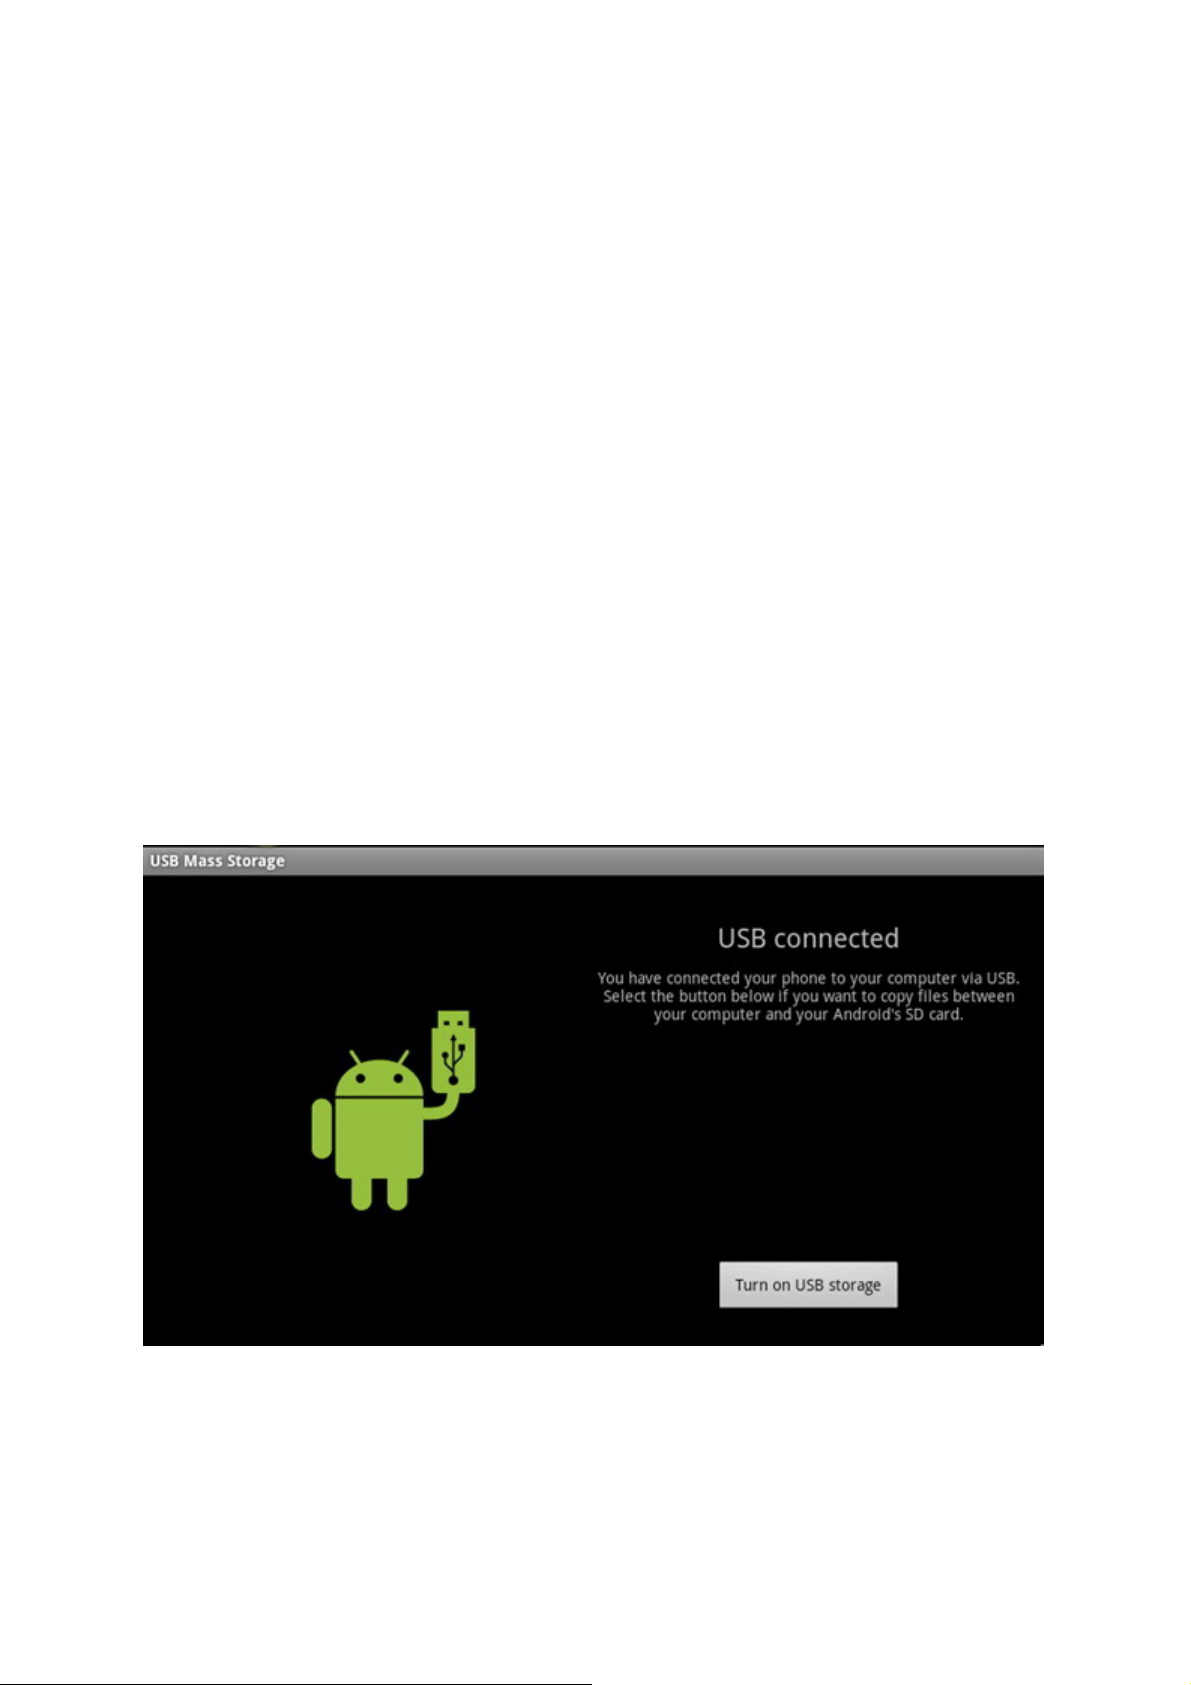
1. Connect your MID to your computer using the USB cable.
2. On the home screen, Touch Notifications, touch USB connected.
3. Touch Turn on USB storage.
4. On your computer, go to the Removable Disk folder.
5. Locate the files on the computer that you want to copy to your MID.
6. Copy and paste files to the desired location in the Removable Disk folder.
Page 11
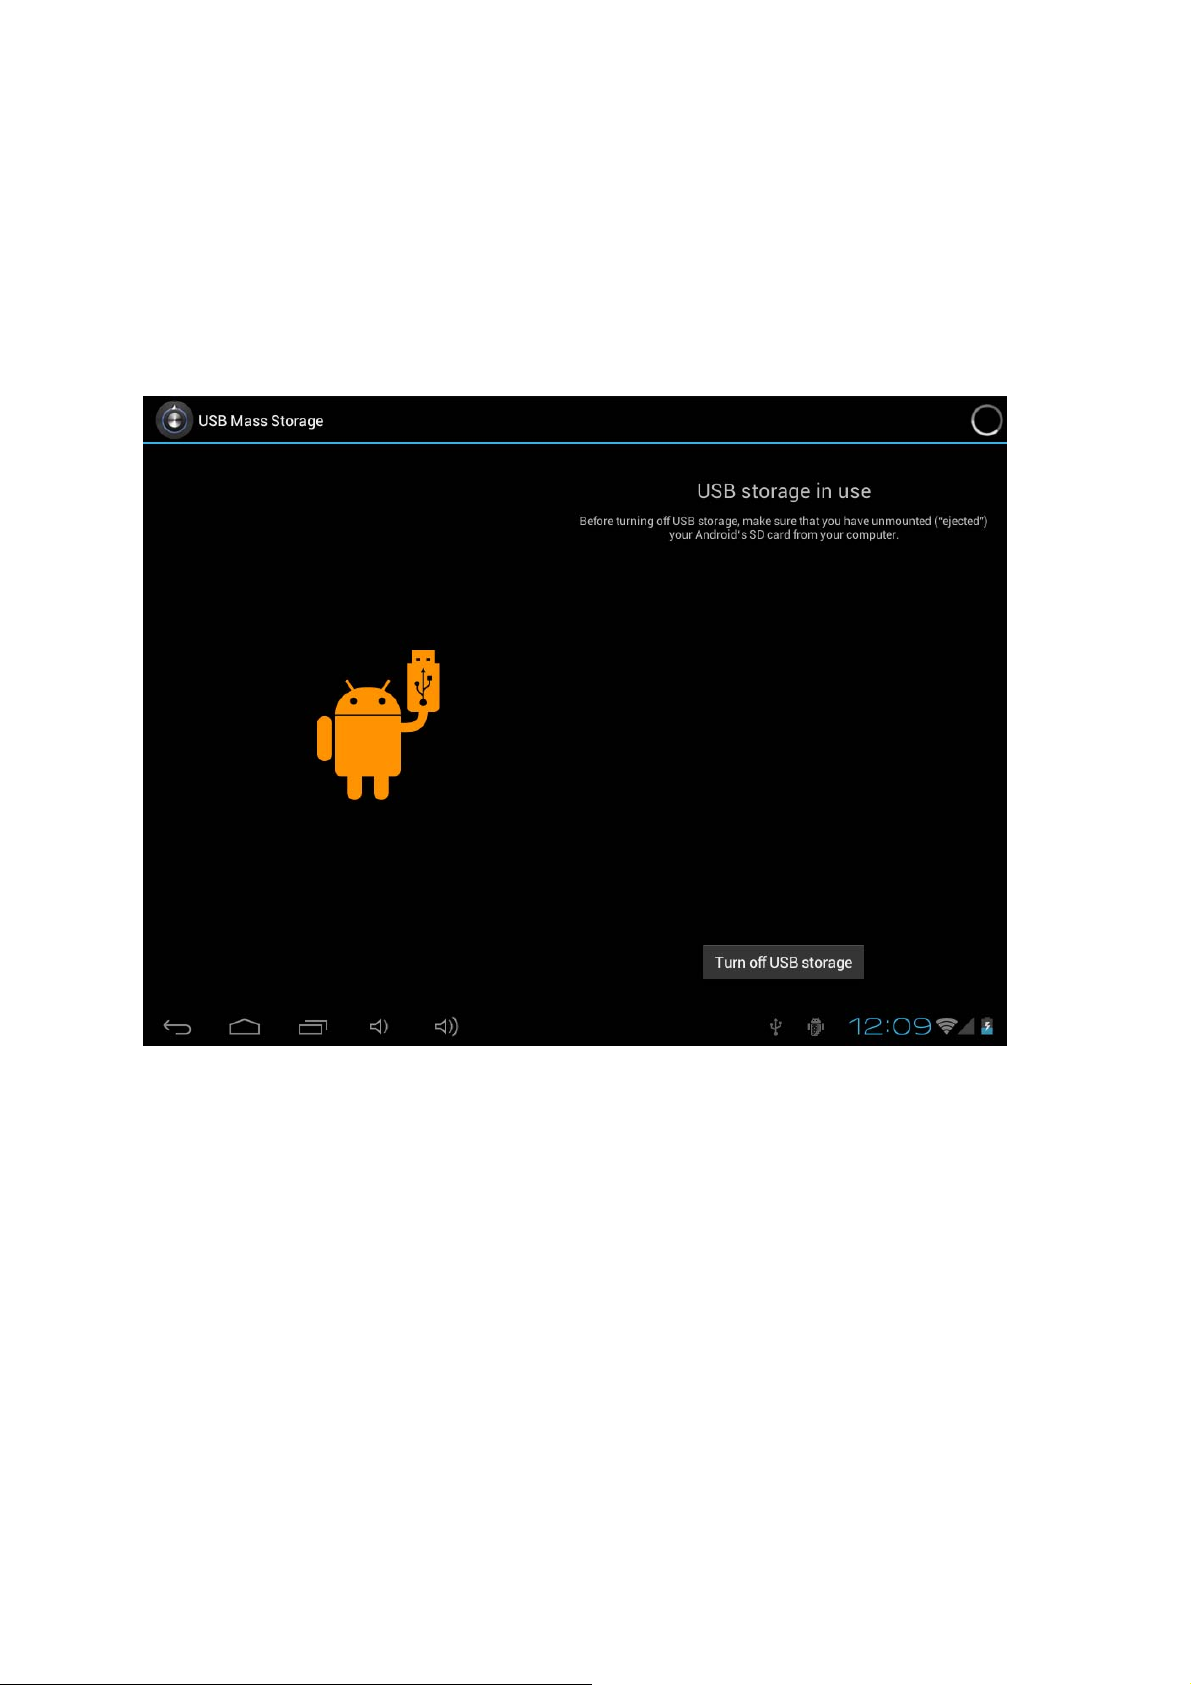
On the Device, find “ File Manager “, and Open it ,then find “SD”, you will see
the content which you copy from PC to MID, but pls make sure that Turn off
USB Storage
Then find the contect on the SD Card ,just like the information as below :
Page 12
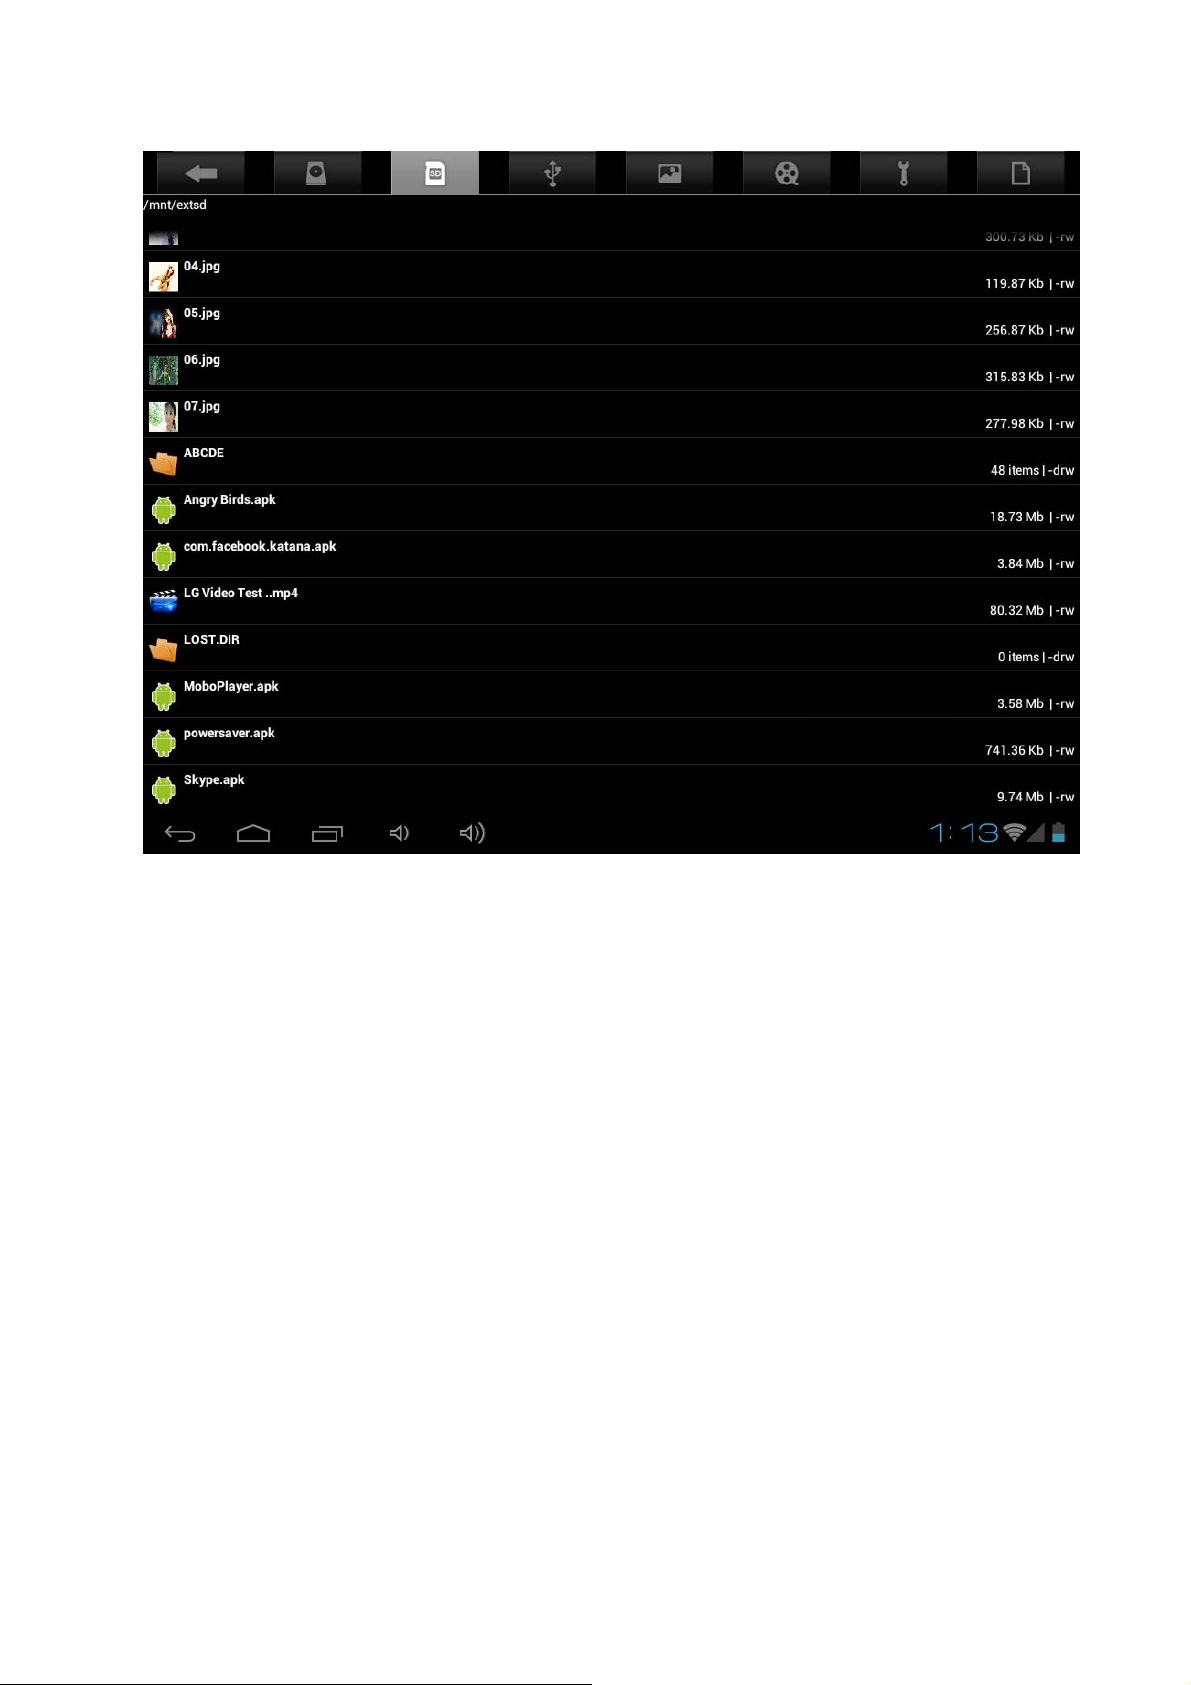
Click the APK which you want to install
B. Delete files on the memory card
1. Locate the file that you want to delete.
2. Touch and hold the file name.
3. Touch Delete.
Page 13
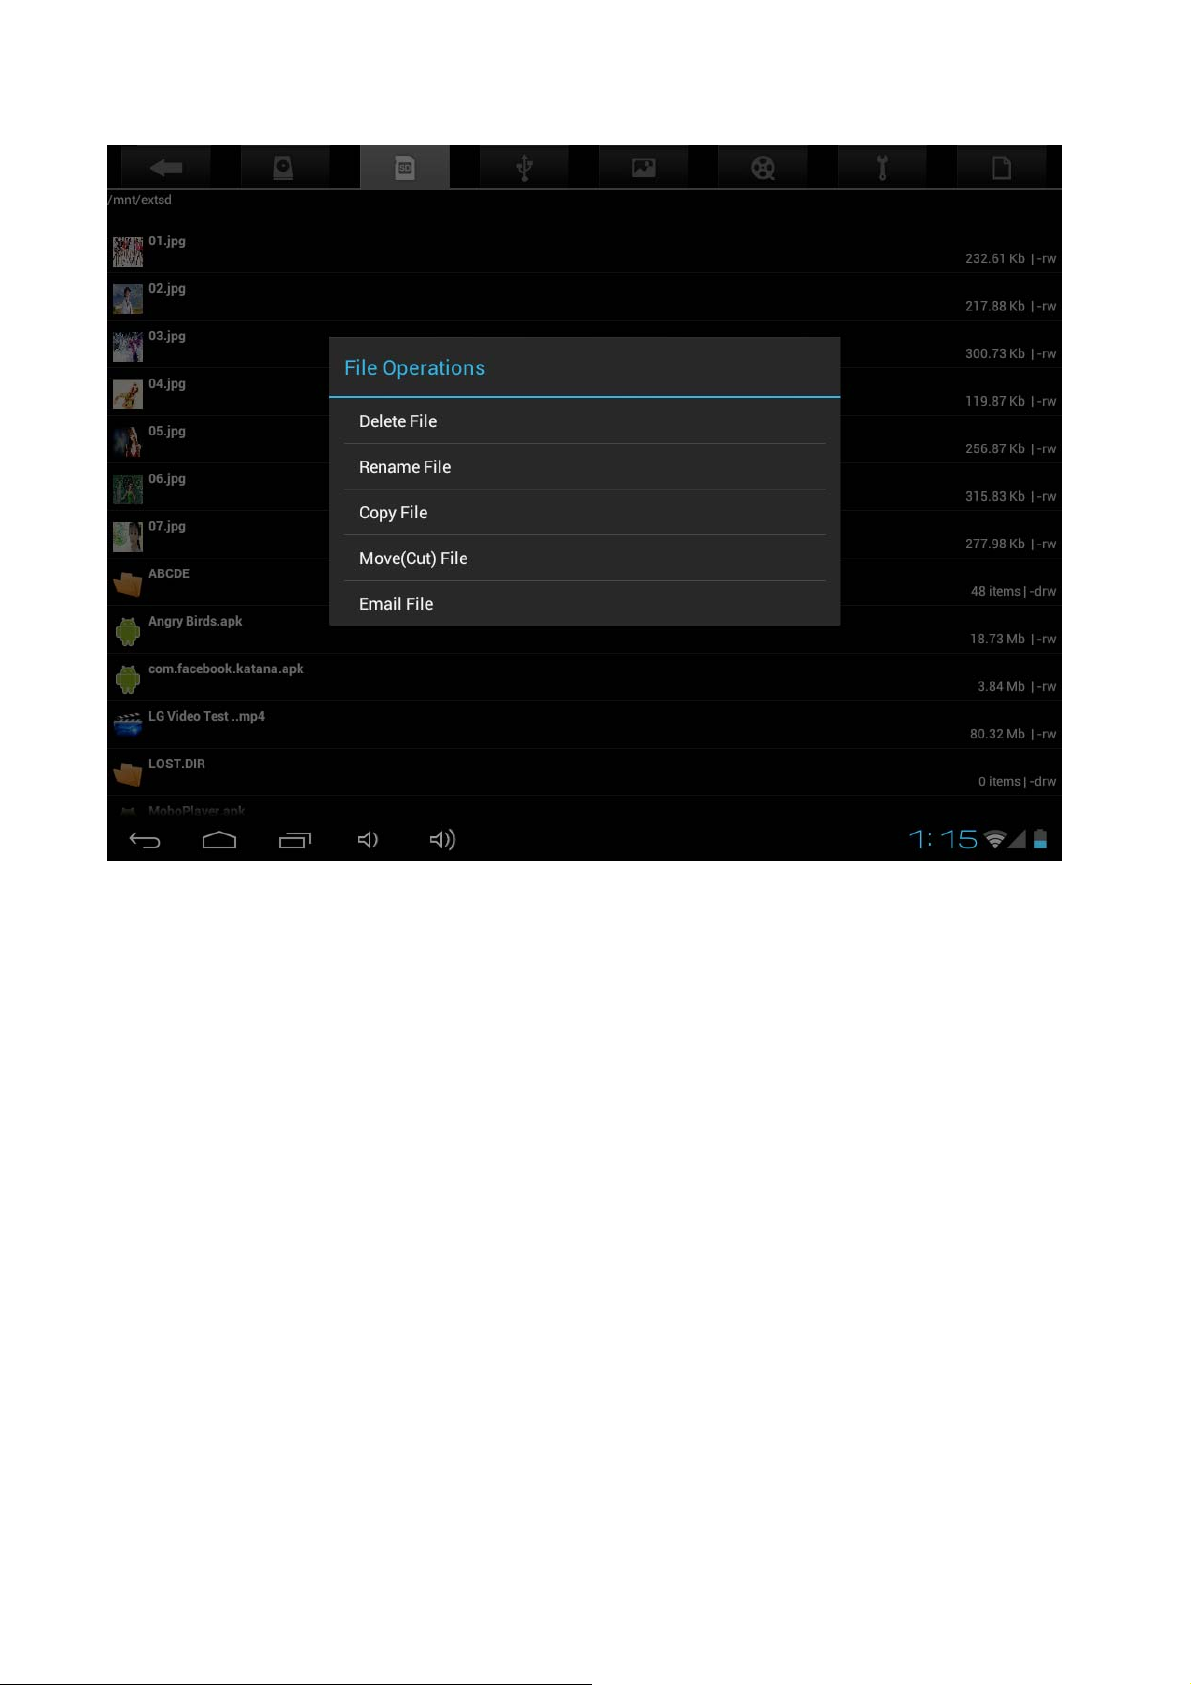
Besides Delete, you also can Rename ,Copy, Move File … Operate on the Memory
Cards .
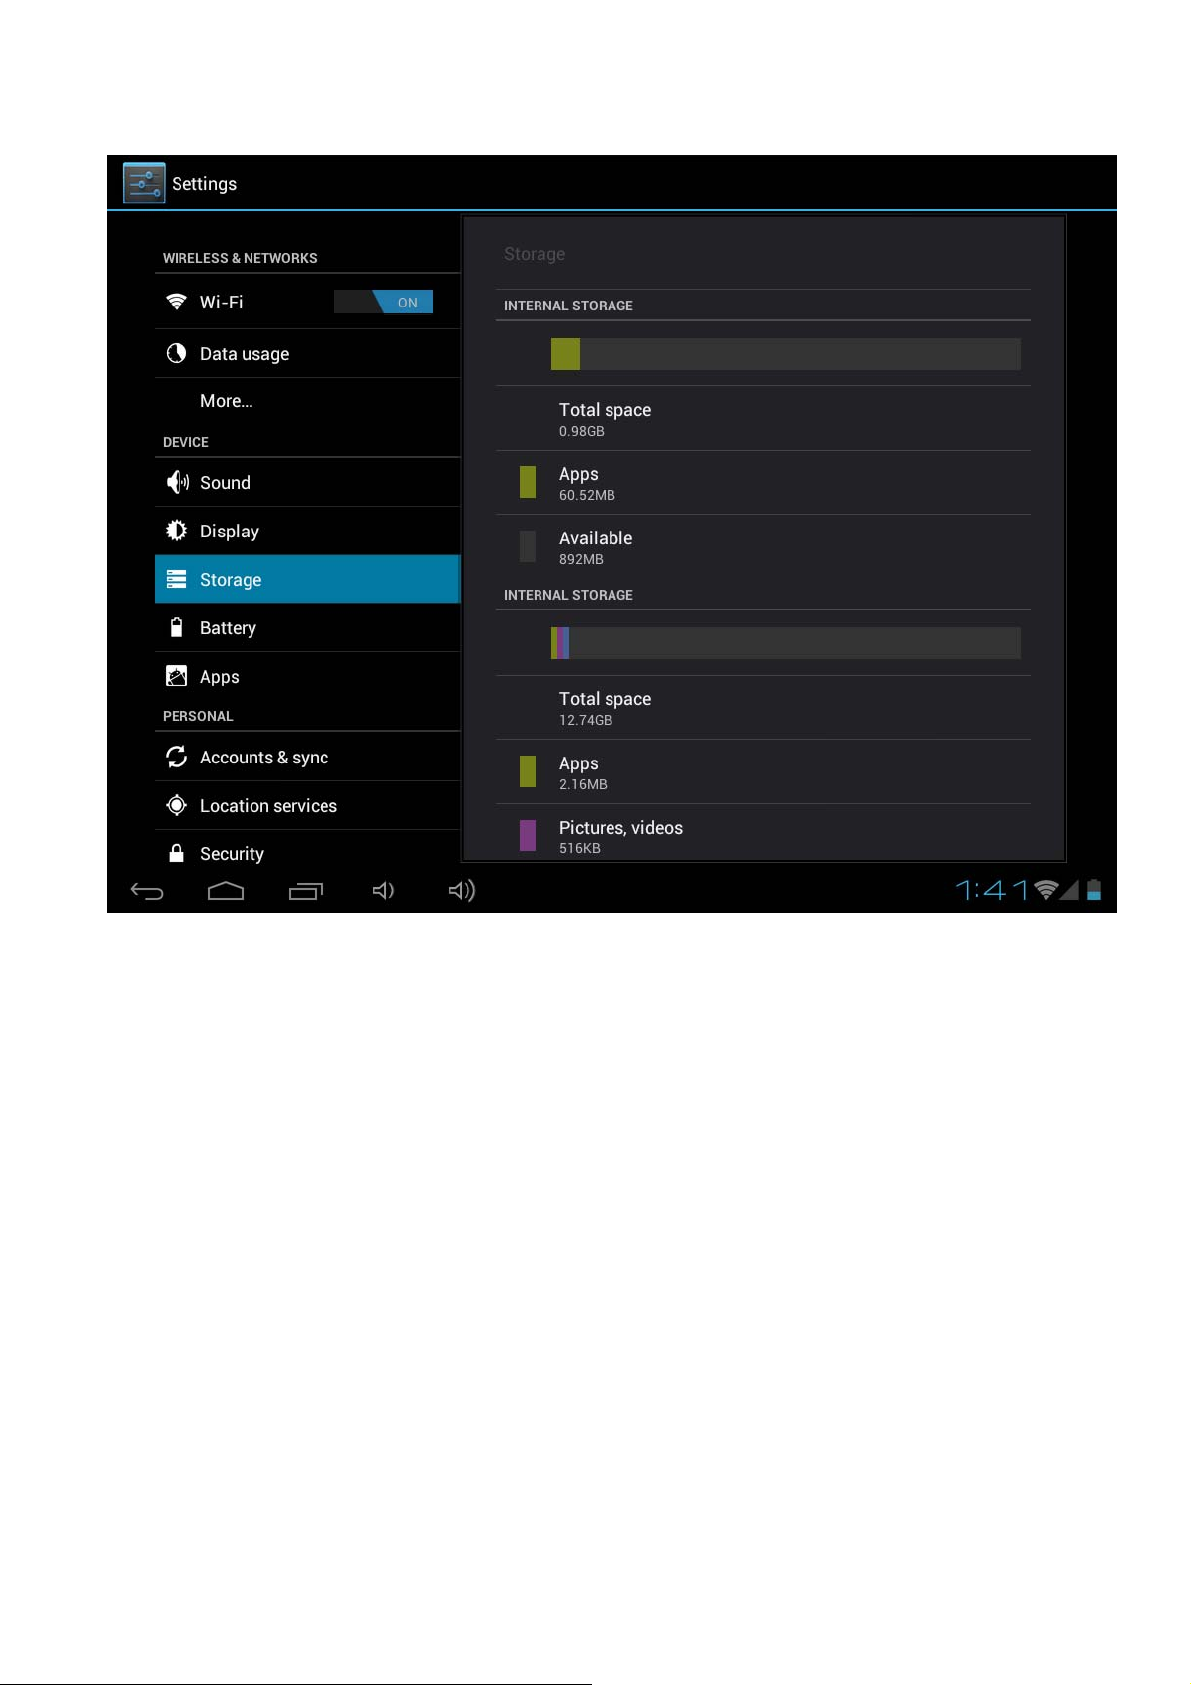
View available memory space
1. Touch settings, Touch storage to view available memory space for your memory
card and Device.
Page 14
Besides copy the information to the Micro SD Card ,you also can copy the
information on the device . Connect the USB Cable to the PC and Device, operate
like above .
Page 15
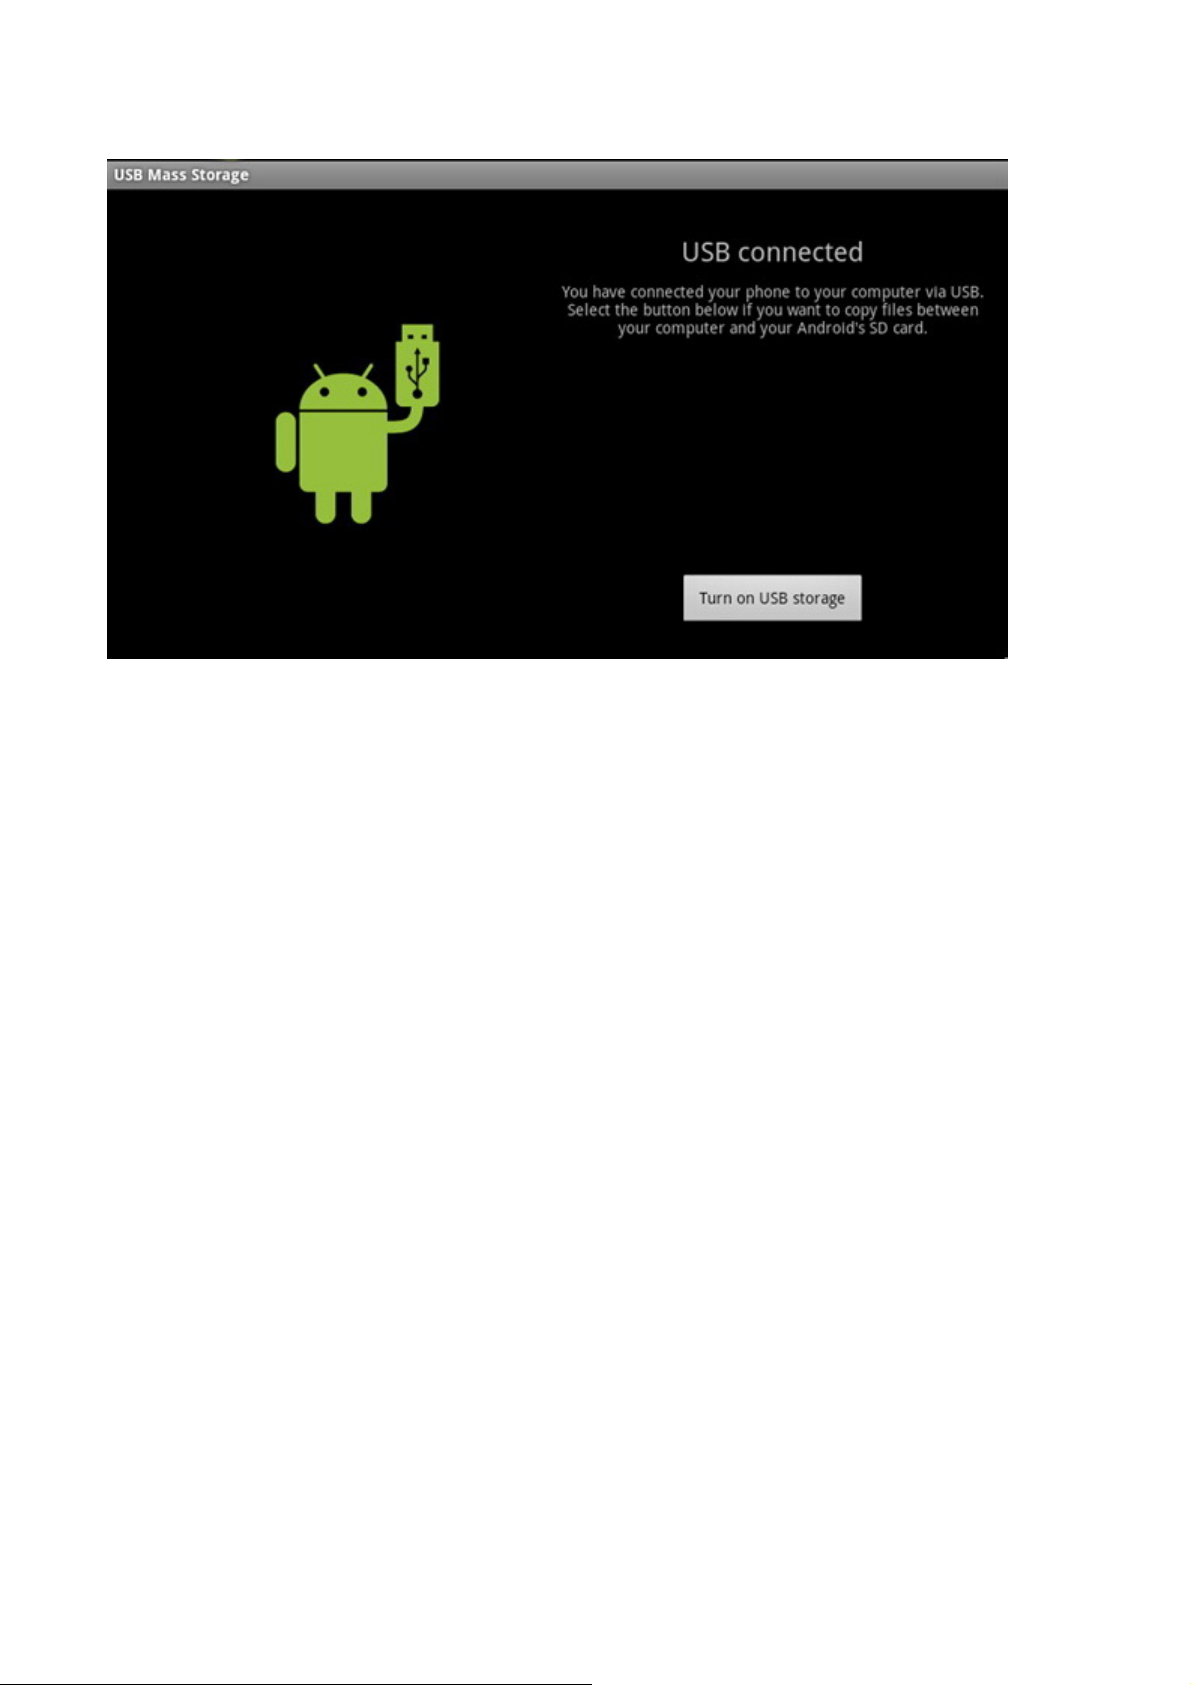
After you click “ turn on USB Stroage”, then check if there are the removable dis k
drive on the PC . Click it, and copy the informaiotn to the removable disk
driver .Then go back to device ,operate as below : Fine File Manager – to check
Page 16
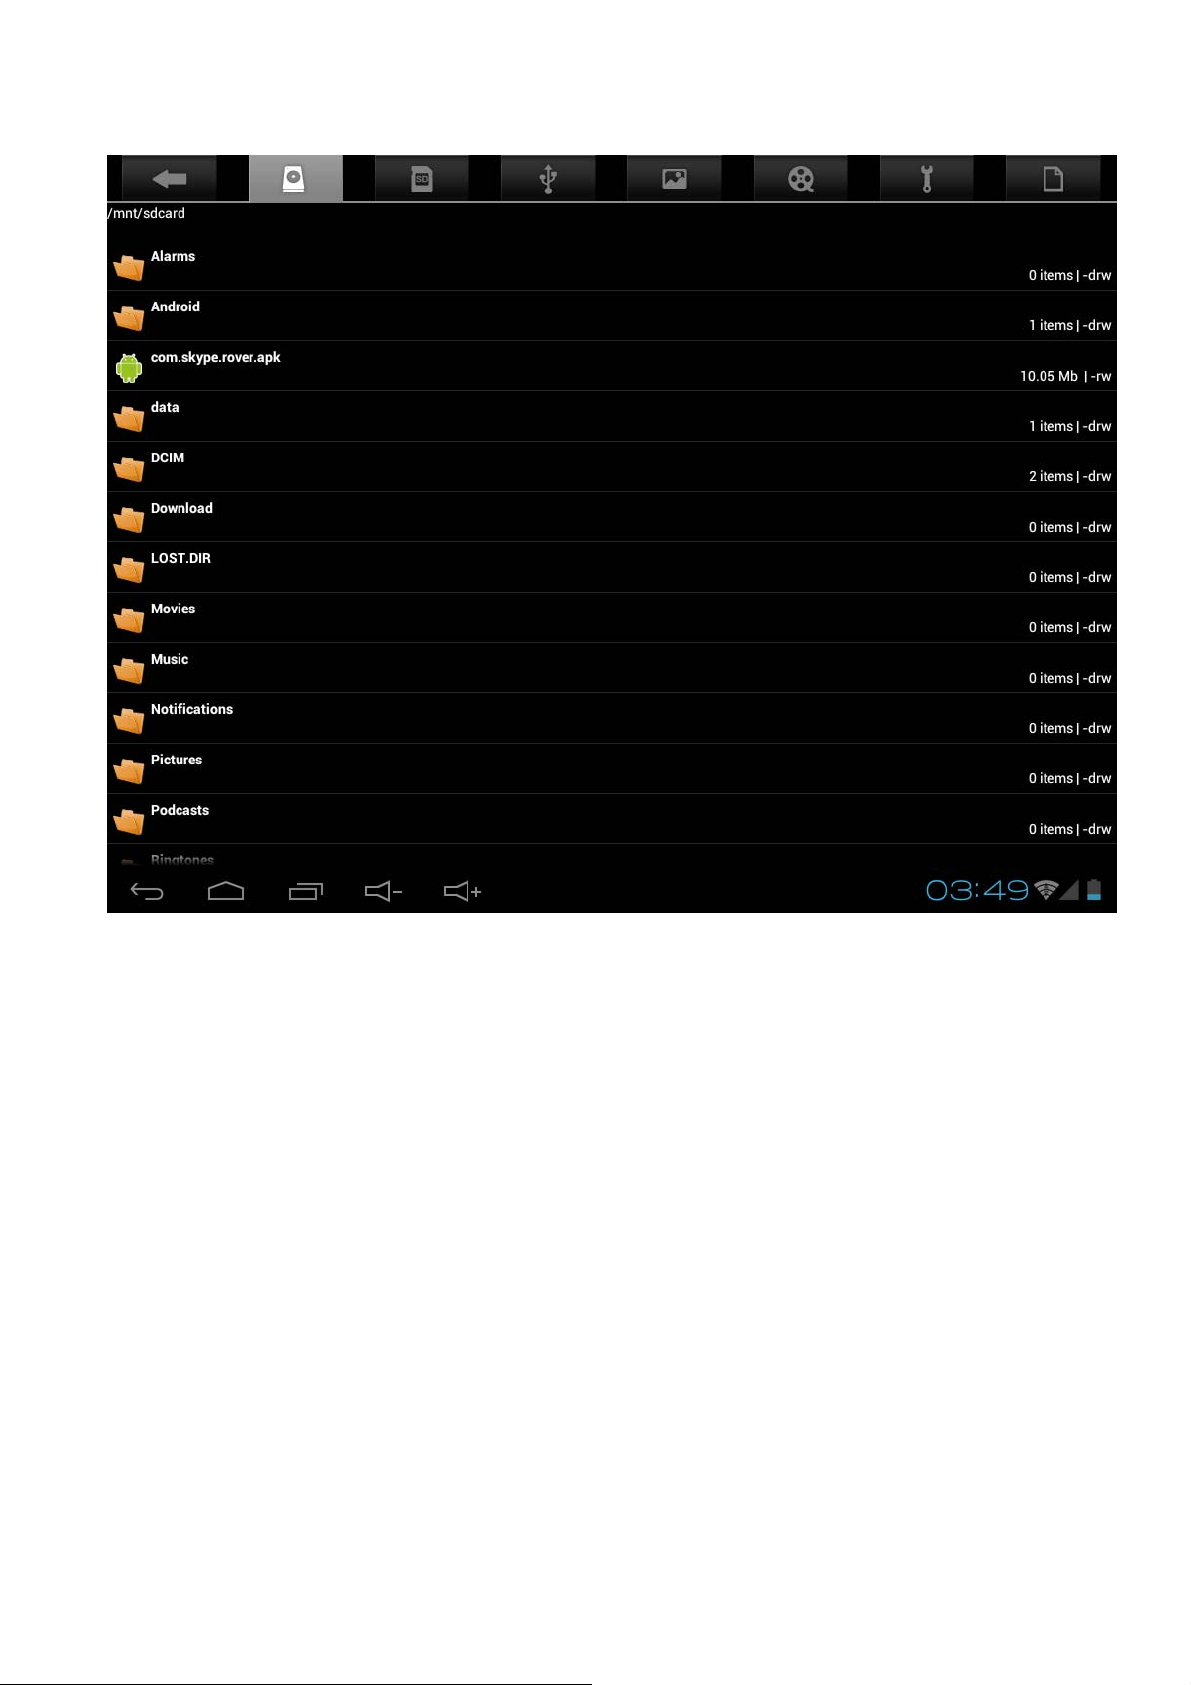
If you copy application to the device ,it should be .APK ,pleas click it ,that will be
installed it in the device.
Page 17

5. HDMI
Use HDMI Cablet to connet Device and LCD Device ,then you can see the information
and Operate it on the LCD Device
USB OTG
USB OTG supports USB-mouse, USB-keyboard, 3G Modem and other peripherals.
6. Language & keyboard
Language
You can setting language for Device To setting
1. Touch settings, touch language & Input
2. Touch language.
3. Touch the language that you want to setting.
Keyboard
You can setting keyboard for Device.To setting
1. Touch settings, touch language & Input.
2. Touch the keyboard that you want to use.
Page 18
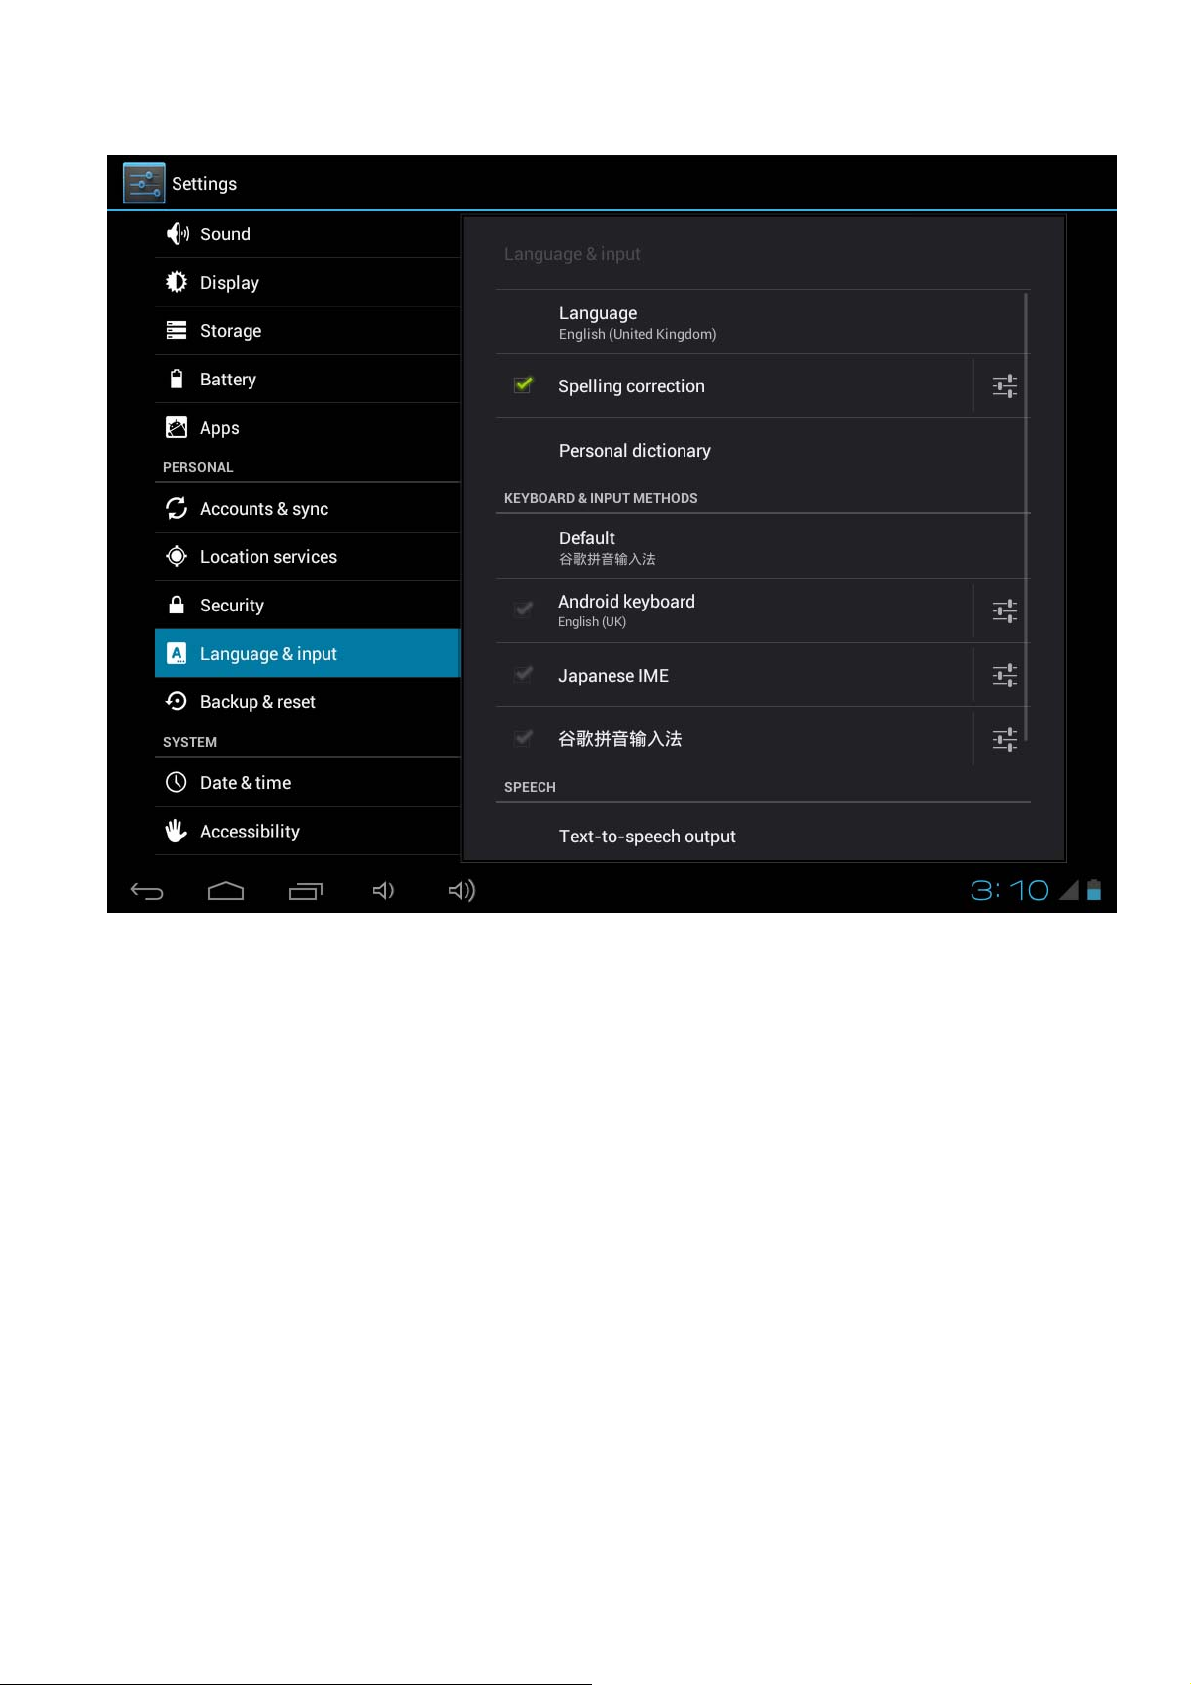
You can install other keyboard for Device. After install ,they will be lised in the Language
& Input ,just like Android Keyboard ,Japanese IME as above pictures .
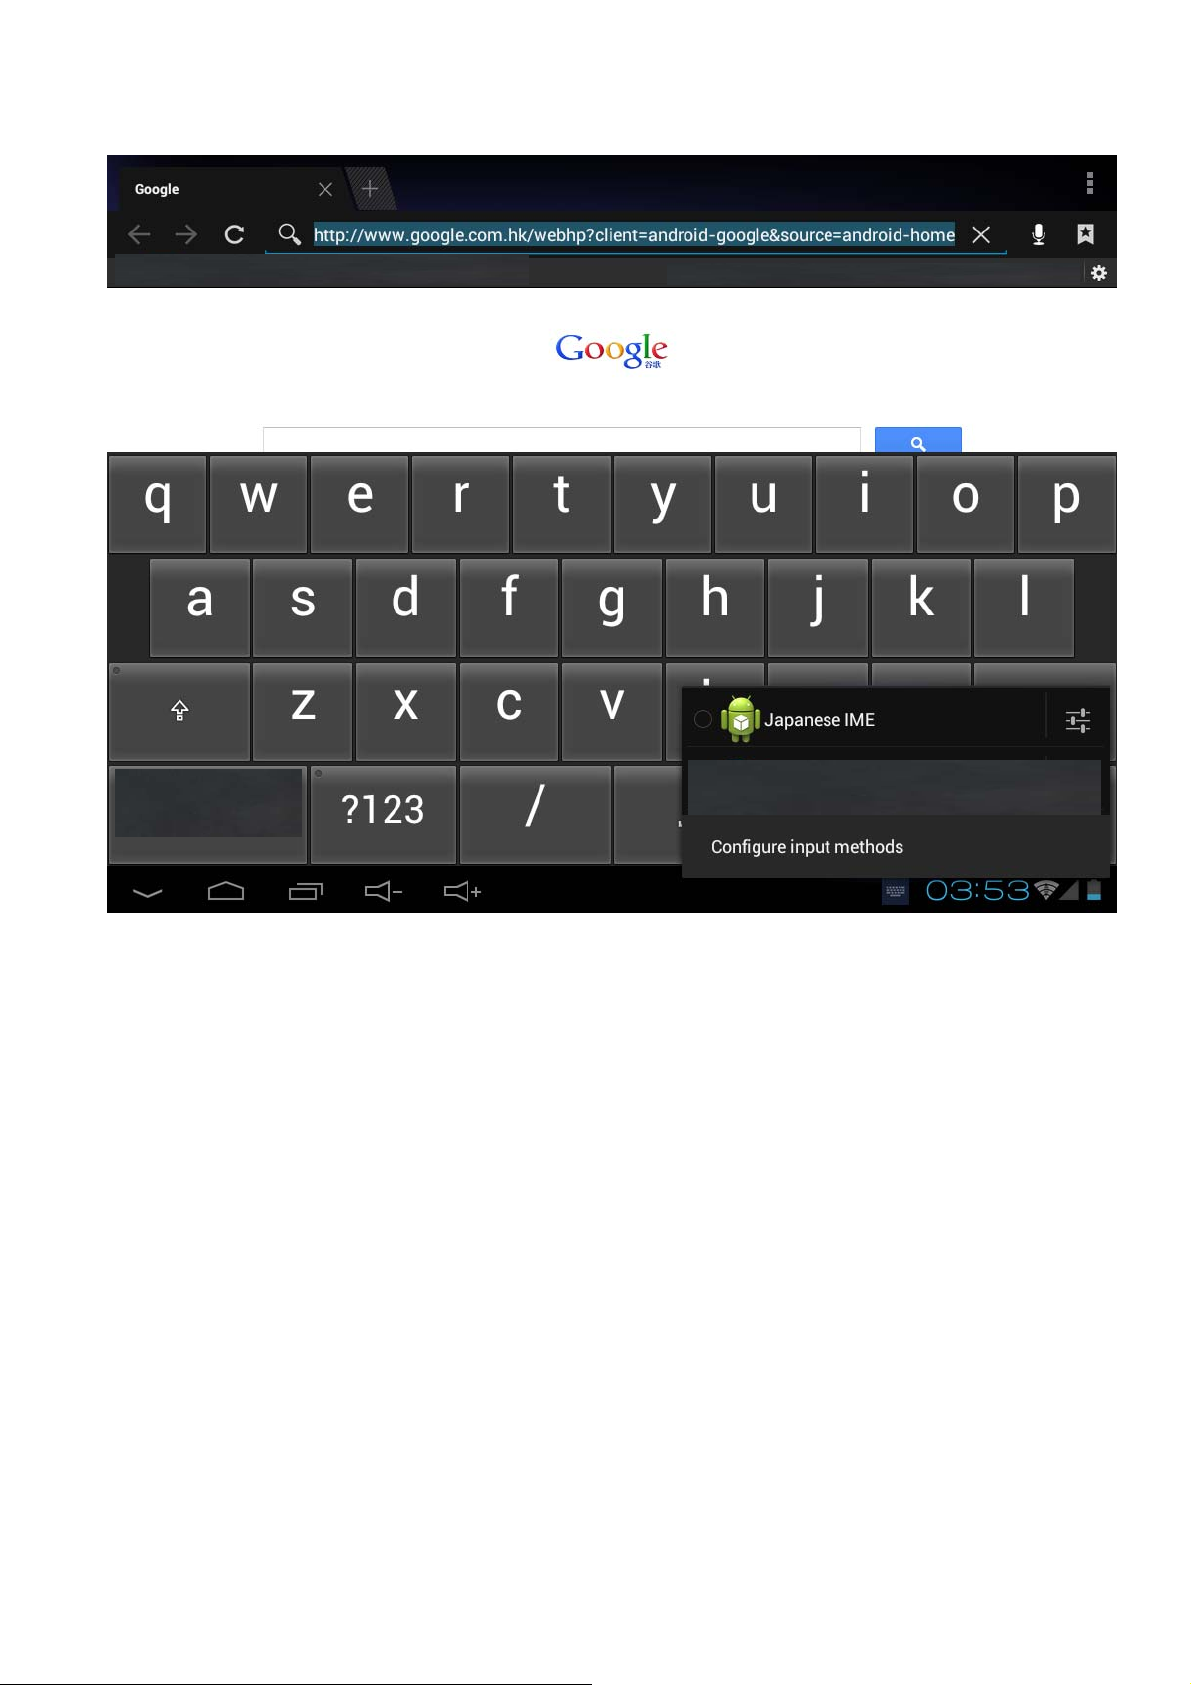
When you input the wores on the brower or type something ,there is also one quick icon
to change the input .
On the left of the time 03.53 ,there is keyboard mark, click it ,then you will see some
input for your choice ,so it is very convenient for you to change the input which you like
Page 19
Page 20
7. Manage Applications
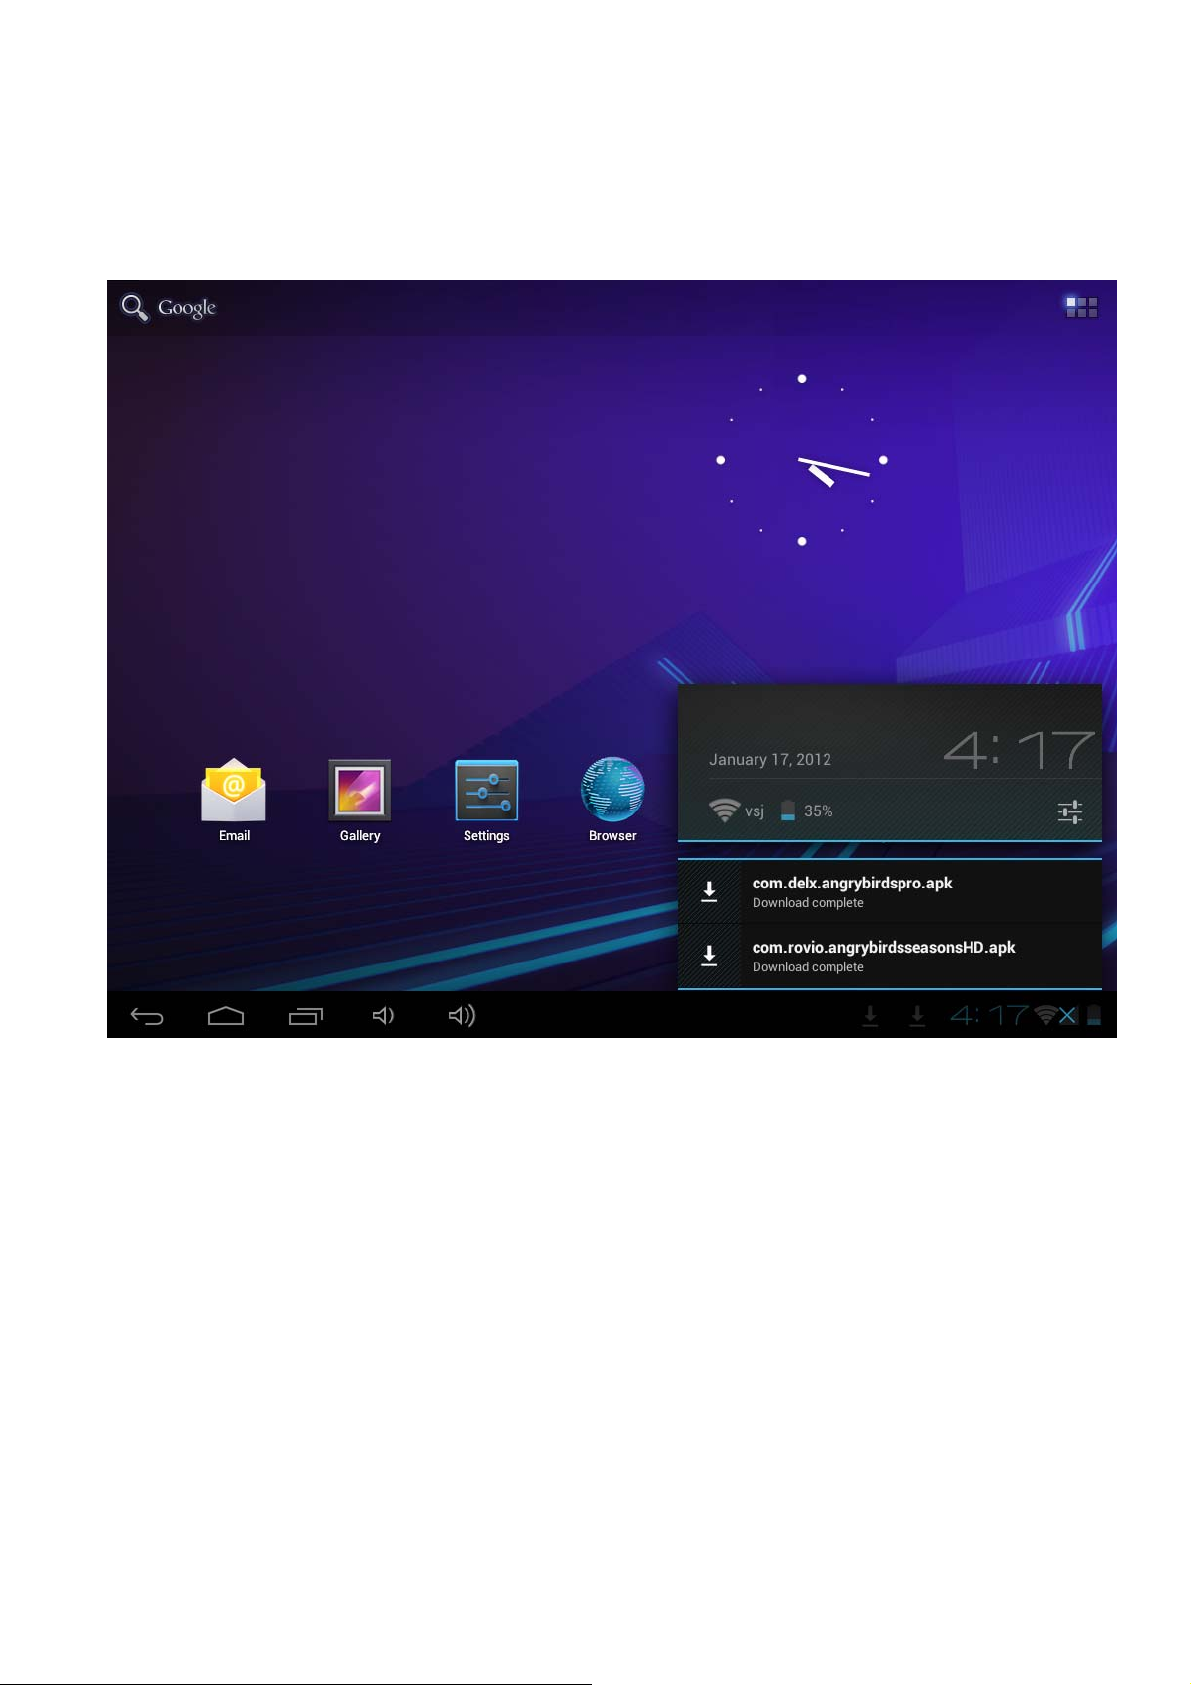
1. After download the file ,please click it and install
Also you can go to Setting- Apps- Downloaded ,install them
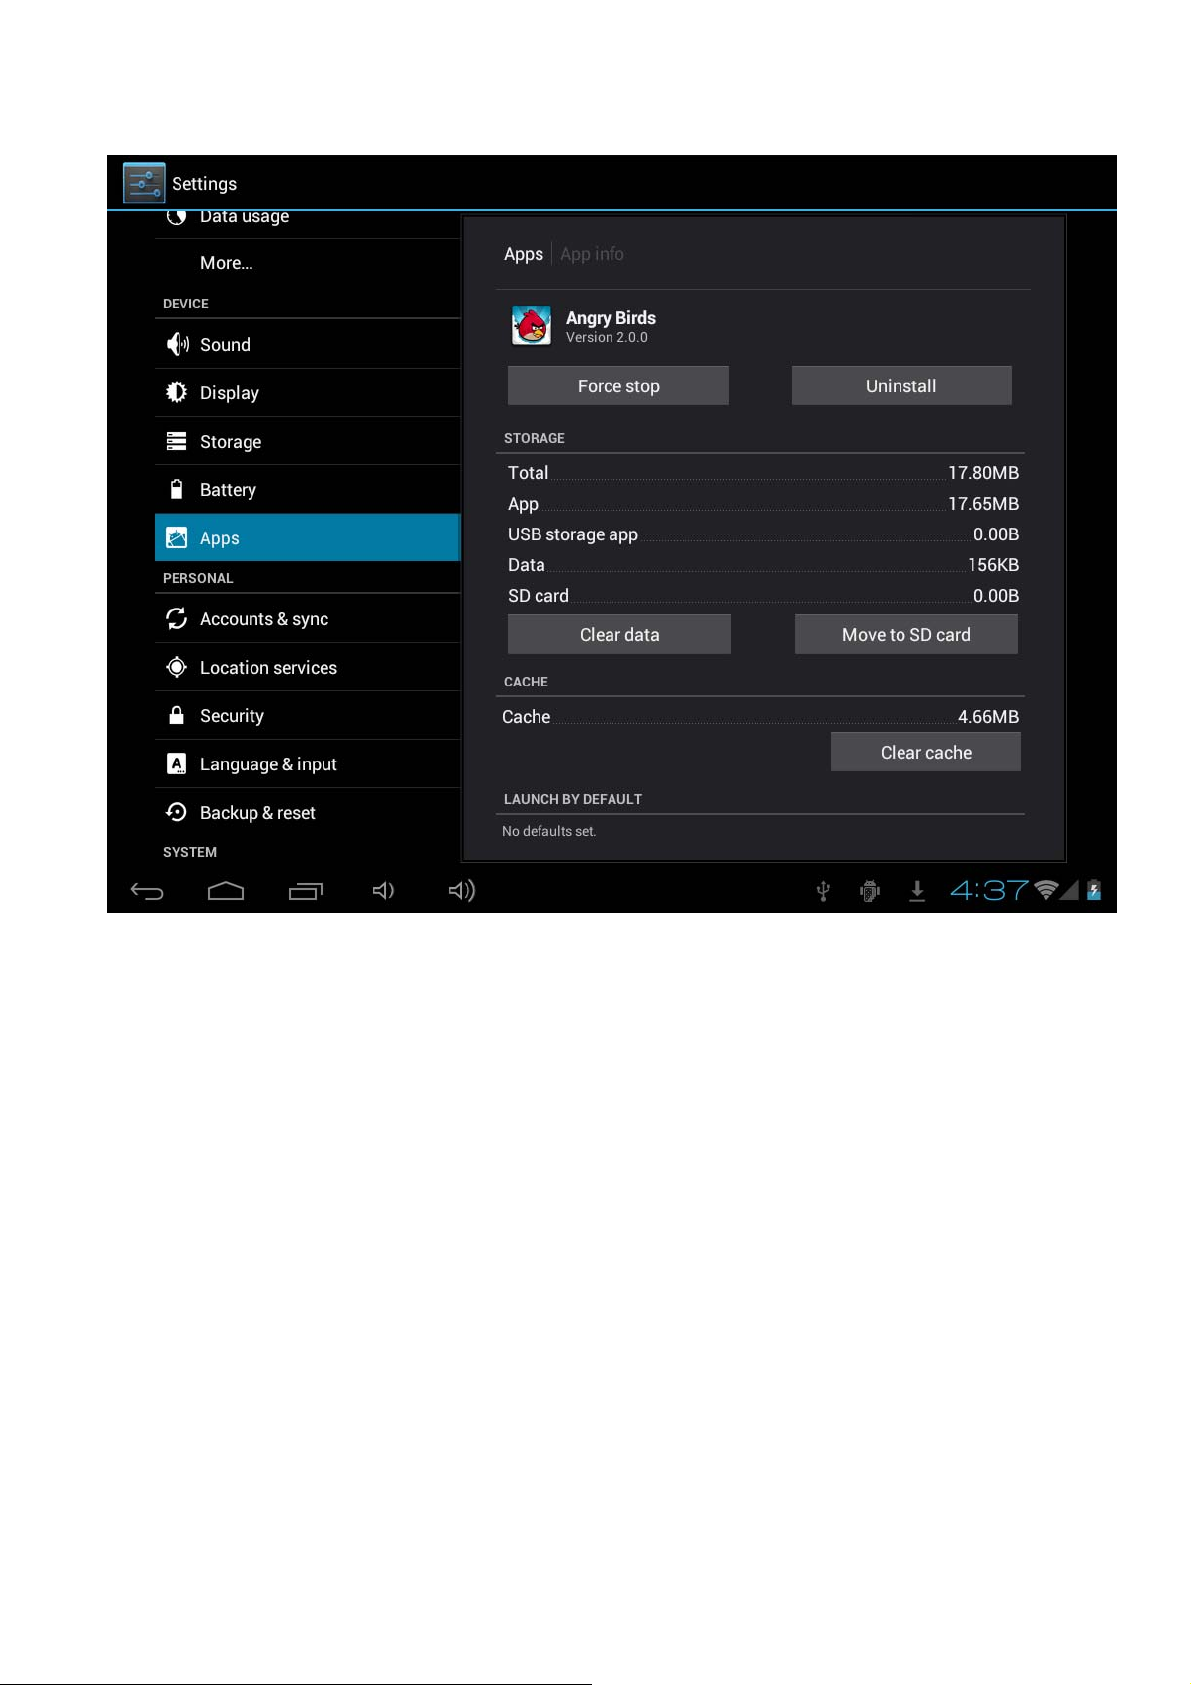
Uninstall Application
1. Touch settings.
2. Touch Apps
3. Touch the application that you want to Uninstall.
4. Touch Uninstall.
5. Touch OK, Touch OK.
Page 21
8. Music
Access and play music
1. On the home screen touch the Application button.
2. Touch Music, T ouch Songs.
3. Touch the song to play.
Delete play lists
1. On the home screen, touch the Application button.
2. Touch Music, touch Playlist.
3. Touch and hold the play list you want to delete.
4. Touch Delete
Page 22
9. Photo
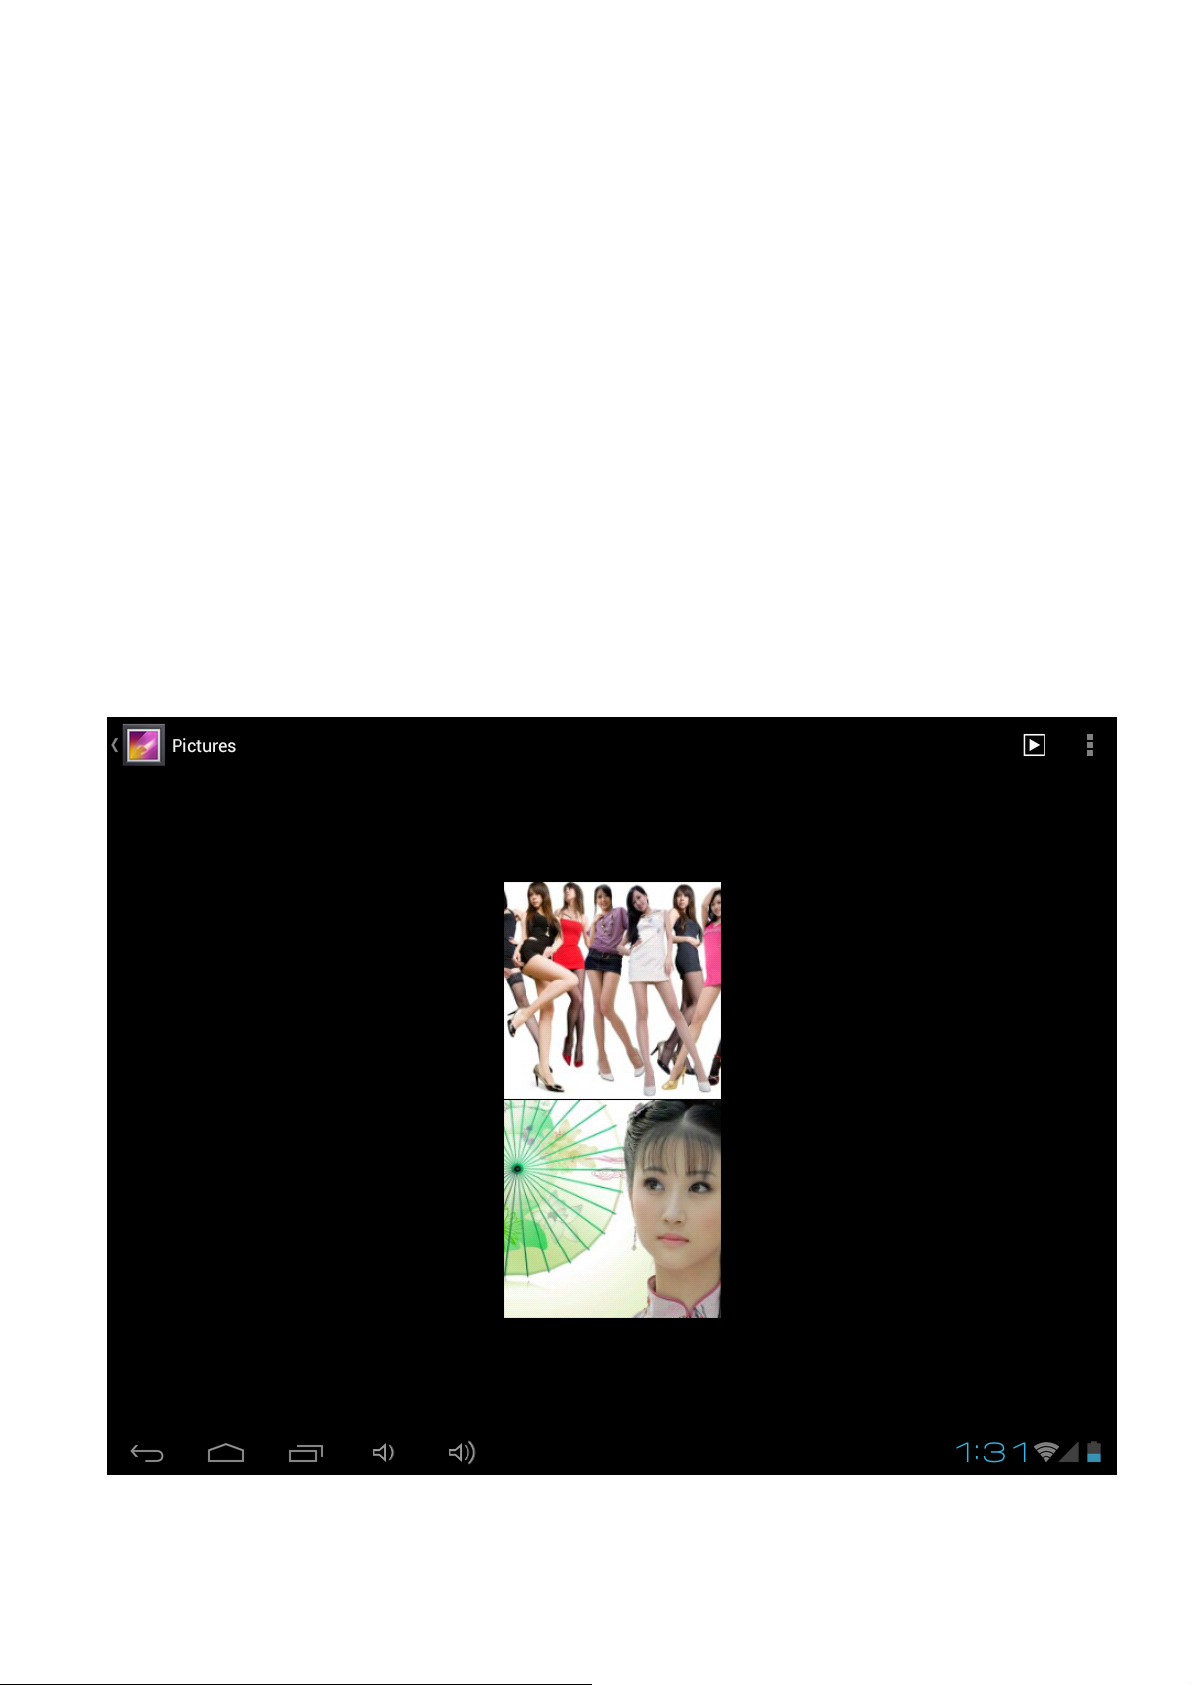
Your Device can play the photo file formats as follows: JPG、BMP、PNG、GIF. You
can keep these files in SD card or in the device.
Slideshow the photos:
1. Copy the photo to SD card.
2. On the home screen touch the Application button.
3. Touch Gallery.
4. Touch the folder of photos. Touch the photo.
5. Touch Slideshow. “ play “ Mark in the device
If you want to delete the pictures , choose the “trash” mark in the device, please operate
Page 23
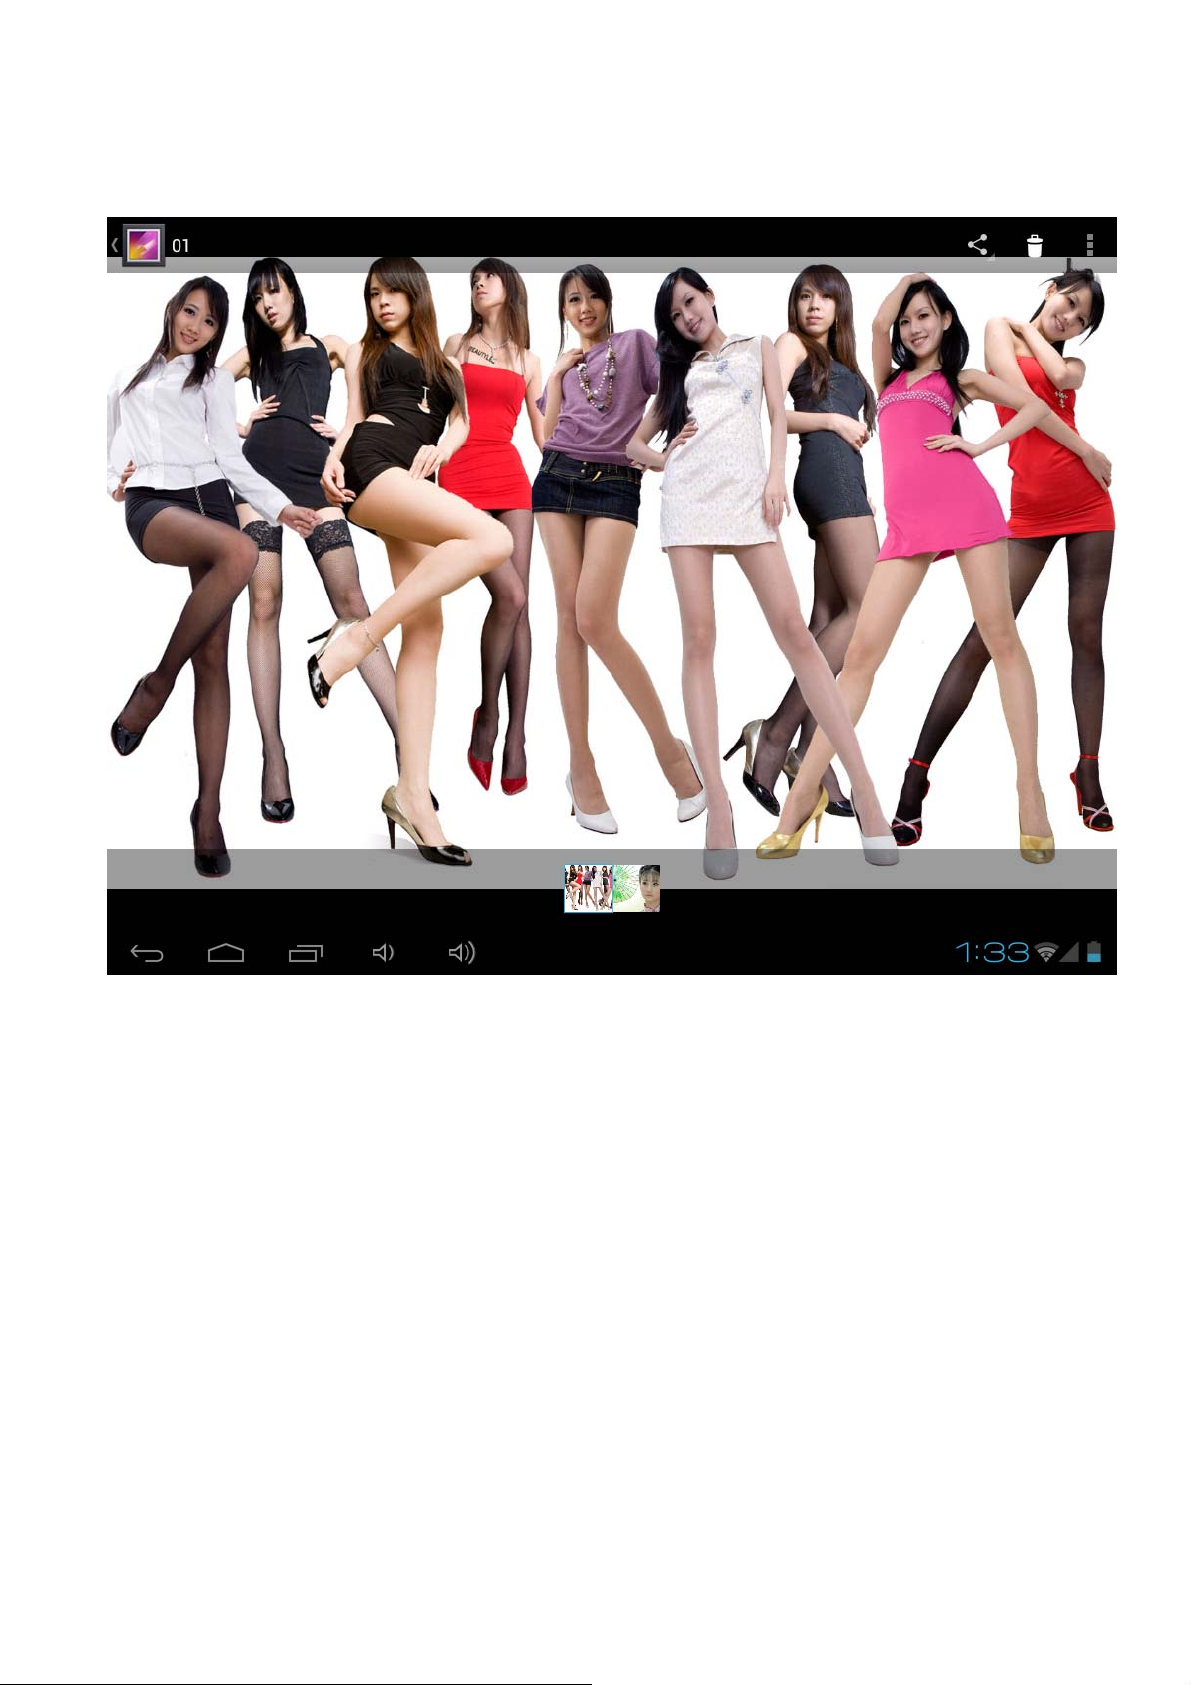
as below :
Page 24
10. Video
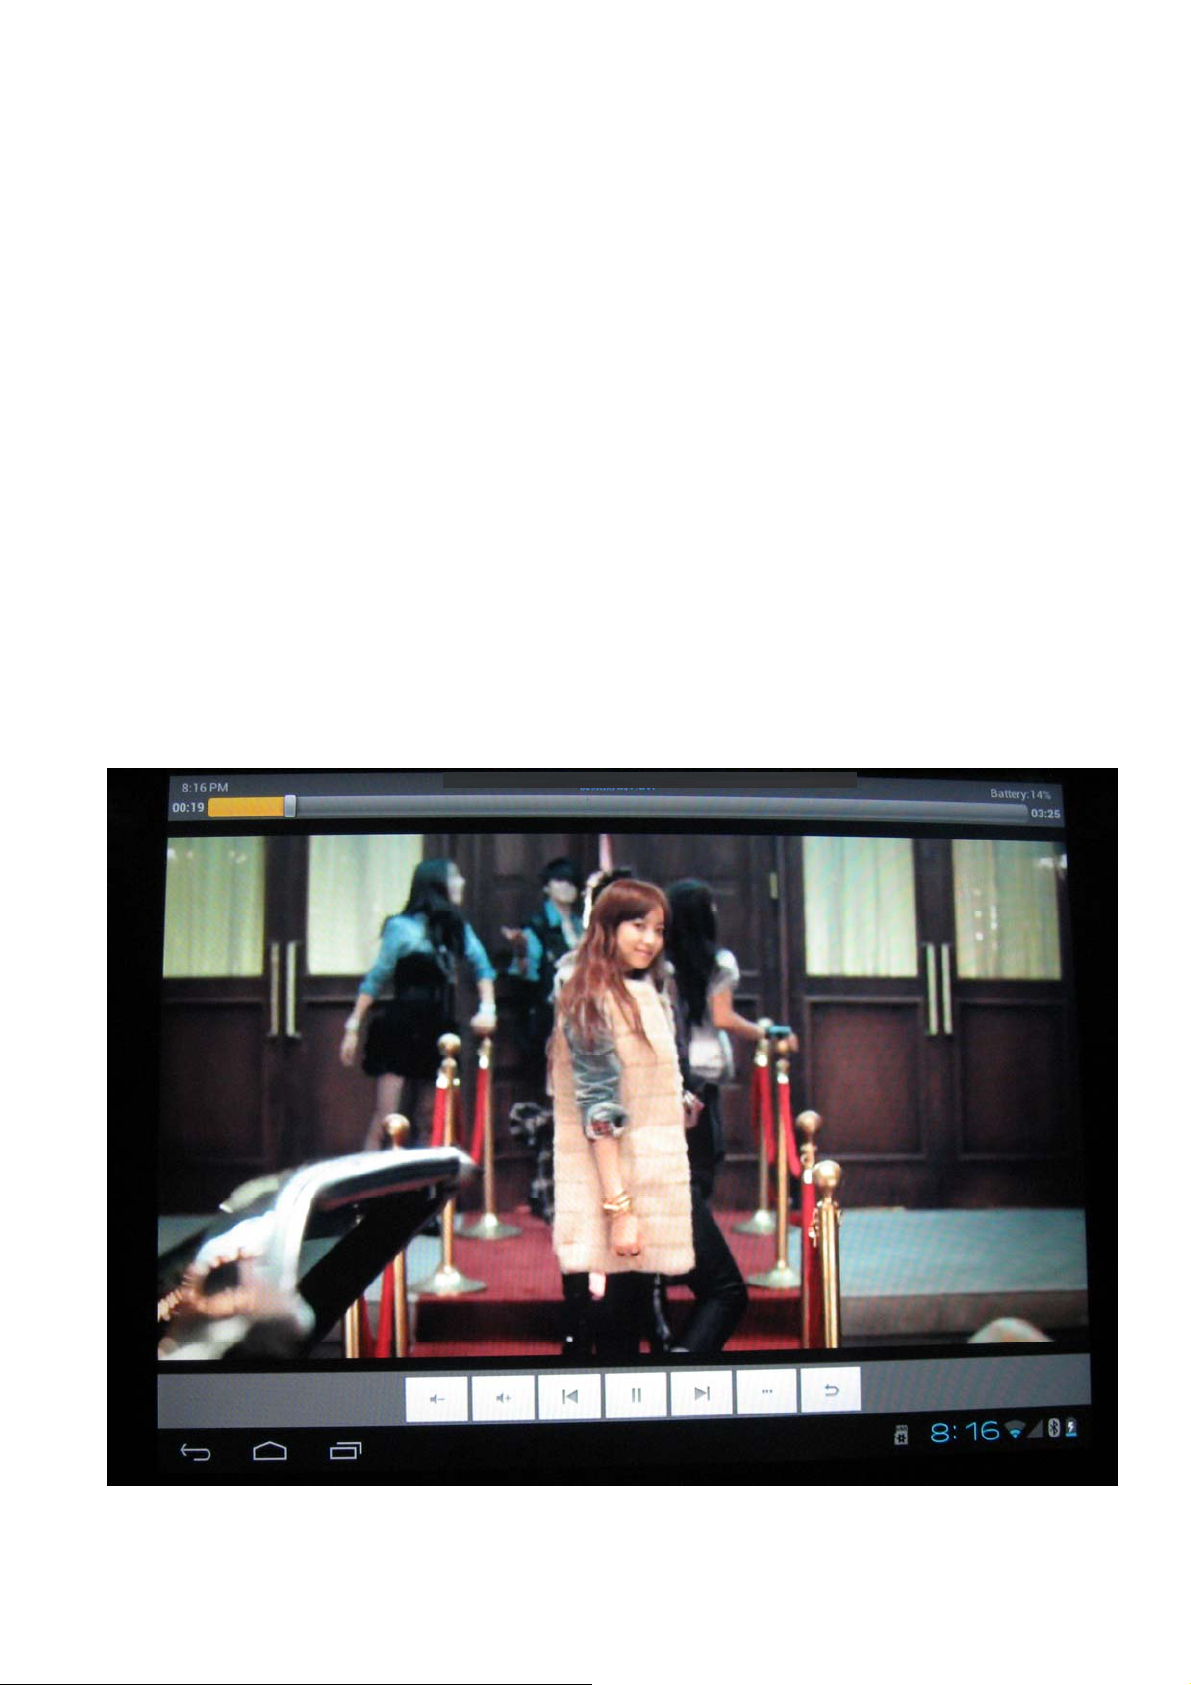
Your MID can play the video file formats as follows:
AVI,MKV(XVID/px/H.264),MOV,TS,M2TS,RM/RMVB,FLV,3GP,MPEG,DAT,MP4(sup
port to 2160P:3480x2160). You can save these files on SD card.
Play a video:
1. Copy the video to SD card.
2. On the home screen touch the Application button.
3. Touch Gallery
4. Touch the video.
Page 25
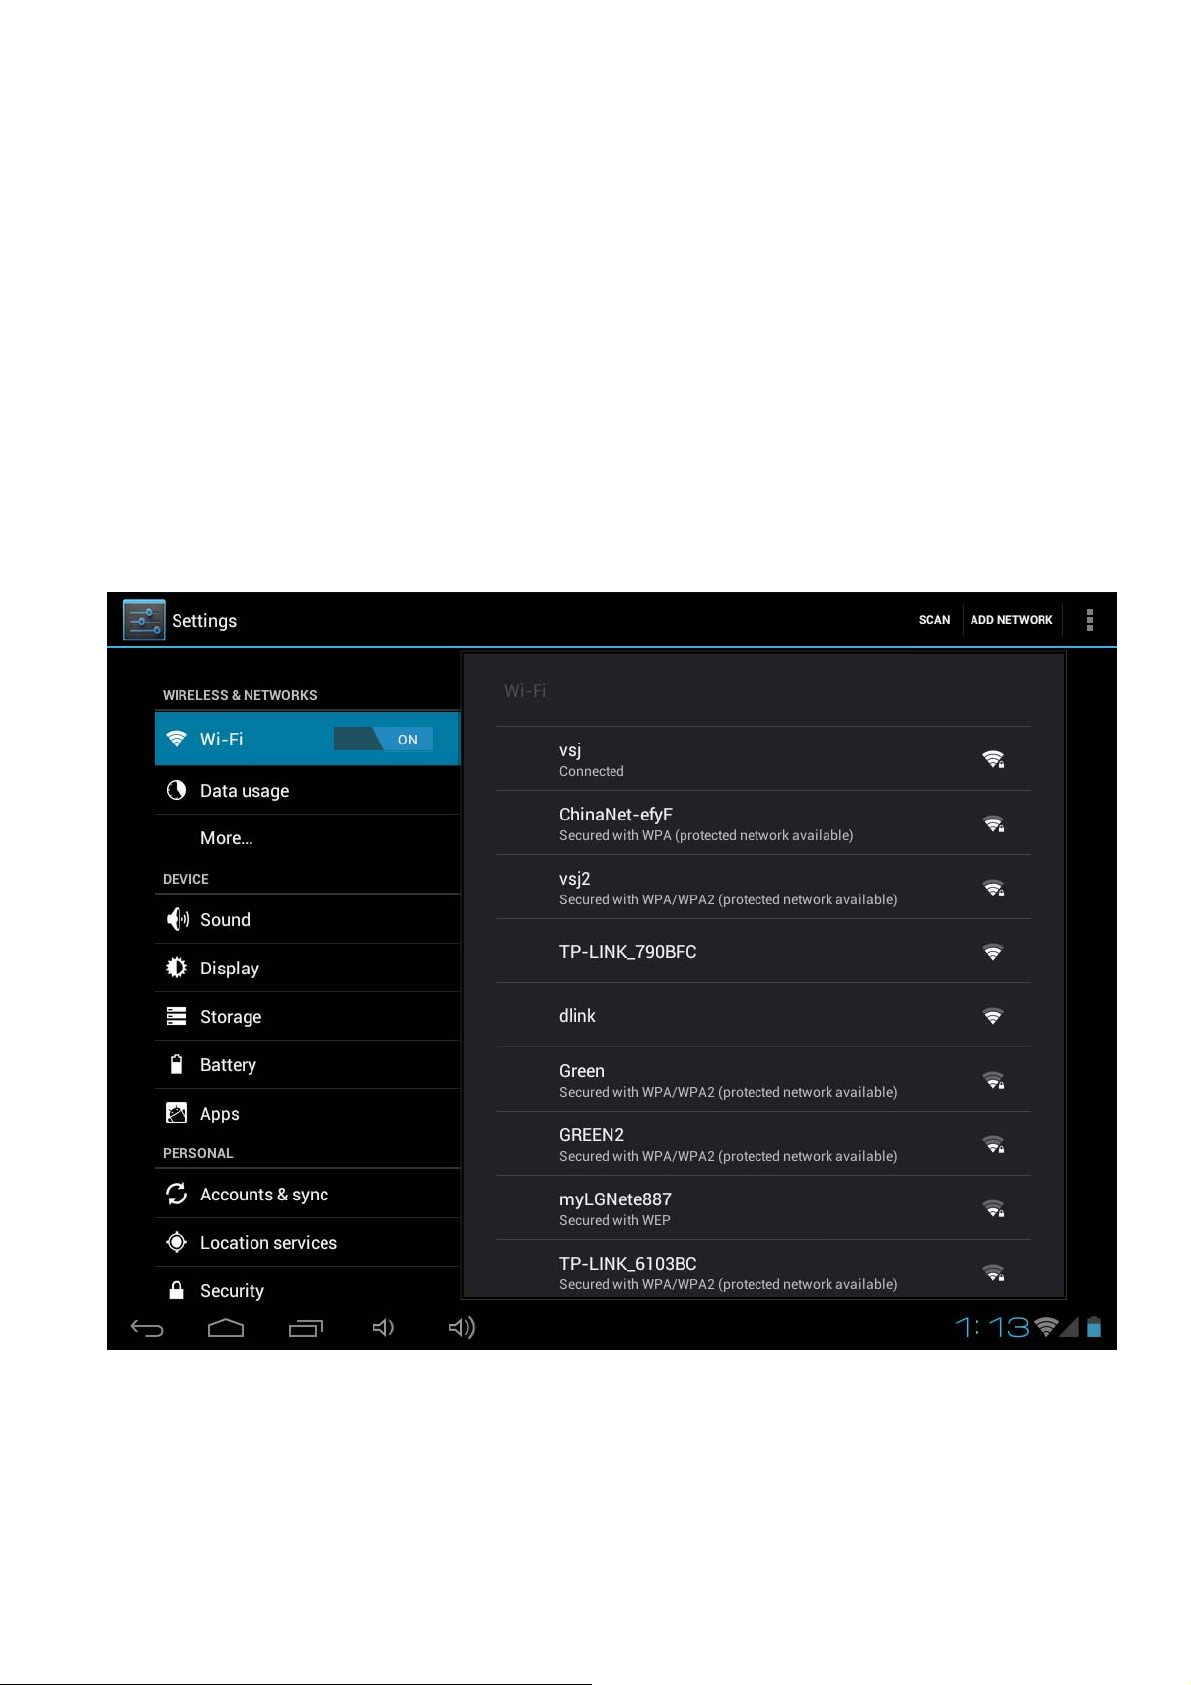
11. Wi-Fi
Your Device can connect to Wi-Fi networks. To connect
1. Touch settings, touch wireless & networks.
2. Touch Wi-Fi to turn it on. Touch Wi-Fi settings. Your Device scans for available
Wi-Fi networks.
3. Touch the Wi-Fi network that you want to connect to.
4. Touch Connect. Some network may need you input the password.
On the Wi-Fi settings screen, press the Menu key, touch Advanced, you will get
more settings for Wi-Fi.
Page 26
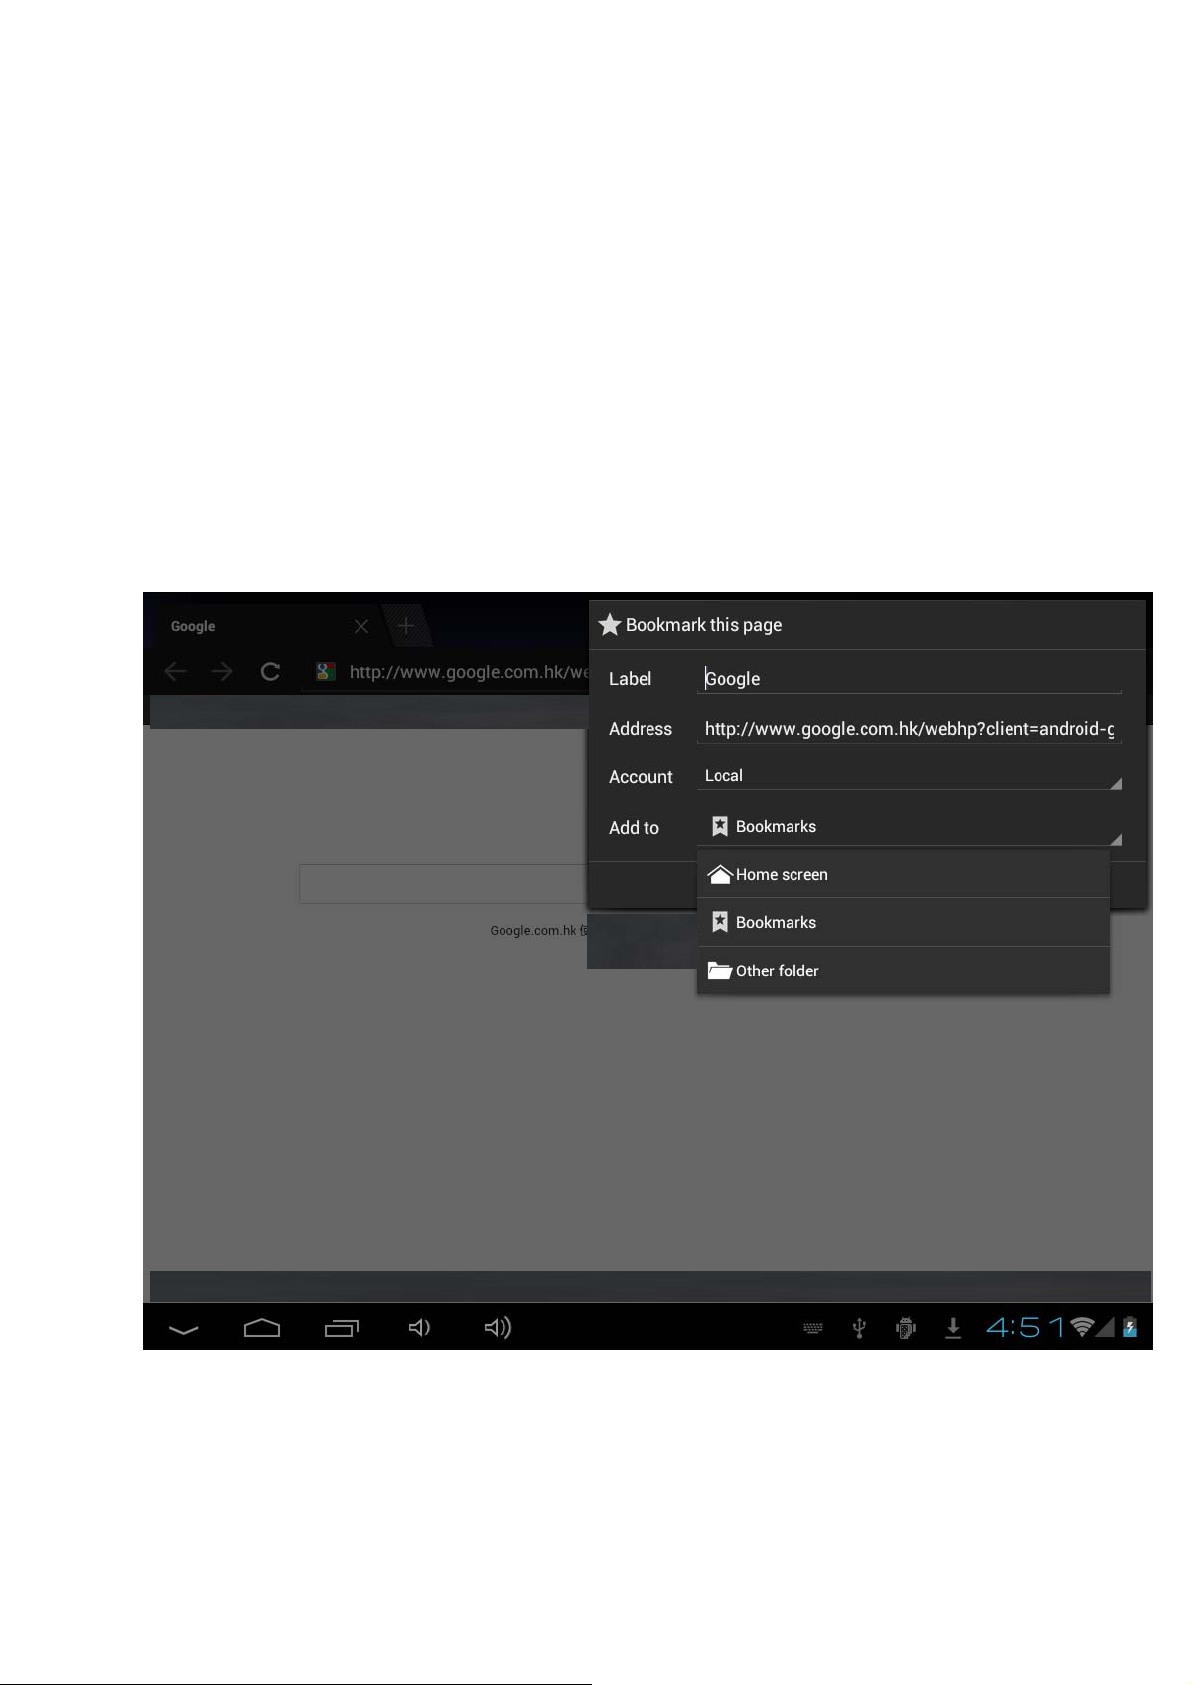
12. Browser
Go to your home page
The Browser always opens to the last Web page you were viewing.
The first time you enter the Browser after powering on, your home page will display.
Change your home page
1. Touch Browser.
2. Press the Bookmark key in the Browser Bar. And change what you like.
Visit Web pages
Page 27
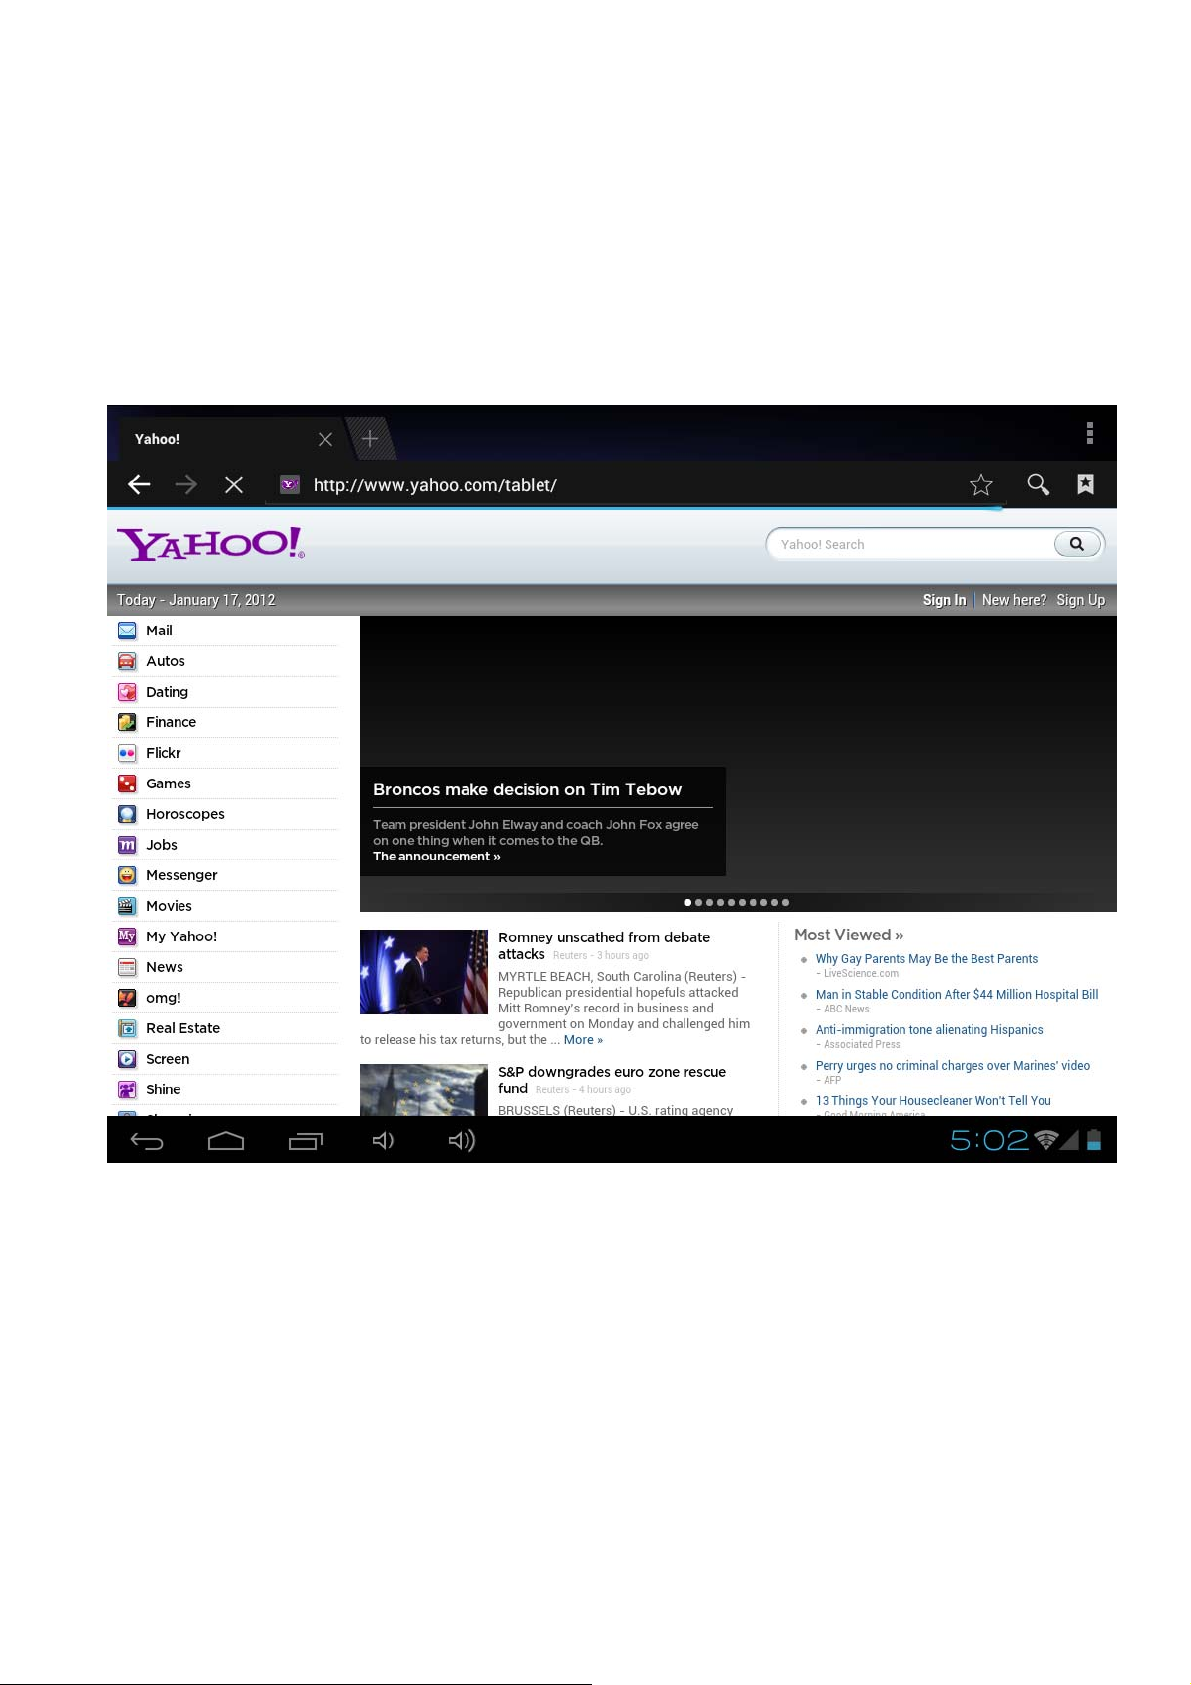
1. Touch Browser.
2. Press the Menu key.
3. Touch address bar.
4. Type the Web address, touch Go. Need network connection
Page 28
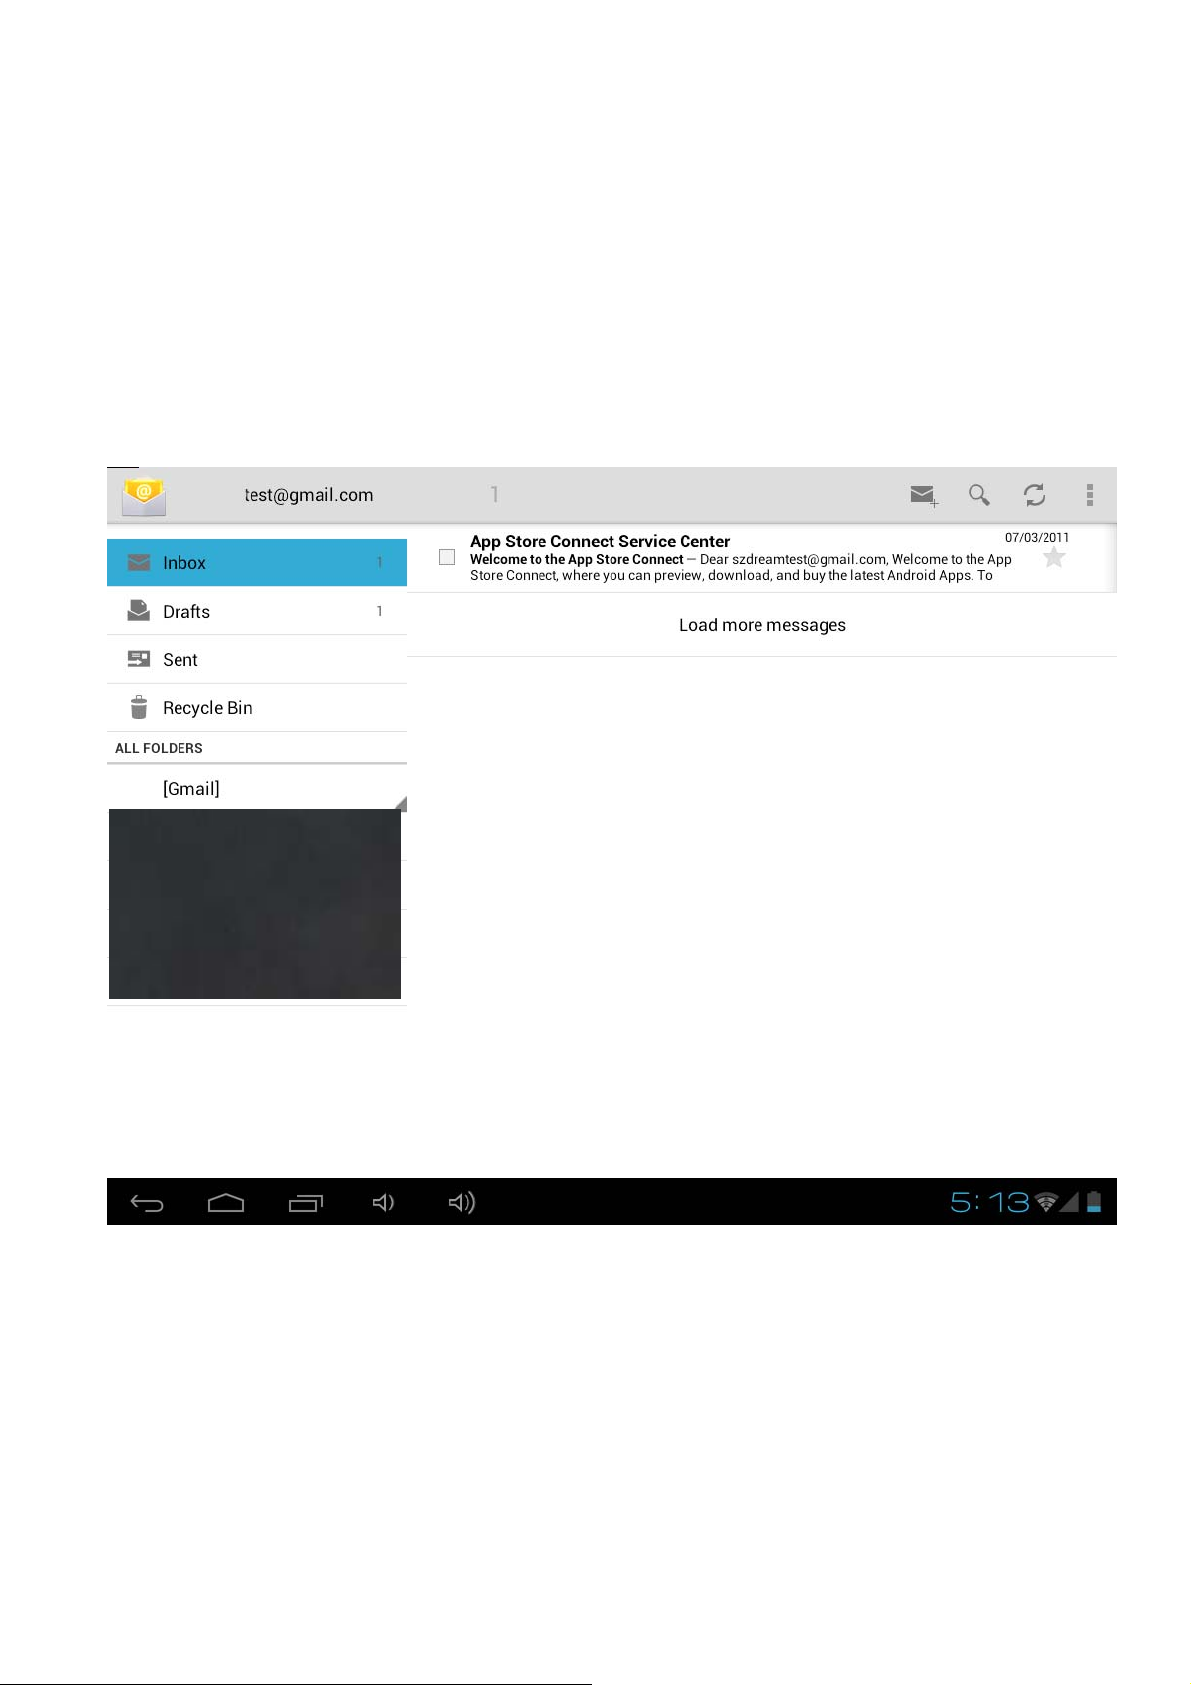
13.Email
Input Email Address and Pass Words in the device. E.G: Gmail
Read new messages
1. On the home screen, touch Gmail to display your inbox.
2. Touch a message to read.
Write new messages
1. On the screen, touch Writing email Mark
2. Type a name or e-mail address in the To field. Matching contacts will appear.
Select the contact or continue typing.
3. Type the subject and message.
Page 29
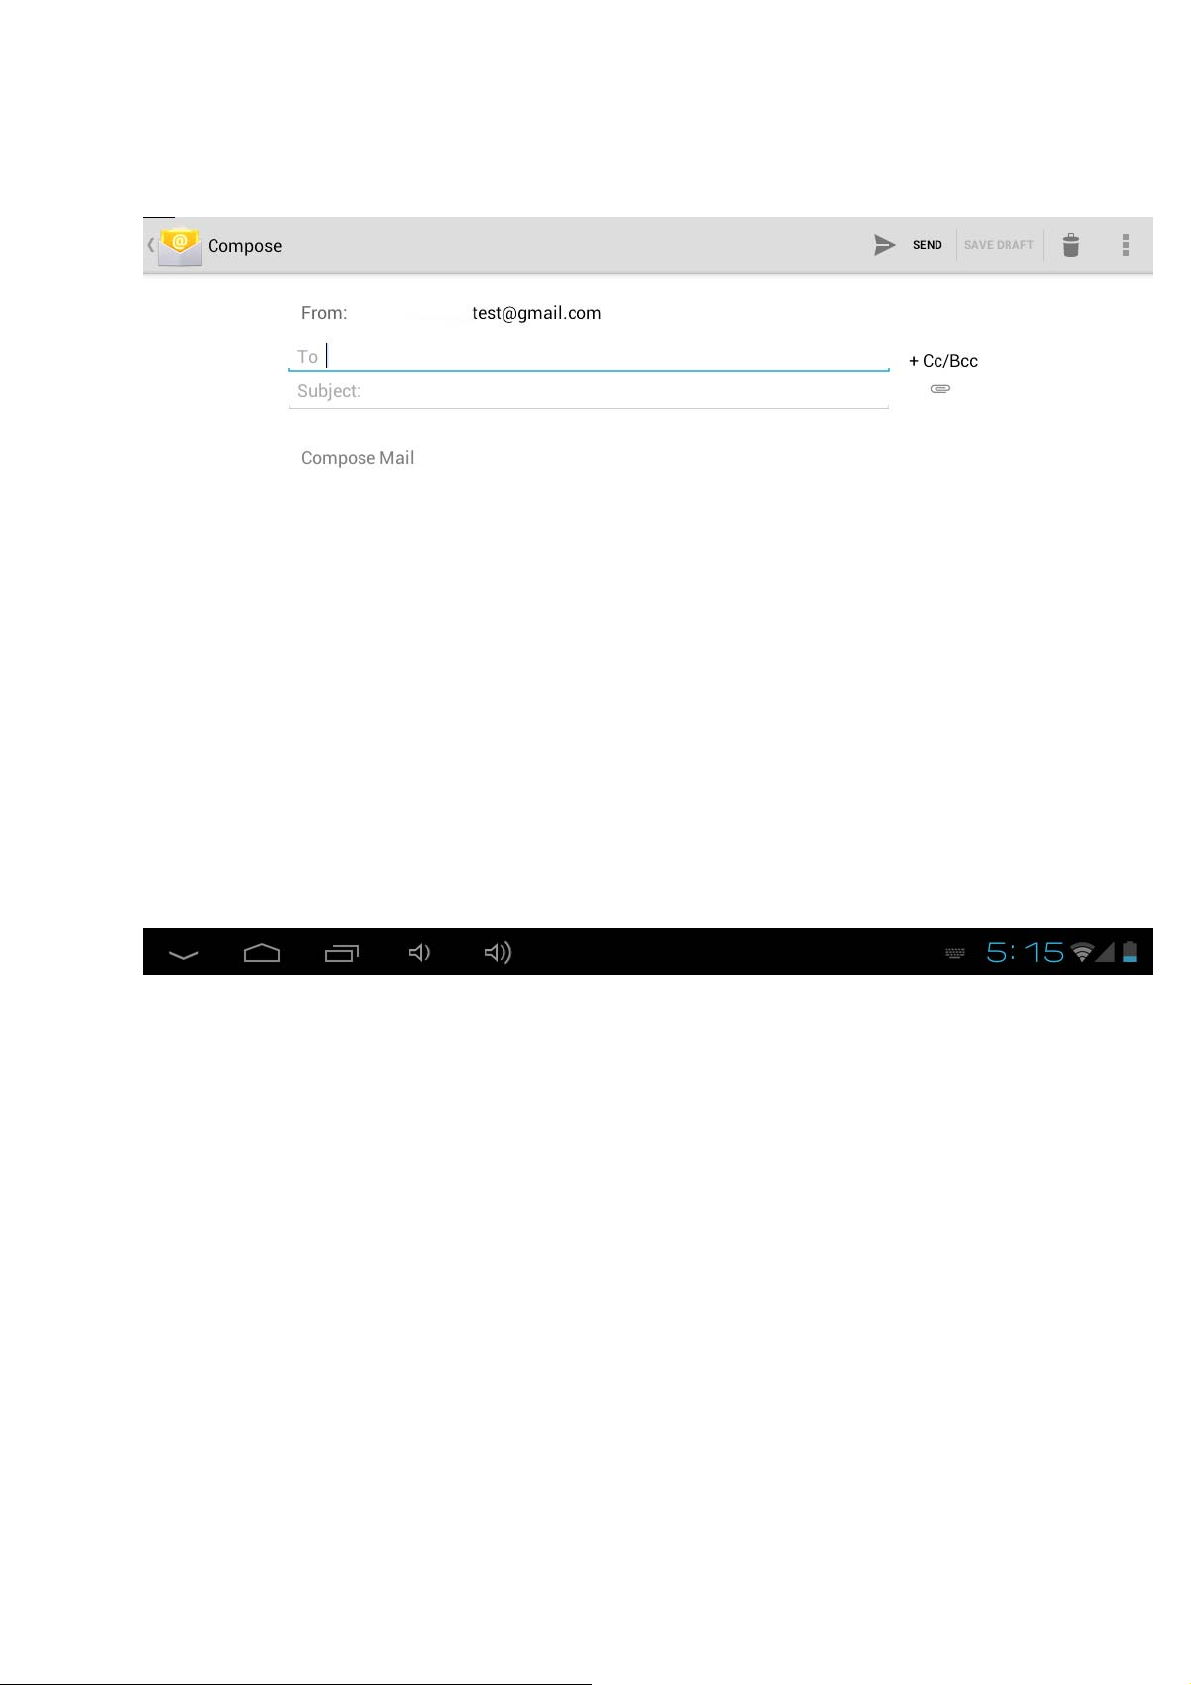
4. Touch Send.
Page 30

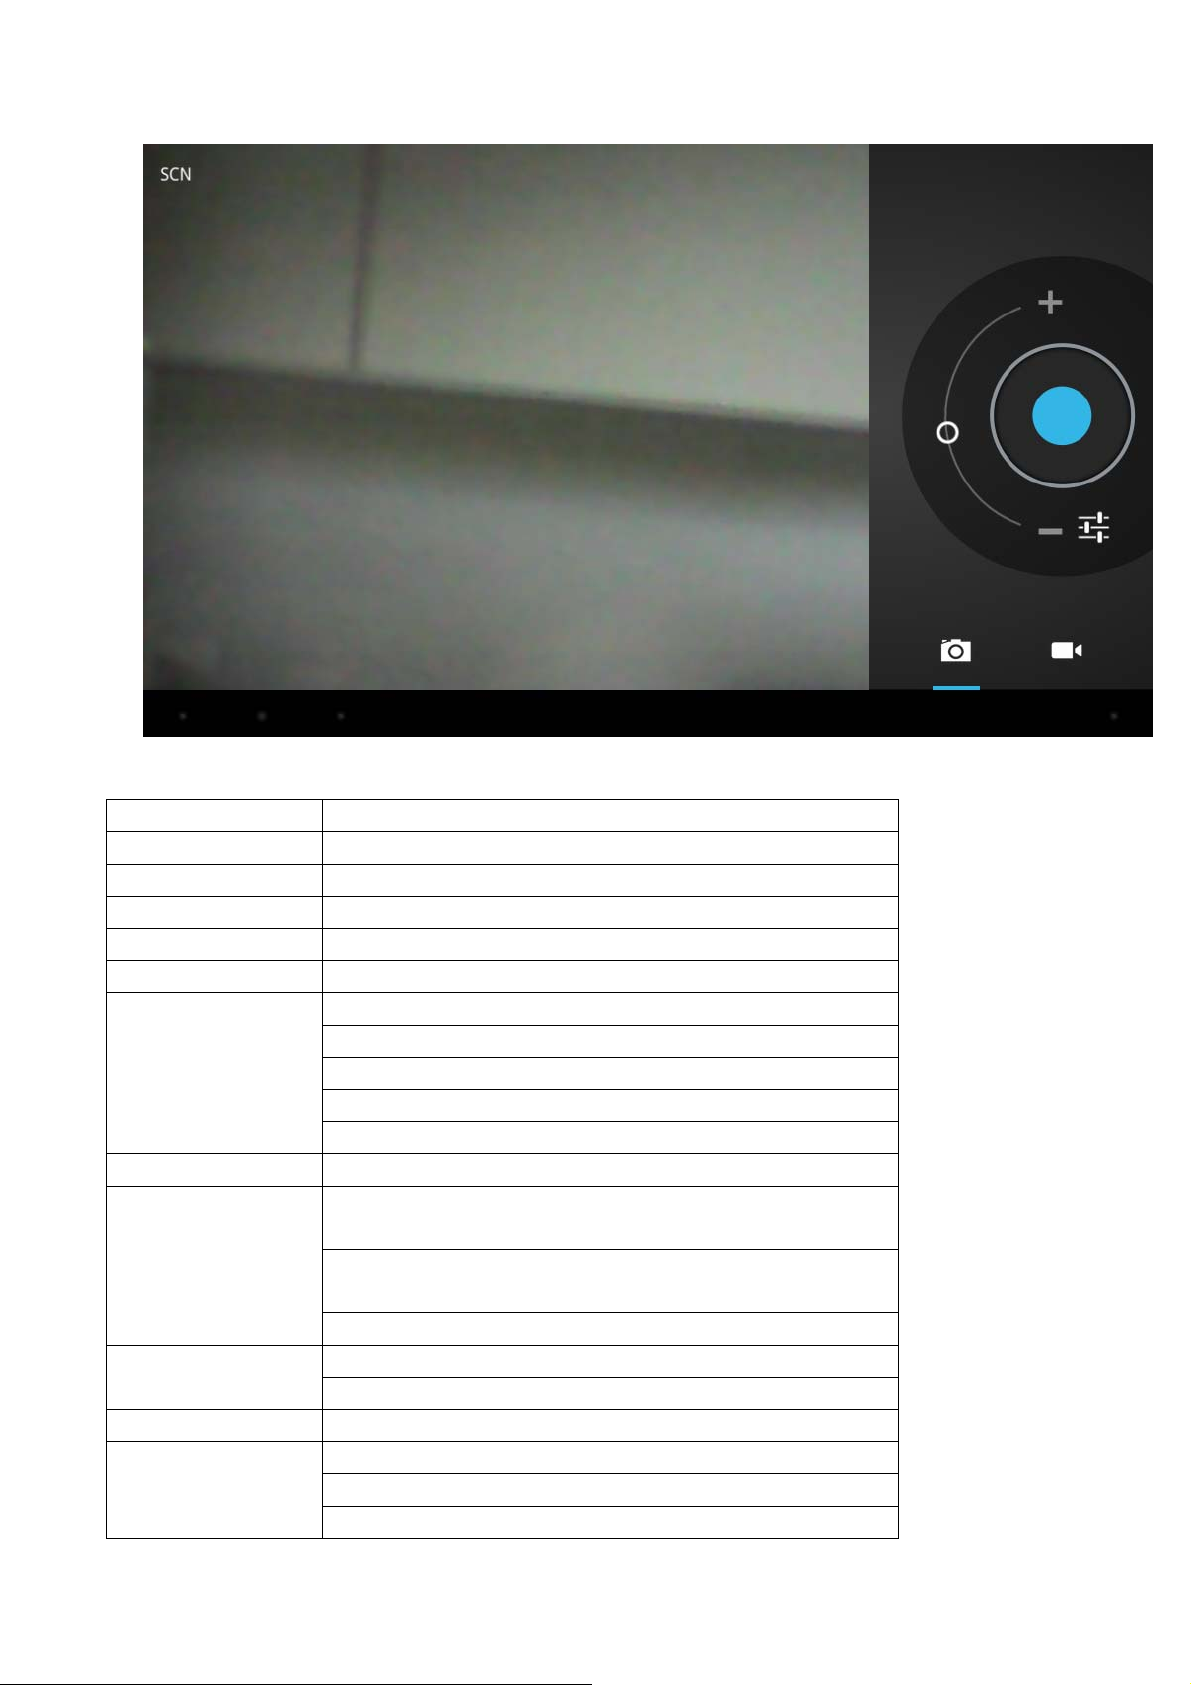
14. Camera
Shooting and playback a video:
1. On the Home screen, touch the Application button.
2. Touch Camera.
3. Drag the button to the shooting mode.
4. Touch Shooting. When finished recording press the Stop.
5. On the Home screen, touch the Application button.
6. Touch Gallery. And found this video just taken.
7. Touch the video and Select a video player to play.
Photo shoot
1. On the Home screen, touch the Application button.
2. Touch Camera.
3. Drag the button to the photo mode.
4. Touch shooting.
Page 31
15. Products Description :
CPU
Display
Touch
System Memory
sensor
Sound System
I/O Ports
Network
Power
In/Output Adapter
O.S.
Application soft
ware
BOXCHIP A10 -1.2GHZ(cortex A8), GPU:Mali-400
10.1"LED screen: 1280*800
5 point Multi-capacitance screen
1GB DDR Nand Flash 16GB
G-sersor 360°
Stereo speaker(1.5w ) / Audio Jack 3.5mm
USB2.0
1 HDMI
1 DC-in jack
1 3.5mm stereo headphone jack
1 TF cardreader
WIFI(Wireless LAN 802.11 b/g)
Battery type:
Lithium-ion 4000MA
Battery life and worktime :
Up to 4 hours of surfing the web using WIFI data network
using USB 3G data network
input:AC100-240V 50-60Hz
output:5V,2A
ANDROID 4.0.4
Google Search / Browser /Camcorder/camera/Email/Gmail
Video Player/Audio Player/Alarm Clock /Apk /Calculator
Calendar/ES file Explorer /ES Task Manager/Global Time
Page 32
Google Maps /Market/NC Manager/PDF Reader/Photo
Browser
MP3、WMA、APE、FLAC、OGG、WAV
Audio Player
Video Player
Frequency response: 20Hz to 20000Hz
AVI, MKV(XVID/px/H.264), MOV, TS, M2TS, FLV,
3GP, MPEG, DAT, MP4 (support to 2160P)
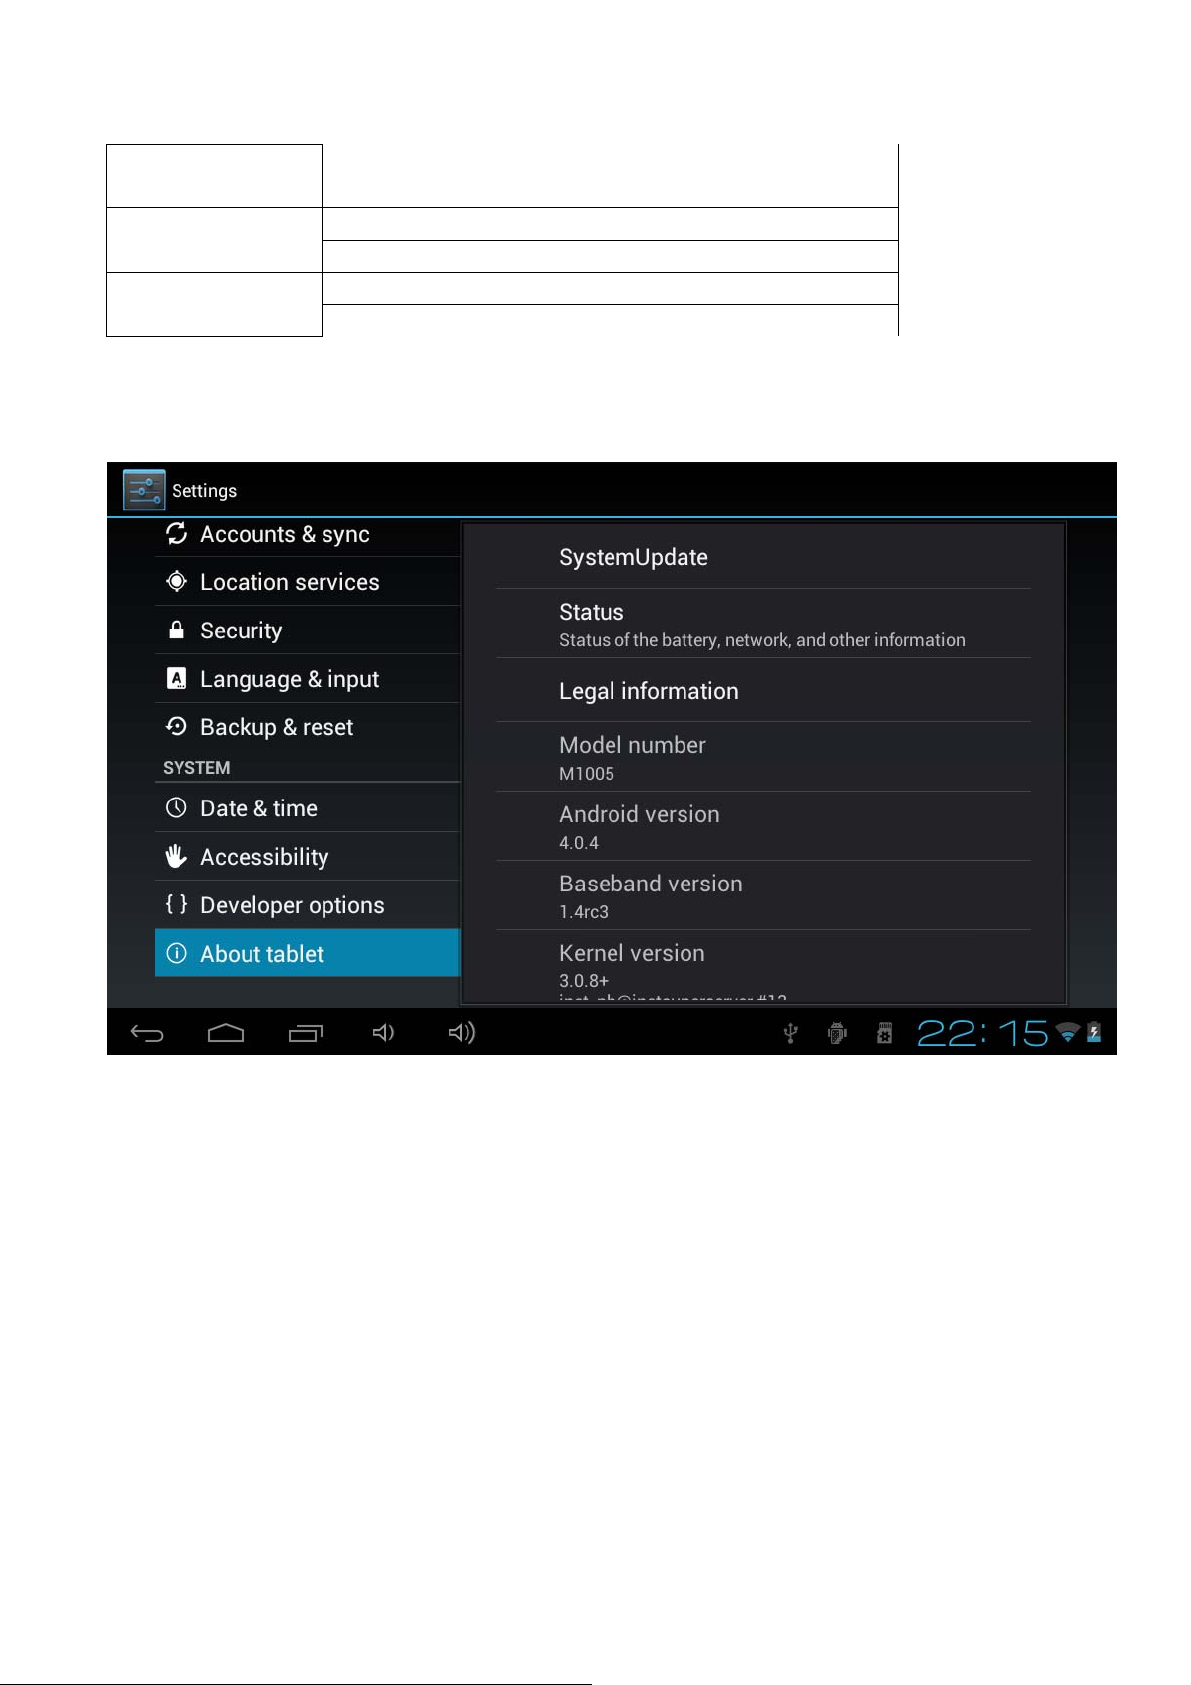
More information for the device ,pleas check information as below:
Many thanks for your usage for our tablet pc . With the time going ,our device will be
much better and perfect. Also,welcome your suggestions to make future models better
one. Thanks again !
We will updated software time by time ,so some details information will be a little
difference on the showed pictures ,please mention this .
Page 33

FCC WARNING:
Changes or modifications not expressly approved by the party responsible for compliance could void
the user's authority to operate the equipment.
This equipment has been tested and found to comply with the limits for a Class B digital device,
pursuant to Part 15 of the FCC Rules. These limits are designed to provide reasonable protection
against harmful interference in a residential installation. This equipment generates uses and can radiate
radio frequency energy and, if not installed and used in accordance with the instructions, may cause
harmful interference to radio communications. However, there is no guarantee that interference will
not occur in a particular installation. If this equipment does cause harmful interference to radio or
television reception, which can be determined by turning the equipment off and on, the user is
encouraged to try to correct the interference by one or more of the following measures:
-- Reorient or relocate the receiving antenna.
-- Increase the separation between the equipment and receiver.
-- Connect the equipment into an outlet on a circuit different from that to which the receiver is
connected. -- Consult the dealer or an experienced radio/TV technician for help
RF Exposure warning statement: The device has been evaluated to meet general RF exposure
requirement. The device can be used in portable exposure condition without restriction.
0
 Loading...