

Page 1
IMPORTANT! KEEP THIS MANUAL FOR FUTURE REFERENCE!
INSTRUCTION MANUAL FOR USE OF
CHILD RESTRAINT SYSTEM
„ROTIX”
This child restraint system is designed and manufactured
in compliance with the requirements of Regulation 44 of the United Nations
Economic Commission for Europe concerning the safe transportation of
children, the provisions of the Product safety Directive 2001/95/EU of the
European Parliament and The Council as well as the Consumer Protection Law
of Bulgarian Legislation.
Page 2
NOTICE
1. This is a “UNIVERSAL” CHILD RESTRAINT. It is approved to Regulation No 44, 04 series of
amendments, for general use in vehicles and it will t most, but not all, car seats.
2. A correct t is likely if the vehicle manufacturer has declared in the vehicle handbook that the
vehicle is capable of accepting a “universal” child restraint for these age groups.
3. This child restraint has been classied as “universal” under more stringent conditions than those
which applied to earlier designs which do not carry this notice.
If in doubt, consult either the child restraint manufacturer or the retailer.
NOTICE
1. This is an ISOFIX CHILD RESTRAINT. It is approved to Regulation No 44, 04 series of
amendments, for general use in vehicles tted with ISOFIX anchorages systems.
2. It will t vehicles with positions approved as ISOFIX positions (as detailed in the vehicle
handbook), depending on the category of the child seat and of the xture.
3. The mass groups and the ISOFIX size class for which this device is intended are GROUP 0+
(0-13 kg) and GROUP I (9-18 kg) , ISOFIX class D.
NOTICE
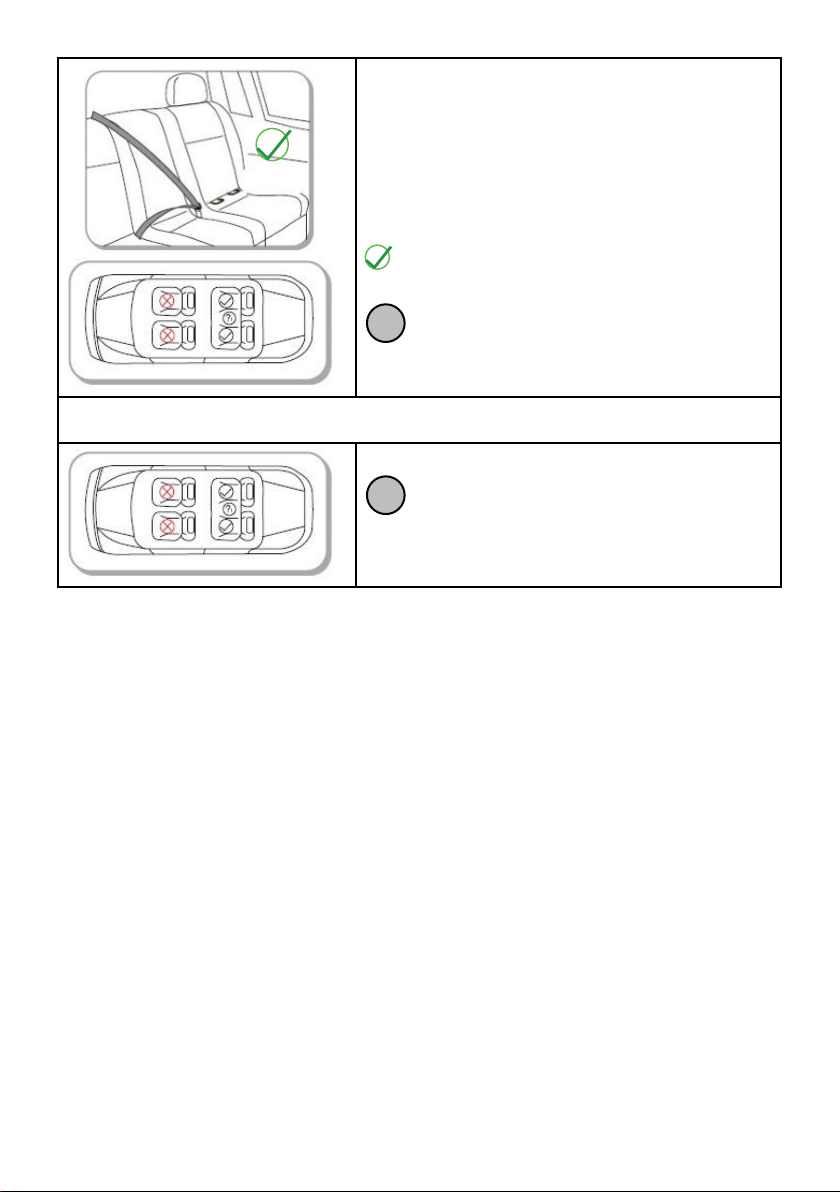
This child restraint is classied Semi-universal use and is suitable for xing into the seat positions of
the following car:
CAR FRONT
Refer to
Vehicle list
Seat positions in other cars may also be suitable to accept this child restraint. If in doubt, consult
either the child restraint manufacturer or the retailer.
Yes
REAR
Centre
Yes No
DO NOT FORGET THAT NO RESTRAINT SYSTEM CAN PROVIDE
ABSOLUTE PROTECTION IN CASE OF A CRASH OR ROAD ACCIDENT!
DRIVE WITH CARE WHEN THERE IS A CHILD IN YOUR VEHICLE!
IN ORDER TO ENSURE THE SAFETY OF YOUR CHILD, FOLLOW EXACTLY
THE INSTRUCTIONS AND SAFETY RECOMMENDATIONS IN THIS MANUAL!
MISUSE OF THE CAR SEAT WILL CONTRIBUTE TO REDUCING ITS
SECURITY AND SAFETY FEATURES! FAILURE OF THE GUIDELINES OF
THIS INSTRUCTION INCREASES THE RISK OF SERIOUS INJURY OR DEATH!
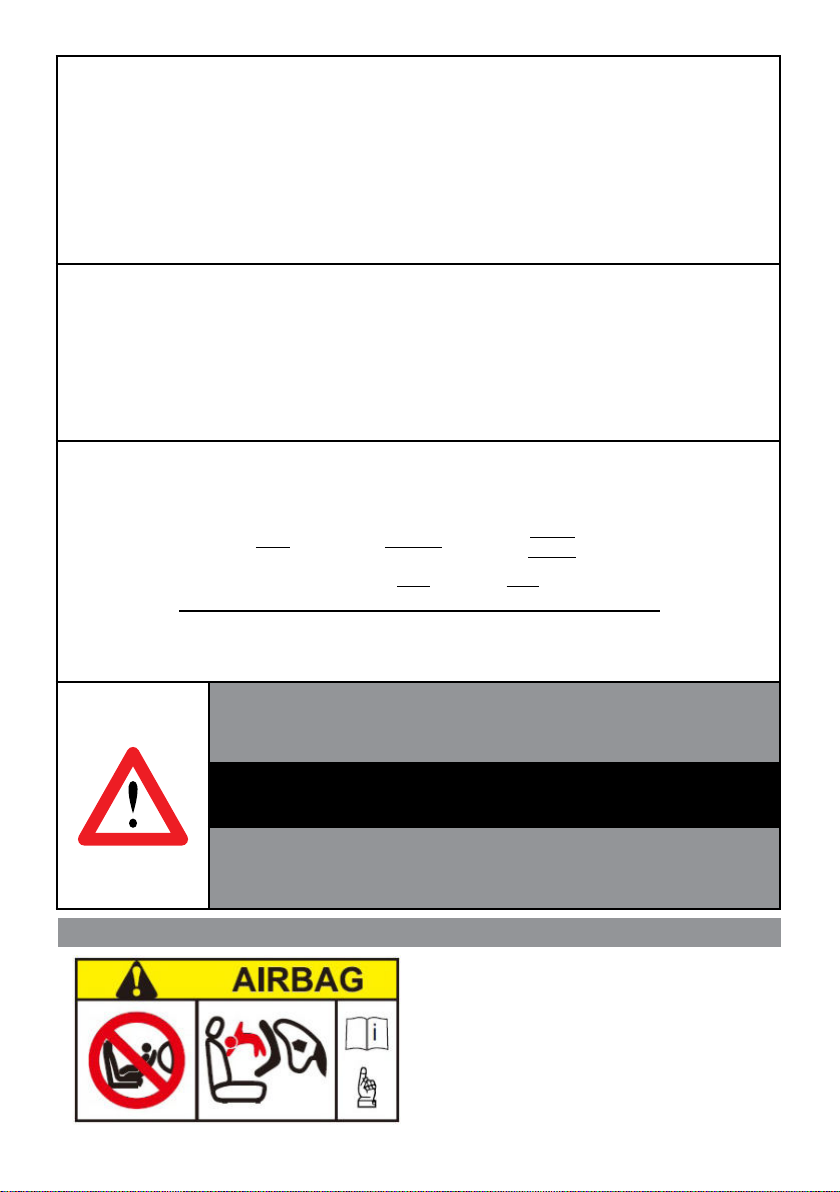
SEAT POSITION OF THE CAR SEAT IN THE VEHICLE
CAUTION! Do not place the restraint system on a
vehicle seat equipped with air bag! This may result
in death or serious injury!
Review the instructions of the vehicle for information about airbags and conditions of transportation
of children.
1
Page 3
CAUTION! This child restraint is suitable for use in vehicles, equipped with approved LAP/3-POINT/STATIC/
WITH RETRACTOR SAFETY BELTS in compliance reg-
ISOFIX
installation
CAUTION! This child restraint is suitable for vehicles which are equipped with ISOFIX connectors.
CAUTION! NEVER LEAVE YOUR CHILD UNATTENDED!
CAUTION! DO NOT USE ANCHOR POINTS OTHER THAN THE ONES DESCRIBED IN THIS
MANUAL AND MARKED ON THE RESTRAINT SYSTEM.
CAUTION! NEVER INSTALL THE CHILD RESTRAINT IN THE DIRECTION OF VEHICLE
MOVEMENT AND FACING FORWARD BEFORE THE CHILD WEIGHT REACHES 9kg!
CAUTION! THE CAR SEAT SAFETY MUST BE PROPERLY ADJUSTED ACCORDING TO CHILD’S
HEIGHT, NOT TWISTED AND SNUG WELL AGAINST BABY’S BODY.
CAUTION! THIS CHILD RESTRAINT SHOULD NOT BE MODIFIED OR ADAPTED WITH NEW
FITTINGS, WITHOUT PREVIOUS AUTHORIZATION BY THE COMPETENT AUTHORITY.
CAUTION! KEEP AWAY FROM FIRE!
Installation in the vehicle and securing the child in the car seat to be done only by adult!
The hard parts and the parts of the child restraint made of plastic should be located and installed
so that when the vehicle is in normal use, they can not be trapped by a sliding seat or in a door of
the vehicle.
Do not allow the safety belts of the car seat and the vehicle to be twisted, frayed or torn, latches and
locks (buckles) must be always in good order and rmly xed.
If you nd uncertainty or defect in the structure, latches, straps or locking mechanisms of the car
seat or ISOFIX connectors , discontinue usage until removal of the damaged parts and replacement
with new ones.
After a violent impact the car seat and belts may be damaged. therefore, it is recommended to re
place the car seat with new one.
Never use a second hand child restraint. it may have suffered structural damage, which may make
the child restraint extremely dangerous.
Do not use this car seat without its seat cover and do not replace it with a new one, unless supplied
by the manufacturer. The fabric parts are integral parts of the restraint system and its safety
features!
ulation № 16 of the UN.
This child restraint can be installed with the diagonal and
lap belt of the vehicle.
CORRECT FITTING/PROPER INSTALLATION
?
1
To be installed on this seat only if it is equipped
with diagonal and lap belt.
?
1
To be installed on this seat only if it is equipped
with ISOFIX attachments.
2
Page 4

Always make sure that you are not carrying any unsecured objects, especially on the back shelf,
which, in case of an accident, may injure the car’s occupants
Do not put additional pads except the ones supplied from the manufacturer! Placing additional pads
may obscure the safety of your child.
Do not use spare parts and other components not supplied by the manufacturer. The manufacturer
assumes no responsibility for safety in the event that are used spare parts other than original.
It is recommended to cover the car seat if the vehicle is parked under strong sun shine – extreme
sun exposure will make the plastic to deteriorate and the fabric to fade. Please, check that the child
restraint has not become too hot before placing your child seat.
The child car seat does not replace the child's cot or bed. When a child needs a sleep, you have to
place him in a suitable baby stroller, baby crib or bed.
Do not attach objects with long cords or strings on the car seat in order to avoid danger of
suffocation!
Never place a child seat on beds, couches or similar soft surfaces!
Do not allow children to play with the product!
Do not remove stickers and warnings – they contain important information!
The packaging of the product must be kept out of the reach of children at the time of and after
unpacking in order to avoid the risk of strangulation!
PRODUCT FEATURES
Child restraint restraint while traveling in a vehicle designed for children weighing
from 0 to 36 kg, classied in weight groups:
• 0+ (0-13 kg): semi-universal integral ISOFIX child restraint, ISOFIX class D. The restraint system
is installed in direction opposite to the direction of the vehicle and the child is "rearward facing". It is
installed in the vehicle using the 3-point vehicle belt or the ISOFIX connectors and the top tether;
• I (9-18kg): semi-universal integral ISOFIX child restraint, ISOFIX class D. The restraint system is
installed in direction opposite to the direction of the vehicle and the child is "rearward facing" or in
the direction of the vehicle and the child is “facing forward”; It is installed in the vehicle using the
ISOFIX connectors and the top tether;
• I (9-18kg): universal integral and semi-universal child restraint system. The restraint system is
installed in direction of the vehicle and the child is „facing forward”. It is installed in the vehicle using
the 3-point vehicle belt or the ISOFIX connectors and the top tether;
• II (15-25kg): universal non-integral and semi-universal non-integral child restraint system.
The restraint system is installed in direction of the vehicle and the child is „facing forward”. It is installed
in the vehicle using the 3-point vehicle belt or the ISOFIX connectors and the top tether;
• III (22-36kg): universal non-integral and semi-universal non-integral child restraint system.
The restraint system is installed in direction of the vehicle and the child is „facing forward”. It is installed
in the vehicle using the 3-point vehicle belt or the ISOFIX connectors and the top tether.
ISOFIX connectors to vehicle;
The restraint rotates 3600 on the base;
Top tether;
Backrest recline in 3 positions;
Head rest height adjustment in 13 positions;
Safety belts height adjustment;
5-point safety belts;
Additional soft pads;
3
Page 5
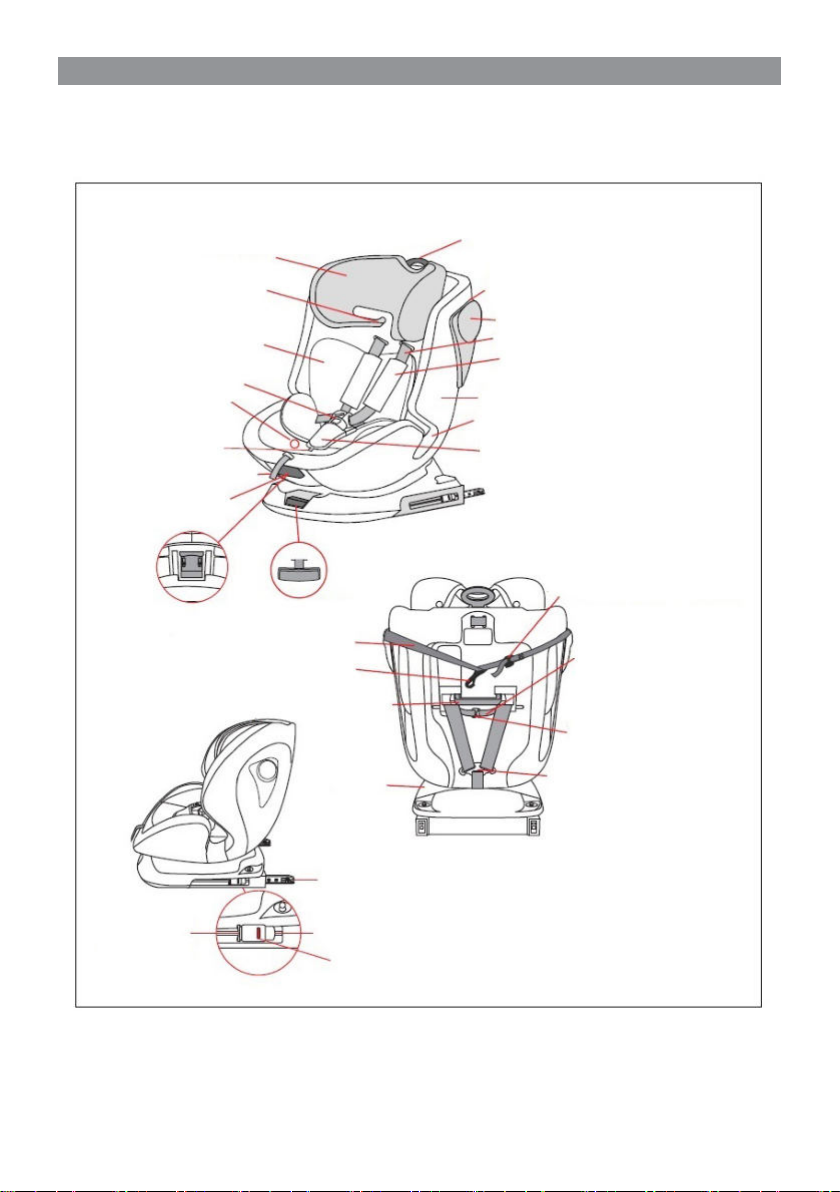
PARTS DIAGRAM
Belt guide (group II, III)
Comfortable cushion
Adjuster
Crotch strap
Adjuster strap of harness
Incline adjuster handle
Headrest
Buckle
Headrest adjuster handle
Top belt guide
(for “rearward facing”)
Side protector
Shoulder strap
Shoulder pad
Seat body
Side belt guide
Crotch pad
ISOFIX release
button
Rotation adjuster
handle
Top Tether strap
Top Tether hook
Headrest Height
Release button (group II, III)
ISOFIX connector
ISOFIX indicator
Base
ISOFIX release button
4
Adjuster of Top Tether
Shoulder pad strap
Shoulder pad strap
connector
Shoulder strap
connector
Page 6
INSTRUCTIONS FOR USE
IMPORTANT!
• Follow exactly the instructions and sequence of installation steps and use of the product described in the text and gures of this manual.
• Check the security of xing after each operation!
• ALWAYS CHECK THE SECURITY OF FIXING OF THE SAFETY BELTS!
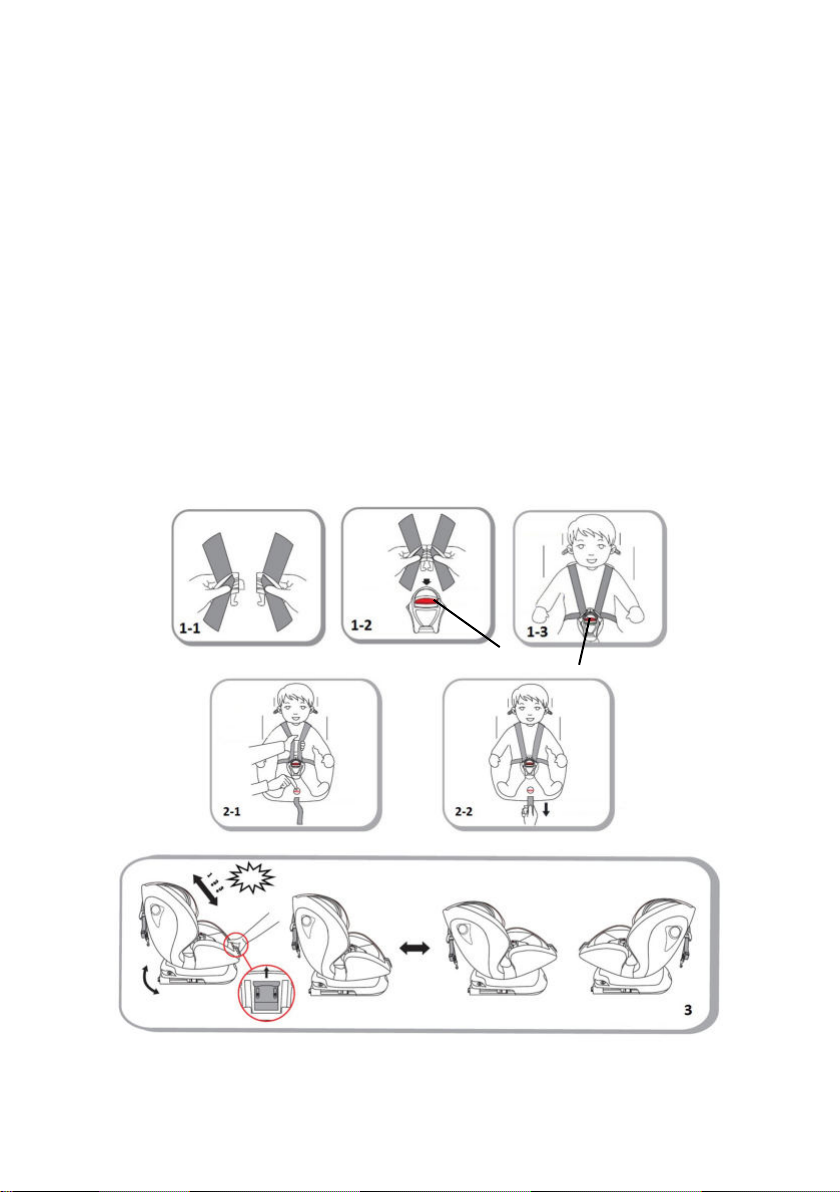
1 – BUCKLE OF THE HARNESS
2 – TIGHTENING AND LOOSENING OF THE SAFETY BELT
3 – RECLINE ADJUSTING OF BACKREST – in three positions according to the weight group
IMPORTANT! Before placing the child in the car seat, adjust the backrest recline according to the child’s
weight group:
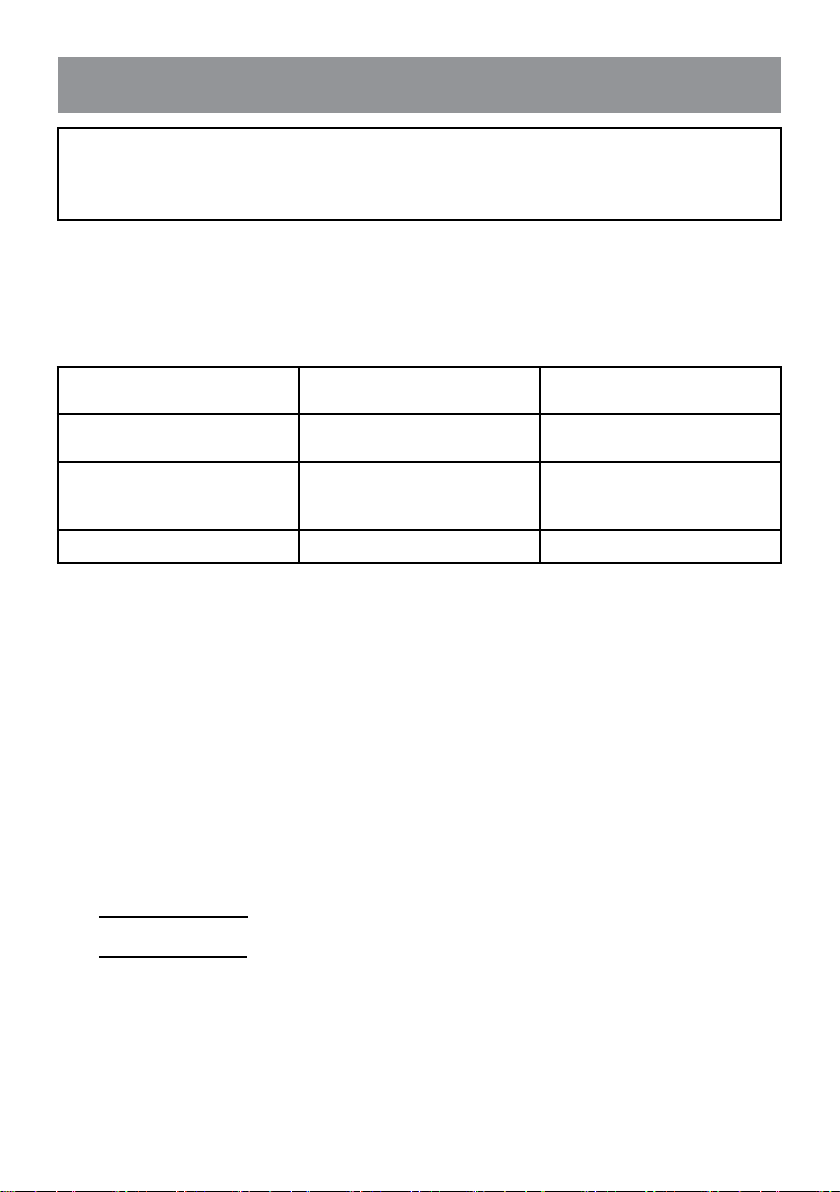
Weight group Child restraint installation
Group 0+ (0-13 kg)
Group I (9-18 kg)
Group I (9-18 kg) FORWARD FACING
Groups II and III (15-36 kg) FORWARD FACING Position 3
IMPORTANT! Use the incline adjuster handle to make sure the chosen position is well xed.
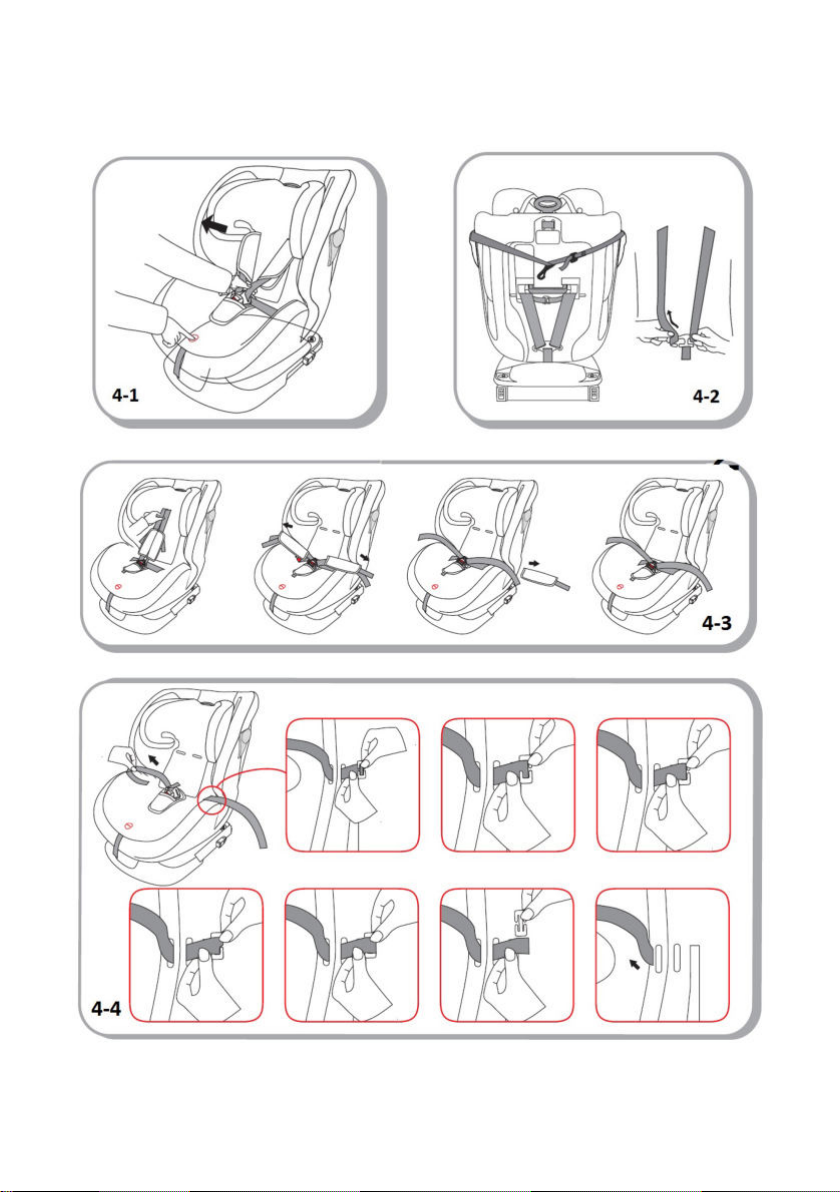
4 – REMOVING THE SAFETY BELT (shoulder belts and the soft pads, the crotch belt and the soft
pad, belt buckle)
4-1 и 4-2 – Loosen the belt and release the shoulder belts from the shoulder strap connector.
4-3 – Pull out the shoulder straps from the seat openings and remove the soft pads.
4-4 – Thread the buckles of the shoulder straps through the openings.
4-5 – Remove the crotch belt, the soft pad and the buckle.
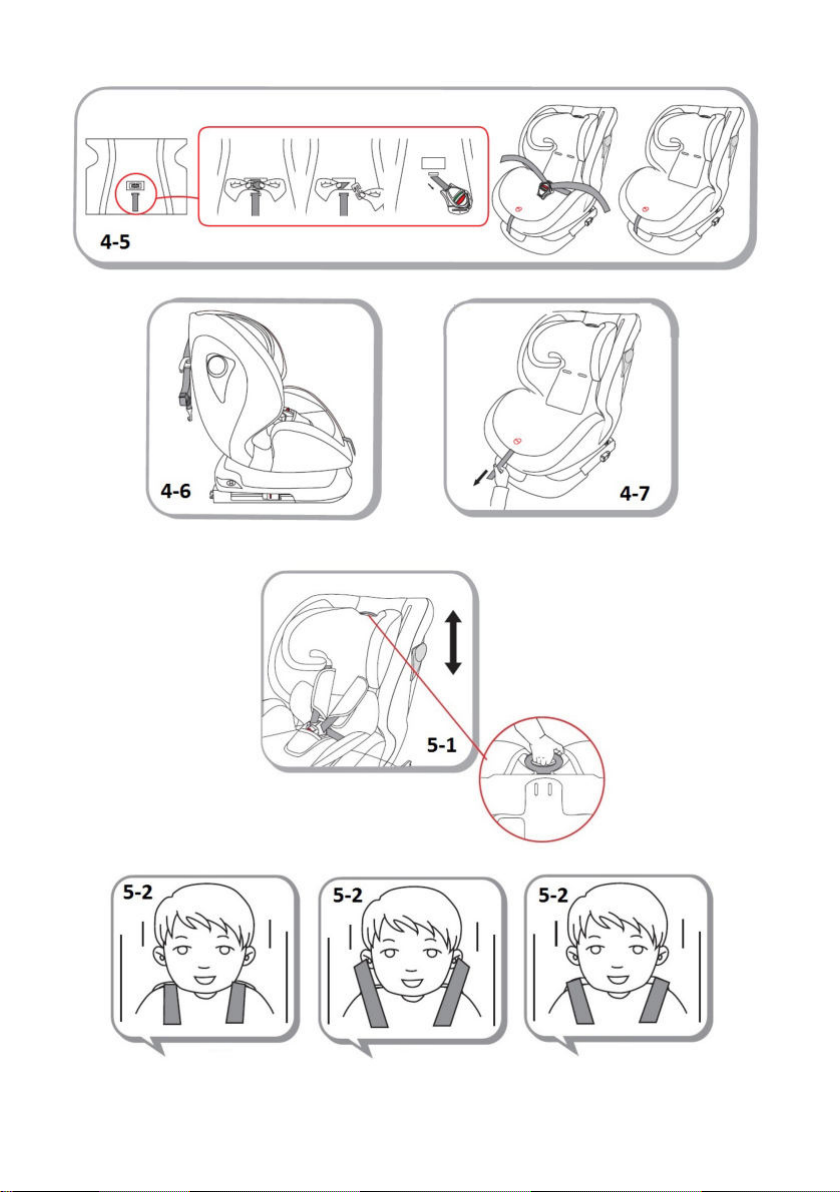
4-6 and 4-7 – Pull the adjuster strap of harness.
After the removal of harness you can use the car seat for children with weight from 15 up to 36 kg
(groups II and III).
5 – ADJUSTING THE HEIGHT OF SHOULDER STRAPS FOR GROUPS 0+ and I
5-1 – Pull up the headrest adjuster handle and move the headrest up. When you reach the desired
position you will hear a click.
5-2 – ATTENTION! The shoulder straps must be at the level of child’s shoulders.
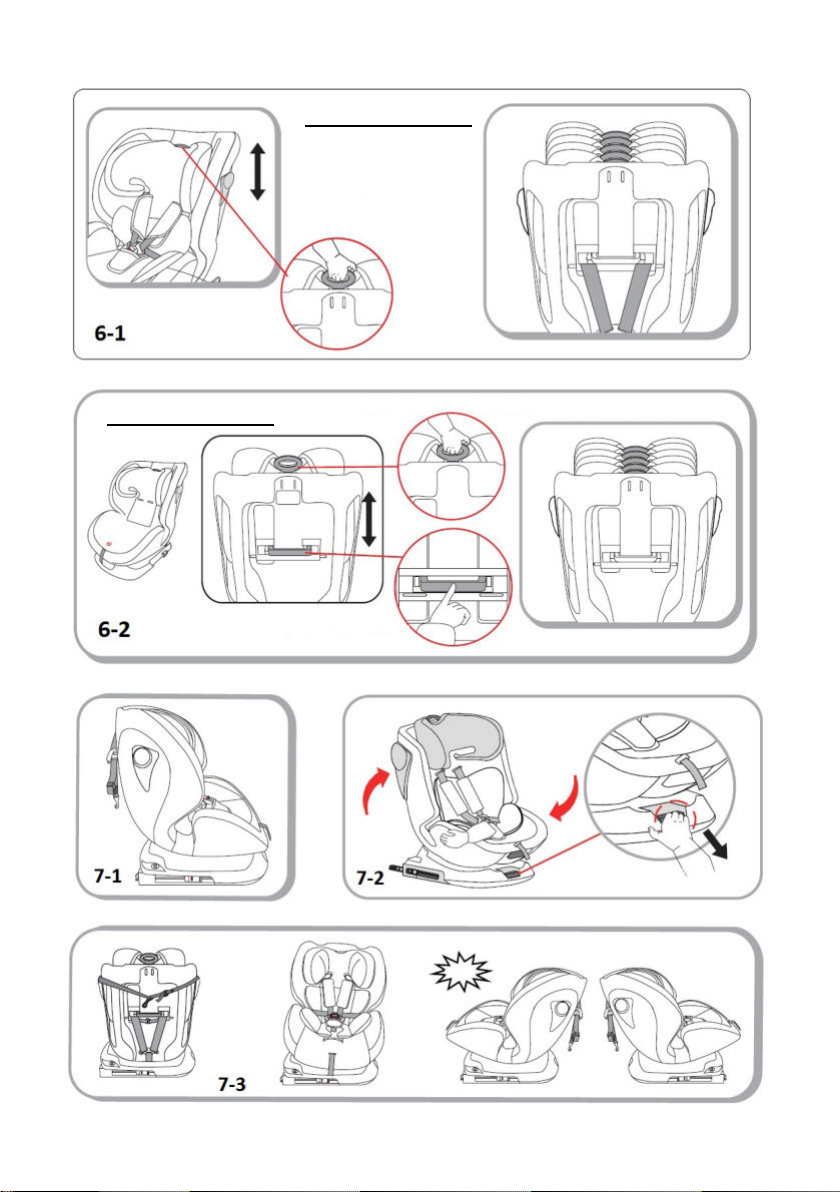
6 – ADJUSTING THE HEADREST HEIGHT (in 13 positions)
6-1 – For groups 0+ and I – adjust the headrest from position 1 up to position 6.
Pull the handle and at the same time move the headrest up or down according to your child’s height.
6-2 – For groups II and III – adjust the headrest from position 6 up to position 13.
Remove the safety harness. Press the headrest height release button. At the same time pull the handle
and move the headrest up or down according to your child’s height.
REARWARD FACING
Recline position
of the backrest
Only
Position 1
Position 1
Position 2
Position 3
5
Page 7

7 – 360° ROTATION/CHANGE OF CAR SEAT DIRECTION
7-1 and 7-2 – Pull the rotation adjuster handle and rotate the car seat in desired direction;
7-3 – Release the handle. The position is xed when you hear a click.
IMPORTANT! Make sure the car seat is securely xed in the desired direction by shaking it in the op-
posite direction!
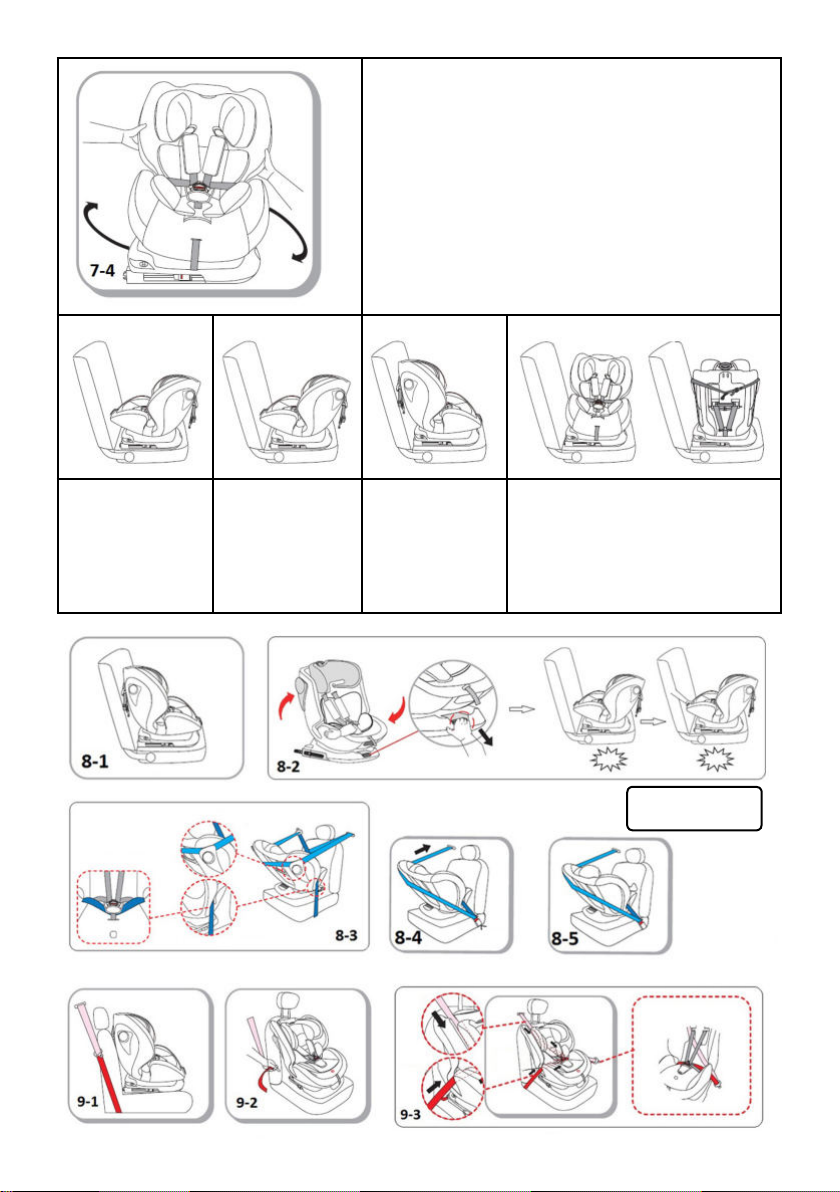
7-4 – Positions of the car seat in the vehicle seat.
Rotated to the side (at 90° to the vehicle door), can be used for putting the child in and taking him out
of the car seat.
INSTALLATION IN THE VEHICLE USING THE
3-POINT (DIAGONAL AND LAP) BELT OF THE VEHICLE
8 – Car seat in „REARWARD FACING ” position using the 3-point (diagonal and lap) belt of the
vehicle for group 0+ (0-13 kg) (Approximate age from birth up to 18 months)
8-1 – Place the car seat in the vehicle in position „FACING FORWARD”, so that the backrest is rmly
snug to the vehicle seat.
8-2 – Rotate the seat so it is in „REARWARD FACING” position (See 7), adjust the seat recline in
Position 1 and unfasten the safety belt.
Note: The front part of the car seat must be snug to the vehicle seat.
8-3 – Thread the diagonal and lap belt as shown in the picture.
8-4 – Fasten the lap and diagonal belt in the vehicle belt buckle and adjust the belt.
8-5 – Place the child in the seat. Adjust the shoulder straps according to child’s height and fasten the
buckle.
In order to remove the car seat repeat the same actions in reverse order.
9 – Car seat in „FORWARD FACING ” position using the 3-point (diagonal and lap) belt of the
vehicle for group I (9-18 kg) (Approximate age from 9 months up to 4 years)
9-1 – Place the car seat in the vehicle in position „FACING FORWARD”, so that the backrest is rmly
snug to the vehicle seat.
9-2 – Pull the 3- point (diagonal and lap) belt of the vehicle.
9-3 – Thread the diagonal and lap belt as shown in the picture.
The diagonal belt must pass above the top edge of the car seat, under the headrest and behind the
5-point safety harness and the soft pad, the lap belt must pass through the side belt guides.
9-4 – Fasten the lap and diagonal belt in the buckle and adjust the vehicle belt.
9-5 – Place the child in the car seat. Fasten the belt in the buckle and adjust the shoulder straps accord-
ing to child’s height.
9-6 – Position of vehicle’s belt buckle.
To remove the car seat, repeat the same actions in reverse order.
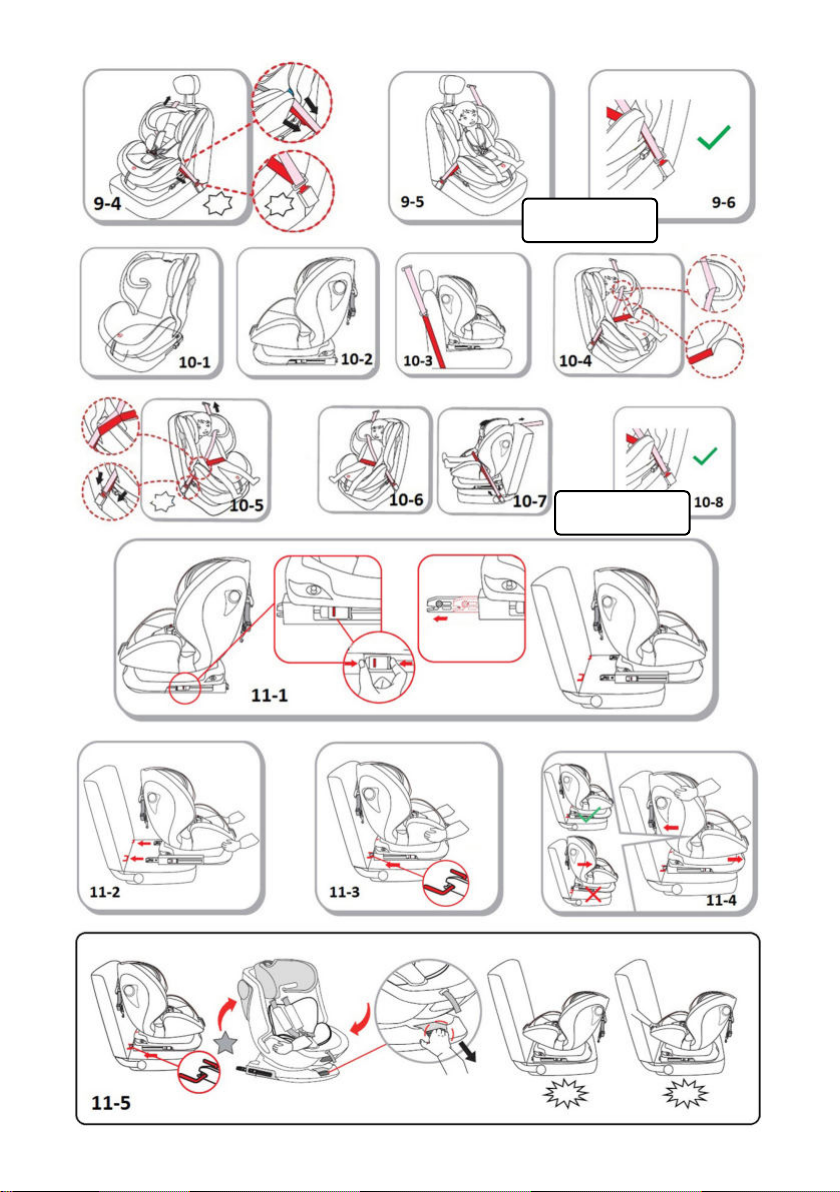
10 – Car seat in „FORWARD FACING” position using the 3-point (diagonal and lap) belt of the
vehicle for groups II and III (15-36 kg) (Approximate age from 3 up to 12 years)
10-1 and 10-2 – Remove the 5-point safety harness.
10-3 – Place the car seat in the vehicle in position „FACING FORWARD”, so that the backrest is rmly
snug to the vehicle seat.
10-4 – Place the child in the car seat. Thread the diagonal and lap belt as shown in the picture.
The diagonal belt must pass through the belt guide under the headrest and the lap belt through the side
belt guides.
10-5 – Fasten the lap and diagonal belt in the vehicle belt buckle and adjust the belt.
10-6 and 10-7 – Make sure that the vehicle belts are not twisted and are well xed.
10-8 – Position of vehicle’s belt buckle.
To remove the car seat, repeat the same actions in reverse order.
6
Page 8

INSTALLATION OF CAR SEAT IN THE VEHICLE SEAT
USING THE ISOFIX CONNECTORS
11 – Car seat in „REARWARD FACING ” position with ISOFIX connectors and top tether for
groups 0+ and I (0-18 kg) (Approximate age from birth up to 4 years)
11-1 – Place the car seat in the vehicle seat in position „FACING FORWARD”. Press the ISOFIX
release buttons in order to release the ISOFIX connectors. Pull out the connecters. ISOFIX indicator
must show „red” color.
11-2 and 11-3 – Install the ISOFIX connectors to the vehicle attachments until you hear a click.
ISOFIX indicator must show „green” color, which shows that the ISOFIX connectors are correctly
attached.
11-4 – CAUTION! After the installation check if the car seat is securely tted. If the car seat is moving or
the ISOFIX connectors are out, repeat the described actions and install the car seat again.
11-5 – Rotate the car seat in order to position it in „REARWARD FACING” position (See 7).
Adjust the backrest recline accordingly (in Position 1) (See 3).
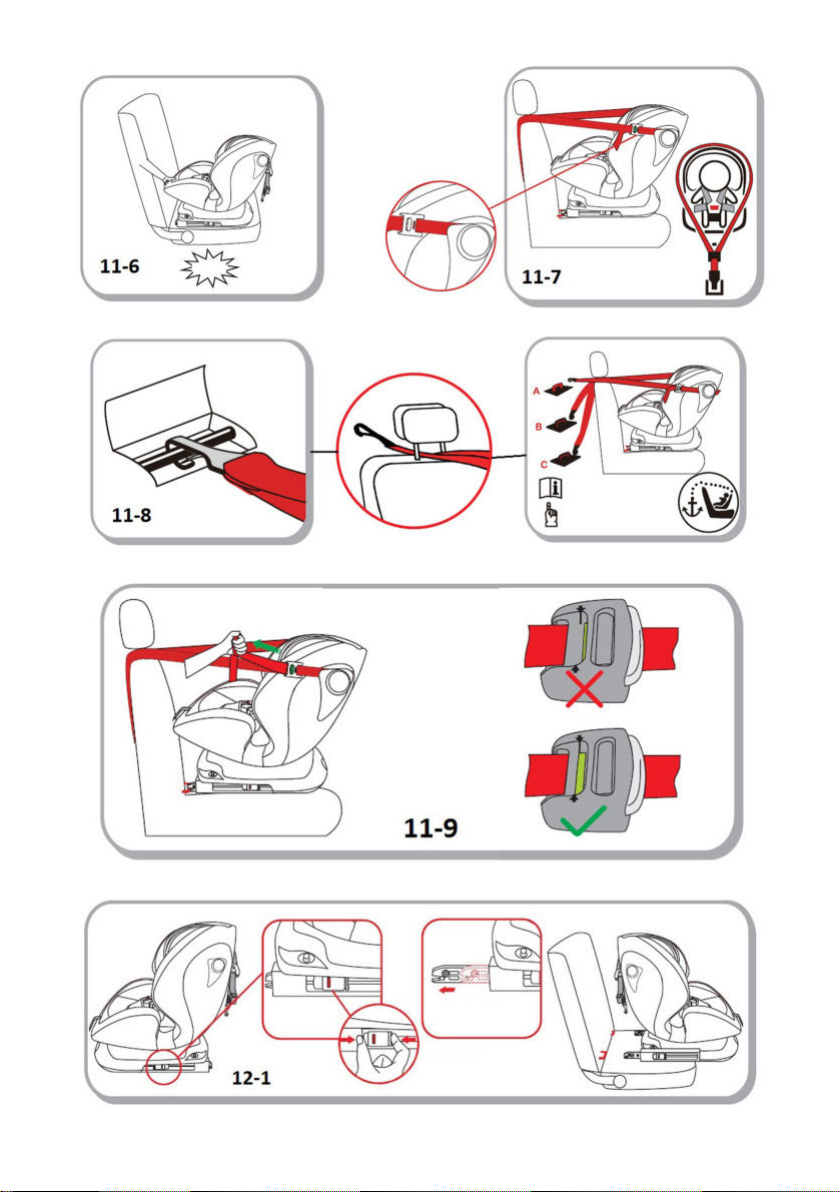
11-6 – Place the child in the car seat. Check the shoulder straps height (See 5) and fasten them in the
vehicle buckle.
11-7 – Slide the belt of the top tether over the top belt guides. Release and adjust the belt t the desired
length.
11-8 – Attach the hook to the corresponding place in the vehicle.
11-9 – IMPORTANT! Tighten the top tether until the indicator shows „green” color. If the indicator does
not show green color, you must repeat the installation.
To remove the car seat, repeat the same actions in reverse order.
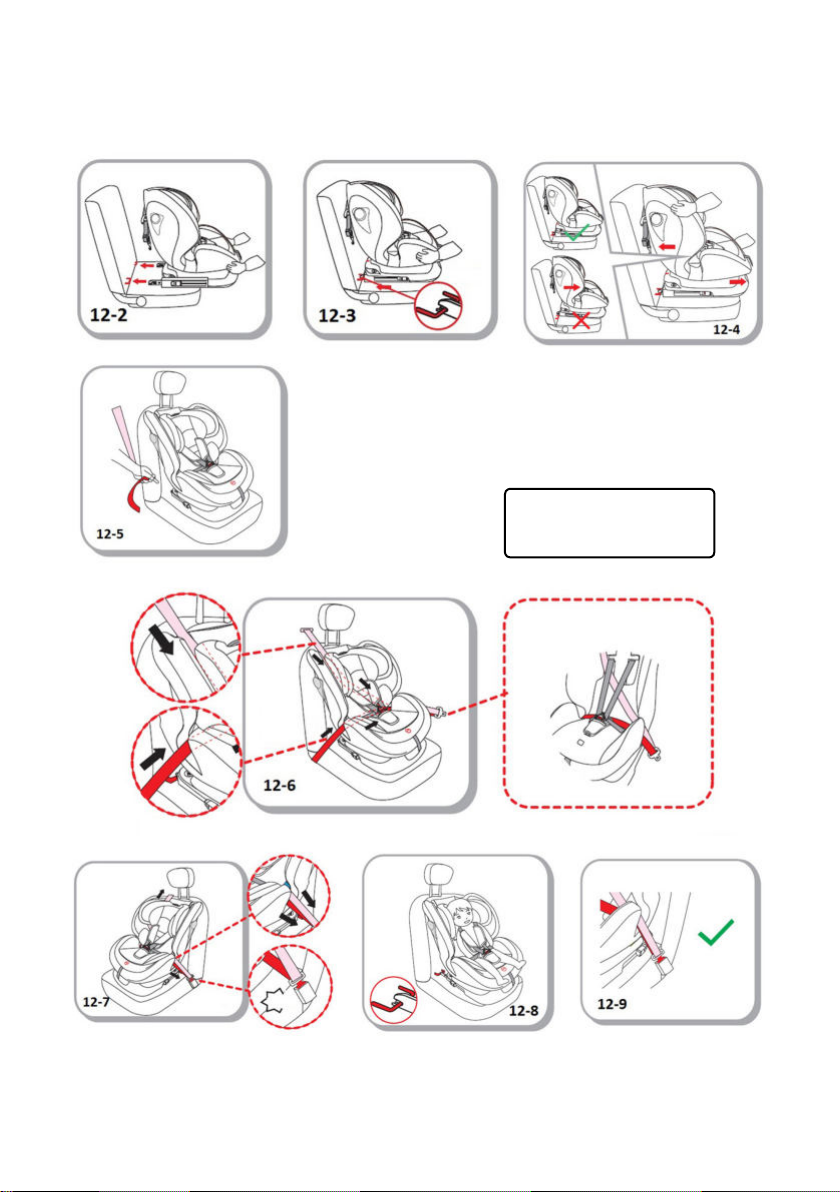
12 – Car seat in „FORWARD FACING ” position for groups I (9-18 kg) with ISOFIX connectors and
the 3-point (diagonal and lap) vehicle belt
12-1 – Place the car seat in the vehicle seat in position „FACING FORWARD”. Press the ISOFIX
release buttons in order to release the ISOFIX connectors. Pull out the connecters. ISOFIX indicator
must show „red” color.
12-2 и 12-3 – Install the ISOFIX connectors to the vehicle attachments until you hear a click
ISOFIX indicator must show „green” color, which shows that the ISOFIX connectors are correctly
attached.
12-4 – CAUTION! After the installation check if the car seat is securely tted. If the car seat is moving or
the ISOFIX connectors are out, repeat the described actions and install the car seat again.
12-5 – Pull the 3- point (diagonal and lap) belt of the vehicle.
12-6 – Thread the diagonal and lap belt as shown in the picture.
The diagonal belt must pass above the top edge of the car seat, under the headrest and behind the
5-point safety harness and the soft pad, the lap belt must pass through the side belt guides.
12-7 – Fasten the lap and diagonal belt in the buckle and adjust the vehicle belt.
12-8 – Place the child in the car seat. Fasten the belt in the buckle and adjust the shoulder straps
according to child’s height.
12-9 – Position of vehicle’s belt buckle.
To remove the car seat, repeat the same actions in reverse order.
7
Page 9
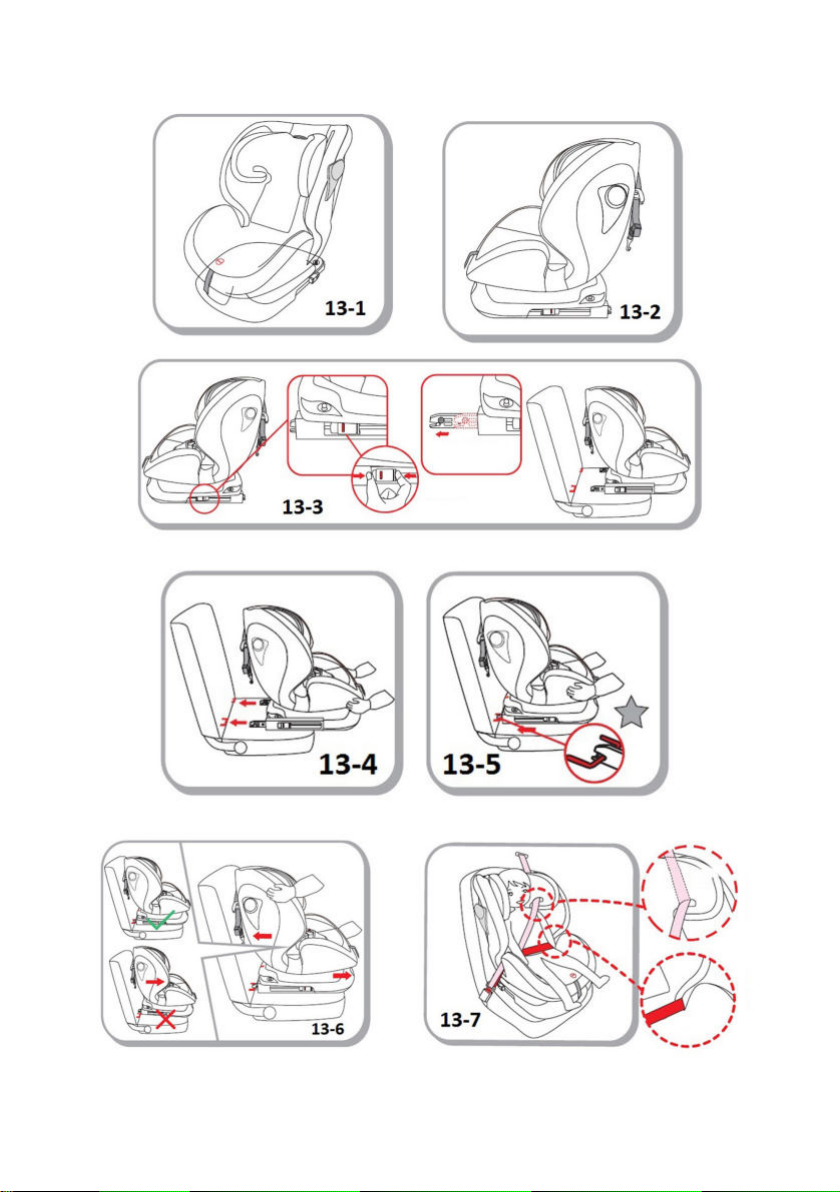
13 – Car seat in „FORWARD FACING ” position for groups II and III (15-36 kg) with ISOFIX
connectors and the 3-point (diagonal and lap) belt of the vehicle
13- 1 and 13-2 – Remove the 5-point safety harness.
13-3 – Place the car seat in the vehicle seat in position „FACING FORWARD”. Press the ISOFIX
release buttons in order to release the ISOFIX connectors. Pull out the connecters. ISOFIX indicator
must show
„red” color.
13-4 and 13-5 – Install the ISOFIX connectors to the vehicle attachments until you hear a click
ISOFIX indicator must show „green” color, which shows that the ISOFIX connectors are correctly
attached
13-6 – CAUTION! After the installation check if the car seat is securely tted. If the car seat is moving or
the ISOFIX connectors are out, repeat the described actions and install the car seat again.
13-7 – Place the child in the car seat. Thread the diagonal and lap belt as shown in the picture.
The diagonal belt must pass through the belt guide under the headrest and the lap belt through the side
belt guides.
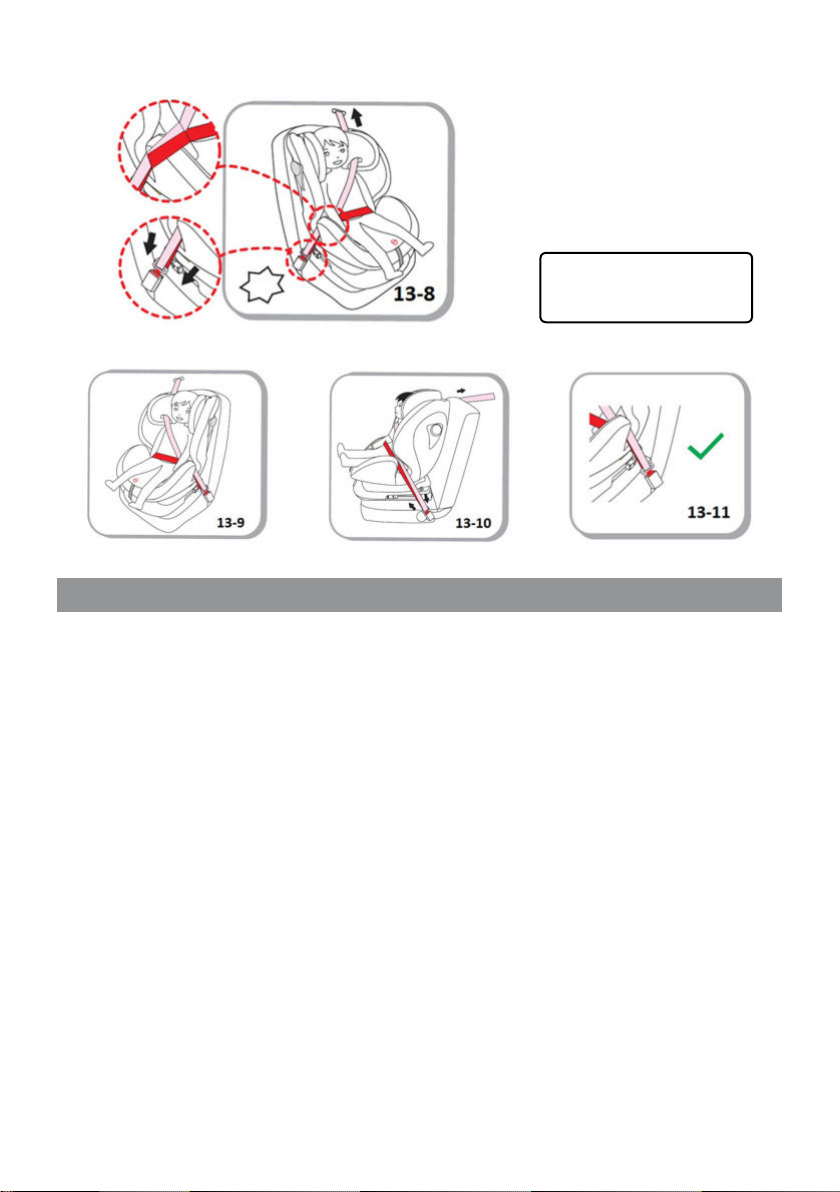
13-8 – Fasten the lap and diagonal belt in the vehicle belt buckle and adjust the belt.
13-9 and 13-10 – Make sure that the vehicle belts are not twisted and are well xed.
13-11 – Position of vehicle’s belt buckle.
To remove the car seat, repeat the same actions in reverse order.
2-move
Step 1
Loosening
2-pull
click
pull
1
Step 2
“click”
1-press
Before adjustment
Step 3
buckle release button
Tightening
After adjustment
‘’forward facing”
After adjustment
‘’rearward facing”
8
Page 10
9
Page 11
pull
NO
Too low
NO
Too high
10
YES
Correct
Page 12
GROUPS 0+ and I
Pull the
handle
Positions from 1 to 6
GROUPS II and III
2-pull the handle
1-press the button
click
Positions from 6 to 13
1-pull the handle
2-rotate the
car seat
11
Page 13
ATTENTION! DANGER!
Before using the car seat make sure that the seat
is well xed by trying to rotate the seat in both
directions.
CAUTION!
Do not drive if the car seat is not placed in a
„FORWARD FACING” or „REARWARD FACING”.
Position „REAR-
WARD FACING”
Only for groups 0+
and I
Installation with
ISOFIX connectors
and top tether
upper belt guide
Under the buckle and
soft pad of crotch belt
Position „REAR-
WARD FACING”
Only for groups 0+
and I
Installation with
3-point vehicle belt
side belt guide
Position „FOR-
WARD FACING”
Only for groups I, II
and III
click
diagonal
belt
lap
belt
side
belt
guides
Position „TO THE SIDE”
click click
WARNING! MAKE SURE
THAT THE VEHICLE BELTS
ARE NOT TWISTED AND ARE
CORRECTLY FITTED!
12
Page 14
pull
click
click
WARNING! MAKE SURE
THAT THE VEHICLE BELTS
ARE NOT TWISTED AND ARE
CORRECTLY FITTED!
diagonal belt
lap belt
clcik
click
press
pull
click
WARNING! MAKE SURE
THAT THE VEHICLE BELTS
ARE NOT TWISTED AND ARE
CORRECTLY FITTED!
13
click
click
Page 15
click
14
pull
press
Page 16
diagonal belt
lap belt
click
WARNING! MAKE SURE
THAT THE VEHICLE BELTS ARE
NOT TWISTED AND ARE
CORRECTLY FITTED!
side
belt
guides
clcik
click
15
Page 17
press
pull
click
diagonal
blt
lap belt
16
Page 18
WARNING! MAKE SURE
click
THAT THE VEHICLE BELTS ARE
NOT TWISTED AND ARE
CORRECTLY FITTED!
CARE AND MAINTENANCE
Clean the fabrics, plastic parts and metal parts with damp cotton cloth or sponge and mild soap
Upholstery may be hand washed at 30oС using mild detergent!
Do not bleach! Do not tumble dry! Do not machine wash! Do not iron!
Do not use abrasive, bleach or other aggressive detergents.
Always after cleaning leave the car seat fully dry and after that use it or store it.
Harnesses must be cleaned with damp cloth and mild soap!
Do not wet or remove the stickers. They contain important information!
Always store your car seat indoors – on dry and clean place. Do not expose to direct environment
inuence - sun, rain, moisture and high temperature intervals.
Please, contact your authorized dealer for problems connected with the use or repair.
Materials used: plastic, metal, textile
STKRX021xxx
17
Page 19
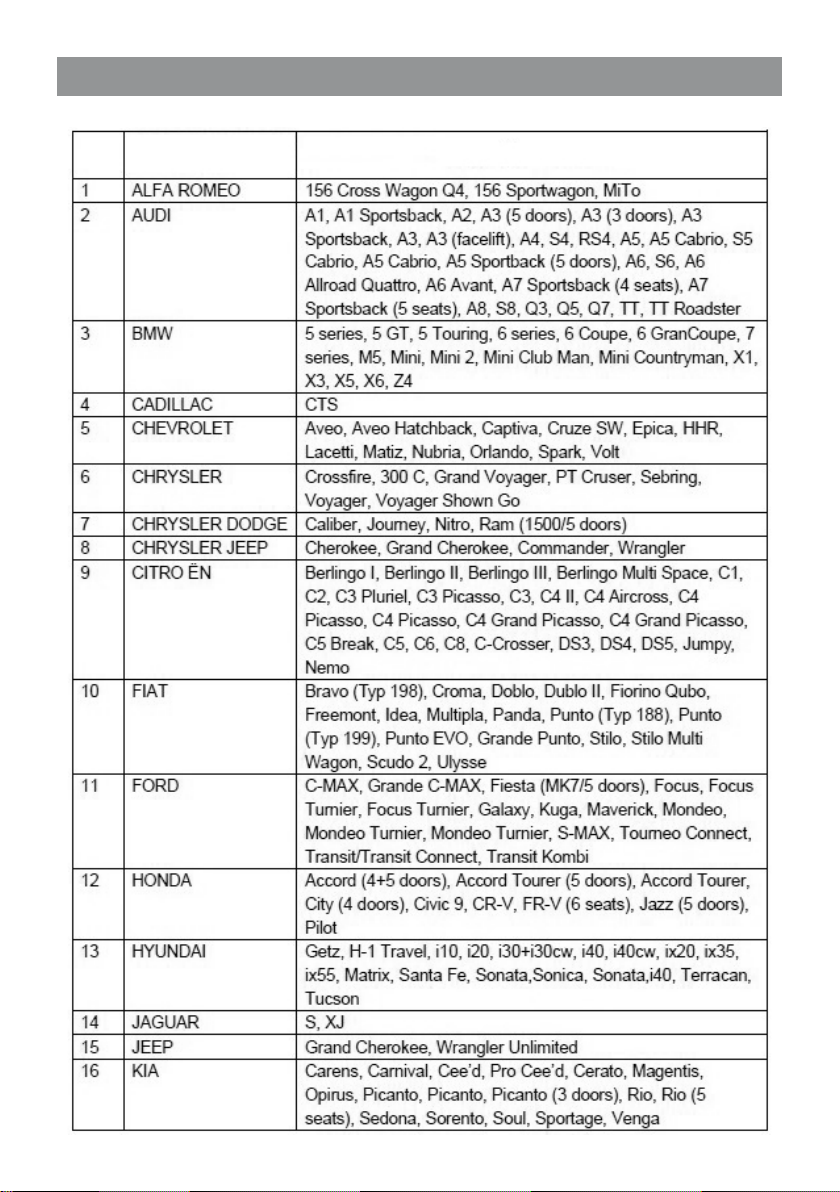
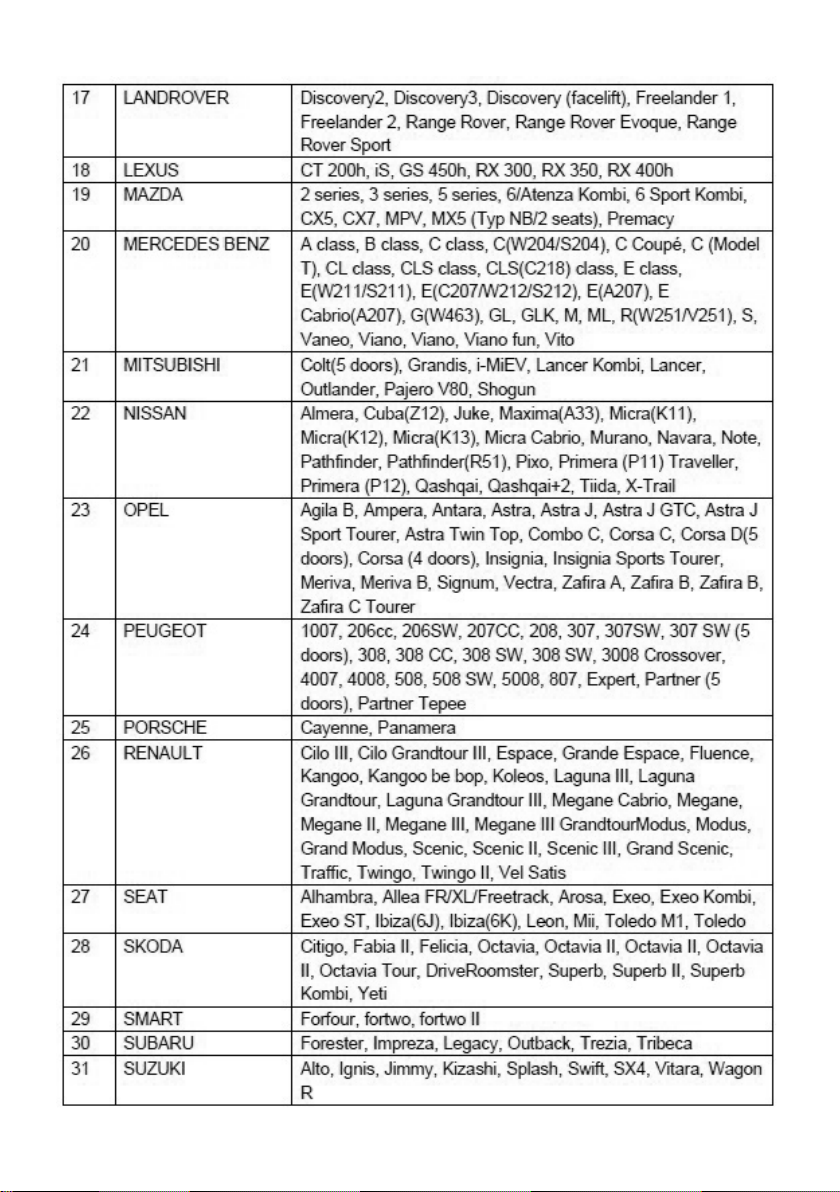
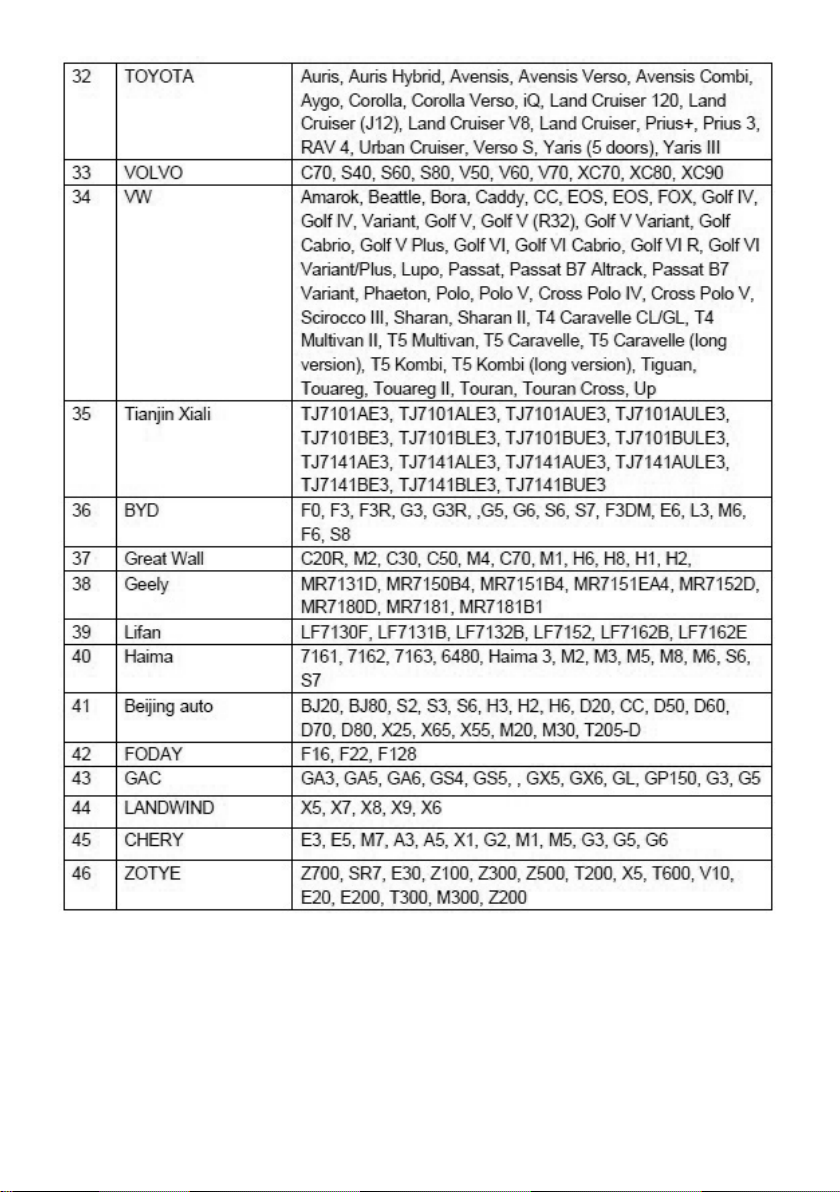
LIST OF VEHICLE EQUIPPED WITH ISOFIX SYSTEM
For use of semi-universal integral ISOFIX child restraint system
*There may be other vehicles where there are suitable places to install this child restraint system.
Trade name of vehicle Model(s) of vehicle
18
Page 20
19
Page 21
20
Page 22

Bulgaria, Plovdiv, Str. Golyamokonarsko shosse № 1
www.chipolino.com
 Loading...