

chinavasion CVAK-E232 User Manual


R6ol$tiail
Catalogue
1. Productor Features
1. Productor Features
2. Prcjector
Brief
3. Safeguards
4. Waming
2, ProiectorOveryiew
1. Top view
Bottomviil
2.
3. Front view
4. Backview
5. Rearview
3, OpeEtionintroduction
1. mnnecting the
2. Power on/Offthe
projector
projeclor
4. Menu opeEtion
5. User's maintenance
1. Cleaning the lens
2. Cleaning the Projector Housing
3. Cleaning the Fliter Cover
4. Replacing the Lamp
5. Simple repair and solution
6, Parameter and function
1. Technimlspecifiction
2. Main functions
Alofes
AC Power Cord must meet the requirement
and ensure
on the
that
the
properAC
AC Power
Power
Cord is used.
lntroduction
Projector Features
prcjector
The
!
Single chip
u High
ofiers the following features:
LCD
technology
perfomance
LED lamp
(with
50,000 hrs life)
Cord
ofcountries where
R------;;',I
tret
i1#:flif
R h;;l
rel
you
use this
prcjectolPlease
m
WI
\--l
I
mnfim
I
yourAC
plug
type
with the
graphics
ope0&ti
tr f,:rdtl&.6ld&dlllrltrAii&,r
(1280x768 pixels)
D WXGA
l l
mmprssion @mpatibility
!
Compatibility with
u lnput sour@ USB/SD/3-HDMI/AV /GNS-VIDEo/Compon€flUTv(analdge)
u User-friendly, multi-language on-scren display
PAL
for VGA,
SVGA,
XGA
and SXGA
! keystone correction
! With USB,SD Slot,support H.265 fomat vidm for USEilSD input
,l
lmportant safeguards
Please read all thse instructions regarding
projector.
on the Led
1.
Read instructions
All the safety and operating instructions should be
2. Retain instructions
The safety and operating instructions should be retained for future reference.
3. Wamings
All wamings on the appliane and in the operating
4. lnstructiore
All operating instructions must be followed.
5. Cleaning
Unplug this
6. Attachmonts
7. Water
8. Accessories
'l
0. Power sourcs
11 . Power-mrd
12. Overloading
13. Objects and liquids
14.
16.
prc.iector
from the wall outlet before cleaning it. Do not use liquid aerosol cleaners. U6B a damp sofr cloth for deaning.
an4equipment
Never add any attachmenb and/or equipment
such additions may result in the risk offire, electric shock or other
moisture
and
proiector
Do not use this
place
Do not
This
power,please
Power-supply mrds should be routed so that they are not likely to be walked on or
particular
under a carpet.
Oo not ovedoad wall outlels and extension cords as
Never
result in a flre or sleclric shock. Never spill
Servicing
Do not attompt
Dameoa
Unplug thl!
(a)
(b)
this
prcjector
consult
protection
attention
push
objecb of any kind through openings of this
roqulring seruie
prolector
pow.f-supply
lf
the
lf llquld has
near water
projector
on an unstable cart,stand, tripod, brackot or tiable. Use only
should be operated only from the type of
your
appliance dealer or lo€l
to cords at
to seMce this
from the wall outlet and refer seruicing to
cord or
been splll€d, or objocG
your
projstor
Led
read
instructions
without
in
or
plugs,
convenience r@ptacles, and
prcjector yourself.Refer
plug
is damaged.
with water.
contact
liquid
of
have fallen into the
and retain them for future reference. Follow all warnings and instructions markod
bsfore the
the approval of
pwer
power
@mpany.
ihis
result in
can
projector
any kind on the
all servicing to
prcjector.
appliance is
should be adhered to
personal
source indicated on the marking label. lf
as they may touch dangorous voltags
qualified
operated.
the manufac{urer as
injury.
with
a cart, shnd, tripod brackst, or table .
pinched
points
where they exit from ths appllance. Do mt
fre
a
or electric shock.
prciecton
qualilied
sorvlce
personnal
seruico
by iterns
personnsl.
under the following @nditions:
you
are not sure of the type of
placod
upon or against thm. Pay
polnts
or short{ut
put
the
power
parts
cord
that could
proiector
(c)
lf
the
Adjust only those controls that are covered by the operating instructions. An improper adjustment of othsr controls may
may often require
and
(d)
lf
the
(e)
lf
the
(D
lfthe
16. Replacement
When replacement
parts
having the same charaderistiG as the original
1 7. Safety check
Upon completion of any serylce or repair to this
is in a safe operating mndition. An appliane and mrt combination should be moved with Ere.
surfaces
18. Ventilation
Slots and openings
Do not block these openings or allow them to be blocked by
adequate ventilation and that the manufacturer's instructions have ben adhered to.
does not operate
proiector
projector
projector
may
extensive
has b€en exposed to rain or water.
has been dropp€d or the cabinst has b€€n damaged.
exhibib a distinct change in
parts
parts
the
cause
in
the cabinet are
normally
work
are required, be sure that the seruie ttrhnician has
and mrt mmbination to overturn.
appliane
provided
by a
you
after
qualifed
performancs
prcjector,
ventilation,
for
follow
ths operating
technician to
part.
restore the
-
this indicates a ne€d for s6rvice.
Unauthorized substitutions
ask the serui@ tshnician to
ensuring roliabls opsration ofthe
placing
the
projector
instructions.
projector
its normal
to
replac€rnent
used
may result in fire, electric shock or other h%rds.
perfom
on a bed, sofa, rug, or bookcase. Ensure that there is
optration.
parts
specified by the manufaclurer or
safety checks detemining that the
stops, excessive fore and uneven
Quick
projector
and to
protect
result in
it from
damagg
projsc'tor
Operutioil Of
Do not look into
Heat.
dust etc.
Place
of
For safety's sake, refrain from setting the
humidity. Please maintain an operating tmperature, humidity, and altitude as specified below.
.
Operating temperature: between
.
Operating humidity: between 30% and 90%
.
Never
.
Do not attach the
.
Do not install
carrying a large curent
.
Place the
producl.
.
Do not stand the
.
Slanting the
.
Do not
Resol,.rk n Prui@tot
Eiah
the ai, outlet
may
blow out of
grille
it
and
when
hurt
installation
+41
T
put
any heat-producing device under the
place
projector
poector
the
prcjector
on a solid, vibration fre surface: otheruise it may fall, eusing serious injury to a child or adult, and serious damage to the
prqjector:
projector
prcjeclor
the
place
to
a
near any equipment that
it.may fall, causing serious injury and damage to the
more than
'1o'(right
near air-conditioning unit or heater to avoid
projec'tor
your
prcjtrtor
(+5C)
that is
unstable
and lefr) o|15'
i8
operaiing.
eyes.
place
at any
+95T
and
projector
or subject to vibEtion.
produces
subjected to high temperature and high
(+351])
projector
so that the
strong magnetic field. Also refrain from installing near the
a
does
not
overheat.
projstor.
(front
and rer) may cause trouble or explosion of the lamp.
hot
air to the exhaust and
ventilation
hole of the
prcjector
prcjector
any
cabls
WARNING..
Unplug immediately if there is something wrong with
Do not operate if
ln
shock.
this case, unplug
Never remove
This
projector
the cabinet.
contains
Ome/s Guide, do
smoke, strange
not
noise or
immediately
high voltage circuiiry An inadvertent
to
attempl
service
mmes
odor
and coniacl
product
this
your
yourself.
Do not modify this equipment
It can lead to fire or electric shock.
lfyou break or drop the cablnet.
Do not kep using this equipment if
keep using the equipment.
Do not face tho
It mn lead to fire.
projector
Use corec't voltage.
incorrect voltage, it can lead to fire.
lfyou use
place
Do not
Place the
prcjectol
the
projection
on a leveled and stable surface only. Plsase do not
Do not look into the lens when it is operating. lt may hurt
Do not turn off the main
lead to
It can
Do
Do not touch them s
not
lamp breakage,
Air
touch
outlet
put
other equipment.Also, do not set the
Clean the airf lter once a month.
the air-filter frequently. lf the filter or ventilalion slots become
Cl6an
and cause some boubles, such as damage of
you
br€k or drop it. Unplug the
lens to the sun.
on uneven surface.
power
abrupuy or unplug ths
fire,
electric shock or other troubla. lt is best to walt for th6 fan to tum
grille
and Bottom
other equipmst in front ofAir outlet
plate
whlch
prcjector
on the desk which is easlly afioc'ted by heat.
parts,
inside
your prcjector.
projector.
your
of
out
dealer.
contact
Please
your
eyss.Nevor let chlldron look lnto the lens whsn lt ls on.
proJsctor
lt might cause fire
may result in
prcjector
durlng
an electric shock.Except as specifically explained
your
contiact
dealer
and @ntacl
place
squlpmsnt on unebbls surfaces.
oporrtlon.
or electric
you
when
your
dealerftr inspstion. lt may l€d to fre if
becomes hot.
grille.
The heated Alr
clogged with
and shortgning ths
grtllo
outlot
dirt or dust, the tmperature inside of the
lifo
of
and Bottom
panel.
to fix,
want
of
adjust or
boforo tuming main
plate
may cause iniury or damage to
inspecl the
power
off.
proimtor
in the
you
may rise
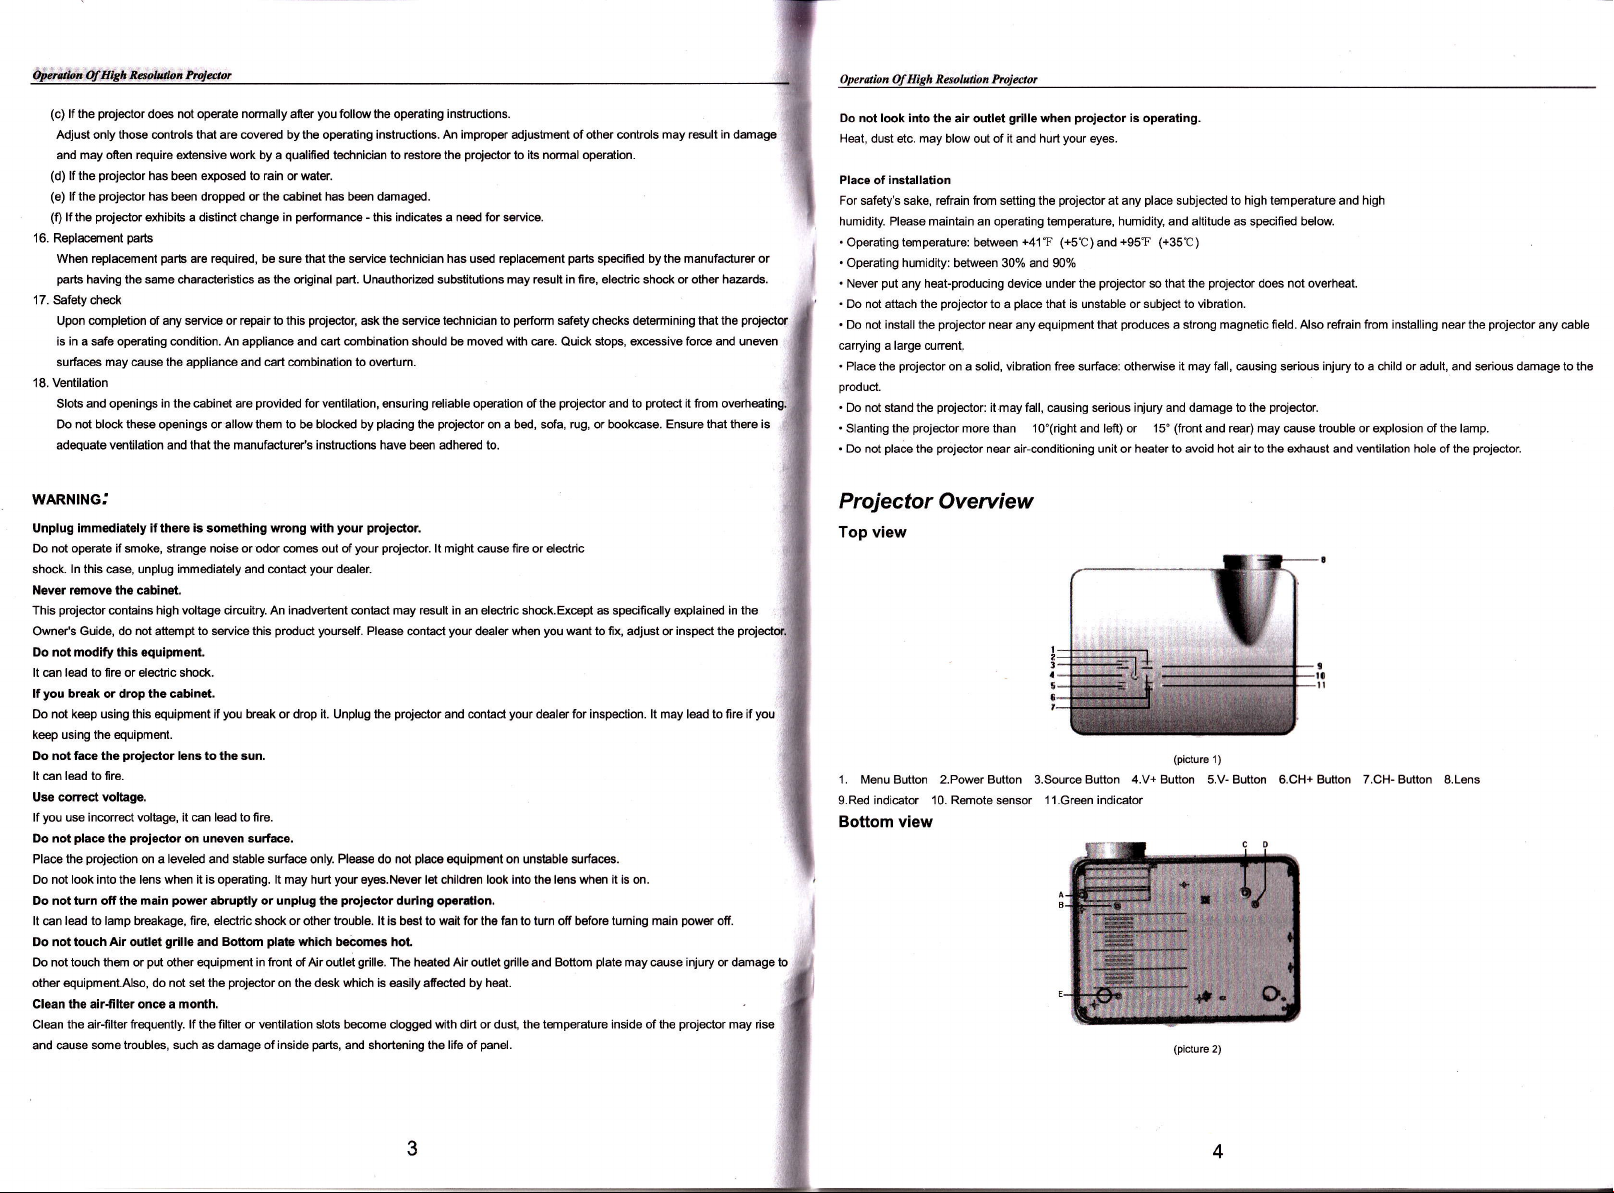
Projector
Overview
Top view
1.
MenuButton 2.PowerButton
g.Red
indi€tor 10. Remote sensor
Bottom view
Button 4.V+ Button
3.Source
1 l.Green indicator
(picture
1)
5.V- Button o.CH+ Button 7.CH-
(picture
2)
Button
8.Lens

Resolildofr
Operuriot Of High Rqohaion PmJetor
hang
of
lhe
A
and C
projector
fee
to ceiling?
prcjector
3
can be adjusted;
feet
(B
D
E) hole,
How
to
fix the 3 feet of mount to the
The height
Back View
(Picture
3)
1.PR(Red)
4.Left audio input
7.HDM13 input
l0.HDMh lnput
t3.TV
t6.vGA
19. Left audio output
(Red)
(Red)
2.PB(Blue)
5.Right audio input(Whlte)
8- Remote Sensor
ll.HDM12lnpui
l4.S-video
input
17.USB
3.Y(Gre6n)
6,AV-lN(Yellow)
9. Keystone conec-tion
12.
reader lnput
Card
'15.
Right audio output
't
8. Power Switch
Rear View
(Picture
4)
1- Exhaustvent 2.Speker
Remote Control
Do not expose the remote control to shocks, liquid or high humidity. Do not expose it to direct sunlight or other intense light
Warning
you
when
operate.)
knob
(White)
I, Power button
Press
this button to switch on the TV
L *u*br,,o,
Press this button to mute
VOL+/VOL-! SOIJND
Press this
button
CH+/CH-: CII button
TV mode,
above
FLIP:
FREEZE:
P.MODE:
l6:9/4:3: Press
ENTER:, okbutton.
MENU:menu
lnsert The Batteries
press
chamel.
Reversedimage.
Picturefreeze.
Press this button to switch
this button to zoom the
butlon.
1. Remove the
2. lnsert the two 1.5V
batteries matches the
3. Replace the battery cover by sliding it in
volume or recovtr.
button
to
adjust volume.
this
button to select the following and
picture
mode.
on
pictue.
battery cover by
(n44
5;r"; batteries
polarity
pressing
it and sliding it down.
making
marks inside the unlt.
you
until
& g X L
SOURCE:Press this
RETURN:Press this
Press
0-9:
-/-:
Channel selection button.
REcALL:Return to
Al,JDlo:Press this
INFO: Press this
Menubutton for left, right,
button to select specific source
SV or other
channel.
button
to
exit OSD menu.
digital button to select chamel.
previous
TV chamel.
to
button
switch on somd mode.
button to show the informtion.
CHLIST chamel list button.
FAV: Press this button to select the favorite
SI.JBTITLE: Not used-
AUD.TRAGK: Notused.
I'usB tir"
I:Press this button to zoom the
I,
I, Press this button
I,
L
f, rr"t uu"L*ard
L
""t""t'
press
ttris outton to
press
ttris uutton to stop.
press
ttris uutton to
ro*urd
r"o
picture(suit
play
video
again(suit for usb,sd card);
paty
to
setected AB.
paly
pauser
or
(for
UsB/Grd readerxred button).
(for
usB/card readerxgreen button).
I' ereviouslyellowButton)
polarity
(btueButton)
(+
-)
or
of the
L r"o
sure the
hear a click sound.
up and down.
such as TV
charurel
for Nb,sd card);
 Loading...