

chinavasion 4CH, 8CH Quick Installation Manual
Models:4/8cH
p
Hardware
description
Wireless N\rR kitQuick
installation
guide
I
Statement
Singerely thanks
for
purchasing
our products, pls
contact us ifany problem
or requirement.
This
manual is
for network
video recorder.
This
user manual
may contain incorrect place
in technology, place
not matching
with
product
fmction
or operation,
or
printing
mistake.
We will
update ou
user manual according
to
our updating in
product,
and will
periodically
improve or
updating the
product
md
programming.
The updating
content
will add in
the new
user manul, we
won't inform.
Ifthe product's
description
in user mmual
is inconsistent
with the
real
products,
pls
based on
the
real
products.
2
Safety
cautions
l. Pls don't
put
a container
with liquid
on DVR(like
Vase) .
2.DVR should
put
at a ventilation place,
and
prevent
clogged the
ventilation
hole.
3.Check the
power
voltage,
in
case of damage
by wrong
voltage.
4.DVR
should work at the
technical standard
range
oftemperature
and humidity.
5.Place
DVR
on level,
pls
avoid installing
at a sharp
pouding
place.
6.Moisture
dust in PCB
will cause
short circuit,
for long-tem
use ofthe
DVR,
you
cm
periodically
remove
dust in PCB
by brush.
7.It will cause burst
ifreplace
battery in wrong
way,
we don't suggest
user to
replace by
himself; ifneed
replace,
only
use the same type
or equivalent
t)?e
battery,
pls
don't try to
open or maintain
the
bahery.
8.DVR
installation need
according to
specification, you
can take the national
or local standard
as reference.
3
Open-package
inspection
After receive
product,
pls
open
giftbox,
remove
NVR and
put
it
on suitable
place,
check
accessories.
If my
damage or lack,
kindly
pls
contact
to the distributor.
Wireless
NVR
kit
Quick
itrstallation guide
Wireless NVR kit
Quick
installation guide
Wireless
N\R kit
Quick
installation
guide
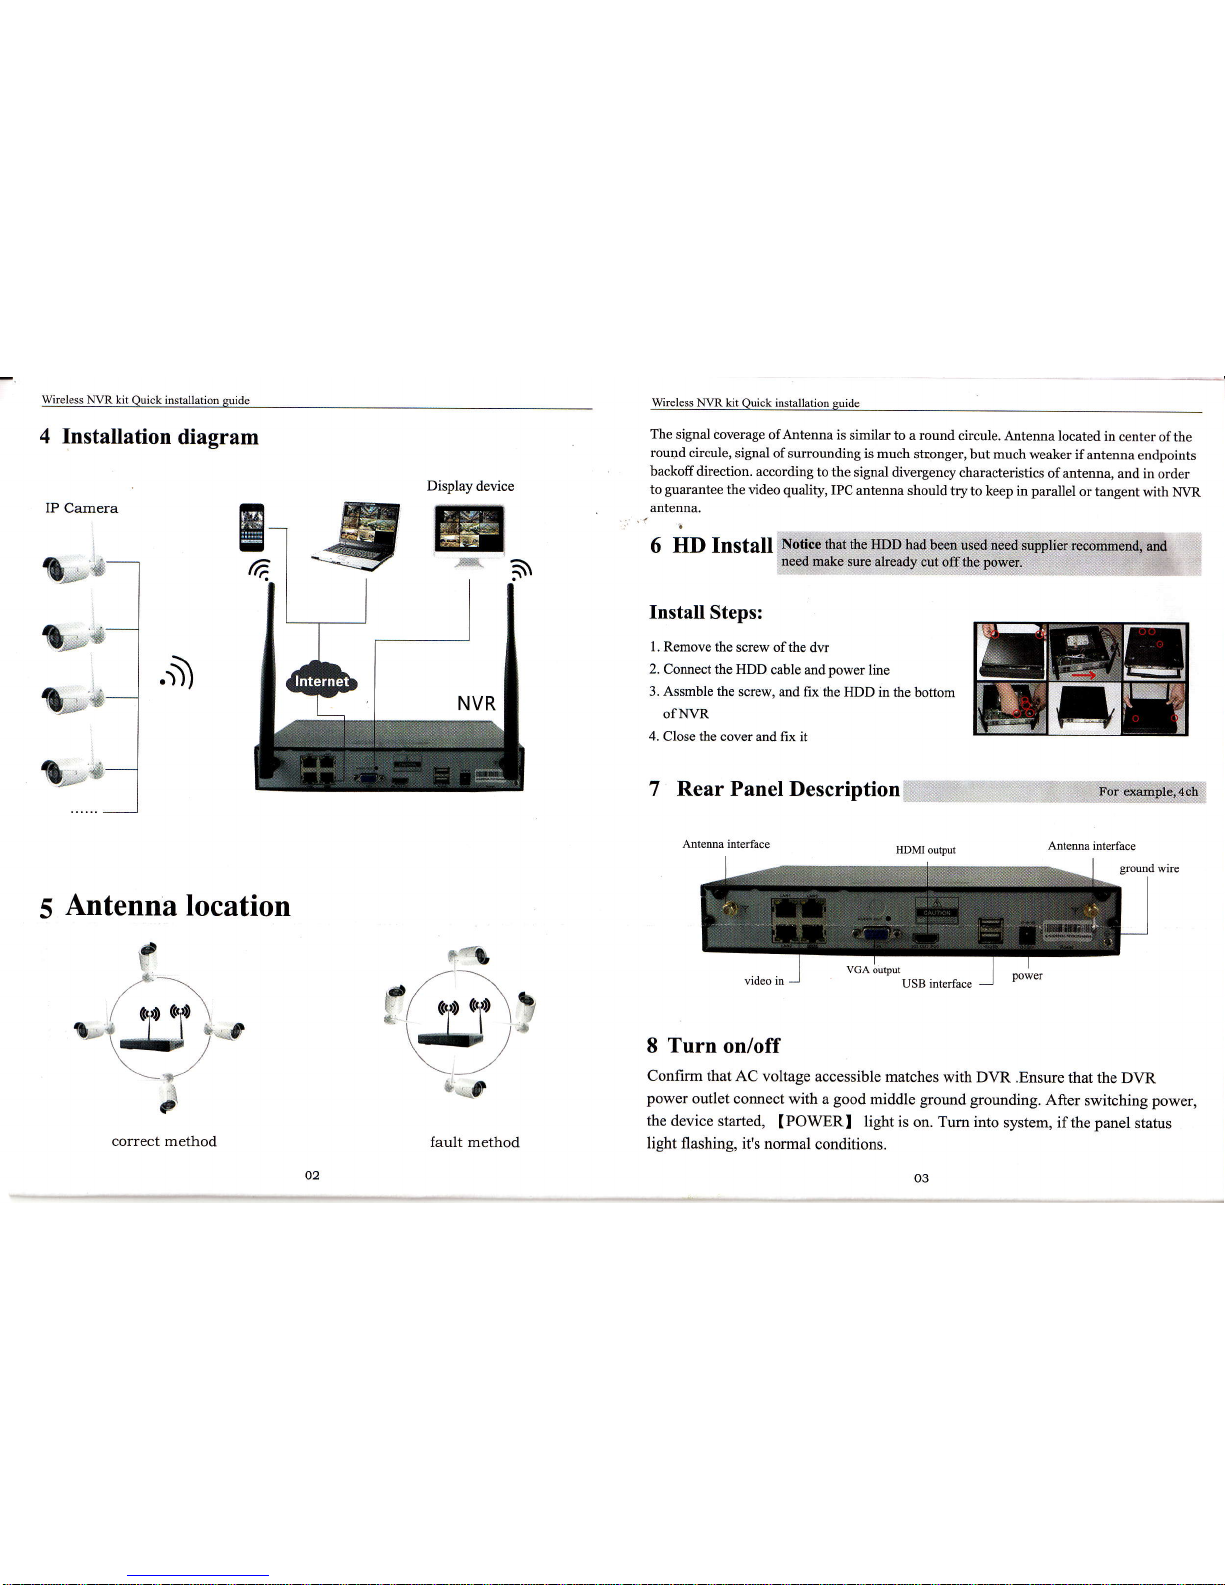
4 Installation
diagram
IP
Camera
A
Wireless Nl/R kit
Quick
installation
guide
The
signal coverage
ofAntenna is similar
to a round circule.
Antenna located
in
center ofthe
round circule,
signal ofsunounding
is much
stronger,
but
much
weaker ifantenna
endpoints
backoffdirection. according
to the signal
divergency characteristics
ofantenna,
and in order
to
guarantee
the video quality,
IPC
antenna should
try to keep in
parallel
or tangent
with N\rR
antenna.
6
HD
InStall
Notice that the
HDD had bem
used need supplier
recomend.enri
'nbod
make
sure
already
cut off the
pow;.
ri1i';iiiiiil,i,i.:iil
irii;,i
Install Steps:
l. Remove the
screw ofthe
dtr
2.
Connect the HDD
cable md
power
line
3. Assmble the
screw, md fix the
HDD in the
bottom
ofNVR
4.
Close the cover md
fix it
7 Rear Panel Descriptionrr;,,ri
;il
i
@W
.il
Antema interface
il
i'ii:,f
"ilg'66-p;
Antema
interface
HDMI outpur
5
gromd
wire
I Turn on/off
Confirm that
AC voltage accessible
matches
with DVR .Ensure
that the DVR
power
outlet
connect with a
good
middle
ground
grounding.
After
switching power
the
device started,
IPOWERI
light
is on. Tum into
system, if
the
panel
status
light flashing,
it's normal
conditions.
O*u'
s#-
{.
*-
t*i,,'d'-
O,-4-
Antenna
location
\i
-'S.
-'.
,\
/ ooG0,
t-r
i t
e,,
\qr
\./
\!-".e'l
J
correct method
Display
device
f,l*i
tt
l r,
oo\
s,
.
(-J-!
);
\,/
\*/
i*-lo
fault method
Wirel6s
NVR kit
Quick
installati@
guide {
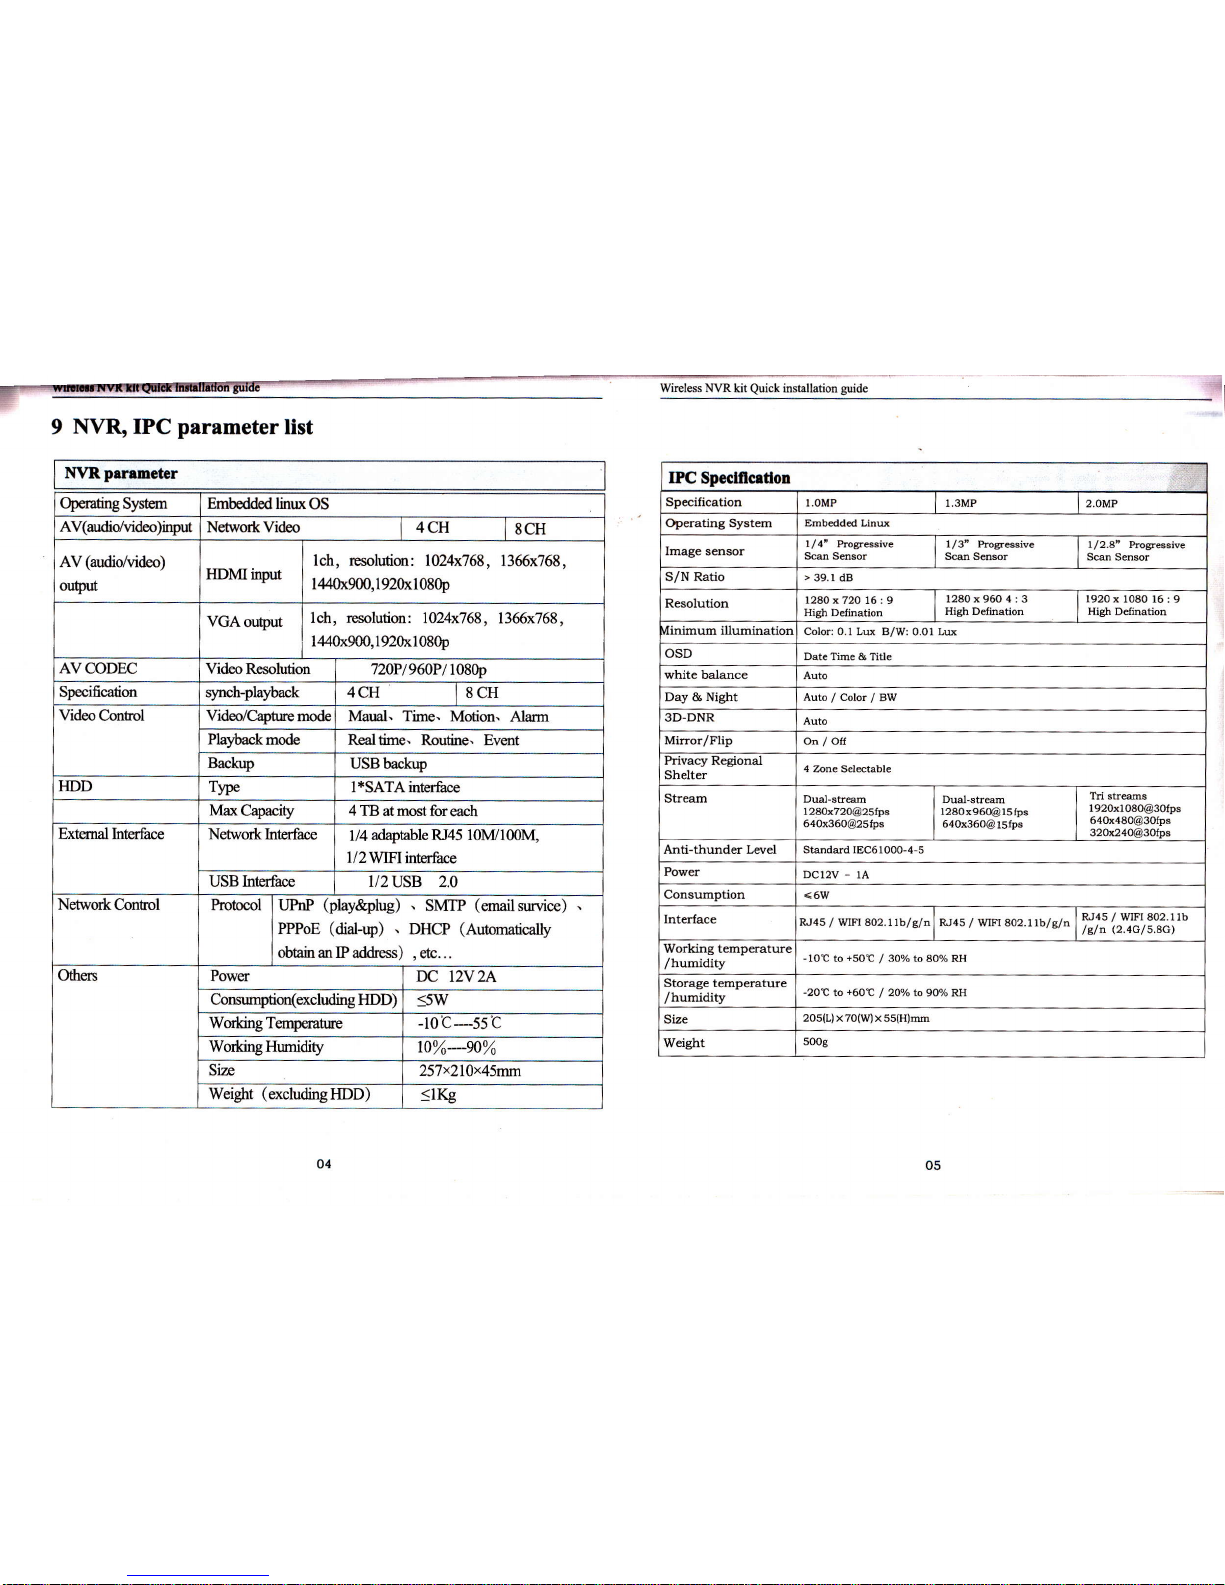
9
l[VR,IPC
parameter
list
NVRprnmc0er
OperaingS)6t€m
Embeddod linux
OS
Av(audidvideo)input
Netwo*Video
4CH
I
sCrr
AV(ardiotuideo)
odflrt
IIDMinput
lch, resolution: 1A4x768, 1366x768,
l,l40x900,l92Oxl080p
VGAoutput
lch, resolution:
1024x768, 1366x768,
1,14Ox900,192Ox1080p
AVCODEC
VideoResoluion
720Pl960P/
1080p
Specification
4CIt
|SCH
VideoConfiol
Videdcaptrrcmode
Manl. Time. Motion. Alarm
PlEfuackmode
Realtime. Routine. Event
Backup
USBbach,p
IIDD
T)rpe 1*SATAinterhce
Max
Capacity 4 TB atmost foreach
External
hterface Network Interface
I / 4
ad,apable RI45 10M1
00M,
1/2WIFI
interface
USB Interface
l/2
usB 2.0
Netwo*C-ontol
Protocol
tlPnP
(play&plug)
.
SMIP
(email
survice)
PPPoE
(dial-rry)
.
DHCP
(Automatically
obain ar IP addrress)
,
etc. . .
Others
Pourer
rc DV2A
Consurnption(excluding HDD)
<5W
Working Ternperature -10c-s5c
WorkingHumidity
t0%----e0%
Size
257x2l0x45mm
Weight
(excludingHDD)
SlKg
IPC
Specllcedon
Spcification I.OMP
I,3MP
2.OMP
Opemtina Systm
Embeddcd Linu
lmage smsor
l/4"
Progresive
Scan Sdsor
1/3" Prog6sive
Sco Sensor
l/2.8' Progreslve
Scan
Sensor
S/N Ratio
>
39.r dB
R6olution
t28O
\ 72O 16 : 9
High Deflnation
1280x9604:3
High Defitration
l92O x 1OE0 16
: 9
High
Delinatioa
Iinimm illumimtion
Color: O.1
Lu B/W: 0.01 Lu
osD
Datc Time
& Tlde
whitc balmce
Auto
Day & Night
Auto/color/Bw
3D.DNR
Minor/Flip Ou
/
OIf
ltlvacy xegroml
Shelter
4
Zone Seletable
Strem Dual-stem
l28ox72o@25lps
6a0x360@25fps
DuaI-sfem
I 280x960@ 15
Ips
640x360@l5fps
Tri str@s
I 92Ox1O80@3ot!ts
64Ox4E0@3OIps
32Oa24OA3O{*
Anti-thunder Lwel
Standdd IEC6lOOO-4-S
Powq
DC12V
-
1A
Consmption
<6W
Intqface
R^r45
/
WIFI 8o2.rlb/s/n R^I45
/
WIFI 802.11b/s/n
R.r4s
/
wrFr
8o2.1tb
/Eln
(2.4G/s.9G')
Working t@p@ture
/humidity
-lot
to
+soI]
/
30olo to
80o/o RH
Storage tmperature
/hmidity
-20t
to
+6ot
I
2oo/otogoo/oRt{
Size
2o5(L) x70(W xss(H)m
Weight
5o0g
o5
 Loading...