

China T A Wow Stuff CC 1007 User Manual
!
Not suitable for children under 3 years old due to small parts which may
represent a choking hazard. Recommended for use by children over 6 years old. This product operates
on 2.4GHz frequency. Do not aim at eyes or face. Do not use near crowds. Do not aim at people or
animals. Only use missiles designed for this product. Do not attempt to catch the missiles. Do not put
your face over the missile even if it is not being used. Do not launch any improvised object other than
the one supplied or recommended by the manufacturer. Please retain this information for future
reference. Adult supervision required.
Battery Information
• Different types of batteries or new and used batteries are not to be mixed.
• Do not mix alkaline, standard (carbon-zinc), or rechargeable (nickel-cadmium) batteries.
• Batteries are to be inserted with the correct polarity.
• Exhausted batteries are to be removed from the toy.
• The supply terminals are not to be short-circuited.
• Non-rechargeable batteries are not to be recharged.
• Rechargeable batteries are only to be charged under adult supervision.
• Rechargeable batteries are to be removed from the toy before being charged.
Always :
• Make sure battery compartments are secure.
• Use batteries of the correct size and type.
• Fit batteries correctly observing the plus and minus marks on the battery and compartment.
• Replace a whole set of batteries at one time.
• Remove dead batteries from equipment.
• Remove batteries from appliance that will not be used again for a long time.
• Please remember that batteries should be kept away from young children as they could be
easily swallowed.
• Seek medical advice if you believe a cell has been swallowed.
• Please ensure that batteries are installed by an adult prior to use.
Never
• Dispose of batteries in a fire.
Consumers have a significant role to play in reducing the impact of waste electrical and electronic
equipment on the environment. You can help by re-using or recycling such equipment. The crossed out
wheelie-bin symbol indicates that the product & batteries must not be disposed of in domestic waste
as they contain substances which can be damaging to the environment and human health. If you
cannot re-use or recycle the product or batteries, please use designated collection points, or civic
recycling facilities to dispose of them.
Conforms to the safety requirements of ASTM F963.
This device complies with Part 15 of the FCC Rules.
Operation is subject to the following two conditions:
(1) This device may not cause harmful interference, and
(2) This device must accept any interference received, including interference that may cause
undesired operation.
WARNING: Changes or modifications to this unit not expressly approved by the party responsible for
compliance could void the users authority to operate the equipment.
NOTE: This equipment has been tested and found to comply with the limits for a Class B digital device,
pursuant to Part 15 of the FCC Rules. These limits are designed to provide reasonable protection
against harmful interference in a residential installation.
This equipment generates, uses and can radiate radio frequency energy and, if not installed and used
in accordance with the instructions, may cause harmful interference to radio communications.
However, there is no guarantee that interference will not occur in a particular installation. If this
equipment does cause harmful interference to radio or television reception, which can be determined
by turning the equipment off and on, the user is encouraged to try to correct the interference by one
or more of the following measures:
· Reorient or relocate the receiving antenna.
· Increase the separation between the equipment and receiver.
· Connect the equipment into an outlet on a circuit different from that to which the receiver is connected.
· Consult the dealer or an experienced radio/TV technician for help.
The manufacturer is not responsible for any radio or TV interference caused by unauthorized
modifications to this equipment. Such modifications could void the user’s authority to operate the
equipment.
The antenna used for this transmitter must be installed to provide a separation distance of at least
20 cm for all persons and must not be co-located or operated in conjunction with any other antenna
or transmitter.
INSTRUCTION GUIDE
CONSTRUCT • CUSTOMIZE • COMPETE
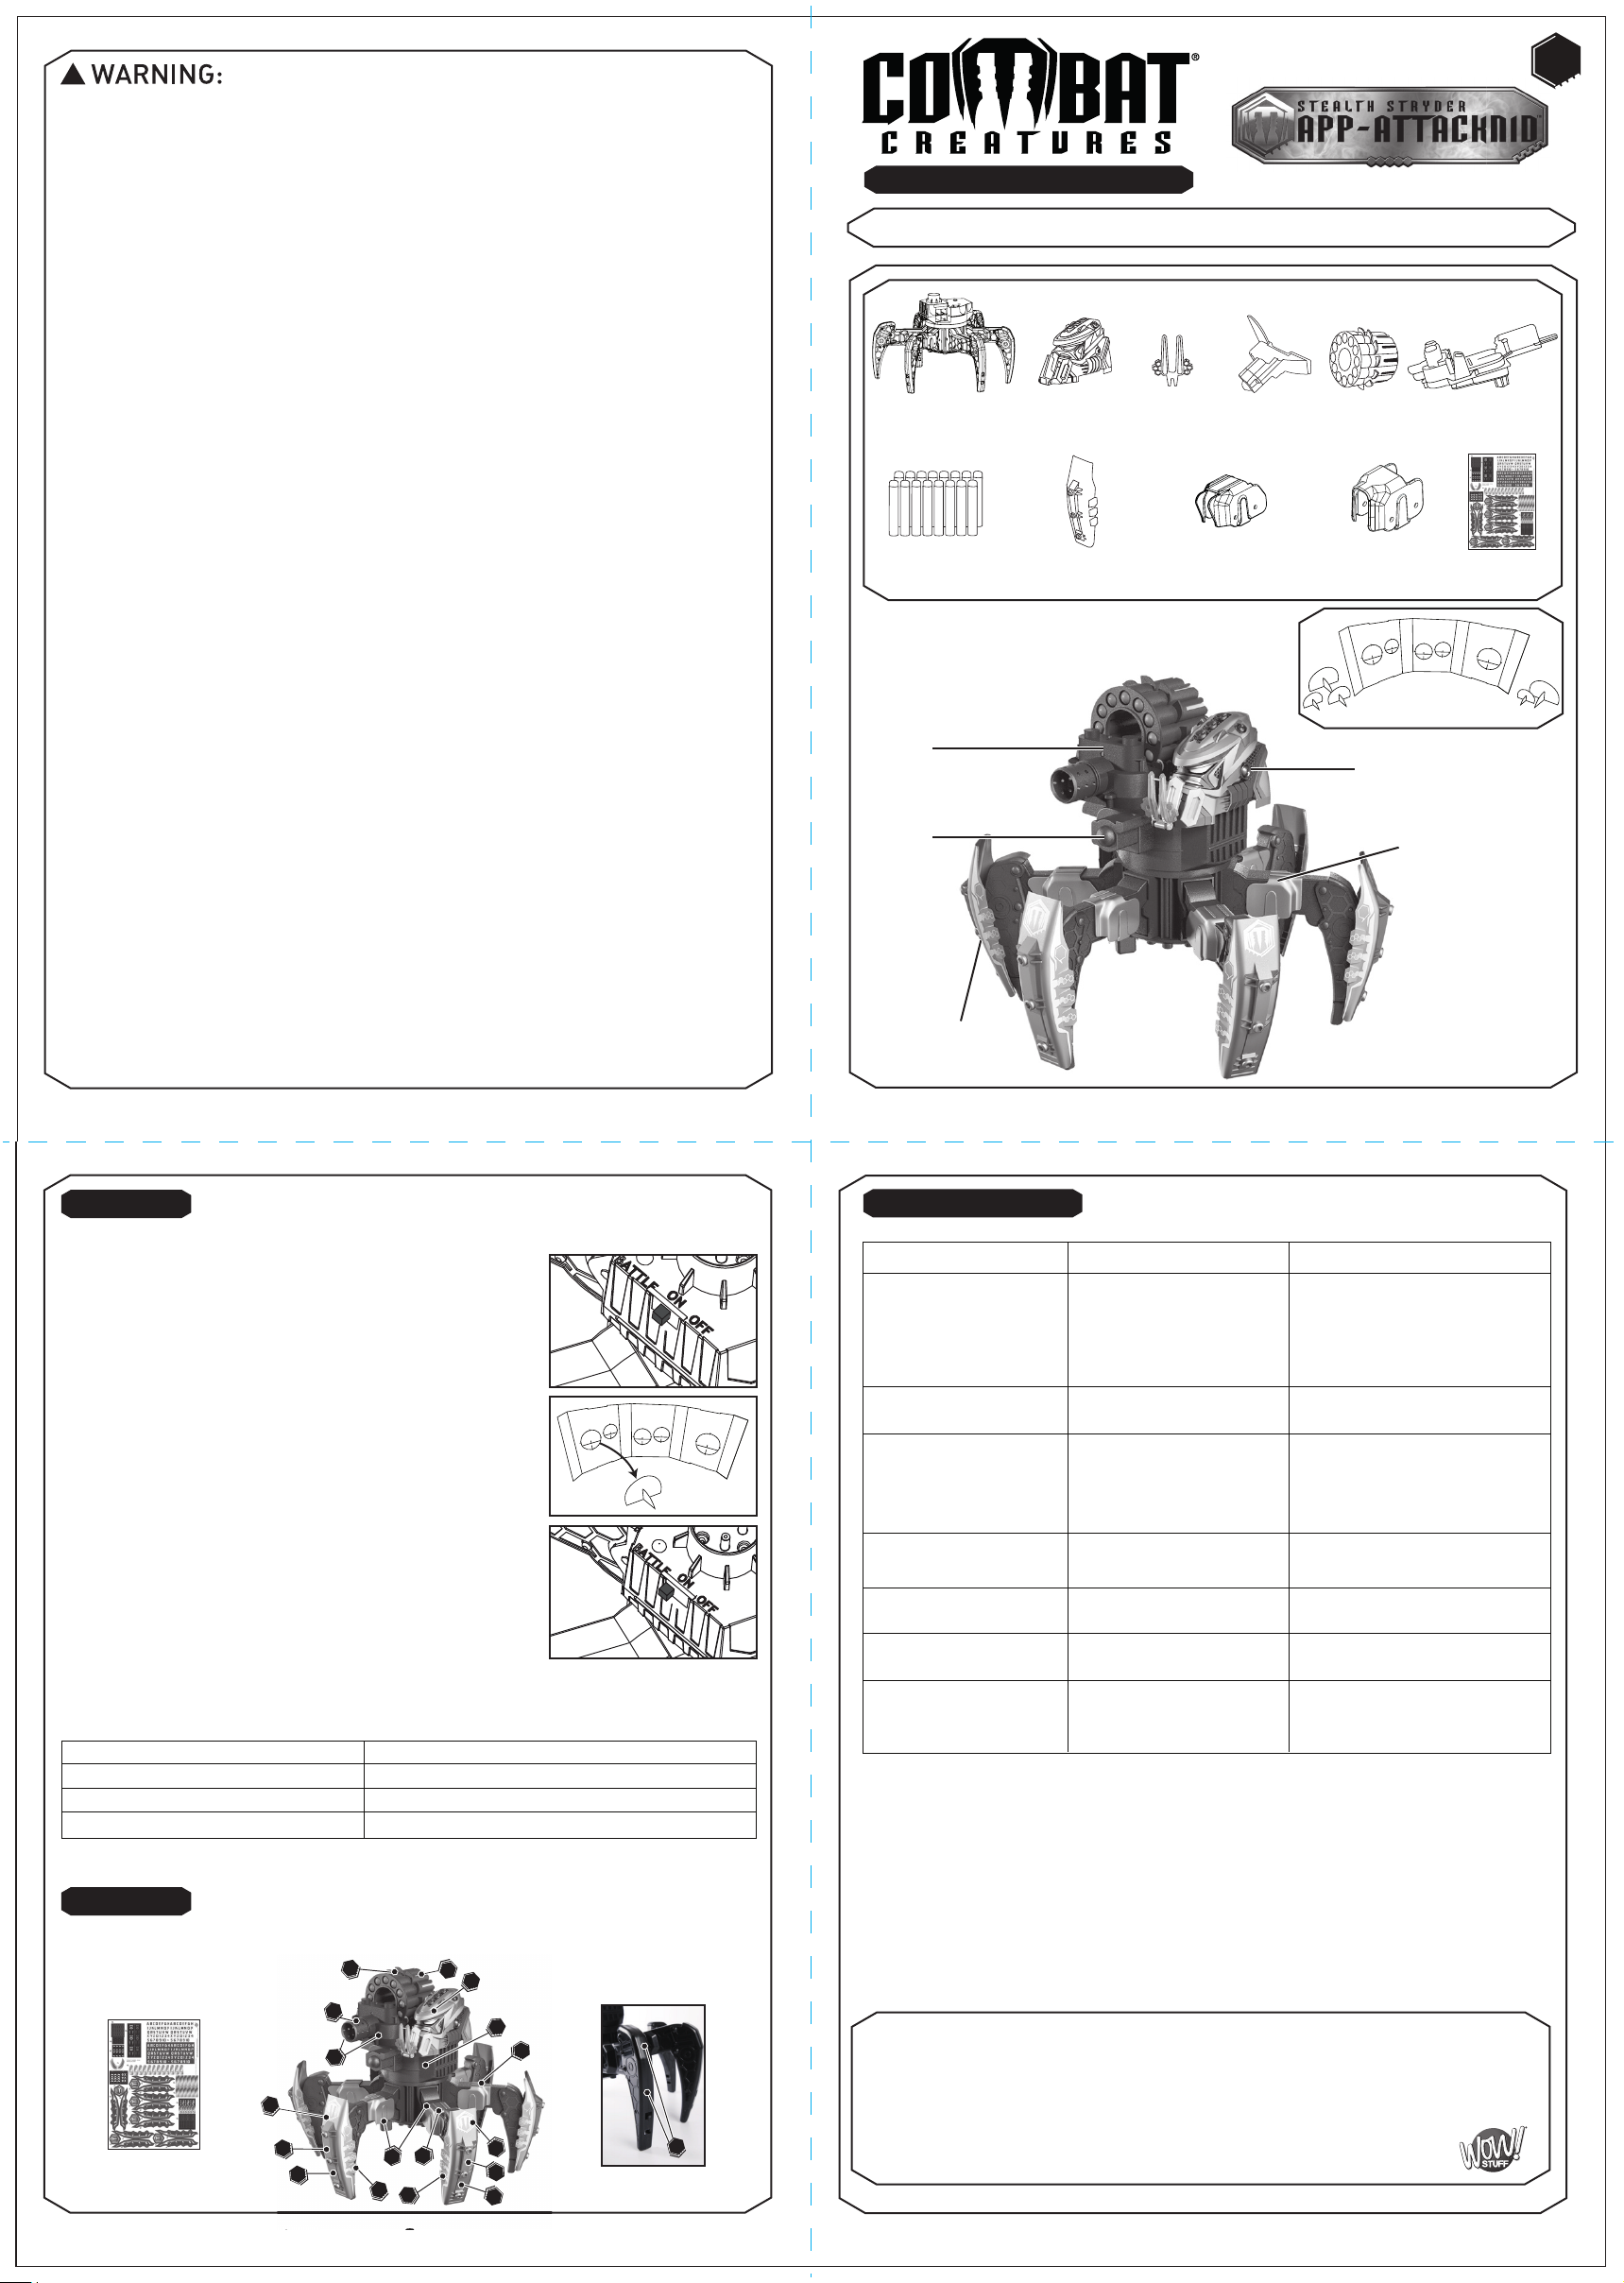
CONTENTS
1 x Attacknid Core
Requires 4 x AA batteries
(not included)
12 x Powa
Darts
1 x Stealth
Stryder
Battle Brain
6 x
Exploda-Armor
1 x Battle
Brain
Target
Additional tools required Cross Head screwdriver
Snypa
Dart Blaster
Electronic
Weapons Elevator
Exploda-Armor x 6
1 x Electronic
3 x
Narrow
Armor Plates
Weapons
Elevator
CC-1007 STEALTH STRYDER
1 x Dart
Magzine
3 x
Wide Armor
Plates
Battle Diorama
Includes 5 x push out Targets
Stealth Stryder
Battle Brain
(Electronic)
1 x Snypa
Dart Blaster
Custom
Decal Pack
Armor Plates x 6
gb
www.facebook.com/combatcreatures
8.
www.combatcreatures.com
GAME PLAY
There are two gaming modes, Training mode for pure blasting fun and Battle mode!
Training Mode - Man vs Machine
1. Turn to the ‘ON’ position. (FIG 23)
2. The Attacknid can be moved around with the Smartdevice.
3. You can fire weapons and complete Assault Courses.
Target Practice
1. Remove the inner diorama scene from the box with the
printed targets on. (FIG 24)
2. These simply push out and assemble.
FIG 23
3. You now have 5 stand alone Attacknid targets to Blast
at but can also use the holes left in the diorama as
additional targets.
4. 10 points large targets, 20 and 30 points medium
targets and 40 points for the small targets.
Let us know how you scored at
www.facebook.com.combatcreatures
Build your own Assault Course
FIG 24
Why not Build your own Assault Course around the house.
This is an all terrain robot, so you can walk your Attacknid
up and down slopes and around tight corners.
See www.combatcreatures.com for ideas.
Battle Mode
1. Switch to Battle Mode.
2. Now the Battle Brain has been activated.
FIG 25
3. Initially, the 3 LEDs on the Attacknid Battle Brain will light
up green. If not see troubleshooting.
4. With each direct hit on the target one green LED goes off and it ‘shudders’ to signify a
life lost.
5. ON the third hit the Attacknid shuts down with all lights off and audible sound.
3 Green Lights Status: HEALTHY No hits
2 Green Lights Status: DAMAGED Hit once
1 Green Light Status: CRITICAL Hit twice
0 Green Lights Status: SHUTDOWN Hit three times
To continue playing you need to turn your Attacknid OFF and then back to either Training or
Battle Mode.
www.facebook.com/combatcreatures
1.
www.combatcreatures.com
TROUBLESHOOTING
Symptom
Weapon will not fire
There are no lights on the
Battle Brain
Attacknid will not sync
with the Smartdevice
Combat Armour will not
go on
The Battle Brain is
not working
Attacknid LED is flashing
Green & Red
Attacknid keeps
switching off
Cause
Dart is jammed
Dart Blaster is not
properly inserted
Battle Brain is not
connected properly
Batteries are low
Needs to be re-synced
It is not properly inserted See this manual or website on
You have the wrong mode Switch from ON to Battle Mode
Batteries are low
Batteries are low or faulty Replace the batteries
Solution
See loading Dart Blaster on how to
load and fire Darts
Remove and re-attach your
Dart Blaster ensuring it is locked
in correctly
See section 5 or website on
how to attach your Battle Brain
Change to high quality Alkaline or
Lithium batteries
See syncing your Attacknid
and Smartdevice
(see section 8)
how to complete
Replace the batteries
Insert high quality branded Alkaline
or Lithium batteries.
For Support Videos, FAQs and details on spare parts go online to
www.combatcreatures.com
CUSTOMIZE
Customize your Attacknid! Use the decals to personalise your Attacknid.
Make it your own and send it to us on our facebook page www.facebook.com/combatcreatures
Decal Pack
10
13
14
www.facebook.com/combatcreatures
4
2
3
7
11
1
6
5
9
8
12
6.
10
13
14
www.combatcreatures.com
15
Manufacturer’s Name: China Industries Ltd. T/A Wow! Stuff
Manufacturer’s Address: Creative Industries Centre, Wolverhampton Science Park,
Wolverhampton, WV10 9TG, UK
Type of Equipment: App-Attacknid
Model Number: CC - 1007
Year of Manufacture: 2013
Made in China
COMBAT CREATURES and all related indicia, TM & ©2012 China Industries Ltd. T/A WOW! Stuff. All Rights Reserved.
www.facebook.com/combatcreatures
7.
www.combatcreatures.com
BUILDING YOUR ATTACKNID
Head
1. INSTALLING THE BATTERIES
Please ensure that the batteries are installed by an adult.
The Attacknid (requires 4 x AA batteries (not included.) (Do not use Rechargeable Batteries)
For best results use High Quality Branded Alkaline or Lithium batteries.
1. Tilt the Attacknid 90° for ease of removing the cover. (FIG 1)
2. Unscrew the battery cover using a cross head screwdriver.
3. Remove the battery cover by pulling from the right hand edge. (FIG 2)
Do not use excessive force.
4. Insert the batteries according to the polarity shown. (FIG 3)
5. Screw the battery cover back into place.
FIG 1 FIG 2
FIG 3
5. ATTACHING THE BATTLE BRAIN
1. Tilt your Attacknid 90° and attach the Battle Brain by pushing down gently.
2. It is important that the clip on the Battle Brain connects with the sensor on the Attacknid.
To do this the clip needs to be in the forward position towards the front of the Battle Brain.
(FIG 8)
3. This is most easily achieved by holding the Battle Brain with its front facing the ground.
With your other hand hold the Attacknid at 90 degrees and insert onto Battle Brain, until
fixed in position. (FIG 9) NOTE: The Battle Brain will only fit one way.
FIG 8 FIG 9
6. ATTACHING THE EXPLODA-ARMOR
1. Align the bottom pin on the armor with the bottom hole on each leg. (FIG 10)
2. Firmly push the bottom of the armor into the Attacknid. (FIG 11)
It is important not to touch the top of the armor as this will make the armor spring off.
3. Complete this process for all 6 legs. (FIG 12)
2. INSERTING THE ELECTRONIC WEAPONS ELEVATOR
1. Slide the Electronic Weapons Elevator into the top part of
the Attacknid body. (FIG 5)
It sits level with the top surface of the Attacknid.
3. CLIPPING ON THE ARMOR PLATES
1. There are 6 Armor Plates, 3 narrow and 3 wide. (FIG 6)
No force is needed they simply clip into position.
2. The wide Armor Plates clip onto the wide legs.
3. The narrow Armor Plates clip onto the narrow legs.
4. Customise your armor plates with suitable paint or decals.
Make sure you do not force narrow plates onto wide legs.
4. ATTACHING THE TARGETS
1. Clip the target on the front of the Brain.
These simply click and lock into position. (FIG 7)
2. To remove the Battle Brain target pull from the top of the
Target and it will simple click out.
FIG 5
FIG 6
FIG 7
FIG 10
FIG 11 FIG 12
7. SNYPA DARTS BLASTER ATTACHMENT
1. Place the 12 darts into the Dart Magazine. These simply push into place.
Make sure the darts are in the correct orientation and fully in the chamber. (FIG 13)
2. Make sure the Dart Prodder is always retracted when reloading - you will need to operate
the fire button on the controller to activate this.
3. Angle the back of the loaded Dart Magazine onto the Darts Blaster, matching up the arrows
as below (FIG 14). Make sure the back rim connects with the sprung loaded guide wheel.
(FIG 14A)
4. Drop the front of the Dart Magazine into the Dart Blaster. (FIG 15)
5. Make sure the front clip goes over the rim of the centre of the Dart Magazine. (FIG 15)
Front
clip
FIG 13
FIG 14
6. Simply plug the Dart
Blaster into the
appropriate slot on
FIG 16
FIG 14A
Dart
Blaster
Slot
FIG 15
FIG 17
the Attacknid. (FIG 16)
Making sure it is facing
the same direction as the
Battle Brain. (FIG 17)
www.facebook.com/combatcreatures
2.
ww.combatcreatures.com
8. SYNCING YOUR ATTACKNID AND SMARTDEVICE APP
Firstly using your Smartdevice download the APP-Attacknid App.
1. On your app store search ‘APP ATTACKNID’ then download
COMPLETELY FREE for apple and android devices!
For help on syncing go to www.combatcreatures.com/video-tutorials
APP ICON
1. Make sure your Attacknid is turned on.
2. Next slide the Attacknid ON/OFF button to the ON position for TRAINING MODE or go to
BATTLE MODE. (FIG 18)
Battle
Switch
FIG 18
3. On your Smartdevice, go to settings - Bluetooth. (see device manual for exact whereabouts)
4. Turn on your Bluetooth signal and pair it to ‘Combat Creatures’.
5. Relaunch App.
6. The Smartdevice and Attacknid are synced and ready to go.
After Approximately 20 minutes of inactivity your Attacknid will go to sleep to preserve power.
Turn your Attacknid off then back on again to bring it back to life.
If the Attacknid is not responding to your Smartdevice it can be easily re-synced.
⁄ Turn both the Attacknid and Smartdevice OFF
⁄ Take the Battle Brain off
⁄ Turn the Attacknid ON - you will see a red flashing light.
⁄ Press and hold down the ‘Battle Switch’ on the Attacknid (FIG 18)
⁄ After 3 seconds release the pressure on the Battle Switch - Lights will now go green.
⁄ Follow step 5 to re-attach the Battle Brain
⁄ Turn the Smartdevice ON - Follow steps 3 to 6 above.
Only 1 Attacknid can be synced to a Smartdevice.
You can sync multiple Attacknids in the same area for battles.
9. ATTACKNID APP NAVIGATOR
For more information on opperating your Attacknid go to www.combatcreatures.com/video-tutorials.
APP-ATTACKNID Main Menu
PLAY - Game play (Remote Control UI) See section 10.
INTRODUTION - How to play the game
ABOUT - Twitter, Facebook & Youtube Links
NO CONNECTION!
www.facebook.com/combatcreatures
3.
www.combatcreatures.com
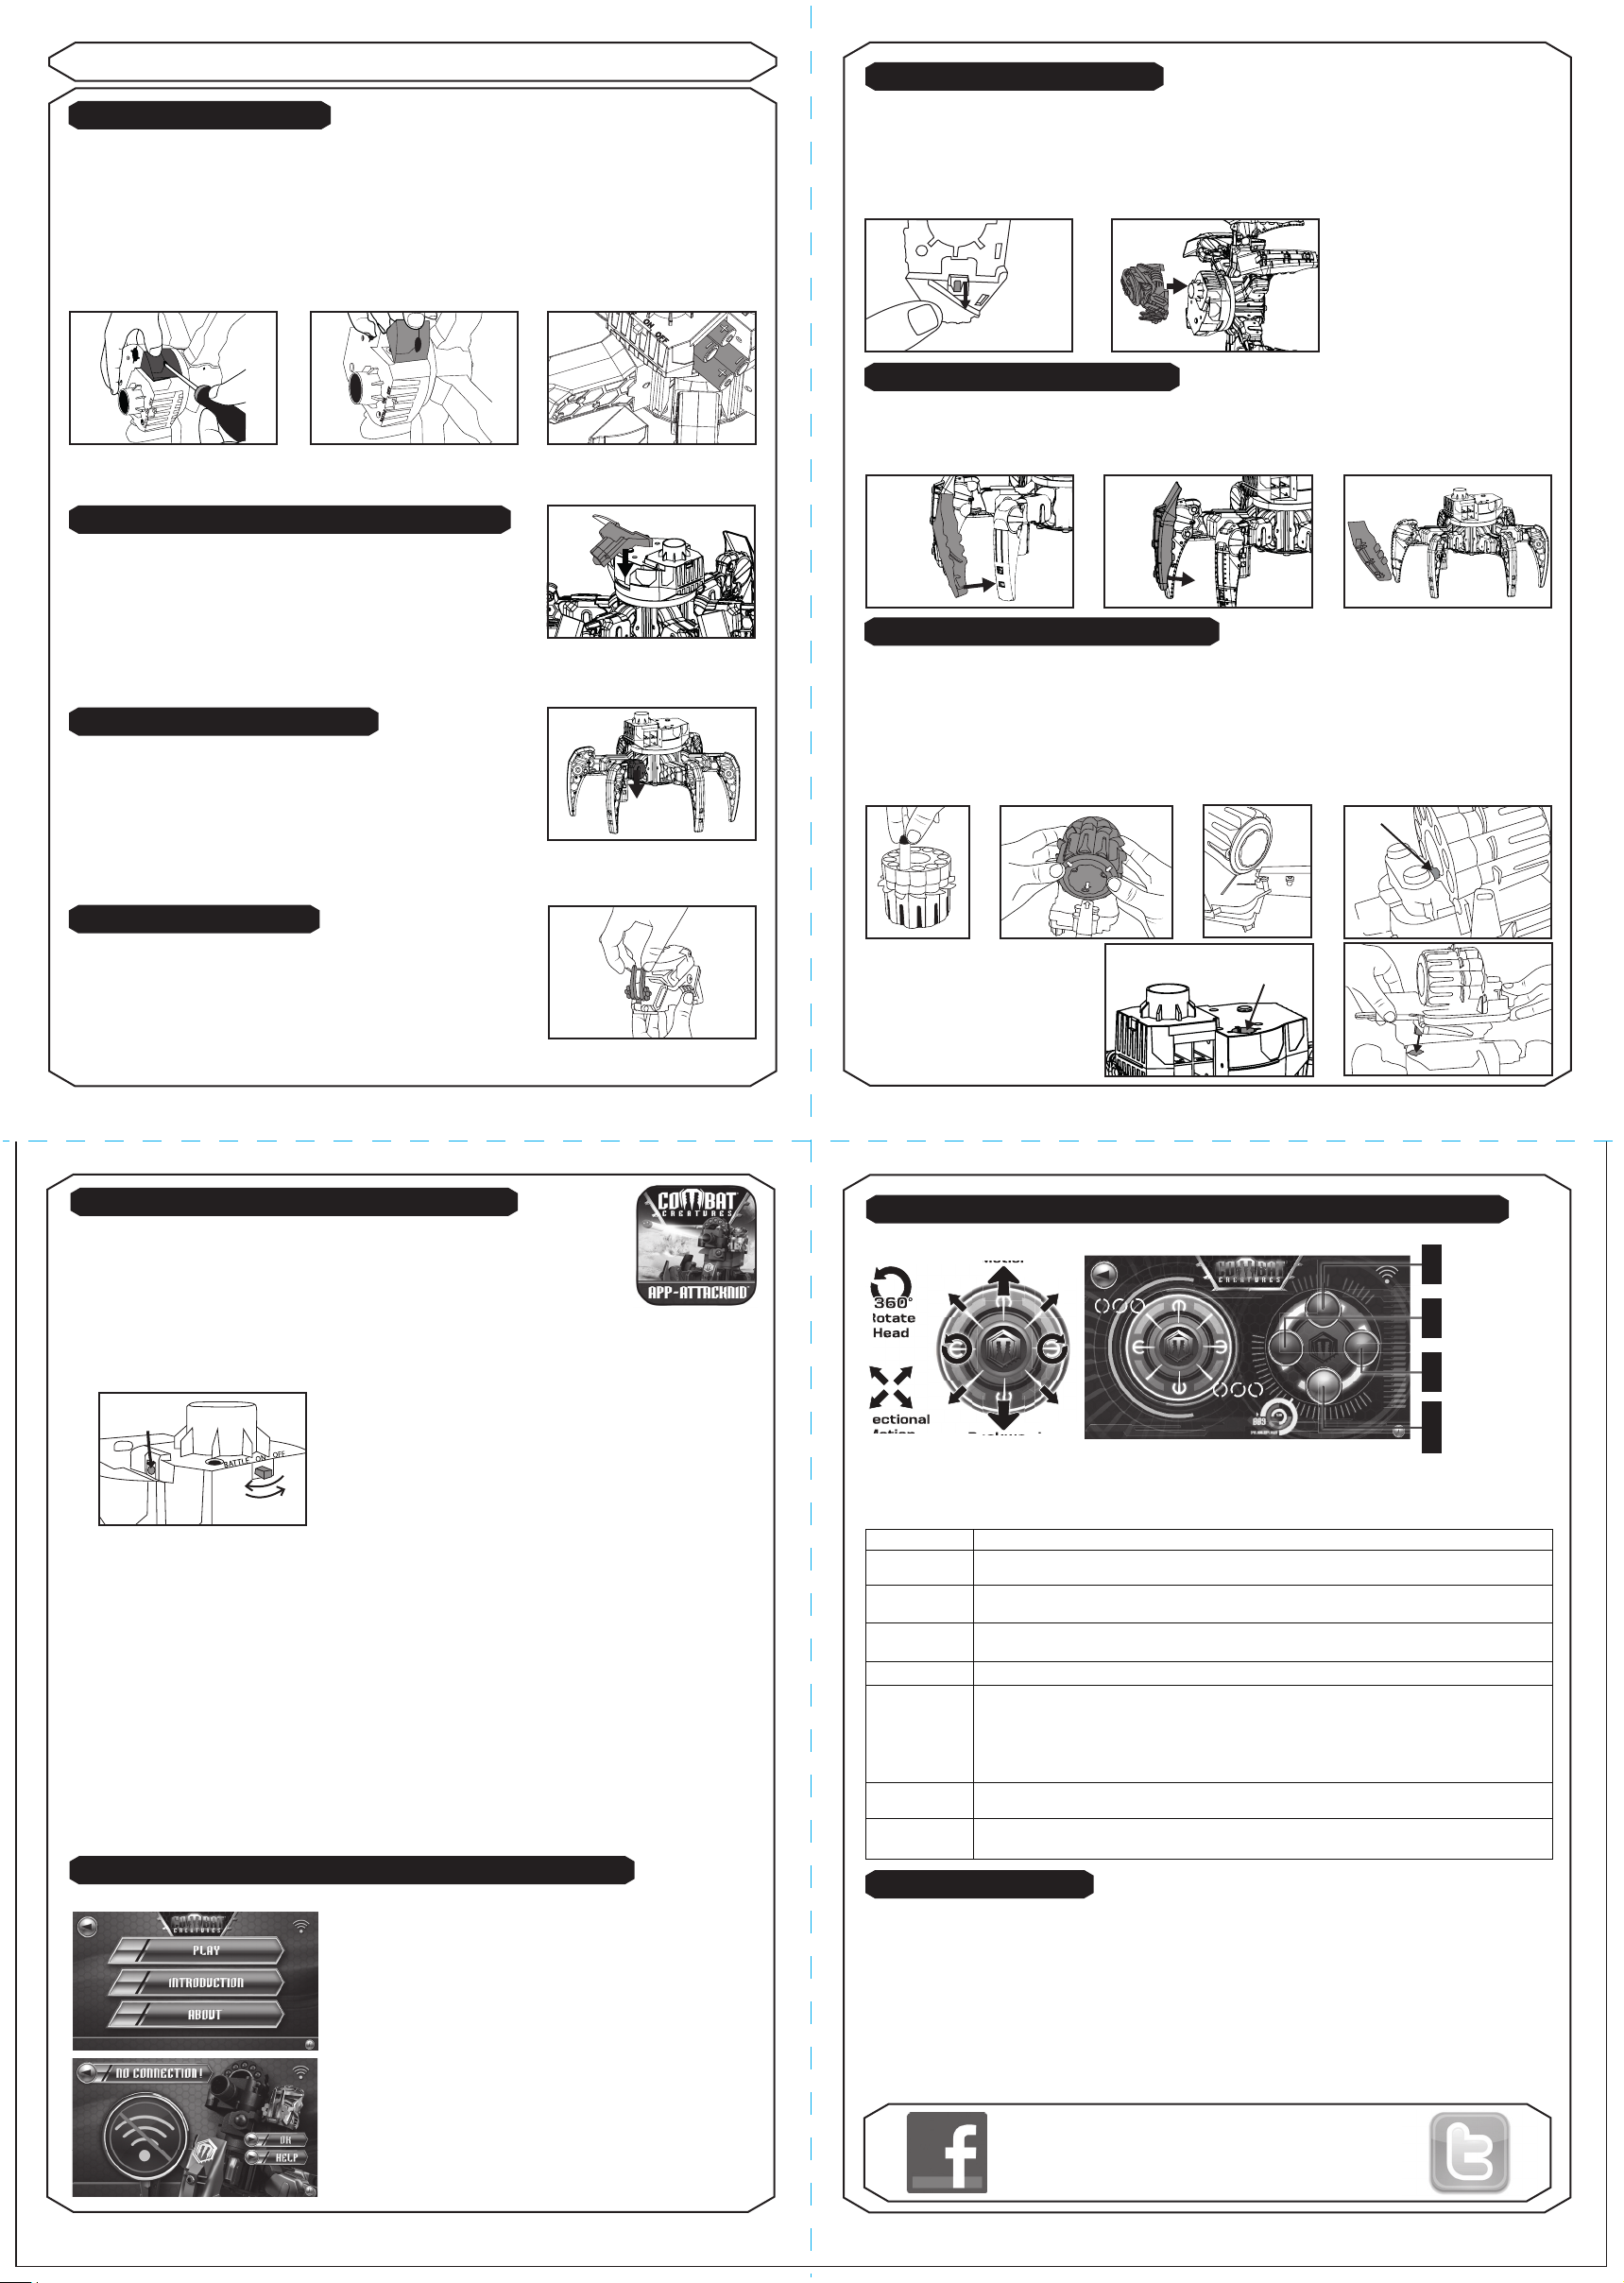
10. OPERATING THE ATTACKNID / APP PLAY SCREEN (REMOTE CONTROL)
Rotate
Head
Directional
Motion
Forward
Motion
Backward
Motion
Micro-Adjustor
& Search Light
GREENREDBLUEYELLOW
Fire Button
Electronic
Weapons
Elevator - Up
Electronic
Weapons
Elevator - Down
1. Use the Rotate Head button to move/rotate the head left or right.
2. Use the Forward Motion button to move your Attacknid in the direction the head is facing.
Button Actions
FORWARD
MOTION
ROTATE
HEAD
BACKWARD
MOTION
RED
GREEN
BLUE &
YELLOW
DIRECTIONAL
MOTION
Attacknid moves in a forward direction.
Rotates head left and right.
Attacknid moves in a backwards direction.
Fires darts.
Press the Green button and then tap Rotate Head Button to micro-adjust
direction.
Press the Green button then gently press the Electronic Weapons Elevator
button (Blue [up] & Yellow [down]) to micro-adjust height of the adjustor.
This micro-adjust function is essential for accurate aiming of the Darts.
Press the Green button on its own for red LED search light.
Moves the Electronics Weapons Elevator up (Blue) and down (Yellow).
Press for Attacknid to move in small circles. Pro-users press and hold to keep
the Attacknid moving as it turns under battle conditions!
11. FIRING YOUR WEAPON
Maximum Distance Firing!
1. Pressing the Red Fire button on the Smartdevice (Remote Control) means that Darts
will continue to fire until all are used up.
2. Turn the Battle Brain left and right. The direction of the Darts are controlled by the direction
the Battle Brain is facing.
3. Height of the Dart is controlled by the Blue (up) and Yellow (down) buttons.
4. To accurately aim the Darts press down the micro-adjustor Button (Green) and then gently
tap Rotate Head and/or the Electronic Weapons Elavator (Blue [up] & Yellow [down] buttons)
for small movements side to side and up and down respectively.
5. Finally... LET BLASTING & BATTLING COMMENCE!
No connection with Attacknid, see how to sync Attacknid in
section 10.
4.
www.combatcreatures.comwww.facebook.com/combatcreatures
Follow Combat Creatures
for Tips & Tricks
Get the best out of your Attacknid!
www.facebook.com/combatcreatures www.combatcreatures.com
5.
 Loading...