


Chiltrix
5.1” Thin DC - Inverter
Water Fan Coil Unit
Floor, Wall or Ceiling
Universal Mount
Manual
Version 1.4
1

CONT
CHAPTER 1 GENERAL INTRODUCTION.................................................................................................................................3
1. Preface.................................................................................................................................................................. 3
2. Product Introduction ............................................................................................................................................ 3
3. Measurements ..................................................................................................................................................... 3
4. Product Features .................................................................................................................................................. 5
5. Safety Precautions and Warnings.........................................................................................................................5
CHAPTER 2 PERFORMANCE AND SPECIFICATIONS...............................................................................................................7
1. Performance Curves ............................................................................................................................................ 7
2. Water Flow Rates and Water Pressure Drops ....................................................................................................17
CHAPTER 3 INSTALLATION..................................................................................................................................................18
1. Installation Precaution ...................................................................................................................................... 18
2. Installation Position - Wall Mounts .................................................................................................................. 18
3. Removing the Side Covers .................................................................................................................................. 19
4. Wall or Vertical Floor Mount Installation ........................................................................................................... 20
5. Hydronic Installation...........................................................................................................................................22
6. Condensate discharge ........................................................................................................................................23
7. Ceiling Installation...............................................................................................................................................24
8. Hydroic Connections for Horizontal Installations ...............................................................................................26
9. Maintenance .......................................................................................................................................................27
CHAPTER 4 FRONT PANEL OPERATION...............................................................................................................................29
1. Buttons ............................................................................................................................................................... 29
2. Operation Instruction ......................................................................................................................................... 29
3. Parameters ......................................................................................................................................................... 33
4. Remote Control .................................................................................................................................................. 34
5. Wiring Diagram ................................................................................................................................................... 36
6. Standard Fan Coil Loop Pump Wiring ................................................................................................................ 37
7. Sensor Resistance Table .................................................................................................................................... 38
8. Trouble Shooting ............................................................................................................................................... 39
9. Parts Breakdown ............................................................................................................................................... 40
EN
TS
2

1
.
1. Preface
Thank you for choosing the Chiltrix DC – Inverter hydronic fan coil.
The manual includes necessary information concerning correct installation, operation, and
maintenance of units. Before installing or operating machines, please carefully read this manual.
When you are installing the vertical water fan coil, connecting the water circuit, or wiring electric or
electronic devices, please adhere to the instructions listed in this manual. Do not power on or test
machines until the installation is complete.
Chiltrix reserves the right to change the specification and design of units which may lead to content
change. Always use the latest version of this manual, the version number is listed on the front page.
1. Production Introduction
Our vertical water fan coil is energy-saving and environmentally friendly equipment. It not only has
compact structure and beautiful appearance, but also occupies little space and is easy to
The vertical fan coil is not only for your home, but also for hotels, offices, restaurants and wherever
you need a comfortable climate.
Model
Net Dimension
(inch: L/W/H)
Net weight / Gross weight
(lb.)
Power Supply
CXI34
27.5 / 5.25 / 25.75
28.7 / 32
110V-1ph-50-60Hz
CXI65
35.25 / 5.25 / 25.75
37.5 / 41.9
110V-1ph-50-60Hz
CXI85
43.25 / 5.25 / 25.75
44.1 / 48.5
110V-1ph-50-60Hz
CXI120
51. / 5.25 / 25.75
50.7 / 57.3
110V-1ph-50-60Hz
CXI148
59.0 / 5.25/25.75
73.8 / 81.1
110V-1ph-50-60Hz
CHAPTER 1 GENERAL INTRODUCTION
3. Measurements
3

Vertical Fan Coil
Installation Template
Drain Pipe
Brackets
Toggle Bolts
Screws
Screw Caps
Remote
Controller
Accessories
The following assemblies are included in the box.
Inspecting and Handling the Unit
After delivery, the package should be checked and any damage should be reported immediately to
the carrier claims agent.
When handling the unit, please take into account the following:
4

4. Product Features
Extremely compact structure, attractive cabinet, and easy to transport.
It can control the temperature both in summer and winter.
Uses a DC fan motor combined with new air-guide technology makes for low noise
ope r a tio n .
Our air exchanger (fin-coil) has a hydrophilic coating.
All units undergo general and operational testing before they are prepared for shipping.
5. Safety Precautions
5

INSTALLATION
Meaning
Meaning
OPERATION
Be sure to use a dedicated circuit breaker, failure to
do so may lead to electrical shock or fire.
Make sure the base or pad of the heat pump is strong
enough to avoid the unit tipping over.
Need circuit breaker
Check the installation
Switch off the unit
Prohibit
Please check the installation base for tilting on a
regular basis, cracked or tilting should be replaced.
Please switch off the power before cleaning or
Please use a suitable breaker and copper wire for the
power connection.
Warning:
Remember that some fundamental safety rules should be followed when using a product that
uses electricity and water, such as:
It is dangerous to touch the appliance with wet hands or body when barefoot.
It is dangerous to carry out any cleaning before having disconnected the appliances from the
electricity power supply by turning the system master switch to OFF.
It is dangerous to modify the safety or adjustment devices or adjust without authorization and
indication of the manufacturer.
It is dangerous to pull, cut or knot the electrical cables coming out of the appliance, even if it is
disconnected from the power supply.
It is dangerous to poke objects or anything else through the inlet or outlet grills.
It is dangerous to dispose of or leave in the reach of children the packaging materials which
could become a source of danger.
It is dangerous to climb onto the appliance or rest any object on it.
It is dangerous to touch the unit with hands directly as the external parts of the appliance can
reach temperatures of more than 158°F.
This appliance is not intended for use by persons (including children) with reduced physical,
sensory or mental capabilities, or lack of experience and knowledge, unless they have been
given supervision or instruction concerning use of the appliance by a person responsible for
their safety.
Children should be supervised to ensure that they do not play with the appliance.
If the supply cord is damaged, it must be replaced by the manufacturer, its service agent or
similarly qualified persons in order to avoid a hazard.
The appliance shall be installed in accordance with local and NEC wiring regulations.
6

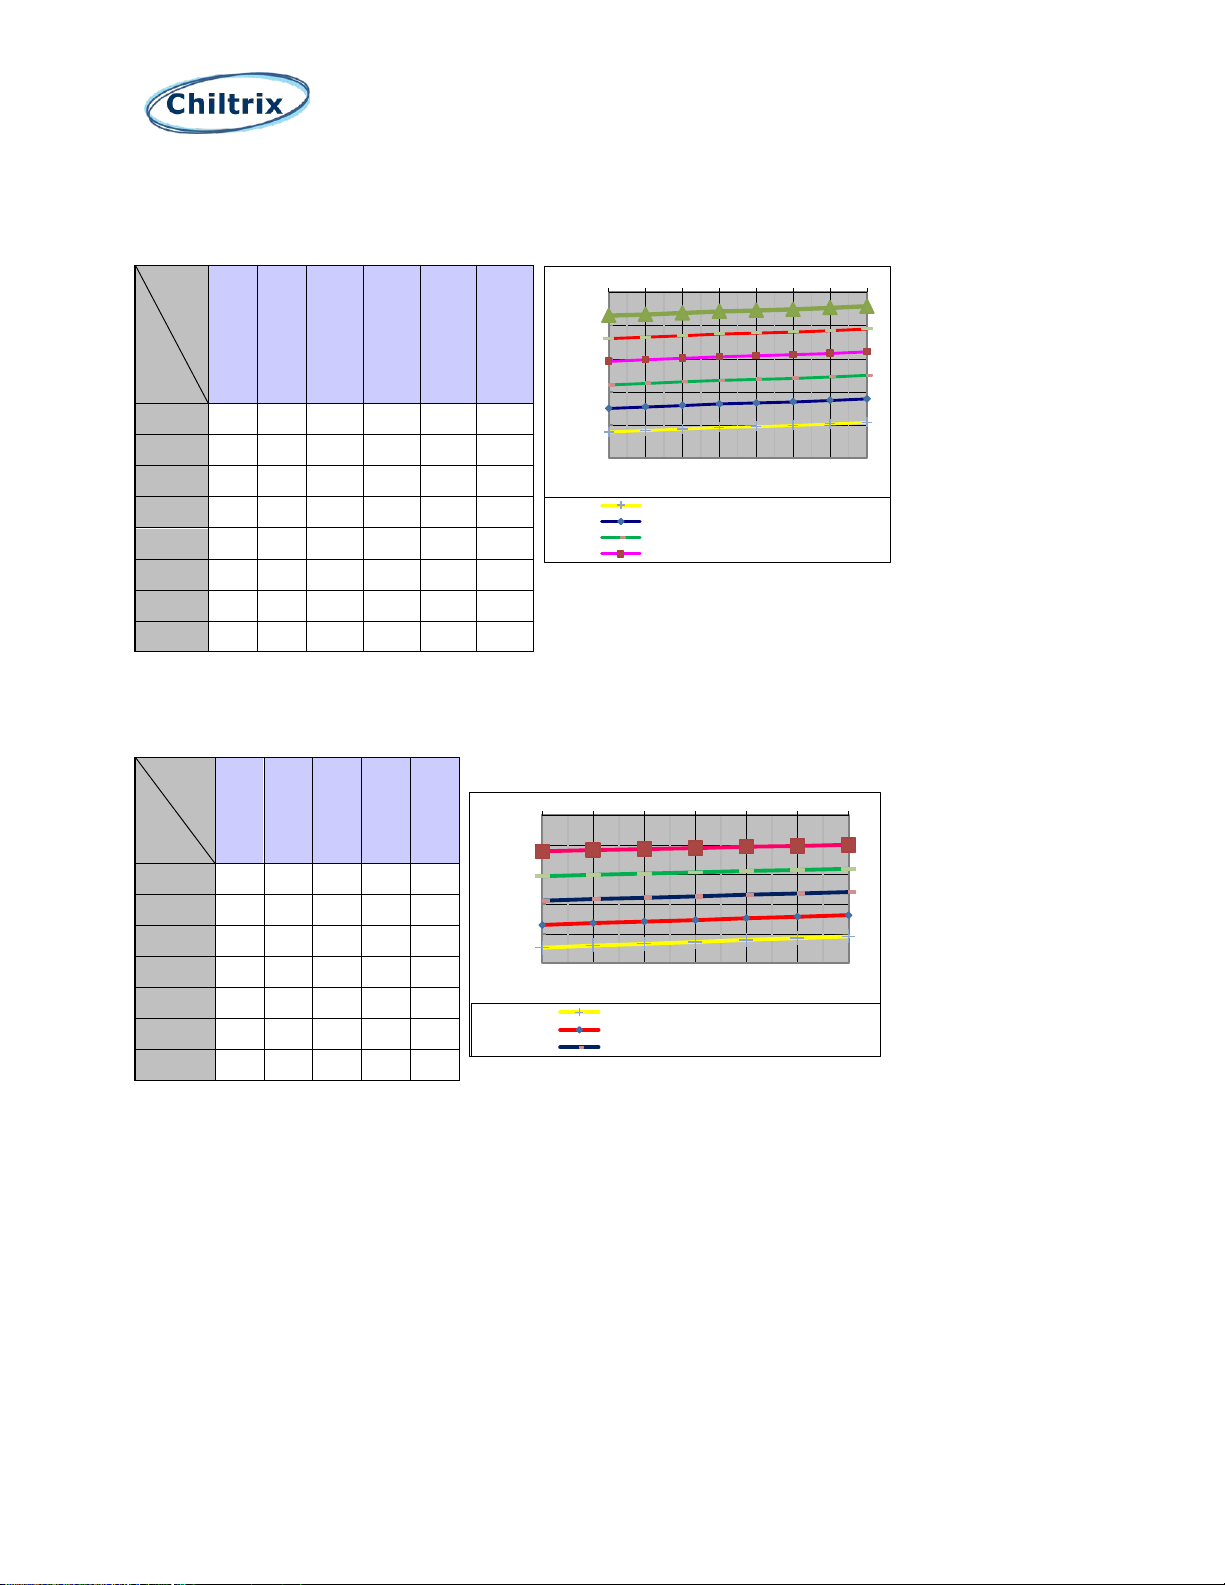
CXI-34 Performance curve
(at 2.4GPM per each 12,000BTU) Temps in F
Heating capacity performance data and curve
Entering
water
Indoor air
95
104
113
122
131
140
63
2802
3556
4309
5062
6205
7348
64
2626
3375
4124
4873
6043
7214
66
2441
3194
3947
4701
5857
7014
68
2260
3013
3767
4520
5667
6814
70
2152
2897
3643
4388
5534
6680
72
2035
2778
3521
4264
5405
6546
73
1843
2599
3354
4109
5228
6346
75
1661
2417
3174
3930
5038
6146
Cooling capacity performance data and curve
Entering
Water
Indoor air
44
49
54
59
64
75.2/62.6
3135
2712
2381
2067
1778
77/64.4
3271
2830
2484
2156
1855
78.8/64.4
3376
2920
2564
2225
1914
80.6/67.1
3480
3010
2643
2294
1973
82.4/68
3615
3127
2746
2383
2050
84.2/69.8
3717
3215
2823
2450
2107
86/71.6
3828
3311
2907
2523
2170
1500
2000
2500
3000
3500
4000
75.2/62.6 77/64.4 78.8/64.4 80.6/67.1 82.4/68 84.2/69.8 86/71.6
Cooling capacity(Btu/h)
Indoor Air DB/WB(℉)
Performance curve
"Entering water 44℉
"Entering water 49℉”
Entering water 54℉
Entering water 59℉ Entering water 64℉
1000
2000
3000
4000
5000
6000
7000
8000
62.6 64.4 66.2 68 69.8 71.6 73.4 75.2
Heatting capacity(Btu/h)
Indoor air temperature (℉)
Performance curve
Entering water 95℉ Entering water104℉
Entering water 113℉ Entering water122℉
Entering water 131℉ Entering water 140℉
CHAPTER 2
PERFORMANCE AND SPECIFICATION
7

CXI-34
The leaving water temperature data – Heating
Entering
water
Indoor air
95
104
113
122
131
140
63
87.0
93.9
100.8
107.6
113.4
119.1
64
87.5
94.4
101.3
108.1
113.8
119.5
66
88.1
94.9
101.8
108.6
114.3
120.1
68
88.6
95.4
102.3
109.2
114.9
120.6
70
88.9
95.8
102.6
109.5
115.3
121.0
72
89.2
96.1
103.0
109.9
115.6
121.4
73
89.8
96.6
103.5
110.3
116.1
122.0
75
90.3
97.1
104.0
110.8
116.7
122.5
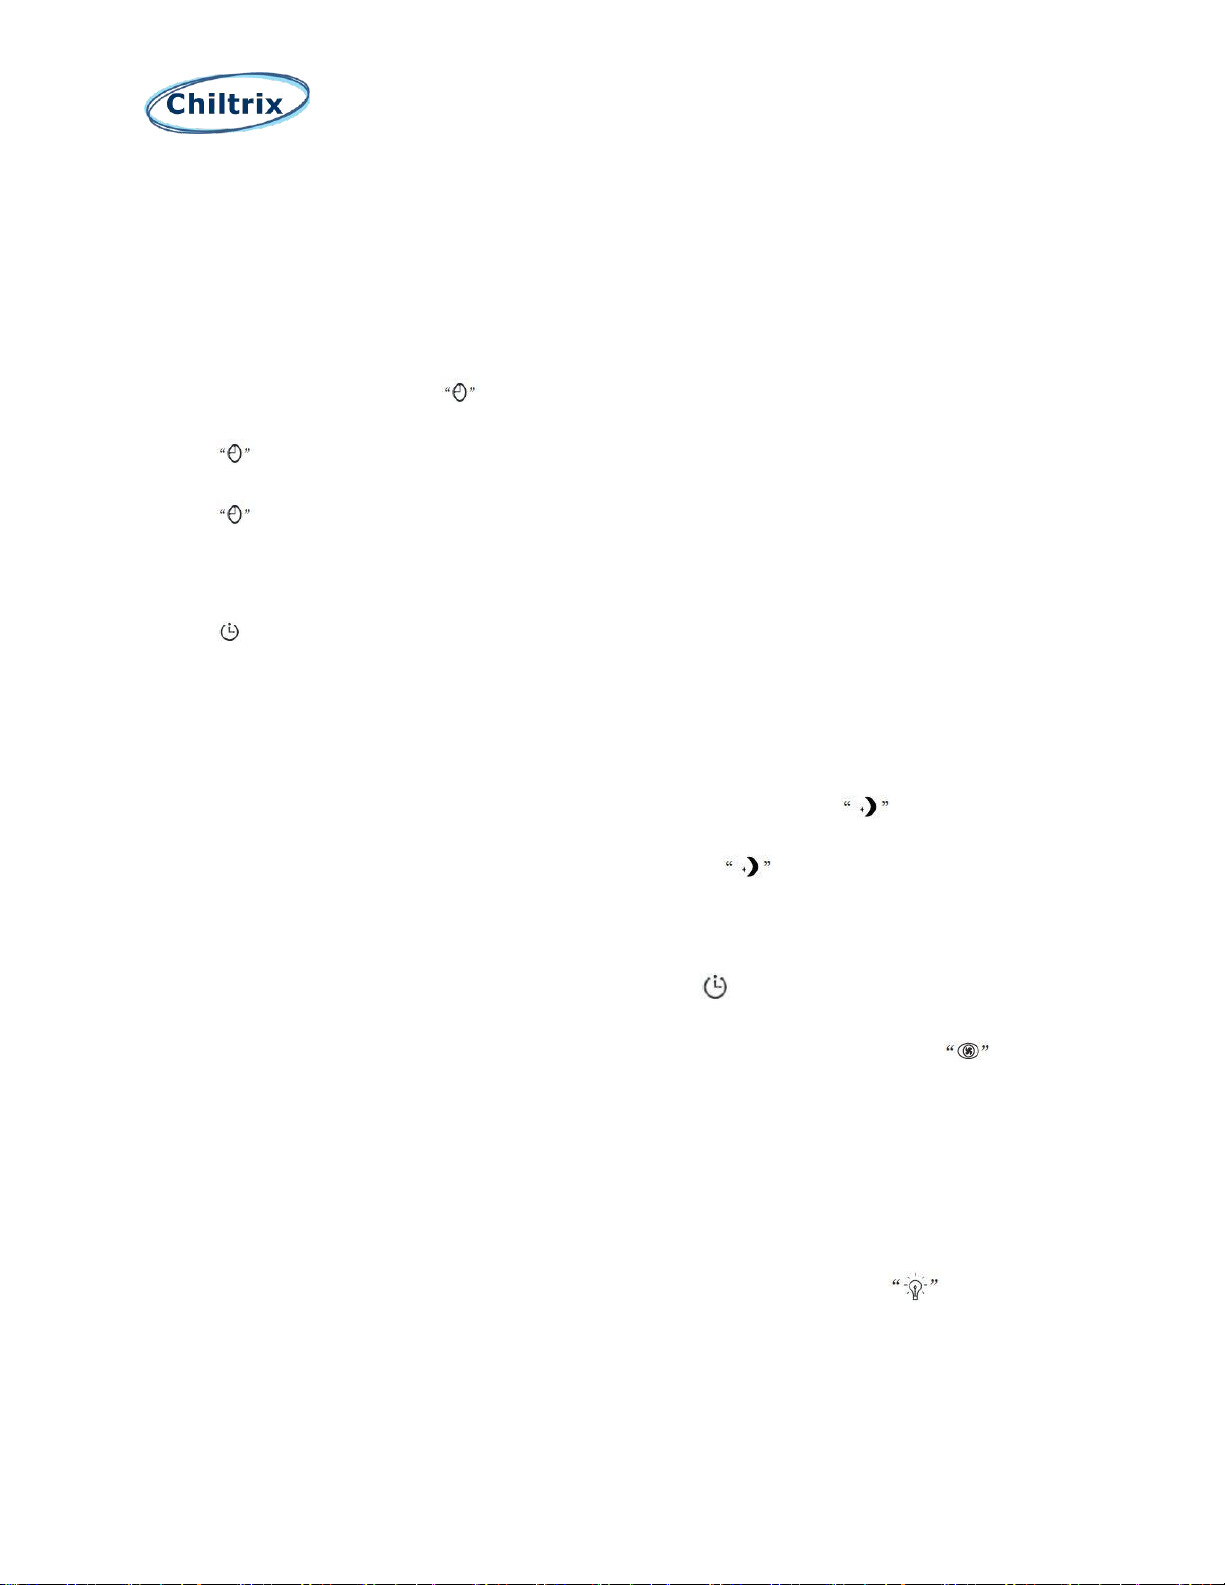
The leaving water temperature data – Cooling
Entering
water
Indoor air
44
49
54
59
64
75.2/62.6
52.9
56.7
60.8
64.9
69.1
77/64.4
53.3
57.0
61.1
65.1
69.3
78.8/64.4
53.6
57.3
61.3
65.3
69.4
80.6/67.1
53.9
57.6
61.5
65.5
69.6
82.4/68
54.3
57.9
61.8
65.8
69.8
84.2/69.8
54.6
58.1
62.0
66.0
70.0
86/71.6
54.9
58.4
62.3
66.2
70.2
80
90
100
110
120
130
62.6 64.4 66.2 68 69.8 71.6 73.4 75.2
The leaving water temperture
Indoor air temperature (℉)
Performance curve
Entering water 95℉
Entering water104℉
Entering water 113℉
Entering water122℉
Entering water 131℉
45
50
55
60
65
70
75
80
75.2/62.6 78.8/64.4 82.4/68 86/71.6
The leaving water temperture
Indoor air temperature (℉)
Performance curve
Entering water 44℉
Entering water49℉
Entering water 54℉
Entering water 59℉
8

CXI-65 Performance curve
(at 2.4GPM per each 12,000BTU) Temps in F
Heating capacity performance data and curve
Entering
water
Indoor air
95
104
113
122
131
140
63
5270
6687
8103
9520
10535
11550
64
4939
6347
7755
9163
10252
11340
66
4590
6007
7423
8840
9933
11025
68
4250
5667
7083
8500
9605
10710
70
4047
5449
6851
8252
9376
10500
72
3827
5224
6621
8019
9154
10290
73
3467
4887
6307
7727
8851
9975
75
3123
4546
5969
7391
8526
9660
Cooling capacity performance data and curve
Entering
water
Indoor
air
44
49
54
59
64
75.2/62.6
5974
5167
4537
3938
3387
77/64.4
6232
5391
4733
4108
3533
78.8/64.4
6431
5563
4884
4240
3646
80.6/67.1
6630
5735
5035
4371
3759
82.4/68
6888
5958
5231
4541
3905
84.2/69.8
7081
6125
5378
4668
4014
86/71.6
7293
6308
5539
4808
4135
3000
5000
7000
9000
11000
13000
62.6 64.4 66.2 68 69.8 71.6 73.4 75.2
Heatting capacity(Btu/h)
Indoor air temperature (℉)
Performance curve
Entering water 95℉ Entering water104℉
Entering water 113℉ Entering water122℉
Entering water 131℉ Entering water 140℉
3000
3500
4000
4500
5000
5500
6000
6500
7000
7500
75.2/62.6 77/64.4 78.8/64.4 8 0.6/67.1 82.4/68 84 .2/69.8 86/71.6
Cooling capacity(Btu/h)
Indoor Air DB/WB(℉)
Performance curve
"Entering water 44℉
"Entering water 49℉”
Entering water 54℉ Entering water 59℉
9

CXI-65
The leaving water temperature data – Heating
Entering
water
Indoor air
95
104
113
122
131
140
63
87.3
94.2
101.1
108.0
115.5
123.0
64
87.7
94.7
101.6
108.5
115.9
123.3
66
88.3
95.2
102.1
109.0
116.4
123.8
68
88.8
95.7
102.6
109.5
116.9
124.3
70
89.1
96.0
102.9
109.9
117.2
124.6
72
89.4
96.3
103.3
110.2
117.6
124.9
73
89.9
96.8
103.7
110.7
118.0
125.4
75
90.4
97.3
104.2
111.1
118.5
125.8
The leaving water temperature data – Cooling
Entering
water
Indoor
air
44
49
54
59
64
75.2/62.6
52.8
56.6
60.7
64.8
69.0
77/64.4
53.1
56.9
60.9
65.0
69.2
78.8/64.4
53.4
57.2
61.2
65.2
69.3
80.6/67.1
53.7
57.4
61.4
65.4
69.5 82.4/68
54.1
57.7
61.7
65.7
69.7
84.2/69.8
54.4
58.0
61.9
65.8
69.9
86/71.6
54.7
58.3
62.1
66.1
70.1
80
90
100
110
120
130
62.6 64.4 66.2 68 69.8 71.6 73.4 75.2
The leaving water temperture
Indoor air temperature (℉)
Performance curve
Entering water 95℉
Entering water104℉
Entering water 113℉
Entering water122℉
50
60
70
80
90
100
110
120
130
62.6 64.4 66.2 68 69.8 71.6
Heatting capacity
(Btu/h)
Indoor air temperature (℉)
Performance curve
50
55
60
65
70
75
80
75.2/62.6 77/64.4 78.8/64.4 80.6/67.1 82.4/68 84.2/69.8 86/71.6
The leaving water temperture
Indoor air temperature (℉)
Performance curve
Entering water 44℉
Entering water49℉
Entering water 54℉
Entering water 59℉
10

Cooling capacity performance data and curve
Entering
water
Indoor
air
44
49
54
59
64
75.2/62.6
7812
6757
5933
5150
4429
77/64.4
8150
7050
6190
5373
4620
78.8/64.4
8410
7275
6387
5544
4768
80.6/67.1
8670
7500
6585
5715
4915
82.4/68
9007
7791
6841
5938
5106
84.2/69.8
9260
8010
7032
6104
5250
86/71.6
9537
8250
7243
6287
5407
CXI-85 Performance curve
(at 2.4GPM per each 12,000BTU) temps in F
Heating capacity performance data and curve
Entering
water
Indoor air
95
104
113
122
131
140
63
7068
8968
10868
12768
14799
16830
64
6623
8512
10401
12289
14407
16524
66
6156
8056
9956
11856
13961
16065
68
5700
7600
9500
11400
13503
15606
70
5428
7308
9188
11068
13184
15300
72
5132
7006
8881
10755
12874
14994
73
4649
6554
8459
10364
12449
14535
75
4189
6097
8005
9913
11995
14076
3000
5000
7000
9000
11000
13000
15000
17000
62.6 64.4 66.2 68 69.8 71.6 73.4 75.2
Heatting capacity(Btu/h)
Indoor air temperature (℉)
Performance curve
Entering water 95℉ Entering water104℉
Entering water 113℉ Entering water122℉
Entering water 131℉ Entering water 140℉
4000
4500
5000
5500
6000
6500
7000
7500
8000
8500
9000
9500
10000
75.2/62.6 77/64.4 78.8/64.4 8 0.6/67.1 82.4/68 84 .2/69.8 86/71.6
Cooling capacity(Btu/h)
Indoor Air DB/WB(℉)
Performance curve
"Entering water 44℉
"Entering water 49℉”
Entering water 54℉
Entering water 59℉ Entering water 64℉
11

CXI-85
The leaving water temperature data – Heating
Entering
water
Indoor air
95
104
113
122
131
140
63
87.2
94.0
100.9
107.8
114.6
121.3
64
87.6
94.5
101.5
108.4
115.0
121.7
66
88.2
95.1
101.9
108.8
115.5
122.2
68
88.7
95.6
102.5
109.3
116.0
122.7
70
89.0
95.9
102.8
109.7
116.4
123.0
72
89.3
96.2
103.1
110.1
116.7
123.4
73
89.8
96.7
103.6
110.5
117.2
123.9
75
90.3
97.2
104.1
111.0
117.7
124.4
The leaving water temperature data – Cooling
Entering
water
Indoor
air
44
49
54
59
64
75.2/62.6
52.7
56.5
60.6
64.7
68.9
77/64.4
53.0
56.8
60.9
65.0
69.1
78.8/64.4
53.3
57.1
61.1
65.2
69.3
80.6/67.1
53.6
57.3
61.3
65.3
69.5 82.4/68
54.0
57.6
61.6
65.6
69.7
84.2/69.8
54.3
57.9
61.8
65.8
69.8
86/71.6
54.6
58.2
62.0
66.0
70.0
80
90
100
110
120
130
62.6 64.4 66.2 68 69.8 71.6 73.4 75.2
The leaving water temperture
Indoor air temperature (℉)
Performance curve
Entering water 95℉
Entering water104℉
Entering water 113℉
Entering water122℉
Entering water 131℉
50
55
60
65
70
75
80
75.2/62.6 77/64.4 78.8/64.4 80.6/67.1 82.4/68 84.2/69.8 86/71.6
The leaving water temperture
Indoor air temperature (℉)
Performance curve
Entering water 44℉
Entering water49℉
Entering water 54℉
Entering water 59℉
12

CXI-120 Performance curve
(at 2.4GPM per each 12,000BTU) Temps in F
Heating capacity performance data and curve
Entering water
Indoor air
95
104
113
122
131
140
63
9052
11485
13919
16352
19022
21692
64
8483
10901
13320
15739
18518
21298
66
7884
10317
12751
15184
17945
20706
68
7300
9733
12167
14600
17357
20114
70
6951
9359
11767
14175
16947
19720
72
6573
8973
11373
13774
16550
19326
73
5955
8394
10833
13273
16003
18734
75
5365
7808
10252
12696
15419
18142
Cooling capacity performance data and curve
Entering
water
Indoor
air
44
49
54
59
64
75.2/62.6
11028
9539
8376
7270
6252
77/64.4
11506
9952
8738
7585
6523
78.8/64.4
11873
10270
9017
7827
6731
80.6/67.1
12240
10588
9296
8069
6939
82.4/68
12716
10999
9657
8383
7209
84.2/69.8
13072
11308
9928
8618
7411
86/71.6
13464
11646
10226
8876
7633
5000
7000
9000
11000
13000
15000
17000
19000
21000
23000
25000
62.6 64.4 66.2 68 69.8 71.6 73.4 75 .2
Heatting capacity(Btu/h)
Indoor air temperature (℉)
Performance curve
Entering water 95℉ Entering water104℉
Entering water 113℉ Entering water122℉
Entering water 131℉ Entering water 140℉
5000
6000
7000
8000
9000
10000
11000
12000
13000
14000
15000
75.2/62.6 77/64.4 78.8/64.4 80.6/67.1 82.4/68 84.2/69.8 86/71.6
Cooling capacity(Btu/h)
Indoor Air DB/WB(℉)
Performance curve
"Entering water 44℉
"Entering water 49℉”
Entering water 54℉
Entering water 59℉ Entering water 64℉
13
CXI-120
The leaving water temperature data – Heating
Entering
water
Indoor
air
95
104
113
122
131
140
63
87.9
95.0
102.1
109.2
116.1
123.0
64
88.3
95.4
102.5
109.6
116.5
123.3
66
88.8
95.9
103.0
110.1
116.9
123.7
68
89.3
96.4
103.5
110.5
117.4
124.2
70
89.5
96.7
103.8
110.9
117.7
124.5
72
89.8
97.0
104.1
111.2
118.0
124.8
73
90.3
97.4
104.5
111.6
118.4
125.3
75
90.8
97.9
105.0
112.0
118.9
125.8
The leaving water temperature data – Cooling
Entering
water
Indoor
air
44
49
54
59
64
75.2/62.6
52.6
56.5
60.6
64.7
68.9
77/64.4
53.0
56.8
60.9
64.9
69.1
78.8/64.4
53.3
57.1
61.1
65.1
69.3 80.6/67.1
53.6
57.3
61.3
65.3
69.4 82.4/68
54.0
57.6
61.6
65.6
69.7 84.2/69.8
54.3
57.9
61.8
65.8
69.8 86/71.6
54.6
58.1
62.0
66.0
70.0
80
90
100
110
120
130
62.6 64.4 66.2 68 69.8 71.6 73.4 7 5 .2
The leaving water temperture
Indoor air temperature (℉)
Performance curve
Entering water 95℉
Entering water104℉
Entering water 113℉
Entering water122℉
50
55
60
65
70
75
75.2/62.6 78.8/64.4 82.4/68 86/71.6
The leaving water
temperture
Indoor air temperature (℉)
Performance curve
Entering water 44℉
Entering water49℉
Entering water 54℉
14

CXI-148 Performance curve
(at 2.4GPM per each 12,000BTU) Temps in F
Heating capacity performance data and curve
Entering
water
Indoor air
95
104
113
122
131
140
63
11036
14003
16969
19936
23993
28050
64
10342
13291
16240
19188
23364
27540
66
9612
12579
15545
18512
22644
26775
68
8900
11867
14833
17800
21905
26010
70
8475
11410
14346
17282
21391
25500
72
8014
10940
13866
16792
20891
24990
73
7260
10234
13208
16182
20203
24225
75
6540
9520
12499
15478
19469
23460
Cooling capacity performance data and curve
Entering
water
Indoor
air
44
49
54
59
64
75.2/62.6
13605
11768
10333
8969
7713
77/64.4
14194
12278
10780
9357
8047
78.8/64.4
14647
12670
11124
9656
8304
80.6/67.1
15100
13062
11468
9954
8561
82.4/68
15687
13569
11914
10341
8893
84.2/69.8
16127
13950
12248
10631
9143
86/71.6
16610
14368
12615
10950
9417
5000
10000
15000
20000
25000
30000
35000
62.6 64.4 66.2 68 69.8 71.6 73.4 75.2
Heatting capacity(Btu/h)
Indoor air temperature (℉)
Performance curve
Entering water 95℉ Entering water104℉
Entering water 113℉ Entering water122℉
Entering water 131℉ Entering water 140℉
6000
8000
10000
12000
14000
16000
18000
75.2/62.6 77/64.4 78.8/64.4 80.6/67.1 82.4/68 84.2/69.8 86/71.6
Cooling capacity(Btu/h)
Indoor Air DB/WB(℉)
Performance curve
"Entering water 44℉
"Entering water 49℉”
Entering water 54℉
Entering water 59℉ Entering water 64℉
15

The leaving water temperature data – Cooling
Entering
water
Indoor
air
44
49
54
59
64
75.2/62.6
52.7
56.5
60.6
64.7
68.9 77/64.4
53.1
56.9
60.9
65.0
69.2 78.8/64.4
53.4
57.1
61.1
65.2
69.3 80.6/67.1
53.7
57.4
61.3
65.4
69.5 82.4/68
54.0
57.7
61.6
65.6
69.7 84.2/69.8
54.3
57.9
61.8
65.8
69.9 86/71.6
54.6
58.2
62.1
66.0
70.0
CXI-148
The leaving water temperature data – Heating
Entering
Water
Indoor air
95
104
113
122
131
140
63
87.9
95.0
102.1
109.2
115.6
122.0
64
88.4
95.5
102.6
109.7
116.0
122.3
66
88.8
95.9
103.0
110.1
116.5
122.8
68
89.3
96.4
103.5
110.6
117.0
123.3
70
89.6
96.7
103.8
110.9
117.3
123.7
72
89.9
97.0
104.1
111.2
117.6
124.0
73
90.3
97.4
104.5
111.6
118.0
124.5
75
90.8
97.9
105.0
112.1
118.5
125.0
80
90
100
110
120
130
62.6 64.4 66.2 68 69.8 71.6 73.4 75.2
The leaving water temperture
Indoor air temperature (℉)
Performance curve
Entering water 95℉ Entering water104℉
Entering water 113℉ Entering water122℉
Entering water 131℉ Entering water 140℉
50
55
60
65
70
75
80
75.2/62.6 77/64.4 78.8/64.4 80.6/67.1 82.4/68 84.2/69.8 86/71.6
The leaving water
temperture
Indoor air temperature (℉)
Performance curve
Entering water 44℉ Entering water49℉
Entering water 54℉ Entering water 59℉
Entering water 64℉
16

Please note;
The chart above refers to GPM per Fan Coil and not GPM per CX30
17

CHAPTER 3
INSTALLATION
1. Installation precaution
To ensure that the installation is performed correctly and the unit operates at optimum
performance, carefully follow the instructions in this manual. Not following the instructions can
cause the unit to malfunction and also invalidate the warranty. Chiltrix will not be responsible
for any damage to persons, animals or property caused by improper installation or operation.
It is important that the electrical installation is compliant with all NEC and local electrical codes.
The appliance must be installed in a suitable position for easy access when cleaning the filter and
general maintenance.
2. Installation position- Wall Mount
The minimum distance from the floor to the lower line must be 3.25”. The minimum distance of
the air outlet grill from any possible obstacle must be 5.5”. The minimum distance between the
front grill and obstacles is 16”. The minimum distance between side and side wall must be at
least 1”, to allow you to remove the cover.
18

3. Removing the side covers
With the fan coil lying face down on the box, locate the rubber plug on the outside cover and
remove the screw behind it.
Gently tap the bottom of the side cover and remove the cover. Do the same for the right side.
19

4. Wall Installation or Vertical Floor Mount
Using the paper template, trace the position of the wall (fig.10). Drill the holes and insert the
anchor bolts (2 for each bracket) (fig.11 ref. A); attach the bracket (fig.11 ref. B) included with
the FCU. The bracket is a one piece that is shipped attached to the back of the fan coil.
.
Attaching the Feet
Before you install the unit on the floor, the feet should be mounted. Lay the unit down on a flat
surface. Take out the screws and two feet from the accessories bag, then line up the screw
holes, and attach the feet with the screws. (See fig.12 and fig.13)
20

Do not over-tighten the screws so that the brackets can be adjusted with a spirit level (fig. 15).
Then fully tighten the four screws to block the two brackets. Mount the unit, checking that it fits
correctly onto the brackets and that it is stable Fig 16.
(fig. 15) (fig. 16)
Mount the Indoor Unit Level on the Wall
Wall mounting
1. Using the paper template, position the connecting pipes, the condensate discharging
pipe and the wall box, including the power supply cable. Then mount the fastening
bracket, according to the holes on the template.
2. The bracket must be fastened to the wall by the expansion screws included. To fasten
the appliance to a wooden wall, use suitable screws.
3. Drill the holes in the wall and fasten the bracket without tightening the screws.
4. Use a level to position the bracket properly (level).
5. Tighten the four expansion screws.
6. Make sure that bracket are stable, by pushing it sideways, upwards and downwards.
7. Mount the unit on the bracket.
21

5. Hydronic Connections
Floor installation& wall installation.
To connect the inlet and outlet water pipes, refer to the figures below.
22

6. Condensate discharge, floor or wall mount only.
The condensate discharge network must be properly sized, (minimum pipe diameter 5/8” OD)
and the piping must be positioned in such a way as to keep an inclination, of at least 1%. The
drain pipe is connected to the pan, positioned under the heat exchanger coil (drain 1). If the
condensate is discharged into the drainage system, it is recommended to install a p-trap to
prevent any pipe smell from entering the rooms. The p-trap must be lower than the drainage
pan.
Condensate flow Connect condensate hose to DRAIN 1 for floor or wall mount
23

7. Ceiling Installation
7.1 Minimum installation distances-------horizontal Ceiling installation
Figure 24 indicates the minimum mounting distances between the wall-mounted
Fan Coil and furniture present in the room.
To remove the side opening refer to page 19 for detailed instructions.
Dismount the upper grill (fig.25 ref. A) by unscrewing the attaching screws.
Remove the rubber plug (fig. 25ref. B) that protects the screw (fig.25 ref. C) and remove the
screw. Move the side panel slightly to the side and lift it out (fig. 25ref.D& E).
24

7.2 Ceiling Mounting
Adjust the units installation angle so that the unit is level and ensure the condensation drainpipe is connected to the 5/8” OD port for condensation water draining when mounted on the
ceiling (fig. 27).
Mount the unit, checking that it fits correctly on the brackets and it is stable (fig. 28 and 27).
25

8. Hydronic connections horizontal installation
8.1 Refer to fig. 29 and fig. 30 to connect the inlet and outlet lines.
Inlet and outlet water lines are ¾” NPT.
Fig. 29 Fig. 30
26

9. Maintenance
Cleaning the Filter
To keep the unit problem free, it is suggested to maintain and clean the unit every six months.
Please take the following steps to clean the strainer regularly:
1) Remove the plastic tape which is used to secure the air inlet grill during shipping.
(A Fig.33)
2) Next, lift the grill upward about ¼” (Fig.34), the grill will pop-up automatically. (Fig.35)
3) Remove the grill (Fig.36), and take out the strainer (Fig.37), the strainer can be washed with
water. (Fig.38).
4) Replace the grill and strainer referring to (Fig.37).
27

5) Set the filter net and the air return grille to the original place. (Fig.39)。
6)Clean up the units outer cover with a soft damp rag (Fig. 40). To protect the paint, use a
mild detergent.
Warning: Cut off power supply before cleaning or maintaining the unit.
28

CHAPTER 4
Front Panel Operation
1. Press this button and select the mode you want to set.
Cooling mode: Cooling indicator light keeps on (green)
Heating mode: Heating indicator light keeps on (red)
Automatic mode: Cooling indicator light and heating indicator light flashes in turn.
Ventilating mode: Cooling and heating indicator lights are off, the fan indicator light keeps
on according to the chosen fan speed.
Dehumidifying mode: Cooling indicator light keeps on for 2 seconds and off for 1 second.
Note: Changes of mode could only be done on main interface.
Press this button and select the fan speed you want to set.
High fan speed: High fan speed indicator light keeps on (blue)
Medium fan speed: Medium fan speed indicator light keeps on (yellow)
Low fan speed: Low fan speed indicator light keeps on (orange)
Automatic: High fan speed indicator light, medium fan speed indicator light and low fan
speed indicator light flashes in turn.
Note: Changes of fan speed could only be done on main interface. You could not choose the
automatic fan speed when in ventilating mode. When in dehumidifying mode, the fan speed
is fixed in low speed. Changes of fan speed could only be done on main interface.
Note: In auto mode, the green (cooling) and red (heating) will flash alternately.
Ventilation and dehumidifying modes can only be selected with the remote control.
29

You could check the setting temperature of unit by pressing this button once.
You could increase the setting temperature by pressing this button again.
You could check the setting temperature of unit by pressing this button once.
You could increase the setting temperature by pressing this button again.
2. Temperature Setting
30

31

Notes:
1) The operation of all parameter settings is the same.
2) If you press the on/off button when the controller is showing the parameter value, it will
switch back to the main interface without saving the setting.
3) If there is no operation in 20 seconds, system would remember the setting and switch back
to the main interface.
32

3. Parameters
Fan coil parameter list for MD1001 controller (V2.0)
No.
Meaning
Range
Default
Level
01
Target temp upper limit, Maximum Temperature, user setting
60°F ~ 205°F
86°F
Factory
02
Target temp lower limit, Minimum Temperature, user setting
60°F ~ 205°F
46°F
Factory
03
Target temp in cooling mode. If the room temp is ≥ 79°F, the
fan will come on. If the room temp is ≤ 78°F, the fan will turn
off.
78°F
End user
04
Target temp in heating mode. If the room temp is ≤ 67°F, the
fan will come on. If the room temp is ≥ 68°F, the fan will turn
off.
68°F
End user
05
Automatic mode target cooling temp. If the room temp is
≥ 79°F the fan will come on in cooling mode. If the room temp
is ≤ 78°F and parameter 20=1,the fan coil will run for 1 min.
every 15 min.
78°F
Factory
06
Automatic mode target heating temp. . If the room temp is
≤67°F the fan will come on in Heating mode. If the room temp
is 68°F and parameter 20=1,the fan coil will run for 1 min.
every 15 min.
68°F
Factory
07
In heating mode, if the coil temp is lower than Parameter 07,
the fan motor will stop. See CX30 heating set temperature.
41°F ~ 104°F
77°F
Factory
08
In cooling mode, if the coil temp. is higher than 68°F, the fan
motor will stop. (1-Yes; 0-No)
0 ~ 1
1
Factory
09
Start the ultra-low fan speed (1-Yes; 0-No)
0 ~ 1
0
Factory
10
Is there a water valve (1-Yes; 0-No)
0 ~ 1
1
Factory
11
Is there floor heating (1-Yes; 0-No)
0 ~ 1
0
Factory
12
Display in Fahrenheit (1-°F; 0-°C)
0 ~ 1
1
Factory
13
Is it the main controller (1-Yes; 0-No)
0 ~ 1
0
Factory
14
Address
1 ~ 99
15
Factory
15
Lock the button (1-Yes; 0-No)
0 ~ 1
0
Factory
16
When the button is locked, is the remote controller working?
(1-Yes; 0-No)
0 ~ 1
1
Factory
17
Is there a password that should be input before locking the
button? (1-Yes; 0-No)
0 ~ 1
0
Factory
18
Password 1
0 ~ 99
50
Factory
19
Password 2
0 ~ 99
50
Factory
20
In standby mode, the fan motor will intermittently turn on
and off. (1-Yes; 0-No)
0 ~ 1
1
Factory
33

4. REMOTE CONTROL
Note:
1) The key “SET” and “OK” are disabled.
2) Take out the batteries if you do not use the remote controller for a long time.
3) Take out the batteries for 35 minutes to reset the remote controller.
34
Using the remote controller
Function of “F.Cool” and “F.Heat”
By pressing the key “F.Cool”, the system will be automatically set to the cooling mode
With a high fan speed.
By pressing the key“F.Heat”, the system will be automatically set to the heating mode
with a high fan speed.
Time Setting
Press and hold the key till the time value flashes, then you can adjust the current
time value by pressing the key “+” or “-”. To save the setting above, please press the key
again. Attention, the 12-hour clock is adopted to show the current time value.
Timing Start-Up or Timing Shut-Down
ON This key is available only when the unit is POWER OFF, but not interruption
of power supply.
TIME ON / 1 One hour after setting Timing Start-Up, the unit will automatically start up.
The number shown stands for the timing hours.
OFF This key is available when the unit is POWERED ON.
TIME OFF / 1 One hour after setting Timing Shut-Down, the unit will automatically shut
down. Also, the number shown stands for the timing hours.
The range of timing is from 1 hour to 11 hours. If the setting value is over 11 hours, the
setting of timing will be cancelled.
Sleeping Function
①To start or cancel the sleeping function, please press the key .
②The sleeping function can only be set in the heating or cooling mode.
③When the sleeping function is activated, the icon will be shown at the top right
corner of the LCD screen which belongs to the remote controller. Meanwhile, “TIME OFF”
and “7”will be shown at the lower right corner of the LCD screen. It means that the unit
will automatically shut down 7 hours after the setting . To change the timing number, even to
cancel the timing function , please press the key “ OFF”.
④1 hour after setting the sleeping function, the wind speed will automatically change to
the low wind speed, but then you can also change the wind speed by press .
⑤In two hours after setting the sleeping function in the cooling mode, the set
temperature will increase 1 ℃ or about 2℉ per hour.
⑥In three hours after setting the sleeping function in the heating mode, the set
temperature will decrease 1 ℃ or about 2℉ per hour .
Switch to Celsius or Fahrenheit
To Switch to Celsius or Fahrenheit, please press the key “C°/F° ”.
LED Screen Light Up or Not
To let the LED Screen of the unit light up or not, please press the key .
35

NO.
Signal
meaning
1
CN2
DC Fan Motor
2
TEMP Sensors
To ambient and coil temperature
3
OUT1
To electromagnetic valve
4 L Hot wire 120 vac Power in
5 N Neutral wire Power in
5. Wiring Diagram
36

6. Standard Fan Coil Loop Pump Wiring
Typical control circuit for adding a second pump to a fan coil Loop using SPST 24vac coil relays.
Relays must have the proper contact load rating for the selected pump.
37

T(⁰F)
R(KΩ)
T(⁰F)
R(KΩ)
T(⁰F)
R(KΩ)
-22.0
63.7306
57.2
7.7643
136.4
1.5636
-20.2
60.3223
59.0
7.4506
138.2
1.5142
-18.4
57.1180
60.8
7.1513
140.0
1.4666
-16.6
54.1043
62.6
6.8658
141.8
1.4206
-14.8
51.2386
64.4
6.5934
143.6
1.3763
-13.0
48.5994
66.2
6.3333
145.4
1.3336
-11.2
46.0860
68.0
6.0850
147.2
1.2923
-9.4
43.7182
69.8
5.8479
149.0
1.2526
-7.6
41.4868
71.6
5.6213
150.8
1.2142
-5.8
39.3832
73.4
5.4048
152.6
1.1771
-4.0
37.3992
75.2
5.1978
154.4
1.1413
-2.2
35.5274
77.0
5.0000
156.2
1.1068
-0.4
33.7607
78.8
4.8108
158.0
1.0734
1.4
32.0927
80.6
4.6298
159.8
1.0412
3.2
30.5172
82.4
4.4566
161.6
1.0100
5.0
29.0286
84.2
4.2909
163.4
0.9800
6.8
27.6216
86.0
4.1323
165.2
0.9509
8.6
26.2913
87.8
3.9804
167.0
0.9228
10.4
25.0330
89.6
3.8349
168.8
0.8957
12.2
23.8424
91.4
3.6955
170.6
0.8695
14.0
22.7155
93.2
3.5620
172.4
0.8441
15.8
21.6486
95.0
3.4340
174.2
0.8196
17.6
20.6380
96.8
3.3113
176.0
0.7959
19.4
19.6806
98.6
3.1937
177.8
0.7730
21.2
18.7732
100.4
3.0809
179.6
0.7508
23.0
17.9129
102.2
2.9727
181.4
0.7293
24.8
17.0970
104.0
2.8688
183.2
0.7086
26.6
16.3230
105.8
2.7692
185.0
0.6885
28.4
15.5886
107.6
2.6735
186.8
0.6690
30.2
14.8913
109.4
2.5816
188.6
0.6502
32.0
14.2293
111.2
2.4934
190.4
0.6320
33.8
13.6017
113.0
2.4087
192.2
0.6144
35.6
13.0057
114.8
2.3273
194.0
0.5973
37.4
12.4393
116.6
2.2491
195.8
0.5808
39.2
11.9011
118.4
2.1739
197.6
0.5647
41.0
11.3894
120.2
2.1016
199.4
0.5492
42.8
10.9028
122.0
2.0321
201.2
0.5342
44.6
10.4399
123.8
1.9656
203.0
0.5196
46.4
9.9995
125.6
1.9015
204.8
0.5055
48.2
9.5802
127.4
1.8399
206.6
0.4919
50.0
9.1810
129.2
1.7804
208.4
0.4786
51.8
8.8008
131.0
1.7232
210.2
0.4658
53.6
8.4385
132.8
1.6680
212.0
0.4533
55.4
8.0934
134.6
1.6149
7. Resistance Chart
38

Malfunction
Code
Cause
Solution
Indoor ambient
P4
Ambient
temperature
Check or replace the
temperature sensor
sensor is in open
circuit
ambient temperature
sensor
or short circuit
P5
Coil temperature
sensor
Check or replace the
Coil temperature
sensor
is in open circuit
Coil temperature
sensor
or short circuit
Motor feedback signal
E0
feedback wire is not
inserted
Check the feedback
wire
well or Fan Motor
failure
or replace the motor
Front air inlet grill
micro switch
Front grill is open, or
sw. is not closed
Close front grill or
replace micro switch
1) When there is a sensor error code, measure the resistance value of the sensor with a multimeter,
and compare the ambient temperature with the table above, then you will know whether the
NTC resistance sensor is faulty.
2) Generally, from above table, you can know the temperature by testing NTC resistance value.
8. Troubleshooting
39

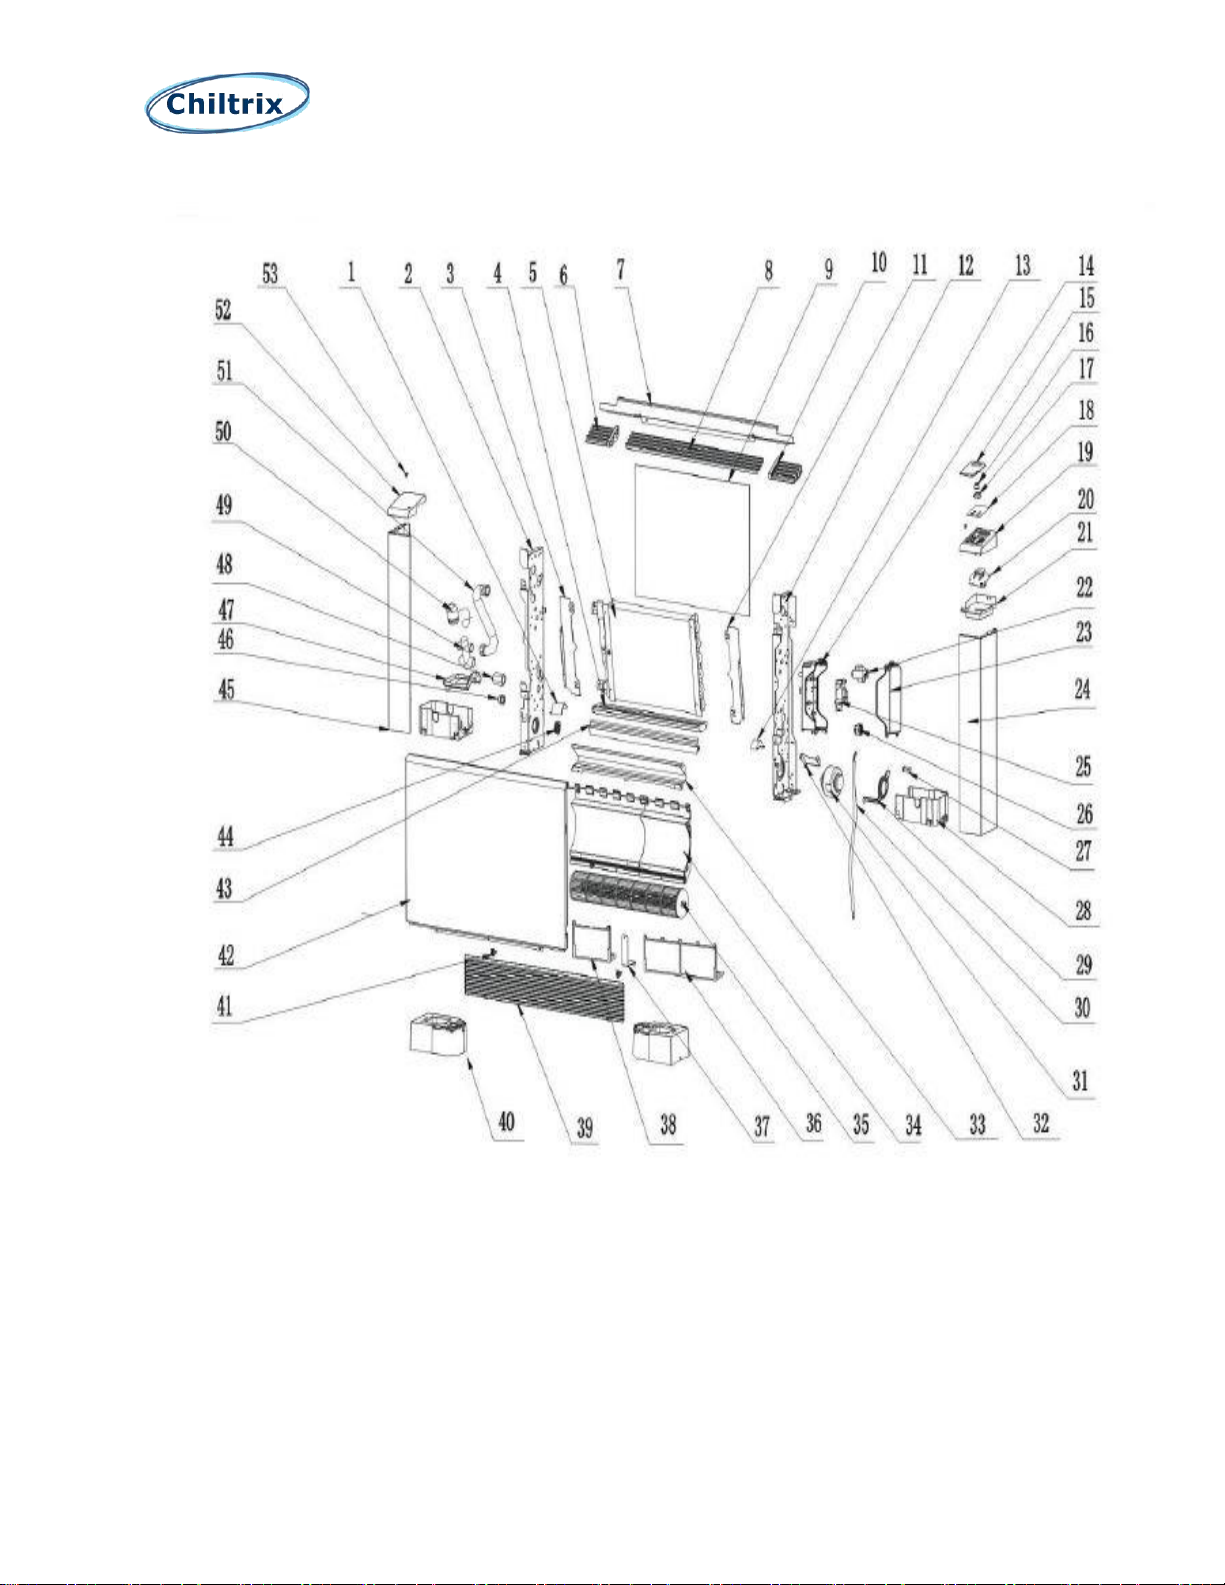
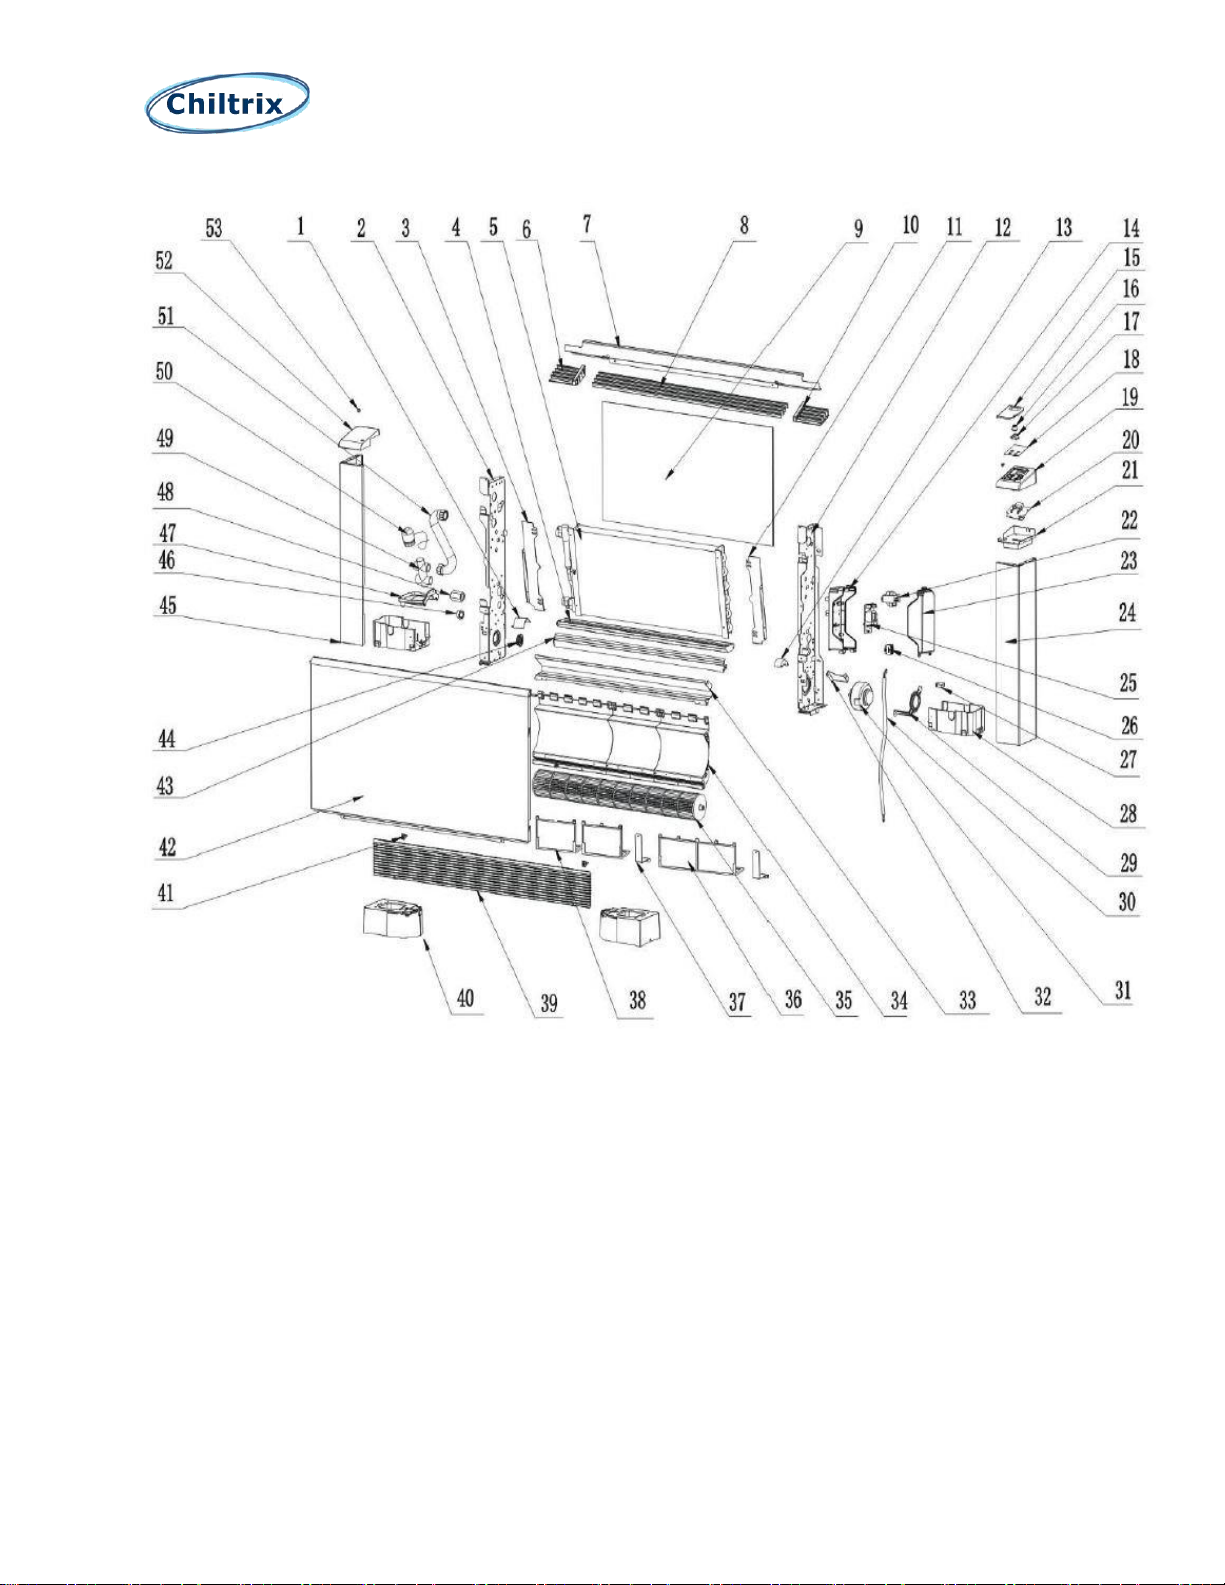
9. Exploded Views
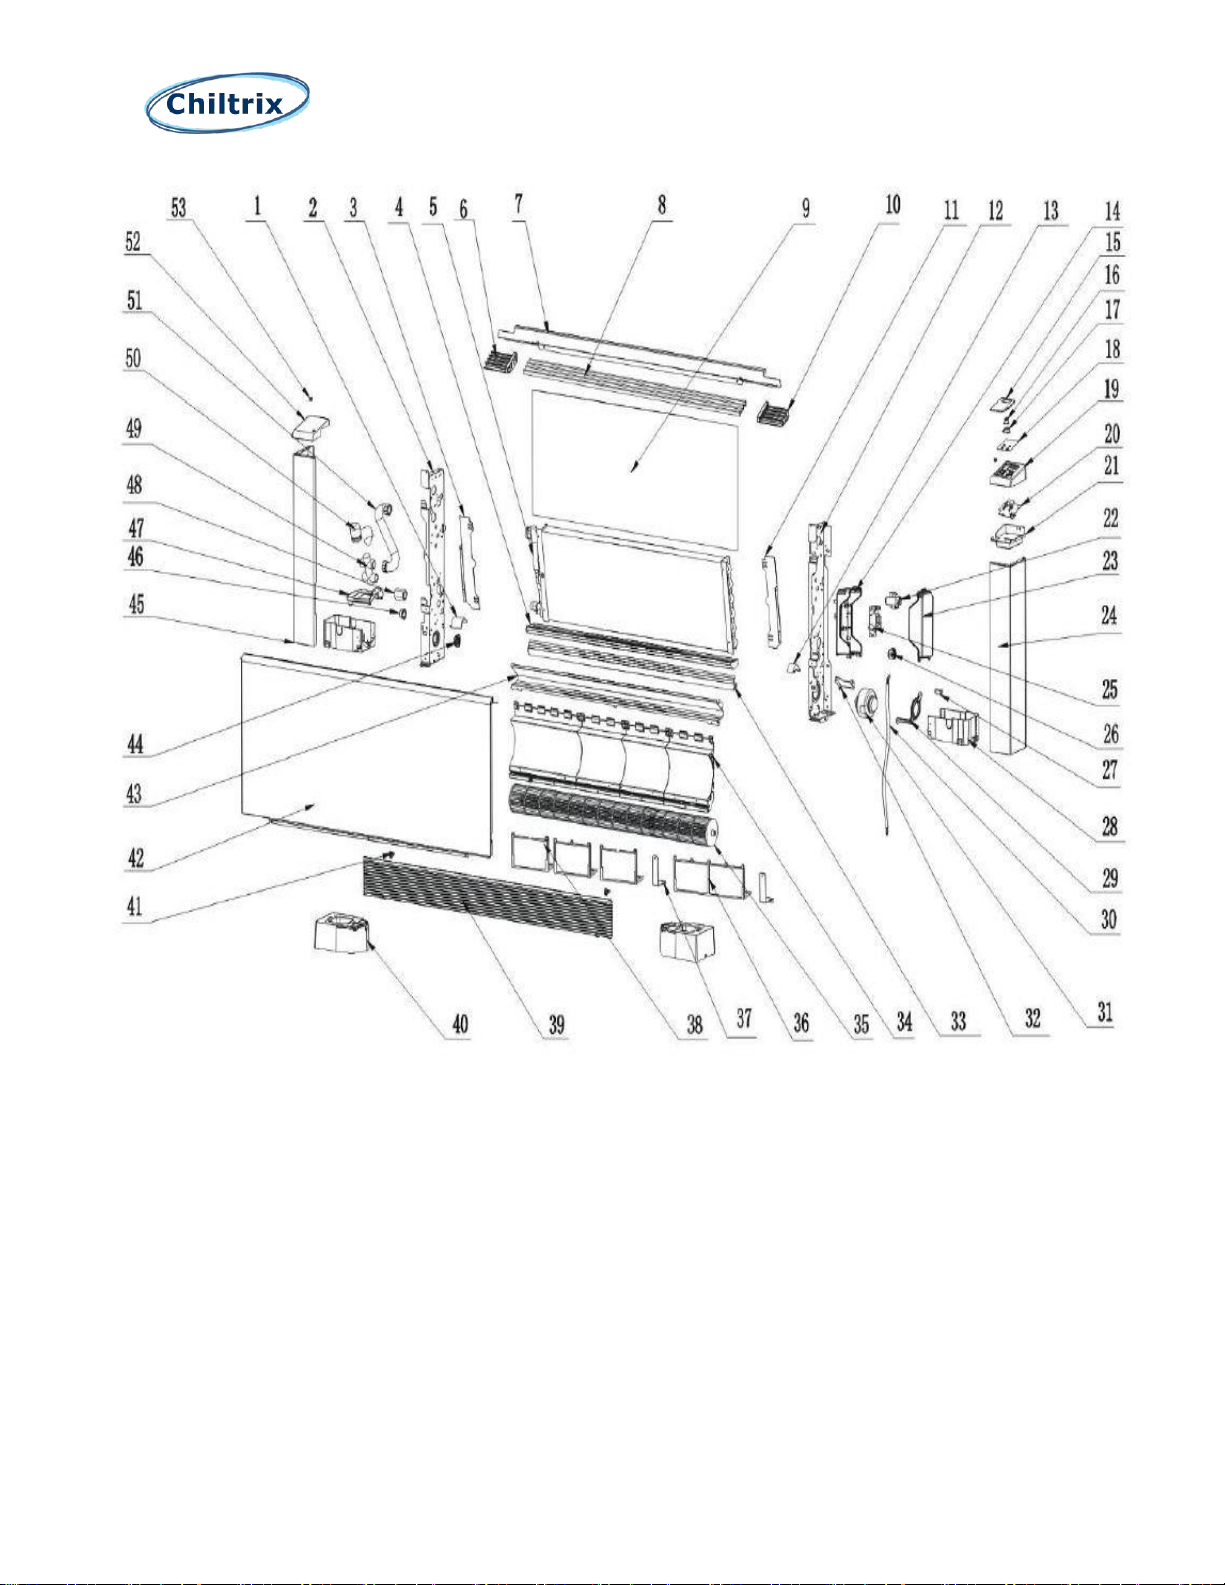
Chiltrix CXI34
40

Chiltrix CXI34
No.
Part Code
Part Name
Note
No.
Part Code
Part No.
Note
1
30036-220030
Left wind shield
29
30036-210014
Fan motor bracket
2
30036-210011
Left support
30
20000-340073
Electric cable
3
30036-220009
Left dam plate condenser
31
20000-330086
DC fan motor
4
30034-220001
Water pan
32
30036-210015
Fixed plate
5
30034-120002
Condenser
33
30034-210004
Air deflector
6
30036-220040
Left bearing for air outlet grill
34
30036-220001/02
Deflector
component
7
30034-210006
Back support
35
K3001-220002
Cross flow fan
8
30034-210008
Air outlet grill
36
30036-220020
Big Filter net
9
K3001-220001
Back wind shield
37
10
30036-220041
Right bearing for air outlet grill
38
11
30036-210003
Right dam plate condenser
39
K3007-210001
Air inlet grill
12
30036-210008
Right Support
40
30036-220019
Footing
13
30036-20031
Right wind shield
41
30036-220006
Hook
14
30036-220035
Electric box
42
30034-210005
Front panel
15
30036-220012
Cover of control panel
43
30034-210003
Air deflector
16
30036-220013
Switch button
44
30036-220025
Bearing support
17
30036-220014
Cover of switch button
45
30036-210010
Left plate
18
20000-230315
Screen protector
46
30036-220004
Soft plug 1
19
30036-220009
Right top-cover
47
30036-220003
Small water pan
20
20000-430025
LED102
48
20000-130151
Female connector
(O) (V)
21
K2000-220011
Electrical bottom box
49
20000-130182
Three-way valve
(O) (V)
22
20000-370018
Transformer
50
200000-320058
Actuator
(O) (V)
23
30036-220036
Electrical box cover
51
20000-130153
Bellows
(O) (V)
24
30036-210007
Right plate
52
30036-220008
Left top-cover
25
20000-430029
Md1001
53
30036-22015
The cap for screw
26
20000-390045-47-49
Connector
54
27
20000-360045
Sensitive switch
(O) Means Optional
28
30036-220018
Footing holder
(V) Means that the material is used for vertical fan coil with a valve
41
Chiltrix CXI65
42

Chiltrix CXI65
No.
Part Code
Part Name
Note
No.
Part Code
Part No.
Note
1
30036-220030
Left wind shield
29
30036-210014
Fan motor bracket
2
30036-210011
Left support
30
20000-340073
Electric cable
3
30036-220009
Left dam plate condenser
31
20000-330086
DC fan motor
4
30034-220001
Water pan
32
30036-210015
Fixed plate
5
30034-120002
Condenser
33
30034-210004
Air deflector
6
30036-220040
Left bearing for air outlet grill
34
30036-220001/02
Deflector component
7
30034-210006
Back support
35
K3001-220002
Cross flow fan
8
30034-210008
Air outlet grill
36
30036-220020
Big Filter net
9
K3001-220001
Back wind shield
37
30036-210020
The holder for wind deflector
10
30036-220041
Right bearing for air outlet grill
38
30036-220021
Filter net
11
30036-210003
Right dam plate condenser
39
K3007-210001
Air inlet grill
12
30036-210008
Right Support
40
30036-220019
Footing
13
30036-20031
Right wind shield
41
30036-220006
Hook
14
30036-220035
Electric box
42
30034-210005
Front panel
15
30036-220012
Cover of control panel
43
30034-210003
Air deflector
16
30036-220013
Switch button
44
30036-220025
Bearing support
17
30036-220014
Cover of switch button
45
30036-210010
Left plate
18
20000-230315
Screen protector
46
30036-220004
Soft plug 1
19
30036-220009
Right top-cover
47
30036-220003
Small water pan
20
20000-430025
LED102
48
20000-130151
Female connector
(O) (V)
21
K2000-220011
Electrical bottom box
49
20000-130182
Three-way valve
(O) (V)
22
20000-370018
Transformer
50
200000-320058
Actuator
(O) (V)
23
30036-220036
Electrical box cover
51
20000-130153
Bellows
(O) (V)
24
30036-210007
Right plate
52
30036-220008
Left top-cover
25
20000-430029
Md1001
53
30036-22015
The cap for screw
26
20000-390045-47-49
Connector
27
20000-360045
Sensitive switch
(O) Means Optional
28
30036-220018
Footing holder
(V) Means that the material is used for vertical fan coil with a valve
43
Chiltrix CXI85
44

Chiltrix CXI85
No.
Part Code
Part Name
Note
No.
Part Code
Part No.
Note
1
30036-220030
Left wind shield
29
30036-210014
Fan motor bracket
2
30036-210011
Left support
30
20000-340073
Electric cable
3
30036-220009
Left dam plate condenser
31
20000-330086
DC fan motor
4
30034-220001
Water pan
32
30036-210015
Fixed plate
5
30034-120002
Condenser
33
30034-210004
Air deflector
6
30036-220040
Left bearing for air outlet grill
34
30036-220001/02
Deflector component
7
30034-210006
Back support
35
K3001-220002
Cross flow fan
8
30034-210008
Air outlet grill
36
30036-220020
Big Filter net
9
K3001-220001
Back wind shield
37
30036-210020
The holder for wind
deflector
10
30036-220041
Right bearing for air outlet grill
38
30036-220021
Filter net
11
30036-210003
Right dam plate condenser
39
K3007-210001
Air inlet grill
12
30036-210008
Right Support
40
30036-220019
Footing
13
30036-20031
Right wind shield
41
30036-220006
Hook
14
30036-220035
Electric box
42
30034-210005
Front panel
15
30036-220012
Cover of control panel
43
30034-210003
Air deflector
16
30036-220013
Switch button
44
30036-220025
Bearing support
17
30036-220014
Cover of switch button
45
30036-210010
Left plate
18
20000-230315
Screen protector
46
30036-220004
Soft plug 1
19
30036-220009
Right top-cover
47
30036-220003
Small water pan
20
20000-430025
LED102
48
20000-130151
Female connector
(O) (V)
21
K2000-220011
Electrical bottom box
49
20000-130182
Three-way valve
(O) (V)
22
20000-370018
Transformer
50
200000-320058
Actuator
(O) (V)
23
30036-220036
Electrical box cover
51
20000-130153
Bellows
(O) (V)
24
30036-210007
Right plate
52
30036-220008
Left top-cover
25
20000-430029
Md1001
53
30036-22015
The cap for screw
26
20000-390045-47-49
Connector
54
27
20000-360045
Sensitive switch
55
(O) Means Optional
28
30036-220018
Footing holder
(V) Means that the material is used for vertical fan coil with a valve
45
Chiltrix CXI120
46

Chiltrix CXI120
No.
Part Code
Part Name
Note
No.
Part Code
Part No.
Note
1
30036-220030
Left wind shield
29
30036-210014
Fan motor bracket
2
30036-210011
Left support
30
20000-340073
Electric cable
3
30036-220009
Left dam plate condenser
31
20000-330086
DC fan motor
4
30034-220001
Water pan
32
30036-210015
Fixed plate
5
30034-120002
Condenser
33
30034-210004
Air deflector
6
30036-220040
Left bearing for air outlet grill
34
30036-220001/02
Deflector component
7
30034-210006
Back support
35
K3001-220002
Cross flow fan
8
30034-210008
Air outlet grill
36
30036-220020
Big Filter net
9
K3001-220001
Back wind shield
37
30036-210020
The holder for wind
deflector
10
30036-220041
Right bearing for air outlet grill
38
30036-220021
Filter net
11
30036-210003
Right dam plate condenser
39
K3007-210001
Air inlet grill
12
30036-210008
Right Support
40
30036-220019
Footing
13
30036-20031
Right wind shield
41
30036-220006
Hook
14
30036-220035
Electric box
42
30034-210005
Front panel
15
30036-220012
Cover of control panel
43
30034-210003
Air deflector
16
30036-220013
Switch button
44
30036-220025
Bearing support
17
30036-220014
Cover of switch button
45
30036-210010
Left plate
18
20000-230315
Screen protector
46
30036-220004
Soft plug 1
19
30036-220009
Right top-cover
47
30036-220003
Small water pan
20
20000-430025
LED102
48
20000-130151
Female connector
(O) (V)
21
K2000-220011
Electrical bottom box
49
20000-130182
Three-way valve
(O) (V)
22
20000-370018
Transformer
50
200000-320058
Actuator drive
(O) (V)
23
30036-220036
Electrical box cover
51
20000-130153
Bellows
(O) (V)
24
30036-210007
Right plate
52
30036-220008
Left top-cover
25
20000-430029
Md1001
53
30036-22015
The cap for screw
26
20000-390045-47-49
Connector
54
27
20000-360045
Sensitive switch
55
(O) Means Optional
28
30036-220018
Footing holder
(V) Means that the material is used for vertical fan coil with a valve
47

Chiltrix CXI148
48

Chiltrix CXI148
No.
Part Code
Part Name
No.
Part Code
Part Name
1
3124-210012
Front Panel
24
31022-220012
Electrical box lining panel
2
31024-210002
Air inlet grill
25
20000-430061
LED102
3
3100-220022/23
Filter net
26
31022-220011
Right top cover
4
31022210048/14
Holder for wind
deflector
27
31022-220015/16
Switch button
5
31024-210011
Deflector component
28
20000-230315
Screen protector 87x62.5
6
31022-220021
Footing
29
31022-220014
Cover of control panel
7
31022-220020
Footing holder
30
31022-220043
Right bracket for air outlet grill
8
31024-220005/6
Cross flow fan
31
31024-210015
Air outlet grill
9
31022220032/33
Left-right wind shield
32
31022-220042
Left bracket for air outlet grill
10
31024-210010
Air deflector 3
33
31022-220010
Left top cover
11
31022-210043
Fan holder
34
31024-210013
Back support
12
20000-330086
DC fan motor
35
31022-210039
Left Panel
13
31022-210044
Fixed panel
36
20000-320100
Actuator Optional
14
31024-220004
Drainage pan
37
20000-130281
3-way water valve Optional
15
31022-210032
Right bracket for
condenser
38
20000-130153
Bellows Optional
16
31022-210036
Right panel
39
20000-130151
Female connector
17
31022-220038
Electrical box cover
40
31022-220005
Small water pan
18
20000-430029
MD1001
41
31022-250022
Insulation for inlet and outlet
19
31022-220037
Electrical box
42
31022-250009
Insulation for left panel
20
31022-210037
Right holder panel
43
31022-210038
Left bracket for condenser
21
31022-250010
Insulation for right
panel
44
31022-210040
Left holder panel
22
20000-220234
Air deflector 2
45
31024-120003
Evaporator
23
20000-220233
Air deflector 1
49

--------
50
 Loading...