


User Guide
Attendant & Self propelled models
TransAqua
This user guide contains essential information in relation to safe use and maintenance and should
be retained with the shower chair for reference
TransAqua User Guide Issue 2.0.indd 1 15/06/2018 14:46:08

Issue 2.0
Contents
These products have been designed to the highest standards with safety, strength and quality in mind.
Follow the recommendations in this guide to ensure maximum benet from your shower commode chair.
Your Chiltern Invadex shower chair has been designed and tested to meet the highest standards of safety.
Read the safety section of this guide prior to use, this is contained on page 1.
Safety considerations .................................. 1
Assembly Instruction ................................... 2-5
Attendant Propelled Model ...................... 2-3
Self Propelled Model ............................... 4-5
Using a Commode Pan ............................... 6
Armrest Adjustment ..................................... 7
Footrest Adjustment..................................... 7
Applying the Brakes..................................... 8
Height Change (engineer required) ............. 9
Fitting Instruction Waist Strap ...................... 9
Fitting Instruction Harness ........................... 10
Cleaning & Maintenance ............................. 11
Spare Parts.................................................. 12-15
Accessories ................................................. 16
Warranty ...................................................... 17
TransAqua
TransAqua User Guide Issue 2.0.indd 2 15/06/2018 14:46:08

Page 1
June 2018
CHAIRS TransAqua
• The chair should be inspected upon delivery, any damage received in transit must be reported
immediately to Chiltern Invadex
• The chair should be inspected prior to each use and should be removed from use immediately
should any sign of damage be observed and a service call arranged.
• These products are designed for use as shower commode chairs, they are not intended to take the
place of a wheelchair. As such, in order to maintain the safety of users and/or carers these products
must not be used outdoors or to negotiate steps and stairs.
• Where the use of safety straps has been assessed and supplied, these must be used.
• The safe working load of 200kg (31 stone) must not be exceeded.
• The backrest and armrests must be used at all times when the chair is occupied.
• The swing out, removable footrests are designed for resting on, not for standing on, or full weight
bearing.
• Check that the wheel and castor fixings are secure.
• Self propelled models are supplied with anti-tip bars, these are to ensure user safety and must not
be removed.
• At all times when transferring onto the shower chair and when the chair is stationary, ensure brakes
are in the on position.
• Where this shower chair has been specified to meet the needs of a specific user, it should not be
used by any other person without a full assessment of risk by a competent person.
• Ensure the cross member clips are always in place before using the chair and that handwheels are
tight.
• The backrest fabric must be fully attached (clips and straps as illustrated)
and the backrest clips must be in place before use.
• Seat clips should be regularly checked for signs of damage, especially
where seats are regularly removed. The chair should be removed from
use immediately should any sign of cracking be observed.
Where there is any doubt as to the safety of the chair, it should be removed from use
pending inspection by a competent person.
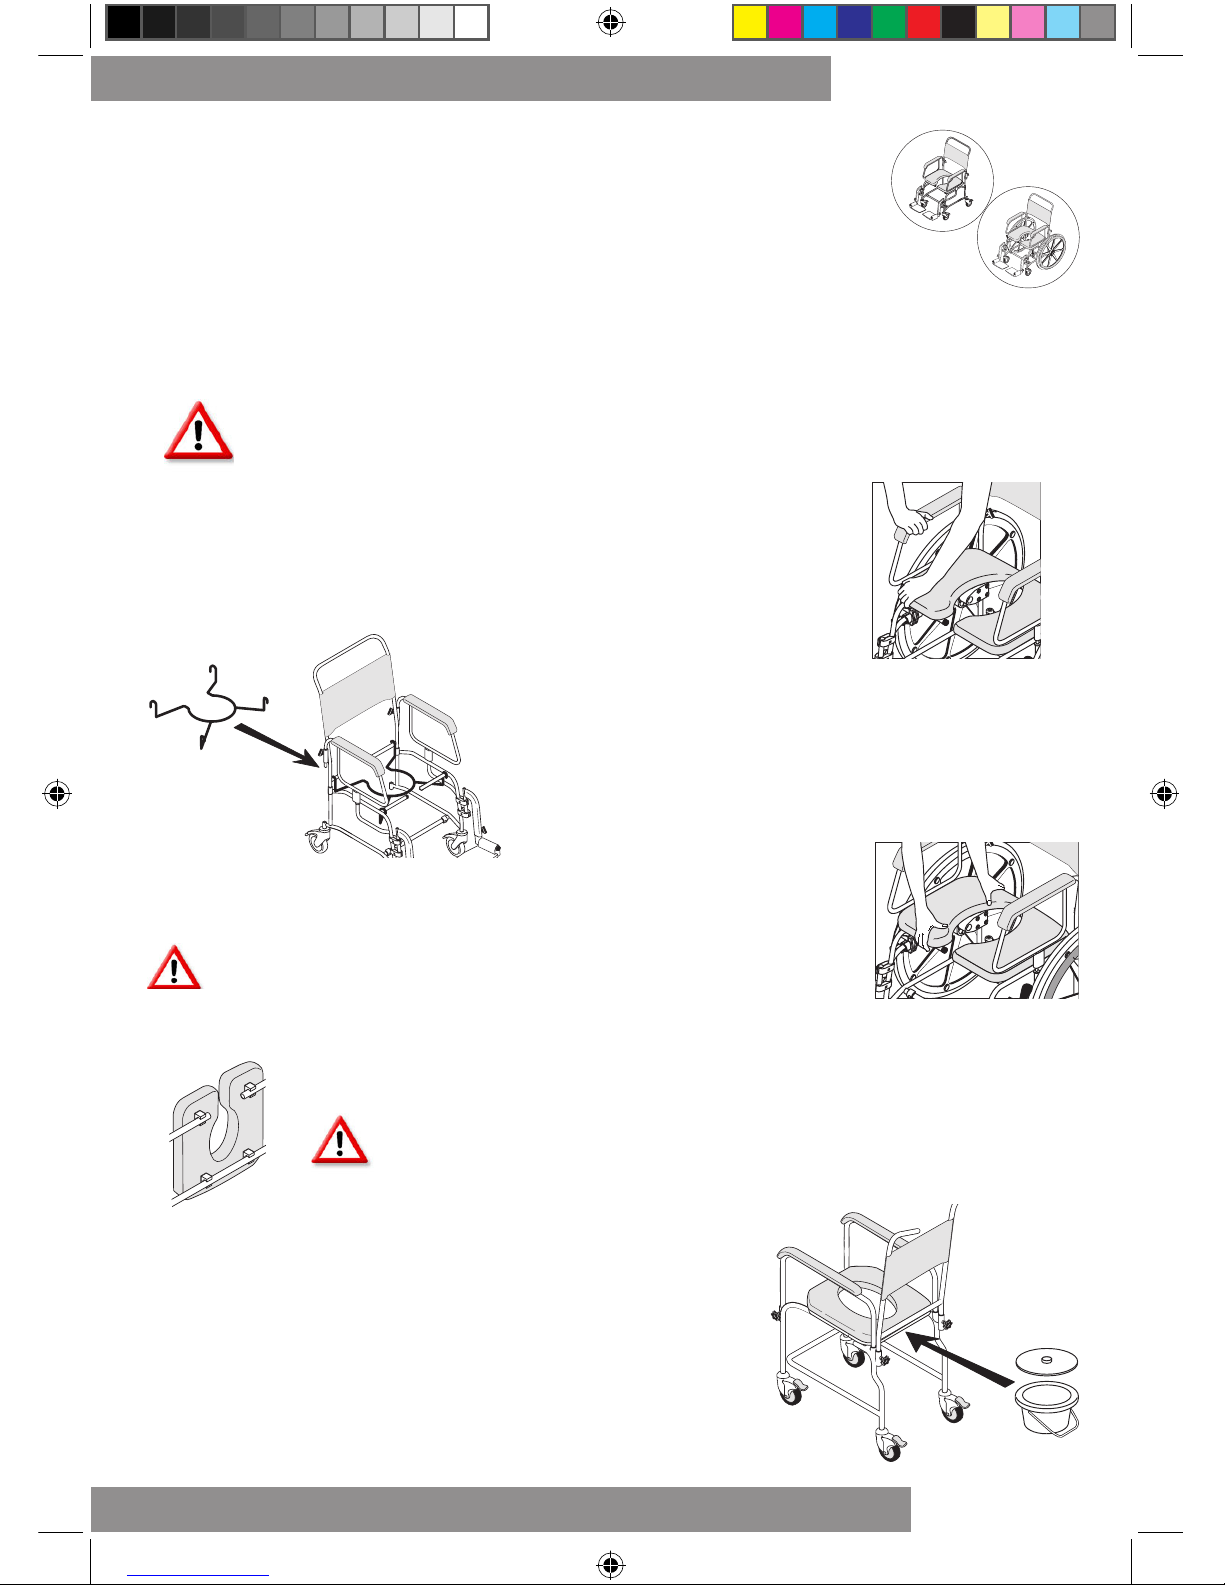
Safety Considerations
Attendant & Self Propelled Models
This section should be read and understood prior to use of the shower chair. Failure to adhere
to the below can lead to serious injury. Should clarification of any point be required, please
call Chiltern Invadex on 01869 365500 prior to use.
TransAqua User Guide Issue 2.0.indd 1 15/06/2018 14:46:09

CHAIRS TransAqua
Page 2
Issue 2.0
June 2018
Assembly Instruction
Attendant Propelled Model
NOTE: Follow the drawings carefully to ensure correct orientation
1
2
3
5
4
6
7
8
8
Holding the left had side frame assembly of the shower
chair (1) push the cross bar (2) into place. Make sure the
holes align.
Locate the right hand side frame (3) on the cross bar, make
sure the holes align and snap home the grey securing pins
(4) fro the front.
Apply the brakes (5).
Place the backrest (6) in the sockets (7) at the rear of the
shower chair (make sure that the orientation of the backrest
is as shown).
Push the backrest into the frame assembly until the holes
are in line and snap home the grey securing pins (8).
Prior to commencing you must ensure that all securing pins are fully inserted.
TransAqua User Guide Issue 2.0.indd 2 15/06/2018 14:46:10

Page 3
June 2018
CHAIRS TransAqua
9
12
10
11
12
14
13
15
Fit the armrest (9) in the socket (10) and pin (11) and
tighten the locking knob (12) repeat for the other side.
Snap on the seat (13) ensuring correct orientation, centralise the
seat in the frame.
There are snap on xings on the underside of the seat, 2 at the
front and 2 at the rear of the seat (3 rear clips on an extended seat).
Place one hand at the front of the seat and one hand at the rear (as shown above). This
avoids the possibility of trapping ngers under the armrest
Fit footrests into sockets (15)
Should you need to disassemble the chair, follow the above instructions in reverse 15 - 1
If a commode cradle is being used, t this to the frame
(as shown) prior to tting the seat.
Tip the chair backward to visually check all clamps are secured. (14)
Seat clips should be regularly checked for signs of damage, especially
where seats are regularly removed. The chair should be removed
from use immediately should any sign of cracking be observed.
TransAqua User Guide Issue 2.0.indd 3 15/06/2018 14:46:12

CHAIRS TransAqua
Page 4
Issue 2.0
June 2018
Assembly Instruction
Self Propelled Model
NOTE: Follow the drawings carefully to ensure correct orientation
1
2
3
4
5
6
7
8
Holding the left had side frame assembly of the shower
chair (1) push the cross bar (2) into place. Make sure the
holes align.
Locate the right hand side frame (3) on the cross bar, make
sure the holes align and snap home the grey securing pins
(4) fro the front.
Apply the brakes (5).
Place the backrest (6) in the sockets (7) at the rear of the
shower chair (make sure that the orientation of the backrest
is as shown).
Push the backrest into the frame assembly until the holes
are in line and snap home the grey securing pins (8).
Prior to commencing you must ensure that all securing pins are fully inserted.
TransAqua User Guide Issue 2.0.indd 4 15/06/2018 14:46:13

Page 5
June 2018
CHAIRS TransAqua
Should you need to disassemble the chair, follow the above instructions in reverse 15 - 1
9
12
11
12
10
13
15
14
Fit the armrest (9) in the socket (10) and pin (11) and
tighten the locking knob (12) repeat for the other side.
Snap on the seat (13) ensuring correct orientation, centralise the
seat in the frame.
There are snap on xings on the underside of the seat, 2 at the
front and 2 at the rear of the seat (3 rear clips on an extended seat).
Place one hand at the front of the seat and one hand at the rear (as shown above). This avoids
the possibility of trapping ngers under the armrest
Tip the chair backward to visually check all clamps are secured. (14)
Seat clips should be regularly checked for signs of damage, especially
where seats are regularly removed. The chair should be removed
from use immediately should any sign of cracking be observed.
Fit footrests into sockets (15)
If a commode cradle is being used, t this to the frame
(as shown) prior to tting the seat.
TransAqua User Guide Issue 2.0.indd 5 15/06/2018 14:46:14
CHAIRS TransAqua
Page 6
Issue 2.0
June 2018
Using a Commode Pan
This is an optional accessory and is not supplied with the chair.
The TransAqua can be used with a commode facility, this can be tted at anytime by the purchase of
a commode pan cradle and commode pan.
Safety Note: To avoid the risk of trapping, do not slide the commode pan on or o the rails
whilst someone is sitting in the chair.
In order to t the cradle the seat must be removed.
Release the seat clips by grasping the front of the seat and pulling up while
holding down the armrest.
Fit the commode pan cradle onto the front and rear cross
bars, as shown.
14
Snap on the seat ensuring correct orientation, centralise the seat
in the frame.
Place one hand at the front of the seat and one hand at the rear (as shown
above). This avoids the possibility of trapping ngers under the armrest
Tip the chair backward to visually check all clamps are secured.
Seat clips should be regularly checked for signs of damage, especially
where seats are regularly removed. The chair should be removed from
use immediately should any sign of cracking be observed.
Slide the commode pan onto the cradle from the rear of the chair.
TransAqua User Guide Issue 2.0.indd 6 15/06/2018 14:46:15

Page 7
June 2018
CHAIRS TransAqua
Armrest Adjustment
Attendant & Self Propelled Models
Standard Armrests
These armrests swing out and can be removed to facilitate transfer.
To remove the armrest, slacken the armrest locking knob and lift
the armrest upwards from the rear of the armrest pad.
Following the transfer the armrests should be replaced and
locked securely.
Armrests should be in used at all times while the chair is
occupied.
Height Adjustable Armrests
These (optional) armrests can be swung out and removed as per the above
instruction.
In addition they can be raised and lowered to suit individual needs. Adjust to
desired height and lock into position as shown.
Footrest Adjustment
Attendant & Self Propelled Models
locking knob
Height Adjustment
Loosen the footrest locking knob, reposition the footrest at the
desired height and retighten the locking knob, see g 1.
Angle Adjustment
Loosen the Allen bolts using a standard 6mm Allen key, see
g 2
Rotate the footrest to the desired angle as g 3 and retighten
the Allen bolts
Fig 1
Fig 2
Fig 3
The height and angle of the footrests can be adjusted to provide maximum user comfort.
TransAqua User Guide Issue 2.0.indd 7 15/06/2018 14:46:15

CHAIRS TransAqua
Page 8
Issue 2.0
June 2018
Applying the Brakes
Attendant Propelled Model
Applying the Brakes
Self Propelled Model
The shower chair is tted with either 4 braked castors or 3 braked castors and 1 directional lock castor.
Braked castors have a grey locking mechanism, the directional lock is indicated by a green locking
mechanism. Note that the directional lock does not prevent the castor from moving, it locks the direction of travel in a straight line.
Brakes should be applied prior to any user
transfer to or from the chair.
To apply the brakes or directional lock, depress
the lever as illustrated.
To release press depress as illustrated.
If the brakes are not functioning or the castors
are found to be damaged or loose, the chair
must be removed from use pending repair.
For maximum stability, braked castors at
the front of the frame should be forward
facing when locked.
Apply
Release
Brakes should be applied prior to any user transfer to or from the chair.
To apply the brakes push the brake lever fully forwards.
To release pull the lever back.
The shower chair is tted with two self propelling wheels and two unbraked castors.
Over time it is possible for the brake xings to become loose,
these can be tightened using a standard 5mm Allen key.
If the brakes are not functioning or the castors
are found to be damaged or loose, the chair
must be removed from use pending repair.
TransAqua User Guide Issue 2.0.indd 8 15/06/2018 14:46:16

Page 9
June 2018
CHAIRS TransAqua
Remove backrest handwheels
Waist Strap Fitting Instruction
Support Strap Fitting Instruction
Remove backrest handwheels
Place the handwheels through the holes in the
middle of the waist strap
Waist Strap Fitting Instruction
Remove backrest handwheels
Place the handwheels through the holes in the
middle of the waist strap
Resecure backrest handwheels
Please Note: if the handwheels will not secure
with the addition of the waist strap an extended
version will be required. These are available
under part number CHCS027
Waist Strap Fitting Instruction
Changing the Seat Height
Attendant & Self Propelled Models
It is possible to increase the height of the TransAqua shower chair by 1” or 2”. This is done through
the addition of leg extension pins which t between the chair frame and the castors and requires
wheel adjustment on self propelling models.
Due to the risk associated with improper installation, this adjustment must only be carried out by a
competent person. For details please contact your equipment provider or Chiltern Invadex.
Important safety note: Poorly tting or faulty support straps can be extremely harmful.
Before each use it is important to check;
• The support has been assessed as suitable for the user;
• The support tension is such that there is no risk of the person in the seat slipping down and suering
positional asphyxiation or strangulation;
• The support and all xings are in good condition to prevent the user falling from the seat.
Waist Strap
The following are optional accessories and are not supplied with the
chair as standard.
TransAqua User Guide Issue 2.0.indd 9 15/06/2018 14:46:16

CHAIRS TransAqua
Page 10
Issue 2.0
June 2018
Fitting Instruction
Full Support Harness
This is an optional accessory and is not supplied with the chair.
Velcro
1. Release the Velcro strap (A) and ensure that
the buckle sections (B) are free from the
harness loops (C)
A
B
C
D
A - Velcro securing strap
B - Buckle sections
C - Loops
D - Shoulder straps
E - Waist straps
2. Fold the Velcro securing strap (A) around the
rear of the chair base frame as shown in the
picture. Ensure that the Velcro is securely
fastened prior to each use.
3. Place the shoulder straps (D) over the backrest
as shown.
4. Feed the waist straps (E) around the backrest
and between the backrest and the armrests.
E
E
5. Feed the buckle sections (B) through the
harness loops (C)
6. Once the user is in the chair the length of the
shoulder straps (D) and the waist strap (E)
should be adjusted to ensure that the user
cannot slip under the harness.
Full Support Harness (p/n 201-00143)
Fitting Instruction
For further assistance please contact customer services on 01869 365500 opt 1.
To prevent potential injury, the fit of the harness, secureness of the buckle fastening and the fitting of the Velcro strap
must be checked at each use.
TransAqua User Guide Issue 2.0.indd 10 15/06/2018 14:46:17

Page 11
June 2018
CHAIRS TransAqua
Cleaning and Maintenance
Attendant & Self Propelled Models
It is recommended that your shower chair is serviced at least annually by Chiltern Invadex or an authorised,
competent service agent. Where the chair is maintained by a loan store, the shower chair should be fully
serviced, prior to re-issue. A full service manual is available on request.
Chairs should be inspected upon receipt to ensure that there is no transit damage. Any damage should be
reported to the equipment provider and the chair should not be used until the damage has been rectied.
Regularly inspect all parts of the chair for defects. Security of armrest, backrest, seat and wheels should be
checked prior to each use. Where defects are identied the chair should be removed from use pending repair.
Cleaning Seats
Seats are Ambla fabric which is resistant to most mild acids, alkalis, drinks and household stains. Clean with
a damp soapy cloth and rinse well with clean water. Do not use solvents, bleaches*, abrasives, synthetic
detergents, wax polishes or aerosol sprays. Disinfectants may be used in dilution as specied by their
manufacturers.
*Chlorine releasing agents – levels of 1 – 10000 parts per million should pose no problems as long as the
material does not endure long soakings at the higher concentrations. Rinse well with clean water. These
include Haz-Tabs and other disinfectants commonly used in hospital infection control programmes.
Dry o the shower chair after use.
Do not oil or grease any parts.
Keep the castors free from limescale, soap residue and hair by cleaning after use in the shower.
Where the chair is maintained by a loan store, the shower chair should be fully serviced, prior to re-issue.
Caring for stainless steel
Stainless steel has excellent corrosion resistance, but it is not stain or rust proof. Regular maintenance will
keep stainless steel clean and free of contaminants. In most applications stainless steel will not rust or stain
even after many years of service, but when used in certain environments such as concentrated chlorine or
other corrosive elements stainless steel requires proper care and maintenance.
1. Clean stainless steel frequently with soap and water. Any cleaner safe for glass is usually safe for stainless steel; apply with a cotton cloth.
2. Use a coating such as a good wax to help safeguard the stainless steel.
3. Remove discolouration or rust spots as soon as possible with a brass, silver or chrome cleaner. Irreversible
pitting will develop under rust that remains on stainless steel for any period of time. Apply a mild cream
cleaner with a wet cotton cloth in the direction of the grain of the nish. Rinse thoroughly and wipe dry.
4. Do not use abrasives such as sandpaper or steel wool on stainless steel.
5. Do not clean with mineral acids or bleaches.
6. Do not leave stainless in contact with iron, steel or other metals.
7. Do not store near any chlorine product.
TransAqua User Guide Issue 2.0.indd 11 15/06/2018 14:46:17

CHAIRS TransAqua
Page 12
Issue 2.0
June 2018
Item Description Part number
1 Seats (see page 13 for horseshoe & aperture sizing guidance)
18” Flat Padded Seat 211-01000
18” Medium Horseshoe Seat 211-01001
18” Medium Horseshoe Seat + Extension 211-01005
18” Large Horseshoe Seat 211-01002
18” Large Horseshoe Seat + Extension 211-01006
18” Medium Aperture Seat 211-01003
18” Large Aperture Seat 211-01004
18” Medium Horseshoe Seat + Skirt 211-01007
18” Large Horseshoe Seat + Skirt 211-01008
18” Medium Aperture Seat + Skirt 211-01009
18” Large Aperture Seat + Skirt 211-01010
18” Medium Horseshoe Seat + Ext + Skt 211-01011
18” Large Horseshoe Seat + Ext + Skt 211-01012
21” Flat Padded Seat 213-01000
21” Large Horseshoe Seat 213-01002
21” Large Horseshoe Seat + Extension 213-01006
21” Large Aperture Seat 213-01004
21” Large Horseshoe Seat + Skirt 213-01008
21” Large Aperture Seat + Skirt 213-01010
21” Large Horseshoe Seat + Ext + Skt 213-01012
2 Backrests
18” Pram handle backrest 211-00505
19” Pram handle backrest 211-00535
21” Pram handle backrest 213-00501
3 Backrest fabric & ties 201-00019
4 Armrests
Standard armrest 211-00500
Height adjustable armrest 211-00512
Armrest pad 201-00066
Spare Parts
Attendant & Self Propelled Models
TransAqua User Guide Issue 2.0.indd 12 15/06/2018 14:46:18

Page 13
June 2018
CHAIRS TransAqua
Item Description Part number
5 Footrests
Left hand footrest 18 degree 211-00503
Right hand footrest 18 degree 211-00504
Left hand footrest 90 degree 211-00526
Right hand footrest 90 degree 211-00527
Left hand footrest 18 degree raised by 65mm 211-00528
Right hand footrest 18 degree raised by 65mm 211-00529
Left hand footrest 90 degree raised by 65mm 211-00530
Right hand footrest 90 degree raised by 65mm 211-00531
6 Footrest bracket 201-00510
Footrest holder 201-00501
7 Cross members
18” Cross member assembly 211-00506
19” Cross member assembly 211-00536
21” Cross member assembly 213-00500
Misc Parts
8 Grey tube clips 002-00010
9 Handwheel CH0208
Aperture
1
2
3
8
8
8
8
9
9
7
5
6
Flat padded
Horseshoe
Aperture + Skt
Horseshoe + Skt
4
TransAqua User Guide Issue 2.0.indd 13 15/06/2018 14:46:18

CHAIRS TransAqua
Page 14
Issue 2.0
June 2018
Spare Parts
Where part numbers are not supplied it is strongly recommended that these parts are
replaced by a competent person. Please contact Chiltern Invadex or your equipment
provider for assistance.
Self Propelled Model
Anti tip bar - small 211-00509
Anti tip bar - medium 211-00510
Unbraked castor
201-00029
Wheel clamp
201-00512
Self propelling wheel
20”, 22” or 24”
Brake assembly
right hand
201-00051
Brake assembly
left hand
201-00050
Braked castor
202-00031
Directional lock castor
202-00030
Attendant Propelled Model
TransAqua User Guide Issue 2.0.indd 14 15/06/2018 14:46:19

Page 15
June 2018
CHAIRS TransAqua
435mm
64mm
445mm
165mm
76mm
64mm
165mm
131mm
445mm
435mm
240mm
64mm
210mm
485mm
76mm
445mm
435mm
64mm
210mm
266mm
445mm
105mm
TransAqua 18” & 19” Seats
Seat Sizing Guidance
The required width is the distance between the armrests 18”, 19” or 21”. 18” seats are used
on both 18” and 19” chairs. The illustrations show dimensions of small, medium and large
horseshoe and aperture seats
Spare Parts
18” & 19 Seats
Medium
Extended seats
64mm
210mm
485mm
76mm
530mm
435mm
64mm
210mm
266mm
530mm
105mm
TransAqua 21” Seats
Large
485mm
Large only
21” Seats
435mm
64mm
445mm
165mm
76mm
64mm
165mm
131mm
445mm
435mm
240mm
64mm
210mm
485mm
76mm
445mm
435mm
445mm
435mm
64mm
210mm
266mm
445mm
105mm
TransAqua 18” & 19” Seats
64mm
210mm
485mm
76mm
530mm
435mm
530mm
435mm
64mm
210mm
266mm
530mm
105mm
TransAqua 21” Seats
TransAqua User Guide Issue 2.0.indd 15 15/06/2018 14:46:21

CHAIRS TransAqua
Page 16
Issue 2.0
June 2018
Accessories
Attendant & Self Propelled Models
Item Description
1 Commode cradle (round or oval options)
2 Commode pan (round or oval options)
3 Clip on padded foot tray
4 Foot plate with toe strap
5 Foot plate with heel strap
6 Foot plate with toe and heel straps
7 Clip on side pad (1”, 2” and 3” options)
8 Calf strap
9 Waist strap (buckle or Velcro fastening)
10 Full support harness
1
2
3
4
5
6
7
8
9
10
TransAqua User Guide Issue 2.0.indd 16 15/06/2018 14:46:22

Page 17
June 2018
CHAIRS TransAqua
The below space can be used to store details of your maintenance contractor, if the
equipment has been provided by a third party for example the Local Authority loan store,
this information will be available from them.
Your Chiltern Invadex Shower Chair carries a 12 month warranty from the
date of purchase, subject to the following conditions;
1. Should you experience any problems with our workmanship or materials within the rst
12 month period please contact your point of purchase.
2. Repairs made during the warranty period will be carried out free of charge, provided the
product has been used strictly in accordance with the guidelines set out in this user guide.
3. Our warranty does not cover replacements, adjustments or repairs which may be required
as a result of normal wear and tear, wilful or accidental damage, misuse, neglect or any
other cause which is beyond the control of Chiltern Invadex.
4. Modications and repairs made to this product by unauthorised persons will render the
warranty void.
5. Only parts manufactured or approved by Chiltern Invadex shall be used to repair this
product. Use of unauthorised parts will invalidate all warranties and remove all liability
from Chiltern Invadex for the safety of this product.
6. Chiltern Invadex shall in no event be liable for any damages, costs or expenses arising
from any claim made under this warranty (save for any legal liability of Chiltern Invadex for
death or personal injury resulting from the company’s negligence in respect of its products).
7. This warranty does not aect your statutory consumer rights.
Warranty
Contractor name:
Contact number:
Account number:
Serial number:
TransAqua User Guide Issue 2.0.indd 17 15/06/2018 14:46:22

FM553189
To request a copy of this guide in large print
please contact
customer services on 01869 365500 opt 1 or
email: sales@chilterninvadex.co.uk
Co py rig ht © Chi lt ern I nva de x (UK) Ltd The design of the product shown in this guide is vested in Chiltern Invadex (UK) Ltd and should not be copied or reproduced in anyway
whatsoever without the express permission in writing of Chiltern Invadex (UK) Ltd.
Registered in England No: 04704248
211-00519 Issue 2.0
June 2018
TransAqua
Chiltern Invadex (UK) Limited
Unit 6C
Thorpe Drive
Banbury
OX16 4UZ
UK
+44 (0)1869 365500
sales@chilterninvadex.co.uk
www.chilterninvadex.co.uk
TransAqua User Guide Issue 2.0.indd 18 15/06/2018 14:46:23
 Loading...